

Philips DVP3142KM-78, DVP3144K, DVP3142K User Manual
DVD VIDEO PLAYER
DVD VIDEO PLAYER
User Manual 6
Manual del usuario 44
Manual do usuário 82
Read your Quick Start Guide and/or User Manual first for quick tips
that make using your Philips product more enjoyable.
Register your product and get support
at www.philips.com/welcome
DVP3142K
DVP3144K
01-43_dvp3142K_55_eng2.indd 101-43_dvp3142K_55_eng2.indd 1 2007-06-18 10:27:58 AM2007-06-18 10:27:58 AM
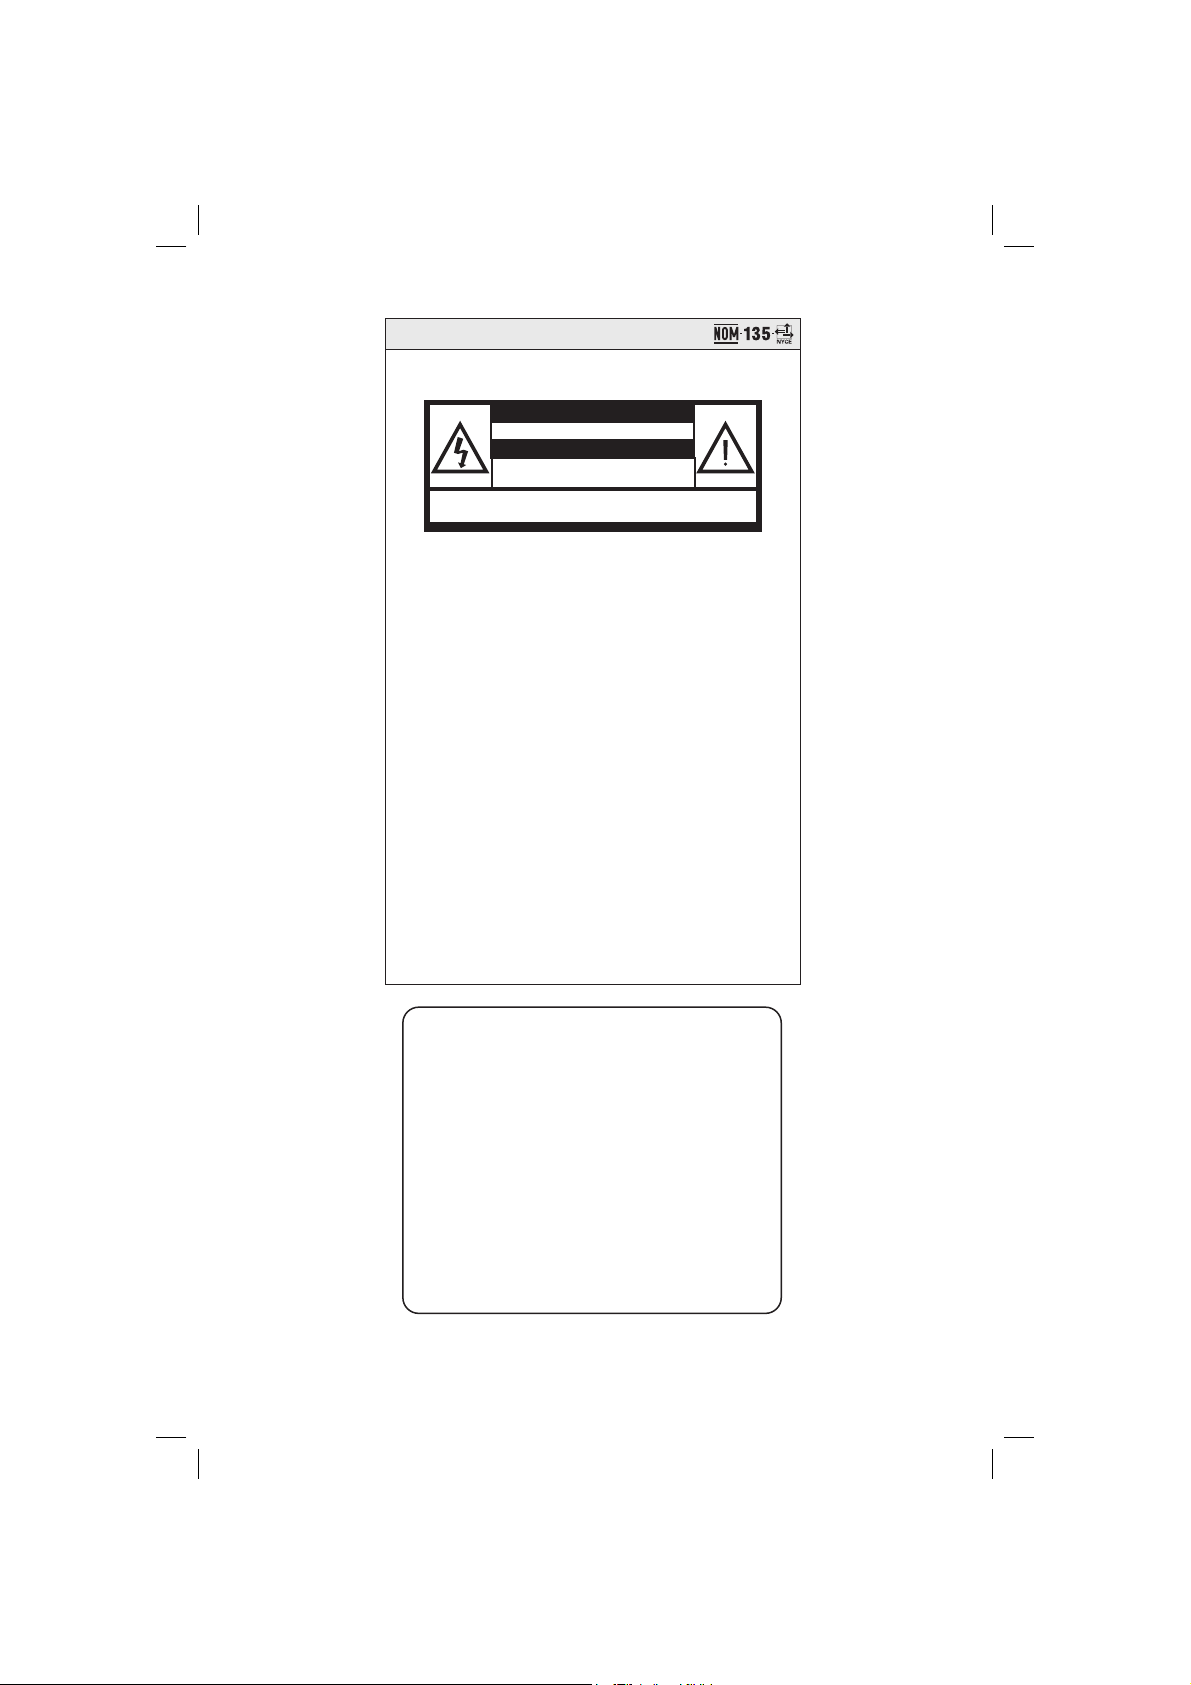
México
Es necesario que lea cuidadosamente su instructivo de manejo.
PRECAUCIÓN - ADVERTENCIA
No abrir, riesgo de choque eléctrico
Verifique que el voltaje de alimentación
Para evitar el riesgo de choque eléctrico, no quite la tapa.
En caso de requerir servicio, dirijase al personal calificado.
ATENCIÓN
sea el requerido para su aparato
Descripción:
Modelo:
Alimentación: 110–127/220–240 V; ~50–60 Hz
Consumo:
DVP3142K/55 & DVP3144K/55
DVD Player
110 - 240V; 50/60Hz
< 10W
Importador: Philips Mexicana, S.A. de C.V.
Domicilio: Av. La Palma No.6,
Col. San Fernando, La Herradura
Huixquilucan, Edo de Mexico
C.P. 52784, Mexico
Localidad y Tel.: Tel. 52 69 90 00
Exportador:
País de Origen:
Nº de Serie: ________________________
LEA CUIDADOSAMENTE ESTE INSTRUCTIVO
ANTES DE USAR SU APARATO.
AVISO IMPORTANTE
Philips Mexicana, S.A. de C.V. no se hace responsable por
daños o desperfectos causados por::
- Maltrato, descuido o mal uso, presencia de insectos o
roedores (cucarachas, ratones etc.).
- Cuando el aparato no haya sido operarado
de acuerdo con el instructivo del uso, fuera
de los valores nominales y tolerancias de las tensiones
(voltaje), frecuencia (ciclaje) de alimentación eléctrica y
las características que deben reunir las instalaciones
auxiliares.
- Por fenómenos naturales tales como: temblores,
inundaciones, incendios, descargas eléctricas, rayos etc.
o delitos causados por terceros (choques asaltos, riñas,
etc.).
2
01-43_dvp3142K_55_eng3.indd 201-43_dvp3142K_55_eng3.indd 2 2007-07-03 9:44:45 AM2007-07-03 9:44:45 AM

Index
English ------------------------------------------6
Español --------------------------------------- 44
Português --------------------------------- 82
English
EspañolPortuguês
CUIDADO! Evite o uso prolongado do aparelho com volume superior
a 85 decibéis, pois isto poderá prejudicar a sua audição.
• A tabela abaixo lista alguns exemplos de situações e respectivos níveis de pres são sonora em decibéis.
Nível de
Decibéis
30 Biblioteca silenciosa, sussurros leves.
40 Sala de estar, refrigerador, quarto longe de trânsito.
50 Transito leve, conversação normal, escritório silencioso.
60 Ar-condicionado a uma distância de 6m, máquina de costura.
70 Aspirador de pó, secador de cabelo, restaurante ruidoso.
80
90 Metrô, motocicleta, tráfego de caminhão, cortador de grama.
100 Caminhão de lixo, serra elétrica, furadeira pneumática.
120 Show de banda de rock em frente ás caixas acústicas, trovão.
140 Tiro de arma de fogo, avião a jato
180 Lançamento de foguete.
• Informação cedida pela Deafness Research Foundation, por cortesia.
01-43_dvp3142K_55_eng3.indd 301-43_dvp3142K_55_eng3.indd 3 2007-07-03 9:44:47 AM2007-07-03 9:44:47 AM
Tráfego médio de cidade, coletor de lixo, alarme de despertador
aumadistânciade60cm.
OS RUÍDOS ABAIXO PODEM SER PERIGOSOS EM CASO DE
EXPOSIÇÃO CONSTANTE
Exemplo

General Information
English
Environmental Information
All unnecessary packaging has been
omitted. The packaging has been made
easy to separate into two materials;
cardboard (box) and polyethylene (bags,
protective foam sheet).
Your DVD player consists of materials
which can be recycled and reused if
disassembled by a specialised company.
Please observe the local regulations
regarding the disposal of packaging
materials, exhausted batteries and old
equipment.
Manufactured under license from
Dolby Laboratories, Dolby
and the double-D symbol are
trademarks of Dolby Laboratories.
Windows Media and the Windows logo
are trademarks, or registered
trademarks of Microsoft Corporation
in the United States and/or other
countries.
DivX Certied products: DivX,
DivX Certied and associated logos
are trademarks of DivX, Inc. and
are used under license.
Laser Safety
This unit employs a laser. Due to possible
eye injury, only a quali ed service person
should remove the cover or attempt to
service this device.
NOTE:
Pictures shown maybe different
between countries.
CAUTION:
WARNING LOCATION: ON THE
BACKPLATE OF THE SET
NEVER MAKE OR CHANGE
CONNECTIONS WITH THE
POWER SWITCHED ON.
Speci cations are subject to change without
notice. Trademarks are the property of
Koninklijke Philips Electronics N.V. or their
respective owners.
This product incorporates copyright protection
technology that is protected by method claims of
certain U.S. patents and other intellectual property
rights owned by Macrovision Corporation and other
rights owners. Use of this copyright protection
technology must be authorized by Macrovision
Corporation, and is intended for home and other
limited viewing uses only unless otherwise authorized
by Macrovision Corporation. Reverse engineering or
disassembly is prohibited.
For Customer Use:
Read carefully the information located at
the bottom or rear of your DVD Video
player and enter below the Serial No.
Retain this information for future
reference.
Model No. DVP 3142K & DVP 3144K
Serial No. ___________________
LASER
Type Semiconductor laser
InGaAlP (DVD)
AIGaAs (CD)
Wave length 658 nm (DVD)
790 nm (CD)
Output Power 7.0 mW (DVD)
10.0 mW (VCD/CD)
Beam divergence 60 degrees
4
01-43_dvp3142K_55_eng3.indd 401-43_dvp3142K_55_eng3.indd 4 2007-07-03 9:44:47 AM2007-07-03 9:44:47 AM
Language Code
English
5
01-43_dvp3142K_55_eng2.indd 501-43_dvp3142K_55_eng2.indd 5 2007-06-18 10:28:14 AM2007-06-18 10:28:14 AM

Contents
English
Care and Safety Information
Setup .............................................................................................................................................................8
Cleaning discs .............................................................................................................................................8
General Information
Accessories supplied ................................................................................................................................9
Region codes ...............................................................................................................................................9
Connections
Connecting to television .......................................................................................... 10-11
Using Composite Video jacks (CVBS) .............................................................................................. 10
Using Component Video jacks (YPbPr) ...........................................................................................10
Using an accessory RF modulator ......................................................................................................11
Connecting the power cord ...........................................................................................12
Optional connections
Connecting to an stereo system ...................................................................................13
Stereo system has Right/Left Audio In jacks .................................................................................. 13
Connecting to a digital AV receiver .............................................................................13
Receiver has a PCM, Dolby Digital or MPEG decoder ................................................................ 13
Product Overview
Front and Rear panels ....................................................................................................14
Remote Control ............................................................................................................. 15
Getting Started
Step 1: Inserting Batteries.............................................................................................16
Using the remote control to operate the system ......................................................................... 16
Step 2: Finding your viewing channel ...........................................................................16
Step 3: Setting up Progressive Scan feature ...............................................................17
Step 4: Selecting the matching color system ............................................................ 18
Step 5: Setting the language .........................................................................................19
On-screen display (OSD) language .................................................................................................... 19
Audio, Subtitle and DVD menu languages ....................................................................................... 19
Playback from Disc
Playable discs .................................................................................................................. 20
Supported formats ................................................................................................................................. 20
Playback Features
Starting disc playback ................................................................................................... 21
Basic playback control .................................................................................................. 21
Pausing playback...................................................................................................................................... 21
Selecting title/chapter/track ................................................................................................................ 21
Stopping playback ................................................................................................................................... 21
Operations for video playback (DVD/VCD/SVCD)................................................... 22
Using the Disc Menu .............................................................................................................................22
Zooming in ...............................................................................................................................................22
Resuming playback from the last stopped point ............................................................................22
Slow Motion ............................................................................................................................................. 22
Forward / Reverse Searching ..............................................................................................................22
6
01-43_dvp3142K_55_eng2.indd 601-43_dvp3142K_55_eng2.indd 6 2007-06-18 10:28:14 AM2007-06-18 10:28:14 AM

Contents
Viewing the disc playback information ..........................................................23-24
Title/Chapter/Track selection ............................................................................................................23
Time Search ............................................................................................................................................. 23
Angle .......................................................................................................................................................... 23
Repeat play mode .......................................................................................................................... 24
Repeating a section within a chapter/track ............................................................................ 24
Special DVD Features ................................................................................................... 25
Playing a Title ........................................................................................................................................... 25
Changing the Audio Language ............................................................................................................. 25
Subtitle ...................................................................................................................................................... 25
Special VCD and SVCD Feature .................................................................................. 25
Playback Control (PBC)........................................................................................................................25
Playing a DivX
Playing MP3/WMA/JPEG/Kodak/Fuji Picture CD ................................................ 26-27
General Operation ................................................................................................................................ 26
Playback selection ..................................................................................................................................27
Zoom picture (JPEG) ............................................................................................................................27
Playback with multi-angles (JPEG) ..................................................................................................... 27
Karaoke Operations
Playing Karaoke disc ...................................................................................................... 28
General Operation ................................................................................................................................28
Vocal........................................................................................................................................................... 28
Karao ke ..................................................................................................................................................... 28
DVD Menu Options
Using the Language setup menu ................................................................................. 29
OSD Language ......................................................................................................................................... 29
Subtitle / Audio / DVD Menu ..............................................................................................................29
Setting DivX
Using the Video setup menu ...................................................................................30-32
Setting the aspect ratio......................................................................................................................... 30
View Mode ............................................................................................................................................... 31
TV System ................................................................................................................................................ 31
Video Out ................................................................................................................................................. 31
Smart Picture ........................................................................................................................................... 32
Using the Audio setup menu ...................................................................................33-34
Digital Output ......................................................................................................................................... 33
Night Mode ..............................................................................................................................................34
Down Sampling .......................................................................................................................................34
Using the Rating setup menu ..................................................................................35-36
Rating level settings .........................................................................................................................35-36
Changing the Password ......................................................................................................................... 36
Using the Misc (Miscellaneous) setup menu ......................................................... 37-38
Restoring the original settings ............................................................................................................ 37
Volume Control ...................................................................................................................................... 38
DivX
Others
Software Upgrade ......................................................................................................... 39
Troublesho oting .......................................................................................................4 0 ~41
Speci cations ................................................................................................................. 42
Glossary........................................................................................................................... 43
®
disc ....................................................................................................... 26
®
Subtitle font ..................................................................................................................29
®
Registration Code ..................................................................................................................... 38
English
7
01-43_dvp3142K_55_eng2.indd 701-43_dvp3142K_55_eng2.indd 7 2007-06-18 10:28:14 AM2007-06-18 10:28:14 AM
Care and Safety Information
English
DANGER!
High voltage! Do not open the
device. You run the risk of getting
an electric shock.
The machine does not contain any
user-serviceable parts. Please leave
all maintenance work to quali ed
personnel.
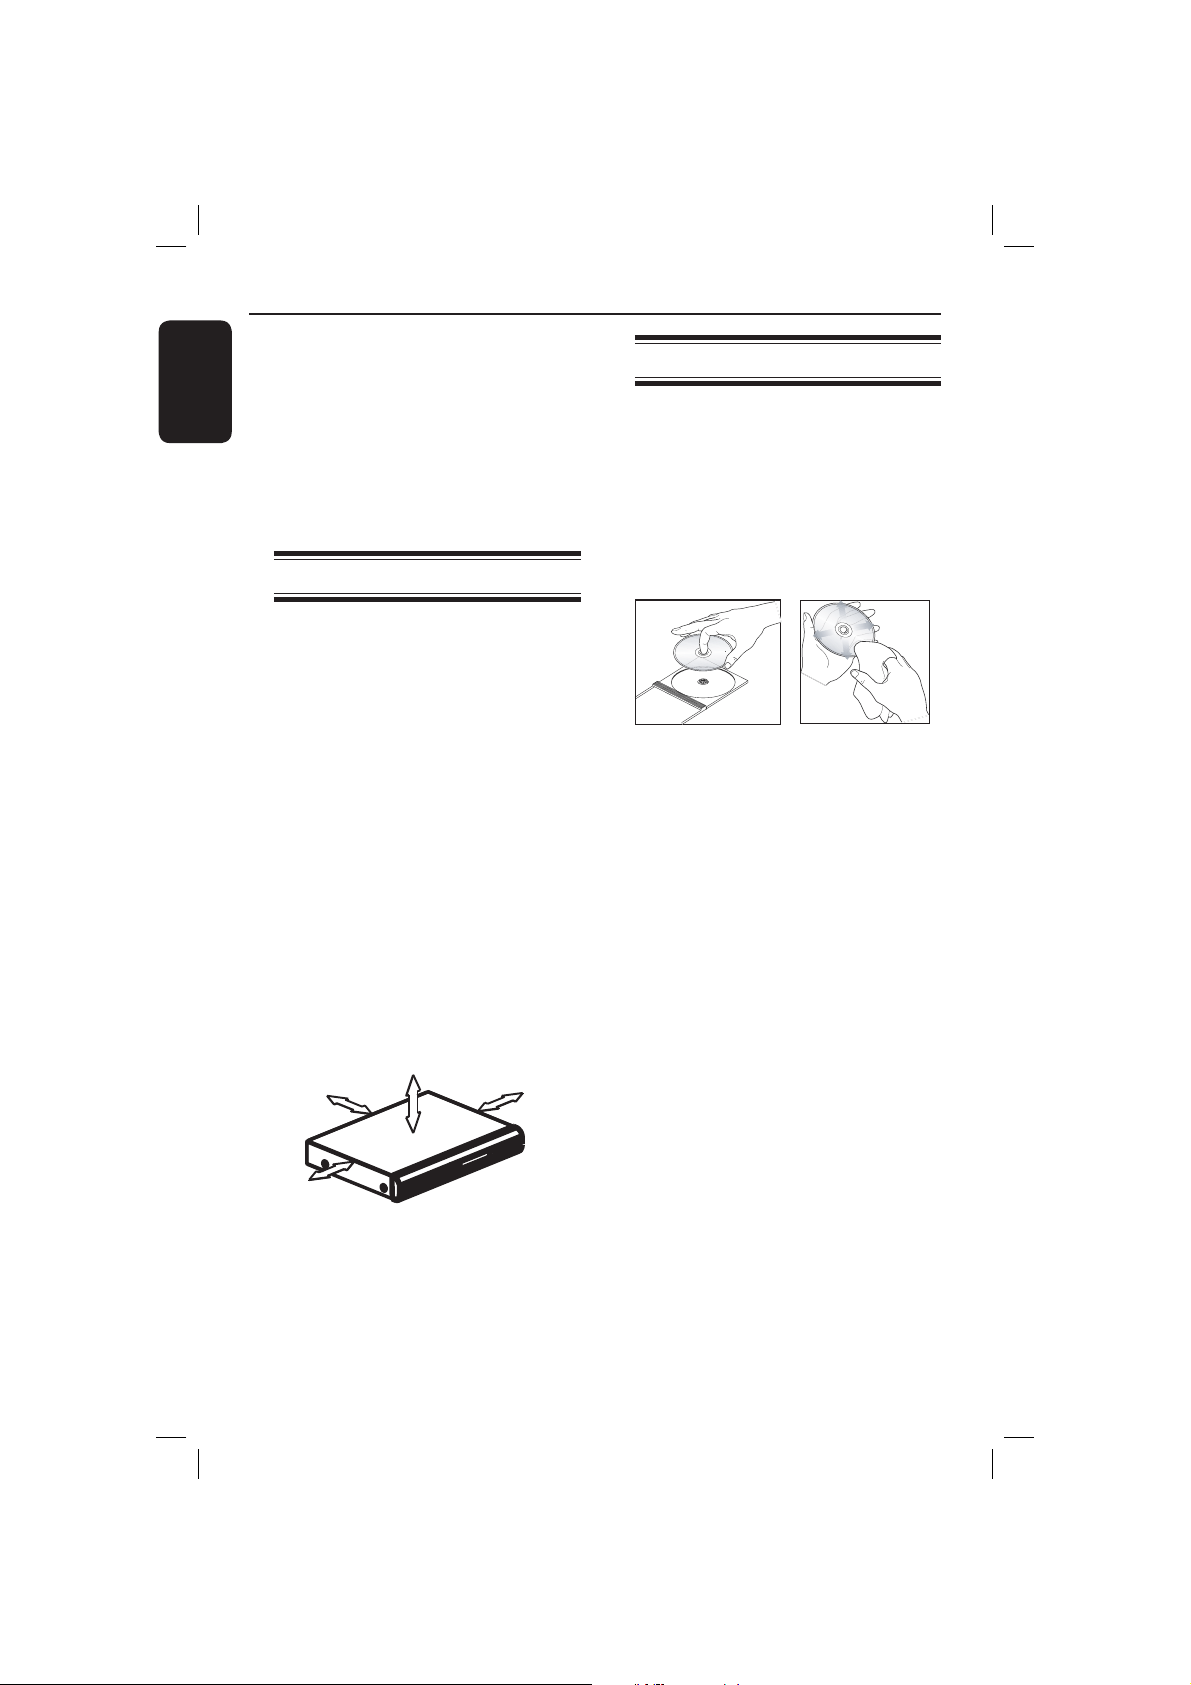
Setup
Finding a suitable location
– Place the set on a at, hard and stable
surface. Do not place the set on a
carpet.
– Do not position the set on top of
other equipment that might heat it up
(such as receiver or ampli er).
–
Do not put anything under the set
(such as CDs, magazines).
– Install this unit near the AC outlet and
where the AC power plug can be
reached easily.
Space for ventilation
– Place the apparatus in a location with
adequate ventilation to prevent
internal heat build up. Allow at least
10 cm (4.0”) clearance from the rear
and the top of the set and 5cm (2.0”)
from the left and right to prevent
overheating.
5cm (2.0")
10cm (4.0")
10cm (4.0")
Cleaning discs
Some problems occur because the disc
inside the player is dirty (frozen picture,
sound disruptions, picture distortions).
To avoid these problems, discs should be
cleaned on a regular basis.
To clean a disc, use a micro bre cleaning
cloth and wipe the disc from the center
to the edge in a straight line.
CAUTION!
Do not use solvents such as benzene,
thinner, commercially available cleaners,
or anti-static sprays intended for analog
discs. Since the optical unit (laser) of the
DVD player operates at a higher power
than regular DVD or CD players,
cleaning CDs intended for DVD or CD
players may damage the optical unit
(laser). Therefore, refrain from using a
cleaning CD.
5cm (2.0")
Avoid high temperatures, moisture,
water and dust
– Apparatus shall not be exposed to
dripping or splashing.
– Do not place any sources of danger
on the apparatus (such as liquid lled
objects, lighted candles).
8
01-43_dvp3142K_55_eng2.indd 801-43_dvp3142K_55_eng2.indd 8 2007-06-18 10:28:14 AM2007-06-18 10:28:14 AM

General Information
ALL
4
ALL
ALL
5
6
ALL
1
ALL
ALL
2
3
Accessories supplied
Composite
video cable
(yellow) and
Audio cables
(white, red)
Remote
control and
two AAA
batteries
Region codes
This DVD player is designed to support
the Region Management System. Check
the regional code number on the disc
package. If the number does not match
the player’s region number (see table
below), the player may be unable to
playback the disc.
Tips:
– It may not be possible to play CD-R/RW
or DVD-R/RW in all cases due to the type of
disc or condition of the recording.
– If you are having trouble playing a certain
disc, remove the disc and try a different one.
Improper formatted disc will not played on
this DVD player.
Region
U.S.A. and
Canada regions
U.K and
Europe regions
Discs that can
be played
English
Asia Paci c,
Taiwan, Korea
AC Power
Cable
Australia,
New Zealand,
Latin America
Russia and
India regions
China, Calcos Islands,
Walls and Futuna
Islands
9
01-43_dvp3142K_55_eng2.indd 901-43_dvp3142K_55_eng2.indd 9 2007-06-18 10:28:15 AM2007-06-18 10:28:15 AM
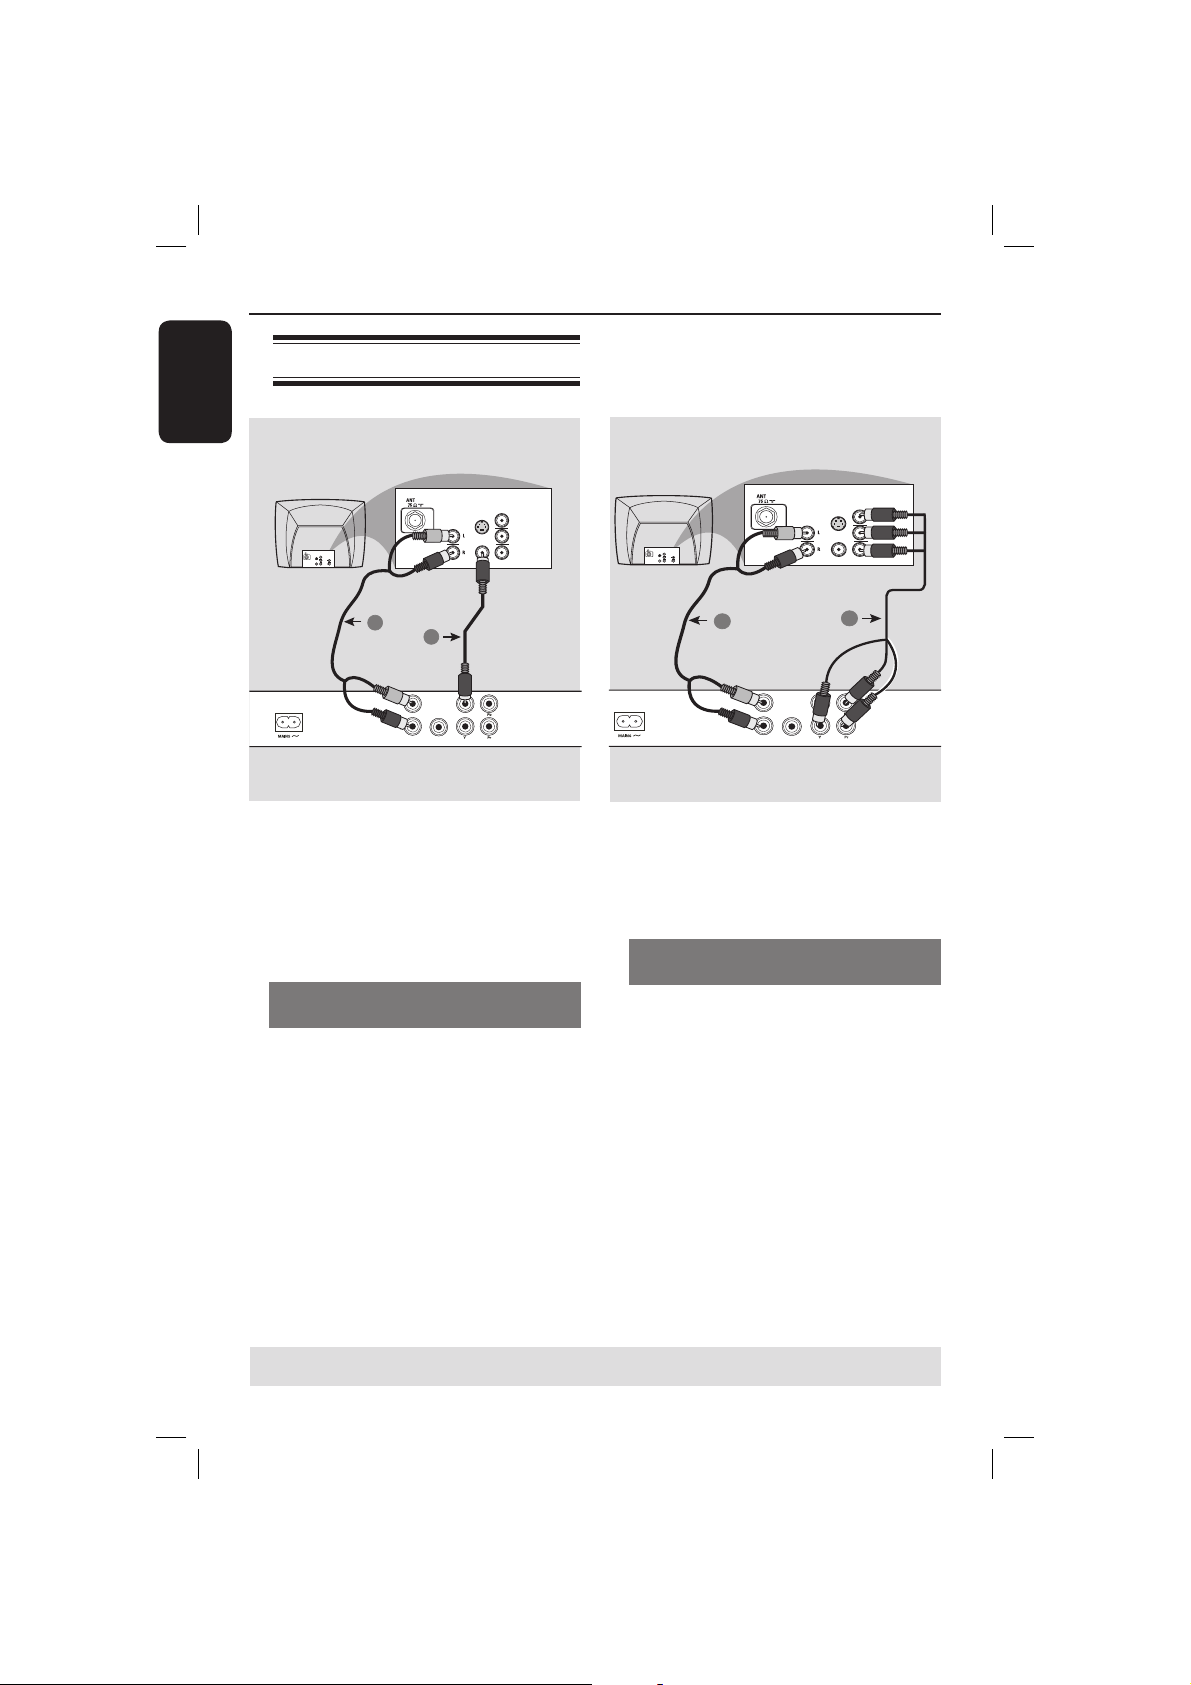
Connections
English
Connecting to television
COMPONENT
VIDEO IN
S-VIDEO
IN
V (Pr/Cr)
AUDIO
OUT
U (Pb/Cb)
VIDEO IN
Y
2
1
DIGITAL
OUT
AUDIO OUT
COAXIAL
IMPORTANT!
– You only need to make one video
connection from the following
options, depending on the
capabilities of your television.
– Connect the DVD player directly
to the television.
Using Composite Video jacks
(CVBS)
A
Use the composite video cable (yellow)
to connect the DVD player’s TV OUT
(CVBS) jack to the video input jack (or
labeled as A/V In, Video In, Composite or
Baseband) on the television (cable
supplied).
B To hear sound of this DVD player
through your television, use the audio
cables (white/red) to connect AUDIO
OUT (L/R) jacks of the DVD player to
the corresponding AUDIO IN jacks on
the television (cable supplied).
AUDIO
IN
TV OUT
COMPONENT VIDEO OUT
S-VIDEO
VIDEO IN
OUT
AUDIO
IN
TV OUT
COMPONENT VIDEO OUT
S-VIDEO
VIDEO IN
COMPONENT
VIDEO IN
IN
V (Pr/Cr)
U (Pb/Cb)
Y
1
COMPONENT
VIDEO IN
IN
V (Pr/Cr)
U (Pb/Cb)
Y
COMPONENT
VIDEO IN
S-VIDEO
IN
V (Pr/Cr)
AUDIO
OUT
U (Pb/Cb)
VIDEO IN
Y
2
DIGITAL
AUDIO OUT
COAXIAL
IMPORTANT!
– The progressive scan video quality
is only possible when using YPbPr
and a progressive scan television is
required.
Using Component Video jacks
(YPbPr)
A
Use the component video cables (red/
blue/green) to connect the DVD player’s
YPbPr jacks to the component video
input jacks (or labeled as YPbPr) on the
television (cable not supplied).
B To hear sound of this DVD player
through your television, use the audio
cables (white/red) to connect AUDIO
OUT (L/R) jacks of the DVD player to
the corresponding AUDIO IN jacks on
the television (cable supplied).
C Proceed to page 17 for detailed
progressive scan setup.
TIPS: Before making or changing any connections, make sure that all the devices are disconnected
from the power outlet.
10
01-43_dvp3142K_55_eng2.indd 1001-43_dvp3142K_55_eng2.indd 10 2007-06-18 10:28:15 AM2007-06-18 10:28:15 AM
Connections (continued)
English
RF coaxial cable to TV
DIGITAL
COAXIAL
OUT
3
TV OUT
COMPONENT VIDEO OUT
4
AUDIO OUT
2
Back of RF Modulator
AUDIO IN
TO TVANT IN
R L
ANT IN
(example only)
VIDEO
IN
CH3 CH4
1
ANT IN
IMPORTANT!
– If your television only has a single
Antenna In jack (or labeled as 75
ohm or RF In,) you will need an RF
modulator in order to view the
DVD playback on the television. See
your electronics retailer or contact
Philips for details on RF modulator
availability and operations.
Using an accessory RF modulator
Use the composite video cable (yellow)
A
to connect the DVD player’s TV OUT
(CVBS) jack to the video input jack on
the RF modulator.
B Use the RF coaxial cable (not supplied) to
connect ANTENNA OUT or TO TV jack
on the RF modulator to the ANTENNA
IN jack on the television.
C To hear sound of this DVD player
through your TV, use the audio cables
(white/red) to connect AUDIO OUT (L/
R) jacks of the DVD player to the
corresponding AUDIO IN jacks on the
RF modulator (cable supplied).
D Connect the Antenna or Cable TV
service signal to the ANTENNA IN or RF
IN jack on the RF modulator. (It may
have been connected to your TV
previously. Disconnect it from the TV).
TIPS: Before making or changing any connections, make sure that all the devices are disconnected
from the power outlet.
11
01-43_dvp3142K_55_eng2.indd 1101-43_dvp3142K_55_eng2.indd 11 2007-06-18 10:28:15 AM2007-06-18 10:28:15 AM
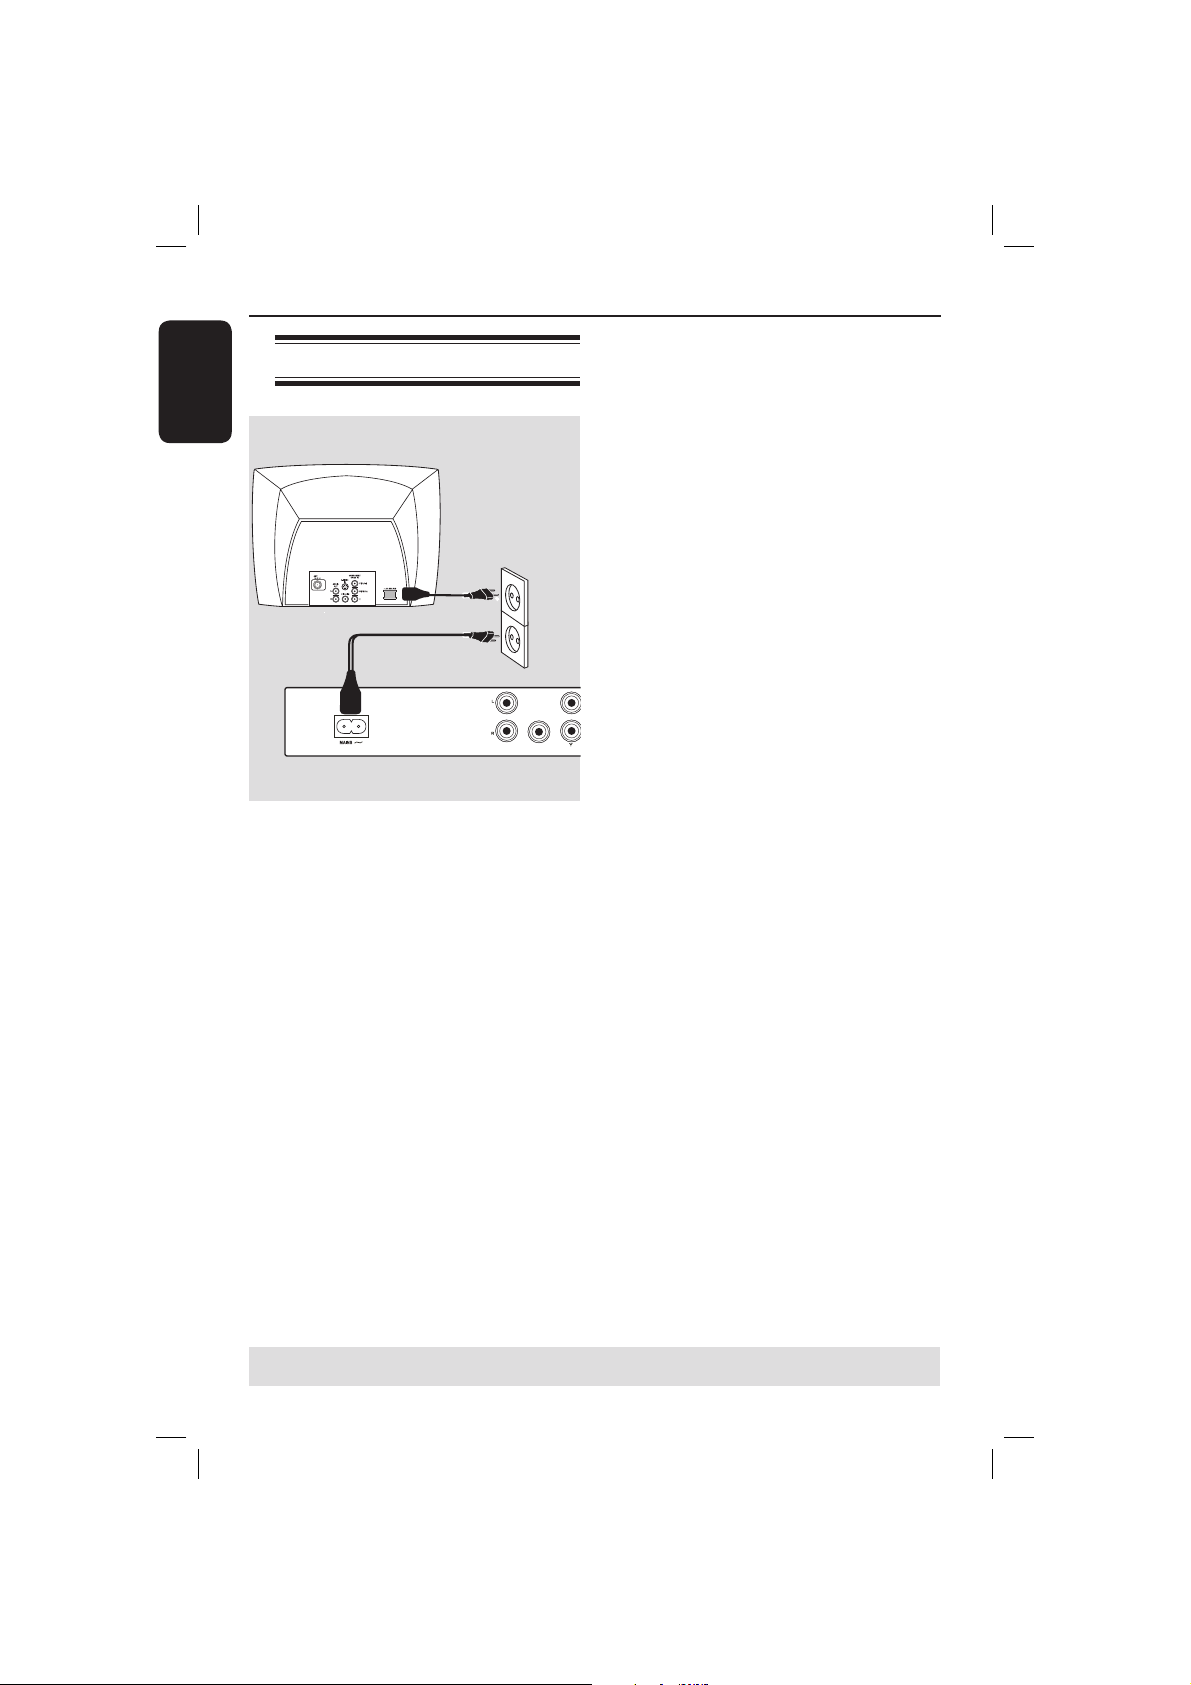
Connections (continued)
English
Connecting the power cord
DIGITAL
TV OUT
OUT
AUDIO OUT
COAXIAL
COMPON
After everything is connected
properly, plug in the AC power cord
to the power outlet.
Never make or change any connections
with the power switched on.
When no disc is loaded, press
STANDBY ON on the DVD player
front panel.
“– – –” may appear on the display
panel.
TIPS: Before making or changing any connections, make sure that all the devices are disconnected
from the power outlet.
12
01-43_dvp3142K_55_eng2.indd 1201-43_dvp3142K_55_eng2.indd 12 2007-06-18 10:28:15 AM2007-06-18 10:28:15 AM

Optional connections
Connecting to an stereo
system
STEREO
AUDIO
IN
DIGITAL
DIGITAL
TV OUT
OUT
AUDIO OUT
COAXIAL
COMPONENT VIDEO OUT
Stereo system has right/ left Audio
In jacks
A
Select one of the video connections
(CVBS VIDEO IN or COMPONENT
VIDEO IN) depending on the options
available on your television.
B Use the audio cables (white/red) to
connect AUDIO OUT (L/R) jacks of the
DVD Player to the corresponding
AUDIO IN jacks on the stereo system
(cable supplied).
Connecting to a digital AV
receiver
AV Receiver
AUDIO OUT
Receiver has a PCM, Dolby Digital
or MPEG decoder
A
Select one of the video connections
(CVBS VIDEO IN or COMPONENT
VIDEO IN) depending on the options
available on your television.
B Connect the COAXIAL jack of the DVD
player to the corresponding Digital Audio
In jack on your receiver (cable not
supplied).
C Set the DVD player’s digital output to
PCM-Only or ALL depending on the
capabilities of your receiver (see page 33
{Digital Output}).
DIGITAL
COAXIAL
OUT
TV OUT
COMPONENT VIDEO OUT
AUDIO
IN
DIGITAL
English
Tip:
– If the audio format of the Digital Output
does not match the capabilities of your
receiver, the receiver will produce a strong,
distorted sound or no sound at all.
TIPS: Before making or changing any connections, make sure that all the devices are disconnected
from the power outlet.
13
01-43_dvp3142K_55_eng2.indd 1301-43_dvp3142K_55_eng2.indd 13 2007-06-18 10:28:15 AM2007-06-18 10:28:15 AM
 Loading...