

Page 1
Register your product and get support at
www.philips.com/welcome
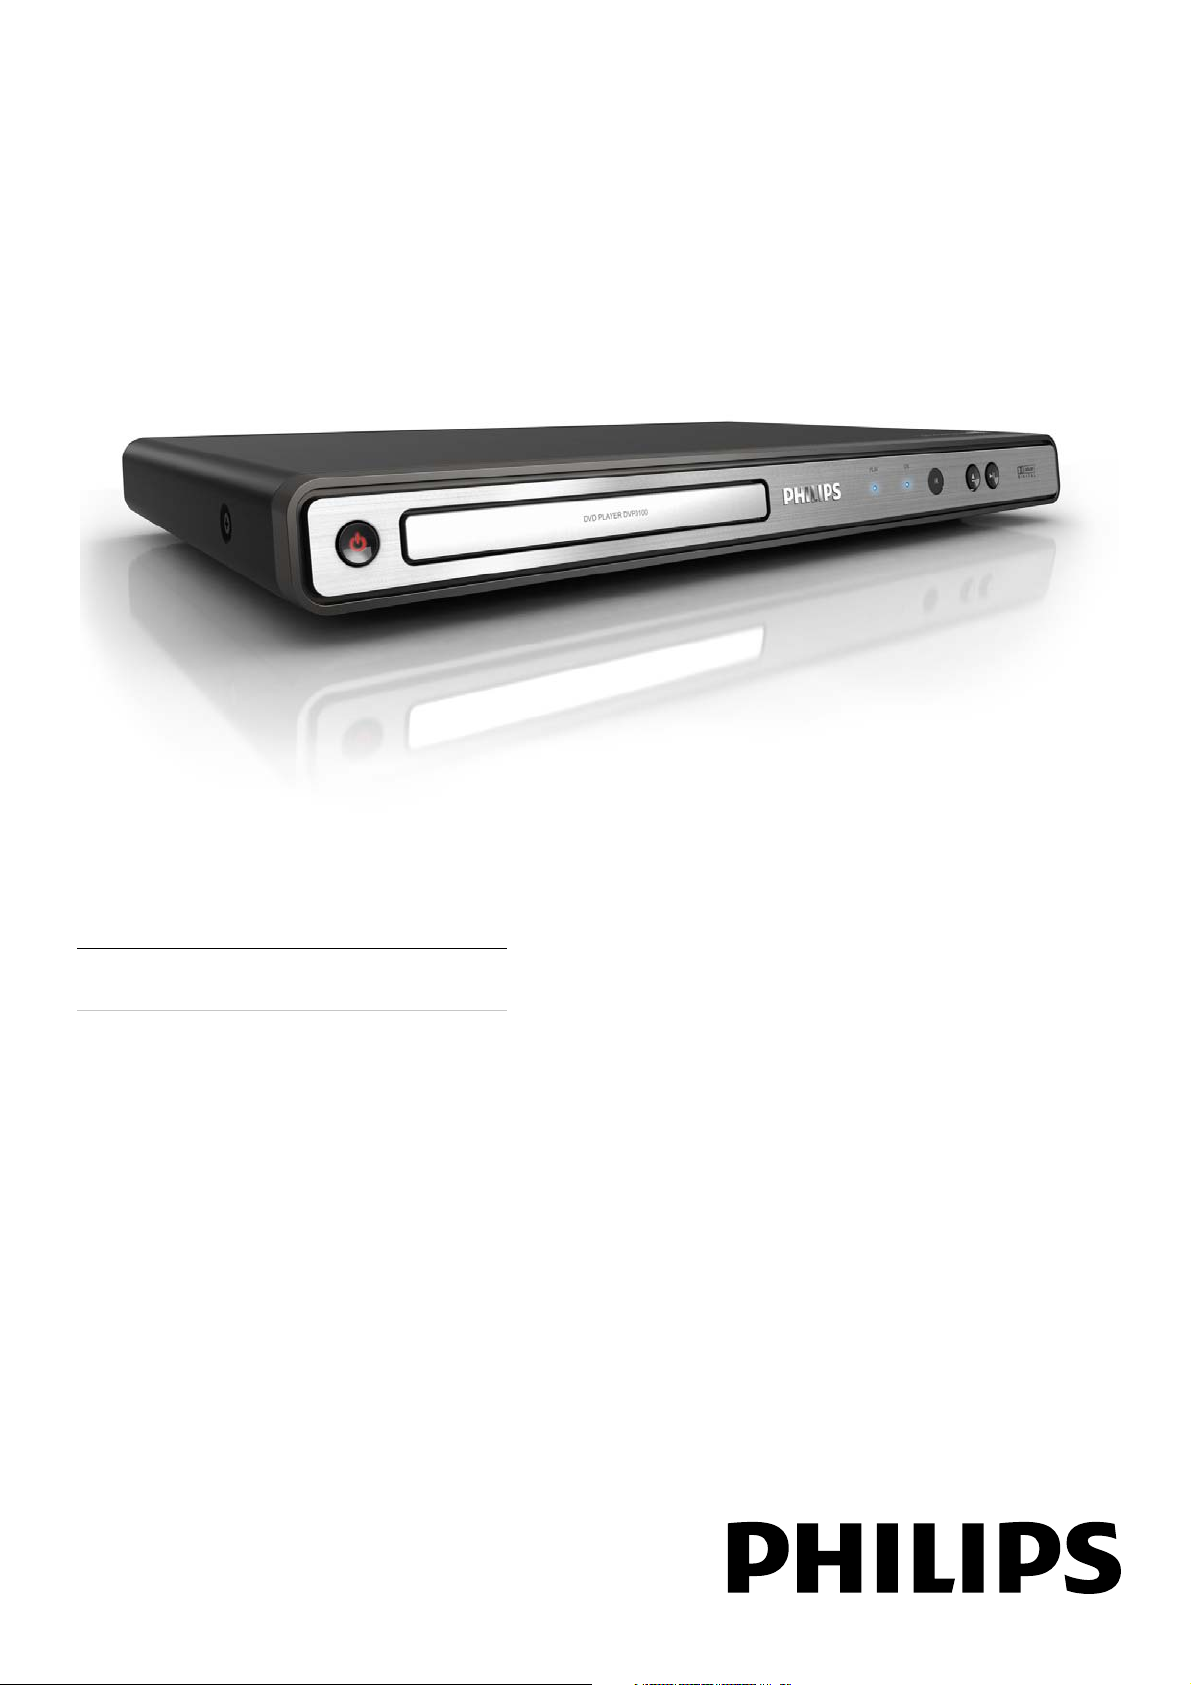
DVP3100
EN User manual
Page 2

Contents
1 Important 4
Safety and important notice 4
Trademark notice 4
2 Your DVD player 5
Feature highlights 5
Product overview 5
3 Connect 6
Connect video cables 6
Connect audio cables 7
Route audio to other devices 7
Connect power 7
4 Get started 7
Prepare the remote control 7
Find the correct viewing channel 8
Select menu display language 8
Turn on progressive scan 8
5 Play 8
Play a disc 8
Play video 9
Play music 10
Play photo 11
English
6 Adjust settings 11
General setup 11
Audio setup 12
Video setup 13
Preferences 13
7 Additional information 14
Care 14
Specifi cations 14
8 Troubleshooting 15
9 Glossary 16
EN
3
Page 3

1 Important
Safety and important notice
Warning
Risk of overheating! Never install the product in a •
confi ned space. Always leave a space of at least 4 inches
around the product for ventilation. Ensure cur tains or
other objects never cover the ventilation slots on the
product.
Never place the product, remote control or batteries
•
near naked fl ames or other heat sources, including direct
sunlight.
Only use this product indoors. Keep this product away
•
from water, moisture and liquid-fi lled objects.
Never place this product on other electrical equipment.
•
Keep away from this product during lightning storms.•
Where the mains plug or an appliance coupler is used as •
the disconnect device, the disconnec t device shall remain
readily operable.
Visible and invisible laser radiation when open. Avoid
•
exposure to beam.
Please act according to your local rules and do not
dispose of your old products with your normal
household waste.
Correct disposal of your old product helps to
prevent potential negative consequences for the
environment and human health.
Your product contains batteries covered by the
European Directive 2006/66/EC, which cannot be
disposed with normal household waste.
Please inform yourself about the local rules on
separate collection of batteries because correct
disposal helps to prevent negative consequences for
the environmental and human health.
Copyright notice
About Progressive Scan
Consumers should note that not all high defi nition
television sets are fully compatible with this product
and may cause artifacts to be displayed in the
picture. In case of 525 or 625 progressive scan
picture problems, it is recommended that the user
switch the connection to the ‘standard defi nition’
output. If there are questions regarding our TV set
compatibility with this model 525p and 625p DVD
player, please contact our customer service center.
Disposal of your old product and
batteries
Your product is designed and manufactured with
high quality materials and components, which can
be recycled and reused.
This product incorporates copyright protection
technology that is protected by method claims
of certain U.S. patents and other intellectual
proper ty rights owned by Macrovision Corporation
and other rights owners. Use of this copyright
protection technology must be authorised by
Macrovision Corporation, and is intended for
home and other limited viewing uses only unless
otherwise authorised by Macrovision Corporation.
Reverse engineering or disassembly is prohibited.
Trademark notice
Manufactured under license from Dolby
Laboratories. Dolby and the double-D symbol are
trademarks of Dolby Laboratories.
When this crossed-out wheeled bin symbol is
attached to a product it means that the product
is covered by the European Directive 2002/96/
EC. Please inform yourself about the local separate
collection system for electrical and electronic
products.
4
EN
‘DVD Video’ is a trademark of DVD Format/Logo
Licensing Corporation.
This apparatus includes this label:
Page 4

2 Your DVD player
Congratulations on your purchase, and welcome to
Philips! To fully benefi t from the support that Philips
offers, register your product at www.philips.com/
welcome.
Remote control
English
1
Feature highlights
Screen Fit
View the movie in full screen display on any TV.
Progressive scan video
Push the limits of standard resolution and provide a
more fi lm-like DVD video display on a TV screen.
Region codes
You can play discs with the following region codes.
DVD region code Countries
Australia, New Zealand
Product overview
Main unit
2
3
4
5
6
7
10
18
17
16
15
14
8
9
13
12
a b c d e f
a
Turn on the unit or switch to standby.•
b Disc compartment
c Indicators
d IR sensor
Remote sensor.•
e
Open or close the disc compartment. •
f
Start, pause or resume disc play.•
a ( Standby-On )
Turn on the DVD player or switches to •
standby mode.
b
c DISC MENU
d
( Open/Close )
Open or close the disc compartment.•
Access or exit the disc menu.•
For VCD and SVCD, turn PBC (playback •
control) on or off in PBC mode.
( Navigation buttons )
Navigate through the menus.•
Search fast-for ward (right) or fast-•
backward (left). Press repeatedly to
change the search speed.
Search slow-forward (up) or slow-•
backward (down). Press repeatedly to
change the search speed.
11
EN
5
Page 5
e BACK
Retu• rn to the previous menu.
For DVD, navigate to title menu.•
For VCD version 2.0 or SVCD with PBC •
turned on, return to the menu.
f
/ ( Previous/Next )
Ski• p to the previous or next title, chapter,
or track.
Press and hold for fast-backward or fast-•
forward search.
g
( Mute )
Mute ot restore audio output.•
h Numeric buttons
Select an item to play.•
i SUBTITLE
Select a subtitle language for video.•
j
ZOOM
Fit• the picture format to the TV screen
(using zoom factor 1.3X and 1.6X).
Zoom • in or out of the picture.
k REPEAT
Toggle between various repeat modes.•
l REPEAT A-B
Mark the section for repeat play, or turn •
off repeat mode.
m AUDIO
Select an audio language or channel.•
Digital amplifi er/receiver•
Analog stereo system•
Note
Refer to the type plate at the back or bottom of the •
product for identifi cation and supply ratings.
Before you make or change any connections, ensure that
•
all the devices are disconnected from the power outlet.
Tip
Different types of connectors may be used to connect •
this product to your TV, depending on availability and
your needs. A comprehensive interactive guide to
help you connect your product is available at ww w.
connectivityguide.philips.com.
Connect video cables
Connect this product to TV to view disc play. Select
the best video connection that TV can support.
• Option 1: Connect to component video jacks
(for a standard TV or Progressive Scan TV).
• Option 2: Connect to video (CVBS) jack (for a
standard TV).
Note
You must connect this product directly to a TV.•
n
( Stop )
Stop disc play.•
o
( Play/Pause )
Start, pause or resume disc play.•
p
INFO
For • discs, display information about the
current status or the disc.
For slide shows, display a thumbnail view •
of photo fi les.
q OK
Confi rm an entry or selection.•
r SETUP
Access or exit the setup menu.•
3 Connect
Make the following connections to use this product.
Basic connections:
Video•
Audio•
Optional connections:
Route audio to other devices:•
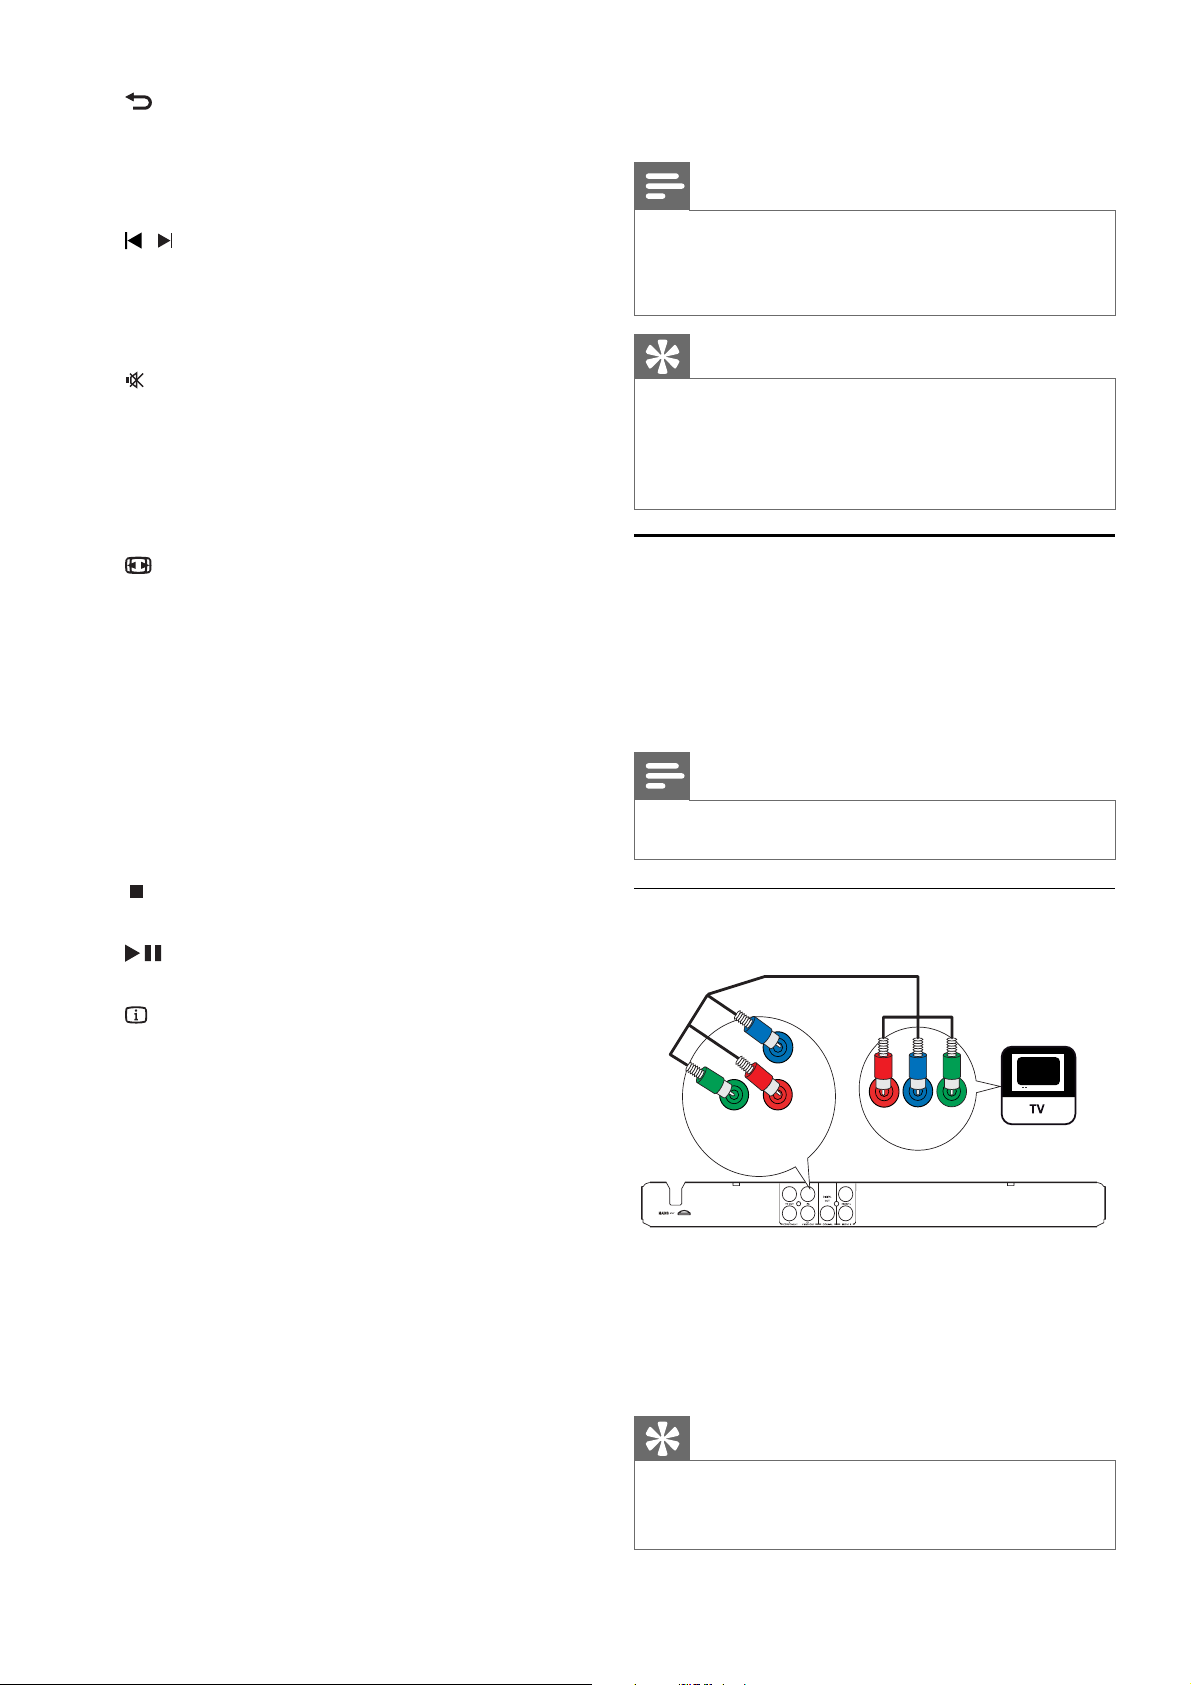
Option 1: Connect to component video
jacks
Pb
Pr
Y
COMPONENT VIDEO OUT
Pr
COMPONENT
Pb
VIDEO IN
Y
1 Connect the component video cables (not
supplied) to:
the • Y Pb Pr jacks on this product.
the COMPONENT VIDEO input jacks •
on the TV.
Tip
The component video input jacks on the T V may be •
labeled as Y Pb/Cb Pr/Cr or YUV.
This type of connection provides good picture quality.
•
6
EN
Page 6

Option 2: Connect to video (CVBS) jack
the COAXIAL/DIGITAL input jack on •
the device.
VIDEO IN
1 Connect a composite video cable to:
the • TV OUT jack on this product.
the video input jack on the TV.•
Tip
The video input jack on the TV may be labeled as A /V •
IN, VIDEO IN, COMPOSITE or BASEBAND.
This type of connection provides standard picture
•
quality.
Connect audio cables
AUDIO IN
Connect analogue stereo system
AUDIO IN
FRONT L
FRONT R
1 Connect the audio cables to:
the • FRONT L/R jacks on this product.
the audio input jacks on the device.•
Connect power
Caution
Risk of product damage! Ensure that the power supply •
voltage corresponds to the voltage printed on the back
of the unit.
Before connecting the AC power cord, ensure you have
•
completed all other connec tions.
English
Connect the audio from this product to the TV to
allow sound output through the TV.
1 Connect the audio cables to:
the • FRONT L/R jacks on this product.
the audio input jacks on the TV.•
Route audio to other devices
Route the audio from this product to other devices
to enhance audio play.
Connect to digital amplifi er/receiver
DIGITAL IN
DIGITAL
OUT
COAXIAL
Note
The type plate is located on the back of the product.•
1 Connect the AC power cable to the wall
socket.
The player is ready to be set up for use.»
4 Get started
Prepare the remote control
1 Connect a coaxial cable (not supplied) to:
the • COAXIAL jack on this product.
1 Open the battery compartment.
2 Insert two R03 or AAA batteries with correct
polarity (+/-) as indicated.
EN
7
Page 7
3 Close the battery compartment.
Caution
Remove batteries if they are exhausted or if the remote •
control is not to be used for a long time.
Do not mix batteries (old and new or carbon and
•
alkaline, etc.).
•
Bat teries contain chemical substances, so they should be
disposed of properly.
Find the correct viewing channel
1 Press to turn on this product.
2 Turn on the TV and switch to the correct
video-in channel. (Refer to the TV user manual
on how to select the correct channel.)
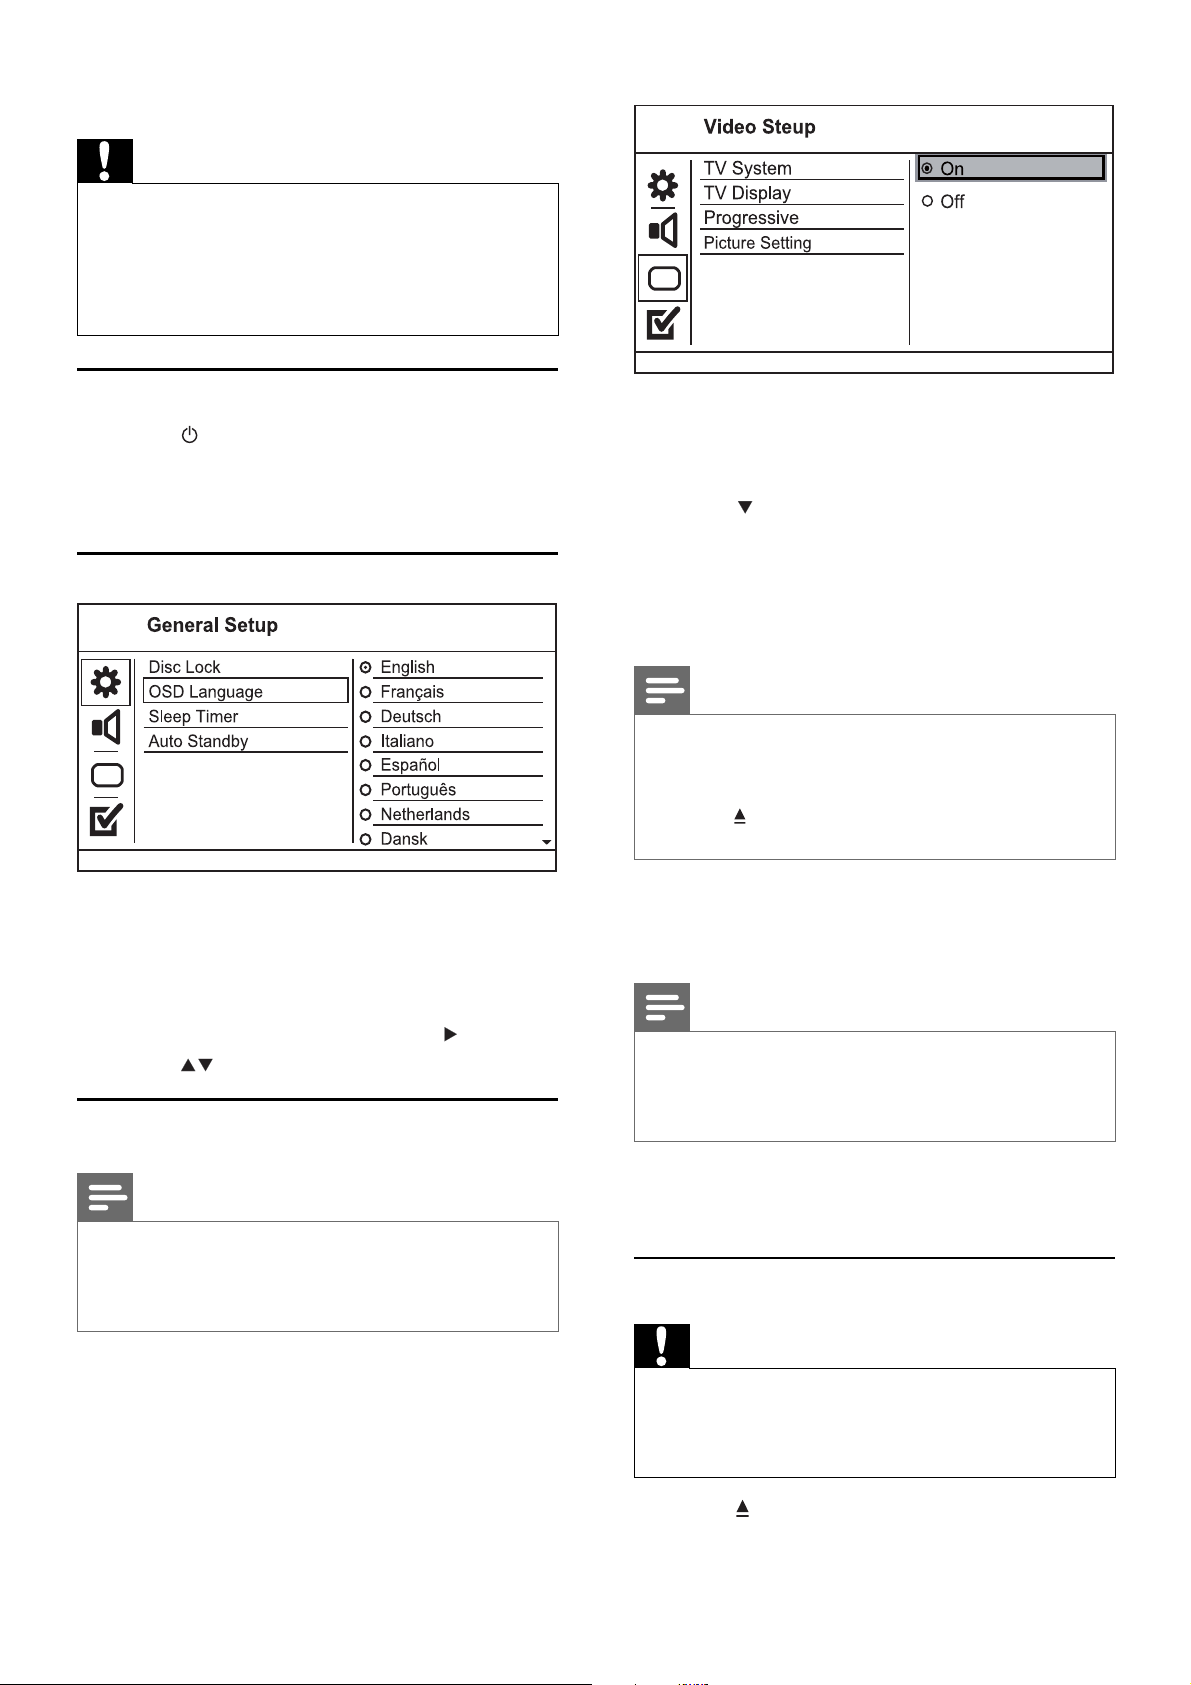
Select menu display language
1 Turn on the TV to the correct viewing channel
for this product.
2 Press SETUP.
3 Press to select [Video Setup].
4 Select [Progressive] > [On], then press OK.
A warning message is displayed.»
5 To proceed, select [Ok] and press OK.
The progressive setup is complete.»
The language options may vary from •
different regions.
1 Press SETUP.
» [General Setup] menu is displayed.
2 Select [OSD language], then press .
3 Press to select a language, then press OK.
Turn on progressive scan
Note
To use the progressive scan feature, you must connect •
a progressive scan TV with the component video jacks
(see “Connect” > “Connect video cables” > “Option 1:
Connect to the component video jacks” for details).
Note
If a blank /distorted screen is displayed, wait for 15 •
seconds for the auto recover y.
If no picture is displayed, turn off the progressive scan
•
mode as follows:
1) Press
• to open the disc compar tment.
2) Press the
• Numeric button ‘1’.
6 Press SETUP to exit the menu.
7 You can now turn on the progressive scan
mode on the TV (see the TV user manual).
Note
During play, when the progressive scan mode is on for •
both this product and the T V, dis torted picture may
display. In this case, turn off the progressive scan feature
on both this product and the TV.
5 Play
Play a disc
Caution
Do not place any objects other than discs into the disc •
compartment.
Do not touch the disc optical lens inside the disc
•
compartment.
1 Press to open the disc compartment.
2 Insert a disc with its label facing up.
8
EN
Page 8
3 Press to close the disc compartment and
star t disc play.
To view disc play, turn on the TV to the •
correct viewing channel for this product.
To stop disc play, press • .
Note
Check the types of discs supported (see “Specifi cations” •
> “Play media”).
If the password entr y menu is displayed, enter the
•
password before you can play the locked or restricted
disc (see “Adjust settings” > “Preferences” > [Parental
Control]).
If you pause or stop a disc, the screen saver appears after
•
5 minutes of inactivity. To deactivate the screen saver,
press DISC MENU.
After you pause or stop a disc and no button is pressed
•
within 15 minutes, this product automatically switches
to standby.
Play video
Note
Some operations may not work with some discs. See the •
information accompanying the disc for details.
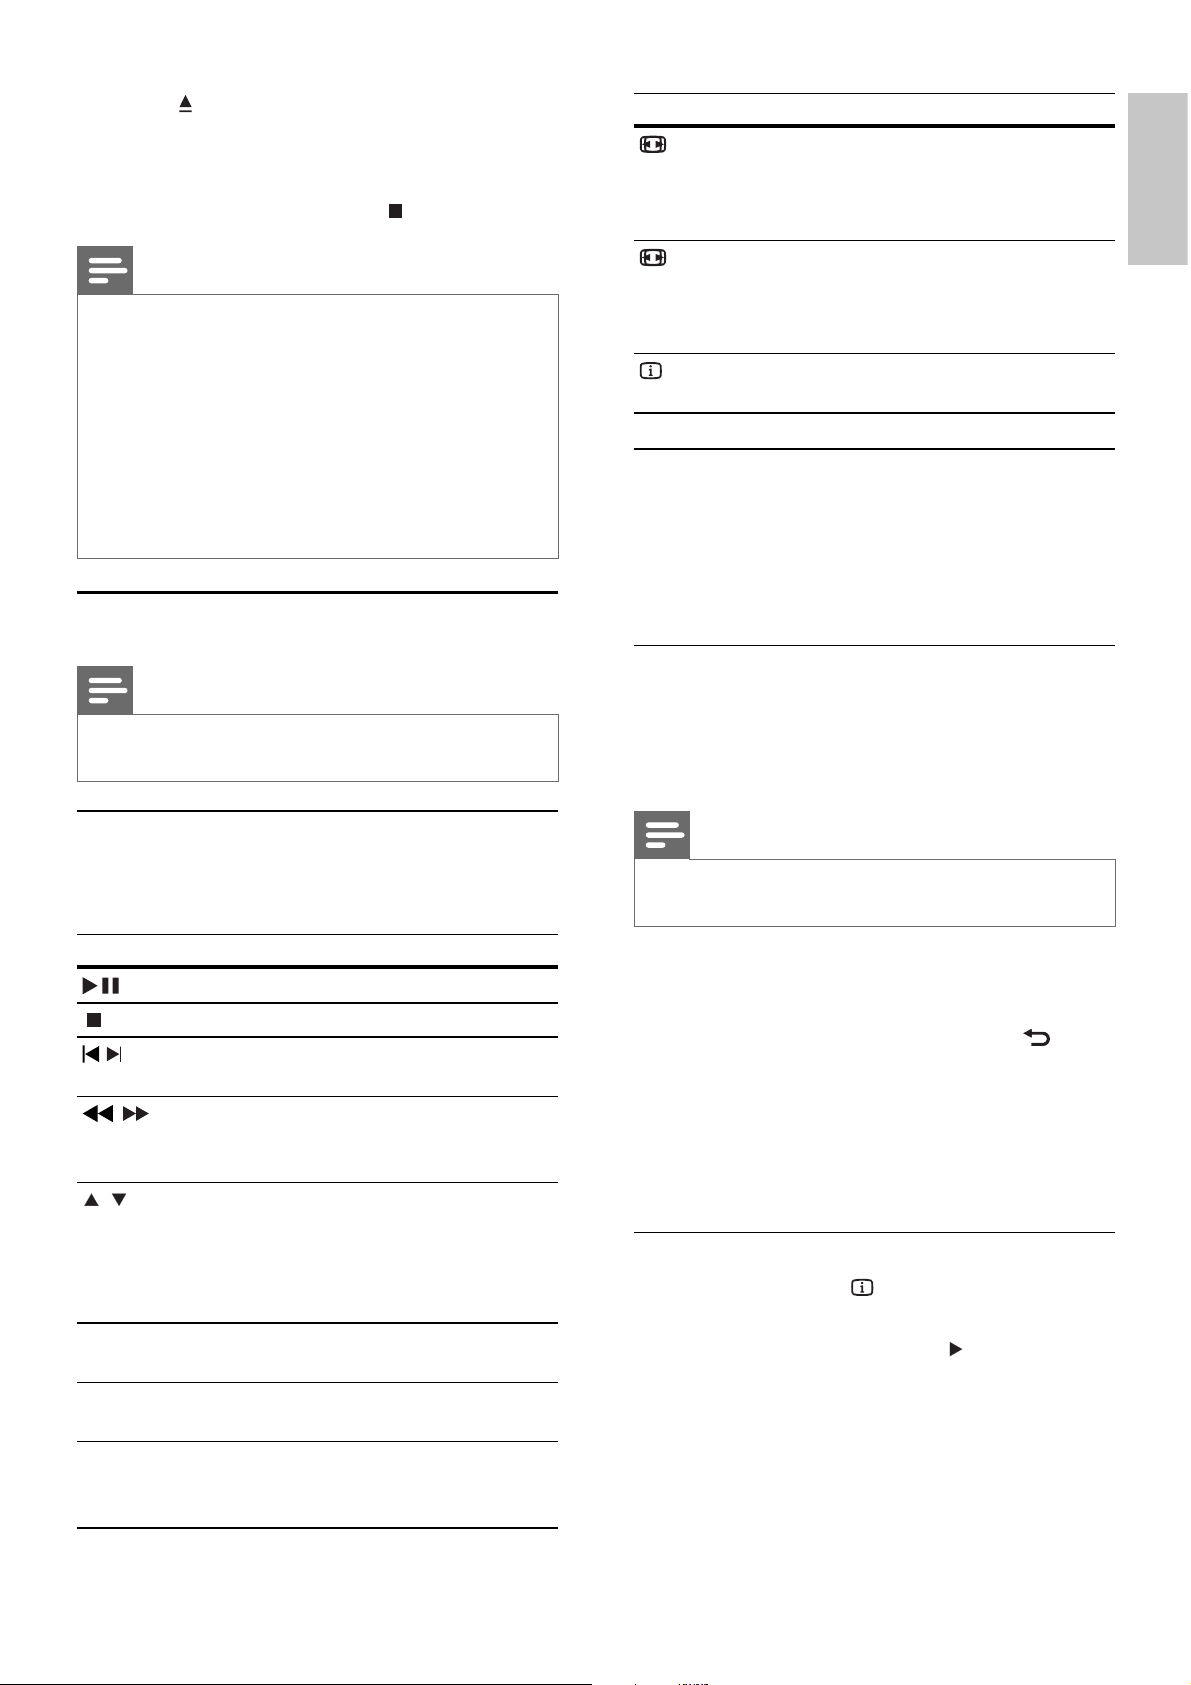
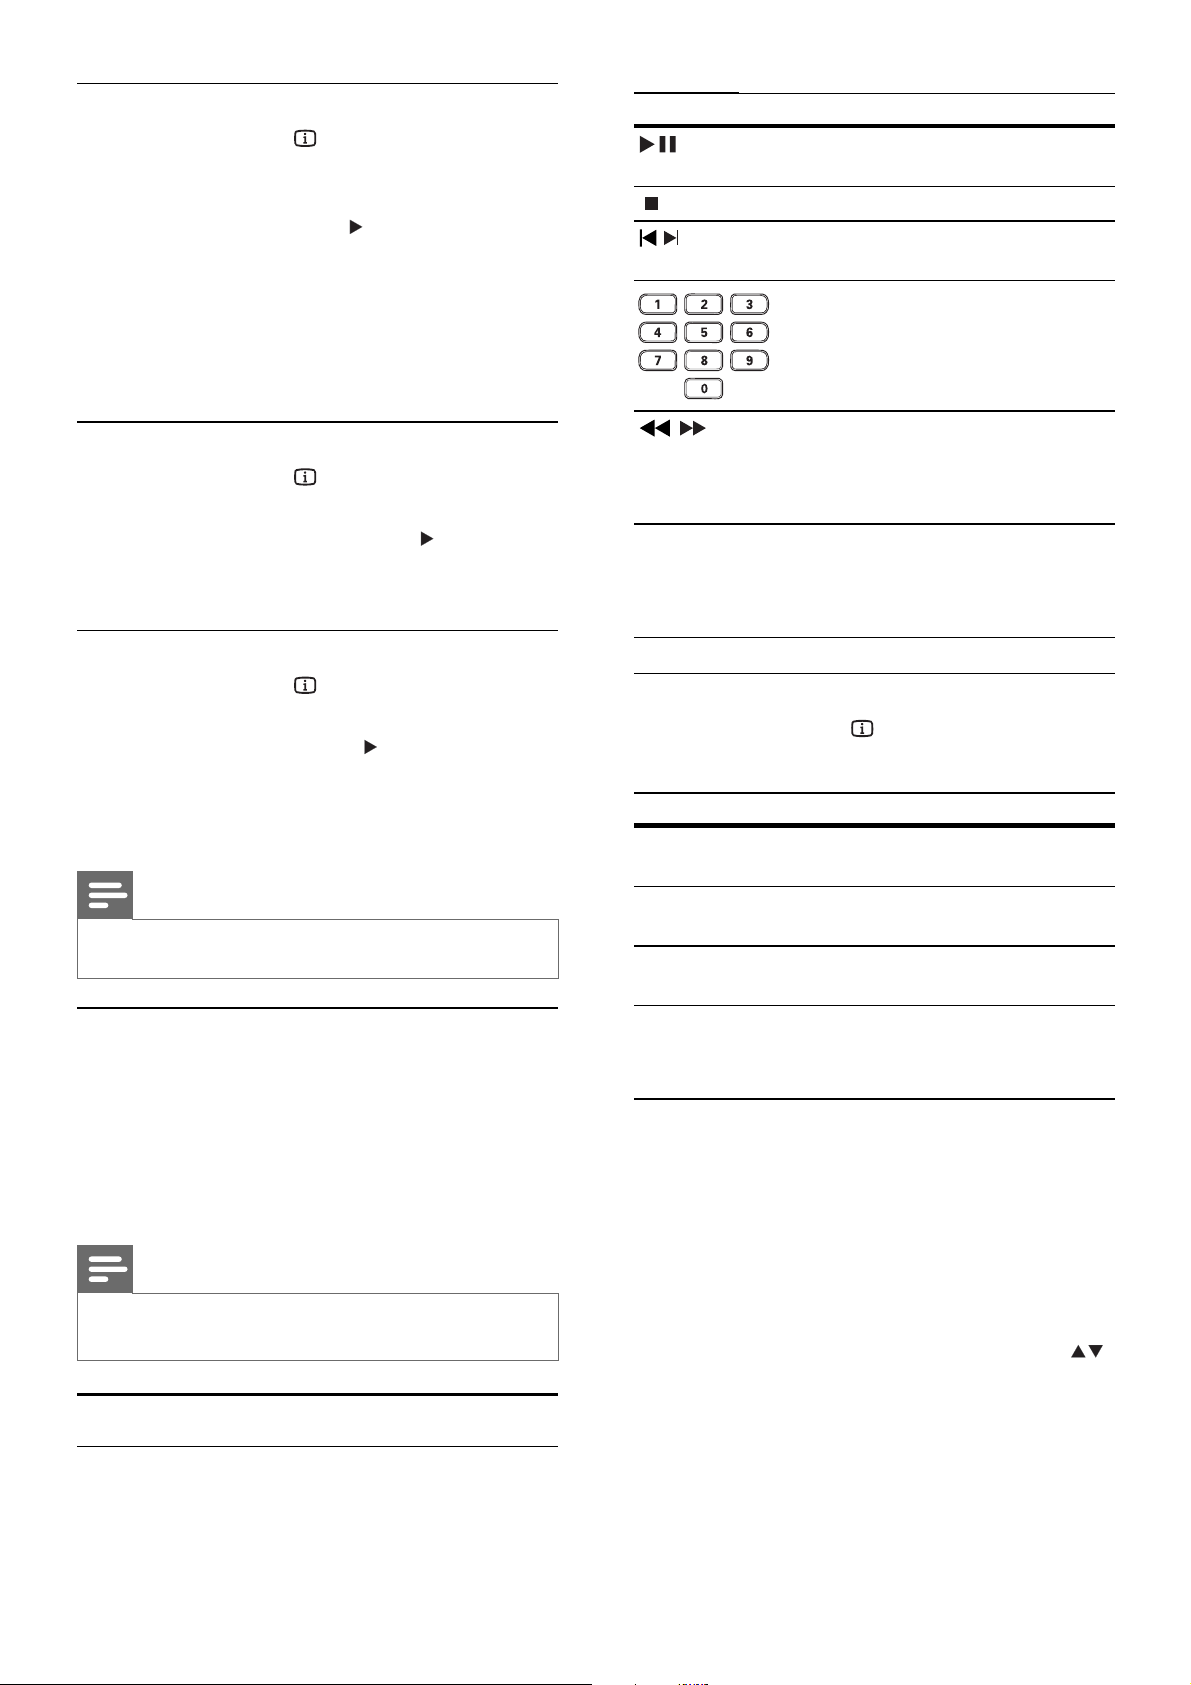
Button Action
ZOOM
ZOOM
INFO
Fit the picture format to the TV
screen.
Press repeatedly until the image is
scaled to fi t to the TV screen.
Toggle between screen aspect ratio
and different zoom factor.
To pan through the zoomed image,
press the Navigation buttons.
Access the play options and display
the current disc status.
Access DVD menu
1 Press DISC MENU to access the disc root
menu.
2 Select a play option, then press OK.
In some menus, press the • Numeric
buttons to input your selection.
Access VCD menu
The PBC (playback control) feature is available for
VCD/SVCD, which can display the contents menu
for you to select a play option. The PBC is on by
default in the factory.
English
Control video play
1 Play a title.
2 Use the remote control to control the play.
Button Action
Start, pause or resume disc play.
Stop disc play.
,
,
,
AUDIO Select an audio language or channel
SUBTITLE Select a subtitle language availabel
REPEAT Select or turn off repeat mode.
Skip to a previous/next title or
chapter.
Search fast-backward or fastforward. Press repeatedly to change
the search speed.
Search slow-forward or slowbackward. Press repeatedly to
change the search speed.
For VCD/SVCD, slow-backward
search is not available.
available on a disc.
on a disc.
Repeat options may vary from disc
type.
Note
See “Adjust set tings” > • [Preferences] > [PBC] on how
to turn PBC on or off.
1 Display the contents menu via one of the
following ways:
If PBC is on, load in a VCD/SVCD.•
During play with PBC on, press •
BACK.
2 Press the Numeric buttons to select a play
option, then press OK to start play.
If PBC is turned off, it skips the menu •
display and star ts play from the fi rst
track.
Preview disc contents
1 During play, press INFO.
The disc status menu is displayed.»
2 Select [Preview], then press .
3 Select a preview option, then press OK.
A thumbnails preview screen is displayed.»
To go to the next/previous prview •
screen, select [Prev] or [Next], then
press OK.
To star t play, press • OK at the selected
thumbnail picture.
EN
9
Page 9
Skip play to a specifi c time
1 During play, press INFO.
The disc status menu is displayed.»
2 Select an option for the current elapsed
playing time, then press .
• [TT Time] (title time)
• [Ch Time] (chapter time)
• [Disc Time] (disc time)
• [Track Time] (track time)
3 Press the Numeric buttons to enter the time
to skip to, then press OK.
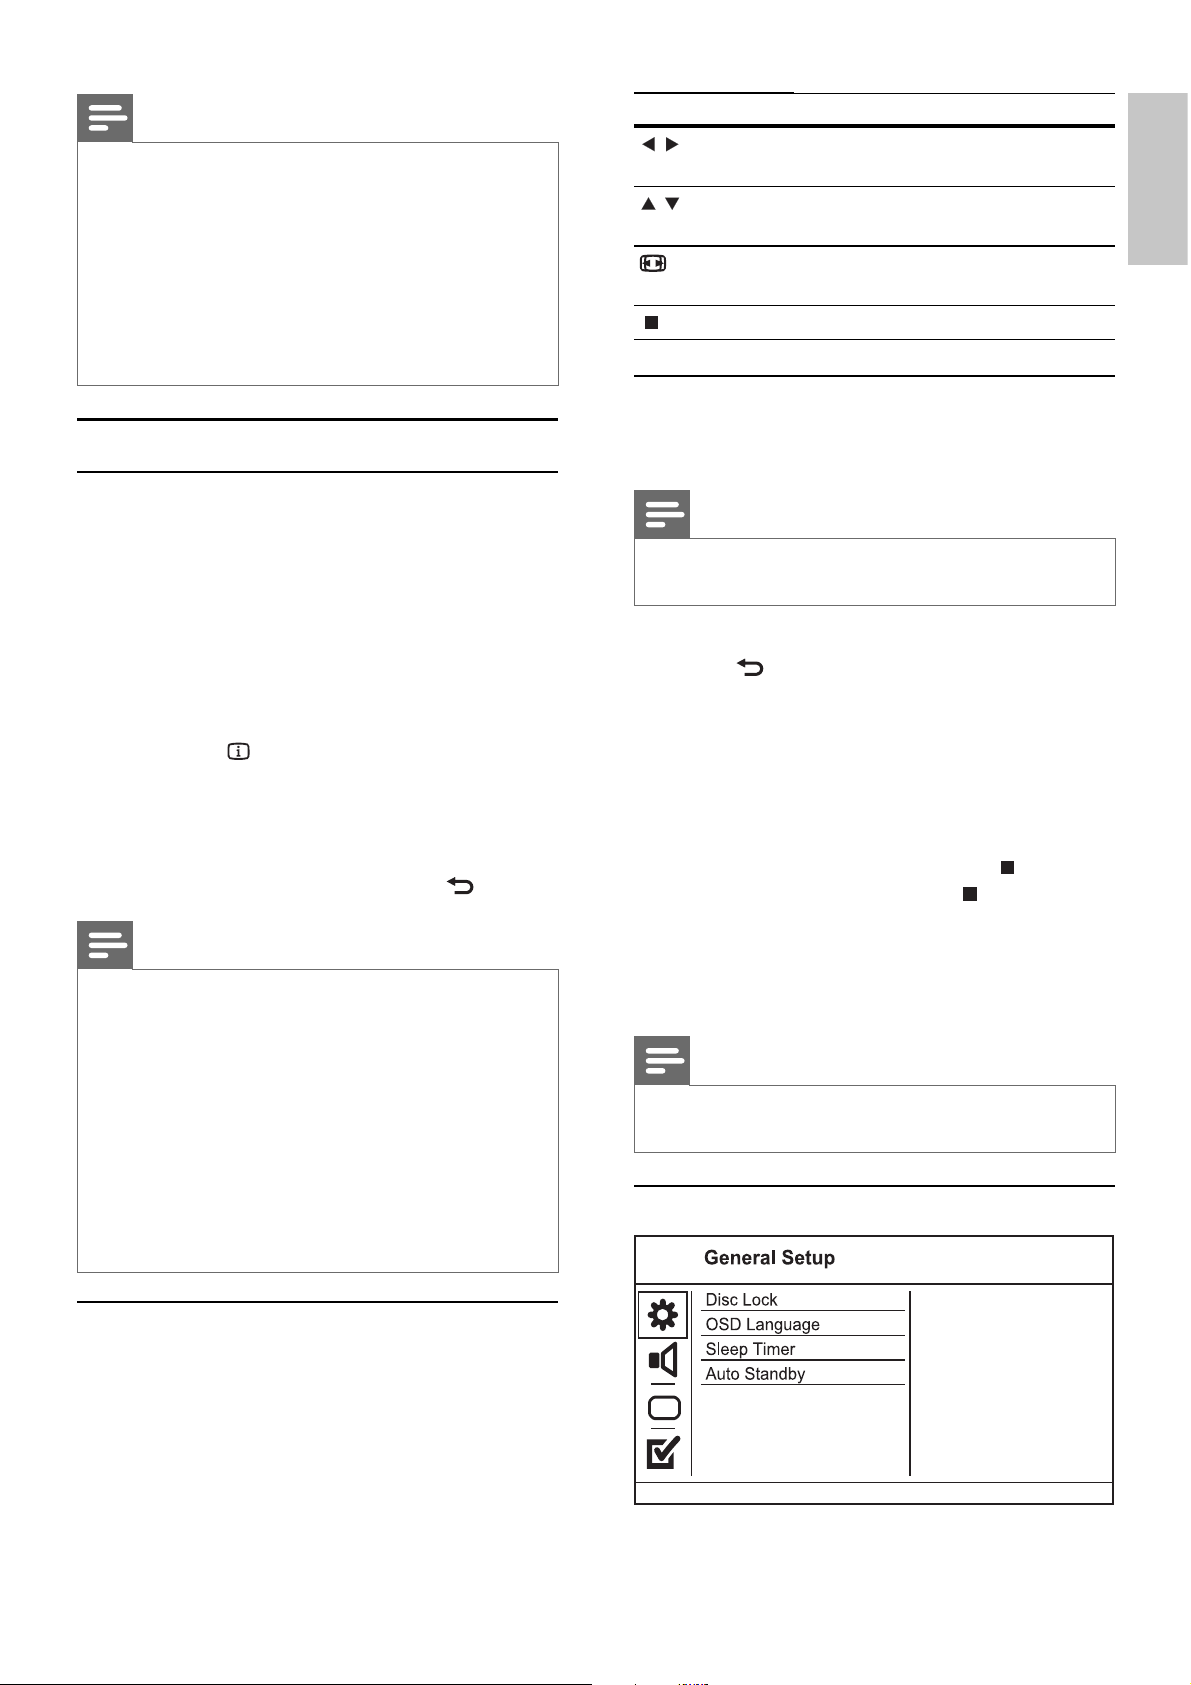
Button Action
Start, pause or resume disc
play.
Stop disc play.
,
Skip to a previous/next
track.
Select an item to play.
Display play time
1 During play, press INFO.
The disc status menu is displayed.»
2 Select [Time Disp.], then press .
The display options vary from disc type.»
3 Select an option, then press OK.
View DVD play from different angles
1 During play, press INFO.
The disc status menu is displayed.»
2 Select [Angle], then press .
3 Press the Numeric buttons to change the
angle.
Play changes to the selected angle.»
Note
Applicable only to discs contain multi-angle scenes.•
,
REPEAT Select or turn off repeat
Searches fast-backward
or fast-forward. Press
repeatedly to change the
search speed.
mode.
Repeat options may vary
from disc type.
Quick skip play
1 During play, press INFO repeatedly to
select an option.
Display Action
[Disc Go To] Skip play to a specifi c
time within the disc.
[Track Go To] Skip play to a specifi c
time within a track.
[Select Track] Skip play to a specifi c
track number.
Repeat play for a specifi c section
1 During play, press REPEAT A-B at the star t
point.
2 Press REPEAT A-B again to set the end point.
Repeat play starts.»
3 To cancel repeat play, press REPEAT A-B
again.
Note
The marked section for repeat play is only possible •
within a track/title.
Play music
Control a track
1 Play a track.
2 Use the remote control to control the play.
2 Press the numeric buttons to change the time/
number to skip to.
Play MP3/WMA music
MP3/WMA is a type of highly compressed audio fi le
(fi les with .mp3, .wma extensions).
1 Insert a disc that contains the MP3/WMA
music.
A contents menu is displayed.»
2 If play does not automatically star t, select a
track to play.
To select another track/folder, press •
then press OK.
,
10
EN
Page 10
Note
For disc recorded in multiple sessions, only the fi rst •
session is played.
For a WMA fi le that is protected by Digital Rights
•
Management (DRM), it cannot be played on this produc t.
This product does not suppor t MP3PRO audio format.
•
For any special char acter that is present in the MP3 tr ack •
name (ID3) or album name, it might not be displayed
correctly on the screen because these characters are not
supported.
Folders/fi les that exceed the supported limit of this
•
product cannot be displayed or played.
Play photo
Play photo as slideshow
You can play JPEG photos (fi les with .jpeg or .jpg
extensions).
1 Insert a disc that contains the JPEG photos.
Slideshow begins (for Kodak disc), or a »
contents menu (for JPEG disc) is displayed.
2 Select a photo folder, then press OK to start
slideshow.
To preview the photos in thumbnail, •
press INFO.
To select a photo, press the • Navigation
buttons.
To enlarge the selected photo and star t •
slideshow, press OK.
To return to the menu, press •
BACK.
Button Action
/
Rotate a photo anti-clockwise/
clockwise.
/
Rotate a photo horizontally/
vertically.
ZOOM
Zoom in or out of a photo.
Play pauses in zoom mode.
Stop a play.
Play musical slideshow
Create a musical slideshow to play MP3/WMA
music fi les and JPEG photo fi les simultaneously.
Note
To create a musical slideshow, the MP3/WMA and JPEG •
fi les must be stored on the same disc.
1 Play MP3/WMA music.
2 Press BACK to return to the main menu.
3 Navigate to the photo folder/album and press
OK to start slideshow play.
Slideshow begins and continues till the end »
of the photo folder or album.
Audio continues to play until the end of »
the disc.
To stop slideshow play, press •
To stop music play, press •
.
again.
English
Note
It may require longer time to display the disc content •
on the TV due to the large number of songs/photos
compiled onto one disc.
If the JPEG photo is not recorded with an ‘exif ’ type
•
fi le, the actual thumbnail picture cannot be shown on
the screen. It is replaced by a ‘blue mountain’ thumbnail
picture.
This player can only display digital camera pictures
•
according to the JPEG-EXIF format, typically used by
almost all digital cameras. It cannot display Motion JPEG,
or pictures in for mats other than JPEG, or sound clips
associated with pictures.
Folders/fi les that exceed the supported limit of this
•
player cannot be displayed or played.
Control photo play
1 Play a photo slideshow.
2 Use the remote control to control the play.
6 Adjust settings
Note
If the setup option is grayed out, it means the setting •
cannot be changed at the current state.
General setup
EN
11
Page 11
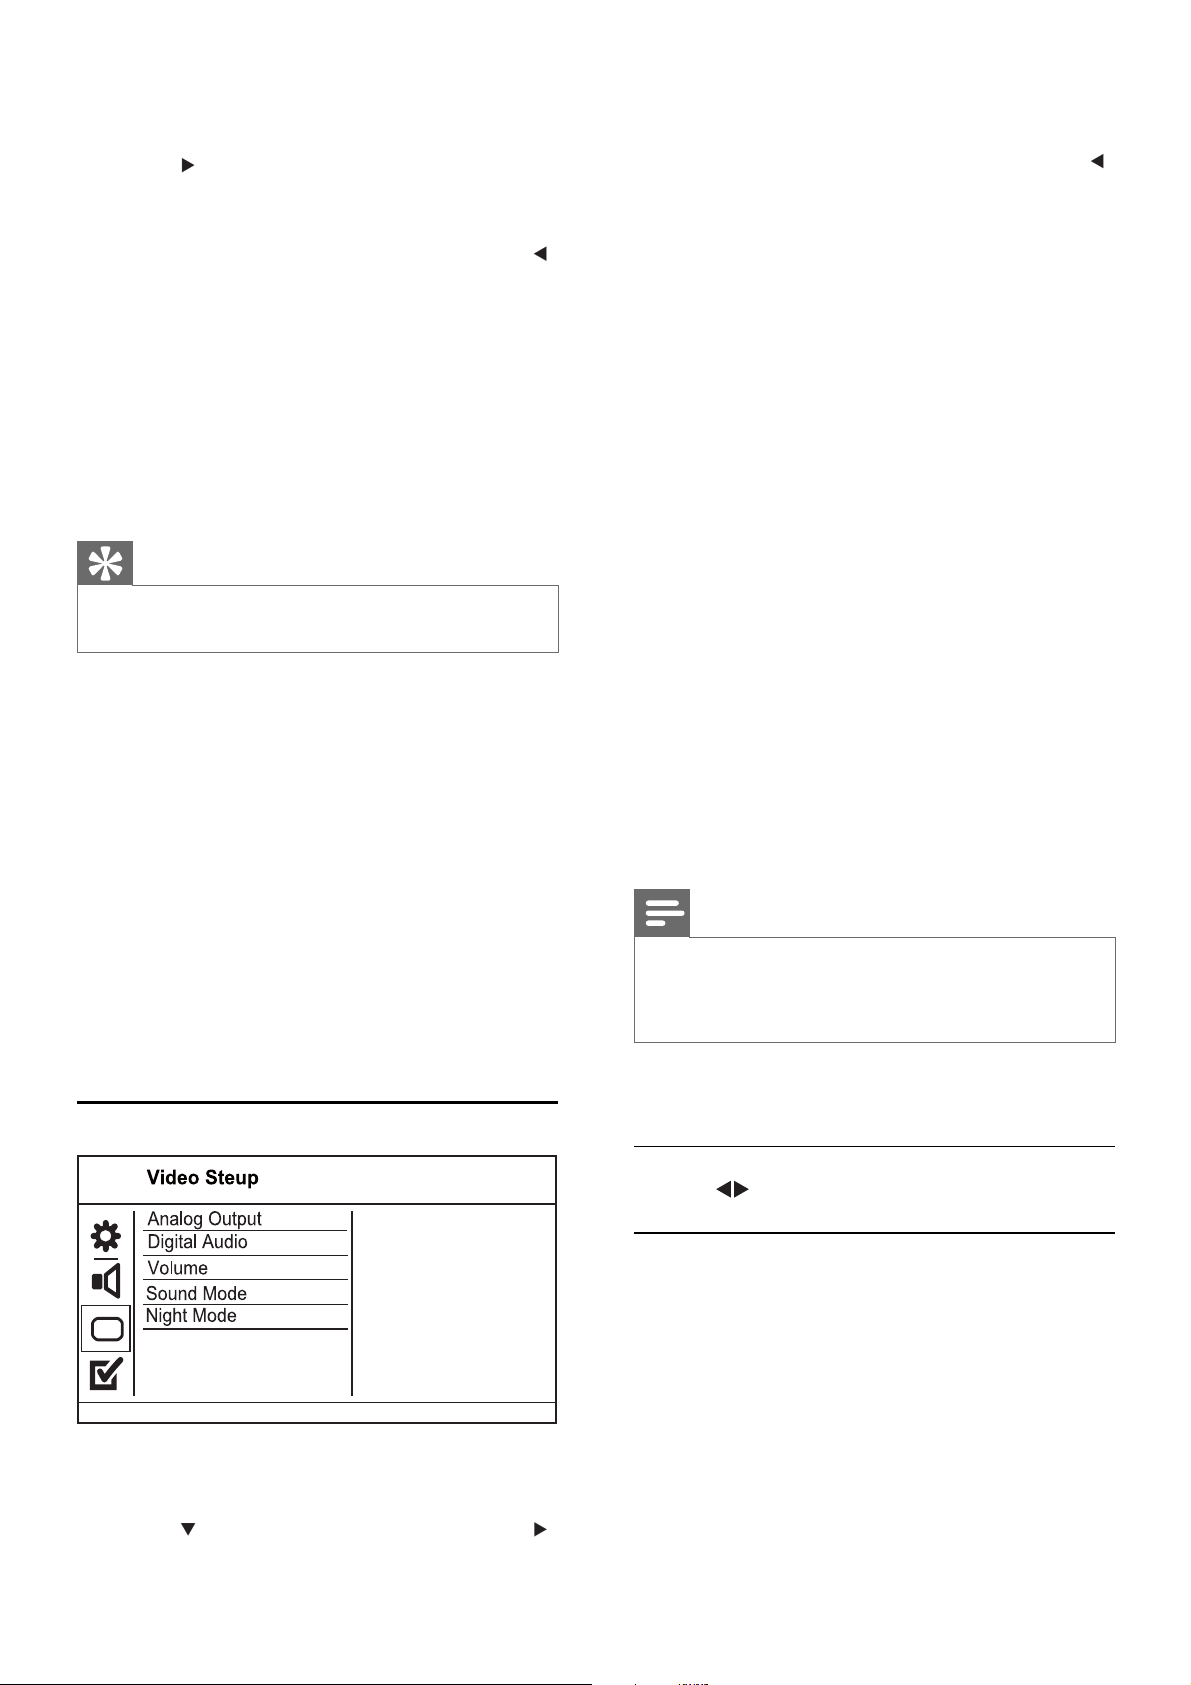
1 Press SETUP.
» [General Setup] menu is displayed.
2 Press .
3 Select an option, then press OK.
4 Select a setting, then press OK.
To return to the previous menu, press •
To exit the menu, press • SETUP.
[Disc Lock]
Set play restriction for a disc which is loaded in
the disc compar tment (maximum 20 discs can be
locked).
• [Lock] - Restrict access to the current disc.
The next time you want to play this disc or
unlock it, you need to enter the password.
[Unlock] • - Play all discs.
Tip
You can set or change the password, go to • [Preferences]
> [Password].
[OSD language]
Select an on-screen menu language.
[Sleep Timer]
Switch automatically to standby at the preset time.
• [Off] - Disable sleep mode.
• [15 mins] , [30 mins] , [45 mins] , [60 mins]
-Select the count down time for this product
to switch to standby.
[Auto standby]
Turn on or off automatically standby.
• [On] - Switch to standby 15 minutes of
inactivity (for example, in pause or stop
mode).
• [Off] - Disable the auto standby mode.
Audio setup
3 Select an option, then press OK.
4 Select a setting, then press OK.
To return to the previous menu, press • .
To exit the menu, press • SETUP.
[Analogue Output]
.
Select an analogue setting based on the audio
device that is connected through the analogue
audio jack.
• [Stereo] - For stereo output.
• [LT/RT] - For surround sound output through
two speakers.
[Digital Audio]
Select a digital setting based on the digital amplifi er/
receiver that is connected through the digital jack
(coaxial/digital).
• [Digital Output] - Select a type of digital
output.
• [Off] - Disable digital output.
• [All] - Support multi-channel audio
formats.
• [PCM Only] - Downmix to two-channel
audio format.
• [LPCM Output] - Select the LPCM (Linear
Pulse Code Modulation) output sampling rate.
• [48kHz] - For discs recorded at sampling
rate of 48 kHz.
• [96kHz] - For discs recorded at sampling
rate of 96 kHz.
Note
• [LPCM Output] setting is only available if the [Digital
Output] is set to [PCM Only].
The higher the sampling rate, the better the sound
•
quality.
[Volume]
Set the default volume level when you play a disc.
1. Press OK.
2. Press to set the volume.
3. Press OK to confi rm and exit.
1 Press SETUP.
» [General Setup] menu is displayed.
2 Press to select [Audio Setup], then press .
12
EN
[Sound Mode]
Select a preset sound effect to enhance the audio
output.
• [3D] - Select a virtual surround sound effect
that is produced from the left and right audio
channels.
• [Movie Mode] - Select a sound effect for
movies.
• [Music Mode] - Select a sound effect for
music.
Page 12
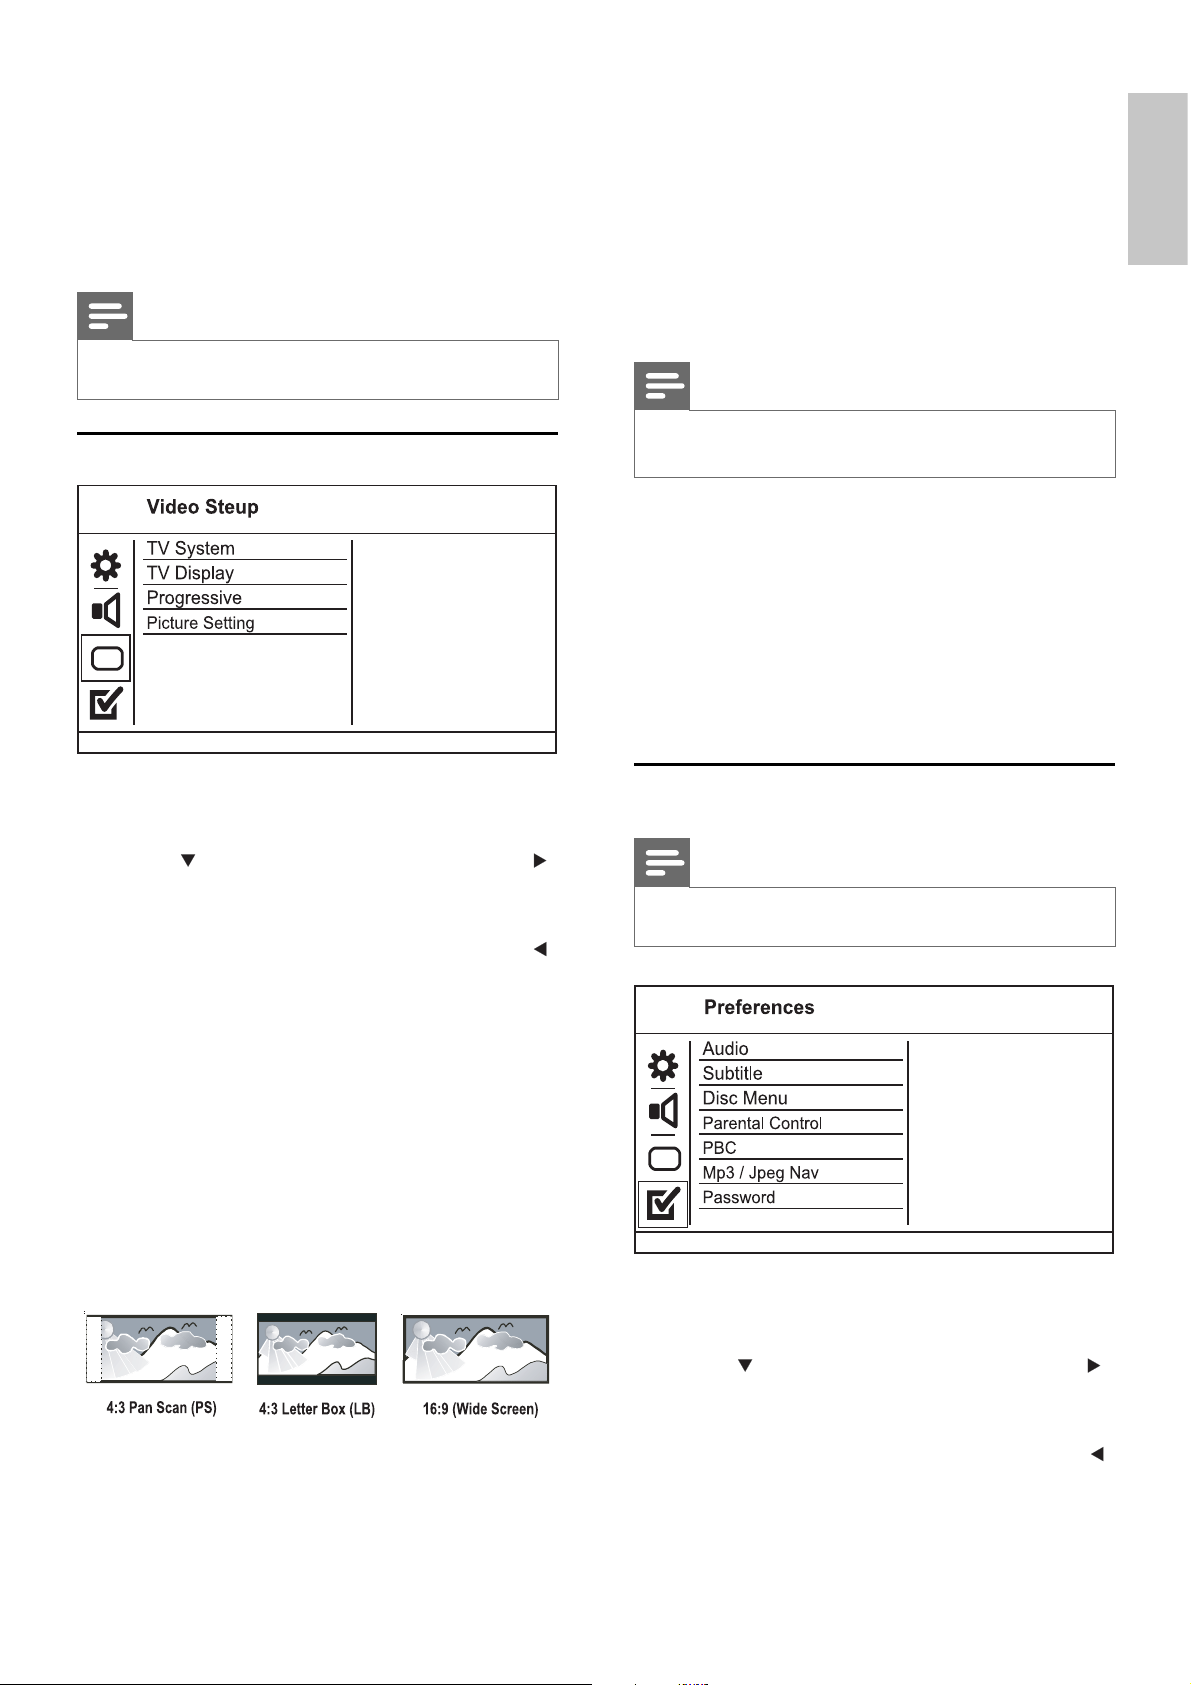
[Night Mode]
Make loud sound level softer and soft sound level
louder so that you can watch the DVD movies at a
low volume, without disturbing others.
• [On] – Enjoy quiet viewing at night.
• [Off] – Enjoy surround sound with a full
dynamic range.
Note
Applicable only to Dolby Digital encoded DVD.•
Video setup
• [4:3 Letter Box] - For 4:3 screen TV: widescreen display with black bars on the top and
bottom of the screen.
• [16:9] - For wide-screen TV: display ratio 16:9.
English
[Progressive]
If a progressive scan TV is connected to this
product, turn on the progressive scan mode.
• [On] - Turn on progressive scan.
• [Off] - Turn off progressive scan mode.
Note
For more detailed description, see “Get star ted” > •
“Turn on progressive scan”.
[Picture Setting]
Select a predefi ned set of picture color settings or
customize the personal setting.
• [Standard] - Original color setting.
• [Bright] - Vibrant color setting.
• [Soft] - Warm color setting.
• [Personal] - Customize the color setting. Set
the level of brightness, contrast, tint and color
saturation, then press OK.
1 Press SETUP.
» [General Setup] menu is displayed.
2 Press to select [Video Setup], then press .
3 Select an option, then press OK.
4 Select a setting, then press OK.
To return to the previous menu, press • .
To exit the menu, press • SETUP.
[TV System]
Change this setting if the video does not appear
correctly. By default, this setting matches the most
common setting for TVs in your country.
• [PAL] - For PAL-system TV.
• [Multi] - For TV that is compatible with both
PAL and NTSC.
• [NTSC] - For NTSC-system TV.
[TV Display]
Select a display format:
• [4:3 Pan Scan] - For 4:3 screen TV: full-height
display with the trimmed sides.
Preferences
Note
Stop disc play before you can access to • [Preferences].
1 Press SETUP.
» [General Setup] menu is displayed.
2 Press to select [Preferences], then press .
3 Select an option, then press OK.
4 Select a setting, then press OK.
To return to the previous menu, press •
To exit the menu, press • SETUP.
[Audio]
.
EN
13
Page 13
Select an audio language for disc play.
[Subtitle]
Select a subtitle language for disc play.
[Disc Menu]
Select a disc menu language.
Note
1. Press the Numeric buttons to enter ‘136900’ or
the last set password at [Old Password] fi eld.
2. Enter the new password at [New Password]
fi eld.
3. Enter the new password again at [Confi rm
PWD] fi eld.
4. Press OK to exit the menu.
If the language you have set is not available on the disc, •
the disc uses its own default language.
For some DVDs, the subtitle/audio language can only
•
change from the disc menu.
To select the languages that are not listed in the menu,
•
select [Others]. Then check the Language Code list at
the back of this user manual and enter the respective
language code.
[Parental control]
Restrict access to discs that are unsuitable for
children. These types of discs must be recorded
with ratings.
1. Press OK.
2. Select a rating level, then press OK.
3. Press the numeric buttons to enter the
password.
Note
Rated DVDs above the level you set in • [Parental
control] require a password to be played.
The ratings are country-dependent. To allow all discs to
•
play, select ‘ 8’.
Some discs have ratings printed on them but are not
•
recorded with ratings. This function has no effect on
such discs.
Note
If you forget the password, enter ‘136900’ before you set •
a new password.
[Version Info]
Display the software version of this product.
Tip
This information is required when you want to fi nd out •
if a newest software version is available at the Philips
website that you may download and install on this
product.
[Default]
Reset all the settings of this product to factory
default, except for [Disc Lock], [Parental control]
and [Password] settings.
7 Additional information
Care
[PBC]
Turn on or off the content menu of VCDs/SVCDs
with PBC (playback control) feature.
• [On] - Display the index menu when you load
a disc for play.
• [Off] - Skip the menu and start play from the
fi rst title.
[MP3/JPEG Nav]
Select to display the folders or display all the fi les.
• [View Files] - Display all the fi les.
• [View Folders] - Display the folders of MP3/
WMA fi les.
[Password]
Set or change the password for locked discs and
play restricted DVDs.
Caution
Never use solvents such as benzene, thinner, cleaners •
available commercially, or anti-s tatic sprays intended
for discs.
Clean discs
Wipe the disc with a micro fi bre cleaning cloth from
the centre to the edge in a straight line movement.
Specifi cations
Note
Specifi cation and design are subject to change without •
notice
14
EN
Page 14
Accessories supplied
Remote control and batteries•
Audio/Video cables•
User Manual•
Play media
DVD-Video, Video CD/SVCD, Audio CD, •
CD-R/CD-RW, DVD+R/+RW, DVD-R/-RW,
Picture CD, MP3-CD, WMA-CD
TV standard
Number of lines:•
625 (PAL/50Hz); 525 (NTSC/60Hz)•
Play: Multi-standard (PAL/NTSC)•
Video performance
Video DAC: 12 bits, 108 MHz•
Y Pb Pr: 0.7 Vpp ~ 75 ohm•
Video output: 1 Vpp ~ 75 ohm•
Video format
Digital compression:•
DVD/SVCD/VCD•
Horizontal resolution:•
DVD: 720 pixels (50 Hz); 720 pixels (60 •
Hz)
VCD: 352 pixels (50 Hz); 352 pixels (60 •
Hz)
Ver tical resolution:•
DVD: 576 pixels (50 Hz); 480 pixels (60 •
Hz)
VCD: 288 lines (50 Hz); 240 lines (60 Hz)•
Audio performance
DA conver ter: 24 bits, 192 kHz•
Frequency response: •
DVD: 4 Hz - 22 kHz (48 kHz); 4 Hz - 44 •
kHz (96 kHz)
SVCD: 4 Hz - 20 kHz (44.1 kHz); 4 Hz - •
22 kHz (48 kHz)
CD/VCD: 4 Hz - 20 kHz (44.1 kHz) •
Signal-Noise (1 kHz): > 90 dB (A-weighted)•
Dynamic range (1 kHz): > 80 dB (A-weighted)•
Crosstalk (1 kHz): > 90 dB•
Distor tion/noise (1 kHz): > 65 dB•
MP3: MPEG L3•
Connections
Y Pb Pr output: Cinch 3x•
Video output: Cinch (yellow)•
Audio output (L+R): Cinch (white/red)•
Digital output: •
1 coaxial: IEC60958 for CDDA/LPCM; •
IEC61937 for MPEG 1/2, Dolby Digital
Main unit
Dimensions (w x h x d): 360 x 37 x 209 (mm)•
Net Weight: approximately 1.3 kg•
Power
Power supply rating: 230 - 240V, 50HZ•
Power consumption: <10 W•
Power consumption in standby mode: <1 W•
Laser specifi cation
Type: Semiconductor laser InGaAIP (DVD), •
AIGaAs (CD)
Wave length: 658 nm (DVD), 790 nm (CD)•
Output Power: 7.0 mW (DVD), 10.0 mW •
(VCD/CD)
Beam divergence: 60 degrees•
8 Troubleshooting
Warning
Risk of electric shock. Never remove the casing of the •
product.
To keep the warranty valid, never try to repair the
product yourself.
If you have problems using this product, check the
following points before you request service. If you
still have a problem, register your product and get
support at www.philips.com/welcome.
If you contact Philips, you will be asked for the model
and serial number of your product. The model
number and serial number are on the back of your
product. Write the numbers here:
Model No. __________________________
Serial No. ___________________________
English
Audio format
Digital: •
MPEG/AC-3: Compressed digital (16, 20, •
24 bits, fs 44.1, 48, 96 kHz)
MP3: 96, 112, 128, 256 kbps & variable bit •
rate, fs 32, 44.1, 48 kHz
Analog sound stereo•
Dolby surround compatible downmix from •
Dolby Digital multi-channel sound
Main unit
The buttons on this unit do not work.
Disconnect this product from the power •
outlet for a few minutes, then connect again.
EN
15
Page 15

No reaction to the remote control.
Connect this product to the power outlet.•
Point the remote control at the IR sensor •
located on the front panel of this product.
Insert the batteries correctly.•
Insert new batteries in the remote control.•
Picture
No picture.
See the TVs user manual on how to select •
the correct input on the TV. Change the TV
channel until you see the Philips screen.
If you have turned on the progressive scan •
setting or change the TV system setting,
switch back to default mode: 1) Press to
open the disc compar tment. 2) Press the
Numeric button ‘1’ (for progressive scan) or
the Numeric button’3’ (for TV system).
J
JPEG
A very common digital still picture format. A stillpicture data compression system proposed by the
Joint Photographic Expert Group, which features
small decrease in image quality in spite of its high
compression ratio. Files are recognized by their fi le
extension ‘.jpg’ or ‘.jpeg.’
M
MP3
A fi le format with a sound data compression
system. MP3 is the abbreviation of Motion Picture
Exper ts Group 1 (or MPEG-1) Audio Layer 3. With
the MP3 format, one CD-R or CD-RW can contain
about 10 times more data than a regular CD.
Sound
No audio output from the TV.
Ensure that the audio cables are connected to •
the audio input of the TV.
Assign the audio input of the TV to the •
corresponding video input. See the TV user
manual for details.
No audio output from the loudspeakers of the
audio device (stereo system/amplifi er/receiver).
Ensure that the audio cables are connected to •
the audio input of the audio device.
Turn on the audio device to its correct audio •
input source.
Play
The aspect ratio of the screen is not aligned with
the TV display setting.
The aspect ratio is fi xed on the disc.•
P
PBC
Playback Control. A system where you navigate
through a Video CD/Super VCD with on-screen
menus that are recorded onto the disc. You can
enjoy interactive playback and search.
Progressive scan
The progressive scan displays twice the number of
frames per second than in an ordinary TV system. It
offers higher picture resolution and quality.
W
WMA
Windows Media™ Audio. Refers to an audio
compression technology developed by Microsoft
Corporation. WMA data can be encoded with
Windows Media player version 9 or Windows
Media player for Windows XP. Files are recognized
by their fi le extension ‘.wma.’
9 Glossary
A
Aspect ratio
Aspect ratio refers to the length to height ratio of
TV screens. The ratio of a standard TV is 4:3, while
the ratio of a high-defi nition or wide TV is 16:9.
The letter box allows you to enjoy a picture with a
wider perspective on a standard 4:3 screen.
16
EN
Page 16

PHILIPS CONSUMER ELECTRONICS
WARRANTY POLICY FOR AUSTRALIA
Effective 1st July 2009
Philips provides its Consumer Electronics products with a 1 Year Manufacturers War ranty.
The benefits given to the purchaser by this warranty are in addition to all other rights and remedies,
which the purchaser has in respect of the product under the Trade Practices Act or other Commonwealth
or State Law.
The conditions contained in this warranty replace and override the provision of the Philips World-Wide Guarantee
for products purchased in Australia and used in Australia.
Please record the following information for your records and keep in a safe place.
It is essential that you retain your original purchase receipt to make a warranty claim.
Model number : ………………………………………………………
Serial number : ………………………………………………………
Date of purchase : ………………………………………………………
Retailer : ………………………………………………………
English
If you require assistance with the operation of the product, its features or specifications, you may call the
Philips Technology Care Centre on 1300 363 391 where support is provided by our trained staff.
If the product fails within 12 months from the date of purchase, please return the faulty product to the place of
purchase.
Conditions of Warranty
a. All claims for warranty can only be made at the place of purchase and a copy of the purchase receipt is required
for any warranty claim.
b. The warranty period is valid from the original date of purchase of the product.
c. This warranty extends only to defects in material or workmanship occurring under normal use of the product
when operated in accordance with the instructions.
d. Philips may, at its discretion choose to repair rather than replace this product.
e. If a replacement product is supplied, it is warranted for the remainder of the warranty period, from the original
date of purchase.
f. This Manufacturers Warranty is limited to 3 months for products used in commercial applications.
g. Product accessories are covered by the same warranty period. If an accessory is faulty, please contact the Philips
Technology Care Centre on 1300 363 391.
h. This Manufacturers Warranty is neither transferable nor valid in countries other than Australia.
This Warranty does not cover:-
a. Ser vice costs arising from failure to correctly adjust the controls of the product or to observe the instructions,
or inspections that reveal that the product is in normal working order.
b. Product failures caused by misuse, neglect, accidental breakage, transit damage, un-authorised repairs or
modification by un-authorised persons, external fires, lightning strikes, floods, vermin infestation or liquid spillage.
c. Reception problems, replacement of worn or used batteries or other consumables.
d. Second hand products or refurbished products.
e. Products failure, caused by other products.
Version 1.3: 1st July 2009
EN
17
Page 17
18
Page 18

Language Code
Abkhazian 6566
Afar 6565
Afrikaans 6570
Amharic 6577
Arabic 6582
Armenian 7289
Assamese 6583
Avestan 6569
Aymara 6589
Azerhaijani 6590
Bahasa Melayu 7783
Bashkir 6665
Belarusian 6669
Bengali 6678
Bihari 6672
Bislama 6673
Bokmål, Norwegian 7866
Bosanski 6683
Brezhoneg 6682
Bulgarian 6671
Burmese 7789
Castellano, Español 6983
Catalán 6765
Chamorro 6772
Chechen 6769
Chewa; Chichewa; Nyanja 7889
9072
中文
Chuang; Zhuang 9065
Church Slavic; Slavonic 6785
Chuvash 6786
Corsican 6779
Česky 6783
Dansk 6865
Deutsch 6869
Dzongkha 6890
English 6978
Esperanto 6979
Estonian 6984
Euskara 6985
6976
Faroese 7079
Français 7082
Frysk 7089
Fijian 7074
Gaelic; Scottish Gaelic 7168
Gallegan 7176
Georgian 7565
Gikuyu; Kikuyu 7573
Guarani 7178
Gujarati 7185
Hausa 7265
Herero 7290
Hindi 7273
Hiri Motu 7279
Hrwatski 6779
Ido 7379
Interlingua (International)7365
Interlingue 7365
Inuktitut 7385
Inupiaq 7375
Irish 7165
Íslenska 7383
Italiano 7384
Ivrit 7269
Japanese 7465
Javanese 7486
Kalaallisut 7576
Kannada 7578
Kashmiri 7583
Kazakh 7575
Kernewek 7587
Khmer 7577
Kinyarwanda 8287
Kirghiz 7589
Komi 7586
Korean 7579
Kuanyama; Kwanyama 7574
Kurdish 7585
Lao 7679
Latina 7665
Latvian 7686
Letzeburgesch; 7666
Limburgan; Limburger 7673
Lingala 7678
Lithuanian 7684
Luxembourgish; 7666
Macedonian 7775
Malagasy 7771
Magyar 7285
Malayalam 7776
Maltese 7784
Manx 7186
Maori 7773
Marathi 7782
Marshallese 7772
Moldavian 7779
Mongolian 7778
Nauru 7865
Navaho; Navajo 7886
Ndebele, North 7868
Ndebele, South 7882
Ndonga 7871
Nederlands 7876
Nepali 7869
Norsk 7879
Northern Sami 8369
North Ndebele 7868
Norwegian Nynorsk; 7878
Occitan; Provencal 7967
Old Bulgarian; Old Slavonic 6785
Oriya 7982
Oromo 7977
Ossetian; Ossetic 7983
Pali 8073
Panjabi 8065
Persian 7065
Polski 8076
Português 8084
Pushto 8083
Russian 8285
Quechua 8185
Raeto-Romance 8277
Romanian 8279
Rundi 8278
Samoan 8377
Sango 8371
Sanskrit 8365
Sardinian 8367
Serbian 8382
Shona 8378
Shqip 8381
Sindhi 8368
Sinhalese 8373
Slovensky 8373
Slovenian 8376
Somali 8379
Sotho; Southern 8384
South Ndebele 7882
Sundanese 8385
Suomi 7073
Swahili 8387
Swati 8383
Svenska 8386
Tagalog 8476
Tahitian 8489
Tajik 8471
Tamil 8465
Tatar 8484
Telugu 8469
Thai 8472
Tibetan 6679
Tigrinya 8473
Tonga (Tonga Islands) 8479
Tsonga 8483
Tswana 8478
Türkçe 8482
Turkmen 8475
Twi 8487
Uighur 8571
Ukrainian 8575
Urdu 8582
Uzbek 8590
Vietnamese 8673
Volapuk 8679
Walloon 8765
Welsh 6789
Wolof 8779
Xhosa 8872
Yiddish 8973
Yoruba 8979
Zulu 9085
19
Page 19

© 2009 Koninklijke Philips Electronics N.V.
All rights reserved.
Document order number:
DVP3100_79_UM_V2.0
 Loading...