

Page 1
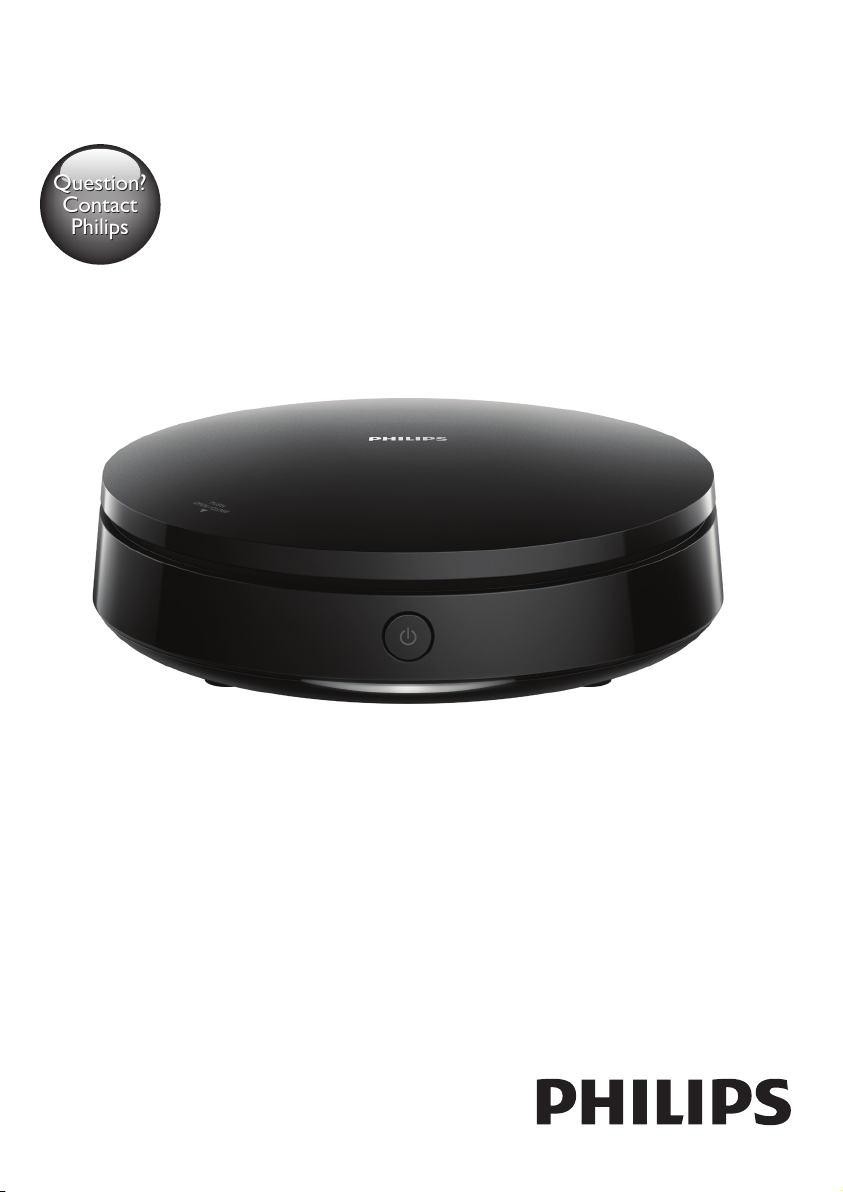
Always there to help you
Question?
Contact
Philips
Question?
Contact
Philips
Register your product and get support at
www.philips.com/support
DVP2980
User manual
Page 2

Page 3
Safety and important
notice
Read and understand all instructions before
you use this DVD player. If damage is caused by
failure to follow the instructions, the warranty
does not apply.
Safety
Risk of electric shock!
• Never remove the casing of the player.
• Never expose the product and accessories
to rain or water. Never place liquid
containers, such as vases, near the product.
If liquids are split on or into the product,
disconnect it from the power outlet
immediately. Contact Philips Consumer
Care to have the product checked before
use.
• Never place the product and accessories
near naked ames or other heat sources,
including direct sunlight.
• Never insert objects into the ventilation
slots or other openings on the product.
• Where the mains plug or an appliance
coupler is used as the disconnect device, it
shall remain readily operable.
• Batteries (battery pack or batteries
installed) shall not be exposed to excessive
heat such as sunshine, re or the like.
• Disconnect the product from the power
outlet before lightning storms.
• When you disconnect the power cord,
always pull the plug, never the cable.
Risk of short circuit or re!
• Before you connect the product to the
power outlet, make sure that the power
voltage matches the value printed on the
back or bottom of the product.
• Avoid applying pressure on the power
plugs. Loose power plugs can cause arcing
or re.
Risk of injury or damage to the product!
• To avoid exposure to laser radiation, do
not disassemble.
• Do not touch the optical lens inside the
disc compartment.
• Never place the product or any objects
on power cords or on other electrical
equipment.
• If the product is transported in
temperatures below 5°C, unpack the
product and wait until its temperature
matches room temperature before
connecting it to the power outlet.
Risk of overheating!
• Never install this product in a conned
space. Always leave a space of at least four
inches around the product for ventilation.
Make sure that curtains or other objects
never cover the ventilation slots on the
product.
Risk of contamination!
• Remove the batteries if at or if the remote
control is not to be used for a long time.
• Batteries contain chemical substances. They
should be disposed of properly.
Risk of swallowing batteries!
• The product/remote control may contain a
coin type battery, which can be swallowed.
Keep the battery out of reach of children
at all times!
This is CLASS II apparatus with double
insulation, and no protective earth provided.
Note
For identication and supply ratings, see the type plate
•
at the back or bottom of the product.
• Before you make or change any connections, make sure
that all devices are disconnected from the power outlet.
1
Page 4
Care for your product
• Do not insert any objects other than discs
into the disc compartment.
• Do not insert warped or cracked discs into
the disc compartment.
• Only use microber cloth to clean the
product.
Care of the environment
Disposal of your old product
Your product is designed and manufactured
with high quality materials and components,
which can be recycled and reused.
Do not throw away the product with the
normal household waste at the end of its life,
but hand it in at an ofcial collection point or
recycling. By doing this, you help to preserve the
environment.
Copyright
This item incorporates copy protection
technology that is protected by U.S. patents
and other intellectual property rights of
Rovi Corporation. Reverse engineering and
disassembly are prohibited.
2
Page 5
1
Quick start guide
3
Page 6
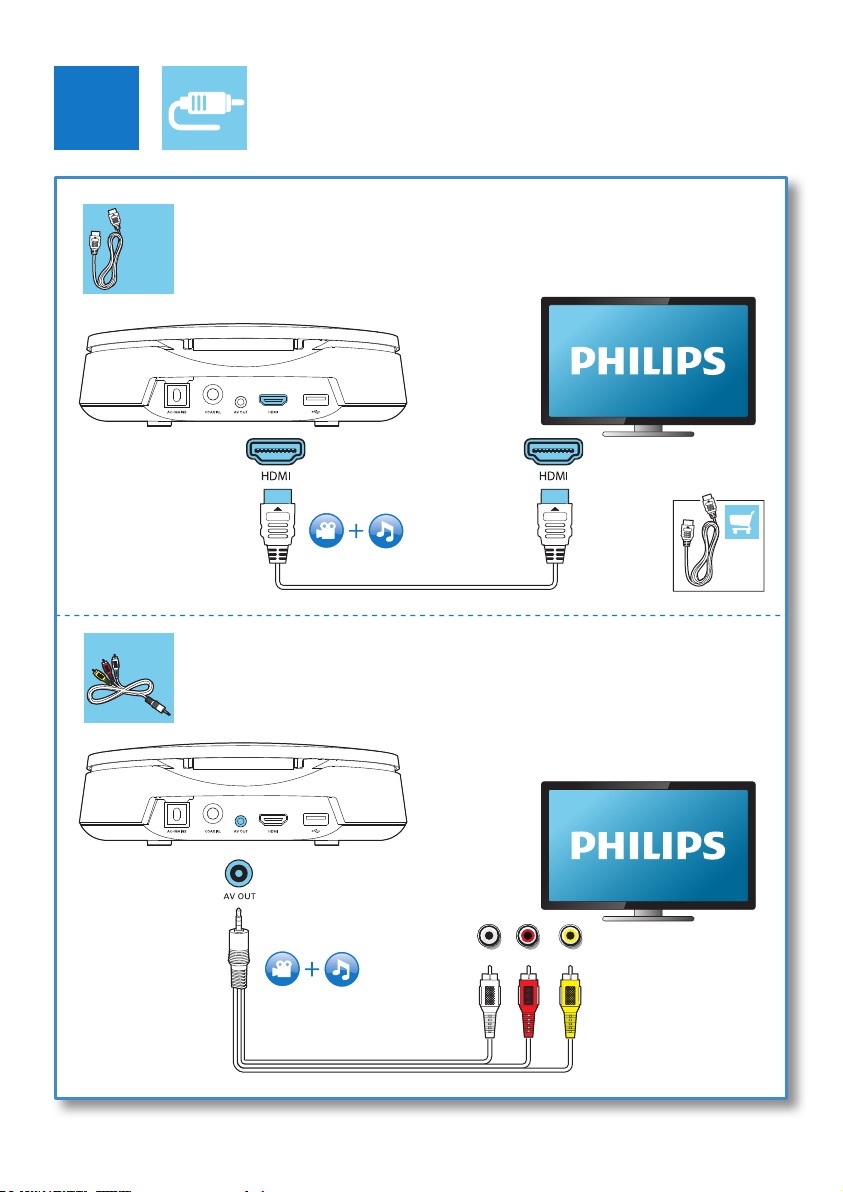
2
R
L
HDMI
HDMI
HDMI
AUX
L R VIDEO
4
Page 7
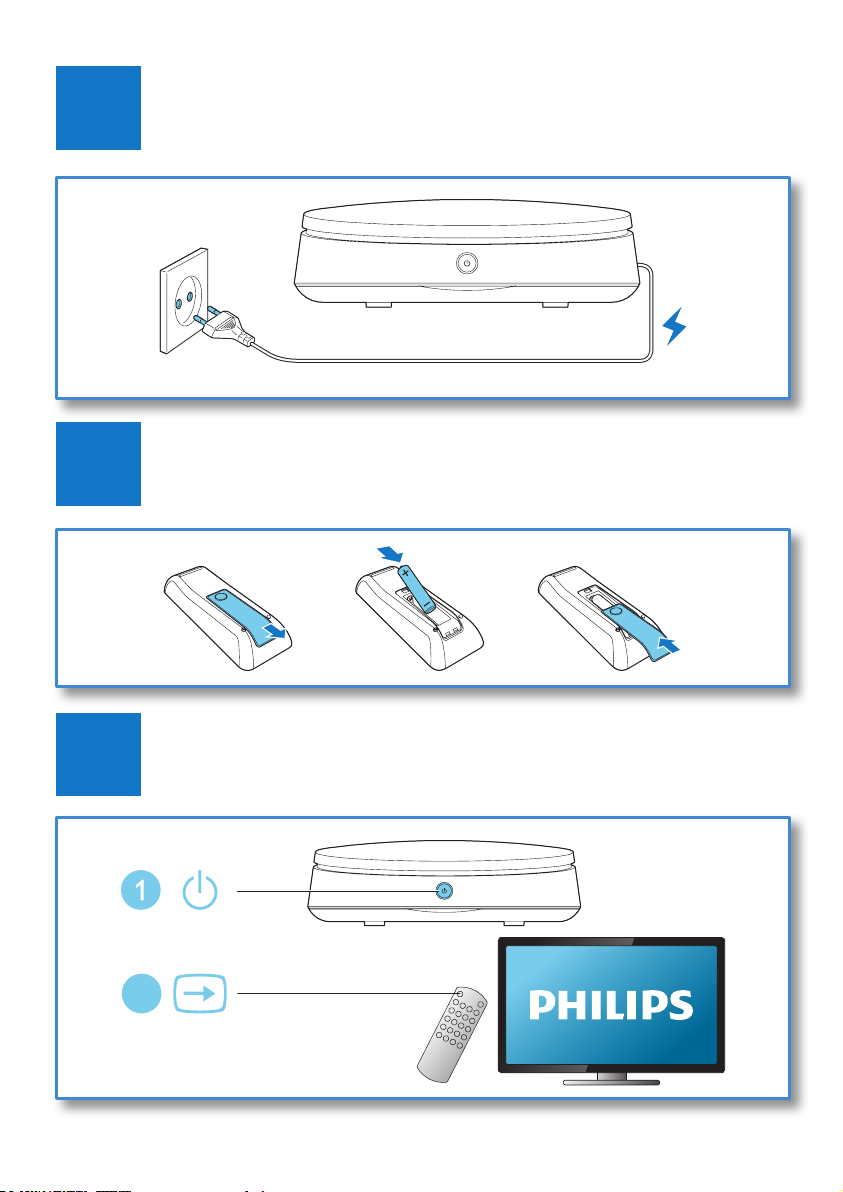
3
4
5
2
SOURCE
TV
5
Page 8
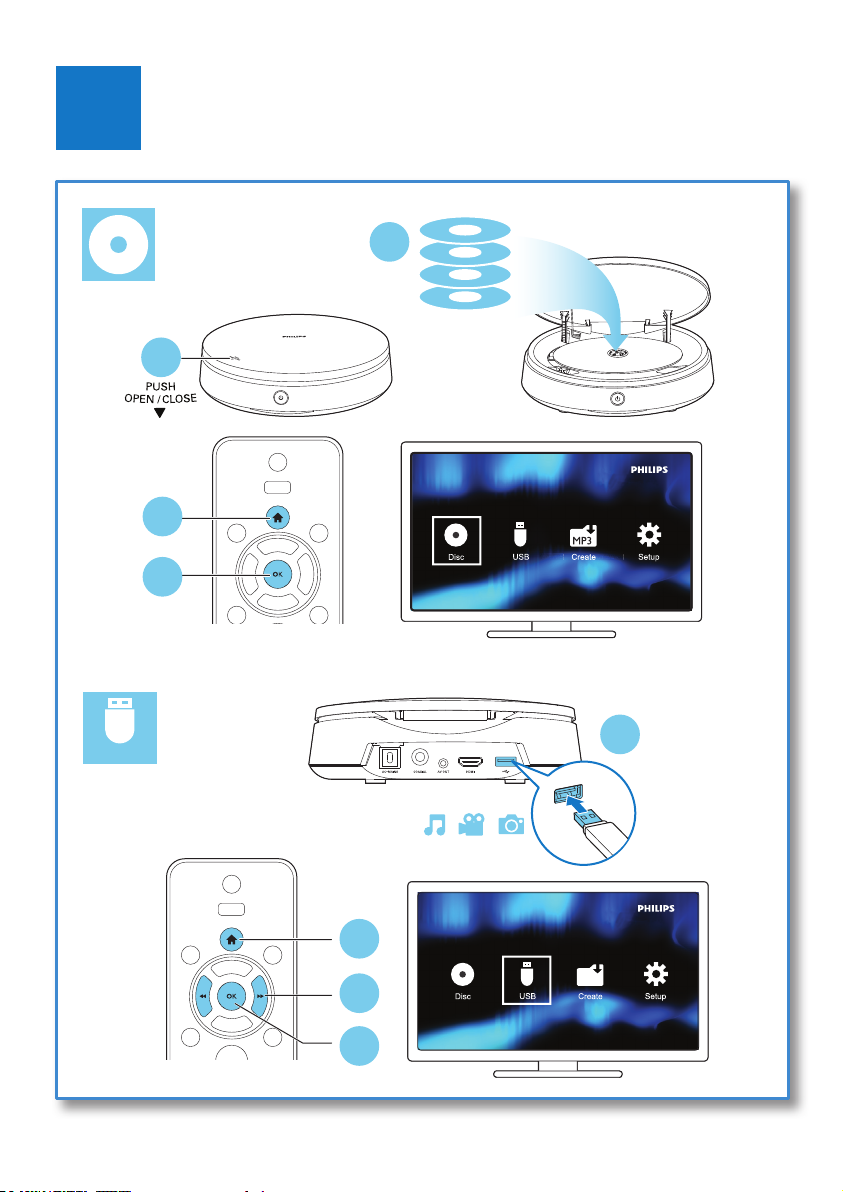
6
USB
Creat
Creatattee
kekekekekkk
2
DVD
VCD
CD
MP3 / JPEG
1
3
Karaoke
Create
4
1
2
MP3
3
4
6
Page 9

Contents
1 Use your DVD player 2
Basic play control 2
Video options 2
Play a musical slideshow 3
Repeat play 3
Skip play 3
Play DivX videos 4
Record audio les from CD to USB 4
Use Philips EasyLink 4
2 Change settings 5
General (sleep, standby...) 5
Picture 6
Sound 6
Preference (languages, parental control...) 7
3 Software update 7
4 Specications 8
5 Troubleshooting 9
1EN
Page 10
1 Use your DVD
player
Congratulations on your purchase, and
welcome to Philips! To fully benet from the
support that Philips offers, register your product
at www.philips.com/welcome.
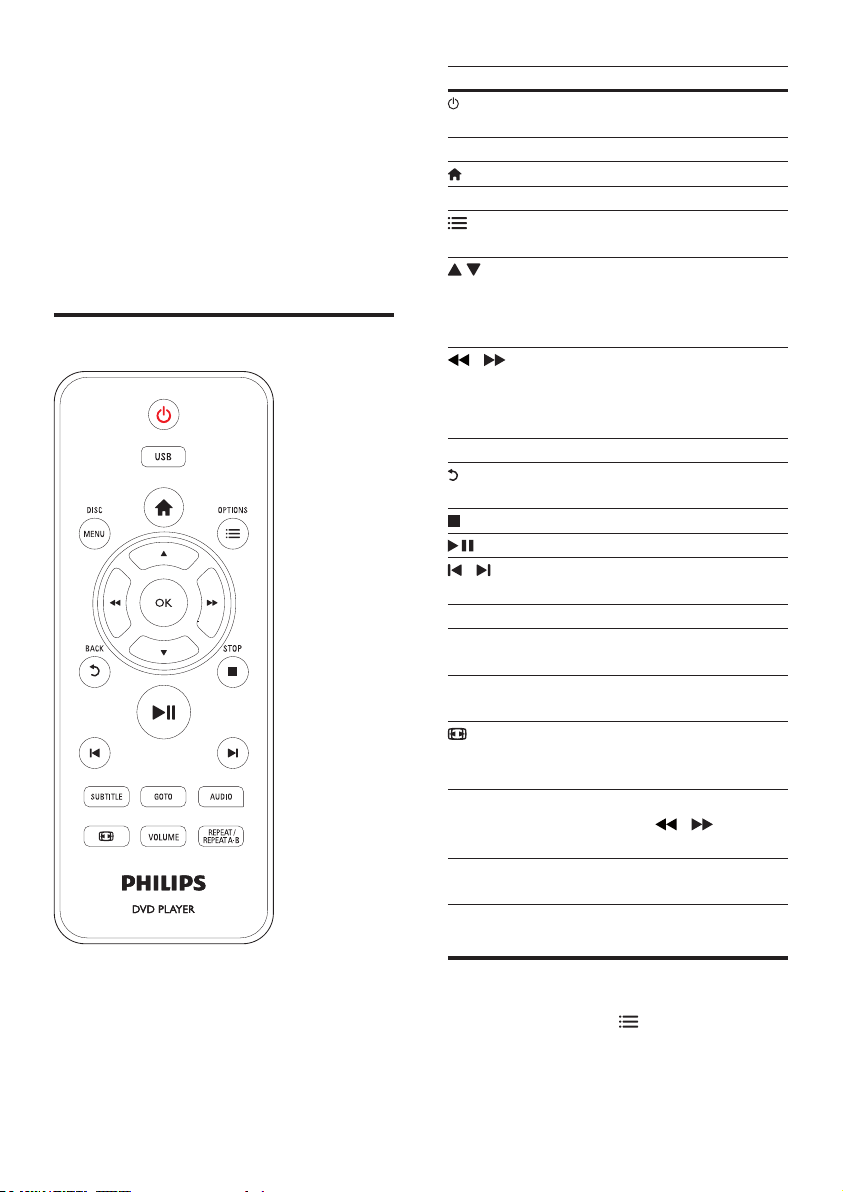
Basic play control
Button Action
Turn on the player, or switch
to standby.
USB Access the USB mode.
Access the home menu.
DISC MENU Access or exit the disc menu.
OPTIONS Access more options during
video play.
Navigate the menus.
Slow forward or backward.
Press repeatedly to change a
search speed.
/ Navigate the menus.
Fast forward or backward.
Press repeatedly to change a
search speed.
OK Conrm a selection or entry.
BACK Return to a previous display
menu.
STOP Stop play.
Start, pause or resume play.
/ Skip to the previous or next
track, chapter or le.
SUBTITLE Select a subtitle language.
GOTO Skip to a title, a chapter or
a track.
AUDIO Select an audio language or
channel.
Fit the picture display to the
TV screen.
Zoom the picture in or out.
VOLUME Activate volume control, and
REPEAT/
REPEAT A-B
then press
a volume level.
Select a repeat play option.
/ to change
During play, press the following buttons to
control the player.
2 EN
Video options
During video play, press OPTIONS to
access the following options.
• [Info]: Display the current play information.
Page 11
• [PBC]: Display or skip the content menu
for VCD and SVCD.
• [Aspect ratio]: Select a picture display
format to t the TV screen.
• [Volume]: Change a volume level.
• [Angle]: Select a camera angle from which
video is viewed.
Play a musical slideshow
Play music and pictures simultaneously to create
a musical slideshow.
1 From a disc or connected USB storage
device, play a music le.
2 Press to navigate to the picture les.
3 Select a picture from the same disc or
USB, and press OK to start slideshow.
4 Press to stop slideshow.
5 Press again to stop music play.
Control photo play
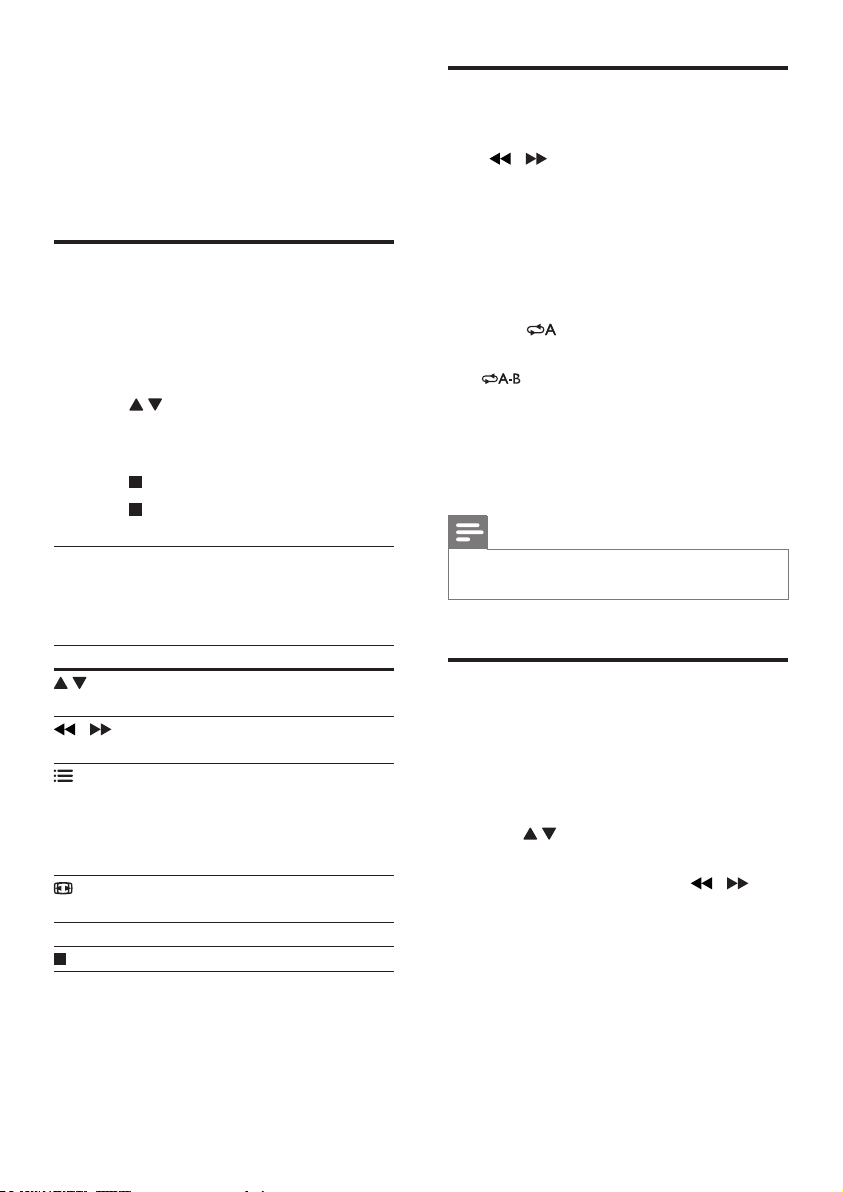
During a photo slideshow, use the remote
control to control the play.
Repeat play
During play, press REPEAT/REPEAT A-B, then
press
option.
• Repeat the current title, chapter, or track.
• Repeat all the contents on a disc, or the
To Repeat play for a specic section
/ repeatedly to select a repeat play
current folder on a USB storage device.
1 Press REPEAT/REPEAT A-B repeatedly to
select
as a start point.
2 Press REPEAT/REPEAT A-B again to select
as an end point.
» The repeat play of the marked section
starts.
3 To cancel repeat play, press REPEAT/
REPEAT A-B until [Off] is displayed.
Note
Repeat play of the marked section is only possible
•
within a title or track.
Button Action
Rotate a picture horizontally/
vertically.
/ Rotate a picture anti-clockwise/
clockwise.
OPTIONS
OK Start or resume a play.
Access to select [Color] to
display a picture in color or black
and white.
Access to select [Photo preview]
to display pictures in thumbnail.
Zoom in or out of a photo.
Play pauses in zoom mode.
Stop a play.
Skip play
You can skip play to a specic title, chapter or
track.
1 During play, press GOTO.
» An input eld bar is displayed.
2 Press to select a digit as a title,
chapter, or track number.
3 After a digit is selected, press / to
change a digit position.
4 If necessary, repeat step 2 and 3 to
complete the input of a title, chapter, or
track number.
5 Press OK.
» The play skips to the selected title,
chapter or track.
3EN
Page 12
Play DivX videos
You can play DivX videos from a disc or a USB
storage device.
VOD code for DivX
• Before you purchase DivX videos and play
them on this player, go to vod.divx.com to
register this player using the DivX VOD
code.
• Display the DivX VOD code: press
select [Setup] > [General] > [DivX(R)
VOD Code].
DivX subtitles
• Press SUBTITLE to select a language.
• If subtitles are not displayed correctly,
change the character set that supports
DivX subtitles. Select a character set: press
, and select [Setup] > [Preference] >
[DivX Subtitle].
Character set Languages
[Standard] English, Albanian,
Danish, Dutch,
Finnish, French, Gaelic,
German, Italian, Kurdish
(Latin), Norwegian,
Portuguese, Spanish,
Swedish and Turkish
[Hebrew] English and Hebrew
[Chinese-Traditional] Traditional Chinese
Note
To play DivX DRM protected les from a USB storage
•
device, connect this player to a TV through HDMI.
• To use the subtitles, make sure that the subtitle le
has the same name as the DivX video le name. For
example, if the DivX video le is named “movie.avi",
save the subtitle le as “movie.srt”, or “movie.sub”.
• This player can play subtitle les in the following
formats: .srt, .sub, .txt, .ssa, and .smi.
, and
Record audio les from CD
to USB
You can record audio les from an audio CD to
a USB storage device. Audio les are recorded
in .mp3 format.
1 Connect a USB storage device to this
player.
2 Load a disc, and start disc play.
3 Press , and select [Create MP3], and
then press OK.
4 Follow the on-screen instructions to
complete an recording.
» A new folder is automatically created
in the USB storage device to store all
the recorded MP3 les.
Note
During recording, do not press any button.
•
• DTS CDs and copy-protected CDs cannot be
converted.
• Write-protected or password-protected USB devices
cannot be used to store MP3 les.
Use Philips EasyLink
This player supports Philips EasyLink which
uses the HDMI CEC (Consumer Electronics
Control) protocol. You can use a single remote
control to control EasyLink compliant devices
that are connected through HDMI. Philips does
not guarantee 100% interoperability with all
HDMI CEC devices.
1 Connect the HDMI CEC compliant devices
through HDMI, and turn on the HDMI
CEC operations on the TV and other
connected devices (see the user manual of
the TV or other devices for details).
2 Press .
3 Select [Setup]> [Video] > [HDMI Setup]
> [EasyLink Setup].
4 EN
Page 13
4 Select [On] under the options: [EasyLink],
[One Touch Play] and [One Touch
Standby].
» EasyLink function is turned on.
One Touch Play
When you play a disc on this player, the TV
automatically switches to the correct video
input source.
One Touch Standby
When a connected device (for example TV)
is put to standby with its own remote control,
this player is put to standby automatically.
2 Change settings
This section helps you change the settings of
this player.
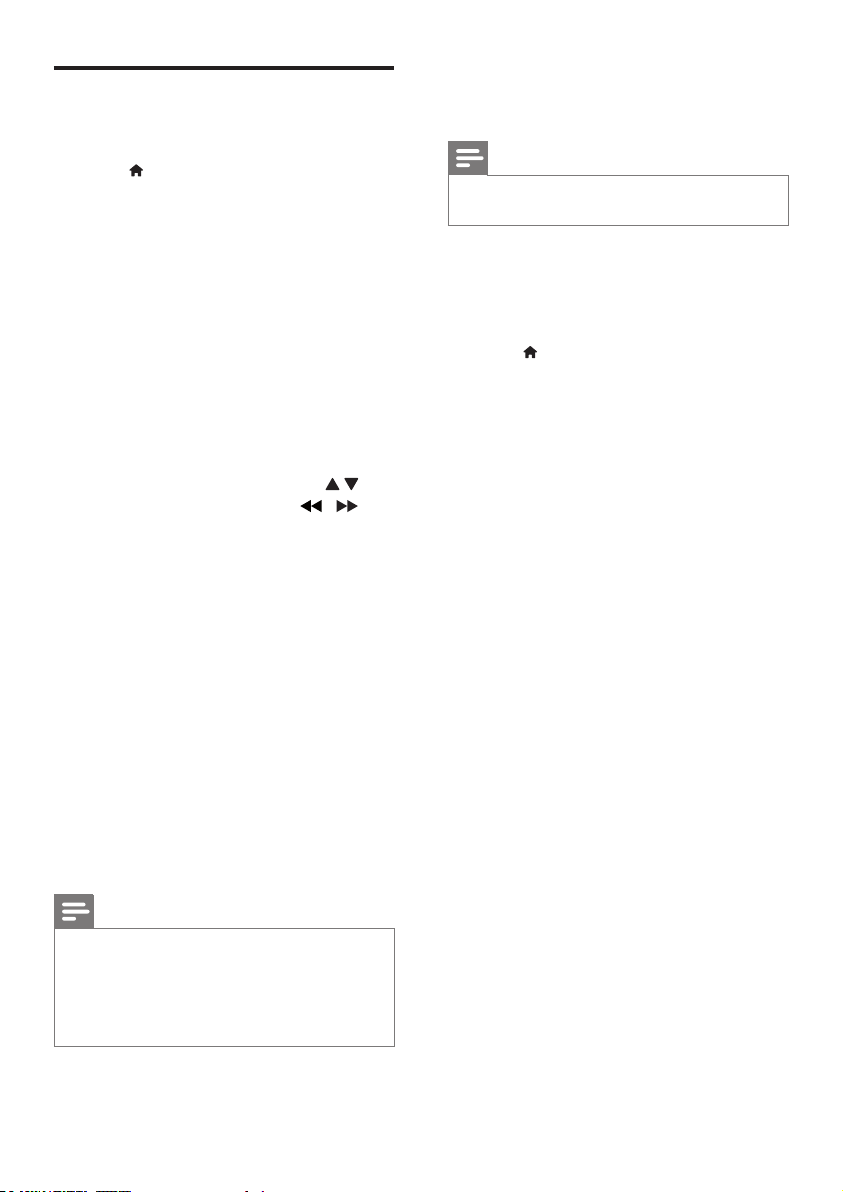
1
2
3
Note
You cannot change a menu option that is grayed out.
•
• To access [Preference], stop the disc play.
• To return to the previous menu, press . To exit the
menu, press
.
General
Video
Audio
Preference
Disc Lock
OSD Language English
Sleep Timer
Auto Standby
DivX(R) VOD Code
Unlock
Off
On
Registration
General (sleep, standby...)
1
Press .
2 Select [Setup] > [General] to access the
general setup options.
• [Disc Lock]: Lock or unlock a disc for
play. To play a locked disc, you need
to input your password: press
to enter a digit, and press
change a digit position. The default
password is “136900”.
• [OSD Language]: Select a language for
on-screen menu.
• [Sleep Timer]: Set a period of time for
this player to switch automatically to
standby mode from play.
/ to
5EN
Page 14

• [Auto Standby]: Enable or disable auto
standby. If enabled, this player switches
automatically to standby after 15
minutes of inactivity (for example, in
pause or stop mode).
• [DivX(R) VOD Code]: Display
the DivX
deregistration code.
®
registration code and
Picture
1
Press .
2 Select [Setup] > [Video] to access the
video setup options.
• [TV System]: Select a TV system that
matches your TV. By default, this setting
matches the common TVs in your
country.
• [Aspect ratio]: Select a picture display
format to t the TV screen.
• [Picture Setting]: Select a predened
color setting, or customize a setting.
• [HD JPEG]: Enable this feature to view
high-denition pictures through HDMI
connection.
• [HDMI Setup]: Set up for HDMI
connection.
• [Resolution]: Select a resolution
for high denition videos.
• [HDMI Deep Color]: Create
vivid images with more color
details when the video content is
recorded in Deep Color and the
TV supports this feature.
• [Wide Screen]: Select a display
format for wide screen videos.
• [EasyLink Setup]: See “Use your
DVD player” > “Use Philips
EasyLink” for details.
Sound
1
Press .
2 Select [Setup] > [Audio] to access the
audio setup options.
• [Analogue Output]: Select an audio
format for sound output when this
player is connected through the
AUDIO OUT L/R connectors.
• [Digital Audio]: Select an audio format
for sound output when this player is
connected through the COAXIAL
connector.
• [Digital Output]: Select a type
of digital output: [Off] - Disable
digital output; [All] - Suppor t
multi-channel audio formats; [PCM
Only] - Downmix to two-channel
audio signal.
• [LPCM Output]: Select a LPCM
(Linear Pulse Code Modulation)
output sampling rate. The higher
the sampling rate, the better the
sound quality. [LPCM Output] is
enabled only when [PCM Only] is
selected under [Digital Output].
• [HDMI Audio]: Enable or disable
the audio output through HDMI
connection.
• [Audio Sync]: Set a delay time for
audio output to match the video play.
• [Volume]: Change a volume level.
• [Sound Mode]: Select a preset sound
effect.
• [Night Mode]: Select quiet or full
dynamic sound. Night mode decreases
the volume of loud sound and
increases the volume of soft sound
(such as speech).
6 EN
Note
Night mode is only available for DVD discs encoded
•
with Dolby Digital.
Page 15
Preference (languages, parental control...)
3 Software update
1
Press .
2 Select [Setup] > [Preference] to access
the preference setup options.
• [Audio]: Select an audio language for
video.
• [Subtitle]: Select a subtitle language for
video.
• [Disc Menu]: Select a menu language
for a video disc.
• [Parental Control]: Restrict access
to discs that are encoded with
ratings. Input “136900” to access
the restriction options: When the
password eld is highlighted, press OK
to enter an input stage, press
to select a digit and press
change a digit position.
• [PBC]: Display or skip the content
menu for VCD and SVCD.
• [Password]: Set or change a password
to play a restricted disc. Input “136900”
if you do not have a password or if you
have forgotten your password
• [DivX Subtitle]: Select a character set
that supports the subtitle of your DivX
video.
• [Version Info]: Display the software
version for this player.
• [Default]: Reset all settings to the
factory default, except for the settings
for [Disc Lock], [Parental Control]
and [Password].
/ to
Note
Power supply must not be interrupted during software
•
update.
To check for updates, compare the current
software version of this player with the latest
software version (if available) at the Philips
website.
1 Press .
2 Select [Setup] > [Preference] > [Version
Info], and then press OK.
3 Write down the model name and the
software version number.
4 Visit www.philips.com/support to check for
the latest software version, using the model
name and software version number.
5 Refer to the upgrade instructions given
on the website to complete the software
update.
Note
If your preferred language is not available for disc
•
language, audio or subtitle, you can select [Others]
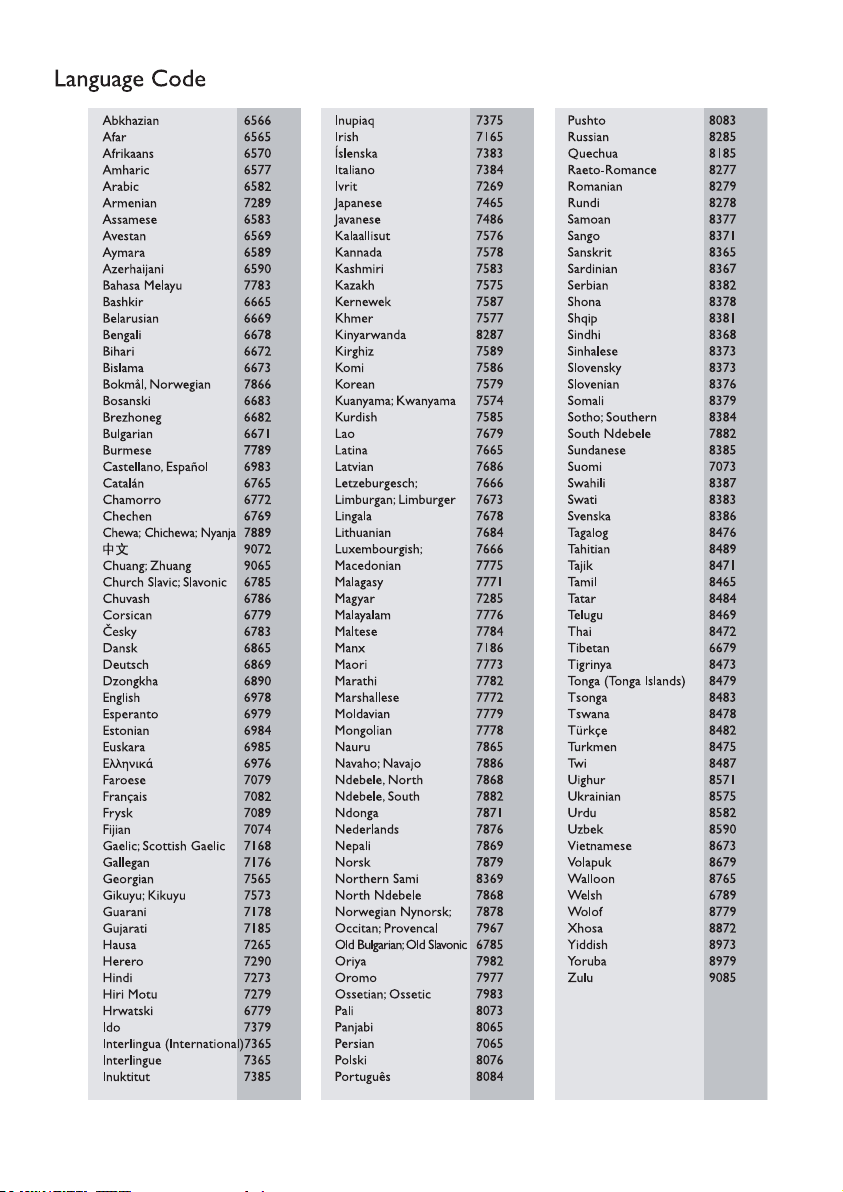
from the menu options and input 4-digit language code
which can be found at the back of this user manual.
• The rating levels are country-dependent. To allow all
discs to be played, select [8 Adult].
7EN
Page 16
4 Specifications
Note
Specications are subject to change without notice
•
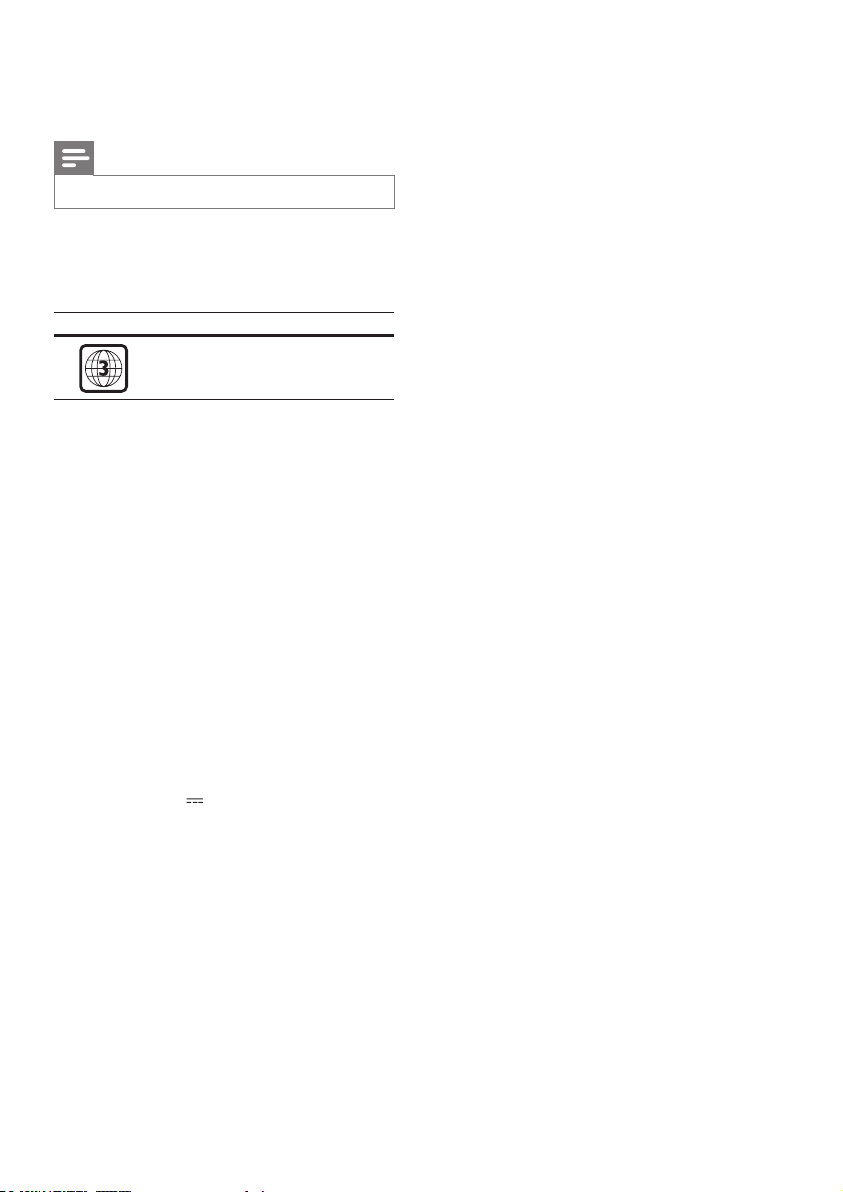
Region code
This player can play discs with the following
region codes.
DVD region code Countries
Asia Pacic, Taiwan, Korea
Playable media
• DVD, DVD-Video, VCD, SVCD, Audio CD
• DVD+R/+RW, DVD-R/-RW, DVD+R/-R
DL (Dual Layer), CD-R/-RW (maximum
199 folders and 9999 les)
• USB storage device
File format
• Video: avi, .divx, .xvid
• Audio: .mp3, .wma
• Picture: .jpg, .jpeg
USB
• Compatibility: Hi-Speed USB (2.0)
• Class support: USB Mass Storage Class
• File system: FAT16, FAT32, NTFS
• Maximum number of albums/folders: 199
• Maximum number of tracks/titles: 9999
• USB port: 5V
• Support USB HDD (Hard Disc Drive): an
external power source may be needed
Video
• Signal system: PAL, NTSC, Multi
• Composite video output: 1 Vp-p (75 ohm)
• HDMI output: 480i, 480p, 576i, 576p, 720p,
1080i, 1080p, Auto
Audio
• 2-channel analog output
• Audio Front L&R : 2 Vrms (47k Ohm)
• Digital output: 0.5 Vp-p (75 Ohm)
• Coaxial
, 500mA
• HDMI output
• Sampling frequency:
• MP3: 22.05 kHz, 24 kHz, 32 kHz,
44.1 kHz, 48 kHz
• WMA: 44.1 kHz, 48 kHz
• Constant bit rate:
• MP3: 8 kbps - 320 kbps
• WMA: 64 kbps - 192 kbps
Main unit
• Dimensions (D x H): 180 x 53.5 (mm)
• Net Weight: 0.59 kg
Power
• Power supply rating: 110-240 V~, 50-60 Hz
• Power consumption: 11 W
• Power consumption in standby mode:
< 0.5 W
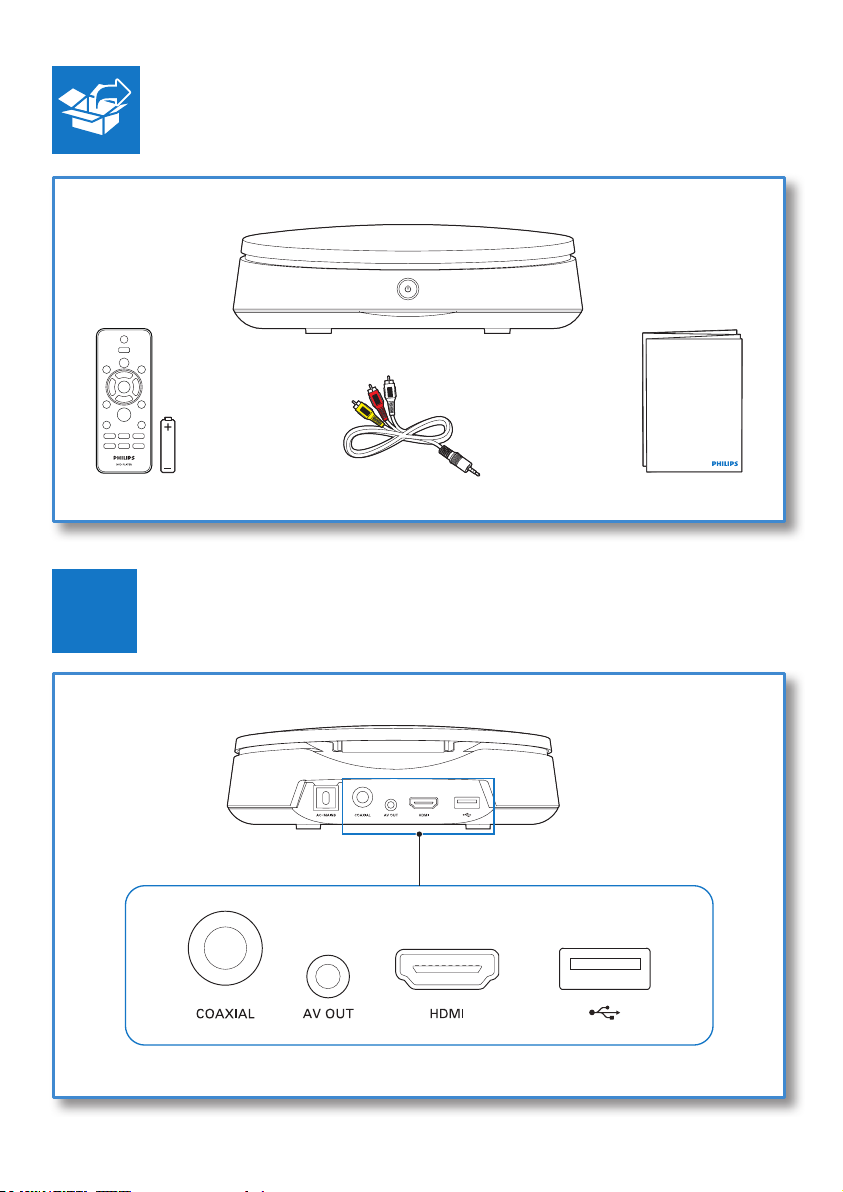
Accessories supplied
• Remote control and one battery
• AV cable
• Quick start guide
Laser specication
• Type: Semiconductor laser InGaAIP (DVD),
AIGaAs (CD)
• Wave length: 658 nm (DVD),
790 nm (CD)
• Output Power : 7.0 mW (DVD),
10.0 mW (VCD/CD)
• Beam divergence: 60 degrees
8 EN
Page 17

5 Troubleshooting
To keep the warranty valid, never try to repair
the player yourself.
If you have problems using this player, check the
following points before you request service. If
you still have a problem, register your player and
get support at www.philips.com/support.
If you contact Philips, you will be asked for the
model and serial number of this player. The
model number and serial number are on the
back of this player. Write the numbers here:
Model No. ____________________________
Serial No. _____________________________
No picture.
• The TV video input channel is not correctly
selected (see the TV’s user manual).
No picture on HDMI connection.
• If this player is connected to an
unauthorized display device, the audio/
video signal cannot be output.
• If the HDMI cable is faulty, replace it with a
new HDMI cable.
• If you have changed the setting for HDMI
video resolution, switch to its default mode.
No sound output from the TV.
• Make sure that the audio cables are
correctly connected between this player
and the TV.
No sound during DivX video playback.
• The audio codes are not supported.
No sound on HDMI connection.
• If the connected device is non-HDCP
compliant or only DVI-compatible, no
sound can be heard from the HDMI
output.
• Make sure that [HDMI Audio] is set to
[On].
No audio output from the loudspeakers of the
connected external audio device (for example,
stereo system, amplier receiver).
• Make sure that the audio cables or coaxial
cable are correctly connected.
• Switch the external audio device to
correct audio input source.
Disc cannot be read.
• Make sure that this player supports the
disc (see “Specications” > “Playable
media”).
• For a recorded disc, make sure that the
disc is nalized.
A USB storage device cannot be read.
• Make sure that the format of the USB
storage device is compatible with this
player (see “Specications” > “USB”).
• Make sure that the le system on the USB
storage device is supported by this player
(see “Specications” > “USB”).
Files cannot be displayed or read.
• Make sure that the number of les or
folders does not exceed the supported
limit of this player (maximum 9999 les or
199 folders).
• Make sure that this player supports these
les (see “Specications” > “File format”).
DivX video les cannot be played.
• Make sure that the DivX video le is
complete.
• Make sure that the le extension is correct.
• To play DivX DRM protected les from a
USB storage device, connect this player to
a TV through HDMI.
DivX subtitles do not display correctly.
• Make sure that the subtitle le has the
same name as the DivX video le.
• Make sure that the subtitle le has an
extension name supported by this player
(.srt, .sub, .txt, .ssa, or .smi).
• Select the character set that supports the
subtitle (see “Use your DVD player” >
“DivX videos”).
9EN
Page 18

EasyLink feature does not work.
• Make sure that this player is connected
to the Philips brand EasyLink TV, and
the EasyLink option is turned on (see
“Use your DVD player” > “Use Philips
EasyLink”).
10
Page 19
This DivX Certied® device has passed
rigorous testing to ensure it plays DivX
To play purchased DivX movies, rst register
your device at vod.divx.com. Find your
registration code in the DivX VOD section of
your device setup menu.
®
DivX
, DivX Ultra®, DivX Cer tied® and
associated logos are trademarks of DivX, LLC
and are used under license.
DivX Ultra
advanced features and premium content.
®
Certied to play DivX® video with
HDMI, the HDMI logo, and High-Denition
Multimedia Interface are trademarks or
registered trademarks of HDMI licensing LLC in
the United States and other countries.
Manufactured under license from Dolby
Laboratories.
Dolby and the double-D symbol are
trademarks of Dolby Laboratories.
®
video.
'DVD Video' is a trademark of DVD Format/
Logo Licensing Corporation.
CLASS 1
LASER PRODUCT
11
Page 20
12
Page 21

Page 22

Specifications are subject to change without notice
© 2015 Koninklijke Philips N.V. All rights reserved.
Trademarks are the property of Koninklijke Philips N.V. or their respective owners.
DVP2980_98_UM_V1.0
 Loading...