

Philips DVD751/D02, DVD751/052, DVD751/05, DVD751/002, DVD751/001 User Manual

CONTENTS 5
Introduction
Entertainment for the new millennium -------------------------------------------------------------------- 6
Introduction -------------------------------------------------------------------------------------------------------------------- 7
Unpacking ------------------------------------------------------------------------------------------------------------------------ 7
Placement ------------------------------------------------------------------------------------------------------------------------ 7
Functional overview
Front panel ---------------------------------------------------------------------------------------------------------------------- 8
Rear panel ------------------------------------------------------------------------------------------------------------------------ 9
Display ---------------------------------------------------------------------------------------------------------------------------- 10
Remote control ------------------------------------------------------------------------------------------------------------ 11
On-screen display information
Menu bar/Status window ------------------------------------------------------------------------------------------ 12
Status window icons -------------------------------------------------------------------------------------------------- 12
Default screen -------------------------------------------------------------------------------------------------------------- 12
Temporary feedback field icons ------------------------------------------------------------------------------ 13
Preparation
General notes -------------------------------------------------------------------------------------------------------------- 14
Connecting to a TV ---------------------------------------------------------------------------------------------------- 14
Connecting to optional equipment ------------------------------------------------------------------ 15-16
Connecting to the power cord -------------------------------------------------------------------------------- 16
Remote Control battery installation ---------------------------------------------------------------------- 16
NTSC/PAL Settings ------------------------------------------------------------------------------------------------------ 16
General explanation ---------------------------------------------------------------------------------------------------- 17
Turning on the power-------------------------------------------------------------------------------------------------- 18
Initial Setup -------------------------------------------------------------------------------------------------------------- 18-19
Personal Preferences -------------------------------------------------------------------------------------------- 19-20
Access Control: child lock ---------------------------------------------------------------------------------------- 21
Access Control: parental control ---------------------------------------------------------------------- 22-23
Operation
Loading discs ------------------------------------------------------------------------------------------------------------------ 24
Playing a DVD-Video disc ------------------------------------------------------------------------------------------ 24
Playing a Video CD ------------------------------------------------------------------------------------------------------ 25
General Features ---------------------------------------------------------------------------------------------------- 25-28
Special DVD features -------------------------------------------------------------------------------------------------- 29
Special VCD features ---------------------------------------------------------------------------------------------------- 30
Playing an Audio CD ---------------------------------------------------------------------------------------------- 30-31
FTS Program ------------------------------------------------------------------------------------------------------------------ 32
Before requesting service
Before requesting service ------------------------------------------------------------------------------------------ 33
Cleaning discs ---------------------------------------------------------------------------------------------------------------- 34
Specifications
Specifications ------------------------------------------------------------------------------------------------------------------ 35
Contents

6 INTRODUCTION
Introduction
Entertainment for the new millennium
Video was never like this before! Digital video discs provide perfect
digital, studio-quality pictures; three dimensional digital, multi-channel
audio; story sequences screened from your choice of camera angle;
sound tracks in as many as eight languages; and up to 32 subtitles (if
available on disc).Whether you watch DVD-Video on wide-screen or
regular TV, you always see it the way it was meant to be.
Digital video
DVD-Video uses state-of-the-art MPEG2 data compression technology
to register an entire movie on a single 5-inch disc. DVD’s variable bitrate
compression, running at up to 9.8 Mbits/second, captures even the most
complex pictures in their original quality.
The crystal-clear digital pictures have a horizontal resolution of over 500
lines, with 720 pixels (picture elements) to each line.This resolution is
more than double that of VHS, superior to Laser Disc, and entirely
comparable with digital masters made in recording studios.
DVD-Video discs conform to either the PAL or NTSC video standard.
This player can play both PAL and NTSC discs, presenting them in the
best possible way on your multi-standard TV screen.
As the universal video system of the future, DVD-Video offers optimal
pictures on any TV screen.
Introduction
Your Philips DVD-Video player will play digital video discs conforming to
the universal DVD-Video standard.With it, you will be able to enjoy fulllength movies with true cinema picture quality, as well as stereo or
multi-channel sound (depending on the disc and your playback setup).
The unique features of DVD-Video, such as selection of sound track,
subtitle languages and different camera angles (again depending on the
disc), are all included.What’s more, Philips Child Lock lets you decide
which discs your children will be able to see.
In addition to DVD-Video discs, you will be able to play all Video CDs
and Audio CDs (including finalized CD Recordable and CD Rewritable).
You will find the On-Screen Display, player display, and remote control
make the player easy to use.This manual provides all the information you
will need, so read on!
DVD-Video
You will recognize DVD-Video discs by the logo shown on left.
Depending on the material on the disc (a movie, video clips, a drama
series, etc.) the disc may have one or more Titles. Each Title may have
one or more Chapters.To make playback easy and convenient, your
player lets you select Titles and playback Chapters.
DVD-VIDEO DISC
TITLE 1 TITLE 2
CHAPTER 1 CHAPTER 2 CHAPTER 1 CHAPTER 2 CHAPTER 3

INTRODUCTION 7
Video CD
You will recognize Video CDs by the logo shown at left.
Depending on the material on the disc (a movie, video clips, a drama
series, etc.) the disc may have one or more tracks.Tracks may have one
or more indexes, as indicated on the disc case.To make playback easy
and convenient, your player lets you select tracks and indexes.
Super VCD
SVCD discs based on the Super VCD IO Standard based on the Stanard
of the Electronics Industry of the People’s Republic of China.
Audio CD
Audio CDs contain music tracks only.
You will recognize Audio CDs by their logo which is shown at left.
You can play them in conventional style through a stereo system, using
the keys on the remote control and/or front panel, or via the TV using
the On-Screen Display (OSD).
Unpacking
First check and identify the contents of your DVD-Video player package.
You should have the following items.
- DVD-Video player
- Remote Control with batteries
- AC power cord
- Audio/Video cable
- SCART cable
- Instructions for use
If any item is damaged or missing, contact your retailer or Philips.
Keep the packaging materials; you may need them to transport your
player in the future.
Placement
● Place the player on a firm, flat surface.
● Keep the player away from domestic heating equipment and direct
sunlight.
● In a cabinet, allow about 2.5 cm (1 inch) of free space all around the
player for adequate ventilation.
● If the DVD-Video player cannot read CDs/DVDs correctly, use a
commonly available cleaning CD/DVD to clean the lens before taking the
DVD-Video player to be repaired. Other cleaning methods may destroy
the lens.Always keep the tray closed to avoid dust on the lens.
● The lens may cloud over when the DVD-Video player is suddenly moved
from cold to warm surroundings. Playing a CD/DVD is not possible then.
Leave the DVD-Video player in a warm environment until the moisture
evaporates.
/
8 FUNCTIONAL OVERVIEW
Functional overview
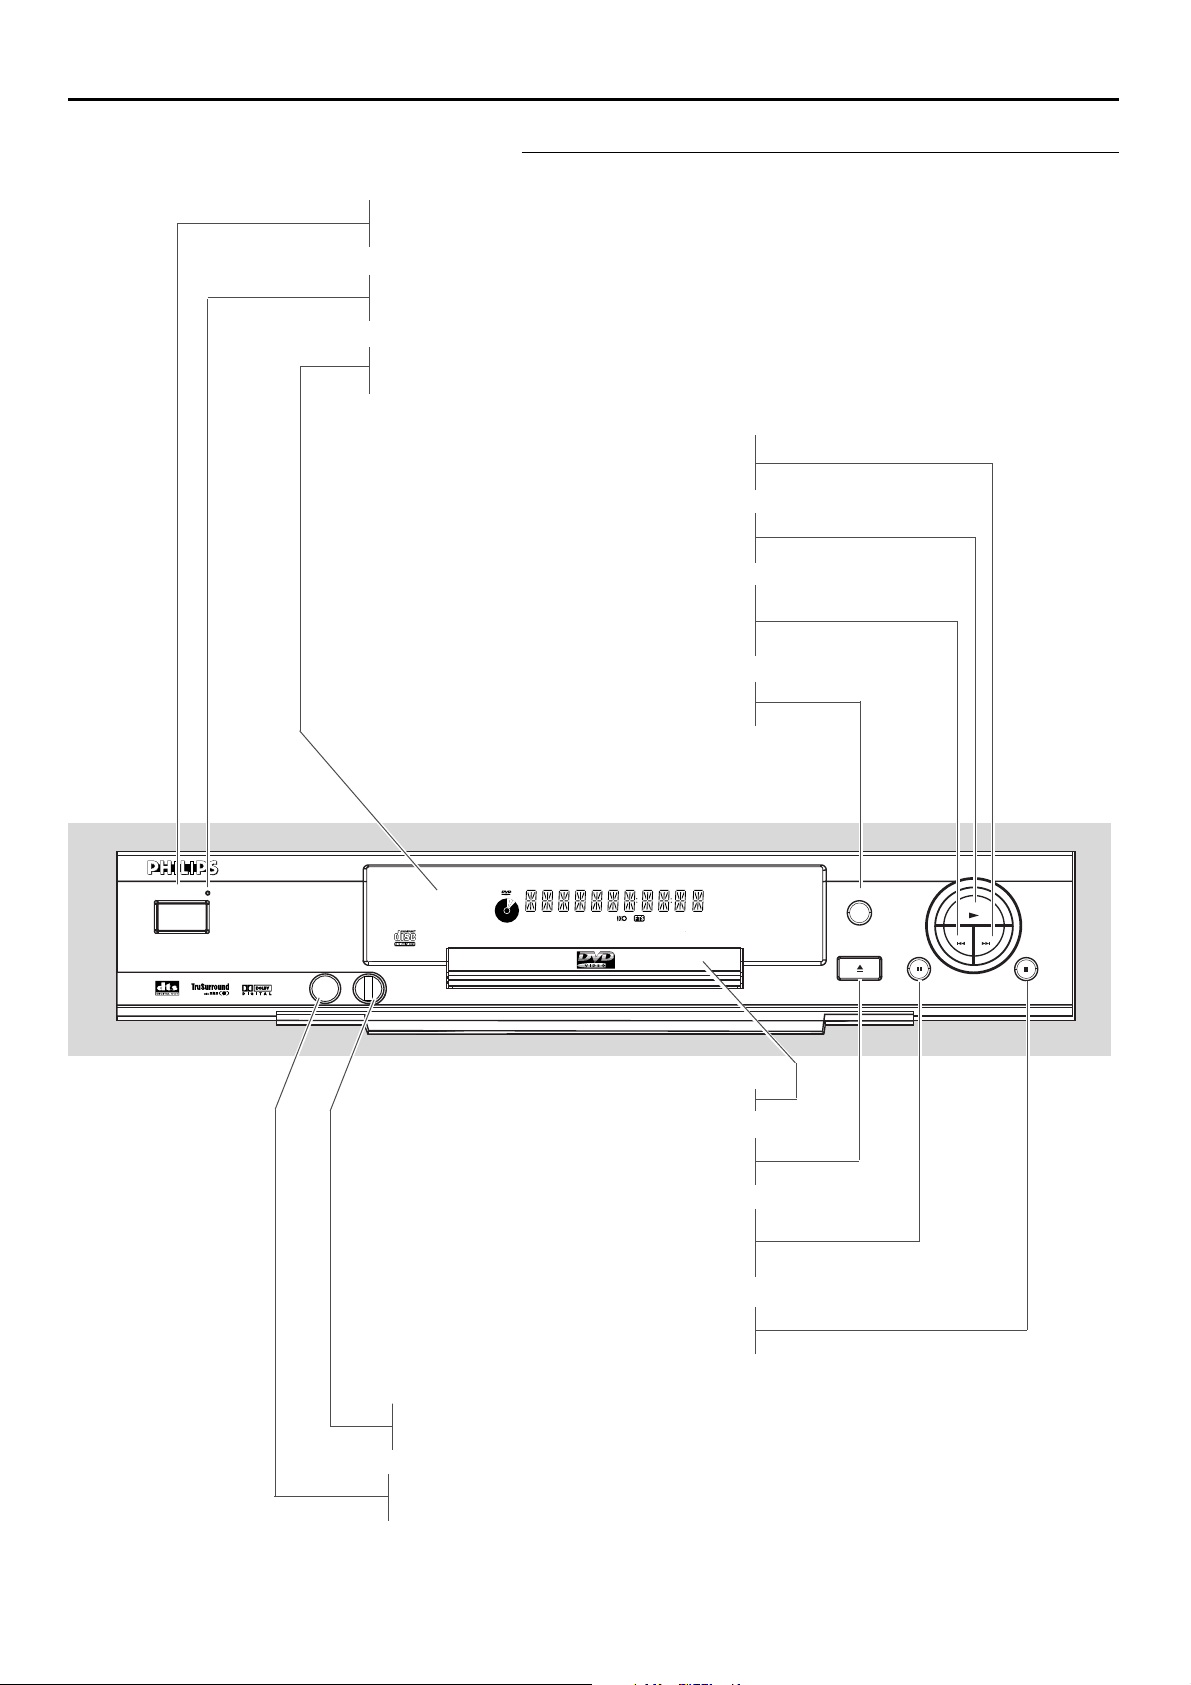
Front panel
PHONES
- for connecting headphones
LEVEL
- headphone volume control
9 STOP
- stops video/audio play
; PAUSE
- interrupts video/audio play or advances
to the next picture frame
/ OPEN/CLOSE
- opens/closes the disc tray
Disc tray
SOUND
- selects Stereo, Dolby Surround or 3D-Sound
S
- PREVious title/chapter/track
2 PLAY
- starts video/audio play
T
- NEXT title/chapter/track
Display
- shows the current status of the player
Standby indicator - lights red when the player is in Standby mode
STANDBY-ON - switches the player to Standby mode or ON
STANDBY-ON
DVD/VIDEO CD/CD PLAYER
DVD 751
TITLE
CHAPTER
TRACK
SCAN
SHUFFLE
-BA
REPEAT
PHONES - LEVEL
CD
V
min.
TRACKTITLE
CHAPTER
SOUND
TIMETRACKTOTAL
OPEN / CLOSE
PAUSE
PREV
PLAY
NEXT
STOP
FUNCTIONAL OVERVIEW 9
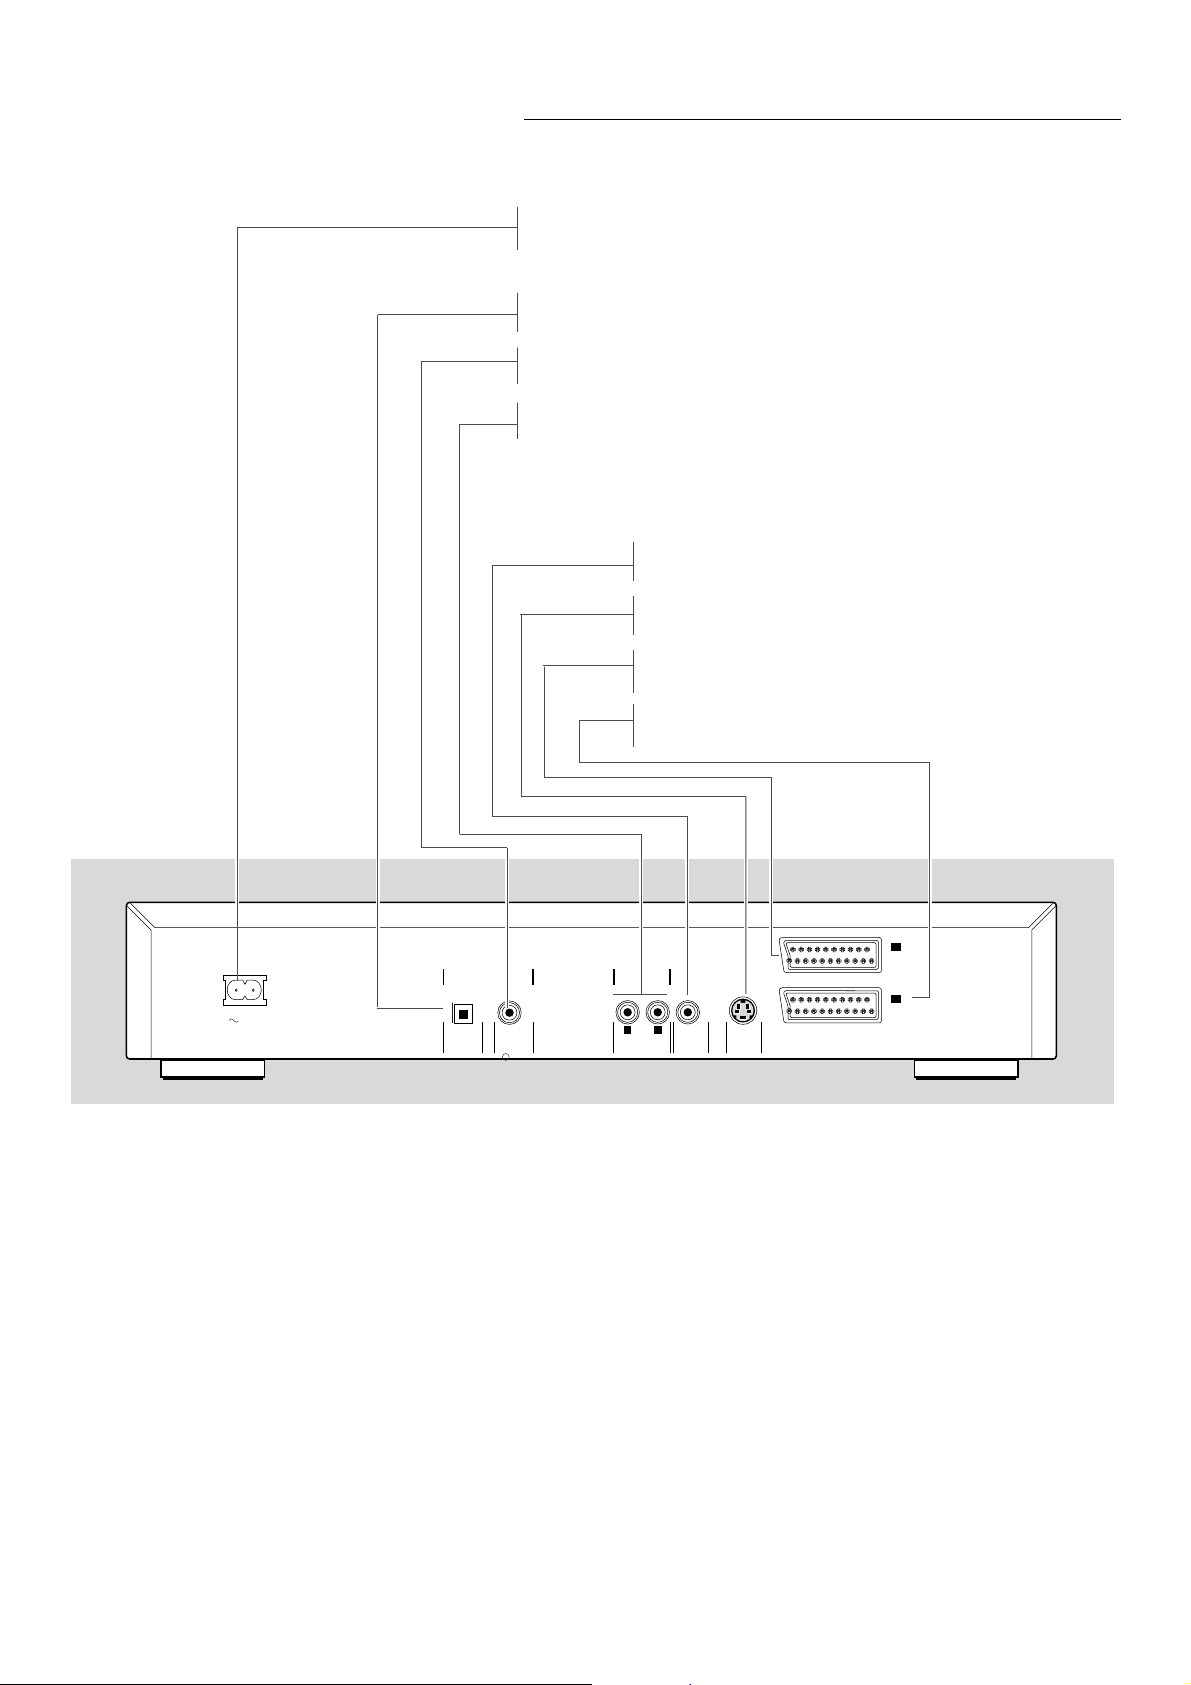
Rear panel
Caution: Do not touch the inner pins of the jacks on the rear
panel connectors. Electrostatic discharge may cause permanent
damage to the unit.
Video Out (CVBS)
- connect to a TV with CVBS video inputs
S-Video Out (S-Video)
- connect to a TV with S-Video (Y/C) inputs
AUX/VCR (SCART)
- connect to a VCR
TV OUT (TV)
- connect to a TV with SCART
Digital audio out jack (optical)
- connect to digital (optical) equipment
Digital audio out jack (coaxial)
- connect to digital (coaxial) equipment
Audio / L/R (Left/Right)
- connect to an amplifier, receiver or stereo system
MAINS (AC) power jack
- connect to the power source
MAINS
DIGITAL AUDIO OUT
PCM/MPEG2/AC3/DTS
OPT OUT
I
AUX/VCR
IN
TV OUT
II
DIG OUT
STEREO OUT
R
AUDIO OUT
L
(CVBS)
VIDEO OUT
(Y/C)
S-VIDEO OUT
10 FUNCTIONAL OVERVIEW
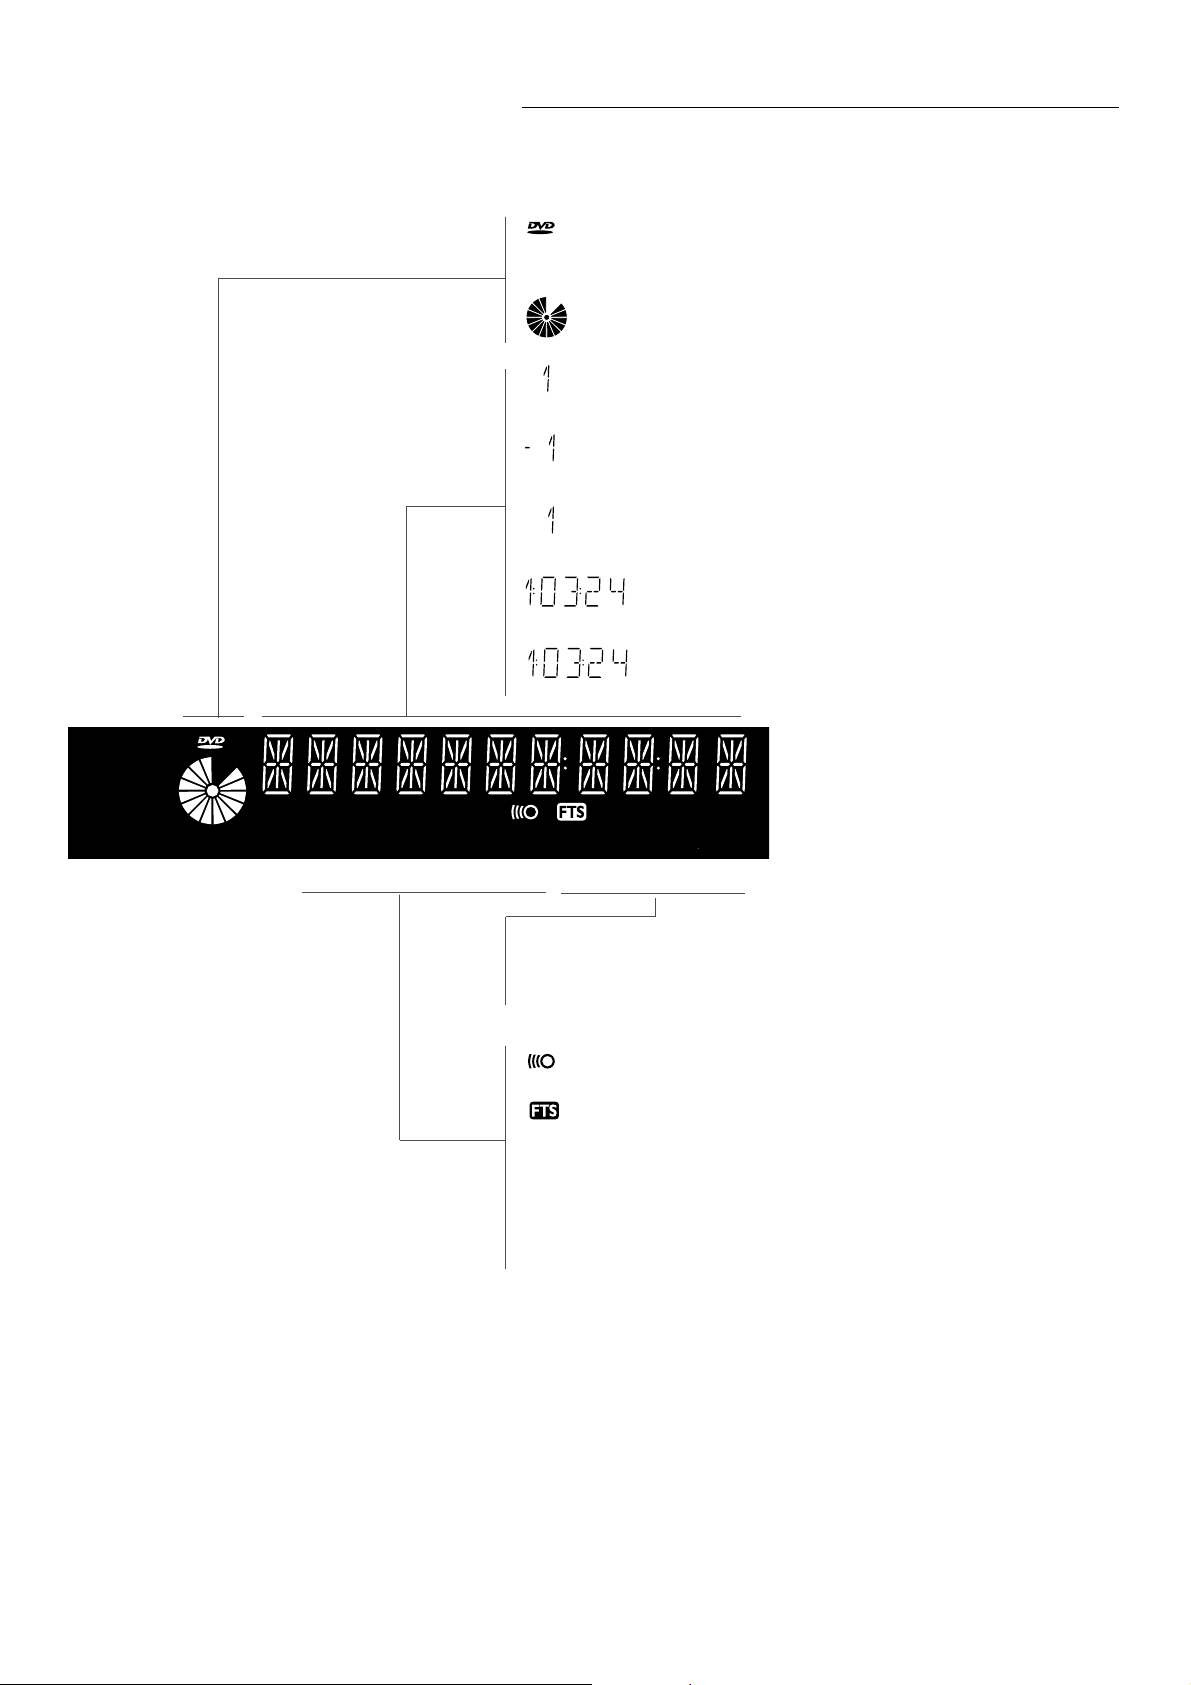
Display
DVD inserted
Video CD or Audio CD inserted
Indicates current player function: Play, Pause, Search, etc.
DVD TITLE number
DVD CHAPTER number
VCD/CD TRACK number
TRACK TIME in hours, minutes and seconds
TOTAL TIME in hours, minutes and seconds
REPEAT CHAPTER/TITLE/TRACK active
Remote control active (flashing)
FTS active
SCAN active
REPEAT A-B active
SHUFFLE active
CD
V
CHAPTER
TRACK
CHAPTER
TITLE
CD
V
SCAN
-BA
TRACK
REPEAT
SHUFFLE
CHAPTER
TIMETRACK
TIMETOTAL
TIMETRACKTOTA L
TRACKTITLE
SCAN
-BA
REPEAT
SHUFFLE

FUNCTIONAL OVERVIEW 11
Remote control (Universal)
TV MUTE
- DVD-mode: selects Stereo, Dolby
Surround, 3D Sound reproduction
- TV-mode: mute ON/OFF
DVD/TV switch
- DVD mode/TV mode selector**
0-9 numerical key pad
RETURN
- go back to previous menu
OK
- acknowledge menu selection
Q O
- search backward* /
previous chapter or track
2
- play
R P
- search forward* /
next chapter or track
;
- pause playback temporarily /
frame-by-frame playback
9
- stop
x
- slow motion
STANDBY-ON
REPEAT
- repeat chapter, track, title, disc
REPEAT A-B
- repeat sequence
SHUFFLE
- playback tracks in random order
SCAN
- playback of the first 10 seconds
of each chapter within a title
(DVD) or the first 10 seconds of
each track on a disc (VCD/CD)
MENU DVD
- access menu of a DVD
MENU OSD
- access or remove On-screen
display
- bit rate indicator*
PROG +/-
- DVD mode: up/down cursor
movement
- TV mode: Program up/down
VOL +/-
- DVD mode: left/right cursor
movement
- TV mode: Volume up/down
Z
- subtitle language selector
Y
- audio language selector
T
- select title
C
- select chapter
c
- activate FTS
}
- select DVD camera angle
a
- enlarge video image
* Press key for about 2 seconds
** Press and hold while you press mute/VOL/PROG keys for compatible TVs
Please refer to list of Remote Control Setup Codes For Television from
page 360 to 363)
12 ON SCREEN DISPLAY INFORMATION
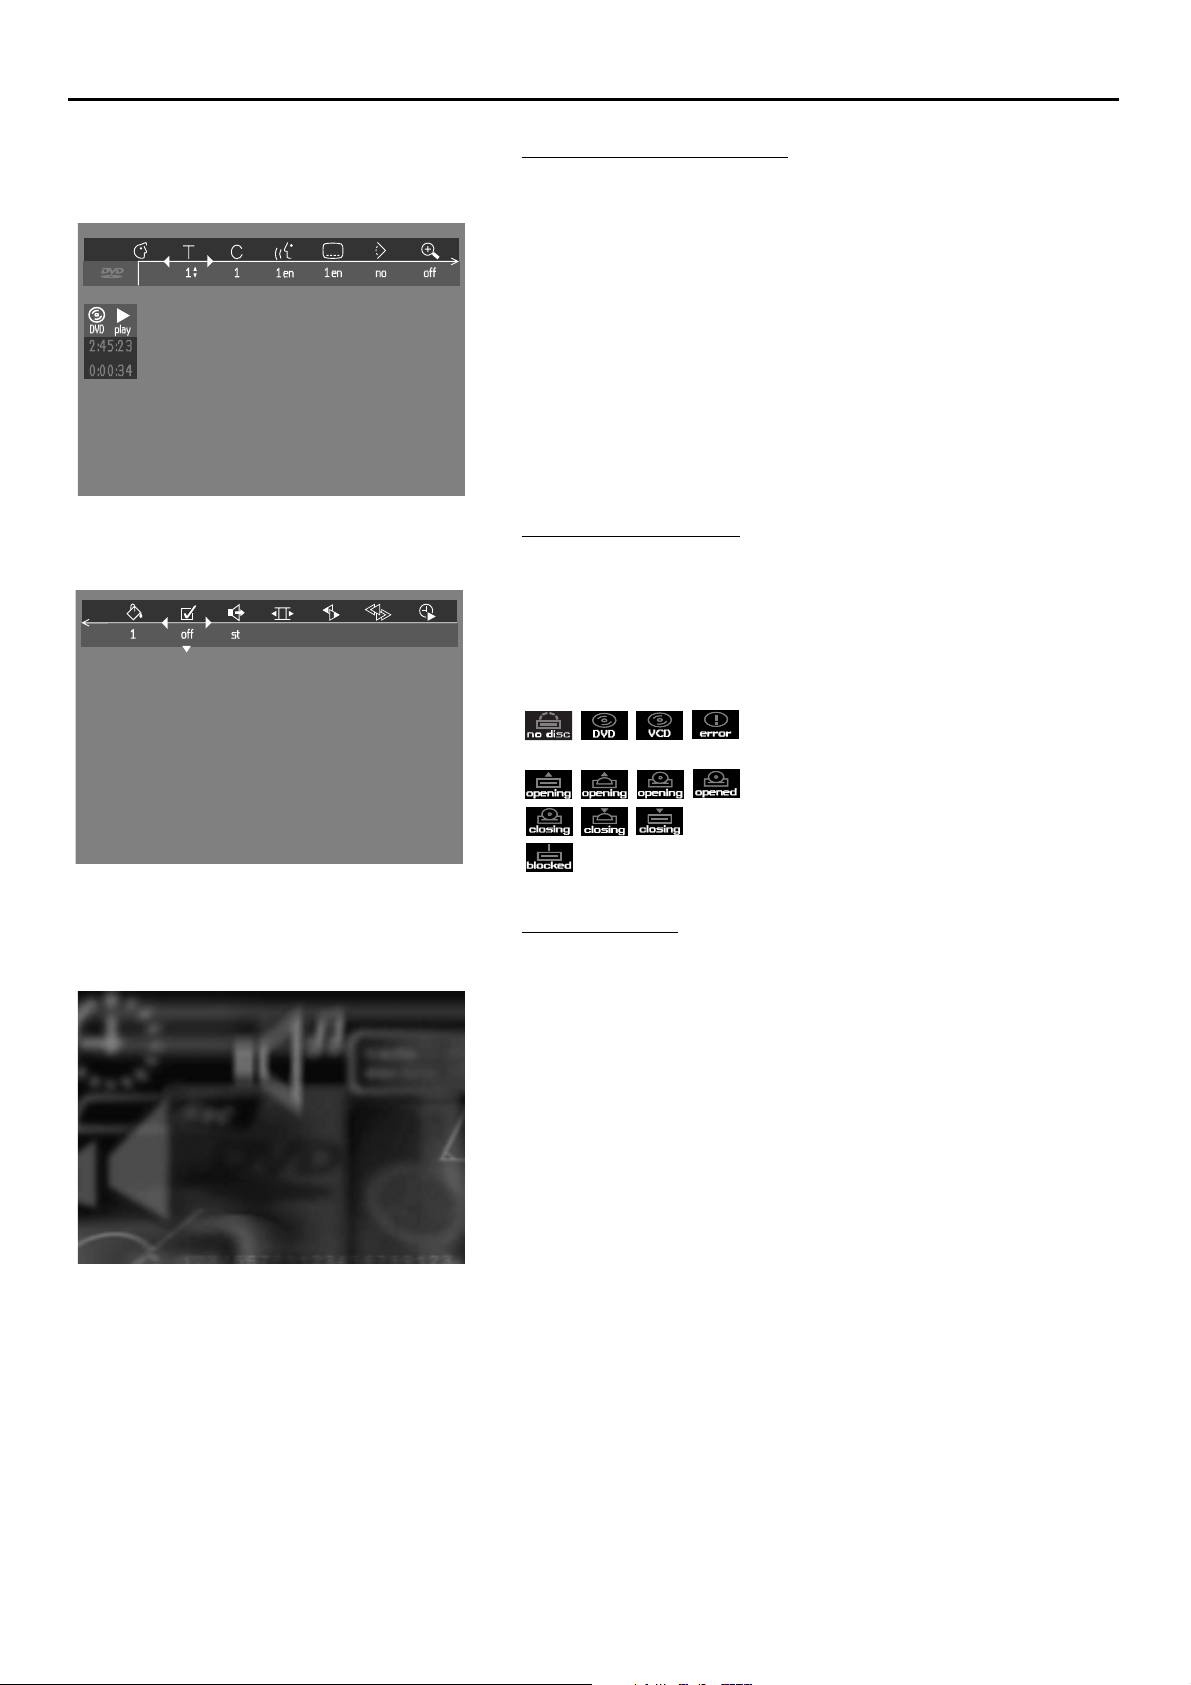
On screen display information
Menu bar/Status window
V Personal Preferences f Slow motion
W Title/Track g Fast motion
X Chapter/Index h Time search
Y Audio language
Z Subtitle language
} Angle
a Zoom
b Color Setting (Smart Picture)
c Video Program
d Sound
e Picture by Picture
Status window icons
The status window displays the current status of the player and appears
with the first part of the menu bar. (You must activate this in the
Features Menu - see Personal Preferences for details).
General
Disc type
Tray status
Default screen
The default screen is displayed when the player is in STOP mode.
It may contain a ‘Status Window’ and a ‘Temporary Feedback Field’.This
gives information concerning prohibited actions, playback modes,
available angles, etc.

ON SCREEN DISPLAY INFORMATION 13
Temporary Feedback Field icons
Scan
Repeat All
Repeat Title
Repeat Track
Repeat Chapter
Shuffle
Shuffle Repeat
Repeat A to end
Repeat A-B
Angle
Child Lock On
Child Safe
Resume
Action prohibited
14 PREPARATION
Preparation
General notes
- Depending on your TV and other equipment you wish to connect,
there are various ways you could connect the player. Possible
connections are shown in the following drawings.
Please refer to the manuals of your TV,VCR, Stereo System or other
devices as necessary to make the best connections.
- Do not connect your DVD-player via your VCR.The video
quality could be distorted by the copy protection system.
- For better sound reproduction, connect the player’s audio out jacks
to the audio in jacks of your amplifier, receiver, stereo or A/V
equipment. See ‘Connecting to optional equipment’.
Caution: Do not connect the player’s audio out jack to the
phono in jack of your audio system.
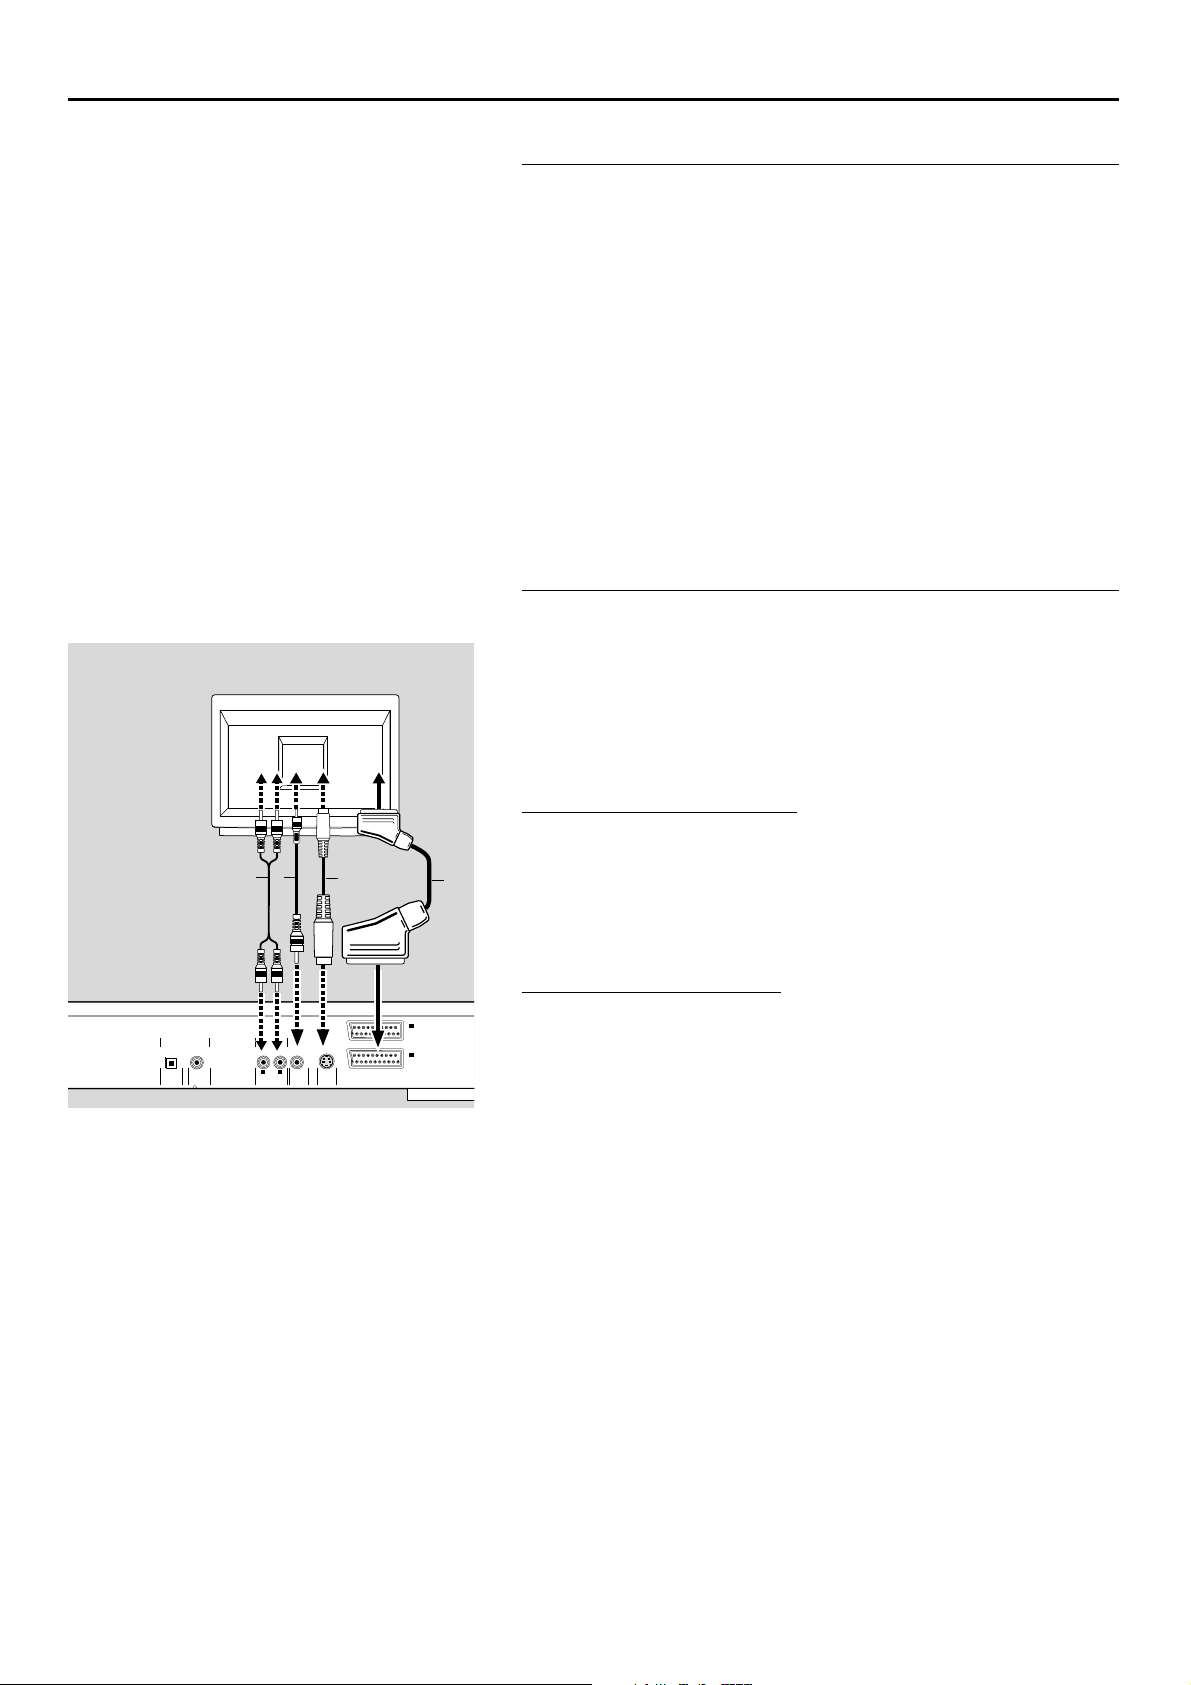
Connecting to a TV
● Connect the SCART to the corresponding connector on the TV using
the SCART cable supplied (A).
If your TV is not equipped with a SCART you can select one of
the following alterative connections:
S-Video (Y/C) connection
1 Connect the S-Video jack on the DVD-player to the S-Video in jack on
the TV using an optional S-Video cable (B).
2 Connect the audio Left and Right out jacks to the audio left/right in
jacks on the TV (D).
Video CVBS connection
1 Connect the Video out (CVBS) jack to the video in jack on the TV using
the video cable supplied (C).
2 Connect the audio Left and Right out jacks to the audio left/right in
jacks on the TV (D).
DIGITAL AUDIO OUT
PCM/MPEG2/AC3/DTS
OPT OUT
DIG OUT
TV
CB
D
STEREO OUT
L
(CVBS)
VIDEO OUT
(Y/C)
S-VIDEO OUT
R
AUDIO OUT
AUX/VCR
A
I
IN
II
TV OUT
 Loading...