

Philips DVD420AT User Manual

MAGNAVOX
Q
MPORTANT
Return Your Warranty Registration Card
Within 10 Days. See Why Inside.

Return your Warranty Registration card today to ensure
you receive all the benefits you’re entitled to.
Once your PHILIPS MAGNAVOX purchase is registered, you’re eligible to receive all the privileges of owning a
PHILIPS MAGNAVOX product So complete and return the Warranty Registration Card enclosed with your purchase
at once. And take advantage of these important benefits.
, Warranty:
Verification
Registering your product within
10 days confirms your right to
maximum protection under the
terms and conditions of your PHILIPS
MAGNAVOX warranty.
Congratulations on your purchase, and
welcome to the “family!”
Dear PHILIPS MAGNAVOX product owner:
Thank you for your confidence in PHILIPS MAGNAVOX. You’ve selected one of the best-built, best-backed products
available today. And we’ll do everything in our power to keep you happy with your purchase for many years to come.
As a member of the PHILIPS MAGNAVOX “family,” you’re entitled to protection by one of the most comprehensive warranties and
outstanding service networks in the industry.
What’s more, your purchase guarantees you’ll receive all the information and special offers for which you qualify, plus easy access to
accessories from our convenient home shopping network.
And most importantly you can count on our uncompromising commitment to your total satisfection.
All of this is our way of saying welcome-and thanks for investing in a PHILIPS MAGNAVOX product.
.Owner
Confirmation
Your completed Warranty
Registration Card serves as
verification of ownership in the
event of product theft or loss.
PHILIPS
.Model
Registration
Returning your Warranty Registration
Card right away guarantees you’ll
receive all the information and special
offers which you qualify for as the
owner of your model.
MAGNAVOX
Sincerely, P.S. Remember, to get the most from your
^ PHILIPS MAGNAVOX produc±, you must
return your Warranty Registration Card
Robert Minkhorst within 10 days. So please mail it to us right
President and Chief Executive Officer now!
For Customer Use
Enter below the Serial No. which is located on the rear of the cabinet. Retain this information for future reference.
Model No. ________________________________________________Serial No.
Know these
SBfstysymbols
RISK OF ELECTRIC SHOCK
A
WARNING
DO NOTOPEN
A
PHILIPS MAGNAVOX Visit our World Wide Web Site at http://www.magnavox.com
A This “bolt of lightning” indicates uninsulated material v^ithin your unit may cause an electrical shoclt
For the safety of everyone in your household, please do not remove produa covering.
/î\ The “exclamation point” calls attention to features for which you should read the enclosed literature
closely to prevent operating and maintenance problems.
WARNING: TO PREVENT FIRE OR SHOCK HAZARD, DO NOT EXPOSE THIS EQUIPMENT TO RAIN
OR MOISTURE.
CAUTION: To prevent electric shock, match wide blade of plug to wide slot, and fully insert
ATTENTION: Pour éviter les chocs électriques, introduire la lame la plus large de la fiche dans la borne
correspondante de la prise et pousser jusqu’au fond.
________________________________________________________________
SAFETY PRECAUTIONS
CAUTION: This Digital Video Disc Player employs a Laser System.
To ensure proper use of this product, please read this owner’s manual carefully and retain for future reference.
Should the unit require maintenance, contact an authorized service location - see service procedure.
Use of controls, adjustments, or the performance of procedures other than those specified herein may result in
hazardous radiation exposure.
To prevent direct exposure to laser beam, do not try to open the enclosure.
Visible laser radiation when open and interlocks defeated.
DO NOT STARE INTO BEAM.
FCC NOTICE: This equipment has been tested and found to comply with the limits for a Class B digital device, pursuant to part
15 of the FCC Rules. These limits are designed to provide reasonable protection against harmful interference in a
residential installation.
This equipment generates, uses, and can radiate radio frequency energy and, if not installed and used in
accordance with the instructions, may cause harmful interference to radio communications.
However, there is no guarantee that interference will not occur in a particular installation.
If this equipment does cause harmful interference to radio or television reception, which can be determined by
turning the equipment off and on, the user is encouraged to try to correct the interference by one or more of the
following measures:
- Reorient or relocate the receiving antenna.
- Increase the separation between the equipment and receiver.
- Connect the equipment into an outlet on a circuit different from that to which the receiver is connected.
- Consult the dealer or an experienced radio/TV technician for help.
WARNING: Changes or modifications made to this equipment, not expressly approved by Philips Consumer Electronics
Company, or parties authorized by Philips Consumer Electronics Company, could void the user’s authority to
operate the equipment.
1
Location of the required label
PRODUCT IS CERTIFIED BY THE MANUFACTURER TO
COMPLY WITH DHHS RULES 21 CFR SUBCHAPTER J
APPLICABLE AT THE DATE OF MANUFACTURE.
MANUFACTURED
DISTRIBUTED BY;
PHILIPS CONSUMER ELECTRONICS CO.
P. O, BOX 14810 KNOXVILLE. TN 37914 -1810

IMPORTANT SAFETY INSTRUCTIONS
CAUTION: PLEASE READ AND OBSERVE ALL WARNINGS AND INSTRUCTIONS GIVEN IN THIS OWNER’S MANUAL AND
THOSE MARKED ON THE UNIT. RETAIN THIS BOOKLET FOR FUTURE REFERENCE.
This set has been designed and manufactured to assure personai safety. Improper use can result in electric shock or fire hazard.
The safeguards incorporated in this unit will protect you if you observe the following procedures for installation, use and sen/icing.
This unit is fully transistorized and does not contain any parts that can be repaired by the user.
DO NOT REMOVE THE CABINET COVER, OR YOU MAY BE EXPOSED TO DANGEROUS VOLTAGE. REFER SERVICING TO
QUALIFIED SERVICE PERSONNEL ONLY.
1. Read owner’s manual
After unpacking this product, read the ^ '
owner’s manual carefully, and follow
all the operating and other instruc
tions.
2. Power Sources
This product should be operated only
from the type of power source indi
cated on the marking label. If you are
not su re of the type of power supply to
your home, consult your product
dealer or local power company. For
products intended to operate from
battery power, or othersources, refer
to the operating instructions.
3. Grounding or Polarization
This product may be equipped with a
polarized alternating current line plug
(a plug having one blade wider than
the other). This plug will fit into the
power outlet only one way. This is a
safety feature. If you are unable to
insert the plug fully into the outlet, try
reversing the plug. If the plug should still fail to fit, contact your
electrician to replace your obsolete outlet. Do not defeat the
safety purpose of the polarized plug.
4. Ventilation
Slots and openings in the cabinet are
provided for ventilation and to en
sure reliable operation of the product
and to protect it from overheating.
These openings must not be blocked
or covered. The openings should
never be blocked by placing the
product on a bed, sofa, rug or other
similar surface. This product should not be placed in a built-in
installation such as a bookcase or rack unless proper ventila
tion is provided or the manufacturer’s instructions have been
adhered to.
6. Water and Moisture
Do not use this product near water for example, near a bath tub, wash
bowl, kitchen sink, or laundry tub; in
a wet basement; or near a swimming
pool and the like.
7. Cleaning
Unplug this product from the wall
outlet before cleaning. Do not use
liquid cleaners or aerosol cleaners.
Use a damp cloth for cleaning.
8. Power-Cord Protection
Power-supply cords should be routed
so that they are not likely to be walked
on or pinched by items placed upon
or against them, paying particular at
tention to cords at plugs, convenience
receptacles, and the point where they
exit from the product.
9. Overloading
Do not overload wall outlets, exten
sion cords, or integral convenience
receptacles as this can result in a risk
of fire or electric shock.
10. Lightning
For added protection for this product
during a storm, or when it is left
unattended and unused for long
periods of time, unplug it from the
wall outlet. This will prevent dam
age to the product due to lightning
and power-line surges.
S.
c ^
5. Heat
The product should be situated away
from heat sources such as radiators,
heat registers, stoves, or other prod
ucts (including amplifiers) that
produce heat.
11. Object and Liquid Entry
Never push objects of any kind into
this productthrough openings as they
may touch dangerous voltage points
or short-out parts that could result in
a fire or electric shock. Never spill
liquid of any kind on the product.
12. Attachments
Do not use attachments not recommended by the product
manufacturer as they may cause hazards.
13, Accessories
Do not place this product on an un
stable cart, stand, tripod, bracket, or
table. The product may fall, causing
serious injury to a child or adult, and
serious damage to the product. Use
only with a cart, stand, tripod, bracket,
or table recommended by the manu
facturer, or sold with the product.
Any mounting of the product should follow the manufacturer’s
instructions, and should use a mounting accessory recom
mended by the manufacturer.
A product and cart combination should be moved with care.
Quick stops, excessive force, and uneven surfaces may cause
the product and cart combination to overturn.
14. Disc Tray
Keep your fingers well clear of the disc
tray as it is closing. It may cause seri
ous personal injury.
18. Damage Requiring Service
Unplug this product from the wall outlet and refer servicing to
qualified service personnel under the following conditions:
a) When the power-supply cord or plug is damaged.
b) If liquid has been spilled, or objects have fallen into the
product.
c) If the product has been exposed to rain or water.
d) If the product does not operate noVmally by following the
operating instructions. Adjust only those controls that are
covered by the operating instructions as an improper ad
justment of other controls may result in damage and will
often require extensive work by a qualified technician to
restore the product to its normal operation.
e) If the product has been dropped or damaged in any way.
f) When the product exhibits a distinct change in performance
- this indicates a need for service.
19. Servicing
Do not attempt to service this prod
uct yourself as opening or removing
covers may expose you to danger
ous voltage or other hazards. Refer
all servicing to qualified service per
sonnel.
15. Burden
Do not place a heavy object on the
product or step on it. The object
may fall, causing serious personal
injury and serious damage to the
product.
16.Headphones
When you use the headphones,
keep the volume at a moderate
level. If you use the headphones
continuously at a high volume, it
may cause hearing damage.
17. Disc
Do not use a cracked, deformed,
or repaired disc. These discs
are easily broken and may cause
serious personal injury and prod
uct malfunction.
20. Replacement Parts
When replacement parts are required, be sure the service
technician has used replacement parts specified by the manu
facturer or have the same characteristics as the original part.
Unauthorized substitutions may result in fire, electric shock, or
other hazards.
21. Safety Check
Upon completion of any service or
repairs to this product, ask the ser
vice technician to perform safety
checks to determine that the prod
uct is in proper operating condition.
Introduction J
Precautions
Notes on Handling
When shipping the DVD video player, the original shipping
carton and packing materials come in handy. For maximum
protection, repack the unit as it was originally packed at the
factory.
Do not use volatile liquids, such as insect spray, near the
DVD video player. Do not leave rubber or plastic products in
contact with the DVD video player for a long time. They will
leave marks on the cabinet.
The top and rear panels of the DVD video player may
become warm after a long period of use. This is not a
malfunction.
When the DVD video player is not in use, be sure to remove
the disc and turn off the power.
If you do not use the DVD video player for a long time, the
unit may not function properly in the future. Use the DVD
video player occasionally.
Notes on Location
When you place this DVD video player near a TV, radio, or
VCR, the playback picture may become poor and the sound
may be distorted. In this case, place the DVD video player
away from the TV, radio, or VCR.
Notes on Cleaning
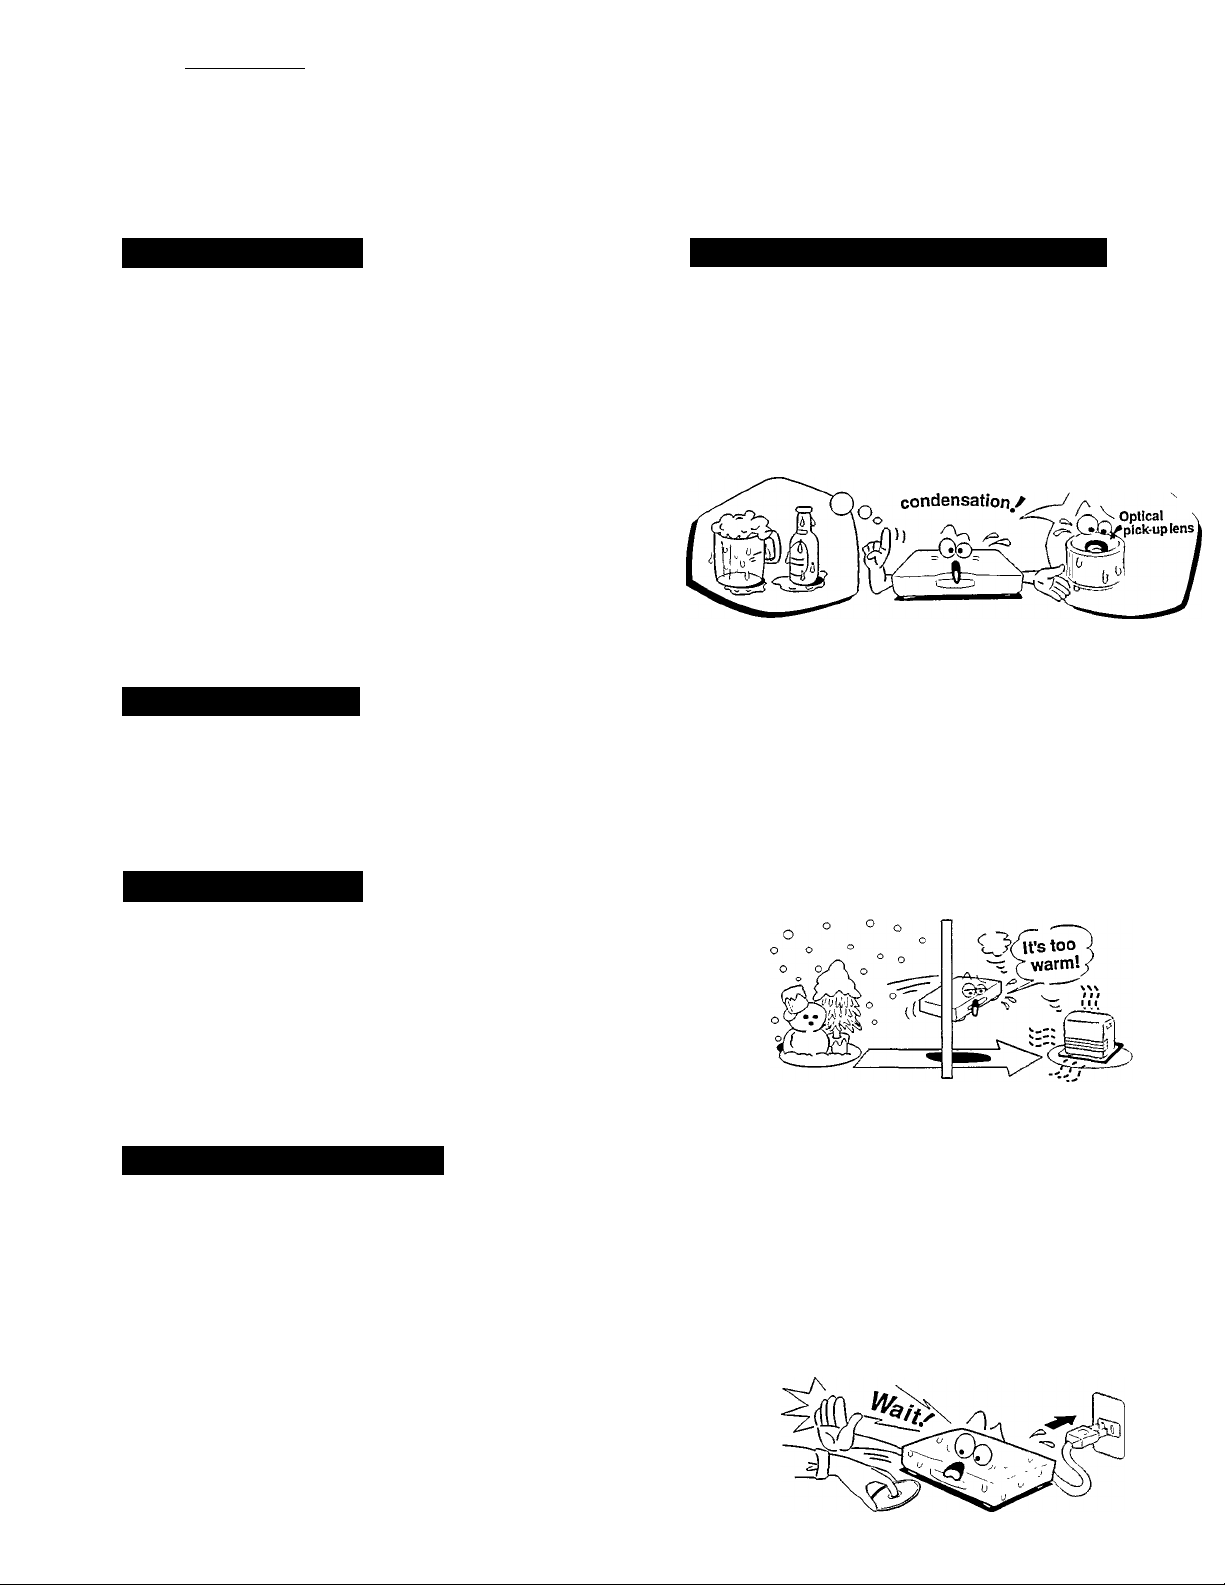
Notes on Moisture Condensation
Moisture condensation damages the DVD video
piayer. Please read the following carefully.
Moisture condensation occurs, for example, when you pour a
cold drink into a glass on a warm day. Drops of water form on
the outside of the glass. In the same way, moisture may
condense on the optical pick-up lens inside this unit, one of the
most crucial internal parts of the DVD video player.
Examples of moisture
Moisture condensation occurs during the following
cases.
When you bring the DVD video player directly from a cold
place to a warm place.
When you use the DVD video player in a room where you
just turned on the heater, or a place where the cold wind from
the air conditioner directly hits the unit.
In summer, when you use the DVD video player in a hot and
humid place just after you move the unit from an air
conditioned room.
Use a soft, dry cloth for cleaning.
• For stubborn dirt, soak the cloth in a weak detergent solution,
wring the cloth well, and wipe the unit. Use a dry cloth to wipe
it dry.
Do not use any type of solvent, such as thinner and benzine,
as they may damage the surface of the DVD video player.
• If you use a chemical saturated cloth to clean the unit, follow
that product’s instructions.
To Obtain a Clear Picture
The DVD video player is a high technology, precision device. If
the optical pick-up lens and disc drive parts are dirty or worn
down, the picture quality becomes poor. To obtain a clear
picture, we recommend regular inspection and maintenance
(cleaning or parts replacement) every 1,000 hours of use
depending on the operating environment. For details, contact
your nearest dealer.
Do not use the DVD video player when moisture
condensation may occur.
If you use the DVD video player in such a situation, it may
damage discs and internal parts. Remove the disc, connect
the power cord of the DVD video player to the wall outlet, turn
on the DVD video player, and leave it on for two or three
hours. After two or three hours, the DVD video player will
have warmed up and evaporated any moisture. Keep the
DVD video player connected to the wall outlet and moisture
condensation will seldom occur.

Introduction )
Table of Contents
^ Introduction
SAFETY PRECAUTIONS....................................2
IMPORTANT SAFETY
INSTRUCTIONS...............................................3,4
Precautions
........................................................
^ Connections
Connecting to a TV...........................................11
Connecting to an Audio System
^ Basic Playback
Playing a Disc.............................................15-18
Basic Playback
Using the Shuttle Ring
Using the Jog Dial
Resuming Playback from the Same Location
^ Advanced Playback
.....................
12
Identification of Controls
Front Panel/Rear Panel/DVD Display
Remote Control
5
Preparing the Remote Control
Operating with the Remote Control
Built-in Locator of the Remote Control
Connecting to Optional Equipment... 13,14
Enjoying Dolby Digital (AC-3) Sound
Enjoying Dolby Pro Logic Surround Sound
Enjoying Two-channel Digital Stereo Sound
Locating a Specific Title, Chapter,
or Track
......................................................
Locating a Title Using the Title Menu
Locating a Title
Locating a Specific Chapter or Track Directly
Locating a Specific Chapter or Track
Locating a Specific Location on the Disc
..................
.7-10
19, 20
1
1
L'ii
■ Playing Repeatedly
Repeating a Title, Chapter, or Track
Repeating a Specific Segment
■ Playing in a Favorite Order
Setting Titles, Chapters, or Tracks in a Favorite Order
■ Playing in Random Order................................23
Playing Titles in Random Order
Playing Chapters or Tracks in Random Order
■ Zooming a Picture............................................24
Zooming a Picture
.........................................
.............................
^ Function Setup
Customizing the Settings
Displaying the SET UP MENU Screen
Setting the Audio Sound
Setting the Functions
Setting the Displays
Setting the Parental Lock
Setting the Parental Lock
..................
..................
^ Others
Notes on Discs.................................................40
Before Caliing Service Personnel
Specifications...................................................42
.28-34
.35, 36
.................
21
22
41
Selecting the Camera Angle/Selecting a Language.. 25
Changing the Camera Angle
Selecting a Playback Audio Setting
Selecting Subtitles
Displaying Subtitles
Selecting a Subtitle Language
Using the On-Screen Display
Checking the Operational Status
Checking the Remaining Time and Setting Status
Operating Other Equipment with the
Remote Control
Programming the Remote Control
Brand Code Table
Buttons to Operate
Table of Languages..........................................39
Memo.................................................................43
Factory Service Center Locations
Limited Warranty
...........................................
..........................
.........................................
...........
.............................
Back cover
26
27
37, 38
45, 46
1
lit
I
Introduction J
identification of Controis
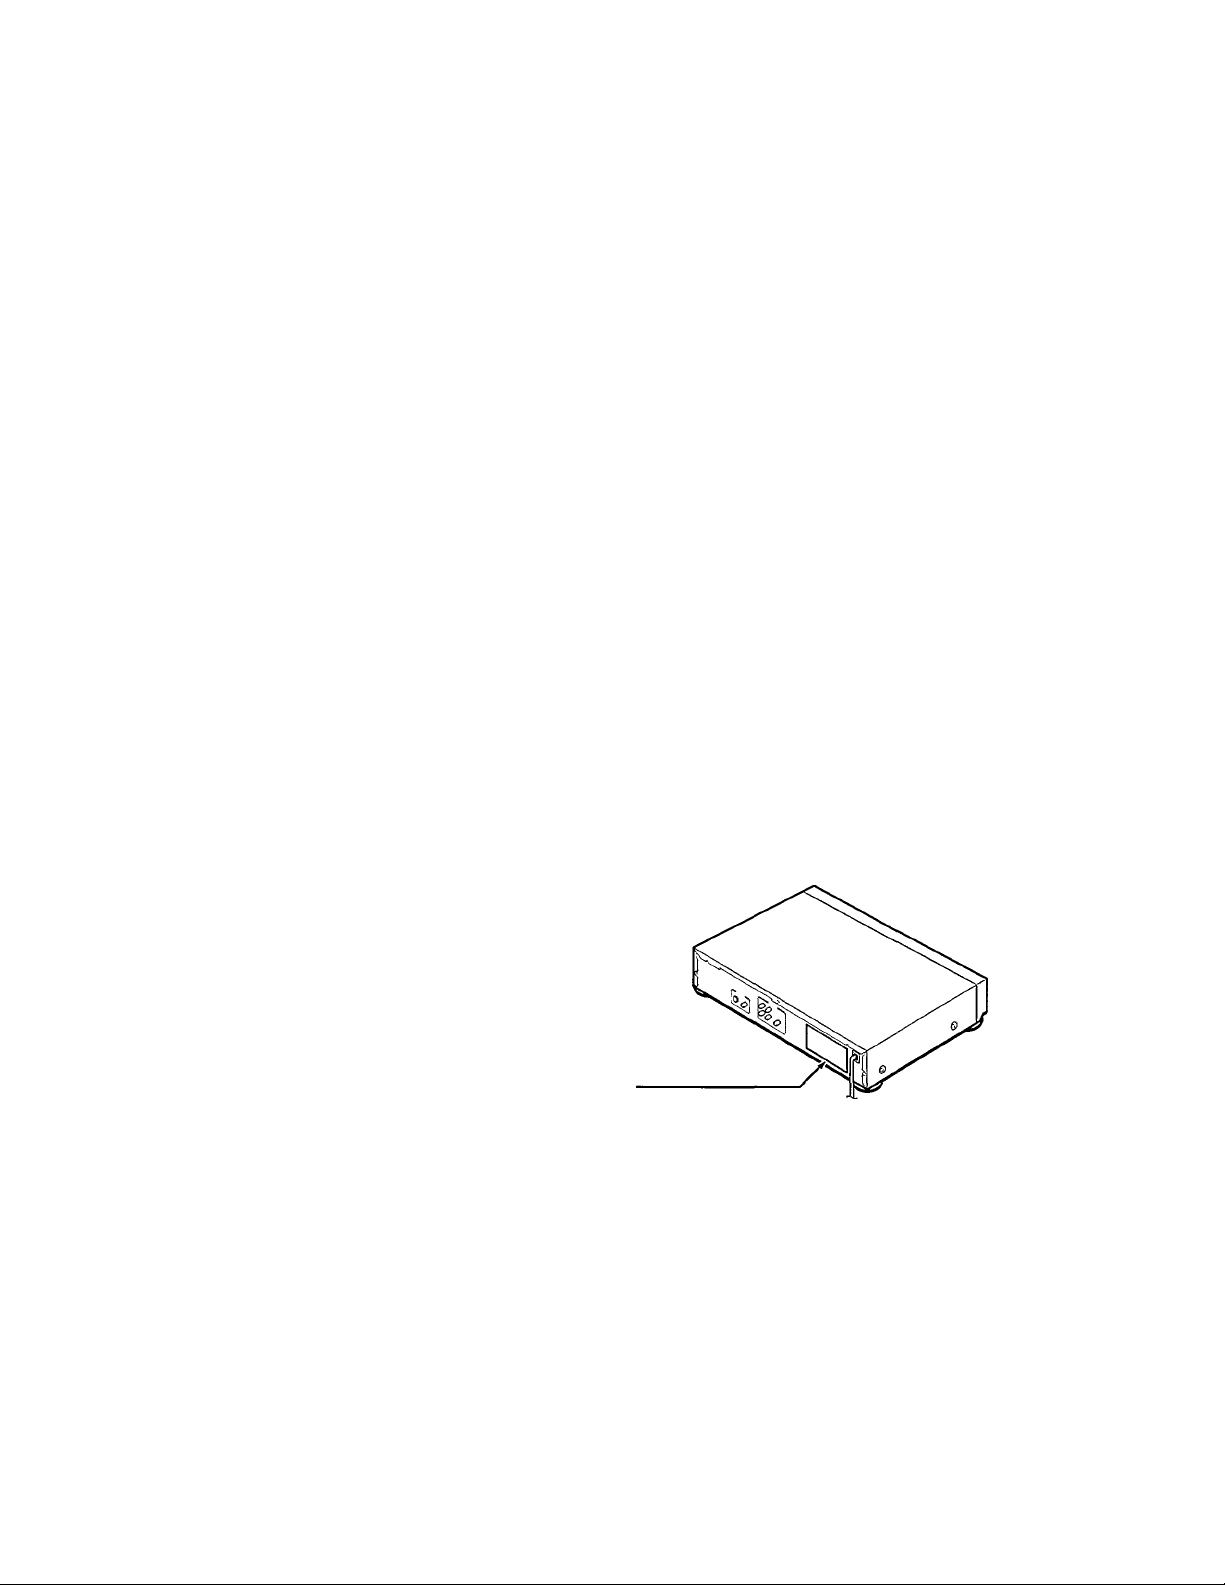
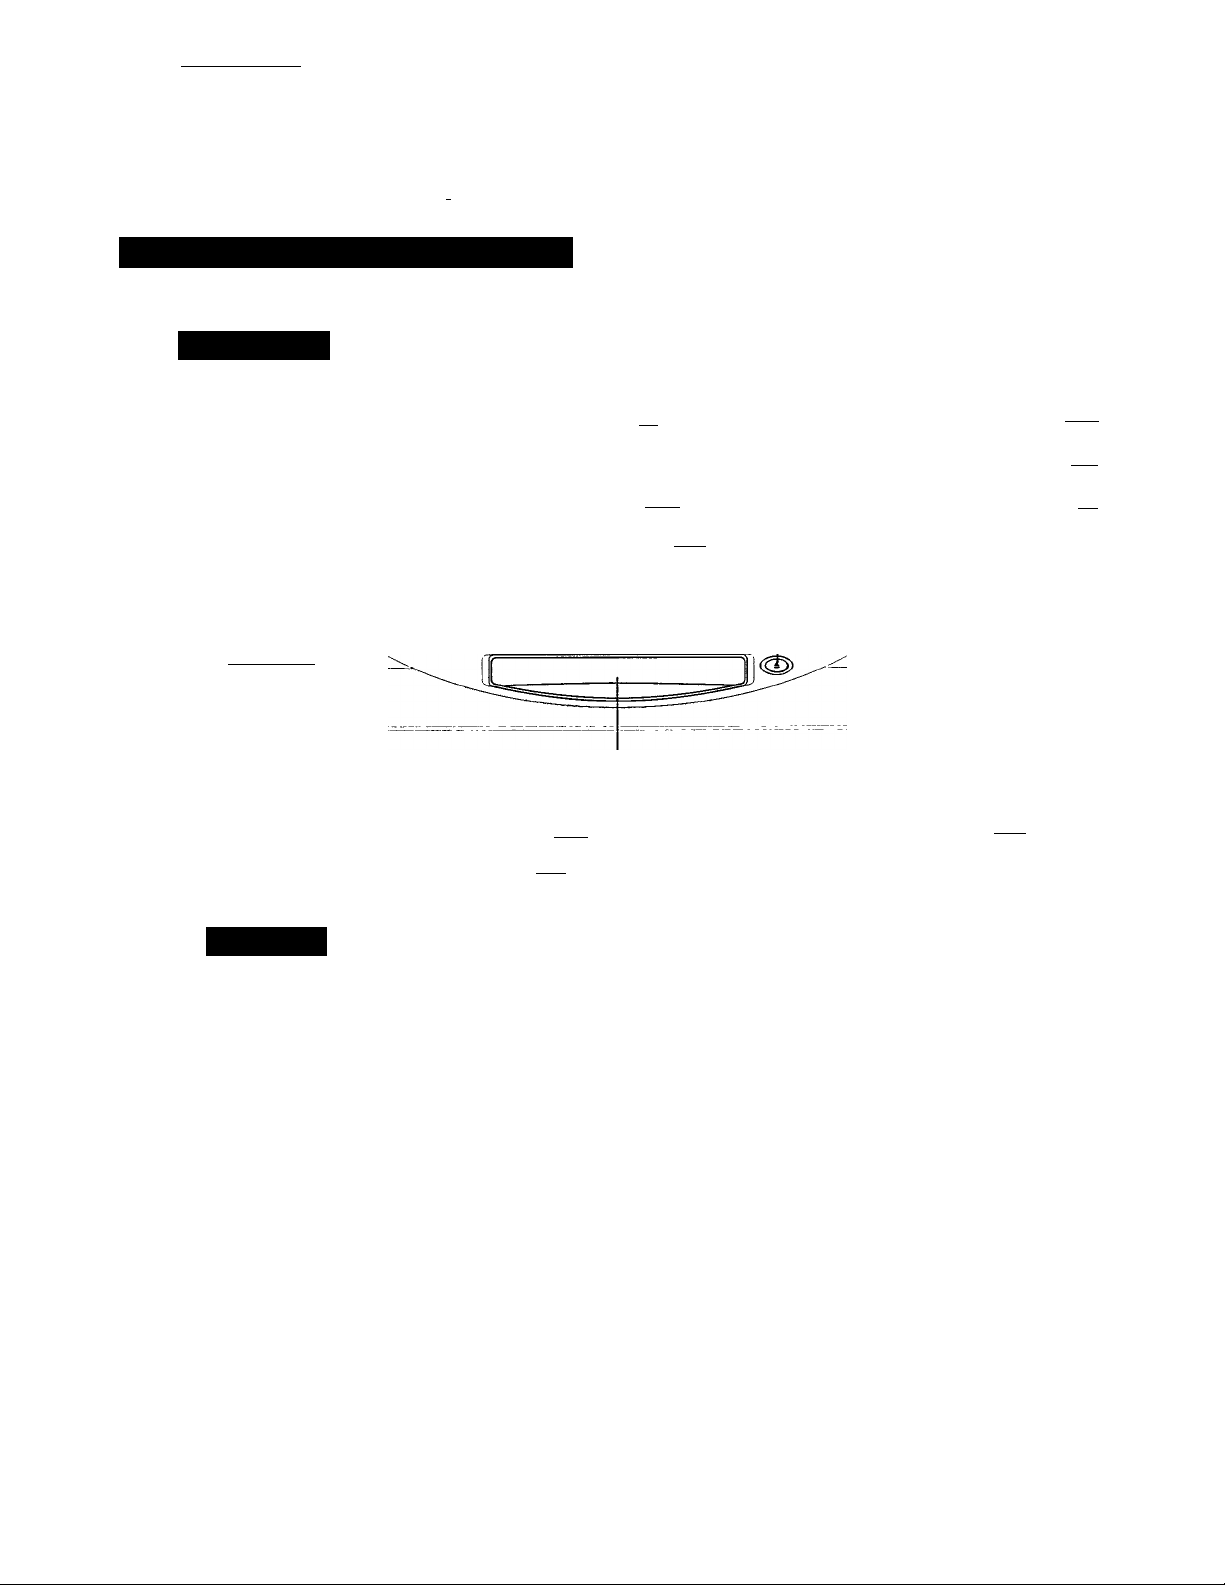
See the page number inside the | for details.
Front Panel/Rear Panel/DVD Display
Front Panel
n-ir; ir-».
----
1 o oo»^
ear Panel
POWER ON / STANDBY indicator [i^
— POWER ON / STANDBY button
---------------------------
- LEVEL knob [TT^
■ PHONES jack pjT)
REPEAT button [21^
DVD display | 8 ^
Disc tray
(Open/Close) button |-|5^
PAUSE button |l6^
- PLAY button (t^
STOP button [16^
000 ■
I 7 I I ^
PREVI (Previous) button ¡20^
NEXT button 120^ •
■ S VIDEO OUT jack plT^[T¥^
J
s. :~C>
ANALOG AUDIO OUT 1 (L7R) jacks pTT^-
PCM/AC-3 DIGITAL
AUDIO OUT jack [T^pj^-
— VIDEO OUT jack |Tr^[T^[i^[T4)
■ ANALOG AUDIO OUT 2 (L/R) jacks [i^[T^
Power cord
Power plug pTT^pii^

Pressing of the FL-DIM button on the remote
control changes the brightness of the display.
FL-DIM
o
Normal
Dimmed Off
VIDEO CD/Audio CD indicator ■
Operating status indicator
Title number indicator
TITLE
o o
U LI
Chapter/track number indicator
DVD indicator
---------------------------
---------
CHPn-RACK
.0 o o
u u u
►*«
CD TOTAL REMAIN
O'O 0*0 o
IJ-IJ IJ'U u
Total playing time/remaining time/elapsed time indicators
The indicators vary depending on the kinds of discs you piay.
WEMORYII
iREPEATi A-B ALL
• Repeat playback mode indicators
11^1«!
@1-
■ MEMORY indicator
■SHUFFLE indicator
--------
PBC indicator
-Angle icon indicator
Other indicators
When playing back the
same title, chapter or
track repeatedly.
When playback is
II paused. [T6>
During random
ESnS playback. (23>
IREPEATI A-B
WEMORYl
■ When playing back a
specific segment
repeatedly. (A-B repeat)
During memory
playback. [|D
When playing back the
entire disc repeatedly.
When the camera angle
can be changed.!^
8

Introduction J
Identification of Controls (continued)
The instructions in this manual describe the functions on the remote control.
See the page number inside the | ^ for details.
Remote Control

Preparing the Remote Control
Operating with the Remote Control
Insert the batteries into the remote control so you can use it to
operate the DVD video player.
Make sure to match the + and - on the
batteries to the marks inside the battery
compartment.
Close the cover.
This section shows you how to use the remote control.
Point the remote control at the
remote sensor and press the buttons.
ji.r 1 1
0 ■!. z'
*.
_
i /
/30°
Within about 20 feet
30°^
I
Distance: About 20 feet from the front of the
remote sensor
Angle:
Do not expose the remote sensor of the
DVD video player to a strong light source
such as direct sunlight or illumination. If
you do so, you may not be able to operate
the DVD video player with the remote
control.
About 30° in each direction of the
front of the remote sensor
a
Improper use of batteries may cause battery leakage and corrosion. To
operate the remote control correctly, follow the instructions below.
• Do not Insert the batteries into the remote control in the wrong
direction (follow the +/- signs).
• Do not charge, heat, open, or short-circuit the batteries. Do not throw
the batteries into a fire.
• Do not leave dead or exhausted batteries in the remote control.
• Do not use different types of batteries together, or mix old and new
batteries.
• If you do not use the remote control for a long period of time, remove
the batteries to avoid possible damage from battery corrosion.
• If the remote control does not function correctly or if the operating
range becomes reduced, replace all batteries with new ones.
• If battery leakage occurs, wipe the battery liquid from the battery
compartment, then insert new batteries.
• Point the remote control at the remote sensor of the DVD video player.
• Do not drop the remote control.
• Do not leave the remote control near an extremely hot or humid place.
• Do not spill water into or put anything wet on the remote control.
• Do not open the remote control.
Built-in Locator of the Remote Control
The remote control lets you know its location by beeping
each time the main power is turned on.
1 Press the POWER ON / STANDBY button on the front
panel of the DVD video player to turn the DVD video
player on.
The remote control beeps so that you can easily locate it.
The remote control should be within about 20 feet from
the DVD video player, not being obstructed.
2 To turn off the beep, press any button on the remote
control.
• Re-execution requires an interval of about thirty seconds.
• The built-in locator may not work depending on the
condition, (ex. obstructions, direction of the remote control,
etc.)
10

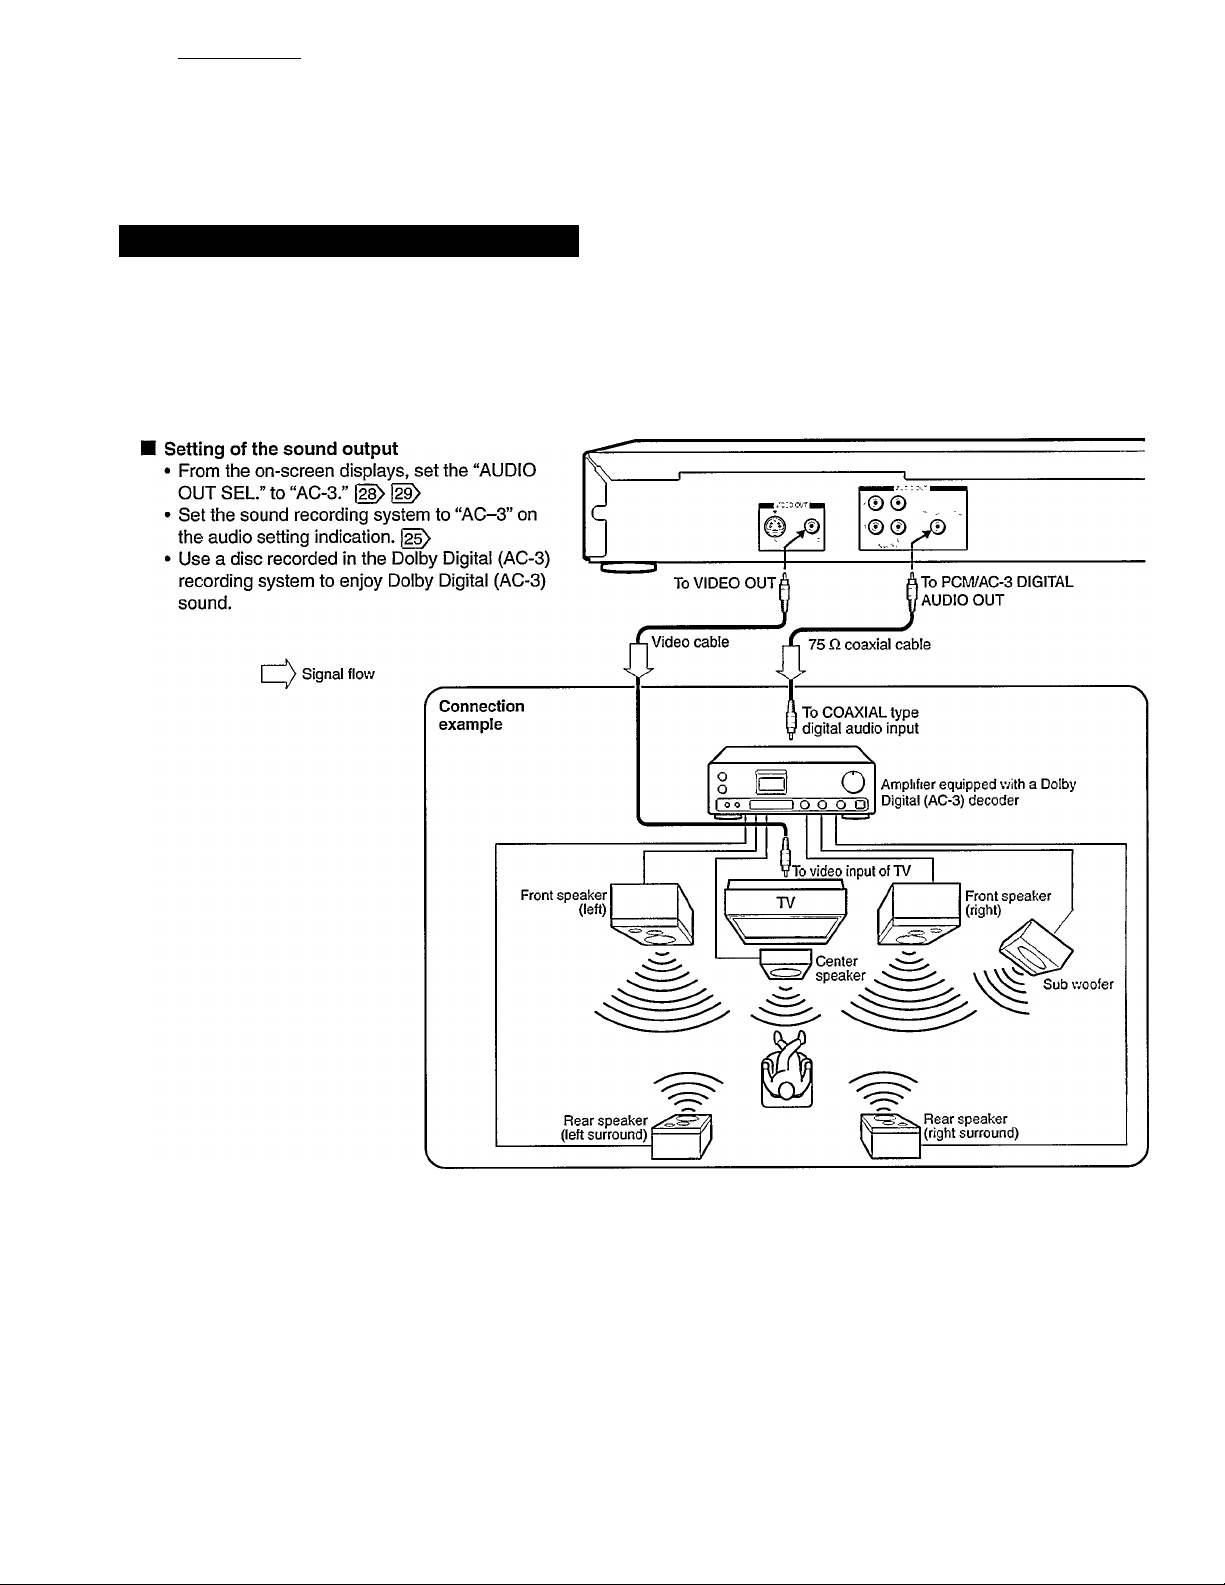
Connections J For details of output sound, see
Connecting to a TV
Connect the DVD video player to your TV.
Connecting to a TV
Setting of the sound output
From the on-screen displays, set “AUDIO OUT SEL” to “PCM.” [29^
To wall outlet
If your TV has an RF (Antenna In) jack only, use an RF
modulator (not supplied) to connect the DVD player to
your TV,
Notes
■ Refer to the owner’s manual of the connected TV as well.
' When you connect the DVD video player to your TV, be sure to turn off the power and unplug both units from the wall outlet before making any
connections.
' If your television set has one audio input, use a Y cable adapter (not supplied) to connect to your TV.
’ Connect the DVD video player directly to your TV. If you connect the DVD video player to a VCR, TVA/CR combination or video selector, the
playback picture will be distorted because DVD video discs are copy protected.
Headphones connection
Connect headphones that have a stereo large
size connector.
Before connecting, temporarily lower the sound
volume, then adjust the volume.
rr
Auxiliary (Line) input.
See your TV owner’s manual
for details.
Down Up
Connections J For details of output sound, see
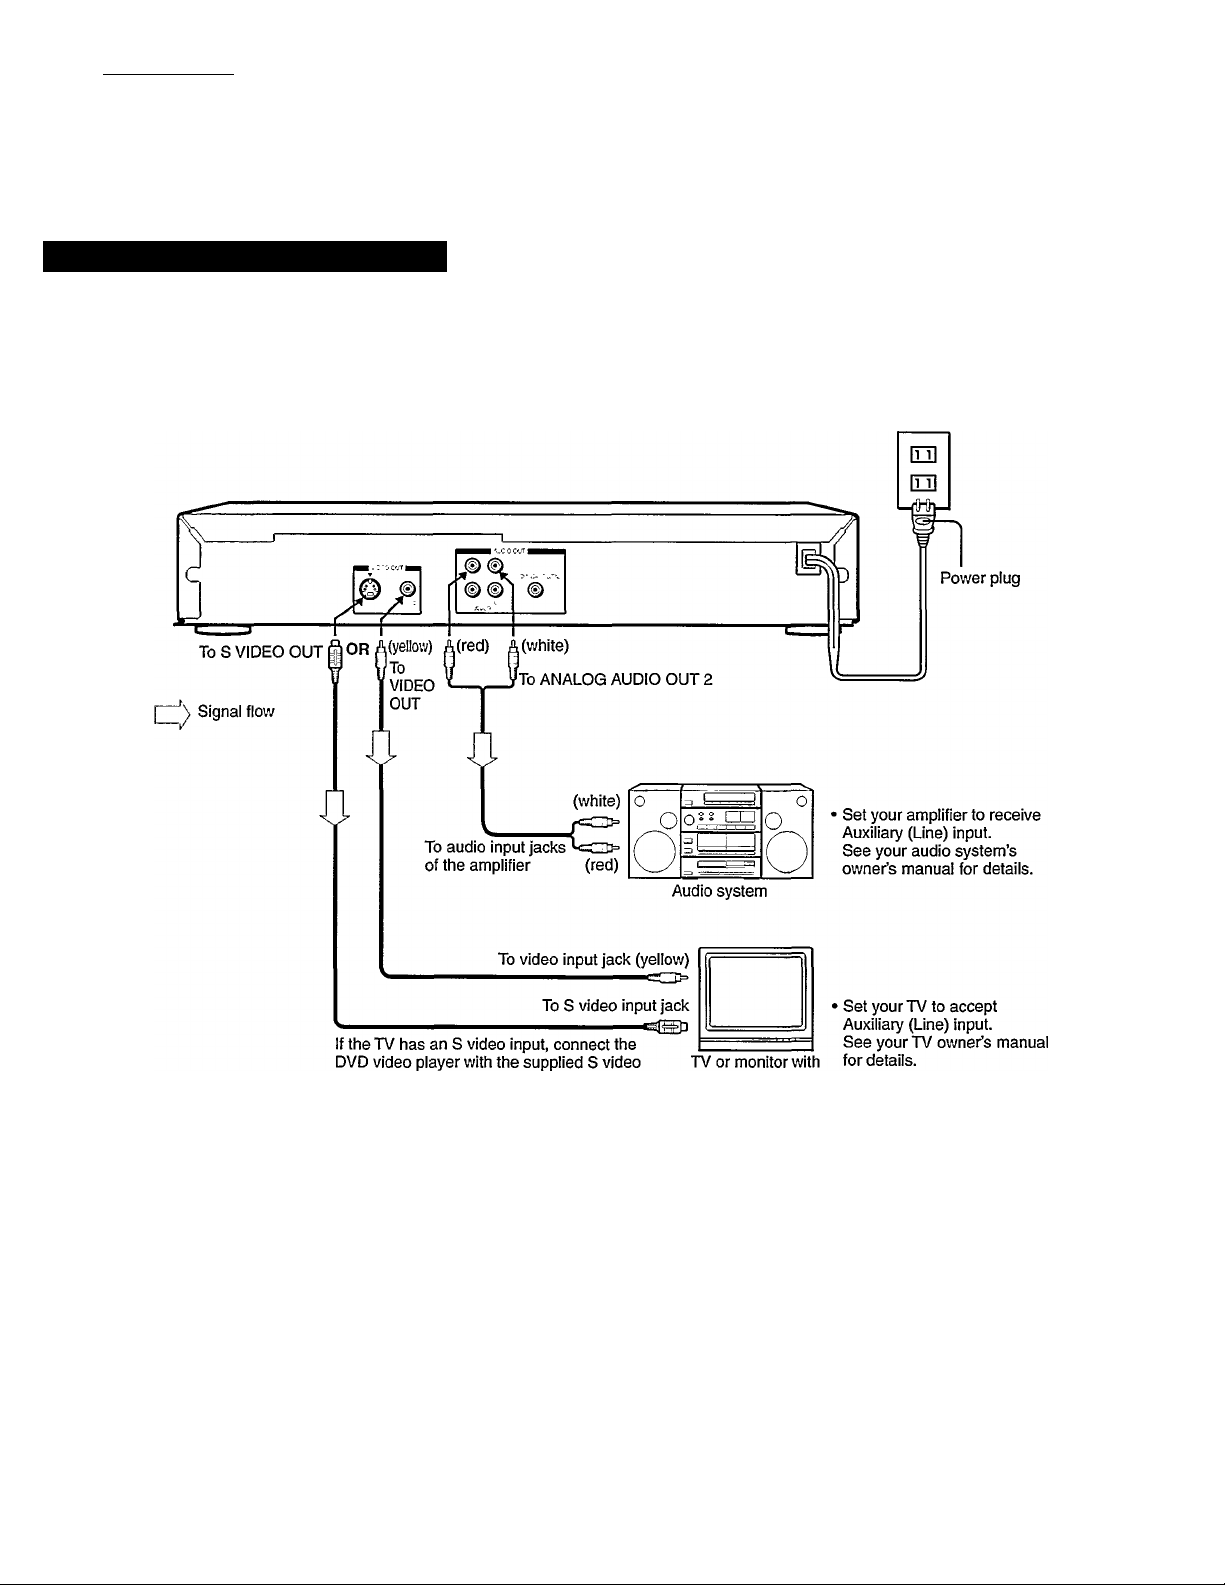
Connecting to an Audio System
You can listen to the sound of the discs in stereo.
Connecting to an Audio System
Setting of the sound output
From the on-screen displays, set “AUDIO OUT SEL.” to “PCM.”
To wall outlet
i
cable. When using the S video cable, there
is no need to connect the yellow video
cable.
Notes
• Refer to the owner’s manual of the connected equipment (TV, audio system) as well.
• When you connect the DVD video player to other equipment, be sure to turn off the power and unplug all of the equipment from the wall outlet
before making any connections.
• If you place the DVD video player near a tuner or radio, the radio broadcast sound might be distorted. In this case, place the DVD video player
away from the tuner and radio.
• The output sound of the DVD video player has a wide dynamic range. Be sure to adjust the receiver’s volume to a moderate listening level.
Otherwise, the speakers may be damaged by a sudden high volume sound.
• Turn off the amplifier before you connect or disconnect the DVD video player’s power cord. If you leave the amplifier power on, the speakers
may be damaged.
a video input jack
12
Connections J For details of output sound, see
Connecting to Optional Equipment
You can enjoy the high quality dynamic sound of Dolby Digital (AC-3), Dolby Pro Logic and 2 Channel Digital Stereo.
Enjoying Dolby Digital (AC-3) Sound
Dolby Digital (AC-3)
Dolby Digital is the surround sound technology used in movie theaters; it is now available in the home. You can enjoy motion picture and live
concert DVD video discs with this dynamic realistic sound by connecting the DVD video player to a six-channel amplifier equipped with a Dolby
Digital (AC-3) decoder or Dolby Digital (AC-3) processor. If you have a Dolby Pro Logic Surround decoder, you wiil obtain the full benefit of Pro
Logic from the same DVD movies that provide fuil 5.1-channel Dolby Digital soundtracks, as well as from titles with the Dolby Surround mark.
Manufactured under license from Dolby Laboratories Licensing Corporation. “Dolby,” “AC-3,” “Pro Logic,” and the double-D symbol are trademarks of
Dolby Laboratories Licensing Corporation.
Notes
• DO NOT connect the PCM/AC-3 DIGITAL AUDIO OUT jack of the DVD video player to the AC-3 RF input of a Dolby Digital Receiver. This input on your A'V
Receiver is reserved for Laserdisc use oniy and is incompatible with the PCM/AC-3 DIGITAL AUDIO OUT jack of the DVD video player.
• Connect the PCM/AC-3 DIGITAL AUDIO OUT jack of the DVD video player to the “DIGITAL” or “COAXIAL” input of a Dolby Digital Receiver or Processor,
• Connect the speakers according to the instructions in the owner's manual for the speaker system.
• Refer to the owner’s manual of the connected equipment as well.
• When you connect the DVD video player to other equipment, be sure to turn off the power and unplug all of the equipment from the wail outlet before making any
connections.
• The output sound of the DVD video player has a wide dynamic range. Be sure to adjust the receiver's volume to a moderate listening level. Othenvise, the
speakers may be damaged by a sudden high volume sound.
• Turn off the amplifier before you connect or disconnect the DVD video player’s power cord. If you leave the amplifier power on, the speakers may be damaged.
13

Warning
Do not set “AUDIO OUT SEL.” to “AC-3" via the on-screen displays [28^ ¡2^ unless you are connecting (via the PCM/AC-3 DIGITAL AUDIO OUT
jack) an AV decoder that has the Dolby Digital (AC-3) decoding function. High volume sound may damage your hearing as well as the speakers.
Enjoying Dolby Pro Logic Surround Sound Enjoying Two-channel Digital Stereo Sound
Dolby Pro Logic Surround
You can enjoy Dolby Pro Logic Surround sound by connecting an
amplifier and speaker system (right and left front speakers, a
center speaker, and one or two rear speakers).
■ With an amplifier equipped with Dolby Digital (AC-3),
connect the equipment the same way as described in “Enjoying
Dolby Digital (AC-3) Sound’’ . Refer to that amplifier’s
owner’s manual and set the amplifier so you can enjoy Dolby Pro
Logic Surround sound.
■ With an amplifier not equipped with Dolby Digital (AC-3),
connect the equipment as follows.
Two-channel Digital Stereo
You can enjoy Two-channel Digital Stereo sound by connecting
an amplifier equipped with a digital audio input and speaker
system (right and left front speakers).
¡O)
(a)
Connect one or two rear
speakers.
^
___
Rear speaker rear speakers will be
Set “AUDIO OUT SEL.” to “PCM” via the on-screen
displays.
The output sound from the
monaural even if you
connect two rear speakers.
Set “AUDIO OUT SEL.” to “PCM” via the on-screen
displays. [28> (29>
Notes
' Connect the speakers according to the instruotions in the owner's manual for the speaker system.
' Refer to the owner’s manual of the connected equipment as well.
' When you connect the DVD video player to other equipment, be sure to turn off the power and unplug all of the equipment from the wall outlet before making any
connections.
' Tho output sound of the DVD video player has a wide dynamic range. Be sure to adjust the receiver’s volume to a moderate listening level. Otherwise, the
speakers may be damaged by a sudden high volume sound.
' Turn off the amplifier before you connect or disconnect the DVD video player’s power cord. If you leave the amplifier power on, the speakers may be damaged.
14
 Loading...