

Page 1
Terrestrial
User manual
Page 2
Congratulations!
Dear Client:
Thank you for choosing our product. This High Denition Digital
Television Receiver (DTR) is an innovative product dedicated to
Digital Terrestrial Television. It has digital HDMI output for
connecting to Plasma or LCD Television for broadcasting digital
image which can ensure maximum image quality.
This manual provides information of appliance usage,
connection, control and protection. You will know your new
receiver better by reading this manual.
For easier comprehension, this manual has been divided into
several sections:
1. Regarding installation, connection to other apparatus, and
remote control.
2. Regarding basic daily usage.
3. Regarding advanced usage, such as customization and more
complex features.
Caution:
We strongly recommend your careful reading of this manual
before using this product.
Note
•
As a result of rmware upgrading, it is possible that the
content in this manual may not exactly correspond to the
operation of the product.
Register your product and get support at
www.philips.com/welcome
2
Page 3

Contents
Where to put your Set-top box?
Warnings and safety instructions
Batteries
Interference
USB Storage devices
Cleaning the Set-top box
2 What‘s in the box 6
Front panel of the Set-top box
Rear panel of the Set-top box
Overview of the remote control
3 Connecting your devices 9
Connection to the terrestrial antenna
Connection to the TV set
Connection to a Home cinema system
4 Before starting 11
5 Getting Started 12
Setup Guider
Search
Program Search
6 Basic Operation 13
Changing Channels
Adjusting the Volume
Accessing the Electronic Program Guide (EPG)
Favorites list
Program Information
TV/Radio mode
Teletext Function
7 System Setup 14
Setting Menu
General Setting
Video Setting
Audio Setting
Password Setting
Factory Setting
8 Information 16
freenet TV
Signal
Network
9 Digital TV 17
Program List
Program Edit
EPG
Timer Setting & Timer Manage
10 Update 18
OTA Update
USB Update
11 Multimedia 19
Video/Music/Recording content Playing
Picture browsing
File Manage
12 Environment 20
Meaning of logos present on the product or its
packaging
41 Safety recommendations
Product recycling and disposal
4
European Directive on Waste Electricaland Electronic
4
Equipment (WEEE)
5
Directive on the Restriction of use of certain hazardous
5
substances in electronic equipment (RoHS)
5
Electrical consumption of the receiver
5
13 Troubleshooting 21
Using the Set-top box
7
Updating the Software
7
8
14 Customer Support 22
9
9
10
12
12
12
13
13
13
13
13
13
13
14
14
14
14
14
15
16
16
16
17
17
17
17
18
18
19
19
19
20
20
20
20
20
21
21
3
Page 4
1 Safety recommendations
Use of the Set-top box issubject to safety measures
designed to protect users and their environment.
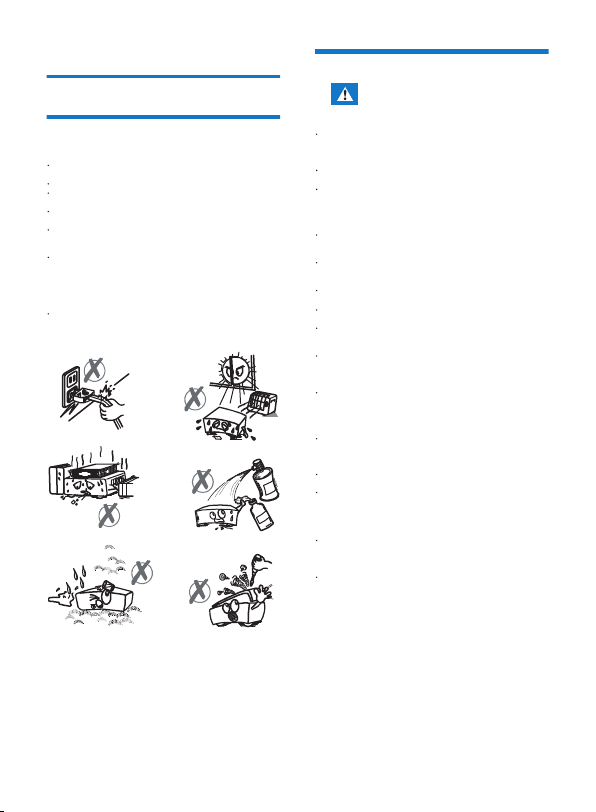
Where to put your Set-top box?
In order to guarantee the correct operation of your Set-top box,
you must:
place it indoors to protect it from lightning, rain, and direct
sunlight,
place it in a dry and well ventilated area,
keep it away from heat sources such as radiators, candles,
lamps,etc.
protect it from dampness, place it on a at surface from
where it will not fall and is out of the reach of children,
avoid violent shocks. Choose a stable, horizontal surface on
which the Set-top box will not be exposed to intense
vibrations.
do not place anything on top of your Set-top box (as it would
restrict ventilation): the ventilation slots located on the casing
prevent your Set-top box from overheating. If you place the
Set-top box in a compartment or other closed space, leave a
space of at least 10 cm on each side and 20 cm on the front
and back of the Set-top box,
connect it directly to the mains with the provided cords, the
socket must be near the Set-top box and easy to access. The
use of an extension cable (with multi-points) is not
recommended.
Warnings and safety instructions
• As a precaution, in case of danger, the power
supply unit acts as a disconnecting mechanism for
the power supply. That is why it is imperative that
you connect the receiver to a power outlet located
nearby and easily accessible.
Connect the Set-top box to the electrical outlet in
accordance with the indications mentioned on the
identication label axed on the Set-top box (voltage,
power, frequency of electricity network).
The identication label is located under the Set-top box or
on the rear panel.
You must imperatively use the Set-top box in an
environment that complies with the following requirements:
• temperature: between 0°C [32°F] and 40°C [104°F].
• ambient humidity: between 20% and 90%.
• altitude: below 2000 m [6562 ft].
To avoid short-circuits (re or electrocution hazard), do not
expose your Set-top box to dampness. Do not place any
object containing liquid (vase for example) on the appliance.
The Set-top box must not be splashed with liquid. If liquid is
spilled onto the Set-top box, unplug it immediately from the
mains and consult your supplier.
Take care not to allow liquids or metal objects to enter the
Set-top box through the ventilation slots.
Avoid reconnecting the Set-top box after it has been
subjected to large changes in temperature.
The Set-top box must be disconnected from power supply
before any modication ofconnection between TV, VCR or
antenna.
In the event of a storm, it is advisable to unplug the antenna.
Even if the Set-top box and the television set are
disconnected from the power supply, lightning can still
damage them.
If you hear unusual noise coming from the mains power
socket or from the power cord , disconnect immediately the
power cord from the mains power socket in accordance with
all the precautions of use, you risk getting an electric shock,
and contact your retailer.
Never connect the Set-top box to a mains power socket
which is
loose, shows signs of wear or damage, you risk getting an
electric shock.
Never touch the power cord with wet hands. You risk getting
an electric shock.
When connecting or disconnecting the power cord, always
take hold of the plug without pulling on the cord. A damaged
cord presents a potential risk of re or electric shock. Never
pull the power cord when disconnecting from the mains
power socket.
Never place objects on the power cord, and never pull on it
or fold it. This may cause a risk of re or electric shock.
Ensure that the Set-top box never lies on the power cord or
any other cables.
Ensure the Set-top box is placed on a at and stable
surface, placing it incorrectly may lead to the power cord
being disconnected.This may cause a risk of re or electric
shock.
4
Page 5

Always keep the power cord unit out of the reach of children
or domestic animals.
Only personnel approved by the manufacturer can repair the
Set-top box. Failure to comply with these safety precautions
will invalidate the guarantee.
Have a specialised installer perform all connections if you
want to use cables that are not provided with the Set-top
box.
Batteries
Batteries are easily swallowed by young children. Do not allow
young children to play with the remote control.
Always keep batteries away from excessive heat sources such
as direct sunlight, re or similar sources.
To avoid damaging the remote control, only use identical
batteries or batteries of an equivalent type. The batteries
provided are not rechargeable.
Interference
Do not place the Set-top box near appliances that may cause
electromagnetic interferences (for example, loudspeakers,
modems, routers or cordless phones). This could aect Set-top
box operation and distort the picture or sound.
USB Storage devices
Please wait until the Set-top box or the multimedia le
application exits the multimedia list manager (multimedia le
application) or is in standby mode before disconnecting your
storage devices. Otherwise, you risk losing data or damage
your storage device.
When connecting a USB peripheral device, respect the way of
insertion and never use force. You may damage your
peripheral device and/or the appliance.
Cleaning the Set-top box
The outer casing of the Set-top box can be cleaned with a soft
and dry cloth. Do not use any type of abrasive pad, scouring
powder or solvents, such as alcohol or turpentine, as they
could damage the surface of the Set-top box.
5
Page 6
2 What‘s in the box
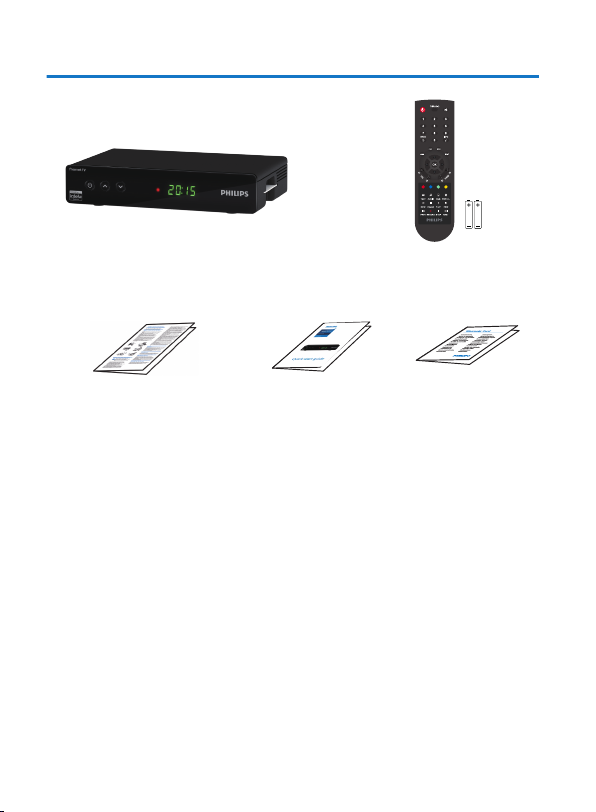
Your new equipment includes:
High Denition Digital
Television Receiver (DTR)
Safety condition
6
Quick start guide warranty card
Remote control
with 2 batteries (AAA)
Page 7
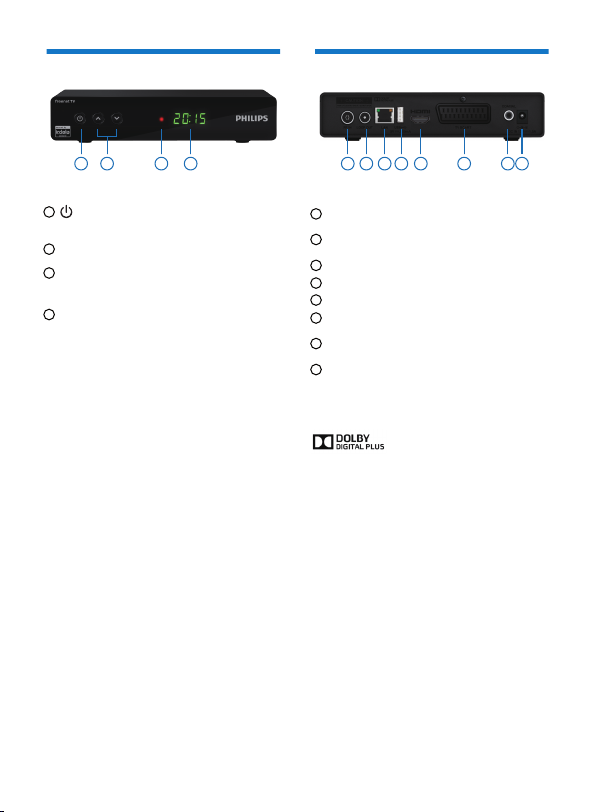
Front panel of the Set-top box
Rear panel of the Set-top box
1 2 3 4 1
1
Key to activate / deactivate the unit.
▲/ ▼- Switch programs.
2
LED
3
• Green
: Operating
• Red : Standby
Digit Displayer:
4
Shows the current time when the Set-top box is in
•
standby.
•
Shows the program number when the Set-top box is
on.
Attention:
The smart card must be inserted in the arrowed
direction, with the metal contact facing down.
2 3 4 5 6 7 8
RF IN - Antenna input socket for connecting a terrestrial
1
antenna system.
LOOP OUT – Antenna signal output port for connecting
2
with the input port of another receiver.
LAN – Network connection.
3
USB - USB port for fast external USB hard drive.
4
HDMI - HDMI port for connecting a HD compatible TV.
5
TV SCART - Socket for connecting a non-HD compatible
6
TV.
COAXIAL - Coaxial digital audio output S / PDIF (optional
7
connection).
Power jack - Power connector
8
Manufactured under license from Dolby Laboratories.
Dolby and the double-D symbol are trademarks of Dolby
Laboratories.
HDMI, HDMI logo and High-Denition Multimedia Interface are
trademarks or registered trademarks of HDMI Licensing LLC.
7
Page 8
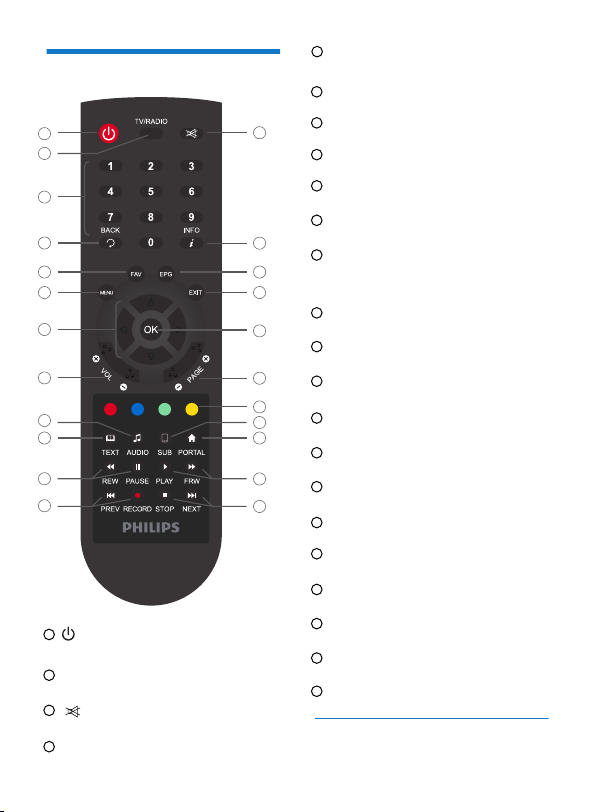
Overview of the remote control
1
2
4
5
8
7
11
13
17
16
20
22
1
STANDBY
Press to set STB to standby mode or wake up from
•
standby mode.
2
TV/RADIO
Switch between TV and Radio mode.
•
3
Press to turn audio on or o.
•
4
Digit keys 0-9
Numeric values to select the channel directly.
•
8
5
BACK
Press to return to the previous menu or return to previous
•
channel you have been watching.
6
INFO
Display program information.
•
7
3
6
9
10
12
14
15
18
19
21
23
MENU
Enter the main menu.
•
8
FAV
The shortcut key to favorites list.
•
9
EPG
Display the Electronic Program Guide (EPG).
•
10
EXIT
Exit from current menu.
•
Navigation keys ▲ / ▼ / ◄ / ►
11
Press ▲ /▼ to move the highlighted bar for selecting
•
an item, or switch to next /previous channel. Press
to move the highlighted bar for selecting an item, or turn
volume down / up.
OK
12
Display the channel list; Conrm a selection.
•
13
VOL + / VOL-
Adjust the volume.
•
PAGE + / PAGE-
14
Program switching.
•
Color keys
15
Color keys
•
TEXT
16
Display teletext pages (if available).
•
AUDIO
17
Enter the audio setting page.
•
SUB
18
Display subtitles (if available).
•
PORTAL
19
Enter the browser’s home page (if available).
•
REW/PAUSE
20
Rewind/Pause the video
•
21
PLAY/FRW
Play/Forward the video
•
PREV/RECORD
22
Previous video/Record the program being played
•
STOP/NEXT
23
Stop/Next video
•
Batteries
The remote control needs two batteries (AAA) to operate. The
drawing in the battery compartment indicates how to install
them.The batteries provided are not rechargeable.
◄ / ►
Page 9
3 Connecting your devices
Before installing your Set-top box:
•
Please check that the delivery is complete (see What‘s in the
box, page 6).
•
Please ensure that the appliances to be connected together
(recorder, TV set, VCR/DVD…) are unplugged before making
any connections.
•
Please ensure that Digital Terrestrial Television (DTT) is
available in your area.
Connection to the terrestrial antenna
Very often to get the best reception, you may simply need to
adjust your antenna. Alternatively, you can connect an indoor
antenna to your system. For more information, please contact
your specialised distributor.
Standard outdoor antenna
Preferably use an outside roof antenna that is designed to
receive UHF channels (21 to 69). However:
•
if your building is equipped with an old antenna model,
digital channels may be dicult or even impossible to
receive. The problem can only be resolved by changing the
antenna.
•
if your building is equipped with a common antenna which
contains selective lters devised for analogue channels,
reception will most probably not work correctly. In this case,
you will have to contact the administrator of the building.
•
some antennas directed towards an analogue TV transmitter
must be re-adjusted towards a digital TV transmitter. If you
encounter reception problems, you can also try placing the
antenna at dierent heights.
Indoor antenna
In ideal reception conditions, this type of antenna is sucient.
Here, however, are some useful tips:
use an antenna designed to receive channels 21 to 69.
•
install the antenna close to the window and direct it towards
•
the digital TV transmitter.
if possible, use an antenna with an amplier. The Set-top box
•
can provide remote power supply to your indoor antenna .
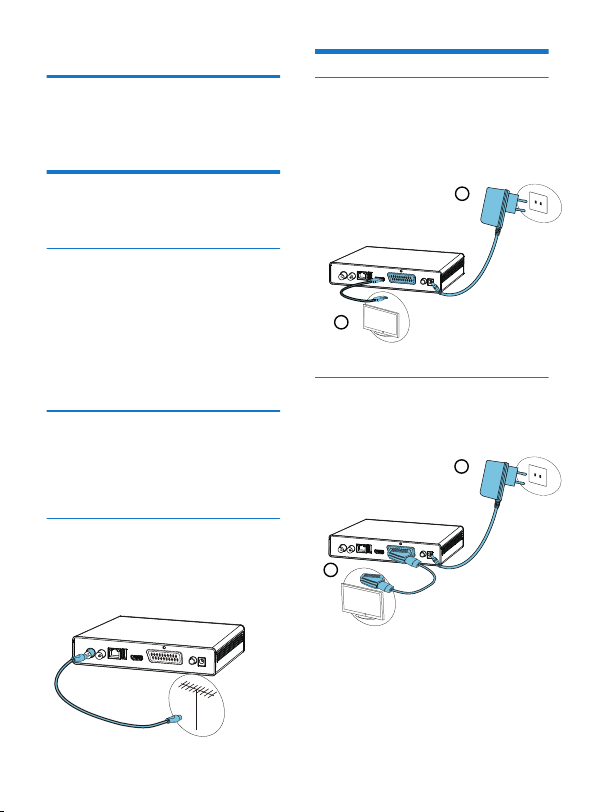
Connection to the antenna
Plug the antenna cable (not supplied) into the ANTENNA
1
IN input connector on your Set-top box.
You can connect the RF output connector of your Set-top
2
box to the antenna input of the television set or VCR/DVD
recorder (cable not supplied).
Connection to the TV set
Connection to a High-Denition television set
using an HDMI lead
To take advantage of High Denition picture quality, you
1
must connect the HDMI connector of your Set-top box to the
HDMI connector on your television set (cable not supplied).
Plug the power cord into the wall socket.
2
2
1
Connection to a Standard-Denition television
set
You must connect the television set to your Set-top box
1
using a SCART connector (not supplied).
Plug the power cord into the wall socket.
2
2
1
9
Page 10
Connection to a Home cinema
system
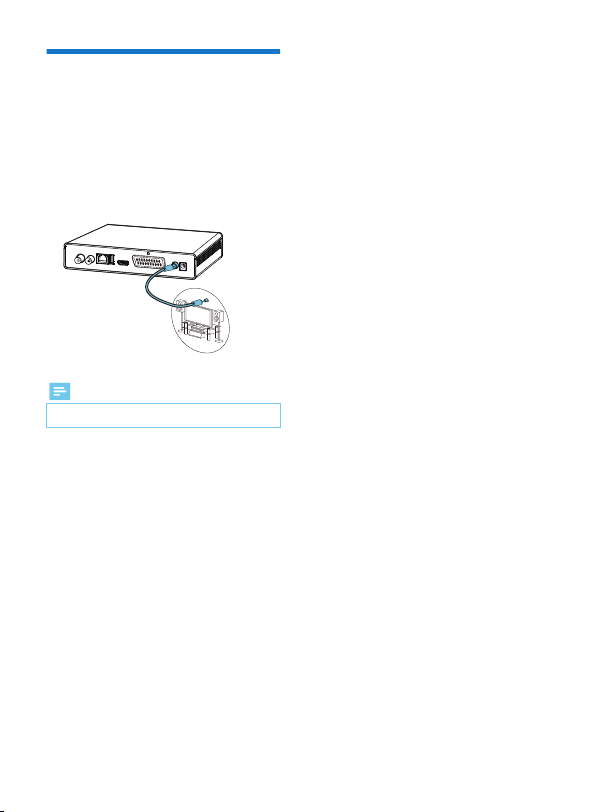
Some programmes are broadcast with a high quality
multichannel digital sound. The connection of your Set-top box
to a Home cinema system will give you a cinematic surround
sound experience when watching these programmes.
This can easily be done by connecting with a coaxial cable (not
supplied) the DIGITAL AUDIO output of your Set-top box to the
digital audio coaxial input of your Home cinema amplier
Dolby® Digital Plus is one of the latest innovations of Dolby
Laboratories in high quality digital audio. Compatible with
Dolby Digital systems, it addresses the expectations of most
demanding viewers, and is scalable to the diverse world of
content delivery, such as, for instance, High Denition TV
broadcast.
Note
•
For more information, please visit the following website:
http://www.dolby.com/consumer/setup/index.html
10
Page 11
4 Before starting
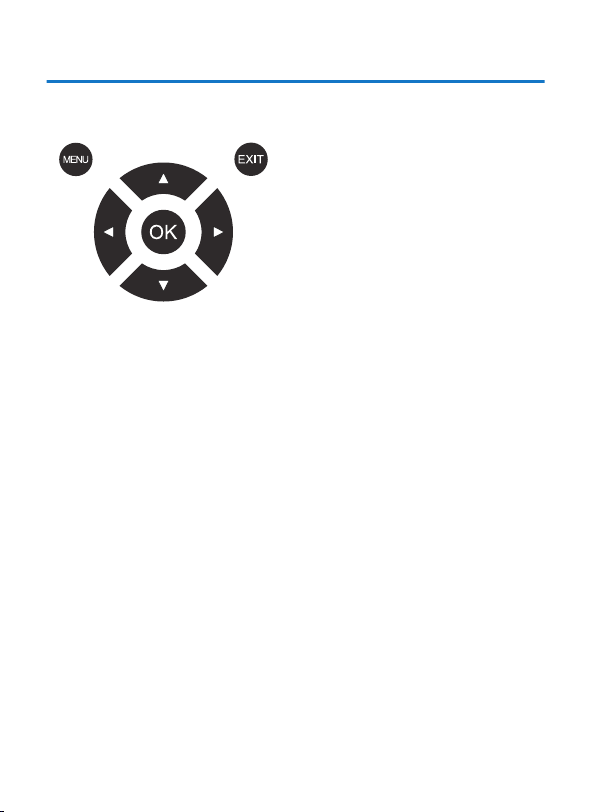
The receiver is operated via the remote control. Please follow the guide of OSD (On Screen Display) as below:
Open and close the OSD:
In OSD, you can set all the functions of the terrestrial receiver. The
call is made by the "MENU" button. To close the OSD, press "EXIT".
Navigating the OSD:
Navigation in the OSD occurs via the control buttons ▲/▼ and
◄/►. Press the "OK" button to activate a selected menu item. Press
“BACK” button to return to the previous menu.
Notes on OSD:
If the menu lock is on, the required password is "0000" and can be
changed later. The menu lock is used to prevent unauthorized
operation of the device.
11
Page 12
5 Getting Started
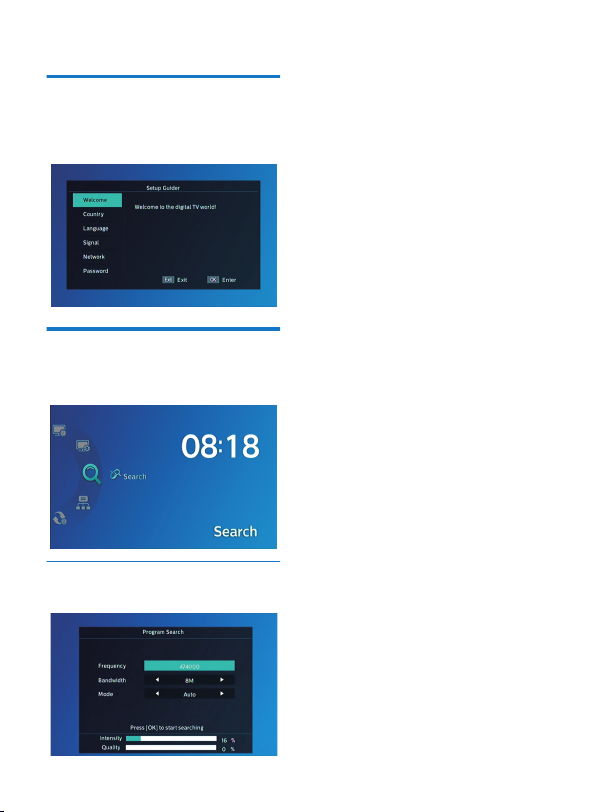
Setup Guider
If you use the Set-top box for the rst time, the “Setup Guider”
menu will appear.
Press cursor button to set the Country, Language, Searching
and network parameters, Password.
Finally press the "OK" button to enter the program search page.
Search
Press the “Menu” button to enter main menu.
1
Press “ ►” button to select the search menu and press “OK”
2
button to enter the sub-menu.
Press “Exit” button to exit.
3
Program Search
Press “
◄/► ” button to set Scan Frequency, Scan Bandwidth,
Scan Mode, then press "OK" button to start channel searching.
12
Page 13
6 Basic Operation
Changing Channels
You can change channels in two ways:
Press “▲ / ▼” button on the remote control to step through
1
the channel selection.
Enter the number of the channel you wish to view using the
2
number keys on the remote control.
Adjusting the Volume
Press “VOL + / VOL-” or “◄ / ►” on the remote control to adjust
the volume. When you adjust the volume, the volume scale is
displayed on the screen. Press “MUTE” button to toggle the
sound on and o.
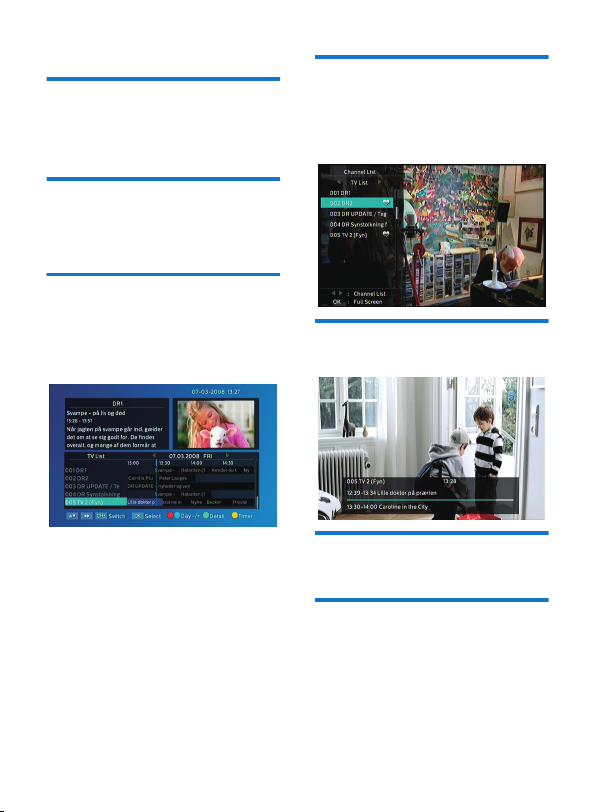
Accessing the Electronic Program
Guide (EPG)
Press “EPG” button to enter EPG menu.
1
Press “▲ / ▼” “◄ / ►” button to select channel or event.
2
Press “Red” or “Blue” button to switch day.
3
Press “Green” button to see program detail.
4
Press “Yellow” button to open timer setting page.
5
Favorites list
The favorite lists can be lled with the favorite channels.
which are chosen by users.
Press “OK” button and open the TV list.
1
Select a channel and press “Red” button to add it to the
2
favorite list.
While watching programs, press “FAV” button to open the
3
favorite list.
Program Information
Press the “INFO” button will activate the information about the
current and next programs.
TV/Radio mode
Press the “TV / RADIO” button to switch between radio mode
and TV mode.
Teletext Function
Many programs broadcast additional information and services.
Teletext pages are "electronic magazines", from which one can
get the latest news, sports results, weather forecasts,
commercial oers and much more information. The scope and
content is dened by the respective program provider. The
teletext function of the receiver is started with the “TEXT”
button.
13
Page 14
7 System Setup
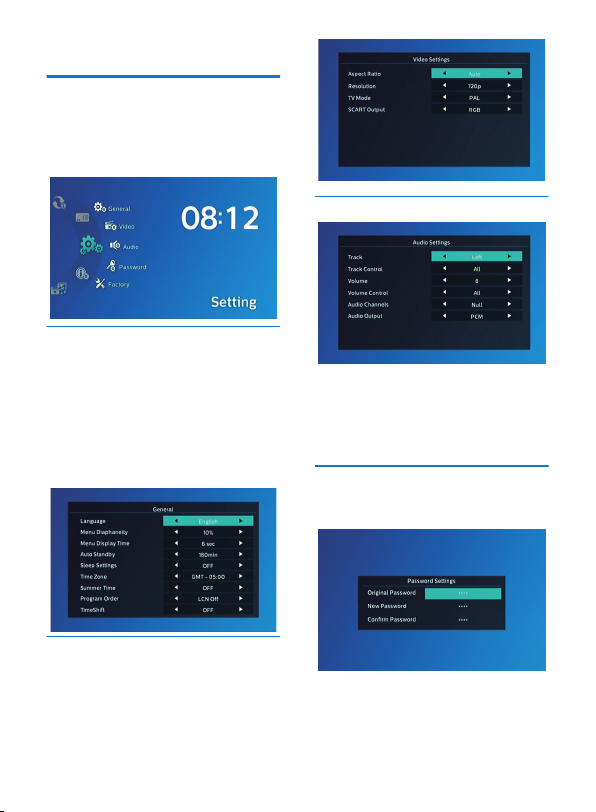
Setting Menu
Setting menu allows you to do the General Setting, Video
Setting, Audio Setting, Password Setting and Factory Setting.
Press the "MENU" button to enter main menu.
1
Press "▲" or "▼" button to highlight "Setting".
2
3
Press "
►" button to enter the Setting menu.
4
Press "▲" or "▼" cursor button to highlight the desired item
and press "OK" button to enter the sub-menu. Press "EXIT"
button to exit.
General Setting
This menu allows us to set the general function.
Language: Select the desired language for displaying on screen.
Menu Diaphaneity: 10%-90%. Adjust the diaphaneity to which
you want.
Menu Display Time: Set the display time of info bar.
Auto Standby: OFF/60min/120min/180min.
Sleep Settings:
OFF/15min/30min/45min/60min/75min/90min/105min/120min
Time Zone: Select the time zone.
Summer Time: Switch on/o summer time.
Program Order: Alphanumeric / LCN O / LCN
TimeShift: Auto/Pause/OFF
Audio Setting
This menu allows us to set audio parameters.
Track: Left/Right/Stereo.
Track Control: Independent/All
Volume: 0-32
Volume Control: Independent/All
Audio Channels: Watch audio channels.
Audio Output: PCM/RAW
Password Setting
This menu allows us to change the password of the receiver,
which is requested enabled Receiver lock or a youth-protective
barrier of the program. The default password is "0000".
Video Setting
This menu allows us to set Aspect ratio, Resolution, TV mode
and SCART Output.
Aspect Ratio: If you have a TV unit with a 16: 9 screen, select
the "16:9". For 4: 3 screens select the setting "4: 3". If you are
not sure, select “Auto”.
Resolution: e.g. 576i, 576p, 720p, 1080i, 1080p.You can
optimize the screen resolution on the HDMI output.
TV MODE : Here you can change the TV mode, like PAL, NTSC.
SCART Output: Here you can change the output mode, like
CVBS and RGB.
14
Page 15
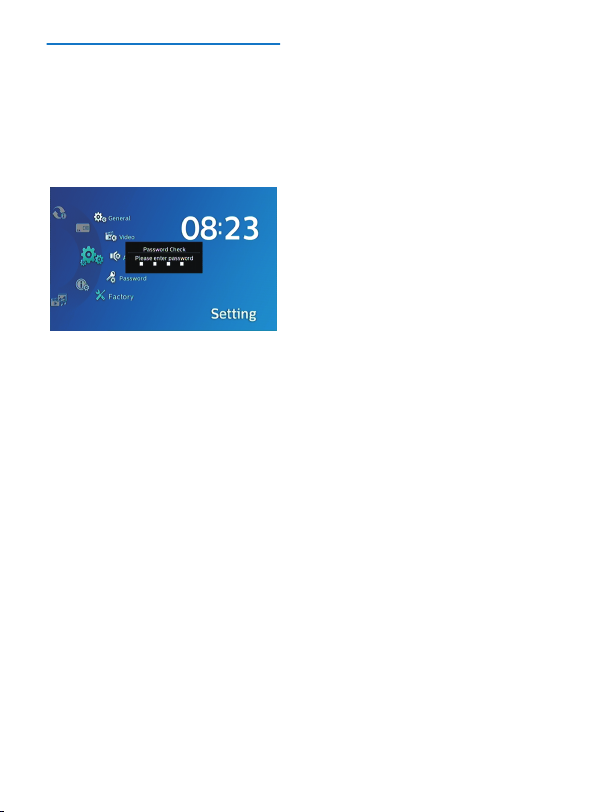
Factory Setting
This menu allows you to re-set the Set-top box back to factory
settings, clear all existing channels.
In the "Setting" menu, select "Factory", press "OK" button.
1
You are asked to input a password (the default password
is"0000").
A conrmation window is displayed.
2
Select "Yes" to return back to factory settings and clear all
channels.
Select "No" to cancel back to factory settings.
3
Press "EXIT" button to exit.
15
Page 16
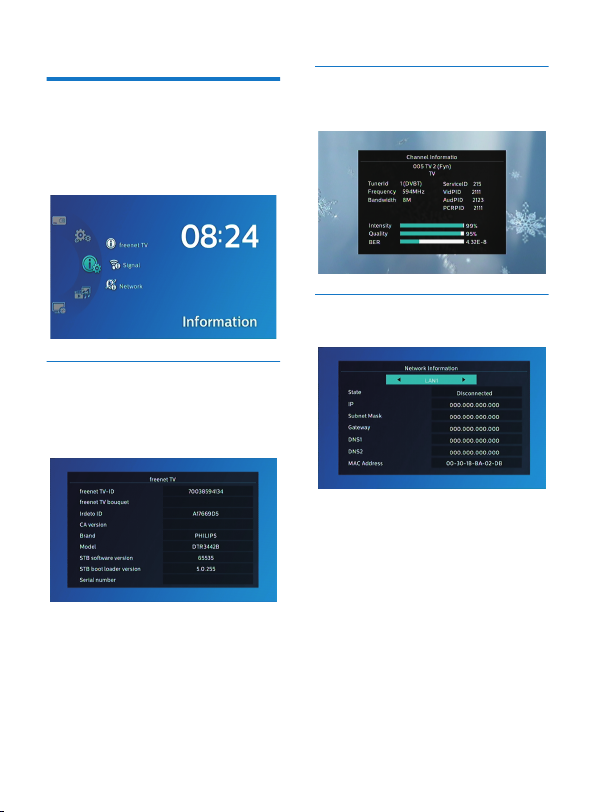
8 Information
In this menu, you can see the current information of this Set
Top Box, Signal information and Network Information.
Press the "MENU" button to enter main menu.
1
Press "▲" or "▼" button to highlight "Information", press "
2
button to enter the Information menu.
Press "▲" or "▼" cursor button to highlight the desired item
3
and press "OK" button to enter the sub-menu.
Press "EXIT" button to exit.
4
freenet TV
You will nd important information here, such as freenet TV-ID,
Irdeto ID, software version, etc.
In "Information" menu, select "freenet TV", press "OK" button
1
to open freenet TV page.
Press "EXIT" button to exit.
2
Signal
You can check the detailed information of the channel, like
frequency, intensity, quality, etc.
Another way to enter this page is by pressing “Info” button
twice while watching programs.
►"
Network
If the network connection is successful from here you can see
network information, such as ip address, subnet mask, gateway,
DNS, etc.
16
Page 17
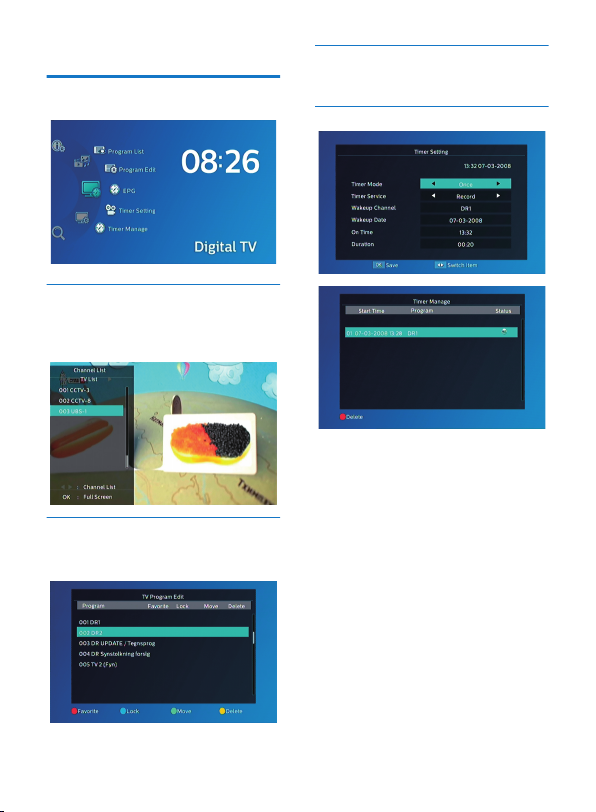
9 Digital TV
From “Digital TV” menu you can check the program list, edit the
programs, check EPG and activate timer function.
Program List
In the “Digital TV” menu, select "Program List", press "OK"
button to enter TV channel list menu. Press "▲" or "▼" button
to highlight channel, press the "OK" button to preview the
desired TV channel.
You can also get access to this list by pressing “OK” button
while watching program.
Program Edit
Enter “Program Edit” from “Digital TV” menu to edit TV
programs. In this menu, you can set favorites, move, lock or
delete channels. Highlight the desired channel and press
corresponding button to activate related function.
EPG
Please refer to “6 Basic Operation-Accessing the Electronic
Program Guide (EPG)”
Timer Setting & Timer Manage
You can set timer parameters in timer setting page.
Timer Mode: Once/Daily/Weekly/Monthly.
Timer Service: Select a wakeup mode. Record is for recording
after wakeup, Channel is for switching channels after wakeup.
Wakeup Channel & Wakeup Date: Select the wakeup channel
and wakeup date.
On time & Duration: Select wakeup time and duration.
Press “OK” button to enter and check the Timer Manage page.
17
Page 18
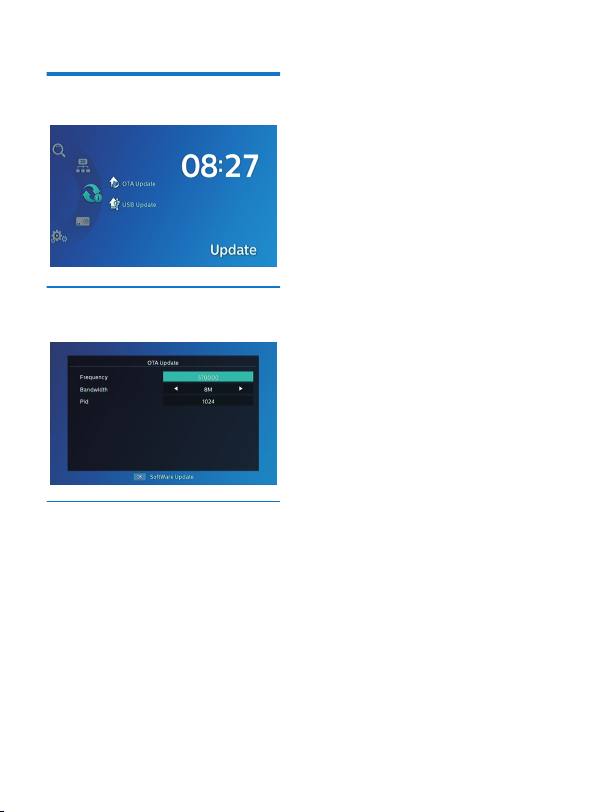
10 Update
We oer the functions for user to upgrade software version by
OTA or by USB.
OTA Update
Enter "Update" menu, select "OTA Update". Press "OK" button,
“OTA Update Setting” menu is shown. From here you can
search OTA stream manually.
USB Update
Insert the USB disk.
1
Enter "Update" menu, select "USB Update". Press "OK"
2
button, it will upgrade automatically.
18
Page 19
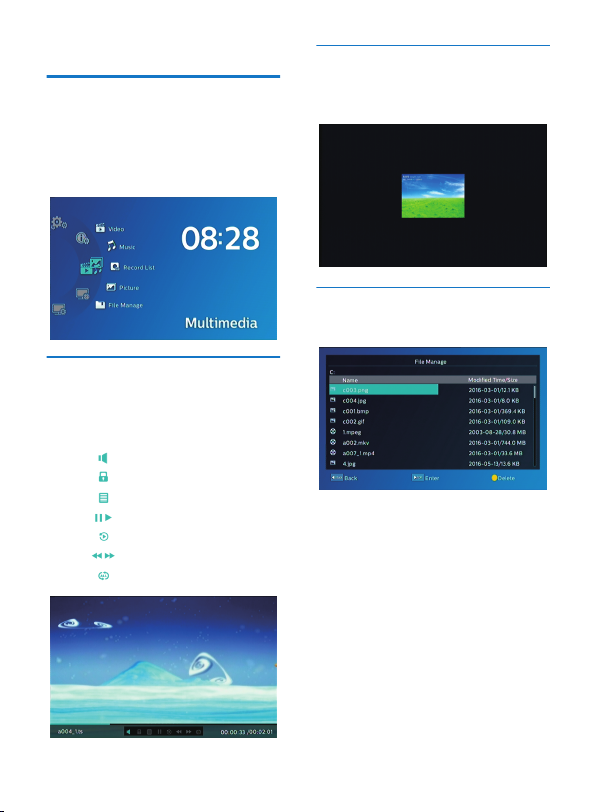
11 Multimedia
Multimedia menu allows you to play music, videos, pictures
and native recorded les from USB disk.
Press the "MENU" button to enter main menu.
1
Press "▲" or "▼" button to highlight "Multimedia".
2
press "
►" button to enter the Media Player menu.
Press "▲" or "▼" cursor button to highlight the desired item
3
and press "OK" button to enter the sub-menu.
Press "EXIT" button to exit.
4
Video/Music/Recording content Playing
This function allows you to play video/music/recording content
from USB disk.
1
In "Multimedia ", press " ►" button to select
"Video"/"Music"/"Record List", press "OK" button to enter the
sub-menu and the media player window will display.
Function keys introduction:
2
Adjust the volume
Lock/Unlock the progress bar.
Open the play list.
Pause/Play the video or music.
Select the time to start playing.
Forward/Rewind
Select the play mode.
Picture browsing
This function allows you to watch images from USB disk.
1
In "Multimedia ", press " ►"button to select "Picture”, press
"OK" button to enter the mode.
2
Press “
◄”/“ ►” button to browse the picture.
File Manage
The menu allows you to manage the les in the USB disk.
Select a le and press “OK” button to play or press “Yellow”
button to delete.
19
Page 20
12 Environment
Preservation of the environment is an essential concern of
Philips.
The desire of Philips is to operate systems observing the
environment and consequently it has decided to integrate
environmental performances in the life cycle of its products,
from manufacturing to commissioning, use and elimination.
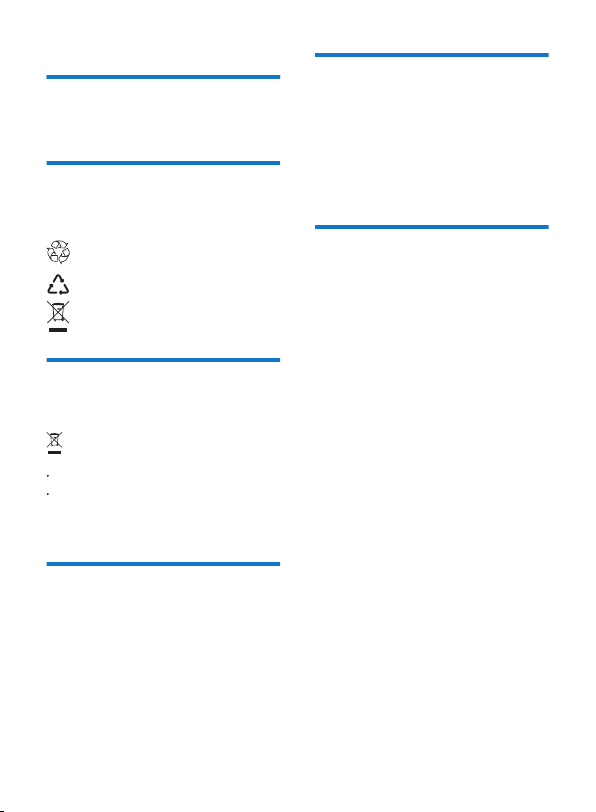
Meaning of logos present on the
product or its packaging
European regulations require packaging to be
recycled. It must not be discarded with unsorted
waste. There are local arrangements for sorting and
recycling this waste.
The looped arrow sign means that the packaging may
be recycled and must not be disposed of with
household waste.
The logo with three arrows shown on the plastic parts
means that they may be recycled and that they must
not be disposed of with household waste.
The crossed-out dustbin sign stuck on the product or
its accessories means that at the end of its life, the
product is subject to selective collection and must not
be thrown away in unsorted household waste.
Product recycling and disposal
To facilitate recycling, please respect the sorting rules set up
locally for this kind of waste.
If your product contains batteries, they must be disposed of at
appropriate collection points.
European regulations ask you to dispose of products
belonging to the family of electrical and electronic equipments
selectively:
At the collection points made available to you locally
(drop-o centre, selective collection, etc.),
At sales points in the event of the purchase of similar
equipment.
In this way you can participate in the re-use and upgrading of
Electrical and Electronic Equipment Waste, which can have an
eect on the environment and human health.
European Directive on Waste
Electricaland Electronic Equipment
(WEEE)
In the context of sustainable development, the reduction of
wastes to be eliminated by reusing, recycling, composting and
energy recovery is strongly advised.
In order to comply with this directive which is applicable to
EEEs sold after 13/08/2005, your receiver will be taken back
free of charge and recycled by the distributor of the EEE within
the limits of the quantity and types of equipment bought from
them. These appliances which contain substances potentially
dangerous to human health and the environment will be
recycled.
Directive on the Restriction of use
of certain hazardous substances in
electronic equipment (RoHS)
Your receiver along with the batteries supplied comply with
the directive relating to the RoHS – dangerous materials such
as lead, mercury or cadmium are not used. This avoids
environmental hazards and any risks to the health of personnel
at the recycling centres. The batteries of the remote control can
be removed simply.
Note: When the batteries of the remote control are worn out,
please dispose of them at a collection point and not with
household waste.
Electrical consumption of the
receiver
To reduce the consumption of your receiver, you are
recommended to place it in standby mode when not in use.
We recommend that you turn o the receiver or unplug it from
the mains if you will not be using it for a prolonged period of
time.
20
Page 21
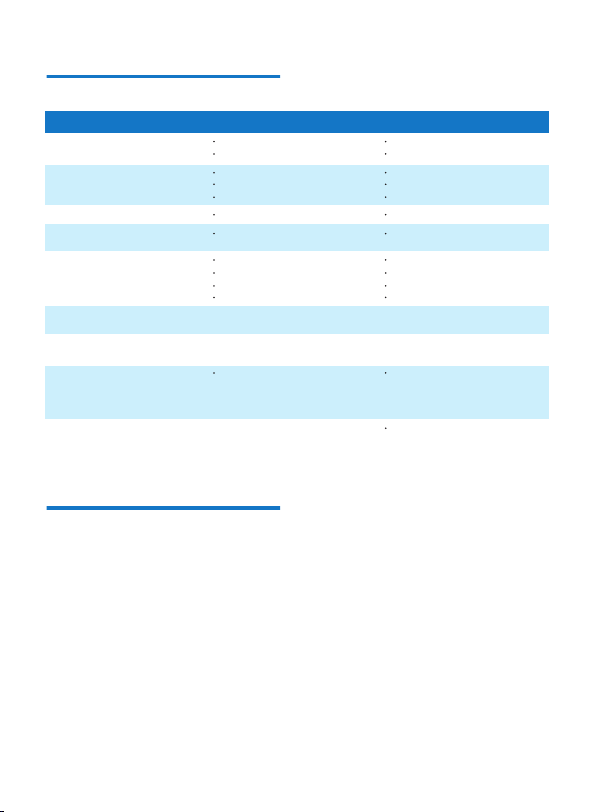
13 Troubleshooting
Using the Set-top box
Problem Solution What to do
Standby light not lit
No signal found
No picture or sound
Scrambled channel
message
No response to remote
control
Forgotten channel lock
code
Forgotten menu lock
code
After moving the Set-top box to
another room you nd you
are no longer able to
receive digital reception
For any other problem
Mains lead unplugged
Aerial is disconnected
Aerial is damaged/misaligned
Out of digital signal area
Scart/AV is not selected on your TV
Channel is scrambled
Set-top box power o
Remote not aimed correctly
Front panel obstructed
Remote batteries exhausted
The aerial feed from new point
may come through a distribution
system which may reduce the
digital signal now received by the
box.
Updating the Software
The Set-top box automatically downloads ’over the air’ new
software and services when they become available.
You can also upgrade your Set-top box using a USB stick.
Please check www.philips.com to nd more information and
the most recent software version for your product.
Check mains lead
Check aerial lead
Check aerial
Check with dealer
Reduce to another channel
Select the right input on your TV
Plug the power cord into the wall socket
Aim handset at front panel
Check for obstructions
Replace batteries
Re-install channels to cancel
channel lock
disable the code by "reset to factory
setting"
Try a direct feed from the antenna
Perform a default factory reset
(see Factory Setting)
21
Page 22

14 Customer Support
At Philips we believe that a high quality product should come
with the highest quality customer service.
In the design of this product we have taken great care to ensure
the maximum quality possible and are sure that you will be
delighted with your purchase.
However, in the rare event that you have any problems with the
product and need advice or support you can be condent that
wewill do our best to help you.
Our dedicated technical helpdesk can be contacted from 09:00
–18:00, Monday to Friday and will oer expert guidance on
your product.
22
Page 23
Page 24

Philips and the Philips Shield Emblem are registered trademarks of Koninklijke Philips N.V. used under license.
This product was brought to the market by X-GEM SAS, further referred to in this document as X-GEM SAS, and is the manufacturer of the product.
2016 © X-GEM SAS.
All rights reserved
Headquarters: X-GEM SAS
9 rue de la Négresse
64200 Biarritz – FRANCE
Tel : +33 (0)5 59 41 53 10 Fax : + 33 (0)5 59 41 53 09
253663894
 Loading...