

Page 1
IEL
p qi.z
Manuale d’’’uuutttiiillliiizzzzzzooo
Page 2

Page 3

Italiano
NOTA
: A causa di aggiornamenti o errori, il contenuto di questo manuale potrebbe non corrispondere esattamente al prodotto reale.
Gentile Cliente,
Vi ringraziamo per aver scelto il ricevitore digitale terrestre e smart-box IP modello Philips DTR3030M.
In questa guida sono fornite informazioni sull’utilizzo del dispositivo, sulle connessioni, sui comandi e sulla cura
dell’apparecchio, con le quali potrete approfondire la conoscenza del vostro nuovo ricevitore.
Per rendere la consultazione più semplice, il manuale è stato diviso in più sezioni:
1. La prima è relativa all’installazione, alle connessioni del ricevitore con altri apparati e alle funzioni del telecomando.
2. La seconda si occupa dell’utilizzo semplificato, dove sono fornite le informazioni principali necessarie all’uso
quotidiano.
3. La terza sezione è dedicata all’utilizzo avanzato, alle personalizzazioni ed alle caratteristiche più complesse.
AVVERTENZA
L’utilizzo del ricevitore, seppur semplice, richiede la conoscenza delle informazioni di base contenute in questa guida. Si
consiglia quindi un’attenta lettura del manuale. In questo modo, sarà possibile utilizzare il dispositivo in modo ottimale,
senza incorrere in problemi o malfunzionamenti.
www.philips.com/welcome
RRReeegggiiissstttrrraaa iiilll tttuuuooo sssooosssttteeegggnnnooo gggeeettt ppprrrooodddooottttttooo aaallllll’’’iiinnndddiiirrriiizzzzzzooo
Page 4

Indice
1 Sezione Installazione ......................................................................................................................................................... 1
1.1 Norme di sicurezza e smaltimento ....................................................................................................................... 1
1.2 Descrizione del prodotto e collegamenti . ............................................................................................................. 2
1.2.1 Pannello frontale ......................................................................................................................................... 2
1.2.2 Pannello posteriore e connessioni . ............................................................................................................ 3
1.2.3 Connessione di un adattatore Wi-Fi (opzionale) ......................................................................................... 4
1.3 Telecomando.......................................................................................................................................................... 5
1.3.1 Batterie ........................................................................................................................................................ 5
1.3.2 Tasti e funzioni del telecomando . ............................................................................................................... 5
1.3.3 Programmazione del tasto TV . .................................................................................................................... 6
1.3.3.1 Cambio codice TV . .................................................................................................................................... 6
1.3.3.2 Ricerca manuale del codice TV . .............................................................................................................. 6
1.3.3.3 Identificazione del codice TV in uso. ........................................................................................................ 6
1.3.3.4 Programmazione tramite apprendimento . ............................................................................................. 6
1.3.3.5 Ripristino dei valori di fabbrica del telecomando (reset) ........................................................................ 7
1.3.4 Utilizzo del telecomando ............................................................................................................................. 7
1.4 Prima Installazione del ricevitore . ........................................................................................................................ 8
2 Sezione per l’utilizzo semplificato ..................................................................................................................................... 9
2.1 Banner informativo dei canali ............................................................................................................................... 9
2.2 Selezione rapida dei canali TV/Radio . ................................................................................................................... 9
2.3 Guida Elettronica ai Programmi (EPG) . .............................................................................................................. 10
2.4 Opzione Audio ...................................................................................................................................................... 10
2.5 Funzione Televideo .............................................................................................................................................. 10
2.6 Funzioni USB ........................................................................................................................................................ 10
2.6.1 Utilizzo e avvertenze .................................................................................................................................. 11
2.6.1.1 Connessione e formattazione disco . ..................................................................................................... 11
2.6.1.2 Rimozione disco ..................................................................................................................................... 11
2.6.2 Registrazione Video Personale (PVR) . ...................................................................................................... 11
2.6.2.1 Registrazione Programmi TV . ............................................................................................................... 11
2.6.2.2 Riproduzione dei contenuti registrati . .................................................................................................. 12
2.6.3 Lettore Multimendiale USB . ...................................................................................................................... 12
2.7 Funzioni di rete .................................................................................................................................................... 13
2.7.1 Portale delle Applicazioni .......................................................................................................................... 13
2.7.2 Lettore Multimediale DLNA ...................................................................................................................... 14
3 Sezione per l’utilizzo avanzato......................................................................................................................................... 15
3.1 Menu Installazione ............................................................................................................................................... 15
3.1.1 Menu Ricerca Canali . ................................................................................................................................. 16
3.1.1.1 Ricerca Automatica ................................................................................................................................ 16
3.1.1.2 Ricerca Manuale .................................................................................................................................... 16
3.1.2 Reset Ricevitore . ........................................................................................................................................ 16
3.2 Menu Gestione Canali . ......................................................................................................................................... 16
3.2.1 Gestione Canali . ......................................................................................................................................... 17
3.2.2 Guida Elettronica ai Programmi - EPG . .................................................................................................... 17
3.3 Menu Multimediale . ............................................................................................................................................. 17
3.3.1 Audio / Video / Immagini ........................................................................................................................... 18
3.3.2 Lista Registrazioni . .................................................................................................................................... 18
3.3.3 DLNA .......................................................................................................................................................... 18
3.4 Menu Applicazioni . ............................................................................................................................................... 18
3.5 Menu Servizi Pay per View. .................................................................................................................................. 18
3.6 Menu Impostazioni ............................................................................................................................................... 18
3.6.1 Configurazione Ricevitore ......................................................................................................................... 18
3.6.1.1 Lingua ..................................................................................................................................................... 18
3.6.1.2 Impostazioni AV ...................................................................................................................................... 19
3.6.1.3 Impostazioni Orario . ............................................................................................................................... 19
3.6.1.4 Controllo Parentale ............................................................................................................................... 20
3.6.1.5 Gestione Energia .................................................................................................................................... 20
3.6.2 Pianifica Attività ......................................................................................................................................... 21
3.6.2.1 Aggiornamento Software . ...................................................................................................................... 21
Page 5

Italiano
3.6.2.2 Aggiornamento Canali ........................................................................................................................... 22
3.6.2.3 Impostazione Timer ............................................................................................................................... 22
3.6.3 Impostazioni Rete ...................................................................................................................................... 23
3.6.4 Informazioni ............................................................................................................................................... 23
4 Mappa dei menu ............................................................................................................................................................... 24
5 Guida alla risoluzione dei problemi . ................................................................................................................................ 25
6 Caratteristiche tecniche .................................................................................................................................................. 26
Appendice A. Codici TV .................................................................................................................................................... i
Page 6

Page 7
Italiano
Philips DTR3030M
1
1 Sezione Installazione
1.1 Norme di sicurezza e smaltimento
Per un utilizzo sicuro dell’apparecchio, e per la vostra incolumità, vi invitiamo a leggere attentamente i seguenti consigli
riguardanti le misure di sicurezza.
ALIMENTAZIONE
x Utilizzare solo l’alimentatore in dotazione. Il ricevitore deve essere collegato esclusivamente ad una presa di
corrente da 230V~ 50Hz.
x Non rimuovere il coperchio del ricevitore. All’interno dell’apparecchio possono essere presenti alte tensioni che
potrebbero mettere a repentaglio la sicurezza dell’utente. L’alta tensione è presente anche quando l’apparecchio
è in modalità standby,pertanto prima di intervenire sul ricevitore è necessario scollegarlo dalla rete elettrica. La
rimozione non autorizzata farà decadere immediatamente la garanzia!
CAVO DI ALIMENTAZIONE
x Prima di installare il prodotto, controllare l’integrità del cavo di alimentazione dell’alimentatore, prestando
particolare attenzione al punto in cui entra nella presa di rete e a quello in cui esce dal ricevitore. In caso il cavo
risultasse danneggiato, non collegare l’apparecchio e rivolgersi al centro assistenza.
x Installare il cavo di alimentazione dell’apparecchio in modo da non causarne lo schiacciamento con oggetti collocati
sopra o accanto ad esso. Evitare inoltre di posizionarlo vicino a zone di passaggio dove possa essere
accidentalmente calpestato, strappato o comunque danneggiato.
x In caso di danneggiamento del cavo, scollegare con attenzione il dispositivo dalla presa di alimentazione e rivolgersi
esclusivamente a personale specializzato o al centro assistenza per la sostituzione.
LIQUIDI
x Tenere il ricevitore lontano da qualsiasi tipo di liquido. Non collocare sul prodotto oggetti contenenti liquidi come
vasi, umidificatori ecc. L’apparecchio non deve essere installato in luoghi in cui possa venire a contatto con spruzzi o
schizzi di liquidi o in ambienti con alto tasso di umidità dove possano formarsi condense.
x Nel caso in cui il ricevitore venga accidentalmente in contatto con liquidi, togliere immediatamente la spina dalla
presa di corrente. NON TOCCARE il ricevitore con le mani prima che sia stato scollegato.
PICCOLI OGGETTI
x Tenere lontano dal ricevitore spilli o altri piccoli oggetti. La caduta di oggetti all’interno del dispositivo, attraverso le
fessure per la ventilazione, può causare seri danni.
PULIZIA
x Prima di procedere ad operazioni di pulizia, staccate il ricevitore dalla presa di corrente.
x Per pulire l’esterno del ricevitore, usare un panno morbido e asciutto o leggermente inumidito d’acqua. Evitare l’uso
di prodotti chimici o solventi.
VENTILAZIONE
x Assicurarsi che nel luogo di installazione dell’apparecchio ci sia una buona circolazione d’aria per consentire
una sufficiente dissipazione del calore ed evitare surriscaldamenti.
x Per consentire una ventilazione adeguata, è opportuno predisporre una distanza minima di 10 cm da entrambi i lati
ed una distanza di 15 cm sopra l’apparecchio.
x Le fessure per la ventilazione devono essere libere, non ostruite dalla presenza di oggetti tipo giornali,
tovaglie, stoffe da arredamento, tendine, tappeti ecc.
x Evitate di installare il ricevitore vicino a fonti di calore (termosifoni, stufe, ecc) o sopra ad altre apparecchiature che
producono calore (amplificatori, videoregistratori, ecc).
ATTENZIONE!
x Tenere il prodotto fuori dalla portata dei bambini.
x I sacchetti di plastica degli imballaggi possono essere pericolosi. Per evitare soffocamenti, tenere i sacchetti
lontani dalla portata dei bambini.
x Non esporre il ricevitore o il telecomando alla luce diretta del sole.
x L’apparecchio deve essere posto su una base solida e sicura.
x Collegare il dispositivo alla presa di corrente solo dopo aver completato l’installazione.
SMALTIMENTO
x Il simbolo del bidoncino sbarrato indica che è vietato disperdere questo prodotto nell’ ambiente o
gettarlo nei comuni rifiuti urbani misti. Chi non rispetta tale regola è sanzionabile secondo legislazione
vigente.
x Un corretto smaltimento dell’apparecchio consente di evitare potenziali danni all’ambiente e alla salute
umana, nonché di facilitare il riciclaggio dei componenti e dei materiali contenuti in esso, con un
conseguente risparmio di energia e risorse.
Page 8
Philips DTR3030M
2
x Il produttore istituisce un sistema di recupero dei Rifiuti da Apparecchiature Elettriche ed Elettroniche (RAEE) del
prodotto oggetto di raccolta separata e sistemi di trattamento, avvalendosi di impianti conformi alle disposizioni
vigenti in materia.
x Portare il prodotto non più utilizzabile (ed eventuali suoi accessori, ivi comprese le batterie) presso un centro di
raccolta autorizzato a gestire rifiuti di apparecchiature elettriche ed elettroniche. In alternativa, è possibile
riconsegnare al rivenditore l’apparecchiatura usata o a fine vita, all’atto dell’acquisto di una nuova di tipo
equivalente oppure a titolo gratuito in caso di apparecchi ad uso domestico di dimensioni esterne inferiori a 25 cm.
1.2 Descrizione del prodotto e collegamenti
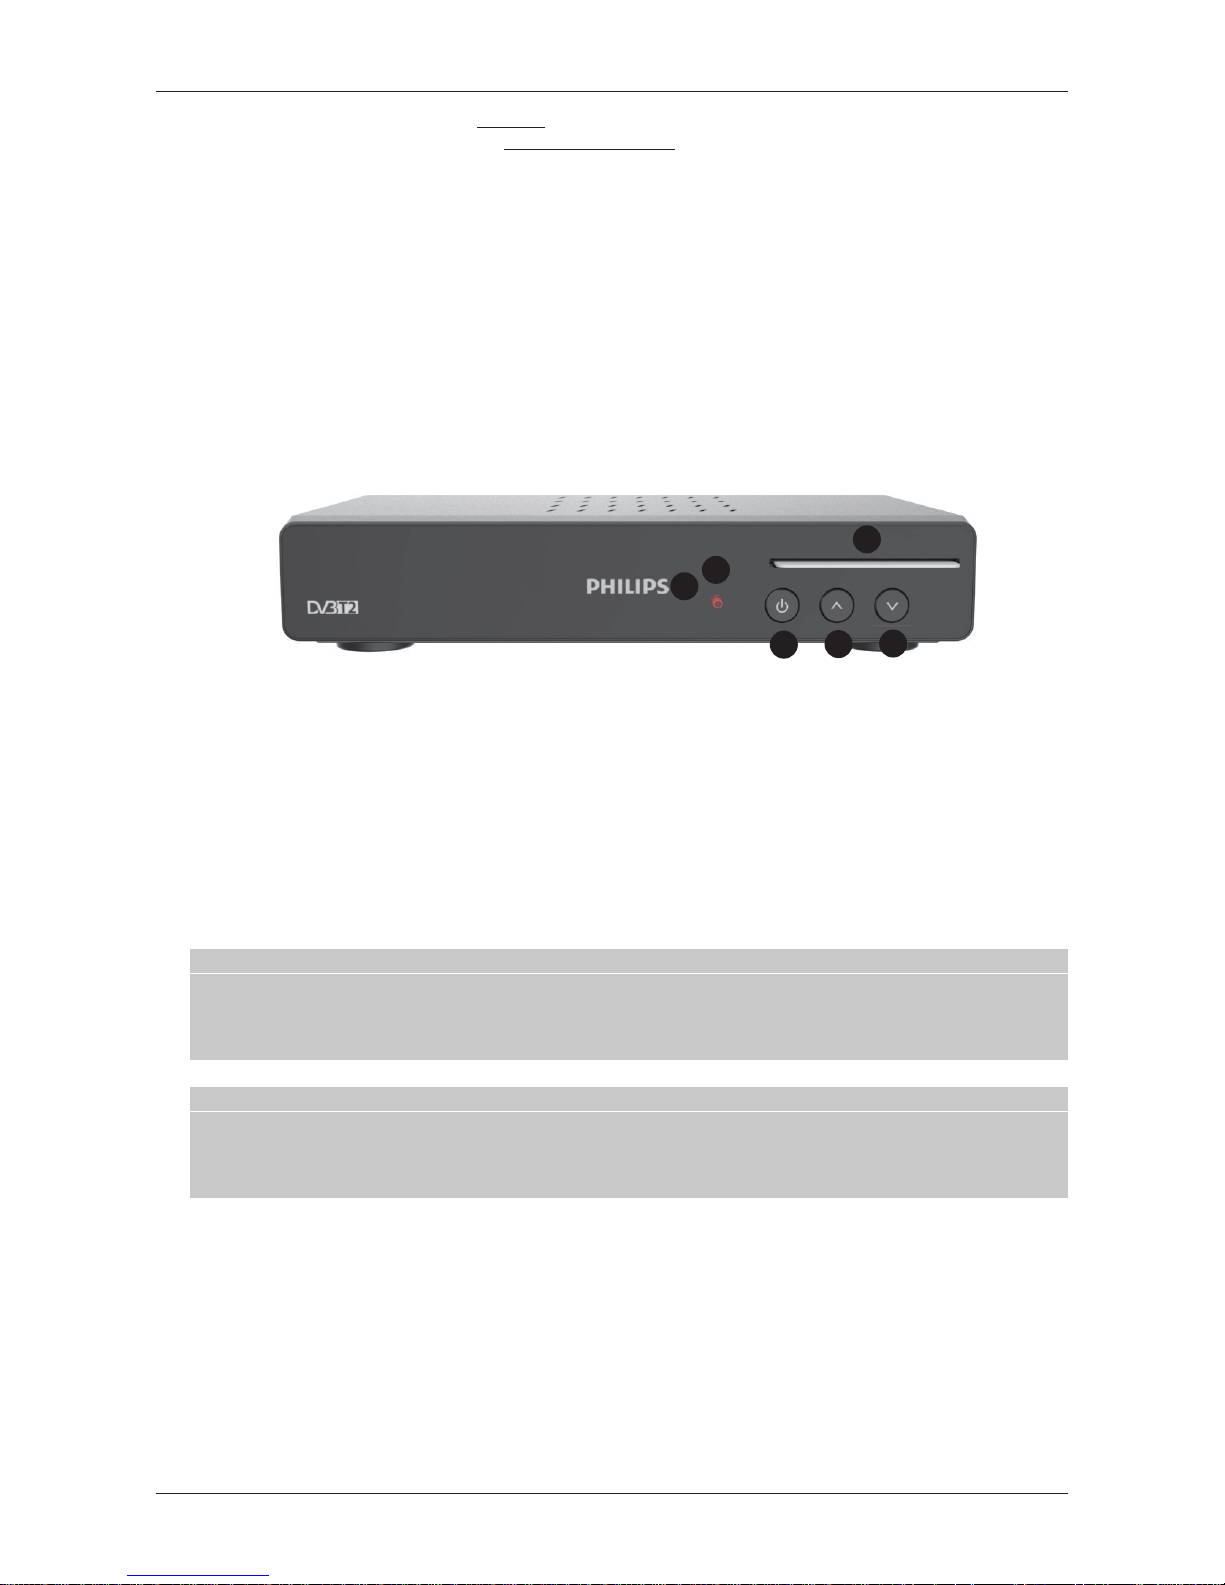
1.2.1 Pannello frontale
1.
IR
Sensore a raggi infrarossi per telecomando.
2.
LED
Indicatore a LED di stato standby (rosso), acceso (verde).
3.
Lettore smart-card
Alloggiamento per scheda Mediaset Premium (opzionale).
AVVERTENZE
x Compatibile con smart-card Mediaset Premium.
x La scheda va inserita con il
Chip
rivolto verso il basso.
x Per l’utilizzo dei servizi a pagamento Mediaset Premium e la gestione della relativa smart-card, riferirsi al
manuale d’uso fornito insieme alla stessa scheda.
4. q Tasto accensione e spegnimento in standby.
NOTA
Quando la funzione di risparmio energetico è attiva, il tempo di reazione all’accensione dallo standby profondo è
piùlungo poichècorrisponde
ad un completo avvio del sistema (par. 3.6.1.5). Per ottenere sempre una rapida
accensione, è necessario disabilitare il
Risparmio Energetico
dal menu I
Impostazioni
> C
Configurazioni Ricevitore
> G
Gestione Energia
.
5. Ÿ Tasto cambio canale successivo.
6. ź Tasto cambio canale precedente.
4
1
2
3
5
6
Page 9
Italiano
Philips DTR3030M
3
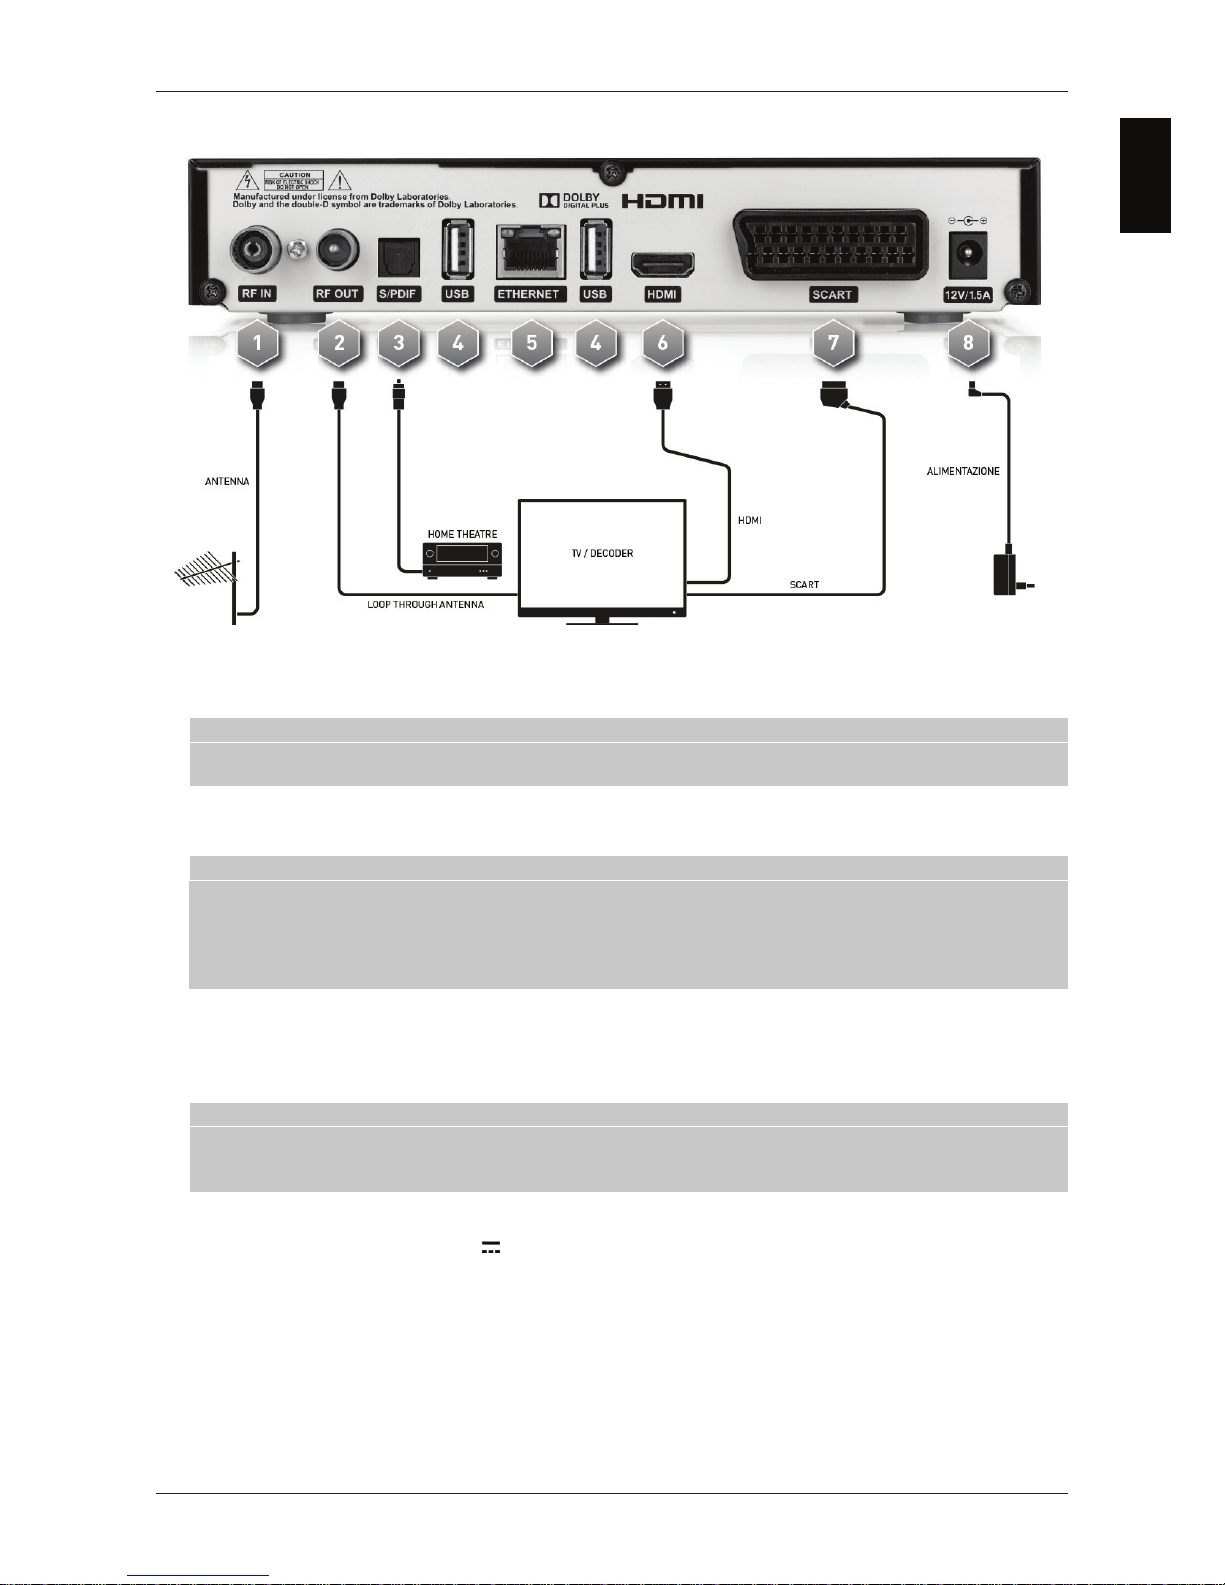
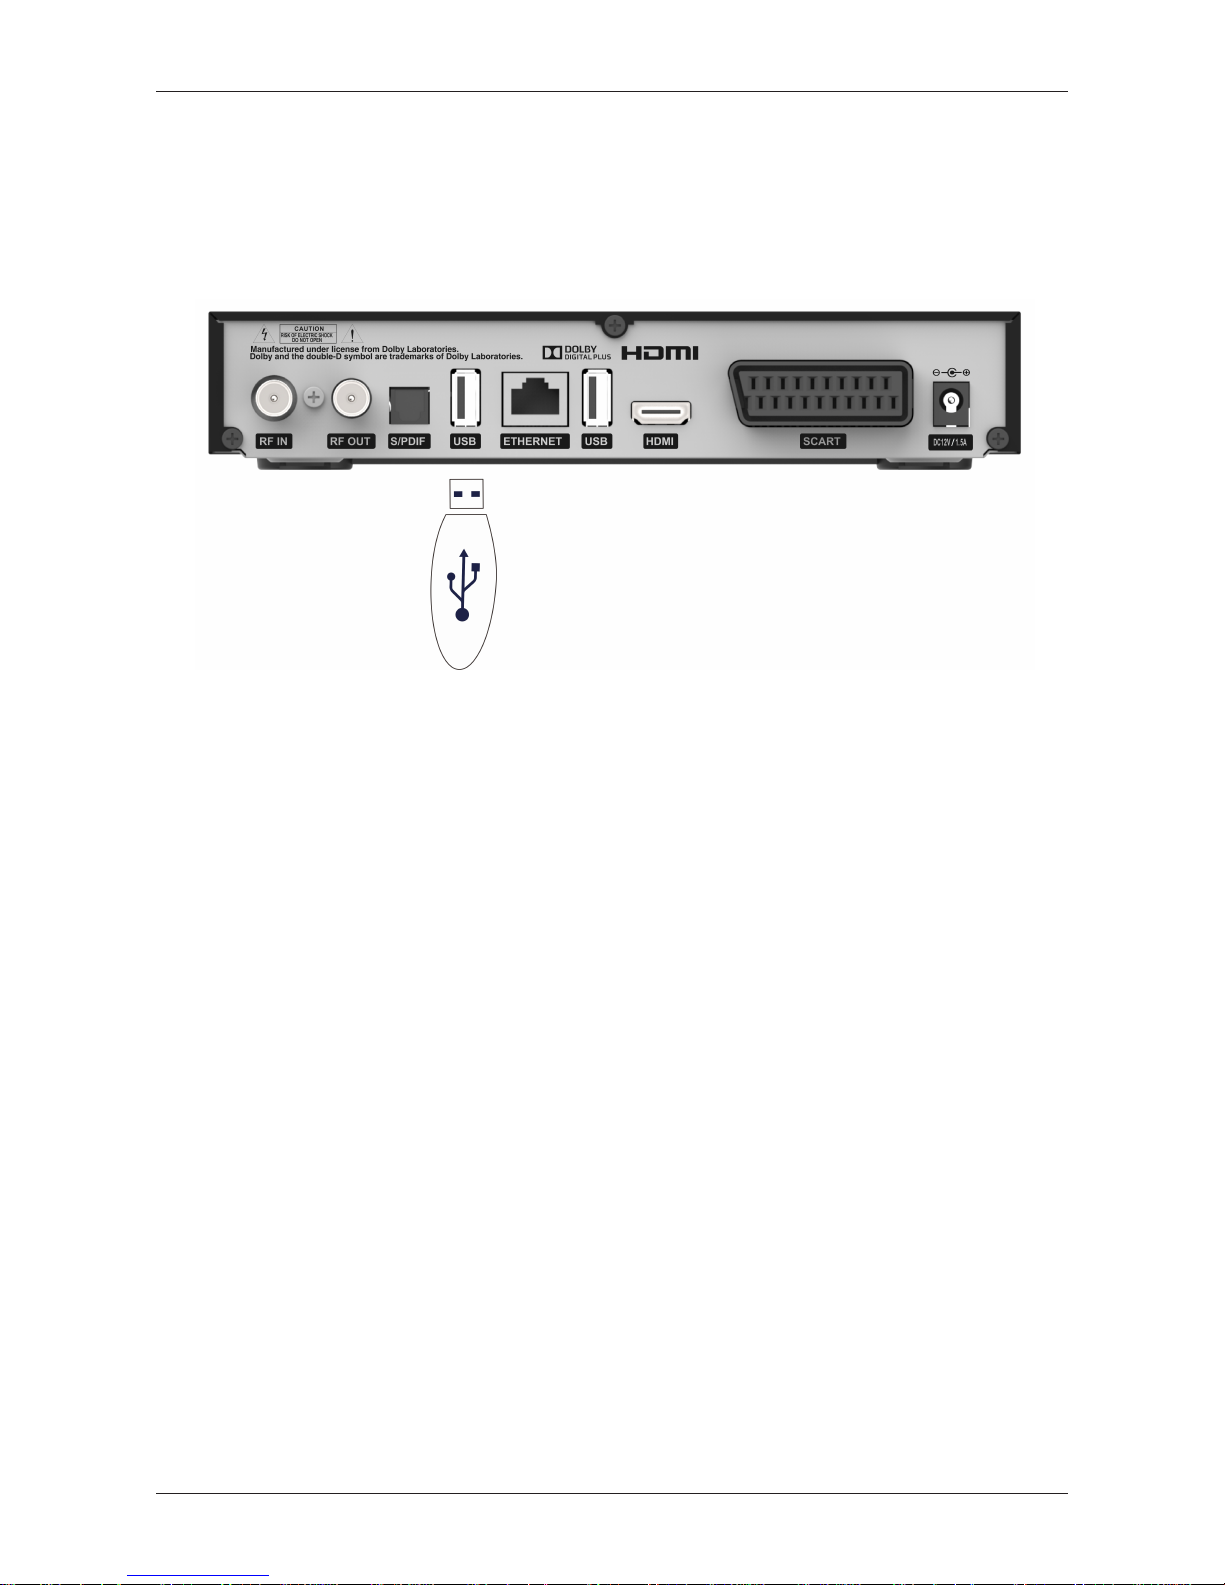
1.2.2 Pannello posteriore e connessioni
1.
RF IN
Ingresso segnale antenna.
2.
RF OUT
Uscita passante segnale antenna per il collegamento di un dispositivo dotato di sintonizzatore TV digitale
terrestre (opzionale).
AVVERTENZA
Quando il ricevitore si trova nello stato di risparmio energetico in standby (par. 3.6.1.5), l’uscita passante antenna
non è attiva.
3.
S/PDIF
Uscita audio digitale ottica per amplificatori audio multicanale Home-Theater (opzionale).
4.
USB
Connettori USB per lettura contenuti multimediali personali (video, immagini, musica) e videoregistrazione da
sintonizzatore digitale terrestre integrato ove consentito dalla trasmissione.
AVVERTENZE
x Compatibile con dispositivi di memoria USB formattati con file system di tipo FAT16, FAT32 e NTFS.
x Non può essere garantita la compatibilità con tutti i dispositivi di memoria USB presenti sul mercato.
x Si consiglia di utilizzare Hard Disk USB con alimentatore esterno, in quanto il ricevitore non può garantire la
corretta alimentazione tramite la porta USB. Questo accorgimento permetterà di evitare un eventuale
danneggiamento del dispositivo di memoria.
5.
ETHERNET
Interfaccia Ethernet da connettere al proprio modem/router per la connessione dati internet a
banda larga,nonché ai file multimediali condivisi in rete locale. Vedi anche par.
1.2.3
6.
HDMI
Uscita audio-video digitale HDMI per l’alta definizione, dedicata al collegamento di uno schermo provvisto di
interfaccia HDMI compatibile con protezione HDCP.
NOTA
Se lo schermo connesso al ricevitore tramite interfaccia HDMI presenta difficoltà di visualizzazione, collegare prima
il ricevitore tramite SCART e regolare la
Risoluzione
video dal menu I
Impostazioni
> C
Configurazioni Ricevitore
>
Impostazioni A/V
dello stesso ricevitore, rispettando le caratteristiche dello schermo collegato.
7.
SCART
Uscita audio-video analogica SCART a risoluzione standard per il collegamento ad uno schermo/TV,
alternativa all’uscita HDMI.
8.
12V/1.5A
Ingresso alimentazione 12V 1.5A, per il collegamento dell’alimentatore in dotazione che a sua volta va
collegato ad una presa di corrente da 230V~ 50Hz.
Page 10
4
1.2.3 Connessione di un adattatore Wi-Fi (opzionale)
Con l’uso di un adattatore WiFi (opzionale), è possibile collegare un router wireless anche se il ricevitore e il router
sono distanti tra loro, evitando così l’uso di un cavo di rete lungo.
Configurare e collegare la rete WiFi seguendo le istruzioni contenute nel questo manuale dell’uso dell’adattatore WiFi. Quindi collegare adattatore e ricevitore presa USB, come mostrato nella immagine.
Philips DTR3030M
Page 11
Italiano
Philips DTR3030M
5
1.3 Telecomando
La conoscenza del telecomando costituisce la base per l’utilizzo del ricevitore e per una facile navigazione tra le varie
funzioni e i menu.
1.3.1 Batterie
Informazioni ed avvertenze
Sostituire o inserire le batterie al primo utilizzo del prodotto o quando il telecomando non risponde più propriamente alla
pressione dei tasti. Batterie compatibili: 2 x AAA, 1.5V.
Per evitare che la perdita di liquido corrosivo danneggi il telecomando, si consiglia di togliere le pile quando il dispositivo
non viene usato per un lungo periodo.
Evitare l’utilizzo di differenti tipi di batterie o batterie scariche e nuove contemporaneamente.
Inserimento e rimozione
Una volta aperto lo sportellino delle batterie posto sul retro del telecomando, inserite le 2 batterie (formato AAA)
rispettando le corrette polarità come indicato all’interno del vano. Chiudere quindi lo sportellino.
Rimuovere le batterie esaurite, che dovranno essere smaltite separatamente dai rifiuti domestici portandole ad un
qualsiasi punto vendita o di raccolta, ripetendo operazioni analoghe a quelle dell’inserimento.
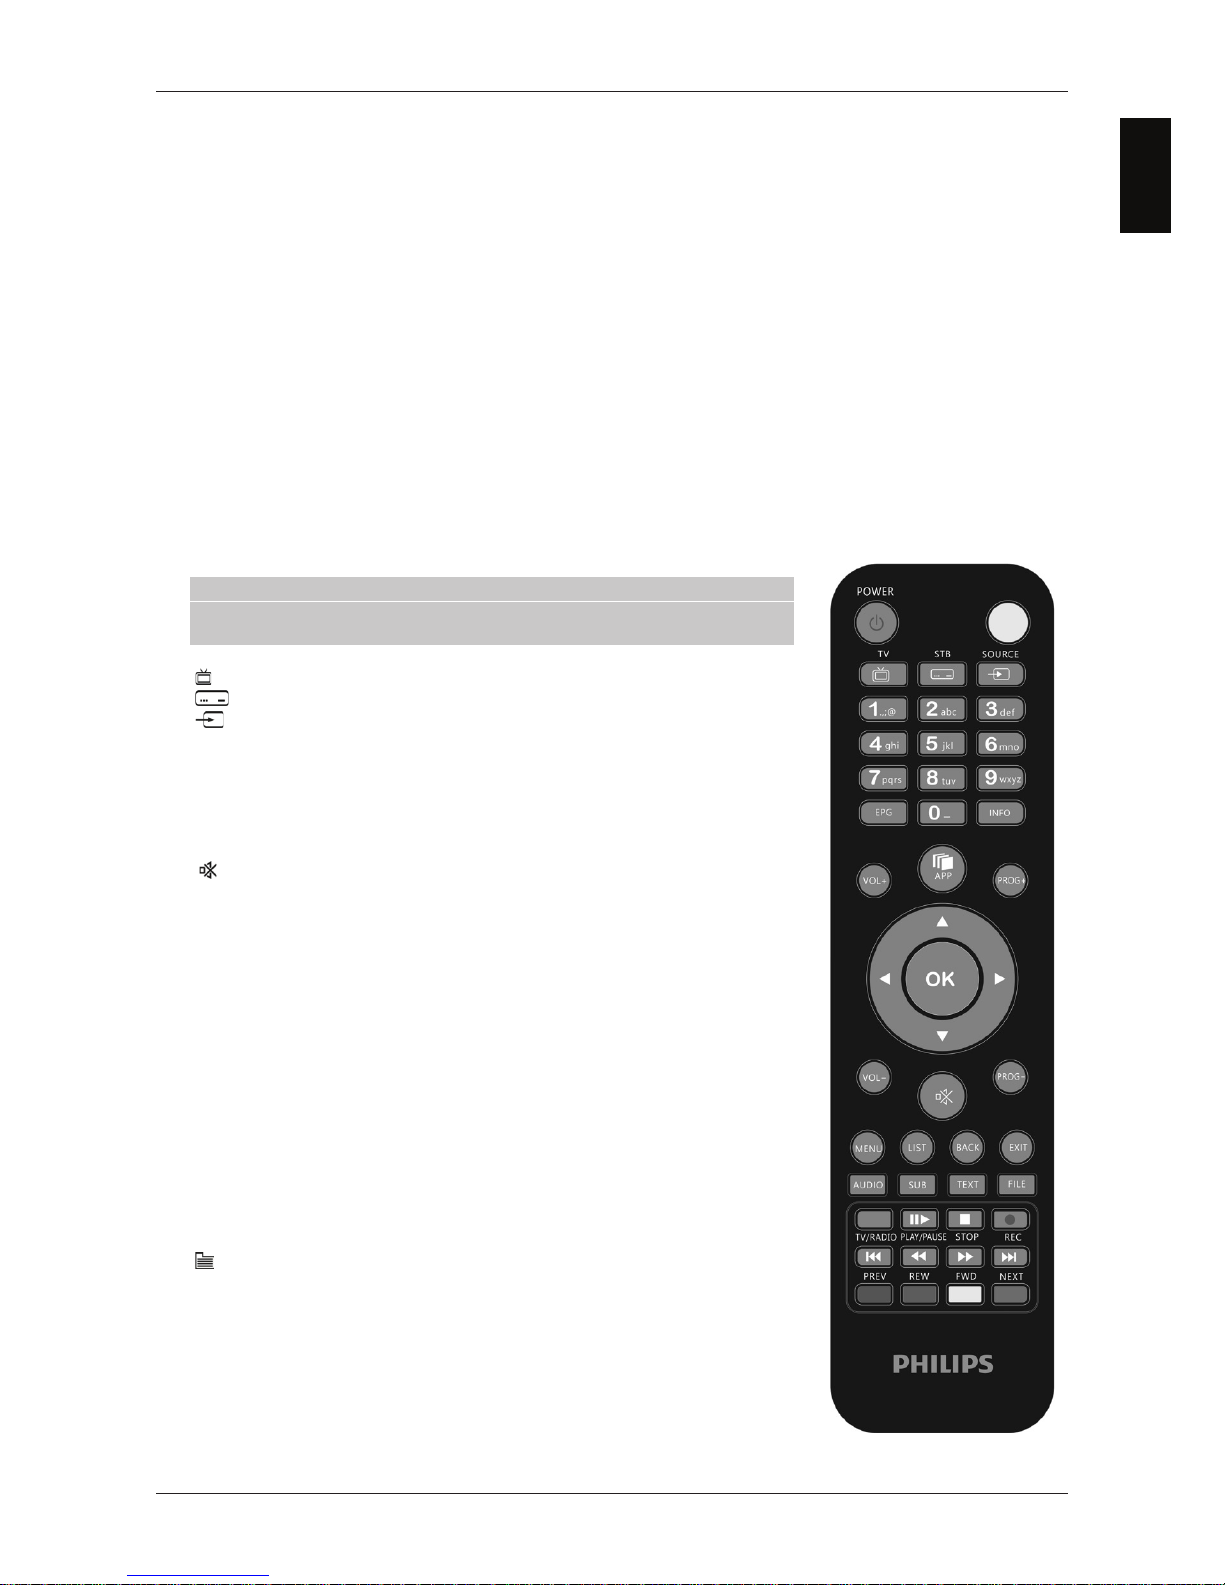
1.3.2 Tasti e funzioni del telecomando
1. q (On/Standby) Accensione o spegnimento in stand-by del ricevitore.
NOTA
Per ottenere sempre una rapida accensione dallo stato di standby, è necessario
disabilitare il
Risparmio Energetico
(vedi par. 3.6.1.5).
2.
LED
Indicatore a LED di funzionamento telecomando.
3. TTV Abilitazione comando televisore.
(*)
4. S
STB
Abilitazione comando decoder (Set Top Box - STB).
5. S
SOURCE
Selezione sorgente audio-video del televisore.
(*)
6.
0÷9
(Tasti alfanumerici) Cambio canale o inserimento valori alfanumerici nei
menu e eventuali applicazioni.
7.
EPG
Guida Elettronica ai Programmi (Electronic Program Guide - EPG).
(**)
8.
INFO
Visualizza a schermo informazioni sul canale sintonizzato.
(**)
9.
VOL+/-
Regolazione livello volume audio.
10.
APP
Accesso al portale delle applicazioni on-line.
11. (MUTE) Audio muto.
12.
PROG+/-
Cambio canale successivo/precedente o scorrimento rapido di una
lista.
13.
MENU
Menu principale.
14.
LIST
Accede alla lista di tutti i canali TV/Radio o di quelli Favoriti.
15.
BACK
Torna alla schermata precedente oppure cancella un carattere digitato
in un campo di immissione testo.
16.
EXIT
Esce da menu, EPG o da altre informazioni visualizzate a schermo.
17. , , , (Frecce del cursore) Navigazione nel menu, nell’EPG e nelle
applicazioni.
18. OK Tasto di conferma azioni/modifiche.
19.
ROSSO
, V
VERDE
, G
GIALLO
, B
BLU
(tasti colorati) Prestano servizio nel menu e
nelle applicazioni per azionare specifiche funzioni.
20.
AUDIO
Seleziona le tracce audio disponibili dei canali TV.
(**)
21.
SUB
Attiva/disattiva sottotitoli dei canali TV.
(**)
22.
TEXT
Accende/spegne il Televideo o attivazione la tastiera virtuale a schermo
in corrispondenza di alcuni campi di inserimento testo.
(**)
23.
TV/RAD
Cambio tra programmi TV e radio.
(**)
24. FILE, 2d PLAY/PAUSE, 3 STOP, 4 REC, 7 PREV, 5 REW, 6 FWD, 8 NEXT
Tasti funzione per videoregistratore (Personal Video Recorder - PVR) e Media
Player.
(*)
Al fine di poter comandare il televisore, il tasto TV deve essere
opportunamente programmato come descritto in questo manuale (par. 1.3.3).
(**)
Le informazioni sui programmi, i sottotitoli, il televideo e le tracce audio
supplementari sono forniti dall’emittente televisiva del canale sintonizzato; tali dati
potrebbero essere incompleti o assenti.
Page 12

6
1.3.3 Programmazione del tasto TV
1.3.3.1 Cambio codice TV
I codici TV predefiniti si trovano nella lista allegata alle presenti istruzioni (vedi A
Appendice A
). Identificare prima la
marca del televisore da comandare, poi seguire i passi qui sotto elencati:
1. Accendere il televisore da comandare.
2. Tener premuto il tasto TTV per più di 3 secondi fino a che l’indicatore L
LED
del telecomando rimarrà acceso.
3. Digitare il codice a 4 cifre corrispondente alla marca del televisore da comandare servendosi dei tasti numerici 0
0÷99
.
4. Se il codice inserito è valido, il L
LED
si spegnerà. Altrimenti, in caso di codice errato, esso lampeggerà per 3 volte
prima di spegnersi e, in tal caso, la programmazione terminerà (ricominciare dal punto 1).
5. Verificare che il televisore risponda propriamente alla pressione dei tasti del telecomando, almeno limitatamente
alle funzioni di base. Se così non fosse, ripetere la programmazione del tasto TTV servendosi di un altro codice, tra
quelli in lista dedicati alla marca del televisore interessato (riprendere dal punto 1).
Se la marca non è presente in lista o nessuno dei codici predefiniti permette di comandare il televisore, provare ad
individuare o definire un programma consono seguendo uno dei metodi descritti di seguito.
1.3.3.2 Ricerca manuale del codice TV
1. Accendere il televisore da comandare.
2. Puntare il telecomando verso il sensore IR del televisore e mantenerlo puntato per tutta la procedura.
3. Tener premuto il tasto T
TV
per più di 3 secondi fino a quando l’indicatore L
LED
del telecomando rimarrà acceso.
4. Premere in successione il tasto q P
POWER
oppure P
PROG+/PPROG-
.
5. Non appena il televisore risponderà propriamente al comando, spegnendosi o cambiando canale (in coerenza con il
tasto premuto), premere il tasto OOK per la memorizzazione del codice. Il L
LED
quindi si spegnerà.
Verificare che il televisore risponda propriamente alla pressione degli altri tasti del telecomando, almeno limitatamente
alle funzioni di base. In caso negativo, riprendere la ricerca di un codice appropriato ripetendo la procedura (riprendere
dal punto 1).
1.3.3.3 Identificazione del codice TV in uso
L’identificazione del codice permette di riconoscere il codice TV attualmente utilizzato dal telecomando. Procedere come
segue:
1. Tener premuto il tasto TTV per più di 3 secondi fino a quando l’indicatore L
LED
del telecomando rimarrà acceso.
2. Premere il tasto S
STB
per circa 3 secondi, quindi rilasciarlo appena il L
LED
si riaccende.
3. Per trovare la prima cifra del codice TV a quattro cifre, selezionare i tasti numerici da 00 a 99 fino a che l’indicatore L
LED
del telecomando emetta un singolo lampeggio. La cifra che fa eseguire il lampeggio corrisponde a quella ricercata.
4. Per ricercare la seconda, la terza e la quarta cifra del codice, ripetere quanto descritto al precedente punto 3.
5. Dopo il rilevamento dell’ultima cifra, l’identificazione dell’intero codice TV è terminato ed il L
LED
si spegnerà.
NOTA
Se il tasto TTV non è ancora stato programmato o il telecomando è stato resettato (par. 1.3.3.5), verrà rilevato il codice
0000.
1.3.3.4 Programmazione tramite acquisizione.
I codici TV elencati in A
Appendice A
forniscono già le funzioni di base per comandare il televisore. È comunque possibile
estendere i programmi associati ai codici TV predefiniti grazie alla funzione Acquisizione.Per usufruire della
programmazione ad Acquisizione, è necessario disporre del telecomando originale del televisore. Utilizzare batterie
nuove sia per il telecomando da programmare del decoder che per quello originale del televisore.
1. Tener premuto il tasto TTV per più di 3 secondi fino a quando l’indicatore L
LED
del telecomando rimarrà acceso.
2. Premere il tasto S
SOURCE
per circa 3 secondi, finché il L
LED
inizierà a lampeggiare, quindi rilasciarlo.
3. Puntare il trasmettitore del telecomando originale del televisore verso il sensore IR del telecomando del decoder, ad
una distanza di circa 3 centimetri. Assicurarsi che i due sensori IR siano allineati per tutta la procedura.
4. Esercitare una singola pressione sul tasto del telecomando del decoder che si desidera programmare: il L
LED
resterà
costantemente acceso.
5. Eseguire una semplice pressione del tasto del telecomando originale del televisore, corrispondente alla funzione da
associare al tasto del telecomando del decoder selezionato al punto precedente. A comando acquisito, il L
LED
del
telecomando del decoder tornerà a lampeggiare ed il telecomando rimarrà in attesa della prossima acquisizione.
NOTA
L’acquisizione non è immediata, essa può richiedere anche 2 o 3 secondi.
6. Ripetere i due passi precedenti, 4 e 5, per tutti i tasti da programmare.
Philips DTR3030M
Page 13
Italiano
Philips DTR3030M
7
7. Terminata la programmazione di tutti i tasti desiderati, premere il tasto TTV per memorizzare il programma ed uscire
dalla modalità di apprendimento.
NOTE E AVVERTENZE
x I singoli tasti programmati mediante funzione di acquisizione manterranno sempre la funzione associata durante
tale programmazione, anche se verrà cambiato il codice TV scegliendolo tra quelli predefiniti. Per cancellare la
funzione acquisita, si dovrà procedere ad un ripristino ai valori di fabbrica (reset) del telecomando, come descritto
nel paragrafo 1.3.3.5.
x Prima di eseguire la programmazione ad acquisizione, si consiglia di usare batterie nuove per entrambi i
telecomandi.
x I tasti TTV, S
STB
e S
SOURCE
non sono programmabili tramite apprendimento.
1.3.3.5 Ripristino dei valori di fabbrica del telecomando (reset)
In caso di necessità, è possibile riportare il telecomando alle impostazioni originali di fabbrica come descritto di seguito:
1. Premere il tasto T
TV
per più di 3 secondi fino a quando l’indicatore L
LED
del telecomando rimarrà acceso, quindi
rilasciarlo.
2. Tener premuto il tasto S
SOURCE
per circa 3 secondi finché il L
LED
inizierà a lampeggiare.
3. Premere di nuovo il tasto S
SOURCE
sino allo spegnimento dell’indicatore L
LED
: il reset è avvenuto.
NOTA
Il reset ripristinerà i programmi/codici TV predefiniti dalla fabbrica, riportando il programma TV al valore 0000 ed
eliminando l’eventuale programmazione dei tasti tramite apprendimento.
1.3.4 Utilizzo del telecomando
Dopo aver programmato il telecomando per il controllo del televisore, esso funzionerà come il telecomando originale
dello stesso televisore, quantomeno limitatamente alle funzioni principali, quali accensione e spegnimento, regolazione
del volume audio e cambio canale.
Per comandare il decoder o il televisore, eseguire una singola breve pressione sui rispettivi tasti funzione S
STB
o TTV e
puntare il telecomando verso il sensore IR del dispositivo interessato. Alla trasmissione di ogni commando infrarosso,
l’indicatore L
LED
del telecomando si illuminerà.
Page 14

Philips DTR3030M
8
1.4 Prima Installazione del ricevitore
Una volta terminato il collegamento del ricevitore (par. 1.2.2) e dopo aver connesso l’alimentatore alla presa di rete
elettrica, il ricevitore si avvierà automaticamente. Se non dovesse accadere, accendere il dispositivo utilizzando
l’apposito tasto q del telecomando o del pannello frontale. Verrà quindi visualizzata a schermo una semplice procedura
guidata di prima installazione.
NOTA
Servirsi dei tasti freccia , , , del telecomando per spostarsi tra voci e opzioni del menu, infine premere il tasto
OK
in corrispondenza della voce
Avanti
per confermare e procedere.
Procedere secondo le indicazioni riportate di seguito:
Scelta Lingua
Scegliere la
Lingua
del menu a schermo (On Screen Display - OSD), quella dell’
Audio Principale
e dei
Sottotitoli
Principali
.
Regolazione Orario
Impostare il
Paese
di installazione e regolare l’
Orario
secondo il riferimento di Greenwich (per l’Italia
GMT+1:00
) e
l’opzione
Orario Legale
, che si consiglia di mantenere automatica (
Auto
).
Definizione PIN
Definire una password numerica a quattro cifre (Personal Identification Number - PIN) per il Controllo Parentale (vedi
anche par. 3.6.3). Immettere prima il PIN scelto nel campo
Nuovo PIN
, quindi reinserirlo in
Conferma PIN
per
confermarlo.
Impostazioni Audio Video
Configurazione dei parametri audio e video del ricevitore in conformità alle caratteristiche dei dispositivi audio/video
collegati allo stesso ricevitore:
1.
Risoluzione
: impostazione della risoluzione video dell’interfaccia audio-video digitale HDMI
2.
Formato Schermo
: formato dello schermo/TV collegato al ricevitore e della relativa modalità di presentazione delle
immagini con formato diverso dallo schermo:
a. 16:9: per schermi 16:9, le immagini 4:3 verranno adattate a tutto lo schermo.
b. 4:3: per schermi 4:3, le immagini 16:9 verranno adattate a tutto lo schermo.
3.
Uscita SCART
: Video output presa SCART (
RGB, CVBS
).
4.
Dolby Digital
: codifica dell’uscita audio digitale tra sorgente originale (
RAW
) e Stereo digitale (
PCM
) e
multicanale (
Dolby Digital
).
Canali - LCN
Scegliere se utilizzare (consigliato) o meno la funzione di numerazione automatica dei canali (Logical Channel
Numbering – LCN), tramite la quale la lista canali verrà ordinata automaticamente secondo la posizione richiesta dalle
stesse emittenti televisive.
Canali - Scansione
Nel caso si utilizzi un’antenna attiva da alimentare con 5V attraverso il cavo coassiale collegato all’ingresso antenna
RF IN del ricevitore, premere il tasto R
ROSSO
(
Antenna 5V
) per attivarla (ON); premerlo nuovamente per disattivarla
(
OFF
).
AVVERTENZA
Se si utilizza un’antenna classica da tetto o un’antenna già alimentata, l’alimentazione antenna deve necessariamente
rimanere spenta: rischio di sovraccarico!
Mantenere il parametro
Modo Scansione
in
Auto
(automatico) ed avviare la ricerca automatica premendo il tasto OOK
del telecomando in corrispondenza della voce
Avanti
.
Terminata la scansione, si passerà all’eventuale risoluzione dei conflitti LCN. In tal caso, se due o più canali richiedono
lo stesso numero di posizione in lista canali, l’utente sarà invitato a scegliere quello a cui assegnare la posizione
contesa. Evidenziare quindi il servizio desiderato spostandosi con i tasti freccia / premere OOK per confermarlo,
quindi premere di nuovo OOK sulla voce
OK
. Procedere così per ogni conflitto; in alternativa, per l’assegnazione
automatica da parte del sistema, premere E
EXIT
oppure attendere qualche istante senza effettuare alcuna scelta.
Risultato
Terminati i suddetti passi e quindi l’installazione, confermare con OOK la consultazione del risultato e si potrà da subito
fruire dei canali digitali terrestri disponibili, nonché del portale della Applicazioni via internet e del lettore multimediale.
NOTE E AVVERTENZE
x Alcuni canali potrebbero risultare non visibili perché soggetti a codifica o non compatibili con questo ricevitore.
x Durante la vita del ricevitore, dei canali potrebbero diventare obsoleti o cambiare i parametri di trasmissione. Si
consiglia tener aggiornata la lista canali (par. 3.1.1).
x Per ottenere sempre una rapida accensione del ricevitore dallo stato di standby, è necessario disabilitare il
Risparmio Energetico
dal menu I
Impostazioni
> C
Configurazioni Ricevitore
> G
Gestione Energia
(par. 3.6.1.5).
Page 15
Italiano
9
2 Sezione per l’utilizzo semplificato
AVVERTENZA
Prima di leggere questo capitolo è necessario aver letto attentamente il capitolo precedente.
Per semplificare l’utilizzo del ricevitore e la gestione dei numerosi canali digitali, sono presenti alcune finestre e menu
raggiungibili con la pressione di un singolo tasto del telecomando (par. 1.3.2). Essi sono pensati per l’uso frequente e le
loro funzioni sono indispensabili per un’interazione rapida col ricevitore.
Per l’impiego avanzato dell’apparecchio, le impostazioni e le personalizzazioni, riferirsi invece al Capitolo 3.
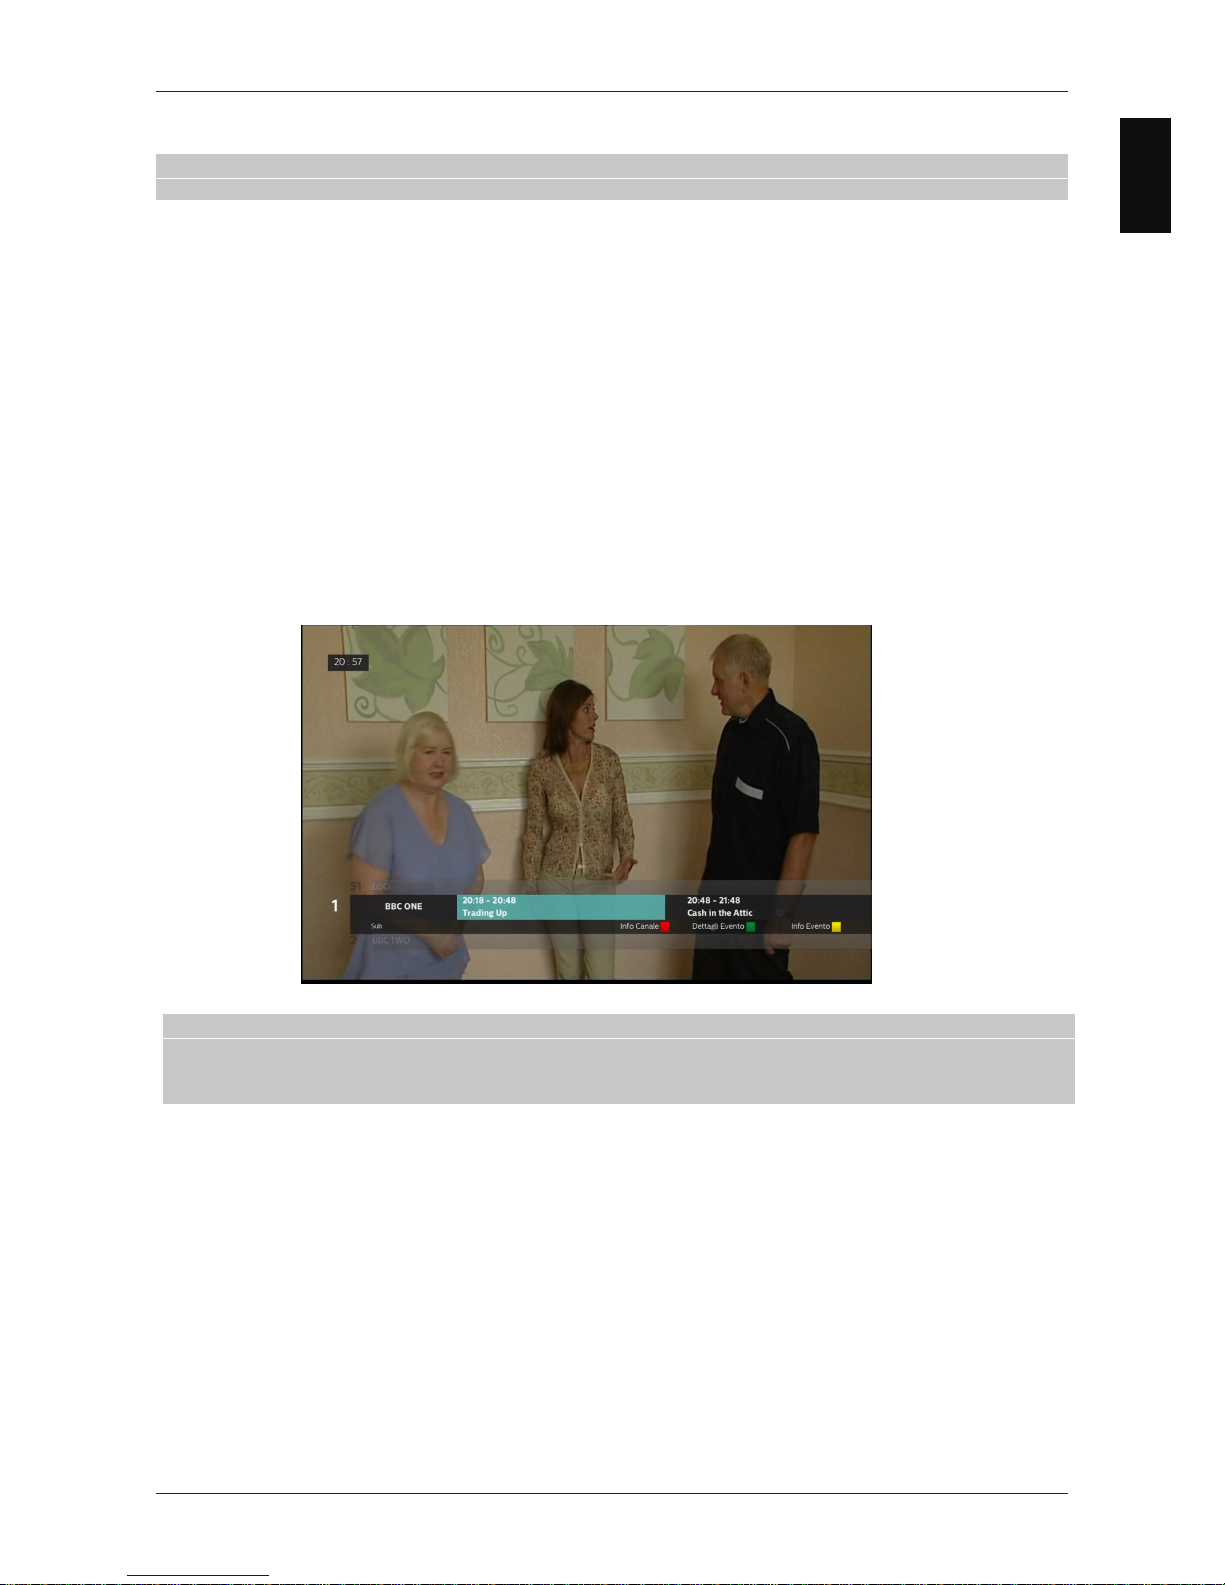
2.1 Banner informativo dei canali
Ogni volta che viene cambiato canale o che viene premuto il tasto I
INFO
, appare in basso sullo schermo per alcuni
secondi una finestra informativa, detta anche banner informativo di canale, relativa al canale sintonizzato. Le
informazioni che possono essere presenti in tale banner, se trasmesse dall’emittente televisiva, sono:
1. Il numero del canale.
2. Il nome del canale.
3. L’orario corrente.
4. Orari e titoli del programma corrente e successivo.
5. Dati aggiuntivi come dati televideo (icona
Text
) e sottotitoli (icona Sub).
Quando il banner di canale è attivo, in corrispondenza dell’evento corrente o successivo:
x Premere il tasto V
VERDE
(
Info Canale
) per avere informazioni tecniche sul canale sintonizzato ed il segnale
d’antenna.
x Premere il tasto G
GIALLO
(
Dettagli Evento
) per consultare le informazioni estese sull’evento.
x Premere il tasto B
BLU
(
Info Evento
)
Infine, per uscire dalle suddette finestre informative, usare il tasto EEEXXXIIITTT.
Philips DTR3030M
per visualizzare le informazioni. sull’evento.
NOTE
x Se l’emittente non trasmette alcune delle suddette informazioni, esse non verranno visualizzate sul banner di
canale.
x Anche se il banner di canale indica la presenza di dati aggiuntivi, essi potrebbero essere nulli e non utilizzabili.
2.2 Selezione rapida dei canali TV/Radio
Il tasto TTV/RADIO del telecomando serve per accedere alla modalità canali desiderata, Televisione o Radio.
Successivamente, per cambiare canale, procedere in uno dei seguenti modi:
x Premere i tasti PPROG+ / PPROG- del telecomando.
x Digitare il numero del canale desiderato tramite i tasti numerici 00÷99 del telecomando.
Per gestire in modo pratico l’ampio numero di canali radio e TV che la trasmissione digitale terrestre mette a
disposizione, servirsi della lista canali rapida accessibile durante la visione dei programmi premendo il tasto LLIST,
quindi:
x Premere OOK sulla lista
Canali TV
(o
Canali Radio
)
x Premere i tasti / per scorrere la lista di un canale alla volta.
x Premere i tasti PROG- / PPROG+ per scorrere la lista di una pagina alla volta.
x Premere il tasto OOK sul canale scelto per sintonizzarlo.
Per la gestione avanzata della lista canali, in particolare per la realizzazione di una lista canali preferiti, riferirsi al
paragrafo 3.2.1.
Page 16
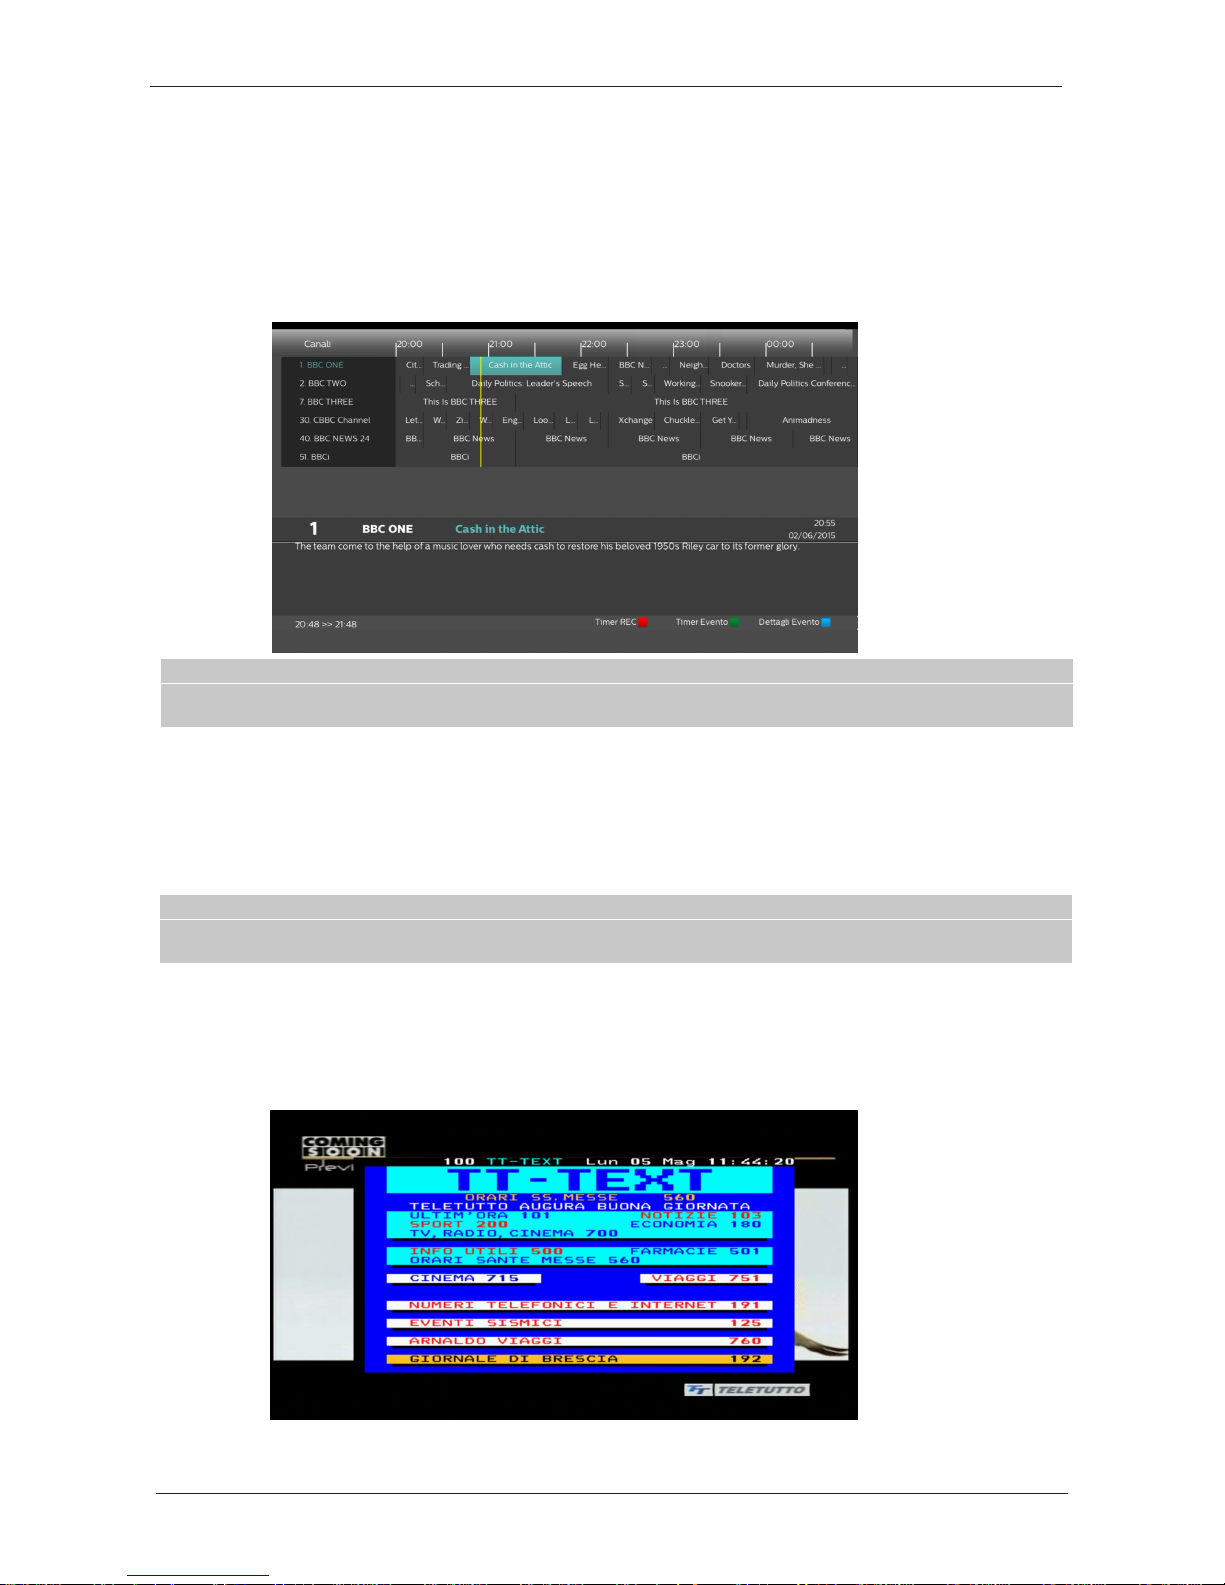
2.3 Guida Elettronica ai Programmi (EPG)
Alcuni canali televisivi digitali trasmettono, oltre ai dati audio-video del programma corrente, anche informazioni
riguardanti la programmazione giornaliera o settimanale. Esse possono essere utilizzate dall’utente pure per la
definizione assistita di un timer.
x Per consultare l’EPG, premere il tasto EEPG del telecomando oppure, in alternativa, accedervi dal menu
Gestione Canali > EEPG.
x Con i tasti / cambiare il canale e premere OOK per sintonizzarlo.
x Con i tasti / spostarsi tra gli eventi in programmazione sul canale scelto.
x Uscire dalla dall’EPG con il tasto EEXIT.
AVVERTENZA
Le informazioni EPG sono dati facoltativi trasmessi dalle emittenti televisive. Perciò, la mancata visualizzazione di tutte o
di alcune informazioni non costituisce un sintomo di malfunzionamento del ricevitore.
2.4 Opzione Audio
In caso la trasmissione del canale corrente sia in multi audio/lingua, l’utente può selezionare la traccia audio che
preferisce. Procedere come segue:
x Premere il tasto A
AUDIO del telecomando.
x Selezionare con i tasti freccia / la traccia desiderata.
x Premere il tasto OOK per confermare.
AVVERTENZA
Le tracce audio multicanale Dolby Digital sono udibili esclusivamente tramite I’uscita audio digitale, non mediante le
uscita audio analogica SCART.
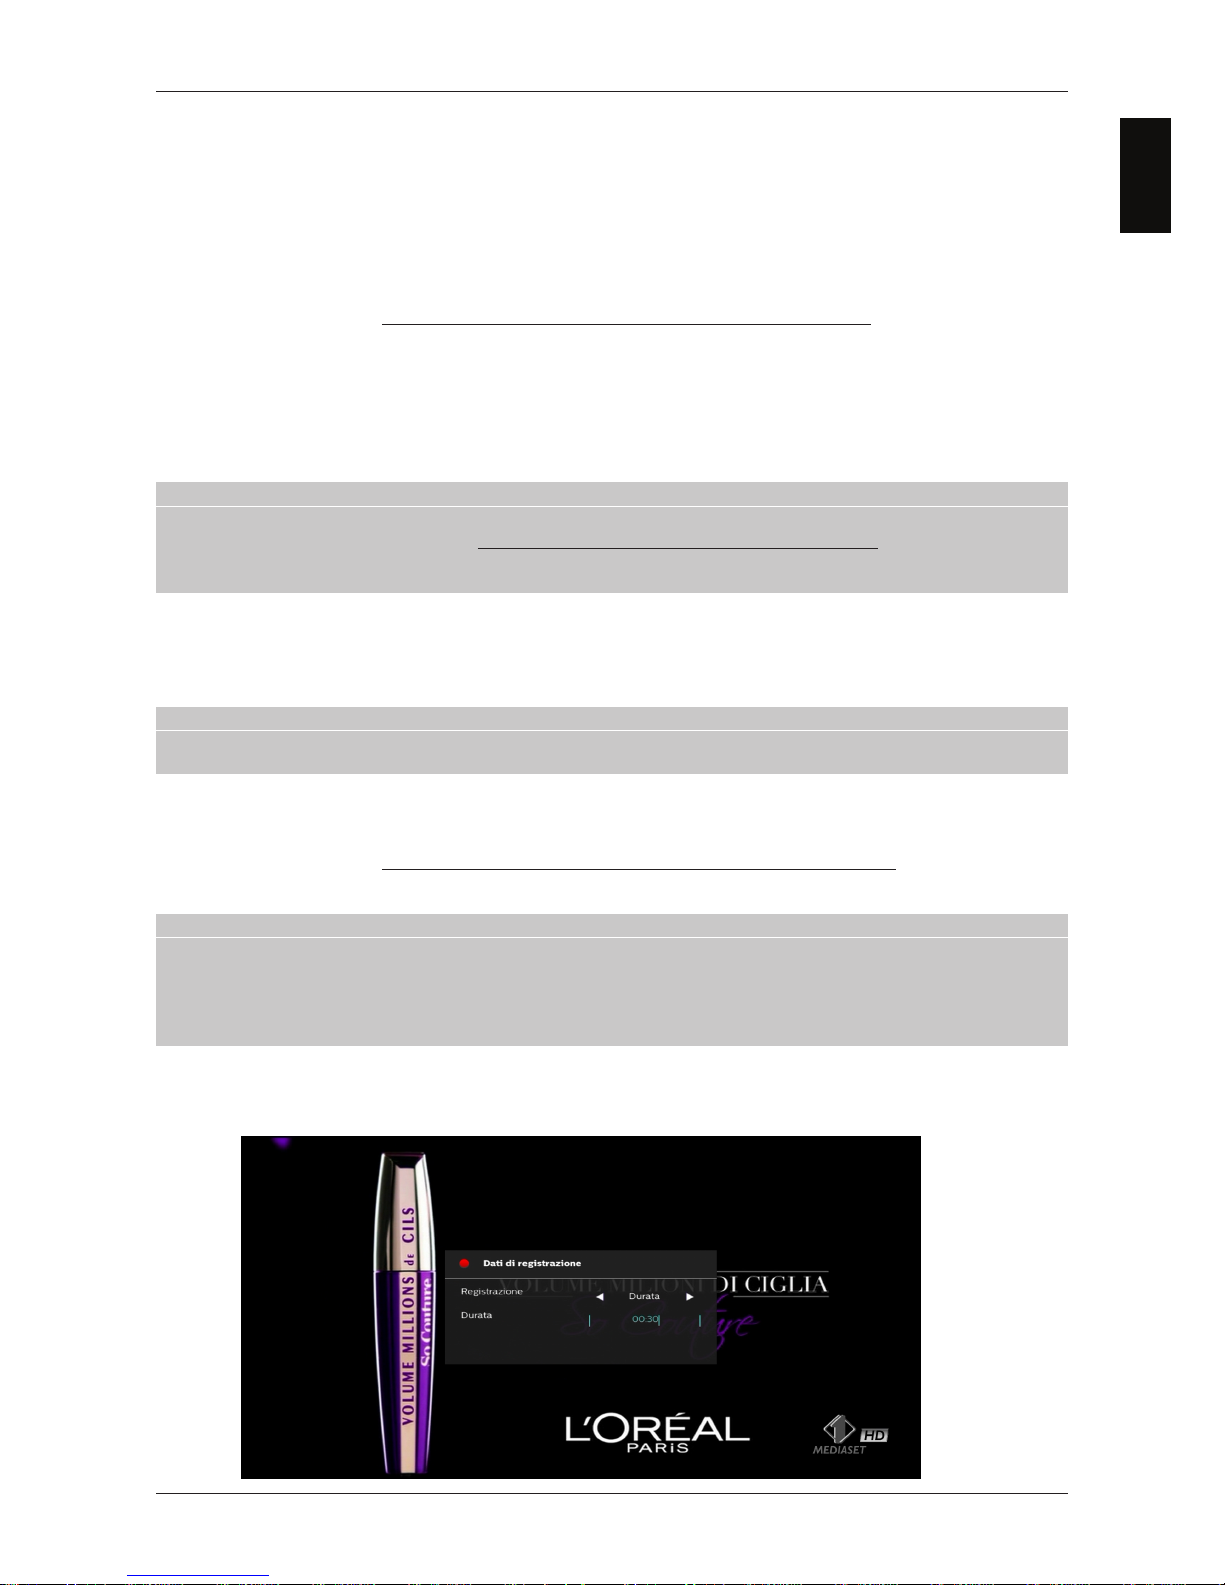
2.5 Funzione Televideo
Se il canale visualizzato è munito di dati televideo:
x Servirsi del tasto TTEXT per avviarlo.
x Utilizzare i tasti numerici 00÷99 per cambiare pagina.
x Premere di nuovo il tasto TEXT per uscire.
Philips DTR3030M
10
Page 17
11
2.6 Funzioni USB
Le due porte USB, site sul pannello posteriore del dispositivo, sono dedicate principalmente al collegamento di memorie
di massa esterne dotate di interfaccia USB 2.0, allo scopo di registrare canali digitali terrestri dal sintonizzatore integrato
nel ricevitore e riprodurre contenuti multimediali personali, ma anche all’interfacciamento con periferiche come tastiera
(con configurazione tasti americana) e mouse, utili per l’utilizzo del portale delle applicazioni.
2.6.1 Utilizzo e avvertenze
Prima di procedere all’impiego di una memoria di massa di tipo USB, come un disco-rigido (Hard Disk Driver - HDD) o
una memoria flash/chiavetta, attenersi alle importanti regole ed avvertenze riportate di seguito.
2.6.1.1 Connessione e formattazione disco
Per usufruire della funzione di videoregistrazione (par. 2.6.2), la memoria USB dovrà essere preventivamente formattata
in FAT32 o in NTFS ed avere una capacità di memoria libera consona alle proprie necessità di registrazione.
In occasione del primo collegamento di un dispositivo di memoria USB o dopo ogni formattazione dello stesso, il
ricevitore chiederà di inizializzare il dispositivo per destinarlo alla funzione di registrazione. Alla conferma, il ricevitore
crerà una cartella denominata
TSPVR
che verrà utilizzata dal ricevitore stesso come archivio delle registrazioni.
AVVERTENZE
x Si consiglia di utilizzare Hard Disk con alimentazione esterna, in quanto la sola porta USB del ricevitore non può
garantire una corretta alimentazione: rischio di danneggiamento del disco e/o del ricevitore!
x Il ricevitore è compatibile con dispositivi di memoria USB formattati con File System FAT32 e NTFS.
x Non è garantita la compatibilità con tutti i dispositivi di memoria USB presenti sul mercato.
2.6.1.2 Rimozione disco
Per una rimozione sicura della memoria, al fine di evitare danneggiamenti dei file o dei dispositivi coinvolti, si consiglia di
scollegare la memoria USB solamente durante l’inattività della porta USB interessata o, meglio, quando il ricevitore si
trova in standby.
AVVERTENZA
La rimozione della memoria durante la scrittura (registrazione) o lettura dati (riproduzione) può danneggiare i contenuti
e i dispositivi coinvolti.
2.6.2 Registrazione Video Personale (PVR)
Prima di procedere all’impiego di una memoria di massa di tipo USB, come un disco-rigido (Hard Disk Driver - HDD) o
una memoria flash/chiavetta, attenersi alle importanti regole ed avvertenze riportate nel par. 2.6.1.
2.6.2.1 Registrazione Programmi TV
NOTE
x Il ricevitore è dotato di un singolo sintonizzatore televisivo, di conseguenza esso potrà visualizzare e registrare un
solo programma alla volta.
x Le emittenti televisive possono decidere di vietare la registrazione per problematiche relative alla salvaguardia dei
diritti d’autore.
x La durata minima di una registrazione è pari a 1 minuto, altrimenti non verrà salvata nella memoria USB.
Philips DTR3030M
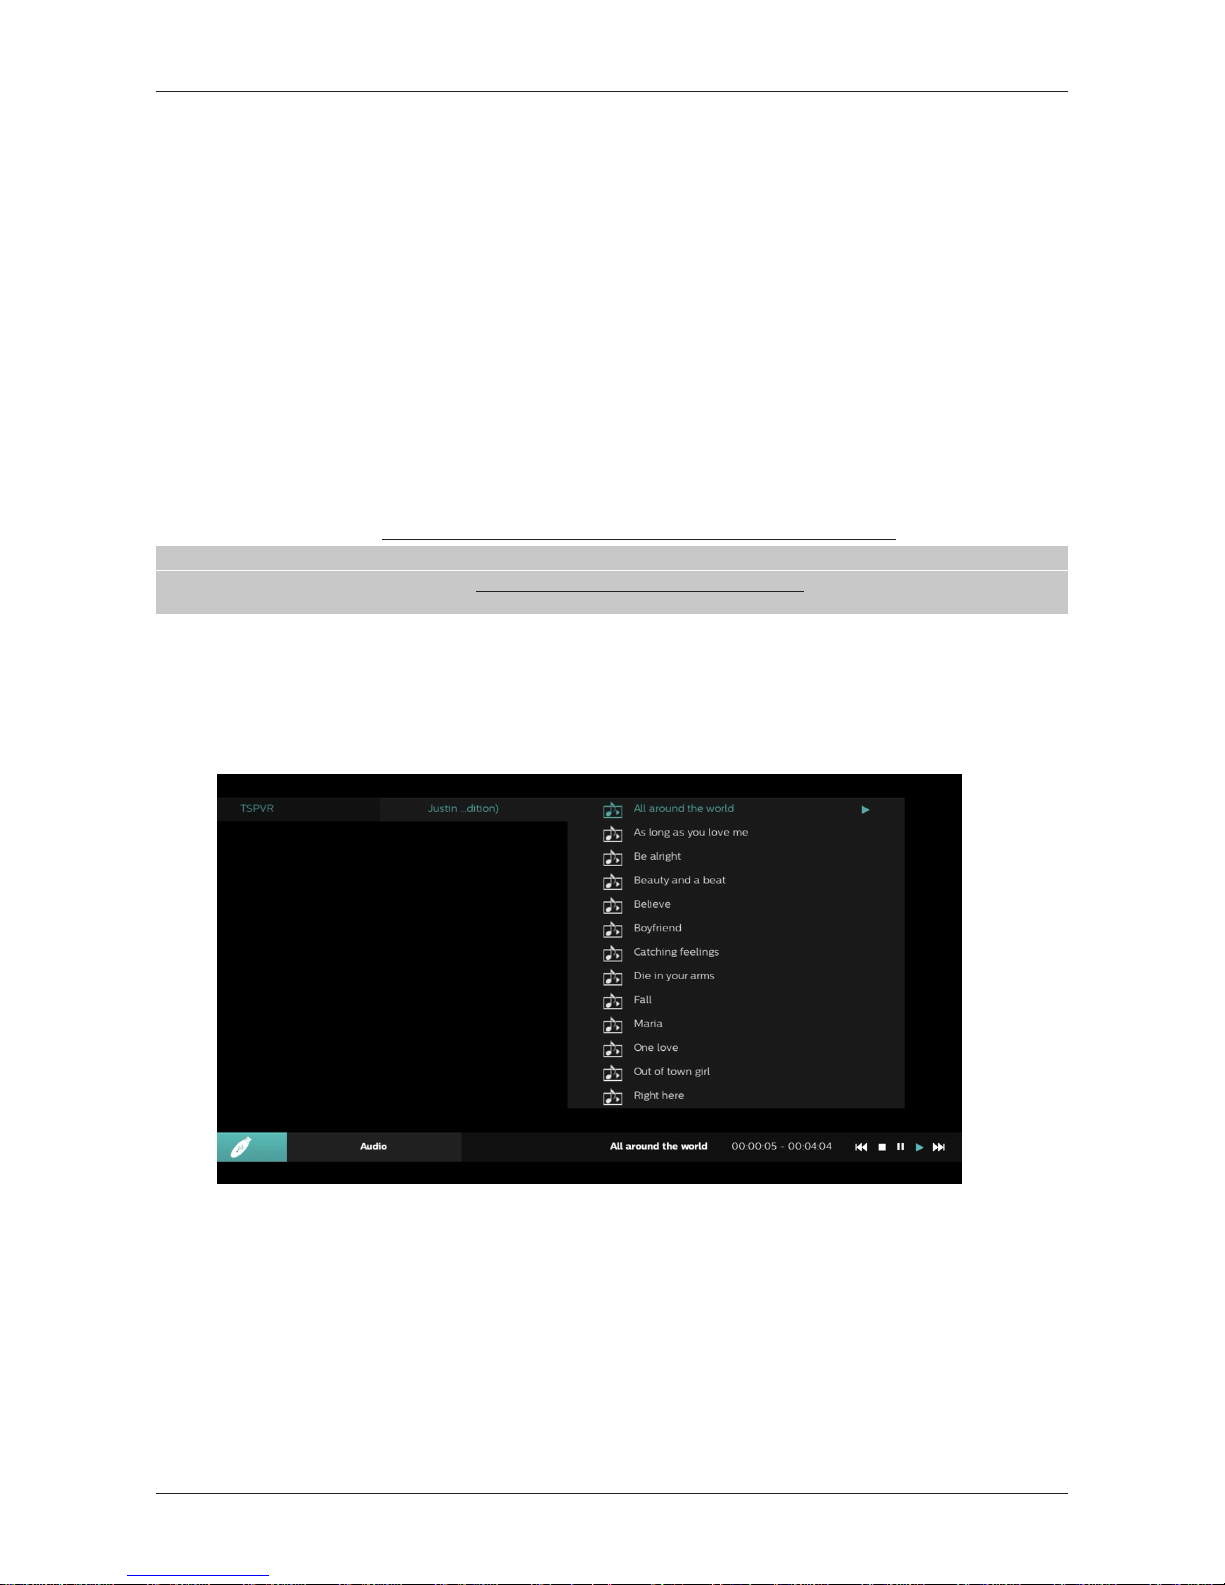
Registrazione istantanea
Per avviare la registrazione manualmente, sintonizzare il canale desiderato e premere il tasto RREC. Il ricevitore inviterà
prima l’utente a scegliere la durata della registrazione; premere quindi OOK per iniziare. Per fermare la registrazione
manualmente prima del termine predefinito, premere il tasto S
STOP e confermare.
Italiano
Page 18
Italiano
12
Registrazione programmata
È possibile programmare più timer di registrazione manualmente dal menu I
Impostazioni
> P
Pianifica Attività
>
Impostazioni Timer
(par. 3.6.2.3).
2.6.2.2 Riproduzione dei contenuti registrati
I file registrati vengono collezionati nella memoria USB dedicata alla registrazione e possono essere richiamati dal menu
Multimediale
> L
Lista Registrazioni
oppure direttamente dal tasto F
FILE
del telecomando.
Premendo il tasto OOK in corrispondenza di una registrazione, si avvierà la riproduzione. Durante la lettura, utilizzare i
tasti P
PLAY/PAUSE
per mettere in pausa/riprendere la visione, R
REW/FFWD
per il riavvolgimento/avanzamento rapido e
STOP
per terminare la riproduzione.
Infine, se è necessario cancellare un file dalla lista delle registrazioni, utilizzare il tasto R
ROSSO
(
Elimina
).
2.6.3 Lettore Multimediale USB
La funzione Riproduttore Multimediale, comunemente chiamata Media Player, consente di:
1. riprodurre contenuti video MPEG 2/MPEG 4,
2. ascoltare musica MP3,
3. visualizzare immagini JPEG,
da una memoria esterna connessa tramite porta USB.
Prima di procedere all’impiego di una memoria di massa di tipo USB, come un disco-rigido (Hard Disk Driver - HDD) o
una memoria flash/chiavetta, attenersi alle importanti regole ed avvertenze riportate nel par. 2.6.1.
NOTA
Al collegamento di una memoria esterna da destinare alla sola lettura multimediale, annullare l’eventuale richiesta di
inizializzazione del disco proposta in automatico dal ricevitore per la funzione di registrazione.
Accedere al menu M
Multimediale
e scegliere il sottomenu dedicato al tipo di contenuto da riprodurre tra A
Audio
, V
Video
e
Immagini
.
Philips DTR3030M
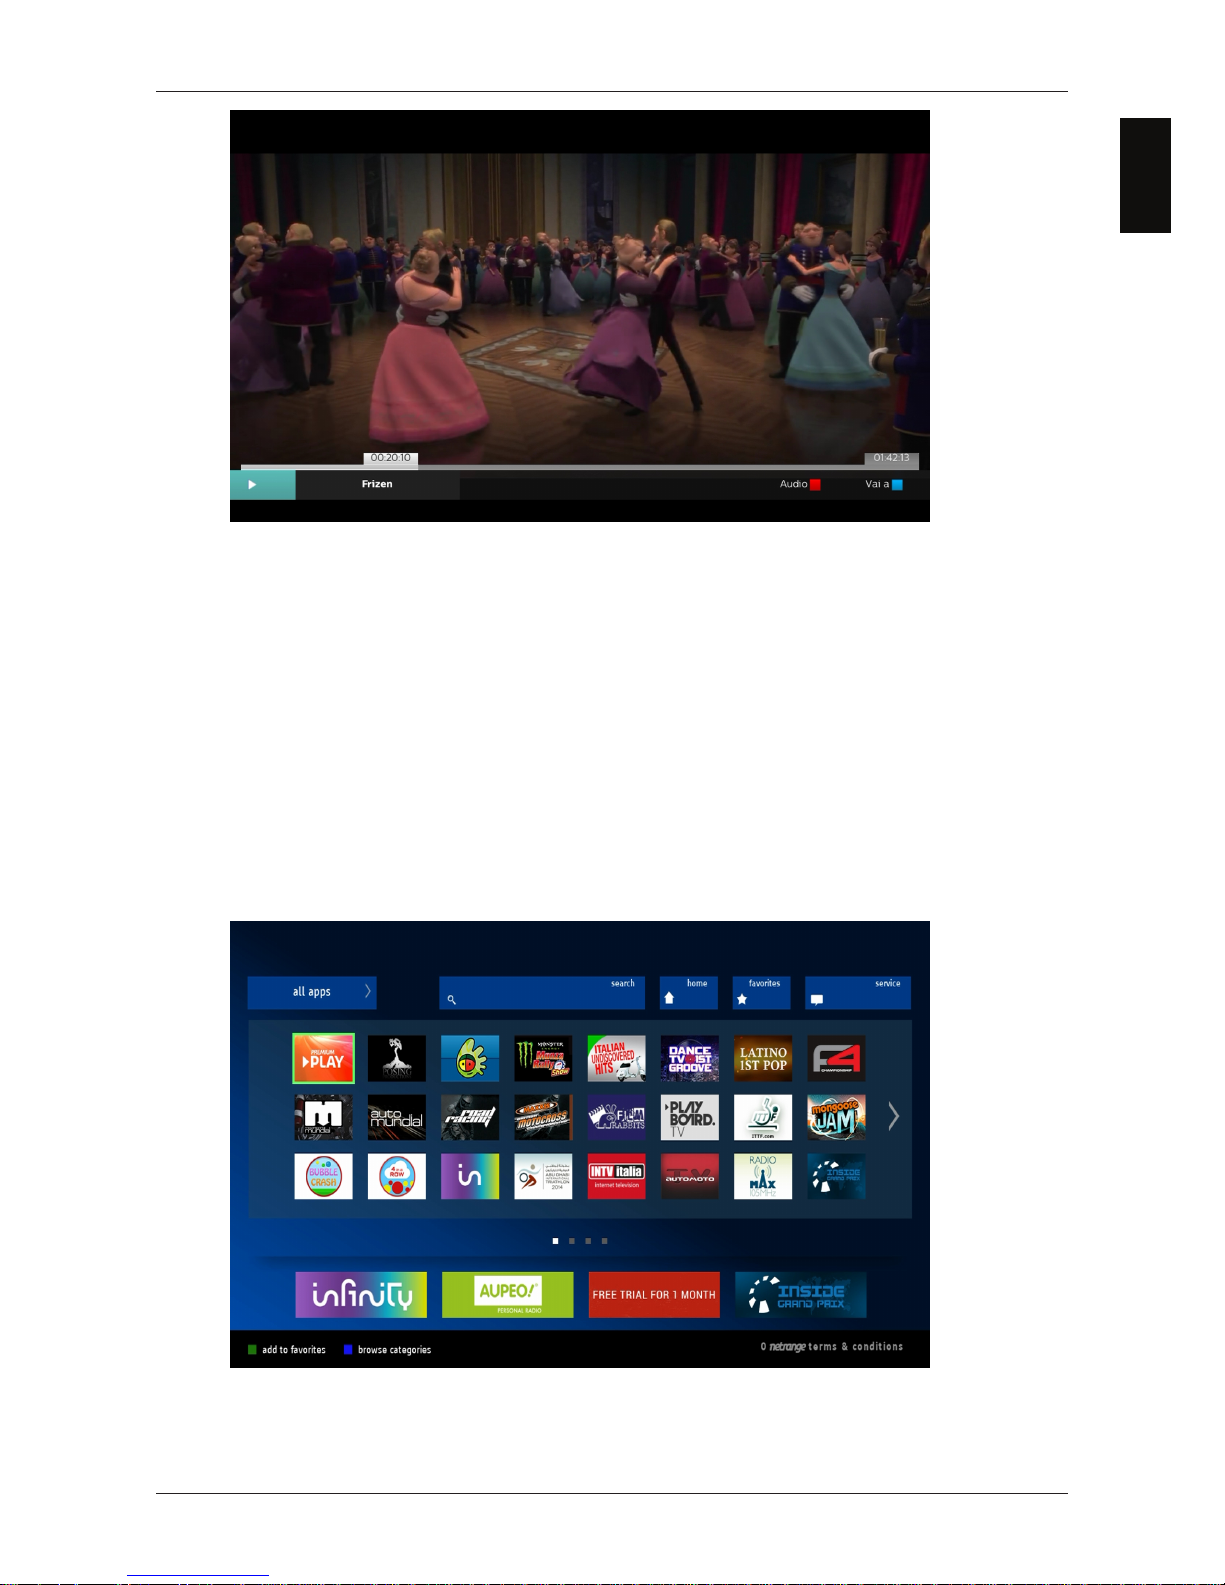
Menu Audio
Per avviare un file musicale MP3, con l’ausilio dei tasti freccia spostarsi tra le cartelle e scegliere il file desiderato,
quindi premere OOK.
Durante la lettura, utilizzare il tasto PPLAY/PAUSE per mettere in pausa o riprendere l’ascolto, SSTOP per terminarlo e i
tasti NNEXT e PPREV per passare alla canzone successiva o precedente.
Per riprodurre un video di formato MPEG2 o MPEG4, navigare tra cartelle e file con i tasti freccia, infine premere OOK in
corrispondenza del contenuto scelto.
Durante la riproduzione, utilizzare il tasto PPLAY/PAUSE per mettere in pausa o riprendere la visione, il tasto SSTOP per
fermarla, il tasto RROSSO (
Audio
) per cambiare traccia audio ed il tasto BBLU (
GoTo
) per andare all’istante desiderato
espresso in formato
hh:mm:ss
. I tasti NNEXT e PPREV invece consentono di andare direttamente al filmato successivo o
precedente.
Menu Video
Page 19
Philips DTR3030M
Menu Immagini
Spostarsi tra le cartelle con i tasti freccia e premere OOK sul file della foto JPEG per aprirla. Usare i tasti NNEXT e PPREV
per proseguire alla successiva foto o tornare a quella precedente. Tornare alla lista dei file con EEEXXXIIITTT...
2.7 Funzioni di rete
Il ricevitore è dotato di un’interfaccia Ethernet 10/100 dedicata alla fruizione delle applicazioni non lineari dal portale Net
Range tramite rete internet a banda larga e alla riproduzione di file multimediali condivisi in una rete locale domestica
tramite protocollo UPnP/DLNA.
2.7.1 Portale delle Applicazioni
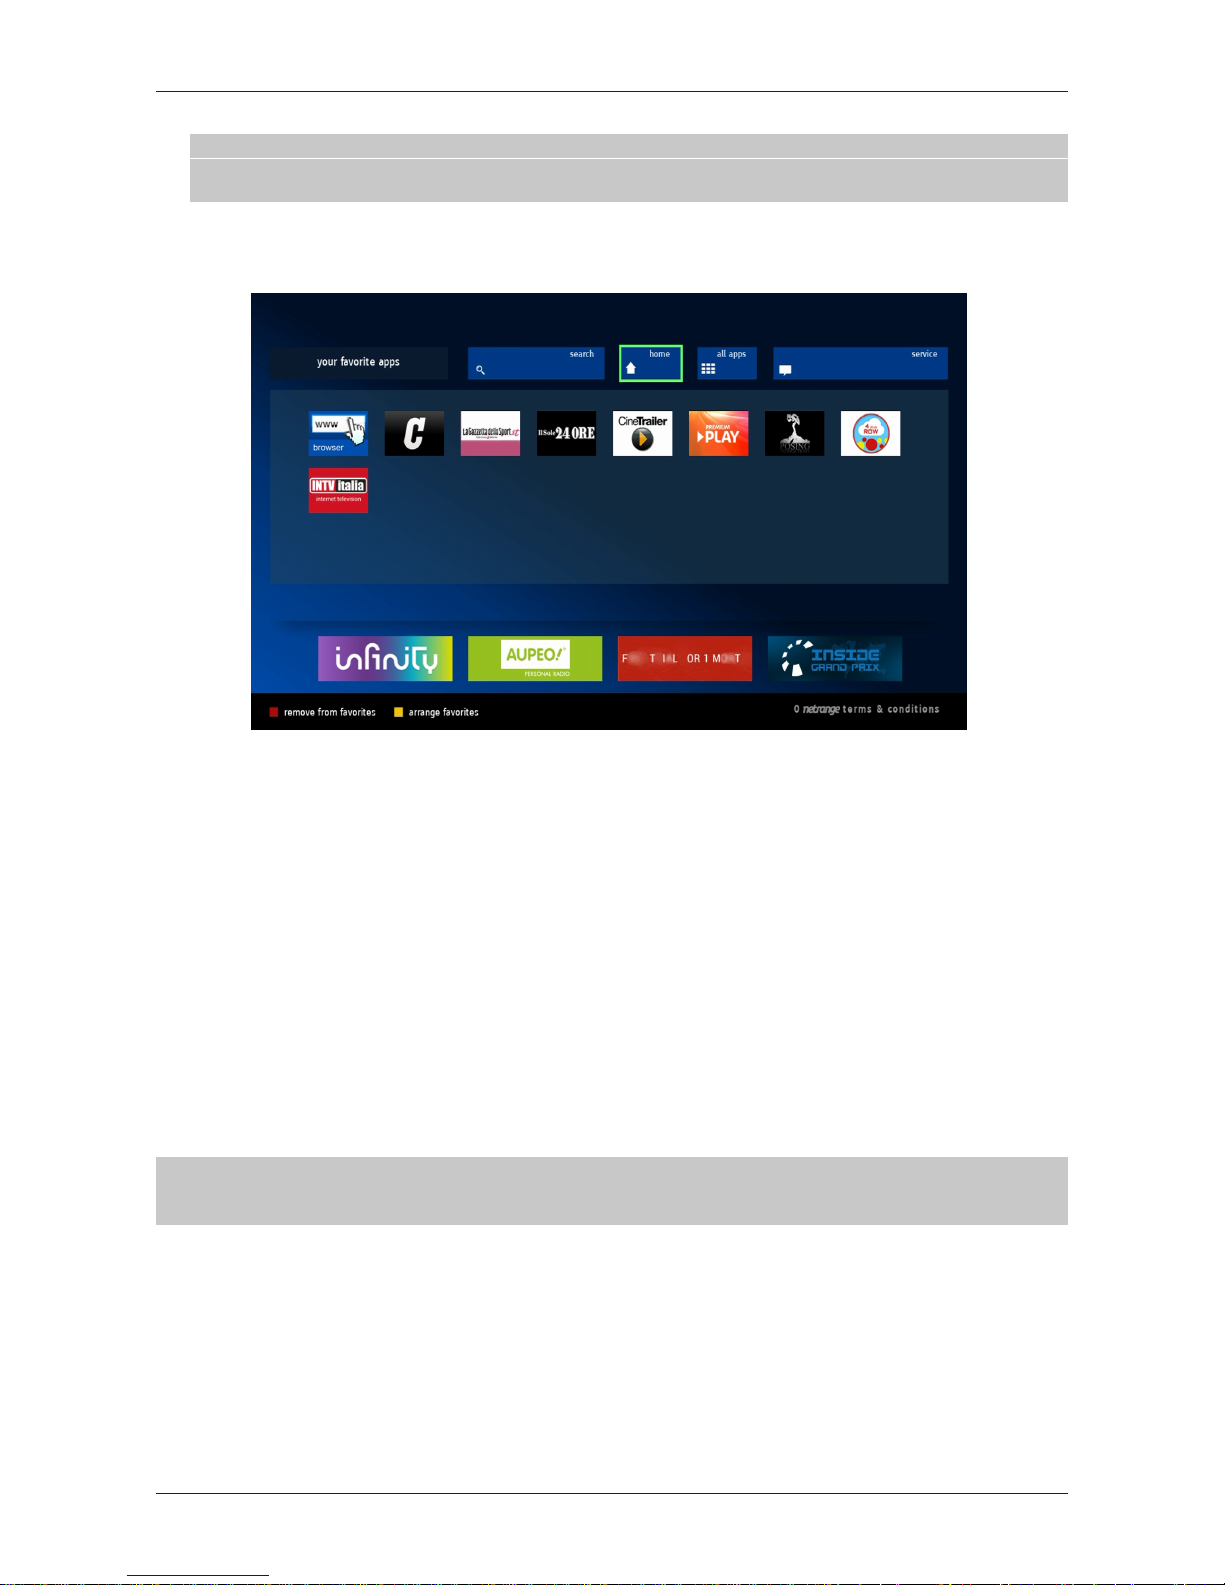
Il portale Net range consente l’accesso ad una considerevole gamma di applicazioni, dalle più conosciute testate
giornalistiche e di informazione ai social network, alle applicazioni di intrattenimento e molte altre.
Il portale mette a disposizione una lista di applicazioni preferite (selezionabili dall’utente) e una lista di applicazioni
suggerite (scelte in automatico dal portale). Inoltre è possibile andare alla lista di tutte le applicazioni attraverso l’icona
Tutte le app
, dove si trovano alcune funzione attivabili da telecomando:
1. Tasto BBLU (
Ricerca categorie
): per filtrare le applicazioni per tipo (ad esempio notizie, servizi, sport,
intrattenimento, musica, giochi e Video On Demand VOD).
13
Italiano
Page 20
14
2. Tasto V
VERDE
(
Aggiungi a preferiti
): per aggiungere l’applicazione selezionata ai preferiti.
AVVERTENZA
Prima di aggiungere una nuova applicazione alla liste di quelle preferite, accertarsi di non aver già raggiunto il
limite massimo di 8 applicazioni.
Per cambiare posizione di un’applicazione nella lista Preferiti, selezionarla e premere il tasto G
GIALLO
; spostarla
quindi nella posizione desiderata utilizzando le frecce / e premere nuovamente il tasto G
GIALLO
per confermare
la nuova posizione. Invece, se si vuole rimuovere un’applicazione, è necessario entrare nel menu P
Preferiti
,
selezionare l’icona dell’applicazione e premere il tasto R
ROSSO
(
Rimuovi
).
Inoltre, sono presenti le sezioni R
Ricerca
(motore di ricerca del portale), H
Home
(per tornare alla schermata principale del
portale) e S
Servizi
(per eventuali comunicazioni all’utente).
Per avviare un’applicazione è sufficiente:
x Selezionare l’applicazione con i tasti freccia.
x Premere il tasto OOK.
2.7.2 Lettore Multimediale DLNA
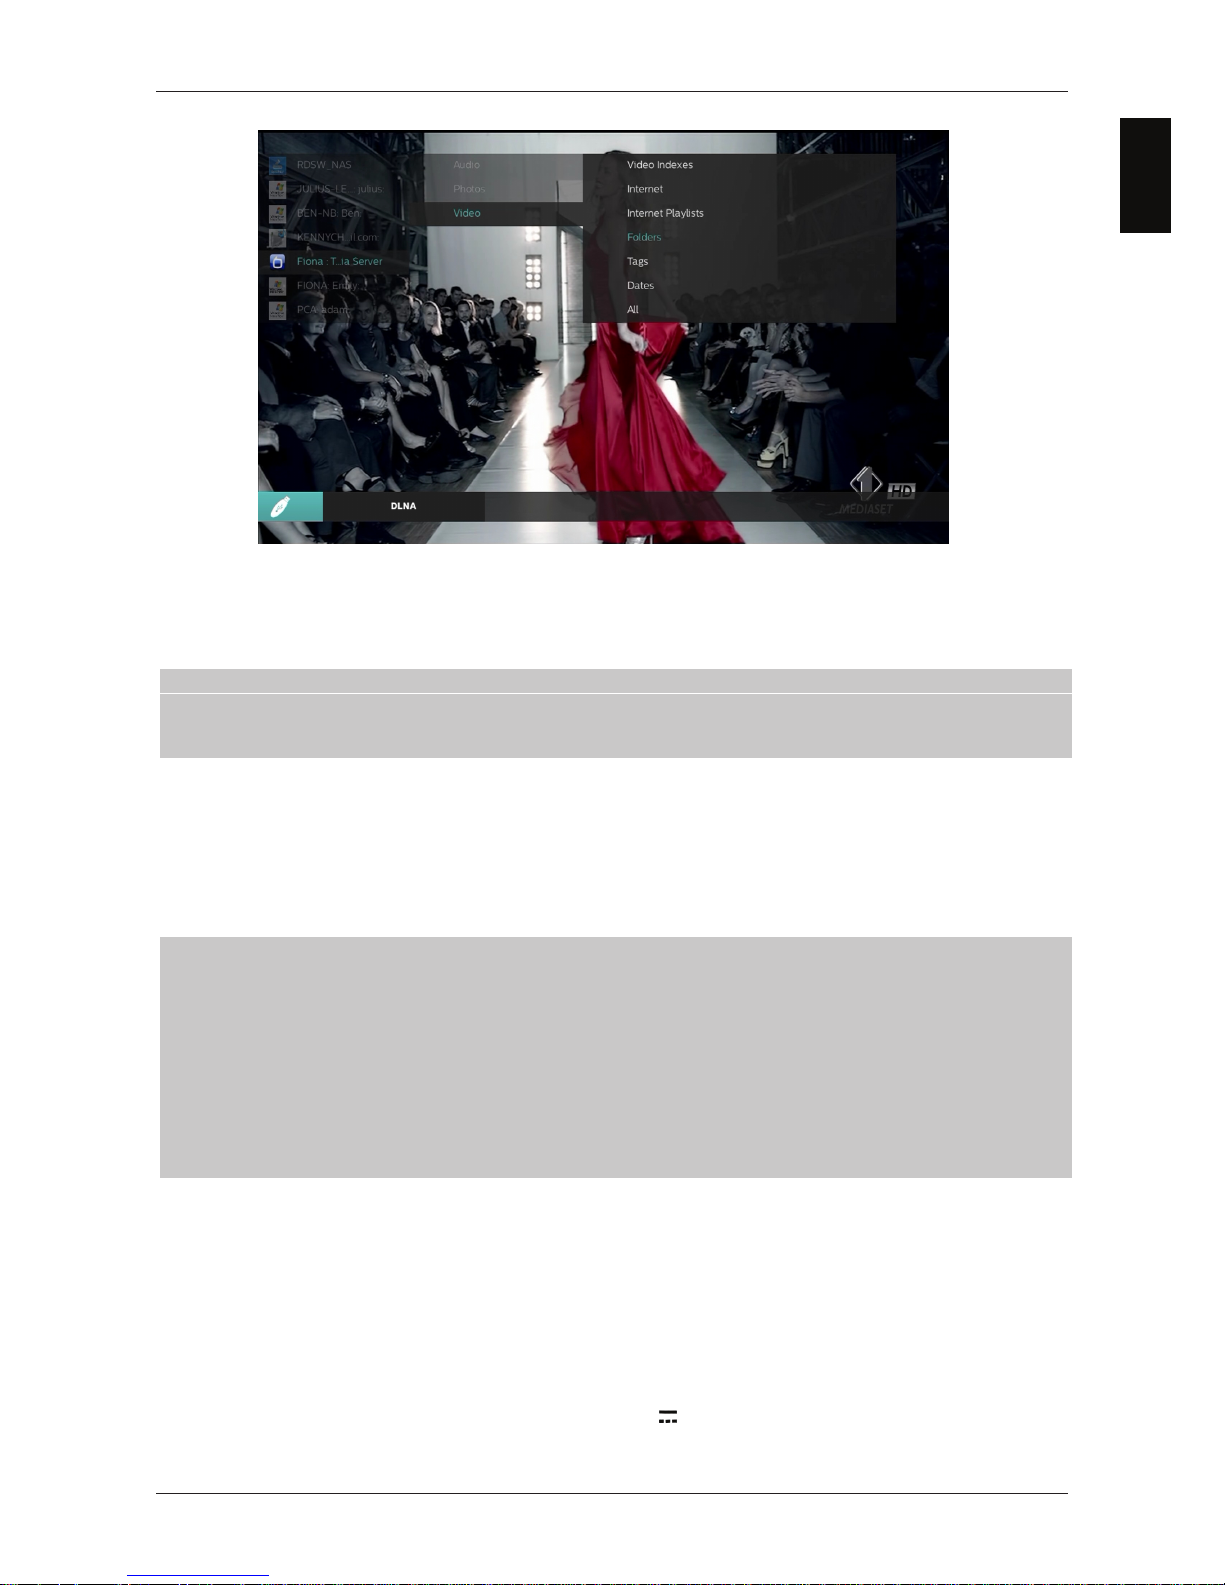
Entrando nel menu M
Multimediale
> D
DLNA
è possibile visualizzare i server UPnP/DLNA disponibili nella propria rete
domestica alla quale è connesso il ricevitore e quindi riprodurre a schermo i contenuti multimediali condivisi dallo
stesso server domestico.
Informazioni di base sulla condivisione DLNA
Se si vogliono condividere i file multimediali (video, musica e foto) archiviati sui propri computer, si individuano due
diversi metodi:
1. Configurare il DLNA server nativo del sistema operativo Microsoft Windows.
2. Installare un server DLNA di terze parti.
In merito al primo dei suddetti metodi, nel sito Microsoft sono presenti istruzioni dettagliate per attivare il server DLNA
nativo. Ricordiamo che, in ogni caso, è necessario aver installato Windows Media Player versione 11 o superiore (già
incluso in Windows 7 o 8).
AVVERTENZA
Attivare il server DLNA di Windows significa condividere i file multimediali delle proprie librerie con tutti i client DLNA
che ne faranno richiesta. Assicurarsi perciò di utilizzare tale funzionalità solo all’interno della propria rete domestica.
Lettura
Una volta configurato il server DLNA e connesso il ricevitore alla rete dati domestica, per riprodurre un contenuto
multimediale:
x Accedere al menu M
Multimediale
> D
DLNA
.
x Con i tasti freccia navigare tra le cartelle disponibili, scegliere il file desiderato e premere OOOKKK per riprodulo.
x Durante la riproduzione, seguire le istruzioni già descritte per la lettura tramite USB (par. 2.6.3) a seconda del
tipo di contenuto scelto (audio, video o foto).
Philips DTR3030M
Page 21
Philips DTR3030M
3 Sezione per l’utilizzo avanzato
AVVERTENZE
La modifica di alcuni parametri dei menu potrebbe pregiudicare il corretto funzionamento del ricevitore stesso. Leggere
quindi attentamente questa sezione del manuale prima di procedere con le regolazioni. Alcune funzioni sono protette da
un codice di sicurezza per evitare manomissioni (vedi par. 3.6.1.4).
Durante la normale visione di un programma, premendo il tasto MMENU del telecomando apparirà a schermo il MMenu
Principale, dove sono presenti i seguenti principali sottomenu:
1. Installazione
2. Gestione Canali
3. Multimediale
4. Applicazioni
5. Servizi Pay Per View
6. Impostazioni
REGOLE GENERALI PER LA NAGIVAZIONE
Per navigare tra i vari menu utilizzare:
x I tasti freccia ,,, per selezionare menu, voci e opzioni.
x Il tasto OOK per aprire un menu o confermare una scelta.
x I tasti 00÷99 per inserire un valore numerico.
x Il tasto TTEXT per far apparire a schermo la tastiera virtuale in corrispondenza di appositi campi di inserimento testo
nel portale delle Applicazioni internet.
x Il tasto EEXIT o BACK, in generale, permette di uscire dal menu o di ritornare alla finestra che precede quella
corrente.
Fare inoltre riferimento alle eventuali indicazioni riportate nei vari menu, che specificano come attuare una funzione
tramite un corrispettivo tasto del telecomando.
3.1 Menu Installazione
Sottomenu:
1. Ricerca Canali
2. Reset Ricevitore
3.1.1 Menu Ricerca Canali
Durante la prima installazione viene eseguita la ricerca automatica dei canali disponibili. Periodicamente, in occasione
dell’attivazione di nuovi servizi televisivi e radiofonici o di modifiche da parte delle emittenti televisive, si suggerisce di
tener aggiornata la lista canali del ricevitore.
Solo nel caso si utilizzi un’antenna attiva da alimentare con 5V attraverso il cavo coassiale collegato all’ingresso
antenna RF IN del ricevitore, premere il tasto R
ROSSO per attivarla (premerlo nuovamente per disattivarla).
15
Italiano
Page 22
Italiano
16
AVVERTENZA
Se si utilizza un’antenna classica da tetto o un’antenna già alimentata, l’alimentazione antenna deve necessariamente
rimanere spenta: rischio di sovraccarico!
3.1.1.1 Ricerca Automatica
Per effettuare una scansione canali su tutte le frequenze disponibili, procedere come segue:
x Impostare il parametro
Modo Scansione
in
Auto
.
x Premere quindi il tasto V
VERDE
del telecomando per avviare la ricerca automatica dei canali.
3.1.1.2 Ricerca Manuale
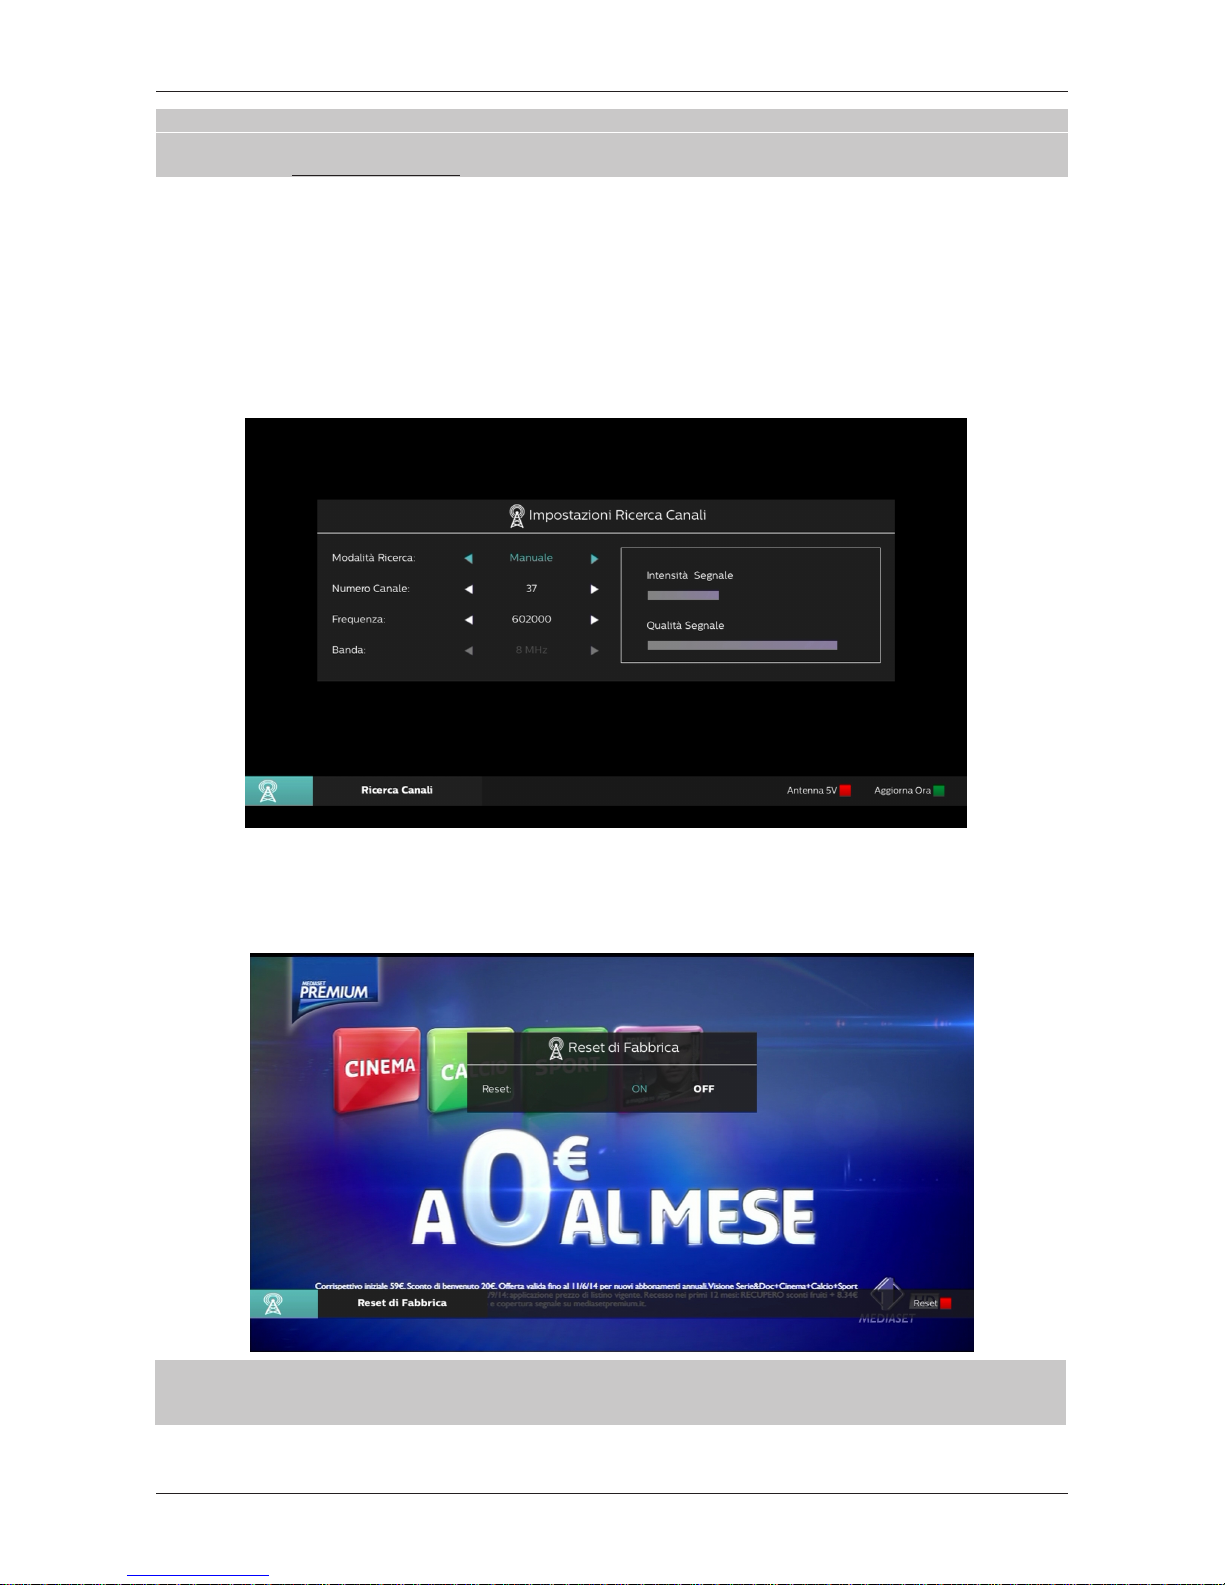
Per eseguire la scansione su uno specifico canale (per utenti esperti), seguire i passi descritto qui sotto:
x Impostare il parametro
Modo Scansione
in
Manuale
.
x Scegliere
Numero Canale/Frequenza
del canale interessato.
x Premere quindi il tasto V
VERDE
del telecomando per avviare la ricerca del canale scelto.
Philips DTR3030M
3.1.2 Reset Ricevitore
La funzione di ripristino della configurazione originale di fabbrica del ricevitore è comunemente chiamata anche Reset.
Per effettuare il reset, spostare il cursore sull’opzione ON (acceso) e premere il tasto OOK, infine premere il tasto RROSSO
(
Reset
).
AVVERTENZA
Eseguendo questa operazione, si perderanno tutte le personalizzazioni dell’utente e tutti i canali caricati, conservando
comunque l’ultima versione software installata.
3.2 Menu Gestione Canali
Page 23
17
Sottomenu:
1.
Gestioni Canali
2. Guida Elettronica ai Programmi -
EPG
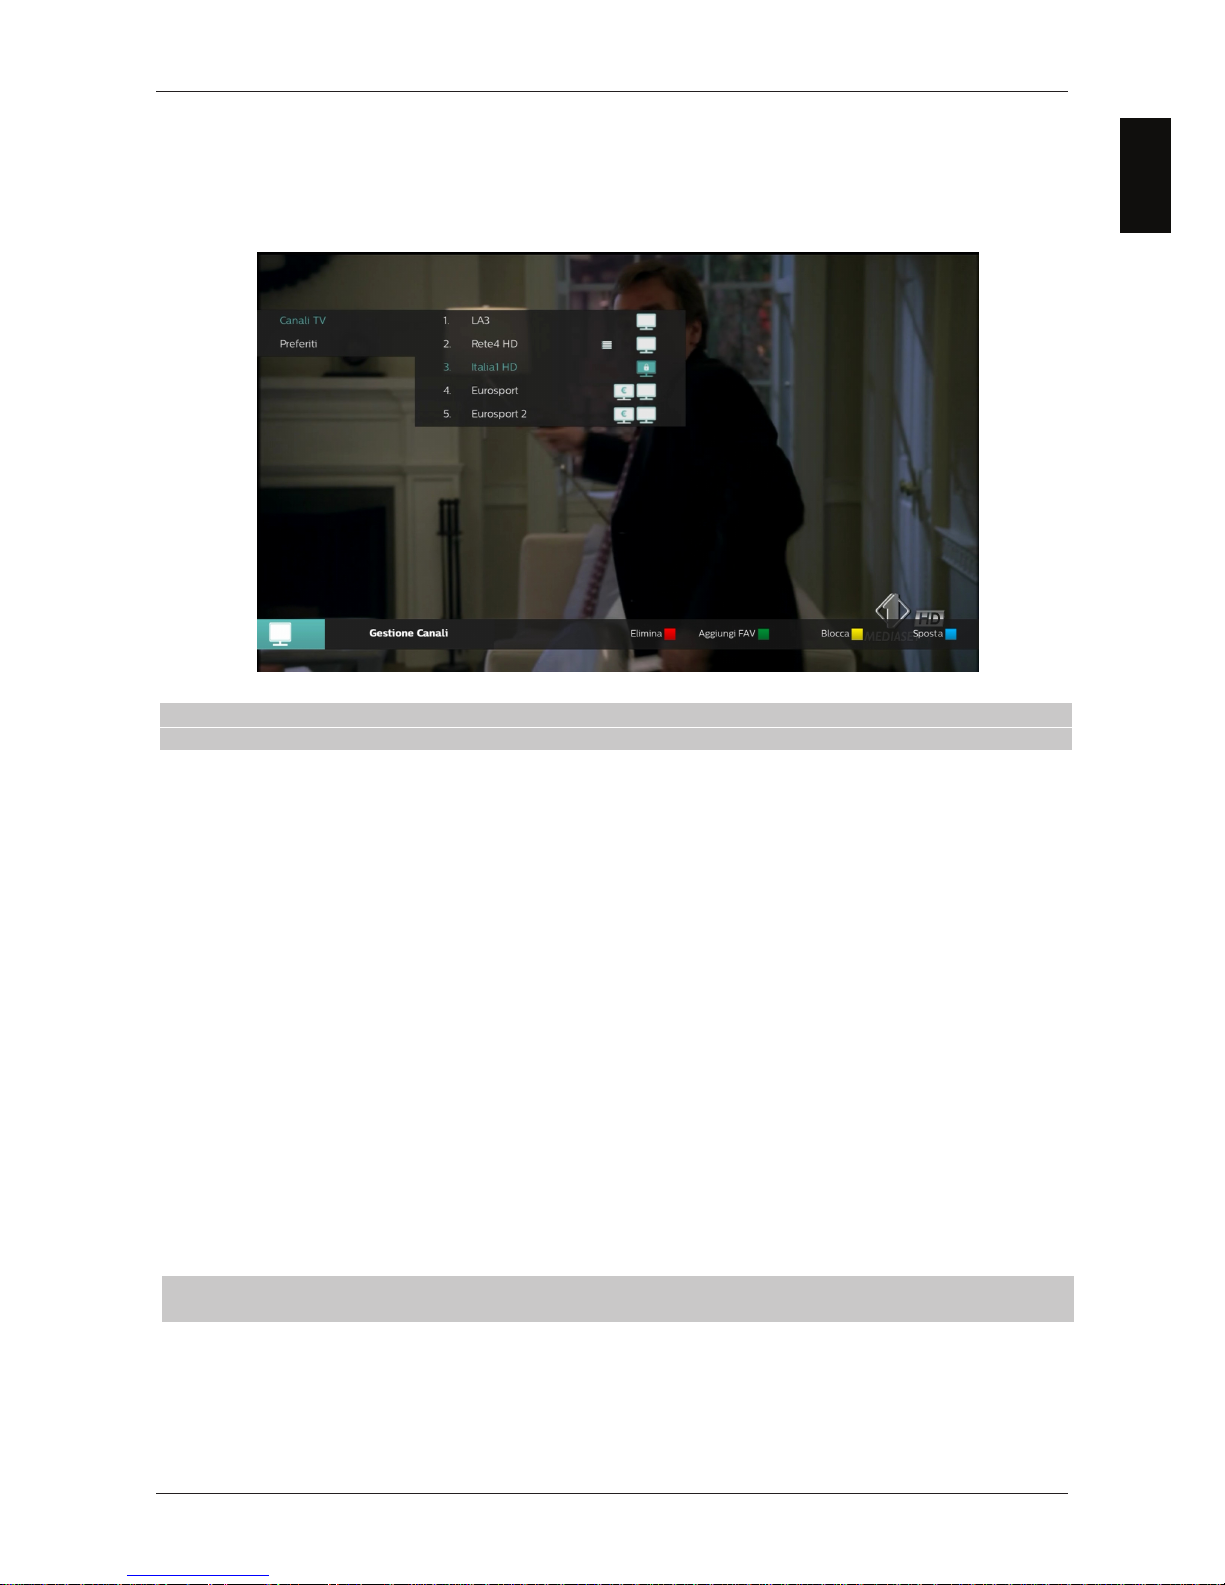
3.2.1 Gestione Canali
Menu per la gestione dell’elenco canali.
Spostamento Canali
NOTA
Lo spostamento manuale dei canali è possibile solamente quando la funzione di ordinamento LCN è disattivata.
Per spostare un canale:
x Selezionare il canale dalla lista principale.
x Premere il tasto B
BLU
(
Sposta
) sul canale scelto.
x Muovere il cursore sulla posizione di destinazione.
x Premere di nuovo il tasto B
BLU
(
Sposta
) per rilasciare il canale sulla posizione scelta.
Blocco Canali
Per la protezione manuale di un canale, con conseguente accesso alla visione tramite inserimento del PIN di sistema
(par. 3.6.1.4):
x Evidenziare il canale dalla lista principale.
x Premere il tasto G
GIALLO
(
Blocca
) per attivare il blocco (o premerlo di nuovo per disattivarlo).
x Inserire il codice PIN.
Philips DTR3030M
Lista Canali Favoriti
Per la realizzazione di una lista canali favoriti:
x Selezionare il canale desiderato dalla lista principale.
x Premere il tasto VVERDE (
Aggiungi FAV
) per aggiungere il canale alla lista dei favoriti.
x Confermare premendo OOK sull’opzione
Canali Favoriti
(oppure
Annulla
per revocare la scelta).
Una volta composta, se la funzione LCN non è attiva, è possibile ordinare anche la lista canali favoriti spostando i canali
con operazioni analoghe a quelle descritte per lo spostamento dei canali della lista principale.
Cancellazione Canale
Per cancellare un singolo canale dalla lista principale o rimuoverlo dalla lista dei favoriti:
x Evidenziare il canale dalla lista.
x Premere il tasto RROSSO (
Elimina
).
x Confermare l’azione.
NOTA
Il canale cancellato dalla lista principale verrà ripristinato in seguito ad un eventuale aggiornamento canali.
3.2.2 Guida Elettronica ai Programmi - EPG
Visualizzazione della guida elettronica ai programmi (Electronic Program Guide – EPG). Riferirsi al paragrafo 2.3.
3.3 Menu Multimediale
Italiano
Page 24
Philips DTR3030M
Menu dedicato alla riproduzione di contenuti multimediali disponibili via USB o in rete locale.
Sottomenu:
1. Audio
2. Video
3. Immagini
4. Lista Registrazioni
5. DLNA
3.3.1 Audio / Video / Immagini
Menu dedicati alla lettura dei file multimediali (audio/video/immagini) da una memoria di massa collegata alla porta USB
del ricevitore. Far riferimento al paragrafo 2.6.3.
3.3.2 Lista Registrazioni
Archivio delle registrazioni TV contenute nella memoria USB riservata alla videoregistrazione. Vedere paragrafo 2.6.2.2.
3.3.3 DLNA
Menu per la lettura di contenuti multimediali condivisi in rete locale da un server UPnP/DLNA. Riferirsi al paragrafo
2.7.2.
3.4 Menu Applicazioni
Portale delle Applicazioni di rete. Vedere al paragrafo 2.7.1.
3.5 Menu Servizi Pay per View
Per l’utilizzo del servizio a pagamento Mediaset Premium e la gestione della relativa smart-card, riferirsi al manuale
d’uso fornito insieme alla scheda.
3.6 Menu Impostazioni
Il menu IImpostazioni Ricevitore è dedicato alla configurazione generale del ricevitore. I suoi sottomenu sono:
1. Configurazione Ricevitore
2. Pianifica Attività
3. Impostazioni Rete
4. Informazione Ricevitore
3.6.1 Configurazione Ricevitore
Sottomenu:
1. Lingua
2. Impostazioni AV
3. Impostazioni Orario
4. Controllo Parentale
5. Gestione Energia
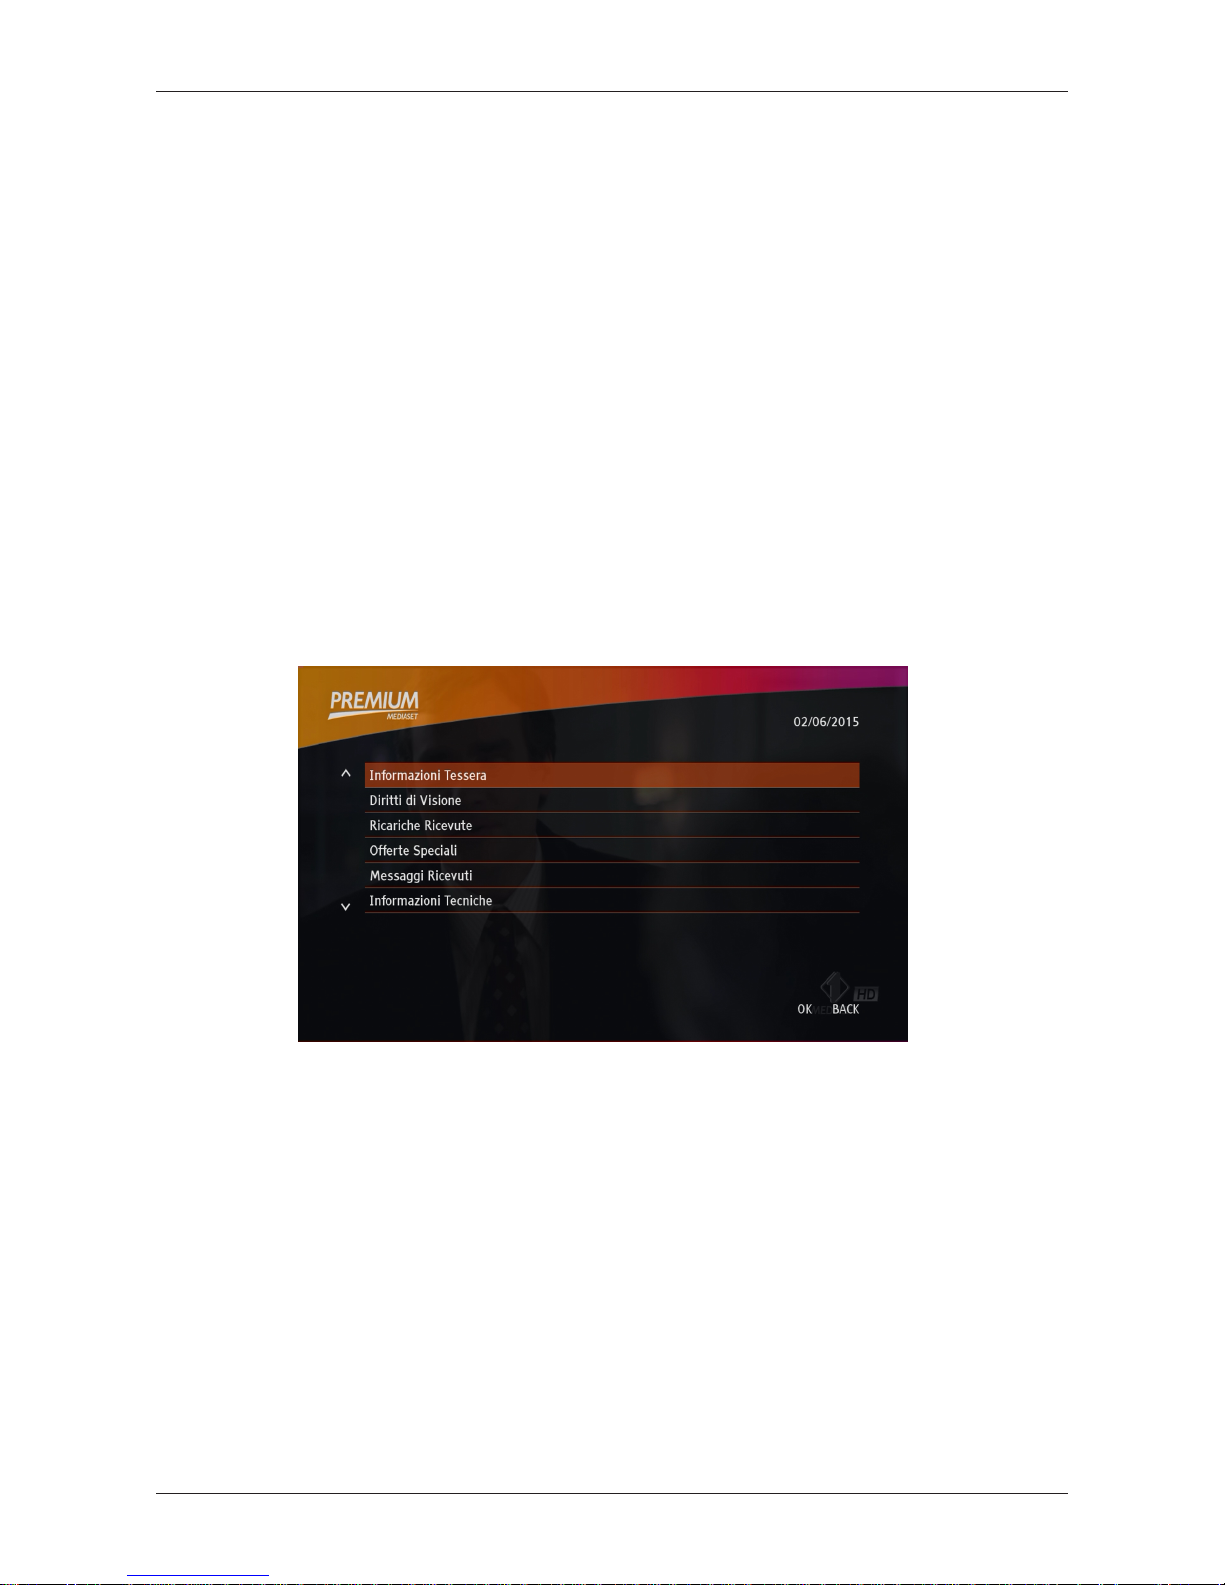
3.6.1.1 Lingua
Sono disponibili le seguenti voci:
1.
Lingua
: lingua del menu visualizzato a video (On Screen Display - OSD).
18
Page 25
Italiano
19
AVVERTENZA
Il corretto funzionamento del ricevitore in relazione alle suddette preferenze su audio e sottotitoli è subordinato dalla
presenza delle relative informazioni trasmesse a discrezione dell’emittente del canale sintonizzato.
3.6.1.2 Impostazioni AV
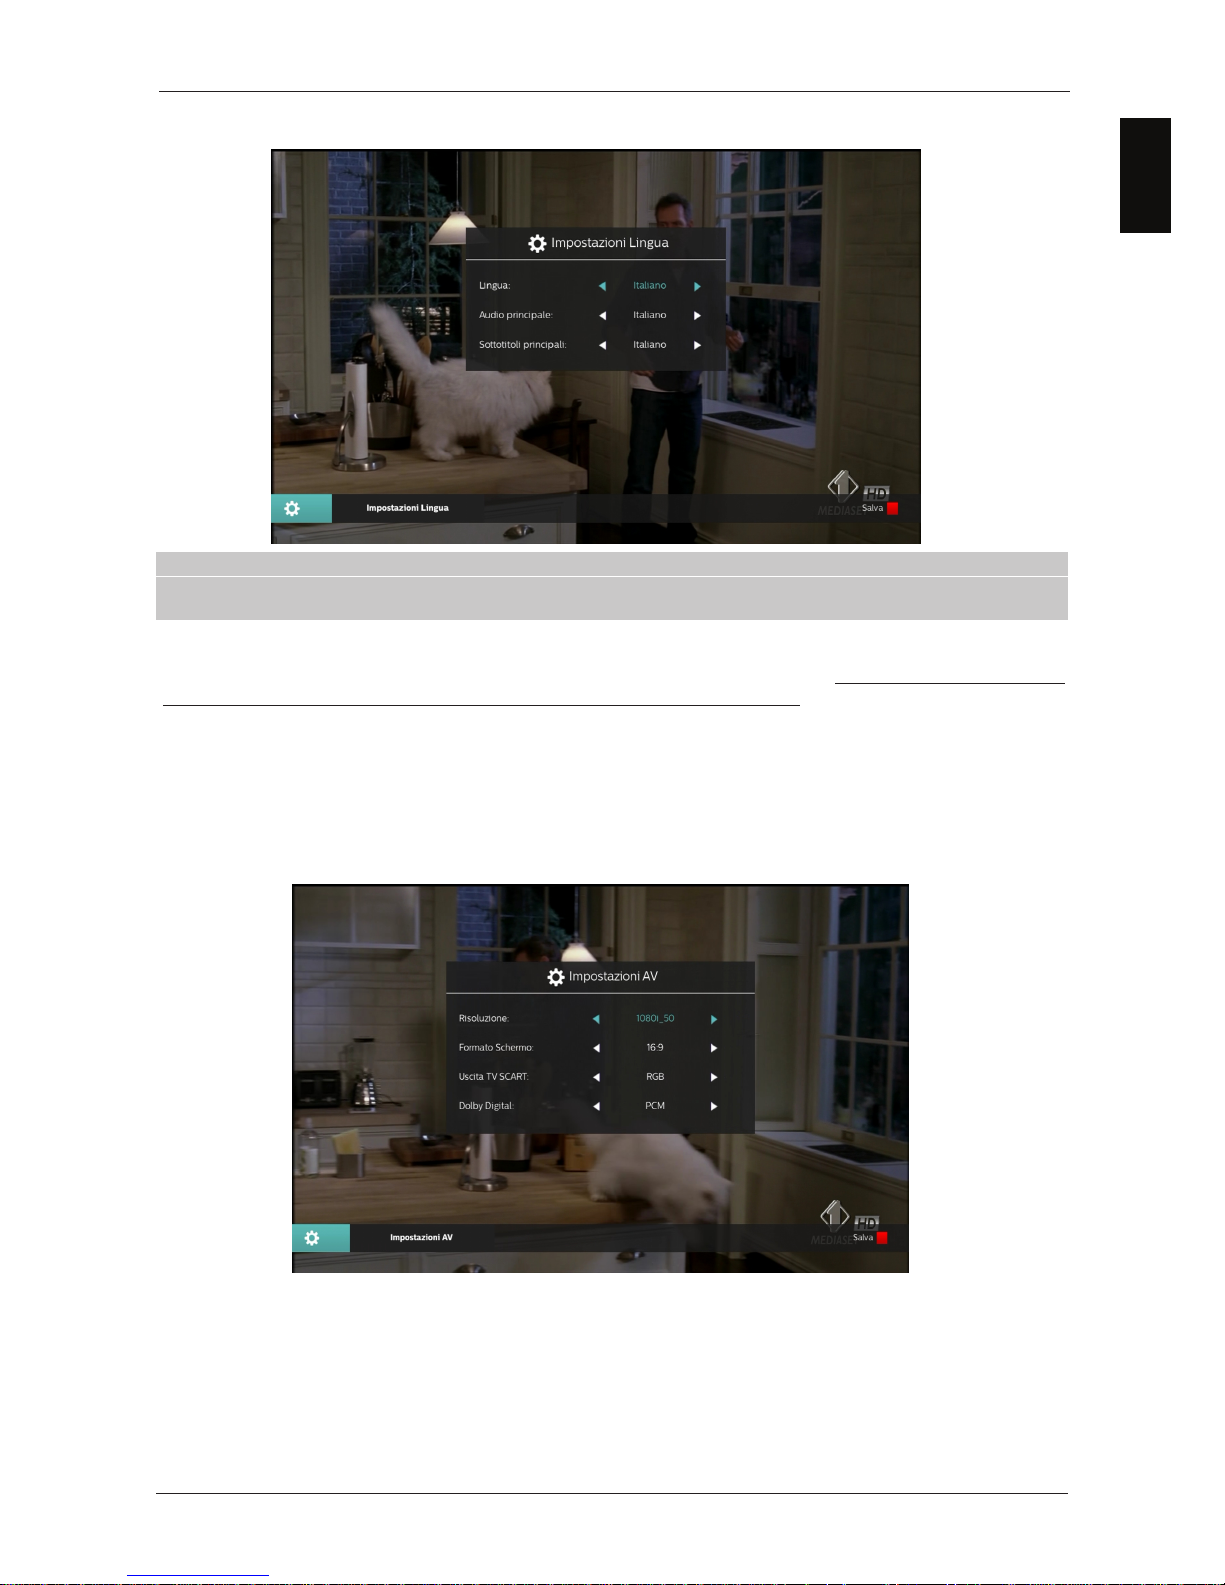
Il menu I
Impostazioni AV
(Audio Video) dispone delle seguenti configurazioni audio-video, da regolare in coerenza con le
caratteristiche di schermo e dispositivi collegati alle prese audio e video del ricevitore:
1.
Risoluzione
: impostazione della risoluzione video dell’uscita audio-video digitale HDMI.
2.
Formato Schermo
: formato dello schermo/TV collegato al ricevitore e della relativa modalità di presentazione delle
immagini con formato diverso dallo schermo:
a. 16:9: per schermi 16:9, le immagini 4:3 verranno adattate a tutto lo schermo.
b. 4:3: per schermi 4:3, le immagini 16:9 verranno adattate a tutto lo schermo.
3.
Uscita SCART
:Video output presa SCART (solo
CVBS
).
4.
Dolby Digital
: codifica dell’uscita audio digitale tra Stereo digitale (
PCM
), multicanale (
Dolby Digital
) e sorgente
originale (
RAW
).
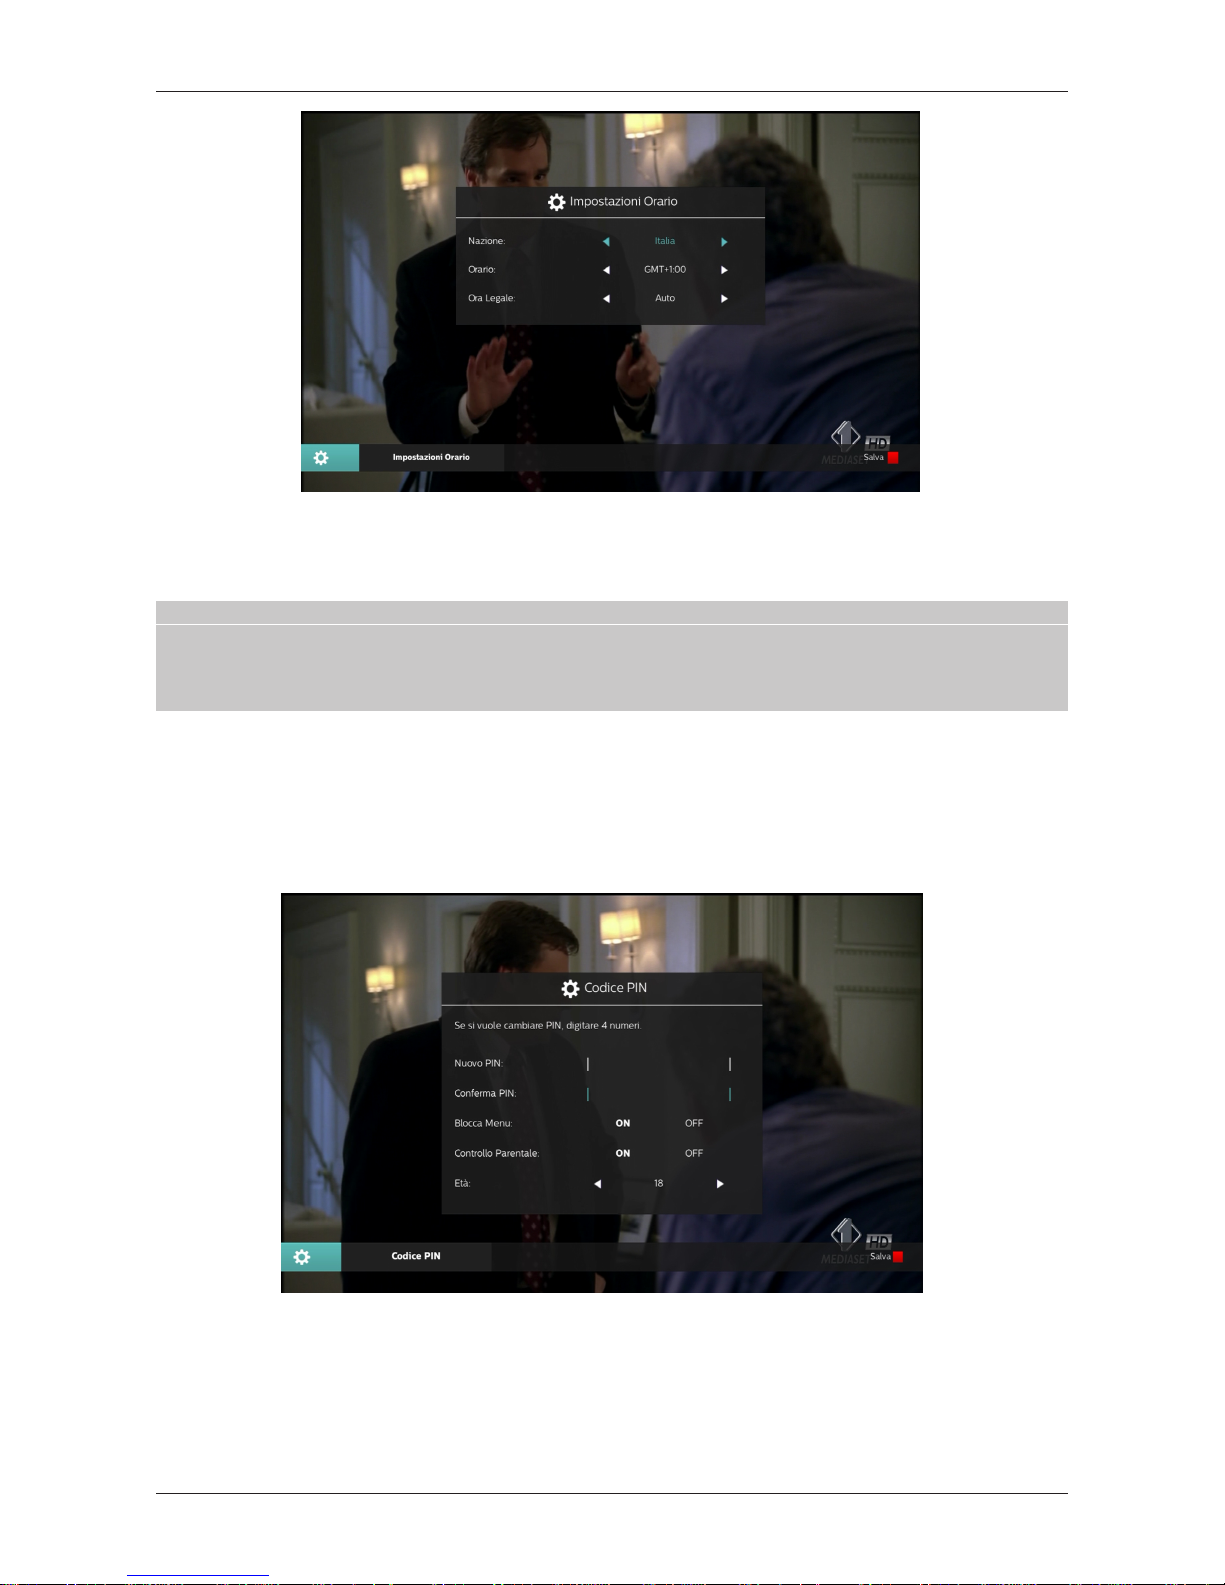
Paese
: nazione di installazione del ricevitore.
2.
Orario
: scostamento orario rispetto al riferimento mondiale di Greenwich (Greenwich Mean Time - GMT). Per
l’Italia, la differenza è di
+01:00
ora (
GMT+1:00
).
3.
Ora Legale
: opzione correzione dell’ora in regime d’orario legale, che si consiglia di mantenere automatica (
Auto
).
Philips DTR3030M
2.
Audio Principale
: lingua audio predominante per i programmi TV.
3.
Sottotitoli Principali
: lingua prescelta per i sottotitoli dei programmi TV.
3.6.1.3 Impostazioni Orario
Tale menu offre i controlli descritti di seguito:
1.
Page 26
20
3.6.1.4 Controllo Parentale
Il menu C
Controllo Parentale
consente di attuare un controllo d’accesso a canali e al menu I
Installazione
>
Ricerca
Canali
tramite password numerica a quattro cifre, detta Personal Identification Number (PIN), nonché di modificare lo
stesso PIN.
NOTE E AVVERTENZE
x Questo menu è sempre protetto con PIN.
x Il codice PIN viene definito dall’utente in fase di prima installazione del dispositivo (par. 1.3.3).
x Se dopo la modifica non si ricorda più la password personale, riportare il ricevitore allo stato di prima installazione
dal menu R
Reset Ricevitore
(par. 3.1.2).
All’interno di questo menu sono presenti le seguenti funzioni di protezione:
1.
Nuovo PIN/Conferma PIN
: modifica del PIN.
2.
Blocco Menu
: blocca (ON) o sblocca (
OFF
) l’accesso con password ad alcuni importanti menu.
3.
Controllo Parentale/Livello d’Età
: abilita (ON) o disabilita (
OFF
) la protezione minori. Viene effettuat un controllo
sulla visione di alcuni eventi sensibili. Quando il canale sintonizzato trasmette un evento con informazione di
protezione di visione da parte di un pubblico di età uguale o superiore al
Livello d’Età
impostato a menu, il ricevitore
bloccherà il canale. Apparirà quindi a video la richiesta di sblocco visione canale tramite inserimento del codice PIN.
Salvare le modifiche apportate premendo il tasto R
ROSSO
(
Salva
).
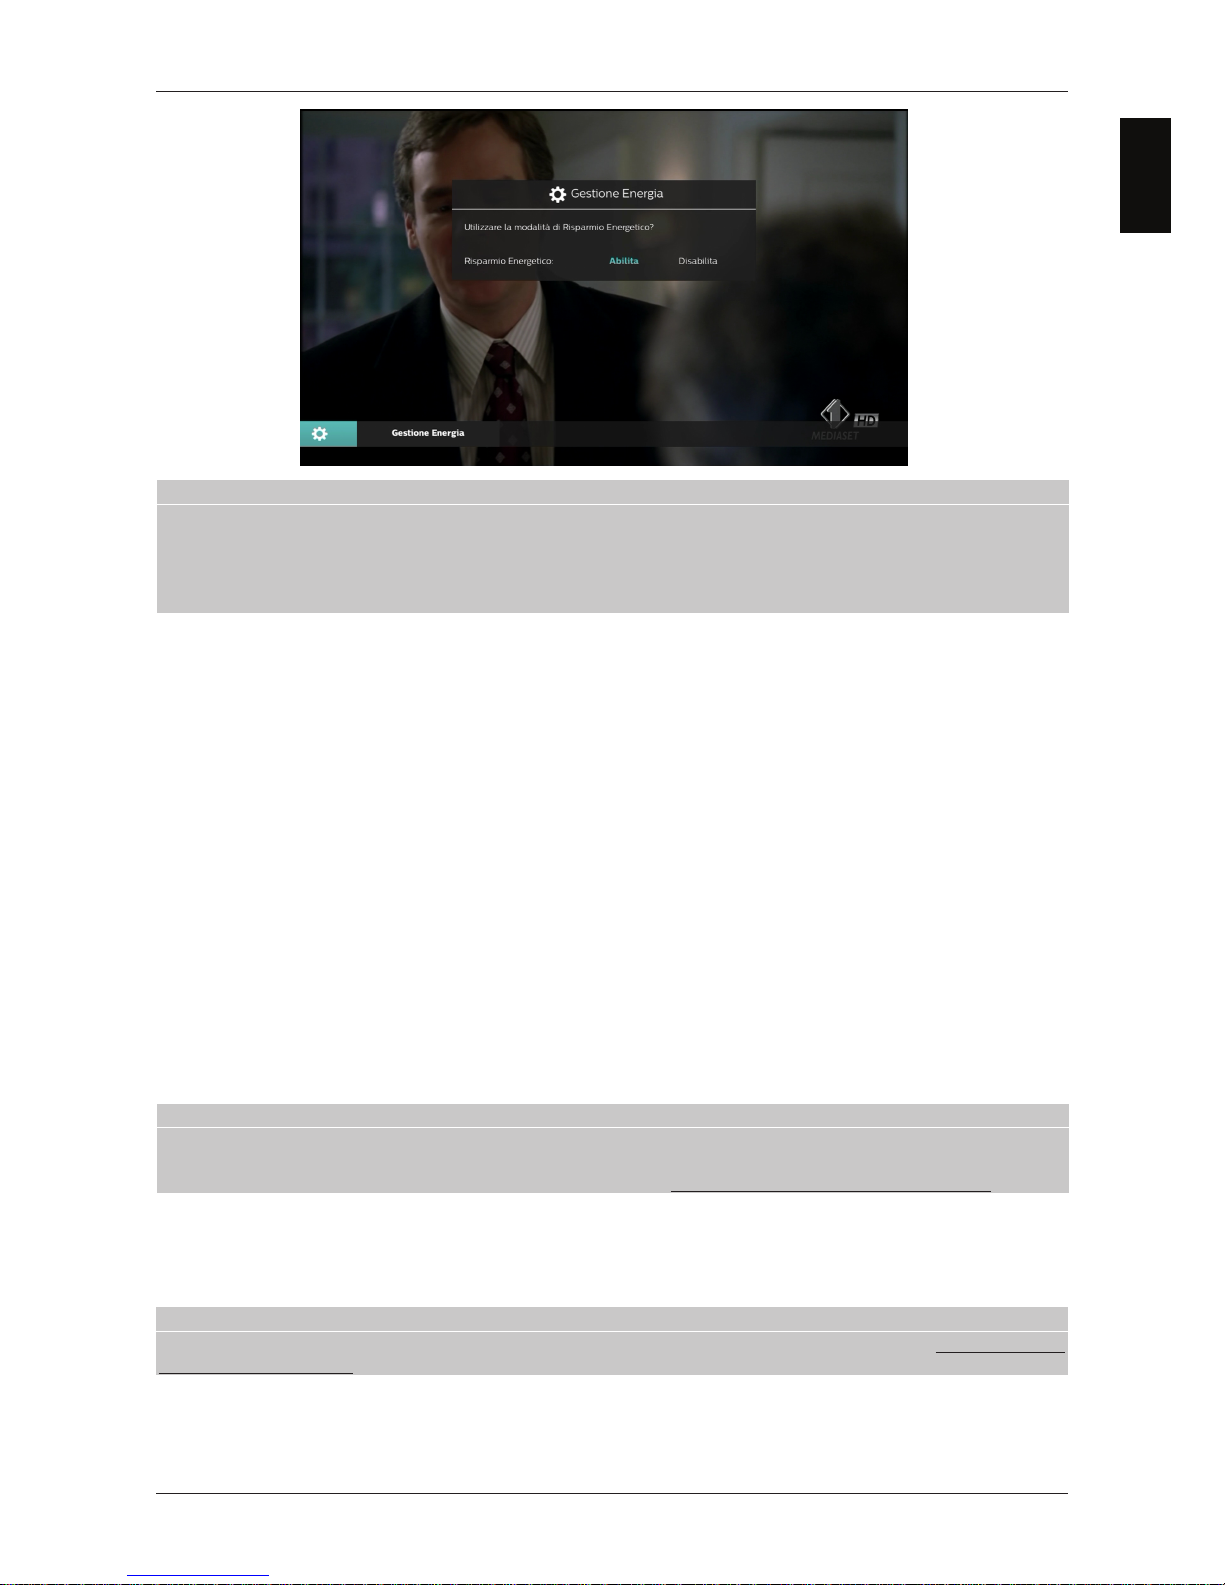
3.6.1.5 Gestione Energia
Il ricevitore è dotato della funzione di risparmio energetico preselezionata da fabbrica, che è eventualmente
disattivabile da questo menu.
Passate tre ore in modalità operativa senza alcun comando da parte dell’utente, esso andrà in standby
automaticamente. Inoltre, ogni volta che il ricevitore viene spento in standby, esso rimarrà per poco più di 30 minuti in
uno stato di standby vigile, durante il quale eseguirà eventuali aggiornamenti come una ricerca di nuovi canali, per poi
passare ad uno stato di standby profondo, di risparmio energetico.
Philips DTR3030M
Page 27
NOTA
Quando il risparmio energetico è attivo, il ricevitore può avere diversi tempi di reazione all’accensione dallo stato di
standby, a seconda che esso si trovi nello stato di standby profondo o vigile. In particolare, dallo standby profondo, il
tempo di reazione all’accensione è molto lungo,poichè corrisponde ad un completo avvio del sistema.
Per ottenere sempre una rapida accensione del ricevitore dallo stato di standby, è quindi necessario disabilitare il
Risparmio Energetico da questo menu.
3.6.2 Pianifica Attività
Menu dedicato alla pianificazione di attività automatiche. Sottomenu:
1. Aggiornamento Software
2. Aggiornamento Canali
3. Impostazioni Timer
3.6.2.1 Aggiornamento Software
Per la fruizione di eventuali nuovi servizi delle emittenti televisive o di nuove funzioni del ricevitore, si consiglia di tenere
sempre aggiornato il software del dispositivo.
L’operazione di aggiornamento software via etere (Over The Air - OTA), che permette al ricevitore di scaricare i dati
direttamente dal segnale d’antenna, è configurabile tramite la maschera
Impostazioni OTA
.
1.
In Modalità Operativa
: Se questa opzione è attiva (ON) ed il ricevitore è acceso, esso segnalerà la presenza di un
eventuale nuovo software solo se trasmesso sul canale sintonizzato.
2.
In Standby
: Il ricevitore è impostato di fabbrica in modo da verificare l’aggiornamento software in modalità di
standby (ON), con cadenza giornaliera, alle ore 4:00. In alternativa, esso può essere configurato diversamente,
modificando i parametri
Frequenza
e
Orario
presenti a menu, nonché essere disattivato (
OFF
).
3.
Modalità Ricerca
: In modalità automatica (
Auto
), il ricevitore eseguirà la scansione OTA su tutte le frequenze
digitali terrestri disponibili. Invece, optando per la modalità
Manuale
, gli utenti esperti potranno inserire i dati per
una ricerca su una determinata frequenza.
La ricerca di un aggiornamento software OTA, può essere anche avviata in ogni istante da parte dell’utente, premendo il
tasto VVERDE (
Aggiorna via OTA
).
AVVERTENZA
L’operazione di scarico ed installazione di un nuovo software via etere può richiedere molto tempo, anche ore,
soprattutto in caso di bassa velocità di trasmissione dell’aggiornamento e/o di ricezione difficoltosa. Durante tale
periodo non interagire col ricevitore e non staccare l’alimentazione: rischio di blocco irreversibile del ricevitore!
In alternativa all’aggiornamento via etere, il software del ricevitore è aggiornabile:
x tramite porta USB, premendo il tasto BBLU (
Aggiorna via USB
), previo inserimento di una chiavetta USB contenente
l’immagine software appropriata,
Philips DTR3030M
x via internet, collegandosi al server degli aggiornamento, con la pressione del tasto GGGIIIAAALLLLLLOOO.
(
Aggiorna via IP
).
AVVERTENZA
Durante un aggiornamento software, non interagire col ricevitore e non staccare l’alimentazione: rischio di blocco
irreversibile del ricevitore!
21
Italiano Italiano
Page 28
22
3.6.2.2 Aggiornamento Canali
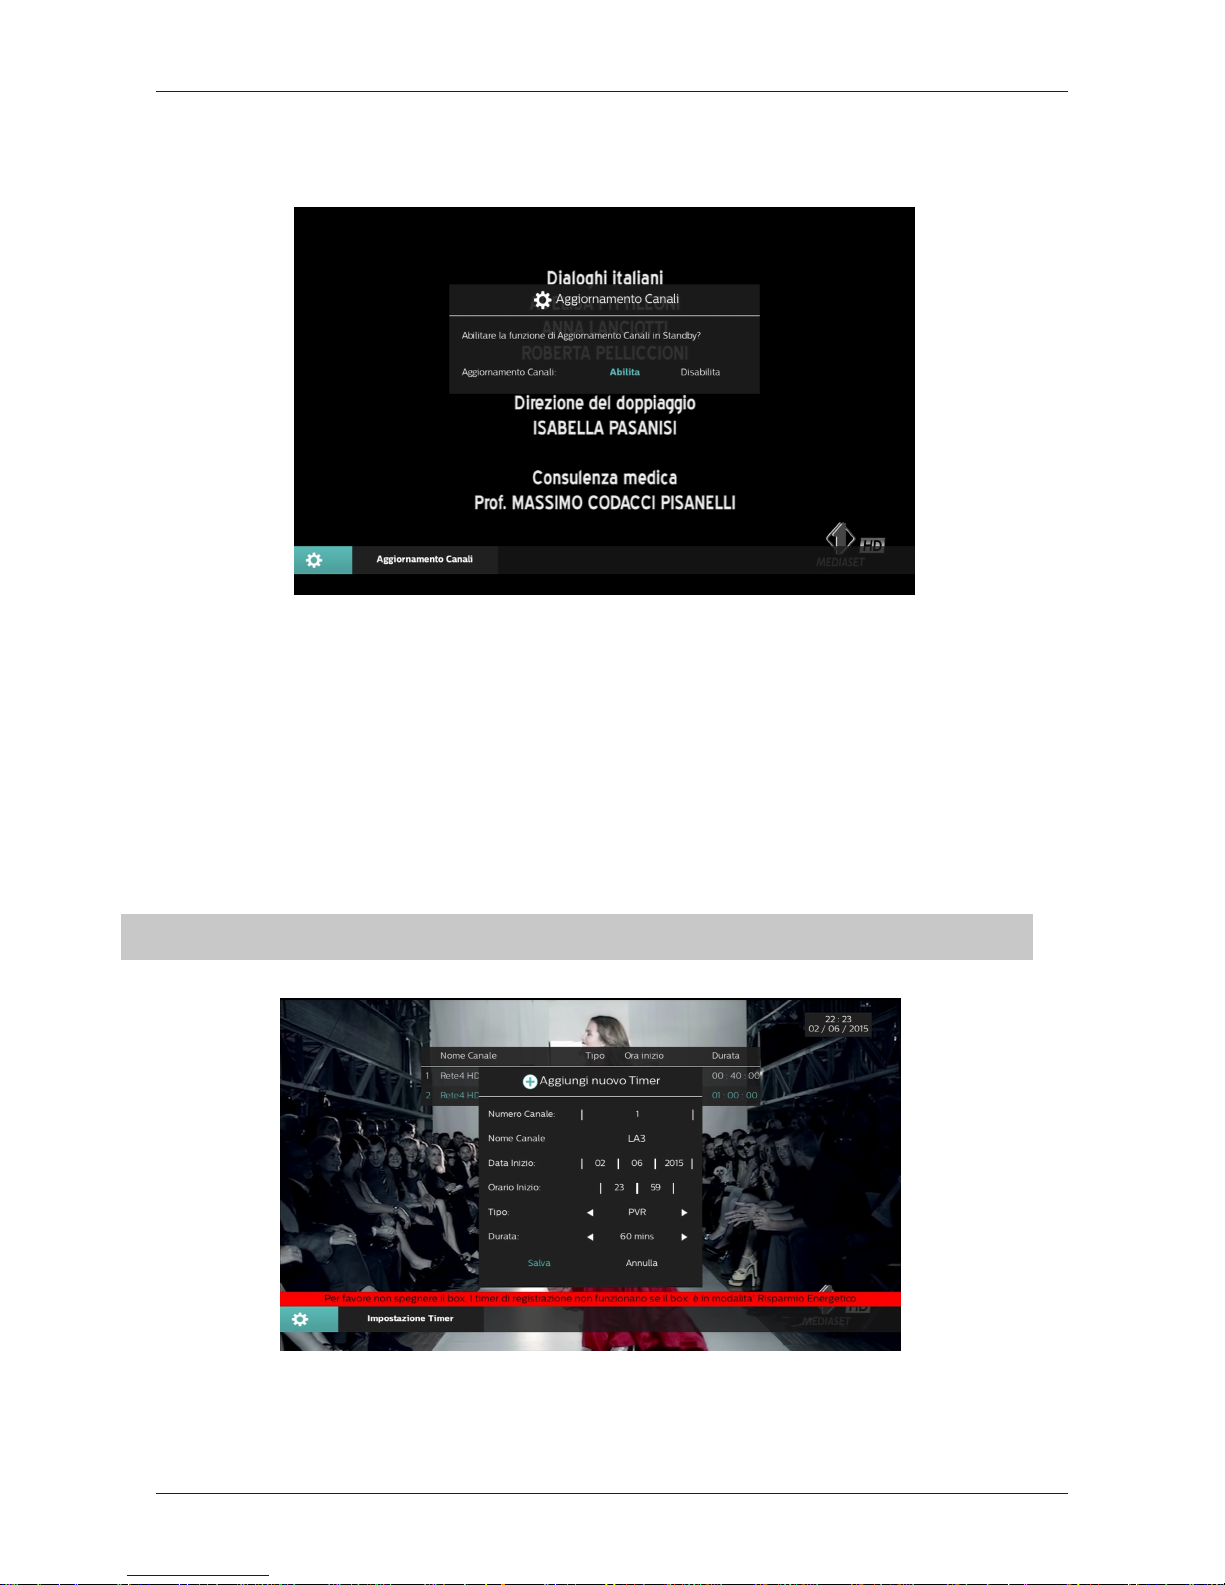
Questo menu è dedicato alla configurazione dell’aggiornamento automatico della lista canali.
Il ricevitore è impostato di fabbrica per effettuare l’aggiornamento automatico dei canali in standby, durante i primi
trenta minuti dallo spegnimento e, giornalmente, alle 4:30 del mattino. In alternativa, esso può essere disattivato.
Impostazioni
> P
Pianifica Attività
> I
Impostazioni Timer
.
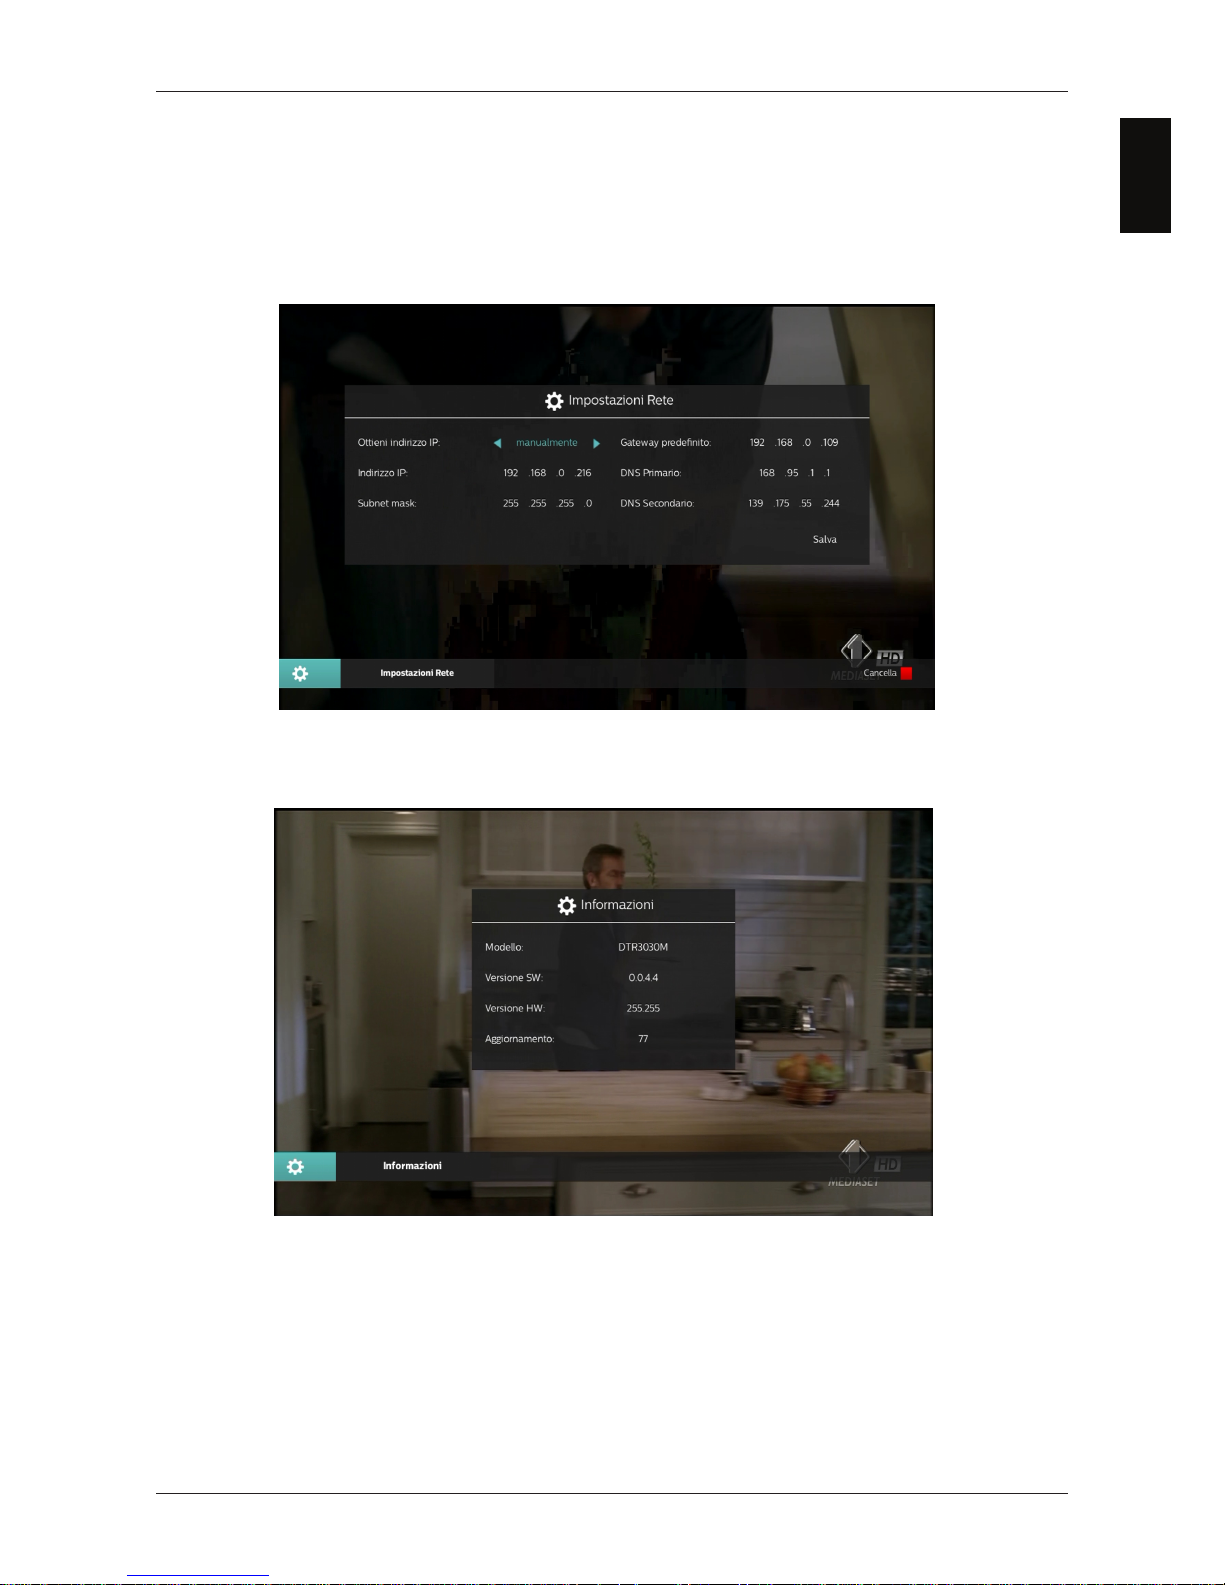
x Premere il tasto V
VERDE
Aggiungi
.
x Completare i campi della maschera A
Aggiungi nuovo Timer
per la definizione del timer:
1.
Numero Canale
: il numero del canale interessato.
2.
Data Inizio
: data di avvio (in formato GG/MM/
AAAA
).
3.
Ora Inizio
: orario di partenza (in formato hh:mm).
4.
Tipo
: tipo di timer, tra registrazione (
PVR
) o visione (
Canale
).
5.
Durata
: durata del Timer.
x Salvare i dati premendo il tasto OOK del telecomando in corrispondenza della voce
Salva
(oppure
Annulla
per
abolire l’inserimento del timer).
NOTE E AVVERTENZE
Nessun timer funzionerà se il ricevitore è spento in standby in modalità di Risparmio Energetico (par. 3.6.1.3).
È possibile cancellare un timer prenotato selezionandolo della lista e premendo il tasto R
ROSSO
Cancella
.
Philips DTR3030M
3.6.2.3 Impostazione Timer
Da questo menu è possibile programmare manualmente un semplice timer di visione o un
timer di registrazione per uno o più eventi TV. Procedere come descritto si seguito:
x Accedere al menu I
Page 29
3.6.3 Impostazioni Rete
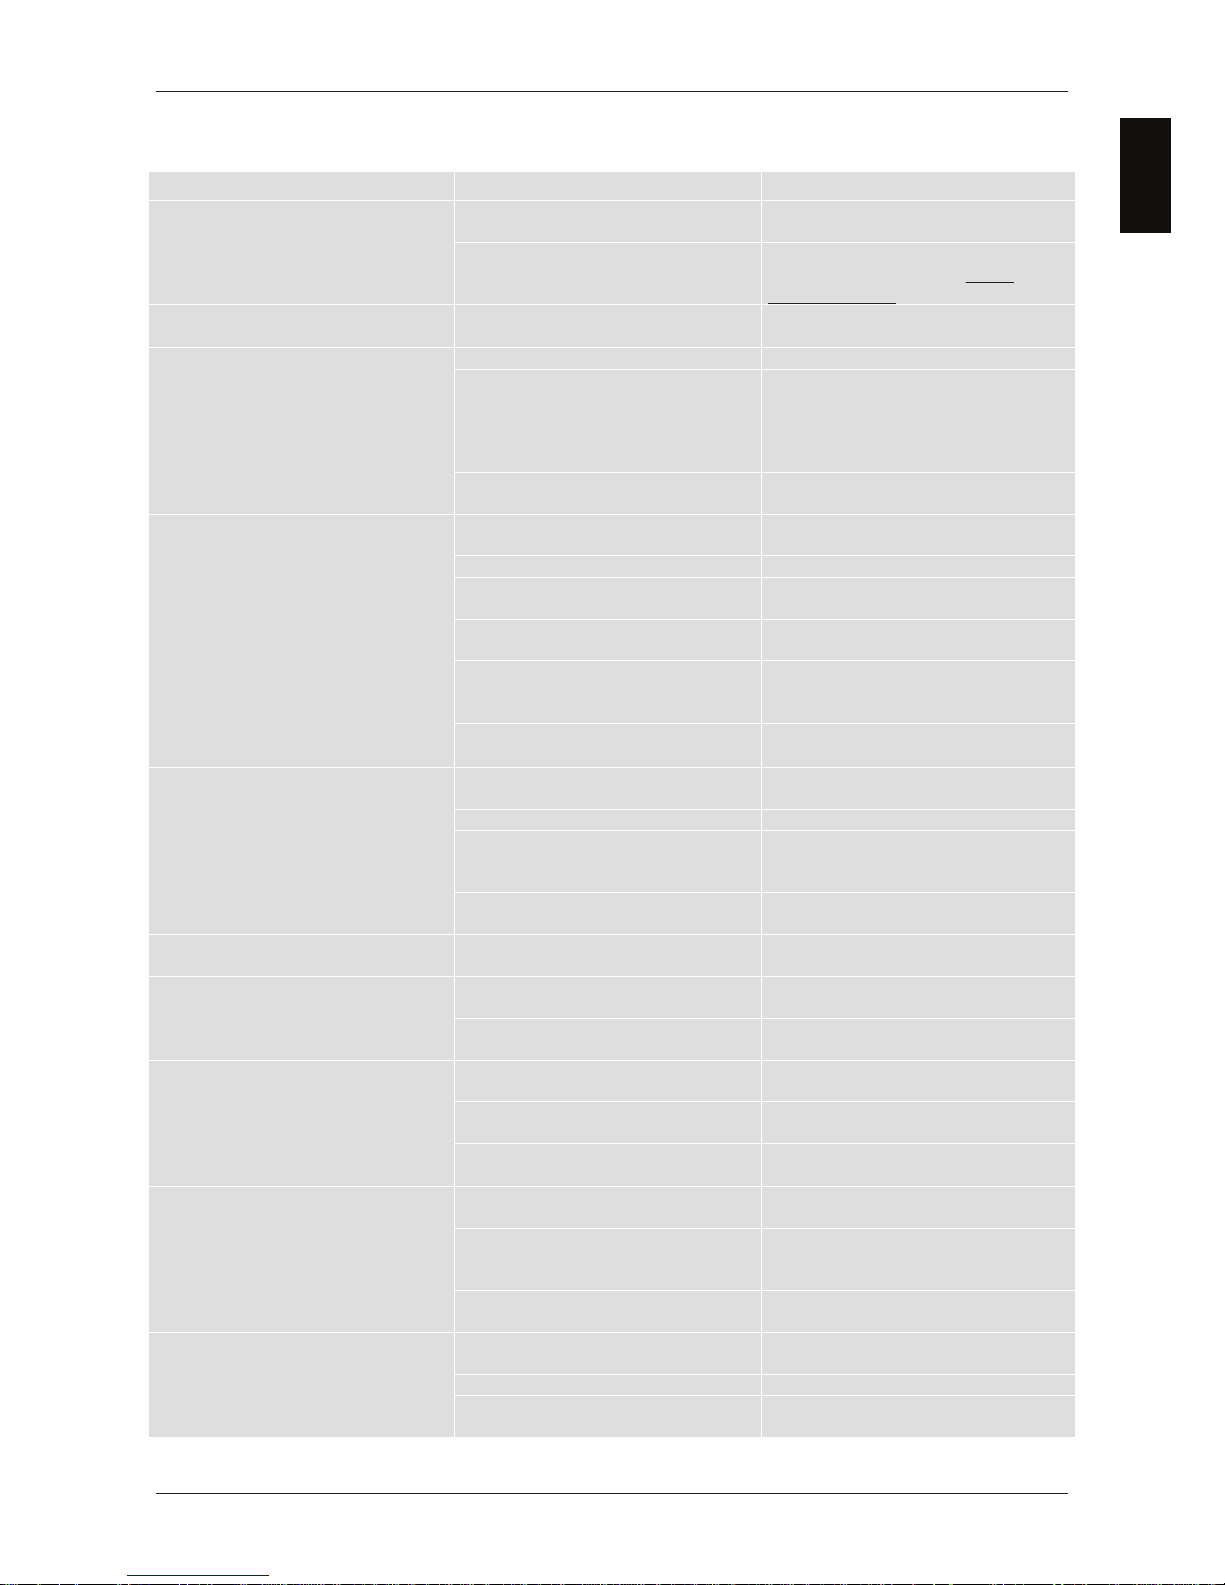
Menu per l’interfacciamento del ricevitore con la rete a banda larga tramite collegamento Ethernet.
La voce
Ottieni indirizzo IP
definisce il tipo di configurazione:
x
automaticamente
(consigliata) Applicazione automatica dei parametri di rete tramite protocollo dinamico DHCP.
x
manualmente
(per utenti esperti) Impostazione manuale da parte dell’utente di tutti i parametri d’accesso alla rete,
utile quanto si vuole assegnare al dispositivo un indirizzo IP statico.
Premere OOK in corrispondenza della voce
Salva
per applicare le impostazioni.
3.6.4 Informazioni
Elenca informazioni di sistema del ricevitore, in particolare la versione software in uso.
Philips DTR3030M
23
Italiano
Page 30

24
4 Mappa dei menu
Il menu del ricevitore è così strutturato:
Menu Principale
-- Installazione
---- Ricerca Canali
---- Reset di Fabbrica
-- Gestione Canali
---- Gestore Canali
----EPG
-- Multimediale
---- Audio
---- Video
----Immagini
----Lista Registrazioni
----DLNA
-- Applicazioni
-- Servizi Pay Per View
----Mediaset Premium
-- Impostazioni
----Configurazione Ricevitore
---- Lingua
---- Impostazioni AV
---- Impostazioni Orario
---- Controllo Parentale
---- Gestione Energia
----Pianifica Attività
---- Aggiornamento Software
---- Aggiornamento Canali
---- Impostazioni Timer
----Impostazioni Rete
----Informazioni Ricevitore
NOTA
La navigazione tra i menu è semplice ed intuitiva. Utilizzare i tasti M
MENU
, B
BACK
, E
EXIT
, cursore (frecce ed OOK) e numerici
(00÷99) del telecomando. Attenersi inoltre alle eventuali indicazioni poste su ogni finestra di dialogo.
Philips DTR3030M
Page 31
Italiano
25
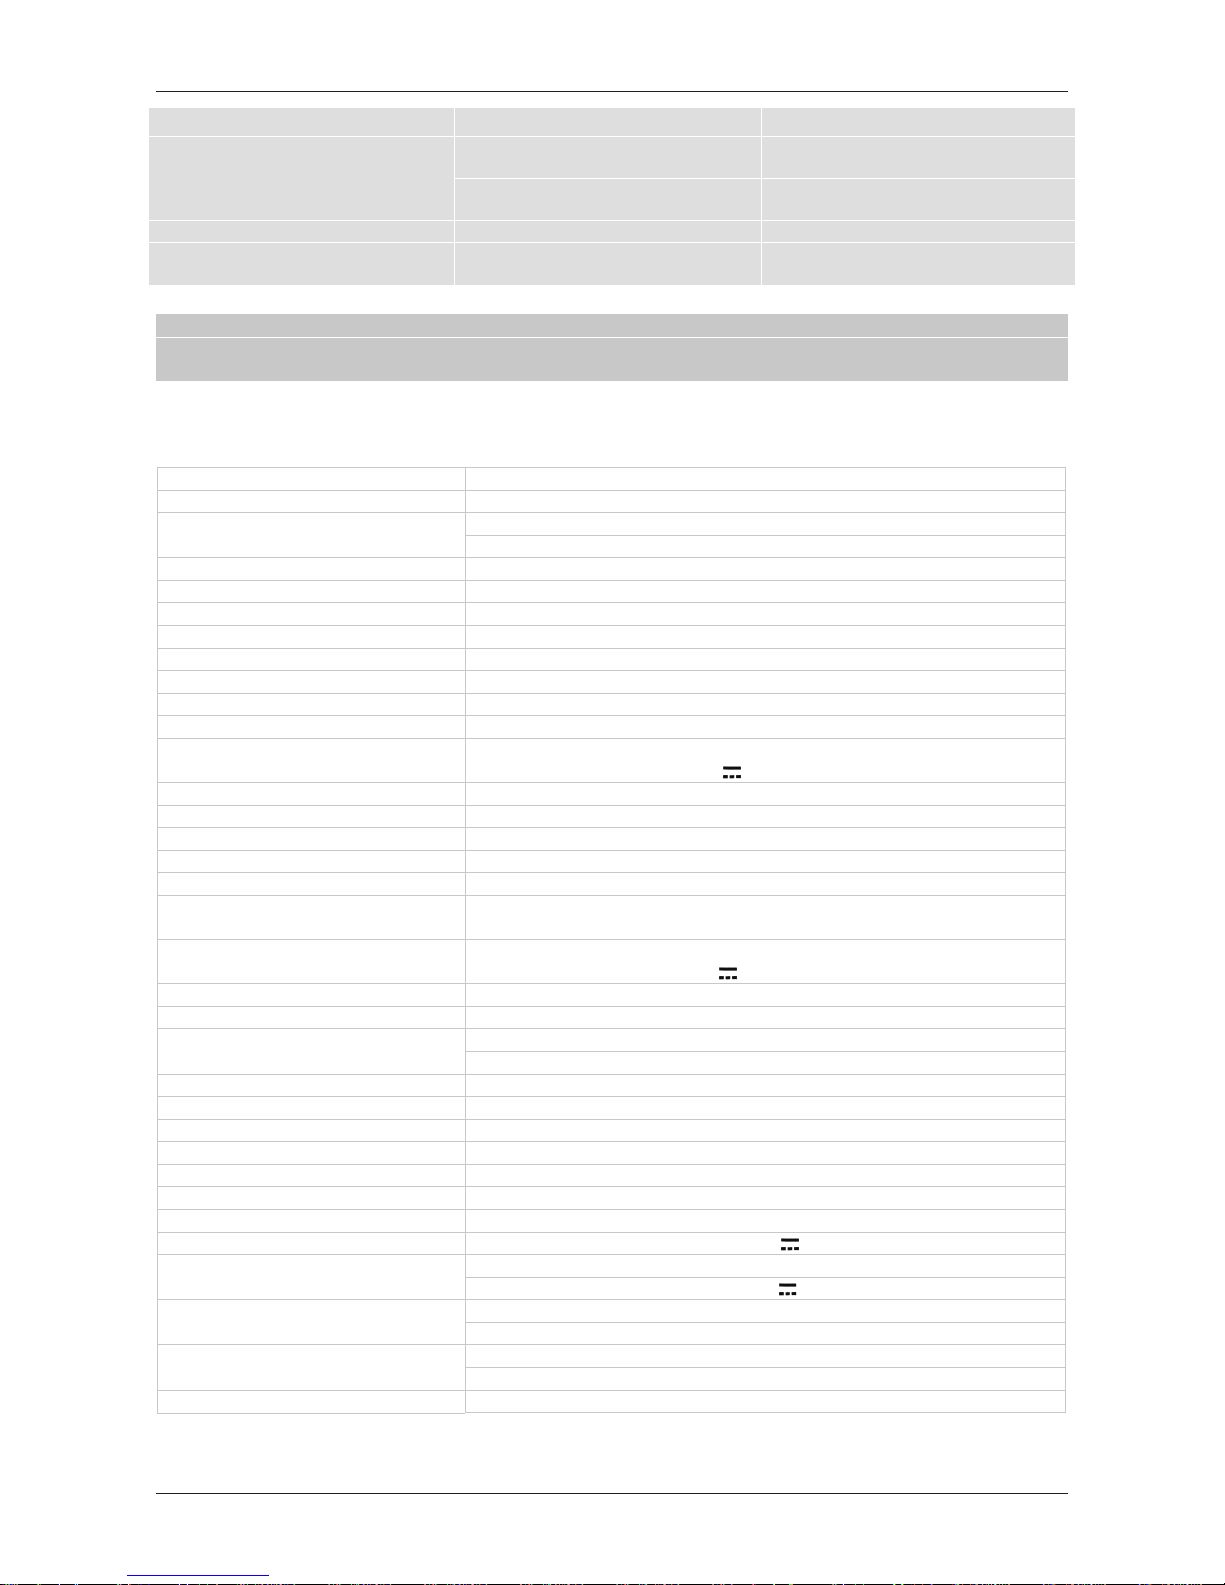
5 Guida alla risoluzione dei problemi
SINTOMO POSSIBILE CAUSA RIMEDIO
Il LED sul pannello frontale non si
accende.
Il ricevitore è scollegato dalla rete
elettrica.
Controllare che il ricevitore sia collegato
alla rete elettrica.
L’alimentatore è inserito ma non
funziona ugualmente.
Accertarsi che l’alimentatore sia
funzionante.
ATTENZIONE
: rischio
di scossa elettrica!
Il ricevitore impiega molto tempo ad
accendersi dallo stato di standby.
È attiva la funzione di risparmio
energetico in standby.
Disabilitare la funzione di risparmio
energetico. Vedi par. 3.6.1.5
Mancanza di segnale.
Cavo antenna non collegato al ricevitore. Collegare il cavo antenna al ricevitore.
Impianto antenna danneggiato.
Verificare l’integrità del vostro impianto
(antenna, cavo coassiale, dispositivi di
distribuzione segnale, etc.).
Si consiglia di far verificare l’impianto da
personale qualificato.
Il canale sintonizzato non sta
trasmettendo o è obsoleto.
Cambiare canale e/o aggiornare la lista
canali.
Assenza di suono e/o immagini.
Volume audio basso o muto.
Aumentare il livello del volume audio del
ricevitore e del televisore.
Il ricevitore è in standby. Accendere il ricevitore.
Televisore spento o posizionato sul
canale errato.
Accendere lo schermo TV e/o posizionarlo
sul canale audio-video corretto
Cavo audio-video (SCART o HDMI) non
connesso al televisore o danneggiato.
Ripristinare propriamente il collegamento
audio-video.
La risoluzione HDMI del ricevitore non è
compatibile con quella dello schermo
collegato.
Collegare il ricevitore tramite SCART al
televisore, regolare la risoluzione, quindi
ricollegare il cavo HDMI.
Si sta tentando di vedere un canale
obsoleto o codificato non compatibile.
Cambiare canale e/o aggiornare la lista
canali.
Il telecomando non funziona.
Il telecomando si trova nella modalità di
funzionamento sbagliata.
Premere il tasto STB par passare al
controllo del ricevitore.
Batterie non inserite o scariche. Inserire le batterie o sostituirle.
Batterie inserite con le polarità errate.
Inserire le batterie nel verso corretto.
Seguire le indicazioni all’interno del vano
batterie.
Il telecomando è caduto e qualche
componente si è danneggiato.
Rivolgersi al proprio rivenditore per
l’acquisto di un nuovo telecomando.
Le regolazioni effettuate a menu non
sono state memorizzate.
Mancata conferma dopo la modifica delle
impostazioni.
Dopo ogni modifica, premere l’eventuale
apposito tasto di conferma/salvataggio.
Le informazioni del programma non
vengono visualizzate.
Il programma interessato non trasmette
informazioni sull’evento.
L’orario del ricevitore non è impostato
correttamente
Regolare l’orario tramite l’apposito menu.
Vedi par. 3.6.1.3.
I timer non partono o non funzionano
propriamente.
L’emittente trasmette dati di orario e/o
data errati.
L’orologio del ricevitore non è regolato
correttamente.
Regolare l’orario tramite l’apposito menu.
Vedi par. 3.6.1.3.
Il ricevitore è spento, in standby, in
modalità di risparmio energetico.
Disattivare la funzione di risparmio
energetico. Vedi par. 3.6.1.5.
Il ricevitore non risponde all’azione dei
tasti del telecomando.
Blocco momentaneo del ricevitore.
Scollegare l’alimentazione del ricevitore e
ricollegarla dopo qualche istante.
Il canale sintonizzato trasmette dei dati
inappropriati che bloccano il ricevitore.
Scollegare il cavo antenna, riavviare il
ricevitore, cambiare canale, quindi
collegare nuovamente l’antenna.
Problemi con il telecomando.
Vedi suggerimenti pertinenti riportati in
questa tabella.
La memoria USB non viene riconosciuta.
Memoria USB non formattata
propriamente.
Formattare la memoria con File System
FAT32 o NTFS.
Memoria USB non compatibile. Provare un’altra memoria USB.
La sola porta USB del box non è
sufficiente ad alimentare la memoria.
Utilizzare l’eventuale alimentatore
esterno per il disco.
La tabella continua a pagina successiva…
Philips DTR3030M
Page 32
26
SINTOMO POSSIBILE CAUSA RIMEDIO
Non è possibile registrare.
L’emittente televisiva non permette la
registrazione.
Memoria non sufficiente.
Liberare spazio sul disco destinato alla
registrazione.
Il ricevitore si spegne in automatico.
Funzione risparmio energetico attiva.
Consultare il par. 3.6.1.5.
È stato dimenticato il PIN.
Eseguire un reset. Consultare par.
3.1.23.6.3.
AVVETENZA
In generale, in caso di comportamento anomalo del ricevitore, un completo riavvio del sistema o il ripristino delle
impostazioni di fabbrica tramite reset (par. 3.1.2) può aiutare a risolvere il problema riscontrato.
6 Caratteristiche tecniche
Tipo prodotto Ricevitore digitale terrestre DVB-T/DVB-T2 H.264 e smart-box IP
Sistema Accesso Condizionato Nagravision (integrato) per Mediaset Premium
Frequenze di ingresso/uscita
VHF: 173,5÷230,5MHz
UHF: 470÷862MHz
Decodifica Video MPEG-2, MPEG-4 (H.264 / AVC)
Decodifica Audio
(*)
MPEG Layer I & II, AAC+ (HE-AAC v1), Dolby Digital, Dolby Digital Plus
Lingue menu Italiano, Inglese
OSD menu
Televideo
Sottotitoli
Guida Elettronica ai Programmi (EPG)
Rapporto di formato video 16:9, 4:3
Alimentazione antenna
Tramite connettore RF IN
5V , 50mA Max
Modulatore RF Modem integrato (RJ-11) Porta Ethernet (RJ-45)
Uscita Audio Digitale (S/PDIF) x1, Ottica
Uscita SCART x1, Video: RGB/CVBS, Audio: L+R
Uscita HDMI
(**)
x1, HDMI v1.3 con protezione HDCP v1.2
Risoluzione/Upscaling video fino a 1080p
Porte USB
x2, posteriori, USB v2.0
5V , 500mA Max
Alloggiamento smart-card x1, per smart-card Mediaset Premium
Aggiornamento canali automatico
Aggiornamento software
Automatico: Via etere (OTA)
Manuale: Via etere (OTA), Via IP (OTN), Via USB (OTU)
Registrazione (PVR) Via USB (FAT32 / NTFS)
Timeshift Riproduzione multimediale Via USB e in rete locale (UPnP/DLNA)
Funzione reset di fabbrica
Lista canali favoriti 1
Programmazione Timer
Auto-spegnimento (risparmio energia)
Alimentazione Diretta: 12V , 1.5A
Alimentatore in dotazione
Ingresso: 100 ÷ 240V~, 50/60Hz, 0.6A Max
Uscita: 12V , 1.5A
Consumo (valori tipici)
Operativo: 18W Max
Standby: <0.50W
Temperatura
Di esercizio: 0 ÷ 40°C
Di stoccaggio: -10 ÷ 80°C
Dimensioni 210x134x40 mm
(*)
Prodotto su licenza di Dolby Laboratories. Dolby e il simbolo della doppia D sono marchi di Dolby Laboratories
(**)
I termini HDMI e High-Definition Multimedia Interface HDMI e il logo HDMI sono marchi o marchi registrati di HDMI Licensing,
LLC negli Stati Uniti e in altri paesi.
Philips DTR3030M
Page 33

Appendice
i
Appendice A. Codici TV
A
A.R.SYSTEMS 1170 1222 1224
ACCENT 1235 1252
ACTION 1235
ADMIRAL 1201 1235 1282
1296 1297 1309 1311
ADURA 1169 1170 1235 1243
1252 1291 1293
AGASHI 1170 1173
AIKO 1223 1235 1243
AIM 1169 1170 1171 1173 1224
1237 1253 1300
AIOSTAY 1235 1294
AIWA 1354 1396 1422 1084
AKAI 1170 1171 1173 1178
1198 1223 1232 1235 1237
1242 1243 1253 1271 1273
1280 1291 1293 1294 1295
1310 1313 1371 1381 1403
1082
AKI 1223
AKIRA 1169 1172
ALBA 1170 1243 1294 1351
ALBIRAL 1170 1173 1217 1222
1224 1247 1248 1252 1269
1274 1294
ALHORI 1223
ALLOGRAN 1223 1284 1287
1375
AMPLIVISION 1223 1224
AMSTRAD 1173 1235 1252
1253 1297 1347
ANEX 1170
ANGLO 1252
ANITECH 1170 1173 1195 1235
1269 1274 1298
ANSONIC 1170
ANTECNO 1243
ARCELIK 1023 1024 1118 1119
1134 1138 1065 1170 1183
1256 1264 1294 1303 1306
1325 1340 1392 1062
ARDEM 1325
ART TECH 1170 1235 1273
ASA 1182 1192 1193 1199
1200 1204 1282 1295
ASTHON 1170
ASTON 1333
ASTRA 1170 1173 1224 1232
1235 1294 1330 1336 1401
1402 1415
ASTRO SOUND 1170 1224
1269 1274 1294
ASUKA 1243 1294
ATAKI 1330
ATLANTIC ATORO 1170 1175
1183 1298 1375 1235
AUDIO STAR 1243 1330
AUDIOSONIC 1170 1173 1183
1217 1222 1223 1235 1243
1252 1269 1279 1285 1325
1382 1437
AUDIOSTAR 1243 1330
AUDIOTON 1223 1235 1243
1298 1330
AURORA 1201 1223 1235 1237
AUSIND 1189
AUTOVOX 1170 1192 1197
1198 1219 1223 1235 1237
1273 1284 1287 1353 1375
1376 1400
AUVISAT 1438
AWA 1170 1173 1223 1229
1235 1237 1273
B
BAIRD 1273 1300
BANG&OLUFSEN 1170 1173
1201
BARCO 1201 1212 1213 1215
1247 1248 1250 1294 1300
BASIC LINE 1170 1243 1284
1287 1288 1330
BAUR 1169 1170 1172 1173
1178 1179 1180 1226 1227
1235 1284 1286 1287 1291
1310 1428
BAZIN 1206 1223 1285
BEKO 1170 1173 1183 1256
1264 1285 1294 1303 1306
1308 1313 1325
BEKO 1337 1340 1392 1425
1437 1098 1166 1062
BEKO DVDLI 1072
BEKOTEKNIK 1174
BENQ 1164
BEON 1271
BIFONIC 1223 1235
BIGSTON 1235 1237 1252
BLAUPUNKT 1178 1179 1180
1181 1185 1187 1222 1229
1239 1242 1329 1348 1382
BLAUSONIC 1223
BLUE STAR 1294
BLUESKY 1170 1438
BRENDSTAR 1235
BRIONVEGA 1170 1171 1201
1203 1204 1212 1220 1221
1266 1296 1297 1353 1359
1426
BRITANNIA 1170 1223 1292
BROTHER 1252 1336 1413
BRUNS 1201 1267 1269 1274
1291
BSR 1285 1290 1347 1351
1377
BUSH(ATAKI) 1286 1293 1294
1330
C
CAMPER 1285
CAPSONIC 1170 1252
CARTEL 1064 1096
CASIO 1170 1171
CBM 1195
CENTURY 1201 1217
CGE 1170 1173 1183 1195
1211 1217 1235 1240 1243
1271 1285 1293 1294 1298
1311
CGM 1170 1174 1183 1235
1252 1325 1330 1369
CHANG HONG 1147
CIE 1235 1237 1243 1377
CIHAN 1170 1173 1285 1294
CLARIVOX 1170 1173 1196
1201 1217 1222 1224 1267
1278 1279
CLATRONIC 1341
COCA COLA 1159
COFADEL 1215 1256 1261
1265
COMPUTRON 1170 1173 1235
1253 1295 1362
CONCORDE 1235
CONDOR 1170 1173 1195 1235
1252 1269 1271 1274 1298
CONIC 1232
CONTEC 1223 1225 1229 1235
1252 1377
CONTI 1170 1173 1061
CONTIN.EDISON 1205 1214
1215 1241 1256 1261 1264
1265 1374
CONTIN.FR 1170 1362
COSMEL 1235 1279
COSMOS 1123
COSMOS 84 EKRAN 1067
COSMOS/TOKAI 1170 1235
CREA 1149 1157 1060
CROSLEY 1184 1195 1201
1211 1217 1240 1299
CROWN/ONWA SAKY 1170
1174 1183 1184 1195 1235
1243 1252 1253 1271 1325
1330 1369
CRYSTAL 1170
CS ELECTR 1243
CTC CLATRONIC 1170 1183
1195 1217 1223 1243 1252
1269 1271 1274 1341
CURTIS 1173
CYMATIC 1222 1223 1285 1294
D
DAEWOO 1170 1171 1173 1217
1219 1223 1235 1237 1243
1273 1280 1331 1382 1409
1410 1140
DANSAI 1232 1252
DAWA 1170 1173
DE GRAAF 1286
DECCA 1170 1172 1173 1222
1223 1228 1268 1273
DENVER 1170 1235
DESMET 1170 1173 1222 1235
1294 1298
DIAMOND 1235 1237
DIGILINE 1170
DIXI 1235
DOMEOS 1170 1407
DOMOH 1170
DORIC 1189 1299
DUAL 1169 1170 1173 1176
1182 1217 1223 1235 1284
1287 1291 1293 1294 1297
1320 1347
DUAL-TEC 1169 1170 1173
1176 1182 1217 1223 1235
1284 1287 1291 1293 1294
1297 1347 1382 1406 1407
1428
DUMONT 1170 1173 1182 1193
1195 1199 1200 1201 1239
1269 1271 1274 1299
DUX 1170 1173
D-VISION 1170
DYNAMIC 1235
DYNATECH DYNISTY 1170
1237
E
EDAN LINE 1170 1300
ELBE 1177 1222 1223 1224
1229 1261 1266 1294 1296
1297 1299 1309 1311 1386
1431
ELECTRO TECH 1235
ELEKTRONSKA 1222 1294
ELIN 1170 1173 1182 1223
1235 1291 1295
ELITE 1239 1298
ELMAN 1269 1274 1294 1347
ELTA 1246
EMERSON 1170 1173 1174
1183 1193 1195 1199 1201
1217 1223 1252 1269 1274
1294 1298
ENGEL 1267 1294
EPSON 1104
ETRON 1235 1253 1363
EUROCOM 1294
EUROLINE 1436
EUROMAN 1170 1173 1184
1223
EUROPHON 1217 1222 1223
1269 1274 1277 1294
EXPERT 1175 1262 1284
F
FAGOR 1294 1332
FALCON 1235
FENNER 1170 1173 1235 1237
FIDELIS 1170 1173 1223 1232
1235
FIDELITY 1214 1217 1223 1232
1243 1253 1264 1284 1287
1292 1294
FILSAI 1223 1235
FINLANDIA 1285 1286
FINLUX 1170 1173 1182 1189
1192 1193 1199 1200 1219
1222 1235 1269 1271 1273
1274 1291 1295 1299 1361
1381 1403
FIRST LINE 1170 1171 1173
1196 1217 1223 1224 1225
1235 1237 1273 1284 1287
1288 1291 1293 1294 1296
1298
FISHER 1174 1182 1201 1223
1225 1229 1230 1231 1234
1267 1284 1287 1299 1300
1310 1428
FLINT 1170 1280 1431
FORMENTI 1170 1173 1183
1189 1195 1201 1222 1223
1235 1239 1252 1269 1271
1274 1285 1294 1298 1299
1347
Page 34

ii
FORTRESS 1201
FRABA 1170
FRONTECH 1170 1217 1219
1223 1232 1235 1286 1294
1347
FUJITEC 1170
FUJITSU 1170 1176 1200 1223
1232 1243 1269 1274 1290
1297 1375 1376 1400
FUMEO 1290
FUNAI 1229 1235 1252 1377
G
GALACTEX 1223 1252
GALAXI 1170 1193
GALAXIS 1170 1183 1193 1271
GALAXY 1178 1183 1193 1195
1223 1269 1271 1274
GALERIA 1235
GBC 1170 1173 1217 1229
1235 1237 1243 1253 1273
1282 1294 1299 1330
GE 1264
GEBER 1284 1287 1288
GEC 1209 1222 1223 1229
1273 1284 1285 1286 1299
1378
GELESO 1217 1222 1235 1237
1243 1282 1294 1299
GENERAL STAR 1328
GENERAL TECHNIC 1235
GIANT 1170 1173 1223 1259
1345
GITEM 1170 1173 1179 1180
1256 1264 1288 1289
GM 1170 1235 1252
GMG 1170 1235 1252 1271
GOLDFUNK 1369
GOLDSTAR 1170 1173 1176
1185 1191 1219 1223 1232
1235 1270 1275 1286 1290
1294 1328 1370 1407 1434
1439
GOODING 1362
GOODMAN 1025
GOODMANS 1170 1171 1173
1223 1229 1235 1237 1243
1253 1264 1294 1337 1369
1382
GORENJE 1170 1174 1183
1184 1284 1287
GPM 1243 1235
GRAETZ(ITT) 1337 1404 1433
1437
GRANADA 1170 1173 1196
1222 1223 1229 1242 1250
1259 1285 1286 1292 1299
1303 1312 1321 1345 1384
1417
GRANDIN 1170 1262 1284
1294 1298 1299 1431
GREAT WALL 1252 1279 1280
GRENADIER 1170 1235 1294
1328
GRONIC 1170 1173 1223 1235
1267 1269 1274 1294
GRUNDIG 1170 1171 1173
1178 1179 1180 1181 1185
1194 1196 1235 1298 1362
1380 1382 1427 1089 1117
1141
GTT 1170 1235 1271 1330
H
HAMERSTEIN 1223 1236 1252
1254
HAMPTON 1223 1299
HANIMEX 1243
HANSEATIC 1169 1170 1179
1180 1222 1223 1229 1235
1284 1286 1287 1291 1298
1299 1377 1382 1410 1434
HANTAREX 1170 1222 1235
HCM 1223 1235 1246 1294
1330
HEMMERMANN 1223 1263
1269 1274 1284 1287
HEXA 1278 1294
HIGASHI 1223
HILINE 1235 1252 1253
HINARI 1170 1228 1232 1235
HISENSE 1286 1300 1054
HISONIC 1234
HITACHI 1171 1223 1229 1232
1261 1270 1284 1285 1286
1287 1294 1295 1299 1306
1307 1308 1346 1356 1378
1379 1381 1382 1410 1429
1075 1097
HOSHAI 1330
HUMAX 1042 1043
HUNTER 1393
HYPER 1170 1219 1223 1235
1238 1243 1253 1285 1294
1330 1346
HYPSON 1170 1173 1235 1252
HYUNDAI 1170 1173 1368
1414 1100 1127
I
IBERVISAO 1284 1287 1294
ICE 1243 1252 1253
IEG 1223
IMPER 1170 1171 1173 1235
1243 1252 1336
IMPERIAL 1170 1173 1183
1195 1211 1217 1240 1252
1271 1285 1293 1294 1311
INDESIT 1257
INF.REM.CONTR 1361
INNO HIT 1170 1173 1191
1217 1222 1223 1232 1235
1243 1253 1273 1299 1330
1126
INTERBUY 1219
INTERDISCOUNT 1170 1226
1256 1264
INTERFUNK 1169 1170 1173
1191 1204 1217 1222 1223
1232 1235 1243 1250 1253
1256 1271 1273 1284 1287
1288 1291 1299
INTERVISION 1170 1217 1219
1223 1269 1274 1275 1276
1294
IRRADIO 1170 1173 1189 1191
1196 1219 1232 1235 1243
1252 1253 1294 1369 1382
ISKRA 1222 1223 1269 1274
1294 1325
ITC 1223 1294
ITL 1170 1235
ITT 1068 1069 1070 1091
ITT SCHAUB LORENZ 1170
1235 1284 1287 1294 1299
1337 1403 1067 1165 1183
1237 1243 1291 1295 1300
1330
ITT/NOKIA 1169 1170 1173
1175 1182 1183 1199 1235
1237 1243 1271 1281 1284
1285 1286 1287 1288 1291
1292 1294 1295 1296 1299
1300 1310 1330 1342 1361
1369 1375 1381 1403
J
JET POINT 1170 1254
JINALIPU 1235
JOHNSON 1223
JVC 1029 1077 1229 1253 1254
1364 1365 1382 1411 1204
K
KORTING 1081
KAISER 1170
KAISUI 1170 1223 1235 1243
1271 1280 1330 1403 1431
KALRMAX 1222 1223 1224
1247 1248 1250 1285 1294
KAMAR 1234
KAMBROOK 1170 1223 1252
1275
KAMOSONIC 1223
KAPSCH 1175 1182 1299 1375
KARCHER 1170 1173 1174
1183 1200 1223 1224 1235
1277 1285 1286 1330
KARDON 1375 1376 1400
KAUASONIC 1393
KELVINATOR 1270
KENDO 1170 1173 1176 1217
1223 1235 1266 1269 1274
1282 1290 1296 1299 1311
1375 1376 1400
KENNEDY 1176 1217 1256
1266 1290 1297 1299 1311
1375 1376 1400
KENNEX 1170 1369
KERION 1170 1173
KIC 1223
KIOTA 1252
KITT 1223 1252
KIYOGIN 1170
KNEISSEL 1170 1177 1225
1311 1370 1382 1431
KOBIC 1235
KOENIG 1298 1299
KOERTING 1170 1174 1201
1209 1284 1287 1288
KOLSTER 1170 1173 1217
1219 1223 1224 1269 1274
1294
KONDA 1094
KONKA 1388 1391
KONTAKT 1362
KOTRON 1252
KRONNE 1223 1294
KUBA ELETRONIC 1428
KYOTO 1222 1223 1294
L
LAVIS 1222
LEADER 1235 1421
LEGEND 1170 1173 1223 1235
1252 1279
LENCO 1170 1173 1237 1269
1274 1291 1369
LENOIR 1170 1173 1223 1235
1237 1284 1287 1330
LEYCO 1170 1252 1273 1347
1377
LG 1425 1439 1407 1434 1083
1135 1155 1063
LIESENKOTTER 1170 1239
LIFE 1235
LLOYD'S 1196 1223 1235 1252
1299
LOEWE 1284 1143 1168
LOEWE OPTA 1169 1170 1172
1182 1201 1203 1204 1222
1223
LOGIK 1216 1228
LUMA 1282 1290 1297 1375
LUMATRON 1170 1113
LUXOR 1191 1219 1223 1270
1285 1286 1289 1291 1295
1299 1300 1357 1403
M
M.ELECTRONIC 1169 1170
1173 1182 1185 1191 1193
1199 1200 1201 1217 1219
1222 1235 1237 1241 1266
1269 1271 1274 1282 1284
1287 1294 1295 1299 1381
1382 1407 1428 1434 1436
MAAZ 1247 1248 1250
MACTH-ITALIA 1170
MAGNADYNE 1170 1173 1178
1201 1217 1222 1235 1269
1271 1274 1282 1284 1287
1294 1299
MAGNAFON 1170 1189 1193
1222 1223 1269 1274 1299
MAGNASONIC 1170 1173
MAGNEX 1170
MANESTH 1170 1285 1288
1291 1294 1298 1303
MANHATTAN 1369
MARANTZ 1170 1173
MARECH 1298
MARK 1325
MASCOT 1217
MATCH ITALIA 1170 1235
MATSUI 1170 1201 1223 1228
1235 1252 1284 1285 1286
1287 1294 1299 1301 1347
1351 1362 1373
MATSUKA 1223 1252 1351
MAXAM 1223 1235 1252
MAXELL 1235
MAXWELL 1170 1222 1248
1250 1269 1274
MCE 1235
MEDIACOM 1124
MEDION 1046
MEGA 1170 1171
MEMPHIS 1279
MERCURY 1223 1235 1252
1321
METZ 1178 1179 1180 1185
1186 1187 1204 1207 1208
1369
MGA 1169 1237 1243 1252
Page 35

Appendice
iii
MICRON 1223
MINERVA 1178 1179 1180
1185 1196 1241 1362
MITRONIC 1232
MITSUBISHI 1102 1178 1201
1204 1228 1229 1235 1237
1259 1345 1349 1382 1169
MIVAR 1177 1188 1190 1191
1218 1222 1223 1323
MTC 1183 1294
MULTITECH 1169 1170 1174
1217 1219 1222 1223 1228
1229 1235 1243 1246 1252
1269 1274 1294 1330 1337
MURPHY 1189 1223 1285 1293
1294 1299
N
NAGEL 1210
NAGOTA 1285
NAKASHI 1170
NAMSONIC 1235
NAMSUNC 1235
NARITA 1237
NEC 1224 1228 1229 1235
1237 1280 1329
NECKERMANN 1170 1171
1173 1179 1180 1183 1185
1204 1223 1226 1227 1239
1266 1282 1285 1286 1298
1370 1377 1382 1436
NECSTAR 1393
NEI 1170 1173 1279 1285 1294
NEWMAR 1223 1285 1294
NEWTECH 1170 1223
NIKKAI 1223 1232 1252 1270
NIKKEI 1170 1173 1369 523
NIKKO 1170 1173 1279
NIPPON 1146
NOBLEX 1229 1230 1231 1234
1235 1236 1237
NOBLIKO 1189 1193 1195
1196 1217 1223 1269 1274
NORDMENDE 1202 1214 1215
1256 1261 1264 1283 1299
1352 1433
NORDWAY 1293
NORTEK 1170 1382
NOVATRONIC 1170 1235 1237
1252
O
O.GENERAL 1229 1235
OCEANIC(ITT) 1258 1262 1281
1284 1285 1286 1288 1289
1291 1295 1299 1300 1381
OCTAL 1223
OKANO 1183
OLYMPIC 1235
ONCEAS 1217 1223 1235
ONIDA 1173
ONWA 1252 1253 1271 1403
ORAVA SLOV 1170 1201 1294
ORAVA/OTF 1170 1235
ORIENT 1170 1235 1335 1090
ORION 1170 1171 1228 1232
1235 1236 1252 1263 1281
1284 1285 1287 1304 1305
1308 1317 1347 1351 1360
1370 1373 1377
ORION HUNGARY 1170 1173
1281 1285 1357 1358
ORMOND 1170 1222 1369
OR-ON 1330
ORSOW'E 1170 1173 1222
1252
OSAKI 1170 1173 1252 1276
OTHER LINE 1173 1222
OTHERS 1101 1105 1106 1107
1108 1133 1396 1324 1343
1367 1148 1158 1116
OTTO VERSAND 1169 1170
1171 1172 1173 1178 1179
1180 1185 1219 1223 1226
1227 1229 1235 1242 1246
1264 1285 1286 1287 1291
1298 1299 1325 1428
P
PAEL 1189 1196 1223
PALLADIUM 1183 1204 1266
PALSONIC 1170 1173 1223
1232 1243 1252
PANAMA 1170 1173 1217 1252
PANASHIBA 1235
PANASONIC 1139 1294 1299
1344 1348 1366 1399 1179
1180 1242
PANAVOX 1170 1235 1299
PANAVSION 1252
PANORAMA 1223 1235 1243
PANORAMIC 1256
PATHE CINEMA 1183 1222
1223 1224 1278 1294 1298
PAUSA 1235
PCM 1170 1173
PEGASUS 1099
PERSHIN 1196 1278
PHILARMONIC 1223
PHILCO 1170 1173 1183 1195
1201 1211 1217 1224 1229
1235 1240 1271 1284 1285
1287 1293 1294 1299 1311
PHILIPS 1041 1145 1150 1151
1156 1170 1171 1173 1179
1180 1201 1204 1223 1224
1249 1250 1251 1271 1334
1355 1372 1382 1407 1412
1428 1435 1436
PHOENIX>FORMENTI 1318
1321
PHONOLA>PHILIPS 1314 1315
PILOT 1408 1433
PIONEER 1170 1173 1291
1370 1418 1073 1058
PLANTRON 1217 1222 1235
1282 1285 1299
PORTLAND 1170
PRANDONI PRINCE 1189 1217
1222 1269 1274 1282 1285
1299
PREMIER 1028 1052 1086
1128 1129 1142 1080 1170
1171 1327 1336 1393 1421
PRIMA 1223 1232 1235 1252
PRINCESS 1232 1235
PROFEX 1195 1235 1239 1291
PROFILO 1131
PROIFLO 1170 1173 1222 1264
1294 1370 1397
PROLINE 1304
PROSONIC 1170
PROTECH 1170 1173 1235
1271 1294 1304 1325 1369
1436
PYE 1170 1171 1173 1237 1250
Q
QUAL CRAFT 1189 1232 1243
1269 1274 1347
QUASAR 1189 1232 1269 1274
1299 1347
QUELLE 1169 1170 1173 1178
1182 1189 1191 1192 1193
1196 1199 1200 1219 1223
1226 1228 1231 1232 1239
1240 1252 1284 1287 1291
R
RADIOLA 1170 1171 1173 1250
RADIONETTE 1182 1200 1284
1299
RADIOTONE 1325 1341
RANK/RBM 1189 1286 1293
1299 1316
RC 903A 1115
RECOR 1169 1170 1173 1252
REDIFFUSION 1291 1299
REFLEX 1170 1369
REGENTE 1235
RFT 1201 1325
RITAR 1295
RIZ 1294
RM 1369
RM2000 1170
ROADMASTER 1050
ROADSTAR 1170 1173 1232
1235 1243 1330 1369 1370
1371 1440
ROB.ELECTR 1201 1267
ROWA 1223 1235 1252
ROWIDO/KONIG 1189 1294
ROWSONIC 1223
ROYAL 1173 1223 1235 1243
1252 1271
RTF 1201
S
S.LORENZ 1170 1183 1235
1237 1243 1284 1287 1291
1295 1299 1300 1330
SABA 1170 1204 1205 1214
1215 1222 1235 1237 1256
1259 1261 1264 1285 1288
1294 1299 1335 1338 1341
1352 1370 1374 1397 1405
1112 1137
SABERG 1170 1173 1195 1271
SAGEM 1431
SAISHO 1223 1224 1228 1237
1243 1303 1347 1351
SAKURA 1235
SALORA 1170 1199 1270 1282
1285 1286 1288 1291 1292
1295 1300 1361
SALORA 1381 1385 1403 1423
SAMBERS 1189 1191 1193
1195 1196 1222 1224 1269
1274
SAMSUNG 1170 1171 1173
1174 1183 1191 1204 1223
1228 1232 1234 1235 1236
1254 1273 1276 1327 1334
1347 1378 1382 1383 1419
1432
SAMSUNG 1435 1144 1059
SANDRA COLOR 1222 1223
SANG 1170 1337 1437
SANKYO 1233 1384
SANSUI 1170 1235 1253 1300
1330 1430
SANYO 1174 1182 1201 1223
1225 1228 1229 1230 1231
1235 1267 1273 1276 1299
1300 1310 1312 1319 1346
1384 1417
SAR 1170 1223 1294
SCHAUPLORENTZ 1337
SCHAUPT LORENZ 1067 1165
SCHNEIDER 1170 1171 1173
1176 1197 1219 1223 1235
1243 1250 1253 1284 1285
1286 1287 1293 1294 1297
1299 1347 1370 1382 1406
SCOTT 1170 1298
SEG 1170 1173 1195 1217
1223 1269 1274 1294 1369
SEIKON 1026 1160
SELECO 1170 1171 1173 1175
1176 1219 1229 1264 1266
1282 1283 1290 1294 1296
1297 1311 1375 1376 1400
SEMP 1313
SENDAY 1170
SENTRA 1303 1321
SEPHIM 1027
SET 1170 1294
SHARP 1229 1244 1245 1246
1321
SHIVAKI 1170 1171
SHOV 1085 1088 1091 1092
1069 1070 1398 1416
SHOV 1170 1171 1173 1235
1252
SHOW 1390 1393
SIAREM 1201 1222 1269 1274
1299
SICATEL 1224 1294
SICE 1178
SIDEC 1294
SIEL 1195
SIEMENS 1170 1173 1178
1179 1180 1181 1185 1196
1222 1231 1232 1239 1344
1384 1417 1074
SILMA 1170
SILVA 1235
SILVER 1243 1252
SIMTEL 1170 1243 1252 1330
1428
SINGER 1170 1173 1201 1217
1222 1223 1235 1253 1262
1269 1274 1299 1311 1347
SINUDYNE 1170 1171 1201
1243 1263 1266 1269 1274
1284 1287 1297 1299 1304
1305 1317 1347 1351 1364
1370 1377
SIREL 1222
SKAY 1330
Page 36

iv
SLAVA 1223
SOLAVOX 1270 1284 1292
1295
SONITRON 1201 1223
SONOKO 1170 1173 1223 1235
1243 1252 1330
SONTEC 1170 1183 1219
SONY 1229 1322 1066 1103
1152 1154 1163 1424 1226
1227 1228
SOUND COLOR 1170
SOUND MASTER 1235
SOUTHERN CROSS 1219
SOWTECH 1169 1219
SPECTRA(ASTRA) 1170 1336
1401 1402 1413 1420
STANDARD 1217 1223 1235
1243 1298
STAR 1173
STAR LINE 1170
STARLITE 1235
STARLUX 1235
STERN 1175 1176 1256 1266
1282 1290 1296 1297 1375
STVI 1223 1294
STZ SUNKAI 1170 1305 1330
SUNNY 1022 1044 1122 1125
1130 1253 1387 1389 1393
SUNSTAR 1170
SUNWATT 1170 1173
SUPERLA 1222 1294
SUPERSONIC 1169 1253 1300
1330
SUPERTEC 1170 1173 1235
1243
SUPRA 1170 1234 1235 1237
1328
SUPREME 1193
SYC LINE 1235
SYDNEY 1222
T
TADISTAR 1271
TALENT 1178
TANDBERG 1186 1192 1203
1204 1208 1222 1256 1261
1297
TANDY 1262 1285 1286
TASHIKO 1223 1286 1378 1384
1417
TATUNG 1172 1178 1222 1223
1228 1268 1273
TCL 1413
TEAK 1169 1170 1173 1223
1235
TEC 1170 1176 1217 1223 1235
1293 1294 1347 1407
TECHLINE 1170
TECHNICA 1243
TECHNICS 1242 1348 1167
TECHNISAT 1170 1370
TECHNOL 1169 1223 1235
1237 1252
TEDELEX 1170 1173 1223
1235 1285 1294
TEINEL 1170 1294
TEKNANT 1170 1235
TELE+ 1170 1235 1326
TELECHROM 1243 1330
TELEFAC 1235
TELEFUNKEN 1095 1111 1114
1137 1294 1335 1341 1350
1370 1397 1405 1170 1216
1217 1222 1235 1236 1237
1240 1256 1257 1259 1260
1264 1265
TELEOPTA 1235
TELEPOINT 1170
TELE SYSTEM 1001 1021 1003
1004 1005 1006 1007 1008
1009 1010 1011 1012 1013
1014 1015 1016 1017 1018
1022
TELESTAR 1170 1235 1252
TELETECH 1170 1217
TELEVIDEON 1170 1173 1189
1223 1285 1298 1299
TELKOM 1170 1294
TELRA 1170 1264 1294 1112
1137
TEMPEST 1223 1235 1243
TENSAI 1170 1173 1182 1200
1217 1223 1232 1235 1237
1243 1269 1274 1275 1277
1294 1298 1369
TESLA 1224
TESLASLOV 1170 1201 1250
1294
TETRAN 1294 1298
THOMSON 1170 1189 1196
1201 1214 1215 1241 1250
1255 1256 1261 1264 1265
1285 1294 1354 1358 1362
1374 1395 1405 1071
THORN 1303 1361
THORN FERGUSON 1169 1170
1171 1173 1178 1179 1180
1182 1195 1196 1199 1200
1216 1222 1223 1224 1226
1227 1229 1231 1252 1254
1256 1262 1264 1268 1272
1273 1276 1284 1285 1287
1288 1291 1292 1297 1299
1300 1301 1303 1310 1312
1319 1320 1322 1345 1346
1350 FERGUSON 1361 1365
1379 1382 1405 1434
TIBISHI 1223 1235 1243 1252
TLFNKN 1074
TOBO 1235
TOKAI 1170 1173 1235 1252
TOKYO 1330
TOMITA 1223
TOPVISION 1170 1285 1294
1325
TOSHIBA 1169 1223 1229 1301
1302 1303 1311 1313 1076
1093 1153
TR CONTINENTS 1170 1222
1282
TRANSONIC 1170 1173 1252
1271
TREVI 1235 1243 1330
TRIAD 1170 1173 1224
TRIDENT 1045 1047 1048 1049
1051 1053 1055 1056 1393
1421 1170 1033 1034 1035
1036 1037 1038 1039 1040
1057 1031 1032
TRILUX 1170 1325
TRIMAX 1161
TRIMAX-SIERRA-GRUNBERG-
SOFTLINE 1079
TRIUMPH 1193 1347
TRIVISION 1235
TTR 1175
TV STAR 1285
TVD 1375
U
UHER 1175 1197 1285 1298
1375 1428
ULTRAVISION 1214 1224
ULTRAVOX 1169 1170 1173
1178 1201 1217 1223 1269
1274 1282 1299 1313 1372
UNIC RADIO 1174 1222 1223
1291 1294
UNIVERSUM 1169 1170 1173
1178 1179 1180 1182 1184
1189 1191 1192 1193 1196
1199 1200 1219 1223 1226
1228 1229 1231 1232 1235
1239 1240 1252 1284 1287
1288 1291 1294 1295 1384
1417
UNIVOX 1170 1173 1201 1217
1224 1284 1294
UNK 1170
URANYA 1170 1189 1222 1235
1237 1269 1274 1298
UTAX 1223 1235
UYDULU 1132
V
VANGUARD 1223 1235 1286
VECO 1170 1173 1235
VESTEL 1077 1120 1121 1136
1162 1078 1170 1171 1173
1183 1195 1217 1233 1286
1293 1294 1369 1394 1436
VEXA 1170 1171 1223 1235
1243 1286 1330
VICEROY 1223 1232 1252
VIDEOCON 1173
VIDEOLOGIC 1223 1243
VIDEOMAC 1223 1252
VIDEOTON 1170 1219 1222
1223 1271 1281 1285 1286
1293 1294 1357
VIDIKRON 1298
VIDION 1235
VISA 1189 1282
VISAELECT 1195 1223 1294
VISION 2000 1170 1235
VISIOREX 1222
VISTAR 1288 1295
VOXSON 1189 1201 1269 1274
1282
W
WALKIE 1176
WALTHAM 1217 1285 1294
WATSON 1170 1173 1239 1252
1282 1294 1298 1299 1347
1369
WATT RADIO 1223 1224 1269
1271 1274 1277 1284 1287
1299 1347 1369
WEGA COLOR 1229
WEGA VISION 1229
WEGAVOX 1170 1217 1235
1271 1293 1369
WELTBLICK 1170 1298
WESTON 1294
WHITE WESTING HOUSE 1169
1170 1175 1183 1193 1195
1223 1235 1266 1269 1271
1294 1298 1375
WINERSAT 1235 1330
WINSTON 1170 1235 1330
WINTERNITZ 1235 1237 1238
1346
WORLD TECH 1170
Y
YOKO 1170 1223 1235 1252
1256 1285
YORK 1243
YU-MA-TU 1170 1235 1252
1271 1339 1030 1080 1087
1109 1110
Z
ZAMPA 1283
ZIRWATEL ZODIAC 1235
1405
Page 37
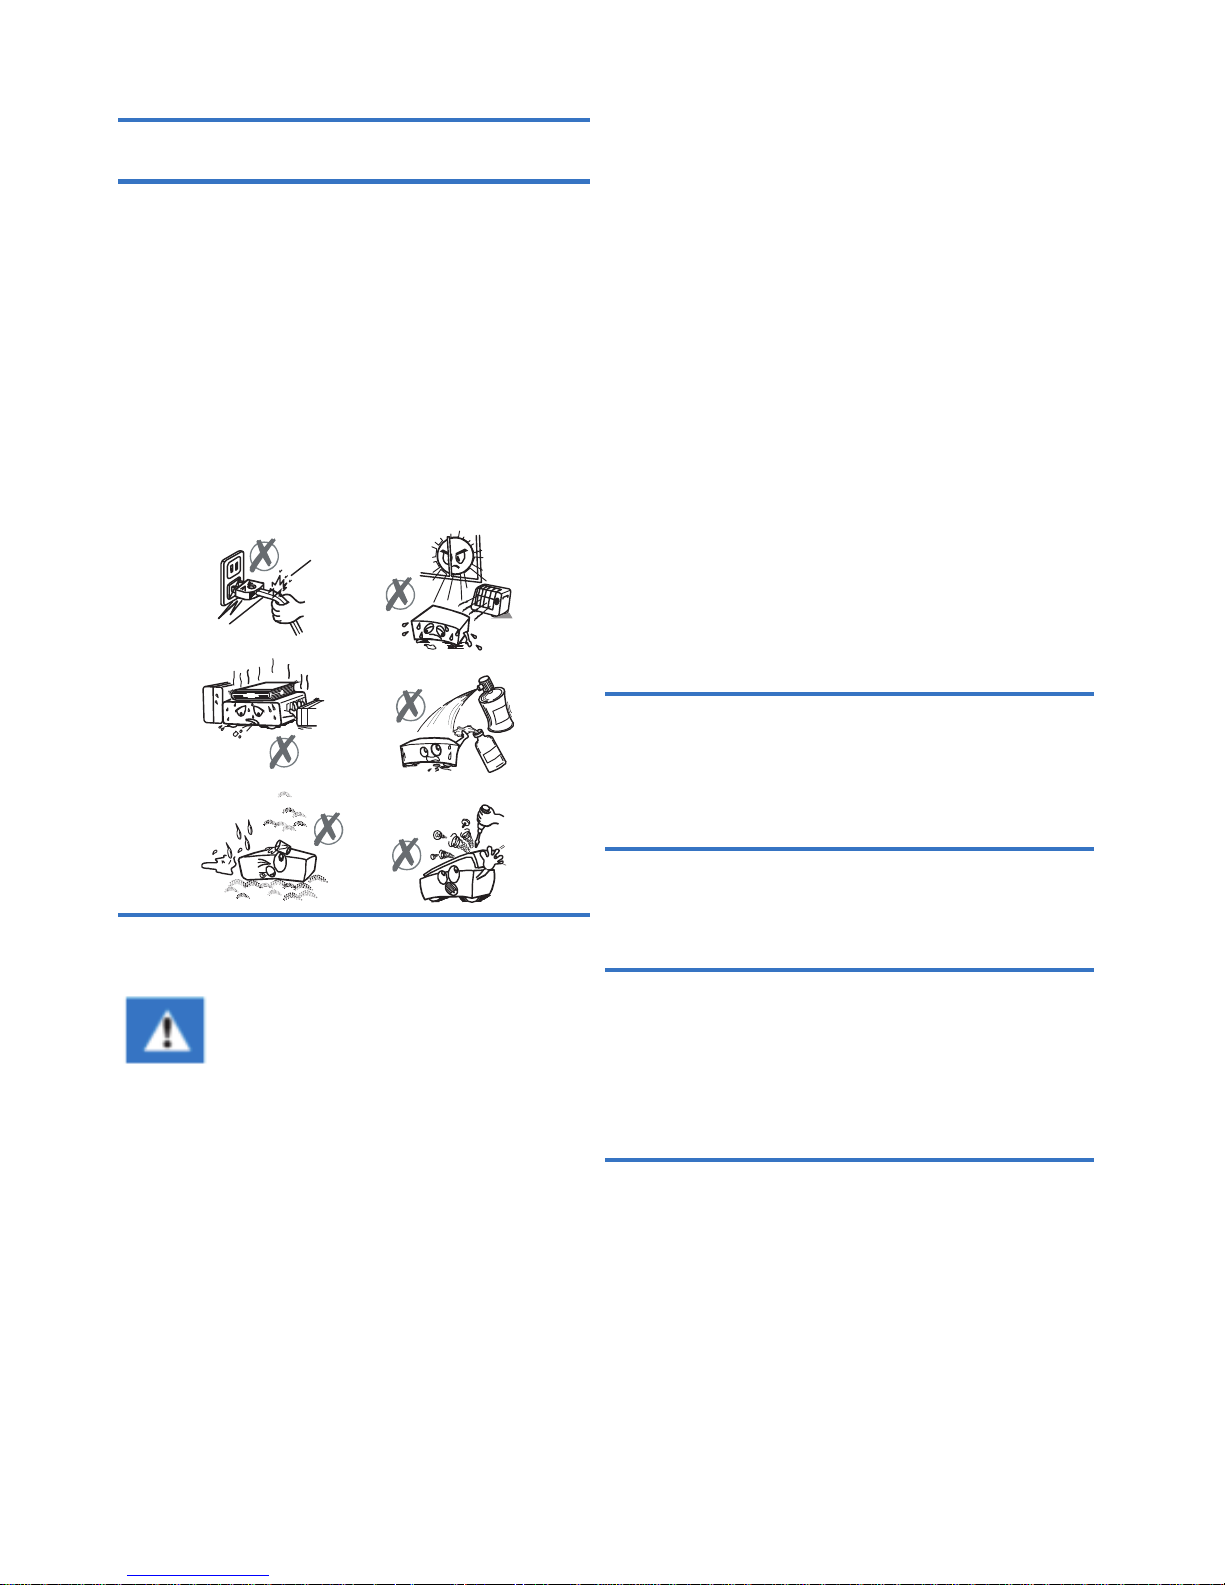
Raccomandazioni di sicurezza
L'uso di STB soggetto a misure di sicurezza progettate per proteggere
gli utenti e il loro ambiente.
Dove mettere la tua STB?
Al fine di garantire il corretto funzionamento della STB, dovresti :
y metterlo dentro per proteggerlo da un fulmine, pioggia e luce
solare diretta.
y metterlo in una secca e ben ventilato campo, tenere lontano da
fonti di calore come radiatori, candele, lampade, ecc.
y proteggerla da l'umidità, metterla su una superficie piana, da cui
non cadrà e fuori dalla portata dei bambini.
y evitare urti violenti. Scegli una stabile superficie orizzontale su
cui la STB non sarebbe più esposta a violenza e alle vibrazioni.
y non collocare nulla sulla parte superiore del Set-top box
(come sarebbe limitare l a ventilazione): l e feritoie di ventilazione
si trovano su l corpo evitare che il STB dal surriscaldamento.
Se metti la STB in un compartimento o altro spazio
chiuso, lascia uno spazio di almeno 10 cm su ciascun lato e
20 cm sul fronte e sul retro della STB.
y collegare direttamente alla rete con le corde gia esistono, purché
la presa deve essere vicino al STB e di facile accesso. L'uso di
un cavo (con estensione, più punti) non è consigliato.
Le avvertenze e le istruzioni di sicurezza
y Fare attenzione a non permettere che gli oggetti liquidi o metallici
inseriscano nella STB attraverso la ventilazione slot
y Evitare di ricollegare la STB dopo che è stata sottoposta a grandi
variazioni di temperatura.
y La STB deve essere staccata dalla potenza prima di qualsiasi
modificazione del legame tra tv e videoregistratore o antenna.
y In caso di tempesta, è consigliabile staccare l'antenna, anche se la
STB e la televisione sono scollegati dall'alimentatore, dato che un
fulmine può danneggiare tutto.
y Se senti rumore strano proveniente dalla rete presa elettrica o dal
cavo, stacca immediatamente il cavo di alimentazione dalla rete
elettrica a secondo delle precauzioni di utilizzo, perché si rischia di
subire una scossa elettrica. Contattare il venditore.
y Non collegare la STB a una presa elettrica lenta o mostra segni di
usura o danni, perché si rischia di scossa elettrica.
y Mai toccare il cavo con le mani bagnate - rischia di subire una
scossa elettrica.
y Quando bisogna connettere o disconnettere il cavo di alimentazione,
sempre ricorda di tenere la spina senza tirare la corda. Una corda
danneggiata presenta un potenziale rischio di incendio o di shock
elettrico. Non tirare il cavo di alimentazione quando staccare la
corrente della presa elettrica.
y Mai mettere oggetti sul cavo di alimentazione, e non lo tiri ne' pieghi.
dato che si può causare un rischio d'incendio o di shock elettrico.
y Attento che la STB non puo' mai trovarsi sul cavo o altri cavi.
y Garantire che la STB è stato posto su una superficie piatta e stabile,
se incorrettamente, e' possibile rendere l'alimentatore staccata
mentre questo può causare un rischio d'incendio o di shock elettrico.
y Sempre tenere l'unità di alimentatore fuori della portata dei bambini
o animali domestici.
y Solo personale approvato dal fabbricante può riparare la STB. Il
mancato rispetto di tali precauzioni di sicurezza invaliderà la
garanzia.
y Se vuoi usare i cavi che non siano forniti con il STB, bisogna un
installatore specializzato che svolge tutte le connessioni.
Batteria
Le batterie sono facile di essere ingoiate da bambini. Non permettere ai
bambini di giocare con il telecomando.
Sempre tenere le pile via da fonti di eccessivo calore come la luce solare
diretta, fuoco o simili fonti.
Per evitare di danneggiare il telecomando, usare solo identici batterie o
batterie equivalente. Le batterie di cui non sono ricaricabili.
Interferenza
Non mettere la STB nei pressi di apparecchi che possono causare
interferenze elettromagnetiche (per esempio, altoparlanti, modem, router
o telefoni cordless). Questo potrebbe influire sulla operazione della STB
e falsare le foto o il suono.
USB dispositivi di memorizzazione
Si prega di aspettare la STB o l'applicazione di file multimediale di uscire
la manager di lista multimediale (applicazione di file multimediale ) o
impostarla in modalità di attesa prima di disconnettere i dispositivi di
memorizzazione. Altrimenti, rischia di perdere dati o danneggiare il
dispositivo di memorizzazione.
Mentre connettere un dispositivo usb perifericho, rispettiamo il modo di
inserimento e non usare la forza che potrebbe danneggiare il dispositivo
periferico e / o l'apparecchio.
La pulizia della STB
L'involucro esterno della STB può essere pulita con un panno morbido e
secco. Non usare nessun tipo di carta abrasiva a strofinare polvere o
solventi, come l'alcol o trementina, in quanto potrebbero danneggiare la
superficie della STB.
y In caso di fallimento, il cavo è il dispositivo di
disconnessione per l'attrezzatura. Per togliere
energia elettrica dalle apparecchiature, devi
staccare il cavo dalla presa elettrica.
y Collegare la STB alla presa elettrica a secondo delle indicazioni
di cui c'e' scritto nell'etichetta apposta sulla STB (tensione,
corrente, la frequenza della rete elettrica).
y La STB va usata in un ambiente che soddisfa i seguenti requisiti:
y temperatura tra 0 ° C [32 ° F] e 40 ° C [104 ° F] .
y umidità ambientale: tra il 20% e il 90%.
y altitudine: al di sotto di 2000 m [6562 ft].
y Per evitare cortocircuiti (fuoco o elettrocuzione azzardo), non
esporre la STB in umidità. Non mettere qualsiasi oggetto che
contiene liquido (vaso per esempio) sull'apparecchio. La STB
non deve essere bagnata dal liquido. Se il liquido è stato sparso
sulla STB, stacca subito dalla rete elettrica e consulta il fornitore.
v
Page 38

to in this document
253650268 DTR3030M User manual
Philips and the Philips Shield Emblem are registered trademarks of Koninklijke Philips N.V.
used under license.
This product was brought to the market by X-GEM SAS, further referred to in this document
as X-GEM SAS, and is the manufacturer of the product.
2015 © X-GEM SAS. All right reserved.
Page 39
User manual
Page 40

Page 41

Dear client:
Thank you for choosing the digital terrestrial receiver and smart-box IP model Philips DTR3030M.
In this guidance, information of appliance use, connection, control and protection are provided, with which you
can know your new receiver better.
To make the reference easier, the manual has been divided into several sections.
1. The rst part is about installation, connection of the receiver with other apparatus and how to use the
remote control.
2. The second part is about basic usage, where is provided the necessary and principal information for daily
use.
3. The third part is about advanced usage, with the customized usage and the more complex characteristics.
Warning
When using the receiver, you shall know at least the basic knowledge in this guidance. Therefore, a careful
reading of the manual is recommended. In this method, you can use the device in an optimal way, without any
problems or malfunctions.
Note: Due to updates or errors, the contents in this manual may not exactly correspond with the actual product.
Register your product and get support at
www.philips.com/welcome
Page 42

Index
1 Section for installation ...............................................................................................1
1.1Safety and disposal ...........................................................................................1
1.2 Product description and connections ................................................................2
1.2.2 Rear panel connections ...........................................................................3
1.2.3 Connecting a wi adapter (optional) .........................................................4
1.3 Remote control .................................................................................................5
1.3.1 Batteries ...................................................................................................5
1.3.2 Buttons and remote control functions .......................................................5
1.3.3 Programming TV button ...........................................................................6
1.3.4 Use of the remote control .........................................................................7
1.4 Receiver installation for the rst time ...............................................................8
2 Section for basic usage .............................................................................................9
2.1 Banner information of channel ..........................................................................9
2.2 Quick Selection of TV/Radio channels..............................................................9
2.3 Electronic program guide (EPG) .....................................................................10
2.4 Audio Option ...................................................................................................10
2.5 Teletext Function .............................................................................................10
2.6 USB Functions ................................................................................................ 11
2.6.1 Use and warnings ..................................................................................11
2.6.2 Personal Video recording (PVR) ............................................................11
2.6.3 Multimedia USB Reader .........................................................................12
2.7 Network functions ...........................................................................................13
2.7.1 Application Portal ...................................................................................13
2.7.2 Multimedia DLNA reader ........................................................................14
3 Section for Advanced Usage ...................................................................................16
3.1 Installation Menu .............................................................................................16
3.1.1 Channel scan .........................................................................................16
3.1.2 Reset Receiver .......................................................................................17
3.2 Channel Management Menu ..........................................................................17
3.2.1 Channel Manager ..................................................................................18
3.2.2 EPG ........................................................................................................18
3.3 Multimedia Menu ............................................................................................18
3.3.1 Audio/Video/Pictures ..............................................................................19
3.3.2 Recording List ........................................................................................19
3.3.3DLNA ......................................................................................................19
3.4 Applications menu ...........................................................................................19
Page 43

3.5 Pay per View Services Menu ..........................................................................19
3.6 Settings Menu .................................................................................................19
3.6.1 STB Settings . ........................................................................................19
3.6.2 Schedules .............................................................................................22
3.6.3 Network Settings . ...................................................................................24
3.6.4 Info . ........................................................................................................24
4 Menu map................................................................................................................25
5 Troubleshooting Guide ............................................................................................26
6 Technical characteristics ..........................................................................................27
Appendix A. TV Codes ..................................................................................................i
Safety recommendations . ..............................................................................................v
Page 44

Page 45
1
1 Section for installation
1.1Safety and disposal
For safe use of the appliance, and for personal safety, we recommend you to read carefully the following advice
regarding the security measures.
POWER SUPPLY
When plugging into the power supply, the receiver must only be connected with the 230V~ 50Hz POWER
SOCKET.
Do not remove the cover of the receiver. There may have been higher voltages inside the unit which
will endanger the user. The high voltage is present even when the appliance is in standby mode, before
working on the receiver you must disconnect it from the electric power. Unauthorized dismantle will
immediately void the warranty!
POWER CORD
Before installing the product, check the integrity of the supply cable of the power supply. Pay particular
attention to the point where it enters the outlet and that in which comes out from the receiver. If the cord is
damaged, do not plug the appliance and contact the Service Center.
Install the power cord of the appliance so as not to cause crushing with placed objects over or next to
it. Also avoid placing it near passageways where it can be accidentally stepped on, torn or otherwise
damaged.
In case the cable is damaged, please disconnect the device from the power supply and contact exclusively
to qualied staff or Service Centre for replacement.
LIQUIDS
Keep the receiver away from any kind of liquid. Do not place objects lled with liquids on the product like
vases, humidiers etc. The appliance must not be installed in places where it may contact with spray or
liquid splashing or in environments with high humidity where condensation may form.
If the receiver is in contact with liquids, immediately remove the plug from the socket. DO NOT TOUCH
the receiver with your hands before it is disconnected.
SMALL ITEMS
Keep the receiver away from pins or other small items. Falling objects into the device, through the slits for
ventilation, can cause serious damage.
CLEANING
Prior to cleaning, disconnect the receiver from the power supply.
To clean the exterior of the receiver, use a soft dry or slightly water moistened cloth. Avoid using chemicals
or solvents.
VENTILATION
Make sure that there is a good air circulation in the installation place of the appliance to allow sufcient
heat dissipation and avoid overheating.
To allow adequate ventilation, it is recommended to provide a minimum distance of 10 cm from both sides
and a distance of 15 cm above the appliance.
The slits for ventilation must be free, not obstructed by type objects, newspapers, tablecloths by furnishing
fabrics, curtains, carpets etc.
Do not install the receiver near any heat sources (radiators, heaters, etc.) or on other devices that
produces heat (AMPS, VCRs, etc.).
ATTENTION!
Keep the product out of the reach of children.
The packing plastic bags can be dangerous. Keep the bags away of the reach of children to avoid
suffocation.
Do not expose the receiver or the remote control to direct sunlight.
The appliance must be placed on a solid and secure base.
Connect the device to the power supply only after you have completed the installation.
DISPOSAL
The symbol indicates that it is prohibited to dispose of this product in the environment or throw it
in the mixed municipal waste. Who does not respect this rule will be punished by the legislation
force.
A proper disposal of the appliance can avoid potential damage to the environment and human
health, as well as facilitate recycling of components and materials contained in it, with a result
of saving energy and resources.
Philips DTR3030M
Page 46
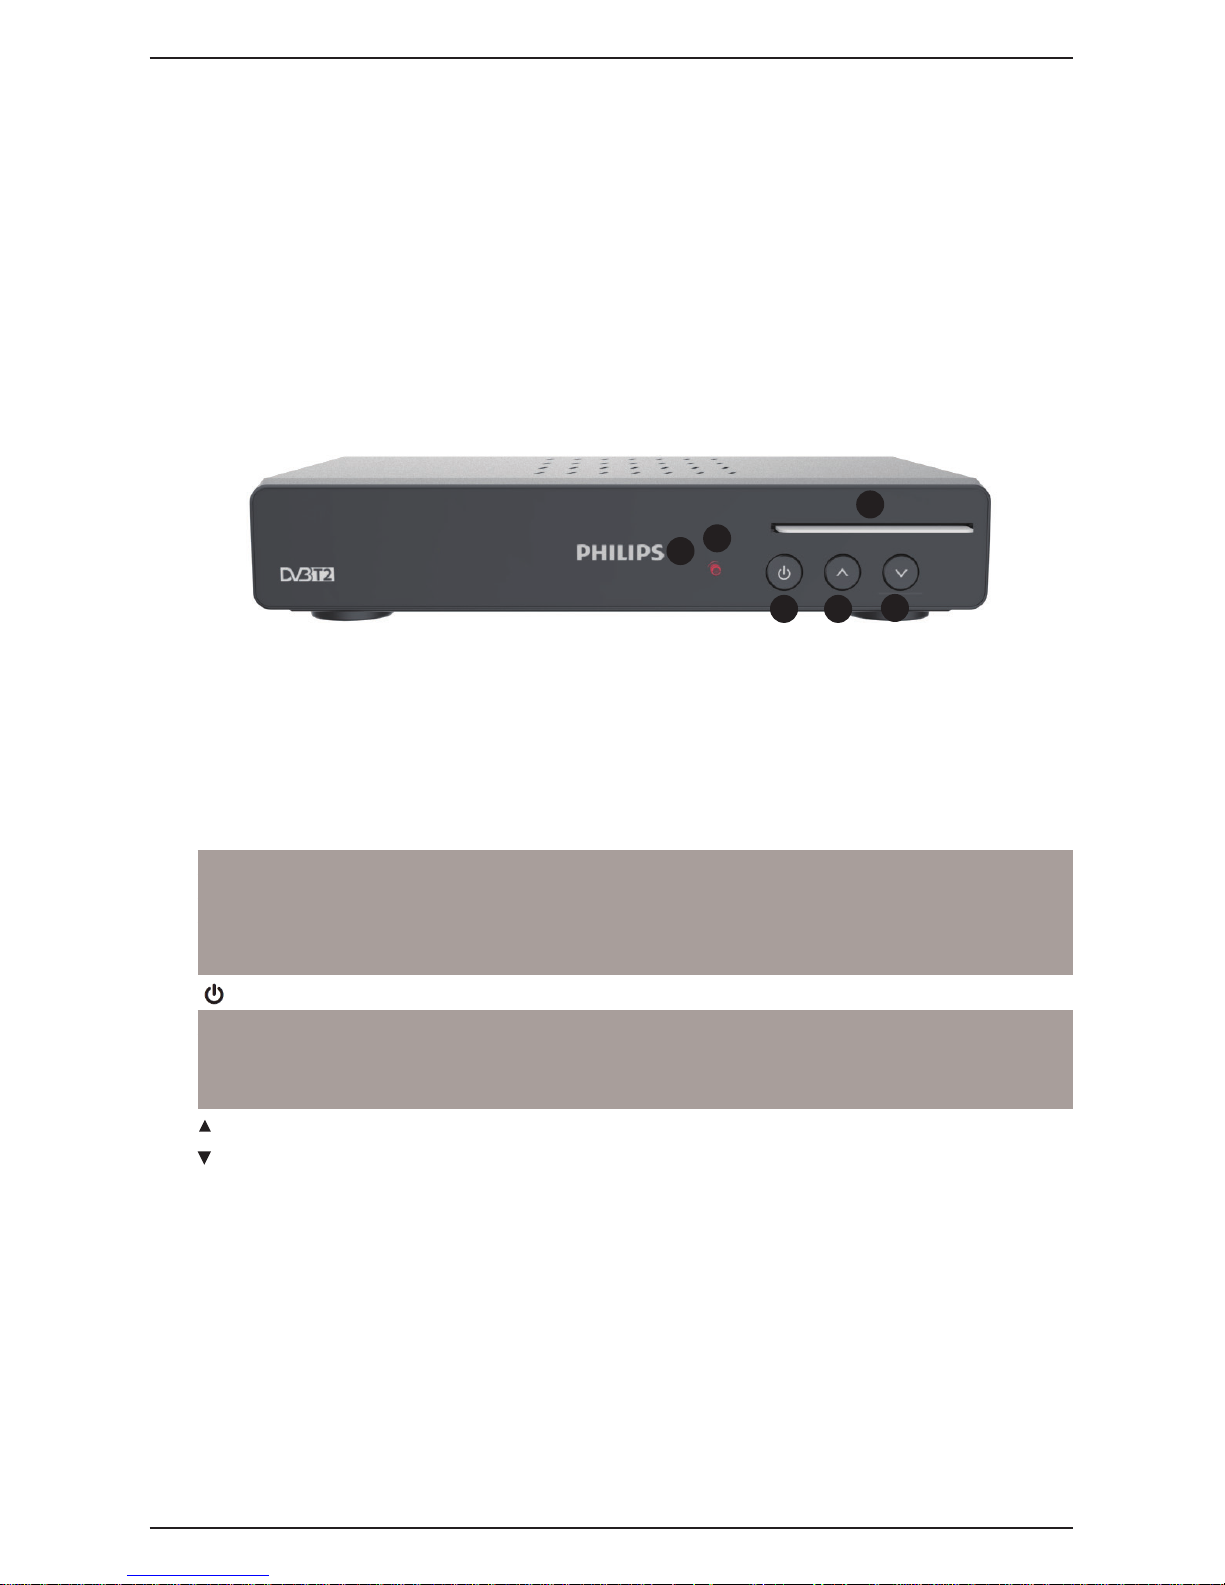
2
The manufacturer establishes a waste recycling system from electrical and electronic equipment (WEEE)
product subject to separate collection and treatment systems, using plants which comply with the
provisions in force.
Take the no longer usable product (and any accessories, including batteries) to an authorized collection
center where treats the electrical and electronic waste equipment. Alternatively, you can return the used
equipment to the retailer or to the end of life, when purchasing a new type of or equivalent at no charge in
case of household appliances by external dimensions smaller than 25 cm.
1.2 Product description and connections
1.2.1 Front Panel
1. IR infrared sensor for remote control.
2. LED Indicator with LED in standby (red), power on (green).
3. smart-card reader Mediaset Premium card slot (optional).
WARNINGS
Compatible with smart-card Mediaset Premium.
The card must be inserted with the golden Chip facing downwards.
To use the Mediaset Premium paid services and manage the related smart-card, refer to the user
manual provided with the same card.
4.
Switching on and off button in standby.
NOTE
When the energy-saving function is activated, the response time when switching on from standby prolongs
many seconds, corresponding to a complete system startup (par. 3.6.1.5). To always get a quick switching
on, you must disable Power Saving menu Settings > Receiver Congurations> Energy Management.
5. Next channel button
6. Previous channel button.
1
2
3
6
4 5
Philips DTR3030M
Page 47
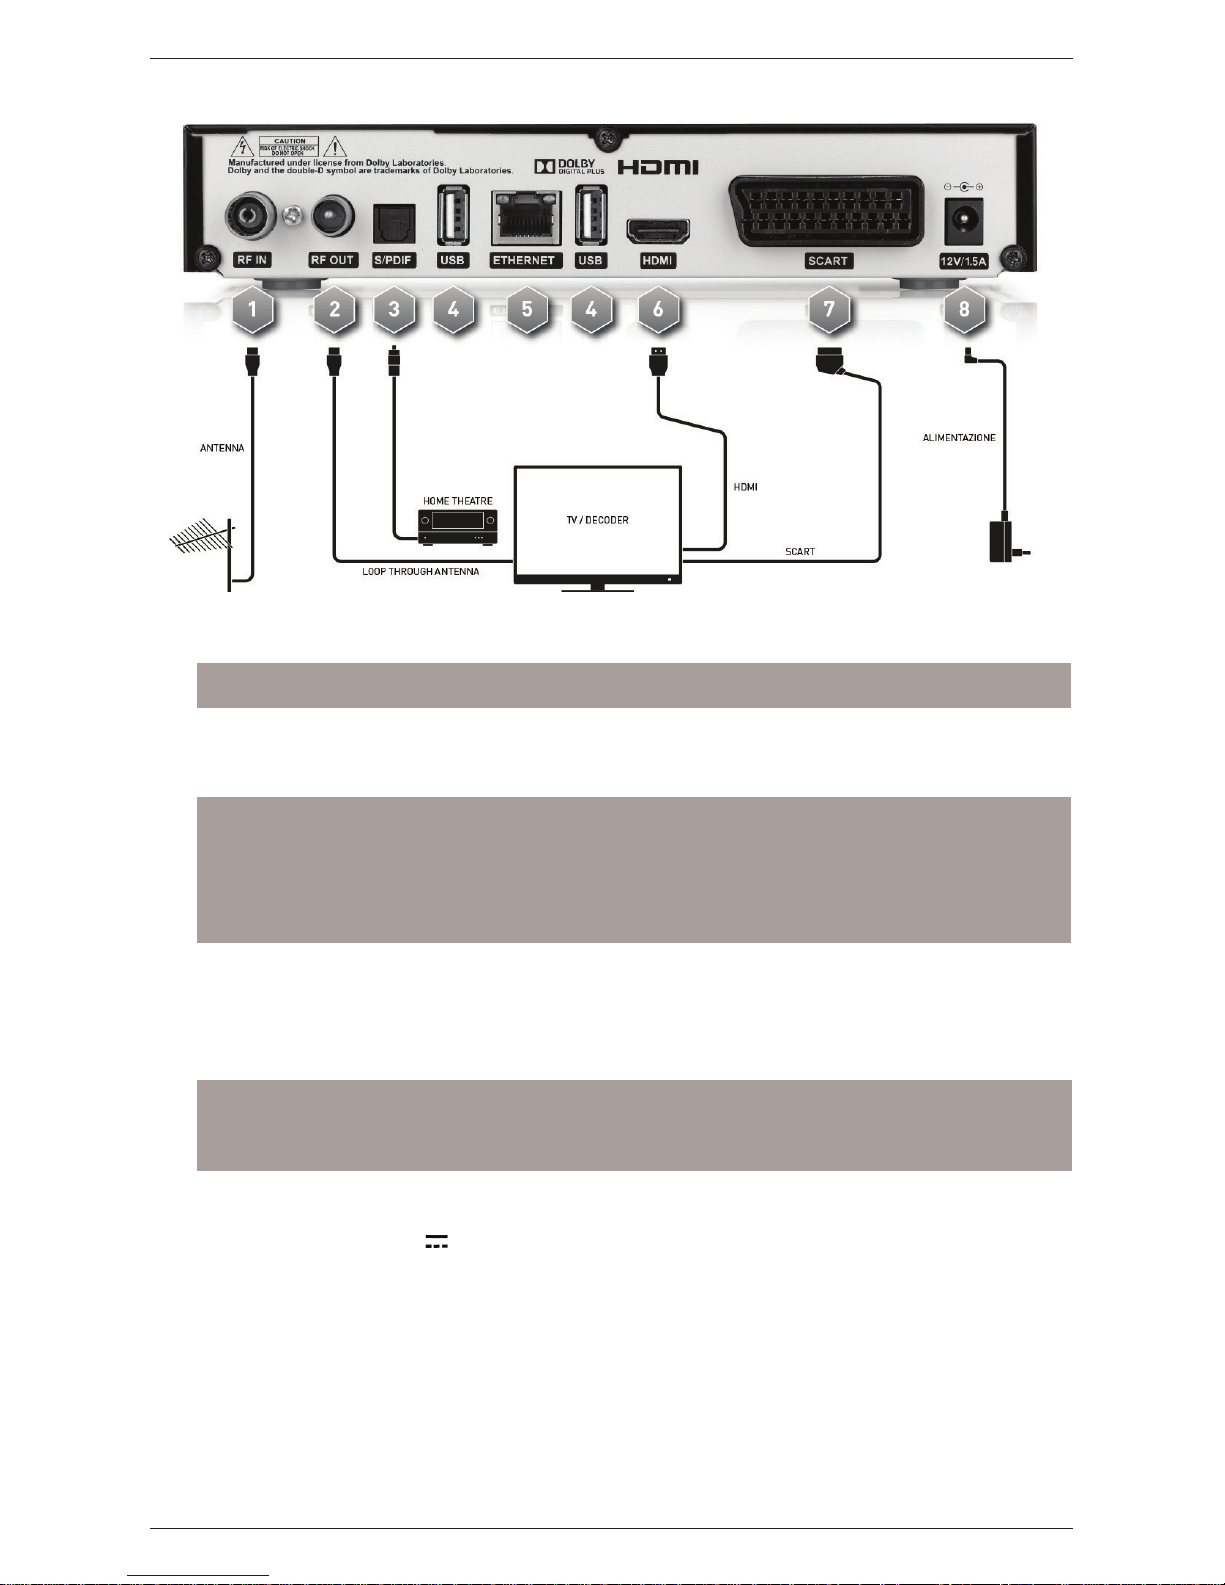
3
1.2.2 Rear panel connections
1. RF IN antenna Input.
2. RF OUT antenna loop Output for connecting a device with digital TV tuner terrestrial (optional).
WARNING
When the receiver is in standby power saving (par. 3.6.1.5), the antenna loop output is not active.
3. S/PDIF optical digital audio output for multi-channel audio ampliers Home-Theater (optional).
4. USB USB Connectors for reading personal multimedia content (videos, pictures, music) and video
recording from integrated digital terrestrial tuner when allowed by the transmission.
WARNINGS
Compatible with USB storage devices formatted with the le system of FAT16, FAT32 and NTFS.
Cannot be guaranteed compatibility with all USB memory devices on the market.
We recommend using USB HDD with external power supply, since the receiver cannot guarantee
the proper power supply through the USB port. This will avoid a possible damage to the storage
device.
5. ETHERNET Ethernet Interface to connect with your modem/router for the broadband data connection,
wide application portal Philips, as well as media files shared on your local network. See also par.
1.2.3
6. HDMI audio-video HDMI output for digital high denition, used to connecting a screen with HDMI interface
compatible with HDCP protection.
NOTE
If the screen connected to the receiver via HDMI interface shows with difculties, rst connect the receiver
via SCART and adjust the video Resolution through menu Settings > Receiver Congurations> > A/V
settings from the same receiver, according to the characteristics of the connected screen.
7. SCART SCART audio-video analog output with standard-resolution for connection with a monitor/TV, an
alternative to HDMI output.
8. 12V/1.5 A Power input 12V 1.5A, for connection with power supply of which 230V ~ 50 Hz.
Philips DTR3030M
Page 48
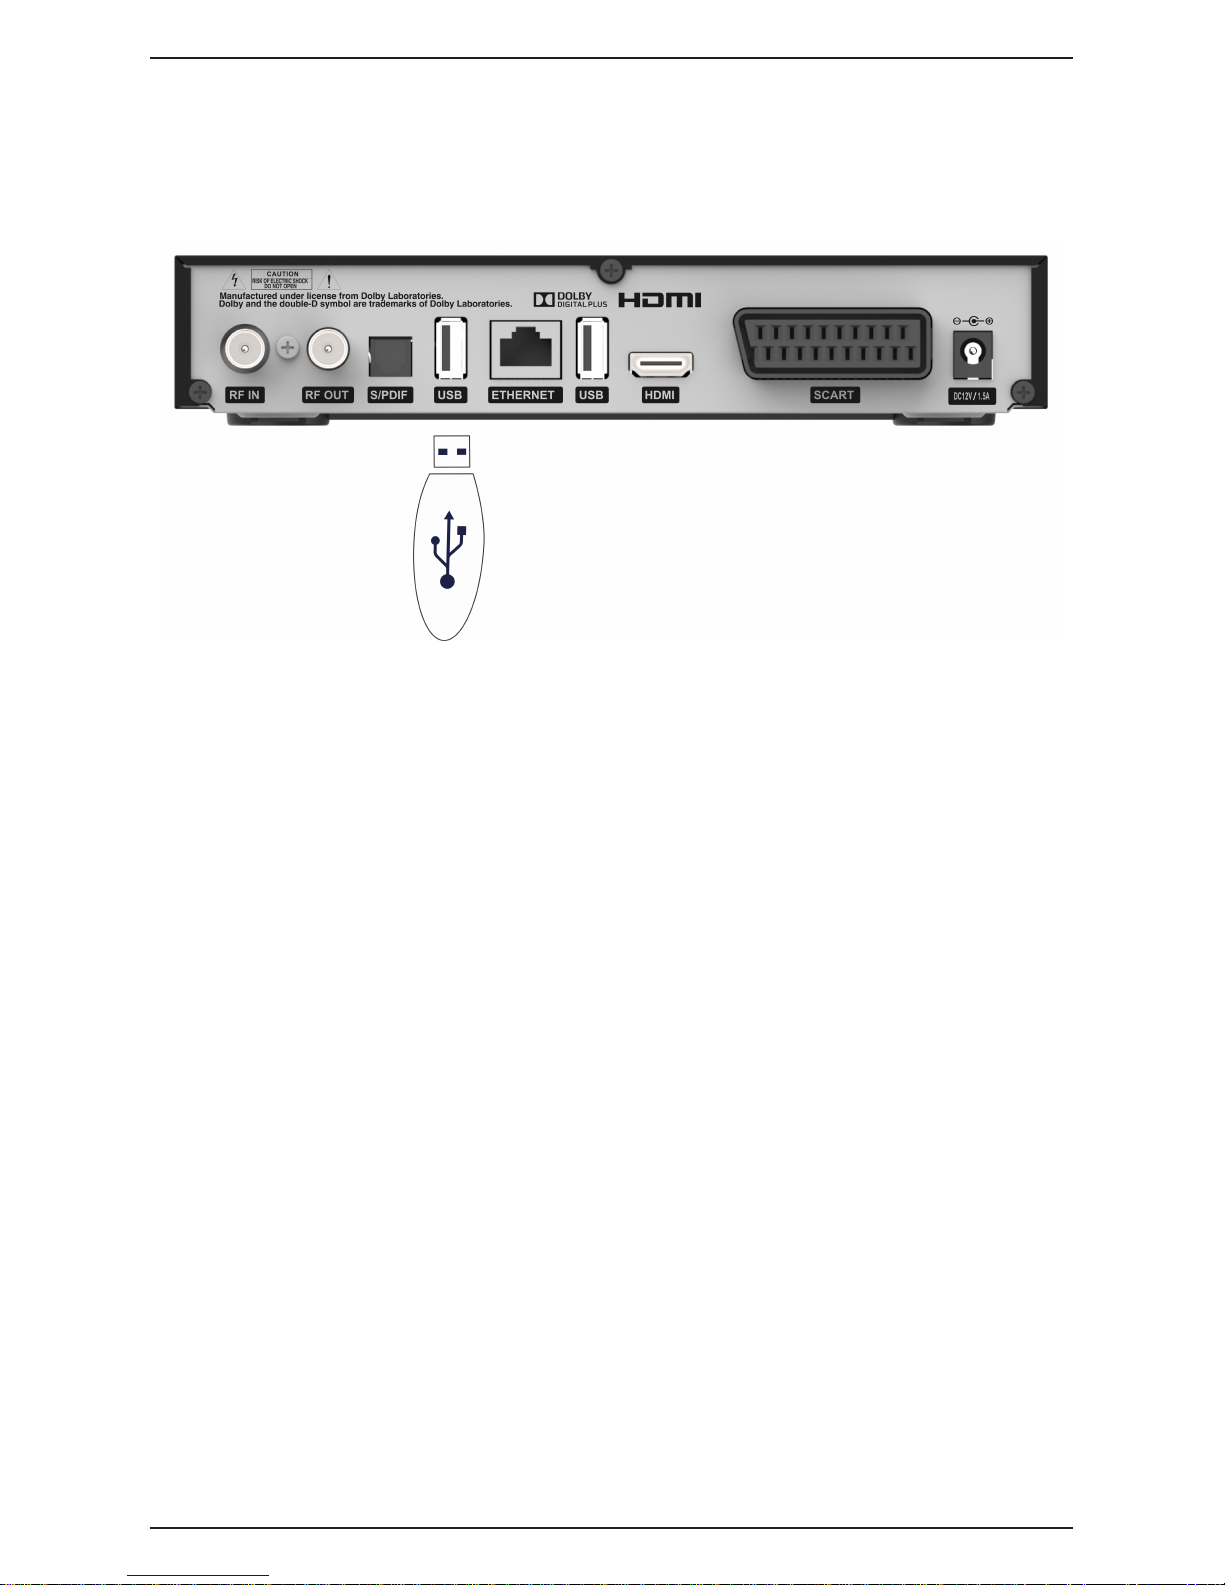
4
1.2.3 Connecting a wi adapter (optional)
With the use of a WiFi adapter (optional), you can connect a wireless router even if the receiver and router are
distant from each other, thus avoiding the use of a long network cable.
Configure and connect the WiFi network following the instructions contained in this manual of the use of the
Wi-Fi adapter. Then connect adapter and receiver USB socket, as shown in the picture.
Philips DTR3030M
Page 49
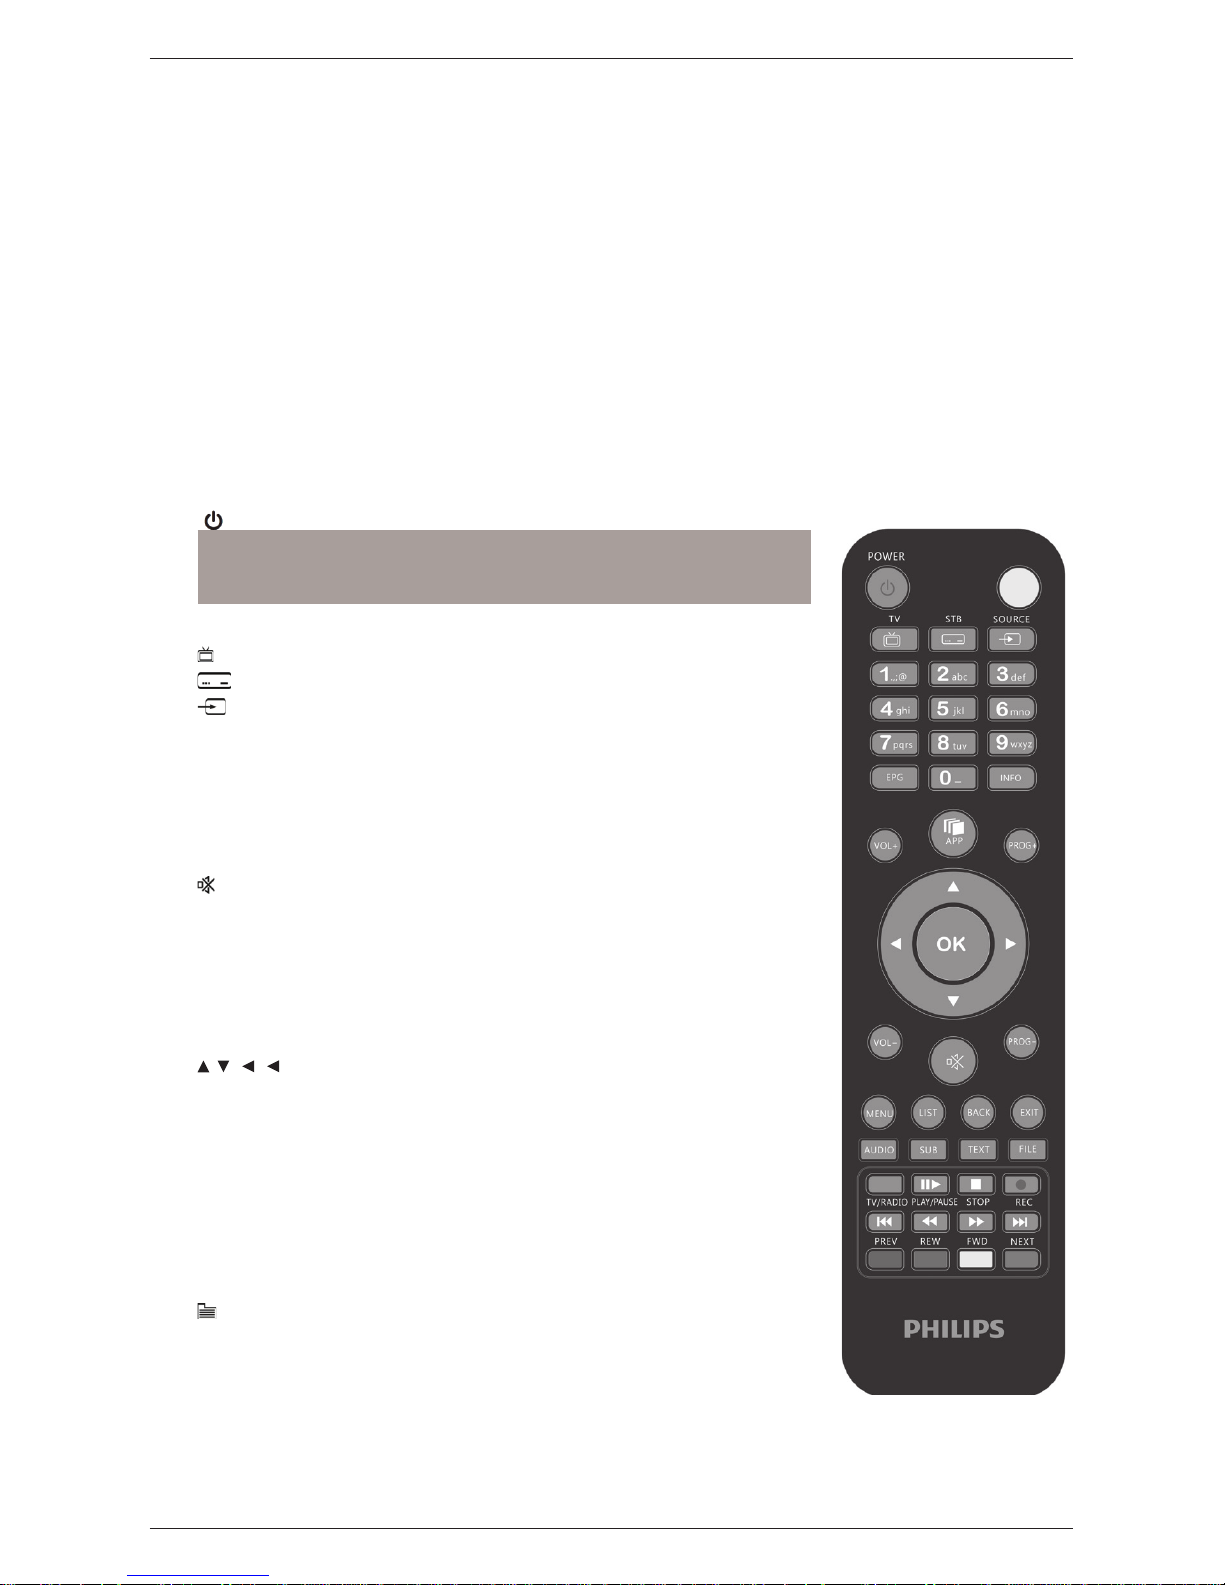
5
1.3 Remote control
The knowledge of remote control is the basis for using the receiver and for an easy navigation between the
various functions and menus.
1.3.1 Batteries
Information and warnings
Replace or insert batteries before the first use of the product or when the remote control stops responding
properly to button presses. Compatible batteries: 2 x AAA, 1.5 V.
To avoid that the leakage of corrosive liquid damages the remote control, we recommend that you shall remove
the batteries when the device is not used for a long period.
Avoid the use of different types of batteries or new and used batteries together.
Inserting and removing
Once you open the battery cover at the back of the remote control, insert 2 batteries (AAA size), according to
the correct polarity as indicated inside the battery compartment. Then close the cover.
Remove exhausted batteries, which must be disposed of separately from domestic waste, and put into the
recycling center, then repeating similar operations to the insertion.
1.3.2 Buttons and remote control functions
1.
(On/Standby) switch on or off in standby mode on the receiver.
NOTE
To always get a quick switch on in standby mode, you must disable the
Power Saving (see par. 3.6.1.5).
2. LED Indicator of remote control operation.
3.
TV Enabling TV command. (*)
4.
STB Enable command decoder STB (Set Top boxes-STB).
5.
SOURCE audio-video source selection on the TV. (*)
6. 0÷9 (numeric buttons) Change channel or insert alphanumeric values in
menu and any applications.
7. EPG Electronic Program Guide (Electronic Program Guide-EPG). (**)
8. INFO screen displays information about the channel being viewed. (**)
9. VOL +/- adjusts volume level.
10. APP access to the portal of on-line applications.
11.
Audio mute (MUTE).
12. PROG +/- next/previous channel or a quick scrolling list.
13. MENU main Menu.
14. LIST access to the list of all TV/Radio channels or favorites.
15. BACK Returns to the previous screen or cancel a typed character in a text
eld.
16. EXIT exits menu, EPG or other information displayed on the screen.
17.
, , ,
(cursor Arrows) navigation in the menu, the EPG and in
applications.
18. OK button of conrming actions/changes.
19. Red, green, yellow, blue (color buttons) They are served in the menu and
in applications to operate specic functions.
20. AUDIO Select audio tracks available in TV channels. (**)
21. SUB activate/dis-activate subtitles in TV channels. (**)
22. TEXT open/close Teletext or the activation of screen virtual keyboard at
some text-entry elds. (**)
23. TV/RAD Change between TV and radio programs. (**)
24. FILE, PLAY/PAUSE, STOP, REC, PREV, REW, FWD,
NEXT Buttons function for VCR (PVR-Personal Video Recorder) and
Media Player.
(
*) In order to control your TV, the TV must be suitably programmed as described in this
manual (section 1.3.3).
(**) Information about programs, Teletext, subtitles and audio tracks are additionally provided
by channel broadcaster; such data may be incomplete or absent.
Philips DTR3030M
Page 50

6
1.3.3 Programming TV button
1.3.3.1 TV code change
TV codes are predened in the list annexed to these instructions (see Appendix A). First identify the brand of
TV that you want to control, then follow the steps listed below:
1. Turn on the TV that you want to control.
2. Hold down the TV button for more than 3 seconds until the LED on the remote control indicator remains lit.
3. Enter the 4-digit code that corresponds to the brand of your TV to be controlled by the numeric buttons 0-9.
4. If the code entered is valid, the LED will turn off. Otherwise, in case of wrong code, it will ash for 3 times
before going off and, in that case, programming will terminate.(start again from point 1).
5. Make sure your TV responds properly to the remote control buttons, at least basic functions. If not, repeat
the programming the TV button by using another code, between those on the list of the brand of your TV
(resume from point 1).
If your brand is not in the list or none of the default codes allows you to control your TV, try to identify or dene
an appropriate program by following one of the following methods.
1.3.3.2 Manual TV Code Search
1. Turn on the TV that you want to control.
2. Point the remote control at the IR sensor of your television and keep it focused throughout the procedure.
3. Hold down the TV button for more than 3 seconds until the LED on the remote control indicator remains lit.
4. Press the button(sign) POWER or PROG + /PROG-.
5. As soon as the TV responds correctly to the command, turning or changing channels (in accordance with
the button pressed), press the OK button to store the code. The LED then goes off.
Verify that the TV responds properly to the other buttons on the remote control, at least basic functions. If not,
continue the search for an appropriate code by repeating the procedure (resume from point 1).
1.3.3.3 TV code identication in use
Code identication allows to recognize the code currently used by the TV remote control. Proceed as follows:
1. Hold down the TV button for more than 3 seconds until the LED on the remote control indicator remains lit.
2. Press the STB button for about 3 seconds, then release it when the LED turns on.
3. To nd the rst digit TV code with four digits, select the numeric buttons from 0 to 9 until the LED indicator
of the remote control emits a single ash. The gure which is ashing is the correct one.
4. To nd the second, third and fourth digit of the code, repeat as described in paragraph 3.
5. After the last digit, the identication of the entire TV code is nished and the LED will turn off.
NOTE
If the button TV has not been programmed or the remote control has been reset (par. 1.3.3.5), the code is
detected 0000.
1.3.3.4 Programming by learning
TV codes listed in Appendix A already provide basic functions to control the TV. You can still extend the
programs associated with the default TV codes by learning function. To take advantage of learning programming,
you must have the original remote control of your TV. Use new batteries for the remote control to program the
original TV decoder.
1. Hold down the TV button for more than 3 seconds until the LED on the remote control indicator remains lit.
2. Press the SOURCE button for about 3 seconds, until the LED starts ashing, then release it.
3. Aim the transmitter of original TV remote control at the sensor IR of the remote control of the decoder, with
a distance of about 3 centimeters. Make sure the two IR sensors are aligned throughout the procedure.
4. Press a single remote control button of the decoder that you want to program: the LED will remain
constantly lit.
5. Press the button on the original remote control of the TV set, corresponding to the function of the decoder
remote control button you selected in the previous step. On command, the LED on the remote control
decoder will ash again and the remote control will be waiting for the next acquisition.
NOTE
The acquisition is not immediate, it may take up to 2 or 3 seconds.
6. Repeat the two previous steps, 4 and 5, for all buttons to be programmed.
Philips DTR3030M
Page 51

7
7. After programming of all buttons you want, press the TV button again to save the program and exit the
learning mode.
NOTES AND WARNINGS
The individual buttons programmed by using the learning function will always be associated with the
function, even if you change the code by choosing among predened TV. To clear the learned function,
you must restore to factory settings (reset) of the remote control, as described in section 1.3.3.5.
Before learning programming, it is recommended to use new batteries for both remotes.
The buttons TV, STB and SOURCE are not programmable through learning.
1.3.3.5 Restore factory settings (reset) of the remote control
If necessary, you can reset the remote to original factory settings as follows:
1. Press the TV button for more than 3 seconds until the LED indicator remains lit on the remote, then
release it.
2. Press and hold the SOURCE button for about 3 seconds until the LED starts to blink.
3. Press the SOURCE button until the LED indicator off: reset is completed.
NOTE
The reset will restore the default programs/TV codes from the factory, bringing the TV program the value 0000
and removing any button programmed through learning.
1.3.4 Use of the remote control
After the remote control of TV is programed, it will work just like the original TV remote control, at least with
the basic functions such as switching on and off, adjusting audio volume and channel change. To control the
decoder or the TV, short press on the corresponding STB or TV function buttons and point the remote control
at the IR sensor of the related device. During the transmission of each remote control, their LED indicators will
illuminate.
Philips DTR3030M
Page 52

8
1.4 Receiver installation for the rst time
When you nish connecting the receiver (para. 1.2.2) and then connect to the mains power supply, the receiver
will start up automatically. If it does not happen, turn on the device using the button on the remote control or
of the front panel. Screen then displays a simple procedure guide for the rst time installation.
NOTE
Use the arrow buttons , , , on the remote control to switch between voices and menu options, then press
the button OK at the Next entry to conrm and proceed.
Follow the instructions below:
Language Choice
Choose the language of the menu on the screen. (OSD-On Screen Display), of the Main Audio and Main
Subtitles.
Time Adjustment
Set the country of installation and set the time according to the reference of Greenwich (Italy GMT + 01:00)
and the Summer Time option, it is recommended that you keep automatic (Auto).
PIN Denition
Dene a four-digit numeric password (PIN-Personal Identication Number) for parental control (see also the
section 3.6.3). Enter the PIN you chose in the eld New PIN, and then reinsert it into PIN Conrmation to
conrm it.
Audio Settings Page
Configuring audio and video parameters of the receiver according to the characteristics of the audio/video
devices connected to the receiver:
1. Resolution: settings of video resolution of the audio- video digital HDMI interface
2. Size: format of screen/TV connected to the receiver and its mode of images presentation with different
format from the screen:
a. 16: 9: for 16: 9 screens, 4: 3 images will be adapted to the entire screen.
b. 4: 3: for 4: 3 screens, 16: 9 images are adapted to the entire screen.
3. SCART output: type of video output of SCART (RGB, CVBS) output
4. Dolby Digital: encode of digital audio output between original source (RAW) and Digital Stereo (PCM)
and Multichannel (Dolby Digital).
Channels-LCN
Choose whether to use (recommended) the function of the auto-numbering channels (Logical Channel
Numbering – LCN), through which the channel list will be sorted automatically according to the location required
by same broadcasters.
Channels-Scan
If you use an active antenna to be supplied with 5V , through the coaxial cable connected to RF IN antenna
input of the receiver, press the red button (5V Antenna) to activate(ON); press it again to turn it off (OFF).
WARNING
If you use a classical roof antenna or an antenna already energized, antenna power must necessarily cut off:
risk of overload!
Keep Scan Mode in Auto e (automatic) and start auto search by pressing the OK button of the remote control
corresponding to the tone Forward.
After the scan, you may meet the LCN conict. In this case, if two or more channels require the same number
in the channel list, the user shall choose the one to avoid conict. Then highlight the desired service by moving
with arrow buttons / (sign)press OK to conrm, then press OK again on OK item. Proceed thus for every
conict; alternatively, for the automatic assignment of the system, press EXIT or wait a few seconds without any
choice.
Result
After completing the above steps, and then install, conrm with OK consultation and you will immediately enjoy
digital terrestrial channels available, and Applications via the internet portal and Media Player.
NOTES AND WARNINGS
Some channels may be not visible, due to encoding or not compatible with this receiver.
During the life of the receiver, the channels could become obsolete or change the transmission
parameters. We recommend that you keep updated the channel list (section 3.1.1).
o always get a quick switch on of the receiver in power standby state, you must disable the Power Saving
in the menu Settings > Receiver Conguration> Power Management (par. 3.6.1.5).
Philips DTR3030M
Page 53
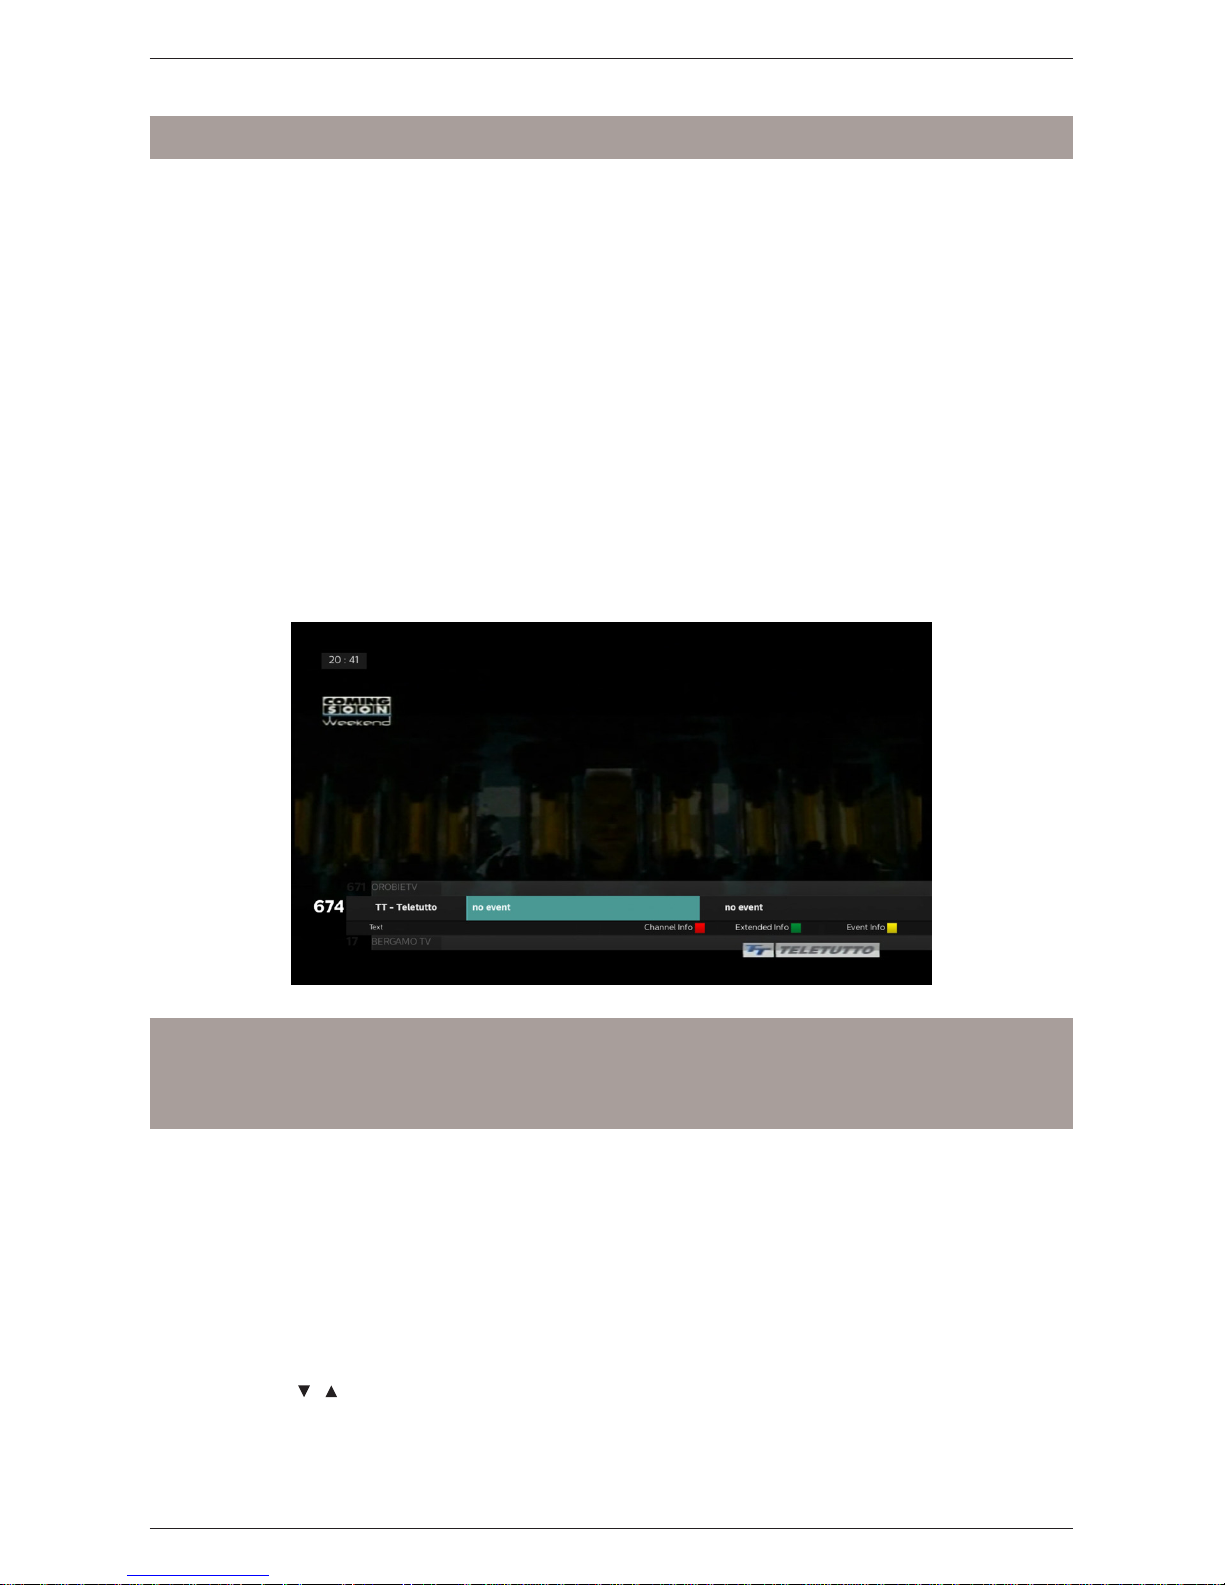
9
2 Section for basic usage
WARNING
Before reading this chapter you should have read the previous chapter.
In order to simplify the use of the receiver and the management of several digital channels, there are some
Windows and menus accessible by pressing a single button on the remote control (para.1.3.2). They are
designed for frequent use and their functions are indispensable for fast interaction with the receiver. For
advanced use, settings and customizations, refer to Chapter 3.
2.1 Banner information of channel
Each time you change channel or press the INFO button, appears at the bottom of the screen for some seconds
an Info window, also known as channel information banner on the tuned channel. The information that can be
present in this banner, if transmitted by the broadcaster, are:
1. The channel number.
2. The name of the channel.
3. The current time.
4. Timetable and current and next program.
5. Additional data as the teletext data (Text icon) and subtitles (Sub icon).
When the channel banner is active at the current or next event:
Press the red button (Channel Info) to get technical information on the tuned channel and the
signal of antenna.
Press the green button (Extended Info) to see the extended information.
Press the yellow button (Event Info) to display information about the event.
Finally, to exit from these informational boxes, use the EXIT button.
NOTES
If the issuer does not transmit some of the above information, they will not appear on the banner of
channel.
Although the channel banner indicates the presence of additional data, they may be invalid and cannot be
used.
2.2 Quick Selection of TV/Radio channels
The TV/RADIO button on the remote control is used to access the desired channels mode, television or Radio.
Next, to change channels, do one of the following ways:
Press PROG +/PROG- on the remote control.
Enter the desired channel number by using the numeric keys 0-9 on the remote control.
For a convenient way to manage a large number of radio and TV channels that digital broadcast offers, use the
accessible quick channel list during the vision of the programs by pressing the LIST button,
then:
Press OK on channel TV list (or Radio Channels)
Press / buttons to scroll through the list of one channel at a time.
Press the PROG-/PROG + button to scroll through the list of a page at a time.
Press the OK button on the chosen channel to tune.
For the advanced management of the channel list, especially for a Favorites channel list, refer to the paragraph
3.2.1.
Philips DTR3030M
Page 54
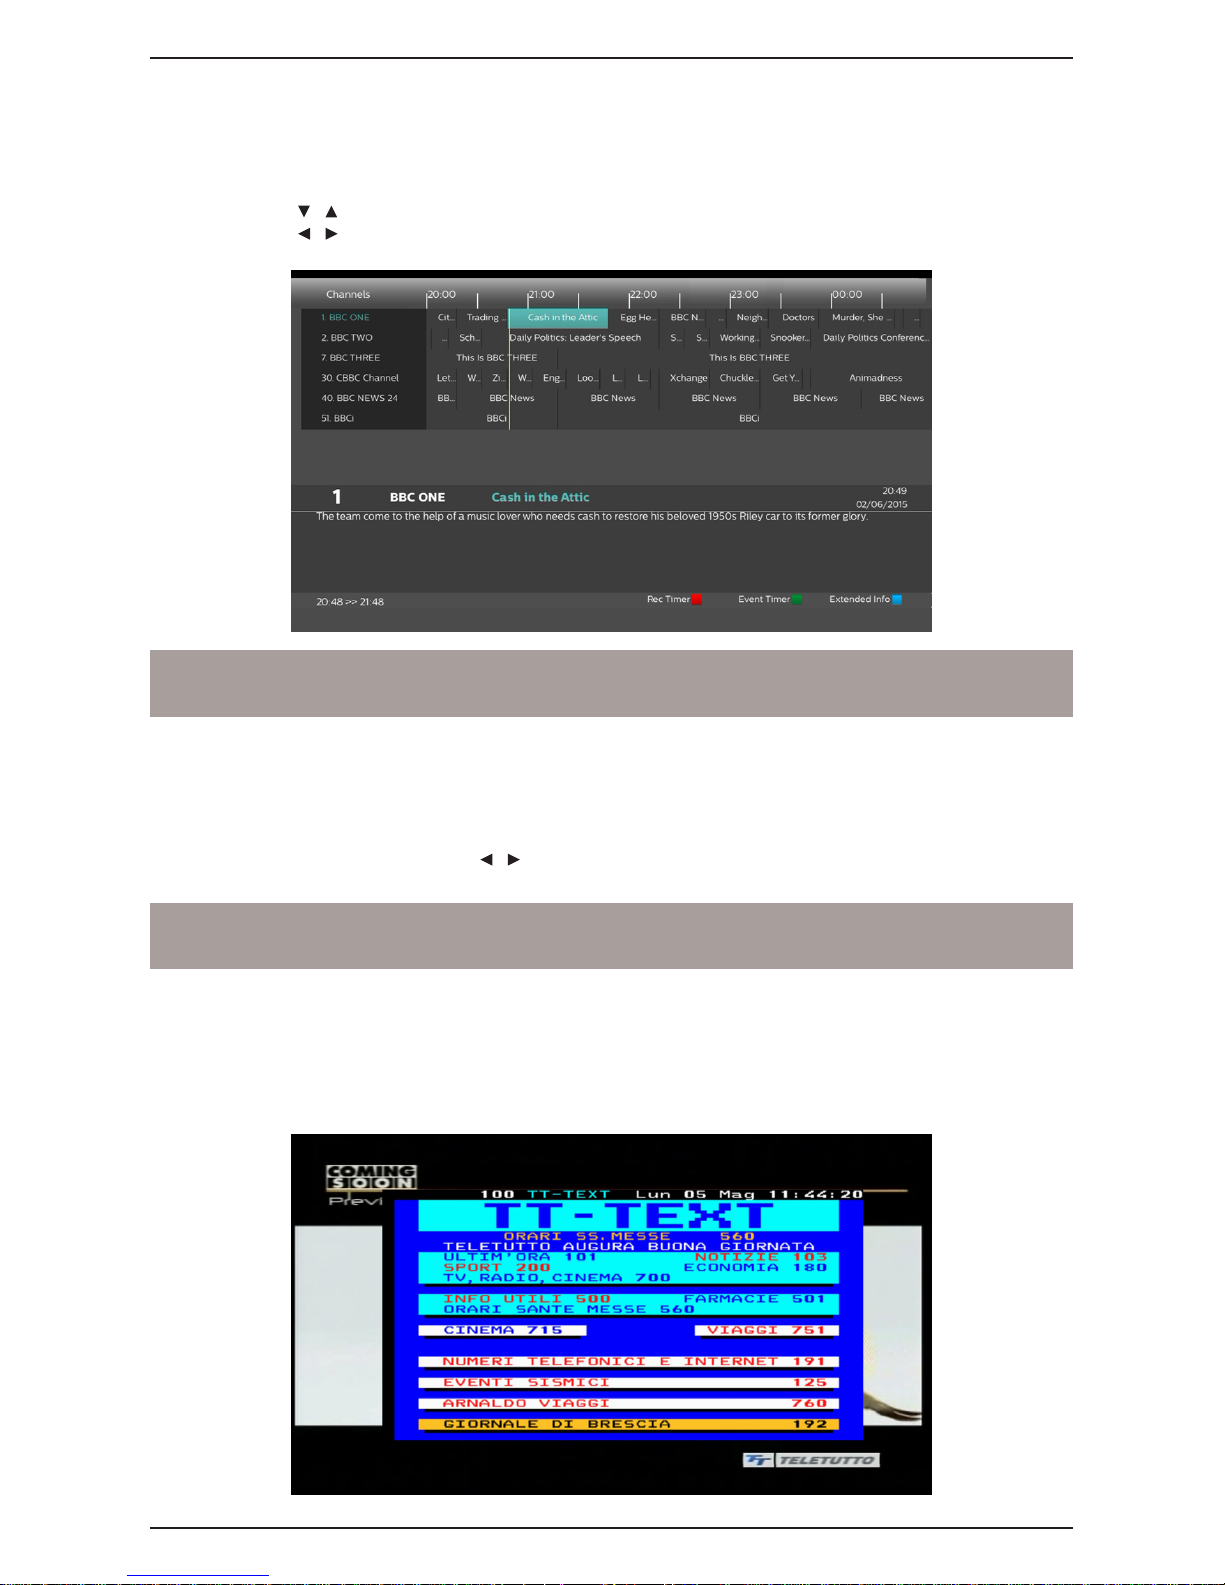
10
2.3 Electronic program guide (EPG)
Some digital TV channels broadcast, in addition to audio-video data of the current program, also including the
information about the daily or weekly programs. They can be used by the user for to set a timer.
To consult the EPG, press the EPG button on the remote control or, alternatively, access from the
menu Channel Manager > EPG.
Using / Buttons to change the channel and press OK to tune.
Using / Buttons to move between the events in programming on the selected channel.
Exit from EPG by pressing EXIT.
WARNING
The EPG information is optional data transmitted from the broadcasters. Therefore, failure to display of all or
some information is not a symptom of failure of the receiver.
2.4 Audio Option
If the current channel is broadcast in multi audio/ language, the user can select the audio track that prefer.
Proceed as follows:
Press the AUDIO button on the remote control.
Select with the arrow button / the desired track.
Press the OK button to conrm.
WARNING
The multichannel Dolby Digital audio tracks are audible only through the digital audio output, not by the analog
audio SCART output.
2.5 Teletext Function
If displayed channel is equipped with teletext data:
Use the TEXT button to start it.
Use the numerical keys 0-9 to change page.
Press the TEXT button again to exit.
Philips DTR3030M
Page 55
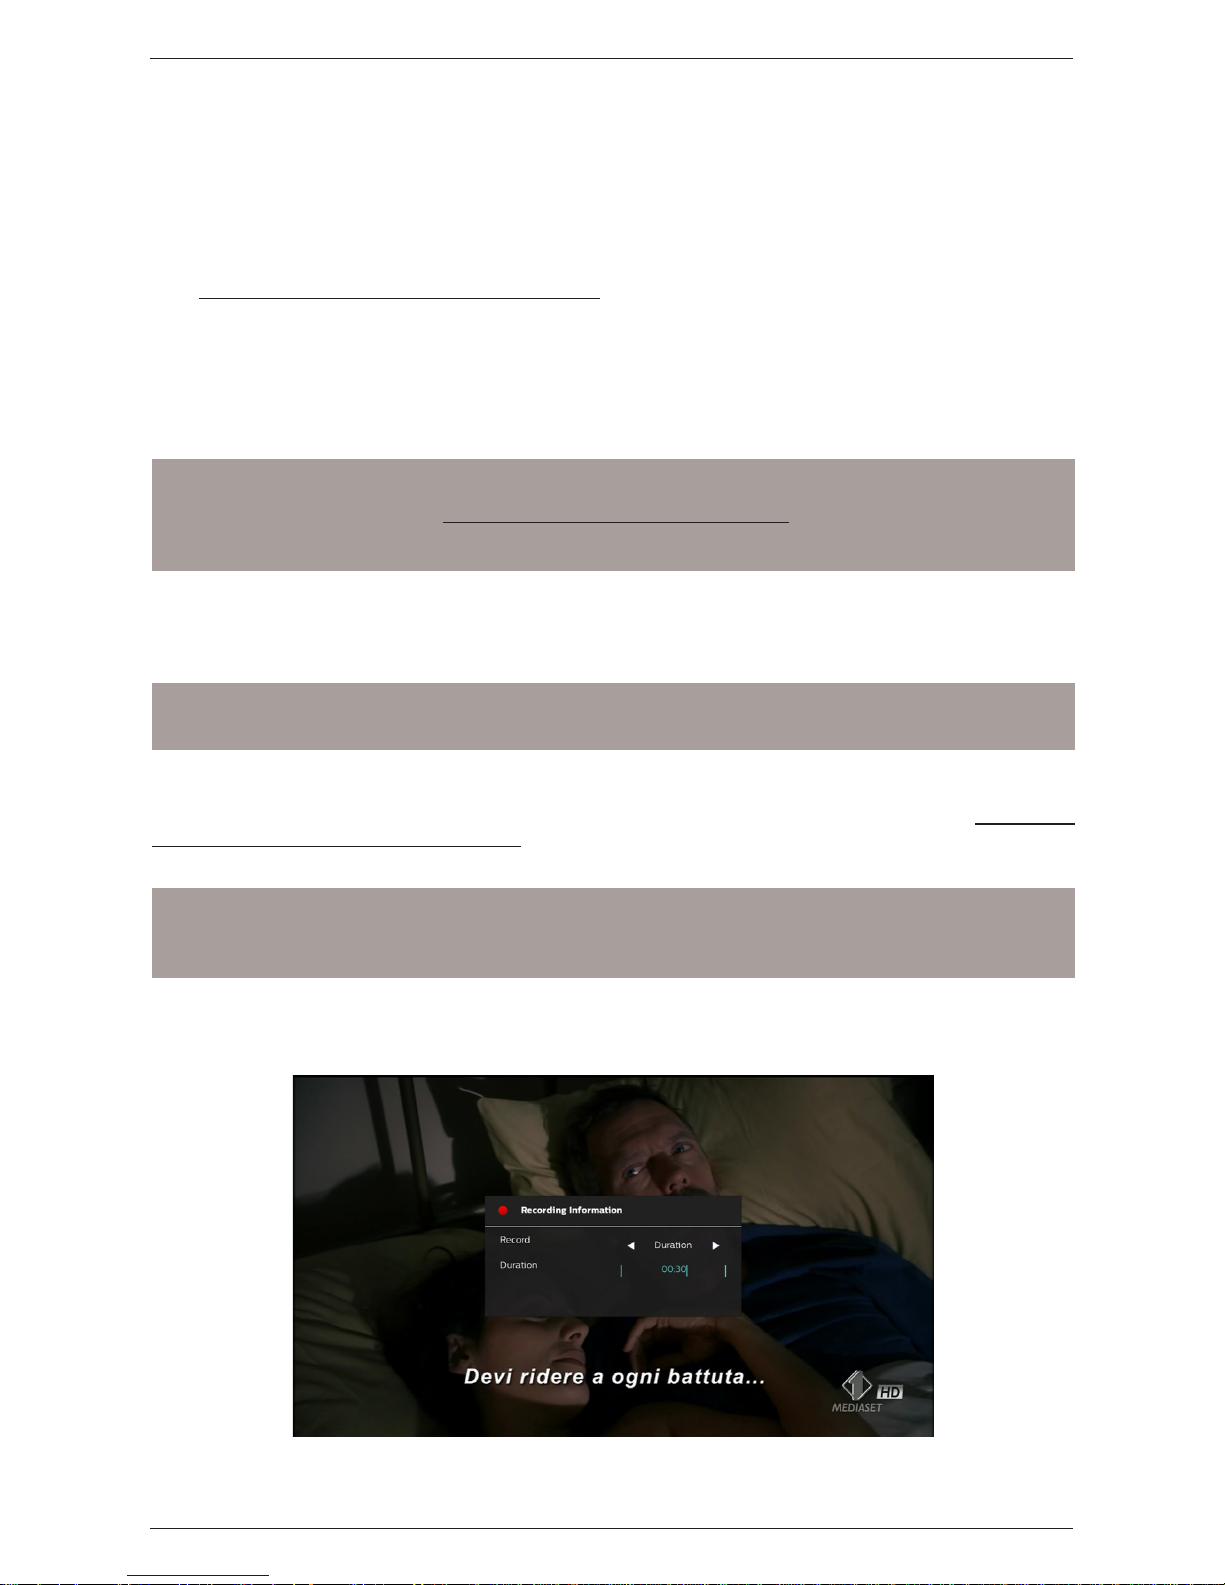
11
2.6 USB Functions
The two USB ports, on the rear panel of the device, are mainly to linked external mass memories equipped with
USB 2.0 interface, in order to record digital channel from integrated tuner in the receiver and reproduce personal
multimedia contents, also like with the device such as keyboard (with American keys conguration) and mouse,
useful for the use of application.
2.6.1 Use and warnings
Before proceeding the use of a USB mass storage, as a hard-disk (Hard Disk-HDD Driver) or ash/memory
stick, follow these important rules and warnings below.
2.6.1.1Connection and disk formatting
To take advantage of the video recording function (section 2.6.2), the USB device must be formatted in advance
in FAT32 or NTFS and get a free memory capacity suited to their needs.
At the rst connection of a USB memory device or after any formatting, the receiver will ask to initialize the
device to get ready to recording function. For conrmation, the receiver will create a folder named TSPVR that
used by the same receiver as the recording archive.
WARNINGS
It is recommended to use hard drives with external power supply, as the only USB port of the receiver
cannot ensure proper power: risk of damage to the disk and/or receiver!
The receiver is compatible with USB storage devices formatted with FAT32 and NTFS File System.
Compatibility is not guaranteed with all USB memory devices on the market.
2.6.1.2 Disk Removal
For a safe removal of the memory, in order to avoid damage of the device or involved file, we recommend
disconnect the USB memory only during the inactivity of the USB port or, better, when the receiver is in standby
mode.
WARNING
The removal of memory while writing (recording) or read data (reproduction) can damage the contents and the
involved devices.
2.6.2 Personal Video recording (PVR)
Before using a mass storage USB, as a hard-disk (Hard Disk-HDD Driver) or ash/memory stick, follow these
important rules and warnings in section 2.6.1.
2.6.2.1 Recording TV programs
NOTES
The receiver is equipped with a single TV tuner, so it will be able to view and record a program at a time.
Broadcasters may decide to prohibit the recording issues due to the protection of copyrights.
The minimum duration of a recording is 1 minute, otherwise they will be saved to the USB memory.
Instant recording
To start recording manually, tune the desired channel and press the REC button. The receiver will let the user
choose the duration of recording; then press OK to start. To stop recording manually before the predened end,
press the STOP button and conrm.
Scheduled recording
You can schedule a timer rather than manually recording from the menu settings > Planning Activities >
Timer settings (par. 3.6.2.3).
Philips DTR3030M
Page 56
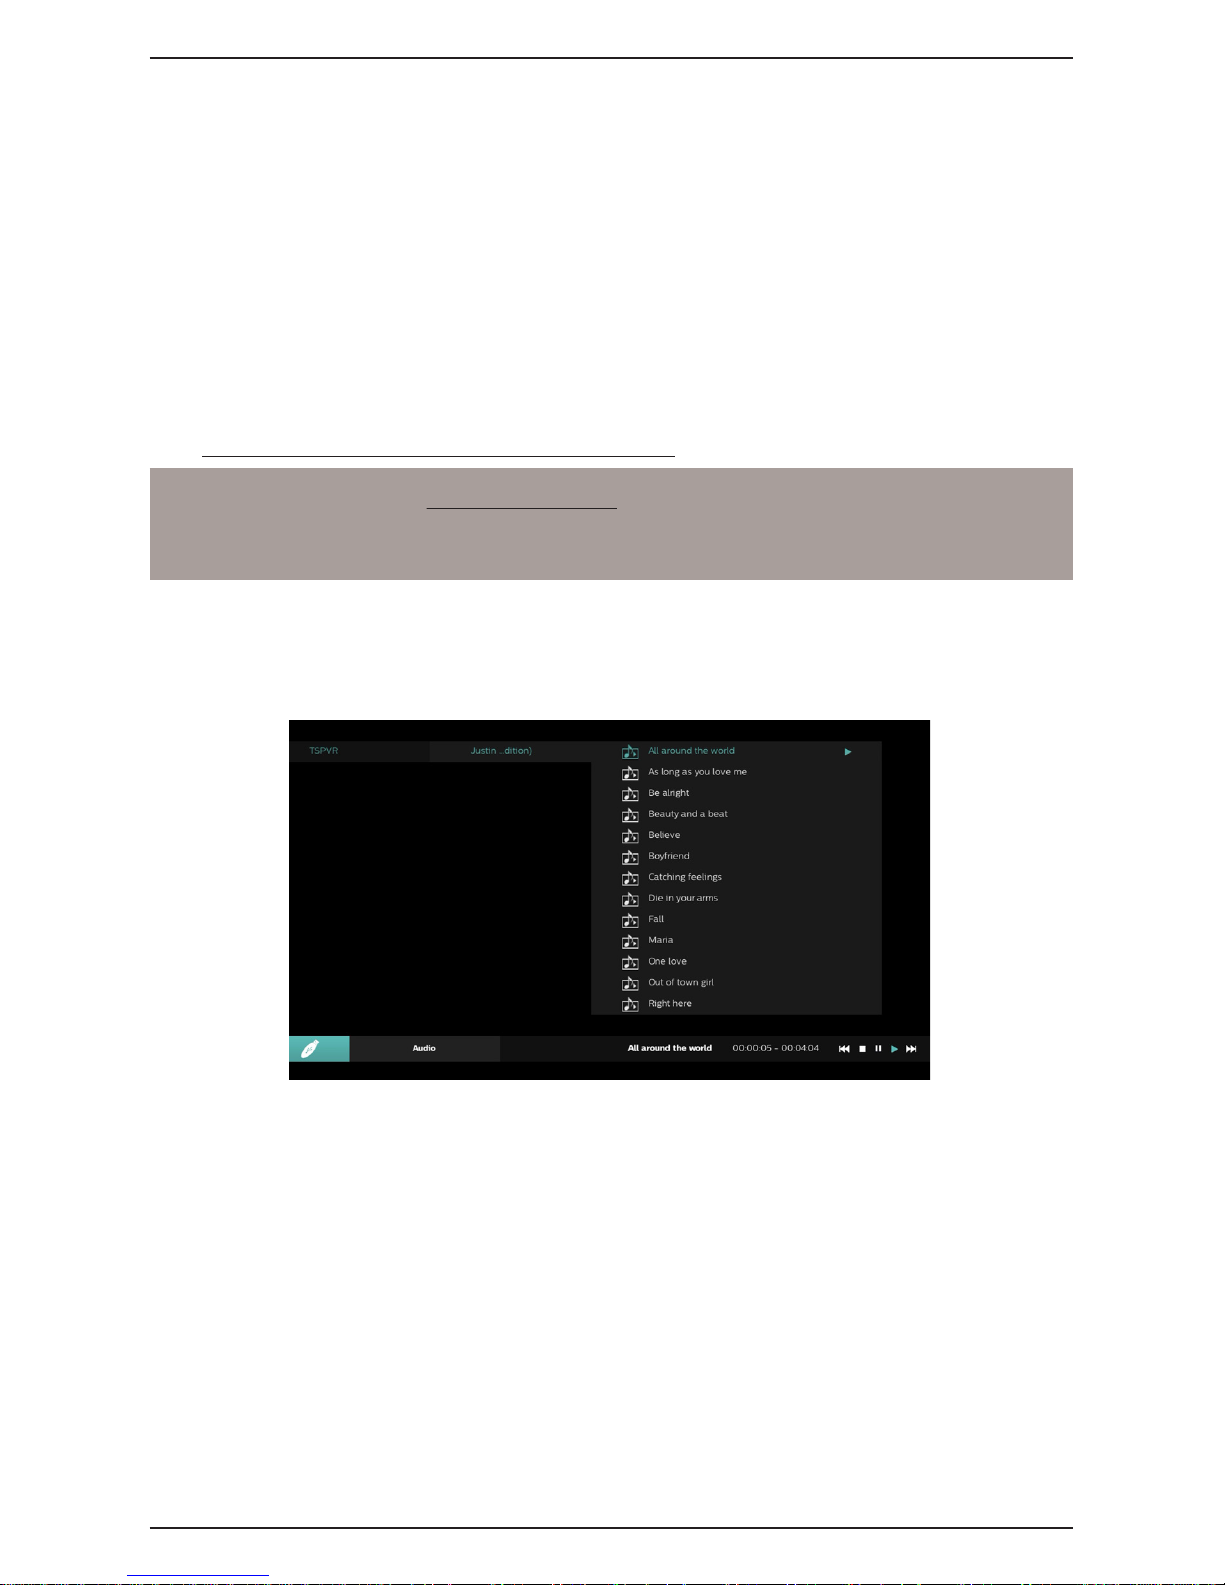
12
2.6.2.2 Playback of recorded content
Recorded les are stored in the USB memory and can be invoked from the menu Multimedia > Recording List
or pressing directly FILE button on the remote control.
By pressing the OK button on a recording, playback will start. When reading, use the PLAY/PAUSE button to
Pause/Resume the vision, REW/FWD to rewind/fast forward and STOP to end playback.
Finally, if you need to delete a le from the list of records, use the RED (delete) button.
2.6.3 Multimedia USB Reader
The Media Player function, commonly called Media Player, allows you to:
1. Play video content MPEG 2 /MPEG 4,
2. Listen to MP3 music,
3. Display JPEG images,
from an external memory connected with USB port.
Before proceeding the use of a mass storage USB, like a hard-disk (Hard Disk-HDD Driver) or ash/memory
stick, follow these important rules and warnings in section 2.6.1.
NOTE
To connect an external memory for the read-only media, cancel any request to disk of proposal initialization in
an automatic way from the receiver for the recording function.
Access the Multimedia menu and choose the sub menu about the kind of content to be played between Audio,
Video and Images.
Audio Menu
To start an MP3 music le, using the arrow keys to navigate through the folders and select the desired le, then
press OK.
When reading, use the PLAY/PAUSE button to pause or resume playback, STOP to nish and the NEXT and
PREV buttons to navigate to the next or previous song.
Video Menu
To play a video of MPEG2 or MPEG4 format, navigate between folders and les with the arrow keys, then press
OK to the chosen content.
During playback, press the PLAY/PAUSE to pause or resume the vision, the STOP button to stop it, RED (Audio)
button to change the audio track and the blue button (GoTo) to go to the desired instant expression in hh: mm:
ss. The NEXT and PREV buttons allow you to go directly to the next movie or the previous.
Philips DTR3030M
Page 57
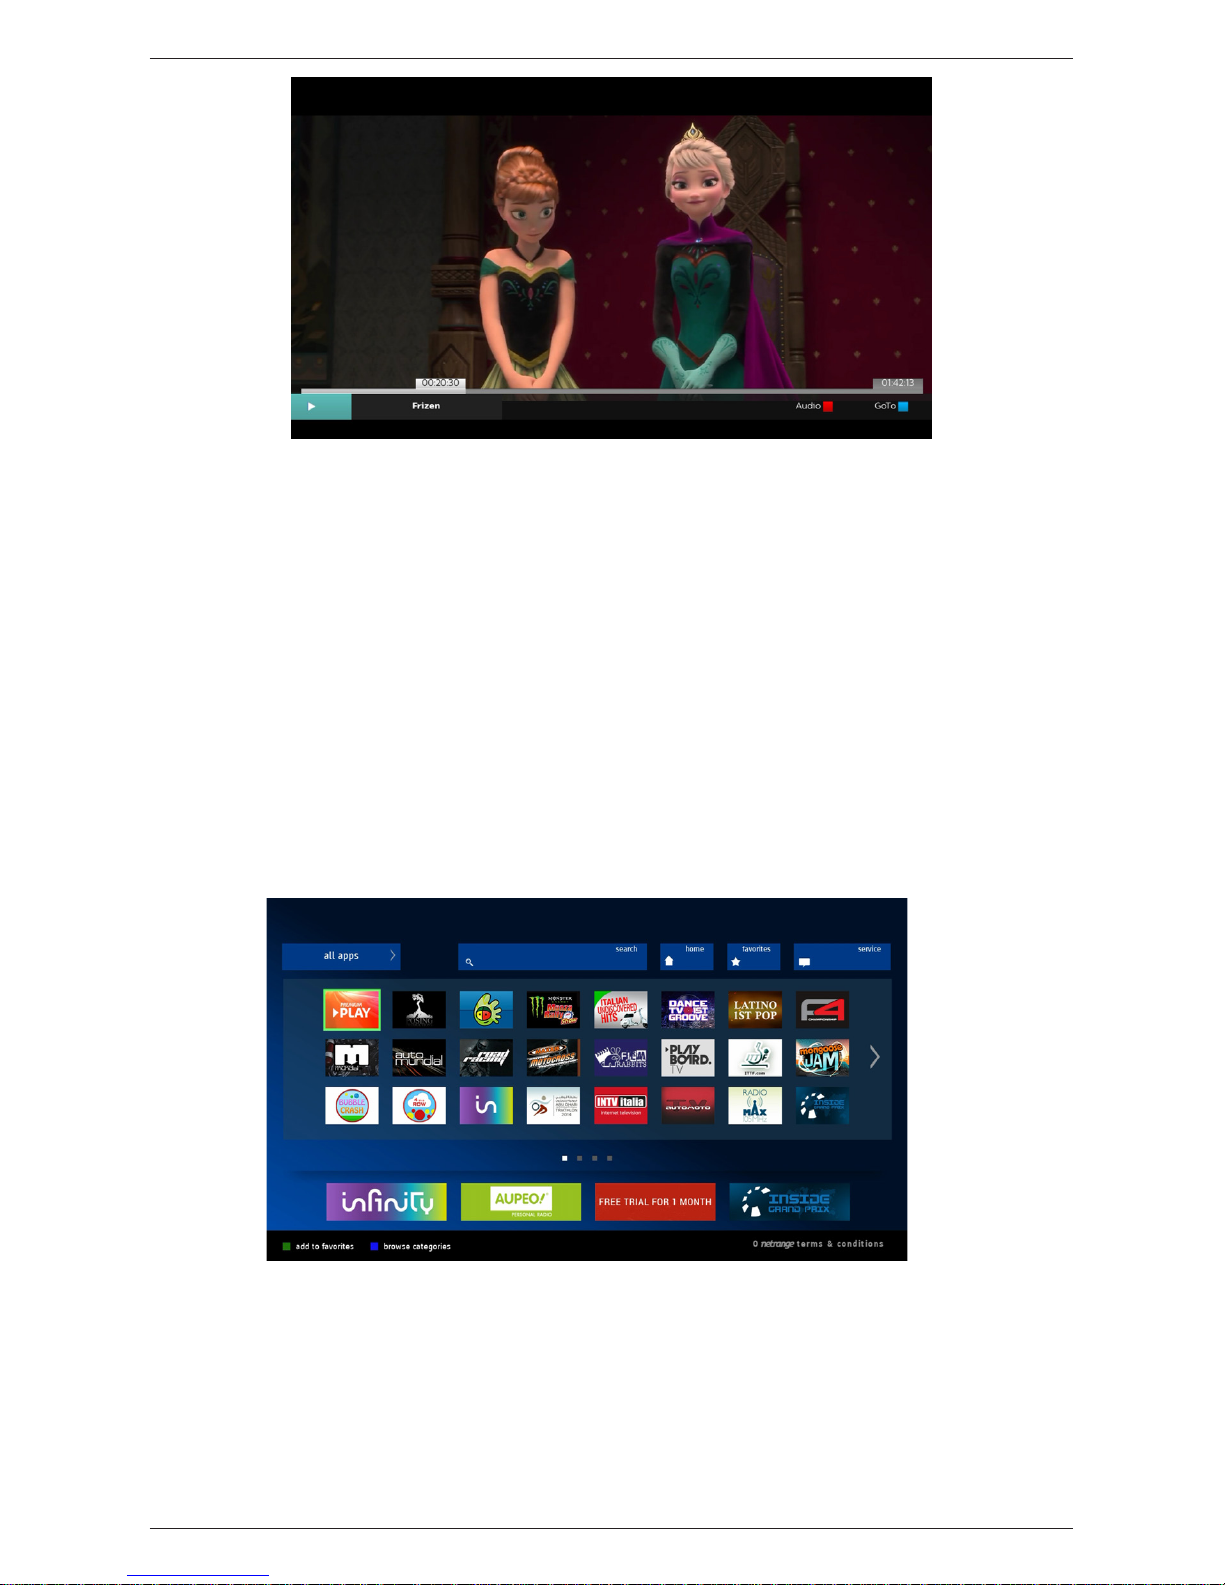
13
Images Menu
Navigate through the folders with the arrow keys and press OK on the JPEG photo le to open it. Use the NEXT
and PREV buttons to continue to the next photo or go back to the previous one. Return to the le list with EXIT.
2.7 Network functions
The receiver is equipped with an Ethernet interface 10/100 for the use of Phillips Portal applications
through broadband internet network and to play multimedia les shared over a local network with home UPnP/
DLNA Protocol.
2.7.1 Application Portal
Phillips Portal provides access to a wide range of applications, from the most known news and
information of social networks, to the entertainment applications and many more. Besides applications, a web
browser that makes surng the internet.
The Portal provides a list of favorite applications (user selectable) and a list of applications suggested (automatic
choices from the Portal). You can also go to the list of all applications through the icon All the app, where you
will nd some function can be activated by remote control:
1. Blue button (search categories): to lter applications by type (e.g. news, services, sports, entertainment,
music, games and Video On Demand VOD).
Philips DTR3030M
Page 58
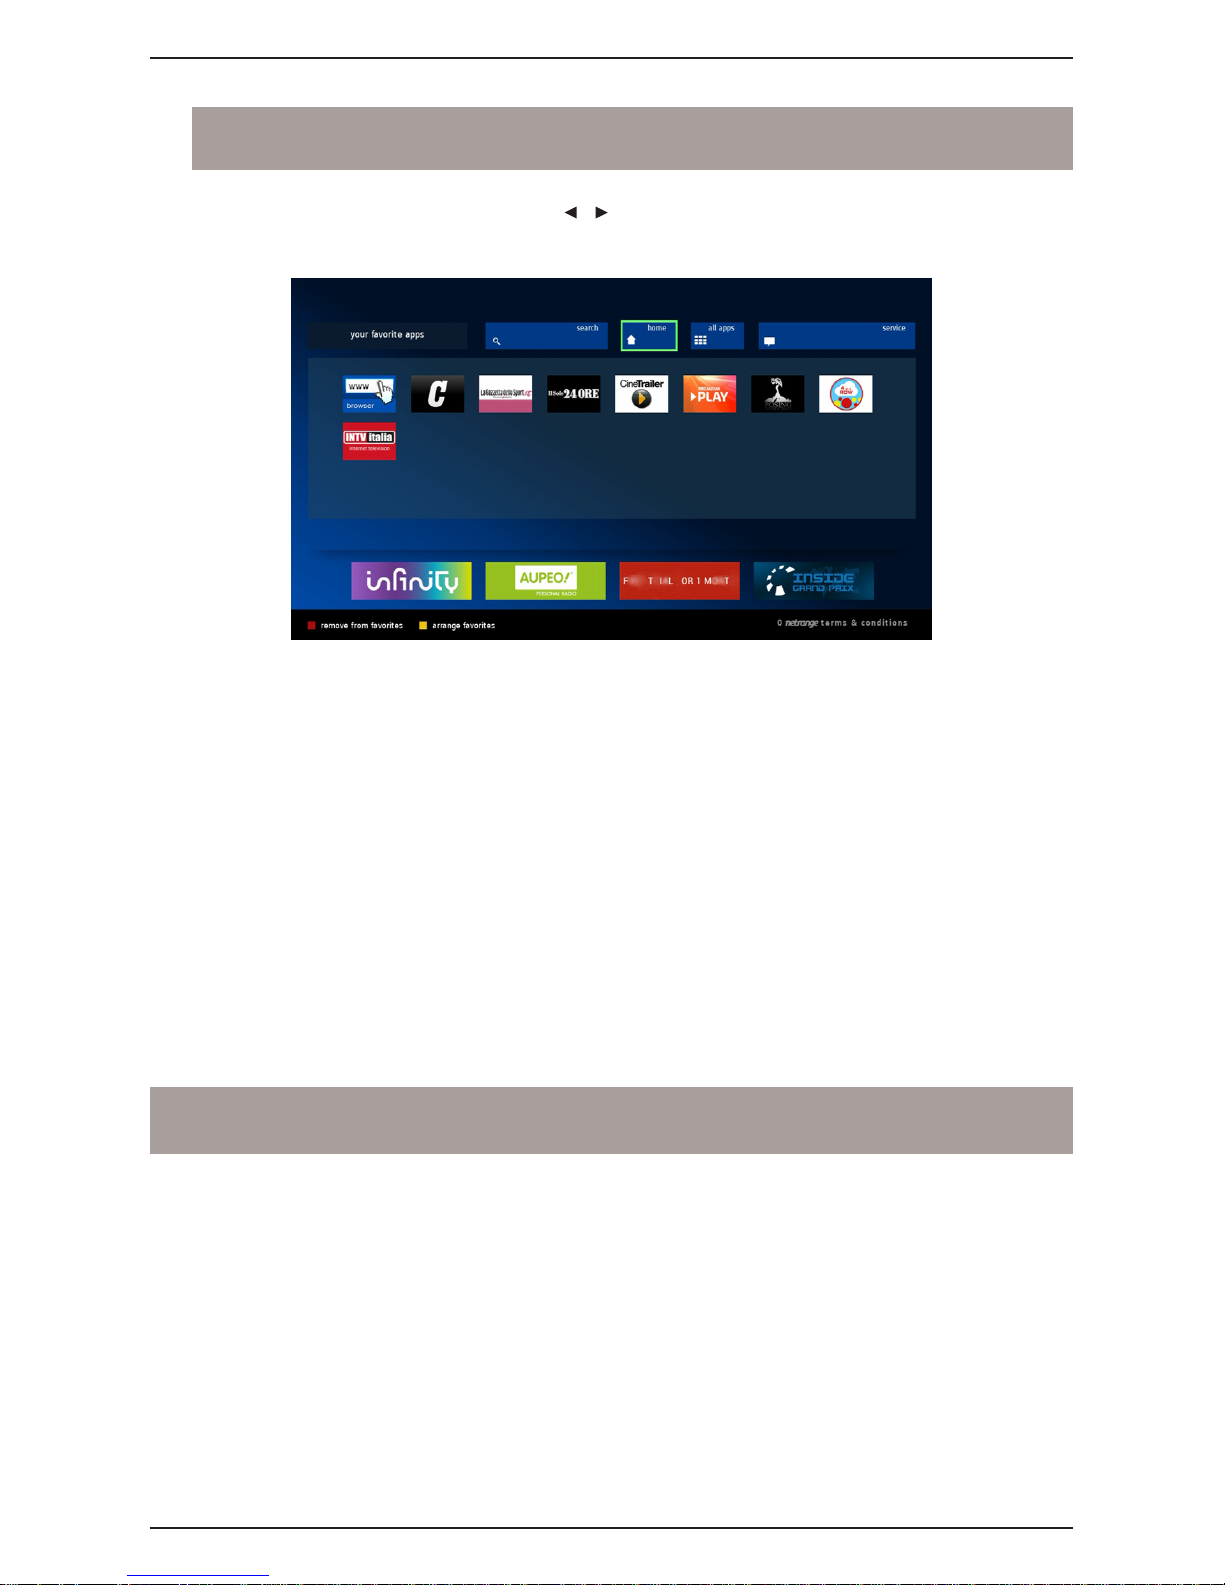
14
2. Green button (Add to Favorites): to add the selected application.
WARNING
Before adding a new application to the list of those you prefer, make sure that you have not already
reached the maximum of 8 applications.
To change an application's location in the Favorites list, select and press the Yellow button; move it then
to the desired location by using the arrows / and press the Yellow button again to conrm the new
position. Instead, if you want to remove an application, you must enter the Favorites menu, select the
application icon and press the Red button (remove).
In addition, there are Search sections (search engine portal), Home(to return to the main screen of Portal) and
services (for any communication to the user).
To start an application:
Select the application with the arrow keys.
Press the OK button.
2.7.2 Multimedia DLNA reader
Entering the menu Multimedia > DLNA you can see the server UPnP/DLNA available on your home network
where the receiver is connected, and then play the media on the screen shared from the same home server.
Information about DLNA sharing
If you want to share media les (video, music and photos) stored on your computers, you have two different
methods:
1. Congure the DLNA local server of Microsoft Windows operating system.
2. Install a DLNA server by third parties.
Regarding the first of these methods, Microsoft site has step-by-step instructions to enable the DLNA local
server. Attention, in any case, you must have installed Windows Media Player version 11 or higher (already
included in Windows 7 or 8).
WARNING
Enable the DLNA server of Windows means sharing multimedia les of their libraries with all DLNA client that
demand. Be sure to use this functionality only within your home network.
Philips DTR3030M
Page 59
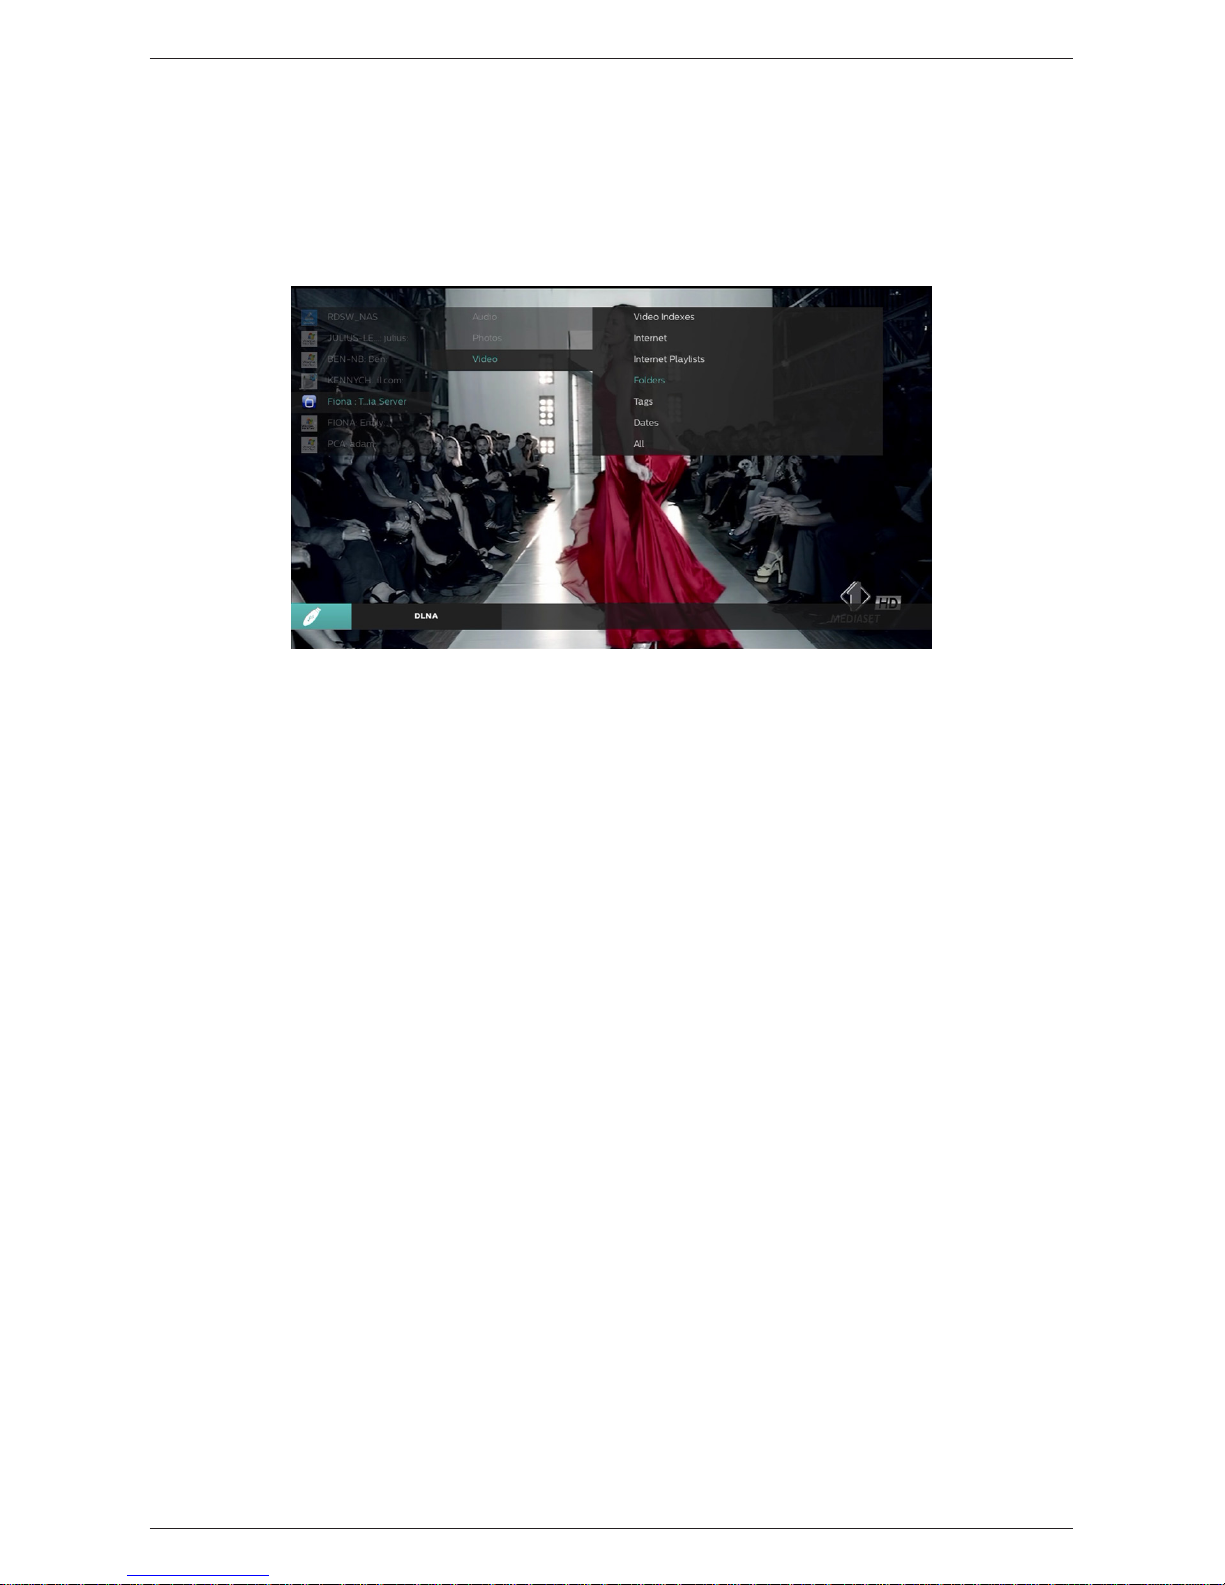
15
Reading
Once the DLNA server congures and the receiver connects with home data network, to reproduce multimedia
content:
Access the menu Multimedia > DLNA.
Use the arrow buttons to browse through the available folders, select the desired le and press OK
to play it.
During playback, follow the instructions already described for reading with USB (section 2.6.3)
according to the selected content type (audio, video or photo).
Philips DTR3030M
Page 60

16
3 Section for Advanced Usage
WARNINGS
Changing some parameters of the menu could affect the correct operation of the receiver. Read then this section
of the guide carefully before proceeding with adjustments. Some functions are protected by a security code to
avoid tampering (see par. 3.6.1.4).
During normal vision of a program, by pressing the MENU button on the remote control, the Principal Menu will
appear on screen, where there are the following main submenu:
1. Installation
2. Channel Manager
3. Multimedia
4. Applications
5. Pay Per View Services
6. Settings
GENERAL RULES FOR THE NAVIGATION
To navigate between various menus use:
Arrow buttons
, , ,
to select menu, sound and options.
The OK key to open a menu or conrm a choice.
The keys 0-9 to enter a numeric value.
The TEXT button to bring up the virtual keyboard on screen at proper text-entry elds in the portal of
internet applications.
The EXIT button or BACK, in general, allows you to exit the menu or return to the preceding current one.
Also refer to any indications given in the various menus, which specify how to implement a function through a
payment button on the remote control.
3.1 Installation Menu
Submenu:
1. Channel Scan
2. Reset Receiver
3.1.1 Channel scan
During the rst installation, available channels will be automatically searched. Periodically, during the activation
of new television and radio services or changing broadcasters, it is suggested to keep updated the channel list
of the receiver.
Only if you use an active antenna to be supplied with 5V through the coaxial cable connected to the input of RF
IN antenna of the receiver, press the Red button to turn it on (press it again to turn it off).
WARNING
If you use a classical roof antenna or an antenna already energized, antenna power must be stayed off: risk of
overload!
3.1.1.1 Automatic search
To scan channels on all frequencies available, proceed as follows:
Set the Scan Mode parameter.
Then press the Green button on the remote control to start the automatic channel search.
3.1.1.2 Manual search
To scan to a specic channel (for advanced users), follow the steps described below:
Set Manual Scan Mode.
Choose Number Channel /Frequency of the interested channel
Then press the Green button on the remote control to start the channel search.
Philips DTR3030M
Page 61
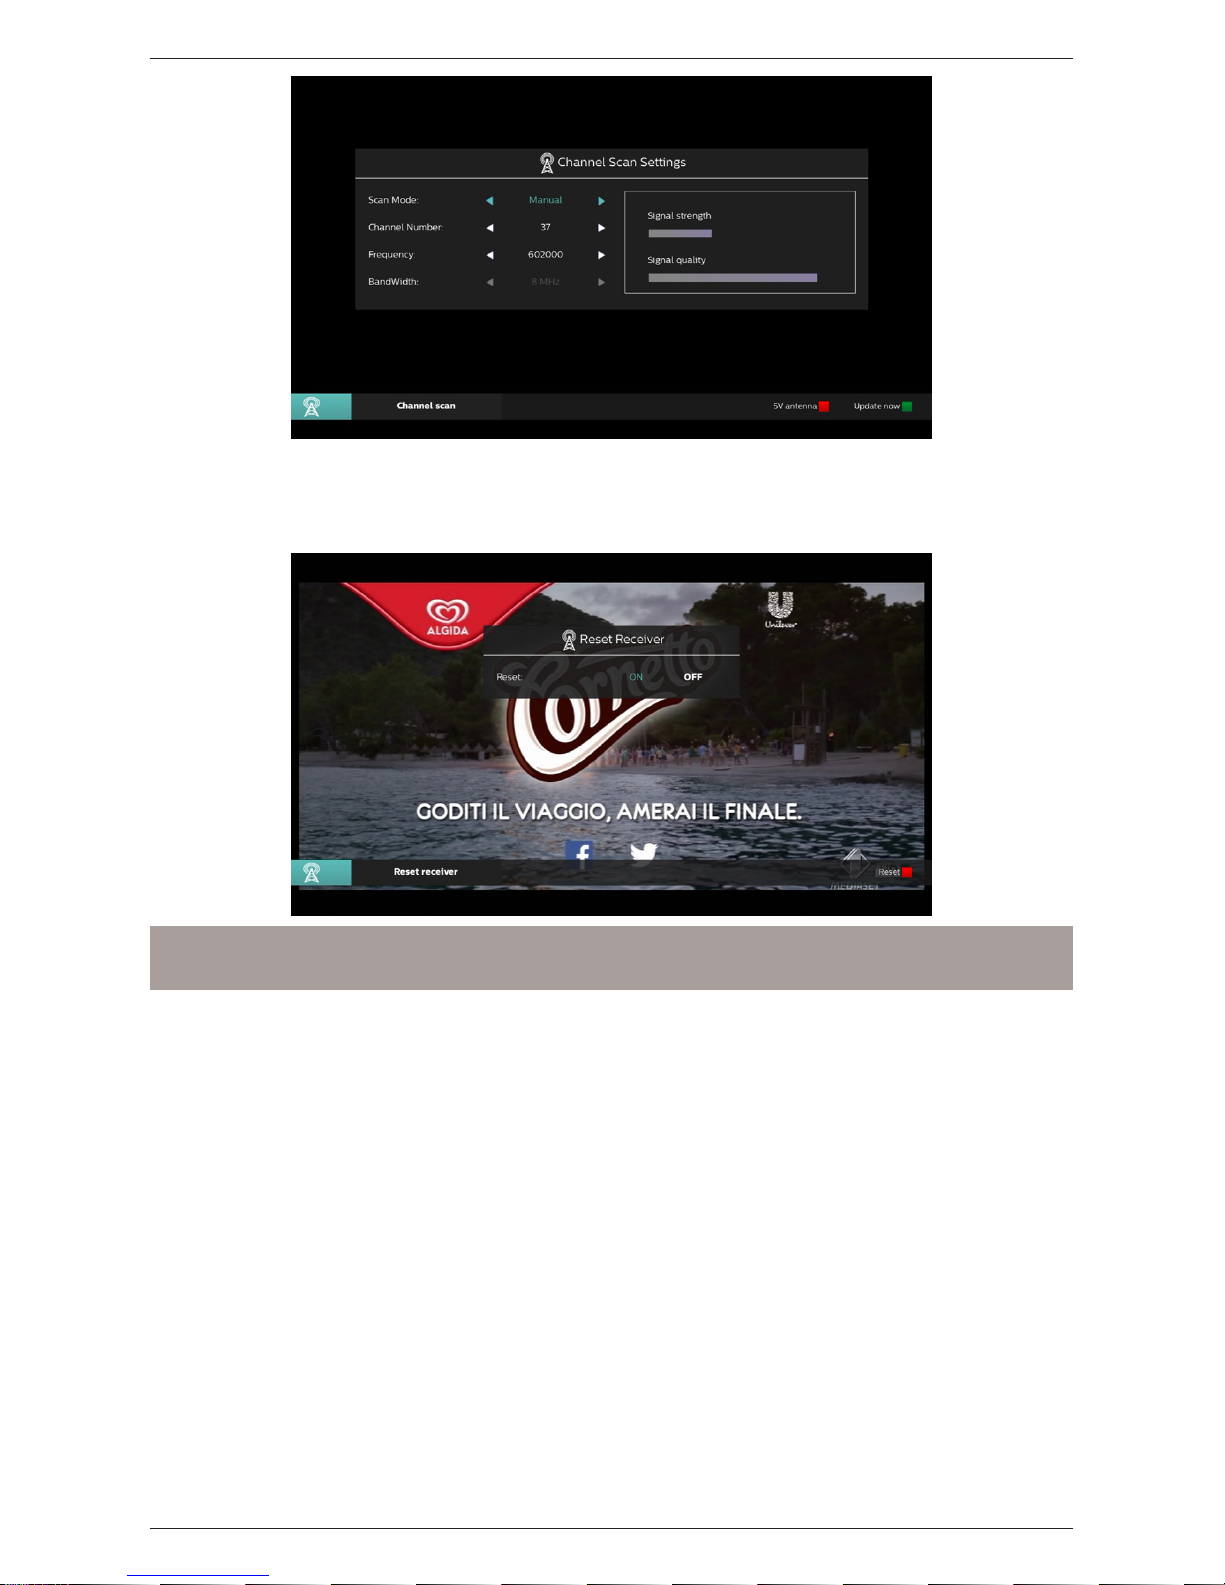
17
3.1.2 Reset Receiver
The function of restoring the original factory conguration of the receiver is commonly also called Reset.
To reset, move the cursor to the option ON (on) and press the OK button, then press the Red button (Reset).
WARNING
If doing this, you will lose all user customizations and all channels loaded, preserving the latest installed
software version.
3.2 Channel Management Menu
Submenu:
1. Channel Manager
2. EPG
Philips DTR3030M
Page 62
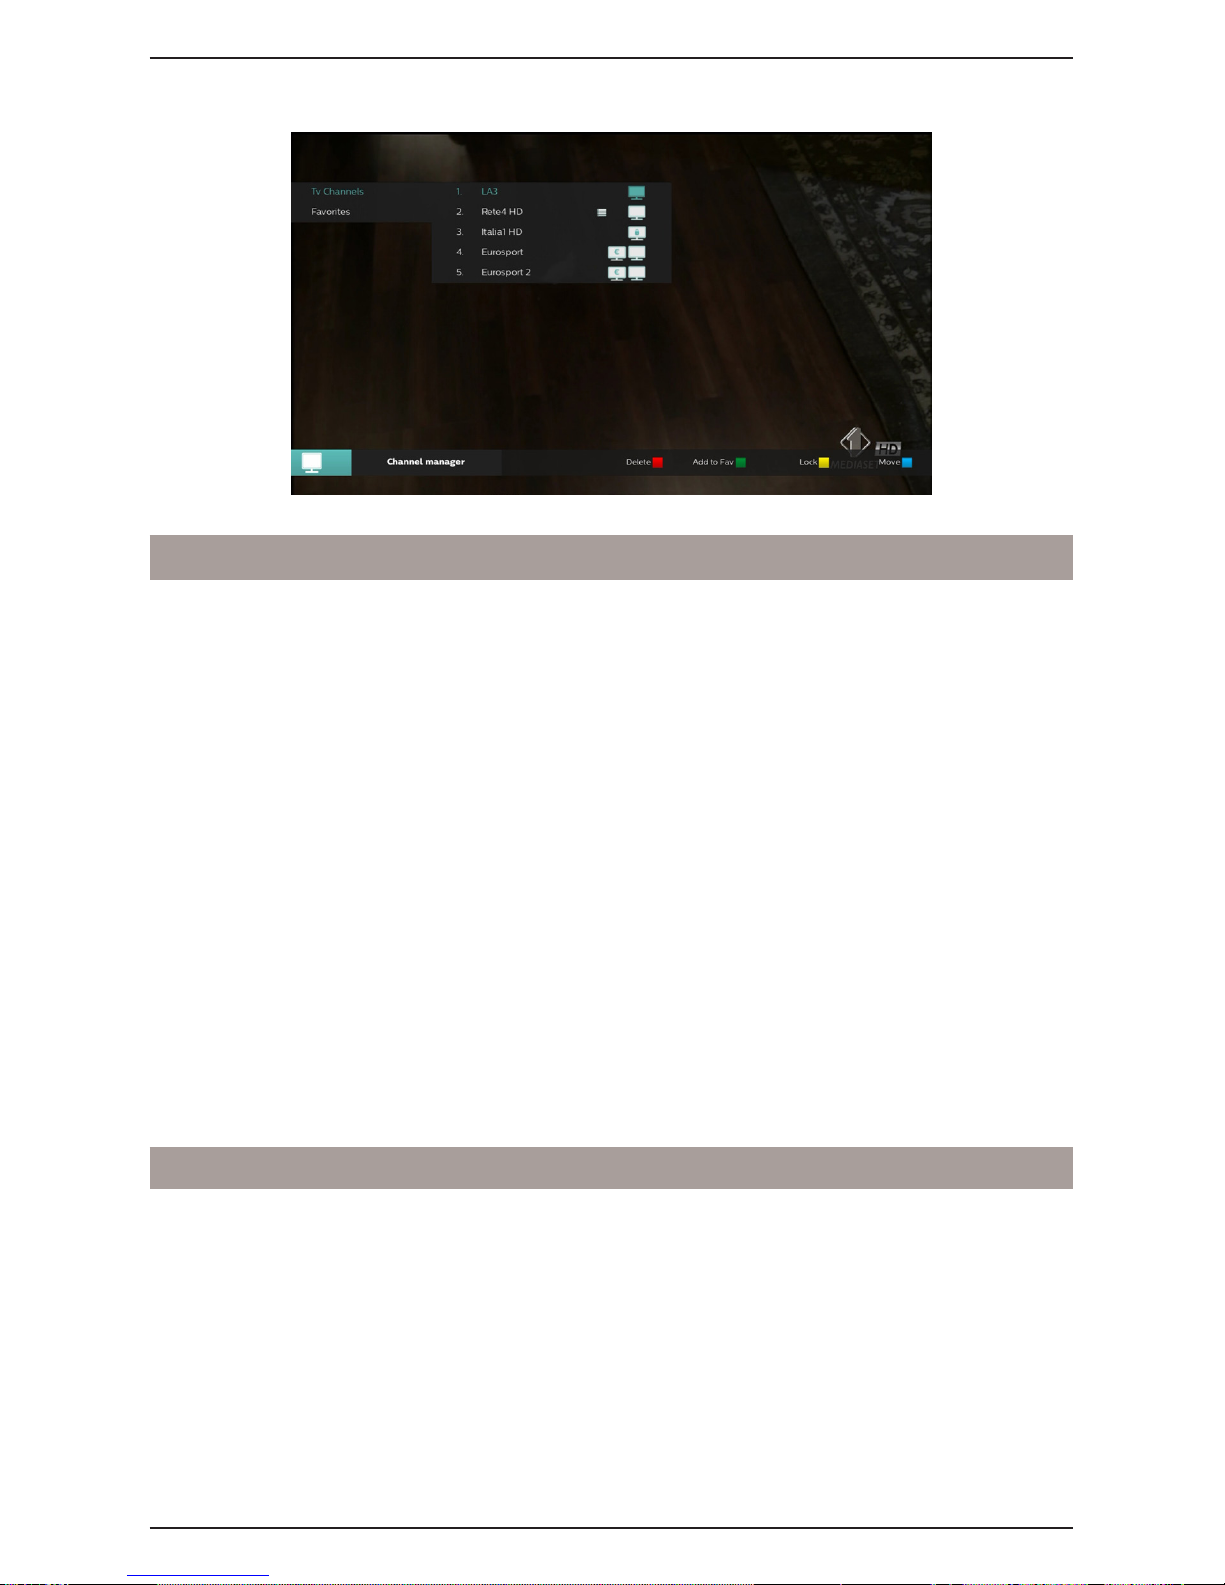
18
3.2.1 Channel Manager
Menu for the management of channel list.
Channel Navigation
NOTE
Moving channels manually is possible only when the LCN function is disabled.
To move a channel:
Select the channel from the main list.
Press the blue button (move) on the chosen channel.
Move the cursor to the target location.
Press the blue button (move) to release the channel on the chosen position.
Channel Block
To protect a channel manually, resulting in vision access through PIN entry system (par. 3.6.1.4):
Highlight the channel from the main list.
Press the yellow button (Lock) to activate the lock (or press it again to turn it off).
Enter the PIN code.
Favorite Channel List
For the realization of a Favorite channels list:
Select the desired channel from the main list.
Press the green button (Add FAV) to add the channel to the Favorites list.
Conrm by pressing OK on the Favorite channels option (or Cancel to cancel the selection).
Once composed, if the LCN function is not active, you can also order the Favorite channels list by moving the
channels with operation similar to those described for moving the channels of the main list.
Delete Channel
To delete a single channel from the main list or remove it from the list of favorites:
Highlight the channel from the list.
Press the Red button (delete).
Conrm the action.
NOTE
The deleted channel from the main list will be restored following an eventual update channels.
3.2.2 EPG
Displays the electronic program guide (Electronic Program Guide-EPG). Refer to paragraph 2.3.
3.3 Multimedia Menu
Menu for the reproduction of multimedia available via USB or on your local network.
Submenu:
1. Audio
2. Video
3. Pictures
4. Rcording List
5. DLNA
Philips DTR3030M
Page 63
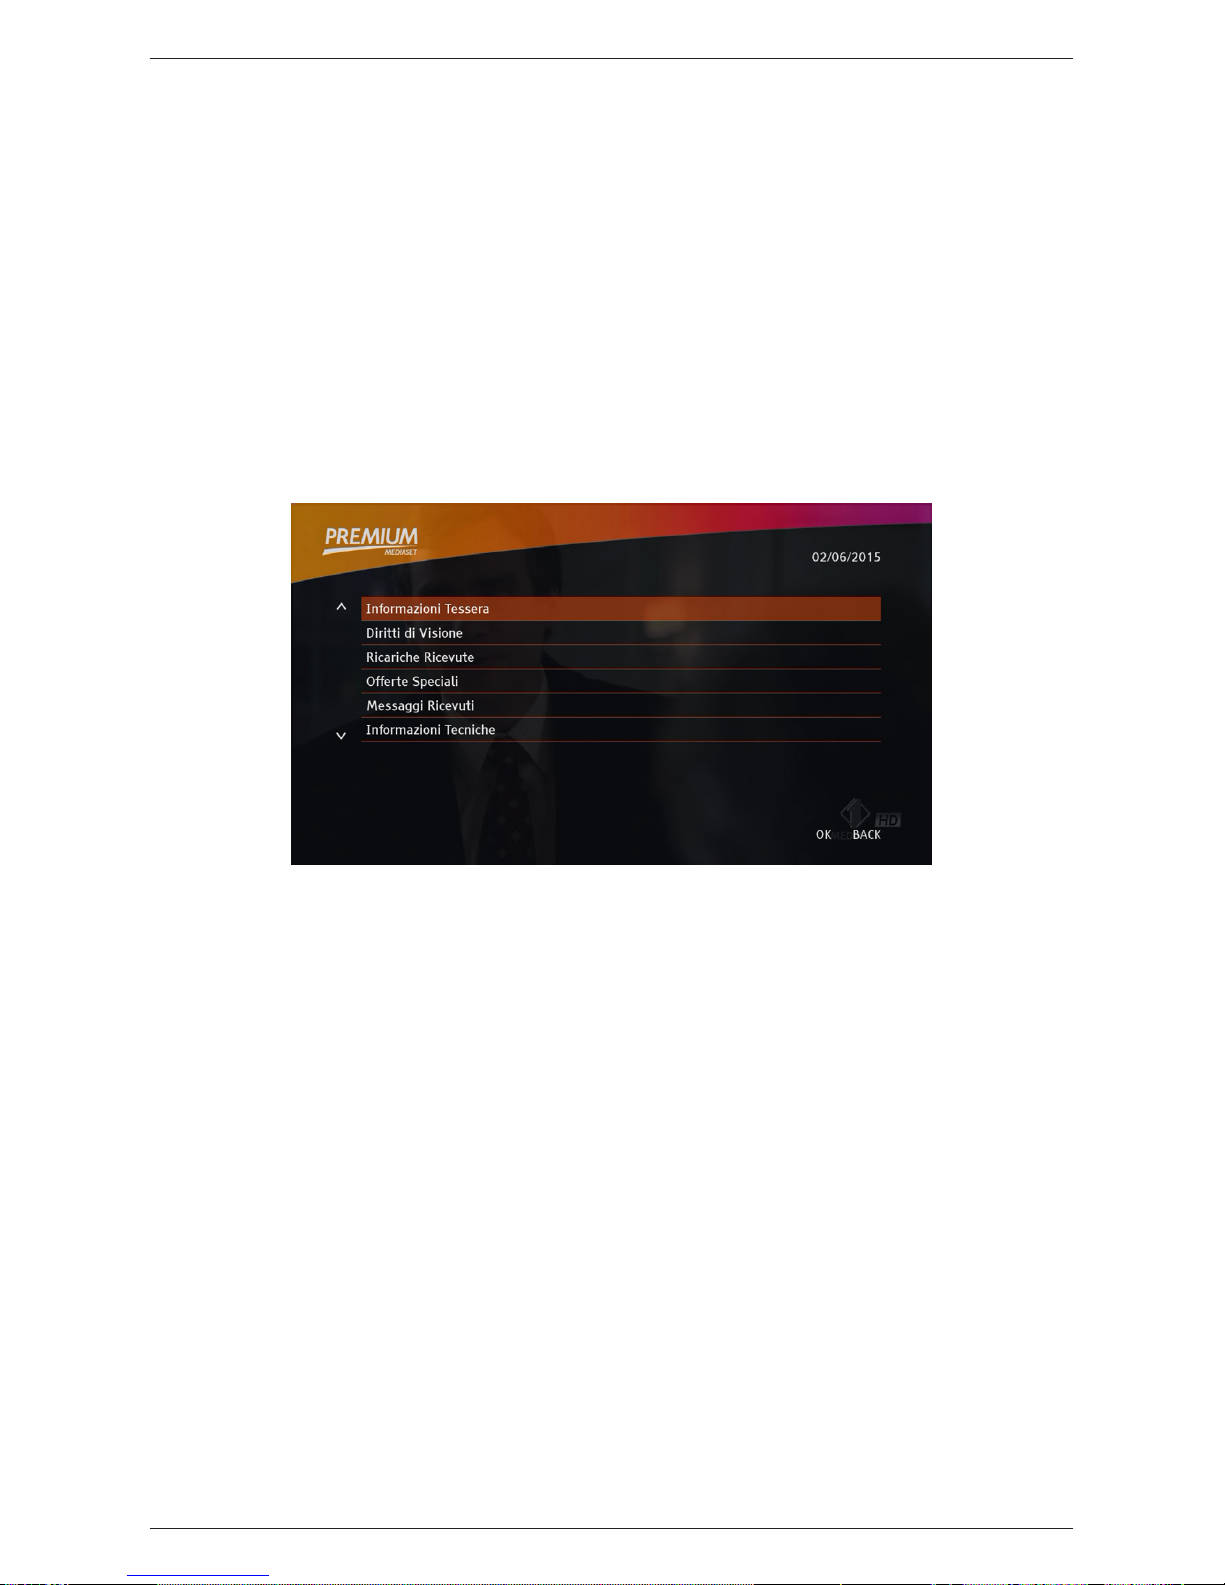
19
3.3.1 Audio/Video/Pictures
Menu used to read multimedia les (audio/video/images) from a mass storage device connected to the USB port
of the receiver. Refer to paragraph 2.6.3.
3.3.2 Recording List
Archive of TV recordings contained in USB memory is reserved for videotaping. See section 2.6.2.2.
3.3.3DLNA
Menu for reading shared media in local network from a UPnP/DLNA server. Refer to paragraph 2.7.2.
3.4 Applications menu
Network applications portal. See paragraph 2.7.1.
3.5 Pay per View Services Menu
To use the paid service Mediaset Premium and the management of its smart-card, refer to the guidance of the
card.
3.6 Settings Menu
The Receiver Settings menu is used for the general conguration of the receiver. Its submenus are:
1. STB Settings
2. Schedules
3. Network Settings
4. STB Information
3.6.1 STB Settings
Submenu:
1. Language
2. AV Settings
3. Time Settings
4. Parental Control
5. Power Management
Philips DTR3030M
Page 64
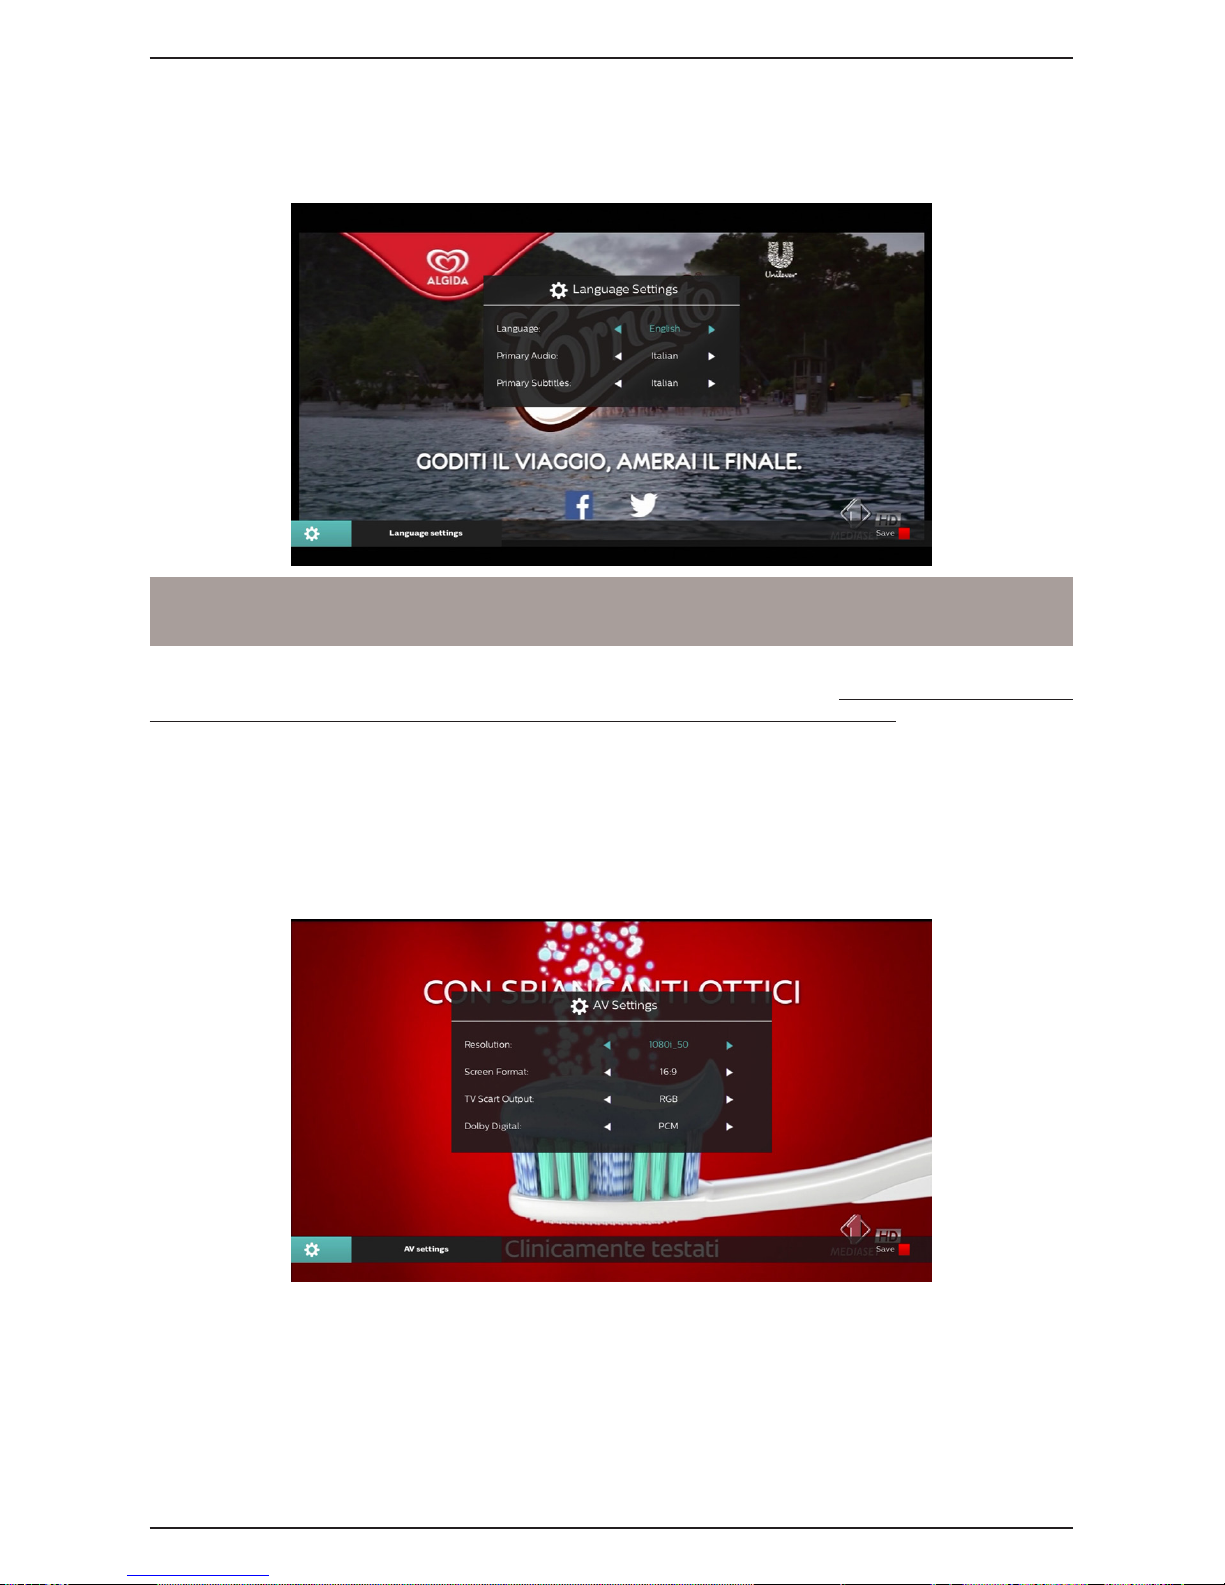
20
3.6.1.1 Language
The following items are available:
1. Language: language of the on-screen menu (OSD-On Screen Display).
2. Principal Audio: predominant audio language for TV programs.
3. Principal Subtitle: select language for the subtitles of TV programs.
WARNING
The correct operation of the receiver in relation to the above preferences on audio and subtitle is conditional on
the presence of information transmitted at the discretion of the issuer of the tuned channel.
3.6.1.2 AV Settings
The menu AV Settings (Audio Video) has the following audio-video congurations to be set in accordance with
the features of screen and devices connected to the video and audio socket of the receiver:
1. Resolution: setting of the video resolution of output of audio – video digital HDMI.
2. Screen format: format of Screen/TV connected with the receiver and its mode of presentation of images
with different format from the screen:
a. 16: 9: for 16: 9 screens, 4: 3 images will be adapted to the entire screen.
b. 4: 3: screens 4: 3, 16: 9 images are adapted to the whole screen.
3. SCART output: type of video of SCART output (CVBS only).
4. Dolby Digital: encode digital audio output between Digital Stereo (PCM), multichannel (Dolby Digital) and
original from source (RAW).
3.6.1.3 Time Settings
This menu offers the following controls:
1. Country: country of installation of the receiver.
2. Time: time set relative to the global reference of Greenwich (Greenwich Mean Time-GMT). For the Italy,
the difference is + 01:00 (GMT + 01:00).
3. Summer-time: time correction option of summer time system that we recommend that you keep automatic
(Auto).
Philips DTR3030M
Page 65
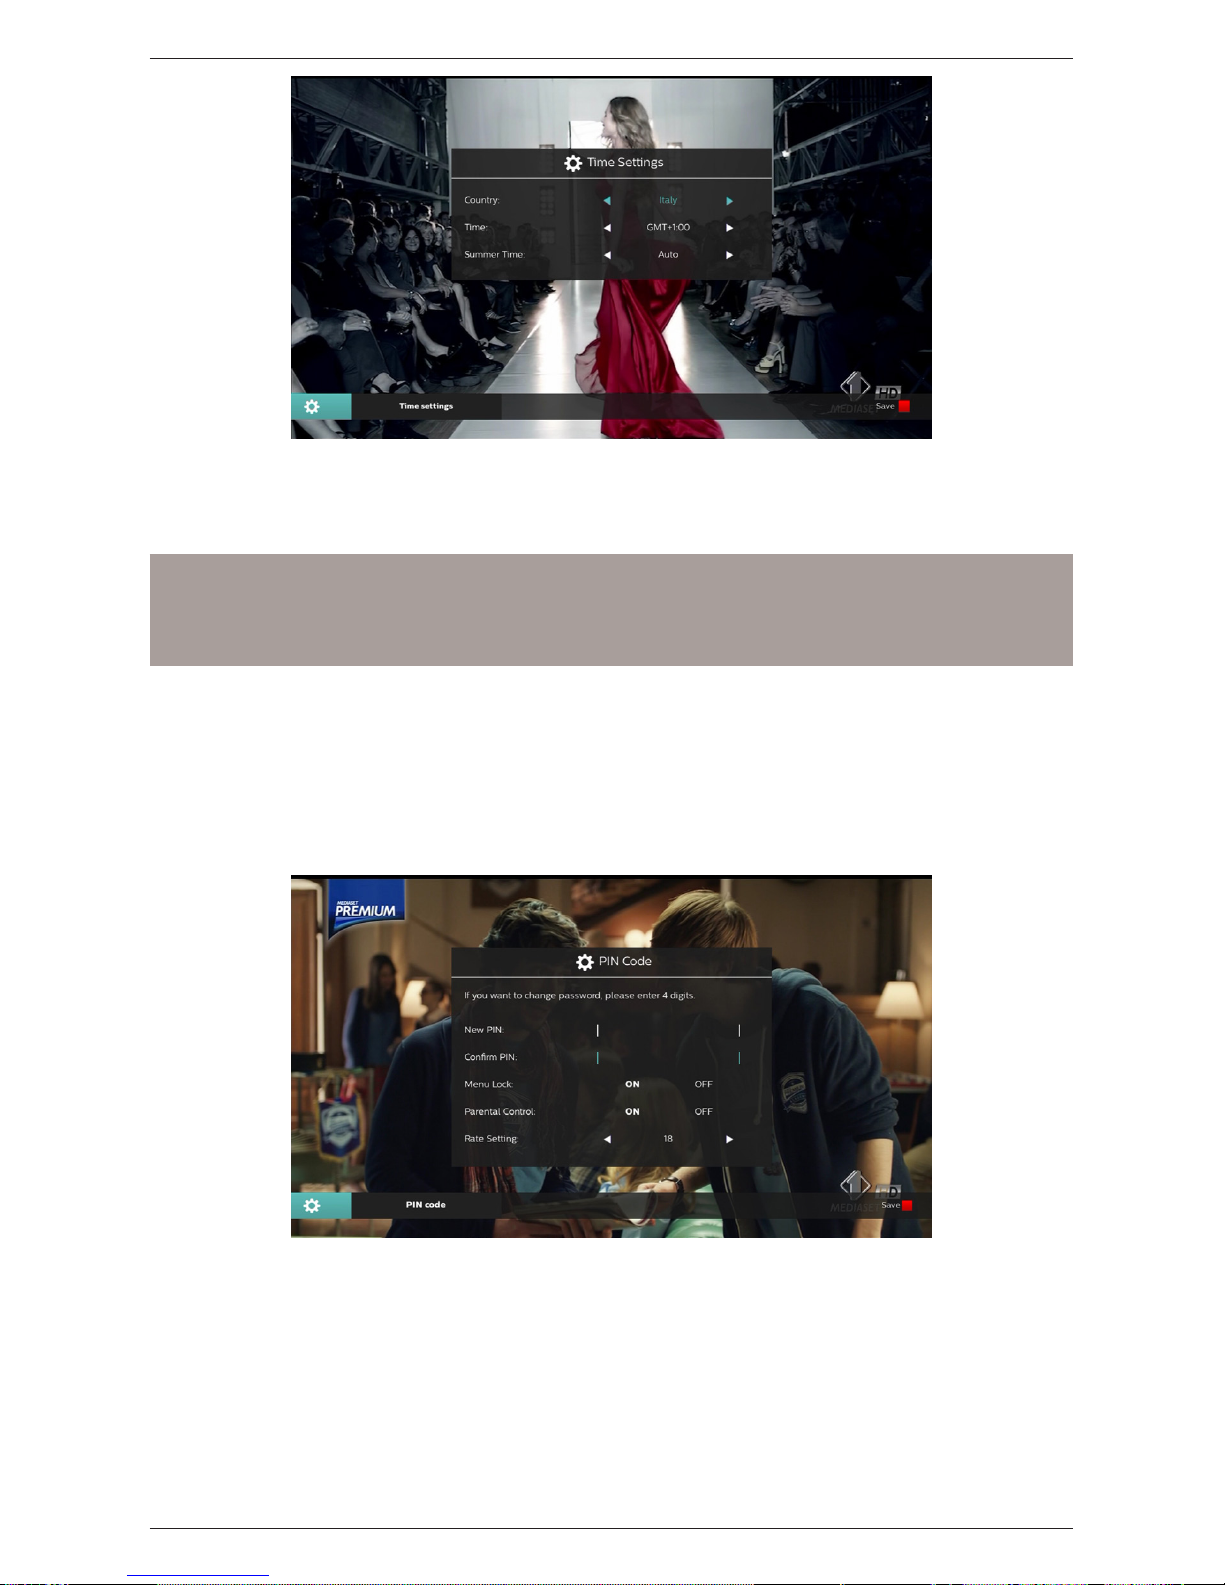
21
3.6.1.4 Parental Control
The Parental Control menu enables you to implement a channel access control and to the menu Installation >
Search >Channels using four-digit numeric password, Personal Identication Number (PIN), and change the
same PIN.
NOTES AND WARNINGS
This menu is always protected with PIN.
The PIN code is dened by the user before installing the device (par. 1.3.3).
If after editing, no longer remembers the personal password, reset the receiver to the initial installation
position of the menu Receiver Reset (par. 3.1.2).
Within this menu it provides the following security features:
1. New PIN/Conrm PIN: PIN change.
2. Menu Lock: locks (ON) or (OFF) unlock access to some important password menu.
3. Parental Control/Rate Setting: enables (ON) or disables (OFF) the protection of the minors. It carries
out a control on the vision of some sensitive events. When the tuned channel transmits an event with
information of vision protection by an audience of age or above Rate Setting set in the receiver menu
block the channel. Then appears in the video request channel vision release via PIN code entry.
Save your changes by pressing the Red button (save).
、
3.6.1.5 Power Management
The receiver is equipped with a preset power saving function, which is possibly deactivated by this menu.
Spend three hours in operating mode without any command from the user, it will go into standby automatically.
In addition, whenever the receiver is switched off in standby mode, it will stay for little more than 30 minutes in a
state of standby alert, during which performs any updates as a search for new channels, then switch to a deep
standby, of power saving.
Philips DTR3030M
Page 66
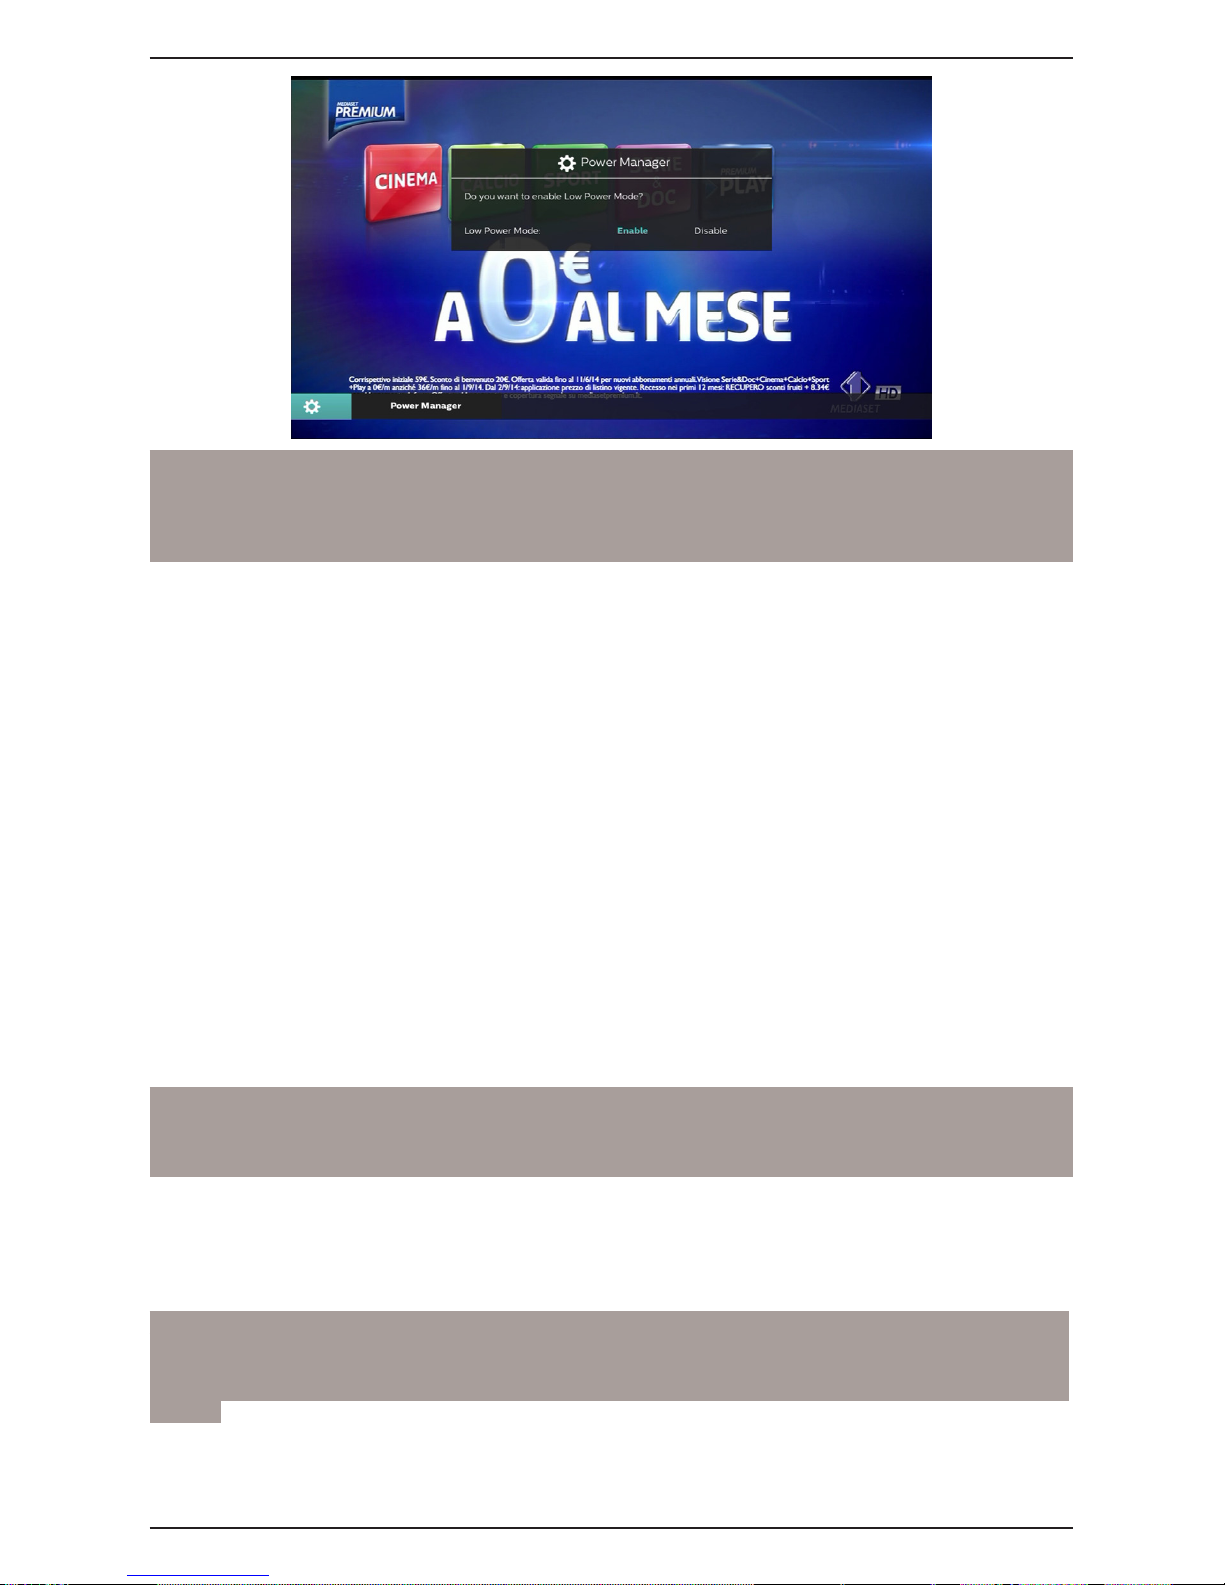
22
NOTE
When the power saving is active, the receiver may have different response times when switching from standby,
depending on whether it is in deep standby or alert. In particular, from deep standby, the response time takes
many seconds, corresponding to a complete startup of the system. To always get a quick startup of the receiver
in power standby state, you must disable the Power savings from this menu.
3.6.2 Schedules
The menu planning for automatic activities. Submenu:
1. Software Upgrade
2. Channel Upgrade
3. Timer Setting
3.6.2.1 Software Upgrade
For the use of any new services of broadcasters or new functions on the receiver, we recommend that you keep
updated the device software.
The software update over the air (Over The Air-OTA), which allows the receiver to download data directly from
the antenna signal, is congurable with the OTA Settings form.
1. Operating Mode: If this option is activated (ON) and the receiver is on, it will indicate the presence of a
new software only if broadcast on the channel being viewed.
2. In Standby: the receiver is set in factory so as to verify the software update in standby (ON) daily at
04:00. Alternatively, it can be congured differently by changing the Frequency and Time parameters in
the menu, and be deactivated (OFF).
3. Search mode: In automatic mode (Auto), the receiver will scan OTA on all available digital terrestrial
frequencies. Instead, opting for the manual mode, users can insert data for a search on a particular
frequency.
Search for an OTA software update, it can also be initiated at any time by the user, pressing the Green button
(update via OTA).
WARNING
The operation and installation of new software over the air can take a long time, even hours, especially in case
of low update rate and/or difcult reception. During this period please not interact with the receiver and do not
disconnect the power supply: risk of irreversible receiver block!
As an alternative to over-the-air update, the receiver is software upgradeable:
via USB port, press the Blue button (update via USB), after inserting a USB stick containing the
appropriate software image
via the internet, connecting to the update server of the Philips, by pressing the Yellow button
(Updates via IP).
WARNING
During a software update, interact with the receiver nor pull out the power supply: risk of irreversible block of the
receiver!
Philips DTR3030M
Page 67
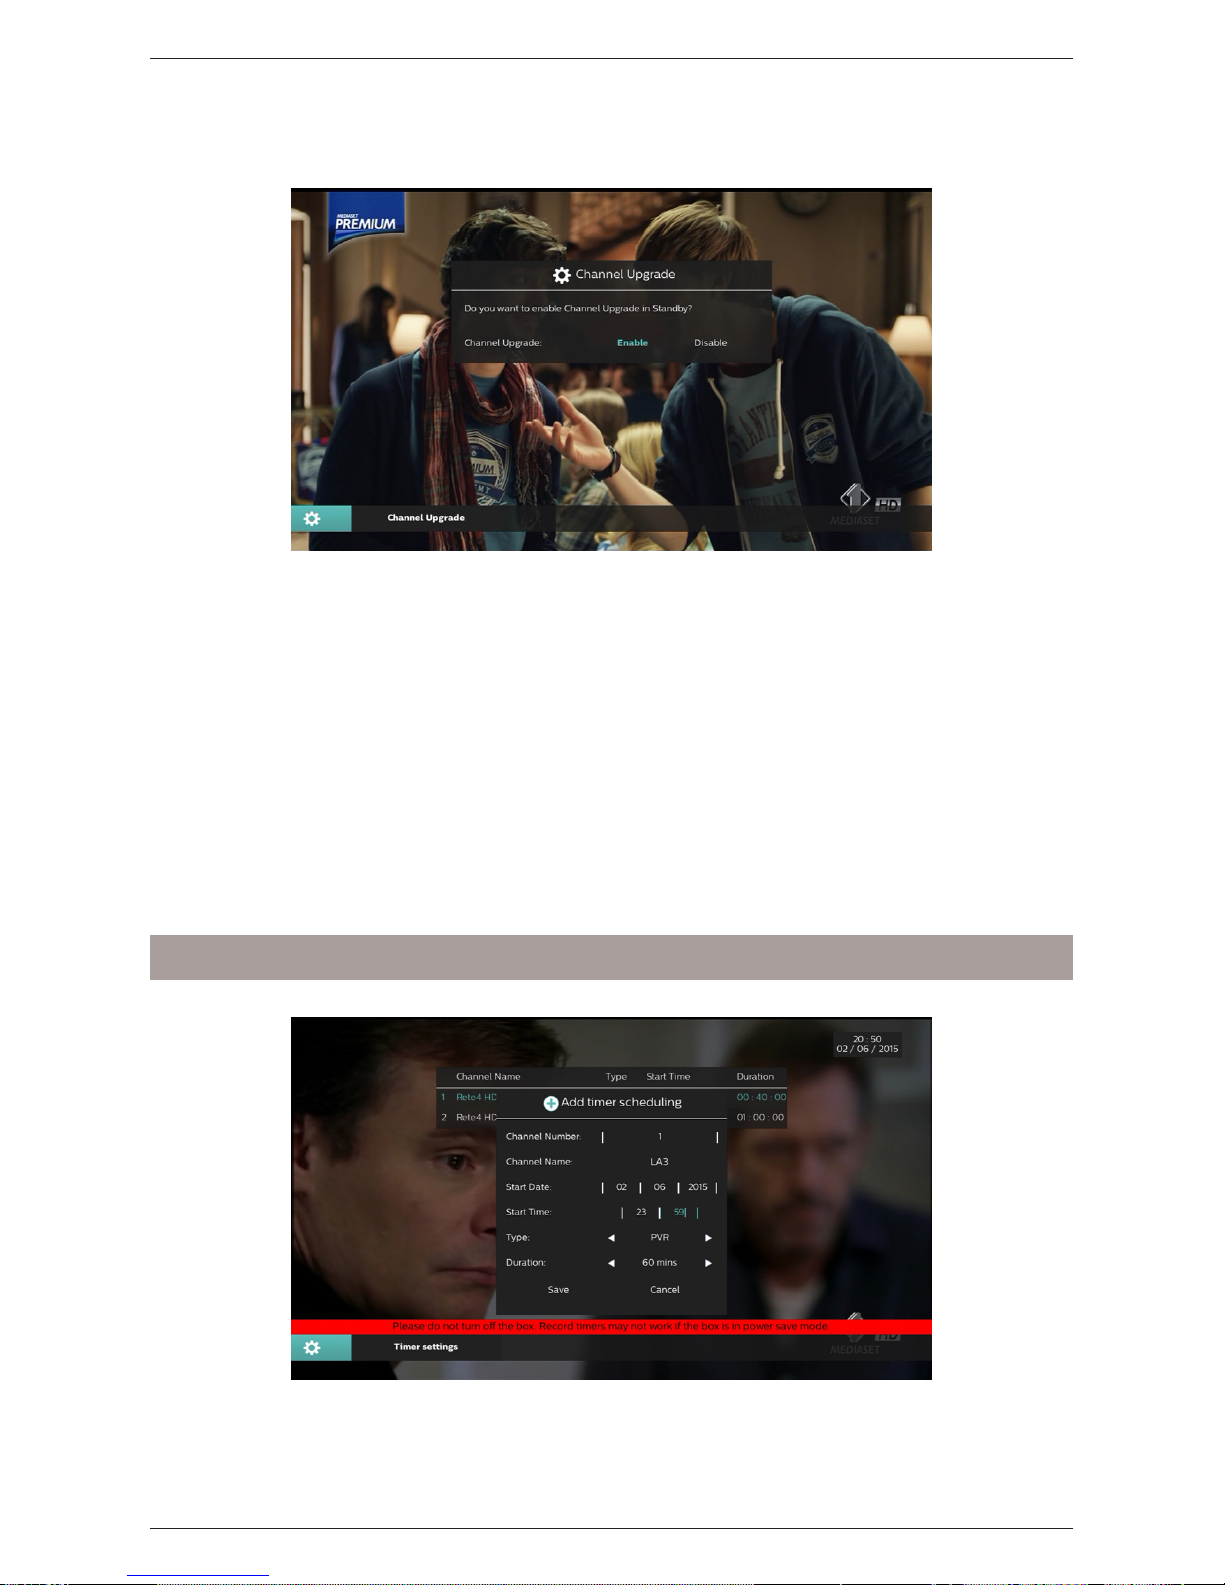
23
3.6.2.2 Channel Upgrade
This menu is used for automatic update conguration of channel list.
The receiver is set in factory to automatic update channels on standby during the rst thirty minutes from the off
mode, and daily at 4:30 in the morning. Alternatively, it can be disabled.
3.6.2.3 Timer Setting
From this menu you can manually program a simple vision timer or a timer for recording one or more TV events.
Proceed as described here:
Access the menu Settings > Activities Plan > Timer Settings.
Press the Green Add button.
Complete the eld Add New Timer to dene the timer:
1. Channel Number: the number of the interested channel.
2. Start date: start date (DD/MM/YYYY).
3. Start time: start time (in form hh: mm).
4. Type: type of timer, between recording (PVR) or vision (channel).
5. Duration: duration of the Timer.
Save your data by pressing the OK button on the remote control to Save item (or Cancel to abolish
the timer).
NOTES AND WARNINGS
No timer will work if the receiver is off in standby power saving mode (par. 3.6.1.3).
You can delete a schedule timer by selecting the list and pressing the Red button Delete.
Philips DTR3030M
Page 68
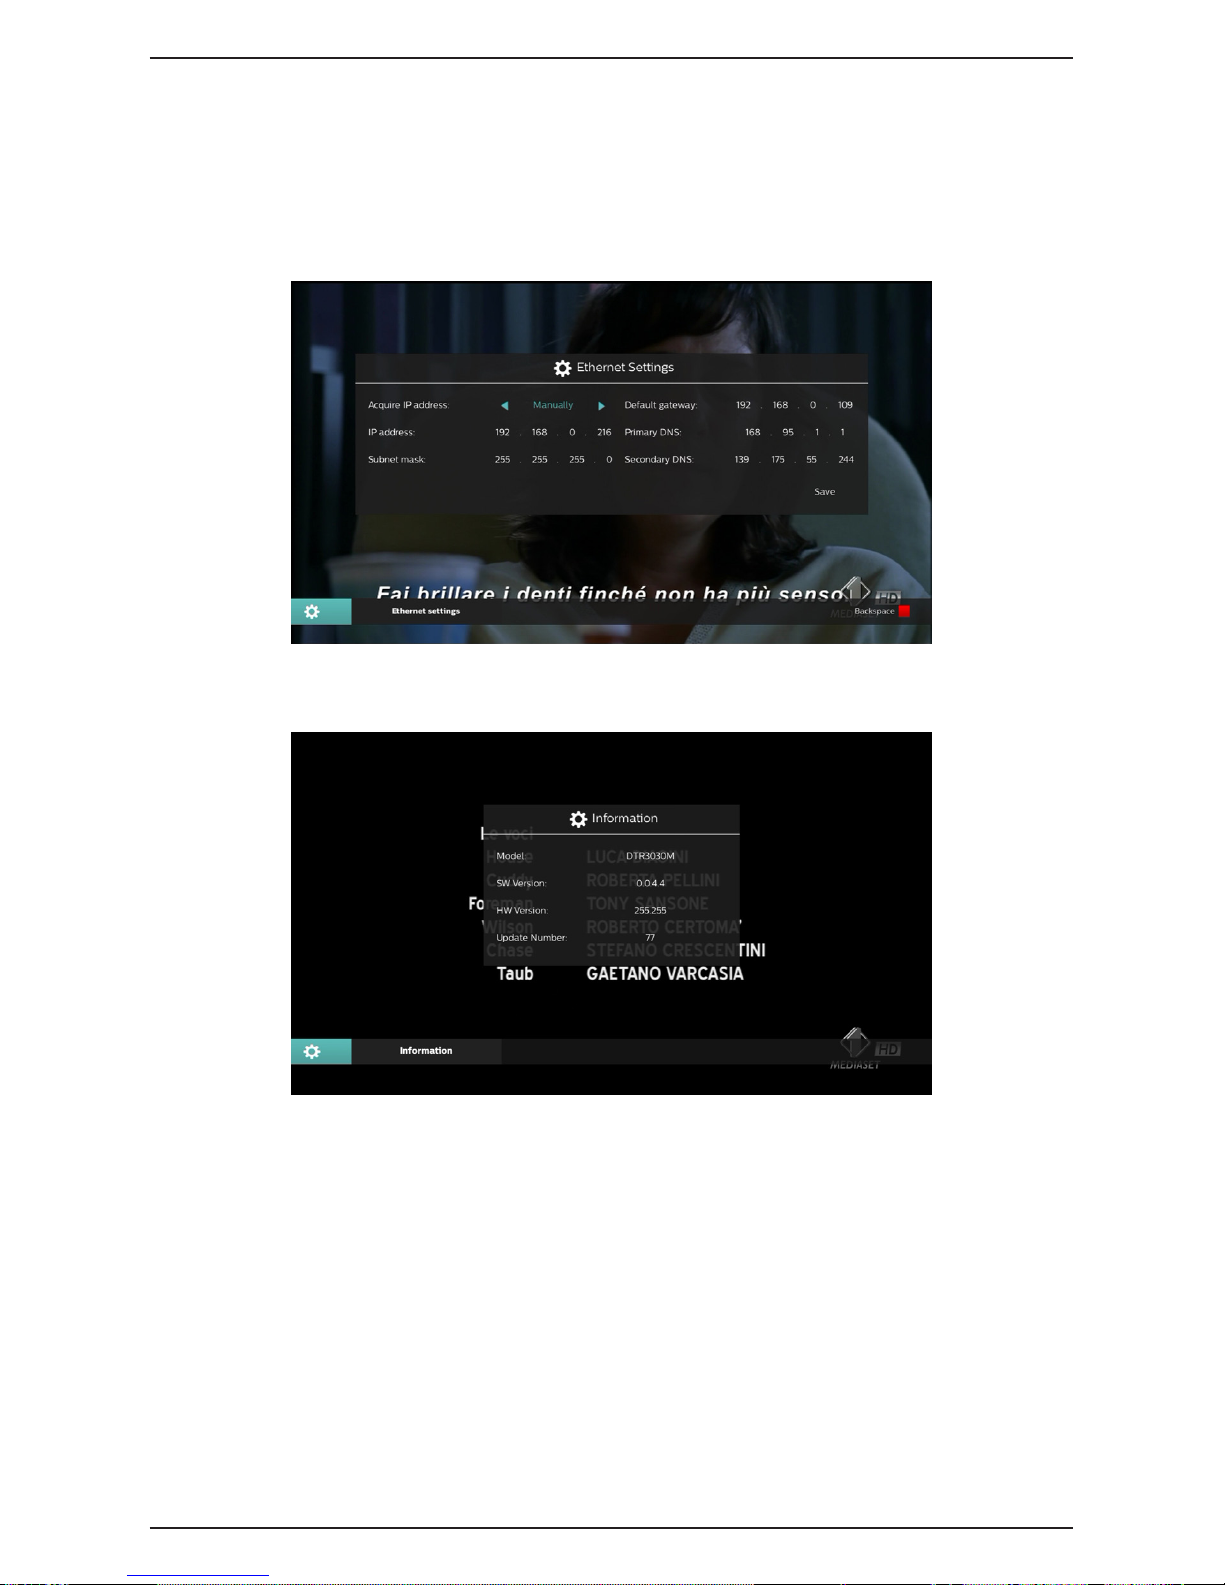
24
3.6.3 Network Settings
Menu for the interface of the receiver with the broadband network through the Ethernet connection.
The entry of Get IP address denes the conguration type:
Automatically (recommended) automatic application of network parameters via DHCP dynamic Protocol.
Manually (for advanced users) Manual setting by the user of all network access parameters. It is useful
when you want to assign a static IP address.
Press OK to Save item to apply the settings.
3.6.4 Info
System information lists of the receiver, in particular the software version in use.
Philips DTR3030M
Page 69

25
4 Menu map
The receiver menu is structured as follows:
Main Menu
-- Installation
---- Channels Scanning
---- Factory Reset
-- Channel Management
---- Channel Manager
---- EPG
-- Multimedia
---- Audio
---- Video
---- Pictures
---- Recordings List
---- DLNA
-- Applications
-- Pay Per View Services
----Mediaset Premium
-- Settings
----Receiver Configuration
---- Language
---- AV Settings
- -- - Time Settings
---- Parental Control
---- E
nergy Management
---- Activities Plan
---- Software Update
---- Channels Update
---- Timer Settings
---- Network Settings
---- Receiver Information
NOTE
The menu navigation is simple and intuitive. Use the buttons MENU, BACK, EXIT, cursor (arrows and OK) and
numerical (0-9) on the remote control. Follow any instruction also placed on each dialog box.
Philips DTR3030M
Page 70

26
5 Troubleshooting Guide
SYMPTOM POSSIBLE CAUSE REMEDY
The LED on the front panel does not
turn on.
The receiver is disconnected from the
power supply.
Check that the receiver is connected to
the power supply.
The power supply is plugged in but it
does not work too
Make sure that the power plug is
running. ATTENTION: risk of electric
shock!
The receiver takes a long time to
switch on from standby.
The power saving function in standby
is activated.
Disable the power saving function
energy. See section 3.6.1.5
Lack of signal Antenna cable not connected to the
receiver.
Connect the antenna cable to the
receiver.
Damaged antenna system. Verify the integrity of your system
(antenna, coaxial cable, signal
distribution, etc.)
It is recommended to check the system
from qualied personnel.
The tuned channel is not transmitting
or is obsolete.
Change channels and/or update
channels the list.
Absence of sound and/or images. Audio volume low or mute Increase the volume level of the audio
of the receiver and the tv.
The receiver is in standby. Turn on the receiver.
Tv turned off or placed on wrong
channel.
Turn on the TV screen and/or place it
on the audio-video correct AV channel
Audio-video cable (SCART or HDMI)
not connected to the tv or damaged.
Restore the audio-video connection
properly
The HDMI receiver resolution is not
compatible with that of the connected
screen.
Connect the receiver via the SCART to
tv, adjust the resolution, then reconnect
the HDMI cable.
a channel view outdated or
incompatible encoded.
Change channels and/or update the
channels list.
The remote control does not work. The remote control is in the wrong
mode of the operation.
Press the STB button to go to receiver
control
Batteries not inserted or exhausted.
Batteries inserted with incorrect
polarity.
Insert the batteries or replace them.
Insert the batteries in the correct
direction.
Follow the inside signs of the battery
compartment.
The remote control has fallen and
some component is damaged.
Contact your dealer for buying a new
remote control.
The settings in the menu have not
been stored.
Failure to conrm after changing the
settings.
After each edit, press any button of
conrmation/save.
Program information not displays. The program concerned does not
transmit information about the event
The receiver's time is not set properly Set the time via the menu. See section
3.6.1.3.
The timer does not start or does not
work properly.
The station broadcasts incorrect time
and/or date.
The receiver's clock is not set properly. Set the time via the menu.
See section 3.6.1.3
Receiver is off in standby in power-
saving mode.
Disable the power saving function. See
section 3.6.1.5.
The receiver does not respond to the
action of buttons on the remote control.
Temporary blocking of the receiver. Disconnect the power supply to the
receiver and reconnect after a few
seconds.
The tuned channel transmits data
inappropriate that blocked by the
receiver.
Disconnect the antenna cable, restart
the receiver, change the channel, then
reconnect the antenna.
Problems with the remote control. See relevant suggestions in this table.
The USB device is not recognized. USB storage not formatted properly. Format the memory in File System
FAT32 or NTFS.
USB memory is not compatible. Try another USB memory.
The only box USB port does not
provide sufcient power.
Use any power supply for the disk
The table continues to the next page ...
Philips DTR3030M
Page 71

27
SYMPTOM POSSIBLE CAUSE REMEDY
It cannot record. The broadcaster does not allow
recording.
Not enough memory. Free up space on the disk for the
recording.
The receiver switches off automatically. Power saving function activates. Consult par.
3.6.1.5.
Forgotten your PIN. Perform a reset. See par.3.1.23.6.3
WARNINGS
Generally, in case of abnormal behavior of the receiver, a complete system reboot or the factory settings reset
(par. 3.1.2) can help solve the problem.
6 Technical characteristics
Product type digital terrestrial receiver DVB-T/DVB-T2 h. 264 and smart-
IP box
conditional access system Nagravision (integrated) for Mediaset Premium
Input/output frequencies VHF: 173.5 ÷ 230, 5 MHz
UHF: 470 – 862 MHz
Video decoding MPEG-2, MPEG-4 (h. 264/AVC
Audio decoding (*) MPEG Layer I II &, AAC + (HE-AAC v1), Dolby Digital,
Dolby Digital Plus
Languages menu Italian, English
OSD menu ●
Teletext ●
Subtitles ●
Electronic program guide (EPG) ●
Video aspect ratio 16: 9, 4: 3
Antenna power RF IN connector 5V 50mA Max
RF-Modulator -
Integrated modem (RJ-11) Ethernet port (RJ-45) ●
Digital Audio output (S/PDIF) x 1, optical
SCART Output x 1, Video: RGB/CVBS, Audio L + R
HDMI Output (**) x 1, HDMI v 1.3 with HDCP protection v 1.2
Resolution/ Up-scaling video up to 1080 p
USB ports X 2, rear, USB v 2.0
5V , 500mA Max
Smart-card slot x 1, X1, for smart-card Premium Mediaset
Aggiornamento canali automatico ●
Automatic channel update Automatic software update: over the air (OTA)
Manual: over the air (OTA) Via IP (OTN) Via USB (OTU)
Recording (PVR) Via USB (FAT32/NTFS)
Time shift Multimedia playback Via USB and LAN (UPnP/DLNA)
Factory reset function ●
Favorite channel list 1
Programming Timer ●
Auto-off (power saving) ●
Power supply Direct supply: 12V , 1.5
Equipment power supply Input: 100-240V ~, 50/60 Hz, 0.6 A Max
Output: 12V , 1.5A
Consumption (typical values) Operating:18W Max
Standby: < 0.50 W
Temperature Operating:0 ÷ 40° C
Storage: -10 ÷ 80° C
Dimensions 210x134x40 mm
(*) Manufactured under license from Dolby Laboratories. Dolby and the double-D symbol are trademarks of Dolby Laboratories
(**) The terms and HDMI High-Denition Multimedia Interface HDMI and the HDMI logo are trademarks or registered trademarks of HDMI Licensing, LLC in
the United States and other countries.
Philips DTR3030M
Page 72

i
Appendix A. TV Codes
A
A.R.SYSTEMS 1170 1222 1224
ACCENT 1235 1252
ACTION 1235
ADMIRAL 1201 1235 1282
1296 1297 1309 1311
ADURA 1169 1170 1235 1243
1252 1291 1293
AGASHI 1170 1173
AIKO 1223 1235 1243
AIM 1169 1170 1171 1173 1224
1237 1253 1300
AIOSTAY 1235 1294
AIWA 1354 1396 1422 1084
AKAI 1170 1171 1173 1178
1198 1223 1232 1235 1237
1242 1243 1253 1271 1273
1280 1291 1293 1294 1295
1310 1313 1371 1381 1403
1082
AKI 1223
AKIRA 1169 1172
ALBA 1170 1243 1294 1351
ALBIRAL 1170 1173 1217 1222
1224 1247 1248 1252 1269
1274 1294
ALHORI 1223
ALLOGRAN 1223 1284 1287
1375
AMPLIVISION 1223 1224
AMSTRAD 1173 1235 1252
1253 1297 1347
ANEX 1170
ANGLO 1252
ANITECH 1170 1173 1195 1235
1269 1274 1298
ANSONIC 1170
ANTECNO 1243
ARCELIK 1023 1024 1118 1119
1134 1138 1065 1170 1183
1256 1264 1294 1303 1306
1325 1340 1392 1062
ARDEM 1325
ART TECH 1170 1235 1273
ASA 1182 1192 1193 1199
1200 1204 1282 1295
ASTHON 1170
ASTON 1333
ASTRA 1170 1173 1224 1232
1235 1294 1330 1336 1401
1402 1415
ASTRO SOUND 1170 1224
1269 1274 1294
ASUKA 1243 1294
ATAKI 1330
ATLANTIC ATORO 1170 1175
1183 1298 1375 1235
AUDIO STAR 1243 1330
AUDIOSONIC 1170 1173 1183
1217 1222 1223 1235 1243
1252 1269 1279 1285 1325
1382 1437
AUDIOSTAR 1243 1330
AUDIOTON 1223 1235 1243
1298 1330
AURORA 1201 1223 1235 1237
AUSIND 1189
AUTOVOX 1170 1192 1197
1198 1219 1223 1235 1237
1273 1284 1287 1353 1375
1376 1400
AUVISAT 1438
AWA 1170 1173 1223 1229
1235 1237 1273
B
BAIRD 1273 1300
BANG&OLUFSEN 1170 1173
1201
BARCO 1201 1212 1213 1215
1247 1248 1250 1294 1300
BASIC LINE 1170 1243 1284
1287 1288 1330
BAUR 1169 1170 1172 1173
1178 1179 1180 1226 1227
1235 1284 1286 1287 1291
1310 1428
BAZIN 1206 1223 1285
BEKO 1170 1173 1183 1256
1264 1285 1294 1303 1306
1308 1313 1325
BEKO 1337 1340 1392 1425
1437 1098 1166 1062
BEKO DVDLI 1072
BEKOTEKNIK 1174
BENQ 1164
BEON 1271
BIFONIC 1223 1235
BIGSTON 1235 1237 1252
BLAUPUNKT 1178 1179 1180
1181 1185 1187 1222 1229
1239 1242 1329 1348 1382
BLAUSONIC 1223
BLUE STAR 1294
BLUESKY 1170 1438
BRENDSTAR 1235
BRIONVEGA 1170 1171 1201
1203 1204 1212 1220 1221
1266 1296 1297 1353 1359
1426
BRITANNIA 1170 1223 1292
BROTHER 1252 1336 1413
BRUNS 1201 1267 1269 1274
1291
BSR 1285 1290 1347 1351
1377
BUSH(ATAKI) 1286 1293 1294
1330
C
CAMPER 1285
CAPSONIC 1170 1252
CARTEL 1064 1096
CASIO 1170 1171
CBM 1195
CENTURY 1201 1217
CGE 1170 1173 1183 1195
1211 1217 1235 1240 1243
1271 1285 1293 1294 1298
1311
CGM 1170 1174 1183 1235
1252 1325 1330 1369
CHANG HONG 1147
CIE 1235 1237 1243 1377
CIHAN 1170 1173 1285 1294
CLARIVOX 1170 1173 1196
1201 1217 1222 1224 1267
1278 1279
CLATRONIC 1341
COCA COLA 1159
COFADEL 1215 1256 1261
1265
COMPUTRON 1170 1173 1235
1253 1295 1362
CONCORDE 1235
CONDOR 1170 1173 1195 1235
1252 1269 1271 1274 1298
CONIC 1232
CONTEC 1223 1225 1229 1235
1252 1377
CONTI 1170 1173 1061
CONTIN.EDISON 1205 1214
1215 1241 1256 1261 1264
1265 1374
CONTIN.FR 1170 1362
COSMEL 1235 1279
COSMOS 1123
COSMOS 84 EKRAN 1067
COSMOS/TOKAI 1170 1235
CREA 1149 1157 1060
CROSLEY 1184 1195 1201
1211 1217 1240 1299
CROWN/ONWA SAKY 1170
1174 1183 1184 1195 1235
1243 1252 1253 1271 1325
1330 1369
CRYSTAL 1170
CS ELECTR 1243
CTC CLATRONIC 1170 1183
1195 1217 1223 1243 1252
1269 1271 1274 1341
CURTIS 1173
CYMATIC 1222 1223 1285 1294
D
DAEWOO 1170 1171 1173 1217
1219 1223 1235 1237 1243
1273 1280 1331 1382 1409
1410 1140
DANSAI 1232 1252
DAWA 1170 1173
DE GRAAF 1286
DECCA 1170 1172 1173 1222
1223 1228 1268 1273
DENVER 1170 1235
DESMET 1170 1173 1222 1235
1294 1298
DIAMOND 1235 1237
DIGILINE 1170
DIXI 1235
DOMEOS 1170 1407
DOMOH 1170
DORIC 1189 1299
DUAL 1169 1170 1173 1176
1182 1217 1223 1235 1284
1287 1291 1293 1294 1297
1320 1347
DUAL-TEC 1169 1170 1173
1176 1182 1217 1223 1235
1284 1287 1291 1293 1294
1297 1347 1382 1406 1407
1428
DUMONT 1170 1173 1182 1193
1195 1199 1200 1201 1239
1269 1271 1274 1299
DUX 1170 1173
D-VISION 1170
DYNAMIC 1235
DYNATECH DYNISTY 1170
1237
E
EDAN LINE 1170 1300
ELBE 1177 1222 1223 1224
1229 1261 1266 1294 1296
1297 1299 1309 1311 1386
1431
ELECTRO TECH 1235
ELEKTRONSKA 1222 1294
ELIN 1170 1173 1182 1223
1235 1291 1295
ELITE 1239 1298
ELMAN 1269 1274 1294 1347
ELTA 1246
EMERSON 1170 1173 1174
1183 1193 1195 1199 1201
1217 1223 1252 1269 1274
1294 1298
ENGEL 1267 1294
EPSON 1104
ETRON 1235 1253 1363
EUROCOM 1294
EUROLINE 1436
EUROMAN 1170 1173 1184
1223
EUROPHON 1217 1222 1223
1269 1274 1277 1294
EXPERT 1175 1262 1284
F
FAGOR 1294 1332
FALCON 1235
FENNER 1170 1173 1235 1237
FIDELIS 1170 1173 1223 1232
1235
FIDELITY 1214 1217 1223 1232
1243 1253 1264 1284 1287
1292 1294
FILSAI 1223 1235
FINLANDIA 1285 1286
FINLUX 1170 1173 1182 1189
1192 1193 1199 1200 1219
1222 1235 1269 1271 1273
1274 1291 1295 1299 1361
1381 1403
FIRST LINE 1170 1171 1173
1196 1217 1223 1224 1225
1235 1237 1273 1284 1287
1288 1291 1293 1294 1296
1298
FISHER 1174 1182 1201 1223
1225 1229 1230 1231 1234
1267 1284 1287 1299 1300
1310 1428
FLINT 1170 1280 1431
FORMENTI 1170 1173 1183
1189 1195 1201 1222 1223
1235 1239 1252 1269 1271
1274 1285 1294 1298 1299
1347
Page 73

ii
FORTRESS 1201
FRABA 1170
FRONTECH 1170 1217 1219
1223 1232 1235 1286 1294
1347
FUJITEC 1170
FUJITSU 1170 1176 1200 1223
1232 1243 1269 1274 1290
1297 1375 1376 1400
FUMEO 1290
FUNAI 1229 1235 1252 1377
G
GALACTEX 1223 1252
GALAXI 1170 1193
GALAXIS 1170 1183 1193 1271
GALAXY 1178 1183 1193 1195
1223 1269 1271 1274
GALERIA 1235
GBC 1170 1173 1217 1229
1235 1237 1243 1253 1273
1282 1294 1299 1330
GE 1264
GEBER 1284 1287 1288
GEC 1209 1222 1223 1229
1273 1284 1285 1286 1299
1378
GELESO 1217 1222 1235 1237
1243 1282 1294 1299
GENERAL STAR 1328
GENERAL TECHNIC 1235
GIANT 1170 1173 1223 1259
1345
GITEM 1170 1173 1179 1180
1256 1264 1288 1289
GM 1170 1235 1252
GMG 1170 1235 1252 1271
GOLDFUNK 1369
GOLDSTAR 1170 1173 1176
1185 1191 1219 1223 1232
1235 1270 1275 1286 1290
1294 1328 1370 1407 1434
1439
GOODING 1362
GOODMAN 1025
GOODMANS 1170 1171 1173
1223 1229 1235 1237 1243
1253 1264 1294 1337 1369
1382
GORENJE 1170 1174 1183
1184 1284 1287
GPM 1243 1235
GRAETZ(ITT) 1337 1404 1433
1437
GRANADA 1170 1173 1196
1222 1223 1229 1242 1250
1259 1285 1286 1292 1299
1303 1312 1321 1345 1384
1417
GRANDIN 1170 1262 1284
1294 1298 1299 1431
GREAT WALL 1252 1279 1280
GRENADIER 1170 1235 1294
1328
GRONIC 1170 1173 1223 1235
1267 1269 1274 1294
GRUNDIG 1170 1171 1173
1178 1179 1180 1181 1185
1194 1196 1235 1298 1362
1380 1382 1427 1089 1117
1141
GTT 1170 1235 1271 1330
H
HAMERSTEIN 1223 1236 1252
1254
HAMPTON 1223 1299
HANIMEX 1243
HANSEATIC 1169 1170 1179
1180 1222 1223 1229 1235
1284 1286 1287 1291 1298
1299 1377 1382 1410 1434
HANTAREX 1170 1222 1235
HCM 1223 1235 1246 1294
1330
HEMMERMANN 1223 1263
1269 1274 1284 1287
HEXA 1278 1294
HIGASHI 1223
HILINE 1235 1252 1253
HINARI 1170 1228 1232 1235
HISENSE 1286 1300 1054
HISONIC 1234
HITACHI 1171 1223 1229 1232
1261 1270 1284 1285 1286
1287 1294 1295 1299 1306
1307 1308 1346 1356 1378
1379 1381 1382 1410 1429
1075 1097
HOSHAI 1330
HUMAX 1042 1043
HUNTER 1393
HYPER 1170 1219 1223 1235
1238 1243 1253 1285 1294
1330 1346
HYPSON 1170 1173 1235 1252
HYUNDAI 1170 1173 1368
1414 1100 1127
I
IBERVISAO 1284 1287 1294
ICE 1243 1252 1253
IEG 1223
IMPER 1170 1171 1173 1235
1243 1252 1336
IMPERIAL 1170 1173 1183
1195 1211 1217 1240 1252
1271 1285 1293 1294 1311
INDESIT 1257
INF.REM.CONTR 1361
INNO HIT 1170 1173 1191
1217 1222 1223 1232 1235
1243 1253 1273 1299 1330
1126
INTERBUY 1219
INTERDISCOUNT 1170 1226
1256 1264
INTERFUNK 1169 1170 1173
1191 1204 1217 1222 1223
1232 1235 1243 1250 1253
1256 1271 1273 1284 1287
1288 1291 1299
INTERVISION 1170 1217 1219
1223 1269 1274 1275 1276
1294
IRRADIO 1170 1173 1189 1191
1196 1219 1232 1235 1243
1252 1253 1294 1369 1382
ISKRA 1222 1223 1269 1274
1294 1325
ITC 1223 1294
ITL 1170 1235
ITT 1068 1069 1070 1091
ITT SCHAUB LORENZ 1170
1235 1284 1287 1294 1299
1337 1403 1067 1165 1183
1237 1243 1291 1295 1300
1330
ITT/NOKIA 1169 1170 1173
1175 1182 1183 1199 1235
1237 1243 1271 1281 1284
1285 1286 1287 1288 1291
1292 1294 1295 1296 1299
1300 1310 1330 1342 1361
1369 1375 1381 1403
J
JET POINT 1170 1254
JINALIPU 1235
JOHNSON 1223
JVC 1029 1077 1229 1253 1254
1364 1365 1382 1411 1204
K
KORTING 1081
KAISER 1170
KAISUI 1170 1223 1235 1243
1271 1280 1330 1403 1431
KALRMAX 1222 1223 1224
1247 1248 1250 1285 1294
KAMAR 1234
KAMBROOK 1170 1223 1252
1275
KAMOSONIC 1223
KAPSCH 1175 1182 1299 1375
KARCHER 1170 1173 1174
1183 1200 1223 1224 1235
1277 1285 1286 1330
KARDON 1375 1376 1400
KAUASONIC 1393
KELVINATOR 1270
KENDO 1170 1173 1176 1217
1223 1235 1266 1269 1274
1282 1290 1296 1299 1311
1375 1376 1400
KENNEDY 1176 1217 1256
1266 1290 1297 1299 1311
1375 1376 1400
KENNEX 1170 1369
KERION 1170 1173
KIC 1223
KIOTA 1252
KITT 1223 1252
KIYOGIN 1170
KNEISSEL 1170 1177 1225
1311 1370 1382 1431
KOBIC 1235
KOENIG 1298 1299
KOERTING 1170 1174 1201
1209 1284 1287 1288
KOLSTER 1170 1173 1217
1219 1223 1224 1269 1274
1294
KONDA 1094
KONKA 1388 1391
KONTAKT 1362
KOTRON 1252
KRONNE 1223 1294
KUBA ELETRONIC 1428
KYOTO 1222 1223 1294
L
LAVIS 1222
LEADER 1235 1421
LEGEND 1170 1173 1223 1235
1252 1279
LENCO 1170 1173 1237 1269
1274 1291 1369
LENOIR 1170 1173 1223 1235
1237 1284 1287 1330
LEYCO 1170 1252 1273 1347
1377
LG 1425 1439 1407 1434 1083
1135 1155 1063
LIESENKOTTER 1170 1239
LIFE 1235
LLOYD'S 1196 1223 1235 1252
1299
LOEWE 1284 1143 1168
LOEWE OPTA 1169 1170 1172
1182 1201 1203 1204 1222
1223
LOGIK 1216 1228
LUMA 1282 1290 1297 1375
LUMATRON 1170 1113
LUXOR 1191 1219 1223 1270
1285 1286 1289 1291 1295
1299 1300 1357 1403
M
M.ELECTRONIC 1169 1170
1173 1182 1185 1191 1193
1199 1200 1201 1217 1219
1222 1235 1237 1241 1266
1269 1271 1274 1282 1284
1287 1294 1295 1299 1381
1382 1407 1428 1434 1436
MAAZ 1247 1248 1250
MACTH-ITALIA 1170
MAGNADYNE 1170 1173 1178
1201 1217 1222 1235 1269
1271 1274 1282 1284 1287
1294 1299
MAGNAFON 1170 1189 1193
1222 1223 1269 1274 1299
MAGNASONIC 1170 1173
MAGNEX 1170
MANESTH 1170 1285 1288
1291 1294 1298 1303
MANHATTAN 1369
MARANTZ 1170 1173
MARECH 1298
MARK 1325
MASCOT 1217
MATCH ITALIA 1170 1235
MATSUI 1170 1201 1223 1228
1235 1252 1284 1285 1286
1287 1294 1299 1301 1347
1351 1362 1373
MATSUKA 1223 1252 1351
MAXAM 1223 1235 1252
MAXELL 1235
MAXWELL 1170 1222 1248
1250 1269 1274
MCE 1235
MEDIACOM 1124
MEDION 1046
MEGA 1170 1171
MEMPHIS 1279
MERCURY 1223 1235 1252
1321
METZ 1178 1179 1180 1185
1186 1187 1204 1207 1208
1369
MGA 1169 1237 1243 1252
Page 74

iii
MICRON 1223
MINERVA 1178 1179 1180
1185 1196 1241 1362
MITRONIC 1232
MITSUBISHI 1102 1178 1201
1204 1228 1229 1235 1237
1259 1345 1349 1382 1169
MIVAR 1177 1188 1190 1191
1218 1222 1223 1323
MTC 1183 1294
MULTITECH 1169 1170 1174
1217 1219 1222 1223 1228
1229 1235 1243 1246 1252
1269 1274 1294 1330 1337
MURPHY 1189 1223 1285 1293
1294 1299
N
NAGEL 1210
NAGOTA 1285
NAKASHI 1170
NAMSONIC 1235
NAMSUNC 1235
NARITA 1237
NEC 1224 1228 1229 1235
1237 1280 1329
NECKERMANN 1170 1171
1173 1179 1180 1183 1185
1204 1223 1226 1227 1239
1266 1282 1285 1286 1298
1370 1377 1382 1436
NECSTAR 1393
NEI 1170 1173 1279 1285 1294
NEWMAR 1223 1285 1294
NEWTECH 1170 1223
NIKKAI 1223 1232 1252 1270
NIKKEI 1170 1173 1369 523
NIKKO 1170 1173 1279
NIPPON 1146
NOBLEX 1229 1230 1231 1234
1235 1236 1237
NOBLIKO 1189 1193 1195
1196 1217 1223 1269 1274
NORDMENDE 1202 1214 1215
1256 1261 1264 1283 1299
1352 1433
NORDWAY 1293
NORTEK 1170 1382
NOVATRONIC 1170 1235 1237
1252
O
O.GENERAL 1229 1235
OCEANIC(ITT) 1258 1262 1281
1284 1285 1286 1288 1289
1291 1295 1299 1300 1381
OCTAL 1223
OKANO 1183
OLYMPIC 1235
ONCEAS 1217 1223 1235
ONIDA 1173
ONWA 1252 1253 1271 1403
ORAVA SLOV 1170 1201 1294
ORAVA/OTF 1170 1235
ORIENT 1170 1235 1335 1090
ORION 1170 1171 1228 1232
1235 1236 1252 1263 1281
1284 1285 1287 1304 1305
1308 1317 1347 1351 1360
1370 1373 1377
ORION HUNGARY 1170 1173
1281 1285 1357 1358
ORMOND 1170 1222 1369
OR-ON 1330
ORSOW'E 1170 1173 1222
1252
OSAKI 1170 1173 1252 1276
OTHER LINE 1173 1222
OTHERS 1101 1105 1106 1107
1108 1133 1396 1324 1343
1367 1148 1158 1116
OTTO VERSAND 1169 1170
1171 1172 1173 1178 1179
1180 1185 1219 1223 1226
1227 1229 1235 1242 1246
1264 1285 1286 1287 1291
1298 1299 1325 1428
P
PAEL 1189 1196 1223
PALLADIUM 1183 1204 1266
PALSONIC 1170 1173 1223
1232 1243 1252
PANAMA 1170 1173 1217 1252
PANASHIBA 1235
PANASONIC 1139 1294 1299
1344 1348 1366 1399 1179
1180 1242
PANAVOX 1170 1235 1299
PANAVSION 1252
PANORAMA 1223 1235 1243
PANORAMIC 1256
PATHE CINEMA 1183 1222
1223 1224 1278 1294 1298
PAUSA 1235
PCM 1170 1173
PEGASUS 1099
PERSHIN 1196 1278
PHILARMONIC 1223
PHILCO 1170 1173 1183 1195
1201 1211 1217 1224 1229
1235 1240 1271 1284 1285
1287 1293 1294 1299 1311
PHILIPS 1041 1145 1150 1151
1156 1170 1171 1173 1179
1180 1201 1204 1223 1224
1249 1250 1251 1271 1334
1355 1372 1382 1407 1412
1428 1435 1436
PHOENIX>FORMENTI 1318
1321
PHONOLA>PHILIPS 1314 1315
PILOT 1408 1433
PIONEER 1170 1173 1291
1370 1418 1073 1058
PLANTRON 1217 1222 1235
1282 1285 1299
PORTLAND 1170
PRANDONI PRINCE 1189 1217
1222 1269 1274 1282 1285
1299
PREMIER 1028 1052 1086
1128 1129 1142 1080 1170
1171 1327 1336 1393 1421
PRIMA 1223 1232 1235 1252
PRINCESS 1232 1235
PROFEX 1195 1235 1239 1291
PROFILO 1131
PROIFLO 1170 1173 1222 1264
1294 1370 1397
PROLINE 1304
PROSONIC 1170
PROTECH 1170 1173 1235
1271 1294 1304 1325 1369
1436
PYE 1170 1171 1173 1237 1250
Q
QUAL CRAFT 1189 1232 1243
1269 1274 1347
QUASAR 1189 1232 1269 1274
1299 1347
QUELLE 1169 1170 1173 1178
1182 1189 1191 1192 1193
1196 1199 1200 1219 1223
1226 1228 1231 1232 1239
1240 1252 1284 1287 1291
R
RADIOLA 1170 1171 1173 1250
RADIONETTE 1182 1200 1284
1299
RADIOTONE 1325 1341
RANK/RBM 1189 1286 1293
1299 1316
RC 903A 1115
RECOR 1169 1170 1173 1252
REDIFFUSION 1291 1299
REFLEX 1170 1369
REGENTE 1235
RFT 1201 1325
RITAR 1295
RIZ 1294
RM 1369
RM2000 1170
ROADMASTER 1050
ROADSTAR 1170 1173 1232
1235 1243 1330 1369 1370
1371 1440
ROB.ELECTR 1201 1267
ROWA 1223 1235 1252
ROWIDO/KONIG 1189 1294
ROWSONIC 1223
ROYAL 1173 1223 1235 1243
1252 1271
RTF 1201
S
S.LORENZ 1170 1183 1235
1237 1243 1284 1287 1291
1295 1299 1300 1330
SABA 1170 1204 1205 1214
1215 1222 1235 1237 1256
1259 1261 1264 1285 1288
1294 1299 1335 1338 1341
1352 1370 1374 1397 1405
1112 1137
SABERG 1170 1173 1195 1271
SAGEM 1431
SAISHO 1223 1224 1228 1237
1243 1303 1347 1351
SAKURA 1235
SALORA 1170 1199 1270 1282
1285 1286 1288 1291 1292
1295 1300 1361
SALORA 1381 1385 1403 1423
SAMBERS 1189 1191 1193
1195 1196 1222 1224 1269
1274
SAMSUNG 1170 1171 1173
1174 1183 1191 1204 1223
1228 1232 1234 1235 1236
1254 1273 1276 1327 1334
1347 1378 1382 1383 1419
1432
SAMSUNG 1435 1144 1059
SANDRA COLOR 1222 1223
SANG 1170 1337 1437
SANKYO 1233 1384
SANSUI 1170 1235 1253 1300
1330 1430
SANYO 1174 1182 1201 1223
1225 1228 1229 1230 1231
1235 1267 1273 1276 1299
1300 1310 1312 1319 1346
1384 1417
SAR 1170 1223 1294
SCHAUPLORENTZ 1337
SCHAUPT LORENZ 1067 1165
SCHNEIDER 1170 1171 1173
1176 1197 1219 1223 1235
1243 1250 1253 1284 1285
1286 1287 1293 1294 1297
1299 1347 1370 1382 1406
SCOTT 1170 1298
SEG 1170 1173 1195 1217
1223 1269 1274 1294 1369
SEIKON 1026 1160
SELECO 1170 1171 1173 1175
1176 1219 1229 1264 1266
1282 1283 1290 1294 1296
1297 1311 1375 1376 1400
SEMP 1313
SENDAY 1170
SENTRA 1303 1321
SEPHIM 1027
SET 1170 1294
SHARP 1229 1244 1245 1246
1321
SHIVAKI 1170 1171
SHOV 1085 1088 1091 1092
1069 1070 1398 1416
SHOV 1170 1171 1173 1235
1252
SHOW 1390 1393
SIAREM 1201 1222 1269 1274
1299
SICATEL 1224 1294
SICE 1178
SIDEC 1294
SIEL 1195
SIEMENS 1170 1173 1178
1179 1180 1181 1185 1196
1222 1231 1232 1239 1344
1384 1417 1074
SILMA 1170
SILVA 1235
SILVER 1243 1252
SIMTEL 1170 1243 1252 1330
1428
SINGER 1170 1173 1201 1217
1222 1223 1235 1253 1262
1269 1274 1299 1311 1347
SINUDYNE 1170 1171 1201
1243 1263 1266 1269 1274
1284 1287 1297 1299 1304
1305 1317 1347 1351 1364
1370 1377
SIREL 1222
SKAY 1330
Page 75

iv
SLAVA 1223
SOLAVOX 1270 1284 1292
1295
SONITRON 1201 1223
SONOKO 1170 1173 1223 1235
1243 1252 1330
SONTEC 1170 1183 1219
SONY 1229 1322 1066 1103
1152 1154 1163 1424 1226
1227 1228
SOUND COLOR 1170
SOUND MASTER 1235
SOUTHERN CROSS 1219
SOWTECH 1169 1219
SPECTRA(ASTRA) 1170 1336
1401 1402 1413 1420
STANDARD 1217 1223 1235
1243 1298
STAR 1173
STAR LINE 1170
STARLITE 1235
STARLUX 1235
STERN 1175 1176 1256 1266
1282 1290 1296 1297 1375
STVI 1223 1294
STZ SUNKAI 1170 1305 1330
SUNNY 1022 1044 1122 1125
1130 1253 1387 1389 1393
SUNSTAR 1170
SUNWATT 1170 1173
SUPERLA 1222 1294
SUPERSONIC 1169 1253 1300
1330
SUPERTEC 1170 1173 1235
1243
SUPRA 1170 1234 1235 1237
1328
SUPREME 1193
SYC LINE 1235
SYDNEY 1222
T
TADISTAR 1271
TALENT 1178
TANDBERG 1186 1192 1203
1204 1208 1222 1256 1261
1297
TANDY 1262 1285 1286
TASHIKO 1223 1286 1378 1384
1417
TATUNG 1172 1178 1222 1223
1228 1268 1273
TCL 1413
TEAK 1169 1170 1173 1223
1235
TEC 1170 1176 1217 1223 1235
1293 1294 1347 1407
TECHLINE 1170
TECHNICA 1243
TECHNICS 1242 1348 1167
TECHNISAT 1170 1370
TECHNOL 1169 1223 1235
1237 1252
TEDELEX 1170 1173 1223 1235
1285 1294
TEINEL 1170 1294
TEKNANT 1170 1235
TELE+ 1170 1235 1326
TELECHROM 1243 1330
TELEFAC 1235 TELEFUNKEN
1095 1111 1114 1137 1294 1335
1341 1350 1370 1397 1405
1170 1216 1217 1222 1235
1236 1237 1240 1256 1257
1259 1260 1264 1265
TELEOPTA 1235
TELEPOINT 1170
TELE SYSTEM 1001 1021 1003
1004 1005 1006 1007 1008
1009 1010 1011 1012 1013
1014 1015 1016 1017 1018
1022
TELESTAR 1170 1235 1252
TELETECH 1170 1217
TELEVIDEON 1170 1173 1189
1223 1285 1298 1299 TELKOM
1170 1294
TELRA 1170 1264 1294 1112
1137
TEMPEST 1223 1235 1243
TENSAI 1170 1173 1182 1200
1217 1223 1232 1235 1237
1243 1269 1274 1275 1277
1294 1298 1369
TESLA 1224
TESLASLOV 1170 1201 1250
1294
TETRAN 1294 1298 THOMSON
1170 1189 1196 1201 1214
1215 1241 1250 1255 1256
1261 1264 1265 1285 1294
1354 1358 1362 1374 1395
1405 1071
THORN 1303 1361
THORN FERGUSON 1169 1170
1171 1173 1178 1179 1180 1182
1195 1196 1199 1200 1216
1222 1223 1224 1226 1227
1229 1231 1252 1254 1256
1262 1264 1268 1272 1273
1276 1284 1285 1287 1288
1291 1292 1297 1299 1300
1301 1303 1310 1312 1319
1320 1322 1345 1346 1350
FERGUSON 1361 1365 1379
1382 1405 1434
TIBISHI 1223 1235 1243 1252
TLFNKN 1074
TOBO 1235
TOKAI 1170 1173 1235 1252
TOKYO 1330
TOMITA 1223
TOPVISION 1170 1285 1294
1325
TOSHIBA 1169 1223 1229 1301
1302 1303 1311 1313 1076
1093 1153
TR CONTINENTS 1170 1222
1282
TRANSONIC 1170 1173 1252
1271
TREVI 1235 1243 1330
TRIAD 1170 1173 1224
TRIDENT 1045 1047 1048 1049
1051 1053 1055 1056 1393
1421 1170 1033 1034 1035
1036 1037 1038 1039 1040
1057 1031 1032
TRILUX 1170 1325
TRIMAX 1161
TRIMAX-SIERRA-
GRUNBERGSOFTLINE
1079
TRIUMPH 1193 1347
TRIVISION 1235
TTR 1175
TV STAR 1285
TVD 1375
U
UHER 1175 1197 1285 1298
1375 1428
ULTRAVISION 1214 1224
ULTRAVOX 1169 1170 1173
1178 1201 1217 1223 1269
1274 1282 1299 1313 1372
UNIC RADIO 1174 1222 1223
1291 1294
UNIVERSUM 1169 1170 1173
1178 1179 1180 1182 1184
1189 1191 1192 1193 1196
1199 1200 1219 1223 1226
1228 1229 1231 1232 1235
1239 1240 1252 1284 1287
1288 1291 1294 1295 1384
1417
UNIVOX 1170 1173 1201 1217
1224 1284 1294
UNK 1170
URANYA 1170 1189 1222 1235
1237 1269 1274 1298
UTAX 1223 1235
UYDULU 1132
V
VANGUARD 1223 1235 1286
VECO 1170 1173 1235
VESTEL 1077 1120 1121 1136
1162 1078 1170 1171 1173
1183 1195 1217 1233 1286
1293 1294 1369 1394 1436
VEXA 1170 1171 1223 1235
1243 1286 1330
VICEROY 1223 1232 1252
VIDEOCON 1173
VIDEOLOGIC 1223 1243
VIDEOMAC 1223 1252
VIDEOTON 1170 1219 1222
1223 1271 1281 1285 1286
1293 1294 1357
VIDIKRON 1298
VIDION 1235
VISA 1189 1282
VISAELECT 1195 1223 1294
VISION 2000 1170 1235
VISIOREX 1222
VISTAR 1288 1295
VOXSON 1189 1201 1269 1274
1282
W
WALKIE 1176
WALTHAM 1217 1285 1294
WATSON 1170 1173 1239 1252
1282 1294 1298 1299 1347
1369
WATT RADIO 1223 1224 1269
1271 1274 1277 1284 1287
1299 1347 1369
WEGA COLOR 1229
WEGA VISION 1229
WEGAVOX 1170 1217 1235
1271 1293 1369
WELTBLICK 1170 1298
WESTON 1294
WHITE WESTING HOUSE 1169
1170 1175 1183 1193 1195
1223 1235 1266 1269 1271
1294 1298 1375
WINERSAT 1235 1330
WINSTON 1170 1235 1330
WINTERNITZ 1235 1237 1238
1346
WORLD TECH 1170
Y
YOKO 1170 1223 1235 1252
1256 1285
YORK 1243
YU-MA-TU 1170 1235 1252
1271 1339 1030 1080 1087
1109 1110
Z
ZAMPA 1283
ZIRWATEL ZODIAC 1235
1405
Page 76
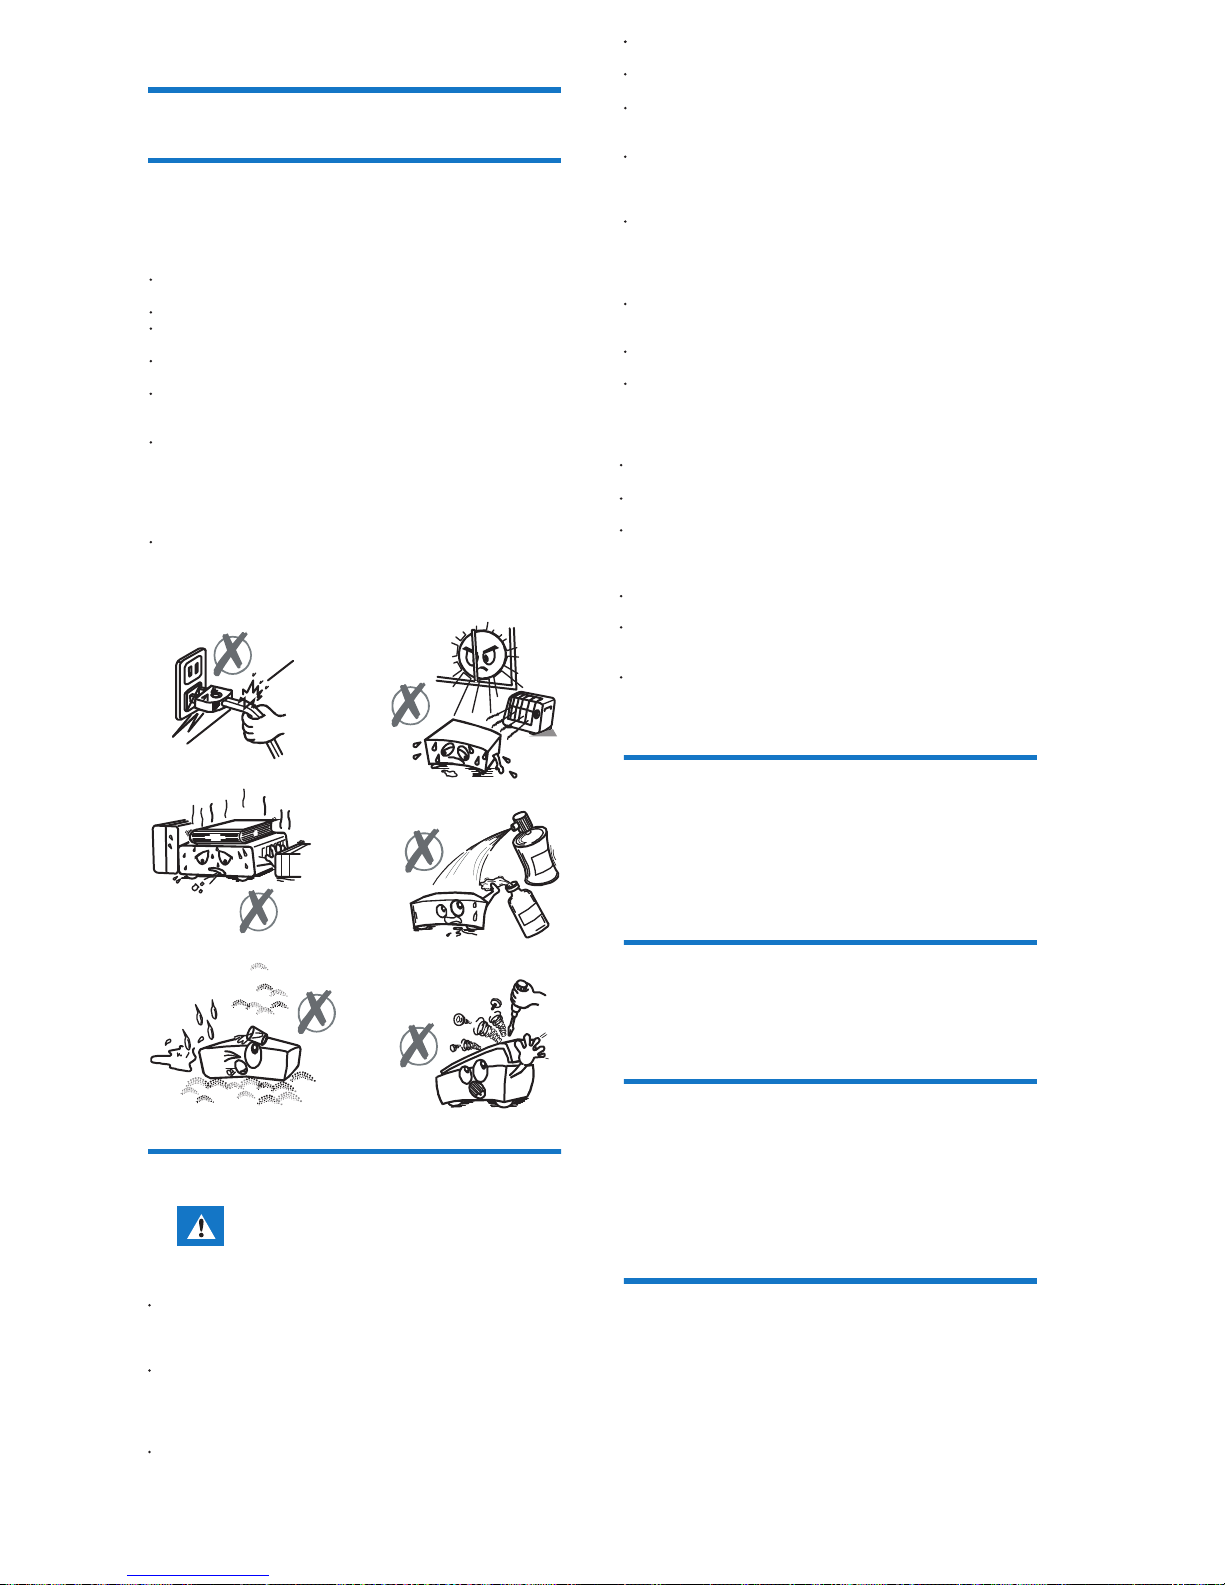
Safety recommendations
Where to put your Set-top box?
Use of the Set-top boxis subject to safety measures
designed to protectusers and their environment.
In order to guarantee the correct operation of your Set-top
box, you must:
place it indoors to protect it from lightning, rain, and direct
sunlight,
place it in a dry and well ventilated area,
keep it away from heat sources such as radiators, candles,
lamps,etc.
protect it from dampness, place it on a at surface from
where it will not fall and is out of the reach of children,
avoid violent shocks. Choose a stable, horizontal surface on
which the Set-top box will not be exposed to intense
vibrations.
do not place anything on top of your Set-top box (as it would
restrict ventilation): the ventilation slots located on the casing
prevent your Set-top box from overheating. If you place the
Set-top box in a compartment or other closed space, leave a
space of at least 10 cm on each side and 20 cm on the front
and back of the Set-top box,
connect it directly to the mains with the provided cords, the
socket must be near the Set-top box and easy to access. The
use ofan extension cable (with multi-points) is not
recommended.
Warnings and safety instructions
• In case of failure, the power cable is the
disconnect device for this equipment. To remove
all electrical power from the equipment,
disconnect the power cable from the electrical
outlet.
Batteries
Interference
USB Storage devices
Cleaning the Set-top box
Batteries are easily swallowed by young children. Do not allow
young children to play with the remote control.
Always keep batteries away from excessive heat sources such
as direct sunlight, re or similar sources.
To avoid damaging the remote control, only use identical
batteries or batteries of an equivalent type. The batteries
provided are not rechargeable.
Do not place the Set-top box near appliances that may cause
electromagnetic interferences (for example, loudspeakers,
modems, routers or cordless phones). This could aect Set-top
box operation and distort the picture or sound.
Please wait until the Set-top box or the multimedia le
application exits the multimedia list manager (multimedia le
application) or is in standby mode before disconnecting your
storage devices. Otherwise, you risk losing data or damage your
storage device.
When connecting a USB peripheral device, respect the way of
insertion and never use force. You may damage your peripheral
device and/or the appliance.
The outer casing of the Set-top box can be cleaned with a soft
and dry cloth. Do not use any type of abrasive pad, scouring
powder or solvents, such as alcohol or turpentine, as they
could damage the surface of the Set-top box.
Take care not to allow liquids or metal objects to enter the
Set-top box through the ventilation slots.
Avoid reconnecting the Set-top box after it has been
subjected to large changes in temperature.
The Set-top box must be disconnected from power supply
before any modication ofconnection between TV, VCR or
antenna.
In the event of a storm, it is advisable to unplug the antenna.
Even if the Set-top box and the television set are
disconnected from the power supply, lightning can still
damage them.
If you hear unusual noise coming from the mains power
socket or from the power cord , disconnect immediately the
power cord from the mains power socket in accordance with
all the precautions of use, you risk getting an electric shock,
and contact your retailer.
Never connect the Set-top box to a mains power socket
which is loose, shows signs of wear or damage, you risk
getting an electric shock.
Never touch the power cord with wet hands. You risk getting
an electric shock.
When connecting or disconnecting the power cord, always
take hold of the plug without pulling on the cord. A damaged
cord presents a potential risk of re or electric shock. Never
pull the power cord when disconnecting from the mains
power socket.
Never place objects on the power cord, and never pull on it
or fold it. This may cause a risk of re or electric shock.
Ensure that the Set-top box never lies on the power cord or
any other cables.
Ensure the Set-top box is placed on a at and stable
surface, placing it incorrectly may lead to the power cord
being disconnected.This may cause a risk of re or electric
shock.
Always keep the power cord unit out of the reach of children
or domestic animals.
Only personnel approved by the manufacturer can repair the
Set-top box. Failure to comply with these safety precautions
will invalidate the guarantee.
Have a specialised installer perform all connections if you
want to use cables that are not provided with the Set-top
box.
Connect the Set-top box to the electrical outlet in
accordance with the indications mentioned on the
identication label axed on the Set-top box (voltage,
power, frequency of electricity network).
You must imperatively use the Set-top box in an
environment that complies with the following requirements:
• temperature: between 0°C [32°F] and 40°C [104°F].
• ambient humidity: between 20% and 90%.
• altitude: below 2000 m [6562 ft].
To avoid short-circuits (re or electrocution hazard), do not
expose your Set-top box to dampness. Do not place any
object containing liquid (vase for example) on the appliance.
The Set-top box must not be splashed with liquid. If liquid is
spilled onto the Set-top box, unplug it immediately from the
mains and consult your supplier.
v
Page 77

Page 78

253650268 DTR3030M User manual
Philips and the Philips Shield Emblem are registered trademarks of Koninklijke Philips N.V.
used under license.
This product was brought to the market by X-GEM SAS, further referred to in this document
as X-GEM SAS, and is the manufacturer of the product.
2015 © X-GEM SAS. All right reserved.
 Loading...