

Page 1

Page 2

II
IMPORTANT SAFETY INSTRUCTIONS
WARNING: TO PREVENT FIRE OR SHOCK HAZARD, DO NOT EXPOSE THIS EQUIPMENT TO RAIN
OR MOISTURE.
Read Instructions - All the safety and operating instructions should be read before the appliance is
operated.
Retain Instructions - The safety and operating instructions should be retained for future reference.
Heed Warnings - All warnings on the appliance and in the operating instructions should be
adhered to.
Follow Instructions - All operating and use instructions should be followed.
Attachments - Do not use attachments not recommended by the manufacturer as they may cause
hazards.
Water and Moisture - Do not use this product near water - for example, near a bath tub, wash bowl, kitchen
sink, or laundry tub, in a wet basement, or near a swimming pool, and the like.
Accessories - Do not place this product on an unstable cart, stand, tripod, bracket, or table.The
product may fall, causing serious injury to a child or adult, and serious damage to the
appliance. Use only with a cart, stand, tripod, bracket, or table recommended by the
manufacturer, or sold with the product. Any mounting of the appliance should follow the
manufacturer’s instructions, and should use a mounting accessory recommended by the
manufacturer.
An appliance and cart combination should be moved with care. Quick stops, excessive force, and uneven
surfaces may cause the appliance and cart combination to overturn.
Ventilation - Slots and openings on the cabinet are provided for ventilation and to ensure reliable
operation of the product and to protect it from overheating.These openings must not
be blocked or covered.The openings should never be blocked by placing the product on
a bed, sofa, rug, or other similar surface.This product should not be placed near or over
a radiator or heat register. This product should not be placed in a built-in installation
such as a bookcase or rack unless proper ventilation is provided or the manufacturer’s
instructions have been adhered to.
Power Sources - This product should be operated only from the type of power source indicated on the
marking label. If you are not sure of the type of power supply to your home, consult
your appliance dealer or local power company.
Grounding or Polarization -
This video product is equipped with a polarized alternating-current line plug (a plug
having one blade wider than the other).This plug will fit into the power outlet in only
one way. This is a safety feature. If you are unable to insert the plug fully into the outlet,
try reversing the plug. If the plug should still fail to fit, contact your electrician to
replace your obsolete outlet. Do not defeat the safety purpose of the polarized plug.
Power Cord Protection -
Power supply cords should be routed so that they are not likely to be walked on or
pinched by items placed upon or against them. Pay particular attention to cords at
plugs, convenience receptacles, and the point where they exit from the appliance.
Page 3
III
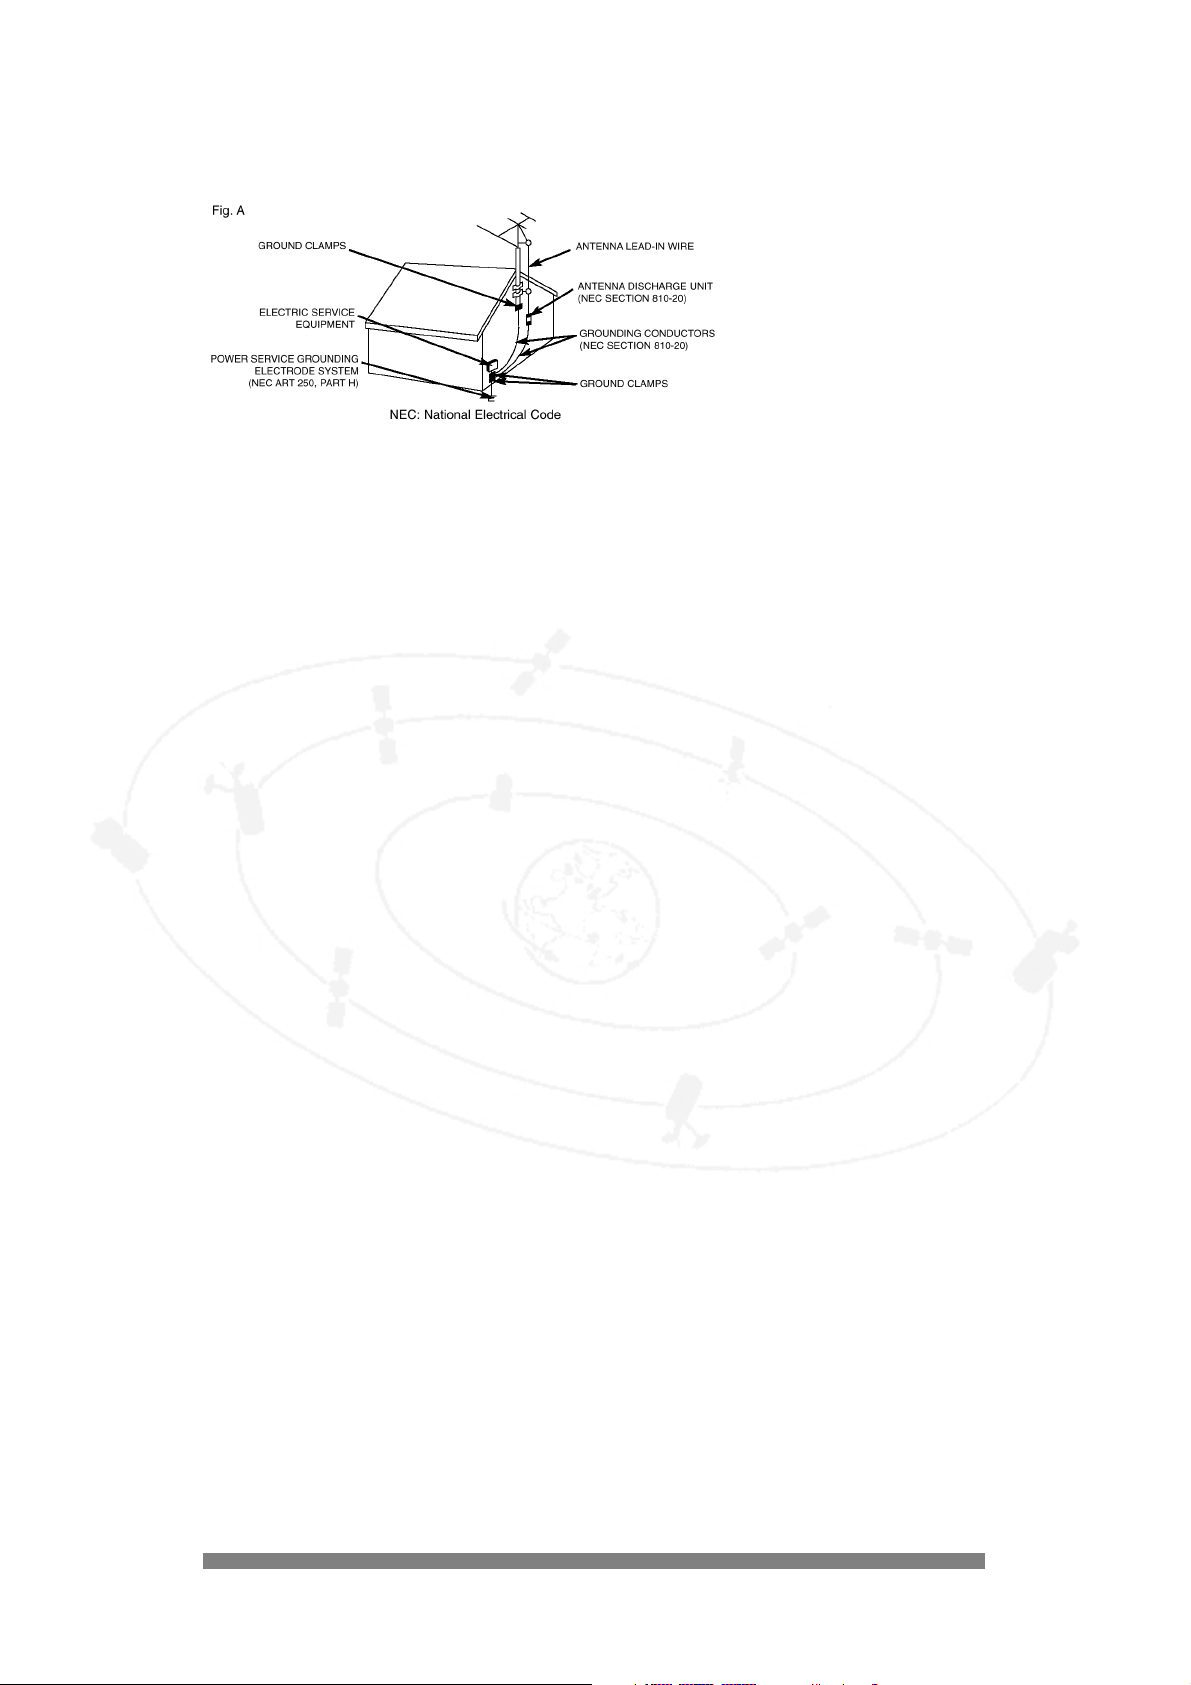
Outdoor Antenna Grounding -
If an outside antenna or cable system is connected to the product, be sure the antenna
or cable system is grounded to provide protection against voltage surges and built-up
static charges.
Section 810 of the National Electrical Code,
ANSI/NFPA 70, provides information with
regard to proper grounding of the mast and
supporting structure, grounding of the lead-in
wire to an antenna discharge unit, size of
grounding conductors, location of antennadischarge unit, connection to grounding
electrodes, and requirements for the
grounding electrode. See Fig.A.
Lightning - For added protection for this product during a lightning storm, or when it is left
unattended and unused for long periods of time, unplug it from the wall outlet and
disconnect the antenna or cable system.This will prevent damage to the product from
lightning and power line surges.
Telephony - Avoid using a telephone (other than a cordless type) during an electrical storm.There
may be a remote risk of electric shock from lightning. Do not use the telephone to
report a gas leak in the vicinity of the leak.
Power Lines - An outside antenna system should not be located in the vicinity of overhead power
lines or other electric light or power circuits, or where it can fall onto such power lines
or circuits.When installing an outside antenna system, extreme care should be taken to
keep from touching such power lines or circuits as contact with them might be fatal.
Refer to installation of ODU.
Overloading - Do not overload wall outlets and extension cords as this can result in a risk of fire or
electric shock.
Object and Liquid Entry - Never push objects of any kind into this product through openings as they may touch
dangerous voltage points or short-out parts that could result in a fire or electric shock.
Never spill liquid of any kind on the product.
Servicing - Do not attempt to service this product yourself, as opening or removing covers may
expose you to dangerous voltage or other hazards. Refer all servicing to qualified
service personnel.
Damage Requiring Service -
Unplug this product from the wall outlet and refer servicing to qualified service
personnel under the following conditions:
• When the power supply cord or plug is damaged.
• If liquid has been spilled, or objects have fallen into the product.
• If the product has been exposed to rain or water.
• If the product does not operate normally when following the operating instructions.Adjust only those controls
that are covered by the operating instructions, as an improper adjustment of other controls may result in damage
and will often require extensive work by a qualified technician to restore the product to its normal operation.
• If the product has been dropped or the cabinet has been damaged in any way.
• When the product exhibits a distinct change in performance - this indicates a need for service.
Replacement Parts - When replacement parts are required, be sure the service technician has used
replacement parts specified by the manufacturer or which have the same characteristics
as the original part. Unauthorized substitutions may result in fire, electric shock or
other hazards.
Safety Check - Upon completion of any service or repairs to this product, ask the service technician to
perform safety checks to determine that the product is in proper operating condition.
Page 4
IV
Carts and Stands - The appliance should be used only with a cart or stand recommended by the
manufacturer.
Heat - The product should be situated away from heat sources such as radiators, heat
registers, stoves, or other products that produce heat.
NOTE TO CATV SYSTEM INSTALLER
Article 820-40 of the NEC (National Electrical Code) provides guidelines for proper grounding
and, in particular, specifies that the cable ground shall be connected to the grounding system
of the building, as close to the point cable entry as practical.
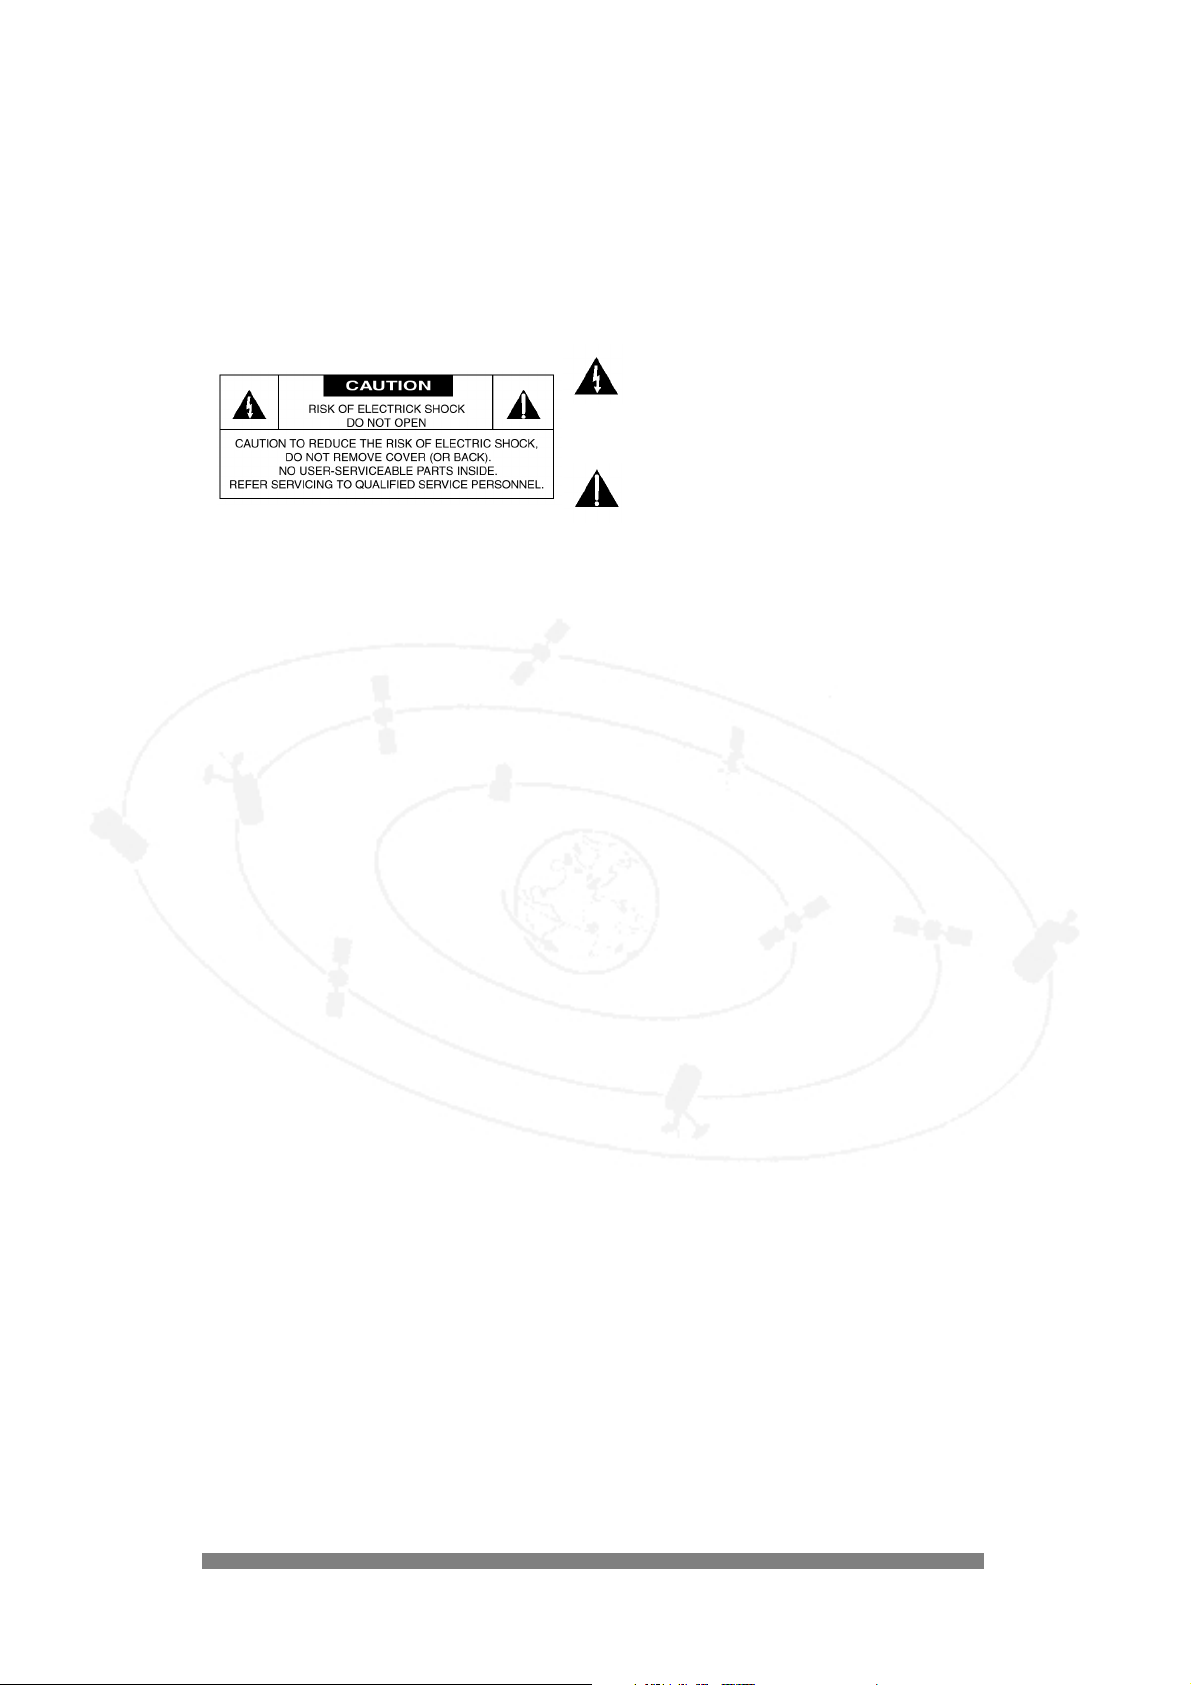
This “bolt of lightning” indicates uninsulated material
within your unit may cause an electrical shock. For the
safety of everyone in your household, please do not
remove product covering.
The “exclamation point” calls attention to features for
which you should read the enclosed literature closely
to prevent operating and maintenance problems.
CAUTION:TO PREVENT ELECTRIC SHOCK, MATCH WIDE BLADE OF PLUG TO WIDE SLOT, FULLY
INSERTED.
ATTENTION: POUR EVITER LES CHOCS ELECTRIQUES, INTRODUIRE LA LAME LA PLUS LARGE DE
LA FICHE DANS LA BORNE CORRESPONDANTE DE LA PRISE ET POUSSER JUSQU'AU
FOND.
WARNING
This device complies with Part 15 of the FCC (U.S.A.) Rules.
Operation is subject to the following two conditions: (1) This device may not cause harmful interference, and (2) this device
must accept any interference received, including interference that may cause undesired operation.
FCC Regulations and Information
This equipment has been tested and found to comply with the limits for a Class B digital device, pursuant to Part 15
of the FCC Rules.These limits are designed to provide reasonable protection against harmful interference in a
residential installation.This equipment generates, uses and can radiate radio frequency energy and, if not installed and
used in accordance with the instructions, may cause harmful interference to radio communications.
However, there is no guarantee that interference will not occur in a particular installation. If this equipment does
cause interference to radio or television reception (which you can determine by turning the equipment off and on),
you are encouraged to try to correct the interference by one or more of the following measures:
• Change the position of the satellite receiver with respect to the radio or television equipment that is receiving
the interference.
• Move the satellite receiver away from the equipment that is receiving the interference.
• Plug the satellite receiver into a different outlet so that the satellite receiver and the equipment receiving the
interference are on different branch circuits.
• Use shielded cables and I/O cords with this equipment to comply with the relevant FCC regulations.
• If these measures do not eliminate the interference, you should consult your dealer or an experienced
radio/television technician for help.
IMPORTANT
Any change or modifications to the equipment by the user not expressly approved by the guarantee or manufacturer could void
the user’s authority to operate such equipment.
Domestic use USA - For units used at 100-120V use only the power supply cord which is supplied with the product.
Page 5

V
General Information
FCC Part 68 ANALOG DEVICE WARNINGS
This equipment complies with part 68 of the FCC rules.
A label on the rear panel of this equipment contains, among other information, the FCC registration number and
ringer equivalence number (REN) for this equipment. If requested, this information must be provided to the
telephone company.
This equipment uses the following USOC jack: RJ-11C.
No telephone cord and modular plug is provided with this equipment
The REN is used to determine the quantity of devices which may be connected to the telephone line. Excessive
RENs on the telephone line may result in the devices not ringing in response to an incoming call. In most, but not all
areas, the sum of RENs should not exceed five (5.0).To be certain of the number of devices that may be connected
to a line, as determined by the total RENs, contact the local telephone company.
Note: RENs are associated with loop-start and ground-start ports. Do not use for E & M or digital
ports.
If the terminal equipment DSX 5250 causes harm to the telephone network, the telephone company will notify you
in advance that temporary discontinuance of service may be required. But if advance notice isn’t practical, the
telephone company will notify the customer as soon as possible.Also, you will be advised of your right to file a
complaint with the FCC if you believe it is necessary.
The telephone company may make changes in its facilities, equipment, operations or procedures that could affect the
operation of the equipment. If this happens the telephone company will provide advance notice in order for you to
make necessary modifications to maintain uninterrupted service.
If the equipment is causing harm to the telephone network, the telephone company may request that you disconnect
the equipment until the problem is resolved.
This equipment cannot be used on public coin phone service provided by the telephone company. Connection to
party line service is subject to state tariffs. (Contact the state public utility commission, public service commission or
corporation commission for information.)
For repair or warranty information, please contact:
DIRECTV
1-800-DIRECTV (347-3288)
Page 6

2
Contents
1. OVERVIEW . . . . . . . . . . . . . . . . . . . . . . . . . . . . . . . . . . . . . . . . . . . . . . . . . . . . . . . . . . . . . . . . . .4
Features . . . . . . . . . . . . . . . . . . . . . . . . . . . . . . . . . . . . . . . . . . . . . . . . . . . . . . . . . . . . . . . . . . .4
Before You Start . . . . . . . . . . . . . . . . . . . . . . . . . . . . . . . . . . . . . . . . . . . . . . . . . . . . . . . . . . . . .4
2. MODES . . . . . . . . . . . . . . . . . . . . . . . . . . . . . . . . . . . . . . . . . . . . . . . . . . . . . . . . . . . . . . . . . . . . .5
Standby Mode . . . . . . . . . . . . . . . . . . . . . . . . . . . . . . . . . . . . . . . . . . . . . . . . . . . . . . . . . . . . . .5
TV Mode . . . . . . . . . . . . . . . . . . . . . . . . . . . . . . . . . . . . . . . . . . . . . . . . . . . . . . . . . . . . . . . . . .5
Guide Mode . . . . . . . . . . . . . . . . . . . . . . . . . . . . . . . . . . . . . . . . . . . . . . . . . . . . . . . . . . . . . . . .5
Menu Mode . . . . . . . . . . . . . . . . . . . . . . . . . . . . . . . . . . . . . . . . . . . . . . . . . . . . . . . . . . . . . . . .5
3. ABOUT YOUR DIRECTV PLUS™ SATELLITE RECEIVER . . . . . . . . . . . . . . . . . . . . . . . . .6
Front View . . . . . . . . . . . . . . . . . . . . . . . . . . . . . . . . . . . . . . . . . . . . . . . . . . . . . . . . . . . . . . . . .6
Rear View . . . . . . . . . . . . . . . . . . . . . . . . . . . . . . . . . . . . . . . . . . . . . . . . . . . . . . . . . . . . . . . . . .6
4. ABOUT THE REMOTE . . . . . . . . . . . . . . . . . . . . . . . . . . . . . . . . . . . . . . . . . . . . . . . . . . . . . . . .7
5. PREPARING YOUR REMOTE FOR USE . . . . . . . . . . . . . . . . . . . . . . . . . . . . . . . . . . . . . . . . .8
Fitting Batteries . . . . . . . . . . . . . . . . . . . . . . . . . . . . . . . . . . . . . . . . . . . . . . . . . . . . . . . . . . . . .8
6. CONNECTING TO YOUR EXISTING EQUIPMENT . . . . . . . . . . . . . . . . . . . . . . . . . . . . . .9
If Your Television has RF Connection Only... . . . . . . . . . . . . . . . . . . . . . . . . . . . . . . . . . . . . . . . .9
If Your Television has A/V Connectors... . . . . . . . . . . . . . . . . . . . . . . . . . . . . . . . . . . . . . . . . . .10
If You have a TV and a VCR... . . . . . . . . . . . . . . . . . . . . . . . . . . . . . . . . . . . . . . . . . . . . . . . . . .11
7. INSERTING YOUR ACCESS CARD . . . . . . . . . . . . . . . . . . . . . . . . . . . . . . . . . . . . . . . . . . . .12
Replacing the Access Card . . . . . . . . . . . . . . . . . . . . . . . . . . . . . . . . . . . . . . . . . . . . . . . . . . . .12
8. INSTALLATION . . . . . . . . . . . . . . . . . . . . . . . . . . . . . . . . . . . . . . . . . . . . . . . . . . . . . . . . . . . . .13
Switching Your Receiver On and Off . . . . . . . . . . . . . . . . . . . . . . . . . . . . . . . . . . . . . . . . . . . . .13
Enter Zip Code . . . . . . . . . . . . . . . . . . . . . . . . . . . . . . . . . . . . . . . . . . . . . . . . . . . . . . . . . . . .13
Dish Configuration . . . . . . . . . . . . . . . . . . . . . . . . . . . . . . . . . . . . . . . . . . . . . . . . . . . . . . . . . .14
Point Dish . . . . . . . . . . . . . . . . . . . . . . . . . . . . . . . . . . . . . . . . . . . . . . . . . . . . . . . . . . . . . . . .14
System Test . . . . . . . . . . . . . . . . . . . . . . . . . . . . . . . . . . . . . . . . . . . . . . . . . . . . . . . . . . . . . . . .14
9. OPERATION . . . . . . . . . . . . . . . . . . . . . . . . . . . . . . . . . . . . . . . . . . . . . . . . . . . . . . . . . . . . . . .15
10.ABOUT THE BANNER . . . . . . . . . . . . . . . . . . . . . . . . . . . . . . . . . . . . . . . . . . . . . . . . . . . . . . .15
Zap Banner . . . . . . . . . . . . . . . . . . . . . . . . . . . . . . . . . . . . . . . . . . . . . . . . . . . . . . . . . . . . . . . .15
Short banner . . . . . . . . . . . . . . . . . . . . . . . . . . . . . . . . . . . . . . . . . . . . . . . . . . . . . . . . . . . . . .15
Long banner . . . . . . . . . . . . . . . . . . . . . . . . . . . . . . . . . . . . . . . . . . . . . . . . . . . . . . . . . . . . . . .15
Browse Banner . . . . . . . . . . . . . . . . . . . . . . . . . . . . . . . . . . . . . . . . . . . . . . . . . . . . . . . . . . . . .16
Song ID Displays . . . . . . . . . . . . . . . . . . . . . . . . . . . . . . . . . . . . . . . . . . . . . . . . . . . . . . . . . . . .16
Notification Displays . . . . . . . . . . . . . . . . . . . . . . . . . . . . . . . . . . . . . . . . . . . . . . . . . . . . . . . . .16
11.USING THE DIRECTV®PROGRAMMING GUIDE . . . . . . . . . . . . . . . . . . . . . . . . . . . . . . .17
What’s in the Guide . . . . . . . . . . . . . . . . . . . . . . . . . . . . . . . . . . . . . . . . . . . . . . . . . . . . . . . . .17
Using the Guide . . . . . . . . . . . . . . . . . . . . . . . . . . . . . . . . . . . . . . . . . . . . . . . . . . . . . . . . . . . .18
Pay per view (PPV) . . . . . . . . . . . . . . . . . . . . . . . . . . . . . . . . . . . . . . . . . . . . . . . . . . . . . . . . . .18
12.FAVORITE CHANNELS . . . . . . . . . . . . . . . . . . . . . . . . . . . . . . . . . . . . . . . . . . . . . . . . . . . . . .21
13.THEMES . . . . . . . . . . . . . . . . . . . . . . . . . . . . . . . . . . . . . . . . . . . . . . . . . . . . . . . . . . . . . . . . . . . .21
14.ALTERNATE AUDIO . . . . . . . . . . . . . . . . . . . . . . . . . . . . . . . . . . . . . . . . . . . . . . . . . . . . . . . . .21
15.OPTIONS MENU . . . . . . . . . . . . . . . . . . . . . . . . . . . . . . . . . . . . . . . . . . . . . . . . . . . . . . . . . . . .22
Other Guides . . . . . . . . . . . . . . . . . . . . . . . . . . . . . . . . . . . . . . . . . . . . . . . . . . . . . . . . . . . . . .22
Go to Date . . . . . . . . . . . . . . . . . . . . . . . . . . . . . . . . . . . . . . . . . . . . . . . . . . . . . . . . . . . . . . .22
Taglist . . . . . . . . . . . . . . . . . . . . . . . . . . . . . . . . . . . . . . . . . . . . . . . . . . . . . . . . . . . . . . . . . . . .22
Menu . . . . . . . . . . . . . . . . . . . . . . . . . . . . . . . . . . . . . . . . . . . . . . . . . . . . . . . . . . . . . . . . . . . .23
Help . . . . . . . . . . . . . . . . . . . . . . . . . . . . . . . . . . . . . . . . . . . . . . . . . . . . . . . . . . . . . . . . . . . . .23
Page 7

3
16.USING MENU MODE . . . . . . . . . . . . . . . . . . . . . . . . . . . . . . . . . . . . . . . . . . . . . . . . . . . . . . . .24
Messages . . . . . . . . . . . . . . . . . . . . . . . . . . . . . . . . . . . . . . . . . . . . . . . . . . . . . . . . . . . . . . . . .24
Using Menu Mode . . . . . . . . . . . . . . . . . . . . . . . . . . . . . . . . . . . . . . . . . . . . . . . . . . . . . . . . . .24
Navigating in Menu Mode . . . . . . . . . . . . . . . . . . . . . . . . . . . . . . . . . . . . . . . . . . . . . . . . . . . . .24
Messages Using Menu Mode . . . . . . . . . . . . . . . . . . . . . . . . . . . . . . . . . . . . . . . . . . . . . . . . . . .24
Menu mode defaults . . . . . . . . . . . . . . . . . . . . . . . . . . . . . . . . . . . . . . . . . . . . . . . . . . . . . . . . .24
17.GENERAL SETTINGS . . . . . . . . . . . . . . . . . . . . . . . . . . . . . . . . . . . . . . . . . . . . . . . . . . . . . . . .25
18.SCREEN FORMAT . . . . . . . . . . . . . . . . . . . . . . . . . . . . . . . . . . . . . . . . . . . . . . . . . . . . . . . . . . .25
19.BANNER DURATION . . . . . . . . . . . . . . . . . . . . . . . . . . . . . . . . . . . . . . . . . . . . . . . . . . . . . . . .25
20.FAVORITE CHANNEL . . . . . . . . . . . . . . . . . . . . . . . . . . . . . . . . . . . . . . . . . . . . . . . . . . . . . . .26
21.ACCESS CONTROL . . . . . . . . . . . . . . . . . . . . . . . . . . . . . . . . . . . . . . . . . . . . . . . . . . . . . . . . .27
Lock/Unlock the System . . . . . . . . . . . . . . . . . . . . . . . . . . . . . . . . . . . . . . . . . . . . . . . . . . . . . .27
Change Password . . . . . . . . . . . . . . . . . . . . . . . . . . . . . . . . . . . . . . . . . . . . . . . . . . . . . . . . . . .27
Channel Lock . . . . . . . . . . . . . . . . . . . . . . . . . . . . . . . . . . . . . . . . . . . . . . . . . . . . . . . . . . . . . .28
Set Purchase Limit . . . . . . . . . . . . . . . . . . . . . . . . . . . . . . . . . . . . . . . . . . . . . . . . . . . . . . . . . .28
Maturity Rating . . . . . . . . . . . . . . . . . . . . . . . . . . . . . . . . . . . . . . . . . . . . . . . . . . . . . . . . . . . . .28
22.REPLACE THE ACCESS CARD . . . . . . . . . . . . . . . . . . . . . . . . . . . . . . . . . . . . . . . . . . . . . . . .29
23.PREFERRED LANGUAGE . . . . . . . . . . . . . . . . . . . . . . . . . . . . . . . . . . . . . . . . . . . . . . . . . . . .29
Purchases . . . . . . . . . . . . . . . . . . . . . . . . . . . . . . . . . . . . . . . . . . . . . . . . . . . . . . . . . . . . . . . . .30
Completed Purchases . . . . . . . . . . . . . . . . . . . . . . . . . . . . . . . . . . . . . . . . . . . . . . . . . . . . . . . .30
Pending Purchases . . . . . . . . . . . . . . . . . . . . . . . . . . . . . . . . . . . . . . . . . . . . . . . . . . . . . . . . . .30
Upgrades . . . . . . . . . . . . . . . . . . . . . . . . . . . . . . . . . . . . . . . . . . . . . . . . . . . . . . . . . . . . . . . . .30
Mail . . . . . . . . . . . . . . . . . . . . . . . . . . . . . . . . . . . . . . . . . . . . . . . . . . . . . . . . . . . . . . . . . . . . .31
24.TROUBLESHOOTING . . . . . . . . . . . . . . . . . . . . . . . . . . . . . . . . . . . . . . . . . . . . . . . . . . . . . . .32
Where to Find Help . . . . . . . . . . . . . . . . . . . . . . . . . . . . . . . . . . . . . . . . . . . . . . . . . . . . . . . . .32
25.GLOSSARY . . . . . . . . . . . . . . . . . . . . . . . . . . . . . . . . . . . . . . . . . . . . . . . . . . . . . . . . . . . . . . . . .34
26.APPENDIX A - INSTALLATION IN EXPERT MODE . . . . . . . . . . . . . . . . . . . . . . . . . . . . .36
Telephone Prefix . . . . . . . . . . . . . . . . . . . . . . . . . . . . . . . . . . . . . . . . . . . . . . . . . . . . . . . . . . . .36
Application Type . . . . . . . . . . . . . . . . . . . . . . . . . . . . . . . . . . . . . . . . . . . . . . . . . . . . . . . . . . . .36
System Test . . . . . . . . . . . . . . . . . . . . . . . . . . . . . . . . . . . . . . . . . . . . . . . . . . . . . . . . . . . . . . . .36
27.SPECIFICATIONS . . . . . . . . . . . . . . . . . . . . . . . . . . . . . . . . . . . . . . . . . . . . . . . . . . . . . . . . . . .37
Page 8

4
Overview
Information in this guide will help you set up and use your Philips manufactured DIRECTV PLUS™ satellite receiver.
Further help is available on screen.A glossary of terms is provided at the end of this manual.
Features
Your satellite receiver lets you receive television signals from up to three satellites. In addition, you can customize
your viewing by setting up custom viewing schedules, setting favorite programs, setting viewing preferences, and
ordering Pay-per-view programs.
9 Use the Guide to see what’s on, and to set a reminder so you don’t miss the start of a program you want to see.
9 Create your own list of favorite channels.
9 Restrict viewing access based on rating levels.
9 Tag programs for future viewing.
9 Receive mail messages from DIRECTV.
Before You Start
Before using your system, check the following:
9 Your system installation has been completed according to the instructions in the installation section.
9 The access card is installed as described on page 16.
9 A telephone line is connected to the system so that you can purchase pay per view programs.You must supply
the phone cord for the connection; it is not included with the satellite receiver.
9 DIRECTV has been called to activate your service.
Call DIRECTV at 1-800-DIRECTV (347-3280) to activate programming.
1
1
Page 9

5
Modes
Your satellite receiver has four modes:
9 Standby - satellite receiver is on but inactive; television is off.
9 TV Mode - displays television programming.
9 Guide Mode - for viewing schedules and tuning to a program.
9 Menu Mode - for setting preferences and access codes.
To change modes, press the GUIDE or MENU button on the remote.
Standby Mode
When you press the POWER button on either the front panel or remote control, the satellite receiver enters
standby mode.When you are not viewing, DO NOT TURN POWER OFF to the satellite receiver, because in standby
mode, the Master Program Guide (MPG) is refreshed continuously to ensure the MPG will be up to date.
Temporarily unlocked channels are NOT maintained when the system goes into standby mode; but themes and/or
favorites selections are maintained.
TV Mode
This is the normal viewing mode in which the program is viewed without a Guide, Menu, or program banner
displayed.
Guide Mode
In Guide mode, you can view lists programs according to their time slot and channel.With it, you can tune to a
program, be notified when a program is about to start, order pay per view programs, search through listings by the
type of program you’re looking for, and tag programs for future viewing.You can also access the menu, other guides, a
tag list, and online help from the Guide.
Menu Mode
Menu mode lets you customize the features of your satellite receiver. Categories include General Settings, Access
Control, Preferred Language, Purchases, Installation, Upgrades and Mail.
2
2
Page 10
6
About your DIRECTV PLUS™satellite
receiver
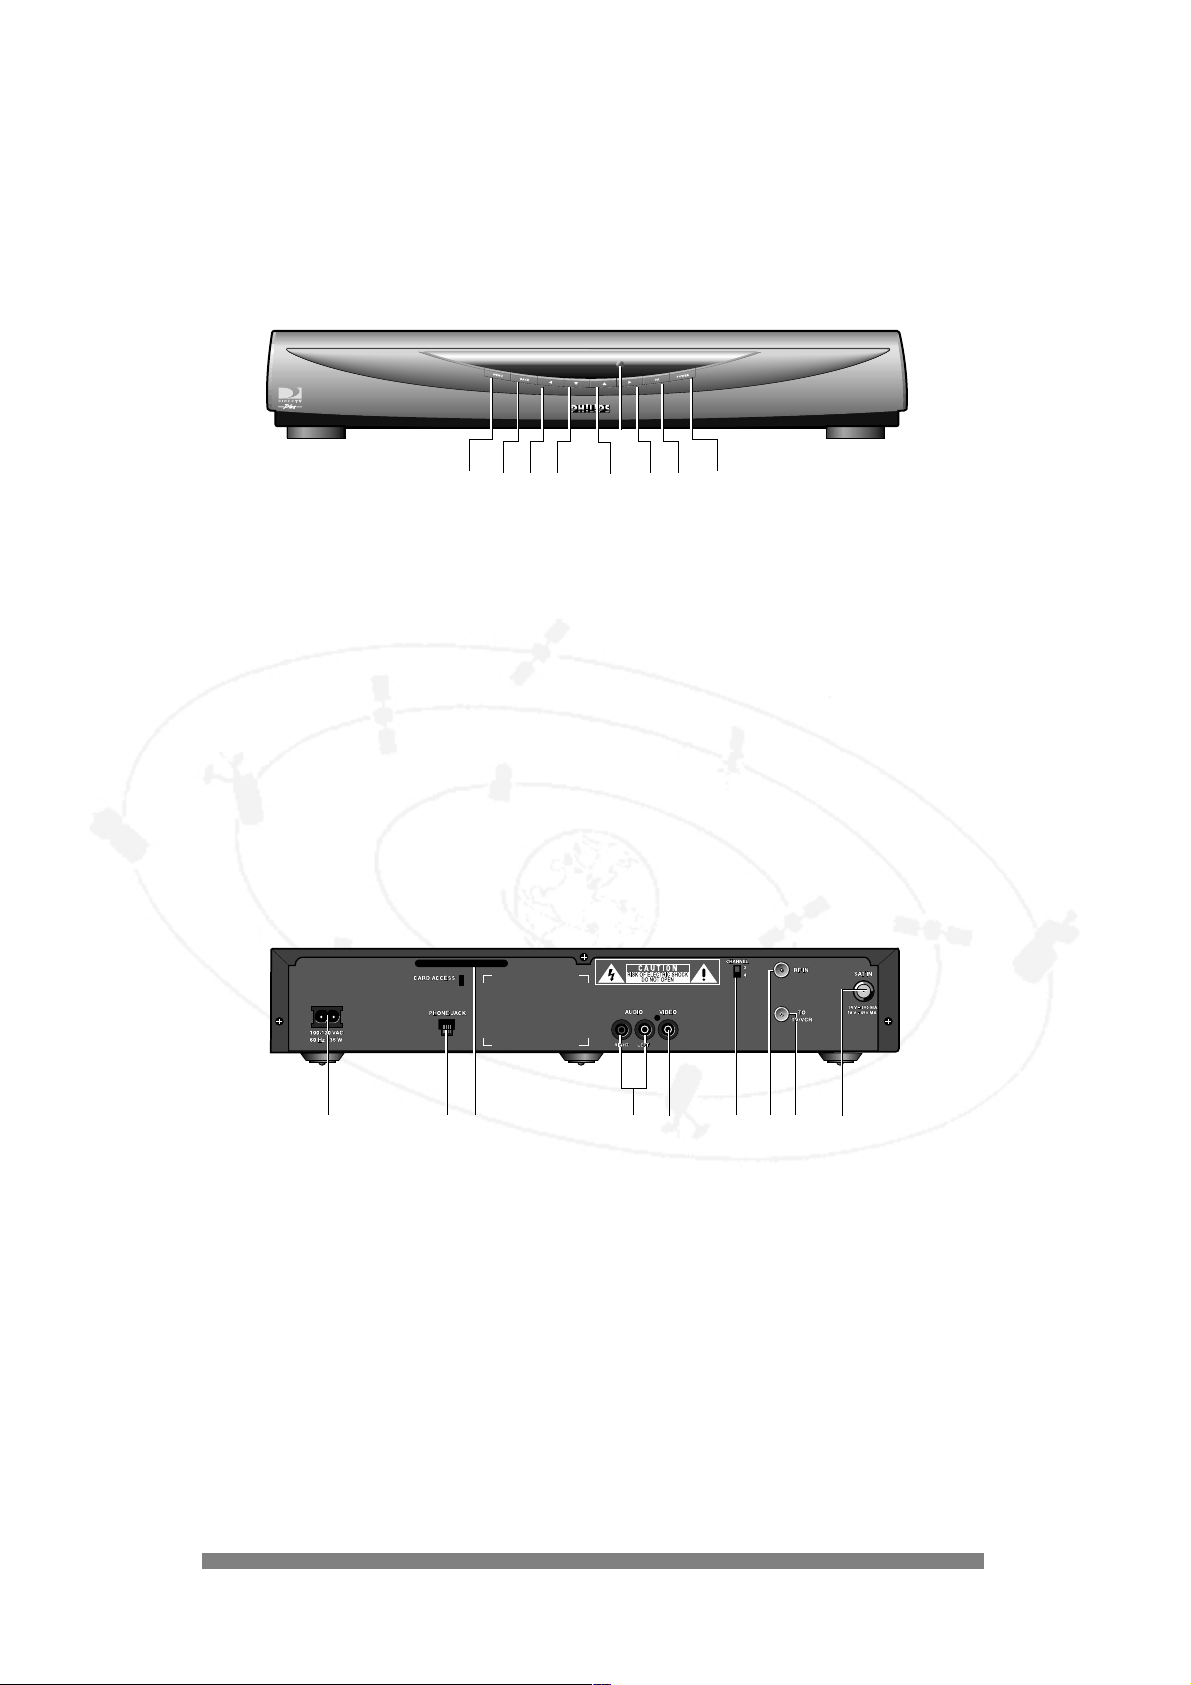
Front View
1. Menu button
2. Back button
3. 1 button
4. 4 button
5. 3 button
6. Power indicator
7. 2 button
8. OK button
9. Power button
These functions are also available on the remote control and are described in that section.The Standby/IR indicator
lights when yous system is active.The light is off when the unit is in Standby mode.
Rear View
1. 100-120 V - 60 Hz AC power input
2. Telephone jack
3. Card Access slot
4. Left/right Audio output for HIFI
5. Output for TV or VCR
6. Channel switch
7. RF input for TV or VCR
8. RF output for TV or VCR
9. Satellite antenna input
1
5
3
78
4
9
6
2
Multimedia Terminal
1234
6
7
5
89
3
3
Page 11
7
1. INFO
Guide mode: pressing INFO toggles between
short and long program information in the banner.
Menu mode: inactive.
TV mode: toggles between short and extended
banners.
2. FAVORITES
Guide mode: toggles display of Favorite channel
list.
Menu mode: inactive.
TV mode: toggles display of the Favorites dialog.
3. PAGE+/-
Guide mode: displays the contents of the next or
previous Guide screen.
Menu mode: used with long lists of options such
as favorite channels, system information, PPV, and
system test to scroll a full page of selection items.
TV mode: lets you view the program banner of
other channels while still viewing the video in from
the current channel.
4. GUIDE
Guide mode: toggles display of the Guide.
Menu mode: inactive.
TV mode: displays the Guide.
5.
11 22 33 44
Guide mode: navigates through the Guide.
Menu mode:
33 44
select and highlight menu
options and move between items on a screen.
11 22
change settings in an item on the screen.
TV mode:
11 22
inactive.
33 44
for channel surfing.
6. VOL +/All modes: increases and decreases volume (Philips
TV sets only).
7. MUTE
All modes: toggles audio on and off (Philips TV sets
only).
8. 0-9
Guide mode: goes to channel entered in Guide.
Menu mode: lets you enter numeric values.
TV mode: allows direct number entry for tuning to
a channel.Tuning occurs immediately after the
channel is entered, or you can press OK after
entering the third digit to tune immediately to the
channel.
9. TV/SAT
All modes: switches to local cable or antenna
broadcasts.
10. POWER
All modes: toggles the satellite receiver between
active and standby modes but does NOT turn off
power to the unit.
11. THEMES
Guide mode: toggles display of themes.Themes
indicate the type of program, for example,
movie/action adventure.
Menu mode: inactive.
TV mode: displays the Themes menu.
12. MENU
Guide mode: enables selection of icons at the
bottom of the Guide. A second press redisplays the
Guide.
Menu mode: dismisses the menu from the screen
and accepts changes. Pressing MENU again exits the
menu and returns to the TV confirming any
previously set values.
TV mode: displays the main menu.
13. OK
Guide mode: confirms current programming.
Pressing OK confirms a selection in a dialog. For
future programming, tags the selection or starts the
PPV sequence.
Menu mode: confirms the selection of a menu
option or list choice.
TV mode: when browsing channels, goes to the
channel displayed in the browse banner.
14. BACK
Guide mode: returns to the previous state.
Menu mode: exits the current menu and confirms
selections in dialogs with non-exclusive options.
TV mode: inactive.
15. EXIT
In Guide and Menu modes: returns to video and
cancels the transaction.
TV mode: inactive.
16. i: reserved for future use.
17. ALT AUDIO
Guide mode: when alternate audio tracks are
available, lets you select another audio track.
Menu mode: inactive.
TV mode: displays a dialog for selecting alternate
audio tracks.
4
4
About the remote
1.
2.
3.
4.
5.
6.
7.
8.
9.
10.
11.
12.
13.
14.
15.
16.
17.
Page 12
8
Preparing your remote for use
Your remote only operates your satellite receiver. If you have a Philips TV set, the VOL +/- and MUTE buttons
operate those functions on the TV.
Before using the remote:
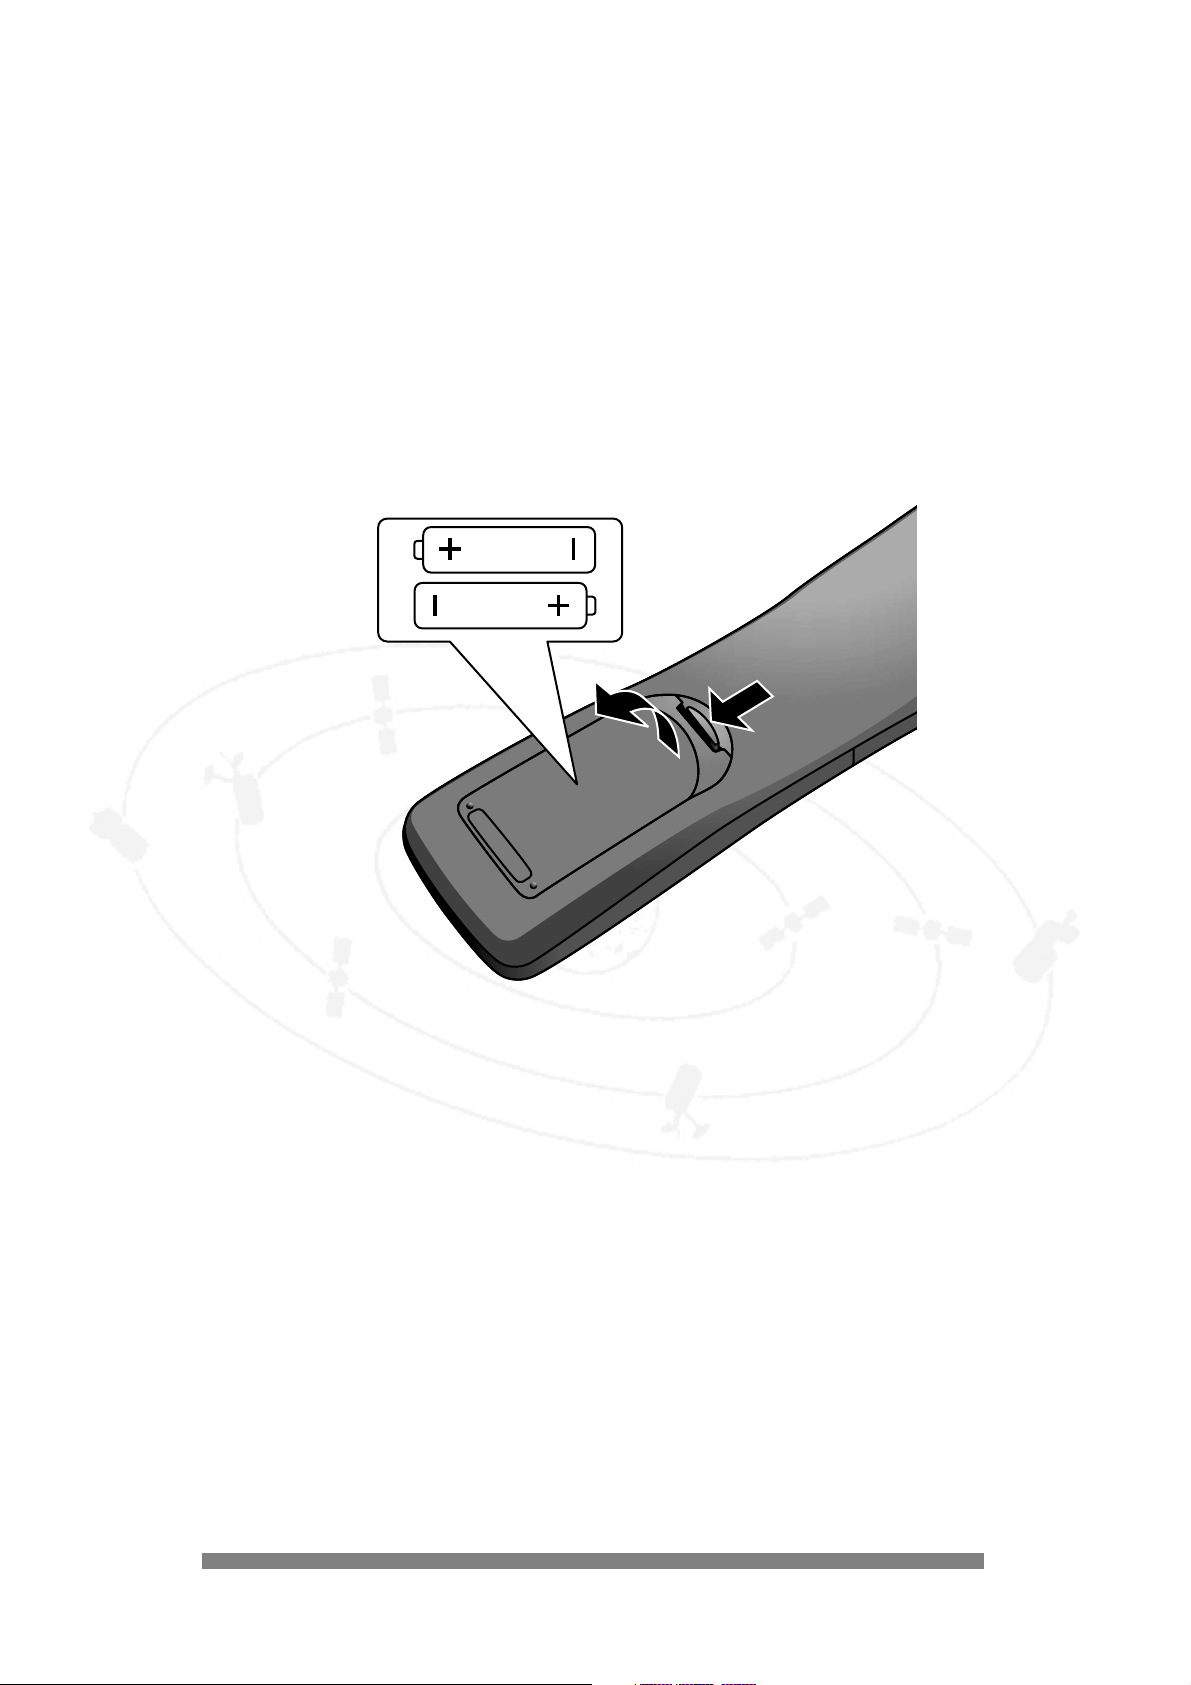
Fitting Batteries
9 Remove its battery compartment cover.
9 Insert the two batteries (type LR6/AA - 1.5 V) supplied.
9 Position them, as shown in the diagram, in the battery compartment.
9 Replace the cover.
CAUTION DO NOT MIX OLD AND NEW BATTERIES,AND NEVER MIX DIFFERENT TYPES
OF BATTERY (STANDARD,ALKALINE, AND SO ON).
The batteries supplied with your receiver’s remote do not contain heavy metals such as mercury
or nickel cadmium. Nevertheless, in many countries exhausted batteries may not be disposed of
with your household waste. Please dispose of exhausted batteries according to local regulations.
5
5
Page 13
9
Connecting to your existing equipment
Unplug all equipment from the mains before making connections.
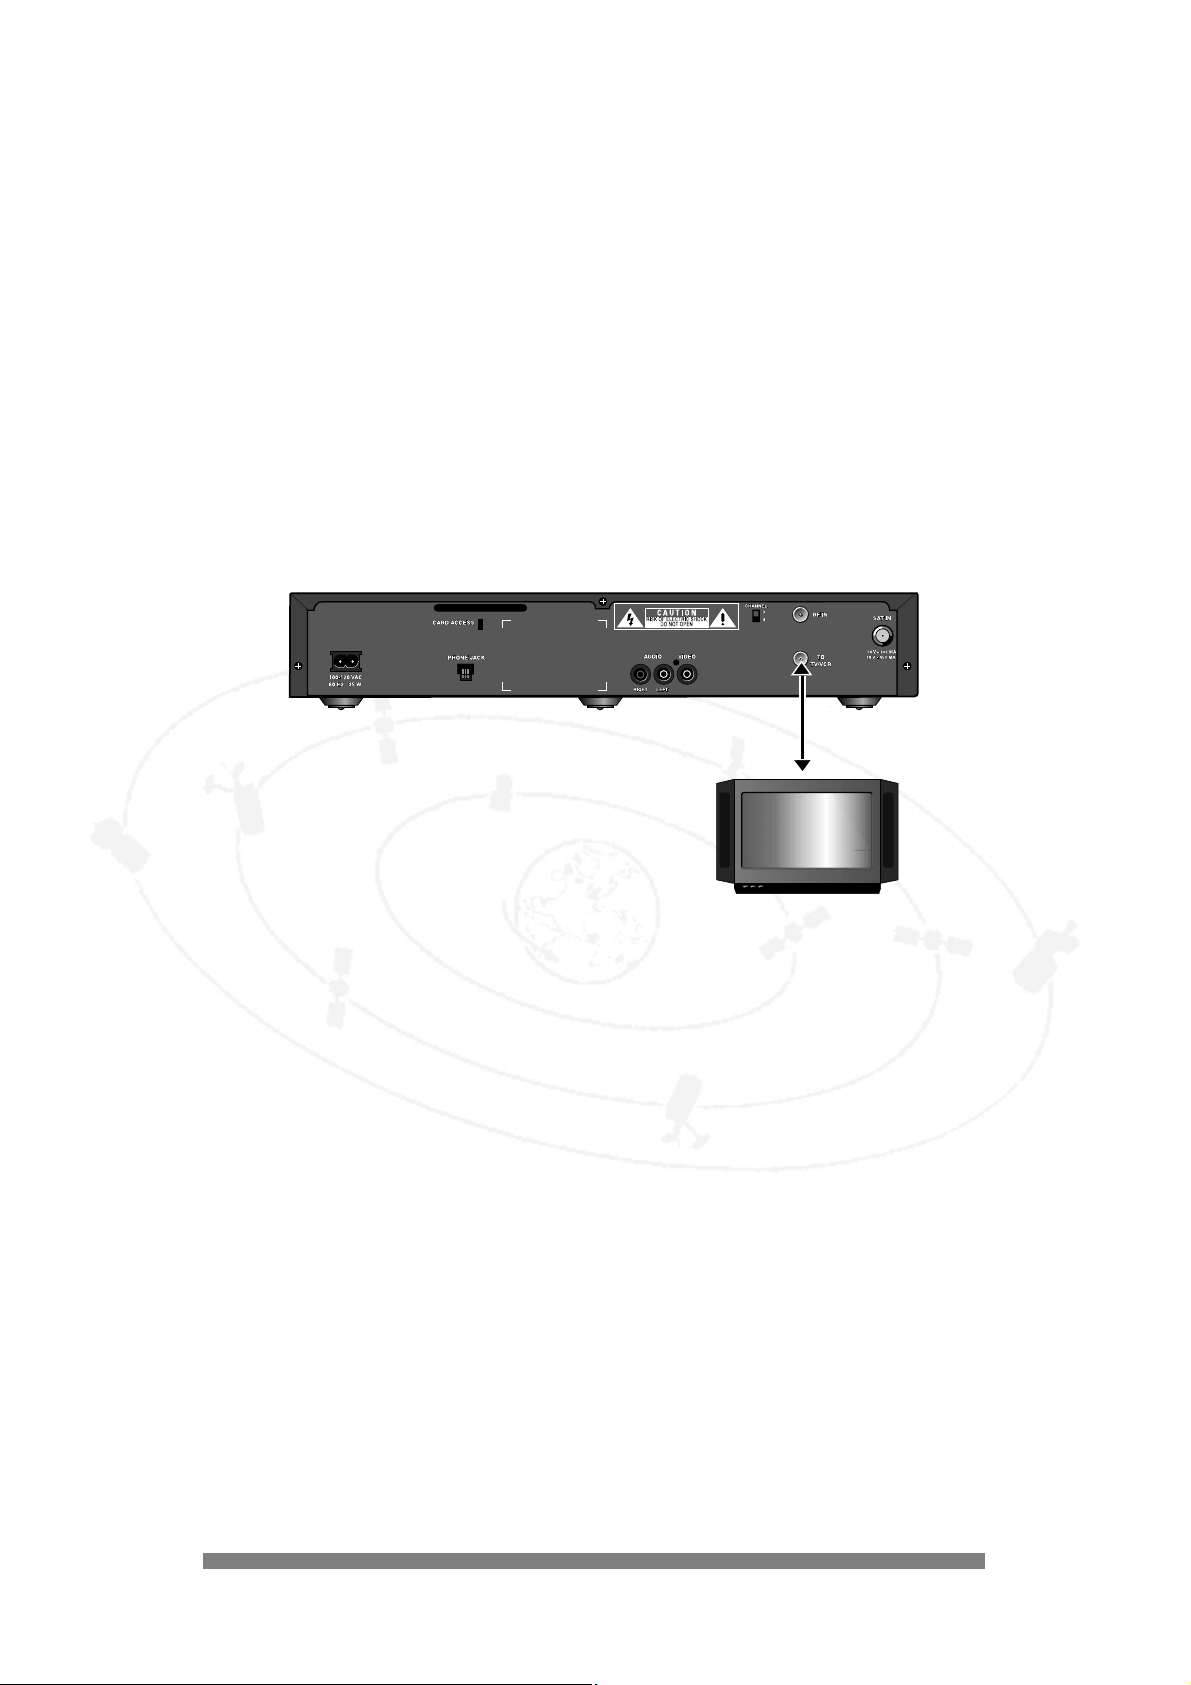
If your Television has RF Connection Only...
Refer to the illustration below:
1. Connect the satellite receiver’s ‘TO TV/VCR’ output jack to the TV’s UHF/VHF input jack.
2. Connect one end of the AC power cord to the satellite receiver’s AC IN jack. Connect the plug end to an AC
outlet.The power LED should light.
3. Connect other equipment to an AC outlet.
4. Switch on your TV first and select channel 3 on your TV. The Welcome screen should display.
5. Your satellite receiver is now ready for installation.To continue, refer to the installation section on page 17.
TV
TV
TV
Coaxial Cable
Digital Satellite Receiver (DSR)
6
6
Page 14

10
If your Television has A/V Connectors...
Refer to the illustration below:
1. Connect the satellite receiver A/V jacks to the TV’s A/V IN jacks. Alternately, you can also connect the satellite
receiver’s AUDIO jacks to your audio receiver’s AUDIO IN jacks using audio cables.
2. Connect one end of the AC power cord to the satellite receiver’s AC IN jack. Connect the plug end to an AC
outlet.
3. Connect other equipment to an AC outlet.
4. Switch on your TV first and select the appropriate A/V mode depending on the connection chosen in step 2.
Refer to the user manual of your TV set to select the proper A/V mode
(AUX/VCR, S-VIDEO, ...).The Power indicator will light and the Welcome screen will display on the TV.
5. Your satellite receiver is now ready for installation.To continue, refer to the installation section on page 17.
TV
TV
TV
Digital Satellite Receiver (DSR)
A/V Cable
Page 15

11
If you have a TV and a VCR...
Refer to the illustration below:
1 Connect the satellite receiver A/V jacks to the TV’s A/V IN jacks. Alternately, you can connect the satellite
receiver’s AUDIO jacks to your audio receiver’s AUDIO IN jacks using audio cables.
Note: If both TV and VCR have A/V jacks, connect additionally the VCR’s A/V OUT jacks to the TV’s
A/V IN jacks to achieve good picture quality at VCR playback.
Note: If your TV has RF input only, connections made in steps 3 and 4 will bring signals to the TV.
2. Connect the VCR’s VHF/UHF OUT jack to the TV’s UHF/VHF IN jack.
3. Connect the satellite receiver’s ‘TO TV/VR’ output jack to the VCR’s UHF/VHF IN jack.
4. Connect one end of the AC power cord to the satellite receiver’s AC IN jack. Connect the plug end to an AC
outlet.
5. Connect other equipment to an AC outlet.
6. Switch on your TV first and select the appropriate channel or A/V mode depending on the connection chosen in
step 2. Refer to the user manuals for your TV and VCR to select proper channel or A/V mode (AUX/VCR, SVIDEO, ...). The Power indicator will light and the Welcome screen will display on the TV.
7. Your satellite receiver is now ready for installation.To continue, refer to the installation section on page 17.
TV
TV
TV
VCR
Digital Satellite Receiver (DSR)
A/V Cable
A/V Cable
Coaxial
Page 16

12
Inserting your Access Card
The access card provided with your system includes information about your purchase authorization and other data.
To watch channels, your viewing access card needs to be inserted in the access card slot on the rear of your satellite
receiver.
When the card is removed, the system will not display any programming guides or video signal.The message,“Please
insert your Access Card” displays.
The access card only needs to be inserted during system setup and generally does not need to be removed. Each
access card has a unique number. Be sure to record this number in the space provided on the back cover of this
manual.
9 Hold the card with the arrow facing upwards and pointing toward the slot in the satellite receiver rear panel.
9 Gently push the card into the slot until it meets the stop.
9 Keep your access card permanently inserted in your satellite receiver.
CAUTION YOUR ACCESS CARD IS FRAGILE.
ALWAYS INSERT CORRECTLY AND CAREFULLY.
DO NOT BEND.
DO NOT REMOVE AND RE-INSERT UNNECESSARILY.
NEVER SUBMERGE IN LIQUID OR APPLY CLEANING FLUIDS.
Replacing the Access Card
When replacing the access card, the system will prompt you with instructions. Gently remove the card from its slot. If
you have to reinsert the card, you should have the ARROW facing forward into the box and the GOLD CHIP facing
down. Push the card into the slot as far as it will go, the end will be visible outside of the slot.
The old card passes information to the new card, and then the old card no longer functions.
Refer to the illustration below:
7
7
Page 17

13
Installation
Switching Your Receiver On and Off
With your satellite receiver connected to the AC outlet, press the front panel POWER button to power
it on.
9 Press the POWER button on your remote to wake up your satellite receiver.
9 Press the POWER button on your remote again to put your satellite receiver into standby.
There is no need to turn off power to the satellite receiver.
When you install a new system, you can skip the installation
procedure if all the defaults listed on page 28 apply.When the Welcome
screen displays, press the 4 button and OK.
If you need to change any settings, you can use the Installation Wizard to
guide you through the setup process which includes entering your zip
code, selecting the dish configuration, pointing the dish, and testing the
system.A series of screens will be displayed and you will be prompted
with onscreen instructions. Once you have entered all the requested
information, a System Test screen displays.When this screen is dismissed, the satellite receiver will be enabled. Be sure
you have contacted DIRECTV and arranged for service.
For installing your satellite dish and making connections, refer to the installation manual for the satellite dish.
After the initial installation, you may want to access the installation features, for example, if you have moved the dish.
The following sections describe the options on the Installation menu.
To access the installation menu:
1. Press MENU on the remote.
2. On the main menu, choose Installation.
Enter Zip Code
Use this function when setting up the satellite antenna to help position it correctly.
To enter the zip code:
1. Press MENU on the remote.
2. Choose Installation/Enter Zip Code.
3. Enter the zip code using the numeric buttons on the remote.
Or
4. Use the 3 and 4 buttons to increment the number in the zip code field. Press the 2 button to move to the next
field.When all the digits have been entered, press OK to return to the installation menu.
8
8
Page 18

14
Dish Configuration
Use this function when setting up the satellite antenna to identify the type of dish in use.
To enter the dish configuration:
1. Press MENU on the remote.
2. Choose Installation/Dish Configuration.
3. Use the 3 and 4 buttons to highlight the dish you have.
4. Press OK to return to the Installation menu.
Point Dish
Use this function while manually pointing the dish to determine that it is correctly aligned with the satellite(s). Refer
to the satellite dish installation manual for instructions.You may want to have a helper to read the onscreen displays
during this procedure. Signal strength readings change approximately two seconds after the adjustment is made. Note
that single dish installations often show higher signal strength than installations which receive signals from two or
three satellites.The onscreen display will tell you how to align your dish for latitude, longitude, azimuth, and rotation
based on your zip code.
To point a round dish:
1. Press MENU on the remote.
2. Choose Installation/Point Dish.
3. A dialog displays showing a signal strength meter.
4. Use the 1 or 2 buttons to change the transponder for the selected satellite.
5. Adjust the dish until the signal strength meter stabilizes at a maximum reading.The range is 0 to 100.
6. Press BACK to return to the Installation menu.
To point an oval dish:
1. Press MENU on the remote.
2. Choose Installation/Point Dish.
3. A dialog displays showing two (or three) signal strength meters, depending on the type of dish you selected in
the Dish Configuration dialog.
4. Use the 3 or 4 arrow buttons to select a satellite.
5. Use the 1 or 2 buttons to change the transponder for the selected satellite.
6. Adjust the dish until the signal strength meters stabilize at a maximum reading.The range is 0 to 100.
7. Press BACK to return to the Installation menu.
System Test
The system test display shows you the results of system tests.
This information is useful if you need to contact customer
service.
To view the system test results:
1. Press MENU on the remote.
2. Choose Installation/System Test.
3. Use the up or down arrow buttons to scroll through the
dialog.
Press the Page +/- buttons to scroll by a full page.
4. Press BACK to return to the Installation menu.
Page 19

15
Operation
Throughout this manual, you will notice that the everyday operation of your satellite receiver is based on a series of
user friendly onscreen displays and menus.These displays will help you get the most from your satellite receiver,
guiding you through initial installation, channel selection, timer settings and many other functions.
Most functions can be carried out using the buttons on the front of your satellite receiver or the remote, however
we suggest that you will find it easier to use your remote in most instances.
About the banner
You can display a program banner by pressing the INFO button on the remote when in TV mode.The banner can
also display notices, help text, icons, and details about the selected program.
Zap Banner
While you’re viewing a program, pressing the INFO button on remote displays the “Zap” (short) banner. Pressing Info
again displays the long banner.The banner displays for the time you set in Menu mode. To dismiss the banner before
the display duration has expired, press EXIT.
Short banner
Long banner
9
9
10
10
Price (If PPV)
Channel
logo, Mail,
or Program
Notification
icon
Program
name
Program
start and
end time
Program
long
description
Rating
Channel
number
Program
theme and
subtheme
Long program
description available
Closed captioning
Alternate audio
language track
Favorites (if on)
Themes
(if on)
Current Time
System locked
Pay per view
Copy/record
protection
Page 20

16
Browse Banner
While watching a program, you can
view information about other programs using the
Browse Banner feature. Press the PAGE+/- buttons
to cycle through channels.As you select a channel,
the short banner for the program is displayed.
Long program information is not available in the
Browse banner.
To dismiss the banner, press EXIT to return to the same channel, or OK to tune to the browsed to channel.
When FAVORITES or THEMES are selected, the zap and browse banners show only information about programs
from the favorites and/or themes lists.
Song ID Displays
When you select a channel that contains audio
only, information about the currently playing music selection is displayed
for each new song. Pressing INFO redisplays the song information and the
zap banner.
Notification Displays
Notifications that a tagged program (see page 26)
is about to begin and the arrival of new mail are displayed in the logo
space.
Notifications are displayed in the order in which they are received. After
10 seconds, the next notification displays.
Tagged program notification icon displays three minutes before a tagged program
is about to start. Press OK to tune to the channel.
The mail icon appears if you have received new mail.
Logo space
Page 21

17
Using the DIRECTV
®
Programming
Guide
The DIRECTV® Programming Guide offers complete TV listings and access to much more.The Guide lists programs
according to their time slot and channel.With it, you can tune to a program, be notified when a program is about to
start, order pay per view programs, search through listings by the type of program you’re looking for, and tag
programs for future viewing.You can also access the menu, other guides, a tag list, and online help from the Guide.
The channel scroll elevator shows the relative location and amount of channels in the display relative to the
number of total channels in selected FAV/THEMES lists. It also implies the amount of total pages accessible by
pressing the PAGE+/- buttons.
The channel list shows the channels available based on FAVS/THEMES/SUBTHEMES currently selected.
Arrows indicate that the program extends beyond the time slot shown.
The Tag mark indicates that the program has been selected for future viewing. If a program is tagged, the tag will
always display in the Guide cell. The system will notify you before the program starts so that you can tune to it.
The Program list shows all the programs airing in a time slot. If program names are too long to fit into a guide cell,
they may be truncated or not displayed at all. However, when a program is selected, its full name appears in the
banner.
What’s in the Guide
The Guide shows the programming available for a 1 1/2 hour period. Programs you can tune to are determined by
settings you make in Menu mode. For example, if you set maturity rating at PG-13, you will not be able to tune to
programs with higher maturity ratings such as R without first entering an access code if you have locked the system
(see page 31).
The Guide also displays network channel information in the banner.When you are displaying programming for the
current time and press the 1 button, the highlight shifts to the channel list and displays the selected channel’s
information in the banner. Long channel information is available when you press INFO.To redisplay program
information, press the 2 button.
11
11
Time
Selected
date
Channel
list
Channel
scroll
elevator
Selected
program
Short
banner
Program list
Tag mark
Arrows
Help
Menu Taglist Go to Date Other Guides
Page 22

18
Using the Guide
To do this.... Do this....
Display the Guide Press the GUIDE button on the remote.
Scroll through the program list Press the 3 and 4 buttons. Press a button continuously to
scroll faster.You can use the PAGE+/- buttons to scroll by a
full page.
Tune to a current program Use the 3 and 4 buttons to scroll through the list of current
programs, then press OK.
Or
Enter the channel’s number on the remote control’s numeric
pad and press OK.
Scroll to another time slot Press the 1 and 2 buttons. Press a button continuously to
scroll faster.When you go into past programming, channel
information displays in the banner.
Choose a program to view Press the arrow buttons until the program you want to view is
highlighted in the Guide. If the program is in the current time
slot, pressing OK tunes to the selected channel and displays
the zap banner for the program.
If the selected program is PPV, the PPV dialog displays.
If the program is in a future time slot, the Tag dialog displays
so you can add the program to your viewing schedule. If it is
already tagged, the Untag dialog displays.
View the “long” information banner You can toggle between the display of short and long
program and channel information by pressing the INFO
button on the remote.
Display Favorites Press FAVORITES on the remote.The Favorites dialog
displays allowing you to select a personalized channel list.
When the dialog is dismissed, the Favorites icon displays at
the top of the banner and the Guide contains listings of
channels that belong to the selected Favorites list.
FAVORITES lists are set up in Menu mode. Refer to p. 25.
Display Themes Press the THEMES button on the remote.The Themes
dialog displays letting you select from program themes and
sub-themes.When the dialog is dismissed, the Themes icon
displays at the top of the banner and the Guide lists
programs for the selected theme. Refer to p. 25.
Purchase a PPV program When you select a PPV program, a $ displays in the banner,
indicating that it is PPV.When you press OK, the PPV
dialogs display and prompt you through the purchase
procedure. If it is a future program, it is tagged. Refer to p. 24.
Page 23

19
Lock the satellite receiver In Menu mode, you can lock the satellite receiver to prevent
unauthorized viewing.When locked, a lock icon displays in
the banner. When you try to tune to a locked item (channel,
exceeds maturity rating threshold or PPV), a dialog displays.
It prompts you to enter the four-digit access code as
described below.The satellite receiver then tunes to the
channel and the banner displays the unlock icon for the rest
of the viewing session.The system remains unlocked until it
enters standby mode.
To enter the password:
Press the numeric buttons on the remote or use the 1 and 2
buttons to highlight a field in the password, then use the
3 and 4 buttons to choose the number. Press the 1 or 2
button to move to the next field.When all the numbers have
been entered, press OK.
Tag a program for future viewing You can set up your viewing schedule ahead of time, so that
you will be automatically notified of the shows you want to
see.This is called “tagging”. On the Guide, tagged programs
have a checkmark to the right of the program name.You can
tag up to 25 programs.
When a program has been tagged for future viewing, the
notification banner displays 3 minutes before the program
starts. Press OK to tune to the channel.
You can still purchase future PPV programs after 25, but you
will not receive a tag notice.
To tag a non-PPV program:
1. Highlight a future program to tag and press OK. In the Tag for
Notification dialog, choose whether you want to tag this
program once, daily, weekly, or Monday-Friday. Remember, you
are actually tagging the time slot, so if the program moves to a
different time slot, you will want to retag it.
2. Press OK on the Tag for Notification dialog. If the program is in
the same time slot as another tagged program, the system will
prompt you that a conflict exists.
To tag a PPV program:
1. Highlight a future program to tag.
The PPV dialog displays.When you have completed the
purchase, the program will be tagged.
Untagging a tagged program To untag a program:
1. Highlight the program and press OK.
2. In the dialog, choose Once if you want to untag a program for
one time slot only, or Always if a program has been tagged more
than once, for example, a program that airs every day.
3. Press OK.
Page 24

20
Pay Per View (PPV)
Pay per view programs include special programming, movies, and sporting programs and are indicated by a “$” in the
banner. In the Guide, you can preview most currently airing pay per view programs, purchase current and future PPV
programs, and cancel a purchase. In Menu mode, you can view the purchase history, cancel purchases, and restrict this
feature by setting rating and spending limits.
Some PPV programs cannot be taped.This is indicated by the recording restriction icon at the lower right
corner of the banner.
To preview a PPV program occurring up to 30 minutes into the program:
1. Highlight the currently airing program in the Guide and also while zapping.
2. If a preview exists, it will automatically be tuned to when you press OK or zap to it.
3. You can purchase the program by pressing OK at any time during the preview. At the end of the preview, a dialog
displays containing alternate start times (if available) and pricing. If you decide to purchase the program, further
dialogs display to guide you through the purchase.
To purchase a PPV program:
1. Highlight the program in the Guide and press OK.
2. In the purchase dialog, choose “Buy Now” and press OK.
3. If alternate start times or pricing are available, a dialog displays in which you can choose the start time. Press the
1 and 2 buttons to select alternate start times.
4. Press the 3 and 4 buttons to move to the next selectable item (if available), then press the 1 and 2 buttons to
select an option.
If you select a program start time that conflicts with a tagged program, you will be notified to the conflict.
5. Press OK to confirm the selections and remove the dialog.
6. If you have locked your satellite receiver and have not entered your access code during this session, the access
code dialog displays and prompts you to enter your access code. Enter the access code and press OK.
If you purchased a future PPV program, the program will have a checkmark next to it in the Guide.
Page 25

21
Favorite Channels
In Menu mode (see page 28), you can add your favorite channels to a list so that only channels with
programming that interests you appear on the Guide when the list is selected.When Favorites is selected, the
Favorites icon displays on the top line of the banner and programs displayed in the Guide are only those in the
selected list.When zapping, you are limited to channels in the favorites list; however, you can access any channel by
entering its number from the remote.
To display favorite channels:
1. Press FAVORITES on the remote.
A dialog displays in which you can select a favorites list.
2. Press the 3 and 4 buttons to highlight the desired list and
press OK.A checkmark displays to the right of the selected list.
3. The Guide displays only programs from your favorite channel list.
You will only be able to zap to channels on the list.
Themes
Choosing Themes causes the Guide to
highlight the programs whose themes match your choices.When zapping, you will
go only to channels containing programs that have the selected themes (smart
surf).You can choose any or all of the themes and sub-themes.When themes are
selected, the Themes icon displays on the top line of the banner.
To select Themes:
1. Press THEMES on the remote.
The Themes dialog displays.
2. Press the 3 and 4 buttons to highlight the desired theme.Themes which
have sub-themes are indicated by an arrow to the right of the theme.To view
the sub-themes, press the 2 button.
3. Press OK to toggle selection of the highlighted theme.
4. Press BACK.
Alternate Audio
Many programs are broadcast with alternate audio tracks. When alternate audio is available, the
alternate audio icon displays on the top line of the banner.
To change audio tracks (when available):
1. Press the Alt Audio button on the remote.
2. A dialog displays the languages available for the selected program. In the
dialog, use the 3 and 4 buttons to highlight the language you want and press
OK.
12
12
13
13
14
14
Page 26

22
Options menu
The bottom of the Guide screen contains five icons which you can access by pressing the MENU button on the
remote when the Guide is displayed. Use the 1 and 2 buttons to highlight an icon and press OK to view its dialog
box.
Other Guides
Selecting Other Guides displays a dialog in which you can
choose a type of guide to view. Use the
3 and 4 buttons to scroll through the list. Use the PAGE+/buttons to scroll to the next page. Press OK to select and
display the highlighted guide.You can view and tag programs
contained in any guide.
Go to Date
Selecting the Go to Date option lets you look at a list of
programs for another day in the week. Use the 3 and 4
buttons to move to the day of interest, then press OK.The
programming information available is limited to the master and
extended program guides.When you press OK, the Guide
displays programming information for the same 1.5 hour block
of time displayed before you selected Go to Date, but for the
day you selected.
Taglist
Selecting Taglist displays the list of your tagged programs, both
free and PPV. Use the 3 and 4 buttons to move through the
list, or the PAGE+/- buttons to scroll by a full page.You can
untag any program in the list.To untag a program, highlight it
and press OK. Press BACK to return to the Guide.When you
return to the Guide, any items untagged in the taglist will be
unchecked in the Guide.
15
15
Page 27

23
Menu
Selecting Menu takes you to the menu module, in which is
described in detail in the next section.
Help
Selecting Help opens a window in which high-level help
information displays.You can scroll through the help information
using the 3 and 4 or PAGE+/- buttons. Context sensitive help
is often available in the banner.
Page 28

24
Using menu mode
Messages
The satellite receiver may occasionally display messages which overlay the Guide.To dismiss a message, press OK.
Software Upgrade Message
When DIRECTV schedules or transmits a software upgrade, you will be notified by an onscreen message. Once a software
upgrade is complete, your satellite receiver is ready to use. Old software cannot be restored.
Using Menu Mode
The Menu mode lets you customize the features of your satellite receiver. Categories include General Settings, Access
Control, Preferred Language, Purchases, Installation, Upgrades and Mail.
In Menu mode, the following buttons on the remote are inactive: FAVORITES,THEMES, GUIDE, and ALT AUDIO.
To access the main menu from the Guide:
1. Press the MENU button on the remote.
2. Press OK.
To access the main menu from the TV:
1. Press the MENU button on the remote.
To dismiss the menu:
Press the MENU button on the remote control.This removes
the menu from the screen and accepts all the changes you have
made.
To return to your program and cancel a transaction:
Press EXIT.
Navigating in Menu Mode
To navigate through the menus, use the 3 and 4 buttons to highlight an option.Then press OK to confirm the
selection and display a sub-menu or dialog. Selecting items on a sub-menu displays a dialog in which you can change
settings or review parameters. To navigate within a dialog, press the 3 and 4 buttons. To accept changes and return
to a sub-menu, press OK. If the dialog contained non-exclusive choices, press OK and BACK.
Menu mode defaults
Menu mode has the following defaults:
Screen Format: Full screen (4:3)
Banner Duration: 5 seconds
Favorites Names: Maximum 4 lists. List 1, List 2, List 3, List 4.Ten characters per list name
Favorites Channels: All channels selected for each list
Channel Lock: None
Maturity Rating: R
Per-Purchase Limit: $10.00
Password: 0000
Password Mode: Unlocked
Menu & Guide Language: English
Audio Track Language: English
Dish Configuration*: Single
The following sections tell you how to change these settings.
*Described in the Installation section (see page 17).
16
16
Page 29

25
General settings
The General Settings option on the main menu let you change the screen format, change the banner duration, and set
the favorite channels list.To change general settings, navigate to the General Settings option on the main menu and
press OK. In the menus that display, use the 3 and 4 buttons to highlight your selection, then press OK to confirm
the selection. Press BACK to return to the main menu.
Screen Format
Screen format defines the width/height ratio of the picture. Options are wide (16:9) or full screen (4:3). Because
programs are transmitted in a variety of formats, your screen format settings will affect position of the picture on
your TV. The effects of these settings are shown below.
A: images appears as broadcasted
B: black bars are added to the left and right of the images, or the image is stretched (dependent on your TV set)
C: image is truncated at the left and right
D: image appears as broadcasted
Banner Duration
Banner durations defines how long the program information banner remains on the screen after you tune to a
program. Options are 5, 10, 15, or 20 seconds.
Broadcast format
User-selected format
Wide (16:9)
Full screen (4:3)
16:9 4:3
16
16
16
16
99
9
9
4
444
3
333
AB
CD
image image
image
image
image
image
17
17
18
18
19
19
Page 30

26
Favorite Channel
You can save up to four different favorite channel lists.This way, members of a household can each set their own
favorite channels.
To edit a Favorites List Name:
1. Navigate to the Favorite Channel menu.
2. Choose Change Name.
3. Use the 3 and 4 buttons to move to the list whose name you want to edit. Press OK. The Edit Name dialog
displays.
4. Use the 3 and 4 buttons to scroll through the alphabet.When the letter you want displays, press
the 1 or 2 to confirm the selection and move to the next character in the name.
5. Press OK to confirm the edited name.
6. Press BACK to return to the previous menu.
To change the contents of a Favorites List:
1. Navigate to the Favorite Channel menu.
2. Choose Change List and select the list you want to change.
3. Press OK.The Change Name submenu displays.
4. Use the 3 and 4 buttons to choose Manual, Select All, or Deselect All.
Manual Select shows a list of all available channels.A checkmark is displayed next to channels on your favorites list.
You can toggle the checkmark by highlighting the channel and pressing OK.
Select All selects all channels in the list.You can then manually deselect any channel.
Deselect All deselects all the channels in the list.You can then manually select any channel.
Use the 3 and 4 buttons to navigate through the list, or use the PAGE +/- buttons to scroll the list up or down by a
complete page.
You can also move to a channel by entering its number using the numeric buttons on the remote control.The
channels list automatically scrolls to the channel whose number you entered.
Press OK to toggle the check marks on the channel. Press BACK to confirm the selection(s).
20
20
Page 31

27
Access Control
With Access Control, you can lock or unlock
the system, change the access code, lock channels, set purchase
limits, set maturity ratings, and replace the access
card (access card) when requested by DIRECTV.
To set access control options, navigate to the Access Control
option on the main menu and press OK. In the menu that
displays, use the 3 and 4 buttons to highlight your selection,
then press OK to confirm the selection. Press BACK to return
to the main menu.
Access to all of these functions can be restricted by an access code. If the access code mode was previously set to
locked (details below) a lock icon displays in the banner.
You can view settings including Channel Lock, Purchase Limit, and Maturity Rating without unlocking your system.
However, you must unlock it to change any of these settings. Unlocking the system (if locked) requires knowledge of
the correct access code.
Lock/Unlock the System
Your satellite receiver can be locked or unlocked.
When it is locked, the system will prompt you to enter
the password whenever you want to change settings in
the following: lock channels, change maturity levels,
change purchase limits, change the password, or replace
the access card.
A locked system is indicated by the lock icon in the
banner. To unlock the system, enter the password as
described below.
To lock or unlock the system:
Choose Lock/Unlock the System from the Access Control menu.
When the system prompts you for an password, enter it using the numeric buttons on the remote control.After the
last digit is correctly entered, the password is automatically validated.
Change Password
The password is four digits.You can change it at any time. Be sure to write it down in case you forget it.
To change your password:
1. Be sure you have unlocked the system using the steps above.
2. Choose Change Password from the Access Control menu and press OK.
3. Enter the current password using the numeric buttons on the remote or by using the 1 and 2 buttons to move
from one field to another. Use the 3 and 4 buttons to scroll password numbers. Press OK.
4. Enter the new password.
You will be prompted to enter it again to verify it. Press OK. Press BACK to return to the previous menu.
21
21
Page 32

28
Channel Lock
Locking channels prevents a viewer from accessing the channels by requiring that the password be entered first.You
must lock the system to enforce these settings. Locked channels are indicated by the lock icon to their right. Use the
3 and 4 buttons to choose Manual Lock, Lock All, or Unlock All.
Manual lock lets you lock individual channels.When you choose this option, a list of all available channels displays. A
lock icon to the right of the channel name indicates that it is locked. Use the 3 and 4 buttons to navigate to a
channel. Use the PAGE +/- buttons to scroll by a full page. Press BACK to confirm the selections and go the previous
menu.
Lock All lets you lock all channels. Use the 3 and 4 buttons to highlight either Yes or No, then press OK to confirm
the selection and go the previous menu.
Unlock All lets you unlock all channels. Use the 3 and 4 buttons to highlight either Yes or No, then press OK to
confirm the selection and go the previous menu.
Press BACK to return to the previous menu.
Set Purchase Limit
You can set a price limit on pay per view programs up to $655.35.This limit is per program; it is not a cumulative
limit.
To set the Purchase Limit:
1. Choose Purchase Limit from the Access Control menu and press OK.
A dialog displays the current purchase limit.
2. Enter the purchase limit using the numeric buttons on the remote. Or, use the 1 and 2 buttons to move from
digit to another, then use the 3 and 4 buttons to scroll the numeric entry for each digit.
3. Press OK to confirm the selection.
Maturity Rating
Maturity ratings help you determine a program’s content, similar to the way films are rated. For example, a rating of
“G” is a program suitable for general audiences, while a rating of “R” might be suitable for adult only viewing.When
you lock a particular rating, all ratings exceeding the locked rating are automatically locked as well. For example, if
you lock “NC-17”, “R” will be automatically locked. Locked programs are displayed in the Guide and the Lock icon is
displayed in the banner.To view a locked program, you must first enter an access code.You must lock the system to
enforce these settings.
To set the Maturity Rating:
1. Choose Maturity Rating from the Access Control menu and press OK.
A ratings list displays.A lock icon to the right of the rating indicates that it is locked.
2. Use the 3 and 4 buttons to navigate to a rating.
3. Press OK to confirm the selection.
Page 33

29
Replace the Access Card
Your service provider may periodically send you a new access card.You will need to use this card in place of the
current card.
To replace the Access Card:
1. Choose Replace Access card from the Access Control menu and press OK. Be sure the current access card is
inserted in the satellite receiver.
The system prompts “Copying OLD access card information....”
2. When the system prompts you, remove the old card, insert the new card and press OK.
Data from the old card will be copied to the new card and the system will prompt you when the procedure is
complete.
3. Press OK to return to the previous menu.
4. Discard the old card, it no longer works.
Preferred language
Many programs are broadcast with program guide information and audio tracks in different languages.You can choose
the language you prefer for the Menu and Guide and for the audio track.
Note: Not all programs offer multiple languages. If the selected program is not available in the
preferred language, it defaults to the first listed audio track.
To choose the preferred language:
1. Choose Preferred Language from the main menu and press OK.
2. Use the 3 and 4 buttons to choose either Menu & Guide or Audio Track.
The currently selected language has a checkmark to its right.
3. Use the 3 and 4 buttons to choose the preferred language from the list.
4. Press OK.
5. If desired, repeat steps 2-4 to change the other option.
22
22
23
23
Page 34

30
Purchases
Use the Purchases dialog to view completed or pending purchases.
Completed Purchases
Completed Purchases displays a summary of your past purchases including the program and channel name, program
date, presentation start and end time, price, and whether the program was viewed or cancelled. Information for all
past purchases is stored on the access card and displayed with the most recent purchase first.
To view completed purchases:
1. Choose Purchases from the main menu and press OK.
2. Use the 3 and 4 buttons to choose Completed and press OK.
A list of completed purchases displays indicating whether they were viewed or cancelled.You can scroll through
the list using the 3 and 4 buttons or using the PAGE+/- buttons to scroll by a full page.
3. Press BACK to return to the previous menu.
Pending Purchases
The Purchases: Pending screen displays all pay per view (PPV) programs that you have purchased but have not yet
viewed.You can cancel any PPV programs which you have not yet watched or did not watch. Information displayed to
cancel a purchase includes the program and channel name, program date, presentation start and end time, price, and
rating. Information for all purchases is stored on the access card and displayed with the most recent purchase first.
Note: You cannot cancel a PPV purchase if you have already tuned to the program.
To cancel purchases:
1. Choose Purchases from the main menu and press OK.
2. Use the 3 and 4 buttons to choose Pending. Press OK.
A list of pending purchases and purchases that were ordered but not viewed displays.You can scroll through the
list using the 3 and 4 buttons or using the PAGE+/- buttons to scroll by a full page.
3. To delete a pending purchase, highlight it and press OK.The checkmark disappears from the right of the
program’s name.
4. Press BACK to return to the previous menu.All unchecked programs will be deleted from the pending purchases
list.
5. If desired, you can verify the purchase was canceled by viewing Purchases:Pending.
Upgrades
The Upgrades dialog displays
information about past and future upgrades which is helpful if
you need to report problems to a customer service
representative.The information presented is for viewing only.
To view Upgrades:
1. Press MENU on the remote.
2. Choose Upgrades from the main menu.
3. Press OK to return to the previous menu.
Page 35

31
Software Upgrade Message
When DIRECTV schedules or transmits a software upgrade, you will be notified by an onscreen message. Once a software
upgrade is complete, your satellite receiver is ready to use. Old software cannot be restored.
Your digital satellite receiver is able to receive upgrades or modifications to some of its features and functions. These
modifications will occur automatically, usually at times when the receiver would likely be turned off. If your receiver is on
when an upgrade or modification is sent, you may experience a disruption in reception for a minute or two.Your reception
should return to normal after the modification is complete.Your receiver must be plugged in to receive upgrade. Do not
unplug your receiver while an upgrade is in progress. Please consult the Upgrade Menu to find a schedule of upgrades or
modifications planned by DIRECTV.
Mail
Your service provider will periodically send you messages.When you receive new mail, the
pigeon mail icon appears at the logo space on the main menu and Guide.You can view and
delete messages. Each message includes the date and time it was sent. A maximum of 30
messages can be stored.When new messages are received, the oldest message is automatically
deleted if the maximum amount of messages is exceeded.The banner on the Mail screen
indicates how many messages you have.
To view mail:
1. Choose Mail from the main menu.
The Mail screen displays the first message.
2. Use the 3 and 4 buttons to scroll through the list of messages.
3. When a message is highlighted, press info to vieuw it.
To delete a message:
1. When a message is displayed, press OK to remove the checkmark to its right.When you press BACK, all
unchecked messages are deleted.
Page 36

32
Troubleshooting
Where to Find Help
The banner area at the top of the display provides context sensitive help text based on the menu, sub-menu, or
object you select. General help is available by highlighting the “?” icon at the bottom of the Guide screen and pressing
OK.
Error messages that display onscreen are self-explanatory.A partial list of possible error messages is included in the
table which follows.To remove an error message from the screen, press OK.
SYMPTOM 9 POSSIBLE SOLUTIONS
No picture, no sound, Power indicator does not light.
9 Receiver is not plugged into the AC outlet or is not switched on.
9 Check AC outlet connection. Press the POWER button on the front of
the receiver
9 Check connections from the satellite receiver to the TV.
Arrow buttons don’t work.
9 Make sure no objects obstruct the line of sight between the remote and
the satellite receiver.
9 The remote may need new batteries.
9 See also “Screen is frozen.”
Cannot access program.
9 Check that you are subscribing to the station to which you want to
tune. Call your program provider if you are not sure.
9 Be sure the system is not locked as indicated by the lock icon in the
banner.
Cannot order PPV program.
9 It may be too late to purchase this program. Check for other showtimes.
9 Make sure the PPV option is not locked (see p. 31).
9 Program may exceed purchase limit.
9 Your access card may be full. Call DIRECTV.
9 Telephone cable not installed or attached correctly.
Cannot cancel PPV
9 You cannot cancel PPV orders that you’ve watched or tuned to.
However, you can cancel programs you’ve ordered but haven’t watched
even if it has already aired.
Guide does not tune to the selected program.
9 Press OK to select the program you highlighted.
Cannot display favorite stations
9 You must set up your Favorites list before favorite channels will display
(see p. 30).
Locks not working
9 Check that the system is locked (see p. 31).
Cannot access lock screens
9 The system must be unlocked before you can make changes to the
access control lock settings (see p. 31).
Cannot lock or unlock the system.
9 Make sure you enter the correct password. If you’ve lost or forgotten
your password, call DIRECTV.
24
24
Page 37

33
SYMPTOM 9 POSSIBLE SOLUTIONS
No picture.
9 Make sure all power cords are connected.
9 Make sure the TV input is set properly.
9 Make sure the TV source is set properly on the TV. Press the TV/SAT
button on the remote.
9 Check that the receiver is on. Check that the access card is inserted
properly in the receiver (see p. 16). If you are receiving only a few
stations, call DIRECTV to have your programming activated.
9 Check the satellite antenna’s signal strength (see p. 18).To ensure a
quality picture, make sure the signal is coming directly from the receiver
and not through your VCR. Call DIRECTV for details.
9 Make sure the RG-6 cable is properly connected to the antenna’s LNB.
9 Check the cable for kinks.
Alternate audio track is not available.
9 Not all programs offer alternate audio tracks and are indicated by the I-
II symbol in the banner. Press ALT AUDIO to see a list of available
languages.
Audio track language is incorrect.
9 Check the default language settings (see p. 33).The program provider
may not make available all the languages displayed in the Language screen
accessed in the main menu.
Access card problems.
9 Check that the card is inserted properly (see p. 16). Call DIRECTV.
Remote control doesn’t work.
9 Make sure the batteries are inserted correctly (see p. 12) and are not
dead. Be sure you are within operating range of the receiver.
No sound.
9 Make sure the Mute isn’t on.
Volume too high.
9 Set TV volume to medium loudness. For Philips TV sets only, you can
adjust the volume with remote.
Screen is frozen or completely black, or Power button doesn’t work.
9 Try turning the satellite receiver power off and on again.
9 Make sure the TV and VCR are set to the correct channel.
You see a message that says a software upgrade is available.
9 Select Update Now. New software is available and will be installed on
your satellite receiver automatically. Doing so is in your best interest
because new features will be available and/or possible difficulties will be
corrected.
LNB has a short circuit.
9 Check for kinked cable.
During zapping, box does not go to the next channel.
9 When Favorites or Themes are selected, only selected channels will
display in the Guide.
Page 38

34
Glossary
A
access card A credit-card-sized plastic card that uses Access card technology to control
authorizations.
alternate audio program Alternate Audio Program lets viewers choose an alternate audio channel which may
broadcast a different language, or alternate versions of the audio program.
azimuth The angular distance from true north, along the horizon, to the satellite. It is used
during the process of setting up the left and right adjustment of the dish antenna.
Azimuth and elevation angles are displayed on a set-up screen based on a zip code
and/or latitude and longitude.
C
CAM Card Access Module.
CC When this symbol is displayed, the audio track is presented as text on the viewing
screen.This is referred to as close captioned.
channel Channels are defined in the DIRECTV system to transmit a specific sequence of
programming. Once defined, the program guide lists programs by channel, allowing a
customer to select a particular show.Valid channel numbers range from 0000 to 9999,
but not all possible channels are defined and not all defined channels transmit
programming all the time.
D
DIRECTV High-power, direct broadcast satellite system and programming, developed and
managed by DIRECTV, Inc.
E
EPG Electronic program guide.
F
favorites A selection of channels that you like.
G
guide An onscreen television program guide.When you press GUIDE on the remote, you’ll
see a list of TV programs broadcast on each channel.You can highlight a program title
for more information about a program.
I
IPPV Impulse Pay Per View - a PPV offering that can be purchased in the home directly by
the customer. This function is only available when your telephone line is connected to
the satellite receiver. Purchases are captured by the access card and forwarded to
DIRECTV at the next callback.
L
letterbox The format of a program or movie originally created for a 16 x 9 theater screen.
When a letterbox program is viewed on a 4 x 3 television screen, a black area appears
above and below the picture to preserve the aspect ratio.
lock symbol If you see a symbol of a lock, it means program can be viewed only by authorized
people.
25
25
Page 39

35
M
MPG Master program guide which lists the programming for all available channels.
P
Pay per view A program that has an associated viewing cost, and which may be purchased separately
from any package or subscription.This could include a movie, special program, sporting
program, or an adult program.
PPV Pay per view.
purchase limit The maximum dollar amount of the PPV purchase balance allowed by the access card
or purchase limit set in the menu.This limit is per-program rather than a limit on total
spending.Also referred to as “spending limit”.
R
rating limit A limit set by the customer to prevent unauthorized viewing of programs with a rating
at or above the set limit. For example, if a limit of R has been set, then programs rated
R,TV-M, NR-Mature, or NC17 cannot be viewed without first entering a access code.
rating level Standard rating levels applied to movies and other programs to help customers
determine the amount of strong language, violence, and/or sex contained in that
program.
S
scroll A method of moving around a web page or text box when the contents are too big to
fit the screen or box.When you scroll, part of the page becomes visible onscreen,
while another part moves offscreen.To scroll, you select an arrow pointing down (to
see more at the bottom) or up (to see more at the top), or press the PAGE +/button on the remote.
spending limit See purchase limit.
SPG Special program guide; for example, a program guide which contains only programs of
a selected theme.
T
tuner A device that receives television signals and determines which TV channel is displayed.
Most VCRs have tuners in them.The Philips satellite receiver also has a tuner.
Page 40

36
Appendix A - Installation in expert Mode
Expert mode installation offers the ability to set the telephone prefix and application type, and includes a more
detailed system test dialog.
To access the expert installation menu:
1. Simultaneously press OK and MENU on the satellite receiver front panel.The first time the system is brought up,
you can also access this menu from the Welcome screen.
Telephone Prefix
Some telephones require that you dial a prefix to reach an outside line.This function lets you set the prefix.
To define the telephone prefix:
1. Press MENU and OK on the satellite receiver front panel.
2. Choose Installation/Telephone Prefix.
3. Use the 1 or 2 buttons to move between None and Prefix.
4. To set the prefix, press the up or down arrow buttons until the correct prefix number is displayed.
5. Press BACK to return to the Installation menu.
Application Type
Your satellite receiver can run special applications.
To run a special application:
1. Press MENU and OK on the satellite receiver front panel.
2. Choose Installation/Application Type.
3. Press the up or down arrow buttons to choose either Normal or Special.
4. Press BACK to return to the Installation menu.
System Test
To types of system test are available: standard and expert.The expert test offers these additional functions:
Macrovision State, Colorburst State if Macrovision Enabled, Memory Status, SRAM Status, Hardware Modification
Version, Demodulator Status, Market ID, Hexadecimal diagnostic information.
To view the system test:
1. Press MENU and OK on the satellite receiver front panel.
2. Choose Installation/System Test.
3. Press the up or down arrow buttons to scroll through the list of tests or the PAGE+/- buttons to scroll by a full
page.
4. Press BACK to return to the Installation menu.
26
26
Page 41

37
Specifications
27
27
Video Decoding
• MPEG-2 compliant (up to Main Profile/Main Level)
• Video bit rate: up to 15 Mbit/sec
• Video format: 4:3 and 16:9
• Resolution: up to 720x576 pixels
Audio Decoding
• MPEG-1 layer II
• Sampling frequency:48KHz
• MPEG-1 system packets
Satellite Antenna Interface
• RF input: F-type connector
• LNB supply: 0V / 14V / 18V
• LNB current: max. 300mA on 14V
max. 450mA on 18V
• Tone switching (on/off): 22kHz
Reception Demodulation
• QPSK Type
• Input frequency range: 950 to 1450 MHz
• Input level range: -69 to -23 dBm
• Symbol rate controlled by application: 20 Mbaud
• FEC ratio: 2/3, 6/7
Input/Output Interfaces
• RF input
• Satellite input
• Video output: CVBS
• Audio output:Audio L/R
• Channel 3/4 (TV/VCR) output
• RJ-11
Integrated telephone modem (Return Path)
• Built-in RJ-11 connector
• Modem type: v.22bis, Bell 212A, Bell 103
• Dialing mode: DTMF & pulse
Descrambling
• Type: DES
• Implementation: internal
• Smart card: 1 for CA
Electrical
• Main power supply: 110V (10%, 60Hz)
• Power consumption:max. 35W
(Max. 450mA of LNB current)
Environmental
• Temperature
- Operating: 5 to 45ºC
- Storage: -10 to 70ºC
Physical Dimensions
• Size: 15 in. (W) x 2.8 in. (H) x 11.4 in. (L)
(380 mm x 71 mm x 290 mm)
• Weight: 5.1 lbs. (2.3 kg)
Package Contents
• DSX5250 digital satellite receiver
• IR remote control
- Battery type:Two AA (included)
• Conditional Access (CA) Smart card
• Main power supply with cord
• User Manual
✁
KEEP IN A SAFE PLACE - FOR FUTURE REFERENCE
Digital Receiver
Model No:
SerialNo:
Smart Card
Card No:
Installer
Name:
Adress:
Tel.No
Page 42

DIRECTV and DIRECTV PLUS are trademarks of DIRECTV, Inc., a unit of Hughes Electronics Corp, and are used with permission.
The products and services described herein are not necessarily available in all countries. Due to continuous product improvements, this document is subject to change without notice.
This device incorporates an anti-copy process technology that is protected by U.S. patents and other intellectual property rights. The anti-copy process is licensed for non-commercial, home use only. Reverse
engineering or disassembly is prohibited.
©2000 PHILIPS Printed in Belgium 3111 176 4985.1
Model no. of product
DSX5250
Date of purchase
day month year 2000
Dealer's name, address and signature
 Loading...