

Philips DSR7000R-17 User Manual

DIRECTV and Philips are dedicated to providing you with quality support and customer service. If you have questions or
difficulties, we would like to hear from you.
For questions regarding your DIRECTV® DVR, DIRECTV® programming or your DIRECTV® DVR with TiVo® service, after
checking the Troubleshooting chapter of this guide, please contact DIRECTV at 1-800-531-5000.
If your DVR is not working properly even after restarting it, you are having trouble with the remote control or have
another technical question, please contact Philips Service Solutions Group at 1-866-628-8606
When you call either Philips or DIRECTV, you will need to provide your recorder's access card number, model number,
and DVR service number, located on a label on the back of the recorder and on the System Information screen under
Messages & Setup.
DIRECTV
®
DVR User's Guide
DIRECTV DVR
User's Guide
WEB SITES
You will find all of the most up-to-date information about DIRECTV products and services
at the DIRECTV web site, DIRECTV.com. The PHILIPS web site at www.PHILIPS.com
has links to a wide variety of products and information.
SDOC-00072-500 Rev. A
3111 176 61121
The On-Screen Menus and the Remote Control
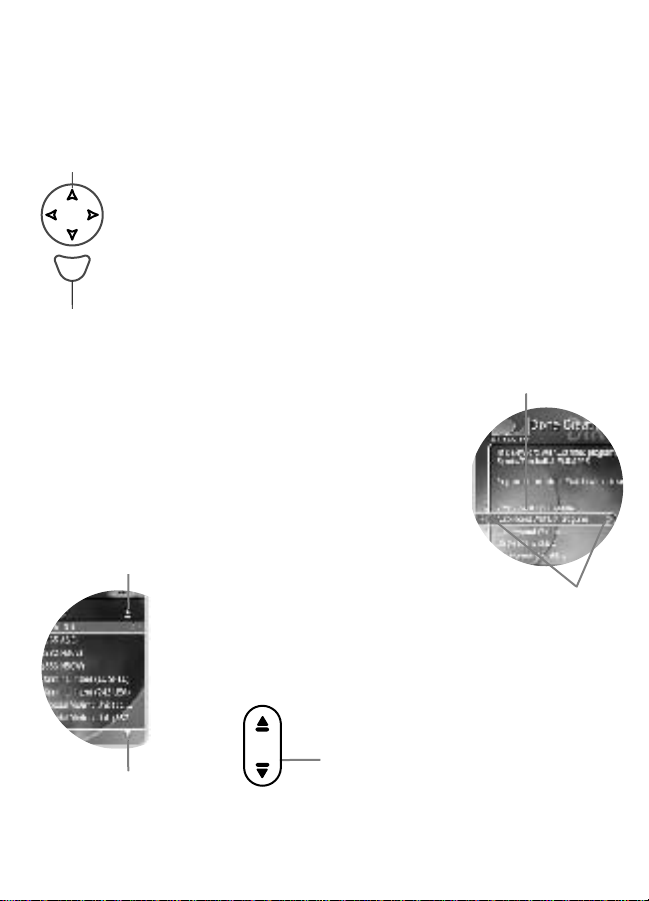
Arrow Buttons
To use the DIRECTV DVR's on-screen menus: Use the remote
control’s arrow buttons to move the highlight bar onto the
option you want, then press SELECT.
S
t
e
c
l
e
Select
The LEFT arrow button often takes you to a previous screen.
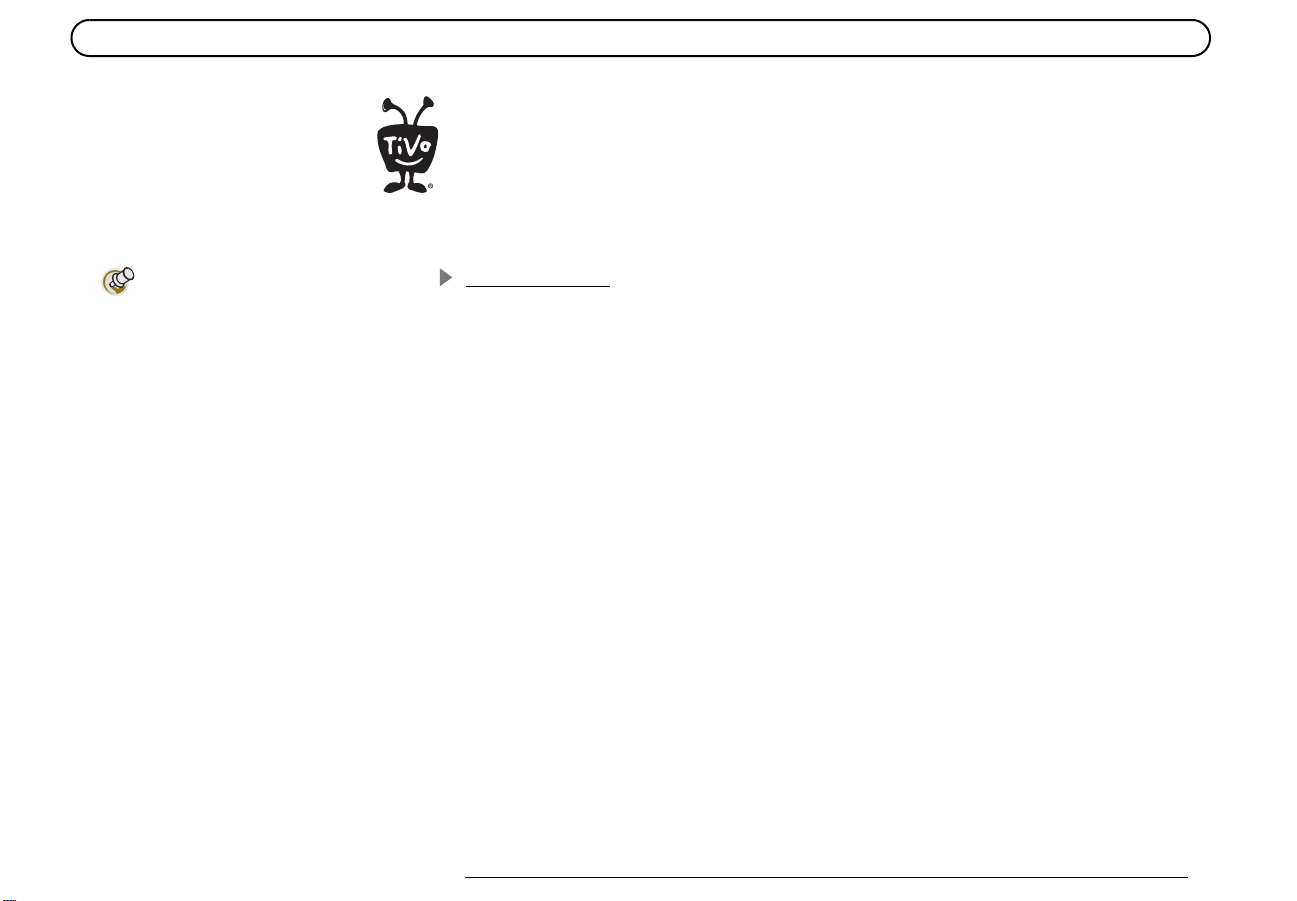
Two Types of On-Screen Arrows
The arrows that appear beside or near the highlight
bar show possible directions. For example: on this
screen, you could press the RIGHT arrow to highlight
Options or the DOWN arrow to highlight Edit
Keyword WishList.
Page Up Arrow
Page Down Arrow
When you see page up or page
down arrows at the top or
bottom of the screen (or a list),
press the CHAN UP/DOWN
button to jump to more items
an entire page at a time.
Chan
P
a
e
g
Chan Up/Down
Button
Highlight Bar
Arrows Near
Highlight Bar

Hints & Shortcuts
Press the DIRECTV button once to go to DIRECTV Central, or twice to
go to the Now Playing List.
LIST brings you directly to the Now Playing List.
Press FWD (fast forward) and BACK (rewind) up to 3 times for 3
speeds. Press them a fourth time to resume normal play.
INSTANT REPLAY replays the last 8 seconds of a program.
Press CLEAR to delete a title in a list (like the Now Playing list) or to
clear things that aren’t part of the program you’re watching (like
the channel banner and status bar).
INFO brings up the channel banner. Press the RIGHT arrow
to switch among three versions of the banner, each with a
different amount of information.
CHAN UP/DOWN does more than change the channel—it also pages
up or down through lists of programs or menu items.
Inserting Batteries in the Remote Control
Hold the remote with the battery door facing you. Place your thumb
in the depression of the door and slide the door towards you.
Insert two AA batteries (supplied). Be sure to match the + and -
marks on the batteries to the + and - marks in the compartment.
Replace the battery door by sliding it back into the case with the
tabs towards the rear of the compartment. You’ll hear a click
when it’s securely back in place.
Press GUIDE to see the DIRECTV Advanced Program Guide™, then
press INFO (while the guide is visible) to see Guide Options and
change the day or time, or show only a category of programs.
EXIT clears all menus and goes to the last channel or recorded
program you were watching. If you press it while you are
watching a program, it clears things that aren't part of the
program (like the channel banner and status bar).
ADVANCE moves you quickly through saved programming. Press it
while you are fast forwarding or rewinding to jump to the next
tick mark on the status bar.
When you’re watching “behind” live TV (for example, if you
paused live TV and later resumed watching from the paused
spot), ADVANCE catches you up to the live broadcast. In a
recorded program, press it once to jump to the end of the
program, then again to jump to the beginning.
If you program your remote control (as explained in chapter seven),
the TV POWER, VOLUME, MUTE, and TV INPUT buttons can
control your TV and A/V equipment.
The SAT/TV Switch sets the remote control to send channel
changing signals to either the DVR (SAT) or the television (TV).
Many of the remote control’s buttons are disabled when this
switch is set to TV (for example, SLOW, FAST FORWARD and
PAUSE), so if your remote control doesn’t seem to be working,
check to make sure this switch is set to SAT.
The WINDOW button is for future use.
DIRECTV Button
Arrow Buttons
Window
Exit
List
Select
Thumbs Down
Mute
Volume
Play
Pause
Back (rewind)
TV
DIREC
d
o
n
i
w
W
i
t
x
E
L
t
i
s
S
t
e
c
l
e
t
u
e
M
Vol
Chan
o
c
r
d
e
R
P
P
y
l
a
Remote Active Light
e
T
v
V
i
L
f
o
n
I
G
e
u
d
i
e
a
g
Live TV
Info
Guide
Thumbs Up
Chan Up/Down
Record
Fast Forward
Slow
( )
Instant Replay
S
o
w
P
e
r
V
T
-
w
l
o
TVSAT
n
p
I
u
t
V
T
Advance
SAT/TV Switch
TV Power TV Input
3
/
r
L
e
a
t
s
n
t
E
TV
Enter/Last
Number Buttons
Clear
102
465
798
a
e
r
l
C
DIREC

Welcome to DIRECTV
®

SDOC-00072-000 Rev. A
3111 176 51121
Philips Consumer Electronics, A Division of Philips Electronics North America Corp.
Philips is a registered trademark of Koninklijke Philips Electronics, NV.
DIRECTV and the Cyclone Design logo, DIRECTV SPORTS THIS WEEK, and DIRECTV
ADVANCED PROGRAM GUIDE are trademarks of DIRECTV, Inc., a unit of Hughes Electronics
Corp., and are used with permission. All rights reserved. DIRECTV, 2230 East Imperial Hwy., El
Segundo, CA 90245.
TiVo and the TiVo logo are a registered trademarks of TiVo Inc. The Instant Replay logo, the Jump
logo, TiVolution Magazine, Season Pass, WishList, Overtime Scheduler, the Thumbs Down logo
and text, the Thumbs Up logo and text, TiVo and Line Design (smile)
are trademarks of TiVo Inc. 1999, 2000. All rights reserved.
TiVo Inc., 2160 Gold Street, P.O. Box 2160, Alviso, CA 95002-2160.
Manufactured under license from Dolby Laboratories.
“Dolby,” “Pro Logic,” and the double-D symbol are trademarks of Dolby Laboratories.
All other trademarks are the properties of their respective owners.
© 1999, 2002 by TiVo Inc. Reproduction in whole or in part without written permission is
prohibited.
ii

Welcome to the DIRECTV family!
DIRECTV offers you more Hollywood hits, classic movies, family programming, news, and
a wide range of exciting sports action. Plus 31 commercial-free audio channels. And that's
only the beginning.
More Choices than ever before.
With access to over 225 channels, it's easy to see why DIRECTV has become the
entertainment choice for millions of American families. And it’s all digitally delivered, so
you get digital-quality sound and razor-sharp picture every time you turn on your TV!
DIRECTV
With DIRECTV, the main event is at your house! You'll have access to great movies,
exclusive special live sports, concerts and special events. DIRECTV offers up to 55
different pay per view choices a day. There's no need to order by phone. Just use your
remote control to give all your friends and family a front-row seat! (Phone connection
required.)
DIRECTV Knows Sports.
DIRECTV offers access to more sports than you ever thought possible. So you can follow
your favorite team across the country with our pro & college sports subscriptions. We'll take
you to the arena for the best sports has to offer. Tune to Channel 212 for DIRECTV
SPORTS THIS WEEK
With DIRECTV you're in control.
Your new DIRECTV
including the DIRECTV Advanced Program Guide
listings, and the ability to pause and replay live TV. Plus, with Pick Programs to Record and
the other incredibly powerful and easy to use features of your DVR service, you have a
Season Pass
®
Pay Per View Movies and Events.
®
.
®
DVR brings you the hottest new entertainment technology,
™
to all your favorite programming.
™
, with up to 14 days of program
iii

Table of Contents
Using this Guide . . . . . . . . . . . . . . . . . . . . . . . . . . . . . . . . . . . . . . . . . . . . . . . . . . . . . . . . . . . . . . . . . . . . . . . . . . . . . vii
Chapter 1: Connecting . . . . . . . . . . . . . . . . . . . . . . . . . . . . . . . . . . . . . . . . . . . . . . . . . . . . . . . . . . . . . . . . . . . .1
Overview . . . . . . . . . . . . . . . . . . . . . . . . . . . . . . . . . . . . . . . . . . . . . . . . . . . . . . . . . . . . . . . . . . . . . . . . . . . . . . . . . . . 2
Before You Begin . . . . . . . . . . . . . . . . . . . . . . . . . . . . . . . . . . . . . . . . . . . . . . . . . . . . . . . . . . . . . . . . . . . . . . . . . . . . 3
Useful Terms . . . . . . . . . . . . . . . . . . . . . . . . . . . . . . . . . . . . . . . . . . . . . . . . . . . . . . . . . . . . . . . . . . . . . . . . . . . . . . . . 5
Cables and Accessories . . . . . . . . . . . . . . . . . . . . . . . . . . . . . . . . . . . . . . . . . . . . . . . . . . . . . . . . . . . . . . . . . . . . . . . . 9
Setup Examples . . . . . . . . . . . . . . . . . . . . . . . . . . . . . . . . . . . . . . . . . . . . . . . . . . . . . . . . . . . . . . . . . . . . . . . . . . . . . 10
Chapter 2: Guided Setup . . . . . . . . . . . . . . . . . . . . . . . . . . . . . . . . . . . . . . . . . . . . . . . . . . . . . . . . . . . . . . . . .23
Overview . . . . . . . . . . . . . . . . . . . . . . . . . . . . . . . . . . . . . . . . . . . . . . . . . . . . . . . . . . . . . . . . . . . . . . . . . . . . . . . . . . 24
Satellite Dish Guided Setup . . . . . . . . . . . . . . . . . . . . . . . . . . . . . . . . . . . . . . . . . . . . . . . . . . . . . . . . . . . . . . . . . . . . 25
Activate . . . . . . . . . . . . . . . . . . . . . . . . . . . . . . . . . . . . . . . . . . . . . . . . . . . . . . . . . . . . . . . . . . . . . . . . . . . . . . . . . . . 29
Phone Setup . . . . . . . . . . . . . . . . . . . . . . . . . . . . . . . . . . . . . . . . . . . . . . . . . . . . . . . . . . . . . . . . . . . . . . . . . . . . . . . . 30
Chapter 3: The Basics in 5 Short Tours . . . . . . . . . . . . . . . . . . . . . . . . . . . . . . . . . . . . . . . . . . . . . . . . . . . . .33
Tour 1: Play With Live TV . . . . . . . . . . . . . . . . . . . . . . . . . . . . . . . . . . . . . . . . . . . . . . . . . . . . . . . . . . . . . . . . . . . . 34
Tour 2: DIRECTV Advanced Program Guide™ . . . . . . . . . . . . . . . . . . . . . . . . . . . . . . . . . . . . . . . . . . . . . . . . . . . . 36
Tour 3: Find and Record Your Favorite Programs . . . . . . . . . . . . . . . . . . . . . . . . . . . . . . . . . . . . . . . . . . . . . . . . . . 38
Tour 4: Search for New Programs . . . . . . . . . . . . . . . . . . . . . . . . . . . . . . . . . . . . . . . . . . . . . . . . . . . . . . . . . . . . . . . 40
Tour 5: Now Playing List . . . . . . . . . . . . . . . . . . . . . . . . . . . . . . . . . . . . . . . . . . . . . . . . . . . . . . . . . . . . . . . . . . . . . . 42
Cool Things You Can Do . . . . . . . . . . . . . . . . . . . . . . . . . . . . . . . . . . . . . . . . . . . . . . . . . . . . . . . . . . . . . . . . . . . . . . 43
Chapter 4: Watching Live TV . . . . . . . . . . . . . . . . . . . . . . . . . . . . . . . . . . . . . . . . . . . . . . . . . . . . . . . . . . . . . .45
Let’s Go! . . . . . . . . . . . . . . . . . . . . . . . . . . . . . . . . . . . . . . . . . . . . . . . . . . . . . . . . . . . . . . . . . . . . . . . . . . . . . . . . . . 46
DIRECTV Advanced Program Guide™ . . . . . . . . . . . . . . . . . . . . . . . . . . . . . . . . . . . . . . . . . . . . . . . . . . . . . . . . . . 48
iv

Channel Banner . . . . . . . . . . . . . . . . . . . . . . . . . . . . . . . . . . . . . . . . . . . . . . . . . . . . . . . . . . . . . . . . . . . . . . . . . . . . . 51
Play with Live TV . . . . . . . . . . . . . . . . . . . . . . . . . . . . . . . . . . . . . . . . . . . . . . . . . . . . . . . . . . . . . . . . . . . . . . . . . . . 52
Status Bar . . . . . . . . . . . . . . . . . . . . . . . . . . . . . . . . . . . . . . . . . . . . . . . . . . . . . . . . . . . . . . . . . . . . . . . . . . . . . . . . . . 53
Music Channels . . . . . . . . . . . . . . . . . . . . . . . . . . . . . . . . . . . . . . . . . . . . . . . . . . . . . . . . . . . . . . . . . . . . . . . . . . . . . 54
Standby . . . . . . . . . . . . . . . . . . . . . . . . . . . . . . . . . . . . . . . . . . . . . . . . . . . . . . . . . . . . . . . . . . . . . . . . . . . . . . . . . . . 55
Chapter 5: Finding and Recording Programs . . . . . . . . . . . . . . . . . . . . . . . . . . . . . . . . . . . . . . . . . . . . . . . . .57
Recording Programs: The Basics . . . . . . . . . . . . . . . . . . . . . . . . . . . . . . . . . . . . . . . . . . . . . . . . . . . . . . . . . . . . . . . . 58
Finding Programs to Record . . . . . . . . . . . . . . . . . . . . . . . . . . . . . . . . . . . . . . . . . . . . . . . . . . . . . . . . . . . . . . . . . . . 68
I Already Know What I Want to Record . . . . . . . . . . . . . . . . . . . . . . . . . . . . . . . . . . . . . . . . . . . . . . . . . . . . . . . . . . 69
I Know What I Like . . . . . . . . . . . . . . . . . . . . . . . . . . . . . . . . . . . . . . . . . . . . . . . . . . . . . . . . . . . . . . . . . . . . . . . . . 73
Help Me Find New Programs . . . . . . . . . . . . . . . . . . . . . . . . . . . . . . . . . . . . . . . . . . . . . . . . . . . . . . . . . . . . . . . . . . 79
Chapter 6: Messages and Setup . . . . . . . . . . . . . . . . . . . . . . . . . . . . . . . . . . . . . . . . . . . . . . . . . . . . . . . . . . .83
Messages from DIRECTV . . . . . . . . . . . . . . . . . . . . . . . . . . . . . . . . . . . . . . . . . . . . . . . . . . . . . . . . . . . . . . . . . . . . . 84
Purchases . . . . . . . . . . . . . . . . . . . . . . . . . . . . . . . . . . . . . . . . . . . . . . . . . . . . . . . . . . . . . . . . . . . . . . . . . . . . . . . . . . 85
My Preferences . . . . . . . . . . . . . . . . . . . . . . . . . . . . . . . . . . . . . . . . . . . . . . . . . . . . . . . . . . . . . . . . . . . . . . . . . . . . . 89
Recorder & Phone Setup . . . . . . . . . . . . . . . . . . . . . . . . . . . . . . . . . . . . . . . . . . . . . . . . . . . . . . . . . . . . . . . . . . . . . . 99
System Information . . . . . . . . . . . . . . . . . . . . . . . . . . . . . . . . . . . . . . . . . . . . . . . . . . . . . . . . . . . . . . . . . . . . . . . . . 106
Troubleshooting . . . . . . . . . . . . . . . . . . . . . . . . . . . . . . . . . . . . . . . . . . . . . . . . . . . . . . . . . . . . . . . . . . . . . . . . . . . . 107
Restart or Reset System . . . . . . . . . . . . . . . . . . . . . . . . . . . . . . . . . . . . . . . . . . . . . . . . . . . . . . . . . . . . . . . . . . . . . . 108
Chapter 7: Programming the Remote Control . . . . . . . . . . . . . . . . . . . . . . . . . . . . . . . . . . . . . . . . . . . . . . 109
Introduction . . . . . . . . . . . . . . . . . . . . . . . . . . . . . . . . . . . . . . . . . . . . . . . . . . . . . . . . . . . . . . . . . . . . . . . . . . . . . . . 110
Instructions: TV Power, Volume, and TV Input . . . . . . . . . . . . . . . . . . . . . . . . . . . . . . . . . . . . . . . . . . . . . . . . . . . 111
Resetting the Programmable Buttons . . . . . . . . . . . . . . . . . . . . . . . . . . . . . . . . . . . . . . . . . . . . . . . . . . . . . . . . . . . . 114
Setting a Remote Address . . . . . . . . . . . . . . . . . . . . . . . . . . . . . . . . . . . . . . . . . . . . . . . . . . . . . . . . . . . . . . . . . . . . 115
v

Chapter 8: Troubleshooting . . . . . . . . . . . . . . . . . . . . . . . . . . . . . . . . . . . . . . . . . . . . . . . . . . . . . . . . . . . . 117
Contacting Customer Care . . . . . . . . . . . . . . . . . . . . . . . . . . . . . . . . . . . . . . . . . . . . . . . . . . . . . . . . . . . . . . . . . . . . 118
Questions About Installation . . . . . . . . . . . . . . . . . . . . . . . . . . . . . . . . . . . . . . . . . . . . . . . . . . . . . . . . . . . . . . . . . . 119
Questions About Live TV (Including Satellite Signal) . . . . . . . . . . . . . . . . . . . . . . . . . . . . . . . . . . . . . . . . . . . . . . 120
Questions About Pick Programs to Record . . . . . . . . . . . . . . . . . . . . . . . . . . . . . . . . . . . . . . . . . . . . . . . . . . . . . . . 125
Questions About Parental Controls . . . . . . . . . . . . . . . . . . . . . . . . . . . . . . . . . . . . . . . . . . . . . . . . . . . . . . . . . . . . . 131
Questions About the DVR’s Phone Calls . . . . . . . . . . . . . . . . . . . . . . . . . . . . . . . . . . . . . . . . . . . . . . . . . . . . . . . . 132
Questions About Audio . . . . . . . . . . . . . . . . . . . . . . . . . . . . . . . . . . . . . . . . . . . . . . . . . . . . . . . . . . . . . . . . . . . . . . 135
Questions About Pay Per View . . . . . . . . . . . . . . . . . . . . . . . . . . . . . . . . . . . . . . . . . . . . . . . . . . . . . . . . . . . . . . . . 136
Questions About the Remote Control . . . . . . . . . . . . . . . . . . . . . . . . . . . . . . . . . . . . . . . . . . . . . . . . . . . . . . . . . . . 138
Questions About the DVR Service . . . . . . . . . . . . . . . . . . . . . . . . . . . . . . . . . . . . . . . . . . . . . . . . . . . . . . . . . . . . . 139
Chapter 9: Warranty and Specifications . . . . . . . . . . . . . . . . . . . . . . . . . . . . . . . . . . . . . . . . . . . . . . . . . . 141
Limited Warranty . . . . . . . . . . . . . . . . . . . . . . . . . . . . . . . . . . . . . . . . . . . . . . . . . . . . . . . . . . . . . . . . . . . . . . . . . . . 142
FCC Information . . . . . . . . . . . . . . . . . . . . . . . . . . . . . . . . . . . . . . . . . . . . . . . . . . . . . . . . . . . . . . . . . . . . . . . . . . . 144
Specifications . . . . . . . . . . . . . . . . . . . . . . . . . . . . . . . . . . . . . . . . . . . . . . . . . . . . . . . . . . . . . . . . . . . . . . . . . . . . . . 146
Safety Instructions . . . . . . . . . . . . . . . . . . . . . . . . . . . . . . . . . . . . . . . . . . . . . . . . . . . . . . . . . . . . . . . . . . . . . . . . . . 148
Appendix A: Back Panel Reference . . . . . . . . . . . . . . . . . . . . . . . . . . . . . . . . . . . . . . . . . . . . . . . . . . . . . . . 151
Appendix B: Gnu General Public License . . . . . . . . . . . . . . . . . . . . . . . . . . . . . . . . . . . . . . . . . . . . . . . . . . 155
Index . . . . . . . . . . . . . . . . . . . . . . . . . . . . . . . . . . . . . . . . . . . . . . . . . . . . . . . . . . . . . . . . . . . . . . . . . . . . . . . 161
vi

Using this Guide
This User’s Guide describes how to connect your new DIRECTV® DVR to your
television and other audio/video equipment. It also provides valuable information about
the features and use of the DVR.
Glossary of Icons. The inside front cover of this guide provides an introduction to the
remote control. The inside back cover has a “Glossary of Icons” that explains many of the
graphic symbols you will see when using your DVR.
Useful Terms. Many of the technical terms you may encounter in this guide are explained
in the “Useful Terms” section beginning on page 5.
Screen Paths. Notes at the bottom of some pages show you how to find the screen being
discussed on that page. For example, page 70 describes the “Record by Time or Channel”
feature. At the bottom of the page is the note “DIRECTV Central Pick Programs to
Record Record by Time/Channel” This note means you can find Record by Time/
Channel, the screen being discussed, by going to DIRECTV Central (press the DIRECTV
button on your remote control) and selecting Pick Programs to Record, then Record by
Time/Channel.
DIRECTV DVR with TiVo
DIRECTV
®
DVR.
®
Service. The recording service provided through the
DIRECTV DVR. Refers collectively to the satellite antenna receiver and the DVR hardware.
Throughout this guide, you will see
important and helpful notes and
tips in this format.
vii
Before you install the DVR, mount
the satellite dish antenna.
Professional installation is highly
recommended. Your dish must be
mounted, with cables running to the room
where your DVR will be installed, before
you can begin the DVR installation as
described in this guide. Dual LNB dish
antenna connection required for full
functionality.
The TiVo Logo. As you use your DIRECTV® DVR, you’ll see the TiVo logo in places
like the Now Playing List and TiVo Suggestions. Your new DVR incorporates the latest
DVR (Digital Video Recorder) technology from TiVo. This means you have access to
exclusive TiVo features such as WishList
™
Up
and Thumbs Down™, TiVo Suggestions, and TiVolution Magazine®. All in one
™
searches, Season Pass™ recordings, Thumbs
seamlessly integrated product that will change the way you watch television.
Getting Started
After a satellite dish antenna has been installed, you’re ready to start using this guide:
1. Connect the DVR according to the proper setup for your Audio/Video equipment. (See
chapter 1, “Connecting.”)
2. Complete Guided Setup to point your satellite dish antenna and activate the
DIRECTV
Setup.”
Start using your DIRECTV
Start Here card. Take the five tours in chapter 3 of this User’s Guide for an interactive
way to learn about the DVR’s powerful features. Chapters 4, 5, 6, and 7 describe the DVR
service in detail. Read through them to become familiar with the service. Chapter 8
provides a comprehensive troubleshooting guide in case you have questions.
®
DVR with TiVo service following the instructions in chapter 2, “Guided
®
DVR. It’s easy! Learn the basics by browsing the back of the
viii

CHAPTER
1
Connecting
Overview 2
Before You Begin 3
Useful Terms 5
Cables and Accessories 9
Setup Examples 10

Chapter 1
Connecting
Jacks are places where cables can
be connected.
OUT IN
Always connect cables from the
OUT jack of one device to the IN
jack of the next. Never connect an IN to an
IN or an OUT to an OUT.
Overview
TVs used to be simple: no color, no digital video, no stereo sound, no digital audio, no
choices. All you needed was an antenna and a TV. The antenna captured pictures and
sounds. A wire connected the antenna to the TV to transfer pictures and sounds.
As televisions have acquired more features, and new devices have been created to work
with them, it may seem that everything has become more complex. Fortunately, the
fundamentals haven’t changed. You may have a VCR, a DVD player and a game system,
in addition to a satellite dish antenna. However, one thing has remained the same: what
you need to do is get the pictures and sounds from their source (the satellite dish antenna)
to your TV.
You use cables to make a path over which the pictures and sounds travel from your
satellite dish antenna to your TV.
On the back of your equipment you will find several jacks. Some are labeled IN and some
are labeled OUT. The pictures and sound enter a piece of equipment through a cable
connected to an IN jack and leave through a cable connected to an OUT jack.
When you connect your DIRECTV
equipment, you are simply creating a path that starts at the satellite dish antenna and goes
in (through IN jacks) and out (through OUT jacks) of your equipment until it reaches
your TV.
®
DVR to your television and other audio/video
2

Before You Begin
Make sure that all of your equipment is turned off and the DVR is unplugged.
Before You Begin
1
Connecting to a Phone Line
You will need access to a standard analog phone jack. Your DVR needs to be connected to
a phone line to communicate with DIRECTV. The DVR occasionally makes a brief
phone call to get updates to the DVR service and Showcases, and for pay per view
functionality.
You do not need to install a new telephone jack or phone number for the DVR to work; it
can detect when your phone line is in use and will only make calls when the phone line is
available. If you don’t have a phone jack nearby, you can use the 25 foot phone cord that
ships with the DVR. If your phone jack is being used for a phone, you can use the
provided splitter to connect both the phone and the DVR to the same phone jack.
Connecting a Dual LNB or a Multi-Satellite Dish Antenna
Your DVR comes equipped with two jacks for satellite input. While the DVR will work if
connected to only one satellite input, connecting both allows you to record from two
channels at the same time. All of the connection examples in this chapter give instructions
for configuring the DVR with connections to both satellite input jacks.
Both a Round Dual LNB dish antenna and an Oval 2 or 3 satellite dish antenna connect to
at least two coaxial RF cables. To connect both of your DVR’s satellite input jacks, you
must have two coaxial RF cables coming from your satellite dish antenna to the room
where the DVR will be installed.
Your DVR should not be used with
a digital PBX phone system. Doing
so may permanently damage your DVR’s
modem and will void your warranty.
Digital PBX phone systems allow many
phones to share a single telephone
number and are usually used in hotels and
office buildings. If you are installing the
DVR in your home, it is very unlikely that
you are using a digital PBX phone system.
If you have a Single LNB satellite
dish antenna, you will need to
upgrade to a Dual LNB for full
functionality. Contact your satellite dish
antenna manufacturer for more
information about upgrading.
3
Chapter 1
For information on how to switch
between watching antenna or
cable channels and watching DIRECTV®
channels, see the connection example in
Chapter 2 that is most appropriate to your
configuration.
The DVR does not have an on/off
switch. To turn the DVR on, plug it
in. The DVR, like a clock or a refrigerator,
is designed for constant use and does not
need to be turned off. If you must turn it
off—for example, to move it—simply
unplug it. (The DVR does have an optional
standby mode, explained on page 55.)
Connecting
If you currently own a Dual LNB satellite dish antenna that is already connected to two
TVs, you can purchase a multiswitch (described on page 6) that will allow you to connect
two cables to your new DVR as well as one to an existing receiver for your second TV.
Using an Antenna or Cable Connection, in Addition to DIRECTV Programming
®
If you have an antenna or cable connection in addition to your satellite dish antenna, you
®
can watch antenna or cable channels while recording DIRECTV
channels. However,
recording and other features (such as parental controls, purchasing pay per view programs,
viewing on-screen menus, or pausing live TV), do not work on cable or antenna channels.
Caring for your DIRECTV DVR
Do not drop. Your new DVR contains a hard disk drive that is constantly in motion; it
may be damaged if the DVR falls or is dropped. Place the DVR in a stable location.
Unplug before moving. To prevent damage to sensitive components such as the hard disk
drive, always unplug your DVR and then wait a moment for the hard disk to stop spinning
before moving it.
Do not stack. Your DVR is NOT designed to carry the weight of other consumer
components such as VCRs, DVD players, or A/V receivers.
Flat, hard surface. The DVR should rest on a flat, hard surface only. Do not operate it on
a carpet or other padded surface, as this can inhibit proper ventilation and cause the unit to
overheat.
Use a surge protector. Like all electronics equipment, your DVR can be damaged by
fluctuations in your power supply. Purchasing a surge protector is highly recommended. If
Be sure to read the safety
instructions on page 148.
you purchase a surge protector that allows you to plug in both your DVR’s power and
your telephone cord, you may prevent damage to the parts of your DVR that are connected
to your phone line as well!
4
Useful Terms
If you’re not an audio/video wizard, you may find yourself stumbling over some of the
names, features and functions of various pieces of equipment. Here’s a quick reference to
help you understand some of the terms you may encounter during installation.
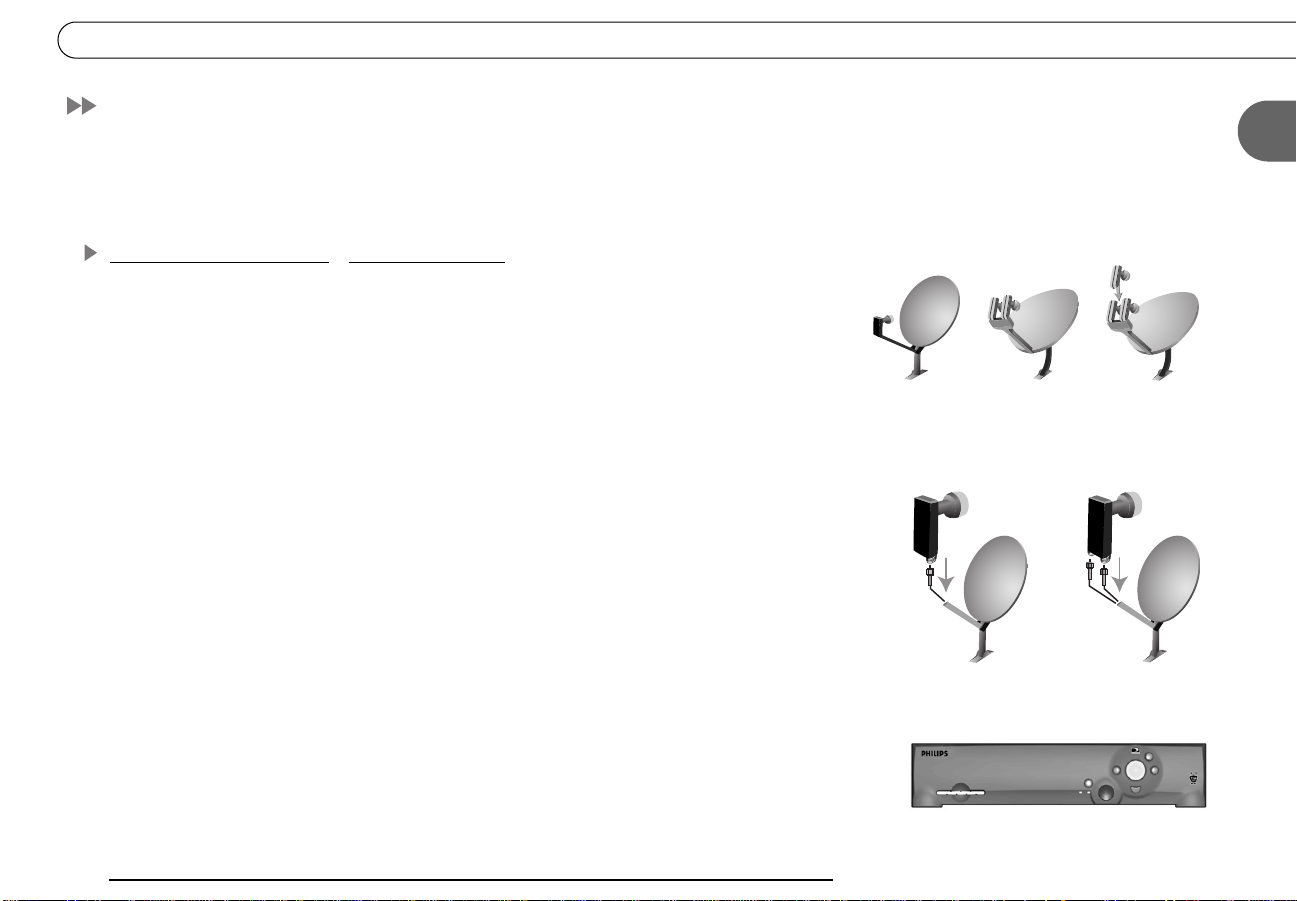
Satellite Dish Antennas—Types and Terms
Round Single Satellite Dish Antenna, Oval 2 Satellite Dish Antenna, and Oval 3
Satellite Dish Antenna: The names Round single, Oval 2, and Oval 3 satellite dish
antennas refer to both the most common shape of the dish and the number of satellites
from which a dish can receive information. To determine what type of dish you have, look
at the arm extending out from the dish. At the end of this arm are one or more “fingers”
ending in mushroom shaped parts pointing back at the dish. A single satellite dish antenna
has one of these “fingers” pointing back at the dish, a 2 satellite dish antenna has two, and
a 3 satellite dish antenna has three. If you own a 2 or 3 satellite dish antenna, your DVR
will not work properly unless you have connected a multiswitch with at least four inputs
and two outputs. For a definition of a multiswitch, see page 6.
Single LNB and Dual LNB Satellite Dish Antennas: Single LNB and Dual LNB refer to
the number of independent signals a dish can send to your audio/video equipment. A
Single LNB sends one signal and has one jack, or connector, inside the arm extending
from the dish. A Dual LNB sends two signals and has two jacks. The easiest way to
determine what type of dish you have is to consult the documentation that came with the
dish. Disassembling the dish to determine its type is not recommended.
Round Single
satellite dish
antenna
Single LNB
(Single Satellite)
Useful Terms
Oval 2
satellite dish
antenna
Oval 3
satellite dish
antenna
Dual LNB
(Single Satellite)
1
Satellite Receiver: A satellite receiver does what its name suggests and more. It
“receives” the signal from your satellite dish antenna, then translates it into a signal your
TV can understand, then sends it to the TV. Your DIRECTV
®
DVR has a built-in satellite
receiver.
5

Chapter 1
Connecting
Dual Tuner: A tuner picks one channel out of all of your available channels. This allows
you to view a single channel and to change channels. “Dual tuner” means your DVR has
two tuners. It can pick out two channels at once, allowing you to record programs on two
channels at the same time.
Multiswitch: A multiswitch lets you use the signal from one satellite dish antenna for more
than two TVs. If you currently own a Dual LNB dish that is connected to two televisions, a
multiswitch will allow you to connect two cables to your new DVR as well as one to a
satellite receiver on your second television. If you own a 2 or 3 satellite dish antenna, your
DVR will not work unless you have connected a multiswitch with at least four inputs and
two outputs.
Access Card: Your access card contains information about your DIRECTV
subscription. It must be properly inserted and activated for your DVR to work.
Transponder: A transponder is a piece of radio equipment on a satellite.The DIRECTV
transponders receive information from DIRECTV and rebroadcast it to your satellite dish
antenna. Each transponder rebroadcasts a different set of channels. If the DVR does not
receive a signal for an individual transponder, it will not be able to show that transponder’s
channels. Each satellite may have a different number of transponders on it.
®
programming
Cables and Connections
Composite Video and Left/Right (L/R) Audio Cables: Composite Video and Left/Right
(L/R) Audio cables may appear to be just one cable, but are actually three separate cables.
The yellow composite cable transfers video. The white and red L/R Audio cables, when
used together, transfer stereo sound. These three cables can be used together or separately.
For example, you could use an S-Video cable to transfer video and use white and red L/R
Audio cables to transfer audio. In this case, you would not need to use the yellow
Composite Video cable at all.
6
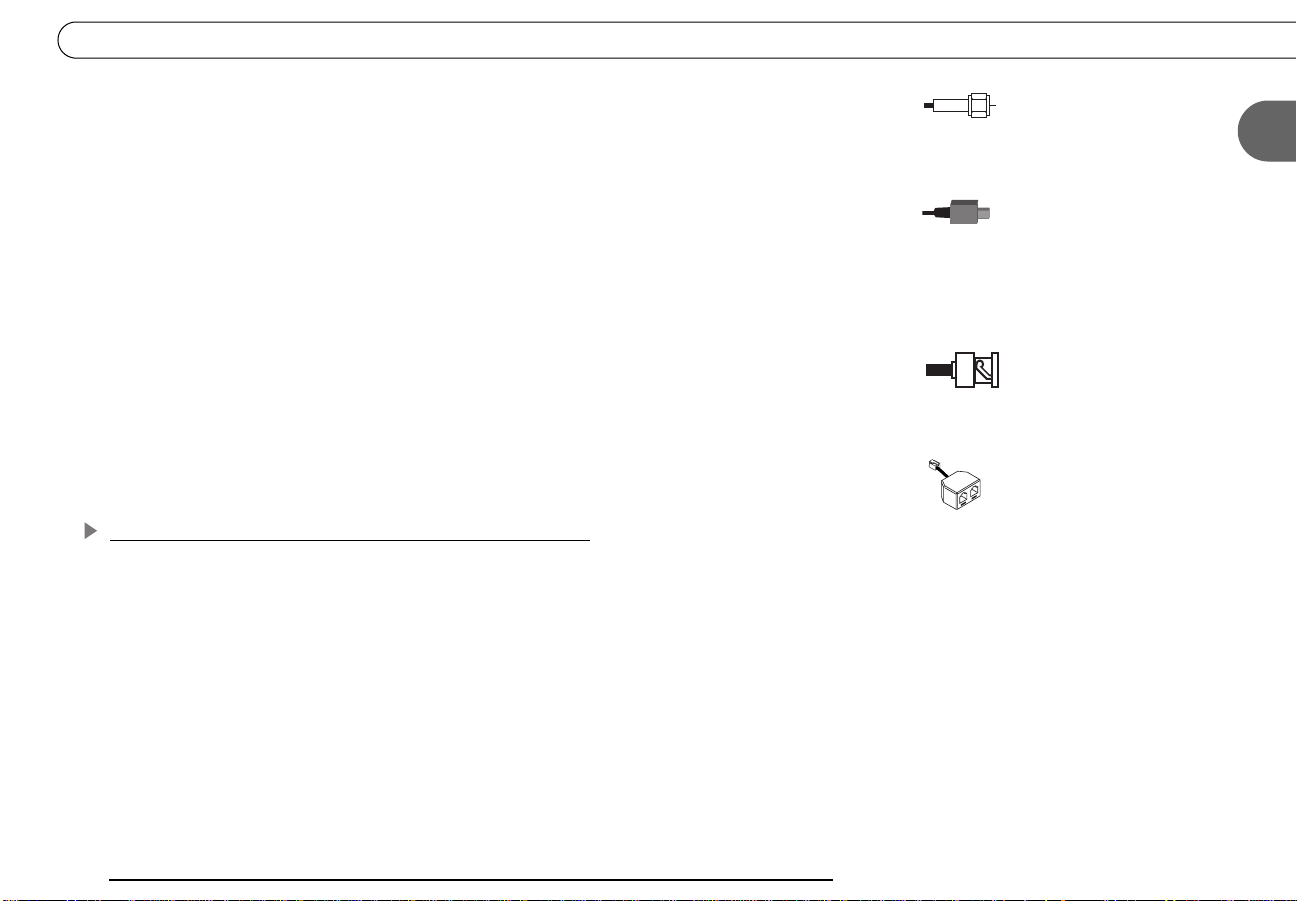
Coaxial RF Cable: A coaxial RF cable transfers both audio and video on a single cable.
Useful Terms
Optical (or Digital) Audio Cable: An optical (or digital) audio cable transfers audio only.
This cable transfers audio at the highest possible quality from your DVR to an A/V
receiver. If you have a home theater, own an A/V receiver capable of receiving Dolby
Digital audio, and wish to use Dolby Digital audio, then you must use this cable. Not all
A/V receivers with optical audio inputs are capable of receiving Dolby Digital audio. An
optical audio cable is not included with the DVR.
BNC Cable: A BNC Cable is similar to a coaxial RF cable and transfers both audio and
video. This type of cable is not included with your DVR. However, you may already be
using a BNC cable in an existing connection to your TV. If so, you can purchase an
adapter that will allow you to connect BNC cables to the RF In or RF Out jacks on your
DVR.
Telephone Line Splitter: The included telephone line splitter allows you to plug both a
telephone and your DVR into a single telephone wall jack.
Video, Audio, and Electronics Equipment and Terms
Switch Box: A switch box is a small box that allows you to connect multiple devices to
your TV, even if your TV does not have enough input jacks to connect them all directly. It
allows you to switch easily between viewing DIRECTV
your DVD player, or running your game system. Switch boxes are inexpensive and can be
purchased at electronics stores.
A/V Receiver: An A/V receiver is similar to a switch box but is more sophisticated. It may
offer additional features such as remote control or Dolby Digital audio capabilities. An
A/V receiver allows you to connect multiple devices to your TV, even if your TV does not
have enough input jacks to connect them all directly. It allows you to switch easily
®
channels, viewing video from
1
7

Chapter 1
Connecting
between viewing DIRECTV® channels, viewing video from your DVD player, or running
your game system by changing the input source.
Dolby
which can be heard on one of six separate speakers. To use Dolby Digital audio, you must
use an optical audio cable to connect your DVR to an A/V receiver capable of supporting
Dolby Digital audio. Not all A/V receivers with optical audio inputs are capable of
receiving Dolby Digital audio. You must also set your DVR to record using Dolby Digital
audio. For more information, see page 96.
Dolby
which can be heard on two or more (usually five) speakers. To use Dolby Surround Sound
audio, you must have an A/V receiver capable of supporting Dolby Surround Sound audio
connected to your DVR using either L/R Audio cables or an optical audio cable.
Digital PBX Phone System: Digital PBX phone systems allow many phones to share a
single telephone number and are usually used in hotels and office buildings. If you are
installing the DVR in your home, it is very unlikely that you are using a digital PBX phone
system. Do not connect your DVR to a digital PBX phone system. Doing so may
permanently damage your DVR’s modem and will void your warranty.
Surge Protector: Surge protectors are devices that protect electronic equipment from
power fluctuations. Like all electronics equipment, your DVR can be damaged by
fluctuations in your line voltage. Purchasing a surge protector is highly recommended. If
you purchase a surge protector that allows you to plug in both your DVR’s power and
your telephone cord, you may prevent damage to the parts of your DVR that are connected
to your phone line as well! Surge protectors can be purchased at hardware, electronics, or
general merchandise stores.
Digital Audio: Dolby Digital audio is recorded on six separate channels, each of
Surround Sound: Dolby Surround Sound audio is recorded on two channels,
8
Cables and Accessories
In addition to your television and the equipment that shipped with this DVR (shown
below), you’ll need a satellite dish antenna
you connect the DVR
—and a standard, analog phone line (see page 3 for details).
—which should be properly mounted before
Cables and Accessories
1
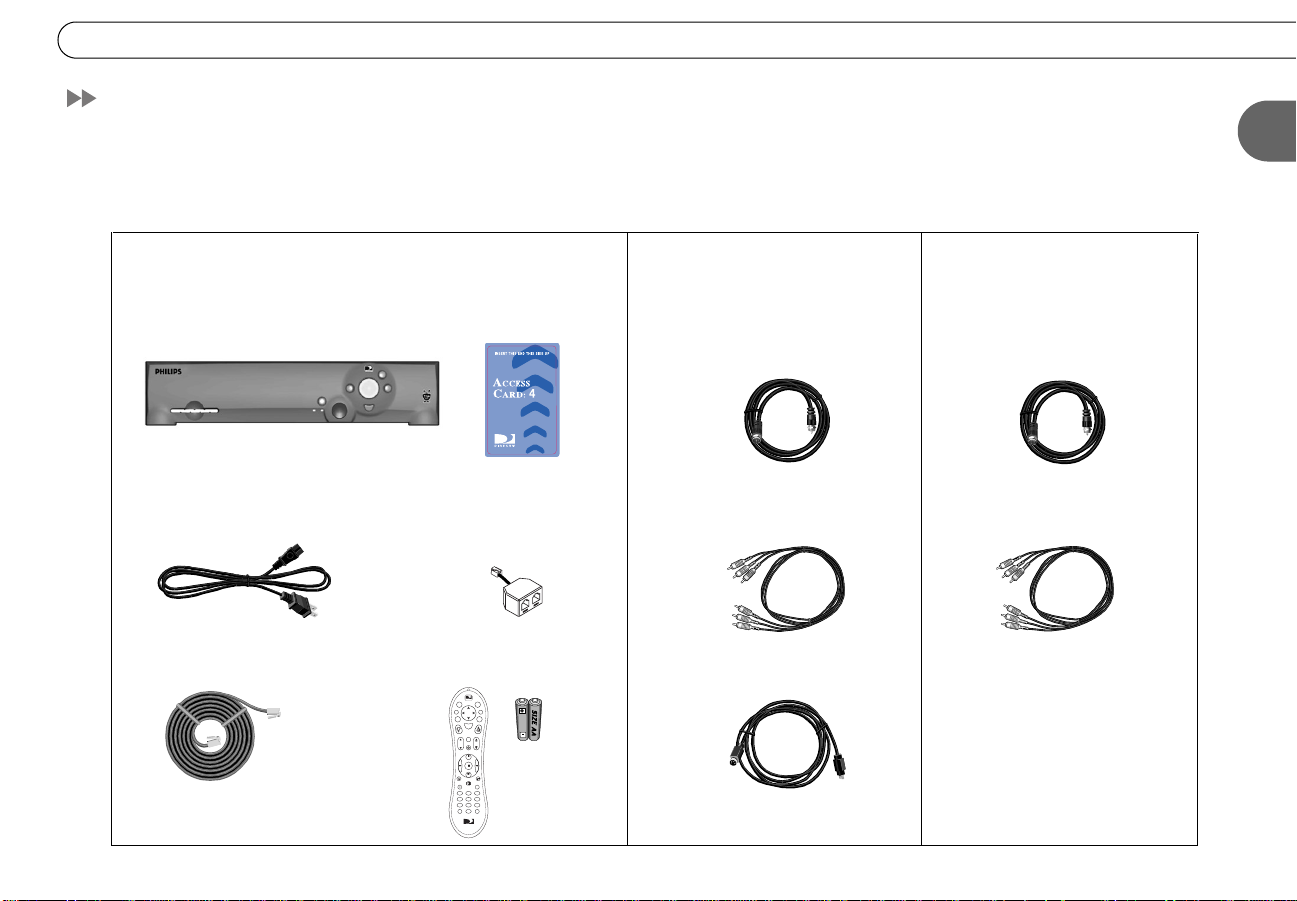
1. These are the basics: 2. See page 10 to choose
audio/video cables. The carton
contains one of each of the
following:
DVR
Power Cord
25’ Phone Cord
DIRECTV Access Card
Phone Line Splitter
TV
DIREC
d
o
e
n
T
v
i
w
V
i
L
W
f
o
i
n
t
x
I
E
G
e
L
t
u
d
i
s
i
S
t
e
c
l
e
t
u
e
M
Chan
Vol
o
c
r
d
e
R
P
e
a
g
P
y
l
a
( )
-
S
w
l
o
Remote Control
TVSAT
o
w
n
p
P
I
u
e
t
V
r
V
T
T
3
102
465
and 2 AA
798
a
/
e
r
L
r
l
e
a
C
t
s
n
t
E
TV
DIREC
Batteries
RF Coaxial Cable
Composite A/V Cable
S-Video Cable
3. You may need to purchase
these additional items for
some setups:
Extra RF Coaxial Cable
Extra Composite A/V
Cables
9
Chapter 1
If your TV has only one audio
connector, connect just the white
and yellow ends of the Composite A/V
cable (don’t connect the red end).
Connecting
Setup Examples
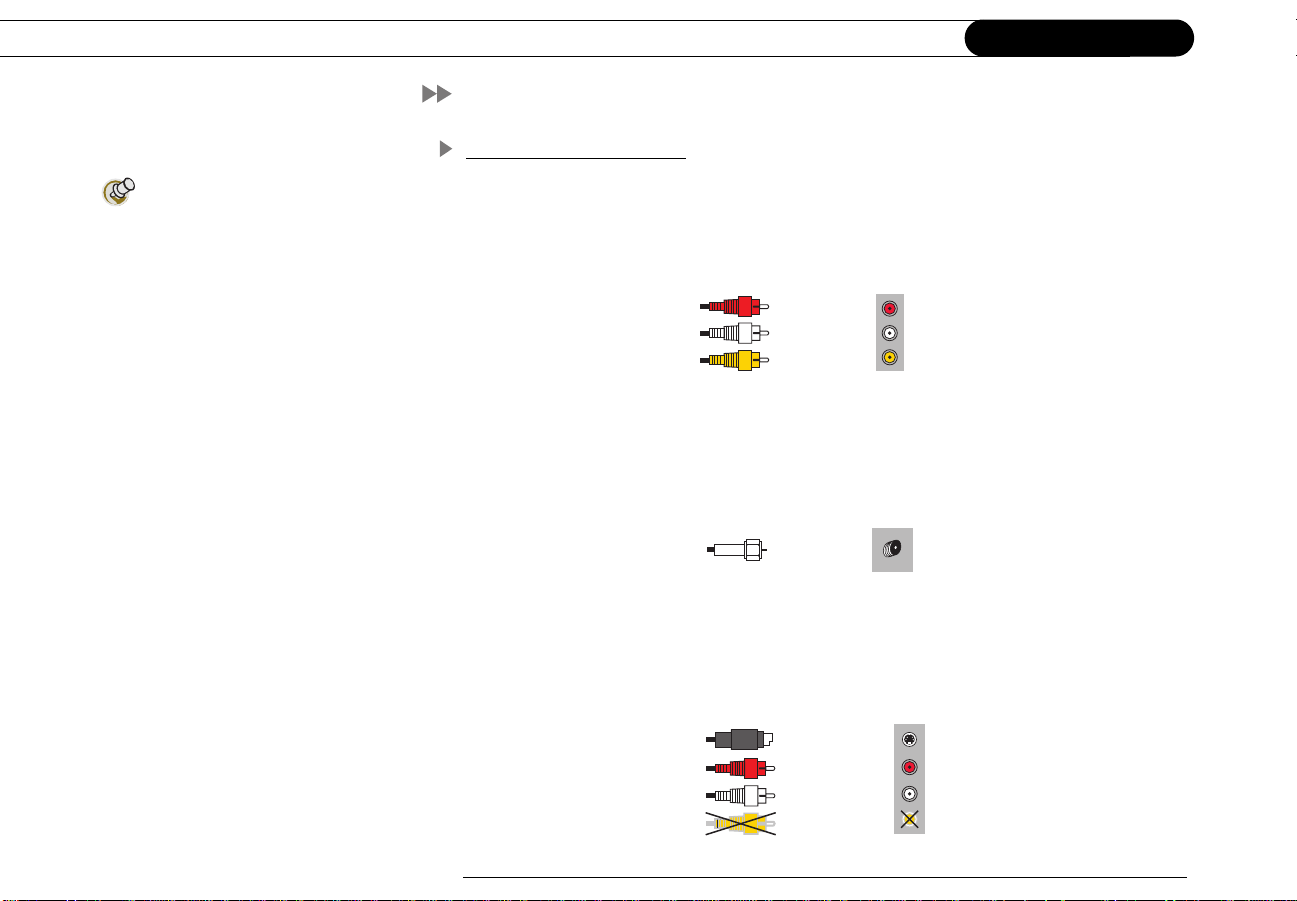
Audio and Video Cables
Composite. Many TVs and VCRs have connectors for Composite A/V cables. If your
equipment has them, you can use the Composite A/V cables for both audio and video..
Composite Video
and L/R
Audio Cables
RF Coaxial. Some TVs only have connectors for RF Coaxial cable. If your TV only has an
RF connector, use the RF Coaxial cable for both audio and video and see Example 4 on
page 18 (or see Example 1 on see page 12 if you also have a VCR):
Connect to
Composite Video
and L/R Audio Jacks
(red)
(white)
(yellow)
10
Coaxial RF
Cable
Connect to RF or
VHF/UHF jack
S-Video. If you have S-Video connectors on your equipment, and want the highest quality
video, use the included S-Video cable. The S-Video cable carries a video signal. You can
connect the red and white ends of a Composite A/V cable to carry the audio signal.
S-Video and Left/
Right Audio Cables
Connect to S-Video
and L/R Audio jacks
(S-Video)
(red)
(white)
(yellow)

Digital Audio. The receiver includes a Digital Audio Out jack for compatibility with
Dolby Digital audio. To use this feature, you will need an optical audio cable
(not supplied), and a device that accepts Dolby Digital input. The optical audio cable will
carry the audio signal. To complete the setup, you'll also need a connection for the video
signal. You can use an S-Video cable to make the connection (for the best video signal), or
the yellow ends of a composite cable. If you use a composite cable, you do not need to
connect the red and white ends of the cable.
Ordinarily, your DVR produces tones to indicate when certain buttons on the remote
control are pressed or to indicate signal strength when you are positioning your dish. If
you use Digital Audio Out, you will not hear these tones.
Setup Examples
This chapter provides detailed examples showing how to connect the DIRECTV DVR to
your existing audio/video system. Choose the example closest to your configuration and
follow the steps in that section.
• Example 1: DVR with VCR, DVD and/or game system, and switch box or A/V
receiver (see page 12)
• Example 2: DVR with VCR (see page 14)
Setup Examples
1
• Example 3: DVR only (see page 16)
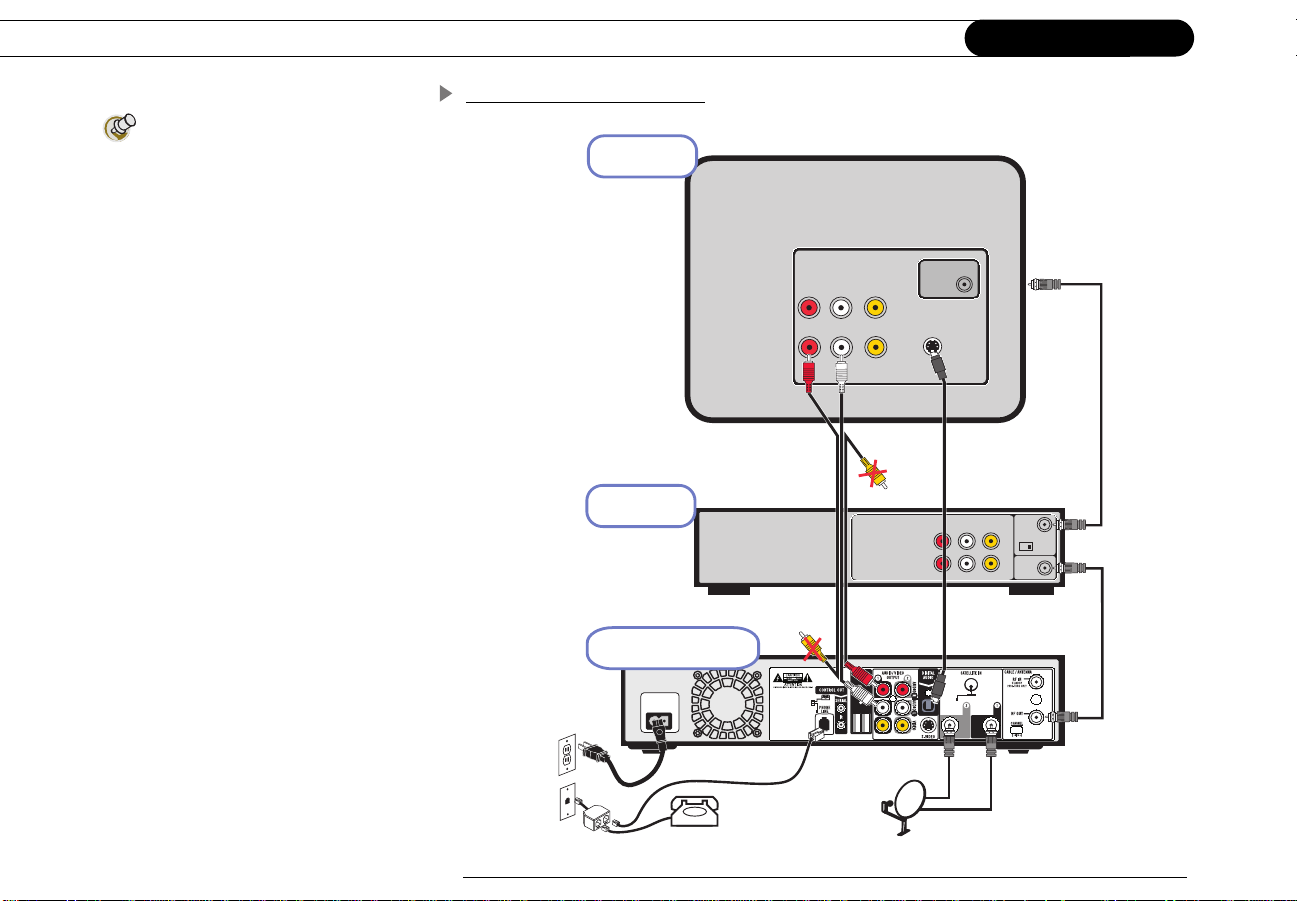
• Example 4: DVR with VCR, antenna or cable, multiple input TV (see page 18)
• Example 5: DVR with VCR, antenna or cable, single input TV (see page 20)
If you have trouble or if your configuration isn’t covered by one of these examples, see the
“Back Panel Reference” on page 152.
11
Chapter 1
Connecting
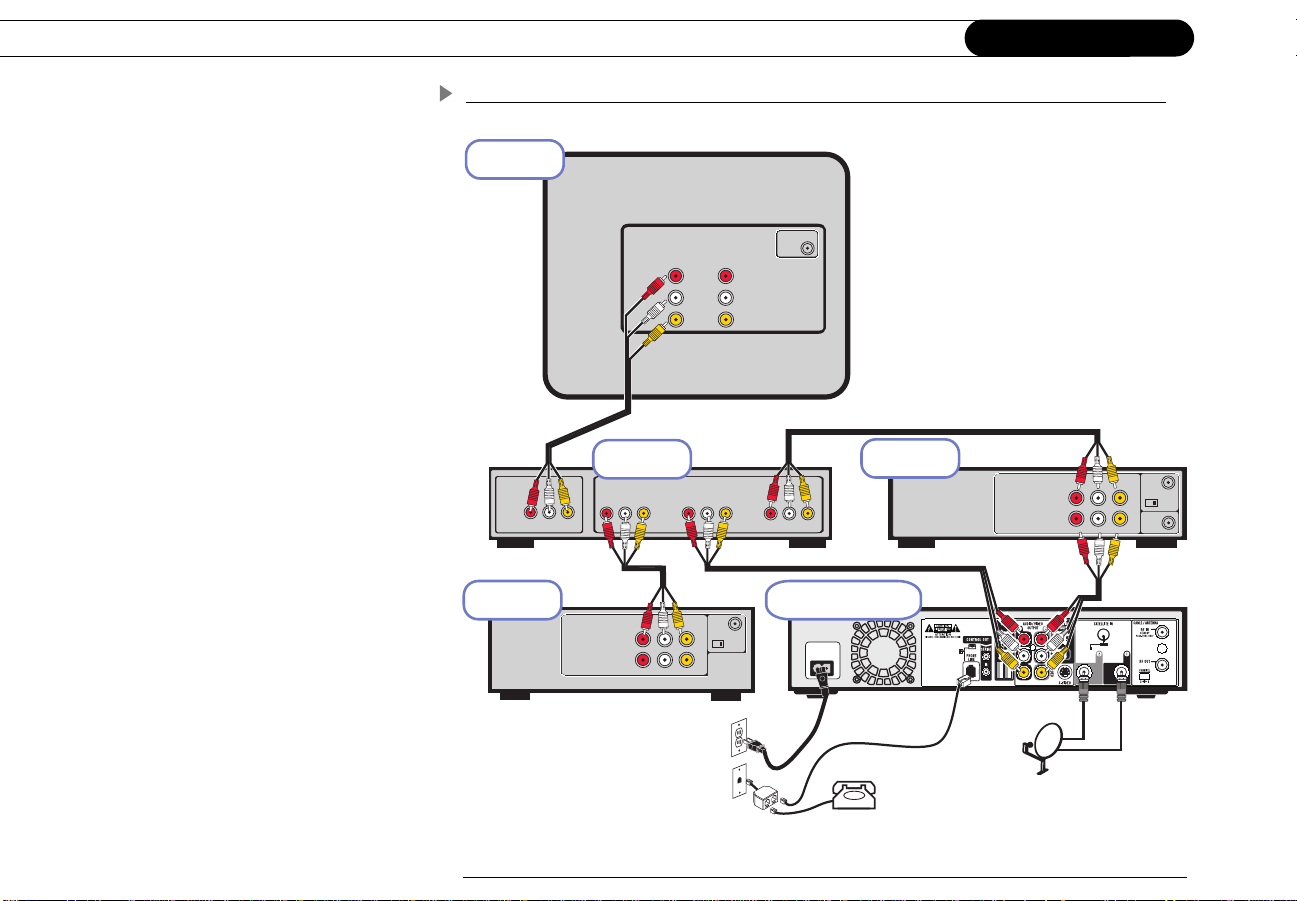
Example 1: VCR, DVD and/or Game System, and Switch Box or A/V Receiver
Television
RF
IN
Audio R
Audio L
Video
In
12
OUT
Audio
IN
Video
R
L
Ch
3/4
RF
Out
RF
In
OUTPUT
Audio
R
DVD Player or
Game System
L
Video
Switch Box or
A/V Receiver
Audio
Video
R
L
Audio
R
L
OUT
Audio
R
Video
INPUT
Video Audio
L
Ch
3/4
RF
Out
R
Video
L
DIRECTV DVR
AC~In
VCR
Note: Audio/Video cables shown are examples only. Use the best connections available on your equipment.

Example 1: VCR, DVD and/or Game System, and Switch Box or A/V Receiver
1 Connect the coaxial RF cables from your satellite dish antenna to the recorder. Connect
one coaxial RF cable that comes from your satellite dish antenna to the jack labeled
“Satellite In 1” on the recorder. If you have a second coaxial RF cable from your satellite
dish antenna, connect it to the jack labeled “Satellite In 2.”
Setup Examples
To switch between watching
DIRECTV® programming and
watching video from your VCR, DVD or
game system:
1
2 Connect the recorder’s output to the switch box or A/V receiver’s input.
3 Connect your switch box or A/V receiver’s output to your TV’s input.
4 Connect the recorder’s output to your VCR’s input. This will allow you to save programs
recorded on your DIRECTV Recorder to videotape.
5 Connect your VCR’s output to your switch box or A/V receiver’s input.
6 Connect your DVD player and/or game system’s output to your switch box or A/V
receiver’s input.
7 Connect the phone line. (For more about the phone connection, see page 3.)
8 Insert the Access Card that came with your DVR. Insert the card into the slot in the
direction indicated on the card. Stop when the card makes contact with the back of the slot.
®
To watch DIRECTV
channels, you must insert the card correctly and activate it (activation
is covered in the next chapter).
9 Plug in all power cords. After you see the Welcome screen, skip to “Guided Setup” on
page 23. If you do not see the Welcome screen, see page 119.
• With a switch box, press the buttons
on your switch box
• With an A/V receiver, use the “Input,”
or “Source” button on the receiver or
its remote control.
If you are having trouble changing the
video source, refer to the instructions that
came with
the A/V receiver or switch box.
13
Chapter 1
To switch between watching your
VCR and watching video from your
DVR, you will need to use the “Input,”
“Source,” or “TV/Video” button on your
TV or TV’s remote control to change the
video source. Some TVs also have a
“Menu” button that allows you to change
the video source using an on-screen
menu.
If you have trouble changing the video
source refer to the instructions that came
with your TV.
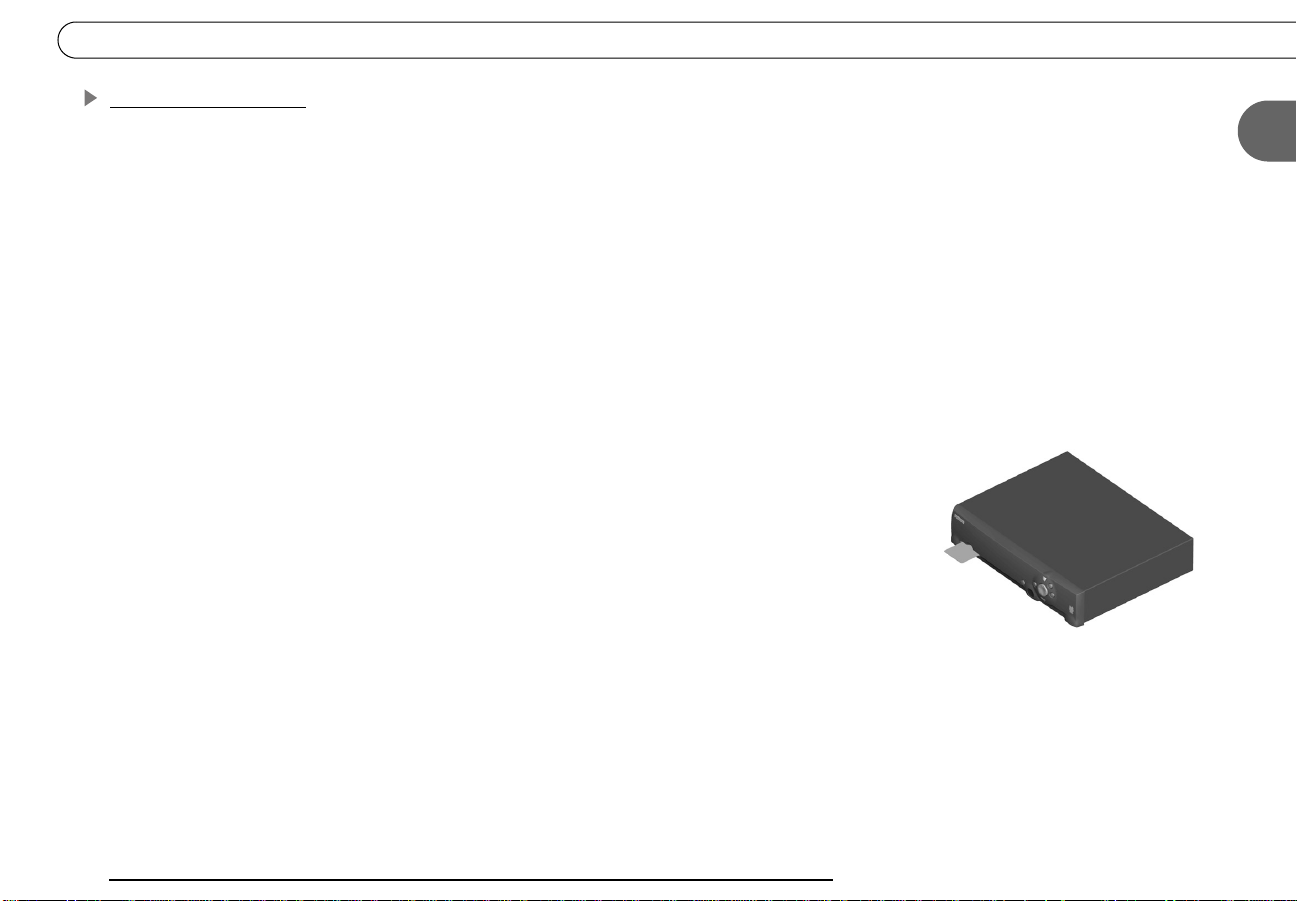
Example 2: DVR with VCR
Television
VCR
INPUT
R
Connecting
Antenna
In
VIDEO
L
S-VIDEO
Audio
OUT
IN
Video
R
L
Ch
3/4
RF
Out
RF
In
14
DIRECTV DVR
AC~In
Note: Audio/Video cables shown are examples only. Use the best connections available on your equipment.
Example 2: DVR with VCR
1 Connect the coaxial RF cables from your satellite dish antenna to the recorder. Connect
one coaxial RF cable that comes from your satellite dish antenna to the jack labeled
“Satellite In 1” on the recorder. If you have a second coaxial RF cable from your satellite
dish antenna, connect it to the jack labeled “Satellite In 2.”
2 Connect the recorder’s output to the switch box or A/V receiver’s input.
3 Connect your switch box or A/V receiver’s output to your TV’s input.
4 Connect the recorder’s output to your VCR’s input. This will allow you to save programs
recorded on your DIRECTV Recorder to videotape.
5 Connect your VCR’s output to your switch box or A/V receiver’s input.
6 Connect your DVD player and/or game system’s output to your switch box or A/V
receiver’s input.
7 Connect the phone line. (For more about the phone connection, see page 3.)
8 Insert the Access Card that came with your DVR. Insert the card into the slot in the
direction indicated on the card. Stop when the card makes contact with the back of the slot.
®
To watch DIRECTV
is covered in the next chapter).
channels, you must insert the card correctly and activate it (activation
Setup Examples
1
9 Plug in all power cords. After you see the Welcome screen, skip to “Guided Setup” on
page 23. If you do not see the Welcome screen, see page 119.
15

Chapter 1
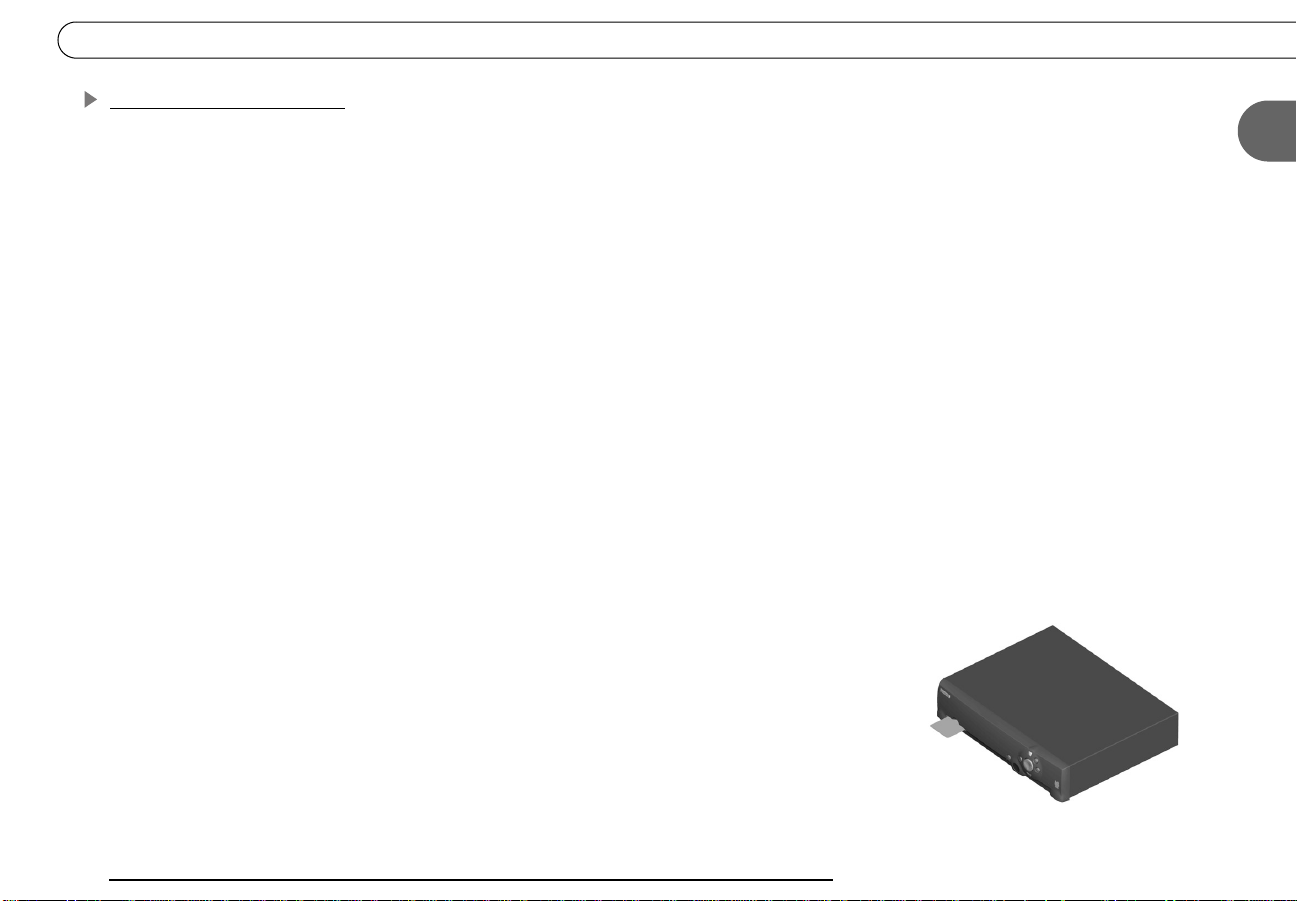
Example 3: DVR Only
Television
INPUT
Antenna
In
Connecting
16
R
VIDEO
L
S-VIDEO
DIRECTV DVR
AC~In
Note: Audio/Video cables shown are examples only. Use the best connections available on your equipment.
Example 3: DVR Only
Setup Examples
1 Connect the coaxial RF cables from your satellite dish antenna to the recorder. Connect
one coaxial RF cable that comes from your satellite dish antenna to the jack labeled
“Satellite In 1” on the recorder. If you have a second coaxial RF cable from your satellite
dish antenna, connect it to the jack labeled “Satellite In 2.”
2 Connect the recorder’s output to the switch box or A/V receiver’s input.
3 Connect your switch box or A/V receiver’s output to your TV’s input.
4 Connect the recorder’s output to your VCR’s input. This will allow you to save programs
recorded on your DIRECTV Recorder to videotape.
5 Connect your VCR’s output to your switch box or A/V receiver’s input.
6 Connect your DVD player and/or game system’s output to your switch box or A/V
receiver’s input.
7 Connect the phone line. (For more about the phone connection, see page 3.)
8 Insert the Access Card that came with your DVR. Insert the card into the slot in the
direction indicated on the card. Stop when the card makes contact with the back of the slot.
®
To watch DIRECTV
is covered in the next chapter).
9 Plug in all power cords. After you see the Welcome screen, skip to “Guided Setup” on
page 23. If you do not see the Welcome screen, see page 119.
channels, you must insert the card correctly and activate it (activation
1
17
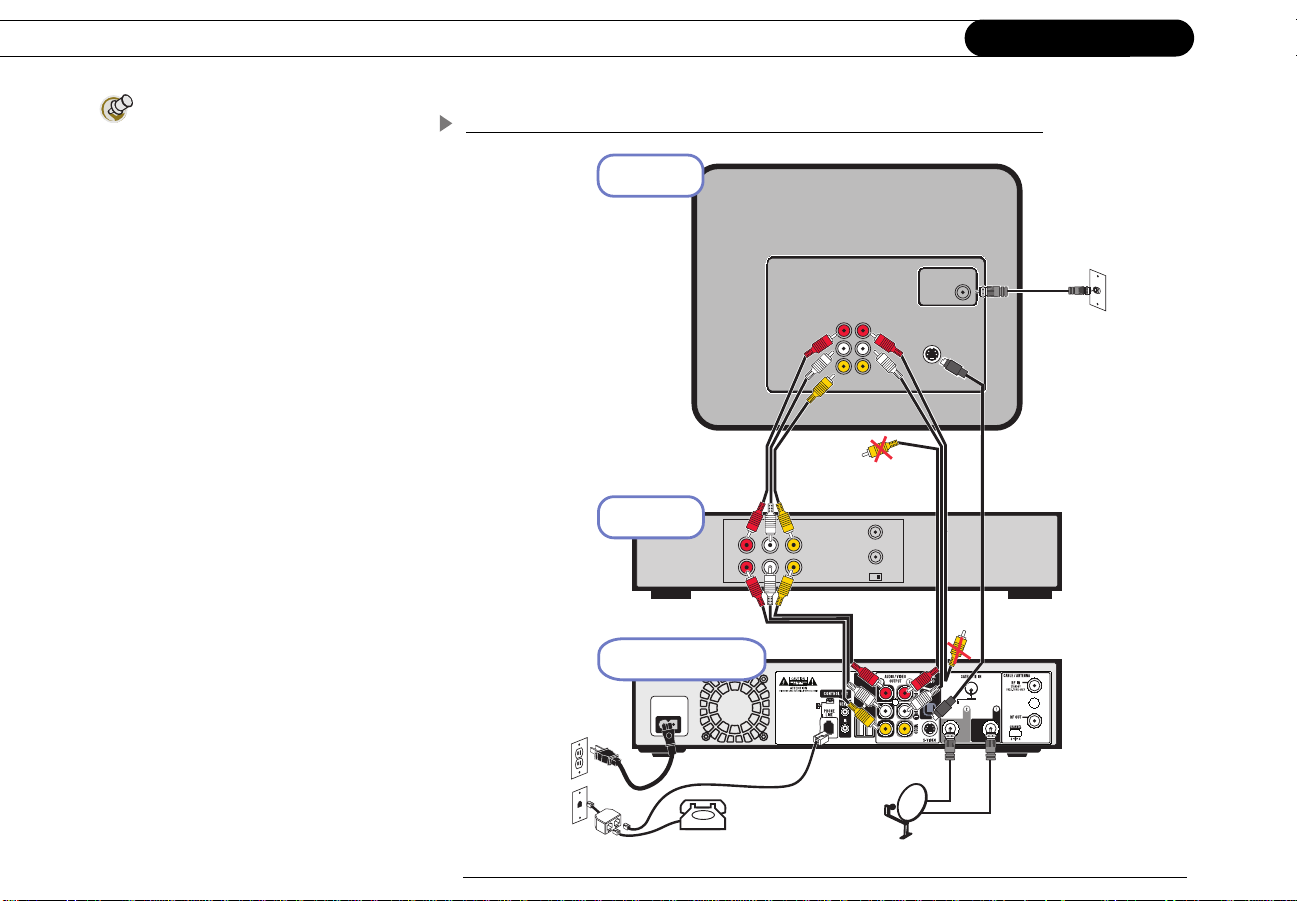
Chapter 1
To switch between watching
DIRECTV® channels and antenna/
cable channels, or tapes on your VCR, use
the “Input,” “Source,” or “TV/Video”
button on your TV’s remote to change the
video source. Some TVs have a “Menu”
button and an on-screen menu that lets
you change the video source.
You can watch an antenna or cable
channel while recording a DIRECTV
channel. You will NOT be able use DVR
functions on antenna or cable channels.
You will also need to use your TV’s remote
control to change antenna/cable
channels.
Connecting
Example 4: DVR, VCR, Antenna or Cable, and Multiple Input TV
Television
Antenna
In
S-VIDEO
R
VCR
Audio
R
L
VIDEO
Video
L
INPUT
OUT
IN
Ch 3/4
RF
Out
RF
In
If you are having trouble changing the
video source, refer to the instructions that
came with your TV.
18
DIRECTV DVR
AC~In
Note: Audio/Video cables shown are examples only. Use the best connections available on your equipment.
Setup Examples
Example 4: DVR, VCR, Antenna or Cable, and Multiple Input TV
1 Connect the coaxial RF cables from your satellite dish antenna to the recorder. Connect
one coaxial RF cable that comes from your satellite dish antenna to the jack labeled
“Satellite In 1” on the recorder. If you have a second coaxial RF cable from your satellite
dish antenna, connect it to the jack labeled “Satellite In 2.”
2 Connect the recorder’s output to the switch box or A/V receiver’s input.
3 Connect your switch box or A/V receiver’s output to your TV’s input.
4 Connect the recorder’s output to your VCR’s input. This will allow you to save programs
recorded on your DIRECTV Recorder to videotape.
5 Connect your VCR’s output to your switch box or A/V receiver’s input.
6 Connect your DVD player and/or game system’s output to your switch box or A/V
receiver’s input.
7 Connect the phone line. (For more about the phone connection, see page 3.)
8 Insert the Access Card that came with your DVR. Insert the card into the slot in the
direction indicated on the card. Stop when the card makes contact with the back of the slot.
®
To watch DIRECTV
is covered in the next chapter).
9 Plug in all power cords. After you see the Welcome screen, skip to “Guided Setup” on
page 23. If you do not see the Welcome screen, see page 119.
channels, you must insert the card correctly and activate it (activation
“Multiple input” means the TV has
multiple input plugs for A/V
connectors.
Steps , , and are shown
using composite and s-video
cables. You can make these connections
with other cables, as explained on page
10. Your DIRECTV DVR comes with one
composite and one s-video cable. To
complete the setup example as shown,
you will need to use cables that came with
your VCR, or purchase additional cables.
1
19
 Loading...