

User manual

Register your product and get support at
www.philips.com/welcome
Dear client: Thank you for choosing the digital terr
DSR3131H. In this guidance, information of appliance use, connection, control and protection are
provided, with which you can know your new receiver better. To make the reference easier, the
manual has been divided into several sections. 1. The first part is about installation, connection of the
receiver with other apparatus and how to use the remote control. 2. The second part is about basic
usage, where is provided the necessary and principal information for daily use. 3. The third part is
about advanced usage, with the customized usage and the more complex characteristics.
Warning
When using the receiver, you shall know at least the
careful reading of the manual is recommended. In this method, you can use the device in an optimal
way, without any problems or malfunctions.
Note: Due to updates or errors, the contents in this manual may not exactly correspond with the
actual product.
estrial receiver and smart-box IP model Philips
basic knowledge in this guidance. Therefore, a
2

Index
1 I
nitiation ................................................................................................................... 5
1.1 Thanks .............................................................................................................. 5
1.2 Information on this Manual .............................................................................. 5
1.3 Explanation of safety ........................................................................................ 5
1.4 Intended Use .................................................................................................... 5
2 First steps.................................................................................................................. 6
2.1 Safety ............................................................................................................... 6
2.2 Unpacking ........................................................................................................ 7
2.3 Controls and ports ............................................................................................ 8
2.4 Connecting the necessary connections ........................................................... 10
2.5 Optional cable connections ............................................................................. 11
3 Operation ................................................................................................................ 12
3.1 Basic Menu Operation ..................................................................................... 12
3.2 Initial Operation ............................................................................................. 12
4 Daily operation ........................................................................................................ 13
4.1 Program Change ............................................................................................. 13
4.2 Volume ........................................................................................................... 13
4.3 EPG - Electronic Programme Guide ................................................................. 13
4.4 Favorites list ................................................................................................... 14
4.5 Teletext .......................................................................................................... 14
4.6 Info button ..................................................................................................... 14
4.7 Switching between TV and radio mode ........................................................... 14
4.8 Automatic shutdown....................................................................................... 15
5 Menu Selection ........................................................................................................ 16
5.1 The OSD menu "Settings" ............................................................................... 16
5.2 The OSD menu "Installation".......................................................................... 21
5.3 The OSD menu "Organizer" ............................................................................ 25
5.4 The OSD menu "System Configuration" .......................................................... 27
5.5 The OSD menu "CA Information" .................................................................... 28
5.6 The OSD menu "Connectivity" (optional)........................................................ 28
5.7 The OSD menu "Software Update" ................................................................. 28
6. Trouble-shooting guide ........................................................................................... 29
7. Service and Support ................................................................................................ 31
7.1 Warranty / Guarantee .................................................................................... 31
7.2 Version ........................................................................................................... 31
8. Cleanse .................................................................................................................... 31
9. Decommissioning / camps ...................................................................................... 31
10. Dispose .................................................................................................................... 31
10.1 Packing ....................................................................................................... 31
3

10.2 Old appliance .............................................................................................. 31
10.3 Battery cells ................................................................................................ 31
11. Features .................................................................................................................. 32
4

1 I
nitiation
1.1 Thanks
You have purchased a quality receiver. Our products are subject to constant strict quality controls. So
we make sure you enjoy our products.
The receiver is a digital receiver for the reception of free radiated and the encrypted HD+ satellite
channels in SD and HDTV formats. Note that you need a digitally-compatible satellite antenna to
operate, which must be equipped with a digital LNB.
Now not only the TV reception is digital! The HD Receiver has the quality, digital HDMI output for
connecting to Plasma and LCD Television. The digital image signal to ensure maximum image quality.
To receive the encrypted HD + HD + programs a prepaid smart card of HD PLUS GmbH is included.
With this card, you can test the HD + programs for a period of 12 months is currently free after first.
Would you then continue to look at the HD + programs, the credit card on the HD Plus GmbH needs
to be recharged. In view of the HD + function of the receiver and the HD + prepaid smart card, see the
terms and conditions of the HD PLUS GmbH application (see page 33)
.
1.2 Information on this Manual
Read the manual carefully. Keep the manual for later use. If you pass the device on to anyone else,
please ensure that you or the user manual.
1.3 Explanation of safety
The manual contains the following categories of safety instructions:
Danger: These statements alert you to potential personal injury
Warning: These instructions warn against possible property or environmental damage
1.4 Intended Use
This device is suitable for satellite reception of unencrypted and encrypted HD + digital TV and radio
signals in private households.
5

2 First steps
2.1 Safety
Read the safety instructions before using the appliance carefully!
Suffocation: Keep plastic bags away from babies, children and animals.
Danger of swallowing: Let small parts out of the reach of children or animals.
Handling battery cells: Do not reverse polarity, the battery cells. Only use battery cells of the same
type. Do not mix old and new battery cells. Follow the safety instructions of the battery manufacturer.
Remove the battery cells and store in a safe when the remote for a long time is not used. This can
prevent damage by leaking battery cells.
Mains voltage: Do not operate the appliance only to power supply systems with the mains voltage
and frequency indicated on the device housing! Connect the device to only after all connection and
installation work on the power grid. The power plug must always be accessible to disconnect the
appliance quickly in an emergency from the mains can. Unplug the appliance immediately from the
power supply when the device or the power cable is damaged.
Site: Do not operate the device in a moderate climate. Place the unit only within dry and closed rooms
with equipment feet down on a straight and level surface. In order to protect them from discoloration
caused by the natural heat generated by the device, place the device on a suitable underlay. Select a
location that protects the device against heavy dirt.
External influences: Prevent the device is exposed to dripping or splashing. Do not expose the
appliance to moisture (eg condensation or splash water) or direct sunlight. Do not place objects filled
with liquids such as Vases on or above the unit. Place the appliance should be situated away from heat
sources, such as Heaters or devices that heat up. Make no open flames like candles or the like on the
device or in the vicinity thereof. Never cover the ventilation slots. Do not place blankets, newspapers
or the like on or under the unit.
Explosive atmosphere: Do not operate the unit not under a very dusty or contaminated with
flammable gases environment (eg workshops).
Earthing: Antenna systems must always be earthed, paying the relevant local and VDE regulations
must be observed.
Objects in the device: Make sure that no objects can enter the ventilation slots. There is risk of a
fatal electric shock! Adequate ventilation: The ventilation slots on the device must never be obscured.
Make sure that the device to the side and above a minimum clearance of 10 cm and that the heat has
to be fully discharged by airflow upwards.
Cleaning: Before cleaning the device, always disconnect or remove the battery cells from the mains.
Use a dry or slightly damp cloth, making sure that no moisture penetrates into the device.
6

Repair: Never open the housing of the device yourself: Even when power disconnection acute risk of
a fatal electric shock. Internal components may be damaged by contact. Repairs may only be carried
out by qualified personnel. Through improper tampered with the warranty, and the safety of the
device can no longer be guaranteed!
Extended absence / thunderstorms: In case of prolonged absence or thunderstorms, remove the
power plug from the outlet. Also disconnect the antenna connections to avoid damage during
thunderstorms.
2.2 Unpacking
2.2.1 Packing
Leave the unit until ready for use in the packaging. If you have Brought the unit from a cold to a hot
environment, leave it Possible Because of the formation of condensation in the device are in the closed
package about an hour! Remove the packaging of the receiver, the remote control and the battery
cells. For have to ship it may help keep the transport packaging.
Danger: Note for the environmentally sound disposal of materials, read the chapter 10 - "Disposal"!
2.2.2 Battery Cells remote
Use the first installation and the replacement of spent cells always two new e battery cells (AAA)
1. Open the battery cover on the back of the handset by gently lifting the closure.
2. Remove possibly discharged battery cells and then put the two battery cells in the polarity
shown in the battery compartment of the remote control (+/-) as indicated.
3. Replace the battery cover then again carefully in the original position, so that snaps into the
last of the closure.
Danger: Note for the disposal of the battery cells, read the chapter 10 - Dispose!
Warning: Batteries must not be exposed to excessive heat such as sunshine fire or the like.
Caution: Do not throw batteries into fire, short or disassemble.
7

2.3 Controls and ports
2.3.1 Remote Control
1. POWER On or off in stand-by the STB (in
use / standby).
2. Digit keys 0-9 To switch to a particular
program or to enter numeric values and
passwords.
3. BACK Switch back to the last-watched before
context switch program.
4. TV/RADIO Switch between TV and radio
mode.
5. Muting / activating the sound.
6. INFO Displays program information.
7. FAV selecting a program / favorites list
8. MENU Access the menu.
9. Navigation keys ▲ / ▼ / ◄ / ►
Navigation in a menu. Outside of menus ▲ /
▼ is for the program switch and
◄ / ► for
Batteries: 2 AAA size
volume setting (VOL - / +) used.
10. OK Confirm the menu selection.
11. EPG Electronic Program Guide (EPG).
12. EXIT Exit menu or quit setting.
13. VOL + / VOL- Adjust the volume.
14. CH + / CH- Program switching.
15. color keys (red, blue, green, yellow).
Function depends on menu screen and mode.
16. TEXT Teletext function start the receiver and
terminate.
17. AUDIO Adjusting the available audio and
audio channels.
18. SUB Displaying subtitles (if available).
19. RES Change resolution.
Caution: Be careful when inserting the batteries in the correct polarity! The polarity is indicated in the
battery compartment.
Attention: Used batteries are hazardous waste - always dispose of properly!
8
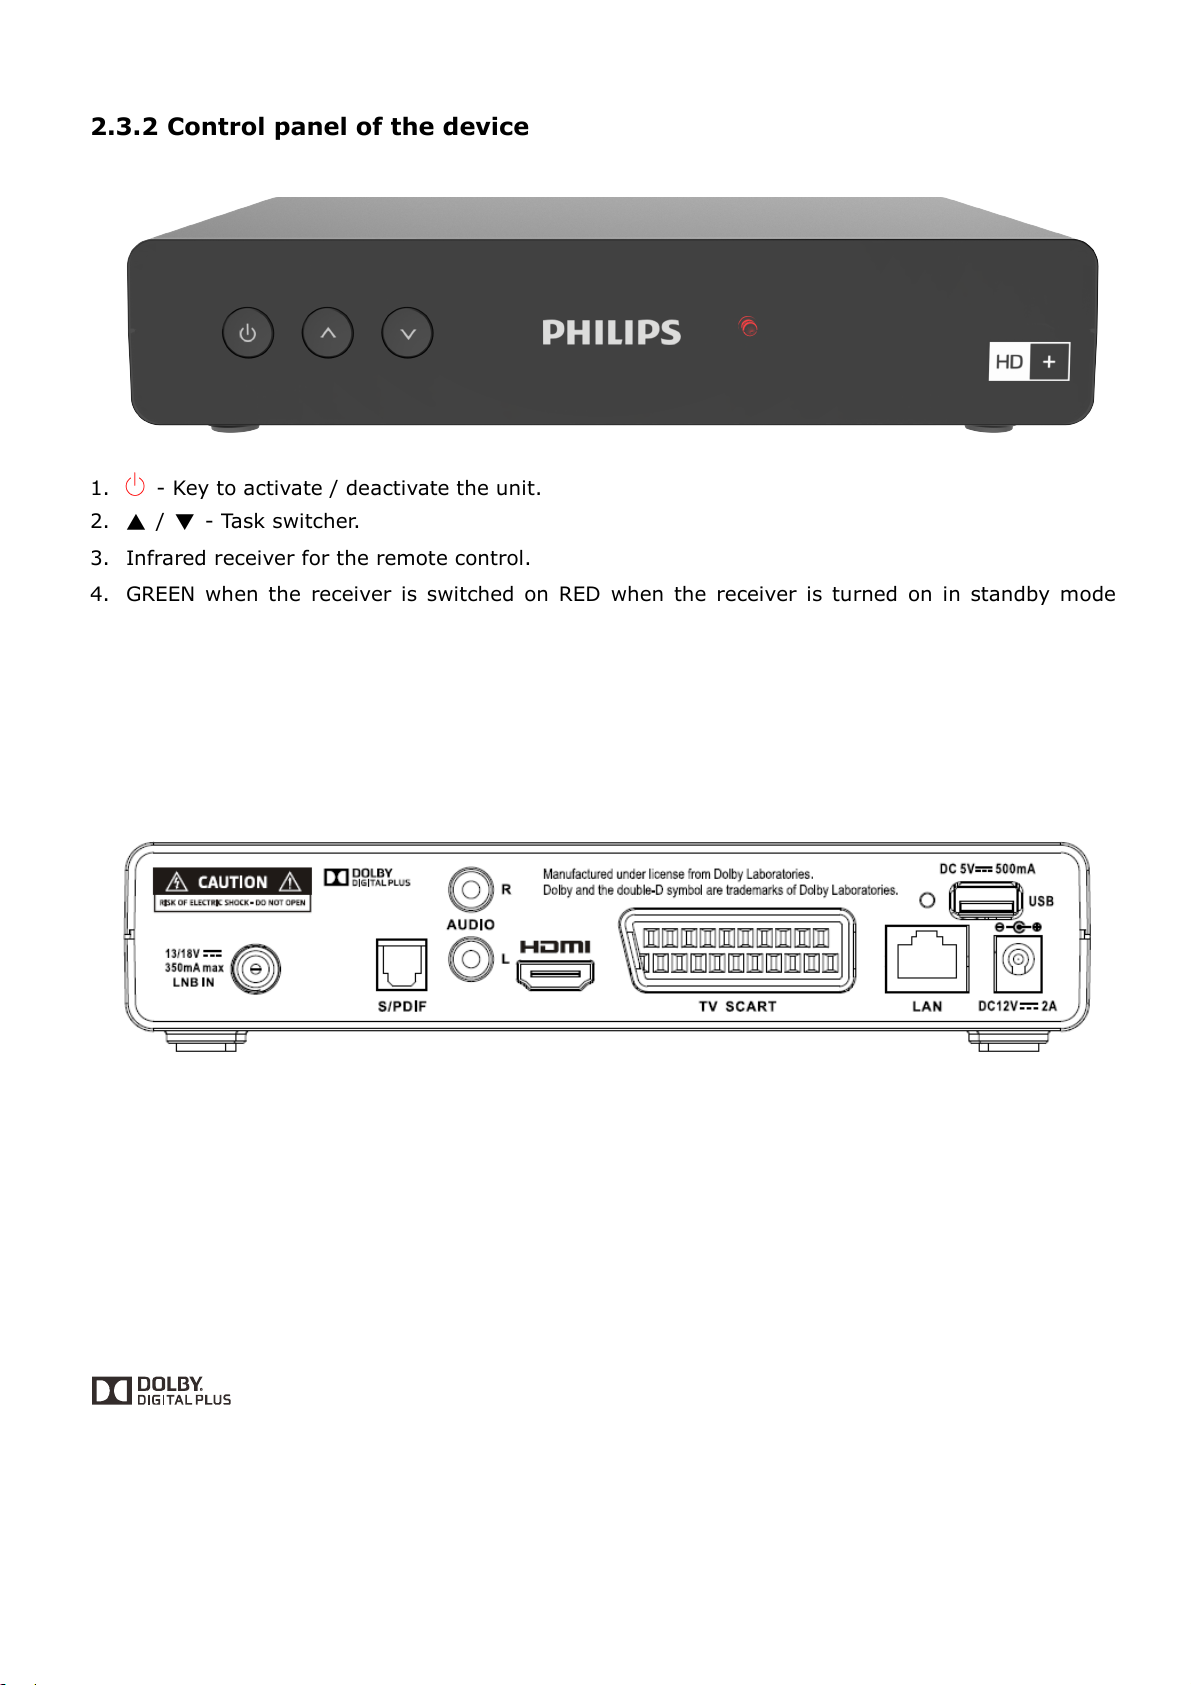
2.3.2 Control panel of the device
1. - Key to activate / deactivate the unit.
2. ▲ / ▼ - Task switcher.
3. Infrared receiver for the remote control.
4. GREEN when the receiver is switched on RED when the receiver is turned on in standby mode
(standby) is.
The HD + smart card must be inserted pointing in the direction of arrow and with the metal contact
facing down.
2.3.3 Connections of the rear panel
1. RF IN - antenna input for connecting an LNB of satellite antenna system. 1. Current max. 350 mA.
2. S/PDIF - Optical digital audio output S / PDIF (connection optional).
3. USB - USB port for fast external USB hard drive.
4. HDMI - HDMI jack for connecting a HD compatible TV.
5. SCART - SCART socket for connecting a non-HD compatible TV.
6. LAN - Ethernet RJ45. Connection for service.
7. Power cable - power supply power cable 12V DC 2A.
Manufactured under license from Dolby Laboratories.
Dolby and the double-D symbol are trademarks of Dolby Laboratories.
HDMI, the HDMI logo and "High-Definition Multimedia Interface" are trademarks or registered
trademarks of HDMI Licensing LLC in the US and other countries.
9

2.4 Connecting the necessary connections
The following output of the receiver must be connected for commissioning. To do this, through the
described steps. Connect the receiver only after the connection of all necessary connections to the
mains.
Danger: Connect the receiver only after the connection of all necessary connections to the mains.
2.4.1 Antenna connect (page 3 · 1 point)
Connect a double shielded F-connector antenna line of the satellite system to the socket "RF IN".
Note that during the initial installation or if the device was disconnected from the mains, the antenna
19.2 ° East has to be aligned for the required HD + Software Update on the Astra satellite.
2.4.2 TV Connect device (Page 3 · 2 point)
Connect a "Standard HDMI" line, the "HDMI" socket on the receiver with your TV.
If you have no HD-compatible television or problems with the HDMI connection, connect a SCART cable
to "SCART" socket of the receiver to your TV. Note, however here is that you then take the picture with
the high HD dissolution only with the normal SD-Au can see dissolution. If the currently set HD +
program are sent due to copyright issues with copy, images are not output via the SCART socket can be
done. Then turn to if necessary on the identical program with SD dissolution.
2.4.3 Mains power supply (Page 3 · 3 point)
If no further optional connections (hereinafter in Section 2.5 above) are made, insert the plug of power
line into an empty socket.
Danger: Do not operate the appliance only to power supply systems with the mains voltage and
frequency indicated on the device housing! Connect the device only after all connection and installation
work on the mains.
10

2.5 Optional cable connections
2.5.1 SPDIF
If an external audio amplifier or a stereo digital SPDIF input are connected, connect with a shielded
coaxial RCA cable, the "S / PDIF coaxial" RCA jack on the receiver to the external audio device.
2.5.2 USB (Chargeable Activation Needed)
USB port (Type A) for connecting an external USB storage device.
Connected USB devices may connect with a maximum current of 500 mA charge to damage to the
receiver and the To prevent USB device! Do not connect hard drives without its own power supply.
If the USB storage device to be removed from the receiver, select Always the menu item "Media
Manager" / Media Information "and then press to log off the storage medium the yellow button" Safely
Remove " Note that for technical reasons, it may result in data errors relating to an external USB storage
device. As the manufacturer of the receiver assume no liability for data loss or damage related to the
use of the USB interface and recommend against the use of media to the receiver always a backup to
perform.
11
3 Operation
3.1 Basic Menu Operation
The receiver is operated via the remote control. The integrated OSD (On Screen Display) operated as
follows:
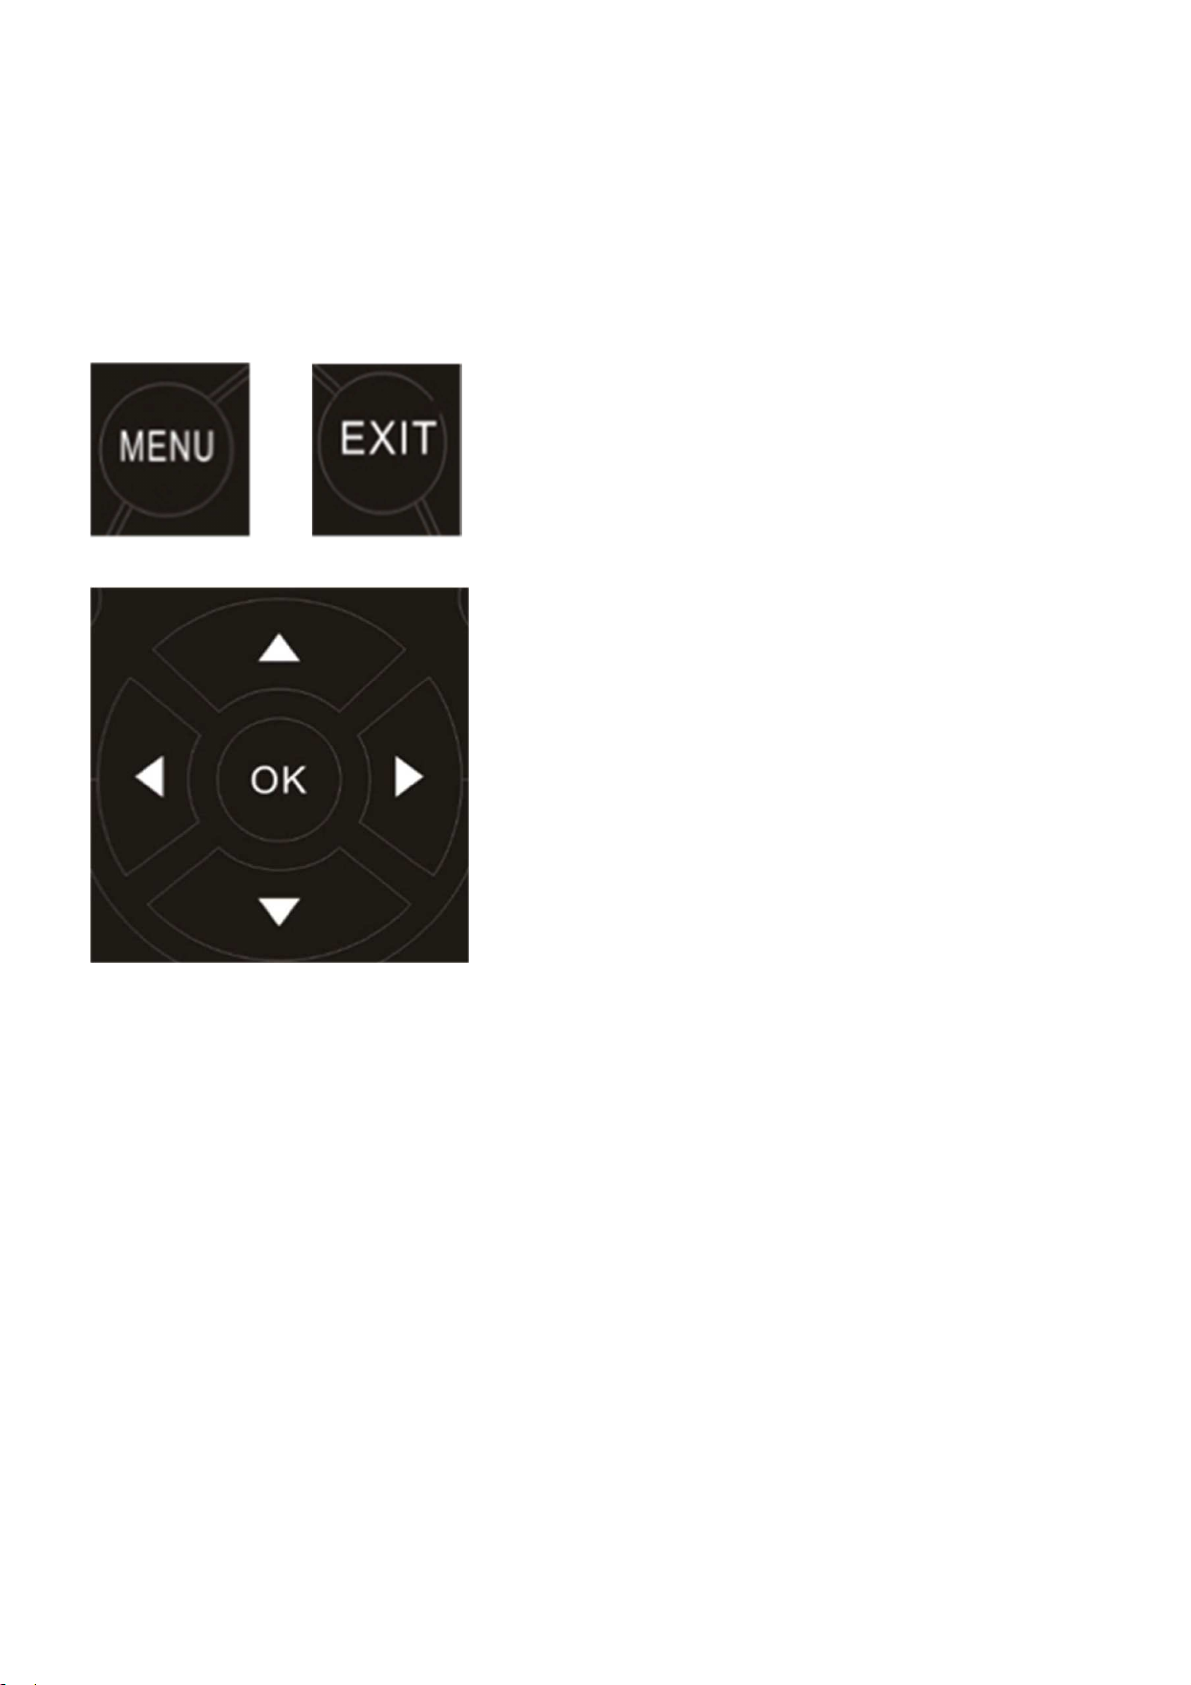
Open and close the OSD: The OSD screen menu,
you make all the settings of the satellite receiver.
The call is made by the "MENU" button. To exit the
OSD, press "EXIT".
Navigating the OSD: Navigation within the OSD
occurs via the control buttons ▲ / ▼ and ◄ / ►
to "mark a menu item or entry or displayed in the
OSD buttons. Use the key.
OK "activates a selected menu item and, if
available, a list of possible settings called. The
BACK button will each return to the previous menu
level.
Notes on OSD: If the menu lock is on, the
required password has been factory "0000" on the
numerical code and can be changed later. The
menu lock is used to prevent unauthorized
operation of the device.
3.2 Initial Operation
3.2.1 Welcome Page
1. When you turn on the device for the first time, the installation wizard starts automatically, just as if
you reset the receiver using the menu in the factory settings.
2. Select the language (display language on-screen menu).
3. Select Astra scan from. For changes to the normal.
Satellite settings, press the blue button. For example, to select a Unicable settings. In case of updating
the receiver is turned on can take 20 to 60 minutes to complete. Have some patience. Because the
update is automatic, you do not need to be present at this time.
12
4 Daily operation
4.1 Program Change
The context switch is done with the CH + / CH- or ▲ / ▼ Buttons.
4.2 Volume
The volume is adjusted with the VOL + / VOL- or ◄ / ► Buttons.
With the MUTE button, the sound can be muted and activated again.
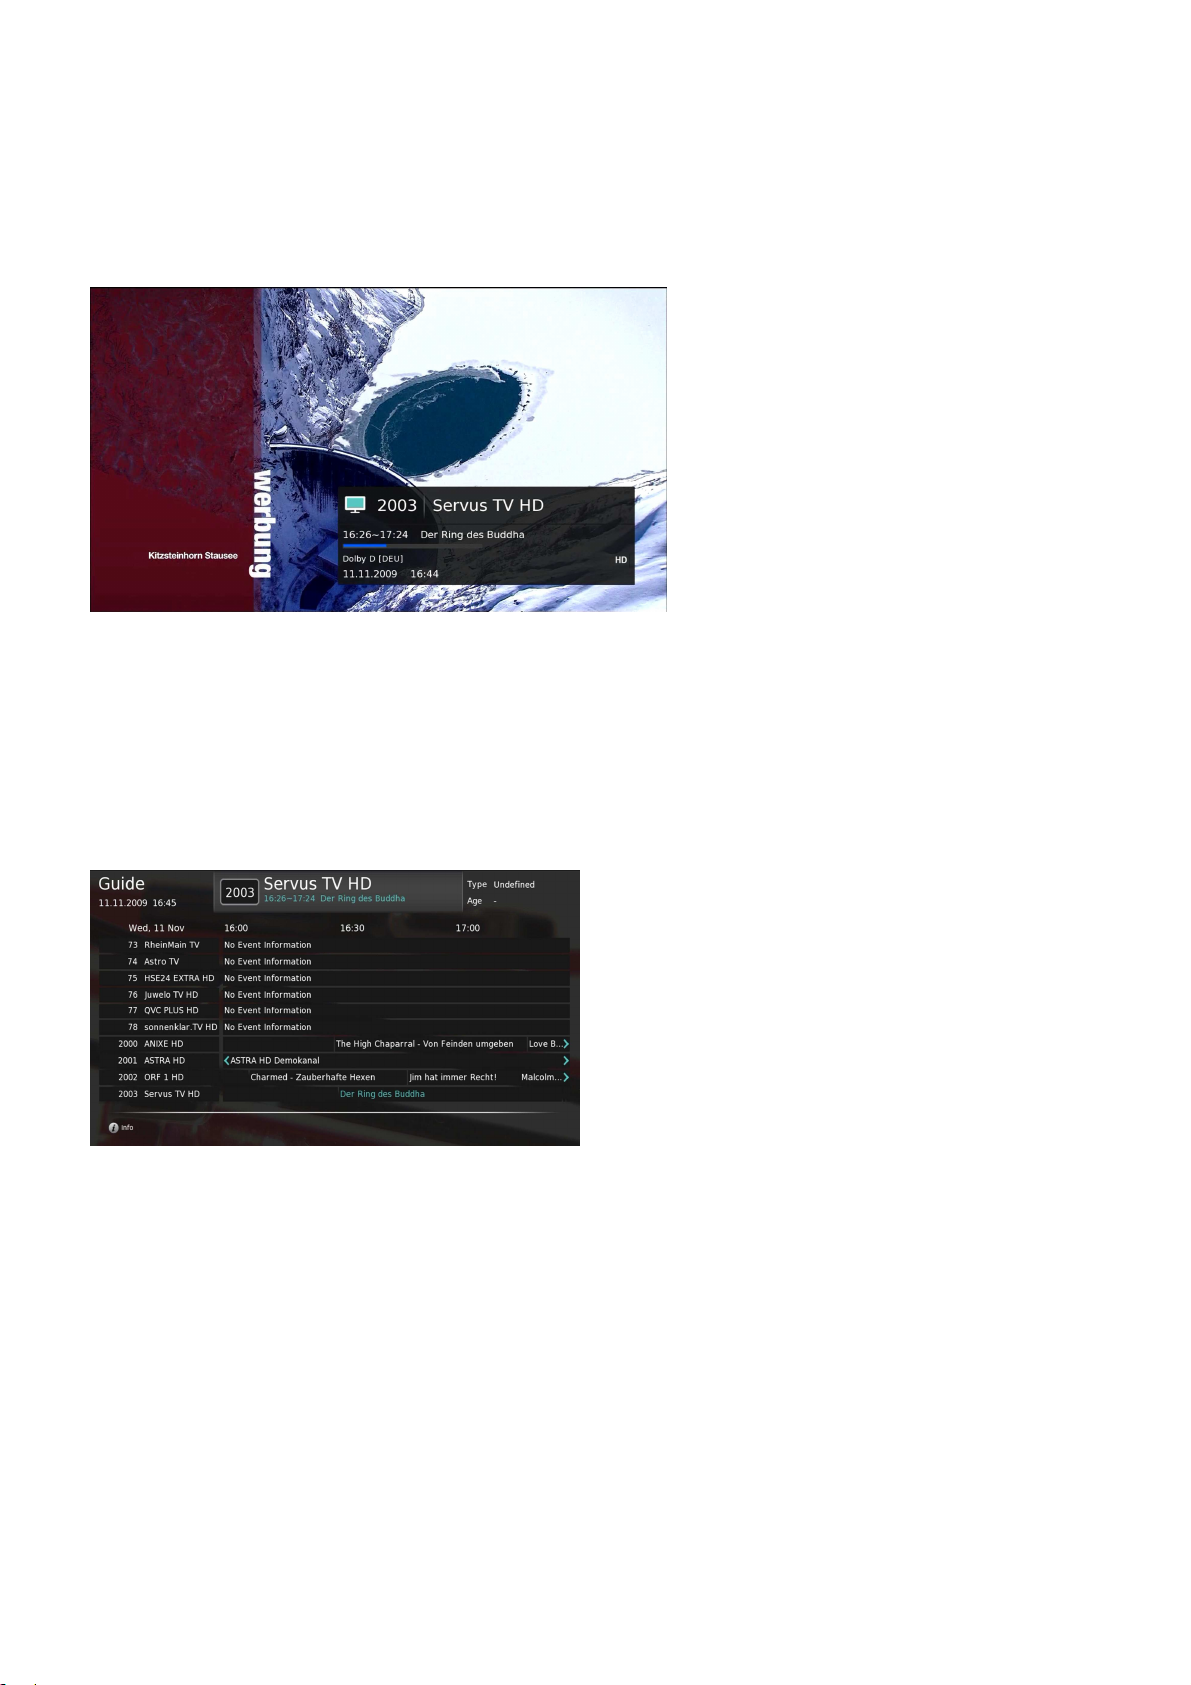
4.3 EPG - Electronic Programme Guide
Press the "EPG" Various information are called.
If the EPG button once, an overview of the
programs for the current day can be displayed.
The overview of subsequent days and again the
index can be attributed to the current day with
the yellow or green button. If a program list is
marked with ▲ / ▼, an with the OK button.
Infotext be accessed through the program and with the BACK button that can be left again. If the EPG
button is pressed again, a daily overview can be shown on the broadcasts of the various programs. With
◄ / ► can be navigated in the daytime. With ▲ / ▼ you can navigate in the list of programs.
13

4.4 Favorites list
With of the Button FAV becomes the Favorites feature called. The favorite lists for example can be filled
with the favorite programs of different users. As long as the List is displayed, can by repeatedly pressing
the FAV button to select the list to be set. When switching is then switched only within the selected
favorites list. With the TV / RADIO button can be returned to the overall channel list. The configuration
of the favorite lists is explained in section 5.3.
4.5 Teletext
Many programs broadcast additional information and services. Teletext pages are "electronic
magazines", from which one can get the latest news, sports results, weather forecasts, commercial
offers and much more. The scope and content is defined by the respective program provider. The
teletext function of the receiver is started with the TEXT button. The home page is always the page 100.
There is a most.
Overview of the further sub-pages (eg page 200, sports overview) displayed. The page numbers always
have three digits with the numeric buttons 0 – 9 be entered. Alternatively, you can navigate with the
arrow keys. Here, with the UP / DOWN buttons to select a teletext page up / down to scroll and buttons
to scroll in the bottoms of a teletext page with the Left / Right. By renewed pressing the TEXT button,
the teletext function of the receiver can be completed.
Note: Loading especially teletext subpages may take some time due to the system.
4.6 Info button
If the INFO button appear information about the current and next programs. Standing information
about the broadcasting times available, the bar graph displays the remaining term of the current
program. Use the arrow key can then be called the info text of the following program.
4.7 Switching between TV and radio mode
With the TV / RADIO button can be switched to radio mode and return to the TV mode. The receiver
always turns it back into the overall program list.
14

4.8 Automatic shutdown
Due to a legal regulation, an automatic shutdown after long periods of inactivity (for example, because
you are asleep) is preset with this receiver. Should the receiver so after a long time, is in no operation
(eg program change) occurs, stop automatically, there is no fault in the device! This function is
convenient, easy on your receiver and possibly save unnecessary electricity costs.
15
5 Menu Selection
Use the MENU key, the OSD (On Screen Display) menu is accessed.
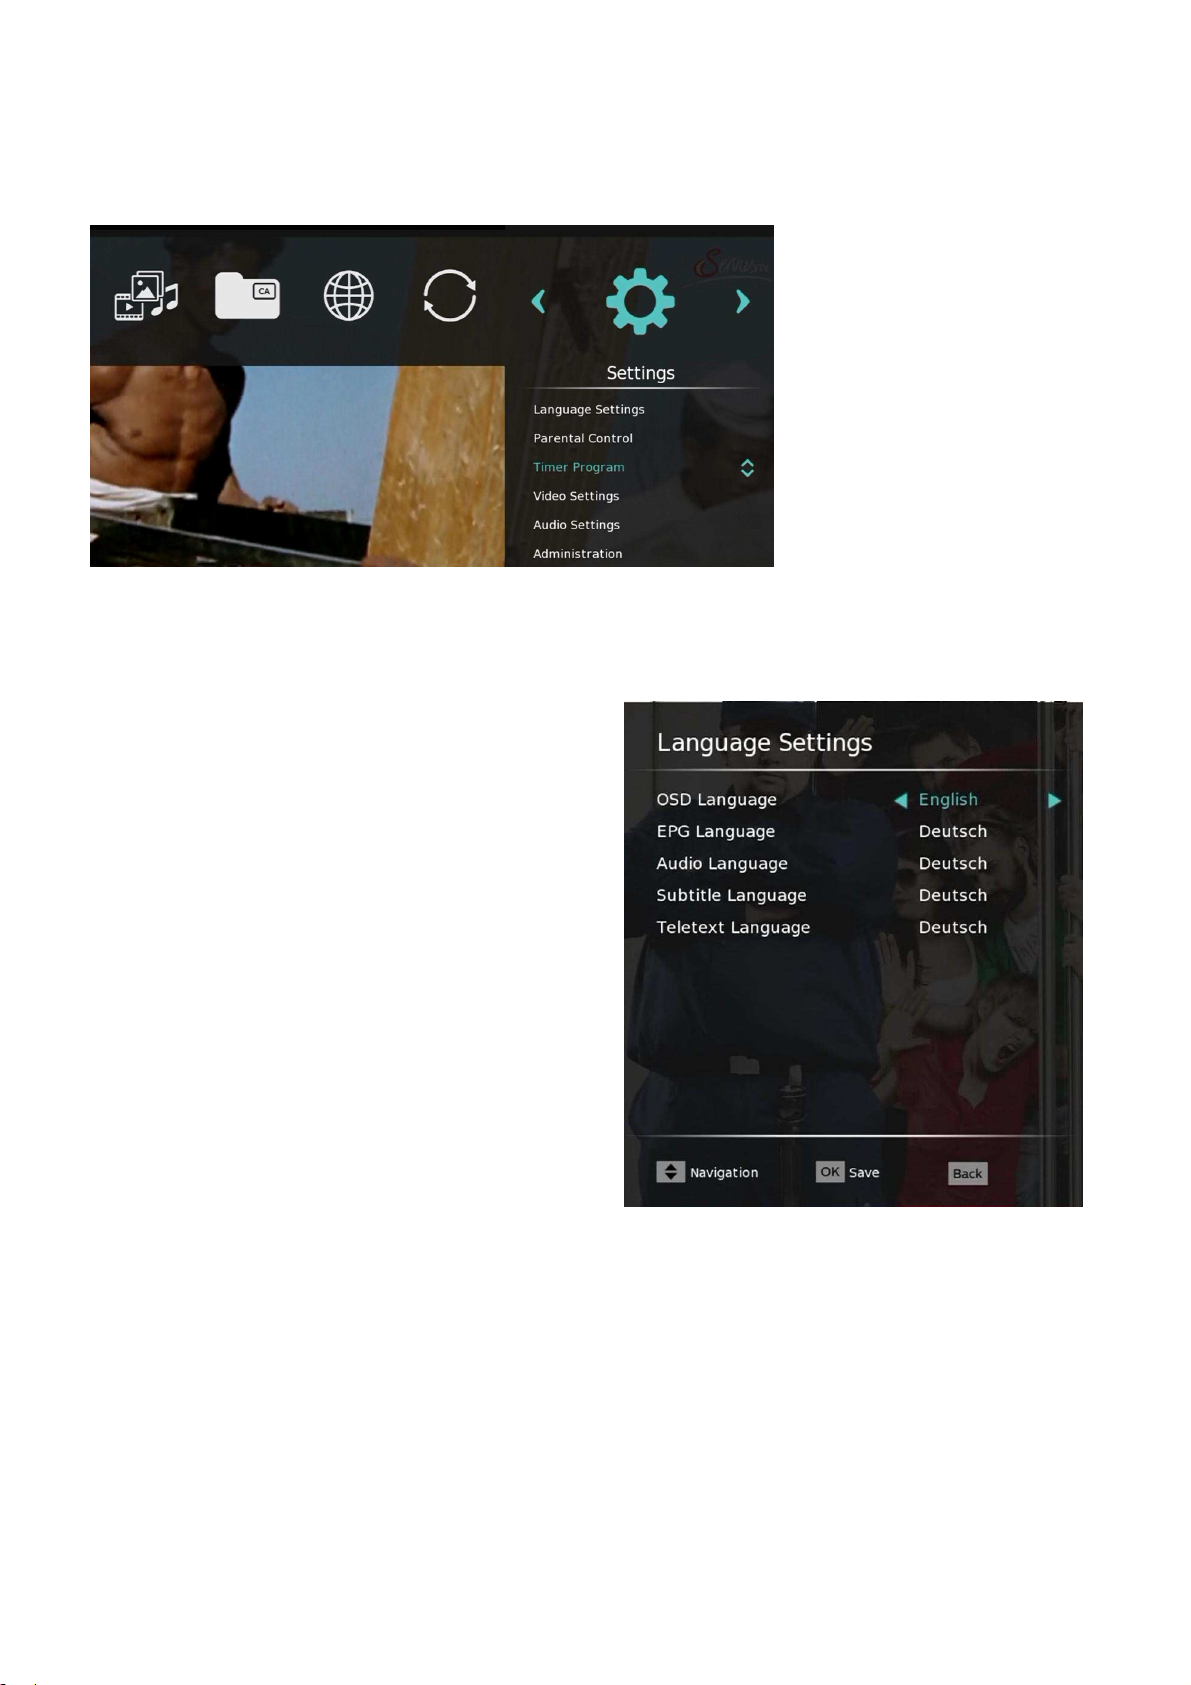
5.1 The OSD menu "Settings"
5.1.1 Language Settings
OSD language
Select the desired language for displaying the
on-screen menus with ◄ / ►.
EPG Language
Select the desired language for the display of the
EPG by pressing ◄ / ►.
Audio language
Select the language to be played back in
multilingual programs if this is available.
Subtitle Language
DVB subtitles can be broadcast in several
languages. Select the preferred language.
Note: DVB subtitles are extremely rare and
transmitted differ from the conventional teletext
subtitles.
Teletext Language
Teletext contents can be broadcast in several languages. Select the preferred language with ◄ / ►.
16
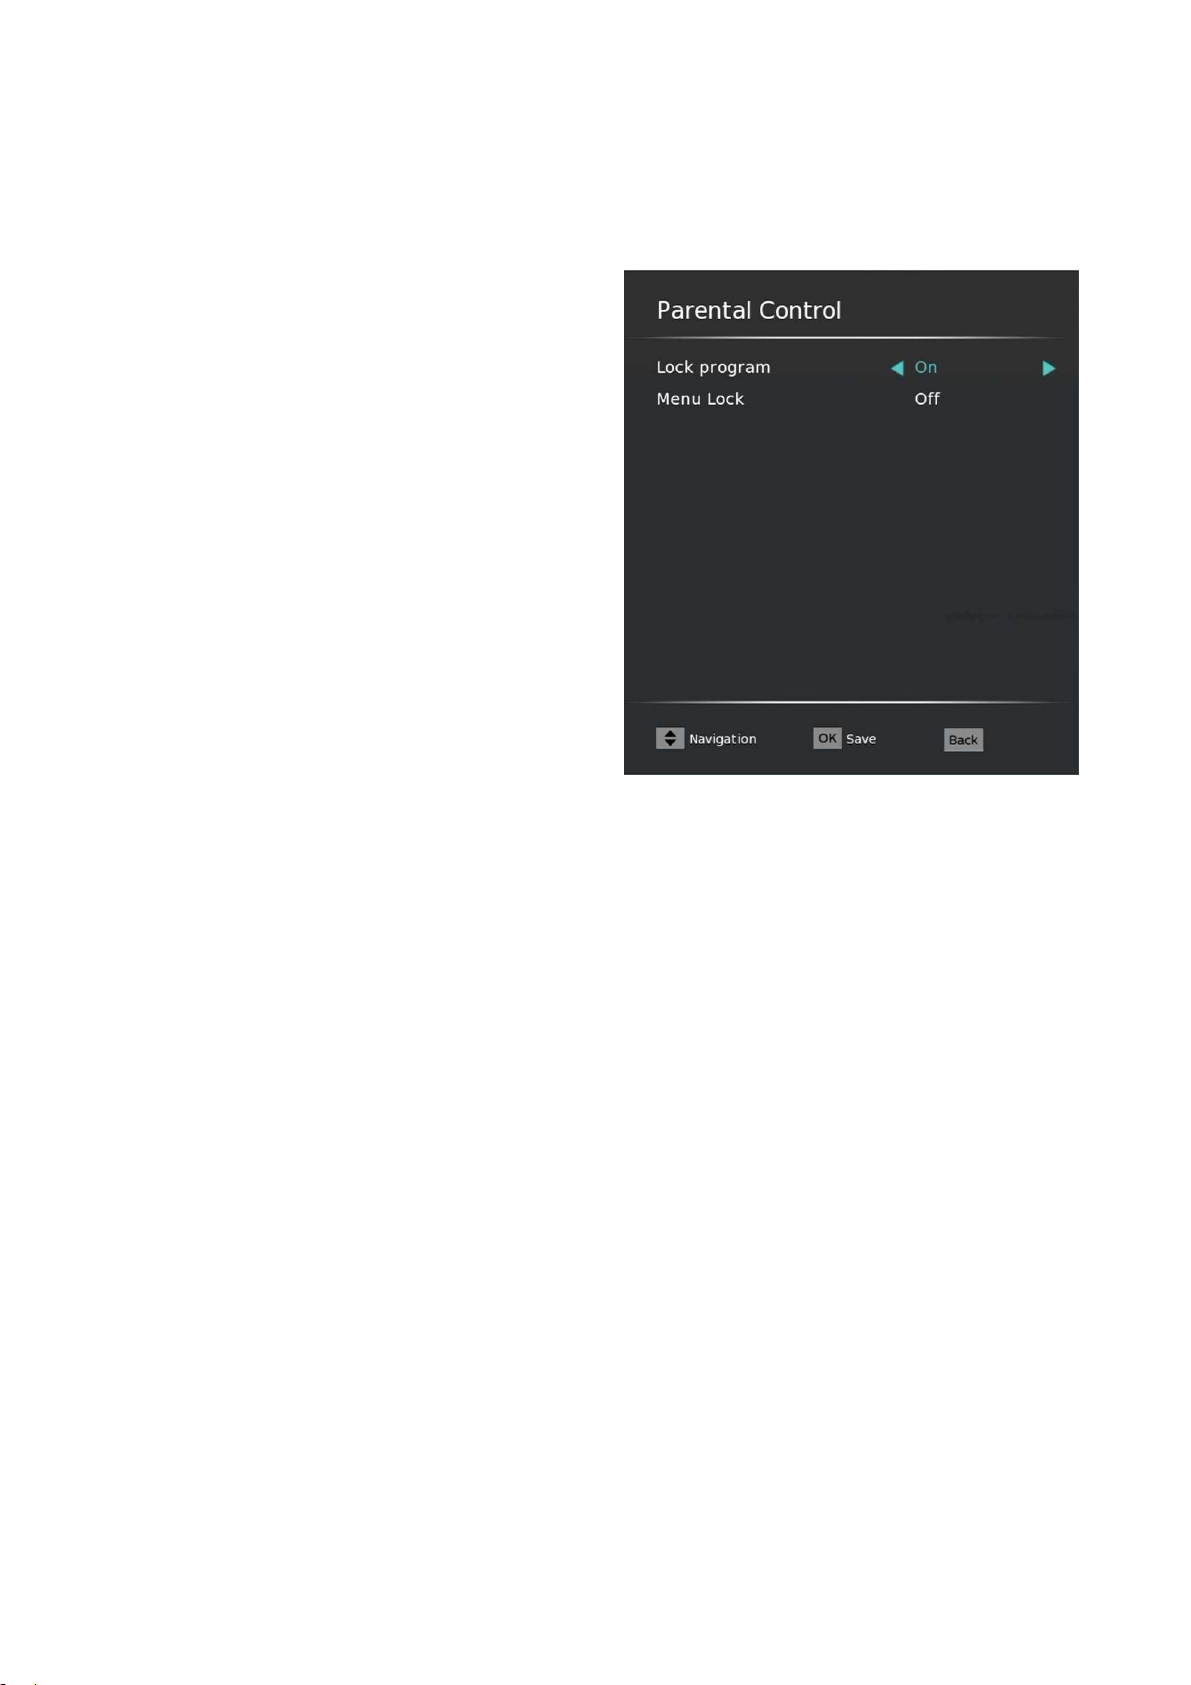
5.1.2 Parental Control
Lock program
Enabling ("On") or disable ("Off") of the program
locks made.
Menu Lock
Enabling ("On") or disable ("Off") denial of access
to the important basic settings of the receiver
Change Receiver PIN
Changing the PIN (password) of the receiver, which is requested enabled Receiver lock or a
youth-protective barrier of the program. The default PIN is "0000".
Should the PIN be changed, a digit sequence of 4 different numbers must be selected. Memorize the
new PIN well or write it down in a safe place.
Change SmartCard PIN
Changing the PIN (password) of the HD + card (smart card) that is queried at a youth protection barrier
of a HD + program. The default PIN is "0000". Should the PIN be changed, a digit sequence of 4
different numbers must be selected. Memorize the new PIN well or write it down on a safe place
17
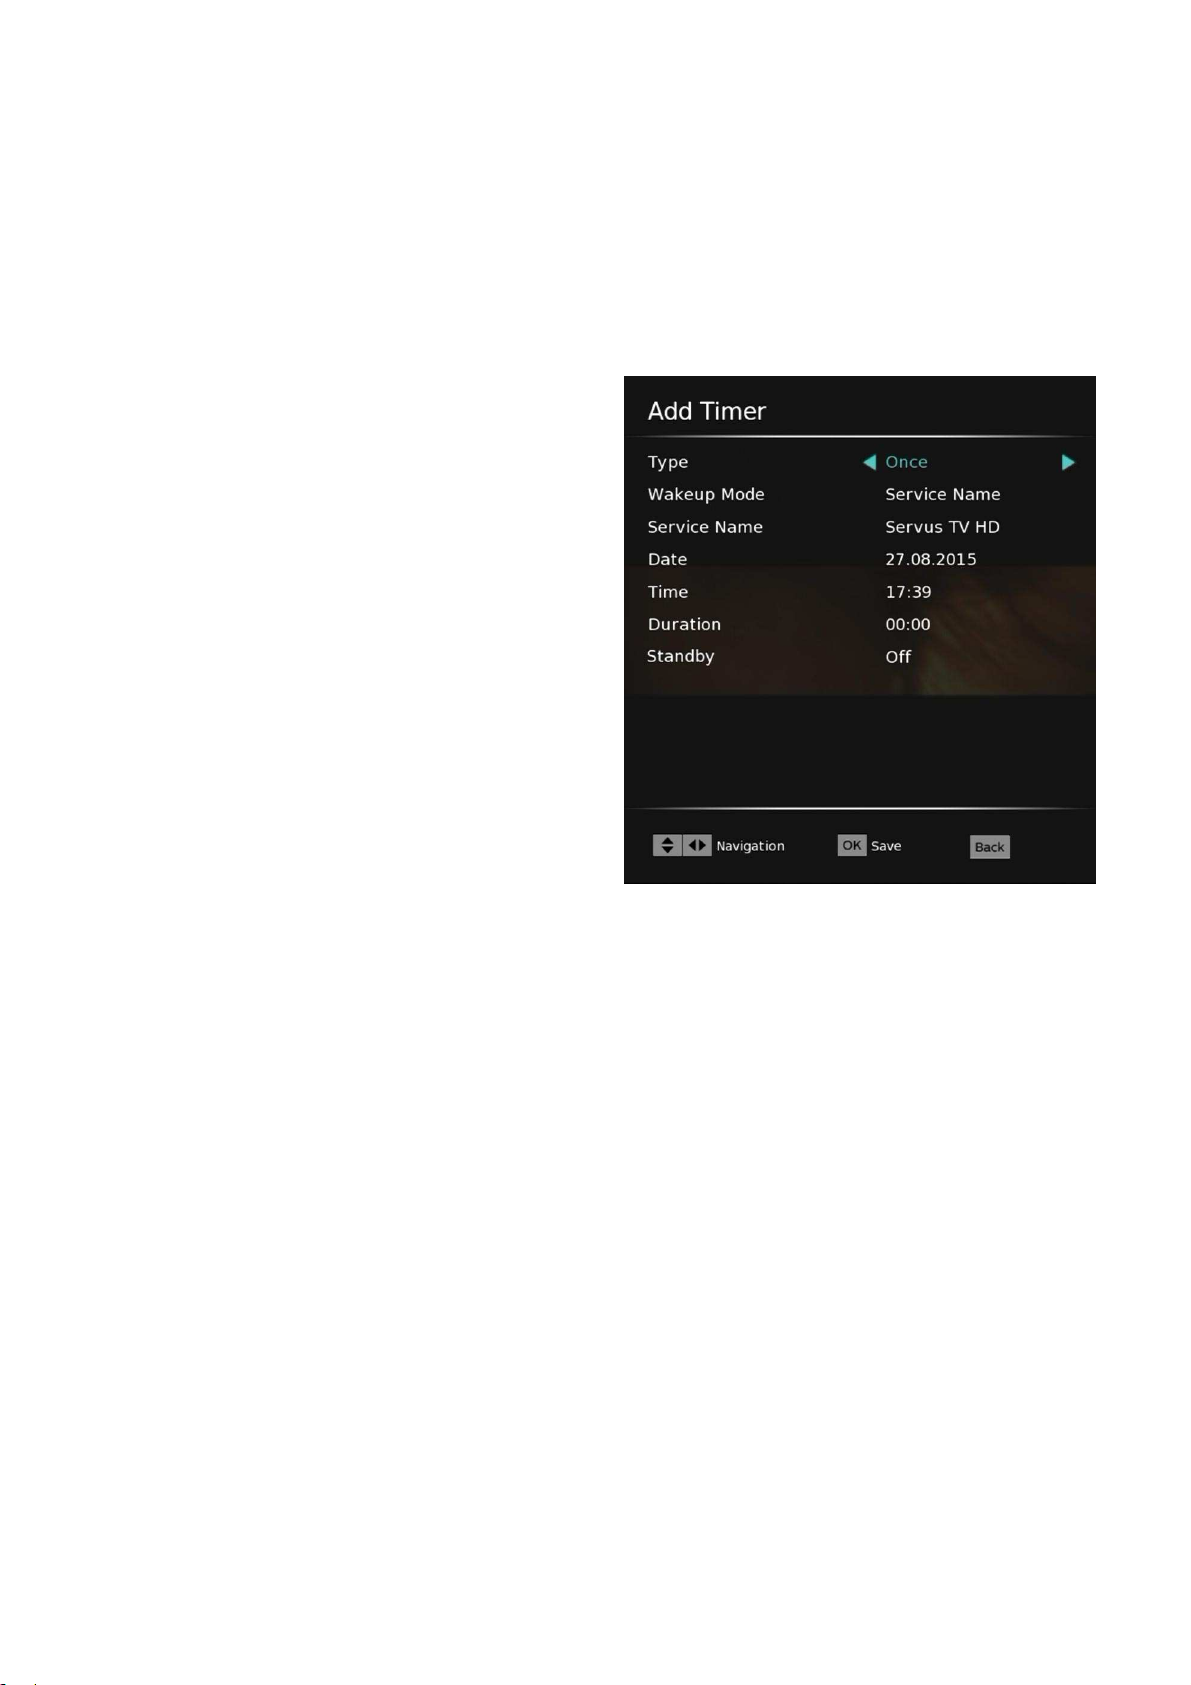
5.1.3 Timer Program
You can program different time events. Press the red button to add a timer. With the green button you
can edit an existing timer. With the yellow button you can delete an existing timer.
Type
Press ◄ / ►, can select Daily/Weekly/Once.
Wakeup Mode
These can be set as a program timer or message
timer.
Service Name/Message
Press ◄ / ► enable the channel list and select
with ◄ / ► the program appear after switching
on.
Date
Enter using the number buttons, the desired date
(eg 01 June 2014) as follows: 01.06.2014.
Time
Enter with ◄ / ► the numeric keys the start time of the event (eg 20:15 clock) as follows: 20:1
Duration
Enter using the number buttons, the duration of the event (eg 01:00 clock) as follows: 01:00.
Standby
Select "ON", after event the STB will automatically enter standby
18
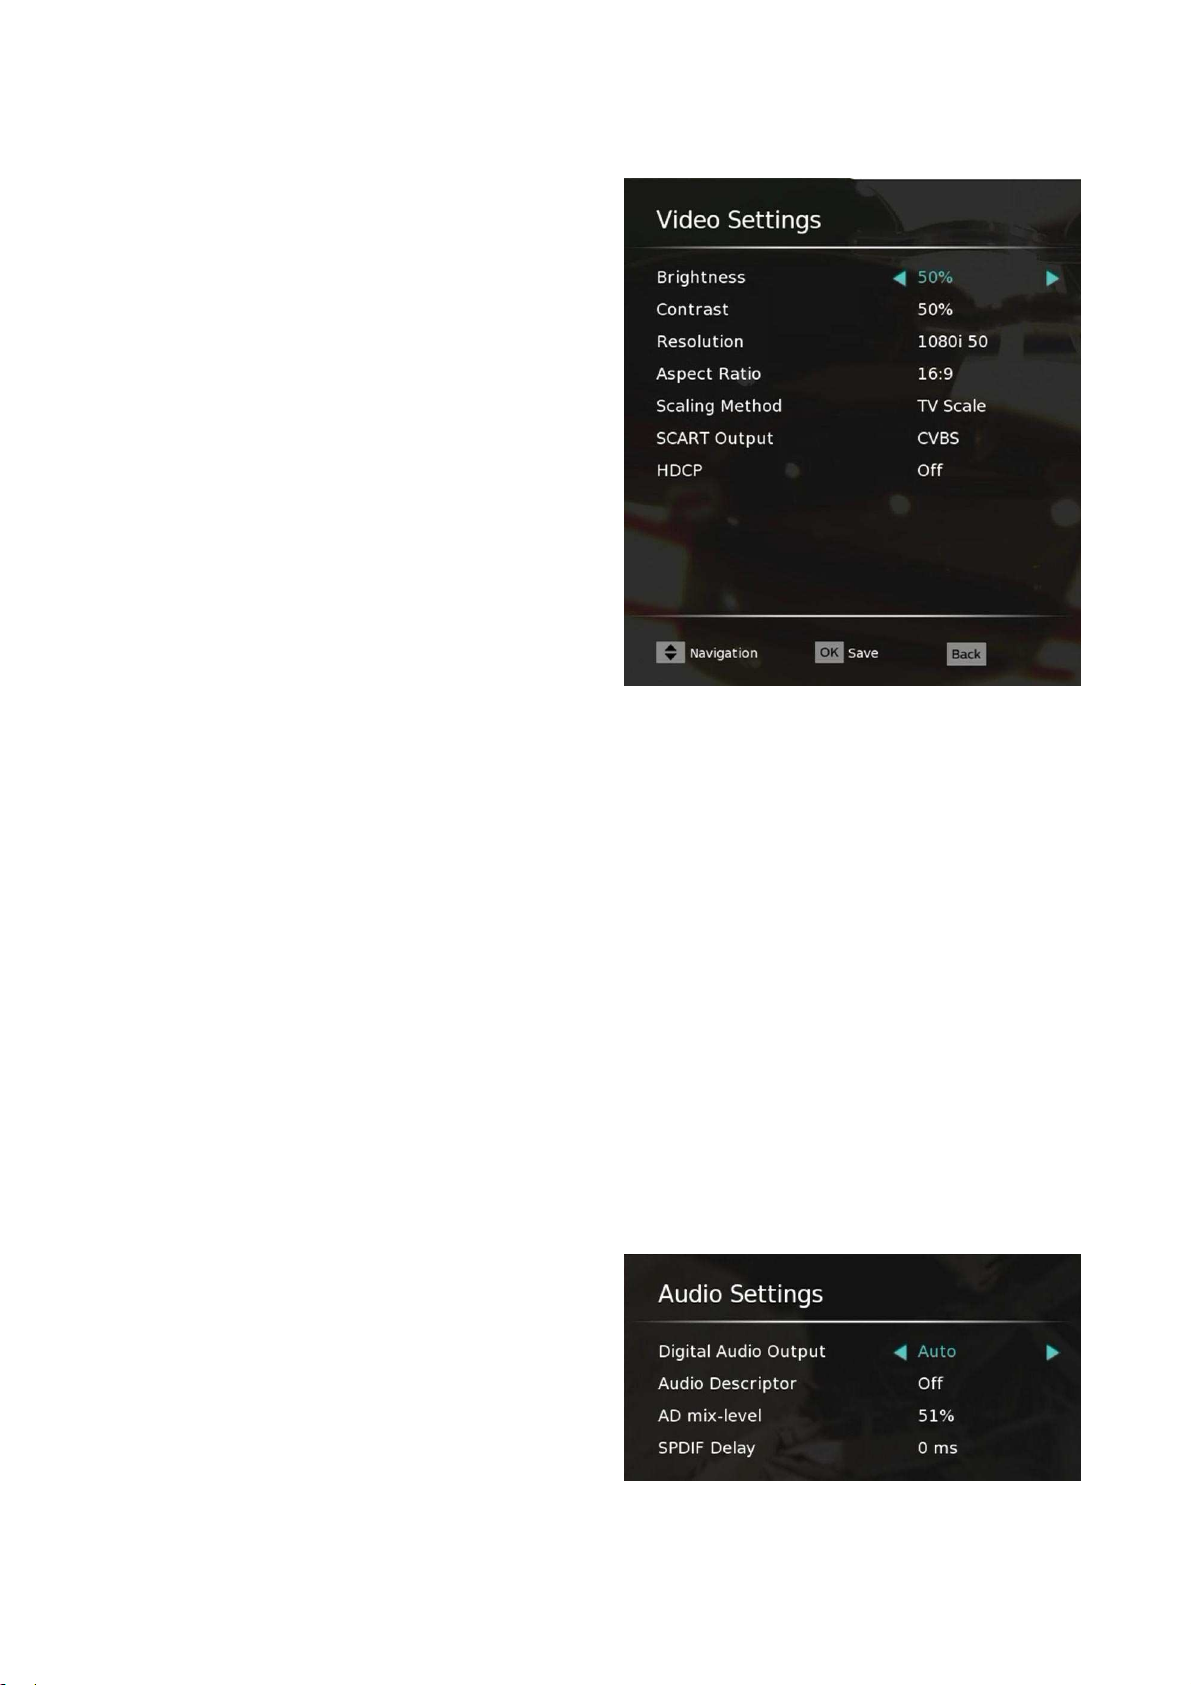
5.1.4 Video Settings
Brightness
0-100%. Here you can adjust the brightness.
Contrast
0-100%. Here you can adjust the contrast.
Resolution
e.g. 576i, 576p, 720p, 1080i, 1080p You can
optimize the screen resolution on the HDMI
output.
Aspect Ratio
have a TV unit with a 16: 9 screen, select the "16:
9". For 4: 3 screens select the setting "4: 3"
Scaling Method
Here you can adjust the screen display to your
needs. The substance may have the settings "TV
scaling", "Pillar box", "Pan & Scan" or “Combined”
HDCP
Determines whether the HDMI jack on the receiver is to represent the HDCP function is available ("On")
or not ("Off"). HDCP stands for High-Bandwidth Digital Content Protection and is an encryption system
that serves the rights holders to protect digital video and audio content against unauthorized use.
Depending on the device type connected and received the program HDCP Function is needed so that can
take place a transfer of data
5.1.5 Audio Settings
Digital Audio Output
With the setting "Dolby D", the existing Dolby Digital sound on Coaxial digital audio output "SPDIF" and
"HDMI" output on the rear panel. With the setting "PCM" converted to PCM format audio signal is output
at. With the "Auto" setting, when the activated TV program supports it, the existing Dolby Digital sound
on Coaxial digital audio output "SPDIF" and "HDMI" output on the rear panel. Otherwise, a converted in
the PCM format audio signal is output at.
Audio Descriptor
Select audio for the visually impaired, if select
“ON”, can able to adjust the AD mix-level value.
AD mix-level
You can set the value by pressing ◄ / ► button
between 1 and 100.
SPDIF delay
Signal delay to keep SPDIF audio synchronized
with video.
19

5.1.6 Administration
OSD Timeout
Select the display time of the information bar at a
program change. You can choose between 2-15
seconds.
LPM in Standby
The LPM (Low Power Mode) function of the
receiver is to ensure that the receiver consumes
only 0.5W in standby mode (standby).
Sleep timer
Off / 10 minutes / 30 minutes / 60 minutes / 90 minutes / 120 Min. The unit enters standby mode
(standby) indicator lights up after the preset time.
APD
Off / 10-240 min The APD (Automatic Power Down) function of the receiver is used to switch the
receiver from the active mode into standby (Standby) if a period (for example, 180 minutes) is carried
out no operation of the receiver (eg, because you are asleep). This can be practical, easy on your
receiver and possibly save unnecessary electricity costs. If this feature out to be impractical, you can
silence or adjust here.
No Signal Timer
Off with no signal, the unit switches off after the set time in standby mode (standby).
Standby OAD
Over Air Download in standby. To ensure that your STB always has the most update information. If
setting “On”, the STB automatically powers up in the morning and searches for any new information and
will download this to your STB automatically.
20

5.2 The OSD menu "Installation"
5.2.1 Satellite Scan
Satellite Scan
Select for which supported satellite the following settings should be made.
By pressing the green button, you can perform a channel scan.
By pressing the red button you can delete a satellite.
Caution: when deleting a satellite all associated transponder and their entries will be
deleted.
satellite selection
In the "Satellite Scan" OSD menu you can individually edit the
satellite settings of your antenna system.
Pressing the yellow button to add a new satellite, edit or adjust your
antenna configuration.
21
5.2.2 Antenna config
LNB Type
Can switch C Band/Extended C Band/Universal/Ku Band /User, with different LNB Type, frequency will
follow different.
22 KHz
The 22kHz signal is used to switch a universal LNB ("Off" = Low Band, "On" = high band). Have you
selected as LNB type "digital" and set "Automatic", the automatic switchover. If you do not have a
commercial LNB, you have to make at this point the setting manually.
DiSEqC (DiSEqC 1.0 or DiSEqC 1.1)
If "DiSEqC" is activated, the setting including the desired port 1 - 16 are elected.
Tone Burst
If "Tone Burst" is activated, the setting Including the Desired Tone Burst "A" or "B" are chosen. Enable
if you have a Tone Burst switch to receive up to two satellites mounted on the antenna system, the "Tone
Burst" feature only.
Positioner
Here you can select whether the rotor control the receiver deactivated ("Off") or activated ("DiSEqC
1.2" or "USALS") to be. Press the blue button to adjust the engine settings.
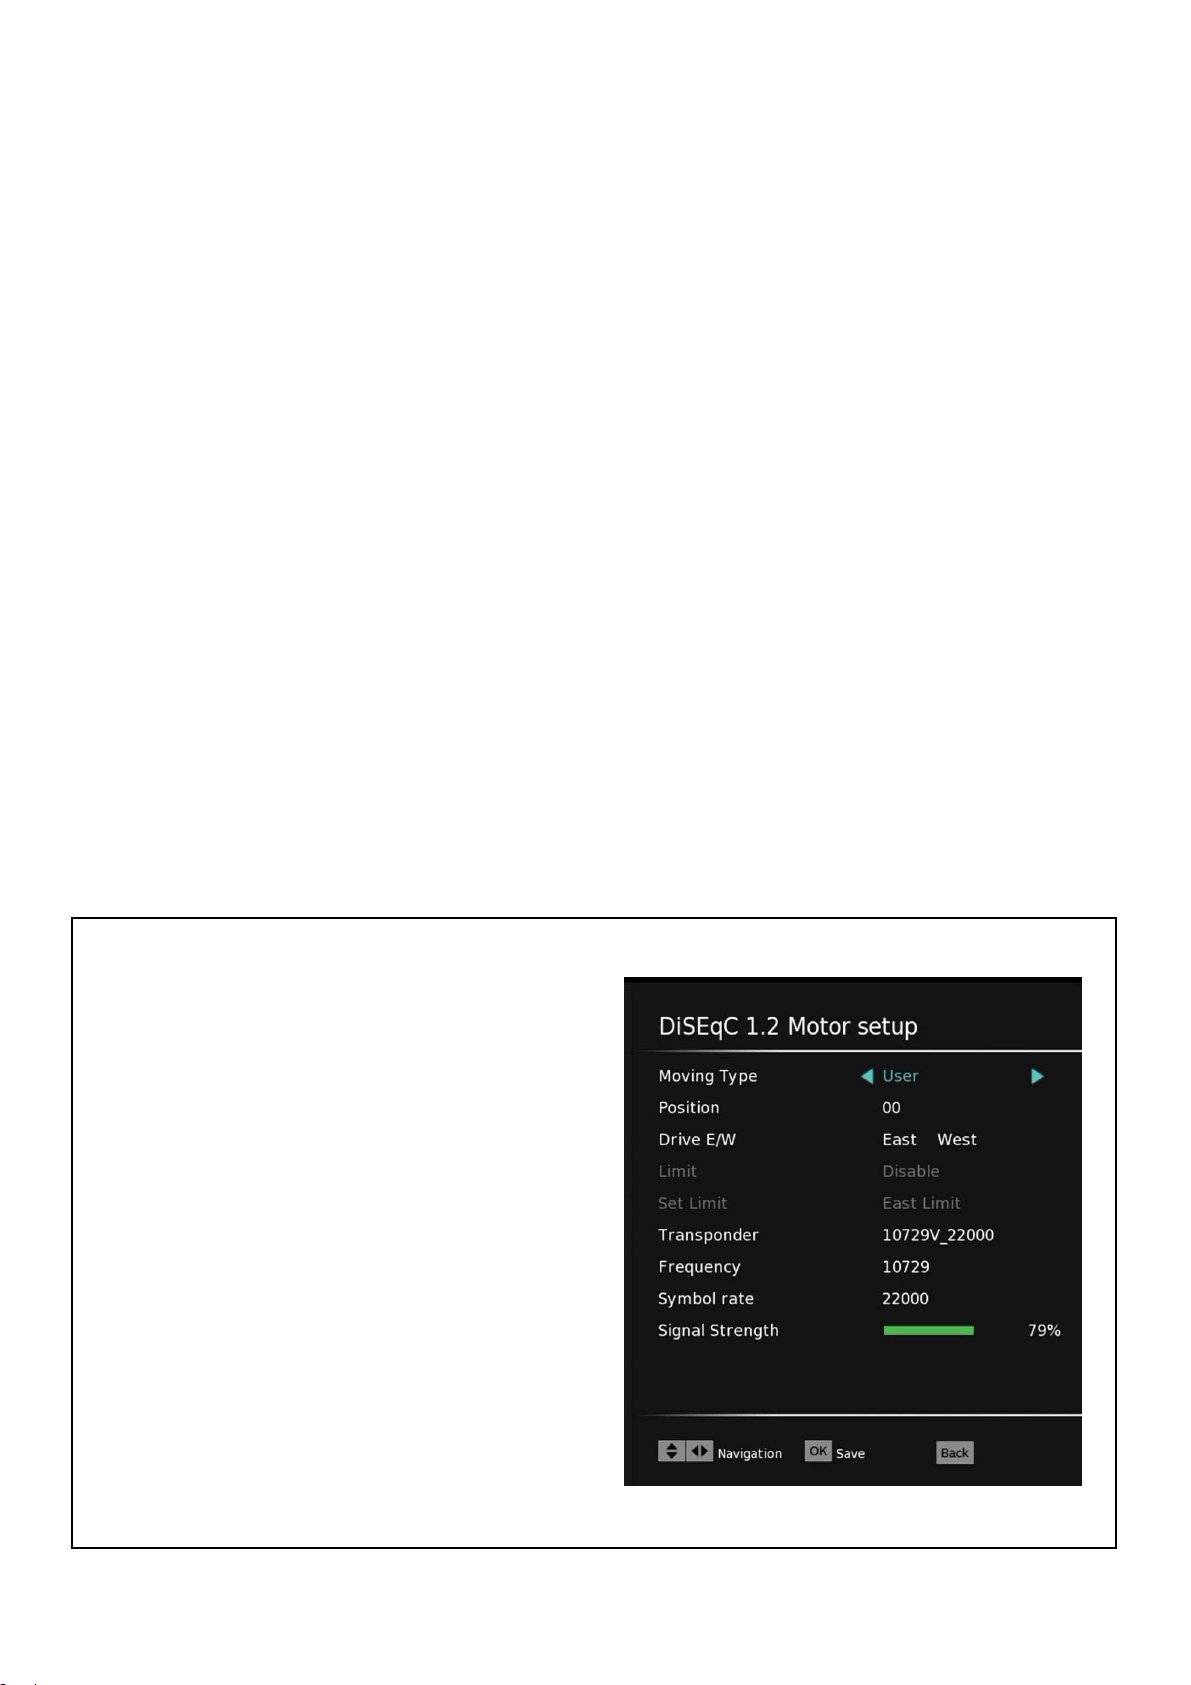
DiSEqC 1.2 Motor type setting
Moving Type
Can switch User/Installer/GOTO X/Advanced. If
switch to Advanced, “Recalculate” and “Reset
Position” is enable.
Go to X
For easy access to other satellites, you can select
saved positions and then drive here directly.
Drive E/W
Control with 3 / 4 the antenna to the west or east.
Observe always the signal indicators. Should you
not receive a signal level in the search, choose
"Select Transponder" another transponder.
22
LNB volts
The LNB voltage of the satellite receiver provides the LNB with an operating v ol t ag e and ensures
switching at the various reception levels. Note: Leave always on the LNB voltage.
Unicalbe
Each receiver needs individual settings concerning. IF channel and IF frequency. Highlight each antenna
socket or each antenna cable with the added thought settings so that they are visible to the user. If
settings are changed, should be turned as far as possible all the recipients connected to the affected
single-cable system, if the settings are applied.
Can switch Deactivate/1/2/3/4/5/6/7/8/. If switch to 1~ 8, can set "Center frequency” and “Port".
Center frequency
Ask here by multitap using the number buttons, the added thought for your receiver and the
single-cable system also supported exact IF frequency. The new settings will take effect the next time
you turn on the receiver.
Port
Set this "A" or "B".
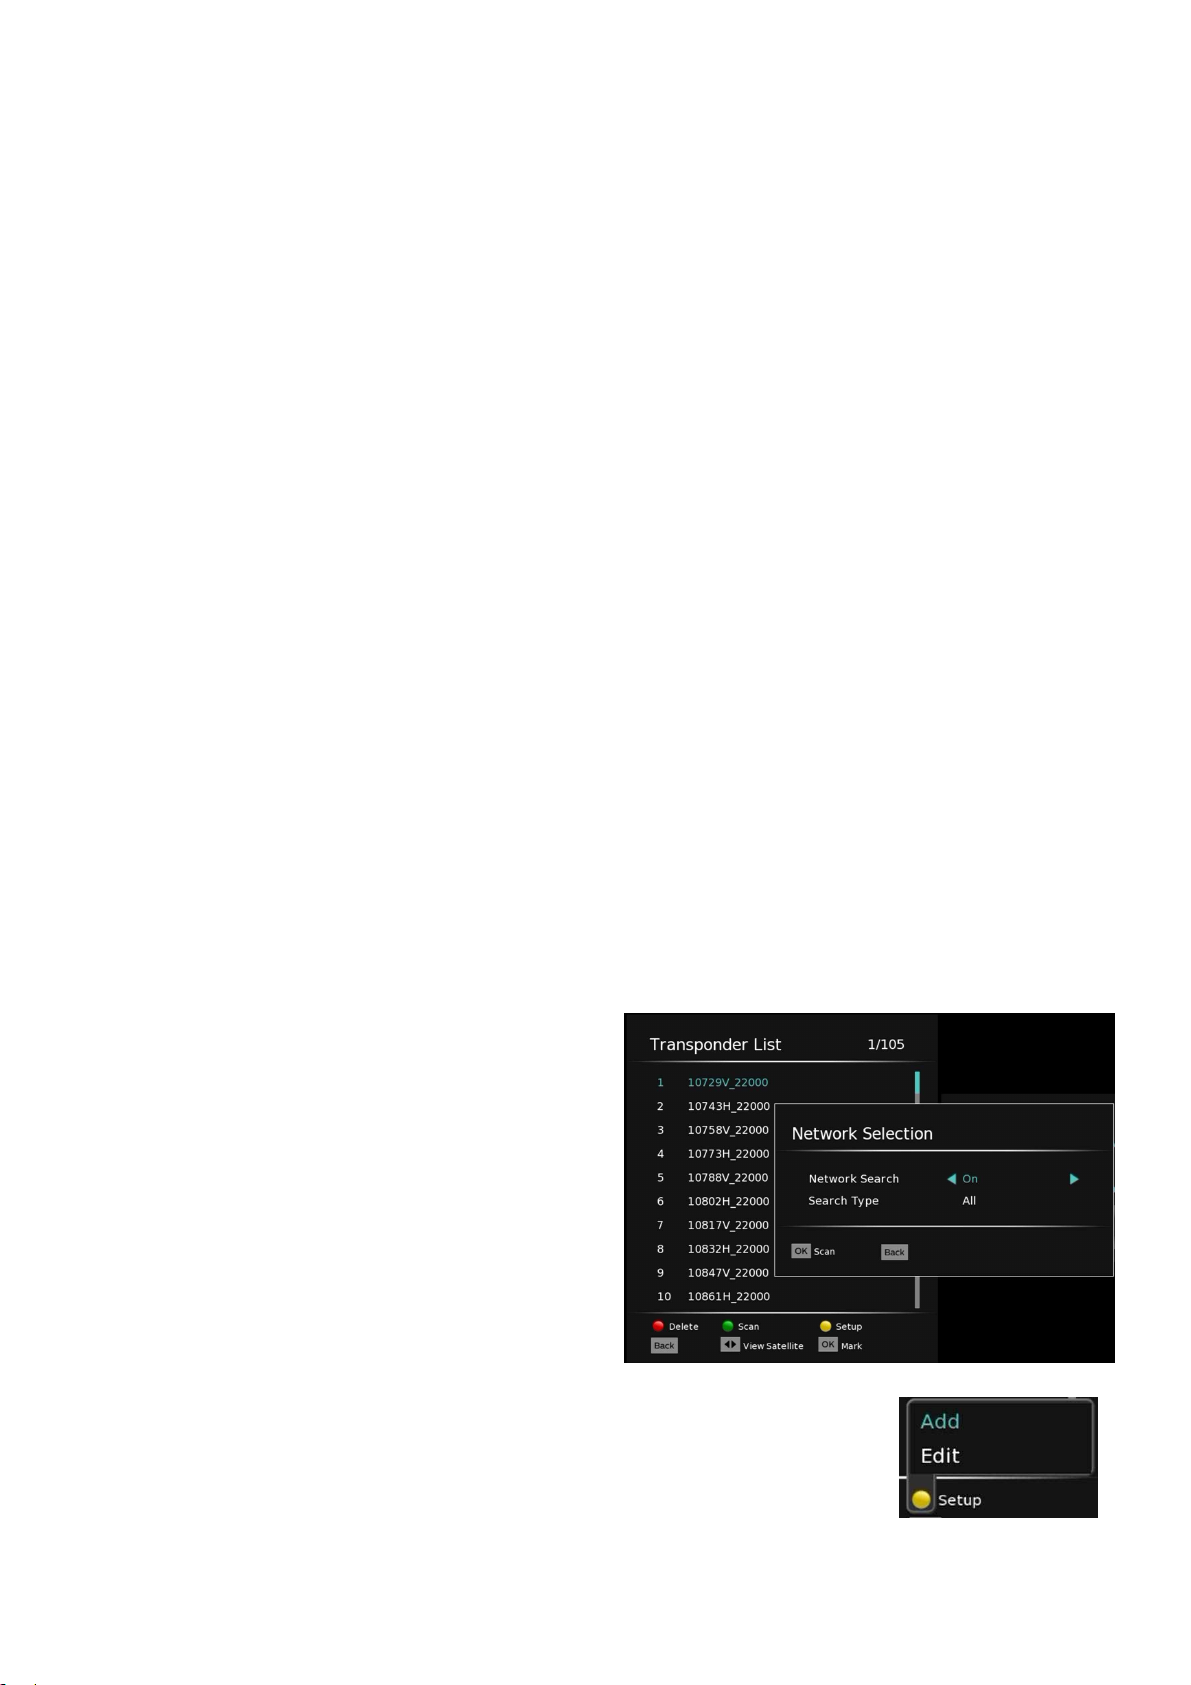
5.2.3 Transponder list
To search for a si ngle transponder. This search method is advisable if you want to save only a particular
program or program package. The respective reception parameters (frequencies, etc.) are available
from the Internet or TV and trade magazines.
Satellite selection
In " Satellite Scan" Press ▲ / ▼ have a
supported satellites.
Edit Transponder
Highlight with◄ / ► and ▲ / ▼ a transponder
entry. Do you w a n t to scan the selected
transponder for the selected satellite for new
channels, press the green button. After setting
the search options described above, the search
can be started by pressing the green button.
To add a new or edit a selected transponder entry, press the yellow button.
The frequency of a satellite transponder the existing list is predefined and
should not be changed under normal circumstances.Change the values by
directly entering.
23
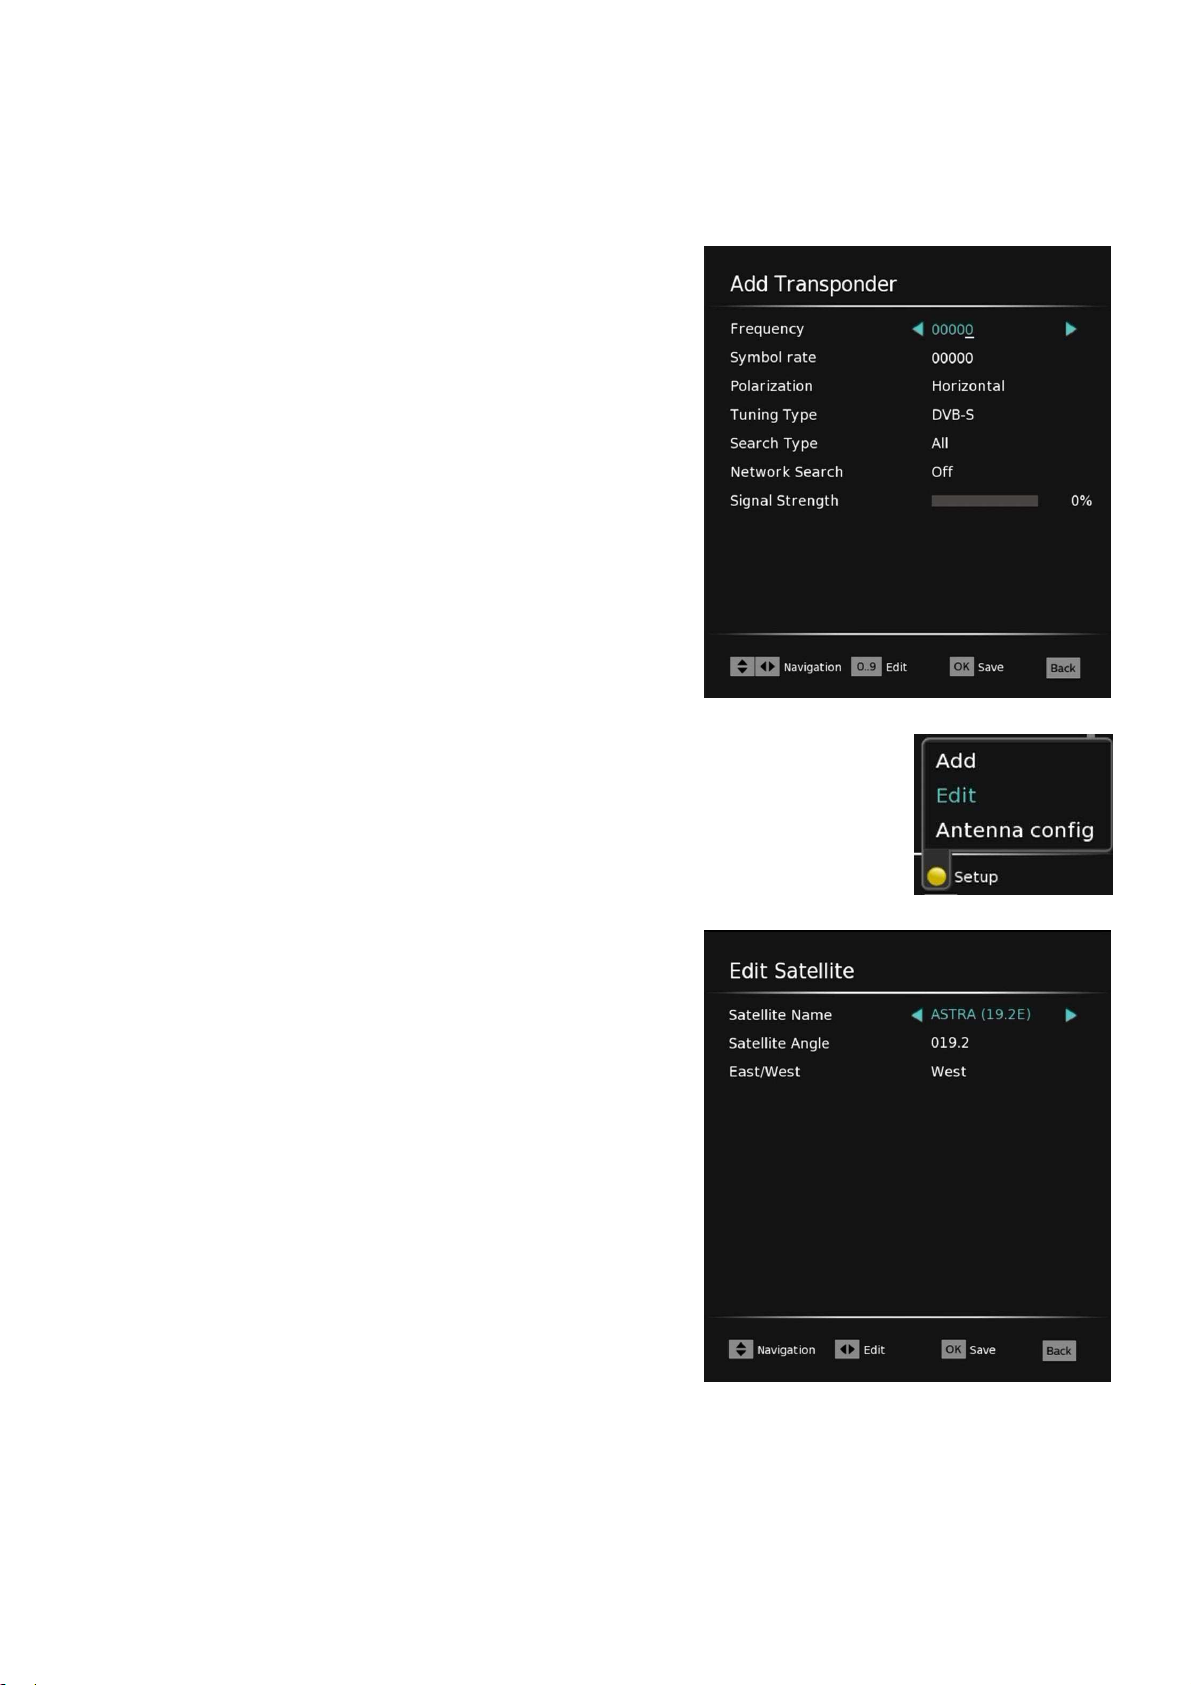
Symbol Rate
The symbol rates of the most common satellite
transponders have almost exclusively the values
27500 or 22000 Kbps. Change the v a l u e s by
directly entering the number buttons.
Polarization
Satellite signals are transmitted horizontally or
vertically polarized. Press◄ / ► "Horizontal" or
"Vertical" from.
Tuning Type: "DVBS" or "DVBS2"
Search Type: "Free" or "scrambled" or "All"
Network Search: "On" or "Off"
5.2.4 Satellite list
In the Satellite list All the preset satellites are listed. Highlight with
▲ / ▼ have a supported satellite from the list to edit this. A satellite
entry can be edited or a new satellite entry will be added to the
yellow button.
Satellite Name
The name of the selected satellite. The editing or
entering the name via the screen keyboard.
Satellite Angle
The value of the orbital position of the satellite.
This shows what position the satellite (eg 19.2 °
East, Astra). Change the v a l u e by direct input
using the number buttons.
East West
Spec i f y the ra n g e of the sa t e l lite or b i t . This sh o w s
whether the satellite is east or west of the 0
meridian is (eg Astra 19.2 ° East ). In order to
complete processing a satellite entry, press the
OK button.
24
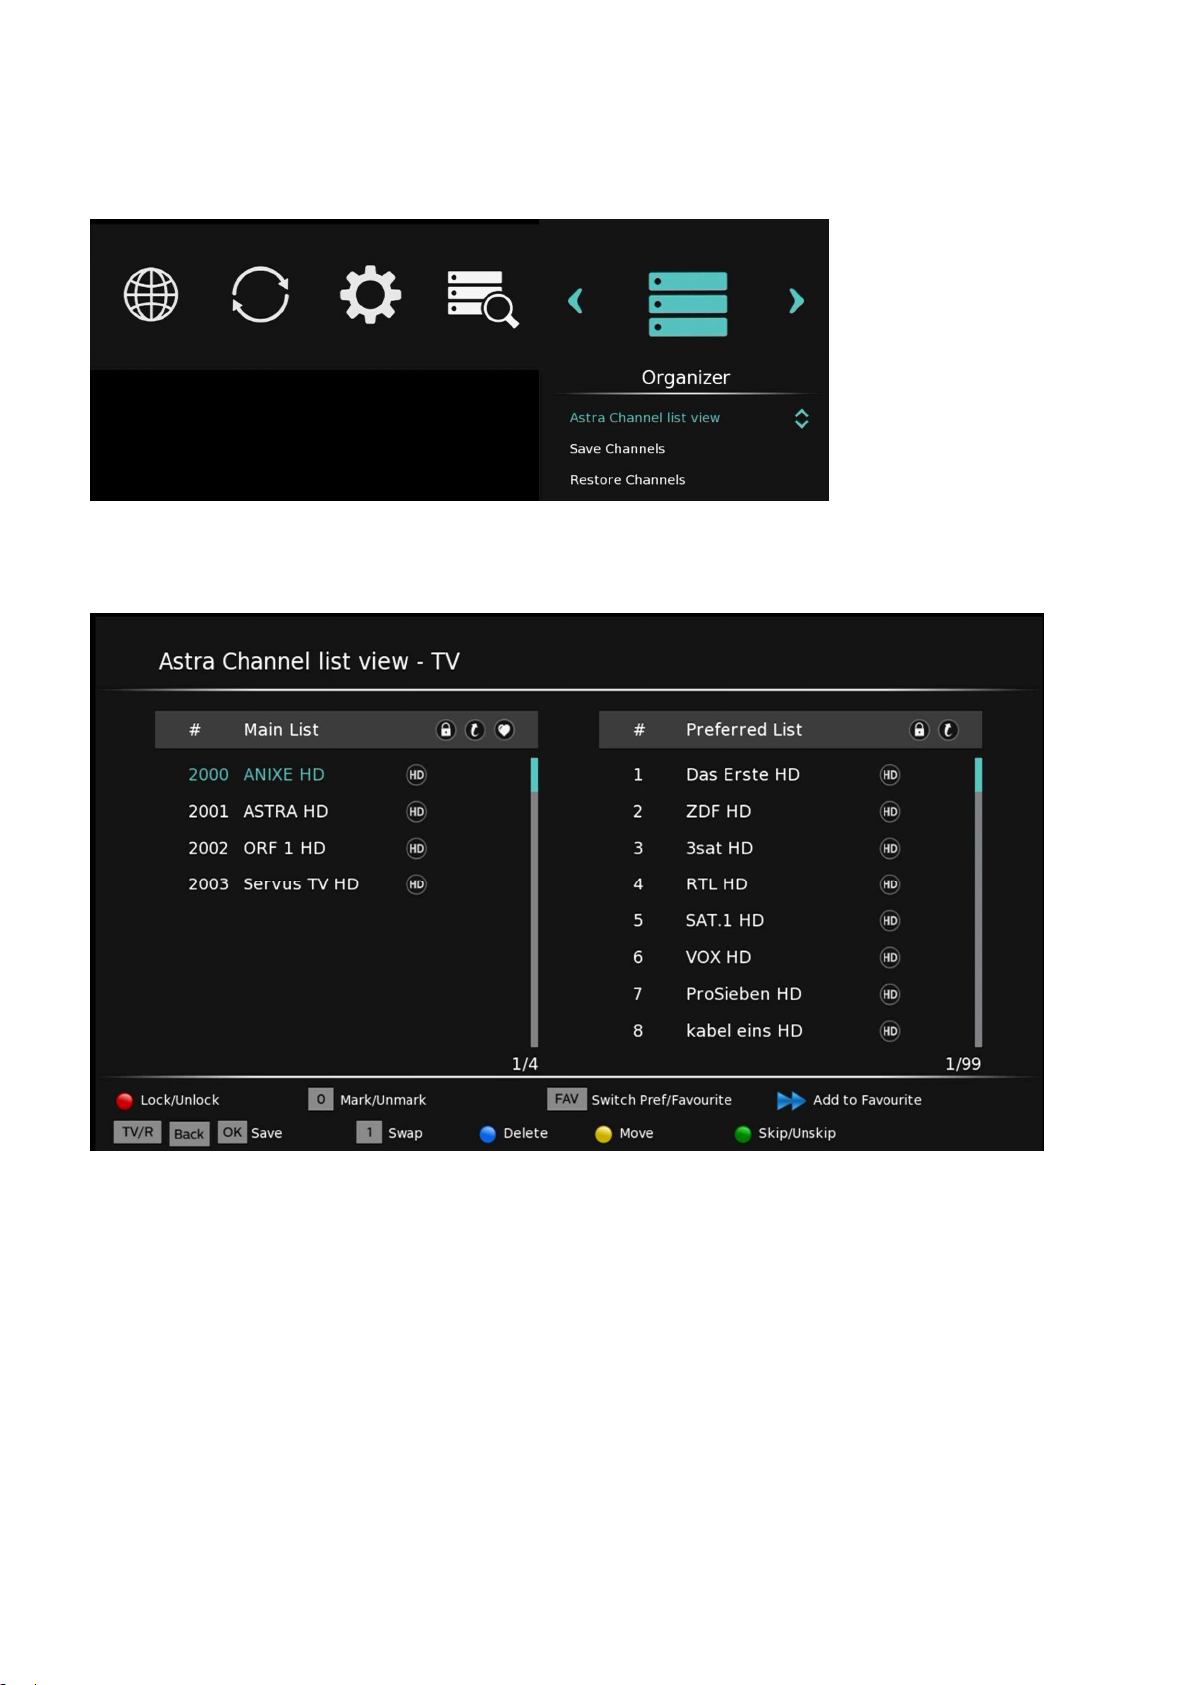
5.3 The OSD menu "Organizer"
You can edit this menu programs, or save or load your current channel list on a USB stick.
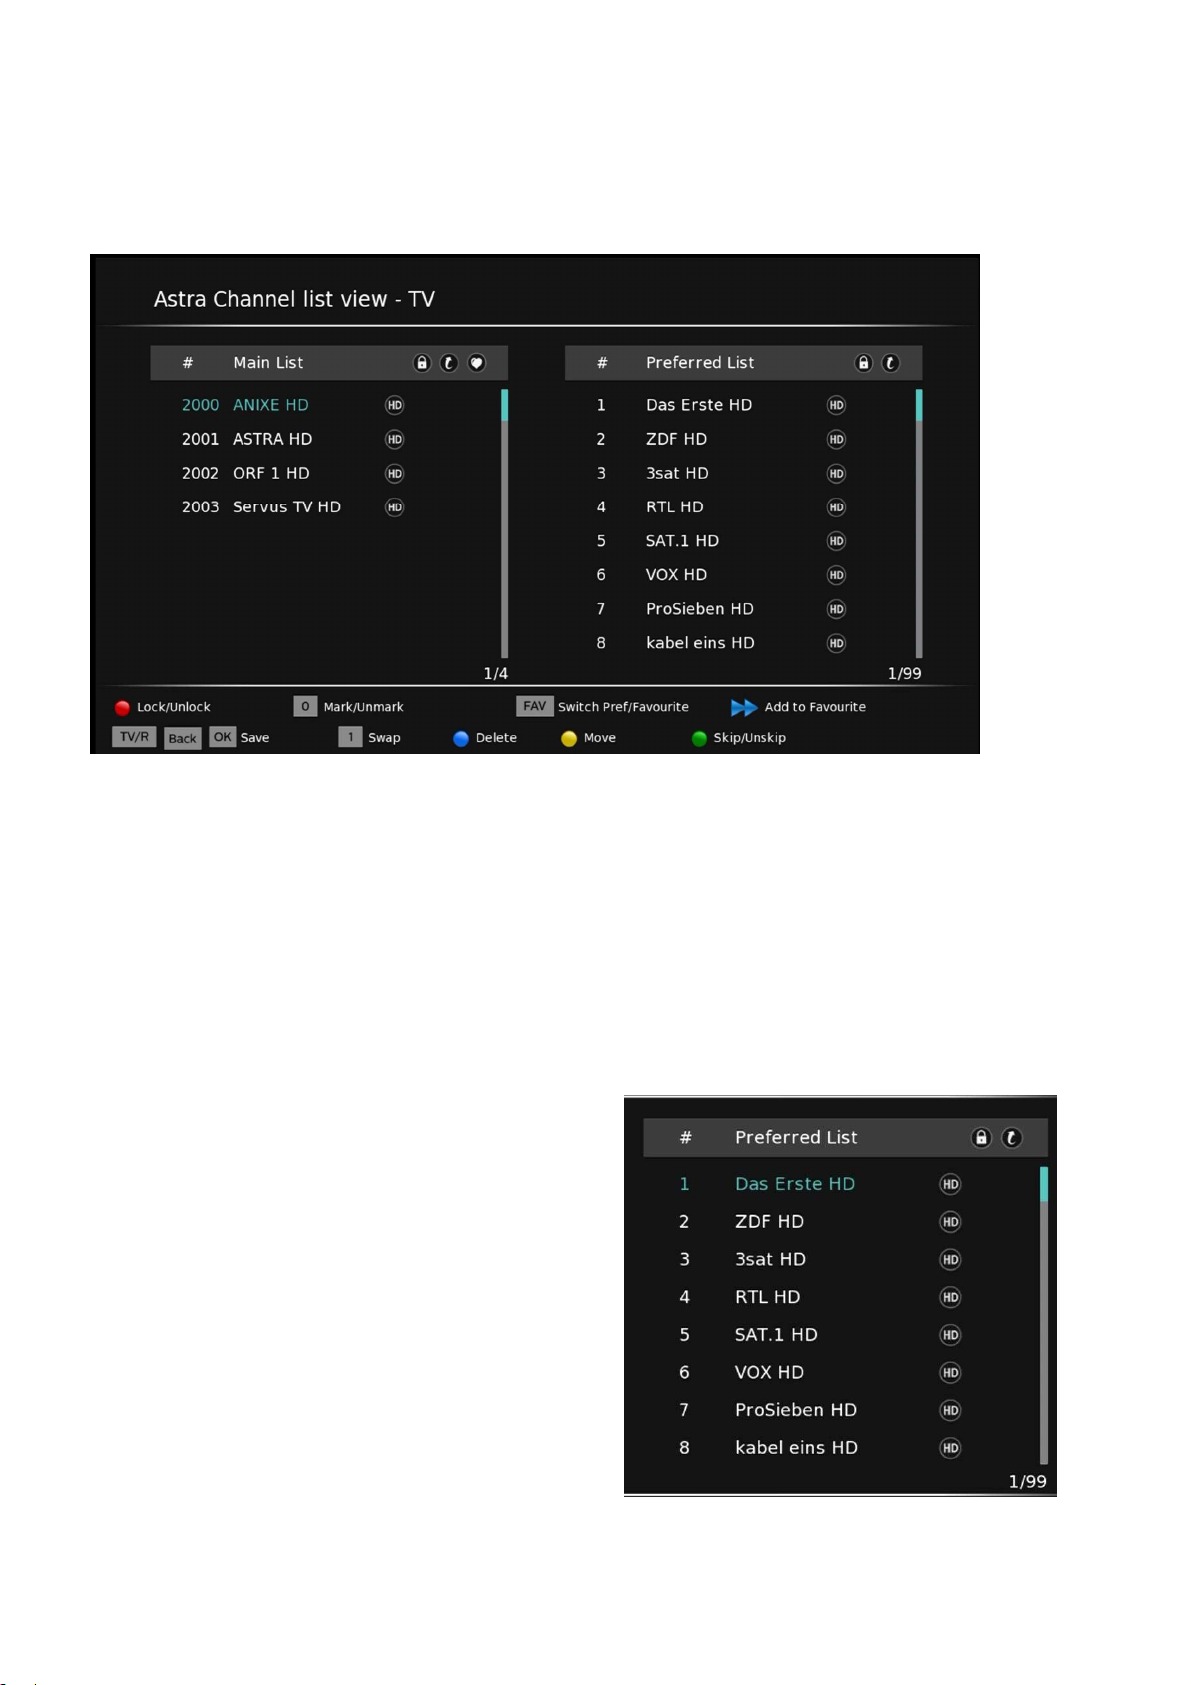
5.3.1 Astra Channel List view
You can change the following properties in the channel list in this menu:
Press [FAV]: Favorites Lists
Press [TV / R]: Edit TV / RADIO List
Press [>>]: Add To Favorites list
Press [0]: Mark programs
Press [1]: Exchange with labeled program.
Press [Yellow]: moving labeled programs.
25
Press [Green]: Programs move (within the main
channel list is not possible)
Press [Blue]: Delete Program (within the main
channel list is not possible)
Press [Red]: Lock Program
5.3.2 Edit Program List 1-99
Proceed as follows to edit the program list 1-99: Press the [>] button to call up the program list and
1-99 to display.
Caution: Pressing the [Blue] key, the channel list will be completely erased 1-99. A recovery is possible
only by resetting to factory settings.
Move around
Proceed as follows to move programs and move to:
• Use the arrow keys ▲ / ▼ select the desired station.
• Press [0] key to highlight the desired station (will appears a mark).
• Use the arrow keys ▲ / ▼ select the new station.
• Then press the [Yellow] button. The
transmitter now switches to the new
station.
• Then press the [1] key to exchange.
• To store, press the [OK] key.
26
5.3.3 Creating favorites list
Proceed as follows to create a personal favorites list:
• Press the [FAV] button to select the desired favorites list 1-9.
• Use the arrow keys ▲ / ▼ select the desired station.
• Press [0] key to highlight the desired station (will appears a mark).
• Press the [>>] button to add station to your Favorites list.
5.3.4 Save channels
You can back up in this menu your current channel list on a USB flash drive to possibly play them back
at a later date or when resetting the device.
5.3.5 Restore Channels
You can import the previously saved to a USB flash drive channel list in this menu item.
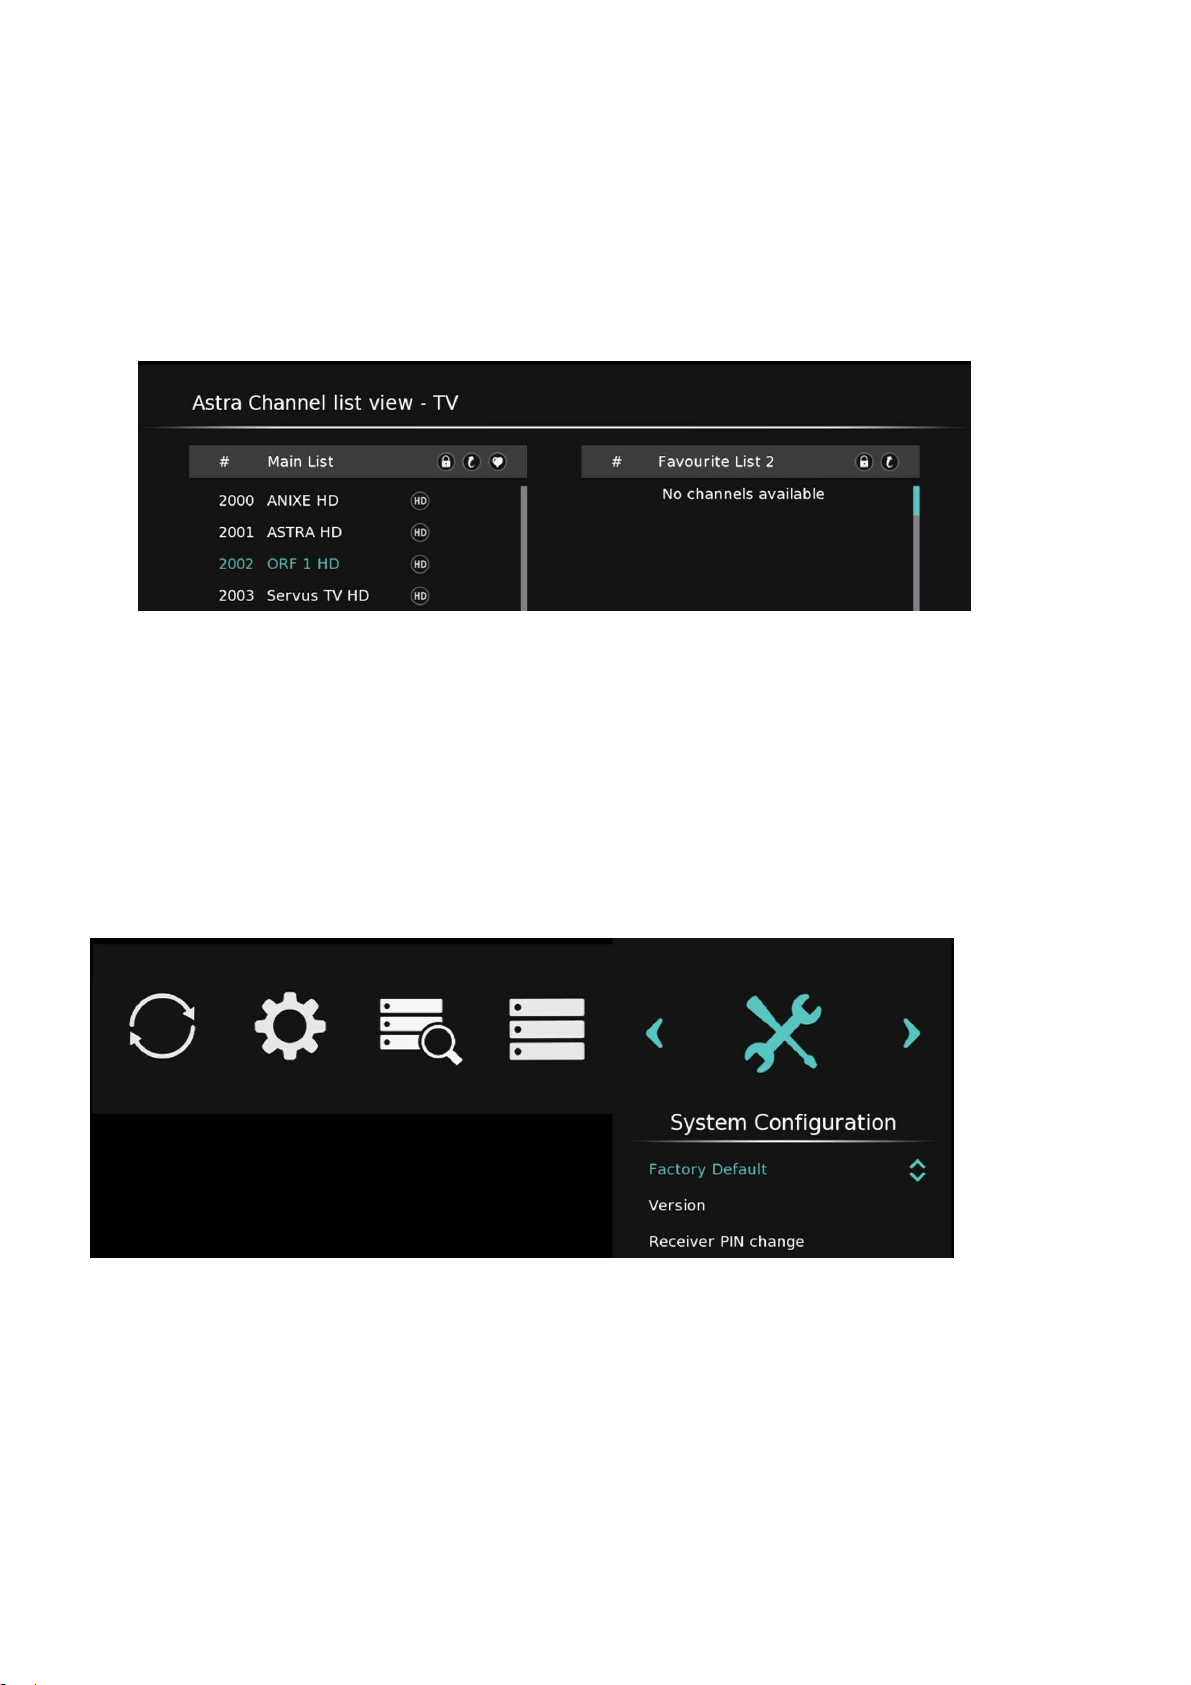
5.4 The OSD menu "System Configuration"
5.4.1 Factory Default
The default function is used to reset the device to its factory settings.
Warning: Any changes since the initial start values, and stored programs will be reset or deleted!
27

5.4.2 Version
Get information about the version of your satellite receiver. Keep this information at hand when you
should contact our technical support team.
5.5 The OSD menu "CA Information"
Here you will find, among others Information on the serial number of the inserted HD + card.
5.6 The OSD menu "Connectivity" (optional)
Internet Radio and Network Settings.
5.7 The OSD menu "Software Update"
Menu to update the receiver software via the Astra satellite at 19.2 ° East. In order to keep the receiver
up to date, the receiver also checks automatically when you turn on new updates and performs this
possibly autonomously by.
28

6 Trouble-shooting guide
Issue
Possible solution
Unit is not functioning
No picture
Common Problems
Check if the power cord securely plugged into a power outlet.
If necessary, check whether other devices to this socket function properly.
If on the TV unit to a TV picture still OSD contents of the receiver display:
Check whether the TV is switched to the input, is connected to the receiver
(HDMI / SCART). Are displayed on the TV only OSD contents of the
receiver, but no TV image of the receiver: If you are self-mounted antenna
connector Ensure that the shield (poultry genuine and film) in contact with
the connector, but does not touch the inner conductor. If necessary, try a
different antenna line. Check the antenna settings: For the ASTRA
satellites should be set as a rule "Digital". Do not use a universal LNB, it
must be the values 9750 MHz and 10600 MHz for the lower and upper LNB
frequency set normally. For troubleshooting, you should connect the
LNB and the receiver directly and remove the switch and splitter. For
copyright reasons there is no image output via the SCART socket, if the
currently selected HD + program will be sent with a copy. Turn in this case,
if necessary, to the identical program in SD dissolution. With SCR
Einkabelanlagen EN 50494 each participant must use a different IF
channel and another IF frequency. This should centrally coordinated and
the data is recorded at all doses antenna / antenna lines. Participants with
a long antenna cable should get preference assigned to the low
frequencies. In the new installation of another receiver every receiver
involved should be switched on if possible. In case of faults, the above
points must be examined. Changed settings will not take effect until the
next time the receiver.
There may be a software upgrade via satellite, which fixes an issue: Turn
Device switchs itself off
29
the receiver off and unplug the power cord from the wall outlet. After a
short wait time you connect the receiver to the power grid, so that the
receiver can perform a possibly via the Astra satellite at 19.2 ° East
existing update. Note that the self-running update can take more than 60
minutes.
This is not an error, but the auto power off (see section 4.10).

Issue
Possible solution
Usb hard drive is not
recognized
Usb hard drive is not
recognized
Perhaps the current consumption of the USB hard drive is too high. Only
use USB hard drives with its own power supply. Perhaps the storage
medium is defective or not properly formatted in FAT32 format. Check the
storage media to a PC to function and format the hard drive, if necessary
on FAT32 format (Note: data loss).
The device displays incorrect program times in the EPG or the wrong time:
After switching on the receiver the data has to be read and evaluated.
Depending on the transponder this process may take some time.
Sometimes it may be necessary to terminate the EPG and call again or
switch the channel position. The device does not respond. If the device is
not in update mode fi nd, unplug the power cord, then wait a few seconds
before putting the instrument back into operation. This does not help,
reset the machine if necessary to the factory settings (Menu Software /
factory settings) .If you can operate a DECT cordless telephone
sporadically cause this interference of satellite reception. This is because
DECT operates on frequencies that are used for the transmission of the
Few programs
Receiver turns itself on or
not immediately
signal from the LNB to satellite receivers. Provide problems for correct
installation of the antenna cable, particularly in view of an effective RF
shielding the line. In addition it recommends to be far away from the
satellite receiver and the antenna line to set up the DECT base station.
The antenna may be aligned to the wrong satellite position. When aligning
the antenna, it can happen that you receive one of numerous satellites,
which is transmitting on a similar frequency and the signal display on the
receiver. When switching channels then often foreign programs and very
often the note appear that no signal is received. It is often enough to turn
the antenna a few degrees to the east or west to receive the desired
channels. Make sure you have the correct list of favorites activated.
The receiver performs automatic data updates periodically and turns this
one and after the upgrade automatically again. In this way, may be
delayed in time and turning off the receiver.
30

7 Service and Support
7.1 Warranty / Guarantee
The warranty for this product meets the legal requirements at the time of acquisition.
Changes to the device will invalidate the warranty and the manufacturer's warranty. A crash of the system
software does not constitute a guarantee will apply.
If a connected USB storage device is not compatible with the receiver, this is no guarantee will apply.
7.2 Version
Equipment Item number:
Issue of instructions:
8 Cleanse
Danger: Before cleaning the device, always disconnect or remove the battery cells by pulling the power plug
from the mains. Never give fluids or cleaning agents directly to the device!
Danger: Clean the unit and the remote control only with a slightly damp, soft, clean cloth. Do not use harsh
or abrasive cleaners. Ensure that no liquid penetrates into the device.
9 Decommissioning / camps
Take the receiver out of order, if you fail to use for a long time. To do this, as follows:
• Switch receiver to be off
• Unplug the receiver from the wall outlet
• Remove all connections on the receiver
• Remove the battery cells from the remote control
• Store batteries safely
• Receivers and accessories in a dry and dust-free place to Store Room Temperature
10 Dispose
10.1 Packing
Do you want to dispose of the packaging materials, follow these for recycling of commodities for commodities
separated municipal waste management for packaging waste to.
10.2 Old appliance
Old electrical appliances are recyclable materials, and does not belong in the household
rubbish! Enter this unit therefore the End of use at the municipal collection points from.
Information on these collection points, please contact your municipal administration.
10.3 Battery cells
Spent battery cells are hazardous waste and must not be disposed of with household garbage
after the battery regulation. Take the battery cells for free at the collection points in retail
stores.
31

11 Features
• Enables reception of HD + encrypted and unencrypted TVProgrammen in standard format (SD) and
high-resolution images (HD).
• Certified integrated encryption system for receiving TV programs of the HD + platform (eg RTL HD,
HD SAT 1, Pro 7 HD, VOX HD, HD cable 1)
32

General terms and conditions of business HD+
1. Scope, object of agreement and HD + Card
1.1 These terms and conditions of HD PLUS GmbH, headquartered in the Betastraße 1-10, 85774 Unterföhring ("HDP") are
specified for the HD + service.
1.2 HDP leaves the user in accordance with the general business condition, the possession of a Disk ("HD + Card"). The on the HD
+ card stored software or data (collectively, the "HD + Software") are only technical prerequisite for decoded reception of
certain digital encrypted radiated TV deals ("Program Offers") via a digital receiver with HD + certification ("HD + Service").
1.3 HDP grants the user a non-exclusive, non-transferable license to use the proper condition located on the HD + card + HD
Software for the purpose of contractual decrypting Program offers. This right is limited to the territory of the Federal Republic
of Germany. It is forbidden to the user to use the HD + Card outside Germany. HDP may require that the HD + card is been
used exclusively in conjunction with an assigned digital receiver. Moreover HDP is entitled to this technically secure (so-called.
pairing of digital receiver and HD + card).
1.4 Activation of the HD + card is up to the user. The HD + card may not be used otherwise than agreed. The user is not entitled to
copy the HD + Software, modify, disassemble, decompile or use other methods to them to find out their source code or its
structure or to bring processes or their state representation unjustified in experience or influence. Legal decompilation right
remain unaffected.
1.5 The digital receiver, the playback device (eg. B.TV) and the program offers are not expressly subject of performance. Certified
digital receivers are in trade available. Your installation is up to the user. In case of technical or general problems with the
set-top box is the responsibility of for customer service by the manufacturer of the digital receiver.
1.6 The number and composition of the program offers may change during the contract period.
1.7 HDP reserves the right to the use of the HD + service and to its amendment or modification required software on the HD + card
and the digital receiver at irregular intervals free to play or update, supplement or amend existing HD + Software.
Notwithstanding the foregoing provisions, the liability of HDP in loss of data on the typical restoration effort is limited.
1.8 HDP reserves the right to terminate your HD + card or not to support the basis of rights abuses by third parties the unauthorized
use of the HD + Service or allow circumvent the encryption. An extension of the HD + service after the activation according to
paragraph 3.1 is not possible on locked or unsupported HD + card.
2. User group and usage conditions
2.1 The HD + service is available to natural persons aged at least 18 years of age and is intended solely for the private,
non-commercial use. The use outside the private budget or the disclosure to third parties to use is not permitted.
2.2 In order to use the HD + Service is a digitally-compatible satellite receiving system, which is aligned on a satellite used by
HDP or sporadically cable reception (see www.hd-plus.de/faq) and marked the use of the HD + logo Digital receiver and a
playback device (eg. B. TV), which are not included in the scope (see. paragraph 1.5).
2.3 An unrestricted, ENTIRE use of the HD + service only when using HD +Certified digital receivers possible. When using digital
receivers without HD + certification may lead to technical restrictions on use of the HD + service, although HD + certified
Common Interface + receiver modules are used. In particular, it may be that the decoding and display of individual program
offers is not possible. The user has therefore compared to HDP neither a warranty nor a special right of termination.
3. Service fee / Term and renewal of the HD + Services
3.1 As part of marketing services, for example in connection with the purchase of an HD +certified digital receiver, HD + cards are
issued, who already have a quality control across months for the HD + service at no additional cost to the user include.
3.2 Moreover, falls for the use of the HD + service a service fee to their own particular conditions.
3.3 The term of the use of the HD + service starts with activation of the HD + card. You activate a card if one is in the appropriate
slot for HD + certified digital receiver and an HD + program is thus decrypted the first time or with extension and activation by
the user.
3.4 Time before the relevant activation of the HD + service, the user is alerted by a display on the playback device on the end and
any possible renewal or new purchase options for the use of the HD + service. The activation of an HD + card should follow
display on the playback device can be extended. Otherwise, the period may be an existing quality control been shorten.
However, the acquisition of an HD + card does not include the right to an extension.
3.5 The program offers and services of third parties and the receipt or use, different cost trigger for which the user is responsible.
4. Compliance with copyrights
4.1 The HD + Software and the HD + Card are protected by law. As far as programs from licensors for application come whose
property is protected to the same extent. The unauthorized duplication or dissemination of the HD + Software or HD + card
and / or their imitation is HDP through civil, optionally also pursuing criminal actions.
5. Rights and obligations of the user
3
3

5.1 Each user of the HD + Service bears sole responsibility for the intended use; the user has in particular ensure that
youth-endangering contents transmitting only the legally permitted group of people.
5.2 The user may not use abusive the HD + service and is committed to protecting its HD + Card from loss and misuse. The user
may in particular make any intervention in the HD + Software or it may proceed, for example, the unauthorized reception of
encrypted to enable program offerings. The use of equipment designed to circumvent the encryption is prohibited. Such abuses
can be prosecuted. Please refer to point 6 and 7.3.
5.3 Replaces the HDP HD + card due to a reason attributable to the user damage or loss, has this compensation to be paid.
5.4 If the provision of HD + services impaired or interrupted due to interference with the user's software or hardware, the HDP is
not responsible for, the user is not required to refund an already paid service fee entitled. This also applies if the HD + Card has
been damaged or has been lost.
6. Exemption
6.1 The User shall be liable to HDP for compliance with the obligations set out in paragraphs 4 and 5. It provides HDP from all
third party claims which are asserted as a result of a culpable breach of these obligations and / or damaging actions by the user
of HDP and make compensation for beyond this damage including the costs of any necessary legal proceedings and defense.
7. Rights and Obligations of HDP
7.1 HDP will inform the user of a not merely insignificant temporary power setting or restriction. This notification requirement does
not apply if the information referred to under the circumstances it is not possible objectively before the start of the power
setting or limiting or elimination would delay already occurred interruptions.
7.2 HDP reserves, without further notice Maintenance and repair work at their perform technical installations for maintenance or
improvement of HD + Services. In this maintenance window, there may be interruptions or impairments when receiving the
program offers to come, but do not entitle the user to reduce.
7.3 In case of violation of these Terms or the reasonable suspicion of a violation by the user, in particular within the meaning of the
above items 4 and 5, HDP is in its sole discretion entitled:
7.3.1 Temporarily or permanently exclude the user from using the HD + Services and / or
7.3.2 Terminate the usage agreement extraordinarily pursuant to paragraph 10.1.
7.4 HDP will admonish the user against exclusion or termination unless the breach is sufficiently serious that HDP is not reasonable
to continue the contractual relationship.
7.5 If based on the fault of the user use exclusion in accordance with section 7.3 of the user remains for the period of use of
exclusion and power cut-off to pay the remuneration committed.
8. Warranty
8.1 HDP provides services under utilization of communication networks or technical facilities of third parties that are outside the
control of HDP. Temporary limitations, impairments or losses of the HD + Service due to influences that HDP is not
responsible for, HDP cannot exclude it. HDP specifically disclaims any guarantee that particular program offers can be
received at any given time; this does not apply if the HDP is responsible for a disturbance.
8.2 The user acknowledges that the quality of the decrypted and made available to program offers on the one hand from the
provided by third signal quality and on the other hand the performance of the playback devices used by the user is dependent
on both outside the responsibility of the HDP is. The user acknowledges also that the recording and playback of recorded
program offers may be limited by third parties.
8.3 HDP Recalls that software programs cannot be developed so that they all requirements without errors.
8.4 HDP addresses within the existing technical and operational possibilities all reported disorders of HD + services that are not
addressed no need for the exchange of HD + card immediately. The costs of requesting service of HDP by the user. Temporary
impairments of receipt by atmospheric disturbances or transmitter, or satellite / cable power failure entitle the user not to
reduce.
9. Liability
9.1 HDP is only liable HDP, its agents and / or statutory representatives commit deliberate or big negligence is a burden.
9.2 In case of damages caused by minor negligence HDP is only liable if an essential contractual obligation was or in the case of
default or impossibility is. In these cases, liability is limited to the typical foreseeable damage.
9.3 To the extent there should be temporary impairments when receiving the program deals are beyond the control of HDP, in
particular in case of failure of the signal, the HDP is not responsible, and HDP is not liable.
9.4 HDP is not responsible for the decrypted by which, it had access program offers and their contents.
9.5 A legally prescribed, no-fault liability of HDP, in particular a liability according to product liability law and a legal liability
guarantee, remains of the above liability limitations unaffected. The same applies to the liability of HDP case of culpable
violation of a user's life, body or health. Strict liability in accordance with § 536 BGB is excluded if the user leaves a HDP HD
+ card.
9.6 The Sections 9.1, 9.5, and 9.2 include all contractual and legal claims, which because of the use the HD + service can be
invoked.
10. Termination of the contract and change the HD + Services
4
3

10.1 The contract for the use of the HD + Service is running for the duration of the previously agreed on activation of HD + card, an
extension assumes that the HD + card not according to Digit 1.8 blocked. Shall remain unaffected any extraordinary rights of
termination.
10.2 The User can not issue an extraordinary termination, because the number or composition of the program offerings, which help
the user can change decrypt HD + Software, during the contract term.
10.3 HDP Announces the HD + service after a warning in the case of clause 7.3, HDP can damages demand according to legal
regulations.
11. Privacy Policy
11.1 Details of the data processing are included in the privacy leaflet
(See www.hd-plus.de/datenschutz).
12. Final Provisions
12.1 HDP is entitled to their rights and obligations under this contract in whole or in part on a for proper continuation of the contract
appropriate third party transfer. The user is in this entitled case, to terminate the contract effective as of the date of transfer.
12.2 The law of the Federal Republic of Germany. The application of CISG is excluded.
Date: July 2014
5
3

Safety recommendations
Use of the Set-top boxis subject to safety measures designed to
protectusers and their environment
Where to put your Set-top box?
In order to guarantee the correct operation of your Set-top box,
you must:
place it indoors to protect it from lightning, rain, and direct
sunlight,
place it in a dry and well ventilated area, keep it away from
heat sources such as radiators, candles, lamps,etc.
protect it from dampness, place it on a flat surface from
where it will not fall and is out of the reach of children, avoid
violent shocks.
Choose a stable, horizontal surface on which the Set-top box
will not be exposed to intense vibrations.
do not place anything on top of your Set-top box (as it would
restrict ventilation): the ventilation slots located on the casing
prevent your Set-top box from overheating.
If you place the Set-top box in a compartment or other closed
space, leave a space of at least 10 cm on each side and 20
cm on the front and back of the Set-top box, connect it
directly to the mains with the provided cords, the socket must
be near the Set-top box and easy to access.
The use ofan extension cable (with multi-points) is not
recommended.
Warnings and safety instructions
In case of failure, the power cable is the
disconnect device for this equipment. To
remove all electrical power from the
equipment, disconnect the power cable
Connect the Set-top box to the electrical outlet in accordance
with the indications mentioned on the identi-cation label axed
on the Set-top box (voltage, power, frequency of electricity
network).
You must imperatively use the Set-top box in an environment
that complies with the following requirements:
temperature: between 0°C [32°F] and 40°C [104°F].
ambient humidity: between 20% and 90%.
altitude: below 2000 m [6562 ft].
from the electrical outlet.
To avoid short-circuits (-re or electrocution hazard), do not
expose your Set-top box to dampness. Do not place any
object containing liquid (vase for example) on the appliance.
The Set-top box must not be splashed with liquid. If liquid is
spilled onto the Set-top box, unplug it immediately from the
mains and consult your supplier.
Take care not to allow liquids or metal objects to enter the
Set-top box through the ventilation slots.
Avoid reconnecting the Set-top box after it has been subjected
to large changes in temperature.
The Set-top box must be disconnected from power supply
before any modi-cation ofconnection between TV, VCR or
antenna.
In the event of a storm, it is advisable to unplug the antenna.
Even if the Set-top box and the television set are disconnected
from the power supply, lightning can still damage them.
If you hear unusual noise coming from the mains power socket
or from the power cord , disconnect immediately the power cord
from the mains power socket in accordance with all the
precautions of use, you risk getting an electric shock, and
contact your retailer.
Never connect the Set-top box to a mains power socket which is
loose, shows signs of wear or damage, you risk getting an
electric shock.
Never touch the power cord with wet hands. You risk getting an
electric shock.
When connecting or disconnecting the power cord, always take
hold of the plug without pulling on the cord. A damaged cord
presents a potential risk of -re or electric shock. Never pull the
power cord when disconnecting from the mains power socket.
Never place objects on the power cord, and never pull on it or
fold it. This may cause a risk of -re or electric shock.
Ensure that the Set-top box never lies on the power cord or any
other cables.
Ensure the Set-top box is placed on a at and stable surface,
placing it incorrectly may lead to the power cord being
disconnected.This may cause a risk of -re or electric shock.
Always keep the power cord unit out of the reach of children or
domestic animals.
Only personnel approved by the manufacturer can repair the
Set-top box. Failure to comply with these safety precautions will
invalidate the guarantee.
Have a specialised installer perform all connections if you want
to use cables that are not provided with the Set-top box.
Batteries
Batteries are easily swallowed by young children. Do not allow
young children to play with the remote control.
Always keep batteries away from excessive heat sources such as
direct sunlight, -re or similar sources.
To avoid damaging the remote control, only use identical batteries
or batteries of an equivalent type. The batteries provided are not
rechargeable.
Interference
Do not place the Set-top box near appliances that may cause
electromagnetic interferences (for example, loudspeakers,
modems, routers or cordless phones). This could aect Set-top box
operation and distort the picture or sound.
USB Storage devices
Please wait until the Set-top box or the multimedia file application
exits the multimedia list manager (multimedia file application) or is
in standby mode before disconnecting your storage devices.
Otherwise, you risk losing data or damage your storage device.
When connecting a USB peripheral device, respect the way of
insertion and never use force. You may damage your peripheral
device and/or the appliance.
Cleaning the Set-top box
The outer casing of the Set-top box can be cleaned with a soft and
dry cloth. Do not use any type of abrasive pad, scouring powder or
solvents, such as alcohol or turpentine, as they could damage the
surface of the Set-top box.
36

DSR3131H User manual
253649992
Philips and the Philips Shield Emblem are registered trademarks of Koninklijke Philips N.V.
used under license.
This product was brought to the market by X-GEM SAS, further referred to in this document
as X-GEM SAS, and is the manufacturer of the product.
2015 © X-GEM SAS. All right reserved.
Headquarters:
X-GEM SAS
9 rue de la Négresse
64200 Biarritz – FRANCE
Tel : +33 (0)5 59 41 53 10 Fax : + 33 (0)5 59 41 53 09
www.xgem.com

Das Benutzerhandbuch

2
Registrieren ihr Produkt und erhalten die Unterstützung unter
www.philips.com/welcome
Lieber Kunde: Danke, dass Sie sich für den digitalen terrestrischen Receiver und Smart-Box-IP-Modell
Philips DSR3131H wählen. In dieser Anleitung, Daten von der Verwendung, Verbindung, Kontrolle und
Schutz des Geräts sind vorgesehen, mit dem Sie Ihr neues Gerät besser kennen. Um die Referenz zu
erleichtern, hat das Handbuch in mehrere Abschnitte unterteilt. 1. Das ersten Teil ist über die
Installation, Anschluss des Receivers mit anderen Geräten und wie Sie die Fernbedienung verwenden.
2. Das zweitem Teil geht es um grundlegende Verwendung, wo ist die notwendige und wesentliche
Informationen für den täglichen Gebrauch zur Verfügung gestellt. 3. Das dritten Teil ist über
erweiterte Nutzung, mit der maßgeschneiderten Nutzung und der komplexeren Eigenschaften.
Die Verwarnung
Bei der Verwendung des Empfängers, sollen Sie zumindest die grundlegenden Kenntnisse in dieser
Anleitung wissen. Daher ist eine sorgfältige Lektüre des Handbuchs empfohlen. Bei dieser Methode
können Sie das Gerät optimal nutzen, ohne irgendwelche Probleme oder Fehlfunktionen.
Der Hinweis: Aufgrund der Updates oder Fehler, die Inhalte in diesem Handbuch möglicherweise
nicht genau mit dem tatsächlichen Produkt überein.

3
Index
1 Einleitung .................................................................................................................. 5
1.1 Dank ................................................................................................................. 5
1.2 Information zu dieser Anleitung ....................................................................... 5
1.3 Erläuterung der Sicherheit................................................................................ 5
1.4 Bestimmungsgemäßer Gebrauch ...................................................................... 5
2 Erster Schritt ............................................................................................................. 6
2.1 Sicherheit ......................................................................................................... 6
2.2 Auspacken ........................................................................................................ 7
2.3 Kontrolle und Anschlüsse ................................................................................. 8
2.4 Verbinden die notwendigen Anschlüsse.......................................................... 10
2.5 Optionale Kabelverbindungen......................................................................... 11
3 Operation ...............................................................................................................111
3.1 Grundlegende Menüfunktion........................................................................... 12
3.2 Initiale Operation ........................................................................................... 12
4 Tägliche operation ................................................................................................... 13
4.1 Programmwechsel .......................................................................................... 13
4.2 Volumen ......................................................................................................... 13
4.3 EPG - Elektronischer Programmführer ............................................................ 13
4.4 Favoritenliste ................................................................................................. 14
4.5 Teletext .......................................................................................................... 14
4.6 Info Tasten ..................................................................................................... 14
4.7 Umschalten zwischen TV und Radio Modus..................................................... 14
4.8 Automatische Abschaltung ............................................................................. 15
5 Menüauswahl .......................................................................................................... 16
5.1 OSD Menü „Einstellung“ .................................................................................. 16
5.2 OSD Menü „Installation“.................................................................................. 21
5.3 OSD Menü „Organizer“ .................................................................................... 25
5.4 OSD Menü„System Konfiguration“ ................................................................... 27
5.5 OSD Menü„CA Information“ ............................................................................. 28
5.6 OSD Menü„Verbindungen“(optional) ............................................................... 28
5.7 OSD Menü„Software Aktualisierung“ ............................................................... 28
6. Fehlersuchhilfen .....................................................................................................299
7. Service und Support ................................................................................................ 31
7.1 Gewährleistung / Garantie ............................................................................. 31
7.2 Version ........................................................................................................... 31
8. Reinigen .................................................................................................................. 31
9. Außerbetriebnahme /Lager ..................................................................................... 31

4
10. Entsorgen ................................................................................................................ 31
10.1 Verpackung ................................................................................................. 31
10.2 Altgerät ....................................................................................................... 31
10.3 Batteriezellen .............................................................................................. 31
11. Funktionen .............................................................................................................. 32

5
1 Einleitung
1.1 Dank
Sie haben ein Qualitätsreceiver gekauft. Unsere Produkte unterliegen einer ständigen strengen
Qualitätskontrollen. So stellen wir sicher, dass Ihnen an unserer Produkte gefallen.
Der Receiver ist ein Digital-Receiver für den Empfang von freien abgestrahlten und die verschlüsselten
HD + Satellitenfernsehen in SD- und HDTV-Formate. Beachten Sie, dass Sie eine digital-kompatiblen
Satelliten-Antenne für den Betrieb, die mit einem Digital-LNB ausgerüstet sein müssen.
Jetzt nicht nur der TV-Empfang ist digital! Der HD-Receiver verfügt über die Qualität, den digitalen
HDMI-Ausgang für den Anschluss an Plasma- und LCD- Fernseher. Das digitalen Bildsignal, um eine
maximale Bildqualität zu gewährleisten.Um die verschlüsselten HD + HD + Programmen eine
Prepaid-Chipkarte der HD PLUS GmbH ist eingeschlossen . Mit dieser Karte können Sie die HD +
Programme für einen Zeitraum von 12 Monaten zu testen, und nach dem ersten Verbrauch frei ist.
Würden Sie dann weiter auf der HD + Programmen suchen, die Kreditkarte auf der HD Plus GmbH
wieder aufgeladen werden muss. Im Hinblick auf die HD + Funktion des Empfängers und der HD +
Prepaid-Chipkarte finden Sie in Geschäftsbedingungen der HD PLUS GmbH Anwendung (siehe Seite
33).
1.2 Information zu dieser Anleitung
Lesen Sie die Bedienungsanleitung sorgfältig durch. Bewahren Sie die Anleitung für den späteren
Gebrauch. Wenn Sie das Gerät an Dritte weitergehen, sicherzustellen, dass Sie oder der Dritte bitte
die Gebrauchsanweisung verstehen.
1.3 Erläuterung der Sicherheit
Das Handbuch enthält folgende Kategorien von Sicherheitshinweisen:
Gefahr: Diese Hinweise machen Sie auf mögliche Verletzungs alarmieren
Achtung: Diese Hinweise warnen vor möglichen Sach- oder Umweltschäden
1.4 Bestimmungsgemäßer Gebrauch
Dieses Gerät eignet sich für den Satelliten-Empfang von freien und verschlüsselten HD + digitalen TVund Radiosignale in Privathaushalten.

6
2 Erster Schritt
2.1 Sicherheit
Lesen Sie die Sicherheitshinweise, bevor Sie das Gerät vorsichtig verwenden.
Erstickungsgefahr: Bewahren Sie den Plastikbeutel weg von Babys, Kinder und Tiere.
Gefahr des Verschluckens: Lassen Sie kleine Teile außerhalb der Reichweite von Kindern oder
Tieren.
Umgang mit Batteriezellen: keine Reverse von Polarität, und Batteriezellen. Verwenden Sie nur
Akkuzellen des gleichen Typs. Verwenden Sie keine alten und neuen Batteriezellen. Beachten Sie die
Sicherheitshinweise des Batterieherstellers. Entfernen Sie die Batteriezellen und lagern in einem
sicheren Ort, wenn die Fernbedienung für längere Zeit nicht verwendet wird. Dies kann zu Schäden
durch ausgelaufene Batteriezellen zu verhindern.
Netzspannung: Betreiben Sie das Gerät nur an Stromversorgungssysteme mit der Netzspannung
und Frequenz auf dem Gerätegehäuse angedeutet! Verbinden Sie das Gerät erst nachdem alle
Anschluss- und Installationsarbeiten an das Stromnetz. Der Netzstecker muss jederzeit zugänglich,
das Gerät im Notfall soll schnell vom Netz trennen kann sein. Ziehen Sie sofort das Gerät von der
Stromversorgung, wenn das Gerät oder das Netzkabel beschädigt ist.
Ortslage: Das Gerät soll nicht in gemäßigtem Klima betrieben werden. Stellen Sie das Gerät nur im
trockenen und geschlossenen Räumen mit Ausrüstungfüße auf einer geraden und ebenen Fläche. Um
sie vor Verfärbungen durch die natürliche Wärmeentwicklung des Gerätes zu schützen, stellen Sie das
Gerät auf eine geeignete Unterlage. Wählen Sie einen Ort, der das Gerät vor starker Verschmutzung
schützt.
Externe Einflüsse: Verhindern Sie das Gerät vom Tropf- oder Spritzwasser ausgesetzt ist. Das Gerät
soll nicht in Feuchtigkeit (zB Kondens- oder Spritzwasser) oder direkter Sonneneinstrahlung bloßlegen.
Nicht legen das Gerät auf wassergefüllten Gegenstände wie Vasen oder über die Einheit. Stellen Sie
das Gerät nicht in der Nähe von Wärmequellen, wie Heizungen oder Geräte, die Wärme erhitzen.
Stellen Sie keine offenen Flammen, wie Kerzen oder ähnliches auf das Gerät oder in der Nähe davon.
Verdecken Sie niemals die Lüftungsschlitze. Stellen Sie keine Decken, Zeitschriften oder dergleichen
auf oder unter dem Gerät.
Explosionsfähige Atmosphäre: Setzen Sie das Gerät nicht in einer Umwelt, die mit strakem Staub
oder Gas verunreinigt (zB Werkstätten), betrieben werden.
Erdung: Die Antennenanlagen sind grundsätzlich zu erden, wobei die einschlägigen örtlichen und
VDE-Vorschriften sind zu beachten.
Gegenstände im Gerät: Achten Sie darauf, dass keine Gegenstände in die Lüftungsschlitze gelangen.
Es besteht die Gefahr eines lebensgefährlichen elektrischen Schlages! Ausreichende Belüftung: Die
Lüftungsschlitze des Gerätes dürfen niemals verdeckt werden. Stellen Sie sicher, dass das Gerät zur

7
Seite und oberhalb einen Freiraum von mindestens 10 cm, und dass die Wärme muss vollständig
durch Luftstrom nach oben abgeleitet werden.
Reinigung: Vor dem Reinigen des Gerätes immer trennen oder entfernen Sie die Batteriezellen aus
der Steckdose. Verwenden Sie ein trockenes oder leicht angefeuchtetes Tuch, um sicherzustellen,
dass keine Feuchtigkeit in das Gerät eindringt.
Reparatur: Öffnen Sie niemals das Gehäuse des Gerätes selbst: Auch bei Netztrennung akute
Lebensgefahr durch einen elektrischen Schlag. Interne Bauteile können durch die Berührung
beschädigt werden. Die Reparaturen dürfen nur von qualifiziertem Personal durchgeführt werden.
Durch unsachgemäße Manipulation mit der Garantie und die Sicherheit des Gerätes nicht mehr
gewährleistet werden kann!
Längere Abwesenheit / Gewitter: Bei längerer Abwesenheit oder Gewitter, ziehen Sie den
Netzstecker aus der Steckdose. Außerdem trennen Sie die Antennenanschlüsse, die während
Gewittern die Schäden zu vermeiden.
2.2 Auspacken
2.2.1 Verpackung
Lassen Sie das Gerät bis zur Verwendung in der Verpackung. Wenn Sie das Gerät von einer kalten in
einer heißen Umgebung gebracht haben, lassen Sie es, weil die Bildung von Kondenswasser im Gerät
in der geschlossenen Verpackung etwa eine Stunde braucht! Entfernen Sie die Verpackung des
Empfängers, der Fernbedienung und der Batteriezellen. Für Versenden müssen kann die
Transportverpackung helfen.
Gefahr: Hinweis für die umweltgerechte Entsorgung von Materialien, lesen Sie das Kapitel 10 –
„ Entsorgung“!
2.2.2 Batteriezellen für die Fernbedienung
Verwenden Sie die ersten Installation und den Austausch der verbrauchten Zellen immer zwei neue
E-Batteriezellen (AAA)
1. Wählen Sie die Batterieabdeckung auf der Rückseite des Mobilteils durch leichtes Anheben des
Verschlusses zu öffnen.
2. Entfernen Sie, ggf. entladen Batteriezellen und setzen Sie dann die beiden Batteriezellen im
Batteriefach der Fernbedienung (+/-) gezeigten Polarität, wie angegeben.
3. Setzen Sie den Batteriefachdeckel wieder sorgfältig in die ursprüngliche Position, so dass in die
letzte der Schließung schnappt.
Gefahr: Hinweis für die Entsorgung der Batteriezellen, lesen Sie im Kapitel 10 - Entsorgen!
Warnung: Batterien dürfen nicht zu starker Wärme durch Sonneneinstrahlung, Feuer oder ähnlichem
ausgesetzt werden.
Achtung: Werfen Sie Batterien nicht ins Feuer, kurz oder zu demontieren.

8
2. 3 Kontrolle und Anschlüsse
2.3.1 Fernbedienung
1. St rom Ei n oder aus i m Stand- by von
STB .
2. Zifferntasten 0-9 Um einem bestimmten
Programm zu wechseln oder um numerische
Werte und Passwörter eingeben.
3. BACK Wechseln wieder zum Programm,
dessen in die zuletzt angeschaut, und bevor
Kontextwechsel.
4. TV/RADIO Schalten zwischen TV und Radio
Modus.
5. Stummschaltung/Aktivierungdes Sounds.
6. INFO Zeigt die Programminformationen.
7. FAV Auswahlä n Programms/ Fa vo rit en - Liste
8. MenüZugriff auf das Menü.
9. Navigationstasten ▲ / ▼ / ◄ / ►
Navigation in einem Menü. Außerhalb des
Menüs ▲ / ▼ für die Programmschalter und
◄ / ► für die Lautstärkeeinstellung (VOL - / +)
verwendet.
10. OK Bestätigen Sie die Menüauswahl.
11. EPG Electronic Program Guide (EPG).
12. EXIT Menü verlassen oder beenden Sie die
Einstellung.
13. VOL + / VOL- Stellen Sie die Lautstärke.
14. CH + / CH- Programmumschaltung.
15. Farbtasten (rot, blau, grün, gelb). Funktion ist
abhängig von Menübildschirm und Mode.
16. TEXT Videotext Funktion starten Sie den
Empfänger und beenden.
17. A U D I O Anpassung der verfügbaren
Audio-und Audio-K a n äl e .
18. SUB Anzeige von Untertiteln (sofern
verfügbar).
19. RES Auflösung ändern.
Batterien: 2 AAA größe
A chtung : Seien Sie vorsichtig beim Einlegen der Batterien auf die richtige Polarität! Die Polung ist im
Batteriefach angegeben.
Achtung: Verbrauchte Batterien sind Sondermüll - stets ordnungsgemäßentsorgen!

9
2.3.2 Bedienfeld des Geräts
1. - Taste zu aktivieren / deaktivieren Sie das Gerät.
2. ▲ / ▼ - Aufgabe Schalter.
3. Infrarot-Empfänger für die Fernbedienung.
4. GRÜN, wenn der Empfänger auf ROT, wenn der Empfänger auf Bereitschaftsmodus (Standby)
eingeschaltet ist,.
Die HD + Smartcard muss in die Richtung des Pfeils, und mit der Metallkontakt nach unten eingelegt
werden.
2.3.3 Anschlüsse von der Rückseite
1. RF IN - Antenneneingang für den Anschluss eines LNB beim Satellitenantennensystem. 1. Strom
max. 350 mA.
2. S/PDIF - Optischer digitalen Audioausgang (S / PDIF-Anschluss optional).
3. USB - USB-Anschluss für schnelle externe USB-Festplatte.
4. HDMI - HDMI-Buchse für den Anschluss eines HD-kompatiblen Fernsehers.
5. SCART - SCART-Buchse für den Anschluss einer nicht-kompatiblen HD-TV.
6. LAN - Ethernet RJ45. Anschluss für Service-.
7. Netzkabel - Netzteil Netzkabel 12V DC 2A.
Hergestellt unter Lizenz von Dolby Labor.
Dolby und das Doppel-D-Symbol sind Warenzeichen von Dolby Labor.
HDMI, das HDMI-Logo und „ High-Definition Multimedia Interface “ sind Warenzeichen oder
eingetragene Warenzeichen von HDMI Lizenzierung LLC in den USA und anderen Ländern.

10
2.4 Verbinden die notwendigen Anschlüsse
Die folgenden Anschlüsse des Receivers müssen zur Inbetriebnahme verbunden werden. Um dies zu,
durch die beschriebenen Schritte zu tun. Schließen Sie den Empfänger erst nach dem Anschluss aller
notwendigen Anschlüsse an das Stromnetz.
Achtung: Schließen Sie den Empfänger erst nach dem Anschluss aller notwendigen Anschlüsse an das
Stromnetz.
2.4.1 Antenne anschließen (Seite 3 • 1 Punkt)
Schließen Sie eine doppelt abgeschirmten F-Stecker-Antennenleitung des Satellitensystems an die
Buchse „RF IN“.
Beachten Sie, dass bei der Erstinstallation oder wenn das Gerät vom Netz getrennt, die Antenne 19,2 °
Ost muss für die erforderliche HD + Software Update über die Astra-Satelliten ausgerichtet werden.
2.4.2 TV-Gerät anschließen (Seite 3 • 2-Punkt)
Schließen Sie eine Zeile „Standard HDMI“, die Buchse "HDMI" am Receiver mit ihrem TV.
Wenn Sie keinen HD-kompatiblen Fernseher, oder keine Probleme mit dem HDMI-Anschluss verfügen,
schließen Sie ein SCART-Kabel an „SCART“ am Receiver an Ihren Fernseher. Beachten Sie jedoch dabei
ist, dass Sie dann die Aufnahme mit der hohen HD-Auflösung nur mit der normalen SD-Au, kann die
Auflösung zu sehen. Wenn das aktuellen eingestellten HD + Programm aus urheberrechtlichen Gründen
mit Kopie geschickt sind, Bilder nicht über die SCART-Buchse ausgegeben werden kann. Dann wenn
nötig, schalten Sie das gleiche Programm mit der SD-Auflösung.
2.4.3 Netzanschluss (Seite 3 • 3-Punkt-)
Wenn keine weiteren optionalen Verbindungen (im folgenden in Abschnitt 2.5 oben) hergestellt sind,
stecken Sie den Stecker der Netzleitung in eine freie Steckdose.
Achtung: Setzen Sie das Gerät nur an Stromversorgungssysteme mit der Netzspannung und Frequenz
auf dem Gerätegehäuse angedeutet betreiben! Schließen Sie das Gerät erst, nachdem alle Anschlussund Installationsarbeiten an das Stromnetz.

11
2.5 Optionale Kabelverbindungen
2.5.1 SPDIF
Wird ein externer Audio-Verstärker oder einen Stereo-Digital SPDIF-Eingang angeschlossen sind,
schließen Sie mit einem geschirmten koaxialen Cinch-Kabel, die „S / PDIF koaxial“ RCA-Buchse des
Receivers an das externe Audiogerät.
2.5.2 USB (Kostenpflichtige Aktivierung nötig)
USB-Anschluss (Typ A) zum Anschluss eines externen USB-Speichergerät.
Angeschlossene USB-Geräte können mit einem maximalen Strom von 500 mA Lade verbinden, um
Schäden an dem Empfänger und dem USB-Gerät zu verhindern! Festplatten anschließen nicht ohne
eigene Stromversorgung.Wenn das USB-Speichergerät aus der Vorlage entfernt wird, wählen Sie
immer den Menüpunkt „Media Manager“ / Media Information und drücken Sie dann, um sich das
Speichermedium abzumelden, mit der gelben Taste „ sicher entfernen“. Beachten Sie, dass aus
technischen Gründen kann es zur Folge in Datenfehler im Zusammenhang mit einem externen
USB-Speichergerät haben. Der Hersteller des Empfängers übernehmen keine Haftung für Datenverlust
oder Schäden an der Verwendung der USB-Schnittstelle, und empfehlt, den Einsatz von Medien an den
Receiver immer ein Backup durchführen.

12
3 Operation
3.1 Grundlegende Menüfunktion
Der Empfänger wird über die Fernbedienung gesteuert. Die integrierte OSD (Bildschirmanzeige)
betrieben wie folgt:
Öffnen und Schließen des OSD: OSD
Bildschirmmenü, Sie machen alle Einstellungen
des Satelliten-Receivers. Der Anruf wird durch die
Taste „ MENU“gemacht. Drücken Sie „EXIT“ um
OSD zu verlassen.
Navigieren durch das OSD-:Über die
Steuertasten▲ / ▼ und ◄ / ►, zu „ einen
Menüpunkt markieren oder eintreten oder in den
OSD-Tasten anzeigen. Verwenden Sie die Taste.
OK „ aktiviert einen ausgewählten Menüpunkt, und
falls vorhanden, eine Liste der möglichen
Einstellungen aufgerufen wird. Die BACK-Taste
wird jeweils zum vorherigen Menüebene
rückgekehrt.
Hinweise zum OSD: Wenn die Menüsperre
aktiviert ist, hat die erforderliche Passwort Fabrik
„0000“ auf dem Zahlencode und kann später
geändert werden. Die Menüsperre wird verwendet,
um unberechtigte Bedienung des Gerätes zu
verhindern.
3.2 Initiale Operation
3.2.1 Begrüßungs-Seite
1. Wenn Sie das Gerät zum ersten Mal einschalten, startet der Installationsassistent automatisch, so als
ob Sie das Menü des Receivers in die Werkseinstellungen zurücksetzen.
2. Die Sprache auswählen (Display-Sprache für das Bildschirmmenüs).
3. Wählen Astra-Scan aus. Für die Änderungen zum Normalen.
Satelliten-Einstellungen, drücken Sie die blauen Taste. Zum Beispiel, um ein Unicable-Einstellungen
auszuwählen. Bei der Aktualisierung des Receivers, kann 20 bis 60 Minuten in Anspruch nehmen um
einzuschalten. Haben Sie etwas Geduld. Da das Update automatisch erfolgt, Sie brauchen nicht zu
dieser Zeit anwesend sein dürfen.

13
4 Tägliche operation
4.1 Programmwechsel
Der Kontext-Schalter wird mit der CH + / CH- oder Tasten ▲ / ▼ getan.
4.2 Volumen
Das Volumen wird mit der VOL + / VOL- oder ◄ / ► -Tasten eingestellt.
Mit der MUTE-Taste kann der Ton geschaltet und wieder aktiviert werden.
4.3 EPG - Elektronischer Programmführer
Drücken Sie die Taste „EPG“ ,Verschiedene Informationen genannt werden.
Wenn die EPG-Taste einmal gedrückt wird, kann
ein Überblick über die Programme für den
aktuellen Tag angezeigt werden. Die Übersicht
der Folgetage wieder der Index auf den aktuellen
Tag mit der gelben oder grünen Taste
zugeschrieben werden. Wenn eine Programmliste
mit ▲ / ▼ markiert, ein Drü cken mit der Taste
OK.
Infotext über das Programm zugegriffen werden kann, und mit der BACK-Taste kann wieder verlassen.
Wenn die EPG-Taste erneut gedrückt wird, kann eine tägliche Übersicht über die Sendungen der
verschiedenen Programme anzeigen. Mit ◄ / ► können in der Tageszeit navigiert werden. Mit ▲ / ▼
Sie in der Liste der Programme navigieren.

14
4.4 Favoritenliste
Mit der Taste FAV wird die Favoriten-Funktion aufgerufen wird. Die Favoritenlisten können
beispielsweise mit den Lieblings-Programme der verschiedenen Nutzer ausgefüllt werden. Solange die
Liste angezeigt wird, kann durch mehrmaliges Drücken der FAV-Taste, um die Liste gesetzt werden
sollen. Beim Einschalten wird, dann einschaltet nur innerhalb des gewählten Favoriten-Liste. Mit der
Taste TV / RADIO können auf die gesamten Kanalliste zurückgegeben werden. Die Konfiguration der
Favoritenlisten ist in Abschnitt 5.3 erläutert.
4.5 Teletext
Viele Programme senden zusätzliche Informationen und Dienste. Teletext-Seiten sind „elektronische
Zeitschriften“, von dem aus man die neuesten Nachrichten, Sportergebnisse, Wettervorhersagen,
kommerzielle Angebote und vieles mehr zu erhalten. Den Umfang und Inhalt wird von der jeweiligen
Programmanbieter definiert. Die Teletext-Funktion des Receivers mit der TEXT-Taste gestartet. Die
Startseite ist immer die Seite 100. Es ist die höchste Seite.
Überblick über die weiteren Unterseiten (zB Seite 200, Sport Übersicht) anzeigt. Die Seitenzahlen sind
immer drei Ziffern mit den Zifferntasten 0-9 eingeben. Alternativ können Sie mit den Pfeiltasten
navigieren. Hier mit den UP / DOWN Tasten, um eine Videotext-Seite nach oben / unten zu gehen,
wählen Sie die Tasten, um im Sumpf einer Videotextseite mit der Links / Rechts scrollen. Durch erneutes
Drücken der Taste TEXT, die Videotext-Funktion des Receivers abgeschlossen werden kann.
Hinweis: Laden vor allem Teletext-Unterseiten kann einige Zeit aufgrund des Systems übernehmen.
4.6 Info Taste
Wenn der INFO-Taste erscheinen die Informationen über die laufenden und nächsten Programmen.
Stehende Information über die Sendezeiten zur Verfügung, zeigt der Bargraph die Restlaufzeit des
aktuellen Programms. Mit der Pfeiltaste können dann die Info-Text des folgenden Programms
aufgerufen werden.
4.7 Umschalten zwischen TV und Radio Modus
Mit der Taste TV / RADIO können den Radio-Modus umgeschaltet werden und Rückkehr zum TV-Modus.
Der Receiver stellt sich immer wieder in der Gesamtprogrammliste.

15
4.8 Automatische Abschaltung
Aufgrund einer gesetzlichen Regelung, eine automatische Abschaltung nach längerer Inaktivität
(beispielsweise, weil Sie schlafen) ist voreingestellt mit diesem Receiver. Wenn der Receiver nach langer
Zeit nicht im Betrieb (zB Programmwechsel), stoppen automatisch, gibt es keine Fehler im Gerät! Diese
Funktion ist praktisch, einfach am Receiver und möglicherweise unnötige Stromkosten sparen.

16
5 Menüauswahl
Verwenden Sie die MENU-Taste, das OSD (Bildschirmanzeige) Menü zugegriffen wird.
5.1 OSD Menü „Einstellungen“
5.1.1 Spracheinstellungen
OSD-Sprache
Wählen Sie die gewünschte Sprache für die
Anzeige des Bildschirmmenüses mit ◄ / ►.
EPG Sprache
Wählen Sie die gewünschte Sprache für die
Anzeige der EPG mit ◄ / ►.
Audio-Sprache
Wählen Sie die Sprache aus, um wieder in
mehrsprachigen Sendungen wiedergegeben
werden, wenn dies verfügbar ist.
Untertitelsprache
DVB Untertitel können in mehreren Sprachen
ausgestrahlt werden. Wählen Sie die gewünschte
Sprache aus.
Hinweis: DVB-Untertitel sind extrem selten und
übertragen von den herkömmlichen
Videotext-Untertitelen.
Teletext-Sprache
Teletext-Inhalte können in mehreren Sprachen ausgestrahlt werden. Wählen Sie die gewünschte
Sprache mit ◄ / ►.

17
5.1.2 Elterliche Kontrolle
Schloss Programm
Aktivieren („ on“) oder deaktivieren („ off “) um
Program sperren zu machen.
Menüsperre
Aktivieren („On“) oder deaktivieren („Aus“)
Verweigerung des Zugangs zu den wichtigen
Grundeinstellungen des Receivers
Ändern Receiver PIN
Ändern PIN (Passwort) des Receivers, es anfordert einen Receiver aktivierter die Receiversperre oder
eine Jugend-Schutzbarriere des Programms. Standard-PIN ist „0000“.
Sollte PIN gewechselt werden, muß eine Ziffernfolge aus 4 verschiedenen Nummern ausgewählt
werden. Neue PIN soll gut gemerkt werden, oder notieren Sie diese an einem sicheren Ort.
Ändern Smartcard PIN
Ändern PIN (Passwort) von HD + Karte (Smartcard), die an einer Jugendschutzbarriere eines HD +
Programm abgefragt wird. Standard-PIN ist„0000“. Sollte die PIN gewechselt werden, muß eine
Ziffernfolge aus 4 verschiedenen Nummern ausgewählt werden. Neue PIN soll gut gemerkt werden,
oder notieren Sie diese an einem sicheren Ort.

18
5.1.3 Timer Programm
Sie können verschiedene Zeitereignisse zu programmieren. Drücken Sie die rote Taste, um einen Timer
hinzuzufügen. Mit der grünen Taste können Sie eine bestehende Time bearbeiten. Mit der gelben Taste
können Sie eine bestehende Time löschen.
Typ
Drücken Sie ◄ / ►, können täglich / wöchentlich
/ einmal wählen.
Weck-Modus
Diese können als den Programm-Timer oder
Nachrichtenzeitgeber festgelegt werden.
Service Name / Meldung
Drücken Sie ◄ / ► die Kanalliste zu aktivieren,
und wählen Sie mit ◄ / ► das Programm nach
dem Einschalten erscheinen.
Datum
Geben Sie mit den Zifferntasten das gewünschten
Datum (zB 1. Juni 2014) wie folgt: 2014.01.06.
Zeit
Geben Sie mit ◄ / ► die Zifferntasten die Startzeit des Ereignisses (zB 20.15 Uhr), wie folgt: 20: 1
Dauer
Geben Sie mit den Zifferntasten, die Dauer der Veranstaltung (zB 01.00 Uhr) wie folgt: 01.00 Uhr.
Standby
Wählen Sie „ON“, nach dem Vorgang dann STB automatisch zu Standby gehen

19
5.1.4 Videoeinstellungen
Helligkeit
0-100%. Hier können Sie die Helligkeit einstellen.
Kontrastieren
0-100%. Hier können Sie den Kontrast einstellen.
Auflösung
z.B. 576i, 576p, 720p, 1080i, 1080p Sie können
die Bildschirmauflösung auf dem HDMI-Ausgang
zu optimieren.
Seitenverhältnis
Hat ein TV-Gerät mit einem 16: 9-Bildschirm,
wählen Sie die „16: 9“. Für 4: 3-Bildschirme
wählen Sie die Einstellung „4: 3“
Skalierungsverfahren
Hier können Sie die Bildschirmanzeige an ihre
Bedürfnisse anpassen. Möglich sind die
Einstellungen „TV Skalierung“, „Briefkasten“,
„Pan &Scan“ oder „Komb“
HDCP
Bestimmt, ob die HDMI-Buchse des Receivers ist, stellen die HDCP-Funktion verfügbar ist („On“) oder
nicht („Off“). HDCP steht für High-Bandwidth Digital Content Protection und ist ein
Verschlüsselungssystem , das dient zum Rechteinhaber, digitale Video- und Audio-Inhalte vor
unbefugter Nutzung zu schützen. Je nach dem Gerätetyp zu verbinden und erhielt das Programm
benötigte HDCP-Funktion, so dass eine Übertragung von Daten stattfinden kann.
5.1.5 Audioeinstellungen
Digital Audio Ausgang
Mit der Einstellung „Dolby D“, vorhandenen Dolby Digital-Sound auf Coaxial Digital Audio Ausgang
„SPDIF“ und „HDMI“ Ausgang auf der Rückseite. Mit der Einstellung „PCM“, um PCM-Format Audiosignal
am Ausgang umgewandelt wird. Mit der Einstellung „Auto“, wenn das TV-Programm aktiviert, das
unterstützt, vorhandenen Dolby Digital-Sound auf Coaxial Digital Audio Ausgang „SPDIF“ und
„HDMI“ Ausgang auf der Rückseite. Andernfalls wird ein im PCM-Format-Signal umgewandelt am
Ausgang wird.
Audio Descriptor
Wählen Sie Audio für Sehbehinderte, wenn „ON“,
können in der Lage, die AD-Mix-Level-Wert
einzustellen.
AD-Mix-Level-
Sie können den Wert durch Drücken von Taste ◄
/ ► zwischen 1 und 100 eingestellt.
SPDIF-Verzögerung
Signalverzögerung um SPDIF Audio mit Video synchronisiert zu halten.

20
5.1.6 Verwaltung
OSD-Timeout
Wählen Sie die Anzeigedauer der
Informationsleiste an einer Programmänderung.
Sie können zwischen 2-15 Sekunden wählen.
LPM in Standby
Das LPM (Low Power Mode) Funktion des
Receivers ist es, sicherzustellen, dass der
Receiver verbraucht nur 0,5 W im Standby-Modus
(Standby).
Sleep-Timer
Off / 10 Minuten / 30 Minuten / 60 Minuten / 90 Minuten / 120 Min. Das Gerät wechselt in den
Standby-Modus (Standby), Anzeige leuchtet auf, nach der eingestellten Zeit.
APD
Off / 10-240 min Die APD (Automatic Power Down) Funktion des Receivers wird verwendet, um den
Receiver aus dem aktiven Modus in den Standby (Standby) zu schalten, wenn eine Periode
(beispielsweise 180 Minuten) wird kein Betrieb des Receivers durchgeführt (zB weil Sie schlafen). Dies
kann praktisch, einfach auf Ihrem Receivers sein und möglicherweise unnötige Stromkosten zu sparen.
Wenn diese Funktion unpraktisch ist, können Sie zum Schweigen zu bringen oder hier einstellen.
Kein Signal Timer
Mit keinem Signal, schaltet sich das Gerät nach der eingestellten Zeit in den Standby-Modus (Standby).
Standby OAD
Download über Antenne im Standby. Um sicherzustellen, dass Sie Ihren STB immer auf dem aktuellen
Stand hat. Wenn die Einstellung „On“, die STB schaltet sich automatisch bis in den Morgen und sucht
nach neuen Informationen um Ihren STB automatisch herunterladen.

21
5.2 OSD Menü „Installation“
5.2.1 Satelliten-Scan
Satelliten-Scan
Wählen Sie für die unterstützten Satelliten sollten die folgenden Einstellungen vorgenommen werden .
Durch Drücken die grünen Taste können Sie einen Sendersuchlauf durchführen.
Durch Drücken die roten Taste können Sie einen Satelliten löschen.
Achtung: Beim Löschen eines Satellitens alle zugehörigen Transponder und ihre Einträge
werden gelöscht.
Satelliten-Auswahl
In der "Satellite Scan" OSD-Menü können Sie individuell die
Satelliteneinstellungen ihres Antennensystems bearbeiten.
Drücken Sie die gelbe Taste, um einen neuen Satelliten hinzufügen,
bearbeiten oder passen Sie ihre Antennenkonfiguration.

22
5.2.2 Antennen-Konfiguration
LNB-Typ
Kann C-Band / Erweiterte C-Band / Universal / Ku-Band /Verwender schalten, mit verschiedenen
LNB-Typ, werden Frequenz unterschiedlich folgen.
22 KHz
Das 22-kHz-Signal wird verwendet, um eine Universal-LNB („Off“ = Low Band, „On“ = High-Band) zu
wechseln. Haben Sie als LNB-Typ „digital“ gewählt, und setzen „Automatisch“, die automatische
Umschaltung. Wenn Sie nicht eine Handels LNB haben, müssen Sie an dieser Stelle die Einstellung
manuell vornehmen.
DiSEqC (DiSEqC 1.0 oder DiSEqC 1.1)
Wenn „DiSEqC“ aktiviert ist, wird die Einstellung auch den gewünschten Anschluss 1 - 16 gewählt
werden.
Tone Burst
Wenn „Tone Burst“ aktiviert ist, werden die Einstellung einschließlich des gewünschten Tone Burst
„A“ oder „B“ ausgewählt. Aktivieren Sie, wenn Sie einen Tone Burst-Schalter haben, dessen zwei
Satelliten auf dem Antennensystem montiert, nur für die „Tone Burst“ -Funktion.
Stellungs
Hier können Sie auswählen, ob die Rotorsteuerung des Receivers deaktiviert („Aus“) oder aktiviert
(„DiSEqC 1.2“ oder „USALS“) zu sein. Drücken Sie die blaue Taste, um die Motor-Einstellungen
anpassen.
DiSEqC 1.2 Motortyp-Einstellung
Bewegender Typ
Können Benutzer / Installateur / GOTO X /
Fortschrittlich wechseln. Wenn auf Fortschrittlich
schalten, „Neu berechnen“ und „Reset
Position“ ist ermöglich.
Zum X
Für einen einfachen Zugang zu anderen Satelliten,
können Sie gespeicherten Positionen auswählen
und dann fahren Sie hier direkt.
Laufwerk E / W
Steuerung mit 3/4 die Antenne nach Westen oder
Osten. Beachten Sie stets die Signalanzeigen.
Sollten Sie einen Signalpegel bei der Suche nicht
erhalten, wählen Sie " „Wählen Sie Transponder
“einen weiteren Transponder.

23
LNB Volt
Die LNB-Spannung des Satellitenreceivers versorgt den LNB mit einer Betriebsspannung und sorgt
Umschalten auf den verschiedenen Empfangspegeln. Hinweis: Lassen Sie immer auf der
LNB-Spannung.
Unicalbe
Jeder Receiver benötigt individuelle Einstellungen über. IF-Kanal und ZF-Frequenz. Markieren Sie jede
Antennensteckdose oder jedes Antennenkabels mit dem zusätzlichen Einstellungen, so dass sie für den
Benutzer sichtbar sind. Falls die Einstellungen geändert werden, sollten so weit wie möglich alle auf den
betroffenen Einkabel-System angeschlossen Receiver eingeschaltet werden, wenn die Einstellungen
werden übernommen.
Kann deaktivieren / 1/2/3/4/5/6/7/8 / wechseln. Wenn zu 1 ~ 8 schalten, können „Mittenfrequenz“ und
„Port“ einstellen.
Mittenfrequenz
Stellen Sie sich hier durch Direkteingabe über die Zifferntasten, die hinzugefügt Gedanke für Ihren
Receiver und der Einkabel-Anlage auch genaue ZF-Frequenz unterstützt. Die neuen Einstellungen
werden beim nächsten Einschalten des Receivers nehmen.
Port
Setzen Sie diese „A“ oder „B“.
5.2.3 Transponderliste
Um für einen einzelnen Transponder zu suchen. Diese Suchmethode ist empfehlenswert, wenn Sie nur
ein bestimmtes Programm oder Programmpaket gespeichert werden soll. Die jeweiligen
Empfangsparameter (Frequenzen, etc.) zur Verfügung aus dem Internet oder TV- und
Fachzeitschriften.
Satelliten-Auswahl
In „Satellite Scan“ mit ▲ / ▼ einen
unterstützten Satelliten haben.
Transponder bearbeiten
markieren mit ◄ / ► und ▲ / ▼ ein
Transponder eingehen. Möchten Sie den
gewählten Transponder des gewählten Satellitens
nach neuen Kanälen zu suchen, drücken Sie die
grüne Taste. Nach dem Einstellen der
Suchoptionen as daroben beschriebt wird, kann
die Suche durch Drücken der grünen Taste
gestartet werden.

24
Um eine neue hinzufügen oder einen ausgewählten Transponder Eintrag zu bearbeiten, drücken Sie die
gelbe Taste.
Die Frequenz eines Satellitentransponders die bestehende Liste ist vordefiniert und
sollte unter normalen Lagen.Ändern die Werte nach
direkter Eingabe.
Symbolrate
Die Symbolraten des gängigsten
Satellitentransponders haben fast ausschließlich
die Werte 27500 oder 22000 Kbps. Ändern Sie die
Werte durch direkte Eingabe der Zifferntasten.
Polarisation
Satellitensignale werden horizontal oder vertikal
polarisiert übertragen. Drücken◄ / ►
„Horizontal“ oder „Vertikal“ aus.
Stimmung Typ: „DVBS“ oder „DVBS2“
Suche Art: „Frei“ oder „verschlüsselt“ oder „Alle“
Netzwerksuche: „Ein“ oder „Aus“
5.2.4 Satellitenliste
In der Satellitenliste alle voreingestellten Satelliten aufgeführt. markieren Sie mit
▲ / ▼ über eines der unterstützten Satelliten aus der Liste, um diese zu bearbeiten. Ein Sat-
Eintrag kann bearbeitet werden, oder einen neuen Satelliten-Eintrag wird in die gelben taste
hinzugefügt werden.
Satellitenname
Der Name des ausgewählten Satellites. Die
Bearbeitung oder Eingabe des Namens über die
Bildschirmtastatur.
Satellitenwinkel
Der Wert von der Orbitalposition des Satellites.
Das zeigt, was die Position des Satellites (zB 19,2
° Ost, Astra). Ändern Sie den Wert durch direkte
Eingabe über die Zifferntasten.
Ost West
Geben Sie den Bereich der Satellitenbahn. Dies
zeigt, ob der Satellit nach Osten oder Westen der
0-Meridian (zB Astra 19,2 ° Ost) richtet. Um eine
vollständige Bearbeitung eines Satelliten-Eintrag
zu machen, und drücken Sie die OK-Taste.

25
5.3 OSD Menü „Organizer“
Sie können diese Menü-Programme bearbeiten oder zu speichern, oder ihre aktuelle Kanalliste auf
einem USB-Stick laden.
5.3.1 Astra Kanallistenansicht
Sie können die folgenden Eigenschaften in der Kanalliste in diesem Menü ändern:
Drücken[FAV]: Favoriten Listen
Drücken [TV / R]: TV editieren / RADIO-Liste
Drücken [>>]:Zu Favoritenliste hinzuzufügen
Drücken [0]: Mark Programme
Drücken [1]: Austauschprogramm mit der Bezeichnung.
Drücken [Gelb]: Bewegen markierten Programme.
Drücken [Grün]: Programme verschieben
(innerhalb der Hauptkanal-Liste ist nicht möglich)
Drücken [Blau]: Delete Program (innerhalb der
Hauptkanal-Liste ist nicht möglich)
Drücken [Rote]: Programm sperren

26
5.3.2 Bearbeiten der Programmliste 1-99
Gehen Sie folgendermaßen vor, um die Programmliste 1-99 bearbeiten: Drücken Sie die [>] -Taste, um
die Programmliste und 1 bis 99 angezeigt werden.
Vorsicht: Durch Drücken der [Blau] drücken, wird die Programmliste 1-99 vollständig gelöscht
werden. Eine Erholung ist nur durch einen Reset auf die Werkseinstellungen möglich.
Herumbewegen
Gehen Sie folgendermaßen vor, um Programme zu bewegen und an die:
Mit den Pfeiltasten ▲ / ▼ den gewünschten Sender aus.
Drücken Sie [0], um den gewünschten Sender zu markieren ( werde eine Markierung erscheinen).
Mit den Pfeiltasten ▲ / ▼ den neuen Sender zu wählen.
Drücken Sie dann die [Gelb] -Taste. Der
Sender schaltet jetzt auf die neue Stations.
Drücken Sie dann die Taste [1], zu
wechseln.
Zu speichern, drücken Sie die Taste [OK].

27
5.3.3 Erstellen von Favoriten-Liste
Gehen Sie folgendermaßen vor, um eine persönliche Favoritenliste erstellen:
Drücken Sie die [FAV] -Taste, um die gewünschten Favoriten-Liste 1-9 zu wählen.
Mit den Pfeiltasten ▲ / ▼ wählen den gewünschten Sender.
Drücken Sie [0], um den gewünschten Sender zu markieren (werde eine Markierung erscheinen).
Drücken Sie die Schaltfläche [>>], um Station zu ihrer Favoritenliste hinzuzufügen.
5.3.4 Speichern Kanäle
Sie können in diesem Menü ihre aktuelle Kanalliste auf einem USB-Flash-Laufwerk zu einem späteren
Zeitpunkt zurück, um möglicherweise sie zu spielen, oder beim Zurücksetzen des Geräts.
5.3.5 Wiederherstellen Channels
Sie können zuvorgespeicherte USB-Stick-Kanalliste in diesem Menüpunkt importieren.
5.4 OSD Menü„System Konfiguration“
5.4.1 Werkseinstellung
Die Standard-Funktion wird verwendet, um das Gerät auf die Werkseinstellungen zurückzusetzen.
Verwarnung: Alle Änderungen, die seit dem ersten Start-Werte, und gespeicherten Programme
werden zurückgesetzt oder gelöscht werden!

28
5.4.2 Version
Hier erhalten Sie Informationen über die Version eines Satelliten-Tuners. Halten Sie diese
Informationen bereit, wenn Sie sollten unseren technischen Support kontaktieren.
5.5 OSD Menü„CA Information“
Hier finden Sie unter anderen Informationen über die Seriennummer der eingesetzten HD + Karte.
5.6 OSD Menü„Verbindungen“(optional)
Internetradio und Netzwerk-Einstellungen.
5.7 OSD Menü„Software Aktualisierung“
Menü, um den Receiver-Software über den Satelliten Astra auf 19,2 ° Ost zu aktualisieren. Um den
Receiver auf dem neuesten Stand zu halten, überprüfen den Receiver auch automatisch, wenn Sie auf
neue Updates drehen, und führen dies möglicherweise autonom durch.

29
6 Fehlersuchhilfen
Sachen M ög l i c h e L ös u n g
Gerät ohne Funktion
Falls notwendig, überprüfen Sie, ob andere Geräte an diese Buchse
ordnungsgemäßfunktionieren.
Kein Bild
Wenn auf dem TV-Gerät an ein TV-Bild noch OSD Inhalt der Vorlage Display hat:
Prüfen Sie, ob das TV-Gerät auf den Eingang geschaltet wird, wird an den Receiver
(HDMI / SCART) verbunden ist. Werden auf dem TV nur OSD Inhalt des Receivers,
aber kein TV-Bild des Receivers anzeigen: Wenn Sie selbst den Antennenanschluss
montieren, Stellen Sie sicher, dass die Abschirmung (Geflügel echte und Film) in
Kontakt mit dem Verbindungsstück, aber nicht berühren den inneren . Wenn nötig
ist, verwenden Sie eine andere Antennenleitung. Überprüfen Sie die
Antenneneinstellungen: die ASTRA-Satelliten in der Regel "Digital" eingestellt
werden sollen. Universal-LNB verwenden Sie nicht, es muss die Werte 9750 MHz
un d 10600 MHz für di e un t ere un d obe re LNB-Frequenz in der Regel zu setzen. Zur
Fehlersuche sollten Sie verbinden LNB und der Receiver direkt und entfernen Sie
den Schalter und Splitter. Aus urheberrechtlichen Gründen gibt es keine
Bildausgabe über die SCART-Buchse, wenn der aktuell gewählte HD + Programm
mit einer Kopie geschickt wird. Schalten in diesem Fall gegebenenfalls auf die
gleiche Programm in SD Auflösung. Mit SCR-Einkabel anlagen EN 50494 muss
jeder Teilnehmer einen anderen IF-Kanal und ein weiteres ZF-Frequenz
verwenden. Dies sollte zentral koordinieren und die Daten werden bei allen
Dosen-Antenne / Antennenleitungen aufgezeichnet. Der Teilnehmer mit einer
langen Antennenkabel sollte bevorzugt ,die niedrigen Frequenzen zugewiesen zu
bekommen. In der neuen Installation von einem anderen Receivers, sollte jeder
Receiver wenn möglich geschaltet werden. Bei Störungen müssen die oben
genannten Punkte überprüft werden. Geänderte Einstellungen werden erst
wirksam, bis zu das nächste Mal des Empfängers.
Häufige Probleme
Geräte switchs sich ab
Es kann eine Software-Upgrade über Satellit haben, das ein Problem behebt sein:
Schalten Sie den Receiver aus und ziehen Sie das Netzkabel aus der Steckdose.
Nach einer kurzen Wartezeit verbinden Sie den Receiver mit dem Stromnetz, so
dass der Receivers möglicherweise über den Satelliten Astra auf 19,2 °Ost
vorhandenen Update durchführen kann. Beachten Sie, dass die selbstlaufende
Aktualisierung kann mehr als 60 Minuten in Anspruch nehmen.
Dies ist kein Fehler, aber die automatische Abschaltfunktion (siehe Abschnitt
4.10).

30
Sachen
M ög l i c h e L ös u n g
USB -Festplatte ist nicht
anerkannt
USB -Festplatte ist nicht
anerkannt
Vielleicht ist der Stromverbrauch des USB-Festplatte ist zu hoch. Verwenden Sie
nur USB-Festplatten mit eigener Stromversorgung. Vielleicht ist das
Speichermedium ist defekt oder in FAT32-Format nicht richtig formatiert.
Überprüfen Sie die Speichermedien an einen PC zu funktionieren und formatieren
Sie die Festplatte, wenn auf FAT32-Format erforderlich (Hinweis: Datenverlust).
Das Gerät zeigt falsche Sendezeiten im EPG oder die falsche Zeit: Nach dem
Einschalten zum Receiver , die Daten sollen gelesen und ausgewertet werden. Je
nach dem Transponder kann dieser Vorgang einige Zeit dauern. Manchmal kann es
notwendig sein, den EPG zu beenden und erneut aufrufen oder schalten Sie den
Programmplatz. Das Gerät reagiert nicht. Wenn das Gerät nicht im Update-Modus
finden, ziehen Sie den Netzstecker und warten Sie ein paar Sekunden, bevor Sie
das Gerät wieder betrieben. Das nicht hilft, setzen Sie das Gerät bei Bedarf auf die
Werkseinstellungen (Menü Software / Werkseinstellungen) .Wenn Sie arbeiten,
kann ein DECT-Schnurlostelefon sporadisch diese Störung des Satellitenempfangs
verursachen. Dies liegt daran, DECT arbeitet mit Frequenzen, die für die
Übertragung des Signals vom LNB zum Satellitenempfänger verwendet.
Bereitzustellen Probleme für die korrekte Installation des Antennenkabels,
insbesondere im Hinblick auf eine effektive Hochfrequenzabschirmung. Darüber
hinaus empfiehlt es weit weg von dem Satelliten-Receiver und die Antennenleitung,
die DECT-Basisstation einzurichten.
W enige Programme
Receiver schaltet sich an oder
nicht sofort
Die Antenne kann an der falschen Position des Satelliten ausgerichtet werden.
Beim Ausrichten der Antenne kann es vorkommen, dass Sie einen der zahlreichen
Satelliten, die auf einer ähnlichen Frequenz und der Signalanzeige auf dem
Empfänger die Übertragung ist zu empfangen. Beim Umschalten die Kanäle dann
oft ausländische Programme und sehr häufig der Hinweis anzeigen, dass kein
Signal empfangen wird. Es ist oft genug, um die Antenne mit dem Osten oder
Westen drehen ein paar Grad, um die gewünschten Kanäle zu empfangen. Achten
Sie darauf, die richtige Favoritenliste aktiviert haben.
Der Receiver führt automatische Daten aktualisiert in regelmäßigen Abständen
und schaltet diese ein und nach wieder automatisch das Upgrade. Auf diese Weise
kann in der Zeit verzögert werden, und zum Ausschalten des Receivers.

31
7 Service und Support
7.1 Gewährleistung / Garantie
Die Garantie für dieses Produkt erfüllt die gesetzlichen Anforderungen zum Zeitpunkt der Übernahme.
Die Veränderungen am Gerät wird die Garantie und die Gewährleistung des Herstellers erlischt. Ein Absturz
der Systemsoftware stellt keine Garantie.
Wenn ein angeschlossenes USB- Speichermedium ist nicht mit dem Empfänger kompatibel, ist d ies keine
Garantie gelten.
7. 2Version
Ausrüstung Artikelnummer:
Ausgabe von Anweisungen:
8 Reinigen
Gef a hr : Vor der Reinigung des Gerätes immer trennen oder entfernen Sie die Batteriezellen durch Ziehen
des Netzsteckers aus der Steckdose. Geben Sie niemals Flüssigkeiten oder Reinigungsmittel direkt auf das
Ge r ät !
Gef a hr : Reinigen Sie das Gerät und die Fernbedienung nur mit einem leicht angefeuchteten, weichen,
sauberen Tuch. Verwenden Sie keine aggressiven oder scheuernden Reinigungsmittel. Stellen Sie sicher,
dass keine Flüssigkeit in das Gerät eindringt.
9 Außerbetriebnahme /Lager
Nehmen Sie den Receiver nicht in Ordnung, wenn Sie für eine lange Zeit nicht verwenden. Um dies zu tun,
wie folgt:
Schalten Sie den Receiver ausgeschaltet zu sein
Ziehen Sie den Receiver aus der Steckdose
Entfernen Sie alle Anschlüsse am Receiver
Entfernen Sie die Batteriezellen aus der Fernbedienung
Bewahren Sie Batterien sicher
Empfänger und Zubehör in einem trockenen und staubfreien Ort auf Raumtemperatur lagern
10 Entsorgen
10.1 Verpackung
Möchten Sie das Verpackungsmaterial entsorgen wollen, gehen Sie folgendermaßen für das Recycling von
Rohstoffen, getrenne kommunalen Abfallmanagement für Verpackungsabfälle.
10.2 Altgerät
Alte Elektrogeräte sind recycelbare Materialien und nicht in den Hausmüll gehören! Geben Sie
das Gerät daher das Nutzungsende an den kommunalen Sammelstellen ab. Informationen zu
den Sammelstellen erhalten Sie bei ihrer Gemeindeverwaltung.
10.3 Batteriezellen
Verbrauchte Batteriezellen sind Sondermüll und dürfen nicht in den Hausmüll nach der Batterieverordnung
zu entsorgen. Nehmen Sie die Batteriezellen kostenlos an den
Sammelstellen in Einzelhandelsgeschäften.

32
11 Funktionen
Ermöglicht den Empfang von HD + verschlüsselt und unverschlüsselt TVProgrammen im
Standardformat (SD) und hochauflösende Bilder (HD).
Zertifiziertes integrierten Verschlüsselungssystem zur Aufnahme von TV-Programmen der HD +
Plattform (zB RTL HD, HD SAT 1, Pro 7 HD, VOX HD, HD-Kabel 1)

33
Allgemeine Geschäftsbedingungen HD+
1. Geltungsbereich, Vertragsgegenstand und HD+ Karte
1.1 Diese allgemeinen Geschäftsbedingungen der HD PLUS GmbH mit Sitz in der Betastraße 1-10,
85774 Unterföhring („HDP“) gelten ausschließlich für den HD+ Service.
1.2 HDP überlässt dem Nutzer nach Maßgabe dieser allgemeinen Geschäftsbedingungen den Besitz an einem
Datenträger („HD+ Karte“). Die auf der HD+ Karte gespeicherte Software bzw. Daten (zusammen die „HD+ Software“) sind lediglich
technische Voraussetzung zum entschlüsselten Empfang bestimmter, digital
verschlüsselt ausgestrahlter TV- Angebote („Programmangebote“) über einen Digitalempfänger mit
HD+ Zertifizierung („HD+ Service“).
1.3 HDP räumt dem Nutzer eine nicht ausschließliche, nicht übertragbare Lizenz zur bedingungsgemäßen Nutzung der auf der HD+ Karte
befindlichen HD+ Software zum Zwecke der vertragsgemäßen Entschlüsselung von
Programmangeboten ein. Dieses Recht ist auf das Gebiet der Bundesrepublik Deutschland beschränkt. Es ist dem Nutzer untersagt, die HD+
Karte außerhalb Deutschlands zu nutzen. HDP kann verlangen, dass die HD+ Karte ausschließlich in Verbindung mit einem ihr zugeordneten
Digitalempfänger verwendet wird. Außerdem ist HDP berechtigt, dies technisch sicherzustellen (sog. Pairing von Digitalempfänger und HD+
Karte).
1.4 Die Aktivierung der HD+ Karte obliegt dem Nutzer. Die HD+ Karte darf nicht anders als vereinbart verwendet werden. Der Nutzer ist nicht
berechtigt, die HD+ Software zu kopieren, zu modifizieren, zu disassemblieren, zu dekompilieren oder andere Verfahren auf sie anzuwenden,
um deren Quellcode oder deren Struktur zu erfahren oder Prozesse oder deren Zustandsrepräsentation unberechtigt in Erfahrung zu bringen
oder zu beeinflussen. Gesetzliche Dekompilierungsrechte bleiben unberührt.
1.5 Der Digitalempfänger, das Wiedergabegerät (z. B. TV) und die Programmangebote sind ausdrücklich nicht Leistungsgegenstand. Zertifizierte
Digitalempfänger sind im Handel erhältlich. Ihre Installation obliegt dem Nutzer. Im Falle technischer oder allgemeiner Probleme mit dem
Digitalempfänger liegt die Verantwortung
für den Kundenservice beim Hersteller des Digitalempfängers.
1.6 Die Anzahl und Zusammenstellung der Programmangebote kann sich während der Vertragslaufzeit ändern.
1.7 HDP behält sich vor, die zur Nutzung des HD+ Services sowie zu dessen Ergänzung oder Änderung
erforderliche Software auf die HD+ Karte sowie den Digitalempfänger in unregelmäßigen Zeitabständen
kostenfrei aufzuspielen oder dort vorhandene HD+ Software zu aktualisieren, zu ergänzen oder zu ändern.
Unbeschadet der vorstehenden Regelungen ist die Haftung von HDP bei Datenverlusten auf den typischen
Wiederherstellungsaufwand beschränkt.
1.8 HDP behält sich vor, HD+ Karten zu sperren bzw. nicht mehr zu unterstützen, die aufgrund von
Rechtsverletzungen auch durch Dritte die unerlaubte Nutzung des HD+ Services bzw. eine Umgehung der
Verschlüsselung ermöglichen. Eine Verlängerung des HD+ Services nach Ablauf der Freischaltung gemäß
Ziffer 3.1 ist auf gesperrten bzw. nicht mehr unterstützten HD+ Karten nicht möglich.
2. Nutzerkreis und Nutzungsvoraussetzungen
2.1 Der HD+ Service steht natürlichen Personen im Alter von mindestens 18 Jahren zur Verfügung und ist
ausschließlich für die private, nicht-gewerbliche Nutzung bestimmt. Die Nutzung außerhalb des privaten
Haushalts bzw. die Weitergabe an Dritte zur Nutzung ist nicht gestattet.
2.2 Voraussetzung für die Nutzung des HD+ Services ist eine digitaltaugliche Satellitenempfangsanlage,
welche auf einen von HDP genutzten Satelliten ausgerichtet ist bzw. vereinzelt auch Kabel-Empfang
(siehe www.hd-plus.de/faq) sowie die Verwendung eines mit dem HD+ Logo gekennzeichneten
Digitalempfängers und ein Wiedergabegerät (z. B. TV), die im Leistungsumfang jedoch nicht enthalten
sind (vgl. Ziffer 1.5).
2.3 Eine uneingeschränkte, vollumfängliche Nutzung des HD+ Services ist nur bei der Verwendung von HD+
zertifizierten Digitalempfängern möglich. Bei der Verwendung von Digitalempfängern ohne HD+ Zertifizierung kann es zu technischen
Nutzungseinschränkungen des HD+ Services kommen, auch wenn HD+ zertifizierte Common-Interface-+ Empfangsmodule verwendet werden.
Insbesondere kann es sein, dass die Entschlüsselung bzw. Darstellung einzelner Programmangebote nicht möglich ist. Der Nutzer hat
deswegen gegenüber HDP
weder einen Gewährleistungsanspruch noch ein Sonderkündigungsrecht.
3. Servicepauschale / Laufzeit und Verlängerung des HD+ Services
3.1 Im Rahmen von Vermarktungsangeboten, beispielsweise in Verbindung mit dem Kauf eines für HD+
zertifizierten Digitalempfängers, werden HD+ Karten ausgegeben, die bereits eine Freischaltung über mehrere
Monate für den HD+ Service ohne weitere Kosten für den Nutzer beinhalten.
3.2 Im Übrigen fällt für die Nutzung des HD+ Services eine Servicepauschale zu den jeweiligen besonderen
Bedingungen an.
3.3 Die Laufzeit der Nutzung des HD+ Services beginnt mit Aktivierung der HD+ Karte. Aktiviert wird eine Karte, wenn sie in den dafür
vorgesehenen Schacht eines für HD+ zertifizierten Digitalempfängers steckt und ein HD+ Programm damit erstmals entschlüsselt wird bzw.
mit Verlängerung und Freischaltung durch den Nutzer
3.4 Rechtzeitig vor Ablauf der jeweiligen Freischaltung des HD+ Services wird der Nutzer durch eine Einblendung auf dem Wiedergabegerät auf
Ablauf und eventuell mögliche Verlängerungs- bzw. Neukaufoptionen für die Nutzung des HD+ Services aufmerksam gemacht. Die
Freischaltung einer HD+ Karte sollte erst nach
Einblendung auf dem Wiedergabegerät verlängert werden. Andernfalls kann sich der Zeitraum einer
bestehenden Freischaltung verkürzen. Der Erwerb einer HD+ Karte beinhaltet jedoch nicht den Anspruch auf Verlängerung derselben.

34
3.5 Die Programmangebote und Services Dritter und deren Empfang bzw. Nutzung können gesonderte Kosten
auslösen, für die der Nutzer selbst verantwortlich ist.
4. Beachtung von Urheberrechten
4.1 Die HD+ Software und die HD+ Karte sind rechtlich geschützt. Soweit Programme von Lizenzgebern zur
Anwendung kommen, ist deren Eigentum in gleichem Umfang geschützt. Die unerlaubte Vervielfältigung
oder Verbreitung der HD+ Software oder der HD+ Karte und/oder deren Nachahmung wird HDP durch zivil-,
gegebenenfalls auch strafrechtliche Maßnahmen verfolgen.
5. Rechte und Pflichten des Nutzers
5.1 Jeder Nutzer des HD+ Services trägt selbst die Verantwortung für die bestimmungsgemäße Nutzung; der Nutzer hat insbesondere
sicherzustellen, dass jugendgefährdende Sendeinhalte nur dem gesetzlich zugelassenen
Personenkreis zugänglich sind.
5.2 Der Nutzer darf den HD+ Service nicht missbräuchlich nutzen und ist verpflichtet, seine HD+ Karte vor Verlust und Missbrauch zu schützen.
Der Nutzer darf insbesondere keine Eingriffe in die HD+ Software vornehmen
oder vornehmen lassen, um beispielsweise den unberechtigten Empfang von verschlüsselten
Programmangeboten zu ermöglichen. Auch die Benutzung von Vorrichtungen zur Umgehung der
Verschlüsselung ist verboten. Solche Missbräuche können zivil- und strafrechtlich verfolgt werden.
Auf Ziffer 6 und Ziffer 7.3wird verwiesen.
5.3 Ersetzt HDP die HD+ Karte aufgrund einer vom Nutzer zu vertretenden Beschädigung oder eines Verlustes,
hat dieser Schadensersatz zu leisten.
5.4 Wird die Bereitstellung des HD+ Services aufgrund von Eingriffen in die Software oder Hardware des Nutzers beeinträchtigt oder
unterbrochen, die HDP nicht zu vertreten hat, ist der Nutzer nicht zur Rückerstattung einer
bereits entrichteten Servicepauschale berechtigt. Dies gilt auch, wenn die HD+ Karte beschädigt wurde oder
abhanden gekommen ist.
6. Freistellung
6.1 Der Nutzer haftet gegenüber HDP für die Einhaltung der in den Ziffern 4 und 5 aufgeführten Pflichten.
Er stellt HDP von sämtlichen Ansprüchen Dritter frei, die infolge einer schuldhaften Verletzung dieser Pflichten und/oder schädigender
Handlungen des Nutzers gegen HDP geltend gemacht werden und leistet Ersatz für
darüber hinausgehende Schäden einschließlich der Kosten für eine eventuell erforderliche Rechtsverfolgung
und -verteidigung.
7. Rechte und Pflichten von HDP
7.1 HDP wird den Nutzer von einer nicht nur unwesentlichen vorübergehenden Leistungseinstellung oder -beschränkung unterrichten. Diese
Mitteilungspflicht besteht nicht, wenn die Unterrichtung nach den jeweiligen Umständen objektiv vor Beginn der Leistungseinstellung oder
-beschränkung nicht möglich ist oder die
Beseitigung bereits eingetretener Unterbrechungen verzögern würde.
7.2 HDP behält sich vor, ohne weitere Ankündigung Wartungs- und Instandhaltungsarbeiten an ihren
technischen Anlagen zur Aufrechterhaltung bzw. Verbesserung des HD+ Services durchzuführen.
In diesem Wartungsfenster kann es zu Unterbrechungen oder Beeinträchtigungen beim Empfang
der Programmangebote kommen, die den Nutzer jedoch nicht zur Minderung berechtigen.
7.3 Bei einem Verstoß gegen diese Nutzungsbedingungen oder dem begründeten Verdacht eines Verstoßes
durch den Nutzer, insbesondere im Sinne der vorstehenden Ziffern 4 und 5, ist HDP nach eigenem Ermessen
berechtigt:
7.3.1 den Nutzer vorübergehend oder dauerhaft von der Nutzung des HD+ Services auszuschließen und/oder
7.3.2 das Nutzungsverhältnis außerordentlich gemäß Ziffer 10.1zu kündigen.
7.4 HDP wird den Nutzer vor Ausschluss oder Kündigung abmahnen, wenn nicht der Verstoß so schwer wiegt, dass HDP eine Fortsetzung des
Nutzungsverhältnisses nicht zumutbar ist.
7.5 Bei einem auf dem Verschulden des Nutzers beruhenden Nutzungsausschluss gemäß Ziffer 7.3 bleibt der Nutzer auch für den Zeitraum des
Nutzungsausschlusses und der Leistungsunterbrechung zur Zahlung der Vergütung
verpflichtet.
8. Gewährleistung
8.1 HDP erbringt Leistungen unter Inanspruchnahme von Kommunikationsnetzen oder technischen Einrichtungen Dritter, die sich außerhalb der
Kontrolle von HDP befinden. Zeitweilige Beschränkungen, Beeinträchtigungen oder Ausfälle des HD+ Services aufgrund von Einflüssen, die
HDP nicht zu vertreten hat, kann HDP darum nicht ausschließen. HDP übernimmt insbesondere keine Gewähr dafür, dass bestimmte
Programmangebote zu einem bestimmten Zeitpunkt empfangen werden können; dies gilt nicht, soweit HDP eine Störung zu vertreten hat.
8.2 Der Nutzer erkennt an, dass die Qualität der entschlüsselten bzw. zugänglich gemachten Programmangebote einerseits von der durch Dritte
bereitgestellten Signalqualität und andererseits von der Leistungsfähigkeit der vom Nutzer eingesetzten Wiedergabegeräte abhängig ist und
beides außerhalb des Verantwortungsbereiches
der HDP liegt. Der Nutzer erkennt ebenfalls an, dass die Aufnahme und Wiedergabe aufgezeichneter
Programmangebote durch Dritte eingeschränkt werden kann.
8.3 HDP weist darauf hin, dass Softwareprogramme nicht so entwickelt werden können, dass sie für alle
Anforderungen fehlerfrei laufen.
8.4 HDP behebt im Rahmen der bestehenden technischen und betrieblichen Möglichkeiten alle ihr gemeldeten Störungen des HD+ Services, für
deren Behebung es nicht des Austauschs der HD+ Karte bedarf, unverzüglich. Die Kosten für die Inanspruchnahme des Kundendienstes von
HDP trägt der Nutzer. Vorübergehende

35
Beeinträchtigungen des Empfanges durch atmosphärische Störungen oder Sender-, oder Satelliten-/Kabelnetzausfall berechtigen den Nutzer
nicht zur Minderung.
9. Haftung
9.1 HDP haftet nur, soweit HDP, ihren Erfüllungsgehilfen und/oder gesetzlichen Vertretern ein vorsätzliches
oder grob fahrlässiges Verhalten zur Last fällt.
9.2 Bei leicht fahrlässig verursachten Schäden haftet HDP nur, wenn eine wesentliche Vertragspflicht verletzt
wurde oder ein Fall des Verzugs oder der Unmöglichkeit vorliegt. In diesen Fällen ist die Haftung auf den
typischen vorhersehbaren Schaden begrenzt.
9.3 Soweit es zu zeitweiligen Beeinträchtigungen beim Empfang der Programmangebote kommen sollte, die
außerhalb des Einflussbereichs von HDP liegen, insbesondere bei einem Ausfall des Signals, den HDP nicht
zu vertreten hat, haftet HDP nicht.
9.4 HDP ist nicht verantwortlich für die von ihr entschlüsselten zugänglich gemachten Programmangebote und deren Inhalte.
9.5 Eine gesetzlich vorgeschriebene, verschuldensunabhängige Haftung von HDP, insbesondere eine Haftung
nach Produkthaftungsgesetz sowie eine gesetzliche Garantiehaftung, bleibt von den vorstehenden
Haftungseinschränkungen unberührt. Gleiches gilt für die Haftung von HDP bei schuldhafter Verletzung von Leben, Körper oder Gesundheit
eines Nutzers. Die verschuldensunabhängige Haftung gemäß § 536a BGB ist ausgeschlossen, wenn HDP dem Nutzer eine HD+ Karte
überlässt.
9.6 Die Ziffern 9.1, 9.2und 9.5 umfassen sämtliche vertraglichen und gesetzlichen Ansprüche, die wegen der
Nutzung des HD+ Services geltend gemacht werden können.
10. Kündigung des Vertrages und Änderung des HD+ Services
10.1 Der Vertrag über die Nutzung des HD+ Service läuft für die jeweils vereinbarte Dauer ab Aktivierung der HD+ Karte Eine Verlängerung setzt
voraus, dass die HD+ Karte nicht gem. Ziffer 1.8gesperrt ist. Unberührt hiervon bleiben etwaige außerordentliche Kündigungsrechte.
10.2 Der Nutzer kann nicht außerordentlich kündigen, weil sich die Anzahl oder Zusammenstellung der
Programmangebote, welche der Nutzer mithilfe der HD+ Software entschlüsseln kann, während der
Vertragslaufzeit ändert.
10.3 Kündigt HDP den HD+ Service nach Abmahnung im Fall der Ziffer 7.3, kann HDP Schadensersatz
nach den gesetzlichen Vorschriften fordern.
11. Datenschutz
11.1 Einzelheiten zur Datenverarbeitung sind im Datenschutzmerkblatt enthalten
(siehe www.hd-plus.de/datenschutz).
12. Schlussbestimmungen
12.1 HDP ist berechtigt, ihre Rechte und Pflichten aus diesem Vertrag ganz oder teilweise auf einen zur
ordnungsgemäßen Fortführung des Vertrages geeigneten Dritten zu übertragen. Der Nutzer ist in diesem
Fall berechtigt, das Vertragsverhältnis mit Wirksamkeit zum Zeitpunkt der Übertragung zu kündigen.
12.2 Es gilt das Recht der Bundesrepublik Deutschland. Die Anwendung von UN-Kaufrecht ist ausgeschlossen.
Stand: Juli 2014

Sicherheitsempfehlungen
Achten Sie darauf, Flüssigkeiten oder Metallgegenstände zu
Die Nutzung der Set-Top-Kontrollkästchen unterliegt
S
icherheitsmaßnahmen, um Protectusers und ihre Umgebung
zu entwickeln
Wo Sie Ihre Set-Top-Box setzen?
Um den einwandfreien Betrieb des Set-Top-Boxs zu
g
ewährleisten, müssen Sie:
legen Sie es in Innenräumen, um es vor Blitzschlag, Regen,
und direkte Sonneneinstrahlung zu schützen,
legen Sie es in einem trockenen und gut belüfteten Ort,
halten Sie es von Wärmequellen wie Heizkörpern, Kerzen,
Lampen, usw.
schützen Sie es vor Feuchtigkeit, legen Sie es auf eine
ebene Fläche, von wo es nicht fallen und ist nicht in die
Hände von Kindern erreichen, zu vermeiden starke Stößen.
Wählen Sie einen stabilen, ebenen Fläche, auf der den
Set-Top-Box nicht an starken Erschütterungen ausgesetzt ist.
Stellen Sie keine Gegenstände auf Ihren Set-Top-Box (wie es
Belüftung zu beschränken): Die Lüftungsschlitze des
Gehäuses befindet, verhindern, dass Ihre Set-Top-Box vor
Überhitzung.
Wenn Sie den Set-Top-Box in einem Fach oder einer
anderen geschlossenen Raum legen, lassen Sie einen
Freiraum von mindestens 10 cm auf jeder Seite und 20 cm
auf der Vorder- und Rückseite des Set-Top-Boxs, schließen
Sie es direkt an das Stromnetz mit de-top box und ist leicht
zugänglich.
Die Verwendung von einem Verlängerungskabel (mit
Multi-Punkte) ist nicht zu empfehlen.
ermöglichen, um den Set-Top-Box durch die Lüftungsschlitze zu
gelangen.
Vermeiden das Wiederanschließen des Set-Top-Boxs, nachdem
es auf große Veränderungen in der Temperatur unterzogen
wurde.
Den Set-Top-Box muss von der Stromversorgung, bevor eine
Modikation der Verbindung zwischen TV, VCR oder Antenne,
getrennt werden.
Im Falle eines Sturms, ist es ratsam, die Antenne zu trennen.
Auch wenn der Set-Top-Box und das TV-Gerät vom Stromnetz
getrennt, kann blitz noch beschädigen.
Wenn Sie ungewöhnliche Geräusche aus der Netzsteckdose
oder von der Netzkabel zu hören, ziehen Sie sofort das
Netzkabel aus der Netzsteckdose, in Übereinstimmung mit allen
Vorsichtsmaßnahmen Bedienung, riskieren Sie einen
elektrischen Schlag, und kontaktieailer.
Schließen Sie niemals den Set-Top-Box an die Steckdose
einstecken, die locker ist, zeigt Anzeichen von Verschleiß oder
Beschädigungen, riskieren Sie einen elektrischen Schlag.
Berühren Sie niemals den Netzstecker mit nassen Händen. Sie
riskieren einen Stromschlag.
Beim Anschließen oder Abtrennen des Netzkabels stets am
Stecker ohne Ziehen am Kabel. Ein beschädigtes Netzkabel
stellt eine potentielle Gefahr von Feuer oder elektrischen
Schlägen. Ziehen Sie niemals am Netzkabel beim Trennen von
der Netzsteckdose.
Stellen Sie niemals auf das Netzkabel, und ziehen Sie nicht auf
es oder falten Sie es. Dies kann eine Gefahr von Feuer oder
elektrischen Schlag verursachen.
Stellen Sie sicher, dass den Set-Top-Box liegt nicht auf das
Netzkabel oder andere Kabel.
Sicherstellen, dass den Set-Top-Box ist auf einem an und
stabile Oberfläche platziert, womit es falsch kann mit dem
Stromkabel führen, dass gerent ist. Es kann eine Gefahr von
Feuer oder elektrischen Schlag verursachen.
Das Netzkabel Einheit immer außerhalb der Reichweite von
Kindern oder Haustieren halten.
Nur vom Hersteller zugelassenen Fachpersonal kann die
Reparatur der Set-Top-Box machen. Die Nichtbeachtung dieser
Sicherheitsmaßnahmen erlischt die Garantie zu erfüllen.
Haben Sie einen spezialisierten Installateur alle Verbindungen
durchgezuführt, wenn Sie das Kabel, das nicht mit der
Set-Top-Box zur Verfügung gestellt werden nutzen wollen.
Batterien
Die Batterien sind leicht von Kleinkindern verschluckt. Lassen Sie
k
leine Kinder mit der Fernbedienung kontroll spielen.
Halten Sie die Batterien nicht bei übermäßiger Wärmequellen wie
direkter Sonneneinstrahlung, Feuer oder ähnliche Quellen.
Um eine Beschädigung der Fernbedienung zu vermeiden, nur
identische Batterien oder Batterien eines gleichwertigen Typs. Die
mitgelieferten Batterien sind nicht wiederaufladbar.
Warnungen und Sicherheitshinweise
Im Fehlerfall ist das Netzkabel als
Trennvorrichtung für dieses Gerät. Um
die Stromversorgung aus dem Gerät zu
entfernen, ziehen Sie das Netzkabel aus
Schließen Sie den Set-Top-Box an die Steckdose in
Übereinstimmung mit den Identikation-Etikett auf den
Set-Top-Box (Spannung, Leistung, Frequenz des
Stromnetzes).
Sie müssen unbedingt den Set-Top-Box in einer
Umgebung verewnden, die die folgenden Anforderungen
erfüllt:
Temperatur: 0 ° C [32 & deg; F] und 40 ° C [104 ° F].
Luftfeuchtigkeit: 20% bis 90%.
Höhe: unter 2000 m [6562 ft].
Um Kurzschlüsse (re oder Stromgefahr ) zu vermeiden,
sollten Sie Ihren Set-Top-Box nicht bei Feuchtigkeit
aussetzen. Stellen Sie keine Objekt mit Flüssigkeit (zum
Beispiel Vasen) auf das Gerät. Den Set-Top-Box darf nicht
mit Flüssigkeit bespritzt werden. Wenn Flüssigkeit auf den
Set-Top-Box gelangen, ziehen Sie es sofort vom Netz und
wenden Sie sich an Ihren Lieferanten.
3
der Steckdose.
Interference
Stellen Sie den Set-Top-Box nicht in der Nähe von Geräten, die
e
lektromagnetische Störungen verursachen können (zB
Lautsprecher, Modems, Router oder schnurlose Telefone). Dies
könnte Set-Top-Box-Betrieb AECT und verzerren das Bild oder
Ton.
USB-Speichermedien
Bitte warten Sie, bis den Set-Top-Box oder der
M
ultimedia-Datei-Anwendung verlässt den
Multimedia-Listenmanager (Multimedia-Datei-Anwendung) oder im
Standby-Modus, bevor Sie Ihre Speichergeräte. Andernfalls
riskieren Sie den Verlust von Daten oder das Speichergerät
beschädigt werden. Beim Anschluss eines USB-Peripheriegeräts,
achten Sie auf die Einführungs und nie mit Gewalt. Sie können Ihre
Peripheriegerät und / oder das Gerät beschädigen.
Reinigung des Set-Top-Boxs
Die Außengehäuse des Set-Top-Box kann mit einem weichen,
trockenen Tuch gereinigt werden. Verwenden Sie keine
Scheuermittel, Scheuerschwämme oder Lösungsmittel wie Alkohol
oder Terpentin, da diese die Oberfläche des Set-Top-Box
beschädigen.
6

DSR3131H User manual
253649992
Philips and the Philips Shield Emblem are registered trademarks of Koninklijke Philips N.V.
used under license.
This product was brought to the market by X-GEM SAS, further referred to in this document
as X-GEM SAS, and is the manufacturer of the product.
2015 © X-GEM SAS. All right reserved.
Headquarters:
X-GEM SAS
9 rue de la Négresse
64200 Biarritz – FRANCE
Tel : +33 (0)5 59 41 53 10 Fax : + 33 (0)5 59 41 53 09
www.xgem.com

Manuale d’utilizzo

Registra il tuo prodotto e richiedi assistenza al sito:
www.philips.com/welcome
Gentile cliente,
Grazie per aver scelto il ricevitore digitale terrestre e smart-box IP Philips modello DSR3131H. In
questo manuale di istruzioni troverai le informazioni di utilizzo, di installazione e di protezione
dell’apparecchio, che ti saranno necessarie per conoscere al meglio le funzioni standard ed
esclusive di questo prodotto. Per facilitarne la comprensione, il manuale è stato suddiviso in diverse
sezioni. 1. La prima parte riguarda l'installazione, il collegamento del ricevitore con altri apparecchi
e l’utilizzo del telecomando. 2. La seconda parte descrive le operazioni di base dell’ apparecchio:
vengono fornite le informazioni principali e necessarie per l’utilizzo quotidiano delle varie funzioni
standard del prodotto. 3. La terza parte riguarda l'uso avanzato, l'uso personalizzato e le
caratteristiche più complesse ed esclusive del prodotto.
AVVERTENZE: Quando si utilizza il ricevitore, si dovrebbero conoscere almeno le informazioni
importanti contenute in questa guida. Pertanto, per garantire il funzionamento sicuro ed ottimale
del prodotto, si raccomanda di leggere attentamente le avvertenze riportate di seguito in modo da
evitare il rischio di malfunzionamenti o problemi di vario genere.
N.B: A causa di errori o aggiornamenti, il contenuto di questo manuale di istruzioni potrebbe non
corrispondere esattamente al prodotto reale.
2

Indice
1 Introduzione 5
1.1 Ringraziamenti 5
1.2 Informazioni sul Manuale di utilizzo 5
1.3 Norme di sicurezza 5
1.4 Funzioni principali 5
2 Primi passi 6
2.1 Sicurezza 6
2.2 Disimballaggio 7
2.3 Descrizioni dei comandi e delle porte 8
2.4 Collegamento dei cavi di connessione in dotazione 10
2.5 Collegamento dei cavi di connessione opzionali 11
3 Guida di installazione 12
3.1 Funzionamento del Menu di Base 12
3.2 Operazioni iniziali 12
4 Funzionamento quotidiano 13
4.1 Cambiare Canale 13
4.2 Regolare il volume 13
4.3 GEP- Guida Elettronica del Programma 13
4.4 Vedere la Lista Preferiti 14
4.5 Televideo 14
4.6 Mostrare le informazioni 14
4.7 Passaggio da modalità Tv a modalità Radio 14
4.8 Spegnimento automatico 15
5 Menu di Selezione 16
5.1 Menu OSD "Impostazioni" 16
5.2 Menu OSD "Installazione" 21
5.3 Menu OSD "Organizer" 25
5.4 Menu OSD “Configurazione di Sistema" 27
5.5 Menu OSD “Informazioni CA” 28
5.6 Menu OSD "Connettività" (facoltativo) 28
5.7 Menu OSD “Aggiornamento Software" 28
6. Guida alla risoluzione dei problemi 29
7. Servizio di assistenza 31
7.1 Garanzia 31
7.2 Versioni 31
8. Pulizia del dispositivo 31
9. Disattivazione 31
10. Smaltimento 31
10.1 Imballaggio 31
3

10.2 Vecchie apparecchiature 31
10.3 Batterie 31
11. Specifiche tecniche 32
4

1. Introduzione
1.1 Ringraziamenti
Congratulazioni per avere acquistato un ricevitore digitale terrestre di alta qualità Philips. I nostri
prodotti sono realizzati conformemente alle norme di sicurezza internazionali e sono soggetti a
continui e severi controlli di qualità, in modo tale da consentirvi di essere sempre soddisfatti del
vostro acquisto. Il ricevitore digitale terrestre Philips, vi consente di accedere gratuitamente a una
vasta gamma di programmazioni su emittenti digitali terrestri, radio, canali criptati nel formato
HD+ nonché canali satellitari dedicati nei formati SD e HDTV. Da notare che è necessario essere in
possesso di un’antenna satellitare digito - compatibile per operare, la quale deve essere dotata di
un LNB digitale.
Ora, la ricezione TV è digitale! Il ricevitore HD offre un’ alta qualità video e audio
grazie all'uscita digitale HDMI per la connessione a Plasma e TV LCD. Il segnale digitale vi
garantisce la massima qualità dell’immagine. Inoltre, per ricevere i programmi criptati HD + HD +,
una smart card prepagata di HD PLUS GmbH è fornita in dotazione. Con questa scheda, è possibile
testare i programmi HD + gratuitamente per un periodo di 12 mesi dopo il primo accesso. Nel caso
in cui vorreste continuare a guardare i programmi HD +, la carta di credito su HD Plus GmbH avrà
bisogno, quindi, di essere ricaricata. Per maggiori informazioni sul funzionamento del ricevitore HD
+ e la smart card prepagata HD +, consultare i termini e le condizioni per la richiesta di HD PLUS
GmbH (vedi pagina 33).
1.2 Informazioni sul Manuale di Utilizzo
Per garantire un utilizzo corretto del prodotto leggere attentamente il Manuale d'Uso e conservarlo
per consultazioni future. Nel caso in cui si decida di cedere il dispositivo a terzi, si prega
cortesemente di allegare il manuale di utilizzo.
1.3 Norme di Sicurezza
Il manuale contiene le seguenti categorie di istruzioni di sicurezza:
Attenzione: Questi avvisi mettono in guardia da possibili lesioni o danni personali.
Avvertenze: Queste istruzioni mettono in guardia da possibili danni materiali o ambientali.
1.4 Funzioni Principali
Questo dispositivo è adatto per la ricezione satellitare dei canali TV e radio digitali terrestri in
abitazioni private trasmette in chiaro e in criptato HD +
5

2. Primi Passi
2.1 Sicurezza
Leggere sempre attentamente le istruzioni di sicurezza prima di utilizzare il dispositivo.
Pericolo di soffocamento: I sacchetti di plastica possono essere pericolosi. Per evitare casi di
soffocamento tenere il sacchetto di plastica e altri imballaggi lontani da neonati, bambini e animali.
Pericolo di ingerimento: Lasciare fuori dalla portata di bambini o animali ogni piccola parte del
dispositivo
Smaltimento delle batterie: Se le batterie sono danneggiate o vengono sostituite con un tipo
scorretto potreste incorrere in rischi di esplosione. Si consiglia di seguire le istruzioni di sicurezza
del produttore della batteria. Pertanto si raccomanda di utilizzare solo batterie dello stesso tipo, di
non invertirne la polarità e di non mischiare batterie vecchie e nuove. Rimuovere le batterie e
conservarle in un posto sicuro quando il telecomando non viene utilizzato per un lungo periodo di
tempo. Questo aiuta a prevenire i danni causati dalla fuoriuscita di liquido dalle batterie.
Voltaggio: Prima di collegare il ricevitore alla rete elettrica, verificare che il voltaggio elettrico
corrisponda al voltaggio indicato sul retro del ricevitore. Nel caso il voltaggio della rete elettrica
risulti differente, non mettere in funzione l’apparecchio. Collegare il dispositivo solo dopo che tutte
le connessioni e i lavori di installazione sulla rete elettrica siano terminati. Se si scollega il
ricevitore dalla rete elettrica, ci si assicuri di staccare la presa dal muro e quella dal retro dell’unità.
La spina di alimentazione deve essere sempre accessibile per staccare l'apparecchio rapidamente in
caso di emergenza. Staccare la spina immediatamente dalla presa di corrente quando il dispositivo
o il cavo di alimentazione presentaano dei danneggiamenti.
Posizione: Utilizzare il dispositivo in un ambiente a temperatura moderata. Per prevenire pericolo
di fuoco o di scossa elettrica, si consiglia di non esporre questo apparecchio alla pioggia o
all’umidità. Posizionare l'unità all'interno di locali asciutti e al chiuso. Collocare il ricevitore su una
superficie piana e stabile. Al fine di proteggere il dispositivo dallo scolorimento causato dal calore
generato dal dispositivo stesso, posizionare il dispositivo su una base adatta. Selezionare, infine,
una posizione che protegga il dispositivo dallo sporco pesante.
Agenti esterni Per prevenire pericolo di fuoco o di scossa, non esporre questo apparecchio alla
pioggia, all’umidità o a spruzzi (ad esempio la formazione di condensa o di spruzzi d’acqua). Non
posizionare oggetti contenenti liquidi, come vasi, sopra o sotto l'unità. Collocare l’apparecchio
lontano dalla luce solare diretta e da fonti di calore, come stufe o dispositivi che si riscaldano.
Evitare di posizionare fiamme libere, come candele o simili, sul dispositivo o in sua prossimità. Non
coprire le fessure di ventilazione. Non collocare coperte, giornali o simili sopra o sotto l’unità.
Agenti esplosivi: Non collocare l’unità in funzione in prossimità di ambienti polverosi o
contaminati con gas infiammabili (ad esempio laboratori).
Messa a terra: I sistemi di antenna devono sempre essere messi a terra, pagando le relative
norme locali e le leggi VDE devono essere rispettate.
Corpi estranei: Assicurarsi che nessun oggetto esterno possa entrare nelle fessure di ventilazione.
Vi è il rischio di una scossa elettrica! Per una ventilazione adeguata, le aperture di ventilazione del
dispositivo non devono mai essere oscurate. Una volta installato il ricevitore, assicurarsi che
rimanga uno spazio di circa 10 cm intorno al ricevitore per permettere la libera circolazione del
flusso d’aria verso l’alto e prevenire il surriscaldamento.
Pulizia: Prima di pulire il dispositivo, scollegare sempre dalla rete elettrica e rimuovere le batterie.
Usare un panno asciutto o leggermente umido, facendo in modo che l'umidità non penetri
all’interno del dispositivo.
6

Riparazione: Non provare mai a riparare o disassemblare il decoder da soli. Aprendo la confezione
esterna si potrebbe incorrere in forti scosse elettriche. I componenti interni potrebbero essere
danneggiati dal contatto. Le riparazioni devono essere eseguite esclusivamente da personale
qualificato. In seguito all’uso improprio o alla manomissione, la garanzia e la sicurezza del
dispositivo potrebbero non essere più garantite!
Assenza prolungata / temporali: In caso di assenza prolungata o di temporali, rimuovere la
spina dalla presa di corrente. Scollegare anche i collegamenti dell'antenna per evitare ulteriori
danneggiamenti.
2.2 Disimballaggio
2.2.1 Imballaggio
Lasciare l’unità nella sua confezione originale fino al momento dell’ utilizzo.
Se avete trasportato l'unità da un ambiente freddo a uno caldo, lasciare il dispositivo nella
confezione chiusa per circa un’ora al fine di evitare la possibile formazione di condensa nel
dispositivo. Dopodiché rimuovere dalla confezione il ricevitore, il telecomando e le batterie.
Conservare l’imballaggio originale in caso di spedizione
Attenzione: Per lo smaltimento ecologicamente corretto dei materiali, vedere capitolo 10 "Smaltimento"!
2.2.2 Batterie:
Per la prima installazione e per la sostituzione delle batterie, si consiglia di utilizzare sempre due
batterie nuove e uguali di tipo AAA e procedere come di seguito:
Aprire il coperchio delle batterie sul retro del telecomando sollevando delicatamente la chiusura.
Rimuovere batterie scariche e poi, eventualmente, inserire le due batterie con la polarità indicata
nel vano batterie del telecomando (+/-).
Riposizionare il coperchio accuratamente nella posizione originale
Attenzione: Per lo smaltimento delle batterie, vedere capitolo 10 - “Smaltimento”!
Avvertenze: Le batterie non devono essere esposte a fonti di calore come luce solare, fuoco o
simili.
Attenzione: Non smontare, forare o incenerire le batteria. Solo le batterie scariche devono essere
smaltite. Non corto circuitare le batterie.
7

2.3 Descrizione dei Comandi e delle Porte
2.3.1 Telecomando
1. POW E R: Pulsante di accensione e
spegnimento e standby del decoder.
(On/standby)
2. 0-9 Tasti numerici : per selezionare i
canali, selezionare direttamente un
elemento del menu, impostare un
parametro, digitare valori numerici e
3. (Back) si ritorna al canale precedentemente
visualizzato.
4. TV/ RADIO si passa dalla Tv alla
Radio e viceversa
5. MUTE: Toglie l’audio alla propria TV al
ricevitore.
6. INFO Visualizza il Banner del canale e il
Banner del canale con le informazioni
dettagliate.
7. FAV seleziona un canale o la lista dei
preferiti.
8. MENU aprire/chiudere il menu
9. Tasti di navigazione ▲ / ▼ / ◄ / ► Per
navigare nel menu. Fuori dai menu, i tasti ▲
/ ▼ sono per cambiare canale, mentre ◄ / ►
per le impostazioni del volume (VOL - / +).
10. OK Confermare la scelta
11. GEP Guida Elettronica del Programma
Electronic Program Guide (EPG).
12. EXIT Per uscire dal menu o dalle
impostazioni.
13. VOL + / VOL- Aggiustare il volume.
14. CH + / CH- Cambiare programma.
15. ROSSO, VERDE, GIALLO, BLU Tasti
colorati le cui funzioni dipendono dal menu e
dalla modalitàdel programma
16. TEXT Per avviare o interrompere la
funzione televideo
17. A UD I O Per aumentare / diminuire l’audio e
l ’audio dei canali
18. SUB Per mostrare i sottotitoli (se
disponibili)
19. RES Per modificare la risoluzione dello
schermo
passwords.
Batterie: 2 di tipo AAA
Attenzione: inserire le due batterie con la polaritàindicata nel vano batterie del telecomando (+/-).
Attenzione: Le batterie usate sono rifiuti pericolosi - smaltirle sempre correttamente
8

2.3.2 Pannello di Controllo del dispositivo
1. - Pulsante per attivare o disattivare l’unità.
2. ▲ / ▼ - Commutatori di attività.
3. Ricevitore infrarossi per il telecomando.
4. LED verde quando il ricevitore èacceso, LED rosso quando èin modalitàstandby.
La smart card HD+ deve essere inserita in direzione della freccia e con i contatti metallici rivolti
verso il basso.
2.3.3 Collegamenti al panello posteriore.
1. RF IN - Entrata per connettere un sistema di antenne satellitare di tipo LNB. 1. Corrente max.
350 mA.
2. S/PDIF - Uscita Audio Digitale Ottico S / PDIF (connessione facoltativa).
3. USB - Porta USB per hard drive esterni veloci.
4. HDMI - Cavo jack HDMI per connettere una TV HD compatibile
5. SCART - Presa SCART per connettere una TV non-HD compatibile.
6. LAN - Ethernet RJ45. Connessione di servizio.
7. Cavo di alimentazione - Cavo di alimentazione 12V CC 2A.
Prodotto su licenza di Dolby Laboratories
Dolby e il simbolo della doppia D sono marchi registrati di Dolby Laboratories.
HDMI, il logo HDMI e "High-Definition Multimedia Interface" sono marchi o marchi
registrati di HDMI Licensing LLC negli Stati Uniti e in altri paesi.
9

2.4 Collegamento dei Cavi di Connessione in dotazione
Il seguente output del ricevitore deve essere collegato per avviare il dispositivo.
Collegare il ricevitore solo dopo aver collegato tutte gli altri collegamenti alla rete elettrica.
Attenzione: Collegare il ricevitore solo dopo il collegamento di tutti i collegamenti necessari alla rete
elettrica.
2.4.1 Connessione Antenna (pagina 3, punto 1 )
Collegare un connettore di tipo F a doppia della linea antenna del sistema satellitare alla presa "RF
IN”. Da notare che durante l'installazione iniziale o nel caso in cui il dispositivo è stato scollegato
dalla rete, l'antenna 19,2 ° Est deve essere allineata per la richiesta di HD + Software Update sul
satellite Astra.
2.4.2 Dispositivo di Connessione TV (Pagina 3, punto 2)
Collegare a "HDMI standard", la presa "HDMI" sul ricevitore con il televisore.
Nel caso in cui non si dispone di una televisione HD o si hanno problemi con la connessione HDMI, è
possibile collegare un cavo SCART alla presa "SCART" del ricevitore al televisore. Si noti, tuttavia,
che quando si scatta la foto con la dissoluzione HD, solo con la normale SD-Au si può vedere
dissoluzione. Se il programma HD+ risulta impostato HD + ma causa problemi di copyright, è
preferibile non trasmettere le immagini tramite la presa SCART. In caso, passare al programma
identico con dissoluzione SD.
2.4.3 Alimentazione di Rete (Pagina 3, punto 3 )
Nel caso in cui non risultano necessari ulteriori collegamenti opzionali (in seguito al precedente punto
2.5), inserire semplicemente la spina della rete elettrica in una presa vuota.
Attenzione: Utilizzare l'apparecchio solo con sistemi di alimentazione la cui tensione di rete e la
frequenza risulti la stessa indicata sulla confezione esterna del prodotto. Collegare il dispositivo solo
dopo che tutte le connessioni e lavori di installazione sulla rete siano stati effettuati.
10

2.5 Collegamento dei Cavi di Connessione Opzionali
2.5.1 SPDIF
Se un amplificatore audio esterno o un ingresso stereo digitale SPDIF sono collegati, collegarsi con
un cavo coassiale RCA schermato, quale il jack RCA "S / PDIF coassiale" del ricevitore al il dispositivo
audio esterno.
2.5.2 USB (Chargeable Activation Needed - Attivazione necessaria a pagamento)
Porta USB (tipo A) per il collegamento di un dispositivo di archiviazione USB esterno.
Le Periferiche USB possono essere collegate con una corrente massima di 500 mA di carica per non
infliggere danni al ricevitore e il dispositivo USB! Non collegare nessun hard disk senza alimentazione
propria.
Nel caso in cui si voglia rimuovere dispositivo di archiviazione USB dal ricevitore, si consiglia di
selezionare sempre la voce "Media Manager" / Media Information “ dal menu e quindi per
disconnettere il supporto di memoria premere il pulsante giallo “Rimozione sicura”.
Si fa presente che per motivi tecnici, ciò può comportare errori dei dati relativi al dispositivo di
archiviazione USB esterno. Al riguardo, i produttori del ricevitore non si assumono alcuna
responsabilità per perdite di dati o danni connessi con l'uso dell'interfaccia USB e pertanto si consiglia
di eseguire sempre un backup.
11

3.Guida di Installazione
3.1 Funzionamento del Menu di Base
hIl ricevitore è controllato da un telecomando. Il sistema integrato OSD (On screen display) funziona
nel seguente modo:
Aprire e chiudere OSD: Il menu and close the OSD: Il menu su schermo raccoglie tutte le
impostazioni del decoder. Si avvia attraverso il pulsante “MENU”. Per uscire da OSD, premere "EXIT"
Navigare nel menu OSD: La navigazione avviene attraverso i pulsanti di controllo ▲ / ▼ and ◄ / ►
per selezionare, immettere o visualizzare un elemento del menu; usare OK per attivare l’elemento
selezionato dal menu e se disponibile, una lista delle possibili opzioni. Il pulsante BACK torna indietro
a livello del menu precedente
Note speciali su OSD: Se il menu è bloccato, la password richiesta è “0000”, ma può essere
modificata in seguito. Il blocco del menu viene utilizzato per prevenire l'utilizzo non autorizzato del
dispositivo.
3.2 Operazioni Iniziale
3.2.1 Pagina di Benvenuto
1. Quando si accende il dispositivo per la prima volta, a procedura guidata di installazione si avvia
automaticamente, proprio come se si volesse reimpostare il destinatario utilizzando il menu delle
impostazioni di fabbrica.
2. Selezionare la lingua (lingua di visualizzazione del menu su schermo).
3. Selezionare scansione da Astra. Per modificare le impostazioni del satellite premere il tasto blu,
per esempio, nel caso in cui si volesse selezionare un delle impostazioni Unicable. In caso di
aggiornamento quando il ricevitore è acceso, esso può richiedere da 20 a 60 minuti. Si consiglia di
portare pazienza poiché, inoltre, l'aggiornamento è automatico e non c'è bisogno di essere presenti
12

4. Funzionamento Quotidiano
4.1Cambiare Canale
Per passare a canali diversi si devono premere i tasto ▲ / ▼ o CH +/CH.
4.2 Regolare il Volume
Premere i tasto VOL + / VOL- or ◄ / ► per regolare il volume.
Con il tasto MUTO il suono può essere attivato e disattivato.
4.3 GEP (EPG) Guida Elettronica dei Programma
Premere “GEP”
Dopodiché può essere visualizzata una
panoramica dei programmi per il giorno
corrente. La panoramica di giorni successivi e l'
indice può essere assegnato al giorno corrente
con il tasto giallo o verde. L’elenco di
programmi è contrassegnato con ▲ / ▼, per
selezionare premere il tasto OK.
Inoltre si può accedere al testo informativo e con il tasto BACK tornare indietro al menu precedente.
Se si preme nuovamente il tasto GEP/EPG una panoramica giornaliera può essere visualizzata sulla
trasmissione dei vari programmi. Con i tasti ◄ / ► - ▲ / ▼ si può navigare nella lista dei
programmi.
13

4.4 Vedere Lista dei Preferiti
Si può premere il tasto FAV per vedere i canali precedentemente impostati come preferiti. Per creare
la propria lista di canali preferiti bisogna premere più volte il tasto FAV e selezionare i canali. Si
possono creare più liste per diversi utenti. Con il tasto TV/RADIO si può tornare alla lista generale.
Fare riferimento alla sezione 5.3 per configurare la lista di Canali Preferiti.
4.5 Televideo
Molti programmi trasmettono ulteriori informazioni e servizi. Le pagine del televideo sono "riviste
elettroniche", dalle quali si possono ottenere ultime notizie, risultati sportivi, previsioni meteo, offerte
commerciali e molto altro. La portata e il contenuto di esse è definito dal rispettivo fornitore di
programmi. La funzione teletext del ricevitore viene avviata con il tasto TEXT. La home page è
sempre la pagina 100. E’ inoltre possibile visualizzare una panoramica delle nuove pagine secondarie
(ad esempio, pagina 200, panoramica sport). I numeri di pagina sono sempre a tre cifre e devono
essere inserite con i tasti numerici 0-9. In alternativa, è possibile navigare con i tasti freccia. Quindi,
con i tasti SU / GIÙ si può selezionare una pagina del televideo, e si può scorrere nei fondi di una
pagina di televideo con i tasti Sinistra / Destra. Premendo nuovamente il tasto TEXR, si può uscire
dalla funzione televideo.
Nota: Caricare le sottopagine del televideo potrebbe richiedere del tempo a causa del sistema.
4.6 Mostrare le Informazioni
Per vedere il banner delle Informazioni, premere il tasto INFO. Appariranno informazioni dettagliate
relative al programma visualizzato, e a quelli successivi. Sono disponibili informazioni sui tempi di
trasmissione disponibili, dove il grafico a barre mostra la durata residua del programma attuale,
Utilizzare il tasto freccia per selezionare i programmi successivi.
4.7 Il passaggio da modalità Tv a modalità Radio.
Con il tasto TV / RADIO è possibile passare facilmente alla modalità radio e tornare alla modalità TV.
Il ricevitore ritorna nuovamente sempre alla lista generale del programma.
14

4.8 Spegnimento Automatico
In seguito alla presente regolamentazione giuridica, un arresto automatico dopo lunghi periodi di
inattività (ad esempio, perché l’utente si è addormentato) è preimpostato in questo ricevitore. Se il
ricevitore è inattivo per un lungo period di tempo, e non si verifica alcuna operazione (ad esempio,
cambio di programma), esso si spegne automaticamente senza provocare alcun guasto nel
dispositivo! Questa utilissima funzione è facile da impostare e aiuta eventualmente anche a
risparmiare ulteriori costi di energia elettrica.
15

5. Menu di Selezione
Utilizzare il tasto MENU per accedere al Menu OSD (On Screen Display).
5.1 Il Menu OSD “Impostazioni”
5.1.1 Scelta Lingua
OSD Lingua
Seleziona la lingua desiderata dal Menu OSD
visualizzato usando i tasti ◄ / ►.
EPG Lingua
Seleziona la lingua desiderata dal Menu EPG
visualizzato usando i tasti ◄ / ►.
Lingua Audio
Select Selezionare la lingua da riprodurre nei
programmi multilingue, se disponibile.
Lingua Sottotitoli
I Sottotitoli DVB possono essere trasmessi in
diverse lingue. Selezionare la lingua preferita.
Nota: I sottotitoli DVB sono estremamente rari
e differiscono dai tradizionali sottotitoli del
televideo.
Lingua Televideo
I contenuti del Televideo possono essere trasmessi in diverse lingue. Selezionare la lingua preferita
usando ◄ / ►.
16

5.1.2 Controllo Genitori
Blocco: Questo servizio è usato per proteggere
l’accesso ai programmi da parte dei più piccoli
"On" per attivare "Off" per disattivare.
Menu di Blocco
Abilitare ("On") o disabilitare ("Off") per
impedire l’accesso alle funzioni principali del
decoder.
Modificare codice PIN del decoder:
Questo servizio è utilizzato per modificare il codice pin (password) a 4 cifre.
All’inizio il codice PIN assegnato è “0000”
Per modificare il proprio codice PIN:- Inserire le cifre sopraindicate.- Quindi inserire le 4 nuove cifre
di propria scelta. - Confermare le nuove cifre reinserendole. Memorizzare il nuovo codice Pin e
conservarlo in un luogo sicuro.
Cambiare PIN della SmartCard
Questo servizio è utilizzato per modificare il codice pin (password) a 4 cifre della smart card HD+.
All’inizio, il codice PIN assegnato è “0000”. Per modificare il proprio codice PIN:- Inserire le cifre
sopraindicate.- Quindi inserire le 4 nuove cifre di propria scelta. - Confermare le nuove cifre
reinserendole. Memorizzare il nuovo codice Pin e conservarlo in un luogo sicuro.
I genitori possono usare i codici PIN di protezione per alcuni contentuti non adatti a un certo tipo di
pubblico.

5.1.3 Gestione Timer
La gestione timer elenca tutti i timer esistenti. Da questo schermo è possibile impostare
modificare e cancellare timer.
Impostazione di un timer
Premere il pulsante rosso per aggiungere un timer. Premere il pulsante verde per modificare un timer
già impostato. Premere il pulsante giallo per eliminare un timer.
Impostare i parametri del timer:
Premere ◄ / ► per impostare la frequenza
giornaliera/settimanale/una volta
Modalità sveglia
Può essere impostato come timer del
programma o di messaggio.
Servizio Nome/Messagio
Premere ◄ / ► per attivare la lista dei canali e
selezionare con i tasti ◄ / ► il programma
desiderato.
Data
Inserire la data usando il tastierino numerico in
questo formato: 01.06.2014.
Ora di inizio e ora di fine
Inserire l’orario usando il tastierino numerico in questo formato: 20:
Durata
Inserire la durata dell’evento usando il tastierino numerico in questo formato: 01:00.
Standby
Selezionare "ON", e lo standby partirà automaticamente dopo la fine dell’evento.
18

5.1.4 Impostazioni Video
Luminosità
Premere per modificare la luminosità da 0100%
Contrasto
Premere per modificare il contrasto da 0-100%
Risoluzione
Permette di ottimizzare la risoluzione dello
schermo sull'uscita HDMI, scegliendo ad
esempio, tra 576i, 576p, 720p, 1080i, 1080p
Modalità di visualizzazione
Se si possiede un televisore con schermo di
proporzioni 16: 9, selezionare il formato "16:
9". Per schermi 4: 3, selezionare il formato “4:
3"
Modalità ridimensionamento immagine
Permette di modificare lo schermo del display
secondo le proper esigenze. Si può scegliere tra:
"TV scaling", "Pillar box", "Pan & Scan" o
“Combined”.
HDCP
Determina se la presa HDMI sul ricevitore ha la funzione di rappresentare la funzione HDCP. Se
disponibile ("On") o no ("Off"). HDCP è acronimo di High-Bandwidth Digital Content Protection ed è
un sistema di codifica che serve ai titolari dei diritti per proteggere video digitali e contenuti audio da
utilizzi non autorizzati. A seconda del tipo di dispositivo collegato, la funzione HDCP è necessaria per
avviare un trasferimento di dati.
5.1.5 Impostazioni Audio
Digital Audio Output (Uscita audio digitale)
Con l'impostazione "Dolby D", il suono Dolby Digital si realizza dall’uscita audio digitale coassiale
"SPDIF" digitale e l'uscita "HDMI" sul pannello posteriore. Con l'impostazione "PCM" convertita in
segnale di formato PCM, l’audio viene emesso. Con l'impostazione "Auto", quando il programma
televisivo attivato lo supporta, il suono Dolby Digital esistenti su uscita audio digitale coassiale
"SPDIF" e l'uscita "HDMI" sul pannello posteriore. Altrimenti, viene emesso un segnale convertito in
PCM
Descrittore Audio
Selezionare l'audio per i non vedenti, premendo "ON", in modo tale da regolare il valore di livello
AD-mixato.
AD-mixato
È possibile impostare il valore premendo il tasto ◄ / ► tra 1 e 100.
Ritardo SPDIF
Ritarda il segnale per mantenere sincronizzato l'audio SPDIF.
19

5.1.6 Amministrazione
Timeout OSD
Selezionare il tempo di visualizzazione della
barra delle informazioni a un cambio di
programma. Si può scegliere tra 2-15 secondi.
LPM in stand-by
La funzione LPM (modalità Low Power) del
ricevitore è quello di garantire che il ricevitore
consuma solo 0,5 W in modalità standby
(attesa).
Sveglia
Off / 10 minuti / 30 minuti / 60 minuti / 90 minuti / 120 min. L’indicatore dell’ unità entra in modalità
di attesa (stand by) e rimane acceso fino allo scattare del tempo predefinito.
APD (Automatic power down o spegnimento automatico)
Off / 10-240 min. La funzione del ricevitore APD (Automatic Power Down) viene solitamente
utilizzata per commutare il ricevitore dalla modalità attiva alla modalità di attesa o standby se per un
periodo (per esempio di 180 minuti) viene effettuata alcuna operazione del ricevitore (ad esempio,
perchè l’utente si è addormentato). Questa funzione è pratica, facile da installare sul vostro decoder
e permette, eventualmente, di risparmiare sui costi di energia elettrica inutili. Se non si desidera
utilizzare questa funzione, è possibile disattivarla o regolarla qui.
Timer Nessun Segnale
In assenza di segnale, l'apparecchio si spegne automaticamente dopo il tempo impostato in modalità
standby (attesa).
Standby OAD (Over Air Download in standby)
Questa funzione è utile per assicurarsi che il decoder disponga sempre di informazioni aggiornate. Se
l'impostazione è attivata ("On"), il decoder si accende automaticamente al mattino e inizia la ricerca
di nuove informazioni, che verranno poi scaricare automaticamente sul ricevitore.
20

5.2 Il menu OSD di "Installazione"
5.2.1Scansione satellitare
Ricerca satellitare automatica
Selezionare le seguenti opzioni per avviare la ricerca satellitare del satellite supportato.
Premendo il pulsante verde, si avvia la ricerca canale.
Premendo il pulsante rosso, si può elimare uno dei satelliti presenti.
Attenzione: quando si elimina un satellite tutti i radar e i dati ad esso associati saranno
eliminati.
Selezione satellitare
Dal menu OSD "Scan Satellitare" è possibile modificare
singolarmente le impostazioni del satellite del proprio sistema di
antenne
Premere il tasto giallo per aggiungere un nuovo satellite, modificare
o regolare la configurazione dell' antenna.
21

5.2.2 Configurazione dell’ Antenna
Tipo LNB
Può passare dalla fascia C / Estesa Banda C / Universal / Ku Band/ utente, con un diverso tipo di
LNB, la frequenza sarà diversa.
22 KHz
Il segnale 22kHz viene utilizzato per commutare un LNB universale ("Off" = banda bassa, "On" =
banda alta). Bisogna selezionare come tipo di LNB "digitale" e impostare "Automatico", la
commutazione avverà quindi automaticamente. Se non si dispone di un LNB commerciale, si deve
procedere, a questo punto, con l' impostazione manuale.
DiSEqC (DiSEqC 1.0 o DiSEqC 1.1)
Se la funzione "DiSEqC" è attivata, l’ impostazione selezionata includerà la porta desiderata da 1-16.
Tone Burst
Se è attivata la funzione "Tone Burst", è necessario selezionare l' impostazione “Comprendi il Tone
Burst desiderato di tipo "A" o "B" per abilitarla. Nel caso in cui si disponga di un interrutore di Tone
Burst è possibile ricevere fino a due satelliti montati sul sistema d'antenna, altrimenti solo la
funzione "Tone Burst" sarà disponibile.
Posizionatore
Qui è possibile selezionare se il controllo del rotore del ricevitore è disattivato ("Off") o attivato
("DiSEqC 1.2" o "USALS"). Premere il pulsante blu per regolare le impostazioni del motore.
DiSEqC 1.2: Impostazioni del tipo di Motore
Tipo “Moving”
Si può scegliere tra le opzioni: utente/
installatore / GOTO X / Avanzato. Se l'
interruttore è posto su Avanzato, le funzioni
"Ricalcola" e "Ripristina posizione" sono abilitate
Tipo “Go to X”
Per un facile accesso ad altri satelliti, è possibile
selezionare le posizioni salvate in precedenza e
passarvi direttamente.
Tipo “Drive E/W”
Questa funzione controlla per 3/4 l'antenna
verso ovest o est. Permette di monitorare di
continuo gli indicatori del segnale. Se non
ricevete un livello adeguato di segnale durante
la ricerca, si consiglia di scegliere "Selezionare
Transponder" per abilitare l’ utilizzo di un altro
transponder.
22

Voltaggio LNB
La tensione LNB del ricevitore satellitare fornisce l' LNB con una tensione di esercizio e garantisce il
passaggio ai vari livelli di ricezione. Nota: lasciare sempre l’interruttore posizionato sul voltaggio
LNB.
Unicalbe
Ogni ricevitore ha bisogno di impostazioni individuali riguardannti il canale IF e la frequenza IF. Si
consiglia di evidenziare ogni presa dell’ antenna o ciascun cavo dell’ antenna con le impostazioni
aggiunte in modo che siano sempre visibili all'utente. Nel caso di modifica delle impostazioni, tutti i
destinatari collegati al ricevitore devono essere attivati, per ricreare il sistema Unicalbe o di single –
cable.
A riguardo, è possibile passare alla funzione Disattiva 1/2/3/4/5/6/7/8. Se si passa da 1 ~ 8, è
possibile impostare "il Centro Frequenze" e la "Porta".
Centro di frequenza
Questa funzione permette di attivare il “multi – tasto” utilizzando i tasti numerici, il pensiero
aggiunto per il ricevitore e il sistema a cavo singolo che supporta,inoltre, l’esatta frequenza IF. Le
nuove impostazioni entreranno in uso alla successiva accensione del dispositivo.
Porta
Selezionare "A" o "B".
5.2.3 Elenco dei transponder
Questa funzione si utilizza per cercare un singolo transponder. Questo metodo di ricerca è
consigliabile se si desidera salvare solo un particolare programma o un pacchetto di programmi. I
rispettivi parametri di ricezione (frequenze, etc.) sono disponibili da Internet o da riviste televisive e
commerciali
Selezione satelliti
In "Scansione Satellite" Premere ▲ / ▼ per
visualizzare la lista dei satelliti supportati
Modifica transponder
Evidenziare e selezionare il transponder usando
i tasti ◄ / ► e ▲ / ▼. Se si vuole eseguire la
scansione del transponder selezionato per il
satellite selezionato e i nuovi canali, premere il
tasto verde. Dopo aver impostato le opzioni di
ricerca sopra descritte, la ricerca può essere
avviata premendo il tasto verde.
23

Per aggiungere una nuova voce o modificare le voci del transponder
selezionato, premere il tasto giallo.
La frequenza di un transponder satellitare nell’ elenco esistente è predefinita e
non dovrebbe essere cambiata.
In circostante normali, per cambiare i valori basta selezione direttamente le voci del menu.
Symbol Rate
I “symbol rate” dei transponder satellitari più
comuni hanno quasi esclusivamente i valori di
27500 o 22000 Kbps. Modificare i valori
immettendo direttamente i tasti numerici.
Polarizzazione
I segnali satellitari vengono polarizzati
orizzontalmente o verticalmente Premere ◄ / ►
"orizzontale" o "verticale"
Tipo di sintonia: "DVBS" o "DVBS2"
Tipo di ricerca: "Libero" o "Criptato" o "Tutti"
Ricerca Network: "On" o "Off"
5.2.4 Lista dei Satelliti
Nella lista dei satelliti disponibili vengono elencati tutti i satelliti precedentemente impostati.
evidenziare utilizzando i tasti ▲ / ▼ si può selezionare un satellite supportato dalla lista.
Per modificare una voce della lista, selezionare un satellite o aggiungere un nuovo satellite premendo
il pulsante giallo.
Nome del satellite
Questa funzione permette di visualizzare il nome del satellite selezionato.
La modifica o l'inserimento del nome deve avvenire tramite la tastiera a
schermo.
Angolo Satellite
Questa funzione permette di visualizzare il valore della posizione
orbitale del satellite. Questa dimostra la posizione del satellite, ad
esempio 19,2 ° Est, Astra. Modificare il valore tramite immissione
diretta utilizzando i tasti numerici.
Est Ovest
Permette di specificare l' intervallo dell' orbita del satellite. Indica
se il satellite si trova a est o a ovest del meridiano 0 è (per esempio
Astra 19.2 ° Est). Al fine di completare l'elaborazione di un satellite,
premere il pulsante OK.
24

5.3 Il menu OSD "Organizer"
È possibile modificare questo programma di menu, o salvare o caricare la vostra lista canali corrente
su una chiavetta USB.
5.3.1 Vista elenco canali Astra stra Channel List view
È possibile modificare le seguenti proprietà nella lista dei canali in questo menu:
Premere [FAV]: Lista dei Preferiti
Premere [TV / R]: Modificare lista TV / RADIO
Premere [>>]: Per aggiungere canali alla lista
dei Preferiti
Premere [0]: Segnare i programmi
Premere [1]: Cambiare il programma
contrassegnato.
Premere [Giallo]: Spostare il programma
contrassegnato
Premere [Verde]: Muovere i programmi (all'
interno della lista dei canali principale non è
possibile)
Premere [Blu]: Cancellare i programmi (all'
interno della lista dei canali principale non è
possibile)
Premere [Rosso]: Bloccare il Programma
25

5.3.2 Modificare Elenco dei Programmi
1-99
Procedere come segue per modificare l'elenco
dei programmi 1-99: Premere il tasto [>] per
richiamare l'elenco dei programmi e i canali da
1 a 99 appariranno sullo schermo.
Attenzione: Premendo il tasto [Azzurro], la lista dei canali 1 – 99 sarà completamente cancellata
Essa potrà essere recuperata solo in seguito al ripristino delle impostazioni di fabbrica.
Muoversi nel menu:
Procedere come segue per spostare i programmi e passare a:
• Usare i tasti freccia ▲ / ▼ selezionare la stazione desiderata.
• Premere [0] per evidenziare la stazione desiderata (comparirà un segno di spunta).
• Usare i tasti freccia ▲ / ▼ per selezionare la nuova stazione.
• Premere quindi il tasto [Giallo]. Il trasmettitore ora passa alla nuova stazione.
• Quindi, premere il tasto [1] per lo scambio.
• Per memorizzare, premere il tasto [OK].
26
 Loading...