

Page 1

© 2008 Koninklijke Philips Electronics N.V.
All rights reserved.
Document order number: 000000000000
Page 2

Register your product and get support at
www.philips.com/welcome
EN User manual
Page 3

Page 4

Page 5

Contents
1 Important 4
Safety 4
Notice 7
2 Your Docking Speaker 10
Introduction 10
What’s in the box
Overview of the main unit
Overview of the remote control
10
11
13
3 Get started 15
Prepare the remote control 15
Connect power
Turn on
17
19
4 Play 21
Play from iPod/iPhone/iPad 21
Play from Bluetooth device
Play from an external device
Adjust volume level
Mute sound
23
24
25
25
5 Product information 26
Specications 26
En glis h
6 Troubleshooting 28
About Bluetooth device 28
EN
3
Page 6

1 Important
Safety
Important Safety Instructions
a Read these instructions.
b Keep these instructions.
c Heed all warnings.
d Follow all instructions.
e Do not use this apparatus near water.
f Clean only with dry cloth.
g Do not block any ventilation openings. Install in accordance
with the manufacturer’s instructions.
h Do not install near any heat sources such as radiators, heat
registers, stoves, or other apparatus (including ampliers)
that produce heat.
i For countries with a polarized mains, do not defeat the
safety purpose of the polarized or grounding-type plug.
A polarized plug has two blades with one wider than the
other. A grounding type plug has two blades and a third
grounding prong. The wide blade or the third prong are
provided for your safety. If the provided plug does not t
into your outlet, consult an electrician for replacement of
the obsolete outlet.
Caution: To prevent electric shock, match the wide blade of
the plug to the wide slot, fully insert.
4
EN
Page 7

j Protect the power cord from being walked on or pinched,
particularly at plugs, convenience receptacles, and the point
where they exit from the apparatus.
k Only use attachments/accessories specied by the
manufacturer.
l Use only with the cart, stand, tripod, bracket, or table
specied by the manufacturer or sold with the apparatus.
When a cart is used, use caution when moving the cart/
apparatus combination to avoid injury from tip-over.
m Unplug this apparatus during lightning storms or when
unused for long periods of time.
n Refer all servicing to qualied service personnel. Servicing is
required when the apparatus has been damaged in any way,
such as power-supply cord or plug is damaged, liquid has
been spilled or objects have fallen into the apparatus, the
apparatus has been exposed to rain or moisture, does not
operate normally, or has been dropped.
o Batteries (battery pack or batteries installed) shall not be
exposed to excessive heat such as sunshine, re or the like.
p Apparatus shall not be exposed to dripping or splashing.
q Do not place any sources of danger on the apparatus (e.g.
liquid lled objects, lighted candles).
En glis h
EN
5
Page 8

r Where the plug of the Direct Plug-in Adapter is used as the
disconnect device, the disconnect device shall remain readily
operable.
Hearing safety
Listen at a moderate volume.
Using headphones at a high volume can impair your hearing.
•
This product can produce sounds in decibel ranges that may
cause hearing loss for a normal person, even for exposure less
than a minute. The higher decibel ranges are offered for those
that may have already experienced some hearing loss.
Sound can be deceiving. Over time your hearing ‘comfort
•
level’ adapts to higher volumes of sound. So af ter prolonged
listening, what sounds ‘normal’ can actually be loud and
harmful to your hearing. To guard against this, set your volume
to a safe level before your hearing adapts and leave it there.
Set your volume control at a low setting.
•
Slowly increase the sound until you can hear it comfortably
•
and clearly, without distor tion.
Prolonged exposure to sound, even at normally ‘safe’ levels,
•
can also cause hearing loss.
Be sure to use your equipment reasonably and take
•
appropriate breaks.
Listen at reasonable volumes for reasonable periods of time.
•
Be careful not to adjust the volume as your hearing adapts.
•
Do not turn up the volume so high that you can’t hear what’s
•
around you.
You should use caution or temporarily discontinue use in
•
potentially hazardous situations. Do not use headphones
while operating a motorized vehicle, cycling, skateboarding,
etc.;itmaycreateatrafchazardandisillegalinmanyareas.
EN
6
Page 9

Warning
Never remove the casing of this apparatus.
•
Never lubricate any part of this apparatus.
•
Never place this apparatus on other electrical equipment.
•
Keepthisapparatusawayfromdirectsunlight,nakedamesorheat.
•
Ensure that you always have easy access to the power cord, plug or
•
adaptor to disconnect the apparatus from the power.
Notice
Anychangesormodicationsmadetothisdevicethatarenot
expressly approved by Philips Consumer Lifestyle may void the
user’s authority to operate the equipment.
Notice for the USA
This equipment has been tested and found to comply with the
limits for a Class B digital device, pursuant to part 15 of the FCC
Rules. These limits are designed to provide reasonable protection
against harmful interference in a residential installation. This
equipment generates, uses, and can radiate radio frequency energy
and, if not installed and used in accordance with the instruction
manual, may cause harmful inter ference to radio communications.
However, there is no guarantee that interference will not occur
in a par ticular installation. If this equipment does cause harmful
inter ference to radio or television reception, which can be
determined by turning the equipment off and on, the user is
encouraged to try to correct the interference by one or more of
the following measures:
Relocate the receiving antenna.
•
Increase the separation between equipment and receiver.
•
Connect the equipment into an outlet on a circuit different
•
from that to which the receiver is connected.
En glis h
EN
7
Page 10
Consult the dealer or an experienced radio/TV technician for
•
help.
This equipment complies with FCC’s and IC’s RF radiation
exposure limits set forth for an uncontrolled environment. The
antenna(s) used for this transmitter must be installed and operated
to provide a separation distance of at least 20 cm from all persons
and must not be collocated or operating in conjunction with
any other antenna or transmitter. Installers must ensure that
20cm separation distance will be maintained between the device
(excluding its handset) and users.
“Made for iPod”, “Works with iPhone” and “Made for iPad”
mean that an electronic accessory has been designed to connect
specicallytoiPod,iPhoneandiPadandhasbeencer tiedbythe
developer to meet Apple performance standards.
Apple is not responsible for the operation of this device or its
compliance with safety and regulatory standards.
iPod is a trademark of Apple Inc., registered in the U.S. and other
countries.
Disposal of your old product and batteries
Your product is designed and manufactured with high quality
materials and components, which can be recycled and reused.
Never dispose of your product with other household waste.
Please inform yourself about the local rules on the separate
collection of electrical and electronic products and batteries.
The correct disposal of these products helps prevent potentially
negative consequences on the environment and human health.
8
EN
Page 11
Your product contains batteries, which cannot be disposed of with
normal household waste.
Please inform yourself about the local rules on separate collection
of batteries. The correct disposal of bat teries helps prevent
potentially negative consequences on the environment and human
health.
Please visit
www.recycle.philips.com for additional information on
a recycling center in your area.
Caution
Removal of the built-in battery invalidates the warranty and may
•
destroy the product.
Always bring your product to a professional to remove the built-in
battery.
Environmental information
All unnecessary packaging has been omitted. We have tried
to make the packaging easy to separate into three materials:
cardboard (box), polystyrene foam (buffer) and polyethylene
(bags, protective foam sheet.)
Your system consists of materials which can be recycled and
reused if disassembled by a specialized company. Please observe
the local regulations regarding the disposal of packaging materials,
exhausted batteries and old equipment.
Note
En glis h
The type plate is located on the bottom of the apparatus.•
9
EN
Page 12

2 Your Docking Speaker
Congratulations on your purchase, and welcome to Philips! To fully
benetfromthesupportthatPhilipsoffers,registeryourproductat
www.philips.com/welcome.
Introduction
With this unit, you can enjoy audio from the iPod/iPhone/iPad and
other audio devices.
What’s in the box
Check and identify the contents of your package:
Main unit
•
Remote control
•
1 x AC adaptor
•
1 x AC power cord
•
1 x Aux-in cable
•
1 x iPad stand
•
User manual
•
Quick star t guide
•
10
EN
Page 13

Overview of the main unit
En glis h
EN
11
Page 14
a b d
e
g f
c
a b d
e
g f
c
a
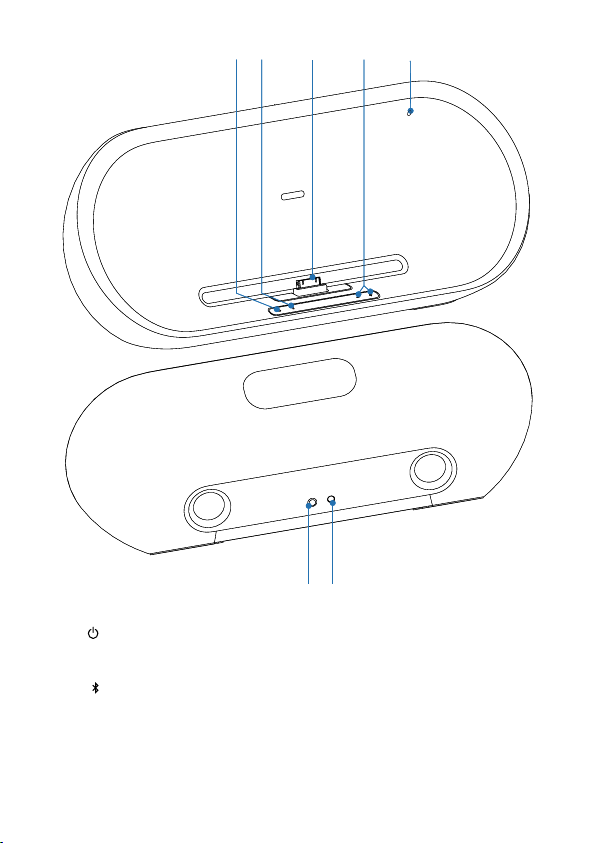
Turn on/off the unit.
•
b
Select Bluetooth mode
•
Pair with Bluetooth device.
•
Disconnect Bluetooth device
•
12
EN
Page 15
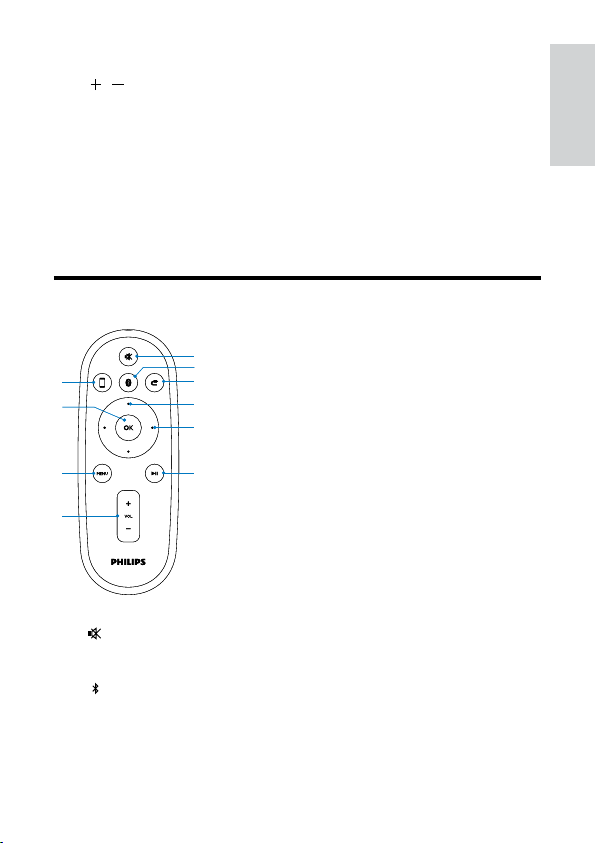
c iPod/iPhone/iPad dock
j
h
g
i
a
f
e
c
b
d
j
h
g
i
a
f
e
c
b
d
d /
Adjust volume.
•
e Built-in battery LED indicator
f Power supply socket
g AUX IN
Jack for an external audio device.
•
Overview of the remote control
En glis h
a
b
Mute volume.
•
Select Bluetooth mode
•
Pair with Bluetooth device.
•
Disconnect Bluetooth device
•
EN
13
Page 16

c
Select Aux-in mode
•
d Up/down keys
Navigate through the iPod/iPhone menu.
•
e Fast forward/backward keys
Fast reverse or fast for ward within a track or iPhone/
•
iPod.
Skip to the previous/next track.
•
f
Star t or pause play.
•
g VOL +/-
Adjust volume.
•
h MENU
Access the iPod menu.
•
i OK
Conrmaselection.
•
j
Select iPod/iPhone dock mode
•
14
EN
Page 17
3 Get started
Caution
Use of controls or adjustments or performance of procedures other
•
than herein may result in hazardous radiation exposure or other
unsafe operation.
Always follow the instructions in this chapter in sequence.
If you contact Philips, you will be asked for the model and serial
number of this apparatus. The model number and serial number are
on the bottom of the apparatus. Write the numbers here:
Model No. __________________________
Serial No. ___________________________
Prepare the remote control
Caution
Riskofexplosion!Keepbatteriesawayfromheat,sunshineorre.
•
Neverdiscardbatteriesinre.
Perchlorate Material - special handling may apply. See www.dtsc.
•
ca.gov/hazardouswaste/perchlorate.
For rst-time use:
1 Remove the protective tab to activate the remote control
battery.
To replace the remote control battery:
1 Open the battery compartment.
En glis h
EN
15
Page 18
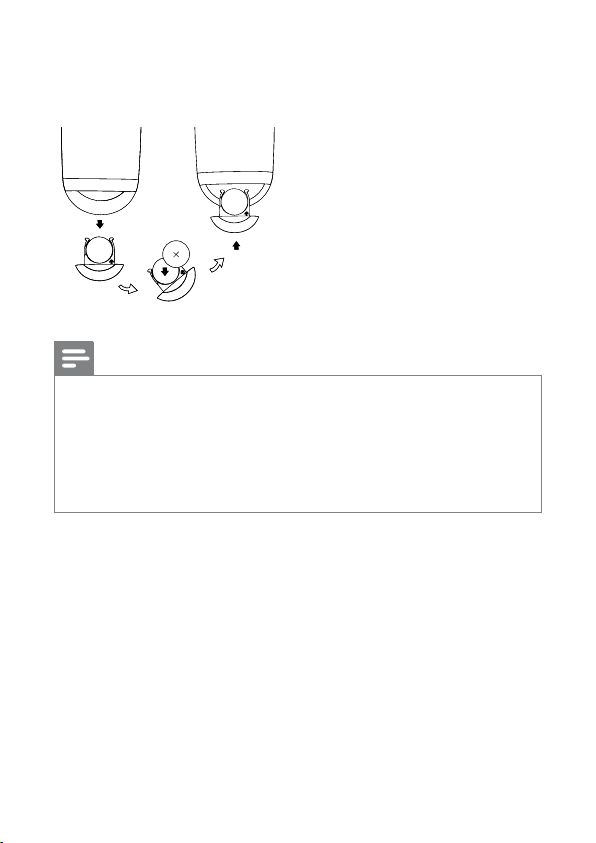
2 Insert one CR2032 battery with correct polarity (+/-) as
indicated.
3 Close the battery compartment.
Note
Beforepressinganyfunctionbuttonontheremotecontrol,rst
•
selec t the correct source with the remote control instead of the main
unit.
If you are not going to use the remote control for a long time,
•
remove the bat ter y.
Batteries contain chemical substances, so they should be disposed of
•
properly.
16
EN
Page 19
Connect power
Caution
Risk of product damage! Ensure that the power supply voltage
•
corresponds to the voltage printed on the bottom of the unit.
Risk of electric shock! When you unplug the AC adaptor, always pull
•
the plug from the socket. Never pull the cord.
Before connecting the AC adaptor, ensure you have completed all
•
other connections.
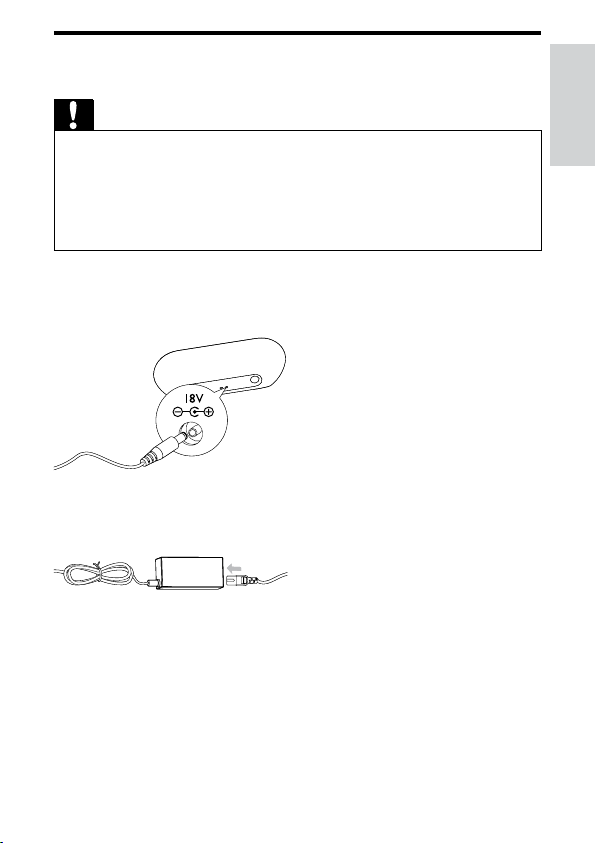
1 Insert the plug from the AC adaptor to the DC IN socket on
the back of the main unit.
2 Connect one end of the AC power cord to the AC adaptor.
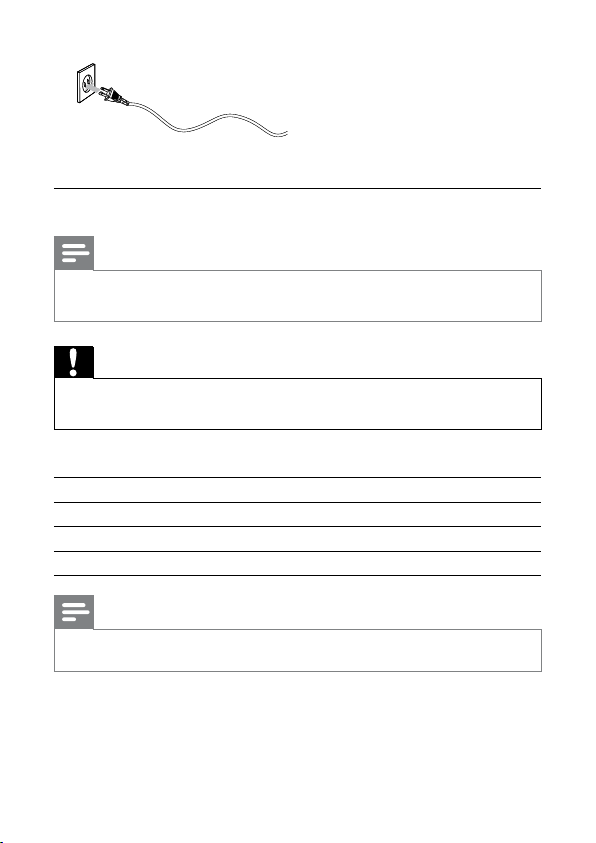
3 Connect the other end of the AC power cord to the wall
outlet.
En glis h
EN
17
Page 20
Built-in Battery
Note
Always bring your product to a professional to remove the built-in
•
battery.
Caution
Danger of explosion if battery is incorrectly replaced. Replace only
•
with the same or equivalent type.
The unit can also operate on built-in rechargeable battery.
Battery power LED indicator
Low Red
Medium Yellow
Full Green
Note
Use only the supplied AC adapter to charge the bat ter y.•
To recharge the built-in battery:
Connect the unit to the mains power supply.
18
EN
Page 21
Turn on
1 Press on the main unit.
Light LED under volume button on the main unit turns on.
»
Switch to ECO standby
The unit switches to standby mode automatically, when:
(at DOCK mode) the iPod/iPhone is disconnected from
•
the unit.
(at AUX mode) the device no longer playing music for
•
more than 5 minutes.
(at Bluetooth mode) the Bluetooth device is
•
disconnected from the unit for more than 5 minutes.
Tip
In standby mode, press , or on the remote control, the unit
•
switches on at the corresponding source.
About ECO power
You can switch the unit to ECO power standby mode to save
power consumption.
1 Press for over 3 seconds.
The unit turns into ECO power mode immediately.
»
If the unit is powered via built-in battery, when it is in
»
standby mode for 5 minutes, it switches to ECO power
mode
automatically.
En glis h
Tip
In ECO power mode, the remote control does not work.•
19
EN
Page 22

To exit ECO power mode, press .
20
EN
Page 23

4 Play
Play from iPod/iPhone/iPad
You can enjoy audio from iPod/iPhone/iPad through this unit.
Compatible iPod/iPhone/iPad
Apple iPod, iPhone and iPad models with a 30-pin dock connector.
Made for :
iPod (5th generation)
•
iPod nano (1st generation)
•
iPod nano (2nd generation)
•
iPod nano (3rd generation)
•
iPod nano (4th generation)
•
iPod nano (5th generation)
•
iPod classic
•
iPod touch (1st generation)
•
iPod touch (2nd generation)
•
iPod touch (3rd generation)
•
iPhone
•
iPhone 3G
•
iPhone 3GS
•
iPad.
•
Load the iPod/iPhone/iPad
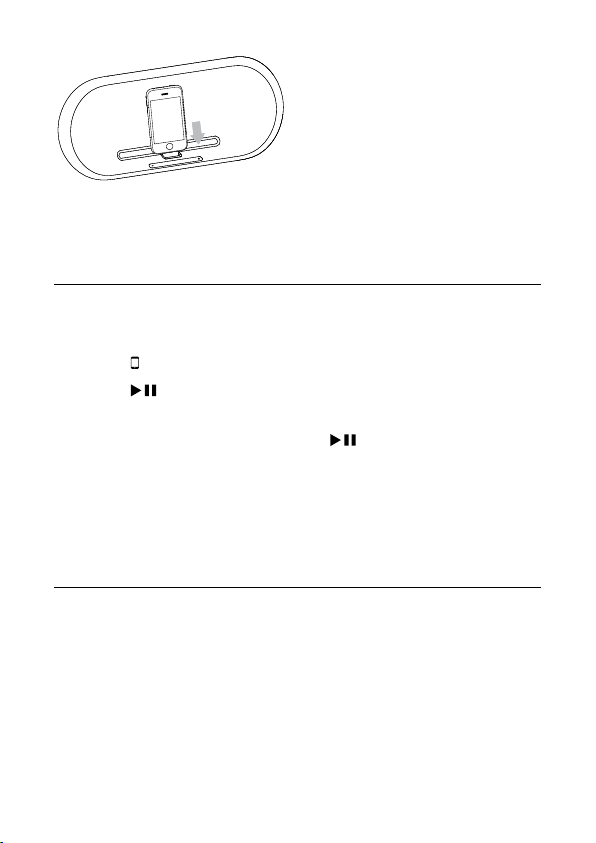
1 Place the iPod/iPhone/iPad in the dock.
En glis h
EN
21
Page 24
Remove the iPod/iPhone/iPad
1 Pull the iPod/iPhone/iPad out of the dock.
Listen to the iPod/iPhone/iPad
1 Ensure that the iPod/iPhone/iPad is loaded correctly.
2 Press to select dock mode.
3 Press .
The connected iPod/iPhone/iPad starts play.
»
To pause/resume play, press
•
To skip to a track, press fast for ward/backward keys.
•
To search during play, press and hold fast forward/
•
backward keys, then release to resume normal play.
To navigate the menu, press
•
keysto select, and press
Charge the iPod/iPhone/iPad
When the unit is connected to AC power, the docked iPod/
iPhone/iPad begins to charge.
.
MENU, then press up/down
OKtoconrm.
22
EN
Page 25
Tip
You can also charge your iPod/iPhone via the built-in battery. Before
•
charging your iPod/iPhone via the built-in battery, ensure the Fidelio
battery-charging function is turn on.
You cannot charge your iPad via the built-in battery. To charge your
•
iPad, connect the unit to AC power.
Play from Bluetooth device
Pair with Bluetooth deivces
1 Press to select Bluetooth source.
The unit starts searching for Bluetooth device. The
»
Bluetooth indicator under
rapidly.
buttononthemainunitashes
2 Turn on Bluetooth function on your device.
3 Search for Bluetooth devices that can pair with your device.
4 When “PHILIPS DC8550” displays, select it to start
connection.
5 When prompted for a password, enter “0000”.
If connection is successful. the unit beeps and the
»
indicator turns on stably.
If the pairing cannot be completed within one minute, the
»
indicatorashesslowly.
En glis h
Tip
If your Bluetooth device is already paired with DS8550 before, you
•
justneedtondoutthe“PHILIPSDS8550”onyourBluetoothmenu,
thenconrmtheconnection.
EN
23
Page 26
To disconnect Bluetooth device,
Move it beyond the communication range; or
•
Press
•
•
Play audio les from bluetooth devices
Make sure the Bluetooth connection between the unit and the device
•
is active.
•
•
•
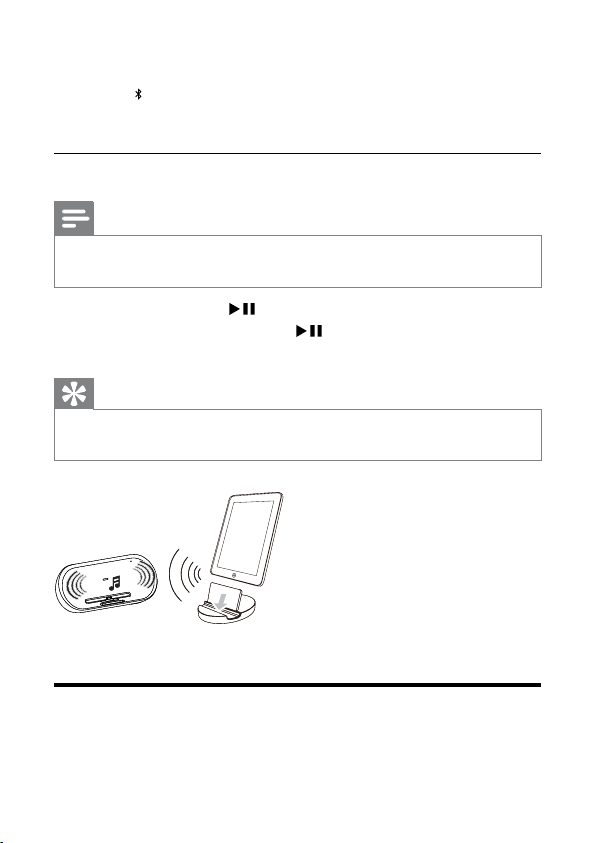
While listening to iPad via Bluetooth, you can use the provided iPad
•
stand to hold up your iPad.
; or
Turn off the connected device
Note
To start play, press on the remote control.
To pause/resume play, press
To track up/down, press forward/backward keys.
Tip
again.
Play from an external device
You can also listen to an external audio device through this unit.
24
EN
Page 27

1 Press to select Aux-in mode.
2 Connect the supplied Aux-in link cable to:
the
•
•
AUX IN jack (3.5mm) on the back of the unit.
the headphone jack on an ex ternal device.
3 Start to play the device (see the device user manual).
Adjust volume level
1 During play, press VOL +/- to increase/decrease the volume
level.
Mute sound
1 During play, press MUTE to mute/unmute sound.
En glis h
EN
25
Page 28
5 Product information
Note
Product information is subject to change without pr ior notice.•
Specications
Amplier
Rated Output Power 2X15 W RMS
Signal to Noise Ratio 85 dB
Aux-in Link 0.6 V RMS 10 kohm
26
EN
Page 29
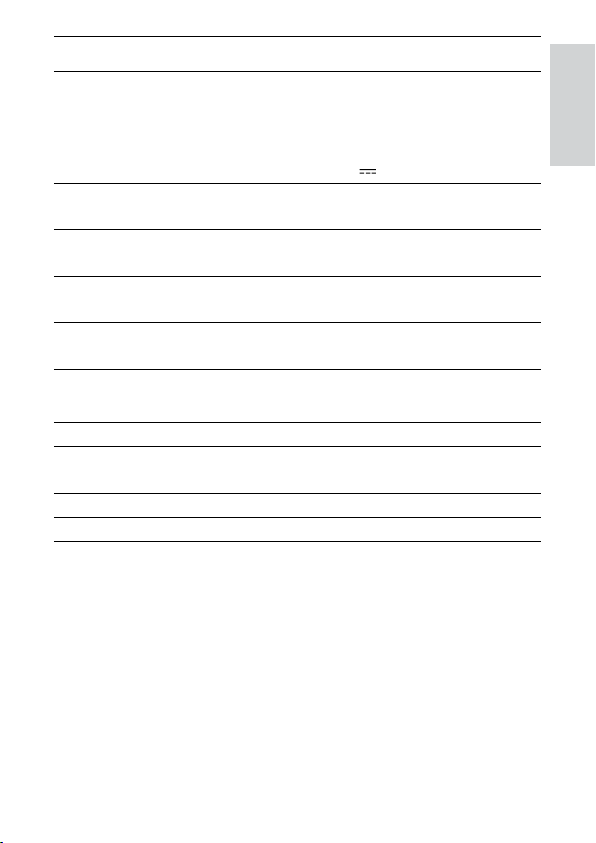
General information
AC power (power
adaptor)
Operation Power
Consumption
ECO Standby Power
Consumption
Dimensions
- Main Unit (W x H x D)
Weight
- Main Unit
Bluetooth
Output power 0 dBm (Class 2)
Frequency band 2.4000 GHz - 2.4835 GHz ISM
Range 6 meters(free space)
Standard Bluetooth2.0specication
For CE: OH-1065A1803500U2(EU)
For USA: OH-1065A1803500U(UL)
Input: 100-240V~, 50/60Hz, 1.5A
MAX;
Output: 18V
3.5A;
<40W
<1W
169 x 420 x 108mm
2.22 kg
Band
En glis h
EN
27
Page 30

6 Troubleshooting
Warning
Never remove the casing of this apparatus. •
To keep the warranty valid, never try to repair the system yourself.
If you encounter problems when using this apparatus, check the
following points before requesting service. If the problem remains
unsolved, go to the Philips web site (www.philips.com/welcome).
When you contact Philips, ensure that the apparatus is nearby and
the model number and serial number are available.
No power
Ensure that the AC power plug of the unit is connected
•
properly.
Ensure that there is power at the AC outlet.
•
No sound
Adjust the volume.
•
No response from the unit
Disconnect and reconnect the AC power plug, then turn on
•
the unit again.
About Bluetooth device
Music playback is unavailable on the system even after successful
Bluetooth connection.
The device cannot be used with the system to play music.
•
The audio quality is poor after connection with a Bluetoothenabled device.
28
EN
Page 31

The Bluetooth reception is poor. Move the device closer to
•
the system or remove any obstacle between the device and
the system.
Cannot connect with the system.
Thedevicedoesnotsuppor ttheprolesrequiredforthe
•
system.
The Bluetooth function of the device is not enabled. Refer to
•
the user manual of the device for how to enable the function.
The system is not in the pairing mode.
•
The system is already connected with another Bluetooth-
•
enabled device. Disconnect that device or all other connected
devices and then try again.
The paired device connects and disconnects constantly.
The Bluetooth reception is poor. Move the device closer to
•
the system or remove any obstacle between the device and
the system.
For some devices, the Bluetooth connection may be
•
deactivated automatically as a power-saving feature. This does
not indicate any malfunction of the system.
En glis h
EN
29
Page 32

30
 Loading...