

Page 1
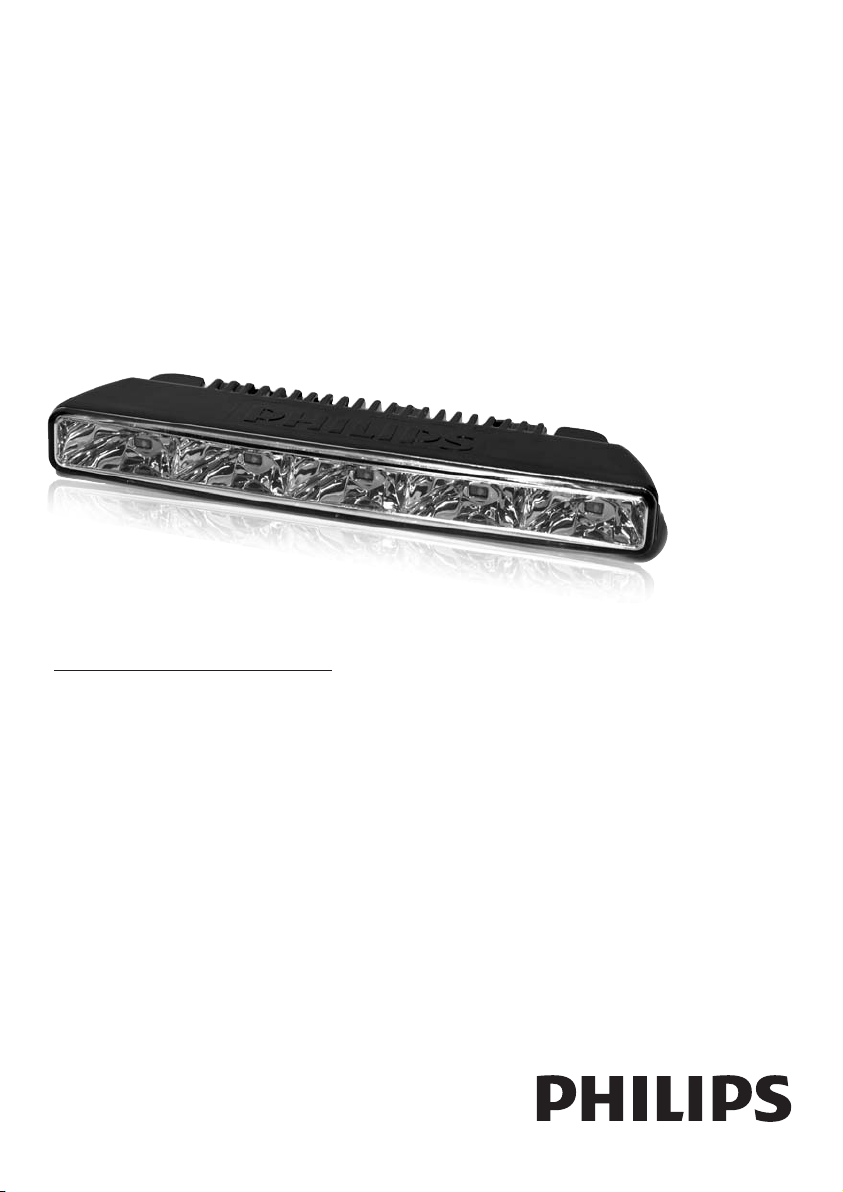
LED Daytime lights
www.philips.com/support
DRL STRIP WLED 12V Click1
EN Daytime Running Lights (DRL)
DE Spezielle Tagfahrlichter (DRL)
FR Feux dédiés diurnes (DRL)
NL Speciale motorvoertuigverlichting overdag (MVO)
ES Faros especiales de conducción diurna (DRL)
IT Fanali di marcia diurna dedicati (DRL)
PT Luzes dedicadas diurnas (DRL)
RU Фары дневного света
PL Specjalne dzienne światła pozycyjne (DRL)
Page 2
2
1 EN Important
Thank you for buying the Philips LED Daytime
lights.
Take time to read the LED Daytime lights
installation guide before you install
the LED Daytime lights on your car.
The Philips guarantee applies provided
the product is handled properly for its intended
use, in accordance with its operating instructions
and upon presentation of the original invoice,
indicating the date of purchase, dealer’s name
and model and production number
of the product.
For your reference, we recommend that the
Philips LED Daytime lights installation guide
is carried with your vehicle documentation
at all times.
The LED Daytime lights are tested
and approved according to the daytime
running lights regulation ECE R87.
E4 00013 by KEMA BV Netherlands
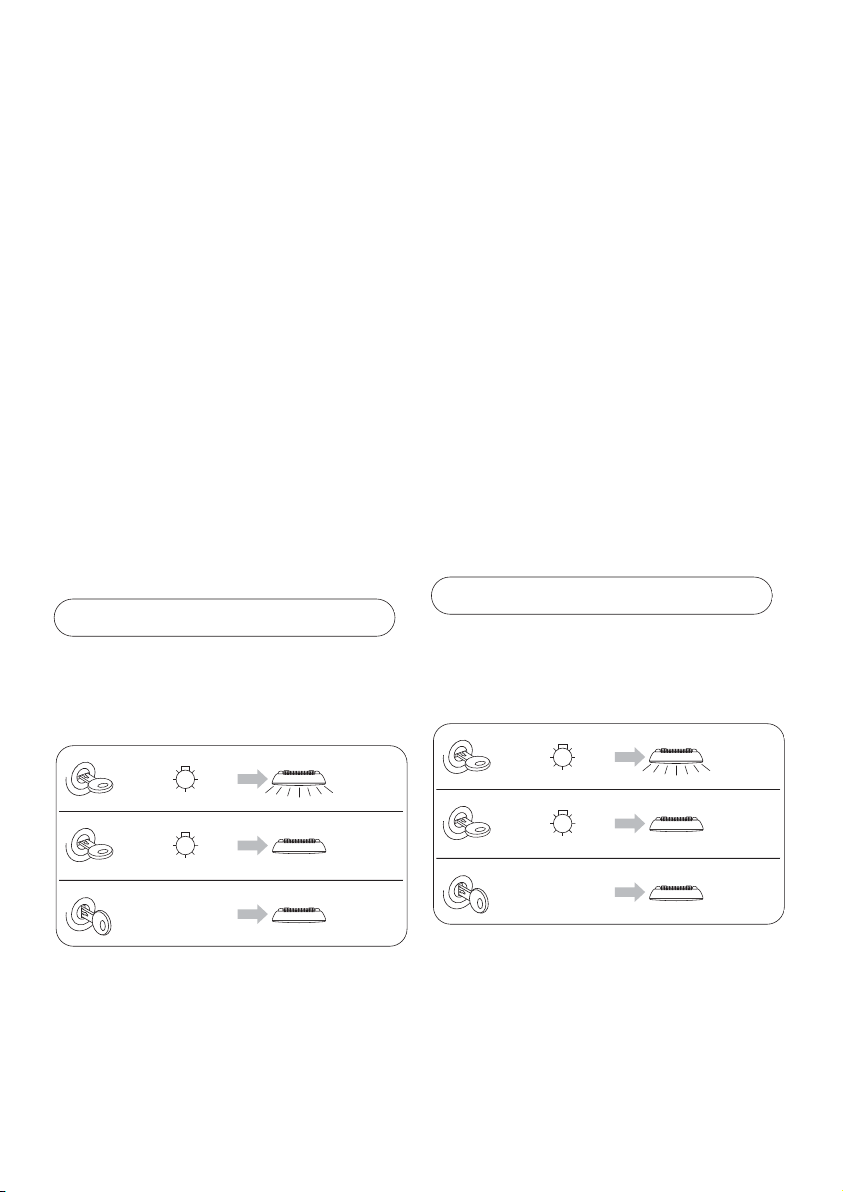
The Philips LED Daytime lights
switch on and off automatically.
ON
OF
F
AUTO ON
OFF
AUTO OFF
AUTO OFF
ON
ON
OF
F
ON
+
OFF
+
ON
ON
OF
F
1 DE Wichtig
Wir beglückwünschen Sie zum Kauf der Philips
LED Daytime Lampen.
Lesen Sie sich erst die Montageanleitung durch,
bevor Sie die LED Daytime Lampen in Ihr Auto
einbauen.
Die Philips Garantie gilt gegen Vorlage
des Originalkaufbelegs versehen mit dem
Anschaffungsdatum, Händlernamen,Modell
und der Herstellnummer des Produkts,
vorausgesetzt, das Produkt wird für
die vorgesehene Verwendung gemäß
der Betriebsanleitung richtig benutzt.
Wir empfehlen Ihnen, stets die Montageanleitung für die LED Daytime Lampen in
Ihren Fahrzeugunterlagen mit sich zu führen.
Die LED Daytime Lampen wurden gemäß
der ECE-Regelung R87 über spezielle
Tagfahrlichter getestet und zugelassen.
E4 00013 von KEMA BV Netherlands
Die Philips LED Daytime Lampen
schalten sich automatisch ein und aus.
ON
OF
F
AUTO ON
OFF
AUTO OFF
AUTO OFF
ON
ON
OF
F
ON
+
OFF
+
ON
ON
OF
F
Page 3
3
ENGLISH • DEUTSCH • FRANÇAIS
EN Important usage precautions
DE Wichtige Bedienungshinweise
FR Précautions d’usage importantes
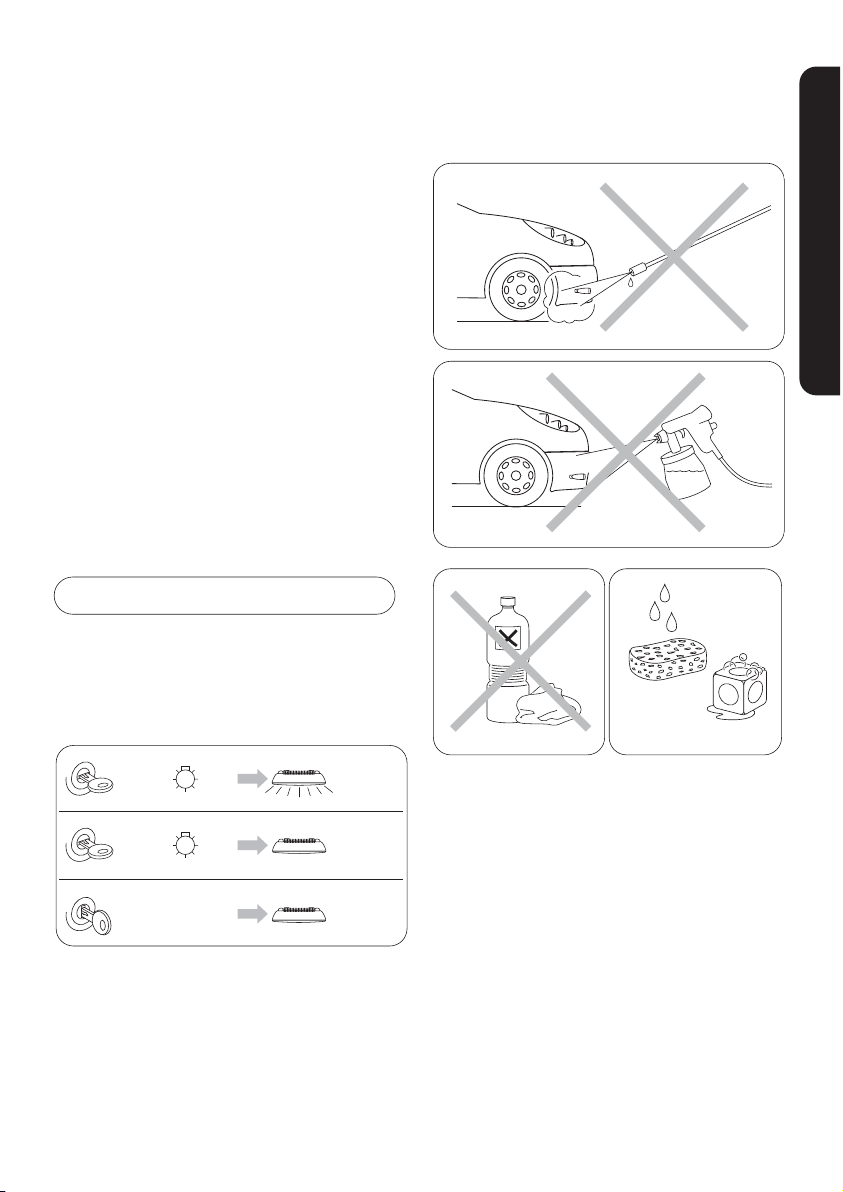
EN • Refer also to the cautions in the text.
• Take the packaging to your local recycling
center.
DE • Bitte beachten Sie die u.g.
Warnhinweise.
• Bitte entsorgen Sie die Verpackung
fachgerecht.
FR • Reportez-vous également aux notes
Attention dans le texte.
• Jetez l’emballage dans un conteneur
de recyclage.
1 FR Impor tant
Merci d’avoir choisi les lampes Philips LED
Daytime.
Prenez le temps de lire ce guide avant d’installer
ces lampes sur votre voiture.
La garantie Philips est applicable si le produit
est utilisé selon les instructions et aux fins
indiquées. Les demandes de garantie sont
uniquement acceptées sur présentation du titre
d’achat d’origine portant mention de la date
d’acquisition, du nom du vendeur, du modèle
et de la référence du produit.
Nous vous recommandons de garder
en permanence ce guide d’installation
dans votre véhicule afin de pouvoir vous
y reporter facilement en cas de besoin.
Les lampes LED Daytime sont testées
et homologuées selon la réglementation
ECE R87 sur les feux diurnes.
E4 00013 par KEMA BV Netherlands
Les lampes Philips LED Daytime
s’allument et s’éteignent
automatiquement.
ON
OF
F
AUTO ON
OFF
AUTO OFF
AUTO OFF
ON
ON
OF
F
ON
+
OFF
+
ON
ON
OF
F
Page 4
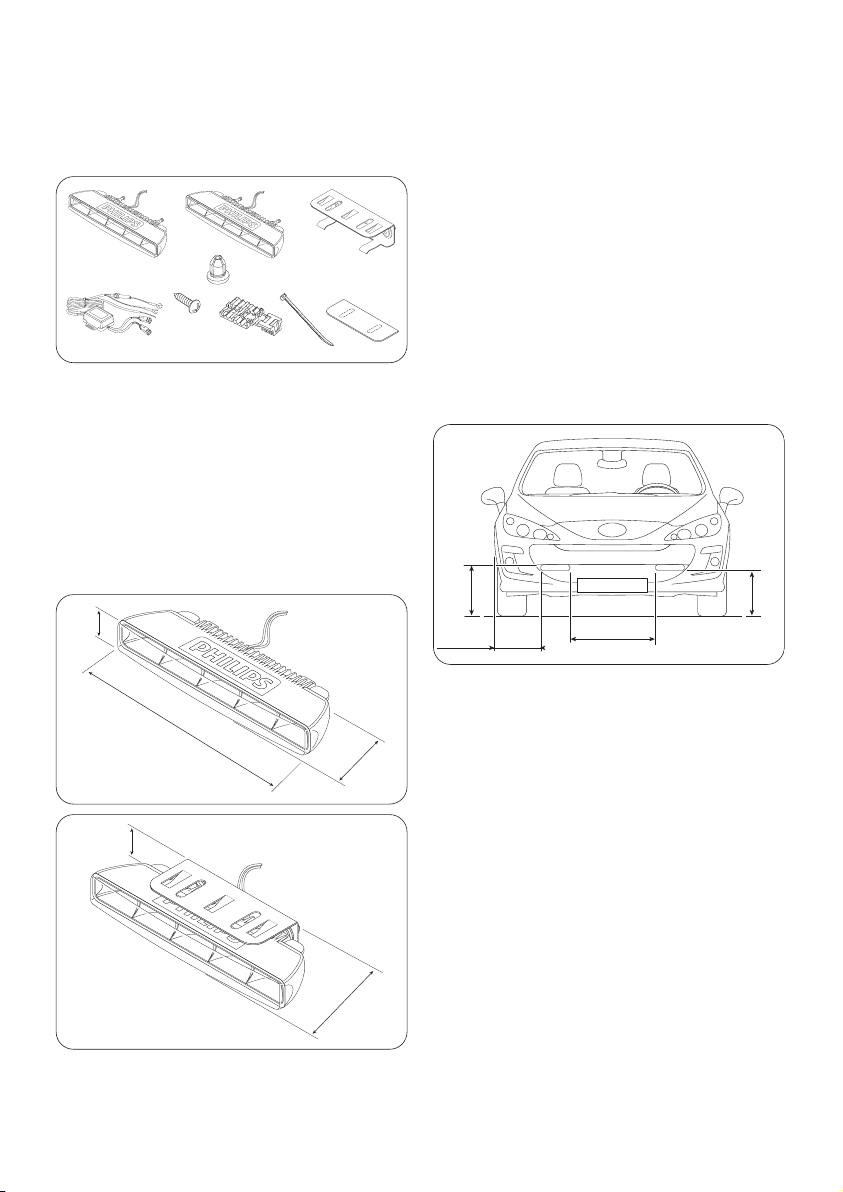
2 EN Content of the kit
DE Set-Inhalt
FR Contenu du kit
3 EN Philips LED Daytime light
dimensions
DE Philips LED Daytime
Lampen Abmessungen
FR Dimensions des lampes
Philips LED Daytime
66 mm
26 mm
181 mm
51 mm
25 mm
2 m 3 m
1x
1x 1x
10x
2x
4x
2x
1x
2x
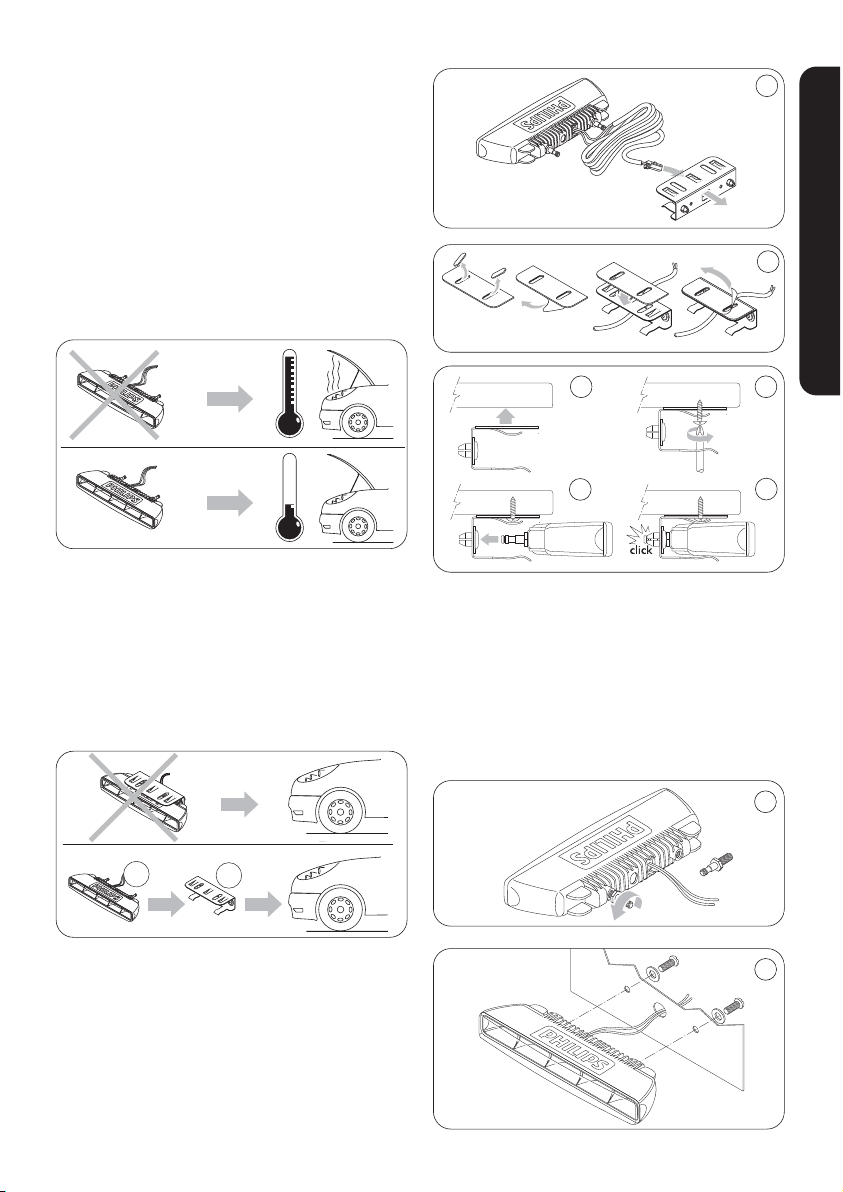
4 EN Where to install Philips
LED Daytime lights
DE Einbauort der Philips LED
Daytime Lampen
FR Où installer les lampes
Philips LED Daytime
EN Legal installation position
ECE regulation 48
DE Zulässige Einbauposition
ECE-Regelung 48
FR Emplacement conforme
à la réglementation ECE 48
EN Make sure that the position of the
LED Daytime lights is conform
to the diagram above.
DE Die Philips LED Daytime Lampen
müssen wie im Schaubild oben
positioniert werden.
FR Veillez à positionner les lampes
LED Daytime conformément au
schéma ci-dessus.
min
250 mm
min 600 mm
max
1500 mm
max
400 mm
4
Page 5
5
EN How to install Philips LED Daytime
lights without clip-on brackets
DE Einbauen der LED Daytime Lampen
ohne Clip-on-Halterung
FR Comment installer les lampes
Philips LED Daytime sans
les étriers de fixation
5 EN How to install Philips
LED Daytime lights
DE Einbauen der Philips
LED Daytime Lampen
FR Comment installer les
lampes Philips LED Daytime
EN Caution
DE Warnhinweis
FR Attention
EN How to install Philips LED Daytime
lights using clip-on brackets
DE Einbauen der Philips LED Daytime
Lampen mit Clip-on-Halterung
FR Comment installer les lampes
Philips LED Daytime avec
les étriers de fixation
EN Insert LED Daytime light module into
the bracket only after it is mounted
on the car!
DE Das LED-Tagfahrlichtermodul erst in
die Halterung einsetzen, nachdem die
Halterung am Auto angebracht wurde!
FR Fixez l’étrier sur le véhicule avant
d’insérer le module LED Daytime!
1
2
°C
°C
3
2
1
4
5
6
1
2
M5
M5
ENGLISH • DEUTSCH • FRANÇAIS
Page 6
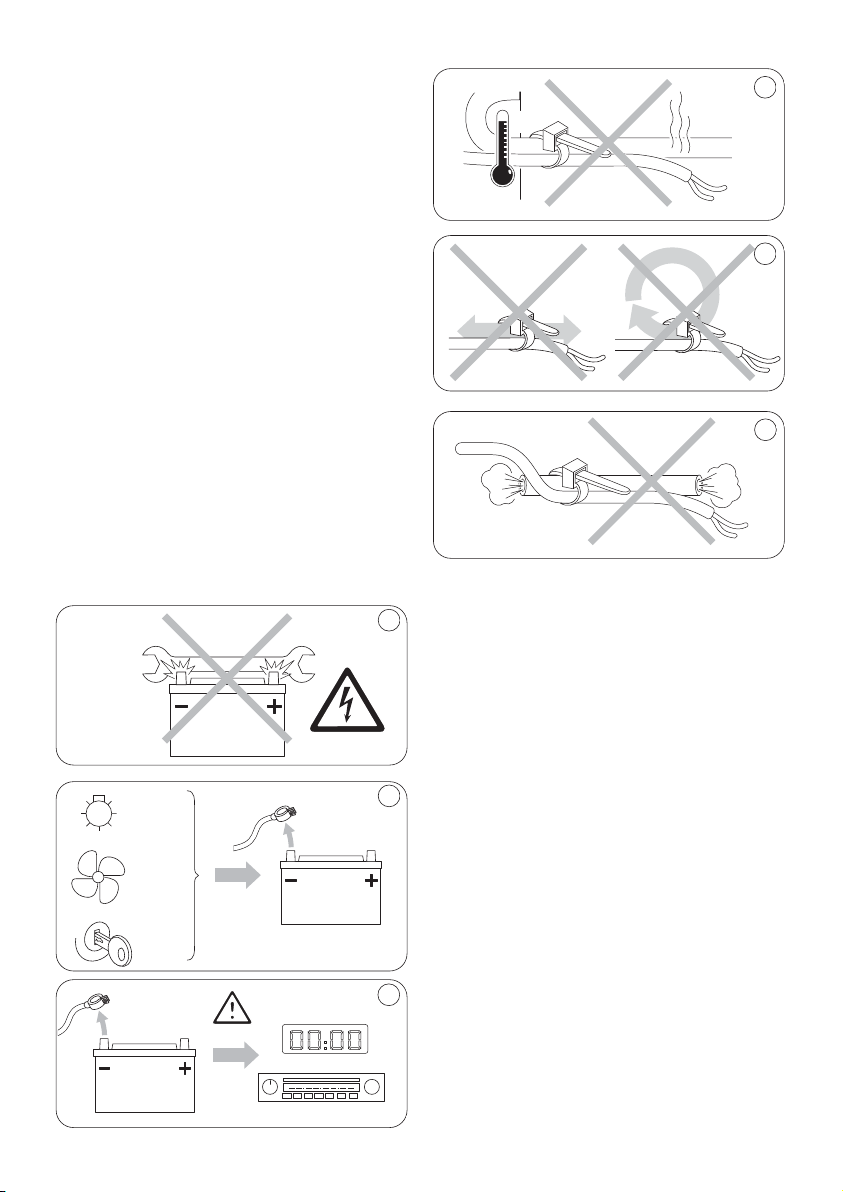
6 EN How to connect Philips
LED Daytime lights
DE Anschließen der Philips
LED Daytime Lampen
FR Comment brancher les
lampes Philips LED Daytime
EN Caution
Before connecting Philips LED Daytime light
to your car battery,make sure you understand
the following important wiring precautions:
DE Warnhinweis
Bevor Sie die Philips LED Daytime Lampen
an Ihre Batterie anschließen, müssen Sie
die folgenden wichtigen Vorsichtsmassnahmen
für das Anschließen beachten:
FR Attention
Avant de brancher les lampes Philips LED
Daytime sur la batterie de votre voiture,
respectez bien les précautions suivantes :
OFF
OFF
OFF
EN Important
Do not modify the lamp harness.
This could result in overheating or in a short
circuit and cause fire in the vehicle.
Philips assumes no liability for defects
resulting from modification of the lamp
harness.
DE Achtung
Ändern Sie den Lichtkabelbaum nicht ab.
Dies könnte zur Überhitzung oder zu einem
Kurzschluss führen und einen Brand im Fahrzeug
entfachen.
Philips haftet nicht für Defekte aus
geändertem Leuchtenkabelbaum.
FR Important
Ne modifiez pas le faisceau de la lampe.
Cela pourrait entraîner une surchauffe ou un
court circuit déclenchant un feu dans le véhicule.
Philips décline toute responsabilité en cas
de défaut résultant de la modification
du faisceau de la lampe.
°C
6
5
4
3
2
1
6
Page 7

7
EN Wiring instructions
Please proceed with the wiring installation of the LED Daytime lights according
to the numbered sequence below:
DE Verdrahtungsanweisungen
Bitte nehmen Sie die Verdrahtung der LED Daytime Lampen vor wie im nummerierten
Ablauf unten beschrieben:
FR Instructions de câblage
Suivez le schéma de câblage ci-dessous en respectant l’ordre indiqué :
ENGLISH • DEUTSCH • FRANÇAIS
Black
Starter
One touch connector
Orange
3m
2m
Red
Parking light
2
1
7
3
4
5
6
Battery
click
One touch
connector
1
2
3
5
EN
Black
Red
Orange
Battery
Starter
One-touch
connector
Parking light
DE
Schwarz
Rot
Orange
Batterie
Starter
Steckbarer
Anschluss
Parkleuchte
FR
Noir
Rouge
Orange
Batterie
Démarreur
Connecteur
à pression
Feu de position
Page 8

8
1 NL Belangrijk
Bedankt voor uw keuze voor deze Philips
LED Daytime lampen.
Neem de tijd om de montagehandleiding
te lezen voordat u de LED Daytime lampen
in uw auto monteert.
De garantie van Philips geldt alleen als het
product goed wordt gehanteerd voor
het bestemde gebruik en conform
de gebruiksaanwijzing, op vertoon
van de originele rekening voorzien
van aankoopdatum, winkelnaam en type
en productienummer van het product.
Wij raden u aan de handleiding van de Philips
LED Daytime lampen permanent te bewaren
bij uw autodocumentatie.
De LED Daytime lampen zijn getest
en goedgekeurd conform het
ECE-reglement 87 inzake
motorvoertuigverlichting overdag.
E4 00013 door KEMA BV Nederland
De Philips LED Daytime lampen gaan
automatisch aan en uit.
ON
OF
F
AUTO ON
OFF
AUTO OFF
AUTO OFF
ON
ON
OF
F
ON
+
OFF
+
ON
ON
OF
F
1 ES Importante
Gracias por comprar las lámparas Philips
LED Daytime.
No se olvide de leer la guía de instalación
de las LED Daytime antes de instalarlas
en su vehículo.
La garantía de Philips se aplica si el producto
se ha manipulado correctamente y para el uso
previsto, según las instrucciones
de funcionamiento, y tras presentación
de la factura original, indicando fecha de
compra, nombre del vendedor, y modelo
y número de producción del producto.
Por si necesita consultarla, le recomendamos
llevar siempre, junto a la documentación
de su vehículo, la guía de instalación de las LED
Philips Daytime.
Las LED Daytime se someten a prueba
y aprueban conforme a la normativa ECE
R87 sobre faros de conducción diurna.
E4 00013 KEMA BV, en los Países Bajos
Las LED Philips Daytime se apagan
y encienden automáticamente.
ON
OF
F
AUTO ON
OFF
AUTO OFF
AUTO OFF
ON
ON
OF
F
ON
+
OFF
+
ON
ON
OF
F
Page 9

9
NEDERLANDS • ESPANOL • ITALIANO
NL Belangrijke voorzorgs-
maatregelen
ES ¡Importante!: precauciones de uso
IT Precauzioni importanti per l’uso
NL • Zie ook de waarschuwingen in de tekst.
• Voer de verpakking correct af voor
recycling.
ES • Vea también las precauciones
en el texto.
• Lleve el embalaje al contenedor
de reciclado.
IT • Consultare la sezione Attenzione
nel testo.
• Smaltire il packaging nel centro
di riciclaggio locale.
1 IT Importante
Si ringrazia per l’acquisto delle lampade
Philips LED Daytime.
Leggere attentamente la guida prima
di procedere all’installazione delle lampade
LED Daytime sul veicolo.
La garanzia Philips è valida a condizione
che il prodotto venga manipolato
correttamente, secondo l’uso previsto,
e su presentazione della fattura originale
con data di acquisto, nome del rivenditore
e numero del modello e di produzione
del prodotto.
Conservare la guida d’installazione delle
lampade Philips LED Daytime insieme alla
documentazione del veicolo per qualsiasi
consultazione.
Le lampade LED Daytime sono testate
e approvate secondo la regolamentazione
vigente ECE R87.
E4 00013 di KEMA BV Netherlands
Le lampade Philips LED Daytime
si accendono e spengono
automaticamente.
ON
OF
F
AUTO ON
OFF
AUTO OFF
AUTO OFF
ON
ON
OF
F
ON
+
OFF
+
ON
ON
OF
F
Page 10

2 NL Inhoud van de set
ES Contenido del kit
IT Contenuto del kit
3 NL Philips LED Daytime
lampen afmetingen
ES Philips LED Daytime
dimensiones
IT Lampade Philips
LED Daytime dimensioni
66 mm
26 mm
181 mm
51 mm
25 mm
2 m 3 m
1x
1x 1x
10x
2x
4x
2x
1x
2x
4 NL Plaatsing van de Philips
LED Daytime lampen
ES Dónde instalar las Philips
LED Daytime
IT Dove installare le lampade
Philips LED Daytime
NL Toegestane montagepositie
ECE-reglement 48
ES Emplazamiento legal
de instalación ECE normativa 48
IT Posizione d’installazione legale
Regolamento ECE 48
NL De positie van de LED Daytime lampen
moet voldoen aan de bovenstaande
tekening.
ES Asegúrese de que las LED Daytime
se adecúan al diagrama de arriba.
IT Accertarsi che la posizione delle
lampade LED Daytime corrisponda
alla figura sopra riportata.
min
250 mm
min 600 mm
max
1500 mm
max
400 mm
10
Page 11

11
NL Montage van de Philips LED Daytime
lampen zonder de bevestigingsclip
ES Cómo instalar las Philips LED Daytime
sin anillas de sujeción
IT Come installare le lampade Philips
LED Daytime senza supporti a clip
5 NL Montage van de Philips
LED Daytime lampen
ES Cómo instalar las Philips
LED Daytime
IT Come installare le lampade
Philips LED Daytime
NL Waarschuwing
ES Precaución
IT Attenzione
NL Montage van de Philips LED Daytime
lampen met de bevestigingsclip
ES Cómo instalar las Philips LED Daytime
mediante las anillas de sujeción
IT Come installare le lampade Philips
LED Daytime usando supporti a clip
NL Schuif de LED daglichtlampen niet
in de clip voordat deze in uw auto
is gemonteerd!
ES ¡Insertar el modulo de LED diurno
en la anilla solo tras su montaje
en el vehículo!
IT Inserire il modulo della lampada
LED Daytime nel supporto dopo
averlo montato sul veicolo!
1
2
°C
°C
3
2
1
4
5
6
1
2
M5
M5
NEDERLANDS • ESPANOL • ITALIANO
Page 12

5 NL Aansluiting van de Philips
LED Daytime lampen
ES Cómo conectar las
Philips LED Daytime
IT Come collegare le lampade
Philips LED Daytime
NL Waarschuwing
Voordat u de Philips LED Daytime lampen
aansluit op uw autoaccu, moet u de
onderstaande waarschuwingen goed
hebben begrepen:
ES Precaución
Antes de conectar las Philips LED Daytime
con la batería de su vehículo, no se olvide
de seguir cuidadosamente las siguientes
precauciones de cableado:
IT Attenzione
Prima di collegare le lampade Philips LED
Daytime alla batteria, accertarsi di aver
compreso le precauzioni elettriche di seguito:
OFF
OFF
OFF
NL Belangrijk
Wijzig de lamphouder niet. Dit kan leiden
tot oververhitting of kortsluiting en kan brand
in de auto veroorzaken.
Philips is niet aansprakelijk voor schade
die voortvloeit uit een wijziging van
de lamphouder.
ES Importante
No modifique el arnés del faro. Podría dar
lugar a sobrecalentamiento o cortocircuito
y provocar un incendio en el vehículo.
Philips no asume responsabilidad alguna
en caso de modificación del arnés de
la lámpara.
IT Importante
Non modificare i cavi della lampada.
Rischio di surriscaldamento o corto circuito
con possibile incendio del veicolo.
Philips declina ogni responsabilità per
i difetti causati dalla modifica dei cavi
della lampada.
°C
6
5
4
3
2
1
12
Page 13

13
NL Aansluitingen
Sluit de LED Daytime lampen aan zoals hieronder beschreven
in de met nummers aangegeven volgorde:
ES Instrucciones de cableado
Proceda con la instalación de cableado de las LED Daytime, según
la secuencia numerada de abajo:
IT Istruzioni di cablaggio
Procedere con l’installazione dei cavi delle lampade LED Daytime
secondo la sequenza numerata sotto:
Black
Starter
One touch connector
Orange
3m
2m
Red
Parking light
2
1
7
3
4
5
6
Battery
click
One touch
connector
1
2
3
5
EN
Black
Red
Orange
Battery
Starter
One-touch
connector
Parking light
NL
Zwart
Rood
Oranje
Accu
Starter
Klem-
connector
Parkeerlicht
ES
Negro
Rojo
Naranja
Batería
Estárter
Conector
a presión
Luces de
posición
IT
Nero
Rosso
Arancione
Batteria
Starter
Connettore
a pressione
Luci di
stazionamento
NEDERLANDS • ESPANOL • ITALIANO
Page 14

1 PT Importante
Obrigado por escolher as lâmpadas Philips
LED Daytime.
Reserve um tempo para ler este guia antes
de instalar estas lâmpadas no seu veículo.
A garantia Philips é válida se o produto
for utilizado de modo adequado e para os fins
indicados. Os pedidos de garantia só são aceites
mediante apresentação da fatura original
indicando a data da compra, o nome
do vendedor, o modelo e a referência
do produto.
Recomendamos que guarde juntamente
com a documentação do seu veículo este guia
de instalação Philips LED Daytime para poder
consultá-lo em caso de necessidade.
As lâmpadas LED Daytime são testadas
e homologadas de acordo com a
regulamentação ECE R87 respeitantes
às luzes diurnas.
E4 00013 por KEMA BV Países Baixos
As lâmpadas Philips LED Daytime
acendem e apagam automaticamente.
ON
OF
F
AUTO ON
OFF
AUTO OFF
AUTO OFF
ON
ON
OF
F
ON
+
OFF
+
ON
ON
OF
F
1 RU Это важно
Благодарим Вас за покупку светодиодных
ламп дневного света Philips LED Daytime.
Прежде чем ставить светодиодные лампы
дневного света на свою машину, внимательно
прочтите руководство по установке этих
изделий.
Гарантия Philips действительна при условии
правильного обращения с изделием,
применения его по назначению в
соответствии с инструкциями по
эксплуатации и представления подлинника
счета с указанием даты покупки,
наименования дилера, модели и заводского
номера изделия.
Мы рекомендуем Вам для справок всегда
держать руководство по установке
светодиодных ламп дневного света Philips
LED Daytime вместе с документацией
на машину.
Светодиодные лампы дневного света
Philips LED Daytime испытаны и
разрешены по нормативам ECE R87
для фар дневного света.
E4 00013 выдано KEMA BV Netherlands
Светодиодные лампы дневного
света Philips LED Daytime
включаются и выключаются
автоматически.
ON
OF
F
AUTO ON
OFF
AUTO OFF
AUTO OFF
ON
ON
OF
F
ON
+
OFF
+
ON
ON
OF
F
14
Page 15

15
PT Acendem e apagam
automaticamente
RU Важные меры предосторожности
при пользовании
PL Ważne środki ostrożności
PT • Referir-se também aos parágrafos
Atenção no texto.
• Depositar a embalagem usada num dos
coletores de reciclagem.
RU • См. также меры предосторожности
в тексте.
• Отправьте упаковку в местный центр
переработки.
PL • Patrz też ostrzeżenia w tekście.
• Zanieś opakowanie do miejscowego
punktu recyklingu.
1 PL Ważne
Dziękujemy za zakup świateł dziennych Philips
LED Daytime.
Przed zamontowaniem w samochodzie świateł
dziennych LED Daytime prosimy przeczytać
instrukcję instalacji.
Produkt objęty jest gwarancją firmy Philips,
pod warunkiem, że jest on wykorzystywany
zgodnie z przeznaczeniem i według zaleceń
instrukcji obsługi oraz po okazaniu oryginału
faktury, na której muszą być podane data
zakupu, nazwa dealera i model oraz numer
produktu.
Zaleca się, aby instrukcję instalacji świateł
dziennych Philips LED Daytime zawsze nosić
razem z dokumentami pojazdu.
Wiatła dzienne Philips LED Daytime
zostały przetestowane i zatwierdzone
zgodnie z rozporządzeniem ECE R87
w sprawie dziennych świateł pozycyjnych.
E4 00013 firmy KEMA BV, Holandia
Świat a dzienne Philips LED Daytime
w ączaj si i wy ączają automatycznie.
ON
OF
F
AUTO ON
OFF
AUTO OFF
AUTO OFF
ON
ON
OF
F
ON
+
OFF
+
ON
ON
OF
F
PORTUGUÊS • РУССКИЙ • POLSKI
Page 16

2 PT Conteúdo do kit
RU Состав комплекта
PL Zawartość zestawu
3 PT Lâmpada Philips LED
Daytime dimensões
RU Размеры светодиодных
ламп дневного света
Philips LED Daytime
PL Wymiary świateł dziennych
Philips LED Daytime
66 mm
26 mm
181 mm
51 mm
25 mm
2 m 3 m
1x
1x 1x
10x
2x
4x
2x
1x
2x
4 PT Onde instalar as lâmpadas
Philips LED Daytime
RU Где устанавливаются
лампы дневного света
Philips LED Daytime
PL Gdzie zamontować
światła dzienne
Philips LED Daytime
PT Posição de instalação em
conformidade com a ECE 48
RU Регламентированное место
установкипо нормативам ECE 48
PL Miejsce montażu zgodne
z przepisami rozporządzenia
ECE nr 48
PT Cuidado para posicionar as lâmpadas
LED Daytime segundo o esquema
acima indicado.
RU Убедитесь, что местоположение
ламп дневного света LED Daytime
соответствует схеме (см. выше).
PL Upewnij się, że położenie świateł
dziennych LED Daytime odpowiada
powyższemu schematowi.
min
250 mm
min 600 mm
max
1500 mm
max
400 mm
16
Page 17

17
PT Como instalar as lâmpadas Philips
LED Daytime sem as placas de encaixe
RU Как устанавливать лампы дневного
света Philips LED Daytime,
не применяя навесного держателя
PL Montaż świateł dziennych Philips
LED Daytime bez wsporników
zatrzaskowych
5 PT Como instalar as lâmpadas
Philips LED Daytime
RU Как устанавливаются лампы
дневного света Philips
PL Jak zamontować światła
dzienne Philips LED Daytime
PT Atenção
RU Меры предосторожности
PL Ostrzeżenie
PT Como instalar as lâmpadas Philips
LED Daytime com as placas de encaixe
RU Как устанавливать лампы дневного
света Philips LED Daytime, применяя
навесной держатель
PL Montaż świateł dziennych Philips LED
z użyciem wsporników zatrzaskowych
PT Inserir o módulo LED Daytime na placa
só depois de tê-la montado no veículo!
RU Вставлять светодиодный модуль
лампы только в держатель,
уже закрепленный на машине!
PL Moduł świateł dziennych LED Daytime
należy włożyć do wspornika dopiero
po zamontowaniu wspornika
w samochodzie!
1
2
°C
°C
3
2
1
4
5
6
1
2
M5
M5
PORTUGUÊS • РУССКИЙ • POLSKI
Page 18

5 PT Como conectar as lâmpadas
Philips LED Daytime
RU Как подключать лампы
дневного света Philips LED
PL Jak podłączyć światła dzienne
Philips LED Daytime
PT Atenção
Antes de conectar as lâmpadas Philips LED
Daytime na bateria do seu carro, verifique se
compreendeu bem as seguintes precauções de
cablagem:
RU Мера предосторожности
Перед подключением светодиодных ламп
дневного света Philips LED Daytime к батарее
автомобиля убедитесь, что Вам понятны
следующие важные меры предосторожности
по части электросхемы:
PL Ostrzeżenie
Przed podłączeniem do akumulatora świateł
dziennych Philips LED Daytime, musisz
koniecznie zrozumieć następujące zalecenia
dotyczące okablowania:
OFF
OFF
OFF
PT Importante
Não modifique os feixes da lâmpada.
Isto acarretaria o sobreaquecimento
ou o curto-circuito, causando incêndio.
Philips não é responsável pela falha
causada pela modificação do feixe da
lâmpada.
RU Это важно
Не меняйте устройства проводов лампы.
Это может привести к перегреву или
короткому замыканию и вызвать пожар
в машине.
Philips не несет ответственности
за неисправности, возникшие из-за
изменения устройства проводов лампы.
PL Ważne
Nie przerabiać wiązki lampy.
Może to doprowadzić do przegrzania lub zwarcia
i spowodować pożar samochodu.
Firma Philips nie ponosi odpowiedzialności
za usterki wynikłe wskutek przeróbki
wiązki lampy.
°C
6
5
4
3
2
1
18
Page 19

19
PT Instruções de cablagem
Siga o esquema de cablagem das lâmpadas Philips LED Daytime ao respeitar a ordem indicada:
RU Инструкции по схеме электропроводки
Монтаж схемы электропроводки светодиодных ламп дневного света Philips LED Daytime
выполнять в последовательности, обозначенной цифрами (см. ниже):
PL Instrukcja okablowania
Przewody dziennych świateł Philips LED Daytime należy podłączyć w następującej kolejności:
PORTUGUÊS • РУССКИЙ • POLSKI
Black
Starter
One touch connector
Orange
3m
2m
Red
Parking light
2
1
7
3
4
5
6
Battery
click
One touch
connector
1
2
3
5
EN
Black
Red
Orange
Battery
Starter
One-touch
connector
Parking light
PT
Preto
Vermelho
Laranja
Bateria
Arrancador
Conector
de pressão
Luz de
presença
RU
Черный
Красный
Оранжевый
Батарея
Стартер
Вставной
соединитель
Стояночный
фонарь
PL
Czarny
Czerwony
Pomarańczowy
Akumulator
Starter
Złączka typu
one-touch
Światła
postojowe
Page 20

www.philips.com/automotive
©2009 Koninklijke Philips Electronics N.V.
All rights reserved.
created by hss france - 05.2009 - printed in France
 Loading...