

Philips DayLight 4
www.philips.com/support
DRL STRIP 2.4 Click2
EN LED Daytime Running Lights (DRL)
DE LED Tagfahrlicht-Set
FR Feux diurnes à LED
NL LED Dagverlichting
ES Faros LED especiales de conducción diurna
IT LED per Luci di marcia diurna
PT Luzes dedicadas diurnas LED
RU Светодиодные (LED) фары дневного света
PL Specjalne dzienne światła pozycyjne LED
SV LED varselljus
NO LED-kjørelysmoduler
DA Specielt LED-kørelys til dagtimerne
SU LED päivä-ajovalot
www.led-drl.co.uk/
1
EN
1 Important
Thank you for buying Philips
LED DayLight 4, the daytime
running light modules that will
make your driving experience
a safe and comfortable one.
Philips Original Equipment
Quality lighting products offer
the excellence, reliability, and
power you need.
The Philips guarantee
applies provided that the
product is handled properly for
its intended use, in accordance
with its operating instructions
and upon presentation of the
original invoice, indicating the
date of purchase, dealer’s name
and model and production
number of the product.
몇 Take time to read the
Philips LED DayLight 4
installation guide before
you install Philips LED
DayLight 4 on your car.
We recommend, that you carry
the Philips LED DayLight 4
installation guide for reference
with your vehicle
documentation at all times.
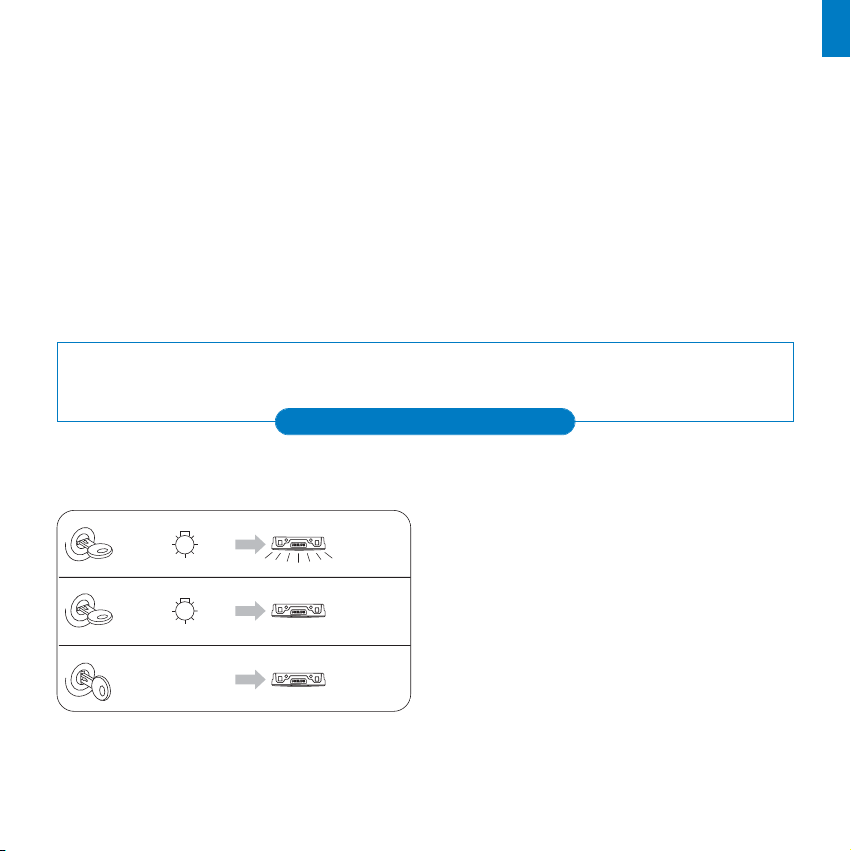
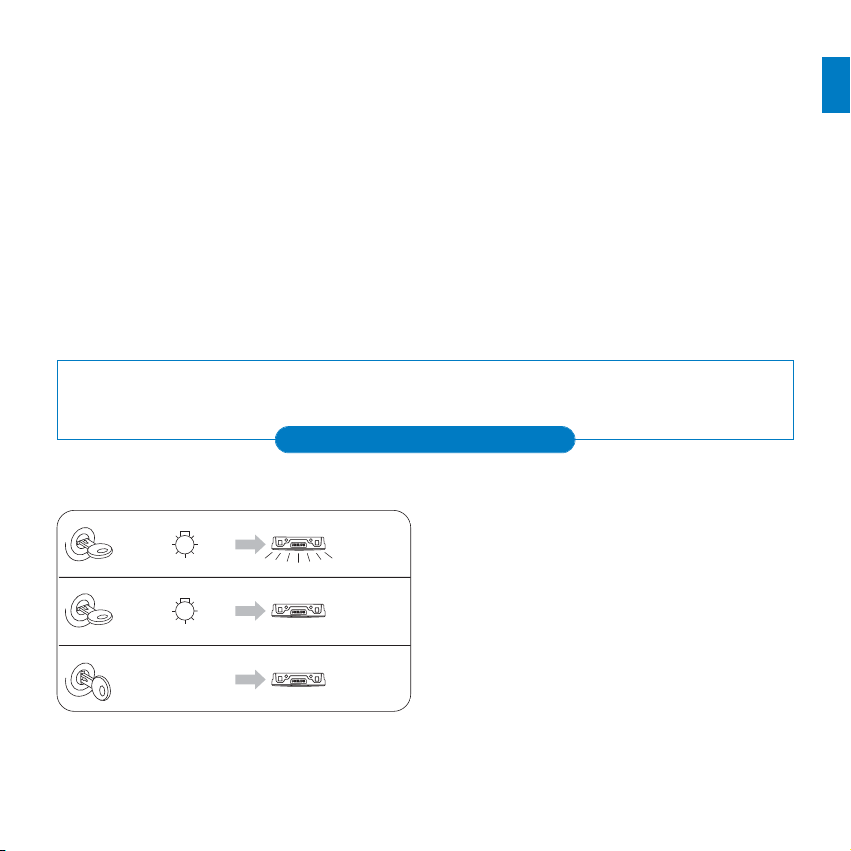
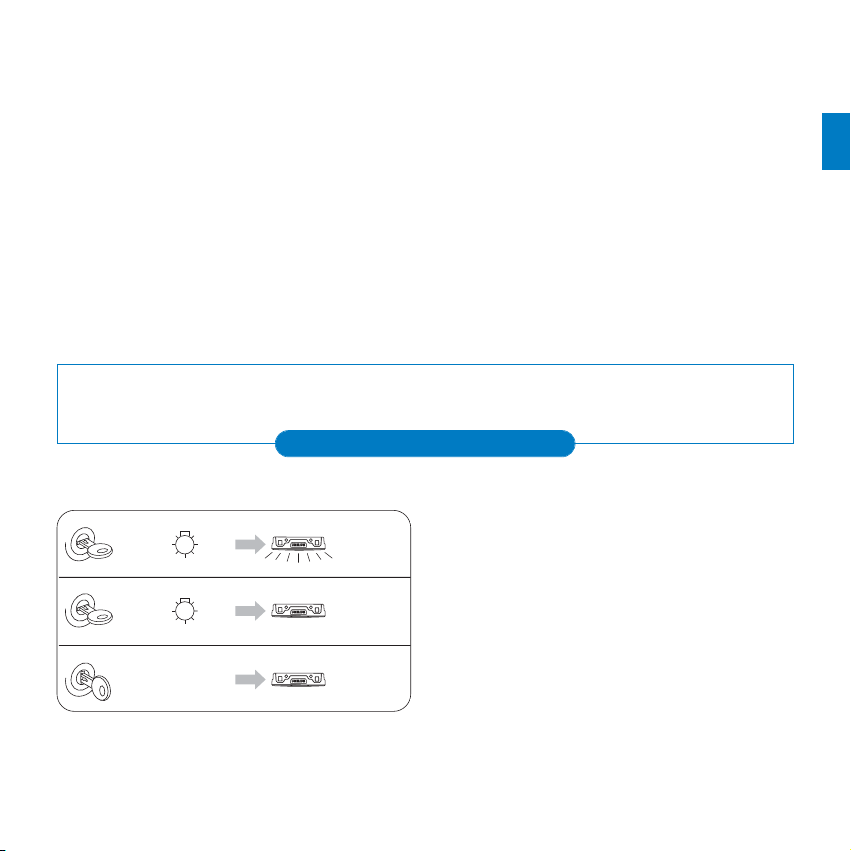
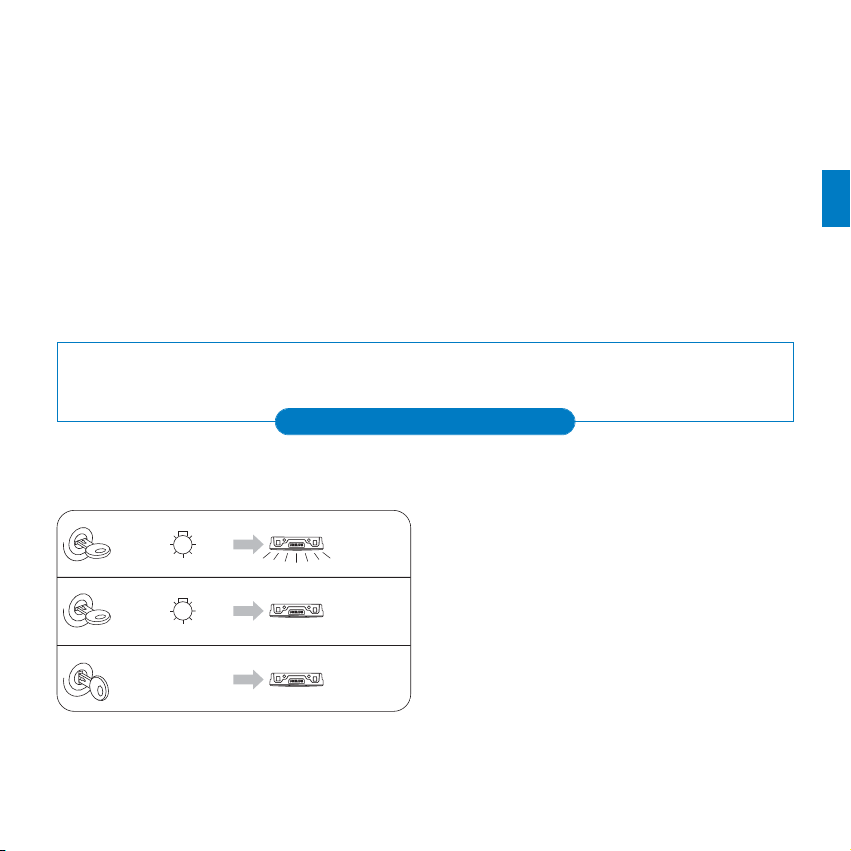
몇 The Philips LED DayLight 4 switches on / off automatically.
ON
OF
F
AUTO ON
OFF
AUTO OFF
AUTO OFF
ON
ON
OF
F
ON
+
OFF
+
ON
ON
OF
F
Important If your car is equipped with
an automatic low-beam switch-on function,
you must disable it. If necessary, consult
a professional.
몇 Philips LED DayLight 4 modules have been tested and approved according to
the daytime running lights regulation ECE R87.
E4-87R-00 0046 by KEMA BV Netherlands

2
2 m
3 m
1x
4x
1x
1x
10x
1x
2x
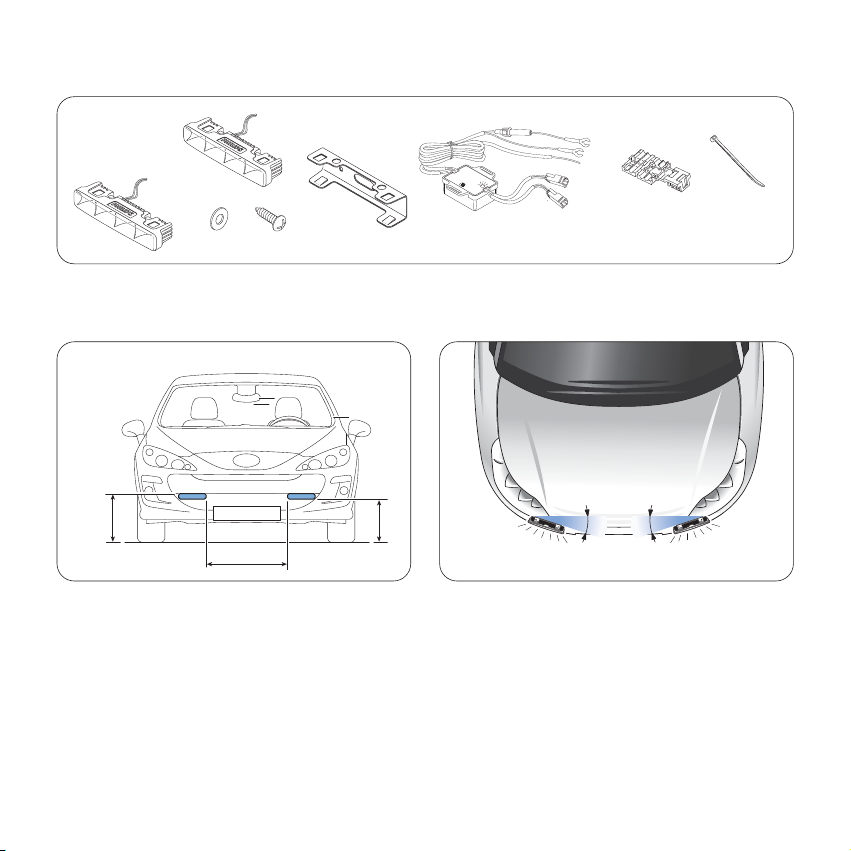
3 Where to install Philips LED DayLight 4
2 Content of the Philips LED DayLight 4 kit
min
250 mm
max
1500 mm
Philips
min 600 mm
10° max 10° max
Legal installation position
ECE regulation 48
Make sure that the installation position of the
Philips LED DayLight 4 modules conforms to
the diagram above.
Horizontal tilting regulation
In order to follow the shape of the vehicle,
Philips LED DayLight 4 optics have been
especially designed to insure full conformity
with the 10° (max) horizontal tilting angle
regulation.
4x

3
EN
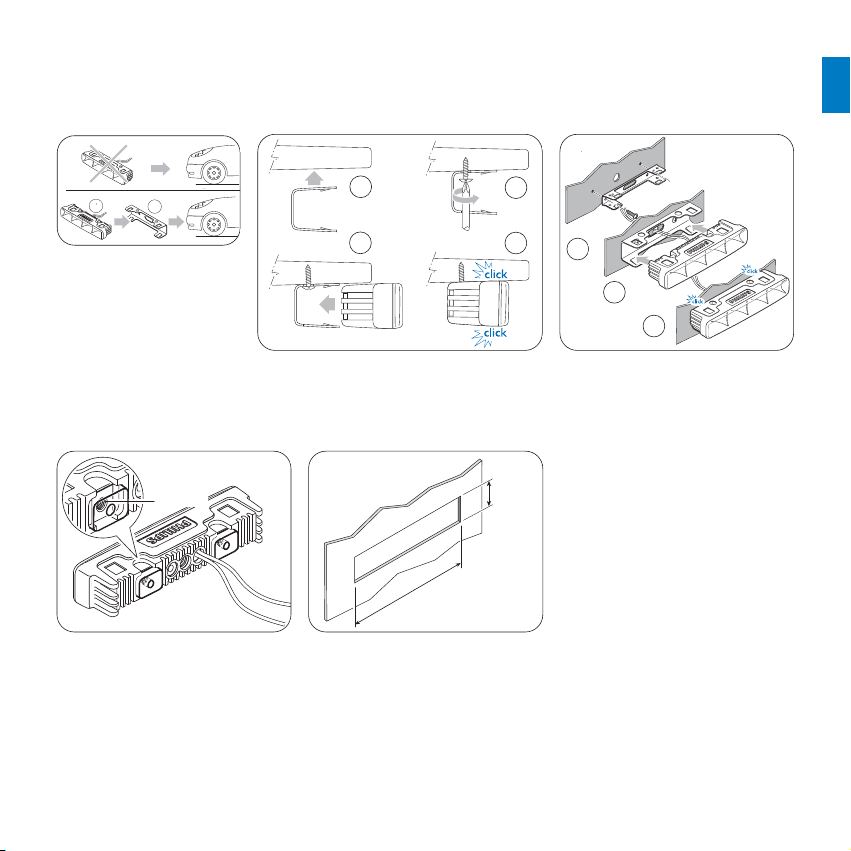
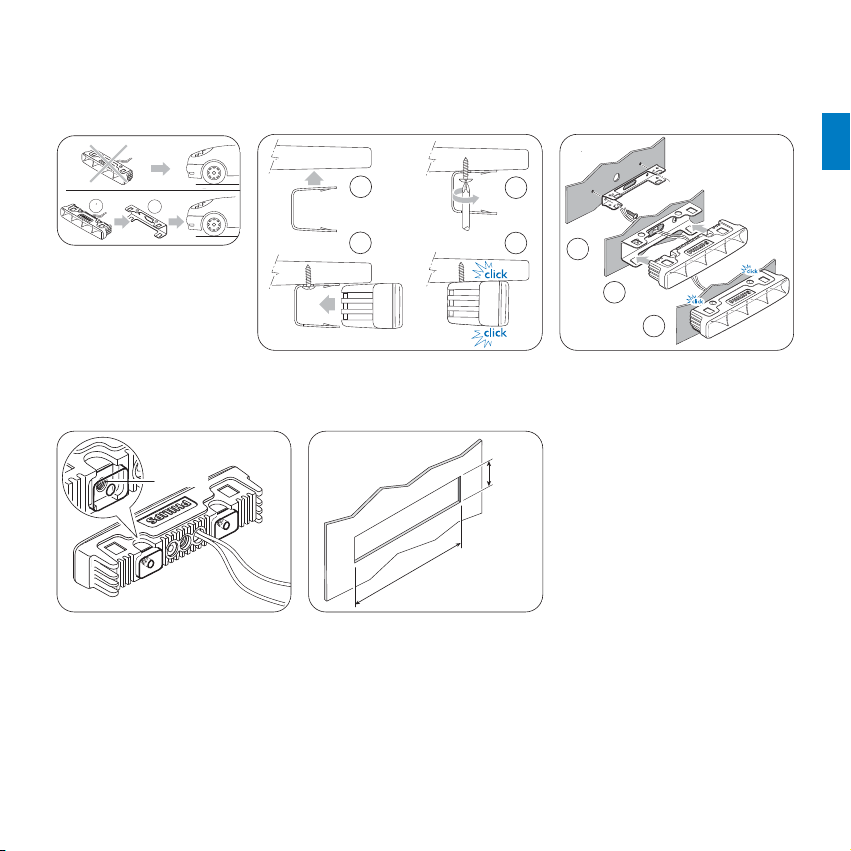
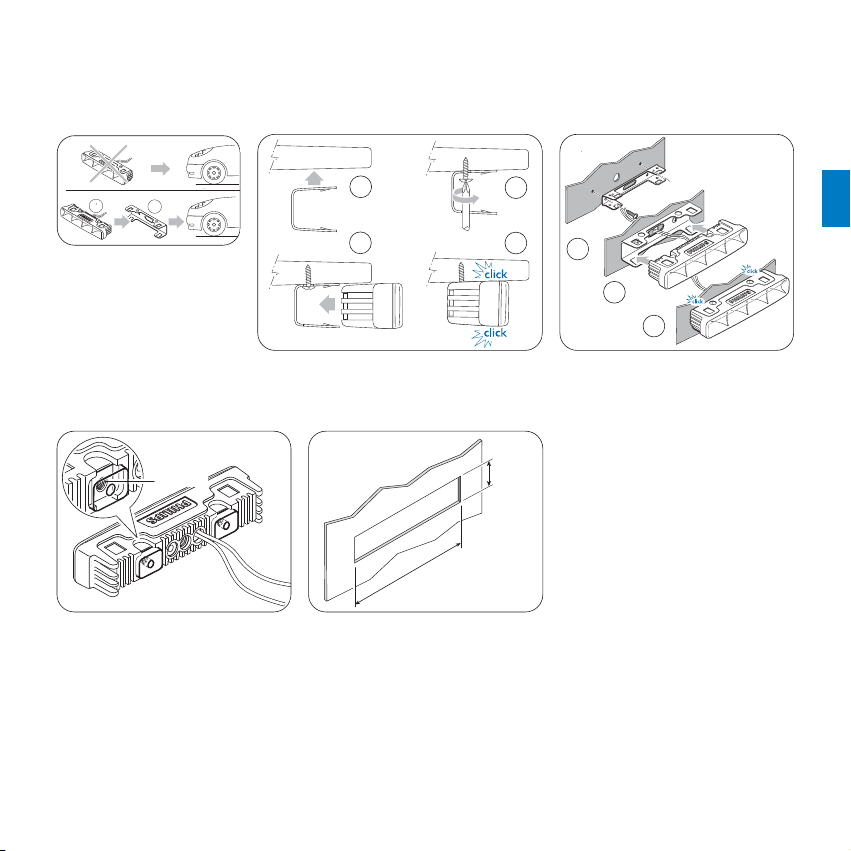
4 How to install Philips LED DayLight 4 on your car
Insert LED DayLight 4
module into the bracket
only after it is mounted
on the car!
How to install the LED modules using clip-on brackets
Useful information for LED DayLight 4 customized installation
1
2
Ø M5
120.5 mm
23.5 mm
Space required for LED
module installation
Make sure you have the above
space available to install each
module.
If necessary, cut out to
exact size (see above).
You may use the M5 tapped holes
inside the module’s body for any
other type of mounting.
Depending on your car model, the
customized installation may be
performed:
- with or without using the clip-on
brackets
- with or without cutting out
the surface.
1
1
2
2
3
3
4
1 Installation on horizontal surface 2 Installation on vertical surface
4
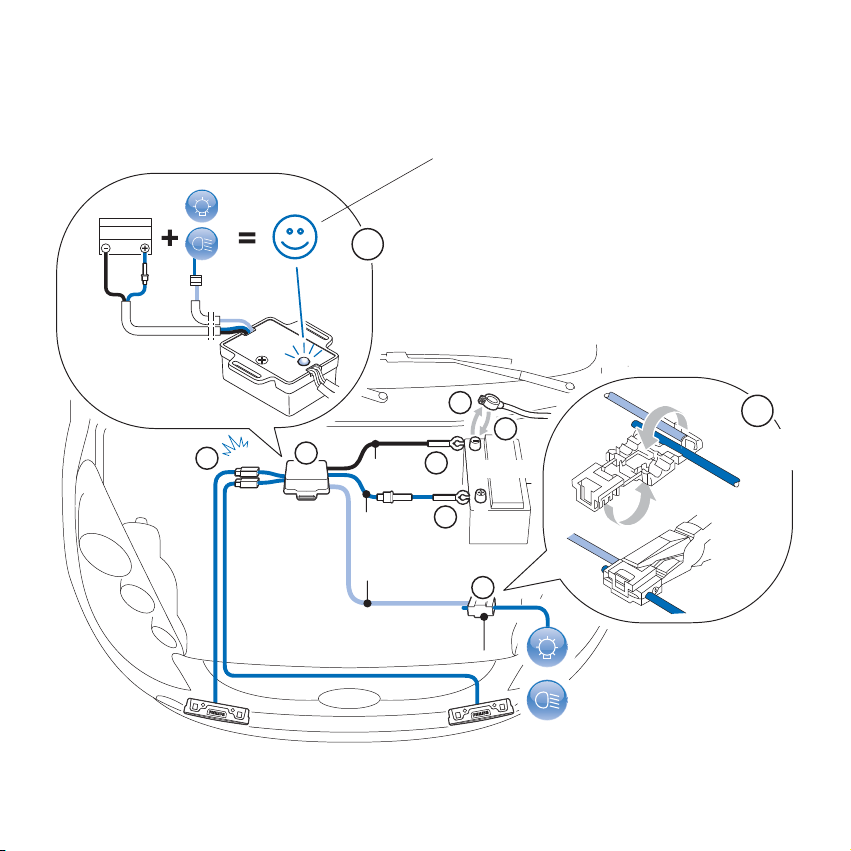
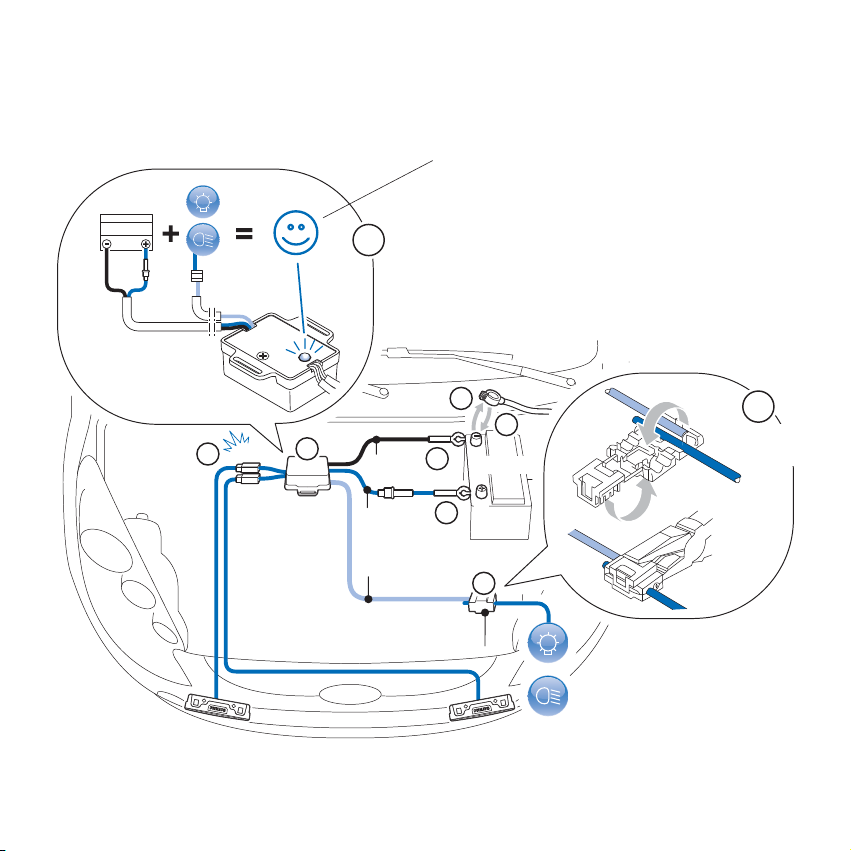
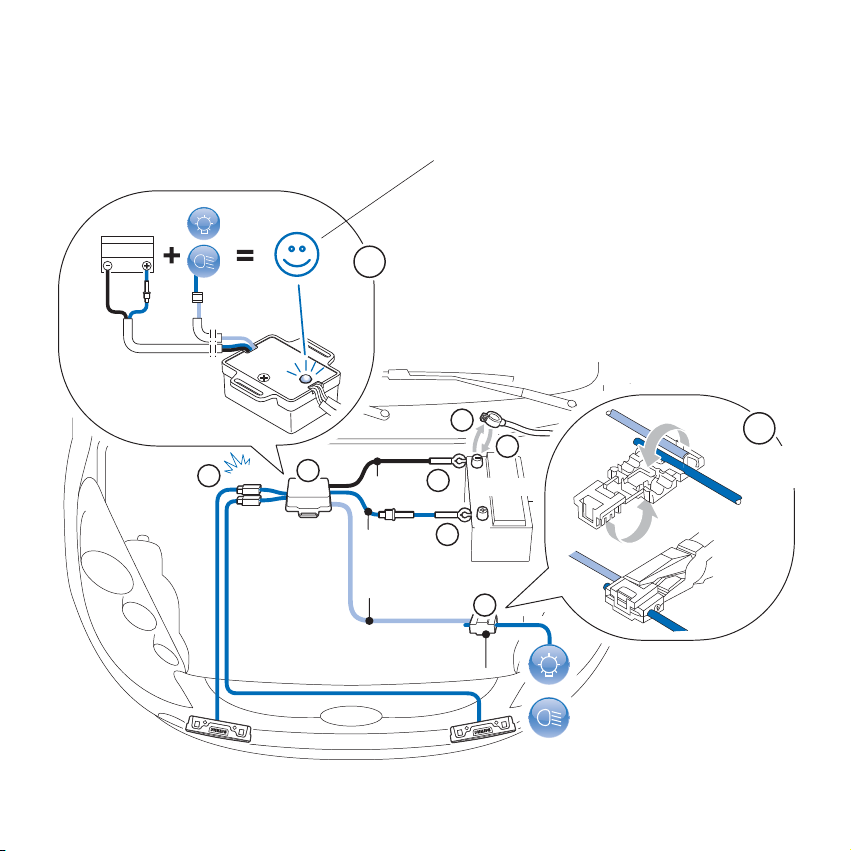
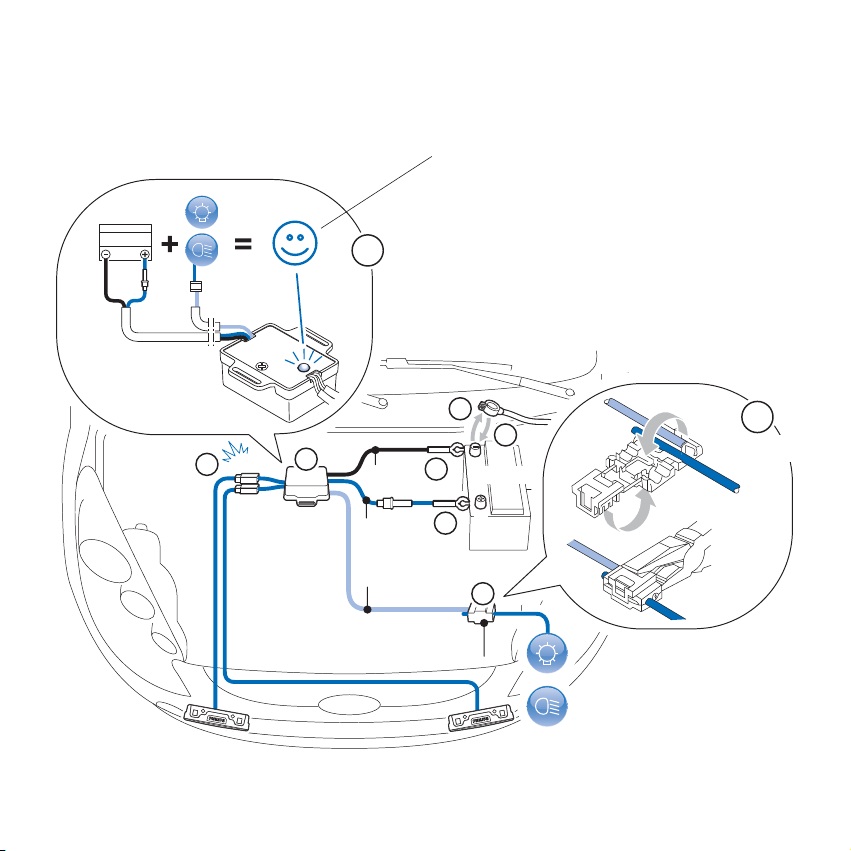
5 Wiring instructions
Tip Before you install the Control box
You can identify the cable you need to connect
the LED modules:
1 Switch on the position (parking) light
2 Unplug the headlamp connector
3 Touch each connector pin with the orange
cable extremity, the control box will identify
the powered cable (LED light will switch on).
Perform the wiring installation of the LED DayLight 4 modules according to the numbered sequence below:
7
1
5
click
4
2m
3m
7
Control
box
Black
Red
Orange
One touch connector
-
3
Battery
+
2
6
1
2
3
6
One touch
connector
5
DE
Die Philips Garantie
gilt gegen Vorlage des
Originalkaufbelegs versehen
mit dem Anschaffungsdatum,
Händlernamen, Modell und der
Herstellnummer des Produkts,
vorausgesetzt, das Produkt wird
für die vorgesehene Verwendung
gemäß der Betriebsanleitung richtig
benutzt.
1 Wichtig
Wir beglückwünschen Sie zum Kauf
des Philips LED DayLight 4, –
das Tagfahrlichtmodul für sicheres
und komfortables Fahren.
Beleuchtungsprodukte von Philips
bieten Ihnen dank ihrer
OE-Qualität (Original Equipment)
die Verlässlichkeit und
Spitzenleistung, die Sie benötigen.
몇 Lesen Sie sich erst die
Philips LED DayLight 4
Montageanleitung durch,
bevor Sie die LED DayLight 4
von Philips in Ihr Auto
einbauen.
Wir empfehlen Ihnen, stets die
Montageanleitung für die
LED-Tagfahrlichter DayLight 4 von
Philips in Ihren Fahrzeugunterlagen
mit sich zu führen.
몇 Das LED DayLight 4 von Philips schaltet sich automatisch ein und aus.
ON
OF
F
AUTO ON
OFF
AUTO OFF
AUTO OFF
ON
ON
OF
F
ON
+
OFF
+
ON
ON
OF
F
Achtung Wenn Ihr Fahrzeug mit
Abblendlichtautomatik versehen ist,
müssen Sie diese deaktivieren.
Wenden Sie sich dafür ggf. an einen
Fachmann.
몇 Die LED DayLight 4 Module von Philips wurden geprüft und zugelassen
gemäß Verordnung ECE R87 für Tagfahrlichter.
E4-87R-00 0046 von KEMA BV Niederlande
6
2 m
3 m
1x
4x
1x
1x
10x
1x
2x
3 Einbauposition der LED DayLight 4 von Philips
2 Inhalt des Philips LED DayLight 4 Sets
min
250 mm
max
1500 mm
Philips
min 600 mm
10° max 10° max
Zulässige Einbauposition
ECE-Regelung 48
Die Philips LED DayLight 4 müssen wie im
Schaubild oben positioniert werden.
Horizontale Kippregelung
Bei der Anpassung an die Fahrzeugform wurde
die Philips LED DayLight 4 Optik speziell
so entwickelt, dass sie die horizontale
Kippwinkelregelung von (max.) 10° erfüllt.
4x
7
DE
4 Einbauweise der LED DayLight 4 von Philips in Ihrem Auto
Das LED DayLight 4
Modul erst in die Halterung
einsetzen, nachdem
die Halterung am Auto
angebracht wurde!
Einbauen der LED-Tagfahrlichter mit Clip-on-Halterung
Nützliche Informationen für einen auf den Kundenbedarf zugeschnittenen Einbau
der LED DayLight 4
1
2
Ø M5
120.5 mm
23.5 mm
Erforderlicher Platz
für die LED Modulinstallation
Stellen Sie sicher, dass Sie oben
noch Platz haben, um jedes Modul
zu montieren.
Schneiden Sie falls erforderlich
die richtige Größe zu (siehe oben).
Sie können die eingelassenen
M5-Gewinde im Körper des
Moduls für beliebige andere
Befestigungsarten benutzen.
Je nach Ihrem Automodell kann
der auf den Kundenbedarf
zugeschnittene Einbau wie folgt
ausgeführt werden:
- mit oder ohne Einsatz
von Clip-on-Halterungen
- mit oder ohne Ausschneiden
der Oberfläche.
1
1
2
2
3
3
4
1 Montieren auf einer waagerechten Fläche 2 Montieren auf einer senkrechten
Fläche
8
5 Verkabelungsanweisungen
Tipp Bevor Sie die Control Box installieren
Sie können das Kabel ausfindig machen, das Sie
brauchen, um die LED-Module anzuschließen:
1 Schalten Sie das Standlicht (Parklicht) ein
2 Entfernen Sie den Stecker des Scheinwerfers
3 Berühren Sie mit dem orangen Kabelende die
einzelnen Anschlüsse; die Control Box erkennt
den richtigen Anschluss (LED leuchtet auf).
Bitte nehmen Sie die Verkabelung der LED DayLight 4 Module wie im nummerierten Ablauf unten
beschrieben vor:
7
1
5
click
4
2m
3m
7
Control
Box
schwarz
rot
orange
steckbarer Anschluss
-
3
Batterie
+
2
6
1
2
3
6
steckbarer
Anschluss
9
FR
1 Important
Merci d’avoir choisi les
modules Philips
LED DayLight 4, les modules
de feux diurnes qui vous
apportent confort et sécurité
au volant. Les lampes de qualité
Équipement d’origine Philips
vous offrent toute l’excellence,
la fiabilité et la puissance dont
vous avez besoin.
La garantie Philips
est applicable si le produit
est utilisé selon les instructions
et aux fins indiquées. Les
demandes de garantie sont
acceptées uniquement sur
présentation du titre d’achat
d’origine portant mention de
la date d’acquisition, du nom
du vendeur, du modèle et de
la référence du produit.
몇 Prenez le temps de lire
ce guide d’installation
avant d’installer les
modules Philips LED
DayLight 4 sur votre
voiture.
Nous vous recommandons
de garder ce guide d’installation
Philips LED DayLight 4 dans
votre véhicule afin de pouvoir
vous y reporter facilement
en cas de besoin.
몇 Les modules Philips LED DayLight 4 s’allument et s’éteignent automatiquement.
ON
OF
F
AUTO ON
OFF
AUTO OFF
AUTO OFF
ON
ON
OF
F
ON
+
OFF
+
ON
ON
OF
F
Important Si votre voiture est équipée
d’un système d’allumage automatique des feux
de croisement, vous devez le désactiver.
Si nécessaire, consultez un professionnel.
몇 Les modules LED DayLight 4 sont testées et homologuées selon
la réglementation ECE R87 sur les feux diurnes.
E4-87R-00 0046 par KEMA BV Netherlands

10
2 m
3 m
1x
4x
1x
1x
10x
1x
2x
3 Où installer les modules Philips LED DayLight 4
2 Contenu du kit Philips LED DayLight 4
min
250 mm
max
1500 mm
Philips
min 600 mm
10° max 10° max
Emplacement conforme
à la réglementation ECE 48
Veillez à positionner les modules Philips LED
DayLight 4 conformément au schéma ci-dessus.
Réglementation sur l’inclinaison
des feux
Afin d’épouser la silhouette du véhicule,
les optiques Philips LED DayLight 4
ont été spécifiquement conçues pour assurer
une inclinaison horizontale de 10° (max.)
conformément à la réglementation.
4x
11
FR
4 Comment installer Philips LED DayLight 4 sur votre voiture
Fixez l’étrier sur
le véhicule avant d’insérer
le module LED DayLight 4 !
Comment installer les modules à LED avec les étriers de fixation
Informations pratiques pour l’installation non-standard des modules LED DayLight 4
1
2
Ø M5
120.5 mm
23.5 mm
Espace nécessaire pour le
montage des modules à LED
Veillez à disposer de l’espace
nécessaire indiqué ci-dessus
pour installer chaque module.
Si nécessaire, découpez
à la taille exacte (voir ci-dessus).
Pour tout autre type d’installation,
vous pouvez utiliser les filetages
M5 situés à l’intérieur du boîtier
du module.
Selon votre modèle de véhicule,
il est possible d’installer
les modules :
- avec ou sans les étriers
de fixation,
- avec ou sans découpe
de la surface.
1
1
2
2
3
3
4
1 Installation sur surface horizontale 2 Installation sur surface
verticale
12
5 Instructions de câblage
Conseil Avant d’installer le boîtier de contrôle
Vous pouvez identifier le câble à brancher aux
modules à LED :
1 Allumez les feux de position,
2 Débranchez le connecteur de la lampe,
3 Faîtes contact sur chaque connecteur avec
l’extrémité du câble orange, le boîtier de contrôle
va alors identifier le câble alimenté
(la LED s’allume).
Suivez le schéma de câblage des modules LED DayLight 4 ci-dessous en respectant l’ordre indiqué :
7
2 m
2
1
3
6
Connecteur
à pression
1
5
click
4
3 m
7
Boîtier
de
contrôle
Noir
Rouge
Orange
Connecteur à pression
-
3
Batterie
+
2
6
13
NL
1 Belangrijk
Bedankt voor uw keuze voor
de Philips LED DayLight 4,
de Dagverlichting die u veilig
en comfortabel laat rijden.
Deze Philips Original
Equipment Quality verlichting
biedt u de kwaliteit, de
betrouwbaarheid en de kracht
die u nodig hebt.
De garantie van Philips
geldt alleen als het product
goed wordt gehanteerd voor
het bestemde gebruik en
conform de gebruiksaanwijzing,
op vertoon van de originele
aankoopbon voorzien van
aankoopdatum, winkelnaam
en type en productienummer
van het product.
몇 Neem de tijd om
de handleiding van de
Philips LED DayLight 4
te lezen voordat u de
Philips LED DayLight 4
in uw auto monteert.
Wij raden u aan de handleiding
van de Philips LED DayLight 4
permanent te bewaren bij
uw autodocumentatie.
몇 De Philips LED DayLight 4 gaat automatisch aan en uit.
ON
OF
F
AUTO AAN
UIT
AUTO UIT
AUTO UIT
AAN
ON
OF
F
AAN
+
UIT
+
AAN
ON
OF
F
Belangrijk Als uw auto is voorzien
van automatisch dimlicht, moet u deze functie
uitschakelen.
Vraag indien nodig advies aan een
deskundige.
몇 De Philips LED DayLight 4 modules zijn getest en goedgekeurd conform
het ECE-reglement 87 inzake motorvoertuigverlichting overdag.
E4-87R-00 0046 van KEMA BV Nederland

14
2 m
3 m
1x
4x
1x
1x
10x
1x
2x
3 Plaatsing van de LED DayLight 4
2 Inhoud van de Philips LED DayLight 4 set
min
250 mm
max
1500 mm
Philips
min 600 mm
10° max 10° max
Toegestane montagepositie
ECE-reglement 48
De positie van de Philips LED DayLight 4 lampen
moet voldoen aan de bovenstaande tekening.
Reglement inzake de horizontale hoek
Om de vorm van de auto te volgen, zijn
de Philips LED DayLight 4 optieken speciaal
ontworpen om volledig te voldoen aan
de maximale horizontale hoek van 10°
van het reglement.
4x
15
NL
4 Montage van de Philips LED DayLight 4 in uw auto
Schuif de LED
DayLight 4 module niet
in de clip voordat deze
in uw auto is gemonteerd!
Montage van de LED-modules met de bevestigingsclips
Nuttige informatie voor een speciale montage van de LED DayLight 4
1
2
Ø M5
120.5 mm
23.5 mm
Noodzakelijke ruimte voor de
montage van de LED-module
Let erop dat de bovengenoemde
ruimte vrij is voor de montage
van elke module.
Snij zonodig, de juiste
maat uit (zie hierboven).
U kunt de gaten
met M5 schroefdraad in
de behuizing van de module
gebruiken voor elke andere
montage.
Afhankelijk van uw type auto,
is een speciale montage mogelijk:
- met of zonder de
bevestigingsclips
- met of zonder het uitsnijden
van het oppervlak.
1
1
2
2
3
3
4
1 Montage op een horizontaal oppervlak 2 Montage op een verticaal
oppervlak
16
5 Aansluitingen
Tip Voordat u de bedieningsunit monteert
U kunt de kabel identificeren die u met
de LED-modules moet verbinden:
1 Schakel de positielichten (parkeerlichten) aan
2 Maak de koplampstekker los
3 Raak met het uiteinde van de oranje kabel ieder
contactpunt aan, de bedieningsunit identificeert
de stroomkabel (LED-lamp gaat aan).
Sluit de LED DayLight 4 modules aan zoals hieronder beschreven in de met nummers aangegeven volgorde:
7
2m
1
5
click
4
3m
7
Bedieningsunit
Zwart
Rood
Oranje
Klemconnector
-
3
Accu
+
2
6
1
2
3
6
Klemconnector

17
ES
1 Importante
Gracias por comprar
Philips LED DayLight 4,
los faros de conducción diurna
que le ofrecen una total
garantía de seguridad y
comodidad al volante.
Con los faros Philips de Calidad
de Equipamiento Original, usted
tiene la excelencia, fiabilidad
y potencia que necesita.
La garantía de Philips
se aplica si el producto se ha
manipulado correctamente
y para el uso previsto, según
las instrucciones de
funcionamiento, y tras
presentación de la factura
original, indicando fecha de
compra, nombre del vendedor,
modelo y número de
producción del producto.
몇 Recuerde leer
atentamente la guía
de instalación antes de
instalar sus Philips LED
DayLight 4 en su vehículo.
Por si necesita consultarla,
le recomendamos llevar
siempre, junto a la
documentación de su vehículo,
la guía de instalación de las
lámparas Philips LED DayLight 4.
몇 Los faros Philips LED DayLight 4 se encienden y apagan automáticamente.
ON
OF
F
AUTO ON
OFF
AUTO OFF
AUTO OFF
ON
ON
OF
F
ON
+
OFF
+
ON
ON
OF
F
Importante Si su vehículo lleva un
sistema de alumbrado automático de las luces
de cruce debe desactivarlo.
Si lo necesita, consulte a un profesional.
몇 Los faros Philips LED DayLight 4 se someten a prueba y están regulados conforme
a la normativa ECE R87 sobre faros de conducción diurna.
E4-87R-00 0046 por KEMA BV Netherlands

18
2 m
3 m
1x
4x
1x
1x
10x
1x
2x
3 Dónde instalar las Philips LED DayLight 4
2 Contenido del kit Philips LED DayLight 4
Mín.
250 mm
Máx.
1500 mm
Philips
Mín. 600 mm
10° máx. 10° máx.
Emplazamiento legal de instalación
ECE normativa 48
Asegúrese de que las Philips LED DayLight 4
se adecúan al gráfico de arriba.
Regulación sobre inclinación
horizontal
Para amoldarse a la forma del vehículo, la óptica
de las Philips LED DayLight 4 se ha diseñado
especialmente para garantizar su total
conformidad con la regulación sobre los 10º
de ángulo máximo de inclinación horizontal.
4x

19
ES
4 Cómo instalar las Philips LED DayLight 4 en su vehículo
¡Inserte el módulo
LED DayLight 4 en la anilla
sólo tras su montaje en
el vehículo!
Cómo instalar los módulos LED usando las anillas de sujeción
Información útil para la instalación personalizada de los LED DayLight 4
1
2
Ø M5
120.5 mm
23.5 mm
Espacio requerido para la
instalación del módulo LED
Cerciórese de disponer del espacio
indicado arriba para instalar cada
modelo.
Si es necesario, recorte
para llegar al tamaño
exacto (véase arriba).
Puede usar las ranuras M5 situadas
en el interior del módulo para
cualquier otro tipo de montaje.
Dependiendo del modelo
de vehículo que usted tenga,
la instalación personalizada podrá
realizarse:
- con o sin las anillas de sujeción
- haciendo o sin hacer una
hendidura en la superficie.
1
1
2
2
3
3
4
1 Instalación en una superficie horizontal 2 Instalación en una superficie vertical

20
5 Instrucciones de cableado
Consejo antes de instalar la caja de control
Puede identificar el cable que necesita conectar
a los módulos LED:
1 Encienda las luces de posición (estacionamiento)
2 Desenchufe el conector de la lámpara
3 Toque cada pin conector con el extremo del cable
de color naranja, la caja de control identificará el
cable que tiene potencia (la luz LED se encenderá).
Proceda con la instalación de cableado de los módulos LED DayLight 4 según la secuencia numerada de abajo:
7
2 m
2
1
3
6
Clema
de conexión
1
5
click
4
3 m
7
Caja
de control
Negro
Rojo
Naranja
Clema de conexión
-
3
Batería
+
2
6

21
IT
1 Importante
Si ringrazia per l’acquisto
di Philips LED DayLight 4,
i moduli di fanali per marcia
diurna in grado di rendere
ancora più sicure e confortevoli
le esperienze al volante.
I prodotti d’illuminazione Philips
di qualità di primo impianto,
offrono l’eccellenza, l’affidabilità
e la potenza cui si aspira.
La garanzia Philips è valida
a condizione che il prodotto
venga maneggiato correttamente,
secondo l’uso previsto, e su
presentazione della fattura
originale con data di acquisto,
nome del rivenditore e numero
del modello e di produzione
del prodotto.
몇 Leggere attentamente
la guida d’installazione
Philips LED DayLight 4
prima di procedere
all’installazione delle
lampade LED DayLight 4
sull’automobile.
Si raccomanda di conservare
la guida LED DayLight 4 insieme
alla documentazione del veicolo
per poterla consultare in
qualsiasi momento.
몇 I moduli Philips LED DayLight 4 si accendono e si spengono automaticamente.
ON
OF
F
AUTO ON
OFF
AUTO OFF
AUTO OFF
ON
ON
OF
F
ON
+
OFF
+
ON
ON
OF
F
Importante Se l'automobile è dotata
di un commutatore di anabbaglianti automatico,
occorre disattivarlo.
Se necessario, consultare un professionista.
몇 I moduli Philips LED DayLight 4 sono stati testati e approvati secondo
la regolamentazione vigente ECE R87 relativa alle luci di Marcia diurna.
E4-87R-00 0046 di KEMA BV Netherlands

22
2 m
3 m
1x
4x
1x
1x
10x
1x
2x
3 Dove installare le lampade Philips LED DayLight 4
2 Contenuto del kit Philips LED DayLight 4
min
250 mm
max
1500 mm
Philips
min 600 mm
10° max 10° max
Posizione d’installazione legale
Regolamento ECE 48
Accertarsi che la posizione delle lampade
LED DayLight 4 corrisponda alla figura
sopra riportata.
Regolazione dell’inclinazione
orizzontale
Per seguire la sagoma del veicolo, l’ottica
delle Philips LED DayLight 4 è stata
appositamente progettata in conformità
alla regolazione dell’angolo di inclinazione
orizzontale consentito di 10° (max).
4x

23
IT
4 Come installare le lampade Philips LED DayLight 4 sulla macchina
Inserire il modulo
LED DayLight 4 nel
supporto dopo averlo
montato sul veicolo!
Come installare i moduli LED usando i supporti a clip
Informazioni utili per l’installazione personalizzata delle lampade LED DayLight 4
1
2
Ø M5
120.5 mm
23.5 mm
Requisiti di spazio per
l’installazione del modulo LED
Accertarsi di avere spazio
disponibile a sufficienza per
installare ogni modulo.
Se necessario, ricavare
la dimensione necessaria
(vedi sopra).
Si possono usare gli otturatori
M5 all’interno del corpo del
modulo per qualsiasi altro tipo
di installazione.
A seconda del modello della
macchina, l’installazione
personalizzata può essere
eseguita:
- con o senza supporti a clip
- ricavando o meno la superficie.
1
1
2
2
3
3
4
1 Installazione su superficie orizzontale 2 Installazione su superficie
verticale

24
5 Istruzioni di cablaggio
Suggerimento
Prima di installare la Control box
Identificare il cavo necessario per collegare
i moduli LED:
1 Accendere le luci di posizione (stazionamento)
2 Scollegare il connettore del proiettore
3 Toccare ogni connettore pin con l’estremità
del cavo arancione, la control box identificherà
il cavo con la corrente (spia LED accesa).
Procedere all’installazione dei cavi dei moduli LED DayLight 4 secondo la sequenza numerata sotto:
7
2m
1
5
click
4
3m
7
Control
box
Connettore a pressione
Nero
Rosso
Arancione
-
3
Batteria
+
2
6
1
2
3
6
Connettore
a pressione

25
PT
A garantia Philips é válida
se o produto for utilizado
de modo adequado e para os fins
indicados. Os pedidos de garantia
só são aceites mediante
apresentação da fatura original
indicando a data da compra,
o nome do vendedor, o modelo
e a referência do produto.
1 Importante
Obrigado por escolher as
lâmpadas Philips LED
DayLight 4. Os módulos de
luzes diurnas contribuem para
o seu conforto e a sua segurança
ao volante. As lâmpadas de
qualidade com equipamento de
origem Philips ofrecem lhe todaa
excelência, a fiabilidade e
a potência de que você necessita.
몇 Reserve um pouco
de tempo para ler este guia
antes de instalar as lâmpadas
Philips LED DayLight 4
no seu veículo.
Recomendamos que guarde
juntamente com a documentação
do seu veículo este guia de
instalação Philips LED DayLight 4
para poder consultá-lo facilmente
em caso de necessidade.
몇 As lâmpadas Philips LED DayLight 4 acendem e apagam automaticamente.
ON
OF
F
AUTO ON
OFF
AUTO OFF
AUTO OFF
ON
ON
OF
F
ON
+
OFF
+
ON
ON
OF
F
Importante Se o seu veículo está
equipado com um sistema de ignição automática
das luzes de cruzamento, você deve desactivá-lo.
Se necessário, consulte um profissional.
몇 As lâmpadas LED DayLight 4 são testadas e homologadas em conformidade
com a regulamentação ECE R87 sobre as luzes diurnas.
E4-87R-00 0046 por KEMA BV Países Baixos

26
2 m
3 m
1x
4x
1x
1x
10x
1x
2x
3 Onde instalar as lâmpadas Philips LED DayLight 4
2 Conteúdo do kit Philips LED DayLight 4
250 mm
mín.
1500 mm
máx.
Philips
600 mm mín.
10° máx. 10° máx.
Posição de instalação em conformidade
com a ECE 48
Atenção ao posicionar as lâmpadas Philips
LED DayLight 4 segundo o esquema acima indicado.
Regulamentação sobre a altura das luzes
Para que as ópticas Philips LED DayLight 4 se adaptem
à silhueta do veículo, são especificamente elaboradas
para estarem totalmente em conformidade com
a regulamentação vigente em matéria de regulação
da altura das luzes (10° máx).
4x

27
PT
4 Instalar as lâmpadas Philips LED DayLight 4 no seu veículo
Fixar o pino no
veículo antes de inserir
o módulo LED DayLight 4!
Como instalar os módulos de LED com os pinos de fixação
Informações práticas em caso de instalação não padrão dos LED DayLight 4
1
2
Ø M5
120.5 mm
23.5 mm
Espaço necessário
à montagem 2 módulos LED
Queira utilizar o espaço
necessário acima indicado
para poder instalar cada módulo.
Se necessário, corte na
medida exacta (ver acima).
Para qualquer outro tipo de
instalação, é possível utilizar as
roscagens M5 que se encontram
dentro da caixa do módulo.
De acordo com o seu modelo
de veículo, é possível instalar
as lâmpadas:
- com ou sem os pinos de fixação
- com ou sem corte da superfície.
1
1
2
2
3
3
4
1 Instalação numa superfície horizontal 2 Instalação numa superfície
vertical

28
5 Instruções de ligação
Conselho Antes de instalar a caixa de controlo
Situe a localização do cabo a ligar aos módulos LED:
1 Acenda as luzes de presença (estacionamento)
2 Desligue o conector da lâmpada
3 Toque em cada pin do conector com a extremidade
do cabo de laranja, a caixa de controlo irá então
identificar o cabo alimentado (a LED acenderá).
Siga o esquema de cablagem abaixo mencionado, respeitando a ordem indicada:
7
2m
1
5
click
4
3m
7
Caixa
de
controlo
Preto
Vermelho
Laranja
Conector de pressão
-
3
Bateria
+
2
6
1
2
3
6
Conector
de pressão

29
RU
1 Внимание
Благодарим Вас за покупку
Philips LED DayLight 4,
модулей светодиодных ламп для
фар дневного света, с которыми
время за рулем машины станет
для Вас безопасным и
комфортным. Качество изделий
собственного изготовления
Philips для автомобильного
освещения обеспечит нужный
Вам уровень технического
совершенства, надежности и
мощности.
Гарантия Philips действительна
при условии правильного
обращения с изделием,
применения его по назначению
в соответствии с инструкциями
по эксплуатации и
предоставления подлинника
счета с указанием даты покупки,
наименования дилера, модели и
заводского номера изделия.
몇 Прежде чем ставить
Philips LED DayLight 4 на
свою машину, внимательно
прочтите руководство по
установке Philips LED
DayLight 4.
Мы рекомендуем Вам для справок
всегда держать руководство по
установке Philips LED DayLight 4
вместе с документацией на
машину.
몇 Philips LED DayLight 4 включаются и выключаются автоматически.
ON
OF
F
АВТО ВКЛ
ВЫКЛ
АВТО ВЫКЛ
АВТО ВЫКЛ
ВКЛ
ON
OF
F
ВКЛ
+
ВЫКЛ
+
ВКЛ
ON
OF
F
Внимание Если Ваша машина
оснащена функцией автоматического
включения ближнего света, то необходимо
отключить ее.
При необходимости проконсультируйтесь
со специалистом.
몇 Модули Philips LED DayLight 4 протестированы и разрешены к применению
по нормативам ECE R87 для фар дневного света.
E4-87R-00 0046 KEMA BV Нидерланды

30
2 м
3 м
1x
4x
1x
1x
10x
1x
2x
3 Где устанавливаются Philips LED DayLight 4
2 Состав комплекта Philips LED DayLight 4
не менее
250 мм
не более
1500 мм
Philips
не менее 600 мм
не более 10° не более 10°
Регламентированное место
установки по нормативам ECE 48
Убедитесь, что местоположение ламп
дневного света Philips LED DayLight 4
соответствует схеме (см. выше).
Настройка горизонтального
отклонения
Для повторения очертаний машины, оптика
Philips LED DayLight 4 специально разработана
так, чтобы обеспечить полную
согласованность с настройкой угла отклонения
по горизонтали величиной не более 10°.
4x

31
RU
4 Как на Вашей машине установить Philips LED DayLight 4
Модуль LED DayLight 4
следует вставлять только
в держатель, уже
установленный на машине.
Как устанавливать модули LED с применением навесных держателей
Полезные сведения об установке LED DayLight 4 с учетом потребностей заказчика
1
2
Ø M5
120.5 мм
23.5 мм
Пространство, которое
требуется для установки
модуля LED
Убедиться, что у Вас есть
указанное пространство для
установки каждого модуля.
Если необходимо, сделать
вырез точно по размеру
(см. выше).
Вы можете воспользоваться
отверстиями с внутренней
резьбой M5 в корпусе модуля
для установки любым другим
способом.
В зависимости от модели Вашей
машины установка может
выполняться по усмотрению
заказчика:
- с применением навесного
держателя или без него
- с вырезом поверхности
или без него.
1
1
2
2
3
3
4
1 Установка на горизонтальной поверхности 2 Установка на вертикальной
поверхности

32
5 Инструкции по схеме электропроводки
Совет перед установкой блока управления
Вы можете найти провод, который Вам нужен
для подключения модулей LED:
1 Включить габаритный (стояночный) фонарь
2 Отсоединить коннектор головного света
3 Cоедините контакты вставного разъема
c окончанием оранжевого провода, Блок
управления покажет кабель под напряжением
(загорится световой индикатор LED).
Монтаж схемы электропроводки модулей LED DayLight 4 выполнять в последовательности,
обозначенной цифрами (см. ниже):
7
2 м
1
5
click
4
3 м
7
блока
управления
Черный
Красный
Оранжевый
Вставной разъем
3
2
-
аккумулятор
+
6
1
2
3
6
Вставной
разъем

33
PL
Produkt objęty jest
gwarancją firmy Philips,
pod warunkiem, że jest on
wykorzystywany zgodnie
z przeznaczeniem i według
zaleceń instrukcji obsługi oraz
po okazaniu oryginału faktury,
na której muszą być podane
data zakupu, nazwa dealera
i model oraz numer produktu.
1 Ważne
Dziękujemy za zakup modułów
specjalnych dziennych świateł
pozycyjnych Philips LED
DayLight 4, które sprawią,
że prowadzenie Twojego
samochodu będzie bezpieczne
i komfortowe. Oryginalne
produkty oświetleniowe firmy
Philips to doskonałość,
niezawodność i moc.
몇 Przed zamontowaniem
modułów Philips LED
DayLight 4, prosimy
o zapoznanie się
z instrukcją instalacji.
Zaleca się, aby instrukcję
instalacji modułów Philips
LED DayLight 4 zawsze nosić
razem z dokumentami
samochodu.
몇 Moduły Philips LED DayLight 4 włączają się i wyłączają automatycznie.
ON
OF
F
AUTO ON
OFF
AUTO OFF
AUTO OFF
ON
ON
OF
F
ON
+
OFF
+
ON
ON
OF
F
Ważne Jeżeli samochód jest wyposażony
w funkcję automatycznego włączania świateł
krótkich, funkcję tę należy wyłączyć.
W razie potrzeby należy poradzić
się profesjonalisty.
몇 Moduły Philips LED DayLight 4 zostały przetestowane i zatwierdzone zgodnie
z przepisami ECE R87 dot. specjalnych dziennych świateł pozycyjnych.
E4-87R-00 0046 firmy KEMA BV, Holandia

34
2 m
3 m
1x
4x
1x
1x
10x
1x
2x
3 Gdzie zamontować moduły Philips LED DayLight 4
2 Zawartość zestawu LED DayLight 4
min.
250 mm
max.
1500 mm
Philips
min. 600 mm
10° max. 10° max.
Miejsce montażu zgodne z przepisami
rozporządzenia ECE nr 48
Upewnij się, że położenie świateł dziennych
Philips LED DayLight 4 odpowiada powyższemu
schematowi.
Regulacja nachylenia w poziomie
Aby dostosować się do kształtu samochodu,
elementy optyczne modułów Philips LED DayLight
4 zostały zaprojektowane w taki sposób, aby
zapewnić pełen komfort użytkowania dzięki 10°
(maksymalnie) regulacji kąta nachylenia świateł
w poziomie.
4x

35
PL
4 Jak zamontować moduły Philips LED DayLight 4
Moduł LED DayLight 4
należy włożyć do wspornika
dopiero po zamontowaniu
wspornika w samochodzie!
Montaż modułów LED z użyciem wsporników zatrzaskowych
Praktyczne informacje na temat niestandardowego montażu modułów LED DayLight 4
1
2
Ø M5
120.5 mm
23.5 mm
Przestrzeń niezbędna do
zamontowania modułu LED
Należy upewnić się, że dysponuje
się powyższą przestrzenią niezbędną
do zamontowania każdego modułu.
W razie potrzeby, wyciąć
otwór o odpowiednich
wymiarach (patrz powyżej).
W przypadku każdego innego
typu instalacji, można wykorzystać
otwory gwintowane M5 wycięte
w obudowie modułu.
W zależności od modelu
samochodu, można wykonać
niestandardowy montaż świateł:
- z użyciem lub bez wsporników
zatrzaskowych
- wycinając lub nie powierzchnię.
1
1
2
2
3
3
4
1 Montaż na powierzchni poziomej 2 Montaż na powierzchni
pionowej

36
5 Instrukcja okablowania
Przewody modułów LED DayLight 4 należy podłączyć w następującej kolejności:
Wskazówka
Przed zamontowaniem modułu sterującego
W celu rozpoznania konektora, do którego należy
podłączyć pomarańczowy przewód modułu sterującego
wykonać następujące czynności:
1 Włącz światła pozycyjne (postojowe)
2 Rozłącz kostkę zasilającą żarówkę światła pozycyjnego
3 Dotykając pomarańczowy przewód modułu sterującego
należy odszukać plus zasilania, który jest sygnalizowany
zaświeceniem się kontrolki LED znajdującej się
w module sterującym.
7
2m
2
1
3
6
Złączka typu
one-touch
1
5
click
4
3m
7
Skrzynki
kontrolnej
Czarny
Czerwony
Pomarańczowy
Złączka typu one-touch
3
2
-
Akumulator
+
6

37
SV
Philips garanti gäller under
förutsättning att produkten
används enligt anvisningarna
och för avsett ändamål.
Garantin kan åberopas mot
uppvisning av originalkvittot,
med inköpsdatum,
återförsäljarens namn och
med produktens modell
och tillverkningsnummer.
1 Viktigt
Tack för ditt köp av
Philips LED DayLight 4,
varselljusmodulerna som
kommer att göra din
körupplevelse säker
och bekväm. Philips
originaltillverkade
kvalitetslampor erbjuder den
spetsteknologi, tillförlitlighet
och styrka du behöver.
몇 Tag tid att läsa
Philips LED DayLight 4
monteringsanvisning innan
du monterar modulerna
på din bil.
Vi rekommenderar att du alltid
har med dig Philips LED
DayLight 4 monteringsanvisning
tillsammans med dina övriga
bildokument som referens.
몇 Philips LED DayLight 4 tänds och släcks automatiskt.
ON
OF
F
AUTO PÅ
AV
AUTO AV
AUTO AV
PÅ
ON
OF
F
PÅ
+
AV
+
PÅ
ON
OF
F
Viktigt Om din bil har automatiskt halvljus,
måste du först koppla ur denna funktion.
Vid behov, kontakta en verkstad.
몇 Philips LED DayLight 4 modulerna har testats och godkänts enligt
bestämmelserna ECE R87 för varselljus.
E4-87R-00 0046 av KEMA BV Netherlands

38
2 m
3 m
1x
4x
1x
1x
10x
1x
2x
3 Placering av Philips LED DayLight 4
2 Innehåll I satsen Förpackningens innehåll, LED DayLight 4
min
250 mm
max
1500 mm
Philips
min 600 mm
max 10° max 10°
Placering enligt standard ECE 48
Se till att Philips LED DayLight 4-lamporna
placeras enligt bilden ovan.
Bestämmelser om vågrät lutning
För att följa bilens konturer, har lamporna,
Philips LED DayLight 4 specialdesignats för att
helt överensstämma med bestämmelserna
om maximal vågrät lutningsvinkel (10°).
4x

39
SV
4 Montering av Philips LED DayLight 4 på din bil
Skjut in LED DayLight
4 modulen i fästet först
efter att detta monterats
på bilen!
Montering av LED-modulerna med användning av clipfästen
Användbar information för specialmontering av LED DayLight 4
1
2
Ø M5
120.5 mm
23.5 mm
Utrymme nödvändigt för
monteringen av LED-modulen.
Försäkra dig om att du har
utrymmet ovan tillgängligt
för att montera varje modul.
Om nödvändigt, skär ut till
exakta mått (se ovan).
Du kan använda de M5-gängade
hålen på modulhusets insida
för andra typer av monteringar.
Beroende på bilmodell,
kan specialmonteringen utföras:
- med eller utan clipfästen
- med eller utan utskärning
av ytan.
1
1
2
2
3
3
4
1 Montering på vågrät yta 2 Montering på lodrät yta

40
5 Kopplingsanvisningar
Tips Innan du monterar manöverboxen
Du kan identifiera kabeln som behöver anslutas
till LED-modulerna:
1 Sätt på positionsljuset*(parkeringsljus)
2 Koppla ur strålkastarkontakten
3 Ta den orangea kabeländen och håll den mot
varje kabel i strålkastarkontakten, manöverboxen
identifierar den strömförande kabeln
(LED-lampan tänds).
Genomför anslutningen av LED DayLight 4 modulerna enligt den angivna ordningen nedan:
*
Halvljuset för SV, NO, SU
7
2m
2
1
3
6
Klämkontakt
1
5
click
4
3m
7
Manöverboxen
Svart
Röd
Orange
Klämkontakt
-
3
Batteri
+
2
6

41
NO
Philips garanti gjelder for dette
produktet dersom det brukes
i henhold til instruksjonene og
for de formål det er beregnet på.
Garantisøknader er kun gyldige
ved fremlegging av den
opprinnelige faktura. Denne
fakturaen skal inneholde datoen
for kjøp, navnet på salgsstedet og
produktets modell og referanse.
1 Viktig
Vi takker deg for å ha valgt
Philips LED DayLight 4,
lysmoduler for kjørelys
som garanterer deg sikker
og behagelig kjøring.
Philips’ originale lysprodukter
er av topp kvalitet, og gir deg
den ytelse, pålitelighet og effekt
som du trenger.
몇 Du bør ta deg tid
til å lese igjennom
installasjonsanvisningen
for Philips LED DayLight 4
før du monterer lysene
på bilen din.
Vi anbefaler deg å oppbevare
denne installasjonsanvisningen
i bilen til enhver tid.
몇 Philips LED DayLight 4 tennes og slukkes automatisk.
ON
OF
F
AUTO ON
OFF
AUTO OFF
AUTO OFF
ON
ON
OF
F
ON
+
OFF
+
ON
ON
OF
F
Viktig Dersom din bil er utstyrt med
en funksjon for automatisk tenning av nærlys,
må denne funksjonen nøytraliseres.
Ta om nødvendig kontakt med
en fagmann.
몇 Philips LED DayLight 4 modulene er testet og godkjent i henhold
til ECE R87-regelverket om kjørelys
E4-87R-00 0046 av Kema BV Netherlands

42
2 m
3 m
1x
4x
1x
1x
10x
1x
2x
3 Hvor skal Philips LED DayLight 4 lysmodulene installeres
2 Innhold i Philips LED DayLight 4-settet
min.
250 mm
maks.
1500 mm
Philips
min. 600 mm
10° maks. 10° maks.
Montering i henhold til ECE 48
regelverket
Påse at Philips LED DayLight 4 lysmodulene
plasseres som vist på tegningen ovenfor.
Vannrett skråstilling
For å følge bilens form har Philips LED
DayLight 4 lysmodulene blitt spesielt utviklet
slik at de er konforme med regelverket
om (maks.) 10° vannrett skråstilling.
4x

43
NO
4 Slik installerer du Philips LED DayLight 4 på bilen
LED DayLight 4
lysmodulen skal festes til
klipset først etter at dette
er montert på bilen!
Slik monterer du LED-modulene ved hjelp av festeklips
Nyttig informasjon om tilpasset installering av LED DayLight 4 lysmodulene
1
2
Ø M5
120.5 mm
23.5 mm
Plass som trengs for
montering av en LED-modul
Påse at du har nok plass
til installering av hver modul.
Om nødvendig, kutt til
riktig størrelse (se over).
Du kan bruke de M5-gjengede
hullene inne i selve modulen
for andre typer montering.
Avhengig av bilmodell kan
installeringen gjøres:
- med eller uten festeklips
- med eller uten utskjæring
av flaten.
1
1
2
2
3
3
4
1 Installering på vannrett flate 2 Installering på loddrett flate

44
5 Koplingsinstruksjoner
Et godt råd før du installerer kontrollenheten
Du kan identifisere den ledningen du trenger
til å kople til LED-modulene:
1 Skru på parkeringslyset
*
2 Kople fra kontakten til hovedlykten
3 Berør hver kontakt med den oransje ledningen,
og kontrollboksen vil identifisere ledningen
med effekt (LED-lyset vil skrus på).
Ved tilkopling av LED DayLight 4 lysmodulene, overhold rekkefølgen som oppgis under:
*
Nærlys for SV, NO, SU.
7
2m
2
3
1
Trykk-kontakt
6
1
5
click
4
3m
7
Kontrollenheten
Sort
Rød
Oransje
Trykk-kontakt
-
3
Batteri
+
2
6

45
DA
1 Vigtigt
Tillykke med de nye Philips
LED DayLight 4-lygter, det
specielle kørelys til dagtimerne,
som vil give dig en sikker og
behagelig køreoplevelse.
Med Philips’originalkvalitetsprodukter opnås den
fortræffelige, pålidelige og
kraftfulde belysning, du har
behov for.
Philips’ garanti gælder,
hvis produktet behandles og
anvendes med omtanke til det
tilsigtede formål og efter
anvisningerne, mod forevisning
af originalfaktura med
købsdato, forhandlerens navn
samt produktmodel og
varenummer.
몇 Læs monteringsvejledningen for Philips
LED DayLight 4, inden
Philips LED DayLight 4lygterne monteres på bilen.
Det anbefales altid at opbevare
Philips LED DayLight 4monteringsvejledningen
sammen med vognens
dokumenter for eventuelle
opslag.
몇 Philips LED DayLight 4 tænder og slukker automatisk.
ON
OF
F
AUTO ON
OFF
AUTO OFF
AUTO OFF
ON
ON
OF
F
ON
+
OFF
+
ON
ON
OF
F
Vigtigt Hvis din bil er udstyret med
automatisk tænding af nærlys, skal denne
funktion slås fra.
Kontakt eventuelt et værksted.
몇 Philips LED DayLight 4-lygterne er testet og godkendt efter ECE-regulativ R87
om anvendelse af kørelys
E4-87R-00 0046 af KEMA BV Nederlandene

46
2 m
3 m
1x
4x
1x
1x
10x
1x
2x
3 Placering af Philips LED DayLight 4
2 Philips LED DayLight 4-sættets indhold
min.
250 mm
max.
1500 mm
Philips
min. 600 mm
Max. 10 ° Max. 10 °
Påbudt placering ifølge
ECE-regulativ 48
Philips LED DayLight 4-lygterne skal placeres
som vist på tegningen ovenfor.
Regulativ om vandret hældning
Philips LED DayLight 4-lygteenhederne
er specielt designet, så de opfylder regulativets
krav om max. 10° vandret hældningsvinkel
og passer til vognens facon.
4x

47
DA
4 Montering af Philips LED DayLight 4 på bilen
Monter beslaget
på bilen først, inden LED
DayLight 4-modulet sættes
fast i beslaget!
Montering af LED-lygterne ved hjælp af clipsebeslag
Nyttige oplysninger vedr. individuelt tilpasset montering af LED DayLight 4
1
2
Ø M5
120.5 mm
23.5 mm
Nødvendig plads
til montering af LED-lygten
Kontroller, at der er den nødvendige
plads til montering af den enkelte
lygte som anført ovenfor.
Eventuelt, skæres ud til den
nøjagtige størrelse (se ovenfor).
M5-gevindhullerne inde
i lygtekassen kan anvendes
til alle andre former for montering
.
Alt efter vognmodel kan den
individuelt tilpassede montering
udføres:
- med eller uden clipsebeslag
- med eller uden udskæring
i fladen.
1
1
2
2
3
3
4
1 Montering på vandret flade 2 Montering på lodret flade

48
5 Elektrisk tilslutning
Gode Råd inden montering af kontrolboks
Ledningen, LED-lygterne skal forbindes med,
kan identificeres:
1 Tænd positions/parkeringslyset
2 Træk forlygtens stik ud
3 Hold den orange kabelende skiftevis på
de enkelte tilslutninger, og kontrolboksen vil vise
det strømførende kabel (LED-lyset tænder).
Tilslut LED DayLight 4-lygterne i den på nedenstående diagram anførte rækkefølge:
7
2 m
2
3
1
stikkonnektor
6
Direkte
1
5
click
4
3 m
7
kontrolboks
Sort
Rød
Orange
Direkte stikkonnektor
-
3
Batteri
+
2
6

49
SU
1 Tärkeää
Me kiitämme sinua siitä, että
olet ostanut Philips LED
DayLight 4-valot, nämä
päiväkäyttöön tarkoitetut
ajovalomoduulit tekevät
ajamisesta turvallisen ja
mukavan kokemuksen.
Alkuperäiset Philipsvalaistustuotteet tarjoavat
korkeaa laatua, luotettavuutta
ja tarvitsemaasi tehoa.
Philips-takuu on voimassa
vain sillä edellytyksellä, että
tuotetta käytetään vain sille
tarkoitettuun käyttöön
käyttöohjeita noudattaen
ja takuukorvauksen vaatija
esittää alkuperäisen laskun,
josta selviää ostopäivä, myyjän
nimi ja tuotteen nimi, malli
ja valmistusnumero.
몇 Varaa aikaa lukeaksesi
Philips LED DayLight 4asennusoppaan ennen
Philips LED DayLight 4valojen asentamista
autoosi.
Me suosittelemme, että pidät
Philips LED DayLight 4asennusoppaan aina autossa
myöhempää käyttöä varten.
몇 Philips LED DayLight 4-valot syttyvät/sammuvat automaattisesti.
ON
OF
F
AUTO ON
OFF
AUTO OFF
AUTO OFF
ON
ON
OF
F
ON
+
OFF
+
ON
ON
OF
F
Tärkeää Jos auto on varustettu
automaattisella lyhyiden valojen
sytytystoiminnolla, se on poistettava käytöstä.
Ota tarvittaessa yhteys ammattilaiseen.
몇 Philips LED DayLight 4-moduulit on testattu ja hyväksytty noudattaen
päiväsaikaan käytettäviä ajovaloja koskevia määräyksiä ECE R87.
E4-87R-00 0046, tekijä KEMA BV Alankomaat

50
2 m
3 m
1x
4x
1x
1x
10x
1x
2x
3 Mihin voit asentaa Philips LED DayLight 4-valot
2 Philips LED DayLight 4-paketin sisältö
minimi
250 mm
maksimi
1500 mm
Philips
minimi 600 mm
10° maksimi 10° maksimi
Lainmukainen asennus
ECE-säädös 48
Varmista, että Philips LED DayLight 4-valojen
kiinnityspaikka vastaa yllä olevaa kuvaa.
Vaakatason kallistusmääräys
Jotta ajoneuvon muotoja noudatettaisiin
Philips LED DayLight 4-optiikka on kehitetty
erityisesti sitä ajatellen, että ne täyttävät
määräysten mukaisen 10° (maksimi)
vaakatason kallistuskulmavaatimuksen.
4x

51
SU
4 Miten asennat Philips LED DayLight 4-valot autoosi
Laita LED DayLight 4-
moduuli kiinnitysalustaan
vasta, kun se on asennettu
autoon!
Miten voit asentaa LED-moduulit käyttäen pihtikiinnitysalustaa
Hyödyllistä tietoa LED DayLight 4-valojen yksilöllistä asentamista varten
1
2
Ø M5
120.5 mm
23.5 mm
LED-moduulin asennusta
varten tarvittava tila
Varmista, että sinulla on yllä
mainittu tila kunkin moduulin
asentamiseksi.
Leikkaa, tarvittaessa
tarkka koko (katso yllä).
Voit käyttää suojattuja M5-aukkoja
moduulin rungon sisällä kaikkiin
muihin asennustyyppeihin.
Autosi mallista riippuen
yksilöllinen asennus voidaan
tehdä seuraavilla tavoilla:
- käyttäen pihtikiinnitysalustoja
tai ilman niitä
- voit leikata pintaa tai jättää
sen ehyeksi.
1
1
2
2
3
3
4
1 Asennus vaakatasolla 2 Asennus pystytasolla

52
5 Johdotusohjeita
Vinkki Ennen käyttörasian asentamista
Voit tunnistaa johdon, jonka tarvitset kytkeäksesi
LED-moduulit:
1 Kytke seisontavalot
*
(paikoitusvalot)
2 Irrota etuvalon liitin
3 Kosketa jokaista liitintä oranssin johdon
päällä, käyttörasia tunnistaa jännitettä sisältävän
virtajohdon (LED-valo syttyy).
Tee LED DayLight 4-moduulien johdotus noudattaen alla olevaa numeroitua toimenpidesarjaa:
*
Lähivalot SV, NO, FI
7
2m
1
5
click
4
3m
7
Käyttörasian
Musta
Punainen
Oranssi
Yksinkertainen liitin
-
3
Akku
+
2
6
1
2
3
6
Yksinkertainen
liitin

www.philips.com/automotive
©2011 Koninklijke Philips Electronics N.V.
All rights reserved.
created by hss france - 01.2011 - printed in Taiwan
min
250 mm
max
1500 mm
Philips
min 600 mm
EN R87 homologated
DE R87 zugelassen
FR Homologué R87
NL R87 gehomologeerd
ES Homologación conforme a R87
IT Omologato R87
PT Homologação R87
RU Утверждено в соответствии с R87
PL Homologacja R87
SV R87 godkända
NO R87-godkjent
DA R87 godkendt
SU R87-homologoitu
✁
Philips LED DayLight 4
EN Garage certificate
DE Werkstattzertifikat
FR Certificat du garage
NL Garagecertificaat
ES Certificado de taller
IT Certificato officina
PT Certificado da garagem
RU Гаражное свидетельство
PL Certyfikat warsztatu
SV Verkstadscertifikat
NO Verksted sertifikat
DA Værkstedscertifikat
SU Autokorjaamosertifikaatti
Road-legal
R48
Garage stamp here
 Loading...