

Page 1
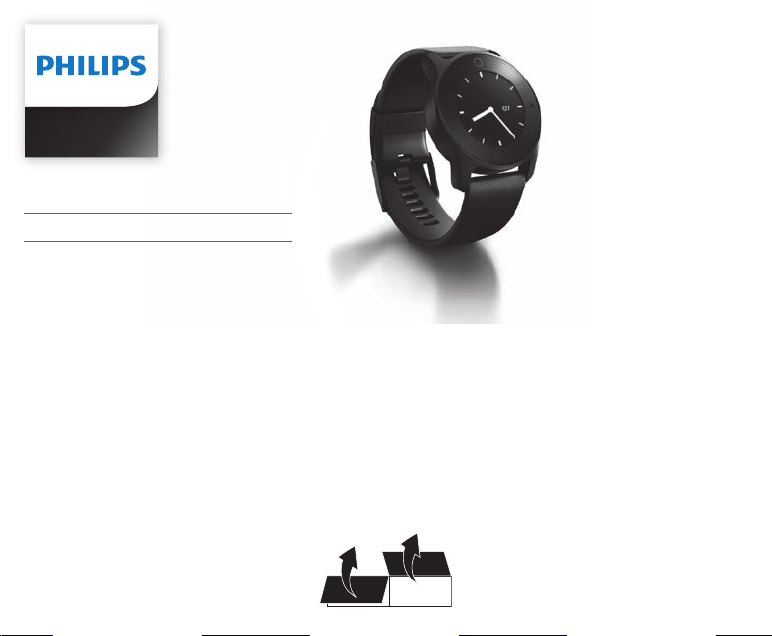
DL8790
EN User manual
Page 2
1
1
2
3
4
5
7
6
Page 3

Contents
Introduction
Intended use
Operating principle
General description
Important safety information
Contraindications
Reactions
Warning
Caution
GENERAL RECOMMENDATIONS
Compliance with standards
Preparing for use
20
10
18
9
11
11
12
13
17
21
7
8
ENGLISH
Page 4

Charging
21
Battery charge indications 23
Pairing and personalizing the Philips health watch 24
Sync and store personal health data in the app 26
Wearing the health watch
28
Replacing the strap 29
User interface
30
User interface icons 31
Main menu 35
Shortcuts menu
Locking and unlocking the screen
Heart rate
36
38
38
Heart rate zones 42
4 5
Page 5

Sleep
Food intake
Activity
Alarm, stopwatch and timer 48
Settings
Cleaning and storage
Ordering accessories
Recycling
Removing the rechargeable battery
Warranty and support
Troubleshooting
44
45
46
49
54
55
55
ENGLISH
52
52
53
Page 6

Compliance information
69
Electromagnetic emissions and immunity 69
EMC Guidance 69
Declaration – electromagnetic immunity 72
Declaration – electromagnetic immunity 76
Recommended separation distances between portable and mobile
79
RF communications equipment and the Medical device
Trademarks
82
BlueTooth wordmark 82
App Store and iPhone 82
Google Play and Android
Explanation of symbols
Specications
6 7
82
83
88
Page 7

Introduction
Congratulations on your purchase and welcome to Philips! To fully benet from the
support that Philips oers, register your product at www.philips.com/welcome.
The Philips health watch empowers you to live a healthier life by continuously tracking
activity, calorie burn, sleep habits, heart rate and other key metrics of your cardio
condition, and more. The watch can wirelessly connect to a smartphone. An always
ON screen and battery charge of up to 4 days allows you to wear the watch every day
and night. You can monitor your metrics and get personalized guidance with the Philips
HealthSuite health app.
ENGLISH
Page 8

Intended use
The medical purpose is to measure and track the vital physiological parameter heart
rate and movement, and derive resting heart rate and energy expenditure of adults at
risk of getting a lifestyle related chronic disease or adult patients suering lifestyle related
chronic disease, specically cardiovascular disease and diabetes type 2. Investigation
of these parameters is used in the assessment of the physiological state of a person
and their daily physical activity level. For people at risk of these lifestyle related chronic
diseases or patients with a pre-existing condition, the continuous monitoring of these
parameters can give insight in changes of heart rate and daily physical activity.
The non-medical purpose is measurement of: steps, heart rate recovery, resting
respiration rate and sleep patterns, and providing: automatic activity recognition
(cycling, running, walking), a heart rate zone indication, a VO2max estimate and
sedentary behavior alerting, for wellness purposes.
8 9
Page 9

Operating principle
The Philips health watch is a wrist-worn device for 24/7 home use (indoor and outdoor).
The device uses a tri-axial accelerometer to measure motion and green Light-Emitting
Diodes (LEDs) and a photodiode to create a photoplethysmogram (PPG).
The accelerometer output and the PPG-signal are analyzed to determine heartbeat,
activity type, steps taken, and are used as input for estimation of energy expenditure
and other parameters.
ENGLISH
Page 10

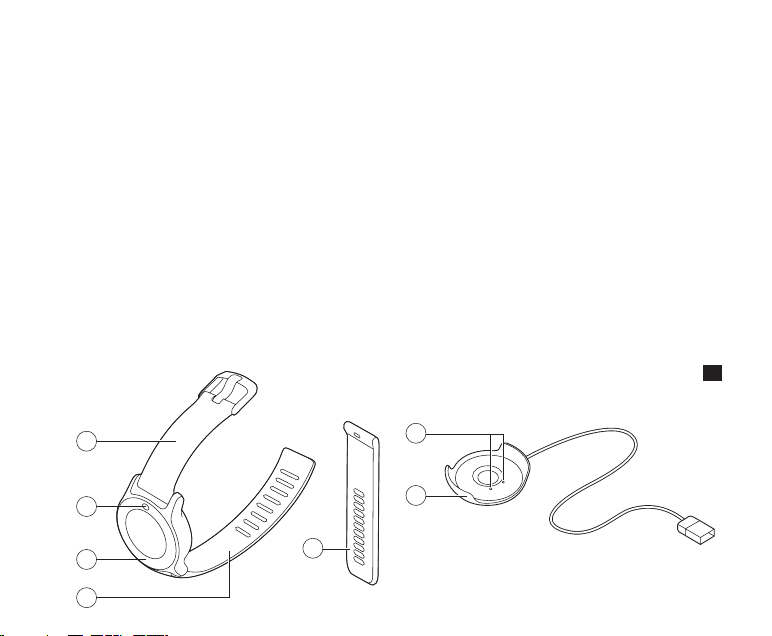
General description
An overview image of the Philips health watch can be found on the fold out page of this
user manual.
1 Wrist band with buckle
2 Menu button
3 Touch ring
4 Large wrist band (M/L)
5 Small wrist band (S/M)
6 USB charging cradle
7 Charging pins
10 11
Page 11

Important safety information
Read this important information carefully before you use the device and save it for
future reference.
Contraindications
Do not use this device if:
- You have skin problems, including wounds, sores and burns, in the wrist area as this
can result in prolongation or aggravation of these symptoms.
ENGLISH
Page 12

Reactions
It is possible that you can experience adverse reactions due to wearing a device that
stays in contact with your skin for long periods at a time. These reactions can include:
- Skin reactions to pressure or friction of the device against the skin.
- Skin reactions to dirt or moisture trapped between the device and the skin.
- Allergic reactions to the materials used; stainless steel, plain plastic or thermoplastic
polyurethane (TPU).
If you experience such reactions remove the watch from your wrist, stop using the watch
and give your skin a couple of days to rest. Before refastening the watch, be sure to read the
instructions on how to wear the watch mentioned in the chapter ‘Wearing the health watch’.
If you continue to experience reactions consult your doctor and notify Philips Consumer Care.
12 13
Page 13
Warning
- Only use a double insulated IEC60950-1 class II USB-adapter or
USB-port for charging.
Check if the USB-adapter has the symbol for double insulation: .
If you don’t use a double insulated IEC60950-1 class II USB-adapter,
the USB-adapter could malfunction and cause injury.
- Consult your doctor prior to starting an exercise regime if you have heart
disease, kidney disease and/or diabetes mellitus type 1 or 2.
- Do not start or continue exercising before consulting your doctor if you
experience any of the following signs or symptoms:
- feeling dizzy, nauseated or about to faint
- feeling unusual fatigue with usual activities,
- feeling pain in your: chest, neck, jaw or arms,
ENGLISH
Page 14

- feeling that your heart is beating too hard or fast,
- having shortness of breath during rest/mild exertion, when lying at or during
the night,
- having a known heart murmur,
- having swollen ankles.
Exercising while experiencing any of these symptoms might increase the risk of heart
problems.
- It is important to always listen to your body rst, instead of only relying upon
measurements that the watch provides.
- If you are taking medicines that lower your maximum heart rate (e.g. for high blood
pressure), consult your doctor. Ask your doctor what your target heart rate zone should be.
14 15
Page 15

- If you have a heart condition or you are in cardiac rehab, talk to a healthcare
professional about what exercises you can engage in and what your target heart rate
should be. Exercising with a too high heart rate could cause health problems, like
temporary chest pain, heart overload or exhaustion.
- Do not share the device. The Philips health watch is designed for personal use only.
The watch measures several health parameters, which are updated over time and
are tailored to you. Switching the watch between dierent people would lead to
inaccurate measurements.
- Do not modify this equipment. This may result in hazardous situations.
Make sure the device is in proper working condition before use.
- Only use the charging cradle and detachable parts authorized by the manufacturer.
The use of unauthorized parts or accessories may cause injury or damage to the device.
ENGLISH
Page 16

- To reduce the risk of skin irritation please follow these instructions:
- Clean the device and skin underneath the device regularly and after each sports
session. Take the watch o once in a while to give your skin some rest.
- Always dry the device when it has become wet.
- Do not wear the strap too tight, to ensure it is still comfortable to wear.
- Follow the instructions in chapter ‚Wearing the health watch‘.
- Keep the device out of reach of infants, children or pets, since inhalation or
swallowing of small parts can be dangerous or even fatal.
- Keep the device away from re and heat sources. The internal batteries can
overheat and may explode or leak, causing re or explosion.
- During pregnancy, always follow your doctor‘s advice with regards to weight
management, exercise type, frequency, duration, intensity and rest intervals.
Be aware that the heart rate zone indicator is not applicable when you are pregnant.
16 17
Page 17

Make sure to update your weight in the app on a regular basis. Failure to do so might
result in inaccurate energy expenditure (calorie burn) estimation.
- Sleep algorithms should not be used for diagnosis or treatment in case of sleep
problems. They have not been validated for people with sleeping disorders.
- Energy expenditure algorithms have not been validated for people with impaired
gait. These users should not use the total and active calories burned as shown on the
device as a reference for their actual calories burned.
Caution
- Do not use the device near strong electrical or magnetic elds,
for example magnets, radio transmitters, microwave ovens. This could cause
measurement errors.
ENGLISH
Page 18

- Use this device under the right environmental conditions as indicated in this user
manual. If not, this could aect the performance and lifetime of the device and
measurement results.
- If you have any problems with this device, such as setting up, malfunction,
maintenance, please contact Philips Consumer Care or visit www.philips.com/support.
- If you have doubts about the accuracy of the measurements by the watch,
stop using the watch and read the troubleshooting section. If you cannot nd a
solution there, please contact Philips Consumer Care or visit www.philips.com/
support. Accurate measurement relies on three key factors: Placement of the sensor
in direct contact with the skin, transmittance of light through the skin, and sucient
blood ow through the skin. There are conditions where accurate optical heart rate
measurement is not possible.
18 19
Page 19

GENERAL RECOMMENDATIONS
- Read this user manual carefully and always follow the instructions.
- Do not use this watch for any other purpose than what it is intended for.
- Make sure the device is in proper working condition before use.
- Do not wear the device when showering, bathing, swimming or scuba diving, as this
may damage the device. The device is water resistant and is protected against rain
and sweat.
- Exercising at the right intensity is important to improve your condition. The general
recommendation for physical activity is to have at least 150 minutes of moderate
intensity activity per week. This can made up of segments of at least 10 minutes
duration. Additionally, it is important to note that even if you cannot achieve the
recommended amount of physical activity, being physically active to a lesser amount
(e.g. 90 minutes per week) is better than being inactive.
ENGLISH
Page 20

- To reduce chances of injury during exercise follow these recommendations:
- Wear appropriate clothing and protective gear
- Always perform proper warm-up and cool-down procedures
- Slowly progress your activity level; plan 2-3 months to gradually increase exercise
duration and intensity. If you are not very active, it is a good idea to start with
taking brisk walks on a regular basis.
- Avoid vigorous to near maximal activity if you are not very active or unaccustomed
to this.
Compliance with standards
- This device complies with all applicable standards and regulations regarding
exposure to electromagnetic elds.
- This is a Class IIa medical device. It meets the requirements of Medical Device
Directive MDD 93/42/EEC and 2007/47/EC.
20 21
Page 21

Preparing for use
Charge the device prior to rst use (see ‚Charging‘). A mobile device with the Philips
HealthSuite health app installed is required to be able to use the Philips health watch.
It is not possible to use third party apps. See the following chapters for more explanation
on how to setup your account.
Note: The watch does not have a power-button. The device will be activated when it is
charged and is always on unless the battery is depleted.
Charging
The device has a built-in rechargeable battery. Use the charging cradle supplied to charge
the battery. Only use a double isolated IEC60950-1 class II USB-adapter for charging.
Check if the adapter or the device with USB-port has the symbol for double isolation.
ENGLISH
Page 22

When the battery is empty, the battery fully charges in approximately 90 minutes.
1 Place the device into the charging cradle.
Note: Check whether the charging pins in the charging cradle are aligned with the
charging pads on the watch.
2 Plug the USB cable in a USB-port of a compatible charger, such as a computer or an
adapter. When the watch starts charging, it will briey vibrate.
3 When the battery is fully charged, the watch will display the battery charge indicator
with 100%.
Tip: Charge your device during a meal or any other time when you are not active.
22 23
Page 23

Battery charge indications
Battery symbol Battery charge indication
77%
Battery is charging
Battery is almost empty and requires charging
When initially charged properly, fully charged batteries can last for approximately four
days. When the battery is almost empty and requires charging, the battery icon is shown
on the clock screen. When the battery is empty, the display turns o and no further data
will be stored.
Note: Tap on the right or left side of the touch ring in the clock screen to see your battery
status.
ENGLISH
Page 24

Pairing and personalizing the Philips health watch
The device is equipped with Bluetooth®. You can sync your personal health data to iOS®
and AndroidTM smartphones and tablets using Bluetooth wireless technology. Download
the Philips HealthSuite health app from the App Store or Google Play. Use the search
term ‚Philips HealthSuite health‘. The app is available for iOS® 8.0+ and AndroidTM 4.4.2+
operating systems.
It is very important that you provide the right prole data in the app to enable
accurate measurements.
1 Place the health watch in the charging cradle and charge the device.
2 Download the Philips HealthSuite health app on your mobile device.
3 Open the app and the setup wizard will guide you through the steps to create a user
24 25
prole. In the page ‚Add a device‘ select the Health watch from the list of devices.
Page 25

4 Tap the ‚>‘ icon on the watch to enable pairing mode.
5 When connected via Bluetooth, the app will show a pop-up asking you to pair.
6 Make sure the app is active and Bluetooth is enabled when pairing is in progress.
- Keep the mobile device and the health watch within syncing range
(no more than 6 feet / 2 meters from each other, in the same room).
- Do not close the app and do not turn Bluetooth o while pairing is in progress.
When the health watch is successfully paired with your mobile device, the rmware of
the watch will be updated to match the local language, time, prole settings and the
latest features. The watch can now automatically sync your personal health data to your
mobile device via Bluetooth.
Pairing the health watch to your mobile device is only necessary once, unless you want
to pair to another smartphone.
ENGLISH
Page 26

If you already have another Philips health connected device, go to the settings of the
app and add a new device.
Tip: If the pairing connection is lost and you want to pair the same phone again,
see chapter ‚Troubleshooting‘ for more information.
Sync and store personal health data in the app
Your personal health data is stored in Philips‘ cloud-based platform and displayed in
the Philips HealthSuite health app. Only when the health app is active (or active in the
background) and Bluetooth is enabled on your smartphone, your personal health data
can be synchronized.
1
Open the Philips HealthSuite health app and activate Bluetooth on your mobile device.
Keep the mobile device and the health watch within syncing distance
(no more than 6 feet / 2 meters from each other, in the same room).
26 27
Page 27

2 Once successfully connected, the measurement results are synced to the Philips
HealthSuite health app.
If the sync is successful, the measurement results are displayed in the Philips
HealthSuite health app, where you can check your personal health data.
Note: Some measurements take up to 24 hours to begin to display data.
Note: If you are unable to sync, see chapter ‚Troubleshooting‘ for more information.
Firmware update: the app will notify you when new rmware of the health watch is
available and will ask you whether you want to update it.
ENGLISH
Page 28

Wearing the health watch
Always wear the Philips health watch on the outside of your wrist, in direct contact with
your skin (Fig. 3). Make sure the watch is not on your wrist bone (Fig. 2).
The straps need to be tight, but comfortable around your wrist to ensure a correct heart rate
measurement. If you feel any discomfort due to the straps, give your skin some rest by not wearing
the watch for a short period of time. When refastening the watch, try loosening the strap a notch.
If you continue to feel discomfort after a short period of rest and loosening the strap, remove
the device and consult Philips Consumer Care and/or your doctor.
Note: Please check and if necessary, change the setting ‚handedness‘ and ‚wearing position‘
in the device settings menu in the HealthSuite health app. This is to indicate if you are left or
right handed and the side that you wear your watch on.
28 29
Page 29

Remove the watch at least once a day (e.g. before or during a meal) to clean your wrist/arm
with some mild soap and water. Clean the watch regularly, especially if your watch becomes
dirty or wet during an activity. Make sure that your watch and arm are dry before refastening
the watch to reduce the risk of skin irritation. If you use skin care products, do so sparingly on
the areas of the skin that are covered by the watch. The watch is splash proof with a 1 atm
rating, which allows you to use it outdoors in the rain.
Replacing the strap
The Philips health watch comes with a second strap that accommodates most common small
size wrists. The straps have quick release pins which allow for easy change of straps.
ENGLISH
Page 30

If you want to use the smaller strap:
1 Turn the watch upside down.
2 Release the pin of the strap (Fig. 4).
3 Gently remove the strap.
4 Position the watch correctly, lock one side of the new strap in the watch, unlock the
of the new strap and lock the strap in the watch (Fig. 5).
pin
User interface
The Philips health watch has a touch sensitive ring around the display.
You can use the touch sensitive ring to navigate the menus.
30 31
Page 31

User interface icons
Symbol Description Explanation
Heart Heart rate menu and indication of heart rate
detection during measurement.
Bed Sleep
Fork and knife Food intake
Clock Menu icon for the stopwatch, timer and
alarm menu and icon for the stopwatch.
ENGLISH
Page 32

Symbol Description Explanation
Hourglass Timer function
Bell Indicates alarm is set
Cogwheel Settings
Battery status Indicates status of battery
Lock Indicates display is locked
32 33
Page 33

Symbol Description Explanation
Walking person Indication of the activity walking
Running person Icon used for the activity menu and
indication for the activity running
Cycling Cycling activity
ENGLISH
Fire Total amount of burned calories (total energy
expenditure).
Fire and active person Amount of burned calories through sustained
physical activity (active energy expenditure)
Page 34

Symbol Description Explanation
Steps Steps taken
Running person with
Active minutes
clock
Check mark Indicates successful operation, e.g.
for pairing or rmware update.
Exclamation mark Indicates an error, e.g. during
pairing, syncing or rmware update
34 35
Page 35

Main menu
The clock screen of the watch shows the current time that it synced with your
smartphone. To access the main menu, tap on the menu button (Fig. 6). The main menu
has 6 dierent menu options which provide information about your activity, heart rate,
sleep, time functions and settings. You can manually add information about your food
intake in the dedicated menu section.
Tap on the touch ring near the icon of the menu option you want to access (Fig. 7).
To return to the main menu, tap on the menu button. From the main menu, return to the
clock screen by tapping the menu button again.
The watch does not have a touch screen, only the ring around the display responds to
touch. The touch interface does not function when it is wet. Wipe the glass dry to enable
it again.
ENGLISH
Page 36

Shortcuts menu
Use the shortcuts menu to go straight to your current heart rate, today‘s burned
kilocalories (active and total energy expenditure), steps taken and active minutes.
In your clock screen, swipe left or right on the lower part of the touch ring (Fig. 8) to
navigate through the shortcuts menu options.
Active energy expenditure
Active energy expenditure shows today‘s amount of burned calories through sustained
physical activity.
Total energy expenditure
Your total energy expenditure is how many calories you have burned overall today.
This number includes your active energy expenditure as well as the calories your body
burns just to function normally.
36 37
Page 37

Steps
Displays today‘s amount of steps.
Active minutes
This is the time, in minutes, that you‘ve spent being active today. According to the World
Health Organisation, your body only starts feeling the eects of increased activity after you‘ve
been moderately active for 9 minutes, so we start tracking your active minutes from then.
If you have set daily goals via the Philips HealthSuite health app, you can also track your
progress here. A progress bar around the outside of the display lets you see how close
you are to reaching your goal (Fig. 9).
Kilocalorie (kcal) is a measurement for energy expenditure as well as for energetic value
of nutrients.
ENGLISH
Page 38

Locking and unlocking the screen
The device automatically returns to the clock screen and locks after 60 seconds of
inactivity. To unlock the screen, quickly tap the lower part of the touch ring three times
(Fig. 10). To lock a screen and prevent the watch from returning automatically to the
clock screen after 60 seconds, quickly tap three times on the lower part of the touch
ring at the 6 o‘clock position (Fig. 11). You will feel a vibration and see a lock appear on
the screen. To unlock, tap the lower part of the touch ring three times again.
Heart rate
Select the heart rate in the main menu to see your current heart rate. Swipe left or right
to select heart rate, resting heart rate or heart rate recovery. Heart rate, resting heart and
heart rate recovery are measured in beats per minute.
38 39
Page 39

Heart rate
Your current heart rate is displayed in beats per minute (bpm).
Resting heart rate
Resting heart rate is the rate that your heart beats at when you are at rest (displayed
as rhr). Resting heart rate values can dier from one person to another. However,
changes in resting heart rate can be an indication of changes in your tness level.
Active people often have a lower resting heart rate because their heart muscle is in
better condition. It will take at least 24 hours of wearing the watch to get a rst resting
heart rate measurement.
ENGLISH
Page 40

Heart rate recovery
Heart rate recovery (HRR) is the dierence in heart rate at peak exercise and the rate as
measured after a one minute recovery period. The watch will measure HRR when you
are exercising with your heart rate being at least 80% of your maximum heart rate for
a minimum of ten minutes. The measurement starts when a change from high intensity
activity (running or cycling) to low intensity activity (walking or other) is registered.
The watch can detect these activities automatically or you can indicate them yourself
(see ‘activity recognition’). To obtain an estimate of HRR sit down immediately after
stopping your activity and then rest for at least 2 minutes to let your heart rate recover.
To make HRR estimates better comparable over time, try to estimate HRR in similar
settings with respect to: time of day, type of activity and activity duration.
40 41
Page 41

Important: Do not try to estimate your HRR if you are not very active or unaccustomed
to high intensity activity. To reduce the chance of injury during exercise please
read the information and follow the general recommendations (see ‚GENERAL
RECOMMENDATIONS‘).
Heart rate measurement
Optical heart rate measurement has been shown to provide valid estimates of heart rate
for most people under most normal conditions. However, for accurate measurement it is
reliant on three key factors:
- Placement of the sensor in direct contact with the skin.
- Transmittance of light through the skin.
- Sucient blood ow through the skin.
ENGLISH
Page 42

Note: When experiencing problems with your heart rate measurements, check if your
problem is already mentioned in the troubleshooting chapter or contact your Philips
Consumer Care center.
Heart rate zones
Heart rate zones span the range between your resting heart rate and your maximum
heart rate and can help you in identifying the intensity of your exercise.
Your heart rate zone is displayed in your heart rate screen. The dot indicates in which
heart rate zone you are exercising. If you have set a target heart rate zone in the app,
this zone is displayed in black (Fig. 12).
- Heart rate zone 1 - Light:
This zone mostly covers regular daily activities such as leisurely strolls, moving
around or performing easy tasks within your house or workplace.
42 43
Page 43

- Heart rate zone 2 - Moderate:
Activities that get your heart rate to zone 2 include brisk walking, hiking, leisurely
biking and swimming. During such moderate intensity activities, your breathing is
often deep and you usually start to sweat after ten minutes.
- Heart rate zone 3 -High:
Training in this zone will help you get tter. It may also improve your cardiovascular
system and help you control your weight.
- Heart rate zone 4 - Anaerobic:
You’ll be in this highest zone only for brief periods of time, as anaerobic exercise
consists of bursts of high-intensity activity such as sprinting, interval training and
heavy weight-lifting.
ENGLISH
Page 44

Sleep
The Philips health watch is designed to also be worn at night to allow automatic sleep
tracking. If you are interested in collecting more sleep related information (for example
the time to fall asleep), you can manually start the sleep mode when you intend to fall
asleep, and stop the sleep mode at the moment of waking up in the morning.
To activate sleep mode select Sleep from the menu and press the play icon. The watch
will automatically estimate the moment when you actually fall asleep. Press the stop
icon when you wake up without the intention to resume sleep.
If you wake up in the middle of the night and get out of bed, you do not have to turn o
sleep mode, the watch will automatically account for this. In case you have also set an
alarm, stopping the alarm will also indicate that you have woken up and stop sleep mode.
Data about your sleep will appear in the app within a few hours after you have woken up.
Note: Activation of sleep mode deactivates Bluetooth and sedentary alerts.
44 45
Page 45

Food intake
This option allows you to manually track your calorie intake in kilocalories directly on
your watch.
Select the food option in the main menu. You have two options:
- The rst screen shows Food. Enter the Food intake menu by tapping the ‚>‘ icon.
Tap the arrows at the bottom of the screen to select breakfast, lunch, dinner, drinks
or snacks to enter your food intake. Indicate the amount of food by selecting small,
normal or large (an average number of calories is assigned).
- Swipe to the second page in the food menu which shows the calories you‘ve logged
today (in kcal). In this screen, tap on the ‚+‘ icon to add calories manually. Tap and
hold + or - to enter the desired amount of calories. Then select the check icon to
conrm the amount of calories.
ENGLISH
Page 46

Tip: In the app you can select a type of food and corresponding amount of calories in
the food database.
Activity
The Philips health watch can help you gain insight into your activity level by measuring
several parameters such as: calorie burn, steps, active minutes, sedentary behavior, heart
rate and heart rate zones. For explanation about heart rate zones, see ‚heart rate‘ chapter.
Activity recognition
The Philips health watch can recognize the activities walking, running and cycling and
start and stop measurements itself. You can also start and stop measurements manually
by selecting the activity option from the main menu.
46 47
Page 47

If you want to start your activity manually, you can tap the ‚play icon‘ in the walking, running
or cycling screens in the activity menu. You can stop or pause the activity when desired.
During your activity you can see information about the activity: the activity duration, your
current heart rate and heart rate zone, number of calories burned and steps (in case of
walking and running).
Note: You cannot manually stop activities on the device that were started automatically.
In User settings you can choose if you see activity screens or current time when an
activity is detected.
Sedentary behavior
To counter the negative eect of prolonged periods of sitting, the sedentary behavior
feature will remind you to move with a short vibrating alert. You can change the time
interval when the sedentary alert will vibrate in the Philips HealthSuite health app.
ENGLISH
Page 48

Alarm, stopwatch and timer
Tap on the Clock icon in the menu. Swipe left or right to select the alarm, stopwatch or timer.
- Alarm: you can set the hours of the alarm time by tapping the + and - icons. Tap
the check icon to conrm. Then set the minutes by tapping the + or - icons. Tap the
check icon again to conrm and set the alarm. When the alarm goes o, the device
vibrates until you stop the alarm by tapping the stop icon. You can tap the snooze
icon to pause the alarm for 9 minutes.
- The stopwatch starts when you tap on the touch ring near the play icon and stops
when you tap on the stop-button.
- Timer: you can set the hours of the timer by tapping the + and - icons. Tap the check
icon to conrm. Then set the minutes by tapping on the + or - icons. Tap the check
icon again to conrm. Then tap the play icon to start the timer. The timer can be
paused or stopped by tapping on the pause or stop icon.
48 49
Page 49

You can select analog or digital clock in the settings menu.
Note: You cannot change the time on the device. The time is synced with your mobile
device settings when you connect the watch to your mobile device.
Settings
Select settings from the main menu. Settings can be adapted to your preference.
Swipe left or right at the bottom of the touch ring and tap to start to set user settings,
to select ight mode, regulatory information or to reset the device to the factory settings.
- User settings: Swipe left or right to select the active view, to invert screen colors or
select the type of clock displayed (analog or digital) and to set up backlight and
vibrations.
ENGLISH
Page 50

- Active view: When this function is enabled, the screen goes to the activity screen
when an activity is detected.
- Invert colors: Select either black or white as your standard screen color.
- Clock: Select analog or digital display of the clock time.
- Backlight: When you enable backlight, the display lights up briey when you
touch the touch ring to improve visibility.
- Vibration: Turn vibration on or o. The alarm will still vibrate in case vibration is
turned o.
- Flight mode: When you select the ight mode, Bluetooth automatically switches o.
Select ‚turn o ight mode‘ to return to normal mode.
- Regulatory information and serial number.
50 51
Page 51

- Unpair: This function unpairs the health watch and smartphone. Use this function if
you want to pair the watch with a new phone or with your current phone in case of
syncing issues. Pairing to the same phone might require to shut down the app and
delete the health watch from your smartphone‘s Bluetooth settings rst.
- Factory reset: This will reset your watch and will unpair your device with the Philips
HealthSuite health app. This will also delete all your unsynchronized data from the
Philips health watch. All settings will switch to default settings and the device will
switch o. To activate the watch again, place it in the charger.
ENGLISH
Page 52

Cleaning and storage
To clean the watch, wipe the surface of the device with a dry or slightly damp cloth
with water or mild detergent. Clean the charging cradle with a dry cloth. Never use
compressed air, scouring pads, abrasive cleaning agents or aggressive liquids such as
petrol or acetone to clean the device. This could damage the device.
Store the device in a dry, dust-free place away from direct sunlight or other heat
sources. Avoid surroundings with uctuating temperatures.
Ordering accessories
To buy accessories or spare parts, visit www.shop.philips.com/service or go to your
Philips dealer. You can also contact the Philips Consumer Care Center in your country
(see the worldwide guarantee leaet for contact details).
52 53
Page 53

Recycling
- This symbol means that this product shall not be disposed of with normal household
waste (2012/19/EU) (Fig. 13).
- This symbol means that this product contains a built-in rechargeable battery which
shall not be disposed of with normal household waste (2006/66/EC) (Fig. 14).
We strongly advise you to take your product to an ocial collection point or a
Philips service centre to have a professional remove the rechargeable battery.
- Follow your country’s rules for the separate collection of electrical and electronic
products and rechargeable batteries. Correct disposal helps prevent negative
consequences for the environment and human health.
ENGLISH
Page 54

Removing the rechargeable battery
Note: We strongly advise you to take your product to an ocial collection point or a
Philips service center to have a professional remove the battery.
The battery cannot be removed from the watch. Follow the procedure below to dispose
of the battery.
1 Remove the straps from the watch.
2 Make sure the rechargeable battery is empty.
3 Dispose of the watch housing as described in chapter ‚recycling‘.
54 55
Page 55

Warranty and support
If you need information or support, please visit www.philips.com/support or read the
separate international warranty leaet.
If you need more information about the app, please visit www.philips.com/
healthprograms
Troubleshooting
This chapter summarizes the most common problems you could encounter with the
appliance. If you are unable to solve the problem with the information below,
visit www.philips.com/support for a list of frequently asked questions or contact the
Consumer Care Center in your country.
You can also visit the help section in the app.
ENGLISH
Page 56

Problem Possible cause Solution
Unable to nd
the Philips
HealthSuite
health app in the
A typo in app store search
is made.
Try to write the name 'HealthSuite'
correctly in your app store or go to
www.philips.com/healthprograms/
for further instructions.
app store.
Unable to
download app.
Pairing was
unsuccessful.
56 57
Smartphone is not
compatible with the app.
Incorrect OS.
Bluetooth is switched o on
your phone.
The app only works with iOS and
Android. Make sure iOS 8.0+ or
Android 4.4.2+ is installed on your
mobile device.
Activate Bluetooth on
smartphone.
Page 57

Symbol Description Explanation
Hold device close to mobile
phone and try again.
Pairing was not enabled on
the health watch.
Devices are not within range
or other devices interfere.
Battery of the device is too
low.
Make sure to enable pairing on
the health watch by tapping the
'>'-button in the pairing screen.
Make sure no other devices are
nearby to avoid interference.
Make sure the battery of the
device is charged.
ENGLISH
Page 58

Symbol Description Explanation
Pairing again with
the same phone
or tablet is not
possible.
On the OS of the phone,
in the app or in the health
watch the former pairing
bond still exists.
If you want to pair to the same
phone again follow these steps
below:
For iOS: 1. Go to Settings on your health
watch and choose the unpair
function.
2. In the Philips HealthSuite health
app, go to Health Watch in
the Settings menu and choose
'Remove device'.
58 59
Page 59

Symbol Description Explanation
3. Shut down the app.
4. Remove the Philips health watch
from the Bluetooth settings menu
of your smartphone.
5. Open the Philips HealthSuite
health app and pair again.
For Android: 1. Go to Settings on your health
watch and choose the unpair
function.
ENGLISH
Page 60

Problem Possible cause Solution
2. In the Philips HealthSuite health
app, go to Health Watch in
the Settings menu and choose
'Remove device'.
3. Try to pair again.
Syncing does not
work.
60 61
Bluetooth is o on your
phone or health watch.
Devices are not within
range.
Activate Bluetooth on your
smartphone and make sure ight
mode is not activated on the health
watch.
Hold device close to mobile phone
and try again.
Page 61

Problem Possible cause Solution
Activate
Bluetooth on
your smartphone
and make sure
ight mode is not
activated on the
health watch.
Device is not
paired.
Touch interface
is not working.
Device is not paired. Make sure device is properly paired.
(see 'Preparing for use')
Battery of the device is too
low.
Make sure the battery of the device
is charged.
The screen is locked. Unlock the screen by tapping three
times on the bottom of the touch
ring.
ENGLISH
Page 62

Problem Possible cause Solution
The device does
not respond or
the display is
dark and the
device seems
switched o.
The battery is empty. Put the device in the charging
cradle and connect to a power
socket. Wait until the device is fully
charged.
There is an internal error. If the device fails to charge or
the device still does not respond,
contact the Philips Consumer Care
Center in your country (see the
worldwide guarantee leaet for
contact details).
62 63
Page 63

Problem Possible cause Solution
The glass of the
device is broken.
The watch was dropped. Contact the Philips Consumer
Care Center in your country (see
the worldwide guarantee leaet
for contact details).Do not use the
device when the glass is broken.
ENGLISH
Page 64

Problem Possible cause Solution
Heart rate signal
is not showing.
Strap is not fastened tight
enough around your wrist.
Make sure the watch is worn
correctly (see 'Wearing the health
watch'). Indicate the side you are
wearing the watch on in the app.
In the app you can also select if
your wearing side is your dominant
hand.
Personal settings are
incorrect in the app.
Update and correct your personal
settings in the app.
Watch or skin is not clean. Clean the device and your skin
under the device.
64 65
Page 65

Problem Possible cause Solution
In doubt about
accuracy. /
My device is
not measuring
correctly.
Direct contact with the skin
can be lost if e.g. the watch
is worn too loosely, when
the strap is positioned over
the wrist bone or when
there is a lot of hand/wrist
movement.
Make sure to position the watch
correctly (see 'Wearing the health
watch') and provide a snug but
comfortable t. If this does not x
the issue, try re-positioning the
watch at bit higher up on the arm
or on the other arm. (if you place
the watch on the other arm, do
not forget to change the watch
placement setting in the app).
ENGLISH
Page 66

Problem Possible cause Solution
Blood ow in the skin can
be impacted by increased
pressure on the small blood
Try loosening the strap a notch to
relieve some pressure, but make
sure the watch still retains a snug t.
vessels in the skin (e.g.
when the watch strap is too
tight).
Blood ow in the skin can
be temporarily reduced
during warm-up exercises
as more blood is directed to
the muscles.
66 67
Disregard inaccurate measures
during warm-up exercises and
provide some time for the blood
ow to the skin to adjust to the
exercising conditions.
Page 67

Problem Possible cause Solution
Blood ow in the skin can
be temporarily reduced
when going outside when it
is very cold as more blood is
directed to the body’s core.
Try wearing long-sleeved clothing
to cover the watch and starting
the measurement inside. Disregard
inaccurate measurements during
the rst couple of minutes and
provide some time for the blood
ow to the skin to adjust to the
exercising conditions.
ENGLISH
Page 68

Problem Possible cause Solution
Transmittance of light
through the skin can be
inuenced by stark contrast
in pigmentation of the skin
(e.g. due to a pattern in a
tattoo). This could result in
Try re-positioning the watch at bit
higher up on the wrist or on the
other wrist (if you place the watch
on the other arm, do not forget
to change the watch placement
setting in the app).
inaccurate optical heart rate
measurement.
68 69
Page 69

Compliance information
Electromagnetic emissions and immunity
The device is approved according to EMC safety standard EN 60601-1-2. It is designed
to be used in typical domestic environments.
EMC Guidance
- The device needs special precautions regarding EMC and needs to be installed and
put into service according to the EMC information provided in the accompanying
documents.
- Wireless communications equipment such as wireless home network devices, mobile
phones, cordless telephones and their base stations, walkie-talkies can aect this
equipment and should be kept at least a distance d = 3.3 m (11 ft) away from the
equipment.
ENGLISH
Page 70

Note: As indicated in IEC 60601-1-2:2007 for ME equipment, a typical cell phone with a
maximum output power of 2 W yields d = 3.3 m (11ft) at an immunity level of 3V/m.
Declaration – Electromagnetic emissions
Guidance and manufacturer’s declaration – electromagnetic emissions.
The device is intended for use in the electromagnetic environment specied below.
The customer or the user of the device should assure that it is used in such an
environment.
70 71
Page 71

Emissions test Compliance Electromagnetic environment
– guidance
RF emissions CISPR 11 Group 1 The device uses RF energy only for
RF emissions CISPR 11 Class B The device is suitable for use in all
Harmonic emissions
IEC 61000-3-2
Voltage uctuations/ icker
emissions IEC 61000-3-3
Not applicable
Not applicable
its internal function. Therefore, its
RF emissions are very low and are
not likely to cause any interference
in nearby electronic equipment.
establishments, including domestic
establishments and those directly
connected to the public low
voltage power supply network
that supplies buildings used for
domestic purposes.
ENGLISH
Page 72

Declaration – electromagnetic immunity
Guidance and manufacturer’s declaration – electromagnetic immunity.
The device is intended for use in the electromagnetic environment specied below.
The customer or the user of the device should assure that it is used in such an environment.
IMMUNITY test IEC 60601 test
level
Electrostatic
discharge (ESD) IEC
61000-4-2
72 73
± 6 kV contact
± 8 kV air
Compliance
level
± 6 kV contact
± 8 kV air
Electromagnetic
environment – guidance
Floors should be wood,
concrete or ceramic tile.
If oors are covered with
synthetic material, the
relative humidity should be
at least 30 %.
Page 73

IMMUNITY test IEC 60601 test
level
Electrical fast
transient/burst IEC
61000-4-4
± 2 kV for power
supply lines
± 1 kV for input/
output Lines
Compliance
level
± 2 kV for power
supply lines
± 1 kV for input/
output Lines
Electromagnetic
environment – guidance
Mains power quality
should be that of a typical
commercial or hospital
environment.
ENGLISH
Surge IEC 610004-5
± 1 kV line(s) to
line(s)
± 2 kV line(s) to
earth
± 1 kV line(s) to
line(s)
Mains power quality
should be that of a typical
commercial or hospital
environment.
Page 74

IMMUNITY test IEC 60601 test
level
Voltage dips, short
interruptions and
voltage variations
on power supply
input lines IEC
61000-4-11
74 75
<5 % UT (>95 %
dip in UT)for 0,5
cycle 40 % UT
(60 % dip in UT)
for 5 cycles 70 %
UT (30 % dip in
UT)for 25 cycles
<5 % UT (>95 %
dip in UT) for 5 s
Compliance
level
<5 % UT (>95 %
dip in UT) for 0,5
cycle 40 % UT
(60 % dip in UT)
for 5 cycles 70 %
UT (30 % dip in
UT)for 25 cycles
<5 % UT (>95 %
dip in UT) for 5s
Electromagnetic
environment – guidance
Mains power quality
should be that of a typical
commercial or hospital
environment. If the user
of the device requires
continued operation during
power mains interruptions,
it is recommended that the
device be powered from
an uninterruptible power
supply or a battery.
Page 75

IMMUNITY test IEC 60601 test
level
Power frequency
(50/60 Hz)
magnetic eld IEC
61000-4-8
Note: UT is the a.c. mains voltage prior to application of the test level.
3 A/m 3A/m Power frequency magnetic
Compliance
level
Electromagnetic
environment – guidance
elds should be at levels
characteristic of a typical
location in a typical
commercial or hospital
environment.
ENGLISH
Page 76

Declaration – electromagnetic immunity
Guidance and manufacturer’s declaration – electromagnetic immunity.
The device is intended for use in the electromagnetic environment specied below.
The customer or the user of the device should assure that it is used in such an
environment.
Immunity test IEC 60601 test level Compliance level
Conducted RF IEC 61000-4-6 3 Vrms 150 kHz to
80 Mhz
Radiated RF IEC 61000-4-3 3 V/m 80 MHz to
2,5 Ghz
76 77
3 Vrms
3 V/m
Page 77

Note 1: At 80 MHz and 800 MHz, the higher frequency range applies.
Note 2: These guidelines may not apply in all situations. Electromagnetic propagation is
aected by absorption and reection from structures, objects and people.
Electromagnetic environment – guidance
Portable and mobile RF communications equipment should be used no closer
to any part of the device, including cables, than the recommended separation
distance calculated from the equation applicable to the frequency of the transmitter.
Recommended separation distance
d = 1.17 √P
d = 1.17 √P 80 MHz to 800 Mhz
d = 2.33 √P 800 MHz to 2,5 GHz
ENGLISH
Page 78

Where P is the maximum output power rating of the transmitter in watts (W) according to
the transmitter manufacturer and d is the recommended separation distance in meters (m).
Field strengths from xed RF transmitters, as determined by an electromagnetic site
survey, should be less than the compliance level in each frequency range. Interference
may occur in the vicinity of equipment marked with the following symbol:
Field strengths from xed transmitters, such as base stations for radio (cellular/cordless)
telephones and land mobile radios, amateur radio, AM and FM radio broadcast
and TV broadcast cannot be predicted theoretically with accuracy. To assess the
electromagnetic environment due to xed RF transmitters, an electromagnetic site
survey should be considered. If the measured eld strength in the location in which the
78 79
Page 79

device is used exceeds the applicable RF compliance level above, the device should be
observed to verify normal operation. If abnormal performance is observed, additional
measures may be necessary, such as re-orienting or relocating the device.
Over the frequency range 150 kHz to 80 MHz, eld strengths should be less than 3 V/m.
Recommended separation distances between portable and mobile
RF communications equipment and the Medical device
The device is intended for use in an electromagnetic environment in which radiated RF
disturbances are controlled. The customer or the user of the device can help prevent
electromagnetic interference by maintaining a minimum distance between portable and
mobile RF communications equipment (transmitters) and the device as recommended
below, according to the maximum output power of the communications equipment.
ENGLISH
Page 80

Separation distance according to frequency of transmitter m
Rated maximum
output power of
transmitter (W)
150 kHz to 80 MHz
outside ISM bands
d=1.17 √P
80 MHz to 800 MHz
d=1.17 √P
800 MHz to 2,5
GHz d=2.23 √P
0,01 0,12 0,12 0,23
0,1 0,38 0,38 0,73
1 1,2 1,2 2,3
10 3,8 3,8 7,3
100 12 12 23
80 81
Page 81

For transmitters rated at a maximum output power not listed above, the recommended
separation distance d in meters (m) can be estimated using the equation applicable to
the frequency of the transmitter, where P is the maximum output power rating of the
transmitter in watts (W) according to the transmitter manufacturer.
Note 1: At 80 MHz and 800 MHz, the separation distance for the higher frequency range
applies.
Note 2: These guidelines may not apply in all situations. Electromagnetic propagation is
aected by absorption and reection from structures, objects and people.
Frequency range: 2400-2478 MHz.
Output power, highest setting: 5 dBm.
Modulation: 1-Mbps GFSK.
ENGLISH
Page 82

Trademarks
BlueTooth wordmark
The BlueTooth® wordmark and logos are registered trademarks owned by Bluetooth
SIG, Inc. and any use of such marks by Philips is under license.
App Store and iPhone
App Store and iPhone are trademarks of Apple Inc., registered in the U.S. and other
countries. App Store is a service mark of Apple Inc.
Google Play and Android
Google Play and Android are trademarks of Google Inc.
82 83
Page 83

Explanation of symbols
The warning signs and symbols are essential to ensure that you use this product safely
and correctly and to protect you and others from injury. Below you nd the meaning of
the warning signs and symbols on the label and in the user manual.
Read the user manual before you
use the device.
This symbol means that the part
of the device that comes into
physical contact with the user
(also known as the applied part)
is of type BF (Body Floating)
according to IEC 60601-1.
The applied part is the wrist band
and back plate of the watch.
ENGLISH
Page 84

Indicates caution.The user should
consult the instructions for use for
important cautionary information
such as warnings and precautions
that cannot, for a variety of
Indicates that an object is
capable of being recycled not that the object has been
recycled or will be accepted in all
recycling collection systems.
reasons, be presented on the
medical device itself.
Symbol for 'the device
complies with European Medical
Device Directive 93/42/EEC
requirements'. 0344 refers to the
notied body.
This symbol means: Totally
protected against dust.
Protected against the eect of
water immersion between 15 cm
and 1 m for 30 minute. This
applies to the watch and not the
charging cradle.
84 85
Page 85

Indicates the manufacturer's model
or type number of the device.
This symbol means: Protected
against falling drops of water.
Symbol for 'Class II Equipment'.
The adapter is double insulated
(Class II).
Manufacturer: Philips Consumer
Lifestyle B.V, Tussendiepen 4, 9206
AD Drachten, Netherlands. Fax: +31
(0)512594316
This means that this device
emits non-ionizing radiation.
All devices with RF transmitters
or that use RF electromagnetic
energy must have a label with
this symbol.
Symbol for the 2 year Philips
guarantee.
ENGLISH
Page 86

This symbol means that this
product contains a built-in
rechargeable battery which shall
not be disposed of with normal
household waste (2006/66/EC).
This symbol means that this
product shall not be disposed
of with normal household waste
(2012/19/EU). See chapter
recycling for more information.
See chapter Recycling for more
information.
The Green Dot ('Der Grüne Punkt'
in German) is the license symbol of
a European network of industryfunded systems for recycling the
packaging materials of consumer
goods.
This symbol is a certication
mark. It is used on electronic
products manufactured or sold in
the United States. It conrms that
the electromagnetic interference
from the device is lower than the
limits approved by the FCC.
86 87
Page 87

10
–20ºC
C
Symbol for USB Indicates the relative humidity
limits to which the device can be
safely exposed: 10% to 93%.
Indicates the storage and
40º
transportation temperature limits
Bluetooth® symbol.
ENGLISH
to which the medical device can be
safely exposed: -20°C to 40°C.
Page 88

Specications
Power supply 3.7V 140 mAh Built-in rechargeable li-polymer battery
Charging cradle 5V DC and 500mA
Display Monochrome display with backlight
Measurement range Heart rate: 30-220 beats per minute. Resting respiration
88 89
rate: 5-45 breaths per minute
Page 89

Accuracy Heart rate:± 10 bpm or 10% (whichever is greater)
Resting heart rate:± 3 bpm
Total energy expenditure:± 15%
Resting respiration rate: ± 5 breaths per minute
Steps: ± 5%
Activity recognition (walking, running, cycling, other):
90% accurately classied
Normal operating conditions Temperature: 5°C / 41°F to 40°C/ 104°F. Relative
humidity: 15% to 93%RH. Atmospheric pressure: 700hPa
to 1060hPa
Storage and transportation
conditions
Temperature:-20°C/ -4° F to 60°C/ 140° F. Relative
humidity: < 93%. Atmospheric pressure: 700hPa to
1060hPa
ENGLISH
Page 90

Net weight Approx. 50g / 1.8 oz
External dimensions Approx. 205.5mm× 38 mm× 10 mm
Accessories Charging cradle, user manual, second strap size S/M.
Mode of operation Continuous operation
Degree of protection Type BF applied part
Device classication Battery Powered Mode: Internally Powered ME
Equipment. Class II ME Equipment
90 PB
Page 91

Materials Housing: Surgical grade stainless steel 316L. Glass:
Corning Glass. Charger bottom and top case: Plain
plasctic. Material of straps: TPU (thermoplastic
polyurethane) DN670.
Service lifetime 4 years
IP 67 for the watch This means: Totally protected against dust. Protected
against the eect of water immersion between 15 cm
and 1 m for 30 minute. This applies to the watch and not
the charging cradle.
IP21 for the charging cradle This means: Protected against falling drops of water.
Caution: No modication of this equipment is allowed.
ENGLISH
91
2
07
7
3
8
07
12 13 14
74
bpm
4
2
1
9
552
kcal
5
2
3
10
72
bpm
3x
6
1
07
11
72
bpm
3x
Page 92

Specications are subject to
change without notice.
© 2017 Koninklijke Philips N.V.
All rights reserved
4222.100.5310.2 (02/2017)
Philips Consumer Lifestyle BV
Tussendiepen 4,
9206AD Drachten, Netherlands
Fax +31 (0)512594316
>75% recycled paper
 Loading...