

Page 1

EasyKey
6000 series
Smart Lever Door
Lock
DDL603E
User
manual
Register your produc t(s) to get
support from below link:
www. philips.com/support
Page 2

Page 3

Contents
1 Important info 02
Security
Caution
Disposal of used
products and batteries
2 Installation 03
Packaging list
Exploded views
Before installation
Instructions
EasyKey
Front escutcheon
Rear escutcheon
4 How to set up your 10
EasyKey
-Before setup
-Modify master PIN code
-User settings
-Deletion of user information
-System settings
-Extended functions
-System query
-Local query
-App binding instruction
5 How to use your 17
EasyKey
Unlocking
Unlock from outside
-With Key tag
-With ngerprint
-With PIN code
Unlock from inside
-With handle
Locking
-Lock from outside
-Lock from inside
Interior lockout
Mechanical key opening3 Get to know your 09
6 Other functions 20
Safehandle function
Restore to factory settings
One-key mute mode
7 Meaning and use of 21
indicators
Door lock status indicator
Mute mode indicator
System lockup indicator
8 Troubleshooting 23
Alerts on Philips Easykey
How to charge Philips Easykey in an
emergency
How to replace batteries
1
Page 4

1.Important info
Security
◆Before using Philips Eas yKey, please read
and understand all instructions . Damage
caused by non- compliance wi th the
instructions will not be covered by warranty.
◆Use only the manufac turer-specied
accessories/components.
◆Use only the alkaline bat teries the
produc t is equipped with, or use the same
specification type of alkaline batteries.
◆Do not forcibly disassemble thi s
produc t to avoid trigger ing an alarm
or damaging the product.
◆Do not scrape the ngerprint sensor
with sharp objec ts, other wise it may
cause permanent damage.
◆Do not expose p roducts to env ironments
where th ere is water leakag e or splashing.
◆Do not expose t he product to
corrosive subs tances to prevent
damaging the protective cover.
◆Do not hang objec ts on the handl e, in case
it might aect the normal use of the lock.
◆Pleae clean the produc t with a soft cloth.
◆Do not remove the b attery during
setting up and operating.
◆Please let a prof essional techni cian
to install the door lock and follow the
installation guidelines provided.Do not
disass emble the lock by yo urself. Keep the
relevan t sealed sticker s properly. Do not
easily disclose the password information.
◆Please modif y the default master
PIN code immediately after installation
and conguration, and keep the
mechani cal key properly.
◆Please replac e all the batteri es immediately
if there is a low bat tery alarm. Please
make sure to correc tly match the poles
(+/-) when installing the bat teries.
Caution
◆Do not place the batter y near
a re to avoid an explosion.
◆Do not use any emer gency power
supply that does n ot meet the safety
require ments to power up the produ ct.
◆Do not connec t the 2 poles of the
batte ries with metals to avoid short
circuit w hich may lead to an explosion .
◆Please make sure any compone nt
replacement is executed by Philips,
Philips authorized service center
or professional technicians.
◆Do not use acces sories or par ts that have
been produced by other manufacturers or
have not been specically recommended
by Philips . Use of such accessories and
parts may void your warrant y.
Disposal of used products
and batteries
◆You can have your locks rec laimed at
Philips authorized service centers. You
will receive corresponding compensation
if your pro ducts meet our condi tions.
◆Please learn by yourself the local electronic
produc t classication and collection system.
◆Please abide by local re gulations
and do not mi x used produc ts with
ordinary domestic waste.
◆Proper disposal of use d products c an
help to avoi d potential negat ive impacts
on the envi ronment and human health.
◆This produ ct contains batteries which can not
be dispo sed of together w ith domestic waste.
◆Please learn th e local regulations concerning
battery classication and collection by
yourself. Prop er disposal of use d batteries
can help to avoid negative imp acts on
environment and human health.
2
Page 5

2.Installation
Packaging list
This packaging list is for reference onl y. Please refer to the ac tual packaging contents.
①Front escutcheon
with silicone pad
②Rear escutcheon
with silicone pad
Easy
Key
User
Manual
③Drilling template ④Mortise
Easy
Key
Warranty
Card
EasyKey
⑤Mounting plate ⑥User manual ⑦Warranty card ⑧Quality certicate
⑨Mechanical key
⑩Installation kit ⑪Cleaning pad ⑫Strike
⑬Key tag
3
Page 6

Exploded views
1.Rear cover x1
2.Anchor screw x3
3.Rear escutcheon x1
4.Compressed spring x2
5.Mounting plate x1
6.Square shaft x2
4
7.Mor t i s e x1
8.Threaded pipe x3
9.Front escutcheon x1
10.Anchor screw of mortise x4
11.Anchor screw of lock cylinder x1
12.Lock cylinder x1
Page 7

Before installation
Step 1 | Conrm door swing direction
This product is suitable for the door going in four directions: left
outward, right inward, right outward and left inward.
Left-handed door Right-handed door
Indoor Indoor
Left
Outdoor
Indoor Indoor
Outdoor Outdoor
inward
Left
outward
Step 2 | Change the front handle direction
Screw
Screw
Cable
Direction
reversing stand
Outdoor
Right
inward
Right
outward
Unscrew two screws
1
and remove direction
reversing stand and
cover.
Rotate the handle
2
to 180 degrees for
optimal placement.
Make sure the cable is
3
in the same position
as the one showed in
the picture one. Then
put the direction
reversing stand back
and tighten the
screws.
5
Page 8

Change the rear handle direction
Screw
Screw
Unscrew two screws
1
and remove the
direction reversing
stand.
Attention
1. Please choose the proper installation kit to suit your door thickness .The default installation
kit is applicable for a door thickness of 60-90mm. If your door thickness does not within this
range, please feel free to contact us.
2. The bar shall be cut to an optimal length as per the thickness of door.
Direction
reversing stand
Rotate the handle
2
to 180 degrees for
optimal placement.
Put the direction
3
reversing stand back and
tighten the screws.
Step 3 | Change the direction of latch bolt
Change the direction of the latch bolt to suit your door swing direction. If the slant
of the latch bolt faces the outside door, then it is the inward opening door. If the
slant of the latch bolt faces the inside door, then it is the out ward opening door.
Latch bolt
6
Inverting tailpiece
Screw
1. Push the inverting tailpiece to the top.
2. Press the latch bolt down to the mortise surface,
then rotate it 180 degrees and pull it out.
3. Push the tailpiece to the bottom.
4. Change the direction of the directional screw based
on the door swing direction.
(The directional screw must be installed on the interior
door that is equipped with rear escutcheon)
Page 9

Instructions
The following instruc tions only apply to right-handed doors. For left-handed doors,
please read [Before installation] carefully and make necessary adjustments.
Mark the hole for drilling with drilling
1
template and drill the marked hole,
then mount the mor tise into the hole
and fasten it with anchor screw.
Attention
The mor tise cable should through the hole
showed on the pic ture.
Install the threaded pipes and place
3
the compressed spring and square
shaft into the hole of the lever.
Insert the gourd lock c ylinder into
2
the corresponding position and
fasten it with screw.
Pull the connector through the
4
hole and align the square shaf t
and threaded pipes on the front
escutcheon with the holes.
Attention
Anti-dismantling component should be ush
agains t the door or an ale rt would be triggered
when Philips easykey is elec tried.
7
Page 10
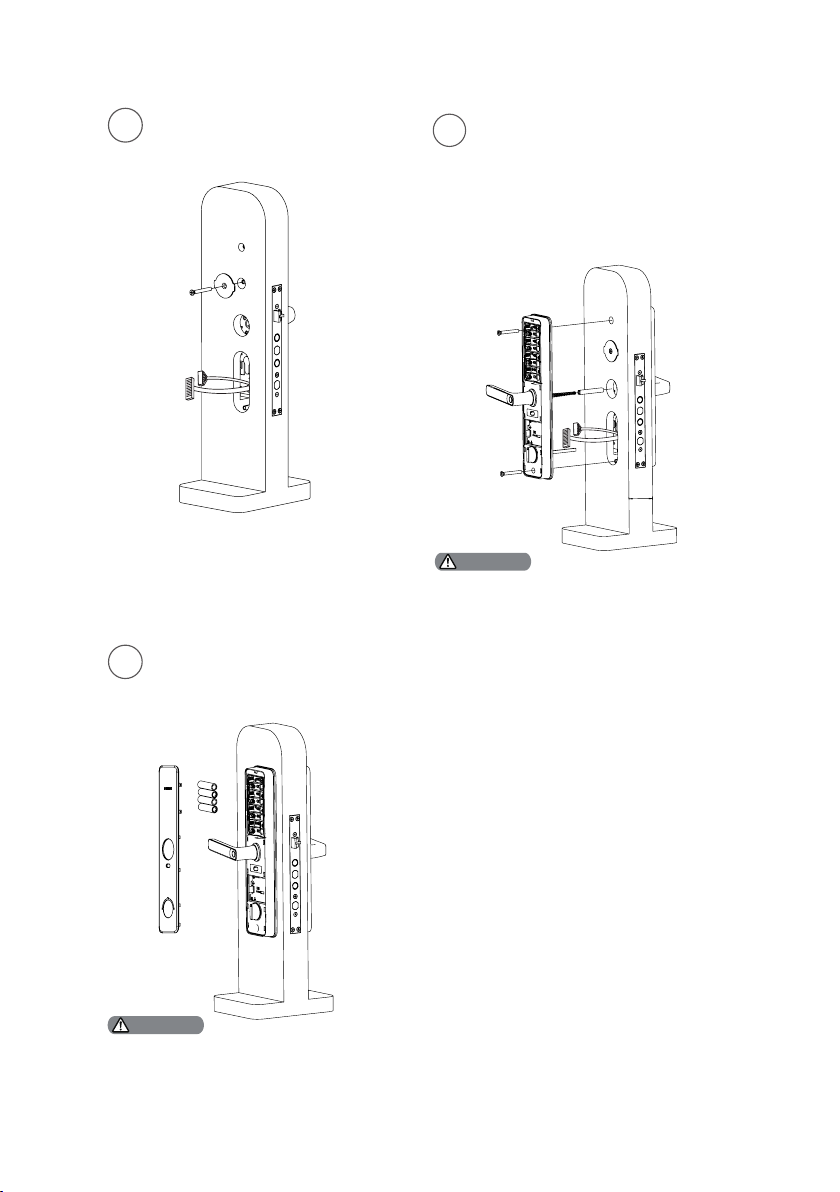
Make sure the mounting plate is
5
installed as shown in the picture and
fasten it with screw.
Install four AA batteries followed by
7
rear cover. Then, test the locking and
unlocking func tion and repeat these
steps if required.
Put the compressed spring and
square shaft to the rear escutcheon.
6
Align the square shaft and bar with
the hole on the mor tise. Connec t
the connector of front escutcheon
and mortise to the connector port of
rear escutcheon and hide the extra
connector in the door hole. Then
fasten the rear escutcheon with
screws.
49.4
Attention
The bar can be cut to an optimal length
based on door thickness and then insert it
into the hole on the mortise.
Attention
Please make sure t he rear cover is r mly fastened in the
installation process, preventing it from falling when
closing door.
8
Page 11
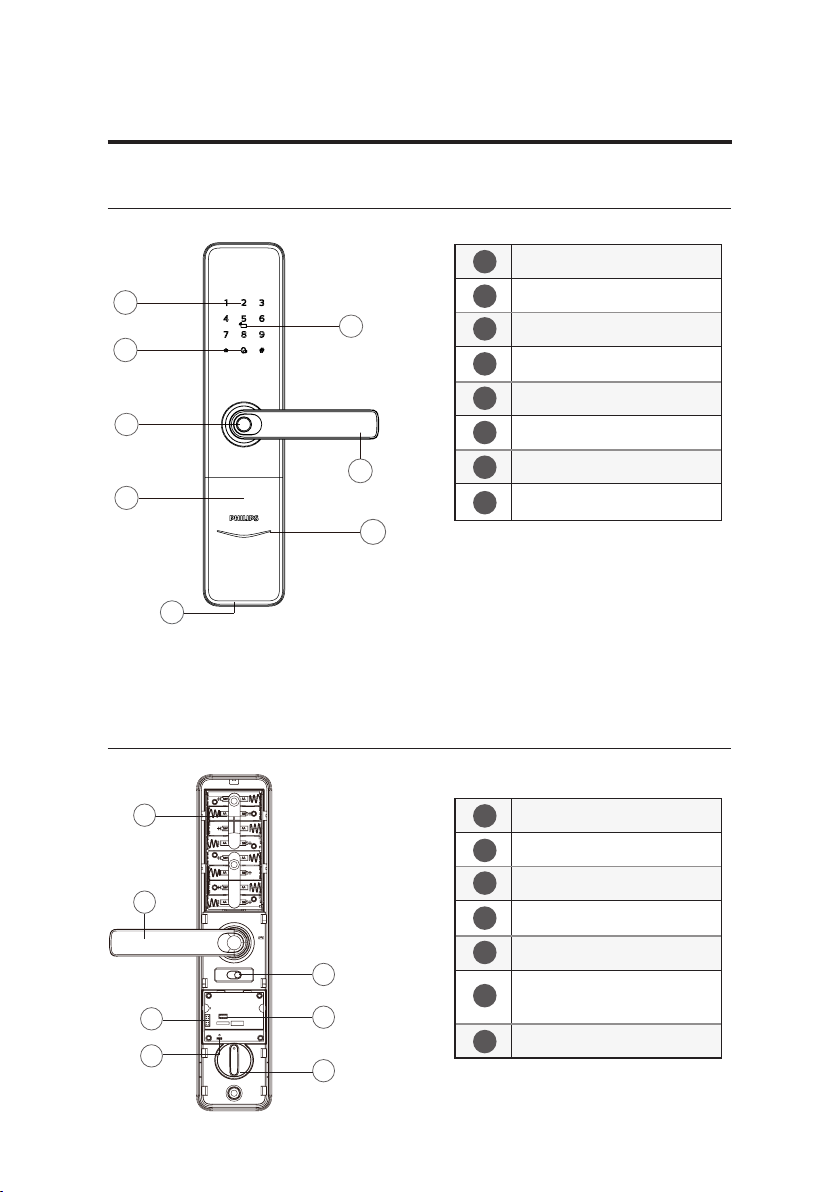
3.Get to know your EasyKey
Front escutcheon
Door status indicator
1
Keypad
2
3
4
5
6
7
1
8
2
3
Keytag reader
4
Mute key
5
Fingerprint sensor
Handle
6
Keyhole
7
USB interface
8
Rear escutcheon
1
2
5
6
1
Battery cover
Handle
2
Safehandle switch
3
4
Extended moudle interface
Burning port
5
3
4
7
Reset button (Restore to
6
default settings)
7
Rotary knob
9
Page 12
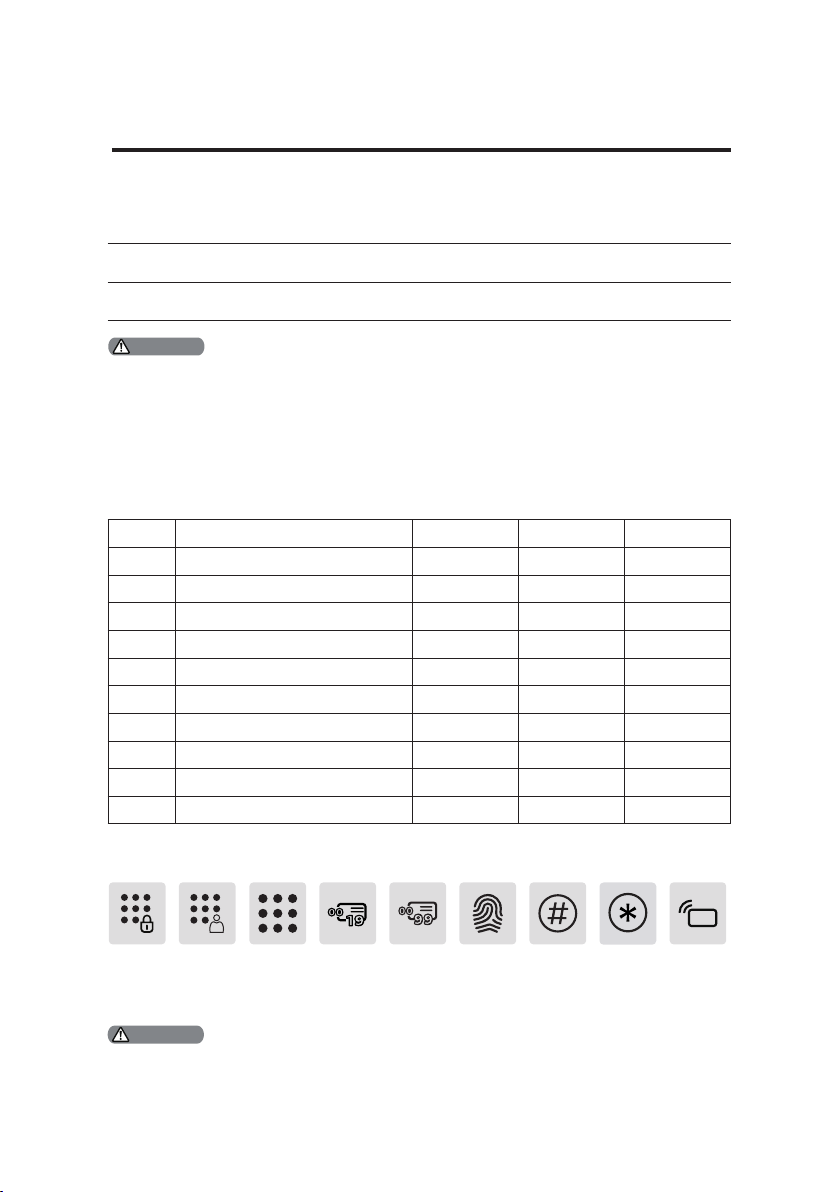
4.How to set up your EasyKey
Before setup
◆Philips EasyKey comes with t wo modes: General mode and Dual verication mode
General mode
Unlock with any r egistered
identity information
Attention
Finger print and Key tag are optional. A ctual unlocking me thods may vary depen ding on the featu re of
product, please refer to th e actual product.
User code
◆
If you want to delete a specic user's information, you could delete the related user code in
the system.
Dual verication mode
Unlock with th e combination of two dierent
vericatio ns among PIN cod e, Key tag and nge rprint.
◆You can record the user information in the following table for future query.
User cod e
00
01
02
03
04
05
06
07
08
09
Name Fingerprint PIN Code Key tag
◆Icon annotation
Master
PIN code
1.Pres s [*] key to retu rn to the previo us menu.
2. The default m aster PIN code is 12345678.
One-time
user PIN
Attention
User PIN
code
code
10
User
code
00 -19
User
Fingerprint # key * key Keytag
code
00-99
Page 13
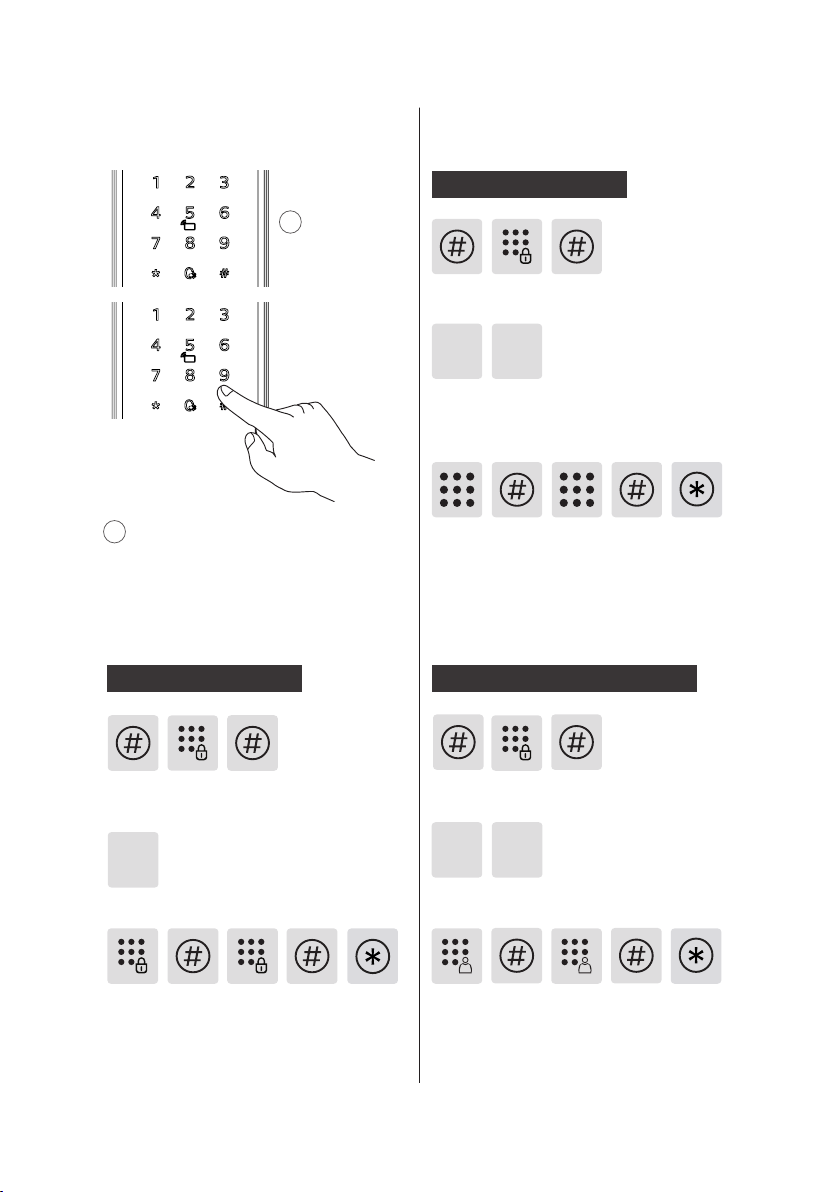
◆How to enter master mode:
1
keypad
User settings
Register a user PIN code
Light up the
Press [#], enter master PIN code and
conrm with [#].
2
Enter [#] before you enter any other
numbers, then enter master PIN code and
conrm with [#].
Modify master PIN code
Press [#], enter master PIN code and conrm
with [#].
1
Press [1] to modify master PIN code.
2
Press [2] to ent er user regis tration, then p ress [1]
to regis ter a new user PIN c ode, which will b e
automatically numbered and bro adcasted by the
system.
Enter a user PIN code of 6 to 12 digits,and
conrm with [#]. Then re- enter the user
PIN code and conrm with [#]. Af ter
hearing a voice prompt of “Succeeded”,
press [*] several times until you exit master
mode.
Register a one-time user PIN code
Press [#], enter master PIN code and
conrm with [#].
1
2 2
Enter [2] to enter us er settin gs, then enter [2] agai n
to add a one -time PIN cod e.
Enter the new master PIN code and conrm
with [#].Re-enter the new master PIN code
and conrm with [#]. After hearing a voice
prompt of “Succeeded”, press [*] several
times until you exit master mode.
Enter a one-time user PIN code of 6 to
12 digits and conrm with [#]. Re- enter
the one-time user PIN code and conrm
with [#]. After hearing a voice prompt of
“Succeeded”, press [*] several times until
you exit master mode.
11
Page 14
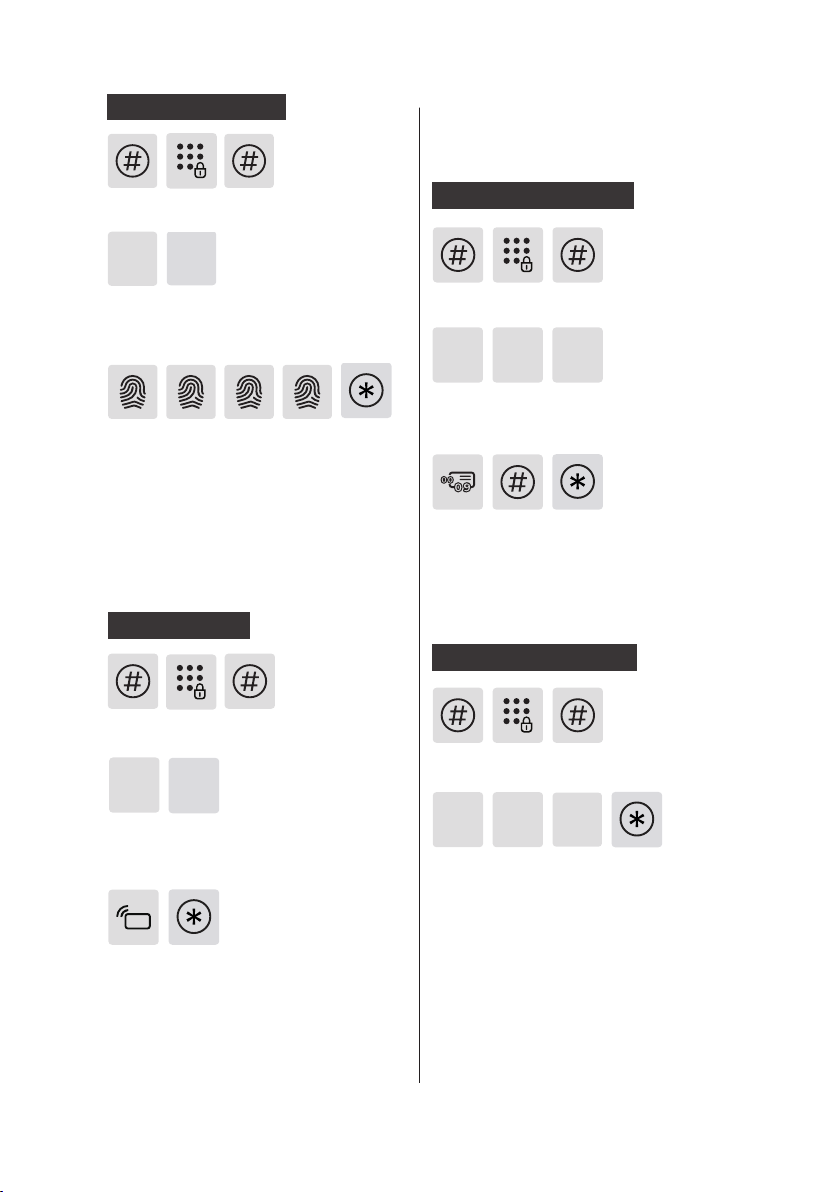
Register a ngerprint
Deletion of user
information
Press [#], enter master PIN code and conrm
with [#].
3
2
Press [2] to en ter user set tings, th en press [3] to ente r
fingerprint registration. The system will automatically
number the fingerprint and broadcast the number.
Place your nger on the ngerprint
sensor. When you hear a voice prompt
of “Move your nger and put on
again", lift your nger and repeat
the process. After you hear a voice
prompt of “Succeeded", keep pressing [*]
until you nally exit the master mode.
Register a keytag
Press [#], enter master PIN code and conrm
with [#].
2
4
Enter [2] to enter user registration and
enter [4] to add a key tag, then the
system will automatically number it
and generate a voice prompt.
Delete a user PIN code
Press [#], enter master PIN code and conrm
with [#].
1 13
Press [3] to enter user deletion, then press [1] to enter
user PIN c ode deleti on. Press [1] again to del ete a
single u ser PIN code.
Enter a two-digit user code (from 00 to 19)
which a PIN code is to be deleted and then
conrm with [#]. After hearing a voice prompt
of “Succeeded”, keep pressing [*] until you
nally exit the master mode.
Delete all user PIN codes
Press [#], enter master PIN code and conrm
with [#].
2
13
Press [3] to enter user deletion, then press [1] to enter
user PIN code deletion. Press [2] to delete all user PIN
codes. After hearing a voice prompt of "Succeeded",
press [*] sev eral times unt il you exit mas ter mode.
Hold the key tag on the reader until you
hear a “Dong” sound. When hearing a voice
prompt of “Succeeded”, keep pressing [*]
until you nally exit the master mode.
12
Page 15
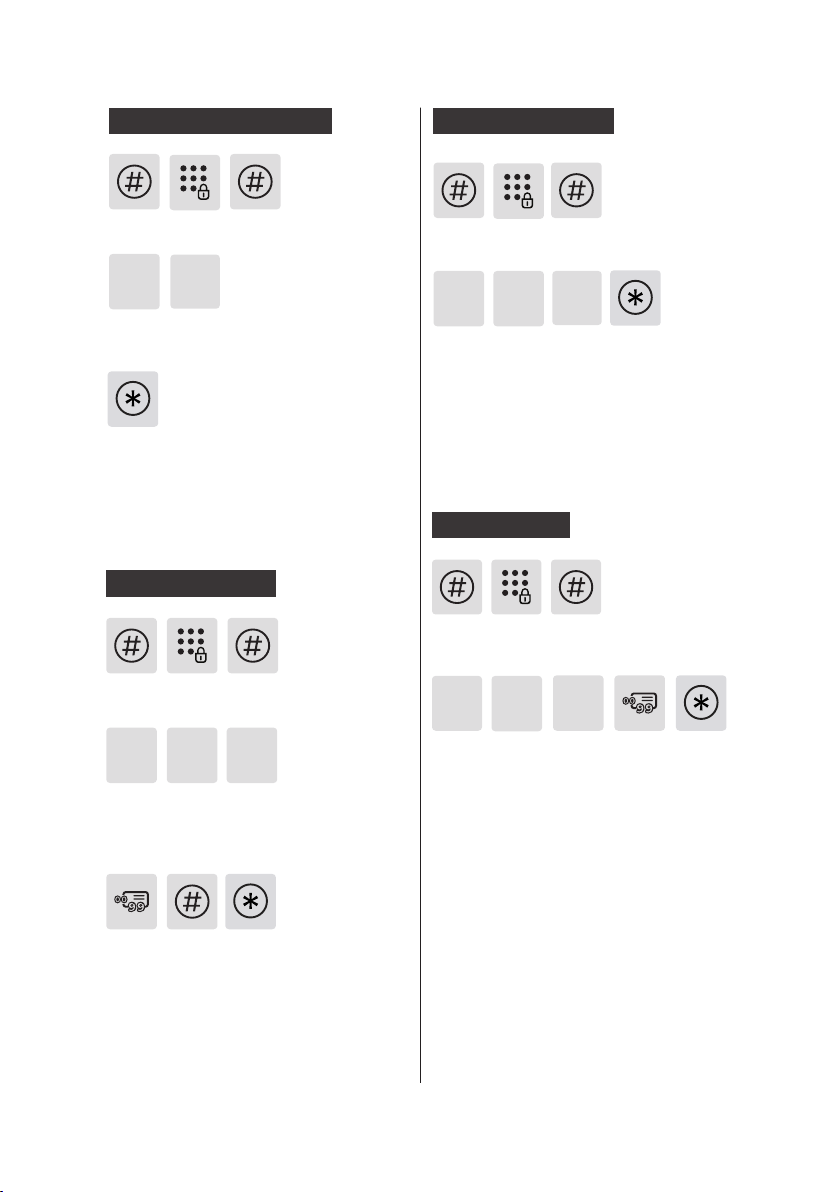
Delete a one-time PIN code
删除一次性用户密码
Delete all ngerprints
Press [#], enter master PIN code and conrm
with [#].
3
Enter [3] to enter user record deletion
and enter [2] to delete one-time PIN
code.
After hearing a voice prompt of “Succeeded”,
press [*] several times until you exit master
mode.
Delete a ngerprint
Press [#], enter master PIN code and conrm
with [#].
2
3 3 1
Enter [3] to enter user record deletion
and enter [3] to enter ngerprint
deletion, then enter [1] to delete a
single ngerprint.
Press [#], enter master PIN code and conrm
with [#].
3 3
Press [3] to enter user deletion, then press
[3] again to enter ngerprint deletion. Press
[2] to delete all ngerprints. After hearing a
voice prompt of "Succeeded", press [*] several
times until you exit master mode.
Delete a key tag
Press [#], enter master PIN code and conrm
with [#].
3
4
Enter [3] to enter the deletion of user
information and enter [4] to enter the
deletion of keytag, then enter [1] to delete
a single key tag. Enter a two-digit user code
(from 00 -99) which a key tag is to be deleted
or place a keytag to be deleted against the
keytag reader. After hearing a voice prompt
of “Succeeded", keep pressing [*] until you
nally exit the master mode.
2
1
Enter a two-digit user code (from 00 to 99)
which a ngerprint is to be deleted and
then conrm with [#]. After hearing a voice
prompt of “Succeeded”,
keep pressing [*] until you nally exit the
master mode.
13
Page 16
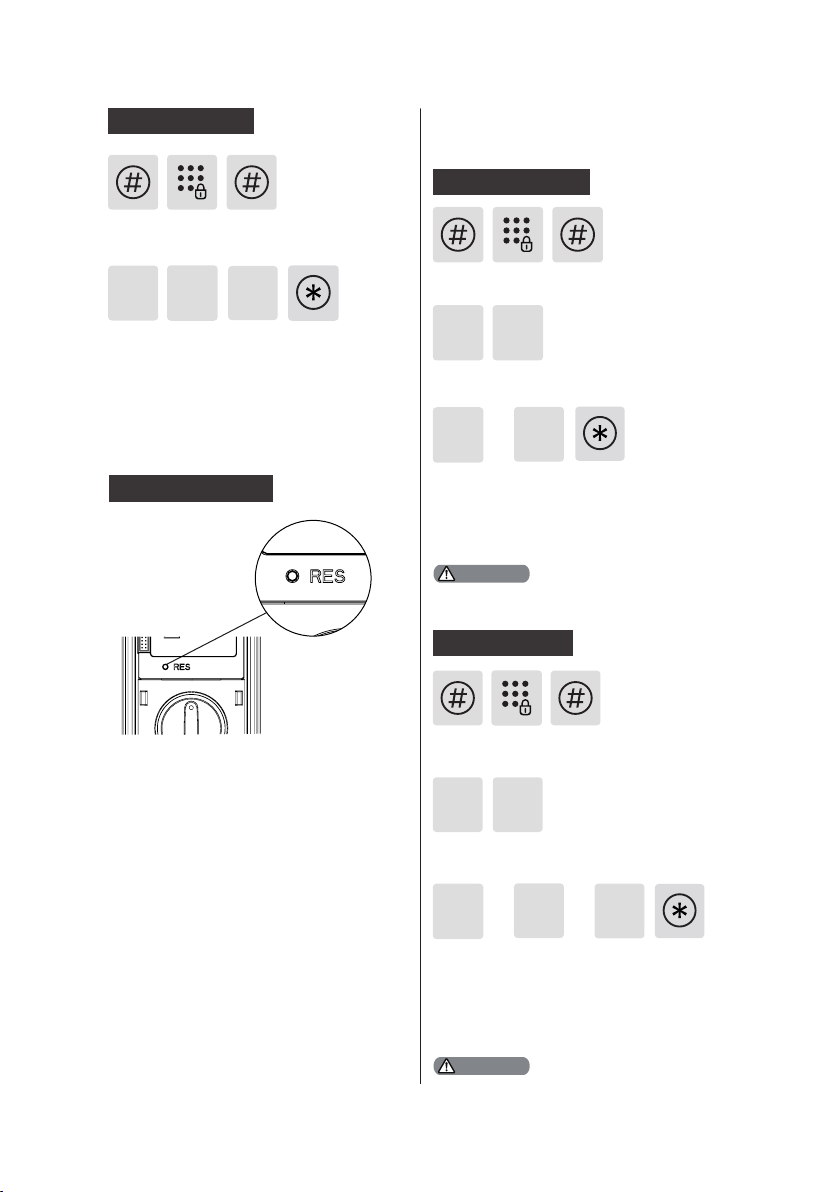
Delete all keytags
Press [#], enter master PIN code and conrm
with [#].
3
4
Press [3] to enter the deletion of user
information and enter [4] to enter the
deletion of keytag, then enter [2] to delete
all keytags. After hearing a voice prompt
of “Succeeded", keep pressing [*] until you
nally exit the master mode.
System initialization
2
System settings
Language settings
Press [#], enter master PIN code and conrm
with [#].
1
Attention
1
or
2
4
Press [4] to enter system settings, then press
[1] to enter language settings.
For Chinese, press [1]; For English, press [2];
For Spanish, press [3]; For Russian, press [4];
For Arabic, press [5]. After hearing a voice
prompt of ”Succeeded”, press [*] until you
nally exit the master mode.
The default language is English.
Volume settings
Remove the battery cover, then double
press the [RES] hole with a sharp
objec t. When you hear a voice prompt
of “Restoring to default settings", it
means that all user information is emptied.
14
Press [#], enter master PIN code and conrm
with [#].
24
Press [4] to enter system settings, then press
[2] to enter volume set tings.
or or
1
Choose the volume as needed: For
high volume, press [1]; for low volume,
press [2]; for mute mode, press [3].
After hearing a voice prompt of
“Succeeded”, keep pressing [*] until you
nally exit the master mode.
Attention
The default volume is “high volume”.
2
3
Page 17
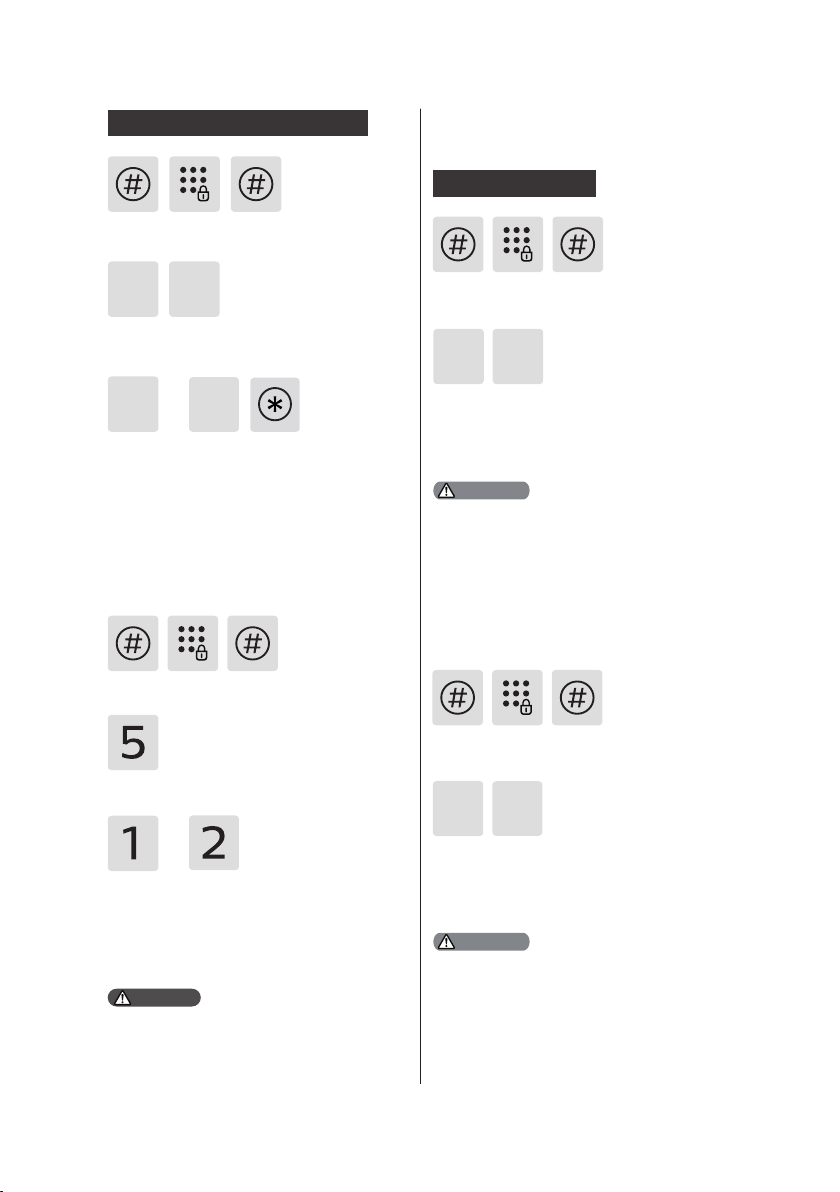
Switch to dual verication mode
System Query
Security code query
Press [#], enter master PIN code and
with [#].
4
Enter [4] to go int o system se ttings, t hen enter [3] to
go into dual v erificat ion mode.
For single verification, press [1]; for dual verification,
press [2]. Af ter heari ng a voice promp t of
“Succe eded”, press [*] sev eral times unt il you exit
master mode.
1
3
or
2
conrm
Extended functions
Enter [#] and enter master PIN code,
then conrm with [#].
Enter [5] to go into extended functions.
or
Enter [1] to join a network. Enter [2] to
exit a network. Before entering into
the extended function settings, please
download and open the TmallGenie
APP on your mobile phone.
Attent ion
Extended functions are applicable to
Wi-Fi enabled product. Please follow
the below instruct ions to connect to
Wi-Fi network.
Press [#], enter master PIN code and
with [#].
6
Enter [6] to go into system quer y, then
enter [1] to check the security code
and the system will automatically
broadcast the product series number.
Directly enter 400# to go into system quer y.
1
Attention
conrm
Local Query
Press [#], enter master PIN code and
with [#].
2
6
Press [6] to enter system query, then press
[2] to get the software version automatically
broadcasted.
Attention
Directly enter 114# to go into the local query.
conrm
15
Page 18
App binding instruction
Attent ion
Due to the functions var y in dierent
model s, please consult the ocial
authorized seller to conrm whether
the product(s) you purchased
support(s) networking.
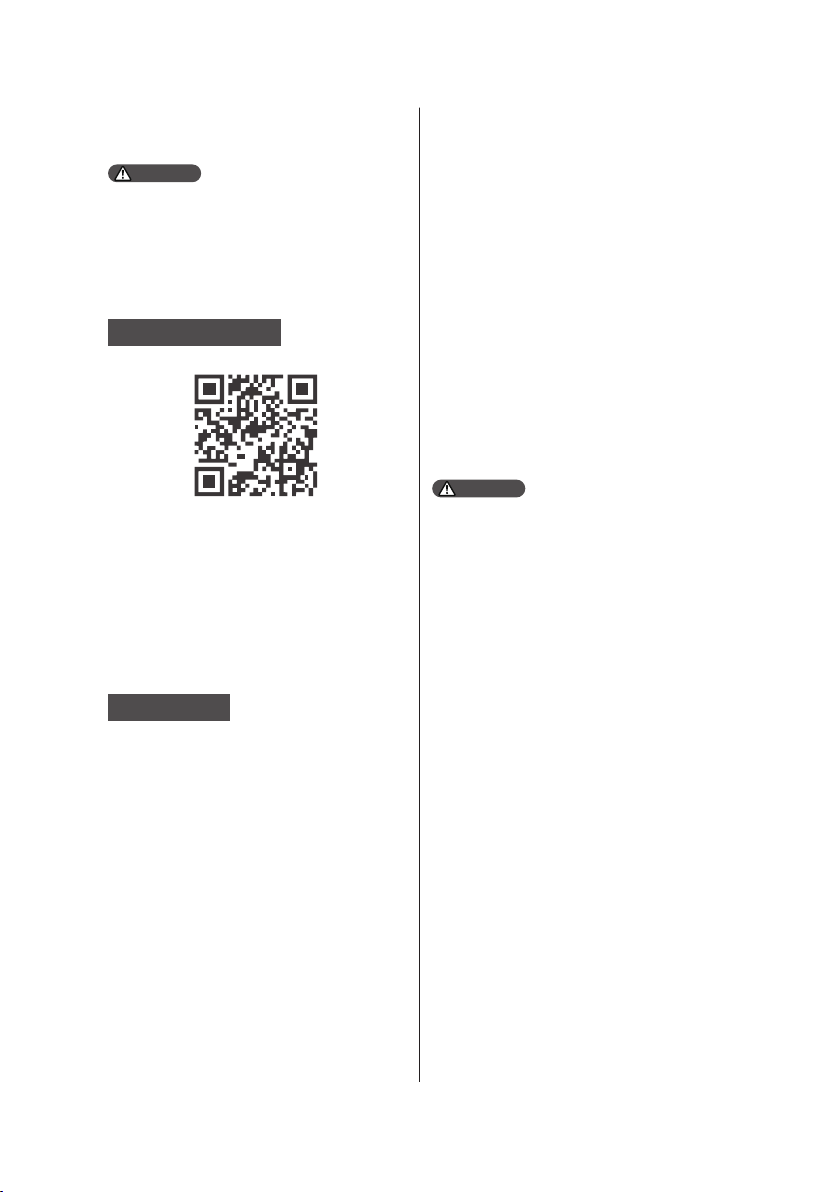
Download the App
Please scan the QR code above to
download the App and install it.
Click the [#] on the smart door
②
lock terminal and enter the
master PIN code, re- click the
[#] to enter master mode, press
[5], then press[1] to enter the
Networking Distribution Mode,
then you will hear a voice prompt
of “Connect ing, please wait a
mome nt ”.
Sign in to the App, click to “Add a
③
device” on the Homepage, choose
[Wi-Fi lock/Facial recognition
lock/Video lock] to enter the
pair ing pa ge, then complete the
pair ing process according to the
App prompts.
Attent ion
The door locks only support
connecting to the 2.4Ghz Wi-Fi router
(5Ghz W i-Fi is not supported). Please
make sure that the visual distance
between the router a nd the door
lock terminal is less than 10 meters ,
other wise, the s ignal might be poor.
Lock pairing
1. For Bluetooth smar t door lock(s)
Make sure the door lock terminal
①
has been installed with bat ter ies
or connected to the power supply.
Sign in to the App, click to “Add
②
a device” on the Homepage,
choose [Bluetooth Smart Door
Lock] to enter the pairing pa ge,
then complete the pair ing process
according to the App prompts.
2. For Wi-Fi smart door lock(s), facial
recognition smar t door lock(s) and
video smar t door lock(s)
Make sure the door lock terminal
①
has been installed with bat ter ies
or connected to the power supply.
16
Page 19
5.How to use your EasyKey
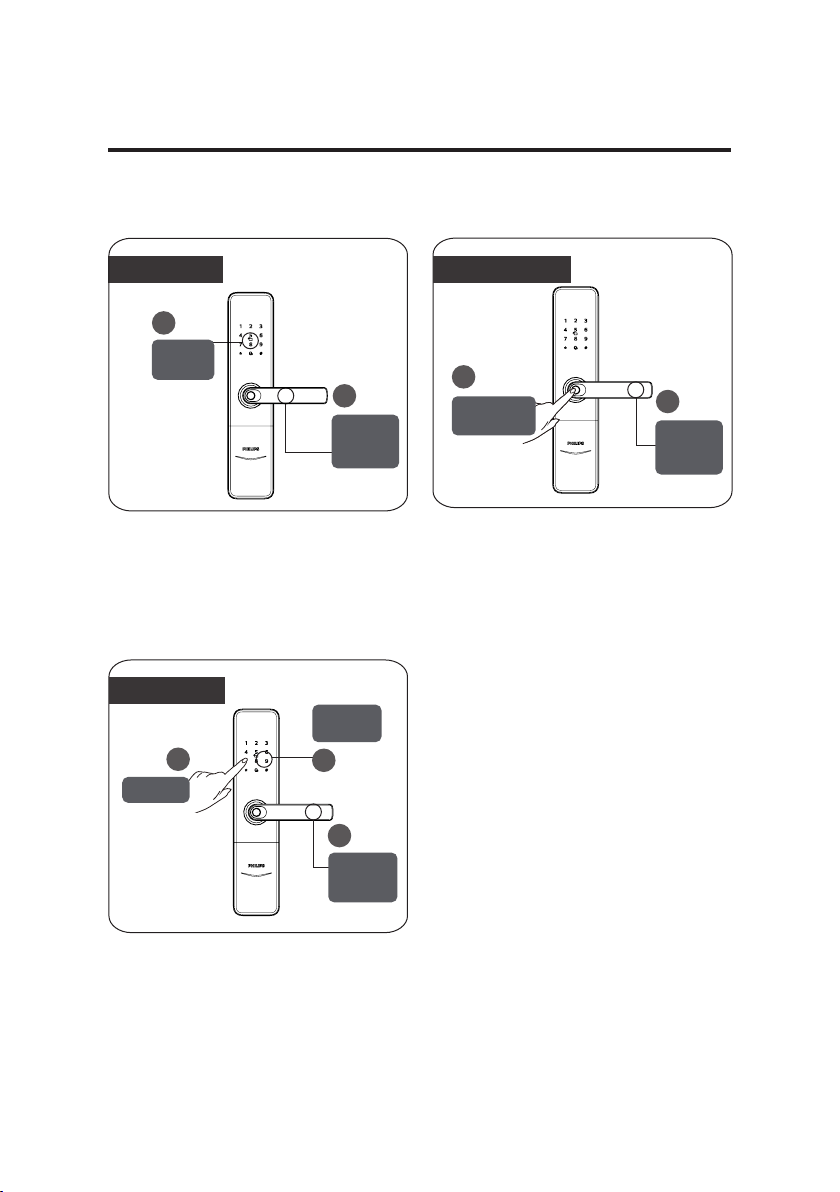
Unlocking | Unlock from outside
With Keytag
1
Keytag
reader
2
Turn the
下
handle
压
down
执
①Place the registered keytag against the
keytag reader.
②When you hear a voice prompt of
“Door opened”, turn the handle down to
unlock the door.
With PIN code
Enter PIN
code
1
Keypad
2
3
Turn the
handle
down
With ngerprint
1
Fingerprint
sensor
①Place the registered finger on the
fingerprint sensor.
②When you hear a voice prompt of
“Door opened”, turn the handle down to
unlock the door.
2
Turn the
handle
down
①Touch the digit input area to light up the
keypad.
② Enter the registered PIN code and
confirm with [#].
③After hearing a voice prompt of “Door
opened”, turn the handle down to unlock
the door.
17
Page 20
Unlocking | Unlock from inside
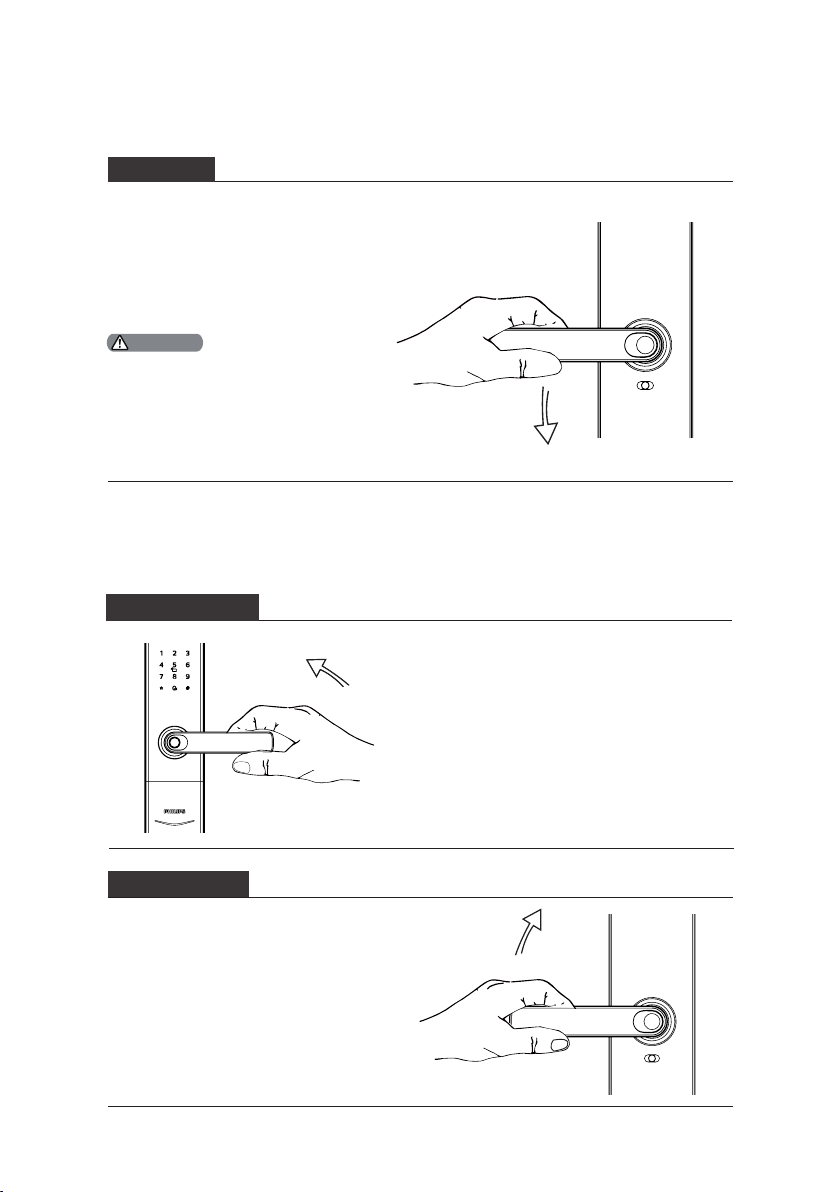
With handle
Philips EasyKey employs indoor
fast opening mortise, allowing you
to direc tly press down the handle
to unlock the door.
Attention
When opening the door from inside,
please make sure t he safe handle s witch
is toggl ed to green scale and the safe
handle function is disabled.
Locking | Lock from outside/inside
Lock from outside
After the door is closed, lifting the handle
can have the latch bolt poped up, locking
the door.
Lock from inside
After the door is closed, lifting
the handle can have the latch
bolt poped up, locking the door.
18
Page 21
Interior lockout
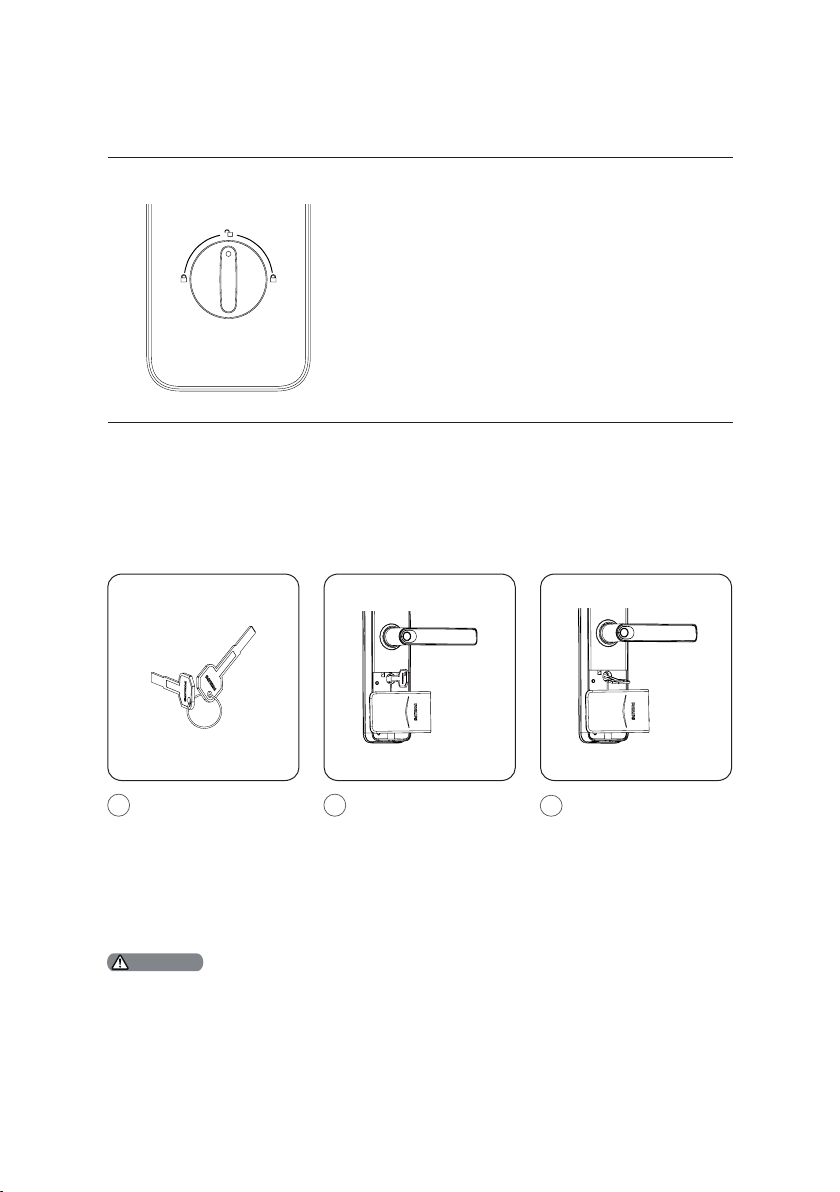
After the door is locked, turning the rotary knob
to the "lock" icon at the lef t or right side of the
rotar y knob as showed in the left image can
enable the inside deadlock.
Twisting the rotary knob to the "unlock" icon can
release the inside deadlock mode.
Mechanical key opening
Find the mechanical key
1
in the Philips Easykey
box.
Attention
It is recommended not to use mec hanical keys daily unle ss there is an eme rgency,
such as the dead battery, forgotten PIN code or system malfunction.
Open the mechanical
2
key cover. Lif t it up and
rotate it 90°.
3
Inser t the mechanical
key into the keyhole and
make sure it remains in
the horizontal position
as shown in the image.
Rotate it clock wise or
counter clockwise by
around a full circle and a
half to unlock the door.
Page 22
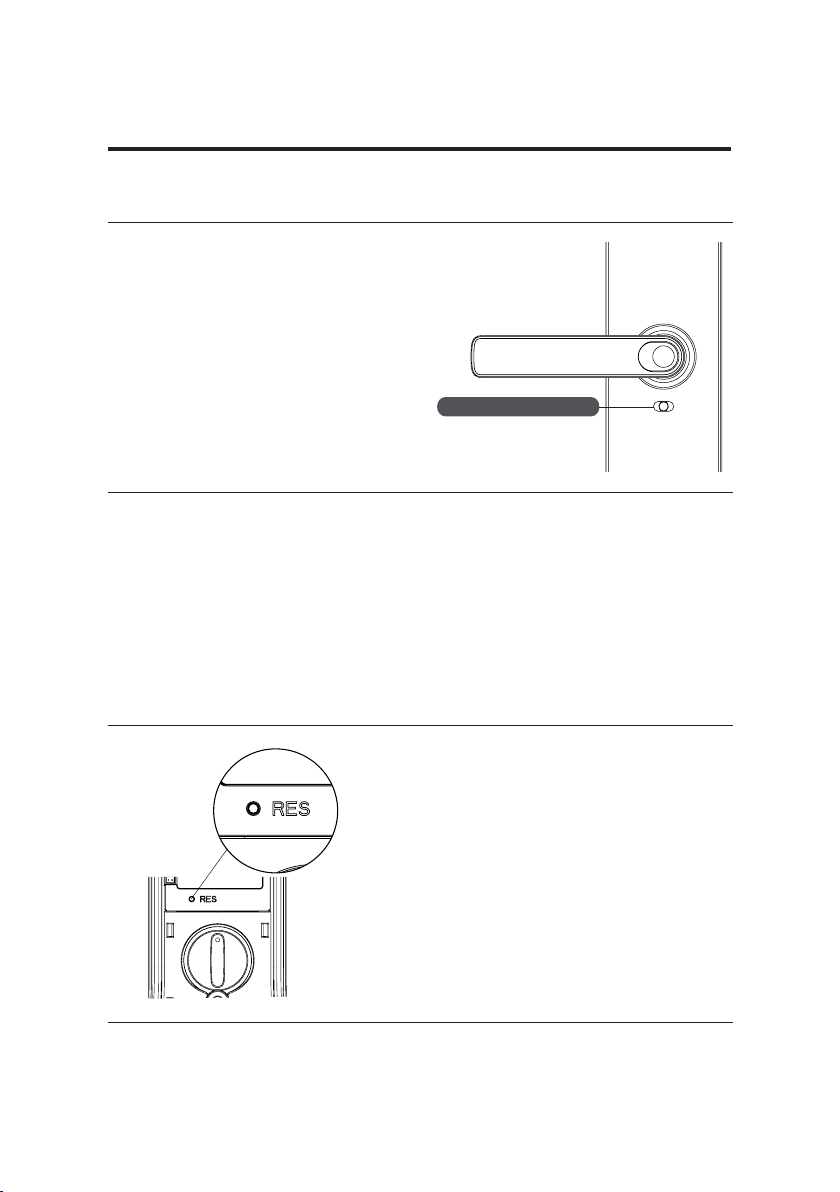
6.Other functions
Safehandle function
Function:
When safe handle function is enabled, you
could lock up the handle from inside, and
doors c an’t be unlocked from inside.
How to use:
1. Enable safe handle function: Toggle the
switch to red scale.
2. Disable safe handle function: Toggle
the switch to green scale.
Restore to factory settings
Safe handle switch
20
Function:
Empty all user information and restore to
factory settings.
How to use:
Double click the [RES] but ton with a sharp
objec t. Then the door lock will be restored to
factory settings and all the user information
will be emptied.
Page 23
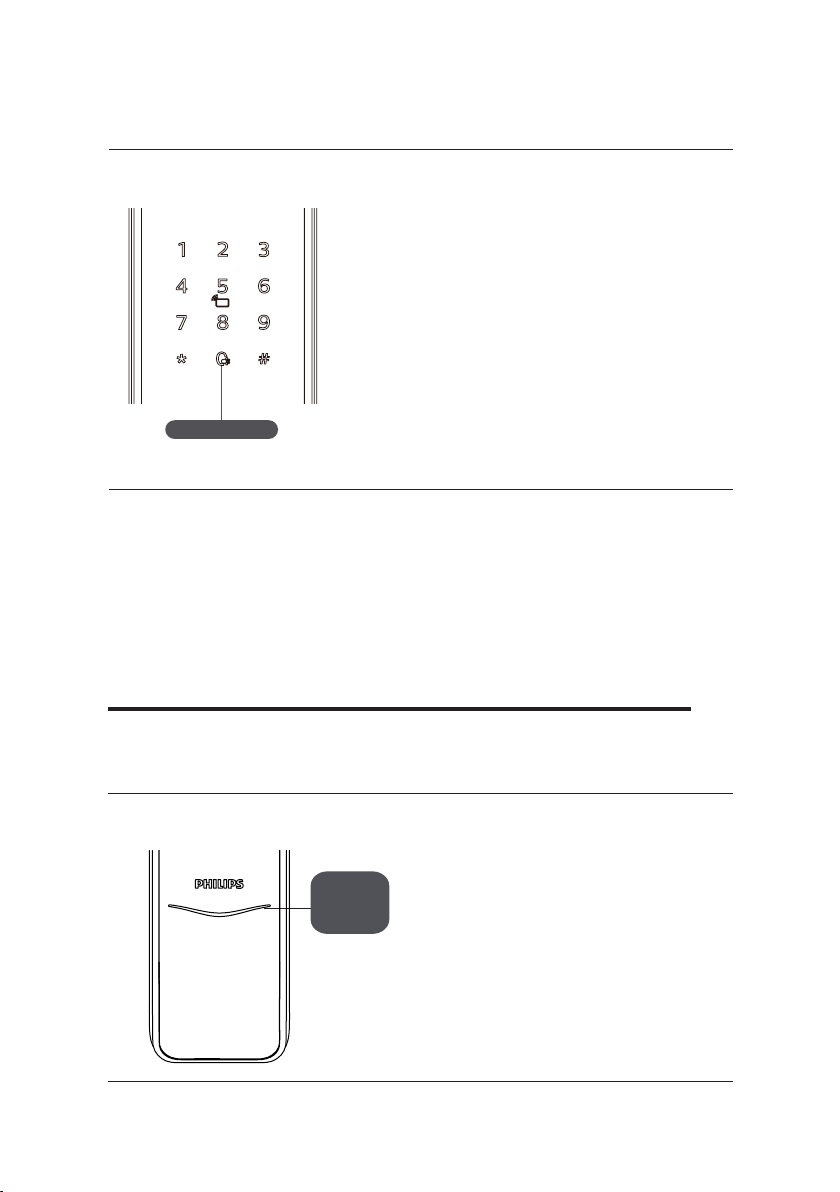
One-key mute mode
Function:
Turning o the voice guide with only one
key, which is applicable to the scenes where
you don’t want to disturb your families.
How to use:
1. Mute: When the system is awake, long press
the mute button for 2 seconds to enter onetime mute mode. The but ton will glow white.
2. Unmute: When the system is awake, long
press the mute button for 2 seconds to restore
the voice guide. The but ton will glow white.
Mute button
7.Meaning and use of indicators
Lock status indicator
Lock
门
status
锁
indicator
状
态
提
示
灯
The mean ings of differ ent light color s
Blue: After the system wakes up, the light
will glow blue, indicating that you can
operate the lock.
Green:After the door is unlocked, the
light will glow green, indicating that the
door is open.
Red:After the door is locked, the light
will glow red, indicating that the door is
closed.
21
Page 24
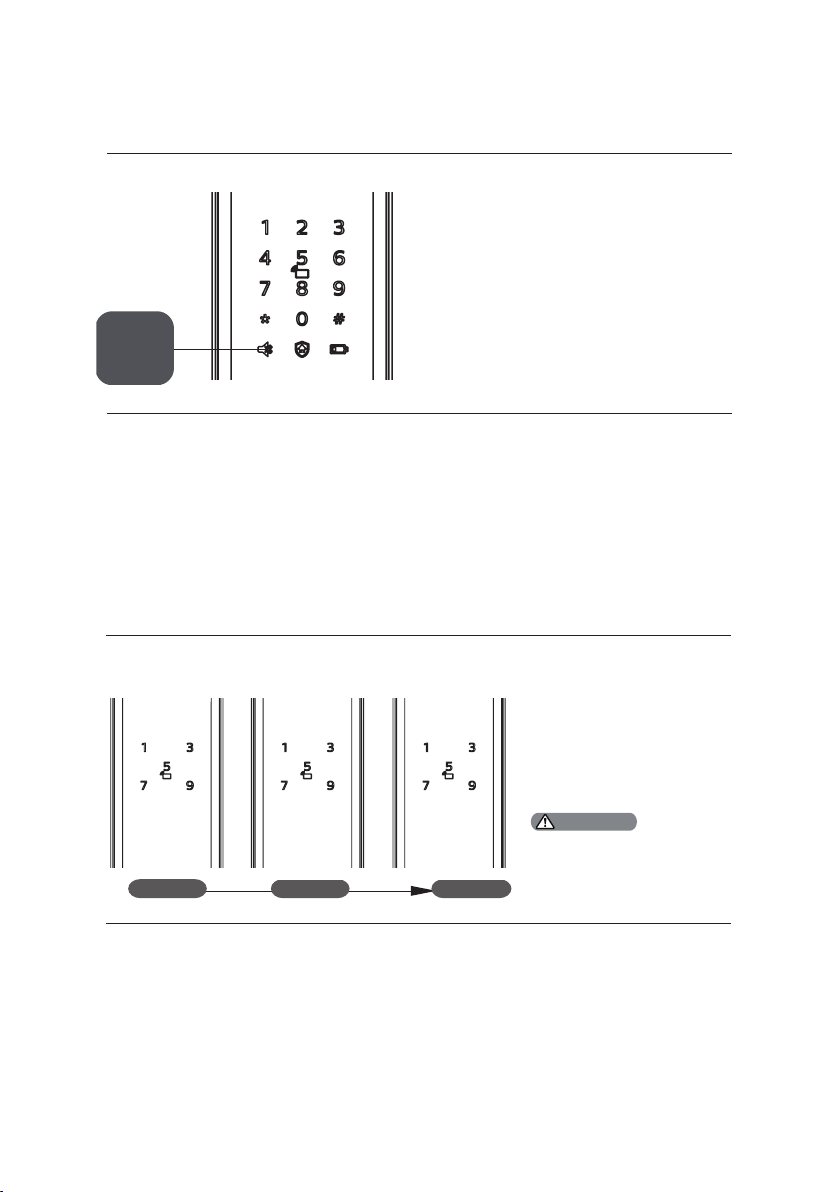
Mute mode indicator
Mute
button
System lockup indicator
Flash three times Flash twice Flash once
The meanings of light colors:
White: The mute mode is on or o.
If there are consecutive
incorrect inputs of any of the
ngerprint, PIN code, or key
tag 5 times within 5 minutes,
the system will lock up for 3
minutes.
22
3 minutes 2 minutes 1 minute
Attention
Only when waking up the
outside escutcheon or verifying
the identity of the user would
the numbers appear.
Page 25
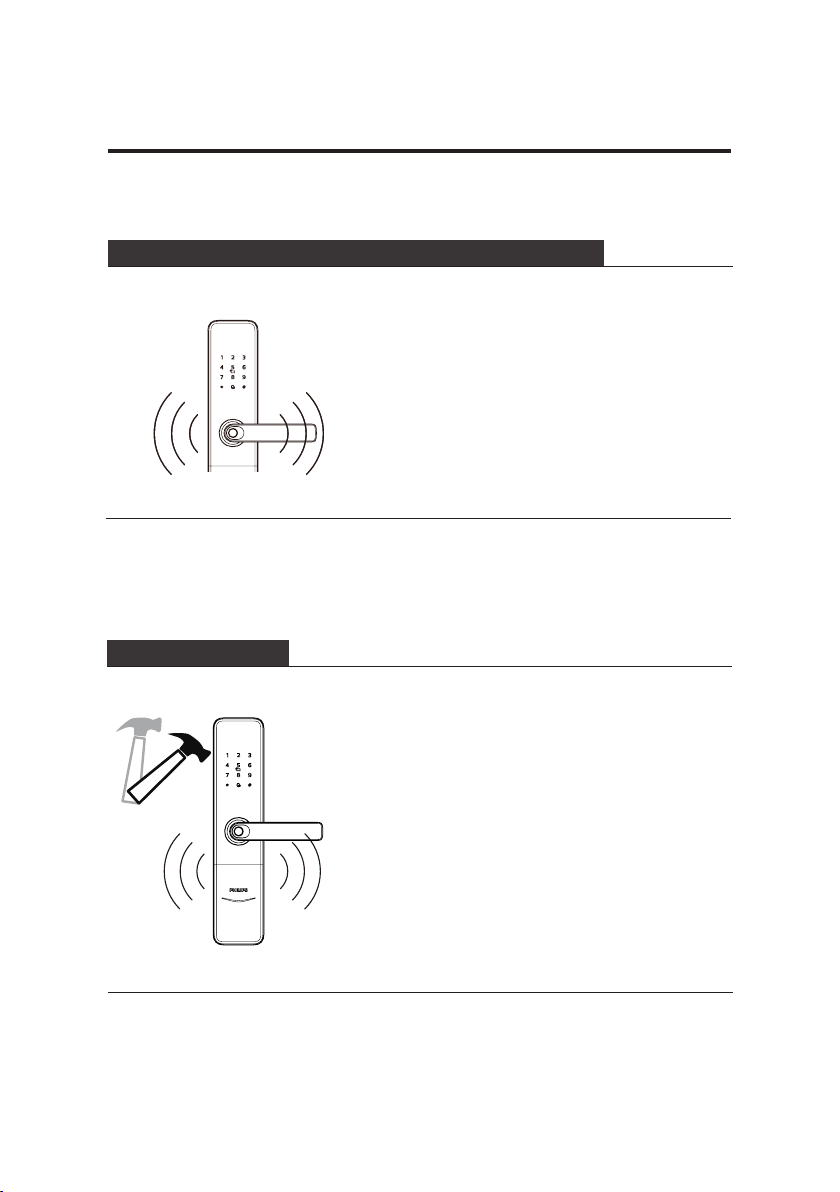
8.Troubleshooting
Alerts on Philips Easykey
Low battery alert, reminding you to replace the batteries in time
Way to trigger: When the system wakes up, it will
automatically check the battery voltage. If the
voltage is too low, then an alert will be triggered
to remind you to replace the batteries.
Way to be alerted: A voice prompt of “Low
battery voltage, please replace all batteries” will
be given when unlocking the door.
Way to turn o: The alert will be automatically
turned o.
Anti-dismantling alert
Way to trigger: The front escutcheon is pried open
and there is a gap between the door frame and the
door lock.
Way to be alerted: Repeat alerts
Way to turn o: Aler t will be turned o
automatically or close after verifying the identity
of the users. And the normal way to unlock the
door from inside or outside could also turn o the
alert.
23
Page 26
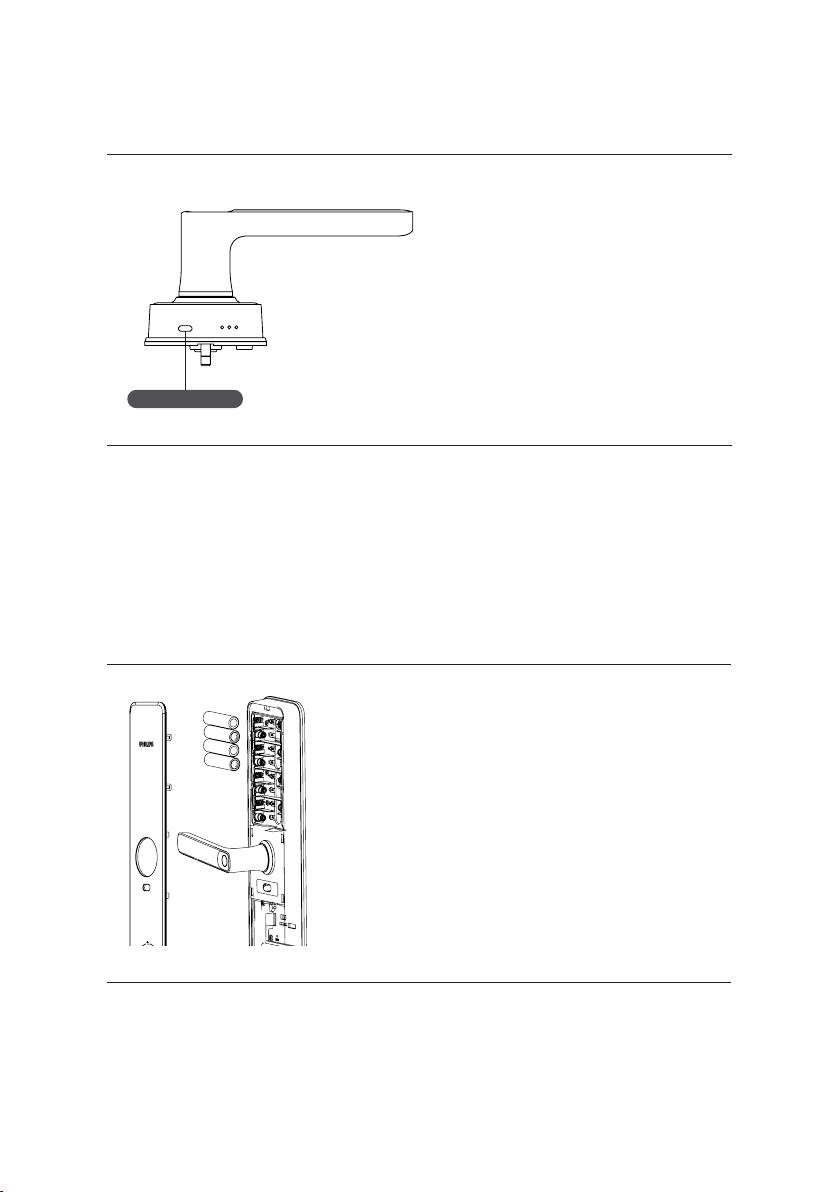
How to charge Philips Easykey in an emergency
When the battery voltage is low and
the door cannot be opened from
outside, you can power up the lock by
plugging 5V power bank into the
micro USB. After the door is unlocked,
please replace the batteries instantly.
USB interfaces
How to replace batteries
24
To keep the batteries running longer and save
you from replacing the batteries repeatedly,
Philips Easykey is powered by four A A batteries
and can contain eight bat teries at the same time.
Remove the batteries by loosening the buckles
on the lower part of rear escutcheon and draging
the rear escutcheon upward.
Page 27

Philips and the Philips Shield Emblem are registered trademarks of Koninklijke Philips N.V.
and are used under license. This product has been manufactured by and is sold under the
responsibility of Shenzhen Conex Intelligent Technology Co., Ltd., and Shenzhen Conex
Intelligent Technology Co., Ltd. is the warrantor in relation to this product.
 Loading...