

Page 1

Docking Entertainment System
Register your product and get support at
www.philips.com/welcome
DC570
Page 2
DOCKING ENTERTAINMENT SYSTEM DC570
7
8
9
0
!
@
POWER
1
2
SOURCE
DSC
DBB
PRESET
+
VOLUME
+
3
4
5
AUX
FM
6
3
Page 3

SHU FFLE
ALBUM/
PRESET
REPEAT
SLEEP
MUTE
SET TIME
TIMER PROG
USB MENU AUX
POWER TUNER
VOL
DSC
DBB
TUNING
TUNING
+
2
3
5
6
8
7
1
9
0
!
#
@
$
%
^
4
4
Page 4

Important notes for users in the
U.K.
Mains plug
This apparatus is fitted with an approved 13
Amp plug. To change a fuse in this type of plug
proceed as follows:
1 Remove fuse cover and fuse.
2 Fix new fuse which should be a BS1362 5 Amp,
A.S.T.A. or BSI approved type.
3 Refit the fuse cover.
If the fitted plug is not suitable for your socket
outlets, it should be cut off and an appropriate
plug fitted in its place.
If the mains plug contains a fuse, this should
have a value of 5 Amp. If a plug without a fuse
is used, the fuse at the distribution board
should not be greater than 5 Amp.
Note: The severed plug must be disposed of to
avoid a possible shock hazard should it be
inserted into a 13 Amp socket elsewhere.
How to connect a plug
The wires in the mains lead are coloured with
the following code: blue = neutral (N),
brown = live (L).
¶ As these colours may not correspond with the
colour markings identifying the terminals in
your plug, proceed as follows:
– Connect the blue wire to the terminal
marked N or coloured black.
– Connect the brown wire to the terminal
marked L or coloured red.
– Do not connect either wire to the earth
terminal in the plug, marked E (or e) or
coloured green (or green and yellow).
Before replacing the plug cover, make certain
that the cord grip is clamped over the sheath
of the lead - not simply over the two wires.
Italia
DICHIARAZIONE DI CONFORMITA’
Si dichiara che l’apparecchio DC570 Philips
risponde alle prescrizioni dell’ar t. 2 comma 1 del
D.M. 28 Agosto 1995 n. 548.
Fatto a Eindhoven
Philips Consumer Electronics
Philips, Glaslaan 2
5616 JB Eindhoven, The Netherlands
Norge
Typeskilt finnes på apparatens underside.
Observer: Nettbryteren er sekundert
innkoplet. Den innebygde netdelen er
derfor ikke frakoplet nettet så lenge
apparatet er tilsluttet nettkontakten.
For å redusere faren for brann eller elektrisk
støt, skal apparatet ikke utsettes for regn eller
fuktighet.
CAUTION
Visible and invisible laser radiation. If
the cover is open, do not look at the
beam.
Copyright in the U.K.
Recording and playback of material may
require consent. See Copyright Act 1956 and
The Performer’s Protection Acts 1958 to 1972.
5
Page 5

DK
Advarsel: Usynlig laserstråling ved åbning
når sikkerhedsafbrydere er ude af funktion.
Undgå utsættelse for stråling.
Bemærk: Netafbryderen er sekundært
indkoblet og ofbryder ikke strømmen fra
nettet. Den indbyggede netdel er derfor
tilsluttet til lysnettet så længe netstikket
sidder i stikkontakten.
S
Klass 1 laseraparat
Varning! Om apparaten används på annat
sätt än i denna bruksanvisning specificerats,
kan användaren utsättas för osynlig
laserstrålning, som överskrider gränsen för
laserklass 1.
Observera! Stömbrytaren är sekundärt
kopplad och bryter inte strömmen från
nätet. Den inbyggda nätdelen är därför
ansluten till elnätet så länge stickproppen
sitter i vägguttaget.
SF
Luokan 1 laserlaite
Var oitus! Laitteen käyttäminen muulla
kuin tässä käyttöohjeessa mainitulla tavalla
saattaa altistaa käyttäjän
turvallisuusluokan 1 ylittävälle
näkymättömälle lasersäteilylle.
Oikeus muutoksiin varataan. Laite ei
saa olla alttiina tippu-ja roiskevedelle.
Huom. Toiminnanvalitsin on kytketty
toisiopuolelle, eikä se kytke laitetta irti
sähköverkosta. Sisäänrakennettu verkkoosa on kytkettynä sähköverkkoon aina
silloin, kun pistoke on pistorasiassa.
6
Page 6

Index
English ------------------------------------------------ 8
Français -------------------------------------------- 24
Español --------------------------------------------- 40
Deutsch--------------------------------------------- 56
Nederlands ---------------------------------------- 73
Italiano ---------------------------------------------- 91
Svenska ------------------------------------------- 108
English
Français
EspañolDeutschNederlandsItalianoSvenskaDanskSuomi
Dansk --------------------------------------------- 125
Suomi --------------------------------------------- 142
Português ---------------------------------------- 158
----------------------------------------- 175
Português
7
Page 7

Sommaire
Français
Information Générale
Informations relatives à l’environnement ..... 25
Accessoires livrés avec l’équipement ............. 25
Informations relatives à la sécurité ................ 25
Préparatifs
Connexions arrière ........................................... 26
Connecter un périphérique USB .......................... 27
Connecter un appareil non-USB ........................... 27
Avant d’utiliser la télécommande ................... 27
Remplacement des batteries de la
télécommande .................................................... 27
Commandes
Unité principale .................................................. 28
Télécommande ................................................... 29
Fonctions de base
Pour mettre le système en marche................ 30
Pour mise en circuit du mode de veille Eco
Power .................................................................... 30
Mettre le système en mode de veille ............ 30
Veille Automatique Économie d’énergie ....... 30
Réglage de volume et de tonalité ................... 30
Réglage du son .................................................... 31
Fonctions de lecture USB
Divers modes de lecture: SHUFFLE et REPEAT
................................................................................ 31
Programmation des plages ............................... 32
Affichage de pistes programmées ................... 32
Modification de pistes programmée .............. 32
Suppression de pistes programmées ............. 32
Réception radio
Réglage sur les émetteurs radio ..................... 33
Programmation des émetteurs radio ............ 33
Programmation automatique .................................33
Programmation manuelle ........................................33
Réglage des émetteurs préréglés ................... 33
Sources externes
Utilisation d'un périphérique non USB ......... 34
Utiliser un périphérique USB de stockage ... 34
Mettre en lecture un périphérique USB de
stockage ......................................................................34
Horloge/Programmateur/Veille
Réglage d’horloge ............................................... 36
Réglage du programmateur.............................. 36
Arrêt du réveil...........................................................36
Réglage du minuteur de mise en veille .......... 36
Station d'accueil iPod
Lecteurs iPod compatibles ............................... 37
Sélection de l'adaptateur pour station d'accuei
adéquat ................................................................. 37
Utilisation des adaptateurs pour station
d'accueil ................................................................ 37
Lecture d'un baladeur iPod .............................. 37
Chargement de la batterie de l'iPod à l'aide de
la station d'accueil .............................................. 37
Spécifications ............................................ 38
Depannage................................................... 39
24
Page 8

Information Générale
Félicitations pour votre achat et bienvenue sur le
site Philips !
Pour profiter pleinement de l'assistance Philips,
enregistrez votre produit sur le site à l'adresse
suivante : www.philips.com/welcome
Informations relatives à
l’environnement
Tous les matériaux d’emballage superflus ont été
supprimés. Nous avons fait notre possible afin
que l’emballage soit facilement séparable en trois
types de matériaux : carton (boîte), polystyrène
expansible (matériel tampon) et polyéthylène
(sachets, feuille de protection en mousse).
Votre appareil est composé de matériaux
pouvant être recyclés et réutilisés s’il est
démonté par une firme spécialisée. Veuillez
observer les règlements locaux sur la manière de
vous débarrasser des anciens matériaux
d’emballage, des piles usagées et de votre ancien
appareil.
Accessoires livrés avec
l’équipement
– télécommande (avec pile)
– câble d’antenne FM
–4adaptateurs pour station d'accueil iPod
– 3.5 mm Câble Line-in
Informations relatives à la
sécurité
● Avant d’utiliser le système, vérifiez si la tension
d’alimentation figurant que la plaquette
signalétique (ou la tension indiquée à côté du
sélecteur de tension) correspond à celle du
secteur. Dans la négative, consultez votre
revendeur.
● Placez l’appareil sur une surface plane, ferme et
stable.
● L’appareil doit être installé à un emplacement
suffisamment ventilé pour écarter tout risque
d’échauffement interne. Laissez un espace d’au
moins 10 cm à l’arrière et au-dessus du boîtier,
et de 5 cm de chaque côté.
● L'aération de l'appareil ne doit pas être
empêchée en couvrant la bouche d'aération avec
des objets tels que journaux, nappe, rideaux, etc.
● L’appareil, les piles ou les disques ne doivent
jamais être exposés à une humidité excessive, à
la pluie, à du sable ou à des sources de chaleur,
dont notamment des appareils de chauffage ou
un ensoleillement direct.
● Ne pas placer sur l'appareil des objets
enflammés telles que des bougies allumées.
● Ne pas placer sur l'appareil des objets remplis
d'eau tels que des vases.
● Les appareils ne doivent pas être exposés à
l'humidité ou aux éclaboussures.
● Installez vos système près d'une prise
d'alimentation AC et où l'accès à la prise
électrique est aisé.
● Lorsque l’appareil est en mode de veille,
il continue à consommer de l’électricité.
Pour le déconnecter totalement de
l’alimentation secteur, débrancher la
fiche secteur de la prise murale.
● Ne réglez pas le volume de sorte que vous
Remarques concernant la
mise au rebut des piles
Votre produit contient des piles relevant
de la directive européenne 2006/66/EC,
qui ne peuvent être jetées avec les
ordures ménagères. Renseignez-vous sur
les dispositions en vigueur dans votre
région concernant la collecte séparée des
piles car la mise au rebut correcte permet
de préserver l’environnement et la santé.
Français
25
Page 9

Préparatifs
Français
Antenne
filaire FM
FM wire antenna
Connexions arrière
La plaquette signalétique est apposée à
l’arrière de l’appareil.
A Pow er
● Avant de brancher le cordon d'alimentation sur
la prise murale, assurez-vous que toutes les
autres connexions ont été effectuée
AVERTISSEMENT!
– Pour des performances optimales, utilisez
uniquement le cordon d'alimentation
d'origine.
– Ne faites ni ne changez jamais les
connexions avec la puissance mise en circuit.
Pour éviter une surchauffe du système, un
circuit de sécurité a été intégré. A cet effet,
votre système peut commuter
automatiquement en mode de veille en cas
de conditions extrêmes. Si cela arrive,
laissez refroidir le système avant de le
réutiliser (non disponible pour toutes les versions).
26
B Connexions d’antenne
Branchez l'antenne FM fournie sur la prise FM.
Déployez l'antenne FM et orientez-la de manière
à optimiser la réception.
Remarque:
– Éloignez l'antenne FM des câbles d'enceinte afin
d'éviter toute interférence électrique.
C Connexions facultatives
Les appareils et cordons ci-dessous ne sont pas
fournis. Pour plus de détails, reportez-vous au
mode d’emploi des appareils connectés.
Page 10

Préparatifs
1
2
3
CR2025
Connecter un périphérique USB
En connectant un périphérique USB de stockage
à une chaîne, Vous pouvez écouter la musique
stockée dans le périphérique à travers les
puissants haut-parleurs de la chaîne.
● Insérez la fiche du périphérique USB dans la
prise de l'appareil.
OU
Pour les appareils avec un câble USB :
1 Insérez une extrémité du câble USB dans la prise
de l'appareil.
2 Insérez l'autre prise du câble USB à la borne de
sortie USB de l'appareil USB.
Connecter un appareil non-USB
Utilisez un line-in pour connecter les prises
AUX IN de sortie audio analogique d’un
appareil externe (téléviseur, magnétoscope,
lecteur de disques laser, d’un lecteur de DVD ou
d’un enregistreur de CD).
Avant d’utiliser la
télécommande
1 Retirez la feuille de protection en plastique.
2 Sélectionnez la source que vous souhaitez
commander en appuyant sur une des touches de
sélection source de la télécommande (par
exemple USB, TUNER).
3 Sélectionnez ensuite la fonction souhaitée (par
exemple ÉÅ).
Retirez la feuille de protection en plastique
Remplacement des batteries de
la télécommande (en lithium
CR2025)
1 Appuyez sur la fente du compartiment des piles.
2 Retirez le compar timent à batterie .
3 Placez une nouvelle batterie et insérez
entièrement le compartiment batterie dans sa
position d’origine.
Français
ATTENTION!
– Les piles renferment des substances
chimiques et doivent donc être éliminées
dans les règles.
27
Page 11

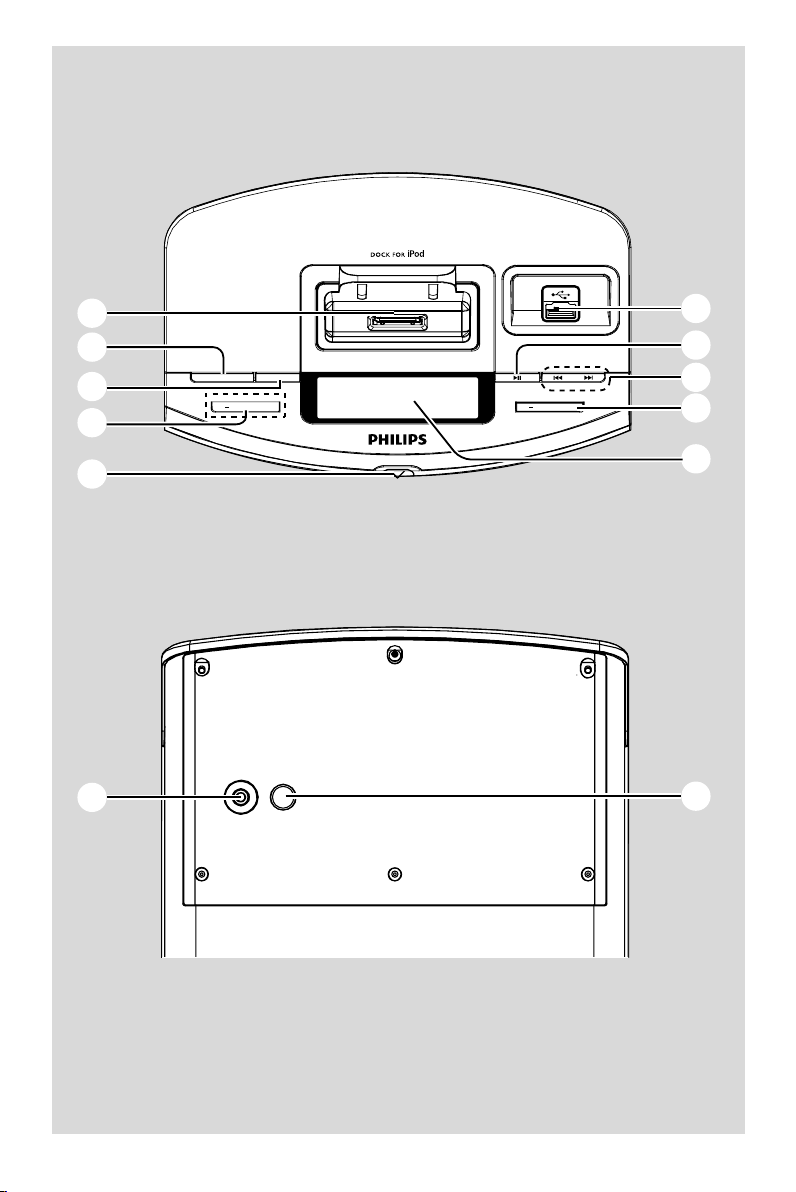
Commandes
Unité principale
1 USB DIRECT
–prise permettant de connecter le lecteur à un
Français
périphérique USB.
2 ÉÅ
– (iPod/USB) pour arrêter ou interrompre la
lecture.
3 S/ T
iPod/ USB .......... recherche arrière ou avant au
sein d’une plage (Maintenez
enfoncée).
................................. permet de passer au début de
l'album en cours/précédent/
suivante.
CLOCK ............... permet de régler les minutes de
la fonction horloge/réveil.
TUNER ............... permet de parcourir les
fréquences FM.
4 VOLUME -/+
– réglage de volume.
5 Affichage
–sinformation sur le fonctionnement de l’appareil.
6 FM antenne
– améliore la réception en FM
7 Station d'accueil pour iPod
– station d'accueil pour adaptateurs permettant de
connecter votre iPod pour que l'appareil le
recharge ou lise son contenu.
8 Power
– permet d'allumer l'appareil en diffusant la
dernière source audio lue.
– permet de passer en mode veille.
9 Source
–Permet de sélectionner les différentes sources
audio : USB, iPod, FM ou AUX
0 PRESET -/+
– (USB) permet de passer au début de la piste
précédente/suivant.
– permet de régler les heures de la fonction
horloge/réveil.
– réglage des émetteurs préréglés.
DBB
–Permet d'améliorer les basses
DSC
–Permet de sélectionner différents effets sonore
! IR
– pointez la télécommande vers ce capteur.
@ AUX
–prise permettant de connecter un périphérique
auxiliaire.
28
Page 12

Commandes
Télécommande
1 iPod
– permet de sélectionner la source audio
correspondant à votre iPod.
2 Power
– permet de passer en mode veille.
3 ÉÅ
– (iPod/USB) pour arrêter ou interrompre la
lecture.
4 Menu
–Permet d'accéder au menu iPod.
5 USB
–Permet de sélectionner la source audio
correspondant à un lecteur audio USB
6 REPEAT/SHUFF
– (USB) permet de basculer entre les différentes
options de lecture de piste/album, telles que le
mode de répétition ou de lecture aléatoire.
7 ALBUM/PRESET3 / 4
– (USB) permet de passer au début de la piste
précédente/suivant.
– réglage des émetteurs préréglés.
DBB
–Permet d'améliorer les basses
DSC
–Permet de sélectionner différents effets sonore
8 SLEEP
– sélectionne le délai avant l'arrêt programmé de
l'appareil.
9 TUNER
– permet de sélectionner la source audio
correspondant à la radio FM.
0 TUNING -/+
TUNER ............... permet de parcourir les
fréquences FM.
CLOCK ............... permet de régler les heures de la
fonction horloge/réveil.
! S / T
iPod/ USB .......... recherche arrière ou avant au
sein d’une plage (Maintenez
enfoncée).
................................. permet de passer au début de
l'album en cours/précédent/
suivante.
CLOCK ............... permet de régler les minutes de
la fonction horloge/réveil.
@ Timer
– permet d'activer/désactiver le mode de réglage
du réveil.
– permet d'activer/désactiver le réveil.
# AUX
–Permet de sélectionner la source audio
correspondant à un autre appareil audio
$ PROG/SET TIME
–(TUNER) permet de programmer des stations
de radio.
– permet de régler la fonction horloge.
– (USB) permet de programmer des pistes.
% VOLUME -/+
– réglage de volume.
^ MUTE
– interrompt et reprend la reproduction du son.
Remarques pour la télécommande:
– Sélectionnez d’abord la source que vous
désirez commander en appuyant sur l’une
des touches de sélection de la source sur la
télécommande (par exemple USB/AUX).
–Sélectionnez ensuite la fonction voulue
(par exemple ÉÅ, S , T).
Français
29
Page 13

Fonctions de base
Français
POWER TUNER
➜ Le système se met en mode de veille
d'économie.
● Si le système est en mode de veille normal avec
l'affichage, appuyez et maintenez Power durant
3 secondes ou plus pour permuter en mode de
veille Eco ou vice versa.
+
TUNING
TUNING
USB MENU AUX
SHU FFLE
REPEAT
ALBUM/
PRESET
SLEEP
TIMER PROG
SET TIME
DSC
VOL
DBB
MUTE
IMPORTANT!
Avant d’utiliser le système pour la
première fois, effectuez d’abord
complètement les opérations
préliminaires.
Pour mettre le système en
marche
● Appuyez sur le bouton Power de l'appareil.
➜ Le système se commute sur la dernière
source sélectionnée.
● Appuyez à plusieurs reprises sur le bouton
Source de l'appareil ou sur la touche USB,
AUX, iPod ou TUNER on the remote
control. de la télécommande.
➜ Le système se commute sur la source
sélectionnée.
Pour mise en circuit du mode de
veille Eco Power
● Maintenez enfoncé Power (Pow er de la
télécommande) dans le mode activé.
Mettre le système en mode de
veille
● Appuyez sur Pow er (ou Power sur la
télécommande).
➜ Le volume (jusqu'à 12 : niveau maximum), le
dernier mode sélectionné, la source et les
présélections de tuner sont mémorisés par
l'appareil.
Veille Automatique Économie
d’énergie
Pour économiser de l'énergie, l'appareil bascule
automatiquement en mode veille 15 minutes
après la fin de la dernière piste de l'iPod/
périphérique USB connecté lorsqu'aucune
commande n'a été utilisée.
Réglage de volume et de tonalité
1 Appuyez sur VOLUME -/+ pour augmenter ou
diminuer le niveau sonore.
➜ L’affichage indique le niveau de volume VOL
et un chiffre 0-32.
2 Appuyez sur MUTE de la télécommande pour
interrompre immédiatement la reproduction du
son.
➜ La lecture continue sans son et MUTE
apparaît
● Pour réactiver la reproduction du son, on peut:
– appuyez à nouveau sur MUTE;
– arégler les commandes de volume;
– changer de source.
30
Page 14

Fonctions de base Fonctions de lecture USB
Réglage du son
Vous ne pouvez sélectionner qu’un contrôle
sonore à la fois: DBB ou DSC .
Fonction DBB
(suramplification des basses)
La fonction DBB améliore le niveau de basses.
iPod/AUX
● Appuyez sur ALBUM/PRESET 4 sur la
télécommande ou PRESET - sur le panneau
pendant pour activer ou désactiver la fonction
DBB.
USB/TUNER
● Maintenez enfoncé ALBUM/PRESET 4 sur la
télécommande ou PRESET - sur le panneau
pendant plus de 2 secondes pour activer ou
désactiver la fonction DBB.
Fonction DSC
(contrôle du son numérique)
La fonction DSC permet d'obtenir différents
types de réglage d'égalisateur prédéfinis.
iPod/AUX
Divers modes de lecture:
SHUFFLE et REPEAT
Vous pouvez sélectionner et changer les modes
divers de lecture avant ou pendant la lecture. Les
modes de lecture pour ré péter, REPEAT
peuvent aussi être combinés avec PROGRAM.
1 Pour sélectionner votre mode de lecture,
appuyez sur la touche REPEAT/SHUFF avant
ou pendant la lecture jusqu'à ce que la fonction
souhaitée s'affiche.
➜ Si onE s'affiche, la piste en cours est lue en
boucle.
➜ Si ALb s'affiche, l'album en cours est lu en
boucle.
➜ Si ALL s'affiche, toutes les pistes sont lues en
boucle.
➜ SHUFF apparaît si la lecture aléatoire est
activée et disparaît si elle est désactivée.
2 Pour repasser en mode de lecture normal,
appuyez sur REPEAT/SHUFF jusqu’à ce que
les différents modes oFF ne soient plus affichés.
● Vous pouvez également appuyer 9 pour annuler
le mode de lecture en cours.
Remarque:
– Les fonctions de répétition et de lecture aléatoire
ne peuvent pas être activées simultanément.
Français
1 Appuyez sur ALBUM/PRESET 3 ou
PRESET + sur le panneau pendant pour passer
en mode DSC.
2 Appuyez à plusieurs reprises sur PRESET +
pour sélectionner les options CLASSIC
(Classique), JAZZ, POP ou ROCK.
USB/TUNER
1 Maintenez enfoncé ALBUM/PRESET 3 ou
PRESET + sur le panneau pendant plus de
2 secondes pour passer en mode DSC.
2 Appuyez à plusieurs reprises sur PRESET +
pour sélectionner les options CLASSIC
(Classique), JAZZ, POP ou ROCK.
31
Page 15

Fonctions de lecture USB
5 Pour lancer la lecture de la programmation,
appuyez directement sur ÉÅ.
Français
POWER TUNER
+
TUNING
TUNING
USB MENU AUX
SHU FFLE
REPEAT
ALBUM/
PRESET
SLEEP
TIMER PROG
SET TIME
DSC
VOL
DBB
MUTE
Programmation des plages
Programmez en position STOP (Arrêt) pour
sélectionner et stocker jusqu'à 20 pistes dans la
mémoire.
1 Appuyez sur PROG/SET TIME de la
télécommande pour commencer la
programmation.
➜ Pr 01 s'affiche et PROG clignote.
2 Appuyez sur S/T pour sélectionner le
numéro de la piste souhaitée.
● MP3 CD, appuyez sur ALBUM/PRESET 3 4
sur la télécommande pour sélectionner le
numéro de la plage désirée.
3 Appuyez sur PROG/SET TIME pour confirmer
le numéro de plage que vous désirez
programmer.
4 Répétez les points 2 et 3 pour sélectionner et
mémoriser toutes les plages souhaitées.
➜ Si vous essayez de programmer plus
de 20 titres, FULL apparaîtra sur
l’affichage.
Affichage de pistes
programmées
Vous pouvez afficher ou modifier les pistes
programmées.
1 Appuyez à plusieurs reprises sur PROG/SET
TIME pour afficher chacune des pistes
programmées.
Modification de pistes
programmée
1 Appuyez à plusieurs reprises sur PROG/SET
TIME jusqu'à ce que vous obteniez la piste
programmée souhaitée.
2 Appuyez sur S/T pour sélectionner le
numéro de piste souhaité.
● Lorsque des pistes se trouvent dans un autre
album, appuyez sur ALBUM/PRESET 3/4
pour sélectionner le numéro d'album souhaité.
3 Appuyez sur PROG/SET TIME pour
confirmer le numéro de piste à mémoriser.
Suppression de pistes
programmées
1 Pour supprimer votre programmé, maintenez
PROG/SET TIME enfoncé pendant plus de
2 secondes.
➜ CLR s'affiche.
32
Page 16

POWER TUNER
+
TUNING
TUNING
USB MENU AUX
SHU FFLE
REPEAT
ALBUM/
PRESET
SLEEP
TIMER PROG
SET TIME
DSC
VOL
DBB
MUTE
Réglage sur les émetteurs radio
1 Appuyez plusieurs fois sur le bouton TUNER
pour sélectionner la source Tuner.
2 Maintenez enfoncé S/T et relâchez la
touche.
➜ Les stations radio présentant un signal
suffisamment puissant sont recherchées
automatiquement.
3 Si nécessaire, répétez le point 2 jusqu’à ce que
vous trouviez l’émetteur souhaité.
● Pour régler une station dont le signal est faible,
appuyez brièvement et à plusieurs reprises sur
S/T.
Réception radio
Programmation des émetteurs
radio
Vous pouvez mémoriser jusqu’à 20 émetteurs
radio.
Programmation automatique
La programmation automatique s'effectue à
partir de la présélection numéro 1 et efface
toutes les présélections existantes.
● Maintenez enfoncé PROG/SET TIME pendant
plus de 3 secondes pour commencer la
programmation.
➜ Toutes les stations sont programmées.
Programmation manuelle
1 Réglez sur un émetteur de votre choix (voir
“Réglage sur les émetteurs radio”).
2 Appuyez sur PROG/SET TIME pour
commencer la programmation.
➜ PROG clignote sur l’afficheur.
3 Appuyez sur ALBUM/PRESET 3 4 pour
accorder à cet émetteur un numéro de 1 à 20.
4 Appuyez à nouveau sur PROG/SET TIME
pour confirmer le réglage.
➜ PROG s’éteint, le numéro préréglé et la
fréquence de l’émetteur préréglé sont affichés.
5 Répétez les quatre opérations précédentes pour
mémoriser d’autres émetteurs.
● Vous pouvez ‘écraser’ un émetteur préréglé en
mémorisant une autre fréquence à sa place.
Réglage des émetteurs préréglés
● Appuyez sur ALBUM/PRESET 3 4 jusqu’à
ce que le numéro préréglé de l’émetteur de
votre choix soit affiché.
Français
33
Page 17

Sources externes
+
Français
SOURCE
POWER
DSC
DBB
PRESET
+
Utilisation d'un périphérique non
USB
1 Connectez les prises de sortie audio de l’appareil
externe (téléviseur, magnétoscope, lecteur de
disques laser, lecteur de DVD ou enregistreur de
CD) aux prises AUX de votre chaîne.
2 Appuyez sur AUX pour sélectionner l’entrée
d’un l’appareil externe.
Remarque:
–Pour de plus amples détails, consultez le mode
d’emploi de l’appareil connecté.
USB MENU AUX
Utiliser un périphérique USB de
stockage
En connectant un périphérique USB de stockage
à une chaîne, Vous pouvez écouter la musique
stockée dans le périphérique à travers les
puissants haut-parleurs de la chaîne.
1 Vérifiez que l'appareil USB a été connecté
correctement (Voir Préparatifs: Connexions
facultatives).
2 Appuyez une fois ou plus sur USB pour
sélectionner.
– L'icône no AUdIO apparaît si aucun fichier
audio n'est trouvé dans le périphérique USB.
3 Repor tez-vous au guide de mise en route ou à la
page Commandes de ce manuel pour les
fonctions basiques de lecture.
Mettre en lecture un périphérique USB
de stockage
Périphériques USB de stockage
compatibles
vous pouvez utiliser :
VOLUME
+
– Mémoire flash USB (USB 2.0 ou USB1.1)
– Lecteurs flash USB (USB 2.0 ou USB1.1)
INFORMATIONS CONCERNANT USB
DIRECT :
1. Compatibilité entre les connexions USB et ce
produit:
a) Ce produit prend en charge la plupart des
périphériques de stockage de masse USB
conformes aux normes MSD USB.
i) Parmi les périphériques de stockage de masse
les plus courants figurent les lecteurs à mémoire
flash, les cartes Memory Stick, les clés USB, etc.
ii) Si la mention " Disc Drive " (Lecteur de
disque) s'affiche sur l'écran de votre ordinateur
après que vous avez branché le périphérique de
stockage de masse sur votre ordinateur, cela
signifie très probablement que ce périphérique
est conforme aux normes MSD et qu'il est
compatible avec ce produit.
b) Si votre périphérique de stockage de masse
doit être alimenté, assurez-vous qu'une nouvelle
pile se trouve bien dans le périphérique ou
rechargez d'abord le périphérique USB, puis
rebranchez-le sur ce produit.
2. Types de fichiers musicaux pris en charge:
a) Ce périphérique prend uniquement en charge
les fichiers musicaux non protégés avec les
extensions suivantes:
.mp3
.wma
b) Les fichiers musicaux achetés en ligne ne sont
pas pris en charge car ils sont protégés par la
gestion des droits numériques (DRM, Digital Right
Management).
c) Les fichiers avec les extensions suivantes ne
sont pas pris en charge :
.wav, .m4a, .m4p, .mp4, .aac, etc
3. La diffusion de fichiers audio par les enceintes
de l'appareil est impossible si votre ordinateur est
connecté directement aux entrées USB.
34
Page 18

Formats acceptés :
– Format USB ou fichier de mémoire FAT12,
FAT16, FAT32 (taille secteur : 512-4096
bytes)
–Taux de bits MP3 (taux de données): 32-320
Kbps et taux de bits variable
– WMA version 9 ou précédente
– Nombre maximal de niveaux imbriqués de
répertoire : 8 niveaux
– Nombre d'albums/dossiers : 99 maximum
– Nombre de plages/titres : 999 maximum
– ID3 tag v2.0 ou version supérieure
– Nom de fichier en Uicode UTF8 (longueur
maximum : 128 bytes)
Le système ne lira ou n'acceptera pas ce
qui suit :
– Les albums vides : un album vide est un album
ne contenant pas de fichiers MP3/WMA et
ne sera pas affiché sur l'écran.
– Les fichiers de format non accepté sont
ignorés. Ce qui signifie par exemple : Des
fichiers en Word.doc ou des fichiers MP3
avec l'extension .dfl sont ignorés et ne seront
pas lus.
–AAC, WAV, PCM fichiers audio
– Les fichiers WMA protégés DRM.
– Fichiers WMA en Lossless
Sources externes
Français
35
Page 19

Horloge/Programmateur/Veille
Français
Réglage d’horloge
L'horloge utilise le mode 24 heures.
IMPORTANT!
– Pour mettre l'horloge en mode d'économie
d'énergie, maintenez enfoncée la touche
POWER de l'appareil pendant au moins 3
secondes de façon à passer en mode veille
normal. Ensuite, suivez la procédure ci-dessous :
1 En mode d’attente, appuyez sur PROG/SET
TIME pendant plus de 3 secondes.
➜ Les chiffres de l'horloge clignotent.
2 Appuyez sur ALBUM/PRESET 3 4 pour
régler les minutes.
3 Appuyez sur S/T pour régler les heures.
4 Appuyez sur PROG/SET TIME pour
confirmer l’heure.
Réglage du programmateur
Vous pouvez uniquement régler le
programmateur en mode veille.
Réveillez-vous avec la musique de votre iPod/
périphérique USB ou avec la radio FM. L’heure
de l’horloge doit être réglée avant d’utiliser le
réveil.
1 Appuyez sur TIMER pendant plus de deux
36
POWER TUNER
+
TUNING
TUNING
USB MENU AUX
SHU FFLE
TIMER PROG
REPEAT
ALBUM/
PRESET
SLEEP
SET TIME
DSC
DBB
MUTE
VOL
secondes pour accéder au mode de réglage du
réveil.
➜ s'affiche.
➜ Les chiffres de l'horloge clignotent.
➜ "Er ror" s'affiche brièvement si vous n'avez pas
réglé l'heure de l'horloge.
2 Appuyez sur TUNING +/- pour régler les
minutes.
3 Appuyez sur S/T pour régler les heures.
4 Appuyez sur iPod, TUNER ou USB pour
sélectionner la source audio.
5 Appuyez sur TIMER pour confirmer votre
réglage.
➜ L'heure s'affiche à nouveau à l'écran.
Remarque :
Le mode TUNER est la source par défaut si :
–Votre périphérique USB ne contient pas de
fichiers MP3 ou WMA.
–Vous avez oublié de connecter un périphérique
USB.
–Vous avez oublié de connecter votre iPod.
Arrêt du réveil
● Pour annuler l'alarme, appuyez sur TIMER en
mode de veille ou lecture.
➜ L'icône s'affiche si l'alarme est activée, et
disparaît dans le cas contraire.
Réglage du minuteur de mise en
veille
La minuterie à rebours permet de mettre
l’équipement automatiquement hors service
après une période de temps préréglée.
1 Appuyez à plusieurs reprises sur SLEEP de la
télécommande.
➜ Les réglages sont les suivants (temps en
minutes):
120120
90 90
60 60
3030
15 15
120 ™
120120
90 ™
90 90
60 ™
60 60
30 ™
3030
15 ™
15 15
OFF OFF
OFF …
OFF OFF
➜SLEEP disparaît.
2 Pour afficher le délai restant avant l'arrêt
programmé, appuyez sur SLEEP.
Note:
– Si vous appuyez à nouveau sur SLEEP, le délai
d'arrêt programmé passe à l'option précédente,
plus courte.
Pour désactiver le temporisateur de
mise en veille
● Appuyez à plusieurs reprises sur SLEEP jusqu’à
ce que "0FF" s’affiche, ou appuyez sur le bouton
Pow er.
Page 20

Station d'accueil iPod
Lecteurs iPod compatibles
● La station d'accueil pour baladeur est compatible
avec tous les modèles d'iPod Apple existants
avec connecteur 30 broches.
Sélection de l'adaptateur pour
station d'accueil adéquat
● Inclus: quatre adaptateurs pour les différents
modèles d'iPod, notamment iPod touch (8 Go,
16 Go), iPod classic (80 Go, 160 Go), iPod nano
3ème génération (4 Go, 8 Go), iPod 5ème
génération (30 Go, 60 Go, 80 Go), iPod nano
2ème génération (2 Go, 4 Go, 8 Go) et iPod
nano 1ère génération (1 Go, 2 Go, 4 Go).
Utilisation des adaptateurs pour
station d'accueil
● Avant de brancher votre lecteur sur la station
d'accueil, connectez l'adaptateur à la station
d'accueil afin d'assurer une connexion fiable du
lecteur.
Lecture d'un baladeur iPod
1 Placez correctement votre iPod sur la station
d'accueil. Assurez-vous que l'adaptateur pour
station d'accueil est compatible.
● Assurez-vous que l'iPod est allumé avant de
sélectionner la source iPod.
2 Appuyez plusieurs fois sur la touche iPod de la
télécommande pour sélectionner la source iPod.
➜ L'icône de la station d'accueil pour iPod
s'affiche.
3 La lecture démarre automatiquement. Les
fonctions de lecture, de passage à la piste
suivante, de recherche rapide et de pause sont
accessibles sur l'appareil et la télécommande.
Chargement de la batterie de
l'iPod à l'aide de la station
d'accueil
● En mode iPod, placez directement votre iPod sur
la station d'accueil pour le charger.
Remarque :
–À des fins d'ÉCONOMIE D'ÉNERGIE, la
recharge de votre iPod et de votre
périphérique USB N'EST PAS PRISE EN CHARGE
lorsque l'unité principale est en Mode veille Éc
Français
37
Page 21

Spécifications
Français
AMPLIFICATEUR
Puissance de sortie ........................... 50W+2 x 25W
Rapport signal/bruit ....................................... ≥ 70 dBA
Réponse en fréquence . 50 Hz – 20 KHz, ± 3 dB
Sensibilité d’entrée AUX ............... 0.5 V (max. 2 V)
CAISSON DE BASSES
Réponse en fréquence ....................... 50 Hz – 1KHz
Impédance ........................................................................ 8 Ω
Puissance nominale .................................................. 50W
TWEETER
Réponse en fréquence ................ 160 Hz – 16 KHz
Impédance ........................................................................ 4 Ω
Puissance nominale ..........................................2 x 25W
SYNTONISEUR
Fréquence FM .....................................87.5 – 108 MHz
Sensibilité à 75 Ω
– FM ................................................................................ 20dBf
Distorsion harmonique totale ........................... ≤ 1%
Réponse de fréquence
– FM .............................................................. 63 – 6000 Hz
Rapport signal/bruit
– FM ....................................................................... ≥ 50 dBA
Lecteur de USB
USB ................................................................... 12Mb/s, V1.1
....... vous pouvez lire fichiers CDDA/MP3/WMA
Nombre d'albums/dossiers ................99 maximum
Nombre de plages/titres ................... 999 maximum
GÉNÉRALITÉS
Puissance CA .......................... 220-240V / 50-60 Hz
Dimensions (l x h x p) . 300 x 300 x 1024 (mm)
Poids ............................................................................. 10.1 kg
Consommation de puissance en attente ... <7 W
Les caractéristiques et l’apparence externe
sont susceptibles d’être modifiées sans
préavis.
38
Page 22

Depannage
ATTENTION
N’ouvrez pas l’appareil en raison des risques d’électrocution! Vous ne devez en aucun cas
tenter de réparer vous-même l’appareil car la garantie serait alors invalidée.
En cas de problème, contrôlez au préalable les points ci-dessous avant de faire réparer
l’appareil. Si vous ne parvenez pas à résoudre le problème en suivant ces conseils, consultez
votre revendeur ou votre centre de service après-vente.
Problème
Solution
Français
“NO USb” s’affiche.
Mauvaise réception radio.
Tous les boutons sont sans effet.
Pas de son ou son de mauvaise qualité.
La télécommande ne fonctionne pas
correctement.
Le réveil ne fonctionne pas.
Le réglage de l’horloge et du
temporisateur est effacé.
✔ Connectez un périphérique USB.
✔ Le signal est trop faible, réglez l’antenne ou
connectez une antenne extérieure pour
améliorer la réception.
✔ Eloignez l’appareil du téléviseur ou du
magnétoscope.
✔ Débranchez puis rebranchez le cordon secteur
puis remettez la chaîne en marche.
✔ Réglez le volume.
✔ Vérifiez si les hauts-parleurs sont correctement
branchés.
✔ Sélectionnez la source (par exemple TUNER,
avant d’appuyer sur le bouton de
fonction (par exemple 3/4, S/T).
✔ Réduisez la distance par rapport à la chaîne.
✔ IInstallez de pile en respectant la polarité
indiquée (signes +/–).
✔ Remplacez la pile.
✔ Dirigez la télécommande vers le capteur de la
chaîne.
✔ Réglez correctement l’horloge.
✔ Appuyez sur TIMER pour mettre le
temporisateur en marche.
✔ Il s’est produit une panne de courant ou le
cordon secteur a été débranché. Réglez de
nouveau l’horloge et le temporisateur.
39
Page 23

English
Français
Español
Português
Español
Deutsch
Deutsch
Nederlands
Nederlands
Italiano
Italiano
Svenska
Svenska
Meet Philips at the Internet
http://www.philips.com
Dansk
Dansk
Suomi
Suomi
Português
Português
Polski
Polski
DC570
© 2010 Koninklijke Philips Electronics N.V.
All rights reserved.
DC570_UM_12_V2.0
 Loading...