

Page 1
Register your product and get support at
www.philips.com/welcome
EN User manual
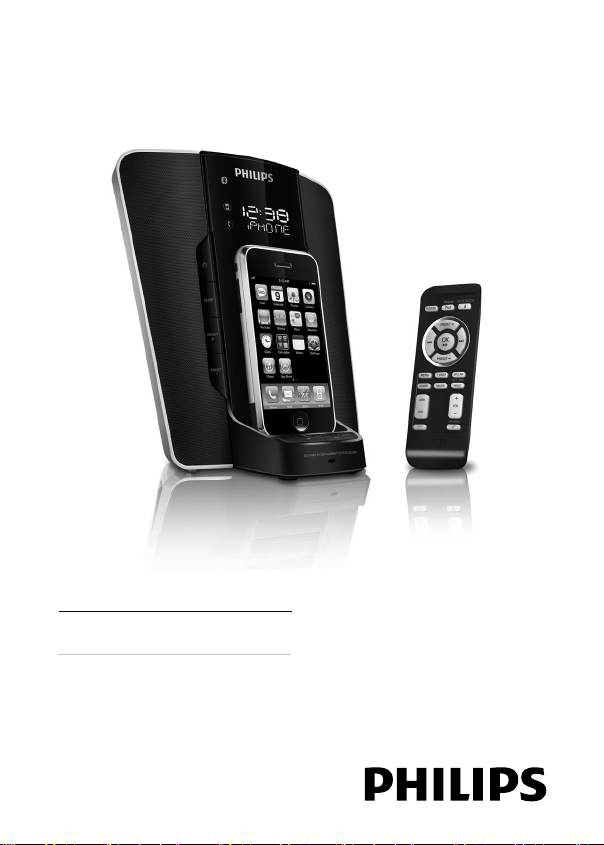
DC350
Page 2

Contents
1
Important 4
Safety 4
Notice 5
2 Your Docking Entertainment System 6
Introduction 6
What’s in the box 6
Overview of the main unit 7
Overview of the remote control 10
3 Get started 12
Prepare the remote control 12
Connect power 13
Set clock and date 14
Turn on 14
4 Play 14
Play from iPod/iPhone 14
Play from an external device 16
5 Adjust sound 16
Adjust volume level 16
Enhance bass 16
Select a preset sound effect 16
Mute sound 17
6 Listen to radio 17
Tune to a radio station 17
Program radio stations automatically 17
Program radio stations manually 17
Select a preset radio station 18
7 Use Bluetooth devices 18
Connect with a Bluetooth device 19
Receive a phone call 20
Listen to music 21
8 Other features 21
Set the alarm timer 21
Set the sleep timer 23
Adjust display brightness 23
9 Product information 23
Specifi cations 23
10 Troubleshooting 25
English
3EN
Page 3

1 Important
Safety
a Read these instructions.
b Keep these instructions.
c Heed all warnings.
d Follow all instructions.
e Do not use this apparatus near water.
f Clean only with dry cloth.
g Do not block any ventilation openings. Install in accordance with the
manufacturer’s instructions.
h Do not install near any heat sources such as radiators, heat registers, stoves, or
other apparatus (including amplifi ers) that produce heat.
i Protect the power cord from being walked on or pinched, particularly at plugs,
convenience receptacles, and the point where they exit from the apparatus.
j Only use attachments/accessories specifi ed by the manufacturer.
k Use only with the cart, stand, tripod, bracket, or table specifi ed by
the manufacturer or sold with the apparatus. When a cart is used,
use caution when moving the cart/apparatus combination to avoid
injury from tip-over.
l Unplug this apparatus during lightning storms or when unused for
long periods of time.
m Refer all servicing to qualifi ed service personnel. Servicing is required when the
apparatus has been damaged in any way, such as power-supply cord or plug is
damaged, liquid has been spilled or objects have fallen into the apparatus, the
apparatus has been exposed to rain or moisture, does not operate normally, or
has been dropped.
n Battery usage CAUTION – To prevent battery leakage which may result in
bodily injury, property damage, or damage to the unit:
Install all batteries correctly, + and - as marked on the unit. •
Do not mix batteries (old and new or carbon and alkaline, etc.).•
Remove batteries when the unit is not used for a long time.•
o Apparatus shall not be exposed to dripping or splashing.
p Do not place any sources of danger on the apparatus (e.g. liquid fi lled objects,
lighted candles).
q This product may contain lead and mercury. Disposal of these materials may
be regulated due to environmental considerations. For disposal or recycling
4
EN
Page 4
information, please contact your local authorities or the Electronic Industries
®
Alliance: www.eiae.org.
r Where the MAINS plug or an appliance coupler is used as the disconnect
device, the disconnect device shall remain readily operable.
Warning
Never remove the casing of this apparatus. •
Never lubricate any part of this apparatus. •
Never place this apparatus on other electrical equipment. •
Keep this apparatus away from direct sunlight, naked fl ames or heat. •
Ensure that you always have easy access to the power cord, plug or adaptor to •
disconnect the apparatus from the power.
Notice
This product complies with the radio interference requirements of the European
Community.
This product complies with the requirements of the following
directives and guidelines: 2004/108/EC + 2006/95/EC + 1999/5/
EC.
The Bluetooth
SIG, Inc. and any use of such marks by Philips is under license.
Any changes or modifi cations made to this device that are not expressly approved by
Philips Consumer Lifestyle may void the user’s authority to operate the equipment.
Recycling
Your product is designed and manufactured with high quality materials and
components, which can be recycled and reused.
When you see the crossed-out wheel bin symbol attached to a product, it
means the product is covered by the European Directive 2002/96/EC:
Never dispose of your product with other household waste. Please inform
yourself about the local rules on the separate collection of electrical and
electronic products. The correct disposal of your old product helps prevent
potentially negative consequences on the environment and human health.
Your product contains batteries covered by the European Directive 2006/66/EC, which
cannot be disposed of with normal household waste.
Please inform yourself about the local rules on separate collection of
batteries. The correct disposal of batteries helps prevent potentially negative
consequences on the environment and human health.
word mark and logos are registered trademarks owned by Bluetooth
English
5
EN
Page 5

Environmental information
All unnecessary packaging has been omitted. We have tried to make the packaging
easy to separate into three materials: cardboard (box), polystyrene foam (buffer) and
polyethylene (bags, protective foam sheet.)
Your system consists of materials which can be recycled and reused if disassembled by
a specialized company. Please observe the local regulations regarding the disposal of
packaging materials, exhausted batteries and old equipment.
Windows Media and the Windows logo are trademarks, or registered
trademarks of Microsoft Corporation in the United States and/or other
countries.
2 Your Docking Entertainment System
Introduction
With this unit, you can enjoy audio from the iPod, iPhone, other audio devices, or the
radio.
If you own a Bluetooth-enabled device, you can also receive phone calls or listen to
audio from the device.
The radio, iPod, or iPhone can be set as the alarm timer. You can set two alarm timers to
go off at different times.
For the best sound quality, enrich sound from any source with Digital Sound Control
(DSC) and Dynamic Bass Boost (DBB).
What’s in the box
Check and identify the contents of your package:
Main unit•
Remote control•
1 x AC adaptor•
1 x MP3 link cable•
1 x mini USB cable•
6
EN
Page 6

Overview of the main unit
English
a ALM 1
b Bluetooth indicator
c
d SLEEP
e PRESET +/-
f MUTE
Set the fi rst alarm timer.•
View the fi rst alarm time.•
Turn off the fi rst alarm tone.•
Indicate Bluetooth connection.•
Turn on the unit or switch to standby mode.•
Turn off an alarm tone.•
Set the sleep timer.•
Select a preset radio station.•
Program radio stations.•
Mute volume.•
Mute the built-in microphone during a phone call.•
PROG
Program radio stations.•
EN
7
Page 7

TIME SET
Set the clock.•
g PAIRING
h
i MIC
j
k iPod/iPhone dock
l VOL +/-
m
n SOURCE
o Tilt adjustment rod
p Display panel
q ALM 2
r REPEAT ALARM/BRIGHTNESS CONTROL
Pair the unit with a Bluetooth device.•
Answer an incoming phone call.•
During a phone call: select to hear the audio from the device or from the •
unit.
/
Skip to the previous/next audio fi le.•
Search within an audio fi le.•
Tune to a radio station.•
Adjust time.•
Select 12 hour or 24 hour format.•
Built-in microphone for phone calls. •
Reject an incoming phone call.•
End a phone call.•
Disconnect a device.•
Load an iPod/iPhone.•
Adjust volume.•
Start or pause iPod/iPhone play.•
Select a source: iPod/iPhone, Bluetooth, tuner or MP3 link.•
Move forward/backward to adjust the angle at which the iPod/iPhone tilts.•
Show current status.•
Set the second alarm timer.•
View the second alarm time.•
Turn off the second alarm tone.•
Repeat an alarm tone at 9-minute intervals.•
Adjust the display brightness.•
8
EN
Page 8
English
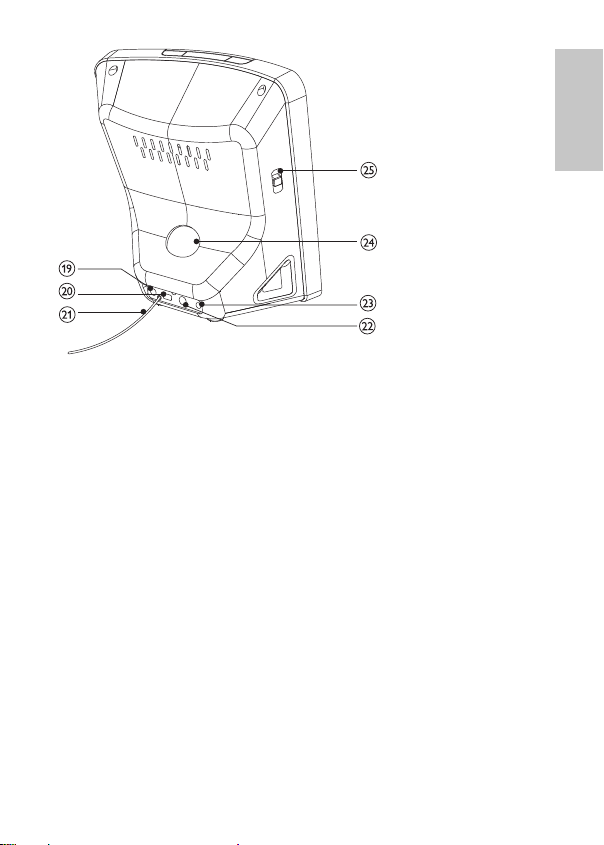
s MP3 LINK
Audio input jack for an external audio device.•
t TO PC
Mini USB jack for synchronization between the iPod/iPhone and a computer.•
u FM antenna
Improve FM reception.•
v DEMO
Jack for a special device (not supplied) to demonstrate features of the unit.•
w DC IN
Jack for the supplied AC adaptor.•
x Tilt adjustment control
Control the angle at which the iPod/iPhone tilts.•
y iPhone/iPod-RADIO-BUZZER
Select alarm mode.•
EN
9
Page 9

Overview of the remote control
a iPod/iPhone
b POWER
c PRESET +/-
d
10
Select iPod/iPhone source.•
Turn on the unit or switch to standby mode.•
Turn off an alarm tone.•
Select a preset radio station.•
Program radio stations.•
Navigate the iPod/iPhone menu.•
/ OK
Start or pause iPod/iPhone play.•
Confi rm an iPod/iPhone menu selection.•
EN
Page 10

e /
Skip to the previous/next audio fi le.•
Search within an audio fi le.•
Tune to a radio station.•
Adjust time.•
Select 12 hour or 24 hour format.•
f TUNER
Select tuner source.•
g MENU
Access iPod/iPhone menu.•
h SLEEP
Set the sleep timer.•
i DBB
Turn on or off dynamic bass enhancement.•
j DSC
Select a preset sound setting: POP, JAZZ, CLASSIC or ROCK.•
k PAIRING
Pair the unit with a Bluetooth device.•
Answer an incoming phone call.•
During a phone call: select to hear the audio from the device or from the •
unit.
l
Reject an incoming phone call.•
End a phone call.•
Disconnect a device.•
m VOL +/-
Adjust volume.•
n SET TIME / PROG
Set the clock.•
Program radio stations.•
o MP3 LINK
Audio input jack for an external audio device.•
p MUTE
Mute volume.•
Mute the built-in microphone during a phone call.•
q BLUETOOTH
Select Bluetooth source.•
English
EN
11
Page 11

3 Get started
Caution
Use the controls only as stated in this user manual. •
Always follow the instructions in this chapter in sequence.
If you contact Philips, you will be asked for the model and serial number of this
apparatus. The model number and serial number are on the bottom of the apparatus.
Write the numbers here:
Model No. __________________________
Serial No. ___________________________
Prepare the remote control
Caution
Risk of explosion! Keep batteries away from heat, sunshine or fi re. Never discard •
batteries in fi re.
For fi rst-time use:
1 Remove the protective tab to activate the remote control battery.
To replace the remote control battery:
1 Open the battery compar tment.
2 Insert 1 CR2025 batter y with correct polarity (+/-) as indicated.
3 Close the battery compar tment.
Note
Before pressing any function button on the remote control, fi rst select the correct •
source with the remote control instead of the main unit.
If you are not going to use the remote control for a long time, remove the battery.
•
12
EN
Page 12

Connect power
Caution
Risk of product damage! Ensure that the power voltage corresponds to the voltage •
printed on the back or underside of the apparatus.
Risk of electric shock! When you unplug the AC adaptor, always pull the plug from the
•
socket. Never pull the cord.
Before connecting the AC adaptor, ensure you have completed all other connections.
•
Note
The type plate is located on the bottom of the main unit. •
1 Prepare the AC power adaptor.
2 Connect one end of the AC adaptor to the DC IN socket on the main unit.
English
EN
13
Page 13

3 Connect the other end of the AC adaptor to the wall outlet.
Set clock and date
1 Press and hold SET TIME for 2 seconds.
2 Press / to set the hour.
3 Press SET TIME to confi rm.
4 Repeat steps 2-3 to set minute, year, month and day.
5 Press / to select 12 hour or 24 hour format.
6 Press SET TIME to confi rm.
The hour digits are displayed and begin to blink. »
The minute digits are displayed and begin to blink. »
Turn on
1 Press POWER .
Switch to standby
1 Press POWER again to switch the unit to standby mode.
The unit switches to the last selected source. »
The date appears on the display panel. »
4 Play
Play from iPod/iPhone
You can enjoy audio from iPod/iPhone through this unit.
Compatible iPod/iPhone
Apple iPod and iPhone models with a 30-pin dock connector:
iPod classic, iPod touch, iPod nano, iPod 5th generation (video), iPod with color •
display, iPod mini.
iPhone, iPhone 3G.•
14
EN
Page 14

Load the iPod/iPhone
2
2
1
1 With the connectors facing each other, place the iPod/iPhone in the dock.
2 Turn the tilt adjustment control to adjust the angle at which the iPod/iPhone tilts.
Remove the iPod/iPhone
1 Pull the iPod/iPhone out of the dock.
Listen to the iPod/iPhone
1 Ensure that the iPod/iPhone is loaded correctly. (see ‘Load the iPod/iPhone’ on
2 Press iPod/iPhone to select iPod/iPhone source.
When the unit is connected to power, the docked iPod/iPhone begins to »
charge.
page 15 )
The connected iPod/iPhone plays automatically. »
To pause/resume play, press • .
To skip to a track, press •
To serach during play, press and hold •
normal play.
To navigate the menu, press • MENU , and press PRESET +/- to select, then
/ OK to confi rm.
press
/ .
/ , then release to resume
English
EN
15
Page 15

Connect to a computer
1 Load the iPod/iPhone in the dock.
2 Press iPod/iPhone to select the iPod/iPhone source.
3 Connect the mini USB cable (supplied) to:
the • TO PC jack (mini USB jack) on the back of the unit.
the USB jack on the computer.•
If iTunes is installed on the computer, the connected iPod/iPhone begins to »
synchronize with iTunes. Refer to the device user manual for more details.
Charge the iPod/iPhone
When the unit is connected to power, the docked iPod/iPhone begins to charge.
Play from an external device
You can also listen to an external audio device through this unit.
1 Press MP3 LINK to select MP3 link source.
2 Connect the supplied MP3 link cable to:
the • MP3 LINK jack (3.5mm) on the back of the unit.
the headphone jack on an external device.•
3 Star t to play the device. (Refer to the device user manual.)
5 Adjust sound
Adjust volume level
1 During play, press VOL +/- to increase/decrease the volume level.
Enhance bass
1 During play, press DBB to turn on or off dynamic bass enhancement.
If DBB is activated, DBB is displayed. »
Select a preset sound effect
1 During play, press DSC repeatedly to select:
16
[POP] (pop)•
[JAZZ] (jazz)•
[CLASSIC] (classic)•
[ROCK] (rock)•
EN
Page 16

Mute sound
1 During play, press MUTE to mute/unmute sound.
6 Listen to radio
Note
Only FM radio reception is available on this unit. •
Tune to a radio station
1 Press TUNER to select FM.
2 Press and hold / for more than 2 seconds.
3 Repeat step 2 to tune to more stations.
Program radio stations automatically
You can program a maximum of 20 preset radio stations.
1 In the tuner mode, press and hold PROG for more than 2 seconds to activate
Program radio stations manually
You can program a maximum of 20 preset radio stations.
1 Press PRESET +/- to select a number (1 to 20).
2 Press and hold PRESET +/- for more than 2 seconds to activate program mode.
3 Tune to a radio station. (see ‘Tune to a radio station’ on page 17 )
[Srch] (search) is displayed. »
The radio tunes to a station with strong reception automatically. »
To tune to a weak station, press •
reception.
automatic program mdoe.
[AUTO] (auto) is displayed. »
All available stations are programmed in the order of waveband reception »
strength.
The fi rst programmed radio station is brodcast automatically. »
“PRXX” is displayed and begins to blink. »
/ repeatedly until you fi nd optimal
English
EN
17
Page 17

4 Press to confi rm.
The frequency of the preset station is displayed. »
5 Repeat the above steps to program other stations.
Note
To overwrite a programmed station, store another station in its place. •
Select a preset radio station
1 Press PRESET +/- to select a preset number.
Tip
Position the antenna as far as possible from TV, VCR or other radiation source. •
For optimal reception, fully extend and adjust the position of the antenna. •
7 Use Bluetooth devices
This unit can wirelessly receive audio from Bluetooth-enabled devices within a range of
approximately 10 meters (30 feet).
Supported Bluetooth profi les
This unit supports these Bluetooth profi les:
Hands-Free Profi le (HFP)•
Headset Profi le (HSP)•
Advanced Audio Distribution Profi le (A2DP)•
Audio Video Remote Control Profi le (AVRCP)•
Tip
Before you use a Bluetooth-enabled device with this unit, read the user manual of the •
device for compatibility.
18
EN
Page 18

Connect with a Bluetooth device
Note
The operational range between this unit and a Bluetooth device is approximately 10 •
meters (30 feet).
Before you connect a Bluetooth device to this unit, familiarize yourself with the
•
Bluetooth capabilities of the device.
Compatibility with all Bluetooth devices is not guaranteed.
•
Any obstacle between this unit and a Bluetooth device can reduce the operational range. •
Keep this unit away from any other electronic device that may cause interference. •
Connect a device for the fi rst time
Tip
This unit can memorize the connection information of up to 8 devices. •
1 Press BLUETOOTH to select the Bluetooth source.
2 For an iPhone, load it in the dock for automatic re-connection setup.
3 Press and hold PAIRING for more than 3 seconds.
4 On the device, set up the Bluetooth connection:
5 Wait until the Bluetooth indicator turns on.
To connect more Bluetooth devices
1 Disconnect the currently-connected device. (see ‘Disconnect a device’ on page 20 )
2 Repeat the steps 1-5 in “Connect a device”.
The Bluetooth indicator blinks. »
a Enable Bluetooth to search for other Bluetooth devices. (Refer to the
device user manual on how to enable the function.)
b When “ PHILIPS DC350” is recognized and displayed, select it to start to
connect.
c When prompted for a password, enter “0000”.
The connection is complete. »
English
Tip
If no connection is made within one minute, [FAILED] (failed) is displayed on the main unit. •
19
EN
Page 19

Disconnect a device
1 Press and hold for more than 5 seconds
To disconnect, you can also turn off the connected device or move it •
beyond the communication range.
The Bluetooth indicator turns off. »
Re-connect a previously-connected device
Tip
For a previously-connected iPhone which Bluetooth function is enabled, once it is •
docked in this unit, it re-connects automatically.
1 Turn on the main unit.
2 On the device, set up the Bluetooth connection:
a Enable Bluetooth to search for other Bluetooth devices. (Refer to the
device user manual on how to enable the function.)
b When “ PHILIPS DC350” is recognized and displayed, select it to start to
connect.
3 Wait until the Bluetooth indicator turns on.
Re-connection is completed. »
Receive a phone call
Note
You can receive phone calls through this unit with devices that support the HFP or HSP •
profi le.
1 Connect the Bluetooth device. (see ‘Connect with a Bluetooth device’ on page 19 )
2 When a call is received, you hear the incoming call alert tone. Press PAIRING to
accept the call.
To reject the call, press •
3 Speak into the MIC located on the front panel.
To increase or decrease the volume, press • VOL +/- .
To mute the microphone, press • MUTE . To unmute, press this button again.
To select to hear the audio from the device or from the main unit, press •
PAIRING
.
4 Press to end the call.
.
20
EN
Page 20

Tip
To be heard more clearly, speak closer to the microphone. •
If an echo is heard, reduce the volume of the main unit. •
If you observe communication diffi culties, position the Bluetooth device closer to the •
main unit.
Listen to music
Note
You can listen to audio through this unit from devices that support A2DP or AVRCP. •
As iPhone doesn’t suppor t Bluetooth audio streaming, this unit doesn’t play audio fi les •
from iPhone through Bluetooth connection.
1 Connect the Bluetooth device. (see ‘Connect with a Bluetooth device’ on page 19 )
2 On the Bluetooth device, start play.
You hear the music through the unit. »
To pause/resume play, press • .
To skip to a track, press •
/ .
8 Other features
Set the alarm timer
You can set two alarms which go off at different time.
1 Ensure that you have set the clock correctly. (see ‘Set clock and date’ on page 14 )
2 Press and hold ALM 1 or ALM 2 on the main unit for 2 seconds.
3 Press / repeatedly to set the hour.
4 Press ALM 1 or ALM 2 to confi rm.
5 Press / repeatedly to set the minute.
6 Press ALM 1 or ALM 2 to confi rm.
7 Press VOL +/- to set a volume level for alarm tone.
8 Press ALM 1 or ALM 2 to confi rm.
Hour digits blink. »
[AL 1] (alarm 1) or [AL 2] (alarm 2) is displayed. »
The volume level is applied to two alarms. »
To set the other alarm, repeat the steps 2 -8.•
English
EN
21
Page 21

Note
Only the latest volume setting for alarm tone works. •
Tip
To view alarm time, press • ALM 1 or ALM 2 repeatedly until alarm time is displayed.
Set alarm mode
1 Adjust the iPhone/iPod-RADIO-BUZZER control on the main unit to select the
source for the alarm.
When the alarm time comes, the selected Phone/iPod, or radio or buzzer »
turns on.
Tip
If iPod/iPhone source is selected but no iPod/iPhone is loaded, the buzzer is selected •
automatically.
Activate and deactivate the alarm timer
Note
An alarm can sound only in the standby mode. •
1 Press repeatedly ALM 1 or ALM 2 on the main unit to activate or deactivate the
timer.
If the timer is activated, »
If the timer is deactivated, »
is displayed.
disappears.
Turn off the alarm tone
During an alarm tone, you can select one of the following to turn it off.
Press • POWER .
The alarm timer remains activated. »
Press • REPEAT ALARM on the main unit.
The alarm call repeats at 9-minute intervals. »
Press • ALM 1 or ALM 2 on the main unit.
The alarm timer remains activated. »
22
EN
Page 22

Set the sleep timer
This unit can switch to standby automatically after a set period of time.
1 When the unit is turned on, press SLEEP repeatedly to select a set period of time
(in minutes).
When the sleep timer is activated, the display shows »
To deactivate sleep timer
.
1 Press SLEEP repeatedly until [OFF] (off) is displayed.
When the sleep timer is deactivated, »
disappears on the display.
Adjust display brightness
1 Press repeatedly BRIGHTNESS CONTROL on the main unit to select:
Bright.•
Dim.•
Off.•
9 Product information
Note
Product information is subject to change without prior notice. •
Specifi cations
Amplifi er
Rated Output Power 2X3W RMS
Frequency Response 125Hz - 16kHz, ±3dB
Signal to Noise Ratio >55dB
Aux Input 0.6 V RMS 10kohm
English
Tuner
Tuning Range FM: 87.5 - 108MHz
Tuning grid 50KHz
Sensitivity
- Mono, 26dB S/N Ratio
- Stereo, 46dB S/N Ratio
<22 dBf
<40 dBf
EN
23
Page 23

Search Selectivity >30 dBf
Total Harmonic Distortion <3%
Signal to Noise Ratio >40 dB
Speakers
Speaker Impedance 4ohm
Speaker Driver 2 x 1” full range driver
Sensitivity >80dB/m/W
Bluetooth
Communication system Bluetooth Standard version 2.0
Output Bluetooth Standard Power Class 2
Maximum communication
range
Frequency band 2.4 GHz band (2.4000 GHz - 2.4835 GHz)
Compatible Bluetooth profi les Hands-Free Profi le (HFP)
Supported codecs
Receive
Transmit
Line of sight approx. 8m
Handset Profi le (HSP)
Advanced Audio Distribution Profi le (A2DP)
Audio Video Remote Control Profi le (AVRCP)
SBC (Sub Band Codec)
SBC (Sub Band Codec)
General information
AC power (power adaptor) Input: 100-240V~, 50/60Hz (or 50-60Hz), 0.8A Max.
(or 0.55A); Output: 12V
Model No.: GFP241DA-1220-1
Operation Power Consumption 20W
Standby Power Consumption <4W
Dimensions
- Main Unit (W x H x D) 173 x185 x 144mm
Weight
- Main Unit 0.62 kg
2.0A; Brand name: Philips;
24
EN
Page 24

10 Troubleshooting
Caution
Never remove the casing of this DC350. •
To keep the warranty valid, never try to repair the system yourself.
If you encounter problems when using this DC350, check the following points before
requesting service. If the problem remains unsolved, go to the Philips web site (www.
Philips.com/support). When you contact Philips, ensure that your DC350 is nearby and
the model number and serial number are available .
No power
Ensure that the AC power plug of the unit is connected properly. •
Ensure that there is power at the AC outlet. •
To save power, the unit switches to standby automatically 15 minutes after a play •
reaches the end and no control is operated.
No sound
Adjust the volume. •
No response from the unit
Disconnect and reconnect the AC power plug, then turn on the unit again. •
Remote control does not work
Before pressing any function button, fi rst select the correct source with the •
remote control instead of the main unit.
Reduce the distance between the remote control and the unit. •
Insert the batter y with its polarities (+/– signs) aligned as indicated. •
Replace the battery. •
Aim the remote control directly at the sensor on the front of the unit. •
Poor radio reception
Increase the distance between the unit and your TV or VCR. •
Fully extend the FM antenna. •
Clock setting erased
Power has been interrupted or the power cable has been disconnected. •
Reset the clock. •
Sound input to the microphone cannot be heard clearly
Speak closer to the microphone when talking, or talk louder. •
Reduce or remove background noise. •
Reduce the volume of the unit to remove an echo. •
English
EN
25
Page 25

Audio quality is poor after connection with a Bluetooth device
The Bluetooth reception is poor. Move the device closer to the unit, or remove •
any obstacle between the device and the unit.
A device cannot connect with the unit
The device does not support Bluetooth communication, or any of the compatible •
profi les required for the unit.
You have not enabled the Bluetooth function of the device. Refer to the user •
manual of the device on how to enable the function.
The device is not correctly connected. • Connect the device correctly. (see ‘Connect
with a Bluetooth device’ on page 19 )
The unit is already connected with another Bluetooth device. Disconnect the •
connected device, then try again.
The connected mobile phone connects and disconnects constantly
The Bluetooth reception is poor. Move the mobile phone closer to the unit, or •
remove any obstacle between the mobile phone and the unit.
Some mobile phones may connect and disconnect constantly when you make or •
end calls. This does not indicate any malfunction of the unit.
For some mobile phones, the Bluetooth connection can be deactivated •
automatically to save power. This does not indicate any malfunction of the unit.
26
EN
Page 26

AUSTRALIA - Philips Manufacturers Warranty for Australia only
y
These warranty conditions are valid for the
following consumer electronics products:
Colour Televisions, Projection TV, Plasma &
LCD TV, Video Cassette Recorders, CD
Recorders & Players, DVD Players, DVD
Recorders, DVD Recorders with HDD, Audio
Systems, Home Theatre systems, Digital Set
Top Box & Portable Audio products.
The benefits given to the purchaser by this
warranty are in addition to all other rights
and remedies which the purchaser has in
respect of the product under the Trade
Practices Act or other Commonwealth or
State Law.
Philips Consumer Electronics warrants its products to
the purchaser as follows and subject to the stated
conditions.
1 Year Free Repair Service - at Philips ASC
Colour Television, Plasma Television, LCD Television,
Projection Televsion, DVDR/VCR Combo, DVD
Recorders with Hard Drive, LCD Projectors, Wireless
Audio Systems, Audio Systems, Home Theatre
Systems & Digital Set-Top-Box.
1 Year free Replacement – at your Retailer
Portable Audio, MP3 Infotainment products, Video
Cassette recorders, DVD Player, DVD/VCR Combo
Player, DVD Recorder without HDD & Portable
DVD/LCD players.
Conditions of Repair Warranty
1. All claims for warranty ser vice should be made to
your nearest Philips Authorised Service Centre or the
Philips Technology Care Centre. Reasonable evidence
of date of purchase must be provided.
2. This warranty extends only to defects in material or
workmanship occurring under normal use of the product
when operated in accordance with the instructions.
3. If a replacement product is supplied under the repair
policy it is warranted, under this warranty, for the
remainder of the warranty of the original purchased
product only.
4. Home ser vice is provided only within the normal
service area of one of our recommended Authorised
Service Centres (ASC). It will be provided for
television receivers only with a screen side of 67cms
or above (product includes CRT, LCD TV, PTV, and
Plasma TV). Televisions with screen side less than
67cms and all other products types are to be taken or
sent by the consumer to the workshop of your
nearest Authorised Service Centre, at the Consumer’s
expense.
5. This Manufacturers Warranty is limited to 3 months
for the above listed Consumer Electronics products if
used in commercial applications.
6. Philips may, at its discretion choose to replace rather
than repair any product covered by this warranty.
7. Product accessories are covered by the same
warranty period. Please contact the Philips Technology
Warrant
valid for all new products purchased after 1st January 2007
Care Centre for free replacement of faulty accessories.
8. This Manufacturers Warranty is neither transferable
nor valid in countries other than Australia.
This warranty does not cover:
a) Mileage or travel outside the normal service area
covered by selected Authorised Service Centre.
b) Ser vice costs arising from failure to correctly
adjust the controls of the product or to observe the
instructions, or inspections that reveal that the
product is in normal working order.
c) Product failures caused by misuse, neglect,
accidental breakage, transit damage, inexpert repairs
or modification by un-authorised persons, external
fires, lightning strikes, floods, vermin infestation or
liquid spillage.
d) Cleaning of video or audio heads.
e) Inadequate receiving antennae.
f) Replacement of worn or used batteries or other
consumables.
g) Consumer products used in commercial applications
(This warranty is limited to 3 months only).
h) Second hand products.
The conditions contained in this warranty
card replace and override the provision of
the Philips World-Wide Guarantee for
products purchased in Australia and used in
Australia.
Service is provided through more than 100
accredited Authorised Service Centres throughout
Australia. For direct contact with the nearest
recommended Authorised Service Centre in capital
& regional cities/towns
Authorised Service Centre Network
1300 361 392
Customer support is provided in Australia by our
trained call centre staff. For assistance with product
features and specifications, please call
Technology Care Centre
1300 363 391
Please record the following information for
your records and keep in a safe place.
We recommend retaining your purchase
receipt to assist with any warranty claim.
Model number:....................................................
Serial number:....................................................
Date of purchase:....................................................
Retailer:....................................................
Philips Consumer Electronics
a division of Philips Electronics Australia Limited
ABN 24 008 445 743,
Level 1, 65 Epping Road NORTH RYDE NSW 2113.
27
Page 27

NEW ZEALAND -
Thank-you for purchasing this quality Philips product.
Philips New Zealand Ltd guarantees this product against defective components and faulty
workmanship for a period of 12 months. Any defect in materials or workmanship occurring
within 12 months from the date of purchase subject to the following conditions will be rectified
free of charge by the retailer from whom this product was purchased.
Conditions
1. The product must have been purchased in New Zealand.As proof of purchase, retain the
original sales docket indicating the date of purchase.
2. The guarantee applies only to faults caused by defective components, or faulty workmanship
on the part of the manufacturer.
3. The guarantee does not cover failures caused by misuse, neglect, normal wear and tear,
accidental breakage, use onthe incorrect voltage, use contrary to operating instructions,
or unauthorised modification to the product or repair by an unauthorised technician.
4. Reasonable evidence (in the form of a sales docket) must be supplied to indicate that the
product was purchased no more than 12 months prior to the date of your claim.
5. In the event of a failure, Philips shall be under no liability for any injury, or any loss or
damage caused to property or products other than the product under guarantee.
This guarantee does not prejudice your rights under common law and statute,
and is in addition to the normal responsibilities of the retailer and Philips.
How to claim
Should your Philips product fail within the guarantee period, please return it to the
retailer from whom it was purchased. In most cases the retailer will be able to
satisfactorily repair or replace the product.
However, should the retailer not be able to conclude the matter satisfactorily, or if you
have other difficulties claiming under this guarantee, please contact
The Guarantee Controller
Philips New Zealand Ltd.
4 P.O. Box 41.021
Auckland
3 (09) 84 94 160
(09) 84 97 858
fax 3
Guarantee and Service for New Zealand
28
Page 28

© 2009 Koninklijke Philips Electronics N.V.
All rights reserved.
DC350_79_UM_V1.0
 Loading...