

Page 1
HR7638
Recipes & Directions for use
Rezepte & Gebrauchanweisung
Recettes & Mode d'emploi.
Recepten & Gebruiksaanwijzing
Recetas & Instrucciones de Uso
Ricette & Istruzioni per l’uso
Receitas & Modo de Emprego
Yemek tarifleri ve kullanma
talimatları
Page 2

2
Page 3
3
A
B
C
D
E
F
G
H
I
J
K
L
M
N
O
P
Q
R
S
T
U
Page 4

Page 5

ENGLISH 6
DEUTSCH 21
FRANÇAIS 37
NEDERLANDS 52
ESPAÑOL 68
ITALIANO 84
PORTUGUÊS 99
TÜRKÇE 114
HR7638
5
Page 6

ENGLISH6
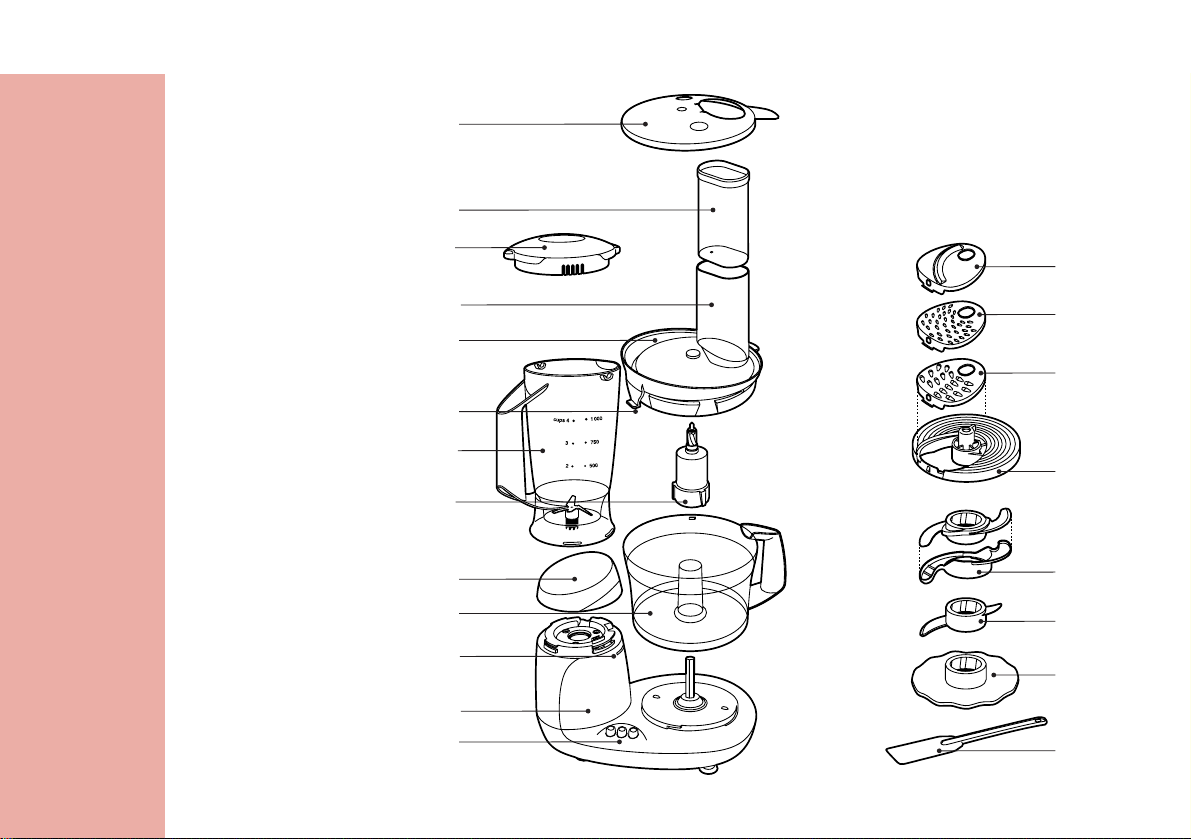
Food processor: parts and accessories
A Speed control
B Motor unit
C Built-in saftely lock
D Bowl
E Screw cap (for closing the blender fixing hole
when the blender is not in use)
F Tool holder
G Blender jar
H Peg of lid (activates and deactivates the safety
switch)
I Lif of bowl
J Feed tube
K Pusher
L Lid of blender jar
M Cover with closable insert storage space
N Slicing insert medium
O Slicing insert fime
P Shredding insert medium
Q Insert holder
R Blade (with protective cover)
S Kneading accessory
T Emulsifying disc
U Spatula
Introduction
This appliance has been equipped with an
automatic thermal cut-off system. This system will
automatically cut off the power supply to the
appliance in case of overheating.
If your appliance suddenly stops
running:
1 Pull the mains plug out of the wall socket.
2 Press the 'PULSE / 0' button to switch the
appliance off.
3 Let the appliance cool down for
60 minutes.
4 Put the mains plug in the wall socket.
5 Switch the appliance on again.
Please contact your Philips dealer or authorised
Philips service centre if the automatic thermal cutout system is activated too often.
CAUTION: In order to avoid a hazardous
situation, this appliance must never be connected
to a timer switch.
Important
◗ Read the instructions for use carefully and
look at the illustrations before using the
appliance.
◗ Keep these instructions for use for future
reference.
◗ Check if the voltage indicated on the
appliance corresponds to the local mains
voltage (110-127V or 220-240V) before you
connect the appliance.
Page 7

ENGLISH 7
◗ Never use any accessories or parts from
other manufacturers or that have not been
specifically advised by Philips. Your guarantee
will become invalid if such accessories or
parts have been used.
◗ Do not use the appliance if the mains cord,
the plug or other parts are damaged.
◗ If the mains cord is damaged, it must be
replaced by Philips, a service centre
authorised by Philips or similarly qualified
persons in order to avoid a hazard.
◗ Thoroughly clean the parts that will come
into contact with food before you use the
appliance for the first time.
◗ Do not exceed the quantities and preparation
times indicated in the tables and recipes.
◗ Do not exceed the maximum content
indicated on the bowl or the blender jar, i.e.
do not fill beyond the top graduation.
◗ Unplug the appliance immediately after use.
◗ Never use your fingers or an object (e.g. a
spatula) to push ingredients down the feed
tube while the appliance is running. Only the
pusher is to be used for this purpose.
◗ Always unplug the appliance before reaching
into the blender jar with your fingers or an
object (e.g. a spatula).
◗ Keep the appliance out of the reach of
children.
◗ Never let the appliance run unattended.
◗ Never switch the appliance off by turning the
lid. Always switch the appliance off by
pressing the PULSE / 0 button.
◗ Switch the appliance off before detaching any
accessory.
◗ Never immerse the motor unit in water or
any other fluid, nor rinse it under the tap. Use
only a moist cloth to clean the motor unit.
◗ When you mount the blender jar, the bowl
and the screw cap in the proper way, you will
hear a click.
◗ The emulsifying disc, the blade and the
kneading accessory have to be placed on the
toolholder that stands in the bowl.
◗ Remove the protective cover from the blade
before use.
◗ Avoid touching the SHARP cutting edges of
the blades and inserts, especially when the
appliance is plugged in.
◗ If one of the blades get stuck, unplug the
appliance before removing the ingredients
that are blocking the blades.
◗ Let hot ingredients cool down before
processing them (max. temperature
80cC/175cF).
◗ If you are processing a liquid that tends to
foam, do not put more than 1 litre into the
blender jar to avoid spillage.
Note that if both the blender and the bowl have
been correctly mounted, only the blender will
function.
Page 8
ENGLISH8
Using the appliance
Bowl
◗ If you want to use the bowl, remove the
blender jar and close the fixing hole with the
screw cap. All functions that require the use
of the bowl will only work if the blender jar
has been removed.
C
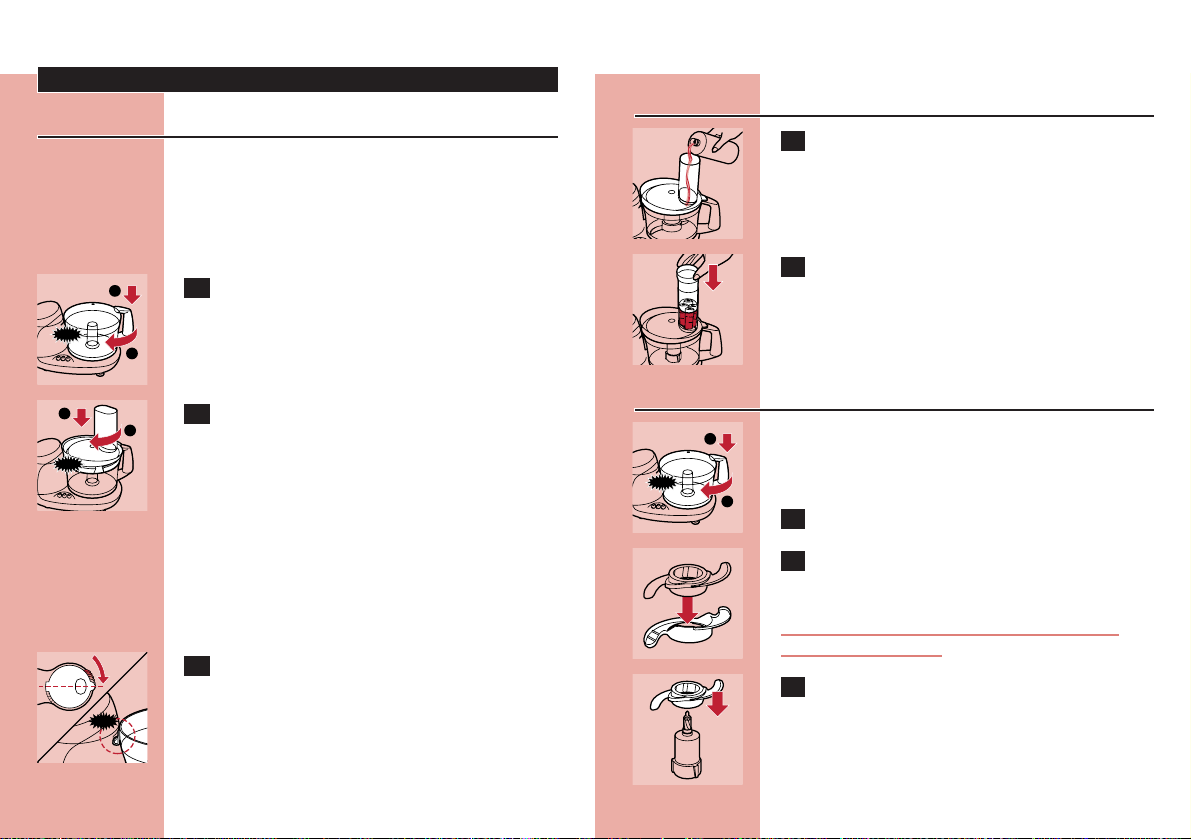
1 Mount the bowl on the food processor by
turning the handle in the direction of the
arrow until you hear a click.
C
2 Put the lid on the bowl. Turn the lid in the
direction of the arrow until you hear a
click (this requires some force).
Built-in safety lock
B
The motor unit as well as the lid have been
provided with marks. The appliance will only
function if the arrow on the motor unit is placed
directly opposite the mark on the lid.
C
1 Make sure that the mark on the lid and
the arrow on the bowl are directly
opposite each other. The projection of the
lid will now cover the opening of the
handle.
CLICK
Feed tube and pusher
C
1 Use the feed tube to add liquid and/or
solid ingredients. Use the pusher to push
solid ingredients down the feed tube.
C
2 You can also use the pusher to close the
feed tube in order to prevent ingredients
from escaping down the feed tube.
Blade
◗ The blade can be used for chopping, mixing,
blending, pureeing and preparing cake
mixtures.
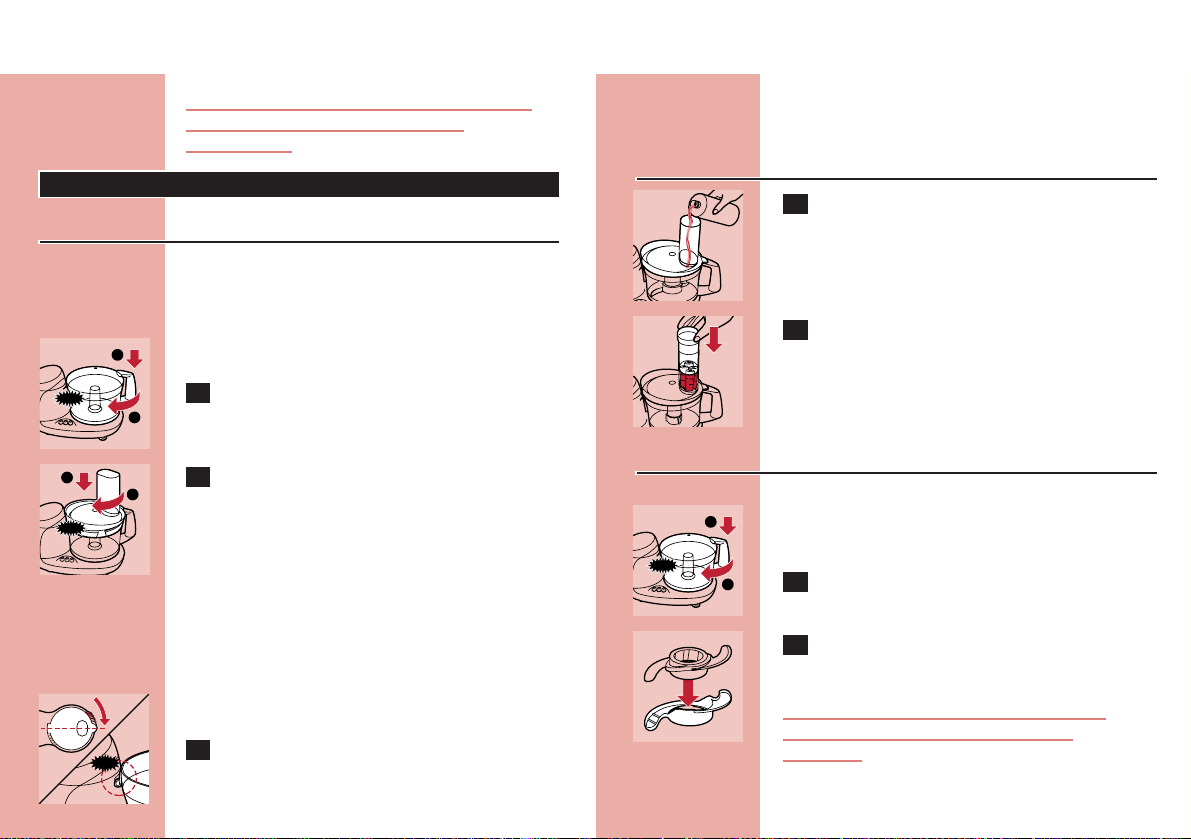
C
1 Put the bowl on the motor unit.
C
2 Remove the protective cover from the
blade.
The cutting edges of the blade are very sharp
Avoid touching them!
C
3 Put the blade on the tool holder.
1
2
CLICK
1
2
CLICK
1
2
CLICK
Page 9

ENGLISH 9
C
4 Put the tool holder in the bowl.
5 Put the ingredients in the bowl. Pre-cut
large pieces of food into pieces of approx.
3 x 3 cm. Put the lid on the bowl.
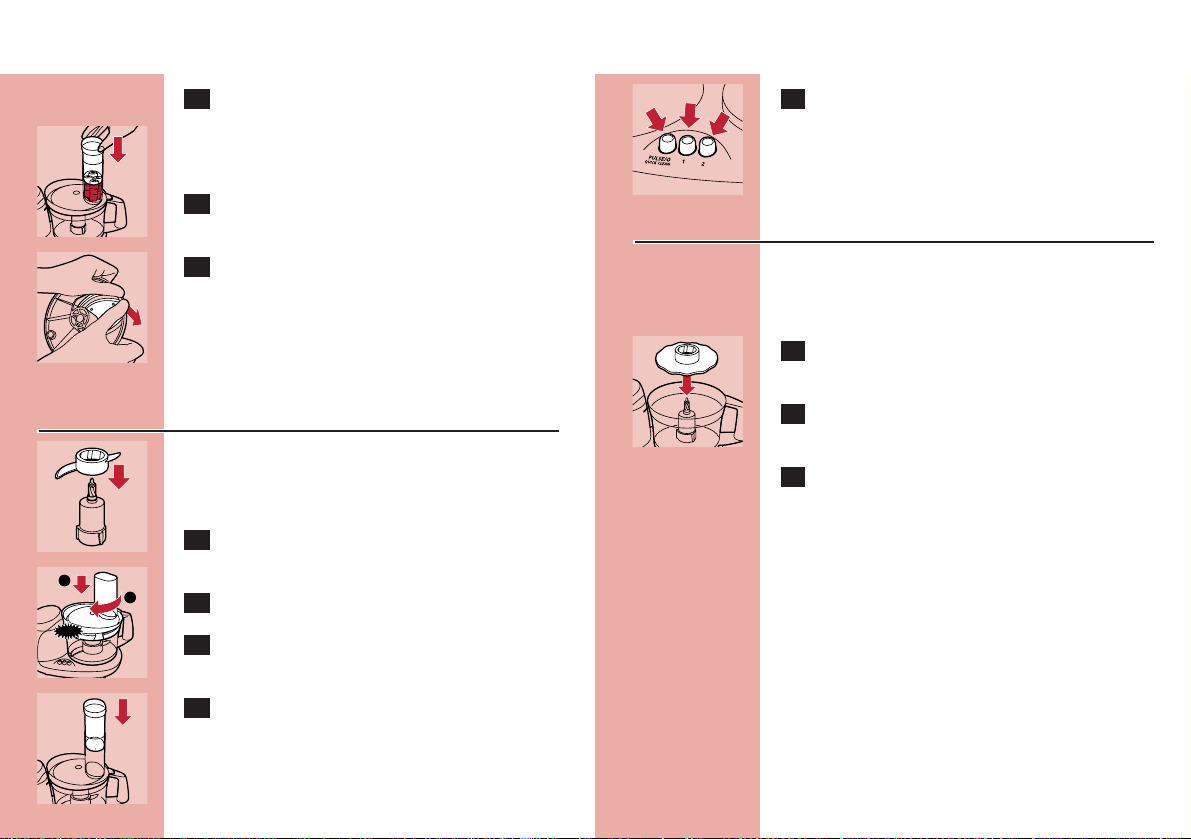
C
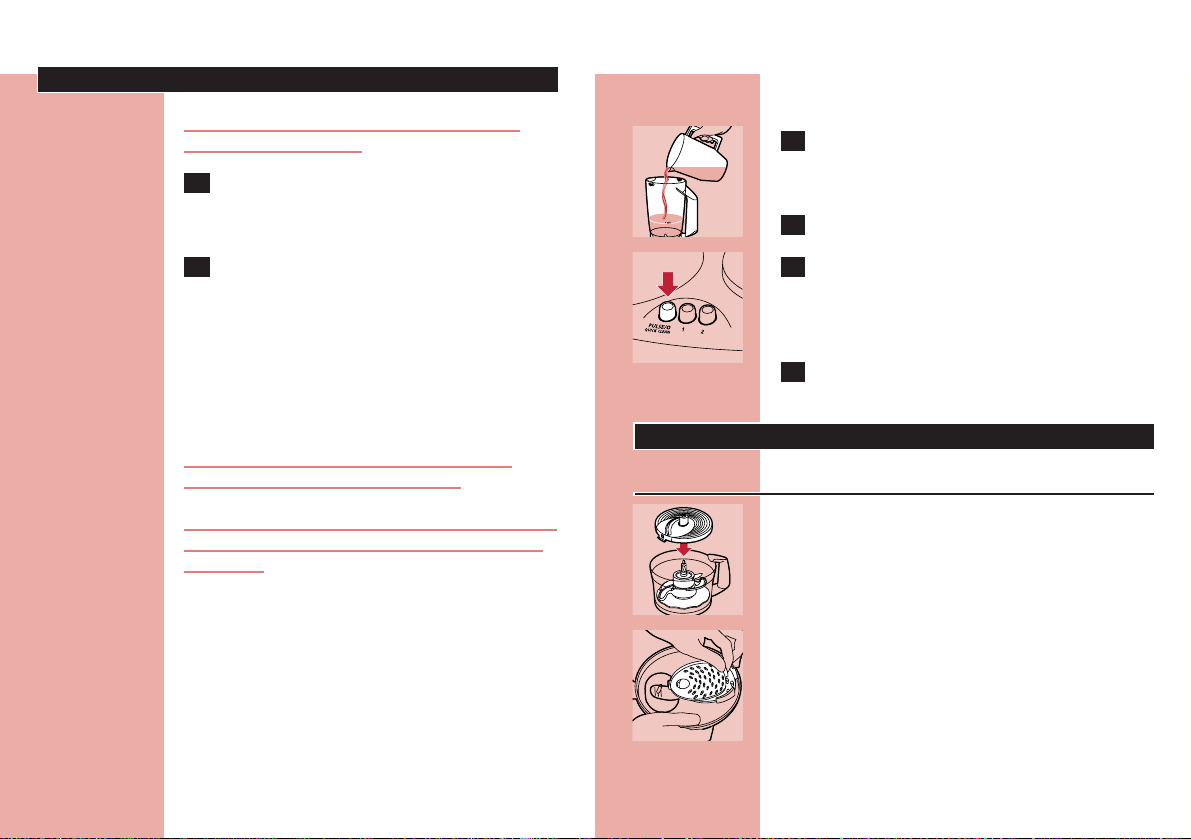
6 The buttons allow you to adjust the speed
of the appliance to obtain optimal results.
B
'PULSE / 0' button: for pulse operation and for
turning the appliance off. If the PULSE / 0 button
is pressed the appliance runs at the highest
speed. The appliance stops running when the
button is released.
B
button 1: for normal speed.
B
button 2: for high speed.
See the table for the recommended speeds.
Processing takes 10 - 60 seconds.
Tips
◗ The appliance chops very quickly. Use the
pulse function for short periods at a time to
prevent the food from becoming too finely
chopped.
◗ Do not let the appliance run too long when
you are chopping (hard) cheese. The cheese
will become too hot, will start to melt and
will turn lumpy.
◗ Do not use the blade to chop very hard
ingredients like coffee beans, nutmeg and ice
cubes. The blade might get blunt.
If food sticks to the blade or to the inside of the
bowl:
1 Switch the appliance off.
2 Remove the lid from the bowl.
3 Remove the ingredients with the spatula.
Inserts
The cutting edges of the inserts are very sharp
Do not touch them!
Do not process hard ingredients, such as ice
cubes, with the inserts!
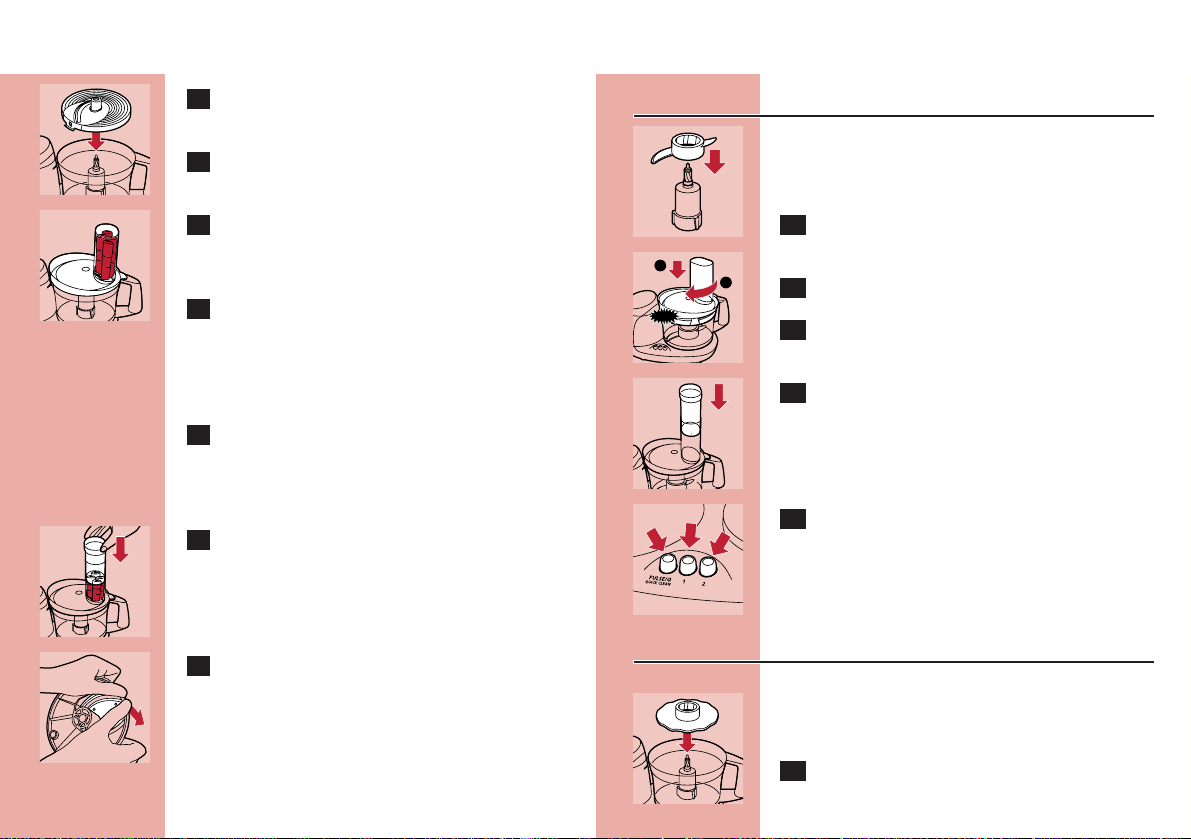
C
1 Put the selected insert in the insert holder.
C
2 Place the insert holder onto the tool
holder that stands in the bowl.
3 Put the lid on the bowl.
C
4 Put the ingredients in the feed tube. Pre-
cut large chunks to make them fit into the
feed tube.
5 Fill the feed tube evenly for the best
results.
When you have to cut large amounts of food,
process only small batches at a time and empty
the bowl regularly between the batches.
1
CLICK
2
Page 10
ENGLISH10
3 Select the appropriate speed to obtain
optimal results. See the table for the
recommended speed.
Processing takes 10-60 seconds.
C
4 Press the ingredients slowly and steadily
down the feed tube with the pusher.
C
5 To remove the insert from the insert
holder, take the insert holder in your
hands with its bottom pointing towards
you. Push the edges of the insert with
your thumbs to make the insert fall out of
the holder.
Kneading accessory
The kneading accessory can be used for kneading
dough for bread and dumplings and for mixing
batters and cake mixtures.
C
6 Fit the kneading accessory onto the tool
holder.
7 Put the ingredients in the bowl.
C
8 Close the bowl with the lid.
C
9 Close the feed tube by placing the pusher
in it.
C
10 Select the appropriate speed to obtain
optimal results. See the table for the
recommended speed.
Emulsifying disc
You can use the emulsifying disc to prepare
mayonnaise, to whip cream and to whisk egg
whites.
C
11 Put the emulsifying disc onto the tool
holder that stands in the bowl.
12 Put the ingredients in the bowl and put
the lid on the bowl.
13 Select the appropriate speed to obtain
optimal results. See the table for the
recommended speed.
Tips
◗ When you want to whisk egg whites, make
sure the eggs are at room temperature.
Take the eggs out of the refrigerator at least half
an hour before you are going to use them.
◗ All the ingredients for making mayonnaise
must be at room temperature.
Oil can be added through the small hole in the
bottom of the pusher.
CLICK
1
2
Page 11

ENGLISH 11
◗ If you are going to whip cream, the cream
must be taken straight from the refrigerator.
Please observe the preparation time in the
table. Cream should not be whipped too long.
Use the pulse function to have more control over
the process.
Blender
The blender is intended for:
- Blending fluids, e.g. dairy products, sauces, fruit
juices, soups, mixed drinks, shakes.
- Mixing soft ingredients, e.g. pancake batter or
mayonnaise.
- Pureeing cooked ingredients, e.g. for making
baby food.
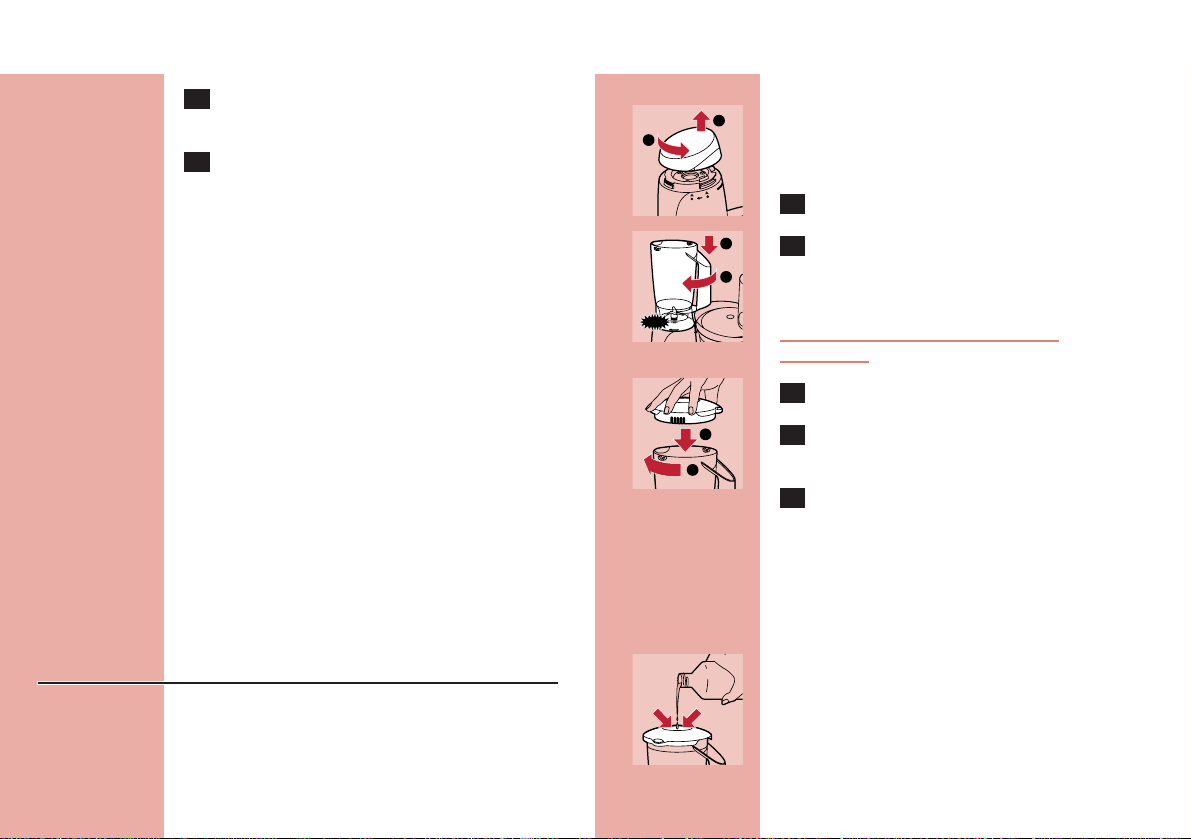
C
14 Remove the screw cap.
C
15 Mount the blender jar in the fixing hole by
turning it in the direction of the arrow
until it is firmly fixed.
Do not exert too much pressure on the handle
of the blender jar.
C
16 Put the ingredients in the blender jar.
17 Screw the lid onto the blender jar.
18 Switch the appliance on and blend the
ingredients. The buttons allow you to
adjust the speed of the appliance to obtain
optimal results. See the table for the
recommended speed.
Tips
C
◗ Pour liquid ingredients into the blender jar
through the hole in the lid.
◗ The longer you let the appliance run, the finer
the blending result will be.
◗ Pre-cut solid ingredients into smaller pieces
before putting them into the blender. If you
want to prepare a large quantity, process
small batches of ingredients instead of trying
to process a large quantity at once.
◗ If you have doubts about the right speed,
always choose the highest speed (button 2).
If ingredients stick to the wall of the blender jar:
1 Switch the appliance off and unplug it.
2 Remove the lid.
Never remove the lid while the appliance is still
running.
3 Use a spatula to remove the ingredients
from the wall of the jar.
Keep the spatula at a safe distance from the
cutting edges of the blade unit (approx. 2 cm).
1
CLICK
2
1
2
1
2
Page 12
ENGLISH12
Cleaning
Always unplug the appliance before you start
cleaning the motor unit.
1 Clean the motor unit with a damp cloth.
Do not immerse the motor unit in water
and do not rinse it either.
2 Always clean the parts that have come
into contact with food in hot water with
washing-up liquid immediately after use.
◗ The bowl, the lid of the bowl, the pusher and
the accessories can also be washed in a
dishwasher.
These parts have been tested for dishwasher
resistance according to DIN EN 12875.
The cover with insert storage space and the
blender jar are not dishwasher proof!
Clean the blade, the blade unit of the blender and
the inserts very carefully. Their cutting edges are
very sharp!
Make sure that the cutting edges of the blade, the
blade unit of the blender and the inserts do not
come into contact with hard objects. This could
cause them to become blunt.
Certain ingredients may cause discolourations on
the surface of the accessories. This does not have
a negative effect on the accessories. The
discolourations usually disappear after some time.
Blender quick-cleaning operation
C
1 Pour lukewarm water (not more than
0.5 litres) and some washing-up liquid into
the blender jar.
2 Assemble the lid.
C
3 Let the appliance run for a few moments
by pressing the Pulse button. (The
appliance stops running when you release
the button.)
4 Detach the blender jar and rinse it with
clean water.
Storage
MicroStore
C
◗ Put the accessories (emulsifying disc, blade,
kneading accessory, insert holder) on the tool
holder and store them in the bowl. Always
end up with the insert holder.
C
◗ Two inserts can be stored in the storage
space in the cover that covers the lid of the
bowl, as indicated on the inside of the cover.
The inserts have to be slid into the cover, not
pressed.
Page 13

13ENGLISH
Quantities and preparation times
C
◗ Place the cover with insert storage space on
the transparent lid of the bowl.
◗ Wrap the mains cord around the reel on the
back of the appliance.
Information & service
If you need information or if you have a problem,
please visit the Philips Web site at
www.philips.com or contact the Philips
Customer Care Centre in your country (you will
find its phone number in the worldwide
guarantee leaflet).
If there is no Customer Care Centre in your
country, turn to your local Philips dealer or
contact the Service Department of Philips
Domestic Appliances and Personal Care BV.
Applications
Pancakes,
waffles
Breadcrumbed
dishes, au
gratin dishes
Desserts,
toppings
Garnishing,
raw
vegetables,
turnip dishes,
cakes, dips
Salads
Garnishing,
soup, sauces,
au gratin
dishes
Sauces, pizzas,
au gratin
dishes, fondue
Procedure
First pour the milk into the
blender and then add the dry
ingredients. Mix the ingredients
approx. 1 minute. If necessary,
repeat this procedure 2 times.
Use dry, crispy bread.
Use soft butter for a light
result.
Cut the vegetables into pieces
that fit into the tube. Fill the
feed tube with the pieces and
shred them while pressing the
pusher down lightly.
Fill the feed tube with pieces of
vegetables and press them
carefully down with the pusher.
Use a piece of rindless
Parmesan and cut it into pieces
of approx. 3 x 3 cm.
Cut the cheese into pieces that
fit into the tube. Press the
pieces carefully down with the
pusher.
Speed
/acces
sory
2 / P
2 / P
2 / P
2 / j
k
2 / P /
g
2 / P
2 / j
k
Max.
quanti
ty
250
ml
milk
100g
300g
350g
350g
200g
200g
Ingredients &
results
Batter
(pancake) whisking
Breadcrumbs chopping
Butter cream
(creme au
beurre) whisking
Vegetables
(carrots,
turnips, white
radishes) shredding
Vegetables
(carrots, leaks,
celery) - slicing
Cheese
(Parmesan) chopping
Cheese
(Gouda) shredding
Page 14

ENGLISH14
Applications
Garnishing,
sauces, pastry,
puddings,
mousses
Purees, soups
Baby and
infant food
Salad,
garnishing
Bread
Pizza
Apple pies,
sweet biscuits,
open fruit flans
Procedure
Use hard, plain chocolate.
Break it into pieces of 2 cm.
Use cooked peas or beans. If
necessary, add some liquid to
improve the consistency of the
mixture.
For coarse puree, add only a
little liquid. For fine puree, keep
adding liquid until the mixture
is smooth enough.
Put the cucumber in the tube
and press it carefully down
with the pusher.
Mix warm water with yeast and
sugar. Add flour, oil and salt
and knead the dough for
approx. 90 seconds. Leave to
rise for 30 minutes.
Follow the same procedure as
for bread dough. Knead the
dough for approx. 1 minute.
First put in the flour and then
the other ingredients.
Use cold margarine, cut into
pieces of 2 cm. Put all the
ingredients in the bowl and
knead until the dough has
turned into a ball. Allow the
dough to cool before further
processing.
Speed
/acces
sory
2 / P
2 / P
D
2 / P
1 / g
2 / {
2 / {
2 / P
Max.
quanti
ty
200g
250g
300g
1
cucum
ber
350g
flour
400g
flour
200g
flour
Ingredients &
results
Chocolate chopping
Cooked peas,
beans pureeing
Cooked
vegetables and
meats pureeing
Cucumbers slicing
Dough (for
bread) kneading
Dough (for
pizzas) kneading
Dough (for
shortcrust
pastry) kneading
Applications
Fruit tarts, pies,
quiches
Luxury bread
Pudding,
soufflees,
meringues
Puddings, baby
food
Garnishing,
dips
Procedure
Use cold margarine and cold
water. Put flour in the bowl
and add the margarine cut into
pieces of 2cm. Mix at the
highest speed until the dough
has become crumbly, then add
cold water while mixing. Stop
as soon as the dough starts to
turn into a ball. Allow the
dough to cool before further
processing.
First mix yeast, warm milk and
some sugar in a separate bowl.
Put all the ingredients in the
food processor bowl and
knead the dough until it is
smooth and no longer sticks to
the wall of the bowl (takes
approx. 1 minute). Leave it to
rise for 30 minutes.
Use egg whites at room
temperature. Note: use at least
2 egg whites.
Tip: add a little lemon juice to
prevent the fruit from
discolouring. Add some liquid
to obtain a smooth puree.
Peel the garlic. Always press
the pulse button several times
to prevent the garlic from
being chopped too fine. Use at
least 150g.
Speed
/acces
sory
2 / P
2 / {
2 / S
P / P
P / P
Max.
quanti
ty
200g
flour
300g
flour
4 egg
whites
500g
300g
Ingredients &
results
Dough (for
tarts, pies) kneading
Dough (yeast)
- kneading
Egg whites emulsifying
Fruit (e.g.
apples,
bananas) chopping/pure
eing
Garlic chopping
Page 15

ENGLISH 15
Applications
Sauces, soups,
garnishing,
herb butter
Fruit juices
Salads,
garnishing and
barbecue
sauces
Steaks tartare,
hamburgers,
meat balls
Milkshakes
Various cakes.
Salads, bread,
almond paste,
puddings
Procedure
Wash and dry the herbs before
chopping
Add water or another liquid
(optional) to obtain a smooth
juice.
All the ingredients must be at
room temperature. Note: use
at least one large egg, two
small eggs or two egg yolks.
Put the egg and a little vinegar
in the bowl and add the oil
drop by drop.
First remove any sinews or
bones. Cut the meat into cubes
of 3 cm. Use the pulse function
for a coarser chopping result.
Puree the fruit (e.g. bananas,
strawberries) with sugar, milk
and some ice cream and mix
well.
The ingredients must be at
room temperature. Mix the
softened butter and the sugar
until the mixture is smooth and
creamy. Then add milk, eggs
and flour.
Use the pulse button for
coarse chopping or speed 2 for
fine chopping.
Speed
/acces
sory
2/P / P
2 / D
1-2 /
S
2/ P /
P
2 / D
2 / P
2/ P /
P
Max.
quanti
ty
Min.
75g
500g
(total
amou
nt)
3 eggs
300g
250ml
milk
3 eggs
250g
Ingredients &
results
Herbs (e.g.
parsley) chopping
Juices (e.g.
papaya, water
melon, pear) blending
Mayonnaise emulsifying
Meat (lean) mincing
Milkshakes blending
Cake mixture
- mixing
Nuts chopping
Applications
Stir-fries,
garnishing
Stir-fries,
garnishing
Minced meat
Soups, sauces
Garnishing,
cream, icecream
mixtures
Procedure
Peel the onions and cut them
into 4 pieces. Note: use at least
100g. Always press the pulse
button several times to prevent
the onions from being chopped
too fine.
Peel the onions and cut them
into pieces that fit into the
tube. Note: use at least 100g.
First remove any sinews or
bones. Cut the meat into cubes
of 3 cm. Use the pulse button
for a coarser chopping result.
Use cooked vegetables
Use cream that comes straight
from the refrigerator. Note:
use at least 125ml cream. The
whipped cream is ready after
approx. 20 seconds.
Speed
/acces
sory
P / P
1 / g
2/ P /
P
2 / D
P / S
Max.
quanti
ty
400g
300g
200g
500ml
350ml
Ingredients &
results
Onions chopping
Onions slicing
Poultry mincing
Soups blending
Whipping
cream whipping
Page 16

ENGLISH16
Recipes
Broccoli soup (for 4 persons)
kP
- 50g mature Gouda cheese
- 300g cooked broccoli (stalks and head)
- cooking liquid of the broccoli
- 2 boiled potatoes in pieces
- 2 stock cubes
- 2 tbsp whipping cream
- curry
- salt
- pepper
- nutmeg
B
Shred the cheese. Puree the broccoli with the
boiled potatoes and some of the cooking liquid of
the broccoli. Put the broccoli puree and the
remaining liquid and stock cubes into a measuring
beaker and fill it up to 750ml. Transfer the soup
to a pan and bring it to the boil while stirring. Stir
in the cheese and season with curry, salt, pepper
and nutmeg and add the cream.
Fruit cake
P
- 450 g dry pitted dates, halved
- 200 g dry plums, halved
- 650 g pecan nuts
- 160 g shredded coconut
- 300 g glazed pineapple
- 1 tin (400 g) sweetened condensed milk
- 1 tsp vanilla essence
B
Grease two 20cm-long baking tins and preheat
the oven to 135° C.
B
Put the halved dates and plums in the food
processor bowl and chop at maximum speed for
30 seconds. Then empty the bowl.
B
Put the pecan nuts in the food processor bowl and
roughly chop the nuts, using the pulse function.
Then empty the bowl.
B
Put the glazed pineapple in the food processor
bowl and chop into pieces, using the pulse
function. Then empty the bowl.
B
Mix the dates, plums, pecan nuts, pineapple and
shredded coconut in a large mixing bowl and mix
them.
B
Add milk and vanilla to the ingredients and mix.
B
Put the fruit mixture in the baking tins and bake
the cakes at 135° C for 90 minutes.
B
Do not process this recipe more than once
without interruption. If you need to process more
quantities, let the appliance cool down first and
then continue the process.
Mashed Potatoes
P
- 750g cooked potatoes
- approx. 250ml hot milk (90cC)
- 1 tbsp of butter
- salt
B
First mash the potatoes, then add milk, salt and
butter. Use speed 1 and process for approx.
30 seconds to prevent the puree from becoming
sticky.
Page 17

ENGLISH 17
Mayonnaise
S
- 2 egg yolks or 1 large egg
- 1 tsp mustard
- 1 tsp vinegar
- 200ml oil
B
The ingredients must be at room temperature. Put
the emulsifying disc in the bowl. Put the egg yolks
or egg, mustard and vinegar in the bowl. Use
speed 1 or 2. Pour the oil gradually through the
feed tube onto the rotating disc. You can use the
hole in the pusher to add the oil.
B
Tip for tartare sauce: add parsley, gherkins and
hard-boiled eggs.
B
Tip for cocktail sauce: add 50ml creme fraiche, a
dash of whisky, 3 tsp tomato puree and a dash of
ginger syrup to 100ml mayonnaise.
Milkshake
P
- 175ml milk
- 10g sugar
- 1/2 banana or approx. 65g other fresh fruit
- 50g vanilla ice cream
B
Mix all the ingredients until the mixture is frothy.
Pizza
{
- 400g flour
- 40ml oil
- 1/2 tsp salt
- 20g fresh yeast or 1.5 sachets dried yeast
- approx. 240ml water (35cC)
B
For the topping:
- 300ml sieved tomatoes (tinned)
- 1 tsp. mixed Italian herbs (dried or fresh)
- salt and pepper
- sugar
- Ingredients to be spread on the sauce: olives,
salami, artichokes, mushrooms, anchovies,
Mozzarella cheese, peppers, grated mature
cheese and olive oil according to taste.
B
Place the kneading accessory in the bowl. Put all
the ingredients in the bowl and select speed 2.
Knead the dough for approx. 1 minute until a
smooth ball has formed. Hold the appliance down
with one hand to prevent it from moving around
on the worktop. Put the dough in a separate bowl,
covered it with a damp cloth and leave it to rise
for about 30 minutes.
B
Use the blade to chop the onion and garlic. Fry
the chopped onion and garlic until transparent.
B
Add the sieved tomatoes and the herbs and
simmer the sauce for about 10 minutes.
B
Season to taste with salt, pepper and sugar. Allow
the sauce to cool down.
B
Heat the oven to 250cC.
Page 18

ENGLISH18
B
Roll the dough out on a floured worktop and
make two round shapes. Place the dough on a
grease baking tray. Spread the topping on the
pizza, leaving the edges free. Spread with the
desired ingredients, scatter some grated cheese
over the pizza and drip some olive oil over it.
B
Bake the pizzas for 12 to 15 minutes.
Potato-courgette gratin
Pgk
- 375g potatoes
- pinch salt
- 1 courgette (approx. 250g)
- 1 clove of garlic, crushed
- approx. 40g butter + butter to grease the oven
dish
- 2 tsp Italian or Provincial herbs
- 1 large egg
- 75ml whipping cream.
- 75ml milk
- pepper
- 70g semi-matured cheese
B
Peel and wash the potatoes.
B
Put the slicing insert in the insert holder disc and
place the insert holder in the bowl. Slice the
potatoes and the courgette at speed 1.
B
Boil the potato slices in boiling water with a pinch
of salt until they are almost done.
B
Put the slices in a colander and drain them
properly.
B
Put 20g butter and crushed garlic in a frying pan,
fry half of the courgette slices for 3 minutes while
turning them frequently. Sprinkle the slices with
1 tsp of Italian or Provincial herbs. Fry the other
half of the courgette slices in the same way.
Sprinkle them with the rest of the herbs.
B
Drain the fried courgette slices on kitchen paper.
B
Grease a low-sided oven dish and put the
courgette and potato slices in the dish, alternating
them and arranging them in such way that they
partly overlap like roof tiles.
B
Whisk the egg with the cream and the milk with
the blade at speed 2. Add salt and pepper
according to taste and pour the mixture over the
potato and courgette slices in the dish.
B
Replace the slicing insert with the shredding insert,
shred the cheese at speed 2 and sprinkle it over
the dish.
B
Put the dish in the centre of a hot oven (200cC)
and brown it in about 15 minutes
Salmon mousse (serves 3-4 people)
PS
- 1 tin of salmon (220g)
- 2 sheets of gelatine
- a few stems of chives
- pinch salt
- pinch cayenne pepper
- half tbsp lemon juice
- 125ml whipping cream
- 1 small onion
- watercress for garnishing
B
Soak the gelatine in plenty of water.
B
Chop the chives and onions in the food processor
using the pulse setting.
Page 19

19ENGLISH
B
Remove the bones and skin from the salmon.
B
Add salt, cayenne pepper, lemon juice, the salmon
and the liquid from the tin to the chopped chives
and onion and puree the ingredients at speed 2.
B
Put the puree in a bowl.
B
Boil a small quantity of water and dissolve the
gelatine in it.
B
Stir the gelatine solution through the salmon
puree.
B
Put the emulsifying disc in the bowl and whip the
cream by pressing the pulse button for about
15 seconds.
B
Fold the whipped cream into the salmon puree
with a wooden spoon.
B
Turn the mousse out onto a dish, cover it and chill
it in the refrigerator for a few hours.
B
Garnish the mousse with some watercress.
Sandwich spread
P
- 2 small carrots in pieces
- 2-3 gherkins in pieces
- 75g cauliflower in pieces
- 75g celeriac in pieces
- green herbs (parsley, dill, tarragon, celery stalks
in pieces)
- 100g mayonnaise
- 100g quark
- salt
- pepper
B
Chop the carrots, gherkins, cauliflower, green herbs
and celeriac fine. Mix in the mayonnaise and quark
carefully and season to taste with pepper and salt.
Spanish cabbage salad
g
- 1 small red cabbage
- 2 red onions
- 1 fennel
- 1 apple
- juice of one orange and 2 tbsp red wine
vinegar
- 1 tbsp mustard
B
Mix the juice, mustard and vinegar. Slice the
cabbage, onions, fennel and apple at speed 1.
B
Combine the ingredients in a salad bowl.
Sponge cake
P
- 4 eggs
- 30ml of water (35cC)
- 1 pinch of salt
- 150g sugar
- 1 sachet vanilla sugar
- 150g sieved flour
- 3g baking powder
B
Beat the eggs and the water for approx. 2 minutes.
Gradually add the sugar, vanilla sugar and the salt
and mix for approx. 1 minute. The mixture should
leave a trail when some of it is lifted from the
bowl with a spoon. Fold in the flour and baking
powder with a spatula. Bake it in the oven at
approx. 170cC for approx. 30-35 minutes.
B
Tip: You can fill the sponge cake with different
kinds of butter cream or simply with whipped
cream and fresh fruit.
Page 20

ENGLISH20
Tzatziki
k
- 1 cucumber
- 200ml yoghurt
- 1 tbsp olive oil
- 2 cloves garlic
- pinch salt
- 1 tsp finely chopped dill
- a few mint leaves
B
Peel the cucumber and shred it at speed 1. Put
the shredded cucumber in a colander and let it
drain properly.
B
Mix the other ingredients, except for the mint
leaves, through the cucumber. Chill the salad by
putting it in a covered bowl in the refrigerator for
one hour. Sprinkle mint leaves on top before
serving.
Page 21

DEUTSCH 21
Küchenmaschine: Teile und Zubehör
A Geräteschalter mit Geschwindigkeitsregler
B Motorgehäuse
C Integrierte Sicherheitsverriegelung
D Schüssel
E Schutzverschluss, verschließt die Öffnung,
wenn der Mixbecher nicht aufgesetzt ist
F Zwischenteil
G Mixbecher
H Haken zur Sicherheitsverriegelung
I Deckel der Schüssel
J Einfüllstutzen
K Stopfer
L Deckel zum Mixbecher
M Deckel mit verschließbarer Kassette zur
Aufbewahrung von Einsätzen
N Schneideinsatz, mittelfein
O Schneideinsatz, fein
P Raspeleinsatz
Q Trägerscheibe, für Schneid- und Raspeleinsätze
R Messer mit Schneidschutz
S Kneteinsatz
T Emulgierscheibe
U Spatel
Einleitung
Dieses Gerät ist mit einem Überhitzungsschutz
versehen, der es bei zu starker Erwärmung
ausschaltet.
Wenn das Gerät plötzlich stillsteht:
1 Ziehen Sie den Stecker aus der Steckdose.
2 Drücken Sie die Taste "PULSE/0" um das
Gerat aus zu .
3 Lassen Sie das Gerät 60 Minuten abkühlen.
4 Stecken Sie den Stecker wieder in die
Steckdose.
5 Schalten Sie das Gerät wieder ein.
Wenn der automatische Überhitzungsschutz das
Gerät wiederholt ausschaltet, so wenden Sie sich
bitte an Ihren Philips-Händler oder an das Philips
Service Center in Ihrem Lande.
VORSICHT: Vermeiden Sie unvorhersehbare
Risiken durch Überhitzung; schließen Sie dieses
Gerät niemals an eine Zeitschaltuhr an!
Wichtig
◗ Lesen Sie diese Gebrauchsanweisung
sorgfältig durch, und sehen Sie sich dabei die
Abbildungen an, bevor Sie das Gerät zum
ersten Mal benutzen.
◗ Bewahren Sie diese Gebrauchsanweisung zur
späteren Einsichtnahme gut auf.
◗ Prüfen Sie, ob die Spannungsangabe auf dem
Gerät (110-127 V bzw. 220-240 V) mit der
örtlichen Netzspannung übereinstimmt.
Page 22

DEUTSCH22
◗ Verwenden Sie mit dieser Küchenmaschine
keine Zusatzgeräte oder andere Teile, die von
Philips nicht ausdrücklich empfohlen werden.
Ist das trotzdem der Fall, führt dies zum
Verlust der Garantie.
◗ Verwenden Sie das Gerät nicht, wenn das
Motorgehäuse, das Netzkabel oder der
Stecker beschädigt ist.
◗ Wenn das Netzkabel defekt oder beschädigt
ist, darf es nur von einem Philips ServiceCenter oder einer von Philips autorisierten
Werkstatt ausgetauscht werden, um ein
Sicherheitsrisiko zu vermeiden.
◗ Waschen Sie vor dem ersten Gebrauch
sorgfältig alle Teile ab, die mit Lebensmitteln
in Berührung kommen können.
◗ Überschreiten Sie nicht die in der Tabelle und
Rezepte angegebenen Mengen und
Zubereitungszeiten.
◗ Füllen Sie die Schüssel und den Mixbecher
niemals höher als bis zur obersten
Markierung.
◗ Ziehen Sie nach Gebrauch sofort den
Netzstecker aus der Steckdose.
◗ Stecken Sie niemals Ihre Finger oder
irgendwelche Gegenstände, auch nicht den
Spatel, in den Einfüllstutzen. Verwenden Sie
hierzu nur den Stopfer.
◗ Ziehen Sie stets den Netzstecker aus der
Steckdose, bevor Sie mit der Hand oder
einem Gegenstand, z. B. dem Spatel, in den
Mixbecher langen.
◗ Halten Sie Kinder von dem Gerät fern.
◗ Lassen Sie das eingeschaltete Gerät niemals
unbeaufsichtigt.
◗ Schalten Sie nie das Gerät aus, indem Sie den
Deckel drehen. Schalten Sie es ausschließlich
mit der Taste "PULS/0" aus.
◗ Schalten Sie das Gerät aus, bevor Sie
irgendeinen Einsatz anbringen oder
austauschen.
◗ Tauchen Sie das Motorgehäuse niemals in
Wasser oder eine andere Flüssigkeit. Spülen
Sie es auch nicht unter fließendem Wasser ab.
◗ Wenn Sie den Mixbecher, die Schüssel oder
den Deckel richtig aufgesetzt haben,
vernehmen Sie ein Geräusch ("Klick").
◗ Die Emulgierscheibe, das Messer und der
Knetaufsatz sind auf das Zwischenteil in der
Schüssel anzubringen.
◗ Nehmen Sie den Schneidschutz vom Messer
ab, bevor Sie das Messer einsetzen.
◗ Die Schneiden des Messers sind SCHARF;
vermeiden Sie darum jede Berührung,
besonders wenn das Gerät eingeschaltet ist.
◗ Wenn das Messer blockiert ist, so ziehen Sie
den Netzstecker aus der Steckdose, bevor Sie
das Messer von den blockierenden Zutaten
frei machen.
◗ Lassen Sie heiße Zutaten auf höchstens 80cC
abkühlen, bevor Sie sie im Gerät verarbeiten.
◗ Wenn Sie Flüssigkeiten verarbeiten, die zum
Schäumen neigen, so füllen Sie nicht mehr als
1 Liter in den Mixbecher, damit sie nicht
überlaufen.
Page 23
DEUTSCH 23
Wenn sowohl die Schüssel wie der Mixbecher
aufgesetzt sind, ist nur der Mixbecher
betriebsbereit.
Der Gebrauch des Geräts
Die Schüssel
◗ Zum Gebrauch der Schüssel entfernen Sie ggf.
den Mixbecher und verschließen die Öffnung
mit dem zugehörigen Deckel. Die Schüssel
lässt sich nur verwenden, wenn der
Mixbecher abgenommen ist.
C
1 Setzen Sie die Schüssel auf das Gerät, und
drehen Sie den Griff in Pfeilrichtung, bis
die Schüssel hörbar einrastet ("Klick").
C
2 Setzen Sie den Deckel auf die Schüssel.
Drehen Sie den Deckel in Pfeilrichtung, bis
auch er hörbar einrastet. Dazu ist ein
leichter Widerstand zu überwinden.
Die integrierte
Sicherheitsverriegelung
B
Das Motorgehäuse und der Deckel sind mit
Markierungen versehen. Das Gerät kann nur
arbeiten, wenn der Pfeil auf dem Motorgehäuse
der Markierung auf dem Deckel in einer Flucht
genau gegenübersteht.
C
1 Achten Sie darauf, dass die Markierung auf
dem Deckel und der Pfeil auf der Schüssel
sich genau gegenüberstehen. Die Öffnung
im Griff der Schüssel wird nun durch die
Ausbuchtung im Deckel verschlossen.
Der Einfüllstutzen
C
1 Durch den Einfüllstutzen lassen sich
flüssige und feste Zutaten in die Schüssel
geben. Verwenden Sie nur den Stopfer, um
die Zutaten anzudrücken.
C
2 Sie können während der Verarbeitung den
Stopfer im Einfüllstutzen lassen, damit
nichts herausspritzt.
Das Messer
◗ Das Messer kann zum Schneiden, Mischen,
Mixen, Pürieren und zum Kneten von Teig
verwendet werden.
C
1 Setzen Sie die Schüssel auf das
Motorgehäuse.
C
2 Nehmen Sie den Schneidschutz vom
Messer ab.
Die Schneiden des Messers sind sehr scharf
Vermeiden Sie jede Berührung mit den
Schneiden.
CLICK
CLICK
1
2
1
2
CLICK
CLICK
1
2
Page 24

DEUTSCH24
C
3 Setzen Sie das Messer auf das
Zwischenteil.
C
4 Setzen Sie das Zwischenteil mit dem
Messer in die Schüssel ein.
5 Geben Sie die Zutaten in die Schüssel.
Schneiden Sie große Stücke zuvor in
Würfel von ca. 3 cm Kantenlänge. Setzen
Sie den Deckel auf.
C
6 Mit dem Geräteschalter lassen sich
verschiedene Geschwindigkeiten wählen,
die optimale Resultate ermöglichen.
B
Position "PULSE/0": Momentschaltung und
Ausschalter. Wird diese Taste gedrückt, arbeitet
das Gerät mit der höchsten Geschwindigkeit. Der
Motor hält an, wenn die Taste losgelassen wird.
B
Position 1: normale Geschwindigkeit.
B
Position 2: hohe Geschwindigkeit.
Vgl. die Tabelle zur Wahl der angemessenen
Geschwindigkeit. Verarbeitungszeit: 1 bis 60
Sekunden.
Hinweise
◗ Das Gerät zerkleinert sehr schnell. Drücken
Sie "PULSE/0" für kurzzeitige Bearbeitung,
damit die Zutaten nicht zu fein zerkleinert
werden.
◗ Wenn Sie (Hart-)Käse verarbeiten, so lassen
Sie das Gerät nicht zu lange laufen. Dadurch
wird der Käse erhitzt, schmilzt und wird
flockig.
◗ Verwenden Sie das Messer nicht, um harte
Zutaten zu zerkleinern, z. B. Kaffeebohnen,
Muskatnüsse und Eiswürfel. Das Messer kann
dadurch stumpf werden.
Wenn Zutaten am Messer kleben oder sich an
der Wand absetzen:
1 Schalten Sie das Gerät aus,
2 nehmen Sie den Deckel von der Schüssel
ab,
3 entfernen Sie die Zutaten mit dem Spatel.
Die Einsätze
Die Schneiden der Einsätze sich sehr scharf
Vermeiden Sie jede Berührung mit den
Schneiden.
Verarbeiten Sie mit den Einsätzen keine harten
Zutaten, z. B. Eiswürfel.
C
1 Setzen Sie den erforderlichen Einsatz in
die Trägerscheibe.
1
CLICK
2
Page 25
25DEUTSCH
C
2 Setzen Sie die Trägerscheibe auf das
Zwischenteil.
3 Setzen Sie den Deckel auf die Schüssel.
C
4 Geben Sie die Zutaten in die Schüssel.
Schneiden Sie größere Stücke so zurecht,
dass sie in den Einfüllstutzen passen.
5 Die besten Resultate erhalten Sie, wenn
Sie den Einfüllstutzen gleichmäßig füllen.
Verarbeiten Sie größere Mengen nach und nach
in Teilmengen. Leeren Sie die Schüssel dann
zwischendurch regelmäßig.
3 Wählen Sie die angemessene
Geschwindigkeit. - Vgl. die Tabelle.
Die Verarbeitung dauert je nach Zutat 10 bis
60 Sekunden.
C
4 Drücken Sie die Zutaten mit dem Stopfer
langsam und gleichmäßig in die
Einfüllöffnung.
C
5 Einen Einsatz nehmen Sie von der
Trägerscheibe ab, indem Sie den
Einsatzträger mit seiner Rückseite auf Sie
weisend in Ihre Hände nehmen. Drücken
Sie die Ränder mit ihrem Daumen, damit
er aus der Trägerscheibefällt.
Der Knetaufsatz
Der Knetaufsatz kann zum Kneten von Brotteig,
Klößen und zum Mischen von Kuchenteig
verwendet werden.
C
6 Setzen Sie den Knetaufsatz auf das
Zwischenteil.
7 Geben Sie die Zutaten in die Schüssel.
C
8 Schließen Sie die Schüssel mit dem
zugehörigen Deckel.
C
9 Verschließen Sie die Einfüllöffnung mit dem
Stopfer.
C
10 Wählen Sie die erforderliche
Geschwindigkeit, um optimale Ergebnisse
zu erzielen. - Vgl. die Tabelle.
Die Emulgierscheibe
Sie können die Emulgierscheibe zur Zubereitung
von Majonäse und zum Schlagen von Sahne oder
Eiern verwenden.
C
11 Setzen Sie die Emulgierscheibe auf das
Zwischenteil in der Schüssel.
1
CLICK
2
Page 26
DEUTSCH26
12 Geben Sie die Zutaten in die Schüssel, und
setzen Sie den Deckel auf.
13 Wählen Sie die erforderliche
Geschwindigkeit, um optimale Ergebnisse
zu erzielen. - Vgl. die Tabelle.
Hinweise
◗ When you want to whisk egg whites, make
sure the eggs are at room temperature.
Nehmen Sie die Eier mindestens eine halbe
Stunde vor der Verarbeitung aus dem
Kühlschrank.
◗ All the ingredients for making mayonnaise
must be at room temperature.
Öl kann durch die kleine Öffnung unten am
Stopfer zugegeben werden.
◗ If you are going to whip cream, the cream
must be taken straight from the refrigerator.
Please observe the preparation time in the
table. Cream should not be whipped too long.
Bei Verwendung der Momentschaltung
("PULSE/0") haben Sie volle Kontrolle über den
Fortgang der Bearbeitung.
Der Mixbecher:
Der Mixer ist geeignet für:
- Mischen von Flüssigkeiten, z.B. Milchprodukte,
Soßen, Obstsäfte, Suppen, Mixgetränke, MilchShakes.
- Mischen weicher Zutaten, z. B. Pfannkuchenteig
und Majonäse.
- Pürieren gegarter Zutaten, z.B. zur Zubereitung
von Baby-Nahrung.
C
14 Nehmen Sie den Schutzverschluss ab.
C
15 Setzen Sie den Mixbecher mit einer
Drehung in Pfeilrichtung in die Öffnung, bis
er fest sitzt.
Ziehen Sie nicht zu stark am Griff des
Mixbechers.
C
16 Geben Sie die Zutaten in den Mixbecher.
17 Schrauben Sie den Deckel auf den
Mixbecher.
18 Schalten Sie das Gerät ein, und mischen
Sie die Zutaten. Mit Hilfe der
verschiedenen Einstellungen können Sie
optimale Resultate erzielen. Vgl. die
Tabelle.
Hinweise
C
◗ Gießen Sie Flüssigkeiten
◗ Je länger Sie das Gerät betreiben, um so
feiner wird das Ergebnis.
◗ Schneiden Sie feste Zutaten zuvor in kleinere
Stücke.
◗ Wählen Sie im Zweifel die höhere
Geschwindigkeit = Position 2.
1
CLICK
2
1
2
1
2
Page 27

DEUTSCH 27
Wenn Zutaten an der Wand des Mixbechers
haften:
1 Schalten Sie das Gerät aus, und ziehen Sie
den Netzstecker aus der Steckdose,
2 und nehmen Sie den Deckel ab.
Nehmen Sie niemals den Deckel bei laufendem
Gerät ab!
3 Entfernen Sie die Zutaten, die an der
Wand haften, mit einem Spatel.
Halten Sie den Spatel in sicherer Entfernung (ca.
2 cm) zum Messer.
Reinigung
Ziehen Sie vor jeder Reinigung den Netzstecker
aus der Steckdose.
1 Reinigen Sie das Motorgehäuse mit einem
feuchten Tuch, auf das Sie bei Bedarf ein
wenig Spülmittel auftragen können.
Tauchen Sie das Motorgehäuse niemals in
Wasser, und spülen Sie es auch nicht unter
fließendem Wasser ab.
2 Spülen Sie alle Teile, die mit Lebensmitteln
in Berührung gekommen sind, sofort nach
Gebrauch in warmem Wasser, dem Sie
etwas Spülmittel zugesetzt haben.
◗ Die Schüssel, der Deckel der Schüssel, der
Stopfer und die Einsätze können im
Geschirrspüler gereinigt werden.
Diese Teile sind getestet und nach DIN EN
12875 spülmaschinenfest.
Der Deckel mit verschließbarer Kassette zur
Aufbewahrung von Einsätzen ist NICHT zur
Reinigung im Geschirrspüler geeignet.
Reinigen Sie das Messer, die Messereinheit des
Mixers und die Einsätze mit großer Vorsicht. Die
Schneiden sind sehr scharf!
Achten Sie darauf, dass die Schneiden des
Messers, der Messereinheit des Mixers und der
Einsätze nicht mit harten Gegenständen in
Kontakt kommen. Sie könnten schartig und
stumpf werden.
Einige Zutaten können an der Oberfläche der
Einsätze eine Verfärbung verursachen. Dies
beeinträchtigt nicht die Funktion dieser Teile.
Meist geht die Verfärbung nach einiger Zeit
zurück.
Schnellreinigung des Mixers
C
1 Gießen Sie nicht mehr als 500 ml
lauwarmes Wasser, dem Sie einige
Tropfen Spülmitel zugefügt haben, in den
Mixbecher.
2 Schrauben Sie den Deckel auf.
Page 28

DEUTSCH28
C
3 Drücken Sie einen Augenblick die Taste
"PULSE/0". Der Motor steht still, sobald
Sie die Taste loslassen.
4 Nehmen Sie den Mixbecher vom Gerät ab,
und spülen Sie ihn mit klarem Waser aus.
Aufbewahrung
Kurzzeitig
C
◗ Setzen Sie alle Einsätze (Emulgierscheibe,
Messer, Knetaufsatz, Trägerscheibe), das
Zwischenstück und zuletzt die Trägerscheibe
auf das Zwischenteil in der Schüssel.
C
◗ Zwei Einsätze lassen sich in der
verschließbaren Kassette des Deckels (G)
unter dem Deckel der Schüssel unterbringen.
Die Einsätze müssen eingeschoben, nicht
eingedrückt werden! - Vgl. den Hinweis auf
der Innenseite des Deckels.
C
◗ Setzen Sie den Deckel mit der Kassette für
die Einsätze auf den transparenten Deckel der
Schüssel.
◗ Wickeln Sie das Netzkabel um die
Kabelaufwicklung an der Rückseite des
Geräts.
Information und Service
Informationen zu Ihren Fragen, Wünschen und
Problemen erhalten Sie auf unserer Homepage
www.philips.com oder beim Philips Service
Center in Ihrem Lande. Sollte sich in Ihrem Lande
kein solches Center befinden, so wenden Sie sich
bitte an das Service Department von Philips
Domestic Appliances and Personal Care BV. Die
Telefonnummern entnehmen Sie bitte der
beigefügten Garantieschrift.
Page 29

DEUTSCH 29
Höchstmengen und Zubereitungszeiten
Anwendungsb
eispiele
Pfannkuchen,
Waffeln
Panierte
Speisen,
Gratins
Desserts,
Garnituren
Garnituren,
Rohkost,
Eintopf,
Kuchen, Dips
Salate
Garnituren,
Suppen,
Soßen, Gratin
Soßen, Pizzas,
Gratin, Fondue
Zubereitung
Zuerst die Milch in den
Mixbecher geben, danach die
trockenen Zutaten. Die
Zutaten ca. 1 Minute mischen.
Den Vorgang bei Bedarf
zweimal wiederholen.
Trockenes Brot oder trockene
Brötchen verwenden.
Weiche Butter ergibt ein
leichtes Resultat.
In Stücke schneiden, die in den
Einfüllstutzen passen. Mit dem
Stopfer leicht nachdrücken.
In den Einfüllstutzen einführen.
Mit dem Stopfer leicht
nachdrücken.
Parmesan ohne Rinde
verwenden. In Würfel von ca. 3
cm Kantenlänge schneiden.
Den Käse in Stücke schneiden,
die in den Einfüllstutzen passen.
Mit dem Stopfer leicht
nachdrücken.
Schalt
erstell
ung /
Zubeh
ör
2 / P
2 / P
2 / P
2 / j
k
2 / P /
g
2 / P
2 / j
k
Höchs
tmeng
e
250
ml
Milch
100 g
300 g
350 g
350 g
200 g
200 g
Zutaten und
Ergebnisse
Pfannkuchente
ig - Schlagen
Paniermehl Zerkleinern
Buttercreme Schlagen
Gemüse
(Möhren,
Rüben,
Rettich) Schneiden
Gemüse
(Möhren,
Lauch, Sellerie)
- Schneiden
Käse
(Parmesan) Zerkleinern
Käse (Gouda)
- Raspeln
Anwendungsb
eispiele
Garnituren,
Soßen,
Gebäck,
Pudding,
Mousse
Pürees,
Suppen
Baby- und
Kindernahrung
Salat,
Garnituren
(Weiß-)Brot
Pizza
Zubereitung
Harte /(Block-)Schokolade
verwenden. In Stücke von 2 cm
Größe brechen.
Gekochte Erbsen bzw.Bohnen
verwenden. Bei Bedarf etwas
Flüssigkeit zufügen.
Für grobes Püree nur wenig
Wasser zufügen. Für feines
Püree langsam Flüssigkeit
zufügen, bis die gewünschte
Konsistenz erreicht ist.
Die Gurke in den Einfüllstutzen
stecken und leicht
nachdrücken.
Warmes Wasser mit Hefe und
Zucker mischen. Mehl, Öl und
Salz hinzugeben und ca. 90
Sekunden kneten. Teig 30
Minuten gehen lassen.
Warmes Wasser mit Hefe und
Zucker mischen. Zuerst das
Mehl, danach Öl und Salt
hinzugeben und ca. 60
Sekunden kneten. Teig ca. 30
Minuten gehen lassen.
Schalt
erstell
ung /
Zubeh
ör
2 / P
2 / P
2 / P
1 / g
2 / {
2 / {
Höchs
tmeng
e
200 g
250 g
300 g
1
Salatg
urke
350 g
Mehl
400 g
Mehl
Zutaten und
Ergebnisse
Schokolade Zerkleinern
Hülsenfrüchte
- Pürieren
Gekochtes
Gemüse und
Fleisch Pürieren
Gurken Schneiden
Brotteig Kneten
Pizzateig Kneten
Page 30

DEUTSCH30
Anwendungsb
eispiele
Apfelkuchen,
süße Biskuits,
ungedeckter
Obstkuchen
Obsttorte,
Quiche
Feingebäck
Zubereitung
Kalte Butter/Margarine in
Stücke von ca. 2 cm
Kantenlänge schneiden. Alle
Zutaten in die Schüssel geben
und kneten, bis der Teig zur
Kugel wird. Vor der
Weiterverarbeitung (im
Kühlschrank) kühlen.
Kalte Margarine/Butter und
kaltes Wasser verwenden. Das
Mehl in die Schüssel geben. Die
Margarine/Butter in Stücken
von 2 cm Kantenlänge
darauflegen. Bei Position 2
mischen, bis der Teig krümelig
ist; dann während des Rührens
nach und nach kaltes Wasser
zufügen. Ausschalten, sobald
der Teig zur Kugel wird. Vor
der Weiterverarbeitung (im
Kühlschrank) kühlen.
Zuerst in einer getrennten
Schüssel Hefe, warme Milch
und etwas Zucker mischen.
Alle Zutaten in die Schüssel
des Geräts geben und ca. 1
Minute kneten, bis der Teig
glatt ist und nicht mehr an der
Wand der Schüssel haftet. Teig
30 Minuten gehen lassen.
Schalt
erstell
ung /
Zubeh
ör
2 / P
2 / P
2 / {
Höchs
tmeng
e
200 g
Mehl
200 g
Mehl
300 g
Mehl
Zutaten und
Ergebnisse
Mürbeteig I Kneten
Mürbeteig II Kneten
Hefeteig Kneten
Anwendungsb
eispiele
Pudding,
Soufflees,
Baisergebäck
Pudding,
Babynahrung
Garnituren,
Dips
Soßen,
Suppen,
Garnituren,
Kräuterbutter
Fruchtsäfte
Salate,
Garnituren,
BarbecueSoßen
Zubereitung
Eier mit Raumtemperatur
verarbeiten. Mindestens 2 Eier
verwenden!
Hinweis: Etwas Zitronensaft
hinzugefügt verhindert, dass
sich das Obst verfärbt.
Die Zehen schälen. Einige Male
kurz "PULSE/0" drücken, damit
der Knoblauch nicht zu fein
zerkleinert wird. Mindestens
150 g verwenden.
Kräuter vor der Verarbeitung
waschen und trocknen.
Bei Bedarf Wasser oder andere
Flüssikeiten hinzufügen.
Alle Zutaten mit
Raumtemperatur. Hinweis:
Wenigstens ein großes Ei oder
zwei kleine Eier bzw. Eigelbe
verwenden. Geben Sie ein Ei
mit ein wenig Essig in die
Schüssel und geben Sie das Öl
tropfenweise hinzu.
Schalt
erstell
ung /
Zubeh
ör
2 / S
P / P
P / P
2/P / P
2 / D
1-2 /
S
Höchs
tmeng
e
4
Eiweiß
e
500 g
300 g
mind.
75 g
500 g
insges
amt
3 Eier
Zutaten und
Ergebnisse
Eischnee
Obst Schneiden /
Pürieren
Knoblauch Zerkleinern
Kräuter (z. B.
Petersilie) Zerkleinern
Säfte (z. B.
Papaya,
Wassermelon
en, Birnen) Mixen
Majonäse Emulgieren
Page 31

DEUTSCH 31
Anwendungsb
eispiele
Hackbraten,
Tartar,
Frikadellen,
Feischbällchen
Milchshakes
Verschiedene
Kuchen
Salate, Brot,
Marzipanmass
e, Puding
Kurz
Gebratenes,
Garnituren
Kurz
Gebratenes,
Garnituren
Zubereitung
Alle Knochen und Sehnen
entfernen. Fleisch in Würfel
von 3 cm schneiden. Mit
"Pulse/2" verarbeiten, um ein
gröberes Ergebnis zu erhalten.
Das Obst (z. B. Bananen,
Erbeeren) pürieren. Mit
Zucker, Milch und etwas
Eiscreme gut vermischen.
Zutaten mit Raumtemperatur
verwenden. Mischen Sie
weiche Butter und Zucker, bis
die Mischung glatt und cremig
ist. Geben Sie dann Milch, Eier
und Zucker hinzu.
Grobes Zerkleinern mit
"PULSE/0". Feines Zerkleinern
mit Position 2.
Die Zwiebeln schälen und sie
in 4 Stücke teilen. Mindestens
100g verwenden. Mit
"PULSE/0" verarbeiten, damit
das Ergebnis nicht zu fein
ausfällt.
Zwiebeln schälen und in 4
Stücke teilen. Mindestens 100 g
verarbeiten.
Schalt
erstell
ung /
Zubeh
ör
2/ P /
P
2 / D
2 / P
2/ P /
P
P / P
1 / g
Höchs
tmeng
e
300 g
250
ml
Milch
3 Eier
250 g
400 g
300 g
Zutaten und
Ergebnisse
Fleisch, mager
- Zerkleinert
Milchshakes
Kuchenmischu
ng - Mischen
Nüsse Zerkleinern
Zwiebeln Zerkleinern
Zwiebeln Schneiden
Anwendungsb
eispiele
Hackfleisch
Suppen, Soßen
Garnituren,
Cremes,
Eiscreme
Zubereitung
Zuerst alle Knochen und
Sehnen entfernen. Das Fleisch
in Würfel von 3 cm
Kantenlänge schneiden. Für
grobes Ergebnis "PULSE/0"
verwenden.
Gekochtes Gemüse
verwenden
Sahne aus dem Kühlschrank
verwenden. Mindestens 125 ml
verarbeiten. Die Schlagsahne ist
nach 20 Sekunden fertig.
Schalt
erstell
ung /
Zubeh
ör
2/ P /
P
2 / D
P / S
Höchs
tmeng
e
200 g
500
ml
350
ml
Zutaten und
Ergebnisse
Geflügel zerkleinern
Suppen Mixen
Schlagsahne Schlagen
Page 32

DEUTSCH32
Rezepte
Brokkoli-Suppe
Einsätze: kP
- 50 g mittelalter Gouda
- 300g gekochte Brokkoli (Röschen und Zweige)
- Wasser, in dem der Brokkoli gekocht wurde
- 2 gekochte Kartoffeln, in Stücken
- 2 Brühwürfel
- Wasser, in dem der Brokkoli gekocht wurde
- Curry
- Salz
- Pfeffer
- Muskat
B
Den Käse raspeln. Den Brokkoli mit den
gekochten Kartoffeln und etwas Brokkoliwasser
pürieren. Das Püree und das restliche BrokkoliWasser mit dem Brühwürfel in einen Messbecher
geben und auf 750 ml auffüllen. In einem
Kochtopf unter Umrühren aufkochen lassen. Den
Käse einrühren, mit Curry, Salz, Pfeffer und
Muskat würzen. Zuletzt die Sahne einrühren.
Obstkuchen
P
- 450 g getrocknete, entkernte, halbierte Datteln
- 200 g Trockenpflaumen, halbiert
- 650 g (Pecan-)Nüsse
- 160 g geraspelte Kokusnuss
- 300 g kandierte Ananas
- 1 Dose (400 g) gesüßte Kondensmilch
- 1 TL Vanille-Essenz
B
Fetten Sie zwei rechteckige Backformen (20 cm
lang) ein, und heizen Sie den Backofen auf 135c
C vor.
B
Geben Sie die halbierten Datteln und Pflaumen in
die Schüssel, und zerkleinern Sie die Zutaten
30 Sekunden auf Höchststufe. Entleeren Sie dann
die Schüssel.
B
Geben Sie die (Pecan-)Nüsse in die Schüssel.
Hacken Sie die Nüsse grob mit Hilfe der
Moment-Taste. Entleeren Sie dann die Schüssel.
B
Geben Sie die kandierte Ananas in die Schüssel,
und schneiden Sie die Ananas in Stücke mit Hilfe
der Moment-Taste. Entleeren Sie dann die
Schüssel.
B
Mischen Sie Datteln, Pflaumen, Nüsse, Ananas
und geraspelte Kokusnuss in einer großen
Rührschüssel.
B
Fügen Sie Kondensmilch und Vanille-Essenz hinzu,
und mischen Sie alle Zutaten gründlich.
B
Verteilen Sie die Kuchenmischung auf die drei
Backformen, und backen Sie die Kuchen
90 Minuten bei 135c C.
B
Verarbeiten Sie dieses Rezept nur einmal ohne
Unterbrechung. Wenn Sie größere Mengen
zubereiten möchten, ist es wichtig, dass Sie das
Gerät abkühlen lassen, bevor Sie fortfahren.
Kartoffelbrei
P
- 750 g gekochte Kartoffeln
- ca. 250 ml heiße Milch von 90c C
- 1 El Butter
- Salz
Page 33

DEUTSCH 33
B
Die Kartoffeln pürieren, dann Milch, Salz und
Butter hinzufügen. Mit Position 1 nur ca.
30 Sekunden verarbeiten, damit die Masse nicht
zu steif wird.
Majonäse
S
- 2 Eigelb oder ein großes Ei
- 1 El Senf
- 1 El Essig
- 200 ml Speiseöl
B
Alle Zutaten bei Raumtemperatur verarbeiten.
Die Emulgierscheibe in die Schüssel setzen. Die
Eigelbe bzw. das Ei, den Senf und den Essig in die
Schüssel geben. Position 1 oder 2 verwenden. Das
Öl nach und nach durch den Einfüllstutzen auf
dierotierende Scheibe geben. Das Öl lässt sich
durch das Loch im Stopfer zufügen.
B
Für Tartar-Soße: Petersilie, Gewürzgurken und hart
gekochte Eier hinzufügenen.
B
Für Cocktail-Soße: 50 ml Crème fraîche, einen
Spritzer Whisky, 3 Tl Tomatenmark und einen
Spritzer Ingwer-Sirup auf 100 ml Majonäse
hinzufügen.
Milchshake
P
- 175 ml Milch
- 10 g Zucker
- 1/2 Banane oder ca. 65 g anderes frisches Obst
- 50 g Vanille-Eiscreme
B
Alle Zutaten mischen, bis die Masse steif
geworden ist.
Pizza
{
- 400 g Mehl
- 40ml Speiseöl
- 1/2 Tl Salz
- 20 g frische Hefe oder 1 1/2 Päckchen
Trockenhefe
- ca. 240 ml Wasser (35c C)
B
Zum Belag:
- 300 ml gesiebte Tomaten, aus Dosen
- 1 Tl gemischte italienische Kräuter, frisch oder
getrocknet
- Salz und Pfeffer
- Zucker
- Zutaten zum Belegen der Soße: Olive, Salami,
Artischocken, Pilze, Anchovis, Mozarella, Pfeffer,
geriebener reifer Käse und Olivenöl nach
persönlichem Geschmack.
B
Die Kneteinheit in die Schüssel einsetzen. Alle
Zutaten in die Schüssel geben und mit Position
2 ca. 1 Minute kneten, bis sich ein glatter Ball
gebildet hat. Das Gerät mit einer Hand
niederdrücken, damit es nicht auf der
Arbeitsfläche wandert. Den Teigball in eine
getrennte Schüssel geben und, mit einem feuchten
Tuch abgedeckt, ca. 30 Minuten gehen lassen.
B
Zwiebeln und Knoblauch mit dem Messer
zerkleinern und glasig dünsten.
B
Die gesiebten Tomaten und die Kräuter
hinzugeben. Alles 10 Minuten köcheln lassen.
B
Mit Salz, Pfeffer und Zucker würzen. Die Soße
abkühlen lassen.
Page 34

DEUTSCH34
B
Den Backofen auf 250c C aufheizen.
B
Den Teig auf einer mit Mehl bestäubten Fläche
ausrollen und daraus zwei runde Schiben formen.
Diese beiden Böden auf ein eingefettetes
Backblech legen. Dann den Belag auftragen; die
Ränder frei lassen. Die Garnitur darauflegen,
geriebenen Käse darüber streuen und etwas
Olivenöl daraufträufeln.
B
Die Pizza 12 bis 15 Minuten backen
Zucchini-Kartoffel-Gratin
Pgk
- 375 g Kartoffeln
- 1 Prise Salz
- 1 Zucchini, ca. 250 g
- 1 Zehe Knoblauch, zerdrückt
- ca. 40 Butter; Butterfett zum Einfetten des
Backblechs
- 2 Tl italienische Kräuter oder Herbes de
Provence
- 1 großes Ei
- 75 ml Schlagsahne
- 75 ml Milch
- Pfeffer
- 70 g mittelalter Käse
B
Die Kartoffeln schälen und waschen.
B
Den Schneideeinsatz auf der Trägerscheibe
anbringen und in die Schüssel setzen. Die Kartoffel
und die Zucchini mit Position 1 schneiden.
B
Die Kartoffelscheiben in mit einer Prise
gesalzenem Wasser kochen, bis sie fast gar sind.
B
Die Kartoffelscheiben in einem Küchensieb gut
trocknen.
B
Eine feuerfeste Schale mit niedrigem Rand
einfetten, mit den Zucchini- und Kartoffelscheiben
so belegen, dass sie miteinander abwechseln und
sich wie Dachziegeln gegenseitig überlappen.
B
Das Ei mit der Sahne und der Milch bei Position 2
mit dem Messer-Einsatz schlagen. Mit Salz und
Pfeffer abschmecken und die Mischung über die
Zucchini- und Kartoffelscheiben gießen.
B
Den Schneideinsatz gegen den Raspeleinsatz
austauschen, den Käse raspeln und über die
Schale streuen.
B
Die Schale in den auf 200c C vorgeheizten
Backofen stellen und ca. 15 Minuten bräunen
lassen.
Lachs-Mousse
PS
- 1 Büchse Lachs (Salm), 220 g
- 2 Blatt Gelatine
- einige Stängel Schnittlauch
- 1 Prise Salz
- 1 Prise Cayenne-Pfeffer
- 1/2 El Zitronensaft
- 125 ml geschlagene Sahne
- 1 kleine Zwiebel
- Brunnenkresse zum Garnieren
Page 35

DEUTSCH 35
B
Die Gelatine in reichlich Wasser einweichen.
B
Schnittlauch und die Zwiebeln mit "PULSE/0"
zerkleinern.
B
Haut und Gräten vom Lachs entfernen.
B
Salz, Pfeffer, Cayenne-Pfeffer, Zitronensaft, den
Lachs und die Flüssigkeit aus der Dose zu den
zerkleinerten Zwiebeln und dem Schnittlauch
hinzugeben und bei Position 2 pürieren.
B
Das Püree in die Schüssel geben.
B
Ein wenig Wasser kochen und die Gelatine darin
auflösen.
B
Die aufgelöste Gelatine unter das Lachs-Püree
rühren.
B
Die Emulgierscheibe in die Schüssel setzen und
die Sahne mit "PULSE/0" ca. 15 Sekunden
schlagen.
B
Die Schlagsahne mit einem Holzlöffel unter das
Lachspüree ziehen.
B
Die Mousse in eine Schüssel stürzen, zudecken
und im Kühlschrank einige Stunden kühlen lassen.
B
Die Mousse mit etwas Brunnenkresse garnieren.
Sandwich-Belag
P
- 2 kleine Möhren in Stücken
- 2 bis 3 Gewürzgurken
- 75 g Blumenkohl
- 75 g Knollensellerie in Stücken
- grüne Kräuter, z. B. Petersilie, Dill, Estragon,
Stangensellerie in Stücken
- 100 g Majonäse
- 100 g Quark
- Salz
- Pfeffer
B
Die Möhren, die Gewürzgurken, den Blumenkohl,
die Kräuter und den Sellerie fein zerkleinern. Die
Majonäse und den Quark vorsichtig darunter
mischen und mit Pfeffer und Salz abschmecken.
Spanischer Kohlsalat
g
- 1 kleiner Rotkohl
- 2 rote Zwiebeln
- 1 Fenchel
- 1 Apfel
- Saft einer Orange und 2 El Rotwein-Essig
- 1 El Senf
B
Den Saft, den Senf und den Essig mixen. Den
Kohl, die Zwiebeln, den Fenchel und den Apfel bei
Position 1 schneiden.
B
Die Zutaten in einer Salatschüssel mischen.
Rührkuchen
P
- 4 Eier
- 30 ml Wasser (35c C)
- 1 Prise Salz
- 150 g Zucker
- 1 Päckchen Vanillin-Zucker
- 150 g gesiebtes Mehl
- 3 g Backpulver
Page 36

DEUTSCH36
B
Das Ei und das Wasser ca. 2 Minuten schlagen.
Zucker, Vanillin-Zucker und das Salz nach und
nach hinzugeben und ca. 1 Minute mixen. Die
Masse soll wie ein dickes Band vom Löffel
herabrinnen. Das Mehl und das Backpulver mit
einem Spatel darunterziehen. Im Backofen bei ca.
170c C 30 bis 35 Minuten backen.
B
Hinweis: Der Rührteig kann mit verschiedenen
Sorten von Cremes oder mit Schlagsahne und
frischem Obst belegt werden.
Tsatsiki
k
- 1 Salatgurke
- 200 ml Joghurt
- 1 El Olivenöl
- 2 Zehen Knoblauch
- 1 Prise Salz
- 1 Tl fein gehackter Dill
- einige Minzblätter
B
Die Gurke schälen und bei Position 1 schnitzeln.
Die geschnitzelte Gurke in einem Haushaltssieb
gründlich trocknen lassen.
B
Die anderen Zutaten, außer den Minzblättern,
unter die Gurke mischen. Den Salat in einer
zugedeckten Schüssel im Kühlschrank eine Stunde
kühlen. Vor dem Servieren mit der Minze
bestreuen.
Page 37

FRANÇAIS 37
Robot de cuisine: composants et accessoires
A Sélecteur de vitesse
B Bloc moteur
C Interrupteur de sécurité
D Bol
E Capuchon de sécurité (pour couvrir
l'ouverture lorsqu'on n'utilise pas le bol mixer)
F Axe d'entraînement
G Bol mixer
H Doigt de sécurité du bol (active et désactive
l'interrupteur de sécurité)
I Couvercle du bol
J Cheminée de remplissage
K Poussoir
L Couvercle mixer
M Couvercle avec espace de rangement pour les
inserts
N Insert à trancher moyen
O Insert à râper fin
P Insert à râper moyen
Q Axe support
R Couteaux (avec gaine de protection)
S Accessoire de pétrissage
T Disque à émulsionner
U Spatule
Introduction
L'appareil est équipé d'un interrupteur
automatique thermique. En cas de surchauffe, ce
dispositif coupe automatiquement l'alimentation
électrique de l'appareil.
Si votre appareil s'arrête
brusquement:
1 Débranchez l'appareil.
2 Appuyez sur le bouton "PULSE / 0".
3 Laissez refroidir l'appareil 60 minutes.
4 Branchez à nouveau l'appareil.
5 Remettez l'appareil en marche.
Consultez votre revendeur ou un Centre Service
Agréé Philips si l'interrupteur de sécurité se
déclenche trop fréquemment.
Avertissement: Afin d'éviter tout accident causé
par la remise en marche de l'interrupteur de
sécurité thermique, l'appareil ne doit pas être
connecté à un minuteur.
Important
◗ Lisez attentivement les instructions ainsi que
les illustrations avant d'utiliser votre appareil.
◗ Conservez ce mode d'emploi pour un usage
ultérieur.
◗ Avant de brancher l'appareil, vérifiez que la
tension indiquée sur l'appareil correspond à la
tension du secteur de votre logement (110127V ou 220-240V).
◗ N'utilisez jamais des accessoires ou des
composants des autres que ceux d'origine et
Page 38

FRANÇAIS38
recommandés par Philips. Philips décline toute
résponsabilité envers la garantie si ce n'était
pas le cas.
◗ N'utilisez pas l'appareil si le cordon
d'alimentation, la fiche ou les autres pièces
sont détériorés.
◗ Si le cordon d'alimentation est endommagé, il
ne doit être remplacé que par Philips, par un
Centre Service Agréé Philips ou par des
personnes qualifiées pour éviter tout
accident.
◗ Avant la première utilisation, nettoyez toutes
les pièces en contact avec les aliments.
◗ Ne dépassez pas les quantités et le temps de
préparation indiqués dans le tableau et les
recettes .
◗ Ne dépassez pas les quantités et les temps
d'utilisation indiqués dans le tableau.
◗ Débranchez l'appareil immédiatement après
utilisation.
◗ Ne mettez jamais vos doigts ou tout autre
objet, (par ex. la spatule), dans la cheminée de
remplissage pour pousser les ingrédients sans
avoir au préalable arrêté l'appareil. Utilisez
uniquement le poussoir.
◗ Débranchez toujours l'appareil avant mettre
vos doigts ou tout autre objet dans le bol
mixer (par ex. la spatule).
◗ Tenez l'appareil hors de portée des enfants.
◗ Ne laissez jamais l'appareil fonctionner sans
surveillance.
◗ N'arrêtez jamais l'appareil en tournant le
couvercle. Arrêtez l'appareil seulement en
appuyant sur le bouton PULSE / 0.
◗ Arrêtez toujours l'appareil avant de détacher
un accessoire.
◗ N'immergez jamais le bloc moteur dans l'eau
ni dans aucun autre liquide. Ne le rincez pas
non plus. Nettoyez-le avec un chiffon humide.
◗ Quand vous montez le bol mixer, le bol et le
capuchon fileté correctement, vous devez
entendre un clic.
◗ Le disque à émulsionner, les couteaux et
l'accessoire de pétrissage doivent être placés
sur l'axe d'entraînement qui se trouve dans le
bol.
◗ Enlevez la gaine de protection du couteau
avant utilisation.
◗ Evitez de toucher aux lames COUPANTES,
surtout lorsque l'appareil est sous tension.
◗ Si les lames se bloquent, DEBRANCHEZ
L'APPAREIL avant de retirer les ingrédients.
◗ Laissez les aliments cuits refroidir avant de les
hacher (température maximale 80cC/ 175cF).
◗ Si vous préparez un liquide qui peut mousser,
n'ajoutez pas plus d'un litre dans le bol mixer
pour éviter tout débordement.
Notez que si le mixer et le bol sont montés
ensembles, seul le mixer fonctionne.
Utilisation de l'appareil
Bol
◗ Si vous voulez utiliser le bol, retirez le bol
mixer et fermez l'ouverture où se fixe le bol
Page 39

FRANÇAIS 39
avec le capuchon fileté. Toutes les fonctions
qui nécessitent l'utilisation du bol
fonctionneront seulement si le bol mixer a
été enlevé.
C
1 Montez le bol sur le robot en tournant la
poignée dans le sens de la flèche jusqu'à ce
que vous entendiez un clic.
C
2 Mettez le couvercle sur le bol. Tournez
fermement le couvercle dans le sens de la
flèche jusqu'à ce que vous entendiez un
clic.
Verrouillage de sûreté incorporé
B
Le bloc moteur et le couvercle comportent des
repères. L'appareil ne peut fonctionner que si la
flèche du bloc moteur coïncide exactement avec
le repère du couvercle.
C
1 Assurez-vous que la flèche du bloc moteur
coïncide exactement avec le repère du
couvercle. L'ergot du couvercle couvre
l'ouverture de la poignée du bol.
La cheminée de remplissage et le poussoir
C
1 Utilisez la cheminée de remplissage pour
ajouter du liquide et/ou des ingrédients
solides. Utilisez le poussoir pour pousser
les ingrédients dans la cheminée.
C
2 Le poussoir peut également servir à
fermer la cheminée pendant que l'appareil
est en marche, pour empêcher toute
projection.
Couteau
◗ Le couteau peut être utilisé pour hacher,
mélanger, mixer, réduire en purée et pour
préparer les pâtes feuilletées, brisées et
sablées.
C
1 Placez le bol sur le bloc moteur.
C
2 Enlevez la gaine de protection du couteau.
Les lames du couteau sont très aiguisées et
tranchantes. Evitez de les toucher!
C
3 Positionnez le couteau sur l'axe
d'entraînement.
C
4 Placez l'axe d'entraînement dans le bol.
5 Mettez les ingrédients dans le bol.
Découpez les ingrédients en dés d'environ
3 cm de côté. Mettez le couvercle sur le
bol.
CLICK
CLICK
1
2
1
2
1
CLICK
2
CLICK
Page 40

FRANÇAIS40
C
6 Les réglages de vitesse vous permettent de
régler la vitesse de l'appareil pour obtenir
des résultats optimaux.
B
la fonction "PULSE / 0": pour une opération
impulse et pour arrêter l'appareil. Si vous
maintenez appuyé la touche "PULSE / 0"
l'appareil fonctionne à vitesse maximum.
L'appareil s'arrête après avoir relâché la touche.
B
réglage 1: pour une vitesse normale
B
réglage 2: pour une vitesse rapide
Consultez le tableau pour les réglages de vitesse
recommandés. La préparation des aliments dure
1 - 60 secondes.
Suggestions
◗ L'appareil hache très rapidement. N'utilisez
pas la touche éclair trop longtemps car les
aliments seraient hachés trop fins.
◗ Ne laissez pas tourner l'appareil trop
longtemps lorsque vous hachez du fromage (à
pâte dure) : le fromage chaufferait trop,
commencerait à fondre et à devenir pâteux.
◗ Ne hachez pas des ingrédients trop durs tels
que des grains de café, des noix de muscade
ou des glaçons. Cela pourrait émousser les
lames du couteau.
Si des aliments s'enroulent autour du couteau ou
collent à la paroi du bol :
1 Débranchez d'abord l'appareil.
2 Retirez le couvercle du bol.
3 Enlevez ensuite les aliments avec la
spatule.
Inserts
Les lames des inserts sont très aiguisées. Evitez de
les toucher!
Ne hachez pas des ingrédients durs tels que les
glaçons avec les inserts.
C
1 Placez l'insert sélectionné sur l'axe des
inserts.
C
2 Placez l'axe des inserts sur l'axe
d'entraînement qui se trouve dans le bol.
3 Mettez le couvercle sur le bol.
C
4 Mettez les ingrédients dans la cheminée.
Coupez les gros morceaux pour pouvoir
les introduire dans la cheminée.
5 Pour les meilleurs résultats remplissez la
cheminée de façon régulière.
Si vous devez traiter d'importantes quantités
d'aliments, ne traitez que des petites portions à la
fois et videz le bol fréquemment.
3 Sélectionnez le réglage de vitesse
approprié pour obtenir des résultats
optimaux. Consultez le tableau pour les
réglages de vitesse recommandés.
1
CLICK
2
Page 41

41FRANÇAIS
La préparation des aliments dure 10 - 60
secondes.
C
4 Appuyez légèrement sur les ingrédients
avec le poussoir.
C
5 Pour retirer un insert du support, prenez
le support dans la main. Poussez les ergots
pour faire sortir l'insert désiré.
Accessoire de pétrissage
L'accessoire de pétrissage sert à pétrir la pâte à
pain, à mixer la pâte à frire ou les ingrédients
pour un gâteau.
C
6 Fixez l'accessoire de pétrissage sur l'axe
d'entraînement.
7 Mettez les ingrédients dans le bol.
C
8 Placez le couvercle sur le bol.
C
9 Fermez la cheminée de remplissage à l'aide
du poussoir.
C
10 Sélectionnez le réglage de vitesse
approprié pour obtenir des résultats
optimaux. Consultez le tableau pour les
réglages de vitesse recommendés.
Disque à émulsionner
Vous pouvez utiliser le disque à émulsionner pour
préparer de la mayonnaise, pour battre des blancs
d'œufs et de la crème fouettée.
C
11 Placez le disque à émulsionner sur l'axe
d'entraînement qui se trouve dans le bol.
12 Mettez les ingrédients dans le bol et placez
le couvercle sur le bol.
13 Sélectionnez le réglage de vitesse
approprié pour obtenir des résultats
optimaux. Consultez le tableau pour les
réglages de vitesse recommendés.
Suggestions
◗ Quand vous voulez fouetter des blancs
d'oeufs, ils doivent être à température
ambiante.
Otez les oeufs du réfrigérateur au moins une
demi-heure avant de les utiliser.
◗ Tous les ingrédients pour la préparation de la
mayonnaise doivent être à température
ambiante.
CLICK
1
2
Page 42

FRANÇAIS42
Vous pouvez verser de l'huile par l'ouverture qui
se trouve au dos du poussoir.
◗ Si vous voulez fouetter de la crème, utilisez
de la crème préalablement refroidie dans le
réfrigérateur. Respectez les temps de
préparation dans le tableau. La crème ne doit
pas être battue trop longtemps.
Utilisez la touche Eclair pour mieux contrôler
l'opération.
Mixer
Le mixer est destiné à:
- Mélanger des ingrédients liquides, tels que les
produits laitiers, les sauces, les jus de fruits, les
soupes, les cocktails, et milk-shakes.
- Mixer des ingrédients mous comme des pâtes à
crêpes ou de la mayonnaise.
- Réduire en purée des aliments cuits, pour les
nourrissons par exemple.
C
14 Retirer le capuchon fileté.
C
15 Fixez le mixer sur l'ouverture de
raccordement en tournant dans le sens de
la flèche jusqu'à son enclenchement.
N'exercez trop de pression sur la poignée du bol
mixer.
C
16 Mettez les ingrédients dans le bol.
17 Vissez le couvercle sur le bol mixer.
18 Mettez l'appareil en marche, et mélangez
les ingrédients. Les réglages de vitesse
vous permettent de régler la vitesse de
l'appareil pour obtenir des résultats
optimaux. Consultez le tableau pour les
réglages de vitesse recommandés.
Suggestions
C
◗ Les ingrédients liquides peuvent être versés
dans le bol par l'ouverture du bouchon qui se
trouve sur le couvercle.
◗ Plus vous laissez l'appareil tourner longtemps,
plus le mélange que vous obtenez est fin.
◗ Coupez les aliments en morceaux fins pour
les introduire dans la cheminée. Si vous devez
traiter d'importantes quantités d'aliments, ne
traitez que des petites portions à la fois.
◗ Si vous hésitez sur la vitesse à utiliser,
choisissez toujours la vitesse la plus élevée
(position 2).
Si des aliments collent à la paroi du bol mixer:
1 Arrêtez l'appareil et débranchez-le.
2 Retirez le couvercle.
Ne retirez jamais le couvercle tandis que
l'appareil fonctionne.
1
CLICK
1
2
2
1
2
Page 43

FRANÇAIS 43
3 Enlevez les aliments avec une spatule.
Tenez la spatule éloignée des couteaux (environ
2 cm).
Nettoyage
Débranchez toujours l'appareil avant de nettoyer
le bloc moteur.
1 Le bloc moteur peut être nettoyé avec un
chiffon humide. N'immergez jamais le bloc
moteur dans l'eau et ne le rincez pas sous
l'eau non plus.
2 Lavez immédiatement après utilisation les
accessoires en contact avec les aliments, à
l'eau chaude savonneuse.
◗ Le bol, le couvercle du bol, le poussoir et les
accessoires peuvent être lavés dans le lavevaisselle.
Ces composants ont été testés pour la resistance
au lave-vaisselle conformément au DIN EN 12875.
Le couvercle avec espace de rangement pour les
inserts et le bol mixer ne sont pas résistants au
lave-vaisselle!
Faites attention en nettoyant le couteau
l'ensemble couteaux et les inserts. Leurs lames
sont très aiguisées !
Evitez de cogner les lames du couteau, et les
inserts contre des objets durs car cela pourrait les
émousser.
Certains aliments peuvent provoquer une
décoloration de la surface des accessoires. Cela
est sans importance sur le bon fonctionnement
de l'appareil. Les décolorations peuvent
disparaitre après quelque de temps.
Nettoyage rapide du mixer
C
1 Versez de l'eau tiède (pas plus de 0,5
litres) et un peu de produit lave-vaisselle
dans le bol mixer.
2 Placez le couvercle.
C
3 Laissez l'appareil fonctionner quelques
instants en appuyant sur la touche Eclair.
(L'appareil ne fonctionne plus lorsque vous
relâchez le bouton.)
4 Détachez le bol mixer et rincez-le avec de
l'eau claire.
Page 44

FRANÇAIS44
Rangement
MicroRangement
C
◗ Mettez les accessoires (disque à émilsionner,
couteau, accessoire à pétrir, axe des inserts)
sur l'axe d'entraînement et placez-les dans le
bol. Rangez toujours l'axe d'entrainement en
dernier.
C
◗ Deux inserts peuvent être rangés dans
l'espace de rangement pour les inserts du
couvercle qui couvre le bol, comme indiqué à
l'intérieur du couvercle. Les inserts doivent
entrer légèrement dans le couvercle, ils ne
doit pas être pressés.
C
◗ Placez le couvercle avec l'espace de
rangement pour les inserts sur le couvercle
transparent du bol.
◗ Enroulez le cordon autour de l'enrouleur au
dos de l'appareil.
Information et service
Pour toute réparation/information, ou en cas de
problème, visitez notre website:
www.philips.com. Ou veuillez contacter le
Service Consommateurs Philips de votre pays
(vous trouverez le numéro de téléphone dans le
dépliant sur la garantie internationale). S'il n'y a
aucun Service Consommateurs Philips dans votre
pays, contactez votre distributeur ou le Service
Department of Philips Domestic Appliances and
Personal Care BV.
Quantité et temps de préparation
Applications
Crêpes,
gaufres
Plats panés,
gratins
Desserts,
garnitures
Garnitures,
légumes crus,
salades de
céléri, gâteaux,
fondues au
savoyarde
Salades
Garnitures,
soupes, sauces,
gratins
Sauces, pizzas,
gratins, fondue
Procédure
Versez d'abord le lait dans le
mixer, puis ajoutez les
ingrédients secs. Mélangez
pendant 1 minute environ. Si
nécessaire, répétez l'opération
2 fois.
Utilisez du pain sec, croustillant
Prenez du beurre mou pour
obtenir une crème légère.
Coupez les légumes
grossièrement pour les
introduire dans la cheminée.
Remplissez la cheminée et
râpez-les en appuyant
doucement sur
Remplissez la cheminée et
tranchez les légumes en
appuyant doucement sur le
poussoir.
Utilisez un morceau de
parmesan sans croûte et
coupez-le en morceaux
d'environ 3 x 3 cm.
Coupez le fromage en
morceaux pour les introduire
dans la cheminée. Appuyez
doucement sur le poussoir.
Réglag
e de
vitess
e /
Acces
soire
2 / P
2 / P
2 / P
2 / j
k
2 / P /
g
2 / P
2 / j
k
Quant
ité
maxi
male
250
ml lait
100g
300g
350g
350g
200g
200g
Ingrédients et
résultats
Pâtes à crêpes
(crêpes) fouetter
Chapelure
Crème au
beurre - battre
Légumes
(carottes,
navets, céleris)
- trancher
Légumes
(carottes,
poireaux,
céleris) trancher
Fromage
(parmesan)râper
Fromage
Page 45

FRANÇAIS 45
Applications
Garnitures,
sauces,
pâtisseries,
flans, mousses
Purées, soupes
Aliments pour
bébés
Salades,
garnitures
Pain
Pizza
Procédure
Utilisez du chocolat noir, dur.
Cassez en morceaux de 2 cm.
Utilisez les légumes cuits. Si
nécessaire, ajoutez du liquide
pour améliorer la consistance
du mélange.
Pour obtenir une purée
épaisse, ajoutez peu de liquide.
Pour une purée fine, ajoutez du
liquide jusqu'à ce que le
mélange soit suffisamment
onctueux.
Mettez le concombre dans la
cheminée et appuyez
doucement.
Mélangez la levure et le sucre
avec de l'eau chaude. Ajoutez
la farine, l'huile et le sel et
mélangez pendant 90 sec.
environ. Laissez lever 30 min.
Même opération que pour la
pâte à pain. Mélangez pendant
1 min. environ. Ajoutez tout
d'abord la farine et ensuite les
autres ingrédients.
Réglag
e de
vitess
e /
Acces
soire
2 / P
2 / P
D
2 / P
1 / g
2 / {
2 / {
Quant
ité
maxi
male
200g
250g
300g
1
conco
mbre
350g
farine
400g
farine
Ingrédients et
résultats
Chocolat
Petits pois,
haricots cuits purée
Légumes et
viandes cuits purée
Concombre trancher
Pâte
Pâte
Applications
Tourtes aux
pommes,
biscuits, tartes
aux fruits
Tartes aux
fruits, pâtés,
quiches
Pain brioché
Procédure
Utilisez de la margarine froide
et coupez-la en morceaux de 2
cm. Mettez tous les ingrédients
dans le bol et pétrissez jusqu'à
ce que la pâte devienne une
boule. Laissez la pâte refroidir
avant de vous en servir.
Utilisez de la margarine et de
l'eau froide. Versez la farine
dans le bol et ajoutez la
margarine coupée en
morceaux de 2 cm. Mélangez à
la vitesse maximum jusqu'à ce
que la pâte devienne friable,
puis ajoutez de l'eau froide
tout en mélangeant. Arrêtez
dès que la pâte commence à
former une boule. Laissez la
pâte refroidir avant de vous en
servir.
Mélangez d'abord la levure, du
lait chaud et un peu de sucre
dans un bol séparé. Ajoutez les
ingrédients dans le bol et
pétrissez la pâte jusqu'à ce
qu'elle ne colle plus au bol
(environ 1minute). Laissez lever
30 minutes.
Réglag
e de
vitess
e /
Acces
soire
2 / P
2 / P
2 / {
Quant
ité
maxi
male
200g
farine
200g
farine
300g
farine
Ingrédients et
résultats
Pâte
Pâte
Pâte
Page 46

FRANÇAIS46
Applications
Entremets,
soufflés,
meringues
Flans, aliments
pour bébés
Garnitures,
fondues
Sauces,
soupes,
garnitures,
beurre aux
herbes
Jus de fruits
Salades,
garnitures et
sauces de
barbecue
Procédure
Utilisez les œufs à température
ambiante. Remarque : utilisez
au moins deux blancs d'œufs.
Suggestion: ajoutez un peu de
jus de citron pour empêcher la
décoloration des fruits. Ajoutez
du liquide pour une purée plus
onctueuse.
Pelez l'ail. Utilisez la touche
Eclair quelques fois pour éviter
un hachage trop fin. Utilisez au
moins 150g d'ail.
Lavez et séchez les herbes
avant de les hacher
Ajoutez de l'eau ou tout autre
liquide (optionnel) pour un jus
plus onctueux.
Tous les ingrédients doivent
être à température ambiante.
Remarque : utilisez au
minimum un gros œuf, deux
petits œufs ou deux gros
jaunes d'œufs. Mettez l'œuf et
un peu de moutarde et un peu
de vinaigre dans le bol et
ajoutez l'huile goutte à goutte.
Réglag
e de
vitess
e /
Acces
soire
2 / S
P / P
P / P
2/P / P
2 / D
1-2 /
S
Quant
ité
maxi
male
4
blancs
d'œufs
500g
300g
Min.
75g
500g
(quant
ité
totale)
3
œufs
Ingrédients et
résultats
Blancs d'œufs
- fouetter
Fruits
Ail - hacher
Herbes
Jus (par ex.
papaye, melon
d'eau, poire) mélanger
Mayonnaise
Applications
Steaks tartare,
hamburgers,
boulette de
viande.
Milkshakes
Divers gâteaux
Salades, pain,
frangipane,
entremets
Sautés,
garnitures
Sautés,
garnitures
Procédure
Retirez d'abord les nerfs ou les
os. Coupez la viande en dés de
3 cm. Utilisez la touche Eclair
pour un hachage grossier.
Réduisez en purée le fruit (par
ex. bananes, fraises) avec du
sucre du lait et de la crème
glacée et mélangez bien.
Utilisez des ingrédients à
température ambiante.
Mélangez le beurre ramolli et le
sucre jusqu'à ce que le
mélange soit onctueux et
crémeux. Ajoutez ensuite le
lait, les œufs et la farine.
Utilisez la touche Eclair pour un
hachage grossier et la vitesse 2
pour un hachage fin.
Pelez les oignons et coupez-les
en quatre. Remarque : utilisez
au moins 100 g. Utilisez la
touche Eclair éviter un hachage
trop fin.
Pelez les oignons et coupez-les
en morceaux pour les
introduire dans la cheminée.
Remarque: utilisez au moins
100 g.
Réglag
e de
vitess
e /
Acces
soire
2/ P /
P
2 / D
2 / P
2/ P /
P
P / P
1 / g
Quant
ité
maxi
male
300g
250ml
lait
3
œufs
250g
400g
300g
Ingrédients et
résultats
Fruits(par ex.
pommes,
bananes) hacher/purée
Milkshakes mélanger
Mélange(gâtea
u) - mixer
Noix - hacher
Oignons hacher
Oignons émincer
Page 47

FRANÇAIS 47
Applications
Viande hachée
Soupes, sauces
Garnitures,
crèmes,
mélanges de
crèmes glacées
Procédure
Retirez d'abord les nerfs ou les
os. Coupez la viande en dés de
3 cm. Utilisez la touche Eclair
pour un hachage plus grossier.
Utilisez des légumes cuits
Utilisez de la crème
préalablement refroidie dans le
réfrigérateur. Remarque: utilisez
au moins 125 ml de crème
liquide. La crème fouettée est
prête en 20 sec.
Réglag
e de
vitess
e /
Acces
soire
2/ P /
P
2 / D
P / S
Quant
ité
maxi
male
200g
500ml
350ml
Ingrédients et
résultats
Volaille hacher
Soupe - mixer
Crème
fouettée fouetter
Recettes
Soupe de brocolis (pour 4 personnes)
Accessoire : kP
- 50g fromage gouda
- 300g de brocolis cuits
- l'eau où les brocolis ont été préalablement
cuits
- 2 pommes de terre bouillies coupés en
morceaux
- 2 bouillon-cubes
- 2 c. à c. crème
- curry
- sel
- poivre
- muscade
B
Râper le fromage. Réduisez en purée les broccolis
et les pommes de terre cuites ; ajoutez y un peu
d'eau de cuisson. Mettez la purée de broccolis, le
liquide restant et le bouillon-cubes dans un verre
gradué et remplissez-le jusqu'à 750ml. Versez le
tout dans une casserole et faites bouillir en
remuant. Ajoutez le fromage en tournant et
assaisonnez de curry, sel, poivre et muscade et
crème.
Tarte aux fruits
P
- 450 g dattes sèches dénoyautées, en moitiés
- 200 g prunes sèches, en moitiés
- 650 g noix de pecan
- 160 g noix de coco râpée
- 300 g ananas givré
- 1 boîte (400 g) de lait concentré sucré
- 1 c. à c. extrait de vanille
Page 48

FRANÇAIS48
B
Graissez deux moules de 20 cm et préchauffez
le four à 135c C.
B
Mettez les moitiés de dattes et de prunes dans le
bol et hachez-les à la vitesse maximale pendant
30 secondes. Ensuite videz le bol.
B
Mettez les noix de pecan dans le bol et hachezles grossièrement à l'aide de la fonction impulse.
Ensuite videz le bol.
B
Mettez l'ananas givré dans le bol et hachez-le à
l'aide de la fonction impulse. Ensuite videz le bol.
B
Mélangez les dattes, les prunes, les noix de
pecan, l'ananas et la noix de coco râpée dans un
grand bol.
B
Ajoutez du lait et de l'extrait de vanille aux
ingrédients et mixez.
B
Versez la composition dans les moules et faites
cuire les tartes à 135c pendant 90 minutes.
B
Ne préparez pas les ingrédients de cette recette
plusieurs fois sans interruption. Si vous voulez
préparer plusieurs quantités, d'abord laissez
l'appareil refroidir et ensuite continuez la
préparation.
Purée de pommes de terre
P
- 750g pommes de terre bouillies
- +/- 250ml lait chaud (90cC)
- 1 c. à s. de beurre
- sel
B
Tout d'abord réduisez les pommes de terre cuites
en purée, ensuite ajoutez le sel et le beurre.
Utilisez la vitesse 1 et mélangez pendant
30 secondes environ.
Mayonnaise
S
- 2 jaunes d'œufs ou un gros œuf
- 1c. à c. de moutarde
- 1c. à c. de vinaigre
- 200ml huile
B
Tous les ingrédients doivent être à température
ambiante. Placez le disque à émulsionner dans le
bol. Mettez les jaunes d'œufs ou le gros œuf, du
vinaigre et du moutarde dans le bol. Utilisez la.
vitesse 1 ou 2. Versez l'huile graduellement par la
cheminée de remplissage sur le disque rotatif.
Vous pouvez utiliser l'orifice du poussoir pour
ajouter de l'huile.
B
Suggestion pour le sauce tartare : ajoutez du
persil, des cornichons et des œufs durs.
B
Suggestion pour la sauce cocktail : ajoutez 50ml
crème fraîche, une goutte de whisky, 3 cuilleres à
café de purée de tomates et une goutte de sirop
de gingembre à 100ml mayonnaise.
Milkshake
P
- 175ml lait
- 10g sucre
- 1/2 banane ou approx. 65g d'autres fruits frais
- 50g glace à la vanille
B
Mélangez les ingrédients jusqu'à ce qu'ils
deviennent mousseux.
Page 49

FRANÇAIS 49
Pâte pour pizza
{
- 400g farine
- 40 ml huile
- 1/2 c. à c. de sel
- 20g levure fraîche ou 1,5 paquet levure
déshydratée
- +/- 240cm˛ eau (35cC)
B
Pour la garniture :
- 300ml tomates passées (en conserve)
- 1 c. à c. d'herbes mixtes (sèches ou fraiches)
- sel et poivre
- sucre
B
Epluchez et lavez les pommes de terre.
B
Mettez l'insert à trancher sur le support et placez
l'ensemble sur l'axe d'entrainement dans le bol.
Tranchez les pommes de terre et la courgette en
utilisant la vitesse 1.
B
Faite cuire les tranches à l'eau bouillante avec une
pinçée de sel.
B
Mettez les tranches dans une passoire et
égouttez-les.
B
Mettez 20g beurre dans une poêle, faites frire
une demie courgette en tranches pendant 3
minutes tout en tournant. Assaisonnez les
tranches avec 1 c. à c. d'herbes.
B
Egouttez les rondelles frites sur un papier essuietout.
B
Graissez un plat et mettez les courgettes et les
pommes de terre sur le plat, en les alternant
comme des tuiles.
B
Fouettez les œufs avec la crème et le lait en
utilisant le couteau à vitesse 2. Ajoutez du sel et
du poivre au goût et versez le mélange sur les
rondelles de pommes de terre et courgette.
B
Remplacez l'insert à trancher avec l'insert à râper,
râpez le fromage à vitesse 2 pour assaisonner le
plat.
B
Mettez le plat au centre d'un four chaud (200cC)
et faites-le dorer pendant 15 minutes.
Mousse au saumon
PS
- 1 boîte de saumon
- 2 feuilles de gélatine
- quelques branches de ciboulettes
- une pinçée de sel
- une pinçée de poivre de cayenne
- 1/2 c. à c. jus de citron
- 125ml crème fouettée
- 1 petit oignon
- cresson pour garnissage
B
Faites tremper la gélatine dans beaucoup d'eau.
B
Hachez les ciboulettes et les oignons dans le robot
en utilisant la touche éclair.
B
Enlevez les arêtes et la peau du saumon.
B
Ajoutez le sel, poivre de cayenne, jus de citron,
saumon et le liquide de la boîte au ciboulettes et
oignons hachés et réduisez tous les ingrédients en
purée en utilisant la vitesse 2.
Page 50

FRANÇAIS50
B
Mettez la purée dans le bol.
B
Amenez à ébullition un peu d'eau et faites fondre
la gélatine dans l'eau.
B
Incorporez la gélatine fondue à la purée de
saumon.
B
Placez le disque à émulsionner dans le bol et
fouettez la crème en appuyant sur la touche éclair
pendant 15 secondes.
B
Incorporez la crème fouettée au purée de saumon
à l'aide d'une cuillère de bois.
B
Démoulez la mousse sur un plateau, couvrez-la et
laissez-la refroidir dans le réfrigérateur pendant
quelques heures.
B
Garnissez la mousse de cresson.
Pâte à tartiner
P
- 2 petites carottes en morceaux
- 2-3 cornichons en morceaux
- 75g chou-fleur en morceaux
- 75g céleri en morceaux
- herbes vertes (percil, aneth, estragon, pieds de
céleris tranchés)
- 100g mayonnaise
- 100g fromage blanc
- sel
- poivre
B
Hachez menu les carottes, cornichons, chou-flour,
herbes vertes, pieds de céleri et céleri-rave.
Incorporez la mayonnaise et le fromage blanc et
assaisonnez à votre goût avec poivre et sel.
Salade de chou espagnole
g
- 1 petit chou rouge
- 2 oignons rouges
- 1 fenouil
- 1 pomme
- jus d'une orange et 2 c.à s. vinaigre de vin
rouge
- 1 c.à s. moutarde
B
Mélangez le jus, la moutarde et le vinaigre.
Tranchez le chou, les oignons, le fenouil et la
pomme en utilisant la vitesse 1.
B
Combinez les ingrédients dans un saladier.
Biscuit de Savoie
P
- 4 œufs
- 300ml eau (35cC)
- une pinçée de sel
- 150g sucre
- 1 sachet sucre vanillé
- 150g farine tamisée
- 3g de levure
B
Fouettez les œufs et l'eau pendant environ
2 minutes. Ajoutez en tournant le sucre, vanille et
sel peu à peu et mélangez pendant 1 minute. Le
mélange doit être homogène. Incorporez la farine
et la levure avec une spatule. Faites cuire au four
pendant environ 170cC pendant 30-35 minutes.
B
Suggestion: Vous pouvez fourrer le biscuit de
Savoie de divers crèmes ou de crème fouettée et
fruits frais.
Page 51

FRANÇAIS 51
Tzatziki
k
- 1 concombre
- 200ml yaourt
- 1 c.à s. huile d'olives
- 2 gousse d'ail
- une pinçée de sel
- 1 c.à c. d'aneth haché menu
- quelques feuilles de menthe
B
Epluchez le concombre et râpez-le en utilisant la
vitesse 1. Mettez le concombre râpé dans une
passoire et laissez-le s'égoutter.
B
Mélangez les autres ingrédients, sauf les feuilles
de menthe au concombre. Versez la salade dans
un bol couvert et mettez-la dans le réfrigérateur
pendant une heure. Assaisonnez avec des feuilles
de menthe avant de servir.
Page 52

NEDERLANDS52
Keukenmachine: onderdelen en accessoires
A Bedieningsknoppen
B Motorgedeelte
C Ingebouwde beveiliging
D Kom
E Schroefkap (voor het afsluiten van de
bevestigingsopening van de blender als de
blender niet gebruikt wordt)
F Accessoirehouder
G Blenderkan
H Nok van deksel (schakelt de beveiliging in en
uit)
I Deksel van kom
J Vultrechter
K Stamper
L Deksel van blender
M Deksel met afsluitbare opbergruimte voor de
inzetschijven
N Middelfijne snijschijf
O Fijne raspschijf
P Middelfijne raspschijf
Q Inzetschijfhouder
R Sikkelmes (met beschermkap)
S Kneedhulpstuk
T Mengschijf
U Spatel
Inleiding
Dit apparaat is uitgerust met een
oververhittingsbeveiliging die het apparaat
automatisch uitschakelt indien het oververhit
raakt.
Als het apparaat opeens ophoudt met
werken:
1 Haal de stekker uit het stopcontact.
2 Druk op de puls/0-knop om het apparaat
uit te schakelen.
3 Laat het apparaat 60 minuten afkoelen.
4 Steek de stekker weer in het stopcontact.
5 Schakel het apparaat weer in.
Neem contact op met uw Philips dealer of een
door Philips geautoriseerd servicecentrum als het
automatische uitschakelsysteem te vaak
geactiveerd wordt.
Pas op: om gevaarlijke situaties te voorkomen
mag u het apparaat nooit op een timer aansluiten
Belangrijk
◗ Lees deze gebruiksaanwijzing zorgvuldig door
en bekijk de illustraties voordat u het
apparaat gaat gebruiken
◗ Bewaar deze gebruiksaanwijzing om hem
indien nodig te kunnen raadplegen.
◗ Controleer of het voltage aangegeven op het
apparaat overeenkomt met de plaatselijke
netspanning (220-240V) voordat u de stekker
in het stopcontact steekt.
Page 53

NEDERLANDS 53
◗ Gebruik nooit accessoires of onderdelen van
andere fabrikanten of die niet specifiek door
Philips aangeraden worden. Uw garantie
vervalt indien gebruik is gemaakt van
dergelijke onderdelen of accessoires.
◗ Gebruik het apparaat niet indien het snoer, de
stekker of andere onderdelen beschadigd zijn.
◗ Indien het netsnoer beschadigd is, moet het
vervangen worden door Philips, een door
Philips geautoriseerd servicecentrum of
personen met vergelijkbare kwalificaties om
gevaar te voorkomen.
◗ Maak de onderdelen die in contact komen
met voedsel goed schoon voordat u het
apparaat voor de eerste keer gebruikt.
◗ Overschrijd de hoeveelheden en
bereidingstijden aangegeven in de tabellen en
recepten niet.
◗ Vul de kom niet verder dan de
maximumindicatie (bovenste lijn van de
schaalverdeling).
◗ Haal na gebruik altijd gelijk de stekker uit het
stopcontact.
◗ Gebruik nooit uw vingers of voorwerpen
(bijvoorbeeld een spatel) om etenswaren
door de vultrechter naar beneden te duwen
terwijl het apparaat werkt. Gebruik hiervoor
alleen de stamper.
◗ Steek nooit uw vingers of voorwerpen
(bijvoorbeeld een spatel) in de blenderkan
terwijl de stekker van het apparaat in het
stopcontact zit.
◗ Houd het apparaat uit de buurt van kinderen.
◗ Laat het apparaat nooit zonder toezicht
werken.
◗ Schakel het apparaat nooit uit door het deksel
te draaien. Druk altijd op de puls/0-knop om
het apparaat uit te schakelen.
◗ Schakel het apparaat uit voordat u accessoires
van het apparaat losmaakt.
◗ Dompel het motorgedeelte nooit in water of
een andere vloeistof en spoel het niet af
onder de kraan. Gebruik alleen een vochtige
doek om het motorgedeelte schoon te
maken.
◗ Wanneer u de blenderkan, de kom en de
schroefkap op de juiste wijze monteert, hoort
u een klik.
◗ De mengschijf, het sikkelmes en het
kneedhulpstuk kunnen op de
accessoirehouder in de kom geplaatst
worden.
◗ Verwijder altijd de beschermkap van het
sikkelmes wanneer u dit mes gebruikt.
◗ Raak de snijkanten van de messen en de
inzetschijven niet aan, vooral niet wanneer de
stekker van het apparaat nog in het
stopcontact zit.
◗ Als één van de messen vastloopt, haal dan
eerst de stekker uit het stopcontact voordat
u de ingrediënten waarop het mes is
vastgelopen verwijdert.
◗ Laat hete ingrediënten afkoelen voordat u ze
in de keukenmachine verwerkt (maximum
temperatuur 80cC).
Page 54

NEDERLANDS54
◗ Als u een vloeistof verwerkt die nogal snel
gaat schuimen, doe dan niet meer dan 1 liter
in de blenderkan om morsen te voorkomen.
Let op: als zowel de blender als de kom op de
juiste wijze zijn gemonteerd, werkt alleen de
blender.
Gebruik van het apparaat
Kom
◗ Als u de kom wilt gebruiken, moet u de
blenderkan verwijderen en het bevestigingsgat
met de schroefkap afsluiten. Alle functies
waarvoor u de kom nodig heeft, werken
alleen als de blenderkan niet op het apparaat
gemonteerd is.
C
1 Monteer de kom op het motorgedeelte
van de keukenmachine door hem in de
richting van de pijl te draaien tot u een klik
hoort.
C
2 Plaats het deksel op de kom en draai het
in de richting van de pijl totdat u een klik
hoort (hier is enige kracht voor nodig).
Ingebouwde beveiliging
B
Op het motorgedeelte en het deksel staan tekens.
Het apparaat werkt alleen als de pijl op het
motorgedeelte recht tegenover het teken op het
deksel staat.
C
1 Zorg ervoor dat het teken op het deksel
en de pijl op de kom recht tegenover
elkaar staan. De lip van het deksel dekt nu
de opening in het handvat af.
Vultrechter en stamper
C
1 Gebruik de vultrechter om vloeistoffen
en/of vaste ingrediënten toe te voegen.
Gebruik de stamper om ingrediënten door
de vultrechter naar beneden te duwen.
C
2 U kunt de stamper ook gebruiken om de
vultrechter af te sluiten om zo te
voorkomen dat ingrediënten door de
vultrechter naar buiten komen.
Sikkelmes
◗ Het sikkelmes kan gebruikt worden om te
hakken, mixen, mengen en te pureren en om
cakebeslag te maken.
C
1 Monteer de kom op het motorgedeelte
van de keukenmachine.
C
2 Verwijder de beschermkap van het
sikkelmes.
Raak de snijkanten van het mes niet aan; deze zijn
erg scherp!
CLICK
CLICK
CLICK
1
2
1
2
1
CLICK
2
Page 55

NEDERLANDS 55
C
3 Plaats het sikkelmes op de
accessoirehouder.
C
4 Plaats de accessoirehouder in de kom.
5 Doe de ingrediënten in de kom. Snijd
grote stukken voedsel in kleinere stukjes
van ongeveer 3 x 3 cm.
C
6 Met de knoppen kunt u de snelheid van
het apparaat regelen voor het verkrijgen
van optimale resultaten.
B
pulse / 0-knop: om het apparaat kortstondig te
laten werken en om het uit te schakelen.
Wanneer de knop ingedrukt wordt, begint het
apparaat op de hoogste snelheid te werken; zodra
de knop weer wordt losgelaten, stopt het
apparaat met werken.
B
knop 1: voor normale snelheid
B
knop 2: voor hoge snelheid
Raadpleeg de tabel voor de aanbevolen
snelheden. Laat het apparaat 10 tot 60 seconden
lopen om het gewenste resultaat te bereiken.
Tips
◗ Het apparaat hakt zeer snel. Laat het slechts
korte tijd achtereen werken om te
voorkomen dat de ingrediënten te fijn gehakt
worden.
◗ Laat het apparaat niet te lang werken
wanneer u (harde) kaas aan het hakken bent.
De kaas wordt anders te heet, gaat smelten
en wordt klonterig.
◗ Gebruik het apparaat niet om zeer harde
ingrediënten zoals koffiebonen, nootmuskaat
en ijsblokjes te hakken, omdat het mes
hierdoor bot zou kunnen worden.
Als er ingredienten aan het mes of aan de
binnenkant van de kom blijven kleven:
1 Schakel het apparaat uit.
2 Haal het deksel van de kom.
3 Verwijder de ingrediënten met de spatel.
Inzetschijven
Raak de snijkanten van de inzetschijven niet aan
deze zijn zeer scherp!
Verwerk geen harde ingrediënten, zoals ijsblokjes
met de inzetschijven.
C
1 Plaats de gewenste inzetschijf in de
inzetschijfhouder.
1
2
CLICK
Page 56

NEDERLANDS56
C
2 Plaats de inzethouder op de
accessoirehouder in de kom.
3 Plaats het deksel op de kom.
C
4 Doe de ingrediënten in de vultrechter.
Snijd grote stukken voedsel in kleinere
stukjes die in de vultrechter passen.
5 Plaats de ingrediënten gelijkmatig in de
vultrechter voor het beste resultaat.
Wanneer u een grote hoeveelheid voedsel wilt
verwerken, doe dan niet alle ingrediënten in één
keer in de kom, maar verwerk kleine
hoeveelheden en maak de kom tussentijds
regelmatig leeg.
3 Kies de juiste snelheid om optimale
resultaten te bereiken. Raadpleeg de tabel
voor de aanbevolen snelheid.
De bewerkingen kosten 10 tot 60 seconden.
C
4 Druk de ingrediënten langzaam maar
gestaag met de stamper door de
vultrechter naar beneden.
C
5 Om de inzetschijf uit de houder te
verwijderen, neemt u de houder
ondersteboven in uw handen (met de
onderkant naar u toe). Duw met uw
duimen op de randen van de inzetschijf om
deze uit de houder te doen loskomen.
Kneedhulpstuk
Het kneedhulpstuk kan worden gebruikt voor het
kneden van brooddeeg en deeg voor appelbollen
en voor het mengen van beslag.
C
6 Plaats het kneedhulpstuk op de
accessoirehouder.
7 Doe de ingrediënten in de kom.
C
8 Sluit de kom af met het deksel.
C
9 Sluit de vultrechter af door er de stamper
in te plaatsen.
C
10 Kies de juiste snelheid om optimale
resultaten te bereiken. Raadpleeg de tabel
voor de aanbevolen snelheid.
Mengschijf
U kunt de mengschijf gebruiken voor het
bereiden van mayonaise en het kloppen van
slagroom en eiwitten.
C
11 Plaats de mengschijf op de
accessoirehouder in de kom.
CLICK
1
2
Page 57

NEDERLANDS 57
12 Doe de ingrediënten in de kom en plaats
het deksel op de kom.
13 Kies de juiste snelheid om een optimaal
resultaat te bereiken. Raadpleeg de tabel
voor de aanbevolen snelheid.
Tips
◗ Zorg ervoor dat u eieren op
kamertemperatuur gebruikt wanneer u
eiwitten wilt stijfkloppen.
Haal de eieren een half uur voordat u ze gaat
verwerken uit de koelkast.
◗ Zorg ervoor dat alle ingrediënten op
kampertemperatuur zijn wanneer u
mayonaise gaat bereiden.
U kunt olie aan de kom toevoegen via de kleine
opening onderin de stamper.
◗ Slagroom moet op koelkasttemperatuur zijn
wanneer u het gaat bereiden. Houd u aan de
bereidingstijd in de tabel; slagroom moet niet
te lang geklopt worden.
Gebruik de pulsfunctie om het mengproces beter
te kunnen beheersen.
Blender
De blender is bedoeld voor:
- het mengen van vloeistoffen, bijv.
zuivelproducten, sauzen, vruchtensappen, soep,
drankjes en milkshakes.
- het mixen van zachte ingrediënten, bijv.
pannenkoekbeslag of mayonaise.
- het pureren van gekookte ingrediënten, bijv.
voor het bereiden van babyvoedsel.
C
14 Verwijder de schroefkap.
C
15 Monteer de blenderkan in het
bevestigingsgat door hem in de richting
van de pijl te draaien tot hij goed vast zit.
Oefen niet te veel druk uit op het handvat van de
blenderkan.
C
16 Doe de ingrediënten in de blenderkan.
17 Schroef het deksel op de blenderkan.
18 Schakel het apparaat in om de
ingrediënten te verwerken. De knoppen
stellen u in staat de snelheid van het
apparaat zo te regelen dat u optimale
resultaten bereikt. Raadpleeg de tabel
voor de aanbevolen snelheid.
Tips
C
◗ Giet vloeibare ingrediënten in de kan via de
opening in het deksel.
◗ Hoe langer u het apparaat laat draaien, hoe
fijner het de ingrediënten zal vermalen.
◗ Snijd vaste ingrediënten in kleinere stukjes
voordat u ze in de blender doet. Wanneer u
1
CLICK
2
1
2
1
2
Page 58

NEDERLANDS58
een grote hoeveelheid voedsel wilt bereiden,
doe dan niet alle ingrediënten in één keer in
de kom, maar verwerk steeds kleine
hoeveelheden.
◗ Als u niet zeker weet wat de juiste snelheid is,
kies dan altijd de hoogste (druk op knop 2).
Als de ingrediënten aan de wand van de
blenderkan blijven kleven:
1 Schakel het apparaat uit en haal de stekker
uit het stopcontact.
2 Verwijder het deksel.
Verwijder het deksel nooit als het apparaat nog
loopt.
3 Gebruik een spatel om de ingrediënten
van de wand van de kan te verwijderen.
Houd de spatel op veilige afstand van de
snijkanten van het blendermes (ongeveer 2 cm).
Schoonmaken
Haal altijd de stekker uit het stopcontact voordat
u het motorgedeelte gaat schoonmaken
1 Maak het motorgedeelte schoon met een
vochtige doek. Dompel het motorgedeelte
niet in water en spoel het ook niet af
2 Was onderdelen die in aanraking zijn
geweest met voedsel altijd gelijk na
gebruik met wat afwasmiddel af
◗ De kom, het deksel van de kom, de stamper
en de accessoires kunnen ook in de
vaatwasser worden gereinigd.
Deze onderdelen zijn getest op
vaatwasserbestendigheid volgens DIN EN 12875.
Het deksel met de opbergruimte voor de
snijschijven en de blenderkan zijn niet
vaatwasserbestendig!
Wees zeer voorzichtig wanneer u het sikkelmes
het mes van de blender en de inzetschijven
schoonmaakt. De snijkanten zijn zeer scherp.
Voorkom dat de snijkanten van het sikkelmes, het
mes van de blender en de inzetschijven in contact
komen met harde voorwerpen, omdat zij
hierdoor bot zouden kunnen worden.
Bepaalde ingrediënten kunnen verkleuringen
veroorzaken op de accessoires. Dit heeft geen
enkel negatief effect; de verkleuringen verdwijnen
na een tijdje meestal vanzelf.
Snelreiniging blender
C
1 Giet lauwwarm water (niet meer dan 0,5
liter) en wat afwasmiddel in de blenderkan.
2 Plaats het deksel op de kan.
Page 59

59NEDERLANDS
C
3 Laat het apparaat een paar tellen lopen
door op de puls/0-knop te drukken (het
apparaat stopt zodra de knop wordt
losgelaten).
4 Haal de kan van het apparaat en spoel hem
met schoon water.
Opbergen
MicroStore
C
◗ Plaats de accessoires (mengschijf, sikkelmes,
kneedhulpstuk en inzetschijfhouder) op de
accessoirehouder en plaats deze in de kom.
De inzetschijfhouder wordt als laatste
geplaatst.
C
◗ Twee inzetschijven kunnen opgeborgen
worden in de opbergruimte in het deksel dat
over het deksel van de kom geplaatst wordt
en wel op de manier die aangegeven staat op
de binnenkant van het deksel. De
inzetschijven moeten in het deksel geschoven
worden en er niet ingeduwd worden.
C
◗ Plaats het deksel met de opbergruimte over
het doorzichtige deksel van de kom.
◗ Wikkel het netsnoer rond de haspel op de
achterzijde van het apparaat.
Informatie & service
Als u informatie nodig heeft of als u een
probleem heeft, bezoek dan de Philips Website
(www.philips.com), of neem contact op met het
Philips Customer Care Centre in uw land (u vindt
het telefoonnummer in het 'worldwide guarantee'
vouwblad). Als er geen Customer Care Centre in
uw land is, ga dan naar uw Philips dealer of neem
contact op met de afdeling Service van Philips
Domestic Appliances and Personal Care BV.
Page 60

NEDERLANDS60
Hoeveelheden en bereidingstijden
Toepassingen
Pannenkoeken,
wafels
Gepaneerde
gerechten,
gegratineerde
gerechten
Dessert,
garnering
Garnering,
rauwkost,
gerechten met
koolrabi,
hartige taarten,
dipsauzen
Salades
Garnering,
soepen,
sauzen,
gegratineerde
gerechten
Werkwijze
Schenk eerst de melk in de
kom en voeg dan de droge
ingrediënten toe. Mix ongeveer
1 minuut. Indien nodig, kunt u
dit max. twee keer herhalen.
Gebruik droog, knapperig
brood.
Gebruik zachte boter voor een
luchtig resultaat.
Snijd de groenten in stukken
die in de vultrechter passen.
Vul de vultrechter met stukken
en rasp ze door ze met de
stamper langzaam naar
beneden te drukken.
Vul de vultrechter met in
stukken gesneden groente en
druk de stukken groente
voorzichtig naar beneden met
de stamper.
Gebruik een stuk korstloze
Parmezaanse kaas en snijd dit
in stukken van ongeveer 3 x 3
cm.
Snelhe
id/acc
essoir
e
2 / P
2 / P
2 / P
2 / j
k
2 / P /
g
2 / P
Max.
hoeve
elheid
250
ml
melk
100 g
300 g
350 g
350 g
200 g
Ingrediënten
& resultaten
Beslag
(pannenkoeke
n) - kloppen
Paneermeel hakken
Crème au
beurre kloppen
Groenten
(wortels,
koolrabi,
rettich) raspen
Groenten
(wortels, prei,
knolselderij) in plakjes
snijden
Kaas
(Parmezaanse)
- hakken
Page 61

NEDERLANDS 61
Toepassingen
Appeltaart,
koekjes, open
vruchtenvlaaie
n
Vruchtentaarte
n, pasteitjes,
hartige taarten,
appelbollen
Luxe brood
Pudding,
soufflé,
schuimgebak
Werkwijze
Gebruik koude margarine; snijd
deze in stukken van 2 cm. Doe
alle ingrediënten in de kom en
kneed het deeg totdat het een
bal is geworden. Laat het deeg
afkoelen voordat u het verder
verwerkt.
Gebruik koude margarine en
koud water. Doe de bloem in
de kom en voeg de margarine
(in stukjes van 2 cm) toe.
Kneed op de hoogste snelheid
totdat het deeg kruimelig is
geworden. Hierna tijdens het
kneden water toevoegen. Stop
zodra het deeg een bal begint
te worden. Laat het deeg
afkoelen voordat u het verder
verwerkt.
Meng het gist in een aparte
kom met warme melk en wat
suiker. Doe alle ingrediënten in
de kom van de keukenmachine
en kneed het deeg totdat het
glad is en niet langer aan de
wand van de kom kleeft (duurt
ongeveer 1 minuut). Laat het
deeg 30 minuten rijzen.
Gebruik eieren op
kamertemperatuur. Gebruik
ten minste twee eiwitten.
Snelhe
id/acc
essoir
e
2 / P
2 / P
2 / {
2 / S
Max.
hoeve
elheid
200 g
bloem
200 g
bloem
300 g
4
eiwitte
n
Ingrediënten
& resultaten
Deeg
(zandtaart) kneden
Deeg (taarten,
pasteien) kneden
Deeg
(gistdeeg) kneden
Eiwitten mengen
Toepassingen
Pudding,
babyvoeding
Garnering,
dipsauzen
Sauzen,
soepen,
garnering,
kruidenboter
Vruchtensappe
n
Salades,
garnering en
barbecuesauze
n
Werkwijze
Tip: voeg een beetje citroensap
toe om te voorkomen dat het
fruit verkleurt. Voeg wat
vloeistof toe om een gladde
puree te verkrijgen.
Pel de knoflook. Druk een paar
maal op de pulsknop om te
voorkomen dat de knoflook te
fijn wordt gehakt. Gebruik
tenminste 150 g.
Was en droog de kruiden
voordat u ze gaat hakken.
Voeg water en eventueel een
andere vloeistof toe om een
gladde sap te verkrijgen.
Alle ingrediënten moeten op
kamertemperatuur zijn.
Gebruik tenminste 1 groot ei,
twee kleine eieren of twee
eierdooiers. Doe het ei/de
eieren in de kom met een klein
beetje azijn en voeg de olie
druppelsgewijs toe.
Snelhe
id/acc
essoir
e
P / P
P / P
2/P / P
2 / D
1-2 /
S
Max.
hoeve
elheid
500 g
300 g
Min.
75 g
500 g
in
totaal
3
eieren
Ingrediënten
& resultaten
Fruit (bijv.
appels,
bananen) hakken/purere
n
Knoflook hakken
Kruiden (bijv.
peterselie) hakken
Sappen (bijv.
papaja,
watermeloen,
peer) blender
Mayonaise mengen
Page 62

NEDERLANDS62
Toepassingen
Tartaartjes,
hamburgers,
gehaktballen
Milkshakes
Verschillende
soorten cake
Salades,
brood,
amandelspijs,
pudding
Roerbakgerech
ten, garnering
Roerbakgerech
ten, garnering
Werkwijze
Verwijder eerst zenen en
botten. Snijd het vlees in
blokjes van 3 cm. Gebruik de
pulsfunctie voor een groffer
hakresultaat.
Pureer het fruit (bijv. bananen,
aardbeien). Suiker, melk en wat
ijs toevoegen en goed mengen.
De ingrediënten moeten op
kamertemperatuur zijn. Klop de
zacht geworden boter en de
suiker totdat het mengsel glad
en schuimig is. Voeg hierna de
melk, eieren en bloem toe.
Gebruik de pulsfunctie voor
een grof resultaat of
snelheidsknop 2 voor een fijn
resultaat.
Pel de uien en snijd ze in 4
stukken. Gebruik ten minste
100 g. Hak de uien door
enkele malen kort de
pulsfunctie te gebruiken. Zo
voorkomt u dat de uien te fijn
gehakt worden.
Pel de uien en snijd ze in
stukken die in de vultrechter
passen. Gebruik ten minste
100 g.
Snelhe
id/acc
essoir
e
2/ P /
P
2 / D
2 / P
2/ P /
P
P / P
1 / g
Max.
hoeve
elheid
300 g
250
ml
melk
3
eieren
250 g
400 g
300 g
Ingrediënten
& resultaten
Vlees (mager)
- hakken
Milkshakes blender
Cakebeslag mixen
Noten hakken
Uien - hakken
Uien - in
plakjes snijden
Toepassingen
Gehakt
Soepen,
sauzen
Garnering,
crèmes,
ijsmengsels
Werkwijze
Verwijder eerst zenen en
botten. Snijd het vlees in
blokjes van 3 cm. Gebruik de
pulsfunctie voor een groffer
hakresultaat.
Gebruik gekookte groenten.
Gebruik slagroom die op
koelkasttemperatuur is.
Gebruik ten minste 125 ml. De
slagroom is na ongeveer 20
seconden klaar.
Snelhe
id/acc
essoir
e
2/ P /
P
2 / D
P / S
Max.
hoeve
elheid
200 g
500
ml
350
ml
Ingrediënten
& resultaten
Gevogelte hakken
Soepen blender
Slagroom kloppen
Page 63

NEDERLANDS 63
Recepten
Broccolisoep (voor 4 personen)
kP
- 50 g belegen Goudse kaas
- 300 g gekookte broccoli (stelen en roosjes)
- kookvocht van de broccoli
- 2 gekookte aardappelen in stukken
- 2 bouillonblokjes
- 2 eetl. ongeklopte slagroom
- kerrie
- zout
- peper
- nootmuskaat
B
Rasp de kaas. Pureer de broccoli en de gekookte
aardappelen met een beetje kookvocht van de
broccoli. Doe de broccolipuree, het overgebleven
kookvocht en de bouillonblokjes in een maatbeker
en vul deze bij met water tot 750 ml. Doe het
mengsel in een pan en breng het al roerend aan
de kook. Roer de kaas door de soep, breng de
soep op smaak met kerrie, zout, peper en
nootmuskaat en voeg de slagroom toe.
Vruchtencake
P
- 450 g droge ontpitte dadels, gehalveerd
- 200 g droge pruimen, gehalveerd
- 650 g pecannoten
- 160 g geraspte cocos
- 300 g gekonfijte ananas
- 1 blikje (400 g) gezoete gecondenseerde melk
- 1 theelepel vanille-essence
B
Vet twee bakblikken van 20 cm in en verwarm de
oven voor op 135c C.
B
Doe de gehalveerde dadels en pruimen in de
keukenmachinekom en hak ze gedurende
30 seconden op de hoogste snelheid. Leeg
vervolgens de kom.
B
Doe de pecannoten in de keukenmachinekom en
hak ze grof met behulp van de pulsfunctie. Leeg
vervolgens de kom.
B
Doe de gekonfijte ananas in de
keukenmachinekom en hak het in stukjes met
behulp van de pulsfunctie. Leeg vervolgens de kom.
B
Meng dadels, pruimen, pecannoten, ananas en
geraspte cocos in een grote kom en meng deze
ingrediënten.
B
Voeg melk en vanille toe en meng.
B
Doe het mengsel over in de bakblikken en bak de
cakes 90 minuten op 135c C.
B
Bereid dit recept niet meer dan 1 keer zonder te
onderbreken. Indien u dit recept meerdere malen
moet bereiden, dient u het apparaat eerst af te
laten koelen alvorens u het proces voortzet.
Aardappelpuree
P
- 750 g gekookte aardappelen
- ongeveer 250 ml hete melk (90cC)
- 1 eetl. boter
- zout
B
Pureer de aardappelen en voeg daarna de melk,
zout en boter toe. Laat het apparaat ongeveer
30 seconden op snelheid 1 werken om te
voorkomen dat de puree kleverig wordt.
Page 64

NEDERLANDS64
Mayonaise
S
- 2 eidooiers of 1 groot ei
- 1 theel. mosterd
- 1 theel. azijn
- 200 ml olie
B
Gebruik ingrediënten op kamertemperatuur.
Plaats de mengschijf in de kom. Doe de eidooiers
of het ei, de mosterd en de azijn in de kom.
Gebruik snelheid 1 of 2. Schenk de olie geleidelijk
door de vultrechter op de mengschijf. U kunt de
olie via het gaatje in de stamper toevoegen.
B
Tip voor tartaarsaus: voeg peterselie, augurken en
hardgekookte eieren toe.
B
Tip voor cocktailsaus: voeg 50 ml crème fraiche,
een scheutje whisky, 3 theel. tomatenpuree en
een scheutje gembersiroop toe aan 100 ml
mayonaise.
Milkshake
P
- 175 ml melk
- 10 g suiker
- 1/2 banaan of ongeveer 65 g ander vers fruit
- 50 g vanilleijs
B
Mix alle ingrediënten totdat het mengsel schuimig
is.
Pizza
{
- 400 g bloem
- 40ml olie
- 1/2 theel zout
- 20 g verse gist of 1,5 zakje gedroogde gist
- ongeveer 240 ml water (35cC)
B
Voor de tomatensaus:
- 300 g uitgelekte tomaten (uit blik)
- 1 thel. gemengde Italiaanse kruiden (gedroogd
of vers)
- zout en peper
- suiker
- Ingrediënten voor bovenop de saus: olijven,
salami, artisjokken, champignons, ansjovis,
Mozzarella, paprika, geraspte belegen kaas en
olijfolie naar smaak.
B
Plaats het kneedhulpstuk in de kom. Doe alle
ingrediënten in de kom en gebruik snelheid 2.
Kneed het deeg gedurende 1 minuut tot een
gladde bal. Duw met één hand op het apparaat
om ervoor te zorgen dat het op zijn plaats blijft
staan. Doe het deeg in een aparte kom, dek het
af met een vochtige doek en laat het ongeveer 30
minuten rijzen.
B
Hak de ui en de knoflook met het sikkelmes en
bak de stukjes totdat ze glazig zijn.
B
Voeg de gezeefde tomaten en de kruiden toe en
laat de saus ongeveer 10 minuten zachtjes koken.
B
Breng op smaak met zout, peper en suiker. Laat
de saus afkoelen.
B
Verwarm de oven voor op 250cC.
Page 65

65NEDERLANDS
B
Rol het deeg uit op een met bloem bestoven
aanrecht en snijd twee ronde pizzabodems uit de
deeglap. Plaats de pizzabodems op een ingevette
bakplaat. Smeer de saus uit over de bodems
maar laat de randen vrij. Verdeel de ingrediënten
over de saus, strooi wat gemalen kaas over de
pizza's en druppel er wat olijfolie op.
B
Bak de pizza's 12 tot 15 minuten.
Aardappel-courgettegratin
Pgk
- 375 g aardappelen
- mespuntje zout
- 1 courgette (ongeveer 250 g)
- 1 teen knoflook, uitgeperst
- ongeveer 40 g boter + boter om de
ovenschaal mee in te vetten
- 2 theel. Italiaanse of Provencaalse kruiden
- 1 groot ei
- 75 ml ongeklopte slagroom
- 75 ml melk
- peper
- 70 g jong belegen kaas
B
Schil en was de aardappelen.
B
Plaats de snijsschijf in de inzetschijfhouder en zet
de houder in de kom. Snijd de aardappels en de
courgette in plakjes op stand 1.
B
Kook de aardappelschijfjes in kokend water met
een mespuntje zout totdat ze bijna gaar zijn.
B
Laat de schijfjes goed uitlekken in een vergiet.
B
Doe de helft van de boter en de uitgeperste
knoflook in een koekenpan en bak de helft van de
courgetteschijfjes al omscheppend gedurende 3
minuten. Bestrooi de schijfjes met de helft van de
kruiden. Bak de andere helft van de
courgetteschijfjes op dezelfde manier en strooi
daar de rest van de kruiden overheen.
B
Laat de gebakken courgetteschijfjes uitlekken op
keukenpapier.
B
Vet een grote, lage ovenschaal in en rangschik
hierin de plakjes aardappel en courgette om en
om en dakpansgewijs.
B
Plaats het sikkelmes in het apparaat en klop
hiermee het ei samen met de slagroom en de
melk. Voeg zout en peper toe naar smaak en giet
het mengsel over de aardappel- en
courgetteschijfjes.
B
Rasp de kaas met de raspschijf op snelheid 2 en
strooi de kaas over de aardappel/courgetteschotel.
B
Plaats de schaal in het midden van een
voorverwarmde oven (200cC) en laat het gerecht
in 15 minuten bruin worden.
Zalmmousse (voor 3-4 personen)
PS
- 1 blikje zalm (220 g)
- 2 blaadjes gelatine
- enkele sprietjes bieslook
- mespuntje zout
- mespuntje cayennepeper
- halve eetl. citroensap
- 125 ml ongeklopte slagroom
- 1 kleine ui
- waterkers voor garnering
Page 66

NEDERLANDS20
B
Week de gelatine in ruim water.
B
Hak de bieslook en de ui fijn met de
keukenmachine. Gebruik de pulsknop.
B
Verwijder graatjes en velletjes uit de zalm.
B
Voeg zout, cayennepeper, citroensap, de zalm en
het vocht uit het blikje toe aan de gehakte
bieslook en pureer de ingrediënten op snelheid 2.
B
Doe de puree over in een kom.
B
Breng een kleine hoeveelheid water aan de kook
en los hierin de gelatine op.
B
Roer de gelatine-oplossing door de zalmpuree.
B
Plaats de mengschijf in de kom en klop de
slagroom in 15 seconden stijf met behulp van de
pulsknop.
B
Spatel de slagroom met een houten lepel door de
zalmpuree.
B
Doe de mousse over op een schaal, dek de
mousse af en laat deze enkele uren in de koelkast
opstijven.
B
Garneer de mousse met een beetje waterkers.
Sandwichspread
P
- 2 kleine wortels in stukjes
- 2-3 augurken in stukjes
- 75 g bloemkool in stukjes
- 75 g knolselderie in stukjes
- groene kruiden (peterselie, dille, dragon,
bleekselderij in stukjes)
- 100 g mayonaise
- 100 g kwark
- zout
- peper
B
Hak de wortels, augurken, bloemkool, groene
kruiden en knolselderie fijn. Mix de mayonaise en
de kwark er voorzichtig doorheen en breng op
smaak met peper en zout.
Spaanse koolsalade (voor 4 personen)
g
- 1 kleine rode kool
- 2 rode uien
- 1 venkelknol
- 1 appel
- sap van 1 sinaasappel en 2 eetl. rode wijnazijn
- 1 eetl. mosterd
B
Meng het sap, de mosterd en de azijn. Snijd de
kool, uien, venkelknol en appel in plakjes op
snelheid 1.
B
Doe de ingrediënten bij elkaar in een slakom en
meng goed.
Biscuitgebak
P
- 4 eieren
- 30 ml water (35cC)
- 1 mespuntje zout
- 150 g suiker
- 1 zakje vanillesuiker
- 150 g gezeefde bloem
- 3g bakpoeder
B
Klop de eieren en het water ongeveer 2 minuten.
Voeg de suiker, vanillesuiker en zout beetje bij
beetje toe en mix ongeveer 1 minuut. Het
Page 67

NEDERLANDS 67
mengsel moet als een dik lint van de lepel
aflopen. Spatel de bloem en het bakpoeder
luchtig door het mengsel heen. Bak in de oven
gedurende 30-35 minuten op ongeveer 170cC.
B
Tip: u kunt het gebak vullen met allerlei soorten
crème, of gewoon met slagroom en vers fruit.
Tzatziki
k
- 1 komkommer
- 200 ml yoghurt
- 1 eetl. olijfolie
- 2 teentjes knoflook
- mespuntje zout
- 1 theel. fijngehakte dille
- enkele blaadjes munt
B
Schil de komkommer en rasp deze op stand 1.
Laat de geraspte komkommer goed uitlekken in
een vergiet.
B
Mix de overige ingrediënten, met uitzondering van
de muntblaadjes, door de komkommer. Dek de
kom af en zet de salade 1 uur in de koelkast.
Garneer met muntblaadjes.
Page 68

ESPAÑOL68
Robot de cocina : Piezas y accesorios
A Control de la velocidad
B Unidad motora
C ncorporado cierre de seguridad
D Recipiente
E Tapa enroscable (Para cerrar el agujero de
fijación de la batidora cuando la jarra batidora
no esté en uso)
F Soporte de la herramienta
G Jarra batidora
H Espiga de la tapa (Activa y desactiva el
interruptor de eguridad)
I Tapa del recipiente
J Tubo de llenado
K Empujador
L Tapa de la batidora
M Cubierta con espacio para guardar los
accesorios
N Accesorio para rebanado medio
O Accesorio para troceado fino
P Accesorio para troceado medio
Q Soporte del accesorio
R Cuchilla (Con cubierta protectora)
S Accesorio amasador
T Disco emulsionador
U Espátula
Introducción
Este aparato ha sido provisto de un sistema
térmico de desconexión automática. Este sistema
desconectará automáticamente la corriente del
aparato en caso de sobrecalentamiento.
Si su aparato se para de repente:
1 Desenchúfenlo de la red.
2 Presionen el botón "TURBO / 0" (PULSE /
0).
3 Dejen que el aparato se enfríe durante 60
minutos.
4 Enchúfenlo a la red.
5 Vuelvan a ponerlo en marcha.
Contacten con su vendedor Philips o con un
Servicio de Asistencia Técnica de Philips si el
sistema térmico de desconexión automática se
activa muy a menudo.
PRECAUCION : A fin de evitar una situación
peligrosa debida a un rearme inadvertido del
deconector térmico, este aparato no se debe
conectar a un temporizador.
Importante
◗ Antes de usar el aparato, lean
cuidadosamente las instrucciones de uso y
miren las ilustraciones.
◗ Guarden estas instrucciones de uso para
futuras consultas.
◗ Antes de enchufar el aparato a la red,
comprueben si el voltaje indicado en el
Page 69

ESPAÑOL 69
aparato se corresponde con el de la red local
(110 - 127 V ó 220 - 240 V).
◗ No usen nunca ningún accesorio o piezas de
otros fabricantes o que no hayan sido
específicamente aconsejados por Philips. Su
garantía quedará invalidada si han usado tales
accesorios o piezas.
◗ No usen el aparato si el cable de red, la clavija
u otras piezas están deteriorados.
◗ Si el cable de red estuviera dañado, deberá
ser sustituido por Philips o por un centro de
servicio autorizado por Philips para evitar
situaciones de peligro.
◗ Antes de usar el aparato por vez primera,
limpien cuidadosamente las piezas que vayan a
entrar en contacto con los alimentos.
◗ No superen las cantidades y los tiempos de
preparación indicados en las tablas y las
recetas.
◗ No excedan el contenido máximo indicado en
el recipiente o en la jarra batidora, por
ejemplo, no llenen por encima de la
graduación máxima.
◗ Desenchufen el aparato de la red
inmediatamente después del uso.
◗ No usen nunca sus dedos o un objeto (Por
ejemplo, una espátula) para presionar los
ingredientes dentro del tubo de llenado
mientras el aparato esté en marcha. Para ese
propósito solo debe usarse el empujador.
◗ Desenchufen siempre el aparato de la red
antes de introducir sus dedos o un objeto
(Por ejemplo, una espátula) en la jarra
batidora.
◗ Mantengan el aparato fuera del alcance de los
niños.
◗ No dejen nunca que el aparato funcione sin
vigilancia.
◗ No paren nunca el aparato haciendo girar la
tapa. Paren siempre el aparato presionando el
botón "TURBO / 0"(PULSE / 0).
◗ Paren el aparato antes de desmontar
cualquier accesorio.
◗ No sumerjan nunca la unidad motora en agua
o en cualquier otro fluído ni la enjuaguen bajo
el agua del grifo. Para limpiar la unidad
motora usen solo un paño húmedo.
◗ Cuando monten la jarra batidora, el
recipiente y enrosquen la tapa de forma
adecuada, oirán un "click".
◗ El disco emulsionador, la cuchilla y el
accesorio amasador deben ser colocados
sobre el soporte de la herramienta que se
coloca derecho dentro del recipiente.
◗ Quiten la cubierta protectora de la cuchilla
antes de usarla.
◗ Eviten tocar las cuchillas AFILADAS,
especialmente cuando el aparato esté
enchufado a la red.
◗ Si las cuchillas se agarrotan, desenchufen el
aparato de la red antes de quitar los
ingredientes que estén bloqueando las
cuchillas.
◗ Dejen que los ingredientes calientes se
enfríen antes de procesarlos (Temperatura
máxima 80cC/175cF).
Page 70

ESPAÑOL70
◗ Para evitar derrames si están procesando un
líquido que tiene tendencia a formar espuma,
no pongan más de 1 litro en la jarra batidora.
Tengan en cuenta que la batidora solo funcionará
si tanto la batidora y como el recipiente han sido
montados correctamente.
Cómo usar el aparato
Recipiente
◗ Si desean usar el recipiente, quiten la jarra
batidora y cierren el agujero de fijación con la
tapa roscada. Todas las funciones que
requieren el uso del recipiente solo
funcionarán si se ha quitado la jarra batidora.
C
1 Monten el recipiente en el Robot de
Cocina haciendo girar la empuñadura en la
dirección de la flecha hasta que oigan un
"click".
C
2 Pongan la tapa en el recipiente. Giren la
tapa en la dirección de la flecha hasta que
oigan un "click" (Ello requerirá un poco de
fuerza).
Cierre de seguridad incorporado
B
Tanto la unidad motora como la tapa están
provistas de marcas. El aparato solo funcionará si
la flecha de la unidad motora está directamente
opuesta a la marca de la tapa.
C
1 Asegúrense de que la marca de la tapa y la
flecha del recipiente estén directamente
opuestas la una con la otra. Entonces, la
proyección de la tapa cubrirá la abertura
de la empuñadura.
Tubo de llenado y empujador
C
1 Usen el tubo de llenado para añadir
ingredientes sólidos y/o líquidos. Usen el
empujador para presionar los ingredientes
sólidos hacia dentro del tubo de llenado.
C
2 También pueden usar el empujador para
cerrar el tubo de llenado a fin de evitar
que los ingredientes se escapen a través
del tubo de llenado.
Cuchilla
◗ La cuchilla puede usarse para picar, mezclar,
batir, hacer puré y preparar mezclas para
pasteles.
C
1 Pongan el recipiente sobre la unidad
motora
C
2 Quiten la tapa protectora de la cuchilla.
Los filos cortantes están muy afilados ¡ Eviten
tocarlos !
CLICK
CLICK
CLICK
1
2
1
2
1
CLICK
2
Page 71

ESPAÑOL 71
C
3 Pongan la cuchilla en el soporte de la
herramienta.
C
4 Pongan el soporte de la herramienta en el
recipiente.
5 Pongan los ingredientes en el recipiente.
Corten antes los trozos grandes de
alimentos en trozos de unos 3 x 3 cm.
Pongan la tapa sobre el recipiente.
C
6 Las posiciones de la velocidad les permiten
ajustar la velocidad del aparato para
obtener unos resultados óptimos.
B
Posición "TURBO / 0" (PULSE / 0) : Para
operaciones pulsantes y para parar el aparato.
Si el botón "TURBO / 0" (PULSE / 0) se presiona,
el aparato funciona a la máxima velocidad .
Al soltar el botón, el aparato se para.
B
Posición 1 : Para velocidad normal
B
Posición 2 : Para velocidad alta
Consulten la tabla para las recomendadas
posiciones de velocidad. El proceso tarda entre
1 y 60 segundos.
Consejos
◗ El aparato pica muy deprisa. Usen la función
"TURBO" (PULSE) durante cortos períodos
cada vez para evitar que la comida quede
picada demasiado finamente.
◗ No dejen que el aparato funcione demasiado
tiempo cuando estén picando queso (Duro).
El queso puede calentarse demasiado,
empezar a fundirse y formar masa.
◗ No usen la cuchilla para picar ingredientes
muy duros, tales como café, granos, nuez
moscada y cubitos de hielo. La cuchilla podría
mellarse
Si la comida se pega a la cuchilla o al interior del
recipiente :
1 Paren el aparato
2 Quiten la tapa del recipiente.
3 Quiten los ingredientes con una espátula.
Insertos
Los filos de los insertos están muy afilados ¡ No
los toquen !
No procesen ingredientes duros como, por
ejemplo, cubitos de hielo, con los insertos.
C
1 Pongan el inserto seleccionado en el
soporte de los insertos.
1
2
CLICK
Page 72

ESPAÑOL72
C
2 Coloquen el soporte del inserto sobre el
soporte de la herramienta que queda
derecho en el recipiente.
3 Pongan la tapa sobre el recipiente.
C
4 Pongan los ingredientes en el tubo de
llenado. Antes corten los trozos grandes
para que puedan pasar por el tubo de
llenado.
5 Para unos mejores resultados, llenen
uniformemente el tubo de llenado.
Cuando necesiten cortar grandes cantidades de
alimentos, procesen solo una pequeña cantidad
cada vez y vacíen regularmente el recipiente entre
cantidades.
3 Seleccionen la posición de velocidad
adecuada para obtener resultados
óptimos. Consulten la tabla para las
posiciones de velocidad recomendadas.
El proceso tarda entre 10 y 60 segundos.
C
4 Presionen los ingredientes, lenta y
constantemente, con el empujador hacia
dentro del tubo de llenado.
C
5 Para quitar el accesorio de su soporte,
cojan el soporte del accesorio con sus
manos y con la parte trasera del inserto
hacia Udes. Presionen los hilos del
accesorio con sus pulgares para hacer que
el inserto se separe del soporte.
Accesorio amasador
El accesorio amasador puede usarse para amasar
pasta para pan y para pudings y para mezclar
pastas culinarias y mezclas para pasteles.
C
6 Fijen el accesorio amasador sobre el
soporte de la herramienta.
7 Pongan los ingredientes en el recipiente.
C
8 Cierren el recipiente con la tapa.
C
9 Cierren el tubo de llenado colocando el
empujador en él.
C
10 Seleccionen la posición de velocidad
adecuada para obtener resultados
óptimos. Consulten la tabla para las
posiciones de velocidad recomendadas.
Disco emulsionador
Pueden usar el disco emulsionador para preparar
mayonesa, montar nata o batir claras de huevo.
C
11 Pongan el disco emulsionador sobre el
soporte de la herramienta que queda
derecho dentro del recipiente.
CLICK
1
2
Page 73

ESPAÑOL 73
12 Pongan los ingredientes en el recipiente y
pongan la tapa sobre el recipiente.
13 Seleccionen la posición de velocidad
adecuada para obtener resultados
óptimos. Consulten la tabla para las
posiciones de velocidad recomendadas.
Consejos
◗ Cuando deseen batir claras de huevo,
asegúrense de que las claras de huevo estén a
temperatura ambiente.
Saquen los huevos del frigorífico al menos hora y
media antes de usarlos.
◗ Todos los ingredientes para hacer mayonesa
deben estar a temperatura ambiente.
El aceite puede ser añadido a través del pequeño
agujero del fondo del empujador.
◗ Si desean montar nata, la nata debe haber
sido sacada directamente del frigorífico.
Consulten el tiempo de preparación en la
tabla. La nata no debe ser montada durante
demasiado tiempo.
Usen la función "TURBO" (PULSE) para tener
más control sobre el proceso.
Batidora
La batidora está pensada para :
- Batir fluidos, por ejemplo, productos de
lechería, salsas, zumos de fruta, sopas, mezclar
bebidas, batidos.
- Mezclar ingredientes blandos, por ejemplo,
pasta para tartas o mayonesa
- Hacer puré de ingredientes cocidos, por
ejemplo, para preparar comida de bebes.
C
14 Quiten la tapa
C
15 Monten la jarra batidora en el agujero de
fijación, girándola en la dirección de la
flecha hasta que esté firmemente fijada.
No ejerzan demasiada presión sobre la
empuñadura de la jarra batidora.
C
16 Pongan los ingredientes en la jarra
batidora.
17 Enrosquen la tapa en la jarra batidora.
18 Pongan en marcha el aparato y batan los
ingredientes. Las posiciones de la
velocidad les permiten ajustar la velocidad
del aparato para obtener resultados
óptimos. Consulten la tabla para las
posiciones de velocidad recomendadas.
Consejos
C
◗ Viertan los ingredientes líquidos en la jarra
batidora a través del agujero de la tapa.
◗ Cuanto más tiempo dejen funcionar el
aparato más fino será el resultado del batido.
◗ Corten los ingredientes sólidos en pedazos
1
CLICK
2
1
2
1
2
Page 74

ESPAÑOL74
más pequeños antes de ponerlos en la
batidora. Si desean preparar una gran
cantidad, procesen pequeñas cantidades de
ingredientes en lugar de tratar de procesar
una gran cantidad de una vez.
◗ Si tienen dudas acerca de la correcta
velocidad, seleccionen siempre la velocidad
más alta (Posición 2).
Si los ingredientes se pegan a la pared de la jarra
batidora :
1 Paren el aparato y desenchúfenlo de la
red.
2 Quiten la tapa
No quiten nunca la tapa mientras el aparato
todavía esté funcionando.
3 Usen una espátula para quitar los
ingredientes de la pared de la jarra.
Mantengan la espátula a una distancia segura de
los hilos de la unidad de cuchillas (Unos 2 cm).
Limpieza
Antes de empezar a limpiar la unidad motora
desenchufen siempre el aparato de la red.
1 Limpien la unidad motora con un paño
húmedo. No sumerjan la unidad motora
en agua ni la enjuaguen bajo el grifo.
2 Limpien, siempre e inmediatamente
después del uso, las piezas que hayan
estado en contacto con los alimentos con
agua caliente con un líquido limpiador.
◗ El recipiente, la tapa del recipiente, el
empujador y los accesorios pueden lavarse en
un lavavajillas.
Esas piezas han sido probadas, desde el punto de
vista de su resistencia al lavavajillas, de acuerdo a
la norma DIN EN 12875.
¡ La cubierta con espacio para guardar el
accesorio y la jarra batidora no están a prueba de
lavavajillas !
Limpien la cuchilla, la unidad de cuchillas de la
batidora y los accesorios con mucho cuidado
Sus hilos cortantes están muy afilados !
Asegúrense de que los hilos cortantes de la
cuchilla, la unidad de cuchillas de la batidora y los
accesorios no entren en contacto con objetos
duros ya que ello podría causarles mellas.
Ciertos ingredientes pueden causar
decoloraciones de la superficie de los accesorios.
Ello no tiene efectos negativos sobre los
accesorios. Estas decoloraciones desaparecen,
normalmente, después de algún tiempo.
Page 75

ESPAÑOL 75
Rápida operación de limpieza de la
batidora
C
1 Pongan agua tibia (No más de 0'5 litros) y
un poco de líquido limpiador en la jarra
batidora.
2 Monten la tapa.
C
3 Presionando el botón "TURBO" (PULSE),
dejen que el aparato funcione durante
unos pocos momentos (El aparato dejará
de funcionar cuando suelten el botón).
4 Desmonten la jarra batidora y enjuágenla
con agua limpia.
Almacenamiento
MicroAlmacenamiento
C
◗ Pongan los accesorios (Disco emulsionador,
cuchilla, accesorio amasador, soporte del
inserto) en el soporte de la herramienta y
guárdenlos en el recipiente. Acaben siempre
poniendo el soporte del inserto.
C
◗ Dos accesorios pueden guardarse en el
espacio para guardar de la cubierta que cubre
la tapa del recipiente, tal como se indica en el
interior de la cubierta. Los accesorios deben
deslizarse (No presionarse) en la cubierta.
C
◗ Coloquen la cubierta con el espacio para
guardar accesorios sobre la tapa transparente
del recipiente.
◗ Enrollen el cable de red alrededor del carrete
de la parte posterior del aparato.
Información y Servicio
Si necesitan información o si tienen algún
problema, visiten la página Web de Philips en
www.philips.com o contacten con el Servicio
Philips de Atención al Cliente de su país (Hallarán
su número de teléfono en el folleto de la
Garantía Mundial). Si en su país no hay Servicio
Philips de Atención al Cliente, contacten con su
distribuidor local Philips o con el Service
Department of Philips Domestic Appliances and
Personal Care BV.
Page 76

ESPAÑOL76
Cantidades y tiempos de preparación
Aplicaciones
Tartas,
barquillos.
Platos
rebozados,
platos
gratinados.
Postres,
acabados
superficiales
Guarniciones,
vegetales
crudos, platos
con nabos,
pasteles,
marinados.
Ensaladas.
Procedimiento
Viertan primero la leche en la
batidora y, entonces, añadan
los ingredientes secos. Mezclen
los ingredientes durante,
aproximadamente, 1 minuto. Si
es necesario, repitan 2 veces
este procedimiento.
Usen pan seco y crujiente
Para un resultado ligero, usen
mantequilla blanda
Corten los vegetales a trozos
que pasen por el tubo. Llenen
el tubo con los trozos y
rállenlos mientras los presionan
ligeramente hacia abajo con el
empujador.
Llenen el tubo con trozos de
vegetales y presiónenlos
cuidadosamente hacia abajo
con el empujador.
Posici
ón de
veloci
dad /
Acces
orio
2 / P
2 / P
2 / P
2 / j
k
2 / P /
g
Canti
dad
máxi
ma
250
ml de
leche
100 g
300 g
350 g
350 g
Ingredientes y
resultados
Pasta culinaria
(Tartas) Agitado
Migas de pan Picado
Crema de
mantequilla
(Creme au
beurre) Agitado
Vegetales
(Zanahorias,
nabos, rábanos
blancos) Rebanado
Vegetales
(Zanahorias,
puerros, apio)
- Rebanado
Aplicaciones
Guarniciones,
sopas, salsas,
platos
gratinados.
Salsas, pizzas,
platos
gratinados,
fondues.
Guarniciones,
salsas,
pastelería,
pudings,
mousses.
Purés, sopas.
Comida de
niños y bebés.
Ensaladas,
guarniciones.
Procedimiento
Usen un pedazo de Parmesano
sin corteza y cortado a trozos
de unos 3 x 3 cm.
Corten el queso a trozos que
pasen por el tubo. Presionen
cuidadosamente con el
empujador.
Usen chocolate duro y plano.
Rómpanlo a trozos de 2 cm.
Usen guisantes o judias
cocidos. Si es necesario, añadan
un poco de líquido para
mejorar la consistencia de la
mezcla.
Para un puré grueso, añadan
solo un poco de líquido. Para
un puré fino, vayan añadiendo
líquido hasta que la mezcla esté
suave.
Pongan el pepino en el tubo y
presiónenlo cuidadosamente.
Posici
ón de
veloci
dad /
Acces
orio
2 / P
2 / j
k
2 / P
2 / P
D
2 / P
1 / g
Canti
dad
máxi
ma
200 g
200 g
200 g
250 g
300 g
1
pepin
o
Ingredientes y
resultados
Queso
(Parmesano) Picado
Queso
(Gouda) Rallado
Chocolate Picado
Guisantes o
judias cocidos
- Hacer puré
Carnes y
vegetales
cocidos Hacer puré
Pepinos Rebanado
Page 77

ESPAÑOL 77
Aplicaciones
Pan
Pizza
Empanadas de
manzana,
bizcochos
dulces, flanes
con trozos de
fruta.
Procedimiento
Mezclen agua caliente con
levadura y azúcar. Añadan
harina y amasen la pasta
durante unos 90 segundos.
Dejen que suba durante 30
minutos.
Sigan el mismo procedimiento
que para la pasta para pan.
Amasen la pasta durante 1
minuto aproximadamente.
Pongan primero la harina y
después los demás
ingredientes.
Usen margarina fría y cortada a
trozos de 2 cm. Pongan todos
los ingredientes en el recipiente
y amásenlos hasta que la pasta
se haya tornado una bola.
Dejen que la pasta se enfríe
antes de las siguientes
operaciones.
Posici
ón de
veloci
dad /
Acces
orio
2 / {
2 / {
2 / P
Canti
dad
máxi
ma
350 g
de
harina
400 g
de
harina
200 g
de
harina
Ingredientes y
resultados
Pasta (Para
pan) Amasado
Pasta (Para
pizzas) Amasado
Pasta (Para
pastelería de
pasta
quebradiza) Amasado
Aplicaciones
Tartas de
frutas,
empanadas,
quiches.
Delicioso pan.
Pudings,
soufflés,
merengues.
Procedimiento
Usen margarina y agua frías.
Pongan la harina en el
recipiente y añadan la
margarina cortada a trozos de
2 cm. Mezclen a la velocidad
más alta hasta que la pasta se
torne desmenuzable. Añadan,
entonces, agua fría mientras
mezclan. Paren tan pronto
como la pasta empiece a
transformarse en un bola.
Dejen que la pasta se enfríe
antes de las siguientes
operaciones.
Mezclen primero la levadura, la
leche caliente y un poco de
azúcar en un recipiente
separado. Pongan todos los
ingredientes en el recipiente
del Robot de Cocina y amasen
la pasta hasta que esté suave y
no se pegue la pared del
recipiente (Tardará
aproximadamente 1 minuto).
Dejen que suba durante 30
minutos.
Usen claras de huevo a
temperatura ambiente. Nota :
Usen, al menos, 2 claras de
huevo.
Posici
ón de
veloci
dad /
Acces
orio
2 / P
2 / {
2 / S
Canti
dad
máxi
ma
200 g
de
harina
300 g
de
harina
4
claras
de
huevo
Ingredientes y
resultados
Pasta (Para
tartas,
empanadas) Amasado
Pasta (Con
levadura) Amasado
Claras de
huevo Emulsionado
Page 78

ESPAÑOL78
Aplicaciones
Pudings,
comida de
bebés.
Guarniciones,
marinados.
Salsas, sopas,
guarniciones,
mantequilla de
hierbas.
Zumos de
frutas
Ensaladas,
guarniciones y
salsas para
barbacoa.
Procedimiento
Consejo : Añadan un poco de
zumo de limón para evitar que
la fruta se descoloree. Añadan
un poco de líquido para
obtener un suave puré.
Pelen el ajo. Presionen siempre
el botón "Turbo" (Pulse)
algunas veces para evitar que el
ajo se pique demasiado
finamente. Usen, al menos, 150
g.
Laven y sequen las hierbas
antes de picarlas.
Añadan agua u otro líquido
(Opcionalmente) para obtener
un zumo suave.
Todos los ingredientes debe
estar a temperatura ambiente.
Nota : Usen, al menos, un
huevo grande, dos huevos
pequeños o dos yemas de
huevo. Pongan el huevo y un
poco de vinagre en el
recipiente y añadan el aceite
gota a gota.
Posici
ón de
veloci
dad /
Acces
orio
P / P
P / P
Min.
75 g
2 / D
1-2 /
S
Canti
dad
máxi
ma
500 g
300 g
Mínim
o 75 g
500 g
(Canti
dad
total)
3
huevo
s
Ingredientes y
resultados
Fruta ( Por
ejemplo,
manzanas,
plátanos) Picado / Hacer
puré
Ajo - Picado
Hierbas (Por
ejemplo,
perejil) Picado
Zumos (Por
ejemplo, de
papaya, sandía,
pera) - Batido
Mayonesa Emulsionado
Aplicaciones
Bistecs
tártaros,
hamburguesas,
albóndigas.
Batidos de
leche
Diversos
pasteles.
Ensaladas, pan,
pasta de
almendras,
pudings.
Sofritos,
guarniciones.
Procedimiento
Primero quiten todos nervios o
huesos. Corten la carne a
trozos de 3 cm. Usen la
función "Turbo" (Pulse) para
obtener un picado grueso.
Hagan puré con la fruta (Por
ejemplo, plátanos, fresas) con
azúcar, leche y un poco de
helado y mezclen bien.
Los ingredientes deben estar a
temperatura ambiente.
Mezclen la suavizada
mantequilla y el azúcar hasta
que la mezcla quede suave y
cremosa y, entonces, añadan la
leche, los huevos y la harina.
Usen el botón "Turbo" (Pulse)
para un picado grueso o la
posición de velocidad 2 para
un picado fino.
Pelen las cebollas y córtenlas
en 4 trozos. Nota : Usen, al
menos, 100 g. Presionen
siempre el botón "Turbo"
(Pulse) varias veces para evitar
que las cebollas se piquen
demasiado finamente.
Posici
ón de
veloci
dad /
Acces
orio
2/ P /
P
2 / D
2 / P
2/ P /
P
P / P
Canti
dad
máxi
ma
300 g
250
ml de
leche
3
huevo
s
250 g
400 g
Ingredientes y
resultados
Carnes
(Magras) Picado
Batidos de
lecha - Batido
Mezcla (Pastel)
- Mezclado
Frutos secos Picado
Cebollas Picado
Page 79

ESPAÑOL 79
Aplicaciones
Sofritos,
guarniciones.
Carne picada.
Sopas, salsas.
Guarniciones,
nata, mezclas
para helado.
Procedimiento
Pelen las cebollas y córtenlas a
trozos que pasen por el tubo.
Nota : Usen, al menos, 100 g.
Primero quiten cualquier nervio
o hueso. Corten la carne a
trozos de 3 cm. Usen el botón
"Turbo" (Pulse) para obtener
un picado más grueso.
Usen vegetales cocidos.
Usen nata directamente sacada
del frigorífico. Nota : Usen, al
menos, 125 ml de nata. La nata
montada estará lista después
de unos 20 segundos.
Posici
ón de
veloci
dad /
Acces
orio
1 / g
2/ P /
P
2 / D
P / S
Canti
dad
máxi
ma
300 g
200 g
500
ml
350
ml
Ingredientes y
resultados
Cebollas Rebanado
Aves de corral
- Picado
Sopas - Batido
Nata montada
- Agitado
Recetas
Sopa de brecol (Para 4 personas)
Accesorio kP
- 50 g de queso Bouda seco.
- 300 g de brecol cocido (Tallos y cabeza)
- El agua de hervir el brecol
- 2 patatas hervidas y a trozos
- 2 cubitos de caldo
- 2 cucharadas de nata no montada
- Curry
- Sal
- Pimienta
- Nuez moscada
B
Rallen el queso. Hagan puré con el brecol y las
patatas hervidos y un poco del agua de hervir el
brecol. Pongan el puré de brecol, el resto de
líquido y los cubitos de caldo en un recipiente
medidor y llénenlo hasta 750 cc. Pásenlo a una
cazuela y, mientras lo remueven, llévenlo hasta la
ebullición. Remuévanlo con el queso, sazónenlo al
gusto con curry, sal, pimienta y nuez moscada y
añadan la nata.
Pastel de fruta
P
- 450 g de dátiles secos deshuesados , partidos
por la mitad
- 200 g de ciruelas pasas, partidas por la mitad
- 650 g de nueces pacanas
- 160 g de coco rallado
- 300 g de piña escarchada
- 1 lata (400 g) de leche condensada
- 1 cucharada pequeña de esencia de vainilla
Page 80

ESPAÑOL80
B
Engrase 2 moldes para horno de 20 cm de largo
y precaliente el horno a 135c C.
B
Coloque los dátiles y las ciruelas partidas por la
mitad en el recipiente para procesar alimentos y
píquelos a la velocidad máxima durante
30 segundos. Después vacíe el recipiente.
B
Eche las nueces pacanas en el recipiente para
procesar alimentos y píquelas usando la función
de impulsos. Después vacíe el recipiente.
B
Eche la piña escarchada en el recipiente para
procesar alimentos y píquela, utilizando la función
de impulsos. Después vacíe el recipiente.
B
Mezcle los dátiles, las ciruelas,las nueces pacanas,
la piña y el coco rallado en un recipiente grande.
B
Añada leche y vainilla a los ingredientes y bátalo.
B
Eche la mezcla de frutas en los moldes y ponga
las tartas en el horno a 135c C durante 90
minutos.
B
No prepare esta receta más de una vez sin
interrupción.Si necesita preparar más
cantidad,deje que el aparato se enfríe antes de
seguir con el proceso.
Puré de patatas
P
- 750 g de patatas cocidas
- Unos 250 ml de leche caliente (90cC)
- 1 cucharada sopera de mantequilla
- Sal
B
Primero amasen las patatas y, después, añadan
la leche, la sal y la mantequilla. Usen la velocidad
1 y procesen los ingredientes solo durante unos
30 segundos para evitar que el puré se vuelva
pegajoso.
Mayonesa
S
- 2 yemas de huevo o 1 huevo grande.
- 1 cucharadita de café de mostaza
- 1 cucharadita de café de vinagre
- 200 ml de aceite
B
Los ingredientes deben estar a temperatura
ambiente. Coloquen el disco emulsionador en el
recipiente. Pongan las yemas de huevo o el huevo,
pimienta y vinagre en el recipiente. Usen la
velocidad 1 ó 2. Viertan el aceite gradualmente a
través del tubo de llenado sobre el disco que gira.
Para añadir el aceite, pueden usar el agujero del
empujador.
B
Consejo para la salsa tártara : Añadan perejil,
pepinillos y huevos duros.
B
Consejo para la salsa para coctel : Añadan 50 ml
de nata fresca, un poquito de whisky, 3
cucharaditas de café de pasta de tomate y un
poquito de almibar de jengibre a 100 ml de
mayonesa.
Batido de leche
P
- 175 ml de leche
- 10 g de azúcar
- Medio plátano o unos 65 g de otra fruta fresca
- 50 g de helado de vainilla
B
Mezclen todos los ingredientes hasta que la
mezcla quede espumosa
Page 81

ESPAÑOL 81
Pasta para pizza
{
- 400 g de harina
- 40 ml de aceite
- Media cucharadita de café de sal
- 20 g de levadura fresca o 1'5 paquetes de
levadura seca
- Unos 250 cc de agua (35cC).
B
Para los ingredientes de la parte superior
- 300 ml de tomado tamizado (De lata)
- 1 cucharadita de café de hierbas italianas (Secas
o frescas).
- Sal y pimienta
- Azúcar
- Ingredientes a esparcir sobre la salsa : Olivas,
salami, alcachofas, setas, anchoas, queso
Mozzarella, pimientos, queso duro rallado y
aceite de oliva al gusto.
B
Coloquen el accesorio amasador en el recipiente.
Pongan todos los ingredientes en el recipiente y
seleccionen la velocidad 2. Amasen la pasta
durante aproximadamente 1 minuto hasta que se
forme un suave bola. Sostengan el aparato con la
mano para evitar que se mueva a lo largo de la
superficie de trabajo. Pongan la pasta en un
recipiente separado, cúbranla con un paño
húmedo y déjenla subir durante unos 30 minutos.
B
Usen la cuchilla de metal para picar la cebolla y
el ajo y fríanlos hasta que queden transparentes.
B
Añadan el tomate tamizado y las hierbas e hiervan
la salsa a fuego lento durante unos 10 minutos.
.
B
Sazonen al gusto con sal, pimienta y azúcar.
Dejen que la salsa se enfríe.
B
Calienten el horno a 250cC.
B
Desenrollen la pasta sobre una enharinada
superficie de trabajo y hagan dos formas redondas.
Coloquen la pasta en una engrasada bandeja para
el horno. Esparzan los ingredientes de la parte
superior sobre la pizza, dejando libres los bordes.
Distribuyan los ingredientes deseados, diseminen un
poco de queso rallado sobre la pizza y viertan un
poco de aceite de oliva sobre ella.
B
Hornéen la pizza durante un período de 12 a 15
minutos.
Gratinado de patatas y calabaza
Pgk
- 375 g de patatas
- Una pizca de sal
- 1 calabaza (De unos 250 g)
- 1 diente de ajo triturado
- Unos 40 g de mantequilla + más la necesaria
para engrasar el plato para el horno
- 2 cucharaditas de café de hierbas italianas o
provenzales.
- 1 huevo grande
- 75 ml de nata montada
- 75 ml de leche
- Pimienta
- 70 g de queso semiseco
B
Pelen y laven las patatas.
B
Pongan el soporte del inserto del disco ( Inserto
rebanador) en el recipiente y rebanen las patatas
y la calabaza a velocidad 1.
B
Hiervan las rebanadas de patata en agua
Page 82

ESPAÑOL82
hirviendo con una pizca de sal hasta que estén
casi hechas.
B
Pongan las rebanadas en un colador y dejen que
se escurran adecuadamente.
B
Pongan la mitad de la mantequilla en una sartén,
frían la mitad de las rebanadas de calabaza
durante 3 minutos mientras las giran
frecuentemente. Espolvoréen las rebanadas con la
mitad de las hierbas.
B
Dejen que las fritas rebanadas de calabaza se
escurran en un papel de cocina.
B
Engrasen la parte inferior de un plato para el
horno y pongan las rebanadas de calabaza y de
patata, alternativamente y disponiéndolas de tal
modo que se solapen parcialmente como las tejas
de un tejado.
B
Batan el huevo, la nata y la leche con la cuchilla
de metal a la velocidad 2. Añadan sal y pimienta
al gusto y viertan la mezcla sobre las rebanadas
de patata y de calabaza del plato.
B
Sustituyan el inserto rebanador por el inserto
rallador, rallen el queso a la velocidad 2 y
espolvoréenlo sobre el plato.
B
Pongan el plato en el centro de un horno caliente
(200cC) y dórenlo durante unos 15 minutos.
Mousse de salmón (Para 3 - 4
personas)
PS
- 1 lata de salmón
- 2 hojas de gelatina
- Unos pocos tallos de cebollino
- Una pizca de sal
- Una pizca de pimienta de Cayena
- Media cucharada sopera de zumo de limón
- 125 ml de nata montada
- 1 cebolla pequeña
- Berro para la guarnición
B
Pongan en remojo la gelatina en agua.abundante.
B
Piquen los cebollinos y las cebollas en el Robot de
Cocina usando la posición "Turbo" (Pulse).
B
Quiten las espinas y la piel del salmón.
B
Añadan sal, pimienta de Cayena, el zumo de
limón, el salmón y el líquido de la lata a los
cebollinos y las cebollas picados y hagan puré a la
velocidad 2.
B
Pongan el puré en el recipiente.
B
Hiervan una pequeña cantidad de agua y
disuelvan la gelatina en ella.
B
Mezclen la solución de gelatina con el puré de
salmón
B
Pongan el disco emulsionador en el recipiente y
monten la nata usando el botón "Turbo" (Pulse)
durante unos 15 segundos.
B
Utilizando una cuchara de madera, incluyan la
nata montada en el puré de salmón.
B
Echen la mousse en un plato, tápenla y enfríenla
en el frigorífico durante unas pocas horas
B
Guarnezcan la mousse con un poco de berro.
Pasta para bocadillos
P
- 2 zanahorias pequeñas y a trozos
- 2 - 2 pepinillos a trozos
- 75 g de coliflor a trozos
- 75 g de arracacha a trozos
- Hierbas verdes (Perejil, eneldo, estragón, tallos
de apio a trozos)
Page 83

ESPAÑOL 83
- 100 g de mayonesa
- 100 g de cuajada
- Sal
- Pimienta
B
Piquen finamente las zanahorias, los pepinillos, la
coliflor, las hierbas verdes y la arracacha. Mezclen
cuidadosamente la mayonesa y la cuajada y
sazonen al gusto con pimienta y sal.
Ensalada de col española
g
- 1 pequeña col roja
- 2 cebollas rojas
- 1 hinojo
- 1 manzana
- El zumo de una naranja y 2 cucharadas soperas
de vinagre de vino tinto.
- 1 cucharada sopera de mostaza
B
Mezclen el zumo, la mostaza y el vinagre.
Rebanen la col, las cebollas, el hinojo y la
manzana a la velocidad 1.
B
Combinen los ingredientes en una ensaladera.
Bizcochuelo
P
- 4 huevos
- 30 ml de agua (35cC).
- Una pizca de sal
- 150 g de azúcar
- 1 bolsita de azúcar de vainilla
- 150 g de harina tamizada
- 3 g de levadura en polvo
B
Batan los huevos y el agua durante unos 2 minutos.
Añadan el azúcar, la vainilla y la sal poco a poco
y mezclen durante 1 minuto aproximadamente.
La mezcla deberá caerse de la cuchara como una
tira espesa. Utilizando una espátula, inclúyanla en
la harina y la levadura en polvo. Hornéenlo en un
horno a unos (35cC) durante un período entre
30 y 35 minutos.
B
Consejo : Pueden rellenar el bizcochuelo con
diferentes tipos de crema o, simplemente, con
nata montada con fruta fresca.
Tzatziki (Ensalada de pepino)
k
- 1 pepino
- 200 ml de yogurt
- 1 cucharada sopera de aceite de oliva
- 2 dientes de ajo
- Una pizca de sal
- 1 cucharadita de café de eneldo finamente
picado
- Unas pocas hojas de menta
B
Pelen el pepino y rállenlo a la velocidad 1. Pongan
el pepino rallado en un colador y dejen que se
escurra adecuadamente.
B
Excepto las hojas de menta, mezclen los demás
ingredientes con el pepino. Enfríen la ensalada
poniéndola en un recipiente tapado en el
frigorífico durante una hora. Antes de servirla,
espolvoreen las hojas de menta en la parte
superior.
Page 84

ITALIANO84
Robot da cucina: componenti e accessori
A Controllo velocità
B Gruppo motore
C Blocco di sicurezza incorporato
D Contenitore
E Tappo a vite (per chiudere il foro
dell'apparecchio quando non è in funzione)
F Porta-accessori
G Vaso frullatore
H Piolo del coperchio (attiva e disattiva
l'interruttore di sicurezza)
I Coperchio del contenitore
J Apertura inserimento cibo
K Pestello
L Coperchio frullatore
M Coperchio richiudibile con spazio per gli
accessori
N Disco per affettare (medio)
O Disco per sminuzzare (fine)
P Disco per sminuzzare (medio)
Q Porta-disco
R Lama (con protezione)
S Accessorio per impastare
T Disco emulsionante
U Spatola
Introduzione
L'apparecchio è provvisto di un sistema di
spegnimento automatico. In caso di
surriscaldamento, il sistema interrompe
automaticamente l'erogazione di corrente
elettrica all'apparecchio.
Se l'apparecchio smette
improvvisamente di funzionare:
1 Togliete la spina dalla presa di corrente.
2 Premete il pulsante "PULSE/0"
3 Lasciate raffreddare l'apparecchio per
60 minuti.
4 Inserite la spina nella presa.
5 Accendete nuovamente l'apparecchio
Vi preghiamo di contattare il vostro rivenditore
Philips o un Centro Assistenza autorizzato Philips
nel caso il sistema di spegnimento automatico
entrasse in funzione troppo spesso.
ATTENZIONE: per evitare rischi dovuti al
dispositivo di spegnimento automatico, questo
apparecchio non deve essere collegato ad un
interrutore provvisto di timer.
Importante
◗ Leggete con attenzione le istruzioni e
osservate le figure prima di usare
l'apparecchio.
◗ Conservate queste istruzioni per ulteriori
consultazioni.
◗ Prima di collegare l'apparecchio, controllate
che la tensione indicata sulla targhetta
Page 85

ITALIANO 85
corrisponda a quella della rete locale (110127 o 220-240V).
◗ Non usate mai accessori o componenti di altri
produttori o non specificatamente consigliati
da Philips. La garanzia decade nel caso
vengano utilizzati tali accessori.
◗ Non usate l'apparecchio nel caso in cui il
cavo, la spina o altri componenti risultassero
danneggiati.
◗ Nel caso il cavo di alimentazione fosse
danneggiato, dovrà essere sostituito da
Philips, presso un Centro Autorizzato Philips
o personale comunque qualificato, per evitare
situazioni a rischio.
◗ Prima di usare l'apparecchio per la prima
volta, lavate con cura tutti i pezzi a contatto
con il cibo.
◗ Non superate le quantità e i tempi di
preparazione indicati nella tabella e ricette.
◗ Non superate il contenuto massimo riportato
sul contenitore o sul vaso del frullatore ( non
superate mai la linea superiore).
◗ Togliete la spina dalla presa di corrente subito
dopo l'uso.
◗ Non usate mai le dita o altri oggetti (ad
esempio la spatola) per spingere gli ingredienti
nell'apertura di inserimento cibo mentre
l'apparecchio è in funzione. A tale scopo,
utilizzate esclusivamente il pestello a corredo.
◗ Togliete sempre la spina dalla presa di
corrente prima di infilare le dita o altri oggetti
(ad esempio la spatola) nel vaso del frullatore.
◗ Tenete l'apparecchio lontano dalla portata dei
bambini.
◗ Non lasciate mai in funzione l'apparecchio
senza sorveglianza.
◗ Non spegnete mai l'apparecchio ruotando il
coperchio. Per spegnere l'apparecchio,
premete sempre il pulsante PULSE/0.
◗ Spegnete sempre l'apparecchio prima di
togliere gli accessori.
◗ Non immergete il gruppo motore in acqua o
altri liquidi. Non risciacquatelo sotto l'acqua
corrente: per pulirlo, usate solo un panno
umido.
◗ Montando il vaso del frullatore, il recipiente e
il tappo a vite in modo corretto, sentirete un
"click".
◗ Il disco emulsionante, le lame e l'accessorio
per impastare devono essere inseriti nel
porta-accessori posto nel recipiente.
◗ togliete le protezioni delle lame prima
dell'uso.
◗ Evitate di toccare le lame AFFILATE,
soprattutto se la spina è inserita nella presa di
corrente.
◗ Nel caso si bloccassero le lame, togliete la
spina prima di togliere gli ingredienti incastrati
fra le lame.
◗ Lasciate raffreddare gli ingredienti prima di
lavorarli (temperatura massima ...).
◗ Se dovete usare un liquido che tende a
produrre schiuma, non versatene più di un
litro nel vaso del frullatore, per evitare che
fuoriesca.
Page 86

ITALIANO86
Nota: se avete montato correttamente il
frullatore e il recipiente, funzionerà soltanto il
frullatore.
Come usare l'apparecchio
Contenitore
◗ Se volete usare il contenitore, togliete il vaso
del frullatore e chiudete con il tappo a vite.
Per tutte le funzioni che richiedono l'uso del
contenitore, togliete il vaso del frullatore.
C
1 Montate il contenitore sull'apparecchio
ruotando il manico nella direzione della
freccia fino a quando sentirete un "click".
C
2 Mettete il coperchio sul contenitore.
Ruotate il coperchio nella direzione della
freccia fino a quando sentirete un "click"
(dovrete esercitare una certa forza).
Blocco di sicurezza incorporato
B
Sia il gruppo motore che il coperchio sono provvisti
di speciali segni. L'apparecchio funziona solo se la
freccia posta sul gruppo motore è rivolta in senso
opposto rispetto al segno sul coperchio.
C
1 Controllate che il segno sul coperchio e la
freccia sul contenitore siano rivolti uno
contro l'altro. La sporgenza del coperchio
copre l'apertura sul manico.
Apertura inserimento cibo e pestello
C
1 Usate l'apertura per aggiungere ingredienti
solidi e liquidi. Usate il pestello per
chiudere l'apertura di inserimento cibo.
C
2 Potete anche usare il pestello per chiudere
l'apertura di inserimento cibo ed evitare la
fuoriuscita degli ingredienti.
Lame
◗ Le lame possono essere usate per tagliare,
miscelare, ridurre in purea e impastare.
C
1 Mettete il recipiente sul gruppo motore.
C
2 Togliete la protezione dalle lame.
Le lame sono estremamente affilate. Evitate di
toccarle!
C
3 inserite le lame nel porta-accessorio.
CLICK
CLICK
1
2
1
2
1
CLICK
2
CLICK
Page 87

ITALIANO 87
C
4 Mettete il porta-accessorio nel
contenitore.
5 Mettete gli ingredienti nel contenitore.
Tagliate a pezzi di 3x3 cm i cibi troppo
grossi. Mettete il coperchio sul
contenitore.
C
6 Grazie alle diverse impostazioni, potrete
regolare la velocità per ottenere un
risultato ottimale in base alle vostre
esigenze.
B
Impostazione a intermittenza "PULSE/0": per far
funzionare l'apparecchio a intermittenzae e per
spegnerlo. Premendo il pulsante a intermittenza,
l'apparecchio funzionerà alla massima velocità.
Lasciando andare il pulsante, l'apparecchio si
fermerà.
B
Velocità 1: velocità normale
B
Velocità 2: velocità massima
Leggete la tabella per conoscere le velocità
consigliate. I tempi per la lavorazione variano da
1 a 60 secondi.
Consigli
◗ L'apparecchio trita molto velocemente. Usate
la funzione a intermittenza per periodi
brevissimi, per evitare di tritare i cibi troppo
finemente.
◗ Non tenete l'apparecchio in funzione per
periodi troppo lunghi quando grattuggiate il
formaggio (stagionato). Riscaldandosi, il
formaggio inizierebbe a fondersi e a
raggrumarsi.
◗ Non tritate cibi troppo duri, come chicchi di
caffè, noce moscata e cubetti di ghiaccio, per
evitare di danneggiare la lama.
Se il cibo si attacca alla lama o alle pareti del
contenitore:
1 Spegnete l'apparecchio
2 Togliete il coperchio dal contenitore
3 Togliete gli ingredienti con la spatola.
Dischi
I bordi dei dischi sono molto taglienti. Evitate di
toccarli!
Do not process hard ingredients, such as ice
cubes, with the inserts.
C
1 Inserite il disco prescelto nel porta-disco.
C
2 Inserite il porta-disco nel porta-accessori
posto nel contenitore.
3 Mettete il coperchio sul contenitore.
1
CLICK
2
Page 88

ITALIANO88
C
4 Mettete gli ingredienti nell'apertura per
l'inserimento del cibo. Se necessario,
tagliate a pezzi gli ingredienti troppo
grossi.
5 Per ottenere risultati migliori, riempite
l'apertura in modo uniforme.
Se dovete tagliare grosse quantità di cibo,
ricordate di infilare solo pochi pezzi alla volta,
svuotando il contenitore di tanto in tanto.
3 Per ottenere risultati ottimali, selezionate
la velocità più adatta alle vostre esigenze,
in base ai consigli forniti nella tabella.
I tempi di preparazione variano da 10 a 60
secondi.
C
4 Premete lentamente e delicatamente il
pestello per spingere gli ingredienti
nell'apertura.
C
5 Per togliere il disco dal porta-disco,
afferrate il porta-disco con le mani in
modo che la parte posteriore sia rivolta
verso di voi. Premete i bordi con i pollici
in modo da estrarlo dal porta-disco.
Accessorio per impastare.
L'accessorio per impastare può essere usato per
preparare la pasta di pane, la pastella e le miscele
per torte.
C
6 Inserite l'accessorio per impastare sul
porta-accessori.
7 Mettete gli ingredienti nel contenitore.
C
8 Chiudete il contenitore con il coperchio.
C
9 Chiudete l'apertura di inserimento cibo
con il pestello.
C
10 Per ottenere risultati ottimali, selezionate
la velocità più adatta alle vostre esigenze,
in base ai consigli forniti nella tabella.
Disco emulsionante
Potete usare il disco emulsionante per preparare
la maionese, montare la panna e gli albumi a neve.
C
11 Inserite il disco emulsionante sul porta-
accessori nel contenitore.
12 Mettete gli ingredienti nel contenitore e
quindi il coperchio.
CLICK
1
2
Page 89

ITALIANO 89
13 Per ottenere risultati ottimali, selezionate
la velocità più adatta alle vostre esigenze,
in base ai consigli forniti nella tabella.
Consigli
◗ Per montare gli albumi a neve, fate in modo
che siano a temperatura ambiente.
Togliete le uova dal frigorifero almeno mezz'ora
prima di usarle.
◗ Per preparare la maionese, tutti gli ingredienti
devono essere a temperatura ambiente.
Aggiungete l'olio attraverso il piccolo foro posto
sul pestello.
◗ Per montare la panna, fate in modo che sia
ben fredda. Fate attenzione anche ai tempi di
preparazione (vedere la tabella). La panna non
deve essere montata troppo a lungo!
Per controllare meglio la lavorazione, usate il
pulsante a intermittenza.
Frullatore
Il frullatore è particolarmente adatto per:
- Frullare sostanze fluide come latticini, creme,
succhi di frutta, zuppe, frappé, frullati.
- Miscelare ingredienti morbidi come la pastella
per i pancake o la maionese.
- Ridurre in purea cibi cotti (ad esempio le pappe
per bambini).
C
14 Togliete il tappo a vite.
C
15 Montate il vaso del frullatore nell'apposito
foro, ruotandolo in direzione della freccia
fino a quando è ben fissato.
Non esercitate troppa pressione sul manico del
frullatore.
C
16 Mettete gli ingredienti nel vaso del
frullatore.
17 Avvitate il coperchio sul vaso del
frullatore.
18 Accendete l'apparecchio e frullate gli
ingredienti. Grazie alle diverse
impostazioni, potete scegliere la velocità
più adatta alle vostre esigenze, per
ottenere un risultato ottimale. Seguite i
consigli forniti nella tabella.
Consigli
C
◗ Versate gli ingredienti liquidi attraverso il foro
nel coperchio.
◗ Più a lungo frullerete gli ingredienti e più fine
sarà il risultato ottenuto.
◗ Tagliate a pezzetti gli ingredienti prima di
metterli nel vaso del frullatore. Se volete
preparare grandi quantità di cibo, frullate
pochi ingredienti alla volta, evitando di
riempire troppo il vaso.
◗ Se avete dubbi circa la velocità da usare,
scegliete sempre la più alta (posizione 2).
CLICK
1
2
1
2
1
2
Page 90

ITALIANO90
Se gli ingredienti si attaccano alla parete del vaso:
1 Spegnete l'apparecchio e togliete la spina.
2 Togliete il coperchio.
Non togliete mai il coperchio mentre
l'apparecchio è in funzione.
3 Usate una spatola per togliere gli
ingredienti dalla parete del vaso.
Tenete la spatola ad una distanza di sicurezza
dalle lame (circa 2 cm).
Pulizia
Togliete sempre la spina dalla presa prima di
pulire il gruppo motore.
1 Pulite il motore con un panno umido. Non
immergete il gruppo motore nell'acqua e
non risciacquatelo sotto il rubinetto.
2 Subito dopo l'uso, lavate sempre con
acqua e detersivo le parti che sono venute
a contatto con il cibo.
◗ Il contenitore, il coperchio, il pestello e gli
accessori possono essere lavati anche in
lavastoviglie.
Prodotti resistenti alla lavastoviglie, testati in
conformità con DIN EN 12875.
Il coperchio con lo spazio per gli accessori e il
vaso del frullatore non possono essere lavati nella
lavastoviglie!
Prestate la massima attenzione quando pulite le
lame e i dischi. Sono molto affilati!
Fate in modo che i bordi delle lame, il gruppo
lame del frullatore e gli accessori non vengano a
contatto con oggetti duri, perché potrebbero
rovinarsi e spuntarsi.
Alcuni ingredienti possono far scolorire la
superficie degli accessori. Si tratta di un fenomeno
del tutto innocuo: di norma gli accessori
recuperano il colore originario dopo un po' di
tempo.
Come pulire rapidamente il frullatore
C
1 Versate un po' d'acqua tiepida (max. 0,5 l)
e un po' di detersivo per piatti nel vaso del
frullatore.
2 Montate il coperchio.
C
3 Fate funzionare l'apparecchio per alcuni
secondi, premendo il pulsante Pulse
(lasciando andare il pulsante, l'apparecchio
si ferma).
4 Togliete il vaso del frullatore e
risciacquatelo con acqua pulita.
Page 91

ITALIANO 91
Come riporre l'apparecchio
Microstore
C
◗ Mettete tutti gli altri accessori (disco
emulsionante, lame, disco per affettare) nel
porta accessori e riponete il tutto nel
contenitore. Terminate sempre con il porta
disco.
C
◗ Due dischi possono essere riposti
nell'apposito scomparto nel coperchio del
contenitore, come indicato nella parte interna
del coperchio. Fate scivolare i dischi nel
coperchio, senza spingerli.
C
◗ Mettete il coperchio con lo scomparto per i
dischi sul coperchio trasparente.
◗ Avvolgete il cavo attorno al supporto posto
sul retro dell'apparecchio.
Informazioni e Assistenza
Se avete bisogno di ulteriori informazioni o in
caso di problemi, vi preghiamo di visitare il sito
Philips www.philips.com oppure contattate il
Centro Assistenza Philips del vostro Paese (per
conoscere il numero di telefono, consultate
l'opuscolo della garanzia.) Qualora nel vostro
Paese non ci sia un Centro Assistenza Clienti,
contattate il vostro rivenditore di fiducia oppure il
Service Department of Philips Domestic
Appliances and Personal Care BV.
Quantità e tempo di preparazione
Utilizzi
Pancakes,
cialde, waffles.
Impanatura,
piatti gratinati
Desser,
farciture
Guarnizione,
verdure crude,
torte, salse.
Insalate.
Guarnizioni,
zuppe, salse,
piatti gratinati.
Salse, pizza,
piatti gratinati,
fonduta
Procedimento
Versate per prima cosa il latte
nel frullatore, poi aggiungete gli
ingredienti solidi. Frullate per
circa 1 minuto. Se necessario,
ripetete 2 volte.
Usate pane secco e croccante
Per ottenere un migliore
risultato, usate burro
ammorbidito.
Tagliate la verduta a pezzetti.
Infilate i pezzetti nell'apertura di
inserimento e premeteli
leggermente con il pestello.
Riempite l'apertura di
inserimento cibo con la
verdura e premete
delicatamente con il pestello.
Usate un pezzo di parmigiano
senza crosta e tagliatelo a
cubetti di circa 3x3 cm
Tagliate a pezzetti il formaggio
e premeteli delicamente con il
pestello.
Impos
tazion
e
veloci
tà /
Acces
sorio
2 / P
2 / P
2 / P
2 / j
k
2 / P /
g
2 / P
2 / j
k
Quant
ità
massi
ma
250
ml di
latte
100 g
300 g
350 g
350 g
200 g
200 g
Ingredienti e
risultati
Pastella
(pancake) Frullare
Pane
grattuggiato grattuggiare
Crema di
burro montare
Verdure
(carote, rape,
rafano) affettare
Verdure
(carote, porri,
sedano) affettare
Formaggio
(parmigiano) grattugiare
Formaggio
(Gouda) sminuzzare
Page 92

ITALIANO92
Utilizzi
Guarnizioni,
salse, dolci,
budini,
mousse.
Purea, zuppe.
Pappe per
bambini
Insalate,
guarnizioni.
Pane
Procedimento
Usate cioccolato fondente,
spezzettato in cubetti di 2 cm.
Usate piselli o fagioli già cotti.
Se necessario, aggiungete un
po' di liquido per migliorare la
consistenza del composto.
Per una purea grossolana,
aggiungete poco liquido. Per
una purea più morbida,
continuate ad aggiungere
liquido fino a quando il
composto risulta liscio e senza
grumi.
Mettete il cetriolo nell'apertura
di inserimento cibo e premete
delicatamente.
Mescolate l'acqua tiepida con il
lievito e lo zucchero.
Aggiungete la farina, l'olio e il
sale e impastate per circa 90
secondi. Lasciate lievitare per
30 minuti.
Impos
tazion
e
veloci
tà /
Acces
sorio
2 / P
2 / P
D
2 / P
1 / g
2 / {
Quant
ità
massi
ma
200 g
250 g
300 g
1
cetriol
o
350 g
di
farina
Ingredienti e
risultati
Cioccolato grattuggiare
Piselli e fagioli
cotti - ridurre
in purea
Carni e
verdure cotte
- ridurre in
purea
Cetrioli affettare
Pasta (di pane)
- impastare
Utilizzi
Pizza
Torta di mele,
biscotti,
crostate di
frutta.
Torte alla
frutta, pie,
quiche
Procedimento
Seguite lo stesso procedimento
previsto per il pane. Impastate
per circa 1 minuto. Versate
prima la farina, poi aggiungete
gli altri ingredienti.
Usate margarina fredda, tagliata
a cubetti di 2 cm. Mettete tutti
gli ingredienti nel contenitore e
impastate fino ad ottenere una
palla. Lasciate raffreddare la
pasta prima di lavorarla.
Usate margarina e acqua
fredda. Versate la farina nel
contenitore aggiungete la
margarina tagliata a cubetti di 2
cm. Frullate alla velocità
massima fino ad ottenere un
ammasso di briciole, poi
aggiungete l'acqua fredda,
continuando a frullare fino ad
ottenere una palla. Lasciate
raffreddare la pasta prima di
lavorarla.
Impos
tazion
e
veloci
tà /
Acces
sorio
2 /
&@5,1
23
2 /
&@5,0
80
2 / P
Quant
ità
massi
ma
400 g
di
farina
200 g
di
farina
200 g
di
farina
Ingredienti e
risultati
Pasta (per
pizza) Impastare
Pasta frolla impastare
Pasta (per
torte, pie) impastare
Page 93

ITALIANO 93
Utilizzi
Pane ricco
Budini, souffle,
meringhe
Budini, pappe
per bambini
Guarnizioni,
salse.
Salse, zuppe,
guarnizioni,
burro alle
erbe.
Procedimento
Mescolate per prima cosa il
lievito con il latte tiepido e un
po' di zucchero in una ciotola.
Mettete tutti gli ingredienti nel
contenitore dell'apparecchio e
impastate fino ad ottenere un
impasto omogeneo, che si
stacca dalle pareti (ci vorrà
circa 1 minuto). Lasciate
lievitare per circa 30 minuti.
Usate albumi a temperatura
ambiente. Nota: usate almeno
2 albumi.
Consiglio: aggiungete un po' di
succo di limone per evitare che
la frutta diventi nera. Per
ottenere una purea omogenea,
aggiungete un po' di liquido.
Sbucciate l'aglio. Premete il
pulsante a intermittenza più
volte per evitare che l'aglio
venga tritato troppo finemente.
Usate almeno 150 g d'aglio.
Lavate e asciugate le erbe
prima di tritarle.
Impos
tazion
e
veloci
tà /
Acces
sorio
2 / {
2 / S
P / P
P / P
2 / P /
P
Quant
ità
massi
ma
300g
di
farina
4
albumi
500 g
300 g
Min.
75 g.
Ingredienti e
risultati
Pasta (lievitata)
- impastare
Albumi a neve
- montare
Frutta (mele,
banane) frullare, ridurre
in purea
Aglio - tritare
Erbe (ad
esempio il
prezzemolo) tritare
Utilizzi
Succhi di
frutta.
Insalate,
guarnizioni e
salse per
barbecue
Bistecche alla
tartara,
hamburger,
polpette
Frappè
Torte di
diverso tipo.
Procedimento
Per ottenere un succo
omogeneo, aggiungete un po'
d'acqua o altro liquido
(optional).
Tutti gli ingredienti devono
essere a temperatura ambiente.
Nota: usate almeno un uovo
grande, 2 uova piccole oppure
due tuorli. Mettete l'uovo e un
po' d'aceto nel contenitore e
aggiungete l'olio goccia a
goccia.
Togliete le ossa e il grasso.
Tagliate la carne a cubetti di 3
cm. Per ottenere un trito
grossolano, usate la funzione a
intermittenza.
Preparate una purea di frutta
(banane fragole ecc.),
aggiungete il latte, lo zucchero
e un po' di gelato e frullate.
Gli ingredienti devono essere a
temperatura ambiente. Frullate
il burro morbido con lo
zucchero fino ad ottenere un
composto soffice e spumoso.
Aggiungete il latte, le uova e la
farina.
Impos
tazion
e
veloci
tà /
Acces
sorio
2 / D
1-2 /
S
2 / P /
P
2 / D
2 / P
Quant
ità
massi
ma
500 g
(totale
)
3
uova
300 g
250
ml di
latte
3
uova
Ingredienti e
risultati
Succhi (ad es.
di papaya,
anguria, pera) frullare
Maionese montare
Carne (magra)
- macinare
Frappè frullare
Impasto (per
torta) - frullare
Page 94

ITALIANO94
Utilizzi
Insalate, pane,
pasta di
mandorle,
budini.
Soffritto,
guarnizioni.
Soffritto,
guarnizioni.
Carne
macinata
Zuppe, salse
Guarnizioni,
panna, gelati
Procedimento
Usate il pulsante a
intermittenza per tritare
grossolanamente oppure la
velocità 2 per ottenere un
composto più fine.
Sbucciate le cipolle e tagliatele
in 4 pezzi. Nota: usate almeno
100 g. Premete più volte il
pulsante a intermittenza per
evitare di tritare le cipolle
troppo finemente.
Sbucciate le cipolle e tagliatele
a pezzetti che infilerete nell'apertura di inserimento cibo.
Nota: usate almeno 100 g.
Togliete le ossa e il grasso.
Tagliate la carne a cubetti di 3
cm. Per un risultato grossolano,
usate il pulsante a
intermittenza.
Usate verdure cotte
Usate la panna appena tolta dal
frigorifero. Nota: montate
almeno 125 ml di panna. La
panna montata sarà pronta
dopo circa 20 secondi.
Impos
tazion
e
veloci
tà /
Acces
sorio
2 / P /
P
P / P
1 / g
2 / P /
P
2 / ...
P / ...
Quant
ità
massi
ma
250 g
400 g
300 g
200 g
500
ml
350
ml
Ingredienti e
risultati
Frutta secca tritare
Cipolle tritare
Cipolle affettare
Pollame tritare
Zuppe frullare
Panna montata
- montare
Ricette
Zuppa di broccoli (per 4 persone)
Accessori: kP
- 50 g di formaggio Gouda
- 300 g di broccoli cotti
- acqua di cottura dei broccoli
- 2 patate lessate, a pezzetti
- 2 dadi
- 2 cucchiai di panna
- curry
- sale
- pepe
- noce moscata
B
Sminuzzate il formaggio. Riducete in purea i
broccoli e le patate lessate, aggiungendo un po'
dell'acqua di cottura dei broccoli. Mettete la purea
di broccoli, il liquido rimasto e i dadi in un recipiente
misurato, fino ad ottenere 750 cc. Trasferite il
composto in una pentola e portate ad ebollizione
continuando a mescolare. Aggiungete il formaggio,
insaporite con curry, sale, pepe e noce moscata ed
aggiungete la panna.
Torta alla frutta
P
- 450g di datteri secchi snocciolati e tagliati a metà
- 200 g di prugne secche snocciolate, tagliate a
metà
- 650 g di noci pecan
- 160 g di cocco grattugiato
- 300 g di ananas glassato
- 1 lattina (400 g) di latte condensato dolce
- 1 cucchiaino di essenza di vaniglia
Page 95

ITALIANO 95
B
Imburrate dueteglie lunghe 20 cm e preriscaldate
il forno a 135cC.
B
Mettete i datteri e le prugne nel robot da cucina e
tritateli alla massima velocità per 30 secondi, poi
metteteli in una ciotola.
B
Tritate grossolanamente le noci, usando il robot da
cucina e la funzione a intermittenza, poi
trasferitele nella ciotola.
B
Mettete l'ananas nel robot da cucina e tagliatelo
a pezzetti usando la funzione a intermittenza, poi
aggiungetele all'altra frutta già preparata.
B
Mettete datteri, prugne, noci, ananas e cocco
grattuggiato in una ciotola capiente e mescolate
bene.
B
Mettete datteri, prugne, noci, ananas e cocco
grattuggiato in una ciotola capiente e mescolate bene.
B
Aggiungete il latte condensato e la vaniglia.
B
Mettete il composto di frutta nelle teglie da forno
e fate cuocere a 135cC per 90 minuti.
B
È consigliabile non proseguire più di una volta
nelle operazioni senza interruzioni. Per preparare
quantità aggiuntive, lasciate prima raffreddare il
motore dell'apparecchio e poi procedete.
Purea di patate
P
- 750 g di patate lessate
- +/- 250 ml di latte caldo (90cC)
- 1 cucchiaio di burro
- sale
B
Schiacciate le patate, poi aggiungete il latte, il sale
e il burro. Frullate a velocità 1 per circa 30
secondi per evitare che la purea diventi granulosa.
Maionese
S
- 2 tuorli o 1 uovo grande
- 1 cucchiaino di senape
- 1 cucchaino di aceto
- 200 ml d'olio
B
Tutti gli ingredienti devono essere a temperatura
ambiente. Inserite il disco emulsionante nel
contenitore. Mettete i tuorli o l'uovo intero, la
senape e l'aceto nel contenitore. Usate la velocità
1 o 2. Versate lentamente l'olio attraverso l'apertura,
direttamente sul disco in funzione. Per aggiungere
l'olio, potete anche usare l'apertura nel pestello.
B
Consiglio per la salsa tartara: aggiungete
prezzemolo, cetriolini e uova sode.
B
Consiglio per la salsa cocktail: aggiungete 50 ml
di panna, una spruzzata di whisky, 3 cucchiai di
concentrato di pomodoro e una spruzzata di
Worcester a 100 ml di maionese.
Frappè
P
- 175 ml di latte
- 10 g di zucchero
- 1/2 banana o circa 65 g di altra frutta fresca
- 50 g di gelato alla vaniglia
B
Frullate tutti gli ingredienti fino ad ottenere un
composto spumoso.
Page 96

ITALIANO96
Pasta per pizza
{
- 400 g di farina
- 40 ml d'olio
- 1/2 cucchiaino di sale
- 20 g di lievito fresco oppure 1 1/2 bustina di
lievito essiccato
- +/- 240 ml di acqua (35cC)
B
Per guarnire:
- 300 ml di pomodori pelati (in scatola)
- 1 cucchiaio di erbe miste (secche o fresche)
- sale e pepe
- zucchero
- Ingredienti da aggiungere alla pizza: olive,
prosciutto, carciofini, funghi, acciughe,
mozzarella, peperoni, formaggio grattuggiato e
olio d'oliva, secondo i gusti.
B
Inserite l'accessorio per impastare nel contenitore.
Mettete tutti gli ingredienti nel contenitore e
selezionate la velocità 2. Impastate per circa
1 minuto fino ad ottenere una palla. Tenete fermo
l'apparecchio con una mano per evitare che si
sposti sul piano di lavoro. Mettete la pasta in un
altro recipiente, copritelo con un panno umido e
lasciate lievitare per circa 30 minuti.
B
Usate le lame di metallo per tritare la cipolla e
l'aglio e soffriggeteli fino a quando saranno
diventati trasparenti.
B
Aggiungete i pomodori pelati e le erbe e fate
cuocere a fuoco basso per circa 10 minuti.
B
Regolate di sale e pepe e aggiungete una punta
di zucchero. Lasciate raffreddare.
B
Preriscaldate il forno a 250°C.
B
Stendete la pasta su un piano infarinato,
ottenendo due pizze. Appoggiate la pasta sul
piano del forno unto d'olio. Mettete la salsa di
pomodoro sulla pizza, lasciando liberi i bordi.
Aggiungete gli ingredienti desiderati, un po' di
formaggio grattuggiato e dell'olio dell'oliva.
B
Fate cuocere la pizza per 12-15 minuti.
Patate e zucchine gratinate
Pgk
- 375 g di patate
- 1 pizzico di sale
- 1 zucchina (circa 250 g)
- 1 spicchio d'aglio schiacciato
- circa 40 g di burro + il burro necessario per
imburrare la teglia
- 2 cucchiaini di erbe di Provenza (o erbe fresche)
- 1 uovo
- 75 ml di panna
- 75 ml di latte
- pepe
- 70 g di formaggio mediamente stagionato
B
Sbucciate e lavate le patate.
B
Inserite il disco per affettare nel contenitore e
affettate le patate e la zucchina a velocità 1.
B
Lessate le patate in acqua bollente con un pizzico
di sale fino a quando saranno quasi cotte.
B
Scolate le fette di patate.
B
Mettete metà del burro in una padella e cuocete
metà delle fette di zucchine per 3 minuti,
B
girandole più volte. Insaporitele con metà delle
erbe di Provenza.
Page 97

ITALIANO 97
B
Mettete la purea nel contenitore.
B
Fate bollire pochissima acqua e usatela per
sciogliere la gelatina.
B
Aggiungete la gelatina al composto di salmone.
B
Inserite il disco emulsionante nel contenitore e
montate la panna usando la funzione a
intermittenza per circa 15 secondi.
B
Aggiungete la panna montata al composto di
salmone usando un cucchiaio di legno.
B
Rovesciate la mousse su un piatto, copritela e
mettetela in frigorifero per alcune ore.
B
Guarnite la mousse con le foglie di crescione.
Farcitura per panini
P
- 2 carote piccole tagliate a pezzetti
- 2-3 cetriolini a pezzetti
- 75 g di cavolfiore a pezzetti
- 75 g di sedano rapa a pezzetti
- erbe fresche (prezzemolo, dragoncello, aneto,
sedano)
- 100 g di maionese
- 100 g di formaggio fresco
- sale
- pepe
B
Tritate le carote, i cetriolini, il cavolviore, le erbe e il
sedano rapa e mescolateli alla maionese e al
formaggio fresco. Regolate di sale e pepe.
Insalata di cavolo spagnola
g
- 1 piccolo cavolo rosso
- 2 cipolle rosse
- 1 finocchio
- 1 mela
- il succo di un'arancia e 2 cucchiai di aceto di
vino rosso
- 1 cucchiaio di senape
B
Mescolate il succo, la senape e l'aceto.
Affettate il cavolo, le cipolle, il finocchio e la mela
alla velocità 1.
B
Riunite tutti gli ingredienti in un'insalatiera.
Pan di Spagna
P
- 4 uova
- 30 ml d'acqua (35cC)
- 1 pizzico di sale
- 150 g di zucchero
- 1 bustina di zucchero vanigliato
- 150 g di farina
- 3 g di lievito
B
Sbattete le uova con l'acqua per circa 2 minuti.
Aggiungete poco a poco lo zucchero, lo zucchero
vanigliato e il sale e mescolate per circa 1 minuto
fino a quando il composto si addensa. Aggiungete
la farina e il lievito con una spatola. Fate cuocere
nel forno a 170°C per circa 30-35 minuti.
B
Consiglio: potete farcire questa torta con diversi
tipi di crema o semplicemente con della panna
montata mescolata a frutta fresca.
Page 98

ITALIANO98
Tzaiziki
k
- 1 cetriolo
- 200 ml di yogurt
- 1 cucchiaio di olio d'oliva
- 2 spicchi d'aglio
- un pizzico di sale
- 1 cucchiaino di aneto tritato finemente
- alcune foglie di menta
B
Sbucciate il cetriolo e affettatelo alla velocità 1.
Poi mettetelo in uno scolapasta e lasciatelo
scolare.
B
Mescolate tutti gli ingredienti ad eccezione delle
foglie di menta. Mettete il composto in una ciotola,
copritelo e mettetelo in frigorifero per un'ora.
decorate con le foglie di menta prima di servire.
Page 99

PORTUGUÊS 99
Robot de cozinha: peças e acessórios
A Controlo da velocidade
B Unidade do motor
C Fecho de segurança integrado
D Taça
E Tampa de enroscar (para fechar o orifício de
fixação da liquidificadora quando esta não está
em uso)
F Suporte para os acessórios
G Copo misturador
H Pega da tampa (activa e desactiva o
interruptor de segurança)
I Tampa da taça
J Tubo dos alimentos
K Pressor
L Tampa
M Cobertura com espaço para guardar o
compartimento dos discos
N Disco para cortar médio
O Disco para ralar finoV) Disco para ralar médio
P Disco para ralar médio
QSuporte para os discos
R Lâmina (com protecção)
S Amassador
T Disco para emulsionar
U Espátula
Introdução
Este aparelho está equipado com um sistema de
corte automático. No caso de sobreaquecimento,
este sistema corta automaticamente a corrente e
o aparelho desliga-se.
Se o aparelho deixar repentinamente
de trabalhar:
1 Retire a ficha da tomada eléctrica.
2 Prima o botão 'PULSE/0'.
3 Deixe o aparelho arrefecer durante
60 minutos.
4 Introduza a ficha na tomada eléctrica.
5 Volte a ligar o aparelho.
Se o sistema térmico de corte automático for
activado muitas vezes, deverá contactar o seu
agente Philips ou um concessionário Philips
autorizado.
ATENÇÃO: Para evitar situações complicadas
originadas pela reposição subsequente a um
corte térmico, este aparelho não deve ser
alimentado através de um temporizador.
Importante
◗ Leia as instruções com atenção e observe as
ilustrações antes de começar a usar o
aparelho.
◗ Guarde este modo de emprego para uma
eventual consulta futura.
◗ Verifique se a voltagem indicada no aparelho
corresponde à tensão eléctrica local (110-
Page 100

PORTUGUÊS100
(110-127V ou 220-240V) antes de ligar o
aparelho à corrente.
◗ Nunca use qualquer acessório ou peça
doutros fabricantes ou que não tenham sido
especificamente aconselhados pela Philips. A
sua garantia será considerada nula se forem
usados acessórios ou peças doutras origens.
◗ Não se sirva do aparelho no caso de o fio, a
ficha ou outro componente se apresentar
danificado.
◗ Se o fio se estragar, deverá ser substituído
pela Philips, por um concessionário
autorizado pela Philips ou por pessoal
devidamente qualificado para se evitarem
situações gravosas para o utilizador.
◗ Antes de se servir do aparelho pela primeira
vez, lave muito bem todas as peças que vão
estar em contacto com os alimentos.
◗ Não exceda as quantidades e tempos de
preparação indicados na tabela e receitas.
◗ Não exceda a quantidade máxima indicada na
taça ou no copo misturador, isto é, não encha
acima da graduação superior.
◗ Desligue o aparelho imediatamente após a sua
utilização.
◗ Nunca use os dedos ou um objecto (por ex.
uma espátula) para empurrar os ingredientes
dentro do tubo dos alimentos quando o
aparelho estiver em funcionamento. Apenas o
pressor deve ser utilizado para essa finalidade.
◗ Nunca coloque os dedos ou qualquer objecto
(por ex. uma espátula) dentro do copo
misturador sem desligar primeiro o aparelho.
◗ Mantenha fora do alcance das crianças.
◗ Nunca deixe o aparelho a trabalhar sem
vigilância.
◗ Nunca desligue o aparelho através da rotação
da tampa. O aparelho deve ser desligado
premindo o botão PULSE/0.
◗ Antes de retirar os acessórios, deve desligar
o aparelho.
◗ Nunca mergulhe a unidade do motor dentro
de água ou de qualquer outro líquido, nem
enxague à torneira. Use apenas um pano
húmido para limpar a unidade do motor.
◗ Quando a liquidificadora, a taça e a tampa de
enroscar estão bem colocadas, ouve-se um
'clique'.
◗ O disco para emulsionar, a lâmina e o
amassador devem ser colocados no suporte
respectivo no interior da taça.
◗ Retire a protecção da lâmina sempre que se
servir dela.
◗ Evite tocar no rebordo AFIADO das lâminas,
principalmente se o aparelho estiver ligado à
corrente.
◗ Se as lâminas ficarem presas, desligue da
corrente antes de retirar os ingredientes que
estiverem a obstruir as lâminas.
◗ Deixe os ingredientes quentes arrefecerem
antes de os processar (temperatura máx.
80cC/175cF).
◗ Se estiver a processar um líquido que tenha
tendência a formar espuma, não deite mais do
que 1 litro no copo misturador para evitar
salpicos e derrames.
 Loading...