

Philips CTX503WHT-00 User Manual
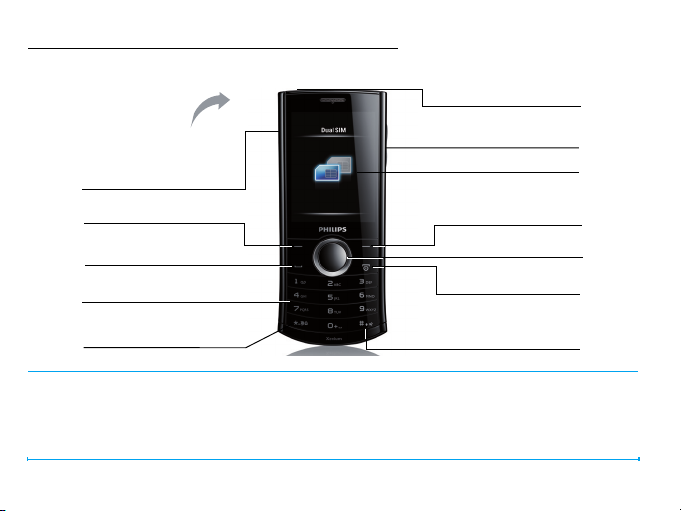
Discover your phone
3.5mm headset jack
Back of phone: 3.2MP camera lens
Charger & USB port
Left soft key
Pick-up key
Alphanumeric keypad
Lock/unlock key,
Symbol input
Philips continuously strives to improve its products. Therefore, Philips reserves the rights to revise this
user guide or withdraw it at any time without prior notice. Philips provides this user guide “as is” and
does not accept, except as required by the applicable law, liability for any error, omission or discrepancy
between this user guide and the product described. The device is meant to be connected to GSM/GPRS/
EDGE networks.
+/-Side volume key
TFT LCD
Right soft key
Navigation and , keys
Hang-up and On/
Off key
Meeting profile On/
Off, selection of text

How to ...
Switch the phone On/Off Long press and release ).
Enter your PIN code Enter your PIN code using the keypad and press
Lock/Unlock keypad On the idle screen, long press *. To unlock keypad, long press
,
to confirm.
*.
Make a call Enter the phone number by using the keypad and press (.
Answer a call When the phones rings, press (.
End a call Press ).
Activate/Deactivate
handsfree mode
Access received messages/
missed calls
Select text entry method Press # repeatedly on the editing screen. Long press * to turn
Access main menu On the idle screen, press ,Menu.
During a call, press ,Handfree/Handheld.
On idle screen, press ,View.
T9 input on or off. Long press # and release to access Writing
Language screen.
1
Dual SIM settings On the idle screen, press ,Menu to go to Settings > SIM settings,
press + or - and , to select: Dual SIM setting, Mode setting or Query
on power up.
Access a submenu directly On the idle screen, press RShortcut.
Quickly return to idle
Press ).
when browsing menus
Vibration on/off (for default
Meeting profile)
2
Long press # on the idle screen.
Soft keys
The ,, L and R are located at the top of
the keypad area. Pressing the soft keys allow you
to select the options above them on the screen.
Such options are contextual: they vary according
to current context.
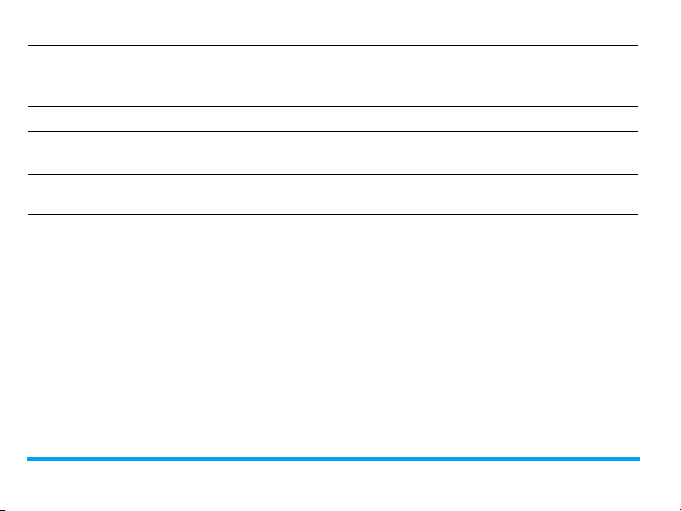
Main Menu
The main menu gives you access to all the
different features of your mobile phone. The
table below summarizes the functional icons on
the main menu. To find more information about
their functions, refer to the pages.
Applications Browser Media player
page 46 page 42 page 48
Camera Messages My files
page 44 page 22 page 54
Tools Contacts Profiles
page 36
Bluetooth Calls Settings
page 58 page 57 page 62
On the idle screen, press ,Menu on idle screen
to access the main menu and press +, -, < or
page 32
page 61
>
to
3

navigate through the icons and lists. Press
access the options related to the selected item.
Press RBack to return to previous menu. Press
)
to return to the idle screen.
,Select to
Fast Keys
0
1
Long press to enter “+” when
making international calls.
Long press to access the voice
mailbox.
Long press to select/unselect
#
Meeting profile (by default,
vibration on or off for incoming
calls or messages).
Navigation keys
You can configure the navigation keys +, -, < or
>
to access your favourite features directly. On
the idle screen, press the keys to access the
features.
Go to Settings > General > Fast keys to check the
4
default settings of the navigation keys +, -, < or >.
To change the default settings,
1.
Select the item to be changed.
2.
Press ,Edit to assign a new shortcut to the
key.
3.
Press + or - to select, and ,Select to
confirm.
Shortcut menu
With shortcuts, you can access a functional submenu directly. You can select the desired
shortcuts and rank them in the order of
preference.
To set your shortcut menu
1.
Go to Settings > General > Shortcut.
2.
Press + or - to check the list of functional
displays. To select/unselect an item, press
,
Enable/Disable.
3.
Press LOptions > Add to add a shortcut.
To use your shortcut menu

• On the idle screen, press RShortcut, and
you can select a functional display as desired.
The idle screen switches to the relevant
display.
Power-saving mode
After the set time span, the phone has the idle
screen turned off automatically. To exit the
power-saving mode, press any key. For powersaving purpose, set the time span to a low value
in Settings > General > Display > Backlight level &
Backlight duration.
Auto keypad lock
In the idle mode, your phone can have the
keypad locked automatically after the set time
span.
To set the auto keypad lock
Go to Settings > Security > Auto keypad lock.
To u nl o ck t h e k ey p a d
Long press *.
To lock the keypad manually
On the idle screen, long press *.
5

Table of contents
Table of contents
1 Getting Started 9
Insert the SIM card 9
Charge the battery 11
Mode settings 12
Set clock 12
Insert the micro-SD card 14
Remove SIM2 14
2 Text Entry 15
Select text entry methods 15
Entering text 15
3 Calling 18
Making a call 18
Answering and ending a call 19
Options during a call 19
Handling multiple calls
(Network-dependent) 20
6 Table of contents
Making an emergency call 21
4 Messaging 22
Creating messages 22
Organizing your messages 24
Defining your message settings 26
E-mail 28
Broadcast messages 31
5 Contacts 32
Adding or editing contacts 32
Searching for a contact 33
Managing your contacts 33
Create your name card 34
Special numbers 35
6 Tools 36
Using your business organizer

Create your task list 36
Check your calendar 37
Edit your task list 37
Sound recorder 37
Using your clock and timer
Alarm 39
Stopwatch 40
Text reader 40
Others
Calculator 41
Unit converter 41
Currency converter 41
7 Browser 42
Managing your browser 42
Accessing web sites 42
Enabling/ disabling push messages 42
STK 43
Table of contents 7
8 Camera 44
Camera 44
Video recorder 45
9 Applications 46
Java games and application 46
10 Media player 48
Music player 48
FM radio 50
View photos 53
Play video clips 53
11 My files 54
Finding your files 54
Managing your files 54
Sharing your files 55
Using your files 56

12 Calls 57
13 Bluetooth 58
About Bluetooth 58
Connecting to a Bluetooth device 58
Getting connected by
a Bluetooth device 59
Editing your device list 60
14 Profiles 61
Adjusting ringer settings to
different scenes 61
15 Settings 62
SIM settings 62
General 62
Security 66
Restore factory settings 66
Icons & Symbols 67
Precautions 69
Tips 75
Troubleshooting 76
Philips Authentic Accessories 80
Trademark Declaration 83
Specific Absorption Rate Information 84
Limited Warranty 86
Declaration of Conformity 90
Call settings 64
Network 65
8 Table of contents
Inserting the SIM card
1 Getting Started
Congratulations on your purchase and welcome
to Philips!
To get the most of your product and enjoy all
Philips has to offer, register your product at
www.philips.com/welcom.
Please read the safety instructions in the
"Precautions" section before use.
To use your phone, you must insert a valid SIM
card supplied by your GSM operator or retailer.
The SIM card contains your subscription
information, your mobile phone number and a
memory in which you can store phone numbers
and messages.
With two SIM card slots, X503 allows you to
use two SIM cards or phone numbers on one
phone. If you select Dual SIM open on Settings >
SIM settings > Mode settings, you can set SIM1
and SIM2 to idle mode.
Getting Started 9
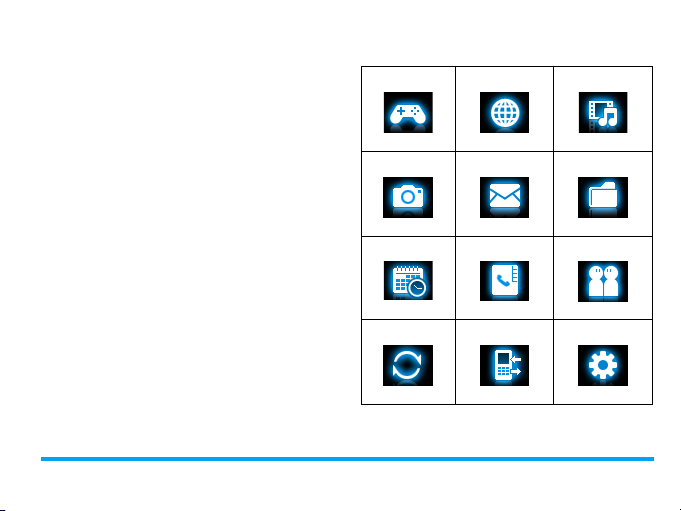
Follow the steps bellow to insert your new SIM
cards. Remember to switch off your mobile
phone before removing the back cover.
1.
Press on the back cover and slide the cover
as shown.
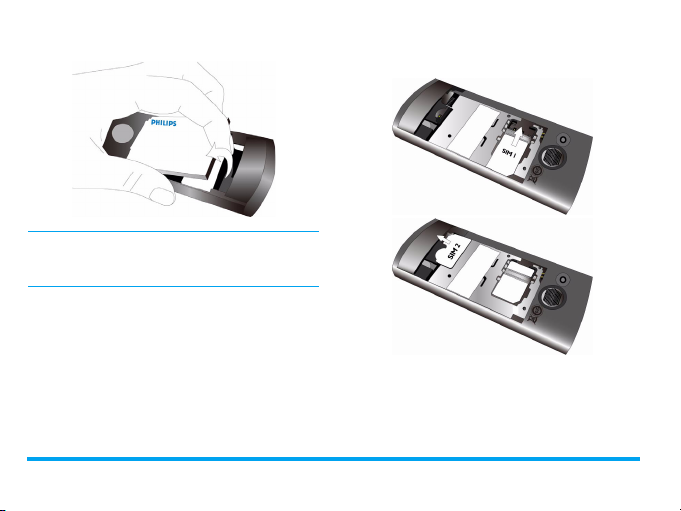
2.
As shown, take out the battery.
gold contact downwards. Insert your SIM
card under the metal clip holder.
You may lose all your personal settings if you
remove the battery when the phone is switched
on.
3.
As shown, align your SIM card with the SIM
care slot, bevelled corner facing you and
10 Getting Started
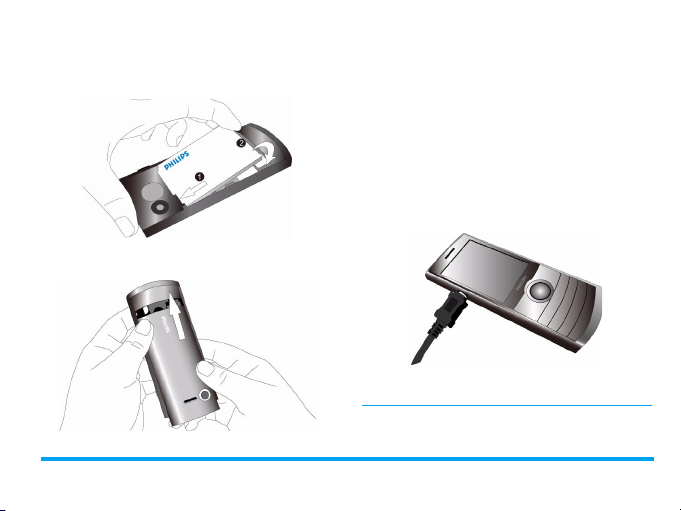
4.
As shown, align the metallic connectors on
the battery and battery slot. Insert the
battery until it is locked.
5.
As shown, insert the back cover from the
bottom. Push the cover until it is locked.
Getting Started 11
Remove the protective film covering the screen
and camera lens before using the phone.
Charging the battery
Your phone is powered by a rechargeable
battery. A new battery is partially charged. The
battery symbol indicates the state of the battery.
To charge the battery, plug in the connector as
shown below. Then plug the other end into a
power socket.
During charging, the battery symbol scrolls.
Keeping the charger plugged to the mobile
phone when the battery is fully charged will not

damage the battery. The only way to turn off the
charger is to unplug it, so it is advisable to use an
easily accessible power socket.
If you do not intend to use your phone for
several days, we recommend that you remove
the battery.
You can use the phone while it is charging. If the
battery is completely flat, the battery symbol will
only reappear after a few minutes of charging.
Mode settings
Once you switch on the phone, you need to set
Mode settings.
1.
Check the Slot 1 and Slot 2 for the SIM
cards (see Step 3 in "Inserting the SIM
card").
2.
Check that your phone is switched on.
Long press ) if necessary. Enter the PIN
code if required. A PIN code is a 4- to 8digit secret code of your SIM card. It is
12 Getting Started
preconfigured and communicated to you by
your network or retailer.
If you enter an incorrect PIN code three times
in succession, your SIM card will be blocked. To
unblock it, you must request the PUK code from
your operator.
3.
The Mode settings screen displays. Press +
or - to select:
Dual SIM open: Set SIM1 and SIM2 to idle
mode.
Only SIM1 open: Only use SIM1 to make/
receive calls and send/receive messages.
Only SIM2 open: Only use SIM2 to make/
receive calls and send/receive messages.
4.
Press ,Select to confirm.
Set clock
1.
Check that your phone is switched on.
2.
On idle screen, press ,Menu and go to
Settings > General >Time and date.
Set format: Select the time (12-hour or 24-

hour clock) and date format by pressing the
navigation keys + or -
Set time/date: Enter the time and date. Press
and ,OK.
+ or - to select the box to be defined, and
then use numeric key to enter your desired
digits.
Show time: To display time and date on idle
screen, press + or - to show the time in a
clock (Analog mode) or digits (Digital mode).
Press ,Select to confirm.
Local settings/Foreign settings: Press < or >
select time zone and city. Press LOptions
to turn on the daylight saving time if
applicable.
Switch local/foreign: Switch between local and
foreign clocks.
Display local and international clocks
You can display two clocks on the idle screen,
one showing your local time and the other the
time of your destination.
1.
Check that you have set your local time and
date.
2.
Go to Settings > General > Time and date >
World clock:
Clock status: Press ,On to turn on/off the
international clock.
Getting Started 13
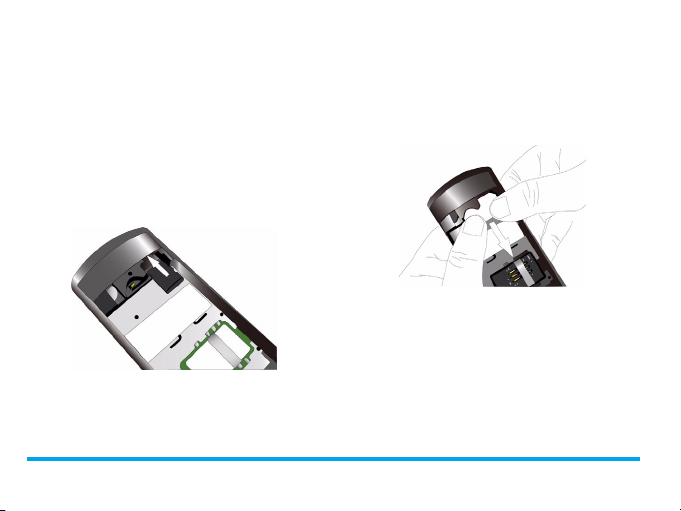
Inserting Micro-SD card (memory card)
You can expand the memory of your phone by
adding a micro-SD card.
Supported capacity: up to 8GB
1.
Follow Step 1 and Step 2 under "Inserting
the SIM card" .
2.
As shown, align your micro-SD card with
the slot. Put it into the slot until it is secure.
To remove the Micro-SD card, press
the card and pull it out.
14 Getting Started
Remove SIM2
1.
Follow Step 1 and Step 2 under "Inserting
the SIM card" .
2.
Press on the card and remove the card as
shown.
editing screen. When you access the editor
2 Text Entry
Your mobile phone supports a number of text
entry methods, including T9 input, multi-tap
input, numeric input and symbol input.
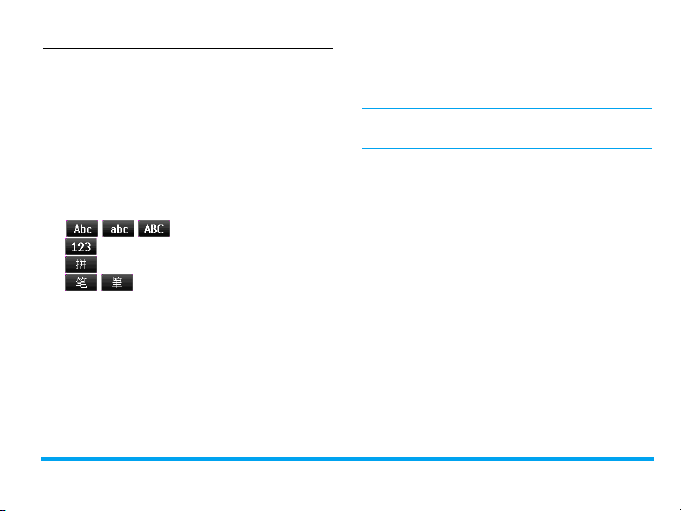
Select text entry modes
1.
During text editing, press # repeatedly
to select your desired inputs:
/ / : for English entry
: for numeric entry
: Phonetic input for simplified Chinese
/ : Stroke input for Simplified /
Traditional Chinese
2.
To switch the T9 English input on or off,
press * more than 3 seconds, and then
release it.
3.
To enter a symbol and punctuations, press
*.
The text editor remembers the last input
method you have used before you exit the
Text Entry 15
again, it will automatically select the last input
method you have used.
Depending on the language you select for your
phone, the supported input methods may vary.
Entering text
1.
Select your desired text entry methods.
2.
Enter text by using the alphanumeric
keypad.
2 to 9 To input letters (T9/ phonetic
input)
Press repeatedly to input desired
letters (multi-tap input).
1 to 6 To enter strokes (stroke input)
<,> To browse candidate words (T9/
phonetic/multi-tap input)
+,-
To browse the candidate words on the
previous/next page (T9 input/multi-tap
input)

L
0 To input a space
R
Long press to clear all entries.
3.
T9® input
You need to press only once on the key
corresponding to each letter needed to spell a
word: keystrokes input are analyzed and the
word suggested by T9® is displayed at the popup window.
16 Text Entry
Select To confirm the selection
Clear
Short press to clear a letter,
If necessary, press ) to exit the input
mode to idle screen.
T9® predictive text input is an
intelligent editing mode for
Tegic Euro. Pat.
App. 0842463
messages, which includes a
comprehensive dictionary. It
allows you to quickly enter text.
Examples: how to enter the word "home":
1.
Press 4, 6, 6, 3.
The screen displays the first word of a list:
Good.
2.
Press > to scroll and select Home.
3.
Press LSelect to confirm.
Multi-tap input (ABC/Abc/abc)
Press the keys that are marked with the
corresponding letter you wish to enter. Press
once to get the first letter on the key, press
twice quickly to get the second letter and so on
until the letter you want is displayed on the
screen.
Example: how to enter the word "home":
Press 4, 4(GHI), 6, 6, 6 (MNO),
(MNO), 3, 3 (DEF).
6
Stroke input
The principle of stroke input is to dissect and
separate every stroke of a Chinese character
according to sequence. When you wish to input

the character, press the keys corresponding to
the required strokes according to sequence to
get the desired character. The stroke input
method in this phone classifies a Chinese
character into 5 basic strokes: (horizontal,
vertical, left falling stroke, right falling stroke and
over-down) as well as a special stroke. When
the stroke you need does not correspond to the
5 basic strokes, replace it with the special stroke
(?).
Text Entry 17

name (up to 5 characters) using the
3 Calling
Making a call
On idle screen
1.
Enter the phone number.
2.
Press
(
If you want to dial the number by
using secondary SIM, press LOpntions
> Dial (SIM2).
3.
Press )
For international calls, long press 0 to
enter the "+" sign for the international prefix.
Use the phonebook (see “Contacts” on
page 32)
1.
Go to ,Menu > Contacts to open the
contacts list.
Press
repeatedly to search for a contact. To
search for a contact, enter the contact
18 Calling
to dial the number.
to hang up.
<
or > to select a phonebook, and -
alphanumeric keypad, or select a contact
from the list.
2.
Press ( to dial the selected number.
For IP calls (China only), select Options >
IP dial (SIM1)/IP dial (SIM2).
You can preset your IP service number
under Settings > Calls settings > IP number.
3.
Press )
to hang up.
Speed dial
On the idle screen, you can call a preset speeddial number by long pressing a numeric key (
to 9).
Set your speed-dial number before dialling it.
To assign a speed-dial key to a contact:
1.
Go to Settings > General > Speed dial.
2.
If necessary, press ,On to turn speed dial
on.
2

To make a speed dial, always check
that the speed-dial function is enabled.
3.
In Set number, select one of the locations
(corresponding to the numeric keys 2 to
9
).
4.
Press LEdit to assign to the location a
contact from your phonebook.
Answering and ending a call
When you receive a call, the number of the caller
may be displayed, depending on whether or not
the calling party has chosen to display his or her ID.
If the number is stored in the phonebook, then the
corresponding name is displayed.
• Answer the call: Press
• Hang up: Press ).
•
To answer or end a call using the supplied
one-key headset, see “Headset” on page 80
• To reject calls from certain contacts, you
can add the contacts or numbers to your
blacklist. In Contacts or Calls, select a contact
or phone number, and press LOptions > Add
Calling 19
(
or
,
.
to Blacklist (For more information about
blacklist, see “Blacklist” on page 65).
Options during a call
During a call, you can press , to select
Handsfree or Handheld mode. Press LOptions
to access the following options:
- Hold single: Put current call on hold
- End single: End current call
- New call: Make a new (a second) call.
- Phonebook: Select or edit contacts in the
phonebook.
- Messages: Send and receive messages.
- Sound recorder: Record conversation
during a call. (see “Sound recorder” on
page 37).
.
- DTMF: Enable the touch tone dialling
system.

Sound recorder
In most countries, recording of telephone
conversation is subject to legislation. We advise
you to notify the caller if you intend to record
the conversation and only do so if they agree.
You should also ensure confidentiality of the
recordings.
To record a conversation during a call, select
Options and select Sound recorder. Recorded
sound is saved in *.amr format and stored in Audio
of My files menu. (see “Finding your files” on page
54).
Mute or unmute a call
During a call, press RMute/Unmute to set the
Mute function on/off. If you select Mute, the
microphone will be deactivated.
20 Calling
Adjust the volume
During a call, press side volume key + or - to
increase or decrease the volume.
Handling multiple calls (Networkdependent)
You can handle two or more calls at the same
time, as well as make conference calls with your
phone. The availability of this feature is
dependent on your network operator and/or
your subscription.
Make a second call
You can make a second call when there is an
active call or with a call on hold. While on the
phone, enter the number (or select a contact
from the phonebook) and press (. The first
call is put on hold and the second number is
dialled. You can then select LOptions to
access the following options:
- Swap: To toggle between 2 calls.

- Conference: To introduce the caller into a
conference call.
- End single: To disconnect one party from
the call.
- End all calls: To disconnect all party from
the call.
- Transfer: Connect the two calls. You are
disconnected when the transfer is
completed.
- Sound recorder: Record conversation
during a call. (see “Sound recorder” on
page 37).
- New call: Make a new (a second) call.
- Phonebook: Select or edit contacts in the
phonebook.
- Messages: Send and receive messages.
- DTMF: Enable the touch tone dialling
system.
Answer a second call
When you receive a second call while already in
communication, the phone will emit a beep tone
Calling 21
and the screen displays information about the
incoming call. You can then:
• Press ( or , to
one is put on hold).
• Press ) to reject the call.
To receive a second call, you must first
deactivate Call Divert for (see page 64) and
activate Call waiting (see page 64) must be
activated.
answer the call (the first
Making an emergency call
Without a SIM card in phone, you can press
R
SOS to make the emergency call.
With a SIM card in phone, you can enter the
emergency number in the idle mode, then press
(
.
In Europe, the standard emergency number is
112, in the UK, it is 999.
2.
Press LOptions to access the following
4 Messages
Creating messages
SMS
SMS enables you to send text messages to the
other party, using Short Messaging Service
(SMS). You can use the Create message > SMS
menu to send messages to another hand-phone
or a device that is capable of receiving SMS
messages. To compose and send a SMS message,
follow the steps below:
1.
Select Create message > SMS, and write your
message.
22 Messages
options:
Send to
Writing
language
Insert template
Advanced
Save as drafts Save as draft
3.
Press ,Send to send the message to the
desired contact or contact group (see
“Contacts” on page 32)
Enter a number or select a
contact from the phonebook.
Select your desired writing
language.
Select to insert a preset
message.
Select to insert the name and
phone number of your
contacts, or website
information you saved as a
bookmark (see “Accessing
web sites” on page 42).
- Save the SMS
messages to drafts of SIM1 or
SIM2.

MMS
Your mobile phone can also send and receive
MMS (Multimedia Messaging Service) messages.
With MMS, you can send messages that contain
pictures, sound and text.
When sending MMS messages, make sure that
your recipient also has an MMS-enabled phone
in order to view your messages. Follow the
steps described below to compose and send an
MMS.
1.
Select Create message > MMS, while edit
content, press LOptions:
Send to
Writing
language
Add picture,
Add sound,
Add video
Add subject Enter the subject of the MMS.
Messages 23
Enter a number or select a contact
from the phonebook.
Select your desired writing
language.
Insert image, audio or video files
to your MMS.
Preview
MMS
Slide options Add Slide beind/Add slide before:
Advanced Press + or - to select:
Preview the current MMS. Press
< or > to move to previous or
next page.
Insert more slides into your
message.
Slide timing: Set the play time of
MMS slides. The default value is 5
seconds.
Insert text template:
a preset message.
Insert attachment: Insert a file
(such as .txt, .jar, etc) to your
message.
Insert contact number/name: Select
to insert the name and phone
number of your contacts.
Select to insert

1.
Insert bookmark
Add website information you
saved as a bookmark (see
“Browser” on page 42).
Save to
Drafts
Save as
template
Details Show the file information of
2.
While finish editing content, press ,Send
to send the message.
Copyright protected pictures and sound cannot
be sent by MMS.
Save the MMS to
Save the MMS to as a preset
message.
current message.
Drafts
.
Use templates for messages
You can use ready-made messages as new
messages. 10 SMS and 5 MMS messages are
preset in the Templates folder. You can also
save a message as a template.
24 Messages
Select Templates > SMS or MMS.
2.
Select your desired templates.
3.
Press LOptions, and select Write message.
The ready-made message appears on the
edit screen.
Organizing your messages
In this phone, your messages are sorted in the
following folders:
Inbox: received messages
Drafts: messages saved as drafts
Outbox: unsuccessfully sent messages
Sent: sent messages
Find a message
Enter a folder, and then press + or - to select a
message.

Manage messages
Select a desired message, press ,View to read
the message, or press LOptions to access the
following options:
For the SMS or MMS, or different folders,
available options may vary.
Reply by
SMS
Reply by
MMS
Call sender Call the sender.
Forward Forward the selected message.
Lock/
Unlock
Delete Delete the selected message.
Delete all Delete all messages in the folder.
Messages 25
Reply to the MMS sender by SMS.
Reply MMS to the sender.
Lock or unlock the selected MMS.
Select
multiple
Edit Edit and send the selected
Save to
phonebook
Sort by Slect the sort method of messages.
Mark as
unread
Details Show the file information of
Advanced Copy or move the selected
Select multiple messages to be
deleted. Press ,Check or Uncheck
to select messages. To delete
selected messages, select
LOptions > Delete.
message.
Save the number of sender to the
phonebook.
Displays the current message as
deleted.
current message.
message to SIM card or phone.

Defining your message settings
Some of your message settings are dependent
on the service you subscribe with the network
operator. Consult your network operator for
your account settings, general settings, server
profile, or other relevant settings.
In Messages > Settings > SMS> SIM1 message
settings/SIM2 message settings,
Account
settings
26 Messages
aProfile name: Edit the name of the
current profile.
SMSC address: Select your default
SMS center. If not available on
your SIM card, you must enter
your SMS centre number.
Voicemail
server
Validity period: Select the length of
time your messages will be
stored in the SMS centre. This is
useful when the recipient is not
connected to the network (and
thus cannot receive your
message immediately).
This feature is subscription
dependent.
Message type: Select the format of
your sent messages. This option is
network dependent.
Edit voice mail server number.

Common
settings
Delivery report: When set to On,
this option will inform you via
SMS whether or not your own
SMS was received.
This feature is subscription
dependent.
Reply path: When On, this option
allows you to transmit the
number of your SMS message
center together with the
message. The recipient can then
reply using your SMS center and
not theirs. This speeds up the
rate of transmission. This feature
is subscription dependent.
Save sent message: When set to
On, the message is sent and saved
Memory
status
This option can display the
memory status of the messages
saved in the SIM card and the
phone.
Preferred
storage
This option allows you to select
the preferred storage. You can
select SIM card or phone.
In Settings > MMS > Common settings,
Create Set Creation modes, Image resizing,
Auto signature and Signature. In
Signature, press ,Edit to enter the
content of signature.
Sending Set Validity period, Delivery report,
Read report, Priority, Delivery time,
Hide sender and Send and save
options for sending an MMS
message.
to the Sent folder.
Messages 27
 Loading...