

Philips CTX503WHT/00 User Manual

Your phone
Headphone
Back of phone:
3.2MP
camera lens
Charger &
USB port
Left soft key
Navigation
and , keys
Pick-up key
Lock/unlock
key; Symbol
input
Philips continuously strives to improve its products. Due to software upgrading, some contents in this user guide
may be different from your product. Philips reserves the rights to revise this user guide or withdraw it at any
time without prior notice. Please take your product as standard.
jack
Side volume key
TFT LCD
Right soft key
Hang-up and
Power key
Alphanumeric
keypad

Home screen
Your phone’s home screen consists of the following
areas:
Status Bar
SIM1 & SIM2, and
Clock display
Shortcut
Keys
Learn about the main keys.
Key Definition Function
(
Dial Make or answer a call.
, Confirm Select or confirm an option.
) Hang-up/
Power/
Exit
L Left soft
key
End a call;
Hold to turn on/off the phone;
Return to home screen.
Select the options on the
screen.
R Right soft
key
* Lock/
unlock
Select the options on the
screen.
Long press to lock or unlock
keys on home screen.
Shortcut menu
The shortcut on home screen can open the
applications tab you often used.
Select shortcut menu:
1
Go to Menu>Settings>General>Shortcut to
enter shortcut list.
2
Press ,Enable/Disable to change shortcut
menu.
3
Press LOptions to enter shortcut settings.
Your phone 1

Icons & symbols
Learn about the icons and symbols on the screen.
Icons Definition Function
Silent
Vibration
only
Battery
SMS
MMS
Wap
message
Missed call
Call diverts
Bluetooth
Bluetooth
headset
Headset
2 Your phone
Your phone will not ring
when receiving a call.
Your phone will vibrate when
receiving a call.
The bars indicate the battery
level.
You have a new message.
You have a new multimedia
message.
You have received a Wap
push message.
You have missed a call.
All your incoming voice calls
are being forwarded to a
number.
Bluetooth is activated.
The Bluetooth headset is
connected.
The headset is plugged into
the phone.
Alarm
Roaming
Home zone
GSM
network
GPRS
attach
EDGE
attach
Blacklist
Key lock
Memory
card
The alarm clock is activated.
Displayed when your phone
is registered to a network
other than your own
(especially when you’re
abroad).
A zone designated by your
network operator. Contact
your service provider for
details.
Your phone is connected to a
GSM network. The more
bars are shown the better the
reception is.
Your phone is connected to
the GPRS network.
Your phone is connected to
the EDGE network.
Indicates that blacklist feature
is activated.
The keypad has been locked.
The memory card is in use.

Table of contents
Getting started . . . . . . . . . . . . . . . . . . . . . . . . . 4
Insert SIM card and Charge the battery. . . . . . . 4
Insert a Micro SD card (Memory card) . . . . . . . 6
Connect to your PC . . . . . . . . . . . . . . . . . . . . . . 6
Customize your phone . . . . . . . . . . . . . . . . . . . . 7
Basic function . . . . . . . . . . . . . . . . . . . . . . . . . .9
Use basic call functions . . . . . . . . . . . . . . . . . . . . 9
Receive and send messages. . . . . . . . . . . . . . . . 10
Enter text . . . . . . . . . . . . . . . . . . . . . . . . . . . . . 11
Manage your phonebook . . . . . . . . . . . . . . . . . 12
MultiMedia. . . . . . . . . . . . . . . . . . . . . . . . . . . . 14
Media player . . . . . . . . . . . . . . . . . . . . . . . . . . . 14
Camera . . . . . . . . . . . . . . . . . . . . . . . . . . . . . . . 15
Video recorder . . . . . . . . . . . . . . . . . . . . . . . . . 16
FM radio . . . . . . . . . . . . . . . . . . . . . . . . . . . . . . 17
Business applications . . . . . . . . . . . . . . . . . . . 18
Manage your calendar . . . . . . . . . . . . . . . . . . . . 18
Alarm . . . . . . . . . . . . . . . . . . . . . . . . . . . . . . . . . 18
Bluetooth. . . . . . . . . . . . . . . . . . . . . . . . . . . . . . 19
Read E-books . . . . . . . . . . . . . . . . . . . . . . . . . . 19
File management . . . . . . . . . . . . . . . . . . . . . . . . 20
Use blacklist . . . . . . . . . . . . . . . . . . . . . . . . . . . 20
Check world clock . . . . . . . . . . . . . . . . . . . . . . 21
Calculator . . . . . . . . . . . . . . . . . . . . . . . . . . . . . 21
Currency converter . . . . . . . . . . . . . . . . . . . . .21
Web applications & Java . . . . . . . . . . . . . . . . . 22
Browser . . . . . . . . . . . . . . . . . . . . . . . . . . . . . . . 22
Java applications . . . . . . . . . . . . . . . . . . . . . . . . . 22
Settings. . . . . . . . . . . . . . . . . . . . . . . . . . . . . . . 24
SIM setting . . . . . . . . . . . . . . . . . . . . . . . . . . . . . 24
General setting . . . . . . . . . . . . . . . . . . . . . . . . . 24
Call settings . . . . . . . . . . . . . . . . . . . . . . . . . . . .25
Network settings. . . . . . . . . . . . . . . . . . . . . . . . 25
Security settings. . . . . . . . . . . . . . . . . . . . . . . . . 25
Restore factory settings . . . . . . . . . . . . . . . . . . 26
Safety & Precaution . . . . . . . . . . . . . . . . . . . . .27
Precaution . . . . . . . . . . . . . . . . . . . . . . . . . . . . . 27
Tips . . . . . . . . . . . . . . . . . . . . . . . . . . . . . . . . . . 28
Troubleshooting . . . . . . . . . . . . . . . . . . . . . . . . 28
Trademark Declaration. . . . . . . . . . . . . . . . . . . 29
Specific Absorption Rate Information . . . . . . . . 30
Limited warranty . . . . . . . . . . . . . . . . . . . . . . . . 30
Declaration of Conformity . . . . . . . . . . . . . . . .32
Tips & tricks. . . . . . . . . . . . . . . . . . . . . . . . . . .33
Table of contents 3

Getting started
Congratulations on your purchase and welcome to
Philips!
To get the most of your product and enjoy all
Philips has to offer, register your product at:
www. philips. com/welcome.
More details about your product, please access:
www.philips.com/support
Note: Please read the safety instructions in the "Safety &
Precaution" section before use.
Insert SIM card and Charge the battery
Learn about installing SIM card and charging the
battery for the first use.
Insert SIM card
Follow the steps below to insert your SIM card.
Remember to turn off your mobile phone before
removing the back cover.
4 Getting started
1
Remove the back cover.
2
Take out the battery.
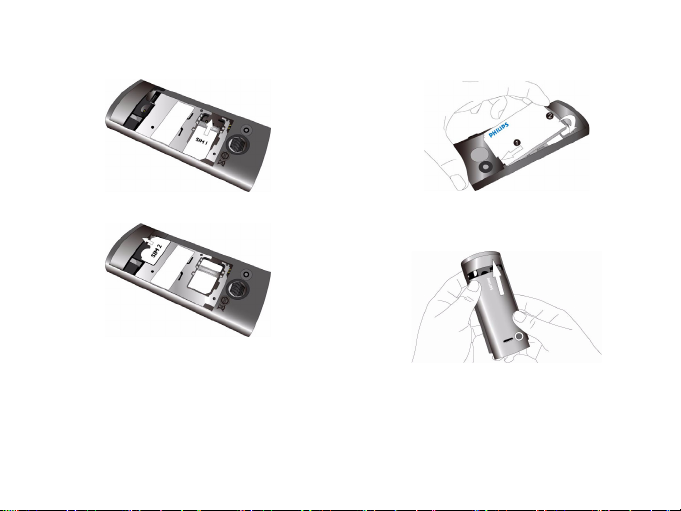
3
Insert SIM1/SIM2.
4
Install the battery.
5
Replace the back cover.
Getting started 5
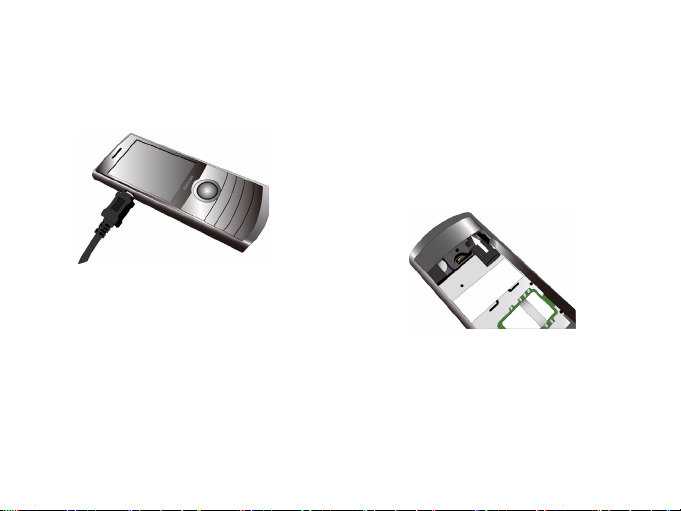
Charge the battery
A new battery is partially charged. The battery icon
in the upper-right corner shows the battery level of
charging status.
Note:
•
You can user the phone while it is charging.
•
Keeping the charger plugged to the mobile phone when
the battery is fully charged will not damage the battery.
The only way to turn off the charger is to unplug it, so it
is advisable to use an easily accessible power socket.
•
If you do not intend to use your phone for several days,
we recommend that you remove the battery.
6 Getting started
Insert a Micro SD card (Memory card)
You can expand the memory of your phone by
adding a micro-SD card.
1
Align your micro-SD card with the slot. Put it in
place.
2
To remove the micro-SD card, press on the card
and pull it out.
Connect to your PC
Data communication software (Mobile Phone
Tools) offers instant sychronization between your
phone and your computer. You can use the
software for the data synchronization between your
phone and PC, like phonebook, calendar, SMS

messages, and audio/video/picture files. With the
software and GPRS service, you can also connect
your PC to the Internet through your phone.
Install MobilePhoneTools on your PC
1
Insert the supplied Data communication
software into the CD drive.
2
Run the autorun.exe program.
3
Make selections as prompted, and installation
starts automatically.
Connecting your Phone to the PC
1
Connect your phone to the PC using the
supplied USB cable or through the Bluetooth.
2
When using the USB cable for connection,
select COM port on your phone.
3
On your PC, double click the MobilePhoneTools
icon, then the connected icon is displayed.
Customize your phone
Customize your phone to match your preferences.
Set clock
1
On the home screen, go to Menu>Settings>
General>Time and date.
2
Select Set time/date: Enter the digits or long
press navigation key
desired digits.
+ or - until you reach the
SIM settings
1
Check that your phone is turned on. Enter the
PIN code if required.
2
Go to Settings>SIM settings>Dual SIM
>SIM1/SIM2 setup, name your SIM card.
setting
3
Select SIM1 or SIM2 to be the primary card.
4
Go to SIM settings>Mode setting, select your
desired options.
Note:
•
The PIN code is preconfigured and communicated to
you by your network operator or retailer.
•
If you enter an incorrect PIN code three times in
succession, your SIM card will be blocked. To unblock it,
you must request the PUK code from your operator.
Getting started 7

•
If you enter an incorrect PUK code ten times in
succession, the SIM card will be locked permanently.
When this happens, please contact your network
operator or retailer.
Profiles
The profiles are defined for several scenes. They
consist of the settings for ringtone, volume, and
others. With preset profiles, you can easily adjust
the settings for incoming calls and messages as
desired.
1
Go to Profiles, press ,Activate to activate
the profile.
2
Press L to modify ringtone, volume and
others.
To activate
Meeting mode, long press # on
the home screen.
Note: If you select Flight mode, you disable the connection
between your phone and your mobile phone network.
8 Getting started

Basic function
Use basic call functions
Learn to make or answer a call and use basic call
functions.
Make a call
1
Enter the phone number.
2
Press ( to dial the number.
3
Press ) to hang up.
Note: For international calls, long press 0 to enter the
"+" sign for the international prefix.
Answer and end a call
1
Press ( to answer the call (Press the side
volume key to adjust the volume).
2
Press , to select handsfree mode.
3
Press ) to hang up.
Note: You can use the supplied headset to answer or end a
call.
Make a conference call
If network applicable, you can handle two or more
calls, or make a conference call.
1
During a call, enter a phone number, and then
press
( to dial the number. The second
number is dialled.
2
The first call is put on hold at this time.
3
You can press LOptions>Swap to toggle
between 2 calls.
4
To end the call, select Options>End single or
End all.
Use speed dial
On the home screen, you can call a number by long
pressing a numeric key.
To assign a contact to a speed-dial key:
1
Select Settings > General > Speed dial > Set
number
2
3
.
Choose a numeric key.
Press L to add a number.
Basic function 9

Make an emergency call
Without a SIM card in phone, you can press R to
make the emergency call.
In Europe, the standard emergency number is 112;
in the UK, it is 999.
Receive and send messages
You can use the Messages menu to send text
message, multimedia message and E-mails.
Send a SMS message
1
Select Menu>Messages> Create message>
SMS.
2
Write your text message.
3
Press , to send the message.
Send a MMS message
1
Select Menu>Messages> Create message>
MMS.
2
Edit contents, and press LOptions to add
multimedia contents (photo, audio, video,
attachment or bookmark text).
3
Enter a number or select a contact from
phonebook.
10 Basic function
4
Press , to send the Multimedia message.
Note: Copyright protected pictures and sound cannot be
sent by MMS.
Send an E-mail
1
Go to E-mail>E-mail accounts, select a profile,
and then select
a new account, press ,
2
Go to Write E-mail, enter the address (To), a
copy (
attachment.
3
Edit the E-mail contents.
4
Press R to send the E-mail.
Note: Consult your mail service provider for the mail
server configuration.
Options > Edit. After setting up
to activate it.
Cc), a blind copy (Bcc), subject and
Receive E-mails
Select E-mail>Send and receive, you can receive
E-mails from the Internet.
To receive E-mails automatically:
1
Go to E-mail > E-mail accounts > Options >
Edit > Advanced settings.
 Loading...