

Page 1
Page 2
Discover your phone
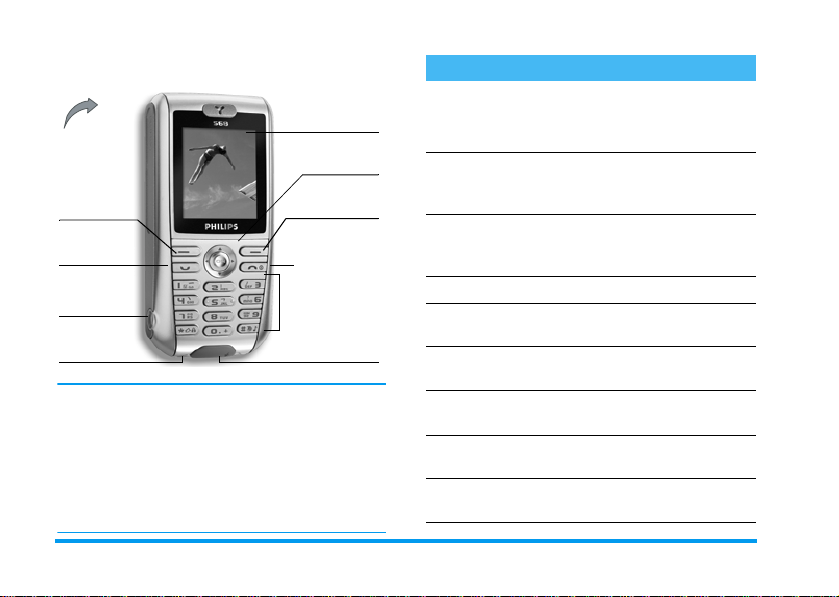
65 000 colours
Back of the
phone:
speaker &
camera lens
Left softkey Right softkey
Pick up key Hang up, cancel
Headset
connector
Microphone
Philips continuously strives to improve its products.
Therefore, Philips reserves the rights to revise this user
guide or withdraw it at any time without prior notice.
Philips provides this user guide «as is» and does not
accept, except as required by applicable law, liability
for any error, omission or discrepancy between this
user guide and the product described. The device is
meant to be connected to GSM/GPRS networks.
main screen
Navigation
and
,
and on/off key
Alphanumeric
keypad
Charger
connector
keys
How to...
Switch the phone
On/Off
Enter your PIN code
Make a call
End a call
Answer a call
Reject a call
Set the conversation
volume
Activate/deactivate
the loudspeaker
Access the main
menu
Long press ).
Enter your PIN code using
the keypad and press
R
to confirm.
Enter the phone number on
the keypad and press
dial.
Press ).
Press ( when your phone
rings.
Press ) when your phone
rings.
Press + or - during a call.
Long press # during a
call.
Press , in idle mode.
,
(
or
to
Page 3
Access the
Manage the
Activate/deactivate
the
Lock/unlock
the keypad
Set the ringer volume
Access the
Go to previous menu
Quickly return
to idle when
browsing menus
Silence
Contacts
Contacts
mode
Call list
Press - in idle mode.
Browse the list by moving
or - and press ( to call
the selected name.
Long press # in idle
mode.
Long press * (the keypad
is automatically unlocked
when receiving a call).
Press , and select
Sound
>
Ringer volume
Press + in idle mode. The
Call list
displays the
, the
missed
the
Calls dialled
Press ) or <.
Press and hold ).
Settings
Calls received
.
.
Calls
and
+
View the last call
made
Use the fast access
softkey
Press ( in idle mode.
Press > when in idle mode to
access or change the feature
set on the softkey.
The matrix
The matrix is t he graphic representation of the menus,
featuring the icons. Each icon represents a feature or
operation of your phone.
,
to access the matrix when in idle mode, then
Press
>
press
+, -, <
or >to browse the icons and lists, or
1
press the keys
option or feature of your choice (the key mapping also
applies to lists).
When navigating in a list, a scroll bar located on the
right hand side of the screen shows your actual
position in the list.
Within lists, press > or , to access the options related
to the selected item, press
one level.
to 9 for a direct access to the
<
or select
Cancel
to go back
Page 4

Softkeys
The right R and left L softkeys located on top
of the keypad allow you to select the corresponding
options displayed on the screen, including during
calls. These keys are contextual: they will vary
according to the current context.
Also, some events may modify the idle screen (missed
call, new message, etc.). Press
corresponding menu.
An option allows you to configure these keys (as well
as keys
2
favorite features or your preferred numbers (see “Set a
flash softkey” page 5 for details).
to 9) for a direct, fast access to your
R
to access the
Page 5

Table of contents
1. Getting started ............................................1
Insert the SIM card ...........................................1
Switch on the phone ........................................2
Copy the SIM phonebook ...............................2
Charge the battery ...........................................2
2. Main features ................................................4
Access and view the phonebook ...................4
Make a call ..........................................................4
Answer and end a call ......................................4
See and hear who’s calling ..............................4
Take a picture ....................................................5
Set a flash softkey .............................................5
Call handsfree ....................................................5
Put the call on hold ..........................................5
Change the ringer .............................................5
Activate the silence mode ..............................6
Activate the vibra alert ....................................6
Read your mobile phone number .................6
Adjust the earpiece volume ............................6
Mute/unmute the microphone .......................6
Clear the call lists ..............................................6
Clear the phonebook .......................................6
Table of contents i
3. Menu tree .......................................................7
4. Text or number entry ......................... 11
T9® Text input .............................................. 11
Basic text input ............................................... 12
5. Camera .......................................................... 13
How to... .......................................................... 13
Activate ............................................................ 14
Video ................................................................ 14
Settings ............................................................. 15
6. Contacts ....................................................... 17
Create and manage contacts ....................... 17
Groups ............................................................. 18
See & hear who’s calling ............................... 19
7. Settings .......................................................... 21
Sound ................................................................ 21
Display .............................................................. 22
Language .......................................................... 23
Device .............................................................. 23
Network .......................................................... 23
Security ............................................................ 25
8. Messages ....................................................... 27
SMS ................................................................... 27
Page 6

MMS ..................................................................29
E-Mail ................................................................33
Voice msg. ........................................................ 35
Cell broadcast ................................................. 35
9. Multimedia
& Demo mode
Picture album .................................................. 37
Sound album ....................................................38
Video album ....................................................38
Voice memo .................................................... 38
Memory status ................................................ 39
Demo mode .................................................... 39
................................................37
10. Games & Applications ...................... 40
Games ............................................................... 40
Organiser ......................................................... 41
Clock .................................................................41
Calculation ....................................................... 42
PC software link .............................................43
11. Call info ......................................................44
Call settings ..................................................... 44
Call list .............................................................. 45
Time/charges ................................................... 45
Erase records .................................................. 46
Barrings ............................................................ 46
Charge settings ............................................... 46
User group ...................................................... 47
12. Operator services ............................... 48
WAP ................................................................. 48
Make a second call ......................................... 51
Answer a second call .................................... 51
Answer a third call ........................................ 52
Icons & symbols ............................................ 53
Precautions ....................................................... 54
Troubleshooting ........................................... 57
Philips authentic accessories ................. 60
SAR Information - EU (RTTE) ............. 61
SAR Information - International
(ICNIRP)
............................................................ 62
ii Table of contents
Page 7
2.
1 • Getting started
Please read the safety instructions in the "Precautions"
section before use.
To use your phone, you must insert a valid SIM card
supplied by your GSM operator or retailer. The SIM
card contains your subscription, your mobile number,
and memory in which you can store phone numbers
and messages (see “Contacts” page 17).
Insert the SIM card
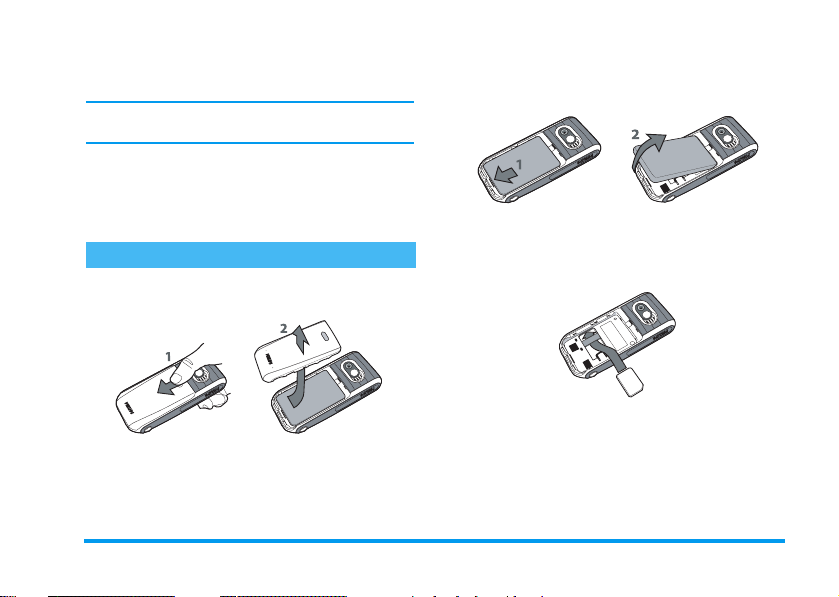
1.
Press on the back cover of your phone as shown
below and slide it downwards to remove it.
If needed, remove the battery: press the inner
clip downwards, then remove the battery by
pulling it from the bottom.
3.
Remove the SIM card from its holder and insert
it under the metal clip holder, until it stops. Be
careful that the clipped corner of the card is in
the correct corner.
Getting started 1
Page 8
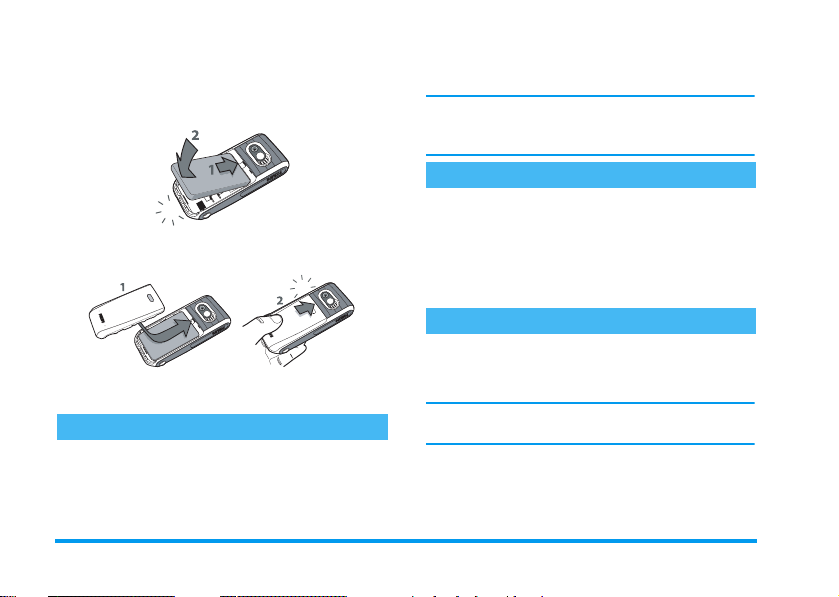
4.
Slide the battery back into its slot, metallic
connectors downwards, until it stops. Then lock
it by pushing it downwards.
communicated to you by your operator or retailer. To
personalise the PIN code, see page 25.
If you enter an incorrect PIN code 3 times, your SIM
card will be blocked. To unblock it, you must request
the PUK code from your operator.
Copy the SIM phonebook
The mobile phone detects a SIM card that already
5.
Replace the back cover by sliding it into its slots,
until it stops.
contains names and a message asks you if you want to
copy your SIM phonebook onto the built-in
phonebook. Press
For complete information about phonebooks, see
“Contacts” page 17.
L
to refuse or R to accept.
Charge the battery
Your phone is powered by a rechargeable battery. A
6.
Remove the protective film covering the screen
and the camera lens before using the phone.
Switch on the phone
)
To switch on the phone, press the
PIN code if required (i.e. the 4- to 8-digit secret code
of your SIM card). It is preconfigured and
key. Enter the
new battery is partially charged and an alarm will warn
you when the battery reaches low.
You may lose all your personal settings if you
the battery when the phone is switched on.
1.
Once the battery and battery cover are clipped
on the phone, plug the connector of the
provided charger into the socket at the base of
remove
2Getting started
Page 9
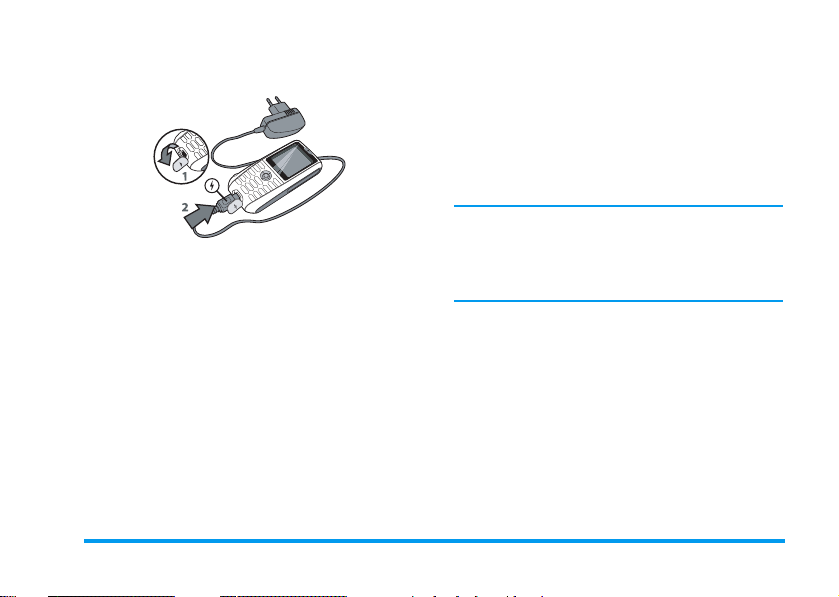
the phone on one end, then plug it into a main
AC power socket.
2.
The battery symbol indicates the state of charge:
- during charging, the 3 charge indicators scroll;
it takes around 2.5 hours to fully recharge your
mobile phone.
- when all 3 bars are steady the battery is fully
charged: disconnect the charger. Depending
on the network and condition of use, talk time
goes up to 4 hrs and stand-by time up to
300 hrs.
Keeping the charger plugged to the mobile when the
battery is fully charged doesn’t damage the battery.
The only way to turn off the charger is to unplug it, so
use an easily accessible AC power socket. You can
connect the charger to an IT supply (Belgium only).
Getting started 3
Page 10
2 • Main features
Access and view the phonebook
In idle mode, press -. During a call, press , or
Menu, select Contacts, then press , or R Select
to display the list. Press
screen.
Enter the first letters of your contact’s name to jump
directly to that name.
)
to return to the in-call
Make a call
1.
In idle mode, enter the phone number using the
keypad. To correct an error, press
2.
Press ( to dial the number and press ) to
hang up.
For an international call, press and hold 0 to
enter the «+» sign instead of the usual international
prefix. Then press
codes.
R
List to access the list of country
L
R
Clear.
Answer and end a call
When receiving a call, the number of the caller may be
displayed. If you stored his/her number, his/her name
is displayed instead of the number.
1.
To answer the call, press (.
2.
To reject a call, press ). If you have activated
Divert (see page 44), the call is diverted to a
number or voice mail.
3.
To hang up, press ).
The phone will not ring if in silence mode (see below).
If you have selected Any To Answer (see page 44), you
can accept a call by pressing any key (except )).
See and hear who’s calling
This feature is available only when selecting the
phonebook in the phone (not the one in the SIM card).
This feature allows you to link one or several names to
a group. When a name in that group calls, it will
appear along with the corresponding picture and the
melody defined for that group will ring. Refer to “See
& hear who’s calling” page 19 for details.
4 Main features
Page 11

Set a flash softkey Tak e a p i c t u re
The right R and left L softkeys located on top
of the keypad allow you to select the corresponding
options displayed on the bottom of the screen in idle
mode. These keys can be configured as follows:
1.
Press either key, then press L Change.
2.
Browse the list of available options.
If you want the softkey to dial a number, select
Phone number and press
choose a name in the contacts list. Press
Select to link this name to the softkey.
3.
Back to idle, press the configured key to launch
the corresponding feature or dial the number.
For speed dialling, keys
as flash hotkeys:
1.
Press and hold the key of your choice, then select
the feature you wish to link to that key.
2.
Back to idle, long press the configured key to
launch the corresponding feature or open the
menu.
R
Select, then
2
to 9 can also be set
R
Your mobile phone features a camera, allowing you to
take pictures and send them to your friends and
relatives. See “Camera” page 13 for complete
information on this subject.
Call handsfree
For your own comfort and safety, ensure you move the
phone away from your ear when calling handsfree,
especially when increasing the volume.
Make a call. Once the connection is established, press
,
or R Menu, select Loudspeaker, then press
or R Change to set in On. Repeat to set it Off
(changes are automatically taken into account).
Put the call on hold
During a call, simply press
the call, press
L
Return.
L
Onhold. To retrieve
Change the ringer
Navigate to Settings > Sound > Ringer, press
Edit, then R Change. Browse the list and press
R
Select to confirm your choice, then R Save.
R
Main features 5
>
Page 12

The above applies to incoming calls. This menu also
allows you to change the Ringer of Alarms, SMS/MMS
& Cell broadcast. See page 21 for details.
Activate the silence mode
If you don’t want your phone to ring when you
receive a call, deactivate the ringer by selecting
Settings > Sound > Ringer volume and press
Edit. Press < until the volume is off, then R Save.
R
Activate the vibra alert
If you want your phone to vibrate when you receive a
call, activate the vibra alert by selecting Settings
> Sound >Vibrator alert, then press
Change. Press + or - to select On, Off or Within
sound, then
to the Sound options.
Activating the vibra doesn’t mute the ringer. If you
want to both mute it and keep the vibra on, activate
the silence mode as described above.
R
Select. Press < or ) to go back
>
or
R
Read your mobile phone number
To read your own mobile phone number, press
when in idle mode and select SIM entries. Then select
Own number: your number is displayed if present on
your SIM card. If not, select <Empty>, press
Edit, then follow the instructions.
Adjust the earpiece volume
During a call, press
volume.
+
or - to increase/decrease the
Mute/unmute the microphone
To mute the microphone so that your caller cannot
hear you, press
Mute, then press
to Unmute (changes are automatically taken into
account).
R
Menu during the call, select
>
or R Change to Mute. Repeat
Clear the call lists
To clear your call lists, press
the Calls missed, Calls received and Calls dialled.
R
Select the list you want to clear, press
Options, then Delete all. Press R Select to delete
all calls at once, confirm with
+
in idle mode to access
R
Clear the phonebook
To clear the content of either phonebook at once,
-
select a con tact and press
all, press
R
Select and confirm with R Yes.
R
Options. Select Delete
R
R
Yes.
6 Main features
Page 13
3 • Menu tree
The table below describe the complete menu tree of
your mobile phone, and the page reference you should
refer to for more information concerning each feature
or setting.
Settings p21
Network p23
Line / Configuration / GPRS info / Bearer
settings / Transfer rate
Security p25
Codes / Protected SIM only / This SIM only
Operator services p48
Sound p21
Ringer / Ringer volume / Vibrator alert / Key
tones / Composer
Display p22
Wallpaper effects / Screen saver / Backlight /
Contrast / Brightness
Language p23
List of the available languages to choose from.
Device p23
Auto key lock / Own greeting / T9 Input /
Check status
Service numbers
The numbers available in this menu are
operator and subscription-dependent, please
check with your operator.
WAP p48
Homepage / Favourites / Profiles / WAP
push setting
Services +
This menu is operator and subscriptiondependent, please check with your operator.
Menu tree 7
Page 14
Messages p27
SMS p27
New SMS / Predefined text / Inbox / Draft /
Outbox / SMS setup / Memory status
MMS p29
New MMS / Inbox / Draft / Outbox / MMS
Setup
E-Mail p33
New Email / Inbox / Draft / Outbox /
Receive / Email setup
Voice msg. p35
Cell broadcast p35
Broadcast / Read new CB / Topic list / Auto
display / CB languages
Contacts p17
SIM entries p17
List of the names saved in the SIM card and
related options.
Groups p18
List of the available groups and related options.
Multimedia & Demo mode p37
Picture album p37
List of all photos & photo folders and related
options.
Video album p38
List of all videos & video folders and related
options.
Sound album p38
List of all sounds & sound folders and related
options.
Voice memo p38
List of all voice memos & voice memo folders
and related options.
Memory status p39
Global status overview.
Demo mode p39
8 Menu tree
Page 15
Call info p44
Call settings p44
Divert / Any to answer / Call waiting /
Minute beep
Call list p45
Missed calls / Calls received / Calls dialled
Time/charges p45
Last call / All calls / Remaining units /
Incoming call / Outgoing calls
Charge settings p46
Currency / Cost/unit / A/C limit / Auto
display
Erase records p46
Barrings p46
All outgoing / Outgoing intern. / Out. int. or
home / All incoming / When roaming /
Change password / Status check / Clear all
User group p47
User group / Select group / Outg. access /
Pref. group
Games & Applications p40
Games p40
Pre-installed / My games & more
Organiser p41
Calendar / Appointments / Missed appts.
Clock p41
Alarm clock / Countdown / World clock /
Auto off
Calculation p42
Calculator / Currency converter
PC software link p43
Camera p13
Activate p14
List of the available options.
Menu tree 9
Page 16

Video p14
List of the available options.
Settings p15
Resolution / Quality / Brightness / Special
effects / Nightshot / Light frequency / Frame
rate / Default setting
10 Menu tree
Page 17
4 • Text or number entry
Text can be entered in editing screens in two different
ways: by using T9
text input. Two other modes for numbers and
punctuation marks, are also available. Icons appearing
on the screen show the active text mode.
T9® Text input
What is it?
Tegic Euro. Pat.
App. 0842463
keystrokes input are analysed and the word suggested
®
by T9
is displayed in the edit screen. If several words
are available according to the keys used, the word you
entered is highlighted: press
the list and to choose from those proposed by the T9
built-in dictionary (see example below).
You can choose the language in which your message
will be written by selecting
T9 Input.
®
predictive Text Input, or basic
T9® predictive Text Input is an
intelligent editing mode for messages,
including a comprehensive dictionary.
It allows you to quickly enter text. Press
only once on the key corresponding to
each letter needed to spell a word:
<
/ > or R to browse
Settings > Device >
How to use it?
Alphabets and symbols represented by each key are as
follows:
2
to 9To key in letters and numbers.
0
R
1
L
)
*
®
Short press: full stop.
Long press: 0.
To browse the list of candidate words.
To confirm entry and/or insert a space.
or
>
To clear an entry.
To quit the editing window, whether
you save the message or not.
Short press:
lower, to UPPER case to numbers, in
T9
Long press:
and symbols table which you can
browse using the navigation key.
to shift from Standard, to
®
or basic text mode.
to display the punctuation
Text or number entry 11
Page 18
#
Short press:
mode.
Long press:
available text editing modes.
to shift from T9® to basic
to display the list of
Example: how to enter the word "home"
1.
Press
4 6 6 3
displays the first word of a list:
2.
Press > to scroll and select Home.
3.
Press , or 1 to confirm selection of the
Home.
word
The screen
Good.
How to save personal words?
When you enter a word and browse the T9
dictionary but cannot get the word you wish, press
L
Spell. Enter the word in the window that
appears and press
dictionary.
R
Save to store it in the T9
Basic text input
If you wish to access the basic text input, press
This method requires multiple key presses to reach the
desired character: the letter "h" is the second letter on
4
key, so you must press it twice to enter "h".
the
*
Example: how to enter the word "home"
Press 4, 4 (GHI) 6, 6, 6 (MNO),
6
(MNO), 3, 3 (DEF). Press , when the
message is completed.
Letters, numbers and symbols are located on each key
as follows:
Short press Long
space 1 1
1
a b c 2 à ä ç A B C 2
2
d e f 3 é è D E F 3
3
®
g h i 4 ì G H I 4
4
®
.
j k l 5 J K L 5
5
m n o 6 ö ñ ò M NO 6
6
p q r s 7 b P Q R 7
7
t u v 8 ü ù T U V 8
8
w x y z 9 æ ø å W X Y Z Æ Ø Å 9
9
Full stop 0
0
press
12 Text or number entry
Page 19
5 • Camera
Your mobile phone features a digital camera that
allows you to take pictures and record short videos,
store them in your phone, use them as wallpaper or
send them to your friends.
How to...
Activate/deactivate
the camera
to take pictures
Zoom in/out
Adjust exposure
Take a pict ur e
Save the picture
Press , and select
>
Activate
Press
Press + (zoom in) or
(zoom out) when the camera
is active.
Press < or > when the camera
is active.
Press , when the camera is
active.
Press R
the shot.
.
)
to deactivate.
Save
right after
Camera
Delete the picture
Activate/deactivate
the video camera
Access the options
Record a video
Save the video
-
Delete the video
Access the camera
& video settings
Within any menu, long press ) to cancel any
current action and go back to idle mode.
Once they have been saved, pictures / videos are
available in
Multimedia
Press L
the shot.
Press , and select
>
Press
Press R
have saved the picture or the
video.
Press R
activated the camera within
the
Press R
to album?
Press L No when the
to album?
Press , and select
>
>
Picture album
Video
.
)
Video
menu.
window appears.
window appears.
Settings
.
Dele te
right after
Camera
to deactivate.
Options
after you
Record
when you
Ye s
when the
Camera
/
Video Album
Save
Save
Camera 13
.
Page 20

See “Multimedia & Demo mode” page 37 for
available options and detailed information.
Activate
Quick settings
Select
Camera
>
Activate
to take JP EG pictures, whic h
are saved in the
Shortkeys allow you to change the camera settings on
the fly: while the camera is active, press
display the four status icons in the top left corner of
the screen. Then press
icons correspond to:
Night shot
and swap from an option to another, simply press the
corresponding key as many times as needed (
Shade
, 2 for
change. Press
Picture album
. To change any of the settings on the fly
Resolution
0
to hide them when you are done.
Pictures and options
1.
Once you have activated the camera, simply
press
,
2.
3.
to take a picture.
Then press L
preview and take a new picture, or
If you choose to save the picture, you can then
press
R
Options
(see page 37).
0
#
to display the settings the
Shade, Resolution, Quality
1
, etc.). The icon shows the
Dele te
to go back to the camera
to accesss the following list:
R
Save
to
and
for
.
View finder
Send via
MMS
Send via
Email
Set to
wallpaper
Picture
album
To go back to the camera preview and
take another picture.
To send the picture via MMS (see
“MMS” page 29).
To send the picture via EMail (see
“E-Mail” page 33).
To set the picture as background
wallpaper.
To go directly to the
last picture taken is highlighted. Its
name and the date of last modification
are displayed. At the bottom of the
screen are a thumbnail of the image
and the file size (see page 37 for
details).
Picture album
Video
Camera
>
Video
The
small video, which you can play, save in the
album
, or send to someone via MMS or Email.
1.
Select
Video
R
Record
L
Stop
option allows you to record a
from the camera menu, then press
to start recording (if needed, press
or R
Pause
during recording).
. The
Video
14 Camera
Page 21

2.
Once the recording is over, a
window automatically appears: press R No to
go back to the video preview and record a new
clip, or press
3.
If you save the clip, you can then press L
or R
Standby
Send via
MMS
Send via
Email
Video
Album
Full screen
L
Ye s
to save the clip.
Options
to accesss the following list:
To go back to the video screen and
record another clip.
To send the clip via MMS (see “MMS”
page 29).
To send the clip via Email
(see“E-Mail” page 33).
To go directly to the
last clip you have recorded is selected,
which allows you to check its length
and size (see “Video album” page 38
for details).
To play the video in full screen.
Settings
The settings available in this menu allow you to adapt
the camera to your environment and select various
Save to album?
Video album
Play
. The
effects or options, whether taking pictures or
recording videos. The following options are available:
Resolution
Quality
The higher the quality and the resolution, the bigger
the file.
Brightness
Special
effects
Nightshot
Light
frequency
Frame rate
Allows you to choose from three
settings: 160 x 120, 320 x 240 or
640 x 480 pixels.
Allows you to choose from three
High, Medium
settings:
Allows you to change the brightness
from -2 to +2 by pressing
To choose from the 4 available effects:
Normal, Mono, Sepia
R
to
Change
To set this mode On or
R
Change
Allows you to choose
Allows you to choose from three
settings:
High, Medium
or
Low
and
the current effect.
.
Off
50Hz
or
Low
.
</ -
or >/+.
Bluish
. Press
by pressing
or
60Hz
.
.
Camera 15
Page 22

Default
setting
Allows you to restore the factory
settings: press
R
Ye s
This option applies to the camera
personal settings only, not to the
contents of
to reset.
Picture
L
No to cancel or
or
Sound album
.
16 Camera
Page 23
2.
6 • Contacts
The Contacts menu allows you to select a name saved
in the phonebook of the SIM (number of entries
depending on capacity) or of the phone, as well as
manage groups.
Create and manage contacts
Contacts
This menu gives you access to the SIM card
phonebook, the groups, and the lists of entries of the
on-phone phonebook (up to 255), which appear in
alphabetical order at the first level. The SIM card
phonebook is the first item of this list: press
enter it.
Add entries
A number is limited to 40 digits, depending on your
SIM card. Entering international prefix, country &
area codes allows you to dial a number from any
location.
SIM entries
1.
Select SIM entries, then press L New.
,
to
Enter the Name of the new contact and press
to enter the Number.
3.
Change the Location and Record No. if
needed, then press
new record in the SIM phonebook.
Phone entries
Managing contacts in the on-phone phonebook
allows you to store more information (email address,
fax number, company name, etc) than if you used the
SIM phonebook.
1.
Navigate to Contacts and press L New to
open the new entry screen.
2.
Enter your contact’s name, then press - to move
down to the next field. Fill in the required fields
and press
the on-phone phonebook.
You can also access the New entry screen by selecting
R
Options when you are browsing the list of
entries.
,
or R Save to save the
,
or R Save to store the entry in
Options
Select a contact of a phonebook and press
Options to access the following options:
View To display the information linked
to the selected contact.
R
Contacts 17
-
Page 24

Edit To edit and change the information
related to this contact.
New entry To enter a new contact in your on-
phone phonebook.
Delete To delete the selected contact.
Only one phonebook is managed at
a time: if a contact is present in both
phonebooks and if you delete it in
the phone, it will rema in unchang ed
in the SIM.
Delete all To delete all contacts of the selected
phonebook.
Copy entry To copy a contact selected in the
SIM phonebook to the on-phone
phonebook.
Copy all To copy all contacts from one
phonebook to another.
Send SMS To send an SMS to the selected
contact.
Send MMS To send an MMS to the selected
contact.
Capacity To check the total capacity of the
phonebooks vs. the capacity used.
Contacts To switch back to the list of contacts
in phone when browsing the SIM
card.
Own number
This entry of the SIM phonebook should contain
your own phone number. If not, we advise that you
enter your mobile number as well as any other
relevant information.
Although all its fields can be empty, the Own number
item cannot be deleted.
Service No
This entry of the SIM phonebook allows you to select
one of the available services provided by your operator
and to copy it into the selected phonebook.
Groups
Using groups, you can create lists of your contacts to
help you keep organised. You can assign a specific
image and melody to a group and even send an SMS
to all a group’s members.
18 Contacts
Page 25

1.
Navigate to Contacts > Group. The list of
groups is displayed. Press
members of the group.
2.
From the Group screen, R Select the New
entry to add a member to the selected group.
Press
L
phonebook, or press
contact, which will both be added to your
phonebook and become a member of the current
group.
3.
The following options are then available for each
member of the group: View, Edit, New entry,
Remove, Send SMS, Send MMS (see “Create
and manage contacts” above for details).
to add a contact from your
L
View to view the
R
Select to enter a new
Options
The following options are available for each group:
Edit name To edit and change the name of the
View
members
group if needed.
To display the complete list of
members of this group.
Remove
entries
Group
image
Group
melody
SMS to
group
To remove members from this
group.
This will only remove them from the
group, it will NOT delete them from
your phonebook.
To select the picture that will appear
on the screen when a member of
this group calls.
To select the melody that will ring
when a member of this group calls.
To send an SMS to all the members
of this group at once.
See & hear who’s calling
This feature is only available for entries of the
phonebook in phone, NOT the entries of the SIM.
This feature allows you to personalise the Groups
available with their own name ("Friends", "Office",
etc.), a given picture from the Picture album
(including one you have taken and saved) and a given
melody (from the Sound album list). You can then
link one or several names to a group: when a name in
that group calls, it will appear along with the
Contacts 19
Page 26

corresponding picture, and the melody defined for
that group will ring.
1.
Select Group and select the group to be
identified (you can rename it if needed). Press
R
Options and select the Group melody
and the Group image to be associated to this
group.
2.
Press ) to go back to the list of groups, or
long press
)
to go back to idle.
20 Contacts
Page 27
R
7 • Settings
The Settings menu allows you to customise your
phone and change the settings related to each available
option (sounds, time and date, security, etc.).
Within most menus, press
Change to access a list, which you browse with - or
+
. Press R Select to confirm your choice.
If the menu only features an On/Off option, simply
press
R
Change to toggle.
Sound
Ringer
To select a ringer tone that will apply to Any call,
Alarm, SMS/MMS and Cell broadcast messages.
Move
-
to access the next field.
You will not hear the melody if the volume ringer is off
(see page 6).
Ringer volume
To set the ringer volume that will also apply to Any
call, Alarm, SMS/MMS and Cell broadcast messages.
R
Edit, then
L
Press
the sound. Move
same way. Press
return to the Sound menu.
Ringer settings
To select one of the following ringer settings:
On Your phone will ring using the selected
Off You phone will not ring. It will only
Beep You phone will emit a single beep, then
Vibrator alert
To set the vibra alert On, Off, or Within sound for all
alarms, incoming calls and messages.
The Within sound setting only applies to .mmf
(SMAF) files. If the sound file has been so configured,
the vibra and the keypad LEDs work in synch with the
melody.
Key tones
To set the key tones On or Off.
Edit, then < or > to increase or decrease
-
to the next field and proceed the
R
Save to save your changes and
ringer tone.
vibrate if you set the vibra alert on.
vibrate if you set the vibra alert on.
Settings 21
Page 28

Composer
To access the list of ringers and related options which
are the following:
Set as ring To set the selected melody as ringer
tone for Any call, Alarms, SMS/
MMS and Cell broadcast messages.
Edit To Edit the main or sub-tracks of
the select ed melody and then Play it,
change its Tempo or its Instrument
and Save it.
Up to five personal melodies (i.e.,
downloaded or recorded) can be
edited. This feature doesn’t apply to
preloaded melodies.
Rename To Rename the selected ringer.
Info To display the information releated
to the selected ringer: name,
creation date and time, file type and
size.
Display
Wallpaper effects
To access the list of Wallpaper effects and related
options which are the following:
Off The background screen will stay
white, in all contexts.
Fit to screen The picture used as wallpaper will
be distort if needed, so that it fits the
actual size of the screen.
Tile The picture will be repeated on the
screen, starting from the upper left
corner.
Best fit The background picture will fit the
screen, in width and height.
Center The picture is centered on the
screen without any size change.
Screen saver
To access one of the following options:
Slide show To access the picture album and
select each of the 4 pictures that will
make the slideshow.
22 Settings
Page 29

Time To display the time as screen saver.
Off To deactivate the screen saver.
The screen saver will start automatically after a given
period of inactivity.
Backlight
To apply the backlight to LCD only, or to Key and
LCD.
Contrast
To set the Contrast: move - or +, press R OK to
confirm your choice.
Brightness
To set the Brightness on Low, Medium, High or
Maximum. Changes are automatically displayed upon
selection: press
R
Select to confirm your choice.
Language
To select or change the language for all menu texts:
browse with
-
or + and press R Select to apply.
Device
Auto key lock
To set the automatic keypad lock On or Off. To
unlock it, press successively
R
Unlock and #.
The keypad is automatically unlocked when receiving
a call.
Own greeting
To edit a text that will be displayed on the screen at
switch on.
T9 Input
To set the T9 preferred text input On or Off (see
“T9® Text input” page 11 for details).
Check status
To restore the Factory settings or to check the Phone
identity (the references displayed on the screen might
be requested by your local consumer help desk for
information).
You will lose all you personal settings when restoring
the Factory setting
Network
Contact your phone operator to have full information
about GPRS availability over their network and for
an appropriate subscription. You might also need to
configure your phone with the GPRS settings supplied
Settings 23
Page 30

by your operator, by using the menus described in this
section.
Line
This menu allows you to R Select Line 1 or Line
2, as well as to block one of the lines. This allows you
for example to block your professional line when
going on holiday, or your personal line during a
meeting.
The availability of this menu depends on your
subscription and requires a phonecode. Please check
with your operator for information.
Configuration
To access one of the following options:
Network info Provides you the list of networks
Choose
network
available in the area: select the
network you want to register with
and press
Launches the automatic selection
of a network.
R
Select.
Auto network Allows you to set the option On
Pref. network Allows you to build a list of
Band selection Allows you to select a bandwidth:
or Off. When On, your phone
will connect automatically to one
of the networks found.
networks, in order of preference.
Once defined, your phone will
try to register on a network,
according to your preferences.
GSM 900/1800 or GSM 900/
1900.
GPRS info
Press R Select to display the transfer volume and
time of your last transmission. Then press
Reset, or R OK to go back to the network
settings.
L
Bearer settings
This menu allows you to create several data profiles:
when using WAP or when sending MMS, the selected
profile will be used to connect to the GSM or GPRS
network.
The CSD settings (GSM network) and the GPRS
settings apply either to an existing profile that you
24 Settings
Page 31
select in the list (then press R Edit to access the
various fields), or to a new profile that you create
(select <Empty>, then also press
Options described below are operator and/or
subscription dependent. Error messages during
connection are mainly due to incorrect parameters:
contact your operator before first use, in order to have
the appropriate settings, which you might receive via
SMS in some cases. Some pre-configured profiles may
be locked, preventing re-programming and renaming.
The available CSD settings are:
Profile name To name the profile such as it
Connect type ISDN or Analog, according to
Dial number Needed to establish the
User name Login used for connection.
Password Password used for connection.
DNS
will appear in the list.
your subscription.
connection and provided to you
by your operator.
IP address of the server the
phone will connect to.
R
Edit).
The GPRS settings are the same as for the CSD
settings, except for the following:
GPRS APN Address of the external data
network you want to connect to
(text string).
Authentication Allows you to Activate or
Deactivate the network
authentication.
Transfer rate
Allows you to select the data transfer rate that will be
applied, whether over the air or via a serial cable:
19.2 Kb/s, 38.4 Kb/s, 57.6 Kb/s, or 115.2 Kb/s.
Transfer rates might also depend on line conditions.
Security
Codes
If you enter an incorrect PIN2 code 3 times, your SIM
card is blocked. To unblock it, request the PUK2 code
from your operator or retailer. If you enter an
incorrect PUK code 10 times in a row, the SIM card
will be blocked and unusable. If this happens, contact
your operator or retailer.
Settings 25
Page 32

The Codes menu allows you to set the following
options:
PIN control to set the PIN protection On or
Change PIN
Change PIN 2
Off. When On, you will be asked
to enter your PIN code when
switching your phone on.
You cannot change your PIN
code if this option is Off.
To change your PIN and PIN 2
codes (depending on your SIM
card, some features or options
may require a PIN2 secret code,
given to you by your operator).
Chg.
phonecode
To change your Phonecode.
Protected SIM only
This menu allows you to restrict outgoing calls to the
numbers you have defined in the Protected SIM
directory. This requires you enter a PIN code 2,
provided to you by your operator.
This SIM only
Th is men u al lo ws yo u to r est ri ct ou tgo in g cal ls to y ou r
SIM only. This requires you enter the phonecode.
26 Settings
Page 33

8 • Messages
SMS
This menu allows you to send short messages with
sounds, animations or pictures, as well as manage the
ones you receive.
New SMS
Select this option to create and send an SMS to a
contact of your choice. Type your message in the
edition window that appears (see “Text or number
entry” page 11).
L
Clear
Press
Options
to access the following:
Send message
Store message
to delete a character, or press
To send your SMS to a contact of
your phonebook, whether on the
SIM card or in the phone.
To send the SMS to any other
number, simply enter it using the
keypad.
To save your message in the
menu, without sending it.
R
Draft
Message size
Tex t fo rma t
Add pic. &
sound
Clear all
To display the information about
the message (number of messages
& number of characters).
To define the
Background color, Font size
Alignment
style,
These options must be set before
entering your text.
To add a predifined picture or
sound, or one you have created and
stored in the albums (see
“Multimedia & Demo mode”
page 37).
You can send up to 2 attachments
of 2 different types. Animations
and pictures are exclusive: if you
first select an animation, then a
picture, only the picture will be
taken into account and vice-versa.
Pictures and sounds cannot be sent
when they are copyright protected.
To clear all characters at once.
and
Font color
Line feed
and
.
Messages 27
,
Page 34

Insert text
Add number
Add email
address
To access the list of predefined texts
(see “Predefined text” page 28 for
details) and insert one in the SMS.
To insert a phone number within
the message.
To insert an Email address within
the message.
Predefined text
This menu allows you to display the predefined texts
and to create new ones that you will then be able to
automatically insert in an SMS.
Predefined texts are limited to 35 characters.
Inbox
This menu lists all the SMS you have received. Select
an item and press
or
View
correspondent,
Edit
it, display the
option allows you to
R
Options
the selected SMS,
Forward
Detail
Delete all
to be able to
the message to someone or
of the message. The last
items of t he list at once.
Reply
Dele te
to your
Outbox
This menu lists all the SMS you have sent, then saved.
The options available are the same as in the
folder.
This menu will not show messages that have been sent
but not saved.
Draft
SMS setup
This menu allows you to set a maximum of 5 profiles
to manage different SMS settings. Select one of the
available profiles and press
R
Options,
settings:
Service centre
Message type
then
To enter the phone number of your
SMS Service center. This number is
provided to you by your operator.
To select the type of message that
will be handled (Normal, fax,
pager, etc.)
L
Change
Activate
to access the following
, or press
Draft
This menu lists all the SMS you have saved but not
sent. The options available are
Edit
or
Delete all
.
Dele te, View, Forward
,
28 Messages
Page 35

Validity period
Status report
Direct reply
To select the length of time your
message is to be stored in your SMS
center. This is useful when the
recipient is not connected to the
network (and thus cannot receive
your message immediately).
Subscription-dependent.
Allows you to set On or
option, which will automatically
inform you via SMS whether your
own SMS was received or not.
Subscription-dependent.
Allows you to set On or
option, which allows you to
transmit the number of your SMS
message centre together with the
message. Your correspondent can
then reply using your own SMS
centre and not theirs. This speeds
up the rate of transmission.
Subscription dependent.
Off
Off
this
this
SMS via GPRS
Allows you to set On or
option, which will send your SMS
over the GPRS (
(
Off
) network.
Access to the GPRS network is
subscription-dependent.
On
Off
this
) or the GSM
Memory status
This menu will display the information about the
memory used by your messages (whether on SIM or
in phone) vs. the memory still available.
MMS
This menu allows you to send and receive multimedia
messages, called MMS, featuring texts, pictures and
sounds. They can be made of one or several slides.
Whether you send it to an e- mail address or to another
mobile phone, the MMS is played in a slide show.
If "Memory full" appears, you must delete messages
(e.g., template, draft, received message, etc.).
New MMS
As described below, two distinct menus allow to to
create and manage the MMS. The
you access to the graphic and sound items that will
Insert
menu gives
Messages 29
Page 36

make up your MMS, whereas the
manage the MMS once you are done creating it.
Predefined and copyright protected pictures & sounds
cannot be sent. In both cases, they will not appear in
the lists from which you are asked to select an item.
Insert
The items in this menu are the following:
Insert picture
Tex t mo du les
Insert video
Insert sound
To select a picture from the
album
and insert it in the current
MMS slide.
To insert a text of 200 characters
max. (see “Text or number entry”
page 11 for details).
To select a video from the
album
and insert it in the current
MMS slide.
You cannot attach a video file to an
MMS that already has a sound file
and vice versa.
To select a sound from the
album
and insert it in the current
MMS slide.
Options
let you
Picture
Video
Sound
Insert voice
Insert page
Display time
Options
The items of this menu are the following:
Send MMS
Store MMS
Delete items
Info
To select a voice memo that will be
inserted in the current slide.
You cannot attach a sound file to an
MMS that already has a voice memo
and vice versa.
To insert a new page in the slide
show.
To set the duration of each slide.
To send the message to someone:
enter the number (
Subject
. You can also send a copy
Cc
) or blind copy (
(
MMS.
To save your message in the
menu, without sending it.
To delete one of the items making
the MMS (sound, picture, text, etc.)
To display the information related
to the selected MMS (Picture size,
Resolution, etc.)
To
) and the
Bcc
) of your
Draft
30 Messages
Page 37

Preview page
Preview MMS
Inbox
This menu lists all the MMS you have received. Once
you have viewed an MMS, press
access the following:
Reply
Reply all
Forward
Call
Delete
Info
To preview the current page.
To preview the whole MMS.
R
Options
To reply to the sender by sending
your own MMS (see “New SMS”
page 27).
To reply to all correspondents at
once, e.g., if a copy of the message
was also sent to someone else than
you.
To forward the MMS to someone
else.
To call the sender of the MMS, if his
number is identified.
To delete the MMS.
To display the information related
to the selected MMS (Picture size,
Resolution, etc.)
Extract
View again
Draft
to
This menu lists all the MMS you have saved but not
sent.
To extract one of the items of the
page that is dipslayed, whether
picture, video or sound.
To play the whole MMS again.
Outbox
This menu lists all the MMS you have sent, then
saved.
Within the
display the date and time it was saved or received, its
size and the number you want to send it to or you
received it from. Press
selected MMS,
at once.
Draft
and
Delete
Outbox
menus, select an item to
R
it, or
Options
Delete all
MMS Setup
Your phone may have been pre-configured to directly
access the services offered. If not, contact your operator
to receive the information items described in the
present section and enter them as given. With some
operators, access parameters can be set "over the air".
to
View
items of the list
the
Messages 31
Page 38

The following settings are available:
Val id it y
period
Delivery
report
MMS
retrieve
To select how long your MMS will be
stored on the server, from
Maximum
. This is useful when the
recipient is not connected to the
network (and thus cannot receive your
message immediately).
Check with your operator what the
Maximum
value is.
This option can be set On or
informs you (via an SMS) of the status
the MMS you have sent (i.e., if it was
read or deleted).
Allows you to choose from:
Auto download:
automatically placed in the
Select one, press
View
to play it.
Deferred retrieve
manually to the server by selecting a
notification in the
download and play it.
received MMS are
R
1 day
Off
and
Inbox
Options
, then
: you connect
Inbox
, then
View
to
Allow info
receiving
Allow spam
Allow
roaming
reception
MMS
profile
.
to
Rejected
: all incoming MMS are
rejected, preventing you from
receiving them.
This option can be set On or
notifies you of incoming MMS.
This option can be set On or
allows you to receive automatic
advertising MMS from the network.
This option can be set On or
allows you to receive MMS even when
your mobile phone is registered to a
network other than your own (e.g.,
when you’re abroad).
Allows you to choose from one of the
available profiles. Press
activate the selected profile, or
Edit
to change its settings (name, IP
address and port, etc.). See “Network”
page 23 for details about profiles
settings.
L
Off
Off
Off
Active
and
and
and
to
R
32 Messages
Page 39

Receive an MMS
If the size of the MMS to download is bigger than the
memory available in your phone, you must free
memory by deleting data (pictures, sounds, etc.). See
“Memory status” page 51.
When you receive an MMS, and if you activated the
Allow info receiving
on the screen to inform you. See “MMS Setup”
page 31 to learn about
retrieve
modes.
If the sender of the message has asked for a
report
, a prompt will ask you to press , to send it or
)
to press
Once the MMS is downloaded, select it in the
list and press R
R
Options
the section “Inbox” page 28.
option, an alert message appears
Auto download
to cancel.
Options
again to access the options described in
, then
or
View
to play it. Press
Deferred
Delivery
Inbox
E-Mail
If not already included in your phone subscription,
you must subscribe to an e-mail account and have
received the settings information from your provider.
In this case, all parameters are communicated to you
by your provider and/or operator as described below
and must be entered as given. In some cases, your
operator might also be your e-mail service provider.
This menu allows you to send and receive e-mails,
with or without attachments. If your
configured, the parameters are already set and you
don’t have to change them, except for
and
E-mail address
an e-mail account.
To enter specific signs such as @ or %, see page 11.
which are up to you when creating
phone was pre-
Login, Password
New Email
Select this menu item to create a new mail, then type
the text in the edition window that appears (see “Text
or number entry” page 11 for details). Once you have
written your message, press
the following:
Recipient
To enter the Email address of the
recipient you will send the message
to (long press
table of symbols including the @
sign).
R
*
Options
to access
to access the
Messages 33
Page 40

To
Bcc
Add
Add
again, select
Select
) and the
) of your
Attachment
. The list
or
to attach it
Draft
Attachment
Save
Line feed
Clear all
Enter the number (
Subject
. You can send also a copy
Cc
) or blind copy (
(
Email.
Press - to access the
filed, then press L
that appears shows the selected
items. Press
one of the
Vo ic e
album. Press
to your Email.
To save your message in the
menu, without sending it.
You must first have entered a correct
Email address.
To begin a new paragraph.
To clear all characters at once.
L
Picture, Video, Sound
album, then an item in the
R
Inbox
This menu lists all the Email you have received. Select
an item and press
Dele te
the selected Email,
R
Options
to be able to
Reply
to it (or reply to all
View
or
recipients),
list or
Delete all
it to someone,
emails in the folder at once.
Draft
This menu lists all the Email you have saved but not
sent. Select an item and press
View
or
Send
to
Delete all
the selected Email,
Emails of the folder at once.
Outbox
This menu lists all the Email you have sent. Select an
item a nd press
an item of the Draft folder.
R
Options
Receive
This menu allows you to connect to your mailbox and
to download the Email or the headers from the server,
then to retrieve the corresponding e-mails (see
“Download” below for details on retrieving options).
Email setup
Error messages during connections are mainly due to
incorrect parameters: contact your operator if needed
before first use, in order to have the correct settings.
This menu features up to 5 profiles for you to choose
from, in order to connect to your Email server.
Copy to Contact
R
Options
to be able
Edit
or
Dele te
it, or
which are the same as for
Forward
34 Messages
Page 41

Select one of them and press L
as the current profile.
Press
R
Options
to access the following:
Active
Edit
Rename
The
Edit
which are provided to you by your Email provider, if
not pre-configured in your mobile phone. The
available fields are the following:
Connect
using
User name
Incoming
setup
Outgoing
setup
To activate the selected profile as
described above.
To edit the selected profile, in order
to change the related settings.
To rename the selected profile.
menu allows you to change the settings,
To choose whether the connection
will be
Automatic
CSD
either
networks. You then select the CSD
and GPRS profile of your choice.
To enter the name used by the Email
server to establish the connection.
To set the information used to
receive Emails (POP server).
To set the information used to send
Emails (SMTP server).
Act ive
to select it
, or will be using
(GSM) or
GPRS
Email address
Downl oad
To enter your email address.
To select the items that willl be
downloaded during connection:
Email
Header only
case, you will then have to connect
manually in order to retrieve the
corresponding Emails.
, or
All
. In the first
Voice msg.
This menu allows you to set your voice mailbox
number and listen to voice messages your
correspondents have left you.
Press
L
Change
mailbox phone number, then press
this number and listen to your messages.
In some cases, you might have to enter two numbers:
one to listen to your mailbox, the other one to forward
calls. Contact your operator for detailed information
on this subject.
to enter or modify your voice
R
Listen
to dial
Cell broadcast
The Cell Broadcast feature is network dependent.
This menu allows you to manage the reception of
SMS broadcasts regularly transmitted to all
Messages 35
Page 42

subscribers on the network. It gives you access to the
following options:
Broadcast
Read new CBTo read any new cell broadcast message
Topi c l is t
To set the reception of cell broadcast
messages
On
or
Off
.
you have received.
To define the type of messages you
want to receive:
•from the
•From the
To obtain the codes corresponding to
the different types, contact your
operator.
User defined
New entry
vided by the operator, and, if
desired, associate a name, or
existing topic in the list, which
you can change or delete.
, enter the code pro-
Current
menu, select
list, select an
Auto
display
CB
languages
To set the automatic display of
incoming CB messages
To select the language in which you
will receive the messages.
On
or
Off
.
36 Messages
Page 43
9 • Multimedia
& Demo mode
Picture album
This menu allows you to manage the pictures stored
in your mobile phone, including the ones you have
shot or downloaded. Select an item in the list and
R
press
View To display the selected picture. A
Send via
MMS
Send via
Email
Options to access the following:
new set of Options then allow you to
Zoom in (then Zoom out), go to the
Previous or Next picture, Delete
the picture, display the Info, Set to
wallpaper (see below) or Rotate.
To send the selected item via MMS
(see “MMS” page 29 for details).
To send the selected item via Email
(see “E-Mail” page 33 for details).
Set to
wallpaper
Create new To create a new Picture album (this
Cut To cut the selected item.
Copy To copy the item you have cut (e.g.,
Delete To delete the selected item.
Rename To rename the selected item.
Info To display the information relating
Delete all To delete all items at once.
To set the selected picture as wallpaper (see “Wallpaper effects” page 22
for details).
is optional). You can create a folder
with or without a password.
Take care to use a password you can
remember. If you loose your folder
password, you will loose the contents
of the folder.
into a new album).
to the selected item (name, file type
and size, resolution, etc.).
Multimedia & Demo mode 37
Page 44

Video album
This menu allows you to manage the videos you have
recorded and stored in your mobile phone. Select an
item in the list and press
same options as the ones described in the above
section "Picture album".
Please note that View allows you to play the selected
video, in standard or full view.
You cannot set a video to wallpaper.
R
Options to access the
Sound album
Thi s menu allows y ou to manage the soun ds store d in
your mobile phone, including the melodies you have
downloaded. Select an item in the list and press
Options to access the following:
Set as ring To set the selected melody as a
ringtone for Any call, Alarm, Cell
broadcast or SMS/MMS.
Info To display the information relating
to the selected melody (name, time
and date of creation, file size and
type).
R
The Sound album only lists MIDI and MMF (SMAF)
melodies. Any Voice memo you record (AMR files)
are stored in the Voice memo sub-menu, from where
you can select them and set them as Ringer.
Voice memo
This menu allows you to record a sound that you can
then set as a ringer, send via Email, etc.
Select
R
the instructions on the screen. Once recorded, select
it in the list and press
following:
New
record
Set as ring To set the selected record as a
Play To play the recorded voice memo.
Send via
Email
Options, then New record and follow
R
Options to access the
To record a new voice memo.
ringtone for Any call, Alarm, Cell
broadcast or SMS/MMS.
To send the selected voice memo via
Email (see “Messages” page 27 for
details).
38 Multimedia & Demo mode
Page 45
Send via
MMS
Delete To delete the selected voice memo.
Rename To rename the selected voice memo.
Info To display the information relating
Delete all To delete all records at once.
Data rate To display and select a data rate.
Recordings can then be used as alarm or incoming call
ringers, etc. Recordings saved cannot be sent by MMS.
To send the selected voice memo via
MMS (see “MMS” page 29 for details).
to the selected voice memo (name,
time and date of creation, file size
and type).
Memory status
This menu allows you to display the percentage of
memory available in your phone. Several features
share the mobile capacity: pictures and sound albums,
recorded memos, messages you have stored in the
phone, games, etc.
R
Press
free and the phone’s total memory in KB, then press
R
feature.
If «List full» appears when saving a new item or to free
memory space, you must delete an item to be able to
create or add a new one.
Select to check the percentage of memory
Detail to display the memory used by each
Demo mode
,
or R Select to launch the Demo movie.
Press
If you turned the phone on without having inserted a
SIM card, this menu is available in the first menu
level.
Multimedia & Demo mode 39
Page 46
10 • Games &
Applications
Games
Pre-installed
This menu features games that are pre-loaded in your
mobile phone. Press
have selected and start playing or
the instructions and learn about levels and scoring.
My games & more
Java is a trademark of
Sun Microsys te ms, In c.
L
Start
to launch a game you
R
Option
to read
Your mobile phone features JAVA,
which allows you to run JAVAcompatible applications such as
games downloaded on the network.
The
My games & more
you to create folders to organise the
games you have downloaded from
the network via WAP.
menu allows
Options allow you to select or set the following items:
Launch
New folder
Info
Rename
Dele te
Security
Profile
About
Exit
To launch the selected game and
start playing.
To create a new folder for your
games.
To display the information
related to the selected game.
To rename the selected game or
folder.
To delete the selected game or
folder.
To set access rights for security
and/or cost sensitive actions (e.g.,
network access, AMR recording,
SMS sending, etc.)
To select a connection profile
Activate
or
Edit
and
the related settings.
To display the information
related to your Java software.
To exit the menu.
it to change
40 Games & Applications
Page 47

Organiser
Calendar
This menu displays the calendar. Once you select it,
press
L
We ek
or L
R
or press
Enter the
the
Appointments
to create new entries.
Agenda
Subject, Start date
Status
and press R
menu. Repeat as many times as needed
Appointments
This menu lists all the appointments. Sel ect an item in
the list and press
eventually
Press
View
Edit
New entry
Delete
Edit
it to change its content.
R
Options
Month
to set a new
L
to access the following:
To display the details of the selected appointments.
To edit the selected appointment
and change its content.
To create a new appointment.
To delete the selected
appointment.
to choose a display,
Appointment
and
Start time
Save
to store it in the
View
to display its details and
, then select
.
Delete all
Capacity
Missed appts.
This menu lists the appointments you have missed.
Clock
This menu gives you access to the following options:
Alarm clock
To delete all appointments at
once.
To check the capacity of the
agenda (number of maximum
items vs. number of free entries).
To set the alarm clock: press
L
Set
once you have entered
the menu, then
set the alarm
to set the
lect the days it will ring. You activate/deactivate the alarm icon
and move to the next day by
pressing
R
OK when done.
The alarm will NOT ring if you
set the ringer volume to silence or
turn the mobile phone off.
L
On
or
Time
L
Off
and - again to se-
Change
Change
. Move
. Press
to
Games & Applications 41
-
Page 48

Countdown
Wor ld cl oc k
Auto off
To
Set, Reset, Start
countdown. You can
Clear
the countdown value (of
max. 23:59:59) at any time.
To set the time zone you belong
+
or - to m ove from one
to. Use
time zone to the next until you
find your own time zone. Press
R
Select
choice. A message appears to ask
you whether you are in Daylight
saving time: press
R
Ye s
as appropriate.
-
and press R
Move
to set the
. Press R
format
done.
Allows you to set the automatic
switch off of your mobile phone
at a given time: press
once you have entered the menu,
L
then
alarm
On
or
Time
and R OK when
the
done.
and
Stop
Change
to validate your
L
No or
Time, Date
and
Save
Change
when
L
Change
to set the
Off
. Move - to set
or
Date
Set
a
Calculation
Calculator
To use the calculator, first enter the figures using the
keypad. Then press:
*
#
+
or
L
R
To toggle between negative and positive figures.
To insert a decimal point.
-
To toggle from addition to
substraction to multiplication to
division.
C
Short press to erase a number, long
press to erase a figure or the whole
calculation.
=
To get the result.
Currency converter
This menu allow you to convert a sum from your local
into a foreign currency. Select the
define the rate by pressing the relevant numeric keys,
then which of the
entered or computed by pressing
Then select
Convert
to obtain the result.
Domestic
or
Compute
, enter a figure and press
Foreign
Rate setting
currency will be
+
or -.
to
R
42 Games & Applications
Page 49

PC software link
This menu can be set
case, it allows you to use your mobile phone together
with a PC, provided you have purchased and installed
the appropriate items. To fully benefit from the
services available via a separate USB data connect
cable (upload and download pictures and sounds in
your phone, synchronize phonebooks, etc.), you must
Off
or On (
AT-D ATA
): in this
first purchase and install PC software link on your PC.
This software application is available on the CD-Rom
shipped with the USB data cable, which is not
shipped as standard with your phone.
The software supplied on the CD-Rom is not
compatible with Apple
only supports Microsoft
®
Macintosh® computers. It
®
Windows® 98/98SE, ME,
2000 & XP.
Games & Applications 43
Page 50
11 • Call info
Most options described in the present chapter are
operator and/or subscription-dependent and require
either a PIN2 code or a phone code (see page 25).
Call settings
This menu allows you to set all the call options (call
forward, waiting, etc.) and gives you access to the
menus described hereafter.
Divert
This menu allows you to
status
of the following call divert options:
Unanswered
All calls
Not
reachable
If you haven’t picked up the call.
Will divert all incoming calls.
When selecting this option, you will
not receive any call at all until you
deactivate it.
Your network isn’t available.
Set, Deactivate
or
Check
No reply
Busy
Receiving fax
Receiving
data
Status check
Clear all
Any to answer
To set the option On or
to accept a call by pressing any key, except
to reject a call.
Call waiting
This menu allows you to
Status
the
Hide ID
To set the option On or
to show or hide your identity to your correspondent.
You haven’t replied to the call.
You are already on the phone and
your subscription doesn’t include
the call waiting option, or you
haven’t activated it.
Will divert all incoming fax calls.
Will divert all incoming data calls.
To display the status of all call divert
options.
To clear all call divert options at
once.
Off
. When On, it allows you
of the Call waiting.
Activate, Deactivate
Off
. When On, it allows you
)
or check
, used
44 Call info
Page 51

Press
R
Select
L
No
correspondent.
, then RYe s
to show your identity to your
Minute beep
Set the
Minute beep On
of your calls. When
emits a beep every minute of an outgoing call (the
beep cannot be heard by the caller).
or
Off
On
, your phone automatically
Call list
This menu provides you with the list of outgoing and
incoming calls, attempts at auto redialling and call
details. The calls (missed, received and dialled) are
displayed in chronological order with the most recent
on top. Select a call in one of the lists and press
Options
to access the following:
View
Correct
number
To display the details of the selected
call. You can then
number in one of the phonebook,
or
R
Return
To edit the number of the selected
call and change it.
to conceal or
to manage the duration
R
L
Save
the
to the list.
Copy to
phonebook
Dele te
Delete all
If a number listed is also in your
corresponding name is displayed. Press
a selected number and press ) to hang up.
To copy the number of the selected
call into the phonebook: press
Ye s
to copy it into the SIM card, or
press
R
into your phone.
To delete the selected call.
To delete all listed calls at once.
To phonebook
to copy it
Contacts
(
to redial
L
, the
Time/charges
This menu allows you to display the call durations and
their charges. Both
options apply to the
and
Outgoing calls
If included in your subscription, you can also display
the
Remaining units
.
.
R
Last call
Select
and/or L
, to
All calls, Incoming calls
Reset
Call info 45
Page 52
Charge settings
Options described below are subscription-dependent.
This menu allows you to manage the charge settings
of your calls by offering the following options:
Currency
Cost/unit
A/C limit
Auto display
To set the currency in which your
charge details will be displayed.
To enter the cost or charge per unit.
To enter the cost limit after which
your operator will bar your calls.
To set On or
display of the length and/or cost of
each call when hanging up.
Off
the systematic
Erase records
This menu allows you to erase all records at once.
Press
R
Ye s
or L No according to your choice.
Barrings
This menu allows you to limit the use of your phone
to specific calls by letting you bar all kinds of calls
(incoming, outgoing, when roaming, etc.).
The types of calls you can bar are the following:
All outgoing
Outgoing
intern.
Out. int. or
home
All incoming
When
roaming
The other options available in this menu are the
following:
Change
password
Status check
Clear all
All outgoing calls: you will not be
able to make any calls until you
deactivate this function.
International outgoing calls only.
All international outgoing calls,
except when calling your home
country from abroad.
All incoming calls: you will not
receive any call until you deactivate
this function.
All calls when roaming: you will not
receive calls when you are outside
your home country.
To change the password used to set
the features described above.
To check the status on call barrings.
To clear all call barrings at once.
46 Call info
Page 53

User group
This menu features options related to services
provided by your operator, whom you should contact
for more details. The following options can be set
or
Off
:
User group
Select group
To activate or deactivate the option.
To select existing groups or to create
new groups.
On
Outg. access
Pref. group
To use your phone in a normal way, you must
deactivate
To authorise or forbid calls made
outside the group.
To define a preferred group to
which calls will be restricted.
User group
and
Outg. access
.
Call info 47
Page 54

12 • Operator services
Most items of this menu are subscription dependent
and specific to operators. Consequently, the menus
described below may or may not be available. If your
phone was pre-configured, it isn’t necessary for you to
change the settings described in this section.
The services provided may involve making a phone
call or sending a SMS for which you may be charged.
Contact your network operator for details.
WAP
This menu allows you to access WAP services
supplied with your network, such as news, sports,
weather, etc.
Select Operator Services
> WAP > Homepage
and press
Press
R
R
Select
+
or -, then press
OK
To launch a WAP
session.
To b r o w s e th e o n - line
pages.
Press R OK To select a highlighted
Press
R
Back
)c
or
Press and hold
Your mobile phone connects to the network according
to the settings you have defined in the menu Settings
> Network (see page 23).
)
item.
To return to the
previous page.
To end the WAP
session and return to
idle.
Homepage
This is the link to the first WAP site you access when
launching a WAP session. In most cases, this menu
item is preconfigured and will connect to your
operator’s WAP homepage. To change this default
homepage see “Profiles” page 50.
While none of the links is selected, press
checkmark) icon to access the following options:
Home To access the Homepage of the
WAP site you are browsing.
Reload To reload the currently browsed
page from its original server.
R
(red
48 Operator services
Page 55

Save items To save items (pictures, sounds,
logos, etc.) included in the pages you
are browsing.
Bookmarks To View the list of bookmarks saved
or save the address you’re currently
browsing by selecting Mark site.
Go to URL To enter the URL address of a WAP
site you want to connect to.
Show URL To display the URL address of the
WAP site you are currently
connected to.
Exit To end the WAP session.
Snapshots To take snapshots of the pages you
are browsing.
Advanced To access the alert Inbox in which
the push messages are saved, to
Restart browser, clear the cache
and go back to the Homepage, or to
display the information About... the
WAP software of your phone.
Settings This menu gives you access to the
following options:
• Scroll Mode to select the Scroll
Mode and the Scroll Speed,
• Downloads to Disable the
automatic downloads of sounds
and pictures embedded in the
pages you browse (this will speed
up the display of WAP pages),
• Security to display information
relating to authentication,
certificates, etc.
• Send Referrer to set the related
HTTP header.
Favourites
This menu allows you to store your favourite WAP
site addresses, rename them and access them quickly
from the list.
R
Press
favourites. When editing a favourite, first enter its
name such as it will appear in the list, then enter the
corresponding URL address. Press
done. Back to the list, select one on the Favourites
and press
Options to Edit, Delete or Delete all
R
Save when
L
Launch to connect to the related site.
Operator services 49
Page 56

Profiles
A profile is a set of parameters that will be used for a
WAP connection. This menu allows you to select one
of the available profiles, then define or change the
connection settings for each of them (press
Active to select / deselect). Press R Edit to access
the following options:
Profile
name
IP address To enter the IP address used for the
IP port To enter the IP port address, also
Homepage To enter a WAP site address, to
Linger time To enter a value of inactivity
To rename the selected profile.
WAP connection.
used for the WAP connection.
which you will connect directly
when connecting using the related
profile.
timeout (in seconds), after which
you phone will automatically
disconnect from WAP.
L
Select
mode
CSD bearer To select one of the CSD profiles
GPRS
bearer
To select the type of connection that
will be established: Auto, CDS
Bearer (over the GSM network) or
GPRS Bearer. If the GPRS network
isn’t available upon connection, a
message will ask you if a CSD
connection should be made instead.
you have set in Settings > Network
> Bearer settings > CSD settings
(see page 24).
To select one of the GPRS profiles
you have set in Settings > Network
> Bearer settings > GPRS settings
(see page 24).
WAP push setting
To set On or Off the automatic reception of messages
automatically sent to you by the network and / or by
your operator.
Push messages include URL links for quick access to
the corresponding WAP services: a single click on the
WAP Push message will connect to the WAP site for
browsing or downloading multimedia files into your
handset.
50 Operator services
Page 57

Check Service Center only if you only want to
receive messages from your operator.
Make a second call
You can make a second call during an active call or
during a call on hold. Dial a number or select a name
in the phonebook, then press
the phone. The first call is put on hold and the second
number is dialled. You can then press:
L
Swap
R
Menu
To toggle between calls (one is put on
hold and the other one is then
activated).
To access the options available during
a call:
• Mute will mute all calls at once,
• Loudspeaker will activate the
loudspeaker for the call in progress,
• Ringer volume,
• Conference call (including Join all,
Hold all, Transfer, End current,
End all),
• Contacts will open the phonebook,
• SMS to open the SMS menu.
(
while already on
)
To hang up all calls at once.
To hang up the current call only, select
Conference, then End current.
The Transfer option connects the
active call and the call on hold, and
disconnects you when the transfer is
completed. This feature is different
from call divert, which takes place
before you pick up the call (see
“Divert” page 44).
Answer a second call
When you receive a second call while already on the
phone, your phone rings or vibrates and the screen
displays Waiting. You can then:
Press
)
To reject the call.
(
Press
To receive a second call, you must have deactivated the
Divert for voice calls (see page 44) and activated the
Call waiting (see page 44).
To answer the call (the first one is put
on hold). Then press
access the options described above.
R
Menu to
Operator services 51
Page 58

Answer a third call
It is possible to receive a third call while you are
speaking to one caller and have another on hold. You
can either end one of the calls before answering the
third one or introduce the calling party into a
conference (see above). This service is limited to two
current communications (one active and one on
hold).
52 Operator services
Page 59
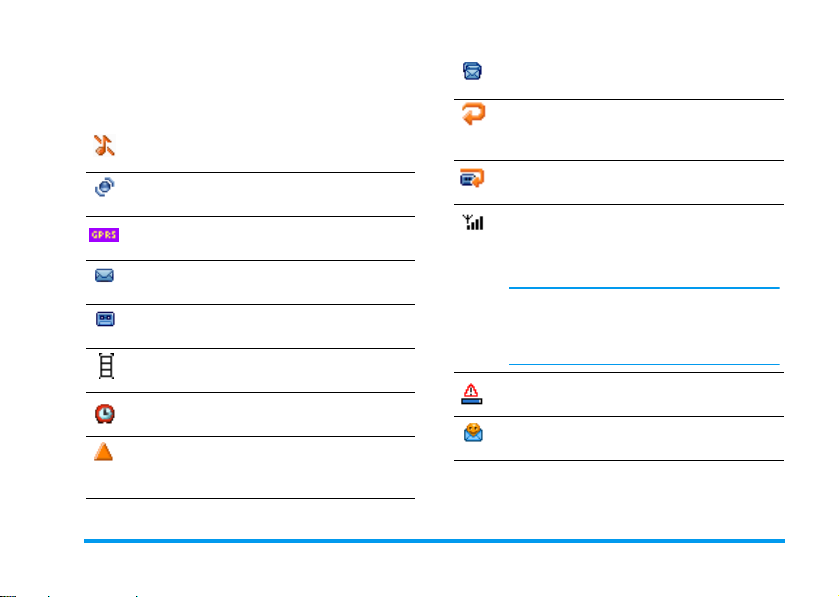
Icons & symbols
In idle mode, several symbols can be displayed
simultaneously on the screen.
Silent - Your phone will not ring when
receiving a call.
Vibra - Your phone will vibrate when
receiving a call.
GPRS attach - Your mobile phone is
connected to the GPRS network.
SMS message - You have received a new
message.
Voice mail - You have received a new voice
mail.
Battery - The bars indicate the battery level
(3 bars = full, 1 bar = low).
Alarm clock activated.
Roaming - Displayed when your phone is
registered to a network other than your own
(especially when you’re abroad).
SMS full - Memory for messages is full. De-
lete old messages to receive new ones.
Call Forward Unconditional to number -
All your incoming voice calls are being forwarded to a number other than voice mail.
Call Forward to voice mailbox - All your
calls are being forwarded to voice mail.
GSM Network: your phone is connected to
a GSM network
Reception quality:
the better the reception is.
If the network symbol isn’t displayed, the
network is not currently available. You may
be in a bad reception area, moving to a
different location may help.
Memory full - The phone’s memory is full.
Delete items to store new ones.
MMS message - You have received a new
multimedia message.
the more bars are shown
Icons & symbols 53
Page 60
Precautions
Radio waves
Your cellular mobile phone is a low power radio
transmitter and receiver. When it is operating, it
sends and receives radio waves. The radio waves
carry your voice or data signal to a base station that
is connected to the telephone network. The
network controls the power at which the phone transmits.
• Your phone transmits/receives radio waves in the GSM
frequency (900 /1800 / 1900 MHz).
• The GSM network controls transmission power (0.01
to 2 watts).
• Your phone complies with all relevant safety standards.
• The CE mark on your phone shows compliancy with
European electromagnetic compatibility (Ref. 89/336/
EEC) and low voltage directives (Ref. 73/23/EEC).
Your cellular mobile phone is your responsibility. To avoid
damage to yourself, to others or to the phone itself, read and
follow all the safety instructions and make them known to
anyone borrowing your phone. Furthermore to prevent
unauthorised use of your phone:
Keep your phone in a safe place and keep it out of
small children's reach.
Avoid writing down your PIN code. Try to
remember it instead.
Switch off the phone and remove the battery if you
are going to leave it unused for a long time.
Use the
Security
purchasing the phone and to activate call restriction options.
menu to change the PIN code after
The design of your phone complies with all
applicable laws and regulations. However your
phone ma y cause inter ference with other electron ic
devices. Consequently you should follow all local
recommendations and regulations when using
your cellular phone both at home and when away.
Regulations on the use of cellular phones in vehicles and
aircraft are particularly stringent.
Public concern has been focused for some time on the possible
health risks for users of cellular phones. The current research
on radio wave technology, including the GSM technology,
has been reviewed and safety standard s have been drawn up to
ensure protection from exposure to radio wave energy. Your
cellular telephone complies with all applicable safety
standards and the Radio Equipment and
Telecommunications Terminal Equipment Directive 1999/
5/EC.
Always switch off your phone
Inadequately protected or sensitive electronic equipment
may be affected by radio energy. This interference can lead to
accidents.
Before boarding an aircraft and/or when packing
the phone in your luggage: the use of mobile
phones in an aircraft may be dangerous for the
operation of the aircraft, disrupt the mobile phones
network and may be illegal.
In hospitals, clinics, other health care centres and
anywhere else where you may be in the close
vicinity of medic
al equ
ipment.
54 Precautions
Page 61
In areas with a potentially explosive atmosphere
(e.g. petrol stations and also areas where the air
contains dust particles, such as metal powders).
In a ve hicle transporting flammab le products (even
if the vehicle is parked) or a vehicle powered by
liquefied petroleum gas (LPG), check first that the vehicle
complies with the applicable safety rules.
In areas where you are requested to turn off radio transmitting
devices, such as quarries or other areas where blasting
operations are in progress.
Check with the vehicle manufacturer that
electronic equipment used in your vehicle will not
be affected by radio energy.
Users of pacemakers
If you are a user of a pacemaker:
• Always keep the phone more than 15cm from your
pacemaker when the phone is switched on, in order to
avoid potential interference.
• Do not carry the phone in a breastpocket.
• Use the ear opposite to the pacemaker to minimise the
potential interference.
• Switch off your phone if you suspect that interference is
taking place.
Users of hearing aids
If you are a user of a hearing aid, consult your physician and
hearing aid manufacturer to learn whether your particular
device is susceptible to cellular phone interference.
Performance improvement
In order to improve the performance of your phone, reduce
radio energy emission, reduce battery consumption and
ensure safe operation adhere to the following guidelines:
For the optimal and satisfactory operation of the
phone you are recommended to use the phone in
the normal operating position (when not using in
hands-free mode or with a hands-free accessory).
• Do not expose your phone to extreme temperatures.
• Treat the phone with care. Any misuse will void the
International Guarantee.
• Do not immerse the phone in any liquid; if your phone
is damp, switch it off, remove the battery and let them
dry for 24hrs before using them again.
• To clean the phone, wipe it with a soft cloth.
• Placing and receiving calls consumes the same amount
of batter y energy. However, the mobile consumes less
energy in idle screen when kept in the same place.
When in idle screen and while you are moving, your
phone consumes energy to transmit updated location
information to the network. Setting the backlight for a
shorter period of time as well as avoiding unnecessary
navigating in the menus will also help to save the battery’s energy for longer phoning and stand-by performances.
Information displayed on battery
• Your phone is powered by a rechargeable battery.
• Use specified charger only.
• Do not incinerate.
Precautions 55
Page 62
• Do not deform or open the battery.
• Do not allow metal objects (such as keys in your
pocket) to short circuit the battery contacts.
• Avoid exposure to excessive heat (>60°C or 140°F),
moisture or caustic environments.
You should only use Philips Authentic Accessories,
as the use of any other accessories may damage
your phone and will make all guarantees for your
Philips phone null and void.
Make sure d amaged parts are replaced immediate ly
by a qualified technician and that they are replaced with
genuine Philips replacement parts.
Do not use your phone
while driving
It lowers concentration, which can be dangerous.
Adhere to the following guidelines:
Give your full attention to driving. Pull off the
road and park before using the phone.
Respect the local regulations in countries where
you drive and use your GSM phone.
If you want to use your phone in a vehicle, install the handsfree car kit which is designed for that purpose, still ensuring
you give full attention to driving.
Ensure that your phone and car kit do not block any air bags
or other security devices fitted in your car.
The use of an alarm system to operate a vehicle's light or horn
to indicate incoming phone calls is proh ibited on publi c roads
in some countries. Check local regulations.
EN 60950 Norm
In case of hot weather or after a prolonged exposure to the sun
(e.g., behind a window or a windscreen), the temperature of
your phone's casing might increase, especially when featuring
a metallic finish. Be very careful in this case when picking up
your phone and also avoid using it with an ambient
temperature over 40°C.
Environmental care
Remember to observe the local regulations
regarding the disposal of your packaging materials,
exhausted batteries and old phone and please
promote their recycling.
Philips has marked the battery and packaging with
standard symbols designed to promote the recycling and
appropriate disposal of your eventual waste.
The battery should not be disposed of with
general household waste.
The labelled packaging material is recyclable.
A financial contribution has been made to the
associated national packaging recovery and
recycling system ( e.g. EcoEmballage in France).
The materials are recyclable (also identifies the
plastic material).
56 Precautions
Page 63

Troubleshooting
The phone
does not
switch on
The display
shows
BLOCKED
when you
switch on
The display
shows IMSI
failure
You r p h on e
doesn’t
return to
the idle
screen
Remove/reinstall the battery (see
page 1). Then charge the phone
until the battery icon stops
scrolling. Unplug from charger and
try to switch the mobile on.
Somebody tried to use your phone
but didn’t know the PIN code nor
the unblocking code (PUK).
Contact your service provider.
This problem is related to your
subscription. Contact your
operator.
Press and hold ) or switch off
the phone, check that the SIM card
and the battery are installed
correctly and switch it on again.
The
symbol is
not
displayed
The display
doesn’t
respond (or
the display
responds
slowly) to
key presses
Yo u r
battery
seems to
over heat
The network connection is lost.
Either you are in a radio shadow (in
a tunnel or between tall buildings)
or you are outside the network
coverage area. Try from another
place, try to reconnect to the
network (especially when abroad),
check that the antenna is in place if
your mobile has an external
antenna, or contact your network
operator for assistance/
information.
The display responds more slowly
at very low temperatures. This is
normal and does not affect the
operation of the phone. Take the
phone to a warmer place and try
again. In other cases please contact
your phone supplier.
You might be using a charger that
was not intended for your phone.
Make sure you always use the
Philips authentic accessory shipped
with your phone.
Troubleshooting 57
Page 64

You r p h on e
doesn’t
display the
phone
numbers of
incoming
calls
You can’t
send text
messages
You can’t
receive and/
or store
JPEG
pictures
You have
the feeling
that you
miss some
calls
This feature is network and
subscription dependent. If the
network doesn’t send the caller’s
number, the phone will display
1
or Withheld instead. Contact
Call
your operator for detailed
information on this subject.
Some networks don’t allow
message exchanges with other
networks. First check that you
entered the number of your SMS
centre, or contact your operator for
detailed information on this
subject.
A picture may not be accepted by
your mobile phone if it is too large,
if its name is too long, or if it
doesn’t have the correct file format.
To receive all calls, make sure that
none of the features "Conditional
call forward" or "unconditional call
forward" is activated (see page 44).
During
battery
charge, the
batter y icon
shows no
bar and the
outline is
flashing
The display
shows SIM
failure
When
attempting
to use a
feature in
the menu,
the mobile
displays
NOT
ALLOWED
The display
shows
INSERT
YOUR S IM
CARD
Only charge the battery in an
environment where the
temperature does not go below 0°C
(32°F) or above 50°C (113°F).
In other cases please contact your
phone supplier.
Check that the SIM card has been
inserted in the right position (see
page 1). If the problem remains,
your SIM card may be damaged.
Contact your operator.
Some features are network
dependent. They are only available,
therefore, if the network or your
subscription supports them.
Contact your operator for detailed
information on this subject.
Check that the SIM card has been
inserted in the right position (see
page 1). If the problem remains,
your SIM card might be damaged.
Contact your operator.
58 Troubleshooting
Page 65

The
autonomy of
your phone
seems lower
that
indicated in
the user
guide
Your phone
doesn’t work
well in your
car
The autonomy is linked to your
settings (e.g., ringer volume,
backlight duration) and the features
you use. To increase the autonomy,
and whenever possible, you must
deactivate features you do not use.
A car contains many metallic parts
that absorb electromagnetic waves
which can affect the phone’s
performances. A car kit is available
Your phone
is not
charging
If your battery is completely flat, it
might take several minutes of precharge (up to 5 minutes in some
cases) before the charging icon is
displayed on the screen.
to provide you with an external
antenna and enables you to make
and receive phone calls without
handling the handset.
Check with local authorities if you
are allowed to use the phone whilst
driving.
Troubleshooting 59
Page 66

Philips authentic
accessories
Some accessories, such as a standard battery and a
charger, are included as standard in the package of
yo ur mob il e ph on e. Ot her a cces sori es mi gh t be sold in
the commercial package (according to the operator or
the retailer), or sold separately. As a consequence, the
package contents may vary.
To maximise the performance of your Philips phone
and not to void the warranty, always purchase Philips
Authentic Accessories that are specially designed for
use with your phone. Philips Consumer Electronics
cannot be held liable for any damage due to use with
non authorised accessories.
Charger
Charges your battery in any AC outlet. Small enough
to carry in a briefcase/handbag.
Carry case
Protects your phone from nicks and scratches.
Data connect kit
Easy data connection to your Philips mobile phone:
the USB cable enable high speed connection between
your phone and your computer. Just connect your
phone to the cable for an automatic organiser and
phonebook synchronization within a few seconds.
The provided software allows you to download
pictures and melodies.
60 Philips authentic accessories
Page 67

SAR Information - EU (RTTE)
THIS MODEL PHONE MEETS THE EU & FCC REQUIREMENTS
Your mobile phone is a radio transmitter and receiver. It is designed and manufactured not to exceed the limits for
exposure to radio frequency (RF) energy recommended by the Council of the European Union. These limits are
part of comprehensive guidelines and establish permitted levels of RF energy for the general population. The
guidelines were developed by independent scientific organisations through periodic and thorough evaluation of
scientific studies. The limits include a substantial safety margin designed to assure the safety of all persons,
regardless of age and health.
The exposure standard for mobile phones employs a unit of measurement known as the Specific Absorption Rate,
or SAR. The SAR limit recommended by the Council of the European Union is 2.0 W/kg. Tests for SAR have
been conducted using standard operating positions with the phone transmitting at its highest certified power level
in all tested frequency bands. Although the SAR is determined at the highest certified power level, the actual SAR
level of the phone while operating can be well below the maximum value. This is because the phone is designed to
operate at multiple power levels so as to use only the power required to reach the network. In general, the closer
you are to a base station antenna, the lower the power output.
Before a phone model is available for sale to the public, compliance with the European RTTE directive must be
shown. This directive includes as one essential requirement the protection of the health and the safety for the user
and any other person.
The highest SAR value for this Philips 568/ CT 5688 model phone when tested for compliance against the
standard was 0.653 W/kg. While there may be differences between the SAR levels of various phones and at various
positions, they all meet the EU requirements for RF exposure.
For body worn operation, this phone has been tested and meets the Federal Communications Commission RF exposure
guidelines when used with the Philips accessories supplied. Use of other accessories may not ensure compliance with FCC
RF exposure guidelines. The SAR limit set by the Federal Communications Commission of the U.S. Government is 1.6
W/kg. The highest reported SAR values are: Head: 0.527 W/kg; Body-worn: 0.505 W/kg.
SAR Information - EU (RTTE) 61
FOR EXPOSURE TO RADIO WAVES
Page 68

SAR Information - International (ICNIRP)
THIS MOBILE PHONE MEETS INTERNATIONAL AND FCC REQUIREMENTS
Your mobile phone is a radio transmitter and receiver. It is designed and manufactured not to exceed the limits for
exposure to radio frequency (RF) recommended by international guidelines (ICNIRP). These limits are part of
comprehensive guidelines and establish permitted levels of RF energy for the general population. The guidelines
were developed by independent scientific organisations through periodic and thorough evaluation of scientific
studies. The guidelines include a substantial safety margin designed to assure the safety of all persons, regardless of
age and health.
The exposure standard for mobile phones employs a unit of measurement known as the Specific Absorption Rate,
or SAR. The SAR limit stated in the international guidelines is 2.0 W/kg. Tests for SAR are conducted using
standard operating positions with the phone transmitting at its highest certified power level in all tested frequency
bands. Although the SAR is determined at the highest certified power level, the actual SAR of the phone while
operating can be well below the maximum value. This is because the phone is designed to operate at multiple power
levels so as to use only the power required to reach the network. In general, the closer you are to a base station, the
lower the power output of the phone.
The highest SAR value for this Philips 568 / CT 5688 model phone when tested for use at the ear is 0.653 W/kg.
While there may be differences between the SAR levels of various phones and at various positions, they all meet
the relevant international guidelines for RF exposure.
For body worn operation, this phone has been tested and meets the Federal Communications Commission RF exposure
guidelines when used with the Philips accessories supplied. Use of other accessories may not ensure compliance with FCC
RF exposure guidelines. The SAR limit set by the Federal Communications Commission of the U.S. Government is 1.6
W/kg. The highest reported SAR values are: Head: 0.527 W/kg; Body-worn: 0.505 W/kg.
62 SAR Information - International (ICNIRP)
FOR EXPOSURE TO RADIO WAVES
Page 69

Declaration of
conformity
We ,
Philips France - Mobile Telephony
4 rue du Port aux Vins - Les patios
92156 Suresnes Cedex
FRANCE
declare under our sole responsibility that the product
Philips 568
CT 5688
Cellular Mobile Radio GSM 900/GSM 1800
TAC: 35405400
to which this declaration relates, is in conformity with
the following Standards:
EN 60950, EN 50360 and EN 301 489-07
EN 301 511 v 7.0.1
We hereby declare that all essential radio test suites
have been carried out and that the above named
product is in conformity to all the essential
requirements of Directive 1999/5/EC.
The conformity assessment procedure referred to in
Article 10 and detailed in Annex V of Directive 1999/
5/EC has been followed related to articles 3.1 and 3.2
with the involvement of the following Notified Body:
BABT, Claremont House, 34 Molesey Road, Waltonon-Thames, KT12 4RQ, UK
Identification mark: 0168
Le Mans, September 7th, 2004
Jean-Omer Kifouani
Quality Manager
In case your Philips product is not working correctly or
is defective, please return your phone to the place of
purchase or to the Philips National Service Center.
Refer to the International Guarantee shipped in the
box for information on Service centers and technical
documentation relevant to your equipment.
 Loading...