

Page 1
Wireless Base Station 11g
Instructions for use
CPWBS054
CPWBS054
Version 1.0
Page 2

2
Page 3

English
Hereby, Philips Consumer Electronics, BLC P&A CC, declares that this CPWBS054 is in compliance
with the essential requirements and other relevant provisions of Directive 1999/5/EC.
Finnish
Philips Consumer Electronics, BLC P&A CC vakuuttaa täten että CPWBS054 tyyppinen laite on
direktiivin 1999/5/EY oleellisten vaatimusten ja sitä koskevien direktiivin muiden ehtojen mukainen.
Dutch
Hierbij verklaart, Philips Consumer Electronics, BLC P&A CC dat het toestel CPWBS054 in
overeenstemming is met de essentiële eisen en de andere relevante bepalingen van richtlijn
1999/5/EG.
French
Par la présente, Philips Consumer Electronics, BLC P&A CC, déclare que l'appareil CPWBS054 est
conforme aux exigences essentielles et aux autres dispositions pertinentes de la directive
1999/5/CE
Swedish
Härmed intygar, Philips Consumer Electronics, BLC P&A CC, att denna CPWBS054 står I
överensstämmelse med de väsentliga egenskapskrav och övriga relevanta bestämmelser som
framgår av direktiv 1999/5/EG.
Danish
Undertegnede Philips Consumer Electronics, BLC P&A CC erklærer herved, at følgende udstyr
CPWBS054 overholder de væsentlige krav og øvrige relevante krav i direktiv 1999/5/EF
3
German
Hiermit erklärt Philips Consumer Electronics, BLC P&A CC die Übereinstimmung des Gerätes
CPWBS054 mit den grundlegenden Anforderungen und den anderen relevanten Festlegungen der
Richtlinie 1999/5/EG.
Greek
O Philips Consumer Electronics, B.U. Peripherals & Accessories
O CPWUA054 O O O
O O 1999/5/
Italian
Con la presente Philips Consumer Electronics, BLC P&A CC dichiara che questo CPWBS054 è
conforme ai requisiti essenziali ed alle altre disposizioni pertinenti stabilite dalla direttiva 1999/5/CE.
Spanish
Por medio de la presente, Philips Consumer Electronics, BLC P&A CC, declara que el CPWBS054
cumple con los requisitos esenciales y cualesquiera otras disposiciones aplicables o exigibles de la
Directiva 1999/5/CE
Portuguese
Philips Consumer Electronics, BLC P&A CC declara que este CPWBS054 está conforme com os
requisitos essenciais e outras disposições da Directiva 1999/5/CE.
Page 4

4
Helpline
☎
België/Belgique/Belgien
02 275 0701
Luxemburg/Luxembourg
26 48 3000
Danmark
35 25 87 61
Deutschland
0696 698 4712
España
09 17456246
France
03 8717 0033
00900 3122 1223
Ireland
01 601 1161
Italia
02 4827 1153
Nederland
053 482 9800
Norge
22 70 82 50
Österreich
01 5465 75603
Portugal
0800-831-363
Schweiz/Suisse/Svizzera
02 2310 2116
Suomi
09 2290 1903
Sverige
08 632 0016
UK (United Kingdom)
0207 949 0069
Cyprus
800-92256
CPWBS054/00
R&TTE Directive 1999/5/EC
BE ✔ DK ✔ GR ✘ ES ✔ FR ✔
IRE ✔ IT ✔ LU ✔ NL ✔ AT ✔
PT ✔ FI ✔ SE ✔ UK ✘ NO✔
DE ✔ CH ✔
Page 5

ENGLISH 5
Ta b le of Contents
Wireless Base Station 11g ...............................................................6
Description / Packaging contents ....................................................................................6
LED Indicators..............................................................................................................................7
Important information/ Disclaimer ..................................................................................8
Installing the Wireless Base Station 11g ........................................9
How to use the Setup program.....................................................................................10
How to create a wired network using Ethernet cables ...................................11
How to create a wireless network...............................................................................11
Installing and Configuring TCP/IP.................................................13
Installing TCP/IP .......................................................................................................................13
Configuring a Macintosh Computer ...........................................................................13
Configuring the Wireless Base Station 11g .................................14
Disable Proxy Connection ................................................................................................14
Adapting your browser configuration:
for Internet Explorer ......................................................................................................14
for Macintosh......................................................................................................................15
Accessing the Wireless Base Station setting menus............................................15
Navigating the Web Browser Interface .....................................................................16
Setup Wizard ............................................................................................................................17
Time Zone ...........................................................................................................................17
Broadband Type.................................................................................................................17
Advanced Setup.......................................................................................................................20
System ...................................................................................................................................21
Internet Settings ................................................................................................................22
Local network ...................................................................................................................25
Wireless ................................................................................................................................26
Network Address Translation ..................................................................................28
Firewall ..................................................................................................................................30
Dynamic DNS Settings..................................................................................................35
Tools .......................................................................................................................................36
Status ......................................................................................................................................38
How to secure the Wireless Base Station 11g? ...........................39
Choosing a password for restricting access to the
Wireless Base Station’s configuration menu............................................................39
Setting an encryption for your wireless network. ................................................42
How to reset the Wireless Base Station 11g to its default
settings?............................................................................................45
How to set-up a computer network?............................................46
What is your Windows version?.....................................................................................46
For Windows XP and Windows 2000.................................................................46
For Windows 98SE and Windows Me ................................................................52
Tr oubleshooting .............................................................................56
Specifications...................................................................................58
Page 6

ENGLISH6
Wireless Base Station 11g
CPWBS054
Thank you for purchasing the Philips Wireless Base Station 11g.
This Wireless Base Station 11g is a 54 Mbps wireless residential gateway,
especially designed to provide a simple and cost effective wireless Internet
sharing solution for both home and small office users.
Besides flexibility on home network connectivity, the Wireless Base Station
11g also provides network security and management features for users like
Network Address Translation (NAT), Dynamic Host Configuration Protocol
(DHCP), advanced packet filtering with hacker attack monitor, logging and
stateful packet inspection (Firewall-SPI). Also, Universal Plug and Play
(UPnP), Dynamic DNS (DDNS),WiFi Protected Access (WPA), 802.1x +
TKIP, and wireless to wired Ethernet bridging are all supported.
Packaging contents
Please check whether all of the following items are present in the box of
the Wireless Base Station 11g.These are provided to help you set up and
use your Wireless Base Station 11g. Contact your Philips retailer if any items
are missing.
• Wireless Base Station 11g
• Power adapter
• Ethernet cable class RJ-45
• Installation CD
• ”How To…?”-booklet
Page 7

Your Wireless Base Station 11g
ENGLISH 7
➊
➋
➍
➌
➎
1 Antennas
For connecting to your Wireless Network Adapters
(also called WLAN or WiFi).
2 Reset button
• Press it for 2 seconds to reboot the wireless base station 11g.
• Keep it pressed for more than 5 seconds to restore the factory
3 Ethernet ports
RJ-45 sockets for Broadband Modem and Ethernet network cables.
4Power
Socket for connecting the power adapter to the Wireless Base Station 11g.
5 Indicator LEDs
Display the network status.
➌
➊
default settings.
LED LED colour Meaning
Power Blue Off when power is disconnected
On when receiving power.
Blinking when rebooting
Wireless Off when wireless is disabled.
(Wireless Blue On when wireless enabled and client active.
home network) Blinking when transmitting.
Modem Blue Off when not connected
(Internet modem) On when a link is established.
Blinking when transmitting.
1/2/3/4 LAN Yellow (10 Mbps) Off when not connected
(Wired home network) Blue (100 Mbps) On when a link is established.
Blinking when transmitting.
6 Label with MAC address
The MAC address consists of 12 characters (e.g. 00:30:F1:A1:F4:A5 or, in
general, xx:xx:xx:xx:xx:xx) and is the unique hardware address of this
network device. Some safety features or network identification purposes
need this MAC address.
Page 8

ENGLISH8
Important information
• Please install and connect the product in the order as described in the
"How to..." booklet only.This assures best installation results with the least
technical hassles.
• Please read this manual and the “How To…?”-booklet carefully before using
the Wireless Base Station 11g; and keep these documents for future
reference.
• The most recent downloads and information on this product will be
available through our web site www.philips.com/support
• During set-up and installation, it may be helpful to have the instructions for
your PC and other network components at hand.
Safety Precautions
• Check if the voltage indicated on the type plate of the adapter corresponds
to the local mains voltage before connecting to the mains power supply.
• Radio equipment for wireless applications is not protected against
disturbance from other radio services.
• Do not expose the product to excessive moisture, rain, sand or heat sources.
• The product should not be exposed to dripping or splashing. No object
filled with liquids, such as vases, should be placed on the product.
• Keep the product away from domestic heating equipment and direct sunlight.
• Allow a sufficient amount of free space all around the product for adequate
ventilation.
• Do not open this product. Contact your Philips retailer if you experience
technical difficulties.
Environmental information
All redundant packing material has been omitted. We have done our utmost
to make the packaging easily separable into three mono materials:
cardboard (box), polystyrene foam (buffer) and polyethylene (bags,
protective foam sheet).Your set consists of materials that can be recycled if
disassembled by a specialised company. Please observe the local regulations
regarding the disposal of packing materials, exhausted batteries and old
equipment.
Disclaimer
This product is provided by "Philips" "as is'' and without any express or implied warranty of any
kind of warranties, including, but not limited to, the implied warranties of merchantability and
fitness for a particular purpose are disclaimed.
In no event shall Philips be liable for any direct, indirect, incidental, special, exemplary,or
consequential damages (including, but not limited to, procurement of substitute goods or services;
loss of information, data, or profits; or business interruption) howsoever caused and on any theory
of liability,whether in contract, strict liability, or tort (including negligence or otherwise) arising in
any way out of the use of inability to use this product, even if advised of the possibility of such
damages.
Philips further does not warrant the accuracy or completeness of the information, text, graphics,
links or other items transmitted by this product.
Page 9

ENGLISH 9
Installing the Wireless Base Station
Install the Wireless Base Station 11g software from the Installation CD and
use the "How to..?" booklet to help you install and configure the Wireless
Base Station 11g. Please, do not make any hardware connections before the
Setup Wizard asks you to do so.
1 Place the CD included in the box in your computer's drive and
start installing the software.
> The CD should start automatically. If it does not, please double-click "My
Computer", then the drive icon and finally "Setup.exe" to start the CD.
2Follow the on-screen instructions for setting up your Wireless
Base Station 11g.
3 In the installation program, look for the picture of the Wireless
Base Station 11g on the screen and click on it to continue the
installation procedure.
Page 10
ENGLISH10
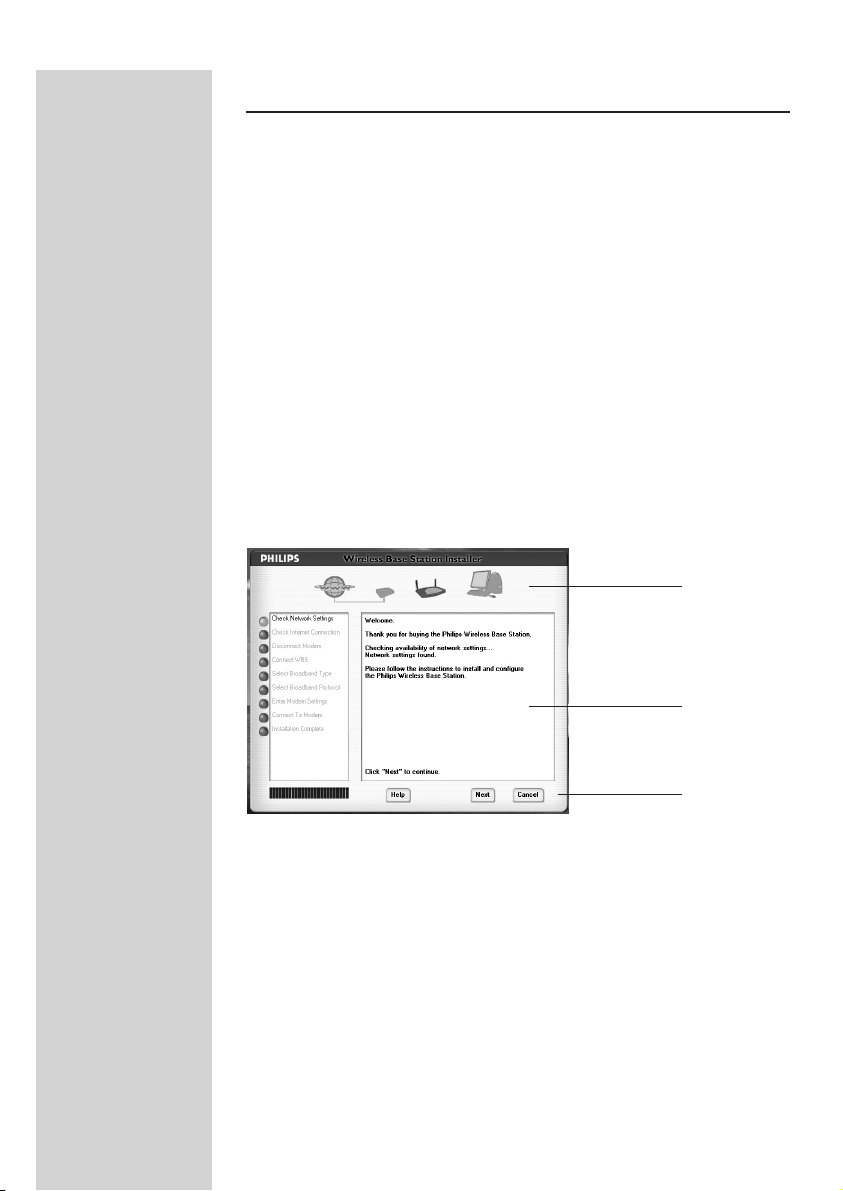
How to use the Setup program
The Setup program will assist you in making the hardware connections for
your Wireless Base Station 11g in the correct order. It will also attempt to
detect your existing network and Internet settings and apply them to the
new situation.
For easy installation of your Wireless Base Station 11g, please follow the
on-screen instructions.
1 Graphical representation of your network, the network connections, and
their status. Unavailable components will be 'blue' and only the available
connections will be indicated in green.
2 Text window that provides you with information on status and on what to
do next.
3 Control buttons for navigating the Setup program
➊
➋
➌
This concludes the installation procedure. Please see the
following sections on connecting, configuring and using the
Wireless Base Station 11g.
Should there appear any error messages or requests for additional
information on the screen, then please read the manual and the
"Troubleshooting" section.With the information given in this manual, you
should be able to solve many problems with installing and using the
Wireless Base Station 11g.
Please visit our web site www.philips.com/support if you need further
assistance. Or, call our help desk for assistance.The help desk telephone
numbers can be found on the opening pages of this manual.
Page 11

ENGLISH 11
How to create a wired network using Ethernet cables
The Ethernet ports will adapt automatically to the connected cable type.
This means you can use either type of Ethernet cable, straight-through or
crossover, provided it is Category 5 or higher quality.The four Local
Network ports 1, 2, 3 and 4 on the Wireless Base Station 11g will
automatically negotiate the connection speed to 10 Mbps Ethernet or
100 Mbps Fast Ethernet, and the transmission mode to half duplex or full
duplex.
Use twisted-pair cable to connect any of the four Local Network ports 1, 2,
3, and 4 on the Wireless Base Station 11g to an Ethernet adapter on your
PC. Otherwise, you can cascade any of the Local Network ports 1, 2, 3, and
4 on the Wireless Base Station 11g to an Ethernet hub or switch, and then
connect your PC or other network equipment to the hub or switch.
When inserting an RJ-45 plug, be sure the tab on the plug clicks into
position to ensure that it is properly seated.
Warning: Do not plug a phone jack connector into any RJ-45 port. This may damage
the Wireless Base Station 11g. Instead, use only twisted-pair cables with
RJ-45 connectors.
How to create a wireless network
For an example, see the chapter on "How to set-up a computer network"'
at the end of this manual.
Install a wireless network adapter in each computer that will be connected
to the Internet or your local network via radio signals. Philips currently
offers several wireless network adapters, including the Philips Wireless USB
Adapter and the Philips Wireless Notebook Adapter.
Rotate both antennas on the back of the Wireless Base Station 11g to the
desired position. For more effective coverage, position antennas along
Page 12

ENGLISH12
different axes; for example around 45 to 90 degrees apart.Try to place the
Wireless Base Station 11g in a position that is located in the center of your
wireless network. Normally, the higher you place the antenna, the better the
performance. Ensure that the Wireless Base Station’s location provides
optimal reception throughout your home or office.
Computers equipped with a wireless adapter can communicate with each
other as an independent wireless Local Network by configuring each
computer to the same radio channel. However, the Wireless Base Station
11g can provide access to your wired/wireless Local Network or to the
Internet for all wireless workstations. Each wireless PC in this network
infrastructure can talk to any computer in the wireless group via a radio link,
or access other computers or network resources in the wired Local
Network infrastructure or over the Internet via the Wireless Base
Station 11g.
The wireless infrastructure configuration not only extends the accessibility
of wireless PCs to the wired Local Network, but also increases the effective
wireless transmission range for wireless PCs by retransmitting incoming
radio signals through the Wireless Base Station 11g.
A wireless infrastructure can be used for access to a central database, or for
connection between mobile workers, as shown in the following figure:
Making the Wireless Local Network Connections
Page 13

ENGLISH 13
Instaling and Configuring TCP/IP
If you have not previously used Internet or installed a computer network on
your PC, refer to the following section.
Installing TCP/IP
Windows 98SE/Me/2000 and XP
Click Start/Help, and seach for the text "TCP/IP". Select the subject on
"Installing Network Protocols" and follow the instructions the Windows
Help function gives you.
Set the TCP/IP protocol you are installing to DHCP for dynamically
allocating IP-addresses within the network. Use the Windows Help function
if you need more information.
Re-run the Setup program from the Installation CD after installing the
TCP/IP-protocol.
Configuring a Macintosh Computer
DHCP IP Configuration
1. Pull down the Apple Menu. Click Control Panel and select TCP/IP.
2. In the TCP/IP dialog box, make sure that Ethernet is selected in the
Connect via: field.
3. Select Using DHCP Server in the Configure field.
4. Close the TCP/IP dialog box.
Page 14

14
ENGLISH14
Configuring the Wireless Base Station 11g
The Wireless Base Station 11g can be configured using Internet Explorer
(version 5.5 or higher or Netscape (version 4.7 or higher). Using the web
management interface, you can configure the Wireless Base Station 11g and
view statistics to monitor network activity.
Note: Before you attempt to configure your Wireless Base Station 11g, if you have
access to the Internet please visit www.philips.com/support and download
the latest firmware update to ensure your Wireless Base Station 11g is
running the latest firmware version.
Before you attempt to log into the Wireless Base Station’s web-based
Settings, please verify that you have disabled any firewall or security software
that may be running.
Disable Proxy Connection
You will also need to verify that the HTTP Proxy feature of your web
browser is disabled.This is so that your web browser will be able to view
the Wireless Base Station 11g configuration pages.The following steps are
for Internet Explorer. Determine which browser you use and follow the
appropriate steps.
Adapting your browser configuration
Adapting your browser configuration for: Internet
Explorer (5 or above)
1. Open Internet Explorer. Click Tools, and then select Internet Options.
2. In the Internet Options window, click the Connections tab.
3. Click the LAN Settings button.
4. Clear all the check boxes and click OK to save these Local Area
Network settings.
5. Click OK again to close the Internet Options window.
6. Restart Internet Explorer for the changes to take effect.
Page 15

ENGLISH 15
Adapting your browser configuration for: Internet
Explorer (for Macintosh)
1. Open Internet Explorer. Click Explorer/Preferences.
2. In the Internet Explorer Preferences window, under Network, select
Proxies.
3. Uncheck all check boxes and click OK.
Accessing the Wireless Base Station setting menus
To access the Wireless Base Station’s management interface, enter the
Wireless Base Station IP address in your web browser http://192.168.2.1.
Then click LOGIN. (By default, there is no password.)
The home page displays the Setup Wizard and Advanced Setup options.
Page 16

ENGLISH16
Navigating the Web Browser Interface
The Wireless Base Station’s management interface features a Setup Wizard
and an Advanced Setup section. Use the Setup Wizard if you want to
quickly set up the Wireless Base Station 11g for use with a cable modem or
DSL modem.
Advanced setup supports more advanced functions like hacker attack
detection, IP and MAC address filtering, intrusion detection, virtual server
setup, virtual DMZ hosts, and other advanced functions.
Making Configuration Changes
Configurable parameters have a dialog box or a drop-down list. Once a
configuration change has been made on a page, be sure to click the APPLY
or NEXT button at the bottom of the page to enable the new setting.
Note: To ensure proper screen refresh after a command entry, ensure that
Internet Explorer 5.0 is configured as follows: Under the menu Tools/
Internet Options/General/Temporary Internet Files/Settings, the setting for
“Check for newer versions of stored pages” should be “Every visit to the
page.”
Page 17
ENGLISH 17
Setup Wizard
If you completed the Setup Wizard from the Installation CD, you do not
need to change any of these settings. Go to 'Advanced Setup' for managing
the Wireless Base Station 11g.
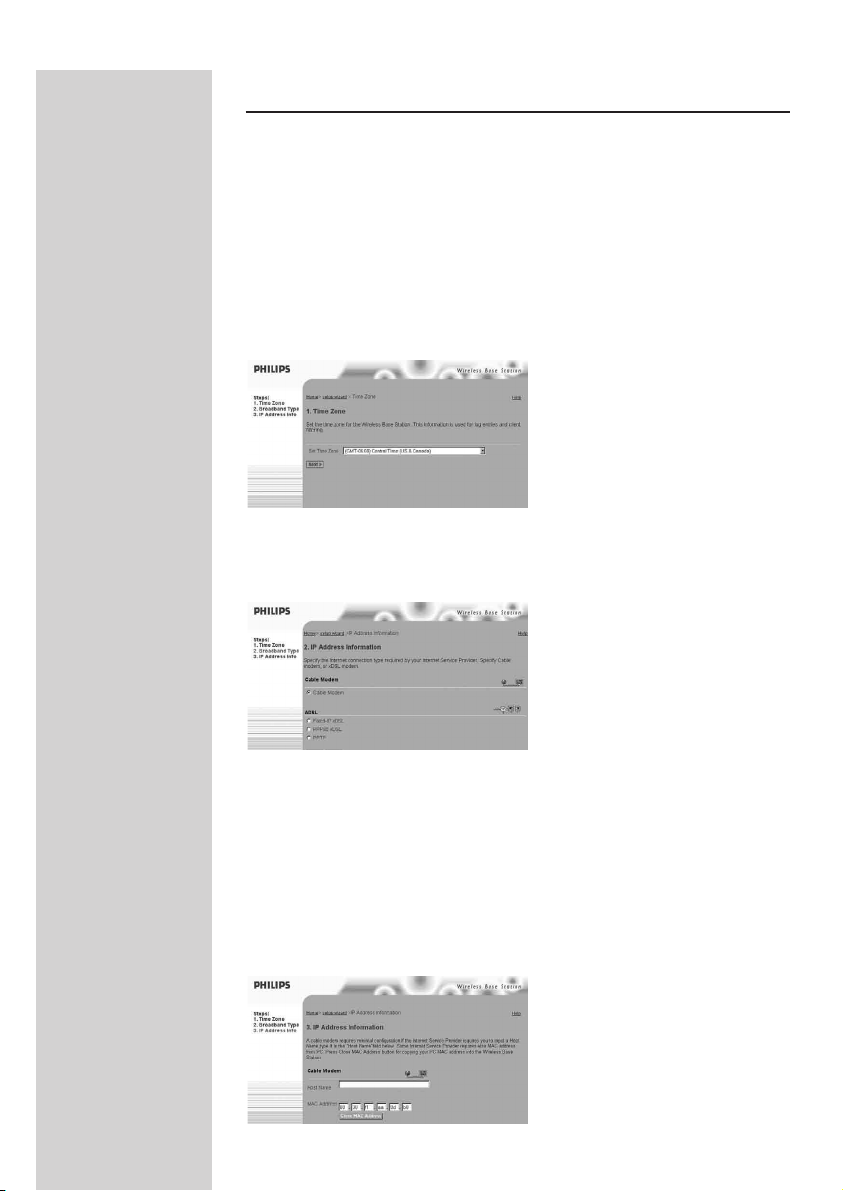
Time Zone
Click on the Setup Wizard picture.The first item in the Setup Wizard is
Time Zone setup.
For accurate timing of client filtering and log events, you need to set the
time zone. Select your time zone from the drop-down list, and click NEXT.
Broadband Type
Select the type of broadband connection you have, Cable Modem or ADSL.
See the following pages for details on the connection type.
Cable Modem
Your Internet Service Provider may have given you a host name. If so, enter
it into the field.
Enter or clone the MAC address of your modem for identifying your
hardware to your ISP.
Click Finish to complete the setup.The Status page will open to allow you
to view the connection status, as well as other information. See “Status” for
details.
Page 18

ENGLISH18
Fixed-IP xDSL
Some xDSL Internet Service Providers may assign a fixed (static) IP address.
If you have been provided with this information, choose this option and
enter the assigned IP address, gateway IP address, DNS IP addresses, and
subnet mask. Click FINISH to complete the setup.
PPPoE xDSL
Enter the PPPoE User Name and Password assigned by your Service
Provider. The Service Name is normally optional, but may be required by
some service providers.
Leave the Maximum Transmission Unit (MTU) at the default value unless
you have a particular reason to change it.
Enter a Maximum Idle Time (in minutes) to define a maximum period of
time for which the Internet connection is maintained during inactivity.
If the connection is inactive for longer than the Maximum Idle Time, it will
be dropped. (Default: 10)
Enable the Auto-reconnect option to automatically re-establish the
connection as soon as you attempt to access the Internet again.
Click FINISH to complete the setup.
Page 19

ENGLISH 19
PPTP (Point-to-Point Tunneling Protocol)
Point-to-Point Tunneling Protocol is a common connection method used for
xDSL connections in Europe. It can be used to join different physical
networks using the Internet as an intermediary.
If you have been provided with the information as shown on the screen,
enter the assigned IP address, subnet mask, default gateway IP address, user
ID and password, and PPTP Gateway.
The MTU (Maximum Transmission Unit) governs the maximum size of the
data packets. Leave this on the default value (1460) unless you have a
particular reason to change it.
Enter a Maximum Idle Time (in minutes) to define a maximum period of
time for which the Internet connection is maintained during inactivity.
If the connection is inactive for longer than the Maximum Idle Time, it will
be dropped. (Default: 0)
Enable the Auto-reconnect option to automatically re-establish the
connection as soon as you attempt to access the Internet again.
Click FINISH to complete the setup.
Page 20

20
ENGLISH
Advanced Setup
Use the web management interface to define system parameters, manage
and control the Wireless Base Station 11g and its ports, or monitor
network conditions.
The following table outlines the selections available from this program.
Menu Description
System Sets the local time zone, the password for administrator access, and the IP
address of a PC that will be allowed to manage the Wireless Base
Station 11g remotely.
Internet Settings Specifies the Internet connection type:
• Dynamic IP host configuration and the physical MAC address of each
media interface
• PPPoE configuration
• PPTP
• Static IP and ISP gateway address
• Specifies DNS servers to use for domain name resolution.
Local network Sets the TCP/IP configuration of the Wireless Base Station’s Local Network
interface and all DHCP clients.
Wireless Configures the radio frequency, Network Name (SSID), and encryption for
wireless communications.
NAT Shares a single ISP account with multiple users, sets up virtual servers.
Firewall Configures a variety of security and specialized functions, including:Access
Control, Intrusion Detection, and DMZ.
DDNS Dynamic DNS provides users on the Internet with a method to tie their
domain name(s) to computers or servers.
Tools Contains options to backup & restore the current configuration, restore all
configuration settings to the factory defaults, upgrade system firmware, or
reset the system.
Status Provides Internet connection type and status, firmware and hardware
version numbers, system IP settings, as well as DHCP, NAT, and Firewall
information.
Displays the number of attached clients, the firmware versions, the physical
MAC address for each media interface, and the hardware version and serial
number.
Shows the security and DHCP client log.
Page 21

ENGLISH 21
System
Time Zone
Select your time zone and time server from the drop-down list for the
Wireless Base Station 11g.This information is used for log entries and client
access control.
Password Settings
Use this menu to restrict access based on a password. By default, there is
no password. For security you should assign one before exposing the
Wireless Base Station 11g to the Internet.
Passwords can contain from 3–12 alphanumeric characters and are not case
sensitive.
Note: If your password is lost, or you cannot gain access to the user interface,
press the Reset button (holding it down for at least five seconds) to restore
the factory defaults. (The default is no password.)
Enter a maximum Idle Time Out (in minutes) to define a maximum period
of time for which the login session is maintained during inactivity. If the
connection is inactive for longer than the maximum idle time, it will perform
system logout, and you have to login to the web management system again.
(Default: 9 minutes)
Page 22

ENGLISH22
Remote Management
Remote Management allows a remote PC to configure, manage, and
monitor the Wireless Base Station 11g using a standard web browser.
Check Enable and enter the IP address of the remote host. Click APPLY.
Note: If you specify 0.0.0.0 as this IP address, any host can manage the Wireless
Base Station 11g.
Internet Settings
Specify the Internet connection type provided by your Internet Service
Provider, then click More Configuration to enter detailed configuration
parameters for the selected connection type.
Dynamic IP
The Host Name is optional, but may be required by some ISPs.The default
MAC address is set to the Internet’s physical interface on the Wireless Base
Station 11g. Use this address when registering for Internet service, and do
not change it unless required by your ISP. If your ISP used the MAC address
of an Ethernet card as an identifier when first setting up your broadband
account, only connect the PC with the registered MAC address to the
Wireless Base Station 11g and click the Clone MAC Address button.
This will replace the current Wireless Base Station MAC address with the
already registered Ethernet card MAC address. If you are unsure of which
PC was originally set up by the broadband technician, call your ISP and
request that they register a new MAC address for your account.
Register the default MAC address of the Wireless Base Station 11g.
Page 23

ENGLISH 23
Point-to-Point Over Ethernet (PPPoE)
Enter the PPPoE User Name and Password assigned by your Service
Provider.The Service Name is normally optional, but may be required by
some service providers.
The MTU (Maximum Transmission Unit) governs the maximum size of the
data packets. Leave this on the default value (1492) unless you have a
particular reason to change it.
Enter a Maximum Idle Time (in minutes) to define a maximum period of
time for which the Internet connection is maintained during inactivity.
If the connection is inactive for longer than the Maximum Idle Time, it will
be dropped. (Default: 10 minutes)
Enable the Auto-reconnect option to automatically re-establish the
connection as soon as you attempt to access the Internet again.
Point-to-Point Tunneling Protocol (PPTP)
Point-to-Point Tunneling Protocol (PPTP) can be used to join different
physical networks using the Internet as an intermediary. Using the above
screen allows client PCs to establish a normal PPTP session and provides
hassle-free configuration of the PPTP client on each client PC.
Enter the assigned IP address, subnet mask and default gateway IP address
(usually supplied by your ISP), and then the PPTP User ID, Password and
PPPTP Gateway IP address.
The MTU (Maximum Transmission Unit) governs the maximum size of the
Page 24

24 ENGLISH
data packets. Leave this on the default value (1460) unless you have a
particular reason to change it.
Enter a maximum Idle Time Out (in minutes) to define a maximum period
of time for which the PPTP connection is maintained during inactivity.
If the connection is inactive for longer than the Maximum Idle Time, it will
be dropped. (Default: 0 minutes)
Enable the Auto-reconnect option to automatically re-establish the
connection as soon as you attempt to access the Internet again.
Static IP
If your Internet Service Provider has assigned a fixed IP address, enter the
assigned address and subnet mask for the Wireless Base Station 11g, then
enter the gateway address of your ISP.
DNS
Domain Name Servers map numerical IP addresses to the equivalent
domain name (e.g., www.philips.com).Your ISP should provide the IP address
of one or more domain name servers. Enter those addresses in this screen.
Page 25

Local netwerk – LAN
• Local Network IP – Use the Local Network menu to configure the
Local Network IP address for the Wireless Base Station 11g and to
enable the DHCP server for dynamic client address allocation.
• Lease Time – Set a period for the lease time if required. For home
networks this may be set to Forever, which means there is no time limit
on the IP address lease.
• IP Address Pool – A dynamic IP start address may be specified, e.g.
192.168.2.100 (default value). Once this start IP address has been
assigned, IP addresses running from 192.168.2.100 to 192.168.2.199 will
be part of the dynamic IP address pool. IP addresses from 192.168.2.2
to 192.168.2.99, and 192.168.2.200 to 192.168.2.254 will be available as
static IP addresses.
25ENGLISH
Remember not to include the address of the Wireless Base Station 11g in
the client address pool. Also remember to configure your client PCs for
dynamic IP address allocation.
Page 26

26 ENGLISH
Wireless
To configure the Wireless Base Station 11g as a wireless access point for
wireless clients (either stationary or roaming), all you need to do is define
the radio channel, the Network Name (or Service Set identifier/SSID)
(Default: philips), and encryption options.
Channel and SSID
You must specify a common radio channel and Network Name (SSID) to
be used by the Wireless Base Station 11g and all of your wireless clients.
Be sure you configure all of your clients to the same values. Network name
(SSID).This should be set to the same value as other wireless devices in
your network. (Default: philips.)
Note: The Network Name (SSID) is case sensitive and can consist of up to
32 alphanumeric characters.
Transmission Rate: Set the data rate transmitted from the Wireless Base
Station 11g.The lower the data rate, the longer the transmission distance.
(Default: Fully Automatic.)
Basic Rate: The highest rate specified is the rate the Wireless Base
Station 11g will use when transmitting broadcast/multicast and management
frames. (Default:All.)
Channel: The radio channel through which the Wireless Base Station 11g
communicates with PCs in its service range. (Default:Auto).
Note: The available channel settings are limited by local regulations.
Broadcast Network Name: Broadcasting the SSID on the wireless network
for easy connection with client PCs.
(Default: Enable)
Page 27

ENGLISH
Encryption
If you are transmitting sensitive data across wireless channels, you should
enable Wired Equivalent Privacy (WEP) and/or WiFi Protected Access
(WPA) encryption. Encryption requires you to use the same set of
encryption/decryption keys for the Wireless Base Station 11g and all of your
wireless clients. You can choose between standard 64-bit or the more
robust 128-bit encryption.
You may automatically generate encryption keys or manually enter the keys.
For automatic 64-bit security, enter a passphrase and click Generate.
Four keys will be generated (as shown below). Choose a key from the
drop-down list or accept the default key. Automatic 128-bit security
generates a single key.
27
If you use encryption, configure the same keys used for the Wireless Base
Station 11g on each of your wireless clients. Note that the encryption
protects data transmitted between wireless nodes, but does not protect any
transmissions over your wired network or over the Internet.
Page 28

28 ENGLISH
Network Address Translation (NAT)
From this section you can configure the Address Mapping,Virtual Server, and
Special Application features that provide control over the port openings in
the Wireless Base Station’s firewall.This section can be used to support
several Internet based applications such as VPN
Address Mapping
Allows one or more public IP addresses to be shared by multiple internal
users. Enter the Public IP address you wish to share into the Global IP field.
Enter a range of internal IPs that will share the global IP.
Virtual Server
If you configure the Wireless Base Station 11g as a virtual server, remote
users accessing services such as web or FTP at your local site via public IP
addresses can be automatically redirected to local servers configured with
private IP addresses. In other words, depending on the requested service
(TCP/UDP port number), the Wireless Base Station 11g redirects the
external service request to the appropriate server (located at another
internal IP address).
For example, if you set Public Port to TCP/80 (HTTP or web) and the
Private IP/Port to 192.168.2.2/80, then all HTTP requests from outside
users will be transferred to 192.168.2.2 on port 80.Therefore, by just
Page 29

entering the IP Address provided by the ISP, Internet users can access the
service they need at the local address to which you redirect them.
The more common TCP service ports include: HTTP: 80, FTP: 21,Telnet: 23,
and POP3: 110
Special Applications
Some applications, such as Internet gaming, videoconferencing, Internet
telephony and others, require multiple connections.These applications
cannot work with Network Address Translation (NAT) enabled. If you need
to run applications that require multiple connections, use the following
screen to specify the additional public ports to be opened for each
application.
2929ENGLISH
Example:
Specify the public port number normally associated with an application in
the Trigger Port field. Set the protocol type to TCP or UDP, then enter the
ports that the application requires.
Special application connections can also be achieved by selecting the
application type and item number in the Popular applications field, and
clicking the Copy to button to easily specify the port numbers. Then set the
protocol type to TCP or UDP.
ID Trigger Port Trigger Type Public Port Public Type Comment
1 6112 UDP 6112 UDP Battle.net
2 28800 TCP 2300-2400, TCP MSN Game
47624 Zone
For a full list of ports and the services that run on them, see
www.iana.org/assignments/port-numbers.
Page 30

3030 ENGLISH
Firewall
The Wireless Base Station 11g firewall can provide access control of
connected client PCs, block common hacker attacks, including IP Spoofing,
Land Attack, Ping of Death, IP with zero length, Smurf Attack, UDP port
loopback, Snork Attack,TCP null scan, and TCP SYN flooding. The firewall
does not significantly affect system performance, so we advise leaving it
enabled to protect your network users.
Access Control
Using this option allows you to specify different privileges based on IP
address for the client PCs.
Note: Click on Add PC and define the appropriate settings for client PC services
(as shown in the following screen).
Page 31

3131ENGLISH
MAC Filtering Table
The MAC Filtering feature of the Wireless Base Station 11g allows you to
control access to your network to up to 32 clients based on the MAC
(Media Access Control) address of the client machine.This ID is unique to
each network adapter. If the MAC address is listed in the table, that client
machine will have access to the network.
Parental Control
To configure the Parental Control feature, use the table below to specify the
web sites (www.somesite.com) and/or keywords you want to filter on your
network.
To complete this configuration, you will need to create or modify an access
rule in “Access Control”.To modify an existing rule, click the Edit option
next to the rule you want to modify.To create a new rule, click on the Add
PC option.
From the Access Control Add PC section check the option for WWW with
Parental Control in the Client PC Service table to filter out the web sites
and keywords specified below.
Use the above screen to block access to web sites or to web URLs
containing the keyword specified in the table.containing the keyword
specified in the table.
Page 32

3232
ENGLISH
Schedule Rule
The Schedule Rule feature allows you to configure specific rules based on
Time and Date.These rules can then be used to configure more specific
Access Control.
Enables Schedule-based Internet access control.
1. Click Add Schedule Rule.
2. Define the settings for the schedule rule (as shown on the following
screen).
3. Click OK and then click the APPLY button to save your settings.
Page 33

3333ENGLISH
Use this section to create your network schedule rules.
The times you set below are the times periods that you want the Access
Control Rule to be active. For example, if you want to block Internet access
(block WWW) from 9AM to 9PM during the week, simply configure
9:00 AM as “Start Time” and 9:00 PM as “End Time” for each weekday.
During that time period the user will be unable to access the internet.
Once the schedule rule is set up, you will need to configure or edit an
Access Control rule, and select the Schedule Rule that you want to apply to
that Access Control rule.You can set the schedule rule at the bottom of the
Access Control Configuration page in the “Scheduling Rule” drop-down
option.
Intrusion Detection
Firewall Configuration
• SPI (Stateful Packet Inspection) and Anti-DoS firewall protection –
The Wireless Base Station’s Intrusion Detection feature limits access for
incoming traffic at the Internet port.When the SPI feature is turned on,
all incoming packets will be blocked.
• Discard Ping from INTERNET – Prevents any response to
ping commands on the Wireless Base Station’s Internet port.
E-Mail Alert Configuration
• When hackers attempt to enter your network, we can alert you by
e-mail – Enter your E-mail address. Specify your SMTP and POP3
servers, user name, and password.
Page 34

3434 ENGLISH
DMZ (Demilitarized Zone)
If you have a client PC that cannot run an Internet application properly
from behind the firewall, then you can open the client up to unrestricted
two-way Internet access. Enter the IP address of a DMZ host to this screen.
Adding a client to the DMZ may expose your local network to a variety of
security risks, so only use this option as a last resort.
Page 35

DDNS (Dynamic DNS – Settings)
Domain Name is a series of alphanumeric strings separated by periods that
maps to the address of a network connection and identifies the owner of
the address.
Dynamic DNS provides users on the Internet with a method to tie their
domain name to a computer or server. DDNS allows your domain name to
follow your IP address automatically by having your DNS records changed
when your IP address changes.
The Server Configuration section automatically opens the TCP port options
checked in the Virtual Server section. Simply enter in the IP Address of your
server, such as a web server, and then click on the port option HTTP
Port 80 so users can access your web server from the Internet connection.
3535ENGLISH
This DNS feature is powered by a DDNS service provider. With a DDNS
connection you can host your own web site, email server, FTP site, and
more at your own location even if you have a dynamic IP address.
(Default: Disable)
Page 36

3636 ENGLISH
Tools
Use the Tools menu to backup the current configuration, restore a
previously saved configuration, restore factory settings, update firmware, and
reset the Wireless Base Station.
Tools – Configuration Tools
• Backup – Saves the Wireless Base Station’s configuration to a file.
• Restore – Restores settings from a saved backup configuration file.
• Restore to factory defaults – Restores the Wireless Base Station settings
back to the factory defaults.
Tools – Firmware Upgrade
Use this screen to update the firmware or user interface to the latest
versions. Download the upgrade file from the Philips web site
(www.philips.com/support) and save it to your hard drive. In the Upgrade
Ta r get field, choose Firmware.Then click Browse to look for the previously
downloaded file. Click APPLY. Check the Status page Information section to
confirm that the upgrade process was successful.
Page 37

Tools – Reboot
Click APPLY to reboot the Wireless Base Station.The reboot will be
complete when the power LED stops blinking.
Note: If you use the Reset button on the Wireless Base Station it will perform a
power reset. If the button is held depressed for over five seconds, all the
LEDs will illuminate and the factory settings will be restored.
3737ENGLISH
Page 38

3838 ENGLISH
Status
The Status screen displays Internet/Local Network connection status,
firmware, and hardware version numbers, illegal attempts to access your
network, as well as information on DHCP clients connected to your
network.
The following items are included on this screen:
Section Description
INTERNET Displays Internet connection type and status.
Wireless Base Station Displays system IP settings, as well as DHCP, Firewall, UPnP and Wireless
status.
INFORMATION Displays the number of attached clients, the firmware versions, the physical
MAC address for each media interface, as well as the hardware version and
serial number.
Security Log Displays illegal attempts to access your network.
Save Click on this button to save the security log file.
Clear Click on this button to delete the security log.
Refresh Click on this button to refresh the screen.
DHCP Client Log Displays information on all DHCP clients on your network.
Page 39

ENGLISH
3939
How to secure the Wireless Base Station 11g?
The next pages will show you how to secure the Philips Wireless Base
Station 11g in two ways:
1. choosing a password for restricting access to the Wireless Base Station’s
configuration menu.
2. setting an encryption for your wireless network.
Note: Philips strongly recommends that you secure your Wireless Base Station 11g
as described in this chapter.
1 – Choosing a password for restricting access to the
Wireless Base Station’s configuration menu.
Go to configuration menu of the Wireless Base Station 11g by entering its
IP address (default 192.168.2.1 into the Address Bar of your Internet
browser program).
Click ‘Enter’ to continue.
Enter a password first if you have set one in the ‘System | Password Settings’
Enlarge the window of your browser program. (E.g., press the F11 key for
Internet Explorer.)
Click on the text “Advanced Setup”.
Page 40

4040 ENGLISH
Click ‘System’.
Click ’Password Settings’.
Page 41

Enter (and re-enter) a new password to restrict login access to your
Wireless Base Station 11g.
Click ‘Apply' to continue.
4141ENGLISH
Page 42

4242
ENGLISH
2 – Setting an encryption for your wireless network.
Click ’Wireless’.
Click ‘Security’ to continue.
Please, do not change any of the other wireless settings at this time.
Page 43

Choose the security mode that you want to use. In this example, click
’WEP’.
4343ENGLISH
Select the encryption strength you want to use (e.g. 128-bit WEP), and
enter a passphrase that will be hard to guess.
Important: 1. You need to make a difference between upper case and lower case
characters. I.e.: “SecretCode” is not the same as “secretcode”.
2. ‘Passphrase’ is not the same as ASCII input.
3. Always use exactly the same key settings on all wireless devices.
Page 44

4444 ENGLISH
1. Take note of your passphrase and encryption settings.
2. Click ‘Generate’ to transform your passphrase into an encryption key.
3. Click ‘Apply’ to start using the encryption.
Important: Configure all your other wireless devices to match the encryption settings
of the Wireless Base Station 11g.
Note: You will now lose the connection with the Wireless Base Station 11g if you
connected to it wirelessly. Re-connect after adapting the encryption settings
of your wireless network adapter.
Note: 1 If you have forgotten your encryption settings, you will need to re-enter
new encryption settings for all of your wireless network devices. If you
cannot connect to the Wireless Base Station 11g anymore, please read
“How to reset the Wireless Base Station 11g to its default settings?”
2 If you have forgotten your password for the configuration menu, you will
need to reset the Wireless Base Station 11g in order to remove the
password setting. Go to “How to reset the Wireless Base Station 11g to
its default settings?”
Page 45

How to reset the Wireless Base Station 11g to its default settings?
The next pages will show you how to reset the Philips Wireless Base
Station 11g.
Ta ke an object with a pointed end and push it firmly into the hole marked
‘Reset’ on the back of the Wireless Base Station 11g.
Observe the ‘power’, ‘wireless’, and ‘modem’ LEDs on the front of the
Wireless Base Station 11g lighting up constantly while keeping the reset
button pressed for at least five seconds.
4545ENGLISH
Release the reset button and observe the LEDs on the front of the
Wireless Base Station 11g.
After about five seconds, the ‘power’ LED should blink several times before
the Base Station re-starts.
If it did not blink first, please repeat the reset procedure.
After resetting, the default Wireless Base Station settings will be:
Wireless network name (SSID): philips
Wireless channel: 6
Wireless encryption: disabled
IP Address for configuration: 192.168.2.1
You will need to run the Setup program on the CD again.
Page 46

4646 ENGLISH
How to set-up a computer network?
The next pages will show you an example of how to set-up a computer
network using the Philips Wireless Base Station 11g.
Warning: The Wireless Base Station 11g only establishes a connection between your
wireless network devices. How you use this connection is up to you.
Setting-up a computer network is to be seen as an independent application
that requires networking software from other manufacturers.
For example, the networking software that has been incorporated in the
Windows Operating System by Microsoft.
Therefore, the description below is to be seen as an example only.
What is your Windows version?
WHAT IS YOUR WINDOWS VERSION?
1. Start setting-up your network with the computer that has the latest
operating system.The order of preference being: Windows XP,
Windows 2000,Windows Me, and finally Windows 98SE.
2. Use its Networking Setup Wizard and allow it to make a networking
setup diskette.
3. With this diskette, set-up your remaining computers.
For Windows XP and Windows 2000.
See further on in this chapter for Windows Me and Windows 98SE.
Click the Windows Start button, and click “Control Panel” from the list.
Page 47

Double-click the “Network and Internet connections” icon.
ENGLISH
4747
Click in the list to the left on “Setting-up a home network or small business
network”.
Page 48

4848 ENGLISH
The Wizard Network Setup appears. Click ‘Next’ to continue.
Wizard Network Settings
1. Please, carefully read the instructions the Wizard gives you, and adapt
your choices to the type of network you want to set-up. Use the Help
feature within the Wizard if you need more information while using the
Wizard.
2. In each window, click ‘Next’ to go to the next step.
3. Below, we will describe some of the crucial steps of this Wizard.
Place a check mark to ignore any broken network connections before
clicking ‘Next’ to continue.
Page 49

1. Enter a description that helps you recognize the computer.
2. Enter a name that is different for each computer.
3. Click ‘Next’ to continue.
4949ENGLISH
Enter the same workgroup name for all computers in the network, then
click ‘Next’ to continue.
Page 50

5050 ENGLISH
Choose to make a networking setup disk.Then click 'Next'.
Click ‘Finish’ to close the Wizard, and then use the disk you made to set-up
your other computers.
Page 51

ENGLISH
To share folders with the network: Start Windows Explorer and right-click
the folder you wish to share with the network. Click the ‘Sharing’ tab and
adapt the settings.
5151
To explore the network: Double-click the Network Environment icon on
the desktop.
If you need more information, consult Windows Help.
Page 52

5252 ENGLISH
For Windows 98SE and Windows Me.
See earlier on in this chapter for Windows XP and Windows 2000.
Click the Windows Start button, click “Settings”, and click “Control Panel”
from the list.
Double-click the “Network” icon.
Page 53

Click the ‘Identification’ tab.
5353ENGLISH
1. Enter a name that is different for each computer.
2. Enter the same workgroup name for all computers in the network.
3. Enter a description that helps you recognize the computer.
4. Click on the ‘Configuration’ tab to continue.
Page 54

5454 ENGLISH
Click the ‘Sharing files and printers’ button.
Select the access options you want, and click ‘OK’ to continue.
Click ‘OK’ to accept the changes.
Page 55

To share folders with the network: Start Windows Explorer and right-click
the folder you wish to share with the network. Click the ‘Sharing’ tab and
adapt the settings.
5555ENGLISH
To explore the network: Double-click the Network Environment icon on
the desktop.
If you need more information, consult Windows Help.
Page 56

5656
ENGLISH
Tr oubleshooting
The information outlined in this section describes some useful steps for
getting your computer and the Wireless Base Station 11g online.
A.Verify your connection to the Wireless Base Station 11g
If you are unable to access the Wireless Base Station’s web-based
administration pages then you may not be properly connected or
configured.The screen shots in this section were taken on a Windows 2000
machine, but the same steps will apply to Windows 95/98/Me/XP.
To determine your TCP/IP configuration status please follow the steps
below:
1. Click Start then choose Run.
2. Type cmd or command to open a DOS prompt.
3. In the DOS window, type ipconfig and verify the information that is
displayed.
4. If your computer is setup for DHCP, then your TCP/IP configuration
should be similar to the information displayed:
• IP Address: 192.168.2.X (x is number between 100 and 199)
• Subnet: 255.255.255.0
• Gateway: 192.168.2.1
If you have any other IP address information listed see below.
If you have an IP address that starts with 169.254.XXX.XXX then see the
next section.
If you have another IP address configured, then see section C.
B. I am getting an IP Address that starts with
169.254.XXX.XXX
If you are getting this IP Address, then you need to check that you are
properly connected to the Wireless Base Station 11g.
Confirm that you have a good link light on the Wireless Base Station 11g
for the corresponding port. If not, please try another cable.
If you have a good link light, please open up a DOS window as described in
the previous section and type ipconfig/renew.
If you are still unable to get an IP Address from the Wireless Base Station
11g, reinstall your network adapter. Please refer to your adapter manual for
information on how to do this.
Page 57

ENGLISH
C. I have another IP Address displayed
If you have another IP address listed then the PC may not be configured for
a DHCP connection. Please refer to “Configuring Client TCP/IP” for
information.
Once you have confirmed your computer is configured for DHCP, then
please follow the steps below.
1. Open a DOS window as described above.
2. Type ipconfig/release.
3. Then type ipconfig/renew.
D. The 10/100 LED does not light after a connection is made.
1. Check that the host computer and the Wireless Base Station 11g are
both powered on.
2. Be sure the network cable is connected to both devices.
3. Verify that Category 5 cable is used if you are operating at 100 Mbps.
4. Verify that the length of any cable does not exceed 100 m (328 ft).
5. Check the network card connections.
6. The RJ-45 port on the Wireless Base Station 11g, network card, or cable
may be defective.
5757
E. Browser Configuration
Confirm your browser is configured for a direct connection to the Internet
using the Ethernet cable that is attached to the computer.This is configured
through the options/preference section of your browser.
Page 58

5858
ENGLISH
Specifications
Below is an outline of the technical specifications for the Philips Wireless
Base Station
Standards • IEEE802.11g
• IEEE 802.3 10BASE-T Ethernet
• IEEE 802.3u 100BASE-TX Fast Ethernet
Data Rate • Auto Fallback: 54/48/36/24/18/12/11/9/6/5.5/2/1”
Security • Wired Equivalent Privacy (WEP) 64/128-Bit
Media Access • CSMA/CA with ACK
Control
Operating Range • Indoor: Up to 150 meters
Outdoors: Up to 400 meters
Internet Sharing • Static IP
Methods • Dynamic IP
• PPPoE
Protocols • TCP/IP
• PPTP/L2TP/IPSec Pass-through (VPN)
• DNS
• SNTP
• NAT
• DHCP
• HTTP
• HTML
• PPP Internet Control Protocol
• PPP Authentication Protocol
• Point-to-Point Protocol
LED Indicators • Power/Status
• Wireless Activity
• Modem Activity
• Local Network Activity
Interface • 4 x 10/100 Base-T RJ-45 Local Network Port with Automatic MDI/MDIX
feature)
• 1 x 10/100 Base-T RJ-45 Broadband Internet port
RF Specification • Emission Type
• Direct Sequence Spread Spectrum (DSSS)
RF Frequency • 2400MHz – 2483.5MHz – Europe
Page 59

Operating • 13 Channels (Europe)
Channel
RF Output Power • 16-18 dBm
Sensitivity • 11Mbps PBCC – 85 dBm
• 11Mbps CCK – 82 dBm
Data modulation • BPSK (1Mbps)
type • QPSK (2Mpbs)
• CCK (5.5/11Mbps)
• PBCC (5.5/11/22 Mbps)
Antenna Type • Dual Dipole Antenna with Diversity
Antenna Gain • 2 dBi (Typically).
RF Power • Under 600 mA
Consumption
ENGLISH
5959
Page 60

Guarantuee certificate
Garantiebewijs
Certificado de garantia
Garantibevis
Certificat de garantie
Certificado de garantia
Garantibevis
Garantieschein
Certificato di garanzia
Garanticertifikat
Takuutodistus
year warranty
année garantie
Jahr Garantie
jaar garantie
año garantia
anno garanzia
år garanti
år garanti
år garanti
vuosi takuu
año garantia
22
Type: CPWBS054
Serial nr: ___________________________________________________________________
Date of purchase – Date de la vente – Verkaufsdatum – Aankoopdatum – Fecha de compra – Date d’acquisito –
Data da adquirição – G-! !2 – Inköpsdatum – Anskaffelsesdato – Kjøpedato – Oatopäivä
Dealer’s name, address and signature
Nom, adresse et signature du revendeur
Name,Anschrift und Unterschrift des Händlers
Naam, adres en handtekening v.d. handelaar
Nombre, direccion y firma del distribudor
Nome, indirizzo e firma del fornitore
!"#$, %&'( )!& (#!*+ "( #. #'("
Återförsäljarens namn, adress och signatur
Forhandlerens navn,adresse og unterskrift
Forhandlerens navn,adresse og unterskrift
Jälleenmyyjän nimi, osoite ja allekirjoitus
Nome, morada e assinature da loja
www.philips.com/support
9082 100 03006
0682
 Loading...