

Philips CEM2250/98 User Manual
Register your product and get support at
www.philips.com/welcome
Always there to help you
Question?
Contact
Philips
CEM2250/98
使用手冊 49
用户手册 25User manual 1

English
Contents
1 Important 2
Safety 2
Notice 2
2 Your car audio system 4
Introduction 4
What's in the box 4
Overview of the main unit 5
3 Install the car audio 7
Connect wires 7
Mount into the dashboard 8
Attach the front panel 10
4 Get started 10
For the rst time use 10
Set the time format 10
Set the clock 11
Select a source 11
Switch music listening zone 11
Mute the button beep 11
5 Listen to radio 12
Select a tuner region 12
Select tuner sensitivity 12
Select radio band 12
Search for a radio station 12
Store radio stations in memory 12
Play with RDS 13
7 Play from iPod/iPhone 16
Compatible iPod/iPhone 16
Connect your iPod/iPhone 16
Control play 17
Charge your iPod/iPhone 17
8 Connect external sound source 18
9 Adjust sound 19
10 Adjust system settings 20
11 Additional information 21
Reset 21
Replace fuse 21
12 Product information 22
13 Troubleshooting 23
14 Glossary 24
6 Play from hard media 15
Play from a Disc 15
Play from USB storage device 15
Control play 15
Switch tracks 16
EN
1

1 Important
Safety
• Read and understand all instructions
before you use your apparatus. If damage is
caused by failure to follow instructions, the
warranty does not apply.
• This apparatus is designed for negative
ground (earth) 12 V DC operation only.
• To ensure safe driving, adjust the volume to
a safe and comfortable level.
• Improper fuses can cause damage or
re. When you need to change the fuse,
consult a professional.
• Use only the supplied mounting hardware
for a safe and secure installation.
• To avoid short circuit, do not expose the
apparatus, remote control or remote
control batteries to rain or water.
• Never insert objects into the ventilation
slots or other openings on the apparatus.
• Clean the apparatus and frame with a soft,
damp cloth. Never use substances such as
alcohol, chemicals or household cleaners
on the apparatus.
• Never place any objects other than discs
into the apparatus.
• Never use solvents such as benzene,
thinner, cleaners available commercially, or
anti-static sprays intended for discs.
• Visible and invisible laser radiation when
open. Avoid exposure to beam.
• Risk of damage to the apparatus screen!
Never touch, push, rub or strike the screen
with any object.
Caution
• Use of controls or adjustments or performance of
procedures other than herein may result in hazardous
radiation exposure or other unsafe operation.
• The apparatus shall not be exposed to
dripping or splashing.
• Do not place any sources of danger on the
apparatus (e.g. liquid lled objects, lighted
candles).
Notice
Any changes or modications made to this
device that are not expressly approved by
Philips Consumer Lifestyle may void the user’s
authority to operate the equipment.
Recycling
Your product is designed and manufactured
with high quality materials and components,
which can be recycled and reused.
When you see the crossed-out wheel bin
symbol attached to a product, it means the
product is covered by the European Directive
2002/96/EC:
Never dispose of your product with other
household waste. Please inform yourself about
the local rules on the separate collection of
electrical and electronic products. The correct
disposal of your old product helps prevent
potentially negative consequences on the
environment and human health.
Environmental information
All unnecessary packaging has been omitted.
We have tried to make the packaging easy to
separate into three materials: cardboard (box),
polystyrene foam (buffer) and polyethylene
(bags, protective foam sheet.)
Your system consists of materials which can
be recycled and reused if disassembled by
a specialized company. Please observe the
2 EN

English
local regulations regarding the disposal of
packaging materials, exhausted batteries and old
equipment.
The making of unauthorized copies of copyprotected material, including computer
programs, les, broadcasts and sound
recordings, may be an infringement of
copyrights and constitute a criminal offence.
This equipment should not be used for such
purposes.
Windows Media and the Windows logo
are trademarks, or registered trademarks of
Microsoft Corporation in the United States
and/or other countries.
“Made for iPod,” and “Made for iPhone,”
mean that an electronic accessory has been
designed to connect specically to iPod or
iPhone, respectively, and has been certied by
the developer to meet Apple performance
standards. Apple is not responsible for the
operation of this device or its compliance with
safety and regulatory standards. Please note that
the use of this accessory with iPod or iPhone
may affect wireless performance.
iPod and iPhone are trademarks of Apple Inc.,
registered in the U.S. and other countries.
This apparatus includes this label:
2013 © Koninklijke Philips Electronics N.V. All
rights reserved.
Specications are subject to change without
notice. Trademarks are the property of
Koninklijke Philips Electronics N.V. or their
respective owners. Philips reserves the right
to change products at any time without being
obliged to adjust earlier supplies accordingly.
EN
3

2 Your car audio
What's in the box
system
Congratulations on your purchase, and
welcome to Philips! To fully benet from the
support that Philips offers, register your product
at www.philips.com/welcome.
Introduction
With the in-car audio system, you can enjoy
your drive while listening to:
• FM or AM (MW) radio
• Audio from CD or MP3 disc
• Audio from USB devices
• Audio from iPod/iPhone
• Audio from other external devices
The unit supports the following media format:
Check and identify the contents of your
package:
a Main unit (with a sleeve)
b Front panel
c Trim plate
d Carrying case for front panel
e ISO male connector
f Rubber cushion
g Screw x 1 pc
h Disassembly tools x 2 pcs
i User manual
a
c
e
b
d
f
g
4 EN
h
i
English
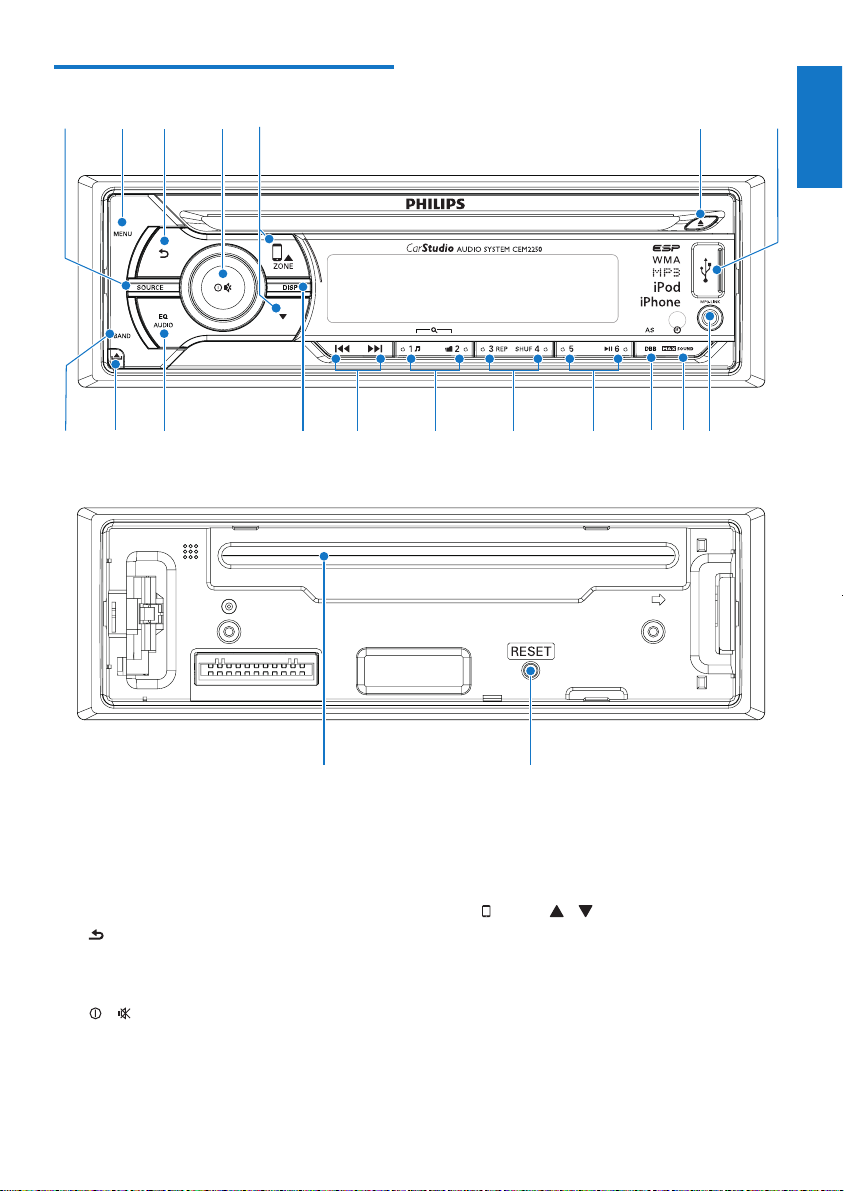
Overview of the main unit
a dc
b
e
f g
p
a SOURCE
• Select audio source.
b MENU
• Access system menu.
c
• Return to previous menu.
• Navigate the iPod/iPhone menu.
d /
• Press and hold to turn the unit on or
off.
• Press to conrm selection.
o hr q
t
n
m
l
s
• Press to mute or unmute sound.
• Rotate to adjust volume.
• Rotate to switch between menu
options.
e ZONE /
• In radio mode. press to select tuner
band.
• For .mp3 and .wma tracks on a storage
device, press to select MP3/WMA
folder.
• Press and hold to switch music
listening zone.
• For iPod/iPhone, press repeatedly to
select a control mode.
k
ij
5
EN

f
• Eject disc.
g
• USB socket.
h MP3 LINK
• Connect external audio device.
6281'
i
/
• Press to turn on or off Maximizing
volume.
• In any mode, press and hold to view
clock.
j DBB/AS
• Press to turn on or off Dynamic Bass
Boost (DBB) sound.
• In radio mode, press and hold to
access to tuner auto store.
k
• In radio mode, press to select preset
radio station No.5/6.
• In radio mode, press and hold to store
the current radio station at station
No. 6.
• Press to start, pause or resume play.
l REP / SHUF
• In radio mode, press to select preset
radio station No.3/4.
• In radio mode, press and hold to store
the current radio station at station No.
3/4.
• For .wma and .mp3 tracks, press to
access to repeat play or shufe play.
m /
• In radio mode, press to select preset
radio station No.1/2.
• In radio mode, press and hold to store
the current radio station at station No.
1/2.
• For .wma and .mp3 tracks on a storage
device, press to access track/folder list.
n /
• In radio mode, press to tune for radio
station.
• Press to skip/search for track.
• Press to fast backward/forward
playback.
o DISP
• Press to display current status.
• In iPod/iPhone mode, press and hold
to access music search mode.
p EQ / AUDIO
• Press repeatedly to select equalizer
(EQ) setting.
• Press and hold to access audio setting
menu.
q
• Unlock the panel.
r BAND
• Select tuner band.
s RESET
• Restore default settings.
t Disc slot
6 EN

English
3 Install the car
audio
These instructions are for a typical installation.
However, if your car has different requirements,
make the corresponding adjustment. If you have
any questions regarding installation kits, consult
your Philips car audio dealer.
Connect wires
Caution
• Ensure that all loose leads are insulated with electrical
tape.
Note
• Consult a professional to connect CEM2250 as
instructed below.
Caution
• This unit is designed for negative ground (earth) 12 V
DC operation only.
• Always install this unit in the car dashboard. Other
locations can be dangerous as the rear of the unit heats
up during use.
• To avoid short-circuit: before you connect, ensure that
the ignition is off.
• Ensure that you connect the yellow and red power
supply leads after all other leads are connected.
• Ensure that all loose leads are insulated with electrical
tape.
• Ensure that the leads do not get caught under screws
orin parts that will move (e.g. seat rail).
• Ensure that all ground (earth) leads are run to a
common ground (earth) point.
• Use only the supplied mounting hardware for a safe
and secure installation.
• Improper fuses can cause damage or re. When you
need to change the fuse, consult a professional.
Note on the power supply lead (yellow)
• When you connect other devices to this
apparatus, ensure that the rating of the car
circuit is higher than the total fuse value of
all the connected devices.
Notes on speaker connection
• Never connect speaker wires to the metal
body or chassis of the car.
• Never connect speaker wires with stripes
to one another.
1 Check the car's wiring carefully and
connect them to the the supplied male
connector.
Note
• Risk of danger! Please consult a professional to perform
the below steps!
ISO male
connectors
1 Green strip, black-
edged green strip
2 White strip, black-
edged white strip
3 Gray strip, black-
edged gray strip
4 Purple strip, black-
edged purple strip
Connect to
Left speaker (Rear)
Left speaker (Front)
Right speaker (Front)
Right speaker (Rear)
EN
7
 Loading...