

Page 1
Always there to help you
Register your product and get support at
www.philips.com/welcome
Question?
Contact
Philips
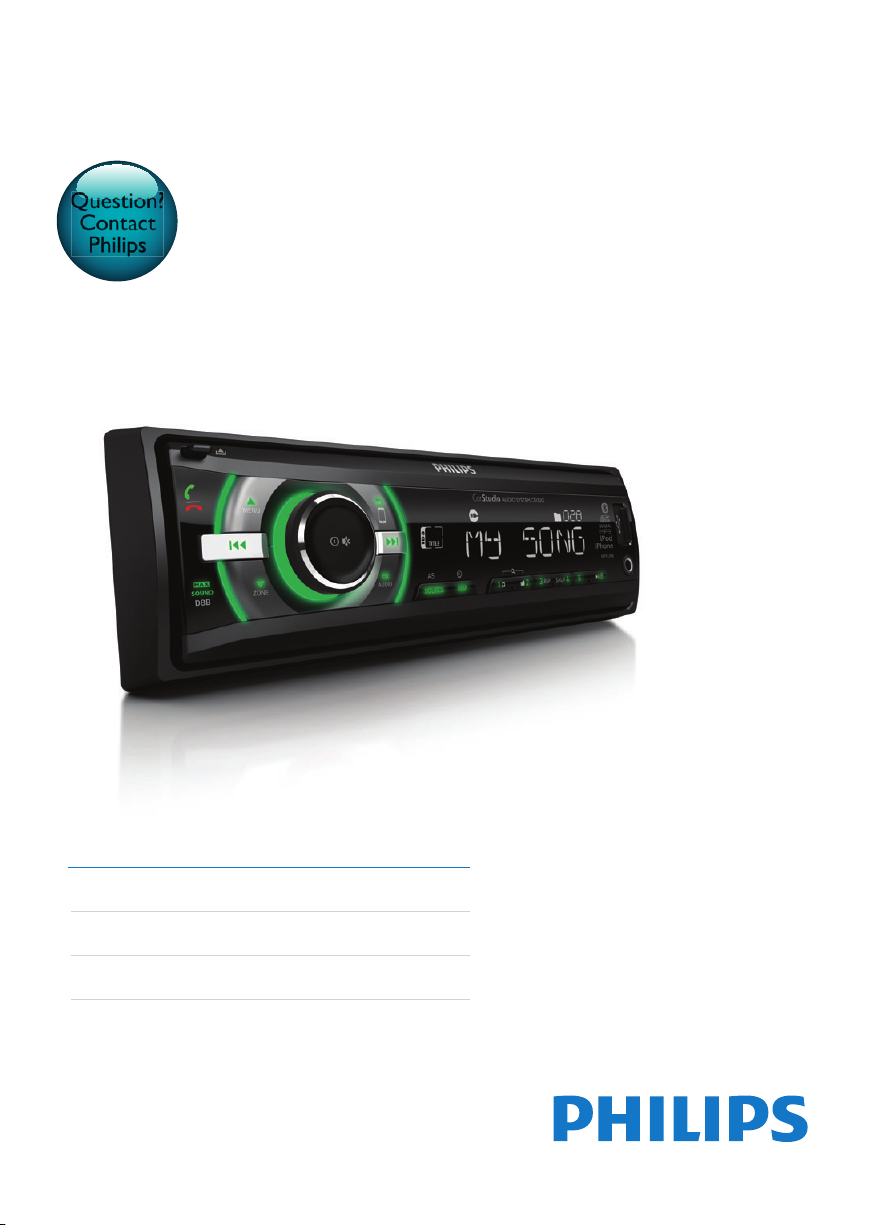
CE152G
User manual 1
Руководствопользователя 27
Посібниккористувача 59
Page 2

Contents
1 Safety 2
2 Yourcaraudiosystem 3
Introduction 3
What's in the box 3
Overview of the system 4
3 Install the car audio system 6
Connect wires 7
Mount into the dashboard 8
Attach the front panel 9
4 Get started 10
For the rst time use 10
Set the time format 10
Set the clock 10
Select a source 10
Select a listening zone 10
Mute the button beep 11
5 Listentoradio 11
Switch to radio mode 11
Select a tuner region 11
Select a tuner sensitivity 11
Search for a radio station 12
Store radio stations in memory 12
Play with RDS 12
8 Use Bluetooth devices 17
English
Connect a device 17
Play audio from a Bluetooth device 18
Make a call 18
9 Listentoanexternalplayer 19
10 Adjust sound 20
11 Additional information 20
Reset the system 20
Replace the fuse 20
12 Productinformation 21
13 Troubleshooting 22
General 22
About the Bluetooth device 23
14 Notice 24
Compliance 24
Care of the environment 24
Trademark notice 24
Copyright 25
6 Play from a storage device 14
Control play 15
Switch tracks 15
7 PlayfromaniPod/iPhone 16
Compatible iPod/iPhone models 16
Connect your iPod/iPhone 16
Control play 16
Charge your iPod/iPhone 17
EN
1
Page 3

1 Safety
Read and understand all instructions before you
use this device. If damage is caused by failure to
follow instructions, the warranty does not apply.
• Modication of the product could result
in hazardous radiation of EMC or other
unsafe operation.
• The device is designed for negative ground
(earth) 12 V DC operation only.
• To ensure safe driving, adjust the volume to
a safe and comfortable level.
• Improper fuses can cause damage or
re. When you need to change the fuse,
consult a professional.
• Use only the supplied mounting hardware
for a safe and secure installation.
• To avoid short circuits, do not expose the
device to rain or water.
• The device shall not be exposed to
dripping or splashing.
• Do not place any sources of danger on
the device (e.g. liquid lled objects, lighted
candles).
• Never insert objects into the ventilation
slots or other openings on the device.
• Clean the device with soft, damp cloth.
Never use substances such as alcohol,
chemicals or household cleaners on the
device.
2 EN
Page 4
2 Yourcaraudio
system
Congratulations on your purchase, and
welcome to Philips! To fully benet from the
support that Philips offers, register your product
at www.philips.com/welcome.
Introduction
With this system, you can:
• enjoy audio from a USB storage device,
SD/SDHC card, iPod/iPhone, and external
player,
• charge your iPod/iPhone,
• listen to radio stations, and
• make phone calls via Bluetooth.
Yo u canenrichsoundoutputwiththesesound
effects:
• Dynamic bass boost (DBB)
• Digital sound control (DSC)
Playable media:
• USB storage device
• Compatibility: USB 2.0, USB 1.1
• Class support: MSC (Mass Storage
Class)
• Maximum capacity: 32 GB
• SD/SDHC card
• Maximum capacity: 32 GB
• Files
• File system: FAT16, FAT32
• Maximum number of folders: 99
• Maximum number of tracks/les: 999
• Maximum level of directory: 8
• .mp3 les
Sampling frequencies: 32 kHz, 44.1 kHz,
48 kHz
Bitrates: 8-320 kbps and variable
bitrates
• .wma les
Versions: V4, V7, V8, V9 (L1 and L2)
Sampling frequencies: 44.1 kHz, 48 kHz
Bitrates: 64-192 kbps and variable
bitrates
• ID3 tag V2.0 or later
• Unsupportedles:
AAC, WAV, and PCM les
DRM protected WMA les (.wav, .m4a,
.m4p, .mp4, and .aac)
WMA les in lossless format
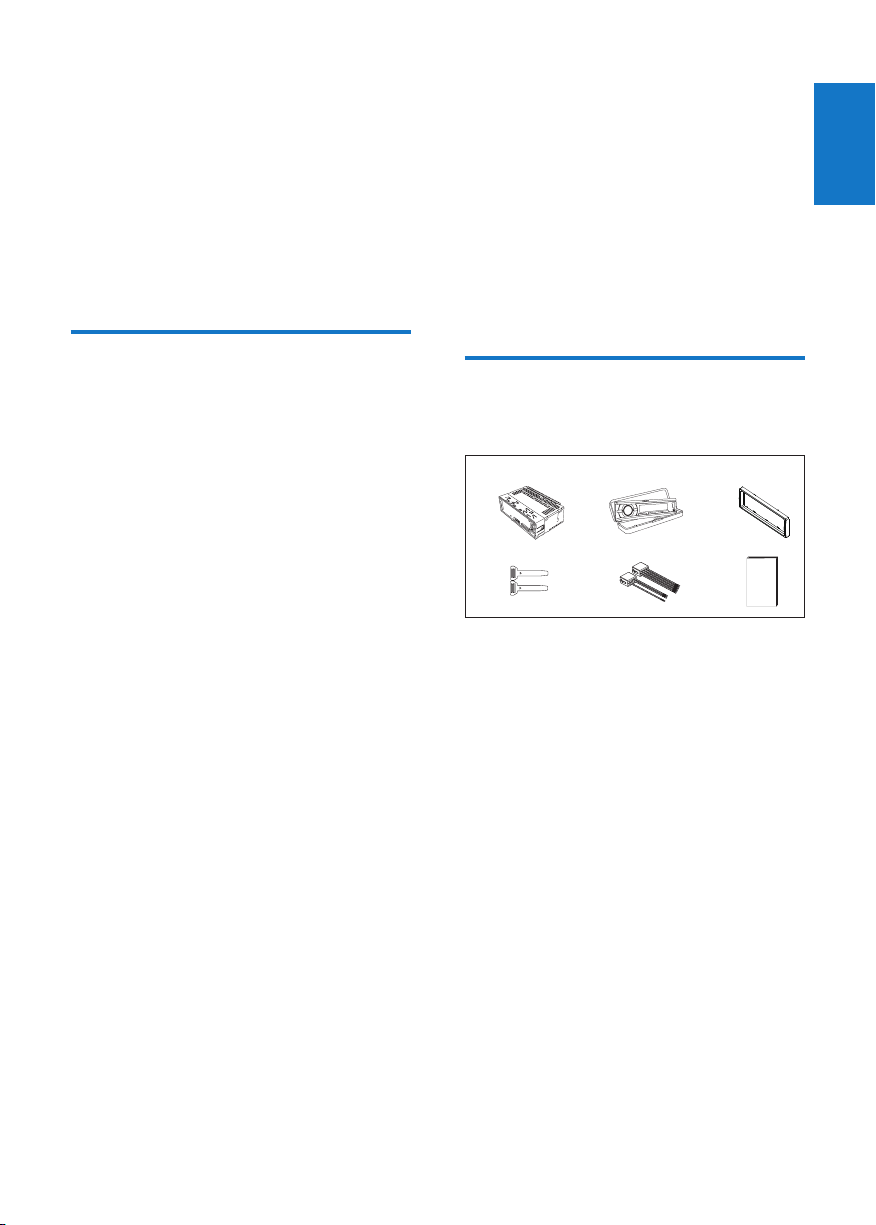
What'sinthebox
Check and identify the contents of the package:
ab c
fed
a Main unit (with a sleeve)
b Carrying case (with front panel included)
c Trim plate
d DisassemblytoolX2
e ISOmaleconnectorX2
f User manual
English
EN
3
Page 5
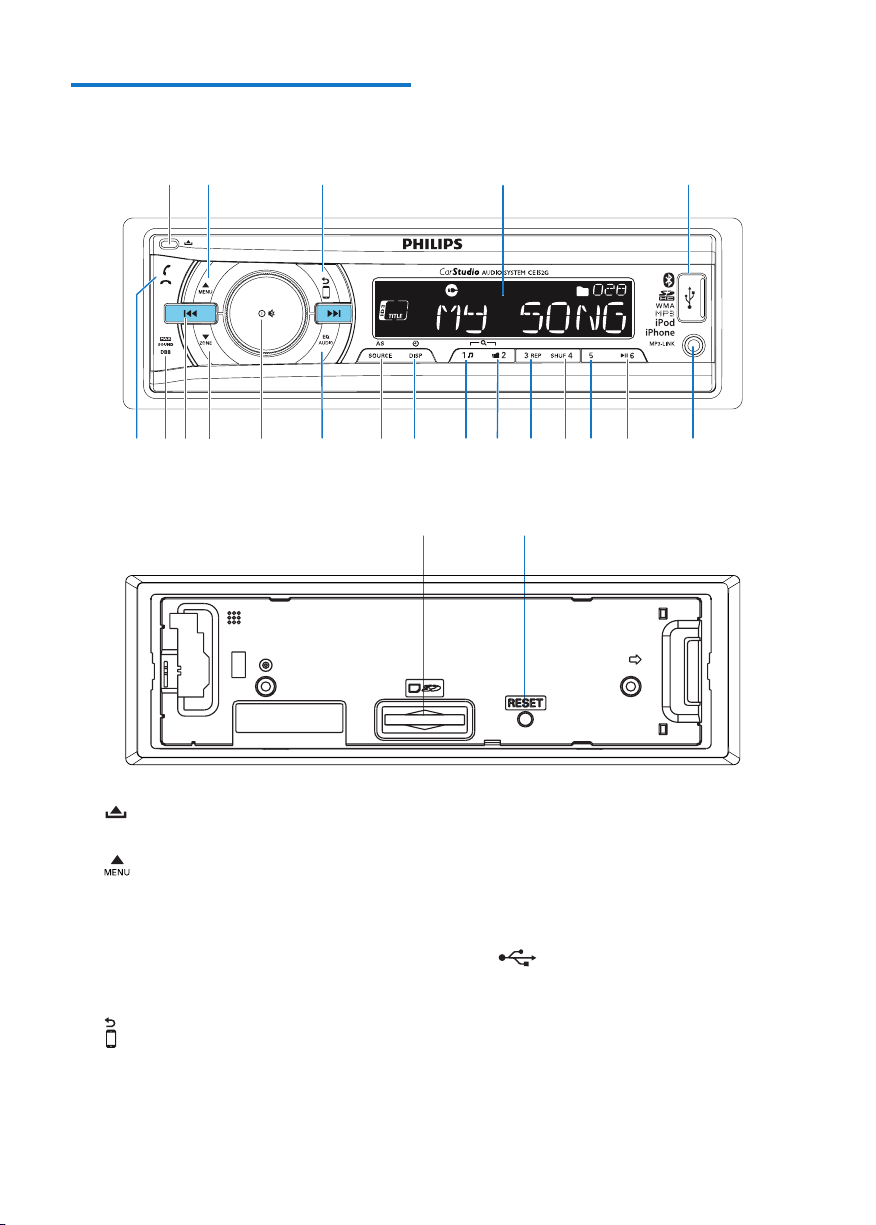
Overview of the system
ab cd e
tsrq ponm lk jihfg
uv
a
• Unlock the front panel.
b
• For .wma and .mp3 tracks on a storage
device, press to select the previous
folder.
• Press and hold to access the system
menu.
• Press to select a tuner band.
c
• Return to the previous menu.
4 EN
• For iPod/iPhone, press repeatedly to
select a control mode: control play on
the iPod/iPhone or on this system.
• During a call, press and hold to transfer
the phone call to mobile phone.
d LCDscreen
e
• Connect to a USB storage device.
• Connect to a compatible iPod/iPhone.
f MP3-LINK
• Connect to the audio output socket
(usually the headphone socket) of an
external device.
Page 6
g
• Start, pause, or resume the play of
tracks.
• In radio mode, press to select the
preset radio station of No. 6.
• In radio mode, press and hold to store
the current radio station at channel
No. 6.
h
• In radio mode, press to select the
preset radio station of No. 5.
• In radio mode, press and hold to store
the current radio station at channel
No. 5.
i
• In radio mode, press to select the
preset radio station of No. 4.
• In radio mode, press and hold to store
the current radio station at channel
No. 4.
• For .wma and .mp3 tracks, press
repeatedly to select a play mode: play
all tracks randomly ([SHUALL]), play
tracks in the current folder or album
randomly ([SHUFLD]/[SHUALBM]) ,
or play all tracks in sequence ([SHU
OFF]).
j
• In radio mode, press to select the
preset radio station of No. 3.
• In radio mode, press and hold to store
the current radio station at channel
No. 3.
• For .wma and .mp3 tracks, press
repeatedly to select a repeat mode.
k
• In radio mode, press to select the
preset radio station of No. 2.
• In radio mode, press and hold to store
the current radio station at channel
No. 2.
• For .wma and .mp3 tracks on a storage
device, press to access the folder list.
l
• In radio mode, press to select the
preset radio station of No. 1.
• In radio mode, press and hold to store
the current radio station at channel
No. 1.
• For .wma and .mp3 tracks on a storage
device, press to access the track list.
• Press to access the music menu of an
iPod/iPhone.
m
/DSP
• Press repeatedly to display available
information about the current track.
• Press repeatedly to display available
RDS information.
• Press and hold to display the set clock.
n AS/SOURCE
• Press repeatedly to select a source.
• In radio mode, press and hold to
activate the automatic search of radio
stations.
o
• Press repeatedly to select a preset
sound equalizer.
• Press and hold to activate the setup of
bass, treble, balance, and fader.
p
• Press to turn on the system.
• Press and hold to turn off the system.
• Press to mute or restore sound.
• Press to conrm an option.
• Rotate to switch between menu
options.
• Rotate to adjust the volume level.
q
• For .wma and .mp3 tracks on a storage
device, press to select the next folder.
• Press and hold to activate the selection
of listening zones.
• Press to select a tuner band.
English
EN
5
Page 7
r /
• Tune to a radio station.
• Press to skip to the previous/next
track.
• Press and hold to rewind a track or
search fast forward.
s
• Press to enable or disable the MAX
Sound feature.
• Press and hold to enable or disable
the DBB (dynamic bass boost) sound
effect.
t
• Press to answer or redial a call.
• Press to hang up a call.
• Press and hold to reject an incoming
call.
u
• Insert an SD/SDHC card.
v RESET
• Press to reboot the system.
3 Install the car
audio system
Caution
Use the controls only as stated in this user manual.
•
Always follow the instructions in this chapter in
sequence.
These instructions are for a typical installation.
However, if your car has different requirements,
make the adjustment accordingly. If you have
any question regarding installation kits, consult
your local retailer.
Note
This system is designed for negative ground (earth) 12V
•
DC operation only.
• Always install this system in the car dashboard. Other
locations can be dangerous as the rear of the system
heats up during use.
• To avoid shor t-circuit: before you connect, make sure
that the ignition is off.
• Make sure that you connect the yellow and red power
supply leads after all other leads are connected.
• Make sure that all loose leads are insulated with
electrical tape.
• Make sure that the leads do not get caught under
screws iron parts that will move (e.g. seat rail).
• Make sure that all ground (earth) leads are run to a
common ground (earth) point.
• Use only the supplied mounting hardware for a safe
and secure installation.
• Improper fuses can cause damage or re. When you
need to change the fuse, consult a professional.
• When you connect other devices to this system, make
sure that the rating of the car circuit is higher than the
total fuse value of all the connected devices.
• Never connect speaker wires to the metal body or
chassis of the car.
• Never connect speaker wires with stripes to one
another.
6 EN
Page 8
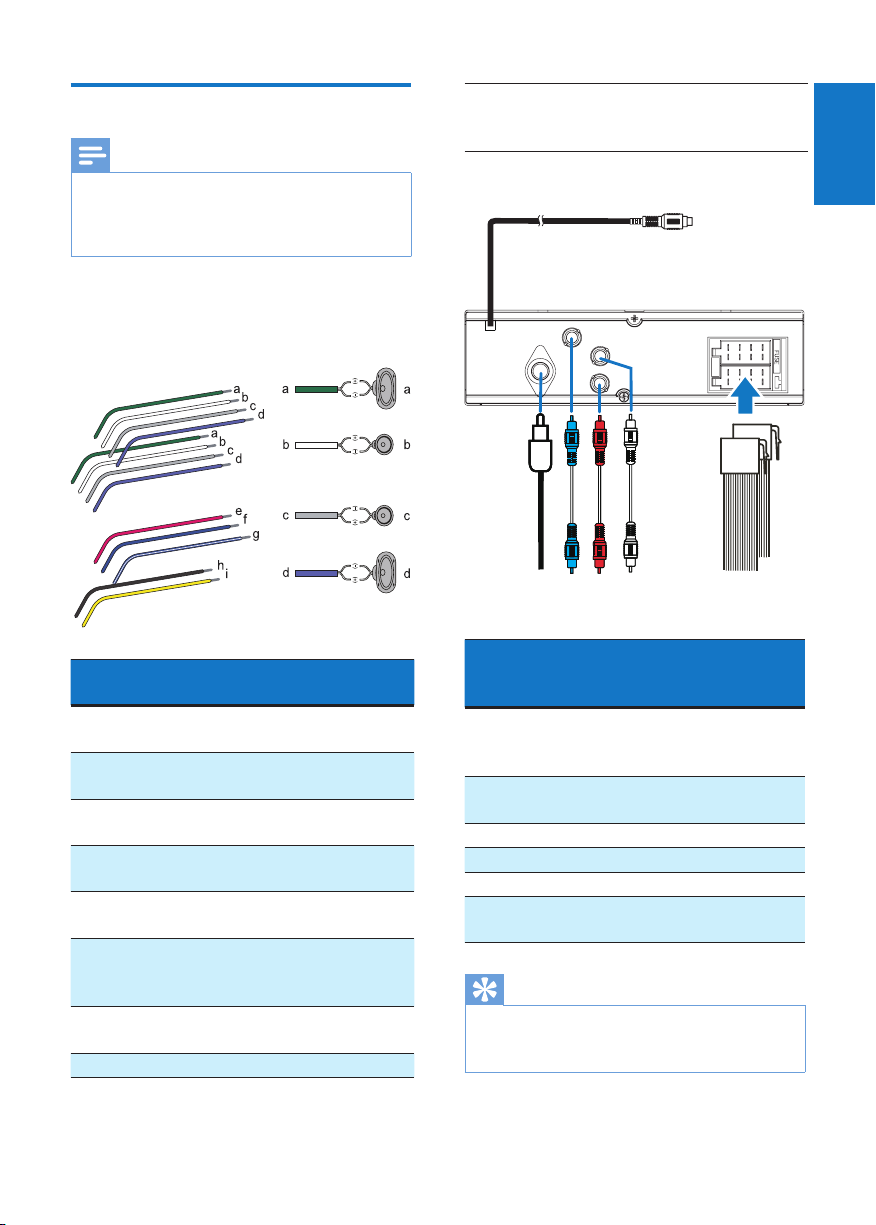
Connect wires
Note
Make sure that all loose leads are insulated with
•
electrical tape.
• Consult a professional to connect wires as instructed
below.
1 Check the car's wiring carefully and
connect them to the the supplied ISO
male connectors.
i Yellow strip To the +12V car
battery which is
energized at all times
English
2 Connect other wires if necessary.
a
ISO male
connectors
a Green strip, black-
edged green strip
b White strip, black-
edged white strip
c Gray strip, black-
edged gray strip
d Purple strip, black-
edged purple strip
e Red strip Ignition key +12V
f Blue strip Motor/electric
g White-edged blue
strip
h Black strip Ground
Connect to
Rear left speaker
Front left speaker
Front right speaker
Rear right speaker
DC when ON/ACC
antenna relay control
lead
Amplier relay
control lead
Sockets or
connectors on
rear panel
1 ExternalMic An external
2 FM/MW radio
antenna socket
3 SUB-W OUT A sub-woofer
4 REAR R Rear right speaker
5 REARL Rear left speaker
6 For ISO male
connectors
Tip
The pin arrangement for the ISO connectors depends
•
on the type of your vehicle. To avoid damage to the
unit, connect properly.
edcb
External sockets or
connectors
microphone for phone
calls
FM/MW radio antenna
ISO male connectors
f
EN
7
Page 9
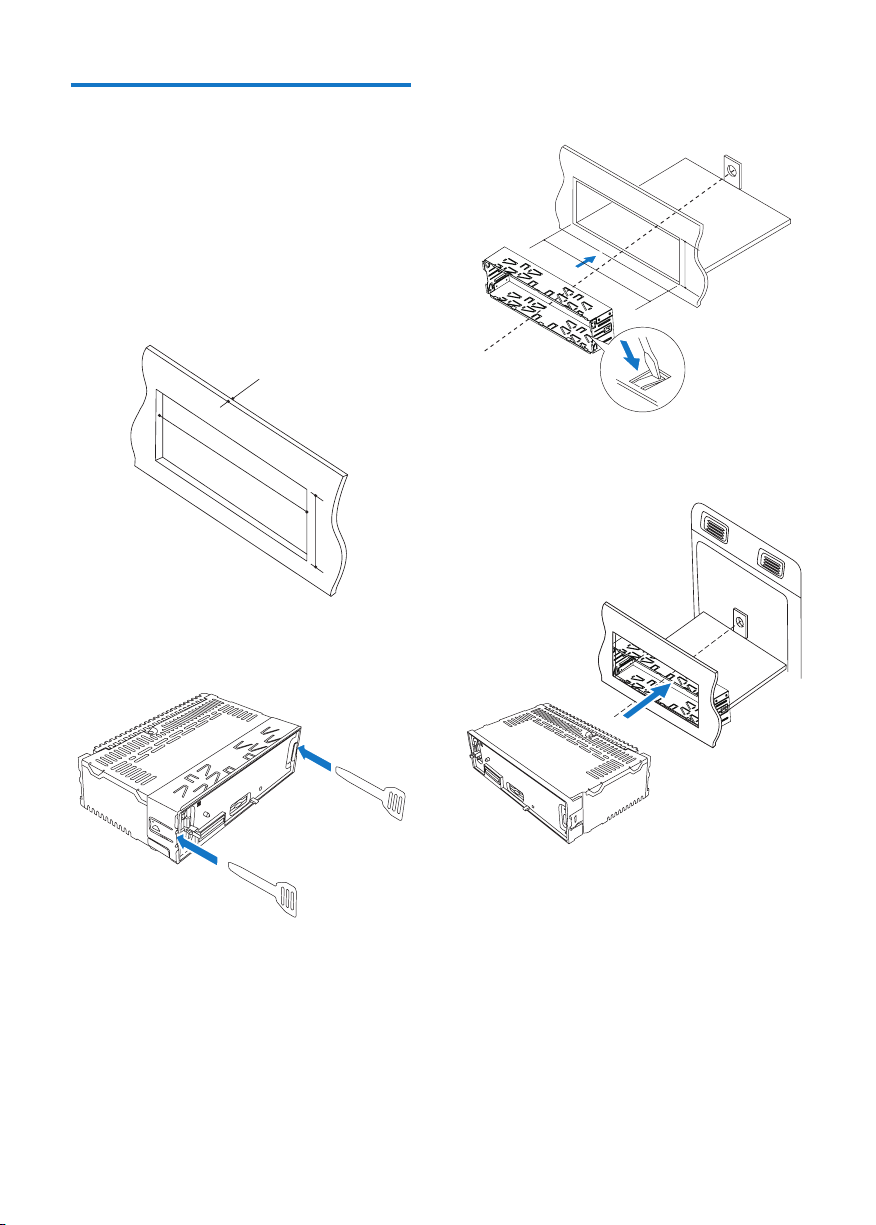
Mount into the dashboard
• If the car does not have an on-board drive
or navigation computer, disconnect the
negative terminal of the car battery.
• If the car battery is not disconnected, to
avoid short-circuit, make sure that the bare
wires do not touch each other.
1 Make sure that the car dashboard opening
is within these measurements:
5mm
3 Install the sleeve into the dashboard and
bend the tabs outward to x the sleeve.
53.5 mm
183 mm
183 mm
53mm
2 Remove the mounting sleeve with the
supplied disassembly tools.
4 Slide the unit into the sleeve until you hear
a "click".
8 EN
Page 10
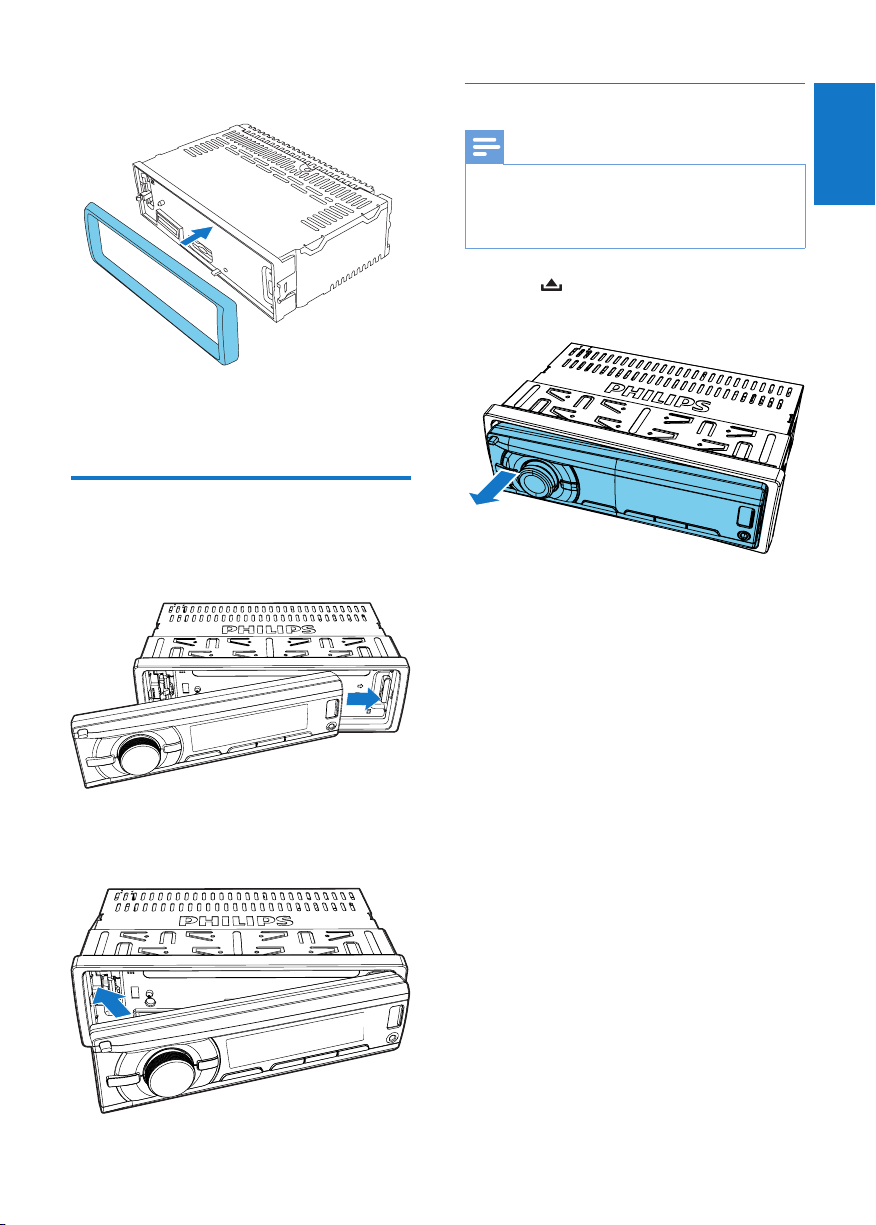
5 Attach the trim plate.
Detach the front panel
6 Reconnect the negative terminal of the car
battery.
Attach the front panel
1
Insert the notch on the front panel to the
chassis on the main unit.
Note
Before you insert an SD/SDHC card or reset the
•
system, detach the front panel.
• Before you detach the front panel, make sure that the
system is turned off.
1 Press to release the front panel.
2 Pull the front panel outwards to remove it.
English
2 Press the left end of the front panel
inwards until it is securely locked with a
"click".
EN
9
Page 11
4 Get started
Forthersttimeuse
1
Press to turn on the system.
» [PHILIPS] is displayed and then
[SELECTOPERATINGREGION]
(select a radio region) scrolls.
2 When one of the following options is
displayed, rotate
region that matches your location.
• [AREAEUROPE] (Western Europe)
• [AREAASIA] (Asia Pacic)
• [AREAMID--EAST] (Middle East)
• [AREAAUST] (Australia)
• [AREARUSSIA] (Russia)
• [AREAUSA] (United States)
• [AREALATIN] (Latin America)
• [AREAJAPAN] (Japan)
3 Press to conrm.
» The system switches to radio mode
automatically.
• To turn off the system, press and hold
until the screen backlight is off.
Set the time format
1
Press and hold to access the system
menu.
2 Press / repeatedly until [CLK24H]
or [CLK12H] is displayed.
3 Rotate to select [CLK24H] or
[CLK12H].
• [CLK24H]: 24-hour time format
• [CLK12H]: 12-hour time format
to select a radio
Set the clock
1
Press and hold to access the system
menu.
2 Press / repeatedly until [CLK] is
displayed with time digits blinking.
3 Rotate anti-clockwise to set the hour.
4 Rotate clockwise to set the minute.
Display the clock
Press and hold /DISP until [CLK] and the set
clock are displayed.
• To exit the clock display, press any button
or rotate
.
Select a source
Press AS/SOURCE repeatedly to select a
source.
• [RADIO]: Listen to FM/AM radio.
• [MP3--LINK]: Listen to the audio input
through the MP3-LINK socket.
• [iPod/USB]: When a USB storage device or
compatible iPod/iPhone is connected and
recognized, you can select this source to
play audio les that are stored on it.
• [SD/SDHC]: When an SD/SDHC card is
inserted and recognized, you can select this
source to play audio les that are stored
on it.
• [BTAUDIO]: When a Bluetooth player
is connected, you can select this source
to transfer audio from the player to this
system via Bluetooth.
10 EN
Page 12
Select a listening zone
1
Press and hold until one of the
following options is displayed.
• [ALL]: For all passengers
• [FRONT-L]: For the front-left seat only
• [FRONT-R]: For the front-right seat
only
• [FRONT]: For front passengers only
2 Press / repeatedly to select a
listening zone.
Mute the button beep
The beep sound of buttons is enabled by
default.
1 Press and hold to access the system
menu.
2 Press / repeatedly until [BEEPON]
or [BEEPOFF] is displayed.
• [BEEPON]: Enable the beep sound of
buttons.
• [BEEPOFF]: Mute the beep sound of
buttons.
3 Rotate to change the setting.
5 Listentoradio
Switch to radio mode
1
Press AS/SOURCE repeatedly to switch
the source to [RADIO].
2 Press / repeatedly to select a band.
Select a tuner region
You can select a radio region that matches your
location.
1 Press and hold to access the system
menu.
2 Press / repeatedly until one of the
following options is displayed.
• [AREAEUROPE] (Western Europe)
• [AREAASIA] (Asia Pacic)
• [AREAMID--EAST] (Middle East)
• [AREAAUST] (Australia)
• [AREARUSSIA] (Russia)
• [AREAUSA] (United States)
• [AREALATIN] (Latin America)
• [AREAJAPAN] (Japan)
3 Rotate to select a region.
English
Select a tuner sensitivity
To search for radio stations with strong signals
only or more radio stations, you can change the
tuner sensitivity.
1 Press and hold to access the system
menu.
2 Press / repeatedly until [LOCON]
or [LOCOFF] is displayed.
3 Rotate to select a setting.
• [LOCON]: Search for radio stations
with strong signals only.
• [LOCOFF]: Search for radio stations
with strong and weak signals.
11
EN
Page 13
Search for a radio station
Search for a radio station
automatically
Press or to search for the previous or
next radio station with strong signals.
3 Press and hold , , , ,
, or to store the radio station at the
selected channel.
• To select a stored radio station, press
, , , , , or .
Play with RDS
Search for a radio station manually
1 Press and hold or until [M] blinks.
2 Press or repeatedly until the
target frequency is displayed.
Store radio stations in
memory
Note
You can store a maximum of six stations in each band.
•
Store radio stations automatically
1 Press or repeatedly to select a band.
2 Press and hold AS/SOURCE until
[STORE---] is displayed.
» After the search is complete, the
rst stored radio station is broadcast
automatically.
• To select a stored radio station, press
, , , , , or .
Store radio stations manually
1 Press or repeatedly to select a
tuner band.
2 Tune to the radio station that you want to
store.
The RDS (Radio Data System) function
operates only in areas with FM stations
broadcasting RDS signals. If you tune to an RDS
station, the station name is displayed.
Enable the RDS function
Note
The RDS function is enabled by default.
•
• Only when the RDS function is enabled, RDS related
settings can be accessed.
1 Press and hold to access the system
menu.
2 Press / repeatedly until [RDSON]
or [RDSOFF] is displayed.
3 Rotate to select [RDSON].
» The RDS function is enabled.
• To disable the RDS function, rotate
to select [RDSOFF].
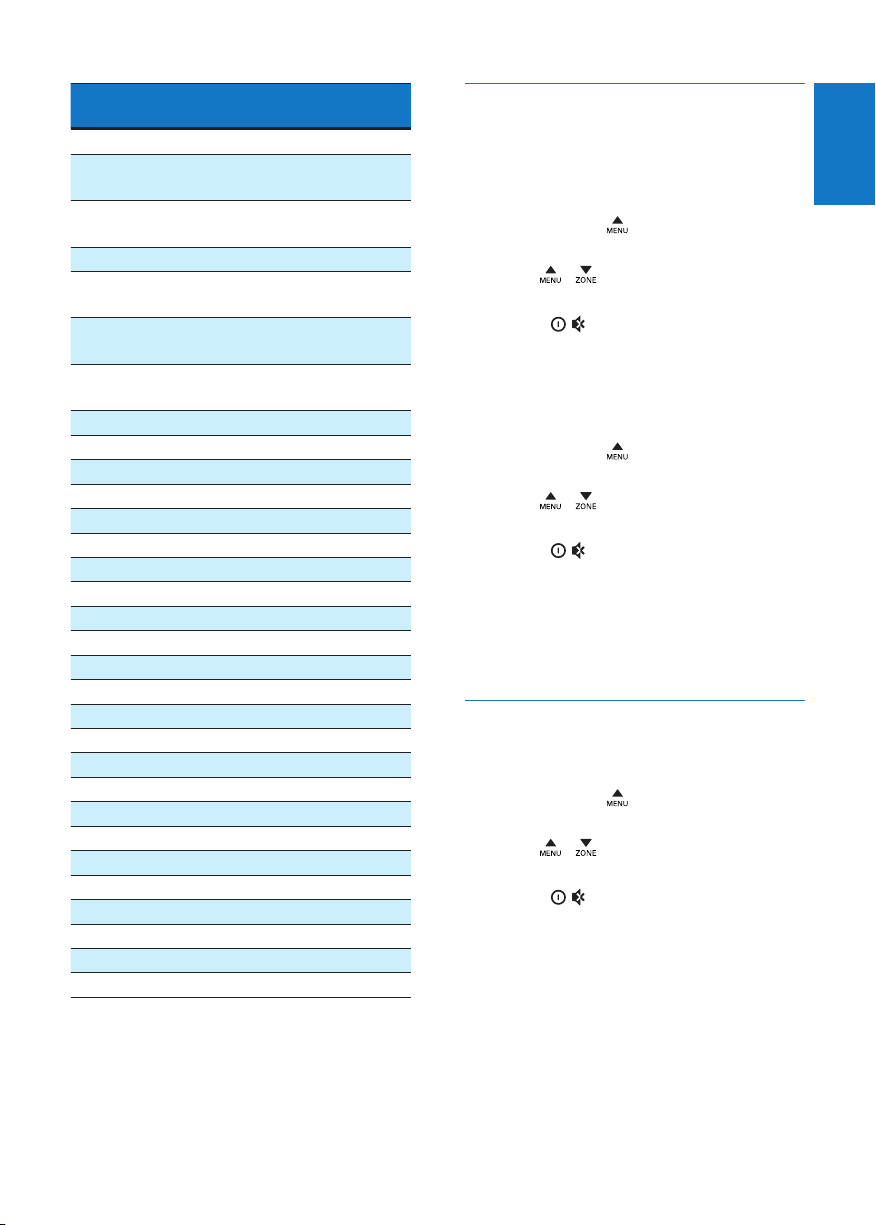
Select a program type
Before tuning to RDS stations, you can select
a program type to search for programs of the
selected category only.
1 Press and hold to access the system
menu.
2 Press / repeatedly until [PTY] is
displayed.
3 Press to access the list of program
types.
4 Rotate to select a program type, and
then press
to conrm.
12 EN
Page 14
Item Program
type
1 NEWS News services
2 AFFAIRS Politics and current
3 INFO Special information
4 SPORT Sports
5 EDUCATE Education and advanced
6 DRAMA Radio plays and
7 CULTURE Culture, religion and
8 SCIENCE Science
9 VARIED Entertainment programs
10 POP M Pop music
11 ROCKM Rock music
12 EASYM Light music
13 LIGHTM Light classical music
14 CLASSICS Classical music
15 OTHER M Special music programs
16 WEATHER Weather
17 FINANCE Finance
18 CHILDREN Children’s programs
19 SOCIAL Social Affairs
20 RELIGION Religion
21 PHONE IN Phone In
22 TRAVEL Tr a v el
23 LEISURE Leisure
24 JAZZ Jazz Music
25 COUNTRY Country Music
26 NATION M National Music
27 OLDIES Oldies Music
28 FOLKM Folk Music
29 DOCUMENT Documentary
30 TEST Alarm Test
31 ALARM Alarm
Description
affairs
programs
training
literature
society
Use alternate frequencies
If the signal of an RDS station is poor, enable
the AF (Alternate Frequency) function to search
for another station that broadcasts the same
program.
1 Press and hold to access the system
menu.
2 Press / repeatedly until [AFON] or
[AFOFF] is displayed.
3 Rotate to select a setting.
• [AFON]: Enable the AF function.
• [AFOFF]: Disable the AF function.
Set the region for AF tuning
You can set the region for AF tuning.
1 Press and hold to access the system
menu.
2 Press / repeatedly until [REGON]
or [REGOFF] is displayed.
3 Rotate to select a setting.
• [REGON]: Only RDS stations in
current region can be tuned to
automatically.
• [REGOFF]: All RDS stations can be
tuned to automatically.
Receivetrafcannouncement
If you want to receive trafc announcement,
enable the TA (Trafc Announcement) function.
1 Press and hold to access the system
menu.
2 Press / repeatedly until [TAON] or
[TAOFF] is displayed.
3 Rotate to select a setting.
• [TAON]: When a trafc
announcement is on air, the system
automatically switches to the tuner
mode and begins to broadcast the
trafc announcement. When the trafc
announcement is over, the system
returns to the previous mode.
• [TAOFF]: Trafc announcement does
not cut in.
English
EN
13
Page 15
Tip
When a trafc announcement cuts in, you can press
•
to switch the system to the previous mode.
Synchronize the system clock
You can synchronize the system clock with an
RDS station that transmits time signals.
1 Press and hold to access the system
menu.
2 Press / repeatedly until [CTON]
or [CTOFF] is displayed.
3 Rotate to select a setting.
• [CTON]: Synchronize the
system clock with the RDS station
automatically.
• [CTOFF]: The automatic clock
synchronization with RDS station is
disabled.
6 Play from a
storage device
This system can play .mp3 and .wma les that
are copied onto a compatible storage device.
Note
Philips does not guarantee compatibility with all storage
•
devices.
• NTFS (New Technology File System) le system is not
supported.
Tip
The accuracy of time depends on the RDS station that
•
transmits time signals.
14 EN
1 Connect a compatible USB storage device
or SD/SDHC card.
• For an SD/SDHC card, detach the
front panel rst, insert the card into
the
front panel.
slot, and then attach the
Page 16
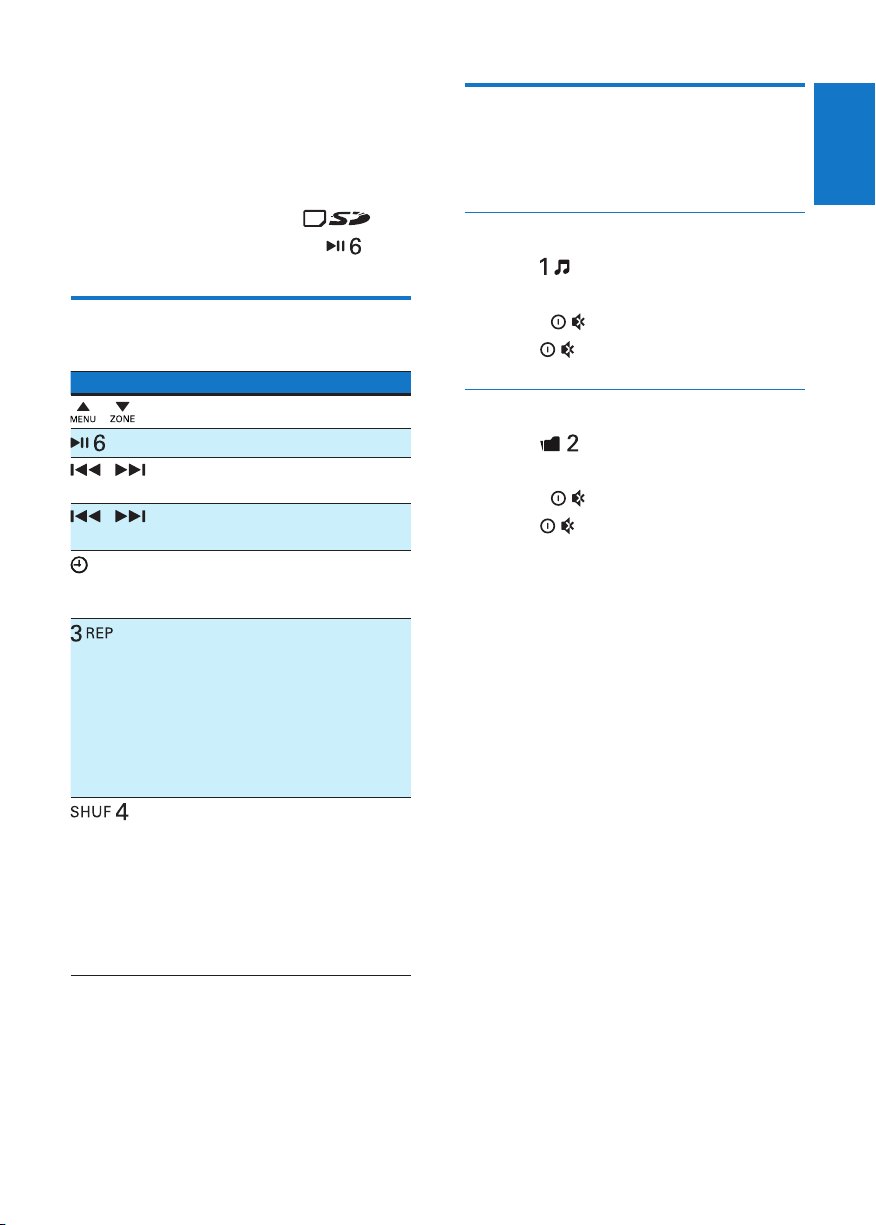
2 Press AS/SOURCE repeatedly to switch
the source.
• [iPod/USB]: For a USB storage device
that is connected to the USB socket
on the front panel
• [SD/SDHC]: For an SD/SDHC card
that is inserted into the
slot
3 If the play does not start, press .
Control play
Button Function
/
/ Press to play the previous or next
/ Press and hold to rewind a track
/DISP
Press repeatedly to select a folder.
Pause or resume play.
track.
or search forward fast.
Press repeatedly to display
available information about the
current track.
Press repeatedly to select a
repeat mode:
• [REPONE]:repeat the current
track,
• [RPTFLD]:repeat all tracks in
the current folder, or
• [RPTALL]:repeat all tracks in
the storage device.
Press repeatedly to select a play
mode:
• [SHUALL]:play all tracks
randomly,
• [SHUFLD]:play tracks in the
current folder randomly, or
• [SHUOFF]:play all tracks in
the storage device in sequence.
Switch tracks
During play, you can switch tracks or folders
quickly.
Switch tracks directly
1 Press to access the track list.
» The le name of current track scrolls.
2 Rotate to toggle through tracks.
3 Press to play the selected track.
Switch folders for a track
1 Press to access the folder list.
» The name of current folder scrolls.
2 Rotate to toggle through folders.
3 Press to select the folder.
» The system starts playing the rst track
under the folder.
English
EN
15
Page 17
7 Playfroman
iPod/iPhone
Note
During play, no audio signals are transferred through
•
the headphone socket of your iPod/iPhone.
Compatible iPod/iPhone
models
This car audio system supports the following
iPod and iPhone models.
• iPhone 4S, iPhone 4, iPhone 3GS, and
iPhone 3G
• iPod touch (2nd, 3rd, and 4th generations)
• iPod classic
• iPod nano (3rd, 4th, 5th, and 6th
generations)
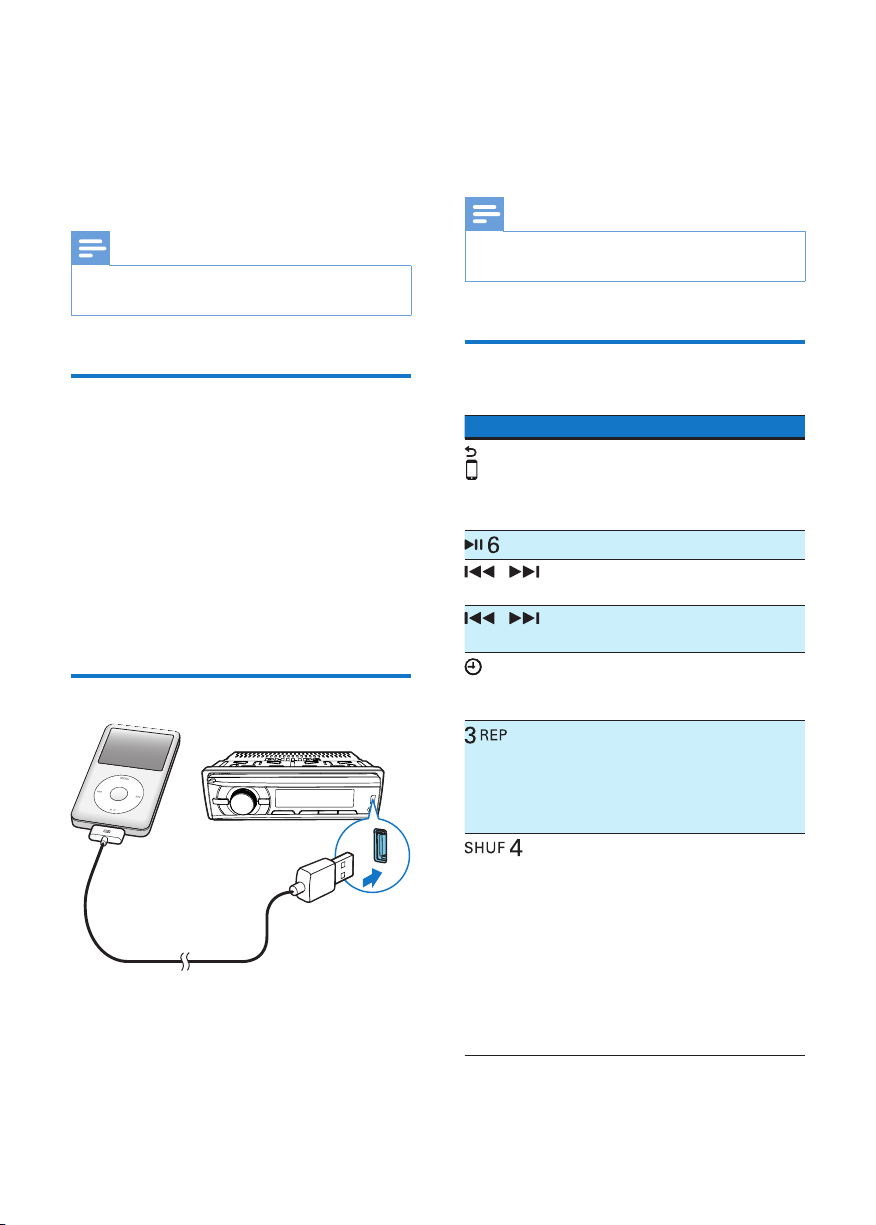
Connect your iPod/iPhone
1 Connect an Apple 30-pin USB cable
between
• the USB socket on the front panel, and
• your iPod/iPhone.
2 Press AS/SOURCE repeatedly to switch
the source to [iPod/USB].
» The system starts playing tracks that
are stored on your iPod/iPhone.
Note
Before you disconnect the iPod/iPhone, switch the
•
system to another source.
Control play
Button Function
Press repeatedly to select a
control mode: control play on
your iPod/iPhone, or on the
system.
Press to pause or resume play.
/ Press to play the previous or
next track.
/ Press and hold to rewind a track
or search forward fast.
/DISP
Press repeatedly to display
available information about the
current track.
Press repeatedly to select a
repeat mode:
• [REPONE]:repeat the cur-
rent track, or
• [REPALL]:repeat all tracks.
Press repeatedly to select a play
mode:
• [SHUALL]:play all tracks
randomly,
• [SHUALBM]:play tracks in
the current album randomly,
or
• [SHUOFF]:play all tracks
in the iPod/iPhone library in
sequence.
16 EN
Page 18
Search for a track
After accessing the iPod/iPhone menu, you can
select a specic track quickly.
1 Press to access the iPod/iPhone menu.
» [PLAYLIST] scrolls.
2 Rotate to select a categor y.
3 Press to access the list of tracks
under the category.
» The le name of the rst track scrolls.
4 Rotate to select a track.
» The le name of current track scrolls.
5 Press to star t play.
Charge your iPod/iPhone
Once the iPod/iPhone is docked and
recognized, the charging starts.
8 Use Bluetooth
devices
With this car audio system, you can listen to
audio from a player or make a call through
Bluetooth.
Connect a device
Note
Philips does not guarantee the compatibility with all
•
Bluetooth devices.
• Before pairing a device with this system, read its user
manual for Bluetooth compatibility.
• Make sure that Bluetooth function is enabled on your
device, and your device is set as visible to all other
Bluetooth devices.
• At one time, you can connect only one Bluetooth
device to this system.
• The operational range between this system and a
Bluetooth device is approximately 3 meters (9 feet).
• Any obstacle between this system and a Bluetooth
device can reduce the operational range.
• Keep away from any other electronic device that may
cause interference.
English
On your device, follow the steps below.
1 Search for Bluetooth devices.
2 In the device list, select CE152.
3 Enter the default password "0000", and
then conrm the password entry.
» If the pairing succeeds, [PAIRED] is
displayed on the LCD screen of this
system.
4 Enable or permit the connection with
CE152.
» If the connection succeeds,
[CONNECTED] scrolls and
displayed on the LCD screen of this
system.
» If the connection fails, [FAILED] is
displayed on the LCD screen of this
system.
is
EN
17
Page 19
Disconnect a device
1 Press and hold to access the system
menu.
2 Press / repeatedly until
[DIS--CON] is displayed.
3 Press .
» [WAIT] is displayed with -, --,
and --- blinking alternately until
[DISCONNECTED] scrolls.
Tip
You can also complete the disconnection on your
•
device.
Reconnect a device
Some Bluetooth devices support the automatic
reconnection with a paired Bluetooth device.
If your device does not support automatic
reconnection, reconnect it with this system
manually.
1 Press and hold to access the system
menu.
2 Press / repeatedly until [RE--CON]
is displayed.
3 Press .
» [WAIT] is displayed with -, --,
and --- blinking alternately until
[CONNECTED] scrolls or [FAILED]
appears.
» If [CONNECTED] scrolls, this system
is reconnected to the last connected
device.
Play audio from a Bluetooth
device
If the connected Bluetooth device supports
Advanced Audio Distribution Prole (A2DP),
you can listen to tracks that are stored on the
device through the system. If the device also
supports Audio Video Remote Control Prole
(AVRCP) prole, you can control play on the
system or with its remote control.
1 Play a track on the connected device.
2 Press AS/SOURCE repeatedly to switch
the source to [BTAUDIO].
» Play star ts automatically.
• To pause or resume play, press
• To skip to the previous or next track,
press
Note
If the connected device does not support the AVRCP
•
prole, control play on the connected device.
/ .
Make a call
Note
Keep the Bluetooth connection active between the
•
system and your mobile phone.
Call a number
On your mobile phone, call a number.
» [CALLING] is displayed.
.
Tip
You can also complete the reconnection on your
•
device.
18 EN
Redial the last called number
1 Press .
» [REDIAL] is displayed.
2 Press to conrm.
» [CALLING] is displayed.
Page 20
Pick up an incoming call
When the system receives an incoming call, the
phone number or [PHONEIN] is displayed.
Press
to answer the call.
9 Listentoan
externalplayer
English
Reject an incoming call
Press and hold until [END] is displayed.
End a call
To end an on-going call, press .
Transfer a call to mobile phone
By default, the voice comes from the
loudspeakers during a call.
1 Press and hold until [TRANSFER] is
displayed.
» The loudspeakers are muted, and the
voice comes from your mobile phone
only.
2 Take up your mobile phone for the
conversation.
You can use the system to amplify the audio
input from an external player, for example, MP3
player.
MP3-LINK
1 Press AS/SOURCE repeatedly to switch
the source to [MP3--LINK].
2 Connect an audio input cable with a 3.5
mm connector on both ends between
• the MP3-LINK socket on the front
panel, and
• the audio output socket (usually the
headphone socket) on the external
player.
3 Play audio on the external player.
EN
19
Page 21
10 Adjust sound
The following operations are applicable to all
supported media.
Button Function
Rotate to increase or decrease the
volume level.
Press to mute the speakers or release
them from mute status.
Press to enable or disable the MAX
Sound feature.
Press and hold to enable or disable
the Dynamic Bass Boost (DBB) effect.
Press repeatedly to select a sound
equalizer.
1 Press and hold to activate the setup
of customized sound equalizer.
2Press repeatedly to select an op-
tion: [BAS] (bass), [TRE] (treble),
[BAL] (balance), [FAD] (fader), or
[SUBW] (sub-woofer).
3 Rotate to adjust the setting.
11 Additional
information
Reset the system
If the system works abnormally, reset the
system to factory default settings.
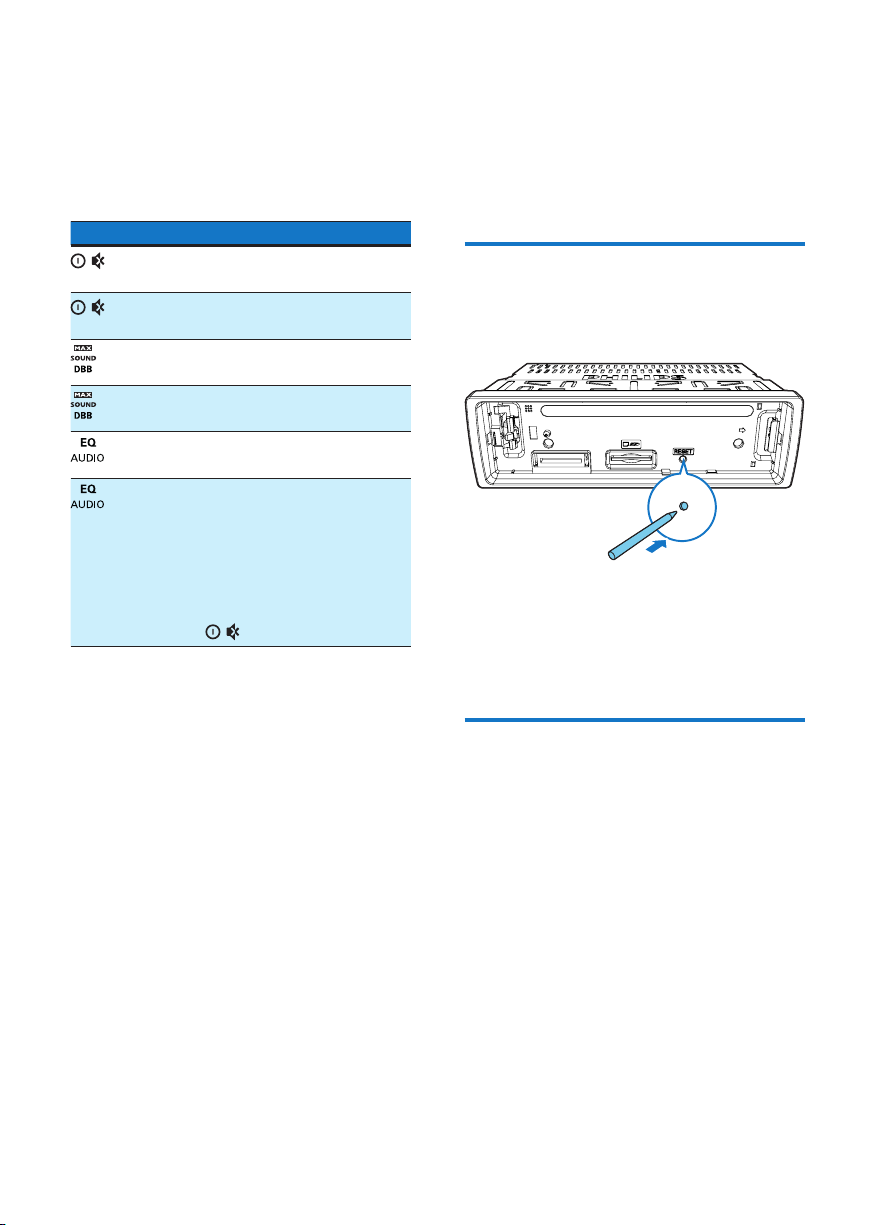
1 Detach the front panel.
2 Press the RESET button with the tip of a
ball-point pen or toothpick.
» All settings are reset to factory default.
20 EN
Replace the fuse
If there is no power, check the fuse and replace
it if it is damaged.
1 Check the electric connection.
2 Remove the damaged fuse from the rear
panel.
Page 22
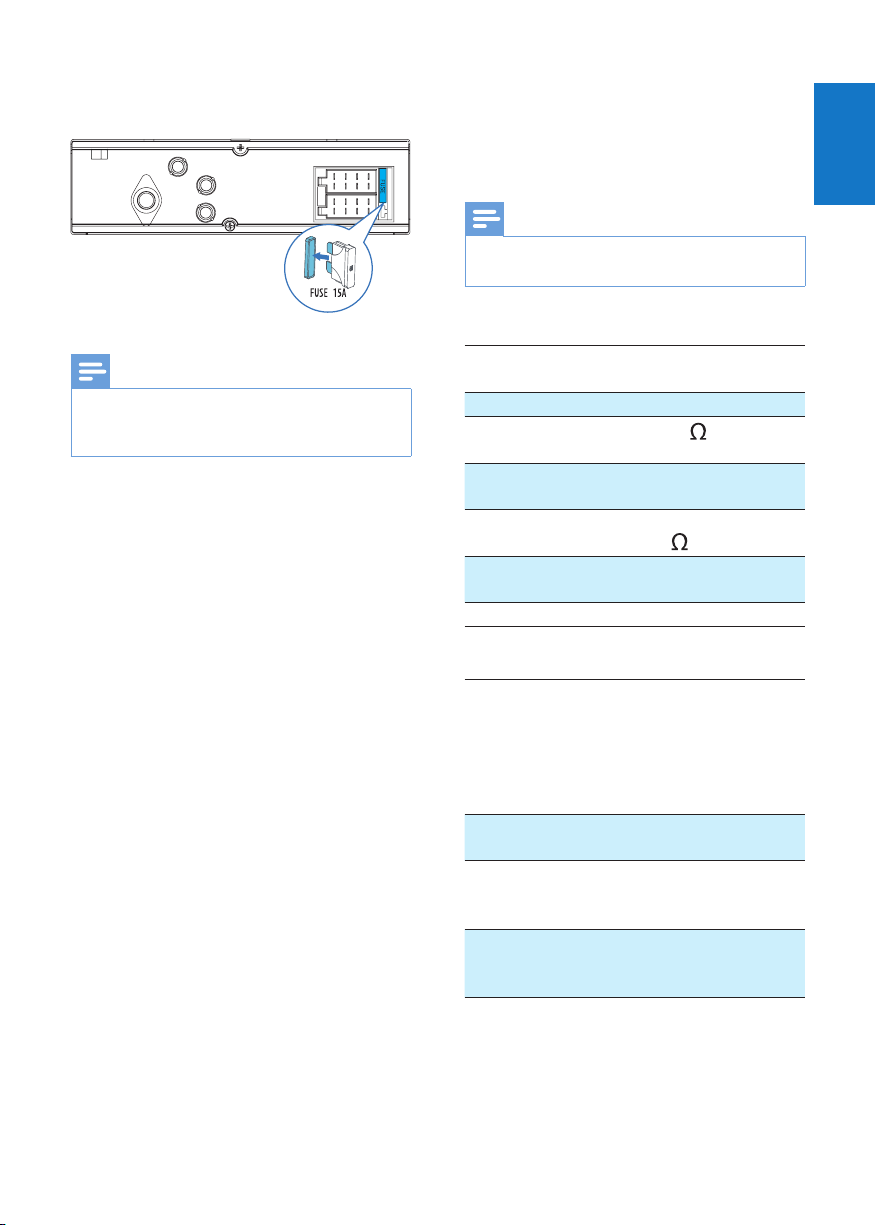
3 Insert a new fuse with the same
specications (15 A).
12Product
Note
If the fuse gets damaged immediately after it is
•
replaced, an internal malfunction may occur. In such
case, consult your Philips retailer.
information
Note
Specicationsaresubjecttochangewithoutprior
•
notice.
General
Power supply 12 V DC (11 V - 16
V), negative ground
Fuse 15 A
Suitable speaker
impedance
Maximum power
output
Continuous power
output
Pre-Amp output
voltage
Aux-in level 500 mV
Radio
Frequency range
- FM
Usable sensitivity FM (S/N = 20 dB)
Frequency range AM(MW)
Usable sensitivity AM(MW) (S/N =
20 dB)
4 - 8
50 W x 4 channels
22 W x 4 RMS
(4
10% T.H.D.)
2.0 V
87.5 - 108.0 MHz,
65.0 - 74.0 MHz
(100kHz per step in
auto search and 50kHz
per step in manual
search)
8 µV
522 - 1620 KHz (9 kHz)
530 - 1710 kHz (10
kHz)
30 µV
English
EN
21
Page 23

Bluetooth
Output
power
Frequency
band
Range 3 meters(free space)
Standard Bluetooth 2.0 specication
Class 2
2.4000 GHz - 2.4835 GHz ISM
Band
13 Troubleshooting
Warning
•
Never remove the casing of this product.
To keep the warranty valid, never try to repair
the product yourself.
If you encounter problems when using this
product, check the following points before
requesting service. If the problem remains
unsolved, go to the Philips Web page
(www.philips.com/support). When you contact
Philips, make sure that the product is nearby
and the model number and serial number are
available.
General
No power or no sound
• The power supply from car battery is cut
off, or the car battery runs out of energy.
Power the system with car battery.
• Car engine is not on. Turn the car engine
on.
• Cable is not correctly connected. Check
connections.
• The fuse is burnt. Replace the fuse.
• Volume is too low. Adjust volume.
• If the above solutions do not work, press
the RESET button.
• Make sure that the current track is in a
compatible format.
Noise in broadcasts
• Signals are too weak. Select other stations
with stronger signals.
• Check the connection of the car antenna.
Preset stations are erased.
• Battery cable is not correctly connected.
Connect the battery cable to the terminal
that is always live.
22 EN
Page 24

Cannot switch the source to iPod/iPhone
• Check whether the iPod/iPhone is securely
connected.
• Check whether the iPod/iPhone is
compatible with this system.
• Check whether the iPod/iPhone battery is
nearly empty. Connect it to this system for
charging rst.
DisplayshowsERR-12.
• Data error. Check the USB storage device
or SD/SDHC card.
About the Bluetooth device
Music playback is unavailable on the system
even after successful Bluetooth connection.
• The device cannot be used with the
system to play music.
The audio quality is poor after connection
with a Bluetooth-enabled device.
• The Bluetooth reception is poor. Move
the device closer to the system or remove
any obstacle between the device and the
system.
Cannot connect with the system.
• The device does not support the proles
required for the system.
• The Bluetooth function of the device is
not enabled. Refer to the user manual of
the device to nd out how to enable the
function.
• The system is not in the pairing mode.
• The system is already connected with
another Bluetooth-enabled device.
Disconnect that device or all other
connected devices and then try again.
The paired mobile phone connects and
disconnects constantly.
• The Bluetooth reception is poor. Move
the mobile phone closer to the system or
remove any obstacle between the mobile
phone and the system.
• Some mobile phones may connect and
disconnect constantly when you make
or end calls. This does not indicate any
malfunction of the system.
• For some mobile phones, the Bluetooth
connection may be deactivated
automatically as a power-saving feature.
This does not indicate any malfunction of
the system.
English
EN
23
Page 25
14 Notice
1177
Any changes or modications made to this
device that are not expressly approved by
Philips Consumer Lifestyle may void the user’s
authority to operate the equipment.
Compliance
This product complies with the radio
interference requirements of the European
Community.
Environmental information
All unnecessary packaging has been omitted.
We have tried to make the packaging easy to
separate into three materials: cardboard (box),
polystyrene foam (buffer) and polyethylene
(bags, protective foam sheet.)
Your system consists of materials which can
be recycled and reused if disassembled by
a specialized company. Please observe the
local regulations regarding the disposal of
packaging materials, exhausted batteries and old
equipment.
Trademark notice
The Bluetooth® word mark and logos are
registered trademarks owned by Bluetooth
SIG, Inc. and any use of such marks by Philips is
under license.
Care of the environment
Your product is designed and manufactured
with high quality materials and components,
which can be recycled and reused.
When this crossed-out wheeled bin symbol is
attached to a product it means that the product
is covered by the European Directive 2002/96/
EC. Please inform yourself about the local
separate collection system for electrical and
electronic products.
Please act according to your local rules and
do not dispose of your old products with your
normal household waste.
Correct disposal of your old product helps to
prevent potential negative consequences for the
environment and human health.
24 EN
Windows Media and the Windows logo
are trademarks, or registered trademarks of
Microsoft Corporation in the United States
and/or other countries.
“Made for iPod” and “Made for iPhone”
mean that an electronic accessory has been
designed to connect specically to iPod or
iPhone respectively, and has been certied by
the developer to meet Apple performance
standards. Apple is not responsible for the
operation of this device or its compliance with
safety and regulatory standards. Please note that
the use of this accessory with iPod or iPhone
may affect wireless performance.
iPod and iPhone are trademarks of Apple Inc.,
registered in the U.S. and other countries.
Other trademarks and trade names are those
of their respective owners.
Page 26

Copyright
2013 © Koninklijke Philips Electronics N.V.
Specications are subject to change without
notice. Trademarks are the property of
Koninklijke Philips Electronics N.V or their
respective owners. Philips reserves the right
to change products at any time without being
obliged to adjust earlier supplies accordingly.
English
EN
25
Page 27

Specifications are subject to change without notice
©2013KoninklijkePhilipsElectronicsN.V.
All rights reserved.
CE152G_51_UM_V1.0
 Loading...