

Page 1

CORRECTION TO THE SERVICE MANUAL
•
MECHANICAL PARTSLIST
Correct code number for pos. 225 WORDMARK PHILIPS reads 3104 120 00290.
CHANGES IN COURSE OF PRODUCTION
•NEW SOFTWARE
- From production week 0152 onwards following new software versions have been implemented in the sets:
CDR80x:
Main µP 7414: V46
CDR module: MO2021, B0042 (MO stands for “Mozart Board”, B stands for “Basic Engine”)
CDR82x:
Main µP 7414: V34
CDR module: MO2021, B3201 (MO stands for “Mozart Board”, B stands for “Basic Engine”)
The upgrade of the CDR module addresses the following issues:
• Playback of Audio CD’s which do not comply with the Red Book standard
• New features in Service Testprogram
• Detection of corrupted mp3 files and proper handling of CRC errors
• Better track time prediction for VBR encoded mp3 files
• Improved CD-TEXT indexing
• Automatic Loader Detection during startup
• Several minor improvements
Software versions V34 (CDR82x) respectively V46 (CDR80x) of the main µP 7414 enable the extended Service Testprogram
which is already indicated in the Service Manual.
For updated flow charts of the Service Testprogram see attached sheets.
Service Information
SSeerrvviiccee
SSeerrvviiccee
Service
Product Service Group CE Audio
Compact Disc Recorder CDR800, CDR802
A02-350
©
3103 785 25170
2002-03-02
Already published Service Informations: none
CDR820, CDR822
Page 2
- From production week 0207 onwards the software of the Mozart Board has been upgraded to MO3001.
This upgrade addresses a major problem with the “Disc Recover Mode” of models CDR820, CDR822 and a few minor problems
valid for all sets.
Problem “Disc Recover Mode”:
After a power failure during recording, the set enters the “Disc Recover Mode” but it does never return from this mode. The
display shows “Disc Recover” even after disconnecting/reconnecting mains.
The faulty disc cannot be removed because the set does not react on any button (i.e. Open/Close).
The problem can be solved by a software upgrade of the Mozart Flash ROM to “MO3001”.
To remove the faulty disc from the tray proceed as follows:
1. Remove Top Cover
2. Connect mains → set will enter Recover Mode
3. Stop the disc manually until an error message is displayed
4. Press Open/Close
•
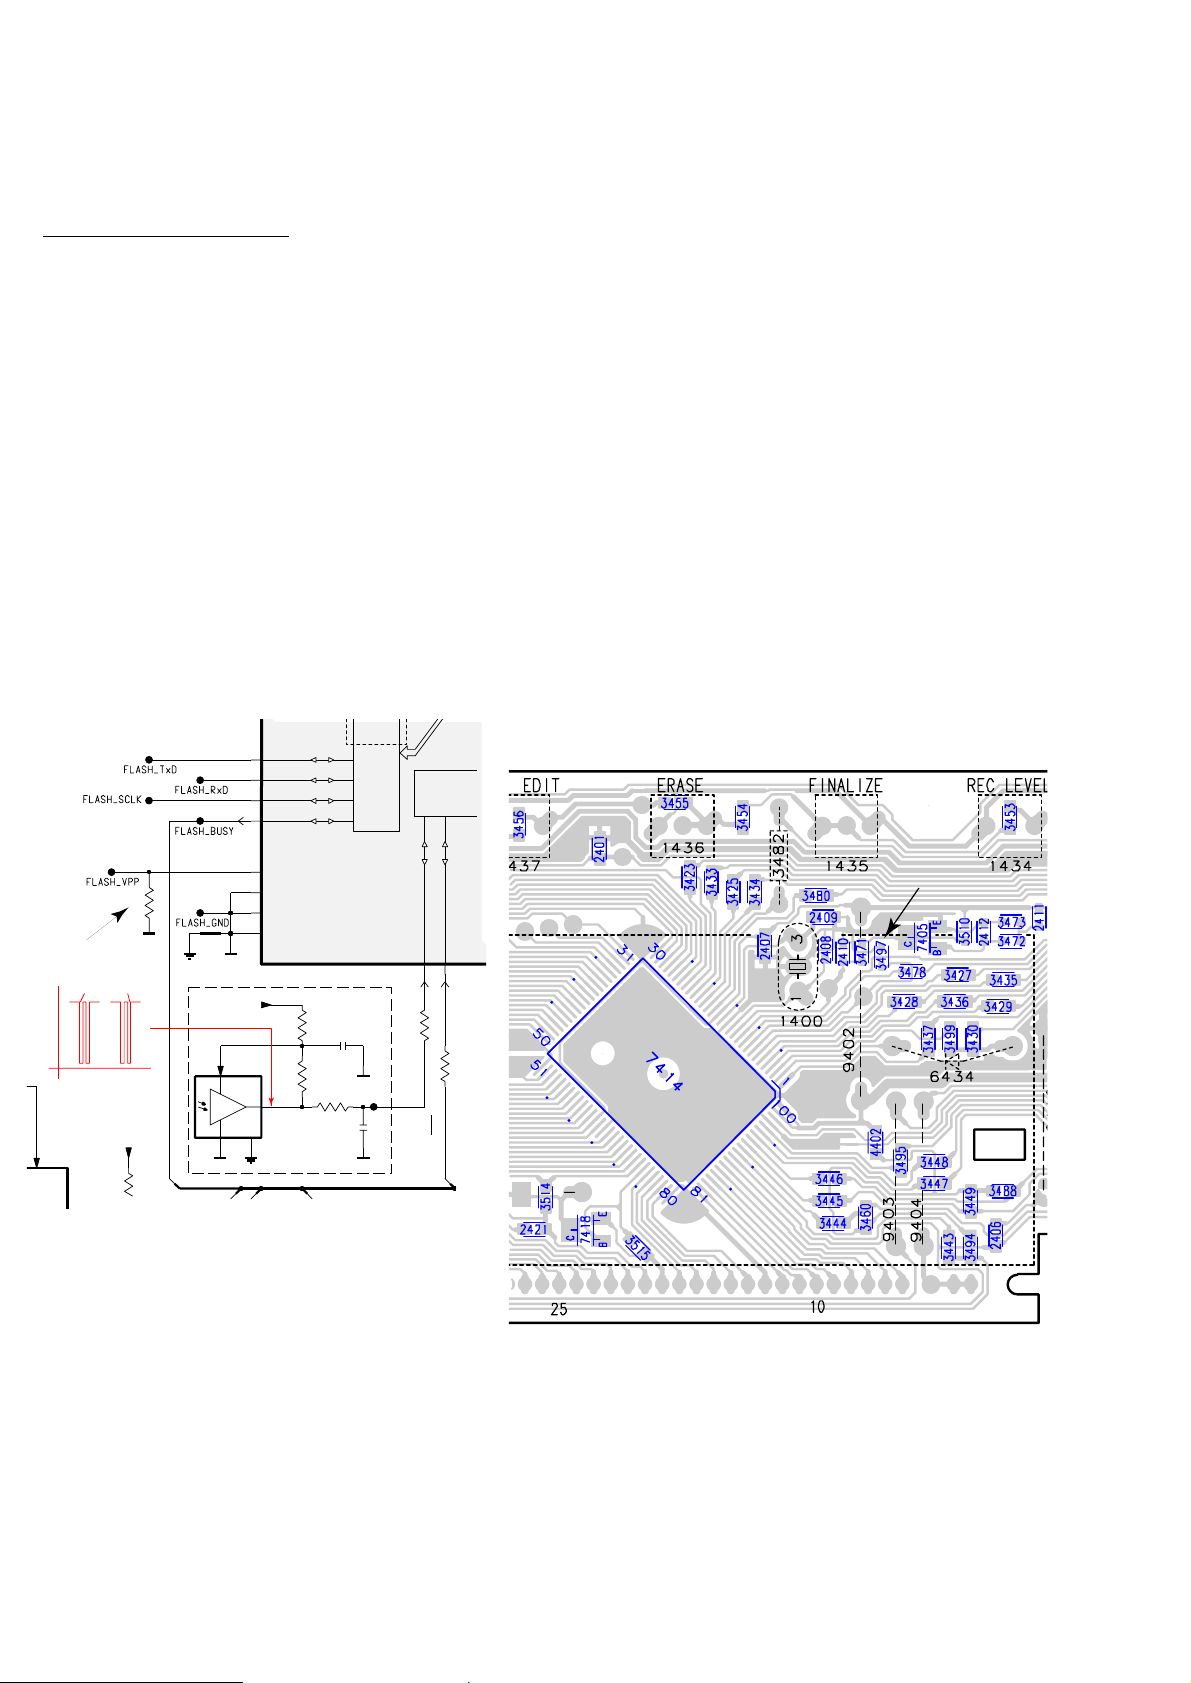
DISPLAY BOARD
The copper pattern has been changed to layout stage .7.
(The layout stage can be identified by the last digit of the 12-figure number, located at the upper left corner of the copper pattern)
Reason: To ensure a reliable startup with the flash-version of the µP over all tolerances, resistor 3497 has been added between
pin 9 of µP 7414 and ground.
3497© 4822 051 30103 10k 5% 0.06W
Portion of Display Board layout stage .7
(copperside view)
added
IR EYE
D
1K
3420
100n
D
D
2400
3440
1K
100R
3438
GP1U28XP
7403
3
GND4MT
1OUT
VSUP
2
3439
10K
2n2
D
2401
KEY
F409
30
29
3465 14 3397 32931
3431
F405
F404
F402
F400
F401
F403
3486
4K7
VCC
8
100n
KEY
+5VST
LED_Speed
Key_ON_OFF
+uP
PORT P4
P47
P46
P45
P44
P71
P70
VSS1
VSS2
TB0IN
TXD0|FLD52
RXD0|FLD53
CTS0|RTS0|FLD55
AVSS
CLK0|FLD54
CNVSS
added
10K
3497
D
4,8V
4,8V
4,9V
5V
5/0V
5V
5V
0V
Communication
Page 3

5-6a5-6a
N
Y
KEY TEST
Display shows
1)
Numbers acc. table 2
are indicated as long as a
button is held depressed.
If a button is pressed
on the Remote Control
KEY RC is shown
and the ; flag flashes.
FFWD 6
button
pressed?
STOP
button
pressed?
N
Y
10
OPEN/CLOSE
(CDR)
FINALIZE CD
SPEED
(CDR820 only))
ERASE CD
COPY CD
CDR
AUX
CD1
20
21
22
23
24
25
99
CD2
5
KEY KEY CODE
exit test
2
3
4
5
6
7
8
9
12
15
11
RECORD
COMPILE CD
14
13
16
17
CD3
CD TEXT
/EDIT
DISPLAY
SHUFFLE
CD CHANGE
PLAY/PAUSE
OPEN/CLOSE
(CDC)
ON/OFF
18
STOP
A-B EDIT
1
0
PROGRAM
REC LEVEL
YES
/ENTER
NO
/CANCEL
6
KEY KEY CODE
KEY CODES
table 2
1)
If the ON/OFF switch is in the position
OFF
, all other keys
are blocked and display will show
99
as long any key is
held depressed.
SERVICE TESTPROGRAM
VARIOUS TESTS
CDR8xx servtest various new, 14.01.02
N
Y
FORMAT EEPROM
Display shows
for 2s.
EEPROM is cleared and
default values are stored.
CD TEXT
button
pressed?
This test should only be used to clear
the EEPROM in case of a µP-"hangup".
Attention: all data are set to default values,
BLACK BOX data are not cleared.
KEY --
DISPLAY
button
pressed?
STOP
button
pressed?
N
N
Y
Y
Display shows all
segments and flags (dimmed)
for checking open circuits.
see figure 1
All LEDs are switched on.
DISPLAY TEST
fig. 1
N
Y
QUARTZ TEST
Display shows
1220±37Hz can be measur.
on (pin 27 of µP).
STOP
button
pressed?
N
Y
REW 5
button
pressed?
Tact frequency µP
(divided 10MHz)
1
10M
NEW
VXX
S
*
To leave Service Testprogram plug mains cord off.
*
In the main menu the sound settings (volume, ...) and
the trays work as in normal mode.
Display shows
version number
of the µP - software.
stands for Service mode
stands for Version number
of the software used in the
Front (Display) µP.
To enter Service
Testprogram hold
PLAY & CD3
buttons
depressed while
plugging mainscord in.
On/Off switch in pos.
ON
S-CDR80-VXX
PASS
N
Y
EEPROM TEST
Display shows
ERR
Display shows
Testpattern is written to
address 1
and
read back again
PROGRAM
button
pressed?
STOP
button
pressed?
Test ok?
N
Y
N
Y
NTC XX
N
Y
TEMPERATURE
(NTC) TEST
Display shows
XX = value in °C
AUX
button
pressed?
STOP
button
pressed?
N
Y
CDR80x
CDR82x
SERVICE TESTPROGRAM
VARIOUS TEST
Page 4

5-7a 5-7a
CDR
DC-ERASE MODE
SERVICE TESTPROGRAM
CDR MODULE
DC-ERASE
finished?
N
Y
BURN IN MODE
CDR MODULE
Display shows:
HH BI RE FE
DC-ERASE MODE
starts.
Record complete disc
from analog source
with normal speed.
Display shows:
HH BI RE FE
Complete disc
recorded?
N
Y
Error detected?
N
Y
Finalize disc
with double speed.
Display shows:
HH BI RE FE
HH stands for the number of hours
the test was running
BI stands for Burn In test
RE number of errors detected during
DC erase and write mode
FE number of errors detected during
Finalizing the disc
CDR8xx servtest CDR module new, 17.01.02
TESTS WORKING FROM FOLLOWING SOFTWARE VERSIONS ONWARDS:
V46, M2021 B0042 CDR80x
V34, M2021 B3201 CDR82x
Y
Disc erased?
N
Y
N
Y
Complete disc will be
erased with 2x/4x speed.
(starting from PMA-area
up to and including
ATIP leadout area)
The display shows the
countdown of the
remaining time required
to complete the operation:
mm ss
Display shows:
PASSED
mm: remaining minutes
ss: remaining seconds
STOP
button
pressed?
Exit DC-ERASE Mode
Note: With the DC-Erase mode the CD-RW can be
changed back in its original state, like a new disc.
Stopping the erase-function by switching power off
will leave the disc in an unpredictable status!
TEST O.K.?
NN
Y
YY
CDR
ELECTRICAL TEST
Insert CD-DA disc
before starting the test
MODULE INFORMATION
MOZART BOARD DIAGNOSTIC
CDR - LOADER TEST
SDRAM TEST 7100
Display shows:
DTST1
CHECKSUM TEST 7101
Display shows:
DTST2
ERASE TEST 7101
Display shows:
DTST3
COMMUNICATION TEST
(UART-BUS)
Display shows:
DTST4
Display shows:
DERR
n
n=number of failed test
Display shows next error
FFWD
6 button
pressed?
N
Y
FFWD
6 button
pressed?
Y
FFWD
6 button
pressed?
Y
FFWD
6 button
pressed?
all errors shown?
N
N
N
TEST O.K.?
NN
Y
Y
Display shows:
BERR 1
Display shows:
PASSED
for 3s
FFWD
6 button
pressed?
The test is performed by
playing 5s at beginning,
5s in the middle and 5s at
the end of the disc.
Display shows actual
playing time.
Note: The BURN-IN mode is an endless cycle of
*
DC erase, to erase the CD-RW disc with max. laser power
*
Recording a CD-RW disc with speed N=1
*
and Finalizing with double speed
This test is intended to check the quality of a CDR loader and
to detect intermittent failures.
Exit CDR electrical Test Exit CDR electrical Test
Display shows for 5s:
MO XXXX BXXXX
• MO xxxx stands for
Software version of
MOZART
(flash ROM 7101)
• Bxxxx stands for
Software version of
Basic engine processor
(flash EPROM 7017)
With the
DISPLAY
button the info on the display can be toggled
to indicate either the status of burn in test or the temperature
measured via the NTC.
1)
1)
1)
1)
S
*
To leave Service Testprogram plug mains cord off.
*
In the main menu the sound settings (volume, ...)
and the trays work as in normal mode.
Display shows
version number
of the µP - software.
To enter Service
Testprogram hold
PLAY & CD3
buttons
depressed while
plugging mainscord in.
On/Off switch in pos.
ON
S-CDR80-VXX
CDR
button
pressed?
N
Y
ERASE CD
button
pressed?
N
Y
RECORD
button
pressed?
N
Y
VXX
stands for Service mode
stands for Version number
of the software used in the
Front (Display) µP.
SERVICE TESTPROGRAM
CDR MODULE
Page 5

5-8a5-8a
SERVICE TESTPROGRAM
CD/CDC MODULE
CDR8xx CD/CDC servtest new, 15.01.02
OPEN/CLOSE
button
pressed?
x
JOG
turned
one step cw?
(
P
)
N
Y
N
Y
PLAY
button
pressed?
N
Y
CDC
MECHANICAL TEST
SLIDE TESTFOCUS TEST TRAY TESTTURNTABLE
TEST
Display shows:
SLIDE
for visual inspection only
(not for CDR82x)
OPEN/CLOSE
button
pressed?
N
Y
Y
N
Y
N
Slide moves
continuously in/out.
Display shows:
CD ME TEST
Display shows:
OPEN
(even when tray is blocked)
Tray opens.
Display shows:
CLOSE
(even when tray is blocked)
Tray closes.
Slide moves to inner
position.
N
Y
STOP
button
pressed?
Exit Mech. Testprogram
Objective moves
continuously up/down.
Display shows:
FOCUS
PLAY
button
pressed?
N
Y
YES
button
pressed?
N
Y
Turntable motor
is switched on.
Display shows:
DISC
YES
button
pressed?
Focus servo
is switched off.
Turntable motor
is switched off.
ALL TESTS ARE WORKING
FROM FOLLOWING SOFTWARE
VERSIONS ONWARDS:
V46, M2021 B0042 CDR80x
V34, M2021 B3201 CDR82x
Open tray to get free insight to the CD drive.
2)
2)
2)
CD CHANGE
button
pressed?
N
Y
CAROUSEL
TEST
CD CHANGE
button
pressed?
N
Y
Display shows:
CAROUSEL
Carousel turns
clockwise.
Carousel
is switched off.
x
JOG
turned
one step cw?
(
P
)
CDC
LOADER TEST
TEST O.K.?
NN
Y
Y
Display shows:
BERR 1
Display shows:
PASSED
for 3s
FFWD
6 button
pressed?
The test is performed by
playing 5s at beginning,
5s in the middle and 5s at
the end of the disc.
Display shows actual
playing time.
N
Y
CD1
button
pressed?
Exit CD electrical Test Exit CD electrical Test
The set does not automatically search for the place where a disc is inserted.
Only that disc will be played which is located on the compartment, which is just in PLAY position.
This will normally be
DISC 1
, except the carousel has been activated by the carousel test before.
It is therefore recommended to insert a CD-DA disc into compartment 1 before starting Service Testprogram.
1)
1)
Insert CD-DA disc
before starting the test
VXX
S
*
To leave Service Testprogram plug mains cord off.
*
In the main menu the sound settings (volume, ...) and
the trays work as in normal mode.
Display shows
version number
of the µP - software.
stands for Service mode
To enter Service
Testprogram hold
PLAY & CD3
buttons
depressed while
plugging mainscord in.
On/Off switch in pos.
ON
S-CDR80-VXX
CD2
button
pressed?
N
Y
stands for Version number
of the software used in the
Front (Display) µP.
SERVICE TESTPROGRAM
3CDC MODULE
 Loading...