

Page 1
CDR795
CDR796
Audio CD Player/Recorder
Audio
Audio
Page 2

.
2
Important notes for users in the U.K.
Mains plug
This apparatus is fitted with an approved 13 Amp plug.
To change a fuse in this type of plug proceed as follows:
1 Remove fuse cover and fuse.
2
Fix new fuse which should be a BS1362
5 Amp, A.S.T.A. or
BSI approved type.
3 Refit the fuse cover.
If the fitted plug is not suitable for your socket outlets,it
should be cut off and an appropriate plug fitted in its place.
If the mains plug contains a fuse, this should have a value
of 5 Amp. If a plug without a fuse is used, the fuse at the
distribution board should not be greater than 5 Amp.
Note:The severed plug must be disposed of to avoid a
possible shock hazard should it be inserted into a 13 Amp
socket elsewhere.
How to connect a plug
The wires in the mains lead are coloured with the
following code: blue = neutral (N), brown = live (L).
00
As these colours may not correspond with the colour
markings identifying the terminals in your plug, proceed as
follows:
– Connect the blue wire to the terminal marked N or
coloured black.
– Connect the brown wire to the terminal marked L or
coloured red.
– Do not connect either wire to the earth terminal in
the plug, marked E (or e) or coloured green (or green
and yellow).
Before replacing the plug cover, make certain that the
cord grip is clamped over the sheath of the lead - not
simply over the two wires.
Copyright in the U.K.
Recording and playback of material may require consent.
See
Copyright Act 1956 and The Performer’s Protection
Acts 1958 to 1972.
Italia
DICHIARAZIONE DI CONFORMITA’
Si dichiara che gli apparecchi CDR795 e
CDR796 Philips rispondono alle prescrizioni
dell’art. 2 comma 1 del D. M. 28 Agosto 1995 n. 548.
Fatto a Eindhoven
Philips Consumer Electronics
Philips, Glaslaan 2
5616 JB Eindhoven,The Netherlands
Norge
Typeskilt finnes på apparatens bakside.
Observer: Nettbryteren er sekundert innkoplet.
Den innebygde netdelen er derfor ikke frakoplet
nettet så lenge apparatet er tilsluttet
nettkontakten.
For å redusere faren for brann eller elektrisk støt, skal
apparatet ikke utsettes for regn eller fuktighet.
Page 3

3
EnglishFrançaisEspañolDeutschNederlandsItaliano
English
_________________________________________________________
4
Français
_______________________________________________________
22
Español
________________________________________________________
40
Deutsch
_______________________________________________________
58
Nederlands
____________________________________________________
76
Italiano
________________________________________________________
94
Page 4

General information
Technical data
_______________________________
5
Environmental information
_____________________
5
Supplied accessories
__________________________
5
Maintenance
________________________________
5
Disc handling
_______________________________
5
Discs for recording
___________________________
6
Discs for playback
____________________________
6
Some words about MP3
______________________
6
Connections
Connections
________________________________
7
Setup information
___________________________
7
Connections general
_________________________
7
Installations
Analogue connections
________________________
8
Digital connections
_________________________
8–9
Mains
_____________________________________
9
Controls
___________________________________
10
Remote control
Remote control usage
_______________________
11
Remote control keys
________________________
11
Basic functions
Switching on, switching to standby
______________
12
Demonstration mode
_______________________
12
Loading discs
______________________________
12
Playback
__________________________________
12
Selecting and searching (on all
discs except MP3-CDs)
______________________
13
Selecting and searching (on MP3-CDs only)
______
13
SHUFFLE and REPEAT
_______________________
14
CD text display
____________________________
14
ID3-tag
___________________________________
14
Programming track numbers
__________________
14
Clearing the program
________________________
14
About recording
Basic information
___________________________
15
What is finalizing?
___________________________
15
Direct Line Recording (DLR)
__________________
15
Adjusting the recording level
__________________
15
Internal recording
What is internal recording?
____________________
16
Selecting the recording speed
_________________
16
Copying an entire CD
_______________________
16
Recording all tracks from a CD
________________
16
Recording a single track
______________________
17
Making and recording a program
_______________
17
External recording
What is external recording?
___________________
18
Analogue or digital recording?
_________________
18
Automatic track increment
____________________
18
Recording with automatic start
________________
18
Manual recording
___________________________
19
Timer recording
____________________________
19
Erasing/CD text editing (on CD recorder only)
Erasing from a CDRW disc
___________________
20
CD text editing
____________________________
20
Troubleshooting
____________________________
21
Contents
4
English
Page 5
Technical Data
Subject to modification without notice.
General
Power consumption
Active
_______________________________
< 20 W
Standby
______________________________
< 0.6 W
Dimensions, w × h × d
____________
435 × 88 × 310 mm
Weight
____________________________________
5 kg
Audio
Frequency response
____________________
2–20,000 Hz
Playback
S/N (A-weighted)
_______________________
120 dB
S/N
__________________________________
110 dB
Dynamic range
__________________________
98 dB
Total harmonic distortion
_________________
-95 dB
Channel separation
______________________
105 dB
Recording
S/N (A-weighted)
________________________
93 dB
S/N digital without SRC
____________
equal to source
Dynamic range
__________________________
90 dB
Total harmonic distortion + noise
___________
-86 dB
Digital/optical input
___________________
12–96 kHz
Laser (CD recorder)
Type
___________________
Semiconductor laser GaAIAs
Wave length
___________________
775–795 nm (at 25°)
Output power
________
2.5 mW (Read), 35 mW (Write)
Beam divergence
________________________
60 degree
As an ENERGY STAR®partner,
Philips has determined that this
product meets the ENERGY STAR
®
guidelines for energy efficiency.
This set complies with the radio interference
requirements of the European Community.
CAUTION
Use of controls or adjustments or performance of
procedures other than herein may result in hazardous
radiation exposure or other unsafe operation.
Environmental information
All redundant packing material has been omitted.We have
done our utmost to make the packaging easily separable
into three mono materials: cardboard (box), polystyrene
foam (buffer) and polyethylene (bags, protective foam
sheet).
Your set consists of materials which can be recycled if
disassembled by a specialised company. Please observe the
local regulations regarding the disposal of packing materials,
exhausted batteries and old equipment.
Supplied accessories
– 2 analogue audio cables (with red and white plugs)
– Remote control
– 2 batteries for the remote control, size AA
– Mains cable
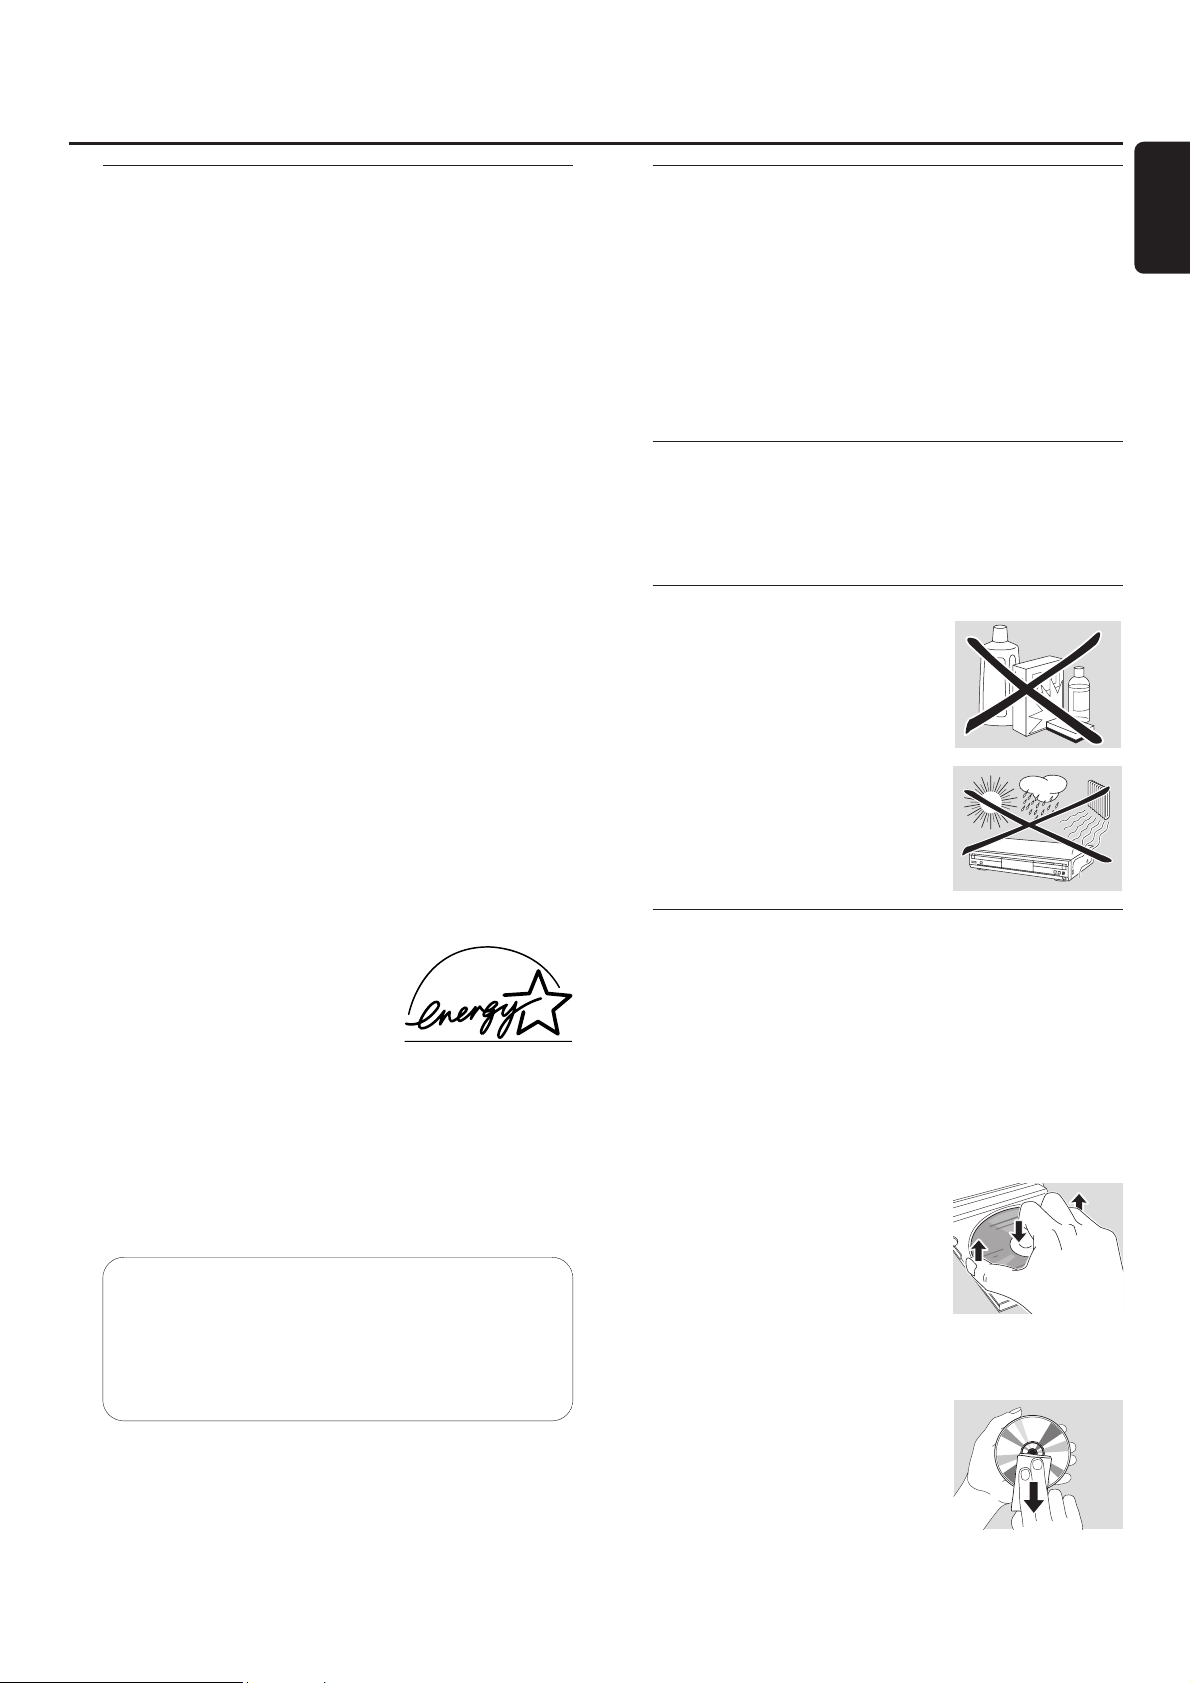
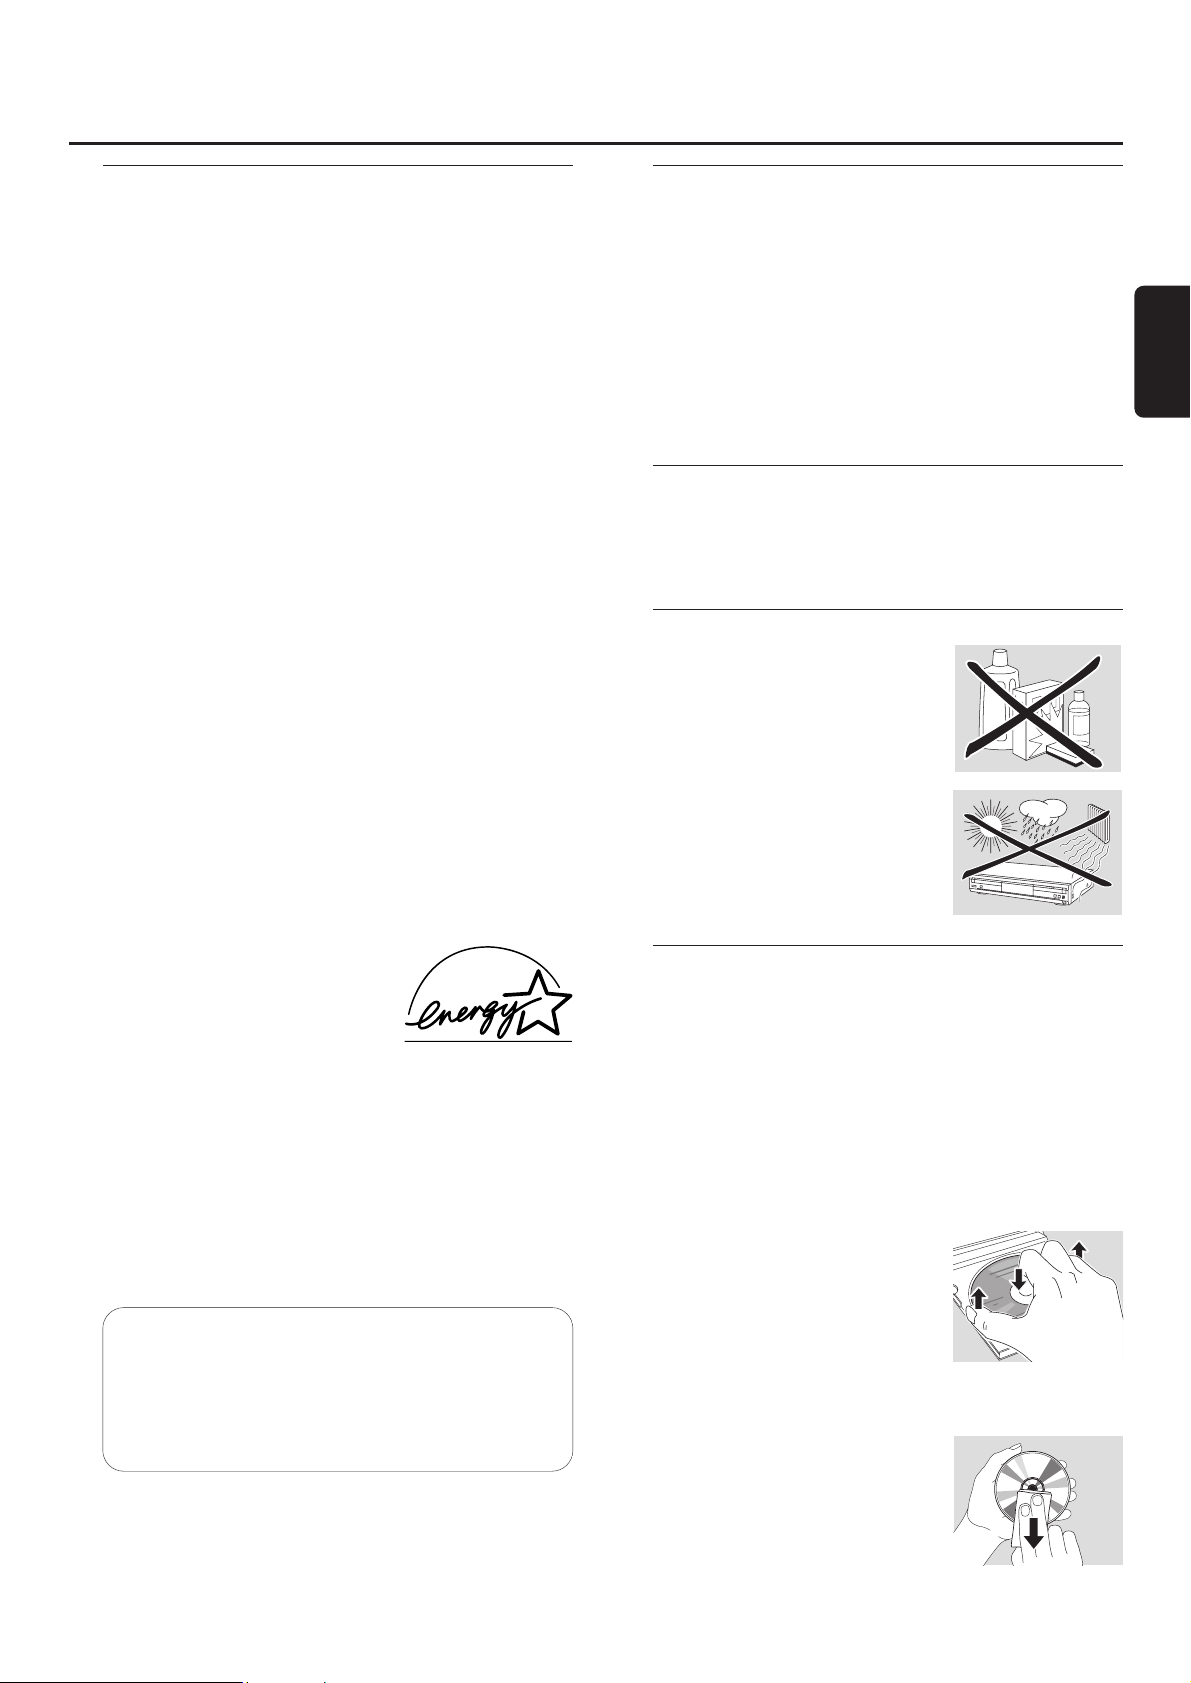
Maintenance
Clean the set with a soft,
slightly dampened, lint-free cloth. Do
not use any cleaning agents as they
may have a corrosive effect.
Do not expose the set, batteries or
discs to humidity, rain, sand or
excessive heat (caused by heating
equipment or direct sunlight).
Disc handling
If the CD player/recorder fails to read discs correctly use a
commonly available cleaning CD to clean the lenses before
submitting the set to repair. Other cleaning methods may
destroy the lenses.Always keep the trays closed to avoid
dust on the lenses.
The lenses may cloud over when the set is suddenly moved
from cold to warm surroundings. Playing a disc is not
possible then. Leave the set in a warm environment until
the moisture evaporates.
To take a disc out of its box easily,
press the centre spindle while lifting
the CD(RW).Always pick up a
CD(RW) by the edge and put it
back in its box after use.
Never write on a CD or attach a
sticker to it.Write only on the printed side of a CDR or
CDRW, and only with a soft felt-tipped pen.
To clean a disc, wipe it in a straight
line from the centre towards the
edge using a soft, lint-free cloth.A
cleaning agent may damage the disc!
General information
5
English
CAUTION
INVISIBLE LASER RADIATION WHEN OPEN.
AVOID EXPOSURETO BEAM.
Note:This warning is located inside
the enclosure.
Page 6

Discs for recording
For recording, make sure to use special audio discs only.
These discs are marked with “Digital Audio”and the logos
shown below.
There are two different types of audio discs for the use on
this CD recorder:
– CD-Audio Recordable (CDR)
discs can be recorded on once and
played on all standard CD players and
CD recorders, when finalized.
– CD-Audio ReWritable (CDRW)
discs can be recorded on, erased and
re-recorded many times and played on
CDRW compatible CD players and
CD recorders, when finalized.
All Philips CD players and CD recorders with
this sticker are CDRW compatible.
To ensure proper working of the set we
recommend the use of Philips audio CDR and audio
CDRW discs only.
Note: Do not use a computer CDR or CDRW as recording will
not work!
Recording is permissible insofar as copyright or
other rights of third parties are not infringed upon.
In some countries the use of the
CD player/recorder as shown or suggested in this user
manual may require the authorisation of copyright
holders.
Discs for playback
For playback on this CD player/recorder you can use
following discs:
– All pre-recorded audio CDs
– All audio CDR and audio CDRW discs
– MP3-CDs (CD-ROMs with MP3 tracks)
Some words about MP3
The revolutionary new music compression technology MP3
(MPEG ! Audio Layer-3) enables shrinking down of original
digital audio sound data with a factor of up to 10 without
losing significant sound quality.This allows you to record up
to 10 hours of CD-like quality music on a single CD-ROM.
Making your own MP3-CD
Basically there are two sources for MP3 music on CD.You
can either transfer music from your own digital audio CDs
via CD-ROM drive onto your PC and encode it into MP3
format (“rip”) or download legal MP3 music from the
Internet.
Record (“burn”) the music from your hard disc on
CD-ROM with your home PC (make sure filename
ends with .mp3). Once finished, you can play your
MP3-CD on this CD player/recorder and enjoy the music.
Data rate
The data rate is of great importance with MP3. It indicates
how fast bits are transfered.
Stereo music on a CD shows a data rate of about
1400 kilobits per second (kbps). To achieve a good MP3
quality a bit rate of 128 kbps is recommended. As
the encoding rate is user-selectable, make sure to reach this
data rate for MP3 as recordings less than 128 kbps will
suffer from a degradation in sound quality.
Recording
Downloading MP3 files from the Internet or ripping songs
from your own digital audio CDs is a delicate process, also
influenced by the quality of the encoder program and
speed of your PC.This may sometimes result in “drop-outs”
or errors which you may experience while listening to your
MP3-CD.
In any case make sure to use a recording speed not faster
than indicated on the CD-ROM and avoid running other
programs simultaneously on your PC during the recording
process.
In compliance with the SDMI (Secure Digital
Music Initiative) the digital outputs of this set will be
deactivated when playing an MP3-CD.
It is not possible to “burn” an MP3-CD on this
CD player/recorder.
It is not possible to record from an MP3-CD.
Supported formats
Following formats are supported on this
CD player/recorder:
– Disc format: ISO 9660 or Joliet
– File format: MPEG ! Audio Layer-3
– Filename: .mp3 (tracks), .m3u or .pls (playlists)
– Bit rate: 32–320 kbps (128 kbps advised) or variable
bit rate
Use ISO 9660 disc format when burning the MP3-CD.
UDF disc format (e.g.“DirectCD” or
“WinOnCD”) is not supported.
General information
6
English
Page 7
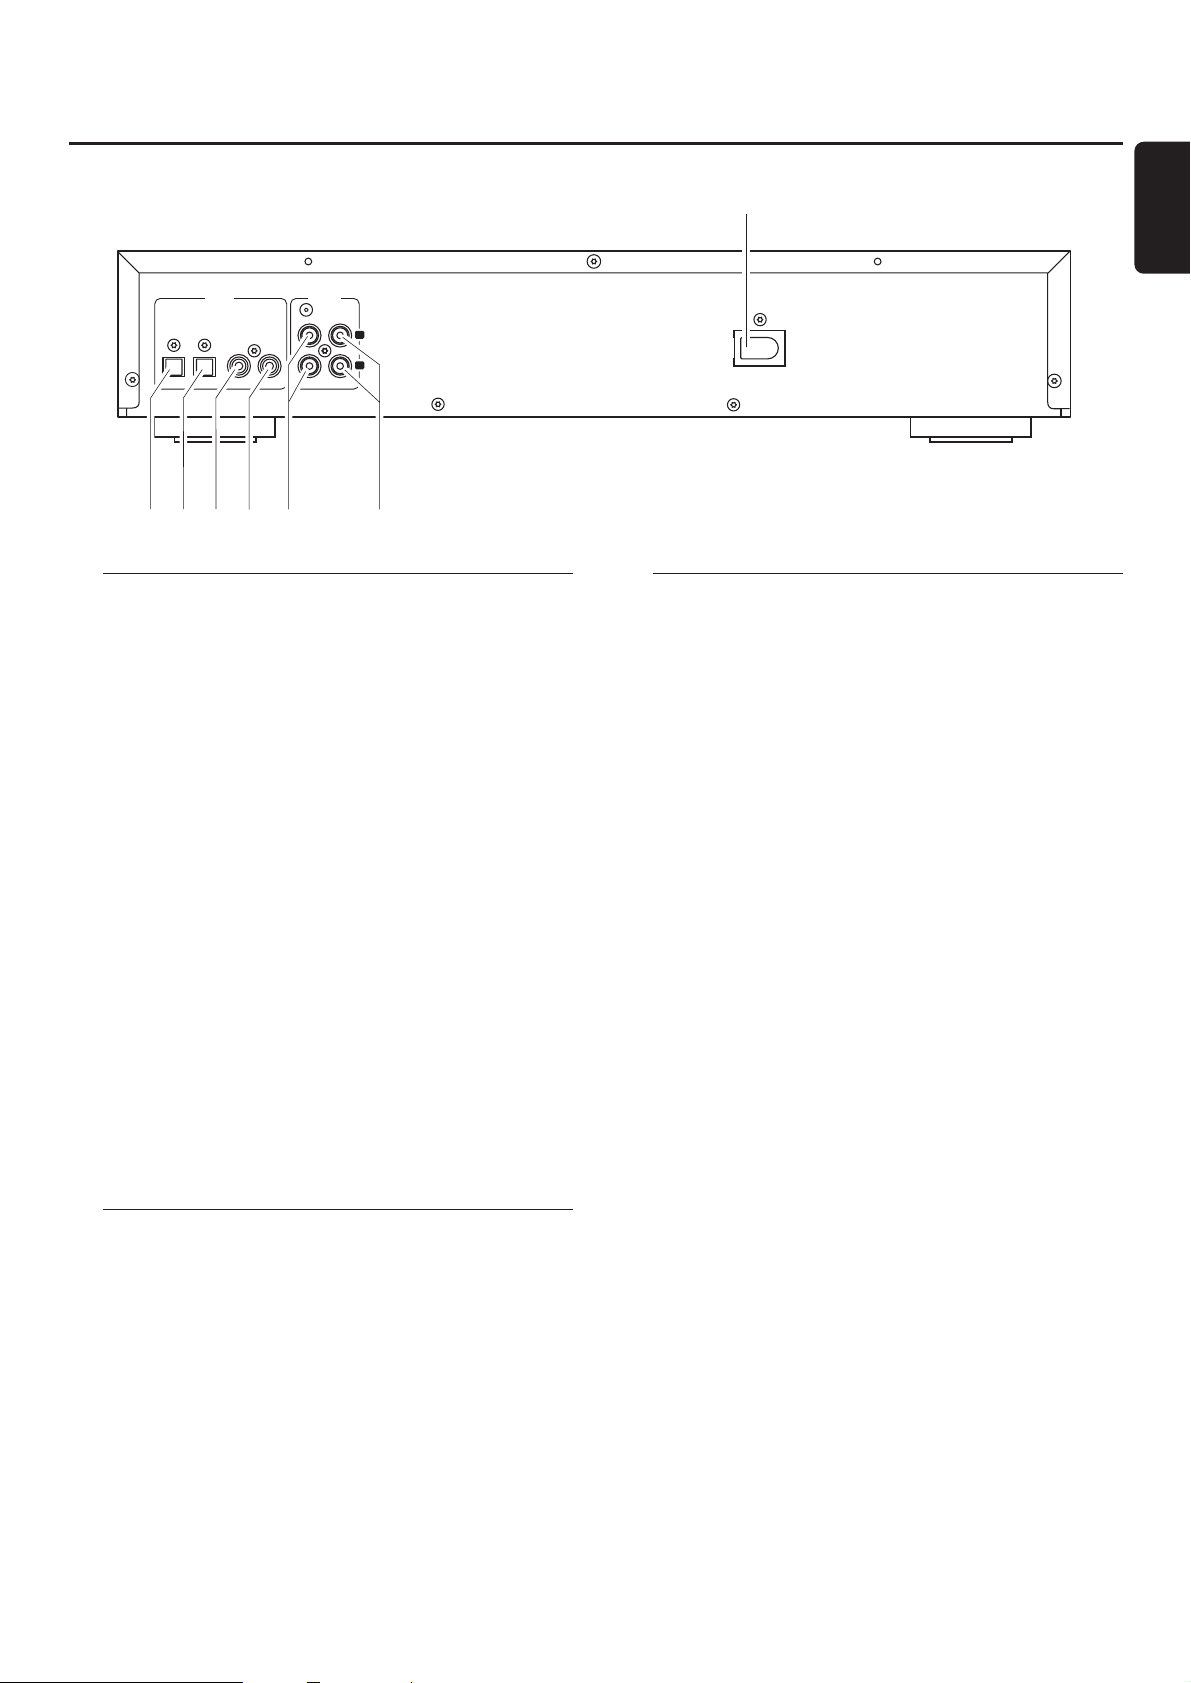
Connections
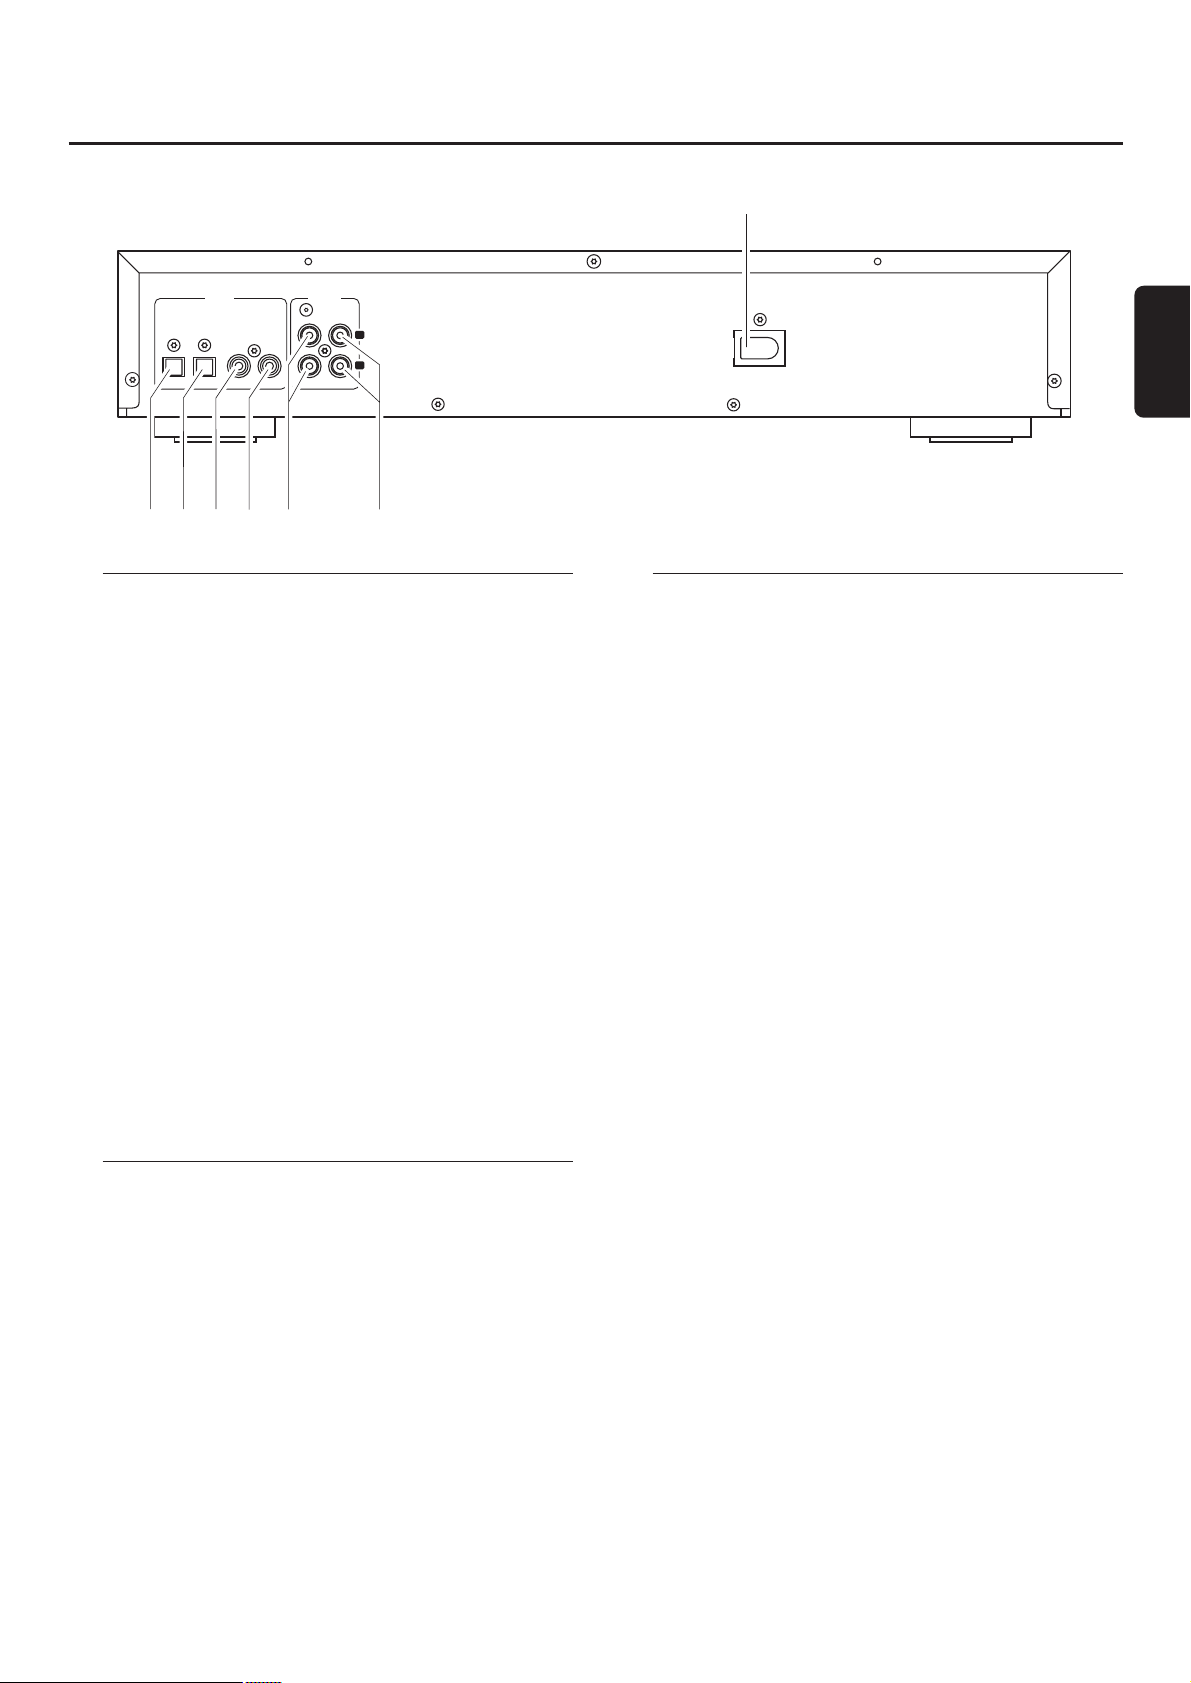
1 OPTICAL IN
connect to the digital optical output of an external digital
appliance
2 OPTICAL OUT
connect to the digital optical input of an external digital
appliance
3 DIGITAL IN
connect to the digital coaxial output of an external digital
appliance
4 DIGITAL OUT
connect to the digital coaxial input of an external digital
appliance
5 ANALOG IN L/R
connect to the analogue audio output of an external
appliance
6 ANALOG OUT L/R
connect to the analogue audio input of an external
appliance
7 AC MAINS ~
After all other connections have been made, connect
the mains lead to the wall socket.
Setup information
Place the set on a flat, hard and stable surface. Do not
position the set on top of other equipment that might heat
it up (e.g. receiver or amplifier).If the set is placed in a
cabinet, make sure to leave at least 3.5 cm free around the
set to prevent overheating.Active mobile phones near the
set may cause malfunctions.
Connections general
Never make or change connections with the mains
supply switched on.
For playback the following outputs are present:
– Analogue output (ANALOG OUT L/R)
– Digital coaxial output (DIGITAL OUT)
– Digital optical output (OPTICAL OUT)
For external recording the following inputs are present:
– Analogue input (ANALOG IN L/R)
– Digital coaxial input (DIGITAL IN)
– Digital optical input (OPTICAL IN)
These inputs can be connected to the corresponding
output(s) of your amplifier/receiver or directly to the
corresponding output(s) of the external appliance.
It is not possible to connect a turntable directly to
ANALOG IN L/R. If you wish to use a turntable with
the set, you have to connect an amplifier/receiver to
ANALOG IN L/R on the CD player/recorder.Then
connect the turntable to the amplifier.
The connections you make will depend upon the
possibilities your audio equipment offers and how you are
going to use the set. Please refer to the user manuals for
your audio equipment first.
We recommend doing analogue recording only if digital
recording is not possible. Digital recording will result in
better sound quality.
If possible, always make both digital and analogue
connections. In this way you can always make analogue
recordings when digital recording is not possible.
Connections
7
English
OUTIN
OPTICAL
DIGITAL
ANALOG
L
R
IN OUTOUTIN
AC MAINS
~
7
5
4
32
1
6
Page 8
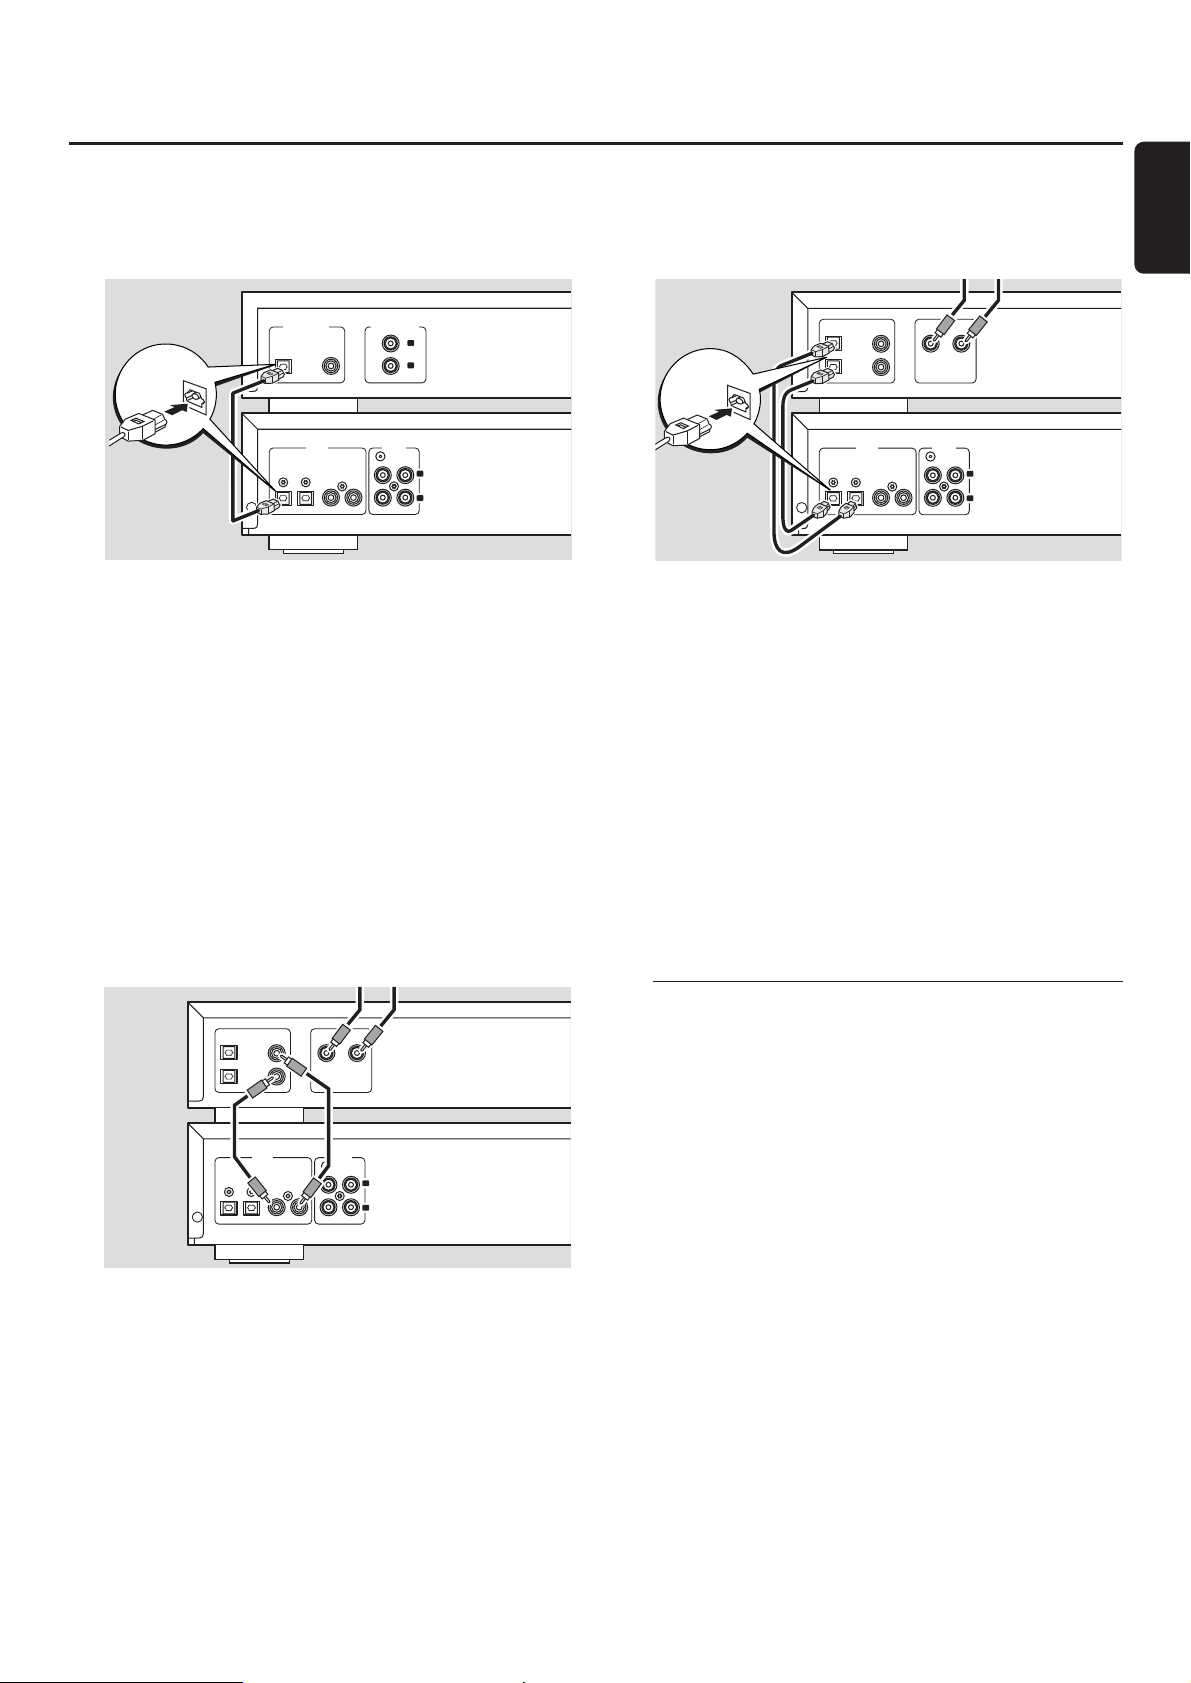
Analogue connections
These connections are required for playback and recording
via an amplifier/receiver, equipped with analogue in- and
outputs.
1 Connect the red plug of the supplied audio cable (cinch) to
the red socket ANALOG IN R and the white plug to the
white socket ANALOG IN L on the CD player/recorder.
2 Connect the other end of the audio cable to the analogue
outputs of the amplifier/receiver (CDR OUT,TAPE OUT,
AUX OUT, REC OUT,etc.).
3 Connect the red plug of the supplied audio cable (cinch) to
the red socket ANALOG OUT R and the white plug to the
white socket ANALOG OUT L on the CD player/recorder.
4 Connect the other end of the audio cable to the analogue
inputs of the amplifier/receiver (CD-R,TAPE IN,AUX,
PLAY IN, etc.).
5 Connect all other components of your system (tape deck,
CD player, tuner, turntable, etc.) via their analogue outputs
to the appropriate analogue inputs of the amplifier/receiver
(CD IN,TUNER IN, AUX IN, PHONO IN, etc.).
00
Recording can be done now with any appliance, connected
to an analogue input of the amplifier/receiver. Press INPUT
on the CD player/recorder repeatedly to select the
analogue input.
➜ ANALOG IN is displayed.
How to connect if the analogue output on the
amplifier/receiver is already being used (occupied)
Most amplifiers/receivers have multiple analogue output
connections (TAPE,VCR,…), but some amplifiers/receivers
have only 1 analogue output. In case you have already
hooked up a tape deck (DAT recorder or MD recorder) to
this output you will have to change the existing
connections.
1 Disconnect the analogue connections from the tape deck
to the amplifier/receiver.
2 Connect the CD player/recorder (see steps 1–4 in the
previous chapter).
3 Connect the analogue outputs of the tape deck to any free
analogue inputs (AUX, CD) on the amplifier/receiver.You
can now playback your tape or record from your tape deck
on CD.However, it is no longer possible to record on tape.
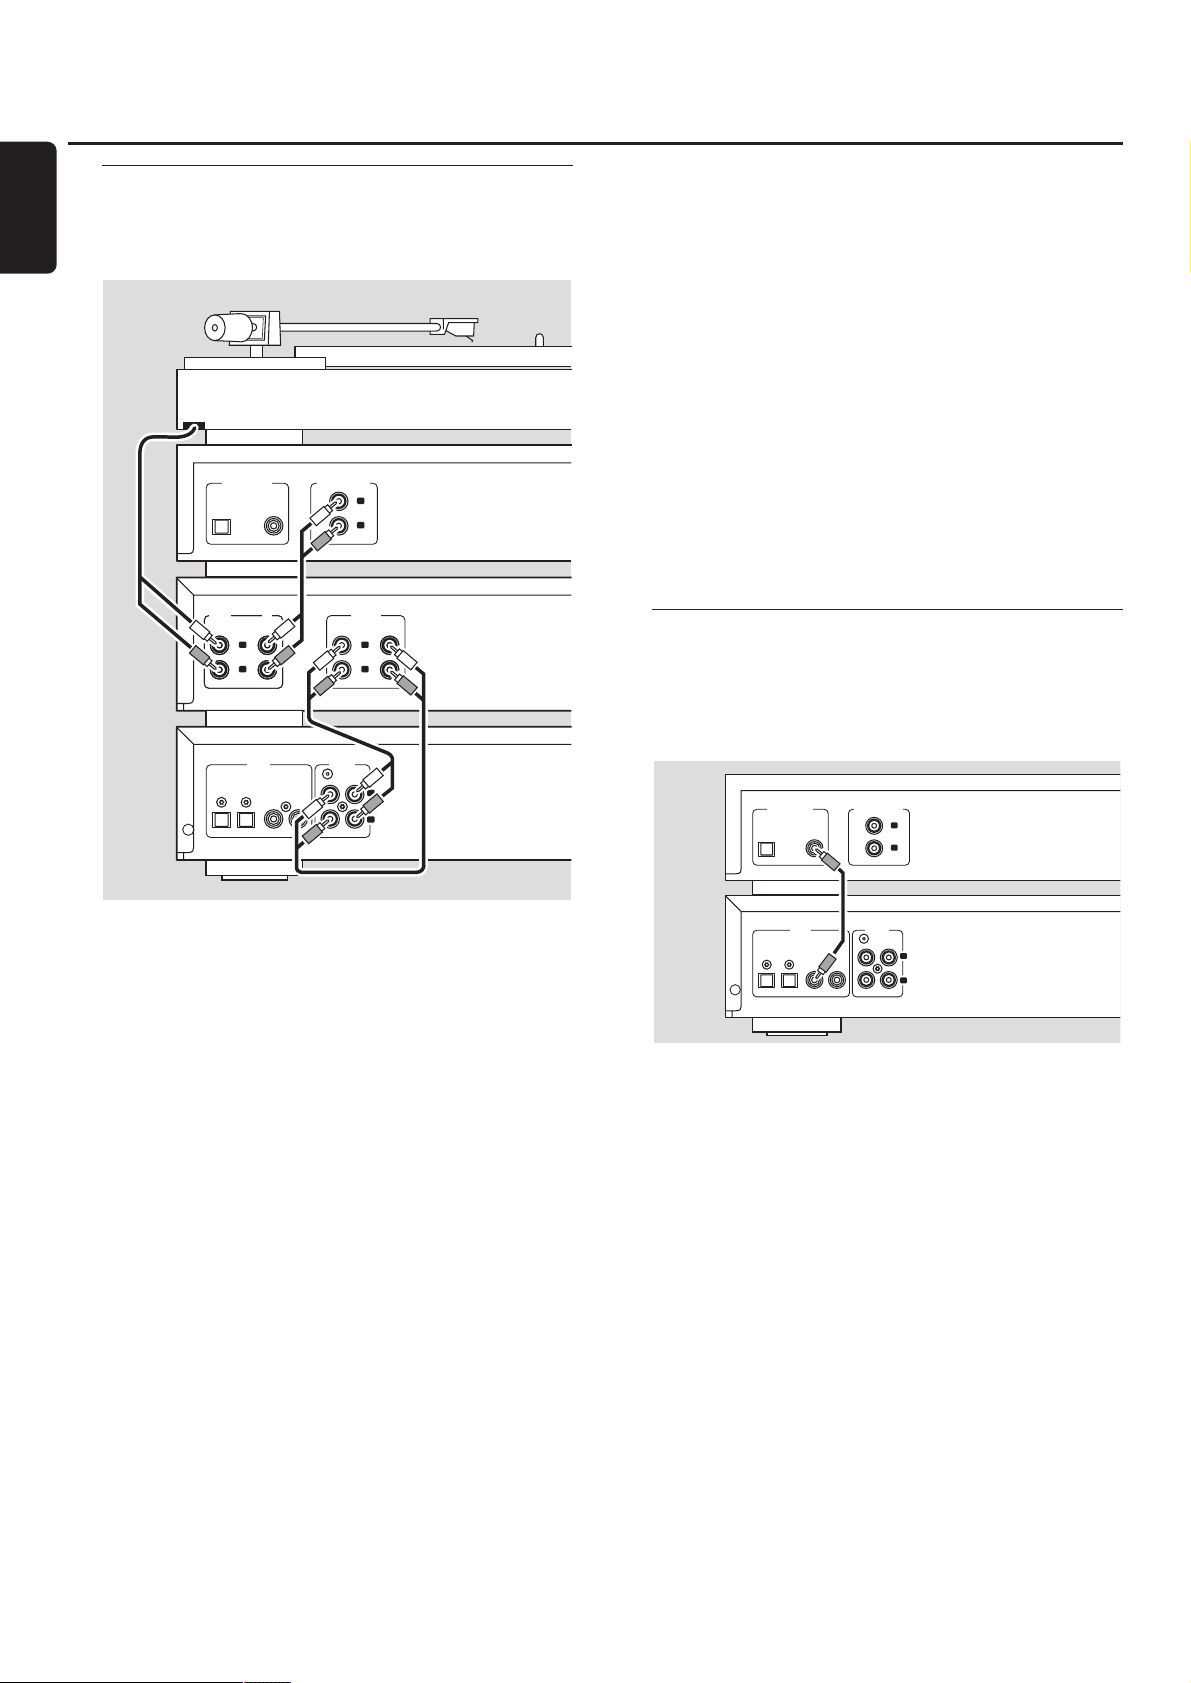
Digital connections
Direct digital coaxial connection
This connection is required for direct recording from any
digital audio equipment with a digital coaxial output
(e.g. CD player or DVD player).
● Use a digital coaxial cable to connect the coaxial output of
the external appliance with DIGITAL IN on the
CD player/recorder.
00
Recording can be done now via the digital coaxial input.
Press INPUT on the CD player/recorder repeatedly to
select the digital coaxial input.
➜ DIGITAL IN is displayed.
Installations
8
English
OUTIN
OPTICAL
DIGITAL
ANALOG
L
R
IN OUTOUTIN
OPTICAL
DIGITAL OUTPUT
ANALOG OUTPUT
L
R
PHONO
L
R
CD
IN IN
CD PLAYER/
RECORDER
AMPLIFIER/
RECEIVER
PHONO
L
R
CD
IN IN
CDR/TAPE
L
R
IN OUT
CD PLAYER
COAX
TURNTABLE
DIGITAL OUTPUT
OPTICAL
DIGITAL
OPTICAL
ANALOG OUTPUT
ANALOG
IN OUTOUTIN
L
R
L
R
CD PLAYER
CD PLAYER/
RECORDER
COAX
OUTIN
Page 9
Direct digital optical connection
This connection is required for direct recording from any
digital audio equipment with a digital optical output
(e.g. CD player or DVD player).
1 Remove the dust caps from the digital optical input of the
CD player/recorder and from the digital optical output of
the external appliance. Keep the caps in a safe place.
2 Use a digital optical cable to connect the optical output of
the external appliance with OPTICALIN on the
CD player/recorder. Make sure you insert both plugs fully,
until a click is heard.
00
Recording can be done now via the digital optical input.
Press INPUT repeatedly on the CD player/recorder to
select the digital optical input.
➜ OPTICAL IN is displayed.
Digital coaxial connections via a digital receiver
If you have a receiver with digital coaxial in- and outputs,
these connections allow you to make digital recordings
from various sources, connected to the receiver.
● Use a coaxial cable to connect the digital coaxial input of
the receiver with DIGITAL OUT on the
CD player/recorder. Use another coaxial cable to connect
the digital coaxial output of the receiver with DIGITAL IN
on the CD player/recorder.
00
Recording can be done now with any digital appliance,
connected to a digital input of the digital receiver
(e.g. CD player or DVD player). Press INPUT on the
CD player/recorder repeatedly to select the digital coaxial
input.
➜ DIGITAL IN is displayed.
Digital optical connections via a digital receiver
If you have a receiver with digital optical in- and outputs,
these connections allow you to make digital recordings
from various sources, connected to the receiver.
1 Remove the dust caps from the digital optical in- and
outputs of the CD player/recorder and from the digital
optical output of the receiver. Keep the caps in a safe place.
2 Use a digital optical cable to connect the optical input of
the receiver with OPTICAL OUT on the
CD player/recorder. Use another digital optical cable to
connect the optical output of the receiver with
OPTICAL IN on the CD player/recorder. Make sure you
insert the plugs fully, until a click is heard.
00
Recording can be done now with any digital appliance,
connected to a digital input of the digital receiver
(e.g. CD player or DVD player). Press INPUT on the
CD player/recorder repeatedly to select the digital optical
input.
➜ OPTICAL IN is displayed.
Mains
The type plate is located on the rear of the set.
1 Check whether the mains voltage as shown on the type
plate corresponds to your local mains voltage. If it does not,
consult your dealer or service organisation.
2 Make sure all connections have been made before
switching on the mains supply.
3 Connect the mains cable supplied to AC MAINS ~ and to
the wall socket.This switches on the mains supply.
When the set is switched to standby, it is still consuming
some power. To disconnect the set from the mains
completely, remove the mains plug from the wall
socket.
For users in the U.K.: please follow the instructions on
page 2.
Installations
9
English
CD PLAYER/
RECORDER
CD PLAYER
OUTIN
OPTICAL
DIGITAL
ANALOG
L
R
IN OUTOUTIN
OPTICAL
DIGITAL OUTPUT
ANALOG OUTPUT
L
R
COAX
“CLICK!”
CD PLAYER/
RECORDER
DIGITAL
RECEIVER
OUTIN
OPTICAL
DIGITAL
ANALOG
L
R
IN OUTOUTIN
OPTICAL
OUT
IN
AUX
CD IN DVD IN
OPTICAL
IN
”
OUT
CD IN DVD IN
AUX
DIGITAL
RECEIVER
“CLICK!
DIGITAL
OPTICAL
ANALOG
L
OUTIN
R
IN OUTOUTIN
CD PLAYER/
RECORDER
Page 10
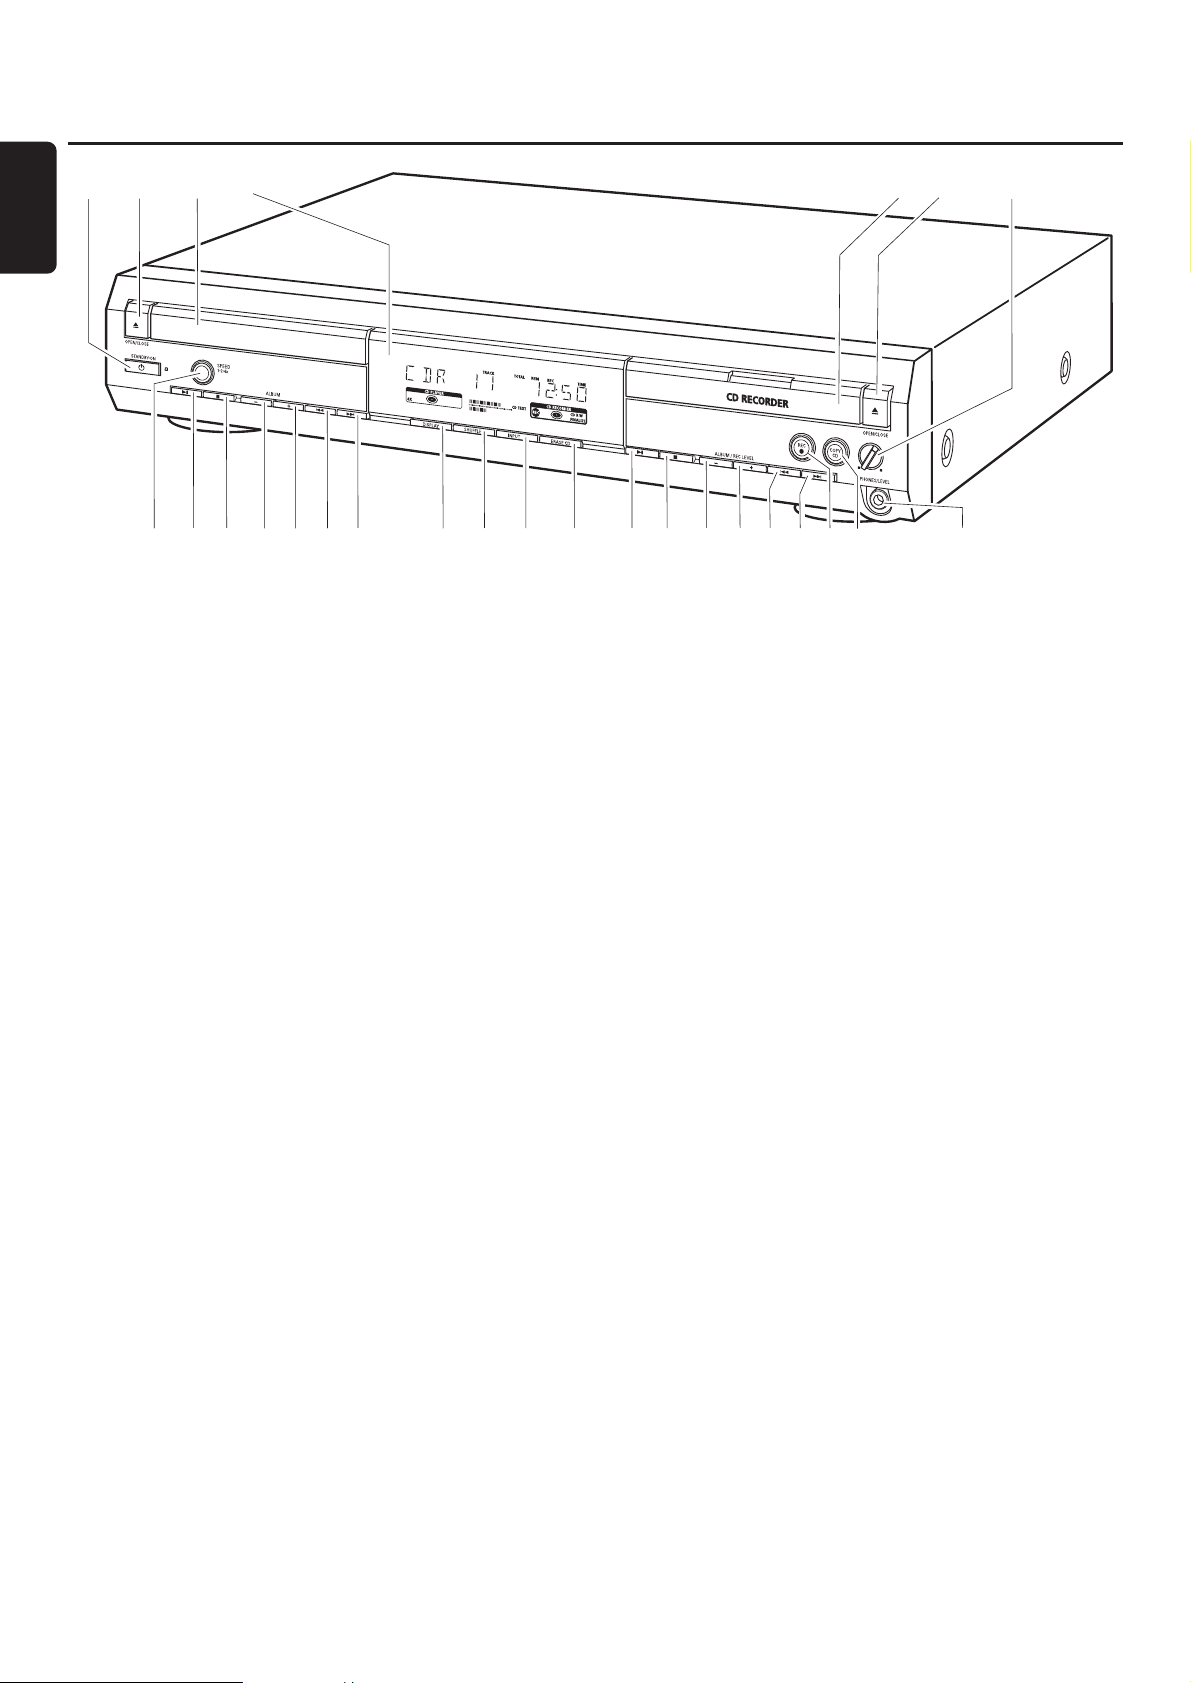
1 2 STANDBY·ON
switches the set on/to standby
2 / OPEN/CLOSE
opens/closes the CD player drawer
3 CD player drawer
4 display
5 CD RECORDER
CD recorder drawer
blue light on: CD recorder is selected
red light on: recording in progress
6 / OPEN/CLOSE
opens/closes the CD recorder drawer
7 PHONES/LEVEL
adjusts the headphone volume
8 PHONES/LEVEL
6.3 mm headphone socket
9 COPY CD
selects recording and automatic finalizing of current CD
0 REC 0
selects other recording modes
! ¢
CD recorder: selects the next track, searches forwards
@ 4
CD recorder: selects the previous track, searches
backwards
# ALBUM/REC LEVEL+
CD recorder: selects the next album on an MP3-CD,
increases the recording level
$ ALBUM/REC LEVEL-
CD recorder: selects the previous album on an MP3-CD,
decreases the recording level
% Ç
CD recorder: stops playback/recording
^ ÉÅ
CD recorder: starts/interrupts playback
& ERASE CD
erases recordings on a CDRW
* INPUT
selects the input for an external appliance
( SHUFFLE
plays tracks in random order
) DISPLAY
selects display information
¡ ¢
CD player: selects the next track, searches forwards
™ 4
CD player: selects the previous track, searches backwards
£ ALBUM+
CD player: selects the next album on an MP3-CD
≤ ALBUM-
CD player: selects the previous album on an MP3-CD
∞ Ç
CD player: stops playback
§ ÉÅ
CD player: starts/interrupts playback
≥ SPEED 1·2·4x
selects the record speed for internal recording
Note: SPEED 1·2·4x, REC and COPY CD will be illuminated
depending on the different modes you are in.This in order to
facilitate finding the relevant keys for selection.
Controls
10
English
1654327
L
R
)¡™9£≤∞§≥
(
*
^
!
@#$%&
80
Page 11
Remote control
11
English
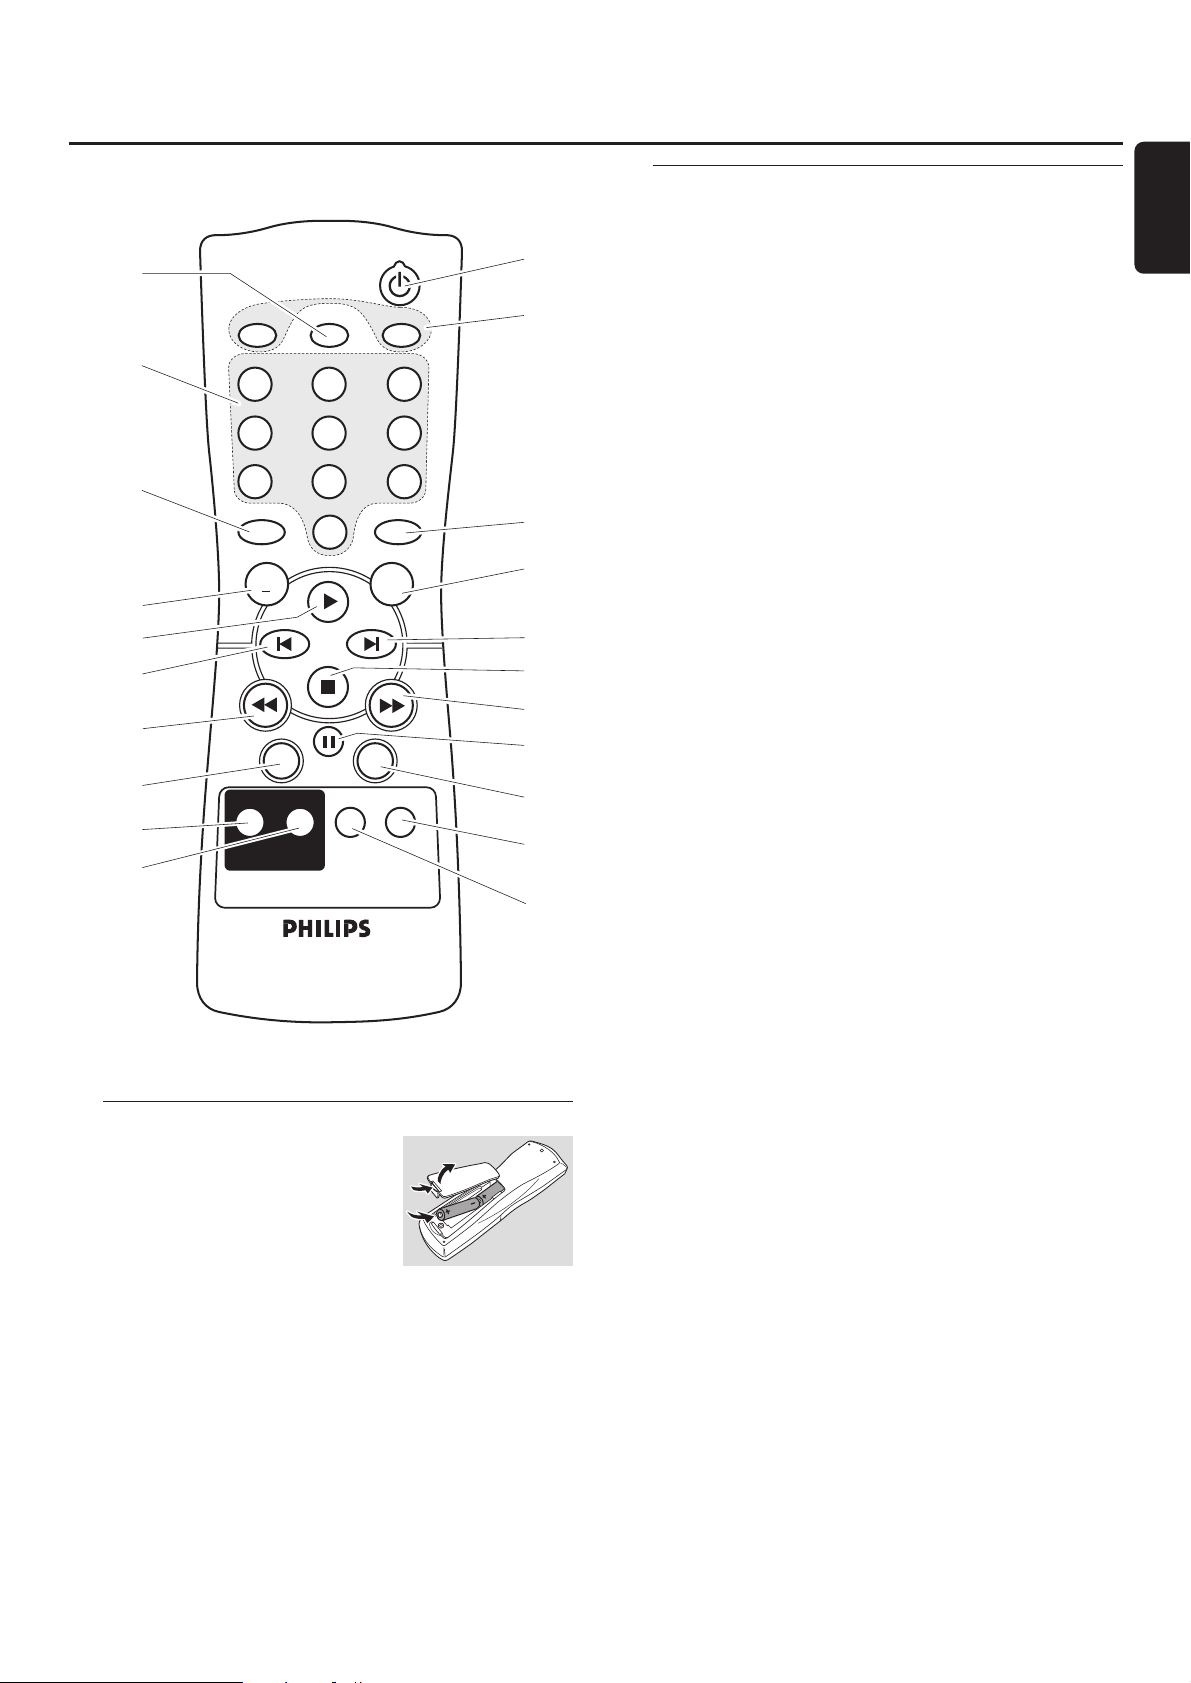
Remote control usage
Open the battery compartment
of the remote control and insert
2 alkaline batteries, type AA (R06,
UM-3).
Do not use old and new or different
types of batteries in combination.
Remove batteries if they are empty or if the remote
control will not be used for a long time.
Batteries contain chemical substances, so they should
be disposed of properly.
The buttons on the remote control work the same way as
the corresponding ones on the set.
Remote control keys
1 2
switches the set on/to standby
2 CD, CDR
selects the CD player deck or the CD recorder deck
3 TIMER REC
starts a time restricted recording
4 Number/alphabet keys
1–0: keys in numbers for tracks
ABC – WXYZ: keys in letters for CD text
SPACE: keys in a space for CD text
. : keys in a dot or symbol for CD text
5 TR. INCR.
selects automatic or manual increment of a track
6 PROGRAM
enters the program menu
7 ALBUM+
selects the next album on an MP3-CD
8 ALBUM-
selects the previous album on an MP3-CD
9 É
starts playback
0 í
selects the previous track
! ë
selects the next track
@ Ç
stops playback
# á
searches forwards
$ à
searches backwards
% Å
interrupts playback
^ DIM
controls the brightness of the display
& DISPLAY
selects display information
* CD TEXT/edit
switches through CD text information, enters/exits the
CD text edit menu
( DELETE
deletes CD text
) REPEAT
repeats a track, an entire CD(RW), or a program
¡ SHUFFLE
plays tracks in random order
3
4
5
8
9
0
$
&
*
(
CD TIMER REC
SPACE ABC
1
GHI JKL
4
PQRS TUV
7
TR.INCR.
2
5
8
.
CDR
DEF
3
MNO
6
WXYZ
9
PROGRAM
0
ALBUM
DISPLAY DIM
CD TEXT/edit DELETE
CD TEXT
ALBUM
+
SHUFFLE REPEAT
1
2
6
7
!
@
#
%
^
)
¡
Page 12

Switching on, switching to standby
● To switch the set on press 2 STANDBY·ON.
➜ WELCOME TO PHILIPS AUDIO is displayed.
● To switch the set to standby press 2 STANDBY·ON
again.
➜ The set is switched to standby.
Demonstration mode
The demonstration mode displays various features of the
set and will start automatically when no key has been
pressed for several minutes or during standby.
● To cancel the demonstration mode keep Ç on the
set pressed for at least 5 seconds.
➜ The demo mode is cancelled permanently.
Loading discs
1 CD player: Press / OPEN/CLOSE to open the CD player
drawer.
➜ OPEN CD is displayed and the drawer is opened.
CD recorder: Press / OPEN/CLOSE to open the
CD recorder drawer.
➜ OPEN CDR is displayed and the drawer is opened.
Notes:
Opening the CD player clears any program containing tracks
from a disc loaded in the CD player.
Opening the CD recorder clears any program containing
tracks from a disc loaded in the CD recorder.
2 Insert a disc (printed side up) in the tray.
3 CD player: Press / OPEN/CLOSE again to close the
drawer.
➜ The drawer is closed and READING is displayed.
➜ CD, the total number of tracks and the total playing time
of the disc are displayed.
CD recorder: Press / OPEN/CLOSE to close the drawer.
➜ The drawer is closed and READING is displayed.
➜ If an unfinalized disc is loaded, INITIALIZING will be
displayed.
➜ CDR, the total number of tracks and the total playing
time of the disc are displayed.
MP3-CD only:
➜ READING MP3 is displayed. MP3 is shown. Due to the
large number of tracks this could take up to 2 minutes.
➜ The first album name is displayed.
Playback
1 Press ÉÅ either on CD player side or CD recorder side
to start playback.
➜ CD or CDR, the current track number and elapsed playing
time are displayed.
MP3-CD only:
➜ In addition, the track name will also be scrolled.
00
To switch through the following information press DISPLAY
repeatedly:
➜ track number, remaining playing time of current track
➜ track number, remaining playing time of disc
➜ track number, elapsed playing time of current track
MP3-CD only:
➜ album number,track number and track name
➜ track number, elapsed playing time of current track
2 Press Ç either on CD player side or CD recorder side to
stop playback.
➜ CD or CDR, the total number of tracks and the total
playing time of the disc are displayed.
MP3-CD only:
➜ The current album name is scrolled.
00
You can interrupt playback by pressing ÉÅ.
➜ The time where playback was interrupted will blink.
00
To resume playback press ÉÅ again.
Basic functions
12
English
Page 13

Selecting and searching (on all
discs except MP3-CDs)
Selecting a track when playback is stopped
1 Press ¢ or 4 as often as necessary either on
CD player side or CD recorder side to skip to the desired
track number.
2 Press ÉÅ to start playback.
➜ Playback starts with the selected track.
Selecting a track during playback
● Press ¢ or 4 as often as necessary either on
CD player side or CD recorder side to skip to the
beginning of the previous or next track on the selected
disc.
➜ Playback continues with the selected track.
Searching for a passage during playback
1 Keep ¢ or 4 pressed either on CD player side or
CD recorder side to find a particular passage in backwards
or forwards direction.
➜ Searching is started and playback continues at a low
volume. After a few seconds the search speeds up with
volume muted.
2 Release the key at the desired passage.
➜ Normal playback continues.
Note: During SHUFFLE, while repeating a track or playing a
program, searching is only possible within the current track.
Selecting and searching (on
MP3-CDs only)
Selecting an album when playback is stopped
● Press ALBUM+ or ALBUM- as often as necessary either
on CD player side or CD recorder side to find the album
number you wish to select.
➜ ALBUM is shown, CD or CDR and the album number are
displayed.
➜ The current album name is scrolled as soon as you do
not press the key again.
00
To start playback of the entire album press ÉÅ.
➜ Playback of the entire album starts.
Selecting an album during playback
● Press ALBUM+ or ALBUM- as often as necessary either
on CD player side or CD recorder side to skip to the
beginning of the previous or next album on the selected
disc.
➜ Playback continues with the selected album as soon as
you do not press the key again.
Selecting a track in the album
1 Press ¢ or 4 as often as necessary either on
CD player side or CD recorder side to skip to the desired
track number.
➜ CD or CDR, the album number and track number are
displayed.
➜ The track name is scrolled as soon as you do not press
the key again.
2 Press ÉÅ to start playback.
➜ Playback starts with the selected track.
Notes:
At the end of your album selection you will recognise an
album called VARIOUS.This album contains all tracks which
were not saved in an album when making the MP3-CD.
If you want to play a playlist which you created on your
MP3-CD when making it, you have to select it directly by using
¢ or 4 and pressing ÉÅ afterwards.
Basic functions
13
English
Page 14
SHUFFLE and REPEAT
Repeating a track, a disc or a program
1 Press REPEAT repeatedly on the remote control during
playback to select either:
➜ REP TRACK:The current track is played repeatedly.
➜ REP DISC:The entire selected disc is played repeatedly.
➜ REP ALL: All discs in the set (or the program) are (is)
played repeatedly.
Notes:
REP DISC is not possible during SHUFFLE or while playing a
program.
REP TRACK is not possible during SHUFFLE.
2 Playback starts in the chosen mode.
00
To return to normal playback press REPEAT on the remote
control until the display indication disappears.
Playing tracks in random order
● Press SHUFFLE before or during playback.
➜ SHUFF ALL is shown and either all tracks of the program
or of all loaded disc(s) in the CD player and
CD recorder are played in random order.
CD text display
This feature allows you to display information such as album
title or track title contained on a specially encoded CD.
● Make sure to insert a CD with CD text.
➜ CD TEXT is shown and the album artist’s name and
album title is scrolled once.
CD text when playback is stopped
● Press CD TEXT/edit on the remote control to see the
following information, which will be scrolled once (if
available):
➜ Album artist’s name
➜ Album title
CD text during playback
● Press CD TEXT/edit on the remote control to see the
following information, which will be scrolled once (if
available):
➜ Track artist’s name
➜ Track title
ID3-tag
This feature allows you to display information such as album
title or track title contained in an MP3-track.
● If you created an ID3-tag for your MP3-track, press
CDTEXT/edit on the remote control during playback to
show the following ID3-tag information:
➜ Album title
➜ Track artist’s name
➜ Track title
Note: In case there is no ID3-tag available, NO TEXT will be
displayed.
Programming track numbers
A program can be used for playback or for specifying the
tracks which will be recorded.You can select up to
99 tracks (also MP3 tracks) and store them in the memory.
It is possible to store any track more than once, in any
order over CD player and CD recorder. However, it is not
possible to combine MP3 tracks and audio tracks or
MP3 tracks from more than one CD.
1 Load the desired disc(s) in the disc tray(s).
2 Press PROGRAM on the remote control to enter the
program menu.
➜ PROG starts blinking and PROGRAM is displayed.
➜ The step number (STEP), the track number and playing
time of the actual track on the current CD are displayed.
3 If you wish to choose a track from the CD player:
Press CD on the remote control and then í or ë as
often as necessary to skip to the desired track.
If you wish to choose a track from the CD recorder:
Press CDR on the remote control and then í or ë as
often as necessary to skip to the desired track.
Note:When selecting a track which has been stored already,
P will be displayed.
4 Press PROGRAM on the remote control to store your
selection in the memory.
➜ The total number of programmed tracks (STEP), PRG
and the total program time are displayed.
5 Repeat steps 3–4 to select and store all desired tracks.
Note: If you try to store more than 99 tracks,
PROGRAM FULL will be displayed.
6 Press Ç to end programming.
Clearing the program
1 If necessary press Ç to stop playback.
2 Keep Ç pressed to clear the program.
➜ PROG CLEARED is displayed and PROG goes off.
Basic functions
14
English
Page 15
Basic information
The CD recorder deck offers you 3 main functions:
– Recording from the internal CD player or from a
selected external source
– Finalizing your CDR(W) discs and unfinalizing your
CDRW discs
– Erasing a CDRW disc
The recording procedure is the same for CDR and CDRW
discs. Make sure the CDR(W) is absolutely free of
scratches and dust particles.
For recordings, the minimum track length is 4 seconds.You
can record up to a maximum of 99 tracks on a disc. If the
recording time left on the disc is less than 7 seconds,
DISC FULL is displayed and you cannot enter the
recording mode.
Copyright protection
The Serial Copy Management System (SCMS) prevents
the making of a digital copy from a digital copy.The system
allows making a digital recording from the original, however,
in some countries this may require the authorisation of
copyright holders.
When you try to record copy protected material from an
external source, COPY PROTECT will be displayed. No
digital recording is possible then.
It is not possible to copy an MP3-CD.
Recording CD text
If the original CD has CD text, this text will be recorded
automatically, provided that the CD text is not copy
protected. In that case, recording of CD text will not be
possible and TEXT PROTECT will be displayed.
What is finalizing?
Finalizing is a simple process that completes the recording
of a CDR(W) necessary to:
– play a recorded CDR on a standard CD player,
– play a recorded CDRW on a CDRW compatible
CD player and CD recorder,
– avoid unwanted recordings on a disc, or
– avoid accidental erasure of tracks on a CDRW.
CDRs are “locked” once they are finalized.No other tracks
or CD text can be added.
CDRWs are also “locked” once they are finalized, but can
be unfinalized to permit additional recording or erasure.
Direct Line Recording (DLR)
The CD recorder is equipped with the high-performance
Direct Line Recording technique. It ensures a perfect
recording of the source material, meaning a true “bit for
bit” recording. DLR will not become active when the
recording level is adjusted.
Adjusting the recording level
You can adjust the reference recording level for recordings
from an additional appliance.This feature can be used for
fading your recordings in or out.
1 Press INPUT repeatedly to select the input of the
additional appliance:
➜ DIGITAL IN: the digital coaxial input is selected.
➜ OPTICAL IN: the digital optical input is selected.
➜ ANALOG IN: the analogue input is selected.
2 Keep ALBUM+ or ALBUM- pressed on the
CD recorder side to adjust the desired recording level.The
loudest sounds in the material to be recorded should not
reach the red levels of the level bar.
➜ The actual recording level (in dB) will be displayed.
Note:The recording level can also be adjusted during recording
from the internal CD player. Keep ALBUM+ or ALBUM-
pressed on the CD recorder side to adjust the desired recording
level.
About recording
15
English
Page 16

What is internal recording?
Recording from the CD player deck of this set is called
“internal recording”.
Selecting the recording speed
It is possible to select the recording speed for internal
recordings.
● Press SPEED 1·2·4x repeatedly to select either:
➜ REC SPEED 1X: for recording with normal speed
➜ REC SPEED 2X: for recording with double speed while
the sound is muted
➜ REC SPEED 4X: for recording with 4 times the normal
speed while the sound is muted
Notes:
Speed selection is not possible during recording.
On some brands of blank audio discs recording at higher
speed is not possible and does not work. In that case select a
lower speed.
Copying an entire CD
This is the easiest way to make a copy of an entire CD,
ready to play on other CD players. However, no other
tracks or CD text can be added.
1 Insert a CDR(W) which is absolutely free of scratches and
dust particles in the CD recorder tray.
2 Insert the disc you wish to copy in the CD player tray.
3 Press COPY CD to start copying of the entire CD.
➜ REC is shown, copying starts and the actual recording
time left starts to count down.
Note: If a program was already available before pressing
COPY CD, this will be ignored. PROG goes off and the current
disc will be recorded.After finishing the recording, PROG is
shown and the program is available again.
Recording all tracks from a CD
You can copy all tracks from a CD and then decide either
to finalize or not to finalize.
1 Insert a CDR(W) which is absolutely free of scratches and
dust particles in the CD recorder tray.
2 Insert the disc from which you wish to record all tracks in
the CD player tray.
3 Press REC to enter the recording menu.
➜ RECORD CD?, followed by PRESS REC are displayed
alternately.
4 Press REC again to start recording of all tracks.
➜ REC is shown, recording starts and the actual recording
time left starts to count down.
00
When you press / OPEN/CLOSE on the CD recorder
side,
➜ CD NOT FINAL and PRESS REC TO FINALIZE are
displayed alternately.
Decide now, either
not to finalize: the CDR is not ready to play on other
CD players, however, other tracks or CD text can still
be added.
Press / OPEN/CLOSE on the CD recorder side again or
wait a few seconds.
➜ The drawer is opened.The CDR(W) is not finalized.
or
to finalize: the CDR is ready to play on other
CD players, however, no other tracks or CD text can
be added.
Press REC to start finalizing.
➜ FINAL is displayed and the actual finalizing time
remaining will start to count down.
Internal recording
16
English
Page 17

Recording a single track
You can copy various tracks from different CDs and then
decide either to finalize or not to finalize.
1 Insert a CDR(W) which is absolutely free of scratches and
dust particles in the CD recorder tray.
2 Play your desired track on the CD player.
3 Press REC to enter the recording menu.
➜ REC TR with the tracknumber and PRESS REC are
displayed alternately.
4 Press REC again to start recording of the track.
➜ REC is shown, recording starts from the beginning of the
selected track and the actual recording time left starts to
count down.
5 To record further tracks repeat steps 2–4.
00
When you press / OPEN/CLOSE on the CD recorder
side,
➜ CD NOT FINAL and PRESS REC TO FINALIZE are
displayed alternately.
Decide now, either
not to finalize: the CDR is not ready to play on other
CD players, however, other tracks or CD text can still
be added.
Press / OPEN/CLOSE on the CD recorder side again or
wait a few seconds.
➜ The drawer is opened.The CDR(W) is not finalized.
or
to finalize: the CDR is ready to play on other
CD players, however, no other tracks or CD text can
be added.
Press REC to start finalizing.
➜ FINAL is displayed and the actual finalizing time
remaining will start to count down.
Making and recording a program
You can make your own program, record it and decide then
either to finalize or not to finalize. However, please note,
that you cannot record a program which contains tracks
from the CD player and CD recorder. In that case
2 DISC PROG and NOT POSSIBLE will be displayed.
1 Load a CDR(W) which is absolutely free of scratches and
dust particles in the CD recorder tray.
2 Load the CD from which you wish to record in the
CD player tray.
3 Select and store all desired tracks from the CD (see
“Programming track numbers”).
00
If the total time of the program is longer than the remaining
recording time of the CDR(W):
➜ DOES NOT FIT will be displayed briefly.
➜ MISSING and the time that cannot be recorded are
displayed.
If you nevertheless start recording, the recording goes on
until the CDR(W) is full.
4 Press REC to enter the recording menu.
➜ REC PROGRAM? and PRESS REC are displayed
alternately.
5 Press REC again to start recording of the current program.
➜ REC is shown, recording starts and the actual recording
time left starts to count down.
00
When you press / OPEN/CLOSE on the CD recorder
side,
➜ CD NOT FINAL and PRESS REC TO FINALIZE are
displayed alternately.
Decide now, either
not to finalize: the CDR is not ready to play on other
CD players, however, other tracks or CD text can still
be added.
Press / OPEN/CLOSE on the CD recorder side again or
wait a few seconds.
➜ The drawer is opened.The CDR(W) is not finalized.
or
to finalize: the CDR is ready to play on other
CD players, however, no other tracks or CD text can
be added.
Press REC to start finalizing.
➜ FINAL is displayed and the actual finalizing time
remaining will start to count down.
Internal recording
17
English
Page 18

What is external recording?
Recording from an additional appliance is called “external
recording”.
Analogue or digital recording?
When making recordings from an external source, we
recommend doing analogue recording only if digital
recording is not possible. Digital recording will result in
better sound quality.
Automatic track increment
When the digital input for recording from a digital
source (e.g. CD player) is used, tracks will be incremented
automatically such that the track numbers are positioned
on the same position as on the original.When the
analogue input for recording from a digital or
analogue source is used, track increment will not take
place automatically unless one of the following settings is
selected.Track increments may not always be positioned
correctly, depending on the quality of the source material.
● Press TR. INCR. as often as necessary on the remote
control during stop to switch through the following
automatic track increment functions:
➜ TURNTABLE: for optimal recording from noisy sources
like turntables (It is not possible to connect a
turntable directly to AUX/CDR IN L/R - see
“Analogue connections”.)
➜ TAPE/TUNER: for optimal recording from a tape
➜ CD/DVD: for optimal recording from high quality sources
like DAT, DCC or DVD
➜ MANUAL: for switching the automatic track function off
Notes:
Track numbers can be incremented manually by pressing
TR. INCR. on the remote control during recording.The
minimum track length is 4 seconds.
Track numbers cannot be changed after recording.
Recording with automatic start
You can quickly and easily record an entire CD or a track.
As soon as playback on the additional appliance is started,
recording starts automatically.
1 Insert a CDR(W) which is absolutely free of scratches and
dust particles in the CD recorder tray.
2 Press INPUT repeatedly on the CD player/recorder to
select the input for the additional appliance you want to
record from.
➜ DIGITAL IN: the digital input is selected.
➜ ANALOG IN: the analogue input is selected.
➜ OPTICAL IN: the optical input is selected.
3 Make sure the desired track on the additional appliance is
selected.
4 Make sure the additional appliance is in pause or stop mode.
5 Press REC on the CD player/recorder to enter the
recording menu.
➜ PREPARING is displayed.
➜ RECORD EXT? and START EXTERN SOURCE! are
displayed alternately.
6 Start playback on the additional appliance within 5 seconds.
➜ Recording starts simultaneously and REC is shown.The
remaining recording time on the CDR(W) is displayed.
Note: Recording can also be started manually by pressing REC
on the CD player/recorder.
00
To stop recording manually press Ç on the CD recorder
side.
00
When you press / OPEN/CLOSE on the CD recorder side,
➜ CD NOT FINAL and PRESS REC TO FINALIZE are
displayed alternately.
Decide now, either
not to finalize: the CDR is not ready to play on other
CD players, however, other tracks or CD text can still
be added.
Press / OPEN/CLOSE on the CD recorder side again or
wait a few seconds.
➜ The drawer is opened.The CDR(W) is not finalized.
or
to finalize: the CDR is ready to play on other
CD players, however, no other tracks or CD text can
be added.
Press REC on the CD player/recorder to start finalizing.
➜ FINAL is displayed and the actual finalizing time
remaining will start to count down.
External recording
18
English
Page 19

Manual recording
You can manually start and stop a recording from an
additional appliance.You can use manual recording for
recording live music, or for particular music like classic
which cannot be recorded with automatic start.
1 Insert a CDR(W) which is absolutely free of scratches and
dust particles in the CD recorder tray.
2 Press INPUT repeatedly on the CD player/recorder to
select the input for the additional appliance from which you
want to record.
➜ DIGITAL IN: the digital input is selected.
➜ ANALOG IN: the analogue input is selected.
➜ OPTICAL IN: the optical input is selected.
3 Start playback on the additional appliance.
4 Press REC on the CD player/recorder to enter the
recording menu.
➜ PREPARING is displayed.
➜ RECORD EXT? and PRESS REC are displayed alternately.
5 Press REC on the CD player/recorder to start recording.
➜ Recording starts and REC is shown.The remaining
recording time on the CDR(W) is displayed.
6 Press Ç on the CD recorder side to stop recording.
00
When you press / OPEN/CLOSE on the CD recorder side,
➜ CD NOT FINAL and PRESS REC TO FINALIZE are
displayed alternately.
Decide now, either
not to finalize: the CDR is not ready to play on other
CD players, however, other tracks or CD text can still
be added.
Press / OPEN/CLOSE on the CD recorder side again or
wait a few seconds.
➜ The drawer is opened.The CDR(W) is not finalized.
or
to finalize: the CDR is ready to play on other
CD players, however, no other tracks or CD text can
be added.
Press REC on the set to start finalizing.
➜ FINAL is displayed and the actual finalizing time
remaining will start to count down.
Timer recording
This feature allows you to start a time restricted recording
via the analogue input (e.g. for recordings from a tuner).You
can choose a recording of 15, 30, 45 or 60 minutes or to
the end of the CDR(W).
1 Insert a CDR(W) which is absolutely free of scratches and
dust particles in the CD recorder tray.
2 Make sure the additional appliance from which you want to
record is connected properly.
3 Press TIMER REC on the remote control to start recording.
➜ 15 MIN, followed by PREPARING, is displayed.
➜ Recording starts and REC is shown.The actual recording
time left is displayed.
00
To select another recording time press TIMER REC on the
remote control repeatedly until the desired time is displayed:
➜ 30 MIN, 45 MIN, 60 MIN, MAXIMUM is displayed.
4 After the chosen time has elapsed, recording stops
automatically and the set switches to standby.
00
To stop recording manually press Ç on the CD recorder
side.
External recording
19
English
Page 20

Erasing from a CDRW disc
It is possible to erase one or more tracks (starting from the
end of the last track) or the entire CDRW. It is not possible
to erase from a CDR.
Erasing one or more tracks
1 Insert the CDRW from which you want to erase tracks in
the CD recorder tray.
2 Press ERASE CD shortly to enter the erasing menu.
If an unfinalized CDRW is inserted:
➜ ERASE LAST TRACK? and PRESS ERASE are
displayed alternately.
If a finalized CDRW is inserted:
➜ FINALIZED CD will be displayed briefly.
➜ ERASE LAST TRACK?, followed by PRESS ERASE
are displayed alternately.
00
To select a particular track you wish to erase press ¢ or
4 as often as necessary on the CD recorder side to
select the desired track number(s).
➜ ERASE TR and the track number (e.g. 10+) are displayed.
To select more tracks to be erased repeat this step.
Note:When erasing several tracks, the tracks to be erased
must be selected in sequence, starting from the last recorded
track. Example:The CDRW has 5 tracks recorded on it. Now,
you can erase tracks 5 and 4.You can also erase tracks 5, 4
and 3, but you cannot erase tracks 5 and 3!
3 Press ERASE CD again to start erasing.
If an unfinalized CDRW is inserted:
➜ ERASE is displayed, the operation time left starts to
count down and erasing starts.
If a finalized CDRW is inserted:
➜ UNFINAL is displayed, the operation time left starts to
count down and unfinalizing starts.
➜ Afterwards ERASE is displayed, the operation time left
starts to count down and erasing starts.
Erasing an entire CDRW
1 Insert the CDRW you want to erase in the CD recorder tray.
2 Keep ERASE CD pressed for more than 1 second to enter
the erasing menu.
If an unfinalized CDRW is inserted:
➜ ERASE DISC? and PRESS ERASE are displayed
alternately.
If a finalized CDRW is inserted:
➜ FINALIZED CD will be displayed briefly.
➜ ERASE DISC? and PRESS ERASE are displayed
alternately.
3 Press ERASE CD again to erase the entire CDRW.
If an unfinalized CDRW is inserted:
➜ ERASE is displayed, the operation time left starts to
count down and erasing of the entire CDRW starts.
If a finalized CDRW is inserted:
➜ UNFINAL is displayed, the operation time left starts to
count down and unfinalizing starts.
➜ ERASE is displayed, the operation time left starts to
count down and erasing of the entire CDRW starts.
CD text editing
After you have recorded your CDR(W) you can enter a
text, e.g. album title or track title.This text will be displayed
during playback on this set, but also on other sets equipped
with the CD text feature. Only use an unfinalized CDR or
CDRW (a finalized CDRW must be unfinalized first).
1 If necessary press Ç to stop playback.
2 Press CDR on the remote control to select the
CD recorder.
3 Press CD TEXT/edit repeatedly on the remote control to
select either:
➜ ALBUM TITLE: for editing the CD title
➜ ALBUM ARTIST: for editing the CD artist’s name
➜ ARTIST TR 1 (or 2, 3,…): for editing the artist’s name
of track 1 (or 2, 3,…)
➜ TITLE TR 1 (or 2, 3,…): for editing the title of track 1
(or 2, 3,…)
4 As soon as the cursor starts blinking, use the
number/alphabet keys on the remote control to select a
character.
➜ After selecting a character the cursor automatically
moves to the next character space.
5 Press CD TEXT/edit on the remote control to save the
created text and to go back to the text editing menu.
6 To leave the text editing menu press Ç.
Deleting and substituting a character
1 Press à or á on the remote control to move to the
character to be deleted or substituted.
➜ The character starts blinking.
2 If you want to delete the character:
Press DELETE on the remote control.
➜ The character is deleted and the text is shifted one
position to the left.
If you want to substitute the character:
Use the number/alphabet keys on the remote control to
select a new character.
00
To change another character press à or á on the
remote control.
Auto copied text
When an artist’s name has been stored for a track, it will be
copied automatically to the next track.
Erasing/CD text editing (on CD recorder only)
20
English
Page 21

WARNING
Under no circumstances should you try to repair the set yourself as this
will invalidate the guarantee. Do not open the set as there is a risk of
electric shock.
If a fault occurs, first check the points listed,before taking the set for
repair.If you are unable to solve a problem by following these hints,
consult your dealer or service centre.
Laser safety
This unit employs a laser. Only a qualified service person should remove
the cover or attempt to service this device, due to possible eye injury.
Problem Solution
No power – Make sure the mains cable is connected properly.
– Press 2 STANDBY·ON on the set to switch it on.
No sound – Check if the audio connections have been installed properly.
– Make sure MP3-tracks are recorded in the correct format.
No reaction to controls – Disconnect the set from power supply, reconnect after a few seconds.
Automatic start of permanent – Keep Ç on the set pressed for at least 5 seconds to cancel the
feature display (demo mode) demonstration mode.
Remote control does not function – Remove batteries and insert them correctly or insert new batteries.
properly – Reduce distance to the set.
WRONG DISC, USE AUDIO CD and – Make sure the disc is not scratched or dirty. Replace or clean the disc.
INSERT DISC indication – Make sure disc is inserted,printed side up.
– Make sure there is no DVD inserted.
– Wait until steamed up laser lens has cleared.
WRONG DISC, USE CDR<W> WITH – A computer CDR(W) is inserted. Make sure a digital audio disc is inserted
`DIGITAL AUDIO´ LOGO and marked with “Digital Audio”and the special logo.
INSERT DISC indication
NO SIGNAL indication or – Check if the connection cable is properly connected.
CHECK INPUT indication – Select the correct input.
– Make sure the external appliance is switched on.
OVERHEATING indication – Do not position the set on top of other equipment that might heat it up
(e.g. receiver).
Does not record – Make sure the CDR(W) is absolutely free of scratches and dust particles.
– Check if a digital audio CDR(W) is inserted and make sure it is unfinalized.
Stops during recording – Use Philips audio CDR(W)s.
– In case recording process is interrupted (power loss, mechanical shock), start
recording again with a new disc.
Recorded disc does not play in – Make sure the CDR(W) is finalized.
another standard CD player – Insert the CDRW in a CDRW compatible CD player.
Missing directories on MP3-CD – Only albums with playable files will be shown.
Elapsed playing time of MP3-track – That is normal behaviour as this MP3-track has a variable bit rate.
counts up very fast or irregularly
Recorded tracks have been merged – Use another track increment mode.
together or tracks do not start – Insert track increments manually with the remote control.
or stop at the correct time
Troubleshooting
21
English
Page 22

Informations générales
Caractéristiques techniques
___________________
23
Informations sur l'environnement
_______________
23
Accessoires fournis
__________________________
23
Entretien
__________________________________
23
Manipulation des disques
_____________________
23
Disques pour l'enregistrement
_________________
24
Disques pour la lecture
______________________
24
Quelques mots sur le MP3
____________________
24
Raccordements
Raccordements
____________________________
25
Informations pour la mise en place
_____________
25
Raccordements – Général
____________________
25
Installations
Raccordements analogiques
___________________
26
Raccordements numériques
________________
26–27
Raccordement au secteur
____________________
27
Commandes
________________________________
28
Télécommande
Utilisation de la télécommande
________________
29
Touches de la télécommande
__________________
29
Fonctions de base
Mise en marche, mise en veille
_________________
30
Mode de démonstration
_____________________
30
Mise en place de disques
_____________________
30
Lecture
___________________________________
30
Sélection et recherche (pour tous les
disques sauf CD-MP3)
_______________________
31
Sélection et recherche (seulement pour
les CD-MP3)
______________________________
31
SHUFFLE et REPEAT
________________________
32
Affichage du texte du CD
____________________
32
ID3-tag
___________________________________
32
Programmation des numéros de pistes
__________
32
Effacement du programme
____________________
32
A propos de l'enregistrement
Informations de base
________________________
33
Qu'est-ce que la finalisation?
__________________
33
Direct Line Recording (DLR)
__________________
33
Réglage du niveau d'enregistrement
_____________
33
Enregistrement interne
Qu'est-ce que l'enregistrement interne?
_________
34
Sélection de la vitesse d'enregistrement
__________
34
Copie d'un CD entier
_______________________
34
Enregistrement de toutes les pistes d'un CD
______
34
Enregistrement d'une seule piste
_______________
35
Création et enregistrement d'un programme
_____
35
Enregistrement externe
Qu'est-ce que l'enregistrement externe?
_________
36
Enregistrement analogique ou numérique?
_______
36
Incrément automatique d'une piste
_____________
36
Enregistrement avec démarrage automatique
_____
36
Enregistrement manuel
_______________________
37
Enregistrement avec minuterie
_________________
37
Effacement/Edition du texte du CD
(sur l'enregistreur de CD uniquement)
Effacement sur un disque CDRW
______________
38
Edition du texte du CD
______________________
38
Guide de dépannage
________________________
39
Table des matières
22
Français
Page 23
Caractéristiques techniques
Sous réserve de modifications sans avis préalable.
Général
Consommation électrique
En service
____________________________
< 20 W
En veille
______________________________
< 0,6 W
Dimensions, L × H × P
____________
435 × 88 × 310 mm
Poids
______________________________________
5 kg
Audio
Réponse en fréquence
_________________
2–20 000 Hz
Lecture
Signal/bruit (A-pondéré)
__________________
120 dB
Signal/bruit
____________________________
110 dB
Plage dynamique
_________________________
98 dB
Distorsion harmonique totale
______________
-95 dB
Séparation des voies
_____________________
105 dB
Enregistrement
Signal/bruit (A-pondéré)
___________________
93 dB
S/N numérique sans SRC
___________
égal à la source
Plage dynamique
_________________________
90 dB
Distorsion harmonique totale + bruit
________
-86 dB
Entrée numérique/optique
_____________
12–96 kHz
Laser (enregistreur de CD)
Type
_______________
Laser à semi-conducteurs GaAlAs
Longueur d'onde
________________
775–795 nm (à 25°)
Puissance de sortie __2,5 mW (lecture), 35 mW (écriture)
Divergence du faisceau
____________________
60 degrés
En sa qualité de partenaire
ENERGY STAR®, Philips confirme
que ce produit est conforme aux
directives ENERGY STAR®de
l'efficacité d'énergie.
Cet appareil est conforme aux exigences
d'interférences radio de la Communauté Européenne.
ATTENTION
L'usage des commandes ou réglages ou l'exécution
d'opérations autrement qu'indiqué ici peuvent
entraîner une exposition dangereuse aux
rayonnements ou toute autre opération dangereuse.
Informations sur l'environnement
Tout matériau d'emballage superflu a été omis. Nous avons
fait notre possible pour faciliter le tri de l'emballage selon trois
matières principales : le carton (boîte), la mousse en
polystyrène (protection) et le polyéthylène (sacs, feuille de
mousse protectrice).
Votre appareil est constitué de matières qui peuvent être
recyclées s'il est démonté par une entreprise spécialisée.
Merci de bien vouloir observer les réglementations locales
pour l'élimination des matériaux d'emballage, des piles
usagées et du matériel usagé.
Accessoires fournis
– 2 câbles audio analogiques (avec fiche rouge et blanche)
– télécommande
– 2 piles pour la télécommande, type AA
– cordon d'alimentation secteur
Entretien
Nettoyez l'appareil avec un chiffon
doux, légèrement humide et qui ne
peluche pas. N’utilisez aucun produit
d'entretien car ils peuvent avoir un
effet corrosif.
N’exposez pas l'appareil, les piles ou
les disques à l'humidité, à la pluie, au
sable ou à une chaleur excessive
(causée par le chauffage ou les
rayons directs du soleil).
Manipulation des disques
Si le lecteur/enregistreur de CD n'arrive pas à lire les disques
correctement, utilisez un CD de nettoyage courant pour
nettoyer les lentilles avant de porter votre appareil en réparation.
Toute autre méthode de nettoyage pourrait détruire les lentilles.
Veillez à toujours garder les plateaux fermés pour éviter le dépôt
de poussière sur les lentilles.
Il peut arriver que les lentilles se couvrent de buée lorsque l'appareil
passe soudainement d'un environnement froid à un environnement
chaud. Il n’est alors pas possible de lire un disque. Laissez l'appareil
dans un environnement chaud jusqu'à ce que l'humidité s’évapore.
Pour retirer facilement un disque de son
boîtier, appuyez sur la broche centrale tout
en soulevant le CD(RW).Veillez à toujours
saisir un CD(RW) par les bords et à le
remettre dans son boîtier après usage.
N'écrivez jamais sur un CD et n'y collez
aucune étiquette. Ecrivez seulement sur le côté imprimé du CDR
ou du CDRW, et uniquement avec un feutre.
Pour nettoyer un disque, essuyez-le
en ligne droite du centre vers le bord,
en utilisant un chiffon doux et qui ne
peluche pas. Un produit de nettoyage
risque d'endommager le disque!
Informations générales
23
Français
ATTENTION
RAYONNEMENT LASER INVISIBLE A L'OUVERTURE.
EVITEZ L'EXPOSITION AU FAISCEAU.
Remarque : Cet avertissement figure à
l'intérieur du boîtier.
Page 24

Disques pour l'enregistrement
Pour l'enregistrement, veillez à utiliser uniquement des
disques audio spéciaux. Ces disques portent l'inscription
« Digital Audio » et les logos ci-dessous.
Il existe deux types différents de disques audio que vous
pouvez utiliser avec cet enregistreur de CD :
– les disques CD audio
enregistrables (CDR) peuvent être
enregistrés seulement une fois et
peuvent être lus par tous les lecteurs
de CD et les enregistreurs de CD
classiques après finalisation.
– les disques CD audio
ré-inscriptibles (CDRW) peuvent
être enregistrés, effacés et ré-enregistrés
plusieurs fois, et être lus par les lecteurs
de CD et par les enregistreurs de CD
compatibles avec les CDRW, après finalisation.
Tous les lecteurs de CD et les enregistreurs de
CD Philips qui portent cet autocollant sont
compatibles avec les CDRW.
Afin de garantir le bon fonctionnement de l'appareil, nous
vous recommandons d'utiliser seulement les CDR audio et
les CDRW audio Philips.
Remarque : N'utilisez pas de CDR ou CDRW informatiques car
l'enregistrement ne se fera pas correctement!
L'enregistrement est autorisé dans la mesure où les
droits d'auteur et autres droits de tierces personnes
ne sont pas violés.
Dans certains pays,l'utilisation du
lecteur/enregistreur de CD,telle qu’indiquée ou
suggérée dans le présent manuel de l'utilisateur,peut
nécessiter l'autorisation des titulaires des droits
d’auteur.
Disques pour la lecture
Pour lire des disques sur ce lecteur/enregistreur de CD,
vous pouvez utiliser les disques suivants :
– Tous les CD audio préenregistrés
– Tous les disques CDR audio et CDRW audio
– Les CD-MP3 (CD-ROM avec des pistes MP3)
Quelques mots sur le MP3
La nouvelle technologie révolutionnaire de compression musicale
MP3 (MPEG ! Audio Layer-3) permet de réduire jusqu'à 10 fois
des données originales audio numériques sans perte significative
de la qualité du son. Cela vous permet d'enregistrer jusqu'à 10
heures de musique de qualité CD sur un seul CD-ROM.
Pour créer vos propres CD-MP3
Il existe principalement deux sources pour la musique MP3 sur CD.
Vous pouvez soit transférer sur votre PC la musique de vos propres
CD audio numériques en passant par un lecteur de CD-ROM et
vous l'encodez (« extrayez ») ensuite au format MP3, soit
télécharger à partir d'internet de la musique MP3 de diffusion légale.
Enregistrez (« gravez ») la musique de votre disque dur sur un
CD-ROM avec votre PC personnel (assurez-vous que le
nom du fichier se termine par .mp3). Quand vous avez
fini, vous pouvez lire vos CD-MP3 sur le lecteur/enregistreur
de CD et apprécier la musique.
Taux de transmission des données
Le taux de transmission des données est très important pour
le MP3. Il indique à quelle vitesse les bits sont transférés.
Sur un CD,la musique stéréo est transmise à une vitesse
d'environ 1400 kilobits par seconde (kbps). Pour atteindre
une bonne qualité MP3, un débit de données de
128 kbps est recommandée. Comme le taux d'encodage
peut être sélectionné par l'utilisateur, veillez à atteindre ce taux
de transmission pour les MP3 car un enregistrement de moins de
128 kbps diminuera la qualité du son.
Enregistrement
Le téléchargement de fichiers MP3 à par tir d'internet ou l'extraction
de morceaux de vos propres CD audio numériques est un procédé
délicat, qui peut également varier en fonction de la qualité du
programme d'encodage et de la vitesse de votre PC. En effet, ils
peuvent être à l'origine des coupures ou des erreurs que vous
pouvez quelquefois percevoir lors de l'écoute de votre CD-MP3.
Quoi qu’il en soit, veillez à ne pas dépasser la vitesse
d'enregistrement indiquée sur le CD-ROM et évitez d'utiliser
simultanément d'autres programmes sur votre PC pendant
l'opération d'enregistrement.
Conformément à la SDMI (Secure Digital Music
Initiative)
, les sorties numériques de cet appareil seront
désactivées pendant la lecture d'un CD-MP3.
Il n’est pas possible de « graver » un CD-MP3 sur ce
lecteur/enregistreur de CD.
Il n’est pas possible d'enregistrer à partir d'un CD-MP3.
Formats reconnus
Les formats suivants sont reconnus par ce lecteur/enregistreur
de CD:
–
format de disques : ISO 9660 ou Joliet
–
format de fichiers : MPEG ! Audio Layer-3
–
nom de fichier : .mp3 (pistes), .m3u ou .pls (listes de lecture)
–
débit de données : 32–320 kbps (128 kbps recommandés)
ou débit de données variable
Utilisez le format de disque ISO 9660 quand vous gravez un
CD-MP3. Le format de disque UDF (par ex.
« DirectCD » ou « WinOnCD ») n'est pas reconnu.
Informations générales
24
Français
Page 25
Raccordements
1 OPTICAL IN
raccordement à la sortie numérique optique d'un appareil
numérique externe
2 OPTICAL OUT
raccordement à l'entrée numérique optique d'un appareil
numérique externe
3 DIGITAL IN
raccordement à la sortie numérique coaxiale d'un appareil
numérique externe
4 DIGITAL OUT
raccordement à l'entrée numérique coaxiale d'un appareil
numérique externe
5 ANALOG IN L/R
raccordement à la sortie audio analogique d'un appareil externe
6 ANALOG OUT L/R
raccordement à l'entrée audio analogique d'un appareil externe
7 AC MAINS ~
Après avoir effectué tous les autres raccordements,
raccordez le cordon d'alimentation secteur à la prise murale.
Informations pour la mise en place
Posez l'appareil sur une surface plane, solide et stable. Ne
placez pas l'appareil au-dessus d'autres appareils qui
risquent de le faire chauffer (par ex. un récepteur ou un
amplificateur). Si l'appareil est placé dans un meuble, veillez
à laisser un espace libre d'au moins 3,5 cm autour de
l'appareil pour éviter toute surchauffe. Le voisinage de
téléphones portables en marche risque de perturber le
bon fonctionnement de l'appareil.
Raccordements – Général
N'effectuez ou ne changez jamais les raccordements
quand l'appareil est branché sur l'alimentation secteur.
Pour la lecture, les sorties suivantes sont présentes :
– Sortie analogique (ANALOG OUT L/R)
– Sortie numérique coaxiale (DIGITAL OUT)
– Sortie numérique optique (OPTICAL OUT)
Pour les enregistrements externes les entrées suivantes
sont présentes :
– Entrée analogique (ANALOG IN L/R)
– Entrée numérique coaxiale (DIGITAL IN)
– Entrée numérique optique (OPTICAL IN)
Ces entrées peuvent être raccordées à la sortie (aux
sorties) correspondante(s) de votre amplificateur/récepteur
ou directement à la/aux sortie(s) correspondante(s) de
l'appareil externe.
Il n’est pas possible de raccorder un tourne-disque
directement à ANALOG IN L/R. Si vous désirez utiliser
un tourne-disque avec l’appareil,vous devez raccorder
un amplificateur/récepteur à ANALOG IN L/R sur le
lecteur/enregistreur de CD.Ensuite connectez un
tourne-disque à l'amplificateur.
Les raccordements que vous allez faire dépendront des
possibilités offertes par votre équipement audio et de la
façon dont vous désirez utilisez l'appareil.Veuillez tout
d'abord vous référer au manuel de l'utilisateur de votre
équipement audio.
Nous recommandons de faire un enregistrement
analogique seulement si l'enregistrement numérique n'est
pas possible. Un enregistrement numérique donnera une
meilleure qualité sonore.
Si possible, faites les raccordements numériques et
analogiques. De cette façon, vous pouvez toujours faire des
enregistrements analogiques quand l'enregistrement
numérique n'est pas possible.
Raccordements
25
Français
OUTIN
OPTICAL
DIGITAL
ANALOG
L
R
IN OUTOUTIN
AC MAINS
~
7
5
4
32
1
6
Page 26

Raccordements analogiques
Ces raccordements sont indispensables pour la lecture et
l'enregistrement à l'aide d'un amplificateur/récepteur
équipé d'entrées et de sorties analogiques.
1 Raccordez la fiche rouge du câble audio (cinch) fourni à la
prise rouge ANALOG IN R et la fiche blanche à la prise
blanche ANALOG IN L sur le lecteur/enregistreur de CD.
2 Raccordez l'autre bout du câble audio aux sorties
analogiques de l'amplificateur/récepteur (CDR OUT,
TAPE OUT, AUX OUT, REC OUT, etc.).
3 Raccordez la fiche rouge du câble audio (cinch) fourni à la
prise rouge ANALOG OUT R et la fiche blanche à la prise
blanche ANALOG OUT L sur le lecteur/enregistreur de CD.
4 Raccordez l'autre bout du câble audio aux entrées
analogiques de l'amplificateur/récepteur (CD-R,TAPE IN,
AUX, PLAY IN, etc.).
5 Raccordez tous les autres composants de votre système
(platine casette, lecteur de CD, tuner, tourne-disque etc.) par
leurs sorties analogiques aux entrées analogiques appropriées
de l'amplificateur/récepteur (CD IN,TUNER IN, AUX IN,
PHONO IN, etc.).
00
L'enregistrement peut maintenant être fait avec n'importe
quel appareil raccordé à une entrée analogique de
l'amplificateur/récepteur. Appuyez sur INPUT sur le
lecteur/enregistreur de CD de façon répétée pour
sélectionner l'entrée analogique.
➜ ANALOG IN s’affiche.
Comment faire les raccordements si la sortie
analogique de l'amplificateur/récepteur est déjà
utilisée (occupée)
La plupart des amplificateurs/récepteurs ont de multiples
sorties analogique (TAPE,VCR…), mais certains
amplificateurs/récepteurs n'ont que 1 sortie analogique. Si
vous avez déjà branché une platine cassette (enregistreur
DAT ou enregistreur MD) à cette sortie, vous allez devoir
modifier les raccordements existants.
1 Déconnectez les raccordements analogiques de la platine
cassette à l'amplificateur/récepteur.
2 Raccordez le lecteur/enregistreur de CD (voir étapes 1–4
du chapitre précédent).
3 Raccordez les sorties analogiques de la platine cassette à
n'importe quelles entrées analogiques libres (AUX, CD) de
l'amplificateur/récepteur.Vous pouvez maintenant lire votre
cassette ou enregistrer à partir de votre platine cassette sur
un CD.Cependant, il n'est plus possible d'enregistrer sur
une cassette.
Raccordements numériques
Raccordement numérique coaxial direct
Ce raccordement est indispensable pour l'enregistrement
direct à partir de n'importe quel équipement audio
numérique équipé d'une sortie numérique coaxiale (p. ex.
un lecteur de CD ou un lecteur de DVD).
● Utilisez un câble coaxial numérique pour raccorder la sortie
coaxiale de l'appareil externe à DIGITAL IN du
lecteur/enregistreur de CD.
00
L'enregistrement peut maintenant être effectué par l'entrée
numérique coaxiale. Appuyez sur INPUT sur le
lecteur/enregistreur de CD de façon répétée pour
sélectionner l'entrée numérique coaxiale.
➜ DIGITAL IN s’affiche.
Installations
26
Français
OUTIN
OPTICAL
DIGITAL
ANALOG
L
R
IN OUTOUTIN
OPTICAL
DIGITAL OUTPUT
ANALOG OUTPUT
L
R
PHONO
L
R
CD
IN IN
CD PLAYER/
RECORDER
AMPLIFIER/
RECEIVER
PHONO
L
R
CD
IN IN
CDR/TAPE
L
R
IN OUT
CD PLAYER
COAX
TURNTABLE
DIGITAL OUTPUT
OPTICAL
DIGITAL
OPTICAL
ANALOG OUTPUT
ANALOG
IN OUTOUTIN
L
R
L
R
CD PLAYER
CD PLAYER/
RECORDER
COAX
OUTIN
Page 27

Raccordement numérique optique direct
Ce raccordement est indispensable pour l'enregistrement
direct à partir de n'importe quel équipement audio
numérique avec une sortie numérique optique (p. ex. un
lecteur de CD ou un lecteur de DVD).
1
Otez les capuchons protège-poussière de l'entrée
numérique optique du lecteur/enregistreur de CD et de la
sortie numérique optique de l'appareil externe. Gardez les
capuchons dans un endroit sûr.
2 Utilisez un câble numérique optique pour raccorder la
sortie optique de l'appareil externe à OPTICAL IN sur le
lecteur/enregistreur de CD.Prenez soin de bien insérer
complètement les deux fiches jusqu'à ce que vous
entendiez un « clic ».
00
L'enregistrement peut maintenant être effectué par l'entrée
numérique optique. Appuyez de façon répétée sur INPUT
sur le lecteur/enregistreur de CD pour sélectionner l'entrée
numérique optique.
➜ OPTICAL IN s’affiche.
Raccordements numériques coaxiaux à l'aide d'un
récepteur digital
Si vous possédez un récepteur avec des entrées et sorties
numériques coaxiales, ces raccordements vous permettent
d'effectuer des enregistrements numériques à partir de
diverses sources, raccordées au récepteur.
● Utilisez un câble coaxial pour raccorder l'entrée numérique
coaxiale du récepteur à DIGITAL OUT du lecteur/
enregistreur de CD.Utilisez un autre câble coaxial pour
raccorder la sortie numérique coaxiale du récepteur à
DIGITAL IN sur le lecteur/enregistreur de CD.
00
L'enregistrement peut maintenant être effectué avec tout
appareil numérique raccordé à une entrée numérique du
récepteur numérique (p. ex. lecteur de CD ou lecteur de DVD).
Appuyez sur INPUT sur le lecteur/enregistreur de CD de façon
répétée pour sélectionner l'entrée numérique coaxiale.
➜ DIGITAL IN s’affiche.
Raccordements numériques optiques à l'aide d'un
récepteur digital
Si vous possédez un récepteur avec des entrées et sorties
numériques optiques, ces raccordements vous permettent
d'effectuer des enregistrements numériques à partir de
diverses sources, raccordées au récepteur.
1 Otez les capuchons protège-poussière des entrées et sorties
numériques optiques du lecteur/enregistreur de CD et de la
sortie numérique optique du récepteur. Gardez les capuchons
dans un endroit sûr.
2
Utilisez un câble numérique optique pour raccorder l'entrée
optique du récepteur à OPTICAL OUT du lecteur/enregistreur
de CD.Utilisez un autre câble numérique optique pour raccorder
la sortie optique du récepteur à OPTICAL IN sur le lecteur/
enregistreur de CD.Prenez soin de bien insérer complètement les
fiches jusqu'à ce que vous entendiez un « clic ».
00
L'enregistrement peut maintenant être effectué avec tout
appareil numérique raccordé à une entrée numérique du
récepteur numérique (p. ex. un lecteur de CD ou un lecteur de
DVD).Appuyez sur INPUT sur le lecteur/enregistreur de CD de
façon répétée pour sélectionner l'entrée numérique optique.
➜
OPTICAL IN s’affiche.
Raccordement au secteur
La plaquette d'identification est située à l'arrière de
l'appareil.
1 Vérifiez que la tension de secteur telle qu'indiquée sur la
plaquette d'identification correspond à la tension de secteur
de votre réseau local. Si tel n'est pas le cas, adressez-vous à
votre revendeur ou à votre service de réparation.
2 Assurez-vous que tous les raccordements ont été faits
avant de brancher l'appareil sur le secteur.
3
Raccordez le cordon d'alimentation secteur fourni à
AC MAINS ~ et à la prise murale. Ceci branche l'appareil
sur l'alimentation secteur.
Lorsque l'appareil est en veille, il continue à consommer de
l'électricité. Pour déconnecter complètement l'appareil
du secteur,enlevez la fiche d'alimentation électrique
de la prise murale.
Installations
27
Français
CD PLAYER/
RECORDER
CD PLAYER
OUTIN
OPTICAL
DIGITAL
ANALOG
L
R
IN OUTOUTIN
OPTICAL
DIGITAL OUTPUT
ANALOG OUTPUT
L
R
COAX
“CLICK!”
CD PLAYER/
RECORDER
DIGITAL
RECEIVER
OUTIN
OPTICAL
DIGITAL
ANALOG
L
R
IN OUTOUTIN
OPTICAL
OUT
IN
AUX
CD IN DVD IN
OPTICAL
IN
”
OUT
CD IN DVD IN
AUX
DIGITAL
RECEIVER
“CLICK!
DIGITAL
OPTICAL
ANALOG
L
OUTIN
R
IN OUTOUTIN
CD PLAYER/
RECORDER
Page 28
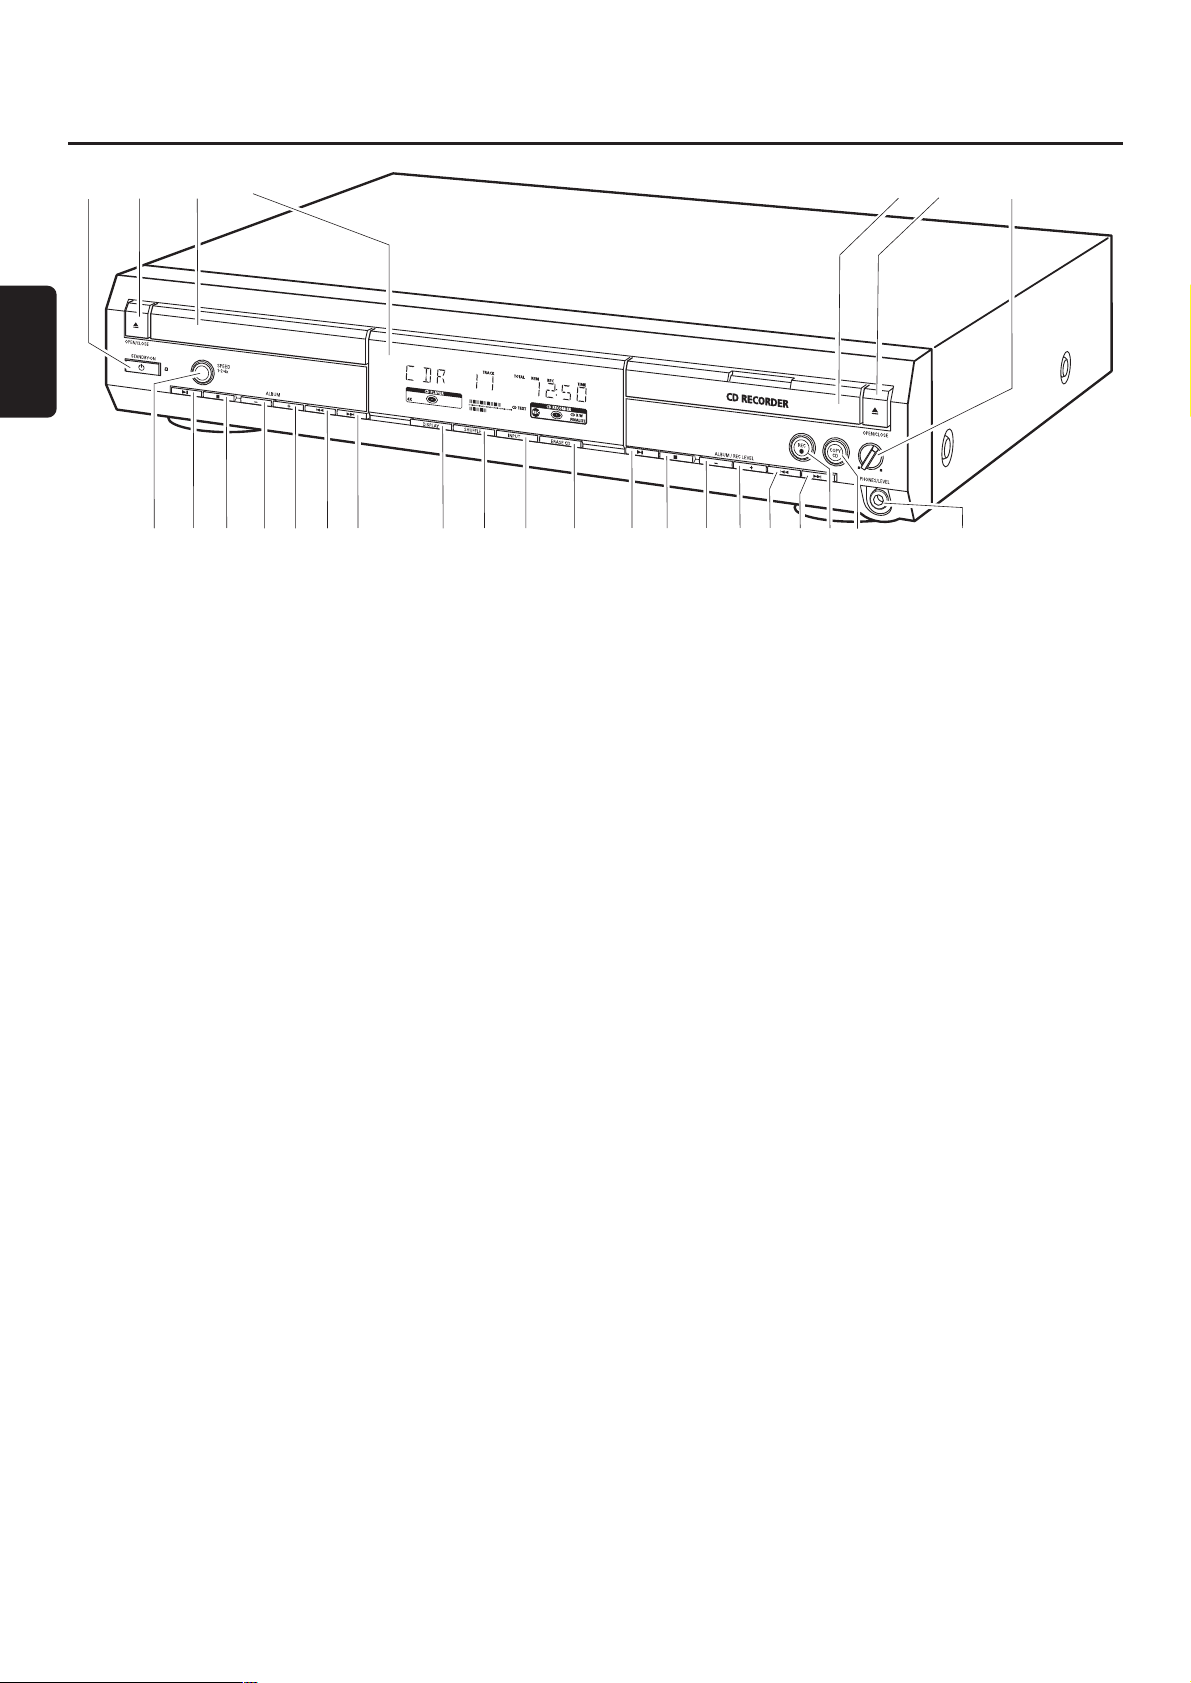
1 2 STANDBY·ON
met l'appareil en marche/en veille
2 / OPEN/CLOSE
ouvre/ferme le tiroir du lecteur de CD
3 tiroir du lecteur de CD
4 affichage
5 CD RECORDER
tiroir de l'enregistreur de CD
lumière bleue allumée : l'enregistreur de CD est sélectionné
lumière rouge allumée : enregistrement en cours
6 / OPEN/CLOSE
ouvre/ferme le tiroir de l'enregistreur de CD
7 PHONES/LEVEL
règle le volume des écouteurs
8 PHONES/LEVEL
prise 6,3 mm pour écouteurs
9 COPY CD
sélectionne l'enregistrement et la finalisation automatique
du CD présent dans l'appareil
0 REC 0
sélectionne d'autres modes d'enregistrement
! ¢
enregistreur de CD : sélectionne la piste suivante, effectue
une recherche vers l'avant
@ 4
enregistreur de CD : sélectionne la piste précédente,
effectue une recherche vers l'arrière
# ALBUM/REC LEVEL+
enregistreur de CD : sélectionne l'album suivant d'un
CD-MP3, augmente le niveau d'enregistrement
$ ALBUM/REC LEVEL-
enregistreur de CD : sélectionne l'album précédent d'un
CD-MP3, réduit le niveau d'enregistrement
% Ç
enregistreur de CD : arrête la lecture/l'enregistrement
^ ÉÅ
enregistreur de CD : lance/interrompt la lecture
& ERASE CD
efface les enregistrements sur un CDRW
* INPUT
sélectionne l'entrée pour un appareil externe
( SHUFFLE
lit les pistes dans un ordre aléatoire
) DISPLAY
sélectionne les informations à l'affichage
¡ ¢
lecteur de CD : sélectionne la piste suivante, effectue une
recherche vers l'avant
™ 4
lecteur de CD : sélectionne la piste précédente, effectue
une recherche vers l'arrière
£ ALBUM+
lecteur de CD : sélectionne l'album suivant sur un CD-MP3
≤ ALBUM-
lecteur de CD : sélectionne l'album précédent sur un
CD-MP3
∞ Ç
lecteur de CD : arrête la lecture
§ ÉÅ
lecteur de CD : lance/interrrompt la lecture
≥ SPEED 1·2·4x
sélectionne la vitesse d'enregistrement pour un
enregistrement interne
Remarque : SPEED 1·2·4x, REC et COPY CD s'illuminent
selon les différents modes dans lesquels vous vous trouvez. Ceci
afin de permettre un repérage facile des touches
correspondantes pour la sélection.
Commandes
28
Français
1654327
L
R
(
)¡™9£≤∞§≥
*
^
!
@#$%&
80
Page 29
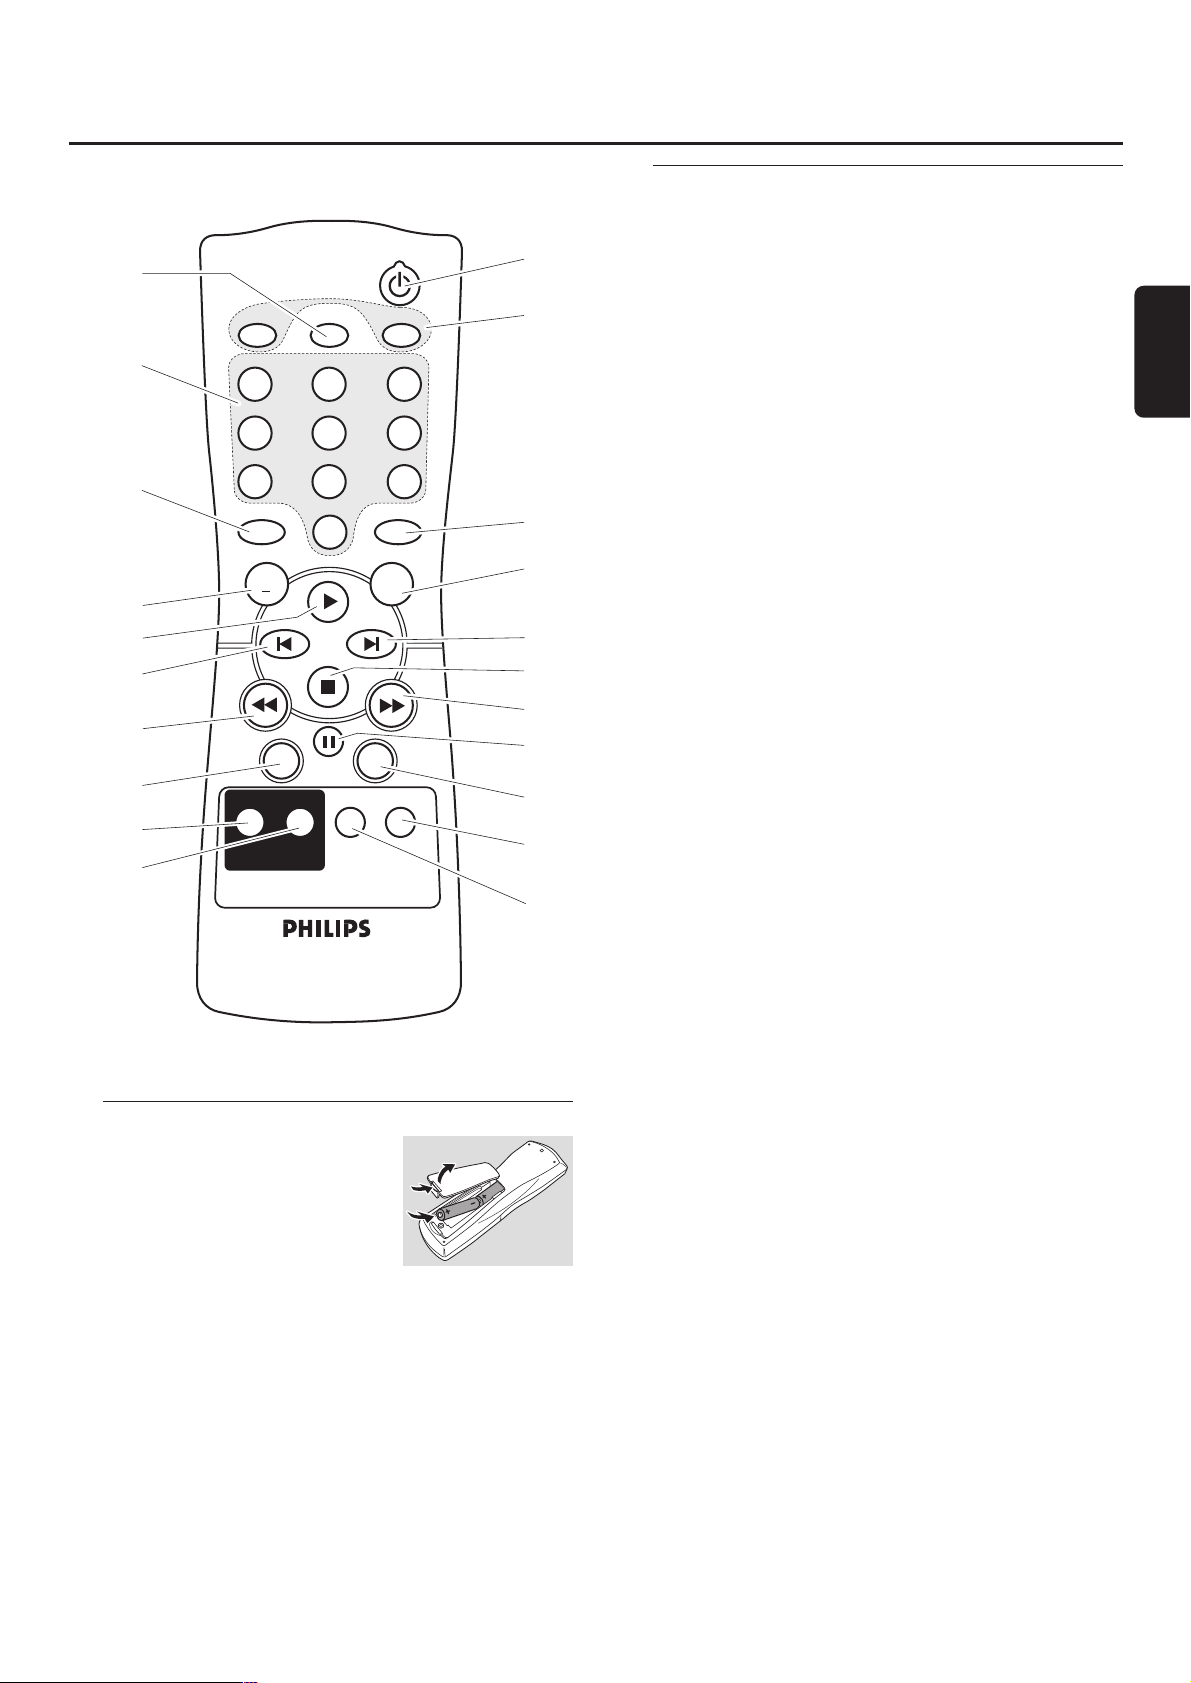
Télécommande
29
Français
Utilisation de la télécommande
Ouvrez le compartiment des piles
de la télécommande et insérez
2 piles alcalines, type AA (R06,
UM-3).
Ne mélangez pas les vieilles piles
avec des neuves ou des piles de
différents types.
Enlevez les piles lorsqu’elles sont vides ou si la
télécommande reste inutilisée pendant une longue durée.
Les piles contiennent des substances chimiques, il
convient donc de s'en débarrasser de façon
appropriée.
Les boutons de la télécommande fonctionnent de la même
façon que les commandes correspondantes sur l'appareil.
Touches de la télécommande
1 2
met l'appareil en marche/en veille
2 CD, CDR
sélectionne la platine lecteur de CD ou la platine
enregistreur de CD
3 TIMER REC
lance un enregistrement minuté
4 Touches alphanumériques
1–0 : insère les numéros pour les pistes
ABC – WXYZ : insère les lettres pour le texte du CD
SPACE : insère un espace dans le texte du CD
. : insère un point ou un symbole dans le texte du CD
5 TR. INCR.
sélectionne l'incrément automatique ou manuel d'une piste
6 PROGRAM
accède le menu de programmation
7 ALBUM+
sélectionne l'album suivant sur un CD-MP3
8 ALBUM-
sélectionne l'album précédent sur un CD-MP3
9 É
lance la lecture
0 í
sélectionne la piste précédente
! ë
sélectionne la piste suivante
@ Ç
arrête la lecture
# á
effectue une recherche vers l'avant
$ à
effectue une recherche vers l'arrière
% Å
interrompt la lecture
^ DIM
contrôle la luminosité de l'affichage
& DISPLAY
sélectionne les informations à l'affichage
* CD TEXT/edit
parcourt les informations du texte du CD, ouvre/ferme le
menu d'édition du texte du CD
( DELETE
efface le texte du CD
) REPEAT
répète une piste, un CD(RW) entier ou un programme
¡ SHUFFLE
lit les pistes dans un ordre aléatoire
3
4
5
8
9
0
$
&
*
(
CD TIMER REC
SPACE ABC
1
GHI JKL
4
PQRS TUV
7
TR.INCR.
2
5
8
.
CDR
DEF
3
MNO
6
WXYZ
9
PROGRAM
0
ALBUM
DISPLAY DIM
CD TEXT/edit DELETE
CD TEXT
ALBUM
+
SHUFFLE REPEAT
1
2
6
7
!
@
#
%
^
)
¡
Page 30
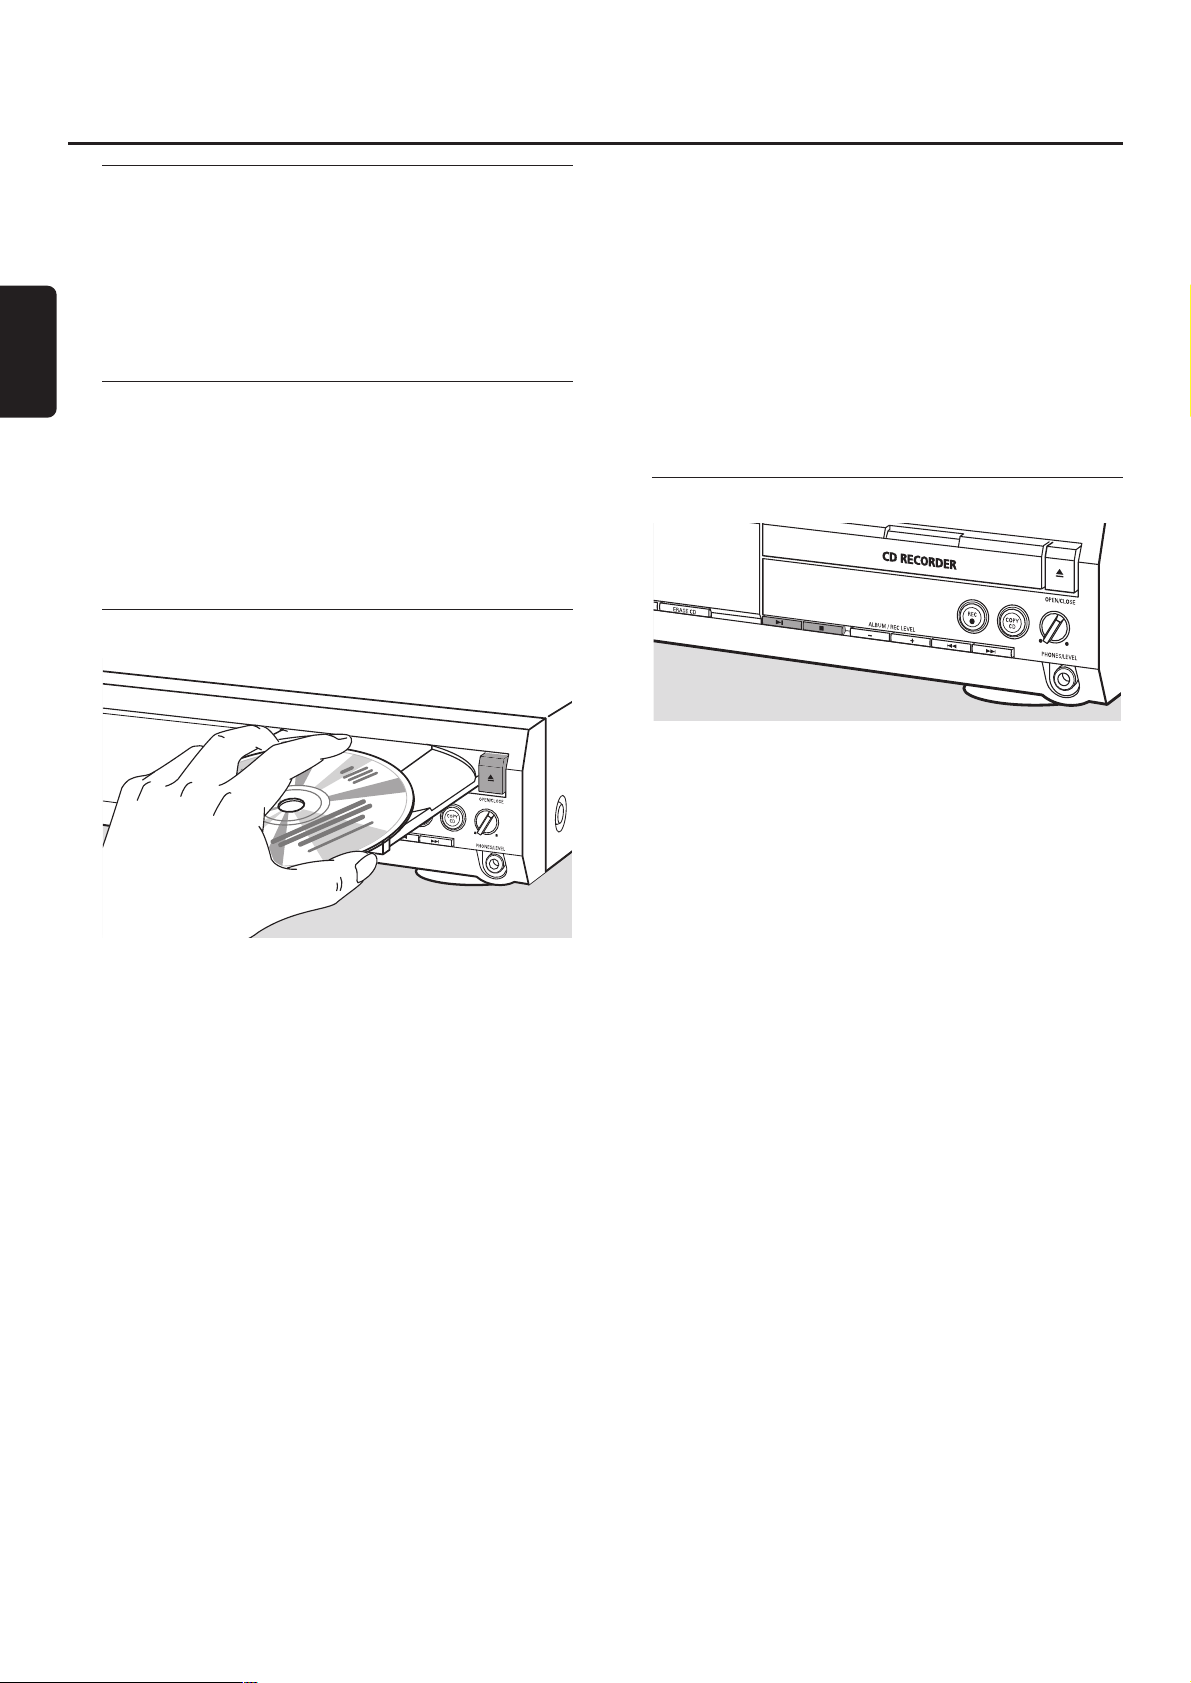
Mise en marche, mise en veille
● Pour mettre l'appareil en marche, appuyez sur
2 STANDBY·ON.
➜ WELCOME TO PHILIPS AUDIO s’affiche.
● Pour mettre l'appareil en veille, appuyez de nouveau
sur 2 STANDBY·ON.
➜ L'appareil est mis en veille.
Mode de démonstration
Le mode de démonstration présente différentes fonctions
de l'appareil et se met en route automatiquement si
aucune touche n'est utilisée pendant plusieurs minutes, ou
en mode veille.
● Pour annuler le mode de démonstration maintenez
appuyé Ç sur l'appareil pendant au moins 5 secondes.
➜ Le mode démo est annulé de façon permanente.
Mise en place de disques
1 Lecteur de CD : Appuyez sur / OPEN/CLOSE pour
ouvrir le tiroir du lecteur de CD.
➜ OPEN CD s’affiche et le tiroir s'ouvre.
Enregistreur de CD : Appuyez sur / OPEN/CLOSE pour
ouvrir le tiroir de l'enregistreur de CD.
➜ OPEN CDR s’affiche et le tiroir s'ouvre.
Remarques :
L'ouverture du lecteur de CD annule tout programme qui
contient des pistes d'un CD inséré dans le lecteur de CD.
L'ouverture de l'enregistreur de CD annule tout programme
qui contient des pistes d'un CD inséré dans l'enregistreur de CD.
2 Placez un disque (face imprimée vers le haut) sur le plateau.
3 Lecteur de CD : Appuyez de nouveau sur
/ OPEN/CLOSE pour fermer le tiroir.
➜ Le tiroir se ferme et READING s’affiche.
➜ CD, le nombre total de pistes et la durée de lecture
totale du disque s'affichent.
Enregistreur de CD : Appuyez sur / OPEN/CLOSE pour
fermer le tiroir.
➜ Le tiroir se ferme et READING s’affiche.
➜ Si vous insérez un disque non finalisé, INITIALIZING
s'affiche.
➜ CDR, le nombre total de pistes et la durée de lecture
totale du disque s'affichent.
Pour les CD-MP3 seulement :
➜ READING MP3 s’affiche. MP3 apparaît.A cause du
nombre important de pistes, ceci peut prendre jusqu'à
2 minutes.
➜ Le nom du premier album s'affiche.
Lecture
1 Appuyez sur ÉÅ soit du côté du lecteur de CD, soit du
côté de l'enregistreur de CD pour lancer la lecture.
➜ CD ou CDR, le numéro de la piste en cours de lecture et
la durée de lecture écoulée s'affichent.
Pour les CD-MP3 seulement :
➜ En plus, le nom de la piste défile.
00
Pour parcourir les informations suivantes, appuyez sur
DISPLAY de façon répétée :
➜ numéro de la piste, durée de lecture restante de la piste
en cours de lecture
➜ numéro de la piste, durée de lecture restante du disque
➜ numéro de la piste, durée de lecture écoulée de la piste
en cours de lecture
Pour les CD-MP3 seulement :
➜ nom de l'album, numéro de la piste et nom de la piste
➜ numéro de la piste, durée de lecture écoulée de la piste
en cours de lecture
2 Appuyez sur Ç soit du côté du lecteur de CD, soit du
côté de l'enregistreur de CD pour arrêter la lecture.
➜ CD ou CDR, le nombre total de pistes et la durée de
lecture totale du disque s'affichent.
Pour les CD-MP3 seulement :
➜ Le nom de l'album en cours de lecture défile.
00
Vous pouvez interrompre la lecture en appuyant sur ÉÅ.
➜ L'indication de temps à l'interruption de la lecture clignote.
00
Pour reprendre la lecture, appuyez de nouveau sur ÉÅ.
Fonctions de base
30
Français
Page 31

Sélection et recherche (pour tous
les disques sauf CD-MP3)
Sélection d'une piste quand la lecture est arrêtée
1 Appuyez sur ¢ ou 4, soit du côté du lecteur de CD
soit du côté de l'enregistreur de CD,autant de fois que
nécessaire pour passer au numéro la piste désirée.
2 Appuyez sur ÉÅ pour lancer la lecture.
➜ La lecture commence avec la piste choisie.
Sélection d'une piste pendant la lecture
● Appuyez sur ¢ ou 4 , soit du côté du lecteur de CD
soit du côté de l'enregistreur de CD,autant de fois que
nécessaire pour passer au début de la piste précédente ou
suivante sur le disque choisi.
➜ La lecture continue avec la piste choisie.
Recherche d'un passage pendant la lecture
1 Maintenez ¢ ou 4 appuyé, soit du côté du lecteur de
CD soit du côté de l'enregistreur de CD,pour trouver un
passage particulier vers l'avant ou vers l'arrière.
➜ La recherche est lancée et la lecture continue en volume
sonore bas.Après quelques secondes, la recherche
s’accélère et le volume est coupé.
2 Relâchez la touche au passage désiré.
➜ La lecture normale continue.
Remarque : Pendant SHUFFLE, lors de la répétition d'une piste
ou de la lecture d'un programme, la recherche est seulement
possible dans la piste en cours de lecture.
Sélection et recherche
(seulement pour les CD-MP3)
Sélection d'un album quand la lecture est arrêtée
● Appuyez sur ALBUM+ ou ALBUM-, soit du côté du
lecteur de CD soit du côté de l'enregistreur de CD,autant
de fois que nécessaire pour trouver le numéro de l'album
que vous désirez choisir.
➜ ALBUM apparaît, CD ou CDR et le numéro de l'album
s'affichent.
➜ Le nom de l'album en cours de lecture défile dès que
vous n'appuyez plus sur la touche.
00
Pour lancer la lecture de l'album entier, appuyez sur ÉÅ.
➜ La lecture de l'album entier démarre.
Sélection d'un album pendant la lecture
● Appuyez sur ALBUM+ ou ALBUM-, soit du côté du
lecteur de CD soit du côté de l'enregistreur de CD,autant
de fois que nécessaire pour passer au début de l'album
précédent ou suivant du disque sélectionné.
➜ La lecture continue avec l'album sélectionné dès que
vous n'appuyez plus sur la touche.
Sélection d'une piste dans l'album
1 Appuyez sur ¢ ou 4, soit du côté du lecteur de CD
soit du côté de l'enregistreur de CD,autant de fois que
nécessaire pour passer au numéro de piste désiré.
➜ CD ou CDR, le numéro de l'album et le numéro de la
piste s'affichent.
➜ Le nom de la piste défile dès que vous n'appuyez plus
sur la touche.
2 Appuyez sur ÉÅ pour lancer la lecture.
➜ La lecture commence avec la piste choisie.
Remarques :
A la fin de votre sélection d'albums, vous reconnaîtrez un
album intitulé VARIOUS. Cet album contient toutes les pistes
qui n’ont pas été enregistrées dans un album lors de la
création du CD-MP3.
Si vous souhaitez lire une liste de lecture que vous avez
créée vous-même sur le CD-MP3 lors de sa création, vous
devez la sélectionner directement en utilisant ¢ ou 4 et
en appuyant ensuite sur ÉÅ.
Fonctions de base
31
Français
Page 32

SHUFFLE et REPEAT
Répétition d'une piste, d'un disque ou d'un programme
1 Appuyez sur REPEAT de façon répétée sur la télécommande
pendant la lecture pour sélectionner au choix :
➜ REP TRACK : La piste en cours de lecture est lue en boucle.
➜ REP DISC :Tout le disque sélectionné est lu en boucle.
➜ REP ALL :Tous les disques qui se trouvent dans l'appareil
(ou le programme) sont (est) lu(s) en boucle.
Remarques :
REP DISC n’est pas possible pendant SHUFFLE ou pendant
la lecture d'un programme.
REP TRACK n'est pas possible pendant SHUFFLE.
2 La lecture démarre dans le mode choisi.
00
Pour revenir à la lecture normale, appuyez sur REPEAT sur
la télécommande jusqu'à ce que l'indication à l'affichage
disparaisse.
Lecture de pistes dans un ordre aléatoire
● Appuyez sur SHUFFLE avant ou pendant la lecture.
➜ SHUFF ALL apparaît et toutes les pistes soit du
programme, soit du (des) CD présent(s) dans le lecteur
de CD et dans l'enregistreur de CD sont lues dans un
ordre aléatoire.
Affichage du texte du CD
Cette fonction vous permet d'afficher des informations
telles que le titre de l'album ou le titre de la piste
contenues sur un CD spécialement encodé.
●
Assurez-vous que vous avez placé un CD avec du texte de CD.
➜ CD TEXT apparaît et le nom de l'artiste de l'album et le
titre de l'album défilent une fois.
Texte du CD quand la lecture est arrêtée
●
Appuyez sur CD TEXT/edit sur la télécommande pour voir les
informations suivantes, qui défileront une fois (si disponibles) :
➜ Nom de l'artiste de l'album
➜ Titre de l'album
Texte du CD pendant la lecture
●
Appuyez sur CD TEXT/edit sur la télécommande pour voir les
informations suivantes, qui défileront une fois (si disponibles) :
➜ Nom de l'artiste de la piste
➜ Titre de la piste
ID3-tag
Cette fonction vous permet d'afficher des informations
telles que le titre de l'album ou le titre de la piste
contenues sur une piste MP3.
● Si vous avez créé un ID3-tag pour votre piste MP3, appuyez
sur CDTEXT/edit sur la télécommande pendant la lecture
pour faire apparaître les informations ID3-tag suivantes :
➜ Titre de l'album
➜ Nom de l'artiste de la piste
➜ Titre de la piste
Remarque : Si aucun ID3-tag n'est disponible, NO TEXT s'affichera.
Programmation des numéros de piste
Vous pouvez utiliser un programme pour la lecture ou pour
spécifier les pistes qui seront enregistrées.Vous pouvez
sélectionner jusqu'à 99 pistes (également des pistes MP3) et
les mettre en mémoire. Il est possible de mettre n'importe
quelle piste plusieurs fois en mémoire, dans n'importe quel
ordre, en passant parte du lecteur de CD ou de l'enregistreur
de CD.Cependant il n'est pas possible de mélanger les pistes
MP3 avec les pistes audio ou des pistes MP3 provenant de
plusieurs CD.
1 Placez le(s) CD désiré(s) sur le(s) plateau(x).
2 Appuyez sur PROGRAM sur la télécommande pour
accéder au menu de programmation.
➜ PROG se met à clignoter et PROGRAM s’affiche.
➜ Le numéro de l'étape (STEP), le numéro de la piste et la
durée de lecture de la piste du CD présent dans
l'appareil sont affichés.
3 Si vous désirez sélectionner une piste du lecteur de CD :
Appuyez sur CD sur la télécommande et ensuite sur í ou
ë autant de fois que nécessaire pour passer à la piste désirée.
Si vous désirez sélectionner une piste de l'enregistreur
de CD:
Appuyez sur CDR sur la télécommande et ensuite sur í ou
ë autant de fois que nécessaire pour passer à la piste désirée.
Remarque : Si vous sélectionnez une piste qui a déjà été mise
en mémoire, P s'affiche.
4 Appuyez sur PROGRAM sur la télécommande pour mettre
votre sélection en mémoire.
➜ Le nombre total des pistes programmées (STEP), PRG et
la durée totale du programme s'affichent.
5 Répétez les étapes 3–4 pour sélectionner et mettre en
mémoire toutes les pistes désirées.
Remarque : Si vous tentez de mettre en mémoire plus de
99 pistes, PROGRAM FULL s'affichera.
6 Appuyez sur Ç pour finir la programmation.
Effacement du programme
1 Si nécessaire, appuyez sur Ç pour arrêter la lecture.
2 Maintenez Ç appuyé pour effacer le programme.
➜ PROG CLEARED s’affiche et PROG disparaît.
Fonctions de base
32
Français
Page 33

Informations de base
La platine enregistreur de CD vous offre 3 fonctions
principales :
– Enregistrement à partir du lecteur de CD interne ou
à partir d'une source externe de votre choix
– Finalisation de vos disques CDR(W) et
définalisation de vos disques CDRW
– Effacement d'un disque CDRW
Le procédé d'enregistrement est le même pour les disques
CDR et CDRW. Assurez-vous que le CDR(W) ne
présente absolument aucune rayure ni trace de
poussière.
Pour les enregistrements,la durée minimum d'une piste est
de 4 secondes.Vous pouvez enregistrer au maximum
99 pistes sur un disque. Si la durée d'enregistrement restante
sur le disque est moins de 7 secondes, DISC FULL s’affiche
et vous ne pouvez pas passer en mode d'enregistrement.
Protection des droits d'auteur
Le Serial Copy Management System (SCMS) empêche la
création d'une copie numérique à partir d'une copie
numérique. Ce système permet la réalisation d'un
enregistrement numérique à partir de l'original, cependant
dans certains pays,ceci peut nécessiter l'autorisation des
titulaires des droits d'auteur.
Lorsque vous essayez d'enregistrer à partir d'une source
externe de la musique protégée à la copie, COPY PROTECT
s’affichera. Il n’est alors pas possible d'effectuer un
enregistrement numérique.
Il n'est pas possible de copier un CD-MP3.
Enregistrement du texte de CD
Si le CD original présente du texte de CD, ce texte sera
enregistré automatiquement, dans la mesure où le texte du
CD n’est pas protégé à la copie. Si tel est le cas,
l'enregistrement du texte du CD ne sera pas possible et
TEXT PROTECT s’affichera.
Qu'est-ce que la finalisation?
La finalisation est un processus simple qui termine
l'enregistrement d'un CD(RW) nécessaire pour :
– lire un CDR enregistré sur un lecteur de CD classique,
– lire un CDRW enregistré sur un lecteur de CD et un
enregistreur de CD compatibles avec des CDRW,
– éviter les enregistrements involontaires sur un disque ou
– éviter d'effacer accidentellement des pistes sur un CDRW.
Les CDR sont « verrouillés » après finalisation.Aucun ajout
de pistes ou de texte du CD n'est alors possible.
Les CDRW sont également « verrouillés » après
finalisation, mais ils peuvent être définalisés pour permettre
des enregistrements supplémentaires ou l'effacement.
Direct Line Recording (DLR)
L'enregistreur de CD est équipé de la technique de haute
performance Direct Line Recording. Ceci assure un
enregistrement de la source parfait, c’est-à-dire un véritable
enregistrement « bit pour bit ». DLR n’est pas actif quand
vous réglez vous-même le niveau d'enregistrement.
Réglage du niveau d'enregistrement
Vous pouvez régler le niveau d'enregistrement de référence
pour les enregistrements à partir d'un appareil
supplémentaire. Cette fonction peut être utilisée pour des
fondus musicaux sur vos enregistrements.
1 Appuyez sur INPUT de façon répétée pour sélectionner
l'entrée de l'appareil supplémentaire :
➜
DIGITAL IN : l'entrée numérique coaxiale est sélectionnée.
➜
OPTICAL IN : l'entrée numérique optique est sélectionnée.
➜
ANALOG IN : l'entrée analogique est sélectionnée.
2 Maintenez appuyé ALBUM+ ou ALBUM- du côté de
l'enregistreur de CD pour régler le niveau d'enregistrement
désiré. Les sons les plus hauts de la source ne doivent pas
atteindre les niveaux rouges de la barre de niveau.
➜ Le niveau d'enregistrement réel (en dB) s’affichera.
Remarque : Le niveau d'enregistrement peut également être réglé
pendant un enregistrement fait à partir du lecteur de CD interne.
Maintenez appuyé ALBUM+ ou ALBUM- du côté de
l'enregistreur de CD pour régler le niveau d'enregistrement désiré.
A propos de l'enregistrement
33
Français
Page 34

Qu'est-ce que l'enregistrement
interne?
L'enregistrement à partir de la platine lecteur de CD de cet
appareil est appelé « enregistrement interne ».
Sélection de la vitesse
d'enregistrement
Il est possible de sélectionner la vitesse d'enregistrement
pour les enregistrements internes.
● Appuyez sur SPEED 1·2·4x de façon répétée pour
sélectionner au choix :
➜ REC SPEED 1X : pour enregistrer à la vitesse normale
➜ REC SPEED 2X : pour enregistrer à double vitesse avec
le son coupé
➜ REC SPEED 4X : pour enregistrer à une vitesse 4 fois
supérieure à la vitesse normale avec le son coupé
Remarques :
La sélection de la vitesse n'est pas possible pendant
l'enregistrement.
Sur certaines marques de disques audio vierges,
l'enregistrement à une vitesse supérieure n'est pas possible et
ne marche pas. Dans ce cas, choisissez une vitesse inférieure.
Copie d'un CD entier
C'est la manière la plus facile de faire une copie d'un CD entier,
prêt à la lecture sur d'autres lecteurs de CD. Cependant, aucun
ajout de pistes ou de texte du CD n'est possible.
1 Placez un CDR(W) totalement exempt de rayures et de
particules de poussière sur le plateau de l'enregistreur de CD.
2 Placez le disque que vous désirez copier sur le plateau du
lecteur de CD.
3 Appuyez sur COPY CD pour lancer la copie du CD entier.
➜ REC apparaît, la copie démarre et le compte à rebours
de la durée d'enregistrement réelle restante commence.
Remarque : Si un programme était déjà disponible avant d'appuyer sur
COPY CD, celui-ci sera ignoré.
PROG
disparaît et le disque présent
dans l'appareil sera copié.Après achèvement de l'enregistrement,
PROG
apparaît et le programme est de nouveau disponible.
Enregistrement de toutes les
pistes d'un CD
Vous pouvez copier toutes les pistes d'un CD et décider
ensuite de finaliser ou de ne pas finaliser.
1 Placez un CDR(W) totalement exempt de rayures ou de
particules de poussière sur le plateau de l'enregistreur de CD.
2 Placez le disque duquel vous souhaitez enregister copier
toutes les pistes sur le plateau du lecteur de CD.
3 Appuyez sur REC pour entrer dans le menu
d'enregistrement.
➜ RECORD CD?, suivi de PRESS REC s'affichent en
alternance.
4 Appuyez de nouveau sur REC pour commencer
l'enregistrement de toutes les pistes.
➜ REC apparaît, l'enregistrement démarre et le compte à
rebours de la durée d'enregistrement réelle restante
commence.
00
Quand vous appuyez sur / OPEN/CLOSE du côté de
l'enregistreur de CD,
➜ CD NOT FINAL et PRESS REC TO FINALIZE
s'affichent en alternance.
Vous devez décider alors, au choix,
de ne pas finaliser : le CDR n'est pas prêt pour la
lecture sur d'autres lecteurs de CD, cependant vous
pouvez encore ajouter des pistes ou du texte de CD.
Appuyez de nouveau sur / OPEN/CLOSE du côté de
l'enregistreur de CD ou patientez quelques secondes.
➜ Le tiroir s'ouvre. Le CDR(W) n'est pas finalisé.
ou
de finaliser : le CDR est prêt pour la lecture sur
d'autres lecteurs de CD, cependant vous ne pouvez
pas ajouter de pistes ou de texte du CD.
Appuyez sur REC pour lancer la finalisation.
➜ FINAL s’affiche et le compte à rebours de la durée
réelle restante de la finalisation commence.
Enregistrement interne
34
Français
Page 35

Enregistrement d'une seule piste
Vous pouvez copier diverses pistes de différents CD et
ensuite décider de finaliser ou de ne pas finaliser.
1 Placez un CDR(W) totalement exempt de rayures et de
particules de poussière sur le plateau de l'enregistreur de
CD.
2 Lancez la lecture de la piste désirée sur le lecteur de CD.
3 Appuyez sur REC pour entrer dans le menu d'enregistrement.
➜ REC TR avec le numéro de la piste et PRESS REC
s'affichent en alternance.
4 Appuyez de nouveau sur REC pour lancer l'enregistrement
de la piste.
➜ REC apparaît, l'enregistrement démarre à partir du début
de la piste sélectionnée et le compte à rebours de la
durée d'enregistrement réelle restante commence.
5 Pour enregistrer des pistes supplémentaires, répétez les
étapes 2–4.
00
Quand vous appuyez sur / OPEN/CLOSE du côté de
l'enregistreur de CD,
➜ CD NOT FINAL et PRESS REC TO FINALIZE
s'affichent en alternance.
Vous devez décider alors, au choix,
de ne pas finaliser : le CDR n'est pas prêt pour la
lecture sur d'autres lecteurs de CD, cependant vous
pouvez encore ajouter des pistes ou du texte de CD.
Appuyez de nouveau sur / OPEN/CLOSE du côté de
l'enregistreur de CD ou patientez quelques secondes.
➜ Le tiroir s'ouvre. Le CDR(W) n'est pas finalisé.
ou
de finaliser : le CDR est prêt pour la lecture sur
d'autres lecteurs de CD, cependant vous ne pouvez
pas ajouter de pistes ou de texte du CD.
Appuyez sur REC pour lancer la finalisation.
➜ FINAL s’affiche et le compte à rebours de la durée
réelle restante de la finalisation commence.
Création et enregistrement d'un
programme
Vous pouvez créér votre propre programme, l'enregistrer et
décider ensuite de finaliser ou de ne pas finaliser. Cependant, il
faut noter que vous ne pouvez pas enregistrer un programme
qui contient des pistes du lecteur de CD et de l'enregistreur
de CD.Dans ce cas, 2 DISC PROG et NOT POSSIBLE
s'affichent.
1 Placez un CDR(W) totalement exempt de rayures et de
particules de poussière sur le plateau de l'enregistreur de CD.
2 Placez le CD à partir duquel vous souhaitez enregistrer sur
le plateau du lecteur de CD.
3 Sélectionnez et mettez en mémoire toutes les pistes du CD
désirées (voir « Programmation des numéros de pistes »).
00
Si la durée totale du programme est plus longue que la
durée d'enregistrement restant sur le CDR(W) :
➜ DOES NOT FIT s'affiche brièvement.
➜ MISSING et la durée qui ne pourra pas être enregistrée
s'affichent.
Si malgré ceci vous lancez l'enregistrement, l'enregistrement
se fait jusqu'à ce que le CDR(W) soit plein.
4 Appuyez sur REC pour entrer dans le menu d'enregistrement.
➜ REC PROGRAM? et PRESS REC s'affichent en
alternance.
5 Appuyez de nouveau sur REC pour lancer l'enregistrement
du programme en cours.
➜ REC apparaît, l'enregistrement démarre et le compte à
rebours de la durée d'enregistrement réelle restante
commence.
00
Quand vous appuyez sur / OPEN/CLOSE du côté de
l'enregistreur de CD,
➜ CD NOT FINAL et PRESS REC TO FINALIZE
s'affichent en alternance.
Vous devez décider alors, au choix,
de ne pas finaliser : le CDR n'est pas prêt pour la
lecture sur d'autres lecteurs de CD, cependant vous
pouvez encore ajouter des pistes ou du texte de CD.
Appuyez de nouveau sur / OPEN/CLOSE du côté de
l'enregistreur de CD ou patientez quelques secondes.
➜ Le tiroir s'ouvre. Le CDR(W) n'est pas finalisé.
ou
de finaliser : le CDR est prêt pour la lecture sur
d'autres lecteurs de CD, cependant vous ne pouvez
pas ajouter de pistes ou de texte du CD.
Appuyez sur REC pour lancer la finalisation.
➜ FINAL s'affiche et le compte à rebours de la durée
réelle restante de la finalisation commence.
Enregistrement interne
35
Français
Page 36

Qu'est-ce que l'enregistrement
externe?
L'enregistrement à partir d'un appareil supplémentaire est
appelé « enregistrement externe ».
Enregistrement analogique ou
numérique?
Quand vous enregistrez à partir d'une source externe, nous
vous recommandons de ne faire un enregistrement analogique
que si un enregistrement numérique n’est pas possible. La
qualité du son est meilleure avec un enregistrement numérique.
Incrément automatique d'une piste
Quand vous utilisez l'entrée numérique pour enregistrer à
partir d'une source numérique (p. ex. un lecteur de CD),les
pistes sont automatiquement incrémentées de telle sorte que les
numéros des pistes sont positionnés au même endroit que sur
l'original. Quand vous utilisez l'entrée analogique pour
enregistrer à partir d'une source numérique ou analogique,
les pistes ne sont pas automatiquement incrémentées à moins
qu’un des réglages suivants n’ait été sélectionné. Il est possible
que les incréments de pistes ne soient pas toujours positionnés
correctement, selon la qualité de la source.
● Appuyez sur TR. INCR. autant de fois que nécessaire sur la
télécommande pendant l’arrêt pour passer à l'une des
fonctions suivantes d'incrément automatique de piste :
➜ TURNTABLE : pour un enregistrement optimal à partir
de sources sonores bruyantes comme un tourne-disque
(Il n’est pas possible de raccorder un tourne-disque
directement à AUX/CDR IN L/R – voir
« Raccordements analogiques ».)
➜ TAPE/TUNER : pour un enregistrement optimal à partir
d'une cassette
➜ CD/DVD : pour un enregistrement optimal à partir de
sources de haute qualité telles que DAT, DCC ou DVD
➜ MANUAL : pour désactiver la fonction d'incrément
automatique de pistes
Remarques :
Les numéros de pistes peuvent être incrémentés manuellement
en appuyant sur TR. INCR. sur la télécommande pendant
l'enregistrement. La durée minimum d'une piste est de 4 secondes.
Les numéros de pistes ne peuvent plus être changés après
enregistrement.
Enregistrement avec démarrage
automatique
Vous pouvez enregistrer rapidement et facilement un CD entier
ou une piste. Dès que la lecture a commencé sur l'appareil
supplémentaire, l'enregistrement commence automatiquement.
1 Placez un CDR(W) totalement exempt de rayures et de
particules de poussière sur le plateau de l'enregistreur de CD.
2 Appuyez sur INPUT de façon répétée sur le lecteur/
enregistreur de CD pour sélectionner l'entrée de l'appareil
supplémentaire à partir duquel vous voulez enregistrer.
➜ DIGITAL IN : l'entrée numérique est sélectionnée.
➜ ANALOG IN : l'entrée analogique est sélectionnée.
➜ OPTICAL IN : l'entrée optique est sélectionnée.
3 Assurez-vous que la piste désirée est bien sélectionnée sur
l'appareil supplémentaire.
4 Assurez-vous que l'appareil supplémentaire est en mode
pause ou arrêt.
5 Appuyez sur REC sur le lecteur/enregistreur de CD pour
entrer dans le menu d'enregistrement.
➜ PREPARING s’affiche.
➜ RECORD EXT? et START EXTERN SOURCE!
s'affichent en alternance.
6 Lancez la lecture sur l'appareil supplémentaire dans les
5 secondes qui suivent.
➜
L'enregistrement commence simultanément et
REC
apparaît.
La durée d'enregistrement restante sur le CDR(W) s'affiche.
Remarque : L'enregistrement peut aussi être lancé manuellement
en appuyant sur REC sur le lecteur/enregistreur de CD.
00
Pour arrêter manuellement l'enregistrement, appuyez sur
Ç du côté de l'enregistreur de CD.
00
Quand vous appuyez sur / OPEN/CLOSE du côté de
l'enregistreur de CD,
➜ CD NOT FINAL et PRESS REC TO FINALIZE
s'affichent en alternance.
Vous devez décider alors, au choix,
de ne pas finaliser : le CDR n'est pas prêt pour la
lecture sur d'autres lecteurs de CD, cependant vous
pouvez encore ajouter des pistes ou du texte de CD.
Appuyez de nouveau sur / OPEN/CLOSE du côté de
l'enregistreur de CD ou patientez quelques secondes.
➜ Le tiroir s'ouvre. Le CDR(W) n'est pas finalisé.
ou
de finaliser : le CDR est prêt pour la lecture sur
d'autres lecteurs de CD, cependant vous ne pouvez
pas ajouter de pistes ou de texte du CD.
Appuyez sur REC sur le lecteur/enregistreur de CD pour
lancer la finalisation.
➜ FINAL s’affiche et le compte à rebours de la durée
réelle restante de la finalisation commence.
Enregistrement externe
36
Français
Page 37

Enregistrement manuel
Vous pouvez lancer et arrêter manuellement un
enregistrement à partir d'un appareil supplémentaire.Vous
pouvez utiliser l'enregistrement manuel pour enregistrer de la
musique en direct, ou pour de la musique particulière comme
la musique classique qui ne peut pas être enregistrée par
démarrage automatique.
1 Placez un CDR(W) totalement exempt de rayures et de
particules de poussière sur le plateau de l'enregistreur de CD.
2 Appuyez sur INPUT de façon répétée sur le lecteur/
enregistreur de CD pour sélectionner l'entrée de l’appareil
supplémentaire à partir duquel vous voulez enregistrer.
➜ DIGITAL IN : l'entrée numérique est sélectionnée.
➜ ANALOG IN : l'entrée analogique est sélectionnée.
➜ OPTICAL IN : l'entrée optique est sélectionnée.
3 Lancez la lecture sur l’appareil supplémentaire.
4 Appuyez sur REC sur le lecteur/enregistreur de CD pour
entrer dans le menu d'enregistrement.
➜ PREPARING s’affiche.
➜ RECORD EXT? et PRESS REC s'affichent en alternance.
5 Appuyez sur REC sur le lecteur/enregistreur de CD pour
lancer l'enregistrement.
➜ L'enregistrement démarre et REC apparaît. La durée
d'enregistrement restant sur le CDR(W) s'affiche.
6 Appuyez sur Ç du côté de l'enregistreur de CD pour
arrêter l'enregistrement.
00
Quand vous appuyez sur / OPEN/CLOSE du côté de
l'enregistreur de CD,
➜ CD NOT FINAL et PRESS REC TO FINALIZE
s'affichent en alternance.
Vous devez décider alors, au choix,
de ne pas finaliser : le CDR n'est pas prêt pour la
lecture sur d'autres lecteurs de CD, cependant vous
pouvez encore ajouter des pistes ou du texte de CD.
Appuyez de nouveau sur / OPEN/CLOSE du côté de
l'enregistreur de CD ou patientez quelques secondes.
➜ Le tiroir s'ouvre. Le CDR(W) n'est pas finalisé.
ou
de finaliser : le CDR est prêt pour la lecture sur
d'autres lecteurs de CD, cependant vous ne pouvez
pas ajouter de pistes ou de texte du CD.
Appuyez sur REC sur l’appareil pour lancer la finalisation.
➜ FINAL s’affiche et le compte à rebours de la durée
réelle restante pour la finalisation commence.
Enregistrement avec minuterie
Cette fonction vous permet de lancer un enregistrement
limité dans le temps par l'entrée analogique (p. ex. pour des
enregistrements à partir d'un tuner).Vous pouvez choisir un
enregistrement de 15, 30, 45 ou 60 minutes ou jusqu'à la
fin du CDR(W).
1 Placez un CDR(W) totalement exempt de rayures et de
particules de poussière sur le plateau de l'enregistreur de CD.
2 Assurez-vous que l'appareil supplémentaire à partir duquel
vous voulez enregistrer est raccordé correctement.
3 Appuyez sur TIMER REC sur la télécommande pour lancer
l'enregistrement.
➜ 15 MIN, suivi de PREPARING, s'affiche.
➜ L'enregistrement commence et REC apparaît. La durée
réelle restante de l'enregistrement s'affiche.
00
Pour sélectionner une autre durée d'enregistrement,
appuyez sur TIMER REC de façon répétée sur la
télécommande jusqu'à ce que la durée désirée s'affiche :
➜ 30 MIN, 45 MIN, 60 MIN, MAXIMUM s’affiche.
4 Après écoulement de la durée choisie, l'enregistrement
s'arrête automatiquement et l'appareil passe en mode veille.
00
Pour arrêter l'enregistrement manuellement, appuyez sur
Ç du côté de l'enregistreur de CD.
Enregistrement externe
37
Français
Page 38

Effacement sur un disque CDRW
Il est possible d'effacer une ou plusieurs pistes (en
commençant par la fin de la dernière piste) ou le CDRW
entier. Il n'est pas possible d'effacer sur un CDR.
Effacement d'une ou plusieurs pistes
1 Placez le CDRW duquel vous souhaitez effacer des pistes
sur le plateau de l'enregistreur de CD.
2 Appuyez brièvement sur ERASE CD pour entrer dans le
menu d'effacement.
Si vous avez placé un CDRW non finalisé :
➜ ERASE LAST TRACK? et PRESS ERASE s'affichent
en alternance.
Si vous avez placé un CDRW finalisé :
➜ FINALIZED CD s'affiche brièvement.
➜ ERASE LAST TRACK?, suivi de PRESS ERASE
s'affichent en alternance.
00
Pour choisir une piste particulière que vous souhaitez
effacer, appuyez autant de fois que nécessaire sur ¢ ou
4 du côté de l'enregistreur de CD pour sélectionner
le(s) numéro(s) de la/des piste(s) désirée(s).
➜ ERASE TR et le numéro de la piste (p. ex 10+) s'affichent.
Pour sélectionner d'autres pistes à effacer, répétez cette étape.
Remarque : Quand vous effacez plusieurs pistes, les pistes à
effacer doivent être sélectionnées dans l'ordre, en commençant
par la piste enregistrée la plus récemment. Exemple : Le CDRW
comporte 5 pistes enregistrées.Vous pouvez maintenant effacer
les pistes 5 et 4.Vous pouvez aussi effacer les pistes 5, 4 et 3,
mais vous ne pouvez pas effacer les pistes 5 et 3!
3
Appuyez de nouveau sur ERASE CD pour lancer l'effacement.
Si vous avez placé un CDRW non finalisé :
➜ ERASE s’affiche, le compte à rebours de la durée restante
de l'opération commence et l'effacement commence.
Si vous avez placé un CDRW finalisé :
➜
UNFINAL s’affiche, le compte à rebours de la durée restante
de l'opération commence et la définalisation commence.
➜
Ensuite ERASE s’affiche, le compte à rebours de la durée
restante de l'opération commence et l'effacement commence.
Effacement d'un CDRW entier
1 Placez le CDRW que vous souhaitez effacer sur le plateau
de l'enregistreur de CD.
2 Maintenez ERASE CD appuyé pendant plus de 1 seconde
pour entrer dans le menu d'effacement.
Si vous avez placé un CDRW non finalisé :
➜
ERASE DISC? et PRESS ERASE s'affichent en alternance.
Si vous avez placé un CDRW finalisé :
➜ FINALIZED CD s'affiche brièvement.
➜
ERASE DISC? et PRESS ERASE s'affichent en alternance.
3
Appuyez de nouveau sur ERASE CD pour effacer le CDRW entier.
Si vous avez placé un CDRW non finalisé :
➜ ERASE s'affiche, le compte à rebours de la durée restante
de l'opération commence et l'effacement du CDRW
entier commence.
Si vous avez placé un CDRW finalisé :
➜ UNFINAL s’affiche, le compte à rebours de la durée restante
de l'opération commence et la définalisation commence.
➜ ERASE s’affiche, le compte à rebours de la durée restante
de l'opération commence et l'effacement du CDRW
entier commence.
Edition du texte du CD
Après avoir enregistré votre CDR(W), vous pouvez entrer
du texte, p. ex. le titre d'un album ou le titre d'une piste. Ce
texte sera affiché pendant la lecture sur cet appareil, mais
aussi sur d'autres appareils équipés de la fonction texte du
CD.Utilisez uniquement un CDR ou CDRW non finalisé
(un CDRW finalisé doit tout d'abord être définalisé).
1 Si nécessaire, appuyez sur Ç pour arrêter la lecture.
2 Appuyez sur CDR sur la télécommande pour sélectionner
l'enregistreur de CD.
3 Appuyez sur CD TEXT/edit de façon répétée sur la
télécommande pour sélectionner au choix :
➜ ALBUM TITLE : pour éditer le titre du CD
➜ ALBUM ARTIST : pour éditer le nom de l'artiste du CD
➜ ARTIST TR 1 (ou 2, 3,…) : pour éditer le nom de
l'artiste de la piste 1 (ou 2, 3,…)
➜ TITLE TR 1 (ou 2, 3,…) : pour éditer le titre de la
piste 1 (ou 2, 3,…)
4 Dès que le curseur se met à clignoter, utilisez les touches
alphanumériques sur la télécommande pour sélectionner
un caractère.
➜ Après avoir sélectionné un caractère,le curseur se
positionne automatiquement sur l'emplacement du
caractère suivant.
5 Appuyez sur CD TEXT/edit sur la télécommande pour
enregister le texte créé et pour retourner au menu
d'édition de texte.
6 Pour sortir du menu d'édition de texte, appuyez sur Ç.
Effacement et remplacement d'un caractère
1 Appuyez sur à ou á sur la télécommande pour vous
déplacer jusqu’au caractère à effacer ou à remplacer.
➜ Le caractère se met à clignoter.
2 Si vous voulez effacer le caractère :
Appuyez sur DELETE sur la télécommande.
➜ Le caractère est effacé et le texte se déplace d'un cran
vers la gauche.
Si vous voulez remplacer un caractère :
Utilisez les touches alphanumériques sur la télécommande
pour sélectionner un nouveau caractère.
00
Pour changer un autre caractère, appuyez sur à ou á sur
la télécommande.
Copie automatique de texte
Lorsque le nom d'un artiste a été mis en mémoire pour
une piste, il sera automatiquement copié sur la piste
suivante.
Effacement/Edition du texte du CD (sur l'enregistreur de CD uniquement)
38
Français
Page 39

AVERTISSEMENT
Vous ne devez en aucune circonstance essayer de réparer l'appareil
vous-même car cela annulerait la garantie.N‘ouvrez pas l‘équipement
au risque de chocs électriques.
Si un défaut survient, commencez d'abord par vérifier les points de la
liste suivante avant de porter votre appareil à réparer. Si vous n’êtes pas
en mesure de résoudre le problème en suivant ces indications, adressezvous à votre revendeur ou à votre centre de réparation.
Sécurité laser
Cet appareil fonctionne avec un laser.En raison des risques de lésions
oculaires, seule une personne qualifiée doit en ôter le boîtier ou tenter
de le réparer.
Problème Solution
Pas de courant – Assurez-vous que le cordon d'alimentation est correctement branché.
– Appuyez sur 2 STANDBY·ON sur l'appareil pour le mettre en marche.
Pas de son – Vérifiez que les raccordements audio ont été faits correctement.
– Assurez-vous que les pistes MP3 ont été enregistrées sous le bon format.
Pas de réaction quand on appuie – Débranchez le cordon d'alimentation de l'appareil, rebranchez-le après
sur les touches quelques secondes.
Démarrage automatique de l'affichage – Appuyez sur Ç sur l'appareil pendant au moins 5 secondes pour annuler le
des fonctions permanent (mode Démo) mode de démonstration.
La télécommande ne fonctionne – Enlevez les piles et insérez-les correctement ou insérez des piles neuves.
pas correctement – Réduisez la distance entre la télécommande et l'appareil.
Indication WRONG DISC, USE AUDIO CD –
Assurez-vous que le disque n'est pas rayé ou sale. Remplacez ou nettoyez le disque.
et INSERT DISC – Assurez-vous qu'un disque est inséré, étiquette vers le haut.
– Assurez-vous qu'un DVD n'est pas inséré.
– Attendez que l’évaporation sur la lentille laser ait disparu.
Indication WRONG DISC, USE CDR<W> WITH
– Un CDR(W) informatique a été inséré. Assurez-vous qu'un disque audio
`DIGITAL AUDIO´ LOGO et INSERT DISC
numérique est inséré, portant la marque « Digital Audio » et le logo spécial.
Indication NO SIGNAL ou – Vérifiez si le câble de raccordement est correctement branché.
indication CHECK INPUT – Sélectionnez l’entrée appropriée.
– Assurez-vous que l'appareil externe est en marche.
Indication OVERHEATING – Ne placez pas l'appareil au-dessus d'autres appareils qui peuvent le faire
chauffer (p. ex. un récepteur).
Pas d'enregistrement – Assurez-vous que le CDR(W) est totalement exempt de rayures et de
particules de poussière.
– Vérifiez qu'un CDR(W) audio numérique a bien été inséré et assurez-vous
qu’il n’est pas finalisé.
Arrêt pendant l'enregistrement – Utilisez des CDR(W) audio Philips.
– Si le processus d'enregistrement est interrompu (coupure de courant, choc
mécanique), recommencez l'enregistrement avec un nouveau disque.
Le disque enregistré n’est pas lu par – Assurez-vous que le CDR(W) est bien finalisé.
un autre lecteur de CD classique – Insérez le CDRW dans un lecteur de CD compatible CDRW.
Répertoires manquants sur un CD-MP3 – Seuls les albums avec des pistes exécutables apparaissent.
La durée de lecture écoulée d'une piste
– Ce comportement est normal car cette piste MP3 présente un débit de
MP3 défile très vite ou de façon irrégulière
données variable.
Les pistes enregistrées ont été fusionnées – Utilisez un autre mode d'incrément de pistes.
entre elles ou les pistes ne commencent – Effectuez les incréments de pistes manuellement avec la télécommande.
pas/ne s’arrêtent pas au bon moment
Guide de dépannage
39
Français
Page 40

Información general
Datos técnicos
_____________________________
41
Información medioambiental
__________________
41
Accesorios incluidos
_________________________
41
Mantenimiento
_____________________________
41
Manejo de disco
____________________________
41
Discos para grabar
__________________________
42
Discos para reproducir
_______________________
42
Unas palabras sobre MP3
_____________________
42
Conexiones
Conexiones
_______________________________
43
Información sobre la instalación
________________
43
Conexiones en general
______________________
43
Instalaciones
Conexiones analógicas
_______________________
44
Conexiones digitales
_____________________
44–45
Red eléctrica
______________________________
45
Controles
__________________________________
46
Mando a distancia
Uso del mando a distancia
____________________
47
Teclas del mando a distancia
__________________
47
Funciones básicas
Encendido, encendido modo de espera
__________
48
Modo demostración
_________________________
48
Carga de discos
____________________________
48
Reproducción
______________________________
48
Selección y búsqueda (en todos los discos
excepto CDs MP3)
_________________________
49
Selección y búsqueda (sólo en CDs MP3)
________
49
SHUFFLE y REPEAT
_________________________
50
Mostrar texto de CD
________________________
50
ID3-tag
___________________________________
50
Programación de números de pistas
____________
50
Borrado del programa
_______________________
50
Sobre la grabación
Información básica
__________________________
51
¿Qué es finalizar?
___________________________
51
Direct Line Recording (DLR)
__________________
51
Ajuste del nivel de grabación
__________________
51
Grabación interna
¿Qué es la grabación interna?
__________________
52
Selección de velocidad de grabación
____________
52
Copia de un CD completo
___________________
52
Grabación de todas las pistas de un CD
_________
52
Grabación de una sola pista
___________________
53
Creación y grabación de un programa
___________
53
Grabación externa
¿Qué es la grabación externa?
_________________
54
¿Grabación digital o analógica?
_________________
54
Incremento automático de pista
________________
54
Grabación con inicio automático
_______________
54
Grabación manual
__________________________
55
Grabación con temporizador
__________________
55
Borrado/Edición de texto de CD (sólo en
grabadora de CD)
Borrado de un disco CDRW
__________________
56
Edición de texto de CD
______________________
56
Localización y solución de averías
____________
57
Contenidos
40
Español
Page 41

Datos técnicos
Sujetos a modificación sin previo aviso.
General
Consumo eléctrico
Activo
_______________________________
< 20 W
En espera
____________________________
< 0,6 W
Dimensiones,A × a × l
____________
435 × 88 × 310 mm
Peso
_______________________________________
5 kg
Audio
Respuesta de frecuencia
________________
2–20.000 Hz
Reproducción
S/N (A-weighted)
_______________________
120 dB
S/N
__________________________________
110 dB
Rango dinámico
_________________________
98 dB
Distorsión armónica total
_________________
-95 dB
Separación de canales
____________________
105 dB
Grabación
S/N (A-weighted)
________________________
93 dB
S/N digital sin SRC
________________
igual a la fuente
Rango dinámico
_________________________
90 dB
Distorsión armónica total + ruido
___________
-86 dB
Entrada digital/óptica
__________________
12–96 kHz
Láser (grabadora de CD)
Tipo
___________________
Semiconductor láser GaAIAs
Longitud de onda
_______________
775–795 nm (a 25°)
Potencia de salida __2,5 mW (lectura), 35 mW (escritura)
Divergencia de haz
_______________________
60 grados
Como socio de ENERGY STAR®,
Philips ha establecido que este
producto cumple las directrices de
ENERGY STAR®sobre rendimiento
energético.
Este equipo cumple los requisitos sobre interferencias
radioeléctricas de la Comunidad Europea.
PRECAUCIÓN
El uso de los controles o ajustes o la ejecución de
procedimientos distintos a los aquí expuestos puede
provocar la exposición a radiaciones peligrosas u
otras operaciones arriesgadas.
Información medioambiental
Se han eliminado todos los materiales de embalaje superfluos.
Hemos procurado hacer el embalaje fácilmente separable en
tres monomateriales: cartón (caja), espuma de poliestireno
(amortiguadores) y polietileno (bolsas,lámina protectora de la
espuma).
Su equipo está compuesto de materiales que pueden ser
reciclados si se desmontan por una empresa especializada. Por
favor, cumpla la normativa local en relación con la eliminación
de materiales de embalaje, pilas gastadas y equipos viejos.
Accesorios incluidos
– 2 cables analógicos de audio (con enchufes blanco y rojo)
– Mando a distancia
– 2 pilas para el mando a distancia, tamaño AA
– Cable de alimentación eléctrica
Mantenimiento
Limpie el equipo con un paño
ligeramente húmedo y sin hilos. No
utilice ningún producto de limpieza,
podría tener un efecto corrosivo.
No exponga el equipo, las pilas o los
discos a la humedad, lluvia, arena o
calor excesivo (provocado por una
calefacción o por su exposición
directa al sol).
Manejo de disco
Si el reproductor/grabadora de CD falla al leer correctamente
los discos, utilice un CD de limpieza normal para limpiar las
lentes antes de llevar el equipo a reparar.Otros métodos de
limpieza podrían dañar las lentes. Mantenga siempre las bandejas
cerradas para evitar la acumulación de polvo en las lentes.
Las lentes pueden empañarse si se traslada el equipo
repentinamente de un ambiente frío a otro cálido. Si esto
ocurre, no es posible la reproducción de un disco.Deje el
equipo en un entorno cálido hasta que se evapore la humedad.
La forma más fácil de sacar un disco
de su caja es presionar ligeramente
sobre el eje central mientras levanta el
CD(RW). Sujete siempre el CD(RW)
por los bordes y vuelva a colocarlo en
su caja después de utilizarlo.
No escriba nunca sobre un CD ni le pegue una pegatina.
Escriba sólo sobre la cara impresa de un CDR o CDRW y
sólo con un medio de escritura de punta suave.
Para limpiar un disco, frótelo
suavemente en línea recta desde el
centro hacia los bordes utilizando un
paño suave y sin hilos. ¡Un producto
de limpieza podría dañar el disco!
Información general
41
Español
PRECAUCIÓN
RADIACIONES LÁSER INVISIBLES AL ABRIR EL
EQUIPO. EVITE LA EXPOSICIÓN A LOS RAYOS.
Nota: Esta advertencia está situada
dentro de la tapa.
Page 42

Discos para grabar
Para grabar,asegúrese de utilizar sólo discos de audio
especiales. Estos discos están marcados con «Digital Audio»
y los logotipos que se muestran más abajo.
Existen dos tipos de discos de audio que se pueden utilizar
con esta grabadora de CD:
– Discos grabables de CD-Audio
(CDR), se pueden grabar una vez y,
una vez finalizados, se pueden
reproducir en reproductores de CD y
en grabadoras de CD estándar.
– Discos reescribibles de
CD-Audio (CDRW), se pueden
grabar,borrar y volver a grabar varias
veces, y una vez finalizados, se pueden
reproducir en reproductores de CD y
grabadoras de CD compatibles con CDRW.
Todos los reproductores de CD y grabadoras de
CD de Philips con esta pegatina son compatibles
con CDRW.
Para asegurar un funcionamiento correcto del equipo, le
recomendamos que sólo utilice discos de audio Philips
CDR y CDRW.
Nota: No utilice un CDR o un CDRW para ordenador, la
grabación no funcionaría correctamente.
Las grabaciones están permitidas siempre que no
infrinjan los derechos de autor u otros derechos de
terceros.
En algunos países, el uso del reproductor/
grabadora de CD,como se muestra o sugiere en este
manual del usuario, puede requerir la autorización de
los titulares de los derechos de autor.
Discos para reproducir
Para reproducir en este reproductor/grabadora de CD,
puede utilizar los siguientes discos de audio:
– Todos los CDs de audio pregrabados
– Todos los discos CDR y CDRW de audio
– CDs MP3 (CD-ROMs con pistas MP3)
Unas palabras sobre MP3
La nueva tecnología revolucionaria de comprensión de música MP3
(MPEG ! Audio Layer-3) es capaz de comprimir datos de sonido de
audio digital con un factor de hasta 10, sin pérdida significativa de
calidad de sonido. Esto le permite grabar hasta 10 horas de música
de calidad igual a la de un CD en un sólo CD-ROM.
Como crear su propio CD MP3
Básicamente hay dos fuentes de música MP3 en CD. Usted
puede o transferir música de sus propios CDs de audio digitales
via la unidad de CD-ROM, introducirla en su PC y codificarla en
formato MP3 («rip»), o cargar música legal MP3 de Internet.
Grabar («quemar») la música desde su disco duro en un
CD-ROM con su PC en casa (asegúrese de que el nombre
del archivo termine con .mp3).Una vez finalizado, puede
reproducir su CD MP3 en este reproductor/grabadora de CD y
disfrutar de la música.
Velocidad de transmisión de datos
La velocidad de transmisión de datos es de gran importancia
para MP3. Indica con que velocidad son transferidos los bits.
La música en estéreo en un CD tiene una velocidad de transmisión
de unos 1400 kilobits por segundo (kbps). Para conseguir una
buena calidad de MP3 se recomienda una velocidad de
bit de 128 kbps. Como la velocidad de codificación puede ser
seleccionada por el usuario, asegúrese de alcanzar esta velocidad de
transmisión de datos para MP3, grabar a menos de 128 kbps
podría causar una degradación en la calidad del sonido.
Grabación
Cargar un archivo MP3 de Internet o extraer canciones de su
propio CD de audio digital es un proceso delicado, también
influenciado por la calidad del programa de codificación y la
velocidad de su PC. Esto puede causar a veces «omisiones» o
errores que usted notará a la hora de escuchar su CD MP3.
En cualquier caso, asegúrese de usar una velocidad de
grabación no superior a la indicada en el CD-ROM y evite
utilizar simultáneamente otros programas en su PC durante el
proceso de grabación.
En conformidad con la SDMI (Secure Digital
Music Initiative) las salidas digitales de este equipo se
desactivarán al reproducir un CD MP3.
No es posible «quemar» un CD MP3 en este
reproductor/grabadora de CD.
No es posible grabar de un CD MP3.
Formatos admitidos
Los siguientes formatos son admitidos en este
reproductor/grabadora de CD:
– Formato de disco: ISO 9660 o Joliet
– Formato de archivo: MPEG ! Audio Layer-3
– Nombre de archivo: .mp3 (pistas),.m3u o .pls
(recopilaciones personales)
– Velocidad de bit: 32–320 kbps (128 kbps aconsejables)
o velocidad de bit variable
Use el formato de disco ISO 9660 cuando grabe el
CD MP3. El formato de disco UDF (p.ej.
«DirectCD» o «WinOnCD») no se admite.
Información general
42
Español
Page 43

Conexiones
1 OPTICAL IN
para conectar la salida digital óptica de un aparato externo
digital
2 OPTICAL OUT
para conectar la entrada digital óptica de un aparato
externo digital
3 DIGITAL IN
para conectar a la salida coaxial digital de un aparato
externo digital
4 DIGITAL OUT
para conectar a la entrada coaxial digital de un aparato
externo digital
5 ANALOG IN L/R
para conectar la salida de audio analógica de un aparato
externo
6 ANALOG OUT L/R
para conectar la entrada de audio analógica de un aparato
adicional externo
7 AC MAINS ~
Una vez realizadas el resto de las conexiones, conecte
el cable de alimentación eléctrica a la toma de pared.
Información sobre la instalación
Coloque el equipo sobre una superficie plana, dura y
estable. No sitúe el equipo encima de otros equipos que
puedan calentarlo (p. ej.receptor o amplificador). Si el
equipo está colocado en un armario, asegúrese de dejar al
menos 3,5 cm de espacio alrededor del equipo para evitar
su sobrecalentamiento.Teléfonos móviles encendidos cerca
del equipo pueden causar un mal funcionamiento.
Conexiones en general
Nunca realice o cambie las conexiones con la
alimentación eléctrica conectada.
Para la reproducción están presentes las siguientes salidas:
– Salida analógica (ANALOG OUT L/R)
– Salida coaxial digital (DIGITAL OUT)
– Salida óptica digital (OPTICAL OUT)
Para la grabación externa están presentes las siguientes
entradas:
– Entrada analógica (ANALOG IN L/R)
– Entrada coaxial digital (DIGITAL IN)
– Entrada óptica digital (OPTICAL IN)
Estas entradas pueden ser conectadas a la(s)
correspondiente(s) salida(s) de su amplificador/receptor o
directamente a la(s) correspondiente(s) salida(s) del
aparato externo.
No es posible conectar un tocadiscos directamente a
ANALOG IN L/R. Si quiere usar un tocadiscos con el
equipo, tiene que conectar un amplificador/receptor
a ANALOG IN L/R en el reproductor/grabadora de
CD. Después conecte el tocadiscos al amplificador.
Las conexiones que realice dependerán de las posibilidades
que su equipo de audio ofrezca y de como va a usar el
equipo. Por favor, remítase primero al manual de
instrucciones de su equipo de audio.
Recomendamos realizar grabaciones analógicas sólo si la
grabación digital no es posible. Las grabaciones digitales
tienen una mejor calidad de sonido.
Si es posible, realice siempre ambas conexiones,digital y
analógica. De este modo podrá realizar siempre grabaciones
analógicas si la grabación digital no fuera posible.
Conexiones
43
Español
OUTIN
OPTICAL
DIGITAL
ANALOG
L
R
IN OUTOUTIN
AC MAINS
~
7
5
4
32
1
6
Page 44

Conexiones analógicas
Estas conexiones son necesarias para la reproducción y la
grabación vía un amplificador/receptor,equipados con
entradas y salidas analógicas.
1 Conecte el enchufe rojo del cable de audio suministrado
(cinch) a la conexión roja ANALOG IN R y el enchufe
blanco a la conexión blanca ANALOG IN L del
reproductor/grabadora de CD.
2 Conecte el otro extremo del cable de audio a las salidas
analógicas del amplificador/receptor (CDR OUT,
TAPE OUT, AUX OUT, REC OUT, etc.).
3 Conecte el enchufe rojo del cable de audio suministrado
(cinch) a la conexión roja ANALOG OUT R y el cable
blanco a la conexión blanca ANALOG OUT L del
reproductor/grabadora de CD.
4 Conecte el otro extremo del cable de audio a la entrada
analógica del amplificador/receptor (CD-R,TAPE IN,AUX,
PLAY IN, etc.).
5 Conecte todos los otros componentes de su sistema
(unidad de cinta, reproductor de CD,radio, tocadiscos,etc.)
vía sus salidas analógicas a las entradas analógicas
apropiadas del amplificador/receptor (CD IN,TUNER IN,
AUX IN, PHONO IN, etc.).
00
La grabación puede ser realizada ahora con cualquier aparato
conectado a la entrada analógica del amplificador/receptor.
Pulse repetidamente INPUT en el reproductor/grabadora de
CD para seleccionar la entrada analógica.
➜ ANALOG IN aparecerá.
Como realizar la conexión si la salida analógica
del amplificador/receptor está siendo utilizada
(ocupada)
La mayoría de los amplificadores/receptores tienen varias
conexiones para salidas analógicas (TAPE,VCR,…) pero
algunos amplificadores/receptores tienen sólo 1 salida
analógica. En el caso de que ya haya conectado una unidad
de cinta (grabadora DAT o grabadora MD) a esta salida,
tendrá que cambiar las conexiones existentes.
1 Desconecte las conexiones analógicas de la unidad de cinta
al amplificador/receptor.
2 Conecte el reproductor/grabadora de CD (consulte los
pasos 1–4 del capítulo anterior).
3 Conecte las salidas analógicas de la unidad de cinta a
cualquier entrada analógica libre (AUX, CD) del
amplificador/receptor. Ahora podrá reproducir su cinta o
grabar desde su unidad de cinta en el CD. Sin embargo, ya
no será posible grabar en la cinta.
Conexiones digitales
Conexión digital coaxial directa
Esta conexión es necesaria para la grabación directa desde
cualquier equipo digital de audio con una salida digital coaxial
(p.ej. un reproductor de CD o un reproductor de DVD).
● Utilice un cable coaxial digital para conectar la salida coaxial
del aparato externo a DIGITAL IN en el
reproductor/grabadora de CD.
00
La grabación se realizará ahora vía la entrada coaxial digital.
Pulse repetidamente INPUT en el reproductor/grabadora
de CD para seleccionar la entrada coaxial digital.
➜ DIGITAL IN aparecerá.
Instalaciones
44
Español
OUTIN
OPTICAL
DIGITAL
ANALOG
L
R
IN OUTOUTIN
OPTICAL
DIGITAL OUTPUT
ANALOG OUTPUT
L
R
PHONO
L
R
CD
IN IN
CD PLAYER/
RECORDER
AMPLIFIER/
RECEIVER
PHONO
L
R
CD
IN IN
CDR/TAPE
L
R
IN OUT
CD PLAYER
COAX
TURNTABLE
DIGITAL OUTPUT
OPTICAL
DIGITAL
OPTICAL
ANALOG OUTPUT
ANALOG
IN OUTOUTIN
L
R
L
R
CD PLAYER
CD PLAYER/
RECORDER
COAX
OUTIN
Page 45

Conexión óptica digital directa
Esta conexión es necesaria para la grabación directa desde
cualquier equipo digital de audio con una salida digital óptica
(p.ej. un reproductor de CD o un reproductor de DVD).
1 Retire las cápsulas antipolvo de la entrada digital óptica del
reproductor/grabadora de CD y de la salida digital óptica
del aparato externo. Guarde las cápsulas en un lugar seguro.
2 Utilice un cable digital óptico para conectar la salida óptica
del aparato externo a OPTICAL IN en el
reproductor/grabadora de CD.Asegúrese de introducir
completamente ambos enchufes, hasta que se oiga un click.
00
La grabación puede realizarse ahora vía la entrada digital
óptica. Pulse repetidamente INPUT en el reproductor/
grabadora de CD para seleccionar la entrada digital óptica.
➜ OPTICAL IN aparecerá.
Conexiones digitales coaxiales vía un receptor digital
Si dispone de un receptor con entradas y salidas coaxiales
digitales, estas conexiones le permitirán realizar grabaciones
digitales desde varias fuentes conectadas al receptor.
● Utilice un cable coaxial para conectar la entrada digital
coaxial del receptor a DIGITAL OUT en el
reproductor/grabadora de CD. Use otro cable coaxial para
conectar la salida digital coaxial del receptor a DIGITAL IN
en el reproductor/grabadora de CD.
00
La grabación puede realizarse ahora con cualquier aparato
digital conectado a la entrada digital del receptor digital
(p.ej. un reproductor de CD o un reproductor de DVD).
Pulse repetidamente INPUT en el reproductor/grabadora
de CD para seleccionar la entrada digital coaxial.
➜ DIGITAL IN aparecerá.
Conexiones digitales ópticas por medio de un
receptor digital
Si dispone de un receptor con entradas y salidas digitales
ópticas, estas conexiones le permitirán realizar grabaciones
digitales desde varias fuentes conectadas al receptor.
1 Retire las cápsulas antipolvo de las entradas y salidas
digitales ópticas del reproductor/grabadora de CD y de la
salida digital óptica del receptor. Guarde las cápsulas en un
lugar seguro.
2 Utilice un cable digital óptico para conectar la entrada
óptica del receptor a OPTICAL OUT en el reproductor/
grabadora de CD. Use otro cable digital óptico para
conectar la salida óptica del receptor a OPTICAL IN en el
reproductor/grabadora de CD.Asegúrese de introducir
completamente ambos enchufes, hasta que se oiga un click.
00
La grabación puede realizarse ahora con cualquier aparato
digital conectado a la entrada digital del receptor digital
(p.ej. un reproductor de CD o un reproductor de DVD).
Pulse repetidamente INPUT en el reproductor/grabadora
de CD para seleccionar la entrada digital óptica.
➜ OPTICAL IN aparecerá.
Red eléctrica
La placa de especificaciones está situada en la parte
posterior del equipo.
1 Compruebe que la tensión eléctrica que aparece en la
placa de especificaciones corresponde a la de su zona. En
caso contrario, consulte al vendedor o al servicio técnico.
2 Compruebe que se han realizado todas las
conexiones antes de conectar la alimentación
eléctrica.
3 Conecte el cable de alimentación eléctrica suministrado a
AC MAINS ~ y a la toma de pared.Así se activará la
alimentación eléctrica.
Cuando el equipo está en modo de espera, sigue
consumiendo una cierta cantidad de electricidad. Para
desconectar completamente la alimentación eléctrica
del equipo, desenchúfelo de la toma de pared.
Instalaciones
45
Español
CD PLAYER/
RECORDER
CD PLAYER
OUTIN
OPTICAL
DIGITAL
ANALOG
L
R
IN OUTOUTIN
OPTICAL
DIGITAL OUTPUT
ANALOG OUTPUT
L
R
COAX
“CLICK!”
CD PLAYER/
RECORDER
DIGITAL
RECEIVER
OUTIN
OPTICAL
DIGITAL
ANALOG
L
R
IN OUTOUTIN
OPTICAL
OUT
IN
AUX
CD IN DVD IN
AUX
OPTICAL
IN
”
OUT
CD IN DVD IN
RECEIVER
“CLICK!
DIGITAL
OPTICAL
ANALOG
L
OUTIN
R
IN OUTOUTIN
CD PLAYER/
RECORDER
DIGITAL
Page 46

1 2 STANDBY·ON
activa/cambia al modo de espera en el equipo
2 / OPEN/CLOSE
abre/cierra el compartimento del reproductor de CD
3 compartimento del reproductor de CD
4 pantalla
5 CD RECORDER
compartimento de la grabadora de CD
luz azul encendida: la grabadora de CD ha sido seleccionada
luz roja encendida: la grabación se está realizando
6 / OPEN/CLOSE
abre/cierra el compartimento de la grabadora de CD
7 PHONES/LEVEL
ajusta el volumen de los auriculares
8 PHONES/LEVEL
clavija de 6,3 mm de los auriculares
9 COPY CD
selecciona la grabación y la finalización automática del CD
en uso
0 REC 0
selecciona otros modos de grabación
! ¢
grabadora de CD: selecciona la siguiente pista, busca hacia
delante
@ 4
grabadora de CD: selecciona la pista anterior, busca hacia
atrás
# ALBUM/REC LEVEL+
grabadora de CD: selecciona el siguiente álbum en un CD
MP3, aumenta el nivel de grabación
$ ALBUM/REC LEVEL-
grabadora de CD: selecciona el álbum anterior en un CD
MP3, disminuye el nivel de grabación
% Ç
grabadora de CD: detiene la reproducción/grabación
^ ÉÅ
grabadora de CD: inicia/interrumpe la reproducción
& ERASE CD
borra las grabaciones de un CDRW
* INPUT
selecciona la entrada para un aparato externo
( SHUFFLE
reproduce las pistas en orden aleatorio
) DISPLAY
selecciona la información en pantalla
¡ ¢
reproductor de CD: selecciona la siguiente pista, busca hacia
delante
™ 4
reproductor de CD: selecciona la pista anterior,busca hacia
atrás
£ ALBUM+
reproductor de CD: selecciona el siguiente álbum en un
CD MP3
≤ ALBUM-
reproductor de CD: selecciona el álbum anterior en un CD MP3
∞ Ç
reproductor de CD: detiene la reproducción
§ ÉÅ
reproductor de CD: inicia/interrumpe la reproducción
≥ SPEED 1·2·4x
selecciona la velocidad de grabación para la grabación interna
Nota: SPEED 1·2·4x, REC y COPY CD se iluminarán
dependiendo de los diferentes modos con los que esté
trabajando. Esto ocurre para poder encontrar fácilmente las
teclas apropiadas para la selección.
Controles
46
Español
1654327
L
R
(
)¡™9£≤∞§≥
*
^
!
@#$%&
80
Page 47

Mando a distancia
47
Español
Uso del mando a distancia
Abra el compartimento de las pilas
del mando a distancia e inserte
2 pilas alcalinas tipo AA (R06,
UM-3).
No utilice a la vez pilas usadas y
nuevas o de diferentes tipos.
Quite las pilas cuando se gasten o si no va a utilizar el
mando a distancia durante un período de tiempo
prolongado.
Las pilas contienen sustancias químicas, por lo que
deben eliminarse según la normativa vigente.
Las teclas del mando a distancia realizan las mismas
funciones que sus correspondientes en el equipo.
Teclas del mando a distancia
1 2
activa/cambia al modo de espera en el equipo
2 CD, CDR
selecciona la unidad del reproductor de CD o la unidad de
la grabadora de CD
3 TIMER REC
inicia una grabación con tiempo limitado
4 Teclas numéricas/alfabéticas
1–0: teclas numéricas para las pistas
ABC – WXYZ: teclas alfabéticas para el texto de CD
SPACE: teclas para espacios entre el texto de CD
. : teclas de puntuación o símbolos para texto de CD
5 TR. INCR.
selecciona el incremento automático o manual de una pista
6 PROGRAM
accede al menú de programación
7 ALBUM+
selecciona el siguiente álbum de un CD MP3
8 ALBUM-
selecciona el álbum anterior de un CD MP3
9 É
inicia la reproducción
0 í
selecciona la pista anterior
! ë
selecciona la siguiente pista
@ Ç
detiene la reproducción
# á
busca hacia delante
$ à
busca hacia atrás
% Å
interrumpe la reproducción
^ DIM
controla la luminosidad de la pantalla
& DISPLAY
selecciona la información en pantalla
* CD TEXT/edit
cambia entre la información de texto de CD, accede al/sale
del menú de edición de texto
( DELETE
borra el texto de CD
) REPEAT
repite una pista, un CD(RW) completo o una programación
¡ SHUFFLE
reproduce las pistas en orden aleatorio
3
4
5
8
9
0
$
&
*
(
CD TIMER REC
SPACE ABC
1
GHI JKL
4
PQRS TUV
7
TR.INCR.
2
5
8
.
CDR
DEF
3
MNO
6
WXYZ
9
PROGRAM
0
ALBUM
DISPLAY DIM
CD TEXT/edit DELETE
CD TEXT
ALBUM
+
SHUFFLE REPEAT
1
2
6
7
!
@
#
%
^
)
¡
Page 48

Encendido, encendido modo de
espera
● Para encender el equipo, pulse 2 STANDBY·ON.
➜ WELCOME TO PHILIPS AUDIO aparecerá.
● Para poner el equipo en modo de espera, pulse de
nuevo 2 STANDBY·ON.
➜ El modo de espera se activará en el equipo.
Modo demostración
Con el modo demostración aparecerán varias funciones del
equipo y se iniciarán automáticamente si no ha sido pulsada
ninguna tecla durante varios minutos o durante el modo de
espera.
● Para cancelar el modo demostración mantenga
pulsada Ç en el equipo un mínimo de 5 segundos.
➜ El modo demostración se cancelará permanentemente.
Carga de discos
1 Reproductor de CD: Pulse / OPEN/CLOSE para abrir el
compartimento del reproductor de CD.
➜ OPEN CD aparecerá y el compartimento se abrirá.
Grabadora de CD: Pulse / OPEN/CLOSE para abrir el
compartimento de la grabadora de CD.
➜ OPEN CDR aparecerá y el compartimento se abrirá.
Notas:
Al abrir el reproductor de CD se borrará la programación que
contenga pistas de un disco cargado en el reproductor de CD.
Al abrir la grabadora de CD se borrará la programación que
contenga pistas de un disco cargado en la grabadora de CD.
2 Inserte un disco (cara impresa hacia arriba) en la bandeja.
3 Reproductor de CD: Pulse de nuevo / OPEN/CLOSE
para cerrar el compartimento.
➜ El compartimento se cerrará y READING aparecerá.
➜ Aparecerán CD, el número total de pistas y el tiempo
total de reproducción del disco.
Grabadora de CD: Pulse / OPEN/CLOSE para cerrar el
compartimento.
➜ El compartimento se cerrará y READING aparecerá.
➜ Si se ha cargado un disco no finalizado, aparecerá
INITIALIZING.
➜ Aparecerán CDR, el número total de pistas y el tiempo
total de reproducción del disco.
Sólo CD MP3:
➜ READING MP3 aparecerá. MP3 se mostrará. Debido al
gran número de pistas podría tardar hasta 2 minutos.
➜ El nombre del primer álbum aparecerá.
Reproducción
1 Pulse ÉÅ en el lado del reproductor de CD o en el lado
de la grabadora de CD para iniciar la reproducción.
➜ Aparecerán CD o CDR, el número de pista actual y el
tiempo de reproducción transcurrido.
Sólo CD MP3:
➜ Además, se desplazará también el nombre de la pista.
00
Para cambiar entre la siguiente información pulse
repetidamente DISPLAY:
➜ número de pista, tiempo restante de reproducción de la
pista actual
➜
número de pista, tiempo restante de reproducción del disco
➜ número de pista, tiempo de reproducción transcurrido
de la pista actual
Sólo CD MP3:
➜ el número de álbum, el número de pista y el nombre de
la pista
➜ el número de pista, el tiempo de reproducción
transcurrido de la pista actual
2 Pulse Ç en el lado del reproductor de CD o en el lado de
la grabadora de CD para detener la reproducción.
➜ Aparecerán CD o CDR, el número total de pistas y el
tiempo total de reproducción del disco.
Sólo CD MP3:
➜ Se desplazará el nombre del álbum actual.
00
Puede interrumpir la reproducción pulsando ÉÅ.
➜ El tiempo en el que la reproducción haya sido detenida
parpadeará.
00
Para reanudar la reproducción pulse de nuevo ÉÅ.
Funciones básicas
48
Español
Page 49

Selección y búsqueda (en todos
los discos excepto CDs MP3)
Selección de una pista si se ha detenido la
reproducción
1 Pulse ¢ o 4 en el lado del reproductor de CD o en el
lado de la grabadora de CD tantas veces como sea
necesario para saltar al número de pista deseado.
2 Pulse ÉÅ para iniciar la reproducción.
➜ La reproducción se iniciará con la pista seleccionada.
Selección de una pista durante la reproducción
● Pulse ¢ o 4 en el lado del reproductor de CD o en el
lado de la grabadora de CD tantas veces como sea
necesario para saltar al comienzo de la pista anterior o
siguiente del disco seleccionado.
➜ La reproducción continuará con la pista seleccionada.
Búsqueda de un pasaje durante la reproducción
1 Mantenga pulsada ¢ o 4 en el lado del reproductor
de CD o en el lado de la grabadora de CD para
seleccionar un pasaje concreto hacia atrás o hacia delante.
➜ Se iniciará la búsqueda y la reproducción continuará a
bajo volumen.Tras unos segundos, la búsqueda se
acelerará con el volumen desactivado.
2 Suelte la tecla en el pasaje que desee.
➜ La reproducción normal continuará.
Nota: Durante SHUFFLE, al repetir una pista o al reproducir una
programación, la búsqueda sólo es posible en la pista actual.
Selección y búsqueda (sólo en
CDs MP3)
Selección de un álbum si se ha detenido la
reproducción
● Pulse ALBUM+ o ALBUM- en el lado del reproductor
de CD o en el lado de la grabadora de CD tantas veces
como sea necesario para encontrar el número de álbum
que desea seleccionar.
➜ ALBUM se mostrará, aparecerán CD o CDR y el número
de álbum.
➜ El nombre del álbum actual se desplazará tan pronto
como deje de pulsar la tecla de nuevo.
00
Para iniciar la reproducción del álbum completo pulse ÉÅ.
➜ La reproducción del álbum completo se iniciará.
Selección de un álbum durante la reproducción
● Pulse ALBUM+ o ALBUM- en el lado del reproductor
de CD o en el lado de la grabadora de CD tantas veces
como sea necesario para saltar al comienzo del álbum
anterior o siguiente del disco seleccionado.
➜ La reproducción continuará con el álbum seleccionado
tan pronto como deje de pulsar la tecla de nuevo.
Selección de una pista del álbum
1 Pulse ¢ o 4 en el lado del reproductor de CD o en el
lado de la grabadora de CD tantas veces como sea
necesario para saltar al número de pista deseado.
➜ CD o CDR, el número de álbum y el número de pista
aparecerán.
➜ El nombre de la pista se desplazará tan pronto como
deje de pulsar la tecla de nuevo.
2 Pulse ÉÅ para iniciar la reproducción.
➜ La reproducción se iniciará con la pista seleccionada.
Notas:
Al final de su selección de álbum, encontrará un álbum
llamado VARIOUS. Este álbum contiene todas las pistas que no
han sido guardadas en un álbum al crear el CD MP3.
Si quiere reproducir una recopilación personal que usted
hizo en su CD MP3 en el momento de crearlo, tiene que
seleccionarla directamente usando ¢ o 4 y pulsando
ÉÅ después.
Funciones básicas
49
Español
Page 50

SHUFFLE y REPEAT
Repetición de una pista, un disco o una programación
1 Pulse REPEAT repetidamente en el mando a distancia
durante la reproducción para seleccionar:
➜ REP TRACK: Se reproduce repetidamente la pista actual.
➜ REP DISC: Se reproduce repetidamente el disco
completo seleccionado.
➜ REP ALL: Se reproducen repetidamente todos los discos
en el equipo (o el programa).
Notas:
REP DISC no es posible durante SHUFFLE o mientras se
reproduce un programa.
REP TRACK no es posible durante SHUFFLE.
2 La reproducción se iniciará en el modo elegido.
00
Para volver a la reproducción normal, pulse REPEAT en el
mando a distancia hasta que desaparezca la indicación en
pantalla.
Reproducción de pistas en orden aleatorio
● Pulse SHUFFLE antes o durante la reproducción.
➜ SHUFF ALL se mostrará y se reproducirán de forma
aleatoria todas las pistas de la programación o las del (de
los) disco(s) cargado(s) en el reproductor de CD y en la
grabadora de CD.
Mostrar texto de CD
Esta función le permite ver en pantalla información, como
título del álbum o de la pista, contenida en un CD
especialmente codificado.
● Asegúrese de que inserta un CD con texto de CD.
➜ CD TEXT se mostrará y el nombre del intérprete y el
título del álbum se desplazarán una vez.
Texto de CD cuando se ha detenido la reproducción
● Pulse CD TEXT/edit en el mando a distancia para ver la
siguiente información, que se desplazará en la pantalla una
vez (si está disponible):
➜ Nombre del intérprete del álbum
➜ Título del álbum
Texto de CD durante la reproducción
● Pulse CD TEXT/edit en el mando a distancia para ver la
siguiente información, que se desplazará en la pantalla una
vez (si está disponible):
➜ Nombre del intérprete de la pista
➜ Título de la pista
ID3-tag
Esta función le permite ver en pantalla información, como el
título del álbum o título de la pista, contenida en una pista MP3.
●
Si ha creado una ID3-tag para su pista MP3, pulse CD TEXT/edit
en el mando a distancia durante la reproducción para que se
muestre la siguiente información ID3-tag:
➜ Título del álbum
➜ Nombre del intérprete de la pista
➜ Título de la pista
Nota: En el caso de que ID3-tag no esté disponible, NO TEXT
aparecerá.
Programación de números de pistas
Un programa puede ser utilizado para la reproducción o
para especificar las pistas que deben ser grabadas. Puede
seleccionar hasta 99 pistas (también pistas MP3) y
almacenarlas en la memoria. Es posible almacenar cualquier
pista más de una vez en cualquier orden, en el reproductor
de CD y en la grabadora de CD. Sin embargo,no es
posible combinar pistas MP3 y pistas de audio o pistas MP3
de más de un CD.
1 Cargue el (los) disco(s) deseado(s) en la(s) bandeja(s).
2 Pulse PROGRAM en el mando a distancia para acceder al
menú de programación.
➜ PROG comenzará a parpadear y aparecerá PROGRAM.
➜ Aparecerán el número de paso (STEP), el número de
pista y el tiempo de reproducción de la pista actual del
CD en uso.
3 Si desea elegir una pista del reproductor de CD:
Pulse CD en el mando a distancia y después í o ë
tantas veces como sea necesario para saltar a la pista
deseada.
Si desea elegir una pista de la grabadora de CD:
Pulse CDR en el mando a distancia y después í o ë
tantas veces como sea necesario para saltar a la pista
deseada.
Nota:Al seleccionar una pista que ya haya sido almacenada,
P aparecerá.
4 Pulse PROGRAM en el mando a distancia para almacenar
su selección en la memoria.
➜ Aparecerán el número total de pistas programadas
(STEP), PRG y el tiempo total del programa.
5 Repita los pasos 3–4 para seleccionar y almacenar todas las
pistas deseadas.
Nota: Si intenta almacenar más de 99 pistas, aparecerá
PROGRAM FULL.
6 Pulse Ç para finalizar la programación.
Borrado del programa
1 Si es necesario, pulse Ç para detener la reproducción.
2 Mantenga pulsada Ç para borrar el programa.
➜ Aparecerá PROG CLEARED y PROG desaparecerá.
Funciones básicas
50
Español
Page 51

Información básica
La unidad de la grabadora de CD le ofrece 3 funciones
principales:
– Grabación desde el reproductor interno de CD o
desde una fuente externa seleccionada
– Finalizar sus discos CDR(W) y definalizar sus discos
CDRW
– Borrar un disco CDRW
El procedimiento de grabación es el mismo para discos
CDR y CDRW. Asegúrese de que el CDR(W) esté
absolutamente libre de rayaduras y partículas de
polvo.
Para grabaciones, la longitud mínima de pista es de
4 segundos. Puede grabar hasta un máximo de 99 pistas en
un disco. Si el tiempo de grabación que queda en el disco
es menor de 7 segundos, aparecerá DISC FULL y no se
podrá acceder al modo de grabación.
Protección de los derechos de autor
El Serial Copy Management System (SCMS) evita la
realización de copias digitales de una copia digital. El sistema
permite realizar una grabación digital del original, sin
embargo, en algunos países se puede necesitar la
autorización de los titulares de los derechos de autor.
Si intenta grabar desde una fuente externa un material
protegido contra copias, COPY PROTECT aparecerá. No
será posible realizar ninguna grabación digital.
No es posible copiar un CD MP3.
Grabación de texto de CD
Si el CD original tiene texto de CD, este texto se grabará
automáticamente siempre que este texto de CD no esté
protegido contra copias. En tal caso, no será posible grabar
el texto de CD y aparecerá TEXT PROTECT.
¿Qué es finalizar?
Finalizar es un sencillo proceso que completa la grabación
de un CDR(W), necesario para:
– reproducir un CDR grabado en un reproductor de CD
estándar,
– reproducir un CDRW grabado en un reproductor de
CD o grabadora de CD compatible con CDRW,
– evitar grabaciones no deseadas en un disco, o
– evitar borrados accidentales de pistas en un CDRW.
Los CDRs están «cerrados» una vez finalizados. No podrán
ser añadidas otras pistas o texto de CD.
Los CDRWs están también «cerrados» una vez que están
finalizados, pero pueden ser definalizados para permitir
grabaciones adicionales o borrado.
Direct Line Recording (DLR)
La grabadora de CD está equipada con la tecnología de
alto rendimiento Direct Line Recording. Esto le asegura
una grabación perfecta del material original, lo que implica
una verdadera grabación «bit por bit». DLR no se activará
cuando el nivel de grabación esté ajustado.
Ajuste del nivel de grabación
Se puede ajustar el nivel de grabación de referencia para
grabaciones desde un aparato adicional. Esta función puede
utilizarse para la aparición o desaparición gradual del
sonido en sus grabaciones.
1 Pulse repetidamente INPUT para seleccionar la entrada del
aparato adicional:
➜ DIGITAL IN: se selecciona la entrada digital coaxial.
➜ OPTICAL IN: se selecciona la entrada digital óptica.
➜ ANALOG IN: se selecciona la entrada analógica.
2 Mantenga pulsada ALBUM+ o ALBUM- en la grabadora
de CD para ajustar el nivel de grabación deseado. El sonido
más alto del material a grabar no debe alcanzar los niveles
rojos de la barra de nivel.
➜ Aparecerá el nivel actual de grabación (en dB).
Nota: El nivel de grabación se puede ajustar también durante
la grabación desde el reproductor interno de CD. Mantenga
pulsada ALBUM+ o ALBUM- en el lado de la grabadora
de CD para ajustar el nivel de grabación deseado.
Sobre la grabación
51
Español
Page 52

¿Qué es la grabación interna?
La grabación realizada desde la unidad de reproductor de
CD en este equipo es denominada «grabación interna».
Selección de velocidad de grabación
Es posible seleccionar la velocidad de grabación para
grabaciones internas.
● Pulse SPEED 1·2·4x para seleccionar:
➜ REC SPEED 1X: para grabar a velocidad normal
➜ REC SPEED 2X: para grabar a doble velocidad mientras
el sonido está desactivado
➜ REC SPEED 4X: para grabar a una velocidad 4 veces
mayor que la normal mientras el sonido está desactivado
Notas:
La selección de la velocidad no es posible durante la
grabación.
En algunas marcas de discos vírgenes no es posible la
grabación a una velocidad más alta y no funciona. En tal caso,
seleccione una velocidad más baja.
Copia de un CD completo
Esta es la forma más fácil de hacer una copia de un CD
completo, preparado para reproducirse en otros
reproductores de CD.Sin embargo, no podrán ser añadidas
otras pistas o texto de CD.
1 Inserte un CDR(W), que esté absolutamente libre de
rayaduras y de partículas de polvo,en la bandeja de la
grabadora de CD.
2 Introduzca el disco que desee copiar en la bandeja del
reproductor de CD.
3 Pulse COPY CD para iniciar la copia del CD completo.
➜ REC se mostrará, la copia se iniciará y el tiempo real de
grabación restante comenzará la cuenta atrás.
Nota: Si un programa estaba ya disponible antes de pulsar
COPY CD, será ignorado. PROG desaparecerá y se grabará el
disco en uso. Una vez finalizada la grabación, PROG se
mostrará y el pograma estará disponible de nuevo.
Grabación de todas las pistas de
un CD
Puede copiar todas las pistas de un CD y decidir entonces
si finalizar o no finalizar.
1 Inserte un CDR(W), que esté absolutamente libre de
rayaduras y de partículas de polvo,en la bandeja de la
grabadora de CD.
2 Introduzca el disco del que desee copiar todas las pistas en
la bandeja del reproductor de CD.
3 Pulse REC para acceder al menú de grabación.
➜ RECORD CD?, seguido de PRESS REC aparecerán
alternativamente.
4 Pulse de nuevo REC para iniciar la grabación de todas las
pistas.
➜ REC se mostrará, la grabación se iniciará y el tiempo real
de grabación restante comenzará la cuenta atrás.
00
Si pulsa / OPEN/CLOSE en el lado de la grabadora de CD,
➜ CD NOT FINAL y PRESS REC TO FINALIZE
aparecerán alternativamente.
Decida ahora entre
no finalizar: el CDR no está preparado para
reproducirse en otros reproductores de CD, sin
embargo, se pueden añadir todavía otras pistas o
texto de CD.
Pulse de nuevo / OPEN/CLOSE en el lado de la
grabadora de CD o espere unos segundos.
➜ El compartimento se abrirá. El CDR(W) no está finalizado.
o
finalizar: el CDR está preparado para reproducirse en
otros reproductores de CD, sin embargo,no se
pueden añadir otras pistas o texto de CD.
Pulse REC para iniciar la finalización.
➜ FINAL aparecerá y el tiempo real de finalización
restante comenzará la cuenta atrás.
Grabación interna
52
Español
Page 53

Grabación de una sola pista
Puede copiar varias pistas de diferentes CDs y decidir
entonces si finalizar o no finalizar.
1 Inserte un CDR(W), que esté absolutamente libre de
rayaduras y de partículas de polvo,en la bandeja de la
grabadora de CD.
2 Reproduzca la pista deseada en el reproductor de CD.
3 Pulse REC para acceder al menú de grabación.
➜ REC TR con el número de pista y PRESS REC
aparecerán alternativamente.
4 Pulse de nuevo REC para iniciar la grabación de la pista.
➜ REC se mostrará, la grabación se iniciará desde el
comienzo de la pista seleccionada y el tiempo real de
grabación restante comenzará la cuenta atrás.
5 Para grabar más pistas repita los pasos 2–4.
00
Si pulsa / OPEN/CLOSE en el lado de la grabadora de CD,
➜ CD NOT FINAL y PRESS REC TO FINALIZE
aparecerán alternativamente.
Decida ahora entre
no finalizar: el CDR no está preparado para
reproducirse en otros reproductores de CD, sin
embargo, se pueden añadir todavía otras pistas o
texto de CD.
Pulse de nuevo / OPEN/CLOSE en el lado de la
grabadora de CD o espere unos segundos.
➜ El compartimento se abrirá. El CDR(W) no está finalizado.
o
finalizar: el CDR está preparado para reproducirse en
otros reproductores de CD, sin embargo,no se
pueden añadir otras pistas o texto de CD.
Pulse REC para iniciar la finalización.
➜ FINAL aparecerá y el tiempo real de finalización
restante comenzará la cuenta atrás.
Creación y grabación de un
programa
Puede crear su propio programa de grabación, grabarlo y
decidir después si finalizar o no finalizar. No obstante,
advierta que no podrá grabar un programa que contenga
pistas del reproductor de CD y de la grabadora de CD. En
tal caso aparecerán 2 DISC PROG y NOT POSSIBLE.
1 Cargue un CDR(W), que esté absolutamente libre de
rayaduras y de partículas de polvo,en la bandeja de la
grabadora de CD.
2 Cargue el CD del que desea grabar en la bandeja del
reproductor de CD.
3 Seleccione y guarde todas las pistas deseadas del CD
(consulte «Programación de números de pistas»).
00
Si el tiempo total de grabación del programa es mayor que
el tiempo de grabación restante del CDR(W):
➜ DOES NOT FIT aparecerá brevemente.
➜ MISSING y el tiempo que no puede ser grabado
aparecerán.
Si no obstante inicia la grabación, la grabación proseguirá
hasta que el CDR(W) esté lleno.
4 Pulse REC para acceder al menú de grabación.
➜ REC PROGRAM? y PRESS REC aparecerán
alternativamente.
5 Pulse de nuevo REC para iniciar la grabación del programa
actual.
➜ REC se mostrará, la grabación se iniciará y el tiempo real
de grabación restante comenzará la cuenta atrás.
00
Si pulsa / OPEN/CLOSE en el lado de la grabadora de CD,
➜ CD NOT FINAL y PRESS REC TO FINALIZE
aparecerán alternativamente.
Decida ahora entre
no finalizar: el CDR no está preparado para
reproducirse en otros reproductores de CD, sin
embargo, se pueden añadir todavía otras pistas o
texto de CD.
Pulse de nuevo / OPEN/CLOSE en el lado de la
grabadora de CD o espere unos segundos.
➜ El compartimento se abrirá. El CDR(W) no está finalizado.
o
finalizar: el CDR está preparado para reproducirse en
otros reproductores de CD, sin embargo,no se
pueden añadir otras pistas o texto de CD.
Pulse REC para iniciar la finalización.
➜ FINAL aparecerá y el tiempo real de finalización
restante comenzará la cuenta atrás.
Grabación interna
53
Español
Page 54

¿Qué es la grabación externa?
La grabación desde un aparato adicional es denominada
«grabación externa».
¿Grabación digital o analógica?
Cuando grabe de una fuente externa, recomendamos que
realice solamente grabaciones analógicas si no fuera posible
realizarlas digitales. Las grabaciones digitales tienen una
mejor calidad de sonido.
Incremento automático de pista
Si se utiliza la entrada digital para grabaciones de una
fuente digital (p.ej. un reproductor de CD), las pistas se
incrementarán de modo automático de forma que los
números de pista se coloquen en la misma posición que en el
original. Si se utiliza la entrada analógica para grabaciones
de una fuente analógica o digital, el incremento de las
pistas no se realizará automáticamente, a menos que se haya
seleccionado uno de los siguientes ajustes. Los incrementos
de pista no siempre pueden colocarse automáticamente,
dependiendo de la calidad del material de la fuente.
● Pulse TR. INCR. en el mando a distancia tantas veces como
sea necesario durante la detención para cambiar entre las
siguientes funciones automáticas de incremento de pista:
➜ TURNTABLE: para la óptima grabación desde fuentes de
ruido, como tocadiscos (No es posible conectar un
tocadiscos directamente a AUX/CDR IN L/R –
consulte «Conexiones analógicas».)
➜ TAPE/TUNER: para la óptima grabación desde una cinta
➜ CD/DVD: para la óptima grabación desde fuentes de alta
calidad como DAT, DCC o DVD
➜ MANUAL: para desactivar la función del incremento
automático de pista
Notas:
Los números de pista se pueden incrementar manualmente
pulsandoTR. INCR. en el mando a distancia durante la
grabación. La longitud mínima de pista es de 4 segundos.
Los números de pista no se pueden cambiar después de la
grabación.
Grabación con inicio automático
Puede grabar rápida y fácilmente un CD completo o una
pista.Tan pronto como la reproducción del aparato adicional
se inicie, la grabación comenzará automáticamente.
1 Inserte un CDR(W), que esté absolutamente libre de
rayaduras y de partículas de polvo,en la bandeja de la
grabadora de CD.
2 Pulse repetidamente INPUT en el reproductor/grabadora
de CD para seleccionar la entrada del aparato adicional del
que quiere grabar.
➜ DIGITAL IN: se selecciona la entrada digital.
➜ ANALOG IN: se selecciona la entrada analógica.
➜ OPTICAL IN: se selecciona la entrada óptica.
3 Asegúrese de que se ha seleccionado la pista deseada en el
aparato adicional.
4
Asegúrese de que el aparato adicional está en pausa o en stop.
5 Pulse REC en el reproductor/grabadora de CD para
acceder al menú de grabación.
➜ PREPARING aparecerá.
➜ RECORD EXT? y START EXTERN SOURCE!
aparecerán alternativamente.
6 Inicie la reproducción en el aparato adicional en 5 segundos.
➜
La grabación se iniciará simultáneamente y
REC
se mostrará.
Aparecerá el tiempo de grabación restante del CDR(W).
Nota: La grabación puede ser iniciada manualmente pulsando
REC en el reproductor/grabadora de CD.
00
Para detener la reproducción manualmente pulse Ç en el
lado del reproductor de CD.
00
Si pulsa / OPEN/CLOSE en el lado de la grabadora de CD,
➜ CD NOT FINAL y PRESS REC TO FINALIZE
aparecerán alternativamente.
Decida ahora entre
no finalizar: el CDR no está preparado para
reproducirse en otros reproductores de CD, sin
embargo, se pueden añadir todavía otras pistas o
texto de CD.
Pulse de nuevo / OPEN/CLOSE en el lado de la
grabadora de CD o espere unos segundos.
➜ El compartimento se abrirá. El CDR(W) no está finalizado.
o
finalizar: el CDR está preparado para reproducirse en
otros reproductores de CD, sin embargo,no se
pueden añadir otras pistas o texto de CD.
Pulse REC en el reproductor/grabadora de CD para iniciar
la finalización.
➜ FINAL aparecerá y el tiempo real de finalización
restante comenzará la cuenta atrás.
Grabación externa
54
Español
Page 55

Grabación manual
Puede iniciar y detener manualmente una grabación desde
un aparato adicional. Puede usar la grabación manual para
grabar música en vivo o para música en particular como
música clásica, que no puede ser grabada con el inicio
automático.
1 Inserte un CDR(W), que esté absolutamente libre de
rayaduras y de partículas de polvo,en la bandeja de la
grabadora de CD.
2 Pulse repetidamente INPUT en el reproductor/grabadora
de CD para seleccionar la entrada del aparato adicional del
que quiere grabar.
➜ DIGITAL IN: se selecciona la entrada digital.
➜ ANALOG IN: se selecciona la entrada analógica.
➜ OPTICAL IN: se selecciona la entrada óptica.
3 Inicie la reproducción en el aparato adicional.
4 Pulse REC en el reproductor/grabadora de CD para
acceder al menú de grabación.
➜ PREPARING aparecerá.
➜ RECORD EXT? y PRESS REC aparecerán
alternativamente.
5 Pulse REC en el reproductor/grabadora de CD para iniciar
la grabación.
➜ La grabación se iniciará y REC se mostrará. Aparecerá el
tiempo restante de grabación del CDR(W).
6 Pulse Ç en el lado del reproductor de CD para detener la
grabación.
00
Si pulsa / OPEN/CLOSE en el lado de la grabadora de CD,
➜ CD NOT FINAL y PRESS REC TO FINALIZE
aparecerán alternativamente.
Decida ahora entre
no finalizar: el CDR no está preparado para
reproducirse en otros reproductores de CD, sin
embargo, se pueden añadir todavía otras pistas o
texto de CD.
Pulse de nuevo / OPEN/CLOSE en el lado de la
grabadora de CD o espere unos segundos.
➜ El compartimento se abrirá. El CDR(W) no está finalizado.
o
finalizar: el CDR está preparado para reproducirse en
otros reproductores de CD, sin embargo,no se
pueden añadir otras pistas o texto de CD.
Pulse REC en el equipo para iniciar la finalización.
➜ FINAL aparecerá y el tiempo real de finalización
restante comenzará la cuenta atrás.
Grabación con temporizador
Esta función le permite iniciar la grabación con un tiempo
limitado vía la entrada analógica (p.ej. para grabaciones de la
radio). Puede elegir una grabación de 15, 30, 45 o
60 minutos o hasta el final del CDR(W).
1 Inserte un CDR(W), que esté absolutamente libre de
rayaduras y de partículas de polvo,en la bandeja de la
grabadora de CD.
2 Asegúrese de que el aparato adicional del que desea grabar
está conectado correctamente.
3 Pulse TIMER REC en el mando a distancia para iniciar la
grabación.
➜ 15 MIN aparecerá, seguido de PREPARING.
➜ La grabación se iniciará y REC se mostrará. Aparecerá el
tiempo real de grabación restante.
00
Para seleccionar otro tiempo de grabación, pulse
repetidamente TIMER REC en el mando a distancia hasta
que aparezca el tiempo deseado:
➜ 30 MIN, 45 MIN, 60 MIN, MAXIMUM aparecerá.
4 Una vez que el tiempo elegido haya transcurrido, la
grabación se detendrá automáticamente y el equipo pasará
al modo de espera.
00
Para detener manualmente la grabación, pulse Ç en el
lado de la grabadora de CD.
Grabación externa
55
Español
Page 56

Borrado de un disco CDRW
Es posible borrar una o más pistas (comenzando por el final
de la última pista) o un CDRW completo.No es posible
borrar de un CDR.
Borrado de una o más pistas
1 Inserte el CDRW del que desea borrar pistas en la bandeja
de la grabadora de CD.
2
Pulse brevemente ERASE CD para acceder al menú de borrado.
Si se ha insertado un CDRW no finalizado:
➜ ERASE LAST TRACK? y PRESS ERASE aparecerán
alternativamente.
Si se ha insertado un CDRW finalizado:
➜ FINALIZED CD aparecerá brevemente.
➜ ERASE LAST TRACK?, seguido de PRESS ERASE
aparecerán alternativamente.
00
Para seleccionar una pista particular que desee borrar, pulse
¢ o 4 tantas veces como sea necesario en el lado de
la grabadora de CD para seleccionar el (los) número(s) de
pista(s) deseado(s).
➜ ERASE TR y el número de pista (p.ej. 10+) aparecerán.
Para seleccionar más pistas para borrar repita este paso.
Nota: Cuando se borren varias pistas, las pistas que desee
borrar deben seleccionarse en secuencia, comenzando por la
última pista grabada. Por ejemplo: El CDRW tiene 5 pistas
grabadas. Podrá borrar las pistas 5 y 4. ¡Podrá borrar también
las pistas 5, 4 y 3, pero no podrá borrar las pistas 5 y 3!
3 Pulse de nuevo ERASE CD para iniciar el borrado.
Si se ha insertado un CDRW no finalizado:
➜ ERASE aparecerá, el tiempo restante de la operación
comenzará la cuenta atrás y el borrado se iniciará.
Si se ha insertado un CDRW finalizado:
➜ UNFINAL aparecerá, el tiempo restante de la operación
comenzará la cuenta atrás y se iniciará la definalización.
➜
Después aparecerá ERASE, el tiempo restante de la
operación comenzará la cuenta atrás y el borrado se iniciará.
Borrado de un CDRW completo
1 Inserte el CDRW que desee borrar en la bandeja de la
grabadora de CD.
2 Mantenga pulsada ERASE CD durante más de un segundo
para acceder al menú de borrado.
Si se ha insertado un CDRW no finalizado:
➜
ERASE DISC? y PRESS ERASE aparecerán
alternativamente.
Si se ha insertado un CDRW finalizado:
➜ FINALIZED CD aparecerá brevemente.
➜
ERASE DISC? y PRESS ERASE aparecerán
alternativamente.
3 Pulse de nuevo ERASE CD para borrar el CDRW completo.
Si se ha insertado un CDRW no finalizado:
➜ ERASE aparecerá, el tiempo restante de la operación
comenzará la cuenta atrás y se iniciará el borrado del
CDRW completo.
Si se ha insertado un CDRW finalizado:
➜ UNFINAL aparecerá, el tiempo restante de la operación
comenzará la cuenta atrás y la definalización comenzará.
➜ ERASE aparecerá, el tiempo restante de la operación
comenzará la cuenta atrás y se iniciará el borrado del
CDRW completo.
Edición de texto de CD
Una vez grabado el CDR(W), puede introducir un texto,
p. ej. el título del álbum o el título de pista. Este texto
aparecerá durante la reproducción en este equipo y en
otros equipos con función de texto de CD.Utilice sólo un
CDR o un CDRW no finalizados (el CDRW finalizado
debe ser definalizado primero).
1 Si es necesario, pulse Ç para detener la reproducción.
2 Pulse CDR en el mando a distancia para seleccionar la
grabadora de CD.
3 Pulse repetidamente CD TEXT/edit en el mando a distancia
para seleccionar:
➜ ALBUM TITLE: para editar el título del CD
➜ ALBUM ARTIST: para editar el nombre del intérprete
del CD
➜ ARTIST TR 1 (o 2, 3,…): para editar el nombre del
intérprete de la pista 1 (o 2, 3,…)
➜ TITLE TR 1 (o 2, 3,…): para editar el título de la
pista 1 (o 2, 3,…)
4 Tan pronto como el cursor empiece a parpadear, use las
teclas numéricas/alfabéticas en el mando a distancia para
seleccionar un carácter.
➜ Tras seleccionar un carácter el cursor se moverá
automáticamente al espacio del carácter siguiente.
5 Pulse CD TEXT/edit en el mando a distancia para guardar
el texto creado y volver al menú de edición de texto.
6 Para salir del menú de edición de texto pulse Ç.
Borrado o sustitución de un carácter
1 Pulse à o á en el mando a distancia para desplazarse a
la posición del carácter que va a borrar o a sustituir.
➜ El carácter comenzará a parpadear.
2 Si desea borrar el carácter:
Pulse DELETE en el mando a distancia.
➜ El carácter se borrará y el texto se desplazará una
posición a la izquierda.
Si desea sustituir el carácter:
Use las teclas numéricas/alfabéticas en el mando a distancia
para seleccionar un nuevo carácter.
00
Para cambiar a otro carácter pulse à o á en el mando a
distancia.
Copia automática de texto
Si se ha almacenado el nombre del intérprete de una pista,
se copiará automáticamente en la pista siguiente.
Borrado/Edición de texto de CD (sólo en grabadora de CD)
56
Español
Page 57

ADVERTENCIA
Bajo ningún concepto deberá intentar reparar el equipo usted mismo,ya que
anularía la garantía.No abra el aparato o podría sufrir una descarga eléctrica.
Si se produjera un fallo,compruebe los puntos relacionados más abajo antes
de llevar a reparar el equipo.Si no pudiese solucionar un problema siguiendo
las sugerencias que se exponen a continuación,consulte a su proveedor o al
servicio técnico.
Seguridad láser
Este aparato emplea un láser.Sólo el personal de servicio técnico
debidamente cualificado debe retirar la cubierta o intentar llevar a cabo
trabajos de reparación,debido a posibles lesiones oculares.
Problema Solución
No se enciende – Asegúrese de que el cable de red está conectado correctamente.
– Pulse 2 STANDBY·ON en el equipo para activarlo.
No hay sonido – Compruebe que las conexiones de audio han sido realizadas correctamente.
– Asegúrese de que las pistas MP3 han sido grabadas con el formato correcto.
No hay respuesta a los controles – Desconecte el equipo de la alimentación eléctrica, vuelva a conectarlo
pasados unos segundos.
Inicio automático de la visualización
– Mantenga pulsada Ç en el equipo al menos 5 segundos para cancelar el
permanente de funciones (modo demostración)
modo demostración.
El mando a distancia no funciona – Quite las pilas e insértelas correctamente o inserte nuevas pilas.
correctamente – Reduzca la distancia al equipo.
Indicación WRONG DISC, USE AUDIO CD – Compruebe que el disco no está rayado o sucio. Cambie o limpie el disco.
y INSERT DISC – Compruebe que se ha insertado el disco, cara impresa hacia arriba.
– Compruebe que no ha insertado un DVD.
– Espere hasta que la lente empañada del láser quede limpia.
Indicación WRONG DISC, USE CDR<W> WITH
– Se ha insertado un CDR(W) de ordenador.Asegúrese de que se ha insertado
`DIGITAL AUDIO´ LOGO y INSERT DISC
un disco digital de audio, con la marca «Digital Audio» y el logotipo especial.
Indicación NO SIGNAL o – Compruebe que el cable de conexión está correctamente conectado.
indicación CHECK INPUT – Seleccione la entrada correcta.
– Asegúrese de que el aparato externo está activado.
Indicación OVERHEATING –
No coloque el equipo encima de otro material que pueda calentarlo (p.ej. un receptor).
No graba – Asegúrese de que el CDR(W) esté completamente libre de rayaduras y de
partículas de polvo.
– Compruebe que ha insertado un CDR(W) de audio digital y asegúrese de
que no está finalizado.
Se interrumpe la grabación – Use CDR(W)s de audio Philips.
– En caso de interrupción del proceso de grabación (pérdida de potencia, golpe
mecánico) reinicie la grabación con un nuevo disco.
El disco grabado no se reproduce en – Asegúrese de que el CDR(W) está finalizado.
otro reproductor de CD estándar – Inser te el CDRW en un reproductor de CD compatible con CDRW.
Se pierden directorios de CD MP3 – Sólo se mostrarán álbums con archivos reproducibles.
El tiempo de grabación transcurrido – Este es el comportamiento normal si esta pista MP3 tiene una velocidad
de una pista MP3 se cuenta muy rápido de bit variable.
o irregularmente
Las pistas grabadas se confunden
– Use otro modo de incremento de pista.
o las pistas no se inician o detienen – Introduzca el incremento de pista manualmente con el mando a distancia.
en el momento correcto
Localización y solución de averías
57
Español
Page 58

Allgemeine Informationen
Technische Daten
___________________________
59
Umweltinformationen
_______________________
59
Mitgeliefertes Zubehör
_______________________
59
Wartung
__________________________________
59
Disk-Handhabung
___________________________
59
Disks zum Aufnehmen
_______________________
60
Disks zum Abspielen
________________________
60
Einige Worte zu MP3
________________________
60
Anschlüsse
Anschlüsse
________________________________
61
Informationen zur Aufstellung
__________________
61
Anschlüsse allgemein
________________________
61
Installationen
Analoge Anschlüsse
_________________________
62
Digitale Anschlüsse
_______________________
62–63
Netzbetrieb
_______________________________
63
Bedienelemente
____________________________
64
Fernbedienung
Gebrauch der Fernbedienung
_________________
65
Tasten der Fernbedienung
____________________
65
Grundfunktionen
Einschalten, in Bereitschaft schalten
_____________
66
Vorführbetrieb
_____________________________
66
Disks laden
________________________________
66
Wiedergabe
_______________________________
66
Auswählen und Suchen (auf allen
Disks außer MP3-CDs)
______________________
67
Auswählen und Suchen (nur auf MP3-CDs)
_______
67
SHUFFLE und REPEAT
_______________________
68
CD-Text-Anzeige
___________________________
68
ID3-Tag
__________________________________
68
Programmieren von Titelnummern
______________
68
Löschen des Programmes
____________________
68
Über das Aufnehmen
Grundlegende Informationen
__________________
69
Was bedeutet finalisieren?
____________________
69
Direct Line Recording (DLR)
__________________
69
Den Aufnahmepegel einstellen
_________________
69
Internes Aufnehmen
Was bedeutet internes Aufnehmen?
____________
70
Die Aufnahmegeschwindigkeit wählen
___________
70
Kopieren einer gesamten CD
__________________
70
Alle Titel von einer CD aufnehmen
_____________
70
Einen einzelnen Titel aufnehmen
_______________
71
Ein Programm erstellen und aufnehmen
_________
71
Externes Aufnehmen
Was bedeutet externes Aufnehmen?
____________
72
Analoges oder digitales Aufnehmen?
____________
72
Automatische Titelnummernvergabe
____________
72
Aufnehmen mit automatischem Start
___________
72
Manuelles Aufnehmen
_______________________
73
Aufnehmen mit Zeitschaltung
_________________
73
Löschen/CD-Text-Bearbeitung (nur am
CD-Rekorder)
Löschen von einer CDRW-Disk
________________
74
CD-Text-Bearbeitung
________________________
74
Fehlerbehebung
____________________________
75
Inhaltsverzeichnis
58
Deutsch
Page 59

Technische Daten
Änderungen vorbehalten.
Allgemein
Stromverbrauch
Aktiv
________________________________
< 20 W
In Bereitschaft
_________________________
< 0,6 W
Abmessungen, b × h × t
___________
435 × 88 × 310 mm
Gewicht
____________________________________
5 kg
Audio
Frequenzgang
_________________________
2–20.000 Hz
Wiedergabe
Signal-Rauschabstand (A-Kurve)
____________
120 dB
Signal-Rauschabstand
____________________
110 dB
Dynamikbereich
_________________________
98 dB
Klirrfaktor
______________________________
-95 dB
Kanaltrennung
__________________________
105 dB
Aufnahme
Signal-Rauschabstand (A-Kurve)
_____________
93 dB
Signal-Rauschabstand digital
ohne SRC
___________________
gleich wie Tonquelle
Dynamikbereich
_________________________
90 dB
Klirrfaktor + Rauschen
____________________
-86 dB
Digitaler/optischer Eingang
_____________
12–96 kHz
Laser (CD-Rekorder)
Ty p
________________________
Halbleiter Laser GaAIAs
Wellenlänge
__________________
775–795 nm (bei 25°)
Ausgangsleistung
___
2,5 mW (Lesen), 35 mW (Schreiben)
Strahldivergenz
___________________________
60 Grad
Als ENERGY STAR®Partner,
hat Philips festgelegt, dass dieses
Produkt den ENERGY STAR
®
Richtlinien für Energie-Effizienz
entspricht.
Dieses Gerät entspricht den Funkentstörungsvorschriften der Europäischen Gemeinschaft.
VORSICHT
Ein anderer Gebrauch der Bedienelemente oder
Einstellungen oder Ausführung der Vorgänge als in
diesem Handbuch beschrieben, kann Sie gefährlicher
Strahlung aussetzen oder zu anderem unsicheren
Betrieb führen.
Umweltinformationen
Überflüssiges Verpackungsmaterial wurde vermieden. Wir haben
unser Möglichstes getan, die Verpackung in drei Materialen
trennbar zu machen:Wellpappe (Schachtel), expandiertes
Polystrol (Puffer) und Polyethylen (Säcke, Schaumstofffolien).
Ihr Gerät besteht aus Materialien, die von darauf spezialisierten
Betrieben wieder verwertet werden können. Bitte informieren
Sie sich darüber, wie Sie Verpackungsmaterialien, leere
Batterien und alte Geräte entsprechend den örtlichen
Bestimmungen entsorgen können.
Mitgeliefertes Zubehör
– 2 analoge Audiokabel (mit roten und weißen Steckern)
– Fernbedienung
– 2 Batterien für die Fernbedienung,Type AA
– Netzkabel
Wartung
Reinigen Sie das Gerät mit einem
weichen, feuchten und fusselfreien
Tuch.Verwenden Sie keine
Reinigungsmittel, da diese das
Gehäuse angreifen können.
Setzen Sie das Gerät, die Batterien
oder die Disks nicht Feuchtigkeit,
Regen, Sand oder extremer Hitze
(verursacht durch Heizgeräte oder
direktes Sonnenlicht) aus.
Disk-Handhabung
Wenn der CD-Spieler/Rekorder Disks nicht korrekt lesen kann,
reinigen Sie die Linsen mit einer im Handel erhältlichen Reinigungs-CD,bevor Sie das Gerät zur Reparatur bringen. Andere
Reinigungsmethoden können die Linsen zerstören. Schließen
Sie stets die Laden, um Staub auf den Linsen zu vermeiden.
Bei einem raschen Wechsel von kalter in warme Umgebung
können die Linsen beschlagen. Das Abspielen einer Disk ist dann
nicht möglich. Lassen Sie dem Gerät in warmer Umgebung Zeit
zum Akklimatisieren.
Um eine Disk leicht aus der Hülle zu
nehmen, drücken Sie die Mittelhalterung
der Hülle, während Sie die CD(RW)
anheben. Fassen Sie die CD(RW)
immer am Rand an und legen Sie sie
nach Gebrauch wieder in die Hülle.
Eine CD niemals beschriften oder mit einem Aufkleber versehen.
Schreiben Sie nur auf der bedruckten Seite einer CDR oder
CDRW, und dies ausnahmslos mit einem weichen Filzstift.
Um eine Disk zu reinigen, wischen
Sie mit einem weichen, fusselfreien
Tuch geradlinig von der Mitte zum
Rand. Ein Reinigungsmittel kann die
Disk beschädigen!
Allgemeine Informationen
59
VORSICHT
UNSICHTBARE LASERSTRAHLUNG BEIM ÖFFNEN.
VERMEIDEN SIE ES, SICH DEM STRAHL AUSZUSETZEN.
Anmerkung: Diese Warnung befindet sich
innen im Gerät.
Deutsch
Page 60

Disks zum Aufnehmen
Stellen Sie sicher, dass Sie zum Aufnehmen nur spezielle
Audio-Disks verwenden. Diese Disks sind mit „Digital
Audio“ und den unten gezeigten Logos gekennzeichnet.
Es gibt zwei verschiedene Arten von Audio-Disks die für
diesen CD-Rekorder verwendet werden können:
– CD-Audio Recordable (CDR)
Disks können zur einmaligen
Aufnahme verwendet werden und in
allen Standard CD-Spielern und
CD-Rekordern, wenn sie finalisiert
sind, gespielt werden.
– CD-Audio ReWritable (CDRW)
Disks können zum mehrmaligen
Aufnehmen, Löschen und wieder
Aufnehmen verwendet werden und in
CDRW-kompatiblen CD-Spielern und
CD-Rekordern, wenn sie finalisiert sind, gespielt werden.
Alle Philips CD-Spieler und CD-Rekorder mit
diesem Aufkleber sind CDRW-kompatibel.
Um ein einwandfreies Funktionieren des Gerätes
zu gewährleisten, empfehlen wir den ausschließlichen
Gebrauch von Philips Audio CDR-Disks und Audio
CDRW-Disks.
Anmerkung: Verwenden Sie keine Computer-CDR oder -CDRW,
da das Aufnehmen nicht einwandfrei funktionieren würde!
Aufnehmen ist nur dann erlaubt, wenn dadurch
nicht in das Urheberrecht oder in andere Rechte
Dritter eingegriffen wird.
In einigen Ländern kann der Gebrauch des
CD-Spielers/Rekorders, wie in diesem Handbuch
gezeigt oder vorgeschlagen, die Autorisierung der
Urheberrechtsinhaber erfordern.
Disks zum Abspielen
Für diesen CD-Spieler/Rekorder können Sie folgende Disks
zum Abspielen verwenden:
– Alle bereits bespielten Audio CDs
– Alle Audio CDR und Audio CDRW Disks
– MP3-CDs (CD-ROMs mit MP3-Titeln)
Einige Worte zu MP3
Die revolutionäre neue Musik-Kompressionstechnologie,
MP3 (MPEG ! Audio Layer-3), erlaubt eine Reduzierung der
originalen digitalen Audio-Sound-Daten um den Faktor 10
ohne wesentlichen Verlust an Soundqualität. Dies
ermöglicht Ihnen, auf einer einzigen CD-ROM bis zu
10 Stunden Musik in CD-ähnlicher Qualität aufzunehmen.
Das Erstellen Ihrer eigenen MP3-CD
Grundsätzlich gibt es zwei Quellen für MP3-Musik auf CD.
Sie können entweder Musik von Ihren eigenen digitalen
Audio CDs per CD-ROM-Laufwerk auf Ihren PC
übertragen und sie in MP3-Format enkodieren („rippen“)
oder legale MP3-Musik aus dem Internet downloaden.
Mit Ihrem PC nehmen Sie dann die Musik von der
Festplatte auf CD-ROM auf („brennen“) (Vergewissern
Sie sich, dass der Dateiname mit .mp3 endet).
Einmal fertiggestellt, können Sie Ihre MP3-CD in diesem
CD-Spieler/Rekorder spielen und die Musik genießen.
Datenrate
Die Datenrate spielt bei MP3 eine wichtige Rolle. Sie gibt
an, wie schnell Bits übertragen werden.
Stereo-Musik auf einer CD weist eine Datenrate von
ca. 1400 Kilobit pro Sekunde (kbps) auf. Um eine gute
MP3-Qualität zu erlangen, wird eine Bitrate von
128 kbps empfohlen. Da die Enkodierungsrate vom
Verbraucher selbst gewählt werden kann, sollten Sie
unbedingt sicherstellen, dass diese Datenrate für MP3
erreicht wird, da Aufnahmen mit weniger als 128 kbps eine
Verschlechterung an Soundqualität erleiden.
Aufnehmen
Das Downloaden von MP3-Dateien aus dem Internet oder
das Rippen von Liedern Ihrer eigenen digitalen Audio CDs
ist ein heikler Vorgang, der auch von der Qualität des
Encodierungsprogrammes und der Geschwindigkeit Ihres
PCs beeinflusst wird. Dies kann manchmal „Drop-outs“ zur
Folge haben, die Sie während des Hörens der MP3-CD
feststellen würden.
Auf jeden Fall sollten Sie sicherstellen, dass Sie keine
schnellere Aufnahmegeschwindigkeit verwenden, als auf der
CD-ROM angegeben und dass während des
Aufnahmevorganges am PC nicht gleichzeitig andere
Programme laufen.
Wenn eine MP3-CD gespielt wird, werden gemäß
der Vorschrift von SDMI (Secure Digital Music
Initiative) die digitalen Ausgänge dieses Gerätes
deaktiviert.
Es ist nicht möglich, mit diesem
CD-Spieler/Rekorder eine MP3-CD zu „brennen“.
Es ist nicht möglich, von einer MP3-CD
aufzunehmen.
Unterstützte Formate
Folgende Formate werden bei diesem CD-Spieler/Rekorder
unterstützt:
– Diskformat: ISO 9660 oder Joliet
– Dateiformat: MPEG ! Audio Layer-3
– Dateiname: .mp3 (Titel), .m3u oder .pls (Playlists)
– Bitrate: 32–320 kbps (128 kbps empfohlen) oder
variable Bitrate
Verwenden Sie das Diskformat ISO 9660, wenn Sie die
MP3-CD brennen. Das Diskformat UDF (z. B.
„DirectCD“ oder „WinOnCD“) wird nicht
unterstützt.
Allgemeine Informationen
60
Deutsch
Page 61

Anschlüsse
1 OPTICAL IN
anzuschließen an den digitalen optischen Ausgang eines
externen digitalen Gerätes
2 OPTICAL OUT
anzuschließen an den digitalen optischen Eingang eines
externen digitalen Gerätes
3 DIGITAL IN
anzuschließen an den digitalen koaxialen Ausgang eines
externen digitalen Gerätes
4 DIGITAL OUT
anzuschließen an den digitalen koaxialen Eingang eines
externen digitalen Gerätes
5 ANALOG IN L/R
anzuschließen an den analogen Audioausgang eines
externen Gerätes
6 ANALOG OUT L/R
anzuschließen an den analogen Audioeingang eines
externen Gerätes
7 AC MAINS ~
Nachdem alle Anschlüsse gemacht wurden, schließen
Sie das Netzkabel an die Netzsteckdose an.
Informationen zur Aufstellung
Stellen Sie das Gerät auf eine flache, harte und stabile
Fläche. Stellen Sie das Gerät nicht auf andere Apparate, die
es möglicherweise erwärmen könnten (z. B. Receiver oder
Verstärker). Falls das Gerät in einem Schrank aufgestellt
wird, stellen Sie sicher, dass mindestens 3,5 cm um das
Gerät herum frei bleiben, um ein Überhitzen zu vermeiden.
Aktive Mobiltelefone nahe dem Gerät können Störungen
verursachen.
Anschlüsse allgemein
Bei eingeschaltetem Netzteil niemals Anschlüsse
machen oder diese verändern.
Zur Wiedergabe stehen folgende Ausgänge zur Verfügung:
– Analogausgang (ANALOG OUT L/R)
– Digitaler koaxialer Ausgang (DIGITAL OUT)
– Digitaler optischer Ausgang (OPTICAL OUT)
Für eine externe Aufnahme stehen folgende Eingänge zur
Verfügung:
– Analogeingang (ANALOG IN L/R)
– Digitaler koaxialer Eingang (DIGITAL IN)
– Digitaler optischer Eingang (OPTICAL IN)
Diese Eingänge können an den entsprechenden Ausgang (an
die entsprechenden Ausgänge) Ihres Verstärkers/Receivers
oder direkt an den entsprechenden Ausgang (an die
entsprechende Ausgänge) eines externen Gerätes
angeschlossen werden.
Es ist nicht möglich, einen Plattenspieler direkt an
ANALOG IN L/R anzuschließen.Wenn Sie einen
Plattenspieler mit dem Gerät verwenden wollen, so
müssen Sie einen Verstärker/Receiver an
ANALOG IN L/R am CD-Spieler/Rekorder
anschließen. Schließen Sie dann den Plattenspieler an
den Verstärker an.
Die Anschlüsse, die Sie machen, werden von den
Möglichkeiten, die Ihre Audiogeräte bieten, abhängig sein und
auch davon, wie Sie das Gerät verwenden werden. Schlagen
Sie bitte zuerst in den Handbüchern Ihrer Audiogeräte nach.
Wir empfehlen nur dann analog aufzunehmen, wenn eine
digitale Aufnahme nicht möglich ist.Eine digitale Aufnahme
resultiert in besserer Tonqualität.
Machen Sie immer, sofern möglich, sowohl digitale als auch
analoge Anschlüsse.Auf diese Weise können Sie jederzeit
analoge Aufnahmen machen,wenn digitales Aufnehmen
nicht möglich ist.
Anschlüsse
61
OUTIN
OPTICAL
DIGITAL
ANALOG
L
R
IN OUTOUTIN
AC MAINS
~
7
5
4
32
1
6
Deutsch
Page 62

Analoge Anschlüsse
Diese Anschlüsse sind für die Wiedergabe und Aufnahme
über einen Verstärker/Receiver, der mit analogen Ein- und
Ausgängen ausgestattet ist, erforderlich.
1 Stecken Sie den roten Stecker des mitgelieferten
Audiokabels (Cinch) in die rote Buchse ANALOG IN R und
den weißen Stecker in die weiße Buchse ANALOG IN L am
CD-Spieler/Rekorder.
2 Verbinden Sie das andere Ende des Audiokabels mit den
analogen Ausgängen des Verstärkers/Receivers (CDR OUT,
TAPE OUT, AUX OUT, REC OUT, etc.).
3 Stecken Sie den roten Stecker des mitgelieferten Audiokabels
(Cinch) in die rote Buchse ANALOG OUT R und den
weißen Stecker in die weiße Buchse ANALOG OUT L am
CD-Spieler/Rekorder.
4 Verbinden Sie das andere Ende des Audiokabels mit den
analogen Eingängen des Verstärkers/Receivers (CD-R,
TAPE IN, AUX, PLAY IN, etc.).
5 Schließen Sie alle anderen Bestandteile Ihres Systems
(Tapedeck, CD-Spieler,Tuner, Plattenspieler, usw.) über
deren analoge Ausgänge an die entsprechenden analogen
Eingänge des Verstärkers/Receivers (CD IN,TUNER IN,
AUX IN, PHONO IN, etc.) an.
00
Eine Aufnahme kann nun mit jedem Gerät, das an den
analogen Eingang des Verstärkers/Receivers angeschlossen
ist, gemacht werden. Drücken Sie wiederholt INPUT am
CD-Spieler/Rekorder, um den analogen Eingang
auszuwählen.
➜ ANALOG IN wird angezeigt.
Wie man anschließt, wenn der analoge Ausgang
am Verstärker/Receiver schon verwendet wird
(besetzt ist)
Die meisten Verstärker/Receiver haben mehrere analoge
Ausgänge (TAPE,VCR,…), manche Verstärker/Receiver
verfügen jedoch über nur 1 analogen Ausgang. Haben Sie in
diesem Fall auch schon ein Tapedeck (DAT-Rekorder oder
MD-Rekorder) an diesen Ausgang angeschlossen, so
müssen Sie die existierenden Anschlüsse ändern.
1 Trennen Sie die analogen Anschlüsse vom Tapedeck zum
Verstärker/Receiver.
2 Schließen Sie den CD-Spieler/Rekorder an (siehe
Schritte 1–4 im vorhergehenden Kapitel).
3 Verbinden Sie die analogen Ausgänge des Tapedecks mit
beliebigen freien analogen Eingängen (AUX, CD) am
Verstärker/Receiver. Sie können nun Kassetten spielen oder
von Ihrem Tapedeck auf CD aufnehmen. Es ist jedoch nicht
mehr möglich auf Kassette aufzunehmen.
Digitale Anschlüsse
Direkter digitaler Koaxialanschluss
Dieser Anschluss ist für die direkte Aufnahme von einem
digitalen Audiogerät mit einem digitalen Koaxialausgang
(z. B. CD-Spieler oder DVD-Spieler) erforderlich.
● Verwenden Sie ein digitales Koaxialkabel, um den koaxialen
Ausgang des externen Gerätes mit DIGITAL IN am
CD-Spieler/Rekorder zu verbinden.
00
Eine Aufnahme kann nun über den digitalen Koaxialeingang
gemacht werden. Drücken Sie wiederholt INPUT am
CD-Spieler/Rekorder, um den digitalen Koaxialeingang
auszuwählen.
➜ DIGITAL IN wird angezeigt.
Installationen
62
OUTIN
OPTICAL
DIGITAL
ANALOG
L
R
IN OUTOUTIN
OPTICAL
DIGITAL OUTPUT
ANALOG OUTPUT
L
R
PHONO
L
R
CD
IN IN
CD PLAYER/
RECORDER
AMPLIFIER/
RECEIVER
PHONO
L
R
CD
IN IN
CDR/TAPE
L
R
IN OUT
CD PLAYER
COAX
TURNTABLE
Deutsch
DIGITAL OUTPUT
OPTICAL
DIGITAL
OPTICAL
ANALOG OUTPUT
ANALOG
IN OUTOUTIN
L
R
L
R
CD PLAYER
CD PLAYER/
RECORDER
COAX
OUTIN
Page 63

Direkter digitaler optischer Anschluss
Dieser Anschluss ist für die direkte Aufnahme von einem
digitalen Audiogerät mit einem digitalen optischen Ausgang
(z. B. CD-Spieler oder DVD-Spieler) erforderlich.
1
Entfernen Sie die Staubschutzkappen vom digitalen optischen
Eingang des CD-Spielers/Rekorders und vom digitalen optischen
Ausgang des externen Gerätes. Bewahren Sie die Schutzkappen
an sicherer Stelle auf.
2
Verwenden Sie ein digitales optisches Kabel, um den optischen
Ausgang des externen Gerätes mit OPTICALIN am
CD-Spieler/Rekorder zu verbinden.Vergewissern Sie sich, dass
beide Stecker ganz eingeschoben sind, bis ein Klicken zu hören ist.
00
Eine Aufnahme kann nun über den digitalen optischen Eingang gemacht werden. Drücken Sie wiederholt INPUT am CD-Spieler/
Rekorder, um den digitalen optischen Eingang auszuwählen.
➜
OPTICAL IN wird angezeigt.
Digitale koaxiale Anschlüsse über einen digitalen Receiver
Wenn Sie einen Receiver mit digitalen koaxialen Ein- und
Ausgängen haben, sind Sie mit diesen Anschlüssen
imstande, digitale Aufnahmen von verschiedenen, an den
Receiver angeschlossenen Tonquellen, zu machen.
●
Verwenden Sie ein Koaxialkabel, um den digitalen Koaxialeingang
des Receivers mit DIGITAL OUT am CD-Spieler/Rekorder zu
verbinden.Verwenden Sie ein weiteres Koaxialkabel, um den
digitalen Koaxialausgang des Receivers mit DIGITAL IN am
CD-Spieler/Rekorder zu verbinden.
00
Eine Aufnahme kann nun mit jedem digitalen Gerät, das an
einen digitalen Eingang des digitalen Receivers angeschlossen
ist (z. B. CD-Spieler oder DVD-Spieler), gemacht werden.
Drücken Sie wiederholt INPUT am CD-Spieler/Rekorder,
um den digitalen Koaxialeingang auszuwählen.
➜ DIGITAL IN wird angezeigt.
Digitale optische Anschlüsse über einen digitalen Receiver
Wenn Sie einen Receiver mit digitalen optischen Ein- und
Ausgängen haben, sind Sie mit diesen Anschlüssen
imstande, digitale Aufnahmen von verschiedenen, an den
Receiver angeschlossenen Tonquellen, zu machen.
1 Entfernen Sie die Staubschutzkappen von den digitalen
optischen Ein- und Ausgängen des CD-Spielers/Rekorders
und vom digitalen optischen Ausgang des Receivers.
Bewahren Sie die Schutzkappen an sicherer Stelle auf.
2 Verwenden Sie ein digitales optisches Kabel, um den
optischen Eingang des Receivers mit OPTICALOUT am
CD-Spieler/Rekorder zu verbinden.Verwenden Sie ein
weiteres digitales optisches Kabel, um den optischen Ausgang
des Receivers mit OPTICAL IN am CD-Spieler/Rekorder zu
verbinden.Vergewissern Sie sich, dass beide Stecker ganz
eingeschoben sind, bis ein Klicken zu hören ist.
00
Eine Aufnahme kann nun mit jedem digitalen Gerät, das an
einen digitalen Eingang des digitalen Receivers angeschlossen
ist (z. B. CD-Spieler oder DVD-Spieler), gemacht werden.
Drücken Sie wiederholt INPUT am CD-Spieler/Rekorder,
um den digitalen optischen Eingang auszuwählen.
➜ OPTICAL IN wird angezeigt.
Netzbetrieb
Das Typenschild befindet sich an der Rückseite des
Gerätes.
1 Prüfen Sie, ob die am Typenschild angegebene Spannung
mit der örtlichen Netzspannung übereinstimmt.Ist dies
nicht der Fall, wenden Sie sich an Ihren Fachhändler oder an
Ihre Servicestelle.
2 Vergewissern Sie sich, dass alle Anschlüsse gemacht
wurden, bevor Sie das Netzteil einschalten.
3 Verbinden Sie das mitgelieferte Netzkabel mit AC MAINS ~
und der Netzsteckdose. Dies schaltet das Netzteil ein.
Auch wenn das Gerät in Bereitschaft geschaltet ist,
verbraucht es geringfügig Strom. Um das Gerät
vollständig vom Netz zu trennen, ziehen Sie den
Stecker aus der Steckdose.
Installationen
63
CD PLAYER/
RECORDER
CD PLAYER
OUTIN
OPTICAL
DIGITAL
ANALOG
L
R
IN OUTOUTIN
OPTICAL
DIGITAL OUTPUT
ANALOG OUTPUT
L
R
COAX
“CLICK!”
CD PLAYER/
RECORDER
DIGITAL
RECEIVER
OUTIN
OPTICAL
DIGITAL
ANALOG
L
R
IN OUTOUTIN
OPTICAL
OUT
IN
AUX
CD IN DVD IN
Deutsch
OPTICAL
IN
”
OUT
CD IN DVD IN
AUX
DIGITAL
RECEIVER
“CLICK!
DIGITAL
OPTICAL
ANALOG
L
OUTIN
R
IN OUTOUTIN
CD PLAYER/
RECORDER
Page 64

1 2 STANDBY·ON
schaltet das Gerät ein/in Bereitschaft
2 / OPEN/CLOSE
öffnet/schließt die CD-Spieler-Lade
3 CD-Spieler-Lade
4 Anzeige
5 CD RECORDER
CD-Rekorder-Lade
blaues Licht an: CD-Rekorder ist ausgewählt
rotes Licht an:Aufnahme ist im Gange
6 / OPEN/CLOSE
öffnet/schließt die CD-Rekorder-Lade
7 PHONES/LEVEL
regelt die Kopfhörerlautstärke
8 PHONES/LEVEL
6,3-mm-Kopfhörerbuchse
9 COPY CD
wählt Aufnehmen und automatisches Finalisieren der
gegenwärtigen CD
0 REC 0
wählt andere Aufnahmemodi
! ¢
CD-Rekorder: wählt den nächsten Titel, sucht vorwär ts
@ 4
CD-Rekorder: wählt den vorhergehenden Titel, sucht
rückwärts
# ALBUM/REC LEVEL+
CD-Rekorder: wählt das nächste Album auf einer MP3-CD,
erhöht den Aufnahmepegel
$ ALBUM/REC LEVEL-
CD-Rekorder: wählt das vorhergehende Album auf einer
MP3-CD,verringert den Aufnahmepegel
% Ç
CD-Rekorder: stoppt das Abspielen/Aufnehmen
^ ÉÅ
CD-Rekorder: startet/unterbricht das Abspielen
& ERASE CD
löscht Aufnahmen auf einer CDRW
* INPUT
wählt den Eingang für ein externes Gerät
( SHUFFLE
spielt Titel in zufälliger Reihenfolge
) DISPLAY
wählt Informationen in der Anzeige
¡ ¢
CD-Spieler: wählt den nächsten Titel, sucht vorwärts
™ 4
CD-Spieler: wählt den vorhergehenden Titel, sucht rückwärts
£ ALBUM+
CD-Spieler: wählt das nächste Album auf einer MP3-CD
≤ ALBUM-
CD-Spieler: wählt das vorhergehende Album auf einer
MP3-CD
∞ Ç
CD-Spieler: stoppt das Abspielen
§ ÉÅ
CD-Spieler: startet/unterbricht das Abspielen
≥ SPEED 1·2·4x
wählt die Aufnahmegeschwindigkeit für interne Aufnahmen
Anmerkung: Abhängig von den verschiedenen Modi, in denen
Sie sich befinden, werden SPEED 1·2·4x, REC und COPY CD
beleuchtet sein. Dies soll Ihnen das Finden der entsprechenden,
jeweils zur Auswahl stehenden Tasten erleichtern.
Bedienelemente
64
Deutsch
1654327
L
R
(
)¡™9£≤∞§≥
*
^
!
@#$%&
80
Page 65

Fernbedienung
65
Gebrauch der Fernbedienung
Öffnen Sie das Batteriefach der
Fernbedienung und legen Sie
2 Alkalibatterien,Typ AA (R06,
UM-3), ein.
Verwenden Sie keine alten und
neuen Batterien gemeinsam und
kombinieren Sie nicht verschiedene
Arten von Batterien miteinander.
Entfernen Sie die Batterien, wenn sie leer sind oder die
Fernbedienung für lange Zeit nicht verwendet wird.
Batterien enthalten chemische Substanzen, deshalb
sollten sie ordnungsgemäß entsorgt werden.
Die Tasten der Fernbedienung funktionieren gleich wie die
entsprechenden Tasten am Gerät.
Tasten der Fernbedienung
1 2
schaltet das Gerät ein/in Bereitschaft
2 CD, CDR
wählt das CD-Spieler-Deck oder das CD-Rekorder-Deck
3 TIMER REC
startet eine zeitlich begrenzte Aufnahme
4 Alphanumerische Tasten
1–0: zum Eintippen von Nummern für Titel
ABC – WXYZ: zum Eintippen von Buchstaben für CD-Text
SPACE: zum Eintippen eines Abstandes für CD-Text
. : zum Eintippen eines Punktes oder eines Zeichens für CD-Text
5 TR. INCR.
wählt automatische oder manuelle Titelnummernvergabe
6 PROGRAM
steigt in das Programmmenü ein
7 ALBUM+
wählt das nächste Album auf einer MP3-CD
8 ALBUM-
wählt das vorhergehende Album auf einer MP3-CD
9 É
startet das Abspielen
0 í
wählt den vorhergehenden Titel
! ë
wählt den nächsten Titel
@ Ç
stoppt das Abspielen
# á
sucht vorwärts
$ à
sucht rückwärts
% Å
unterbricht das Abspielen
^ DIM
regelt die Helligkeit der Anzeige
& DISPLAY
wählt Informationen in der Anzeige
* CD TEXT/edit
schaltet zwischen CD-Text-Informationen um, steigt in das
(aus dem) Textbearbeitungsmenü ein (aus)
( DELETE
löscht CD-Text
) REPEAT
wiederholt einen Titel, die gesamte CD(RW) oder ein
Programm
¡ SHUFFLE
spielt Titel in zufälliger Reihenfolge
3
Deutsch
4
5
8
9
0
CD TIMER REC
SPACE ABC
1
GHI JKL
4
PQRS TUV
7
TR.INCR.
ALBUM
1
CDR
DEF
2
5
8
.
3
MNO
6
WXYZ
9
PROGRAM
0
ALBUM
+
2
6
7
!
@
$
#
%
^
)
&
*
DISPLAY DIM
CD TEXT/edit DELETE
CD TEXT
SHUFFLE REPEAT
(
¡
Page 66

Einschalten, in Bereitschaft schalten
● Um das Gerät einzuschalten, drücken Sie
2 STANDBY·ON.
➜ WELCOME TO PHILIPS AUDIO wird angezeigt.
● Um das Gerät in Bereitschaft zu schalten, drücken
Sie nochmals 2 STANDBY·ON.
➜ Das Gerät ist in Bereitschaft geschaltet.
Vorführbetrieb
Der Vorführbetrieb zeigt verschiedene Besonderheiten des
Gerätes und startet automatisch wenn für einige Minuten
keine Taste gedrückt wurde oder wenn das Gerät in
Bereitschaft geschaltet ist.
● Um den Vorführbetrieb zu löschen, halten Sie für
mindestens 5 Sekunden Ç am Gerät gedrückt.
➜ Der Vorführbetrieb ist dauerhaft gelöscht.
Disks laden
1 CD-Spieler: Drücken Sie / OPEN/CLOSE, um die
CD-Spieler-Lade zu öffnen.
➜ OPEN CD wird angezeigt und die Lade wird geöffnet.
CD-Rekorder: Drücken Sie / OPEN/CLOSE, um die
CD-Rekorder-Lade zu öffnen.
➜ OPEN CDR wird angezeigt und die Lade wird geöffnet.
Anmerkungen:
Das Öffnen des CD-Spielers löscht jedes Programm, das Titel
von einer CD beinhaltet, die im CD-Spieler geladen ist.
Das Öffnen des CD-Rekorders löscht jedes Programm, das
Titel von einer CD beinhaltet, die im CD-Rekorder geladen ist.
2 Legen Sie eine Disk (bedruckte Seite nach oben) in das Fach.
3 CD-Spieler: Drücken Sie nochmals / OPEN/CLOSE, um
die Lade zu schließen.
➜ Die Lade wird geschlossen und READING wird angezeigt.
➜ CD, die Gesamtanzahl der Titel und die Gesamtspielzeit
der Disk werden angezeigt.
CD-Rekorder: Drücken Sie / OPEN/CLOSE, um die Lade
zu schließen.
➜ Die Lade wird geschlossen und READING wird angezeigt.
➜ Wenn eine nicht finalisierte Disk eingelegt ist, wird
INITIALIZING angezeigt.
➜ CDR, die Gesamtanzahl der Titel und die Gesamtspielzeit
der Disk werden angezeigt.
Nur für MP3-CD:
➜ READING MP3 wird angezeigt. MP3 erscheint. Dies kann
bei einer großen Anzahl von Titeln bis zu 2 Minuten dauern.
➜ Der erste Albumname wird angezeigt.
Wiedergabe
1 Drücken Sie entweder auf der CD-Spieler-Seite oder der
CD-Rekorder-Seite ÉÅ, um das Abspielen zu starten.
➜ CD oder CDR, die gegenwärtige Titelnummer und die
verstrichene Spielzeit werden angezeigt.
Nur für MP3-CD:
➜ Auch der Name des Titels läuft zusätzlich ab.
00
Um durch folgende Informationen zu schalten, drücken Sie
wiederholt DISPLAY:
➜ Titelnummer, verbleibende Spielzeit des gegenwärtigen
Titels
➜ Titelnummer, verbleibende Spielzeit der Disk
➜ Titelnummer, verstrichene Spielzeit des gegenwärtigen
Titels
Nur für MP3-CD:
➜ Albumnummer,Titelnummer und Name des Titels
➜ Titelnummer, verstrichene Spielzeit des gegenwärtigen
Titels
2 Drücken Sie entweder auf der CD-Spieler-Seite oder der
CD-Rekorder-Seite Ç, um das Abspielen zu stoppen.
➜ CD oder CDR, die Gesamtanzahl der Titel und die
Gesamtspielzeit der Disk werden angezeigt.
Nur für MP3-CD:
➜ Der gegenwärtige Albumname läuft ab.
00
Sie können das Abspielen unterbrechen,indem Sie ÉÅ
drücken.
➜ Die Spielzeit zum Zeitpunkt der Unterbrechung blinkt.
00
Um das Abspielen wieder zu starten, drücken Sie
nochmals ÉÅ.
Grundfunktionen
66
Deutsch
Page 67

Auswählen und Suchen (auf allen
Disks außer MP3-CDs)
Auswählen eines Titels bei gestoppter Wiedergabe
1 Drücken Sie so oft wie notwendig entweder auf der
CD-Spieler-Seite oder der CD-Rekorder-Seite ¢ oder
4, um zur gewünschten Titelnummer zu springen.
2 Drücken Sie ÉÅ, um das Abspielen zu starten.
➜ Das Abspielen startet mit dem gewählten Titel.
Auswählen eines Titels während des Abspielens
● Drücken Sie so oft wie notwendig entweder auf der
CD-Spieler-Seite oder der CD-Rekorder-Seite ¢ oder
4, um zum Anfang des vorhergehenden oder nächsten
Titels auf der gewählten Disk zu springen.
➜ Das Abspielen wird mit dem gewählten Titel fortgesetzt.
Suchen einer Stelle während des Abspielens
1 Halten Sie entweder auf der CD-Spieler-Seite oder der
CD-Rekorder-Seite ¢ oder 4 gedrückt, um eine
bestimmte Stelle rückwärts oder vorwärts zu suchen.
➜ Die Suche beginnt und das Abspielen wird mit geringer
Lautstärke fortgesetzt. Nach einigen Sekunden wird die
Suche ohne Ton beschleunigt.
2 Lassen Sie die Taste an der gewünschten Stelle los.
➜ Normales Abspielen wird fortgesetzt.
Anmerkung:Während SHUFFLE, während ein Titel wiederholt
oder ein Programm gespielt wird, kann nur innerhalb des
gegenwärtigen Titels gesucht werden.
Auswählen und Suchen (nur auf
MP3-CDs)
Auswählen eines Albums bei gestoppter Wiedergabe
● Drücken Sie so oft wie notwendig entweder auf der
CD-Spieler-Seite oder der CD-Rekorder-Seite ALBUM+
oder ALBUM-, um die Albumnummer, die Sie auswählen
möchten, zu finden.
➜ ALBUM erscheint, CD oder CDR und die Albumnummer
werden angezeigt.
➜ Der gegenwärtige Albumname läuft ab sobald Sie die
Taste nicht mehr drücken.
00
Um das Abspielen des gesamten Albums zu starten,
drücken Sie ÉÅ.
➜ Das Abspielen des gesamten Albums startet.
Auswählen eines Albums während des Abspielens
● Drücken Sie so oft wie notwendig entweder auf der
CD-Spieler-Seite oder der CD-Rekorder-Seite ALBUM+
oder ALBUM-, um zum Anfang des vorhergehenden oder
nächsten Albums auf der gewählten Disk zu springen.
➜ Das Abspielen wird mit dem gewählten Album
fortgesetzt sobald Sie die Taste nicht mehr drücken.
Auswählen eines Titels innerhalb des Albums
1 Drücken Sie so oft wie notwendig entweder auf der
CD-Spieler-Seite oder der CD-Rekorder-Seite ¢ oder
4, um zur gewünschten Titelnummer zu springen.
➜ CD oder CDR, die Albumnummer und die Titelnummer
werden angezeigt.
➜ Der Name des Titels läuft ab sobald Sie die Taste nicht
mehr drücken.
2 Drücken Sie ÉÅ, um das Abspielen zu starten.
➜ Das Abspielen startet mit dem gewählten Titel.
Anmerkungen:
Am Ende Ihrer Albumauswahl werden Sie ein Album mit
dem Namen VARIOUS bemerken. Dieses Album beinhaltet alle
Titel, die beim Erstellen der MP3-CD nicht in einem Album
abgespeichert wurden.
Wenn Sie beim Erstellen Ihrer MP3-CD eine Playlist
gemacht haben und diese spielen möchten, müssen Sie sie
direkt auswählen, indem Sie ¢ oder 4 verwenden und
anschließend ÉÅ drücken.
Grundfunktionen
67
Deutsch
Page 68

SHUFFLE und REPEAT
Wiederholen eines Titels, einer Disk oder eines
Programmes
1 Drücken Sie während des Abspielens wiederholt REPEAT
auf der Fernbedienung, um wie folgt auszuwählen:
➜ REP TRACK: Der gegenwärtige Titel wird wiederholt.
➜ REP DISC: Die gesamte ausgewählte Disk wird
wiederholt.
➜ REP ALL: Alle Disks im Gerät (oder das Programm)
werden (wird) wiederholt.
Anmerkungen:
REP DISC ist während SHUFFLE oder während des Spielens
eines Programmes nicht möglich.
REP TRACK ist während SHUFFLE nicht möglich.
2 Das Abspielen beginnt im gewählten Modus.
00
Um zum normalen Abspielen zurückzukehren, drücken Sie
REPEAT auf der Fernbedienung, bis der Hinweis in der
Anzeige erlischt.
Spielen von Titeln in zufälliger Reihenfolge
● Drücken Sie SHUFFLE vor oder während des Abspielens.
➜ SHUFF ALL erscheint und entweder alle Titel des
Programmes oder der geladenen Disk(s) im CD-Spieler
und CD-Rekorder werden in zufälliger Reihenfolge gespielt.
CD-Text-Anzeige
Diese Funktion erlaubt die Anzeige von Informationen wie
Albumtitel oder Name des Titels, welche auf einer speziell
kodierten CD enthalten sind.
● Stellen Sie sicher,eine CD mit CD-Text einzulegen.
➜ CD TEXT erscheint und der Name des Interpreten auf
dem Album und der Albumtitel läuft einmal ab.
CD-Text bei gestoppter Wiedergabe
● Drücken Sie CD TEXT/edit auf der Fernbedienung, um
folgende Informationen zu sehen, welche einmal ablaufen
(falls verfügbar):
➜ Name des Interpreten auf dem Album
➜ Albumtitel
CD-Text während der Wiedergabe
● Drücken Sie CD TEXT/edit auf der Fernbedienung, um
folgende Informationen zu sehen, welche einmal ablaufen
(falls verfügbar):
➜ Name des Interpreten des Titels
➜ Name des Titels
ID3-Tag
Diese Funktion erlaubt die Anzeige von Informationen wie
Albumtitel oder Name des Titels, welche in einem MP3-Titel
enthalten sind.
● Wenn Sie einen ID3-Tag für Ihren MP3-Titel erstellt haben,
drücken Sie während des Abspielens CDTEXT/edit auf der
Fernbedienung, um folgende ID3-Tag-Informationen zu zeigen:
➜ Albumtitel
➜ Name des Interpreten des Titels
➜ Name des Titels
Anmerkung: Falls kein ID3-Tag verfügbar ist, wird NO TEXT
angezeigt.
Programmieren von Titelnummern
Ein Programm kann zum Abspielen oder zum Bestimmen der
Titel, die dann aufgenommen werden, verwendet werden. Sie
können bis zu 99 Titel (auch MP3-Titel) auswählen und diese
im Speicher ablegen. Sie können jeden Titel auch mehrmals
speichern, in beliebiger Reihenfolge wechselnd zwischen
CD-Spieler und CD-Rekorder. Es ist jedoch nicht möglich,
MP3-Titel und Audiotitel oder MP3-Titel von mehr als einer
CD miteinander zu kombinieren.
1 Legen Sie die gewünschte(n) Disk(s) in das (die) Disk-Fach
(Disk-Fächer).
2 Drücken Sie PROGRAM auf der Fernbedienung, um in das
Programmmenü einzusteigen.
➜ PROG beginnt zu blinken und PROGRAM wird angezeigt.
➜
Die Schrittnummer (
STEP
), die Titelnummer und Spielzeit des
aktuellen Titels auf der gegenwärtigen CD werden angezeigt.
3 Wenn Sie einen Titel vom CD-Spieler wählen wollen:
Drücken Sie CD auf der Fernbedienung und danach so oft wie
notwendig í oder ë, um zum gewünschten Titel zu springen.
Wenn Sie einen Titel vom CD-Rekorder wählen wollen:
Drücken Sie CDR auf der Fernbedienung und danach so oft wie
notwendig í oder ë, um zum gewünschten Titel zu springen.
Anmerkung:Wenn Sie einen Titel wählen, der bereits ausgewählt
wurde, wird P angezeigt.
4 Drücken Sie PROGRAM auf der Fernbedienung, um Ihre
Auswahl im Speicher abzulegen.
➜ Die Gesamtanzahl der programmierten Titel (STEP), PRG
und die gesamte Programmzeit werden angezeigt.
5 Wiederholen Sie die Schritte 3–4, um alle gewünschten
Titel auszuwählen und zu speichern.
Anmerkung:Wenn Sie versuchen mehr als 99 Titel zu
speichern, wird PROGRAM FULL angezeigt.
6 Drücken Sie Ç, um das Programmieren zu beenden.
Löschen des Programmes
1
Falls erforderlich drücken Sie Ç, um das Abspielen zu stoppen.
2 Halten Sie Ç gedrückt, um das Programm zu löschen.
➜ PROG CLEARED wird angezeigt und PROG erlischt.
Grundfunktionen
68
Deutsch
Page 69

Grundlegende Informationen
Das CD-Rekorder-Deck bietet Ihnen 3 Hauptfunktionen:
– Aufnehmen vom internen CD-Spieler oder von einer
gewählten externen Tonquelle
– Finalisieren Ihrer CDR(W)-Disks und definalisieren
Ihrer CDRW-Disks
– Löschen einer CDRW-Disk
Der Aufnahmevorgang ist der gleiche für CDR- und
CDRW-Disks. Stellen Sie sicher, dass die CDR(W)
absolut frei von Kratzern und Staubpartikeln ist.
Für Aufnahmen beträgt die Mindestdauer eines Titels
4 Sekunden. Sie können maximal 99 Titel auf eine Disk
aufnehmen.Wenn die verbleibende Aufnahmezeit auf der
Disk weniger als 7 Sekunden beträgt, wird DISC FULL
angezeigt und Sie können nicht in den Aufnahmemodus
einsteigen.
Schutz des Urheberrechtes
Das Serial Copy Management System (SCMS) verhindert
das Erzeugen einer digitalen Kopie von einer digitalen
Kopie. Das Gerät erlaubt, dass eine digitale Aufnahme vom
Original gemacht wird, jedoch kann dies in einigen Ländern
die Autorisierung durch die Inhaber des Urheberrechtes
erfordern.
Wenn Sie versuchen, ein kopiergeschütztes Material von einer
externen Tonquelle aufzunehmen, wird COPY PROTECT
angezeigt. Es ist dann keine digitale Aufnahme möglich.
Es ist nicht möglich eine MP3-CD aufzunehmen.
Aufnehmen von CD-Text
Wenn die Original-CD über CD-Text verfügt, so wird dieser
Text automatisch aufgenommen, vorausgesetzt, der CD-Text
ist nicht kopiergeschützt. In diesem Fall ist die Aufnahme von
CD-Text nicht möglich und TEXT PROTECT wird angezeigt.
Was bedeutet finalisieren?
Finalisieren ist ein einfacher Vorgang, der die Aufnahme auf
einer CDR(W) abschließt und notwendig ist, um:
– eine aufgenommene CDR in einem Standard-CD-Spieler
abzuspielen,
–
eine aufgenommene CDRW in einem CDRW-kompatiblen
CD-Spieler und CD-Rekorder abzuspielen,
– unerwünschte Aufnahmen auf einer Disk zu vermeiden
oder
– das versehentliche Löschen von Titeln auf einer CDRW zu
vermeiden.
CDRs sind „gesperrt“ sobald sie einmal finalisiert sind. Es
können keine weiteren Titel oder CD-Text hinzugefügt
werden.
CDRWs sind ebenfalls „gesperrt“ sobald sie einmal
finalisiert sind, können aber definalisiert werden, um ein
nachträgliches Aufnehmen oder Löschen zuzulassen.
Direct Line Recording (DLR)
Der CD-Rekorder ist mit der Hochleistungstechnik Direct
Line Recording ausgestattet. Diese garantiert eine perfekte
Aufnahme des Ausgangsmaterials, nämlich eine wirkliche
„Bit für Bit“-Aufnahme. DLR wird nicht aktiv, wenn der
Aufnahmepegel eingestellt ist.
Den Aufnahmepegel einstellen
Sie können den Referenzaufnahmepegel für Aufnahmen
von einem zusätzlichen Gerät einstellen. Diese Funktion
kann zum Ein- oder Ausblenden Ihrer Aufnahmen
verwendet werden.
1 Drücken Sie wiederholt INPUT, um den Eingang für das
zusätzliche Gerät auszuwählen:
➜ DIGITAL IN: Der digitale koaxiale Eingang ist ausgewählt.
➜ OPTICAL IN: Der digitale optische Eingang ist ausgewählt.
➜ ANALOG IN: Der analoge Eingang ist ausgewählt.
2 Halten Sie auf der CD-Rekorder-Seite ALBUM+ oder
ALBUM- gedrückt, um den gewünschten Aufnahmepegel
einzustellen. Der lauteste Ton am Aufnahmematerial sollte
nicht in die roten Bereiche des Anzeigebalkens reichen.
➜ Der aktuelle Aufnahmepegel (in dB) wird angezeigt.
Anmerkung: Der Aufnahmepegel kann auch während dem
Aufnehmen vom internen CD-Spieler eingestellt werden. Halten
Sie auf der CD-Rekorder-Seite ALBUM+ oder ALBUMgedrückt, um den gewünschten Aufnahmepegel einzustellen.
Über das Aufnehmen
69
Deutsch
Page 70

Was bedeutet internes Aufnehmen?
Das Aufnehmen vom CD-Spieler-Deck dieses Gerätes wird
als „internes Aufnehmen“ bezeichnet.
Die Aufnahmegeschwindigkeit wählen
Für interne Aufnahmen kann die Aufnahmegeschwindigkeit
gewählt werden.
●
Drücken Sie wiederholt SPEED 1·2·4x, um wie folgt zu wählen:
➜ REC SPEED 1X: für das Aufnehmen mit
Normalgeschwindigkeit
➜ REC SPEED 2X: für das Aufnehmen mit doppelter
Geschwindigkeit während der Ton stillgeschaltet ist
➜ REC SPEED 4X: für das Aufnehmen mit 4-facher
Normalgeschwindigkeit während der Ton stillgeschaltet ist
Anmerkungen:
Während dem Aufnehmen kann die Geschwindigkeit nicht
gewählt werden.
Bei einigen Marken unbespielter Audio-Disks sind Aufnahmen
mit höherer Geschwindigkeit nicht möglich und funktionieren
nicht.Wählen Sie in diesem Fall eine geringere Geschwindigkeit.
Kopieren einer gesamten CD
Dies ist der einfachste Weg, eine Kopie einer gesamten CD,
die dann in anderen CD-Spielern gespielt werden kann,
fertigzustellen. Weitere Titel oder CD-Text können jedoch
nicht mehr hinzugefügt werden.
1 Legen Sie eine CDR(W), die absolut frei von Kratzern und
Staubpartikeln ist,in die CD-Rekorder-Lade ein.
2 Legen Sie die Disk, die Sie kopieren möchten, in das
CD-Spieler-Fach ein.
3 Drücken Sie COPY CD, um das Kopieren der gesamten CD
zu starten.
➜ REC erscheint, das Kopieren startet und die aktuell
verbleibende Aufnahmezeit wird heruntergezählt.
Anmerkung:Wenn ein Programm schon verfügbar war, bevor Sie
COPY CD drücken, so wird dieses ignoriert.
PROG
erlischt und die
gegenwärtige Disk wird aufgenommen. Nach Beendigung der
Aufnahme erscheint
PROG
und das Programm ist wieder verfügbar.
Alle Titel von einer CD aufnehmen
Sie können alle Titel von einer CD kopieren und danach
entscheiden, ob Sie finalisieren möchten oder nicht.
1 Legen Sie eine CDR(W), die absolut frei von Kratzern und
Staubpartikeln ist,in das CD-Rekorder-Fach ein.
2 Legen Sie die Disk, von der Sie alle Titel kopieren möchten,
in das CD-Spieler-Fach ein.
3 Drücken Sie REC, um in das Aufnahmemenü einzusteigen.
➜ RECORD CD?, gefolgt von PRESS REC werden
abwechselnd angezeigt.
4 Drücken Sie nochmals REC, um das Aufnehmen aller Titel
zu starten.
➜ REC erscheint, das Aufnehmen star tet und die aktuell
verbleibende Aufnahmezeit wird heruntergezählt.
00
Wenn Sie auf der CD-Rekorder-Seite / OPEN/CLOSE
drücken,
➜ werden CD NOT FINAL und PRESS REC TO
FINALIZE abwechselnd angezeigt.
Entscheiden Sie jetzt, ob Sie entweder
nicht finalisieren: die CDR ist dann nicht fertiggestellt,um
in anderen CD-Spielern gespielt zu werden,weitere Titel
oder CD-Text können jedoch noch hinzugefügt werden.
Drücken Sie auf der CD-Rekorder-Seite nochmals
/ OPEN/CLOSE oder warten Sie einige Minuten.
➜ Die Lade wird geöffnet. Die CDR(W) ist nicht finalisiert.
oder ob Sie
finalisieren: die CDR ist dann fertiggestellt,um in
anderen CD-Spielern gespielt zu werden,weitere Titel
oder CD-Text können nicht mehr hinzugefügt werden.
Drücken Sie REC, um das Finalisieren zu starten.
➜ FINAL wird angezeigt und die aktuell verbleibende
Finalisierungszeit wird heruntergezählt.
Internes Aufnehmen
70
Deutsch
Page 71

Einen einzelnen Titel aufnehmen
Sie können mehrere Titel von verschiedenen CDs kopieren
und danach entscheiden, ob Sie finalisieren möchten oder
nicht.
1 Legen Sie eine CDR(W), die absolut frei von Kratzern und
Staubpartikeln ist,in die CD-Rekorder-Lade ein.
2 Spielen Sie Ihren gewünschten Titel im CD-Spieler.
3 Drücken Sie REC, um in das Aufnahmemenü einzusteigen.
➜ REC TR mit der Titelnummer und PRESS REC werden
abwechselnd angezeigt.
4 Drücken Sie nochmals REC, um das Aufnehmen des Titels
zu starten.
➜ REC erscheint, das Aufnehmen star tet vom Anfang des
gewählten Titels und die aktuell verbleibende
Aufnahmezeit wird heruntergezählt.
5 Um weitere Titel aufzunehmen wiederholen Sie die
Schritte 2–4.
00
Wenn Sie auf der CD-Rekorder-Seite / OPEN/CLOSE drücken,
➜
werden CD NOT FINAL und PRESS REC TO FINALIZE
abwechselnd angezeigt.
Entscheiden Sie jetzt, ob Sie entweder
nicht finalisieren: die CDR ist dann nicht fertiggestellt,um
in anderen CD-Spielern gespielt zu werden,weitere Titel
oder CD-Text können jedoch noch hinzugefügt werden.
Drücken Sie auf der CD-Rekorder-Seite nochmals
/ OPEN/CLOSE oder warten Sie einige Sekunden.
➜ Die Lade wird geöffnet. Die CDR(W) ist nicht finalisiert.
oder ob Sie
finalisieren: die CDR ist dann fertiggestellt,um in
anderen CD-Spielern gespielt zu werden,weitere Titel
oder CD-Text können nicht mehr hinzugefügt werden.
Drücken Sie REC, um das Finalisieren zu starten.
➜ FINAL wird angezeigt und die aktuell verbleibende
Finalisierungszeit wird heruntergezählt.
Ein Programm erstellen und
aufnehmen
Sie können Ihr eigenes Programm erstellen, es aufnehmen
und danach entscheiden, ob Sie finalisieren möchten oder
nicht. Bitte beachten Sie aber, dass Sie ein Programm, das
Titel vom CD-Spieler und vom CD-Rekorder enthält, nicht
aufnehmen können. In diesem Fall wird 2 DISC PROG und
NOT POSSIBLE angezeigt.
1 Legen Sie eine CDR(W), die absolut frei von Kratzern und
Staubpartikeln ist,in die CD-Rekorder-Lade ein.
2 Legen Sie die CD von der Sie aufnehmen möchten in das
CD-Spieler-Fach.
3 Wählen und speichern Sie alle gewünschten Titel von der
CD (siehe „Programmieren von Titelnummern“).
00
Wenn die Gesamtzeit des Programmes länger als die
verbleibende Aufnahmezeit auf der CDR(W) ist:
➜ DOES NOT FIT wird kurz angezeigt.
➜ MISSING und die Zeitspanne, die nicht aufgenommen
werden kann, werden angezeigt.
Wenn Sie trotzdem das Aufnehmen starten, geht die
Aufnahme so lange weiter bis die CDR(W) voll ist.
4 Drücken Sie REC, um in das Aufnahmemenü einzusteigen.
➜ REC PROGRAM? und PRESS REC werden
abwechselnd angezeigt.
5 Drücken Sie nochmals REC, um die Aufnahme des
gegenwärtigen Programmes zu starten.
➜ REC erscheint, das Aufnehmen star tet und die aktuell
verbleibende Aufnahmezeit wird heruntergezählt.
00
Wenn Sie auf der CD-Rekorder-Seite / OPEN/CLOSE drücken,
➜
werden CD NOT FINAL und PRESS REC TO FINALIZE
abwechselnd angezeigt.
Entscheiden Sie jetzt, ob Sie entweder
nicht finalisieren: die CDR ist dann nicht fertiggestellt,um
in anderen CD-Spielern gespielt zu werden,weitere Titel
oder CD-Text können jedoch noch hinzugefügt werden.
Drücken Sie auf der CD-Rekorder-Seite nochmals
/ OPEN/CLOSE oder warten Sie einige Minuten.
➜ Die Lade wird geöffnet. Die CDR(W) ist nicht finalisiert.
oder ob Sie
finalisieren: die CDR ist dann fertiggestellt,um in
anderen CD-Spielern gespielt zu werden,weitere Titel
oder CD-Text können nicht mehr hinzugefügt werden.
Drücken Sie REC, um das Finalisieren zu starten.
➜ FINAL wird angezeigt und die aktuell verbleibende
Finalisierungszeit wird heruntergezählt.
Internes Aufnehmen
71
Deutsch
Page 72

Was bedeutet externes Aufnehmen?
Das Aufnehmen von einem zusätzlichen Gerät wird als
„externes Aufnehmen“ bezeichnet.
Analoges oder digitales Aufnehmen?
Wenn Sie Aufnahmen von einer externen Tonquelle
machen, empfehlen wir, nur dann analog aufzunehmen,
wenn eine digitale Aufnahme nicht möglich ist. Digitales
Aufnehmen resultiert in besserer Tonqualität.
Automatische Titelnummernvergabe
Wenn der digitale Eingang zum Aufnehmen von einer
digitalen Tonquelle (z. B. CD-Spieler) verwendet wird, werden
Titel automatisch so aneinander gereiht, dass die Titelnummern
an der gleichen Stelle positioniert werden wie am Original.Wenn
der analoge Eingang zum Aufnehmen von einer digitalen
oder analogen Tonquelle verwendet wird, findet die
Titelnummernvergabe solange nicht automatisch statt, bis eine
der folgenden Einstellungen gewählt wurde. Unter Umständen
kann die Titelnummernvergabe, abhängig von der Qualität des
Ausgangsmaterials, nicht immer korrekt positioniert sein.
● Drücken Sie im Stopp-Modus so oft wie notwendig
TR. INCR. auf der Fernbedienung, um durch folgende Arten
der automatischen Titelnummernvergabe zu schalten:
➜
TURNTABLE: für eine optimale Aufnahme von geräuschvollen
Tonquellen wie Schallplattenspieler (Es ist nicht möglich,
einen Schallplattenspieler direkt an AUX/CDR IN L/R
anzuschließen - siehe „Analoge Anschlüsse“.)
➜ TAPE/TUNER: für eine optimale Aufnahme von einer
Kassette
➜ CD/DVD: für eine optimale Aufnahme von hochwertigen
Tonquellen wie DAT, DCC oder DVD
➜ MANUAL: um die automatische Titelnummernvergabe
auszuschalten
Anmerkungen:
Titelnummern können händisch, durch Drücken vonTR. INCR.
auf der Fernbedienung während des Aufnehmens, vergeben
werden. Die Mindestlänge eines Titels beträgt 4 Sekunden.
Titelnummern können nach der Aufnahme nicht geändert werden.
Aufnehmen mit automatischem Start
Sie können schnell und einfach eine gesamte CD oder einen
Titel aufnehmen. Sobald die Wiedergabe am zusätzlichen
Gerät gestartet wird, startet die Aufnahme automatisch.
1 Legen Sie eine CDR(W), die absolut frei von Kratzern und
Staubpartikeln ist,in die CD-Rekorder-Lade ein.
2 Drücken Sie wiederholt INPUT am CD-Spieler/Rekorder,
um den Eingang für das zusätzliche Gerät, von dem Sie
aufnehmen möchten, zu wählen.
➜ DIGITAL IN: Der digitale Eingang ist ausgewählt.
➜ ANALOG IN: Der analoge Eingang ist ausgewählt.
➜ OPTICAL IN: Der optische Eingang ist ausgewählt.
3 Vergewissern Sie sich, dass der gewünschte Titel am
zusätzlichen Gerät ausgewählt ist.
4 Vergewissern Sie sich, dass sich das zusätzliche Gerät im
Pause- oder Stopp-Modus befindet.
5 Drücken Sie REC am CD-Spieler/Rekorder, um in das
Aufnahmemenü einzusteigen.
➜ PREPARING wird angezeigt.
➜ RECORD EXT? und START EXTERN SOURCE!
werden abwechselnd angezeigt.
6 Starten Sie innerhalb von 5 Sekunden die Wiedergabe am
zusätzlichen Gerät.
➜
Die Aufnahme startet gleichzeitig und
REC
erscheint. Die
verbleibende Aufnahmezeit auf der CDR(W) wird angezeigt.
Anmerkung: Die Aufnahme kann auch händisch durch Drücken
von REC am CD-Spieler/Rekorder gestartet werden.
00
Um die Aufnahme händisch zu stoppen,drücken Sie auf der
CD-Rekorder-Seite Ç.
00
Wenn Sie auf der CD-Rekorder-Seite / OPEN/CLOSE drücken,
➜
werden CD NOT FINAL und PRESS REC TO FINALIZE
abwechselnd angezeigt.
Entscheiden Sie jetzt, ob Sie entweder
nicht finalisieren: die CDR ist dann nicht fertiggestellt,um
in anderen CD-Spielern gespielt zu werden,weitere Titel
oder CD-Text können jedoch noch hinzugefügt werden.
Drücken Sie auf der CD-Rekorder-Seite nochmals
/ OPEN/CLOSE oder warten Sie einige Minuten.
➜ Die Lade wird geöffnet. Die CDR(W) ist nicht finalisiert.
oder ob Sie
finalisieren: die CDR ist dann fertiggestellt,um in
anderen CD-Spielern gespielt zu werden,weitere Titel
oder CD-Text können nicht mehr hinzugefügt werden.
Drücken Sie REC, um das Finalisieren zu starten.
➜ FINAL wird angezeigt und die aktuell verbleibende
Finalisierungszeit wird heruntergezählt.
Externes Aufnehmen
72
Deutsch
Page 73

Manuelles Aufnehmen
Sie können die Aufnahme von einem zusätzlichen Gerät
händisch starten und stoppen. Sie können das manuelle
Aufnehmen zur Aufnahme von Live-Musik oder spezieller
Musik wie Klassik, die nicht mit automatischem Start
aufgenommen werden kann, verwenden.
1 Legen Sie eine CDR(W), die absolut frei von Kratzern und
Staubpartikeln ist,in die CD-Rekorder-Lade ein.
2 Drücken Sie wiederholt INPUT am CD-Spieler/Rekorder,
um den Eingang für das zusätzliche Gerät, von dem Sie
aufnehmen möchten, zu wählen.
➜ DIGITAL IN: Der digitale Eingang ist ausgewählt.
➜ ANALOG IN: Der analoge Eingang ist ausgewählt.
➜ OPTICAL IN: Der optische Eingang ist ausgewählt.
3 Starten Sie die Wiedergabe am zusätzlichen Gerät.
4 Drücken Sie REC am CD-Spieler/Rekorder, um in das
Aufnahmemenü einzusteigen.
➜ PREPARING wird angezeigt.
➜ RECORD EXT? und PRESS REC werden abwechselnd
angezeigt.
5 Drücken Sie REC am CD-Spieler/Rekorder, um die
Aufnahme zu starten.
➜ Die Aufnahme startet und REC erscheint. Die verbleibende
Aufnahmezeit auf der CDR(W) wird angezeigt.
6 Drücken Sie auf der CD-Rekorder-Seite Ç, um die
Aufnahme zu stoppen.
00
Wenn Sie auf der CD-Rekorder-Seite / OPEN/CLOSE drücken,
➜
werden CD NOT FINAL und PRESS REC TO FINALIZE
abwechselnd angezeigt.
Entscheiden Sie jetzt, ob Sie entweder
nicht finalisieren: die CDR ist dann nicht fertiggestellt,um
in anderen CD-Spielern gespielt zu werden,weitere Titel
oder CD-Text können jedoch noch hinzugefügt werden.
Drücken Sie auf der CD-Rekorder-Seite nochmals
/ OPEN/CLOSE oder warten Sie einige Minuten.
➜ Die Lade wird geöffnet. Die CDR(W) ist nicht finalisiert.
oder ob Sie
finalisieren: die CDR ist dann fertiggestellt,um in
anderen CD-Spielern gespielt zu werden,weitere Titel
oder CD-Text können nicht mehr hinzugefügt werden.
Drücken Sie REC, um das Finalisieren zu starten.
➜ FINAL wird angezeigt und die aktuell verbleibende
Finalisierungszeit wird heruntergezählt.
Aufnehmen mit Zeitschaltung
Diese Funktion erlaubt eine zeitlich begrenzte Aufnahme über
den analogen Eingang zu starten (z. B. für Aufnahmen von
einem Tuner). Sie können eine Aufnahme von 15, 30, 45 oder
60 Minuten oder bis zum Ende der CDR(W) auswählen.
1 Legen Sie eine CDR(W), die absolut frei von Kratzern und
Staubpartikeln ist,in die CD-Rekorder-Lade ein.
2 Vergewissern Sie sich, dass das zusätzliche Gerät, von dem
Sie aufnehmen möchten, ordnungsgemäß angeschlossen ist.
3 Drücken Sie TIMER REC auf der Fernbedienung, um das
Aufnehmen zu starten.
➜ 15 MIN, gefolgt von PREPARING, wird angezeigt.
➜ Das Aufnehmen startet und REC erscheint. Die aktuell
verbleibende Aufnahmezeit wird angezeigt.
00
Um eine andere Aufnahmezeit zu wählen, drücken Sie
wiederholt TIMER REC auf der Fernbedienung,bis die
gewünschte Zeitspanne angezeigt wird:
➜ 30 MIN, 45 MIN, 60 MIN, MAXIMUM wird angezeigt.
4 Nach Ablauf der gewählten Zeitspanne stoppt das
Aufnehmen automatisch und das Gerät schaltet sich in
Bereitschaft.
00
Um das Aufnehmen händisch zu stoppen,drücken Sie auf
der CD-Rekorder-Seite Ç.
Externes Aufnehmen
73
Deutsch
Page 74

Löschen von einer CDRW-Disk
Es ist möglich, einen oder mehrere Titel (beginnend vom
Ende des letzten Titels) oder die gesamte CDRW zu
löschen. Es ist nicht möglich von einer CDR zu löschen.
Einen oder mehrere Titel löschen
1 Legen Sie die CDRW, von der Sie Titel löschen möchten, in
die CD-Rekorder-Lade ein.
2
Drücken Sie kurz ERASE CD, um in das Löschmenü einzusteigen.
Wenn eine nicht finalisierte CDRW eingelegt ist:
➜ ERASE LAST TRACK? und PRESS ERASE werden
abwechselnd angezeigt.
Wenn eine finalisierte CDRW eingelegt ist:
➜ FINALIZED CD wird kurz angezeigt.
➜ ERASE LAST TRACK?, gefolgt von PRESS ERASE
werden abwechselnd angezeigt.
00
Um einen speziellen Titel, den Sie löschen wollen, auszuwählen,
drücken Sie so oft wie notwendig auf der CD-Rekorder-Seite ¢
oder 4, um die gewünschte(n) Titelnummer(n) auszuwählen.
➜
ERASE TR und die Titelnummer (z. B. 10+) werden angezeigt.
Um weitere Titel, die gelöscht werden sollen, zu wählen,
wiederholen Sie diesen Schritt.
Anmerkung:Wenn Sie mehrere Titel löschen, müssen die zu löschenden
Titel aufeinander folgend, beginnend vom zuletzt aufgenommenen Titel,
ausgewählt werden. Beispiel: Auf die CDRW wurden 5 Titel
aufgenommen. Nun können Sie die Titel 5 und 4 löschen. Sie können
auch die Titel 5, 4 und 3 löschen,aber nicht die Titel 5 und 3!
3
Drücken Sie nochmals ERASE CD, um das Löschen zu starten.
Wenn eine nicht finalisierte CDRW eingelegt ist:
➜ ERASE wird angezeigt, die verbleibende Zeit für diesen
Vorgang wird heruntergezählt und das Löschen startet.
Wenn eine finalisierte CDRW eingelegt ist:
➜
UNFINAL wird angezeigt, die verbleibende Zeit für diesen
Vorgang wird heruntergezählt und das Definalisieren startet.
➜
Danach wird ERASE angezeigt,die verbleibende Zeit für
diesen Vorgang wird heruntergezählt und das Löschen startet.
Eine gesamte CDRW löschen
1 Legen Sie die CDRW, die Sie löschen möchten,in die
CD-Rekorder-Lade ein.
2 Halten Sie ERASE CD für länger als 1 Sekunde gedrückt,
um in das Löschmenü einzusteigen.
Wenn eine nicht finalisierte CDRW eingelegt ist:
➜ ERASE DISC? und PRESS ERASE werden
abwechselnd angezeigt.
Wenn eine finalisierte CDRW eingelegt ist:
➜ FINALIZED CD wird kurz angezeigt.
➜ ERASE DISC? und PRESS ERASE werden
abwechselnd angezeigt.
3 Drücken Sie nochmals ERASE CD, um die gesamte CDRW
zu löschen.
Wenn eine nicht finalisierte CDRW eingelegt ist:
➜ ERASE wird angezeigt, die verbleibende Zeit für diesen
Vorgang wird heruntergezählt und das Löschen der
gesamten CDRW startet.
Wenn eine finalisierte CDRW eingelegt ist:
➜ UNFINAL wird angezeigt,
die verbleibende Zeit für diesen
Vorgang wird heruntergezählt und das Definalisieren startet.
➜ ERASE wird angezeigt,
die verbleibende Zeit für diesen
Vorgang wird heruntergezählt und das Löschen der gesamten
CDRW startet.
CD-Text-Bearbeitung
Nachdem Sie Ihre CDR(W) aufgenommen haben, können Sie
einen Text eingeben, z. B. einen Namen für ein Album oder für
einen Titel. Dieser Text wird während der Wiedergabe bei
diesem Gerät, aber ebenso bei anderen Geräten, die mit der
CD-Text-Funktion ausgestattet sind, angezeigt.Verwenden Sie
ausschließlich eine nicht finalisierte CDR oder CDRW (eine
finalisierte CDRW muss zuerst definalisiert werden).
1 Falls notwendig drücken Sie Ç,um das Abspielen zu stoppen.
2 Drücken Sie CDR auf der Fernbedienung, um den
CD-Rekorder zu wählen.
3
Drücken Sie wiederholt CD TEXT/edit auf der Fernbedienung,
um wie folgt auszuwählen:
➜ ALBUM TITLE: zur Eingabe des CD-Titels
➜
ALBUM ARTIST: zur Eingabe des Namens des CD-Interpreten
➜ ARTIST TR 1 (oder 2, 3,…): zur Eingabe des Namens
des Interpreten des Titels 1 (oder 2, 3,…)
➜ TITLE TR 1 (oder 2, 3,…): zur Eingabe des Namens
des Titels 1 (oder 2, 3,…)
4 Sobald der Positionsanzeiger zu blinken beginnt, benützen
Sie die alphanumerischen Tasten auf der Fernbedienung, um
einen Buchstaben zu wählen.
➜ Nach dem Wählen eines Buchstabens springt der
Positionsanzeiger automatisch zur nächsten Stelle.
5 Drücken Sie CD TEXT/edit auf der Fernbedienung, um den
erstellten Text zu sichern und um zum Textbearbeitungsmenü
zurückzugehen.
6 Um aus dem Textbearbeitungsmenü auszusteigen, drücken
Sie Ç.
Einen Buchstaben löschen und ersetzen
1
Drücken Sie à oder á auf der Fernbedienung, um zu dem
Buchstaben zu gelangen, der gelöscht oder ersetzt werden soll.
➜ Der Buchstabe beginnt zu blinken.
2 Wenn Sie den Buchstaben löschen wollen:
Drücken Sie DELETE auf der Fernbedienung.
➜ Der Buchstabe wird gelöscht und der Text wird um eine
Position nach links verschoben.
Wenn Sie den Buchstaben ersetzen wollen:
Benützen Sie die alphanumerischen Tasten auf der
Fernbedienung, um einen neuen Buchstaben zu wählen.
00
Um einen weiteren Buchstaben zu ändern, drücken Sie
à oder á auf der Fernbedienung.
Automatisch kopierter Text
Wenn ein Name eines Interpreten für einen Titel gespeichert
wurde, so wird er automatisch in den nächsten Titel kopiert.
Löschen/CD-Text-Bearbeitung (nur am CD-Rekorder)
74
Deutsch
Page 75

WARNUNG
Versuchen Sie unter keinen Umständen,das Gerät selbst zu reparieren,
da die Garantie dadurch ihre Gültigkeit verliert.Versuchen Sie nicht, das
Gerät zu öffnen, da Sie hiermit einen elektrischen Schlag riskieren.
Wenn ein Fehler auftritt, prüfen Sie zuerst die nachstehenden Hinweise
bevor Sie das Gerät zur Reparatur bringen.Wenn Sie ein Problem trotz
dieser Hinweise nicht lösen können, wenden Sie sich an Ihren
Fachhändler oder eine Service-Stelle.
Laser-Sicherheit
Dieses Gerät verwendet einen Laser.Nur eine qualifizierte Person vom
Service sollte die Abdeckung entfernen oder das Gerät zu reparieren
versuchen, da die Möglichkeit einer Augenverletzung besteht.
Problem Lösung
Kein Strom – Stellen Sie sicher, dass das Netzkabel ordnungsgemäß angeschlossen ist.
– Drücken Sie 2 STANDBY·ON am Gerät, um es einzuschalten.
Kein Ton – Überprüfen Sie, ob die Audioanschlüsse ordnungsgemäß installiert wurden.
– Stellen Sie sicher, dass MP3-Titel im richtigen Format aufgenommen wurden.
Keine Reaktion bei Betätigung der Tasten – Unterbrechen Sie die Stromversorgung und stellen Sie diese nach einigen
Sekunden wieder her.
Automatischer Start der ständigen Anzeige
– Halten Sie für mindestens 5 Sekunden Ç am Gerät gedrückt, um den
von Besonderheiten (Vorführbetrieb)
Vorführbetrieb zu löschen.
Fernbedienung funktioniert nicht –
Entfernen Sie die Batterien und legen Sie sie richtig ein oder legen Sie neue Batterien ein.
einwandfrei –
Verringern Sie den Abstand zum Gerät.
WRONG DISC, USE AUDIO CD und – Stellen Sie sicher, dass die Disk nicht zerkratzt oder schmutzig ist. Ersetzen
INSERT DISC Anzeige oder reinigen Sie die Disk.
–
Stellen Sie sicher, dass eine Disk mit der bedruckten Seite nach oben eingelegt ist.
– Stellen Sie sicher, dass keine DVD eingelegt ist.
– Warten Sie,bis sich die beschlagene Laserlinse geklärt hat.
WRONG DISC, USE CDR<W> WITH `DIGITAL –
Eine Computer-CDR(W) ist eingelegt. Stellen Sie sicher, dass eine digitale Audio-Disk,
AUDIO´ LOGO und INSERT DISC Anzeige
gekennzeichnet mit „Digital Audio“ und dem speziellen Logo, eingelegt ist.
NO SIGNAL Anzeige oder – Überprüfen Sie, ob das Verbindungskabel ordnungsgemäß angeschlossen ist.
CHECK INPUT Anzeige – Wählen Sie den richtigen Eingang.
– Stellen Sie sicher, dass das externe Gerät eingeschaltet ist.
OVERHEATING Anzeige –
Stellen Sie das Gerät nicht auf andere Geräte, die es erwärmen könnten (z. B. Receiver).
Aufnehmen funktioniert nicht –
Stellen Sie sicher, dass die CDR(W) absolut frei von Kratzern und Staubpartikeln ist.
–
Überprüfen Sie, ob eine digitale Audio-CDR(W) eingelegt ist und stellen Sie sicher,
dass diese nicht finalisiert ist.
Stoppt während der Aufnahme – Verwenden Sie Philips Audio-CDR(W)s.
– Falls der Aufnahmevorgang unterbrochen wurde (Stromausfall, mechanischer
Schock), starten Sie die Aufnahme nochmals mit einer neuen Disk.
Aufgenommene Disk spielt nicht in – Stellen Sie sicher, dass die CDR(W) finalisiert ist.
einem anderen Standard-CD-Spieler – Legen Sie die CDRW in einen CDRW-kompatiblen CD-Spieler ein.
Fehlendes Verzeichnis auf der MP3-CD – Es werden nur Alben mit spielbaren Dateien gezeigt.
Verstrichene Spielzeit des MP3-Titels – Dies ist ein normales Verhalten, da dieser MP3-Titel eine variable Bitrate hat.
läuft sehr schnell oder unregelmäßig ab
Aufgenommene Titel gehen ineinander – Verwenden Sie einen anderen Modus für die Titelnummernvergabe.
über oder Titel starten oder stoppen – Vergeben Sie die Titelnummern händisch mittels Fernbedienung.
nicht zur korrekten Zeit
Fehlerbehebung
75
Deutsch
Page 76

Algemene informatie
Technische gegevens
________________________
77
Milieu-informatie
___________________________
77
Meegeleverde accessoires
____________________
77
Onderhoud
_______________________________
77
Behandeling van disks
________________________
77
Disks om op te nemen
_______________________
78
Disks om af te spelen
________________________
78
Kort iets over MP3
__________________________
78
Aansluitingen
Aansluitingen
______________________________
79
Informatie over de opstelling
__________________
79
Aansluitingen algemeen
______________________
79
Installaties
Analoge aansluitingen
________________________
80
Digitale aansluitingen
_____________________
80–81
Netaansluiting
______________________________
81
Bedieningsorganen
__________________________
82
Afstandsbediening
Gebruik afstandsbediening
____________________
83
Toetsen afstandsbediening
____________________
83
Basisfuncties
Inschakelen, in stand-by schakelen
______________
84
Demonstratieprogramma
_____________________
84
Disks laden
________________________________
84
Afspelen
__________________________________
84
Kiezen en zoeken (op alle disks behalve MP3-cd’s)
___
85
Kiezen en zoeken (alleen op MP3-cd’s)
__________
85
SHUFFLE en REPEAT
________________________
86
Weergave cd-tekst
__________________________
86
ID3-tag
___________________________________
86
Nummers programmeren
____________________
86
Het programma wissen
______________________
86
Over het opnemen
Basisinformatie
_____________________________
87
Wat is afronden?
___________________________
87
Direct Line Recording (DLR)
__________________
87
Het opnameniveau instellen
___________________
87
Intern opnemen
Wat is intern opnemen?
______________________
88
De opnamesnelheid kiezen
___________________
88
Een gehele cd kopiëren
______________________
88
Alle nummers van een cd opnemen
____________
88
Een afzonderlijk nummer opnemen
_____________
89
Een programma maken en opnemen
____________
89
Extern opnemen
Wat is extern opnemen?
_____________________
90
Analoog of digitaal opnemen?
_________________
90
Automatische nummerophoging
_______________
90
Opnemen met automatische start
______________
90
Handmatig opnemen
________________________
91
Opnemen met de timer
______________________
91
Wissen/Bewerken van cd-tekst (alleen bij
cd-recorder)
Wissen van een CD-RW disk
_________________
92
Cd-tekst bewerken
_________________________
92
Problemen oplossen
_________________________
93
Inhoud
76
Nederlands
Page 77

Technische gegevens
Wijzigingen zonder voorafgaande kennisgeving
voorbehouden.
Algemeen
Opgenomen vermogen
Ingeschakeld
___________________________
< 20 W
Stand-by
_____________________________
< 0,6 W
Afmetingen, b × h × d
____________
435 × 88 × 310 mm
Gewicht
____________________________________
5 kg
Audio
Frequentieweergave
___________________
2–20 000 Hz
Afspelen
S/R (A-gewogen)
_______________________
120 dB
S/R
__________________________________
110 dB
Dynamisch bereik
________________________
98 dB
Totale harmonische vervorming
_____________
-95 dB
Kanaalscheiding
_________________________
105 dB
Opnemen
S/R (A-gewogen)
________________________
93 dB
S/R digitaal zonder SRC
_____________
gelijk aan bron
Dynamisch bereik
________________________
90 dB
Totale harmonische vervorming + ruis
_______
-86 dB
Digitale/optische invoer
________________
12–96 kHz
Laser (cd-recorder)
Type
______________________
Halfgeleider laser GaAIAs
Golflengte
____________________
775–795 nm (bij 25°)
Uitgangsvermogen
___
2,5 mW (Lezen), 35 mW (Schrijven)
Straalafwijking
___________________________
60 graden
Als ENERGY STAR®partner heeft
Philips bepaald dat dit product
voldoet aan de ENERGY STAR
®
richtlijnen voor efficiënt
energiegebruik.
Dit toestel voldoet aan de radio-ontstoringseisen van
de Europese Gemeenschap.
VOORZICHTIG
Gebruik van bedieningsorganen of instellingen of
uitvoering van andere procedures dan hierin voorzien
kunnen gevaarlijke straling of andere onveilige
werking veroorzaken.
Milieu-informatie
Alle overbodige verpakkingsmateriaal is weggelaten.Wij hebben
ervoor gezorgd dat de verpakking gemakkelijk in drie aparte
materialen te scheiden is: karton (doos), polystyreenschuim
(buffer) en polyethyleen (zakken, beschermfolie).
Uw toestel bestaat uit materialen die na demontage door
een gespecialiseerd bedrijf gerecycled kunnen worden.
Houd u aan de plaatselijke voorschriften voor het inleveren
van verpakkingsmateriaal, lege batterijen en oude apparatuur.
Meegeleverde accessoires
– 2 analoge audiokabels (met rode en witte stekkers)
– Afstandsbediening
– 2 batterijen voor de afstandsbediening, type AA
– Netvoedingskabel
Onderhoud
Maak het toestel schoon met een
zachte, licht vochtige doek die niet
pluist. Gebruik geen
schoonmaakmiddelen, deze kunnen
het oppervlak aantasten.
Stel het toestel, de batterijen en de
disks niet bloot aan vocht, regen,
zand of overmatige warmte
(veroorzaakt door
verwarmingsapparatuur of direct
zonlicht).
Behandeling van disks
Als de cd-speler/recorder de disks niet goed leest, gebruik dan
een in de handel verkrijgbare reinigings-cd om de lenzen
schoon te maken voordat u het toestel in reparatie geeft.
Andere reinigingsmethoden kunnen de lenzen blijvend
beschadigen. Houd de laden altijd dicht, zodat er geen stof op
de lenzen kan komen.
De lenzen kunnen beslaan als het toestel plotseling uit een
koude naar een warme omgeving wordt verplaatst. Het is
dan niet mogelijk een disk af te spelen. Laat het toestel in
een warme omgeving staan tot het vocht verdampt is.
Om een disk gemakkelijk uit zijn
doosje te halen, drukt u op de
vergrendeling in het midden terwijl u
de CD(-RW) naar boven trekt.Pak een
CD(-RW) altijd bij de rand vast en doe
hem na gebruik terug in het doosje.
Schrijf nooit op een cd en plak er nooit een sticker op.
Schrijf uitsluitend op de bedrukte kant van een CD-R of
CD-RW, en uitsluitend met een zachte viltstift.
Maak een disk schoon door in een
rechte lijn vanuit het midden naar de
rand te vegen, met een zachte doek
die niet pluist. Een schoonmaakmiddel
kan de disk beschadigen!
Algemene informatie
77
Nederlands
VOORZICHTIG
ONZICHTBARE LASERSTRALING INDIEN GEOPEND.
VERMIJD BLOOTSTELLING AAN STRAAL.
Opmerking: Deze waarschuwing bevindt
zich in de cd-lade.
Page 78

Disks om op te nemen
Gebruik voor het opnemen uitsluitend speciale audiodisks.
Deze disks zijn bedrukt met „Digital Audio” en de
hieronder afgebeelde logo’s.
Er zijn twee verschillende soorten audiodisks voor gebruik
in deze cd-recorder:
– CD-Audio Recordable disks
(CD-R) kunnen eenmalig voor
opname worden gebruikt en na het
afronden worden afgespeeld op alle
standaard cd-spelers en cd-recorders.
– CD-Audio ReWritable disks
(CD-RW) kunnen meerdere keren
voor opname worden gebruikt, gewist
en opnieuw voor opname worden
gebruikt, en na het afronden worden
afgespeeld op CD-RW-compatibele cd-spelers
en cd-recorders.
Alle cd-spelers en cd-recorders van Philips met
deze sticker zijn CD-RW-compatibel.
Om de goede werking van het toestel te
waarborgen raden wij u aan uitsluitend Philips audio-CD-R
en audio-CD-RW disks te gebruiken.
Opmerking: Gebruik geen voor computers bestemde CD-R of
CD-RW, want hierop kan niet worden opgenomen!
Opnemen is toegestaan voor zover geen inbreuk
wordt gemaakt op het auteursrecht of andere
rechten van derden.
In bepaalde landen is de vergunning van
auteursgerechtigden vereist voor het gebruik van de
cd-speler/recorder zoals in deze gebruiksaanwijzing
afgebeeld of beschreven.
Disks om af te spelen
Op deze cd-speler/recorder kunt u voor het afspelen de
volgende disks gebruiken:
– Alle voorbespeelde audio-cd’s
– Alle audio CD-R en audio CD-RW disks
– MP3-cd’s (cd-roms met MP3-nummers)
Kort iets over MP3
Met MP3 (MPEG ! Audio Layer-3), de revolutionaire nieuwe
techniek voor het comprimeren van muziek, kunnen
originele digitale audiogeluidsgegevens met een maximale
factor van 10 worden verkleind zonder dat er veel
geluidskwaliteit verloren gaat. Zo kunt u op een enkele
cd-rom tot 10 uur muziek van cd-kwaliteit opnemen.
Uw eigen MP3-cd maken
I
n principe zijn er twee bronnen voor MP3-muziek op cd. U
kunt muziek van uw eigen digitale audio-cd’s via de cd-romdrive
naar uw PC overzetten en coderen naar MP3-formaat
(„rippen”) of legale MP3-muziek van het internet downloaden.
U kunt met uw PC de muziek van uw harde schijf opnemen
(„branden”) op cd-rom (zorg dat de bestandsnaam
eindigt op .mp3). Hierna kunt u uw MP3-cd op deze
cd-speler/recorder afspelen en van de muziek genieten.
Gegevensoverdrachtssnelheid
De gegevensoverdrachtssnelheid is bij MP3 bijzonder
belangrijk. Deze geeft aan hoe snel bits worden overgedragen.
Stereomuziek op een cd laat een
gegevensoverdrachtssnelheid zien van circa 1400 kilobits
per seconde (kbps). Voor een goede MP3-kwaliteit
wordt een bitsnelheid van 128 kbps aanbevolen.
De codeersnelheid kan door de gebruiker worden
gekozen, dus zorg dat deze gegevensoverdrachtssnelheid
voor MP3 wordt bereikt omdat bij opnamen met minder
dan 128 kbps de geluidskwaliteit achteruit gaat.
Opnemen
Het downloaden van MP3-bestanden van het internet of het rippen
van liedjes van uw eigen digitale audio-cd’s is een kritiek proces, dat
ook wordt beïnvloed door de kwaliteit van het codeerprogramma
en de snelheid van uw PC. Dit kan soms leiden tot „drop-outs” of
fouten die te horen zijn als u naar uw MP3-cd luistert.
Zorg in ieder geval dat de opnamesnelheid die u gebruikt niet
hoger is dan aangegeven op de cd-rom en laat tijdens de
opname geen andere programma’s gelijktijdig op uw PC draaien.
Overeenkomstig de SDMI (Secure Digital Music
Initiative) worden de digitale uitgangen van dit toestel
uitgeschakeld bij het afspelen van een MP3-cd.
Het is op deze cd-speler/recorder niet mogelijk een
MP3-cd te „branden”.
Het is niet mogelijk om van een MP3-cd op te nemen.
Ondersteunde formaten
Onderstaande formaten worden op deze
cd-speler/recorder ondersteund:
– Diskformaat: ISO 9660 of Joliet
– Bestandsformaat: MPEG ! Audio Layer-3
– Bestandsnaam: .mp3 (nummers), .m3u of .pls
(afspeellijsten)
– Bitsnelheid: 32–320 kbps (128 kbps aanbevolen) of
variabele bitsnelheid
Gebruik diskformaat ISO 9660 voor het branden van de
MP3-cd. Diskformaat UDF (bijv. „DirectCD” of
„WinOnCD”) wordt niet ondersteund.
Algemene informatie
78
Nederlands
Page 79

Aansluitingen
1 OPTICAL IN
aansluiten op de digitale optische uitgang van een extern
digitaal apparaat
2 OPTICAL OUT
aansluiten op de digitale optische ingang van een extern
digitaal apparaat
3 DIGITAL IN
aansluiten op de digitale coaxiale uitgang van een extern
digitaal apparaat
4 DIGITAL OUT
aansluiten op de digitale coaxiale ingang van een extern
digitaal apparaat
5 ANALOG IN L/R
aansluiten op de analoge audio-uitgang van een extern
apparaat
6 ANALOG OUT L/R
aansluiten op de analoge audio-ingang van een extern
apparaat
7 AC MAINS ~
Nadat alle overige aansluitingen gemaakt zijn, sluit u
het netsnoer aan op het stopcontact.
Informatie over de opstelling
Plaats het toestel op een vlakke, harde en stevige ondergrond.
Zet het toestel niet boven op andere apparatuur die het zou
kunnen verhitten (bijv.ontvanger of versterker). Als het toestel
in een kast wordt geplaatst, zorg dan dat er minimaal 3,5 cm
rondom het toestel vrij blijft om oververhitting te voorkomen.
Ingeschakelde mobiele telefoons in de buurt van het toestel
kunnen storingen veroorzaken.
Aansluitingen algemeen
Maak of verander nooit aansluitingen bij
ingeschakelde netvoeding.
Voor het afspelen zijn er de volgende uitgangen:
– Analoge uitgang (ANALOG OUT L/R)
– Digitale coaxiale uitgang (DIGITAL OUT)
– Digitale optische uitgang (OPTICAL OUT)
Voor extern opnemen zijn er de volgende ingangen:
– Analoge ingang (ANALOG IN L/R)
– Digitale coaxiale ingang (DIGITAL IN)
– Digitale optische ingang (OPTICAL IN)
Deze ingangen kunnen worden aangesloten op de
overeenkomstige uitgang(en) van uw versterker/ontvanger
of rechtstreeks op de overeenkomstige uitgang(en) van het
externe apparaat.
Het is niet mogelijk een platenspeler rechtstreeks op
ANALOG IN L/R aan te sluiten.Als u een
platenspeler bij het toestel wilt gebruiken, moet u een
versterker/ontvanger aansluiten op ANALOG IN L/R
van de cd-speler/recorder. Sluit vervolgens de
platenspeler aan op de versterker.
De benodigde aansluitingen zijn afhankelijk van de
mogelijkheden die uw audioapparatuur biedt en het
gebruik dat u van dit toestel wilt maken. Raadpleeg eerst de
gebruiksaanwijzingen van uw audioapparatuur.
Wij raden u aan alleen analoog op te nemen als digitaal
opnemen niet mogelijk is. Digitaal opnemen levert een
betere geluidskwaliteit op.
Maak indien mogelijk altijd zowel digitale als analoge
aansluitingen. Dan kunt u altijd analoge opnamen maken als
digitaal opnemen niet mogelijk is.
Aansluitingen
79
Nederlands
OUTIN
OPTICAL
DIGITAL
ANALOG
L
R
IN OUTOUTIN
AC MAINS
~
7
5
4
32
1
6
Page 80

Analoge aansluitingen
Deze aansluitingen zijn nodig voor afspelen en opnemen via een
versterker/ontvanger, voorzien van analoge in- en uitgangen.
1 Sluit de rode stekker van de meegeleverde audiokabel
(cinch) aan op de rode bus ANALOG IN R en de witte
stekker op de witte bus ANALOG IN L van de
cd-speler/recorder.
2 Sluit het andere eind van de audiokabel aan op de analoge
uitgangen van de versterker/ontvanger (CDR OUT,
TAPE OUT, AUX OUT, REC OUT, etc.).
3 Sluit de rode stekker van de meegeleverde audiokabel
(cinch) aan op de rode bus ANALOG OUT R en de witte
stekker op de witte bus ANALOG OUT L van de
cd-speler/recorder.
4 Sluit het andere eind van de audiokabel aan op de analoge
ingangen van de versterker/ontvanger (CD-R,TAPE IN,
AUX, PLAY IN, etc.).
5 Sluit alle andere componenten van uw systeem (tapedeck,
cd-speler, tuner, platenspeler, etc.) via hun analoge uitgangen
aan op de betreffende analoge ingangen van de
versterker/ontvanger (CD IN,TUNER IN,AUX IN,
PHONO IN, etc.).
00
Nu kan worden opgenomen met elk apparaat dat is
aangesloten op een analoge ingang van de
versterker/ontvanger. Druk op de cd-speler/recorder
telkens op INPUT om de analoge ingang te kiezen.
➜ ANALOG IN wordt weergegeven.
Hoe aan te sluiten als de analoge uitgang op de
versterker/ontvanger al gebruikt (bezet) is
De meeste versterkers/ontvangers hebben meerdere
analoge uitgangen (TAPE,VCR,…), maar sommige
versterkers/ontvangers hebben slechts 1 analoge uitgang.
Wanneer u op deze uitgang al een tapedeck (DAT-recorder
of MD-recorder) hebt aangesloten, zult u de bestaande
aansluitingen moeten veranderen.
1 Ontkoppel de analoge aansluitingen van de tapedeck op de
versterker/ontvanger.
2 Sluit de cd-speler/recorder aan (zie stappen 1–4 in het
vorige hoofdstuk).
3 Sluit de analoge uitgangen van de tapedeck aan op één van
de vrije analoge ingangen (AUX, CD) van de
versterker/ontvanger. U kunt nu uw tape afspelen of van uw
tapedeck opnemen op cd. Het is echter niet meer mogelijk
op tape op te nemen.
Digitale aansluitingen
Directe digitale coaxiale aansluiting
Deze aansluiting is nodig voor rechtstreeks opnemen vanaf
allerlei digitale audioapparatuur met een digitale coaxiale
uitgang (zoals cd-speler of dvd-speler).
● Gebruik een digitale coaxiale kabel om de coaxiale uitgang
van het externe apparaat aan te sluiten op DIGITAL IN van
de cd-speler/recorder.
00
Er kan nu worden opgenomen via de digitale coaxiale
ingang. Druk op de cd-speler/recorder telkens op INPUT
om de digitale coaxiale ingang te kiezen.
➜ DIGITAL IN wordt weergegeven.
Installaties
80
Nederlands
OUTIN
OPTICAL
DIGITAL
ANALOG
L
R
IN OUTOUTIN
OPTICAL
DIGITAL OUTPUT
ANALOG OUTPUT
L
R
PHONO
L
R
CD
IN IN
CD PLAYER/
RECORDER
AMPLIFIER/
RECEIVER
PHONO
L
R
CD
IN IN
CDR/TAPE
L
R
IN OUT
CD PLAYER
COAX
TURNTABLE
DIGITAL OUTPUT
OPTICAL
DIGITAL
OPTICAL
ANALOG OUTPUT
ANALOG
IN OUTOUTIN
L
R
L
R
CD PLAYER
CD PLAYER/
RECORDER
COAX
OUTIN
Page 81

Directe digitale optische aansluiting
Deze aansluiting is nodig voor rechtstreeks opnemen vanaf
allerlei digitale audioapparatuur met een digitale optische
uitgang (zoals cd-speler of dvd-speler).
1 Verwijder de stofkapjes van de digitale optische ingang van
de cd-speler/recorder en van de digitale optische uitgang
van het externe apparaat. Bewaar de kapjes op een veilige
plaats.
2 Gebruik een digitale optische kabel om de optische uitgang
van het externe apparaat aan te sluiten op OPTICAL IN
van de cd-speler/recorder. Zorg dat u beide stekkers goed
inplugt, tot u een klik hoort.
00
Er kan nu worden opgenomen via de digitale optische
ingang. Druk op de cd-speler/recorder telkens op INPUT
om de digitale optische ingang te kiezen.
➜ OPTICAL IN wordt weergegeven.
Digitale coaxiale aansluitingen via een digitale
ontvanger
Als u een ontvanger heeft met digitale coaxiale in- en
uitgangen, kunt u met deze aansluitingen digitale opnamen
maken vanaf diverse op de ontvanger aangesloten bronnen.
● Gebruik een coaxiale kabel om de digitale coaxiale ingang
van de ontvanger aan te sluiten op DIGITAL OUT van de
cd-speler/recorder. Gebruik een tweede coaxiale kabel om
de digitale coaxiale uitgang van de ontvanger aan te sluiten
op DIGITAL IN van de cd-speler/recorder.
00
Nu kan worden opgenomen met elk digitaal apparaat dat is
aangesloten op een digitale ingang van de digitale ontvanger
(bijv.cd-speler of dvd-speler). Druk op de cd-speler/recorder
telkens op INPUT om de digitale coaxiale ingang te kiezen.
➜ DIGITAL IN wordt weergegeven.
Digitale optische aansluitingen via een digitale
ontvanger
Als u een ontvanger heeft met digitale optische in- en
uitgangen, kunt u met deze aansluitingen digitale opnamen
maken vanaf diverse op de ontvanger aangesloten bronnen.
1 Verwijder de stofkapjes van de digitale optische in- en
uitgangen van de cd-speler/recorder en van de digitale
optische uitgang van de ontvanger. Bewaar de kapjes op
een veilige plaats.
2 Gebruik een digitale optische kabel om de optische ingang
van de ontvanger aan te sluiten op OPTICAL OUT van de
cd-speler/recorder. Gebruik een tweede digitale optische
kabel om de optische uitgang van de ontvanger aan te
sluiten op OPTICAL IN van de cd-speler/recorder. Zorg
dat u de stekkers goed inplugt, tot u een klik hoort.
00
Nu kan worden opgenomen met elk digitaal apparaat dat is
aangesloten op een digitale ingang van de digitale ontvanger
(bijv.cd-speler of dvd-speler). Druk op de cd-speler/recorder
telkens op INPUT om de digitale optische ingang te kiezen.
➜ OPTICAL IN wordt weergegeven.
Netaansluiting
Het typeplaatje bevindt zich op de achterzijde van
het toestel.
1 Controleer of de netspanning, die op het typeplaatje is
aangegeven, overeenkomt met de plaatselijke netspanning. Is
dit niet het geval, raadpleeg dan uw dealer of servicedienst.
2 Zorg dat alle aansluitingen gemaakt zijn voordat u de
netvoeding inschakelt.
3 Sluit de meegeleverde netvoedingskabel aan op
AC MAINS ~ en op het stopcontact. Zo wordt de
netvoeding ingeschakeld.
Als het toestel in stand-by geschakeld is, wordt er nog
steeds wat stroom verbruikt. Om het toestel volledig
elektrisch uit te schakelen, verwijdert u de stekker uit
het stopcontact.
Installaties
81
Nederlands
CD PLAYER/
RECORDER
CD PLAYER
OUTIN
OPTICAL
DIGITAL
ANALOG
L
R
IN OUTOUTIN
OPTICAL
DIGITAL OUTPUT
ANALOG OUTPUT
L
R
COAX
“CLICK!”
CD PLAYER/
RECORDER
DIGITAL
RECEIVER
OUTIN
OPTICAL
DIGITAL
ANALOG
L
R
IN OUTOUTIN
OPTICAL
OUT
IN
AUX
CD IN DVD IN
AUX
OPTICAL
IN
”
OUT
CD IN DVD IN
DIGITAL
RECEIVER
“CLICK!
DIGITAL
OPTICAL
ANALOG
L
OUTIN
R
IN OUTOUTIN
CD PLAYER/
RECORDER
Page 82

1 2 STANDBY·ON
schakelt het toestel in/in stand-by
2 / OPEN/CLOSE
opent/sluit de lade van de cd-speler
3 lade cd-speler
4 display
5 CD RECORDER
lade cd-recorder
blauw lampje aan: cd-recorder is gekozen
rood lampje aan: er wordt opgenomen
6 / OPEN/CLOSE
opent/sluit de lade van de cd-recorder
7 PHONES/LEVEL
stelt het volume van de hoofdtelefoon in
8 PHONES/LEVEL
hoofdtelefooningang 6,3 mm
9 COPY CD
kiest opnemen en automatisch afronden van huidige cd
0 REC 0
kiest andere opnamemogelijkheden
! ¢
cd-recorder: kiest het volgende nummer, zoekt vooruit
@ 4
cd-recorder: kiest het vorige nummer,zoekt achteruit
# ALBUM/REC LEVEL+
cd-recorder: kiest het volgende album op een MP3-cd,
verhoogt het opnameniveau
$ ALBUM/REC LEVEL-
cd-recorder: kiest het vorige album op een MP3-cd,
verlaagt het opnameniveau
% Ç
cd-recorder: stopt het afspelen/opnemen
^ ÉÅ
cd-recorder: start/onderbreekt het afspelen
& ERASE CD
wist opnamen van een CD-RW
* INPUT
kiest de ingang voor een extern apparaat
( SHUFFLE
speelt nummers in willekeurige volgorde af
) DISPLAY
kiest informatie weergeven
¡ ¢
cd-speler: kiest het volgende nummer, zoekt vooruit
™ 4
cd-speler: kiest het vorige nummer,zoekt achteruit
£ ALBUM+
cd-speler: kiest het volgende album op een MP3-cd
≤ ALBUM-
cd-speler: kiest het vorige album op een MP3-cd
∞ Ç
cd-speler: stopt het afspelen
§ ÉÅ
cd-speler: start/onderbreekt het afspelen
≥ SPEED 1·2·4x
kiest de opnamesnelheid voor intern opnemen
Opmerking: SPEED 1·2·4x, REC en COPY CD lichten op,
afhankelijk van de verschillende instellingen. Zo vindt u
gemakkelijk de betreffende toetsen voor uw keuze.
Bedieningsorganen
82
Nederlands
1654327
L
R
(
)¡™9£≤∞§≥
*
^
!
@#$%&
80
Page 83

Afstandsbediening
83
Nederlands
Gebruik afstandsbediening
Open het batterijvakje van de
afstandsbediening en plaats 2 alkaline
batterijen, formaat AA (R06, UM-3).
Gebruik geen oude en nieuwe of
verschillende soorten batterijen
door elkaar.
Verwijder de batterijen als ze leeg zijn of als de
afstandsbediening langere tijd niet gebruikt wordt.
De toetsen van de afstandsbediening werken hetzelfde als
de overeenkomstige toetsen van het toestel.
Toetsen afstandsbediening
1 2
schakelt het toestel in/in stand-by
2 CD, CDR
kiest het cd-spelerdeck of het cd-recorderdeck
3 TIMER REC
start een op tijd ingestelde opname
4 Cijfer-/lettertoetsen
1–0: cijfertoetsen voor nummers
ABC – WXYZ: lettertoetsen voor cd-tekst
SPACE: spatietoets voor cd-tekst
. : toets voor punten of symbolen in cd-tekst
5 TR. INCR.
kiest automatische of handmatige nummerophoging
6 PROGRAM
opent het programmeermenu
7 ALBUM+
kiest het volgende album op een MP3-cd
8 ALBUM-
kiest het vorige album op een MP3-cd
9 É
start het afspelen
0 í
kiest het vorige nummer
! ë
kiest het volgende nummer
@ Ç
stopt het afspelen
# á
zoekt vooruit
$ à
zoekt achteruit
% Å
onderbreekt het afspelen
^ DIM
regelt de helderheid van het display
& DISPLAY
kiest informatie weergeven
* CD TEXT/edit
schakelt door cd-tekstinformatie, opent/verlaat het
cd-tekstbewerkingsmenu
( DELETE
wist cd-tekst
) REPEAT
herhaalt een nummer, een gehele CD(-RW),of een programma
¡ SHUFFLE
speelt nummers in willekeurige volgorde af
3
4
5
8
9
0
CD TIMER REC
SPACE ABC
1
GHI JKL
4
PQRS TUV
7
TR.INCR.
ALBUM
1
CDR
DEF
2
5
8
.
3
MNO
6
WXYZ
9
PROGRAM
0
ALBUM
+
2
6
7
!
@
$
DISPLAY DIM
&
CD TEXT/edit DELETE
SHUFFLE REPEAT
*
(
CD TEXT
#
%
^
)
¡
Batterijen niet weggooien,
ñ
maar inleveren als KCA.
Page 84

Inschakelen,in stand-by schakelen
● Om het toestel in te schakelen drukt u op
2 STANDBY·ON.
➜ WELCOME TO PHILIPS AUDIO wordt weergegeven.
● Om het toestel in stand-by te schakelen drukt u
nogmaals op 2 STANDBY·ON.
➜ Het toestel wordt in stand-by geschakeld.
Demonstratieprogramma
Het demonstratieprogramma geeft diverse mogelijkheden
van het toestel weer en start automatisch als er gedurende
enkele minuten of tijdens stand-by geen toets is ingedrukt.
● Om het demonstratieprogramma buiten werking
te stellen houdt u op het toestel Ç minimaal 5 seconden
ingedrukt.
➜ Het demo-programma is blijvend buiten werking gesteld.
Disks laden
1 Cd-speler: Druk op / OPEN/CLOSE om de lade van de
cd-speler te openen.
➜ OPEN CD wordt weergegeven en de lade gaat open.
Cd-recorder: Druk op / OPEN/CLOSE om de lade van
de cd-recorder te openen.
➜ OPEN CDR wordt weergegeven en de lade gaat open.
Opmerkingen:
Als u de cd-speler opent, wordt elk programma met
nummers van een in de cd-speler geladen disk gewist.
Als u de cd-recorder opent, wordt elk programma met
nummers van een in de cd-recorder geladen disk gewist.
2 Leg een disk (bedrukte kant boven) in de houder.
3 Cd-speler: Druk nogmaals op / OPEN/CLOSE om de
lade te sluiten.
➜ De lade sluit en READING wordt weergegeven.
➜ CD, het totaal aantal nummers en de totale speelduur
van de disk worden weergegeven.
Cd-recorder: Druk op / OPEN/CLOSE om de lade te
sluiten.
➜ De lade sluit en READING wordt weergegeven.
➜ Als er een niet-afgeronde disk geladen is, wordt
INITIALIZING weergegeven.
➜ CDR, het totaal aantal nummers en de totale speelduur
van de disk worden weergegeven.
Alleen MP3-cd:
➜ READING MP3 wordt weergegeven. MP3 verschijnt. In
verband met het grote aantal nummers kan dit wel
2 minuten duren.
➜ De naam van het eerste album wordt weergegeven.
Afspelen
1 Druk op de cd-speler of op de cd-recorder op ÉÅ om
het afspelen te starten.
➜ CD of CDR, het huidige nummer en verstreken speelduur
worden weergegeven.
Alleen MP3-cd:
➜ Daarnaast is ook de naam van het nummer te lezen.
00
Druk telkens op DISPLAY om tussen de volgende
informatie te schakelen:
➜ nummer, resterende speelduur van huidig nummer
➜ nummer, resterende speelduur van disk
➜ nummer, verstreken speelduur van huidig nummer
Alleen MP3-cd:
➜ albumnummer,huidig nummer en naam nummer
➜ nummer, verstreken speelduur van huidig nummer
2 Druk op de cd-speler of op de cd-recorder op Ç om het
afspelen te stoppen.
➜ CD of CDR, het totaal aantal nummers en de totale
speelduur van de disk worden weergegeven.
Alleen MP3-cd:
➜ De naam van het huidige album is te lezen.
00
U kunt het afspelen onderbreken door op ÉÅ te drukken.
➜ Het tijdstip waarop het afspelen werd onderbroken gaat
knipperen.
00
Druk nogmaals op ÉÅ om het afspelen te hervatten.
Basisfuncties
84
Nederlands
Page 85

Kiezen en zoeken (op alle disks
behalve MP3-cd’s)
Een nummer kiezen als het afspelen gestopt is
1 Druk op de cd-speler of cd-recorder zo vaak als nodig is op
¢ of 4 om naar het gewenste nummer te springen.
2 Druk op ÉÅ om het afspelen te starten.
➜ Het afspelen start bij het gekozen nummer.
Een nummer kiezen tijdens het afspelen
● Druk op de cd-speler of cd-recorder zo vaak als nodig is op
¢ of 4 om naar het begin van het vorige of volgende
nummer van de gekozen disk te springen.
➜ Het afspelen vervolgt met het gekozen nummer.
Zoeken naar een passage tijdens het afspelen
1 Houd op de cd-speler of cd-recorder ¢ of 4
ingedrukt om achteruit of vooruit naar een bepaalde
passage te zoeken.
➜ Het zoeken begint en het afspelen vervolgt op laag
volume. Na enkele seconden wordt het zoeken met
gedempt volume versneld.
2 Laat de toets bij de gewenste passage los.
➜ Het afspelen wordt normaal vervolgd.
Opmerking:Tijdens SHUFFLE, bij herhaling van een nummer of
het afspelen van een programma is zoeken alleen binnen het
huidige nummer mogelijk.
Kiezen en zoeken (alleen op
MP3-cd’s)
Een album kiezen als het afspelen gestopt is
● Druk op de cd-speler of cd-recorder zo vaak als nodig is op
ALBUM+ of ALBUM- om het albumnummer te zoeken
dat u wilt kiezen.
➜ ALBUM verschijnt, CD of CDR en het albumnummer
worden weergegeven.
➜ De huidige albumnaam is te lezen zodra u de toets niet
meer indrukt.
00
Om het afspelen van het gehele album te starten drukt u
op ÉÅ.
➜ Het afspelen van het gehele album start.
Een album kiezen tijdens het afspelen
● Druk op de cd-speler of cd-recorder zo vaak als nodig is op
ALBUM+ of ALBUM- om naar het begin van het vorige
of volgende album van de gekozen disk te springen.
➜ Het afspelen vervolgt met het gekozen album zodra u de
toets niet meer indrukt.
Een nummer in het album kiezen
1 Druk op de cd-speler of cd-recorder zo vaak als nodig is op
¢ of 4 om naar het gewenste nummer te springen.
➜ CD of CDR, het albumnummer en huidig nummer
worden weergegeven.
➜ De naam van het nummer is te lezen zodra u de toets
niet meer indrukt.
2 Druk op ÉÅ om het afspelen te starten.
➜ Het afspelen start bij het gekozen nummer.
Opmerkingen:
Als laatste album treft u een album aan, genaamd
VARIOUS. Dit album bevat alle nummers die bij het maken van
de MP3-cd niet in een album werden opgeslagen.
Wilt u een afspeellijst afspelen, die u bij het maken van uw
MP3-cd hebt opgesteld, dan moet u deze rechtstreeks kiezen
met ¢ of 4 en daarna op ÉÅ drukken.
Basisfuncties
85
Nederlands
Page 86

SHUFFLE en REPEAT
Herhalen van een nummer, een disk of een
programma
1 Druk tijdens het afspelen op de afstandsbediening telkens
op REPEAT om te kiezen tussen:
➜ REP TRACK: Het huidige nummer wordt steeds opnieuw
afgespeeld.
➜ REP DISC: De gehele gekozen disk wordt steeds opnieuw
afgespeeld.
➜ REP ALL: Alle disks in het toestel (of het programma)
worden (wordt) steeds opnieuw afgespeeld.
Opmerkingen:
REP DISC is niet mogelijk tijdens SHUFFLE of bij het
afspelen van een programma.
REP TRACK is niet mogelijk tijdens SHUFFLE.
2 Het afspelen start volgens de gekozen optie.
00
Om terug te keren naar normaal afspelen drukt u op de
afstandsbediening op REPEAT tot de aanduiding in het
display verdwijnt.
Afspelen van nummers in willekeurige volgorde
● Druk voor of tijdens het afspelen op SHUFFLE.
➜ SHUFF ALL verschijnt en alle nummers van het
programma of van alle in de cd-speler en cd-recorder
geladen disks worden in willekeurige volgorde afgespeeld.
Weergave cd-tekst
Hiermee kunt u de op een speciaal gecodeerde cd vervatte
informatie weergeven, zoals een titel van een album of een
titel van een nummer.
● Zorg dat u een cd met cd-tekst inlegt.
➜ CD TEXT verschijnt en de naam van de artiest van het
album en de titel van het album zijn eenmaal te lezen.
CD-tekst als het afspelen gestopt is
● Druk op de afstandsbediening op CD TEXT/edit om de
volgende informatie te zien, die eenmaal te lezen is (mits
beschikbaar):
➜ Naam van de artiest van het album
➜ Titel van het album
CD-tekst tijdens het afspelen
● Druk op de afstandsbediening op CD TEXT/edit om de
volgende informatie te zien, die eenmaal te lezen is (mits
beschikbaar):
➜ Naam van de artiest van het nummer
➜ Titel van het nummer
ID3-tag
Hiermee kunt u de in een MP3-nummer vervatte informatie
weergeven, zoals een titel van een album of een titel van
een nummer.
●
Als u een ID3-tag voor uw MP3-cd hebt aangemaakt, drukt u
tijdens het afspelen op de afstandsbediening op CDTEXT/edit
om de volgende ID3-taginformatie te laten verschijnen:
➜ Titel van het album
➜ Naam van de artiest van het nummer
➜ Titel van het nummer
Opmerking: Als er geen ID3-tag beschikbaar is, wordt
NO TEXT weergegeven.
Nummers programmeren
Een programma kan worden gebruikt voor het afspelen of
voor het opgeven van de nummers die worden opgenomen. U
kunt maximaal 99 nummers (ook MP3-nummers) kiezen en in
het geheugen opslaan. Het is mogelijk een nummer meerdere
keren op te slaan, willekeurig over cd-speler en cd-recorder.
Het is echter niet mogelijk MP3-nummers met audionummers
of MP3-nummers van meer dan één cd te combineren.
1 Plaats de gewenste disk(s) in de diskhouder(s).
2 Druk op de afstandsbediening op PROGRAM om naar het
programmeermenu te gaan.
➜
PROG
begint te knipperen en PROGRAM wordt weergegeven.
➜ Het stapnummer (STEP), het betreffende nummer en de
speelduur van het actuele nummer op de huidige cd
worden weergegeven.
3 Als u een nummer van de cd-speler wilt kiezen:
Druk op de afstandsbediening op CD en daarna zo vaak als
nodig is op í of ë om naar het gewenste nummer te
springen.
Als u een nummer van de cd-recorder wilt kiezen:
Druk op de afstandsbediening op CDR en daarna zo vaak
als nodig is op í of ë om naar het gewenste nummer te
springen.
Opmerking: Als u een nummer kiest dat al is opgeslagen, wordt
P weergegeven.
4 Druk op de afstandsbediening op PROGRAM om uw
keuze in het geheugen op te slaan.
➜
Het totaal aantal geprogrammeerde nummers (
STEP
), PRG
en de totale duur van het programma worden weergegeven.
5 Herhaal stappen 3–4 om alle gewenste nummers te kiezen
en op te slaan.
Opmerking: Als u meer dan 99 nummers probeert op te slaan
wordt PROGRAM FULL weergegeven.
6 Druk op Ç om het programmeren te beëindigen.
Het programma wissen
1 Druk zo nodig op Ç om het afspelen te stoppen.
2 Houd Ç ingedrukt om het programma te wissen.
➜ PROG CLEARED wordt weergegeven en PROG verdwijnt.
Basisfuncties
86
Nederlands
Page 87

Basisinformatie
Het cd-recorderdeck biedt u 3 hoofdfuncties:
– Opnemen vanaf de interne cd-speler of vanaf een
gekozen externe bron
– Afronden van uw CD-R(W) disks en afronden
ongedaan maken van uw CD-RW disks
– Wissen van een CD-RW disk
De procedure voor het opnemen is bij CD-R en CD-RW
disks hetzelfde. Zorg dat de CD-R(W) volkomen vrij
is van krassen en stofdeeltjes.
Voor opnamen is de lengte van een nummer minimaal
4 seconden. U kunt maximaal 99 nummers op een disk
opnemen.Als er minder dan 7 seconden opnametijd op de
disk over is, wordt DISC FULL weergegeven en kunt u
geen opname instellen.
Bescherming auteursrecht
Het Serial Copy Management System (SCMS) verhindert
dat er een digitale kopie van een digitale kopie wordt
gemaakt. Met het systeem kan wel een digitale opname van
het origineel worden gemaakt, maar in bepaalde landen kan
daarvoor de vergunning van auteursgerechtigden vereist zijn.
Als u probeert tegen kopiëren beveiligd materiaal van een
externe bron op te nemen, wordt COPY PROTECT
weergegeven. Het is dan niet mogelijk digitaal op te nemen.
Het is niet mogelijk een MP3-cd te kopiëren.
Opnemen van cd-tekst
Als de originele cd cd-tekst heeft, wordt deze tekst
automatisch opgenomen, mits de cd-tekst niet tegen kopiëren
beveiligd is. In dat geval is het niet mogelijk de cd-tekst op te
nemen en wordt TEXT PROTECT weergegeven.
Wat is afronden?
Het afronden is een eenvoudige procedure die de opname
van een CD-R(W) voltooit en nodig is om:
– een opgenomen CD-R op een standaard cd-speler af te
spelen,
– een opgenomen CD-RW op een CD-RW-compatibele
cd-speler en cd-recorder af te spelen,
– ongewenste opnamen op een disk te voorkomen, of
– abusievelijk wissen van nummers op een CD-RW te
voorkomen.
CD-R’s zijn „geblokkeerd”na afronding. Er kunnen geen
andere nummers of cd-tekst aan worden toegevoegd.
CD-RW’s zijn ook „geblokkeerd” na afronding, maar deze
afronding kan ongedaan worden gemaakt om daarna weer
op te nemen of te wissen.
Direct Line Recording (DLR)
De cd-recorder is voorzien van de hoogwaardige Direct
Line Recording-techniek. Hiermee wordt een perfecte
opname van het bronmateriaal gewaarborgd, namelijk een
rechtstreekse „bit voor bit”-opname. DLR wordt niet
ingeschakeld als het opnameniveau wordt ingesteld.
Het opnameniveau instellen
U kunt het referentie-opnameniveau instellen voor
opnamen vanaf een extra apparaat. Hiermee kunt u uw
opnamen in- en uitfaden.
1 Druk zo vaak op INPUT tot de ingang van het extra
apparaat is gekozen:
➜ DIGITAL IN: de digitale coaxiale ingang wordt gekozen.
➜ OPTICAL IN: de digitale optische ingang wordt gekozen.
➜ ANALOG IN: de analoge ingang wordt gekozen.
2 Houd op de cd-recorder ALBUM+ of ALBUM-
ingedrukt om het gewenste opnameniveau in te stellen. De
hardste geluiden in het op te nemen materiaal mogen niet
in de rode niveaus van de niveauaanwijzer komen.
➜ Het actuele opnameniveau (in dB) wordt weergegeven.
Opmerking: Het opnameniveau kan ook tijdens opnemen
vanaf de interne cd-speler worden ingesteld. Houd op de
cd-recorder ALBUM+ of ALBUM- ingedrukt om het
gewenste opnameniveau in te stellen.
Over het opnemen
87
Nederlands
Page 88

Wat is intern opnemen?
Het opnemen vanaf het cd-spelerdeck van dit toestel
wordt „intern opnemen” genoemd.
De opnamesnelheid kiezen
Het is mogelijk de opnamesnelheid voor interne opnamen
te kiezen.
● Druk telkens op SPEED 1·2·4x om te kiezen tussen:
➜ REC SPEED 1X: voor opname op normale snelheid
➜ REC SPEED 2X: voor opname op dubbele snelheid
terwijl het geluid gedempt is
➜ REC SPEED 4X: voor opname op 4 maal de normale
snelheid terwijl het geluid gedempt is
Opmerkingen:
Tijdens het opnemen kan geen snelheid worden gekozen.
Bij sommige merken lege audiodisks is opnemen met
hogere snelheid niet mogelijk en werkt dat niet. Kies in dat
geval een lagere snelheid.
Een gehele cd kopiëren
Dit is de gemakkelijkste manier om een kopie te maken van
een gehele cd, die op andere cd-spelers kan worden
afgespeeld. Er kunnen echter geen andere nummers of
cd-tekst aan worden toegevoegd.
1 Leg een CD-R(W) die volkomen vrij is van krassen en
stofdeeltjes in de houder van de cd-recorder.
2 Leg de disk die u wilt kopiëren in de houder van de cd-speler.
3 Druk op COPY CD om het kopiëren van de gehele cd te
starten.
➜ REC verschijnt, het kopiëren start en de resterende
actuele opnametijd begint af te tellen.
Opmerking:Als er al een programma beschikbaar was voordat u
op COPY CD drukte, wordt dit genegeerd.PROG verdwijnt en
de huidige disk wordt opgenomen. Nadat de opname is voltooid,
verschijnt PROG en is het programma weer beschikbaar.
Alle nummers van een cd opnemen
U kunt alle nummers van een cd kopiëren en daarna
besluiten af te ronden of niet af te ronden.
1 Leg een CD-R(W) die volkomen vrij is van krassen en
stofdeeltjes in de houder van de cd-recorder.
2 Leg de disk waarvan u alle nummers wilt opnemen in de
houder van de cd-speler.
3 Druk op REC om naar het opnamemenu te gaan.
➜ RECORD CD?, gevolgd door PRESS REC worden
beurtelings weergegeven.
4 Druk nogmaals op REC om het opnemen van alle
nummers te starten.
➜ REC verschijnt, het opnemen start en de resterende
actuele opnametijd begint af te tellen.
00
Als u op de cd-recorder op / OPEN/CLOSE drukt, worden
➜ CD NOT FINAL en PRESS REC TO FINALIZE
beurtelings weergegeven.
Nu beslist u
niet af te ronden: de CD-R kan niet worden
afgespeeld op andere cd-spelers, maar er kunnen wel
andere nummers of cd-tekst aan worden toegevoegd.
Druk op de cd-recorder nogmaals op / OPEN/CLOSE of
wacht enkele seconden.
➜ De lade gaat open. De CD-R(W) is niet afgerond.
of
wel af te ronden: de CD-R kan worden afgespeeld op
andere cd-spelers, maar er kunnen geen andere
nummers of cd-tekst aan worden toegevoegd.
Druk op REC om het afronden te starten.
➜ FINAL wordt weergegeven en de actuele resterende
afrondingstijd begint af te tellen.
Intern opnemen
88
Nederlands
Page 89

Een afzonderlijk nummer opnemen
U kunt diverse nummers van verschillende cd’s kopiëren en
daarna besluiten af te ronden of niet af te ronden.
1 Leg een CD-R(W) die volkomen vrij is van krassen en
stofdeeltjes in de houder van de cd-recorder.
2 Speel het door u gewenste nummer af op de cd-speler.
3 Druk op REC om naar het opnamemenu te gaan.
➜ REC TR met het betreffende nummer en PRESS REC
worden beurtelings weergegeven.
4 Druk nogmaals op REC om het opnemen van het nummer
te starten.
➜ REC verschijnt, het opnemen start vanaf het begin van
het gekozen nummer en de resterende actuele
opnametijd begint af te tellen.
5 Herhaal stappen 2–4 om meer nummers op te nemen.
00
Als u op de cd-recorder op / OPEN/CLOSE drukt, worden
➜ CD NOT FINAL en PRESS REC TO FINALIZE
beurtelings weergegeven.
Nu beslist u
niet af te ronden: de CD-R kan niet worden
afgespeeld op andere cd-spelers, maar er kunnen wel
andere nummers of cd-tekst aan worden toegevoegd.
Druk op de cd-recorder nogmaals op / OPEN/CLOSE of
wacht enkele seconden.
➜ De lade gaat open. De CD-R(W) is niet afgerond.
of
wel af te ronden: de CD-R kan worden afgespeeld op
andere cd-spelers, maar er kunnen geen andere
nummers of cd-tekst aan worden toegevoegd.
Druk op REC om het afronden te starten.
➜ FINAL wordt weergegeven en de actuele resterende
afrondingstijd begint af te tellen.
Een programma maken en
opnemen
U kunt uw eigen programma maken, het opnemen en
daarna besluiten af te ronden of niet af te ronden. Denk er
echter aan dat u niet een programma kunt opnemen dat
nummers van de cd-speler en cd-recorder bevat. In dat
geval worden 2 DISC PROG en NOT POSSIBLE
weergegeven.
1 Plaats een CD-R(W) die volkomen vrij is van krassen en
stofdeeltjes in de houder van de cd-recorder.
2 Plaats de cd waarvan u wilt opnemen in de houder van de
cd-speler.
3 Kies alle gewenste nummers van de cd en sla ze op (zie
„Nummers programmeren”).
00
Als de totale tijdsduur van het programma langer is dan de
resterende opnametijd van de CD-R(W):
➜ DOES NOT FIT wordt kort weergegeven.
➜ MISSING en de tijd die niet kan worden opgenomen
worden weergegeven.
Als u het opnemen toch start, wordt er opgenomen tot de
CD-R(W) vol is.
4 Druk op REC om naar het opnamemenu te gaan.
➜ REC PROGRAM? en PRESS REC worden beurtelings
weergegeven.
5 Druk nogmaals op REC om het opnemen van het huidige
programma te starten.
➜ REC verschijnt, het opnemen start en de resterende
actuele opnametijd begint af te tellen.
00
Als u op de cd-recorder op / OPEN/CLOSE drukt, worden
➜ CD NOT FINAL en PRESS REC TO FINALIZE
beurtelings weergegeven.
Nu beslist u
niet af te ronden: de CD-R kan niet worden
afgespeeld op andere cd-spelers, maar er kunnen wel
andere nummers of cd-tekst aan worden toegevoegd.
Druk op de cd-recorder nogmaals op / OPEN/CLOSE of
wacht enkele seconden.
➜ De lade gaat open. De CD-R(W) is niet afgerond.
of
wel af te ronden: de CD-R kan worden afgespeeld op
andere cd-spelers, maar er kunnen geen andere
nummers of cd-tekst aan worden toegevoegd.
Druk op REC om het afronden te starten.
➜ FINAL wordt weergegeven en de actuele resterende
afrondingstijd begint af te tellen.
Intern opnemen
89
Nederlands
Page 90

Wat is extern opnemen?
Het opnemen vanaf een extra apparaat wordt „extern
opnemen” genoemd.
Analoog of digitaal opnemen?
Voor het maken van opnamen vanaf een externe bron,
raden wij u aan alleen analoge opnamen te maken als
digitaal opnemen niet mogelijk is. Digitaal opnemen levert
een betere geluidskwaliteit op.
Automatische nummerophoging
Als de digitale invoer voor opname vanaf een digitale
bron (bijv. cd-speler) wordt gebruikt, worden de nummers
automatisch opgehoogd zodat de nummers op dezelfde
plaats worden gezet als op het origineel.Als de analoge
invoer voor opname vanaf een digitale of analoge
bron wordt gebruikt, vindt er geen automatische
nummerophoging plaats tenzij een van de onderstaande
instellingen wordt gekozen. Nummerophoging verloopt niet
altijd even goed en is afhankelijk van de kwaliteit van het
bronmateriaal.
● Druk in de stopstand op de afstandsbediening zo vaak op
TR. INCR. als nodig is om over te schakelen tussen de
volgende functies voor automatische nummerophoging:
➜ TURNTABLE: voor optimale opname vanaf lawaaierige
bronnen zoals platenspelers. (Het is niet mogelijk een
platenspeler rechtstreeks op AUX/CDR IN L/R aan
te sluiten – zie „Analoge aansluitingen”.)
➜ TAPE/TUNER: voor optimale opname vanaf een band
➜ CD/DVD: voor optimale opname vanaf hoogwaardige
bronnen zoals DAT, DCC of DVD
➜
MANUAL: om de automatische nummerfunctie uit te schakelen
Opmerkingen:
De nummers kunnen handmatig worden opgehoogd door
tijdens het opnemen op de afstandsbediening op TR. INCR. te
drukken. De minimale lengte van een nummer is 4 seconden.
De nummering kan na het opnemen niet worden gewijzigd.
Opnemen met automatische start
U kunt snel en gemakkelijk een gehele cd of een nummer
opnemen. Zodra het afspelen op het extra apparaat gestart
is, start het opnemen automatisch.
1 Leg een CD-R(W) die volkomen vrij is van krassen en
stofdeeltjes in de houder van de cd-recorder.
2 Druk op de cd-speler/recorder zo vaak op INPUT tot de
ingang van het extra apparaat waarvan u wilt opnemen is
gekozen.
➜ DIGITAL IN: de digitale ingang wordt gekozen.
➜ ANALOG IN: de analoge ingang wordt gekozen.
➜ OPTICAL IN: de optische ingang wordt gekozen.
3 Zorg dat het gewenste nummer op het extra apparaat
gekozen is.
4 Zorg dat het extra apparaat op pauze of stop staat.
5 Druk op de cd-speler/recorder op REC om naar het
opnamemenu te gaan.
➜ PREPARING wordt weergegeven.
➜ RECORD EXT? en START EXTERN SOURCE! worden
beurtelings weergegeven.
6 Start het afspelen op het extra apparaat binnen 5 seconden.
➜ Het opnemen start tegelijkertijd en REC verschijnt. De
resterende opnametijd op de CD-R(W) wordt
weergegeven.
Opmerking: Het opnemen kan ook met de hand worden
gestart door op de cd-speler/recorder op REC te drukken.
00
Druk op de cd-recorder op Ç om het opnemen met de
hand te stoppen.
00
Als u op de cd-recorder op / OPEN/CLOSE drukt, worden
➜ CD NOT FINAL en PRESS REC TO FINALIZE
beurtelings weergegeven.
Nu beslist u
niet af te ronden: de CD-R kan niet worden
afgespeeld op andere cd-spelers, maar er kunnen wel
andere nummers of cd-tekst aan worden toegevoegd.
Druk op de cd-recorder nogmaals op / OPEN/CLOSE of
wacht enkele seconden.
➜ De lade gaat open. De CD-R(W) is niet afgerond.
of
wel af te ronden: de CD-R kan worden afgespeeld op
andere cd-spelers, maar er kunnen geen andere
nummers of cd-tekst aan worden toegevoegd.
Druk op de cd-speler/recorder op REC om het afronden
te starten.
➜ FINAL wordt weergegeven en de actuele resterende
afrondingstijd begint af te tellen.
Extern opnemen
90
Nederlands
Page 91

Handmatig opnemen
U kunt een opname vanaf een extra apparaat handmatig
starten en stoppen. U kunt handmatig opnemen gebruiken
voor het opnemen van live muziek, of voor bepaalde
muziek zoals klassiek, die niet met automatische start kan
worden opgenomen.
1 Leg een CD-R(W) die volkomen vrij is van krassen en
stofdeeltjes in de houder van de cd-recorder.
2 Druk op de cd-speler/recorder zo vaak op INPUT tot de
ingang van het extra apparaat waarvan u wilt opnemen is
gekozen.
➜ DIGITAL IN: de digitale ingang wordt gekozen.
➜ ANALOG IN: de analoge ingang wordt gekozen.
➜ OPTICAL IN: de optische ingang wordt gekozen.
3 Start het afspelen op het extra apparaat.
4 Druk op de cd-speler/recorder op REC om naar het
opnamemenu te gaan.
➜ PREPARING wordt weergegeven.
➜ RECORD EXT? en PRESS REC worden beurtelings
weergegeven.
5 Druk op de cd-speler/recorder op REC om het opnemen
te starten.
➜ Het opnemen start en REC verschijnt. De resterende
opnametijd op de CD-R(W) wordt weergegeven.
6 Druk op de cd-recorder op Ç om het opnemen te stoppen.
00
Als u op de cd-recorder op / OPEN/CLOSE drukt, worden
➜ CD NOT FINAL en PRESS REC TO FINALIZE
beurtelings weergegeven.
Nu beslist u
niet af te ronden: de CD-R kan niet worden
afgespeeld op andere cd-spelers, maar er kunnen wel
andere nummers of cd-tekst aan worden toegevoegd.
Druk op de cd-recorder nogmaals op / OPEN/CLOSE of
wacht enkele seconden.
➜ De lade gaat open. De CD-R(W) is niet afgerond.
of
wel af te ronden: de CD-R kan worden afgespeeld op
andere cd-spelers, maar er kunnen geen andere
nummers of cd-tekst aan worden toegevoegd.
Druk op het toestel op REC om het afronden te starten.
➜ FINAL wordt weergegeven en de actuele resterende
afrondingstijd begint af te tellen.
Opnemen met de timer
Hiermee kunt u een op tijd ingestelde opname via de
analoge ingang starten (bijv. voor opnamen vanaf een
tuner). U kunt een opnametijd kiezen van 15, 30, 45 of 60
minuten of tot het eind van de CD-R(W).
1 Leg een CD-R(W) die volkomen vrij is van krassen en
stofdeeltjes in de houder van de cd-recorder.
2 Zorg dat het extra apparaat waarvan u wilt opnemen goed
aangesloten is.
3 Druk op de afstandsbediening op TIMER REC om het
opnemen te starten.
➜ 15 MIN, gevolgd door PREPARING, wordt weergegeven.
➜ Het opnemen start en REC verschijnt. De actuele
resterende opnametijd wordt weergegeven.
00
Om een andere opnametijd te kiezen, drukt u op de
afstandsbediening zo vaak op TIMER REC tot de gewenste
tijd wordt weergegeven:
➜
30 MIN, 45 MIN, 60 MIN, MAXIMUM wordt weergegeven.
4 Nadat de gekozen tijd verstreken is, stopt het opnemen
automatisch en schakelt het toestel in stand-by.
00
Druk op de cd-recorder op Ç om het opnemen met de
hand te stoppen.
Extern opnemen
91
Nederlands
Page 92

Wissen van een CD-RW disk
Het is mogelijk een of meer nummers (te beginnen bij het
eind van het laatste nummer) of de gehele CD-RW te
wissen. Het is niet mogelijk om van een CD-R te wissen.
Een of meer nummers wissen
1 Leg de CD-RW waarvan u nummers wilt wissen in de
houder van de cd-recorder.
2 Druk kort op ERASE CD om naar het wismenu te gaan.
Als er een niet-afgeronde CD-RW is ingelegd:
➜ ERASE LAST TRACK? en PRESS ERASE worden
beurtelings weergegeven.
Als er een afgeronde CD-RW is ingelegd:
➜ FINALIZED CD wordt kort weergegeven.
➜ ERASE LAST TRACK?, gevolgd door PRESS ERASE
worden beurtelings weergegeven.
00
Om een bepaald nummer te kiezen dat u wilt wissen, drukt
u op de cd-recorder zo vaak als nodig is op ¢ of 4 om
het gewenste nummer of de gewenste nummers te kiezen.
➜
ERASE TR en het nummer (bijv. 10+) worden weergegeven.
Herhaal deze stap om meer te wissen nummers te kiezen.
Opmerking:Voor het wissen van meerdere nummers moeten
de te wissen nummers in volgorde worden gekozen, te
beginnen bij het laatst opgenomen nummer.Voorbeeld: Op de
CD-RW zijn 5 nummers opgenomen. U kunt nu de nummers
5 en 4 wissen. U kunt ook de nummers 5, 4 en 3 wissen, maar
u kunt niet de nummers 5 en 3 wissen!
3 Druk nogmaals op ERASE CD om het wissen te starten.
Als er een niet-afgeronde CD-RW is ingelegd:
➜ ERASE wordt weergegeven, de resterende
bewerkingstijd begint af te tellen en het wissen start.
Als er een afgeronde CD-RW is ingelegd:
➜
UNFINAL wordt weergegeven,de resterende bewerkingstijd
begint af te tellen en het afronden ongedaan maken start.
➜ Daarna wordt ERASE weergegeven, de resterende
bewerkingstijd begint af te tellen en het wissen start.
Een gehele CD-RW wissen
1 Leg de CD-RW die u wilt wissen in de houder van de
cd-recorder.
2 Houd ERASE CD langer dan 1 seconde ingedrukt om naar
het wismenu te gaan.
Als er een niet-afgeronde CD-RW is ingelegd:
➜ ERASE DISC? en PRESS ERASE worden beurtelings
weergegeven.
Als er een afgeronde CD-RW is ingelegd:
➜ FINALIZED CD wordt kort weergegeven.
➜ ERASE DISC? en PRESS ERASE worden beurtelings
weergegeven.
3
Druk nogmaals op ERASE CD om de gehele CD-RW te wissen.
Als er een niet-afgeronde CD-RW is ingelegd:
➜
ERASE wordt weergegeven,de resterende bewerkingstijd
begint af te tellen en het wissen van de gehele CD-RW start.
Als er een afgeronde CD-RW is ingelegd:
➜ UNFINAL wordt weergegeven, de resterende
bewerkingstijd begint af te tellen en het afronden
ongedaan maken start.
➜ ERASE wordt weergegeven, de resterende
bewerkingstijd begint af te tellen en het wissen van de
gehele CD-RW start.
Cd-tekst bewerken
Nadat u uw CD-R(W) hebt opgenomen kunt u een tekst
invoeren, bijv. titel van album of titel van nummer. Deze tekst
wordt tijdens het afspelen op dit toestel weergegeven, maar
ook op andere toestellen die van CD text zijn voorzien.
Gebruik uitsluitend een niet-afgeronde CD-R of CD-RW (van
een afgeronde CD-RW moet de afronding eerst ongedaan
worden gemaakt).
1 Druk zo nodig op Ç om het afspelen te stoppen.
2 Druk op de afstandsbediening op CDR om de cd-recorder
te kiezen.
3 Druk op de afstandsbediening telkens op CD TEXT/edit
om te kiezen tussen:
➜ ALBUM TITLE: om de titel van de cd te beschrijven
➜ ALBUM ARTIST: om de naam van de artiest van de cd
te beschrijven
➜ ARTIST TR 1 (of 2, 3,…): om de naam van de artiest
van nummer 1 (of 2, 3,…) te beschrijven
➜ TITLE TR 1 (of 2, 3,…): om de titel van nummer 1
(of 2, 3,…) te beschrijven
4 Zodra de cursor begint te knipperen, gebruikt u de
cijfer-/lettertoetsen op de afstandsbediening om een teken
te kiezen.
➜ Nadat er een teken gekozen is, verschuift de cursor
automatisch naar de volgende positie.
5 Druk op de afstandsbediening op CD TEXT/edit om de
gemaakte tekst op te slaan en terug te keren naar het
tekstbewerkingsmenu.
6 Druk op Ç om het tekstbewerkingsmenu te verlaten.
Een teken wissen of vervangen
1 Druk op de afstandsbediening op à of á om naar het
teken te gaan dat moet worden gewist of vervangen.
➜ Het teken begint te knipperen.
2 Als u het teken wilt wissen:
Druk op de afstandsbediening op DELETE.
➜ Het teken wordt gewist en de tekst schuift één positie
naar links.
Als u het teken wilt vervangen:
Gebruik de cijfer-/lettertoetsen op de afstandsbediening om
een nieuw teken te kiezen.
00
Druk op de afstandsbediening op à of á om nog een
teken te wijzigen.
Automatisch gekopieerde tekst
Als de naam van een artiest voor een nummer is opgeslagen,
wordt deze automatisch gekopieerd naar het volgende nummer.
Wissen/Bewerken van cd-tekst (alleen bij cd-recorder)
92
Nederlands
Page 93

WAARSCHUWING
Probeer het toestel nooit zelf te repareren daar dan de garantie vervalt.
Maak het apparaat niet open want dan loopt u het risico een
elektrische schok te krijgen.
Controleer bij mankementen eerst onderstaande punten voordat u het
toestel in reparatie geeft.Als u met deze aanwijzingen het probleem niet
kunt oplossen, raadpleeg dan uw dealer of servicedienst.
Laserbeveiliging
Dit apparaat gebruikt een laser.In verband met mogelijk oogletsel mag
uitsluitend een erkend reparateur de afdekking verwijderen of proberen
dit onderdeel te repareren.
Probleem Oplossing
Geen stroom – Zorg dat de netvoedingskabel goed aangesloten is.
– Druk op het toestel op 2 STANDBY·ON om het in te schakelen.
Geen geluid – Controleer of de audio-aansluitingen goed geïnstalleerd zijn.
– Zorg dat MP3-nummers op het juiste formaat opgenomen zijn.
Geen reactie op bedieningen – Schakel de stroom naar het toestel uit, schakel na enkele seconden opnieuw in.
Overzicht van de mogelijkheden blijft – Houd op het toestel Ç minimaal 5 seconden ingedrukt om het
automatisch starten (demo-programma) demonstratieprogramma uit te schakelen.
Afstandsbediening werkt niet goed – Verwijder de batterijen en leg ze goed in of leg nieuwe batterijen in.
– Verklein de afstand tot het toestel.
Aanduiding WRONG DISC, USE AUDIO CD – Controleer of de disk niet beschadigd of vuil is.Vervang of reinig de disk.
en INSERT DISC – Zorg dat er een disk is ingelegd, bedrukte kant boven.
– Zorg dat er geen dvd ingelegd is.
– Wacht tot de beslagen laserlens weer helder is.
Aanduiding WRONG DISC, USE CDR<W> – Er is een voor computers bestemde CD-R(W) ingelegd. Zorg dat er een
WITH`DIGITAL AUDIO´ LOGO en digitale audiodisk is ingelegd, bedrukt met „Digital Audio” en het speciale logo.
INSERT DISC
Aanduiding NO SIGNAL of – Controleer of de aansluitkabel goed aangesloten is.
aanduiding CHECK INPUT – Kies de juiste ingang.
– Zorg dat het externe apparaat ingeschakeld is.
Aanduiding OVERHEATING – Zet het toestel niet boven op andere apparatuur die het zou kunnen
verhitten (bijv.ontvanger).
Neemt niet op – Controleer of de CD-R(W) volkomen vrij is van krassen en stofdeeltjes.
– Controleer of er een digitale audio-CD-R(W) is ingelegd en of deze niet
afgerond is.
Opname wordt afgebroken – Gebruik Philips audio-CD-R(W)’s.
– Wanneer de opname wordt onderbroken (stroomuitval, mechanische schok)
begin de opname dan opnieuw met een nieuwe disk.
Opgenomen disk kan niet in een andere – Controleer of de CD-R(W) afgerond is.
standaard cd-speler worden afgespeeld – Leg de CD-RW in een CD-RW-compatibele cd-speler.
Ontbrekende inhoudsopgaven op MP3-cd – Alleen albums met afspeelbare bestanden verschijnen op het display.
Verstreken speelduur van MP3-nummer – Dat is normaal,omdat dit MP3-nummer een variabele bitsnelheid heeft.
telt zeer snel of onregelmatig op
Opgenomen nummers gaan in elkaar – Gebruik een andere manier voor nummerophoging.
over of nummers starten of stoppen – Voeg met de afstandsbediening handmatig nummerophogingen in.
niet op het juiste moment
Problemen oplossen
93
Nederlands
Page 94

Informazioni generali
Dati tecnici
________________________________
95
Informazioni ambientali
______________________
95
Accessori di serie
___________________________
95
Manutenzione
______________________________
95
Come maneggiare un disco
___________________
95
Dischi per la registrazione
____________________
96
Dischi per la riproduzione
____________________
96
Alcune parole sull’MP3
_______________________
96
Collegamenti
Collegamenti
______________________________
97
Informazioni sull'impostazione
_________________
97
Indicazioni generali sui collegamenti
_____________
97
Installazioni
Collegamenti analogici
_______________________
98
Collegamenti digitali
______________________
98–99
Rete
_____________________________________
99
Comandi
__________________________________
100
Telecomando
Uso del telecomando
_______________________
101
Tasti del telecomando
______________________
101
Funzioni di base
Accensione, accensione in standby
_____________
102
Modalità dimostrazione
_____________________
102
Caricamento dischi
_________________________
102
Riproduzione
_____________________________
102
Selezione e ricerca (su tutti i dischi,
tranne i CD MP3)
_________________________
103
Selezione e ricerca (solo su CD MP3)
__________
103
SHUFFLE e REPEAT
________________________
104
Visualizzazione testo CD
____________________
104
ID3-tag
__________________________________
104
Programmazione dei numeri dei brani
__________
104
Cancellazione del programma
________________
104
Informazioni sulla registrazione
Informazioni di base
________________________
105
Che cos'è la finalizzazione?
___________________
105
Direct Line Recording (DLR)
_________________
105
Regolazione del livello di registrazione
__________
105
Registrazione interna
Che cos'è la registrazione interna?
_____________
106
Selezione della velocità di registrazione
_________
106
Copia di un intero CD
______________________
106
Registrazione di tutti i brani da un CD
__________
106
Registrazione di un singolo brano
______________
107
Realizzazione e registrazione di un programma
___
107
Registrazione esterna
Che cos'è la registrazione esterna?
_____________
108
Registrazione analogica o digitale?
_____________
108
Incremento automatico del brano
_____________
108
Registrazione con avvio automatico
____________
108
Registrazione manuale
______________________
109
Registrazione con timer
_____________________
109
Cancellazione/Modifica testo CD (solo su
registratore CD)
Cancellazione da un disco CDRW
_____________
110
Modica di testo CD
________________________
110
Ricerca guasti
_____________________________
111
Indice
94
Italiano
Page 95

Dati tecnici
Soggetti a modifiche senza preavviso.
Informazioni generali
Consumo energetico
Attivo
_______________________________
< 20 W
Standby
______________________________
< 0,6 W
Dimensioni, l × h × p
_____________
435 × 88 × 310 mm
Peso
_______________________________________
5 kg
Audio
Risposta in frequenza
___________________
2–20.000 Hz
Riproduzione
Segnale/Rumore (pesato A)
_______________
120 dB
Segnale/Rumore
________________________
110 dB
Gamma dinamica
________________________
98 dB
Distorsione armonica totale
_______________
-95 dB
Separazione canale
______________________
105 dB
Registrazione
Segnale/Rumore (pesato A)
________________
93 dB
Segnale/Rumore digitale
senza SRC
___________________
come alla sorgente
Gamma dinamica
________________________
90 dB
Distorsione armonica totale + rumore
_______
-86 dB
Ingresso digitale/ottico
________________
12–96 kHz
Laser (registratore CD)
Tipo
__________________
Semiconduttore laser GaAIAs
Lunghezza d'onda
_______________
775–795 nm (a 25°)
Potenza in
uscita
______
2,5 mW (in lettura), 35 mW (in scrittura)
Divergenza raggio
_________________________
60 gradi
In qualità di partner ENERGY STAR®,
Philips ha determinato la conformità
di questo prodotto alle direttive
ENERGY STAR®per l'efficienza
energetica.
Quest'apparecchio è conforme ai requisiti di
interferenza radio della Comunità Europea.
ATTENZIONE
L’esecuzione di comandi,regolazioni o procedure
diverse da quanto specificato nel presente manuale
può provocare l’esposizione a radiazioni pericolose o
un funzionamento non sicuro.
Informazioni ambientali
Tutto il materiale di imballaggio in eccesso è stato eliminato.
Abbiamo fatto quanto in nostro potere per rendere
l'imballaggio facilmente divisibile in tre materiali singoli:
cartone (scatolone), schiuma di polistirolo (imbottitura) e
polietilene (sacchetti, strati di schiuma protettiva).
L'apparecchio è formato da materiali riciclabili previo
smontaggio da parte di aziende specializzate.Attenersi alla
normativa locale relativa allo smaltimento di materiali da
imballaggio, batterie scariche e attrezzature obsolete.
Accessori di serie
– 2 cavi audio analogici (con spina rossa e spina bianca)
– Telecomando
– 2 batterie per il telecomando, dimensione AA
– Cavo di rete
Manutenzione
Pulire l'apparecchio con un panno
morbido, leggermente umido, privo
di pelucchi. Non utilizzare detergenti
che possano avere un effetto
corrosivo.
Non esporre apparecchio, batterie
o dischi a umidità, pioggia, sabbia o
calore eccessivo (dovuto a
riscaldamento o luce solare diretta).
Come maneggiare un disco
Se il lettore/registratore CD non riesce a leggere il disco
correttamente, utilizzare un CD per la pulizia comunemente
disponibile per pulire le lenti, prima di sottoporre
l'apparecchio a riparazione.Altri metodi di pulizia
potrebbero danneggiare le lenti.Tenere sempre le piastre
chiuse per evitare che la polvere si depositi sulle lenti.
Le lenti possono appannarsi quando l'apparecchio viene
spostato improvvisamente da un ambiente freddo ad un
ambiente caldo. In questo caso non è possibile riprodurre
un disco. Lasciare l'apparecchio in un ambiente caldo fino
all'evaporazione dell'umidità.
Per estrarre facilmente il disco dalla
custodia, premere il perno centrale e,
contemporaneamente, sollevare il
CD(RW).Tenere sempre il CD(RW) dal
bordo e riporlo nella custodia dopo l'uso.
Non scrivere su un CD né attaccarvi
adesivi. Scrivere soltanto sul lato stampato di un CDR o CDRW,
utilizzando esclusivamente un pennarello dalla punta morbida.
Per pulire un disco, strofinarlo in
linea retta dal centro verso il bordo
con un panno morbido, privo di
pelucchi. I detergenti possono
danneggiare il disco!
Informazioni generali
95
Italiano
ATTENZIONE
RADIAZIONE LASER INVISIBILE ALL'APERTURA.
EVITARE L'ESPOSIZIONE AL RAGGIO.
Nota: Quest'avvertenza è posizionata all'interno
dell’alloggiamento.
Page 96

Dischi per la registrazione
Per la registrazione, assicurarsi di utilizzare esclusivamente
speciali dischi audio.Tali dischi sono contrassegnati
dall’indicazione « Digital Audio» e dai logo sotto riportati.
Esistono due diversi tipi di dischi audio da utilizzare su
questo registratore CD:
– I dischi CD audio registrabili
(CDR) possono essere registrati una
sola volta e riprodotti su tutti i lettori
CD e registratori CD standard, se
finalizzati.
– I dischi CD audio riscrivibili
(CDRW) possono essere registrati,
cancellati e riregistrati più volte,
nonché riprodotti su lettori CD e
registratori CD CDRW compatibili, se
finalizzati.
Tutti i lettori CD e i registratori CD Philips
recanti questa etichetta sono CDRW compatibili.
Per assicurare il corretto funzionamento
dell'apparecchio, si consiglia di utilizzare unicamente dischi
audio CDR e audio CDRW Philips.
Nota: Non utilizzare CDR o CDRW per computer, in quanto la
registrazione non funzionerà!
La registrazione è consentita nella misura in cui
non vengono violati diritti d'autore o altri diritti di
terzi.
In alcuni paesi l'uso del lettore/registratore CD
come mostrato o indicato nel presente manuale
utente può richiedere l'autorizzazione dei titolari dei
diritti d'autore.
Dischi per la riproduzione
Per eseguire la riproduzione su questo lettore/registratore
CD è possibile utilizzare i seguenti dischi:
– Tutti i CD audio preregistrati
– Tutti i dischi audio CDR e audio CDRW
– CD MP3 (CD-ROM con brani MP3)
Alcune parole sull’MP3
La nuova e rivoluzionaria tecnologia di compressione
musicale MP3 (MPEG ! Audio Layer-3) consente la riduzione
di dati audio digitali originali con un fattore massimo pari a
10 senza perdite significative in termini di qualità del suono.
Ciò consente di registrare su un solo CD-ROM fino a
10 ore di musica qualitativamente pari a quella dei CD.
Creazione di CD MP3
Fondamentalmente esistono 2 fonti di musica MP3 su CD.
È possibile trasferire la musica dai propri CD audio digitali
tramite drive CD-ROM nel proprio PC ed eseguire la
codifica in formato MP3 (« copiare ») oppure scaricare
legalmente musica MP3 da Internet.
Registrare (« masterizzare») musica dal proprio disco rigido su
CD-ROM con il proprio PC (verificare che il nome file
termini con .mp3).Al termine, è possibile riprodurre il
CD MP3 su questo lettore/registratore CD e godersi la musica.
Velocità di trasferimento dati
La velocità di trasferimento dati è di estrema importanza
per l’MP3. Indica la velocità di trasferimento dei bit.
La musica stereo su un CD indica una velocità di trasferimento
dati di circa 1400 kilobit al secondo (kbps). Per ottenere un
MP3 di buona qualità, si consiglia una velocità di
trasferimento bit di 128 kbps. Poiché la velocità di codifica
è selezionabile dall'utente, assicurarsi di raggiungere tale velocità
di trasferimento dati per MP3, in quanto la registrazione a
meno di 128 kbps subirebbe un degrado qualitativo del suono.
Registrazione
Scaricare file MP3 da Internet oppure copiare canzoni dai
propri CD audio digitali rappresenta un processo delicato,
influenzato inoltre dalla qualità del programma di codifica e
dalla velocità del PC. Ciò può provocare talvolta « salti » o
errori durante l'ascolto del CD MP3.
In ogni caso, assicurarsi di utilizzare una velocità di
registrazione non superiore a quella indicata sul CD-ROM
ed evitare di eseguire contemporaneamente altri programmi
sul proprio PC durante il processo di registrazione.
In conformità della SDMI (Secure Digital Music
Initiative), le uscite digitali di questo apparecchio saranno
disattivate durante la riproduzione di un CD MP3.
Non è possibile « masterizzare » un CD MP3 su
questo lettore/registratore CD.
Non è possibile registrare da un CD MP3.
Formati supportati
Su questo lettore/registratore CD sono supportati i
seguenti formati:
– Formato disco: ISO 9660 o Joliet
– Formato file: MPEG ! Audio Layer-3
– Nome file: .mp3 (brani), .m3u o .pls (playlists)
– Velocità di trasferimento bit: 32–320 kbps
(128 consigliati) o velocità di trasferimento bit variabile
Utilizzare il formato disco ISO 9660 per masterizzare un
CD MP3. Il formato disco UDF (per esempio
« DirectCD » o « WinOnCD») non è supportato.
Informazioni generali
96
Italiano
Page 97

Collegamenti
1 OPTICAL IN
collegare all'uscita ottica digitale di un apparecchio digitale
esterno
2 OPTICAL OUT
collegare all'ingresso ottico digitale di un apparecchio
digitale esterno
3 DIGITAL IN
collegare all'uscita coassiale digitale di un apparecchio
digitale esterno
4 DIGITAL OUT
collegare all'ingresso coassiale digitale di un apparecchio
digitale esterno
5 ANALOG IN L/R
collegare all'uscita audio analogica di un apparecchio esterno
6 ANALOG OUT L/R
collegare all'ingresso audio analogico di un apparecchio
esterno
7 AC MAINS ~
Una volta eseguiti tutti gli altri collegamenti, collegare
il conduttore di rete alla presa a muro.
Informazioni sull'impostazione
Posizionare l'apparecchio su una superficie piana, rigida e
stabile. Non posizionare l'apparecchio sopra altre
apparecchiature che potrebbero surriscaldarlo (per
esempio ricevitore o amplificatore). Se l'apparecchio è
posizionato in un armadio, lasciare almeno 3,5 cm
di spazio attorno all'apparecchio per evitare il
surriscaldamento. I telefoni cellulari attivati in prossimità
dell'apparecchio possono provocare malfunzionamenti.
Indicazioni generali sui collegamenti
Non eseguire né modificare i collegamenti con
l'alimentazione di rete inserita.
Per la riproduzione sono disponibili le seguenti uscite:
– Uscita analogica (ANALOG OUT L/R)
– Uscita coassiale digitale (DIGITAL OUT)
– Uscita ottica digitale (OPTICAL OUT)
Per la registrazione esterna sono disponibili i seguenti ingressi:
– Ingresso analogico (ANALOG IN L/R)
– Ingresso coassiale digitale (DIGITAL IN)
– Ingresso ottico digitale (OPTICAL IN)
Questi ingressi possono essere collegati all’uscita corrispondente
(alle uscite corrispondenti) dell'amplificatore/ricevitore o
direttamente all’uscita corrispondente (alle uscite
corrispondenti) dell'apparecchio esterno.
Non è possibile collegare un piatto direttamente ad
ANALOG IN L/R. Per utilizzare il piatto con
l'apparecchio, collegare un amplificatore/ricevitore
ad ANALOG IN L/R sul lettore/registratore CD.
Collegare quindi il piatto all'amplificatore.
I collegamenti effettuati dipendono dalle opportunità offerte
dall'attrezzatura audio di cui si dispone e dalle modalità di
utilizzo dell'apparecchio. Fare innanzitutto riferimento ai
manuali utenti relativi alla propria attrezzatura audio.
Si consiglia di eseguire la registrazione analogica solo se la
registrazione digitale risulta impossibile. La registrazione
digitale fornisce una qualità del suono migliore.
Se possibile, effettuare i collegamenti sia digitali che analogici.
In tal modo è possibile eseguire sempre registrazioni
analogiche quando la registrazione digitale risulta impossibile.
Collegamenti
97
Italiano
OUTIN
OPTICAL
DIGITAL
ANALOG
L
R
IN OUTOUTIN
AC MAINS
~
7
5
4
32
1
6
Page 98

Collegamenti analogici
Questi collegamenti sono necessari per riproduzioni e
registrazioni tramite amplificatore/ricevitore dotato di uscite
e ingressi analogici.
1 Collegare la spina rossa del cavo audio fornito in dotazione
(cinch) alla presa rossa ANALOG IN R e la spina bianca alla
presa bianca ANALOG IN L sul lettore/registratore CD.
2 Collegare l'altra estremità del cavo audio alle uscite
analogiche dell'amplificatore/ricevitore (CDR OUT,
TAPE OUT, AUX OUT, REC OUT, ecc.).
3 Collegare la spina rossa del cavo audio fornito in dotazione
(cinch) alla presa rossa ANALOG OUT R e la spina bianca
alla presa bianca ANALOG OUT L sul lettore/registratore
CD.
4 Collegare l'altra estremità del cavo audio agli ingressi
analogici dell'amplificatore/ricevitore (CD-R,TAPE IN,AUX,
PLAY IN, ecc.).
5 Collegare tutti gli altri componenti del sistema (piastra di
registrazione, lettore CD, sintonizzatore, piatto, ecc.) tramite
uscite analogiche ai corrispondenti ingressi analogici
dell'amplificatore/ricevitore (CD IN,TUNER IN,AUX IN,
PHONO IN, ecc.).
00
A questo punto è possibile eseguire la registrazione con
qualsiasi apparecchio collegato ad un ingresso analogico
dell'amplificatore/ricevitore. Premere ripetutamente INPUT
sul lettore/registratore CD per selezionare l'ingresso
analogico.
➜ Viene visualizzato ANALOG IN.
Modalità di collegamento con uscita analogica
sull’amplificatore/sul ricevitore già in uso (occupata)
La maggior parte degli amplificatori/ricevitori dispone di più
collegamenti su uscite analogiche (TAPE,VCR,…); tuttavia,
alcuni amplificatori/ricevitori dispongono di 1 sola uscita
analogica. Se a tale uscita è già collegata una piastra di
registrazione (registratore DAT o registratore MD), sarà
necessario modificare i collegamenti esistenti.
1 Scollegare i collegamenti analogici dalla piastra di
registrazione all'amplificatore/ricevitore.
2 Collegare il lettore/registratore CD (ved. fasi 1–4 nel
capitolo precedente).
3 Collegare le uscite analogiche della piastra di registrazione a
qualsiasi ingresso analogico libero (AUX, CD)
sull'amplificatore/ricevitore. A questo punto è possibile
riprodurre la registrazione o registrare dalla piastra di
registrazione sul CD.Tuttavia, non è più possibile registrare
su nastro.
Collegamenti digitali
Collegamento coassiale digitale diretto
Tale collegamento è necessario per la registrazione diretta
da qualsiasi apparecchio audio digitale con uscita coassiale
digitale (ad esempio lettore CD o lettore DVD).
● Utilizzare un cavo coassiale digitale per collegare l'uscita
coassiale dell'apparecchio esterno con DIGITAL IN sul
lettore/registratore CD.
00
A questo punto, è possibile eseguire la registrazione tramite
ingresso coassiale digitale. Premere ripetutamente INPUT
sul lettore/registratore CD per selezionare l'ingresso
coassiale digitale.
➜ Viene visualizzato DIGITAL IN.
Installazioni
98
Italiano
OUTIN
OPTICAL
DIGITAL
ANALOG
L
R
IN OUTOUTIN
OPTICAL
DIGITAL OUTPUT
ANALOG OUTPUT
L
R
PHONO
L
R
CD
IN IN
CD PLAYER/
RECORDER
AMPLIFIER/
RECEIVER
PHONO
L
R
CD
IN IN
CDR/TAPE
L
R
IN OUT
CD PLAYER
COAX
TURNTABLE
DIGITAL OUTPUT
OPTICAL
DIGITAL
OPTICAL
ANALOG OUTPUT
ANALOG
IN OUTOUTIN
L
R
L
R
CD PLAYER
CD PLAYER/
RECORDER
COAX
OUTIN
Page 99

Collegamento ottico digitale diretto
Tale collegamento è necessario per la registrazione diretta
da qualsiasi apparecchio audio digitale con uscita ottica
digitale (per esempio lettore CD o lettore DVD).
1 Rimuovere le protezioni antipolvere dall'ingresso ottico
digitale del lettore/registratore CD e dall'ingresso ottico
digitale dell'apparecchio esterno. Conservare le protezioni
in un luogo sicuro.
2 Utilizzare un cavo ottico digitale per collegare l'uscita ottica
dell'apparecchio esterno con OPTICAL IN sul
lettore/registratore CD.Assicurarsi di inserire
completamente entrambe le spine, fino ad udire uno scatto.
00
A questo punto, è possibile eseguire la registrazione tramite
ingresso ottico digitale. Premere ripetutamente INPUT sul
lettore/registratore CD per selezionare l'ingresso ottico digitale.
➜ Viene visualizzato OPTICAL IN.
Collegamenti coassiali digitali tramite ricevitore digitale
Se si dispone di un ricevitore con ingressi e uscite coassiali
digitali, tali collegamenti consentono di effettuare
registrazioni digitali da diverse fonti collegate al ricevitore.
● Utilizzare un cavo coassiale per collegare l'ingresso coassiale
digitale del ricevitore con DIGITAL OUT sul
lettore/registratore CD. Utilizzare un altro cavo coassiale
per collegare l'uscita coassiale digitale del ricevitore con
DIGITAL IN sul lettore/registratore CD.
00
A questo punto, è possibile eseguire la registrazione tramite
qualsiasi apparecchio digitale, collegato a un ingresso digitale
del ricevitore digitale (per esempio lettore CD o lettore
DVD). Premere ripetutamente INPUT sul lettore/registratore
CD per selezionare l'ingresso coassiale digitale.
➜ Viene visualizzato DIGITAL IN.
Collegamento ottico digitale tramite ricevitore digitale
Se si dispone di un ricevitore con uscite e ingressi ottici
digitali, tali collegamenti consentono di effettuare
registrazioni digitali da diverse fonti collegate al ricevitore.
1 Rimuovere le protezioni antipolvere dalle uscite e dagli
ingressi ottici digitali del lettore/registratore CD e dall'uscita
ottica digitale del ricevitore. Conservare le protezioni in un
luogo sicuro.
2 Utilizzare un cavo ottico digitale per collegare l'ingresso
ottico del ricevitore con OPTICAL OUT sul
lettore/registratore CD. Utilizzare un altro cavo ottico digitale
per collegare l'uscita ottica del ricevitore con OPTICAL IN
sul lettore/registratore CD.Assicurarsi di inserire
completamente entrambe le spine, fino ad udire uno scatto.
00
A questo punto, è possibile eseguire la registrazione tramite
qualsiasi apparecchio digitale, collegato ad un ingresso
digitale del ricevitore digitale (ad esempio lettore CD o
lettore DVD). Premere ripetutamente INPUT sul
lettore/registratore CD per selezionare l'ingresso ottico
digitale.
➜ Viene visualizzato OPTICAL IN.
Rete
La targhetta di identificazione è situata sulla parte
posteriore dell'apparecchio.
1 Verificare che la tensione di rete riportata sulla targhetta di
identificazione corrisponda alla tensione di rete locale.In caso
contrario, consultare il rivenditore o il fornitore del servizio.
2 Assicurarsi che tutti collegamenti siano stati eseguiti
prima di inserire l'alimentazione di rete.
3 Collegare il cavo di rete di serie alla AC MAINS ~ e alla
presa a muro. Ciò consente di attivare l'alimentazione di rete.
Quando l'apparecchio viene acceso in standby, continua a
consumare energia. Per scollegare completamente
l'apparecchio dalla rete, rimuovere la spina di rete
dalla presa a muro.
Installazioni
99
Italiano
CD PLAYER/
RECORDER
CD PLAYER
OUTIN
OPTICAL
DIGITAL
ANALOG
L
R
IN OUTOUTIN
OPTICAL
DIGITAL OUTPUT
ANALOG OUTPUT
L
R
COAX
“CLICK!”
CD PLAYER/
RECORDER
DIGITAL
RECEIVER
OUTIN
OPTICAL
DIGITAL
ANALOG
L
R
IN OUTOUTIN
OPTICAL
OUT
IN
AUX
CD IN DVD IN
OPTICAL
IN
”
OUT
CD IN DVD IN
AUX
DIGITAL
RECEIVER
“CLICK!
DIGITAL
OPTICAL
ANALOG
L
OUTIN
R
IN OUTOUTIN
CD PLAYER/
RECORDER
Page 100

1 2 STANDBY·ON
accende l'apparecchio/porta l'apparecchio in standby
2 / OPEN/CLOSE
apre/chiude il cassetto del lettore CD
3 cassetto del lettore CD
4 display
5 CD RECORDER
cassetto del registratore CD
luce blu accesa: registratore CD selezionato
luce rossa accesa: registrazione in corso
6 / OPEN/CLOSE
apre/chiude il cassetto del registratore CD
7 PHONES/LEVEL
regola il volume delle cuffie
8 PHONES/LEVEL
presa cuffie 6,3 mm
9 COPY CD
seleziona la registrazione e la finalizzazione automatica del
CD corrente
0 REC 0
seleziona altre modalità di registrazione
! ¢
registratore CD: seleziona il brano successivo,ricerca avanti
@ 4
registratore CD: seleziona il brano precedente, ricerca indietro
# ALBUM/REC LEVEL+
registratore CD: seleziona l'album successivo su un
CD MP3, aumenta il livello di registrazione
$ ALBUM/REC LEVEL-
registratore CD: seleziona l'album precedente su un
CD MP3, riduce il livello di registrazione
% Ç
registratore CD: arresta la riproduzione/registrazione
^ ÉÅ
registratore CD: avvia/interrompe la riproduzione
& ERASE CD
cancella le registrazioni su un CDRW
* INPUT
seleziona l'ingresso per un apparecchio esterno
( SHUFFLE
riproduce brani in ordine sparso
) DISPLAY
seleziona le informazioni da visualizzare
¡ ¢
lettore CD: seleziona il brano successivo, ricerca avanti
™ 4
lettore CD: seleziona il brano precedente, ricerca indietro
£ ALBUM+
lettore CD: seleziona l'album successivo su un CD MP3
≤ ALBUM-
lettore CD: seleziona l'album precedente su un CD MP3
∞ Ç
lettore CD: arresta la riproduzione
§ ÉÅ
lettore CD: avvia/interrompe la riproduzione
≥ SPEED 1·2·4x
seleziona la velocità di registrazione per la registrazione interna
Nota: SPEED 1·2·4x, REC e COPY CD si accendono a
seconda delle diverse modalità in cui ci si trova. Ciò al fine di
semplificare l'individuazione dei relativi tasti di selezione.
Comandi
100
Italiano
1654327
L
R
(
)¡™9£≤∞§≥
*
^
!
@#$%&
80
 Loading...