

Page 1

Audio CD Player/Recorder
CDR-795 • CDR-796
Audio
Audio
Read this manual first!
Congratulations on purchasing this Philips product.
We’ve included everything you need to get started.
If you have any problems, Philips Representatives can
help you get the most from your new product by explaining:
• Hookups,
• First Time Setup, and
• Feature Operation.
Do not attempt to return this product to the store.
For fast help, call us first!
1-800-531-0039
Thank you for making Philips a part of your home!
S
E
E
W
H
Y
I
N
S
I
D
E
I
M
P
O
R
T
A
N
T
!
Return
your Warranty
Registration Card
within 10 days
Page 2
Know these
ssaaffeettyy symbols
t
This “bolt of lightning” indicates
uninsulated material within your unit
may cause an electrical shock. For
the safety of everyone in your household,
please do not remove product covering.
s
The “exclamation point” calls attention
to features for which you should read
the enclosed literature closely to
prevent operating and maintenance problems.
WARNING: TO PREVENT FIRE OR
SHOCK HAZARD, DO NOT EXPOSE THIS
EQUIPMENT TO RAIN OR MOISTURE.
CAUTION: To prevent electric shock,
match wide blade of plug to wide slot, and
fully insert.
For Customer Use
Enter below the Serial No. which is located
on the rear of the cabinet. Retain this
information for future reference.
Model No. ___________________________
Serial No. ____________________________
CAUTION
RISK OF ELECTRIC SHOCK
DO NOT OPEN
CAUTION: TO REDUCE THE RISK OF ELECTRIC SHOCK, DO NOT
REMOVE COVER (OR BACK). NO USER-SERVICEABLE PARTS
INSIDE. REFER SERVICING TO QUALIFIED SERVICE PERSONNEL.
• Once your Philips purchase is registered, you’re eligible to
receive all the privileges of owning a Philips product.
• So complete and return the Warranty Registration Card
enclosed with your purchase at once, and take advantage
of these important benefits.
Return your Warranty Registration card today to
ensure you receive all the benefits you’re entitled to.
Warranty
Verification
Registering your product within 10 days
confirms your right to maximum
protection under the terms and
conditions of your Philips warranty.
Owner
Confirmation
Your completed Warranty Registration
Card serves as verification of ownership
in the event of product theft or loss.
Model
Registration
Returning your Warranty Registration
Card right away guarantees you’ll
receive all the information and special
offers which you qualify for as the
owner of your model.
Congratulations on your purchase,
and welcome to the “family!”
Dear Philips product owner:
Thank you for your confidence in Philips.You’ve selected one of the best-built,
best-backed products available today.And we’ll do everything in our power to
keep you happy with your purchase for many years to come.
As a member of the Philips “family,” you’re entitled to protection by one of the
most comprehensive warranties and outstanding service networks in the industry.
What’s more, your purchase guarantees you’ll receive all the information and
special offers for which you qualify, plus easy access to accessories from our
convenient home shopping network.
And most importantly you can count on our uncompromising commitment to
your total satisfaction.
All of this is our way of saying welcome – and thanks for investing in a Philips product.
Sincerely,
Lawrence J. Blanford
President and Chief Executive Officer
P.S. Remember, to get the most from your Philips product, you must
return your Warranty Registration Card within 10 days. So please
mail it to us right now!
MAC5097
Visit our World Wide Web Site at http://www.philips.com
I
T
O
A
N
R
T
S
I
G
E
R
S
Y
Hurry!
A
D
0
N
E
E
D
E
D
W
I
T
H
I
1
N
Page 3

3
EnglishFrançaisEspañol
English
_________________________________________________________
5
Français
_______________________________________________________
26
Español
________________________________________________________
48
Page 4

4
Canada
English:
This digital apparatus does not exceed the Class B limits
for radio noise emissions from digital apparatus as set
out in the Radio Interference Regulations of the
Canadian Department of Communications.
Français:
Cet appareil numérique n'émet pas de bruits
radioélectriques dépassant les limites applicables aux
appareils numériques de Classe B prescrites dans le
Règlement sur le Brouillage Radioélectrique édicté par
le Ministère des Communications du Canada.
This warning label is located on the rearside and inside this laser product.
CAUTION
:
INVISIBLE
LASER RADIATION
WHEN OPEN. DO NOT STARE INTO BEAM.
DANGER
:
INVISIBLE LASER RADIATION WHEN OPEN.
AVOID DIRECT EXPOSURE TO BEAM.
VAR O!
AVATTAESSA JA SUOJALUKITUS OHITETTAESSA OLET
ALTTIINANAKYMATTOMAALLE LASERSATEILYLLE.ALA
KATSO SATEESEEN.
VARNING!
OSYNLIG LASERSTRÅLNING NÄR DENNA DEL ÄR ÖPPNAD.
OCH SPARREN AR URKOPPLAD.BETRAKTA EJ STRÅLEN.
DANGER
- Invisible laser radiation when open.
AVOID DIRECT EXPOSURE TO BEAM.
or
Page 5
AC Polarized
Plug
1. Read these instructions.
2. Keep these instructions.
3. Heed all warnings.
4. Follow all instructions.
5. Do not use this apparatus near water.
6. Clean only with dry cloth.
7. Do not block any ventilation openings. Install in
accordance with the manufacturer´s instructions.
8. Do not install near any heat sources such as
radiators, heat registers, stoves, or other apparatus
(including amplifiers) that produce heat.
9. Do not defeat the safety
purpose of the polarized or
grounding-type plug.A polarized plug
has two blades with one wider than
the other. A grounding type plug has two blades and a third
grounding prong.The wide blade or the third prong are
provided for your safety. If the provided plug does not fit
into your outlet, consult an electrician for replacement of
the obsolete outlet.
10.
Protect the power cord from being walked on or
pinched, particularly at plugs, convenience receptacles, and
the point where they exit from the apparatus.
11.Only use attachments/accessories specified by the
manufacturer.
12. Use only with the cart, stand, tripod,
bracket, or table specified by the manufacturer
or sold with the apparatus.When a cart is used,
use caution when moving the cart/apparatus
combination to avoid injury from tip-over.
13.Unplug this apparatus during lightning storms or when
unused for long periods of time.
14.Refer all servicing to qualified service personnel.
Servicing is required when the apparatus has been
damaged in any way, such as power-supply cord or plug is
damaged, liquid has been spilled or objects have fallen into
the apparatus, the apparatus has been exposed to rain or
moisture, does not operate normally, or has been dropped.
15. Battery usage CAUTION – To prevent battery leakage
which may result in bodily injury or damage to the unit:
● Install all batteries correctly, + and - as marked on the unit.
● Do not mix batteries (old and new or carbon and
alkaline, etc.).
● Remove batteries when the unit is not used for a long time.
EL 6475-E003: 01/6
IMPORTANT SAFETY INSTRUCTIONS
5
Class II equipment symbol
This symbol indicates that the unit has a double
insulation system.
Page 6

General information
Technical data
_______________________________
7
Environmental information
_____________________
7
Supplied accessories
__________________________
7
Maintenance
________________________________
7
Disc handling
_______________________________
7
Discs for recording
___________________________
8
Discs for playback
____________________________
8
Some words about MP3
______________________
8
Connections
Connections
________________________________
9
Setup information
___________________________
9
Connections general
_________________________
9
Installations
Analog connections
_________________________
10
Digital connections
_______________________
10–11
Power
____________________________________
11
Controls
___________________________________
12
Remote control
Remote control usage
_______________________
13
Remote control keys
________________________
13
Basic functions
Switching on, switching to standby
______________
14
Demonstration mode
_______________________
14
Loading discs
______________________________
14
Playback
__________________________________
14
Selecting and searching (on all
discs except MP3-CDs)
______________________
15
Selecting and searching (on MP3-CDs only)
______
15
SHUFFLE and REPEAT
_______________________
16
CD text display
____________________________
16
ID3-tag
___________________________________
16
Programming track numbers
__________________
16
Clearing the program
________________________
16
About recording
Basic information
___________________________
17
What is finalizing?
___________________________
17
Direct Line Recording (DLR)
__________________
17
Adjusting the recording level
__________________
17
Internal recording
What is internal recording?
____________________
18
Selecting the recording speed
_________________
18
Copying an entire CD
_______________________
18
Recording all tracks from a CD
________________
18
Recording a single track
______________________
19
Making and recording a program
_______________
19
External recording
What is external recording?
___________________
20
Analog or digital recording?
___________________
20
Automatic track increment
____________________
20
Recording with automatic start
________________
20
Manual recording
___________________________
21
Timer recording
____________________________
21
Erasing
Erasing from a CDRW disc
___________________
22
CD text editing (on CD recorder only)
CD text editing
____________________________
23
Troubleshooting
____________________________
24
Limited warranty
___________________________
25
Contents
6
English
Page 7
Technical Data
Subject to modification without notice.
General
Power consumption
Active
_______________________________
< 20 W
Standby
______________________________
< 0.6 W
Dimensions, w × h × d
____________
435 × 88 × 310 mm
17.1 × 3.5 × 12.2 inches
Weight
_______________________________
5 kg, 8.8 lb
Audio
Frequency response
____________________
2–20,000 Hz
Playback
S/N (A-weighted)
_______________________
120 dB
S/N
__________________________________
110 dB
Dynamic range
__________________________
98 dB
Total harmonic distortion
_________________
-95 dB
Channel separation
______________________
105 dB
Recording
S/N (A-weighted)
________________________
93 dB
S/N digital without SRC
____________
equal to source
Dynamic range
__________________________
90 dB
Total harmonic distortion + noise
___________
-86 dB
Digital/optical input
___________________
12–96 kHz
Laser (CD recorder)
Type
___________________
Semiconductor laser GaAIAs
Wave length
___________________
775–795 nm (at 25°)
Output power
________
2.5 mW (Read), 35 mW (Write)
Beam divergence
________________________
60 degree
As an ENERGY STAR®partner,
Philips has determined that this
product meets the ENERGY STAR
®
guidelines for energy efficiency.
The set complies with the FCC-Rules, Part 15 and
with 21 CFR 1040.10. Operation is subject to the
following two conditions:
1.This device may not cause harmful interference,
and
2.This device must accept any interference
received, including interference that may cause
undesired operation.
CAUTION
Use of controls or adjustments or performance of
procedures other than herein may result in hazardous
radiation exposure or other unsafe operation.
Environmental information
All redundant packing material has been omitted.We have
tried to make the packaging easy to separate into three
mono materials: cardboard (box), polystyrene foam (buffer)
and polyethylene (bags, protective foam sheet).
Your unit consists of materials which can be recycled if
disassembled by a specialized company. Please observe the
local regulations regarding the disposal of packing materials,
exhausted batteries and old equipment.
Supplied accessories
– 2 analog audio cables (with red and white plugs)
– Remote control
– 2 batteries for the remote control, size AA
– Power cable
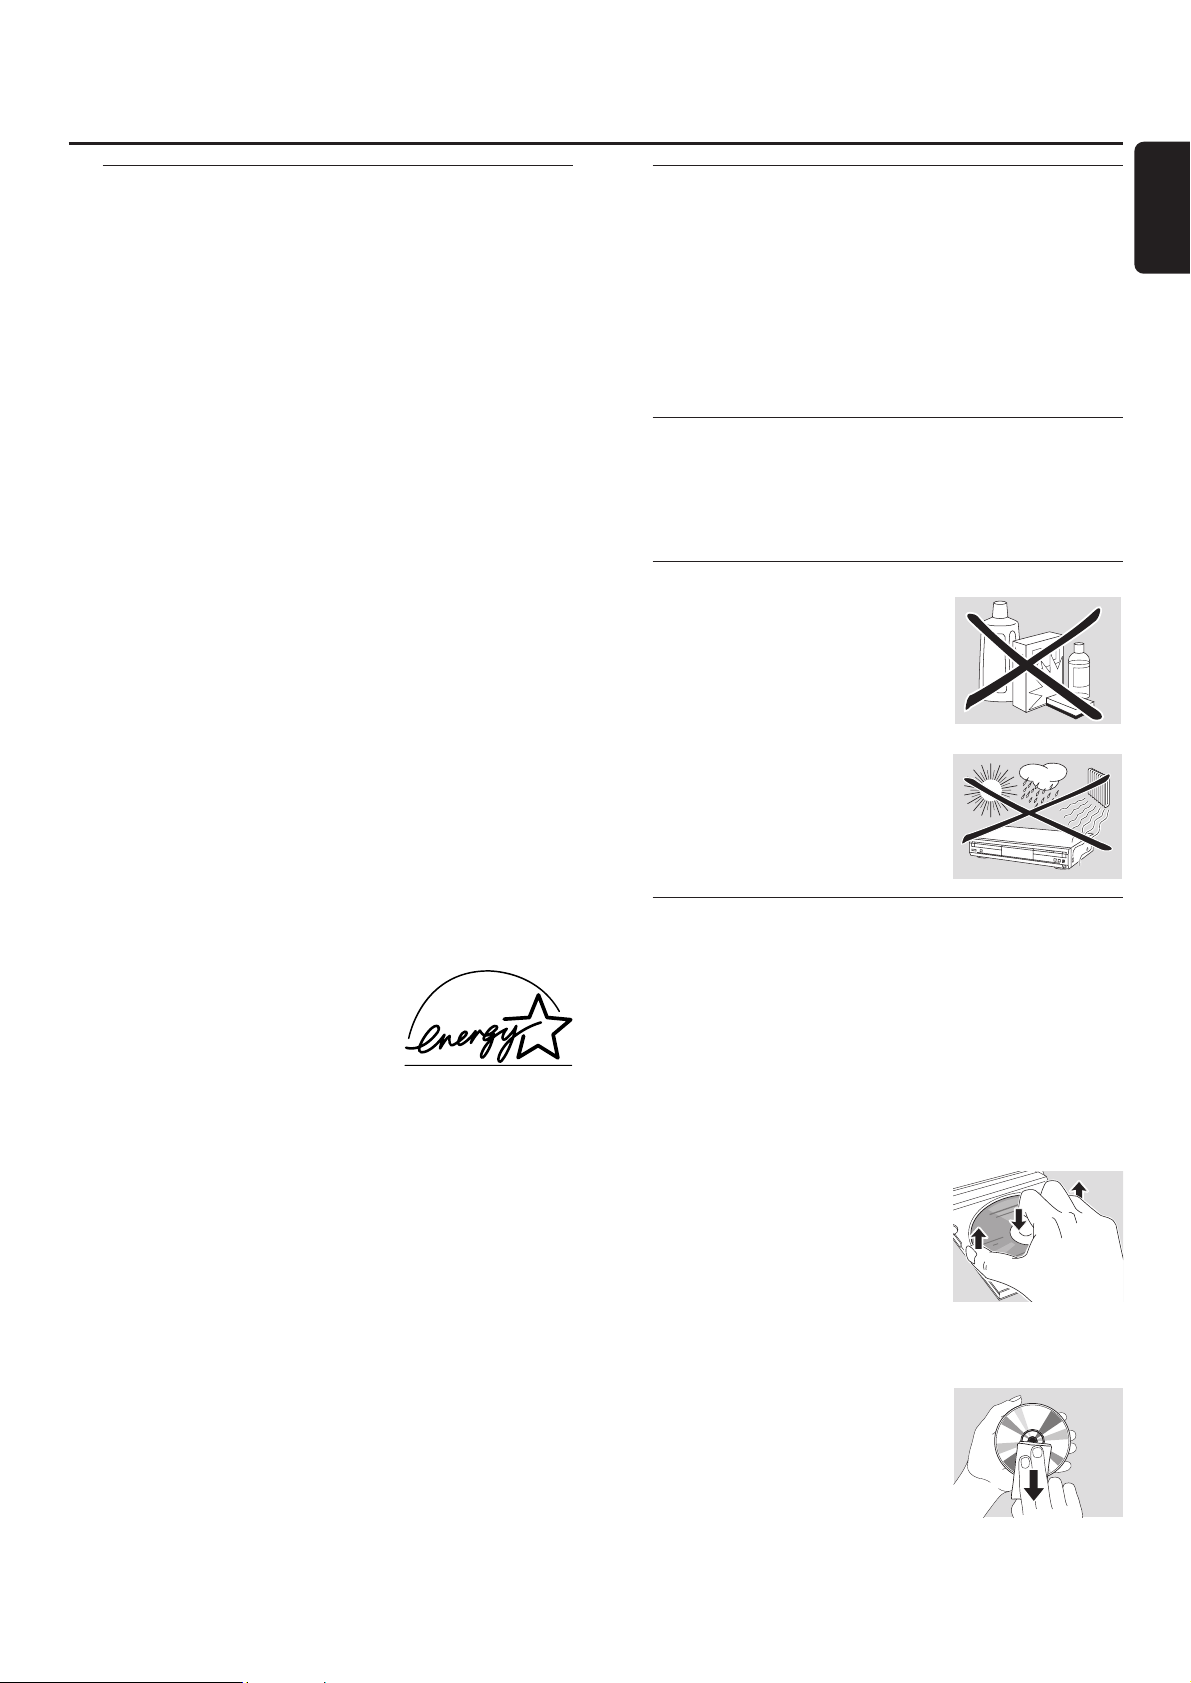
Maintenance
Clean the unit with a soft,
slightly dampened, lint-free cloth. Do
not use any cleaning agents as they
may have a corrosive effect.
Do not expose the unit, batteries or
discs to humidity, rain, sand or
excessive heat (caused by heating
equipment or direct sunlight).
Disc handling
If the CD player/recorder fails to read discs correctly, use a
commonly available cleaning CD to clean the lenses before
submitting the unit to repair. Other cleaning methods may
destroy the lenses.Always keep the trays closed to avoid
dust on the lenses.
The lenses may cloud over when the unit is suddenly
moved from cold to warm surroundings. Playing a disc is
not possible then. Leave the unit in a warm environment
until the moisture evaporates.
To take a disc out of its box easily,
press the center spindle while lifting
the CD(RW).Always pick up a
CD(RW) by the edge and put it
back in its box after use.
Never write on a CD or attach a
sticker to it.Write only on the printed side of a CDR or
CDRW, and only with a soft felt-tipped pen.
To clean a disc, wipe it in a straight
line from the center toward the
edge using a soft, lint-free cloth. A
cleaning agent may damage the disc!
General information
7
English
Page 8

Discs for recording
For recording, make sure to use special audio discs only.
These discs are marked with “Digital Audio”and the logos
shown below.
There are two different types of audio discs for the use on
this CD recorder:
– CD-Audio Recordable (CDR)
discs can be recorded on once and
played on all standard CD players and
CD recorders, when finalized.
– CD-Audio ReWritable (CDRW)
discs can be recorded on, erased and
re-recorded many times and played on
CDRW compatible CD players and
CD recorders, when finalized.
All Philips CD players and CD recorders with
this sticker are CDRW compatible.
To ensure proper working of the unit we
recommend the use of Philips audio CDR and audio
CDRW discs only.
Note: Do not use a computer CDR or CDRW as recording will
not work!
Recording is permissible insofar as copyright or
other rights of third parties are not infringed upon.
In some countries the use of the
CD player/recorder as shown or suggested in this user
manual may require the authorization of copyright
holders.
Discs for playback
For playback on this CD player/recorder you can use the
following discs:
– All pre-recorded audio CDs
– All audio CDR and audio CDRW discs
– MP3-CDs (CD-ROMs with MP3 tracks)
Some words about MP3
The revolutionary new music compression technology MP3
(MPEG ! Audio Layer-3) enables shrinking down of original
digital audio sound data with a factor of up to 10 without
losing significant sound quality.This allows you to record up
to 10 hours of CD-like quality music on a single CD-ROM.
Making your own MP3-CD
Basically there are two sources for MP3 music on CD.You
can either transfer music from your own digital audio CDs
via CD-ROM drive onto your PC and encode it into MP3
format (“rip”) or download legal MP3 music from the
Internet.
Record (“burn”) the music from your hard disc on
CD-ROM with your home PC (make sure filename
ends with .mp3). Once finished, you can play your
MP3-CD on this CD player/recorder and enjoy the music.
Data rate
The data rate is of great importance with MP3. It indicates
how fast bits are transfered.
Stereo music on a CD shows a data rate of about
1400 kilobits per second (kbps). To achieve a good MP3
quality a bit rate of 128 kbps is recommended. As
the encoding rate is user-selectable, make sure to reach this
data rate for MP3 as recordings less than 128 kbps will
suffer from a degradation in sound quality.
Recording
Downloading MP3 files from the Internet or ripping songs
from your own digital audio CDs is a delicate process, also
influenced by the quality of the encoder program and the
speed of your PC.This may sometimes result in “drop-outs”
or errors which you may experience while listening to your
MP3-CD.
In any case make sure to use a recording speed not faster
than indicated on the CD-ROM and avoid running other
programs simultaneously on your PC during the recording
process.
In compliance with the SDMI (Secure Digital
Music Initiative) the digital outputs of this unit will
be deactivated when playing an MP3-CD.
It is not possible to “burn” an MP3-CD on this
CD player/recorder.
It is not possible to record from an MP3-CD.
Supported formats
The following formats are supported on this
CD player/recorder:
– Disc format: ISO 9660 or Joliet
– File format: MPEG ! Audio Layer-3
– Filename: .mp3 (tracks), .m3u or .pls (playlists)
– Bit rate: 32–320 kbps (128 kbps advised) or variable
bit rate
Use ISO 9660 disc format when burning the MP3-CD.
UDF disc format (e.g.“DirectCD” or
“WinOnCD”) is not supported.
General information
8
English
Page 9
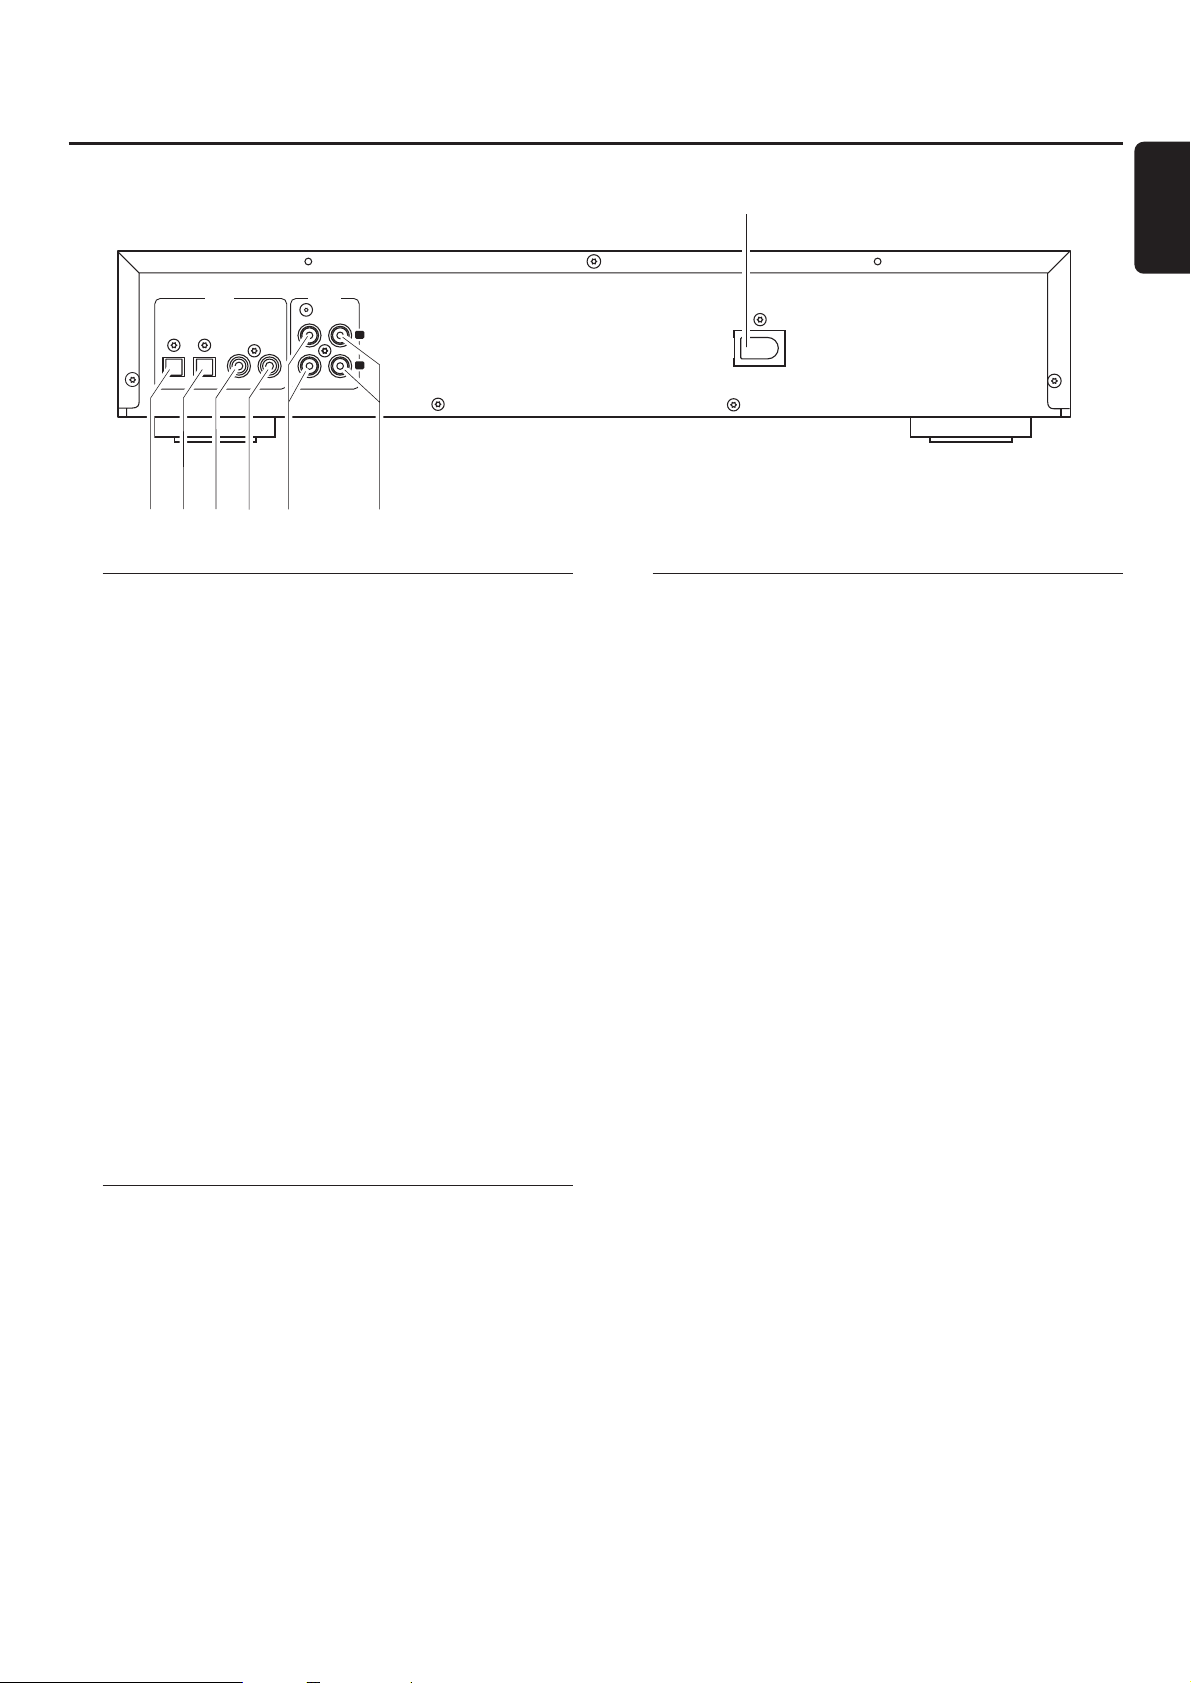
Connections
1 OPTICAL IN
connect to the digital optical output of an external digital
appliance
2 OPTICAL OUT
connect to the digital optical input of an external digital
appliance
3 DIGITAL IN
connect to the digital coaxial output of an external digital
appliance
4 DIGITAL OUT
connect to the digital coaxial input of an external digital
appliance
5 ANALOG IN L/R
connect to the analog audio output of an external
appliance
6 ANALOG OUT L/R
connect to the analog audio input of an external appliance
7 AC MAINS ~
After all other connections have been made, connect
the power cord to the power outlet.
Setup information
Place the unit on a flat, hard and stable surface. Do not
position the unit on top of other equipment that might
heat it up (e.g. receiver or amplifier).If the unit is placed in a
cabinet, make sure to leave at least 3.5 cm (1.5 inches) free
around the unit to prevent overheating.Active mobile
phones near the unit may cause malfunctions.
Connections general
Never make or change connections with the power
supply switched on.
For playback the following outputs are present:
– Analog output (ANALOG OUT L/R)
– Digital coaxial output (DIGITAL OUT)
– Digital optical output (OPTICAL OUT)
For external recording the following inputs are present:
– Analog input (ANALOG IN L/R)
– Digital coaxial input (DIGITAL IN)
– Digital optical input (OPTICAL IN)
These inputs can be connected to the corresponding
output(s) of your amplifier/receiver or directly to the
corresponding output(s) of the external appliance.
It is not possible to connect a turntable directly to
ANALOG IN L/R. If you wish to use a turntable with
the unit, you have to connect an amplifier/receiver to
ANALOG IN L/R on the CD player/recorder.Then
connect the turntable to the amplifier.
The connections you make will depend upon the
possibilities your audio equipment offers and how you are
going to use the unit. Please refer to the user manuals for
your audio equipment first.
We recommend doing analog recording only if digital
recording is not possible. Digital recording will result in
better sound quality.
If possible, always make both digital and analog connections.
In this way you can always make analog recordings when
digital recording is not possible.
Connections
9
English
OUTIN
OPTICAL
DIGITAL
ANALOG
L
R
IN OUTOUTIN
AC MAINS
~
7
5
4
32
1
6
Page 10
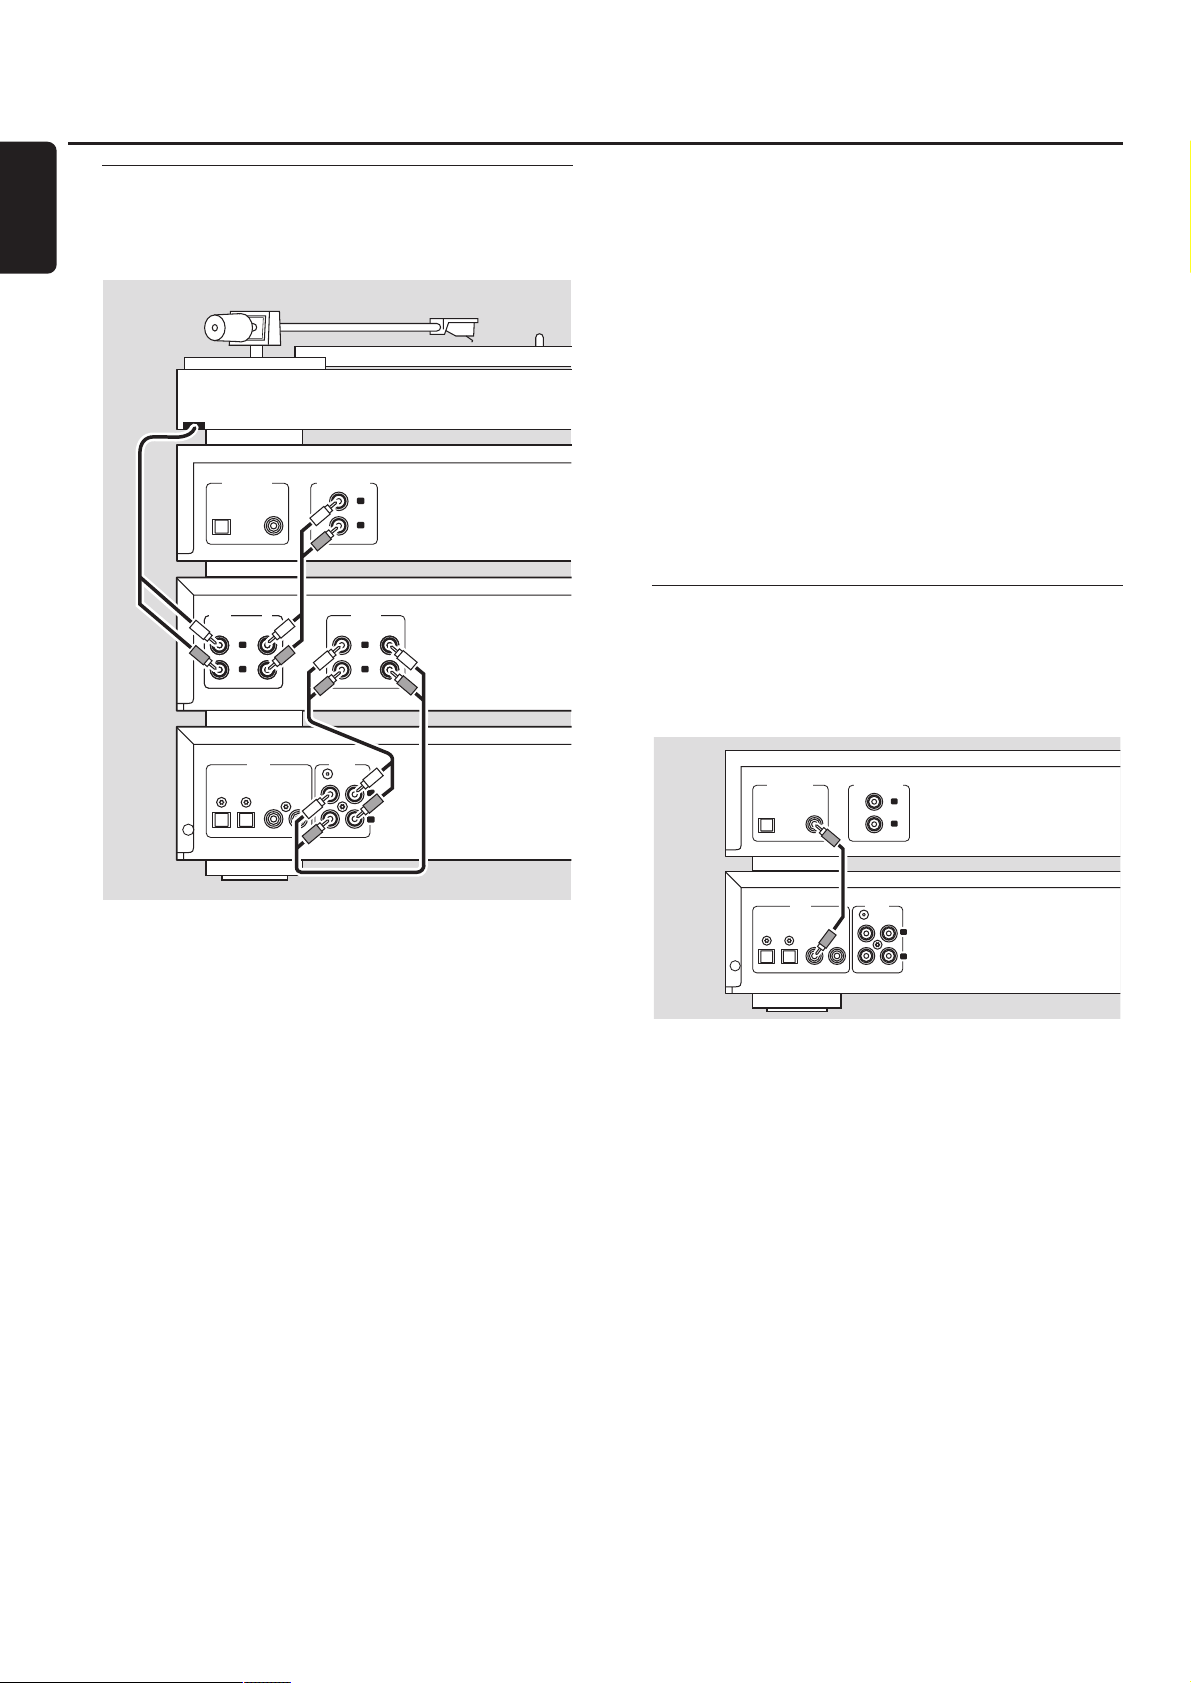
Analog connections
These connections are required for playback and recording
via an amplifier/receiver, equipped with analog in- and
outputs.
1 Connect the red plug of the supplied audio cable (cinch) to
the red jack ANALOG IN R and the white plug to the
white jack ANALOG IN L on the CD player/recorder.
2 Connect the other end of the audio cable to the analog
outputs of the amplifier/receiver (CDR OUT,TAPE OUT,
AUX OUT, REC OUT, etc.).
3 Connect the red plug of the supplied audio cable (cinch) to
the red jack ANALOG OUT R and the white plug to the
white jack ANALOG OUT L on the CD player/recorder.
4 Connect the other end of the audio cable to the analog
inputs of the amplifier/receiver (CD-R,TAPE IN,AUX,
PLAY IN, etc.).
5 Connect all other components of your system (tape deck,
CD player, tuner, turntable, etc.) via their analog outputs to
the appropriate analog inputs of the amplifier/receiver
(CD IN,TUNER IN, AUX IN, PHONO IN, etc.).
00
Recording can be done now with any appliance connected
to an analog input of the amplifier/receiver. Press INPUT on
the CD player/recorder repeatedly to select the analog
input.
➜ ANALOG IN is displayed.
How to connect if the analog output on the
amplifier/receiver is already being used (occupied)
Most amplifiers/receivers have multiple analog output
connections (TAPE,VCR,…), but some amplifiers/receivers
have only 1 analog output. In case you have already hooked
up a tape deck (DAT recorder or MD recorder) to this
output you will have to change the existing connections.
1 Disconnect the analog connections from the tape deck to
the amplifier/receiver.
2 Connect the CD player/recorder (see steps 1–4 in the
previous chapter).
3 Connect the analog outputs of the tape deck to any free
analog inputs (AUX, CD) on the amplifier/receiver.You can
now playback your tape or record from your tape deck on
CD.However, it is no longer possible to record on tape.
Digital connections
Direct digital coaxial connection
This connection is required for direct recording from any
digital audio equipment with a digital coaxial output (e.g.
CD player or DVD player).
● Use a digital coaxial cable to connect the coaxial output of
the external appliance with DIGITAL IN on the
CD player/recorder.
00
Recording can be done now via the digital coaxial input.
Press INPUT on the CD player/recorder repeatedly to
select the digital coaxial input.
➜ DIGITAL IN is displayed.
Installations
10
English
OUTIN
OPTICAL
DIGITAL
ANALOG
L
R
IN OUTOUTIN
OPTICAL
DIGITAL OUTPUT
ANALOG OUTPUT
L
R
PHONO
L
R
CD
IN IN
CD PLAYER/
RECORDER
AMPLIFIER/
RECEIVER
PHONO
L
R
CD
IN IN
CDR/TAPE
L
R
IN OUT
CD PLAYER
COAX
TURNTABLE
DIGITAL OUTPUT
OPTICAL
DIGITAL
OPTICAL
ANALOG OUTPUT
ANALOG
IN OUTOUTIN
L
R
L
R
CD PLAYER
CD PLAYER/
RECORDER
COAX
OUTIN
Page 11

Direct digital optical connection
This connection is required for direct recording from any
digital audio equipment with a digital optical output (e.g.
CD player or DVD player).
1 Remove the dust caps from the digital optical input of the
CD player/recorder and from the digital optical output of
the external appliance. Keep the caps in a safe place.
2 Use a digital optical cable to connect the optical output of
the external appliance with OPTICAL IN on the
CD player/recorder. Make sure you inser t both plugs fully,
until a click is heard.
00
Recording can be done now via the digital optical input.
Press INPUT repeatedly on the CD player/recorder to
select the digital optical input.
➜ OPTICAL IN is displayed.
Digital coaxial connections via a digital receiver
If you have a receiver with digital coaxial in- and outputs,
these connections allow you to make digital recordings
from various sources connected to the receiver.
● Use a coaxial cable to connect the digital coaxial input of
the receiver with DIGITAL OUT on the CD player/recorder.
Use another coaxial cable to connect the digital coaxial
output of the receiver with DIGITAL IN on the
CD player/recorder.
00
Recording can be done now with any digital appliance
connected to a digital input of the digital receiver (e.g.
CD player or DVD player). Press INPUT on the
CD player/recorder repeatedly to select the digital coaxial
input.
➜ DIGITAL IN is displayed.
Digital optical connections via a digital receiver
If you have a receiver with digital optical in- and outputs,
these connections allow you to make digital recordings
from various sources connected to the receiver.
1 Remove the dust caps from the digital optical in- and
outputs of the CD player/recorder and from the digital
optical output of the receiver. Keep the caps in a safe place.
2 Use a digital optical cable to connect the optical input of
the receiver with OPTICAL OUT on the
CD player/recorder. Use another digital optical cable to
connect the optical output of the receiver with
OPTICAL IN on the CD player/recorder. Make sure you
insert the plugs fully, until a click is heard.
00
Recording can be done now with any digital appliance
connected to a digital input of the digital receiver (e.g.
CD player or DVD player). Press INPUT on the
CD player/recorder repeatedly to select the digital optical
input.
➜ OPTICAL IN is displayed.
Power
The type plate is located on the rear of the unit.
1 Check whether the power voltage as shown on the type
plate corresponds to your local power voltage. If it does
not, consult your dealer or service organization.
2 Make sure all connections have been made before
switching on the power supply.
3 Connect the power cable supplied to AC MAINS ~ and to
the power outlet.This switches on the power supply.
When the unit is switched to standby, it is still consuming
some power. To disconnect the unit from the power
completely, remove the power plug from the power
outlet.
Installations
11
English
CD PLAYER/
RECORDER
CD PLAYER
OUTIN
OPTICAL
DIGITAL
ANALOG
L
R
IN OUTOUTIN
OPTICAL
DIGITAL OUTPUT
ANALOG OUTPUT
L
R
COAX
“CLICK!”
CD PLAYER/
RECORDER
DIGITAL
RECEIVER
OUTIN
OPTICAL
DIGITAL
ANALOG
L
R
IN OUTOUTIN
OPTICAL
OUT
IN
AUX
CD IN DVD IN
OPTICAL
IN
”
OUT
CD IN DVD IN
AUX
DIGITAL
RECEIVER
“CLICK!
DIGITAL
OPTICAL
ANALOG
L
OUTIN
R
IN OUTOUTIN
CD PLAYER/
RECORDER
Page 12
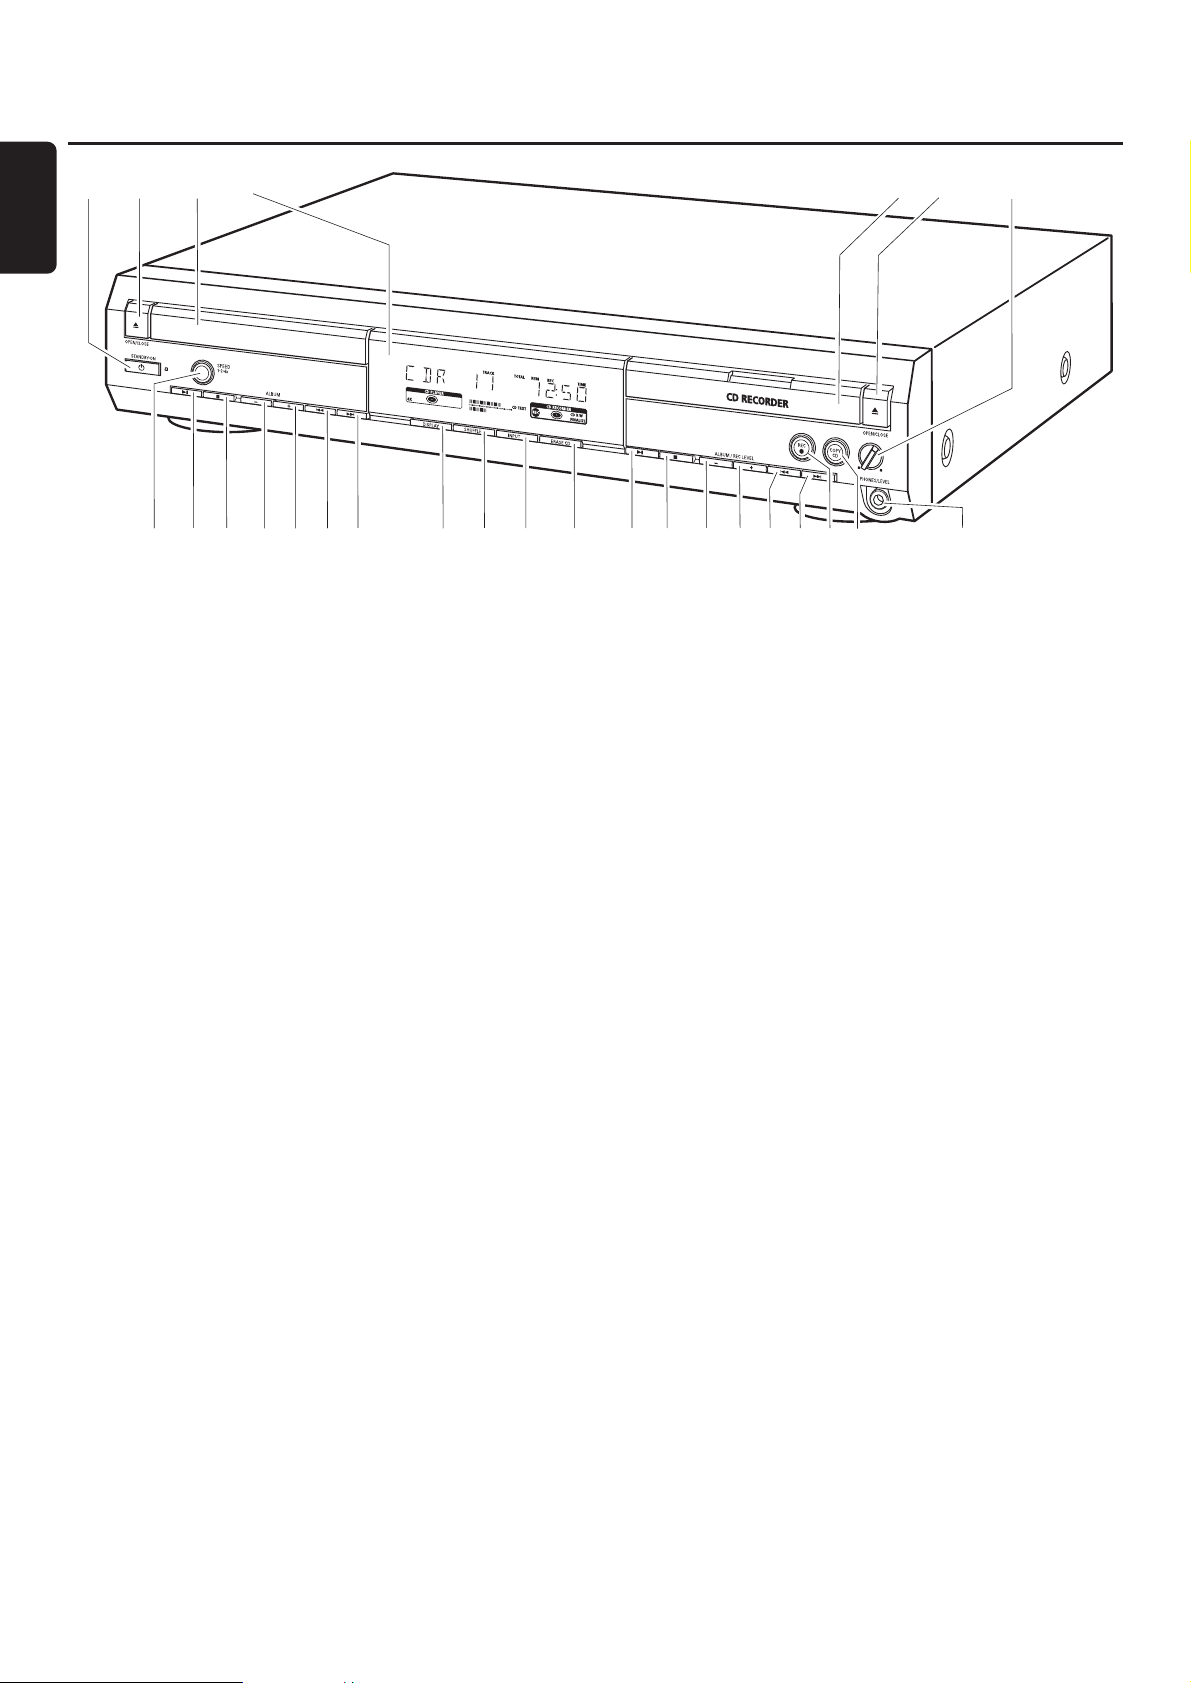
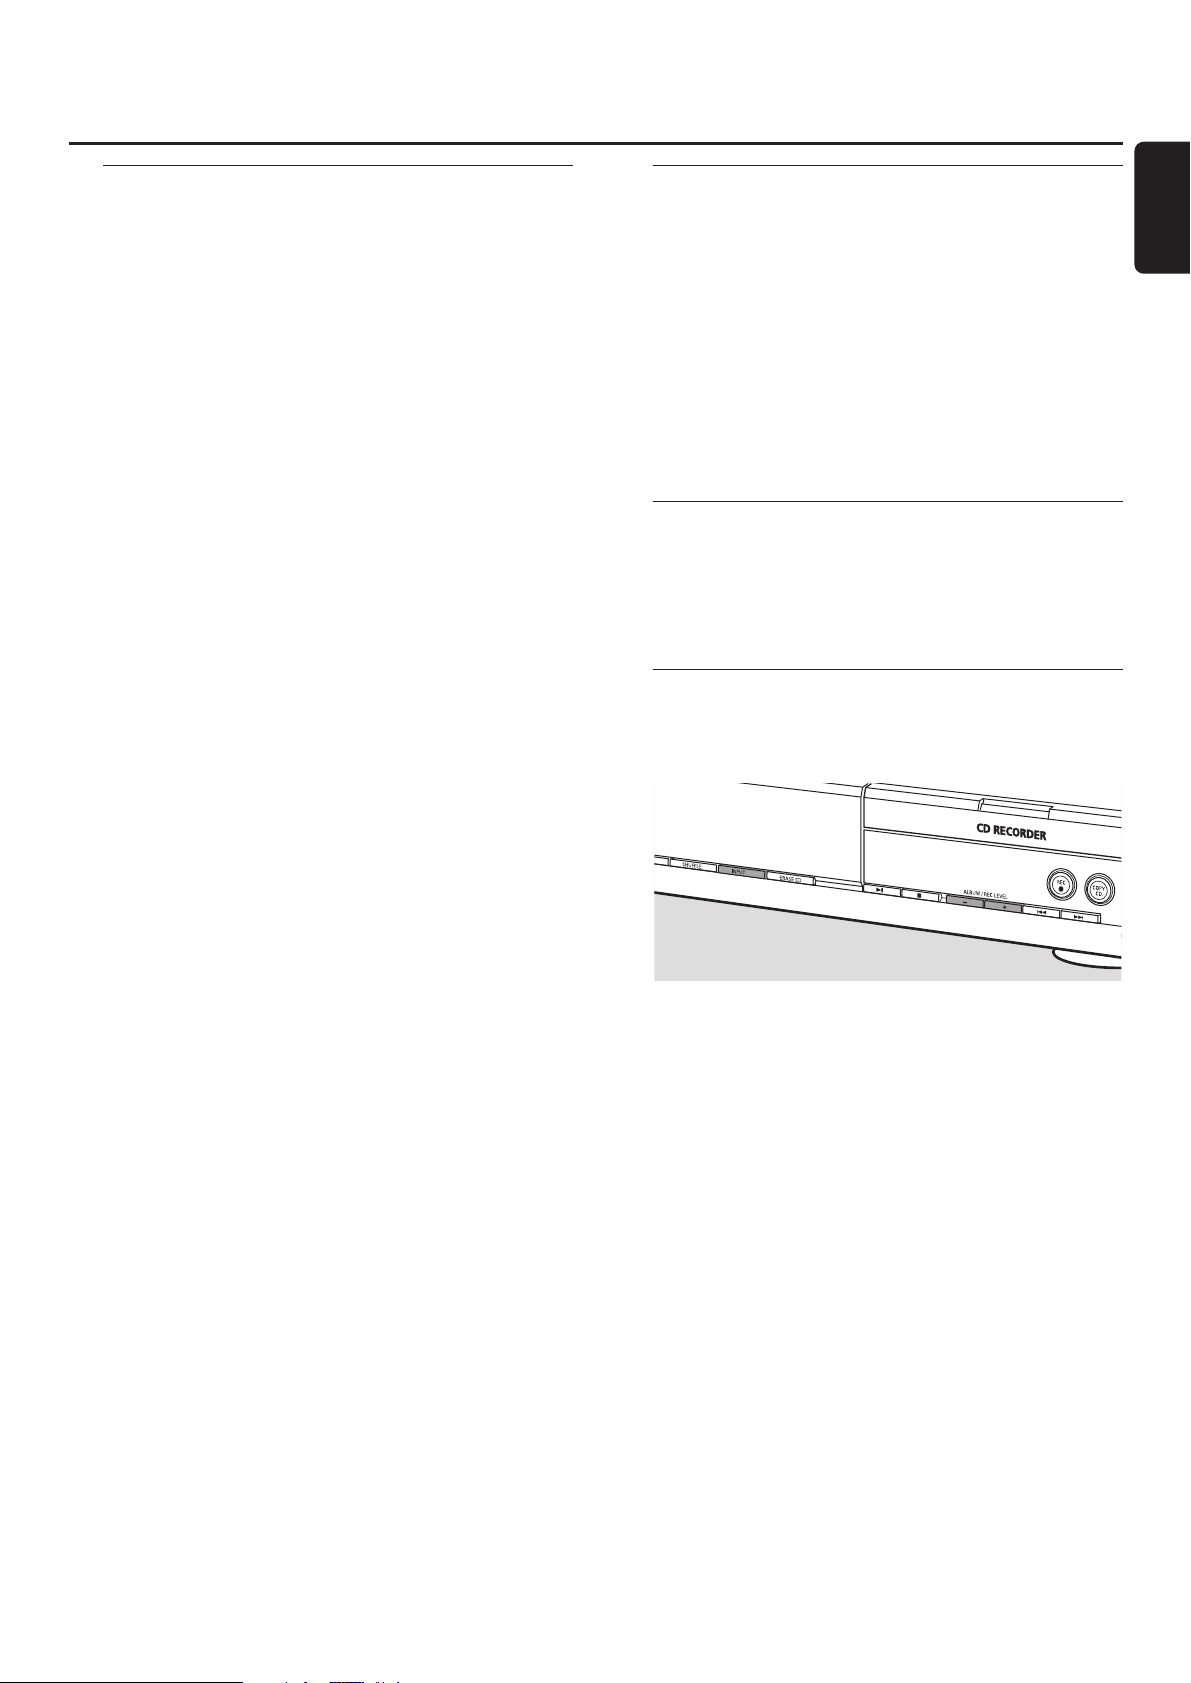
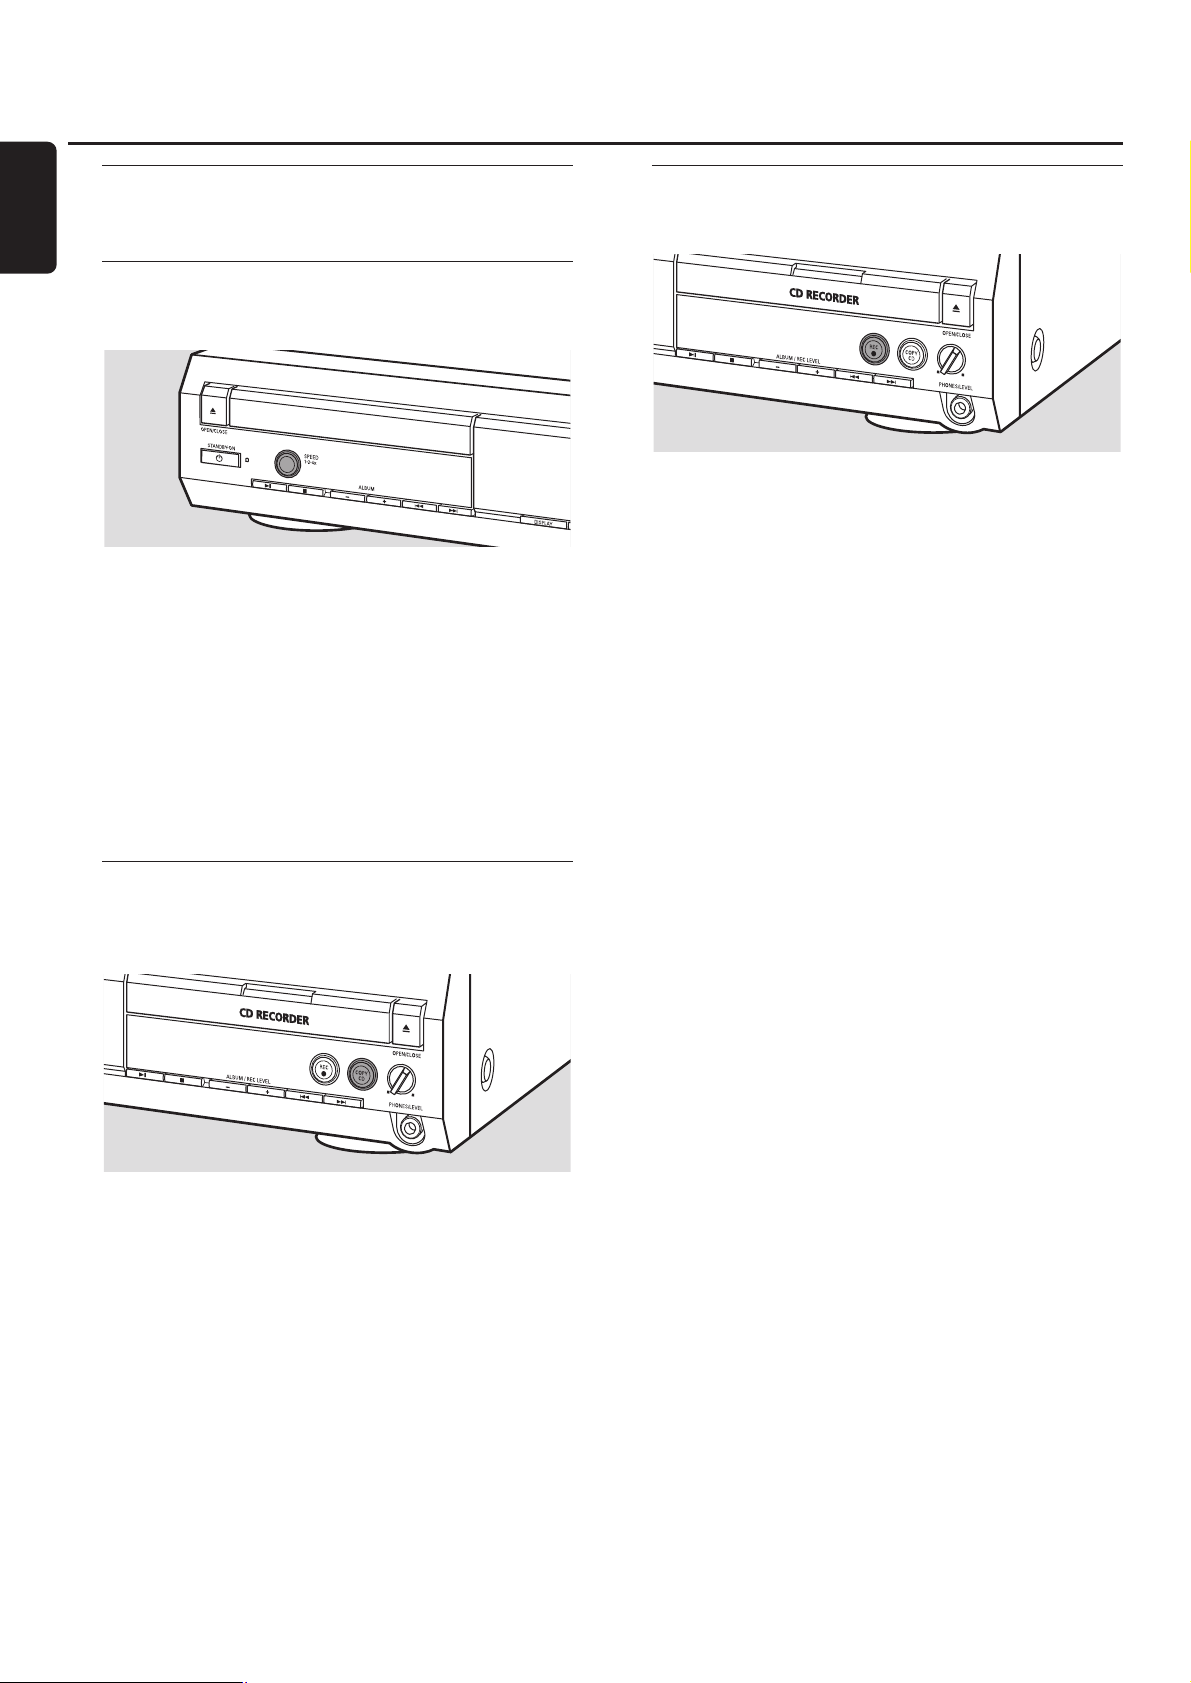
1 2 STANDBY·ON
switches the unit on/to standby
2 / OPEN/CLOSE
opens/closes the CD player drawer
3 CD player drawer
4 display
5 CD RECORDER
CD recorder drawer
blue light on: CD recorder is selected
red light on: recording in progress
6 / OPEN/CLOSE
opens/closes the CD recorder drawer
7 PHONES/LEVEL
adjusts the headphone volume
8 PHONES/LEVEL
6.3 mm headphone jack
9 COPY CD
selects recording and automatic finalizing of current CD
0 REC 0
selects other recording modes
! ¢
CD recorder: selects the next track, searches forward
@ 4
CD recorder: selects the previous track, searches backward
# ALBUM/REC LEVEL+
CD recorder: selects the next album on an MP3-CD,
increases the recording level
$ ALBUM/REC LEVEL-
CD recorder: selects the previous album on an MP3-CD,
decreases the recording level
% Ç
CD recorder: stops playback/recording
^ ÉÅ
CD recorder: starts/interrupts playback
& ERASE CD
erases recordings on a CDRW
* INPUT
selects the input for an external appliance
( SHUFFLE
plays tracks in random order
) DISPLAY
selects display information
¡ ¢
CD player: selects the next track, searches forward
™ 4
CD player: selects the previous track, searches backward
£ ALBUM+
CD player: selects the next album on an MP3-CD
≤ ALBUM-
CD player: selects the previous album on an MP3-CD
∞ Ç
CD player: stops playback
§ ÉÅ
CD player: starts/interrupts playback
≥ SPEED 1·2·4x
selects the record speed for internal recording
Note: SPEED 1·2·4x, REC and COPYCD will be illuminated
depending on the different modes you are in.This in order to
facilitate finding the relevant keys for selection.
Controls
12
English
1654327
L
R
)¡™9£≤∞§≥
(
*
^
!
@#$%&
80
Page 13

Remote control
13
English
Remote control usage
Open the battery compartment
of the remote control and insert
2 alkaline batteries, type AA (R06,
UM-3).
Do not use old and new or different
types of batteries in combination.
Remove batteries if they are dead or if the remote control
will not be used for a long time.
Batteries contain chemical substances, so they should
be disposed of properly.
The buttons on the remote control work the same way as
the corresponding ones on the unit.
Remote control keys
1 2
switches the unit on/to standby
2 CD, CDR
selects the CD player deck or the CD recorder deck
3 TIMER REC
starts a time restricted recording
4 Number/alphabet keys
1–0: keys in numbers for tracks
ABC – WXYZ: keys in letters for CD text
SPACE: keys in a space for CD text
. : keys in a dot or symbol for CD text
5 TR. INCR.
selects automatic or manual increment of a track
6 PROGRAM
enters the program menu
7 ALBUM+
selects the next album on an MP3-CD
8 ALBUM-
selects the previous album on an MP3-CD
9 É
starts playback
0 í
selects the previous track
! ë
selects the next track
@ Ç
stops playback
# á
searches forward
$ à
searches backward
% Å
interrupts playback
^ DIM
controls the brightness of the display
& DISPLAY
selects display information
* CD TEXT/edit
switches through CD text information, enters/exits the
CD text edit menu
( DELETE
deletes CD text
) REPEAT
repeats a track, an entire CD(RW), or a program
¡ SHUFFLE
plays tracks in random order
3
4
5
8
9
0
$
&
*
(
CD TIMER REC
SPACE ABC
1
GHI JKL
4
PQRS TUV
7
TR.INCR.
2
5
8
.
CDR
DEF
3
MNO
6
WXYZ
9
PROGRAM
0
ALBUM
DISPLAY DIM
CD TEXT/edit DELETE
CD TEXT
ALBUM
+
SHUFFLE REPEAT
1
2
6
7
!
@
#
%
^
)
¡
Page 14
Switching on, switching to standby
● To switch the unit on press 2 STANDBY·ON.
➜ WELCOME TO PHILIPS AUDIO is displayed.
● To switch the unit to standby press 2 STANDBY·ON
again.
➜ The unit is switched to standby.
Demonstration mode
The demonstration mode displays various features of the
unit and will start automatically when no key has been
pressed for several minutes or during standby.
● To cancel the demonstration mode keep Ç on the
unit pressed for at least 5 seconds.
➜ The demo mode is cancelled permanently.
Loading discs
1
CD player: Press / OPEN/CLOSE to open the CD player drawer.
➜ OPEN CD is displayed and the drawer is opened.
CD recorder: Press / OPEN/CLOSE to open the CD recorder
drawer.
➜ OPEN CDR is displayed and the drawer is opened.
Notes:
Opening the CD player clears any program containing tracks
from a disc loaded in the CD player.
Opening the CD recorder clears any program containing
tracks from a disc loaded in the CD recorder.
2 Insert a disc (printed side up) in the tray.
3
CD player: Press / OPEN/CLOSE again to close the drawer.
➜ The drawer is closed and READING is displayed.
➜ CD, the total number of tracks and the total playing time
of the disc are displayed.
CD recorder: Press / OPEN/CLOSE to close the drawer.
➜ The drawer is closed and READING is displayed.
➜ If an unfinalized disc is loaded, INITIALIZING will be
displayed.
➜ CDR, the total number of tracks and the total playing
time of the disc are displayed.
MP3-CD only:
➜ READING MP3 is displayed. MP3 is shown. Due to the
large number of tracks this could take up to 2 minutes.
➜ The first album name is displayed.
Playback
1 Press ÉÅ either on CD player side or CD recorder side
to start playback.
➜ CD or CDR, the current track number and elapsed playing
time are displayed.
MP3-CD only:
➜ In addition, the track name will also be scrolled.
00
To switch through the following information press DISPLAY
repeatedly:
➜ track number, remaining playing time of current track
➜ track number, remaining playing time of disc
➜ track number, elapsed playing time of current track
MP3-CD only:
➜ album number, track number and track name
➜ track number, elapsed playing time of current track
2 Press Ç either on CD player side or CD recorder side to
stop playback.
➜ CD or CDR, the total number of tracks and the total
playing time of the disc are displayed.
MP3-CD only:
➜ The current album name is scrolled.
00
You can interrupt playback by pressing ÉÅ.
➜ The time where playback was interrupted will blink.
00
To resume playback press ÉÅ again.
Basic functions
14
English
Page 15

Selecting and searching (on all
discs except MP3-CDs)
Selecting a track when playback is stopped
1 Press ¢ or 4 as often as necessary either on
CD player side or CD recorder side to skip to the desired
track number.
2 Press ÉÅ to start playback.
➜ Playback starts with the selected track.
Selecting a track during playback
● Press ¢ or 4 as often as necessary either on
CD player side or CD recorder side to skip to the beginning
of the previous or next track on the selected disc.
➜ Playback continues with the selected track.
Searching for a passage during playback
1 Keep ¢ or 4 pressed either on CD player side or
CD recorder side to find a particular passage in backwards
or forwards direction.
➜ Searching is started and playback continues at a low
volume. After a few seconds the search speeds up with
volume muted.
2 Release the key at the desired passage.
➜ Normal playback continues.
Note: During SHUFFLE, while repeating a track or playing a
program, searching is only possible within the current track.
Selecting and searching (on
MP3-CDs only)
Selecting an album when playback is stopped
● Press ALBUM+ or ALBUM- as often as necessary either
on CD player side or CD recorder side to find the album
number you wish to select.
➜ ALBUM is shown, CD or CDR and the album number are
displayed.
➜ The current album name is scrolled as soon as you do
not press the key again.
00
To start playback of the entire album press ÉÅ.
➜ Playback of the entire album starts.
Selecting an album during playback
● Press ALBUM+ or ALBUM- as often as necessary either
on CD player side or CD recorder side to skip to the
beginning of the previous or next album on the selected disc.
➜ Playback continues with the selected album as soon as
you do not press the key again.
Selecting a track in the album
1 Press ¢ or 4 as often as necessary either on
CD player side or CD recorder side to skip to the desired
track number.
➜ CD or CDR, the album number and track number are
displayed.
➜ The track name is scrolled as soon as you do not press
the key again.
2 Press ÉÅ to start playback.
➜ Playback starts with the selected track.
Notes:
At the end of your album selection you will recognize an
album called VARIOUS. This album contains all tracks which
were not saved in an album when making the MP3-CD.
If you want to play a playlist which you created on your
MP3-CD when making it, you have to select it directly by using
¢ or 4 and pressing ÉÅ afterwards.
Basic functions
15
English
Page 16
SHUFFLE and REPEAT
Repeating a track, a disc or a program
1 Press REPEAT repeatedly on the remote control during
playback to select either:
➜ REP TRACK:The current track is played repeatedly.
➜ REP DISC:The entire selected disc is played repeatedly.
➜ REP ALL:All discs in the unit (or the program) are (is)
played repeatedly.
Notes:
REP DISC is not possible during SHUFFLE or while playing a
program.
REP TRACK is not possible during SHUFFLE.
2 Playback starts in the chosen mode.
00
To return to normal playback press REPEAT on the remote
control until the display indication disappears.
Playing tracks in random order
● Press SHUFFLE before or during playback.
➜ SHUFF ALL is shown and either all tracks of the program
or of all loaded disc(s) in the CD player and
CD recorder are played in random order.
CD text display
This feature allows you to display information such as album
title or track title contained on a specially encoded CD.
● Make sure to insert a CD with CD text.
➜ CD TEXT is shown and the album artist’s name and
album title is scrolled once.
CD text when playback is stopped
● Press CD TEXT/edit on the remote control to see the
following information, which will be scrolled once (if available):
➜ Album artist’s name
➜ Album title
CD text during playback
● Press CD TEXT/edit on the remote control to see the
following information, which will be scrolled once (if available):
➜ Track artist’s name
➜ Track title
ID3-tag
This feature allows you to display information such as album
title or track title contained in an MP3-track.
● If you created an ID3-tag for your MP3-track, press
CDTEXT/edit on the remote control during playback to
show the following ID3-tag information:
➜ Album title
➜ Track artist’s name
➜ Track title
Note: In case there is no ID3-tag available, NO TEXT will be
displayed.
Programming track numbers
A program can be used for playback or for specifying the
tracks which will be recorded.You can select up to 99 tracks
(also MP3 tracks) and store them in the memory. It is possible
to store any track more than once, in any order over
CD player and CD recorder. However, it is not possible to
combine MP3 tracks and audio tracks or MP3 tracks from
more than one CD.
1 Load the desired disc(s) in the disc tray(s).
2 Press PROGRAM on the remote control to enter the
program menu.
➜ PROG star ts blinking and PROGRAM is displayed.
➜ The step number (STEP), the track number and playing
time of the actual track on the current CD are displayed.
3 If you wish to choose a track from the CD player:
Press CD on the remote control and then í or ë as
often as necessary to skip to the desired track.
If you wish to choose a track from the CD recorder:
Press CDR on the remote control and then í or ë as
often as necessary to skip to the desired track.
Note:When selecting a track which has been stored already,
P will be displayed.
4 Press PROGRAM on the remote control to store your
selection in the memory.
➜ The total number of programmed tracks (STEP), PRG
and the total program time are displayed.
5 Repeat steps 3–4 to select and store all desired tracks.
Note: If you try to store more than 99 tracks,
PROGRAM FULL will be displayed.
6 Press Ç to end programming.
Clearing the program
1 If necessary press Ç to stop playback.
2 Keep Ç pressed to clear the program.
➜ PROG CLEARED is displayed and PROG goes off.
Basic functions
16
English
Page 17
Basic information
The CD recorder deck offers you 3 main functions:
– Recording from the internal CD player or from a
selected external source
– Finalizing your CDR(W) discs and unfinalizing your
CDRW discs
– Erasing a CDRW disc
The recording procedure is the same for CDR and CDRW
discs. Make sure the CDR(W) is absolutely free of
scratches and dust particles.
For recordings, the minimum track length is 4 seconds.You
can record up to a maximum of 99 tracks on a disc. If the
recording time left on the disc is less than 7 seconds,
DISC FULL is displayed and you cannot enter the
recording mode.
Copyright protection
The Serial Copy Management System (SCMS) prevents
the making of a digital copy from a digital copy.The system
allows making a digital recording from the original, however,
in some countries this may require the authorization of
copyright holders.
When you try to record copy protected material from an
external source, COPY PROTECT will be displayed. No
digital recording is possible then.
It is not possible to copy an MP3-CD.
Recording CD text
If the original CD has CD text, this text will be recorded
automatically, provided that the CD text is not copy
protected. In that case, recording of CD text will not be
possible and TEXT PROTECT will be displayed.
What is finalizing?
Finalizing is a simple process that completes the recording
of a CDR(W) necessary to:
– play a recorded CDR on a standard CD player,
– play a recorded CDRW on a CDRW compatible
CD player and CD recorder,
– avoid unwanted recordings on a disc, or
– avoid accidental erasure of tracks on a CDRW.
CDRs are “locked” once they are finalized. No other tracks
or CD text can be added.
CDRWs are also “locked” once they are finalized, but can
be unfinalized to permit additional recording or erasure.
Direct Line Recording (DLR)
The CD recorder is equipped with the high-performance
Direct Line Recording technique. It ensures a perfect
recording of the source material, meaning a true “bit for
bit” recording. DLR will not become active when the
recording level is adjusted.
Adjusting the recording level
You can adjust the reference recording level for recordings
from an additional appliance.This feature can be used for
fading your recordings in or out.
1 Press INPUT repeatedly to select the input of the
additional appliance:
➜ DIGITAL IN: the digital coaxial input is selected.
➜ OPTICAL IN: the digital optical input is selected.
➜ ANALOG IN: the analog input is selected.
2 Keep ALBUM+ or ALBUM- pressed on the
CD recorder side to adjust the desired recording level.The
loudest sounds in the material to be recorded should not
reach the red levels of the level bar.
➜ The actual recording level (in dB) will be displayed.
Note:The recording level can also be adjusted during recording
from the internal CD player. Keep ALBUM+ or ALBUM-
pressed on the CD recorder side to adjust the desired recording
level.
About recording
17
English
Page 18
What is internal recording?
Recording from the CD player deck of this unit is called
“internal recording”.
Selecting the recording speed
It is possible to select the recording speed for internal
recordings.
● Press SPEED 1·2·4x repeatedly to select either:
➜ REC SPEED 1X: for recording with normal speed
➜ REC SPEED 2X: for recording with double speed while
the sound is muted.
➜ REC SPEED 4X: for recording with 4 times the normal
speed while the sound is muted.
Notes:
Speed selection is not possible during recording.
On some brands of blank audio discs recording at higher
speed is not possible and does not work. In that case select a
lower speed.
Copying an entire CD
This is the easiest way to make a copy of an entire CD,
ready to play on other CD players. However, no other
tracks or CD text can be added.
1 Insert a CDR(W) which is absolutely free of scratches and
dust particles in the CD recorder tray.
2 Insert the disc you wish to copy in the CD player tray.
3 Press COPY CD to star t copying of the entire CD.
➜ REC is shown, copying starts and the actual recording
time left starts to count down.
Note: If a program was already available before pressing
COPY CD, this will be ignored. PROG goes off and the current
disc will be recorded. After finishing the recording, PROG is
shown and the program is available again.
Recording all tracks from a CD
You can copy all tracks from a CD and then decide either
to finalize or not to finalize.
1 Insert a CDR(W) which is absolutely free of scratches and
dust particles in the CD recorder tray.
2 Insert the disc from which you wish to record all tracks in
the CD player tray.
3 Press REC to enter the recording menu.
➜ RECORD CD?, followed by PRESS REC are displayed
alternately.
4 Press REC again to start recording of all tracks.
➜ REC is shown, recording starts and the actual recording
time left starts to count down.
00
When you press / OPEN/CLOSE on the CD recorder side,
➜ CD NOT FINAL and PRESS REC TO FINALIZE are
displayed alternately.
Decide now, either
not to finalize: the CDR is not ready to play on other
CD players, however, other tracks or CD text can still
be added.
Press / OPEN/CLOSE on the CD recorder side again or
wait a few seconds.
➜ The drawer is opened.The CDR(W) is not finalized.
or
to finalize: the CDR is ready to play on other
CD players, however, no other tracks or CD text can
be added.
Press REC to start finalizing.
➜ FINAL is displayed and the actual finalizing time
remaining will start to count down.
Internal recording
18
English
Page 19

Recording a single track
You can copy various tracks from different CDs and then
decide either to finalize or not to finalize.
1 Insert a CDR(W) which is absolutely free of scratches and
dust particles in the CD recorder tray.
2 Play your desired track on the CD player.
3 Press REC to enter the recording menu.
➜ REC TR with the tracknumber and PRESS REC are
displayed alternately.
4 Press REC again to start recording of the track.
➜ REC is shown, recording starts from the beginning of the
selected track and the actual recording time left starts to
count down.
5 To record further tracks repeat steps 2–4.
00
When you press / OPEN/CLOSE on the CD recorder side,
➜ CD NOT FINAL and PRESS REC TO FINALIZE are
displayed alternately.
Decide now, either
not to finalize: the CDR is not ready to play on other
CD players, however, other tracks or CD text can still
be added.
Press / OPEN/CLOSE on the CD recorder side again or
wait a few seconds.
➜ The drawer is opened.The CDR(W) is not finalized.
or
to finalize: the CDR is ready to play on other
CD players, however, no other tracks or CD text can
be added.
Press REC to start finalizing.
➜ FINAL is displayed and the actual finalizing time
remaining will start to count down.
Making and recording a program
You can make your own program, record it and decide then
either to finalize or not to finalize. However, please note,
that you cannot record a program which contains tracks
from the CD player and CD recorder. In that case
2 DISC PROG and NOT POSSIBLE will be displayed.
1 Load a CDR(W) which is absolutely free of scratches and
dust particles in the CD recorder tray.
2 Load the CD from which you wish to record in the
CD player tray.
3 Select and store all desired tracks from the CD (see
“Programming track numbers”).
00
If the total time of the program is longer than the remaining
recording time of the CDR(W):
➜ DOES NOT FIT will be displayed briefly.
➜ MISSING and the time that cannot be recorded are
displayed.
If you nevertheless start recording, the recording goes on
until the CDR(W) is full.
4 Press REC to enter the recording menu.
➜
REC PROGRAM? and PRESS REC are displayed alternately.
5 Press REC again to start recording of the current program.
➜ REC is shown, recording starts and the actual recording
time left starts to count down.
00
When you press / OPEN/CLOSE on the CD recorder side,
➜ CD NOT FINAL and PRESS REC TO FINALIZE are
displayed alternately.
Decide now, either
not to finalize: the CDR is not ready to play on other
CD players, however, other tracks or CD text can still
be added.
Press / OPEN/CLOSE on the CD recorder side again or
wait a few seconds.
➜ The drawer is opened.The CDR(W) is not finalized.
or
to finalize: the CDR is ready to play on other
CD players, however, no other tracks or CD text can
be added.
Press REC to start finalizing.
➜ FINAL is displayed and the actual finalizing time
remaining will start to count down.
Internal recording
19
English
Page 20

What is external recording?
Recording from an additional appliance is called “external
recording”.
Analog or digital recording?
When making recordings from an external source, we
recommend doing analog recording only if digital recording
is not possible. Digital recording will result in better sound
quality.
Automatic track increment
When the digital input for recording from a digital
source (e.g. CD player) is used, tracks will be incremented
automatically such that the track numbers are positioned
on the same position as on the original.When the analog
input for recording from a digital or analog source is
used, track increment will not take place automatically
unless one of the following settings is selected.Track
increments may not always be positioned correctly,
depending on the quality of the source material.
● Press TR. INCR. as often as necessary on the remote
control during stop to switch through the following
automatic track increment functions:
➜ TURNTABLE: for optimal recording from noisy sources
like turntables (It is not possible to connect a
turntable directly to AUX/CDR IN L/R - see “Analog
connections”.)
➜ TAPE/TUNER: for optimal recording from a tape
➜ CD/DVD: for optimal recording from high quality sources
like DAT, DCC or DVD
➜ MANUAL: for switching the automatic track function off
Notes:
Track numbers can be incremented manually by pressing
TR. INCR. on the remote control during recording. The
minimum track length is 4 seconds.
Track numbers cannot be changed after recording.
Recording with automatic start
You can record an entire CD or a track quickly and easily.
As soon as playback on the additional appliance is started,
recording starts automatically.
1 Insert a CDR(W) which is absolutely free of scratches and
dust particles in the CD recorder tray.
2 Press INPUT repeatedly on the CD player/recorder to
select the input for the additional appliance you want to
record from.
➜ DIGITAL IN: the digital input is selected.
➜ ANALOG IN: the analog input is selected.
➜ OPTICAL IN: the optical input is selected.
3 Make sure the desired track on the additional appliance is
selected.
4 Make sure the additional appliance is in pause or stop mode.
5 Press REC on the CD player/recorder to enter the
recording menu.
➜ PREPARING is displayed.
➜ RECORD EXT? and START EXTERN SOURCE! are
displayed alternately.
6 Start playback on the additional appliance within 5 seconds.
➜ Recording starts simultaneously and REC is shown.The
remaining recording time on the CDR(W) is displayed.
Note: Recording can also be started manually by pressing REC
on the CD player/recorder.
00
To stop recording manually press Ç on the CD recorder
side.
00
When you press / OPEN/CLOSE on the CD recorder side,
➜ CD NOT FINAL and PRESS REC TO FINALIZE are
displayed alternately.
Decide now, either
not to finalize: the CDR is not ready to play on other
CD players, however, other tracks or CD text can still
be added.
Press / OPEN/CLOSE on the CD recorder side again or
wait a few seconds.
➜ The drawer is opened.The CDR(W) is not finalized.
or
to finalize: the CDR is ready to play on other
CD players, however, no other tracks or CD text can
be added.
Press REC on the CD player/recorder to start finalizing.
➜ FINAL is displayed and the actual finalizing time
remaining will start to count down.
External recording
20
English
Page 21

Manual recording
You can manually start and stop a recording from an
additional appliance.You can use manual recording for
recording live music, or for particular music like classic
which cannot be recorded with automatic start.
1 Insert a CDR(W) which is absolutely free of scratches and
dust particles in the CD recorder tray.
2 Press INPUT repeatedly on the CD player/recorder to
select the input for the additional appliance from which you
want to record.
➜ DIGITAL IN: the digital input is selected.
➜ ANALOG IN: the analog input is selected.
➜ OPTICAL IN: the optical input is selected.
3 Start playback on the additional appliance.
➜ PREPARING is displayed.
➜ RECORD EXT? and PRESS REC are displayed
alternately.
4 Press REC on the CD player/recorder to start recording.
➜ Recording starts and REC is shown.The remaining
recording time on the CDR(W) is displayed.
5 Press Ç on the CD recorder side to stop recording.
00
When you press / OPEN/CLOSE on the CD recorder side,
➜ CD NOT FINAL and PRESS REC TO FINALIZE are
displayed alternately.
Decide now, either
not to finalize: the CDR is not ready to play on other
CD players, however, other tracks or CD text can still
be added.
Press / OPEN/CLOSE on the CD recorder side again or
wait a few seconds.
➜ The drawer is opened.The CDR(W) is not finalized.
or
to finalize: the CDR is ready to play on other
CD players, however, no other tracks or CD text can
be added.
Press REC on the unit to start finalizing.
➜ FINAL is displayed and the actual finalizing time
remaining will start to count down.
Timer recording
This feature allows you to start a time restricted recording
via the analog input (e.g. for recordings from a tuner).You
can choose a recording of 15, 30, 45 or 60 minutes or to
the end of the CDR(W).
1 Insert a CDR(W) which is absolutely free of scratches and
dust particles in the CD recorder tray.
2 Make sure the additional appliance from which you want to
record is connected properly.
3 Press TIMER REC on the remote control to start recording.
➜ 15 MIN, followed by PREPARING, is displayed.
➜ Recording starts and REC is shown.The actual recording
time left is displayed.
00
To select another recording time press TIMER REC on the
remote control repeatedly until the desired time is displayed:
➜ 30 MIN, 45 MIN, 60 MIN, MAXIMUM is displayed.
4 After the chosen time has elapsed, recording stops
automatically and the unit switches to standby.
00
To stop recording manually press Ç on the CD recorder
side.
External recording
21
English
Page 22

Erasing from a CDRW disc
It is possible to erase one or more tracks (starting from the
end of the last track) or the entire CDRW. It is not possible
to erase from a CDR.
Erasing one or more tracks
1 Insert the CDRW from which you want to erase tracks in
the CD recorder tray.
2 Press ERASE CD shortly to enter the erasing menu.
If an unfinalized CDRW is inserted:
➜ ERASE LAST TRACK? and PRESS ERASE are
displayed alternately.
If a finalized CDRW is inserted:
➜ FINALIZED CD will be displayed briefly.
➜ ERASE LAST TRACK?, followed by PRESS ERASE
are displayed alternately.
00
To select a particular track you wish to erase press ¢ or
4 as often as necessary on the CD recorder side to
select the desired track number(s).
➜ ERASE TR and the track number (e.g. 10+) are displayed.
To select more tracks to be erased repeat this step.
Note:When erasing several tracks, the tracks to be erased
must be selected in sequence, starting from the last recorded
track. Example:The CDRW has 5 tracks recorded on it. Now,
you can erase tracks 5 and 4.You can also erase tracks 5, 4
and 3, but you cannot erase tracks 5 and 3!
3 Press ERASE CD again to start erasing.
If an unfinalized CDRW is inserted:
➜ ERASE is displayed, the operation time left starts to
count down and erasing starts.
If a a finalized CDRW is inserted:
➜ UNFINAL is displayed, the operation time left starts to
count down and unfinalizing starts.
➜ Afterwards ERASE is displayed, the operation time left
starts to count down and erasing starts.
Erasing an entire CDRW
1 Insert the CDRW you want to erase in the CD recorder
tray.
2 Keep ERASE CD pressed for more than 1 second to enter
the erasing menu.
If an unfinalized CDRW is inserted:
➜ ERASE DISC? and PRESS ERASE are displayed
alternately.
If a finalized CDRW is inserted:
➜ FINALIZED CD will be displayed briefly.
➜ ERASE DISC? and PRESS ERASE are displayed
alternately.
3 Press ERASE CD again to erase the entire CDRW.
If an unfinalized CDRW is inserted:
➜ ERASE is displayed, the operation time left starts to
count down and erasing of the entire CDRW starts.
If a finalized CDRW is inserted:
➜ UNFINAL is displayed, the operation time left starts to
count down and unfinalizing starts.
➜ ERASE is displayed, the operation time left starts to
count down and erasing of the entire CDRW starts.
Erasing
22
English
Page 23

CD text editing (on CD recorder only)
23
English
CD text editing
After you have recorded your CDR(W) you can enter a
text, e.g. album title or track title.This text will be displayed
during playback on this unit, but also on other units
equipped with the CD text feature. Only use an unfinalized
CDR or CDRW (a finalized CDRW must be unfinalized
first).
1 If necessary press Ç to stop playback.
2 Press CDR on the remote control to select the CD recorder.
3 Press CD TEXT/edit repeatedly on the remote control to
select either:
➜ ALBUM TITLE: for editing the CD title
➜ ALBUM ARTIST: for editing the CD artist’s name
➜ ARTIST TR 1 (or 2, 3,…): for editing the artist’s name
of track 1 (or 2, 3,…)
➜ TITLE TR 1 (or 2, 3,…): for editing the title of track 1
(or 2, 3,…)
4 As soon as the cursor starts blinking, use the
number/alphabet keys on the remote control to select a
character.
➜ After selecting a character the cursor automatically
moves to the next character space.
5 Press CD TEXT/edit on the remote control to save the
created text and to go back to the text editing menu.
6 To leave the text editing menu press Ç.
Deleting and substituting a character
1 Press à or á on the remote control to move to the
character to be deleted or substituted.
➜ The character starts blinking.
2 If you want to delete the character:
Press DELETE on the remote control.
➜ The character is deleted and the text is shifted one
position to the left.
If you want to substitute the character:
Use the number/alphabet keys on the remote control to
select a new character.
00
To change another character press à or á on the
remote control.
Auto copied text
When an artist’s name has been stored for a track, it will be
copied automatically to the next track.
Page 24

Troubleshooting
24
English
WARNING
Under no circumstances should you try to repair the unit yourself as this
will invalidate the guarantee. Do not open the unit as there is a risk of
electric shock.
If a fault occurs, first check the points listed, before taking the unit for
repair. If you are unable to solve a problem by following these hints,
consult your dealer or service center.
Laser safety
This unit employs a laser. Only a qualified service person should remove
the cover or attempt to service this device, due to possible eye injury.
Problem Solution
No power – Make sure the power cable is connected properly.
– Press 2 STANDBY·ON on the unit to switch it on.
No sound – Check if the audio connections have been installed properly.
– Make sure MP3-tracks are recorded in the correct format.
No reaction to controls – Disconnect the unit from power supply, reconnect after a few seconds.
Automatic start of permanent – Keep Ç on the unit pressed for at least 5 seconds to cancel the
feature display (demo mode) demonstration mode.
Remote control does not function – Remove batteries and insert them correctly or insert new batteries.
properly – Reduce distance to the unit.
WRONG DISC, USE AUDIO CD and – Make sure the disc is not scratched or dirty. Replace or clean the disc.
INSERT DISC indication – Make sure disc is inserted, printed side up.
– Make sure there is no DVD inserted.
– Wait until steamed up laser lens has cleared.
WRONG DISC, USE CDR<W> WITH – A computer CDR(W) is inserted. Make sure a digital audio disc is inserted
`DIGITAL AUDIO´ LOGO and marked with “Digital Audio”and the special logo.
INSERT DISC indication
NO SIGNAL indication or – Check if the connection cable is properly connected.
CHECK INPUT indication – Select the correct input.
– Make sure the external appliance is switched on.
OVERHEATING indication – Do not position the unit on top of other equipment that might heat it up
(e.g. receiver).
Does not record – Make sure the CDR(W) is absolutely free of scratches and dust particles.
– Check if a digital audio CDR(W) is inserted and make sure it is unfinalized.
Stops during recording – Use Philips audio CDR(W)s.
– In case recording process is interrupted (power loss, mechanical shock), start
recording again with a new disc.
Recorded disc does not play in – Make sure the CDR(W) is finalized.
another standard CD player – Insert the CDRW in a CDRW compatible CD player.
Missing directories on MP3-CD – Only albums with playable files will be shown.
Elapsed playing time of MP3-track – That is normal behavior as this MP3-track has a variable bit rate.
counts up very fast or irregularly
Recorded tracks have been merged – Use another track increment mode.
together or tracks do not start – Insert track increments manually with the remote control.
or stop at the correct time
Page 25

AUDIO SYSTEM
One Year Free Labor
One Year Free Service on Parts
This product must be carried in for repair.
LIMITED WARRANTY
WHO IS COVERED?
You must have proof of purchase to receive warranty service.A sales
receipt or other document showing that you purchased the product
is considered proof of purchase.
WHAT IS COVERED?
Warranty coverage begins the day you buy your product. For one
year thereafter, all parts will be repaired or replaced, and labor is
free.After one year from the day of purchase, you pay for the
replacement or repair of all parts, and for all labor charges.
All parts, including repaired and replaced parts, are covered only for
the original warranty period.When the warranty on the product
expires, the warranty on all replaced and repaired parts also expires.
WHAT IS EXCLUDED?
Your warranty does not cover:
• labor charges for installation or setup of the product, adjustment
of customer controls on the product, and installation or repair of
antenna systems outside of the product.
• product repair and/or part replacement because of misuse, accident, unauthorized repair or other cause not within the control of
Philips Consumer Electronics Company.
• reception problems caused by signal conditions or cable or antenna systems outside the unit.
• a product that requires modification or adaptation to enable it to
operate in any country other than the country for which it was
designed, manufactured, approved and/or authorized, or repair of
products damaged by these modifications.
• incidental or consequential damages resulting from the product.
(Some states do not allow the exclusion of incidental or consequential damages, so the above exclusion may not apply to you.
This includes, but is not limited to, prerecorded material, whether
copyrighted or not copyrighted.)
• a product that is used for commercial or institutional purposes.
WHERE IS SERVICE AVAILABLE?
Warranty service is available in all countries where the product is
officially distributed by Philips Consumer Electronics Company. In
countries where Philips Consumer Electronics Company does not
distribute the product, the local Philips service organization will
attempt to provide service (although there may be a delay if the
appropriate spare parts and technical manual(s) are not readily available).
MAKE SURE YOU KEEP...
Please keep your sales receipt or other document showing proof of
purchase.Attach it to this owner’s manual and keep both nearby. Also
keep the original box and packing material in case you need to return
your product.
BEFORE REQUESTING SERVICE...
Please check your owner’s manual before requesting service.
Adjustments of the controls discussed there may save you a service
call.
TO GET WARRANTY SERVICE IN U.S.A.,
PUERTO RICO OR U.S. VIRGIN ISLANDS...
Take the product to a Philips factory service center (see enclosed
list) or authorized service center for repair. When the product has
been repaired, you must pick up the unit at the center. Centers may
keep defective parts. (In U.S.A., Puerto Rico and U.S.Virgin Islands, all
implied warranties, including implied warranties of merchantability
and fitness for a particular purpose, are limited in duration to the
duration of this express warranty. But, because some states do not
allow limitations on how long an implied warranty may last, this limitation may not apply to you.)
TO GET WARRANTY SERVICE IN CANADA...
Please contact Philips at:
1-800-661-6162 (French Speaking)
1-800-363-7278 (English Speaking)
(In Canada, this warranty is given in lieu of all other warranties. No
other warranties are expressed or implied, including any implied warranties of merchantability or fitness for a particular purpose. Philips is
not liable under any circumstances for any direct, indirect, special,
incidental or consequential damages, howsoever incurred, even if
notified of the possibility of such damages.)
REMEMBER...
Please record the model and serial numbers found on the product
below.Also, please fill out and mail your warranty registration card
promptly. It will be easier for us to notify you if necessary.
MODEL # ________________________________________
SERIAL # ________________________________________
EL4965E005 / MAC 4110 / 1-97
This warranty gives you specific legal rights.You may have other rights which vary from state/province to state/province.
Philips Service Solutions Group, P.O. Box 2976, Longview,Texas 75606, (903) 242-4800
Page 26

Connaissez ces
symboles de
ssééccuurriittee
t
Cet « éclair à pointe de flèche »
indique qu’un matériau non isolé,
situé à l’intérieur de l’unité, risque
de provoquer un choc électrique. Pour la
sécurité de chacun, nous vous prions de ne pas
retirer le boîtier de ce produit.
s
Le « point d’exclamation » attire
votre attention sur des sujets
risquant de provoquer des
problèmes de fonctionnement et d’entretien si
vous ne lisez pas les informations s’y reportant.
DANGER: NE PAS EXPOSER CET
ÉQUIPEMENT A LA PLUIE NI A UNE HUMIDITÉ
EXCESSIVE POUR ÉVITER LES RISQUES
D’INCENDIE ET DE CHOC ÉLECTRIQUE.
ATTENTION: Pour éviter les chocs
électriques, introduire la lame la plus large de
la fiche dans la borne correspondante de la
prise et pousser jusqu’au fond.
Cet espace vous est réservé
Inscrivez ci-dessous le numéro de série situé à
l’arrière du bloc. Conservez cette information
pour vous y reporter à l’avenir.
N° de modèle ________________________
N° de série __________________________
ATTENTION
RISQUE DE CHOC ELECTRIQUE
NE PAS OUVRIR
ATTENTION: POUR REDUIRE LE RESQUE DE CHOC ELECTRIQUE, NE PAS ENLEVER
LE COUVERCLE (NI LE PANNEAU ARRIERE). CET APPAREIL NE COMPORTE AUCUNE
PIECE POUVANT TRE REPAREE PAR L’UTILISATEUR. CONFIER SON ENTRETIEN A
UN TECHNICIEN QUALIFIE.
• Dès que l’achat de votre appareil Philips est enregistré,
vous avez droit à tous les avantages dont bénéficient les
possesseurs des produits Philips.
• Remplissez et renvoyez votre carte d’enregistrement de
garantie jointe à votre appareil sans tarder et vous
bénéficierez de ces avantages importants.
Renvoyez votre carte d’enregistrement de garantie pour vous
assurer de recevoir tous les avantages auxquels vous avez droit.
Vérification
de garantie
Enregistrez votre produit dans les
10 jours pour confirmer votre droit à
une protection maximum selon les
termes et les conditions de votre
garantie Philips.
Confirmation
de possession
Votre carte d’enregistrement de
garantie prouve que vous possédez
l’appareil en cas de vol ou de perte
du produit.
Enregistrement
du modèle
Renvoyez votre carte d’enregistrement
de garantie dès aujourd’hui pour vous
assurer de recevoir toutes les
informations, les offres et les bonus
auxquels vous avez droit en tant que
possesseur de ce modèle.
Vous félicitant de votre achat,
la « famille » vous souhaite la bienvenue!
Cher possesseur de produit Philips,
Nous vous remercions de la confiance dont vous témoignez à Philips.Vous avez
choisi l’un des produits actuellement sur le marché les mieux construits et
bénéficiant d’un des meilleurs service après-vente. Et nous mettrons tout en
oeuvre pour que vous demeuriez satisfait de votre produit au cours des
nombreuses années à venir.
A présent membre de la « famille » Philips, vous êtes protégé par l’une des
garanties les plus complètes et l’un des réseaux de service les plus
exceptionnels de l’industrie.
De plus, grâce à votre achat vous recevrez toutes les informations, offres et
tous les bonus auxquels vous avez droit ainsi qu’un accès facile à notre réseau
d’achat à domicile très pratique.
Et, plus important encore, vous pouvez compter sur notre dévouement
incomparable à vous apporter une satisfaction totale.
Nous vous souhaitons ainsi la bienvenue tout en vous remerciant d’avoir investi
dans un produit Philips.
Sincèrement,
Lawrence J. Blanford
Président Directeur général
P.S. N’oubliez pas de renvoyer votre carte d’enregistrement de
garantie dans les 10 jours pour obtenir le maximum de votre
produit Philips.Veuillez donc la renvoyer dès maintenant!
MAC5097
Visitez notre World Wide Web site sur http://www.philips.com
M
E
E
R
T
S
I
G
E
R
N
E
S
R
Vite!
U
O
J
0
1
S
E
L
N
T
N
E
C
E
S
S
A
I
R
E
D
A
N
S
Page 27

CONSIGNES DE SÉCURITÉ IMPORTANTES
27
Prise
polarisée C.A.
1. Lisez ces instructions.
2. Conservez ces instructions.
3. Respectez les avertissements.
4. Suivez toutes les instructions.
5. N’utilisez pas cet appareil à proximité d’une
source d’eau.
6. Nettoyez l’appareil uniquement avec un chiffon sec.
7. N’obstruez aucun orifice de ventilation. Installez
l’appareil selon les instructions du fabricant.
8. N’installez pas l’appareil près d’une source de
chaleur comme par exemple des radiateurs, bouches de
chaleur, cuisinières, ou autres appareils (même des
amplificateurs) dégageant de la chaleur.
9. Ne détruisez pas la sécurité
incorporée dans la prise de terre ou
prise polarisée fournie – Une prise
polarisée est dotée de deux lames
dont une plus large que l’autre. Une prise de terre est
dotée de deux fiches semblables et d’une troisième, plus
large, qui assure la mise à la terre pour votre sécurité. Si la
prise fournie ne convient pas à la prise murale dont vous
disposez, consultez un électricien pour remplacer et
adapter votre prise murale.
10.
Protégez le cordon d’alimentation pour éviter de
marcher dessus ou de le pincer particulièrement aux
endroits des prises, mâles et femelles, et au point de
raccordement sur l’appareil lui-même.
11. Utilisez uniquement des accessoires ou options
recommandés par le fabricant.
12. Utilisez uniquement un meuble sur
roulettes, un support, un pied, une étagère ou
une table de type recommandé par le fabricant.
Si vous utilisez un meuble sur roulettes, veillez à
le déplacer avec précaution afin d’éviter tout
accident corporel si l’équipement se renversait.
13. Débranchez l’appareil pendant les orages ou s’il doit
rester inutilisé pendant une période de temps prolongée.
14. Pour toute réparation, faites appel à un personnel
qualifié. Une réparation sera nécessaire si l’appareil a subi
des dommages tels que détérioration du cordon
d’alimentation ou de la prise, liquide renversé sur l’appareil,
ou encore si un objet est tombé dessus, si l’appareil a été
exposé à la pluie ou à l’humidité, s’il ne fonctionne pas
correctement ou s’il a fait une chute.
15.PRÉCAUTION
d’emploi des piles – Afin d’éviter
toute fuite des piles qui risquerait de causer des blessures
corporelles ou d’endommager l’appareil :
● Installez toutes les piles correctement, + et - tels
qu’indiqués sur l’appareil.
● Ne mélangez pas les piles (pas de piles neuves avec des
usagées ou de piles au carbone avec des alcalines, etc.).
● Enlevez les piles lorsque l’appareil reste inutilisé pendant
une longue période.
EL 6475-F002: 01/6
Symbole d’ un appareil de classe II
Ce symbole indique que l’appareil est équipé
d’un système à double isolation.
Page 28

Informations générales
Caractéristiques techniques
___________________
29
Informations sur l'environnement
_______________
29
Accessoires fournis
__________________________
29
Entretien
__________________________________
29
Manipulation des disques
_____________________
29
Disques pour l'enregistrement
_________________
30
Disques pour la lecture
______________________
30
Quelques mots sur le MP3
____________________
30
Raccordements
Raccordements
____________________________
31
Informations pour la mise en place
_____________
31
Raccordements – Général
____________________
31
Installations
Raccordements analogiques
___________________
32
Raccordements numériques
________________
32–33
Raccordement au secteur
____________________
33
Commandes
________________________________
34
Télécommande
Utilisation de la télécommande
________________
35
Touches de la télécommande
__________________
35
Fonctions de base
Mise en marche, mise en veille
_________________
36
Mode de démonstration
_____________________
36
Mise en place de disques
_____________________
36
Lecture
___________________________________
36
Sélection et recherche (pour tous les
disques sauf CD-MP3)
_______________________
37
Sélection et recherche (seulement pour
les CD-MP3)
______________________________
37
SHUFFLE et REPEAT
________________________
38
Affichage du texte du CD
____________________
38
ID3-tag
___________________________________
38
Programmation des numéros de pistes
__________
38
Effacement du programme
____________________
38
A propos de l'enregistrement
Informations de base
________________________
39
Qu'est-ce que la finalisation?
__________________
39
Direct Line Recording (DLR)
__________________
39
Réglage du niveau d'enregistrement
_____________
39
Enregistrement interne
Qu'est-ce que l'enregistrement interne ?
_________
40
Sélection de la vitesse d'enregistrement
__________
40
Copie d'un CD entier
_______________________
40
Enregistrement de toutes les pistes d'un CD
______
40
Enregistrement d'une seule piste
_______________
41
Création et enregistrement d'un programme
_____
41
Enregistrement externe
Qu'est-ce que l'enregistrement externe ?
_________
42
Enregistrement analogique ou numérique?
_______
42
Incrément automatique d'une piste
_____________
42
Enregistrement avec démarrage automatique
_____
42
Enregistrement manuel
_______________________
43
Enregistrement avec minuterie
_________________
43
Effacement
Effacement sur un disque CDRW
______________
44
Edition du texte du CD
(sur l'enregistreur de CD uniquement)
Edition du texte du CD
______________________
45
Guide de dépannage
________________________
46
Garantie limitée
____________________________
47
Table des matières
28
Français
Page 29

Caractéristiques techniques
Sous réserve de modifications sans avis préalable.
Général
Consommation électrique
En service
____________________________
< 20 W
En veille
______________________________
< 0,6 W
Dimensions, L × H × P
____________
435 × 88 × 310 mm
17,1 × 3,5 × 12,2 pouces
Poids
_________________________________
5 kg, 8,8 lb
Audio
Réponse en fréquence
_________________
2–20 000 Hz
Lecture
Signal/bruit (A-pondéré)
__________________
120 dB
Signal/bruit
____________________________
110 dB
Plage dynamique
_________________________
98 dB
Distorsion harmonique totale
______________
-95 dB
Séparation des voies
_____________________
105 dB
Enregistrement
Signal/bruit (A-pondéré)
___________________
93 dB
S/N numérique sans SRC
___________
égal à la source
Plage dynamique
_________________________
90 dB
Distorsion harmonique totale + bruit
________
-86 dB
Entrée numérique/optique
_____________
12–96 kHz
Laser (enregistreur de CD)
Type
_______________
Laser à semi-conducteurs GaAlAs
Longueur d'onde
________________
775–795 nm (à 25°)
Puissance de sortie __2,5 mW (lecture), 35 mW (écriture)
Divergence du faisceau
____________________
60 degrés
En sa qualité de partenaire
ENERGY STAR®, Philips confirme
que ce produit est conforme aux
directives ENERGY STAR®de
l'efficacité d'énergie.
L’appareil répond aux normes FCC, Part 15 et
21 CFR 1040.10. Fonctionnement soumis aux deux
conditions suivantes :
1. Cet appareil ne doit pas provoquer
d’interférences nuisibles, et
2. Cet appareil doit accepter toute interférence
reçue, y compris les interférences susceptibles de
provoquer un fonctionement peu satisfaisant.
ATTENTION
L'usage des commandes ou réglages ou l'exécution
d'opérations autrement qu'indiqué ici peuvent
entraîner une exposition dangereuse aux
rayonnements ou toute autre opération dangereuse.
Informations sur l'environnement
Tout matériau d'emballage superflu a été omis. Nous avons
fait notre possible pour faciliter le tri de l'emballage selon trois
matières principales : le carton (boîte), la mousse en
polystyrène (protection) et le polyéthylène (sacs, feuille de
mousse protectrice).
Votre appareil est constitué de matières qui peuvent être
recyclées s'il est démonté par une entreprise spécialisée.
Merci de bien vouloir observer les réglementations locales
pour l'élimination des matériaux d'emballage, des piles
usagées et du matériel usagé.
Accessoires fournis
– 2 câbles audio analogiques (avec fiche rouge et blanche)
– télécommande
– 2 piles pour la télécommande, type AA
– cordon d'alimentation secteur
Entretien
Nettoyez l'appareil avec un chiffon
doux, légèrement humide et qui ne
peluche pas. N’utilisez aucun produit
d'entretien car ils peuvent avoir un
effet corrosif.
N’exposez pas l'appareil, les piles ou
les disques à l'humidité, à la pluie, au
sable ou à une chaleur excessive
(causée par le chauffage ou les
rayons directs du soleil).
Manipulation des disques
Si le lecteur/enregistreur de CD n'arrive pas à lire les disques
correctement, utilisez un CD de nettoyage courant pour
nettoyer les lentilles avant de porter votre appareil en réparation.
Toute autre méthode de nettoyage pourrait détruire les lentilles.
Veillez à toujours garder les plateaux fermés pour éviter le dépôt
de poussière sur les lentilles.
Il peut arriver que les lentilles se couvrent de buée lorsque l'appareil
passe soudainement d'un environnement froid à un environnement
chaud. Il n’est alors pas possible de lire un disque. Laissez l'appareil
dans un environnement chaud jusqu'à ce que l'humidité s’évapore.
Pour retirer facilement un disque de son
boîtier, appuyez sur la broche centrale tout
en soulevant le CD(RW).Veillez à toujours
saisir un CD(RW) par les bords et à le
remettre dans son boîtier après usage.
N'écrivez jamais sur un CD et n'y collez
aucune étiquette. Ecrivez seulement sur le côté imprimé du CDR
ou du CDRW, et uniquement avec un feutre.
Pour nettoyer un disque, essuyez-le
en ligne droite du centre vers le bord,
en utilisant un chiffon doux et qui ne
peluche pas. Un produit de nettoyage
risque d'endommager le disque !
Informations générales
29
Français
Page 30

Disques pour l'enregistrement
Pour l'enregistrement, veillez à utiliser uniquement des
disques audio spéciaux. Ces disques portent l'inscription
« Digital Audio » et les logos ci-dessous.
Il existe deux types différents de disques audio que vous
pouvez utiliser avec cet enregistreur de CD :
– les disques CD audio
enregistrables (CDR) peuvent être
enregistrés seulement une fois et
peuvent être lus par tous les lecteurs
de CD et les enregistreurs de CD
classiques après finalisation.
– les disques CD audio
ré-inscriptibles (CDRW) peuvent
être enregistrés, effacés et ré-enregistrés
plusieurs fois, et être lus par les lecteurs
de CD et par les enregistreurs de CD
compatibles avec les CDRW, après finalisation.
Tous les lecteurs de CD et les enregistreurs de
CD Philips qui portent cet autocollant sont
compatibles avec les CDRW.
Afin de garantir le bon fonctionnement de l'appareil, nous
vous recommandons d'utiliser seulement les CDR audio et
les CDRW audio Philips.
Remarque : N'utilisez pas de CDR ou CDRW informatiques car
l'enregistrement ne se fera pas correctement!
L'enregistrement est autorisé dans la mesure où les
droits d'auteur et autres droits de tierces personnes
ne sont pas violés.
Dans certains pays, l'utilisation du
lecteur/enregistreur de CD, telle qu’indiquée ou
suggérée dans le présent manuel de l'utilisateur, peut
nécessiter l'autorisation des titulaires des droits
d’auteur.
Disques pour la lecture
Pour lire des disques sur ce lecteur/enregistreur de CD,
vous pouvez utiliser les disques suivants :
– Tous les CD audio préenregistrés
– Tous les disques CDR audio et CDRW audio
– Les CD-MP3 (CD-ROM avec des pistes MP3)
Quelques mots sur le MP3
La nouvelle technologie révolutionnaire de compression musicale
MP3 (MPEG ! Audio Layer-3) permet de réduire jusqu'à 10 fois
des données originales audio numériques sans perte significative
de la qualité du son. Cela vous permet d'enregistrer jusqu'à
10 heures de musique de qualité CD sur un seul CD-ROM.
Pour créer vos propres CD-MP3
Il existe principalement deux sources pour la musique MP3 sur CD.
Vous pouvez soit transférer sur votre PC la musique de vos propres
CD audio numériques en passant par un lecteur de CD-ROM et
vous l'encodez (« extrayez ») ensuite au format MP3, soit
télécharger à partir d'internet de la musique MP3 de diffusion légale.
Enregistrez (« gravez ») la musique de votre disque dur sur un
CD-ROM avec votre PC personnel (assurez-vous que le
nom du fichier se termine par .mp3). Quand vous avez
fini, vous pouvez lire vos CD-MP3 sur le lecteur/enregistreur
de CD et apprécier la musique.
Taux de transmission des données
Le taux de transmission des données est très important pour
le MP3. Il indique à quelle vitesse les bits sont transférés.
Sur un CD, la musique stéréo est transmise à une vitesse
d'environ 1400 kilobits par seconde (kbps). Pour atteindre
une bonne qualité MP3, un débit de données de
128 kbps est recommandée. Comme le taux d'encodage
peut être sélectionné par l'utilisateur, veillez à atteindre ce taux
de transmission pour les MP3 car un enregistrement de moins de
128 kbps diminuera la qualité du son.
Enregistrement
Le téléchargement de fichiers MP3 à par tir d'internet ou l'extraction
de morceaux de vos propres CD audio numériques est un procédé
délicat, qui peut également varier en fonction de la qualité du
programme d'encodage et de la vitesse de votre PC. En effet, ils
peuvent être à l'origine des coupures ou des erreurs que vous
pouvez quelquefois percevoir lors de l'écoute de votre CD-MP3.
Quoi qu’il en soit, veillez à ne pas dépasser la vitesse
d'enregistrement indiquée sur le CD-ROM et évitez d'utiliser
simultanément d'autres programmes sur votre PC pendant
l'opération d'enregistrement.
Conformément à la SDMI (Secure Digital Music
Initiative)
, les sorties numériques de cet appareil seront
désactivées pendant la lecture d'un CD-MP3.
Il n’est pas possible de « graver » un CD-MP3 sur ce
lecteur/enregistreur de CD.
Il n’est pas possible d'enregistrer à partir d'un CD-MP3.
Formats reconnus
Les formats suivants sont reconnus par ce lecteur/enregistreur
de CD:
–
format de disques : ISO 9660 ou Joliet
–
format de fichiers : MPEG ! Audio Layer-3
–
nom de fichier : .mp3 (pistes), .m3u ou .pls (listes de lecture)
–
débit de données : 32–320 kbps (128 kbps recommandés)
ou débit de données variable
Utilisez le format de disque ISO 9660 quand vous gravez un
CD-MP3. Le format de disque UDF (par ex.
« DirectCD » ou « WinOnCD ») n'est pas reconnu.
Informations générales
30
Français
Page 31

Raccordements
1 OPTICAL IN
raccordement à la sortie numérique optique d'un appareil
numérique externe
2 OPTICAL OUT
raccordement à l'entrée numérique optique d'un appareil
numérique externe
3 DIGITAL IN
raccordement à la sortie numérique coaxiale d'un appareil
numérique externe
4 DIGITAL OUT
raccordement à l'entrée numérique coaxiale d'un appareil
numérique externe
5 ANALOG IN L/R
raccordement à la sortie audio analogique d'un appareil externe
6 ANALOG OUT L/R
raccordement à l'entrée audio analogique d'un appareil externe
7 AC MAINS ~
Après avoir effectué tous les autres raccordements,
raccordez le cordon d'alimentation secteur à la prise murale.
Informations pour la mise en place
Posez l'appareil sur une surface plane, solide et stable. Ne
placez pas l'appareil au-dessus d'autres appareils qui
risquent de le faire chauffer (par ex. un récepteur ou un
amplificateur). Si l'appareil est placé dans un meuble, veillez
à laisser un espace libre d'au moins 3,5 cm (1,5 pouce)
autour de l'appareil pour éviter toute surchauffe. Le
voisinage de téléphones portables en marche risque de
perturber le bon fonctionnement de l'appareil.
Raccordements – Général
N'effectuez ou ne changez jamais les raccordements
quand l'appareil est branché sur l'alimentation secteur.
Pour la lecture, les sorties suivantes sont présentes :
– Sortie analogique (ANALOG OUT L/R)
– Sortie numérique coaxiale (DIGITAL OUT)
– Sortie numérique optique (OPTICAL OUT)
Pour les enregistrements externes les entrées suivantes
sont présentes :
– Entrée analogique (ANALOG IN L/R)
– Entrée numérique coaxiale (DIGITAL IN)
– Entrée numérique optique (OPTICAL IN)
Ces entrées peuvent être raccordées à la sortie (aux
sorties) correspondante(s) de votre amplificateur/récepteur
ou directement à la/aux sortie(s) correspondante(s) de
l'appareil externe.
Il n’est pas possible de raccorder un tourne-disque
directement à ANALOG IN L/R. Si vous désirez utiliser
un tourne-disque avec l’appareil, vous devez raccorder
un amplificateur/récepteur à ANALOG IN L/R sur le
lecteur/enregistreur de CD.Ensuite connectez un
tourne-disque à l'amplificateur.
Les raccordements que vous allez faire dépendront des
possibilités offertes par votre équipement audio et de la
façon dont vous désirez utilisez l'appareil.Veuillez tout
d'abord vous référer au manuel de l'utilisateur de votre
équipement audio.
Nous recommandons de faire un enregistrement
analogique seulement si l'enregistrement numérique n'est
pas possible. Un enregistrement numérique donnera une
meilleure qualité sonore.
Si possible, faites les raccordements numériques et
analogiques. De cette façon, vous pouvez toujours faire des
enregistrements analogiques quand l'enregistrement
numérique n'est pas possible.
Raccordements
31
Français
OUTIN
OPTICAL
DIGITAL
ANALOG
L
R
IN OUTOUTIN
AC MAINS
~
7
5
4
32
1
6
Page 32

Raccordements analogiques
Ces raccordements sont indispensables pour la lecture et
l'enregistrement à l'aide d'un amplificateur/récepteur
équipé d'entrées et de sorties analogiques.
1 Raccordez la fiche rouge du câble audio (cinch) fourni à la
prise rouge ANALOG IN R et la fiche blanche à la prise
blanche ANALOG IN L sur le lecteur/enregistreur de CD.
2 Raccordez l'autre bout du câble audio aux sorties
analogiques de l'amplificateur/récepteur (CDR OUT,
TAPE OUT, AUX OUT, REC OUT, etc.).
3 Raccordez la fiche rouge du câble audio (cinch) fourni à la
prise rouge ANALOG OUT R et la fiche blanche à la prise
blanche ANALOG OUT L sur le lecteur/enregistreur de CD.
4 Raccordez l'autre bout du câble audio aux entrées
analogiques de l'amplificateur/récepteur (CD-R,TAPE IN,
AUX, PLAY IN, etc.).
5 Raccordez tous les autres composants de votre système
(platine casette, lecteur de CD, tuner, tourne-disque etc.) par
leurs sorties analogiques aux entrées analogiques appropriées
de l'amplificateur/récepteur (CD IN,TUNER IN, AUX IN,
PHONO IN, etc.).
00
L'enregistrement peut maintenant être fait avec n'importe
quel appareil raccordé à une entrée analogique de
l'amplificateur/récepteur. Appuyez sur INPUT sur le
lecteur/enregistreur de CD de façon répétée pour
sélectionner l'entrée analogique.
➜ ANALOG IN s’affiche.
Comment faire les raccordements si la sortie
analogique de l'amplificateur/récepteur est déjà
utilisée (occupée)
La plupart des amplificateurs/récepteurs ont de multiples
sorties analogique (TAPE,VCR…), mais certains
amplificateurs/récepteurs n'ont que 1 sortie analogique. Si
vous avez déjà branché une platine cassette (enregistreur
DAT ou enregistreur MD) à cette sortie, vous allez devoir
modifier les raccordements existants.
1 Déconnectez les raccordements analogiques de la platine
cassette à l'amplificateur/récepteur.
2 Raccordez le lecteur/enregistreur de CD (voir étapes 1–4
du chapitre précédent).
3 Raccordez les sorties analogiques de la platine cassette à
n'importe quelles entrées analogiques libres (AUX, CD) de
l'amplificateur/récepteur.Vous pouvez maintenant lire votre
cassette ou enregistrer à partir de votre platine cassette sur
un CD. Cependant, il n'est plus possible d'enregistrer sur
une cassette.
Raccordements numériques
Raccordement numérique coaxial direct
Ce raccordement est indispensable pour l'enregistrement
direct à partir de n'importe quel équipement audio
numérique équipé d'une sortie numérique coaxiale (p. ex.
un lecteur de CD ou un lecteur de DVD).
● Utilisez un câble coaxial numérique pour raccorder la sortie
coaxiale de l'appareil externe à DIGITAL IN du
lecteur/enregistreur de CD.
00
L'enregistrement peut maintenant être effectué par l'entrée
numérique coaxiale. Appuyez sur INPUT sur le
lecteur/enregistreur de CD de façon répétée pour
sélectionner l'entrée numérique coaxiale.
➜ DIGITAL IN s’affiche.
Installations
32
Français
OUTIN
OPTICAL
DIGITAL
ANALOG
L
R
IN OUTOUTIN
OPTICAL
DIGITAL OUTPUT
ANALOG OUTPUT
L
R
PHONO
L
R
CD
IN IN
CD PLAYER/
RECORDER
AMPLIFIER/
RECEIVER
PHONO
L
R
CD
IN IN
CDR/TAPE
L
R
IN OUT
CD PLAYER
COAX
TURNTABLE
DIGITAL OUTPUT
OPTICAL
DIGITAL
OPTICAL
ANALOG OUTPUT
ANALOG
IN OUTOUTIN
L
R
L
R
CD PLAYER
CD PLAYER/
RECORDER
COAX
OUTIN
Page 33

Raccordement numérique optique direct
Ce raccordement est indispensable pour l'enregistrement
direct à partir de n'importe quel équipement audio
numérique avec une sortie numérique optique (p. ex. un
lecteur de CD ou un lecteur de DVD).
1
Otez les capuchons protège-poussière de l'entrée
numérique optique du lecteur/enregistreur de CD et de la
sortie numérique optique de l'appareil externe. Gardez les
capuchons dans un endroit sûr.
2 Utilisez un câble numérique optique pour raccorder la
sortie optique de l'appareil externe à OPTICAL IN sur le
lecteur/enregistreur de CD. Prenez soin de bien insérer
complètement les deux fiches jusqu'à ce que vous
entendiez un « clic ».
00
L'enregistrement peut maintenant être effectué par l'entrée
numérique optique. Appuyez de façon répétée sur INPUT
sur le lecteur/enregistreur de CD pour sélectionner l'entrée
numérique optique.
➜ OPTICAL IN s’affiche.
Raccordements numériques coaxiaux à l'aide d'un
récepteur digital
Si vous possédez un récepteur avec des entrées et sorties
numériques coaxiales, ces raccordements vous permettent
d'effectuer des enregistrements numériques à partir de
diverses sources, raccordées au récepteur.
●
Utilisez un câble coaxial pour raccorder l'entrée numérique
coaxiale du récepteur à DIGITAL OUT du lecteur/
enregistreur de CD. Utilisez un autre câble coaxial pour
raccorder la sortie numérique coaxiale du récepteur à
DIGITAL IN sur le lecteur/enregistreur de CD.
00
L'enregistrement peut maintenant être effectué avec tout
appareil numérique raccordé à une entrée numérique du
récepteur numérique (p. ex. lecteur de CD ou lecteur de DVD).
Appuyez sur INPUT sur le lecteur/enregistreur de CD de façon
répétée pour sélectionner l'entrée numérique coaxiale.
➜ DIGITAL IN s’affiche.
Raccordements numériques optiques à l'aide d'un
récepteur digital
Si vous possédez un récepteur avec des entrées et sorties
numériques optiques, ces raccordements vous permettent
d'effectuer des enregistrements numériques à partir de
diverses sources, raccordées au récepteur.
1 Otez les capuchons protège-poussière des entrées et sorties
numériques optiques du lecteur/enregistreur de CD et de la
sortie numérique optique du récepteur. Gardez les capuchons
dans un endroit sûr.
2
Utilisez un câble numérique optique pour raccorder l'entrée
optique du récepteur à OPTICAL OUT du lecteur/enregistreur
de CD. Utilisez un autre câble numérique optique pour raccorder
la sortie optique du récepteur à OPTICAL IN sur le lecteur/
enregistreur de CD. Prenez soin de bien insérer complètement les
fiches jusqu'à ce que vous entendiez un « clic ».
00
L'enregistrement peut maintenant être effectué avec tout
appareil numérique raccordé à une entrée numérique du
récepteur numérique (p. ex. un lecteur de CD ou un lecteur de
DVD).Appuyez sur INPUT sur le lecteur/enregistreur de CD de
façon répétée pour sélectionner l'entrée numérique optique.
➜
OPTICAL IN s’affiche.
Raccordement au secteur
La plaquette d'identification est située à l'arrière de
l'appareil.
1 Vérifiez que la tension de secteur telle qu'indiquée sur la
plaquette d'identification correspond à la tension de secteur
de votre réseau local. Si tel n'est pas le cas, adressez-vous à
votre revendeur ou à votre service de réparation.
2 Assurez-vous que tous les raccordements ont été faits
avant de brancher l'appareil sur le secteur.
3
Raccordez le cordon d'alimentation secteur fourni à
AC MAINS ~ et à la prise murale. Ceci branche l'appareil
sur l'alimentation secteur.
Lorsque l'appareil est en veille, il continue à consommer de
l'électricité. Pour déconnecter complètement l'appareil
du secteur, enlevez la fiche d'alimentation électrique
de la prise murale.
Installations
33
Français
CD PLAYER/
RECORDER
CD PLAYER
OUTIN
OPTICAL
DIGITAL
ANALOG
L
R
IN OUTOUTIN
OPTICAL
DIGITAL OUTPUT
ANALOG OUTPUT
L
R
COAX
“CLICK!”
CD PLAYER/
RECORDER
DIGITAL
RECEIVER
OUTIN
OPTICAL
DIGITAL
ANALOG
L
R
IN OUTOUTIN
OPTICAL
OUT
IN
AUX
CD IN DVD IN
OPTICAL
IN
”
OUT
CD IN DVD IN
AUX
DIGITAL
RECEIVER
“CLICK!
DIGITAL
OPTICAL
ANALOG
L
OUTIN
R
IN OUTOUTIN
CD PLAYER/
RECORDER
Page 34

1 2 STANDBY·ON
met l'appareil en marche/en veille
2 / OPEN/CLOSE
ouvre/ferme le tiroir du lecteur de CD
3 tiroir du lecteur de CD
4 affichage
5 CD RECORDER
tiroir de l'enregistreur de CD
lumière bleue allumée : l'enregistreur de CD est sélectionné
lumière rouge allumée : enregistrement en cours
6 / OPEN/CLOSE
ouvre/ferme le tiroir de l'enregistreur de CD
7 PHONES/LEVEL
règle le volume des écouteurs
8 PHONES/LEVEL
prise 6,3 mm pour écouteurs
9 COPY CD
sélectionne l'enregistrement et la finalisation automatique
du CD présent dans l'appareil
0 REC 0
sélectionne d'autres modes d'enregistrement
! ¢
enregistreur de CD : sélectionne la piste suivante, effectue
une recherche vers l'avant
@ 4
enregistreur de CD : sélectionne la piste précédente,
effectue une recherche vers l'arrière
# ALBUM/REC LEVEL+
enregistreur de CD : sélectionne l'album suivant d'un
CD-MP3, augmente le niveau d'enregistrement
$ ALBUM/REC LEVEL-
enregistreur de CD : sélectionne l'album précédent d'un
CD-MP3, réduit le niveau d'enregistrement
% Ç
enregistreur de CD : arrête la lecture/l'enregistrement
^ ÉÅ
enregistreur de CD : lance/interrompt la lecture
& ERASE CD
efface les enregistrements sur un CDRW
* INPUT
sélectionne l'entrée pour un appareil externe
( SHUFFLE
lit les pistes dans un ordre aléatoire
) DISPLAY
sélectionne les informations à l'affichage
¡ ¢
lecteur de CD : sélectionne la piste suivante, effectue une
recherche vers l'avant
™ 4
lecteur de CD : sélectionne la piste précédente, effectue
une recherche vers l'arrière
£ ALBUM+
lecteur de CD : sélectionne l'album suivant sur un CD-MP3
≤ ALBUM-
lecteur de CD : sélectionne l'album précédent sur un
CD-MP3
∞ Ç
lecteur de CD : arrête la lecture
§ ÉÅ
lecteur de CD : lance/interrrompt la lecture
≥ SPEED 1·2·4x
sélectionne la vitesse d'enregistrement pour un
enregistrement interne
Remarque : SPEED 1·2·4x, REC et COPYCD s'illuminent
selon les différents modes dans lesquels vous vous trouvez. Ceci
afin de permettre un repérage facile des touches
correspondantes pour la sélection.
Commandes
34
Français
1654327
L
R
(
)¡™9£≤∞§≥
*
^
!
@#$%&
80
Page 35

Télécommande
35
Français
Utilisation de la télécommande
Ouvrez le compartiment des piles
de la télécommande et insérez
2 piles alcalines, type AA (R06,
UM-3).
Ne mélangez pas les vieilles piles
avec des neuves ou des piles de
différents types.
Enlevez les piles lorsqu’elles sont vides ou si la
télécommande reste inutilisée pendant une longue durée.
Les piles contiennent des substances chimiques, il
convient donc de s'en débarrasser de façon
appropriée.
Les boutons de la télécommande fonctionnent de la même
façon que les commandes correspondantes sur l'appareil.
Touches de la télécommande
1 2
met l'appareil en marche/en veille
2 CD, CDR
sélectionne la platine lecteur de CD ou la platine
enregistreur de CD
3 TIMER REC
lance un enregistrement minuté
4 Touches alphanumériques
1–0 : insère les numéros pour les pistes
ABC – WXYZ : insère les lettres pour le texte du CD
SPACE : insère un espace dans le texte du CD
. : insère un point ou un symbole dans le texte du CD
5 TR. INCR.
sélectionne l'incrément automatique ou manuel d'une piste
6 PROGRAM
accède le menu de programmation
7 ALBUM+
sélectionne l'album suivant sur un CD-MP3
8 ALBUM-
sélectionne l'album précédent sur un CD-MP3
9 É
lance la lecture
0 í
sélectionne la piste précédente
! ë
sélectionne la piste suivante
@ Ç
arrête la lecture
# á
effectue une recherche vers l'avant
$ à
effectue une recherche vers l'arrière
% Å
interrompt la lecture
^ DIM
contrôle la luminosité de l'affichage
& DISPLAY
sélectionne les informations à l'affichage
* CD TEXT/edit
parcourt les informations du texte du CD, ouvre/ferme le
menu d'édition du texte du CD
( DELETE
efface le texte du CD
) REPEAT
répète une piste, un CD(RW) entier ou un programme
¡ SHUFFLE
lit les pistes dans un ordre aléatoire
3
4
5
8
9
0
$
&
*
(
CD TIMER REC
SPACE ABC
1
GHI JKL
4
PQRS TUV
7
TR.INCR.
2
5
8
.
CDR
DEF
3
MNO
6
WXYZ
9
PROGRAM
0
ALBUM
DISPLAY DIM
CD TEXT/edit DELETE
CD TEXT
ALBUM
+
SHUFFLE REPEAT
1
2
6
7
!
@
#
%
^
)
¡
Page 36

Mise en marche, mise en veille
● Pour mettre l'appareil en marche, appuyez sur
2 STANDBY·ON.
➜ WELCOME TO PHILIPS AUDIO s’affiche.
● Pour mettre l'appareil en veille, appuyez de nouveau
sur 2 STANDBY·ON.
➜ L'appareil est mis en veille.
Mode de démonstration
Le mode de démonstration présente différentes fonctions
de l'appareil et se met en route automatiquement si
aucune touche n'est utilisée pendant plusieurs minutes, ou
en mode veille.
● Pour annuler le mode de démonstration maintenez
appuyé Ç sur l'appareil pendant au moins 5 secondes.
➜ Le mode démo est annulé de façon permanente.
Mise en place de disques
1 Lecteur de CD : Appuyez sur / OPEN/CLOSE pour
ouvrir le tiroir du lecteur de CD.
➜ OPEN CD s’affiche et le tiroir s'ouvre.
Enregistreur de CD : Appuyez sur / OPEN/CLOSE pour
ouvrir le tiroir de l'enregistreur de CD.
➜ OPEN CDR s’affiche et le tiroir s'ouvre.
Remarques :
L'ouverture du lecteur de CD annule tout programme qui
contient des pistes d'un CD inséré dans le lecteur de CD.
L'ouverture de l'enregistreur de CD annule tout programme
qui contient des pistes d'un CD inséré dans l'enregistreur de CD.
2 Placez un disque (face imprimée vers le haut) sur le plateau.
3 Lecteur de CD : Appuyez de nouveau sur
/ OPEN/CLOSE pour fermer le tiroir.
➜ Le tiroir se ferme et READING s’affiche.
➜ CD, le nombre total de pistes et la durée de lecture
totale du disque s'affichent.
Enregistreur de CD : Appuyez sur / OPEN/CLOSE pour
fermer le tiroir.
➜ Le tiroir se ferme et READING s’affiche.
➜ Si vous insérez un disque non finalisé, INITIALIZING
s'affiche.
➜ CDR, le nombre total de pistes et la durée de lecture
totale du disque s'affichent.
Pour les CD-MP3 seulement :
➜ READING MP3 s’affiche. MP3 apparaît. A cause du
nombre important de pistes, ceci peut prendre jusqu'à
2 minutes.
➜ Le nom du premier album s'affiche.
Lecture
1 Appuyez sur ÉÅ soit du côté du lecteur de CD, soit du
côté de l'enregistreur de CD pour lancer la lecture.
➜ CD ou CDR, le numéro de la piste en cours de lecture et
la durée de lecture écoulée s'affichent.
Pour les CD-MP3 seulement :
➜ En plus, le nom de la piste défile.
00
Pour parcourir les informations suivantes, appuyez sur
DISPLAY de façon répétée :
➜ numéro de la piste, durée de lecture restante de la piste
en cours de lecture
➜ numéro de la piste, durée de lecture restante du disque
➜ numéro de la piste, durée de lecture écoulée de la piste
en cours de lecture
Pour les CD-MP3 seulement :
➜ nom de l'album, numéro de la piste et nom de la piste
➜ numéro de la piste, durée de lecture écoulée de la piste
en cours de lecture
2 Appuyez sur Ç soit du côté du lecteur de CD, soit du
côté de l'enregistreur de CD pour arrêter la lecture.
➜ CD ou CDR, le nombre total de pistes et la durée de
lecture totale du disque s'affichent.
Pour les CD-MP3 seulement :
➜ Le nom de l'album en cours de lecture défile.
00
Vous pouvez interrompre la lecture en appuyant sur ÉÅ.
➜ L'indication de temps à l'interruption de la lecture clignote.
00
Pour reprendre la lecture, appuyez de nouveau sur ÉÅ.
Fonctions de base
36
Français
Page 37

Sélection et recherche (pour tous
les disques sauf CD-MP3)
Sélection d'une piste quand la lecture est arrêtée
1 Appuyez sur ¢ ou 4, soit du côté du lecteur de CD
soit du côté de l'enregistreur de CD, autant de fois que
nécessaire pour passer au numéro la piste désirée.
2 Appuyez sur ÉÅ pour lancer la lecture.
➜ La lecture commence avec la piste choisie.
Sélection d'une piste pendant la lecture
● Appuyez sur ¢ ou 4 , soit du côté du lecteur de CD
soit du côté de l'enregistreur de CD, autant de fois que
nécessaire pour passer au début de la piste précédente ou
suivante sur le disque choisi.
➜ La lecture continue avec la piste choisie.
Recherche d'un passage pendant la lecture
1 Maintenez ¢ ou 4 appuyé, soit du côté du lecteur de
CD soit du côté de l'enregistreur de CD, pour trouver un
passage particulier vers l'avant ou vers l'arrière.
➜ La recherche est lancée et la lecture continue en volume
sonore bas. Après quelques secondes, la recherche
s’accélère et le volume est coupé.
2 Relâchez la touche au passage désiré.
➜ La lecture normale continue.
Remarque : Pendant SHUFFLE, lors de la répétition d'une piste
ou de la lecture d'un programme, la recherche est seulement
possible dans la piste en cours de lecture.
Sélection et recherche
(seulement pour les CD-MP3)
Sélection d'un album quand la lecture est arrêtée
● Appuyez sur ALBUM+ ou ALBUM-, soit du côté du
lecteur de CD soit du côté de l'enregistreur de CD, autant
de fois que nécessaire pour trouver le numéro de l'album
que vous désirez choisir.
➜ ALBUM apparaît, CD ou CDR et le numéro de l'album
s'affichent.
➜ Le nom de l'album en cours de lecture défile dès que
vous n'appuyez plus sur la touche.
00
Pour lancer la lecture de l'album entier, appuyez sur ÉÅ.
➜ La lecture de l'album entier démarre.
Sélection d'un album pendant la lecture
● Appuyez sur ALBUM+ ou ALBUM-, soit du côté du
lecteur de CD soit du côté de l'enregistreur de CD, autant
de fois que nécessaire pour passer au début de l'album
précédent ou suivant du disque sélectionné.
➜ La lecture continue avec l'album sélectionné dès que
vous n'appuyez plus sur la touche.
Sélection d'une piste dans l'album
1 Appuyez sur ¢ ou 4, soit du côté du lecteur de CD
soit du côté de l'enregistreur de CD, autant de fois que
nécessaire pour passer au numéro de piste désiré.
➜ CD ou CDR, le numéro de l'album et le numéro de la
piste s'affichent.
➜ Le nom de la piste défile dès que vous n'appuyez plus
sur la touche.
2 Appuyez sur ÉÅ pour lancer la lecture.
➜ La lecture commence avec la piste choisie.
Remarques :
A la fin de votre sélection d'albums, vous reconnaîtrez un
album intitulé VARIOUS. Cet album contient toutes les pistes
qui n’ont pas été enregistrées dans un album lors de la
création du CD-MP3.
Si vous souhaitez lire une liste de lecture que vous avez
créée vous-même sur le CD-MP3 lors de sa création, vous
devez la sélectionner directement en utilisant ¢ ou 4 et
en appuyant ensuite sur ÉÅ.
Fonctions de base
37
Français
Page 38

SHUFFLE et REPEAT
Répétition d'une piste, d'un disque ou d'un programme
1 Appuyez sur REPEAT de façon répétée sur la télécommande
pendant la lecture pour sélectionner au choix :
➜ REP TRACK : La piste en cours de lecture est lue en boucle.
➜ REP DISC : Tout le disque sélectionné est lu en boucle.
➜ REP ALL :Tous les disques qui se trouvent dans l'appareil
(ou le programme) sont (est) lu(s) en boucle.
Remarques :
REP DISC n’est pas possible pendant SHUFFLE ou pendant
la lecture d'un programme.
REP TRACK n'est pas possible pendant SHUFFLE.
2 La lecture démarre dans le mode choisi.
00
Pour revenir à la lecture normale, appuyez sur REPEAT sur
la télécommande jusqu'à ce que l'indication à l'affichage
disparaisse.
Lecture de pistes dans un ordre aléatoire
● Appuyez sur SHUFFLE avant ou pendant la lecture.
➜ SHUFF ALL apparaît et toutes les pistes soit du
programme, soit du (des) CD présent(s) dans le lecteur
de CD et dans l'enregistreur de CD sont lues dans un
ordre aléatoire.
Affichage du texte du CD
Cette fonction vous permet d'afficher des informations
telles que le titre de l'album ou le titre de la piste
contenues sur un CD spécialement encodé.
●
Assurez-vous que vous avez placé un CD avec du texte de CD.
➜ CD TEXT apparaît et le nom de l'ar tiste de l'album et le
titre de l'album défilent une fois.
Texte du CD quand la lecture est arrêtée
●
Appuyez sur CD TEXT/edit sur la télécommande pour voir les
informations suivantes, qui défileront une fois (si disponibles) :
➜ Nom de l'artiste de l'album
➜ Titre de l'album
Texte du CD pendant la lecture
●
Appuyez sur CD TEXT/edit sur la télécommande pour voir les
informations suivantes, qui défileront une fois (si disponibles) :
➜ Nom de l'artiste de la piste
➜ Titre de la piste
ID3-tag
Cette fonction vous permet d'afficher des informations
telles que le titre de l'album ou le titre de la piste
contenues sur une piste MP3.
● Si vous avez créé un ID3-tag pour votre piste MP3, appuyez
sur CD TEXT/edit sur la télécommande pendant la lecture
pour faire apparaître les informations ID3-tag suivantes :
➜ Titre de l'album
➜ Nom de l'artiste de la piste
➜ Titre de la piste
Remarque : Si aucun ID3-tag n'est disponible, NO TEXT s'affichera.
Programmation des numéros de piste
Vous pouvez utiliser un programme pour la lecture ou pour
spécifier les pistes qui seront enregistrées.Vous pouvez
sélectionner jusqu'à 99 pistes (également des pistes MP3) et
les mettre en mémoire. Il est possible de mettre n'importe
quelle piste plusieurs fois en mémoire, dans n'importe quel
ordre, en passant parte du lecteur de CD ou de l'enregistreur
de CD. Cependant il n'est pas possible de mélanger les pistes
MP3 avec les pistes audio ou des pistes MP3 provenant de
plusieurs CD.
1 Placez le(s) CD désiré(s) sur le(s) plateau(x).
2 Appuyez sur PROGRAM sur la télécommande pour
accéder au menu de programmation.
➜ PROG se met à clignoter et PROGRAM s’affiche.
➜ Le numéro de l'étape (STEP), le numéro de la piste et la
durée de lecture de la piste du CD présent dans
l'appareil sont affichés.
3 Si vous désirez sélectionner une piste du lecteur de CD :
Appuyez sur CD sur la télécommande et ensuite sur í ou
ë autant de fois que nécessaire pour passer à la piste désirée.
Si vous désirez sélectionner une piste de l'enregistreur
de CD:
Appuyez sur CDR sur la télécommande et ensuite sur í ou
ë autant de fois que nécessaire pour passer à la piste désirée.
Remarque : Si vous sélectionnez une piste qui a déjà été mise
en mémoire, P s'affiche.
4 Appuyez sur PROGRAM sur la télécommande pour mettre
votre sélection en mémoire.
➜ Le nombre total des pistes programmées (STEP), PRG et
la durée totale du programme s'affichent.
5 Répétez les étapes 3–4 pour sélectionner et mettre en
mémoire toutes les pistes désirées.
Remarque : Si vous tentez de mettre en mémoire plus de
99 pistes, PROGRAM FULL s'affichera.
6 Appuyez sur Ç pour finir la programmation.
Effacement du programme
1 Si nécessaire, appuyez sur Ç pour arrêter la lecture.
2 Maintenez Ç appuyé pour effacer le programme.
➜ PROG CLEARED s’affiche et PROG disparaît.
Fonctions de base
38
Français
Page 39

Informations de base
La platine enregistreur de CD vous offre 3 fonctions
principales :
– Enregistrement à partir du lecteur de CD interne ou
à partir d'une source externe de votre choix
– Finalisation de vos disques CDR(W) et
définalisation de vos disques CDRW
– Effacement d'un disque CDRW
Le procédé d'enregistrement est le même pour les disques
CDR et CDRW. Assurez-vous que le CDR(W) ne
présente absolument aucune rayure ni trace de
poussière.
Pour les enregistrements, la durée minimum d'une piste est
de 4 secondes.Vous pouvez enregistrer au maximum
99 pistes sur un disque. Si la durée d'enregistrement restante
sur le disque est moins de 7 secondes, DISC FULL s’affiche
et vous ne pouvez pas passer en mode d'enregistrement.
Protection des droits d'auteur
Le Serial Copy Management System (SCMS) empêche la
création d'une copie numérique à partir d'une copie
numérique. Ce système permet la réalisation d'un
enregistrement numérique à partir de l'original, cependant
dans certains pays, ceci peut nécessiter l'autorisation des
titulaires des droits d'auteur.
Lorsque vous essayez d'enregistrer à partir d'une source
externe de la musique protégée à la copie, COPY PROTECT
s’affichera. Il n’est alors pas possible d'effectuer un
enregistrement numérique.
Il n'est pas possible de copier un CD-MP3.
Enregistrement du texte de CD
Si le CD original présente du texte de CD, ce texte sera
enregistré automatiquement, dans la mesure où le texte du
CD n’est pas protégé à la copie. Si tel est le cas,
l'enregistrement du texte du CD ne sera pas possible et
TEXT PROTECT s’affichera.
Qu'est-ce que la finalisation?
La finalisation est un processus simple qui termine
l'enregistrement d'un CD(RW) nécessaire pour :
– lire un CDR enregistré sur un lecteur de CD classique,
– lire un CDRW enregistré sur un lecteur de CD et un
enregistreur de CD compatibles avec des CDRW,
– éviter les enregistrements involontaires sur un disque ou
– éviter d'effacer accidentellement des pistes sur un CDRW.
Les CDR sont « verrouillés » après finalisation.Aucun ajout
de pistes ou de texte du CD n'est alors possible.
Les CDRW sont également « verrouillés » après
finalisation, mais ils peuvent être définalisés pour permettre
des enregistrements supplémentaires ou l'effacement.
Direct Line Recording (DLR)
L'enregistreur de CD est équipé de la technique de haute
performance Direct Line Recording. Ceci assure un
enregistrement de la source parfait, c’est-à-dire un véritable
enregistrement « bit pour bit ». DLR n’est pas actif quand
vous réglez vous-même le niveau d'enregistrement.
Réglage du niveau d'enregistrement
Vous pouvez régler le niveau d'enregistrement de référence
pour les enregistrements à partir d'un appareil
supplémentaire. Cette fonction peut être utilisée pour des
fondus musicaux sur vos enregistrements.
1 Appuyez sur INPUT de façon répétée pour sélectionner
l'entrée de l'appareil supplémentaire :
➜
DIGITAL IN : l'entrée numérique coaxiale est sélectionnée.
➜
OPTICAL IN : l'entrée numérique optique est sélectionnée.
➜
ANALOG IN : l'entrée analogique est sélectionnée.
2 Maintenez appuyé ALBUM+ ou ALBUM- du côté de
l'enregistreur de CD pour régler le niveau d'enregistrement
désiré. Les sons les plus hauts de la source ne doivent pas
atteindre les niveaux rouges de la barre de niveau.
➜ Le niveau d'enregistrement réel (en dB) s’affichera.
Remarque : Le niveau d'enregistrement peut également être réglé
pendant un enregistrement fait à partir du lecteur de CD interne.
Maintenez appuyé ALBUM+ ou ALBUM- du côté de
l'enregistreur de CD pour régler le niveau d'enregistrement désiré.
A propos de l'enregistrement
39
Français
Page 40

Qu'est-ce que l'enregistrement
interne?
L'enregistrement à partir de la platine lecteur de CD de cet
appareil est appelé « enregistrement interne ».
Sélection de la vitesse
d'enregistrement
Il est possible de sélectionner la vitesse d'enregistrement
pour les enregistrements internes.
● Appuyez sur SPEED 1·2·4x de façon répétée pour
sélectionner au choix :
➜ REC SPEED 1X : pour enregistrer à la vitesse normale
➜ REC SPEED 2X : pour enregistrer à double vitesse avec
le son coupé
➜ REC SPEED 4X : pour enregistrer à une vitesse 4 fois
supérieure à la vitesse normale avec le son coupé
Remarques :
La sélection de la vitesse n'est pas possible pendant
l'enregistrement.
Sur certaines marques de disques audio vierges,
l'enregistrement à une vitesse supérieure n'est pas possible et
ne marche pas. Dans ce cas, choisissez une vitesse inférieure.
Copie d'un CD entier
C'est la manière la plus facile de faire une copie d'un CD entier,
prêt à la lecture sur d'autres lecteurs de CD. Cependant, aucun
ajout de pistes ou de texte du CD n'est possible.
1 Placez un CDR(W) totalement exempt de rayures et de
particules de poussière sur le plateau de l'enregistreur de CD.
2 Placez le disque que vous désirez copier sur le plateau du
lecteur de CD.
3 Appuyez sur COPY CD pour lancer la copie du CD entier.
➜ REC apparaît, la copie démarre et le compte à rebours
de la durée d'enregistrement réelle restante commence.
Remarque : Si un programme était déjà disponible avant d'appuyer sur
COPY CD, celui-ci sera ignoré.
PROG
disparaît et le disque présent
dans l'appareil sera copié.Après achèvement de l'enregistrement,
PROG
apparaît et le programme est de nouveau disponible.
Enregistrement de toutes les
pistes d'un CD
Vous pouvez copier toutes les pistes d'un CD et décider
ensuite de finaliser ou de ne pas finaliser.
1 Placez un CDR(W) totalement exempt de rayures ou de
particules de poussière sur le plateau de l'enregistreur de CD.
2 Placez le disque duquel vous souhaitez enregister copier
toutes les pistes sur le plateau du lecteur de CD.
3 Appuyez sur REC pour entrer dans le menu
d'enregistrement.
➜ RECORD CD?, suivi de PRESS REC s'affichent en
alternance.
4 Appuyez de nouveau sur REC pour commencer
l'enregistrement de toutes les pistes.
➜ REC apparaît, l'enregistrement démarre et le compte à
rebours de la durée d'enregistrement réelle restante
commence.
00
Quand vous appuyez sur / OPEN/CLOSE du côté de
l'enregistreur de CD,
➜ CD NOT FINAL et PRESS REC TO FINALIZE
s'affichent en alternance.
Vous devez décider alors, au choix,
de ne pas finaliser : le CDR n'est pas prêt pour la
lecture sur d'autres lecteurs de CD, cependant vous
pouvez encore ajouter des pistes ou du texte de CD.
Appuyez de nouveau sur / OPEN/CLOSE du côté de
l'enregistreur de CD ou patientez quelques secondes.
➜ Le tiroir s'ouvre. Le CDR(W) n'est pas finalisé.
ou
de finaliser : le CDR est prêt pour la lecture sur
d'autres lecteurs de CD, cependant vous ne pouvez
pas ajouter de pistes ou de texte du CD.
Appuyez sur REC pour lancer la finalisation.
➜ FINAL s’affiche et le compte à rebours de la durée
réelle restante de la finalisation commence.
Enregistrement interne
40
Français
Page 41

Enregistrement d'une seule piste
Vous pouvez copier diverses pistes de différents CD et
ensuite décider de finaliser ou de ne pas finaliser.
1 Placez un CDR(W) totalement exempt de rayures et de
particules de poussière sur le plateau de l'enregistreur de
CD.
2 Lancez la lecture de la piste désirée sur le lecteur de CD.
3 Appuyez sur REC pour entrer dans le menu d'enregistrement.
➜ REC TR avec le numéro de la piste et PRESS REC
s'affichent en alternance.
4 Appuyez de nouveau sur REC pour lancer l'enregistrement
de la piste.
➜ REC apparaît, l'enregistrement démarre à partir du début
de la piste sélectionnée et le compte à rebours de la
durée d'enregistrement réelle restante commence.
5 Pour enregistrer des pistes supplémentaires, répétez les
étapes 2–4.
00
Quand vous appuyez sur / OPEN/CLOSE du côté de
l'enregistreur de CD,
➜ CD NOT FINAL et PRESS REC TO FINALIZE
s'affichent en alternance.
Vous devez décider alors, au choix,
de ne pas finaliser : le CDR n'est pas prêt pour la
lecture sur d'autres lecteurs de CD, cependant vous
pouvez encore ajouter des pistes ou du texte de CD.
Appuyez de nouveau sur / OPEN/CLOSE du côté de
l'enregistreur de CD ou patientez quelques secondes.
➜ Le tiroir s'ouvre. Le CDR(W) n'est pas finalisé.
ou
de finaliser : le CDR est prêt pour la lecture sur
d'autres lecteurs de CD, cependant vous ne pouvez
pas ajouter de pistes ou de texte du CD.
Appuyez sur REC pour lancer la finalisation.
➜ FINAL s’affiche et le compte à rebours de la durée
réelle restante de la finalisation commence.
Création et enregistrement d'un
programme
Vous pouvez créér votre propre programme, l'enregistrer et
décider ensuite de finaliser ou de ne pas finaliser. Cependant, il
faut noter que vous ne pouvez pas enregistrer un programme
qui contient des pistes du lecteur de CD et de l'enregistreur
de CD. Dans ce cas, 2 DISC PROG et NOT POSSIBLE
s'affichent.
1 Placez un CDR(W) totalement exempt de rayures et de
particules de poussière sur le plateau de l'enregistreur de CD.
2 Placez le CD à partir duquel vous souhaitez enregistrer sur
le plateau du lecteur de CD.
3 Sélectionnez et mettez en mémoire toutes les pistes du CD
désirées (voir « Programmation des numéros de pistes »).
00
Si la durée totale du programme est plus longue que la
durée d'enregistrement restant sur le CDR(W) :
➜ DOES NOT FIT s'affiche brièvement.
➜ MISSING et la durée qui ne pourra pas être enregistrée
s'affichent.
Si malgré ceci vous lancez l'enregistrement, l'enregistrement
se fait jusqu'à ce que le CDR(W) soit plein.
4 Appuyez sur REC pour entrer dans le menu d'enregistrement.
➜ REC PROGRAM? et PRESS REC s'affichent en
alternance.
5 Appuyez de nouveau sur REC pour lancer l'enregistrement
du programme en cours.
➜ REC apparaît, l'enregistrement démarre et le compte à
rebours de la durée d'enregistrement réelle restante
commence.
00
Quand vous appuyez sur / OPEN/CLOSE du côté de
l'enregistreur de CD,
➜ CD NOT FINAL et PRESS REC TO FINALIZE
s'affichent en alternance.
Vous devez décider alors, au choix,
de ne pas finaliser : le CDR n'est pas prêt pour la
lecture sur d'autres lecteurs de CD, cependant vous
pouvez encore ajouter des pistes ou du texte de CD.
Appuyez de nouveau sur / OPEN/CLOSE du côté de
l'enregistreur de CD ou patientez quelques secondes.
➜ Le tiroir s'ouvre. Le CDR(W) n'est pas finalisé.
ou
de finaliser : le CDR est prêt pour la lecture sur
d'autres lecteurs de CD, cependant vous ne pouvez
pas ajouter de pistes ou de texte du CD.
Appuyez sur REC pour lancer la finalisation.
➜ FINAL s'affiche et le compte à rebours de la durée
réelle restante de la finalisation commence.
Enregistrement interne
41
Français
Page 42

Qu'est-ce que l'enregistrement
externe?
L'enregistrement à partir d'un appareil supplémentaire est
appelé « enregistrement externe ».
Enregistrement analogique ou
numérique?
Quand vous enregistrez à partir d'une source externe, nous
vous recommandons de ne faire un enregistrement analogique
que si un enregistrement numérique n’est pas possible. La
qualité du son est meilleure avec un enregistrement numérique.
Incrément automatique d'une piste
Quand vous utilisez l'entrée numérique pour enregistrer à
partir d'une source numérique (p. ex. un lecteur de CD), les
pistes sont automatiquement incrémentées de telle sorte que les
numéros des pistes sont positionnés au même endroit que sur
l'original. Quand vous utilisez l'entrée analogique pour
enregistrer à partir d'une source numérique ou analogique,
les pistes ne sont pas automatiquement incrémentées à moins
qu’un des réglages suivants n’ait été sélectionné. Il est possible
que les incréments de pistes ne soient pas toujours positionnés
correctement, selon la qualité de la source.
● Appuyez sur TR. INCR. autant de fois que nécessaire sur la
télécommande pendant l’arrêt pour passer à l'une des
fonctions suivantes d'incrément automatique de piste :
➜ TURNTABLE : pour un enregistrement optimal à partir
de sources sonores bruyantes comme un tourne-disque
(Il n’est pas possible de raccorder un tourne-disque
directement à AUX/CDR IN L/R – voir
« Raccordements analogiques ».)
➜ TAPE/TUNER : pour un enregistrement optimal à partir
d'une cassette
➜ CD/DVD : pour un enregistrement optimal à partir de
sources de haute qualité telles que DAT, DCC ou DVD
➜ MANUAL : pour désactiver la fonction d'incrément
automatique de pistes
Remarques :
Les numéros de pistes peuvent être incrémentés manuellement
en appuyant sur TR. INCR. sur la télécommande pendant
l'enregistrement. La durée minimum d'une piste est de 4 secondes.
Les numéros de pistes ne peuvent plus être changés après
enregistrement.
Enregistrement avec démarrage
automatique
Vous pouvez enregistrer rapidement et facilement un CD entier
ou une piste. Dès que la lecture a commencé sur l'appareil
supplémentaire, l'enregistrement commence automatiquement.
1 Placez un CDR(W) totalement exempt de rayures et de
particules de poussière sur le plateau de l'enregistreur de CD.
2 Appuyez sur INPUT de façon répétée sur le lecteur/
enregistreur de CD pour sélectionner l'entrée de l'appareil
supplémentaire à partir duquel vous voulez enregistrer.
➜ DIGITAL IN : l'entrée numérique est sélectionnée.
➜ ANALOG IN : l'entrée analogique est sélectionnée.
➜ OPTICAL IN : l'entrée optique est sélectionnée.
3 Assurez-vous que la piste désirée est bien sélectionnée sur
l'appareil supplémentaire.
4 Assurez-vous que l'appareil supplémentaire est en mode
pause ou arrêt.
5 Appuyez sur REC sur le lecteur/enregistreur de CD pour
entrer dans le menu d'enregistrement.
➜ PREPARING s’affiche.
➜ RECORD EXT? et START EXTERN SOURCE!
s'affichent en alternance.
6 Lancez la lecture sur l'appareil supplémentaire dans les
5 secondes qui suivent.
➜
L'enregistrement commence simultanément et
REC
apparaît.
La durée d'enregistrement restante sur le CDR(W) s'affiche.
Remarque : L'enregistrement peut aussi être lancé manuellement
en appuyant sur REC sur le lecteur/enregistreur de CD.
00
Pour arrêter manuellement l'enregistrement, appuyez sur
Ç du côté de l'enregistreur de CD.
00
Quand vous appuyez sur / OPEN/CLOSE du côté de
l'enregistreur de CD,
➜ CD NOT FINAL et PRESS REC TO FINALIZE
s'affichent en alternance.
Vous devez décider alors, au choix,
de ne pas finaliser : le CDR n'est pas prêt pour la
lecture sur d'autres lecteurs de CD, cependant vous
pouvez encore ajouter des pistes ou du texte de CD.
Appuyez de nouveau sur / OPEN/CLOSE du côté de
l'enregistreur de CD ou patientez quelques secondes.
➜ Le tiroir s'ouvre. Le CDR(W) n'est pas finalisé.
ou
de finaliser : le CDR est prêt pour la lecture sur
d'autres lecteurs de CD, cependant vous ne pouvez
pas ajouter de pistes ou de texte du CD.
Appuyez sur REC sur le lecteur/enregistreur de CD pour
lancer la finalisation.
➜ FINAL s’affiche et le compte à rebours de la durée
réelle restante de la finalisation commence.
Enregistrement externe
42
Français
Page 43

Enregistrement manuel
Vous pouvez lancer et arrêter manuellement un
enregistrement à partir d'un appareil supplémentaire.Vous
pouvez utiliser l'enregistrement manuel pour enregistrer de la
musique en direct, ou pour de la musique particulière comme
la musique classique qui ne peut pas être enregistrée par
démarrage automatique.
1 Placez un CDR(W) totalement exempt de rayures et de
particules de poussière sur le plateau de l'enregistreur de CD.
2 Appuyez sur INPUT de façon répétée sur le lecteur/
enregistreur de CD pour sélectionner l'entrée de l’appareil
supplémentaire à partir duquel vous voulez enregistrer.
➜ DIGITAL IN : l'entrée numérique est sélectionnée.
➜ ANALOG IN : l'entrée analogique est sélectionnée.
➜ OPTICAL IN : l'entrée optique est sélectionnée.
3 Lancez la lecture sur l’appareil supplémentaire.
➜ PREPARING s’affiche.
➜ RECORD EXT? et PRESS REC s'affichent en alternance.
4 Appuyez sur REC sur le lecteur/enregistreur de CD pour
lancer l'enregistrement.
➜ L'enregistrement démarre et REC apparaît. La durée
d'enregistrement restant sur le CDR(W) s'affiche.
5 Appuyez sur Ç du côté de l'enregistreur de CD pour
arrêter l'enregistrement.
00
Quand vous appuyez sur / OPEN/CLOSE du côté de
l'enregistreur de CD,
➜ CD NOT FINAL et PRESS REC TO FINALIZE
s'affichent en alternance.
Vous devez décider alors, au choix,
de ne pas finaliser : le CDR n'est pas prêt pour la
lecture sur d'autres lecteurs de CD, cependant vous
pouvez encore ajouter des pistes ou du texte de CD.
Appuyez de nouveau sur / OPEN/CLOSE du côté de
l'enregistreur de CD ou patientez quelques secondes.
➜ Le tiroir s'ouvre. Le CDR(W) n'est pas finalisé.
ou
de finaliser : le CDR est prêt pour la lecture sur
d'autres lecteurs de CD, cependant vous ne pouvez
pas ajouter de pistes ou de texte du CD.
Appuyez sur REC sur l’appareil pour lancer la finalisation.
➜ FINAL s’affiche et le compte à rebours de la durée
réelle restante pour la finalisation commence.
Enregistrement avec minuterie
Cette fonction vous permet de lancer un enregistrement
limité dans le temps par l'entrée analogique (p. ex. pour des
enregistrements à partir d'un tuner).Vous pouvez choisir un
enregistrement de 15, 30, 45 ou 60 minutes ou jusqu'à la
fin du CDR(W).
1 Placez un CDR(W) totalement exempt de rayures et de
particules de poussière sur le plateau de l'enregistreur de CD.
2 Assurez-vous que l'appareil supplémentaire à partir duquel
vous voulez enregistrer est raccordé correctement.
3 Appuyez sur TIMER REC sur la télécommande pour lancer
l'enregistrement.
➜ 15 MIN, suivi de PREPARING, s'affiche.
➜ L'enregistrement commence et REC apparaît. La durée
réelle restante de l'enregistrement s'affiche.
00
Pour sélectionner une autre durée d'enregistrement,
appuyez sur TIMER REC de façon répétée sur la
télécommande jusqu'à ce que la durée désirée s'affiche :
➜ 30 MIN, 45 MIN, 60 MIN, MAXIMUM s’affiche.
4 Après écoulement de la durée choisie, l'enregistrement
s'arrête automatiquement et l'appareil passe en mode veille.
00
Pour arrêter l'enregistrement manuellement, appuyez sur
Ç du côté de l'enregistreur de CD.
Enregistrement externe
43
Français
Page 44

Effacement sur un disque CDRW
Il est possible d'effacer une ou plusieurs pistes (en
commençant par la fin de la dernière piste) ou le CDRW
entier. Il n'est pas possible d'effacer sur un CDR.
Effacement d'une ou plusieurs pistes
1 Placez le CDRW duquel vous souhaitez effacer des pistes
sur le plateau de l'enregistreur de CD.
2 Appuyez brièvement sur ERASE CD pour entrer dans le
menu d'effacement.
Si vous avez placé un CDRW non finalisé :
➜ ERASE LAST TRACK? et PRESS ERASE s'affichent
en alternance.
Si vous avez placé un CDRW finalisé :
➜ FINALIZED CD s'affiche brièvement.
➜ ERASE LAST TRACK?, suivi de PRESS ERASE
s'affichent en alternance.
00
Pour choisir une piste particulière que vous souhaitez
effacer, appuyez autant de fois que nécessaire sur ¢ ou
4 du côté de l'enregistreur de CD pour sélectionner
le(s) numéro(s) de la/des piste(s) désirée(s).
➜ ERASE TR et le numéro de la piste (p. ex 10+) s'affichent.
Pour sélectionner d'autres pistes à effacer, répétez cette étape.
Remarque : Quand vous effacez plusieurs pistes, les pistes à
effacer doivent être sélectionnées dans l'ordre, en commençant
par la piste enregistrée la plus récemment. Exemple : Le CDRW
comporte 5 pistes enregistrées. Vous pouvez maintenant effacer
les pistes 5 et 4.Vous pouvez aussi effacer les pistes 5, 4 et 3,
mais vous ne pouvez pas effacer les pistes 5 et 3!
3
Appuyez de nouveau sur ERASE CD pour lancer l'effacement.
Si vous avez placé un CDRW non finalisé :
➜ ERASE s’affiche, le compte à rebours de la durée restante
de l'opération commence et l'effacement commence.
Si vous avez placé un CDRW finalisé :
➜
UNFINAL s’affiche, le compte à rebours de la durée restante
de l'opération commence et la définalisation commence.
➜
Ensuite ERASE s’affiche, le compte à rebours de la durée
restante de l'opération commence et l'effacement commence.
Effacement d'un CDRW entier
1 Placez le CDRW que vous souhaitez effacer sur le plateau
de l'enregistreur de CD.
2 Maintenez ERASE CD appuyé pendant plus de 1 seconde
pour entrer dans le menu d'effacement.
Si vous avez placé un CDRW non finalisé :
➜
ERASE DISC? et PRESS ERASE s'affichent en alternance.
Si vous avez placé un CDRW finalisé :
➜ FINALIZED CD s'affiche brièvement.
➜
ERASE DISC? et PRESS ERASE s'affichent en alternance.
3
Appuyez de nouveau sur ERASE CD pour effacer le CDRW entier.
Si vous avez placé un CDRW non finalisé :
➜ ERASE s'affiche, le compte à rebours de la durée restante
de l'opération commence et l'effacement du CDRW
entier commence.
Si vous avez placé un CDRW finalisé :
➜ UNFINAL s’affiche, le compte à rebours de la durée restante
de l'opération commence et la définalisation commence.
➜ ERASE s’affiche, le compte à rebours de la durée restante
de l'opération commence et l'effacement du CDRW
entier commence.
Effacement
44
Français
Page 45

Edition du texte du CD (sur l'enregistreur de CD uniquement)
45
Français
Edition du texte du CD
Après avoir enregistré votre CDR(W), vous pouvez entrer
du texte, p. ex. le titre d'un album ou le titre d'une piste. Ce
texte sera affiché pendant la lecture sur cet appareil, mais
aussi sur d'autres appareils équipés de la fonction texte du
CD. Utilisez uniquement un CDR ou CDRW non finalisé
(un CDRW finalisé doit tout d'abord être définalisé).
1 Si nécessaire, appuyez sur Ç pour arrêter la lecture.
2 Appuyez sur CDR sur la télécommande pour sélectionner
l'enregistreur de CD.
3 Appuyez sur CD TEXT/edit de façon répétée sur la
télécommande pour sélectionner au choix :
➜ ALBUM TITLE : pour éditer le titre du CD
➜ ALBUM ARTIST : pour éditer le nom de l'artiste du CD
➜ ARTIST TR 1 (ou 2, 3,…) : pour éditer le nom de
l'artiste de la piste 1 (ou 2, 3,…)
➜ TITLE TR 1 (ou 2, 3,…) : pour éditer le titre de la
piste 1 (ou 2, 3,…)
4 Dès que le curseur se met à clignoter, utilisez les touches
alphanumériques sur la télécommande pour sélectionner
un caractère.
➜ Après avoir sélectionné un caractère, le curseur se
positionne automatiquement sur l'emplacement du
caractère suivant.
5 Appuyez sur CD TEXT/edit sur la télécommande pour
enregister le texte créé et pour retourner au menu
d'édition de texte.
6 Pour sortir du menu d'édition de texte, appuyez sur Ç.
Effacement et remplacement d'un caractère
1 Appuyez sur à ou á sur la télécommande pour vous
déplacer jusqu’au caractère à effacer ou à remplacer.
➜ Le caractère se met à clignoter.
2 Si vous voulez effacer le caractère :
Appuyez sur DELETE sur la télécommande.
➜ Le caractère est effacé et le texte se déplace d'un cran
vers la gauche.
Si vous voulez remplacer un caractère :
Utilisez les touches alphanumériques sur la télécommande
pour sélectionner un nouveau caractère.
00
Pour changer un autre caractère, appuyez sur à ou á sur
la télécommande.
Copie automatique de texte
Lorsque le nom d'un artiste a été mis en mémoire pour
une piste, il sera automatiquement copié sur la piste
suivante.
Page 46

Guide de dépannage
46
Français
AVERTISSEMENT
Vous ne devez en aucune circonstance essayer de réparer l'appareil
vous-même car cela annulerait la garantie. N‘ouvrez pas l‘équipement
au risque de chocs électriques.
Si un défaut survient, commencez d'abord par vérifier les points de la
liste suivante avant de porter votre appareil à réparer. Si vous n’êtes pas
en mesure de résoudre le problème en suivant ces indications, adressezvous à votre revendeur ou à votre centre de réparation.
Sécurité laser
Cet appareil fonctionne avec un laser.En raison des risques de lésions
oculaires, seule une personne qualifiée doit en ôter le boîtier ou tenter
de le réparer.
Problème Solution
Pas de courant – Assurez-vous que le cordon d'alimentation est correctement branché.
– Appuyez sur 2 STANDBY·ON sur l'appareil pour le mettre en marche.
Pas de son – Vérifiez que les raccordements audio ont été faits correctement.
– Assurez-vous que les pistes MP3 ont été enregistrées sous le bon format.
Pas de réaction quand on appuie – Débranchez le cordon d'alimentation de l'appareil, rebranchez-le après
sur les touches quelques secondes.
Démarrage automatique de l'affichage – Appuyez sur Ç sur l'appareil pendant au moins 5 secondes pour annuler le
des fonctions permanent (mode Démo) mode de démonstration.
La télécommande ne fonctionne – Enlevez les piles et insérez-les correctement ou insérez des piles neuves.
pas correctement – Réduisez la distance entre la télécommande et l'appareil.
Indication WRONG DISC, USE AUDIO CD –
Assurez-vous que le disque n'est pas rayé ou sale. Remplacez ou nettoyez le disque.
et INSERT DISC – Assurez-vous qu'un disque est inséré, étiquette vers le haut.
– Assurez-vous qu'un DVD n'est pas inséré.
– Attendez que l’évaporation sur la lentille laser ait disparu.
Indication WRONG DISC, USE CDR<W> WITH
– Un CDR(W) informatique a été inséré. Assurez-vous qu'un disque audio
`DIGITAL AUDIO´ LOGO et INSERT DISC
numérique est inséré, portant la marque « Digital Audio » et le logo spécial.
Indication NO SIGNAL ou – Vérifiez si le câble de raccordement est correctement branché.
indication CHECK INPUT – Sélectionnez l’entrée appropriée.
– Assurez-vous que l'appareil externe est en marche.
Indication OVERHEATING – Ne placez pas l'appareil au-dessus d'autres appareils qui peuvent le faire
chauffer (p. ex. un récepteur).
Pas d'enregistrement – Assurez-vous que le CDR(W) est totalement exempt de rayures et de
particules de poussière.
– Vérifiez qu'un CDR(W) audio numérique a bien été inséré et assurez-vous
qu’il n’est pas finalisé.
Arrêt pendant l'enregistrement – Utilisez des CDR(W) audio Philips.
– Si le processus d'enregistrement est interrompu (coupure de courant, choc
mécanique), recommencez l'enregistrement avec un nouveau disque.
Le disque enregistré n’est pas lu par – Assurez-vous que le CDR(W) est bien finalisé.
un autre lecteur de CD classique – Insérez le CDRW dans un lecteur de CD compatible CDRW.
Répertoires manquants sur un CD-MP3 – Seuls les albums avec des pistes exécutables apparaissent.
La durée de lecture écoulée d'une piste
– Ce comportement est normal car cette piste MP3 présente un débit de
MP3 défile très vite ou de façon irrégulière
données variable.
Les pistes enregistrées ont été fusionnées – Utilisez un autre mode d'incrément de pistes.
entre elles ou les pistes ne commencent – Effectuez les incréments de pistes manuellement avec la télécommande.
pas/ne s’arrêtent pas au bon moment
Page 47

SYSTÈME SONORE
Main d’œuvre gratuite pendant un an
Pièces garanties pendant un an
Il faut porter ce produit à un centre de service pour réparations.
GARANTIE LIMITÉE
QUI EST COUVERT ?
Il faudra présenter une preuve d’achat pour pouvoir bénéficier des
services de la garantie. Le reçu,la facture ou un autre document portant la date d’achat et qui prouve que vous avez bien acheté le produit est considéré comme preuve d’achat.
QU’EST-CE QUI EST COUVERT?
La couverture de la garantie entre en vigueur le jour où vous achetez
le produit. Pendant un an à compter de cette date, toute pièce sera
réparée ou remplacée gratuitement et la main d’œuvre sera sans
frais.Après cette période d’un an, les frais de remplacement ou de
réparation des pièces, ainsi que la main d’œuvre, seront facturés au
consommateur.
Toute pièce, y compris une pièce réparée ou remplacée, est couverte
seulement pendant la période de garantie d’origine. Lorsque la
garantie du produit arrive à terme fin, la garantie de toute pièce remplacée ou réparée est terminée aussi.
QU’EST-CE QUI EST EXCLU DE LA GARANTIE ?
La garantie ne couvre pas:
• les frais de main d’œuvre pour installer ou préparer, pour régler
les commandes et pour installer ou réparer les systèmes d’antenne à l’extérieur du produit.
• la réparation du produit et/ou d’une pièce pour cause du mauvais
emploi, d’accident, de réparations non-agréées ou d’une autre raison qui ne peut pas être contrôlée par Philips Consumer Electronics Company.
• des problèmes de réception dûs à des conditions de signal, au
câble ou aux systèmes d’antenne à l’extérieur de l’unité.
• un produit qui nécessite des modifications ou adaptations pour lui
permettre de fonctionner dans un pays autre que le pays pour
lequel il a été conçu, fabriqué, agréé et/ou autorisé, ou la réparation de produits endommagés par de telles modifications.
• des dommages indirects ou conséquents qui résultent du produit.
(Certains états ou provinces ne permettent pas l’exclusion de
dommages indirects ou conséquents. Il est donc possible que l’exclusion ci-dessus ne s’applique pas au cas présent. Cela comprend,
mais de façon non-limitative, enregistrements, qu’ils soient protégés ou non par les lois sur les droits d’auteur).
• un appareil acheté, utilisé ou réparé en dehors des États-Unis, de
Porto Rico, des Îles Vierges ou du Canada ou utilisé à des fins
commerciales ou institutionnelles (y compris mais non limités aux
appareils utilisés pour la location).
OÙ LE SERVICE EST-IL PROPOSÉ ?
Le service de garantie est disponible dans tout pays où le produit est
distribué officiellement par Philips Consumer Electronics Company.
Dans des pays où Philips Consumer Electronics Company ne distribue pas le produit, l’organisme local de service Philips tentera de
fournir le service (mais il pourra y avoir des retards si la bonne pièce
ou les manuels techniques ne sont pas facilement disponibles).
NE PAS OUBLIER DE GARDER…
Veuillez garder le reçu, la facture ou tout autre document qui prouve
l’achat. L’attacher à ce manuel d’emploi et les garder tous les deux à
portée de main. Garder aussi le carton et l’emballage d’origine pour
le cas où il faudra renvoyer le produit.
AVANT DE FAIRE APPEL AU TECHNICIEN…
Veuillez consulter le manuel d’instructions avant de faire appel à un
technicien. Un petit réglage d’une des commandes expliqué dans le
manuel d’instructions pourrait éviter de faire appel à un technicien.
POUR BÉNÉFICIER DU SERVICE DE
GARANTIE AUX É.-U.,AU PUERTO RICO OU
DANS LES ÎLES VIERGES AMÉRICAINES…
Porter le produit à un centre de service Philips (voir liste ci-jointe) ou bien
à un centre de service agréé pour les réparations. Lorsque le produit aura
été réparé, il faudra aller le chercher au centre. Les centres ont le droit de
garder les pièces défectueuses.
(Aux É.-U., au Puerto Rico et aux Îles Vierges, toute garantie implicite, y
compris des garanties de vendabilité et d’aptitude à un but spécifique, est
limitée à la durée de cette garantie explicite. Mais, étant donné que certains
états et provinces ne permettent pas de limité la durée d’une garantie
implicite, cette limitation pourrait ne pas s’appliquer au cas présent.)
POUR BÉNÉFICIER DU SERVICE DE
GARANTIE AU CANADA…
Veuillez contacter Philips á :
1-800-661-6162 (Francophone)
1-800-363-7278 (Anglophone)
(Au Canada, cette garantie est consentie à la place de toute autre
garantie.Aucune autre garantie, qu’elle soit explicite ou implicite,
n’est donnée, y compris la garantie implicite de vendabilité ou d’aptitude à un but spécifique. Philips n’est en aucun cas responsable des
dommages, qu’ils soit directs ou indirects, spéciaux, secondaires ou
conséquents, quelles que soient leurs origines, même en présence
d’une mise en garde contre de tels dommages.)
RAPPEL IMPORTANT...
Veuillez inscrire ci-dessous les numéros de modèle et de série qui se
trouvent sur le produit même. De plus, veuillez remplir et renvoyer
sans délai la carte d’enregistrement de garantie. Il nous sera ainsi plus
facile de vous contacter en cas de besoin.
Nº DE MODÈLE __________________________________
Nº DE SÉRIE __________________________________
EL4965F005 / MAC 4110 / 1-97
Cette garantie vous donne des droits légaux spécifiques et vous pourriez avoir d’autres droits qui varient d’état en état et de province en province.
Philips Service Solutions Group, P.O. Box 2976, Longview,Texas 75606 É.-U., (903) 242-4800
Page 48

Conozca estos
simbolos de
sseegguurriiddaadd
t
El símbolo del «rayo» indica que
algún material no aislado dentro de
su unidad podría resultar en una
sacudida eléctrica. Para la seguridad de todos,
favor de no remover la cubierta del producto.
s
El «signo de exclamación» le llama la
atención a características sobre las
que Ud. debe leer la información
adjunta detenidamente para evitar problemas
de funcionamiento y mantenimiento.
ADVERTENCIA: PARA EVITAR EL
RIESGO DE SACUDIDA ELECTRICA O
INCENDIO, NO EXPONGA ESTE EQUIPO A
LLUVIA NI A HUMEDAD.
PRECAUCION: Para evitar sacudida
eléctrica, introduzca la patilla ancha del enchufe
al fondo de la ranura ancha.
Para uso del cliente:
Escriba abajo el número de serie que se
encuentra en el panel posterior. Guarde esta
información para el futuro.
No. de modelo ________________________
No. de serie __________________________
PRECAUCION
RIESGO DE SACUDIDA ELECTRICA
NO ABRIR
PRECAUCION: PARA REDUCIR EL RIESGO DE SACUDIDA ELECTRICA,NO RETIRE
LA CUBIERTA (NI EL PANEL POSTERIOR). ESTE APARATONO CONTIENE NINGUNA
PARTE QUE PUEDA SER REPARADA POREL USARIO. DE SER NECESARIO ALGUN
SERVICIO O REPARACIONDEL APARATO, LLEVELO UN TECNICO CALIFICADO.
• Una vez que se registre la compra de su aparato Philips, Ud.
tiene derecho a todas las ventajas correspondientes al dueño
de un producto Philips.
• Sírvase llenar y devolver en seguida la Tarjeta de
Registro de la Garantía empacada con su aparato y
saque provecho de estas ventajas importantes.
Envie hoy su Tarjeta de Registro de la Garantía
para recibir todas las ventajas correspondientes.
Verificación
de la garantía
Registre su producto dentro de
10 días para confirmar su derecho a
máxima protección bajo los términos
y condiciones de la garantía de Philips.
Confirmación
del dueño
Su Tarjeta de Registro de la Garantía
comprueba que Ud. es el dueño del
aparato en caso de robo o pérdida
del producto.
Registro
del modelo
La devolución inmediata de su Tarjeta
de Registro de la Garantía le
garantiza que recibirá toda la
información y todas las promociones
especiales que le corresponden por
ser el dueño de su modelo.
¡Felicidades por su compra y
bienvenido a la «familia»!
Estimado dueño del producto Philips:
Gracias por su confianza en Philips. Ud. ha elegido uno de los mejores
productos disponibles hoy en cuanto a fabricación y respaldo después de la
venta. Haremos todo lo posible para que Ud. quede satisfecho con su producto
por muchos años.
Como miembro de la «familia» Philips, Ud. está protegido por una de las
garantías más completas y una de las redes de servicio más sobresalientes de
la industria.
Y además, gracias a su compra, Ud. recibirá toda la información y todas las
promociones especiales que le corresponden, y también tendrá acceso fácil a
los accesorios a través de nuestra conveniente red de compras a domicilio.
Y lo más importante es que Ud. puede contar con nuestro compromiso
incondicional de lograr su satisfacción total.
Todo esto es nuestra manera de darle la bienvenida y las gracias por invertir en
un producto Philips:
Atentamente,
Lawrence J. Blanford
Presidente y Director General
P.D. Recuerde que para sacar máximo provecho de su producto
Philips, Ud. debe devolver su Tarjeta de Registro de la Garantía
dentro de 10 días. ¡Sírvase enviárnosla ahora mismo!
MAC5097
Visite nuestro sitio del World Wide Web en http://www.philips.com
O
R
T
S
I
G
E
R
S
A
I
D
Apurese!
0
1
E
D
R
E
Q
U
E
R
I
D
O
D
E
N
T
R
O
Page 49

INSTRUCCIONES IMPORTANTES DE SEGURIDAD
49
Clavija
polarizada de CA
1. Lea estas instrucciones.
2. Conserve estas instrucciones.
3. Lea todos los avisos.
4. Siga todas las instrucciones.
5. No utilice este aparato cerca del agua.
6. Para limpiar el aparato utilice sólo un trapo seco.
7. No tape las aperturas de ventilación. Proceda a su
instalación de acuerdo con las instrucciones del
fabricante.
8. No instale el equipo cerca de fuentes de calor –
Como radiadores, calentadores, estufas o cualquier otro
aparato (incluyendo los amplificadores) generador de calor.
9. No anule la seguridad de la
clavija de corriente (ya sea de
tipo polarizado o con toma de
tierra). Las clavijas polarizadas tienen
dos patillas, una más ancha que la otra. Las que disponen de
toma de tierra tienen dos patillas y una tercera que es la de
conexión a tierra.Tanto la patilla más ancha como la toma
de tierra han sido incorporadas a la clavija para su
seguridad personal. Si la clavija suministrada con el equipo
no es compatible con su toma de corriente, consulte a un
electricista para sustituir la toma de corriente obsoleta.
10.
Proteja debidamente el cable impidiendo que pueda
pisarse o incluso perforarse, especialmente en la parte más
próxima a la clavija y en el punto de salida del equipo.
11. Utilice exclusivamente aquellos dispositivos/
accesorios recomendados por el fabricante.
12. Coloque el equipo exclusivamente sobre
aquellos carros, bases, trípodes, soportes o mesas
especificados por el comerciante o vendidos con
el equipo. Cuando utilice un carro, tenga cuidado
al desplazar el conjunto carro/equipo para evitar
posibles daños por vuelco.
13. Desenchufe el aparato durante tormentas eléctricas o
cuando no vaya a ser utilizado durante largo tiempo.
14. Confíe el mantenimiento y las reparaciones a
personal técnico especializado. El equipo deberá repararse
siempre que haya resultado dañado de alguna manera,
como por ejemplo por daños en el cable o en la clavija, por
derrame de líquido sobre el equipo, por objetos que
hubieran podido introducirse en su interior, por exposición
del equipo a la lluvia o a ambientes húmedos, cuando el
equipo no funcione con normalidad o cuando hubiera
sufrido algún tipo de caída.
15.
Uso de las pilas – PRECAUCIÓN:
Para prevenir
escapes en las pilas, que pueden ocasionar lesiones físicas o
daños en la unidad:
● Instale todas las pilas correctamente, + y - como está
marcado en la unidad.
● No mezcle las pilas (viejas con nuevas o de carbono y
alcalinas, etc.).
● Extraiga las pilas cuando no vaya a usar la unidad durante
largo tiempo.
EL 6475-S002: 01/6
Símbolo del equipo Clase II
Este símbolo indica que la unidad tiene un sistema
doble de aislamiento.
Page 50

Información general
Datos técnicos
_____________________________
51
Información medioambiental
__________________
51
Accesorios incluidos
_________________________
51
Mantenimiento
_____________________________
51
Manejo de disco
____________________________
51
Discos para grabar
__________________________
52
Discos para reproducir
_______________________
52
Unas palabras sobre MP3
_____________________
52
Conexiones
Conexiones
_______________________________
53
Información sobre la instalación
________________
53
Conexiones en general
______________________
53
Instalaciones
Conexiones analógicas
_______________________
54
Conexiones digitales
_____________________
54–55
Red eléctrica
______________________________
55
Controles
__________________________________
56
Mando a distancia
Uso del mando a distancia
____________________
57
Teclas del mando a distancia
__________________
57
Funciones básicas
Encendido, encendido modo de espera
__________
58
Modo demostración
_________________________
58
Carga de discos
____________________________
58
Reproducción
______________________________
58
Selección y búsqueda (en todos los discos
excepto CDs MP3)
_________________________
59
Selección y búsqueda (sólo en CDs MP3)
________
59
SHUFFLE y REPEAT
_________________________
60
Mostrar texto de CD
________________________
60
ID3-tag
___________________________________
60
Programación de números de pistas
____________
60
Borrado del programa
_______________________
60
Sobre la grabación
Información básica
__________________________
61
¿Qué es finalizar?
___________________________
61
Direct Line Recording (DLR)
__________________
61
Ajuste del nivel de grabación
__________________
61
Grabación interna
¿Qué es la grabación interna?
__________________
62
Selección de velocidad de grabación
____________
62
Copia de un CD completo
___________________
62
Grabación de todas las pistas de un CD
_________
62
Grabación de una sola pista
___________________
63
Creación y grabación de un programa
___________
63
Grabación externa
¿Qué es la grabación externa?
_________________
64
¿Grabación digital o analógica?
_________________
64
Incremento automático de pista
________________
64
Grabación con inicio automático
_______________
64
Grabación manual
__________________________
65
Grabación con temporizador
__________________
65
Borrado
Borrado de un disco CDRW
__________________
66
Edición de texto de CD (sólo en grabadora de CD)
Edición de texto de CD
______________________
67
Localización y solución de averías
____________
68
Garantía limitada
___________________________
69
Contenidos
50
Español
Page 51

Datos técnicos
Sujetos a modificación sin previo aviso.
General
Consumo eléctrico
Activo
_______________________________
< 20 W
En espera
____________________________
< 0,6 W
Dimensiones, A × a × l
____________
435 × 88 × 310 mm
17,1 × 3,5 × 12,2 pulgadas
Peso
_________________________________
5 kg, 8,8 lb
Audio
Respuesta de frecuencia
________________
2–20.000 Hz
Reproducción
S/N (A-weighted)
_______________________
120 dB
S/N
__________________________________
110 dB
Rango dinámico
_________________________
98 dB
Distorsión armónica total
_________________
-95 dB
Separación de canales
____________________
105 dB
Grabación
S/N (A-weighted)
________________________
93 dB
S/N digital sin SRC
________________
igual a la fuente
Rango dinámico
_________________________
90 dB
Distorsión armónica total + ruido
___________
-86 dB
Entrada digital/óptica
__________________
12–96 kHz
Láser (grabadora de CD)
Tipo
___________________
Semiconductor láser GaAIAs
Longitud de onda
_______________
775–795 nm (a 25°)
Potencia de salida __2,5 mW (lectura), 35 mW (escritura)
Divergencia de haz
_______________________
60 grados
Como socio de ENERGY STAR®,
Philips ha establecido que este
producto cumple las directrices de
ENERGY STAR®sobre rendimiento
energético.
El aparato cumple las normas FCC, Parte 15 y
21 CFR 1040.10. Funcionamiento dependiente de dos
condiciones siguientes:
1. Este aparato no puede provocar interferencia
dañina, y
2. Este aparato debe aceptar cualquier
interferencia recibida, incluyendo las interferencias
que pueden provocar un funcionamiento insuficiente.
PRECAUCIÓN
El uso de los controles o ajustes o la ejecución de
procedimientos distintos a los aquí expuestos puede
provocar la exposición a radiaciones peligrosas u
otras operaciones arriesgadas.
Información medioambiental
Se han eliminado todos los materiales de embalaje superfluos.
Hemos procurado hacer el embalaje fácilmente separable en
tres monomateriales: cartón (caja), espuma de poliestireno
(amortiguadores) y polietileno (bolsas, lámina protectora de la
espuma).
Su equipo está compuesto de materiales que pueden ser
reciclados si se desmontan por una empresa especializada. Por
favor, cumpla la normativa local en relación con la eliminación
de materiales de embalaje, pilas gastadas y equipos viejos.
Accesorios incluidos
– 2 cables analógicos de audio (con enchufes blanco y rojo)
– Mando a distancia
– 2 pilas para el mando a distancia, tamaño AA
– Cable de alimentación eléctrica
Mantenimiento
Limpie el equipo con un paño
ligeramente húmedo y sin hilos. No
utilice ningún producto de limpieza,
podría tener un efecto corrosivo.
No exponga el equipo, las pilas o los
discos a la humedad, lluvia, arena o
calor excesivo (provocado por una
calefacción o por su exposición
directa al sol).
Manejo de disco
Si el reproductor/grabadora de CD falla al leer correctamente
los discos, utilice un CD de limpieza normal para limpiar las
lentes antes de llevar el equipo a reparar. Otros métodos de
limpieza podrían dañar las lentes. Mantenga siempre las bandejas
cerradas para evitar la acumulación de polvo en las lentes.
Las lentes pueden empañarse si se traslada el equipo
repentinamente de un ambiente frío a otro cálido. Si esto
ocurre, no es posible la reproducción de un disco. Deje el
equipo en un entorno cálido hasta que se evapore la humedad.
La forma más fácil de sacar un disco
de su caja es presionar ligeramente
sobre el eje central mientras levanta el
CD(RW). Sujete siempre el CD(RW)
por los bordes y vuelva a colocarlo en
su caja después de utilizarlo.
No escriba nunca sobre un CD ni le pegue una pegatina.
Escriba sólo sobre la cara impresa de un CDR o CDRW y
sólo con un medio de escritura de punta suave.
Para limpiar un disco, frótelo
suavemente en línea recta desde el
centro hacia los bordes utilizando un
paño suave y sin hilos. ¡Un producto
de limpieza podría dañar el disco!
Información general
51
Español
Page 52

Discos para grabar
Para grabar, asegúrese de utilizar sólo discos de audio
especiales. Estos discos están marcados con «Digital Audio»
y los logotipos que se muestran más abajo.
Existen dos tipos de discos de audio que se pueden utilizar
con esta grabadora de CD:
– Discos grabables de CD-Audio
(CDR), se pueden grabar una vez y,
una vez finalizados, se pueden
reproducir en reproductores de CD y
en grabadoras de CD estándar.
– Discos reescribibles de
CD-Audio (CDRW), se pueden
grabar, borrar y volver a grabar varias
veces, y una vez finalizados, se pueden
reproducir en reproductores de CD y
grabadoras de CD compatibles con CDRW.
Todos los reproductores de CD y grabadoras de
CD de Philips con esta pegatina son compatibles
con CDRW.
Para asegurar un funcionamiento correcto del equipo, le
recomendamos que sólo utilice discos de audio Philips
CDR y CDRW.
Nota: No utilice un CDR o un CDRW para ordenador, la
grabación no funcionaría correctamente.
Las grabaciones están permitidas siempre que no
infrinjan los derechos de autor u otros derechos de
terceros.
En algunos países, el uso del reproductor/
grabadora de CD,como se muestra o sugiere en este
manual del usuario, puede requerir la autorización de
los titulares de los derechos de autor.
Discos para reproducir
Para reproducir en este reproductor/grabadora de CD,
puede utilizar los siguientes discos de audio:
– Todos los CDs de audio pregrabados
– Todos los discos CDR y CDRW de audio
– CDs MP3 (CD-ROMs con pistas MP3)
Unas palabras sobre MP3
La nueva tecnología revolucionaria de comprensión de música MP3
(MPEG ! Audio Layer-3) es capaz de comprimir datos de sonido de
audio digital con un factor de hasta 10, sin pérdida significativa de
calidad de sonido. Esto le permite grabar hasta 10 horas de música
de calidad igual a la de un CD en un sólo CD-ROM.
Como crear su propio CD MP3
Básicamente hay dos fuentes de música MP3 en CD. Usted
puede o transferir música de sus propios CDs de audio digitales
via la unidad de CD-ROM, introducirla en su PC y codificarla en
formato MP3 («rip»), o cargar música legal MP3 de Internet.
Grabar («quemar») la música desde su disco duro en un
CD-ROM con su PC en casa (asegúrese de que el nombre
del archivo termine con .mp3). Una vez finalizado, puede
reproducir su CD MP3 en este reproductor/grabadora de CD y
disfrutar de la música.
Velocidad de transmisión de datos
La velocidad de transmisión de datos es de gran importancia
para MP3. Indica con que velocidad son transferidos los bits.
La música en estéreo en un CD tiene una velocidad de transmisión
de unos 1400 kilobits por segundo (kbps). Para conseguir una
buena calidad de MP3 se recomienda una velocidad de
bit de 128 kbps. Como la velocidad de codificación puede ser
seleccionada por el usuario, asegúrese de alcanzar esta velocidad de
transmisión de datos para MP3, grabar a menos de 128 kbps
podría causar una degradación en la calidad del sonido.
Grabación
Cargar un archivo MP3 de Internet o extraer canciones de su
propio CD de audio digital es un proceso delicado, también
influenciado por la calidad del programa de codificación y la
velocidad de su PC. Esto puede causar a veces «omisiones» o
errores que usted notará a la hora de escuchar su CD MP3.
En cualquier caso, asegúrese de usar una velocidad de
grabación no superior a la indicada en el CD-ROM y evite
utilizar simultáneamente otros programas en su PC durante el
proceso de grabación.
En conformidad con la SDMI (Secure Digital
Music Initiative) las salidas digitales de este equipo se
desactivarán al reproducir un CD MP3.
No es posible «quemar» un CD MP3 en este
reproductor/grabadora de CD.
No es posible grabar de un CD MP3.
Formatos admitidos
Los siguientes formatos son admitidos en este
reproductor/grabadora de CD:
– Formato de disco: ISO 9660 o Joliet
– Formato de archivo: MPEG ! Audio Layer-3
– Nombre de archivo: .mp3 (pistas), .m3u o .pls
(recopilaciones personales)
– Velocidad de bit: 32–320 kbps (128 kbps aconsejables)
o velocidad de bit variable
Use el formato de disco ISO 9660 cuando grabe el
CD MP3. El formato de disco UDF (p. ej.
«DirectCD» o «WinOnCD») no se admite.
Información general
52
Español
Page 53

Conexiones
1 OPTICAL IN
para conectar la salida digital óptica de un aparato externo
digital
2 OPTICAL OUT
para conectar la entrada digital óptica de un aparato
externo digital
3 DIGITAL IN
para conectar a la salida coaxial digital de un aparato
externo digital
4 DIGITAL OUT
para conectar a la entrada coaxial digital de un aparato
externo digital
5 ANALOG IN L/R
para conectar la salida de audio analógica de un aparato
externo
6 ANALOG OUT L/R
para conectar la entrada de audio analógica de un aparato
adicional externo
7 AC MAINS ~
Una vez realizadas el resto de las conexiones, conecte
el cable de alimentación eléctrica a la toma de pared.
Información sobre la instalación
Coloque el equipo sobre una superficie plana, dura y
estable. No sitúe el equipo encima de otros equipos que
puedan calentarlo (p. ej. receptor o amplificador). Si el
equipo está colocado en un armario, asegúrese de dejar al
menos 3,5 cm (1,5 pulgadas) de espacio alrededor del
equipo para evitar su sobrecalentamiento.Teléfonos móviles
encendidos cerca del equipo pueden causar un mal
funcionamiento.
Conexiones en general
Nunca realice o cambie las conexiones con la
alimentación eléctrica conectada.
Para la reproducción están presentes las siguientes salidas:
– Salida analógica (ANALOG OUT L/R)
– Salida coaxial digital (DIGITAL OUT)
– Salida óptica digital (OPTICAL OUT)
Para la grabación externa están presentes las siguientes
entradas:
– Entrada analógica (ANALOG IN L/R)
– Entrada coaxial digital (DIGITAL IN)
– Entrada óptica digital (OPTICAL IN)
Estas entradas pueden ser conectadas a la(s)
correspondiente(s) salida(s) de su amplificador/receptor o
directamente a la(s) correspondiente(s) salida(s) del
aparato externo.
No es posible conectar un tocadiscos directamente a
ANALOG IN L/R. Si quiere usar un tocadiscos con el
equipo, tiene que conectar un amplificador/receptor
a ANALOG IN L/R en el reproductor/grabadora de
CD. Después conecte el tocadiscos al amplificador.
Las conexiones que realice dependerán de las posibilidades
que su equipo de audio ofrezca y de como va a usar el
equipo. Por favor, remítase primero al manual de
instrucciones de su equipo de audio.
Recomendamos realizar grabaciones analógicas sólo si la
grabación digital no es posible. Las grabaciones digitales
tienen una mejor calidad de sonido.
Si es posible, realice siempre ambas conexiones, digital y
analógica. De este modo podrá realizar siempre grabaciones
analógicas si la grabación digital no fuera posible.
Conexiones
53
Español
OUTIN
OPTICAL
DIGITAL
ANALOG
L
R
IN OUTOUTIN
AC MAINS
~
7
5
4
32
1
6
Page 54

Conexiones analógicas
Estas conexiones son necesarias para la reproducción y la
grabación vía un amplificador/receptor, equipados con
entradas y salidas analógicas.
1 Conecte el enchufe rojo del cable de audio suministrado
(cinch) a la conexión roja ANALOG IN R y el enchufe
blanco a la conexión blanca ANALOG IN L del
reproductor/grabadora de CD.
2 Conecte el otro extremo del cable de audio a las salidas
analógicas del amplificador/receptor (CDR OUT,
TAPE OUT, AUX OUT, REC OUT, etc.).
3 Conecte el enchufe rojo del cable de audio suministrado
(cinch) a la conexión roja ANALOG OUT R y el cable
blanco a la conexión blanca ANALOG OUT L del
reproductor/grabadora de CD.
4 Conecte el otro extremo del cable de audio a la entrada
analógica del amplificador/receptor (CD-R,TAPE IN,AUX,
PLAY IN, etc.).
5 Conecte todos los otros componentes de su sistema
(unidad de cinta, reproductor de CD, radio, tocadiscos, etc.)
vía sus salidas analógicas a las entradas analógicas
apropiadas del amplificador/receptor (CD IN,TUNER IN,
AUX IN, PHONO IN, etc.).
00
La grabación puede ser realizada ahora con cualquier aparato
conectado a la entrada analógica del amplificador/receptor.
Pulse repetidamente INPUT en el reproductor/grabadora de
CD para seleccionar la entrada analógica.
➜ ANALOG IN aparecerá.
Como realizar la conexión si la salida analógica
del amplificador/receptor está siendo utilizada
(ocupada)
La mayoría de los amplificadores/receptores tienen varias
conexiones para salidas analógicas (TAPE,VCR,…) pero
algunos amplificadores/receptores tienen sólo 1 salida
analógica. En el caso de que ya haya conectado una unidad
de cinta (grabadora DAT o grabadora MD) a esta salida,
tendrá que cambiar las conexiones existentes.
1 Desconecte las conexiones analógicas de la unidad de cinta
al amplificador/receptor.
2 Conecte el reproductor/grabadora de CD (consulte los
pasos 1–4 del capítulo anterior).
3 Conecte las salidas analógicas de la unidad de cinta a
cualquier entrada analógica libre (AUX, CD) del
amplificador/receptor. Ahora podrá reproducir su cinta o
grabar desde su unidad de cinta en el CD. Sin embargo, ya
no será posible grabar en la cinta.
Conexiones digitales
Conexión digital coaxial directa
Esta conexión es necesaria para la grabación directa desde
cualquier equipo digital de audio con una salida digital coaxial
(p.ej. un reproductor de CD o un reproductor de DVD).
● Utilice un cable coaxial digital para conectar la salida coaxial
del aparato externo a DIGITAL IN en el
reproductor/grabadora de CD.
00
La grabación se realizará ahora vía la entrada coaxial digital.
Pulse repetidamente INPUT en el reproductor/grabadora
de CD para seleccionar la entrada coaxial digital.
➜ DIGITAL IN aparecerá.
Instalaciones
54
Español
OUTIN
OPTICAL
DIGITAL
ANALOG
L
R
IN OUTOUTIN
OPTICAL
DIGITAL OUTPUT
ANALOG OUTPUT
L
R
PHONO
L
R
CD
IN IN
CD PLAYER/
RECORDER
AMPLIFIER/
RECEIVER
PHONO
L
R
CD
IN IN
CDR/TAPE
L
R
IN OUT
CD PLAYER
COAX
TURNTABLE
DIGITAL OUTPUT
OPTICAL
DIGITAL
OPTICAL
ANALOG OUTPUT
ANALOG
IN OUTOUTIN
L
R
L
R
CD PLAYER
CD PLAYER/
RECORDER
COAX
OUTIN
Page 55

Conexión óptica digital directa
Esta conexión es necesaria para la grabación directa desde
cualquier equipo digital de audio con una salida digital óptica
(p.ej. un reproductor de CD o un reproductor de DVD).
1 Retire las cápsulas antipolvo de la entrada digital óptica del
reproductor/grabadora de CD y de la salida digital óptica
del aparato externo. Guarde las cápsulas en un lugar seguro.
2 Utilice un cable digital óptico para conectar la salida óptica
del aparato externo a OPTICAL IN en el
reproductor/grabadora de CD. Asegúrese de introducir
completamente ambos enchufes, hasta que se oiga un click.
00
La grabación puede realizarse ahora vía la entrada digital
óptica. Pulse repetidamente INPUT en el reproductor/
grabadora de CD para seleccionar la entrada digital óptica.
➜ OPTICAL IN aparecerá.
Conexiones digitales coaxiales vía un receptor digital
Si dispone de un receptor con entradas y salidas coaxiales
digitales, estas conexiones le permitirán realizar grabaciones
digitales desde varias fuentes conectadas al receptor.
● Utilice un cable coaxial para conectar la entrada digital
coaxial del receptor a DIGITAL OUT en el
reproductor/grabadora de CD. Use otro cable coaxial para
conectar la salida digital coaxial del receptor a DIGITAL IN
en el reproductor/grabadora de CD.
00
La grabación puede realizarse ahora con cualquier aparato
digital conectado a la entrada digital del receptor digital
(p.ej. un reproductor de CD o un reproductor de DVD).
Pulse repetidamente INPUT en el reproductor/grabadora
de CD para seleccionar la entrada digital coaxial.
➜ DIGITAL IN aparecerá.
Conexiones digitales ópticas por medio de un
receptor digital
Si dispone de un receptor con entradas y salidas digitales
ópticas, estas conexiones le permitirán realizar grabaciones
digitales desde varias fuentes conectadas al receptor.
1 Retire las cápsulas antipolvo de las entradas y salidas
digitales ópticas del reproductor/grabadora de CD y de la
salida digital óptica del receptor. Guarde las cápsulas en un
lugar seguro.
2 Utilice un cable digital óptico para conectar la entrada
óptica del receptor a OPTICAL OUT en el reproductor/
grabadora de CD. Use otro cable digital óptico para
conectar la salida óptica del receptor a OPTICAL IN en el
reproductor/grabadora de CD. Asegúrese de introducir
completamente ambos enchufes, hasta que se oiga un click.
00
La grabación puede realizarse ahora con cualquier aparato
digital conectado a la entrada digital del receptor digital
(p.ej. un reproductor de CD o un reproductor de DVD).
Pulse repetidamente INPUT en el reproductor/grabadora
de CD para seleccionar la entrada digital óptica.
➜ OPTICAL IN aparecerá.
Red eléctrica
La placa de especificaciones está situada en la parte
posterior del equipo.
1 Compruebe que la tensión eléctrica que aparece en la
placa de especificaciones corresponde a la de su zona. En
caso contrario, consulte al vendedor o al servicio técnico.
2 Compruebe que se han realizado todas las
conexiones antes de conectar la alimentación
eléctrica.
3 Conecte el cable de alimentación eléctrica suministrado a
AC MAINS ~ y a la toma de pared.Así se activará la
alimentación eléctrica.
Cuando el equipo está en modo de espera, sigue
consumiendo una cierta cantidad de electricidad. Para
desconectar completamente la alimentación eléctrica
del equipo, desenchúfelo de la toma de pared.
Instalaciones
55
Español
CD PLAYER/
RECORDER
CD PLAYER
OUTIN
OPTICAL
DIGITAL
ANALOG
L
R
IN OUTOUTIN
OPTICAL
DIGITAL OUTPUT
ANALOG OUTPUT
L
R
COAX
“CLICK!”
CD PLAYER/
RECORDER
DIGITAL
RECEIVER
OUTIN
OPTICAL
DIGITAL
ANALOG
L
R
IN OUTOUTIN
OPTICAL
OUT
IN
AUX
CD IN DVD IN
AUX
OPTICAL
IN
”
OUT
CD IN DVD IN
RECEIVER
“CLICK!
DIGITAL
OPTICAL
ANALOG
L
OUTIN
R
IN OUTOUTIN
CD PLAYER/
RECORDER
DIGITAL
Page 56

1 2 STANDBY·ON
activa/cambia al modo de espera en el equipo
2 / OPEN/CLOSE
abre/cierra el compar timento del reproductor de CD
3 compartimento del reproductor de CD
4 pantalla
5 CD RECORDER
compartimento de la grabadora de CD
luz azul encendida: la grabadora de CD ha sido seleccionada
luz roja encendida: la grabación se está realizando
6 / OPEN/CLOSE
abre/cierra el compar timento de la grabadora de CD
7 PHONES/LEVEL
ajusta el volumen de los auriculares
8 PHONES/LEVEL
clavija de 6,3 mm de los auriculares
9 COPY CD
selecciona la grabación y la finalización automática del CD
en uso
0 REC 0
selecciona otros modos de grabación
! ¢
grabadora de CD: selecciona la siguiente pista, busca hacia
delante
@ 4
grabadora de CD: selecciona la pista anterior, busca hacia
atrás
# ALBUM/REC LEVEL+
grabadora de CD: selecciona el siguiente álbum en un
CD MP3, aumenta el nivel de grabación
$ ALBUM/REC LEVEL-
grabadora de CD: selecciona el álbum anterior en un
CD MP3, disminuye el nivel de grabación
% Ç
grabadora de CD: detiene la reproducción/grabación
^ ÉÅ
grabadora de CD: inicia/interrumpe la reproducción
& ERASE CD
borra las grabaciones de un CDRW
* INPUT
selecciona la entrada para un aparato externo
( SHUFFLE
reproduce las pistas en orden aleatorio
) DISPLAY
selecciona la información en pantalla
¡ ¢
reproductor de CD: selecciona la siguiente pista, busca hacia
delante
™ 4
reproductor de CD: selecciona la pista anterior, busca hacia
atrás
£ ALBUM+
reproductor de CD: selecciona el siguiente álbum en un
CD MP3
≤ ALBUM-
reproductor de CD: selecciona el álbum anterior en un CD MP3
∞ Ç
reproductor de CD: detiene la reproducción
§ ÉÅ
reproductor de CD: inicia/interrumpe la reproducción
≥ SPEED 1·2·4x
selecciona la velocidad de grabación para la grabación interna
Nota: SPEED 1·2·4x, REC y COPY CD se iluminarán
dependiendo de los diferentes modos con los que esté
trabajando. Esto ocurre para poder encontrar fácilmente las
teclas apropiadas para la selección.
Controles
56
Español
1654327
L
R
(
)¡™9£≤∞§≥
*
^
!
@#$%&
80
Page 57

Mando a distancia
57
Español
Uso del mando a distancia
Abra el compartimento de las pilas
del mando a distancia e inserte
2 pilas alcalinas tipo AA (R06,
UM-3).
No utilice a la vez pilas usadas y
nuevas o de diferentes tipos.
Quite las pilas cuando se gasten o si no va a utilizar el
mando a distancia durante un período de tiempo
prolongado.
Las pilas contienen sustancias químicas, por lo que
deben eliminarse según la normativa vigente.
Las teclas del mando a distancia realizan las mismas
funciones que sus correspondientes en el equipo.
Teclas del mando a distancia
1 2
activa/cambia al modo de espera en el equipo
2 CD, CDR
selecciona la unidad del reproductor de CD o la unidad de
la grabadora de CD
3 TIMER REC
inicia una grabación con tiempo limitado
4 Teclas numéricas/alfabéticas
1–0: teclas numéricas para las pistas
ABC – WXYZ: teclas alfabéticas para el texto de CD
SPACE: teclas para espacios entre el texto de CD
. : teclas de puntuación o símbolos para texto de CD
5 TR. INCR.
selecciona el incremento automático o manual de una pista
6 PROGRAM
accede al menú de programación
7 ALBUM+
selecciona el siguiente álbum de un CD MP3
8 ALBUM-
selecciona el álbum anterior de un CD MP3
9 É
inicia la reproducción
0 í
selecciona la pista anterior
! ë
selecciona la siguiente pista
@ Ç
detiene la reproducción
# á
busca hacia delante
$ à
busca hacia atrás
% Å
interrumpe la reproducción
^ DIM
controla la luminosidad de la pantalla
& DISPLAY
selecciona la información en pantalla
* CD TEXT/edit
cambia entre la información de texto de CD, accede al/sale
del menú de edición de texto
( DELETE
borra el texto de CD
) REPEAT
repite una pista, un CD(RW) completo o una programación
¡ SHUFFLE
reproduce las pistas en orden aleatorio
3
4
5
8
9
0
$
&
*
(
CD TIMER REC
SPACE ABC
1
GHI JKL
4
PQRS TUV
7
TR.INCR.
2
5
8
.
CDR
DEF
3
MNO
6
WXYZ
9
PROGRAM
0
ALBUM
DISPLAY DIM
CD TEXT/edit DELETE
CD TEXT
ALBUM
+
SHUFFLE REPEAT
1
2
6
7
!
@
#
%
^
)
¡
Page 58

Encendido, encendido modo de
espera
● Para encender el equipo, pulse 2 STANDBY·ON.
➜ WELCOME TO PHILIPS AUDIO aparecerá.
● Para poner el equipo en modo de espera, pulse de
nuevo 2 STANDBY·ON.
➜ El modo de espera se activará en el equipo.
Modo demostración
Con el modo demostración aparecerán varias funciones del
equipo y se iniciarán automáticamente si no ha sido pulsada
ninguna tecla durante varios minutos o durante el modo de
espera.
● Para cancelar el modo demostración mantenga
pulsada Ç en el equipo un mínimo de 5 segundos.
➜ El modo demostración se cancelará permanentemente.
Carga de discos
1 Reproductor de CD: Pulse / OPEN/CLOSE para abrir el
compartimento del reproductor de CD.
➜ OPEN CD aparecerá y el compartimento se abrirá.
Grabadora de CD: Pulse / OPEN/CLOSE para abrir el
compartimento de la grabadora de CD.
➜ OPEN CDR aparecerá y el compartimento se abrirá.
Notas:
Al abrir el reproductor de CD se borrará la programación que
contenga pistas de un disco cargado en el reproductor de CD.
Al abrir la grabadora de CD se borrará la programación que
contenga pistas de un disco cargado en la grabadora de CD.
2 Inserte un disco (cara impresa hacia arriba) en la bandeja.
3 Reproductor de CD: Pulse de nuevo / OPEN/CLOSE
para cerrar el compartimento.
➜ El compartimento se cerrará y READING aparecerá.
➜ Aparecerán CD, el número total de pistas y el tiempo
total de reproducción del disco.
Grabadora de CD: Pulse / OPEN/CLOSE para cerrar el
compartimento.
➜ El compartimento se cerrará y READING aparecerá.
➜ Si se ha cargado un disco no finalizado, aparecerá
INITIALIZING.
➜ Aparecerán CDR, el número total de pistas y el tiempo
total de reproducción del disco.
Sólo CD MP3:
➜ READING MP3 aparecerá. MP3 se mostrará. Debido al
gran número de pistas podría tardar hasta 2 minutos.
➜ El nombre del primer álbum aparecerá.
Reproducción
1 Pulse ÉÅ en el lado del reproductor de CD o en el lado
de la grabadora de CD para iniciar la reproducción.
➜ Aparecerán CD o CDR, el número de pista actual y el
tiempo de reproducción transcurrido.
Sólo CD MP3:
➜ Además, se desplazará también el nombre de la pista.
00
Para cambiar entre la siguiente información pulse
repetidamente DISPLAY:
➜ número de pista, tiempo restante de reproducción de la
pista actual
➜
número de pista, tiempo restante de reproducción del disco
➜ número de pista, tiempo de reproducción transcurrido
de la pista actual
Sólo CD MP3:
➜ el número de álbum, el número de pista y el nombre de
la pista
➜ el número de pista, el tiempo de reproducción
transcurrido de la pista actual
2 Pulse Ç en el lado del reproductor de CD o en el lado de
la grabadora de CD para detener la reproducción.
➜ Aparecerán CD o CDR, el número total de pistas y el
tiempo total de reproducción del disco.
Sólo CD MP3:
➜ Se desplazará el nombre del álbum actual.
00
Puede interrumpir la reproducción pulsando ÉÅ.
➜ El tiempo en el que la reproducción haya sido detenida
parpadeará.
00
Para reanudar la reproducción pulse de nuevo ÉÅ.
Funciones básicas
58
Español
Page 59

Selección y búsqueda (en todos
los discos excepto CDs MP3)
Selección de una pista si se ha detenido la
reproducción
1 Pulse ¢ o 4 en el lado del reproductor de CD o en el
lado de la grabadora de CD tantas veces como sea
necesario para saltar al número de pista deseado.
2 Pulse ÉÅ para iniciar la reproducción.
➜ La reproducción se iniciará con la pista seleccionada.
Selección de una pista durante la reproducción
● Pulse ¢ o 4 en el lado del reproductor de CD o en el
lado de la grabadora de CD tantas veces como sea
necesario para saltar al comienzo de la pista anterior o
siguiente del disco seleccionado.
➜ La reproducción continuará con la pista seleccionada.
Búsqueda de un pasaje durante la reproducción
1 Mantenga pulsada ¢ o 4 en el lado del reproductor
de CD o en el lado de la grabadora de CD para
seleccionar un pasaje concreto hacia atrás o hacia delante.
➜ Se iniciará la búsqueda y la reproducción continuará a
bajo volumen.Tras unos segundos, la búsqueda se
acelerará con el volumen desactivado.
2 Suelte la tecla en el pasaje que desee.
➜ La reproducción normal continuará.
Nota: Durante SHUFFLE, al repetir una pista o al reproducir una
programación, la búsqueda sólo es posible en la pista actual.
Selección y búsqueda (sólo en
CDs MP3)
Selección de un álbum si se ha detenido la
reproducción
● Pulse ALBUM+ o ALBUM- en el lado del reproductor
de CD o en el lado de la grabadora de CD tantas veces
como sea necesario para encontrar el número de álbum
que desea seleccionar.
➜ ALBUM se mostrará, aparecerán CD o CDR y el número
de álbum.
➜ El nombre del álbum actual se desplazará tan pronto
como deje de pulsar la tecla de nuevo.
00
Para iniciar la reproducción del álbum completo pulse ÉÅ.
➜ La reproducción del álbum completo se iniciará.
Selección de un álbum durante la reproducción
● Pulse ALBUM+ o ALBUM- en el lado del reproductor
de CD o en el lado de la grabadora de CD tantas veces
como sea necesario para saltar al comienzo del álbum
anterior o siguiente del disco seleccionado.
➜ La reproducción continuará con el álbum seleccionado
tan pronto como deje de pulsar la tecla de nuevo.
Selección de una pista del álbum
1 Pulse ¢ o 4 en el lado del reproductor de CD o en el
lado de la grabadora de CD tantas veces como sea
necesario para saltar al número de pista deseado.
➜ CD o CDR, el número de álbum y el número de pista
aparecerán.
➜ El nombre de la pista se desplazará tan pronto como
deje de pulsar la tecla de nuevo.
2 Pulse ÉÅ para iniciar la reproducción.
➜ La reproducción se iniciará con la pista seleccionada.
Notas:
Al final de su selección de álbum, encontrará un álbum
llamado VARIOUS. Este álbum contiene todas las pistas que no
han sido guardadas en un álbum al crear el CD MP3.
Si quiere reproducir una recopilación personal que usted
hizo en su CD MP3 en el momento de crearlo, tiene que
seleccionarla directamente usando ¢ o 4 y pulsando
ÉÅ después.
Funciones básicas
59
Español
Page 60

SHUFFLE y REPEAT
Repetición de una pista, un disco o una programación
1 Pulse REPEAT repetidamente en el mando a distancia
durante la reproducción para seleccionar :
➜ REP TRACK: Se reproduce repetidamente la pista actual.
➜ REP DISC: Se reproduce repetidamente el disco
completo seleccionado.
➜ REP ALL: Se reproducen repetidamente todos los discos
en el equipo (o el programa).
Notas:
REP DISC no es posible durante SHUFFLE o mientras se
reproduce un programa.
REP TRACK no es posible durante SHUFFLE.
2 La reproducción se iniciará en el modo elegido.
00
Para volver a la reproducción normal, pulse REPEAT en el
mando a distancia hasta que desaparezca la indicación en
pantalla.
Reproducción de pistas en orden aleatorio
● Pulse SHUFFLE antes o durante la reproducción.
➜ SHUFF ALL se mostrará y se reproducirán de forma
aleatoria todas las pistas de la programación o las del (de
los) disco(s) cargado(s) en el reproductor de CD y en la
grabadora de CD.
Mostrar texto de CD
Esta función le permite ver en pantalla información, como
título del álbum o de la pista, contenida en un CD
especialmente codificado.
● Asegúrese de que inserta un CD con texto de CD.
➜ CD TEXT se mostrará y el nombre del intérprete y el
título del álbum se desplazarán una vez.
Texto de CD cuando se ha detenido la reproducción
● Pulse CD TEXT/edit en el mando a distancia para ver la
siguiente información, que se desplazará en la pantalla una
vez (si está disponible):
➜ Nombre del intérprete del álbum
➜ Título del álbum
Texto de CD durante la reproducción
● Pulse CD TEXT/edit en el mando a distancia para ver la
siguiente información, que se desplazará en la pantalla una
vez (si está disponible):
➜ Nombre del intérprete de la pista
➜ Título de la pista
ID3-tag
Esta función le permite ver en pantalla información, como el
título del álbum o título de la pista, contenida en una pista MP3.
●
Si ha creado una ID3-tag para su pista MP3, pulse CD TEXT/edit
en el mando a distancia durante la reproducción para que se
muestre la siguiente información ID3-tag:
➜ Título del álbum
➜ Nombre del intérprete de la pista
➜ Título de la pista
Nota: En el caso de que ID3-tag no esté disponible, NO TEXT
aparecerá.
Programación de números de pistas
Un programa puede ser utilizado para la reproducción o
para especificar las pistas que deben ser grabadas. Puede
seleccionar hasta 99 pistas (también pistas MP3) y
almacenarlas en la memoria. Es posible almacenar cualquier
pista más de una vez en cualquier orden, en el reproductor
de CD y en la grabadora de CD. Sin embargo, no es
posible combinar pistas MP3 y pistas de audio o pistas MP3
de más de un CD.
1 Cargue el (los) disco(s) deseado(s) en la(s) bandeja(s).
2 Pulse PROGRAM en el mando a distancia para acceder al
menú de programación.
➜ PROG comenzará a parpadear y aparecerá PROGRAM.
➜ Aparecerán el número de paso (STEP), el número de
pista y el tiempo de reproducción de la pista actual del
CD en uso.
3 Si desea elegir una pista del reproductor de CD:
Pulse CD en el mando a distancia y después í o ë
tantas veces como sea necesario para saltar a la pista
deseada.
Si desea elegir una pista de la grabadora de CD:
Pulse CDR en el mando a distancia y después í o ë
tantas veces como sea necesario para saltar a la pista
deseada.
Nota: Al seleccionar una pista que ya haya sido almacenada,
P aparecerá.
4 Pulse PROGRAM en el mando a distancia para almacenar
su selección en la memoria.
➜ Aparecerán el número total de pistas programadas
(STEP), PRG y el tiempo total del programa.
5 Repita los pasos 3–4 para seleccionar y almacenar todas las
pistas deseadas.
Nota: Si intenta almacenar más de 99 pistas, aparecerá
PROGRAM FULL.
6 Pulse Ç para finalizar la programación.
Borrado del programa
1 Si es necesario, pulse Ç para detener la reproducción.
2 Mantenga pulsada Ç para borrar el programa.
➜ Aparecerá PROG CLEARED y PROG desaparecerá.
Funciones básicas
60
Español
Page 61

Información básica
La unidad de la grabadora de CD le ofrece 3 funciones
principales:
– Grabación desde el reproductor interno de CD o
desde una fuente externa seleccionada
– Finalizar sus discos CDR(W) y definalizar sus discos
CDRW
– Borrar un disco CDRW
El procedimiento de grabación es el mismo para discos
CDR y CDRW. Asegúrese de que el CDR(W) esté
absolutamente libre de rayaduras y partículas de
polvo.
Para grabaciones, la longitud mínima de pista es de
4 segundos. Puede grabar hasta un máximo de 99 pistas en
un disco. Si el tiempo de grabación que queda en el disco
es menor de 7 segundos, aparecerá DISC FULL y no se
podrá acceder al modo de grabación.
Protección de los derechos de autor
El Serial Copy Management System (SCMS) evita la
realización de copias digitales de una copia digital. El sistema
permite realizar una grabación digital del original, sin
embargo, en algunos países se puede necesitar la
autorización de los titulares de los derechos de autor.
Si intenta grabar desde una fuente externa un material
protegido contra copias, COPY PROTECT aparecerá. No
será posible realizar ninguna grabación digital.
No es posible copiar un CD MP3.
Grabación de texto de CD
Si el CD original tiene texto de CD, este texto se grabará
automáticamente siempre que este texto de CD no esté
protegido contra copias. En tal caso, no será posible grabar
el texto de CD y aparecerá TEXT PROTECT.
¿Qué es finalizar?
Finalizar es un sencillo proceso que completa la grabación
de un CDR(W), necesario para:
– reproducir un CDR grabado en un reproductor de CD
estándar,
– reproducir un CDRW grabado en un reproductor de
CD o grabadora de CD compatible con CDRW,
– evitar grabaciones no deseadas en un disco, o
– evitar borrados accidentales de pistas en un CDRW.
Los CDRs están «cerrados» una vez finalizados. No podrán
ser añadidas otras pistas o texto de CD.
Los CDRWs están también «cerrados» una vez que están
finalizados, pero pueden ser definalizados para permitir
grabaciones adicionales o borrado.
Direct Line Recording (DLR)
La grabadora de CD está equipada con la tecnología de
alto rendimiento Direct Line Recording. Esto le asegura
una grabación perfecta del material original, lo que implica
una verdadera grabación «bit por bit». DLR no se activará
cuando el nivel de grabación esté ajustado.
Ajuste del nivel de grabación
Se puede ajustar el nivel de grabación de referencia para
grabaciones desde un aparato adicional. Esta función puede
utilizarse para la aparición o desaparición gradual del
sonido en sus grabaciones.
1 Pulse repetidamente INPUT para seleccionar la entrada del
aparato adicional:
➜ DIGITAL IN: se selecciona la entrada digital coaxial.
➜ OPTICAL IN: se selecciona la entrada digital óptica.
➜ ANALOG IN: se selecciona la entrada analógica.
2 Mantenga pulsada ALBUM+ o ALBUM- en la grabadora
de CD para ajustar el nivel de grabación deseado. El sonido
más alto del material a grabar no debe alcanzar los niveles
rojos de la barra de nivel.
➜ Aparecerá el nivel actual de grabación (en dB).
Nota: El nivel de grabación se puede ajustar también durante
la grabación desde el reproductor interno de CD. Mantenga
pulsada ALBUM+ o ALBUM- en el lado de la grabadora
de CD para ajustar el nivel de grabación deseado.
Sobre la grabación
61
Español
Page 62

¿Qué es la grabación interna?
La grabación realizada desde la unidad de reproductor de
CD en este equipo es denominada «grabación interna».
Selección de velocidad de grabación
Es posible seleccionar la velocidad de grabación para
grabaciones internas.
● Pulse SPEED 1·2·4x para seleccionar:
➜ REC SPEED 1X: para grabar a velocidad normal
➜ REC SPEED 2X: para grabar a doble velocidad mientras
el sonido está desactivado
➜ REC SPEED 4X: para grabar a una velocidad 4 veces
mayor que la normal mientras el sonido está desactivado
Notas:
La selección de la velocidad no es posible durante la
grabación.
En algunas marcas de discos vírgenes no es posible la
grabación a una velocidad más alta y no funciona. En tal caso,
seleccione una velocidad más baja.
Copia de un CD completo
Esta es la forma más fácil de hacer una copia de un CD
completo, preparado para reproducirse en otros
reproductores de CD. Sin embargo, no podrán ser añadidas
otras pistas o texto de CD.
1 Inserte un CDR(W), que esté absolutamente libre de
rayaduras y de partículas de polvo, en la bandeja de la
grabadora de CD.
2 Introduzca el disco que desee copiar en la bandeja del
reproductor de CD.
3 Pulse COPY CD para iniciar la copia del CD completo.
➜ REC se mostrará, la copia se iniciará y el tiempo real de
grabación restante comenzará la cuenta atrás.
Nota: Si un programa estaba ya disponible antes de pulsar
COPY CD, será ignorado. PROG desaparecerá y se grabará el
disco en uso. Una vez finalizada la grabación, PROG se
mostrará y el pograma estará disponible de nuevo.
Grabación de todas las pistas de
un CD
Puede copiar todas las pistas de un CD y decidir entonces
si finalizar o no finalizar.
1 Inserte un CDR(W), que esté absolutamente libre de
rayaduras y de partículas de polvo, en la bandeja de la
grabadora de CD.
2 Introduzca el disco del que desee copiar todas las pistas en
la bandeja del reproductor de CD.
3 Pulse REC para acceder al menú de grabación.
➜ RECORD CD?, seguido de PRESS REC aparecerán
alternativamente.
4 Pulse de nuevo REC para iniciar la grabación de todas las
pistas.
➜ REC se mostrará, la grabación se iniciará y el tiempo real
de grabación restante comenzará la cuenta atrás.
00
Si pulsa / OPEN/CLOSE en el lado de la grabadora de CD,
➜ CD NOT FINAL y PRESS REC TO FINALIZE
aparecerán alternativamente.
Decida ahora entre
no finalizar: el CDR no está preparado para
reproducirse en otros reproductores de CD, sin
embargo, se pueden añadir todavía otras pistas o
texto de CD.
Pulse de nuevo / OPEN/CLOSE en el lado de la
grabadora de CD o espere unos segundos.
➜ El compartimento se abrirá. El CDR(W) no está finalizado.
o
finalizar: el CDR está preparado para reproducirse en
otros reproductores de CD, sin embargo, no se
pueden añadir otras pistas o texto de CD.
Pulse REC para iniciar la finalización.
➜ FINAL aparecerá y el tiempo real de finalización
restante comenzará la cuenta atrás.
Grabación interna
62
Español
Page 63

Grabación de una sola pista
Puede copiar varias pistas de diferentes CDs y decidir
entonces si finalizar o no finalizar.
1 Inserte un CDR(W), que esté absolutamente libre de
rayaduras y de partículas de polvo, en la bandeja de la
grabadora de CD.
2 Reproduzca la pista deseada en el reproductor de CD.
3 Pulse REC para acceder al menú de grabación.
➜ REC TR con el número de pista y PRESS REC
aparecerán alternativamente.
4 Pulse de nuevo REC para iniciar la grabación de la pista.
➜ REC se mostrará, la grabación se iniciará desde el
comienzo de la pista seleccionada y el tiempo real de
grabación restante comenzará la cuenta atrás.
5 Para grabar más pistas repita los pasos 2–4.
00
Si pulsa / OPEN/CLOSE en el lado de la grabadora de CD,
➜ CD NOT FINAL y PRESS REC TO FINALIZE
aparecerán alternativamente.
Decida ahora entre
no finalizar: el CDR no está preparado para
reproducirse en otros reproductores de CD, sin
embargo, se pueden añadir todavía otras pistas o
texto de CD.
Pulse de nuevo / OPEN/CLOSE en el lado de la
grabadora de CD o espere unos segundos.
➜ El compartimento se abrirá. El CDR(W) no está finalizado.
o
finalizar: el CDR está preparado para reproducirse en
otros reproductores de CD, sin embargo, no se
pueden añadir otras pistas o texto de CD.
Pulse REC para iniciar la finalización.
➜ FINAL aparecerá y el tiempo real de finalización
restante comenzará la cuenta atrás.
Creación y grabación de un
programa
Puede crear su propio programa de grabación, grabarlo y
decidir después si finalizar o no finalizar. No obstante,
advierta que no podrá grabar un programa que contenga
pistas del reproductor de CD y de la grabadora de CD. En
tal caso aparecerán 2 DISC PROG y NOT POSSIBLE.
1 Cargue un CDR(W), que esté absolutamente libre de
rayaduras y de partículas de polvo, en la bandeja de la
grabadora de CD.
2 Cargue el CD del que desea grabar en la bandeja del
reproductor de CD.
3 Seleccione y guarde todas las pistas deseadas del CD
(consulte «Programación de números de pistas»).
00
Si el tiempo total de grabación del programa es mayor que
el tiempo de grabación restante del CDR(W):
➜ DOES NOT FIT aparecerá brevemente.
➜ MISSING y el tiempo que no puede ser grabado
aparecerán.
Si no obstante inicia la grabación, la grabación proseguirá
hasta que el CDR(W) esté lleno.
4 Pulse REC para acceder al menú de grabación.
➜ REC PROGRAM? y PRESS REC aparecerán
alternativamente.
5 Pulse de nuevo REC para iniciar la grabación del programa
actual.
➜ REC se mostrará, la grabación se iniciará y el tiempo real
de grabación restante comenzará la cuenta atrás.
00
Si pulsa / OPEN/CLOSE en el lado de la grabadora de CD,
➜ CD NOT FINAL y PRESS REC TO FINALIZE
aparecerán alternativamente.
Decida ahora entre
no finalizar: el CDR no está preparado para
reproducirse en otros reproductores de CD, sin
embargo, se pueden añadir todavía otras pistas o
texto de CD.
Pulse de nuevo / OPEN/CLOSE en el lado de la
grabadora de CD o espere unos segundos.
➜ El compartimento se abrirá. El CDR(W) no está finalizado.
o
finalizar: el CDR está preparado para reproducirse en
otros reproductores de CD, sin embargo, no se
pueden añadir otras pistas o texto de CD.
Pulse REC para iniciar la finalización.
➜ FINAL aparecerá y el tiempo real de finalización
restante comenzará la cuenta atrás.
Grabación interna
63
Español
Page 64

¿Qué es la grabación externa?
La grabación desde un aparato adicional es denominada
«grabación externa».
¿Grabación digital o analógica?
Cuando grabe de una fuente externa, recomendamos que
realice solamente grabaciones analógicas si no fuera posible
realizarlas digitales. Las grabaciones digitales tienen una
mejor calidad de sonido.
Incremento automático de pista
Si se utiliza la entrada digital para grabaciones de una
fuente digital (p.ej. un reproductor de CD), las pistas se
incrementarán de modo automático de forma que los
números de pista se coloquen en la misma posición que en el
original. Si se utiliza la entrada analógica para grabaciones
de una fuente analógica o digital, el incremento de las
pistas no se realizará automáticamente, a menos que se haya
seleccionado uno de los siguientes ajustes. Los incrementos
de pista no siempre pueden colocarse automáticamente,
dependiendo de la calidad del material de la fuente.
● Pulse TR. INCR. en el mando a distancia tantas veces como
sea necesario durante la detención para cambiar entre las
siguientes funciones automáticas de incremento de pista:
➜ TURNTABLE: para la óptima grabación desde fuentes de
ruido, como tocadiscos (No es posible conectar un
tocadiscos directamente a AUX/CDR IN L/R –
consulte «Conexiones analógicas».)
➜ TAPE/TUNER: para la óptima grabación desde una cinta
➜ CD/DVD: para la óptima grabación desde fuentes de alta
calidad como DAT, DCC o DVD
➜ MANUAL: para desactivar la función del incremento
automático de pista
Notas:
Los números de pista se pueden incrementar manualmente
pulsando TR. INCR. en el mando a distancia durante la
grabación. La longitud mínima de pista es de 4 segundos.
Los números de pista no se pueden cambiar después de la
grabación.
Grabación con inicio automático
Puede grabar rápida y fácilmente un CD completo o una
pista.Tan pronto como la reproducción del aparato adicional
se inicie, la grabación comenzará automáticamente.
1 Inserte un CDR(W), que esté absolutamente libre de
rayaduras y de partículas de polvo, en la bandeja de la
grabadora de CD.
2 Pulse repetidamente INPUT en el reproductor/grabadora
de CD para seleccionar la entrada del aparato adicional del
que quiere grabar.
➜ DIGITAL IN: se selecciona la entrada digital.
➜ ANALOG IN: se selecciona la entrada analógica.
➜ OPTICAL IN: se selecciona la entrada óptica.
3 Asegúrese de que se ha seleccionado la pista deseada en el
aparato adicional.
4
Asegúrese de que el aparato adicional está en pausa o en stop.
5 Pulse REC en el reproductor/grabadora de CD para
acceder al menú de grabación.
➜ PREPARING aparecerá.
➜ RECORD EXT? y START EXTERN SOURCE!
aparecerán alternativamente.
6 Inicie la reproducción en el aparato adicional en 5 segundos.
➜
La grabación se iniciará simultáneamente y
REC
se mostrará.
Aparecerá el tiempo de grabación restante del CDR(W).
Nota: La grabación puede ser iniciada manualmente pulsando
REC en el reproductor/grabadora de CD.
00
Para detener la reproducción manualmente pulse Ç en el
lado del reproductor de CD.
00
Si pulsa / OPEN/CLOSE en el lado de la grabadora de CD,
➜ CD NOT FINAL y PRESS REC TO FINALIZE
aparecerán alternativamente.
Decida ahora entre
no finalizar: el CDR no está preparado para
reproducirse en otros reproductores de CD, sin
embargo, se pueden añadir todavía otras pistas o
texto de CD.
Pulse de nuevo / OPEN/CLOSE en el lado de la
grabadora de CD o espere unos segundos.
➜ El compartimento se abrirá. El CDR(W) no está finalizado.
o
finalizar: el CDR está preparado para reproducirse en
otros reproductores de CD, sin embargo, no se
pueden añadir otras pistas o texto de CD.
Pulse REC en el reproductor/grabadora de CD para iniciar
la finalización.
➜ FINAL aparecerá y el tiempo real de finalización
restante comenzará la cuenta atrás.
Grabación externa
64
Español
Page 65

Grabación manual
Puede iniciar y detener manualmente una grabación desde
un aparato adicional. Puede usar la grabación manual para
grabar música en vivo o para música en particular como
música clásica, que no puede ser grabada con el inicio
automático.
1 Inserte un CDR(W), que esté absolutamente libre de
rayaduras y de partículas de polvo, en la bandeja de la
grabadora de CD.
2 Pulse repetidamente INPUT en el reproductor/grabadora
de CD para seleccionar la entrada del aparato adicional del
que quiere grabar.
➜ DIGITAL IN: se selecciona la entrada digital.
➜ ANALOG IN: se selecciona la entrada analógica.
➜ OPTICAL IN: se selecciona la entrada óptica.
3 Inicie la reproducción en el aparato adicional.
➜ PREPARING aparecerá.
➜ RECORD EXT? y PRESS REC aparecerán
alternativamente.
4 Pulse REC en el reproductor/grabadora de CD para iniciar
la grabación.
➜ La grabación se iniciará y REC se mostrará. Aparecerá el
tiempo restante de grabación del CDR(W).
5 Pulse Ç en el lado del reproductor de CD para detener la
grabación.
00
Si pulsa / OPEN/CLOSE en el lado de la grabadora de CD,
➜ CD NOT FINAL y PRESS REC TO FINALIZE
aparecerán alternativamente.
Decida ahora entre
no finalizar: el CDR no está preparado para
reproducirse en otros reproductores de CD, sin
embargo, se pueden añadir todavía otras pistas o
texto de CD.
Pulse de nuevo / OPEN/CLOSE en el lado de la
grabadora de CD o espere unos segundos.
➜ El compartimento se abrirá. El CDR(W) no está finalizado.
o
finalizar: el CDR está preparado para reproducirse en
otros reproductores de CD, sin embargo, no se
pueden añadir otras pistas o texto de CD.
Pulse REC en el equipo para iniciar la finalización.
➜ FINAL aparecerá y el tiempo real de finalización
restante comenzará la cuenta atrás.
Grabación con temporizador
Esta función le permite iniciar la grabación con un tiempo
limitado vía la entrada analógica (p.ej. para grabaciones de la
radio). Puede elegir una grabación de 15, 30, 45 o
60 minutos o hasta el final del CDR(W).
1 Inserte un CDR(W), que esté absolutamente libre de
rayaduras y de partículas de polvo, en la bandeja de la
grabadora de CD.
2 Asegúrese de que el aparato adicional del que desea grabar
está conectado correctamente.
3 Pulse TIMER REC en el mando a distancia para iniciar la
grabación.
➜ 15 MIN aparecerá, seguido de PREPARING.
➜ La grabación se iniciará y REC se mostrará. Aparecerá el
tiempo real de grabación restante.
00
Para seleccionar otro tiempo de grabación, pulse
repetidamente TIMER REC en el mando a distancia hasta
que aparezca el tiempo deseado:
➜ 30 MIN, 45 MIN, 60 MIN, MAXIMUM aparecerá.
4 Una vez que el tiempo elegido haya transcurrido, la
grabación se detendrá automáticamente y el equipo pasará
al modo de espera.
00
Para detener manualmente la grabación, pulse Ç en el
lado de la grabadora de CD.
Grabación externa
65
Español
Page 66

Borrado de un disco CDRW
Es posible borrar una o más pistas (comenzando por el final
de la última pista) o un CDRW completo. No es posible
borrar de un CDR.
Borrado de una o más pistas
1 Inserte el CDRW del que desea borrar pistas en la bandeja
de la grabadora de CD.
2
Pulse brevemente ERASE CD para acceder al menú de borrado.
Si se ha insertado un CDRW no finalizado:
➜ ERASE LAST TRACK? y PRESS ERASE aparecerán
alternativamente.
Si se ha insertado un CDRW finalizado:
➜ FINALIZED CD aparecerá brevemente.
➜ ERASE LAST TRACK?, seguido de PRESS ERASE
aparecerán alternativamente.
00
Para seleccionar una pista particular que desee borrar, pulse
¢ o 4 tantas veces como sea necesario en el lado de
la grabadora de CD para seleccionar el (los) número(s) de
pista(s) deseado(s).
➜ ERASE TR y el número de pista (p.ej. 10+) aparecerán.
Para seleccionar más pistas para borrar repita este paso.
Nota: Cuando se borren varias pistas, las pistas que desee
borrar deben seleccionarse en secuencia, comenzando por la
última pista grabada. Por ejemplo: El CDRW tiene 5 pistas
grabadas. Podrá borrar las pistas 5 y 4. ¡Podrá borrar también
las pistas 5, 4 y 3, pero no podrá borrar las pistas 5 y 3!
3 Pulse de nuevo ERASE CD para iniciar el borrado.
Si se ha insertado un CDRW no finalizado:
➜ ERASE aparecerá, el tiempo restante de la operación
comenzará la cuenta atrás y el borrado se iniciará.
Si se ha insertado un CDRW finalizado:
➜ UNFINAL aparecerá, el tiempo restante de la operación
comenzará la cuenta atrás y se iniciará la definalización.
➜
Después aparecerá ERASE, el tiempo restante de la
operación comenzará la cuenta atrás y el borrado se iniciará.
Borrado de un CDRW completo
1 Inserte el CDRW que desee borrar en la bandeja de la
grabadora de CD.
2 Mantenga pulsada ERASE CD durante más de un segundo
para acceder al menú de borrado.
Si se ha insertado un CDRW no finalizado:
➜
ERASE DISC? y PRESS ERASE aparecerán
alternativamente.
Si se ha insertado un CDRW finalizado:
➜ FINALIZED CD aparecerá brevemente.
➜
ERASE DISC? y PRESS ERASE aparecerán
alternativamente.
3 Pulse de nuevo ERASE CD para borrar el CDRW completo.
Si se ha insertado un CDRW no finalizado:
➜ ERASE aparecerá, el tiempo restante de la operación
comenzará la cuenta atrás y se iniciará el borrado del
CDRW completo.
Si se ha insertado un CDRW finalizado:
➜ UNFINAL aparecerá, el tiempo restante de la operación
comenzará la cuenta atrás y la definalización comenzará.
➜ ERASE aparecerá, el tiempo restante de la operación
comenzará la cuenta atrás y se iniciará el borrado del
CDRW completo.
Borrado
66
Español
Page 67

Edición de texto de CD (sólo en grabadora de CD)
67
Español
Edición de texto de CD
Una vez grabado el CDR(W), puede introducir un texto,
p. ej. el título del álbum o el título de pista. Este texto
aparecerá durante la reproducción en este equipo y en
otros equipos con función de texto de CD. Utilice sólo un
CDR o un CDRW no finalizados (el CDRW finalizado
debe ser definalizado primero).
1 Si es necesario, pulse Ç para detener la reproducción.
2 Pulse CDR en el mando a distancia para seleccionar la
grabadora de CD.
3 Pulse repetidamente CD TEXT/edit en el mando a distancia
para seleccionar:
➜ ALBUM TITLE: para editar el título del CD
➜ ALBUM ARTIST: para editar el nombre del intérprete
del CD
➜ ARTIST TR 1 (o 2, 3,…): para editar el nombre del
intérprete de la pista 1 (o 2, 3,…)
➜ TITLE TR 1 (o 2, 3,…): para editar el título de la
pista 1 (o 2, 3,…)
4 Tan pronto como el cursor empiece a parpadear, use las
teclas numéricas/alfabéticas en el mando a distancia para
seleccionar un carácter.
➜ Tras seleccionar un carácter el cursor se moverá
automáticamente al espacio del carácter siguiente.
5 Pulse CD TEXT/edit en el mando a distancia para guardar
el texto creado y volver al menú de edición de texto.
6 Para salir del menú de edición de texto pulse Ç.
Borrado o sustitución de un carácter
1 Pulse à o á en el mando a distancia para desplazarse a
la posición del carácter que va a borrar o a sustituir.
➜ El carácter comenzará a parpadear.
2 Si desea borrar el carácter:
Pulse DELETE en el mando a distancia.
➜ El carácter se borrará y el texto se desplazará una
posición a la izquierda.
Si desea sustituir el carácter:
Use las teclas numéricas/alfabéticas en el mando a distancia
para seleccionar un nuevo carácter.
00
Para cambiar a otro carácter pulse à o á en el mando a
distancia.
Copia automática de texto
Si se ha almacenado el nombre del intérprete de una pista,
se copiará automáticamente en la pista siguiente.
Page 68

Localización y solución de averías
68
ADVERTENCIA
Bajo ningún concepto deberá intentar reparar el equipo usted mismo,ya que
anularía la garantía.No abra el aparato o podría sufrir una descarga eléctrica.
Si se produjera un fallo,compruebe los puntos relacionados más abajo antes
de llevar a reparar el equipo.Si no pudiese solucionar un problema siguiendo
las sugerencias que se exponen a continuación,consulte a su proveedor o al
servicio técnico.
Seguridad láser
Este aparato emplea un láser.Sólo el personal de servicio técnico
debidamente cualificado debe retirar la cubierta o intentar llevar a cabo
trabajos de reparación,debido a posibles lesiones oculares.
Problema Solución
No se enciende – Asegúrese de que el cable de red está conectado correctamente.
– Pulse 2 STANDBY·ON en el equipo para activarlo.
No hay sonido – Compruebe que las conexiones de audio han sido realizadas correctamente.
– Asegúrese de que las pistas MP3 han sido grabadas con el formato correcto.
No hay respuesta a los controles – Desconecte el equipo de la alimentación eléctrica, vuelva a conectarlo
pasados unos segundos.
Inicio automático de la visualización
– Mantenga pulsada Ç en el equipo al menos 5 segundos para cancelar el
permanente de funciones (modo demostración)
modo demostración.
El mando a distancia no funciona – Quite las pilas e insértelas correctamente o inserte nuevas pilas.
correctamente – Reduzca la distancia al equipo.
Indicación WRONG DISC, USE AUDIO CD – Compruebe que el disco no está rayado o sucio. Cambie o limpie el disco.
y INSERT DISC – Compruebe que se ha insertado el disco, cara impresa hacia arriba.
– Compruebe que no ha insertado un DVD.
– Espere hasta que la lente empañada del láser quede limpia.
Indicación WRONG DISC, USE CDR<W> WITH
– Se ha insertado un CDR(W) de ordenador.Asegúrese de que se ha insertado
`DIGITAL AUDIO´ LOGO y INSERT DISC
un disco digital de audio, con la marca «Digital Audio» y el logotipo especial.
Indicación NO SIGNAL o – Compruebe que el cable de conexión está correctamente conectado.
indicación CHECK INPUT – Seleccione la entrada correcta.
– Asegúrese de que el aparato externo está activado.
Indicación OVERHEATING –
No coloque el equipo encima de otro material que pueda calentarlo (p.ej. un receptor).
No graba – Asegúrese de que el CDR(W) esté completamente libre de rayaduras y de
partículas de polvo.
– Compruebe que ha insertado un CDR(W) de audio digital y asegúrese de
que no está finalizado.
Se interrumpe la grabación – Use CDR(W)s de audio Philips.
– En caso de interrupción del proceso de grabación (pérdida de potencia, golpe
mecánico) reinicie la grabación con un nuevo disco.
El disco grabado no se reproduce en – Asegúrese de que el CDR(W) está finalizado.
otro reproductor de CD estándar – Inser te el CDRW en un reproductor de CD compatible con CDRW.
Se pierden directorios de CD MP3 – Sólo se mostrarán álbums con archivos reproducibles.
El tiempo de grabación transcurrido – Este es el compor tamiento normal si esta pista MP3 tiene una velocidad
de una pista MP3 se cuenta muy rápido de bit variable.
o irregularmente
Las pistas grabadas se confunden
– Use otro modo de incremento de pista.
o las pistas no se inician o detienen – Introduzca el incremento de pista manualmente con el mando a distancia.
en el momento correcto
Español
Page 69

SISTEMA DE AUDIO
Mano de obra gratis por un año
Servicio gratis por un año para piezas
Para reparaciones, hay que presentarse en persona con este producto.
GARANTIA LIMITADA
¿QUIEN TIENE PROTECCION?
Usted debe tener su comprobante de venta para recibir servicio bajo
la garantía. Una nota de venta u otro documento mostrando que
usted compró el producto se considera un comprobante de venta.
¿QUE CUBRE?
La protección bajo la garantía comienza el mismo día en que usted
compra el producto. Durante un año a partir de esta fecha, todas las
piezas serán reparadas o reemplazadas gratis y no se cobrará mano
de obra. Después de este plazo de un año, usted tendrá que pagar el
costo del reemplazo o reparación de las piezas y también toda mano
de obra.
Todas las piezas, inclusive las piezas reparadas y de repuesto, tienen
cobertura sólo durante el período de la garantía original. Una vez que
venza la garantía del producto, la garantía de cualquier pieza reemplazada o reparada también habrá vencido.
¿QUE EXCLUYE LA GARANTIA?
Su garantía no cubre:
• cobros por mano de obra durante la instalación o montaje del
producto, ajuste de los controles del cliente o de preferencia e
instalación o reparación de los sistemas con antena fuera de la
unidad.
• reparación del producto y/o reemplazo de piezas, a raíz de uso
indebido, accidente, reparación no autorizada u otra causa no bajo
el control de Philips Consumer Electronics Company.
• problemas de recepción ocasionados por condiciones de señales
o sistemas de cable o de antena fuera de la unidad.
• un producto que requiera modificación o adaptación para que
opere en un país que no sea el país para el que fue concebido, fabricado, aprobado y/o autorizado, o la reparación de productos
dañados por tales modificaciones.
• daños incidentales o consecuentes que resulten del producto.
(Algunos estados no permiten la exclusión por daños incidentales
o consecuentes, de modo que es posible que la exclusión arriba
indicada no le sea aplicable a usted. Esto incluye, sin limitarse,
materiales pregrabados con o sin amparo de derechos de autor.)
• Una unidad que se ha comprado, usado o reparado fuera de los
EE.UU., Puerto Rico, las Islas Virgenes y el Canadá, o que se ha
usado para fines comerciales o institucionales (inclusive productos
usados con fines de arrendamiento, pero sin limitarse a éstos).
¿DONDE SE OBTIENE SERVICIO?
El servicio de garantía está disponible en todos los países con distribución oficial del producto por Philips Consumer Electronics
Company. En países donde Philips Consumer Electronics Company
no distribuye el producto, la entidad local de servicio Philips tratará
de brindar servicio (aunque puede haber demora si las piezas de
repuesto o manuales técnicos correspondientes no están fácilmente
disponibles.
NO SE OLVIDE DE GUARDAR…
Favor de guardar su nota de venta y otros materiales para comprobar
la compra del producto.Adjúntelos a este manual de instrucciones y
reténgalo a la mano. Favor de retener también la caja y material de
empaque originales en caso de tener que devolver el producto.
ANTES DE LLAMAR PARA OBTENER SERVICIO…
Sírvase chequear su manual de instrucciones. Algunos ajustes de los
controles según las indicaciones en el manual podrían ahorrarle una
llamada para servicio.
PARA SERVICIO DE GARANTIA EN LOS EE.UU.,
PUERTO RICO O LAS ISLAS VIRGENES…
Lleve el producto a un centro de servicio Philips (ver lista adjunta) o
a un centro de servicio autorizado para reparaciones. Una vez terminada la reparación del producto, usted debe recogerlo del centro. Los
centros tienen derecho a guardar toda pieza defectuosa.
(En los EE.UU., Puerto Rico o las Islas Vírgenes, toda garantía implícita, inclusive las garantías implícitas de comerciabilidad y aptitud para
un propósito en particular, están limitadas en cuanto a duración al
plazo de esta garantía expresa. Puesto que algunos estados no permiten limitaciones sobre la duración de una garantía implícita, es posible que la limitación arriba indicada no le sea aplicable a usted.)
PARA SERVICIO DE GARANTIA EN EL CANADA…
Favor de comunicarse con Philips al:
1-800-661-6162 (francófono)
1-800-363-7278 (anglófono)
(En el Canadá, esta garantía es otorgada en lugar de toda otra garantía. No se otorga ninguna otra garantía expresa ni implícita, comprendiéndose aquí ninguna garantía implícita de comerciabilidad o
aptitud para propósito alguno. Philips no será responsable bajo circunstancia alguna por daños y perjuicios directos, indirectos, especiales, incidentales o consecuentes, independientemente de la manera
ocasionada, aún con notificación de la posibilidad de los mismos.)
RECUERDE…
Favor de anotar los números de modelo y serie del producto en el
espacio abajo.También, sírvase llenar y enviar oportunamente su tarjeta de registro de la garantía.Así nos será más fácil notificarle en
caso de ser necesario.
Modelo No. _______________________________________
Serie No. _______________________________________
EL4965S005 / MAC 4110 / 1-97
Esta garantía le otorga derechos legales específicos y usted podría gozar de otros derechos que varían de un estado a otro.
Philips Service Solutions Group, P.O. Box 2976, Longview,Texas 75606 USA, (903) 242-4800
Page 70

70
Page 71

71
Page 72

IB8340T001 / VieEvS0210
English Français Español
PHILIPS CONSUMER ELECTRONICS COMPANY
A Division of Philips Electronics North America Corporation
Knoxville,Tennessee 37914-1810, U.S.A.
W
Printed in China
3103 306 1873.1
CLASS 1
LASER PRODUCT
 Loading...