

Page 1
Audio CD Recorder
CDR778
•
Instructions for use
•
Mode d'emploi
•
Instrucciones de manejo
•
Instructions for use
•
Mode d'emploi
•
Instrucciones de manejo
•
Bedienungsanleitung
•
•
Instructions for use
•
Mode d'emploi
•
Instrucciones de manejo
•
Page 2

Philips Authorised Service Centres
To contact your nearest Philips Authorised Service Centre call 1300-36-13-92
from anywhere in Australia.
Sydney
Canberra
Adelaide
Newcastle
Melbourne
Hobart
Perth
Brisbane
Wollongong
Service is provided through 350 accredited service dealers throughout
Australia. To find out about your nearest centre, call 1300 36 13 92.
Please record the following information for your records and keep in a safe
place.
Model No:....................................................
Serial No:....................................................
Please retain your purchase receipt which is required
to claim service under warranty.
Philips Consumer Electronics Australia Limited
ACN 008 445 743, 3 Figtree Drive
Homebush NSW 2140
Thank-you for purchasing this quality Philips product.
Philips New Zealand Ltd guarantees this product against defective components and faulty workmanship for a period of 12 months. Any defect in materials or workmanship occurring within 12 months from the date of purchase
subject to the following conditions will be rectified free of charge by the
retailer from whom this product was purchased.
Conditions
1. The product must have been purchased in New Zealand. As proof of pur-
chase, retain the original sales docket indicating the date of purchase.
2. The guarantee applies only to faults caused by defective components, or
faulty workmanship on the part of the manufacturer.
3. The guarantee does not cover failures caused by misuse, neglect, normal
wear and tear, accidental breakage, use on the incorrect voltage, use contrary to operating instructions, or unauthorised modification to the product
or repair by an unauthorised technician.
4. Reasonable evidence (in the form of a sales docket) must be supplied to
indicate that the product was purchased no more than 12 months prior to
the date of your claim.
5. In the event of a failure, Philips shall be under no liability for any injury, or
any loss or damage caused to property or products other than the product
under guarantee.
This guarantee does not prejudice your rights under common law and statute,
and is in addition to the normal responsibilities of the retailer and Philips.
How to claim
Should your Philips product fail within the guarantee period, please return it
to the retailer from whom it was purchased. In most cases the retailer will be
able to satisfactorily repair or replace the product.
However, should the retailer not be able to conclude the matter satisfactorily,
or if you have other diffi-culties claiming under this guarantee, please contact
The Guarantee Controller
Philips New Zealand Ltd.
4 P.O. Box 41.021
Auckland
3 (09) 84 94 160
fax 3 (09) 84 97 858
NEW ZEALAND
Guarantee and Service for New Zealand
Philips Product Warranty
(FOR AUSTRALIA ONLY)
Warranty conditions valid for Colour Television, Video
Cassette Recorders, CD Recordable, DVD Players,
Audio Systems, and Portable Audio.
The benefits given to the purchaser by this warranty are in addition to all
other rights and remedies which the purchaser has in respect of the product
under the Trade Practices Act or other Commonwealth or State Law.
Philips Consumer Electronics warrants its products to the purchaser as
follows and subject to the stated conditions.
12 months free service
Conditions of warranty
1. All claims for warranty service should be made to your nearest Philips
Authorised Service Center. Reasonable evidence of date of purchase
must be provided.
2. This warranty extends only to defects occurring under normal use of the
product when operated in accordance with the instructions.
3. Home service within the normal service area of one of our Authorised
Service Centres will be provided for television receivers with screen
size 48cm and above. All other products are to be brought or sent to
your nearest Authorised Service Centre.
4. This warranty does not cover:
a) Mileage or traveling time, pickup or delivery, cost of insurance.
b) Service costs arising from failure to correctly adjust the controls of
the product or to observe the instructions, or inspections that
reveal that the product is in normal working order.
c) Product failures caused by misuse, neglect, normal wear and tear,
accidental breakage, transit damage, inexpert repairs or modification by unauthorised persons, lightning strikes, vermin infestation
or liquid spillage.
d) Cleaning of video or audio heads.
e) Inadequate receiving antennae.
f) Replacement of worn or used batteries, styli or other consumables.
The conditions contained in this warranty replace and override the provision
of the World-Wide Guarantee for products sold in Australia.
AUSTRALIA
Philips product warranty for Australia
2
Page 3

3
CONTENTS
English ....................................................5
Français.................................................31
Español .................................................57
................................................83
EnglishFrançaisEnspañol
Page 4
4
LASER
Type Semiconductor laser GaAlAs
Wave lenght 775~795 nm (at 25° C)
Output Power 2,5 mW (Read)
35 mW (Write)
Beam divergence 60 degree.
Read carefully the information located at the back plate of
your CD recorder/player and enter below the Serial N°.
Retain this information for future reference.
Model No. ..............CDR778..........................................
Serial No...............................................................................
For Customer Use:
CAUTION
INVISIBLE LASER RADIATION WHEN OPEN AVOID
EXPOSURE TO BEAM
Note : This warning is located inside the enclosure
This unit employs a laser. Due to possible eye injury, only a
qualified service person should remove the cover or attempt
to service this device.
LASER SAFETY
CAUTION
USE OF CONTROLS OR ADJUSTMENTS OR
PERFORMANCE OF PROCEDURES OTHER THAN THOSE SPECIFIED
HEREIN MAY RESULT IN HAZARDOUS RADIATION EXPOSURE OR
OTHER UNSAFE OPERATION.
Es necesario que lea cuidadosamente su in-struc-ti-vo de
manejo.
Descripción: ..................Grabadora de CD
Modelo : ......................CDR778
Alimentación:................110–127/220–240 V; ~50–60 Hz
Consumo: ......................20 W
Importador: ..................Philips Mexicana, S.A. de C.V.
Domicilio:......................Norte 45, # 669, Col. Industrial
Vallejo
Localidad y Telefono:....C.P. 02300 México D.F., Tel. 7284200
Exportador:....................Philips HK, Ltd.
País de Origen: ............China
Nº de Serie: ..................________________________
LEA CUIDADOSAMENTE ESTE INSTRUCTIVO
ANTES DE USAR SU APARATO.
México:
PRECAUCION - ADVERTENCIA
NO ABRIR, RIESGO DE CHOQUE ELECTRICO
ATENCION
VERIFIQUE QUE EL VOLTAJE DE ALIMENTACION
PARA EVITAR EL RIESGO DE CHOQUE ELECTRICO, NO QUITE LA TAPA;
EN CASO DE REQUERIR SERVICIO, DIRIJASE AL PERSONAL AUTORIZADO DE PHILIPS.
SEA EL REQUERIDO PARA SU APARATO
CLASS 1
LASER PRODUCT
Page 5
110
Es necesario que lea cuidadosamente su instructivo de manejo.
MEXICO
PRECAUCIÓN - ADVERTENCIA
No abrir, riesgo de choque eléctrico
Verifique que el voltaje de alimentación
Para evitar el riesgo de choque eléctrico, no quite la tapa.
En caso de requerir servicio, dirijase al personal calificado.
ATENCIÓN
sea el requerido para su aparato
POLIZA DE GARANTÍA
ESTA POLIZA ES GRATUITA
Este aparato ha sido cuidadosamente diseñado y se ha fabricado con los mejores materiales bajo un estricto
control de calidad, garantizando su buen funcionamiento por los periodos establecidos según el aparato (ver
lista en la parte inferior) a partir de la entrega del aparato al consumidor. Esta póliza incluye la
reparación o reposición gratuita de cualquier parte o componente que eventualmente fallase y la
mano de obra necesaria para su reparación, misma que se hará efectiva en cualquiera de nuestros
centros de servicio autorizados en el país.
Si su aparato llegase a requerir de nuestro servicio de garantía, acuda al centro de servicio más cercno a su
domicilio, de tener alguna duda por favor llame a nuestra central de servicio al tel.: 728 4252, y en el interior
del país LADA sin costo al 01 800 506 9200 en donde con gusto le indicaremos el cetro de servicio autorizado
más cercano a su domicilio.
PHILIPS MEXICANA S.A. de C.V. a través de sus centros de servicio autorizados reparará y devolverá a usted
su aparato en un plazo no mayor a 20 días hábiles, contados a partir de la fecha de ingreso, impresa en la
orden de servicio de cualquiera de nuestros centros de servicio autorizados.
La garantía de esta póliza cubre cualquier desperfecto o daño eventualmente ocasionado por los
trabajos de reparación y/o traslado del aparato en el interior de nuestros centros de servicio
autorizados.
Esta póliza sólo tendrá validez, si está debidamente requisitada, sellada y firmada por la casa
vendedora, en caso de extravío de esta póliza, podrá hacer efectiva su garantía con la presentación de su
factura de compra.
ESTA POLIZA NO SE HARÁ EFECTIVA EN LOS SIGUIENTES CASOS:
• Cuando el aparato sea utilizado en condiciones anormales y los daños o desperfectos que manifieste sean
causados por mal trato, descuido o mal uso.
• Cuando el aparato no haya sido operado de acuerdo a su instructivo de uso, en donde se señalan las
condiciones normales de operación, los valores nominales y las tolerancias de las tensiones (voltaje),
frecuencia (ciclaje) de alimentación eléctrica y las características que deben reunir las instalaciones auxiliares.
• Cuando la causa de la falla o mal funcionamiento sea consecuencia de una reparación inadecuada o
alteración producida por personas no autorizadas por PHILIPS MEXICANA S.A. de C.V.
• Cuando los datos de esta póliza hayan sido alterados o modificados.
• Por fenómenos naturales no imputables a la empresa tales como: temblores, inundaciones, incendios,
descargas eléctricas, rayos, etc.
PERIODOS DE GARANTÍA
12 MESES. – Televisores, videocaseteras, proyectores, cámaras de video, decodificadores de señal (IRD), T.V.
hotel, sistemas de observación, televisores de proyección, teléfonos celulares, pagers, equipos
modulares, sintoamplificadores.
6 MESES. – Radio grabadoras con y sin compact disc, mini reproductores de cassette, reproductor de CD
portátil, radio relojes, radios A.M.F.M., auto estéreos, teléfonos inalámbricos.
3 MESES. – Accesorios, controles remotos y bocinas.
MC-719-ARCO
Page 6

TABLE OF CONTENTS
English
5
Table of contents
GENERAL INFORMATION AND DISCS
Welcome ......................................................................6
About this manual........................................................6
Technical data ..............................................................6
Discs for recording.......................................................7
Discs for playback........................................................7
Maintenance ................................................................7
Accessories .................................................................7
CONTROLS AND CONNECTIONS
Controls on the front....................................................8
Connections at the back ..............................................9
DISPLAY
DISPLAY indications.....................................................9
DISPLAY messages....................................................10
MENU messages........................................................11
INSTALLATION
Connections general ..................................................11
Analogue connections CD recorder & CD player ......12
Analogue connections CD player deck......................12
Digital coaxial connections CD recorder ...................13
Digital optical connections CD recorder....................13
Power supply..............................................................14
Setup recommendations............................................14
Inserting batteries in the remote control ..................14
REMOTE CONTROL
Remote control commands ........................................15
Inserting discs............................................................15
RECORDING
Remarks about recording...........................................16
Recording modes........................................................16
High speed recording from internal CD player..........17
Listen mode recording from internal CD player ........18
Manual recording from external CD player...............19
Autostart recording from external
CD player - CD SYNC.................................................20
Finalising CDR & CDRW discs...................................21
Unfinalising CDRW discs...........................................21
Erasing CDRW discs ..................................................22
PLAYING
Play a 2-disc changer (Changer mode) ......................23
Playing CDs on Deck 1 and/or Deck 2 (DJ mode) .....23
Selecting a track ........................................................24
Search ........................................................................24
Shuffle (random order) play .......................................24
Repeat CD, track or program .....................................24
PROGRAMMING
Remarks about programming.....................................25
MENU MODE
Remarks about Menu mode.......................................26
General operation of Menu .......................................26
A. Text input ...............................................................27
B. Erasing text............................................................27
C. Reviewing CD Text memory...................................28
D. Auto track increment.............................................29
E. Balance...................................................................29
FIXING PROBLEMS
Troubleshooting..........................................................30
Page 7

English
6
Welcome !
Thank you for buying this Philips Compact Disc Recorder /
Player Double Deck.
In the eighties Philips invented a new audio system - the CD.
The CD (compact disc) revealed to you the new dimensions of
digital sounds and added to the pleasures of audio.
Compact disc technology permits a high contrast in loud as
well as in quiet passages, with perfect channel separation.
Philips has now further developed compact disc technology
and the result is the CD recorder.
With your Philips CD recorder/player, you can make your own
high-quality audio CDs (subject only to legal restrictions on
copying), either by recording at normal or high speed from the
Player to the Recorder, or by recording from an external
source. And naturally, you can also play all pre-recorded audio
CDs, using one or both decks individually, or together as a 2deck changer.
It is forbidden to copy material protected by copyright,
including computer programs, films, television and audio
recordings. This appliance may not be used for such
applications.
This manual gives instructions for operating this CD recorder
where:
- the figures (1) throughout the text indicate a sequence of
actions necessary to perform a certain operation;
- the arrows (➜) indicate the reaction from the recorder;
- the dots (•) indicate remarks, advice or special options
within a sequence of actions. The dot-marked instructions
are not necessary for the required operation.
Subject to modification without notice.
General
Power consumption ..........................................................20 W
Power consumption in Standby ..........................................6 W
Operating temperature ..................................................5-35° C
Weight ..............................................................................4.5 kg
Dimensions ..................................................435 x 310 x 88 mm
Audio
Frequency response ........................................20Hz - 20000 Hz
Playback S/N (A-weighted) ............................................100 dB
Playback S/N .................................................................. 100 dB
Playback dynamic range CDR ..............................95 dB (90 dB)
Playback dynamic range CD..............................................90 dB
Playback total harmonic distortion CDR........88 dB = 0.0033 %
Playback total harmonic distortion CD..........85 dB = 0.0056 %
Channel separation ........................................................100 dB
Recording S/N (A-weighted) ............................................98 dB
Recording S/N digital without SRC ..................equal to source
Recording dynamic range..................................................92 dB
Recording total harmonic distortion + noise..............................
........................................................................85 dB (0.0056%)
Technical data
About this manual
GENERAL INFORMATION
Page 8
English
7
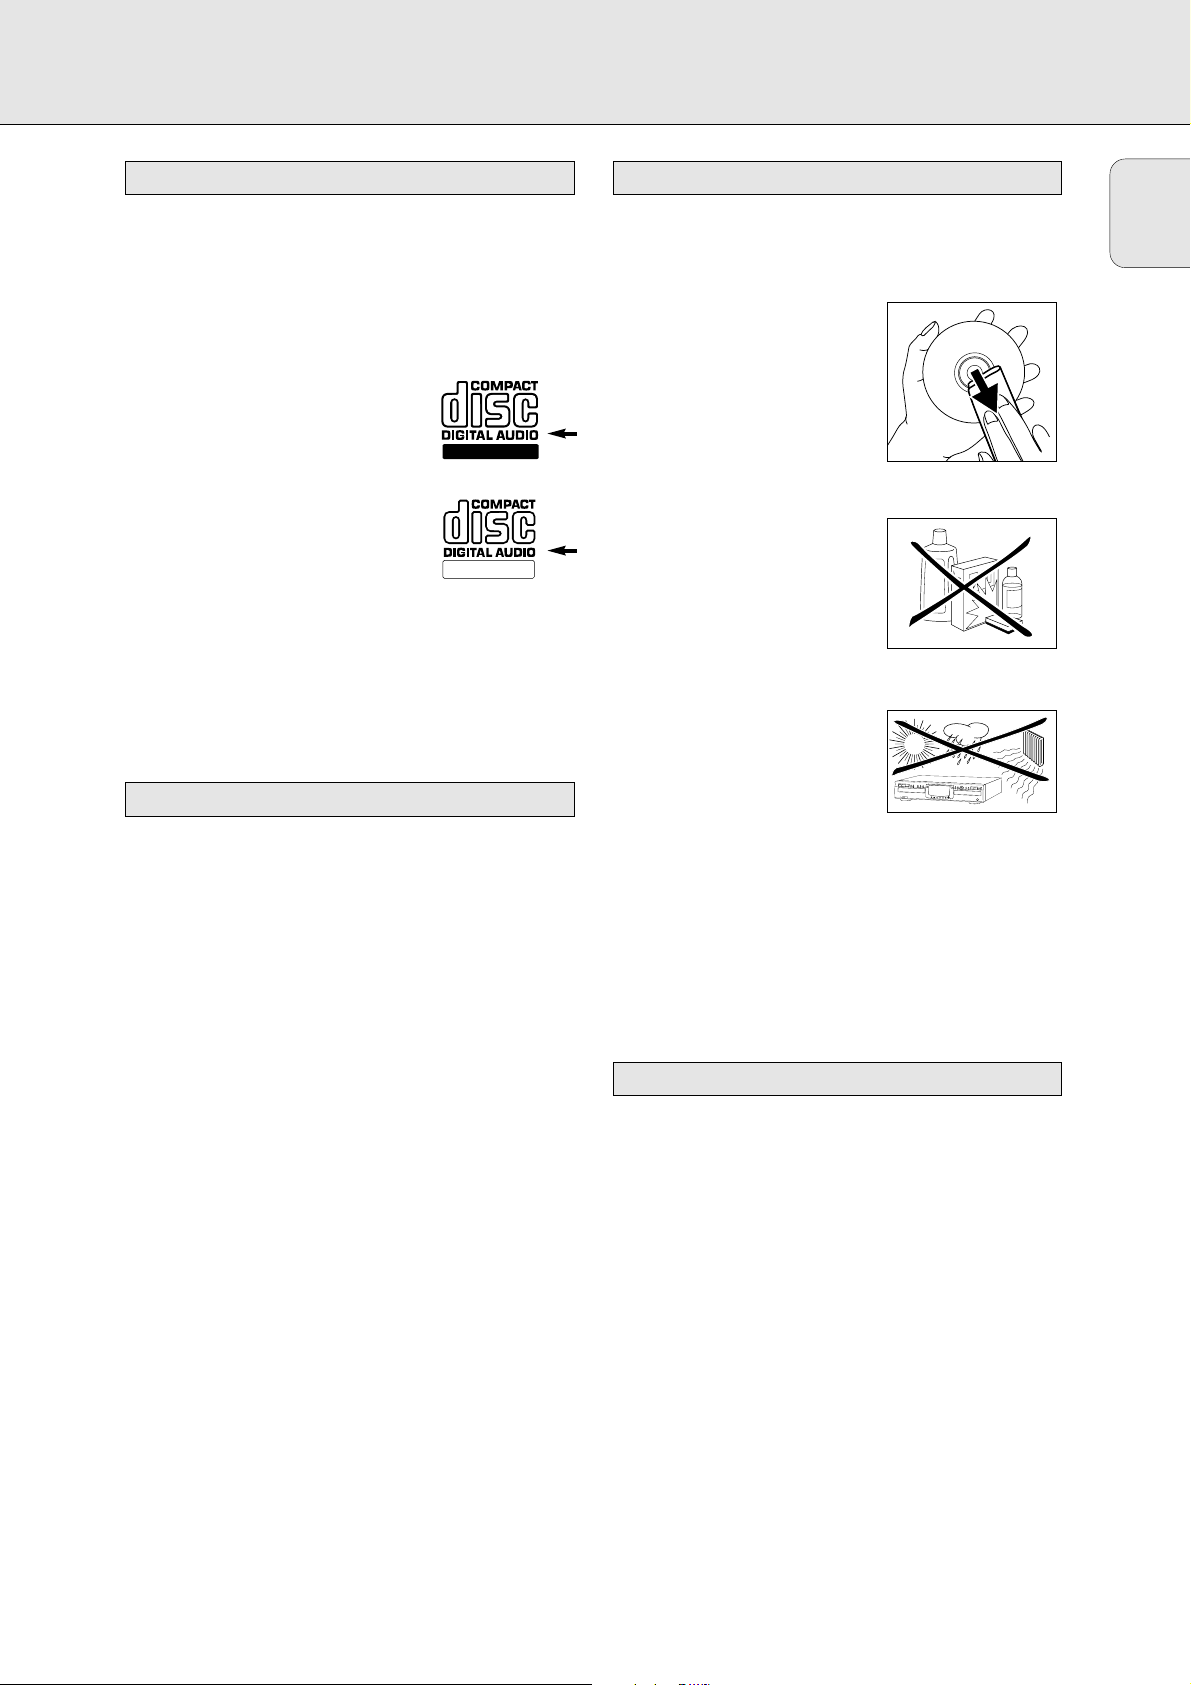
For recording use, special audio discs must be used (for music
only). These Discs bear the logos as shown below. The text
‘DIGITAL AUDIO’ is present!
Your recorder uses two types of discs for recording purposes:
- CD-Audio Recordable (CDR) discs:
fully recorded and finalised, these discs
play on all CD players and recorders.
- CD-Audio ReWritable (CDRW) discs:
can be recorded, erased and re-recorded
hundreds of times. When finalised, they
play on CDRW compatible CD
players and recorders. In the course of
1999 most Philips CD players and recorders will be CDRW
compatible.
Important:
To ensure proper working of the set we recommend the use of
Philips audio CDR and audio CDRW discs only.
Your CD recorder is able to play:
- All pre-recorded audio CDs.
- All Audio CDR and Audio CDRW.
Note: CDR(W) discs recorded with a computer can only be
used when they are correctly treated according the
audio standard (IEC958: Consumer part). Single session
only!
For recording it is very important to use dust and scratch free
discs.
To clean a CD, wipe it in a straight
line from the center toward the edge
using a soft, lint-free cloth. A
cleaning agent may damage the
disc! Write only on the printed side
of a CDR or CDRW, and only with a
soft felt-tipped pen.
Clean the CD recorder with
a soft, slightly dampened lint-free
cloth. Do not use any cleaning
agents as they may have a corrosive
effect.
Do not expose the CD recorder,
batteries or CDs to humidity, rain,
sand or excessive heat (caused by
heating equipment or direct
sunlight).
Always keep the tray closed to avoid dust on the lens.
The lenses may cloud over when the CD recorder is suddenly
moved from cold to warm surroundings. It is not possible to
play a CD then. Leave the CD recorder in a warm environment
until the moisture evaporates.
- 2 Analogue audio cables (with red and white plugs)
- 1 Digital coaxial cable (with black plugs)
- Power cord
- 2 Batteries
- Remote control
- Guarantee
Accessories
Maintenance
Discs for playback
ReWritable
Recordable
Discs for recording
GENERAL INFORMATION AND DISCS
O
P
E
N
/
C
L
O
S
E
P
L
A
Y
/
P
A
U
S
E
S
T
O
P
A
U
D
I
O
C
D
R
E
C
O
R
D
A
B
L
E
/
R
E
W
R
I
T
A
B
L
E
Page 9
English
8
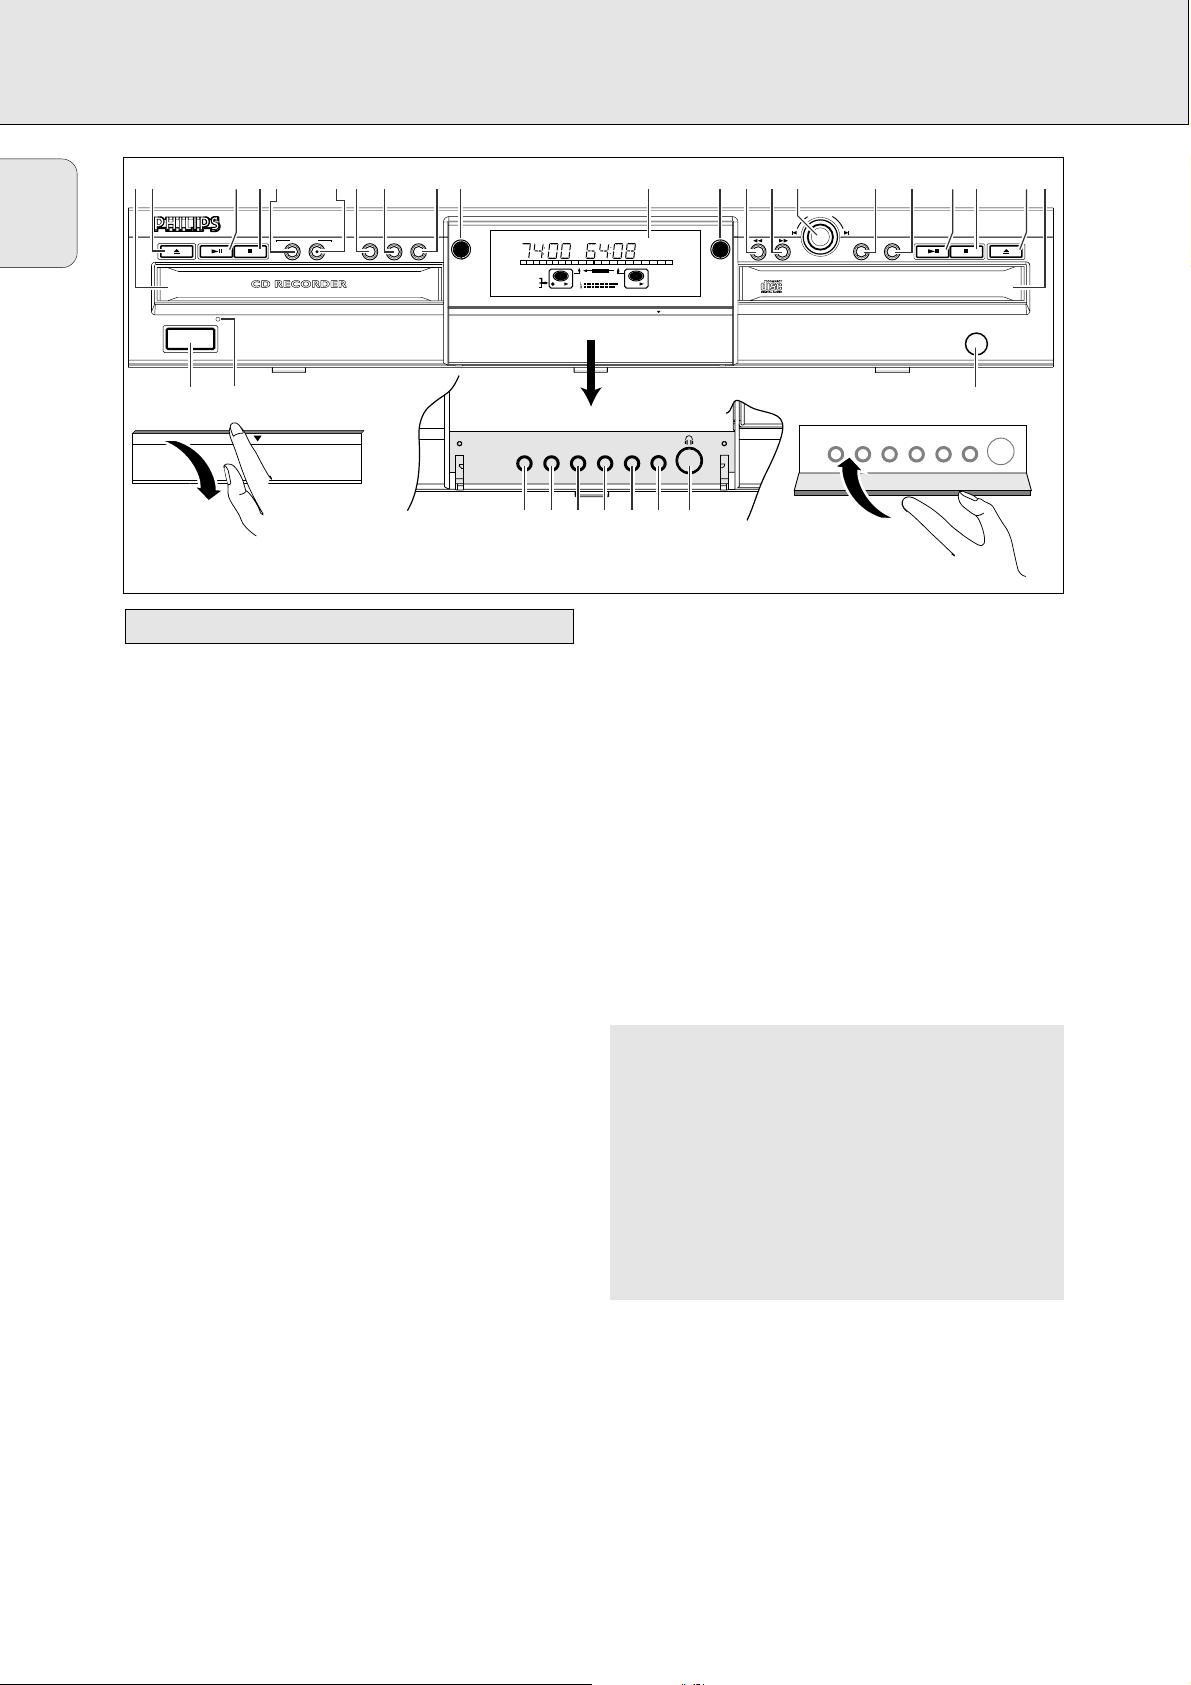
CD recorder
1 POWER ON/OFF ........turns the CD recorder ON or OFF (if
the recorder is in Standby mode,
any key press will activate the CD
recorder)
2 Standby indicator
3 Disc tray
4 OPEN/CLOSE /..........opens/closes disc tray
5 PLAY/PAUSE 2;......starts play/interrupts play or
recording
6 STOP 9........................stops/clears a program
7 RECORDING-TYPE ......selects recording modes
8 RECORDING-RECORD…starts recording, finalising,
erasing
9 FINALIZE ....................selects finalise mode
0 ERASE..........................selects erasing mode (disc or track)
! EXT SOURCE ..............selects external input source
@ CDR ............................selects CD recorder deck
display/keys
CD player
$ CD ..............................selects CD player deck
display/keys
) PLAY/PAUSE 2;......starts play/interrupts play
¡ STOP 9........................stops/clears a program
™ OPEN/CLOSE /..........opens/closes disc tray
£ Disc tray
General
# Display ..........................information screen
% Q ............................- searches backward
- cursor control in Menu/Prog.
review mode
^ R ............................- searches forward
- cursor control in Menu/Prog.
review mode
& ¡ EASY JOG ™ ........- previous/next track (Play and
(rotate) Program mode)
- recording level control (recording)
- selects settings (menu on)
ENTER..........................- plays selected tracks
(push) - selects settings in Menu mode
- programs track numbers
* STORE/MENU ............- enters Menu mode
- stores Menu settings
( CANCEL/DELETE ......- deletes tracks from a program
- deletes text in Menu mode
- returns to a higher level in the
menu
≤ IR sensor ....................receives signals from the remote
control
∞nn................................socket for headphones
§ DJ MODE ....................separate play of CD recorder deck
and CD player deck
≥ REPEAT........................repeats play (All, program or track)
• SCROLL........................activates scrolling of text over the
display (once)
ª DISPLAY......................selects display information,
permanent text scrolling and time
º SHUFFLE......................plays CD(RW) or program in
random order
⁄ PROG(ram) ..................opens/closes program memory
Note: Unless stated otherwise, all controls are on the front of
the CD recorder. When provided on the remote control,
you can also use the corresponding buttons, after
selecting the CD recorder deck or CD player deck by
pressing CDR or CD.
Controls on the front
CONTROLS AND CONNECTIONS
34 567 89 0 !@ $ % ^ & * ( )¡ £™
CDR 778 AUDIO CD RECORDER
OPEN/CLOSE PLAY / PAUSE STOP OPEN/CLOSEPLAY / PAUSE STOP
POWER ON/OFF
RECORDING
TYPE
RECORD
FINALIZE ERASE EXT SOURCE
DOUBLE SPEED
CDR
CDR
OPTICAL
REC
REM
TIME
3
45
9
678
1
10 11 12 13 14 15
2
CD
II
RW
21
PUSH DOWN TO OPEN
OPEN
#
EASY JOG
TIME
TOTAL
16 17
18 19 20
RECORD
PROG
CD
+
PUSH DOWN TO OPEN
CD
CD
STORE/MENU CANCEL/ DELETE
ENTER
AUDIO CD PLAYBACK
IR SENSOR
≤
DJ MODEREPEATSCROLLDISPLAYSHUFFLEPROG
CLOSE
∞§≥•ªº⁄
Page 10
English
9
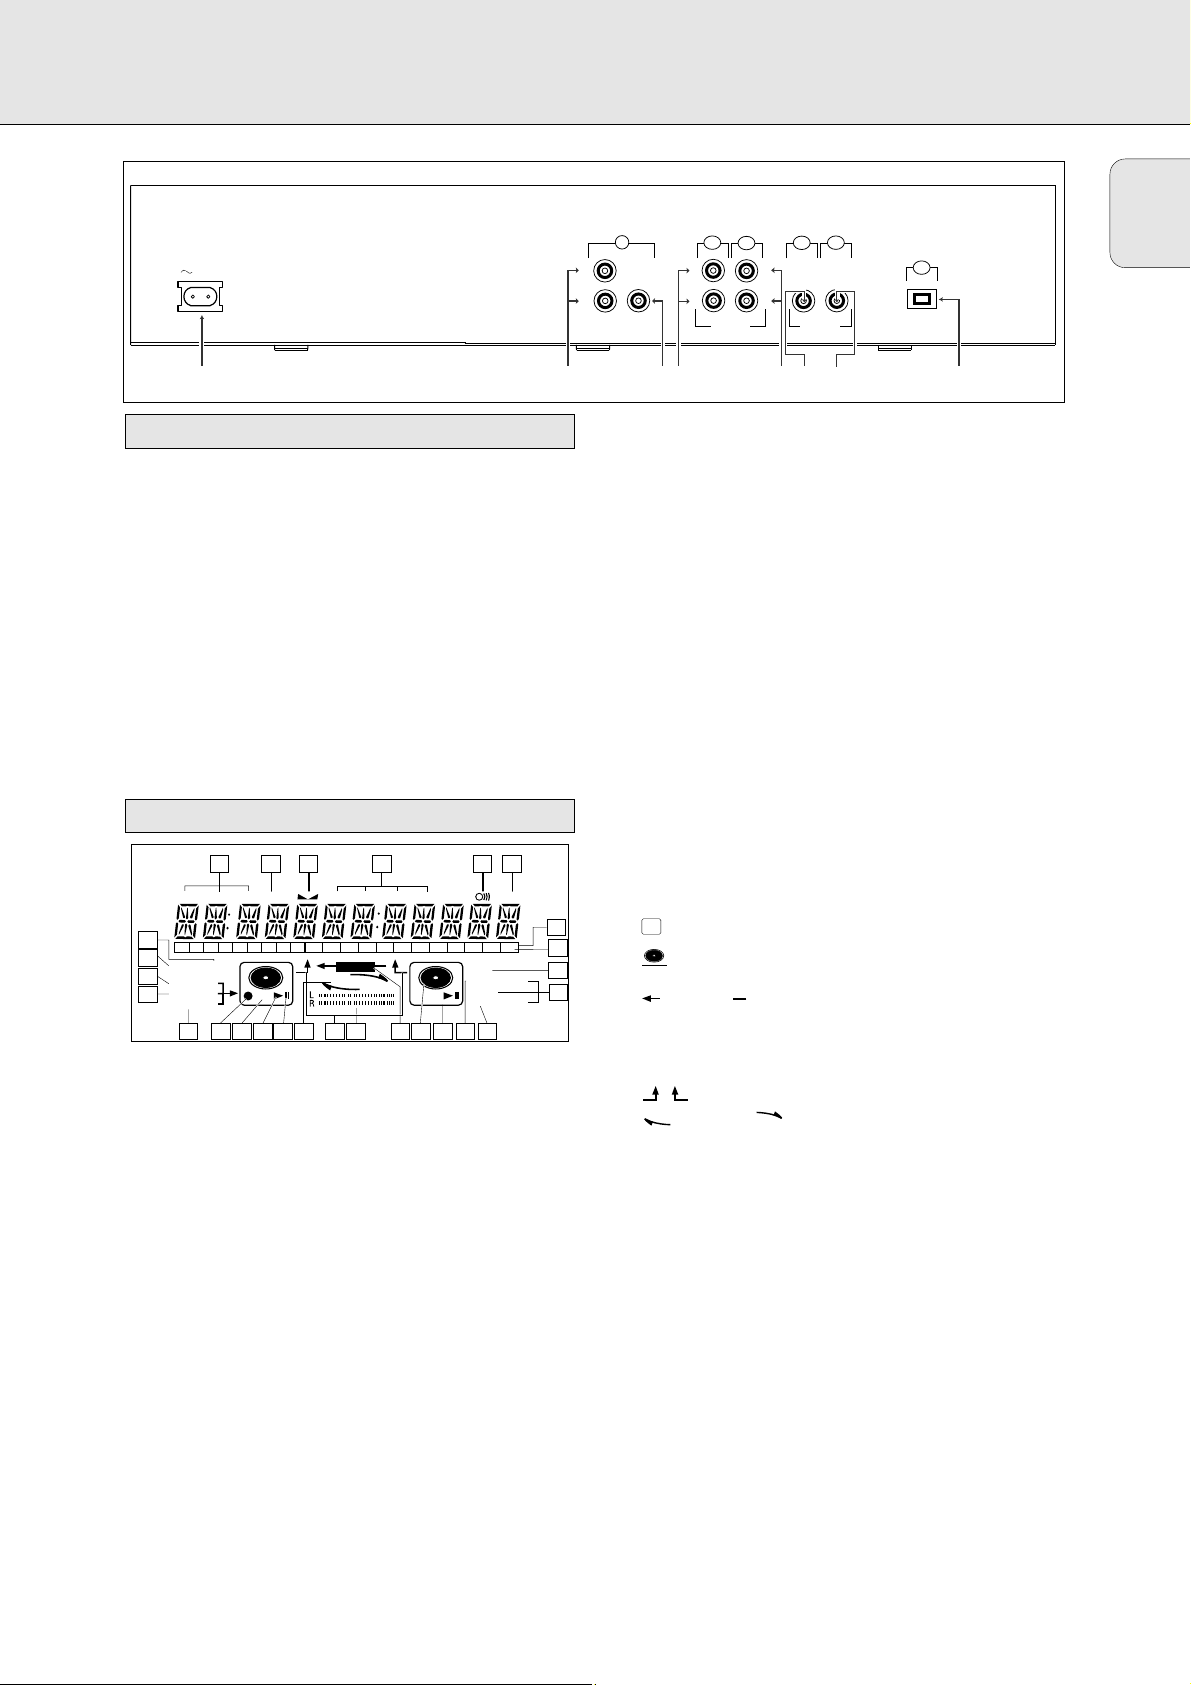
1 Connection to power supply
2 ANALOG OUT CD ....connects CD player deck to the
line input of an amplifier (left and
right)
3 DIGITAL OUT CD ......connects CD player deck to the
digital coaxial input of e.g.
amplifier or recording device
4 ANALOG IN ................connects to the line output of an
amplifier (left and right)
5 ANALOG OUT CDR & CD
......................................connects to the line input of an
amplifier (left and right)
6 DIGITAL IN..................connects to the digital coaxial
output of an external CD player
7 DIGITAL OUT CDR & CD
......................................connects to the digital coaxial
input of e.g. amplifier or recording
device
8 OPTICAL IN ................connects to the digital optical
output of an external CD player
Connections at the back
CONTROLS AND CONNECTIONS DISPLAY
1 REM/REC TIME ..........remaining time/remaining
recording time/recording time
2 TRACK ........................track number
3
FE
..............................balance (lights during balance
adjustment)
4 TOTAL REM
TRACK TIME ..............total or remaining time of disc or
track
5 } ................................remote control active
6 STEP ............................indicates the number of tracks in a
program
7 Track bar ....................indicates:
- tracks on a disc or in a program
- track in play
8 + 20 ..............................disc or program contains more
than 20 tracks
9 PROG(ram) ..................flashes during programming/lights
in program mode
0 REPEAT TRACK/ALL..lights up when a track/ complete
disc (or program) is repeated.
! SCAN ..........................lights up when the first 10
seconds of each track are played.
@ SHUFFLE......................plays tracks in random order
# ..............................CD player deck selected
$ ..............................CD inserted (a pre-recorded CD or
finalised CDR or CDRW disc)
% RECORD ............lights during recording from the
internal CD
^ L/R ; ; ........................record/play level bar. Indicates the
audio signal level.
& ........................DJ mode selected
* CHANGER ....changer mode selected
( ; ..................................pause function active
) B ................................lights during play
¡ R(W) ............................unfinalised CDR(W) disc inserted
™ 0 ................................lights during recording
£ ANALOG ......................- analogue input selected for
external recording
- analogue recording
≤ OPTICAL I ..................optical input I selected for external
recording
∞ DIGITAL I ....................digital input I selected for external
recording
§ SYNC ..........................automatic or synchronised start of
external recording
≥ MANUAL ....................manual start of external recording
DISPLAY indications
MAINS
1 2
CDR
DIGITAL
CDR
CD
CDR
OUTIN
IN
OPTICAL
L
R
OUT
ANALOG
CD
OUT
DIGITAL
34 5 6 7 8
CDR
CDR
CD
L
R
ANALOG
L
R
OUTIN
1 2 3 4 5
REC
REM
27
123456789
26
SYNC MANUAL
25
24
DIGITAL
OPTICAL
ANALOG
23
I
I
TIME
TRACK
10 11 12 13 14 15 16 17 18 19 20 +
RECORD
CD
RW
CHANGER
19202122
1617
18
TIME STEPTRACK
REMTOTAL
CD
RW
PROG
SHUFFLE
REPEAT
SCAN
12131415
6
7
8
9
ALL
10
TRACK
11
Page 11

English
10
Messages, as listed and explained here, may appear on the
display for your guidance.
General
READING..........................reading disc information
OPEN..................................during tray opening
CLOSE ..............................during tray closing
NO DISC ..........................no disc inserted, disc unreadable
or disc inserted upside down
PROG FULL ....................program full
INSERT DISC ..............insert disc or insert disc in correct
way
WRONG DISC ..................inserted disc is not an audio CD
UNFINALIZED ..............unfinalised CDR(W) disc
MEMORY XXù ............indicates the amount of text
memory used for unfinalised discs
Recording
WAIT..................................- when STOP 9 is pressed during
recording
- when STOP 9 is pressed during
recording the first 4 seconds of a
track
UPDATE ..........................updating disc contents
DISC FULL ....................no more recording possible
DIGITAL 1 ....................digital coaxial input 1 selected
OPTICAL ........................digital optical input selected
ANALOG ............................analogue input selected
COPY PROTECT ............no digital recording can be made
of the external source
NOTFINALIZED ............when opening the tray with an
unfinalised disc inserted
(CD recorder)
RECORD FAST ..............High Speed recording selected
REC LISTEN ..................Listen Speed recording selected
MAKE CD ..........................High Speed Recording of a
complete disc and Auto Finalise
function selected
REC EXT DISC ............Synchronised start of recording
from external source selected
REC EXT MAN................Manual start of recording from
external source selected
_XX DB ............................level is being adjusted
DOES NOT FIT ............time left on CDR(W) disc is not
enough for proposed recording
ANALOG REC ..................copy prohibited track found during
recording. Track will be copied
analogue (Copy Protection
Regulations).
ERASE TRACK ..............when erasing one or more tracks
ERASE DISC ..................when erasing a disc
FINALIZE CD ..............when finalising a disc
FINALIZED ....................when trying to finalise an already
finalised disc
CHECK INPUT ..............when RECORD is pressed while no
digital source is detected
XX XX ERASE................time countdown when erasing a
track or a disc
XX XX FINAL................time countdown when finalizing a
disc
PRESS RECORD ............to start manual recording,
finalizing or erasing
START SOURCE ............to start synchronised recording
from a source (e.g. CD player)
FINALIZED CD ............when trying to record on a
finalised CDR or a prerecorded CD
UNFINALIZE/ ................when trying to record on a
PRESS ENTER finalised CDRW
PROF SOURCE ..............when a professional source is
connected
REC TEXT ......................when reading CD text from source
disc for recording
TEXT PROTECT ............when CD text of source disc is
subjected to copy protection (CD
text will not be recorded)
Play
CHANGER MODE ............CD changer-mode selected
DJ-MODE ..........................DJ- mode selected when recording
keys are pressed in DJ-mode
PROGRAM..........................program mode selected
ALBUM TITLE ..............will be followed by album title
TRACK TITLE ..............will be followed by track title
ALBUM ARTIST ............will be followed by artist name
TRACK ARTIST ............will be followed by track artist
name
Others
NO AUDIO TR................when the recorder enters a data
track during recording
FINALIZE CD ..............laser power calibration performed
96 times, finalise disc needed
INITIALIZING ............during laser power calibration for
unfinalised discs
DISC RECOVER ............during disc recovering after power
failure
OPC ERROR ....................OPC failure during OPC procedure
(OPC = Optimum Power
Calibration)
RECORD ERROR ............recording error in menu mode
DISC ERROR ..................when trying to record on or
finalise a recovered disc
MEMORY FULL/ ..............when text memory is full. To add a
FINALIZE CD CD to the list, first finalise or
erase another disc from the list.
NOT POSSIBLE ............when trying to erase a CDR
DISPLAY messages
DISPLAY
Page 12

English
11
Menu messages
NO TRACKS ....................when attempting to edit text for a
disc which has no tracks
TEXT EDIT ....................when entering Text Edit mode
ALBUM ARTIST ............when editing or erasing an artist
name
ALBUM TITLE ..............when editing or erasing a title
ARTIST TR N................when editing or erasing an artist
name per track
TITLE TR N ..................when editing or erasing a title per
track
TEXT ERASE ..................when entering Text Erase mode
ALL TEXT ......................when entering All Text mode
ERASE OK ......................when confirmation for erasing has
to be given with ENTER key
ERASE ALL OK ............when confirmation for erasing has
to be given with ENTER key
ERASE MEMORY ............when waiting for confirmation
when erasing a disc
MEMORY VIEW ..............when selecting text review per
unfinalised disc in memory
MEMORY EMPTY ............when REVIEW is selected while no
text is in memory
AUTO TRACK ..................when selecting auto track
increment ON or OFF
ON ......................................Auto Track increment on
OFF ....................................Auto Track increment off
SET BALANCE ..............when selecting BALANCE
NO TEXT ..........................no text stored for disc
For playback on the CD recorder (and/or CD player deck) the
following outputs are present:
- Digital coaxial output (CD & CDR);
- Analogue output (CD & CDR).
We advise you to connect these to the TAPE or CDR input on
your amplifier.
For external recording the following inputs are present:
- Digital optical input;
- Digital coaxial input;
- Analogue input.
For playback of CD player deck separately (DJ mode) from the
CD recorder the following outputs are present:
- Digital coaxial output (CD);
- Analogue output (CD).
We advise you to connect these to the CD input on your
amplifier.
The connections you make will depend upon the possibilities
your audio equipment offers. Please refer to the user manuals
for your other audio equipment first.
Digital recordings (optical or coaxial) give the best
performance in audio and usability (e.g. auto-track).
(The digital optical connection is less sensitive to external
disturbances).
If your equipment does not offer digital connections, the high
quality Analogue-Digital-Convertor of your CD recorder will
ensure very good audio performance when recordings are
made from the analogue input.
Playback via the digital coaxial output of the CD recorder
gives the best audio performance.
If your equipment does not offer digital connections, the high
quality Digital-Analogue-Convertor of the CD recorder ensures
a very good sound quality via the analogue output.
We advise you to always establish both digital and analogue
connections. In this way you can always make analogue
recordings when digital recording is not possible.
We have described the most common ways of connecting the
CD recorder. If you still have difficulties with the connections
you can always contact the Philips Consumer Service desk in
your country.
Connections general
MENU messages - See Menu mode
DISPLAY INSTALLATION
REC
REM
TRACK
TIME
SYNC MANUAL
I
DIGITAL
I
OPTICAL
ANALOG
RW
RECORD
CHANGER
CD
TIME STEPTRACK
REMTOTAL
PROG
ALL
SHUFFLE
CD
REPEAT
RW
TRACK
SCAN
EASY JOG
ENTER
STORE/MENU
CANCEL/DELETE
Page 13

English
12
This connection must be made for playback on the CD
recorder deck as well as the CD player deck (cable 2).
Cable 1 is only required if you want to make recordings from
an external analogue source.
Use the audio cables supplied. Connect the red plugs to the
R sockets, and the white plugs to the L sockets.
1 For recording, connect cable 1 between the ANALOG IN-
sockets on the CD recorder and the CDR LINE- or TAPE OUTsockets of an amplifier.
Note: For recording directly from a CD player, the analogue
input of the CD recorder should be connected to the
analogue output of the CD player.
2 For playback, connect cable 2 between the ANALOG OUT-
sockets on the CD recorder and the input sockets of an
amplifier e.g. TAPE IN, CDR or AUX.
Note: Never use the PHONO input.
This connection is only required if you want to playback on
the CD player deck separately from the CD recorder deck. This
will be the case in DJ-mode.
1 For separate playback on the CD player deck, connect a
third cable 3 (not supplied) between the ANALOG OUT
sockets of the CD recorder and the input sockets of an
amplifier e.g. CD, or AUX.
(Connect the red plugs to the R sockets, and the white plugs
to the L socket.)
Note:
- Never use the PHONO input.
- Your CD recorder/player is equipped with a digital coaxial
output for the CD player deck. This output can be used for
digital playback.
Analogue connections CD player deck
Analogue connections CD recorder & CD
player
INSTALLATION
Page 14

English
13
This connection is only required if you want to make
recordings from an external CD player with a digital coaxial
output.
Use the digital coaxial cable supplied.
1 For external recording, connect the cable 4 between the
DIGITAL IN-socket on the CD recorder and the DIGITAL OUTsocket of an external CD player.
Note: Your CD recorder is equipped with a digital coaxial
output (common output for CD recorder & CD player
deck). This output can be used for digital playback.
This connection is only required if you want to make
recordings from an external CD player with a digital optical
output.
When connecting the Digital
Optical cable, make sure it
is fully inserted until
there is a click.
1 Remove the dust caps from the digital optical connection.
(We recommend you save the cap.)
2 For external recording, connect a fibre-optic cable 5
between the digital optical input of the CD recorder and the
digital-optical output of an external CD player.
Note: For playback, the digital coaxial outputs or analogue
outputs of the CD Player and CD recorder should be
connected to an amplifier
Digital optical connections CD recorderDigital coaxial connections CD recorder
INSTALLATION
Page 15

English
14
1 Plug the power cord supplied into the MAINS connector on
the CD recorder, then into a mains socket.
2 Press POWER ON/OFF.
➜The CD recorder will switched on.
Note:
- If the CD recorder is in Standby mode (red led on), press any
key to activate the recorder.
- The CD recorder will automatically adjust to the local mains
voltage.
- When the CD recorder is in the ‘OFF’ position, it is still
consuming some power. If you wish to disconnect your
player completely from the mains, withdraw the plug from
the AC outlet.
- Place the CD recorder on a solid, vibration free surface.
- Do not place the CD recorder near a source of heat or in
direct sunlight.
- Do not use the CD recorder under extremely damp
conditions.
- If the CD recorder is placed in a cabinet, make sure that a
2.5 cm space remains free on all sides of the CD
recorder/player for proper ventilation.
Important:
- Do not put the CD recorder on top of other equipment that
heats up the CD recorder (e.g. receiver or amplifier).
1 Open the battery compartment cover.
2 Insert 2 batteries (“AA”, LR-6 or UM-3; as supplied) as
shown.
3 Replace the cover.
Note: We recommend you use 2 batteries of the same type
and condition.
Batteries contain chemical substances, so they should
be disposed of properly.
Inserting batteries in the remote control
Setup recommendations
Power supply
INSTALLATION
Page 16

English
15
STANDBY BB....................switches to Standby/On
SCAN ................................plays the first 10 seconds of each
track
SHUFFLE............................plays CD(RW) or program in
random order
REPEAT..............................repeat play
Number/alphabet keys 0 - 9
......................................- selects a track by number
- selects character for text input
TRACK INCR(ement) ........increases track numbers during
recording
SPACE................................inserts a space character during
text input
SCROLL..............................activates scrolling of text over the
display
CDR ....................................selects CD recorder deck
CD ......................................selects CD player deck
2 ......................................starts CD(RW) play
O ......................................- previous track (Play and Program
mode)
- cursor control in Menu/Prog.
review mode
P ......................................- next track (Play and Program
mode)
- cursor control in Menu/Prog.
review mode
9 ......................................stops CD(RW) and clears a
program
Q ..................................searches backward
R ..................................searches forward
; ......................................interrupts CD(RW) play/recording
MENU/STORE ..................- enters Menu mode
- stores Menu settings
PROG.(ram) ........................opens/closes program memory
ENTER................................- selects settings in Menu mode
- programs track numbers
- starts playback of selected track
CANCEL ............................- deletes tracks from a program
- deletes text in Menu mode
- returns to a higher level in the
menu
1 Press OPEN/CLOSE to open the disc tray.
➜OPEN lights up.
2 Insert a CD, CDR or CDRW in the appropriate recess in the
tray, label side up.
3 Press OPEN/CLOSE to close the tray (see also Playing a CD).
➜CLOSE lights up, followed by READING and the
display will show the type of disc you inserted.
•If you insert a blank or partly-recorded CDR or unfinalised
CDRW, the CD recorder will calibrate the disc for optimum
recording. During this process the display will first show
INITIALIZING and then the number of audio tracks.
Calibration can take up to 25 seconds.
•If a CDR(W) is finalised it will show
CD on the display.
•If CD-text is available the TITLE/ARTIST will scroll by.
Note:
- Only Audio CDs will be accepted. If a non-audio disc is
inserted, the display shows
WRONG DISC
/
USE AUDIO CD
.
- Reading an unfinalised disc in the CD recorder deck could
take approximately 1 minute
- For recording it is important that the blank disc is
completely free from dust particles or scratches. (see
maintenance).
Inserting discs
Remote control commands
REMOTE CONTROL
SHUFFLE REPEAT
SCAN
ABC DEF GHI
1
JKL MN OPQ
456
RST UVW XYZ
7
TRACK INCR.
56
MENU/
STORE
3
2
8
9
SPACE SCROLL
0
CDR
CD
2
KJ
9
;
PROG.
ENTER CANCEL
O
P
E
N
/C
L
O
S
E
P
L
A
Y
/P
A
U
S
E
S
T
O
P
RECORDING
TYPE
FIN
ALIZE
RECORD
ER
ASE
EX
T S
C
D
OUR
R
CE
C
D
DOUBLE SPEED
PROG
SHUFFLE
ALL
REPEAT
SCAN
TRACK
PROG
SHUFFLE
ALL
REPEAT
SCAN
TRACK
PROG
SHUFFLE
ALL
REPEAT
TRACK
SCAN
R
P
O
W
E
R
O
N
/
O
F
F
D
IR
E
C
T
L
IN
E
R
E
C
O
R
D
IN
G
REC
REM
SYNC MANUAL
I
DIGITAL
I
OPTICAL
ANALOG
TIME
TRACK
CD
RW
RECORD
CHANGER
TIME STEPTRACK
REMTOTAL
CD
RW
REC
REM
SYNC MANUAL
DIGITAL
OPTICAL
ANALOG
TRACK
TIME
RECORD
CD
I
I
RW
CHANGER
TIME STEPTRACK
REMTOTAL
RW
CD
REC
REM
123456789
SYNC MANUAL
DIGITAL
OPTICAL
ANALOG
TRACK
TIME
CD
I
I
RW
10 11 12 13 14 15
RECORD
CHANGER
TIME STEPTRACK
REMTOTAL
CD
RW
C
D
R
Page 17

English
16
You will soon discover how easy it is to make your own CDs.
Nevertheless, it is advisable to use a CDRW disc for your first
try.
We will describe:
- Recording from internal CD player deck: high speed or
listen mode.
- Recording from an external CD player deck: synchronised
start with CD player or manual start. (analogue or digital)
•If the disc is a CDRW and is already finalised you must
unfinalise it first.
•The recording procedure is the same for CDRs and
CDRWs.
•If the disc already contains recordings, the CD recorder will
automatically search for the end of the last track, so that
recording can start from there.
•CD text can be added to a recording in Stop mode and
during recording.
•CD text can not be recorded from an external CD player.
(Text information is not available on the output of the CD
player.)
•The CD recorder deck is able to record CD text from the
internal CD player deck. (If not subjected to copy
protection.) This may take up to 2 minutes.
•There must be at least 7 seconds of recording time left on
the disc, otherwise you will not be able to enter record
standby mode. DOES NOT FIT then lights up.
•If the display indicates COPY PROTECT, no digital
recording can be made of the source material. Recording
will not start.
•The Serial Copy Management System (SCMS) only
allows digital recording under specific conditions:
- This means that it is not possible to make a digital copy
from a digital copy.
- Analogue recording is always possible !
- The number of recordings from the original is unlimited.
•A maximum of 99 tracks can be recorded on a disc.
Minimum allowable track length is 4 seconds.
•Recordings from DAT or DCC players will not always stop
automatically.
Important:
If you want to play the recorded CDR disc on any
regular CD player, it must first be finalised. See
finalising discs.
Finalised CDRW discs play only on CDRW compatible
CD players.
For recording from CD changers always use
REC EXT
DISC
.
Your recorder offers several recording modes.
For recording from internal CD-deck:
- RECORD FAST (high speed digital recording) - fast recording
of a disc or programmed tracks.
- REC LISTEN (normal speed digital recording) - listening to a
recording while making it.
- MAKE CD (high speed digital recording and auto-finalise) -
fast recording of a disc or programmed tracks. Recording
will be finalised automatically.
Warning: No more recording possible after finalising CDR
disc!
For recording from external sources:
- REC EXT DISC (automatic start of recording) - to make an
automatic recording of an external source simply by starting
the source.
- REC EXT MAN (manual start of recording) - to start a manual
recording from an external source.
Some remarks on recording:
- During high speed recording, the original recording quality
will be maintained.
- When Auto track is on (default setting), track numbers will
automatically be increased during recording.
- By programming tracks first, a compilation can be recorded.
- If a finalised CD recordable disc is inserted in the CD
recorder, FINALIZED CD will be displayed when
RECORDING-TYPE is pressed. Recording is not possible.
- If a finalised CD rewritable disc is inserted in the CD
recorder, UNFINALIZE and PRESS ENTER will be
displayed when the RECORDING-TYPE is pressed. If ENTER
is pressed, the disc will be unfinalised.
Note: If during recording
ANALOG REC
appears, the track
will be recorded as analogue, at normal speed. All
other tracks will be copied normally (at double speed).
Recording modesRemarks about recording
RECORDING
REC
REM
SYNC MANUAL
DIGITAL
OPTICAL
ANALOG
TRACK
TIME
RECORD
CD
I
I
RW
CHANGER
TIME STEPTRACK
REMTOTAL
PROG
ALL
SHUFFLE
CD
REPEAT
RW
SCAN
TRACK
Page 18

English
17
During high speed recording the sound is not audible.
Preparing for high speed recording
1 Make sure that the recording disc is absolutely free of
scratches and dust particles.
2 Press RECORDING-TYPE to choose the type of recording:
once: to select ‘RECORD FAST’ if you wish to make a
fast recording of a disc or programmed tracks;
three times: to select ‘MAKE CD’ if you wish to make a
fast recording of a disc or programmed tracks
and to automatically finalise the recording.
➜The display first shows the selection.
The RECORD label starts blinking. After 3 seconds
the display shows the remaining CDR(W) recording time
on the left and total time of source on the right. (every 2
seconds PRESS RECORD is displayed.) The left
selection indicator is lit.
•If DOES NOT FIT appears on the display, there is not
enough recording space left on the CDR(W) disc.
You can press RECORDING-RECORD: only complete tracks
that still fit on the CDR(W) will recorded.
or
You can press PROG to select one or more tracks for
recording (see programming):
- rotate the EASY JOG/ENTER key to the required track
number, then press the key (or ENTER on the remote
control)
or
- directly select the track number via the 10-keypad on the
remote control then press the ENTER key to confirm your
selection and go to the next step.
Start high speed recording
1 Press RECORDING-RECORD to start recording.
➜WAIT lights up. The display shows the total remaining
time for the selected recording. High speed recording
starts. RECORD lights continuously.
•To check the track number and track time, press DISPLAY.
This can be done during recording.
•Recording will stop automatically.
Note: Copy prohibited tracks will be copied analogue.
ANALOG REC
is displayed.
2 To stop recording manually, press STOP.
➜UPDATE lights up, RECORD goes out and
recording stops. (Minimal track length must be 4 seconds
otherwise silence will be added to the track.)
•If STOP was pressed within 3 seconds after RECORDINGRECORD, no recording will take place.
After recording, the display shows UPDATE for several
seconds. The Total time indications can differ slightly.
However, no music information is lost.
Note: In this Recording mode, the Pause function is not
operative.
Important:
If you want to play the recorded CDR disc on any
regular CD player, it must first be finalised. See
finalising discs.
Finalised CDRW discs play only on CDRW compatible
CD players.
High speed recording from internal CD player
RECORDING
E
AS
Y
JO
G
STORE/MENU
CAN
CEL/DELETE
PLAY
/PA
USE
STOP
OP
EN
C
OPEN/CLOSE
PLAY/PAUSE
D
STOP
RECORDING
FINALIZE
TYPE
RECORD
EN
T
ER
ERASE
EXT SOURCE
C
D
R
DJ MODEREPEATSCROLLDISPLAYSHUFFLEPROG
/CLOSE
REC
REM
SYNC MANUAL
I
DIGITAL
I
OPTICAL
ANALOG
REC
REM
SYNC MANUAL
I
DIGITAL
I
OPTICAL
ANALOG
REC
REM
TIME
TIME
TIME
TRACK
CD
RW
TRACK
CD
RW
TRACK
RECORD
CHANGER
RECORD
CHANGER
TIME STEPTRACK
REMTOTAL
PROG
ALL
SHUFFLE
CD
REPEAT
RW
TIME STEPTRACK
REMTOTAL
CD
RW
TIME STEPTRACK
REMTOTAL
SCAN
PROG
SHUFFLE
REPEAT
SCAN
TRACK
ALL
TRACK
SYNC MANUAL
I
DIGITAL
I
OPTICAL
ANALOG
RECORD
CD
RW
CHANGER
PROG
ALL
SHUFFLE
CD
REPEAT
RW
SCAN
TRACK
Page 19

English
18
During Listen mode recording you listen to the recording
while you are making it.
Preparing for Listen mode recording
1 Make sure that the recording disc is absolutely free of
scratches and dust particles.
2 For recording, press RECORDING-TYPE twice:
➜the display first shows the selection.
the RECORD label starts blinking. After 3 seconds
the display shows the remaining CDR(W) recording time
on the left and total time of source on the right. (every 2
seconds PRESS RECORD is displayed) The left
selection indicator is lit.
•If DOES NOT FIT appears on the display, there is not
enough recording space left on the CDR(W) disc.
You can press RECORDING-RECORD: only complete tracks
that still fit on the CDR(W) will recorded.
or
You can press PROG to select one or more tracks for
recording (see programming):
- rotate the EASY JOG/ENTER key to the required track
number, then press the key (or ENTER on the remote
control)
or
- directly select the track number via the 10-keypad on the
remote control then press the ENTER key to confirm your
selection and go to the next step.
3 Play the source first to set the optimal recording level on
the CD recorder.
4 Rotate the EASY JOG/ENTER key until, on the Record/Play
Level bar, all the blue segments are alight, but the red
segments do not light continuously during the loudest
passages.
➜Display shows _XX DB (Decibel, e.g. -3DB).
5 Stop the source.
Start Listen mode recording
1 To start recording, press RECORDING-RECORD.
➜WAIT lights up. RECORD lights continuously and
the selected track or program is copied at normal speed.
The track number and the recording time left will appear.
•To check the track time, press DISPLAY. This can be done
during recording.
•Recording will stop automatically.
Note: Copy prohibited tracks will be copied analogue.
ANALOG REC
is displayed.
2 To stop recording, press STOP.
➜UPDATE lights up, RECORD goes out and
recording stops. (Minimal track length must be 4 seconds
otherwise silence will be added to the track.)
•If STOP was pressed within 3 seconds after RECORDINGRECORD, no recording will take place.
After recording, the display shows UPDATE for several
seconds. The Total time indications can differ slightly.
However, no music information is lost.
Note: In this Recording mode, the Pause function is not
operative.
Important:
If you want to play the recorded CDR disc on any
regular CD player, it must first be finalised. See
finalising discs.
Finalised CDRW discs play only on CDRW compatible
CD players.
Listen mode recording from internal CD player
RECORDING
E
AS
Y
JO
G
STORE/MENU
CANCEL/DELETE
P
LAY/PAUSE
STOP
OPEN
C
OPEN/CLOSE
PLAY/PAUSE
D
STOP
RECORDING
FINALIZE
TYPE
RECORD
E
N
TER
ERASE
EXT SOURCE
C
D
R
DJ MODEREPEATSCROLLDISPLAYSHUFFLEPROG
REC
REM
SYNC MANUAL
I
DIGITAL
I
OPTICAL
ANALOG
REC
REM
TIME
TIME
TRACK
CD
RW
TRACK
RECORD
CHANGER
TIME STEPTRACK
REMTOTAL
PROG
SHUFFLE
CD
REPEAT
RW
SCAN
TIME STEPTRACK
REMTOTAL
/CLOSE
ALL
TRACK
SYNC MANUAL
I
DIGITAL
I
OPTICAL
ANALOG
REC
REM
SYNC MANUAL
I
DIGITAL
I
OPTICAL
ANALOG
TIME
CD
RW
TRACK
CD
RW
RECORD
CHANGER
REMTOTAL
RECORD
CHANGER
PROG
ALL
SHUFFLE
CD
REPEAT
RW
TIME STEPTRACK
CD
RW
SCAN
PROG
SHUFFLE
REPEAT
SCAN
TRACK
ALL
TRACK
Page 20

English
19
Important:
- Recording from CD-changers should always be started in the
Auto-Start mode.
- Only make analogue recordings when digital recording is not
possible.
Preparing for manual recording
1 Make sure the disc is absolutely free of scratches and dust
particles.
2 Press EXT(ernal) SOURCE repeatedly until (depending on the
connection used):
➜DIGITAL I, OPTICAL I or ANALOG lights up and
DIGITAL 1, OPTICAL or ANALOG appears on the
display.
•When Auto Track is On (default setting), track numbers will
automatically be increased during recording.
•To switch off the Auto Track function you have to enter
Menu mode.
If you wish to increase track numbers manually, press
TRACK INCR(ement) on the remote control. For further
instructions see Menu mode.
ON (AUTO): The track increments are automatically taken over
from the digital source material or after 2.7
seconds silence during analogue recording.
OFF (MANUAL): While recording track numbers can be
incremented manually by pressing TRACK
INCR(ement) on the remote control.
(Minimum track length is 4 sec.) (This can
also be done in Auto track ON mode.)
• Track numbers cannot be changed after recording.
Note: Auto track works only with Consumer Sources with a
digital output signal according to the IEC 958
(consumer part) audio standard.
3 With the recorder stopped, press RECORDING-TYPE five
times to enter the Manual Record standby mode.
➜
MANUAL starts to flash and the display shows REC EXT
MAN followed by WAIT. After a few seconds PRESS
RECORD followed by the remaining time and track
number appear on the display.
4 Play the source first to set the optimal recording level on
the CD recorder.
5 Rotate the EASY JOG/ENTER key until, on the Record/Play
Level bar, all the blue segments are alight, but the red
segments do not light continuously during the loudest
passages.
➜Display shows _XX DB (Decibel, e.g. -3DB).
6 Stop the source.
Start manual recording
1 To start recording, press RECORDING-RECORD on the CD
recorder and immediately start the source (from Pause or
Stop-mode).
➜ lights continuously. The track number and recording
time left appear on the display.
•If CHECK INPUT message also flashes, the digital
connection is incorrect.
•To record a 3-second silence at the start of a track, press
PAUSE on the CD recorder before starting the source.
•To check the total remaining recording time, press DISPLAY
on the CD recorder. (This can also be done during the
recording.)
2 To stop recording, press STOP on the CD recorder.
➜UPDATE lights up and goes out.
•If STOP was pressed within 3 seconds after RECORDINGRECORD, no recording will take place.
•To interrupt recording, press PAUSE on the CD recorder.
starts to flash. Press PAUSE again to restart recording.
( A new track will always be made.)
After recording the display will show UPDATE for several
seconds.
Note: With
AUTO TRACK ON
, the recorder will stop and go
to REC STANDBY for 1 minute and then goes to Stop
mode automatically. Recordings from DAT, DCC or
recordings made analogously will stop after 20 seconds
silence. With
AUTO TRACK OFF
, the auto stop
mode is disabled.
Important:
If you want to play the recorded CDR disc on any
regular CD player, it must first be finalised. See
finalising discs.
Finalised CDRW discs play only on CDRW compatible
CD players.
Manual recording from external CD player
RECORDING
EA
S
Y JO
G
STORE/MENU
C
ANCEL/DELETE
PLAY
/PAUSE
STOP
C
D
EN
T
ER
OPEN/CLOS
E
REM
REC
TRACK
TIME
TIME STEPTRACK
REMTOTAL
OPEN/CLOSE
PLAY/PAUSE
STOP
RECORDING
FINALIZE
ERASE
TYPE
EXT SOURCE
RECORD
C
D
R
DJ MODEREPEATSCROLLDISPLAYSHUFFLEPROG
REC
REM
SYNC MANUAL
I
DIGITAL
I
OPTICAL
ANALOG
TIME
TRACK
CD
RW
RECORD
CHANGER
TIME STEPTRACK
REMTOTAL
PROG
SHUFFLE
REPEAT
SCAN
ALL
TRACK
CD
RW
SYNC MANUAL
I
DIGITAL
I
OPTICAL
ANALOG
CD
RW
RECORD
CHANGER
PROG
SHUFFLE
REPEAT
SCAN
ALL
TRACK
CD
RW
Page 21

English
20
For recording from CD changers always use
REC EXT
DISC
.
The CD-SYNC feature enables you to make fast and easy
recordings of a CD. Track increments are automatically
detected from the source material. Track increments cannot
be added manually. In analogue source material a silence of
2.7 seconds or more is automatically detected as a track
increment.
Preparing for autostart recording
1 Make sure the disc is absolutely free of scratches and dust
particles.
2 Press EXT(ernal) SOURCE repeatedly until (depending on the
digital connection used):
➜DIGITAL I, OPTICAL I or ANALOG lights up and
DIGITAL 1, OPTICAL or ANALOG appears on the
display.
3 With the CD recorder stopped, press RECORDING-TYPE
four times:
if you wish to record a complete disc or program.
➜ and
SYNC start to flash and the display shows REC
EXT DISCand WAIT followed by the track number,
the total remaining time and START SOURCE.
•If input label (DIGITAL I) flashes, the digital connection is
incorrect.
Start autostart recording
1 To start recording, press PLAY on the selected source.
➜ The CD recorder automatically starts to record and
lights continuously. The track number and track time
appear on the display.
•If, however, you start the source during a track, CD-SYNC
recording starts at the beginning of the next track or after
2.7 seconds of silence in analogue recordings.
•To check the remaining recording time on the CDR(W), press
DISPLAY. (This can also be done during recording)
•The EASY JOG/ENTER key can be used to adjust the
recording level.
•The recorder stops automatically.
2 To stop recording manually, press STOP on the CD recorder.
➜UPDATE lights up and
SYNC and go out.
•If STOP 9 was pressed within 3 seconds after pressing
PLAY, no recording will take place.
•To interrupt recording, press PAUSE on the CD recorder.
➜ starts to flash. (Autostart recording is disabled.) To
resume, press RECORDING-RECORD on the CD recorder.
After recording the display will show UPDATE for several
seconds.
Note:
- Recordings from DAT, DCC or analogue sources will only
stop after 20 seconds silence.
- Auto track is always active.
Important:
If you want to play the recorded CDR disc on any
regular CD player, it must first be finalised. See
finalising discs.
Finalised CDRW discs play only on CDRW compatible
CD players.
For recording from CD changers always use
REC EXT
DISC
.
Autostart recording from external CD player
CD-SYNC
RECORDING
O
P
E
N
/
C
L
O
S
E
P
L
A
Y
/
P
A
U
S
E
S
T
O
P
R
E
C
O
R
D
I
N
G
F
I
N
A
L
I
Z
E
E
R
A
S
E
E
X
T
S
O
U
R
C
T
Y
P
E
R
E
C
O
E
R
D
CDR
DJ MODEREPEATSCROLLDISPLAYSHUFFLEPROG
REC
REM
SYNC MANUAL
I
DIGITAL
I
OPTICAL
ANALOG
TIME
TRACK
CD
RW
RECORD
CHANGER
TIME STEPTRACK
REMTOTAL
PROG
SHUFFLE
REPEAT
SCAN
ALL
TRACK
CD
RW
REC
REM
SYNC MANUAL
I
DIGITAL
I
OPTICAL
ANALOG
TIME
TRACK
CD
RW
RECORD
CHANGER
TIME STEPTRACK
REMTOTAL
PROG
SHUFFLE
REPEAT
SCAN
ALL
TRACK
CD
RW
Page 22

English
21
During finalising the Table of Contents (TOC) is written to the
disc.
Finalising is a simple procedure, necessary to:
- be able to play recordings on a CD PLAYER,
- avoid further unwanted recordings on a disc,
- avoid erasure of tracks on a CDRW,
- write CD text on a CDR(W).
Auto finalising
Auto finalising is possible when using the MAKE CD
recording function.
Manual finalising
1 Make sure the disc (in the CD recorder deck) is absolutely
free of scratches and dust particles.
2 With the recorder stopped press FINALIZE.
➜The display shows FINALIZE CD and PRESS
RECORD.
3 Press RECORDING-RECORD.
➜XX XX FINAL and the approximate finalization time
appears on the display.
The display counts down through the finalization.
On completion, the total number of tracks and the total
time recorded appears on the display.
For CDR(W), changes to on display.
Finalising will take at least 2 - 4 minutes.
Note:
- During finalization, the CD recorder accepts no operating
commands.
- When a CDR is finalised no more recordings can be added.
For CDRW discs only.
If you want to make more recordings (or erasure of tracks) on a
finalised disc you must unfinalise it first. The Table of Contents
(TOC) will be removed. (This is not possible for CDR discs.)
To unfinalise:
1 With the CD recorder stopped, press RECORDING-TYPE or
ERASE.
➜UNFINALIZE and PRESS ENTER will appear on
the display.
2 Press JOG (ENTER).
➜The disc will now be unfinalised and can be recorded on
again and the Recording or Erasure mode is entered.
3 You can now start recording or erasing. If no further
recording or erasure is required press STOP 9.
Note:
- Unfinalising will take approximately 1 minute 30 seconds.
- When unfinalising a CDRW disc with text on it available,
this text will be transferred to the CD recorder memory. It
may occur that the text memory is full. The message
MEMORY FULL/FINALIZE CD
will be displayed.
To empty the recorders text memory you have to erase text
from it. This can be done in two ways:
1) Finalise one or more unfinalised discs for which CD text
is available.
2) Delete text of unfinalised discs with the ‘memory view’
option in the Menu mode.
Unfinalising CDRW discs
Finalising CDR & CDRW discs
RECORDING
REC
REM
SYNC MANUAL
I
DIGITAL
I
OPTICAL
ANALOG
TIME
TRACK
CD
RW
RECORD
CHANGER
TIME STEPTRACK
REMTOTAL
PROG
SHUFFLE
REPEAT
SCAN
ALL
TRACK
CD
RW
REC
REM
SYNC MANUAL
DIGITAL
OPTICAL
ANALOG
REM
SYNC MANUAL
DIGITAL
OPTICAL
ANALOG
TRACK
TIME
RECORD
CD
I
I
RW
REC
TRACK
TIME
CD
I
I
RW
CHANGER
RECORD
CHANGER
REC
REM
TIME
TRACK
TIME STEPTRACK
REMTOTAL
PROG
SHUFFLE
REPEAT
SCAN
PROG
SHUFFLE
REPEAT
SCAN
ALL
TRACK
ALL
TRACK
CD
RW
TIME STEPTRACK
REMTOTAL
CD
RW
TIME STEPTRACK
REMTOTAL
REC
REM
SYNC MANUAL
I
DIGITAL
I
OPTICAL
ANALOG
TIME
TRACK
CD
RW
RECORD
CHANGER
TIME STEPTRACK
REMTOTAL
PROG
SHUFFLE
REPEAT
SCAN
ALL
TRACK
CD
RW
RW
123456789
SYNC MANUAL
I
DIGITAL
I
OPTICAL
ANALOG
CD
RW
10 11 12 13 14 15
RECORD
CHANGER
PROG
SHUFFLE
REPEAT
SCAN
ALL
TRACK
CD
RW
Page 23

English
22
For unfinalised CDRW discs only.
You can erase:
- Tracks can only be erased from the end.
- With the EASY JOG you can erase more tracks.
Note: It is not possible to erase tracks within the
sequence.
- It is also possible to erase the entire disc at once.
To erase one or more tracks from the end:
1 Press ERASE once.
➜ The display shows the number of tracks and their total
playing time. ERASE TRACK and PRESS RECORD
lights up.
•If the disc is finalised, CD appears on the display after
inserting a CDRW in the recorder. The recorder will ask you
to confirm unfinalising first. Confirm by pressing the EASY
JOG/ENTER key or ENTER on the remote control.
2 Select the track(s) you wish to erase by turning the EASY
JOG/ENTER key to the left.
➜The selected track numbers start blinking on the track
bar.
➜The display shows the remaining time after erasing the
selected track(s), the shown track will also be included
in the erasure of tracks.
3 Press RECORDING-RECORD.
➜The display shows the total countdown time and
ERASE.
➜After the selected track(s) have erased, the display
shows the remaining tracks and their total playing time.
To erase the entire disc:
1 Press ERASE twice.
➜The display shows the number of tracks and their total
playing time. ERASE DISC and PRESS RECORD
light up.
•If the disc is finalised,
CD appears on the display after
inserting a CDRW in the recorder. The recorder will ask you
to confirm unfinalising first. Confirm by pressing the EASY
JOG/ENTER key or ENTER on the remote control.
2 Press RECORDING-RECORD.
➜The display shows the total countdown time and
ERASE The complete disc will be erased.
Erasure of a complete disc may take up to 15 seconds.
Erasing CDRW discs
RECORDING
E
A
SY
J
O
G
STORE/MENU
CANCEL/DELETE
C
OPEN/CLOSE
PLAY/PAUSE
D
STOP
RECO
RDING
FINALIZE
TYPE
RECO
RD
ENTER
ERASE
E
XT SOURCE
1
2
345
678
910
1
2
345
678
910
PLAY/PAUSE
C
D
R
STOP
REC
REM
123456789
SYNC MANUAL
DIGITAL
OPTICAL
ANALOG
REM
123456789
SYNC MANUAL
DIGITAL
OPTICAL
ANALOG
TRACK
TIME
CD
I
I
RW
REC
TRACK
TIME
CD
I
I
RW
10 11
10 11
REMTOTAL
RECORD
CHANGER
REMTOTAL
RECORD
CHANGER
REC
REM
TIME
123456
SYNC MANUAL
I
DIGITAL
I
OPTICAL
ANALOG
TRACK
CD
RW
REMTOTAL
RECORD
CHANGER
TIME STEPTRACK
PROG
SHUFFLE
REPEAT
SCAN
PROG
SHUFFLE
REPEAT
SCAN
PROG
SHUFFLE
REPEAT
SCAN
ALL
TRACK
ALL
TRACK
ALL
TRACK
CD
RW
TIME STEPTRACK
CD
RW
TIME STEPTRACK
CD
RW
REC
REM
123456789
SYNC MANUAL
DIGITAL
OPTICAL
ANALOG
REM
123456789
SYNC MANUAL
DIGITAL
OPTICAL
ANALOG
TRACK
TIME
CD
I
I
RW
REC
TRACK
TIME
CD
I
I
RW
10
10
RECORD
CHANGER
RECORD
CHANGER
TIME STEPTRACK
REMTOTAL
PROG
SHUFFLE
REPEAT
SCAN
PROG
SHUFFLE
REPEAT
SCAN
ALL
TRACK
ALL
TRACK
CD
RW
TIME STEPTRACK
REMTOTAL
CD
RW
Page 24

English
23
Your CD recorder is able to play the two decks sequentially
(CHANGER mode). This is the default setting.
1 Select Changer mode using the DJ MODE key.
➜CHANGER appears on the display and
CHANGER lights up.
2 On the deck you want to play, press PLAY/PAUSE 2;to
start CD play.
➜2 lights up, the track number and track time of the track
in play appear on the display.
➜After playing the first disc the second disc will
automatically be played.
•Press DISPLAY once, twice or three times to see:
➜Remaining track time, total remaining time, permanent
text information (see Menu mode).
•To interrupt play temporarily, press PLAY/PAUSE 2;again.
➜; lights on the display.
•To continue play, press PLAY/PAUSE 2;again.
3 To stop play, press STOP 9.
➜The number of tracks and the total playing time appear
on the display.
•If you want to see the information about the other deck,
press the CDR key or the CD key in the display frame.
With this double deck it is possible to play the CD recorder
deck and/or the CD player deck individually (at the same
time). In this case the extra CD output must also be connected
to an amplifier.
1 Select DJ mode using the DJ MODE key.
➜DJ MODE appears on the display and lights up.
2 On the deck you want to play, press PLAY/PAUSE 2;to
start CD play.
➜2 lights up and the track number and track time of the
track in play appear on the display.
•You can also play the two decks at the same time. By
pressing the CDR key or the CD key you can choose the
deck you want to listen to.
•Press DISPLAY once, twice or three times to see:
➜Remaining track time, total remaining time, permanent
text information (see Menu mode).
•To interrupt play temporarily, press PLAY/PAUSE 2;again.
➜; lights on the display.
•To continue play, press PLAY/PAUSE 2;again.
3 To stop play, press STOP 9.
➜The number of tracks and the total playing time appear
on the display. If you want to see this information about
the other deck, press CDR or CD.
Playing CDs on Deck 1 and/or Deck 2 (DJ mode)
Play a 2-disc changer (Changer mode)
PLAYING
REC
REM
123456789
SYNC MANUAL
DIGITAL
OPTICAL
ANALOG
TRACK
TIME
10 11 12
RECORD
CD
I
I
RW
CHANGER
TIME STEPTRACK
REMTOTAL
PROG
SHUFFLE
REPEAT
SCAN
ALL
TRACK
CD
RW
REC
REM
123456789
SYNC MANUAL
DIGITAL
OPTICAL
ANALOG
TRACK
TIME
10 11
RECORD
CD
I
I
RW
CHANGER
TIME STEPTRACK
REMTOTAL
PROG
SHUFFLE
REPEAT
SCAN
ALL
TRACK
CD
RW
REC
REM
TRACK
CDR
CDR
TIME
123456789
SYNC MANUAL
CD
I
DIGITAL
I
OPTICAL
RW
ANALOG
10 11
REMTOTAL
RECORD
CHANGER
TIME STEPTRACK
PROG
SHUFFLE
ALL
CD
REPEAT
RW
SCAN
TRACK
PUSH DOWN TO OPEN
CD
CD
Page 25

English
24
Selecting a track during play
1 Turn the EASY JOG/ENTER key until the required track
number appears on the display.
➜Play skips to the beginning of the selected track.
or
Select CDR or CD on the remote control and key in the
required track number using the numerical keys on the
remote control. For 2-digit track numbers, press the keys in
rapid succession. For tracks on the other disc, first press CD
or CDR as applicable.
➜Play skips to the beginning of the selected track.
or
Press ¡ or ™ on the remote control one or more times.
➜Play skips to the beginning of the present, previous or
subsequent tracks, including tracks on the disc in the
other deck. (Changer mode only.)
Selecting a track when CD play is stopped
1 Turn the EASY JOG/ENTER key until the required track
number appears on the display.
2 Press EASY JOG/ENTER or ENTER on the remote control to
confirm or press PLAY/PAUSE 2;to start playing.
or
1 Select CDR or CD on the remote control and key in the
required track number using the numerical keys. For 2-digit
track numbers, press the keys in rapid succession. Play
starts.
or
1 Briefly press ¡ or ™ one or more times.
2 Start playback by pressing PLAY/PAUSE 2;, EASY
JOG/ENTER or ENTER on the remote control.
1 Hold down 5 or 6 (in play mode).
➜The player first searches backwards or forwards at 10
times normal speed with sound at low volume, then
goes to 50 times normal speed with sound muted.
2 Release the button at the desired passage.
➜Play starts at the desired passage.
Note: During Shuffle, Repeat Track or Programmed play,
search is restricted to within the track being played at
the time.
Only in Changer mode
1 Select Changer mode, if necessary, using the DJ MODE key.
2 Press SHUFFLE before or during CD play to start shuffle
play.
➜The tracks on the CD (or program if set) play in random
order.
3 Press SHUFFLE again to disable the Shuffle mode.
➜CD recorder goes to Stop mode.
Note: Shuffle is also cleared if you open the disc tray.
1 Press REPEAT one or more times during CD play.
➜When
REPEAT TRACK lights up, the current track plays
repeatedly. When REPEAT ALL lights up, the disc or
program plays repeatedly.
2 To return to normal play, press REPEAT one or more times
until:
➜REPEAT label disappears from the display.
Note:
- You can use shuffle in combination with REPEAT ALL or
programmed play of the 2-disc changer.
- REPEAT is also cleared if you open the disc tray.
Repeat CD, track or program
Shuffle (random order) play
Search
C
Selecting a track
PLAYING
E
A
S
Y
J
O
G
STORE/MENU
CANCEL/DELETE
PLAY/PAUSE
C
D
O
P
E
N
/
C
L
O
S
E
P
L
A
Y
/P
A
U
S
E
S
T
O
P
R
E
C
O
R
D
IN
G
F
IN
A
L
IZ
T
Y
P
E
E
R
E
C
O
R
D
ENTER
E
R
A
S
E
E
X
T
S
O
U
R
C
E
C
D
R
STOP
EASY JOG
OPEN/
CD
ENTER
STORE/M
ENU
C
A
N
C
E
L
/D
E
L
E
T
E
P
L
A
Y
/P
REM
REC
TRACK
TIME
TIME STEPTRACK
REMTOTAL
A
U
S
E
S
T
O
P
O
P
E
N
/C
L
O
S
E
123456789
SYNC MANUAL
I
DIGITAL
I
OPTICAL
ANALOG
10 11
RECORD
CD
RW
CHANGER
PROG
SHUFFLE
REPEAT
SCAN
ALL
TRACK
CD
RW
Page 26

English
25
•You can program up to 99 tracks to play in any desired
sequence.
•Tracks can be programmed more than once, but each time
counts as a track.(
STEP)
•A program for playback can be made from both the disc in
the recorder deck and the disc in the player deck. A program
for recording can only be made from the disc in the player
deck.
Programming for playback
1 Select Changer mode or DJ mode using the DJ MODE key.
➜CHANGER or DJ MODE appears on the display.
2 Press CDR or CD to select the required deck.
➜Selected key lights up.
3 Press PROG(ram) to enter Program mode.
➜PROG flashes and PROGRAM followed by track
information appears on the display.
4 Select the required track numbers by turning the EASY
JOG/ENTER key left or right and store by pressing ENTER.
or:
Key in a track number with the number keys on the remote
control and press ENTER to confirm. For 2-digit numbers,
press the keys in rapid succession.
➜The track will be stored in the program.
➜The track number, total program time and the number of
programmed tracks (STEPS) are displayed.
5 Repeat step 4 for all tracks to be programmed.
6 Press STOP or PROG(ram) to end programming.
➜
PROG lights continuously.
7 Press PLAY/PAUSE 2; to start programmed play.
Programming for recording
1 Press RECORDING-TYPE to select the required recording
mode (see ‘Recording’).
2 Compile your programme as described in “programming for
playback”. (steps 3 to 5)
•Only tracks from the disc in the CD player can be stored.
3 Press RECORDING-RECORD to start recording.
Note:
- To review the program, press PROG(ram), followed by
5
or
6
with the CD player or CD recorder in stop mode.
- To add more tracks to the program, repeat steps 1 to 7.
- If you try to store more than 99 tracks,
PROG FULL
appears on the display.
Clearing a program
1 Press STOP 9 if necessary to stop programmed play.
2 Press STOP 9 again to clear the program.
➜PROG disappears from the display.
•The program is also cleared if you open the disc tray.
Erasing a track from a program
1 In Stop mode press PROG(ram) to enter Program mode.
2 Use 5 or 6 to select the track that has to be deleted.
➜The track number and program step will be shown on the
display.
3 Press CANCEL/DELETE to erase the track from the program.
➜The remaining program steps and the remaining playing
time of the program will be displayed.
4 Repeat step 2 and 3 for all tracks to be erased.
5 Press STOP 9 or PROG(ram) to end erasing.
➜PROG lights continuously.
Remarks about programming
PROGRAMMING
REM
123456789
SYNC MANUAL
DIGITAL
OPTICAL
ANALOG
REM
1
SYNC MANUAL
DIGITAL
OPTICAL
ANALOG
REC
TRACK
TIME
10 11
RECORD
CD
I
I
RW
REC
TRACK
TIME
CD
I
I
RW
CHANGER
RECORD
CHANGER
TIME STEPTRACK
REMTOTAL
PROG
SHUFFLE
REPEAT
SCAN
PROG
SHUFFLE
REPEAT
SCAN
ALL
TRACK
ALL
TRACK
CD
RW
TIME STEPTRACK
REMTOTAL
CD
RW
REC
REM
SYNC MANUAL
DIGITAL
OPTICAL
ANALOG
TRACK
TIME
278
CD
I
I
RW
11
RECORD
CHANGER
TIME STEPTRACK
REMTOTAL
PROG
SHUFFLE
REPEAT
SCAN
ALL
TRACK
CD
RW
Page 27

•In Menu mode you will have access to a number of features
which are not available via the regular keys (on the deck’s
front and the remote control).
•The TEXT submenus (A-B) allow you to give names to discs
and tracks. The disc and track names will be displayed
during playback.
•In the RECORDING submenus (D-E) you can set Auto Track
and Balance.
•All settings (except Balance) made in Menu mode will be
stored in the deck’s memory and can be called up and
changed at any time.
Menu active in Recording or Stop mode.
1 When using the remote control select first CDR.
2 Press STORE/MENU on the deck or the remote control to
enter Menu mode.
➜TEXT EDIT appears on the display.
3 Rotate EASY JOG/ENTER to select the required submenus.
4 Press EASY JOG/ENTER to confirm selections.
5 Rotate EASY JOG/ENTER to select options in the submenus.
6 Press EASY JOG/ENTER to confirm selections.
7 Press STORE/MENU to store settings and return to the
submenu.
8 Press STOP 9 to store settings and exit Menu mode.
Note: Text can only be edited for unfinalised discs. (Finalised
CDRW discs must be unfinalised first.)
General operation of MenuRemarks about Menu mode
MENU MODE
English
26
E
A
S
Y
J
O
G
S
T
O
R
E
/M
E
N
U
ENTER
2
KJ
9
56
MENU/
STORE
;
ENTER CANCEL
PROG.
MAIN MENU LEVEL 2LEVEL 1
REC
REM
TRACK
CA
N
C
EL/D
ELETE
A
TIME
123456789
SYNC MANUAL
CD
I
DIGITAL
I
OPTICAL
RW
ANALOG
REMTOTAL
10 11 12 13 14 15 16 17
RECORD
CHANGER
TIME STEPTRACK
PROG
SHUFFLE
ALL
CD
REPEAT
RW
SCAN
TRACK
ALBUM ARTIST
ALBUM TITLE
ARTIST TR 1
TITLE TR 1
REC
REM
TRACK
TIME
123456789
SYNC MANUAL
CD
I
DIGITAL
I
OPTICAL
RW
ANALOG
REMTOTAL
10 11 12 13 14 15 16 17
RECORD
CHANGER
TIME STEPTRACK
PROG
SHUFFLE
ALL
CD
REPEAT
RW
SCAN
TRACK
ARTIST TR N
TITLE TR N
REC
REM
TRACK
TIME
B
123456789
SYNC MANUAL
CD
I
DIGITAL
I
OPTICAL
RW
ANALOG
REMTOTAL
10 11 12 13 14 15 16 17
RECORD
CHANGER
TIME STEPTRACK
PROG
SHUFFLE
ALL
CD
REPEAT
RW
SCAN
TRACK
ALL TEXT
ALBUM ARTIST
ALBUM TITLE
ARTIST TR 1
TITLE TR 1
ARTIST TR N
REC
REM
TRACK
TIME
123456789
SYNC MANUAL
CD
I
DIGITAL
I
OPTICAL
RW
ANALOG
REC
REM
TRACK
TIME
123456789
SYNC MANUAL
CD
I
DIGITAL
I
OPTICAL
RW
ANALOG
REMTOTAL
10 11 12 13 14 15 16 17
RECORD
CHANGER
REMTOTAL
10 11 12 13 14 15 16 17
RECORD
CHANGER
TIME STEPTRACK
PROG
SHUFFLE
ALL
CD
REPEAT
RW
SCAN
TRACK
TIME STEPTRACK
PROG
SHUFFLE
ALL
CD
REPEAT
RW
SCAN
TRACK
TITLE TR N
REC
REM
TRACK
TIME
C
123456789
SYNC MANUAL
CD
I
DIGITAL
I
OPTICAL
RW
ANALOG
REMTOTAL
10 11 12 13 14 15 16 17
RECORD
CHANGER
TIME STEPTRACK
PROG
SHUFFLE
ALL
CD
REPEAT
RW
SCAN
TRACK
"TITLE CD 1"
"TITLE CD 2"
"TITLE CD 3"
"TITLE CD n"
REC
REM
TRACK
TIME
D
123456789
SYNC MANUAL
CD
I
DIGITAL
I
OPTICAL
RW
ANALOG
REMTOTAL
10 11 12 13 14 15 16 17
RECORD
CHANGER
TIME STEPTRACK
PROG
SHUFFLE
ALL
CD
REPEAT
RW
SCAN
TRACK
ON
OFF
REC
REM
TRACK
TIME
E
123456789
SYNC MANUAL
CD
I
DIGITAL
I
OPTICAL
RW
ANALOG
REMTOTAL
10 11 12 13 14 15 16 17
RECORD
CHANGER
TIME STEPTRACK
PROG
SHUFFLE
ALL
CD
REPEAT
RW
SCAN
TRACK
L 100 R 100
Page 28

CD Text can be added to a recording or changed.This can be
done in Stop mode or during recording.
Text will be stored in the recorder memory and can be edited
until the CDR is finalised. Text on a (unfinalised) CDRW can
be edited at any time.
1 Press STORE/MENU.
➜TEXT EDIT appears on the display.
2 Press EASY JOG/ENTER to confirm.
➜ALBUM ARTIST appears on the display.
3 Rotate EASY JOG/ENTER to select the required option in
the submenu: ALBUM ARTIST, ALBUM TITLE,
ARTIST TR 1, TITLE TR 1, etc.
4 Press EASY JOG/ENTER to confirm.
➜The first character space appears on the display.
5 Select the characters by rotating the EASY JOG/ENTER key
or by pressing the corresponding numeric/alphabet key on
the remote control.
6 Press EASY JOG/ENTER to store each character and move
to the next cursor position.
•With the 5 6 keys you can move to a required cursor
position.
•With the CANCEL key you can delete a character.
7 Press STORE/MENU to store a name you have entered and
return to the submenu resume at 3 or STOP 9 to exit.
Note:
- A maximum of 60 characters can be stored per item.
- By pressing the EASY JOG/ENTER key or ENTER on the
remote control without selecting a character first, you can
insert a space between characters.
- When an artist’s name has been stored for a certain track,
the name will automatically be copied for the next track.
The name can be confirmed by pressing STORE/MENU or a
new name can be entered as described above.
1 Press STORE/MENU.
➜TEXT EDIT appears on the display.
2 Rotate the EASY JOG/ENTER key to select the TEXT ERASE
submenu.
➜TEXT ERASE appears on the display.
3 Press EASY JOG/ENTER to confirm.
➜If text is available ALL TEXT appears on the display.
(When there is no text available the message NO TEXT
appears on the display.)
4 Rotate EASY JOG/ENTER to select the required option in
the submenu: ALL TEXT, ALBUM ARTIST, ALBUM
TITLE, ARTIST TR 1, TITLE TR 1, etc.
5 Press EASY JOG/ENTER to confirm.
➜The display will ask you to reconfirm your selection.
ERASE OK appears on the display.
6 Press EASY JOG/ENTER to reconfirm.
➜UPDATE appears on the display.
7 Press STORE/MENU to return to the submenu or STOP 9 to
exit.
B. Erasing text / text erase
A. Text input / text edit
MENU MODE
English
27
TEXT EDIT
ALBUM ARTIST
ALBUM TITLE
ARTIST TR N
TITLE TR N
TEXT ERASE
ALL TEXT
ALBUM ARTIST
ALBUM TITLE
ARTIST TR N
TITLE TR N
NO TEXT
REC
REM
123456789
SYNC MANUAL
DIGITAL
OPTICAL
ANALOG
TRACK
TIME
CD
I
I
RW
10 11
RECORD
CHANGER
TIME STEPTRACK
REMTOTAL
PROG
SHUFFLE
REPEAT
SCAN
ALL
TRACK
CD
RW
Page 29

CD Text is stored in the recorders memory. When a CDR(W)
will be finalised the CD Text will be written on the disc and
removed from the recorders memory. With the MEMORY
VIEW function one can view/delete the CD Text in the
recorders memory per unfinalised disc. The amount of
memory used is displayed each time the tray opens with an
unfinalised CDR(W) inserted.
(e.g. MEMORY 9%)
1 Press STORE/MENU.
➜TEXT EDIT appears on the display.
2 Rotate the EASY JOG/ENTER key to select the MEMORY
VIEW submenu.
➜MEMORY VIEW appears on the display.
3 Press EASY JOG/ENTER to confirm.
➜The first album title in the recorder memory appears on
the display.
4 Select the album title you wish to erase by rotating the
EASY JOG/ENTER key.
5 Press EASY JOG/ENTER to confirm.
➜ERASE MEMORY appears on the display.
6 Press the EASY JOG/ENTER key to confirm the erasure of
the text for that particular disc.
➜UPDATE appears on the display.
7 Press STORE/MENU to return to the submenu or STOP 9 to
exit.
Note:
- If there are no discs in the memory, the message
MEMORY
EMPTY
appears on the display.
- When the text memory of your CD recorder is full, the
message
MEMORY FULL
will appear, followed by
FINALIZE CD
. If you want to add a CD to the list of
discs for which text is stored, you have to erase a disc from
this list or finalise another disc. (“for which text is stored”)
-
MEMORY FULL/FINALIZE CD
may also appear when
unfinalising a CDRW disc for which text was stored (see
‘Unfinalising CDRW discs’). The same action(s) should be
taken in order to obtain memory space.
C. Reviewing CD Text in memory / memory view
MENU MODE
English
28
MEMORY VIEW
CD 1
CD 2
CD N
REC
REM
123456789
SYNC MANUAL
DIGITAL
OPTICAL
ANALOG
TRACK
TIME
CD
I
I
RW
10 11
RECORD
CHANGER
TIME STEPTRACK
REMTOTAL
PROG
SHUFFLE
REPEAT
SCAN
ALL
TRACK
CD
RW
REC
REM
123456789
SYNC MANUAL
DIGITAL
OPTICAL
ANALOG
TRACK
TIME
CD
I
I
RW
10 11
RECORD
CHANGER
TIME STEPTRACK
REMTOTAL
PROG
SHUFFLE
REPEAT
SCAN
ALL
TRACK
CD
RW
Page 30

1 Press STORE/MENU.
➜TEXT EDIT appears on the display.
2 Rotate the EASY JOG/ENTER key to select the AUTO TRACK
submenu.
➜AUTO TRACK appears on the display.
3 Press EASY JOG/ENTER to confirm.
➜ON appears on the display.
4 Turn the EASY JOG/ENTER key to select Auto track ON or
OFF.
•When ON is selected, track numbers will be automatically
incremented during recording.
•When OFF is selected, you can number the recorded tracks
yourself.
5 Press EASY JOG/ENTER to confirm.
➜AUTO TRACK appears on the display.
6 Press STORE/MENU to store settings and return to the
submenu or STOP 9 to exit.
1 Press STORE/MENU.
➜TEXT EDIT appears on the display.
2 Rotate the EASY JOG/ENTER key to select the SET
BALANCE submenu.
➜SET BALANCE appears on the display.
3 Press EASY JOG/ENTER to confirm.
➜
FE
and L 100 R 100 appear on the display.
4 Adjust recording balance by turning the EASY JOG/ENTER
key.
•Turn left: the figure left (F) counts down, right counts up.
•Turn right: the figure right (E) counts down, left counts up.
5 Press EASY JOG/ENTER to confirm.
6 Press STORE/MENU to store settings.
Note: The balance setting will not be stored permanently.
E. Balance (only active in Record/Standby mode)
D. Auto track increment / auto track
MENU MODE
English
29
AUTO TRACK
ON
OFF
REC
REM
TRACK
TIME
123456789
SYNC MANUAL
DIGITAL
OPTICAL
ANALOG
CD
I
I
RW
10 11
CHANGER
REMTOTAL
RECORD
TIME STEPTRACK
PROG
SHUFFLE
CD
REPEAT
RW
SCAN
TRACK
EA
S
Y
JO
G
STORE/MENU
EN
ALL
TER
SET BALANCE
L 100 R 100
REC
REM
SYNC MANUAL
DIGITAL
OPTICAL
ANALOG
TRACK
TIME
RECORD
CD
I
I
RW
CHANGER
TIME STEPTRACK
REMTOTAL
PROG
SHUFFLE
REPEAT
SCAN
ALL
TRACK
CD
RW
Page 31

If your CD recorder is defective, it is wise to check this list
first. You may have forgotten a simple step.
Warning!
Under no circumstances should you attempt to repair
the CD recorder yourself as this will invalidate the
guarantee.
SYMPTOM • possible solution:
No power • ensure that the POWER ON/OFF button is on
(red led on): the CD Recorder is in standby
mode, press any key to activate it.
• ensure that the mains cable is plugged in
correctly.
• switch the recorder OFF and then
immediately back ON.
Auto track does not work
• check if auto track on is selected in the
menu.
• check if there are 2.7 seconds silence in
between the tracks (analogue recording only).
• check if the source is a consumer source with
the digital output according to the IEC audio
standard.
• source is DVD player (no track information).
No sound • check the audio connections.
• if using an amplifier, try using a different
source.
Amplifier sound is distorted
• check that the CD recorder analogue output is
not connected to the amplifier Phono input.
Play will not start
• ensure that the label of the CD is facing up
• clean the disc.
• check that the disc is not defective by trying
another disc.
Remote control does not work
• point the remote control towards the CD
recorder.
• check the batteries and replace if necessary.
• select the correct source first.
Will not record
• clean the disc.
• check if CDR(W) is an unfinalised disc.
• check that the disc is recordable and replace
if necessary.
• the disc is not an AUDIO disc (WRONG
DISC).
• wrong input source chosen. Input label
flashing (CHECK INPUT).
• text memory full (MEMORY FULL /
FINALIZE CD). When a CDRW has to be
unfinalised for recording. Erase text for other
disc(s) or finalise other disc(s) to obtain
memory space.
• total remaining time not sufficient, try
programming tracks (see programming).
Recording is distorted
• make sure the recording level is correct.
20 second pause between recordings
• see Autostart recording from external CD
player (CD-SYNC).
Player does not react
• switch the POWER ON/OFF button on the
front of the player off and back on.
DISC RECOVER on display
• a power failure has occurred during
recording, the CD recorder is attempting to
repair the disc.
• if DISC ERROR then appears on the
display, the disc cannot be recorded further,
and cannot be finalised. But it can still be
played on the CD recorder or another CD
recorder.
• on a CDRW disc, the track being recorded is
lost, but further recording and finalization can
still be done.
TROUBLESHOOTING
FIXING PROBLEMS
English
30
 Loading...