

Page 1
Audio CD Recorder
CDR770/771
•
Instructions for use
•
Mode d'emploi
•
Instrucciones de manejo
•
Bedienungsanleitung
•
Gebruiksaanwijzing
•
Istruzioni per l'uso
•
Brugsanvisning
•
Bruksanvisning
•
Käyttöohje
•
Manual de utilização
•
O‰ËÁ›Â˜ ¯Ú‹Ûˆ˜O‰ËÁ›Â˜ ¯Ú‹Ûˆ˜
•
Instructions for use
•
Mode d'emploi
•
Instrucciones de manejo
•
Bedienungsanleitung
•
Gebruiksaanwijzing
•
Istruzioni per l'uso
•
Brugsanvisning
•
Bruksanvisning
•
Käyttöohje
•
Manual de utilização
•
•
AUDIO CD RECORDABLE/REWRITABLE
OPEN / CLOSE
PLAY / PAUSE
STOP
PHONES
INFRA RED
EASY JOG
CDR77X AUDIO CD RECORDER
STORE/
MENU
REC
TYPE
REM
TRACKRECORD TIME
DIGITAL
OPTICAL
ANALOG
PROGRAM
SHUFFLE
REPEAT
SCAN
1
1
CD
RW
SYNC MANUAL
REMTOTAL
LEVEL
ALL
TRACK
TEXT TIME
STEP
TRACK
1 2 3 4 5 6 7 8 9 10 11 12 13 14 15 16 17 18 19 20
Recordable
ON / OFF
SHUFFLE
SCROLLPROGRAM
REPEAT
PHONES
INFRA RED
EASY JOG
STORE/
MENU
OPEN / CLOSE
PLAY / PAUSE
STOP
SOURCE
ERASEFINALIZE
OPEN / CLOSE
PLAY / PAUSE
STOP
SOURCE
ERASEFINALIZE
AUDIO CD RECORDABLE/REWRITABLE
AUDIO CD RECORDABLE/REWRITABLE
DISPLAY
ENTER
CANCEL/
DELETE
SCROLLPROGRAM
EASY JOG
STORE/
MENU
CANCEL/
DELETE
RECORD
Page 2
English
8
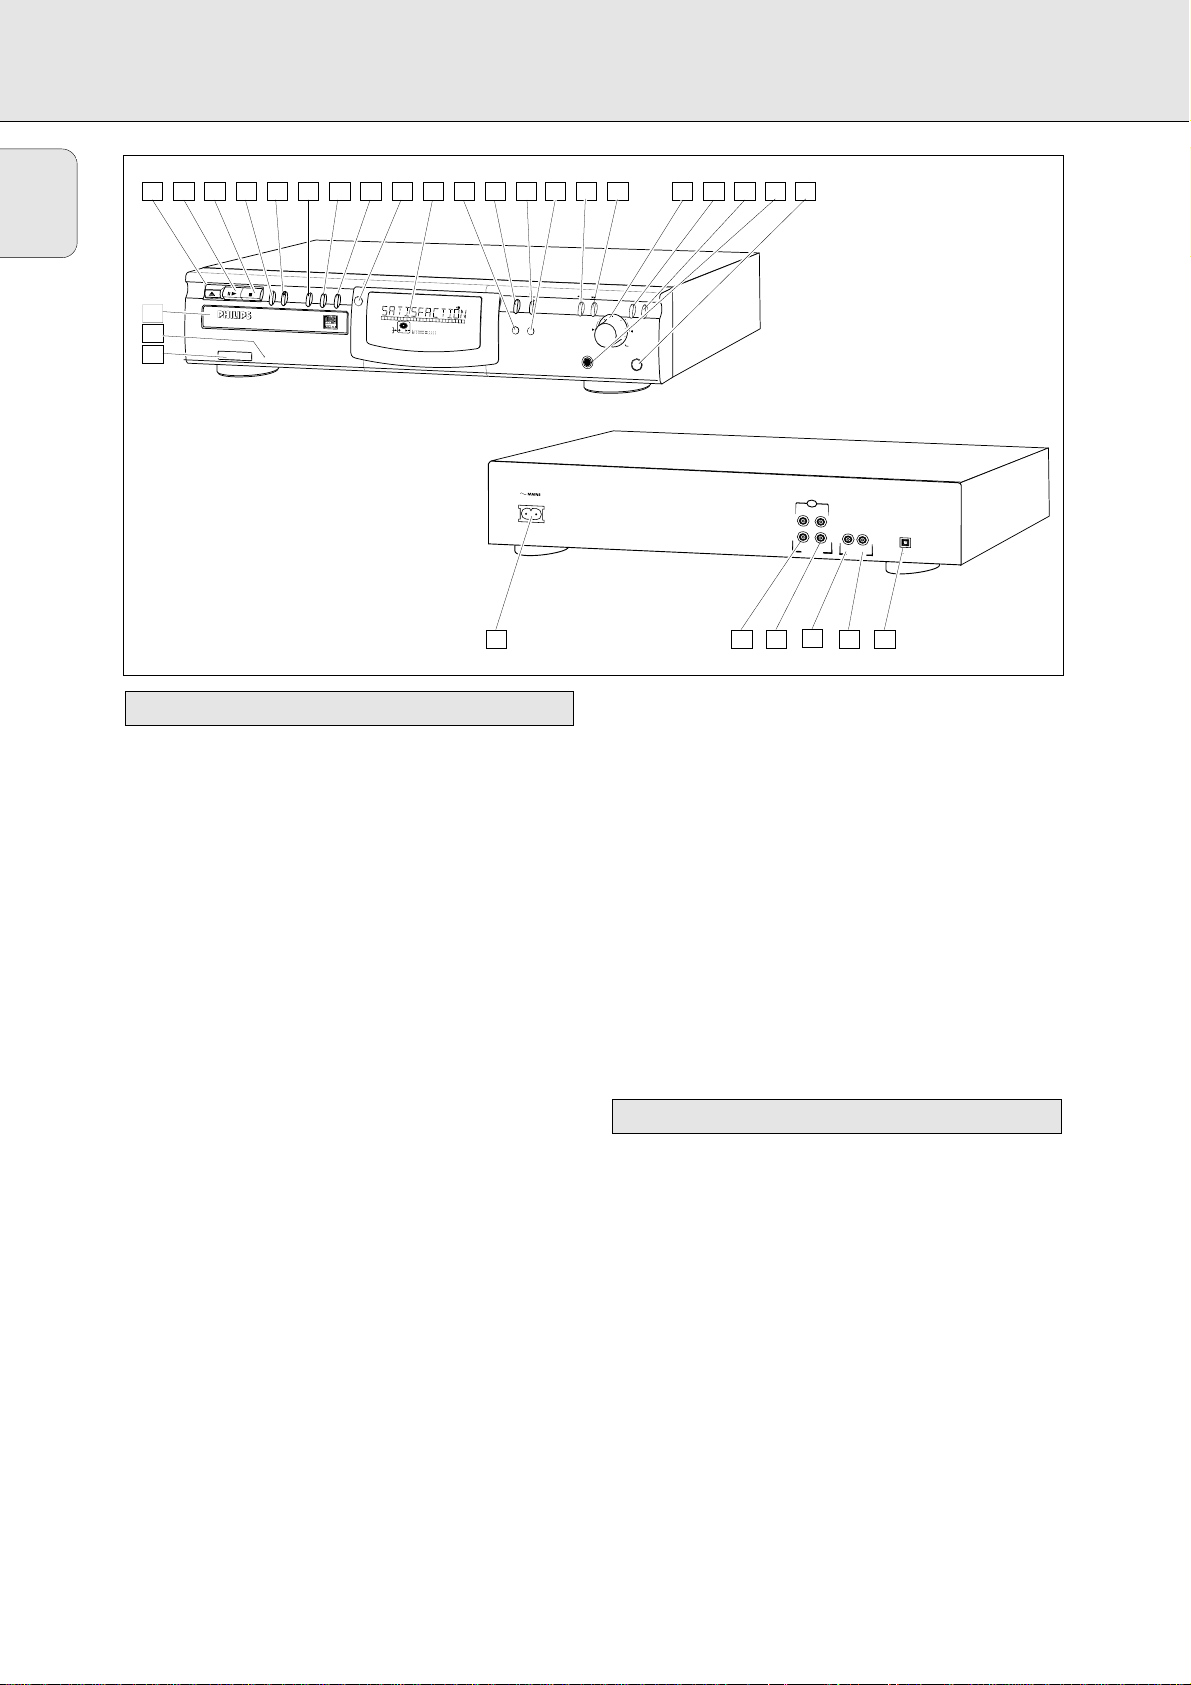
1 ON/OFF ........................turns the CD recorder ON and OFF
2 Standby indicator
3 Disc tray
4 OPEN/CLOSE /..........opens/closes disc tray
5 PLAY/PAUSE 2; ......starts play/interrupts play or
recording
6 STOP 9........................stops/clears a program
7 REC(ord) TYPE ............selects recording modes
8 RECORD ......................starts recording, finalizing, erasing
9 FINALIZE ....................selects finalize mode
0 ERASE..........................selects erasing mode (disc or track)
! SOURCE ......................selects input source
@ DISPLAY......................selects display information,
permanent text scrolling and time
# Display..........................information screen
$ SHUFFLE......................plays CD(RW) or program in
random order
% PROGRAM ..................opens/closes program memory
^ SCROLL........................activates scrolling of text over the
display (once)
& REPEAT........................repeats play (all, program or track)
* Q ............................- searches backward
- cursor control in Menu/Prog.
review mode
( R ............................- searches forward
- cursor control in Menu/Prog.
review mode
) ¡ EASY JOG ™ ........- previous/next track (Play and
(rotate) Program mode)
- recording level control (recording)
- selects settings (menu on)
ENTER (push) ..............- plays selected tracks
- selects settings in Menu mode
- programs track numbers
¡ STORE/MENU ............- enters Menu mode
- stores Menu settings
™ CANCEL/DELETE ......- deletes tracks from a program
- deletes text in Menu mode
- returns to a higher level in the
menu
£ PHONES......................socket for headphones
≤ IR sensor ....................receives signals from the remote
control
Note: Unless stated otherwise, all controls are on the front of
the CD recorder. When provided on the remote control,
you can also use the corresponding buttons, after
selecting the CD recorder or separate CD player by
pressing CDR or CD.
1 Connection to mains
2 ANALOG IN ................connects to the line output of an
amplifier (left and right)
3 ANALOG OUT CDR ....connects to the line input of an
amplifier (left and right)
4 DIGITAL IN..................connects to the digital coaxial
output of an external CD player
5 DIGITAL OUT CDR ....connects to the digital coaxial
input of e.g. amplifier or recording
device
6 OPTICAL IN ................connects to the digital optical
output of an external CD player
Connections at the back
Controls on the front
CONTROLS AND CONNECTIONS
OPEN / CLOSE
OPEN / CLOSE
3
2
1
PLAY / PAUSE
PLAY / PAUSE
STOP
STOP
AUDIO CD RECORDABLE/REWRITABLE
AUDIO CD RECORDABLE/REWRITABLE
ON / OFF
REC
RECORD
TYPE
ERASEFINALIZE
SOURCE
DISPLAY
REM
TRACKTIME
TEXT
REMTOTALLEVEL
TRACK
TIME STEP
1 2 3 4 5 6 7 8 9 10 11 12 13 14 15 16 17 18 19 20 21
SYNCMANUAL
Recordable
DIGITAL
OPTICAL
ANALOG
CD
1
RECORD
1
RW
AUDIO CD RECORDABLE/REWRITABLE CDR77X
22
23
24
25
+
SHUFFLE
PROGRAM
SHUFFLE
ALL
REPEAT
SCAN
TRACK
17 18 19 20 21 22 23 244 65 9 10 11 12 13 14 15 167 8
SCROLLPROGRAM
REPEAT
STORE/
STORE/
CANCEL/
EASY JOG
EASY JOG
MENU
MENU
DELETE
ENTER
PHONES
PHONES
INFRA RED
INFRA RED
CDR
L
L
R
R
IN
OUT
IN
OUT
DIGITAL
OPTICAL
IN
ANALOG
1 65
4
32
Page 3

English
11
For recording the following inputs are present:
- Digital optical input.
- Digital coaxial input.
- Analog input.
For playback the following outputs are present:
- Digital coaxial output.
- Analog output.
We advise you to connect these to the CD input on your
amplifier.
The connections you make will depend upon the possibilities
your audio equipment offers. Please refer to the user manuals
for your other audio equipment first.
Digital recordings (optical or coaxial) give the best
performance in audio and usability (e.g. auto-track).
(The digital optical connection is less sensitive to external
disturbances).
If your equipment does not offer digital connections, the high
quality Analog-Digital-Convertor of your CD recorder will
ensure very good audio performance when recordings are
made from the analog input.
Playback via the digital coaxial output of the CD recorder
gives the best audio performance.
If your equipment does not offer digital connections, the high
quality Digital-Analog-Convertor of the CD recorder ensures a
very good sound quality via the analog output.
We advise you to always establish both digital and analog
connections. In this way you can always make analog
recordings when digital recording is not possible.
We have described the most common ways of connecting the
CD recorder. If you still have difficulties with the connections
you can always contact the Philips Consumer Service desk in
your country.
Analog connection is required for playback of CDs (use cable
2) and for recording from external analog sources
(use cable 1).
Use the audio cables supplied. Connect the red plugs to the
R sockets, and the white plugs to the L sockets.
1 For recording, connect cable 1 between the ANALOG IN-
sockets on the CD recorder and the CDR LINE- or TAPE OUTsockets of an amplifier.
Note: For recording directly from a CD player, the analog
input of the CD recorder should be connected to the
analog output of the CD player.
2 For playback, connect cable 2 between the ANALOG OUT-
sockets on the CD recorder and the input sockets of an
amplifier e.g. TAPE IN, CDR or AUX.
Note: Never use the PHONO input.
Analog connectionsConnections general
INSTALLATION
L
L
R
IN
TAPE
R
OUT
RECEIVER
2
1
L
R
IN
OUT
ANALOG
CD RECORDER
L
R
IN
OUT
DIGITAL
OPTICAL
IN
Page 4

English
12
Digital coaxial connection is only required in case you wish to
record from a CD player with a digital coaxial output.
Use the digital coaxial cable supplied.
1 For recording, connect the cable 3 between the DIGITAL
IN-socket on the CD recorder and the DIGITAL OUT-socket of
a CD player.
Note: Your CD recorder is equipped with a digital coaxial
output. This output can be used for digital playback.
Digital optical connection is only required in case you wish to
record from a CD player with a digital optical output.
When connecting the Digital
Optical cable, make sure it
is fully inserted until
there is a click.
1 Remove the dust caps from the digital optical connection.
(We recommend you save the cap).
2 For recording, connect a fibre-optic cable 4 between the
digital optical input of the CD recorder and the digitaloptical output of a CD player.
Note: For playback, the digital coaxial output or analog output
should be connected to an amplifier.
Digital optical connections
Digital coaxial connections
INSTALLATION
L
L
R
R
IN
TAPE
OUT
2
1
L
L
R
R
IN
OUT
ANALOG
ANALOG
IN
DIGITAL
L
R
OUT
RECEIVER
CD RECORDER
OUT
IN
OPTICAL
3
CD PLAYER
OUT
DIGITAL
OUT
OPTICAL
L
L
R
R
IN
TAPE
OUT
2
1
L
L
R
R
IN
OUT
ANALOG
OUT
ANALOG
IN
DIGITAL
L
R
RECEIVER
CD RECORDER
OUT
OPTICAL
IN
4
CD PLAYER
OUT
DIGITAL
OUT
OPTICAL
Page 5

English
13
1 Plug the power cord supplied into the MAINS connector on
the CD recorder, then into a mains socket.
2 Press ON/OFF.
➜The CD recorder will switch on.
Note:
- If the CD recorder is in Standby mode (red led on), press any
key to activate the recorder.
- The CD recorder will automatically adjust to the local mains
voltage.
- When the CD recorder is in the ‘OFF’ position, it is still
consuming some power. If you wish to disconnect your
player completely from the mains, withdraw the plug from
the AC outlet.
- Place the CD recorder on a solid, vibration free surface.
- Do not place the CD recorder near a source of heat or in
direct sunlight.
- Do not use the CD recorder under extremely damp
conditions.
- If the CD recorder is placed in a cabinet, make sure that a
2.5 cm space remains free on all sides of the CD recorder
for proper ventilation.
Important:
- Do not put the CD recorder on top of other equipement that
heats up the CD recorder (e.g. receiver or amplifier).
1 Open the battery compartment cover.
2 Insert 2 batteries (“AA”, LR-6 or UM-3; as supplied) as
shown.
3 Replace the cover.
Note: We recommend you use 2 batteries of the same type
and condition.
Batteries contain chemical substances, so they should
be disposed of properly.
Inserting batteries in the remote control
Setup recommendations
Power supply
INSTALLATION
 Loading...