

Page 1

Instructions for use
Mode d’emploi
Instrucciones de manejo
CDR 760 CD recorder
P
o
w
e
r O
n
/O
ff
P
o
w
e
r O
n
/O
ff
R
E
C
L
E
V
E
L
P
h
o
n
e
s
P
h
o
n
e
s
C
D
-S
yn
c
C
D
R
7
6
0
R
E
C
O
R
D
A
B
L
E
/R
E
W
R
IT
A
B
L
E
C
D
R
7
6
0
-R
E
C
O
R
D
A
B
L
E
/R
E
W
R
IT
A
B
L
E
R
E
C
O
R
D
P
L
A
Y
P
A
U
S
E
S
T
O
P
F
I
N
A
L
I
Z
E
E
R
A
S
E
O
P
E
N
/C
L
O
S
E
O
P
E
N
/C
L
O
S
E
C
D
-S
y
n
c
R
E
C
O
R
D
P
L
A
Y
P
A
U
S
E
S
T
O
P
F
IN
A
L
IZ
E
E
R
A
S
E
D
I
R
E
C
T
L
I
N
E
R
E
C
O
R
D
I
N
G
D
I
R
E
C
T
L
I
N
E
R
E
C
O
R
D
I
N
G
8
0
5
0
1
2
0
2
1
0
3
9
4
5
7
6
P
R
O
G
R
E
P
E
A
T
1
P
A
U
S
E
D
I
G
C
D
S
Y
N
C
T
O
T
A
L
T
R
A
C
K
R
E
M
T
I
M
E
L
R
-50
-40 -30
-20
-10 -6
-3
0
O
V
E
R
R
E
C
O
R
D
A
B
L
E
R
E
C
O
R
D
C
D
C
D
-R
E
C
O
R
D
A
B
L
E
/R
E
W
R
IT
A
B
L
E
C
D
-R
E
C
O
R
D
A
B
L
E
/R
E
W
R
IT
A
B
L
E
R
e
c
o
r
d
a
b
le
S
O
U
R
C
E
D
IS
P
L
A
YAU
T
O
/M
A
N
A
L
S
O
U
R
C
E
D
IS
P
L
A
YA
U
T
O
/M
A
N
A
L
PAUSE
NEXT
PREV.
R
E
P
E
A
T
D
I
S
P
L
A
Y
P
R
O
G
R
A
M
C
D
R
C
D
S
H
U
F
F
L
E
O
P
E
N
/
C
L
O
S
E
STOP
PLAY
1
2
3
4
5
7
8
0
6
9
y
Page 2
IMPORTANT SAFETY INSTRUCTIONS
1. Read Instructions - All the safety and operating instructions
should be read before the appliance is operated.
2. Retain Instructions - The safety and operating instructions should
be retained for future reference.
3. Heed Warnings - All warnings on the appliance and in the
operating instructions should be adhered to.
4. Follow Instructions - All operating and use instructions should be
followed.
5. Water and Moisture - The appliance should not be used near
water - for example, near a bathtub, washbowl, kitchen sink,
laundry tub, in a wet basement, or near a swimming pool, and the
like.
6. Carts and Stands - The appliance should be used only with a cart
or stand that is recommended by the manufacturer.
6A. An appliance and cart combination should be moved
with care. Quick stops, excessive force, and uneven
surfaces may cause the appliance and cart
combination to overturn.
7. Wall or Ceiling Mounting - The applicance should be mounted to
a wall or ceiling only as recommended by the manufacuter.
8. Ventilation - The appliance should be situated so that its location
or position does not interfere with its proper ventilation. For
example, the appliance should not be situated on a bed, sofa, rug, or
simular surface that may block the ventilation openings; or, placed
in a built-in instalation, such as a bookcase or cabinet that may
impede the flow of air trough the ventilation openings.
9. Heat - The applicance should be situated away from heat sources
such as radiators, heat registers, stoves, or other appliances
(including amplifiers) that produce heat.
10. Power Sources - The appliance should be connected to a power
supply only of the type described in the operation instructions or as
marked on the appliance.
11. Grounding or Polarization - The precautions that should be
taken so that the grounding or polarization
means of an appliance is not defeated.
12. Power-Cord Protection - Power-Supply cords should be routed
so that they are not likely to be walked on or pinched by items
placed upon or against them, paying particular attention to cords at
plugs, convenience receptacles, and the point where they exit from
the appliance.
13. Cleaning - The appliance should be cleaned only as
recommended by the manufacturer.
14. Nonuse Periods - The power cord of the appliance should be
unplugged from the outlet when left unused for a long period of
time.
15. Object and Liquid Entry - Care should be taken so that objects
do not fall and liquids are not spilled into the enclosure through
openings.
16. Damage Requiring Service - The apliance should be seviced by
qualified service personnel when :
a. The power-supply cord or plug has been damaged; or
b. Objects have fallen, or liquid has been spilled into the
appliance; or
c. The appliance has been exposed to rain ; or
d. The appliance does not appear to operate normally or exhibits a
marked change in performance; or
e. The appliance has been dropped, or the enclosure damaged.
17 Servicing - The user should not attempt to service the appliance
beyond that described in the operating instructions. All other
servicing should be referred to qualified service personel.
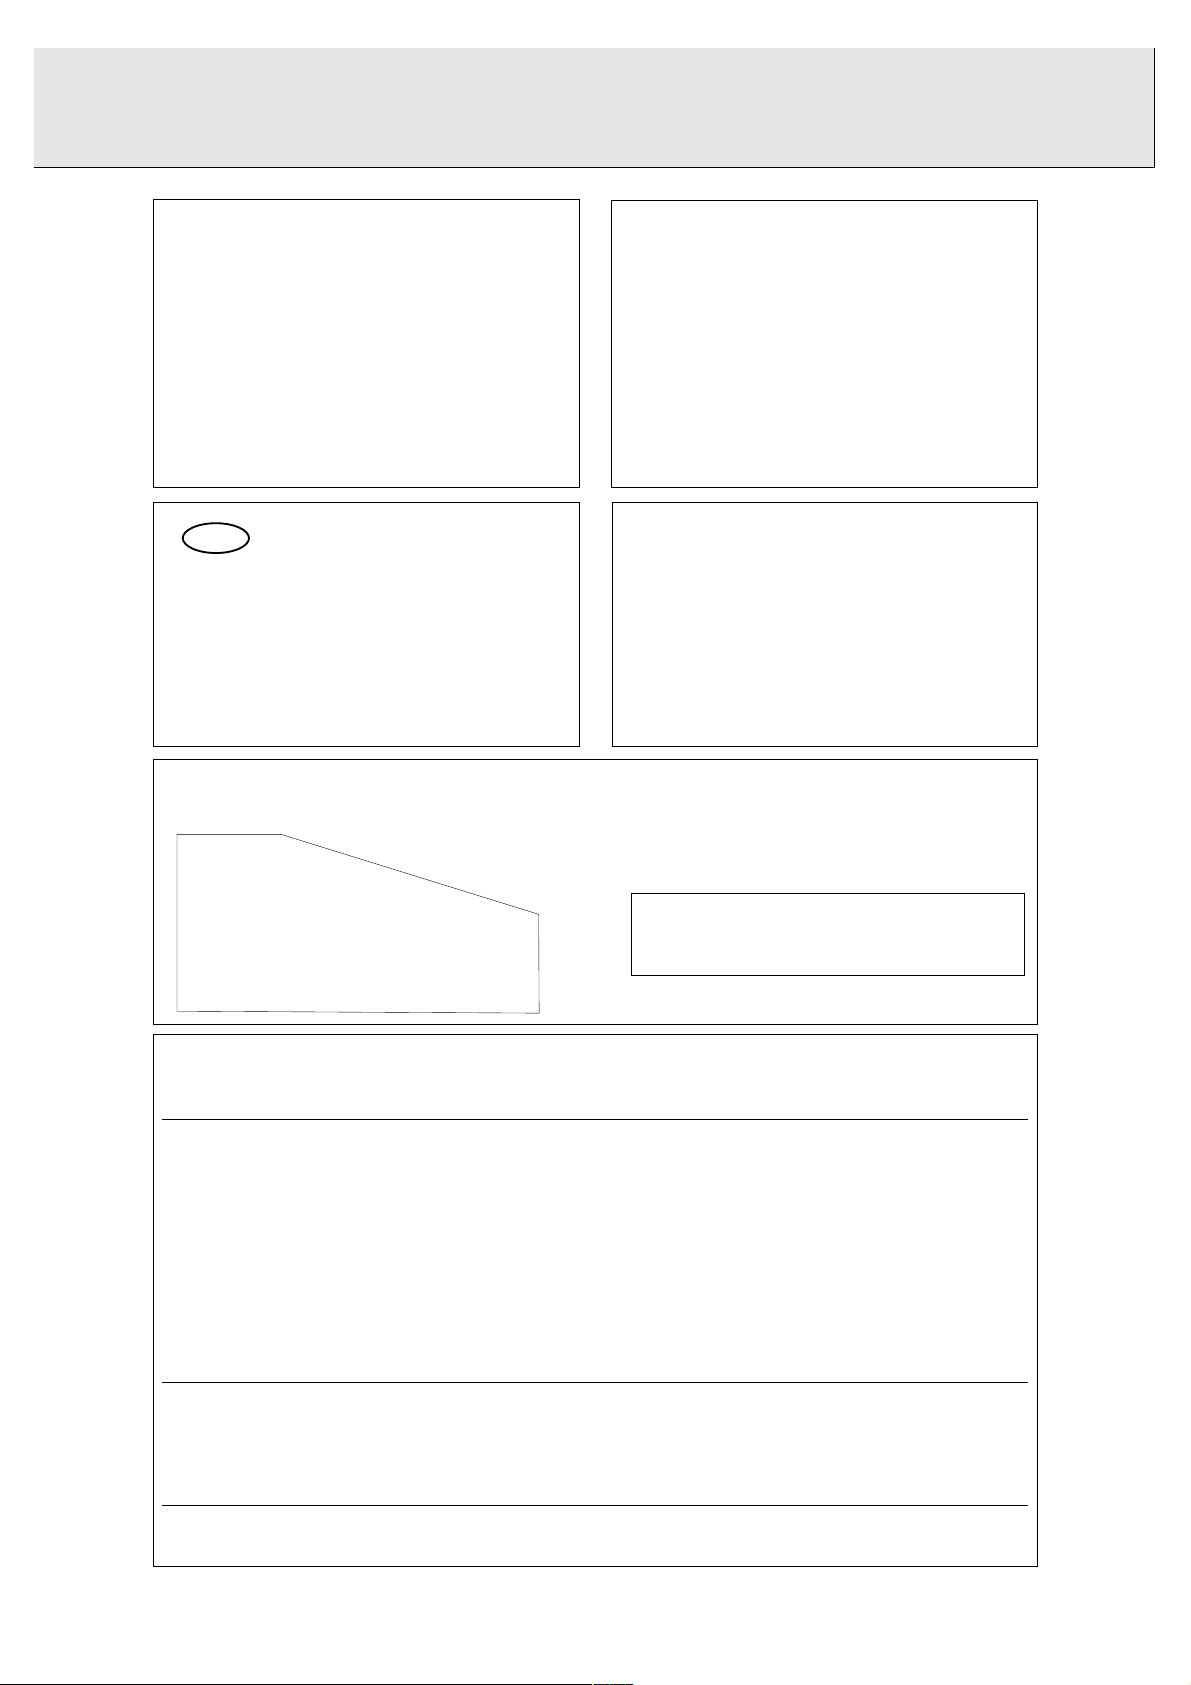
The lightning flash with arrowhead symbol,
within an equilateral triangle, is intended to
alert the user to the presence of uninsulated
“dangerous voltage” within the product’s
enclosure that may be of sufficient magnitude
to constitute a risk of electric shock to
persons.
The exclamation point within an equilateral
triangle is intended to alert the user to the
presence of important operating and
maintenance (servicing) instructions in the
literature accompanying the appliance.
WARNING
TO REDUCE THE RISK OF FIRE OR ELECTRIC SHOCK ,
DO NOT EXPOSE THIS APPLIANCE TO RAIN OR MOISTURE.
CAUTION
RISK OF ELECTRIC SHOCK
DO NOT OPEN
CAUTION: TO REDUCE THE RISK OF ELECTRIC SHOCK, DO NOT
REMOVE COVER (OR BACK). NO USER-SERVICEABLE PARTS
INSIDE. REFER SERVICING TO QUALIFIED SERVICE PERSONNEL.
Page 3

CONTENTS
English ....................................................4
Français.................................................19
Español .................................................37
EnglishFrançaisEnspañol
Page 4
GENERAL INFORMATION
This equipment has been tested and found to comply with
the limits for a Class B digital device, pursuant to part 15
of the FCC Rules. These limits are designed to provide
reasonable protection against harmful interference in a
residential installation. This equipment generates, uses and
can be used in accordance with the instructions, may
cause harmful interference to radio communications.
However, there is no guarantee that interference will not
occur in a particular installation.
If this equipment does cause harmful interference to radio
or television reception, which can be determined by
turning this equipment off and on, the user is encouraged
to try to correct the interference by one or more of the
following measures :
- reorient or relocate the receiving antenna.
- increase the separation between the equipment and
receiver.
- connect the equipment into an outlet on a circuit
different from that to which the receiver is connected.
- consult the dealer or an experienced radio/TV technician
for help.
NNOOTTEE
THIS DEVICE COMPLIES WITH PART 15 OF THE FCC (U.S.A.) RULES.
OPERATION IS SUBJECT TO THE FOLLOWING TWO CONDITIONS : (1) THIS DEVICE MAY NOT CAUSE HARMFUL
INTERFERENCE, AND (2) THIS DEVICE MUST ACCEPT ANY INTERFERENCE RECEIVED, INCLUDING INTERFERENCE THAT MAY
CAUSE UNDESIRED OPERATION.
IIMMPPOORRTTAANNTT
THIS PRODUCT WAS FCC VERIFIED UNDER TEST CONDITIONS THAT INCLUDED USE OF SHIELDED CABLES AND
CONNECTORS BEWTEEN SYSTEM COMPONENTS. IT IS IMPORTANT THAT YOU USE SHIELDED CABLES TO REDUCE THE
POSSIBILITY OF CAUSING INTERFERENCE TO RADIOS, TELEVISION SETS AND OTHER ELECTRONIC DEVICES.
IF YOU HAVE ANY PROBLEMS CONTACT YOUR DEALER.
ANY CHANGE OR MODIFICATIONS TO THE EQUIPMENT BY THE USER NOT EXPRESSLY APPROVED BY THE
GRANTEE OR MANUFACTURER COULD VOID THE USER’S AUTHORITY TO OPERATE SUCH EQUIPMENT.
CCaannaaddaa
This digital apparatus does not exceed the Class B
limits for radio noise emissions from digital apparatus
as set out in the Radio Interference Regulations of the
Canadian Department of Communications.
Cet appareil numérique n’émet pas de bruits
radioélectriques dépassant les limites applicables dans
la règlement sur le brouillage radioélectriques édicté
par le ministère des communications du Canada.
CDN
CAUTION
USE OF CONTROLS OR ADJUSTMENTS OR
PERFORMANCE OF PROCEDURES OTHER
THAN THOSE SPECIFIED HEREIN MAY
RESULT IN HAZARDOUS RADIATION
EXPOSURE.
The set complies with the FCC-Rules, Part 15
and with 21 CFR 1040.1
CAUTION
TO PREVENT ELECTRIC SHOCK, MATCH
WIDE BLADE OF PLUG TO WIDE SLOT,
FULLY INSERTED.
ATTENTION
POUR EVITER LES CHOCS ELECTRIQUES,
INTRODUIRE LA LAME LA PLUS LARGE DE
LA FICHE DANS LA BORNE CORRESPONDANTE DE LA PRISE ET POUSSER
JUSQU AU FOND.
LASER
Type Semiconductor laser GaAlAs
Wave lenght 775-795 nm (at 25¡C)
Output Power 2,5 mW (Read)
35 mW (Write)
Beam divergence 60 degree
This warning label is located on the rearside and inside this laser product.
CAUTION: INVISIBLE
LASER RADIATION
WHEN OPEN. DO NOT STARE INTO BEAM
DANGER: INVISIBLE LASER RADIATION WHEN OPEN.
AVOID DIRECT EXPOSURE TO BEAM.
VARO! AVATTAESSA JA SUOJALUKITUS OHITEJTAESSA OLET
ALTTIINANAKYMATTOMAALLE LASERSATEILYLLE.ALA
KATSO SATEESEEN.
OSYNLIG LASERSTRÅLNING NÄR DENNA DEL ÄR ÖPPNAD
VARNING!OCH SPARREN AR URKOPPLAD. BETRAKTA EJ STRALEN
DANGER - Invisible laser radiation when open.
AVOID DIRECT EXPOSURE TO BEAM
or
Page 5

LIMITED WARRANTY
CD-R PLAYER
90 Days Free Labor
One Year Exchange Warranty on Parts
This product must be carried in for repair.
WHO IS COVERED?
You must have proof of purchase to receive warranty service. A sales
receipt or other document showing that you purchased the product
is considered proof of purchase.
WHAT IS COVERED?
Warranty coverage begins the day you buy your product. For 90 days
thereafter, all parts will be repaired or replaced, and labor is free. From
90 days to one year from the day of purchase, all parts will be repaired
or replaced, but you pay for all labor charges. After one year from the
day of purchase, you pay for the replacement or repair of all parts,
and for all labor charges.
All parts, including repaired and replaced parts, are covered only for
the original warranty period. When the warranty on the product
expires, the warranty on all replaced and repaired parts also expires.
WHAT IS EXCLUDED?
Your warranty does not cover:
• labor charges for installation or setup of the product, adjustment
of customer controls on the product, and installation or repair of
antenna systems outside of the product.
• product repair and/or part replacement because of misuse,
accident, unauthorized repair or other cause not within the
control of Philips Consumer Electronics Company.
• reception problems caused by signal conditions or cable or
antenna systems outside the unit.
• a product that requires modification or adaptation to enable it to
operate in any country other than the country for which it was
designed, manufactured, approved and/or authorized, or repair of
products damaged by these modifications.
• incidental or consequential damages resulting from the product.
(Some states do not allow the exclusion of incidental or
consequential damages, so the above exclusion may not apply to
you. This includes, but is not limited to, prerecorded material,
whether copyrighted or not copyrighted.)
• a product that is used for commercial or institutional purposes
(including but not limited to rental purposes).
WHERE IS SERVICE AVAILABLE?
Warranty service is available in all countries where the product is
officially distributed by Philips Consumer Electronics Company. In
countries where Philips Consumer Electronics Company does not
distribute the product, the local Philips service organization will
attempt to provide service (although there may be a delay if the
appropriate spare parts and technical manual(s) are not readily
available).
MAKE SURE YOU KEEP ...
Please keep your sales receipt or other document showing proof of
purchase. Attach it to this owner’s manual and keep both nearby.
Also keep the original box and packing material in case you need to
return your product.
BEFORE REQUESTING SERVICE...
Please check your owner’s manual before requesting service.
Adjustments of the controls discussed there may save you a service
call.
TO GET WARRANTY SERVICE IN U.S.A.,
PUERTO RICO OR U.S.VIRGIN
ISLANDS...
Take the product to a Philips factory service center (see enclosed
list) or authorized service center for repair.When the product has
been repaired, you must pick up the unit at the center. Centers may
keep defective parts.
(In U.S.A., Puerto Rico and U.S.Virgin Islands, all implied warranties,
including implied waarranties of merchantability and fitness for a
particular purpose, are limited in duration to the duration of this
express warranty. Because some states do not allow limitations on
how long an implied warranty may last, this limitation may not apply
to you.)
TO GET WARRANTY SERVICE IN
CANADA...
Take the product to a Philips consumer service center (listed below),
self-servicing dealer ar autorized service depot.
Philips Electronics Ltd.
601 Milner Avenue, Scarborough, Ontario, M1B 1M8
(416) 292-5161
4977 Levy Street, St. Laurent Québec, H4R 2N9
(514) 956-0120
1741 Boundary Road, Vancouver, B.C.VSM 3Y7
(604) 294-3441
(In Canada, this warranty is given in lieu of all other warranties. No
other warranties are expressed or implied, including any implied
warranties of merchantability or fitness for a particular purpose.
Philips is not liable under any circumstances for any direct, indirect,
special, incidental or consequential damages, howsoever incurred,
even if notified of the possibility of such damages.)
REMEMBER...
Please record the model and serial numbers found on the product
below. Also, please fill out and mail your warranty registration card
promptly. It will be easier for us to notify you if necessary.
MODEL #
SERIAL #
EL6191E001 / MAC 6058 / 10-96
Philips Service Company, P.O. Box 555, Jefferson City,Tennessee 37760, (423) 475-8869
This warranty gives you specific legal rights. You may have other rights which vary from state/province to state/province.
IB7922E001
Page 6

4
English
Welcome !
Thank you for buying this Philips Compact Disc Recorder.
In the 1980s Philips invented a new audio system - the CD.
The CD (compact disc) revealed the new dimensions of digital
sounds and enhanced the pleasures of audio.
Compact disc technology permits a high contrast in both loud
and quiet passages, with perfect channel separation. Philips
has continued to develop compact disc technology and the
result is the CD recorder.
With your Philips CD-Recordable/ReWritable Recorder, you
can record, play and erase your own high-quality audio CDs,
subject only to legal restrictions on copying.
Naturally, you will also be able to play all pre-recorded audio
CDs, and combined CDs such as CD Extra.
Recordings may only be made for personal use. It is forbidden
to copy material protected by copyright, including computer
programs, films, television and audio recordings. This
appliance may not be used for such applications.
Subject to modification without notice.
Digital frequency response ......................................0-22,050Hz
Playback S/N ....................................................................100dB
Playback dynamic range ....................................................95dB
Play back total harmonic distortion..................0.0056%, -85dB
Recording S/N (Analogue)..................................................90dB
Recording S/N (Digital)......................................Equal to source
Recording dynamic range ..................................................92dB
Recording total harmonic distortion ................0.0056%, -85dB
Digital coaxial input (IEC 958) ....................44.1Khz +/-100ppm
Digital optical input (IEC958) ....................44.1Khz +/- 100ppm
Analogue input (level potmeter) ............500mVrms/50kΩ=0dB
Audio output ........................................................2V RMS ±2dB
Digital coaxial output ............................................0.5 Vpp/75Ω
Headphones ..............................................0-5V RMS/8-2000Ω
Dimensions....................................................435 x 305 x 88mm
Weight ..................................................................................4kg
Power consumption.............................................................15W
Operating temperature...................................................5 - 35°C
Power Supply ................................................................AC 120V
Technical information
Table of contents
GENERAL INFORMATION
Technical information ....................................................4
Disc for recording ..........................................................5
Discs for playback ........................................................5
Maintenance ................................................................5
Accessories ..................................................................5
OPERATING BUTTONS AND CONNECTIONS
Operating buttons on the front ....................................6
Connections on the back ..............................................6
DISPLAY
DISPLAY explanation ....................................................7
DISPLAY messages........................................................7
INSTALLATION
Connections general......................................................8
Analogue connections ..................................................8
Digital coaxial connections ..........................................9
Digital optical connections ..........................................9
Power supply ..............................................................10
Set-up recommendations ............................................10
Inserting batteries in the remote control....................10
REMOTE CONTROL & INSERTING DISCS
Remote control commands ........................................11
Inserting discs ............................................................11
RECORDING
Remarks about recording ............................................12
Digital recording - unsynchronized ............................12
Synchronized digital recording - CD-SYNC ................13
Analogue recording ....................................................14
Finalizing CD-R & CD-RW discs ..................................15
Unfinalizing CD-RW discs ..........................................15
ERASING & PLAYING
Erasing CD-RW discs ..................................................16
Playing a CD ................................................................16
PLAYING
Selecting a track or searching ....................................17
Shuffle play ................................................................17
Repeat CD, track or program ......................................17
Programming ..............................................................17
FIXING PROBLEMS
Troubleshooting ..........................................................18
Diagnostic program ....................................................18
GENERAL INFORMATION
Page 7
5
English
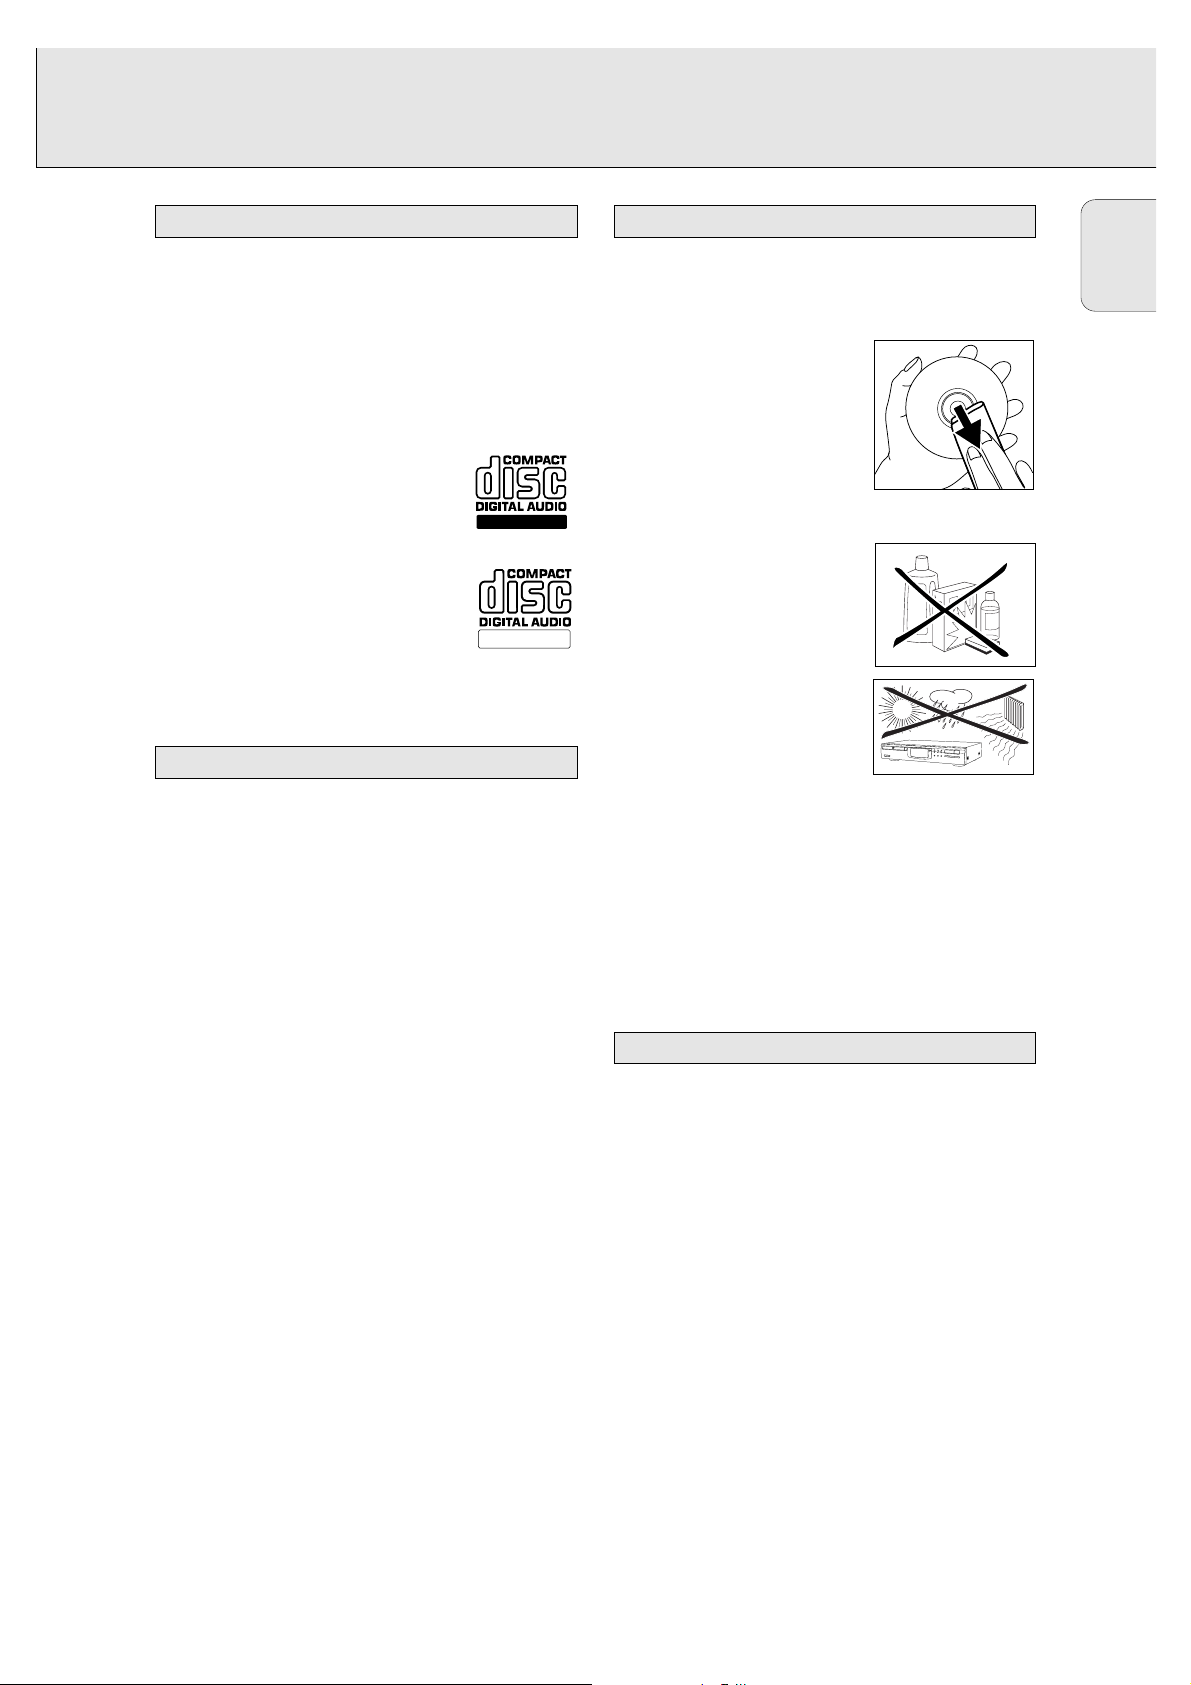
For recording use, special audio discs must be used (for music
only). These Discs bear the logos as shown below. The text
'DIGITAL AUDIO' is present! Copyright fees have been paid on
these discs in some countries.
With your recorder you can use two types of discs for
recording purposes:
- CD-Audio Recordable (CD-R) discs:
Fully recorded and finalized, these discs play
on all CD players and recorders.
- CD-Audio ReWritable (CD-RW) discs:
Can be recorded, erased and re-recorded
hundreds of times. When finalized, they play
on CD-RW compatible CD players and
recorders. In the course of 1999 most Philips
CD players and recorders will be CD-RW compatible.
Your CD recorder is able to play:
- All prerecorded audio CDs, and combined CDs such as CD
Extra.
- All Audio CD-R and Audio CD-RW.
Note: CD-R discs recorded with a computer can only be used
when they are correctly treated according the audio
standard (IEC958: Consumer part). Single session only!
It is extremely important that the discs used for recording are
free of dust and scratches.
To clean a CD, wipe it in a straight
line from the center towards the
outer edge using a soft, lint-free
cloth. Cleaning agents may damage
the disc! Write only on the printed
side of a CD-R or CD-RW, and only
with a soft felt-tipped pen.
Clean the CD recorder with a soft,
slightly dampened lint-free cloth. Do
not use any cleaning agents as they
may have a corrosive effect.
Do not expose the CD recorder,
batteries or CDs to humidity, rain,
sand or excessive heat (caused by
heating equipment or direct sunlight).
If the CD recorder cannot read CDs correctly, use a cleaning
CD to clean the lens before taking the CD player to be
repaired. Other cleaning methods may destroy the lens.
Always keep the tray closed to avoid dust on the lens.
The lenses may cloud over when the CD recorder is suddenly
moved from cold to warm surroundings, making it temporarily
impossible to play a CD. Leave the CD recorder in a warm
environment until the moisture evaporates.
- 2 Analogue audio cables (with red and white plugs)
- 1 Digital coaxial cable (with black plugs)
- Power cord
- 2 Batteries
- Remote control
- Guarantee
Accessories
Maintenance
Discs for playback
ReWritable
Recordable
Discs for recording
GENERAL INFORMATION
Page 8
6
English
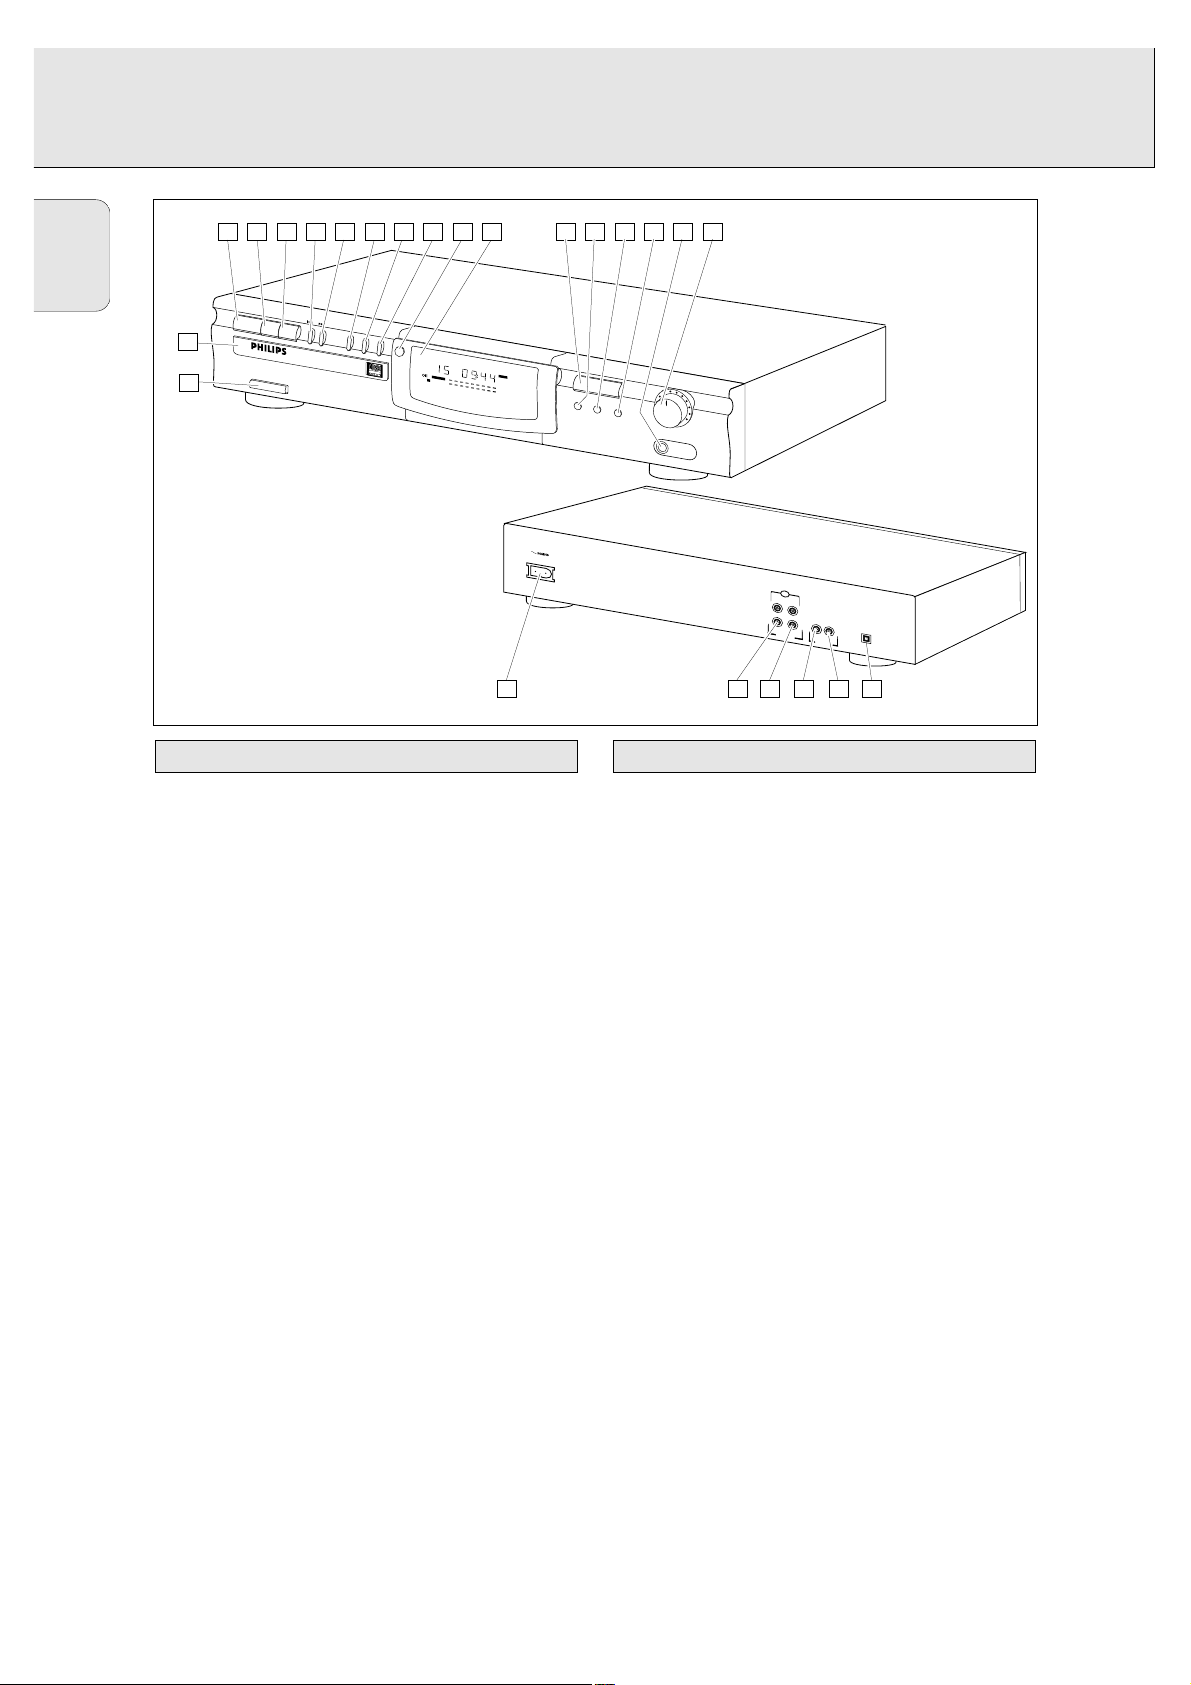
1 ON/OFF . . . . . . . . . turn the CD recorder ON and OFF
2 Disc tray
3 PLAY 2 . . . . . . . . . start to play or record
4 PAUSE ; . . . . . . . . interrupt play
5 STOP 9 . . . . . . . . . stops
6 ∞ . . . . . . . . . . . . . previous track/search back
7 § . . . . . . . . . . . . . next track/search forward/new track
8 RECORD. . . . . . . . . record
9 FINALIZE . . . . . . . . finalize recording
0 ERASE . . . . . . . . . . erase recording
! CD-SYNC . . . . . . . .synchronized recording (automatic
start when recording)
@ DISPLAY (information screen)
# OPEN/CLOSE. . . . . open/close disc tray
$ DISPLAY . . . . . . . . select display information
% SOURCE . . . . . . . . .select digital or analogue input
^ AUTO/MANUAL . . select track numbering method
& PHONES . . . . . . . . plug for headphones
* REC LEVEL . . . . . . adjust the recording level (analogue)
1 Connection to power supply
2 ANALOG IN . . . . . connects to the line output of an
amplifier (left and right)
3 ANALOG OUT. . . . connects to the line input of an
amplifier (left and right)
4 DIGITAL IN . . . . . . connects to the digital coaxial
output of a CD player
5 DIGITAL OUT . . . . connects to the digital coaxial input
of e.g. amplifier or recording device
6 OPTICAL IN . . . . . connects to the digital optical
output of a CD player
Connections on the backOperating buttons on the front
OPERATING BUTTONS AND CONNECTIONS
3 54 8 9 10 11 126 7
P
LA
Y
2
CD-R
1
ECOR
Power On/Off
P
A
USE
DABLE/REWRITAB
13 14 15 16 17 18
S
TO
P
R
E
C
O
R
D
F
I
N
A
L
I
Z
E
E
R
A
S
E
C
D
-S
y
nc
D
I
LE
DIRECT LINE
RECORDING
R
Recordable
eco
G
T
R
A
C
K
R
E
P
E
A
T
1
T
O
T
A
L
R
E
M
P
R
O
G
rd
ab
le
C
D
R
E
C
O
R
D
A
B
L
E
L
-5
R
CDR 760-RECORDA
T
I
M
E
C
D
S
Y
N
C
R
E
C
O
R
D
0
-4
0
-3
0
-2
0
1
0
-6
-3
0
O
V
E
R
P
A
U
S
E
BLE/REW
RITABLE
1 65
O
PEN
/C
LOSE
DISPLAY
SOURCE
AUTO/MANAL
R
E
C
LE
V
E
L
6
5
7
4
8
3
9
2
10
1
20
0
50
Phones
CDR
L
L
R
R
IN
O
U
T
ANA
IN
LO
G
O
UT
D
IG
ITA
L
IN
O
PT
ICAL
4
32
Page 9

7
English
1 ANALOG. . . . . . . . . analogue input is selected
2 DIG . . . . . . . . . . . . . lights up when digital input is
selected and flashes when digital
input is incorrect.
3 AUTO TRACK. . . . . automatically increase track
numbers
4 REPEAT (1) . . . . . . . repeat function activated during play
5 Track number and time.
6 CD-SYNC . . . . . . . . synchronized recording is active.
7 RECORD . . . . . . . . . lights up during recording and
flashes in record standby
8 FINALIZE . . . . . . . . lights up during finalizing and
flashes in finalize standby
9 ERASE . . . . . . . . . . lights up during erase recording and
flashes in erase standby
0 COPY PROHIBIT . . Lights when trying to record digital
protected audio
! PAUSE . . . . . . . . . . pause function is active
@ Record/play level bar (analogue)
# RECORDABLE . . . . Unfinalized CD-R disc inserted
$ REWRITABLE. . . . . CD-RW disc inserted
% CD . . . . . . . . . . . . . .CD inserted (a pre-recorded CD or
finalized CD-R or CD-RW disc)
^ . . . . . . . . . . . remote control active
& PROG . . . . . . . . . . . programmed play
Messages as listed and explained here may appear on the
display for your guidance.
READING ......player is reading disc information
OPC ................during OPC procedure
OPEN ............during tray opening
CLOSE ..........during tray closing
NO DISC ......no disc inserted or disc unreadable
UPDATE ........updating disc contents
ERROR ..........write error during recording
RECOVER ......during recovery procedure
WAIT ..............recording stop (4 seconds) in progress
SYNC ..............during synchronized recording standby
TRACK ..........during erase-track standby
DISC ............during erase-disc standby
SERVICE ......self-test failed
OPCFAIL ......laser power calibration failed. Further
recording not possible
FULL ............program full
CD FULL ......no more recording possible
EMPTY ............no recordings on disc, finalizing not possible
NO AUDIO ....(flashing) no audio disc loaded or failure to
read data
FINAL ............laser power calibration performed 96 times,
finalize disc
COAXIAL ......digital coaxial input selected
OPTICAL ......digital optical input selected
SHUFFLE ......during shuffle
RC-DISC ......recovered disc. Finalizing not possible
TOC ................flashes during unfinalize disc standby, lights
during unfinalize disc
INPUT ..........during input selection (CD-SYNC)
ANALOG ........analogue input selected
Display messages
Display explanation
DISPLAY
OVER
654321
CD SYNC
RECORD
FINALIZE
ERASE
COPY
PROHIBIT
PAUSE
DIG
ANALOG
17
PROG
RECORDABLE
CD
REWRITABLE
16 15 14 13 12 11
REPEAT 1
TOTALAUTO TRACK TRACKREM TIME
L
-50 -40 -30 -20 -10 -6 -3 0
R
7
8
9
10
Page 10
8
English
The CD recorder has the following recording inputs:
- Digital optical input
- Digital coaxial input
- Analogue input
The CD recorder has the following playback outputs:
- Digital coaxial output
- Analogue output
The connections to be made depend upon the possibilities
your audio equipment offers. Please refer to the user manuals
for your other audio equipment first.
Recordings made from a digital source (CD player) via the
digital optical or digital coaxial connection will give the best
performance in audio and usability (e.g. auto-track).
(The digital optical connection is less sensitive to external
disturbances).
If your equipment does not offer digital connections, the high
quality Analogue-Digital-Converter of your CD recorder will
ensure high audio performance when recordings are made
from the analogue input.
Playback via the digital coaxial output of the CD recorder
gives the best audio performance. If your equipment does not
offer digital connections the high quality Digital-AnalogueConverter of the CD recorder ensures a high sound quality via
the analogue output.
We recommend that both digital and analogue connections be
made, so that analogue recordings can be made when digital
recording is not possible.
The most common ways of connecting the CD recorder are
explained below. If you still have difficulties with the
connections, feel free to contact the Philips Consumer Service
desk in your country.
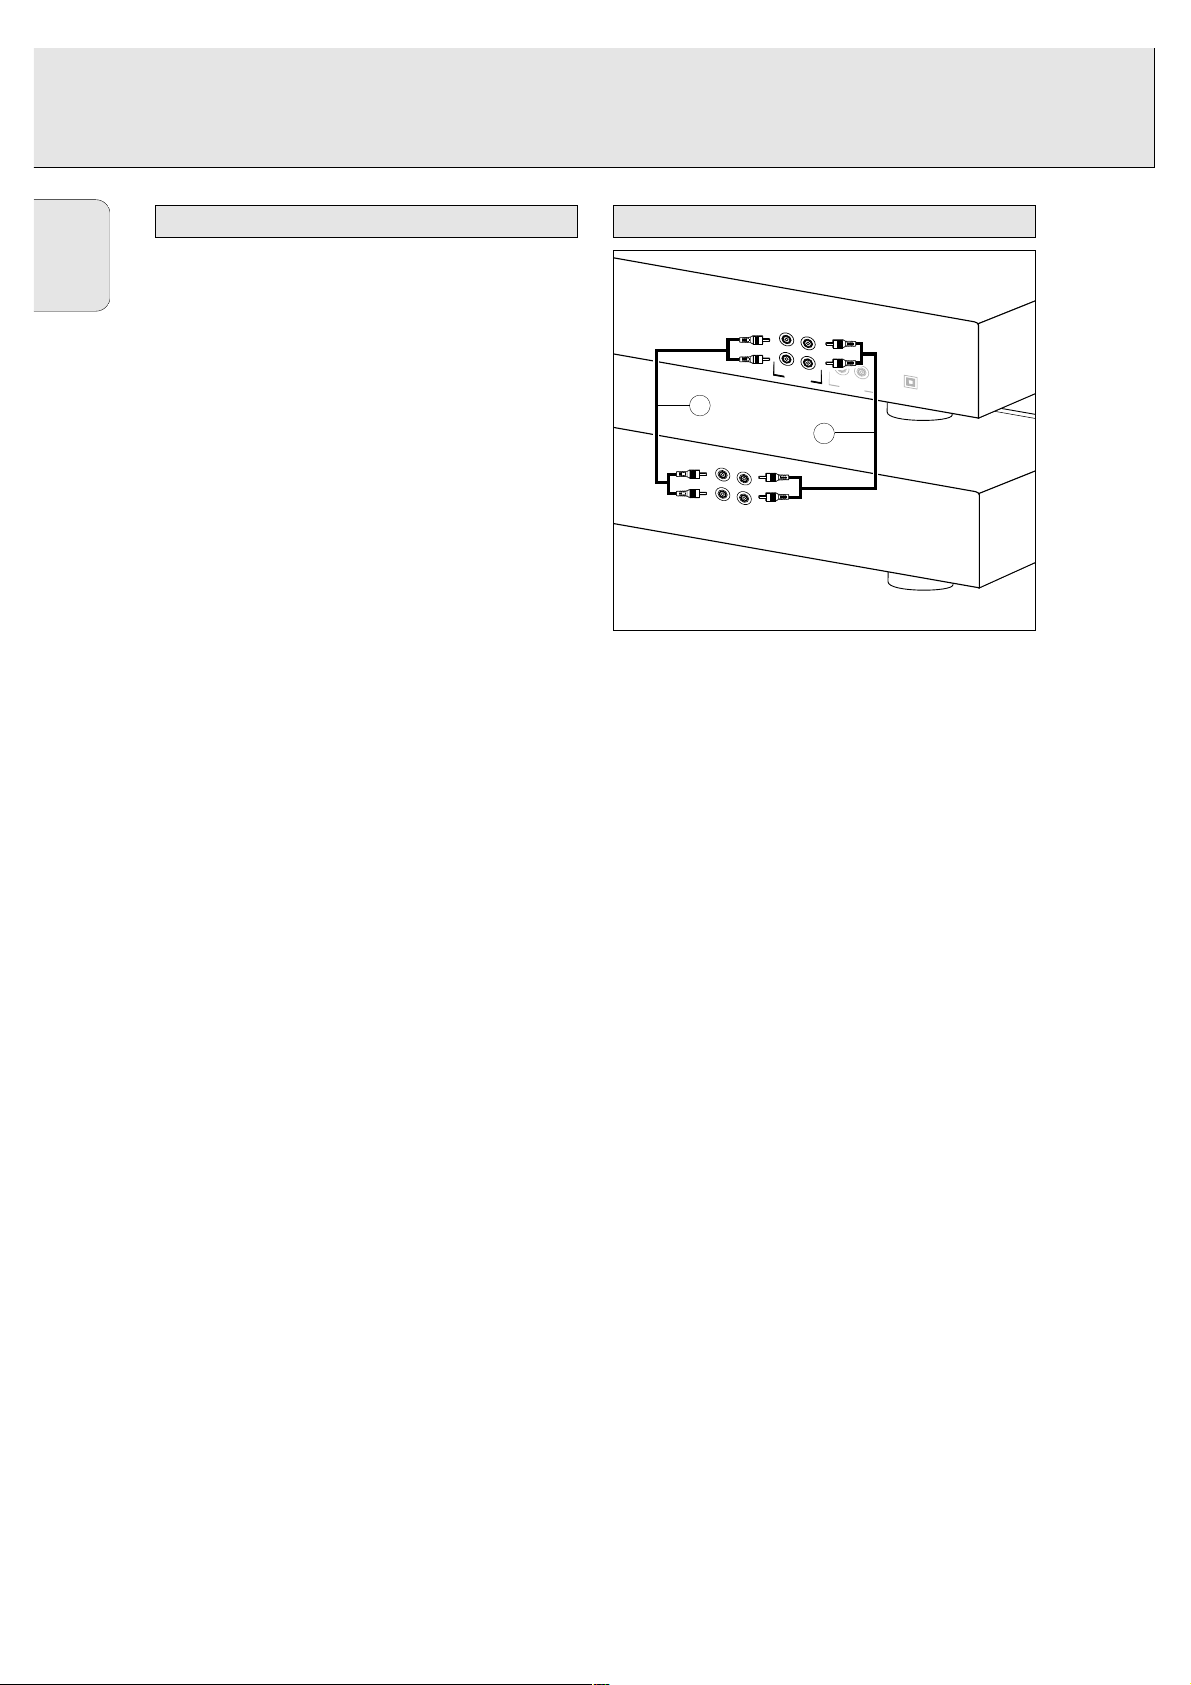
Use the audio cables supplied. Connect the red plugs to the
R sockets, and the white plugs to the L sockets.
1 For recording, connect cable 1 between the ANALOGUE
IN sockets on the CD recorder and the LINE- or TAPE OUT
sockets of an amplifier.
Note: For recording directly from a CD player the analogue
input of the CD recorder should be connected to the
analogue output of the CD player.
2 For playback, connect cable 2 between the ANALOGUE
OUT sockets on the CD recorder and the input sockets of an
amplifier e.g. TAPE IN, CD-R or AUX.
Note: Never use the PHONO input.
Analogue connectionsConnections general
INSTALLATION
L
R
O
U
T
A
IN
L
O
G
D
2
CD RECORDER
O
U
T
I
G
IT
A
L
IN
O
P
T
I
C
A
L
RECEIVER
L
R
I
N
A
N
1
L
L
R
R
O
U
T
I
N
TA
PE
Page 11

9
English
Use the supplied cable with the black plugs.
1 For recording, connect the cable 3 between the DIGITAL
IN socket on the CD recorder and the DIGITAL OUT socket
of a CD player.
Note: Your CD recorder is equipped with a digital coaxial
output. This output can be used for digital playback.
1 Remove the dust caps from the digital optical connections.
(We recommend that you save the caps).
2 For recording, connect a fiber-optic cable 4 between the
digital optical input of the CD recorder and the digitaloptical output of a CD player.
Note: For playback the digital coaxial output or analogue
output should be connected to an amplifier.
When connecting the Digital Optical
cable, make sure it is fully inserted
until there is a click.
Digital optical connections
Digital coaxial connections
INSTALLATION
L
R
ANALO
G
O
UT
DIGITAL
OUT
CD PLAYER
O
UT
O
PTICAL
3
L
R
CD RECORDER
IN
O
UT
DIGITAL
OPTICAL
IN
L
R
IN
OUT
ANALOG
1
2
L
R
CD
IN
L
L
R
R
OUT
IN
TAPE
RECEIVER
L
R
AN
ALOG
OUT
3
L
L
R
R
IN
OUT
ANALOG
1
2
L
R
CD
IN
L
L
R
R
OUT
IN
TAPE
CD PLAYER
DIGITAL
OUT
OUT
OPTICAL
4
CD RECORDER
IN
OUT
DIGITAL
OPTICAL
IN
RECEIVER
Page 12
10
English
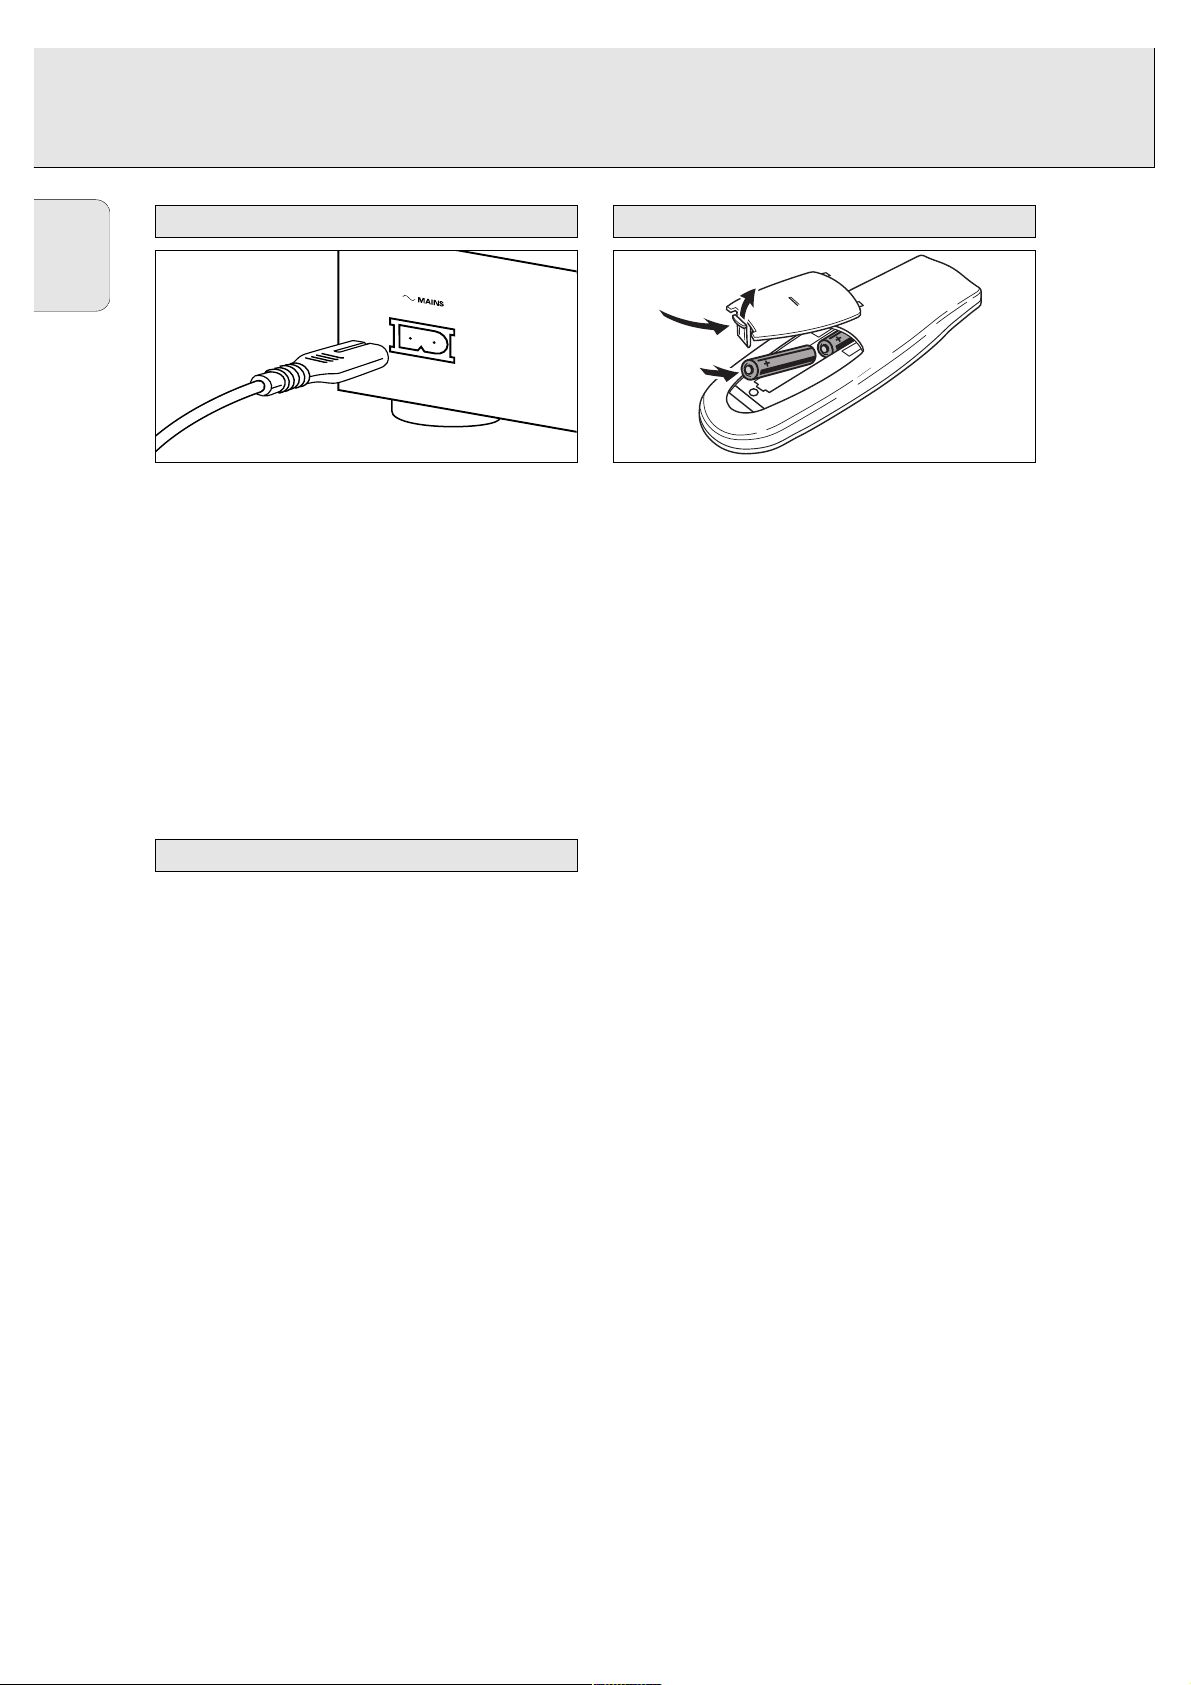
1 Plug the power cord supplied into the MAINS connector on
the CD recorder, then into a wall socket.
2 Press ON/OFF to turn the CD recorder on.
Note:
- The CD recorder will automatically adjust to the local mains
voltage.
- When the CD recorder is in the “OFF” position, it is still
consuming some power. If you wish to disconnect your CD
recorder completely from the mains, withdraw the plug from
the AC Outlet.
- Place the CD recorder on a solid, vibration free surface.
- Do not place the CD recorder near a source of heat or in
direct sunlight.
- Do not use the CD recorder under extremely damp
conditions.
- If the CD recorder is placed in a cabinet, make sure that a
one-inch space remains free on all sides of the recorder for
proper ventilation.
1 Open the battery compartment cover.
2 Insert 2 batteries (AAA, R03 or UM-4; as supplied) as
shown.
3 Replace the cover.
Note: We recommend using 2 batteries of the same type and
condition.
Batteries contain chemical substances; dispose of
them properly.
Inserting batteries in the remote control
Set-up recommendations
Power supply
INSTALLATION
Page 13
11
English
PROGRAM. . . . . . . . . . programs track numbers
DISPLAY . . . . . . . . . . . selects display information
Number keys 0 - 9 . . . select a track by number
SHUFFLE . . . . . . . . . . . plays CD(RW) or program in random
order
Q . . . . . . . . . . . . . . . searches backward
PREVIOUS O . . . . . . . selects the beginning of a previous
track
STOP 9 . . . . . . . . . . . . stops CD(RW) and clears a program
PAUSE ; . . . . . . . . . . . interrupts CD(RW) play
NEXT P . . . . . . . . . . . selects the beginning of subsequent
PLAY 2 . . . . . . . . . . . . starts CD(RW) play
R . . . . . . . . . . . . . . .searches forward
REPEAT . . . . . . . . . . . . repeat play
CD . . . . . . . . . . . . . . . . CDR 765 only
CD-R. . . . . . . . . . . . . . . CDR 765 only
OPEN/CLOSE . . . . . . . .opens or closes the disc tray
When you press a button on the remote control, the indicator
on the display will light up.
Note: Unless otherwise stated, all operating buttons are on
the front of the CD recorder. The corresponding buttons
on the remote control can also be used.
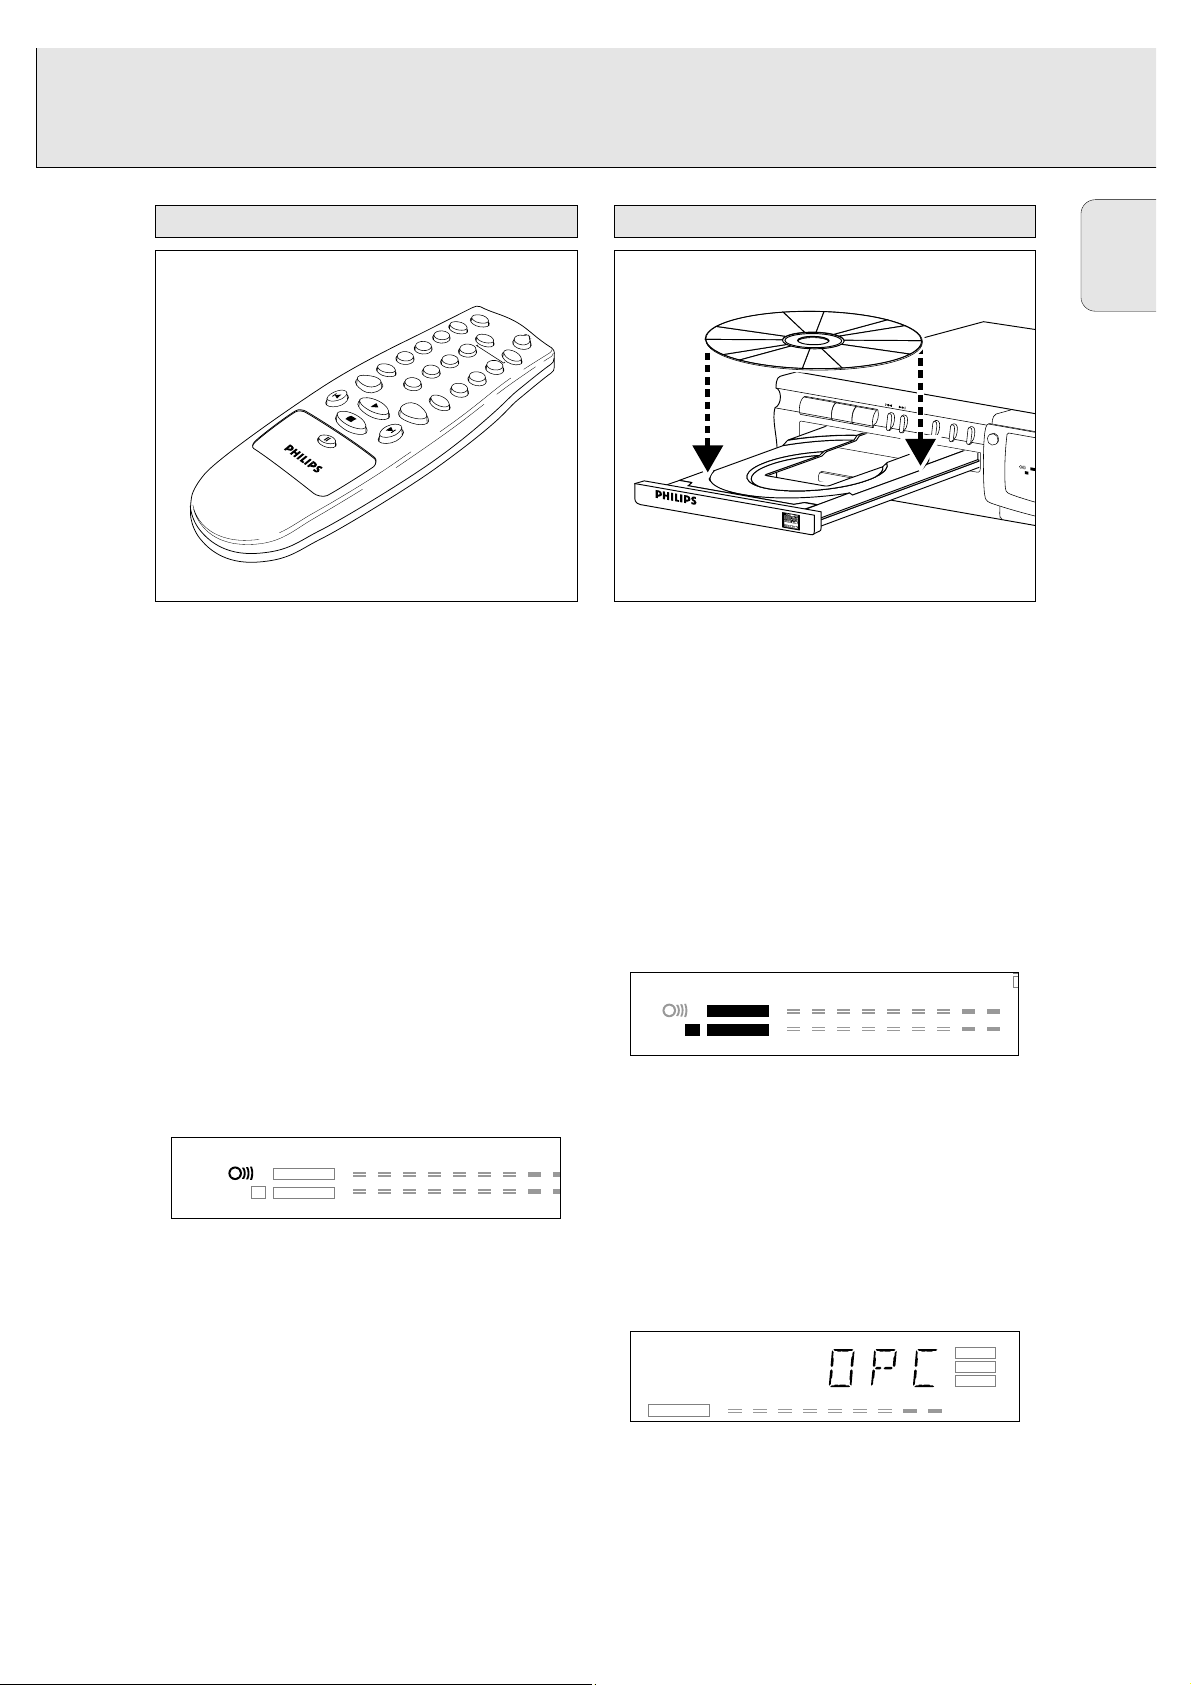
1 Press OPEN/CLOSE (13) to open the disc tray.
2 Insert a CD, CD-R or CD-RW in the appropriate recess in
the tray, label side up.
IMPORTANT:
For recording it is important that the blank disc be
completely free of dust particles or scratches. (see
Disc Maintenance, p.5).
3 Gently push the front of the tray or press OPEN/CLOSE to
close the tray (see also Playing a CD).
➜ The display will indicate the type of disc you have
inserted.
• If a CD-R is finalized the display will indicate
CD.
• If a CD-RW is finalized it is still a CD-ReWritable and the
display will indicate CD REWRITABLE.
If you insert a blank or partly-recorded CD-R or CD-RW, the
CD recorder will calibrate the disc for optimum recording.
During this process the display will first show
OPC
and then
the number of audio tracks previously recorded. Calibration
can take up to 25 seconds.
Note: Only Audio CDs will be accepted. If a non-audio disc is
inserted, the display will indicate
NO AUDIO
.
P
O
Inserting discs
Remote control commands
REMOTE CONTROL & INSERTING DISCS
PROG
R
AM
DISPLA
Y
1
C
DR
4
7
5
S
H
U
FF
L
8
E
5
P
R
E
V
P
A
U
S
E
0
.
P
S
TO
P
R
E
P
E
L
A
Y
A
T
6
N
E
X
T
y
2
C
D
3
6
9
O
P
E
N
/C
L
O
S
E
P
L
A
Y
P
A
U
S
E
Power On/Off
C
D
R
E
C
O
R
D
A
B
L
E
/
R
E
W
R
I
T
A
B
L
E
PROG
CD
RECORDABLE
REWRITABLE
R
e
c
o
rd
a
b
le
L
-50 -40 -30 -20 -10 -6 -3 0
R
S
T
O
P
D
R
R
E
C
O
R
D
F
I
N
A
L
I
Z
E
E
R
A
S
E
CD
-Sync
D
I
G
P
R
O
G
R
E
C
C
IR
E
C
T
L
IN
E
E
C
O
R
D
IN
G
D
OVER
PROG
RECORDABLE
CD
REWRITABLE
L
-50 -40 -30 -20 -10 -6 -3 0
R
OV
REPEAT 1
DIG
G
TOTALAUTO TRACK TRACKREM TIME
OG
RECORDABLE
L
-
-
-
-
-
-
-
CD SYNC
RECORD
FINALIZE
ERASE
COPY
Page 14

12
English
You will soon discover how easy it is to make your own CDs.
Nevertheless, we recommend that you use a CD-RW disc for
your first try. The three ways to make recordings are
described below:
- Digital unsynchronized
- Digital synchronized
- Analogue
• The recording procedure is the same for CD-Rs or CD-RWs.
• If the disc is a CD-RW and is already finalized you must
unfinalize it first (page 15).
• If the disc already contains recordings, the CD recorder will
automatically search for the end of the last track, so that
you can start recording from there.
• There must be at least 7 seconds of recording time left on
the disc, or you will not be able to activate the record
standby mode.
• If the display indicates COPY PROHIBIT, no digital recording
can be made of the source material. Recording will not
start or will stop after 4 seconds.
• The Serial Copy Management System (SCMS) only
allows digital recording under specific conditions:
- It is not possible to make a digital copy from a digital
copy.
- Analogue recording is always possible!
- The number of recordings from the original is unlimited.
• A maximum of 99 tracks can be recorded on a disc. The
minimum allowable track length is 4 seconds.
• Digital recordings can be made from CDs (or other sources
with an output Sample Frequency of 44.1 kHz +/- 100 ppm)
via the digital input.
Important:
If you want to play the recorded CD-R disc on a regular
CD player, it must be finalized first. See finalizing discs
(p.15).
Finalized CD-RW discs play only on CD-RW compatible
CD players.
Preparing for digital recording
1 Make sure the disc is absolutely free of scratches and dust
particles.
2 Press Source repeatedly until (depending on the digital
connection used):
➜ DIG COAXIAL or DIG OPTICAL appears on the
display.
3 Press AUTO/MANUAL to switch between auto and manual
track numbering.
➜ If AUTO is selected, (preferred) AUTO TRACK will appear
on the display.
• AUTO: The track increments are automatically copied from
the digital source material.
• MANUAL: Track numbers can be incremented manually by
pressing §. (minimum track length is 4
seconds).
(This can also be done in AUTO mode).
• Track numbers cannot be changed after recording.
Note: Auto track works only with Consumer Sources with a
digital output signal according to the IEC 958 (consumer
part) audio standard.
A
S
C
A
Y
O
L
TABLE
Power On/Off
CD-RECORDABLE/REWRITABLE
RECORD
P
LA
Y
P
A
U
S
E
S
T
O
P
FINAL
D
IR
E
C
T
L
IN
E
R
E
C
O
R
D
IN
G
Digital recording - unsynchronizedRemarks about recording
RECORDING
O
P
E
N
/C
L
O
DISPLAY
S
SOURCE
D
IG
T
R
A
CK R
R
E
P
E
A
T
1
T
O
T
A
L
E
L
-
R
5
0
-
4
0
-3
0
MT
-
2
0
-
1
0
-
6-30
IM
E
C
D
S
Y
N
C
R
E
C
O
R
D
O
V
E
R
P
A
U
S
E
P
R
O
G
R
E
C
O
R
D
A
B
LE
C
D
CDR 760-RECORDABLE/REWRI
ANALOG
DIG
PROG
REPEAT 1
TOTALAUTO TRACK TRACKREM TIME
E
AUTO/MANAL
CD S
REC
FINA
ERA
ANALOG
DIG
PROG
REPEAT 1
TOTALAUTO TRACK TRACKREM TIME
CD
RE
FIN
ER
Page 15

13
English
Start digital recording
1 With the recorder stopped, press RECORD to enter the
Record standby mode.
➜ RECORD will flash.
• If
DIG also flashes, the digital connection is incorrect.
2 To start recording, press PLAY and immediately start the
source (from stop mode).
➜ RECORD lights continuously. The track number and
recording time used will be indicated on the display.
• To record a 3-second silence at the start of a track, press
PAUSE.
• To check the (remaining) recording time, press DISPLAY.
(This can also be done during the recording.)
3 To stop recording, press STOP on the CD recorder.
➜ RECORD will go out.
• To interrupt recording, press PAUSE.
➜
RECORD starts to flash. Resume at step 2.
After recording the display will show UPDATE for several
seconds.
Note: With AUTO TRACK on, the recorder will stop
automatically. Recordings from DAT or DCC will stop
after 20 seconds silence. With AUTO TRACK off, the AUTO
STOP
mode is disabled.
Preparing for synchronized digital recording
The CD-SYNC feature enables you to make a fast and easy
digital recording of a CD. Track increments are automatically
detected from the digital source material. Track increments
cannot be added manually.
1 Make sure the disc is absolutely free of scratches and dust
particles.
2 Press Source repeatedly until (depending on the connection
used):
➜
DIG COAXIAL or DIG OPTICAL will appear on the
display.
Start synchronized digital recording
1 With the CD recorder stopped, press CD-SYNC.
➜ On the display, CD-SYNC & SYNC appears. After a time,
RECORD starts to flash.
• If DIG also flashes, the digital connection is incorrect.
2 To start recording, press Play on the digital source.
➜ The CD recorder automatically starts to record and
RECORD lights continuously. The track number and
recording time used will be indicated on the display
• If you start the source during a track, CD-SYNC will not
start recording until the beginning of the next track.
• To check the (remaining) recording time, press Display.
(This can also be done during recording)
3 To stop recording, press STOP on the CD recorder.
➜ CD-SYNC and RECORD will go out.
• To interrupt recording, press PAUSE.
➜ RECORD will start to flash. To resume, press PLAY on the
CD recorder.
Synchronized digital recording - CD-SYNC
RECORDING
ANALOG
PROG
DIG
REPEAT 1
TOTALAUTO TRACK TRACKREM TIME
CD SYNC
RECORD
FINALIZE
ERASE
R
EC
O
R
D
FIN
A
LIZE
ER
A
SE
CD-Sync
D
IG
T
R
A
C
K
R
E
P
E
A
T
1
T
O
T
A
L
R
E
P
R
O
R
e
co
rdab
le
G
R
E
C
O
R
D
A
B
L
E
L
C
D
R
DIG
LOG
PROG
REPEAT 1
TOTALAUTO TRACK TRACKREM TIME
M
-5
0-4
0
-3
0
-2
0-1
0
CD SYNC
RECORD
FINALIZE
ERASE
-
6-
30
T
IM
E
O
V
E
R
Page 16
14
English
After recording the display will show UPDATE for several
seconds.
Note:
- The CD recorder will not start until it recognizes a digital
signal. Although the reaction time is less than 200
milliseconds, the very beginning of the music may
sometimes not be recorded. If this happens, you can start
the recording manually (see digital recordingunsynchronized).
- Recordings from DAT or DCC will only stop after 20 silence.
Only make analogue recordings if digital recording is not
possible.
Preparing for analogue recording
1 Make sure the disc is absolutely free of scratches and dust
particles.
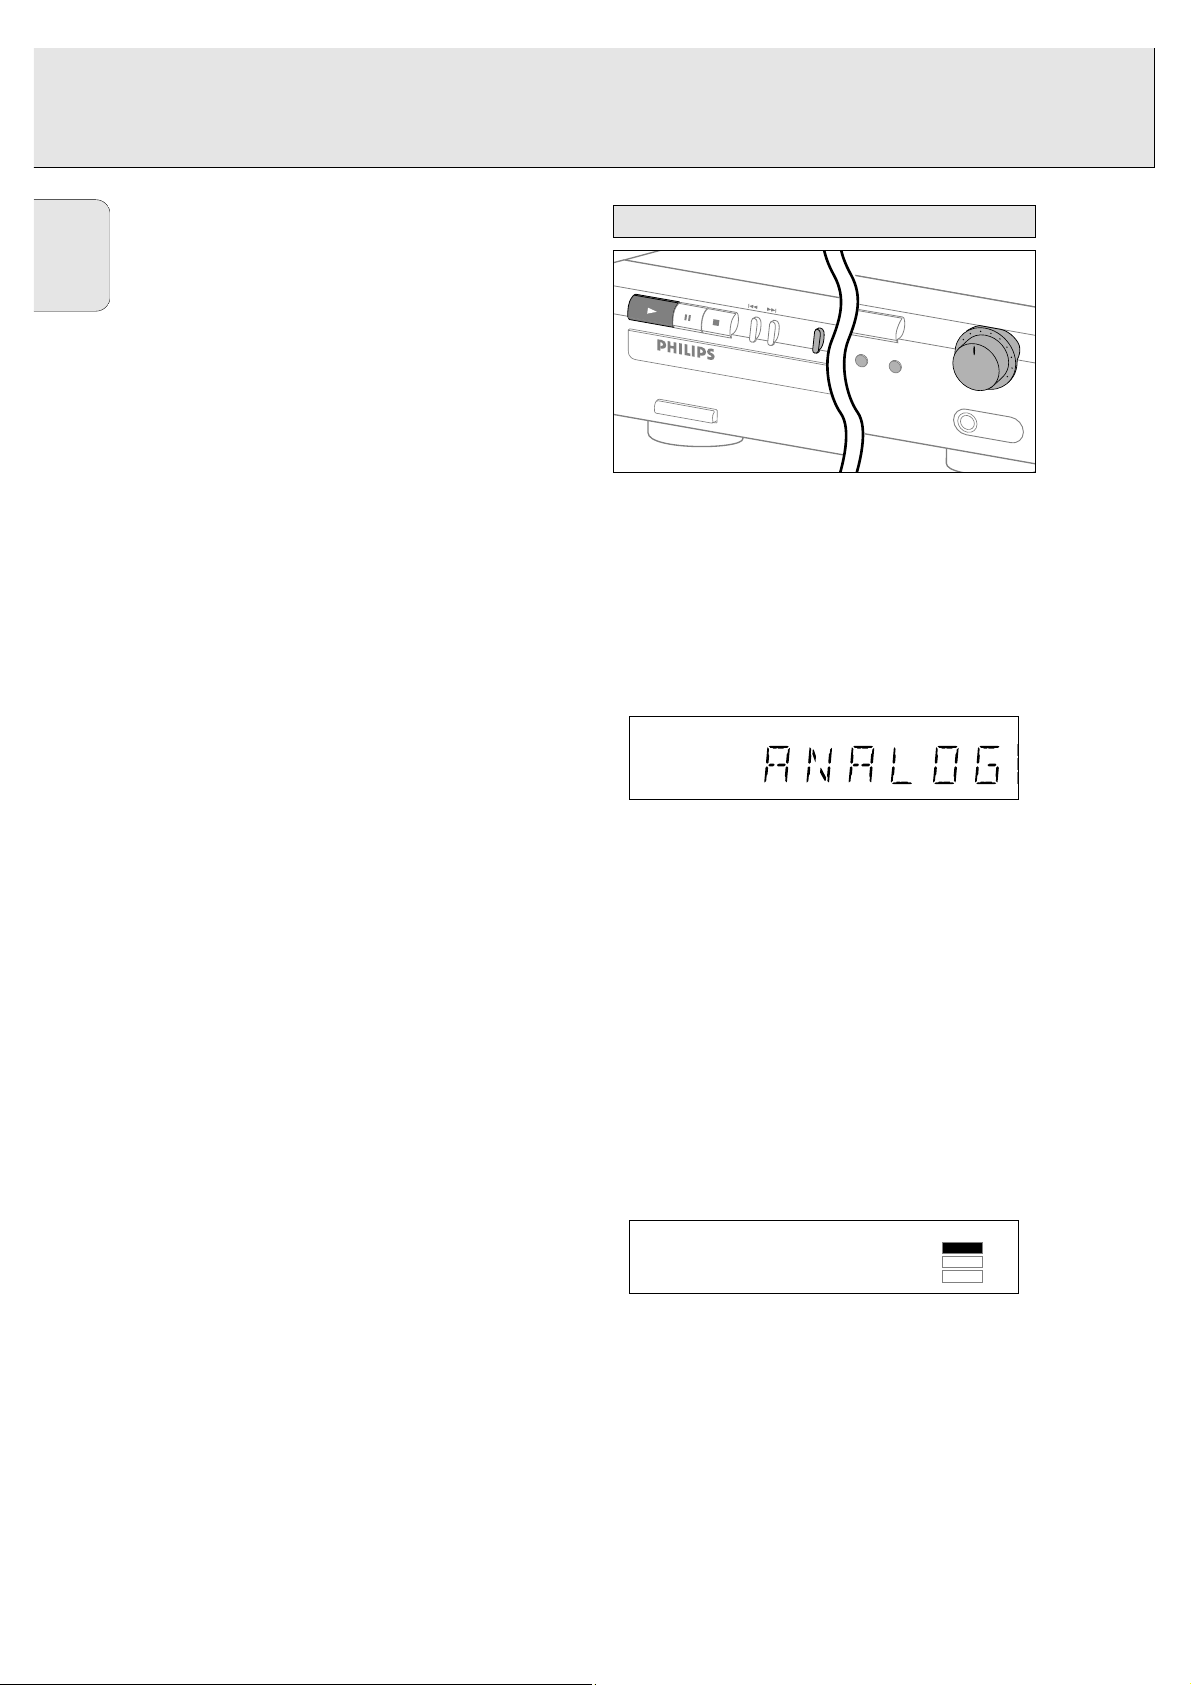
2 Press Source repeatedly until:
➜
ANALOG appears on the display.
3 Press AUTO/MANUAL to switch between auto and manual
track numbering.
➜ If Auto is selected (preferred), AUTO TRACK appears on
the display.
• AUTO: The track number is automatically incremented after
a silence on the original of at least 3 seconds.
• MANUAL: Track numbers can be incremented manually by
pressing §. (minimum track length is 4 seconds ).
(This can also be done in AUTO mode)
• Track numbers cannot be changed after recording.
4 With the recorder stopped, press RECORD to enter Record
standby mode.
➜ RECORD will flash
5 Play the source first to set the optimal recording level on
the CD recorder.
6 Adjust the REC LEVEL until all blue segments on the
Record/Play Level bar light up but no red segments light
continuously during the loudest passages.
7 Stop the source.
P
o
w
e
r O
n/O
ff
C
D
-R
E
C
O
R
D
A
B
L
E
/R
EW
R
IT
A
B
L
E
RECORD
PLAY
PAUSE
STOP
FINALIZ
D
IR
E
C
T
L
IN
E
R
E
C
O
R
D
IN
G
S
O
U
R
C
E
A
U
T
O
/M
A
N
A
L
R
E
C
L
E
V
E
L
P
h
o
n
e
s
OPEN/CLOSE
8
0
50
1
20
2
10
3
9
4
5
7
6
Analogue recording
RECORDING
ANALOG
PROG
DIG
REPEAT 1
TOTALAUTO TRACK TRACKREM TIME
REPEAT 1
IG
TOTALAUTO TRACK TRACKREM TIME
CD SYNC
RECORD
FINALIZE
ERASE
Page 17

15
English
Start analogue recording
1 To start recording, press PLAY on the CD recorder and
immediately start the source.
➜ RECORD lights continuously. The track number and
recording time used appear on the display.
• To record a 3-second silence at the beginning of a track,
press PAUSE.
• To check the (remaining) recording time, press Display.
(This can also be done during the recording.)
2 To stop recording, press STOP on the CD recorder.
➜
RECORD will go out.
• To interrupt recording, press PAUSE.
➜ RECORD will start to flash. Resume at step 1.
After recording the display will show UPDATE for several
seconds.
Note: With AUTO TRACK on, the recorder will stop
automatically after 20 seconds silence. With AUTO
TRACK off, the AUTO STOP mode is disabled.
Finalizing is a simple procedure that is necessary in order to
play the discs on a regular (non-recording) CD player.
Note: Finalizing prevents any further recording on a CD-R. A
finalized CD-RW must be unfinalized to allow further
recording or erasure of tracks.
1 Make sure the disc is absolutely free of scratches and dust
particles.
2 With the recorder stopped press FINALIZE and then within
3 seconds press RECORD.
➜ The approximate finalization time will appear in the
display.
RECORD & FINALIZE lights up.
The display counts down through the finalization. On
completion, the total number of tracks and the total time
recorded will appear on the display.
For CD-R CD RECORDABLE will change to CD on the
display. For CD-RW no change will be seen on the
display.
Finalizing will last at least 2 minutes.
Note: During finalization, the CD recorder will not accept
operating commands.
For CD-RW discs only.
If you want to make more recordings (or to erase tracks) on a
finalized disc you must unfinalize it first. The Table of
Contents (TOC) on the disc will be removed.
To unfinalize:
1 Press ERASE twice.
➜ On the display, TOC and ERASE will flash.
2 Press RECORD within 3 seconds.
➜ TOC and ERASE light up continuously during erasure.
Note: This will take approximately 1 minute.
Unfinalizing CD-RW discs
Finalizing CD-R & CD-RW discs
RECORDING
DIG
LOG
PROG
REPEAT 1
TOTALAUTO TRACK TRACKREM TIME
CD SYNC
RECORD
FINALIZE
ERASE
REPEAT 1
DIG
LOG
PROG
TOTALAUTO TRACK TRACKREM TIME
CD SYNC
RECORD
FINALIZE
ERASE
Page 18

16
English
For CD-RW discs only.
You can erase:
- track by track from the end.
- the entire disc.
To erase the last track :
1 Make sure the disc is not finalized (Showing OPC on
display during start up). Otherwise unfinalize first (p. 15)
2 Press ERASE.
➜ On the display, TRACK and ERASE will flash.
3 Press RECORD within 3 seconds.
➜ TRACK and ERASE light continuously during erasure.
To erase the entire disc:
1 Press ERASE once (for finalized CD-RW) and twice (for
unfinalized CD-RW).
➜ On the display, DISC and ERASE will flash.
2 Press RECORD within 3 seconds.
➜ DISC and
ERASE light continuously during erasure.
Erasure of a complete disc may take up to 1.5 minutes.
1 Press PLAY to start CD play.
➜ The track number and track time appear on the display,
together with the record/play level indicator.
2 Press Display once, twice, or three times to see:
➜ remaining track time; Total remaining time; Track time
with the record/play level bar off.
3 To interrupt play temporarily, press PAUSE.
➜
PAUSE will light up on the display
4 To continue play, press PAUSE again or press PLAY.
5 To stop play, press STOP.
➜ The number of tracks and the total playing time will
appear on the display.
L
Playing a CD
Erasing CD-RW discs
ERASING & PLAYING
DIG
LOG
PROG
REPEAT 1
TOTALAUTO TRACK TRACKREM TIME
CD SYNC
RECORD
FINALIZE
ERASE
PLAY
PAUSE
STOP
CD-RECORDABLE/REWRITABLE
Power On/Off
R
EC
O
R
D
FIN
A
DIG
LOG
PROG
REPEAT 1
TOTALAUTO TRACK TRACKREM TIME
CD SYNC
RECORD
FINALIZE
ERASE
Page 19

17
English
Selecting a track during play
1 Briefly press ∞ or § one or more times.
➜ Play skips to the beginning of the present, previous or
following track.
or
• Press the required track number using the numerical keys
on the remote control. For 2-digit track numbers, press the
keys in rapid succession.
➜ Play skips to the beginning of the selected track.
Selecting a track when CD play is stopped
1 Briefly press ∞ or § one or more times.
2 Press PLAY.
➜ Play starts at the selected track.
or
• Press the required track number using the numerical keys
on the remote control. For 2-digit track numbers, press the
keys in rapid succession.
Searching during CD play
1 Hold down ∞ or § (or 5 or 6 on the remote control).
➜ The player first searches backwards or forwards at 10
times normal speed with sound at low volume, then
goes to fast reverse or fast forward with sound muted.
2 Release the button at the desired passage.
➜ Play starts at the desired passage.
Note: During Shuffle, Repeat or Program play, search is
restricted to within the track being played at the time.
1 Press SHUFFLE (or PLAY) on the remote control before or
during CD play to start shuffle play.
➜ The tracks on the CD (or program if set) play in random
order. SHUFFLE will appear on the display between
tracks.
2 Press SHUFFLE again to return to normal CD play.
Note: Shuffle is also cleared when you open the disc tray.
1 Press REPEAT on the remote control one or more times
during CD play.
➜ When
REPEAT 1 appears on the display, the current track
plays repeatedly. When
REPEAT appears on the display,
the disc or program plays repeatedly.
2 To return to normal play, press REPEAT one or more times
until:
➜ the REPEAT message disappears from the display.
Note:
- You can use shuffle in combination with repeat CD or
program play.
- Repeat is also cleared when you open the disc tray.
You can program up to 30 tracks to play in any desired
sequence. Tracks can be programmed more than once, but
each time counts as a track.
1 On the remote control press PROGRAM to start
programming.
➜ PROG flashes on the display.
2 Press a track number with the number keys. For 2-digit
numbers, press the keys in rapid succession.
➜ On the display, the track number appears briefly,
followed by the total programmed tracks and total
program time.
3 Repeat step 2 for all tracks to be programmed.
4 Press STOP or PROGRAM to end programming.
➜ PROG lights continuously.
Note:
- To review the program, press ∞or §in stop mode.
- To add more tracks to the program, repeat steps 1 through
4.
- If you try to store more than 30 tracks,
FULL
appears on
the display
5 Press PLAY to start programmed play.
Clearing a program
1 Press STOP if necessary to stop programmed play.
2 Press STOP again to clear the program.
➜ PROG disappears from the display.
Note: The program is also cleared when you open the disc
6
Programming
Repeat CD, track or program
A
Y
Shuffle play
Selecting a track or searching
PLAYING
PLAY
PAUSE
STOP
R
ECO
R
D
FIN
A
LIZE
E
RA
S
E
CD-RECORDABLE/REW
Power On/Off
RITABLE
R
e
cordable
CD-Sync
4
7
S
H
U
F
F
L
8
E
PROGRAM
DISPLAY
1
CDR
2
5
3
O
P
E
N
/C
y
L
O
S
E
C
D
1
4
7
5
S
H
U
F
F
L
8
E
5
0
P
R
E
V
.
P
L
A
Y
S
T
9
R
E
P
E
A
T
6
O
P
C
E
D
N
R
/C
y
L
O
S
2
6
E
C
D
3
Page 20

18
English
tray.
If you think your CD recorder is defective, it is wise to check
this list first and run the diagnostic program. Maybe you have
forgotten a simple step.
Warning!
Under no circumstances should you attempt to repair
the CD recorder yourself as this will invalidate the
guarantee.
SYMPTOM: • SOLUTION:
No power • check to ensure that the ON/OFF button is on
• check to ensure that the power cable is
plugged in correctly
• switch the recorder OFF and then immediately
back ON
Auto track does not work
• check to ensure that auto track is selected.
• check to ensure that there are 3 seconds
silence in between the tracks (analogue
recording only)
• check to ensure that the source is a consumer
source with the digital output according the
IEC audio standard.
No sound • check the audio connections
• if using an amplifier, try using a different
source
Amplifier sound is distorted
• check to ensure that the CD recorder analogue
output is not connected to the amplifier Phono
input.
Play will not start
• check to ensure that the label of the CD is
facing up
• clean the disc
• check to ensure that the disc is not defective
by trying another disc
Remote control does not work
• point the remote control directly at the CD
recorder
• check the batteries and replace if necessary
• select the right source first
Will not record
• clean the disc.
• check to ensure that CD-RW is not finalized
• check to ensure that the disc is recordable and
replace if necessary
• the disc is not an AUDIO disc
• wrong input source selected.
Analog recording is distorted
• make sure the recording level is correct
20 second pause between recordings
• see synchronized digital recording (CD-SYNC) p. 8
Player does not react
• switch the ON/OFF button on the front of the
player off and back then on
SERVICE on display after switching on
•try switching off and on again
RECOVER on display
• a power failure has occurred during recording;
the CD recorder is attempting to repair the
disc.
• if RC-DISC then appears on the display, the
disc cannot be recorded further, and cannot be
finalized. However, it can be played on a CD
recorder.
• on a CD-RW disc, the track being recorded is
lost, but further recording and finalization can
still be done.
• if OPC FAIL appears, no further recording
is possible. You can still use the disc as a CD
on this recorder.
If the malfunction continues, perform the Diagnostic Program:
1 Switch the recorder off using ON/OFF.
2 Simultaneously press PLAY and STOP and switch the
recorder back on using ON/OFF.
➜ The display will now indicate BUSY and after a few
minutes, the message will change to ERROR or
PASSED
• If the ERROR message appears, your recorder is
defective and needs to be repaired. Consult your supplier
or call the Philips Consumer Line to find the nearest
service center. The number of the Consumer Line can be
found in the guarantee booklet.
• If the PASSED message appears, you may be
misinterpreting the user instructions or using an
inappropriate disc, or there may be a mechanical defect or
an incorrect connection. Carefully read the user
instructions once again; and if necessary contact your
supplier.
• If you cannot solve the problem, contact to the nearest
service center.
3 Switch off the recorder using ON/OFF to exit from the
Diagnostic Program.
Diagnostic program
Troubleshooting
FIXING PROBLEMS
Page 21

19
Français
Bienvenue!
Nous vous remercions d’avoir choisi un enregistreur de
disques compacts Philips.
Dans les années 1980, Philips a inventé un nouveau système
audio : le disque compact, couramment appelé CD (compact
disc). Les disques compacts vous ont fait découvrir la
nouvelle dimension du son numérique, accroissant ainsi votre
plaisir d’écoute.
La technologie du disque compact permet en effet d’obtenir
un son contrasté, quelle que soit son intensité, avec une
séparation parfaite des voies.
Voici maintenant l’enregistreur de CD, qui est le fruit des
recherches que Philips a poursuivi dans ce domaine.
Avec votre enregistreur de disques CD-R (CD-Recordable) et
CD-RW (ReWritable) Philips, et à condition de respecter les
restrictions légales sur la reproduction des œuvres, vous
pouvez enregistrer vous-même des disques compacts audio
de grande qualité, les écouter et les effacer. Bien entendu,
vous pouvez également écouter tous les disques compacts
audio pré-enregistrés, ainsi que les disques compacts mixtes
tels que les CD Extra.
Les enregistrements sont strictement réservés à un usage
privé. Il est interdit de reproduire le matériel protégé par un
droit d’auteur, y compris les programmes informatiques, les
films, les enregistrements télévisés et audio. L’appareil ne
doit pas être utilisé à cet effet.
Ces caractéristiques peuvent être modifiées sans préavis.
Digital réponse en fréquence
......................................0–22,050Hz
Rapport signal/bruit en lecture
............................................100dB
Gamme dynamique en lecture
..............................................95dB
Distorsion harmonique totale en lecture..................
0.0056%, -85dB
Rapport signal/bruit en enregistrement (analogue)
..................90dB
Rapport signal/bruit en enreg. (numérique)
......
identique a la source
Gamme dynamique en enregistrement
....................................92dB
Distorsion harmonique totale en enregistrement
....0.0056%, -85dB
Entrée coaxiale numérique (CEI 958)
)..............44.1 Khz +/-100ppm
Entrée optique numérique (CEI 958)
..............44.1 Khz +/- 100ppm
Entrée analogique (potentiomêtre de niveau)
500mVrms/50kΩ=0dB
Sortie audio
..........................................................2V RMS ±2dB
Sortie coaxiale numérique
........................................0.5 Vpp/75Ω
Casque d’écoute
..........................................0-5V RMS/8-2000Ω
Dimensions
....................................................435 x 305 x 88mm
Poids
......................................................................................4kg
Consommation électrique ............................................................
.15W
Température en fonctionnement
.........................................5 - 35°C
Tension d’alimentation
....................................................AC 120V
Caractéristiques techniques
Table des matières
GÉNÉRALITÉS
Caractéristiques techniques ......................................19
Disques destinés à l’enregistrement ........................20
Disques destinés à la lecture ....................................20
Entretien ....................................................................20
Accessoires................................................................20
COMMANDES ET CONNEXIONS
Commandes en façade ..............................................21
Connexions à l’arrière................................................21
AFFICHEUR
Description ................................................................22
Messages ..................................................................22
INSTALLATION
Généralités sur les connexions..................................23
Connexions analogiques............................................23
Connexions coaxiales numériques ............................24
Connexions optiques numériques..............................24
Alimentation ..............................................................25
Conseils d’installation................................................25
Mise en place des piles dans la télécommande ......25
UTILISATION DE LA TÉLÉCOMMANDE ET MISE EN
PLACE DES DISQUES
Commandes à distance..............................................26
Mise en place des disques........................................26
ENREGISTREMENT
Remarques préliminaires ..........................................27
Enregistrement numérique sans synchronisation ....27
Enregistrement numérique synchronisé (CD-SYNC)..28
Enregistrement analogique........................................29
Finalisation (disques CD-R et CD-RW) ......................30
Annulation la finalisation (disques CD-RW)..............30
EFFACEMENT ET LECTURE
Effacement des disques CD-RW................................31
Lecture d’un disque compact ....................................31
LECTURE
Sélection d’une plage ou recherche..........................32
Lecture en mode aléatoire ........................................32
Répétition de la lecture d’un disque, d’une plage ou
d’un programme ........................................................32
Programmation ..........................................................33
EN CAS DE PROBLÈMES
Dépannage ................................................................34
Programme de diagnostic ..........................................35
GÉNÉRALITÉS
Page 22

20
Français
Pour l’enregistrement, il faut utiliser des disques
audionumériques spéciaux (pour musique seulement). Ces
disques portent, selon leur type, un des logos indiqués cidessous ainsi que la mention « DIGITAL AUDIO ». Des
redevances de droits d’auteur ont été payées pour ces
disques dans certains pays.
Votre enregistreur accepte deux types de disques pour
l’enregistrement :
- Les disques de type CD-R (CD Audio Recordable),
enregistrables une fois. Une fois enregistrés
et finalisés, ces disques peuvent être lus par
tous les lecteurs et les enregistreurs de CD.
- Les disques de type CD-RW (CD Audio
ReWritable), qui sont réinscriptibles. Ces disques peuvent
être enregistrés, effacés et réenregistrés des
centaines de fois. Une fois finalisés, ils
doivent être lus par des lecteurs et des
enregistreurs compatibles CD-RW.
Il est prévu qu’au cours de l’année 1999 la
plupart des lecteurs et des enregistreurs de CD Philips
seront compatibles CD-RW.
Votre lecteur de CD peut lire :
- Tous les CD audionumériques pré-enregistrés et les CD
mixtes tels que les CD Extra;
- Tous les disques audio de type CD-R et CD-RW.
Remarque : Les disques CD-R enregistrés avec un ordinateur
peuvent être utilisés s’ils ont été traités
conformément à la norme CEI 958 relative aux
appareils audionumériques grand public. Session
unique seulement!
Il est essentiel que les disques destinés à l’enregistrement
soient exempts de poussière et de rayures.
Pour nettoyer un disque compact,
essuyez-le en passant un linge doux
et non pelucheux en un mouvement
rectiligne dirigé du centre vers les
bords. Les produits de nettoyage
peuvent endommager le disque.
Écrivez seulement sur le côté imprimé
des CD-R ou des CD-RW et uniquement avec un stylo feutre à
pointe douce.
Nettoyez l’enregistreur de CD avec un
linge doux non pelucheux légèrement
humide. N’utilisez pas de produits de
nettoyage, car ils peuvent être
corrosifs.
N’exposez ni l’enregistreur, ni les
piles, ni les disques compacts à
l’humidité, à la pluie, au sable ou à
une chaleur excessive (appareil de
chauffage ou ensoleillement direct).
Si l’enregistreur de disque compact ne peut lire les CD
correctement, nettoyez la lentille au moyen d’un disque de
nettoyage. D’autres méthodes de nettoyage peuvent détruire
cette dernière. Gardez toujours le tiroir de chargement fermé
pour éviter que la poussière ne se dépose sur la lentille. Si le
problème persiste, portez l’appareil à réparer.
Les lentilles peuvent s’obscurcir lorsque l’appareil passe
rapidement d’un environnement froid à un environnement
chaud. Dans ce cas, il est impossible de lire un disque
compact et il faut attendre que l’humidité s’évapore.
- 2 câbles audio analogiques (avec des fiches rouges et
blanches)
- 1 câble coaxial numérique (avec des fiches noires)
- 1 cordon d’alimentation
- 2 piles
- 1 télécommande
- un livret de garantie
Accessoires
Entretien
Disques destinés à la lecture
ReWritable
Recordable
Disques destinés à l’enregistrement
GÉNÉRALITÉS
Page 23

21
Français
1 ON/OFF. . . . . . . . . . mise sous tension/hors tension
2 Tiroir de chargement
3 PLAY 2 . . . . . . . . . mise en marche de la lecture ou de
l’enregistrement
4 PAUSE ; . . . . . . . . interruption temporaire de la lecture
5 STOP 9. . . . . . . . . . arrêt
6 ∞ . . . . . . . . . . . . . . plage précédente/recherche arrière
7 § . . . . . . . . . . . . . . plage suivante/recherche avant/
nouvelle plage
8 RECORD . . . . . . . . . enregistrement
9 FINALIZE . . . . . . . . finalisation de l’enregistrement
0 ERASE . . . . . . . . . . effacement de l’enregistrement
! CD-SYNC . . . . . . . . enregistrement synchronisé
(démarrage automatique à
l’enregistrement)
@ AFFICHEUR (messages d’information)
# OPEN/CLOSE . . . . . ouverture/fermeture du tiroir de
chargement
$ DISPLAY. . . . . . . . .
sélection de l’information sur l’afficheur
% SOURCE . . . . . . . . .sélection de l’entrée numérique ou
analogique
^ AUTO/MANUAL. . . incrémentation automatique ou
numérotation manuelle des plages
& PHONES. . . . . . . . . prise pour casque
* REC LEVEL réglage du niveau d’enregistrement
(analogique)
1 Connexion secteur
2 ANALOG IN . . . . . pour connexion à sortie de linge
d’un amplificateur (gauche et droite)
3 ANALOG OUT. . . . pour connexion à entrée de ligne
d’un amplificateur (gauche et droite)
4 DIGITAL IN . . . . . . pour connexion à sortie coaxiale
numérique d’un lecteur de CD
5 DIGITAL OUT . . . . pour connexion à entrée coaxiale
numérique d’un amplificateur ou
d’un système d’enregistrement, par
exemple
6 OPTICAL IN . . . . . connects to the digital optical pour
connexion à sortie optique
numérique d’un lecteur de CD
Connexions à l’arrière Commandes en façade
COMMANDES ET CONNEXIONS
3 54 8 9 10 11 126 7
P
LAY
2
CD-RECORDABLE/R
1
13 14 15 16 17 18
P
A
USE
S
TOP
R
E
C
O
R
D
F
IN
A
L
IZ
E
E
R
A
S
E
C
D
-S
y
EW
RI
TAB
LE
Power On/Off
DIRECT LINE
RECORDING
nc
D
I
G
T
R
A
C
K
R
E
P
E
A
T
1
T
O
T
A
L
R
E
M
P
R
O
G
R
Recordable
e
c
orda
b
le
C
D
T
I
M
E
C
D
S
Y
N
C
R
E
C
E
CDR 760-R
O
R
D
L
-5
0
-4
0
R
-3
0
-2
0
1
0
-6
-3
0
O
V
E
R
P
A
U
S
E
ECORDA
BLE/
REWR
ITABLE
R
E
C
O
R
D
A
B
L
1 65
O
PEN
/CLOS
E
DISPLAY
SOURCE
AUTO/MANAL
R
EC
L
E
V
E
L
6
5
7
4
8
3
9
2
10
1
2
0
0
50
Phones
CDR
L
L
R
R
IN
O
UT
AN
A
IN
LO
G
O
U
T
D
IG
ITA
L
IN
OP
T
IC
AL
4
32
Page 24

22
Français
1 ANALOG. . . . . . . . . indique que l’entrée analogique est
sélectionnée.
2 DIG . . . . . . . . . . . . . s’allume lorsque l’entrée numérique
est sélectionnée et clignote lorsque
l’entrée numérique est incorrecte.
3 AUTO TRACK. . . . . indique que la numérotation
automatique des plages est en
fonction.
4 REPEAT (1) . . . . . . . indique que la fonction de répétition
est activée en lecture.
5 Numéro de plage et durée.
6 CD-SYNC . . . . . . . . indique que l’enregistrement
synchronisé est actif.
7 RECORD . . . . . . . . . s’allume pendant l’enregistrement
et clignote en mode d’attente.
8 FINALIZE . . . . . . . . s’allume pendant la finalisation et
clignote en mode d’attente.
9 ERASE . . . . . . . . . . s’allume pendant l’effacement d’un
enregistrement et clignote en mode
d’attente.
0 COPY PROHIBIT . . s’allume lors d’une tentative
d’enregistrement d’un disque
numérique protégé.
! PAUSE . . . . . . . . . . indique que la fonction arrêt
momentané est activée.
@ Indicateur de niveau d’enregistrement ou de lecture
(mode analogique).
# RECORDABLE . . . . indique qu’un disque CD-R non
finalisé a été mis en place.
$ REWRITABLE. . . . . indique qu’un disque CD-RW a été
mis en place.
% CD . . . . . . . . . . . . . .indique qu’un disque a été mis en
place (CD préenregistré, disques
CD-R ou CD-RW finalisés).
^ . . . . . . . . . . . indique que la télécommande est
activée.
& PROG . . . . . . . . . . . indique qu’un programme de lecture
est en cours.
Les messages suivants s’affichent le cas échéant pour votre
information :
READING ......lecture des informations du disque
OPC ................procédure de calibrage en cours (Optical
Power Calibration)
OPEN ..............ouverture du tiroir en cours
CLOSE ............fermeture du tiroir en cours
NO DISC ......aucun disque mis en place ou disque illisible
UPDATE ........mise à jour du contenu du disque
ERROR ............erreur d’écriture en cours d’enregistrement
RECOVER ......procédure de récupération en cours
WAIT ..............fin de l’enregistrement (4 secondes) en cours
SYNC ..............attente d’enregistrement synchronisé
TRACK ............attente d’effacement de plage
DISC ..............attente d’effacement du disque
SERVICE ......échec de l’autotest
OPCFAIL ......échec du calibrage; enregistrement ultérieur
impossible
FULL ..............programme complet
CD FULL ......impossibilité d’enregistrer davantage
EMPTY ............absence d’enregistrement sur le disque,
finalisation impossible
NO AUDIO ....(clignotant) absence de disque audio ou
impossibilité de lire les données
FINAL ............calibrage effectué 96 fois, finalisation requise
COAXIAL ......entrée coaxiale numérique sélectionnée
OPTICAL ......entrée optique numérique sélectionnée
SHUFFLE ......lecture aléatoire en cours
RC-DISC ......disque récupéré, finalisation impossible
TOC ................clignote lors de l’attente de la finalisation
d’un disque, s’allume lors de l’annulation de la
finalisation d’un disque
INPUT ............sélection de l’entrée en cours (CD-SYNC)
ANALOG ........entrée analogique sélectionnée
MESSAGES
Description
AFFICHEUR
OVER
654321
CD SYNC
RECORD
FINALIZE
ERASE
COPY
PROHIBIT
PAUSE
17
REPEAT 1
DIG
ANALOG
PROG
RECORDABLE
CD
REWRITABLE
16 15 14 13 12 11
TOTALAUTO TRACK TRACKREM TIME
L
-50 -40 -30 -20 -10 -6 -3 0
R
7
8
9
10
Page 25

23
Français
Pour l’enregistrement, l’enregistreur de CD est doté des
entrées suivantes :
- Optique numérique;
- Coaxiale numérique;
- Analogique.
Pour la lecture, il est doté des sorties suivantes :
- Coaxiale numérique;
- Analogique.
Les connexions à effectuer dépendent de l’équipement audio
dont vous disposez déjà. Veuillez tout d’abord vous reporter
au mode d’emploi de votre matériel.
Les enregistrements effectués à partir d’une source
numérique (lecteur de CD) par l’intermédiaire d’une connexion
optique numérique ou coaxiale numérique donnent les
meilleurs résultats, tant pour la qualité du son que pour la
facilité d’utilisation (p. ex., la numérotation des plages se fait
automatiquement). En effet, la connexion optique numérique
est moins sensible aux perturbations externes.
Si votre matériel n’est pas équipé à cet effet, votre
enregistreur de CD possède un convertisseur
analogique/numérique de très grande qualité qui assure de
très bonnes performances audio pour
les enregistrements effectués par l’entrée analogique.
La meilleure performance audio est obtenue lorsque la lecture
s’effectue par le biais de la sortie coaxiale numérique de
l’enregistreur CD. Si votre matériel n’est pas équipé à cet
effet, l’enregistreur de CD possède un convertisseur
numérique/analogique qui assure un son de très bonne
qualité par l’intermédiaire de la sortie analogique.
Nous vous conseillons d’établir systématiquement les deux
types de connexions, numériques et analogiques. Ainsi, vous
pouvez toujours réaliser des enregistrements analogiques
lorsque l’enregistrement numérique est impossible.
Nous décrivons ci-après les méthodes les plus courantes pour
connecter le lecteur de CD. Si vous éprouvez malgré tout des
difficultés, vous pouvez contacter le centre de service à la
clientèle de Philips situé dans votre pays.
Utilisez les câbles audio fournis avec l’appareil. Branchez les
fiches rouges sur les prises R et les fiches blanches sur les
prises L.
1 Pour les enregistrements, branchez le câble 1 d’un côté
sur les prises ANALOG IN de l’enregistreur de CD et de
l’autre sur les prises LINE OUT ou TAPE OUT d’un
amplificateur.
Remarque : L’enregistrement direct à partir d’un lecteur de
CD nécessite l’établissement d’une connexion
entre l’entrée analogique de l’enregistreur de CD
et la sortie analogique du lecteur de CD.
2 Pour la lecture, branchez le câble 2 d’un côté sur les
prises ANALOG OUT de l’enregistreur de CD et de l’autre
sur les prises d’entrée d’un amplificateur, p. ex., TAPE IN,
CD-R ou AUX.
Remarque : N’utilisez jamais l’entrée PHONO.
Connexions analogiques
Généralités sur les connexions
INSTALLATION
L
R
O
U
T
A
I
N
L
O
G
D
2
CD RECORDER
O
U
T
IG
I
T
A
L
IN
O
P
T
IC
A
L
RECEIVER
L
R
I
N
A
N
1
L
L
R
R
O
U
T
I
N
TA
PE
Page 26

24
Français
Utilisez le câble fourni avec l’appareil (avec fiches noires).
1 Pour l’enregistrement, branchez le câble 3 d’un côté sur
la prise DIGITAL IN de l’enregistreur de CD et de l’autre sur
la prise DIGITAL OUT d’un lecteur de CD.
Remarque : Votre enregistreur de CD comporte une sortie
coaxiale numérique, qui peut être utilisée pour la
lecture en mode numérique.
1 Ôtez les capuchons de protection des connecteurs optiques
numériques. Nous vous conseillons de conserver ces
capuchons.
2 Pour l’enregistrement, branchez un câble en fibres optiques
4 d’un côté sur l’entrée optique numérique de
l’enregistreur de CD et de l’autre sur la sortie optique
numérique d’un lecteur de CD.
Remarque : Pour la lecture, la sortie coaxiale numérique ou la
sortie analogique doit être connectée à un
amplificateur.
Lorsque vous connectez le câble
optique numérique, assurez-vous
qu’il est complètement introduit :
vous devez entendre un déclic.
Connexions optiques numériques
Connexions coaxiales numériques
INSTALLATION
L
R
ANALO
G
O
UT
DIGITAL
OUT
CD PLAYER
OUT
O
PTICAL
3
L
R
CD RECORDER
IN
O
UT
DIGITAL
OPTICAL
IN
L
R
IN
OUT
ANALOG
1
2
L
R
CD
IN
L
L
R
R
OUT
IN
TAPE
RECEIVER
L
R
L
R
ANALOG
OUT
3
L
L
R
R
IN
OUT
ANALOG
1
2
L
CD
IN
L
R
R
OUT
IN
TAPE
CD PLAYER
DIGITAL
OUT
OUT
O
PTICAL
4
CD RECORDER
IN
O
UT
DIGITAL
IN
O
PTICAL
RECEIVER
Page 27

25
Français
1 Branchez la fiche appropriée du cordon d’alimentation sur
la prise MAINS de l’enregistreur de CD et l’autre fiche sur
une prise d’alimentation électrique.
2 Appuyez sur ON/OFF pour mettre l’enregistreur de CD sous
tension.
Remarque:
- L'enregistreur de CD d’ajuste automatiquement sur la
tension secteur locale.
- Lorsque l'enregistreur de CD est sur la position “OFF” (arrêt),
il consomme encore un peu d’énergie. Si vous désirez
débrancher complètement votre enregistreur de CD, retirez
la fiche de la prise CA.
- Installez l’enregistreur de CD sur une surface stable
exempte de vibrations.
- Ne placez pas l’enregistreur de CD près d’une source de
chaleur ou au soleil.
- N’utilisez pas l’enregistreur de CD dans des conditions
d’humidité extrêmes.
- Si l’enregistreur de CD est placé dans un meuble, assurezvous qu’il reste autour de l’appareil un espace d’au moins
2,5 cm pour permettre une ventilation suffisante.
1 Ouvrez le couvercle du compartiment des piles.
2 Mettez en place deux piles (AAA, R03 ou UM-4; voir les
piles fournies avec l’appareil) comme le schéma l’indique.
3 Remettez le couvercle en place.
Remarque : Nous vous conseillons d’utiliser deux piles de
même type et de même degré d’usure.
Les piles contiennent des substances chimiques; par
conséquent, il faut suivre certaines règles pour les
mettre au rebut.
Mise en place des piles dans la télécommande
Conseils d’installation
Alimentation
INSTALLATION
Page 28

26
Français
PROGRAM. . . . . . . . . . programmation de la lecture d’une
suite de plages
DISPLAY . . . . . . . . . . . sélection de l’information à afficher
Tastes numérque 0 - 9
sélection d’une plage par son numéro
SHUFFLE . . . . . . . . . . . lecture d’un CD ou d’un CD-RW ou
d’un programme en mode aléatoire
Q . . . . . . . . . . . . . . . recherche arrière
PREVIOUS O . . . . . . . sélection du début de la plage
précédente
STOP 9 . . . . . . . . . . . . arrêt d’un CD ou d’un CD-RW et
effacement du programme
PAUSE ;. . . . . . . . . . interruption de la lecture d’un CD ou
d’un CD-RW
NEXT P . . . . . . . . . . . sélection du début de la plage
suivante
PLAY 2 . . . . . . . . . . . . démarrage de la lecture d’un CD ou
d’un CD-RW
R . . . . . . . . . . . . . . .recherche avant
REPEAT . . . . . . . . . . . . lecture en mode répétition
CD . . . . . . . . . . . . . . . . CDR 765 seulement
CD-R. . . . . . . . . . . . . . . CDR 765 seulement
OPEN/CLOSE . . . . . . . .ouverture ou fermeture du tiroir de
chargement
Lorsque vous appuyez sur un bouton de la télécommande,
l’indicateur d’usage de la télécommande s’allume sur
l’afficheur.
Remarque : Sauf indication contraire, toutes les commandes
mentionnées sont celles de la façade de
l’appareil. Lorsqu’elles existent sur la
télécommande, vous pouvez également utiliser
les boutons correspondants.
1 Appuyez sur OPEN/CLOSE (13) pour ouvrir le tiroir de
chargement.
2 Mettez en place un CD, un CD-R ou un CD-RW dans
l’évidement du tiroir, face imprimée vers le haut.
IMPORTANT :
Pour l’enregistrement, il est important d’utiliser un
disque vierge absolument exempt de particules de
poussière ou de rayures (voir Entretien, p. 22).
3 Poussez le tiroir avec précaution ou appuyez sur
OPEN/CLOSE pour le refermer le (voir également Lecture
d'un disque compact).
➜ Le type de disque s’allume sur l’afficheur.
• Dans le cas d’un CD-R finalisé,
CD s’allume.
• Dans le cas d’un disque CD-RW finalisé, celui-ci restant
réinscriptible, CD REWRITABLE s’allume.
Si vous mettez en place un CD-R ou bien un CD-RW vierge ou
partiellement enregistré, l’enregistreur de CD calibre le
disque de façon à obtenir un enregistrement optimal. Durant
cette procédure, le message
OPC
, puis le nombre de plages
audio s’affichent. Le calibrage peut prendre jusqu’à 25
secondes.
Remarque : L’appareil accepte uniquement les CD audio. Si
vous avez mis en place un disque non audio, le
message
NO AUDIO
s’affiche.
P
O
Mise en place des disques
Commandes à distance
UTILISATION DE LA TÉLÉCOMMANDE ET MISE EN PLACE DES DISQUES
PR
OG
RA
M
DIS
PLA
Y
1
4
7
5
S
H
U
F
FL
8
E
5
0
P
R
E
V
.
P
LA
Y
S
T
O
P
P
A
U
S
E
9
R
E
P
E
A
T
6
N
E
X
T
PROG
CD
RECORDABLE
REWRITABLE
L
-50 -40 -30 -20 -10 -6 -3 0
R
O
P
CD
E
N
R
y
2
C
D
3
6
/C
L
O
S
E
P
L
A
Y
P
A
U
S
E
S
T
O
P
Power On/Off
D
IR
E
R
E
C
-
-
O
C
D
R
E
C
O
R
D
A
B
L
E
/
R
E
W
R
I
T
A
B
L
E
R
e
c
o
r
d
a
b
le
PROG
RECORDABLE
CD
REWRITABLE
L
-50 -40 -30 -20 -10 -6 -3 0
R
OV
DIG
G
REPEAT 1
TOTALAUTO TRACK TRACKREM TIME
OG
RECORDABLE
L
-
-
-
-
R
E
C
O
R
D
F
I
N
A
L
I
Z
E
E
R
A
S
E
CD-Sync
D
IG
P
R
O
G
R
E
C
C
C
T
L
IN
E
R
D
IN
G
D
OVER
CD SYNC
RECORD
FINALIZE
ERASE
-
COPY
Page 29

27
Vous allez bientôt découvrir à quel point il est facile de
réaliser vos propres CD. Toutefois, pour votre premier essai,
il vaut mieux utiliser un disque réinscriptible (CD-RW). Trois
modes d’enregistrement peuvent être utilisés :
- numérique sans synchronisation;
- numérique synchronisé;
- analogique.
• La procédure d’enregistrement est identique pour les CD-R
et les CD-RW.
• S’il s’agit d’un disque CD-RW déjà finalisé, vous devez
d’abord annuler la finalisation (voir p. 30).
• Si le disque comporte déjà des enregistrements,
l’enregistreur de CD se positionne automatiquement à la fin
de la dernière plage.
• Il doit rester au moins 7 secondes de durée
d’enregistrement sur le disque, sinon vous ne pouvez
sélectionner le mode d’attente d’enregistrement.
• Si le message
COPY PROHIBIT est affiché, cela signifie qu’il
n’est pas possible d’enregistrer numériquement la source.
Au bout de 4 secondes, on n’observe aucun démarrage de
l’enregistrement ou bien celui-ci s’arrête.
• Le système de protection contre les duplications en chaîne
SCMS (Serial Copy Management System) permet de
faire des enregistrements numériques sous certaines
conditions :
- il est impossible d’effectuer une copie numérique à partir
d’une autre copie numérique;
- l’enregistrement analogique est toujours possible;
- le nombre d’enregistrements à partir de l’original est
illimité.
• On peut enregistrer au maximum 99 plages sur un disque.
La durée minimale d’une plage est de 4 secondes.
• Il est possible de faire des enregistrements numériques du
contenu de disques compacts (ou d’autres sources ayant
une fréquence d’échantillonnage en sortie de 44,1 kHz +/100 ppm) par l’intermédiaire de l’entrée numérique de
l’enregistreur.
Important :
Si vous voulez passer un disque CD-R enregistré sur un
lecteur de CD classique, vous devez d’abord le
finaliser. Reportez-vous à la section relative à la
finalisation des disques (voir p. 30). Les disques CDRW finalisés peuvent être lus uniquement par des
lecteurs compatibles CD-RW.
Préparation
1 Vérifiez que le disque est absolument exempt de rayures et
de particules de poussière.
2 Appuyez sur SOURCE plusieurs fois (selon le type de
connexion numérique utilisée) :
➜
DIG COAXIAL ou DIG OPTICAL s’affiche.
3 Appuyez sur AUTO/MANUAL pour choisir la numérotation
automatique ou manuelle des plages.
➜ Si AUTO est sélectionné (préférence),
AUTO TRACK
apparaît sur l’afficheur.
• AUTO : La numérotation des plages est reprise
automatiquement du matériel numérique source.
• MANUAL : Le numéro de plage peut être incrémenté
manuellement en appuyant sur § (durée
minimale des plages : 4 s). Cette opération peut
également être effectuée en mode
automatique.
• Les numéros de plage ne peuvent être changés une fois
l’enregistrement terminé.
Remarque : La numérotation automatique des plages est
possible uniquement si le signal de sortie
numérique des appareils est conforme à la norme
audio CEI 958 relative au matériel grand public.
A
S
C
A
Y
O
L
Power On/Off
CD-RECORDABLE/REWRITABLE
RECORD
P
L
A
Y
P
A
U
S
E
S
T
O
P
FINAL
D
IR
E
C
T
L
IN
E
R
E
C
O
R
D
IN
G
Enregistrement numérique sans synchronisation
Remarques préliminaires
Français
ENREGISTREMENT
O
P
E
N
/C
LO
DISPLAY
S
SOURCE
D
IG
T
R
A
C
KR
R
E
PE
A
T
1
T
O
T
A
L
P
R
O
G
R
E
C
O
R
D
A
B
LE
C
D
EM
T
IM
L
-
5
0
-
4
0
R
-
3
0
CDR 760-RECORDABLE/REWRITABLE
E
-2
0
-
1
0
-
6-
30
O
V
E
CD
S
Y
N
C
R
E
C
O
R
D
R
P
A
U
S
E
ANALOG
DIG
REPEAT 1
TOTALAUTO TRACK TRACKREM TIME
PROG
ANALOG
DIG
PROG
REPEAT 1
TOTALAUTO TRACK TRACKREM TIME
E
AUTO/MANAL
CD S
REC
FINA
ERA
CD
RE
FIN
ER
Page 30

28
Démarrage de l’enregistrement numérique
1 L’enregistreur étant à l’arrêt, appuyez sur RECORD pour
activer le mode d’attente d’enregistrement :
➜
RECORD clignote.
• Si DIG clignote également, cela signifie que la connexion
numérique est incorrecte.
2 Pour démarrer l’enregistrement, appuyez sur PLAY et mettez
la source en marche immédiatement.
➜
RECORD s’allume. Le numéro de plage et la durée
d’enregistrement écoulée s’affichent.
• Pour enregistrer un silence de 3 secondes au début d’une
plage, appuyez sur PAUSE.
• Pour vérifier la durée d’enregistrement restante, appuyez
sur DISPLAY. Il est également possible d’effectuer cette
vérification pendant l’enregistrement.
3 Pour arrêter l’enregistrement, appuyez sur la touche STOP
de l’enregistreur.
➜
RECORD s’éteint.
• Pour interrompre l’enregistrement, appuyez sur PAUSE.
➜
RECORD clignote. Reprenez ensuite à l’étape 2.
À la fin de l’enregistrement, UPDATE s’affiche pendant
quelques secondes.
Remarque : Lorsque le message “AUTO TRACK” s’allume,
l’enregistreur s’arrête automatiquement. Les
enregistrements effectués à partir des
magnétophones DAT ou DCC s’arrêteront après
20 secondes de silence. Dès que le message
“AUTO TRACK” s’éteint, le mode d’arrêt
automatique est désactivé.
Préparation
La fonction CD-SYNC vous permet d’enregistrer rapidement et
facilement un CD. La numérotation des plages est reprise
automatiquement du matériel numérique source. Il n’est pas
possible d’ajouter manuellement des numéros de plages.
1 Vérifiez que le disque est absolument exempt de rayures et
de particules de poussière.
2 Appuyez sur SOURCE plusieurs fois (selon le type de
connexion utilisée) :
➜ Jusqu’à ce que
DIG COAXIAL ou DIG OPTICAL
s’affiche.
Démarrage de l’enregistrement numérique synchronisé
1 L’enregistreur de CD étant à l’arrêt, appuyez sur CD-SYNC.
➜
CD-SYNC et SYNC s’affichent. Quelques instants après,
RECORD clignote.
• Si DIG clignote également, cela signifie que la connexion
numérique est incorrecte.
2 Pour démarrer l’enregistrement, appuyez sur la touche PLAY
de la source numérique.
➜ L’enregistreur de CD démarre l’enregistrement
automatiquement et
RECORD s’allume. Le numéro de
plage et la durée d’enregistrement écoulée s’affichent.
• Si vous démarrez la source au milieu d’une plage,
l’enregistrement CD-SYNC débute au début de la plage
suivante.
• Pour vérifier la durée d’enregistrement restante, appuyez
sur DISPLAY. Il est possible d’effectuer cette manœuvre
pendant l’enregistrement.
3 Pour arrêter l’enregistrement, appuyez sur la touche STOP
de l’enregistreur de CD.
➜CD-SYNC
et RECORD s’éteignent.
• Pour interrompre l’enregistrement, appuyez sur PAUSE.
➜ RECORD clignote. Pour poursuivre, appuyez sur PLAY sur
l’enregistreur de CD.
Enregistrement numérique synchronisé - CD-SYNC
Français
ENREGISTREMENT
ANALOG
PROG
DIG
REPEAT 1
TOTALAUTO TRACK TRACKREM TIME
CD SYNC
RECORD
FINALIZE
ERASE
R
EC
O
R
D
F
IN
A
LIZE
E
R
A
S
E
CD-Sync
D
IG
T
R
A
C
K
R
E
P
E
A
T
1
T
O
T
A
L
R
E
P
R
O
R
e
co
rdab
le
G
R
E
C
O
R
D
A
B
L
E
L
C
D
R
M
-
5
0
-
4
0
-3
0
-2
0-1
0
-6 -3 0
DIG
LOG
PROG
REPEAT 1
TOTALAUTO TRACK TRACKREM TIME
CD SYNC
RECORD
FINALIZE
ERASE
T
IM
E
O
V
E
R
Page 31

29
Une fois l’enregistrement terminé, UPDATE s’affiche
pendant quelques secondes.
Remarque :
- L’enregistreur de CD ne démarre pas avant d’avoir reconnu
un signal numérique. Bien que le temps de réaction soit
inférieur à 200 millisecondes, les premières mesures d’une
pièce musicale peuvent parfois ne pas être enregistrées. Si
cela se produit, vous pouvez démarrer l’enregistrement
manuellement. (voir Enregistrement numérique sans
synchronisation, p. 27).
- Les enregistrements effectués à partir des magnétophones
DAT ou DCC s’arrêteront après 20 secondes de silence.
Faites des enregistrements analogiques uniquement si
l’enregistrement numérique est impossible.
Préparation
1 Vérifiez que le disque est absolument exempt de rayures et
de particules de poussière.
2 Appuyez sur SOURCE plusieurs fois jusqu’à ce que :
➜
ANALOG s’allume.
3 Appuyez sur AUTO/MANUAL pour choisir la numérotation
automatique ou manuelle.
➜ Si AUTO est sélectionné (préférence),
AUTO TRACK
apparaît sur l’afficheur.
• AUTO : Le numéro de plage est incrémenté
automatiquement dès que l’appareil détecte un
silence d’au moins 3 secondes sur l’original.
• MANUAL : Le numéro de plage peut être incrémenté
manuellement en appuyant sur § (durée
minimale des plages : 4 secondes). Cette
opération peut être également effectuée en
mode AUTO.
• Les numéros de plage ne peuvent être changés une fois
l’enregistrement terminé.
4 L’enregistreur étant à l’arrêt, appuyez sur RECORD pour
activer le mode d’attente d’enregistrement.
➜
RECORD clignote.
5 Mettez d’abord la source en marche, puis réglez le niveau
d’enregistrement optimal sur l’enregistreur de CD.
6 Tournez le bouton REC LEVEL de manière à ce que tous les
segments bleus de l’indicateur de niveau d’enregistrement
et de lecture soient allumés, mais que les segments rouges
ne s’allument que temporairement, pendant les passages
les plus intenses.
7 Arrêtez la source.
P
o
w
er O
n
/O
ff
C
D
-R
E
C
O
R
D
A
B
L
E
/R
E
W
R
IT
A
B
LE
RECORD
PLAY
PAUSE
STOP
FINALIZ
D
IR
E
C
T
L
IN
E
R
E
C
O
R
D
IN
G
S
O
U
R
C
E
A
U
T
O
/M
A
N
A
L
R
E
C
L
E
V
E
L
P
h
o
n
e
s
OPEN/CLOSE
8
0
50
1
20
2
1
0
3
9
4
5
7
6
Enregistrement analogique
Français
ENREGISTREMENT
ANALOG
PROG
DIG
REPEAT 1
TOTALAUTO TRACK TRACKREM TIME
IG
REPEAT 1
TOTALAUTO TRACK TRACKREM TIME
CD SYNC
RECORD
FINALIZE
ERASE
Page 32

30
Démarrage de l’enregistrement analogique
1 Pour débuter l’enregistrement, appuyez sur PLAY sur
l’enregistreur de CD et débutez immédiatement la lecture
de la source.
➜
RECORD s’allume. Le numéro de plage et la durée
d’enregistrement écoulée s’affichent.
• Pour enregistrer un silence de 3 secondes au début d’une
plage, appuyez sur PAUSE.
• Pour vérifier la durée d’enregistrement restante, appuyez
sur DISPLAY. Il est également possible d’effectuer cette
vérification pendant l’enregistrement.
2 Pour arrêter l’enregistrement, appuyez sur la touche STOP
de l’enregistreur.
➜ RECORD s’éteint.
• Pour interrompre l’enregistrement, appuyez sur PAUSE.
➜ RECORD clignote. Reprenez ensuite à l’étape 1.
À la fin de l’enregistrement, UPDATE s’affiche pendant
quelques secondes.
Remarque : Lorsque le message “AUTO TRACK” s’allume,
l’enregistreur s’arrête automatiquement après 20
secondes de silence. Dès que le message “
AUTO
TRACK” s’éteint, le mode d’arrêt automatique est
désactivé.
La finalisation est une procédure simple qui est nécessaire
pour que les disques puissent être lus par un lecteur de CD
classique (appareil ne faisant pas d’enregistrements).
Remarque : La finalisation empêche tout enregistrement
ultérieur sur un CD-R. Il faut annuler la
finalisation sur un disque de type CD-RW pour
effectuer des enregistrements ultérieurs ou pour
effacer des plages.
1 Vérifiez que le disque est absolument exempt de rayures et
de particules de poussière.
2 L’enregistreur étant à l’arrêt, appuyez sur FINALIZE puis,
dans les 3 secondes, sur RECORD.
➜ La durée approximative de finalisation s’affiche alors.
RECORD et FINALIZE s’allument. L’afficheur décompte la
durée restante jusqu’à la fin de la finalisation.
Une fois celle-ci terminée, le nombre total de plages et
la durée totale d’enregistrement s’affichent.
Pour les disques de type CD-R, CD RECORDABLE est
remplacé par CD sur l’afficheur.
Pour les disques de type CD-RW, l’affichage ne change pas.
La finalisation dure au moins 2 minutes.
Remarque : Au cours de la finalisation, aucune commande
n’est acceptée par l’enregistreur de CD.
Cette procédure s’applique uniquement aux disques de type
CD-RW.
Pour effacer des plages ou en ajouter sur un disque finalisé, il
faut d’abord annuler la finalisation, ce qui supprime la table
des matières (TOC, Table of content).
Pour annuler la finalisation :
1 Appuyez deux fois sur ERASE.
➜ TOC et ERASE clignotent sur l’afficheur.
2 Appuyez sur RECORD dans les 3 secondes qui suivent.
➜ TOC et ERASE restent allumés durant l’effacement.
Remarque : La procédure prend environ 1 minute.
Annulation de la finalisation (disques CD-RW)
Finalisation (disques CD-R et CD-RW)
Français
ENREGISTREMENT
DIG
LOG
PROG
REPEAT 1
TOTALAUTO TRACK TRACKREM TIME
CD SYNC
RECORD
FINALIZE
ERASE
DIG
LOG
PROG
REPEAT 1
TOTALAUTO TRACK TRACKREM TIME
CD SYNC
RECORD
FINALIZE
ERASE
Page 33

31
Cette procédure s’applique uniquement aux disques de type
CD-RW.
Vous pouvez :
- soit effacer plage par plage à partir de la fin,
- soit effacer le disque en entier.
Pour effacer la dernière plage :
1 Vérifiez que le disque n’est pas finalisé (le message OPC
doit s’afficher au démarrage). Sinon, procédez d’abord à
l’annulation de la finalisation (voir p. 30).
2 Appuyez sur ERASE.
➜ TRACK et
ERASE clignotent sur l’afficheur.
3 Appuyez sur RECORD dans les 3 secondes qui suivent.
➜ TRACK et ERASE restent allumés pendant l’effacement.
Pour effacer le disque en entier :
1 Appuyez une fois sur ERASE (pour les disques CD-RW
finalisés) ou deux fois (pour les disques CD-RW non
finalisés).
➜ DISC et ERASE clignotent sur l’afficheur.
2 Appuyez sur RECORD dans les 3 secondes qui suivent.
➜ DISC et ERASE restent allumés durant l’effacement.
L’effacement complet d’un disque peut prendre jusqu’à une
minute et demi.
1 Appuyez sur PLAY pour démarrer la lecture d’un disque.
➜ Le numéro et la durée de la plage s’affichent ainsi que
l’indicateur de niveau d’enregistrement et de lecture.
2 Appuyez une, deux ou trois fois sur DISPLAY pour afficher
respectivement les données suivantes :
➜ durée de la plage restant à lire; durée totale restante;
durée de la plage sans affichage de l’indicateur de
niveau d’enregistrement et de lecture.
3 Pour interrompre la lecture, appuyez sur PAUSE.
➜
PAUSE s’allume sur l’afficheur.
4 Pour reprendre la lecture, réappuyez sur PAUSE de nouveau
ou appuyez sur PLAY.
5 Pour arrêter la lecture, appuyez sur STOP.
➜ Le nombre de plages et la durée totale de lecture
s’affichent.
Lecture d’un disque compact
Effacement des disques CD-RW
Français
EFFACEMENT ET LECTURE
DIG
LOG
PROG
DIG
LOG
PROG
REPEAT 1
TOTALAUTO TRACK TRACKREM TIME
REPEAT 1
TOTALAUTO TRACK TRACKREM TIME
CD SYNC
RECORD
FINALIZE
ERASE
CD SYNC
RECORD
FINALIZE
ERASE
PLAY
PAUSE
STOP
CD-RECORDABLE/REW
RITABLE
Power On/Off
R
EC
O
R
D
FIN
A
L
Page 34

32
Sélection d’une plage pendant la lecture
1 Appuyez brièvement sur ∞ ou § une ou plusieurs fois.
➜ Le lecteur se positionne au début de la plage en cours,
de la plage précédente ou de la plage suivante, selon le
cas.
ou
• Utilisez la télécommande et appuyez sur les chiffres
correspondant au numéro de plage. Pour les numéros de
plages à 2 chiffres, appuyez rapidement sur la suite de
touches correspondantes.
➜ Le lecteur se positionne au début de la plage
sélectionnée.
Sélection d’une plage avec le lecteur à l’arrêt
1 Appuyez brièvement sur ∞ ou § une ou plusieurs fois.
2 Appuyez sur PLAY.
➜ La lecture démarre à la plage sélectionnée.
ou
• Utilisez la télécommande et appuyez sur les chiffres
correspondant au numéro de plage. Pour les numéros de
plages à 2 chiffres, appuyez rapidement sur la suite de
touches correspondantes.
Recherche pendant la lecture de disque
1 Maintenez la pression sur ∞ ou § (ou sur 5 ou 6 de la
télécommande).
➜ Le lecteur recherche d’abord vers l’arrière ou vers
l’avant à 10 fois la vitesse normale avec le son à faible
volume, puis passe en recherche rapide avant ou arrière,
le son étant coupé.
2 Lâchez le bouton une fois le passage voulu atteint.
➜ La lecture démarre au passage voulu.
Remarque : Lorsque l’appareil est en mode lecture aléatoire
(SHUFFLE), répétition de lecture (REPEAT) ou
lecture programmée (PROGRAM), la recherche
est restreinte à la plage en cours d’exécution.
1 Appuyez sur SHUFFLE (ou PLAY) sur la télécommande avant
ou pendant la lecture d’un CD pour activer le mode de
lecture aléatoire.
➜ Toutes les plages du CD ou du programme, le cas
échéant, sont lues dans le désordre. SHUFFLE
s’affiche entre chaque plage.
2 Réppuyez sur SHUFFLE pour revenir au mode de lecture
normal.
Remarque: L’ouverture du tiroir de chargement annule
également la fonction de lecture aléatoire.
1 Appuyez une ou plusieurs fois sur la touche REPEAT de la
télécommande pendant la lecture d’un disque.
➜ Lorsque
REPEAT 1 s’affiche, la lecture de la plage en
cours se répète. REPEAT indique la répétition de tout le
disque ou du programme.
2 Pour revenir au mode normal de lecture, appuyez une ou
plusieurs fois sur REPEAT jusqu’à ce que :
➜ REPEAT s’éteigne.
Remarques :
- Vous pouvez combiner les fonctions de lecture aléatoire et
de répétition du disque ou d’un programme.
- L’ouverture du tiroir de chargement annule également le
mode répétition de la lecture.
Répétition de la lecture d’un disque, d’une
plage ou d’un programme
O
1
Lecture en mode aléatoire
E
Sélection d’une plage ou recherche
Français
LECTURE
PLAY
PAUSE
STOP
CD-RECORDABLE/REWRITABLE
R
EC
OR
P
C
E
DR
N
/C
y
L
O
S
4
7
D
FIN
A
LIZE
ER
A
SE
CD-Sync
S
H
U
F
F
LE
5
P
R
EV
.
P
L
A
Y
S
T
O
P
N
E
X
2
5
8
0
6
T
6
9
R
E
P
E
A
T
E
C
D
3
R
ecordab
Power On/Off
D
IR
le
Page 35

33
Français
Vous pouvez programmer la lecture d’au maximum 30 plages
dans l’ordre voulu. Une plage peut être programmée plusieurs
fois, mais elle est prise en compte à chaque fois.
1 Appuyez sur la touche PROGRAM de la télécommande pour
démarrer la programmation.
➜ PROG clignote sur l’afficheur.
2 Sélectionnez un numéro de plage grâce aux touches
numérotées. Pour les nombres à deux chiffres, appuyez
rapidement sur la suite de touches correspondantes.
➜ Le numéro de plage apparaît brièvement sur l’afficheur,
suivi du nombre total de plages programmées et de la
durée totale du programme.
3 Répétez l’étape 2 pour chaque plage à programmer.
4 Appuyez sur STOP ou PROGRAM pour mettre fin à la
programmation.
➜ PROG Le message PROG s’allume.
Remarques :
- Pour vérifier le programme, appuyez sur ∞ou §,le lecteur
étant à l’arrêt.
- Pour ajouter des plages au programme, répétez les étapes 1
à 4.
- Si vous tentez de programmer plus de 30 plages, le message
FULL
s’affiche.
5 Appuyez sur PLAY pour démarrer la lecture du programme.
Effacement d’un programme
1 Appuyez sur STOP pour arrêter la lecture du programme si
nécessaire.
2 Réappuyez sur STOP pour effacer le programme.
➜ PROG s’éteint.
Remarques: L’ouverture du tiroir de chargement efface
également le programme.
0
5
Programmation
LECTURE
4
7
S
H
U
F
F
L
8
E
PROGRAM
DISPLA
Y
1
2
5
O
P
CD
E
N
R
/C
y
L
O
S
E
C
D
3
6
Page 36

EN CAS DE PROBLEMES
34
Si vous pensez que votre enregistreur de CD est défectueux,
vérifiez d’abord les points suivants et lancez le programme de
diagnostic. Peut-être avez-vous simplement oublié une étape.
Attention!
N’essayez en aucun cas de réparer l’enregistreur de
CD vous-même, car cela annulerait la garantie.
SYMPTÔME
• SOLUTION:
Pas de courant.
• Assurez-vous que la touche ON/OFF est
placée sur ON.
• Assurez-vous que le cordon d’alimentation
est branché correctement.
• Mettez l’enregistreur hors tension (OFF), puis
remettez-le immédiatement sous tension
(ON).
La numérotation automatique des plages ne fonctionne
pas.
• Vérifiez si la fonction est sélectionnée.
• Vérifiez si le silence séparant les plages est
bien de 3 secondes (enregistrement
analogique uniquement).
• Vérifiez si la source est un appareil grand
public conforme à la norme audionumérique
de la CEI.
Pas de son.
• Vérifiez les connexions audio.
• Si vous utilisez un amplificateur, essayez une
autre source.
Distorsion du son de l’amplificateur.
• Vérifiez que la sortie analogique de
l’enregistreur n’est pas connectée à l’entrée
Phono de l’amplificateur.
La lecture ne démarre pas.
• Assurez-vous que la face imprimée du
disque se trouve vers le haut.
• Nettoyez le disque.
• Vérifiez si le disque est défectueux en
essayant un autre CD.
La télécommande ne fonctionne pas.
• Orientez la télécommande directement vers
l’enregistreur.
• Inspectez les piles et remplacez-les si
nécessaire.
• Commencez par sélectionner la source
souhaitée.
L’enregistrement n’est pas possible.
• Nettoyez le disque.
• Dans le cas d’un disque CD-RW, vérifiez qu’il
n’est pas finalisé.
• Vérifiez que le disque est enregistrable et
remettez-le en place si nécessaire.
• Il ne s’agit pas d’un disque AUDIO.
• La source d’entrée choisie est inadéquate.
L’enregistrement analogique présente des distorsions.
• Assurez-vous que le niveau d’enregistrement
est approprié.
Les enregistrements sont séparés par des pauses de 20
secondes.
• Reportez-vous à la section sur
l’enregistrement numérique synchronisé (CDSYNC), p. 28.
Le lecteur ne réagit pas.
• Mettez le lecteur hors tension (OFF), puis à
nouveau sous tension (ON) à l’aide de la
touche en façade.
Le message SERVICE s’affiche à la mise sous tension.
• Mettez le lecteurs hors tension, puis à
nouveau sous tension.
Le message RECOVER s’affiche.
• Une panne de courant est survenue pendant
l’enregistrement. L’enregistreur de CD tente
de réparer le disque.
• Si le message RC-DISC s’affiche ensuite,
il n’est pas possible de poursuivre
l’enregistrement et le disque ne peut Ítre
finalisé. Il peut toutefois être lu sur un
enregistreur de CD.
• Sur un disque de type CD-RW, la plage en
cours d’enregistrement est perdue, mais il
est possible de poursuivre l’enregistrement
et de finaliser le disque.
• Si le message OPC FAIL s’affiche, aucun
enregistrement ultérieur n’est possible.
• Vous pouvez toutefois lire le disque sur cet
enregistreur.
Dépannage
Français
Page 37

EN CAS DE PROBLEMES
35
Si le problème persiste, vous pouvez lancer le programme de
diagnostic:
1 Mettez l’enregistreur hors tension (OFF) à l’aide de la
touche ON/OFF.
2 Appuyez simultanément sur PLAY et STOP et remettez
l’enregistreur sous tension à l’aide de la touche ON/OFF.
➜ Le message BUSY s’affiche et après quelques minutes,
ERROR ou PASSED s’affiche.
• Si le message ERROR s’affiche, votre enregistreur est
défectueux et doit être réparé. Consultez votre revendeur
ou appelez le Centre d’information aux consommateurs
(CIC) Philips afin d’obtenir les coordon-nées du centre de
réparation le plus proche. Le numéro de téléphone du CIC
figure dans le livret de garantie.
• Si le message PASSED s’affiche, il est possible que vous
ayez interprété le mode d’emploi de façon erronée, que
vous utilisiez un disque inapproprié, qu’il y ait un défaut
mécanique ou qu’un branchement soit incorrect. Dans ce
cas, relisez attentivement le mode d’emploi et contactez
votre revendeur si nécessaire.
• Si le problème persiste, contactez le centre de réparation
le plus proche.
3 Mettez l’enregistreur hors tension à l’aide de la touche
ON/OFF pour quitter le programme de diagnostic.
Programme de diagnostic
Français
Page 38

REMARQUES
36
Français
Page 39

37
Enspañol
Bienvenido
Gracias por adquirir este Grabador de CD Philips.
En los años ochenta, Philips inventó un nuevo sistema de
audio: el CD. El disco compacto reveló al usuario las nuevas
dimensiones de los sonidos digitales y se sumó a los placeres
del mundo del audio.
La tecnología de los compactos admite un alto contraste
tanto en los pasajes fuertes como en los débiles, con una
separación entre canales perfecta.
Philips avanza ahora un paso más en esta tecnología y el
resultado es el grabador de CD.
Con el grabador CD-R/RW de Philips, podrá grabar, reproducir
y borrar sus propios CD-audio de alta calidad, sujeto
únicamente a las limitaciones de copia establecidas por la
ley.
Naturalmente, también podrá reproducir todos los CD-audio
pregrabados y los CD combinados, como los CD Extra.
Las grabaciones sólo pueden realizarse para uso personal.
Está prohibido copiar material protegido por las leyes de
copyright, incluidos los programas informáticos, películas,
televisión y grabaciones de audio. Este equipo no puede ser
utilizado en tales aplicaciones.
Sujeto a modificación sin previo aviso.
Respuesta digital en frecuencia ............................0-22.050 Hz
Relación S/R en reproducción ........................................100 dB
Margen dinámico en reproducción ..................................95 dB
Distorsión armónica total en reproducción ....0,0056%, -85 dB
Relación S/R (analógica) ..................................................90 dB
Relación S/R en grabación (digital) ............Igual que la fuente
Margen dinámico en grabación ........................................92 dB
Distorsión armónica total en grabación..........0,0056%, -85 dB
Entrada digital coaxial (IEC 958) ..............44,1 Khz +/-100 ppm
Entrada digital óptica (IEC958) ................44,1 Khz +/- 100 ppm
Entrada analógica (medidor de nivel)500 mVrms/50 kΩ = 0 dB
Salida de audio ..................................................2 V RMS ±2 dB
Salida digital coaxial............................................0,5 Vpp/75 Ω
Auriculares ..............................................0-5 V RMS/8-2000 Ω
Dimensiones..................................................435 x 305 x 88mm
Peso......................................................................................4 kg
Consumo ............................................................................15 W
Temperatura de funcionamiento ...................................5 - 35°C
Alimentación ..............................................................120 V c.a.
Datos técnicos
Indice
INFORMACIÓN GENERAL
Datos técnicos ..........................................................37
Disco para grabación ................................................38
Discos para reproducir ..............................................38
Mantenimiento ..........................................................38
Accesorios ................................................................38
CONTROLES Y CONEXIONES
Controles del panel frontal ........................................39
Conexiones del panel posterior ................................39
PANTALLA
Descripción de la pantalla ........................................40
Mensajes de pantalla ................................................40
INSTALACIÓN
Conexiones generales................................................41
Conexiones analógicas ..............................................41
Conexiones digitales coaxiales ................................42
Conexiones digitales ópticas ....................................42
Alimentación..............................................................43
Recomendaciones de configuración..........................43
Inserción de las pilas en el mando a distancia ........43
MANDO A DISTANCIA E INSERCIÓN DE DISCOS
Órdenes del mando a distancia ................................44
Inserción de discos ....................................................44
GRABACIÓN
Observaciones sobre la grabación ............................45
Grabación digital - no sincronizada ..........................45
Grabación digital sincronizada - CD-SYNC ..............46
Grabación analógica ..................................................47
Finalización de discos CD-R y CD-RW ......................48
Rehabilitación de discos CD-RW ..............................48
BORRADO Y REPRODUCCIÓN
Borrado de discos CD-RW ........................................49
Reproducción de un CD..............................................49
REPRODUCCIÓN
Selección de pista o búsqueda..................................50
Reproducción aleatoria..............................................50
Repetición de CD, pista o programa..........................51
Programación ............................................................51
DETECCIÓN DE PROBLEMAS
Solución de problemas ..............................................52
Programa de diagnóstico ..........................................52
INFORMACIÓN GENERAL
Page 40

Para las grabaciones, deben utilizarse discos especiales de
audio (sólo música) que exhiban los logotipos indicados y la
leyenda “DIGITAL AUDIO”. En algunos países se han
satisfecho tasas de copyright sobre estos discos.
El equipo utiliza dos tipos de discos para fines de grabación:
- CD-audio grabables (CD-R):
Completamente grabados y finalizados, estos
discos se pueden utilizar en todos los
reproductores y grabadores de CD.
- CD-audio regrabables (CD-RW):
Pueden grabarse, borrarse y regrabarse
cientos de veces. Una vez finalizados,
funcionan en reproductores y grabadoras de
CD compatibles con el formato CD-RW.
En el año 1999, la mayoría de los reproductores y
grabadoras de CD Philips serán compatibles con el formato
CD-RW.
El grabador de CD puede reproducir:
- Todos los CD-audio pregrabados y los CD combinados, como
el CD Extra.
- Todos los discos de audio CD-R y CD-RW.
Observación: Los discos CD-R grabados con un ordenador sólo
podrán utilizarse si son procesados debidamente
conforme al estándar de audio (IEC958:
Consumo). Recuérdese: sólo una sesión de
grabación.
En las grabaciones, es muy importante que los discos no
estén sucios ni rayados.
Para limpiar un CD, pase un paño
suave y sin pelusas en línea recta
desde el centro hacia afuera. Los
productos de limpieza pueden dañar
el disco. Escriba únicamente en la
cara rotulada del CD-R o CD-RW, y
sólo con rotulador (punta de fieltro
blanda).
Limpie el grabador de CD con un
paño suave, que no suelte pelusa,
ligeramente humedecido. No utilice
productos de limpieza, ya que podrían
tener un efecto corrosivo.
No exponga el grabador de CD,
las pilas ni los discos a la humedad,
lluvia, arena o temperaturas elevadas
(calefacción, luz solar directa).
Si el grabador de CD no puede leer los discos correctamente,
utilice un CD de limpieza normal para limpiar la lente antes
de llevar el equipo a reparar. Otros métodos de limpieza
podrían inutilizar la lente. Mantenga siempre cerrada la
bandeja para evitar la acumulación de polvo en la lente.
Las lentes se pueden empañar si la grabadora se traslada
súbitamente de un entorno frío a otro cálido. En tal caso, la
reproducción de un CD resultará imposible. Espere a que se
evapore la humedad del equipo.
- 2 cables de audio analógicos (conectores rojo y blancos)
- 1 cable digital coaxial (conectores negros)
- Cable de alimentación
- 2 pilas
- Mando a distancia
- Garantía
Accesorios
Mantenimiento
Discos para reproducción
ReWritable
Recordable
Discos para grabación
38
Enspañol
INFORMACIÓN GENERAL
Page 41

39
Enspañol
1 ON/OFF . . . . . . . . . enciende y apaga el grabador de CD
2 Bandeja de disco
3 PLAY 2 . . . . . . . . . activa la reproducción o grabación
4 PAUSE ; . . . . . . . . activa una pausa
5 STOP 9 . . . . . . . . . parada
6 ∞ . . . . . . . . . . . . . pista anterior/búsqueda atrás
7 § . . . . . . . . . . . . . siguiente pista/búsqueda
adelante/nueva pista
8 RECORD. . . . . . . . . grabación
9 FINALIZE . . . . . . . . finaliza recording
0 ERASE . . . . . . . . . . borra la grabación
! CD-SYNC . . . . . . . .grabación sincronizada (comienzo
automático)
@ DISPLAY (pantalla de información)
# OPEN/CLOSE. . . . . abre/cierra la bandeja de disco
$ DISPLAY . . . . . . . . selecciona la información de la
pantalla
% SOURCE . . . . . . . . .selecciona la entrada digital o
analógica
^ AUTO/MANUAL . . selecciona el método de marcación
de número de pista
& PHONES . . . . . . . . toma de auriculares
* REC LEVEL . . . . . . ajusta el nivel de grabación
(analógica)
1 Conexión a la red
2 ANALOG IN . . . . . conexión a la salida de línea de un
amplificador (izquierda y derecha)
3 ANALOG OUT. . . . conexión a la entrada de línea de un
amplificador (izquierda y derecha)
4 DIGITAL IN . . . . . . conexión a la salida digital coaxial
de un reproductor de CD
5 DIGITAL OUT . . . . conexión a la entrada digital coaxial
de, por ejemplo, un amplificador o
equipo de grabación
6 OPTICAL IN . . . . . conexión a la salida digital óptica de
un reproductor de CD
Conexiones del panel posteriorControles del panel frontal
CONTROLES Y CONEXIONES
3 54 8 9 10 11 126 7
P
LAY
2
CD-RECORDABLE/R
1
13 14 15 16 17 18
P
A
USE
S
TOP
R
E
C
O
R
D
F
IN
A
L
IZ
E
E
R
A
S
E
C
D
-S
y
EW
RI
TAB
LE
Power On/Off
DIRECT LINE
RECORDING
nc
D
I
G
T
R
A
C
K
R
E
P
E
A
T
1
T
O
T
A
L
R
E
M
P
R
O
G
R
Recordable
e
c
orda
b
le
C
D
T
I
M
E
C
D
S
Y
N
C
R
E
C
E
CDR 760-R
O
R
D
L
-5
0
-4
0
R
-3
0
-2
0
1
0
-6
-3
0
O
V
E
R
P
A
U
S
E
ECORDA
BLE/
REWR
ITABLE
R
E
C
O
R
D
A
B
L
1 65
O
PEN
/CLOS
E
DISPLAY
SOURCE
AUTO/MANAL
R
EC
L
E
V
E
L
6
5
7
4
8
3
9
2
10
1
2
0
0
50
Phones
CDR
L
L
R
R
IN
O
UT
AN
A
IN
LO
G
O
U
T
D
IG
ITA
L
IN
OP
T
IC
AL
4
32
Page 42

40
Enspañol
1 ANALOG. . . . . . . . . está seleccionada la entrada
analógica
2 DIG . . . . . . . . . . . . . se ilumina cuando está
seleccionada la entrada digital, y
parpadea cuando la entrada digital
es incorrecta
3 AUTO TRACK. . . . . incremento automático de número
de pista
4 REPEAT (1) . . . . . . . función de repetición activada
durante la reproducción
5 Número de pista y tiempo
6 CD-SYNC . . . . . . . . está activada la grabación
sincronizada
7 RECORD . . . . . . . . . se ilumina durante la grabación, y
parpadea en espera de grabación
8 FINALIZE . . . . . . . . se ilumina durante la finalización, y
parpadea en espera de finalización
9 ERASE . . . . . . . . . . se ilumina durante el borrado, y
parpadea en espera de borrado
0 COPY PROHIBIT . . se ilumina cuando se intenta grabar
material digital protegido
! PAUSE . . . . . . . . . . pausa activada
@ Barra de nivel de grabación/reproducción (analógica)
# RECORDABLE . . . . se ha insertado un CD-R sin finalizar
$ REWRITABLE. . . . . se ha insertado un CD-RW
% CD . . . . . . . . . . . . . .hay un CD insertado (CD pregrabado
o CD-R/CD-RW finalizado)
^ . . . . . . . . . . . mando a distancia activo
& PROG . . . . . . . . . . . reproducción programada
La pantalla puede ofrecer los siguientes mensajes
informativos:
READING ......leyendo información del disco
OPC ................procedimiento de calibración OPC en curso
OPEN ............apertura de bandeja
CLOSE ..........cierre de bandeja
NO DISC ......no hay ningún disco insertado, o es ilegible
UPDATE ........actualizando el contenido del disco
ERROR ..........error de escritura durante la grabación
RECOVER ......procedimiento de recuperación en curso
WAIT ..............parada de grabación (4 segundos)
SYNC ..............espera de grabación sincronizada
TRACK ..........espera de borrado de pista
DISC ............espera de borrado de disco
SERVICE ......error encontrado en autocomprobación
OPCFAIL ......fallo en calibración láser. Imposibles más
grabaciones
FULL ............programa completo
CD FULL ......no es posible seguir grabando
EMPTY ............no hay grabaciones en el disco; imposible
finalizar
NO AUDIO ....(intermitente) no hay cargado un disco de
audio, o es imposible leer los datos
FINAL ............se ha ejecutado la calibración láser en 96
ocasiones; finalice el disco
COAXIAL ......entrada digital coaxial seleccionada
OPTICAL ......entrada digital óptica seleccionada
SHUFFLE ......reproducción al azar
RC-DISC ......disco recuperado. No es posible la finalización
TOC ................parpadea durante la espera de rehabilitación
de disco, iluminado fijo durante la operación
de rehabilitación de disco
INPUT ..........selección de entrada (CD-SYNC)
ANALOG ........entrada analógica seleccionada
Mensajes de pantalla
Descripción de la pantalla
PANTALLA
OVER
654321
CD SYNC
RECORD
FINALIZE
ERASE
COPY
PROHIBIT
PAUSE
DIG
ANALOG
17
PROG
RECORDABLE
CD
REWRITABLE
16 15 14 13 12 11
REPEAT 1
L
-50 -40 -30 -20 -10 -6 -3 0
R
TOTALAUTO TRACK TRACKREM TIME
7
8
9
10
Page 43

41
Enspañol
Para la grabación, el equipo dispone de las siguientes
entradas:
- Entrada digital óptica
- Entrada digital coaxial
- Entrada analógica
Para la reproducción, el equipo dispone de las siguientes
salidas:
- Salida digital coaxial
- Salida analógica
Las conexiones dependerán de las posibilidades que ofrezca
su equipo de audio. Consulte primero los manuales de uso de
sus otros componentes.
Las grabaciones realizadas de una fuente digital (reproductor
de CD) a través de los terminales digitales óptico o coaxial
proporcionarán la mejor calidad de audio y prestaciones (por
ejemplo, numeración automática).
(La conexión digital óptica es menos sensible a las
interferencial externas).
Si su equipo no dispone de conexiones digitales, el
sofisticado convertidor D/A de la grabadora de CD garantizará
un excelente rendimiento cuando se realicen grabaciones a
través de la entrada analógica.
La reproducción a través de la salida digital coaxial de la
grabadora de CD ofrece los mejores resultados.
Si su equipo no dispone de conexiones digitales, el
sofisticado convertidor D/A de la grabadora de CD garantizará
una excelente calidad de sonido a través de la salida
analógica.
Le recomendamos efectuar siempre las conexiones digitales y
analógicas. De esta manera, siempre podrá realizar
grabaciones analógicas cuando no sea posible la grabación
digital.
A continuación explicamos las maneras más habituales de
conectar el grabador de CD. Si aun así tiene dudas con las
conexiones, puede contactar en cualquier momento con el
Centro de Información al Consumidor de su país.
Utilice los cables de audio facilitados. Inserte los conectores
rojos en los terminales R, y los blancos en los terminales L.
1 Para la grabación, conecte el cable 1 entre las entradas
ANALOG IN del grabador de CD y las salidas LINE o TAPE
OUT de un amplificador.
Observación: Para la grabación directa de un reproductor de
CD, la entrada analógica del grabador deberá
conectarse a la salida analógica del reproductor.
2 Para la reproducción, conecte el cable 2 entre las salidas
ANALOG OUT del grabador de CD y las entradas de un
amplificador, por ejemplo TAPE IN, CD-R o AUX.
Observación: No utilice nunca la entrada PHONO.
Conexiones analógicasConexiones generales
INSTALACIÓN
L
R
O
U
T
A
I
N
L
O
G
D
CD RECORDER
O
U
T
IG
I
T
A
L
IN
O
P
T
IC
A
L
L
R
I
N
A
N
1
2
L
L
R
R
O
U
T
I
N
TA
PE
RECEIVER
Page 44

42
Enspañol
Utilice el cable provisto de conectores negros.
1 Para la grabación, conecte el cable 3 entre la entrada
DIGITAL IN del grabador de CD y la salida DIGITAL OUT de
un reproductor de CD.
Observación: El grabador de CD está provisto de una salida
digital coaxial, que puede utilizarse para la
reproducción digital.
1 Retire las tapas de las conexiones digitales ópticas (le
recomendamos que las conserve).
2 Para la grabación, conecte un cable de fibra óptica 4 entre
la entrada digital óptica del grabador de CD y la salida
digital óptica de un reproductor de CD.
Observación: Para la reproducción, la salida digital coaxial o
la salida analógica deberán conectarse a un
amplificador.
Cuando conecte el cable digital
óptico, asegúrese de insertarlo
por completo (oirá un clic).
Conexiones digitales ópticas
Conexiones digitales coaxiales
INSTALACIÓN
L
R
ANALO
G
O
UT
DIGITAL
OUT
CD PLAYER
OUT
O
PTICAL
3
L
R
CD RECORDER
IN
O
UT
DIGITAL
OPTICAL
IN
L
R
IN
OUT
ANALOG
1
2
L
R
CD
IN
L
L
R
R
OUT
IN
TAPE
RECEIVER
L
R
L
R
ANALOG
OUT
3
L
L
R
R
IN
OUT
ANALOG
1
2
L
CD
IN
L
R
R
OUT
IN
TAPE
CD PLAYER
DIGITAL
OUT
OUT
O
PTICAL
4
CD RECORDER
IN
OUT
DIGITAL
OPTICAL
IN
RECEIVER
Page 45

43
Enspañol
1 Conecte el cable de alimentación a la entrada MAINS del
grabador de CD, y seguidamente a la toma de red.
2 Pulse ON/OFF para encender el grabador de CD
Observación:
- El grabador de CD se adapta automáticamente a la tensión
de red local.
- Aunque el grabador de CD se encuentre apagado (“OFF”),
seguirá consumiendo algo de corriente. Si desea interrumpir
el suministro por completo, deberá desconectar el cable de
la toma de alimentación.
- Coloque el grabador de CD sobre una superficie sólida que
no esté expuesta a vibraciones.
- No sitúe el grabador de CD cerca de una fuente de calor o a
la luz solar directa.
- No utilice el grabador de CD en entornos extremadamente
húmedos.
- Si se integra el grabador de CD en un mueble, asegúrese de
que quede libre un espacio de 2,5 cm alrededor de la unidad
para su correcta ventilación.
1 Abra el compartimento de las pilas.
2 Inserte 2 pilas (AAA, R03 o UM-4; incluidas) como se ilustra
en la figura.
3 Cierre el compartimento.
Observación: Recomendamos el uso de 2 pilas del mismo tipo
y estado.
Las pilas contienen sustancias químicas. Deshágase
de las pilas usadas conforme a las disposiciones
vigentes.
Inserción de las pilas en el mando a distancia
Recomendaciones de configuración
Alimentación
INSTALACIÓN
Page 46

44
Enspañol
PROGRAM. . . . . . . . . . programación de números de pista
DISPLAY . . . . . . . . . . . selecciona la información de la
pantalla
Teclas numéricas 0 - 9 Seleccionan las pistas por su
número
SHUFFLE . . . . . . . . . . . reproduce el CD(RW) o programa
enun orden aleatorio
Q . . . . . . . . . . . . . . . búsqueda hacia atrás
PREVIOUS O . . . . . . . para desplazarse al principio de una
pista anterior
STOP 9 . . . . . . . . . . . . detiene el CD(RW) y borra un
programa
PAUSE ; . . . . . . . . . . . activa una pausa en el CD(RW)
NEXT P . . . . . . . . . . . para desplazarse al principio de una
pista posterio
PLAY 2 . . . . . . . . . . . . activa la reproducción del CD(RW)
R . . . . . . . . . . . . . . . Búsqueda hacia adelante
REPEAT . . . . . . . . . . . . modo de repetición
CD . . . . . . . . . . . . . . . . sólo CDR 765
CD-R. . . . . . . . . . . . . . . sólo CDR 765
OPEN/CLOSE . . . . . . . . Abre y cierra la bandeja de discoy
Mientras mantenga pulsado un botón del mando a distancia,
el indicador de la pantalla permanecerá iluminado
Observación: Salvo indicación contraria, todos los controles se
encuentran en el frontal del grabador de CD.
También pueden usarse indistintamente los
equivalentes del mando a distancia.
1 Pulse OPEN/CLOSE (13) para abrir la bandeja de disco.
2 Inserte un CD, CD-R o CD-RW en la bandeja, con la cara de
la etiqueta hacia arriba.
IMPORTANTE:
Para la grabación, conviene que el disco vacío esté
completamente limpio de partículas de polvo y rayal
(véase Mantenimiento, p.38).
3 Pulse ligeraùente el frente a bandeja o pulse el botón
OPEN/CLOSE para cerrar el compartimento (véase también
Reproducción de un CD).
➜ La pantalla le informará sobre el tipo de disco insertado.
• Si un CD-R está finalizado, se visualizará
CD en la pantalla.
• Si un CD-RW está finalizado, seguirá siendo regrabable y
se visualizará CD REWRITABLE en la pantalla.
Si inserta un CD-R o CD-RW en blanco o parcialmente grabado, la unidad calibrará el disco para optimizar la grabación.
Durante esta operación, la pantalla indicará primero
OPC
y, a
continuación, el número de pistas de audio. La calibración
puede requeria hasta 25 segundos.
Observación: Sólo se pueden utilizar discos de audio. Si se
inserta un disco que no sea de audio, la pantalla
indicará
NO AUDIO
.
P
O
Inserción de discos
Órdenes del mando a distancia
MANDO A DISTANCIA E INSERCIÓN DE DISCOS
PRO
G
RAM
DIS
PLA
Y
1
4
7
5
S
H
U
F
F
LE
5
P
R
E
V
.
S
T
O
P
P
A
U
S
E
8
0
9
R
E
P
P
L
A
Y
E
A
T
6
N
E
X
T
PROG
CD
RECORDABLE
REWRITABLE
L
-50 -40 -30 -20 -10 -6 -3 0
R
O
P
CDR
E
N
/C
y
L
O
S
2
6
E
C
D
3
P
L
A
Y
P
A
U
S
E
S
T
O
P
Power On/Off
D
IR
E
C
T
L
IN
E
R
E
C
O
R
D
IN
C
D
R
E
C
O
R
D
A
B
L
E
/
R
E
W
R
I
T
A
B
L
E
R
e
c
o
r
d
a
b
le
PROG
RECORDABLE
CD
REWRITABLE
L
-50 -40 -30 -20 -10 -6 -3 0
R
OV
REPEAT 1
DIG
G
OG
RECORDABLE
L
-
TOTALAUTO TRACK TRACKREM TIME
-
-
-
-
G
-
-
R
E
C
O
R
D
F
I
N
A
L
I
Z
E
CD SYNC
RECORD
FINALIZE
E
R
A
S
E
ERASE
COPY
CD-Sync
OVER
D
IG
P
R
O
G
R
E
C
C
D
Page 47

45
En poco tiempo comprobará lo fácil que es crear sus propios
discos compactos.
No obstante, es aconsejable utilizar un CD-RW la primera vez.
Existen tres modalidades de grabación:
- Digital no sincronizada
- Digital sincronizada
- Analógica
• El procedimiento de grabación es igual para los CD-R y para
los CD-RW.
• Si se trata de un CD-RW finalizado, en primer lugar deberá
rehabilitarlo (página 48).
• Si el disco ya contiene grabaciones, la unidad buscará
automáticamente el final de la última pista para iniciar la
grabación desde ese punto.
• En el disco deben quedar al menos 7 segundos de tiempo
disponible, o de lo contrario no podrá activar el modo de
espera de grabación.
• Si la pantalla indica
COPY PROHIBIT, no podrá realizar
ninguna grabación digital del material fuente. La grabación
no comenzará, o se detendrá a los 4 segundos.
• El sistema SCMS (gestión de copias en serie) sólo
permite la grabación digital en determinadas condiciones:
- Significa que no es posible realizar una copia digital de
una copia digital.
- La grabación analógica siempre es posible.
- El número de grabaciones del original es ilimitado.
• Un disco admite un máximo de 99 pistas grabadas. La
longitud mínima de pista admisible es de 4 segundos.
• Se pueden realizar grabaciones digitales de discos
compactos (u otras fuentes con una frecuencia de muestreo
a la salida de 44,1 kHz +/- 100 ppm) a través de la entrada
digital.
Importante:
Si desea reproducir un CD-R en un lector de CD
normal, antes deberá ser finalizado. Véase el capítulo
de finalización de discos (P 48).
Los CD-RW finalizados sólo son utilizables en
reproductores de CD compatibles con el formato CD-RW.
Preparación para la grabación digital
1 Asegúrese de que el disco está absolutamente limpio y no
presenta rayal.
2 Pulse SOURCE repetidas veces hasta que (según la
conexión digital utilizada):
➜ aparezca DIG COAXIAL o DIG OPTICAL en la
pantalla.
3 Pulse AUTO/MANUAL para seleccionar la numeración de
pistas automática o manual.
➜ Si se selecciona AUTO (recomendable), en la pantalla
aparece la indicación AUTO TRACK.
• AUTO: Los incrementos de pista se toman automáticamente
del material fuente digital.
• MANUAL: Los números de pista se pueden incrementar
manualmente pulsando § (la longitud mínima
de pista es de 4 segundos).
(También se puede hacer en el modo AUTO).
• Los números de pista no pueden cambiarse después de la
grabación.
Observación: La numeración automática funciona sólo con las
fuentes provistas de señal de salida digital
conforme al estándar de audio IEC 958
(consumo).
A
S
C
A
Y
O
L
Power On/Off
CD-RECORDABLE/REWRITABLE
RECORD
P
L
A
Y
P
A
U
S
E
S
T
O
P
FINAL
D
IR
E
C
T
L
IN
E
R
E
C
O
R
D
IN
G
Grabación digital - no sincronizadaObservaciones sobre la grabación
Enspañol
GRABACIÓN
O
P
E
N
/C
DISPLAY
L
SOURCE
D
IG
T
R
A
C
KR
R
E
PE
A
T
1
T
O
T
A
L
E
P
R
O
G
R
E
C
O
R
D
A
B
L
E
C
D
CDR 760-RECORDABLE/REWRITABLE
M
T
IM
E
C
D
S
Y
N
C
R
E
C
O
R
-
6-30
D
O
V
E
R
P
A
U
S
E
L
-
5
0
-
4
0
R
-
3
0
-
2
0
-
1
0
ANALOG
DIG
PROG
REPEAT 1
TOTALAUTO TRACK TRACKREM TIME
O
S
E
AUTO/MANAL
CD S
REC
FINA
ERA
ANALOG
DIG
PROG
REPEAT 1
TOTALAUTO TRACK TRACKREM TIME
CD
FIN
RE
ER
Page 48

46
Comienzo de grabación digital
1 Desde la posición de parada, pulse RECORD para activar el
modo de estera de grabación.
➜
RECORD record parpadea.
• Si
DIG también parpadea, la conexión digital es incorrecta.
2 Para dar comienzo a la grabación, pulse PLAY e
inmediatamente ponga en marcha la fuente (desde la
posición de parada).
➜ RECORD se ilumina. En la pantalla aparece el número de
pista y el tiempo de grabación utilizado.
• Para grabar un silencio de 3 segundos al principio de la
pista, pulse PAUSE.
• Para comprobar el tiempo de grabación (restante), pulse
DISPLAY (también se puede hacer durante la grabación)
3 Para detener la grabación, pulse STOP en el grabador de
CD.
➜
RECORD se apaga.
• Para interrumpir la grabación, pulse PAUSE.
➜ RECORD comienza a parpadear. Reanude la grabación
como en el paso 2.
Después de la grabación, la pantalla indicará UPDATE
durante algunos segundos.
Observación: Si está activada la función “
AUTO TRACK”, la
grabadora se detendrá de forma automática. Las
grabaciones de DAT o DCC se detendrán tras un
silencio de 20 segundos. Si se desactiva “AUTO
TRACK”, el modo de parada automática queda
desactivado.
Preparación para la grabación digital sincronizada
La función CD-SYNC le permite realizar una grabación digital
rápida y sencilla de un CD. Los incrementos de pista se
detectan automáticamente del material original, y no se
pueden añadir manualmente.
1 Asegúrese de que el disco está absolutamente limpio y no
presenta rayal.
2 Pulse SOURCE repetidas veces hasta que (según la
conexión utilizada):
➜
DIG COAXIAL o DIG OPTICAL aparezcan en la
pantalla.
Inicie la grabación digital sincronizada
1 Con la grabadora en la posición de parada, pulse CD-SYNC.
➜ En la pantalla aparecen las indicaciones CD-
SYNC
y
SYNC. Tras unos instantes,RECORD comienza a
parpadear.
• Si DIG también parpadea, la conexión digital es incorrecta.
2 Para dar comienzo a la grabación, pulse PLAY en la fuente
digital.
➜ La unidad comienza de inmediato a grabar, y RECORD
permanece iluminado En la pantalla se visualiza el
número de pista y el tiempo de grabación utilizado.
• No obstante, si pone en marcha la fuente durante la
reproducción de una pista, la grabación sincronizada
comenzará al principio de la siguiente.
• Para comprobar el tiempo de grabación (restante), pulse
Display.
(También se puede hacer durante la grabación).
Grabación digital sincronizada - CD-SYNC
Enspañol
GRABACIÓN
ANALOG
PROG
DIG
REPEAT 1
TOTALAUTO TRACK TRACKREM TIME
CD SYNC
RECORD
FINALIZE
ERASE
R
EC
O
R
D
FIN
A
LIZE
ER
A
S
E
CD-Sync
D
IG
T
R
A
C
K
R
E
P
E
A
T
1
T
O
T
A
L
R
P
R
O
R
ec
ordable
G
R
E
C
O
R
D
A
B
L
E
L
C
D
R
E
-5
0-4
0
-3
0
-
2
0-1
0
M
-6 -3 0
T
IM
E
O
V
E
R
DIG
LOG
PROG
REPEAT 1
TOTALAUTO TRACK TRACKREM TIME
CD SYNC
RECORD
FINALIZE
ERASE
Page 49

47
3 Para detener la grabación, pulse STOP en el grabador de
CD.
➜
CD-SYNC y RECORD se apagan.
• Para interrumpir momentáneamente la grabación, pulse
PAUSE.
➜ RECORD comienza a parpadear. Para reanudar, pulse PLAY
en el grabador de CD.
Después de la grabación, la pantalla indicará UPDATE
durante algunos segundos.
Observación:
- El grabador de CD no se activará hasta que no reconozca
una señal digital. Aunque el tiempo de respuesta no llega a
200 milisegundos, el comienzo real de la música puede
perderse en ocasiones. En tal caso, puede activar la
grabación manualmente (véase la grabación digital no
sincronizada).
- Las grabaciones de DAT o DCC únicamente se detendrán
tras un silencio de 20 segundos.
Realice grabaciones analógicas únicamente si no es posible
grabar digitalmente.
Preparación para la grabación analógica
1 Asegúrese de que el disco está absolutamente limpio y no
presenta rayal.
2 Pulse Source repetidas veces hasta que:
➜
ANALOG aparezca en la pantalla.
3 Pulse AUTO/MANUAL para seleccionar la numeración de
pistas automática o manual.
➜ Si se selecciona AUTO (recomendable), en la pantalla
aparece la indicación AUTO TRACK.
• AUTO: El número de pista se incrementa automáticamente
después de un silencio en el original de más de 3
segundos.
• MANUAL: Los números de pista se pueden incrementar
manualmente pulsando § (la longitud mínima
de pista es de 4 segundos).
(También se puede hacer en el modo AUTO).
• Los números de pista no se pueden cambiar después de la
grabación.
4 Con el grabador parado, pulse RECORD para activar el
modo de espera de grabación.
➜ RECORD parpadea
5 Reproduzca la fuente en primer lugar para ajustar el nivel
de grabación óptimo en el grabador de CD.
P
o
w
e
r O
n
/O
ff
C
D
-R
E
C
O
R
D
A
B
LE
/R
E
W
R
IT
A
B
LE
RECORD
PLAY
PAUSE
STOP
FINALIZ
D
IR
E
C
T
L
IN
E
R
E
C
O
R
D
IN
G
S
O
U
R
C
E
A
U
T
O
/M
A
N
A
L
R
E
C
L
E
V
E
L
P
h
o
ne
s
OPEN/CLOSE
8
0
5
0
1
20
2
10
3
9
4
5
7
6
Grabación analógica
Enspañol
GRABACIÓN
ANALOG
PROG
DIG
REPEAT 1
TOTALAUTO TRACK TRACKREM TIME
REPEAT 1
IG
TOTALAUTO TRACK TRACKREM TIME
CD SYNC
RECORD
FINALIZE
ERASE
Page 50

48
6 Gire el control REC LEVEL para que se iluminen todos los
segmentos azules en la barra de nivel de
grabación/reproducción, pero de forma que no se iluminen
continuamente los segmentos rojos durante los pasajes
más altos.
7 Detenga la fuente.
Inicie la grabación analógica
1 Para dar comienzo a la grabación, pulse PLAY en la
grabadora de CD e inmediatamente ponga en marcha el
equipo fuente.
➜
RECORD se ilumina. En la pantalla aparece el número de
pista y el tiempo de grabación utilizado.
• Para grabar un silencio de 3 segundos al principio de la
pista, pulse PAUSE.
• Para comprobar el tiempo de grabación (restante), pulse
DISPLAY (también se puede hacer durante la grabación).
2 Para detener la grabación, pulse STOP en el grabador de
CD.
➜
RECORD se apaga.
• Para interrumpir momentáneamente la grabación, pulse
PAUSE.
➜
RECORD comienza a parpadear. Reanude la grabación
como en el paso 1.
Después de la grabación, la pantalla indicará UPDATE
durante algunos segundos.
Observación: Si está activada la función “AUTO TRACK”, la
grabadora se detendrá de forma automática
tras un silencio de 20 segundos. Si se desactiva
“
AUTO TRACK”, el modo de parada automática
queda desactivado.
La finalización es un procedimiento muy sencillo, necesario
para reproducir los discos en un lector normal de CD.
Observación: La finalización impide realizar más grabaciones
en un CD-R. Un CD-RW finalizado deberá
rehabilitarse para poder grabar o borrar pistas.
1 Asegúrese de que el disco está absolutamente limpio y no
presenta rayal.
2 Con el grabador parado, pulse FINALIZE y, antes de 3
segundos, RECORD.
➜ En la pantalla se visualiza el tiempo aproximado de la
operación.
RECORD y FINALIZE se iluminan. La pantalla inicia una
cuenta atrás.
Finalizada la finalización, la pantalla indica el número
total de pistas y el tiempo total grabado. Con los CD-R
CD RECORDABLE se convierte en CD en la pantalla.
Con los CD-RW la pantalla no cambia.
La operación de finalización durará como mínimo 2 minutos.
Observación: Durante la finalización, el grabador de CD no
acepta órdenes operativas.
Sólo discos CD-RW.
Si desea realizar más grabaciones (o borrar pistas) en un
disco finalizado, primero deberá rehabilitarlo. Se eliminará la
información TOC (tabla de contenidos).
Para rehabilitar un disco:
1 Pulse dos veces ERASE.
➜ En la pantalla parpadean, TOC y ERASE.
2 Pulse RECORD antes de 3 segundos.
➜ TOC y ERASE permanecen iluminados durante la
operación de borrado.
Observación: Esta operación tardará aproximadamente 1
minuto.
Rehabilitación de discos CD-RW
Finalización de discos CD-R y CD-RW
Enspañol
GRABACIÓN
DIG
LOG
PROG
REPEAT 1
TOTALAUTO TRACK TRACKREM TIME
CD SYNC
RECORD
FINALIZE
ERASE
DIG
LOG
PROG
REPEAT 1
TOTALAUTO TRACK TRACKREM TIME
CD SYNC
RECORD
FINALIZE
ERASE
Page 51

49
Sólo discos CD-RW.
Puede borrar:
- pista a pista desde el final.
- el disco entero.
Para borrar la última pista:
1 Asegúrese de que el disco no está finalizado (se visualiza
OPC en la pantalla durante el arranque). De lo contrario,
rehabilítelo primer (p.48)
2 Pulse ERASE.
➜ En la pantalla parpadean TRACK y
ERASE .
3 Pulse RECORD antes de 3 segundos.
➜ TRACK y ERASE permanecen iluminados durante la
operación de borrado.
Para borrar todo el disco:
1 Pulse ERASE una vez (si se trata de un CD-RW finalizado) o
dos veces (no finalizado)
➜ En la pantalla parpadean DISC y ERASE .
2 Pulse RECORD antes de 3 segundos.
➜ DISC y ERASE permanecen iluminados durante la
operación de borrado.
El borrado de un disco completo puede tardar hasta 1,5
minutos.
1 Pulse PLAY para dar comienzo a la reproducción de un CD.
➜ En la pantalla aparece el número de pista y su duración,
junto con el indicador de nivel de
grabación/reproducción.
2 Pulse DISPLAY una, dos o tres veces para visualizar:
➜ tiempo restante de pista; tiempo restante total; tiempo
de pista con la barra de nivel apagada.
3 Para interrumpir momentáneamente la reproducción, pulse
PAUSE.
➜
PAUSE se ilumina en la pantalla
4 Para reanudar la reproducción, pulse PAUSE de nuevo o
PLAY
5 Para detener la reproducción, pulse STOP.
➜ En la pantalla aparece el número total de pistas y el
tiempo total de reproducción.
L
Reproducción de un CD
Borrado de discos CD-RW
Enspañol
BORRADO Y REPRODUCCIÓN
DIG
LOG
PROG
REPEAT 1
TOTALAUTO TRACK TRACKREM TIME
CD SYNC
RECORD
FINALIZE
ERASE
PLAY
PAUSE
STOP
CD-RECORDABLE/REW
RITABLE
Power On/Off
R
EC
O
R
D
FIN
A
DIG
LOG
PROG
REPEAT 1
TOTALAUTO TRACK TRACKREM TIME
CD SYNC
RECORD
FINALIZE
ERASE
Page 52

50
Enspañol
Selección de una pista durante la reproducción
1 Pulse brevemente ∞ ó § una o más veces.
➜ La reproducción salta al principio de la pista actual,
anterior o siguiente.
o bien
• Teclee el número de pista deseado con los botones
numéricos del mando a distancia. Si el número consta de
dos cifras, pulse las teclas en rápida sucesión.
➜ La reproducción salta al principio de la pista
seleccionada.
Selección de una pista con el disco parado
1 Pulse brevemente ∞ ó §, una o más veces.
2 Pulse PLAY.
➜ La reproducción comienza en la pista seleccionada.
o bien
• Teclee el número de pista deseado con los botones
numéricos del mando a distancia. Si el número consta de
dos cifras, pulse las teclas en rápida sucesión.
Búsqueda durante la reproducción de CD
1 Mantenga pulsado ∞ ó § (o los 5 ó 6 en el mando a
distancia).
➜ El reproductor busca primero hacia atrás o hacia
adelante a 10 veces la velocidad normal, con el sonido a
bajo volumen, y después prosigue el avance o retroceso
rápidos con el sonido silenciado.
2 Libere el botón cuando localice el pasaje deseado.
➜ La reproducción se inicia en el pasaje deseado.
Observación: Durante la reproducción aleatoria, repetida o
programada, la búsqueda se limita a la pista en
curso.
1 Pulse SHUFFLE (o PLAY) en el mando a distancia antes o
durante la reproducción de CD para activar el modo de
reproducción al azar.
➜ Las pistas del CD (o programa, en su caso) se
reproducirán en un orden aleatorio. SHUFFLE aparece
intercalado en la pantalla entre pista y pista.
2 Pulse de nuevo SHUFFLE para restablecer la reproducción
normal.
Observación: La reproducción aleatoria también se desactiva
si se abre la bandeja de disco.
O
1
Reproducción aleatoria
IR
Selección de una pista o búsqueda
REPRODUCCIÓN
PLAY
PAUSE
STOP
CD-RECORDABLE/REWRITABLE
R
EC
P
C
E
DR
N
/C
y
L
O
S
4
7
OR
D
FIN
A
LIZE
ER
A
SE
CD-Sync
S
H
U
F
F
LE
5
P
R
E
V
.
P
LA
Y
S
T
O
P
2
5
8
0
6
6
9
R
E
P
E
A
T
E
C
D
3
R
Power On/Off
D
ecordab
le
Page 53

REPRODUCCIÓN
51
1 Pulse REPEAT en el mando a distancia una o más veces
durante la reproducción de CD.
➜ Cuando aparezca
REPEAT 1 en la pantalla, la pista en
curso se repetirá de forma ininterrumpida. Cuando se
visualice
REPEAT, el disco o programa se repetirá
continuamente.
2 Para restablecer la reproducción normal, pulse REPEAT una
o más veces hasta que:
➜ la indicación REPEAT desaparezca de la pantalla.
Observación:
- Puede activar la reproducción aleatoria al mismo tiempo que
la repetición de CD o de programa.
- El modo de repetición también se desactiva si se abre la
bandeja de disco.
Puede programar hasta 30 pistas para que se reproduzcan en
el orden deseado. Las pistas se pueden programar más de
una vez, pero todas contarán como posiciones del programa.
1 Pulse PROGRAM en el mando a distancia para iniciar la
programación.
➜ PROG parpadea en la pantalla.
2 Teclee el número de pista con los botones numéricos. Si el
número consta de dos cifras, teclee los botones en rápida
sucesión.
➜ En la pantalla se visualiza brevemente el número de
pista, seguido del número total de pistas programadas y
el tiempo total del programa.
3 Repita el paso 2 con todas las pistas que desee incluir en
el programa.
4 Pulse STOP o PROGRAM para finalizar la programación.
➜ PROG se ilumina en la pantalla.
Observación:
- Para revisar el programa, pulse ∞ó§desde la posición
de parada.
- Para añadir más pistas al programa, repita los pasos 1 a 4.
- Si intenta programar más de 30 pistas, la pantalla indicará
FULL
(completo).
5 Pulse PLAY para dar comienzo a la reproducción del
programa.
Borrado de un programa
1 Pulse STOP si es necesario para detener la reproducción
del programa.
2 Pulse de nuevo STOP para borrar el programa.
➜ PROG desaparece de la pantalla.
Observación: El programa también se borra si se abre la
bandeja de disco.
6
ProgramaciónRepetición de CD, pista o programa
Enspañol
4
7
S
H
U
F
F
L
8
E
PROGRAM
DISPLA
Y
1
2
5
O
P
CDR
E
N
/C
y
L
O
S
E
C
D
3
Page 54

DETECCIÓN DE PROBLEMAS
52
Si cree que el grabador de CD no funciona correctamente,
conviene revisar primero la siguiente lista y ejecutar el
programa de diagnóstico. Puede que se haya olvidado de
algún detalle simple.
Advertencia!
Bajo ninguna circunstancia intente reparar el grabador
por su cuenta, o quedaría invalidada la garantía.
SÍNTOMA:
• SOLUCIÓN:
No se enciende la unidad
• compruebe que está activado (ON) el botón de
encendido
• compruebe que está correctamente conectado el
cable de alimentación
• apague la grabadora y enciéndala de nuevo
inmediatamente
No funciona la numeración automática de pistas
• compruebe si está seleccionada la función.
• compruebe si hay un silencio de 3 segundos entre
las pistas (sólo grabación analógica)
• compruebe si la fuente es un equipo con salida
digital conforme al estándar de audio IEC.
No hay sonido
• revise las conexiones de audio
• si utiliza amplificador, pruebe con otra fuente
Sonido de amplificador distorsionado
• compruebe que la salida analógica del grabador de
CD no está conectada a la entrada Phono del
amplificador.
No se inicia la reproducción
• asegúrese de que la etiqueta del disco está
mirando hacia arriba
• limpie el disco
• compruebe que el disco no está defectuoso,
probando con otro
No funciona el mando a distancia
• apunte con el mando directamente al grabador
• compruebe las pilas y sustitúyalas si es necesario
• seleccione primero la fuente de sonido adecuada
Imposible grabar
• limpie el disco
• compruebe si el CD-RW no está finalizado
• compruebe que es disco es grabable, y sustitúyalo
si es preciso
• el disco no es de audio
• selección incorrecta de fuente de entrada
Grabación analógica distorsionada
• revise el nivel de grabación
Pausa de 20 segundos entre grabaciones
• véase la grabación digital sincronizada (CD-SYNC) p. 46
El reproductor no responde
• apague la unidad con el botón ON/OFF del panel
frontal, y vuélvala a encender
Indicación SERVICE en pantalla después del
encendido
• pruebe a apagar y encender la unidad
Indicación RECOVER en pantalla
• se ha producido un corte de fluido durante la
grabación, y la unidad está intentando reparar el
disco.
• si después aparece RC-DISC el disco ya no
acepta más grabaciones y no se puede ultimar,
aunque podrá ser reproducido en una grabadora de
CD.
• en un CD-RW, se ha perdido la pista que se estaba
grabando, pero aún puede grabarse en él y
ultimarse.
• si se visualiza OPC FAIL ya no es posible
realizar más grabaciones, si bien podrá utilizarlo
como CD en esta grabadora.
Si persiste la anomalía, ejecute el programa de diagnóstico:
1 Apague la grabadora con el botón ON/OFF.
2 Pulse al mismo tiempo PLAY y STOP, y vuelva a encender la
unidad con el botón ON/OFF.
➜ La pantalla indicará BUSY y, después de unos minutos,
ERROR o PASSED
• Si aparece la indicación ERROR, la grabadora tiene
algún defecto y debe ser reparada. Consulte a su
distribuidor o llame a la Línea del Cliente de Philips para
que le informen sobre el centro de servicio más próximo.
El número de la Línea del Cliente se facilita en el libro de
garantía.
• Si aparece la indicación PASSED , puede ser que haya
interpretado erróneamente las instrucciones, que esté
utilizando un disco inapropiado, o que se trate de un
defecto mecánico o de una conexión incorrecta. Relea
detenidamente las instrucciones, y si es necesario
consulte a su distribuidor.
• Si no puede solucionar el problema, póngase en contacto
con el centro de servicio más cercano.
3 Apague la grabadora con el botón ON/OFF para salir del
programa de diagnóstico.
Programa de diagnóstico
Solución de problemas
Enspañol
 Loading...