

Page 1
W CONSUMER ELECTRONICS
PHILIPS
CD
CD
CD
CD
(D
Compact Disc Player
Lecteur ’Compact Disc’
Compact-Disc-Spieler
Compact Disc-Speler
Reproductor ’Compact Disc’
Lettore Compact Disc
Compact Disc-Afspiller
Compact Disc-Spelaren
Compact Disc -Soitin
Page 2

English
Figures
page 1
page 74
Français
Figures
i
page 9
page 74
Deutsch Seite 18
Abbildungen Seite 74
Nederlands
Figuren
pagina 27
pagina 74
Español página 35
Figuras
Italiano
Figure
página 74
pagina 43
pagina 74
Dansk side 51
Figurer
Svenska
Figurer
side 74
sida 59
sida 74
Suomi
Kuvat
sivu 66
slvu 74
Page 3

English
INTRODUCTION
Welcome to the new sound experience of Compact Disc Digital
Audio.
Compact Disc is the biggest advance ever made in audio
technology. By employing the most sophisticated digital and
optical technologies, Compact Disc not only produces the
ultimate in sound reproduction, it also gives you, the user, access
to operating features which have never before been seen in audio
equipment designed for the home, such as fast access to every
track and index number on the disc and very simple programming
facilities.
To make operation even easier, this Compact Disc player can be
remotely controlled.
In these instructions you will find everything you need to know
about installing, operating and programming your Compact Disc
player. Read through the text carefully and you will quickly
become familiar with all the facilities offered by this new way of
listening to discs.
CONTENTS Page
INSTALLATION 1-2
Unpacking 1
Checking the Power Supply Setting 1
Removing the Transit Clamps 1
Siting the Player 1
Connections 1,2
OPERATION 2-4
The Display 2
Switching On and Off 3
Loading and Unloading the Disc 3
Changing to Track Number Indication 3
Playing the Complete Disc 3
Going back to the Beginning of a Track 3
Moving to Another Track 3
Moving to Another Index Number 3
Beginning at a Specific Track Number 3,4
Beginning at a Specific Index Number 4
Searching for a Particular Passage 4
Holding Play at the Start of a Track or a Passage/
Interrupting Play 4
Repeating the Disc 4
Stopping Play 4
PROGRAMMING 4-6
Programming the Short-term Memory 4,5
Programming the FTS Memory 5,6
USE OF THE REMOTE CONTROL HANDSET 6,7
Inserting the Batteries in the Remote Control Handset 6
The facilities of the Remote Control Handset 6
Adapting the Sound Level 6
Using Keys 0-9 6
Range of the Remote Control Handset 7
Connection of a Separate Receiver for the
Remote Control Handset 7
ADDITIONAL INFORMATION 7
Listening with a Headphone 7
Disc Maintenance 7
Player Maintenance 7
Technical Data 7
FAULTS AND THEIR LIKELY CAUSES 8
INSTALLATION
Unpacking
The following accessories are supplied with this Compact Disc
player:
• a power supply lead;
• a signal output cable for connection to the amplifier:
• a remote control handset;
• batteries for the remote control handset.
Make sure that you take all these accessories out of the box.
Remove all packaging materials from the player and the acces
sories.
Peel the transparent protective foil off the display. This foil is only
held in place by static attraction and can easily be removed,
beginning at one corner.
Checking the Power Supply Setting (Fig. 1)
The type plate, at the rear of your Compact Disc player, tells you
the supply voltage for which the player is set.
If your mains supply voltage is different, or becomes different in
the future, get your dealer or our Service Organisation to change
the voltage setting for you.
Removing the Transit Ciamps (Fig. 2-3)
On the bottom of the player you will see two red transit clamps.
These lock the player mechanism and the disc tray to protect
them during transportation.
Turn both of these clamps anti-clockwise, withdraw them from
the player, and store them in the recesses provided.
If, at any time, you want to transport the Compact Disc player, you
must lock the mechanism and the disc tray again to avoid damage.
To do this, turn the player upside-down, insert the clamps in their
slots and rotate them clockwise until they reach a stop.
Siting the Piayer
This Compact Disc player can equally well be sited free-standing
as in an audio rack, or it can be stacked with other components.
Never stand the player in persistent direct sunlight or near any
heat source.
a. Free-standing - If sited free-standing, the player must always
stand horizontally on a flat, firm surface, not on a mat or anything
similar.
If siting the player in a cupboard or a wall unit, always allow a
minimum free space of 3 cm above the player so as not to
interfere with the cooling of the player.
b. in an audio-rack-In an audio-rack the player can be sited in any
desired position.
c. Stacked - In a stack of your own selected equipment, site the
player for preference at the bottom or on the top. Under no
circumstances stand the player directly upon a high-power
amplifier, because such an amplifier gives off a substantial
amount of heat.
Warning - Do not place audio or video cassettes on the player
because of the effects of the magnetic fields produced by the
player transformer.
Connections (Fig. 4)
At the back of the player you will find the following connection
sockets:
a OUT: for the signal output cable to the amplifier,
b RC5IN/OUT: for a separate receiver for the signals from the
remote control handset.
Page 4

c DIG OUT: for digital equipment. This socket makes the player
suitable for future Compact Disc applications such as CD-I and
digital signal processing,
d Connection for the mains lead.
The Display (Fig. 6-14)
Because of the diversity of indications the display can show, these
are described separately below.
Connecting the Signal Output Cable - The signal output cable has,
at both ends, a red plug (forthe right channel) and a black or white
plug (for the left channel).
Insert one red plug in the socket R (right channel) and the
corresponding black or white plug into the socket L (left channel).
Insert both other plugs into the corresponding sockets of the CD
or AUX input on your (pre-)amplifier.
If these sockets are already in use, you can also use the TUNER
or TAPE IN connection, but never the PHONO input! This latter
is not suitable for the connection of a Compact Disc player.
Connecting the Mains Lead- Fit the female plug of the mains lead
into the connection socket on the player, and the male plug into
a suitable mains supply socket.
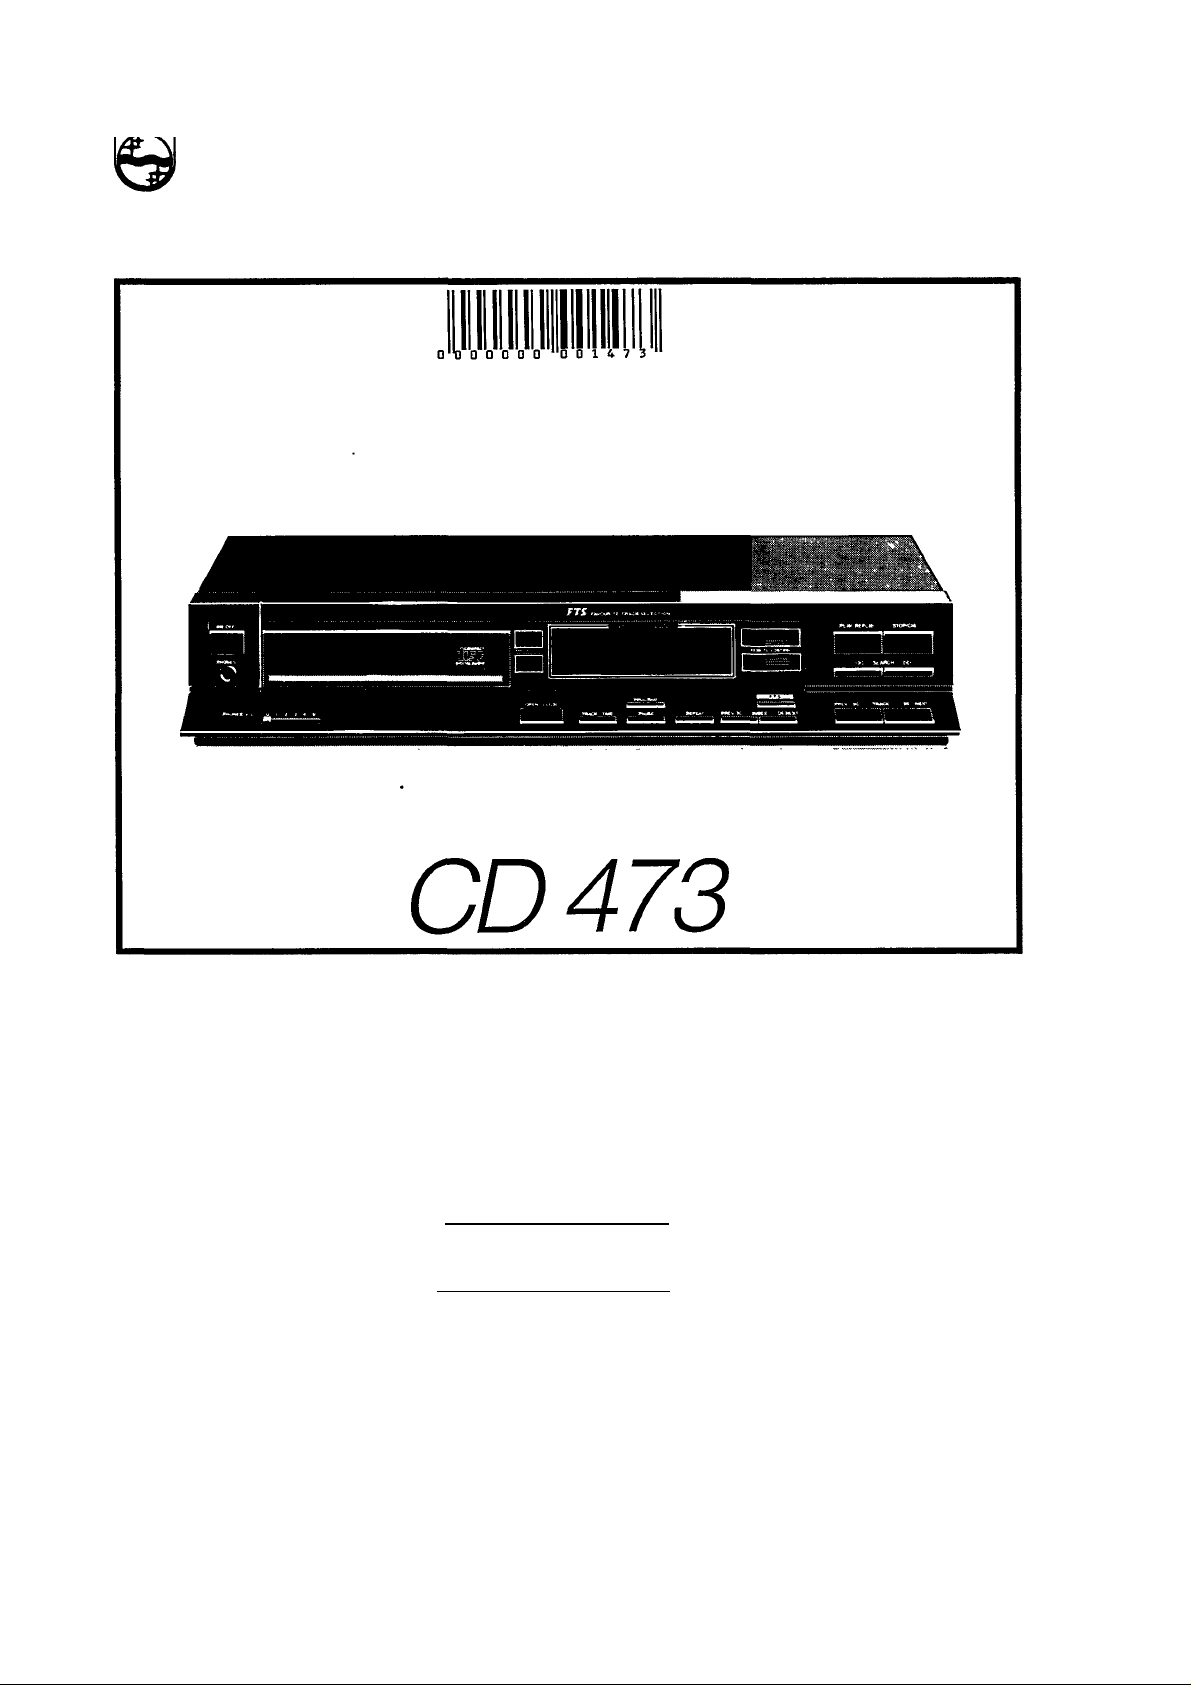
OPERATION (Fig. 5)
Your Compact Disc player is now ready for use. Before
attempting to operate it, however, it is advisable to familiarise
yourself with the functions of its keys and display as described
briefly below. The names used here for the controls will be used
throughout the text. In this connection, see also ’USE OF THE
REMOTE CONTROL HANDSET’.
1 ON/OFF key: for switching the player on and off.
2 Display: functions as on/off and stand-by indicator; shows the
total number of tracks on the disc; during play, indicates the
number of the track which is being played and the elapsed time
of that track; can also show the total playing time of the disc;
signals faults in operation or programming; at the same time gives
information about particular functions of the player. See also ’The
Display’.
3 REMOTE CONTROL eye: for receiving the signals from the
remote control handset.
4 <M SEARCH » keys: for fast search to a particular passage (<M
backwards, t>I> fonvards).
5 PLAY/REPLAY key: for starting play (PLAY) and returning to
the beginning of a track (REPLAY).
6 STOP/CM key: for stopping play during playback (STOP) and
for erasing a programme (CM = Clear Memory).
7 PHONES socket: for the connection of a headphone for
listening to discs without using an amplifier. See also: ’Listening
with a Headphone’ under ’ADDITIONAL INFORMATION’.
8 PHONES VOL control: for adjusting the volume when listening
with a headphone.
9 OPEN/CLOSE key: for opening (OPEN) and closing (CLOSE)
the disc tray.
10 TRACK TIME key: for switching from playing time to track
number indication and vice-versa.
11 PROGRAM key: for storing the track numbers of a pro
gramme, erasing track numbers from a programme, and dis
playing the stored programme.
12 PAUSE key: for holding play at the start of a track or passage,
and for interrupting play.
13 REPEAT key: for repeating a disc or a programme.
14 PREV. I< INDEX N NEXT keys: for returning to a previous index
number or moving on to a later one during play; also for indicating
the index number which you want play to begin with (PREV. 1<
from index number 99 to index number 01, tH NEXT from index
number 01 to index number 99).
15 FTS key; for storing and playing favourite selections.
16 PREV. M TRACK W NEXT keys: for returning to a previous
track number or moving on to a later one during play; also for
Indicating the track number you want to begin with, and selecting
track numbers when compiling a programme (PREV. M from high
to low and >1 NEXT from low to high).
On/Off Indication (6) - When the player is switched on, the TIME,
min, sec and ’- -’ indications light up, together with all the
numbers on the track matrix (1-20) and the IR emblem. They go
off again when the player is switched off.
Stand-by Indication (7) - At the moment that the disc tray closes,
the indication ’- -’ starts to flash as a sign that the player is
scanning the contents list on the disc. The indication keeps
flashing until this is finished.
Track number matrix (8) - As soon as the contents list on the disc
has been read, the numbers displayed on the track number matrix
show the number of tracks present on the disc (e.g. ’1-14’) for a
disc with 14 tracks). The progress of play can be followed by the
successive flashing and going off of these numbers.
Elapsed Playing Time Indication (9) - During play, the TIME
indication is lit, and the elapsed playing time of each track appears
in minutes and seconds under min and sec.
Track and index Number Indication above TRACK and INDEX (10)
- You can display the numbers of the tracks and indexes on the
disc above TRACK and INDEX. To do this, you press the
TRACK TIME key. The TIME, min and sec indications then go off
and TRACK and INDEX light up.
According to the progress of play, the numbers are shown as 101,
201 and so on. The numbers above INDEX change only if different
passages within a track have index numbers: see the contents list
in the disc-holder.
Total Playing Time Indication (11)-\f you want to know the total
playing time of a disc, close the tray with the OPEN/CLOSE key
or by hand. Under min and sec, the total playing time now appears
in minutes and seconds. (For example ’59 17’.)
Discs with more than 20 tracks (12) - In playing these discs you
must take into account the operation of the track number matrix.
This works normally for the first 20 tracks, i.e. after the reading of
the contents list, all 20 numbers remain alight. In addition, the
-I- 20 indication lights up.
The 20 numbers go off in succession as play progresses. When
the 20th track ends, the +20 indication starts flashing, to indicate
that there are still more tracks to follow. The numbers of these
tracks are not displayed on the track number matrix, but you can
still display them above TRACK and INDEX by pressing the
TRACK TIME key.
If you close the disc tray with the OPEN/CLOSE key, or by hand,
you can also display the total number of tracks on the disc above
TRACK by pressing TRACK TIME.
Error Indication (13) - If you make a mistake when operating or
programming, the Err (for Error) warning appears for a short time.
It also appears, though not of course meant as a warning, when
you switch on the player with an empty disc tray, and close the
empty tray after use.
Other indications (14) - PAUSE and REPEAT light when you press
the corresponding keys. FTS flashes or lights continuously after
the FTS key has been pressed, o))) lights up when you give a
command via the remote control handset.
Page 5

Switching On and Off (ON/OFF)
Going back to the Beginning of a Track (PLAY/REPLAY)
Switching on - You switch the player on by pressing the ON/OFF
key. The TIME, min, sec and on/off indication light, together
with the full track number matrix and the IR emblem.
Switching off - When you press ON/OFF again, the player is
switched off. All lights are extinguished.
Loading and Unloading the Disc (OPEN/CLOSE)
Loading (Fig. 15-16) - You open the disc tray by pressing the
OPEN/CLOSE key. The tray then slides out automatically. The tray
must not be obstructed in this, otherwise it will stop after about
3 seconds. Should this happen, you should press the key twice
in succession to bring the tray fully out.
With your hand open, and thumb and fingers extended, take the
disc out of its holder and fit it, iabei side up, into the cradle in the
disc tray.
You close the tray by pressing the PLAY/REPLAY or the
OPEN/CLOSE key, or by simply pushing the front of the tray with
the hand. The best method for you to use is given for each specific
case.
In all cases, the tray slides in automatically. Again, the tray must
not be obstructed as it closes. Should this in fact happen, the tray
stops, and you must press OPEN/CLOSE to slide the tray out
again.
If the Err Indication appears after the tray is closed, it means that
you have loaded the disc upside-down or forgotten to load the
disc at all, or that the disc is dirty, badly scratched or otherwise
unacceptable.
Unioading - You open the disc tray by pressing OPEN/CLOSE.
When unloading, hold the disc in the same way as when loading,
this avoids soiling.
Close an empty tray by pushing the front of the tray with the hand
or by pressing OPEN/CLOSE.
To prevent the ingress of dust, avoid leaving the tray standing
open.
Avoid opening the tray during play also, unless your intention is
to stop the disc.
Changing to Track Number Indication (TRACK TIME)
if you want the track number indication above TRACK and INDEX
Instead of the playing time indication - which you get automatically
after switching on - you can at any time press the TRACK TIME
key.
To return to playing time indication you have to press TRACK
TIME again. Selection of the track number indication is also
cancelled when the player is switched off.
Playing the Complete Disc (PLAY/REPLAY)
If you simply want to play the whole disc, close the tray by pressing
the PLAY/REPLAY key. Once the contents list on the disc has
been read:
• the track number matrix shows how many tracks the disc
contains,
• the ’1’ of the track number matrix starts flashing,
• the display also indicates ’T,
• and play begins simultaneously with the display of elapsed
playing time under min and sec.
Each time a track finishes, the corresponding number of the track
number matrix goes off and the following number starts flashing:
at the same time, the elapsed playing time display starts again at
'000*.
As soon as all the tracks have been played, the disc stops. The
track number matrix again shows the total number of tracks on
the disc and the total playing time appears under min and sec.
You can go back to the beginning of a track which is being played,
by pressing the PLAY/REPLAY key. After the track number has
been briefly displayed, the track then starts again from the
beginning.
Moving to Another Track (PREV. M TRACK >1 NEXT)
Any time during play you can select another track. This can be
either a following track or a previous one.
As soon as you touch a key to make your choice, the elapsed
playing time indication gives way to the track number indication,
although the TRACK and INDEX indications do not light up. When
you release the key, play is interrupted, to be resumed as soon
as the chosen number begins to flash on the track number matrix
and the elapsed playing time indication returns.
Seiecting a Foiiowing Track- Press the TRACK >1 NEXT key until
the desired track number appears on the display.
If you press TRACK >1 NEXT when playing the last track, the Err
indication appears, to remind you that there is no next track, and
play continues with the last track. If the player is in the repeat
mode, the Err indication does not appear, and play continues with
the first track.
You can also use TRACK >1 NEXT to get a quick idea of the disc
contents by listening briefly to the beginning of each track.
Seiecting a Previous Track - Press the PREV. M TRACK key until
the desired track number appears on the display.
If you press PREV. M TRACK during the first track, the Err
indication appears, to remind you that there is no previous track,
and play continues with the first track. If the player is in the repeat
mode, the Err indication does not appear, and play continues with
the last track.
Moving to Another Index Number
(TRACK TIME and PREV. M INDEX IH NEXT)
During play you can also change to a following index number or
return to a previous one. This can either be an index number of
the same track or an index number of another one.
To see which index number is being played, press the TRACK
TIME key. The track and index numbers being played then appear
above TRACK and INDEX.
As soon as you have made your choice play is interrupted, to be
resumed immediately the laser pick-up reaches the beginning of
the selected index number.
If you make a mistake by selecting too high an index number, the
Err indication appears and play begins with the first index number
of the track.
If you want to return to elapsed playing time indication after
making your choice, you must press TRACK TIME again.
Seiecting within the Same Track- Press the INDEX >1 NEXT or the
PREV. M INDEX key until the desired index number appears
above INDEX.
Seiecting within Another Track - First select the desired track
number using TRACK W NEXT or PREV. M TRACK. Then press
the INDEX IH NEXT or the PREV. M INDEX key until the desired
index number appears above INDEX.
Beginning at a Specific Track Number
(PREV. M TRACK N NEXT and PLAY/REPLAY)
Instead of the first track you can also start play with any other
track.
in this case you close the tray with OPEN/CLOSE or by hand. The
highest track number you can choose is then stored in the player
memory, and cannot be exceeded.
Page 6

The display, however, shows the total playing time of the diso until
you make your choice: TRACK W NEXT brings the first track
number on to the display and PREV. M TRACK brings the highest.
Use the key which brings up the required track number quickest.
The selected number remains displayed until play begins. On the
track number matrix the selected number begins flashing, while
all lower numbers go out.
Start play by pressing PLAY/REPLAY; this also restores the
elapsed playing time display.
To show that you have pressed PAUSE, the PAUSE indication will
light.
When you want to start play, press PAUSE again. The PAUSE
indication will go out.
For short play interruptions, you can also press PAUSE. The disc
continues to spin, but the sound stops; the PAUSE indication also
lights.
If you press PAUSE again, the sound re-starts at the exact point
where it was interrupted. The PAUSE indication will go out.
Beginning at a Specific Index Number (TRACK TIME,
PREV. I< TRACK >1 NEXT, PREV. M INDEX IH NEXT and PLAY/
REPLAY)
You can start play with a specific index number too. For this, you
must first select the desired track number, and then the index
number.
Once more close the tray with OPEN/CLOSE or by hand, and
press the TRACK TIME key.
By pressing TRACK W NEXT or PREV. M TRACK, bring the
desired track number to appear above TRACK.
Then press the INDEX >1 NEXT or the PREV. M INDEX key until the
desired index number appears above INDEX.
If you make a mistake by not selecting a track number first, the
Err indication appears.
Press PLAY/REPLAY as soon as the selection has been made.
Play will begin with the index number as shown.
If you have selected too high an index number, the Err indication
appears and play begins with the first index number of the track.
If, after play has begun, you want to return to elapsed playing time
indication, you must press TRACK TIME again.
Searching for a Particular Passage (<M SEARCH 1»)
During play, you can quickly locate a particular passage in a track
with the «1 SEARCH and SEARCH 1» keys. While you hold
<M SEARCH down, the laser pick-up runs back towards the
beginning; while you hold SEARCH down, the laser pick-up
runs forwards towards the end. The two search directions can be
used alternately, until the desired passage is found. At the
moment you release the key, play re-starts at once.
During search, the laser pick-up moves at three successive
speeds: for the first seconds relatively slowly, thereafter some
what faster; and the highest speed is reached after approximately
10 seconds if you continue to hold down the key.
At the first two speeds the sound of the disc remains audible,
though accelerated, unless you have also pressed PAUSE; after
that it disappears. When searching for a passage by ear it is
therefore advisable to release the key at that moment; you then
keep the sound as an aid to searching.
Of course, you can also search with the help of the elapsed
playing time indication or index numbers; in that case there is no
reason not to use the highest speed. As soon as you then reach
the vicinity of the desired passage release the key momentarily to
go back to the lowest speed.
If, by pressing « SEARCH, you take the laser pick-up beyond the
run-in of the first track, the Err indication appears and the laser
pick-up stops at the beginning of the track. The disc continues
to spin, however, so that play resumes as soon as you release the
key.
If, by pressing SEARCH W>, you take the laser pick-up beyond the
run-out of the last track, the Err indication appears, and the laser
pick-up jumps back over the disc to about 10 seconds of playing
time, and remains at that point until you release the key. This is
to prevent the disc stopping when not intended during search.
Holding Play at the Start of a Track or a Passage/Interrupting
Play (PAUSE)
In all the foregoing modes you can stop the laser pick-up exactly
at the start of a track or a passage by pressing the PAUSE key
before giving the actual command.
Repeating the Disc (REPEAT)
If you want to hear the whole disc again, you must press the
REPEAT key before play ends; the REPEAT indication will light.
The numbers on the track number matrix do not now go off as play
of each track finishes and the disc will play continuously until you
either press REPEAT again, or press STOP/CM or OPEN/
CLOSE.
In the first case the disc will play on to the end before stopping,
in the other two cases play will stop at once. The REPEAT
indication will go out.
Stopping Play (STOP/CM or OPEN/CLOSE)
To stop play before the end of the disc, you press the STOP/CM
key.
If you also want to take out the disc you stop play by pressing the
OPEN/CLOSE key.
PROGRAMMING
Instead of playing a complete disc, you can choose a number of
tracks, and play only these. You can even decide on the playing
sequence.
To do this, it is necessary to store your choice in the form of a
programme in the memory of the player. This consists of a
short-term section and a long-term (FTS) section.
A programme is stored in the short-term memory and is
automaticaily erased when the disc tray is opened. If, however,
you wish to retain the programme, you can transfer it to the FTS
memory. See ’Programming the FTS Memory’ for this.
Programming the Short-term Memory
The short-term memory will accept a maximum of 20 entries,
which means that at most, 20 tracks can be stored. You can,
however, only store each track once. If you exceed the maximum
of 20 tracks, the Err sign appears to warn you that the memory is
full and cannot accept any more commands.
Programming is only possible before the disc has started playing.
In principle, you could therefore already store the desired
programme before loading the disc in the player, but then you run
the risk of erroneously programming one or more higher track
numbers than actually exist on the disc. Such numbers are
certainly erased from the memory when the programme starts to
play - the Err indication appears at this stage - but the programme
then contains fewer tracks than you expected.
We advise you, therefore, to load the disc in the tray and close it
using OPEN/CLOSE or by hand. The highest track number that
you can select is then stored in the player memory and cannot be
exceeded. Now, once again, the total playing time is shown on the
display until you start selecting.
To store the track numbers that you want to include in a
programme (these can be selected from the contents list in the
disc holder) you press PROGRAM after bringing up the tracks on
the display with TRACK >1 NEXT, starting from the first track
number or with PREV. M TRACK, starting from the highest track
number.
Do not allow more than /seconds to elapse between the
appearance of a number and the storing of it, othenwise the
microprocessor in the player will assume that you have changed
Page 7

your mind and the dash after the track number will stop flashing.
The track number can then no longer be stored, and the ’Err’
indication will appear as a result - or the previously stored track
numbers will be displayed - if you still press ’PROGRAM’.
However, you can re-activate a missed track number by bringing
up either the previous or the following track number and then
returning immediately to the one desired.
Index numbers cannot be programmed. They still remain acces
sible, however, during programmed play.
Storing a Programme-?vom a disc containing 14 tracks, you want
for example to listen to tracks 7, 3, 9, 5,12 and 10 in that order.
Load the disc in the tray and close it using OPEN/CLOSE or by
hand. When the contents list has been read, the total playing time
of the disc appears on the display and numbers ’1-14’ of the track
number matrix light up.
Now press the TRACK >1 NEXT key until ’7 -’ appears on the
display and then press the PROGRAM key. The flashing dash is
now replaced by ’P’ (for Programme) as a sign that this track has
been stored: you now read ’7 P’. On the track number matrix, ’7’
begins to flash and the other numbers go off.
Continue by going back to ’3 -’ using the PREV. M TRACK key and
then pressing the PROGRAM key again; you now read ’3 P’. On
the track number matrix, ’3’ begins to flash and ’7’ lights
continuously.
You display the remaining tracks in turn by pressing
TRACK >1 NEXT or PREV. M TRACK, and then store them succes
sively by pressing PROGRAM. Each time you pass an already
stored number, the P after it flashes as a reminder. As soon as
the last track number is stored you will see ’10 P’; this remains
until play is started. On the track number matrix, ’10’ remains
flashing: the other stored numbers are lit continuously.
If you make a mistake and store a wrong track number, you can
rectify this by bringing up the previous or following number,
returning to the wrong one and then pressing PROGRAM again.
To show that the wrong track number has been erased, the ’P’
after it is replaced by a ’C’ (for Clear). On the track number matrix,
the erased number keeps flashing until you have stored another
number, then it goes off.
Using our example: you have stored ’4’ instead of ’5’. You go back
to ’3’ using PREV. 14 TRACK, return to ’4’ using TRACK >1 NEXT
and then press PROGRAM. You will then read ’4 C’. Now proceed
by storing ’5’.
During programming or after you have finished, you can read off
the contents of the programme from the track number matrix.
You check the programme sequence by pressing PROGRAM: all
the track numbers then appear in succession, after which the last
stored number is once again displayed. In our example: ’-7-’ -
■- 3-' . 9-- . 5-’ . •-12-’ - ’-10-’ - ’10 P’.
When, after pressing PROGRAM the Err indication appears, this
means that no track is stored.
If you decide that the programme contains a track number you do
not want, you can still erase it by displaying it using
TRACK >1 NEXT or PREV. 14 TRACK and then pressing
PROGRAM. On the track number matrix, the erased number
keeps flashing until play is started, then it goes off.
To erase the whole programme, press STOP/CM.
Playing a Programme - During programmed play, all player
functions remain operative, except beginning at a specific track
or index number.
You start play by pressing PLAY/REPLAY: the last stored number
disappears from the display and the elapsed playing time
indication returns; on the track number matrix, the first number
of the programme begins to flash. The progress of play can be
followed by the successive flashing and going off of the
programmed numbers. During programme repeat the numbers of
the tracks already played remain lit.
To go back to the beginning of a track you press PLAY/REPLAY.
If you want to go on to a following track number in the programme,
press TRACK >1 NEXT; should you do this during the last track,
the Err indication appears and play continues with the last track.
To go back to a previous track number in the programme, you
press PREV. 14 TRACK; should you do this during the first track,
the Err indication appears and play continues with the first track.
To go to another index number within the same track you press
INDEX >1 NEXT or PREV. 14 INDEX. If you want to go to an index
number within another programmed track, you press
TRACK >1 NEXT or PREV. 14 TRACK and INDEX >1 NEXT or
PREV. 14 INDEX.
Searching for a particular passage using 44 SEARCH and
SEARCH W> is limited to the space between the beginning and
end of the track being played; you cannot move the laser pick-up
outside these limits to prevent movement into another track,
either programmed or not programmed, which would upset the
programme. Arrival at either limit is indicated by the appearance
of the Err indication, upon which the laser pick-up stops until you
release the key.
To hold play at the beginning of a track or a passage, or to
interrupt the programme, press PAUSE.
If you want to repeat the programme, press REPEAT.
If you press ’STOP/CM’ or when all tracks of the programme have
been played, the disc stops. However, the programme is retained
in the memory: the track number matrix again shows all the
programmed numbers.
You only erase the programme when you open the tray. The
programme is also erased if you press STOP/CM twice in
succession during play. All the numbers of the track number
matrix then light up again.
Programming the FTS Memory (FTS=Favourite Track Selec
tion)
If a programme contains your favourite selection from a disc,
which you always want to play, you can keep it by transferring it
to the FTS memory. Such a selection can then be called up again
at any desired time.
The F^S memory will accept 2045 entries. 8 of these are used for
the identification of each disc that you store in the FTS memory.
In addition, 1 entry is used for each track in the programme.
The number of discs that you can store is thus dependent on the
number of tracks per disc that you programme, if, for example,
you programme an average of 5 tracks per disc, there is enough
room for 157 discs - 2045: (8-I-5).
Each disc stored in the FTS memory is allocated a 3-digit ’ranking’
number, which is indicated on the display as ’001’, ’002’ etc.
254 ranking numbersare available. Asheetwith 254 self-adhesive
numbered stickers is supplied so that you can easily distinguish
the discs with an FTS programme. The sheet also contains a
quantity of un-numbered stickers so that you can correct
possible mistakes.
A disc always retains the originally allocated ranking number,
even when you erase the original selection by storing a new one.
A ranking number only lapses if you erase the disc completely
from the FTS memory. However, the number is not re-allocated
to another disc, and for this reason there are more ranking
numbers than the total number of discs it is possible to store. Only
when the entire FTS memory is erased, do ail the ranking numbers
become available again.
By erasing selections, space is made free in the memory. This also
happens if you make a new selection for an already stored disc;
this new selection is in fact stored in a different location from the
old selection.
This unused space is, however, only called upon when the
memory is filled during the storage of a new selection. At that
moment, the memory is re-organised, which is to say that the free
space becomes available.
This re-organisation is indicated by accelerated flashing of the
FTS indication, and can take up to 1 minute. The player should
definitely not be switched off during this accelerated flashing,
otherwise the entire FTS memory will be erased when switching
on again!
Storing a disc in the FTS memory does not mean that you can only
play the selected tracks. You can just as easily play the complete
Page 8

disc, or compile another, short-term programme. The brief
flashing of the FTS indication afterthe disc is loaded reminds you,
however, that it has an FTS programme. If you still wantto play that
programme, press FTS and straight away PLAY/REPLAY.
The FTS facility is activated by pressing the FTS key. The FTS
indication then flashes for approximately 5 seconds. During this
time, you must give the next command, otherwise the micro
processor will assume that you have changed your mind, and
extinguish the indication again. If this happens, you can re
activate the FTS facility by pressing FTS again.
Storing a Favourite Seiection in the FTS Memory- First compile
the programme as described in ’Programming the Short-term
Memory’.
Then press the FTS key - the FTS indication begins to flash - and
straight away press the PROGRAM key. The FTS indication goes
out and the the ranking number allocated to the disc appears on
the display for about 2 seconds, as an indication that the
programme is stored in the FTS memory.
Fix the sticker with the allocated ranking number on the spine of
the disc holder.
If the Err indication appears when PROGRAM is pressed, it can
be for one of the following reasons:
• The FTS memory is full, but the ranking number is still less than
254. You need to erase one or more old selections to make room
for the new programme. (See ’Erasing a Favourite Selection’.)
• All 254 ranking numbers have been used. You must now erase
the entire FTS memory if you still wish to store the new selection.
(See ’Erasing all Favourite Selections.)
• You did not store a short-term programme first.
Piaying a Favourite Selection - Press the FTS key - the FTS
indication flashes - and straight away press the PLAY/REPLAY
key. The FTS indication now lights continuously. When the
contents list of the disc has been read, the FTS indication flashes
briefly again and the ranking number of the disc appears briefly
on the display. Immediately afterwards, play of the stored
selection begins, and the FTS indication lights continuously.
During the play of a favourite selection, the same player functions
remain operative as for playing a programme, with the exception
of the procedure for erasure.
Erasing a Favourite Selection - The selection for a particular disc
can be erased without the disc being loaded in the tray. It can even
take place while another disc is being played. It is only necessary
that, at the time of erasure, the ranking number of the disc is
shown on the display.
Press and hold the FTS key - the FTS indication keeps flashing and meanwhile press as often as necessary on TRACK >1 NEXT
or PREV. M TRACK to bring up the ranking number to be erased
on the display. Still holding FTS pressed, press the STOP/CM key.
’000’ then appears briefly on the display to indicate that the
selection is erased.
Erasing all Favourite Selections - Press the FTS key. While the
FTS indication is flashing, press and hold the REPEAT key and
press the STOP/CM key. The FTS indication keeps flashing until
the erasure is completed. At that moment it goes out and ’000’
appears briefly on the display. Only then may the player be
switched off, if desired!
USE OF THE REMOTE CONTROL HANDSET
Inserting the Batteries in the Remote Control Handset
(Fig. 17)
The remote control handset runs on three R03, UM4 or AAA
1.5 Volt batteries.
Slide open the cover at the rear of the remote control handset and
insert the batteries according to the diagram in the battery
compartment. Then slide the cover closed again.
The life of a set of batteries is normally about one year. Remove
the batteries as soon as they are flat, or if you are not going to use
the remote control handset for a long time, to prevent damage to
the remote control handset by possible battery leakage.
The Facilities of the Remote Control Handset
• With the exception of on and off switching, opening the disc
tray and programming the FTS memory, all player functions can
also be operated from the remote control handset, with the
qualification that searching for a particular passage can not be
done at the highest speed.
• The following remote control keys have a different label from
the equivalent keys on the player; their functions are nevertheless
the same:
STOP; = STOP/CM
<M = <M SEARCH
M>; = SEARCH W>
PROGR;= PROGRAM
REP; = REPEAT
• As extra keys, the remote control handset also has:
— VOLUME +, for adapting the sound level;
0-9, which can be used instead of the M TRACK >I keys.
Adapting the Sound Level (- VOLUME +)
With the — VOLUME + keys, you can affect the sound level for
disc playback remotely, even if your amplifier has no remote
control. This happens as follows; If you press - VOLUME, the
volume as set at the amplifier decreases in steps to a set level.
If you press VOLUME -I-, the volume increases in the same steps
to, at the maximum, the originally set level.
The setting chosen with the remote control handset is canncelled
when you switch the player off.
It is not recommended to use — VOLUME + when making
recordings, because the operation reduces the signal strength
from the player.
Using Keys 0-9
These keys can be used, instead of the M TRACK >1 keys, to key
in the desired track number directly when moving to another
track, beginning at a specific track number or programming the
short-term memory. You must however, bear certain factors in
mind. They are given below for each case.
Moving to Another Track - Key in the desired track number and
then press PLAY/REPLAY within 7seconds. If you exceed this
time, the laser pick-up does not move and the elapsed playing
time of the track that was being played reappears on the display.
Play then continues with that track.
Beginning at a Specific Track Number- Key in the desired track
number and then press PLAY/REPLAY within 7seconds. If you
exceed this time, the highest track number of the disc appears
on the display and play begins with the first track.
Programming the Short-term Memory- Key in the desired track
numbers and store each number within 7seconds by pressing
PROGR. Exceeding this time is now indicated, however, not by
the dash after the track number ceasing to flash, but by the
appearance of the highest track number of the disc on the display.
Page 9

Range of the Remote Control Handset Technical Data
Although the player can receive the signal beam also via
reflection, you are recommended to aim the remote control
handset directly at the REMOTE CONTROL eye.
The reception of a command is confirmed by the lighting up of the
indication o))).
Connection of a Separate Receiver for the Remote Control
Handset
If, because of the siting of the player, it is difficuit for the signals
from the remote control handset to reach the player directly, or
if the distance between the player and the place where you want
to use the handset is too great, you can connect a separate
receiver to the RC5IN/OUT socket. This is availabie as an
accessory under type number EM 2200.
ADDITIONAL INFORMATION
Listening with a Headphone (PHONES)
With a headphone connected to the PHONES socket, you can
listen to discs without having to use an amplifier.
The headphone must have a 6.3 mm jack piug and an impedance
between 8 and 1000 ohms.
You adjust the sound level with the PHONES VOL control.
Disc Maintenance
Although the music tracks in the disc are covered with a
protective layer, it is still advisable to treat discs carefully. As long
as you always pick up discs by the edge, and put them back in
their holders immediately after use, cleaning will not normally be
necessary.
However, should fingerprints, dust or dirt appear, you can wipe
them off with a soft, lint-free cloth. Always wipe the disc in a
straight line from centre to edge.
You can breathe lightly on the disc first if necessary, but
detergent or abrasive cleaning agents must never be used, nor
must be cleaning agents for conventional records!
Never write on the disc label: this can cause irreparable damage
to the music tracks.
Player Maintenance
The player mechanism is fitted with self-lubricating bearings, and
must not be oiled or greased.
You can clean the cabinet, when necessary, with a chamois
leather slightly moistened with water. Do not use cleaning agents
containing alcohol, spirits, ammonia or abrasives.
The disc tray should be kept free of dust.
Typical Audio Performance
• Number of Channels: 2
• Frequency Range: 2-20,000 Hz
• Amplitude Linearity: ±0.1 dB (20-20,000 Hz)
• Phase Linearity: ±0.5° (20-20,000 Hz)
• Dynamic Range: >96 dB (20-20,000 Hz)
• Signal-to-Noise Ratio: >100 dB (20-20,000 Hz)
• Channel Separation: >96 dB (20-20,000 Hz)
• Total Harmonic Distortion: <0.003% (20-20,000 Hz)
• Wow and Flutter: quartz crystal precision
• D/A Conversion: quadrupie oversampling (176.4 kHz) with
digital filter and two 16-bit D/A converters
• Error Correction System: Cross Interleaved Reed Solomon
Code (CIRC)
• Audio Output Level: 2V„ng
• Impedance PHONES socket: 8-1000 ohms
Optical Readout System
• Laser: semi-conductor AiGaAs
• Wave length: 800 nm
Signal Format
• Sampling Frequency: 44.1 kHz
• Quantization: 16 bit linear/channel
Power Supply
.• Mains Voltage and Frequency: see the type plate at the rear of
the player
• Power Consumption: 25 W approx.
• Safety Requirements: lEC
Cabinet, general
• Material/finish: metal and polystyrene with decorative trim
• Dimensions (w x h X d): 420 X 81 X 280 mm
• Weight: 3.1 kg approx.
Disc
• Diameter: 120 mm
• Thickness: 1.2 mm
• Direction of Rotation (seen from reading side): anti-clockwise
• Scanning Velocity: 1.2-1.4m/s
• Rotation Speed: 500-200 rpm
• Playing Time (theoretical): 74 min (stereo)
• Track Pitch: 1.6 pm
• Materiai: plastic
The right is reserved to change data if necessary
This Compact Disc player complies with radio interference
requirements as laid down in EEC regulations.
Page 10

FAULTS AND THEIR LIKELY CAUSES
Although the greatest care has been taken in the manufacture of
this Compact Disc player, the possibility remains that faults could
appear during use or that the player fails to function to your
compiete satisfaction.
The cause, however, will certainly not always be found in the
piayer itself. External factors, and the fact that it takes time to
become accustomed to the whole concept of the new product
and the new discs, can aiso play a role.
To save you unnecessary calls on your dealer or our Service
Organisation, we have compiled a list of possibie faults and their
causes. To even mention some of these causes, such as those
to do with the mains suppiy, may perhaps seem excessive. Our
experience shows, however, that they are easily overlooked as
sources of trouble.
If, by using this list, you do not succeed in solving the probiem,
stop your investigation. Disconnect the mains plug and contact
your dealer.
Under no circumstances should you open up the player; this will
invalidate all rights under the guarantee!
1. After pressing ON/OFF, the display does not light.
• The key was not pressed in far enough.
• One of the plugs of the mains lead is not connected or is not
making contact.
• There is no supply at the mains socket. Plug in another
electrical appliance and check if that works.
2. After pressing OPEN/CLOSE, the disc tray does not slide out.
5. The disc is being played because the track number matrix
and the elapsed time indication change regularly, but there is
no sound.
• The (pre-)amplifier is not switched on.
• The position of the (pre-)amplifier source seiector switch does
not correspond with the input to which the piayer is connected.
• The (pre-)amplifierorthe (active) loudspeakers connected to
it are not working. Switch to another sound source to see if this
is the case.
• The headphone jack is not piugged in, or the VOLUME control
is set to the extreme left.
• The connection between the player and the (pre-)amplifier is
broken.
• The input to which the player is connected is defective. Check
this by connecting the piayer to another input.
6. The sound is poor or distorted or you can hear only one
channel.
• The player is not connected to the CD, AUX, TUNER orTAPE IN
input of the (pre-)amplifier but to the PHONO input.
• One of the plugs of the connection cable is either not
connected or not properly connected.
• The headphone jack is not property plugged in.
• The disc is dirty or badly scratched. See if cleaning the disc or
using another, ciean or scratch-free or aimost scratch-free disc
improves the situation.
• There is an unwanted object in the disc tray.
• The (pre-)amplifier or the (active) loudspeakers connected to
it are not working properly. Check with another sound source to
see if this is the case.
• The transit ciamps have not been removed.
• The player is not switched on. Check if the display is lit.
• The microprocessor has not received the command properly.
Check if the tray opens if you switch the player off and on again,
and then press OPEN/CLOSE once more.
• The tray drive is not functioning. You cannot rectify this
yourseif.
3. After pressing OPEN/CLOSE or PLAY/REPLAY, the disc tray
does not slide in.
• The mains supply has been interrupted. Check if the display is
lit.
• The microprocessor has not received the command correctiy.
Check if the tray cioses if you switch the player off and on again.
• The tray drive is not functioning. You cannot rectify this
yourseif. If a disc is in position, remove it, then push the tray in
carefuliy to close it.
4. After closing the disc tray the stand-by indication stops
flashing and lights continuously after a few seconds, and all
the numbers on the track number matrix remain lit.
• The disc is not inserted with the label upwards or there is no
disc in the tray.
• The disc is dirty. See if cleaning the disc, or using another, clean
disc, ciears the fault.
• The disc is defective. Try another disc and see if that clears the
fault.
• There is an unwanted object in the disc tray.
7. Programming is not working.
• The disc is dirty or badiy scratched. See if cleaning the disc
helps or try programming a scratch-free or almost scratch-free
disc.
• The microprocessor has not processed the commands
property. Erase the programme by pressing STOP/CM and store
it again; re-start play and check if the fault has cleared.
• All 20 memory places are already occupied and you have
missed the Err sign that indicates this. Check by pressing
PROGRAM and counting the number of tracks dispiayed.
• The FTS memory is full.
8. The following faults can be caused by the same circumstances:
Playback does not begin with the first track number on the disc
or of the programme, but with another.
Playback stops before the end of the disc or the programme.
• The microprocessor has not processed the command cor
rectly. Check if switching the player off and on again, and then
re-starting clears the fault.
• The disc is dirty or badly scratched. See if cleaning the disc or
using another, clean or scratch-free or almost scratch-free disc
clears the fault.
• The disc is defective. Try another disc and see if that clears the
fault.
• There is an unwanted object in the disc tray.
9. The player does not react to commands from the remote
control handset.
• The distance to the player was too great, or you did not aim
accurately enough in the direction of the player.
• The batteries are weak or flat.
Page 11

X.
a be
S'
О
1
1
1
1 о
N
___
:
I 2 3 4 e <3+20
6 7 8 9 10 I
II 12 13 14 15 ^
16 17 18 19 20
n n n 6 7 8 9 10
LI LI LI ” '3 M (jf g
9 10 11 12 13 14 15 16
1 2 3 4 6 <3+20
6 7 8 9 10 I
” ’3 « .5 (jjg
I I 6 7 8 9 10 I
_________
I LI I " '3 ’3 M Jig
MlilMM шиитлш L. ■_
1 2 3 4 6
3 4 5 6
C о / ■”/ 6 7 e 9 10
_/ _/ II " - и M
tí
I
I 2 3 4 5 <3+20
6 7 8 9 10 I
II 12 13 14 15 ЛЯ1
74
Page 12

Page 13

3104 106 79302
Printed in Belgium
1187/1
 Loading...