

Page 1
PHILIPS
CD 335
(g|) Compact Disc Player
CE) Lecteur de CD
CD Compact Disc-Spieler
Compact Disc-speler
CD Reproductor 'Compact Disc' 26 ►
CD Lettore di Compact Disc 31 ►
@) Compact Disc-Afspiller
(D Compact Disc-Spelare 41 ►
(|E) Compact Disc-Soitin
PHILIPS
5^
11 ►
16 ►
21 ►
36 ►
46 ►
Page 2
(GB) English
Illustrations
Technical data...................................................page 53-55
Guarantee and service
................................................................
............
.................................
....page 5 CD Italiano
page 3
page 56-58
............. ...
Illustrazioni
Dati tecnici......................................................pagina 53-55
Garanzia e servizio.......................................pagina 56-58
..............................................................
pagina 31
pagina 3
CE) Français
Illustrations
Caractéristiques techniques
Garantie et service après-vente
(E) Deutsch
Abbildungen...............................................................Seite 3
Technische Daten
Garantieleistung und Service
................................................................
........... ...
...........................................
..............page 11
.......................
................
....................
(g) Dansk....................side 36
page 3
page 53-55
page 56-58
Seite 16 CD Svenska
Seite 53-55
Seite 56-58
Figurer..........................................................................
Tekniske data.....................................................side 53-55
Garanti og service............................................side 56-58
Figurer
...........................................................................
Tekniska data......................................................sida 53-55
Garantí och Service
(® Nederlands....... ...pagina 21 (|f) Suomi
Afbeeldingen...........................................................pagina 3
Technische gegevens
Garantie en service......................................pagina 56-58
CD Español
Ilustraciones
Datos técnicos
Garantía
............................................................
..........................................................
.................................
............
.............................................
pagina 53-55
página 26
página 3
página 53-55
página 56-58
México.
PRECAUCION - ADVERTENCIA
I NO ABRIR, RIESGO DE CHOQUE ELECTRICO I
ATENCION
IVERIRQUE QUE EL VOLTAJE DE AUMENTACION
I
SEA EL REQUERIDO PARA SU APARATO
PARA EVITAR EL RIESGO DE CHOQUE ELECTRICO, NO QUITE LA TAPA.
EN CASO DE REQUERIR SERVICIO, DIRUASE AL PERSONAL AUTORIZADO DE PHIUPS.
|M
Es necesario que lea cuidadosamente su instructi
vo de manejo.
Kuvat................................................................................sivu 3
Tekniset tiedot
Takuu ja huolto..................................................sivu 56-58
® Norge
Typeskilt finnes bak pa apparaten.
Nettbryteren er sekundert innkopplet. Den innebygde netdelen er derfor ikke frakoplet nettet sa lenge apparat er tilsfuttet nettkontakten
..!!2M Garanti og service
.............. ...
.........................................
.................. ....
...................................................
OBSERVER!
...............................................
side 3
sida 41
sida 3
sida 56-58
sivu 46
sivu 53-55
side 56-58
Page 3
1 2 3
4 5
12 3 4
o u u u
PROGRAM SCAN SHUFFLE REPEAT PAUSE EDfT
U u:u U
6 7
9 10 11 12 13 14
Page 4

Page 5

INSTALLATION
POWER SUPPLY SETTING
Check that the type plate on the rear of your
player indicates the correct supply voltage.
If your mains supply voltage is different, con
sult your dealer or our Service Organisation.
Certain versions of this player are equipped
with a voltage selector (3), which enables you
to set the player to the correct mains voltage
yourself. When changing the voltage setting, it
IS also necessary to change the mains fuse (1)
to one of the correct rating: T200 mA (slow
blow fuse) for 110/127 V; T100 mA (slow blow
fuse) for 220 V - 230 V/ 230 V - 240 V.
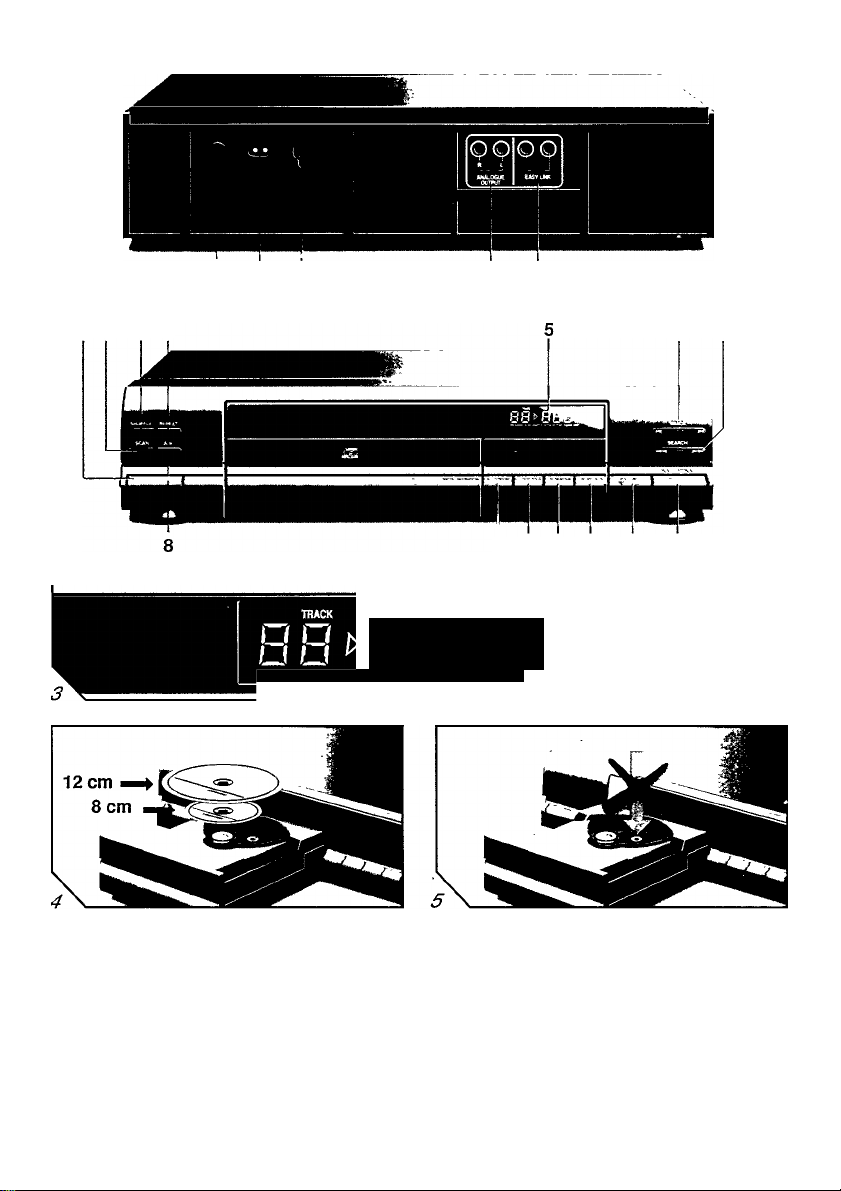
CONNECTIONS fF/g. 1)
1 Mains fuse holder (not all versions)
See 'Power supply setting'.
2 Mains socket
• Insert the plug of the mains lead (supplied) into
the mains socket.
• Connect the other end to your mains supply.
- The player is now switched on immediately.
3 Voltage selector (not all versions)
See 'Power supply setting'.
4 ANALOGUE OUT
For the connecting cable to the amplifier.
• Insert a red plug into the 'R' socket and the
other plug into the 'L' socket.
• Insert the two other plugs into the correspon
ding sockets of the CD or AUX input of your
amplifier. You can also use the TUNER or TAPE
IN connection, but never the PHONO input!
5 EASY LINK
- For connecting up the equipment in a PHILIPS
HiFi system with its own remote control sys
tem.
- For connecting the remote control receiver EM
2200, available as an accessory. (Not available
in the U.K.)
- For connecting the player to a PHILIPS cassette
deck with a CD DUBBING function. See also
'CD DUBBING’ on page 9.
FITTING A MAINS PLUG (U.K. only)______________
The wires in the mains lead are coloured in accor
dance with the following code:
Blue - Neutral; Brown - Live.
As the colours of the wires may not correspond
with the terminal identification in your plug, pro
ceed as follows:
• Connect the brown wire to the terminal marked
'L' or coloured brown or red.
• Connect the blue wire to the terminal marked
'N' or coloured blue or black.
No connection should be made to the earth
terminal of the plug!
For 13 A plugs, conforming to BS1363, use a 3
A fuse.
For other plugs, use a 5 A or lower fuse in the
plug, adaptor or at the distribution board.
S)
c
Ul
When using the player in the Philips HiFi
system FS 320, it is recommended that the units
are stacked as follows (from top to bottom):
7 record player FP 320;
2 receiver FR 320;
3 CD-player CD 335,
4 cassette deck FC 320.
This stacking order gives the optimum sound
quality and prevents any interference from out
side
NOTE!
Page 6

OPERATION
FRONT OF PLAYER (Rg. 2)
m
1 STAND BY/ON
3
la
Switching on and off.
SCAN
Automatically playing the beginning of each
track.
3 SHUFFLE
Playing in random order.
4 REPEAT
Repeating play.
5 Display
Informs you about the functioning of the play
er.
6 NTRACKW
- Selecting another track during play.
- Selecting a track to start play with.
- Selecting tracks when compiling a programme.
- Selecting the tape length when making a tape
recording.
7 ◄◄ SEARCH ►►
- Fast search for a passage.
- Selecting the tape length when making a tape
recording.
8 A-B
Setting the starting and stopping point of a
passage to be repeated.
9 OPEN/CL(ose)
Opening and closing the CD compartment.
10 PROGRAM
- Storing tracks in a programme.
- Checking the programme.
- Erasing tracks from a programme.
11 ADV(anced) EDIT
Selecting EDIT mode to enter the tape length
when making a tape recording.
12 STOP/CP
- Stopping play.
- Erasing a programme (CM = Clear Memory).
13 PAUSE
Interrupting play.
14 PLAY/REPLAY
- Starting play.
- Returning to the beginning of a track.
DISPLAY {Fig. 3)____________________________________
TRACK - Indicates the track number being play
ed; shows how many tracks there are on the CD.
>
- Lights during play;
- Flashes when play is interrupted (PAUSE).
TIME - Indicates the elapsed playing time of the
track being played.
TOTAL TIME - Indicates the total playing time of
a disc or a programme.
PROGRAM - Lights up when a programme is be
ing stored.
SCAN - Lights up when the first 10 seconds of
each track are played.
SHUFFLE - Lights up when the tracks are played
in random order.
A-B - Lights up when a passage is repeated.
REPEAT - Lights up when the entire CD or a pro
gramme is repeated.
EDIT - Lights up when the player is put in the
EDIT mode.
ERR(or)~ Lights up if you:
- make an error in operating the player;
- try to start play «'hen the CD is inserted with
the printed side ng down or if the CD is
damaged.
disc- Lights up if you try to start play without a
CD in the CD compartmen;
OPEN-Lights up when you open the CD com
partment.
SWITCHING ON AND OFF (STAND BY/ON)
• Press STAND BY/ON to switch the player on.
• Press STAND BY/ON again to switch the player
off.
• Remove the plug from the wall socket to fully
switch off the player.
PLAYBACK (PLAY/REPLAY)
• Open the CD compartment by pressing
OPEN/CL(ose).
• Insert a CD in the CD compartment, printed
side up (Rg. 4).
• Close the CD compartment by hand or by
pressing OPENZCL(ose).
- Press PLAY/REPLAY.
- /> lights up and playback starts.
You can also press PLAY/REPLAY immediately
after inserting the CD; the CD compartment
then closes automatically.
- The track being played is always shown under
TRACK and its elapsed playing time is shown
under TIME.
- After the last track play stops.
- The display shows the number of tracks and
the playing time'of the CD.
You can interrupt playback by pressing PAUSE;
PAUSE then lights up and i> starts flashing. Press
PLAY/REPLAY to restart.
If you press PLAY/REPLAY during play, the cur
rent track starts again from the beginning.
You can stop playback by pressing STOP/CP or
OPENZCL(ose).
IMPORTANT!
The lens of the laser (ftg. S) should never be
touched!
Page 7

OPERATION
SELECTING ANOTHER TRACK DURING
PLAY (HTRACKS! )
• Press ►! or !◄ until the desired track number
appears under TRACK.
- The music stops and a moment later the selec
ted track begins to play.
FAST SEARCH FOR A PASSAGE
(◄◄ SEARCH ►►)
Hold
Hold
The searching speed is determined by how long a
key is pressed:
- the first 2 seconds fairly slowly, with sound;
- then at maximum speed, with no sound.
If you reach the end of the last track of the CD
and release ►►, play will resume a few seconds
before the end.
STARTING WITH A PARTICULAR TRACK
(H TRACK ►! and PLAY/REPLAY)
• Close the CD compartment by hand or by
pressing OPEN/CL(ose).
- The display shows the number of tracks and
the playing time of the CD.
• Press IH or !◄ until the desired track number
appears under TRACK.
• Now press PLAY/REPLAY within 8 seconds.
- Play starts from the selected track.
SCANNING THE DISC (SCAN)
• Press SCAN before or during play.
- If the CD compartment was open, it will now
close.
- SCAN lights up and the first 10 seconds of
each track are played in turn; 10 seconds are
counted down each time under TIME.
• When the player reaches a track which you
wish to hear in full, press SCAN again.
During scanning, the !◄ TRACK ►! keys can be
used.
PLAYING IN A RANDOM ORDER (SHUFFLE)
• Press SHUFFLE before or during play.
- If the CD compartment was open it will now
clos©.
- SHUFFLE lights up.
- The tracks are now played in a random order.
• Press SHUFFLE again if you wish to revert to
normal play.
If you press !◄, you will return to a track which
has already been played.
If you press ►!, you are selecting any other track.
If you press REPEAT, the tracks will be repeated
in a different order each time.
_________________________________
down to search backwards,
down to search fonwards.
___________
_____________________
'
REPEATING A PASSAGE (A-B)
• During play press A-B at the required starting
point.
- A lights up.
• Press A-B again at the required stopping point.
- B lights up. The passage between points A and
B will now be replayed continuously.
• Press A-B again if you wish to return to normal
play.
To find the starting and stopping points quickly,
you can use the ◄◄ SEARCH ►► keys.
REPEATING THE CD (REPEAT)
• Press REPEAT before or during play.
- REPEAT lights up and the CD will now be re
peated again and again.
• Press REPEAT again to stop the REPEAT func
tion.
_____________________
D)
c
lU
Page 8

PROGRAMMING
You can store 20 tracks from each CD in any re
quired sequence in a programme. If you exceed
3
(O
the maximum of 20 tracks, FULL lights up.
(A
3"
STORING A PROGRAMME
(K TRACK ►! and PROGRAM)
_____________________
• Close the CD compartment by hand or by
pressing OPEN/CL(ose).
- The display shows the number of tracks and
the playing time of the CD.
• Press W or !◄ until the first track number you
wish to programme appears under TRACK.
• Now press PROGRAM within 8 seconds.
- PROGRAM lights up, followed by a P (for Pro
gramme); the number has now been stored in
the player's memory.
• Select the other track numbers required and
store each track by pressing PROGRAM.
- The number of tracks and the playing time of
the programme will be shown under TRACK
and TOTAL TIME (for 2 seconds).
STORING A PROGRAMME USING SCAN
• Press SCAN before or during play.
- If the CD compartment was open, it will now
close.
- SCAN lights up and the first 10 seconds of
each track are played in turn; ten seconds are
counted down each time under TIME.
• Press PROGRAM at each track you wish to in
clude in the programme.
- The player immediately starts to play the first
10 seconds of the next track.
• Press PLAY/REPLAY to play the programme.
CHECKING THE PROGRAMME (PROGRAM)
• Press PROGRAM before, during or after
programmed play.
- All the track numbers appear in the program
med sequence on the display.
PLAYING THE PROGRAMME (PLAY/REPLAY)
• Press PLAY/REPLAY.
- £> lights up and play begins with the first num
ber of the programme.
All keys can be used during programmed play.
Searching for a passage is limited to within the
track being played.
ERASING A PROGRAMME
(STOP/CP or OPEN/CL)
• Press STOP/CP twice, or, if the CD has already
stopped, just once; you can also press OPEN/CL(ose) straight away.
- The programme has now been erased.
ERASING A TRACK FROM A PROGRAMME
(K TRACK H and PROGRAM)
_______________________
• Press ►! or !◄, before or after programmed
play, until the number you wish to erase ap
pears on the display.
• Press PROGRAM iv/f/j/n Sseconete.
- The Pafterthe number disappears; the number
has now been erased.
- The remaining tracks and their playing time are
shown on the display.
Page 9

OTHER POSSIBILITIES
RECORDING FROM YOUR CD PLAYER
(ADV. EDIT)
In the EDIT mode you can store the tape length
m the player memory/. This will then determine
which tracks fit on one side of the tape and a
pause will automatically be inserted after the
last track.
Press EDIT (in STOP mode).
C 90 lights up.
With ►! and K you can now select the required
tape length: C 30, C46, C 60, C 90 or C 120:
other tape lengths can be selected using the
◄◄ SEARCH ►►keys.
You can now record the CD or a programme
from it; the programme must be stored in ad
vance.
Press PLAY/REPLAY.
> lights up and play begins.
After each track a 5 second pause will be in
serted.
Play will stop after the last track.
PAUSE lights up and i> starts flashing.
Turn the tape over.
Press PLAY/REPLAY.
The remaining tracks will now be played.
NOTE!
You can also start playback with SHUFFLE;
the tracks will then be recorded in a random
order.
As soon as you press PLAY/REPLAY or
SHUFFLE, the other player functions will
temporarily be switched off to prevent the
recording being interfered with
You can stop playback/recording by pressing
STOP/CP or OPEN/CL(ose); EOfTCANCEL
LED then lights up
Should the CD or the programme be longer
than the total tape length, play will stop after
the last track that fits onto side B of the tape.
CD DUBBING (synchronised recording)
If the player is connected via the EASY LINK
sockets to a PHILIPS cassette deck having a
CD DUBBING function, synchronised record
ings can be made.
• Set the player to the STOP or EDIT mode.
• Press CD DUBBING on the cassette deck.
- Playback and recording will start at the same
time.
• You can stop playback/recording by pressing
STOP/CP or OPEN/CLfose).
NOTE!
As soon as you press CD DUBBING, the other
player functions will temporarily be switched
off to prevent the recording being interfered
with.
STAND BY
If the player is connected via the EASY LINK
sockets to a PHILIPS HiFi system, the player can
be set to STAND BY mode by pressing the
STAND BY button of the system.
STAND BY is cancelled when any of the following
functions are activated;
PLAY/REPLAY, STOP/CP, SCAN, SHUFFLE,
ADVianced) EDIT, OPEN/CLfose), ►lorW.
NOTE!
If, during play, you select another source on the
amplifier, then play will be interrupted (PAUSE);
except when CD DUBBING is active. You can
restart playback by pressing PLAY/REPLAY on
the player.
£
.22
"to
c
lU
Page 10

ADDITIONAL INFORMATION
MAINTENANCE
m
The CDs
3
(O
• Never write on the printed side of a CD.
5'
• Do not attach any stickers to the CD.
3"
• Keep the shiny surface of the CD clean.
Use a soft lint-free cloth and always wipe the
disc in a straight line from centre to edge.
• Never use cleaning agents for conventional rec
ords.
• Detergents or abrasive cleaning agents should
not be used either.
The player
• A chamois leather slightly moistened with wa
ter is sufficient for cleaning the player.
• Do not use cleaning agents containing alcohol,
spirits, ammonia or abrasives.
• The lens of the laser (f7g. 5} should nof be
cleaned.
FAULTS AND THEIR LIKELY CAUSES
If a fault occurs, run through the points listed be
low before taking your player for repair. Check
whether;
- condensation has formed on the lens of the
laser due to a dramatic change in temperature;
this will disappear automatically after some
time;
- the CD has been inserted correctly with the
printed side up and that there is a CD in the
compartment;
- the CD is dirty, badly scratched or warped;
- the player has been connected to the PHONO
socket of the amplifier.
If the fault remains, try to clear it by switching the
player off and on again;
• Remove the mains plug from the wall socket.
• Insert the mains plug in the wall socket again.
If this also fails to help, consult your dealer.
Under no circumstances should you repair
the player yourself, as this will Invalidate
the guarantee!
10
Page 11

NOTES
51
Page 12

NOTES
52
Page 13

TECHNICAL DATA
________________________
Typical Audio Performance
Frequency range...................................2 - 20,000 Hz
Amplitude linearity:......................................0.035 dB
Phase linearity...........................0.5° (20 - 20,000 Hz)
Dynamic range
Signal-to-noise ratio
Channel separation
Total harmonic distortion-
D/A conversion
Bitstream conversion (256 x oversampling, 1 bit)
Audio output level-
..................................................
..................
...........................................
............................................
100 dB (A-welghted)
............................
92 dB
95 dB
0,0025%
2Vm^s
Power supply
Mams voltage and frequency;
see the type plate on the rear of the player
Power consumption;
- 10 W in PLAY mode
- 5 W in STAND BY mode
Safety requirements:.........................................lEC 65
Cabinet
Material/finish:
metal and polystyrene with decorative trim
Dimensions (w x h x d)
Weight:
................................................
............
360 x 100 x 280 mm
2.7 kg approx.
Subject to modification
This Compact Disc player complies with radio
interference requirements as laid down in EC
regulations.
CARACTERISTIQUES TECHNIQUES
____________
Caractéristiques audio (typiques)
Bande passante;.....................................2 20.000 Hz
Linéarité d'amplitude:
Linéarité de phase ...................0,5° (20 - 20,000 Hz)
Dynamique
Rapport signal/bruit-....................100 dB (ponderé-A)
Séparation des voies:
Distorsion harmonique totale:
Conversion numénque/analogique:
convertisseur Bitstream (256 x suréchantillonage,
1 bit)
Signal de sortie audio-
.........................................................92 dB
...................................
.......................................
....................
....................................
0,0025%
0,035 dB
95 dB
2Vgf{
Alimentation
Tension d'alimentation et fréquence du secteur:
reportez-vous à la plaquette signalétique à ¡'arrière
du lecteur
Consommation électnque-
- en position de lecture (PLAY):
- en position de veille (STAND BY)-....................5 W
Conditions de sécurité
..........................
..................................
10 W
C.E.l. 65
Boîtier
Matière/finition;
métal et polystyrène avec enjoliveurs
Dimensions (I x h x p):
Poids.........................................................env. 2,7 kg
.............
360 x 100 x 280 mm
@
Sous réserve de modifications
Ce lecteur de disques compacts satisfait aux
prescriptions de la CE en matière de dépara
sitage radio.
TECHNISCHE DATEN (typisch) <d>
Frequenzumfang:
........................................
2 - 20.000 Hz
Amplitudenlineahtät:..................................................0,035 dB
Phasenlinearitäf.
...........................
0,5° (20 - 20.000 Hz)
Dynamikumfang:........................................................92 dB
Störabstand:..................................100 dB (A-gewichtet)
Kanaltrennung:....................................................................95 dB
Klirrfaktor:.....................................................................0,0025 %
Digital/Analog-Umsetzung:
Bitstream-Umsetzung (256fach Oversampling,
1-bit)
Audio-Ausgangssignal:............................................2 V@ff
Stromversorgung
Netzspannung und -frequenz:
siehe Typenschild an der Rückseite des Spielers
Leistungsaufnahme:
- im Spieibetrieb (PLAY):
.......................................
- in Bereitschaft (STAND BY):....................................5 W
Sicherheitsanforderungen:,...entsprechend lEC 65
Gehäuse
Materiai/Ausführung:
Metall und Polystyrol, mit Zierteilen
Abmessungen (B x H x T): ....360 x 100 x 280 mm
Gewicht: ca.................................................................2,7 kg
®
Änderungen Vorbehalten
Dieses Gerät entspricht den Funkentstör
vorschriften des Europäischen Gemeinschaft.
Hiermit wird bescheinigt, daß dieses Gerät in
Übereinstimmung mit den Bestimmungen der
Amtsblattverfügung 1046/1984 funkentstört
ist.
Der Deutschen Bundespost wurde das In
verkehrbringen diesesjGerätes angezeigt und
die Berechtigung zur Überprüfung der Serie
auf Einhaltung der Bestimmungen
eingeräumt.
CD
10 W
53
Page 14

TECHNISCHE GEGEVENS
______________________
®
Audiospecificaties (typisch)
Frequentiegebied:.......................................2 - 20.000 Hz
Amplitude-lineariteit:
Fase-Iineariteit:
..........................................
.............................
0,5° (20 - 20.000 Hz)
0,035dB
Dynamisch bereik;......................................................92 dB
Signaal/ruisverhouding:
Kanaalscheiding:
............
100 dB (A-gewogen)
................................................................
95 dB
Totale harmonische vervorming:........................0,0025 %
Digitaal/analoog-omzetting;
Bitstream-omzetting (256 x oversampling, 1 bit)
Audio-uitgangssignaal:...........................................
Este reproductor de discos compactos cumple
las normas para interferencias de radio es
tablecidas por la CE.
Este aparato lleva los elementos antiparas!tarios necesarios para cumplir con las normas
que se establecen en el Anexo Sdel Regla
mento sobre Perturbaciones Radioeléctricas e
Interferencias aprobado por el Real Decreto
138/1989 (B.O.E. de 9 de Febrero 1989).
Voeding
Netspanning en -frequentie:
zie het typeplaatje op de achterkant van de speler
Opgenomen vermögen:
- in afspeelstand (PLAY):................................................10 W
- in STAND BY-stand:
Veiligheidseisen:
.................................................
......................................................
5W
lEC 65
Behuizing
Materiaal/afwerking:
metaal en polystyreen met siermaterialen
Afmetingen (b x h x d):.............360 x 100 x 280 mm
Gewicht: ca.................................................................2,7 kg
Wljzigingen voorbehouden
Deze Compact Disc-speler voldoet aan de ra-
diostoringseisen zoals deze door de EG zijn
opgelegd.
DATOS TÉCNICOS
______________________________
®
Especificaciones (nominales) de audio
Margen de frecuencias:......................................2-20.000 Hz
Linealidad de la amplitud:........................................0,035 dB
Linealidad de la fase:
Margen dinámico:
Relación señal/ruido:
Separación de canales:
..................
0,5° (20 - 20.000 Hz)
....................................................
...............
100 dB (A-ponderada)
....................................................
92 dB
95 dB
Distorsión total armónica:.....................................0,0025 %
Conversión digital/analógica:
transformación Bitstream (transformación del con
junto de bits, 256 sobremuestreos, 1 bit)
Señal salida de audio:
............................................
2Vrms
Alimentación
Tensión y frecuencia de red: ver la placa de tipo
detrás del reproductor
Consumo de potencia:
- en posición PLAY:..................................................10 W
- en posición STAND BY:
.................................................
5 W
Normas de seguridad:....................................................lEC 65
Caja
Material/acabado:
metal y poliestireno con materiales decorativos
Dimensiones (an x al x pr);....360 x 100 x 280 mm
Peso:...................................................................unos 2,7 kg
Salvo modifícacíones sin previo aviso
54
DATI TECNICI
___________________________________
О
Specificazioni audio (tipiche)
Risposta in frequenza:
Amplitudine-linearità:
..............................
2 - 20.000 Hz
................................................
0,035 dB
Fase-linearità:..................................0,5° (20-20 000 Hz)
Gamma dinamica:.....................................................92 dB
Rapporto segnale/disturbo;...100 dB (A-ponderato)
Separazione dei canali:....................................................95 dB
Distorsione armonica totale:
.......................
0,0025 %
Conversione D/A:
conversione Bitstream (256 x sovracampionamen-.
to, 1 bit)
Uscita audio:...............................................................2V|-rns
Alimentazione
Tensione e frequenza di rete;
ved. la targhetta sul retro del lettore
Potenza assorbita:
- nel modo PLAY;
- nel modo STAND BY:
.............................................................
..............................................
10 W
5W
Norme di sicurezza;.................................................... lEC
Mobile
Materiale/finìtura:
metallo e polistirene con profili decorativi
Dimensioni (larghezza x altezza x profondità);
...........................................................360 X 100x280 mm
Peso;
..................................................................
2,7 kg circa.
Tutti I diritti di modifiche riservati
Questo lettore dì Compact Disc risponde alle
esigenze imposte dalle normative della C.E.
circa le interferenze radio.
_____________
NORME DI SICUREZZA
______________
Questo apparecchio corrisponde alle norme dì
sicurezza VDE 0860 e quindi alle norme inter
nazionali lEC 65 rìsp. le CEE 1.
L'apparecchio è conforme al DM 13-04-1989
(Direttiva CEE/87/308) sulla soppressione dei
radiodisturbi.
Page 15

TEKNISKE DATA________________________________@
Lyd performance (typisk)
Frekvensgang.................................................2-20.000 Hz
Amplitude Imiaritet'........................................0,035dB
Fase iiniaritet'
Dynamik....................................................................92 dB
Signal/stoj:
Kanaladskillelse........................................................95 dB
Total harmonisk forvrængning:
D/A-konvertenng
Bitstream konvertermg (256 x oversampling, 1 bit)
Lydudgangsniveau-.........................................2Vr(.ns
............................
.....................................
0,5° (20 - 20 000 Hz)
.........................
100 dB (A-vejet)
0,0025 %
Stromforsyning
Lysnetspænding og -frekvens:
Se typeskiltet pa bagsiden af afspilleren
Stromforbrug:
- i PLAY-funktionen
- I STAND BY-funktionen:.........................................5 W
Sikkerhedskrav
.................................................
.......................................................
10 W
lEC 65
Kabinet
Materiale/firush
Metal og polystyren med profiler
Dimensioner (b x h x d)
Vægt.............................................................ca. 2,7 kg
...........
360 x 100 x 280 mm
Ret til aendnnger forbeholdes
Dette apparat overholder det gældende EF-direktiv vedrerende radiostoj.
TEKNISETTIEDOT
______________________________
®
Âanentoisto (tyypillinen)
Taajuusalue:
...................................................
2 - 20 000 Hz
Amplitudilineaarisuus:................................................0,035 dB
Vaihelineaarisuus:
.........................
0,5° (20 - 20 000 Hz)
Dynamiikka:..........................................................................92 dB
Signaali-kohinasuhde:
..............
100 dB (A-painotettu)
Kanavaerotus:......................................................................95 dB
Harmoninen sarò:
.....................................................
0,0025 %
D/A-muunto;
Bittivirtamuunto (256 x ylinaytteitys, 1 bitti)
Àânen lafitotaso:........................................................
Virtalahde
Verkkojánnite ja -taajuus:
katso soittimen takana devasta arvokilvestâ
Tehontarve:
- toistotoiminnossa (PLAY):..........................................10 W
- valmiustoiminnossa (STAND BY);..............................5 W
Turvallisuusnormit:...........................................................lEC 65
Kotelo
Materiaali/viimeistely; metalli ja polystyreeni
Mitât (I x к X s):............................360 x 100 x 280 mm
Paino:...................................................................noin 2,7 kg
Oikeus muutoksHn varataan
Luokan I laserlaite
Klass 1 laserapparat
TEKNISKA DATA
Ljuddelen
Frekvensomfang:..
Amplitudawikelse ....
Fasavvikelse:...
Dynamik'
Signal/brusforhallande:.
KanalseparationHarmonisk distortion THD:
D/A-omvandling:
Bitstream-omvandling (256 x oversampling, 1 bit)
Utsignak
.........................
..............
2 - 20000 Hz
......................0,035dB
. ...0,5° (20-20000 Hz)
............................
........
100 dB (A-kurva)
............................
..........................
0,0025 %
..2V,
Natdelen
Natspanning och natfrekvens: se typskylten pa
apparatens baksida
Effektforbrukning.
- iPLAY-lage;
- 1 STAND BY-lage
Sakerhetsforeskrifter: . .enligt SEMKO och lEC 65
....................................................
..............................................
Allmanna data
Material, metali och polystyrene med profiler
Dimensioner (b x h x d):
Vikt
..........................................................
.........
360 x 100 x 280 mm
cirka 2,7 kg
Reservation for eventuella andrlngar.
Klass 1 laserapparat
CD
92 dB
95 dB
rms
10 W
5W
55
Page 16

GUARANTEE AND SERVICE FOR UNITED KINGDOM
Philips se'l this product subject to the understanding that if any defect m manufacture:
or maienal shall appear m it withm 12 months from the date of consurrer safe, the
deafe?from v-fiom the product v/as purchased v//iJ arrange for such defect to be recti-
fied With out charge, provi ded
1. Reasonabfe e.ndence is supplied that the product v/as purchased within 12 rrionths
prior to the date of claim
Z The defect is not due to use of the product for other than domestic purposes, or on
an ircorrect voltage, or contrary to the Company's operating instructions, or to acci*
dental damage (whether in transit or otheavise). misuse, neglect or inexpert repair
Products sent for seance should be adequately packed as no liability can be accepted
for damage or loss in transit, and name and address must be enclosed
facts about free service
When semce is required, apply to the dealer from whom the product was purchased.
Should any difficulty be experienced in obtaining Service, eg m the e'.ent of the deal
er having ceased to trade. \ou are advised to contact Philips Service.
Tj7es& ststemsnis do not affect the statutory r/ghts of a consumer
If you have any questions wh ch \our dealer cannot answer, please wmte to
Philips Consumer Relations, ^P.O. Box238,420London Road,
CROYDON CR93QR, or (01) 683-2166 Consumer Advice.
Piease retain this card Produce if servxe is required
GUARANTEE AND SERVICEVAUD FOR IREUND
This apparatus is made of high quality material and great care has been taken tn its
manufacture
Philips, therefore, give you a guarantee on parts against failures arising ficrrt faulty
workmanship or material for 12 tr.onths after date of purchase This guarantee'S vahd
on the condition that this certificate is completed and signed immediately on delivery
of the apparatus In case of failure ask your dealer for further information
If you have any questions wh'Ch^our dealer cannot answer, you may apply to
Philips Electrical (Ireland) Ltd., Service Department Newstead, Clonskeagh,
DUBUN14,^633355.____________________________________________________
GUARANTEE AND SERVICEVAUD FOR AUSTRAUA
The benefits given to the purchaser by this warranty are in addition to all other nghts
and rerriedies. wh ch. under the Trade Practices Act or o^er Commonwealth or State
law. the purchaser or o.vrer has m respect of die product
The Philips product carries the following warranties
C-senesHifi-systerris 12months'Compact DiscPiayers 12months HomeAudiOiSystems 6 months Clock radios, portable radios, cassette recorders, cassette p'ayers
and radio recorders 90 days
Any defect tn materials or workmanship occurring w'lthm the specified pencd from the
date of delivery, will be rectified free of charge by the retailer from whom this product
w'as purchased
Note Please retain your purchase docket to assist prompt service
Conditions of^is warranty
1. All claims for warranty se^'.ce must be made to the retailer from whom this prod
uct was purchased AU transport charges incurred m connection with warranty ser-
v.ce or replacerr.ent Will be paid by the purchaser
Z These warranties do not cover batteries and extend only to defe^cts in materials or
w'orkmanship occurring under normal use of the product where operated in accor
dance w'lth our instructions
Philips Consumer Products Division, Technology Park, Rgtree Drive,
Australia Centre, H0MEBUSH2140, New South Wales
GUARANTEE AND SERVICE FOR NEWZEAIAND
Thank-you for purchasing this quality Philips product The ¿ooomeni you are now
reading is your guarantee card
Guarantee.
Philips New Zealand Ltd guarantees this product agamst defective ccmponenis and
faul^ workmanship for a period of 12 months Any defect in materials or workmarvship occurring W'lthm 12 months from the date of purchase subject to the following
conditions Will be rectified free of chaige by the reader from whom this product was
purchased
Conditions.
1. The product must have been purchased m New Zealand, and this guarantee canl
completed at time of purchase {this is your proof of the date of purchase)
Z The guarantee applies only to faults caused by defective components, or faulty
workmanship on the part of the manufacturer
3. The guarantee does cot cover failures caused by misuse, neglect, normal wear and
tear, a^idental breakage, use on the incorrect voltage, use contrary to operating in
structions, or unauthorised modification to the product or repair by an unauthorised
technician
4. Reasonable evidence (m the form of a sales docket or comp'eted guarantee card)
must be supplied to indicate that №e product was purchased no more than 12
months prior to the date of your claim
5. In the e.ent of a failure. Philips shall be under no liability for any injury, or any loss
or damage caused to property or products other than the product under guarantee
This gusrsntcs does notprejudce your rrghts under common fe.vend statute, and rs
in addition to the normal responsibilities of die retailer and Philips
How to claim.
Should your Philips product fad within the guarantee penod, p’ease return it to the re
tailer from whom it v.as purchased In most cases the retailer will be able to satisfac
torily repair or rep'ace the product
Ho.’.ever, should the retailer not be able to conclude the matter satisfactorily, or if you
have other difficulties claiming under this guarantee, please contact
the Guarantee Controller, Philips New Zealand Ltd,
Box 1041. AUCKLAND - a (09)605-914
_______________________
GARANTIE EN SERVICE IN NEDERLAND
• IVaf wordt gegarandeerd?
Philips Nederland B V garandeert dat dit apparasi kosteloos wordt bersteld md'cn •
b;/norrraaI partrculiergebruik volgens de gebruiksaan;vi;?mg ■ b nnen 12maandt.n nj
aankcopdatum fabncage- en/of matenaalfouten optreden
• Wie voert de garantie uit?
De zorg voor de uitvcenng van de garantie berust bij de handelaar d e u het apporout
verkocht heeft De handelaar kan daarbij c.entueel een beroep dcen op ccn der
Philips Serv.cevestigingen
• Uw aankoopbon+de identificatiekaart
De identificatiekaart is uw garantiebe.vijs U kunt alleen een beroep doen op do bovenomschreven garantie tegen o.erleggmg van de aaokcopbon (factuur, kacsabon cf
kwiianhe). m eomb natie met de identificatiekaart. waarcp tipemjmmer en sencnumm.er zijn vermeld Uit de aankoopbon d.enen du'doiijk de aankoopdatum en do riucm
van de handeiaar te bljken Mccht het noodzakehjk zijn deze dccuir.entcn aan uw
handelaar af te geven. dan kunt u bem daarvcor een cntvangstbevvijs vragen
De garantie vervalt md en cp de gencemde docurrenten lets »s veranderd. dcorqehaald. verwijderd of onleestaar gemaakt De garantie vernali evenecns mdivn het
typenummer en/of senenumrrer op het apparaat is veranderd. dcorgehaa'd, vcrwijdenl of onleesbaar gerraakt
• Hoe te handelen bij een storing?
Om onnod ge kosten te voorkcmen. raden wij u aan bg stonngen ecrst nau.vkuunq do
gebruiksaanv.ijzmg te lezen Ind en de gebruiksaanwijzing daarm geen uitkomst b tdt
kunt u irw hande'aar raadp'egen en/of hem het apparaat ter reparatie oanb c den
• ...en bij Problemen?
Bij Problemen omtrent de garantie-uitvoermg kunt u ZiCh in verbindiog stellen mtt
Philips Nederland B.V. AfdeUng Consumentenbelangen AntwoordnummerSOO, 5600 VB £Wg//0 VflVipostzegel met ned gl of P 040-781178.
GARANTIE FÜR DIE SCHWEIZ
Philips-Gerate sind aus einwandfreiem Material und mi groSer Sorgfalt fergesteKt
worden Dieses Gerät vrorcl Ihnen gute D.enste feisten, sofern es sachgerrjS budront
und unterhalten Wird Trotz aller Sorgfalt ist das Auftreten von Fehlern mcht ganz auszuschlieSen Im Palle emes Defektes wenden Sro sch bitte unter Vorlage des Eirikaufsteleges und des Geratepasses an das Fachgeschäft, m welchem Sro dos GoMl
erworben haben_________________________________________________________________________
GARANTIE POUR LA SUISSE
Les appareils Philips ont été fabriqués au moyen de matériaux de toute première qual
ité et avec beaucoup de soins Cet appareil vous donnera encore p’us de satisfaction
SI l'utilisation et l'entretien sont suiv/s selon le trode d'errp’oi Malgré toui. les so ns
apportés, l'apparition de défauts n'est pas exclue Dans ce cas. nous vous serions re
connaissants de b en vouloir vous adresser directement chez voue vendeur muni du
passeport de l'appareil amst que de fa facture s'y reportant
GARANZIA PER LA SVIZZERA
Gli apparecchi Pmlips sono prodotti con materiali di pnma quahtä e assemb'ati con la
massima cura Essi Vi offriranno un ottirro servizio, in cambio di un accurato uso e
m.anuten2ione Malgrado tutti » nostri sforzi, non è escluso che possano ùwuniff dùi
guasti In caso di difetto Vi pregh'amo di rivolgervi al Vostro fornitore specjl'zzato.
portando con Voi il passaporto assierre ai documenti d'acquisto
GARANTIE EN SERVICE IN BELGIË EN LUXEMBURG
In Belgio en Luxemburg gelden uitsluitend de garantiebepalmgen dem het door u.v
handelaar varstrekte garantiebe.vijs staan aangegeven
• VoorBelgieilni en u ra de aankcopvan een of ander Philips apparasi prob’emen
heeft met b;jv de waatorg. de werkmg. of het gebruik eivan, en md en do verdcicr
die u deze apparaten verkocht heeft rr.oeilijkheden ondervmdt om dezu prob'erren cp
te fossen. sielt u zrch dan telefonisch of schnftelijk in verb ndrog met onzo diunj-t
'KlantenKontakt'.deBrouckèrepieinZ 1000BRUSSEL-^aÔU2119111
GARANTIE EN BELGIQUE ET LUXEMBOURG
Poor les conditions de garantie en Belg que et Luxembourg veuillez vous réféftr à b
carte de garantie que le revendeur doit vous remettre
• Pour la BelgiquetSi après l'achat de l'un ou l'autre appareil Philips vous a.ez dos
problèmes concernant par exemple la garantie. le fonctionnemeni ou f'uîiiisaiion do
l'appareil et que le distributeur qui vous a vendu ces appareils éprouve dos difficuiiô..
pour les résoudre, prenez contact, sou par téléphone, soit par écrit avec notre ccfi..cu
'Contact Clientèle’, Place de BrouckèreZ1000BRUXELLES ■•B 02/2119111
GARANHEIN ÖSTERREICH
In Osterre.ch ist die Ge/.'ahrleistung fut Verträge zwischen Hund'erund Kuufvr gesetz
lich geregelt Zur Geltendmachung des Gewährleislungsanspruches dient der Kaufteleg
Die Osterrerohische Philips Industrie GmbH imterstutzt die Gewahdtvstungs.erpfi'chtung Ihres Händlers für Neugeräte, die der Handel über die Österre chischo Pmiips In
dustrie GmbH b2w Homy Vertnebsgmbh bezogen hat. dadurch, daß für den Käufer in
nerhalb von 6 Monaten ab Verkaufsdatum Funklionsmange! Ifabrikations- eduf Mat'.-nalfeWer) in e.ner unserer Serv.ce-Filialen kostenlos, dh ohne Verrechnung von Ar
beitszeit und Material behoben werden
Schäden, dte durch äußere Einflüsse, unsachgemäße Behandlung oder un,-3chg-‘maSen Fremideingnif entstanden sind, sowie Gehausefeh'er oder Glasbruch, sind von
d'eserZusage ausgeschlossen
Phiiips Zentrale Kundeninformation:
- 1101 WIEN, Triesterstraße64,^ 0222-601Û1-DW1620 oder 1563
- 6020 INNSBRUCK, Klostergasse 4,17 05222-74694
- 9020KLAGENFURT, Villacher Straße 161,'B0463-22397-DW94
Philips Service-Organisation: 1232 WIEN, Ketzargasse 120, TP 0222-8662-0
___________________________
______________________
56
Page 17

GARANTIE ET SERVICE APRES-VENTE EN FRANCE
Cci ûppîfeil 0 4\é fabriqué û'.ec le souct de vous donner cruière satisfectioo
PHILIPS fournira gratuiterr ;nî au vendeur les pièces détachées nécessaires à sa ré
paration pendant les punodes suivantes, chacune prenant effet a compter de la date
dovente
- 6 mois pour les magnétophones à cassetto portatifs, les récepteurs radio portatifs,
los radiocassettcs. lesradio-ré.eilsct lesefectropbones,
- 12 mois pour les radiccossettes équipés de la fonction Compact Disc et les bala
deurs Compact Oise,
- 12 mois pour les appareils entrant dans la composition d'une chaîne électro-acous
tique, y compris (es chaînes compactes stationnaires équipés d'au moins deux
sources sonores.
‘.auf SI la déténorotion résulte d'une cause étrangère à l'appareil ou du non respect
dos proscriptions d’utilisation
Vous fcunuficicrcz en tout état de cause des dispositions des art 1641 et suivants du
Code Civil relatifs a la garantie légale
Pour tout conseil ou inteaention.adfesse2-vous à votre vendeur
Pour tout rcnseignem.ent comp'cir.enta're, vous pouvez vous adresser à la succursale
Pmiipiiapius proche
SouciCux d'amiéliorcr continuellement la qualité de nos produits, nous nous réseaons
le droit d'en modifier a tout morr ent les caractéristiques
PHIUPS Électronique Domestique - Société en nom collectif
fíCSmNT£fífí£B333760833
64, Bue Carnot-^B.P. 306-92156SURESN£SCédex
Informations Consommateurs:*Sl16-1)6480S454
GARANTIE FUR DIE BUNDESREPUBUK DEUTSCHLAND
Pnilip'>-6cf.jte Sind Madenartéci, die mit gruSter Präzision nach modernsten Fertiqungsrr.cthodon und mit einem Höchstmaß an Sorgfalt fierc'estelít werden Oas
Gcr.jt Wird Ihnen gute Dienste leisten, vorausgesetzt daS Sie es sachgemäß bedienen
und unterhalten Trotz aller Sorgfalt ist das Auftreten von Fehlem nicht auszuschlielicn Ihr Partner für die Behebung derartiger Fehler ist ihr Fachhandler, bei dem das
Ger.jt cavorten wurde Falls e n ReUamationsfall emtntt, wenden Sie S'ch bitte unter
Vorlage des pinkaufst aleges und des Gerutepasses an Ihren Fachhandler
GARANZIA E ASSISTENZA VAUDE PER LfTAUA
Üuesto apparecchi ò stato realizzato con materiali di poma qualità e costruito con la
massima curo Lo Pnibps comunque fornisce all'acquirente una Garanzia di buon fun/lüiion.ento secondo le condizioni stabilite daU'A/V/£
fole Goronzia decorre dalla dato di acquisto ed ha fa durata di 6mesi. Per aver diritto
all 1 Goranzia è necessario che questo certificato nporti i dati di Modello e Matricola
doll'apparccchio, la dato di acquisto ed il timbro del rivenditore, inoltre par tutti gli
opparecchi per t quali u previsto la 'noe.uta fiscale' (o altro documento di consegna) il
documento stesso do.ru essere consea-ato con questo certificato a certificazione del
la dato d'acquisto
In co''o di necessita il prodotto do.r<i essere fatto paaenire al Centro di Assistenza
piu Vicino il CUI recapito y pubblicato sugli elenchi telefon ci della zona di residenza
olio voce Philips
Por questo apparecchio Pnilips offre un Abbonamento all'Assistenza Tecnica Per informoziom rivolgersi ai Centri di Assistenza о al seauzio Consumatori Philips
PhìHpsS.pA, VialehFulvio Testi32120162MILANO,^ 1B78-20Q2B
CONDIÇÔES VÁUDAS PARA PORTUGAL
A Pnilips Portuguesa, SA, asscgura ao comprador deste apareiho garantía contra
qualquuí deferto do material cu fabrico, pelo prazo de 6 meses, contado a partir da
data de cquiS'Çuo As ogulhas de fonocaptores nao tém qualquer garantía
A Pnilips Portuguesa, SA. anula a garantía ao apareiho desde que se verifique ser a
duficiuncia m.otivada por acídente, utiiiza;äo incorrecto, causas e.xtenias, cu nos ca-
■'os cm que aposente vestíg.os de ter sido violado, ajustado ou reparado por entidade
nuo autorizada Tarnt um sera considerada nula з garantía se este certificado apresentor rasuras ou altcranoes
A Pnilips Portuguesa, SA, obriga-se a prestar a garantía refenda semente nos seus
Scfv'iros Técnicos cu nos Concessionáfios de Seango autorizados As despssas e
riscos de transporto de e para as oficinas seráo semp'e da responsabilidade do com
prador
Noto Para que o apareiho seja assistido ao abrigo da garantía, é mdispansável que
si'ja aprcseniado este certificado, devidamente preenchido e autenticado, por vende
dor autorizado, aquando da sua aquiS'çào
Se sobre esta garantía necessitar oigum e-clarecnrento que o vendedor nao ihe pos
sa dor, de.e difigir-se a Philips Portuguesa, SA,
- Outurela - Camaxide ■ 2795 UND A A VELHA 418 00 71/9
- B.£ng.£zequielde Campos, 182>4100PORTO672613
GARANTI OG SERVICE FOR DANMARK
Do er nu ejcr af et apparat, hvis konstru'-rtion er baseret pà erfarmg og lang tids fersknmg Pnilips garanterer for Ivairteten, og hvert led » fabnkationen er underkastet stadig lontfoi Alle henvendelscr om fejl under garantien skal rettes til den forhandler.
dur har udieveret og underskre.et garantibsviset, hvorpà de gældende garantibestemmielscr Mlige er anfcrt Garantien er Lun gsefefendé t Ircbslandet
GARANTI I NORGE
Do cf пЗ еюг av el apparat som er basert pâ lang tids forskmng og erfanng
Pnilipe garanterer for fa'aliteter), men hvas en feil skulle oppstl bes De ta kentakt med
den forhandler som har utievert og underskrevet garantibaviset Garantien gjelder kun
11 jcpsiandet hvor de gjeldcnde garantit astemmelser mä feiges
Hvis De irengcr ytterligerc opplysnmger utover de fcrhandleren kan gi Dem. kan De
hen.cnde Dem til Norsk A/S Philips, Avd. Audio/Video,
Sandstuveien 70. OSLO 6-^02-680200
______________________
____________
TAKUUJAHUOLTO
Taman tuotteen rakenne on pitkaaikaisen, kokemuksella tehdyn tutkimustydn tulos
Jatkuvan eri tuotantovaiheissa tehtavan laatutarickailun vuokst Philips takaa tuotteensalaadun
Tarkemmat tiedot takuuehdoista saat Philips-myyjalta tai alia olevasta osoitteesta
Oy Philips AB, Sinikalllontie3,02630ESPOO - ÎT f358-0)-5Q261
В Oy Philips AB, P.O. Box 75,02631 ESPOO________________________________
GARANTÍA PARA MÉXICO
Este aparato está fabricado con materiales de alta calidad y ha sido cui dadosamente
verificado Philips, por lo tanto, da a usted una garantía de 12 meses a partir de su
fecha de compra
La garantía ampara la reposición de las p.ezas defectuosas debidas a fallas en su
montaje o en los materiales, incluyendo la mano de obra necesaria para su reemplazo
en nuestras Sucursales o talleres autorizados
En caso de fallas en su aparato le rogamos se sirva poner en contacto con su dis
tribuidor
Esta garantía no cubrirá las avenas que resulten como consecuencia de una insta
lación incorrecta del aparato, manifiesto maltrato o uso inadecuado del mismo
Pnilips se obliga a reparar y devolver a usted su aparato en un p’azo no mayor de 30
días hábiles contados a partir de la fecha de haber ingresado su aparato a uno de
nuestros talleres
Para que esta garantía sea vébda. es necesario que el certificado que figura en la
parte posterior de esté instructivo ha'/a sido debidamente llenado en e! momento de
la compra de! aparato
En caso de extravío del certificado con la presentación de la factura o remisión de su
aparato podrá hacer efectiv-a la garantía correspondiente
Si usted tiene alguna duda o pregunta que no le pueda solucionar su distribuidor, por
favor ponerse en contacto con Oficinas Centrales de Servicio,
Av. Coyoacán No. 1051, Coi. del Valle, 03100 MÉXICO, D.F.
5-75-20-22 o 5-75-01-00
PHIUPS IBÉRICA. SAE.
Garantiza este aparato durante 6 meses, a partir de la fecha de adquisición, da ía for
ma siguiente
7. Cubriendo cualquier defecto de fabricación o vicio de origen, así como la totalidad
de sus componentes, incluyendo la mano de obra necesan para el reerop'azo de
las p ezas defectuosas, por nuestros talleres autorizados
2. Esta garantía no cubrirá la avería, si es consecuencia de incorrecta instalación del
aparato, rramfiesto mal trato o uso inadecuado deí mismo La calificación de las
averías corresponderá únicamente a los serv.cios técnicos de los talleres autoriza
dos Philips
3. Las reparaciones que pudieran producirse durante el período de vigencia de la pre
sente garantía se efectuarán, bien en el domicilio del usuario, b en en los talleres
autorizados Pmlips, a libre elección y criterio de ésta ultima
4. Transcurrido un mes desde la fecha de adquisición del aparato, todos los gastos de
desplazamiento del personal técnico para preceder al examen y/o reparación del
aparató correrán por cuenta del usuario de acuerdo con las tarifas estab'ecidas
para este concepto
5. En todas las reparaciones se deberá acompañar al aparato factura de compra y la
presente garantía debidamente cumplimentada, con la indicación exacta de la
fecha de venta del aparato
6. En todo caso, el titular de la garantía tiene los derechos mínimos reconocidos por
la Ley
Titular (Comprador)
Domicilio
ПЛНРОФОР1Е5; ПА SERVICE KAIEITYHSH 2THN EiVi\AAA
H ooaKevn Ojsrf/júex охоХаспш, r\ íxitoupyia vt\^ civai аркутп
Kca Xoyto; ссутгкатаотаагго; щд 6sv проттса oe Koppia перпехохл)
va npoK\>xti. Av opcoç пар' oXà аътсе, колою e^crpnipct iSev >xiTot)p-
ТПоа, то е^ортпцег ¿uto кса ц ерутхою GttCKSOTiç nopsxov’TCci ало
TTiv eraipia ^pecev. H npooKopiÇopevTy yia елгокеоп <ла<УК£г>т1 лрела
va owoSeDerai onopaiTïVca ало то ДЕЛТ10 AIAi№KH£ ППЛНХЕПЕ,
Tl фгототолш ТОТ), кш то лороу еи*т\)ло <л)|длХт1рсо)Г£^о ка\ aípporjtapev’O ало то катаопура а-рра; тот».
Н еууо11<я| уга ENA его;, ало тпу Typepoptivaa ayopai;. H
Тиг|(Л1 Sev onç лоракатго itepiitriooeiç:
a Па CiV(ûpa>via оуд <хло рХорп tïiç огхукеоту?. о?.?.а ало çnJopa г\
р?.арт|, лои лро>Лт1д11ке ало трпоо; г\ ало ретароХп таоесо;
той т\?хктр1ко\) ре^ратод.
р. Гla av'(opa?.ia Хоуто е?хитто)дат1КТ]д еукатаотаоеок xnç стхткеоп?-
Y 'Otov о ctpi>dpo; катаокету-пуд triç отхгкеыу^ е/а oXXoicodei.
о. Па кефа?х<; Л1к-ал каг piKporpcovo.
Н €руа<ла елюкеял)!; yiverai ага Ep^jCtonipia ttiç ETOipiaç, олоо о
ЛЕХатп<; прела va рета<рере1 тгу сгиткеиту ре GiKiy тои 5олсолу.
Kccv'ev’c4 оутшроашо? 5ev ey.ei то Gucauopa ctXXcrpy^ to>v opoav erf-
'fwyeo^ Мега Tty Я»у^ту тоъ j^povom cvrvryoecoç, yta txtûc лрор?.пра
Gt)vnypry<Jeo>;, emOKe\)Tyç ту GDppovXtyç, octç ciaviaroopc va onoreiveaOe ста ката толоо; Service Tryç ETOtpiaç.
At£i)vwoTi Kex^piKCûv SERVICE PHIUPS:
2Srç Mapnov 15,177 78 Tavpo^ - “S 4894.911
ToipiGKi} 62,546 93 &S(T(7C£XoMKTj -^260.621
_________________________________________
^
57
Page 18

CD 335
Guarantee certificate
Identificatiekaart
Garantibeviset
Type no. of product:
No. de type du produit:
Typennummer des Gerätes:
Typenr. van het apparaat:
Tipo no. del producto:
Certificat de garantie
Certificado de garantía
Takuutodistus
Type plate
Date of purchase - Date d'achat-Kaufdatum-Koopdatum-Fecha de compra-Data da compra
to - Inkópsdato - Ostopaivà - Hpepopiiviot ayopa?
Dealer's name, address and signature
Nom, adresse et signature du revendeur
Name, Anschnft und Unterschrift des Handlers
Naam, adres en handtekening van de handelaar
Nombre, direcciûn y firma del distribuidor
Nome, indirizzo e firma del fornitore
Nome, morada e assinatuta da loja
Forhandlerens navn, adresse og underskrift
Àterforsaljarens namn, adress och namnteckning
Myyjan nimi, osoite ¡a allekirjoitus
Ovopa/Eitcovupo Avtutpoaconou
Garantieschein
Certificato di garanzia
Eyyuticrri
Data di acquisto - Kobsdato Kjopeda-
19
3104 115 2044 2
Printecf in Portugal 0591/1
 Loading...