

Page 1
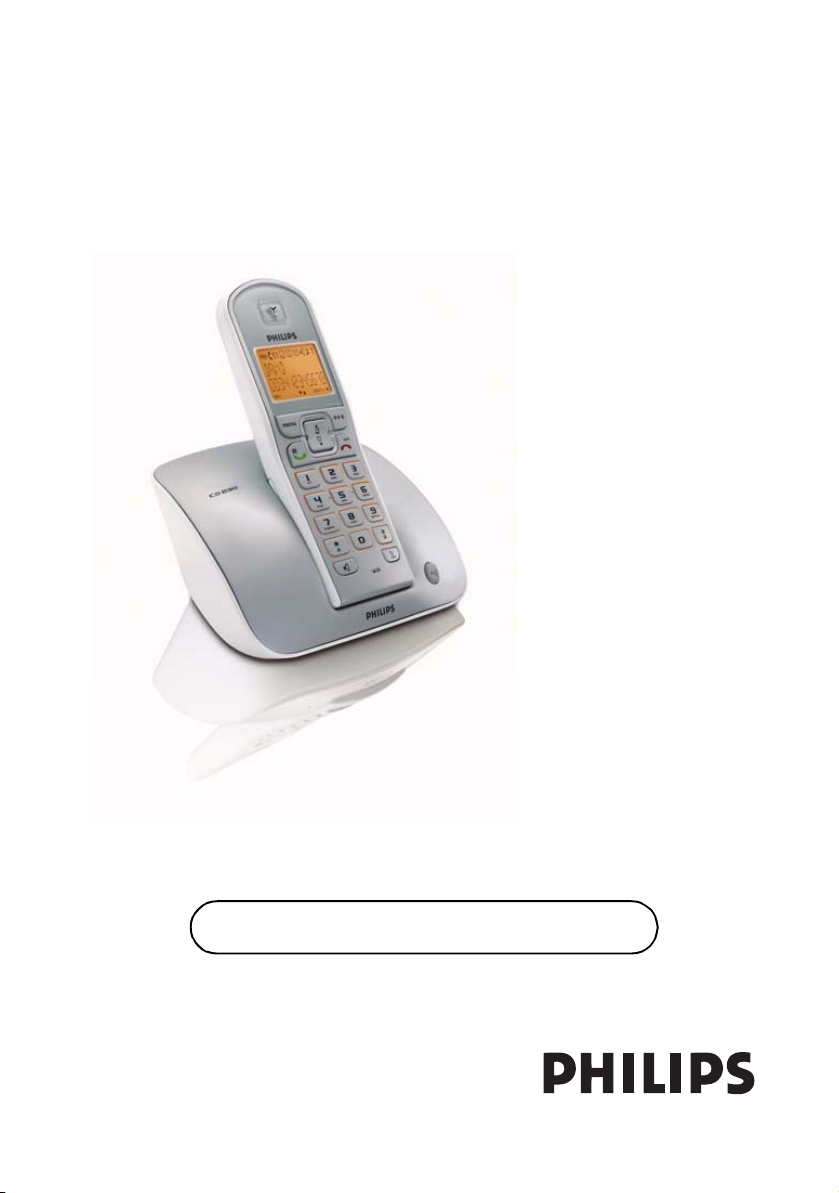
User manual
Charge the handset(s) for 24 hours before use !
Page 2

EN
Welcome mode
Before using your CD 230, you need to configure it according to the country of use. Install the batteries
(see page 8). After a few minutes of charge, the Welcome screen appears and displays an animated
welcome message in different languages.
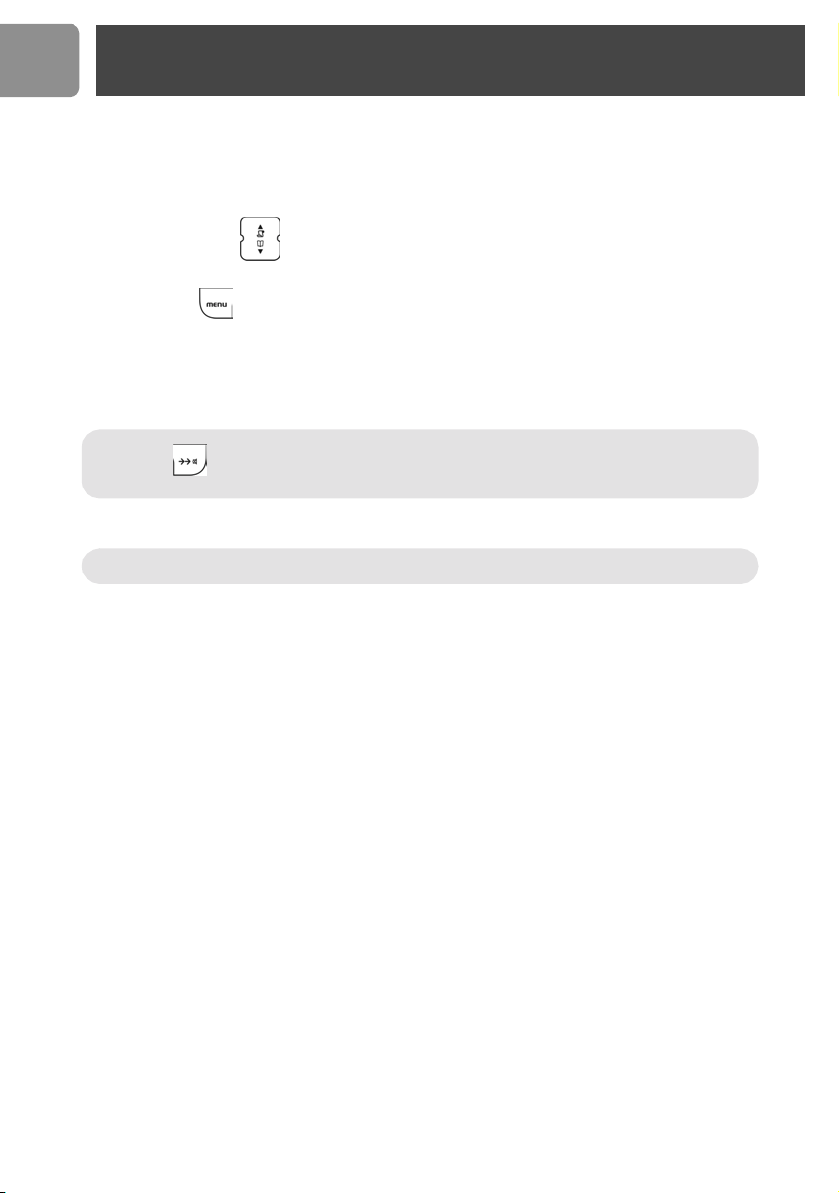
1. Press any key on the handset to stop the animation.
2. Press UP / DOWN to browse through the different countries and select your desired
country.
3. Press softkey OK to confirm the country that suits you.
After a short time you will hear a confirmation tone.
Then your phone is ready to be used.
If you need to re-configurate your CD 230, see page 26.
Note : If BACK is pressed, the handset will show the country selection screen again.
WARNING ! Only the handset language will be updated if there is no link with a base.
Page 3
EN
Welcome mode
Before using your CD 230, you need to configure it according to the country of use. Install the batteries
(see page 8). After a few minutes of charge, the Welcome screen appears and displays an animated
welcome message in different languages.
1. Press any key on the handset to stop the animation.
2. Press UP / DOWN to browse through the different countries and select your desired
country.
3. Press softkey OK to confirm the country that suits you.
After a short time you will hear a confirmation tone.
Then your phone is ready to be used.
If you need to re-configurate your CD 230, see page 26.
Note : If BACK is pressed, the handset will show the country selection screen again.
WARNING ! Only the handset language will be updated if there is no link with a base.
Page 4

Contents
Welcome mode ........................................................................ 2
Contents .................................................................................... 3
Important information ............................................................. 4
What’s in the box ...................................................................... 5
Handset and base station ......................................................... 6
Icons on the handset display .................................................... 7
Installing your phone ................................................................ 8
Battery life and range ............................................................................. 9
Using GAP standard compliance ............................................ 9
Using the menus ..................................................................... 10
Registering your handset ....................................................... 10
Menu structure ........................................................................ 11
Standby mode ......................................................................... 12
Text or number entry ............................................................ 12
Call ........................................................................................... 13
Phonebook ............................................................................... 16
Call log ..................................................................................... 18
Redial list .................................................................................. 19
Clock and alarm settings ........................................................ 20
Personalizing your phone ....................................................... 21
Giving your phone a name ..................................................................22
Setting your phone’s language ............................................................ 22
Turning the backlight on/off ...............................................................22
Auto answer ........................................................................................... 22
Selecting your handset’s ringing melody ..........................................22
Selecting your handset’s ringing volume ..........................................23
Turning the key beep on/off ...............................................................23
Advanced features .................................................................. 24
Recall time ..............................................................................................24
Dial mode ............................................................................................... 24
Area code ...............................................................................................24
Baby call ...................................................................................................24
Registering a handset ........................................................................... 25
Selecting a base ...................................................................................... 25
Un-registering a handset ..................................................................... 26
Changing the Base PIN ........................................................................ 26
Resetting .................................................................................................. 26
Selecting country ................................................................................... 26
Additional features ................................................................. 27
Lock keypad ............................................................................................ 27
Shortcut for turning handset ringer on/off ..................................... 27
Message waiting indication ..................................................................27
Paging ....................................................................................................... 27
Caller ID first ring suppression .......................................................... 27
Using the intercom ................................................................. 28
Calling someone in the house ............................................................ 28
Preparatory Intercom Dialling ........................................................... 28
Calling someone in the house while you are
talking on the phone ............................................................................. 28
Transferring your call to another handset ......................................29
Making a 3-way conference call ......................................................... 29
Default settings ....................................................................... 30
Troubleshooting ...................................................................... 31
Information .............................................................................. 32
Safety information ................................................................................. 32
Conformity .............................................................................................32
Environmental care ...............................................................................32
EN
3
Page 5

EN
Important information
For your safety
Before installing your CD 230, carefully read the following information.
Power requirements
The product requires an electrical supply of 220-240 volts, alternating monophased power, excluding IT
>
installations defined in standard EN60-950. In case of power failure, the communication can be lost.
Warning ! The electrical network is classified as hazardous according to criteria in the standard
EN 60950. The only way to power down this product is to unplug the power supply unit from the
electrical outlet. Ensure the electrical outlet is located close to the apparatus and is always easily
accessible.
Telephone connection
Always use the line cable provided with the product otherwise you may not have a dialling tone.
>
If you have a broadband DSL Internet connection, please make sure you have one DSL filter plugged
>
directly on each line socket used in the house and check the modem and the phone are plugged in the
correct filter slot (one specific for each).
Need help?
For more information on troubleshooting and FAQ’s:
Online help: www.p4c.philips.com
Troubleshooting : see page 31
4
Page 6
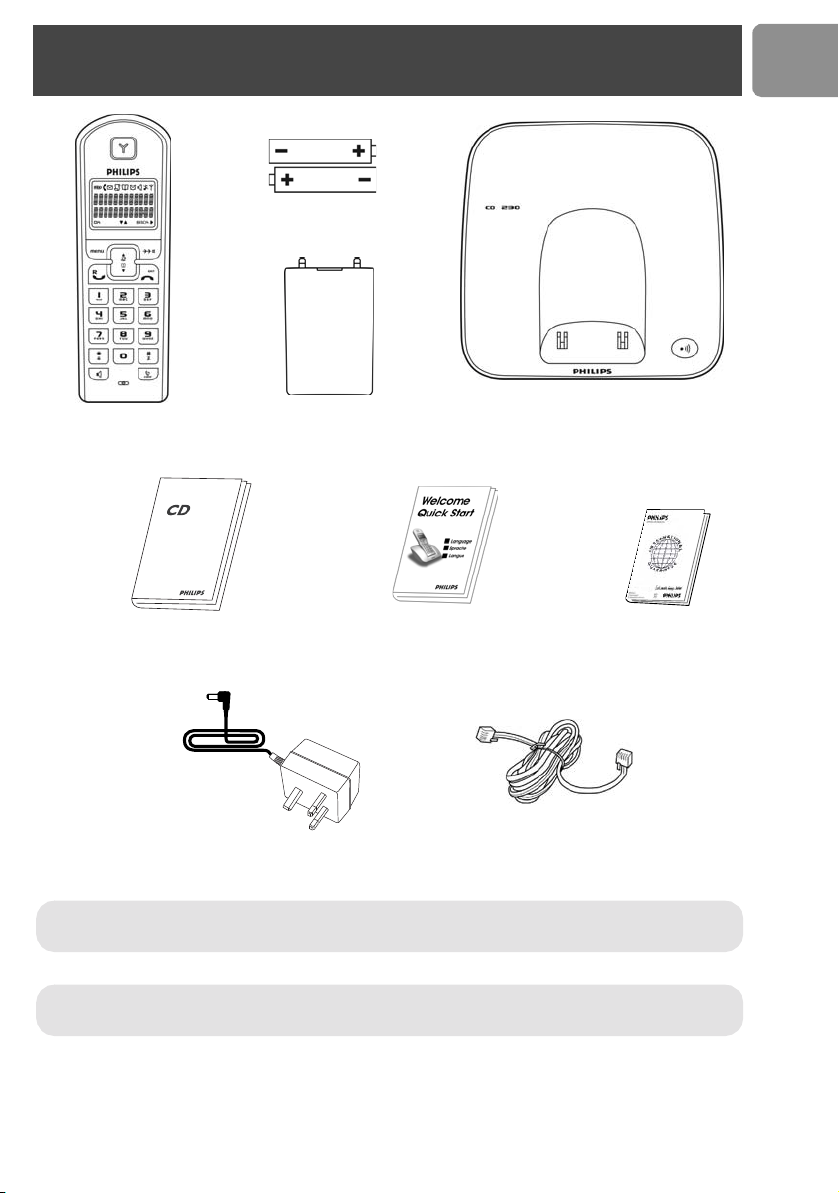
What’s in the box
2 AAA Batteries
EN
Handset CD 230
230
User manual Quick Start Guide
A power supply unit
*Note : You may find in the box the line adaptor delivered separately from the line cord. In this case,
please plug first this line adaptor onto the line cord before connecting it to the line socket.
Battery door
Base station CD 230
Guarantee
A line cord*
Note : In multihands et pac ks, yo u will find one or more additio nal ha ndset, chargers with power supp ly
units and additional rechargeable batteries.
5
Page 7
EN
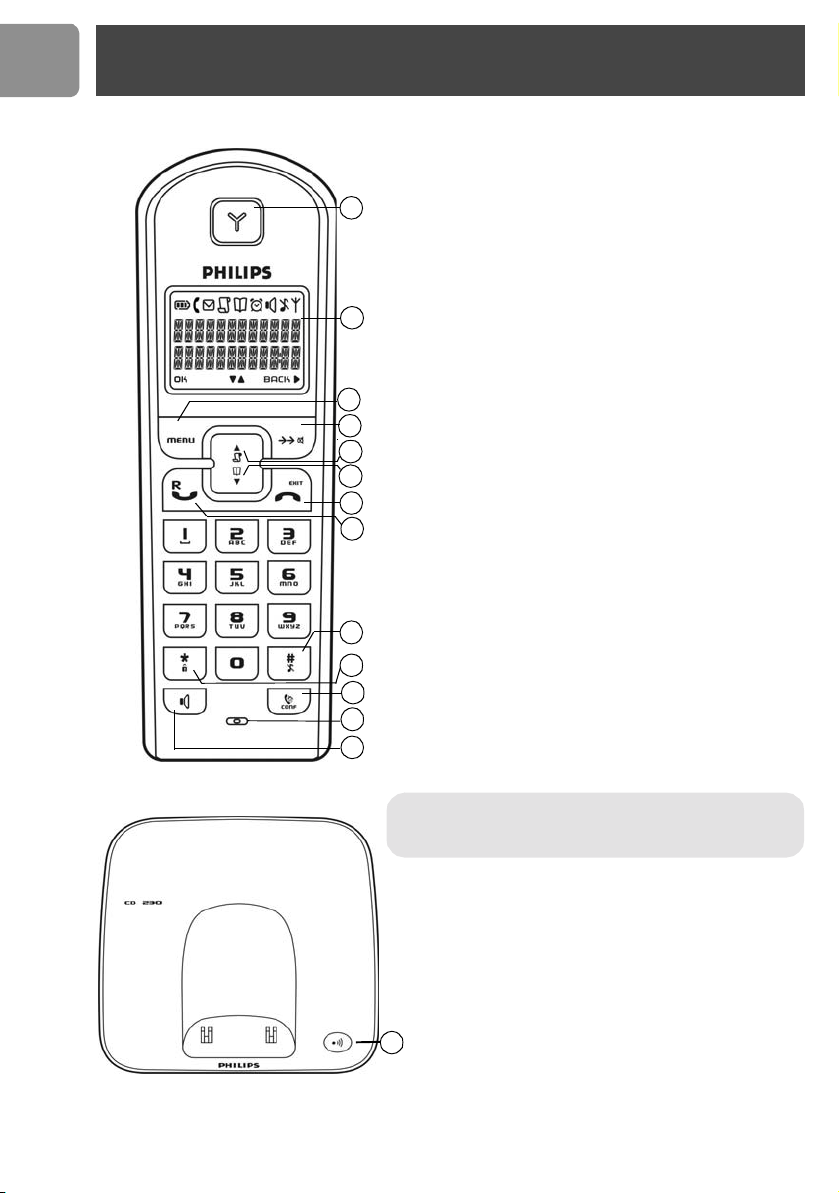
Handset and base station
CD 230 handset
1Earpiece
2Display, icons see page 7
3Menu & OK Key
Use to enter menus.
1
2
3
4
5
6
7
8
9
10
11
12
13
Use to select menu.
Use to confirm an operation.
4 Redial, Mute & Back Key
Use to switch between call details (name/number or
date /time).
Use to enter redial list.
Use to redial last dialled number.
Use in talk mode to mute/unmute the handset microphone.
Use in edit mode to delete the last character or digit.
5 Call log & Scroll up Key
Use to enter call log.
Use to scroll up items.
Use to increase ringer and receiver volume.
6 Phonebook & Scroll down Key
Use to access phonebook.
Use to scroll down items.
Use to reduce ringer and receiver volume.
7 Off & Exit Key
Use to end a call.
Use to exit menus.
8 Talk & Recall Key
Use to take the line and answer a call.
In Phonebook mode, Redial list and Call log use to dial
the selected number.
Use to send flash signal.
9 Insert #, Ringer off & Pause Key
Use to insert #.
Use to enter a pause (P) when dialling.
Use to turn the ringer on/off.
10 Insert star & Key lock Key
Use to lock the keypad.
11 Intercom and Conference Key
Use to make intercom calls.
Use to set up 3-way conference.
12 Microphone
13 Loudspeaker Key*
Use to turn the speaker on/off.
*Warning ! Handsfree activation could suddenly increase
the volume in the loudspeaker to a very high level. Make
sure the handset is not too close to your ear.
CD 230 Base station
1Paging Key
Use for registration.
Use for locating handset(s).
1
6
Page 8
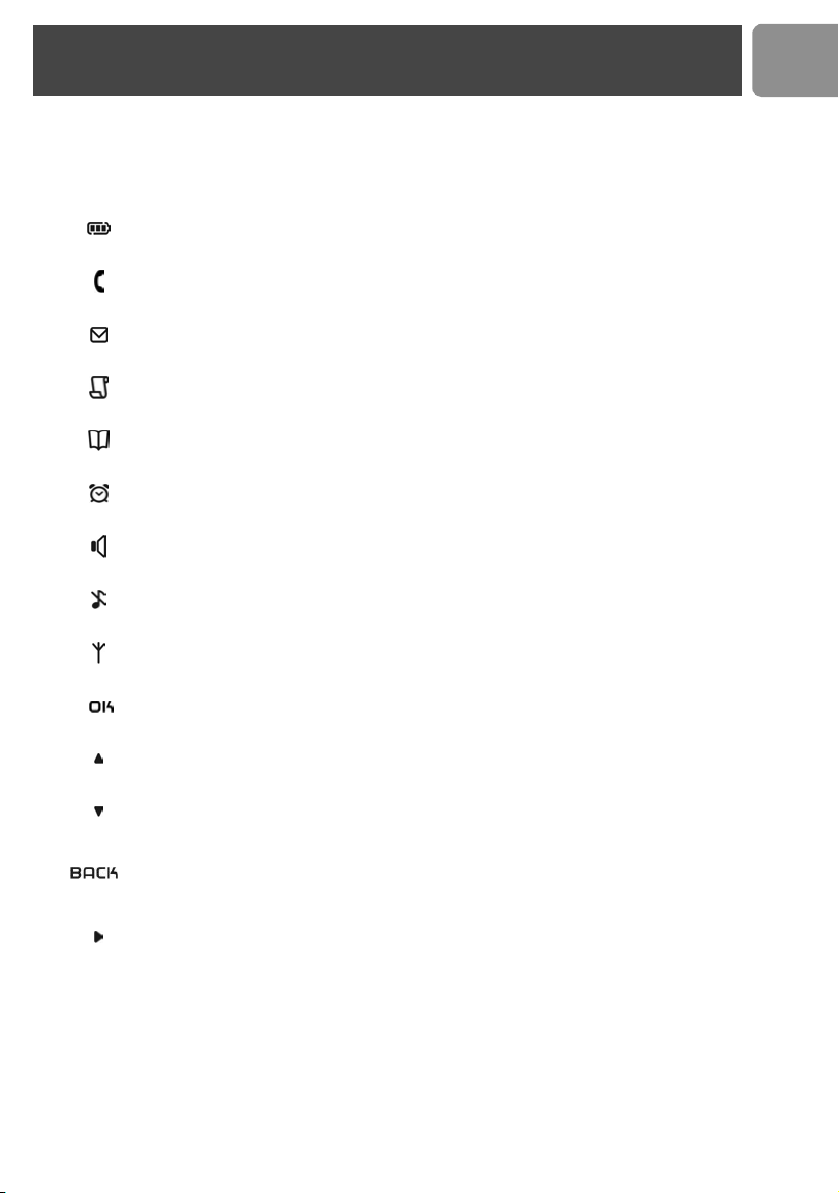
Icons on the handset display
When being used for the first time, it is sometimes necessary to wait until the batteries are
sufficiently charged before the icons appear on the display.
The display gives information about the operation of your telephone. Following icons can be
shown in the headline of the display.
Displays the current battery level. It scrolls during charging.
The phone is in use. It blinks during ringing.
There is a new voice mail in your network mailbox (subscription needed).
There is a new Call log record or Call log records are being reviewed.
Phonebook records are being reviewed.
The alarm clock is turned on.
Loudspeaker is turned on.
The ringer is turned off.
EN
The handset is linked to the base.
Press to confirm selection or operation.
More menu options are available upward.
More menu options are available downward.
Press to return to the previous screen.
Press to delete characters or digits.
There are more digits on the right.
7
Page 9
EN
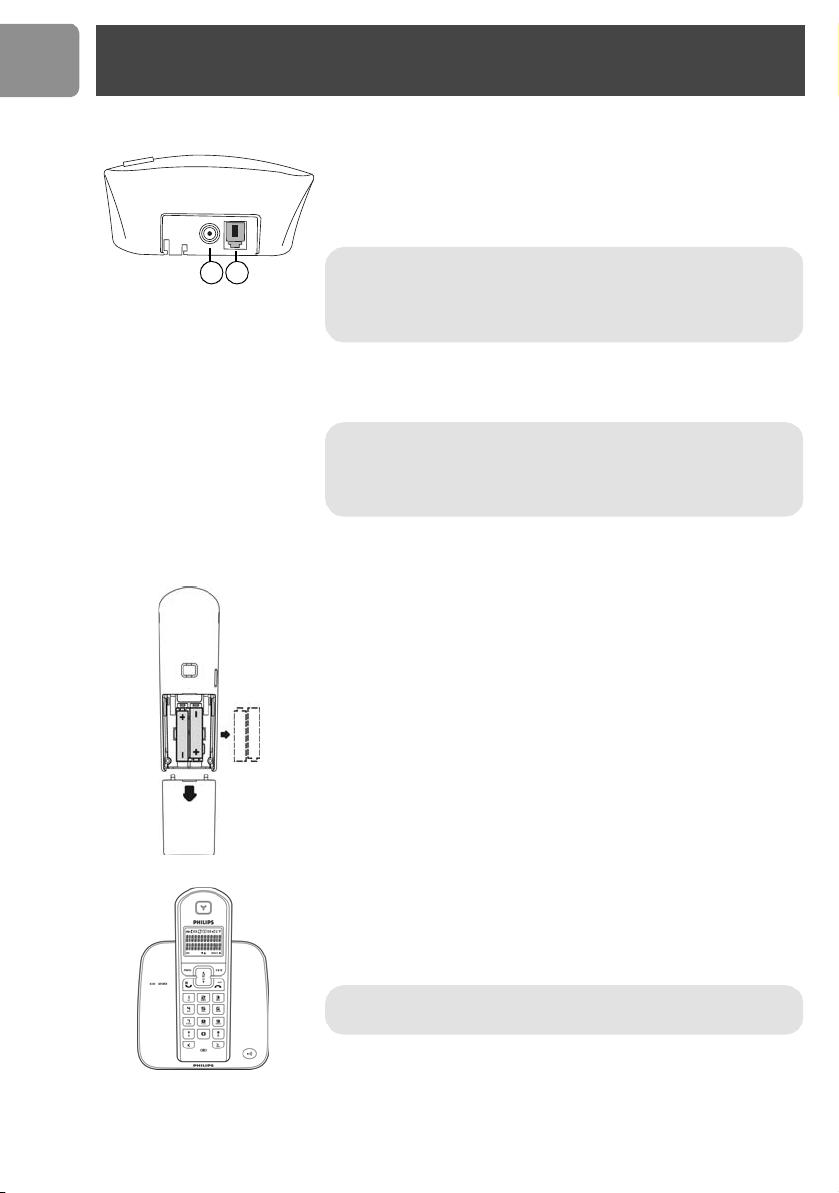
Installing your phone
Installing the base station
Place the base station close enough to the telephone and mains power
sockets so that the cables will reach.
1. Connect the output plug of the base adaptor to the adaptor socket on
the back of the base unit and the base adaptor to the wall mains
supply.
1 2
Warning ! The electrical network is classified as hazardous
according to criteria in the standard EN 60-950. The only way to
power down this product is to unplug the power supply from the
electrical outlet. Ensure the electrical outlet is located close to the
apparatus and is always easily accessible.
2. Connect the telephone line cord to the phone socket on the back of
the base unit and to the wall phone socket.
Warning ! Always use the line cable provided with the product
otherwise you may not have a dialling tone.
Please take care that the power supply and telephone line are
connected to the correct sockets as incorrect placement could
damage your equipment.
3. If you have bought a multi-pack product, each extra handset comes
with a charger and a charger adaptor. Connect the output plug of the
charger adaptor to the adaptor socket on the bottom of the charger.
Connect the charger adaptor to the wall mains supply.
Installing and replacing the batteries in the handset
1. Place 2 rechargeable NiMH AAA batteries (included), with the correct
polarity, into the battery compartment on the handset.
2. Slide the battery door firmly into place.
3. Place the handset on the base unit or the charger and let the batteries
continuously charge for 24 hours before using. The handset may get
warm during the initial charge. This is normal.
On first use it may be necessary to wait for a few minutes before
seeing symbols on the display.
Warning : The base station must always be plugged into the mains
when charging or when in use. Always use rechargeable batteries.
The warranty does not apply to the batteries and any other components
which have a limited lifetime or are exposed to wear.
8
Page 10
Battery life and range
Low battery warning
A low battery alert (during off hook) will inform you that the handset has to be recharged. If this happens during
a call, the call may end shortly after the alert.
An empty battery icon indicates the batteries need recharging. Place the handset on the base unit or the
charger to recharge the batteries. A handset reaching a very low battery voltage level will go into sleep mode,
displaying LOW BATTERY on the screen.
Note : The warranty does not apply to the batteries and any other components which have a limited
lifetime or are exposed to wear.
Batteries should not be disposed of with general household waste.
Battery life and range
Optimal battery life is reached after 3 cycles of complete charging & discharging. When reaching the range limit
and the conversation becomes crackly, move closer to the base. To reach optimal range, place the base station
away from electrical appliances.
Battery life in talk
time
up to 10 hours up to 120 hours up to 50 metres up to 300 metres
Battery life in standby
mode
Indoor range Outdoor range
Using GAP standard compliance
EN
The GAP standard guarantees that all DECT
operating standard irrespective of their make. Your CD 230 handset and base station are GAP compliant,
which means the minimum guaranteed functions are : register a handset, take the line, receive a call and dial.
The advanced features may not be available if you use another handset than a CD 230 with your base station.
To register and use your CD 230 handset with a GAP standard base station of a different make, first follow
the procedure described in the manufacturer’s instructions, then follow the procedure described on page 25.
To register a handset of another make to the CD 230 base station, place the base station into registration
mode (page 25), then follow the procedure in the manufacturer’s instructions.
TM
is a Trade Mark of ETSI registered for the benefit of the implementers of the DECT technology.
DECT
TM
GAP handsets and base stations comply with a minimum
9
Page 11
EN
Registering your handset
You will need to register your handset if it shows UNREGISTERED in the display or if you wish to register
the handset to a different base unit. You can register up to 4 handsets on a single base, and you can register a
handset to 4 bases.
To register your handset :
1. Press .
If your handset displays UNREGISTERED, go to step 5.
2. Select ADVANCED SET and press
3. Select REGISTRATION and press
4. Before you enter the PIN code, press and hold the PAGING key on the base for 4 seconds. The
base is now in the registration mode. (If the base is full and cannot take on any more handset, you will not
be able to register. See “Un-registering a handset”, page 26 to delete a currently registered handset.)
5. Enter the PIN code (default: 0000) and press
6. Select a base station using the digit keys 1, 2 , 3 or 4. A blinking digit indicates that the base number is
already used.
If the registration failed, follow the procedure and try again.
.
.
.
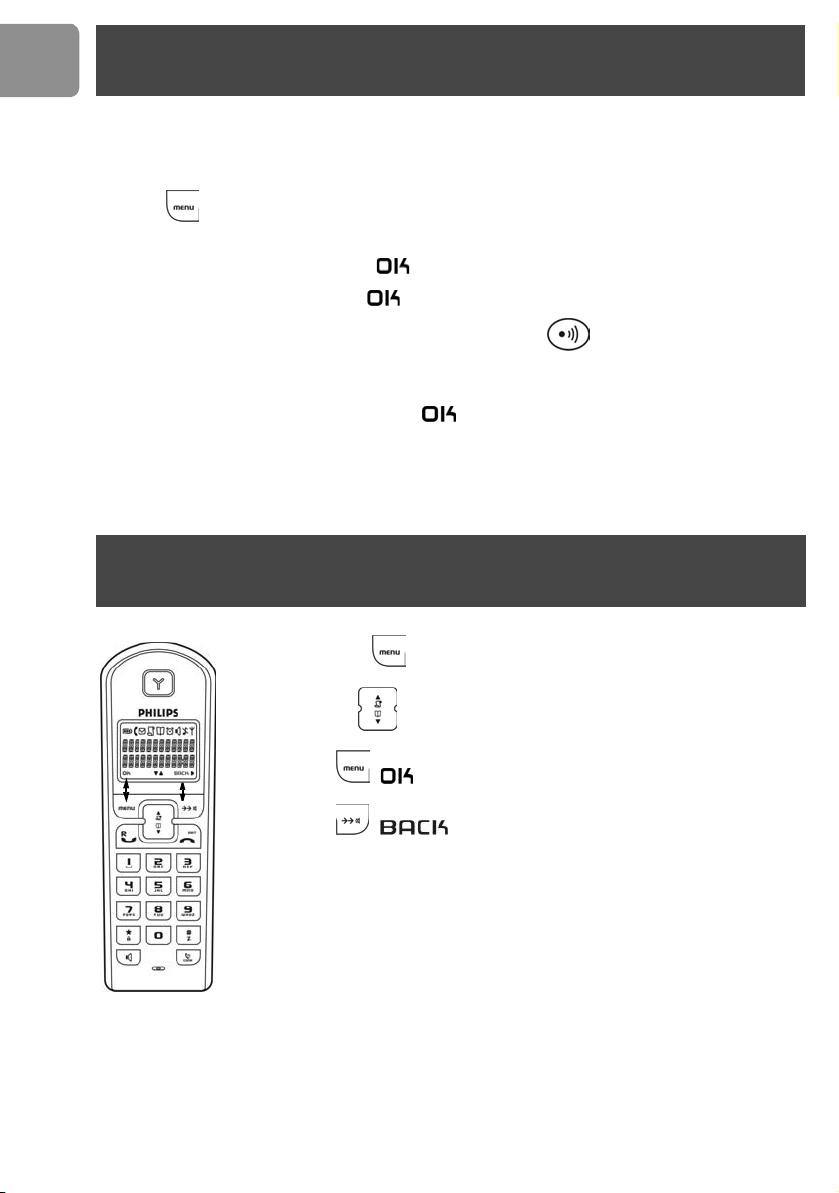
Using the menus
10
From standby, press to enter the menu.
Use UP/DOWN to go up or down in the menu list.
Press Softkey to confirm the selection.
Press Softkey to exit the menu or to go back to the previous menu
level.
Page 12

Menu structure
Your phone offers a variety of functions and features that are grouped in the menus.
EN
PHONEBOOK
CLOCK/ALARM
PERSONAL SET
ADVANCED SET
ADD
EDIT
DELETE
DELETE ALL
TIME
SET ALARM
ALARM TONE
HANDSET TONE
HANDSET NAME
AUTO ANSWER
BACKLIGHT
LANGUAGE
RECALL TIME
DIAL MODE*
AREA CODE*
BABY CALL
REGISTRATION PIN
BASE SELECT
DELETE HS
CHANGE PIN
RESET
COUNTRY*
SET CLOCK
ON/OFF
MELODY
VOLUME
MELODY
VOLUME VOLUME 1-5/OFF
KEY BEEP
ON/OFF
ON/OFF
Language list
RECALL 1/2
TONE/PULSE
ON/OFF
AUTO/BASE 1
HANDS ET 1/2/3/4
Enter PIN
PIN
COUNTRY 1 - 8
MELODY 1 - 1 0
ON/OFF
BASE 1/2/3/4
*Country dependent features, these menus are not available in some countries.
11
Page 13

EN
Text or number entry
You can enter the names of your phonebook entries character by character, pressing the corresponding key
as many times as necessary to reach the desired character.
Press Softkey under the label to delete a character.
Example to write “Peter”
Press once : P
Press twice : PE
Press once : PET
Press twice : PETE
Press three times : PETER
Keypad
Keys
1 [space] 1 < >
2 A B C 2
3 D E F 3
4 G H I 4
5 J K L 5
6 M N O 6
7 P Q R S 7
8 T U V 8
9 W X Y Z 9
0 0 - / \ o
Multi-tap Sequence
Standby mode
In standby mode, the CD 230 display shows various information :
• The current battery level and the range ,
• the name of the handset and the time,
• new calls , if any,
• new voice mails , if any
• and the alarm clock , if activated.
12
Page 14

Call
Making a call
1. Press and wait for the dial tone.
2. Dial the number you want to call. The number appears on the display and is dialled.
Note : If you move too far away from the base unit during a call, your phone will sound an alert tone,
and will flash. You need to move closer to the base unit or your call will be disrupted.
Note : If, during a call, your phone starts to run out of batteries, you will be warned by an alert tone.
You should charge the handset as soon a s possible or it would turn off wh en it is o ut of battery . Placing
the handset on the base unit or charger will end the current call.
Call timer
The call timer shows the duration of your current call on display. It is shown in minutes and seconds (MM-SS)
in the first hour. After that, it will be shown in hours and minutes (HH-MM).
Preparatory Dialling (Pre-Dial)
With pre-dial, you can see and edit the number you are calling on the display before dialling it.
1. Enter the number you want to call.
The number appears on the display. You can enter up to 20 digits.
2. Press .
Note : Press to delete an incorrect digit.
Long press the # key to enter a pause. It is displayed as P.
EN
Redialling the last number
With off-hook redialling, you can redial the last number dialled.
1. Press .
2. Press .
Calling from the redial list
Your phone records the last 5 numbers you have dialled. Only the first 20 digits of each number are stored.
To redial one of the last 5 dialled numbers,
1. Press . The most recently dialled number appears.
2. Press UP / DOWN to choose the number you want to dial.
If the name and number are available, press to toggle between them.
3. Press .
13
Page 15

EN
Call
Calling from the phonebook
1. Press DOWN to directly acces the phonebook.
2. Press the UP / DOWN to search for the record that you would like to dial.
3. Press .
Note : You can use the number keys to jump directly to the record starting with the corresponding
letters of that key. For example, press 2 to search for records starting with A.
If the number has more than 12 digits, press to view off screen digits, and press once more
to view the first 12 digits again.
Ending a call
Press or place the handset on the base unit or charger.
Answering a call
When you receive a call, the phone will ring and will flash on the display.
Press to answer the call.
Note : If a caller ID record is received (subscription needed), turns on and the caller information
is displayed. When the phone is ringing, you can press to turn the ringer off for this incoming call.
Answering a call in hands free mode
The handsfree feature enables you to talk to the caller without holding onto the phone. It also allows others
in the room to join in the conversation.
Press to turn the loudspeaker on/off during a call.
Note : appears to indicate the loudspeaker is on.
Call in progress
Setting the earpiece volume
You can increase or reduce the volume of a caller’s voice during a call. There are 3 different volume levels.
Press UP / DOWN to adjust the receiver or loudspeaker volume.
Warning ! Handsfree activation could suddenly increase the volume in the loudspeaker to a very high
level. Make sure the handset is not too close to your ear.
14
Page 16

Call
Microphone mute
During a call, you can speak to someone privately without the caller hearing you.
Press to mute/unmute the microphone during a call.
MUTE appears to indicate the call is being muted.
Chain dialling
You can dial out numbers from the phonebook even after you have seized the phone line. And there is no limit
to the number of times chain dialling is accessed.
1. Long press DOWN for 2 seconds.
2. Press UP / DOWN to scroll through the phonebook records or you can use the number keys to
jump directly to the record starting with the corresponding letters of that key.
3. Press .
Note : If you decide to quit using chain dialling, simply long press DOWN for 2 seconds again
to exit.
Recall
You can use the recall function to make or receive a second call. Please subscribe and consult the details for
this service from your local service provider.
EN
Making a second call
1. Press to put the current call on hold. You will hear the dialling tone.
2. Enter the number of the second call and it will be dialled out.
3. When the second call is answered, you can press to toggle between the 2 calls.
Answering a second call
If another call comes in during a call, you can answer it without ending the current call. During a call, the
handset will sound a short beep periodically to notify you of another incoming call.
1. Press to put the current call on hold and talk with the second caller.
If you have subscribed for caller ID service, the caller ID of this second caller appears on the display.
2. Subsequent presses of will toggle you between these 2 callers.
15
Page 17

EN
Phonebook
You can use your phonebook to manage your contacts. If you have more than one handset, each handset has
its own phonebook.
Access/view the phonebook
Your phonebook can store up to 50 records. Each record can store a name up to 12 characters and a number
up to 20 digits.
1. Press DOWN to directly acces the phonebook.
2. Press UP / DOWN to scroll through the records.
OR
You can use the number keys to jump directly to the record starting with the corresponding letters of
that key.
Adding entry in phonebook
1. Press .
2. Select PHONEBOOK and press OK.
3. Select ADD and press OK.
4. Use the number keys to enter a name.
Note : Press once to enter a space. Press to delete an incorrect character.
5. Press OK to confirm the name.
Note : You are not allowed to save a name that already exists in the phonebook. Edit the name and try
again.
6. Enter the phone number.
7. Press OK to save the number.
Note : Repeat steps 3 to 7 to add another record.
16
Page 18

Phonebook
Editing a phonebook entry
1. Press .
2. Select PHONEBOOK and press OK.
3. Select EDIT and press OK.
4. Press UP / DOWN to search for the record that you would like to edit or use the number keys
to jump directly to the record starting with the corresponding letters of that key.
5. Press OK to select the record and edit the name.
6. Press OK to confirm name changed and edit the number.
7. Press OK to confirm number changed.
Note : Repeat steps 3 to 7 to edit another record.
Deleting a phonebook entry
1. Press .
2. Select PHONEBOOK and press OK.
3. Select DELETE and press OK.
4. Search for the record you want to delete.
5. Press OK to select the record.
6. Press OK to confirm.
Note : Repeat steps 3 to 6 to delete another record.
Deleting all phonebook entries
Instead of deleting the records one by one, you have this option to delete the entire phonebook.
EN
1. Press .
2. Select PHONEBOOK and press OK.
3. Select DELETE ALL and press OK.
4. Press OK again to confirm.
WARNING : All deleted r ecords cannot be recovered.
17
Page 19

EN
Call log
Caller ID display
If you have subscribed to the caller identification service with your operator, your phone automatically stores
the last 20 incoming calls. Each record stores a name up to 12 characters and a number up to 20 digits.
If you have more than one handset, each handset has its own call list.
Order of display
If the caller’s name is available, the first 12 characters will be displayed with the date and time the call received.
If the name is not available, the first 12 digits of the caller’s number will be displayed with the date and time.
Matching your phonebook record
If the caller’s number matches a phone number stored in the phonebook, that phonebook name will be
displayed instead of the CID name.
Accessing the call log
1. Press UP to directly access the call log. The caller name (or number) of the most recent call
record is displayed with the date and time. If viewing a record for the first time, a star is displayed in front
of the time.
2. Press to view the number.
3. Press again to see the name again.
4. Press or place the handset on the base unit or charger to exit.
Note : Whether you are viewing the name, number or date / time, pressing the DOWN key
will display the next older record and the UP key the next newer record.
Calling back from a call record
While you are viewing a call record, you can return the call, provided that it contains a valid phone number, by
pressing .
Saving call log entry in the phonebook
To save the phone number of your family, friends, and colleagues, you can save the call records to your
phonebook if you do not already have their contact information.
1. While you are viewing the call record that you would like to save, press .
2. Select SAVE and press OK.
3. Edit the caller’s name if necessary, or enter a name if caller’s name is not available.
4. Press OK to save the name.
5. Edit the number if necessary and press OK.
Note : The call record is now saved into the phonebook. The call record is still in your call list but it
will show the new name entered.
18
Page 20

Call log
Deleting a call log entry
1. While you are viewing the call record that you would like to delete, press .
2. Select DELETE and press OK.
3. Press OK to confirm.
Deleting all call log entries
Instead of deleting the records one by one, you have this option to delete the entire call list.
1. While you are viewing the call log, press .
2. Select DELETE ALL and press OK.
3. Press OK to confirm.
EN
Stripping the area code* *
You can strip the area code from the incoming caller’s number. A return call can be made directly using the
number in the call log.
The area code can be up to 5 digits long. The area code will be removed from the incoming caller’s number
that begins with the same area code entered.
To strip the area code,
1. Press .
2. Select ADVANCED SET and press OK.
3. Select AREA CODE and press OK.
4. Enter the area code and press OK to confirm.
menu not available for some countries
Redial list
Accessing redial list
Your phone stores the last 5 numbers you have dialled, up to 20 digits each. If you have more than one handset,
each handset has its own dial list.
1. Press . The last number dialled is displayed.
2. Press to scroll through the last 5 dialled numbers.
3. Press the BACK key or the key repeatedly to view the details of thi s dialled record.
4. Press or place the handset on the base unit or charger to exit.
19
Page 21

EN
Redial list
Calling a number from the redial list
1. Press and scroll to select an entry.
2. Press .
Saving a redial list number into the phonebook
1. While you are viewing a dial record that you would like to save, press .
2. Select SAVE and press OK.
3. Enter a name for this dial record and press OK to save the name.
4. Edit the number if necessary and press OK.
Note : The record is now saved into the phonebook. The dial record is still in your dial list but it will
show the new name entered.
Deleting a number from redial list
1. While you are viewing a dial record that you would like to delete, press .
2. Select DELETE and press OK.
3. Press OK to confirm.
Deleting all redial entries
Instead of deleting the records one by one, you have this option to delete the entire dial list.
1. While you are viewing any dial record, press .
2. Select DELETE ALL and press OK.
3. Press OK to confirm.
Clock and alarm settings
Setting the time
The time is displayed during standby mode.
1. Press .
2. Select CLOCK/ALARM and press OK.
3. Select TIME and press OK.
4. Select SET CLOCK and press OK. The current setting is displayed.
5. Edit the time using the digit keys and press OK to confirm.
20
Page 22

Clock and alarm settings
Setting the alarm time
1. Press .
2. Select CLOCK/ALARM and press OK.
3. Select SET ALARM and press OK. The current setting is displayed.
4. Select ON or OFF and press OK. If you selected ON, continue to step 5.
5. Enter the alarm time using the digit keys and press OK to confirm.
The alarm will ring for 1 minute. Press to turn off the alarm clock.
Selecting your alarm clock’s ringing melody
1. Press .
2. Select CLOCK/ALARM and press OK.
3. Select ALARM TONE and press OK.
4. Select MELODY and press OK. The current melody is displayed.
5. Select the desired melody and press OK to confirm.
Selecting your alarm clock’s ringing volume
1. Press .
2. Select CLOCK/ALARM and press OK.
3. Select ALARM TONE and press OK.
4. Select VOLUME and press OK. The current volume level is displayed.
5. Press UP/DOWN to increase/decrease the volume level and press OK to confirm.
EN
Personalizing your phone
Your phone comes with a selection of settings that you can change to personalize the phone the way you like
it to work.
Personalizing your phone will be done in the various menu items. At any time, you can press the BACK key
to exit the current menu or cancel the confirmation. If you press , the phone will simply abort all
programming and return to standby.
21
Page 23

EN
Personalizing your phone
Personalizing your phone’s display
Giving your phone a name
You can give your phone a different name. If you have more than one handset, you can give each handset its
own name.
The handset name can be up to 10 characters long and it can be composed of A-Z, 0-9, and space.
1. Press .
2. Select PERSONAL SET and press OK.
3. Select HANDSET NAME and press OK. The current handset name is displayed.
4. Edit the handset name and press OK to confirm.
Setting your phone’s language* *menu not available for some countries
Your phone comes with several languages. When you change your phone’s language, the menus will be displayed
in the chosen language.
1. Press .
2. Select PERSONAL SET and press OK.
3. Select LANGUAGE and press OK. The current language is displayed.
4. Select the desired language and press OK to confirm.
Turning the backlight on/off
The LCD and keypad will be lit when the phone is being used.
1. Press .
2. Select PERSONAL SET and press OK.
3. Select BACKLIGHT and press OK. The current setting is displayed.
4. Select ON or OFF and press OK to confirm.
Auto answer
Auto answer gives you the convenience of answering a call by just picking up the phone from the cradle or
charger. You don’t need to press the TALK key.
1. Press .
2. Select PERSONAL SET and press OK.
3. Select AUTO ANSWER and press OK. The current setting is displayed.
4. Select ON or OFF and press OK to confirm.
Personalizing your phone’s sounds
You can assign different ringing melodies for each handset at different volume levels.
Selecting your handset’s ringing melody
1. Press .
2. Select PERSONAL SET and press OK.
3. Select HANDSET TONE and press OK.
4. Select MELODY and press OK. The current melody is displayed.
5. Select the desired melody and press OK to confirm.
22
Page 24

Personalizing your phone
Selecting your handset’s ringing volume
1. Press .
2. Select PERSONAL SET and press OK.
3. Select HANDSET TONE and press OK.
4. Select VOLUME and press OK. The current volume level is displayed.
5. Press UP/DOWN to increase/decrease the volume level.
6. Press OK to confirm.
Turning off your handset’s ringer
Setting OFF (see page 27) will turn off the ringer. appears to indicate that the ringer is turned off.
Ringer does not emit any sound to indicate an incoming call.
Turning the key beep on/off
Key beeps are tones that your phone makes each time you press a key on the handset.
1. Press .
2. Select PERSONAL SET and press OK.
3. Select HANDSET TONE and press OK.
4. Select KEY BEEP and press OK. The current setting is displayed.
5. Select ON or OFF and press OK to confirm.
EN
23
Page 25

EN
Advanced features
Note : Your handset must have a link with the base unit in order to use any advanced features
mentioned in this section.
Recall time*
This option is helpful when using operator services. The default value of recall time that is preset in your
CD 230 should be the best suited for your country network and therefore you should not need to change it.
1. Press .
2. Select ADVANCED SET and press OK.
3. Select RECALL TIME and press OK. The current setting is displayed.
4. Select the desired recall durations and press OK to confirm.
Dial mode*
The default value of dial mode that is preset in your CD 230 should be the best suited for your country network
and therefore you should not need to change it.
1. Press .
2. Select ADVANCED SET and press OK.
3. Select DIAL MODE and press OK. The current setting is displayed.
4. Select TONE or PULSE and press OK to confirm.
*country dependent, menu not available for some countries
*country dependent
Temporary tone dialling in pulse dial mode
If the dialling mode is set to pulse, you can long press to set temporary tone dialling. d will be displayed
on the screen. All the following digits will be dialled as tones until you hang up.
Area code*
If your local PSTN sends the CID with local area code attached, it is necessary to filter out the local area code
when dial back from call log. The AREA CODE function allows you to remove the local area code from the call
log entries. The local area code can be set from 1 to 5 digits. The default setting is blank.
*country dependent, menu not available for some countries
1. Press .
2. Select ADVANCED SET and press OK.
3. Select AREA CODE and press OK. The current area code (if available) is displayed.
4. Enter or edit the number and press OK to confirm.
Baby call
Baby call allows you dial out a programmed number by pressing any key on the handset (except ).
To turn on Baby call,
1. Press .
2. Select ADVANCED SET and press OK.
3. Select BABY CALL and press OK. The current setting is displayed.
4. Select ON and press OK.
5. Enter or edit the number and press OK to confirm.
BABY CALL is displayed when you return to standby mode.
24
Page 26

Advanced features
To turn off Baby call,
1. Press .
2. Select OFF and press OK.
Registering a handset
Each base can register up to 4 handsets. Each handset can register up to 4 bases.
If you have inadvertently unregistered your handset, you can register it again. Additional handsets must be
registered to the base before use.
Note : If yo u wi sh to reg ist er n on P hil ips handse ts t o a C D 23 0 ba se s tati on, mak e su re th at this han dse t
is GAP compliant otherwise it will not operate properly (see page 9).
1. Press .
If your handset displays UNREGISTERED, go to step 5.
2. Select ADVANCED SET and press OK.
3. Select REGISTRATION and press OK.
4. Before you enter the PIN, long press the PAGING key on the base for 4 seconds. The base is now
in the registration mode.
Note : If the base is full and cannot take on any more handset, you will not be able to register. See the
section “Un-registering a handset”, page 26 to un-register a handset.
5. Enter the Base PIN (by default 0000) and press OK.
6. Select a base using the digit keys. A blinking digit indicates that the base number is already used.
The handset name, the handset number, and the clock will be displayed.
If the registration is not successful,
- the handset registers back to its original base unit, or
- SEARCHING is displayed if it has lost link with its original base, or
- UNREGISTERED is displayed if it is registering for the first time.
Follow the procedure and try again.
EN
Selecting a base
If your handset is registered to more than 1 base, you can select which base the handset will use. You can
choose a fixed base or you can allow the handset to automatically search for a nearby available base (Auto
Base).
1. Press .
2. Select ADVANCED SET and press OK.
3. Select BASE SELECT and press OK. The current setting is displayed.
4. Select the base you want your handset to use and press OK.
25
Page 27

EN
Advanced features
Un-registering a handset
A handset can un-register another handset registered to the same base. It cannot un-register itself.
1. Press .
2. Select ADVANCED SET and press OK.
3. Select DELETE HS and press OK.
4. Select the handset you would like to un-register and press OK.
5. Enter the Base PIN (by default 0000) and press OK to confirm.
Note : If you have your handset serviced, please make sure it is unregistered from the base station
before taking it back to the repair centre. At least one handset must stay registered on the base.
Changing the Base PIN
A PIN (personal identification number) code is required to access the registration, delete handset, and reset
mode.
The factory preset code is “0000”. You can change it to a unique code of your own. A PIN code can be up to
8 digits long.
1. Press .
2. Select ADVANCED SET and press OK.
3. Select CHANGE PIN and press OK.
4. Enter the current Base PIN and press OK.
5. Enter the new Base PIN and press OK.
6. Repeat the new Base PIN and press OK to confirm.
Note : You will hear a reject tone if the new PIN is not repeated correctly. Follow steps 3 to 7 and try
again.
Resetting
Warning: Please note that after a reset all your personal settings will be deleted, however your
phonebook and call log entries remain unchanged.
You can reset the display, sounds, and other settings of your phone. Refer to the section page 30.
1. Press .
2. Select ADVANCED SET and press OK.
3. Select RESET and press OK.
4. Enter the Base PIN and press OK to confirm.
Selecting country*
The correct country setting properly configures your phone to the correct network and language settings of
the country that you are currently in.
1. Press .
2. Select ADVANCED SET and press OK.
3. Select COUNTRY and press OK.
4. Select the desired country and press OK to confirm.
26
*country dependent
Page 28

Additional features
Lock keypad
Keypad can be locked to prevent accidental key press.
When the keypad is locked, you can still answer an incoming call by pressing . During the call, the keypad
is active. When the call is ended, the keypad will be locked again.
To lock and unlock the keypad,
Long press to lock or unlock the keypad.
When locked, LOCKED appears on the display.
Shortcut for turning handset ringer on/off
You can use this shortcut to turn on/off the handset ringer.
Long press .
Note : appears to indicate the ringer is turned off. The handset will not emit any sound for any
incoming call. Only the handset backlight will turn on to inform you about an incoming call.
Message waiting indication
If you have subscribed to the voicemail service from your local service provider, turns on when you have
a new message in your mailbox. After you’ve listened to all the new messages, will turn off.
You can also turn it off by long press during standby.
EN
Paging
You can locate the handsets by using this feature.
Press on the base.
All handsets registered to the base will produce the paging tone for 30 seconds and the screen displays
PAG I N G.
Note : You can stop the paging by pressing any key on each handset or pressing on the base
again.
Caller ID first ring suppression
If you have subscribed for Caller ID service by your operator, your phone will suppress the first ring before the
CID. After resetting, first ring suppression will be deactivated. Your phone will automatically detect if CID
service is subscribed after the first call. If CID service is detected, your phone will start suppressing the first
ring after the first call.
Note : Once first ring suppression is activated, the first ring before CID will be suppressed even after
you have unsubscribed the CID service. If you have unsubscribed the CID service and do not wish to
have the first ring suppressed, please reset the power of the base by disconnecting and re-connecting
the power supply.
27
Page 29

EN
Using the intercom
Note : You need at least 2 handsets to carry out the functions mentioned in this section.
Calling someone in the house
You can call someone in the house by using the intercom function on your phone.
To make an intercom call,
1. Press .
2. Press UP/DOWN to select the handset you want to call and press OK.
Note : You can also enter the handset number you want to call. You will hear a busy tone if the other
handset is not available.
3. Press or place the handset in the cradle to end an internal call.
Preparatory Intercom Dialling
With pre-dial, you can see and edit the handset number you are calling on the display before dialling it.
1. Enter the handset number you want to call.
2. Press .
If an external call comes in while you are on an intercom call, the caller ID will display if you have subscribed
for caller ID service. To answer the external call:
1. Press to end the intercom call.
2. Press to answer the external call.
Calling someone in the house while you are talking on the phone
While you are on an external call, you can put the external call on hold and make a call (inquiry call) to someone
in the house.
To make an inquiry call during an external call,
1. Press .
2. Press UP/DOWN to select the handset you want to call and press OK.
3. Wait for the other handset to answer your call.
After the other handset has answered, you can press repeatedly to switch between the external call and
the intercom call.
Note : If the other handset does not answer, press again to cancel the attempt and return to
the external call.
28
Page 30

Using the intercom
Transferring your call to another handset
During an external call,
1. Press .
2. Enter the number of the handset you want to call and press OK.
3. Wait for the other handset to answer your call.
4. When the other handset has answered your call, press or place the handset on cradle.
The external call is transferred.
Making a 3-way conference call
You can invite another handset to join a call with the external line.
During an external call,
1. Press .
2. Press UP/DOWN to select the handset you want to call and press OK.
3. Wait for the other handset to answer your call.
4. When the other handset has answered your call, long press .
You are now in a conference call.
During the conference call,
1. Press to put the external line on hold and you can talk to the other handset in private.
2. Long press to re-establish the conference call.
Note : Ending the call before the other handset answers will drop the external call.
Any handset hangs up during a conference call will leave the other handset still connecting with the
external call.
EN
29
Page 31

EN
Default settings
Handset name : PHILIPS
Time : 00:00
Ringer melody : Melody 1
Ringer volume : Level 3
Alarm : Off
Alarm ringer melody : Melody 2
Alarm ringer volume : Level 3
Key t one : ON
Backlight : ON
Recall duration : 100 ms
Dial mode : Tone
Auto answer : OFF
Menu language : English
Earpiece volume : Medium
Keyl oc k: OFF
Message waiting information : OFF
Base PIN : 0000
30
Page 32

Troubleshooting
Problems Solutions
The phone does not work at all. • Make sure that the adaptor and the phone cord are connected
The phone does not ring. • Make sure that the adaptor and the phone cord are connected
There is no dial tone. • Check that the phone cord is connected properly.
Caller ID does not work properly. • Check with your local phone company that the CID service is
The Call Waiting call cannot be
answered.
The empty battery icon appears
soon after the batteries are charged.
The handset is unable to register. • Make sure that the PAGING key has been pressed for 4
properly.
• Check that the batteries are fully charged and installed
properly.
• This phone does not work during power failure.
properly.
• Move the handset closer to the base unit.
• Make sure the handset ringer is turned on.
• Check the handset is fully charged.
• Move the handset closer to the base unit.
subscribed to.
• Let the phone ring at least once before answering.
• Check with your local phone company and select the correct
recall duration.
• Replace the batteries with new ones (use only rechargeable
baterries).
seconds before pressing the OK key.
• Each base can only register up to four handsets. See section
“Un-registering a handset”, page 26 - to remove a currently
registered handset.
EN
If the above solutions do not help, remove the power from both, the handset and the base. Wait for 15 minutes
and try again.
31
Page 33

EN
Information
Safety information
This equipment is not designed to make emergency calls when the power fails. An alternative has to be made
available to allow emergency calls.
Conformity
Hereby, Philips declares that the CD 230 is in compliance with the essential requirements and other relevant
provisions of Directive 1999/5/EC. This product can only be connected to the analogue telephone networks
of the countries mentioned on the packaging.
The Declaration of conformity is available on www.p4c.philips.com.
Safety precautions
Do not allow the handset to come into contact with water. Do not open the handset or the base station. You
could be exposed to high voltages. Do not allow the charging contacts or the batteries to come into contact
with conductive materials. Never use any battery type other than the one supplied : risk of explosion.
WARNING ! Never use non-rechargeable batteries. For use only with rechargeable batteries PHILIPS,
size AAA, 1.2V 650mAh. For use only with power supply SUNSTRONG, MODEL BD090030C for base,
and BD090015A for charger.
Environmental care
Please remember to observe the local regulations regarding the disposal of your packaging materials, exhausted
batteries and old phone and, where possible, promote their recycling.
Recycling & disposal
Disposal instructions for old products :
The purpose of the WEEE directive (Waste Electrical and Electronic Equipment; 2002/96/EC) is to ensure that
products are recycled using best available treatment, recovery and recycling techniques to ensure human health
and high environmental protection.
Your product is designed and manufactured with high quality materials and components, which can be recycled
and reused.
Do not dispose of your old product in your general household waste bin.
Inform yourself about the local separate collection system for electrical and electronic products
marked by this symbol.
Use one of the following disposal options :
1. Dispose of the complete product (including its cables, plugs and accessories) in the designated WEEE
collection facilities.
2. If you purchase a replacement product, hand your complete old product back to the retailer. He should
accept it as required by the WEEE directive.
Philips has marked the packaging with standard symbols designed to promote the recycling and
appropriate disposal of your eventual waste.
A financial contribution has been paid to the associated national recovery & recycling system.
The labelled packaging material is recyclable.
32
Page 34

Page 35

Specifications are subject to change without notice.
Trademarks are the property of Koninklijke Philips Electronics N.V. or their respective owners.
2006 © Koninklijke Philips Electronics N.V. All rights reserved.
www.philips.com
3111 285 28851
 Loading...