

Page 1
Bluetooth Wireless Micro System
BTM630
Thank you for choosing Philips.
Need help fast?
Read your Quick Start Guide and/or
User Manual first for quick tips
that make using your Philips product
more enjoyable.
If you have read your instructions
and still need assistance,
you may access our online help at
www.philips.com/welcome
1-888-PHILIPS (744-5477)
(and Model / Serial number)
or call
while with your product.
Philips vous remercie de
votre confiance.
Besoin d'une aide
rapide?
Le Guide rapide de début et Manuel de
l'utilisateur regorgent d'astuces destinées à
simplifier l'utilisation de votre produit Philips.
Toutefois, si vous ne parvenez pas à résoudre
votre probléme, vous pouvez accéder à
notre aide en ligne à l'adresse
www.philips.com/welcome
ou formez le
1-800-661-6162 (Francophone)
1-888-PHILIPS (744-5477) (English speaking)
Veillez à avoir votre produit à
portée de main.
(et model / serial nombre)
Gracias por escoger Philips
Necesita ayuda
inmediata?
Lea primero la Guía rápida del comienzo
o el Manual del usuario, en donde encontrará
consejos que le ayudarán a disfrutar
plenamente de su producto Philips.
Si después de leerlo aún necesita ayuda,
consulte nuestro servicio de
asistencia en línea en
www.philips.com/welcome
o llame al teléfono
1-888-PHILIPS (744-5477)
y tenga a mano el producto.
(y número de model / serial)
pg001-034_BTM630_37-Eng 2007.6.14, 17:151
Page 2
Canada
English:
This digital apparatus does not exceed
the Class B limits for radio noise
emissions from digital apparatus as set
out in the Radio Interference
Regulations of the Canadian
Department of Communications.
Français:
Cet appareil numérique n'emet pas
de bruits radioélectriques dépassant
les limites applicables aux appareils
numériques de Class B prescrites dans
le Règlement sur le Brouillage
Radioélectrique édicté par le Ministère
des Communications du Canada.
Class II equipment symbol
This symbol indicates that the unit has
a double insulation system
CAUTION
Use of controls or adjustments or
performance of procedures other
than herein may result in hazardous
radiation exposure or other unsafe
operation.
ATTENTION
L'utilisation des commandes ou
réglages ou le non-respect des
procédures ci-incluses peuvent se
traduire par une exposition
dangereuse à l'irradiation.
ATENCIÓN
El uso de mando o ajustes o la
ejecucción de métodos que no sean
los aquí descritos puede ocasionar
peligro de exposición a radiación.
FCC Rules
This equipment has been tested and found to
comply with the limits for a Class B digital device,
pursuant to Part 15 of the FCC Rules. These
limits are designed to provide reasonable
protection against harmful interference in a
residential installation. This equipment generates,
uses and can radiate radio frequency energy and,
if not installed and used in accordance with the
instructions, may cause harmful interference to
radio communications. However, there is no
guarantee that interference will not occur in a
particular installation.
If this equipment does cause harmful
interference to radio or television reception,
which can be determined by turning the
equipment off and on, the user is encouraged to
try to correct the interference by one or more
of the following measures:
2
pg001-034_BTM630_37-Eng 2007.6.14, 17:342
– Reorient or relocate the receiving antenna.
– Increase the separation between the
equipment and receiver.
– Connect the equipment into an outlet on a
circuit different from that to which the receiver is
connected.
– Consult the dealer or an experienced radio/
TV technician for help.
Do not make changes or modify the device in
any way. Changes or modifications not expressly
approved by the party responsible for
compliance could void the user’s authority to
operat4e the equipment.
Page 3
ª
fi
º
&
1
3
fl
⁄
‹
›
0
5
*
8
#•£
7
$9
4
pg001-034_BTM630_37-Eng 2007.6.14, 17:153
2
6
3
Page 4
1
•
$
§
%
@
¤
9
!
≥
#
≤
£
3
^
@
(
8
5
)
™
∞
&
4
pg001-034_BTM630_37-Eng 2007.6.14, 17:154
¡
‹
›
Page 5
Return your Product Registration Card or register online at
www.philips.com/welcome today to get the very most from your purchase.
Registering your model with PHILIPS makes you eligible for all of the valuable benefits listed below, so
don't miss out. Complete and return your Product Registration Card at once, or register online at
www.philips.com/welcometo ensure:
*Proof of Purchase
Returning the enclosed card
guarantees that your date of
purchase will be on file, so no
additional paperwork will be
required from you to obtain
warrranty service.
*Product Safety
Notification
By registering your product,
you'll receive notification directly from the manufacturer
- in the rare case of a product
recall or safety defect.
Congratulations on your purchase,
and welcome to the “family!”
Dear PHILIPS product owner:
Thank you for your confidence in PHILIPS.
Yo u’ve selected one of the best-built, bestbacked products available today. We’ll do
everything in our power to keep you happy
with your purchase for many years to come.
As a member of the PHILIPS “family,” you’re
entitled to protection by one of the most
comprehensive warranties and outstanding
service networks in the industry.What’s
more, your purchase guarantees you’ll
receive all the information and special offers
for which you qualify, plus easy access to
accessories from our convenient home
shopping network.
Most importantly, you can count on our
uncompromising commitment to your total
satisfaction.
All of this is our way of saying welcome and thanks for investing in a PHILIPS product.
P. S. To get the most from your PHILIPS
purchase, be sure to complete and
return your Product Registration Card
at once, or register online at:
www.philips.com/welcome
*Additional Benefits
Registering your product guarantees that you'll receive all of
the privileges to which you're
entitled, including special
money-saving offers.
Know these
safety
CAUTION: TO REDUCE THE RISK OF ELECTRIC SHOCK, DO NOT
REMOVE COVER (OR BACK). NO USER-SERVICEABLE PARTS
INSIDE. REFER SERVICING TO QUALIFIED SERVICE PERSONNEL.
This “bolt of lightning” indicates unin-
sulated material within your unit may
cause an electrical shock. For the safety of
everyone in your household, please do not
remove product covering.
The “exclamation point” calls attention
to features for which you should read
the enclosed literature closely to prevent
operating and maintenance problems.
WARNING: To r educe the risk of fire or
electric shock, this apparatus should not be
exposed to rain or moisture and objects
filled with liquids, such as vases, should not
be placed on this apparatus.
CAUTION: To prevent electric shock, match
wide blade of plug to wide slot, fully insert.
ATTENTION:Pour éviter les choc électriques, introduire la lame la plus large de la
fiche dans la borne correspondante de la
prise et pousser jusqu’au fond.
Enter below the Serial No. which is located
on the rear of the cabinet. Retain this
information for future reference.
Model No. __________________________
Serial No. __________________________
For Customer Use
symbols
CAUTION
RISK OF ELECTRIC SHOCK
DO NOT OPEN
Visit our World Wide Web Site at http://www.philips.com/welcome
pg001-034_BTM630_37-Eng 2007.6.14, 17:155
5
Page 6
IMPORTANT SAFETY INSTRUCTIONS
Clean only with dry cloth.
6
pg001-034_BTM630_37-Eng 2007.6.14, 17:156
materials
19 . Where the MAINS plug or an appliance coupler
is used as the disconnect device, the disconnected
device shall remain readily operable.
Page 7
Index
English ------------------------------------------------ 6
Français -------------------------------------------- 37
Español --------------------------------------------- 77
English
Français
Español
pg001-034_BTM630_37-Eng 2007.6.14, 17:157
7
Page 8
Contents
English
General Information
Environmental Information ................................ 9
Supplied accessories ............................................ 9
Safety Information ................................................ 9
Hearing Safety ..................................................... 10
Preparations
Rear connections ........................................ 11~12
Inserting batteries into the Remote Control ...
Controls
Controls on the system and remote control ...
Basic Functions
Switching the system on ................................... 16
Switching the system to Eco Power Standby
mode ..................................................................... 16
Power Saving Automatic Standby .................... 16
Adjusting volume and sound............................ 16
................................................................................ 13
Using the Remote Control to operate the system
...................................................................................... 13
......................................................................... 14~15
iPod Dock
Compatible iPod players ................................... 25
Selecting the correct dock adaptor ............... 25
Setup ..................................................................... 25
Playing an iPod portable player ....................... 25
Charging iPod battery using the dock ........... 25
Bluetooth Operation
Pairing a Bluetooth-enabled device with the
system ............................................................ 26~27
Operating a connected Bluetooth-enabled
device through the system ........................ 27~28
Receiving a call through the system ..................... 28
Holding a call through the system ........................28
Listening to music from the connected device
through the system .................................................. 28
Clock/Timer
Clock setting ....................................................... 29
Timer setting ....................................................... 29
Activating and deactivating timer ..........................29
Sleep timer setting ............................................. 30
Specifications ........................................... 31
CD/MP3-CD/WMA Operation
Loading a disc ...................................................... 17
Basic playback controls ..................................... 17
Playing an MP3/WMA disc ............................... 18
Different play modes: SHUFFLE and REPEAT ...
................................................................................ 19
Programming track numbers ........................... 19
Erasing the program .......................................... 19
Radio Reception
Tuning to radio stations .................................... 20
Programming radio stations ............................. 20
Automatic programming .........................................20
Manual programming ............................................... 20
Tuning to preset radio stations ....................... 21
External Sources
Using a non-USB device.................................... 22
Using a USB mass storage device/SD/MMC
memory card ................................................ 22~23
Ripping function .................................................. 24
8
Maintenance.............................................. 31
Tr oubleshooting ............................. 32~33
pg001-034_BTM630_37-Eng 2007.6.14, 17:158
Page 9
General Information
Environmental Information
All unnecessary packaging has been omitted. We
have tried to make the packaging easy to
separate into three materials: cardboard (box),
polystyrene foam (buffer) and polyethylene (bags,
protective foam sheet).
Your system consists of materials which can be
recycled and reused if disassembled by a
specialized company. Please observe the local
regulations regarding the disposal of packaging
materials, exhausted batteries and old
equipment.
Disposal of your old product
Your product is designed and manufactured with
high quality materials and components, which
can be recycled and reused.
When this crossed-out
wheeled bin symbol is attached
to a product it means the
product is covered by the
European Directive 2002/96/
EC
Please inform yourself about the local separate
collection system for electrical and electronic
products.
Please act according to your local rules and do
not dispose of your old products with your
normal household waste. The correct disposal of
your old product will help prevent potential
negative consequences for the environment and
human health.
Supplied accessories
– remote control (with battery)
– FM antenna
– AM antenna
–8 X iPod dock adaptors
–1 X Aux-in cable
–1 X certified AC/DC adapter
(Input: 100- 240V ~ 50/60Hz 1.2 A, Output:15V
3A; manufacturer: GFT TECHNOLOGY
CO., LTD.; model No.: GFP451-1530BX-1)
Safety Information
● Before operating the system, check that the
operating voltage indicated on the typeplate of
your system is identical with the voltage of your
local power supply. If not, please consult your
dealer.
● Place the system on a flat, hard and stable
surface.
● Place the system in a location with adequate
ventilation to prevent internal heat build-up in
your system. Allow at least 10 cm (4 inches)
clearance from the rear and the top of the unit
and 5 cm (2 inches) from each side.
● The ventilation should not be impeded by
covering the ventilation openings with items,
such as newspapers, table-cloths, cur tains, etc.
● Do not expose the system, batteries or discs to
excessive moisture, rain, sand or heat sources
caused by heating equipment or direct sunlight.
● No naked flame sources, such as lighted candles,
should be placed on the apparatus.
● No objects filled with liquids, such as vases, shall
be placed on the apparatus.
● Install this unit near the AC outlet and where the
AC power plug can be reached easily.
● The apparatus shall not be exposed to dripping
or splashing.
● Excessive sound pressure from earphones and
headphones can cause hearing loss.
● Battery shall not be exposed to excessive heat
such as sunshine, fire or the like.
● If the system is brought directly from a cold to a
warm location, or is placed in a very damp room,
moisture may condense on the lens of the disc
unit inside the system. Should this occur, the CD
player would not operate normally. Leave the
power on for about one hour with no disc in the
system until normal playback is possible.
● The mechanical par ts of the set contain self-
lubricating bearings and must not be oiled or
lubricated.
● When the system is switched to Standby
mode, it is still consuming some power.
To disconnect the system from the
power supply completely, remove the AC
power plug from the wall socket.
English
pg001-034_BTM630_37-Eng 2007.6.14, 17:159
9
Page 10
General Information
English
Hearing Safety
Listen at a moderate volume.
● Using headphones at a high volume can impair
your hearing. This product can produce sounds
in decibel ranges that may cause hearing loss for
a normal person, even for exposure less than a
minute. The higher decibel ranges are offered
for those that may have already experienced
some hearing loss.
● Sound can be deceiving. Over time your hearing
"comfort level" adapts to higher volumes of
sound. So after prolonged listening, what sounds
"normal" can actually be loud and harmful to
your hearing. To guard against this, set your
volume to a safe level before your hearing
adapts and leave it there.
To establish a safe volume level:
● Set your volume control at a low setting.
● Slowly increase the sound until you can hear it
comfortably and clearly, without distor tion.
Listen for reasonable periods of time:
● Prolonged exposure to sound, even at normally
"safe" levels, can also cause hearing loss.
● Be sure to use your equipment reasonably and
take appropriate breaks.
Be sure to observe the following
guidelines when using your headphones.
● Listen at reasonable volumes for reasonable
periods of time.
● Be careful not to adjust the volume as your
hearing adapts.
● Do not turn up the volume so high that you
can't hear what's around you.
● You should use caution or temporarily
discontinue use in potentially hazardous
situations.
● Do not use headphones while operating a
motorized vehicle, cycling, skateboarding, etc.; it
may create a traffic hazard and is illegal in many
areas.
10
pg001-034_BTM630_37-Eng 2007.6.14, 17:1510
Page 11
Preparations
FM wire antenna
Rear connections
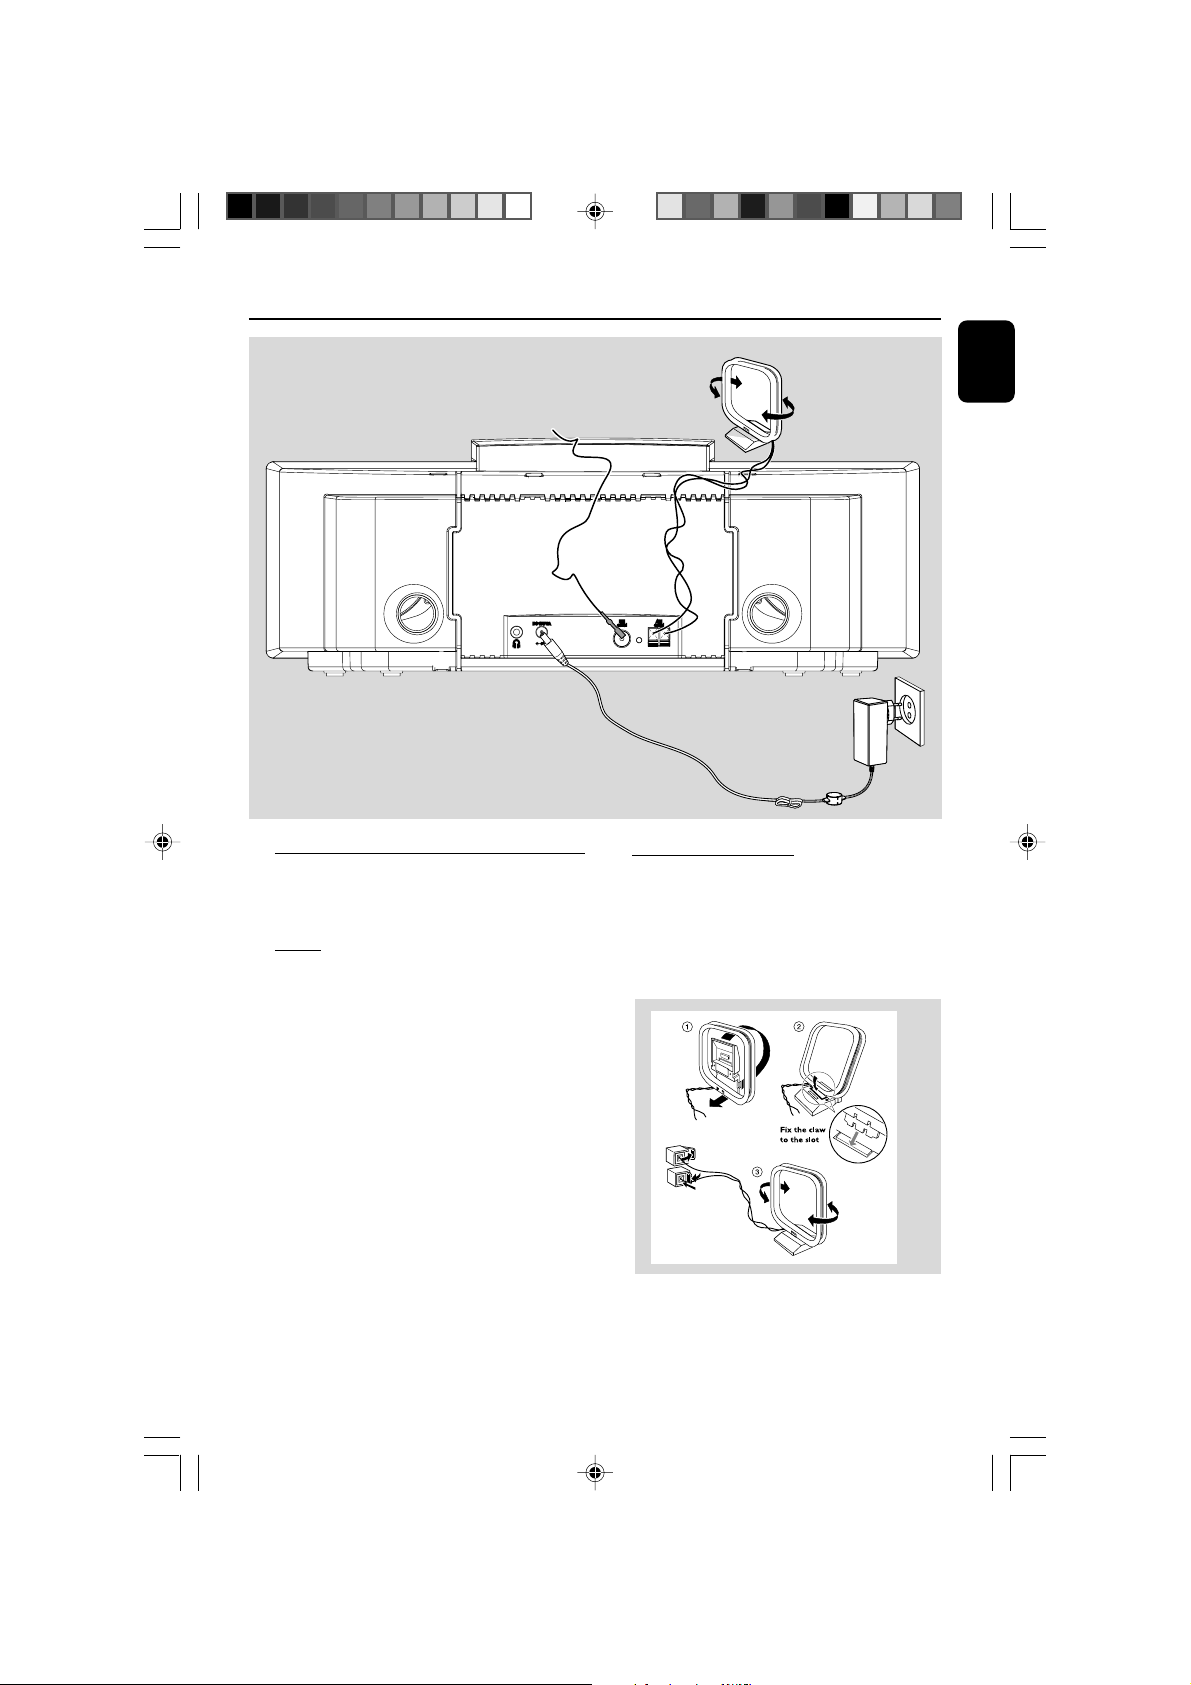
The type plate is located at the rear of the
system.
A Pow er
● Before connecting the AC power adaptor to the
wall outlet, ensure that all other connections
have been made.
WARNING!
– Use the supplied AC power adaptor only!
Using any other power connection device
may damage your main set!
–For optimal performance, use only the
original AC power adaptor.
–Never make or change connections with
the power switched on.
AM loop
antenna
AC power adaptor
B Antennas Connection
Connect the supplied AM loop antenna and FM
antenna to the respective terminals. Adjust the
position of the antenna for optimal reception.
AM Antenna
English
To avoid overheating of the system, a safety
circuit has been built in. Therefore, your
system may switch to Standby mode
automatically under extreme conditions. If
this happens, let the system cool down
before reusing it (not available for all versions).
pg001-034_BTM630_37-Eng 2007.6.14, 17:1511
● Position the antenna as far as possible from a TV,
VCR or other radiation source.
11
Page 12
Preparations
English
FM Antenna
Connecting other equipment to your
system
● Use the supplied Aux-in cable to connect the
AUX jack (3.5mm, located on the top panel) to
an AUDIO OUT or headphone jack on an
external device (such as TV, Laser Disc player,
DVD player or CD recorder).
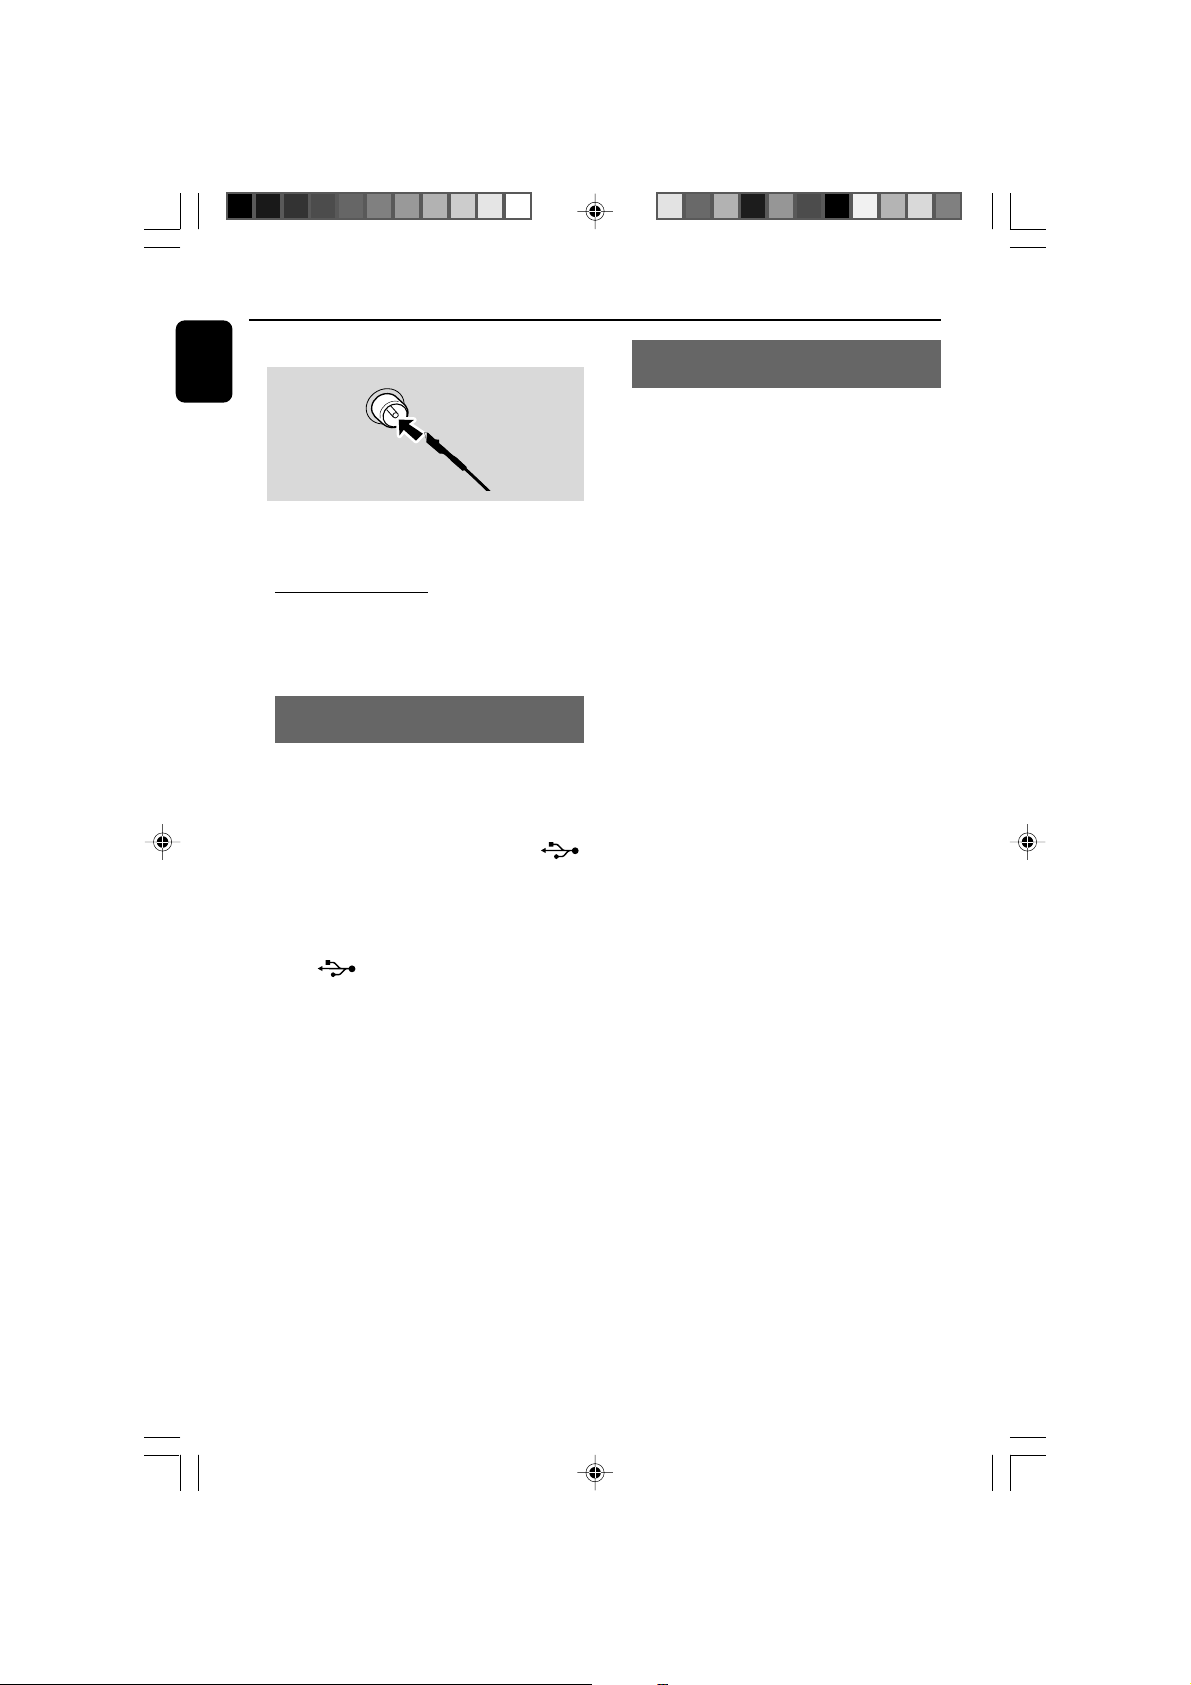
● For better FM stereo reception, connect an
outdoor FM antenna to the FM AERIAL (FM
ANTENNA) terminal.
C Optional connection
The optional equipment and connecting cords are
not supplied. Refer to the operating instructions
of the connected equipment for details.
Connecting a USB mass storage device
or SD/MMC memory card
By connecting a USB mass storage device or SD/
MMC memory card to the Hi-Fi system, you can
enjoy the device's or card’s stored music through
the powerful speakers of Hi-Fi system.
● Inser t the USB device's USB plug into the
socket on the set.
OR
for the devices with USB cables:
1 Insert one plug of the USB cable (not supplied)
to the socket on the set.
2 Insert the other plug of the USB cable to the
USB output terminal of the USB device.
OR
for the memory card:
● Fully inser t the memor y card into the SD •
MMC slot on the top of the system.
Note:
–To connect equipment with two AUX OUT (left/
right) terminals, you can use a “single to double”
cinch cable (not supplied).
12
pg001-034_BTM630_37-Eng 2007.6.14, 17:1512
Page 13
Preparations
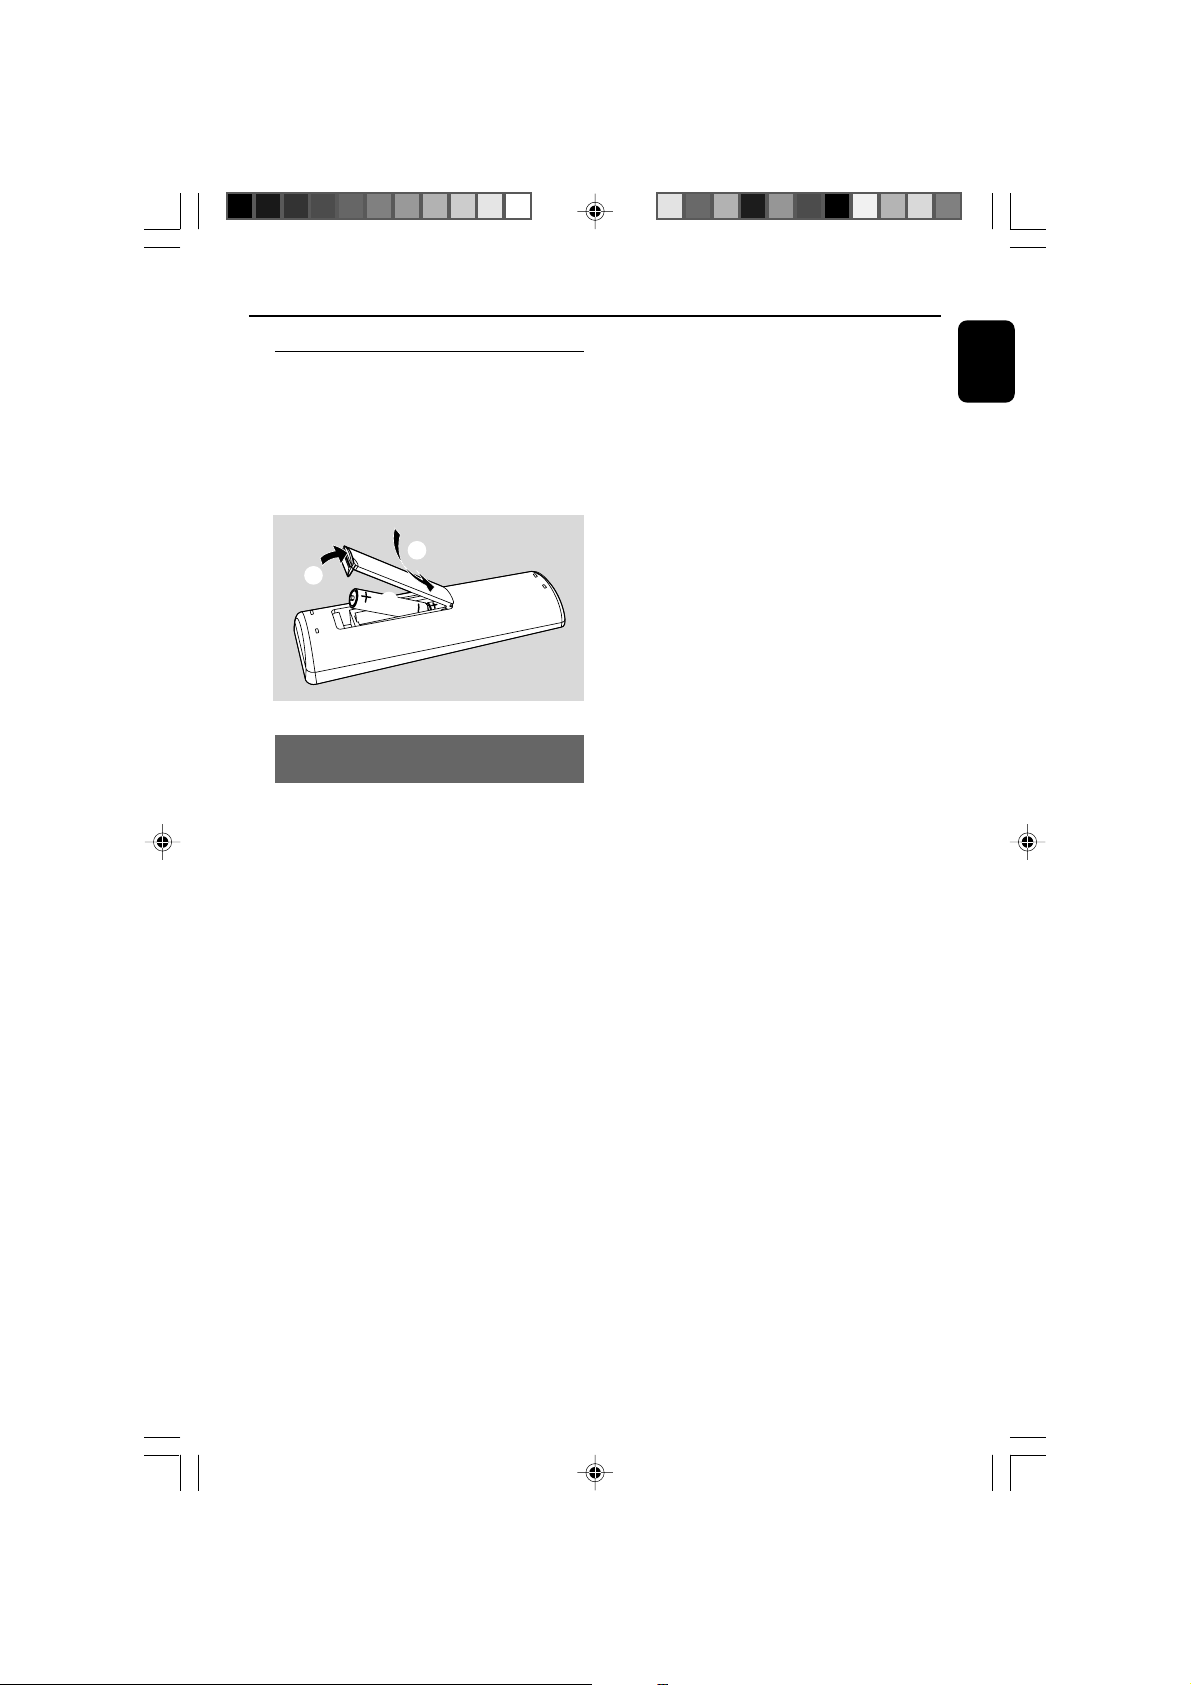
Inserting batteries into
the Remote Control
1
Open the battery compar tment.
2 Insert two R03 or AAA batteries following the
indications (+/-) inside the compartment.
3 Close the cover.
3
1
2
Using the Remote Control to operate
the system
1 Aim the Remote Control directly at the remote
sensor (IR) on the front panel.
2 Do not put any objects between the Remote
Control and the system while operating the
system.
CAUTION!
– Remove batteries if they are
exhausted or if the Remote Control is
not being used for a long time.
– Do not use old and new or different
types of batteries in combination.
– Batteries contain chemical substances,
so they should be disposed of properly.
English
pg001-034_BTM630_37-Eng 2007.6.14, 17:1513
13
Page 14
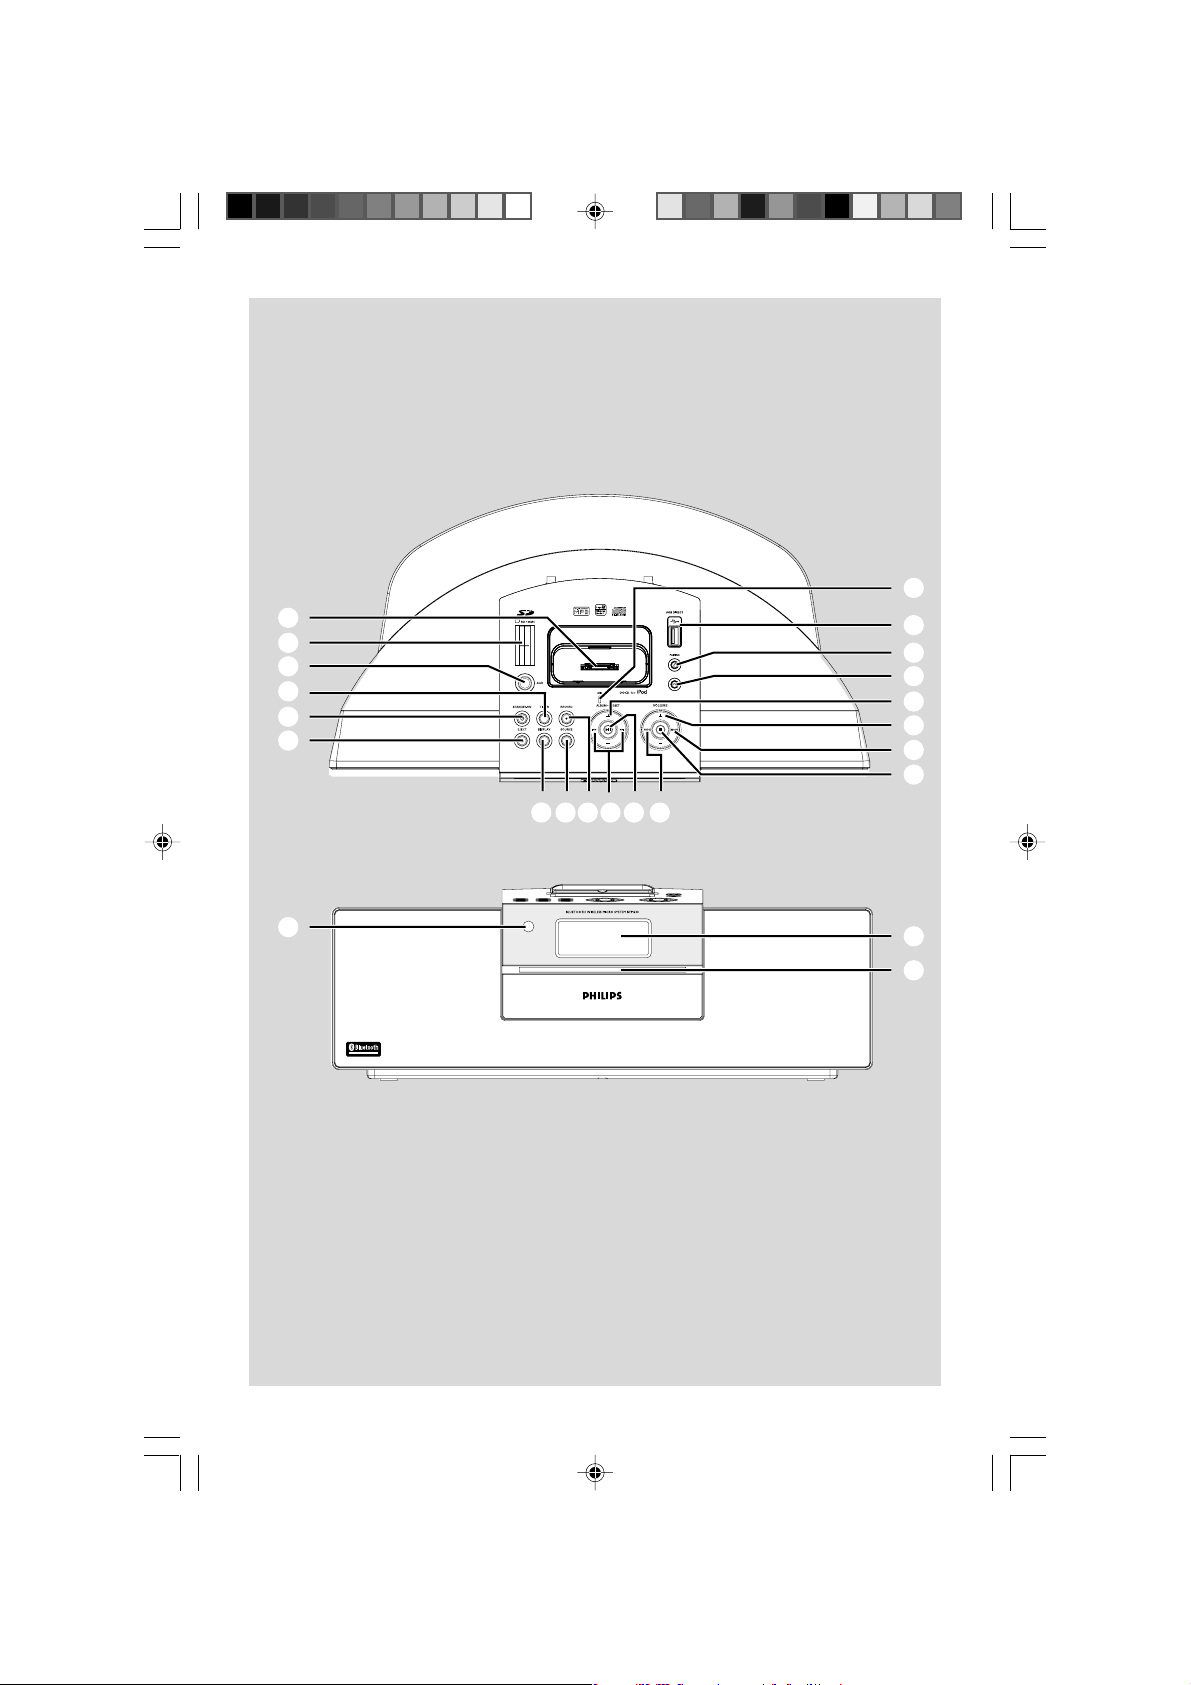
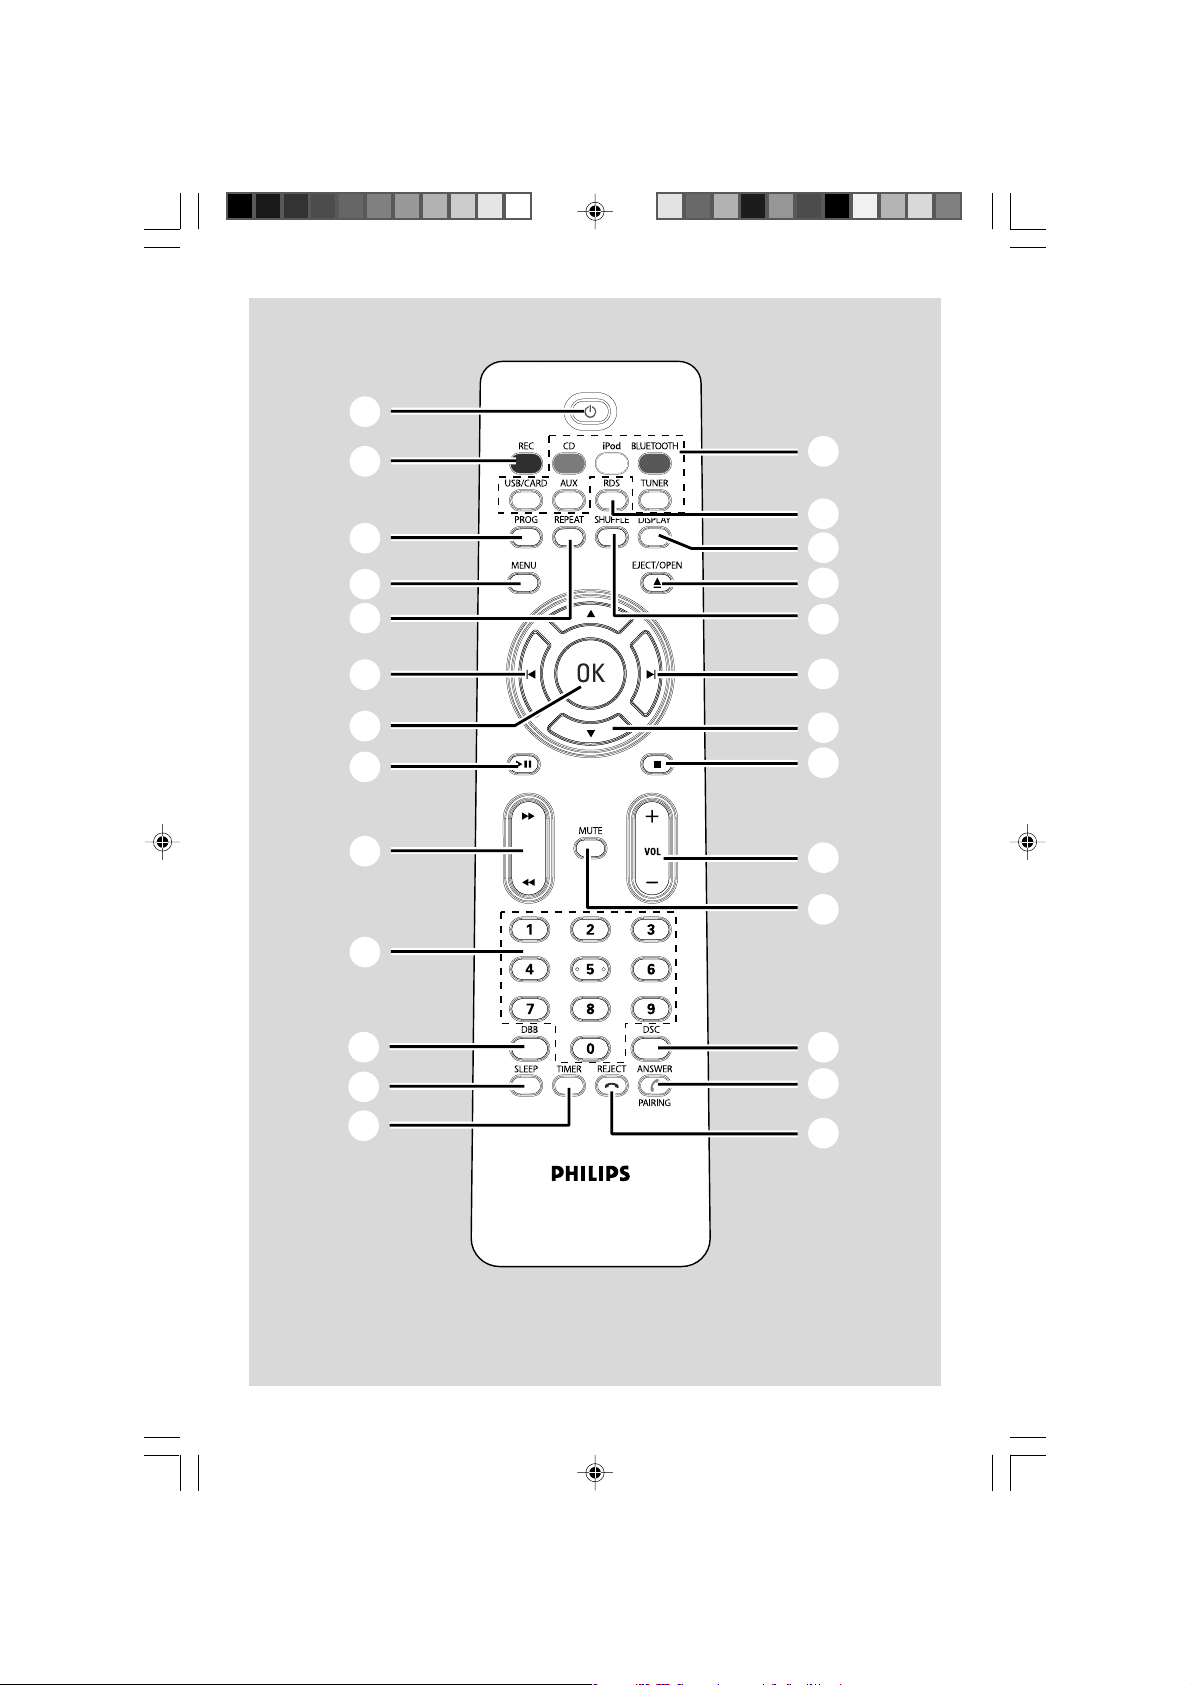
Controls (illustrations on page 3 & 4)
English
Controls on the system and
remote control
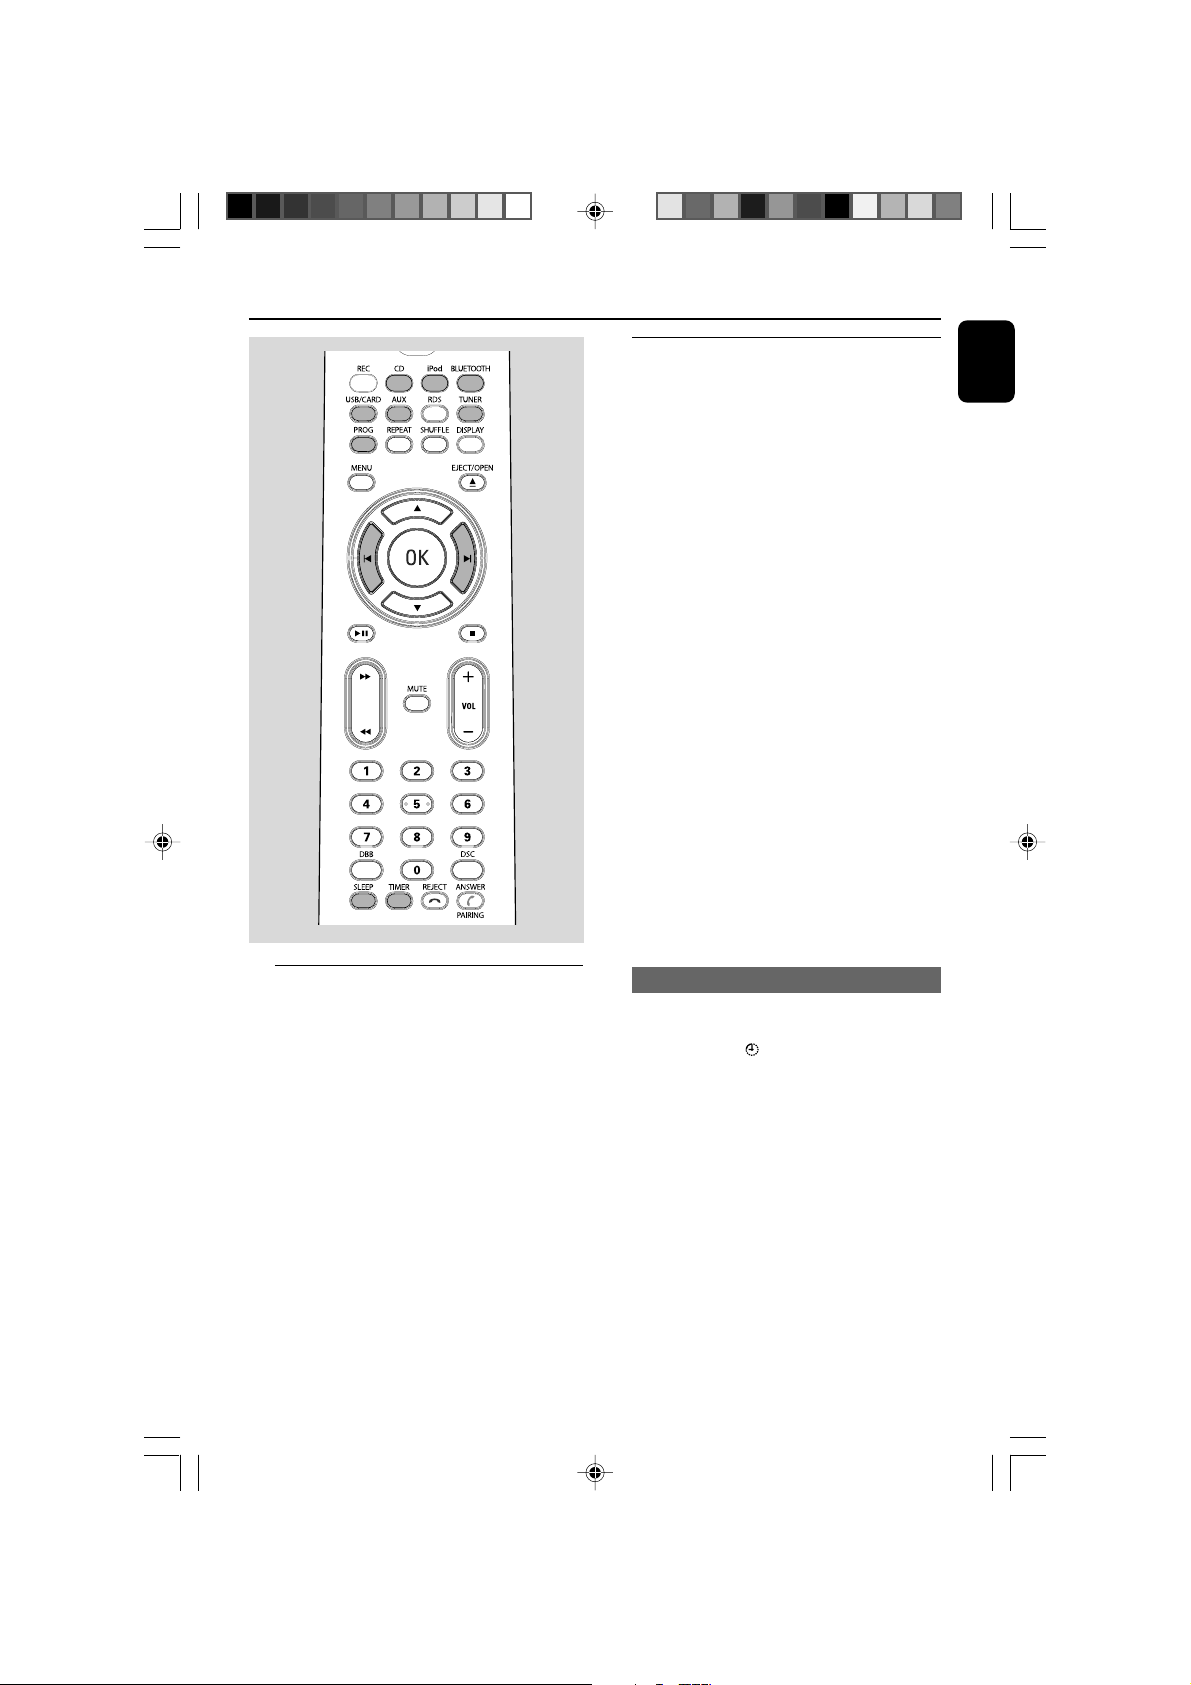
1 STANDBY-ON/ECO POWERB
– switches the system on or to Eco Power
standby/normal standby with clock display.
2 Display screen
– shows the status of the system.
3 EJECT/OPEN 0
– loads a disc to or ejects a disc from the disc
loader.
4 IR SENSOR
– remote sensor
5 VOLUME +/- (VOL +/-)
– adjusts the volume level.
6 Disc loader
7 S/T
for CD/MP3-CD/WMA/USB/CARD
fast searches back and
forward within a track/disc (press
and hold).
................................. skips to the beginning of a
current/previous/subsequent
track.
8 9
– stops disc playback or erases a disc program.
9 ÉÅ
– starts or interrupts playback.
0 ALBUM•PRESET +/-
–(for MP3-CD/WMA/USB/CARD) skips to the
beginning of a current/previous/subsequent
album.
– adjusts the hours and minutes for the clock/timer
function.
– selects a preset radio station.
! 5 /6
for CD/MP3-CD/WMA/USB/CARD/BT
fast searches back and
forward within a track/disc (press
and hold).
for TUNER ........ tunes to radio stations (down/
up).
@ ¡ / ™
for CD/MP3-CD/WMA/USB/CARD
................................. skips to the beginning of a
current/previous/subsequent
track.
# SOURCE
– selects the respective sound source for DISC
(CD)/TUNER (FM/AM)/BT (BLUETOOTH)/
DOCK (iPod)/USB/CARD (SD/MMC)/AUX.
$ PROG
–(for CD/MP3/USB/CARD) programs tracks.
–(for TUNER) programs radio stations.
– sets the clock function.
% REPEAT
for CD/MP3/USB/CARD
................................. selects a repeat playback mode.
^ SHUFFLE
– plays disc/USB/CARD tracks randomly.
& TIMER
– sets the timer function.
* MODE
– selects various repeat modes or the shuffle play
mode for a disc.
( 3 / 4
–(for MP3-CD/USB/CARD) skips to the beginning
of a current/previous/subsequent album.
) MUTE
– interrupts and resumes sound production.
– holds a call during calling or ripping. (When a
Bluetooth-enabled mobile phone is paired)
¡ DSC (Digital Sound Control)
– selects sound characteristics: ROCK/POP/JAZZ/
CLASSIC.
™ DBB (Dynamic Bass Boost)
– enhances the bass.
£ DISPLAY
– selects different disc information display modes
during playback.
≤ RDS (unavailable for this version)
–for TUNER, displays RDS information.
∞ SLEEP
– selects the sleeper time.
14
pg001-034_BTM630_37-Eng 2007.6.14, 17:1514
Page 15
§ MENU
– is equivalent to the MENU button on your iPod
player.
≥ Numerical Keypad (0~9)
–(for CD/MP3/USB/CARD) selects a track directly.
• REC •
– copies music to an external portable USB
storage device or SD/MMC card.
ª iPod dock
– is used to dock your iPod player for playback or
recharging through this system.
º AUX
– is the jack used to connect an auxiliary device.
⁄ USB DIRECT
– jack for the external USB mass storage device.
¤ OK
– confirms a selection (for iPod menu operation
only).
‹ ANSWER/PAIRING
– pairs with a bluetooth-enabled device.
when a Bluetooth-enabled mobile is
paired
– answers an incoming call.
– (press and hold) redials the last number retained
in the memory of the mobile phone.
– (press and hold during a call) transfers sound
from system speakers to the mobile phone or
conversely.
› REJECT
– rejects an incoming call.
– exits pairing and disconnects all paired devices.
fi SD • MMC
– is the slot used to insert an SD/MMC memor y
card.
fl MIC
– is the built-in microphone (available only when a
Bluetooth-enabled mobile is paired with the
system).
Controls
English
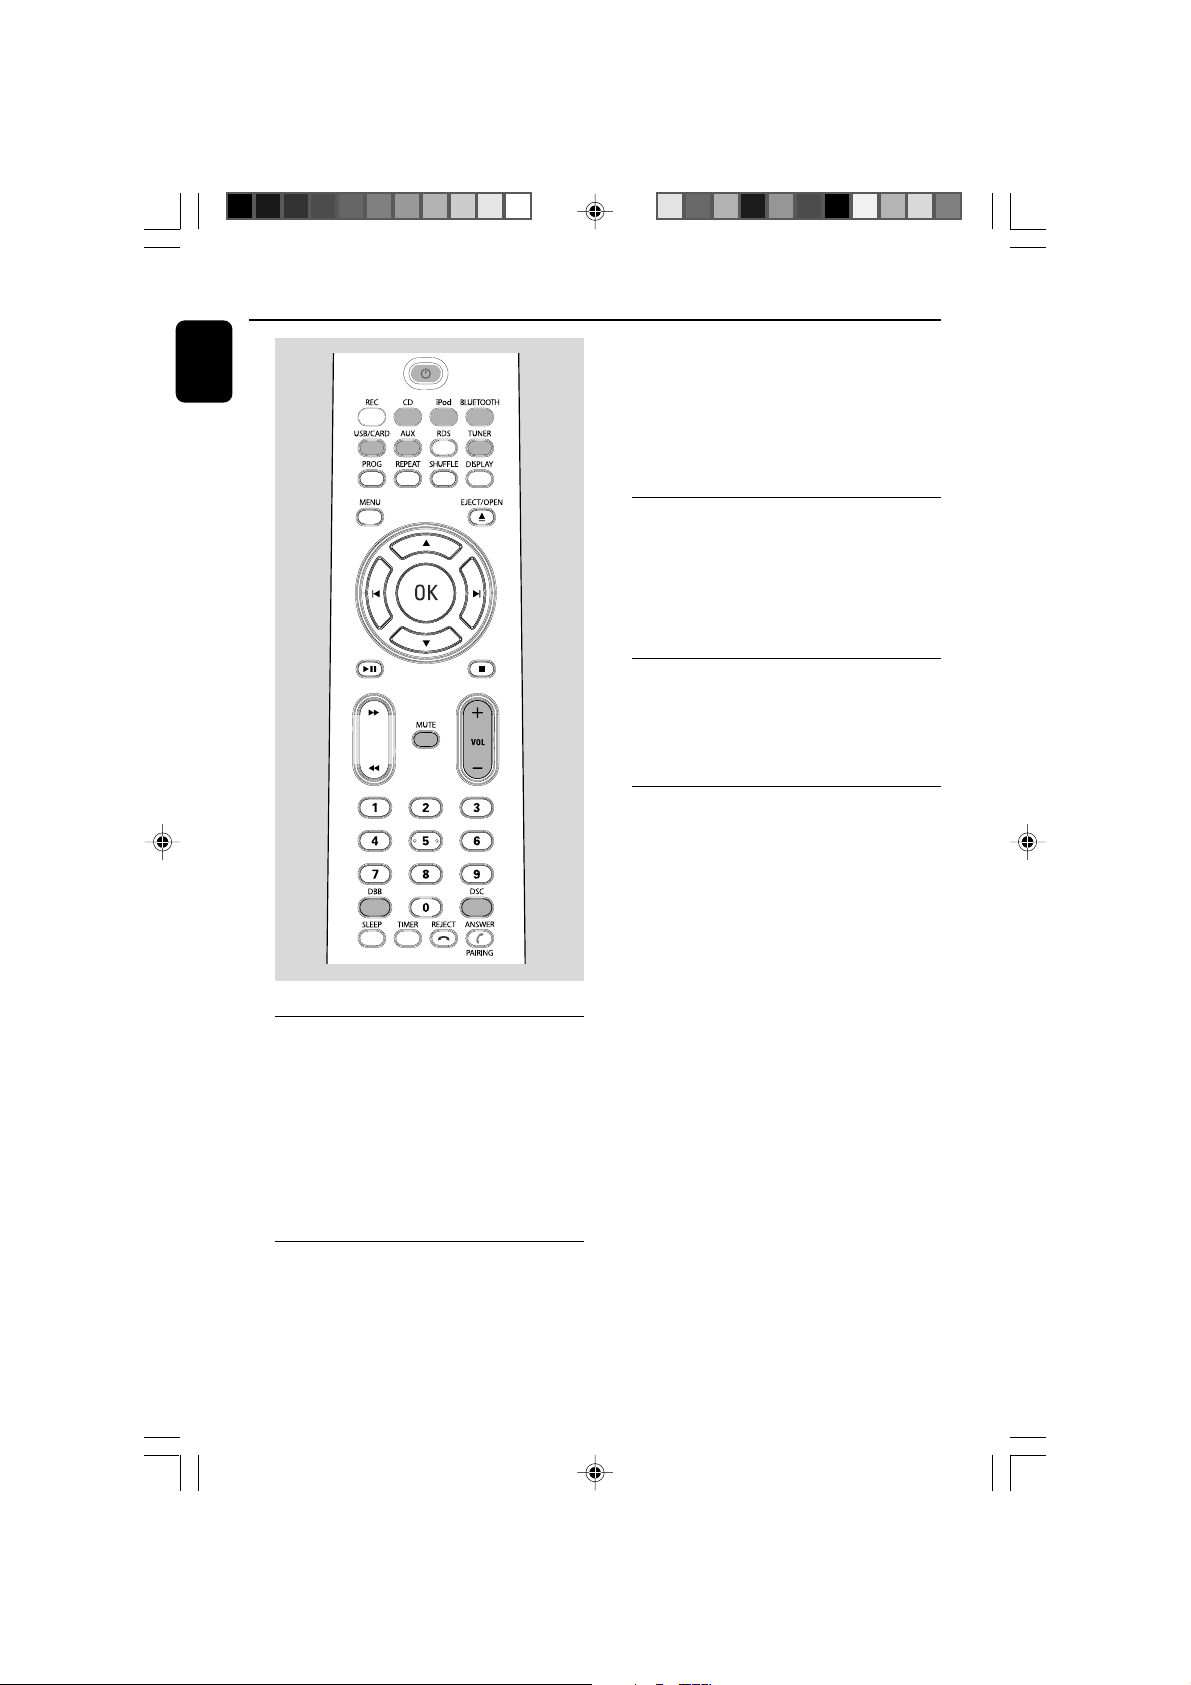
Notes for remote control:
– First select the source you wish to control
by pressing one of the source select keys on
the remote control (for example CD, FM).
– Then select the desired function (for
example ÉÅ,à , á).
pg001-034_BTM630_37-Eng 2007.6.14, 17:1515
15
Page 16
Basic Functions
English
Switching the system on
● Press STANDBY-ON/ECO POWER B (or
B on the remote).
➜ The system will switch to the last selected
source.
● Press SOURCE on the top of the system or
CD, iPod, BLUETOOTH, USB/CARD,
AUX or TUNER on the remote control.
➜ The system will switch to the selected source.
Switching the system to standby
mode
● Press STANDBY-ON/ECO POWER B (or
B on the remote).
➜ The backlight for clock display is dim in
standby.
➜ The volume level (up to a maximum volume
level of 12), interactive sound settings, last
selected mode (ECO Power Standby or normal
standby), source and tuner presets will be
retained in the player's memory.
Switching the system to Eco
Power Standby mode
● Press and hold STANDBY-ON/ECO
POWER B (or B on the remote) for more
than 2 seconds.
➜ The backlight will go blank.
Power Saving Automatic Standby
As a power-saving feature, the system
automatically switches to Eco Power/ Standby 15
minutes after playback has reached the end and
no control is operated.
Adjusting volume and sound
1 Press VOLUME +/- (or VOL +/- on the
remote control) to decrease or increase the
volume.
➜ Display shows the volume level VOL and a
number from MIN 1, 2, ...31 MAX.
2 Press DSC repeatedly to select the desired
sound effect: ROCK/POP/JAZZ/CLASSIC.
3 Press DBB to switch bass enhancement on or
off.
➜ If the DBB is activated, DBB ON is shown.
➜ If the DBB is deactivated, DBB OFF is shown.
4 Press MUTE on the remote control to
interrupt sound reproduction instantly.
➜ Playback will continue without sound and
MUTE will flash on the display.
● To activate sound reproduction you can:
– press MUTE again;
– adjust the volume controls;
– change source.
To listen through the headphone
● Connect the headphone plug to the n socket
on the rear of the set.
➜ The speakers will be muted.
16
pg001-034_BTM630_37-Eng 2007.6.14, 17:1516
Page 17
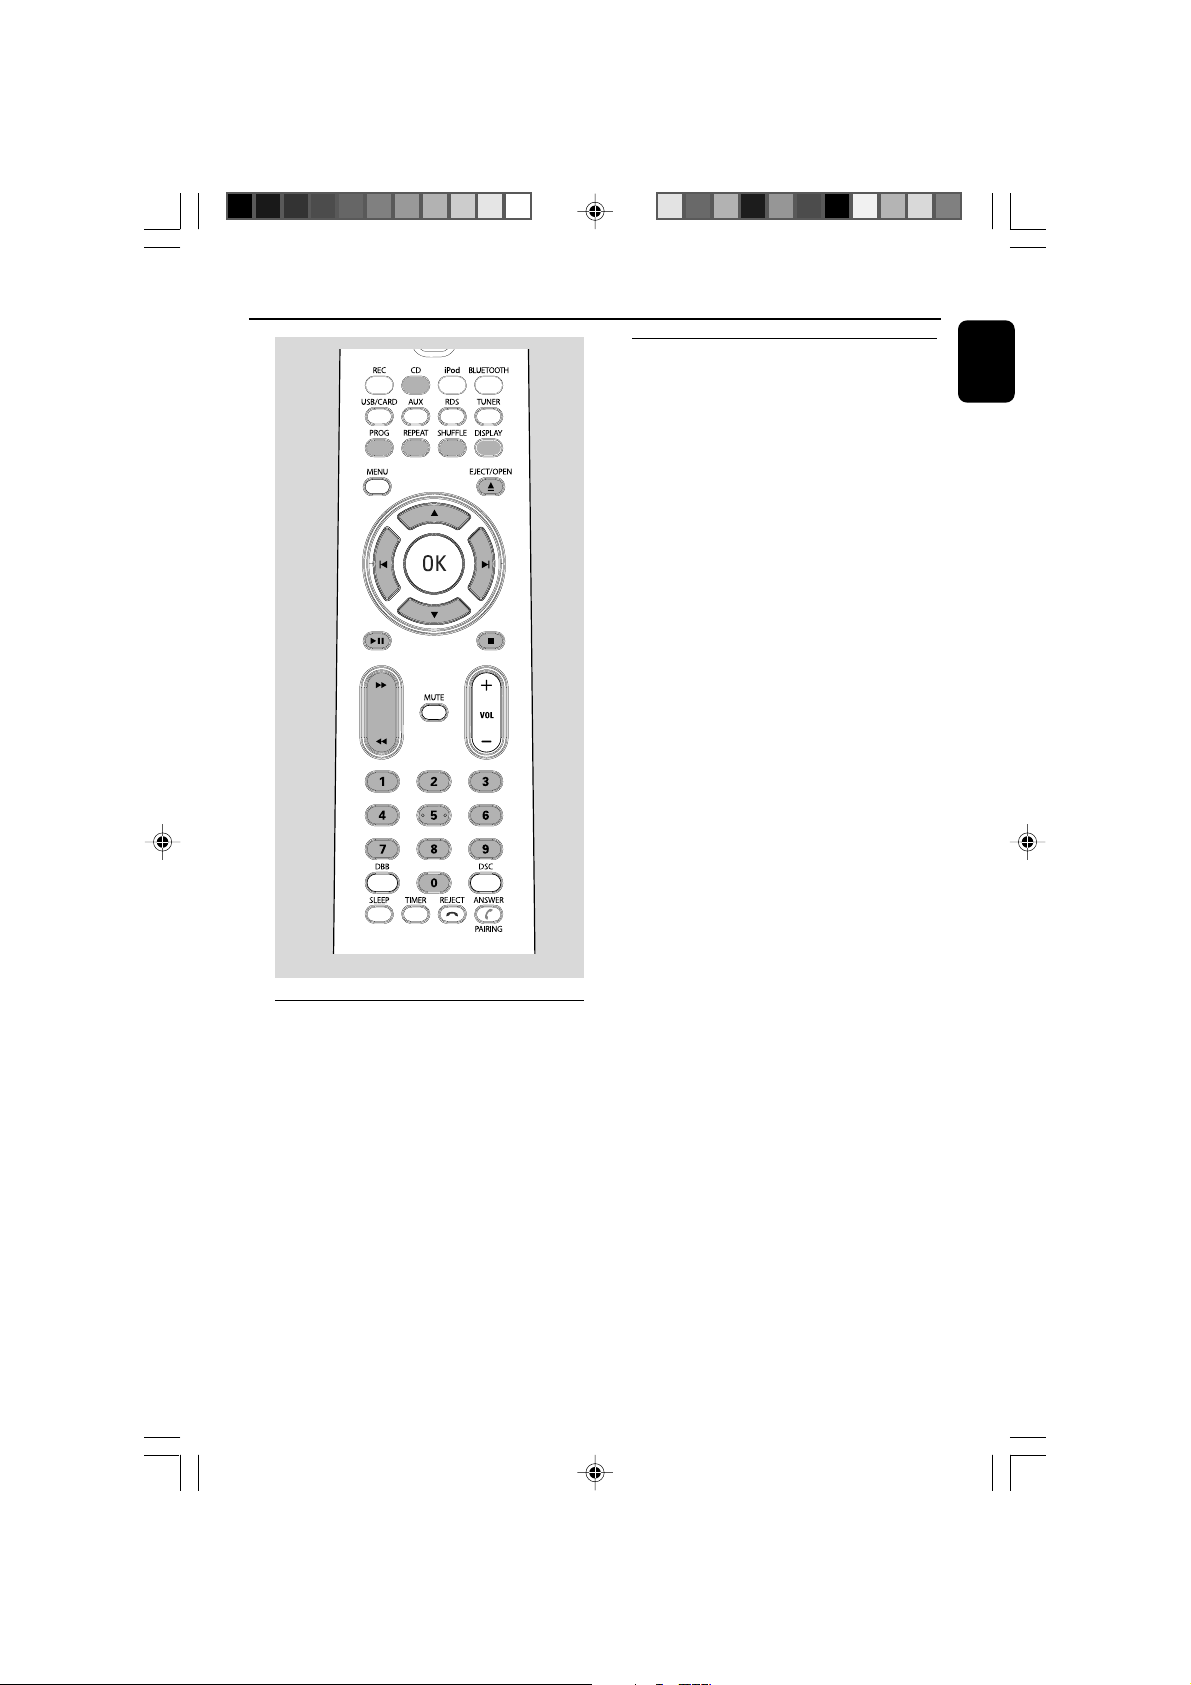
CD/MP3-CD/WMA Operation
Loading a disc
This CD player plays Audio Discs including CD
Recordables, CD-Rewritables, MP3 CD and
WMA disc.
● CD-ROM, CD-I, CDV, VCD, DVD or computer
CDs, however, are not possible.
1 Press SOURCE on the top of the system to
select CD or press CD on the remote.
2 Insert a disc into the disc loader..
➜ Make sure the label side is facing up.
➜ Make sure you have removed any other disc
from the slot loader.
3 Press ÉÅ to start playback.
4 At any time, simply press 9 to stop playback.
Basic playback controls
To play a disc
● Press ÉÅ to start playback.
➜ The current track number and elapsed
playing time of the track are displayed during
disc playback.
To select a different track
● Press S/T (or ¡ / ™ on the remote
control) once or repeatedly until the desired
track number appears in the display.
● You can also use the Numerical Keypad
(0~9) on the remote to select a track directly.
● If you have selected a track number shortly after
loading a disc or in the PAUSE position, you will
need to press ÉÅ to start playback.
Te xt display during playback
In CD mode
● Press DISPLAY repeatedly to see the
following information.
➜ Tr ack number and elapsed playback time of
current track.
➜ Tr ack number and total elapsed playback
time.
➜ Tr ack number and remaining playback time
of current track.
➜ Tr ack number and total remaining playback
time.
In MP3/WMA/USB/CARD mode
● Press DISPLAY repeaedly to see the following
information:
➜ Tr ack number and elapsed playback time of
current track
➜ Title name
➜ Album name
➜ ID3 (if available)
English
pg001-034_BTM630_37-Eng 2007.6.14, 17:1517
17
Page 18
CD/MP3-CD/WMA Operation
English
To find a passage within a track
1 Press and hold S/T (or 5 /6 on the
remote control).
2 When you recognize the passage you want,
release S/T (or 5 /6 on the remote
control).
➜ Normal playback continues.
To stop playback
● Press 9.
To interrupt playback
● Press ÉÅ during playback.
➜ The display freezes and the elapsed playing
time flashes when playback is interrupted.
➜ To resume, press ÉÅ again.
Notes:
CD play will also stop when;
– you eject the disc.
– the disc has reached the end.
– you select another source: TUNER, BT
(Bluetooth), DOCK (iPod), USB, USB or C ARD (SD/
MMC).
– you select standby.
– the set auto off time expires.
Playing an MP3/WMA disc
1 Load an MP3/WMA disc.
➜ The disc reading time may exceed 10
seconds due to the large number of songs
compiled into one disc.
2 Press ALBUM • PRESET +/- (or 3 / 4 on
the remote control) to select a desired album.
3 Press S/T (or ¡ /™ on the remote
control) to select a desired track.
➜ The album number will change accordingly as
you reach the first track of an album by pressing
S (¡ on the remote) or the last track of an
album by pressing T (™ on the remote).
4 Press ÉÅ to start playback.
Supported MP3 disc formats:
– ISO9660, Joliet
– Maximum title number: 999 (depending on
filename length)
– Maximum album number: 99
– Supported sampling frequencies: 32 kHz,
44.1kHz, 48 kHz
– Supported Bit-rates: 32~256 (kbps), variable
bitrates
18
pg001-034_BTM630_37-Eng 2007.6.14, 17:1518
Page 19
CD/MP3-CD/WMA Operation
Different play modes: SHUFFLE
and REPEAT
You can select and change the various play
modes before or during playback. The REPEAT
modes can also be combined with PROGRAM.
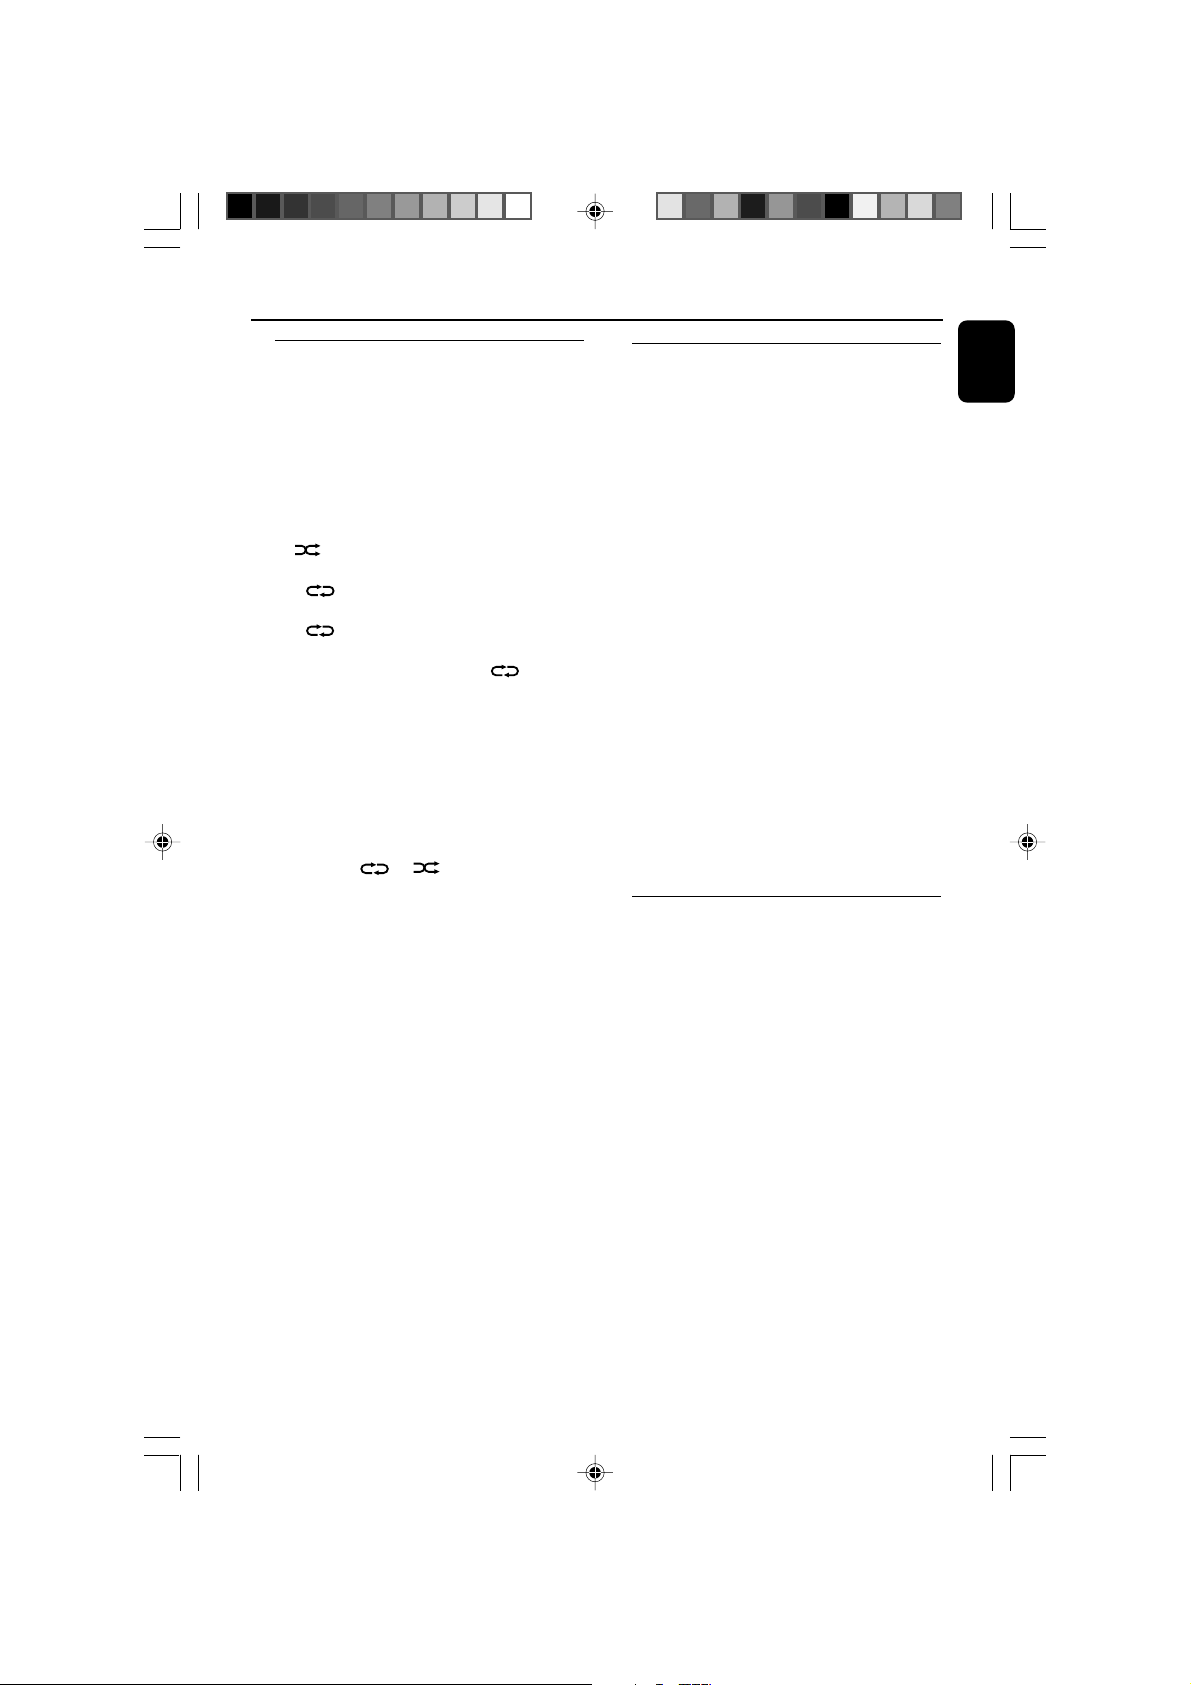
1 To select your play mode, press MODE
(SHUFFLE or REPEAT on the remote
control) before or during playback until the
display shows the desired function.
➜ appears if the shuffle playback is
activated and disappears if deactivated.
➜ If appears, it indicates to play the
current track repeatedly.
➜ If ALL is displayed, it indicates to play
all tracks in the whole disc repeatedly.
➜ For an MP3 CD/WMA, if both and ALB
appear on the display panel, it indicates to play
the current album repeatedly.
2 Press ÉÅ to start playback if in the STOP
position.
➜ If you have selected SHUFFLE, playback starts
automatically.
3 To return to normal playback, press the MODE
(SHUFFLE or REPEAT on the remote
control) until or is no longer
displayed.
● You can also press 9 to stop playback and
cancel your play mode.
Note:
– The Repeat and Shuffle functions cannot be
activated simultaneously.
Programming track numbers
Program in the STOP position to select and
store your disc tracks in the desired sequence. If
you like, store any track more than once. Up to
40 tracks can be stored in the memory.
1 Press PROG to enter the programming mode.
➜ A track number flashes.
2 Press S/T (or ¡ / ™ on the remote
control) to select your desired track number.
● For an MP3 CD, Press ALBUM • PRESET +/-
(or ¡ / ™ on the remote control) to select a
desired album number.
3 Press PROG to confirm the track number to be
stored.
➜ PR X displays, in which X denotes the next
program number to be stored.
4 Repeat steps 2-3 to select and store all desired
tracks.
➜ PROGRAM FULL appears if you attempt to
program more than 40 tracks.
5 Press 9 to finish programming.
➜ PROG displays on the screen.
6 To star t playback of your disc program, press
ÉÅ directly.
Erasing the program
You can erase the progr am by:
● pressing 9 once in the STOP mode;
● pressing 9 twice during playback;
➜ PROG disappears.
● ejecting the current disc;
English
pg001-034_BTM630_37-Eng 2007.6.14, 17:1519
19
Page 20
Radio Reception
English
Tuning to radio stations
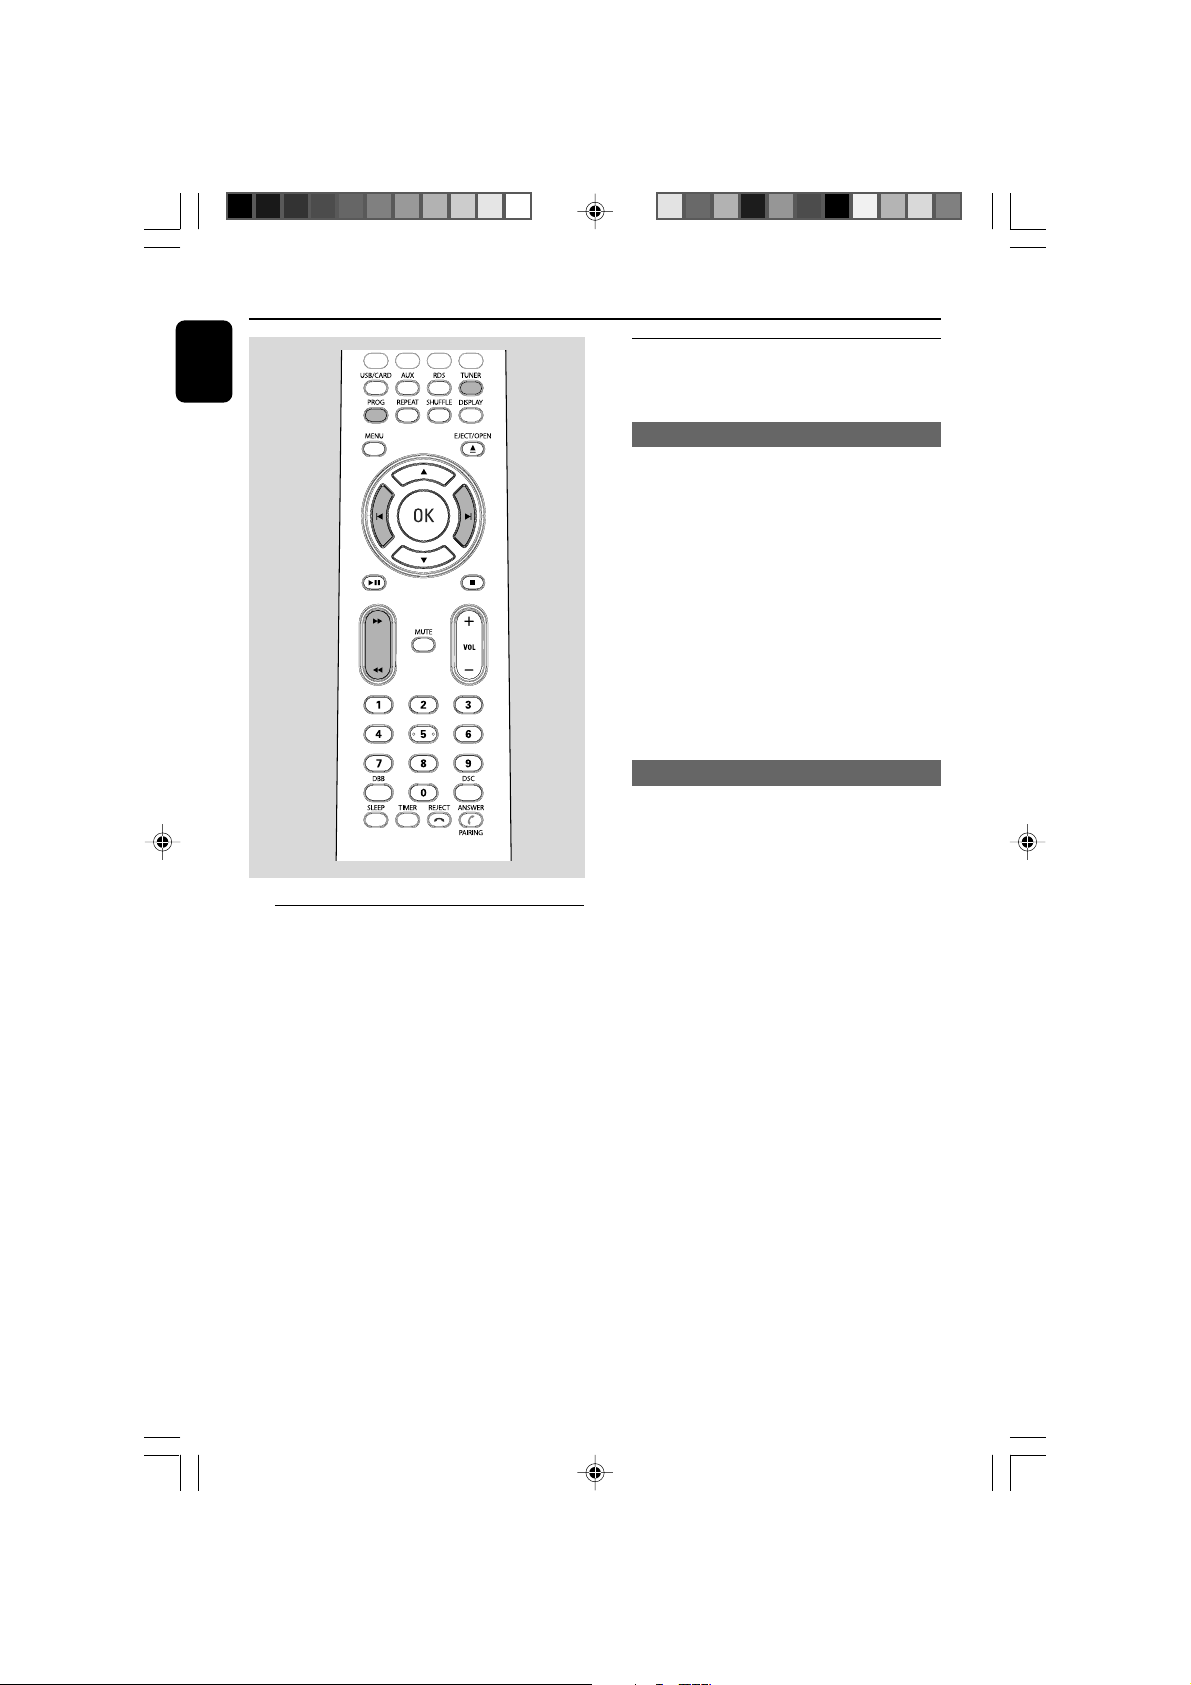
1 Press SOURCE repeatedly (or TUNER on the
remote control) to select the tuner source (FM
or AM).
2 Hold S/T (or 5 /6 on the remote
control) and then release the button.
➜ The system will start searching for a radio
station with sufficient signal strength.
3 Repeat step 3 if necessar y until you find the
desired station.
● To tune to a weak station, press S/T (or
5 /6 on the remote control) briefly and
repeatedly until you have found optimal
reception.
Programming radio stations
You can store up to a total of 40 radio stations
(30 for FM and 10 for AM) in the memory.
Automatic programming
Automatic programming will start with a chosen
preset number. From this preset number
upwards, former programmed radio stations will
be overridden.
1 Press ALBUM • PRESET +/- (or ¡ / ™ on
the remote control) to select the preset number
where programming should start.
Note:
– If no preset number is selected, default is preset
(1) and all your presets will be overridden.
2 Press PROG for more than two seconds to
activate programming.
➜ All available stations are programmed.
Manual programming
1 Tune to your desired station (refer to “Tuning to
radio stations”).
2 Press PROG to activate programming.
➜ PROG flashes in the display.
3 Press ALBUM • PRESET +/- (or 3 / 4 on
the remote control) to allocate a number from 1
to 40 to this station.
4 Press PROG again to confirm the setting.
➜ PROG disappears, the preset number and
the frequency of the preset station are shown.
5 Repeat the above four steps to store other
stations.
● You can override a preset station by storing
another frequency in its place.
20
pg001-034_BTM630_37-Eng 2007.6.14, 17:1520
Page 21
Tuning to preset radio stations
● Press ALBUM • PRESET +/- (or 3 / 4 on
the remote control) until the desired preset
station is displayed.
Radio Reception
English
pg001-034_BTM630_37-Eng 2007.6.14, 17:1521
21
Page 22
External Sources
English
Using a non-USB device
Use the supplied Aux-in cable to connect the
1
AUX jack (3.5mm, located on the top panel) to
an AUDIO OUT or headphone jack on an
external device (such as TV, Laser Disc player,
DVD player or CD recorder).
2 Press SOURCE repeatedly (or AUX on the
remote control) to select external equipment.
Note:
– All the sound control features (DSC or DBB, for
example) are available for selection.
– Refer to the operating instructions for the
connected equipment for details.
Using a USB mass storage
device/SD/MMC memory card
By connecting a USB mass storage device or SD/
MMC memory card to the Hi-Fi system, you can
enjoy the device's or card’s stored music through
the powerful speakers of Hi-Fi system.
Playing a USB mass storage device/SD/
MMC memory card
Compatible mass storage devices/cards
With the Hi-Fi system, you can use:
– USB flash memory (USB 2.0 or USB1.1)
– USB flash players (USB 2.0 or USB1.1)
– SD/MMC memory cards
Notes:
– In some USB flash players (or memory devices),
the stored contents are recorded using copyright
protection technology. Such protected contents will
be unplayable on any other devices (such as this
Hi-Fi system).
– Compatibility of the USB connection on this
product:
a) This product supports most USB Mass storage
devices (MSD) that are compliant to the USB
MSD standards.
i) Most common Mass storage class devices are
flash drives, memory sticks, jump drives and etc.
ii) If you see a "Disc Drive" show up on your
computer after you plugged the mass storage
device into your computer, most likely it is MSD
compliant and it will work with this product.
b) If your Mass storage device required a battery/
power source. Please make sure you have a fresh
battery in it or charge the USB device first and
then plug it into the product again.
– Supported Music type:
a) This device only supports unprotected music
with the following file extension:
.mp3
.wma
b) Music bought from on-line music stores are not
supported because they are secured by Digital
Rights Management protection (DRM).
c) File name extensions that end with the
following are not supported:
.wav; .m4a; .m4p; mp4; .aac and etc.
– No Direct connection can be made from
Computer USB port to the product even you have
either or both mp3 or wma files in your computer.
Supported formats:
– USB or memory file format FAT12, FAT16,
FAT32 (sector size: 512 bytes)
– MP3 bit rate (data rate): 32-320 Kbps and
variable bit rate
– WMA v9 or earlier
– Directory nesting up to a maximum of 8
levels
– Number of albums/ folders: maximum 99
– Number of tracks/titles: maximum 400
– ID3 tag v2.0 or later
– File name in Unicode UTF8 (maximum length:
128 bytes)
The system will not play or support the
following:
– Empty albums: an empty album is an album
that does not contain MP3/WMA files, and
will not be shown in the display.
– Non-supported file formats are skipped. This
means that e.g.: Word documents .doc or
MP3 files with extension .dlf are ignored and
will not be played.
–AAC , WAV, PCM audio files
– DRM protected WMA files
– WMA files in Lossless format
22
pg001-034_BTM630_37-Eng 2007.6.14, 17:1522
Page 23
External Sources
How to transfer music files from PC to a
USB mass storage device/SD/MMC
memory card
By dragging and dropping music files, you can
easily transfer your favorite music from PC to a
USB mass storage device/SD/MMC memory
card.
For a flash player, you can also use its music
management software for the music transfer.
However, those WMA files may be
unplayable for compatibility reasons.
How to organize your MP3/WMA files on
the USB mass storage device/SD/MMC
memory card
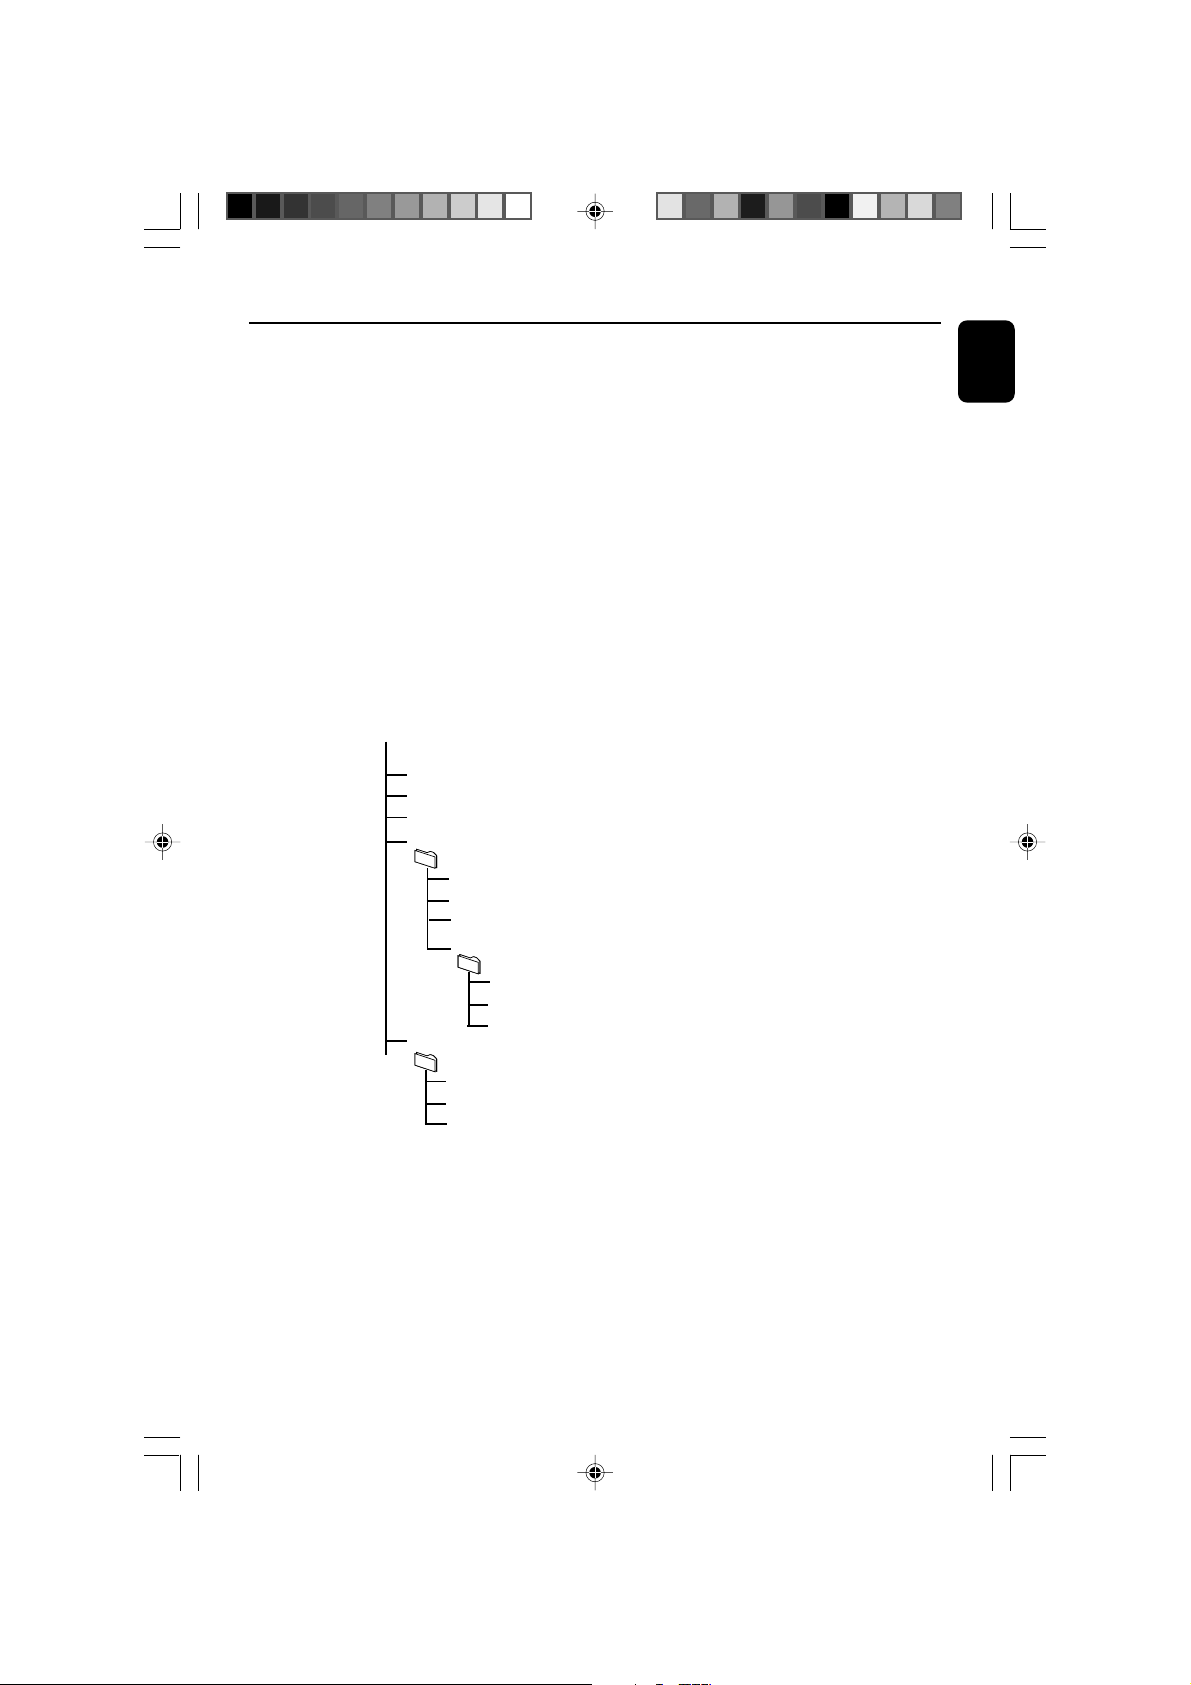
This Hi-Fi system will browse the MP3/WMA
files in the folders/sub-folders/titles order.
Example:
Root
Title 001
Title 002
Title 003
Album 01
Title 001
Title 002
Title 003
Album 02
Title 001
Title 002
Title 003
Album 03
Organize your MP3/WMA files in different
folders or subfolders as required.
Notes:
– If you have not organized MP3/WMA files into
any albums on your disc, an album "01" will be
automatically assigned for all those files.
– Make sure that the file names of MP3 files end
with .mp3. and the file names of WMA files end
with .wma.
–For DRM protected WMA files, use Windows
Media Player 10 (or later) for conversion. Visit
www.microsoft.com for details about Windows
Media Player and WM DRM (Windows Media
Digital Rights Management).
1 Check the USB device/SD/MMC memory card
has been properly connected. (See
”Preparations: Connecting a USB mass storage
device or SD/MMC memory card”).
2 Press SOURCE (USB/CARD on the remote)
once or more to select USB/CARD.
– NO FILE appears if no audio file is found in
the USB device/SD/MMC memory card.
3 Play the available audio files as you do with the
albums/tracks on a CD (See “CD/MP3
Operations”).
Notes:
–For compatibility reasons, the album/track
information may differ from what it is displayed
through flash players' music management software.
– File names or ID3 tags will be displayed as --- if
they are not in English.
English
Title 001
Title 002
Title 003
pg001-034_BTM630_37-Eng 2007.6.14, 17:1523
23
Page 24
External Sources
English
Ripping function
This function enables you to record music to a
connected USB mass storage device or SD/
MMC memory card from any other source (i.e.,
DISC, AUX or BT) without interr upting your
enjoyment of the music.
1 Inser t a USB mass device with sufficient free
space to the USB DIRECT socket on
the set. .
● Or inser t an SD/MMC memor y card with
sufficient free space to the SD • MMC slot on
the top of the system.
(See "Preparations: Connecting a USB device or
SD/MMC memory card")
2 Prepare the source to record from.
DISC - load the disc. (See "CD/MP3-CD/WMA
Operations".)
BT (BLUETOOTH) - Connect a Bluetooth-
enabled device supporting the A2DP profile to
the system. Select a track where ripping will start
(See “Bluetooth Operation”).
AUX - connect external equipment.
3 Press REC • to star t ripping.
➜ "NO MEDIA" will be displayed briefly if there
is no USB mass storage device or SD/MMC
memory card connected to the system.
➜ "REC" will start flashing on the display.
➜ In the DISC mode, "REC_1ONE" will scroll
once.
● In the DISC mode, to record all tracks starting
from the one you selected, press REC • again.
➜ "REC ALL" will be displayed briefly.
● In the TOC mode of a disc, press REC • again
to start speedy ripping.
4 At any moment, simply press 9 to stop ripping.
Notes:
– Some functions may be unavailable during
ripping. In this case, you may see a prompt of
“PRESS STOP TO RELEASE” on the display panel.
–You can continue enjoying music during ripping.
However, music playback will be interrupted during
speedy ripping.
– This function can also be combined with the
programme function. In this case, selection of "REC
ALL" in DISC mode will record all programmed
tracks from the starting point to the USB mass
storage device or SD/MMC memory card.
–Never unplug the USB mass storage device or
SD/MMC memory card before pressing 9 to stop
ripping.
– In the DISC mode, when you stop ripping or the
free space is insufficient, the current track being
ripped will not be recorded to your USB mass
storage device or SD/MMC memory card and the
playback will stop at the same time.
To delete a track from your USB mass
storage device or SD/MMC memory card
1 Plug in the USB mass storage device or SD/
MMC memory card.
2 Select the track to be deleted during playback.
3 Press and hold 9 for 3 seconds.
➜ "PRESS OK TO DELETE" scrolls.
4 Press OK to confirm the deletion within 5
seconds.
➜ "DELETE" appears.
The making of unauthorized copies of
copy-protected material, including
computer programmes, files, broadcasts and
sound recordings, may be an infringement
of copyrights and constitute a criminal
offence. This equipment should not be used
for such purposes.
24
pg001-034_BTM630_37-Eng 2007.6.14, 17:1524
Page 25
iPod Dock
Compatible iPod players
● Most Apple iPod models with 30-pin dock
connectors as follows: 20GB, 40GB, 20/30GB
Photo, 40/60GB Photo, 30GB Video, 60GB Video,
80GB Video, Mini, Nano and Nano 2nd
generation.
Selecting the correct dock
adaptor
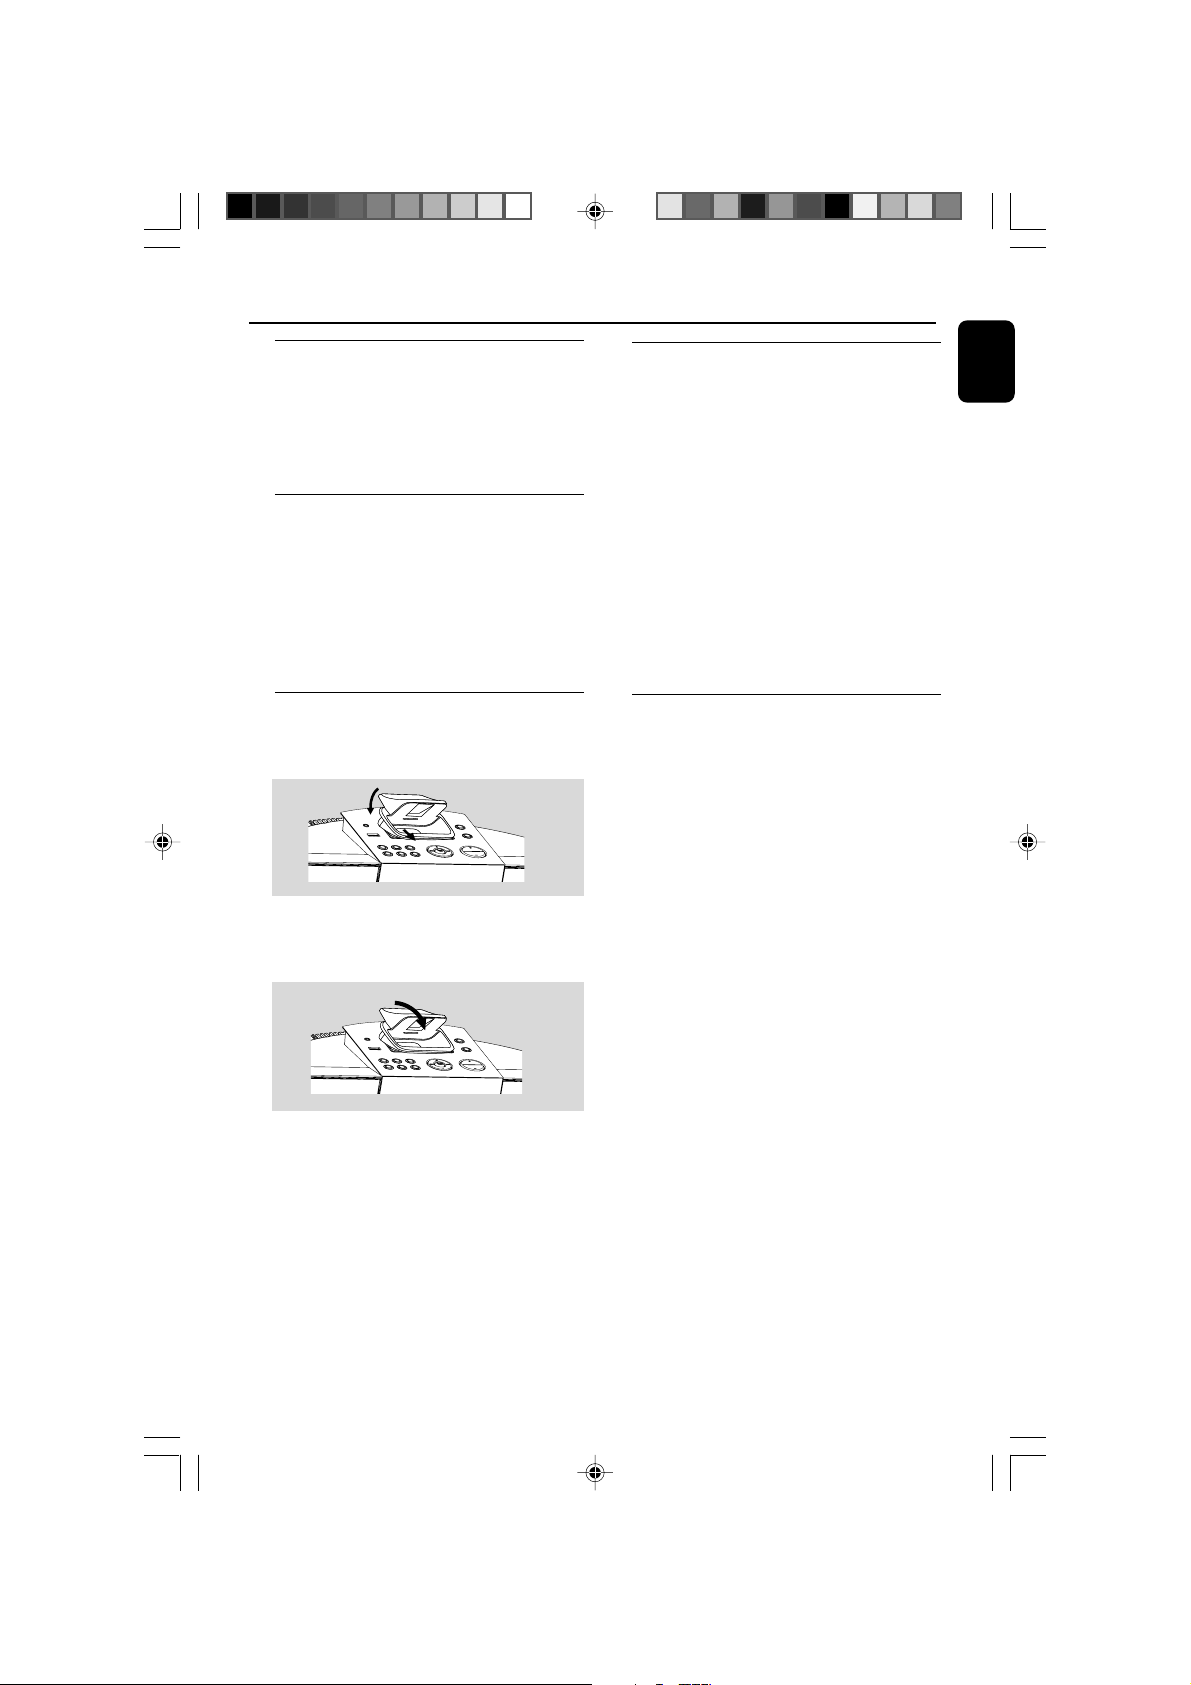
● 8 iPod dock adaptors of different type, as
indicated at the back of the adaptor, are included
to fit the following iPod:
20GB, 40GB, 20/30GB Photo, 40/60GB Photo,
30GB Video, 60GB Video, 80GB Video, Mini,
Nano and Nano 2nd generation.
Setup
● Inser t a dock adapter corresponding to the
portable player you use.
2
11
● To connect with a different iPod portable player,
pop up the corresponding dock adapter and
replace with a new one of the matching type.
Playing an iPod portable player
1 Correctly dock your iPod portable player in the
cradle. Make sure the dock adaptor is
compatible.
● Make sure that you have powered on your iPod
player before selecting DOCK source.
➜ On the display, "iPod" is displayed if iPod is
connected.
2 Press SOURCE on the system repeatedly or
iPod on the remote control to select iPod
source.
3 Playback starts automatically. You can select
available features (such as play/pause, skip track,
fast forward/backward, menu selection) during
playback.
Charging iPod battery using the
dock
● In DOCK mode, directly dock your iPod
portable player on the cradle for charging.
Note:
–For the purpose of SAVING POWER, recharging
of your iPod or USB device is NOT SUPPORTED
when the main set is in the ECO POWER
STANDBY MODE.
English
pg001-034_BTM630_37-Eng 2007.6.14, 17:1525
25
Page 26
Bluetooth Operation
English
The Bluetooth capabilities of BTM630 enable it
to receive audio from various other Bluetoothenabled devices wirelessly (for example, a mobile
phone, PDA etc.) within a range of
approximately 8 meters.
Supported Bluetooth profiles
Your system suppor ts the following Bluetooth
profiles:
Hands-Free Profile (HFP)
Headset Profile (HSP)
Advanced Audio Distribution Profile (A2DP)
Audio Video Remote Control Profile (AVRCP)
Note:
– Before pairing a Bluetooth-enabled device with
this system, please first read the user manual of
the device to check whether it supports any of the
above profiles.
Pairing a Bluetooth-enabled
device with the system
IMPORTANT!
– The Bluetooth transmitter and
receiver hardware in this system has an
approximate operational range of 8
meter in open space. Generally
Bluetooth devices can communicate with
each other clearly within a regular sized
room or office. Operation between
different rooms will depend on the
construction of the room. It is important
to recognize the fact that Bluetooth
communication range may be
substantially reduced if the signal passes
through a solid object. Human bodies,
brick and concrete walls, and heavy
furniture or bookcases will reduce the
operational range of your Bluetooth
devices. Glass, dry-wall or wood paneled
walls and office partitions may have a less
severe but noticeable effect. You should
position your Bluetooth devices closer to
each other if you observe
communication difficulties.
– Please familiarize yourself with the
Bluetooth capabilities of your device
before connecting it to this system.
Compatibility with all Bluetooth devices
is not guaranteed!
–Keep the system away from any other
electronic device that may cause
interference, e.g., a PC or microwave
oven.
1 Place the Bluetooth-enabled device for pairing
within 8 meters from the system.
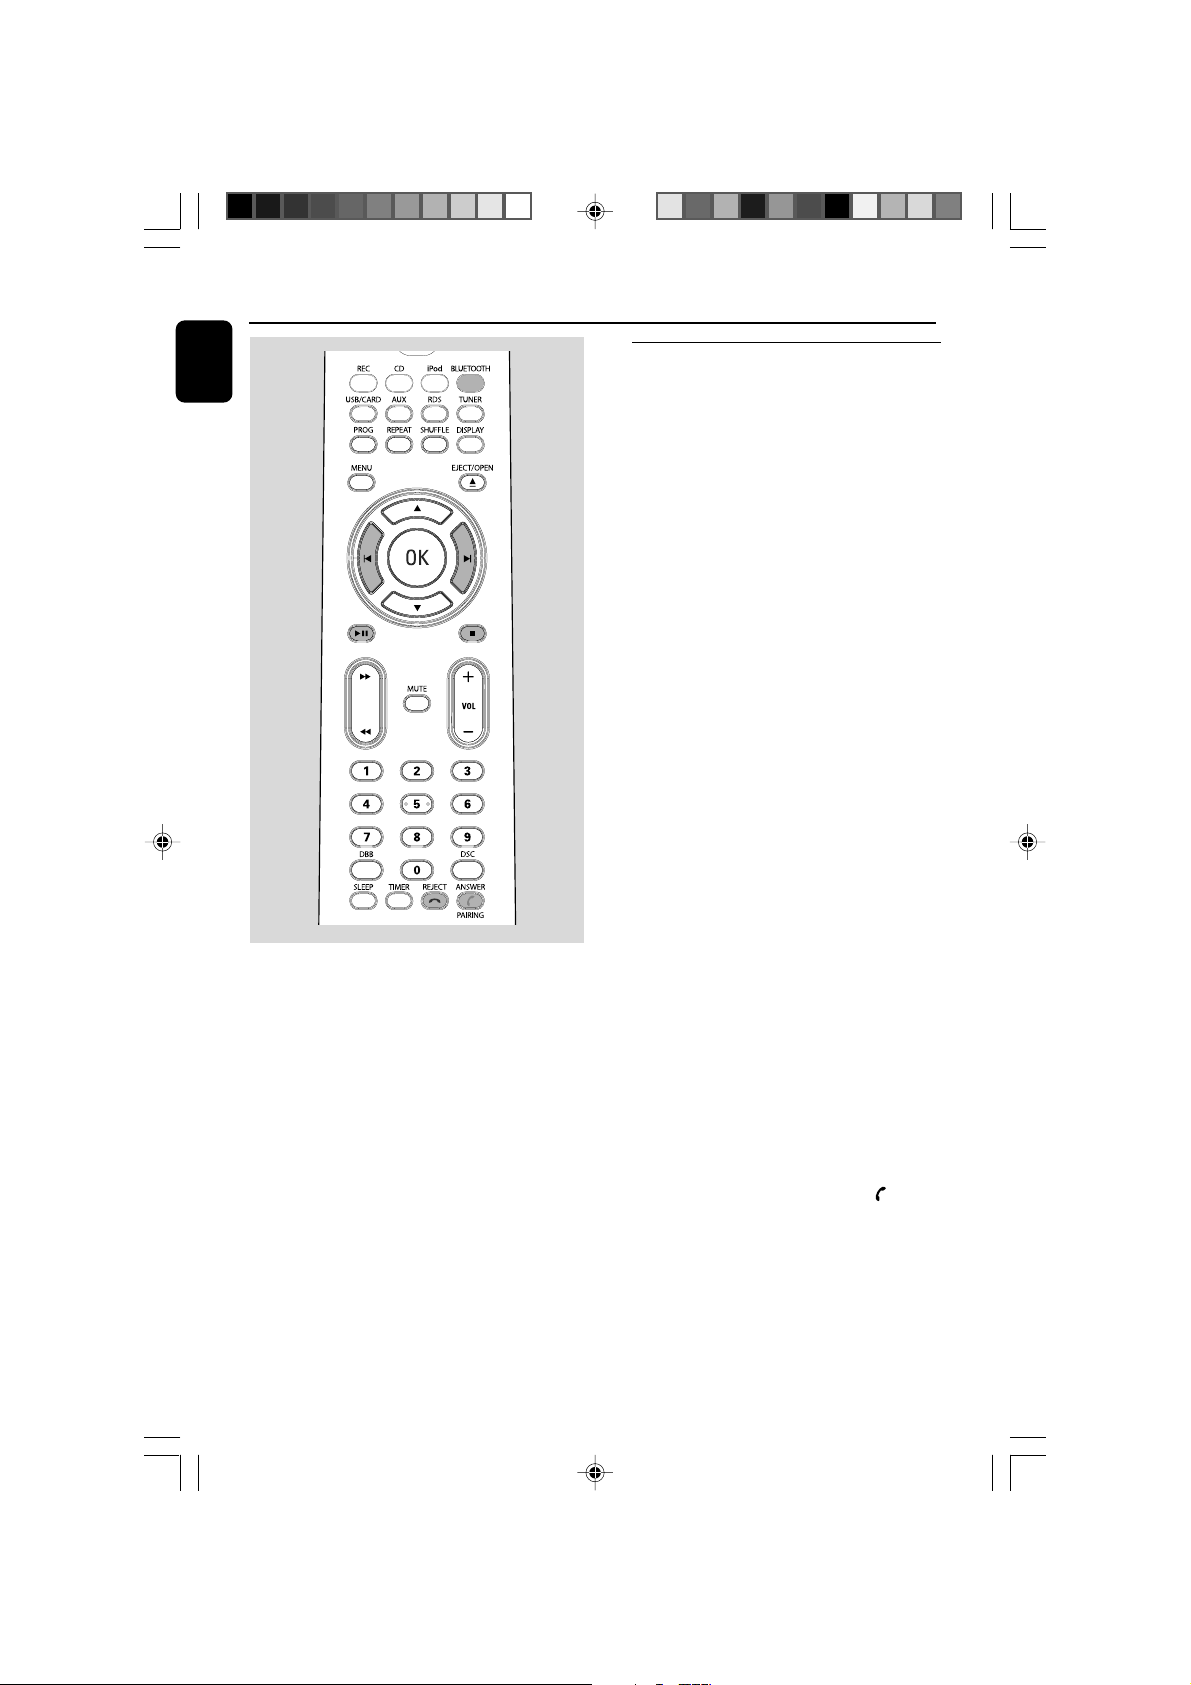
2 Press SOURCE on the top of the system (or
BLUETOOTH on the remote control) to
select the Bluetooth source.
➜ “BT” appears on the display panel.
3 Press and hold ANSWER/PAIRING
top of the system or the remote control for
more than 3 seconds.
➜ “PAIRING” starts flashing on the display panel.
on the
4 Set the Bluetooth-enabled device to search for
other available Bluetooth devices until it
recognizes “BTM630”. (Refer to the user manual
of the device to be connected for detailed
operations.)
26
pg001-034_BTM630_37-Eng 2007.6.14, 17:1526
Page 27
Bluetooth Operation
5 Select “BTM630” to star t pairing.
6 Enter “0000” when prompted for a keyword.
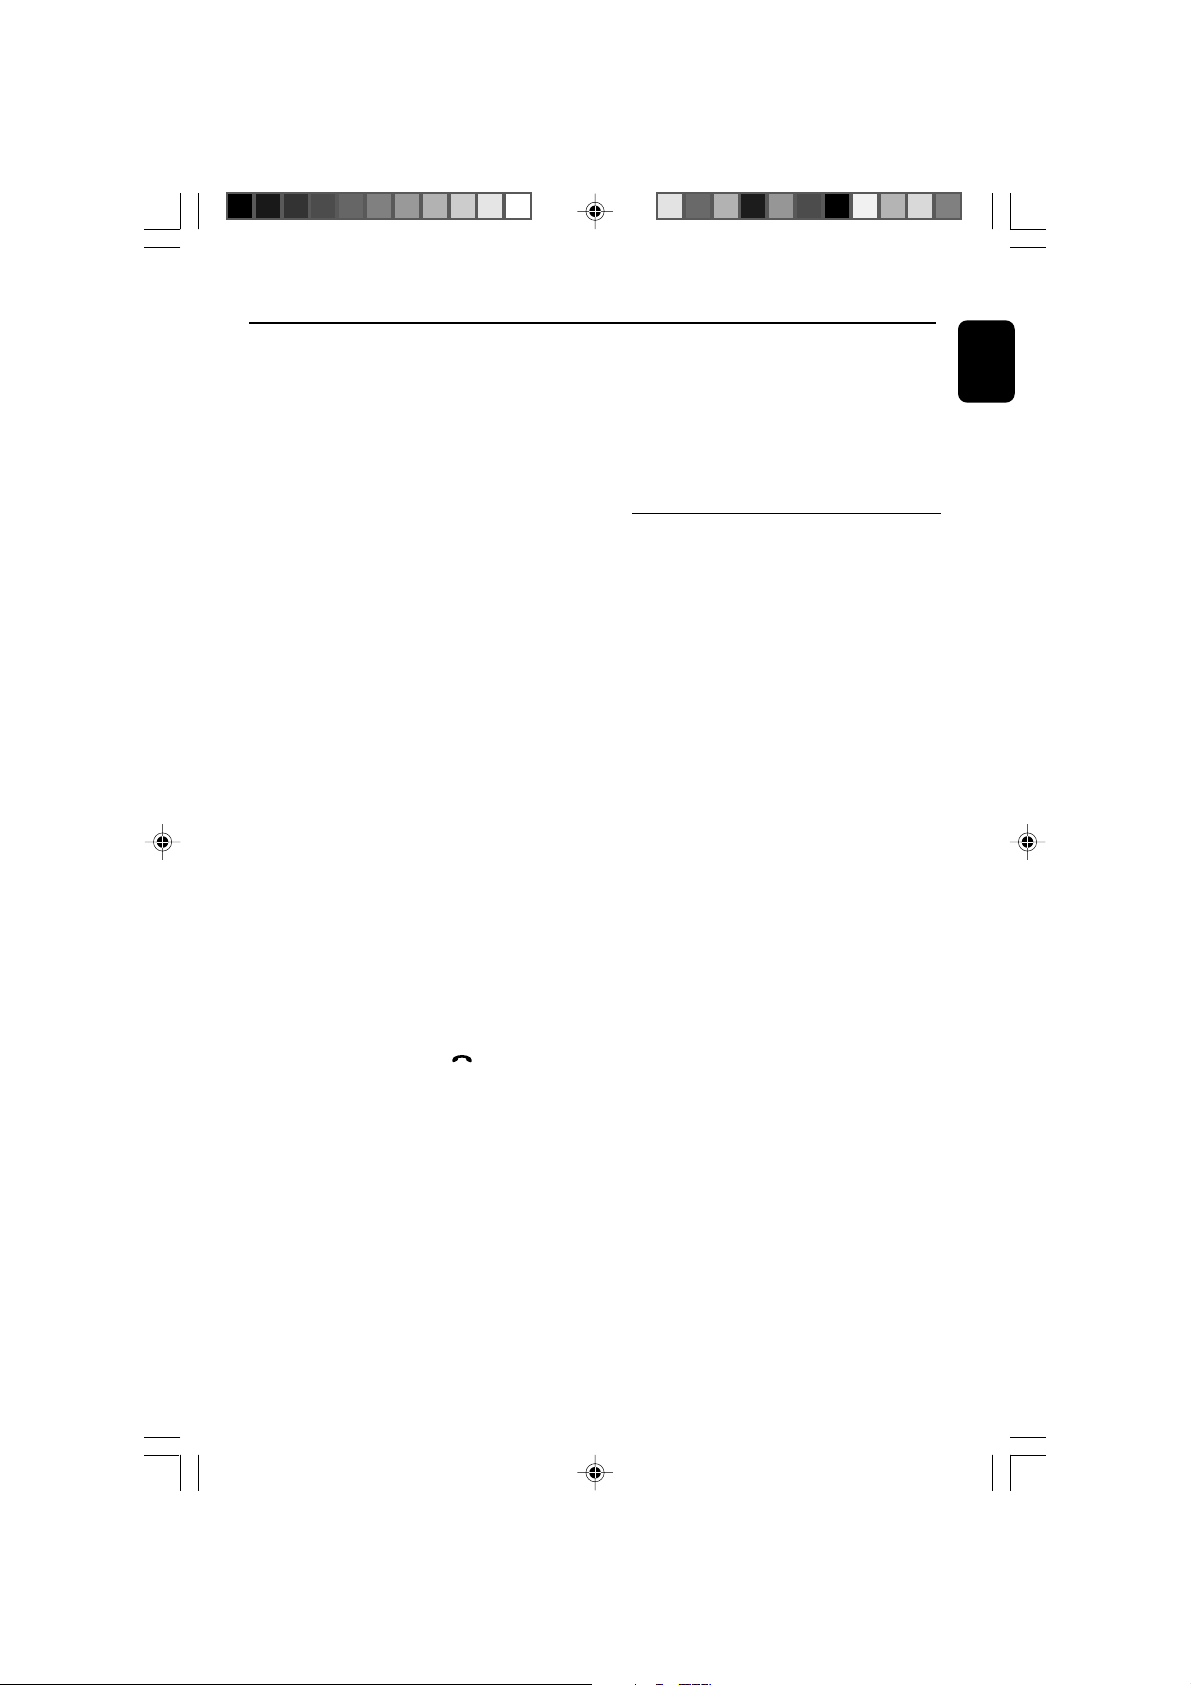
7 Wait for completion of the pairing until you hear
a double beep from the system and the
bluetooth icon turns on.
➜ If the connected device (mobile phone)
supports the HFP and/or HSP profiles, the
display panel of the system will show “PHONE
CONNECTED” briefly.
➜ If the connected device (mobile phone or
other device) supports the A2DP profile, the
display panel of the system will show “PHONE
CONNECTED” followed by “STEREO
CONNECTED” briefly.
➜ You may be asked to grant permission for
"AVRCP" or "Remote Control" functions. You
should grant this permission for complete
connection.
➜ The name of the paired device will appear on
the display panel after successful pairing.
8 Repeat the above steps if you want to pair more
Bluetooth-enabled devices with the system.
To disconnect a paired device
● Switch off the device or move it beyond the
communication range.
➜ “DISCONNECT PHONE” or
“DISCONNECT STEREO” will appear on the
display panel of the system briefly when the
connection is terminated.
➜ You will hear a long beep from the system.
To disconnect all paired devices
● Press and hold on REJECT for more than 5
seconds until “DISCONNECT ALL” appear on
the display panel of the system.
➜ No message on the display panel indicates
that there is no active connection to terminate.
Notes:
– The system can store pairing information of up
to 7 devices. You do not need to pair a device every
time you want to reconnect it with this system. As
long as the system is powered on and the
reconnection function of device is activated, the
paired device will reconnect to the system
whenever it comes into the communication range.
– If an eighth device is paired, the pairing
information of the first paired device will be
overwritten.
–“FAILED” will appear on the display panel of the
system if no pairing is made within one minute. In
this case, please refer to the related items in
“Troubleshooting” for a solution to the problem.
Operating a connected
Bluetooth-enabled device
through the system
BTM630 is designed with a built-in high-quality
microphone (speakerphone) allowing you to
make or end calls of a connected mobile phone
through this system.
Notes for the speakerphone:
–To achieve the best performance from your
system, please follow these guidelines for
placement and use of the speakerphone:
1) Choose a quiet environment.
The microphone on the unit will pick up your
voice, as well as some amount of background
noise. Using this unit in a quiet place will make it
easier for the party you are calling to hear your
voice.
2) Minimize echo in the room.
Using this unit in a room that has carpets, drapes
and soft furnishings will give better performance
than using in a room with highly reflective
surfaces such as tile, concrete and glass.
3) Keep in range of the microphone.
The closer you speak to the microphone, the
more clearly your voice will be heard. If you are
within 2 meter of the microphone you may talk at
a normal volume and your voice should be clear
to the party you are calling. If you move beyond 3
meter, you will need to raise your voice in order to
be heard clearly. Use beyond 5 meter range is not
recommended.
4) Choose a sensible listening volume.
This unit is designed to perform best at moderate
listening levels. If you increase the volume too
much, you may begin to hear an echo. The best
listening level is normally a maximum volume
level of 16.
English
pg001-034_BTM630_37-Eng 2007.6.14, 17:1527
27
Page 28
Bluetooth Operation
English
5) Place the unit in line with your mouth.
If you will be using this unit while sitting down,
place the unit at tabletop level, in line with the
level of your mouth. Placing the unit on a high
cabinet or on the floor may reduce the pick-up of
the microphone.
Receiving a call through the system (for
a connected mobile phone supporting
the HFP and HSP profiles)
When there is an incoming call to the connected
mobile device, you will hear an incoming call
alert tone from the speakers of the system and
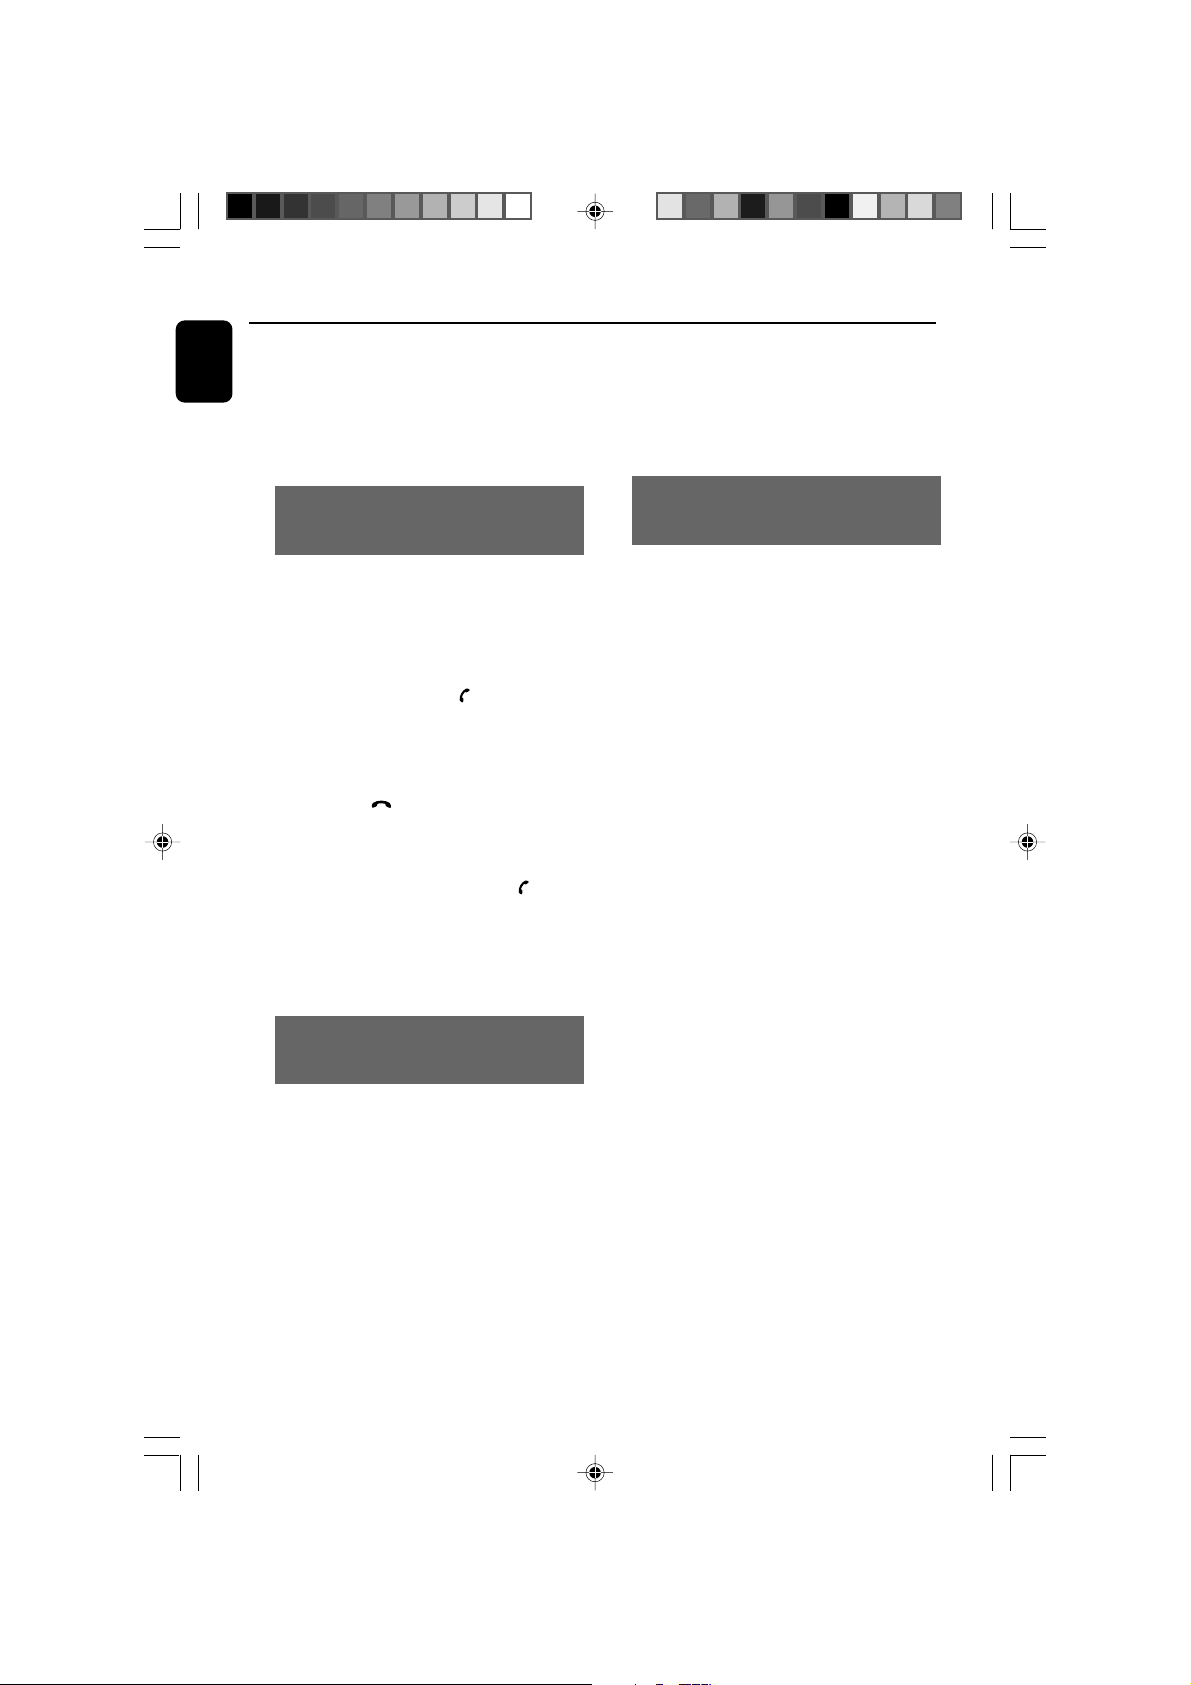
the display panel of the system will show “IN
CALL” and the calling number (if available). In
this case, you can:
● Press ANSWER/PAIRING on the top of
the system or the remote control to accept the
call.
➜ The display panel of the system will show
“CALLING”.
● Press REJECT on the top of the system or
the remote control to reject the call.
➜ The display panel of the system will show
“END CALL”.
● Press and hold ANSWER/PAIRING on the
top of the system or the remote control to
transfer sound from system speakers to the
mobile phone or conversely.
➜ The display panel of the system will show
“TRANSFER”.
To resume sound input of the
microphone
● Press MUTE again.
➜ The display panel of the system will show
“CALLING”.
Listening to music from the connected
device through the system (for a device
supporting the A2DP profile)
BTM630 allows you to connect your A2DPcapable device and stream high-quality stereo
music over Bluetooth to the system for playback.
If the connected device also supports the
AVRCP profile, you can also control music
playback of the connected device from the
system or its remote control:
● Press ÉÅ to star t playback.
● Press ÉÅ again to pause playback.
● Press S/T on the top of the system (or ¡
/ ™ on the remote control) to select a track.
● Press 9 to stop playback.
Holding a call through the system (for a
connected mobile phone supporting the
HFP and HSP profiles)
● During a call, you can press MUTE on the
remote control to mute the microphone
(speakerphone) so that the other party cannot
hear your voice.
➜ The display panel of the system will show
“MIC MUTE”.
28
pg001-034_BTM630_37-Eng 2007.6.14, 17:1528
Page 29
Clock/Timer
Timer setting
● The system can be used as an alarm clock,
whereby the DISC (CD)/TUNER (FM/AM)/
DOCK (iPod)/USB/CARD (SD/MMC) is
switched on at a set time (one time operation).
The clock time needs to be set first before the
timer can be used.
● During setting, if no button is pressed within 90
seconds, the system will exit timer setting mode
automatically.
1 In standby mode, press TIMER for more than
two seconds.
2 Press SOURCE repeatedly (or the respective
source keys on the remote control) to select the
sound source.
➜ “SET TIMER” and “SELECT SOURCE” are
displayed.
3 Press TIMER to confirm your desired mode.
➜ The clock digits for the hours flash.
4 Press ALBUM • PRESET +/- (or 3 / 4on the
remote control) to set the hours.
5 Press TIMER again.
➜ The clock digits for the minutes flash.
6 Press ALBUM • PRESET +/- (or 3 / 4 on
the remote control) to set the minutes.
7 Press TIMER to confirm the time.
➜ The timer is now set and activated.
English
Clock setting
The clock can be set in either 12-hour or
24-hour mode (12HR or 24HR for example).
1 In standby mode, press PROG.
➜ SET CLOCK is displayed briefly. Then, 12HR
or 24HR is displayed.
2 Press ALBUM • PRESET +/- (or 3 / 4 on
the remote control) to select clock mode. Press
PROG to confirm.
➜ The clock digits for the hours continue to
flash.
3 Press ALBUM • PRESET +/- (or 3 / 4 on
the remote control) to set the hours.
4 Press PROG again.
➜ The clock digits for the minutes flash.
5 Press ALBUM • PRESET +/- (or 3 / 4 on
the remote control) to set the minutes.
6 Press PROG to confirm the time.
pg001-034_BTM630_37-Eng 2007.6.14, 17:1529
Activating and deactivating timer
● In standby or during playback, press TIMER
once on the remote control.
➜ Display shows if activated, and disappears if
deactivated.
29
Page 30
Clock/Timer
English
Sleep timer setting
The sleep timer enables the system to switch off
by itself after a set period of time.
1 Press SLEEP on the remote control repeatedly
to select a preset time.
➜ The selections are as follows (time in
minutes):
OFF ™ 90 ™ 75 ™ 60 ™ 45 ™ 30 ™ 15 ™
OFF ™ 90 …
➜ "SLEEP XX" is displayed. "XX" is the time in
minutes.
➜
is displayed if the sleep time you have
selected is not OFF.
2 When you reach the desired length of time, stop
pressing the SLEEP button.
To deactivate the sleep timer
● Press SLEEP repeatedly until "0FF" is displayed,
or press ECO POWER/STANDBY ON 2.
30
pg001-034_BTM630_37-Eng 2007.6.14, 17:1530
Page 31
Specifications
AMPLIFIER
Output power ....................................... 2 x 15 W RMS
Signal-to-noise ratio ....................................... ≥ 70 dBA
Frequency response ...... 20 Hz – 20 KHz, ± 3 dB
Input sensitivity AUX ....................... 0.5 V (max. 2 V)
Impedance loudspeakers ......................................... 4 Ω
Impedance headphones ........................................ 32 Ω
Output power headphones ....................... <50 mW
CD PLAYER
Frequency range ................................ 20 Hz – 20 kHz
Signal-to-noise ratio ............................................ 70 dBA
TUNER
FM wave range ...................................87.5 – 108 MHz
AM wave range ................................. 530 – 1700 KHz
Antenna
FM ....................................................................... 75 Ω wire
AM .............................................................. Loop antenna
USB PLAYER/SD/MMC CARD
USB ................................................................... 12Mb/s, V1.1
......................................... support MP3 and WMA files
Number of albums/folders ................. maximum 99
Number of tracks/titles ...................... maximum 400
Bluetooth
Communication system.......... Bluetooth Standard
ver sion 2.0
Output ............ Bluetooth Standard Power Class 2
Maximum communication range ...... Line of sight
approx. 10m
1)
Frequency band .... 2.4 GHz band (2.4000 GHz -
2.4835 GHz)
Modulation method ................................................. FHSS
Compatible Bluetooth profiles
2)
.............................................................
...... A2DP (Advanced Audio Distribution Profile)
.. AVRCP (Audio Video Remote Control Profile)
Supported codecs
Receive .................... SBC (Sub Band Codec), MP3
Tr ansmit.............................. SBC (Sub Band Codec)
1) The actual r ange will vary depending on factor s such as
obstacles between devices, magnetic fields around a microwave
oven, static electricity, reception sensitivity, antenna’s performance,
operating system, software application, etc.
2) Bluetooth standard profiles indicate the purpose of Bluetooth
communication between devices.
GENERAL INFORMATION
AC Power ............................. 100 – 240 V / 50-60 Hz
Dimensions (w x h x d) . 206 x 141 x 390 (mm)
Weight..................................................................... 2.374 kg
Standby power consumption ............................ <7 W
Eco power standby ................................................. <1 W
Specifications and external appearance are
subject to change without notice.
English
Cleaning the Cabinet
● Use a soft cloth slightly moistened with a mild
detergent solution. Do not use a solution
containing alcohol, spirits, ammonia or abrasives.
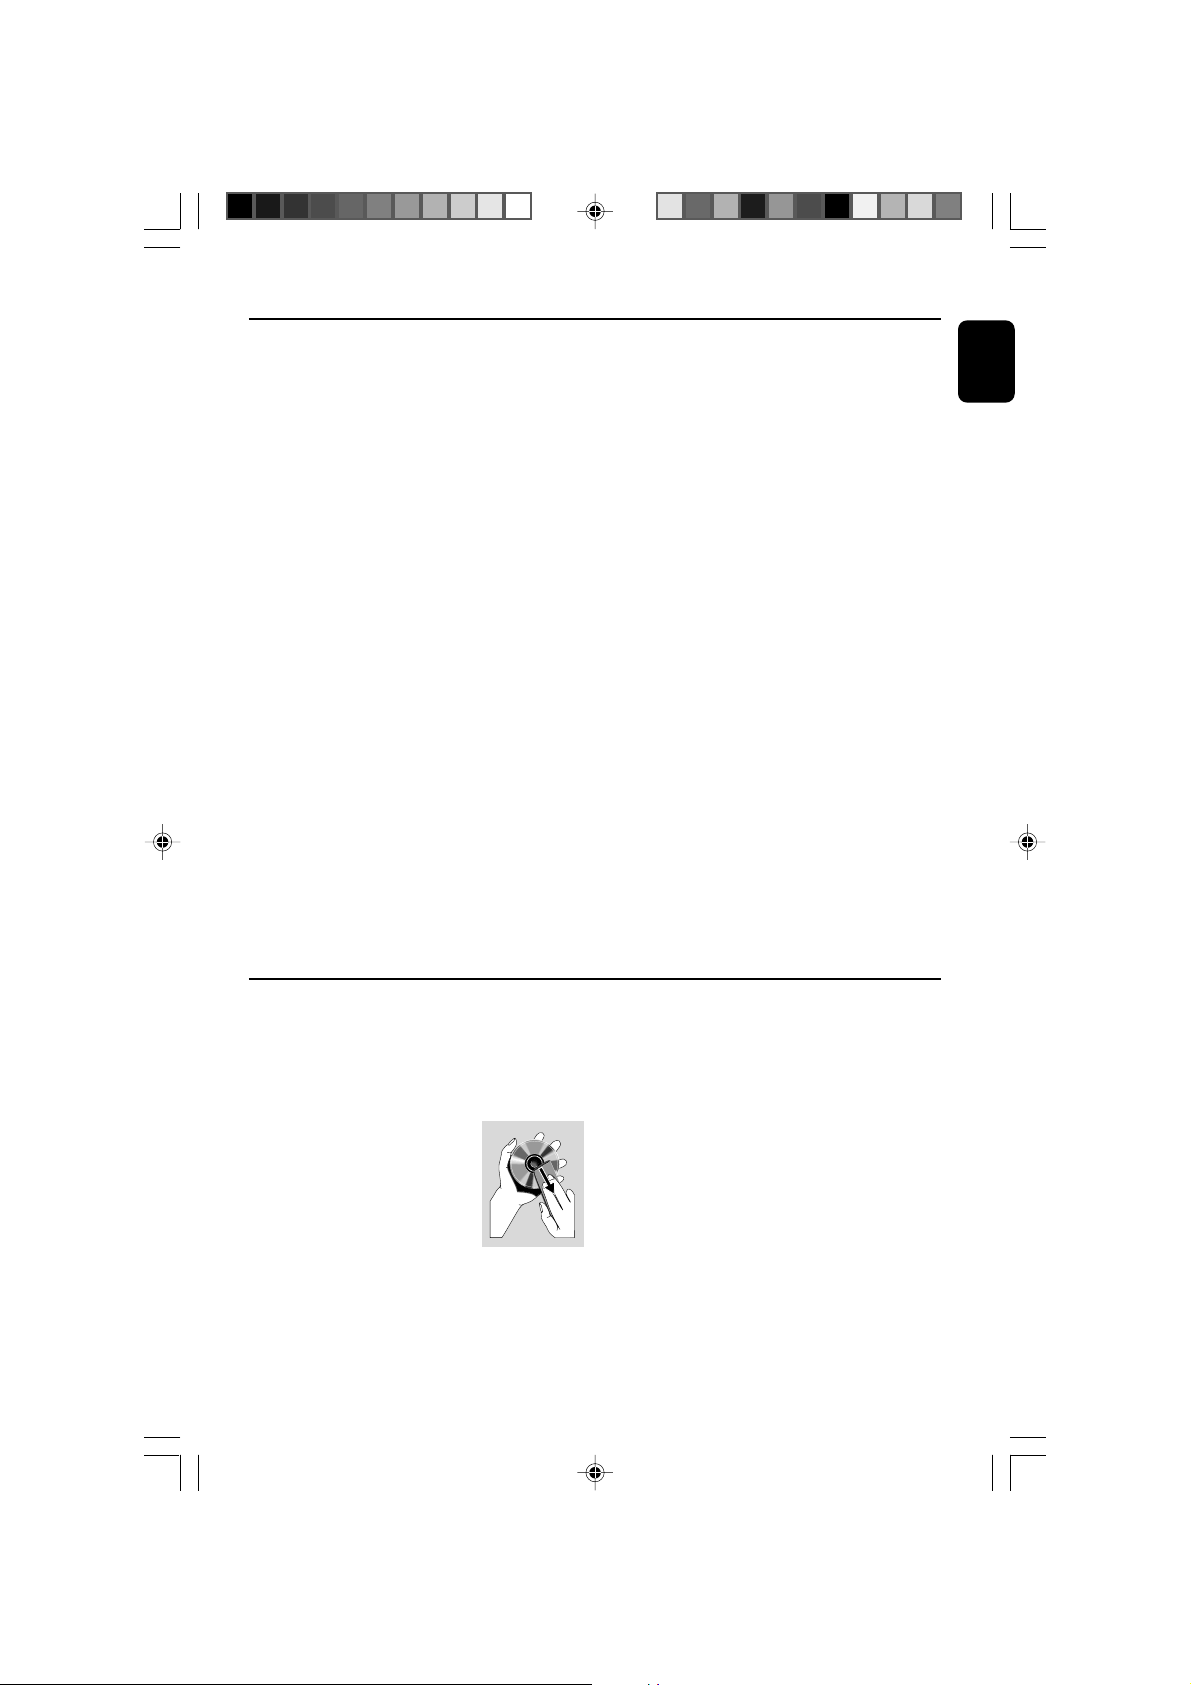
Cleaning Discs
● When a disc becomes dir ty,
clean it with a cleaning cloth.
Wipe the disc from the centre
out.
● Do not use solvents such as
benzene, thinner, commercially
available cleaners, or antistatic spray intended for
analogue records.
pg001-034_BTM630_37-Eng 2007.6.14, 17:1531
Maintenance
Cleaning the disc lens
● After prolonged use, dirt or dust may
accumulate at the disc lens. To ensure good
playback quality, clean the disc lens with Philips
CD Lens Cleaner or any commercially available
cleaner. Follow the instructions supplied with
cleaner.
31
Page 32
Troubleshooting
English
WARNING
Under no circumstances should you try to repair the system yourself, as this will invalidate the
warranty. Do not open the system as there is a risk of electric shock.
If a fault occurs, first check the points listed below before taking the system for repair. If you
are unable to remedy a problem by following these hints, consult your dealer or Philips for
help.
Problem
“PLEASE INSERT CD/MP3 DISC” is
displayed.
Radio reception is poor.
The system does not react when buttons
are pressed.
Sound cannot be heard or is of poor
quality.
The remote control does not function
properly.
Solution
✔ Insert a disc.
✔ Check if the disc is inserted upside down.
✔ Wait until the moisture condensation at the lens
has cleared.
✔ Replace or clean the disc, see “Maintenance”.
✔ Use a finalised CD-RW or correct format disc.
✔ If the signal is too weak, adjust the antenna or
connect an external antenna for better
reception.
✔ Increase the distance between the Micro HiFi
System and your TV or VCR.
✔ Remove and reconnect the AC power plug and
switch on the system again.
✔ Adjust the volume.
✔ Disconnect the headphone.
✔ Select the source (CD or TUNER, for example)
before pressing the function button (ÉÅ, 5 /
6).
✔ Reduce the distance between the remote
control and the system.
✔ Insert the batter y with its polarities
(+/– signs) aligned as indicated.
✔ Replace the battery.
✔ Point the remote control directly toward
IR sensor on the front of the system.
The timer is not working.
The Clock/Timer setting is erased.
32
pg001-034_BTM630_37-Eng 2007.6.14, 17:1532
✔ Set the clock correctly.
✔ Switch on the timer.
✔ Power has been interrupted or the power cord
has been disconnected. Reset the clock/timer.
Page 33
Troubleshooting
Problem
Some files on the USB device are not
displayed.
“DEVICE NOT SUPPORTED” scrolls on the
display.
Sound input to the microphone cannot
be heard clearly.
The audio quality is poor after
connection with a Bluetooth-enabled
device.
A device cannot pair or connect with the
system.
Solution
✔ Check if the number of folders exceeds 99 or
the number of titles exceeds 400.
✔ Remove the USB mass storage device or select
another source.
✔ Move closer to the microphone when talking or
talk louder.
✔ Choose an environment with less echo effect
and/or less background noise.
✔ Reduce the system volume to achieve the
optimal echo performance.
✔ The Bluetooth reception is poor. Move the
device closer to the system or remove any
obstacle between the device and system.
✔ The device does not support Bluetooth
communication or any of the compatible profiles
required for the system.
✔ You have not enabled the Bluetooth function of
the device. Please refer to the user manual of the
device for how to enable the function.
✔ The system is not in the pairing mode. Select the
Bluetooth source and press and hold
ANSWER/PAIRING for more than 3
seconds until “PAIRING” appears on the display
panel.
✔ The system is already connected with another
Bluetooth-enabled device. Disconnect that
device or all other connected devices and then
try again.
English
The paired mobile phone connects and
disconnects constantly.
pg001-034_BTM630_37-Eng 2007.6.14, 17:1533
✔ The Bluetooth reception is poor. Move the
mobile phone closer to the system or remove
any obstacle between the mobile phone and
system.
✔ Some mobile phones may connect and
disconnect constantly when you make or end
calls. This does not indicate any malfunction of
the system.
✔ For some mobile phones, the Bluetooth
connection may be deactivated automatically as
a power-saving feature. This does not indicate any
malfunction of the system.
33
Page 34
34
pg001-034_BTM630_37-Eng 2007.6.14, 17:1534
 Loading...