

Philips BRE652/10, BRE652/00, BRE651/00, BRE650/10, BRE650/00 User Manual [el]
...
BRE610-BRE652
234
1
2
5
678
9
101112
13
141516
17
18
192021
222324
25
262728
>75% recycled paper
>75% papier recyclé
© 2017 Koninklijke Philips N.V.
All rights reserved
8888.989.2532.1 (8/8/2017)

English
8
7
13
22
24 25
23
17
18
19
2021
14
16
15
11
2728
1
3
4
2
5
6
26
BRE652/10
BRE652/00
BRE651/00
BRE650/10
BRE650/00
BRE644/10
BRE644/00
BRE640/10
BRE640/00
BRE632/00
BRE631/00
BRE630/10
BRE630/00
BRE619/00
BRE652/10
BRE652/00
BRE651/00
BRE650/10
BRE651/00
BRE631/00
BRE652/10
BRE652/00
BRE651/00
BRE650/10
BRE650/00
BRE644/10
BRE644/00
BRE640/10
BRE640/00
BRE634/10
BRE632/00
BRE630/10
BRE630/00
BRE620/10
BRE620/00
BRE619/00
BRE610/00
BRE652/10
BRE652/00
BRE651/00
BRE650/10
BRE650/00
BRE644/10
BRE644/00
BRE640/10
BRE640/00
BRE634/10
BRE632/00
BRE631/00
BRE630/10
BRE630/00
BRE619/00
BRE611/00
BRE652/10
BRE652/00
BRE644/10
BRE644/00
BRE640/10
BRE640/00
BRE632/00
BRE631/00
BRE611/00
BRE651/00
BRE650/00
BRE650/10
BRE640/10
BRE640/00
BRE634/10
BRE631/00
BRE630/10
BRE630/00
BRE620/10
BRE620/00
BRE652/10 BRE652/00
BRE652/10
BRE652/00
BRE651/00
BRE650/10
BRE650/00
BRE644/10
BRE644/00
BRE640/10
BRE640/00
BRE634/10
BRE619/00
BRE650/00
BRE644/10
BRE644/00
BRE652/10
BRE652/00
BRE651/00
BRE650/10
BRE644/10
BRE644/00
BRE650/10
BRE650/00
BRE652/10
BRE652/00
BRE651/00
BRE650/10
BRE650/00
12
10
9
1
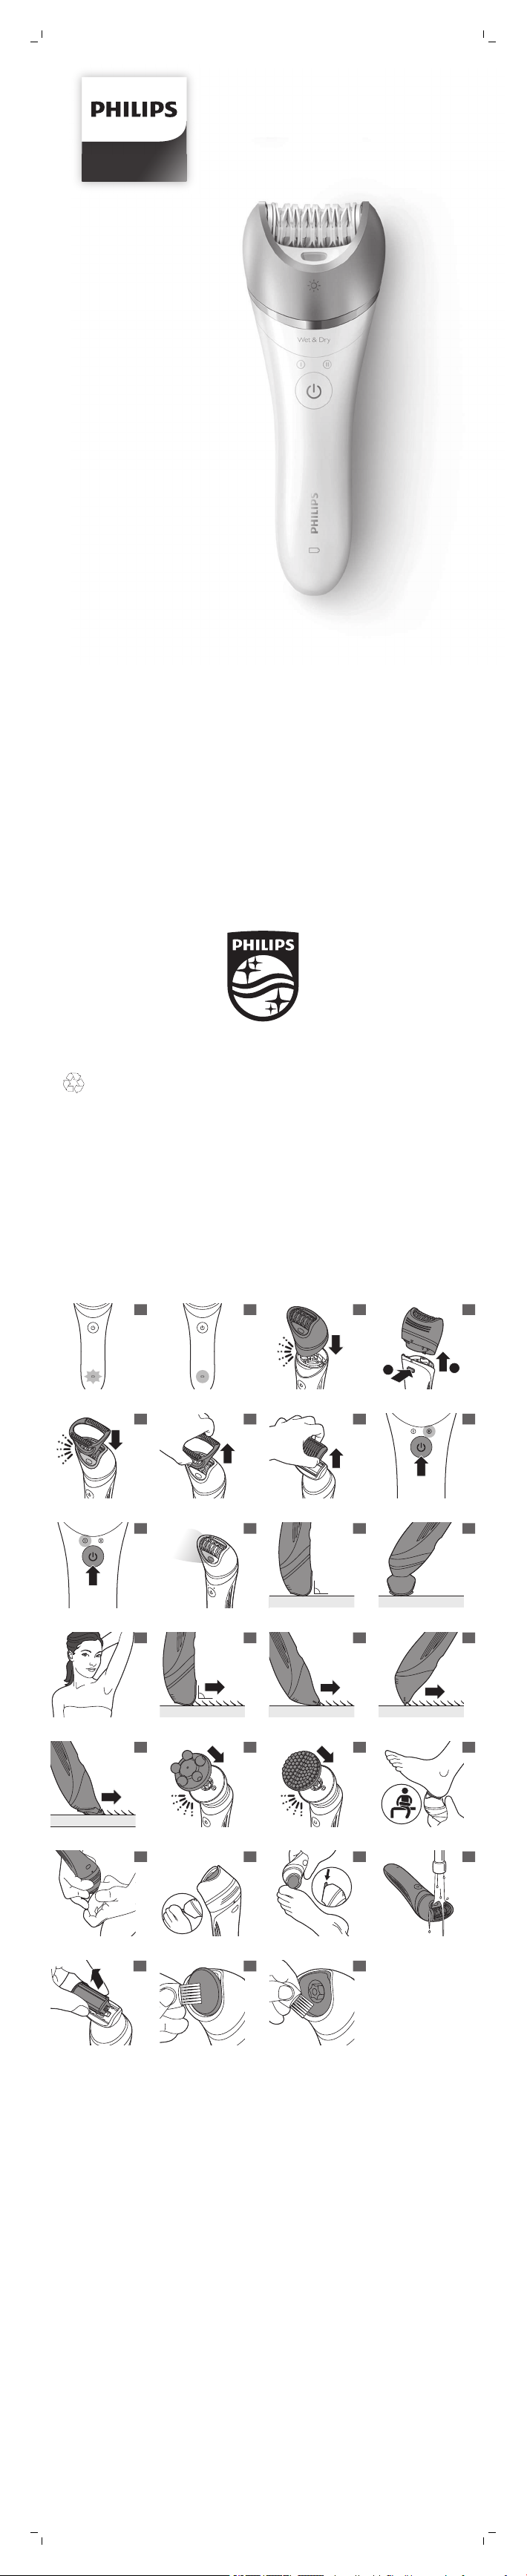
General Description Fig. 1
1 Handle
2 Speed lights (I and II)
3 On/off button
4 Battery indicator
5 Release button
6 Socket for small plug
7 Epilating head
8 Integrated light
9 Massage cap
10 Facial cap
11 Delicate area cap
12 Skin stretcher cap
13 Shaving head
14 Foil
15 Trimmers
16 Comb for shaving head
17 Trimming head
18 Comb for trimming head
19 Callus removal attachment
20 Callus removal disk
21 Protection cap
22 Coupling unit
23 Body massage head
24 Body exfoliation brush
25 Protection cap for body exfoliation brush
26 Supply unit
27 Tweezers with light
28 Tweezers
Not shown: Pouch
Not shown: Exfoliation glove
Not shown: Cleaning brush
Note: The heads and accessories supplied vary for different type numbers.
Consult the overview illustration for the heads and accessories supplied
with your particular appliance, or consult the information on the box.
Charging
Note: Charge the appliance fully before you use it for the first time.
Note: This appliance can only be used without cord.
To charge the appliance, insert the small plug into the socket in the bottom
of the appliance and put the supply unit in the wall socket.
- The charge indicator flashes white (Fig. 2): the appliance is charging.
Chargingtakes up to 1.5 hours.
- The charge indicator lights up white continuously (Fig. 3): the appliance is
fully charged and has a cordless operating time up to 40 minutes.
- The charge indicator does not light up when the appliance is switched
on: the appliance contains enough energy to be used.
- The battery indicator flashes orange (Fig. 2): the battery is almost empty
and needs to be charged. Charge the appliance when you have finished
using it.
Note: If the appliance is fully charged but still connected to the wall socket,
the battery indicator flashes a few times when you press the on/off button.
This indicates that you should disconnect the appliance from the wall
socket before you can switch it on.
Quick charge
- When the battery is completely empty and you start charging it, the
battery indicator flashes white quickly.
- After approximately 15 minutes, the battery indicator starts flashing white
slowly. At this point, the battery contains enough energy for up to 10
minutes of use.
Using the appliance
Attaching and detaching heads
1 To attach a head, press it onto the handle ('click') (Fig. 4).
2 To detach a head, press the release button on the back of the appliance
(Fig. 5).
Attaching and detaching accessories
1 To attach an accessory, simply snap it onto the head ('click') (Fig. 6).
2 To detach an accessory, grab its front and back and pull it upwards off
the head (Fig. 7). To detach a comb, pull its back upwards with a
fingernail (Fig. 8).
Switching the appliance on and off
1 To switch on the appliance, press the on/off button once. Speed 2 is
selected automatically and speed light II lights up (Fig. 9).
2 If you want to select speed 1, press the on/off button again. Speed light I
lights up (Fig. 10).
3 To switch off the appliance, press the on/off button once more.
The integrated light goes on automatically to give you a better view while
you use the epilating head (Fig. 11). If you want to switch off the integrated
light, keep the on/off button pressed for 3 seconds when you switch on the
appliance.
Epilating, shaving and trimming
The appliance is suitable for use in the bath or shower, but it can also be
used dry. If you want to use creams or body lotion, apply them after you
have used the appliance.
For gentle, less painful epilation, use the appliance on wet skin with or
without your regular shower gel.
Slight skin irritation like red skin or red dots may occur after epilation. This is
normal. We advise you to epilate before you go to bed at night, as any
redness or skin irritation usually disappears overnight.
Note: The appliance can only be used without cord.
1 When you epilate (with or without an accessory on the epilating head),
place the appliance on the skin at the angle shown in the illustration (Fig.
12).
2 When you use the appliance with other heads and accessories than the
epilating head, make sure you place the heads and accessories flat onto
the skin (Fig. 13).
3 When you use the appliance on sensitive areas, stretch the skin with
your free hand. When you use the appliance on your underarms, raise
your arm and put your hand on the back of your head to stretch the skin
(Fig. 14).
4 Move the appliance slowly against the direction of hair growth (Fig. 15).
Note: If you move the appliance over your skin too fast, you may not obtain
a smooth result.
Note: If your hairs are longer than 3-4mm, pretrim them for easier and more
comfortable epilation.
Epilating head
You can use the epilating head to epilate your legs, underarms and bikini
line.
Select speed 2 for most efficient epilation. Select speed 1 for areas with little
hair growth and for hard-to-reach areas such as knees and ankles.
Massage cap
You can attach the massage cap onto the epilating head to massage the
skin and minimize the pulling sensation of epilation during use.
Skin stretcher cap
You can attach the skin stretcher cap onto the epilating head. It keeps the
skin tight during epilation to reduce pain.
Delicate area cap
You can attach the delicate area cap onto the epilating head for more
comfortable epilation of delicate areas (e.g. the underarms and bikini line).

Facial cap
You can attach the facial cap onto the epilating head for precise epilation of
facial hair (e.g. above your upper lip).
Do not use the appliance to epilate eyelashes, eyebrows or scalp hair.
Shaving head
You can use the shaving head to shave your legs and body.
Note: The appliance can be moved in two directions, for easier shaving of
underarms.
Note: Always check the foil before use. If it is damaged in any way, replace
the cutting unit right away (see 'Replacement').
Comb for shaving head
You can attach the comb onto the shaving head to trim hairs to a length of
3mm.
Trimming head
You can use the trimming head to trim hard-to-reach areas in the bikini
zone.
Place the trimming head flat onto the skin to trim (Fig. 16). Place the
trimming head perpendicularly onto the skin for styling and shaping (Fig. 17).
Comb for trimming head
You can attach the comb onto the trimming head to trim hairs in the bikini
area to a length of 3mm (Fig. 18).
Body massage head
The body massage head rotates firmly to relax your muscles.
Note: You have to put the body massage head on the coupling unit before
you can attach it onto the handle (Fig. 19).
Body exfoliation brush
You can use the body exfoliation brush to remove dead skin cells.
Do not use the body exfoliation brush on your face.
Note: You have to put the body exfoliation brush on the coupling unit
before you can attach it onto the handle (Fig. 20).
Callus removal head
Note: This appliance is only intended to be used on the feet.
You can use the callus removal disk in 3 different ways, depending on the
area or callus you want to treat.
1 To treat a large, flat area, Use the entire disk (Fig. 21). Make sure you
place the disk flat onto the skin for good control during use.
2 For precision treatment of smaller areas and good visibility of the treated
area (Fig. 22), use the top part of the disk that sticks out beyond the top
of the head (Fig. 23).
3 For precision treatment and for buffing away hard skin very quickly, use
the narrow edge of the protruding top part of the disk (Fig. 24).
Move the disk back and forth gently over the skin you want to treat. Do not
push too hard. When you push too hard, the disk might stop rotating.
Cleaning and storage
Keep the supply unit dry.
1 To clean the epilating head, use the cleaning brush to brush away any
hairs, hold the appliance upside down, switch it on and rinse it with cold
water for 15 seconds after every use (Fig. 25).
2 To clean the shaving head: use the cleaning brush to brush away any
hairs that have collected under the trimmers. Grab the two trimmers of
the cutting unit and pull the cutting unit out of the shaving head (Fig. 26).
Clean all parts of the shaving head with the cleaning brush, except the
foil.
Note: Lubricate trimmer teeth and foils with a drop of sewing machine oil
every six weeks for optimal performance.
3 Rinse the cutting unit, heads and accessories under the tap. Shake them
firmly to remove water drops.
4 To clean the callus removal head and disk (if supplied): clean the outside
of the head and disk with the cleaning brush supplied (Fig. 27). Then
remove the disk off the head and clean the inside of the head with the
cleaning brush supplied (Fig. 28). If you prefer, you can rinse the callus
removal head and disk under a running tap.
5 Let all parts dry completely.
6 Place the cutting unit back into the shaving head ('click').
7 Put protection caps or combs on the heads to prevent damage to the
heads when you store them.
8 Store the appliance, its heads and accessories in the pouch.
Replacement
To buy accessories or spare parts, visit www.shop.philips.com/service or go
to your Philips dealer. You can also contact the Philips Consumer Care
Center in your country (see the international warranty leaflet for contact
details).
Body exfoliation brush (if supplied): If you use the body exfoliation brush
2-3 times a week, it lasts approximately 3 months. Replace the body
exfoliation brush every 3 months with one of the original type (BRE394).
Callus removal head (if supplied): Replace the callus removal disk with one
of the original type (BCR372) when its effectiveness decreases. We advise
you to replace the disk at least once every year.
Shaving head (if supplied): For optimal performance, we advise you to
replace the cutting unit of the shaving head every two years. If you use the
shaving head twice or more times a week, replace the cutting unit more
often. Always replace the cutting unit with one of the original type (BRL384).
Troubleshooting
This chapter summarizes the most common problems you could encounter
with the appliance. If you are unable to solve the problem with the
information below, visit www.philips.com/support for a list of frequently
asked questions or contact the Consumer Care Center in your country.
Problem Solution
The appliance
does not work as
well as it should.
After charging, the
battery indicator
flashes when I
press the on/off
button, but the
appliance does not
switch on.
During use, the
appliance becomes
hot and suddenly
stops operating.
Then both speed
lights flash for 4
seconds.
My skin is irritated
after I have used
the appliance.
When you use the epilating head or the shaving
Epilation causes
ingrown hairs.
Make sure you hold the appliance at the correct
angle (Fig. 12) and move it across the skin slowly,
against the direction of hair growth.
Clean the heads and accessories after every use.
The appliance is still connected to the wall socket. In
this case, the battery indicator flashes to indicate
that you should disconnect the appliance from the
wall socket before you can switch it on.
The overheat protection has been activated. The
overheat protection switches off the appliance
automatically if it becomes too hot. To reset the
overheat protection, let the appliance cool down and
then switch it on again. To avoid overheating of the
appliance, do not press it too hard onto your skin.
When you use the epilating head or the shaving
head, slight skin irritation like red skin or red dots
may occur. This is normal. To avoid irritated skin,
make sure that you gently move the appliance
against the direction of hair growth. Do not apply too
much pressure. If the irritation lasts longer than 3
days, we advise you to consult a doctor.
head, always stretch the skin with your free hand.
When you use the appliance on your underarms,
raise your arm and put your hand on the back of
your head to stretch the skin (Fig. 14).
You can use the body exfoliation brush 24 hours
before or 48 hours after epilating, to help prevent
ingrown hairs.
Note: Do not exfoliate immediately after epilation, as
this may intensify possible skin irritation caused by
epilation.
Dansk
Generel beskrivelse (fig. 1)
1 Håndtag
2 Hastighedsindikatorer (I og II)
3 On/off-knap
4 Indikator for batteriniveau
5 Udløserknap
6 Lille strømstik
7 Epilatorhoved
8 Integreret lys
9 Massagekappe
10 Ansigtskappe
11 Kappe til følsomme områder
12 Dæksel til hudstrammer
13 Shaverhoved
14 Skær
15 Trimmere
16 Kam til shaverhoved
17 Trimmehoved
18 Kam til trimmerhoved
19 Tilbehør til fjernelse af hård hud
20 Skive til fjernelse af hård hud
21 Beskyttelseshætte
22 Koblingsenhed
23 Kropsmassagehoved
24 Kropseksfolieringsbørste
25 Beskyttelseshætte til kropseksfolieringsbørste
26 Forsyningsenhed
27 Pincetter med lys
28 Pincet
Ikke vist: Etui
Ikke vist: Peeling handske
Ikke vist: Rensebørste

Bemærk: Det medfølgende hoved og tilbehør varierer for forskellige
typenumre. Se oversigtsillustrationen for at se det hoved og det tilbehør,
der følger med din enhed, eller læs oplysningerne på emballagen.
Opladning
Bemærk: Før apparatet bruges første gang, skal det være helt opladet.
Bemærk: Dette apparat kan kun bruges uden ledning.
Apparatet oplades ved at sætte det lille stik i indgangen i bunden af
apparatet og sætte strømforsyningsenheden i stikkontakten.
- Opladningsindikatoren blinker hvidt (fig. 2): Apparatet oplades.
Opladningtager op til 1,5 time.
- Opladningsindikatoren lyser konstant hvidt (fig. 3): Apparatet er fuldt
opladet og har en ledningsfri brugstid på op til 40 minutter.
- Opladningsindikatoren lyser ikke, når apparatet tændes: Apparatet er
opladet og klar til brug.
- Batteriindikatoren blinker orange (fig. 2): Batteriet er næsten afladet og
skal oplades. Oplad apparatet, når du er færdig med at bruge det.
Bemærk: Hvis apparatet er fuldt opladet, men stadig tilsluttet til
stikkontakten, blinker batteriindikatoren et par gange, når du trykker på
on/off-knappen. Dette angiver, at du skal frakoble apparatet fra
stikkontakten, før du kan bruge det.
Hurtig opladning
- Når batteriet er helt tomt, og du begynder at oplade det, blinker
batteriindikatoren hurtigt hvidt.
- Efter ca. 15 minutter, begynder batteriindikatoren at blinke langsomt
hvidt. På dette tidspunkt indeholder batteriet tilstrækkelig energi til op til
10 minutters brug.
Sådan bruges apparatet
Påsætning og aftagning af hoveder.
1 Du påsætter et hoved ved at trykke det fast på håndtaget ("klik") (fig. 4).
2 Du tager hovedet af ved at trykke på udløserknappen bag på apparatet
(fig. 5).
Påsætning og aftagning af tilbehør
1 Du fastgør tilbehør ved at trykke det fast på hovedet ("klik") (fig. 6).
2 Du tager tilbehør af ved at tage fat i det fortil og bagtil og trække det
opad af hovedet (fig. 7). Du tager en kam af ved at trække den opad
bagtil med en fingernegl (fig. 8).
Sådan tændes og slukkes for apparatet
1 Apparatet tændes ved at trykke én gang på on/off-knappen. Hastighed
2 vælges automatisk, og hastighedsindikator II lyser (fig. 9).
2 Hvis du vil vælge hastighed 1, skal du trykke på on/off-knappen igen.
Hastighedsindikator I lyser (fig. 10).
3 Tryk én gang mere på tænd/sluk-knappen for at slukke for apparatet.
Det indbyggede lys tændes automatisk for at give et bedre udsyn under
brug af epileringshovedet (fig. 11). Hvis du vil slukke det indbyggede lys, skal
du holde on/off-knappen nede i 3 sekunder, når du tænder apparatet.
Epilering, barbering og trimning
Apparatet er velegnet til brug i badet eller under bruseren, men det kan
også bruges tørt. Hvis du vil bruge cremer eller bodylotion, skal disse
påføres, når du er færdig med at bruge apparatet.
Du kan gøre epileringen mere skånsom og mindre smertefuld ved at bruge
apparatet på våd hud med eller uden din normale sæbe.
Let hudirritation som rød hud eller røde pletter kan forekomme efter
epilering. Dette er normalt. Vi anbefaler, at du bruger epilatoren, før du går i
seng om aftenen, da rødme eller hudirritation for det meste forsvinder i
løbet af natten.
Bemærk: Apparatet kan kun bruges uden ledning.
1 Når du epilerer (med eller uden tilbehør på epilatorhovedet), skal du
placere apparatet på huden i den vinkel, der er vist på illustrationen (fig.
12).
2 Når du bruger apparatet med andre hoveder og andet tilbehør end
epilatorhovedet, skal du sørge for at placere hoveder og tilbehør fladt på
huden (fig. 13).
3 Når du bruger apparatet på følsomme områder, skal du stramme huden
med den anden hånd. Når du bruger apparatet til armhulen, skal du løfte
armen og føre hånden om til nakken for at stramme huden (fig. 14).
4 Bevæg apparatet med langsomme bevægelser imod hårenes
vækstretning (fig. 15).
Bemærk: Hvis du bevæger apparatet for hurtigt hen over huden,får du
muligvis ikkeet glat resultat.
Bemærk: Hvis hårene er længere end 3-4 mm, skal du trimme dem for at
gøre epileringen nemmere og mere behagelig.
Epilatorhoved
Du kan bruge epileringshovedet til at epilere benene, armhulerne og
bikinilinjen.
Vælg hastighed 2 for at få den mest effektive epilering. Vælg hastighed I til
områder med lille hårvækst og områder, der er vanskelige at nå, for
eksempel knæ og ankler.
Massagekappe
Du kan sætte massagekappen på epileringshovedet for at massere huden
og minimere smertefornemmelsen ved brug af epilatoren.
Dæksel til hudstrammer
Du kan sætte hudstrammerkappen på epileringshovedet. Den holder huden
stram under epilering for at reducere smertefornemmelsen.
Kappe til følsomme områder
Du kan sætte kappen til følsomme områder på epileringshovedet for at få
mere behagelig epilering af følsomme områder (f.eks. armhuler og
bikinilinje).
Ansigtskappe
Du kan sætte ansigtskappen på epileringshovedet for at få mere præcis
epilering af ansigtshår (f.eks. på overlæben).
Brug ikke apparatet til at epilere øjenvipper, øjenbryn eller hovedhår.
Shaverhoved
Du kan bruge shaverhovedet til barbering af kroppen og benene.
Bemærk: Apparatet kan bevæges i to retninger for at gøre det nemmere at
barbere armhulerne.
Bemærk: Kontrollér altid skæret inden brug. Hvis det på nogen måde er
beskadiget, skal skærhovedet udskiftes med det samme (se "Udskiftning").
Kam til shaverhoved
Du kan sætte kammen på shaverhovedet for at trimme hårene til en længde
på 3 mm.
Trimmehoved
Du kan bruge trimmerhovedet til at trimme steder, der er svære at nå, i
bikiniområdet.
Placer trimmerhovedet fladt på huden for at trimme (fig. 16). Placer
trimmerhovedet vinkelret mod huden for at style og forme (fig. 17).
Kam til trimmerhoved
Du kan sætte kammen på trimmerhovedet for at trimme hårene i
bikiniområdet til en længde på 3 mm (fig. 18).
Kropsmassagehoved
Kropsmassagehovedet roterer for at afslappe musklerne.
Bemærk: Du skal sætte kropsmassagehovedet på koblingsenheden, før du
kan fastgøre det til håndtaget (fig. 19).
Kropseksfolieringsbørste
Du kan bruge kropseksfolieringsbørsten til at fjerne døde hudceller.
Brug ikke kropseksfolieringsbørsten på ansigtet.
Bemærk: Du skal sætte kropseksfolieringsbørsten på koblingsenheden, før
du kan fastgøre den til håndtaget (fig. 20).
Hoved til fjernelse af hård hud
Bemærk: Dette apparat er kun beregnet til brug på fødderne.
Du kan bruge skiven til fjernelse af hård hud på tre forskellige måder
afhængigt af området eller den type hård hud, du vil behandle.
1 Hvis det er et stort fladt område, der skal behandles, skal du bruge hele
skiven (fig. 21). Sørg for at holde skiven fladt mod huden, så du kan styre
den under behandlingen.
2 Ved præcisionsbehandling af mindre områder, hvor du kan se det
behandlede område (fig. 22), skal du bruge den øverste del af skiven, der
stikker du ved toppen af hovedet (fig. 23).
3 Ved præcisionsbehandling og ved meget hurtig fjernelse af hård hud
skal du bruge den smalle kant af den fremskudte topdel af skiven (fig.
24).
Bevæg skiven forsigtigt frem og tilbage over det hudområde, der skal
behandles. Tryk ikke for hårdt. Hvis du trykker for hårdt, kan skiven stoppe
med at rotere.
Rengøring og opbevaring
Hold strømforsyningsenheden tør.
1 Epilatorhovedet rengøres ved at fjerne eventuelle hår med rensebørsten,
vende apparatet på hovedet, tænde det, og skylle det med koldt vand i
15 sekunder efter hver brug (fig. 27).
2 Rengøring af skærehovedet: Brug rensebørsten til at børste eventuelle
hår væk, der har samlet sig under trimmerne. Tag fat i skærenhedens to
trimmere, og træk skærenheden ud af shaverhovedet (fig. 28). Rengør
alle dele af shaverhovedet med rensebørsten, undtagen skæret.
Bemærk: Smør trimmerens tænder og skær med en dråbe symaskineolie
hver sjette ugefor at sikre optimal funktionsevne.
3 Skyl skærenheden, hovederne og tilbehøret under vandhanen. Ryst
delene grundigt for at fjerne vanddråber.
4 Sådan rengøres hovedet og skiven til fjernelse af hård hud (hvis de
medfølger): Rengør den udvendige side af hoved og skive ved hjælp af
den medfølgende (fig. 25) rensebørste. Tag derefter skiven af hovedet,
og rengør den indvendige side af hovedet med den medfølgende (fig.
26) rensebørste. Du kan eventuelt rengøre hovedet og skiven til fjernelse
af hård hud under vandhanen.
5 Lad alle delene tørre helt.
6 Sæt skærenheden tilbage i shaverhovedet (der høres en kliklyd).
7 Sæt beskyttelseskapper eller kamme på hovederne for at forhindre, at
hovederne beskadiges, når du opbevarer dem.
8 Opbevar apparatet, dets hoveder og tilbehør i etuiet.
 Loading...