

Page 1
BRE610-BRE652
234
1
2
5
678
9
101112
13
141516
17
18
192021
222324
25
262728
>75% recycled paper
>75% papier recyclé
© 2017 Koninklijke Philips N.V.
All rights reserved
8888.989.2532.1 (8/8/2017)
Page 2

English
8
7
13
22
24 25
23
17
18
19
2021
14
16
15
11
2728
1
3
4
2
5
6
26
BRE652/10
BRE652/00
BRE651/00
BRE650/10
BRE650/00
BRE644/10
BRE644/00
BRE640/10
BRE640/00
BRE632/00
BRE631/00
BRE630/10
BRE630/00
BRE619/00
BRE652/10
BRE652/00
BRE651/00
BRE650/10
BRE651/00
BRE631/00
BRE652/10
BRE652/00
BRE651/00
BRE650/10
BRE650/00
BRE644/10
BRE644/00
BRE640/10
BRE640/00
BRE634/10
BRE632/00
BRE630/10
BRE630/00
BRE620/10
BRE620/00
BRE619/00
BRE610/00
BRE652/10
BRE652/00
BRE651/00
BRE650/10
BRE650/00
BRE644/10
BRE644/00
BRE640/10
BRE640/00
BRE634/10
BRE632/00
BRE631/00
BRE630/10
BRE630/00
BRE619/00
BRE611/00
BRE652/10
BRE652/00
BRE644/10
BRE644/00
BRE640/10
BRE640/00
BRE632/00
BRE631/00
BRE611/00
BRE651/00
BRE650/00
BRE650/10
BRE640/10
BRE640/00
BRE634/10
BRE631/00
BRE630/10
BRE630/00
BRE620/10
BRE620/00
BRE652/10 BRE652/00
BRE652/10
BRE652/00
BRE651/00
BRE650/10
BRE650/00
BRE644/10
BRE644/00
BRE640/10
BRE640/00
BRE634/10
BRE619/00
BRE650/00
BRE644/10
BRE644/00
BRE652/10
BRE652/00
BRE651/00
BRE650/10
BRE644/10
BRE644/00
BRE650/10
BRE650/00
BRE652/10
BRE652/00
BRE651/00
BRE650/10
BRE650/00
12
10
9
1
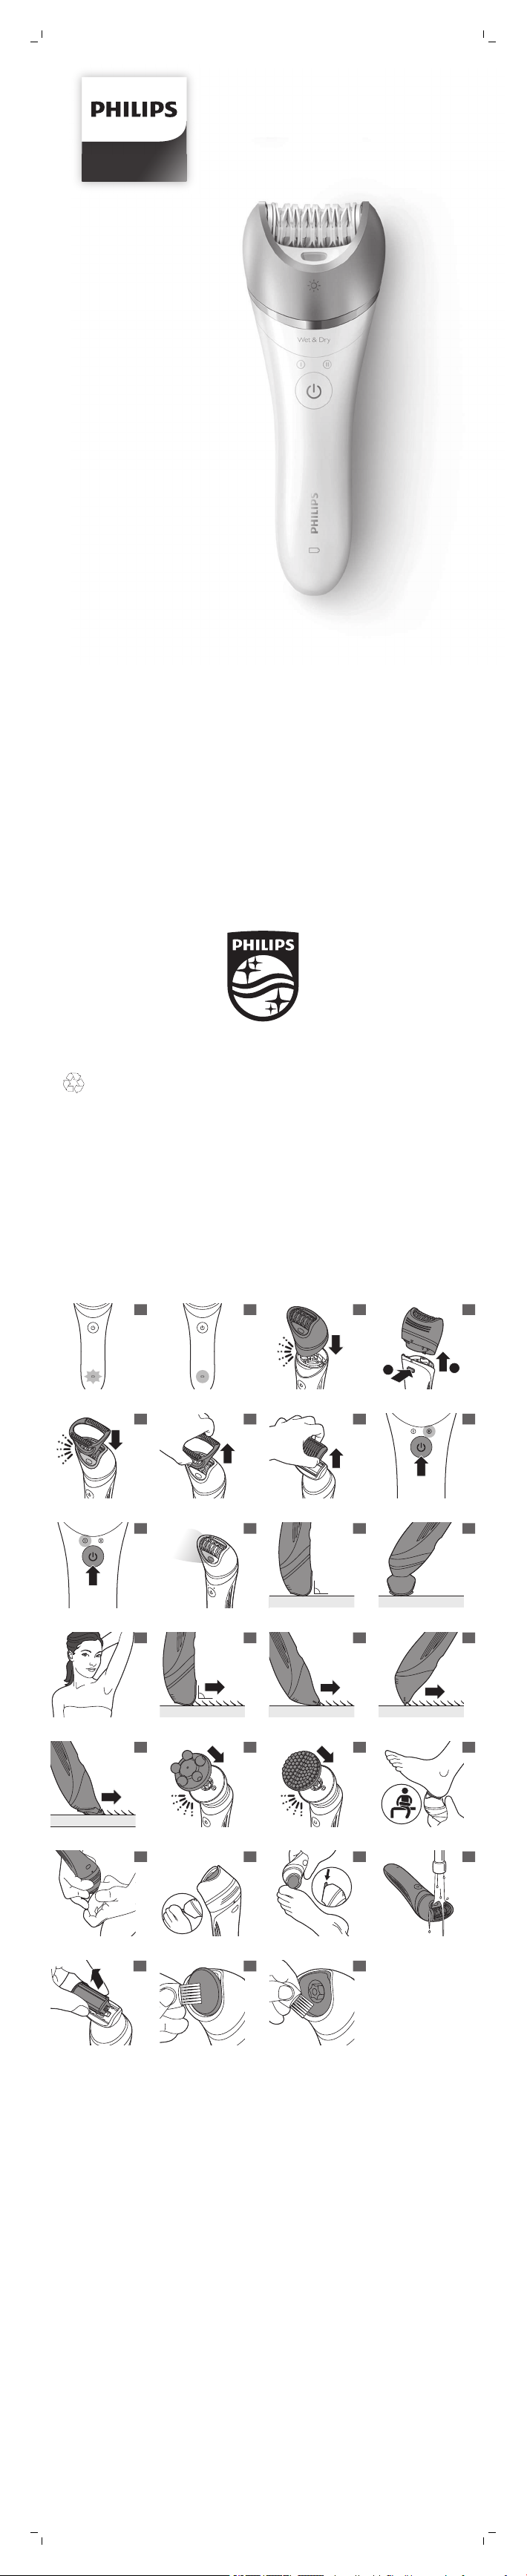
General Description Fig. 1
1 Handle
2 Speed lights (I and II)
3 On/off button
4 Battery indicator
5 Release button
6 Socket for small plug
7 Epilating head
8 Integrated light
9 Massage cap
10 Facial cap
11 Delicate area cap
12 Skin stretcher cap
13 Shaving head
14 Foil
15 Trimmers
16 Comb for shaving head
17 Trimming head
18 Comb for trimming head
19 Callus removal attachment
20 Callus removal disk
21 Protection cap
22 Coupling unit
23 Body massage head
24 Body exfoliation brush
25 Protection cap for body exfoliation brush
26 Supply unit
27 Tweezers with light
28 Tweezers
Not shown: Pouch
Not shown: Exfoliation glove
Not shown: Cleaning brush
Note: The heads and accessories supplied vary for different type numbers.
Consult the overview illustration for the heads and accessories supplied
with your particular appliance, or consult the information on the box.
Charging
Note: Charge the appliance fully before you use it for the first time.
Note: This appliance can only be used without cord.
To charge the appliance, insert the small plug into the socket in the bottom
of the appliance and put the supply unit in the wall socket.
- The charge indicator flashes white (Fig. 2): the appliance is charging.
Chargingtakes up to 1.5 hours.
- The charge indicator lights up white continuously (Fig. 3): the appliance is
fully charged and has a cordless operating time up to 40 minutes.
- The charge indicator does not light up when the appliance is switched
on: the appliance contains enough energy to be used.
- The battery indicator flashes orange (Fig. 2): the battery is almost empty
and needs to be charged. Charge the appliance when you have finished
using it.
Note: If the appliance is fully charged but still connected to the wall socket,
the battery indicator flashes a few times when you press the on/off button.
This indicates that you should disconnect the appliance from the wall
socket before you can switch it on.
Quick charge
- When the battery is completely empty and you start charging it, the
battery indicator flashes white quickly.
- After approximately 15 minutes, the battery indicator starts flashing white
slowly. At this point, the battery contains enough energy for up to 10
minutes of use.
Using the appliance
Attaching and detaching heads
1 To attach a head, press it onto the handle ('click') (Fig. 4).
2 To detach a head, press the release button on the back of the appliance
(Fig. 5).
Attaching and detaching accessories
1 To attach an accessory, simply snap it onto the head ('click') (Fig. 6).
2 To detach an accessory, grab its front and back and pull it upwards off
the head (Fig. 7). To detach a comb, pull its back upwards with a
fingernail (Fig. 8).
Switching the appliance on and off
1 To switch on the appliance, press the on/off button once. Speed 2 is
selected automatically and speed light II lights up (Fig. 9).
2 If you want to select speed 1, press the on/off button again. Speed light I
lights up (Fig. 10).
3 To switch off the appliance, press the on/off button once more.
The integrated light goes on automatically to give you a better view while
you use the epilating head (Fig. 11). If you want to switch off the integrated
light, keep the on/off button pressed for 3 seconds when you switch on the
appliance.
Epilating, shaving and trimming
The appliance is suitable for use in the bath or shower, but it can also be
used dry. If you want to use creams or body lotion, apply them after you
have used the appliance.
For gentle, less painful epilation, use the appliance on wet skin with or
without your regular shower gel.
Slight skin irritation like red skin or red dots may occur after epilation. This is
normal. We advise you to epilate before you go to bed at night, as any
redness or skin irritation usually disappears overnight.
Note: The appliance can only be used without cord.
1 When you epilate (with or without an accessory on the epilating head),
place the appliance on the skin at the angle shown in the illustration (Fig.
12).
2 When you use the appliance with other heads and accessories than the
epilating head, make sure you place the heads and accessories flat onto
the skin (Fig. 13).
3 When you use the appliance on sensitive areas, stretch the skin with
your free hand. When you use the appliance on your underarms, raise
your arm and put your hand on the back of your head to stretch the skin
(Fig. 14).
4 Move the appliance slowly against the direction of hair growth (Fig. 15).
Note: If you move the appliance over your skin too fast, you may not obtain
a smooth result.
Note: If your hairs are longer than 3-4mm, pretrim them for easier and more
comfortable epilation.
Epilating head
You can use the epilating head to epilate your legs, underarms and bikini
line.
Select speed 2 for most efficient epilation. Select speed 1 for areas with little
hair growth and for hard-to-reach areas such as knees and ankles.
Massage cap
You can attach the massage cap onto the epilating head to massage the
skin and minimize the pulling sensation of epilation during use.
Skin stretcher cap
You can attach the skin stretcher cap onto the epilating head. It keeps the
skin tight during epilation to reduce pain.
Delicate area cap
You can attach the delicate area cap onto the epilating head for more
comfortable epilation of delicate areas (e.g. the underarms and bikini line).
Page 3

Facial cap
You can attach the facial cap onto the epilating head for precise epilation of
facial hair (e.g. above your upper lip).
Do not use the appliance to epilate eyelashes, eyebrows or scalp hair.
Shaving head
You can use the shaving head to shave your legs and body.
Note: The appliance can be moved in two directions, for easier shaving of
underarms.
Note: Always check the foil before use. If it is damaged in any way, replace
the cutting unit right away (see 'Replacement').
Comb for shaving head
You can attach the comb onto the shaving head to trim hairs to a length of
3mm.
Trimming head
You can use the trimming head to trim hard-to-reach areas in the bikini
zone.
Place the trimming head flat onto the skin to trim (Fig. 16). Place the
trimming head perpendicularly onto the skin for styling and shaping (Fig. 17).
Comb for trimming head
You can attach the comb onto the trimming head to trim hairs in the bikini
area to a length of 3mm (Fig. 18).
Body massage head
The body massage head rotates firmly to relax your muscles.
Note: You have to put the body massage head on the coupling unit before
you can attach it onto the handle (Fig. 19).
Body exfoliation brush
You can use the body exfoliation brush to remove dead skin cells.
Do not use the body exfoliation brush on your face.
Note: You have to put the body exfoliation brush on the coupling unit
before you can attach it onto the handle (Fig. 20).
Callus removal head
Note: This appliance is only intended to be used on the feet.
You can use the callus removal disk in 3 different ways, depending on the
area or callus you want to treat.
1 To treat a large, flat area, Use the entire disk (Fig. 21). Make sure you
place the disk flat onto the skin for good control during use.
2 For precision treatment of smaller areas and good visibility of the treated
area (Fig. 22), use the top part of the disk that sticks out beyond the top
of the head (Fig. 23).
3 For precision treatment and for buffing away hard skin very quickly, use
the narrow edge of the protruding top part of the disk (Fig. 24).
Move the disk back and forth gently over the skin you want to treat. Do not
push too hard. When you push too hard, the disk might stop rotating.
Cleaning and storage
Keep the supply unit dry.
1 To clean the epilating head, use the cleaning brush to brush away any
hairs, hold the appliance upside down, switch it on and rinse it with cold
water for 15 seconds after every use (Fig. 25).
2 To clean the shaving head: use the cleaning brush to brush away any
hairs that have collected under the trimmers. Grab the two trimmers of
the cutting unit and pull the cutting unit out of the shaving head (Fig. 26).
Clean all parts of the shaving head with the cleaning brush, except the
foil.
Note: Lubricate trimmer teeth and foils with a drop of sewing machine oil
every six weeks for optimal performance.
3 Rinse the cutting unit, heads and accessories under the tap. Shake them
firmly to remove water drops.
4 To clean the callus removal head and disk (if supplied): clean the outside
of the head and disk with the cleaning brush supplied (Fig. 27). Then
remove the disk off the head and clean the inside of the head with the
cleaning brush supplied (Fig. 28). If you prefer, you can rinse the callus
removal head and disk under a running tap.
5 Let all parts dry completely.
6 Place the cutting unit back into the shaving head ('click').
7 Put protection caps or combs on the heads to prevent damage to the
heads when you store them.
8 Store the appliance, its heads and accessories in the pouch.
Replacement
To buy accessories or spare parts, visit www.shop.philips.com/service or go
to your Philips dealer. You can also contact the Philips Consumer Care
Center in your country (see the international warranty leaflet for contact
details).
Body exfoliation brush (if supplied): If you use the body exfoliation brush
2-3 times a week, it lasts approximately 3 months. Replace the body
exfoliation brush every 3 months with one of the original type (BRE394).
Callus removal head (if supplied): Replace the callus removal disk with one
of the original type (BCR372) when its effectiveness decreases. We advise
you to replace the disk at least once every year.
Shaving head (if supplied): For optimal performance, we advise you to
replace the cutting unit of the shaving head every two years. If you use the
shaving head twice or more times a week, replace the cutting unit more
often. Always replace the cutting unit with one of the original type (BRL384).
Troubleshooting
This chapter summarizes the most common problems you could encounter
with the appliance. If you are unable to solve the problem with the
information below, visit www.philips.com/support for a list of frequently
asked questions or contact the Consumer Care Center in your country.
Problem Solution
The appliance
does not work as
well as it should.
After charging, the
battery indicator
flashes when I
press the on/off
button, but the
appliance does not
switch on.
During use, the
appliance becomes
hot and suddenly
stops operating.
Then both speed
lights flash for 4
seconds.
My skin is irritated
after I have used
the appliance.
When you use the epilating head or the shaving
Epilation causes
ingrown hairs.
Make sure you hold the appliance at the correct
angle (Fig. 12) and move it across the skin slowly,
against the direction of hair growth.
Clean the heads and accessories after every use.
The appliance is still connected to the wall socket. In
this case, the battery indicator flashes to indicate
that you should disconnect the appliance from the
wall socket before you can switch it on.
The overheat protection has been activated. The
overheat protection switches off the appliance
automatically if it becomes too hot. To reset the
overheat protection, let the appliance cool down and
then switch it on again. To avoid overheating of the
appliance, do not press it too hard onto your skin.
When you use the epilating head or the shaving
head, slight skin irritation like red skin or red dots
may occur. This is normal. To avoid irritated skin,
make sure that you gently move the appliance
against the direction of hair growth. Do not apply too
much pressure. If the irritation lasts longer than 3
days, we advise you to consult a doctor.
head, always stretch the skin with your free hand.
When you use the appliance on your underarms,
raise your arm and put your hand on the back of
your head to stretch the skin (Fig. 14).
You can use the body exfoliation brush 24 hours
before or 48 hours after epilating, to help prevent
ingrown hairs.
Note: Do not exfoliate immediately after epilation, as
this may intensify possible skin irritation caused by
epilation.
Dansk
Generel beskrivelse (fig. 1)
1 Håndtag
2 Hastighedsindikatorer (I og II)
3 On/off-knap
4 Indikator for batteriniveau
5 Udløserknap
6 Lille strømstik
7 Epilatorhoved
8 Integreret lys
9 Massagekappe
10 Ansigtskappe
11 Kappe til følsomme områder
12 Dæksel til hudstrammer
13 Shaverhoved
14 Skær
15 Trimmere
16 Kam til shaverhoved
17 Trimmehoved
18 Kam til trimmerhoved
19 Tilbehør til fjernelse af hård hud
20 Skive til fjernelse af hård hud
21 Beskyttelseshætte
22 Koblingsenhed
23 Kropsmassagehoved
24 Kropseksfolieringsbørste
25 Beskyttelseshætte til kropseksfolieringsbørste
26 Forsyningsenhed
27 Pincetter med lys
28 Pincet
Ikke vist: Etui
Ikke vist: Peeling handske
Ikke vist: Rensebørste
Page 4

Bemærk: Det medfølgende hoved og tilbehør varierer for forskellige
typenumre. Se oversigtsillustrationen for at se det hoved og det tilbehør,
der følger med din enhed, eller læs oplysningerne på emballagen.
Opladning
Bemærk: Før apparatet bruges første gang, skal det være helt opladet.
Bemærk: Dette apparat kan kun bruges uden ledning.
Apparatet oplades ved at sætte det lille stik i indgangen i bunden af
apparatet og sætte strømforsyningsenheden i stikkontakten.
- Opladningsindikatoren blinker hvidt (fig. 2): Apparatet oplades.
Opladningtager op til 1,5 time.
- Opladningsindikatoren lyser konstant hvidt (fig. 3): Apparatet er fuldt
opladet og har en ledningsfri brugstid på op til 40 minutter.
- Opladningsindikatoren lyser ikke, når apparatet tændes: Apparatet er
opladet og klar til brug.
- Batteriindikatoren blinker orange (fig. 2): Batteriet er næsten afladet og
skal oplades. Oplad apparatet, når du er færdig med at bruge det.
Bemærk: Hvis apparatet er fuldt opladet, men stadig tilsluttet til
stikkontakten, blinker batteriindikatoren et par gange, når du trykker på
on/off-knappen. Dette angiver, at du skal frakoble apparatet fra
stikkontakten, før du kan bruge det.
Hurtig opladning
- Når batteriet er helt tomt, og du begynder at oplade det, blinker
batteriindikatoren hurtigt hvidt.
- Efter ca. 15 minutter, begynder batteriindikatoren at blinke langsomt
hvidt. På dette tidspunkt indeholder batteriet tilstrækkelig energi til op til
10 minutters brug.
Sådan bruges apparatet
Påsætning og aftagning af hoveder.
1 Du påsætter et hoved ved at trykke det fast på håndtaget ("klik") (fig. 4).
2 Du tager hovedet af ved at trykke på udløserknappen bag på apparatet
(fig. 5).
Påsætning og aftagning af tilbehør
1 Du fastgør tilbehør ved at trykke det fast på hovedet ("klik") (fig. 6).
2 Du tager tilbehør af ved at tage fat i det fortil og bagtil og trække det
opad af hovedet (fig. 7). Du tager en kam af ved at trække den opad
bagtil med en fingernegl (fig. 8).
Sådan tændes og slukkes for apparatet
1 Apparatet tændes ved at trykke én gang på on/off-knappen. Hastighed
2 vælges automatisk, og hastighedsindikator II lyser (fig. 9).
2 Hvis du vil vælge hastighed 1, skal du trykke på on/off-knappen igen.
Hastighedsindikator I lyser (fig. 10).
3 Tryk én gang mere på tænd/sluk-knappen for at slukke for apparatet.
Det indbyggede lys tændes automatisk for at give et bedre udsyn under
brug af epileringshovedet (fig. 11). Hvis du vil slukke det indbyggede lys, skal
du holde on/off-knappen nede i 3 sekunder, når du tænder apparatet.
Epilering, barbering og trimning
Apparatet er velegnet til brug i badet eller under bruseren, men det kan
også bruges tørt. Hvis du vil bruge cremer eller bodylotion, skal disse
påføres, når du er færdig med at bruge apparatet.
Du kan gøre epileringen mere skånsom og mindre smertefuld ved at bruge
apparatet på våd hud med eller uden din normale sæbe.
Let hudirritation som rød hud eller røde pletter kan forekomme efter
epilering. Dette er normalt. Vi anbefaler, at du bruger epilatoren, før du går i
seng om aftenen, da rødme eller hudirritation for det meste forsvinder i
løbet af natten.
Bemærk: Apparatet kan kun bruges uden ledning.
1 Når du epilerer (med eller uden tilbehør på epilatorhovedet), skal du
placere apparatet på huden i den vinkel, der er vist på illustrationen (fig.
12).
2 Når du bruger apparatet med andre hoveder og andet tilbehør end
epilatorhovedet, skal du sørge for at placere hoveder og tilbehør fladt på
huden (fig. 13).
3 Når du bruger apparatet på følsomme områder, skal du stramme huden
med den anden hånd. Når du bruger apparatet til armhulen, skal du løfte
armen og føre hånden om til nakken for at stramme huden (fig. 14).
4 Bevæg apparatet med langsomme bevægelser imod hårenes
vækstretning (fig. 15).
Bemærk: Hvis du bevæger apparatet for hurtigt hen over huden,får du
muligvis ikkeet glat resultat.
Bemærk: Hvis hårene er længere end 3-4 mm, skal du trimme dem for at
gøre epileringen nemmere og mere behagelig.
Epilatorhoved
Du kan bruge epileringshovedet til at epilere benene, armhulerne og
bikinilinjen.
Vælg hastighed 2 for at få den mest effektive epilering. Vælg hastighed I til
områder med lille hårvækst og områder, der er vanskelige at nå, for
eksempel knæ og ankler.
Massagekappe
Du kan sætte massagekappen på epileringshovedet for at massere huden
og minimere smertefornemmelsen ved brug af epilatoren.
Dæksel til hudstrammer
Du kan sætte hudstrammerkappen på epileringshovedet. Den holder huden
stram under epilering for at reducere smertefornemmelsen.
Kappe til følsomme områder
Du kan sætte kappen til følsomme områder på epileringshovedet for at få
mere behagelig epilering af følsomme områder (f.eks. armhuler og
bikinilinje).
Ansigtskappe
Du kan sætte ansigtskappen på epileringshovedet for at få mere præcis
epilering af ansigtshår (f.eks. på overlæben).
Brug ikke apparatet til at epilere øjenvipper, øjenbryn eller hovedhår.
Shaverhoved
Du kan bruge shaverhovedet til barbering af kroppen og benene.
Bemærk: Apparatet kan bevæges i to retninger for at gøre det nemmere at
barbere armhulerne.
Bemærk: Kontrollér altid skæret inden brug. Hvis det på nogen måde er
beskadiget, skal skærhovedet udskiftes med det samme (se "Udskiftning").
Kam til shaverhoved
Du kan sætte kammen på shaverhovedet for at trimme hårene til en længde
på 3 mm.
Trimmehoved
Du kan bruge trimmerhovedet til at trimme steder, der er svære at nå, i
bikiniområdet.
Placer trimmerhovedet fladt på huden for at trimme (fig. 16). Placer
trimmerhovedet vinkelret mod huden for at style og forme (fig. 17).
Kam til trimmerhoved
Du kan sætte kammen på trimmerhovedet for at trimme hårene i
bikiniområdet til en længde på 3 mm (fig. 18).
Kropsmassagehoved
Kropsmassagehovedet roterer for at afslappe musklerne.
Bemærk: Du skal sætte kropsmassagehovedet på koblingsenheden, før du
kan fastgøre det til håndtaget (fig. 19).
Kropseksfolieringsbørste
Du kan bruge kropseksfolieringsbørsten til at fjerne døde hudceller.
Brug ikke kropseksfolieringsbørsten på ansigtet.
Bemærk: Du skal sætte kropseksfolieringsbørsten på koblingsenheden, før
du kan fastgøre den til håndtaget (fig. 20).
Hoved til fjernelse af hård hud
Bemærk: Dette apparat er kun beregnet til brug på fødderne.
Du kan bruge skiven til fjernelse af hård hud på tre forskellige måder
afhængigt af området eller den type hård hud, du vil behandle.
1 Hvis det er et stort fladt område, der skal behandles, skal du bruge hele
skiven (fig. 21). Sørg for at holde skiven fladt mod huden, så du kan styre
den under behandlingen.
2 Ved præcisionsbehandling af mindre områder, hvor du kan se det
behandlede område (fig. 22), skal du bruge den øverste del af skiven, der
stikker du ved toppen af hovedet (fig. 23).
3 Ved præcisionsbehandling og ved meget hurtig fjernelse af hård hud
skal du bruge den smalle kant af den fremskudte topdel af skiven (fig.
24).
Bevæg skiven forsigtigt frem og tilbage over det hudområde, der skal
behandles. Tryk ikke for hårdt. Hvis du trykker for hårdt, kan skiven stoppe
med at rotere.
Rengøring og opbevaring
Hold strømforsyningsenheden tør.
1 Epilatorhovedet rengøres ved at fjerne eventuelle hår med rensebørsten,
vende apparatet på hovedet, tænde det, og skylle det med koldt vand i
15 sekunder efter hver brug (fig. 27).
2 Rengøring af skærehovedet: Brug rensebørsten til at børste eventuelle
hår væk, der har samlet sig under trimmerne. Tag fat i skærenhedens to
trimmere, og træk skærenheden ud af shaverhovedet (fig. 28). Rengør
alle dele af shaverhovedet med rensebørsten, undtagen skæret.
Bemærk: Smør trimmerens tænder og skær med en dråbe symaskineolie
hver sjette ugefor at sikre optimal funktionsevne.
3 Skyl skærenheden, hovederne og tilbehøret under vandhanen. Ryst
delene grundigt for at fjerne vanddråber.
4 Sådan rengøres hovedet og skiven til fjernelse af hård hud (hvis de
medfølger): Rengør den udvendige side af hoved og skive ved hjælp af
den medfølgende (fig. 25) rensebørste. Tag derefter skiven af hovedet,
og rengør den indvendige side af hovedet med den medfølgende (fig.
26) rensebørste. Du kan eventuelt rengøre hovedet og skiven til fjernelse
af hård hud under vandhanen.
5 Lad alle delene tørre helt.
6 Sæt skærenheden tilbage i shaverhovedet (der høres en kliklyd).
7 Sæt beskyttelseskapper eller kamme på hovederne for at forhindre, at
hovederne beskadiges, når du opbevarer dem.
8 Opbevar apparatet, dets hoveder og tilbehør i etuiet.
Page 5

Udskiftning
Du kan købe tilbehør og reservedele på www.shop.philips.com/service
eller hos din Philips-forhandler. Du kan også kontakte det lokale Philipskundecenter (du kan finde kontaktoplysninger i folderen "World-Wide
Guarantee").
Kropseksfolieringsbørste (hvis det medfølger): Hvis du bruger
kropseksfolieringsbørsten 2-3 gang om ugen, holder den ca. 3 måneder.
Udskift altid kropseksfolieringsbørsten hver 3. måned med en af den
oprindelige type (BRE394).
Hoved til fjernelse af hård hud (hvis det medfølger): Udskift skiven til
fjernelse af hård hud med en ny af den oprindelige type (BCR372), når
skivens effekt er aftaget. Vi anbefaler at udskifte skiven mindst én gang om
året.
Sådan rengøres hovedet (hvis det medfølger): For at få optimal ydeevne
anbefaler vi, at du udskifter shaverhovedets skærenhed hvertandet år. Hvis
du bruger shaverhovedet to gange om ugen eller mere, skal du udskifte
skærenheden oftere. Udskift altid skærenheden med en af den oprindelige
type (BRL384).
Fejlfinding
Dette afsnit opsummerer de mest almindelige problemer, der kan
forekomme ved brug af apparatet. Har du brug for yderligere hjælp og
vejledning, så besøg www.philips.com/support for at se en liste med ofte
stillede spørgsmål, eller kontakt dit lokale Philips Kundecenter.
Problem Løsning
Apparatet fungerer
ikke så godt, som
det burde.
Efter opladning
blinker
batteriindikatoren,
når jeg trykker på
on/off-knappen,
men apparatet
tænder ikke.
Apparatet bliver
varmt under brug,
og holder pludselig
op med at fungere.
Derefter blinker
begge
hastighedsindikato
rer i 4 sekunder.
Min hud er irriteret,
når jeg har brugt
apparatet.
Stræk altid huden ud med din frie hånd, når du
Epilation forårsager
indgroede hår.
Sørg for at holde apparatet i den korrekte vinkel (fig.
12), og bevæg det langsomt over huden imod
hårenes vækstretning.
Rengør hoveder og tilbehør efter hver brug.
Apparatet er stadig sluttet til stikkontakten. I dette
tilfælde blinker batteriindikatoren for at angive, at du
skal frakoble apparatet fra stikkontakten, før du kan
bruge det.
Beskyttelsesfunktionen mod overophedning er
blevet aktiveret. Beskyttelsesfunktionen mod
overophedning slukker automatisk apparatet, hvis
det bliver for varmt. For at nulstille
overophedningssikringen skal du lade apparatet køle
ned og derefter tænde det igen. Pres ikke apparatet
for hårdt mod huden, da dette kan forårsage
overophedning.
Ved brug af epilatorhoved eller skærehoved kan der
forekomme en let hudirritation som rød hud eller
røde pletter. Dette er normalt. For at undgå irriteret
hud skal du sørge for at bevæge apparatet nænsomt
mod hårenes vækstretning. Tryk ikke for hårdt. Hvis
irritationen varer længere end 3 dage, anbefaler vi, at
du spørger din læge.
bruger epilatorhovedet eller skærehovedet. Når du
bruger apparatet i armhulerne, skal du løfte armen
og placere hånden på baghovedet for at strække
huden (fig. 14).
Du kan gøre noget for at forhindre indgroede hår ved
at bruge kropseksfolieringsbørsten 24 timer før eller
48 timer efter epilering.
Bemærk: Undgå at eksfoliere umiddelbart efter
epilering, da det kan forstærke eventuelle
hudirritationer forårsaget af epilatoren.
Norsk
Generell beskrivelse fig. 1
1 Håndtak
2 Hurtiglys (I og II)
3 Av/på-knapp
4 Batteriindikator
5 Utløserknapp
6 Uttak for liten kontakt
7 Epileringshode
8 Integrert lys
9 Massasjehette
10 Ansiktshette
11 Hette for ømfintlige områder
12 Hudstrekkingshette
13 Skjærehode
14 Folie
15 Trimmere
16 Kam for skjærehode
17 Trimmehode
18 Kam for trimmehode
19 Tilbehør for fjerning av hard hud
20 Skive for fjerning av hard hud
21 Beskyttelsesdeksel
22 Koblingsenhet
23 Kroppsmassasjehode
24 Kroppseksfolieringsbørste
25 Beskyttelseshette for kroppseksfolieringsbørste
26 Forsyningsenhet
27 Pinsett med lys
28 Pinsett
Ikke vist: Etui
Ikke vist: Peeling hanske
Ikke vist: Rengjøringsbørste
Merk: Hodene og tilbehøret som følger med, kan variere for de ulike
typenumrene. Se oversiktsillustrasjonen for hodene og tilbehøret som følger
med ditt apparat, eller les informasjonen på esken.
Lading
Merk: Lad apparatet helt opp før du bruker det for første gang.
Merk: Dette apparatet kan bare brukes trådløst.
Du lader apparatet ved å sette den lille kontakten i uttaket i bunnen av
apparatet og sette forsyningsenheten i stikkontakten.
- Ladeindikatoren blinker hvitt (Fig. 2): apparatet lades. Ladingtar opptil
1,5 timer.
- Ladeindikatoren lyser hvitt kontinuerlig (Fig. 3): apparatet er fulladet og
har en trådløs driftstid på opptil 40 minutter.
- Ladelampen lyser ikke når apparatet slås på: apparatet har nok strøm til
å brukes.
- Batteriindikatoren blinker oransje (Fig. 2): batteriet er nesten tomt og må
lades. Lad apparatet når du er ferdig med å bruke det.
Merk: Hvis apparatet er fulladet, men fremdeles er koblet til stikkontakten,
blinker batteriindikatoren noen ganger når du trykker på av/på-knappen.
Dette indikerer at du må koble apparatet fra stikkontakten før du kan slå det
på.
Rask lading
- Når batteriet er helt tomt og du begynner å lade det, blinker
batteriindikatoren hvitt raskt.
- Etter ca. 15 minutter begynner batteriindikatoren å blinke hvitt sakte. På
dette tidspunktet inneholder batteriet nok energi til opptil 10 minutters
bruk.
Bruke apparatet
Feste og løsne hoder
1 Fest et hode ved å trykke det på håndtaket ("klikk") (Fig. 4).
2 Løsne et hode ved å trykke på utløserknappen på baksiden av apparatet
(Fig. 5).
Feste og løsne tilbehør
1 Hvis du vil feste et tilbehør, trykker du det ganske enkelt på hodet
("klikk") (Fig. 6).
2 Hvis du vil løsne et tilbehør, tar du tak i for- og baksiden, og trekker det
oppover av hodet (Fig. 7). Hvis du vil løsne en kam, trekker du baksiden
oppover med en fingernegl (Fig. 8).
Slå apparatet av eller på
1 Du slår på apparatet ved å trykke på av/på-knappen én gang. Hastighet
2 velges automatisk, og hurtiglys II lyser (Fig. 9).
2 Hvis du vil velge hastighet 1, trykker du på av/på-knappen igjen. Hurtiglys
I lyser (Fig. 10).
3 Du slår av apparatet ved å trykke på av/på-knappen én gang til.
Det integrerte lyset tennes automatisk for at du skal se bedre mens du
bruker epileringshodet (Fig. 11). Hvis du vil slå av det integrerte lyset, holder
du av/på-knappen inne i 3 sekunder når du slår på maskinen.
Epilering, barbering og trimming
Apparatet er egnet for bruk i badekar eller dusj, men det kan også brukes
tørt. Hvis du vil bruke kremer eller bodylotion, tar du på disse etter at du har
brukt apparatet.
For mild, mindre smertefull epilering bruker du apparatet på våt hud med
eller uten din vanlige dusjsåpe.
Lett hudirritasjon, som rød hud eller røde prikker, kan forekomme etter
epilering. Dette er normalt. Vi anbefaler deg å epilere før du går til sengs om
kvelden, ettersom eventuell rødhet eller hudirritasjon vanligvis forsvinner
over natten.
Merk: Apparatet kan kun brukes uten ledning.
1 Når du epilerer (med eller uten et tilbehør på epileringshodet), plasserer
du apparatet på huden ved vinkelen som er vist på illustrasjonen (Fig. 12).
2 Når du bruker apparatet med andre hoder og tilbehør enn
epileringshodet, må du plassere hodene og tilbehøret flatt på huden
(Fig. 13).
3 Strekk ut huden med den ledige hånden når du bruker apparatet på
sensitive områder. Når du bruker apparatet på armhulene, hever du
armen og legger hånden på baksiden av hodet ditt for å strekke huden
(Fig. 14).
Page 6

4 Før apparatet sakte mot retningen av hårveksten (Fig. 15).
Merk: Hvis du flytter apparatet over huden for fort, vil du kanskje ikke få et
jevnt resultat.
Merk: Hvis hårene er lengre enn 3–4mm, forhåndstrimmer du dem for
enklere og mer behagelig epilering.
Epileringshode
Du kan bruke epileringshodet til å epilere beina, armhulene og bikinilinjen.
Velg hastighet 2 for mest mulig effektiv epilering. Velg hastighet 1 for
områder med lite hårvekst og for områder som er vanskelige å nå, som knær
og ankler.
Massasjehette
Du kan feste massasjehetten på epileringshodet for å massere huden og
minimere drafornemmelsen ved epilering under bruk.
Hudstrekkingshette
Du kan feste hudstrekkingshetten på epileringshodet. Den holder huden
stram under epilering for å redusere smerte.
Hette for ømfintlige områder
Du kan feste hetten for ømfintlige områder på epileringshodet for mer
behagelig epilering av ømfintlige områder (f.eks. armhulene og bikinilinjen).
Ansiktshette
Du kan feste ansiktshetten på epileringshodet for presis epilering av
ansiktshår (f.eks. over overleppen).
Ikke bruk apparatet til å epilere øyenvipper, øyenbryn eller hodehår.
Skjærehode
Du kan bruke skjærehodet til å barbere beina, armhulene og kroppen.
Merk: Apparatet kan flyttes i to retninger, for enklere barbering av armhuler.
Merk: Kontroller alltid folien før bruk. Hvis den er skadet på noen måte, må
du straks bytte ut kutteenheten (se Utskiftning).
Kam for skjærehode
Du kan feste kammen på barberhodet for å trimme hårene til en lengde på
3mm.
Trimmehode
Du kan bruke trimmehodet til å trimme områder som er vanskelige å nå i
bikinilinjen.
Plasser trimmehodet flatt på huden slik for å trimme (Fig. 16). Plasser
trimmehodet vinkelrett på huden for styling og forming (Fig. 17).
Kam for trimmehode
Du kan feste kammen på trimmehodet for å trimme hår i bikinilinjen til en
lengde på 3mm (Fig. 18).
Kroppsmassasjehode
Kroppsmassasjehodet roterer bestemt for å få musklene dine til å slappe av.
Merk: Du må sette kroppsmassasjehodet på koblingsenheten før du kan
feste det på håndtaket (Fig. 19).
Kroppseksfolieringsbørste
Du kan bruke kroppseksfolieringsbørsten til å fjerne døde hudceller.
Ikke bruk kroppseksfolieringsbørsten i ansiktet.
Merk: Du må sette kroppseksfolieringsbørsten på koblingsenheten før du
kan feste den på håndtaket (Fig. 20).
Hode for fjerning av hard hud
Merk: Dette apparatet er bare ment for bruk på føttene.
Skiven for fjerning av hard hud kan brukes på 3 ulike måter, avhengig av
området eller huden du ønsker å behandle.
1 Bruk hele skiven (Fig. 21) hvis du skal behandle et stort, flatt område.
Hold skiven flatt mot huden for å ha god kontroll under bruk.
2 Bruk den øvre delen av skiven som stikker ut over toppen på hodet (Fig.
23), for god sikt over behandlingsområdet (Fig. 22) samt
presisjonsbehandling av mindre områder.
3 Bruk den smale kanten på den utstikkende øvre delen av skiven (Fig. 24)
for presisjonsbehandling og rask filing av hard hud.
Beveg skiven forsiktig frem og tilbake over huden som skal behandles. Ikke
trykk for hardt. Hvis du trykker for hardt, kan skiven slutte å rotere.
Rengjøring og oppbevaring
Hold forsyningsenheten tørr.
1 For å rengjøre epileringshodet koster du vekk eventuelle hår med
rengjøringsbørsten, holder apparatet opp ned, slår det på og skyller det
med kaldt vann i 15sekunder etter hver gangs bruk (Fig. 27).
2 Slik rengjør du skjærehodet: bruk rengjøringsbørsten til å børste vekk hår
som har samlet seg under trimmedelene. Ta tak i de to trimmedelene på
klippeenheten og trekk klippeenheten ut av barberhodet (Fig. 28).
Rengjør alle deler av skjærehodet med rengjøringsbørsten, bortsett fra
folien.
Merk: Smør tennene og foliene på trimmeren med en dråpe symaskinolje
hver sjette uke for optimal trimmerytelse.
3 Skyll klippeenheten, hoder og tilbehør under springen. Rist dem godt for
å fjerne vanndråper.
4 Hvis hode og skive for fjerning av hard hud følger med, skal disse
rengjøres slik: rengjør utsiden av hodet og skiven med den medfølgende
(Fig. 25) rengjøringsbørsten. Ta deretter skiven av hodet, og rengjør
innsiden av hodet med den medfølgende (Fig. 26) rengjøringsbørsten.
Hodet og skiven for fjerning av hard hud kan eventuelt også skylles
under springen.
5 La alle delene tørke helt.
6 Sett klippeenheten tilbake i skjærehodet ("klikk").
7 Sett beskyttelseshetter eller kammer på hodene for å hindre skade på
hodene når du oppbevarer dem.
8 Oppbevar apparatet, hodene og tilbehøret i posen.
Utskiftning
Gå til www.shop.philips.com/service eller din lokale Philips-forhandler for å
kjøpe tilbehør eller reservedeler. Du kan også kontakte Philips'
forbrukerstøtte i landet der du bor (du finner kontaktinformasjonen i
garantiheftet).
Kroppseksfolieringsbørste (hvis det følger med): Hvis du bruker
kroppseksfolieringsbørsten 2–3 ganger i uken, varer den i ca. 3 måneder.
Bytt ut kroppseksfolieringsbørsten hver 3. måned med en børste av original
type (BRE394).
Hode for fjerning av hard hud (hvis det følger med): Når skiven for fjerning av
hard hud begynner å miste effekt, må den byttes ut med en ny av original
type (BCR372). Vi anbefaler at du bytter skiven minst én gang i året.
Skjærehodet (hvis det følger med): For optimal ytelse anbefaler vi at du
bytter ut klippeenheten til skjærehodet annethvert år. Hvis du bruker
skjærehodet to eller flere ganger i uken, bytter du ut klippeenheten oftere.
Bytt alltid ut klippeenheten til en enhet av original type (BRL384).
Feilsøking
Dette kapitlet oppsummerer de vanligste problemene som kan oppstå med
apparatet. Hvis du ikke kan løse problemet ved hjelp av informasjonen
nedenfor, kan du gå til www.philips.com/support for å se en liste over
vanlige spørsmål, eller du kan kontakte forbrukerstøtten i landet der du bor.
Problem Løsning
Apparatet fungerer
ikke slik det skal.
Etter lading blinker
batteriindikatoren
når jeg trykker på
av/på-knappen,
men apparatet slår
seg ikke på.
Under bruk blir
apparatet varmt og
slutter plutselig å
fungere. Begge
hurtiglysene blinker
deretter i 4
sekunder.
Huden min er
irritert etter at jeg
har brukt
apparatet.
Strekk alltid huden med den ledige hånden når du
Epilering fører til
inngrodde hår.
Hold apparatet i riktig vinkel (Fig. 12), og beveg det
sakte over huden, mot hårets vekstretning.
Rengjør hodene og tilbehøret etter hver bruk.
Apparatet er fortsatt koblet til stikkontakten.
Batteriindikatoren vil da blinke for å angi at du må
koble apparatet fra stikkontakten før du kan slå det
på.
Overopphetingsbeskyttelsen er aktivert.
Overopphetingsbeskyttelsen slår av apparatet
automatisk hvis det blir for varmt. Hvis du vil
tilbakestille overopphetingsbeskyttelsen, lar du
apparatet kjøle seg ned før du slår det på igjen. Ikke
trykk apparatet for hardt mot huden, da dette kan
føre til overoppheting.
Ved bruk av epilerings- eller skjærehodet kan det
oppstå lett hudirritasjon (f.eks. rød hud eller røde
prikker). Dette er normalt. Beveg apparatet forsiktig
over huden, mot hårets vekstretning, for å unngå
irritert hud. Ikke trykk for hardt. Hvis irritasjonen varer
lenger enn 3 dager, anbefaler vi at du oppsøker lege.
bruker epilerings- eller skjærehodet. Når du bruker
apparatet i armhulene, løfter du armen og legger
hånden på baksiden av hodet for å strekke huden
(Fig. 14).
For å unngå inngrodde hår kan du bruke
peelingbørsten 24 timer før eller 48 timer etter
epilering.
Merk: Unngå peeling like etter epilering, da dette kan
forsterke en eventuell hudirritasjon forårsaket av
epileringen.
Suomi
Laitteen osat (kuva 1)
1 Runko
2 Nopeuden merkkivalot (I ja II)
3 Virtapainike
4 Akun merkkivalo
5 Vapautuspainike
6 Liitäntä pienelle liittimelle
7 Epilointipää
8 Integroitu valo
9 Hierontaosa
10 Kasvo-osa
11 Herkkien ihoalueiden osa
12 Ihon venytinosa
Page 7

13 Ajopää
14 Teräverkko
15 Trimmerit
16 Ajopään kampa
17 Trimmausosa
18 Trimmausosan kampa
19 Kovettumanpoistolisäpää
20 Kovettumanpoistokiekko
21 Teräsuojus
22 Liitinkappale
23 Kehon hierontapää
24 Kehon kuorintaharja
25 Kehon kuorintaharjan suojus
26 Virtalähde
27 Valopinsetit
28 Pinsetit
Ei kuvassa: Pussi
Ei kuvassa: Kuorintakäsine
Ei kuvassa: Puhdistusharja
Huomautus: Toimitukseen sisältyvät päät ja lisäosat voivat vaihdella
tyyppinumerokohtaisesti. Tarkista oman laitteesi mukana toimitettavat päät
ja lisäosat yllä olevasta kuvasta tai katso tietoja pakkauksesta.
Lataaminen
Huomautus: Lataa laitteen akku täyteen ennen ensimmäistä käyttökertaa.
Huomautus: tätä laitetta voi käyttää vain ilman johtoa.
Voit ladata laitteen akun asettamalla pienen liittimen laitteen pohjassa
olevaan liitäntään ja liittämällä virtalähteen pistorasiaan.
- Latauksen merkkivalo vilkkuu valkoisena (kuva 2): laite latautuu.
Lataaminenkestää jopa 1,5 tuntia.
- Latauksen merkkivalo palaa jatkuvasti valkoisena (kuva 3): laite on
latautunut täyteen, ja sen ajoaika ilman johtoa on 40 minuuttia.
- Latausmerkkivalo ei syty, kun laitteeseen on kytketty virta: laitteessa on
tarpeeksi virtaa sen käyttöön.
- Akun merkkivalo vilkkuu oranssina (kuva 2): akun virta on lähes lopussa,
ja akku on ladattava. Lataa laite, kun olet lopettanut sen käytön.
Huomautus: Jos laitteen akku on latautunut täyteen sen ollessa yhä
liitettynä pistorasiaan, akun merkkivalo välähtää muutaman kerran, kun
painat virtapainiketta. Tämä ilmaisee, että pistoke on irrotettava
pistorasiasta, ennen kuin voit käynnistää laitteen.
Pikalataus
- Kun akku on täysin tyhjä ja aloitat sen lataamisen, akun merkkivalo
vilkkuu nopeasti valkoisena.
- Noin 15 minuutin kuluttua akun merkkivalo alkaa vilkkua hitaasti
valkoisena. Tällöin akussa on riittävästi virtaa enintään 10 minuutin
käyttöön.
Käyttö
Päiden kiinnittäminen ja irrottaminen
1 Kiinnitä pää painamalla se kiinni runkoon (kunnes se napsahtaa) (kuva
4).
2 Irrota pää painamalla laitteen (kuva 5) takana olevaa vapautuspainiketta.
Lisätarvikkeiden kiinnittäminen ja irrottaminen
1 Kiinnitä lisätarvike painamalla se kiinni päähän (kunnes se napsahtaa)
(kuva 6).
2 Irrota lisätarvike tarttumalla sen etu- ja takaosaan ja vetämällä sitä
päästä (kuva 7) ylöspäin. Irrota kampa vetämällä sitä kynnellä (kuva 8)
taakse- ja ylöspäin.
Laitteen virran kytkeminen ja katkaiseminen
1 Käynnistä laite painamalla kerran virtapainiketta. Nopeus 2 valitaan
automaattisesti, ja nopeuden merkkivalo II syttyy (kuva 9).
2 Jos haluat valita nopeuden 1, paina virtapainiketta uudelleen. Nopeuden
merkkivalo I syttyy (kuva 10).
3 Sammuta laite painamalla virtapainiketta uudelleen.
Integroitu valo syttyy automaattisesti ja parantaa näkyvyyttä epilointipään
(kuva 11) käytön aikana. Jos haluat sammuttaa integroidun valon, paina
virtapainiketta 3 sekuntia, kun käynnistät laitteen.
Epilointi, ajeleminen ja trimmaaminen
Laite sopii käytettäväksi kylvyssä tai suihkussa, mutta sitä voidaan käyttää
myös kuiva-ajoon. Jos haluat käyttää voidetta tai kosteusemulsiota, levitä
ne iholle laitteen käytön jälkeen.
Käytä laitetta märällä iholla tavallisen suihkusaippuan kanssa tai ilman sitä.
Näin epilointi on miellyttävämpää ja hellempää.
Epiloinnin jälkeen voi esiintyä lievää ihoärsytystä, kuten ihon punoitusta tai
punaisia pisteitä iholla. Tämä on normaalia. Suosittelemme poistamaan
ihokarvat illalla ennen nukkumaanmenoa, sillä punoitus tai ihoärsytys
yleensä katoaa yön aikana.
Huomautus: Laitetta voi käyttää vain ilman johtoa.
1 Aseta laite epiloitaessa (epilointipäässä olevan lisätarvikkeen kanssa tai
ilman sitä) iholle kuvan osoittamassa kulmassa (kuva 12).
2 Kun käytät laitetta muiden päiden ja lisätarvikkeiden kuin epilointipään
kanssa, aseta päät ja lisätarvikkeet tasaisesti ihoa (kuva 13) vasten.
3 Kun käytät laitetta herkillä alueilla, venytä ihoa vapaalla kädellä. Kun
käytät laitetta kainaloissa, venytä ihoa (kuva 14) nostamalla käsivartesi
ylös ja asettamalla kätesi pääsi taakse.
4 Liikuta laitetta hitaasti ihokarvojen kasvusuuntaa (kuva 15) vastaan.
Huomautus: Jos liikutat laitetta iholla liian nopeasti, et välttämättä saavuta
sileää lopputulosta.
Huomautus: Jos ihokarvojen pituus on yli 3–4 mm, lyhennä niitä, jotta
epilointi on helpompaa ja mukavampaa.
Epilointipää
Voit käyttää epilointipäätä ihokarvojen poistamiseen sääristä, kainaloista ja
bikinirajasta.
Valitse nopeus 2, jos haluat epiloida mahdollisimman tehokkaasti. Valitse
nopeus 1 alueille, joilla ihokarvoja kasvaa vähän ja joille on vaikea ulottua,
kuten polville ja nilkoille.
Hierontaosa
Voit kiinnittää epilointipäähän hierontaosan, jos haluat hieroa ihoa ja
vähentää epiloinnin ihoärsytystä käytön aikana.
Ihon venytinosa
Voit kiinnittää epilointipäähän ihon venytinosan. Se vähentää kipua
venyttämällä ihon kireäksi epiloinnin aikana.
Herkkien ihoalueiden osa
Voit kiinnittää epilointipäähän herkkien ihoalueiden osan, joka tekee
epiloinnista mukavampaa aroilla alueilla (esimerkiksi kainaloissa ja
bikinirajassa).
Kasvo-osa
Voit kiinnittää epilointipäähän herkkien kasvo-osan, joka mahdollistaa
ihokarvojen tarkan poiston (esimerkiksi ylähuulesta).
Älä käytä laitetta silmäripsien, kulmakarvojen tai hiusten epilointiin.
Ajopää
Ajopään avulla voit ajaa karvoja jaloistasi ja vartalostasi.
Huomautus: Laitetta voidaan liikuttaa kahteen suuntaan kainaloiden
ajamisen helpottamiseksi.
Huomautus: Tarkista teräverkko aina ennen käyttöä. Jos se on millään
tavalla vahingoittunut, vaihda terä heti (katso kohta Varaosat).
Ajopään kampa
Voit kiinnittää ajopäähän kamman, jolla voit trimmata ihokarvat 3 mm:n
pituisiksi.
Trimmausosa
Voit käyttää trimmausosaa bikinialueen hankalien paikkojen
trimmaamiseen.
Aseta trimmausosa tasaisesti ihoa vasten trimmausta (kuva 16) varten. Aseta
trimmausosa kohtisuoraan ihoa vasten muotoilua (kuva 17) varten.
Trimmausosan kampa
Voit kiinnittää trimmausosaan kamman, jolla voit trimmata bikinialueen
ihokarvat 3 mm:n (kuva 18) pituisiksi.
Kehon hierontapää
Voimakkaasti pyörivä kehon hierontaosa rentouttaa lihakset.
Huomautus: Kehon hierontaosa on kiinnitettävä liitinkappaleeseen, ennen
kuin sen voi kiinnittää runkoon (kuva 19).
Kehon kuorintaharja
Kehon kuorintaharjalla voi poistaa kuolleet ihosolut.
Älä käytä kehon kuorintaharjaa kasvoilla.
Huomautus: Kehon kuorintaharja on kiinnitettävä liitinkappaleeseen, ennen
kuin sen voi kiinnittää runkoon (kuva 20).
Kovettumanpoistopää
Huomautus: Laite on tarkoitettu käytettäväksi vain jaloissa.
Kovettumanpoistokiekkoa voi käyttää kolmella eri tavalla käsiteltävän
alueen tai kovettuman mukaan.
1 Käytä suuren ja tasaisen alueen käsittelemisessä koko kiekkoa (kuva 21).
Varmista, että asetat kiekon tasaisesti ihoa vasten. Näin sitä on helppo
hallita käytön aikana.
2 Voit käyttää kovettumanpoistopäästä (kuva 23) ulkonevaa kiekon
yläosaa pienten alueiden tarkkuuskäsittelyyn, kun näet käsiteltävän
alueen (kuva 22) hyvin
3 Kiekon (kuva 24) yläosasta ulkonevan kapean reunan avulla voit poistaa
kovettumia nopeasti ja käsitellä pieniä alueita tarkasti.
Liikuta kiekkoa edestakaisin käsiteltävällä iholla. Älä paina liian
voimakkaasti. Kiekko voi pysähtyä, jos painat liian voimakkaasti.
Puhdistus ja säilytys
Pidä virtalähde kuivana.
1 Puhdista epilointipää jokaisen käyttökerran jälkeen (kuva 27) poistamalla
ihokarvat puhdistusharjalla. pitelemällä laitetta ylösalaisin,
käynnistämällä se ja huuhtelemalla sitä kylmällä vedellä 15 sekunnin
ajan.
2 Ajopään puhdistaminen: poista ihokarvat puhdistusharjalla huolellisesti
ohjauskammoista. Tartu teräyksikön kahteen ohjauskampaan ja irrota
teräyksikkö ajopäästä (kuva 28) vetämällä. Puhdista ajopään kaikki osat
teräverkkoa lukuun ottamatta puhdistusharjalla.
Page 8

Huomautus: Levitä trimmerin terään ja teräverkkoon pisara
ompelukoneöljyä kuuden viikon välein. Tämä takaa laitteen parhaan
mahdollisen toiminnan.
3 Huuhtele teräyksikkö, päät ja lisätarvikkeet juoksevalla vedellä. Poista
vesipisarat ravistamalla osia voimakkaasti.
4 Kovettumanpoistopään ja kiekon (jos sisältyvät toimitukseen)
puhdistaminen: puhdista kovettumanpoistopään ulkopuoli ja kiekko
toimitukseen sisältyvällä (kuva 25) puhdistusharjalla. Irrota sitten kiekko
kovettumanpoistopäästä, ja puhdista kovettumanpoistopään sisäpuoli
toimitukseen sisältyvällä (kuva 26) puhdistusharjalla. Voit halutessasi
huuhdella kovettumanpoistopään ja kiekon juoksevalla vedellä.
5 Anna kaikkien osien kuivua kokonaan.
6 Napsauta teräyksikkö takaisin ajopäähän.
7 Laita päihin suojukset tai kammat, jotta ne eivät pääse vahingoittumaan
säilytyksen aikana.
8 Säilytä laitetta sekä sen päitä ja lisäosia pussissa.
Varaosat
Voit ostaa tarvikkeita ja varaosia osoitteesta www.shop.philips.com/service
ja Philips-jälleenmyyjiltä. Voit myös ottaa yhteyttä oman maasi Philipsasiakaspalveluun (eri maiden tukipuhelinnumerot on lueteltu
takuulehtisessä).
Kehon kuorintaharja (jos sisältyy toimitukseen): jos käytät kehon
kuorintaharjaa 2–3 kertaa viikossa, se kestää noin 3 kuukautta. Vaihda
kehon kuorintaharjan tilalle 3 kuukauden välein alkuperäisen tyyppinen osa
(BRE394).
Kovettumanpoistokiekko (jos sisältyy toimitukseen): kun
kovettumanpoistokiekon teho heikkenee, vaihda sen tilalle alkuperäisen
tyyppinen osa (BCR372). Kiekko on suositeltavaa vaihtaa vähintään kerran
vuodessa.
Ajopää (jos sisältyy toimitukseen): optimaalisen ajotuloksen saavuttamiseksi
ajopään teräyksikkö on suositeltavaa vaihtaa kahden vuoden välein. Jos
käytät ajopäätä vähintään kaksi kertaa viikossa, vaihda teräyksikkö tätä
useammin. Vaihda teräyksikön tilalle aina alkuperäisen tyyppinen osa
(BRL384).
Vianmääritys
Tähän osaan on koottu tavallisimmat laitteen käytössä ilmenevät ongelmat.
Ellet löydä ongelmaasi ratkaisua jäljempänä olevista tiedoista, lue
osoitteesta www.philips.com/support vastauksia usein kysyttyihin
kysymyksiin tai ota yhteyttä maasi asiakaspalveluun.
Ongelma Ratkaisu
Laite ei toimi niin
hyvin kuin sen
pitäisi.
Akun merkkivalo
välähtää
lataamisen jälkeen,
kun painan
virtapainiketta,
mutta laite ei
käynnisty.
Laite kuumenee
käytön aikana ja
lakkaa yllättäen
toimimasta. Tällöin
molemmat
nopeuden
merkkivalot
vilkkuvat 4
sekunnin ajan.
Ihoni on ärtynyt
laitteen käytön
jälkeen.
Kiristä aina ihoa venyttämällä sitä vapaalla kädellä
Epilointi aiheuttaa
ihokarvojen
sisäänkasvamista.
Pitele laitetta oikeassa kulmassa (kuva 12) ihoa
vasten ja liikuta sitä iholla hitaasti karvojen
kasvusuuntaa vastaan.
Puhdista päät ja lisätarvikkeet jokaisen käyttökerran
jälkeen.
Laite on edelleen kytkettynä pistorasiaan. Tässä
tapauksessa akun merkkivalon vilkkuminen ilmaisee,
että pistoke on irrotettava pistorasiasta, ennen kuin
voit käynnistää laitteen.
Ylikuumenemissuoja on aktivoitunut.
Ylikuumenemissuoja sammuttaa laitteen
automaattisesti, jos laite kuumenee liikaa. Voit
palauttaa ylikuumenemissuojan käynnistämällä
laitteen uudelleen, kun se on jäähtynyt. Älä paina
laitetta liian voimakkaasti ihoa vasten, jotta se ei
ylikuumene.
Epilointipää ja ajopää voivat aiheuttaa lievää
ihoärsytystä, kuten ihon punoitusta tai punaisia
pisteitä iholla. Tämä on normaalia. Vältä ihoärsytystä
varmistamalla, että liikutat laitetta varovasti
ihokarvojen kasvusuuntaa vastaan. Älä käytä liikaa
voimaa. Jos ihon ärsytys ei häviä kolmessa
vuorokaudessa, ota yhteys lääkäriin.
käyttäessäsi epilointipäätä tai ajopäätä. Kun käytät
laitetta kainaloissa, venytä ihoa (kuva 14) nostamalla
käsivartesi ylös ja asettamalla kätesi pääsi taakse.
Voit yrittää ehkäistä ihokarvojen sisäänkasvamista
käyttämällä kuorintaharjaa 24 tuntia ennen epilointia
tai 48 tuntia sen jälkeen.
Huomautus: Älä suorita kuorintaa heti epiloinnin
jälkeen, koska se voi lisätä epiloinnin mahdollisesti
aiheuttamaa ihoärsytystä.
Svenska
Allmän beskrivning bild 1
1 Handtag
2 Hastighetslampor (I och II)
3 På/av-knapp
4 Batteriindikator
5 Frigöringsknapp
6 Anslutning för liten kontakt
7 Epileringshuvud
8 Inbyggd belysning
9 Massagetillbehör
10 Ansiktstillbehör
11 Tillbehör för känsliga områden
12 Hudsträckare
13 Rakhuvud
14 Folie
15 Trimsaxar
16 Kam till rakhuvud
17 Trimhuvud
18 Kam för trimhuvud
19 Pedikyrtillbehör för förhårdnader
20 Pedikyrskiva för förhårdnader
21 Skyddskåpa
22 Kopplingsenhet
23 Kroppsmassagehuvud
24 Exfolieringsborste för kroppen
25 Skyddslock för exfolieringsborste för kroppen
26 Nätadapter
27 Pincett med lampa
28 Pincett
Visas inte: Fodral
Visas inte: Peeling handske
Visas inte: Rengöringsborste
Obs! Huvuden och tillbehör varierar beroende på typnummer. Se
översiktsillustrationen eller informationen på förpackningen för de huvuden
och tillbehör som medföljde din apparat.
Laddning
Obs! Ladda apparaten fullständigt innan du använder den första gången.
Obs! Den här apparaten kan endast användas utan sladd.
Ladda apparaten genom att sätta i den lilla kontakten i uttaget på
apparatens undersida och ansluta nätadaptern till vägguttaget.
- Laddningsindikatorn blinkar vitt (Bild 2): apparaten laddas. Laddningen
tarupp till 1,5 timmar.
- Laddningsindikatorn lyser med konstant vitt sken (Bild 3): apparaten är
fulladdad och har en sladdlös drifttid på upp till 40 minuter.
- Laddningsindikatorn tänds inte om apparaten är påslagen: batteriet
innehåller tillräckligt mycket energi för att apparaten ska kunna
användas.
- Batteriindikatorn blinkar orange (Bild 2): batteriet är nästan urladdat och
behöver laddas. Ladda apparaten när du har använt den.
Obs! Om apparaten är fulladdad men fortfarande är ansluten till
vägguttaget blinkar batteriindikatorn några gånger när du trycker på på/avknappen. Blinkningarna anger att du måste koppla bort apparaten från
vägguttaget innan du kan slå på den.
Snabbladdning
- När batteriet är fullständigt urladdat och du börjar ladda det blinkar
batteriindikatorn snabbt med vitt sken.
- Efter cirka femton minuter börjar batteriindikatorn blinka långsamt med
vitt sken. När detta sker har batteriet laddats tillräckligt mycket för tio
minuters användning.
Använda apparaten
Sätta på och ta av huvudena
1 Sätt fast ett huvud genom att trycka fast det på handtaget (ett klickljud
hörs) (Bild 4).
2 Ta av ett huvud genom att trycka på frigöringsknappen på apparatens
(Bild 5) baksida.
Sätta på och ta av tillbehör
1 Sätt på ett tillbehör genom att helt enkelt trycka fast det på huvudet (ett
klickljud hörs) (Bild 6).
2 Ta av ett tillbehör genom att ta tag i dess fram- och baksida och dra det
rakt upp från huvudet (Bild 7). Ta av en kam genom att dra dess bakdel
uppåt med en nagel (Bild 8).
Slå på och stänga av apparaten
1 Slå på apparaten genom att trycka en gång på på/av-knappen.
Hastighet 2 väljs automatiskt och hastighetslampa II tänds (Bild 9).
2 Om du vill välja hastighet 1 trycker du på på/av-knappen igen.
Hastighetslampa I tänds (Bild 10).
3 Stäng av apparaten genom att trycka på på/av-knappen en gång till.
Den inbyggda lampan tänds automatiskt för att göra det enklare att
använda epileringshuvudet (Bild 11). Du kan stänga av den inbyggda lampan
genom att trycka på på/av-knappen i tre sekunder när du slår på
apparaten.
Page 9

Epilering, rakning och trimning
Apparaten kan användas i både badet och duschen men den kan även
användas utan vatten. Om du vill använda krämer eller body lotion gör du
detta efter att du har använt apparaten.
Epileringen gör mindre ont om du använder apparaten på våt hud eller utan
den duschgelé du normalt använder.
En lätt hudirritation i form av röd hud eller röda prickar kan uppstå dagen
efter epileringen. Det är normalt. Vi rekommenderar att du epilerar dig innan
du går och lägger dig eftersom röd hud eller hudirritation vanligtvis
försvinner under natten.
Obs! Apparaten kan endast användas utan sladd.
1 Håll apparaten mot huden i den vinkel som visas i bilden (Bild 12) när du
epilerar dig (med eller utan ett tillbehör på epileringshuvudet).
2 Håll apparaten rakt mot huden (Bild 13) när du använder den
tillsammans med andra huvuden och tillbehör än epileringshuvudet.
3 Sträck ut huden med din lediga hand när du använder apparaten på
känsliga områden. Lyft armen och håll handen bakom huvudet för att
sträcka huden (Bild 14) när du använder apparaten på underarmarna.
4 För apparaten långsamt mot hårets växtriktning (Bild 15).
Obs! Om du för apparaten för snabbt över huden kan resultatet bli ojämnt.
Obs! Om dina hårstrån är längre än 3–4 mm bör du förtrimma dem för att
göra epileringen enklare och mer bekväm.
Epileringshuvud
Du kan använda epileringshuvudet för att epilera dina ben, underarmar och
bikinilinjen.
Epileringen blir mer effektiv om du väljer hastighet 2. Välj hastighet 1 för
områden med sparsam hårväxt och svåråtkomliga områden, till exempel
knän och fotleder.
Massagetillbehör
Du kan fästa massagetillbehöret på epileringshuvudet för att massera
huden och minimera den ryckande känsla som uppstår under epileringen.
Hudsträckare
Du kan fästa hudsträckaren på epileringshuvudet. Detta tillbehör sträcker ut
huden för att minska den smärta som kan uppstå under epileringen.
Tillbehör för känsliga områden
Du kan fästa tillbehöret för känsliga områden på epileringshuvudet för att
göra epileringen av känsliga delar av kroppen (till exempel underarmarna
och bikinilinjen) mer behaglig.
Ansiktstillbehör
Du kan fästa ansiktstillbehöret på epileringshuvudet för att göra en
noggrann epilering av ansiktshår (till exempel ovanför överläppen).
Använd inte apparaten för att epilera ögonfransar, ögonbryn eller hår
på huvudet.
Rakhuvud
Du kan använda rakhuvudet för att raka benen och kroppen.
Obs! Rakningen av underarmarna blir enklare genom att du kan föra
apparaten i två riktningar.
Obs! Kontrollera alltid folien innan du använder apparaten. Om folien är
skadad på något sätt bör du byta ut klippenheten omedelbart (se ”Byten”).
Kam till rakhuvud
Du kan fästa kammen på rakhuvudet för att trimma hårstrån ned till 3 mm
längd.
Trimhuvud
Du kan använda trimhuvudet för att trimma svåråtkomliga områden längs
bikinilinjen.
Håll trimhuvudet rakt mot huden för att trimma (Bild 16). Håll trimhuvudet
vinkelrätt mot huden för styling och formning (Bild 17).
Kam för trimhuvud
Du kan fästa kammen på trimhuvudet för att trimma håret i bikiniområdet
till 3 mm (Bild 18) längd.
Kroppsmassagehuvud
Huvudet för kroppsmassage roterar kraftfullt för att hjälpa dina muskler att
slappna av.
Obs! Du måste placera huvudet för kroppsmassage på kopplingsenheten
innan du kan fästa den på handtaget (Bild 19).
Exfolieringsborste för kroppen
Du kan använda exfolieringsborsten för kroppen för att ta bort döda
hudceller.
Använd inte exfolieringsborsten för kroppen i ansiktet.
Obs! Du måste placera exfolieringsborsten för kroppen på
kopplingsenheten innan du kan fästa den på handtaget (Bild 20).
Pedikyrhuvud för förhårdnader
Obs! Den här apparaten är endast avsedd att användas på fötter.
Beroende på vilken sorts område eller förhårdnad du vill behandla finns det
tre olika sätt att använda pedikyrskivan för förhårdnader.
1 Om du vill behandla ett stort, jämnt område använder du hela skivan
(Bild 21). Se till att du håller skivan rakt mot huden så att du har god
kontroll under användningen.
2 Om du vill behandla mindre områden som kräver hög precision och god
sikt över det behandlade området (Bild 22) använder du den översta
delen av skivan som sticker ut över pedikyrhuvudet (Bild 23).
3 Om du vill ha hög precision och fila bort förhårdnader snabbt använder
du den smala kanten på den översta delen av skivan som sticker ut över
pedikyrhuvudet (Bild 24).
Rör försiktigt skivan fram och tillbaka över den hud du vill behandla. Tryck
inte för hårt. Om du trycker för hårt kan skivan sluta att rotera.
Rengöring och förvaring
Blöt inte ned nätadaptern.
1 Rengör epileringshuvudet genom att borsta bort hår med
rengöringsborsten och sedan hålla apparaten upp och ned, slå på
apparaten och skölja huvudet med kallt vatten under femton sekunder
efter varje användning (Bild 27).
2 Så här rengörs rakhuvudet: Använd rengöringsborsten för att borsta bort
hår som har samlats under trimsaxarna. Ta tag i skärenhetens båda
trimsaxar och dra loss klippenheten från rakhuvudet (Bild 28). Rengör
rakhuvudets alla delar, förutom folien, med rengöringsborsten.
Obs! Smörj trimsaxens tänder och folier med en droppe symaskinsolja
var sjätte vecka för att få optimal prestanda.
3 Skölj av klippenheten, huvudena och tillbehören under kranen. Skaka
dem ordentligt för att få bort alla vattendroppar.
4 Så här rengörs pedikyrhuvudet och -skivan för förhårdnader (om det
medföljer): Rengör utsidan av huvudet och skivan med den medföljande
rengöringsborsten (Bild 25). Ta sedan av skivan från huvudet och rengör
insidan av huvudet med den medföljande rengöringsborsten (Bild 26).
Om du föredrar det kan du skölja pedikyrhuvudet och -skivan för
förhårdnader under rinnande vatten.
5 Låt alla delar torka fullständigt.
6 Sätt tillbaka klippenheten på rakhuvudet (ett klickljud hörs).
7 Sätt på skyddskåporna eller kammarna på huvudena för att förhindra att
de skadas i samband med förvaringen.
8 Förvara apparaten, dess huvuden och tillbehör i fodralet.
Byten
Du kan köpa tillbehör och reservdelar på www.shop.philips.com/service
och hos din lokala Philips-återförsäljare. Du kan även kontakta Philips
kundtjänst i ditt land (kontaktinformation finns i garantibroschyren).
Exfolieringsborste för kroppen (om den medföljer): Om du använder
exfolieringsborsten för kroppen två till tre gånger i veckan håller den i
ungefär tre månader. Byt ut exfolieringsborsten för kroppen mot en
originalborste (BRE394) var tredje månad.
Pedikyrhuvud för förhårdnader (om det medföljer): Byt ut pedikyrskivan för
förhårdnader mot en av originaltyp (BCR372) när effektiviteten minskar. Vi
rekommenderar att du byter ut skivan minst en gång om året.
Rakhuvud (om det medföljer): Vi rekommenderar att du byter ut
rakhuvudets klippenhet vartannat år för att få optimal prestanda. Om du
använder rakhuvudet minst två gånger i veckan bör du byta ut klippenheten
oftare. Byt alltid ut klippenheten mot en originalenhet (BRL384).
Felsökning
Det här kapitlet sammanfattar de vanligaste problemen som kan uppstå
med apparaten. Om du inte kan lösa problemet med hjälp av informationen
nedan kan du besöka www.philips.com/support och läsa svaren på vanliga
frågor eller kontakta kundtjänsten i ditt land.
Problem Lösning
Apparaten fungerar
inte som den ska.
När jag har laddat
apparaten blinkar
batteriindikatorn
när jag trycker på
på/av-knappen,
men apparaten
startar inte.
Apparaten blir
varm och slutar
fungera under
användning. Sedan
blinkar båda
hastighetslampor
na under 4
sekunder.
Huden blir irriterad
när jag har använt
apparaten.
Var noga med att hålla apparaten i korrekt vinkel
(Bild 12) mot huden och för den långsamt över
huden, mot hårets växtriktning.
Rengör huvudena och tillbehören efter varje
användning.
Apparaten är fortfarande ansluten till vägguttaget. I
det här fallet anger batteriindikatorns blinkningar att
du måste koppla bort apparaten från vägguttaget
innan du kan slå på den.
Överhettningsskyddet har aktiverats.
Överhettningsskyddet stänger av apparaten
automatiskt om den blir för varm. Låt apparaten
svalna för att återställa överhettningsskyddet och
sätt sedan på den igen. Apparaten kan överhettas
om du trycker den för hårt mot huden.
När du använder epileringshuvudet eller rakhuvudet
kan en lätt hudirritation i form av röd hud eller röda
prickar uppstå. Det är normalt. Du minskar risken för
hudirritation genom att föra apparaten försiktigt mot
hårets växtriktning. Tryck inte för hårt. Om irritationen
inte försvinner inom tre dygn bör du kontakta en
läkare.
Page 10

Problem Lösning
Epilering leder till
inåtväxande
hårstrån.
Türkçe
Sträck alltid ut huden med din lediga hand när du
använder epileringshuvudet eller rakhuvudet. Lyft
armen och håll handen bakom huvudet för att
sträcka huden (Bild 14) när du använder apparaten
på underarmarna.
Genom att använda exfolieringsborsten för kroppen
ett dygn innan eller två dygn efter epileringen kan du
hjälpa till att förebygga inåtväxande hårstrån.
Obs! Exfoliera inte huden direkt efter epileringen,
eftersom det kan förvärra en eventuell hudirritation
som orsakats av epileringen.
Genel Açıklama Şek. 1
1 Tutma yeri
2 Hız ışıkları (I ve II)
3 Açma/kapama düğmesi
4 Pil göstergesi
5 Ayırma düğmesi
6 Küçük fiş için soket
7 Epilasyon başlığı
8 Entegre ışık
9 Masaj başlığı
10 Yüz başlığı
11 Hassas bölge başlığı
12 Cilt germe başlığı
13 Tıraş başlığı
14 Folyo
15 Düzelticiler
16 Tıraş başlığı tarağı
17 Düzeltme başlığı
18 Düzeltme başlığı tarağı
19 Nasır sökücü aparatı
20 Nasır sökücü disk
21 Koruma kapağı
22 Bağlantı ünitesi
23 Vücut masaj başlığı
24 Vücut ovma fırçası
25 Vücut ovma fırçası koruyucu kapağı
26 Besleme birimi
27 Işıklı cımbız
28 Cımbız
Gösterilmeyen: Kılıf
Gösterilmeyen: Peeling eldiveni
Gösterilmeyen: Temizleme fırçası
Not: Cihazla birlikte verilen başlıklar ve aksesuarlar kod numaralarına göre
farklılık gösterebilir. Cihazınızla birlikte verilen başlıkları ve aksesuarları
görmek için genel çizime bakabilir veya kutunun üzerindeki bilgilere
başvurabilirsiniz.
Şarj etme
Not: İlk kullanımdan önce cihazı tamamen şarj edin.
Not: Bu cihaz sadece kablosuz olarak kullanılabilir.
Cihazı şarj etmek için küçük fişi cihazın tabanındaki sokete, besleme birimini
de prize takın.
- Şarj göstergesi beyaz renkte (Şek. 2) yanıp söndüğünde: cihaz şarj olur.
Şarj olma 1,5 saate kadarsürebilir.
- Şarj göstergesi sürekli beyaz renkte (Şek. 3) yandığında: cihaz tamamen
şarj olmuştur ve 40 dakikaya kadar kablosuz çalışabilir.
- Şarj göstergesinin ışığı cihaz açık konumdayken yanmıyorsa: cihaz
kullanım için yeterli enerjiye sahiptir.
- Pil göstergesi turuncu renkte (Şek. 2) yanıp söndüğünde: pil neredeyse
boştur ve şarj edilmesi gerekir. Kullanmayı bitirdiğinizde cihazı şarj edin.
Not: Cihaz tamamen şarj olduğu halde prize takılıysa, açma/kapama
düğmesine bastığınızda pil göstergesi birkaç kez yanıp söner. Bu, cihazı
açmadan önce prizden çıkarmanız gerektiğini gösterir.
Hızlı şarj
- Pil tamamen boş olduğunda ve pili şarj etmeye başladığınızda, pil
göstergesi hızlı bir şekilde beyaz renkte yanıp söner.
- Yaklaşık 15 dakikadan sonra, pil göstergesi yavaş bir şekilde beyaz renkte
yanıp sönmeye başlar. Bu noktada, pilde 10 dakikalık kullanıma yetecek
kadar enerji vardır.
Cihazın kullanımı
Başlıkların takılıp çıkarılması
1 Başlığı takmak için sapa bastırın ('klik' sesi duyulur) (Şek. 4).
2 Başlığı çıkarmak için cihazın (Şek. 5) arkasındaki ayırma düğmesine basın.
Aksesuarların takılıp çıkarılması
1 Aksesuarı takmak için onu başlığa oturtun ('klik' sesi duyulur) (Şek. 6).
2 Aksesuarı çıkarmak için, ön ve arka tarafından tutarak başlıktan (Şek. 7)
yukarıya doğru çekin. Tarağı çıkarmak için, tırnağınızı (Şek. 8) kullanarak
arkasından yukarıya doğru çekin.
Cihazın açılması ve kapatılması
1 Cihazı açmak için açma/kapama düğmesine bir kez basın. Hız 2 otomatik
olarak seçilir ve hız ışığı II yanar (Şek. 9).
2 Hız 1'i seçmek istiyorsanız, açma/kapama düğmesine tekrar basın. Hız
ışığı I yanar (Şek. 10).
3 Cihazı kapatmak için açma/kapama düğmesine bir kere daha basın.
Epilasyon başlığını (Şek. 11) kullanırken size daha iyi bir görünüm sağlamak
için entegre ışık otomatik olarak yanacaktır. Entegre ışığı kapatmak
istiyorsanız, cihazı açtığınızda açma/kapama düğmesini 3 saniye boyunca
basılı tutun.
Epilasyon, tıraş ve düzeltme
Cihaz banyo veya duşta kullanılmaya uygundur, ancak kuru olarak da
kullanılabilir. Krem veya vücut losyonu kullanmak istiyorsanız bunları cihazı
kullandıktan sonra uygulayın.
Hassas ve daha az acılı bir epilasyon için cihazı ıslak ciltte normal duş
jelinizle veya jelsiz kullanın.
Epilasyondan sonra ciltte kızarıklık ya da kırmızı noktalar gibi hafif cilt tahrişi
oluşabilir. Bu durum normaldir. Herhangi bir kızarıklık ya da cilt tahrişi
genellikle bir gecede kaybolduğundan, epilasyon işlemini yatmadan önce
uygulamanızı öneririz.
Not: Cihaz sadece kablosuz olarak kullanılabilir.
1 (Epilasyon başlığına takılı bir aksesuarla veya aksesuarsız) epilasyon
yaparken, cihazı cildinize şekilde gösterilen açıyla (Şek. 12) konumlandırın.
2 Cihazı, epilasyon başlığı dışında başka başlıklar ya da aksesuarlarla
kullandığınızda, başlıkları ve aksesuarları cildinize (Şek. 13) düz bir şekilde
konumlandırdığınızdan emin olun.
3 Cihazı hassas bölgeler için kullanırken boştaki elinizle cildinizi gerin.
Cihazı koltuk altlarınızda kullanırken cildi germek için (Şek. 14) kolunuzu
kaldırın ve elinizi başınızın arkasına koyun.
4 Cihazı yavaşça tüy uzama (Şek. 15) yönünün tersine hareket ettirin.
Not: Cihazı cildinizin üzerinde çok hızlı hareket ettirirseniz pürüzsüz bir
sonuç elde edemeyebilirsiniz.
Not: Tüyleriniz 3-4 mm'den uzunsa, daha kolay ve rahat bir epilasyon için
tüylerinizi önceden kısaltın.
Epilasyon başlığı
Bacaklarınızı, koltuk altınızı ve bikini bölgenizin epilasyonu için epilasyon
başlığını kullanabilirsiniz.
En etkiliepilasyon için hız 2'yi seçin. Diz ve ayak bileği gibi tüylerin az olduğu
ve ulaşılması güç alanlar için hız 1'i seçin.
Masaj başlığı
Cildinize masaj yapmak ve kullanım sırasında epilasyonun çekme hissini en
aza indirmek için masaj başlığını epilasyon başlığına takabilirsiniz.
Cilt germe başlığı
Cilt germe balığını epilasyon başlığına takabilirsiniz. Bu işlem, acıyı azaltmak
için epilasyon sırasında cildin gergin kalmasını sağlar.
Hassas bölge başlığı
Hassas bölgelerde (örn. koltuk altları ve bikini bölgesi) daha rahat bir
epilasyon için hassas bölge başlığını epilasyon başlığına takabilirsiniz.
Yüz başlığı
Yüz bölgesindeki tüylerin (ör. dudak üzerindeki bölge) hassas epilasyonu
için yüz başlığını epilasyon başlığına takabilirsiniz.
Cihazı, kaş, kirpik ve saç epilasyonu için kullanmayın.
Tıraş başlığı
Bacaklarınızdaki ve vücudunuzdaki tüyleri almak için tıraş başlığını
kullanabilirsiniz.
Not: Koltuk altlarındaki tüylerin daha kolay alınması sağlamak için cihaz iki
yönde de hareket ettirilebilir.
Not: Cihazı kullanmadan önce folyoyu her zaman kontrol edin. Herhangi bir
hasar varsa, kesme ünitesini hemen değiştirin (bkz. 'Değişim').
Tıraş başlığı tarağı
3 mm'ye kadar uzun tüyleri düzeltmek için tarağı tıraş başlığına takabilirsiniz.
Düzeltme başlığı
Bikini bölgesindeki ulaşılması zor yerleri düzeltmek için düzeltme başlığını
kullanabilirsiniz.
Düzeltme (Şek. 16) işlemi için düzeltme başlığını düz bir şekilde cildinize
yerleştirin. Stil ve şekillendirme (Şek. 17) için düzeltme başlığını dik olarak
cildinize yerleştirin.
Düzeltme başlığı tarağı
Bikini bölgesindeki 3 mm (Şek. 18)'ye kadar uzun tüyleri düzeltmek için tarağı
düzeltme başlığına takabilirsiniz.
Vücut masaj başlığı
Vücut masaj başlığı kaslarınızı rahatlatmak için sert bir şekilde döner.
Not: Vücut masaj başlığını sap (Şek. 19) üzerine takmadan önce bağlantı
ünitesine takmanız gerekir.
Page 11

Vücut peeling fırçası
Ölü cilt hücrelerinden kurtulmak için vücut peeling fırçasını kullanabilirsiniz.
Vücut peeling fırçasını yüzünüzde kullanmayın.
Not: Vücut peeling fırçasını sap (Şek. 20) üzerine takmadan önce bağlantı
ünitesine takmanız gerekir.
Nasır sökme başlığı
Not: Bu cihaz, yalnızca ayaklar için kullanılmak üzere tasarlanmıştır.
Nasır sökücü diski, uygulamak istediğiniz bölgeye veya nasıra göre 3 farklı
şekilde kullanabilirsiniz.
1 Büyük ve düz bir alan için, bütün diski (Şek. 21) kullanın. Kullanım
sırasında kontrol sağlayabilmek için diski cildinize düz bir şekilde
yerleştirdiğinizden emin olun.
2 Daha küçük alanlarda hassas uygulama ve uygulama yapılan bölgede
(Şek. 22) görünürlüğü arttırmak için başlığın (Şek. 23) üst kısmından çıkan
diskin üst kısmını kullanın.
3 Hassas uygulama ve sert deriden hızlıca kurtulmak için diskin (Şek. 24)
üst kısmındaki çıkıntılı dar kenarı kullanın.
Diski, uygulama yapmak istediğiniz bölgenin üzerinde nazikçe ileri geri
hareket ettirin. Çok fazla bastırmayın. Çok fazla bastırmak diskin durmasına
neden olabilir.
Cihazın temizliği ve saklanması
Güç kaynağı ünitesini kuru tutun.
1 Epilasyon başlığını temizlemek için her kullanımdan sonra (Şek. 27)
temizleme fırçasıyla tüm tüyleri temizleyin, cihazı ters bir şekilde tutun,
açın ve 15 saniye boyunca soğuk suyla yıkayın.
2 Tıraş başlığını temizlemek için: Düzelticilerin altında birikmiş tüyleri
temizleme fırçasını kullanarak temizleyin. Kesme ünitesindeki iki
düzelticiyi tutun ve kesme ünitesini tıraş başlığından (Şek. 28) çıkarın.
Tıraş başlığının folyo hariç tüm kısımlarını temizleme fırçasını kullanarak
temizleyin.
Not: En iyi performans için düzelticinin dişlerini ve folyoları bir damla
dikiş makinesi yağı kullanarak altı ayda bir yağlayın.
3 Kesme ünitesini, başlıkları ve aksesuarları musluk altında durulayın.
Üzerlerindeki su damlalarından kurtulmak için iyice silkeleyin.
4 Nasır sökme başlığını ve diskini temizlemek için (varsa): Başlığın ve diskin
dışını verilen (Şek. 25) temizleme fırçasıyla temizleyin. Ardından diski
başlıktan çıkarın ve başlığın içini verilen (Şek. 26) temizleme fırçasıyla
temizleyin. Tercih ederseniz, nasır sökme başlığını ve nasır sökücü diski
musluk suyunda yıkayabilirsiniz.
5 Tüm parçaların tamamen kurumasını bekleyin.
6 Kesme ünitesini tıraş başlığına geri takın ('klik' sesi duyulur).
7 Başlıkların zarar görmesini engellemek için onları kaldırmadan önce
başlıklara koruyucu kapak ya da tarakları takın.
8 Cihazı, başlıklarını ve aksesuarlarını kılıfta saklayın.
Değişim
Aksesuar veya yedek parça satın almak için www.shop.philips.com/service
adresini ziyaret edin ya da Philips bayinize gidin. Ülkenizdeki Philips
Müşteri Hizmetleri Merkezi ile de iletişim kurabilirsiniz (iletişim bilgileri için
dünya çapında geçerli garanti belgesine göz atın).
Vücut peeling fırçası (varsa): Vücut peeling fırçasını hafta 2-3 defa
kullanıyorsanız, yaklaşık 3 ay kullanabilirsiniz. Vücut peeling fırçasını 3 ayda
bir orijinaliyle değiştirin (BRE394).
Nasır sökme başlığı (varsa): Verimliliği azaldığında, nasır sökücü diski
orijinaliyle (BCR372) değiştirin. Diski en az yılda bir kere değiştirmenizi
öneririz.
Tıraş başlığı (varsa): En iyi performansı elde etmek için tıraş başlığının kesme
ünitesiniiki yılda bir değiştirmenizi öneririz. Tıraş başlığını haftada iki veya
daha fazla kez kullanıyorsanız kesme ünitesini daha sık değiştirin. Kesme
ünitesini her zaman orijinal bir kesme ünitesiyle değiştirin (BRL384).
Sorun giderme
Bu bölümde, cihazla ilgili en sık karşılaşabileceğiniz sorunları özetleyeceğiz.
Sorunu aşağıda verilen bilgileri kullanarak çözemiyorsanız, sık sorulan
sorular listesi için www.philips.com/support adresini ziyaret edin veya
ülkenizdeki Müşteri Destek Merkezi ile iletişim kurun.
Sorun Çözüm
Cihaz olması
gerektiği gibi
çalışmıyor.
Şarj olduktan
sonra,
açma/kapama
düğmesine
bastığımda pil
göstergesi yanıp
sönüyor, ancak
cihaz açılmıyor.
Kullanım sırasında
cihaz ısınıyor ve
aniden çalışmayı
durduruyor.
Ardından, her iki hız
ışığı da 4 saniye
boyunca yanıp
sönüyor.
Cihazı kullandıktan
sonra cildimde
tahriş oluyor.
Epilasyon başlığını veya tıraş başlığını kullanırken, her
Epilasyon batık
tüylere neden olur.
Cihazı doğru açıda (Şek. 12) tuttuğunuzdan ve cildiniz
üzerinde yavaşça ve tüylerin uzama yönünün tersine
hareket ettirdiğinizden emin olun.
Başlıkları ve aksesuarları her kullanımdan sonra
temizleyin.
Cihaz hala prize bağlıdır. Bu durumda pil göstergesi,
cihazı açmadan önce prizden çıkarmanız gerektiğini
göstermek için yanıp sönmektedir.
Aşırı ısınma koruması etkinleşmiştir. Cihaz çok ısınırsa,
aşırı ısınma koruması cihazı otomatik olarak kapatır.
Aşırı ısınma korumasını sıfırlamak için cihazın
soğumasını bekleyin ve ardından cihazı tekrar açın.
Cihazın aşırı ısınmasını önlemek için cihazı cildinize
çok fazla bastırmayın.
Epilasyon başlığını veya tıraş başlığını
kullandığınızda, ciltte kızarıklık ya da kırmızı noktalar
gibi hafif cilt tahrişi oluşabilir. Bu durum normaldir.
Cilt tahrişini önlemek için cihazı tüy uzama yönünün
aksine hareket ettirdiğinizden emin olun. Çok fazla
basınç uygulamayın. Tahriş 3 günden fazla sürerse,
bir doktora danışmanızı öneririz.
zaman diğer elinizle cildinizi gerin. Cihazı koltuk
altlarınızda kullandığınızda, cildi (Şek. 14) germek için
kolunuzu kaldırın ve elinizi başınızın arkasına koyun.
Batık tüyler önlemek için, epilasyondan 24 saat önce
veya 48 saat sonra vücut ovma fırçasını
kullanabilirsiniz.
Not: Epilasyonun neden olabileceği cilt tahrişini
artırabileceğinden epilasyondan hemen sonra
peeling uygulamayın.
Ελληνικα
Γενική περιγραφή Εικ. 1
1 Λαβή
2 Λυχνίες ταχύτητας (Ι και II)
3 Κουμπί ενεργοποίησης/απενεργοποίησης
4 Ένδειξη μπαταρίας
5 Κουμπί απασφάλισης
6 Υποδοχή για μικρό βύσμα
7 Αποτριχωτική κεφαλή
8 Ενσωματωμένο φως
9 Καπάκι μασάζ
10 Καπάκι προσώπου
11 Καπάκι για τις ευαίσθητες περιοχές
12 Καπάκι για το σύστημα τεντώματος δέρματος
13 Ξυριστική κεφαλή
14 Πλέγμα
15 Τρίμερ
16 Χτένα για ξυριστική κεφαλή
17 Κεφαλή τριμαρίσματος
18 Χτένα για κεφαλή τριμαρίσματος
19 Εξάρτημα αφαίρεσης κάλων
20 Δίσκος αφαίρεσης κάλων
21 Προστατευτικό κάλυμμα
22 Μονάδα σύνδεσης
23 Κεφαλή μασάζ σώματος
24 Βουρτσάκι απολέπισης σώματος
25 Καπάκι προστασίας για βουρτσάκι απολέπισης σώματος
26 Τροφοδοτικό
27 Τσιμπιδάκι με φως
28 Τσιμπιδάκι
Δεν απεικονίζονται: Θήκη
Δεν απεικονίζονται: Απολέπισης γάντι
Δεν απεικονίζονται: Βουρτσάκι καθαρισμού
Σημείωση: Οι κεφαλές και τα παρελκόμενα που παρέχονται διαφέρουν ανάλογα με
τον τύπο. Συμβουλευτείτε την εικόνα επισκόπησης για τις κεφαλές και τα
παρελκόμενα που παρέχονται με τη δική σας συσκευή ή συμβουλευθείτε τις
πληροφορίες που υπάρχουν επάνω στο κουτί.
Φόρτιση
Σημείωση: Φορτίστε πλήρως τη συσκευή πριν τη χρησιμοποιήσετε για πρώτη φορά.
Σημείωση: Αυτή η συσκευή μπορεί να χρησιμοποιηθεί μόνο χωρίς καλώδιο.
Για να φορτίσετε τη συσκευή, εισαγάγετε το μικρό βύσμα στην υποδοχή στην κάτω
πλευρά της συσκευής και τοποθετήστε το τροφοδοτικό στην πρίζα.
- Η ένδειξη φόρτισης αναβοσβήνει λευκό (Εικ. 2): η συσκευή φορτίζει. Η
φόρτισηδιαρκεί έως 1,5 ώρα.
- Η ένδειξη φόρτισης ανάβει λευκό συνεχώς (Εικ. 3): η συσκευή είναι πλήρως
φορτισμένη και διαθέτει έως και 40 λεπτά αυτονομίας.
- Η φωτεινή ένδειξη φόρτισης δεν ανάβει όταν η συσκευή είναι ενεργοποιημένη: η
συσκευή περιέχει αρκετή ενέργεια ώστε να χρησιμοποιηθεί.
- Η ένδειξη μπαταρίας αναβοσβήνει πορτοκαλί (Εικ. 2): η μπαταρία είναι σχεδόν
άδεια και χρειάζεται φόρτιση. Φορτίστε τη συσκευή όταν τελειώσετε με τη χρήση
της.
Σημείωση: Εάν η συσκευή είναι πλήρως φορτισμένη αλλά ακόμα δεν είναι
συνδεδεμένη στην επιτοίχια πρίζα, η ένδειξη μπαταρίας αναβοσβήνει λίγες φορές
όταν πατάτε το κουμπί ενεργοποίηση/απενεργοποίηση. Αυτό δείχνει ότι πρέπει να
αποσυνδέσετε τη συσκευή από την επιτοίχια πρίζα προτού μπορέσετε να την
ενεργοποιήσετε.
Page 12

Γρήγορη φόρτιση
- Όταν η μπαταρία είναι τελείως άδεια και αρχίζετε να την φορτίζετε, η ένδειξη της
μπαταρίας αναβοσβήνει με λευκό γρήγορα.
- Μετά από περίπου 15 λεπτά, η ένδειξη της μπαταρίας αρχίζει να αναβοσβήνει
λευκό αργά. Σε αυτό το σημείο, η μπαταρία περιέχει αρκετή ισχύ για έως και 10
λεπτά χρήσης.
Χρήση της συσκευής
Προσάρτηση και αφαίρεση κεφαλών
1 Για να προσαρτήσετε μια κεφαλή, πατήστε την στο χερούλι («κούμπωμα») (Εικ. 4).
2 Για να αποσπάσετε μια κεφαλή, πατήστε το κουμπί απελευθέρωσης στο πίσω
μέρος της συσκευής (Εικ. 5).
Προσάρτηση και αφαίρεση εξαρτημάτων
1 Για να προσαρτήσετε ένα εξάρτημα, απλά κουμπώστε το στην κεφαλή
(«κούμπωμα») (Εικ. 6).
2 Για να αποσπάσετε ένα εξάρτημα, αρπάξτε το μπροστινό και πίσω μέρος και
τραβήξτε το προς τα πάνω εκτός της κεφαλής (Εικ. 7). Για να αποσπάσετε μια
χτένα, τραβήξτε το πίσω μέρος της προς τα πάνω με το νύχι (Εικ. 8).
Ενεργοποίηση/απενεργοποίηση της συσκευής
1 Για να ενεργοποιήσετε τη συσκευή, πατήστε το κουμπί
ενεργοποίησης/απενεργοποίησης μία φορά. Η ταχύτητα 2 επιλέγεται αυτόματα και
ανάβει (Εικ. 9) το φως ταχύτητας ΙΙ.
2 Εάν θέλετε να επιλέξετε την ταχύτητα 1, πατήστε ξανά το κουμπί
ενεργοποίηση/απενεργοποίηση. Το φως ταχύτητας I ανάβει (Εικ. 10).
3 Για να απενεργοποιήσετε τη συσκευή, πατήστε το κουμπί
ενεργοποίησης/απενεργοποίησης μία ακόμη φορά.
Το ενσωματωμένο φως ανάβει αυτόματα για να βλέπετε καλύτερα ενώ
χρησιμοποιείτε την κεφαλή (Εικ. 11) αποτρίχωσης. Εάν θέλετε να απενεργοποιήσετε
το ενσωματωμένο φως, κρατήστε το κουμπί ενεργοποίηση/απενεργοποίηση πατημένο
για 3 δευτερόλεπτα όταν ενεργοποιείτε τη συσκευή.
Αποτρίχωση, ξύρισμα και τριμάρισμα
Η συσκευή είναι κατάλληλη για χρήση στο μπάνιο ή στο ντους, αλλά μπορεί να
χρησιμοποιηθεί και σε στεγνό δέρμα. Εάν θέλετε να χρησιμοποιήσετε κρέμες ή λοσιόν
σώματος, απλώστε τις αφού έχετε χρησιμοποιήσει τη συσκευή.
Για απαλή, λιγότερο επώδυνη αποτρίχωση, χρησιμοποιήστε τη συσκευή σε υγρό
δέρμα με ή χωρίς το συνηθισμένο αφρόλουτρο.
Μετά την αποτρίχωση μπορεί να εμφανιστεί ελαφρύς ερεθισμός του δέρματος όπως
ερυθρό δέρμα ή κόκκινες κουκκίδες. Αυτό είναι φυσιολογικό. Σας συμβουλεύουμε να
κάνετε αποτρίχωση το βράδυ πριν κοιμηθείτε, καθώς τυχόν ερυθρότητα ή ερεθισμός
του δέρματος συνήθως υποχωρεί κατά τη διάρκεια της νύχτας.
Σημείωση: Η συσκευή μπορεί να χρησιμοποιηθεί μόνο χωρίς καλώδιο.
1 Όταν αποτριχώνετε (με ή χωρίς ένα εξάρτημα στην κεφαλή αποτρίχωσης),
τοποθετήστε τη συσκευή στο δέρμα υπό τη γωνία που φαίνεται στην εικόνα (Εικ.
12).
2 Όταν χρησιμοποιείτε τη συσκευή με άλλες κεφαλές και εξαρτήματα από την
κεφαλή αποτρίχωσης, φροντίστε να τοποθετείτε τις κεφαλές και τα εξαρτήματα
επίπεδα πάνω στο δέρμα (Εικ. 13).
3 Όταν χρησιμοποιείτε τη συσκευή σε ευαίσθητες περιοχές, τεντώνετε το δέρμα με
το ελεύθερό σας χέρι. Όταν χρησιμοποιείτε τη συσκευή στις μασχάλες σας,
σηκώστε το χέρι σας και βάλτε την παλάμη σας στο πίσω μέρος του κεφαλιού για
να τεντώσετε το δέρμα (Εικ. 14).
4 Μετακινήστε τη συσκευή αργά, αντίθετα από τη φορά των τριχών (Εικ. 15).
Σημείωση: Αν μετακινείτε τη συσκευή πολύ γρήγορα πάνω στο δέρμα,ενδεχομένως
δεν θα έχετετο επιθυμητό λείο αποτέλεσμα.
Σημείωση: Εάν οι τρίχες σας είναι μακρύτερες από 3-4 mm, κόψτε τις για πιο εύκολη
και άνετη αποτρίχωση.
Αποτριχωτική κεφαλή
Μπορείτε να χρησιμοποιήσετε την κεφαλή αποτρίχωσης για να αποτριχώσετε τα
πόδια σας, τις μασχάλες και τη γραμμή του μπικίνι.
Επιλέξτε την ταχύτητα 2 για πιο αποτελεσματική αποτρίχωση. Επιλέξτε την ταχύτητα
1 για περιοχές με λιγότερη τριχοφυΐα και για δύσκολες περιοχές, όπως είναι τα
γόνατα και οι αστράγαλοι.
Καπάκι μασάζ
Μπορείτε να προσαρτήσετε το καπάκι μασάζ στην κεφαλή αποτρίχωσης για να κάνετε
μασάζ στο δέρμα και να ελαχιστοποιήσετε την αίσθηση του τραβήγματος της
αποτρίχωσης κατά τη χρήση.
Καπάκι για το σύστημα τεντώματος δέρματος
Μπορείτε να προσαρτήσετε το καπάκι του συστήματος τεντώματος δέρματος στην
κεφαλή αποτρίχωσης. Διατηρεί το δέρμα σφιχτό κατά την αποτρίχωση για να μειωθεί
ο πόνος.
Καπάκι για τις ευαίσθητες περιοχές
Μπορείτε να προσαρτήσετε το καπάκι ευαίσθητης περιοχής στην κεφαλή
αποτρίχωσης για πιο άνετη αποτρίχωση ευαίσθητων περιοχών (π.χ. τις μασχάλες και
τη γραμμή του μπικίνι).
Καπάκι προσώπου
Μπορείτε να προσαρτήσετε το καπάκι προσώπου στην κεφαλή αποτρίχωσης για
ακριβή αποτρίχωση τριχών προσώπου (π.χ. το μουστάκι).
Μη χρησιμοποιείτε τη συσκευή για να αποτριχώσετε βλεφαρίδες, φρύδια ή τα
μαλλιά.
Ξυριστική κεφαλή
Μπορείτε να χρησιμοποιήσετε την κεφαλή ξυρίσματος για να ξυρίσετε τα πόδια σας
και το σώμα.
Σημείωση: Η συσκευή μπορεί να μετακινηθεί προς δύο κατευθύνσεις, για ευκολότερο
ξύρισμα της μασχάλης.
Σημείωση: Να ελέγχετε πάντα το πλέγμα πριν τη χρήση. Εάν έχει υποστεί
οποιαδήποτε βλάβη, αντικαταστήστε τη μονάδα κοπής αμέσως (βλέπε
«Αντικατάσταση»).
Χτένα για ξυριστική κεφαλή
Μπορείτε να προσαρτήσετε τη χτένα στην κεφαλή ξυρίσματος για να αποτριχώσετε
τρίχες σε μήκος 3 mm.
Κεφαλή τριμαρίσματος
Μπορείτε να χρησιμοποιήσετε την κεφαλή τριμαρίσματος για να κόψετε τις τρίχες σε
δυσπρόσιτες περιοχές στη γραμμή του μπικίνι.
Τοποθετήστε την κεφαλή κοπής επίπεδη στο δέρμα για να κόψετε τρίχες (Εικ. 16).
Τοποθετήστε την κεφαλή κοπής κάθετα στο δέρμα για φορμάρισμα και διαμόρφωση
(Εικ. 17).
Χτένα για κεφαλή τριμαρίσματος
Μπορείτε να προσαρτήσετε τη χτένα στην κεφαλή κοπής για να αποτριχώσετε τρίχες
στη γραμμή του μπικίνι σε μήκος 3 mm (Εικ. 18).
Κεφαλή μασάζ σώματος
Η κεφαλή μασάζ σώματος περιστρέφεται σταθερά για να χαλαρώσουν οι μυς σας.
Σημείωση: Πρέπει να βάλετε την κεφαλή μασάζ σώματος στη μονάδα σύνδεσης
προτού μπορέσετε να την προσαρτήσετε στο χερούλι (Εικ. 19).
Βουρτσάκι απολέπισης σώματος
Μπορείτε να χρησιμοποιήσετε το βουρτσάκι απολέπισης σώματος για να αφαιρέσετε
νεκρά κύτταρα του δέρματος.
Μη χρησιμοποιείτε το βουρτσάκι απολέπισης σώματος στο πρόσωπό σας.
Σημείωση: Πρέπει να βάλετε το βουρτσάκι απολέπισης σώματος στη μονάδα
σύνδεσης προτού μπορέσετε να την προσαρτήσετε στο χερούλι (Εικ. 20).
Κεφαλή αφαίρεσης κάλων
Σημείωση: Η συσκευή αυτή προορίζεται μόνο για χρήση στα πόδια.
Μπορείτε να χρησιμοποιήσετε το δίσκο αφαίρεσης κάλων με 3 διαφορετικούς
τρόπους, ανάλογα με την περιοχή ή τον κάλο που θέλετε να θεραπεύσετε.
1 Για να θεραπεύσετε μια μεγάλη και επίπεδη επιφάνεια, χρησιμοποιήστε ολόκληρο
το δίσκο (Εικ. 21). Βεβαιωθείτε ότι τοποθετείτε το δίσκο επίπεδο στο δέρμα για
καλό έλεγχο κατά τη χρήση.
2 Για θεραπεία ακριβείας μικρότερων περιοχών και καλή ορατότητα της
θεραπευόμενης περιοχής (Εικ. 22), χρησιμοποιήστε το πάνω μέρος του δίσκου
που προεξέχει πέρα από την κορυφή της κεφαλής (Εικ. 23).
3 Για θεραπεία ακριβείας και για να λειάνετε σκληρό δέρμα πολύ γρήγορα,
χρησιμοποιήστε τη στενή άκρη του προεξέχοντος πάνω μέρους του δίσκου (Εικ.
24).
Μετακινήστε το δίσκο προς τα πίσω και προς τα εμπρός απαλά πάνω από το δέρμα
που θέλετε να θεραπεύσετε. Μην σπρώχνετε πολύ δυνατά. Όταν σπρώχνετε πολύ
δυνατά, ο δίσκος μπορεί να πάψει να περιστρέφεται.
Καθαρισμός και αποθήκευση
Διατηρήστε το τροφοδοτικό στεγνό.
1 Για να καθαρίσετε την κεφαλή αποτρίχωσης, χρησιμοποιήστε το βουρτσάκι
καθαρισμού για να απομακρύνετε τυχόν τρίχες, κρατήστε τη συσκευή ανάποδα,
ενεργοποιήστε την και ξεπλύνετέ την με κρύο νερό για 15 δευτερόλεπτα μετά από
κάθε χρήση (Εικ. 27).
2 Για να καθαρίσετε την ξυριστική κεφαλή: χρησιμοποιήστε το βουρτσάκι
καθαρισμού για να απομακρύνετε τυχόν τρίχες που έχουν συγκεντρωθεί κάτω
από τους κόπτες. Πιάστε τους δύο κόπτες της μονάδας κοπής και τραβήξτε τη
μονάδα κοπής της κεφαλής ξυρίσματος (Εικ. 28). Καθαρίστε όλα τα μέρη της
ξυριστικής κεφαλής με το βουρτσάκι καθαρισμού, εκτός του πλέγματος.
Σημείωση: Λιπάνετε τα δοντάκια και τα πλέγματα του τρίμερ, με μια σταγόνα λάδι
ραπτομηχανής κάθε έξι εβδομάδες για βέλτιστη απόδοση.
3 Ξεπλύνετε τη μονάδα κοπής, τις κεφαλές και τα αξεσουάρ κάτω από τη βρύση.
Κουνήστε τα καλά για να αφαιρέσετε σταγόνες νερού.
4 Για να καθαρίσετε την κεφαλή και το δίσκο αφαίρεσης κάλων (εάν παρέχεται):
καθαρίστε το εσωτερικό της κεφαλής και του δίσκου με το βουρτσάκι καθαρισμού
που παρέχεται (Εικ. 25) μαζί με τη συσκευή. Στη συνέχεια αφαιρέστε το δίσκο από
την κεφαλή και καθαρίστε το εσωτερικό της κεφαλής με το βουρτσάκι καθαρισμού
που παρέχεται (Εικ. 26) μαζί με τη συσκευή. Εάν προτιμάτε, μπορείτε να ξεπλύνετε
την κεφαλή και το δίσκο αφαίρεσης κάλων με νερό της βρύσης.
5 Αφήστε όλα τα μέρη να στεγνώσουν καλά.
6 Επανατοποθετήστε τη μονάδα κοπής πίσω στην ξυριστική κεφαλή («κούμπωμα»).
7 Τοποθετήστε προστατευτικά καπάκια ή χτένες στις κεφαλές για να αποτρέψετε
ζημιά στις κεφαλές όταν τις αποθηκεύετε.
8 Αποθηκεύστε τη συσκευή, τις κεφαλές της και τα παρελκόμενά της μέσα στη θήκη.
Αντικατάσταση
Για να αγοράσετε παρελκόμενα ή ανταλλακτικά, ανατρέξτε στη διεύθυνση
www.shop.philips.com/service ή απευθυνθείτε στον τοπικό αντιπρόσωπο της Philips.
Μπορείτε επίσης να επικοινωνήσετε με το Τμήμα Εξυπηρέτησης Καταναλωτών της
Philips στη χώρα σας (βλέπε το Διεθνές Φυλλάδιο Εγγύησης για τις λεπτομέρειες
επικοινωνίας).
Βουρτσάκι απολέπισης σώματος (εάν παρέχεται) Εάν χρησιμοποιείτε το βουρτσάκι
απολέπισης σώματος 2-3 φορές την εβδομάδα, διαρκεί περίπου 3 μήνες.
Αντικαθιστάτε το βουρτσάκι απολέπισης σώματος κάθε 3 μήνες με ένα γνήσιο
(BRE394).
Κεφαλή αφαίρεσης κάλων (εάν παρέχεται): Αντικαταστήστε το δίσκο αφαίρεσης
κάλων με γνήσιο δίσκο (BCR372) όταν η αποτελεσματικότητά του μειωθεί. Σας
συνιστούμε να αντικαθιστάτε το δίσκο τουλάχιστον μία φορά το χρόνο.
Page 13

Ξυριστική κεφαλή (εάν παρέχεται): Για βέλτιστη απόδοση, συνιστούμε να
αντικαθιστάτε τη μονάδα κοπής της ξυριστικής κεφαλής κάθεδύο χρόνια. Εάν
χρησιμοποιείτε την κεφαλή ξυρίσματος δύο φορές ή περισσότερες την εβδομάδα,
αντικαθιστάτε τη μονάδα κοπής πιο συχνά. Να αντικαθιστάτε πάντα τη μονάδα κοπής
με γνήσια (BRL384).
Αντιμετώπιση προβλημάτων
Σε αυτό το κεφάλαιο συνοψίζονται τα πιο συνηθισμένα προβλήματα που ενδέχεται να
αντιμετωπίσετε με τη συσκευή. Εάν δεν μπορέσετε να λύσετε το πρόβλημα με τις
παρακάτω πληροφορίες, ανατρέξτε στη λίστα συχνών ερωτήσεων στη διεύθυνση
www.philips.com/support ή επικοινωνήστε με το Κέντρο Εξυπηρέτησης Καταναλωτών
στη χώρα σας.
Πρόβλημα Λύση
Η απόδοση της
συσκευής δεν είναι
αυτή που πρέπει.
Μετά τη φόρτιση, η
ένδειξη μπαταρίας
αναβοσβήνει όταν
πατάω το κουμπί
ενεργοποίησης/απεν
εργοποίησης, αλλά η
συσκευή δεν
ενεργοποιείται.
Κατά τη χρήση, η
συσκευή ζεσταίνεται
και ξαφνικά σταματά
να λειτουργεί. Στη
συνέχεια, και οι δύο
λυχνίες ταχύτητας
αναβοσβήνουν για 4
δευτερόλεπτα.
Το δέρμα μου είναι
ερεθισμένο μετά τη
χρήση της συσκευής.
Όταν χρησιμοποιείτε την αποτριχωτική κεφαλή ή την
Η αποτρίχωση
προκαλεί το γύρισμα
των τριχών προς τα
μέσα.
Βεβαιωθείτε ότι κρατάτε τη συσκευή υπό τη σωστή γωνία
(Εικ. 12) και μετακινήστε την κατά μήκος του δέρματος
αργά, αντίθετα προς τη φορά των τριχών.
Καθαρίζετε τις κεφαλές και τα εξαρτήματα μετά από κάθε
χρήση.
Η συσκευή εξακολουθεί να είναι συνδεδεμένη στην πρίζα.
Σε αυτήν την περίπτωση, η ένδειξη μπαταρίας αναβοσβήνει
για να υποδείξει ότι πρέπει να αποσυνδέσετε τη συσκευή
από την επιτοίχια πρίζα προτού μπορέσετε να την
ενεργοποιήσετε.
Η προστασία υπερθέρμανσης έχει ενεργοποιηθεί. Η
προστασία από υπερθέρμανση απενεργοποιεί τη συσκευή
αυτόματα, εάν αυτή ζεσταθεί πολύ. Για να επαναφέρετε την
προστασία από υπερθέρμανση, αφήστε τη συσκευή να
κρυώσει και ενεργοποιήστε την ξανά. Για να αποφύγετε την
υπερθέρμανση της συσκευής, μην την πιέζετε πολύ δυνατά
στο δέρμα σας.
Όταν χρησιμοποιείτε την αποτριχωτική κεφαλή ή την
ξυριστική κεφαλή, μπορεί να εμφανιστεί ελαφρύς ερεθισμός
του δέρματος όπως ερυθρό δέρμα ή κόκκινες κουκκίδες.
Αυτό είναι φυσιολογικό. Για να αποφύγετε τον ερεθισμό του
δέρματος, φροντίστε να μετακινείτε τη συσκευή απαλά
αντίθετα προς τη φορά των τριχών. Μην ασκείτε
υπερβολική πίεση. Εάν ο ερεθισμός διαρκέσει πάνω από 3
ημέρες, σας συμβουλεύουμε να απευθυνθείτε σε γιατρό.
ξυριστική κεφαλή να τεντώνετε πάντα το δέρμα με το
ελεύθερο χέρι σας. Κατά τη χρήση της συσκευής στις
μασχάλες, σηκώστε το χέρι σας και βάλτε την παλάμη σας
στο πίσω μέρος του κεφαλιού για να τεντώσετε το δέρμα
(Εικ. 14).
Μπορείτε να χρησιμοποιείτε το βουρτσάκι απολέπισης
σώματος 24 ώρες πριν ή 48 ώρες μετά την αποτρίχωση, για
να συμβάλλετε στον περιορισμό των τριχών που γυρίζουν
προς τα μέσα.
Σημείωση: Μην κάνετε απολέπιση αμέσως μετά την
αποτρίχωση, καθώς μπορεί να επιδεινωθεί τυχόν ερεθισμός
του δέρματος που έχει προκληθεί από την αποτριχωτική
μηχανή.
 Loading...