

Philips BRE605 User Manual [ru]
© 2018 Koninklijke Philips N.V.
BRE65x, BRE64x,
BRE63x, BRE62x ,
BRE61x, BRE60x
RU
234
1
2
5
678
9
10
11
75°
12
13
14
75°
151617
18
192021
22
All rights reserved
4222.003.0142.6 (27/3/2018)
>75% recycled paper
>75% papier recyclé
English
BRE651/00
BRE650/10
BRE650/00
BRE644/10
BRE644/00
BRE651/00
BRE650/00
BRE650/10
BRE640/10
BRE640/00
BRE634/10
BRE635/00
BRE635/50
BRE630/10
BRE630/01
BRE630/00
BRE620/00
BRE651/00
BRE650/10
BRE650/00
BRE644/10
BRE644/00
BRE644/10
BRE644/00
BRE640/00
BRE651/00BRE640/10
BRE632/00
BRE651/00
BRE650/10
BRE650/00
BRE651/00
BRE650/10
BRE650/00
BRE644/10
BRE644/00
BRE640/10
BRE640/00
BRE634/10
BRE632/00
BRE630/10
BRE630/00
BRE620/00
BRE610/00
BRE651/00
BRE650/10
BRE650/00
BRE640/00
BRE644/00
BRE644/10
BRE640/10
BRE635/00
BRE635/50
BRE632/00
BRE630/10
BRE630/00
BRE651/00
BRE650/10
BRE650/00
BRE644/10
BRE644/00
BRE640/10
BRE640/00
BRE635/00
BRE635/50
BRE634/10
BRE632/00
BRE630/10
BRE630/01
BRE630/00
BRE651/00
BRE650/10
BRE650/00
BRE644/10
BRE644/00
BRE640/10
BRE640/00
BRE635/00
BRE635/50
BRE634/10
BRE630/01
2
1
7
9 10 12
11
23
24
8
13
19 20 21 22
16
17
18
3
4
5
6
14
15
1
Introduction
Congratulations on your purchase and welcome to Philips! To fully benefit
from the support that Philips offers, register your product at
www.philips.com/welcome.
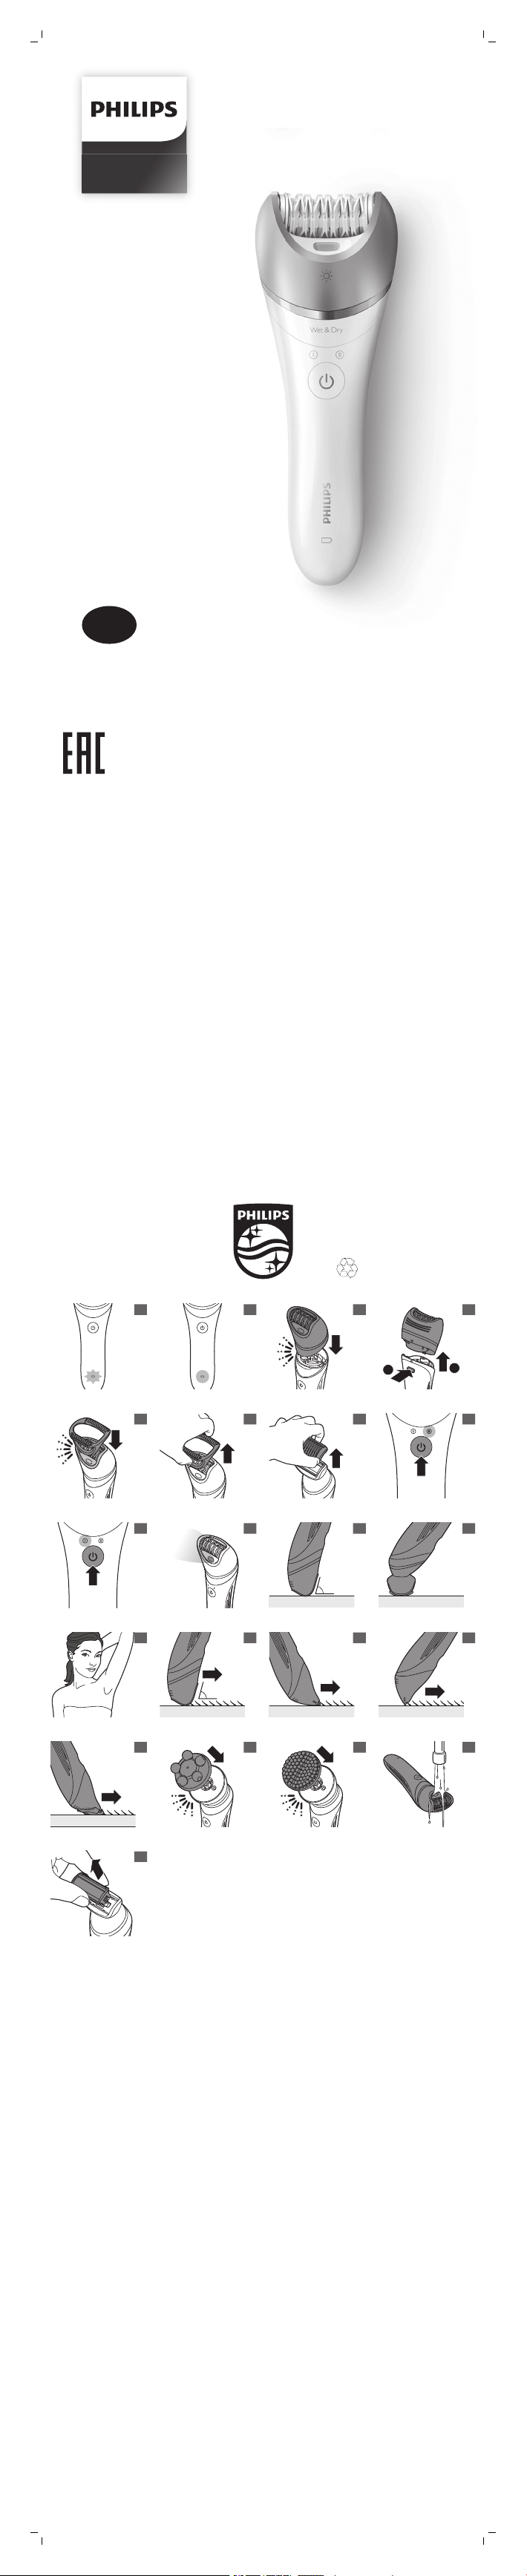
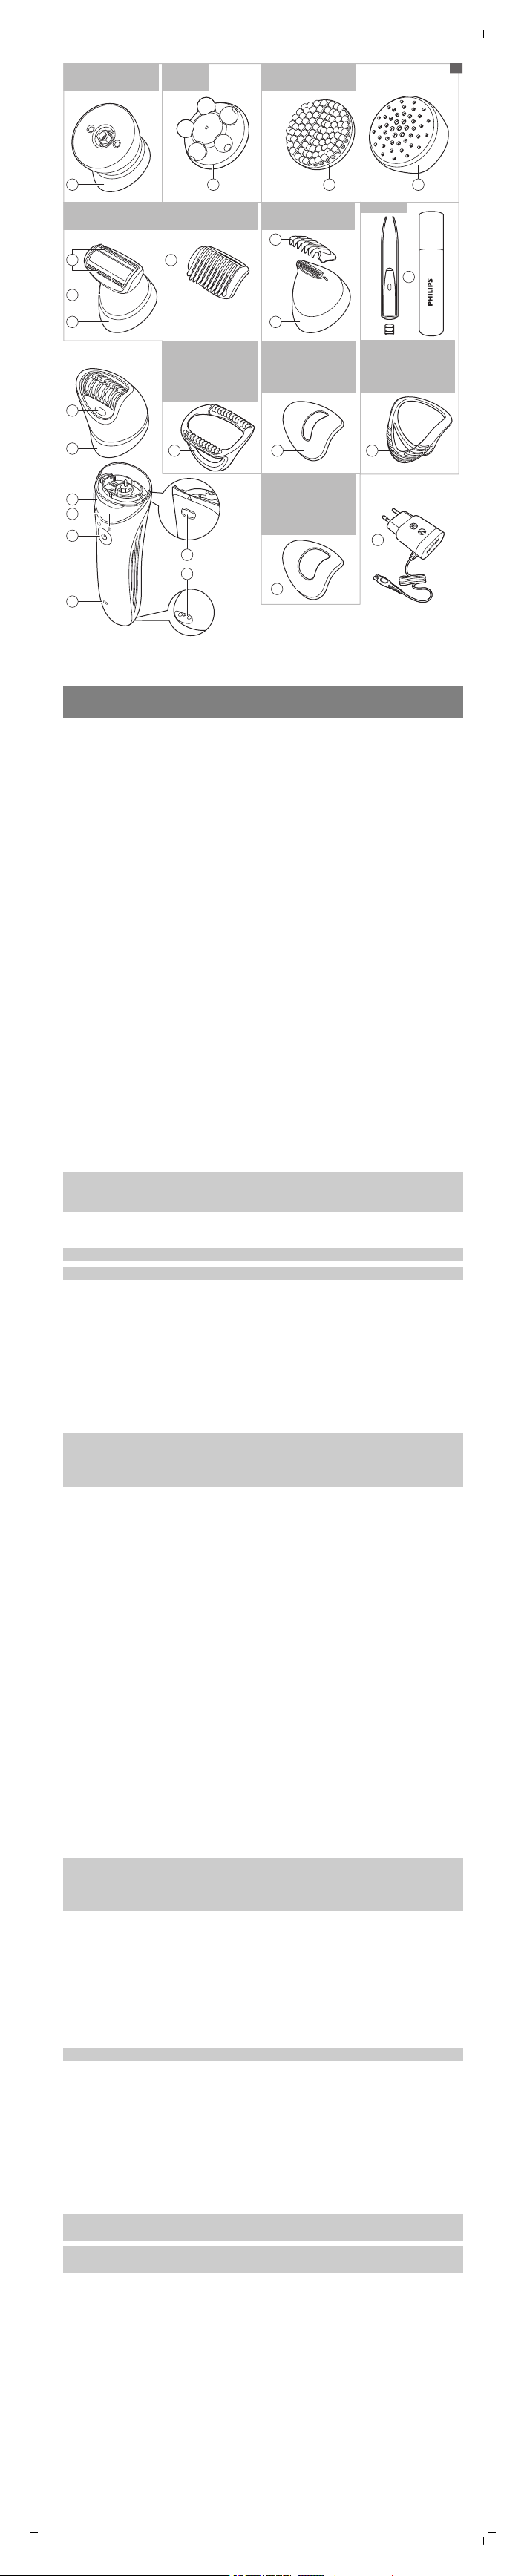
General description (Fig. 1)
1 Handle
2 Speed lights (I and II)
3 On/off button
4 Battery indicator
5 Release button
6 Socket for small plug
7 Epilating head
8 Integrated light
9 Massage cap
10 Facial area cap
11 Delicate area cap
12 Skin stretcher cap
13 Shaving head
14 Foil
15 Trimmers
16 Comb for shaving head
17 Trimming head
18 Comb for trimming head
19 Coupling unit
20 Body massage head
21 Body exfoliation brush
22 Protection cap for body exfoliation brush
23 Supply unit
24 Tweezers with light
Not shown: Pouch
Not shown: Cleaning brush
Note: The heads and accessories supplied vary for different type numbers.
Consult the overview illustration for the heads and accessories supplied
with your particular appliance.
Charging
Note: Charge the appliance fully before you use it for the first time.
Note: This appliance can only be used without cord.
To charge the appliance, insert the small plug into the socket in the bottom
of the appliance and put the supply unit in the wall socket.
- The charge indicator flashes white (Fig. 2): the appliance is charging.
Chargingtakes up to 1.5 hours.
- The charge indicator lights up white continuously (Fig. 3): the appliance is
fully charged and has a cordless operating time up to 40 minutes.
- The charge indicator does not light up when the appliance is switched
on: the appliance contains enough energy to be used.
- The battery indicator flashes orange (Fig. 2): the battery is almost empty
and needs to be charged. Charge the appliance when you have finished
using it.
Note: If the appliance is fully charged but still connected to the wall socket,
the battery indicator flashes a few times when you press the on/off button.
This indicates that you should disconnect the appliance from the wall
socket before you can switch it on.
Quick charge
- When the battery is completely empty and you start charging it, the
battery indicator flashes white quickly.
- After approximately 15 minutes, the battery indicator starts flashing white
slowly. At this point, the battery contains enough energy for up to 10
minutes of epilation.
Using the appliance
Attaching and detaching heads
1 To attach a head, press it onto the handle ('click') (Fig. 4).
2 To detach a head, press the release button on the back of the appliance
(Fig. 5).
Attaching and detaching accessories
1 To attach an accessory, simply snap it onto the head ('click') (Fig. 6).
2 To detach an accessory, grab its front and back and pull it upwards off
the head (Fig. 7). To detach a comb, pull its back upwards with a
fingernail (Fig. 8).
Switching the appliance on and off
1 To switch on the appliance, press the on/off button once. Speed 2 is
selected automatically and speed light II lights up (Fig. 9).
2 If you want to select speed 1, press the on/off button again. Speed light I
lights up (Fig. 10).
3 To switch off the appliance, press the on/off button once more.
The integrated light goes on automatically to give you a better view while
you use the epilating head (Fig. 11). If you want to switch off the integrated
light, keep the on/off button pressed for 3 seconds when you switch on the
appliance.
Epilating, shaving and trimming
The appliance is suitable for use in the bath or shower, but it can also be
used dry. If you want to use creams or body lotion, apply them after you
have used the appliance.
For gentle, less painful epilation, use the appliance on wet skin with or
without your regular shower gel.
Slight skin irritation like red skin or red dots may occur after epilation. This is
normal. We advise you to epilate before you go to bed at night, as any
redness or skin irritation usually disappears overnight.
Note: The appliance can only be used without cord.
1 When you epilate (with or without an accessory on the epilating head),
place the appliance on the skin at the angle shown in the illustration (Fig.
12).
2 When you use the appliance with other heads and accessories than the
epilating head, make sure you place the heads and accessories flat onto
the skin (Fig. 13).
3 When you use the appliance on sensitive areas, stretch the skin with
your free hand. When you use the appliance on your underarms, raise
your arm and put your hand on the back of your head to stretch the skin
(Fig. 14).
4 Move the appliance slowly against the direction of hair growth (Fig. 15).
Note: If you move the appliance over your skin too fast, you may not obtain
a smooth result.
Note: If your hairs are longer than 3-4mm, pretrim them for easier and more
comfortable epilation.
Epilating head
You can use the epilating head to epilate your legs, underarms and bikini
line.
Select speed 2 for most efficient epilation. Select speed 1 for areas with little
hair growth and for hard-to-reach areas such as knees and ankles.
Massage cap
You can attach the massage cap onto the epilating head to massage the
skin and minimize the pulling sensation of epilation during use.
Skin stretcher cap
You can attach the skin stretcher cap onto the epilating head. It keeps the
skin tight during epilation to reduce pain.
Delicate area cap
You can attach the delicate area cap onto the epilating head for more
comfortable epilation of delicate areas (e.g. the underarms and bikini line).

Facial cap
You can attach the facial cap onto the epilating head for precise epilation of
facial hair (e.g. above your upper lip).
Do not use the appliance to epilate eyelashes, eyebrows or scalp hair.
Shaving head
You can use the shaving head to shave your legs and body.
Note: The appliance can be moved in two directions, for easier shaving of
underarms.
Note: Always check the foil before use. If it is damaged in any way, replace
the cutting unit right away (see 'Replacement').
Comb for shaving head
You can attach the comb onto the shaving head to trim hairs to a length of
3mm.
Trimming head
You can use the trimming head to trim hard-to-reach areas in the bikini
zone.
Place the trimming head flat onto the skin to trim (Fig. 16). Place the
trimming head perpendicularly onto the skin for styling and shaping (Fig. 17).
Comb for trimming head
You can attach the comb onto the trimming head to trim hairs in the bikini
area to a length of 3mm (Fig. 18).
Body massage head
The body massage head rotates firmly to relax your muscles.
Note: You have to put the body massage head on the coupling unit before
you can attach it onto the handle (Fig. 19).
Body exfoliation brush
You can use the body exfoliation brush to remove dead skin cells.
Do not use the body exfoliation brush on your face.
Note: You have to put the body exfoliation brush on the coupling unit
before you can attach it onto the handle (Fig. 20).
Cleaning and storage
Keep the supply unit dry.
1 To clean the epilating head, hold the appliance upside down, switch it
on and rinse it with cold water for 15 seconds after every use (Fig. 21).
2 To clean the shaving head (if supplied): Use the cleaning brush to brush
away any hairs that have collected under the trimmers. Grab the two
trimmers of the cutting unit and pull the cutting unit out of the shaving
head (Fig. 22). Clean all parts of the shaving head with the cleaning
brush, except the foil.
Note: Lubricate trimmer teeth and foils with a drop of sewing machine oil
every six weeks for optimal performance.
3 Rinse the cutting unit, heads and accessories under the tap. Shake them
firmly to remove water drops.
4 Let all parts dry completely.
5 Place the cutting unit back into the shaving head ('click').
6 Put protection caps or combs on the heads to prevent damage to the
heads when you store them.
7 Store the appliance, its heads and accessories in the pouch.
Note: Lubricate trimmer teeth and foils with a drop of sewing machine oil
every six weeks for optimal performance.
Replacement
To buy accessories or spare parts, visit www.shop.philips.com/service or go
to your Philips dealer. You can also contact the Philips Consumer Care
Center in your country (see the international warranty leaflet for contact
details).
Shaving head (if supplied): For optimal performance, we advise you to
replace the cutting unit of the shaving head every two years. If you use the
shaving head twice or more times a week, replace the cutting unit more
often. Always replace the cutting unit with one of the original type
(CP0634/01).
Body exfoliation brush (if supplied): If you use the body exfoliation brush
2-3 times a week, it lasts approximately 3 months. Replace the body
exfoliation brush every 3 months with one of the original type (BRE394).
Troubleshooting
This chapter summarizes the most common problems you could encounter
with the appliance. If you are unable to solve the problem with the
information below, visit www.philips.com/support for a list of frequently
asked questions or contact the Consumer Care Center in your country.
Problem Possible cause
The appliance
does not work as
well as it should.
After charging, the
battery indicator
flashes when I
press the on/off
button, but the
appliance does not
switch on.
During use, the
appliance becomes
hot and suddenly
stops operating.
Then both speed
lights flash for 4
seconds.
My skin is irritated
after I have used
the appliance.
When you use the epilating head or shaving head,
Make sure you hold the appliance at the correct
angle (Fig. 12) and move it across the skin slowly,
against the direction of hair growth.
Clean the heads and accessories after every use.
The appliance is still connected to the wall socket. In
this case, the battery indicator flashes to indicate
that you should disconnect the appliance from the
wall socket before you can switch it on.
The overheat protection has been activated. The
overheat protection switches off the appliance
automatically if it becomes too hot. To reset the
overheat protection, let the appliance cool down and
then switch it on again. To avoid overheating of the
appliance, do not press it too hard onto your skin.
When you use the epilating head or shaving head,
slight skin irritation like red skin or red dots may
occur. This is normal. To avoid irritated skin, make
sure that you gently move the appliance against the
direction of hair growth. Do not apply too much
pressure. If the irritation lasts longer than 3 days, we
advise you to consult a doctor.
always stretch the skin with your free hand. When
you use the appliance on your underarms, raise your
arm and put your hand on the back of your head to
stretch the skin (Fig. 14).
Русский
Введение
Поздравляем с покупкой продукции Philips! Чтобы воспользоваться
всеми преимуществами поддержки Philips, зарегистрируйте изделие
на веб-сайте www.philips.com/welcome.
Общее описание (рис. 1)
1 Ручка
2 Индикаторы скорости (I и II)
3 Кнопка включения/выключения
4 Индикатор уровня заряда аккумулятора
5 Кнопка отсоединения
6 Гнездо для малого штекера
7 Эпиляционная головка
8 Встроенная подсветка
9 Массажная насадка
10 Насадка для лица
11 Насадка для чувствительных участков тела
12 Колпачок для разглаживания кожи
13 Бритвенная головка
14 Сетка
15 Триммеры
16 Гребень для бритвенной головки
17 Насадка-триммер
18 Гребень для насадки-триммера
19 Соединительное устройство
20 Массажная насадка для тела
21 Щеточка для пилинга тела
22 Защитный колпачок для щеточки для пилинга тела
23 Адаптер
24 Пинцет с подсветкой
Нет на иллюстрации: Чехол
Нет на иллюстрации: Щеточка для очистки
Примечание. Входящие в комплект насадки и аксессуары могут
различаться в зависимости от номера модели продукта. Насадки и
аксессуары, входящие в комплект вашего устройства, показаны на
иллюстрации с его общим видом.
Зарядка
Примечание. Перед первым использованием полностью зарядите
аккумуляторную батарею.
Примечание. Данный прибор можно использовать, только если шнур
не подключен.
Чтобы зарядить прибор, вставьте маленький штекер в гнездо,
расположенное в нижней части прибора, и подключите адаптер
питания к розетке электросети.
- Индикатор зарядки мигает белым (Рис. 2): прибор заряжается.
Зарядкааккумулятора занимает до 1,5 часа.
- Индикатор зарядки светится ровным белым светом (Рис. 3):
аккумулятор прибора полностью заряжен и обеспечивает до
40минут автономной работы.
- Индикатор зарядки не загорается при включении прибора: заряда
аккумулятора достаточно для использования.
- Индикатор зарядки аккумулятора мигает оранжевым (Рис. 2):
аккумулятор разряжен и прибор необходимо зарядить. Закончив
использовать прибор, зарядите его.
Примечание. Если полностью заряженный прибор подключен к
розетке электросети, при нажатии кнопки включения/выключения
индикатор зарядки аккумулятора мигает несколько раз. Это указывает
 Loading...