

Page 1
BG2038, BG2036, BG2028, BG2026, BG2025, BG2024
Page 2
Page 3
1
2
9
10
12
3
5
6
7
8
11
BG2024
BG2025
BG2026
BG2028
BG2036
BG2038
13
4
Page 4

Page 5

English 6
Dansk 17
Deutsch 28
Español 39
Français 50
Italiano 61
Nederlands 72
Norsk 83
Português 93
Suomi 104
Svenska 114
Türkçe 124
Ελληνικα 134
Page 6

6
English
Introduction
Congratulations on your purchase and welcome to Philips! To fully benefit
from the support that Philips offers, register your product at
www.philips.com/welcome.
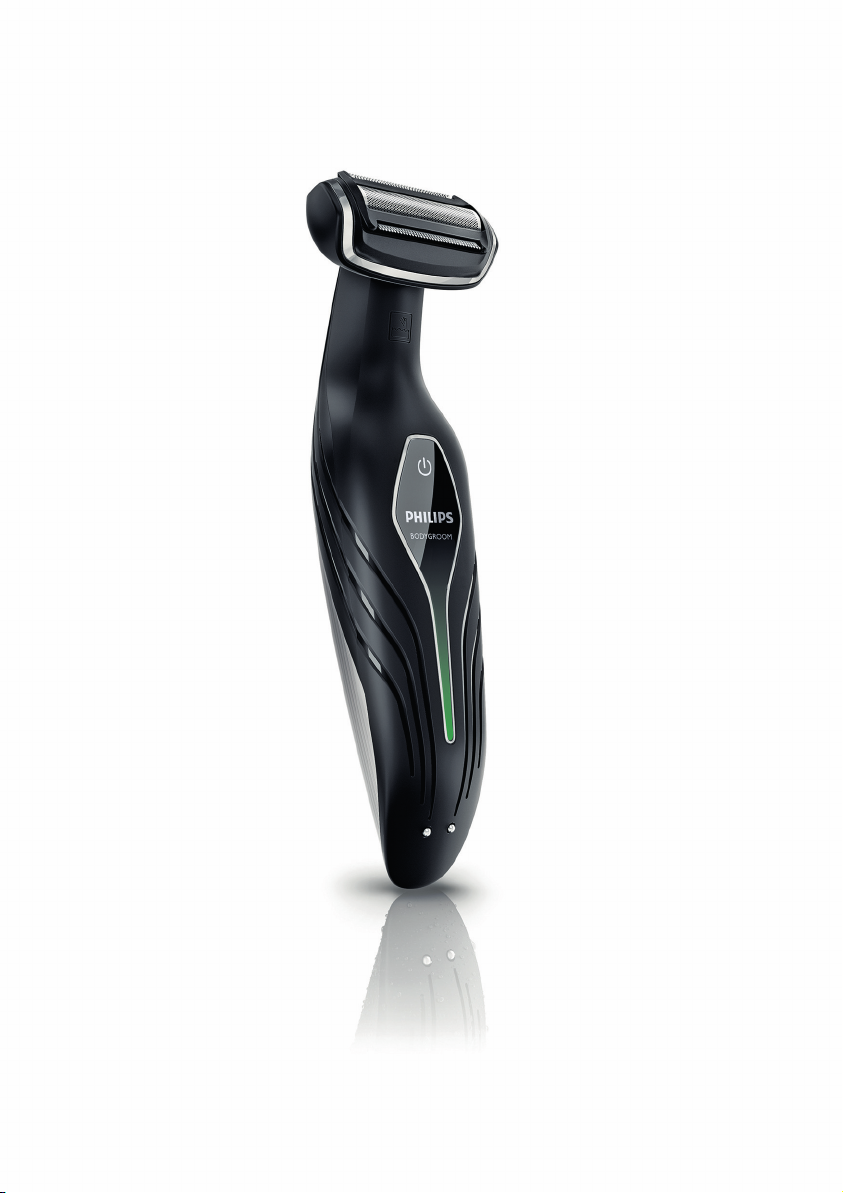
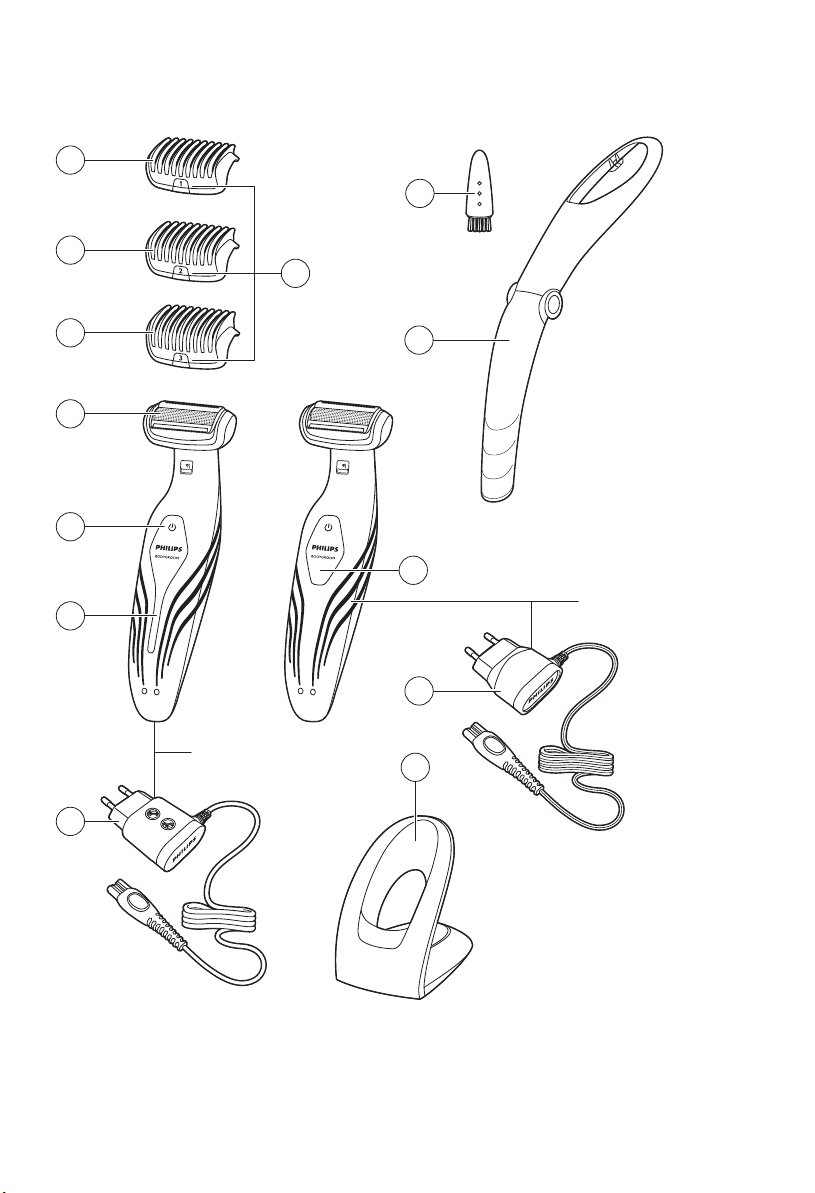
General description (Fig. 1)
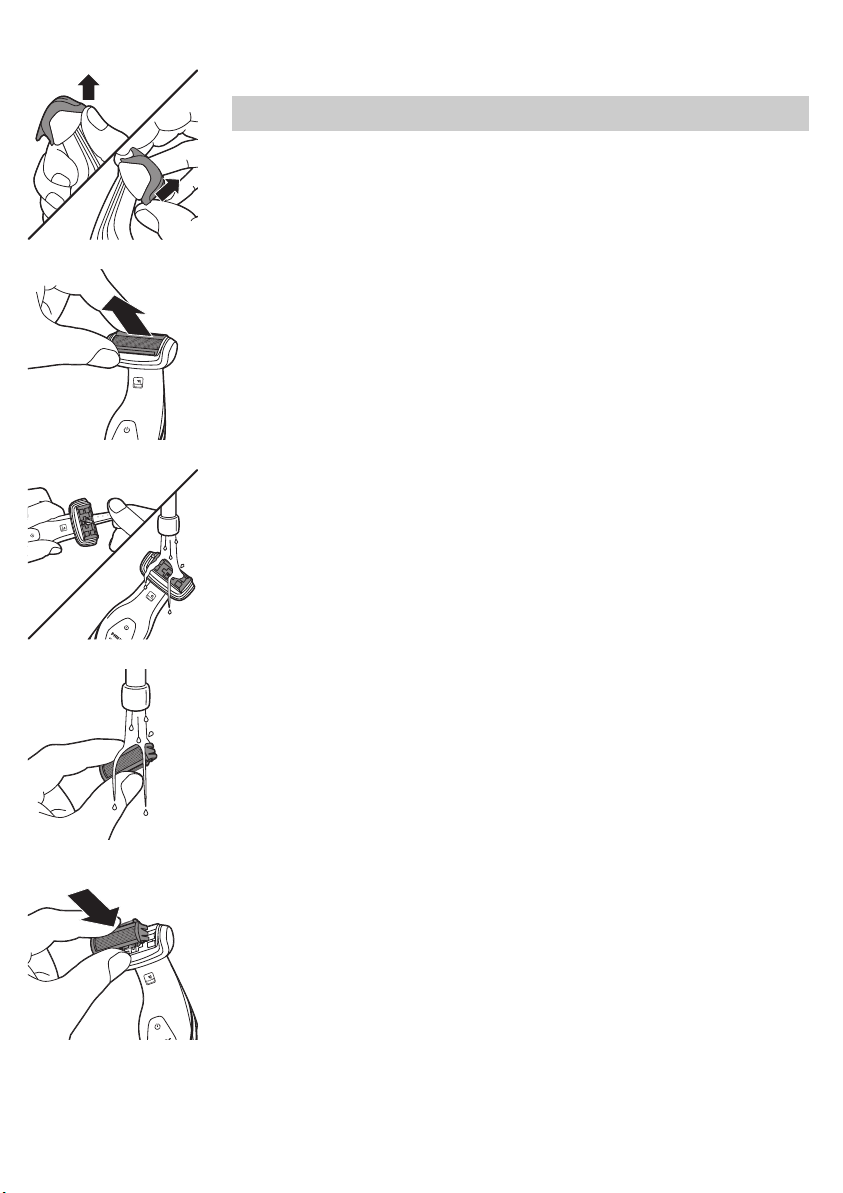
1 Trimming comb 1 (3mm/0.11 inch)
2 Trimming comb 2 (5mm/0.19 inch) (BG2038/BG2036/BG2028/BG2026
only)
3 Trimming comb 3 (7mm/0.27 inch) (BG2038/BG2036/BG2028/BG2026
only)
4 Hair length indication (1, 2 or 3)
5 Shaving unit
6 On/off button
7 Battery status indicator
8 Supply unit (adapter, type HQ8500, BG2038/ BG2036 only)
9 Cleaning brush (BG2038/BG2036/BG2028/BG2026 only)
10 Back shaving attachment (BG2038/BG2036 only)
11 Battery status indicator
12 Supply unit (adapter, type HQ850, BG2028/BG2026/BG2025/BG2024
only)
13 Charging stand
Important safety information
Read this important information carefully before you use the appliance and
its accessories and save it for future reference. The accessories supplied
may vary for different products.
Danger
Warning
-
Keep the supply unit dry.
-
The supply unit contains a transformer. Do not
cut off the supply unit to replace it with another
plug, as this causes a hazardous situation.
-
Only charge the appliance with the supply unit
provided.
Page 7
English
-
This appliance can be used by children aged
from 8 years and above and persons with
reduced physical, sensory or mental capabilities
or lack of experience and knowledge if they
have been given supervision or instruction
concerning use of the appliance in a safe way
and understand the hazards involved. Children
shall not play with the appliance. Cleaning and
user maintenance shall not be made by children
without supervision.
-
Always unplug the appliance before you clean it
under the tap.
-
Always check the appliance before you use it.
Do not use the appliance if it is damaged, as this
may cause injury. Always replace a damaged
part with one of the original type.
-
Do not open the appliance to replace the
rechargeable battery.
7
Caution
-
Never immerse the charging stand in water and
do not rinse it under the tap.
-
Never use water hotter than 80°C to rinse the
appliance.
-
Only use this appliance for its intended purpose
as shown in the user manual.
-
For hygienic reasons, the appliance should only
be used by one person.
-
Never use compressed air, scouring pads,
abrasive cleaning agents or aggressive liquids
such as petrol or acetone to clean the appliance.
Page 8
8
English
-
Do not use the supply unit in or near wall
sockets that contain or have contained an
electric air freshener to prevent irreparable
damage to the supply unit.
Electromagnetic fields (EMF)
-
This Philips appliance complies with all applicable standards and
regulations regarding exposure to electromagnetic fields.
General
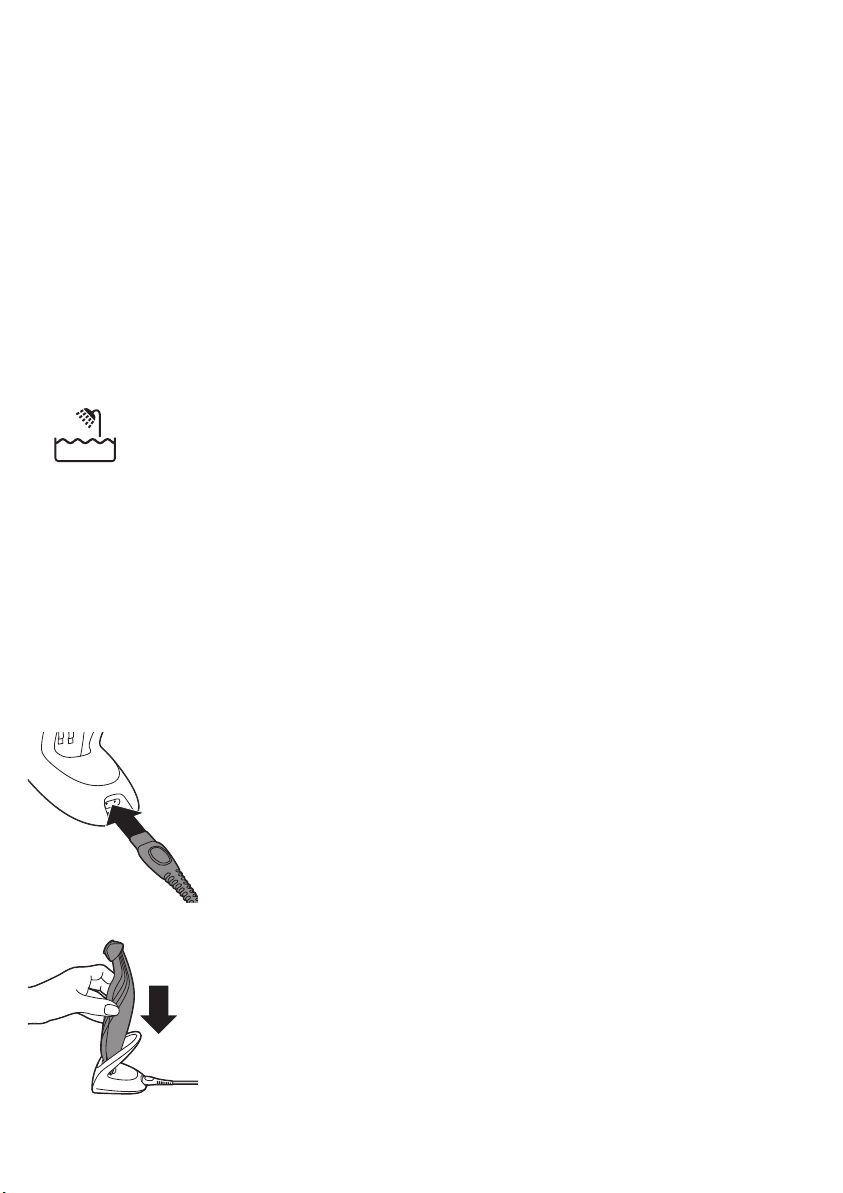
-
This appliance is waterproof. It is suitable for use in the bath or shower
and for cleaning under the tap. For safety reasons, the appliance can
therefore only be used without cord.
-
The appliance is suitable for mains voltages ranging from 100 to 240
volts.
-
The supply unit transforms 100-240 volts to a safe low voltage of less
than 24 volts.
Charging
Charging takes 1 hour (BG2038/BG2036) or 8 hours
(BG2028/BG2026/BG2025/BG2024) depending on the model. When the
appliance is fully charged, it has an operating time of up to 50 minutes.
When the battery status indicator flashes red, the battery is running low
(approx. 10 minutes of operating time left) and you need to recharge the
appliance.
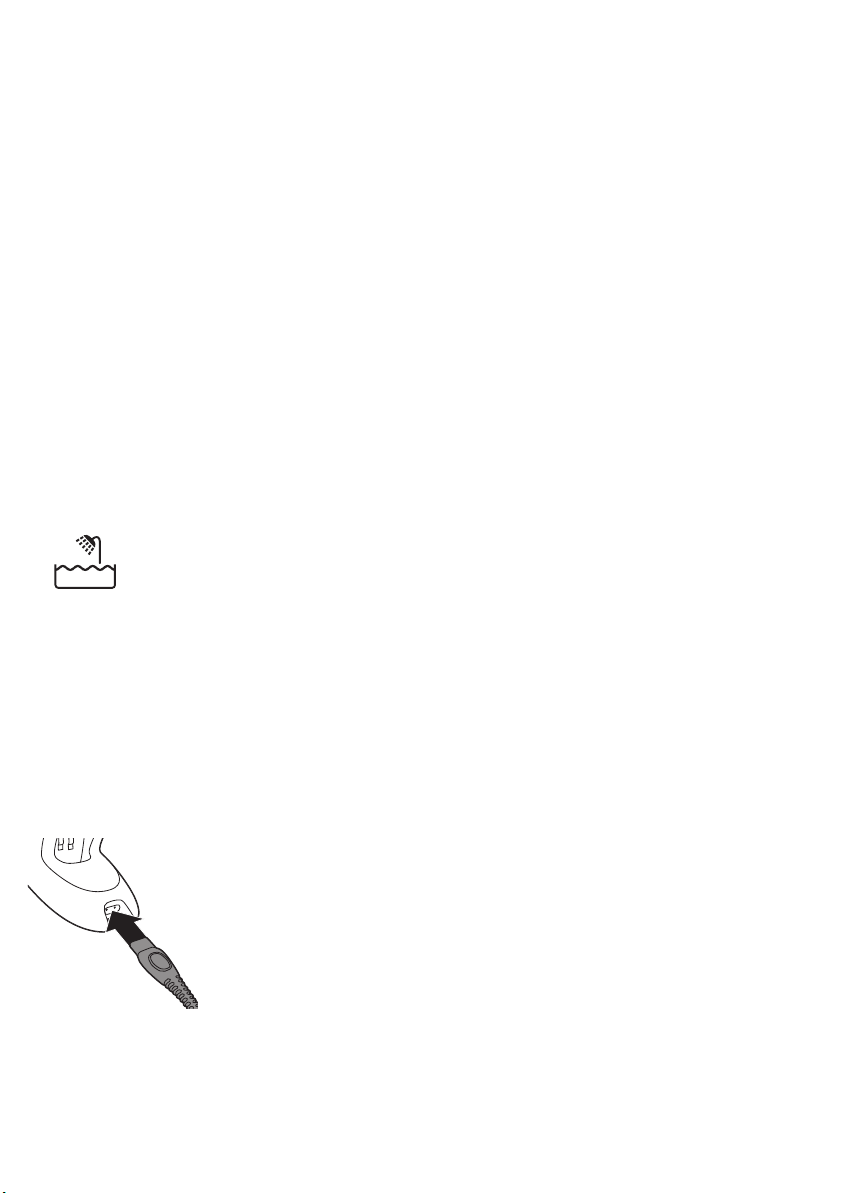
1 Insert the small plug into the charging stand.
2 Put the appliance in the charging stand.
Page 9
The battery status indicator flashes green to indicate that the appliance is
charging.
Note: The battery status indicator of BG2028, BG2026, BG2025 and
BG2024 looks different, but works in the same way.
When the appliance is fully charged, the battery status indicator lights up
green continuously.
Note: If the fully charged appliance is still in the plugged-in charging
stand after 30 minutes, the battery status indicator goes out to save
energy.
Using the appliance
You can use the appliance wet or dry to shave or trim hair on all parts of the
body below the neckline.
Note: Do not use this appliance to shave or trim facial hair or scalp hair.
English
9
Trimming and shaving tips
-
Take your time when you first start to shave sensitive areas. You have to
acquire practice with the appliance. Your skin also needs some time to
adjust to the procedure.
-
If the hairs are longer than 10 mm, you can trim them first with trimming
comb 1 to a length of 3 mm to make shaving easier.
-
You get the best trimming results when the skin and hair are dry.
-
You can use the appliance to shave in the shower or bath. To ensure
easier gliding, apply some shaving foam or shower gel to your skin.
Trimming combs
BG2025 and BG2024 come with trimming comb 1.
BG2038, BG2036, BG2028 and BG2026 come with trimming combs 1, 2 and
3.
The back of each comb has been numbered 1, 2 and 3 (see the table below
for the corresponding hair lengths after trimming).
A trimming comb allows you to cut hair to a specific length (see the table
below).
If your appliance comes with 3 combs, start trimming with trimming comb 3
to acquire practice with this appliance.
Comb size indication
Hair length after trimming
Page 10
10
English
1 3mm/0.11 inch
2 5mm/0.19 inch
3 7mm/0.27 inch
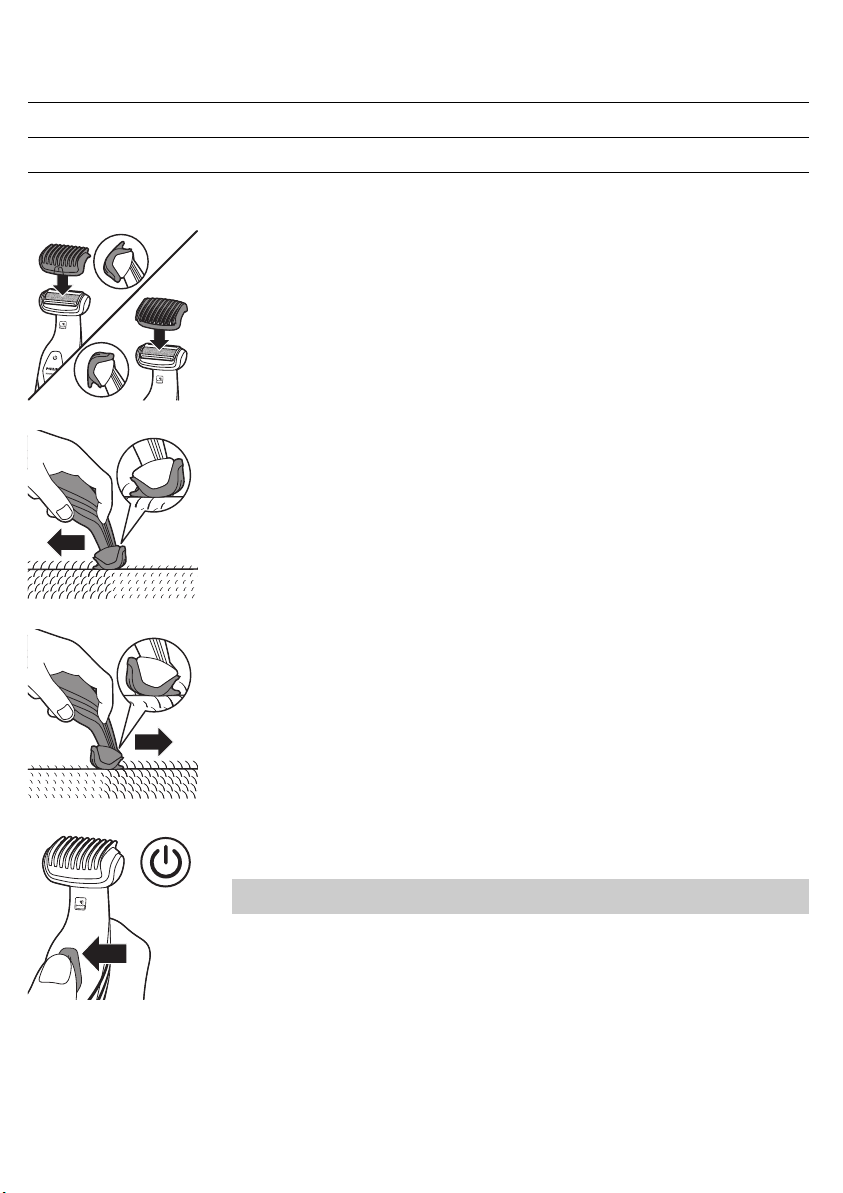
Trimming
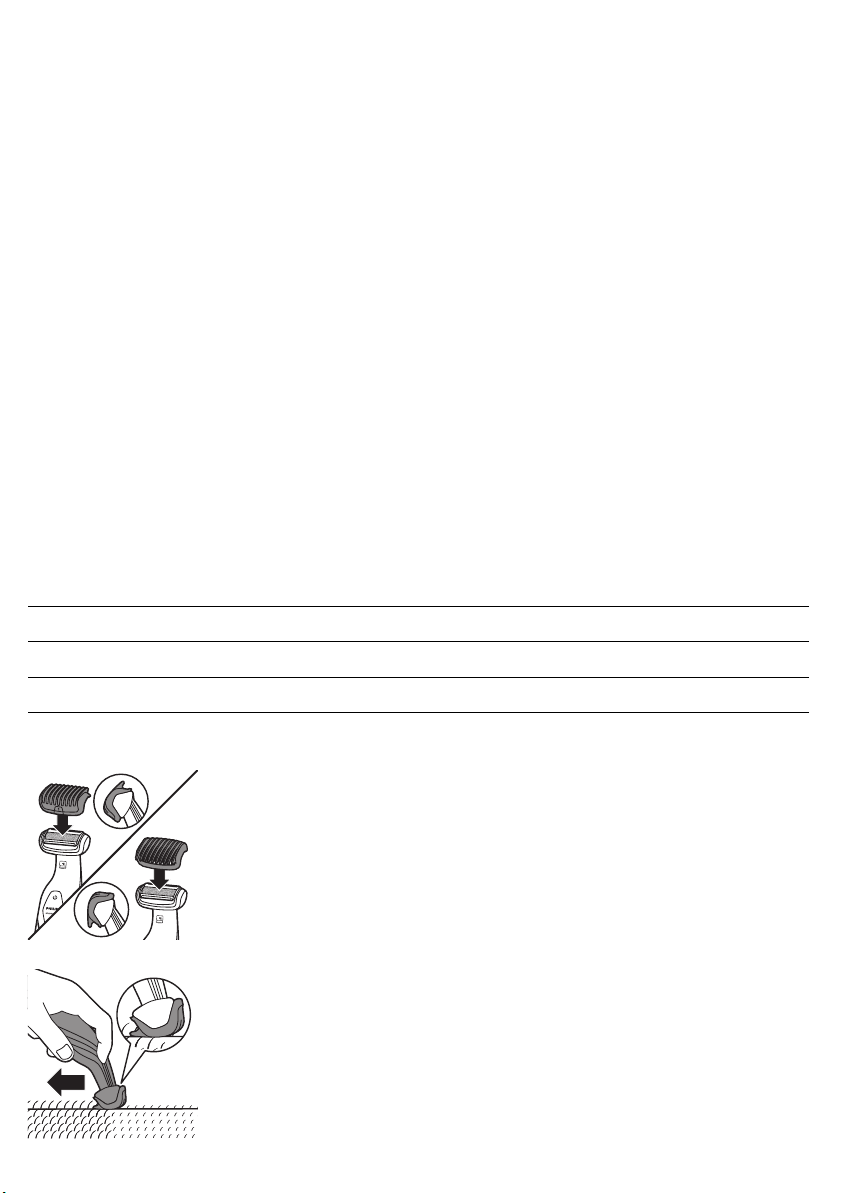
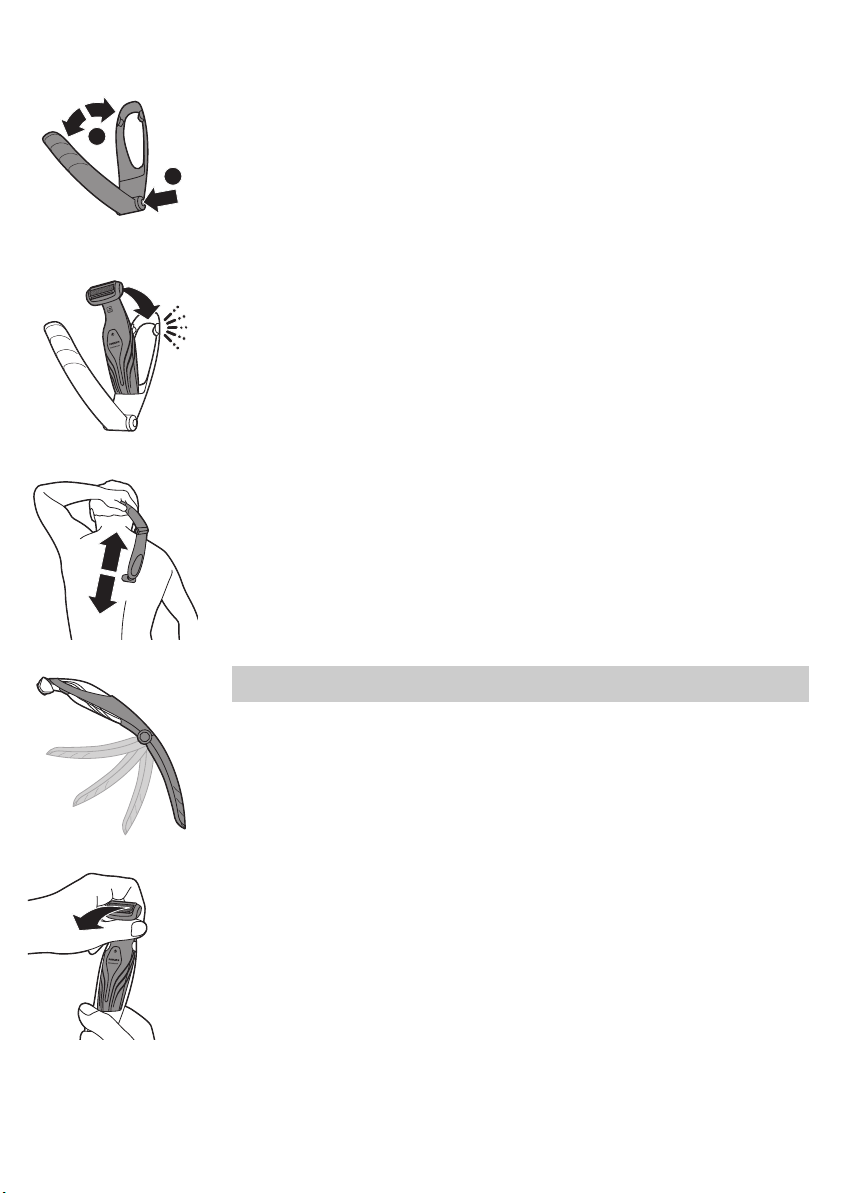
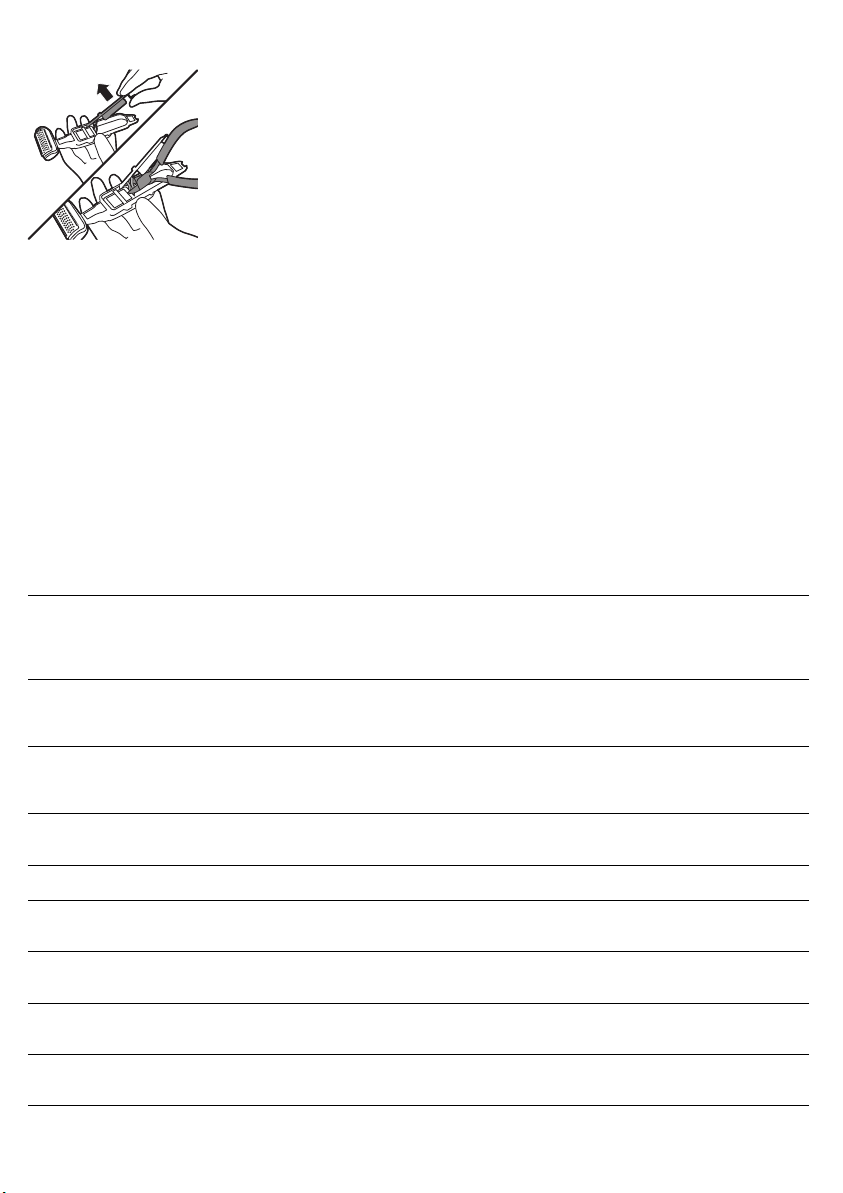
1 Snap the appropriate trimming comb onto the appliance. Make sure the
teeth of the comb point in the direction in which you are going to move
the appliance.
When you move the appliance towards you, the teeth have to point
towards you.
When you move the appliance away from you, the teeth have to point
away from you.
2 Press the on/off button to switch on the appliance.
3 Move the appliance against the direction of hair growth.
Note: Make sure that the flat part of the trimming comb is always fully in
contact with the skin.
Page 11
2
1
English
Shaving
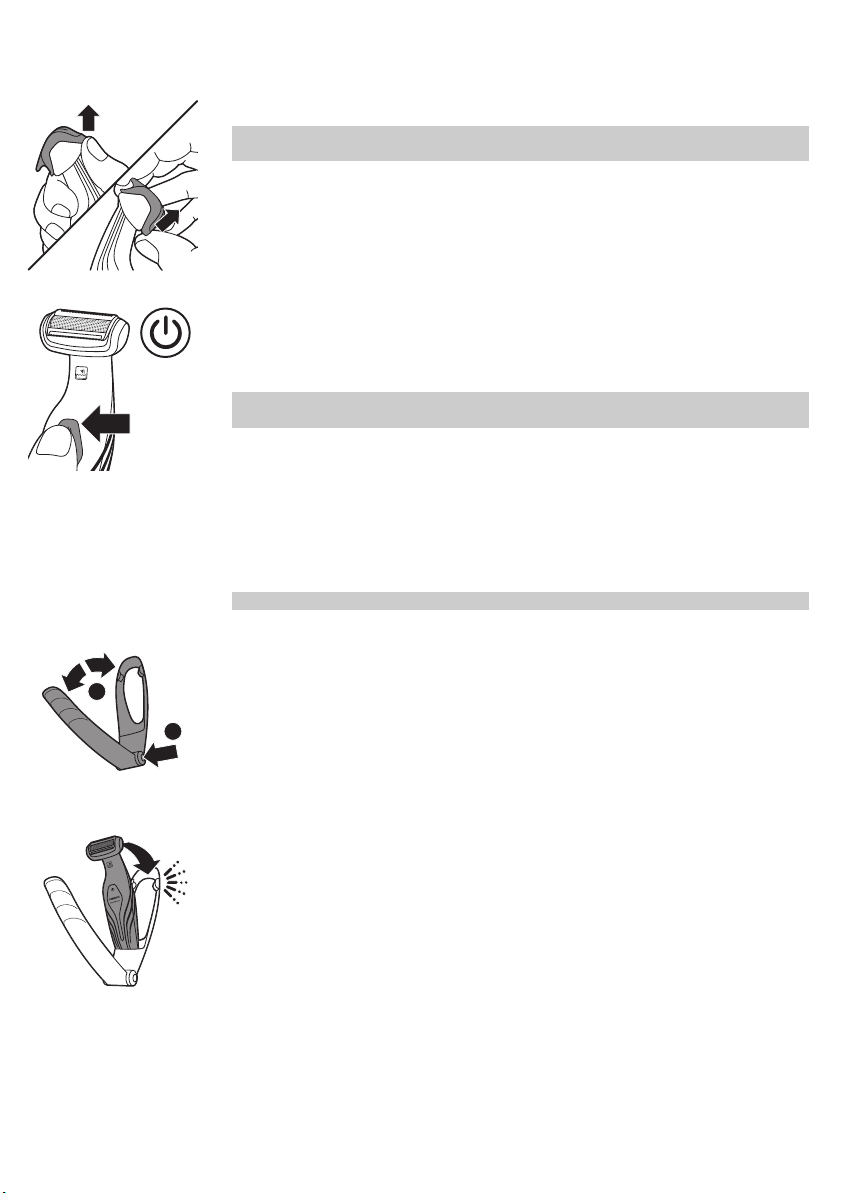
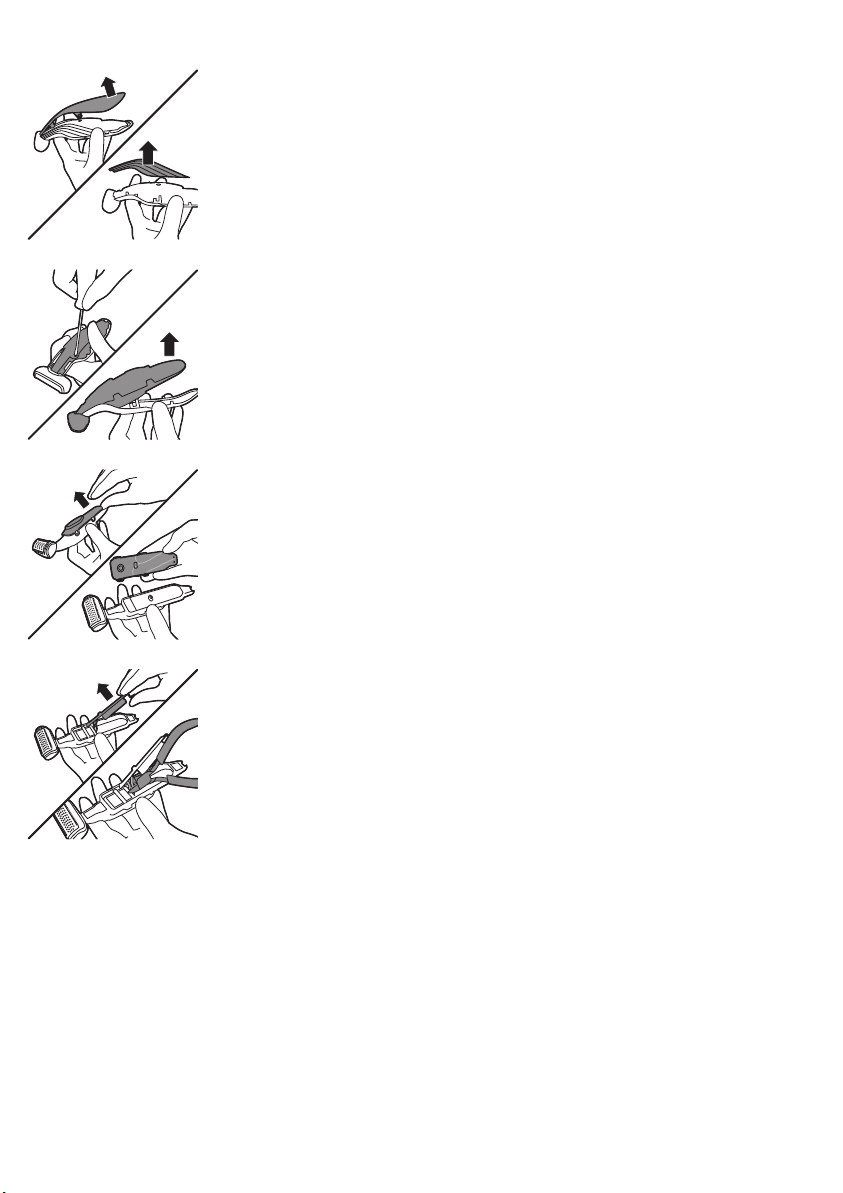
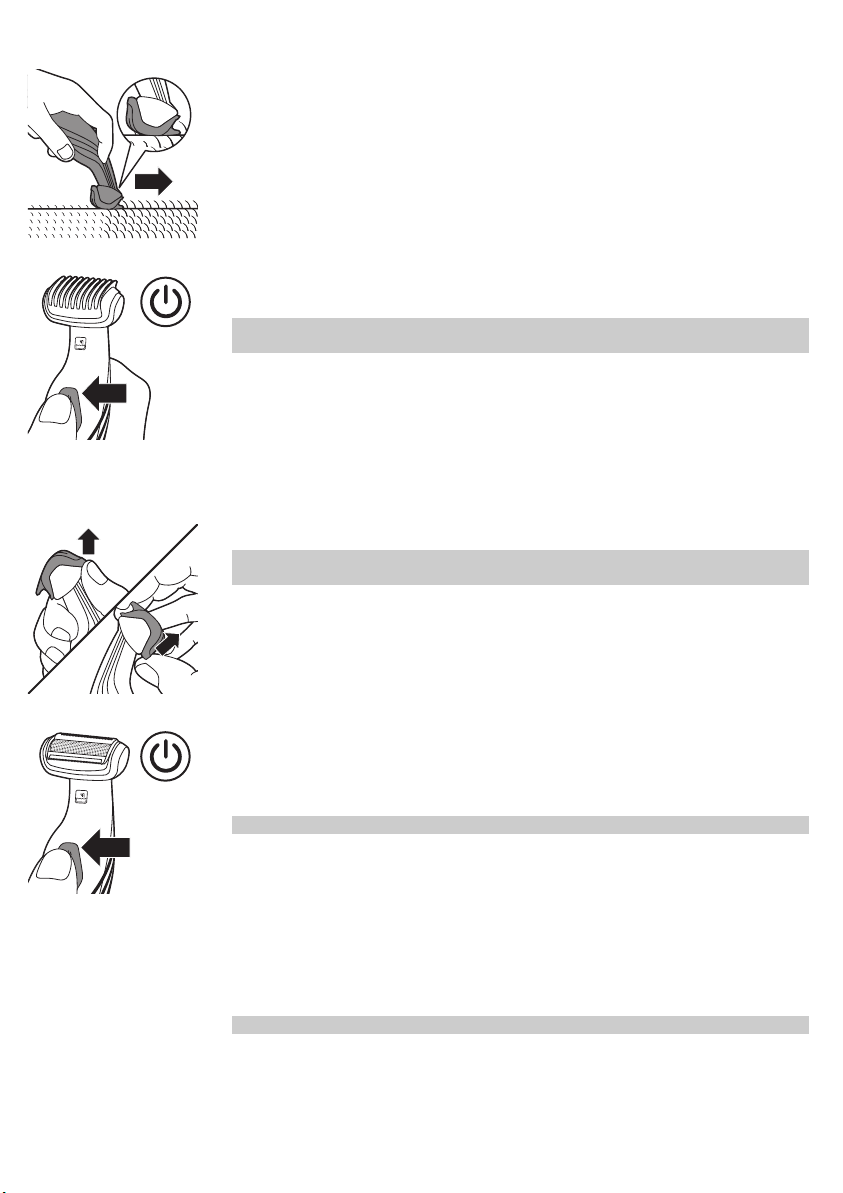
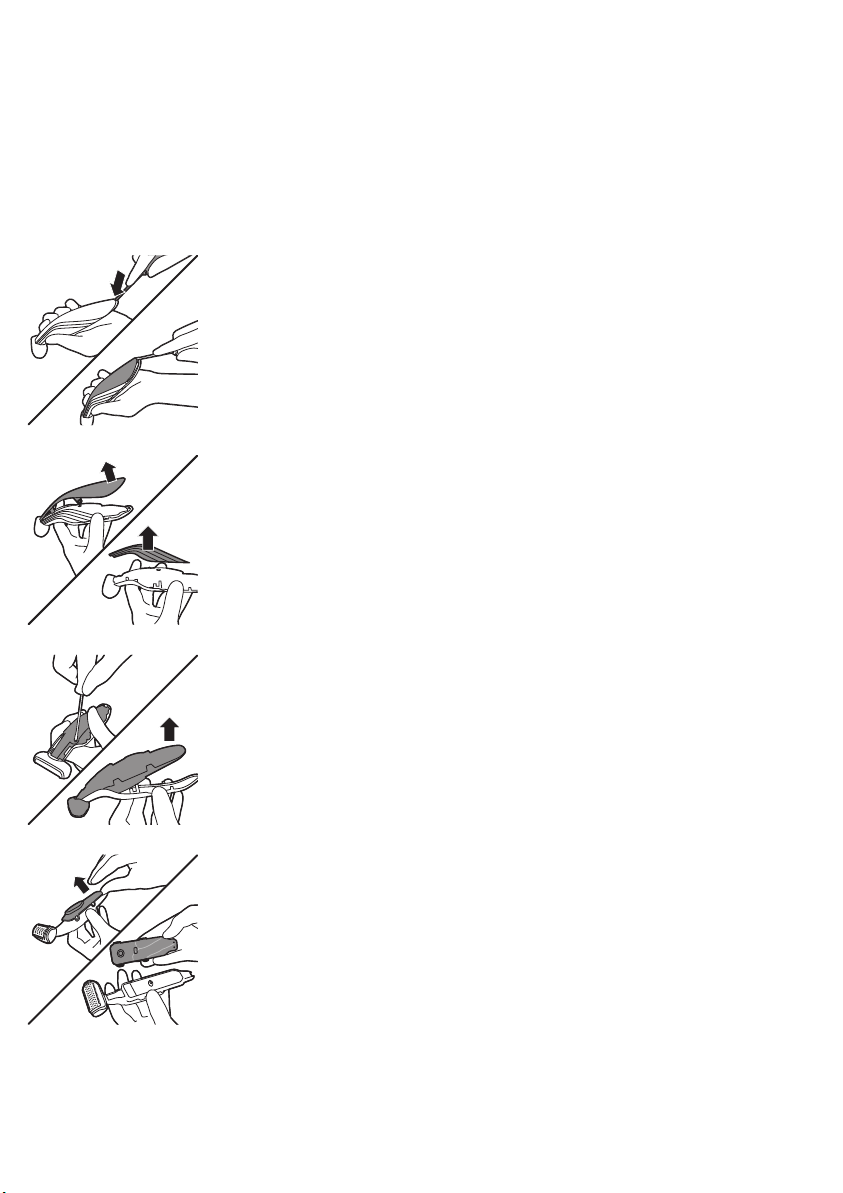
1 If a trimming comb is still attached, remove it.
Note: You can either push the trimming comb off the appliance or pull it
off, depending on how the comb is placed on the appliance.
2 Press the on/off button once to switch on the appliance.
3 Place the shaving unit on the skin.
4 Move the appliance against the direction of hair growth with one hand,
while you stretch the skin with the other hand.
Note: Make sure that the shaving unit is always fully in contact with the
skin.
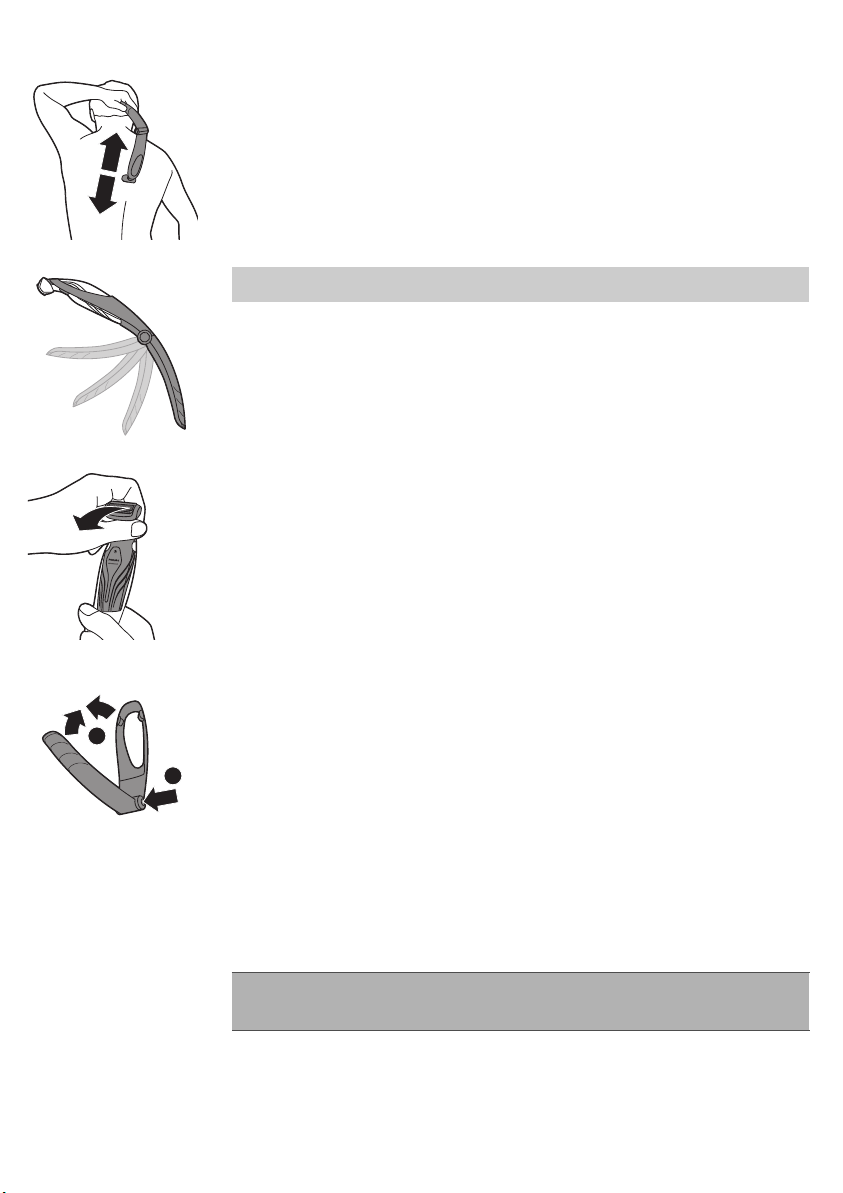
Shaving with the back shaving attachment (BG2038, BG2036 only)
Note: The back shaving attachment is suitable for both wet and dry use.
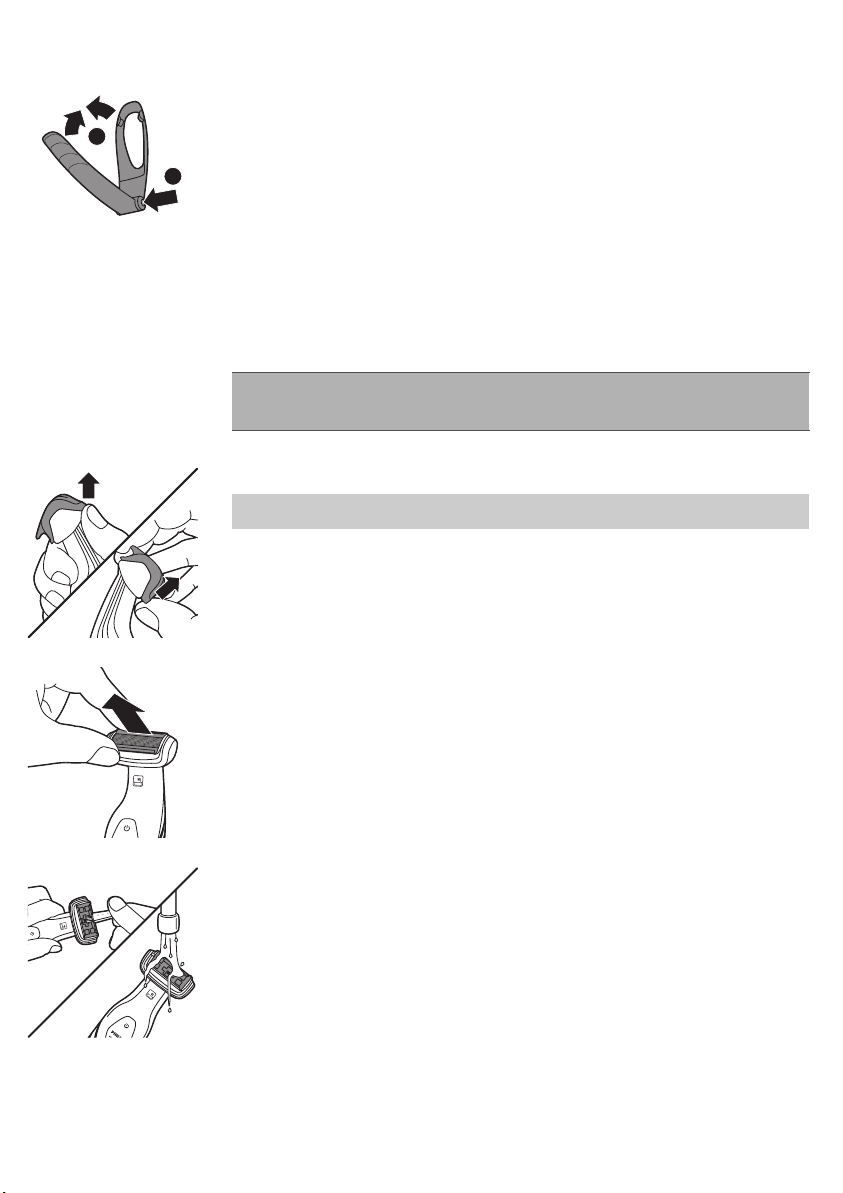
1 Press and hold the release button (1) and open the back shaving
attachment (2).
11
2 Place the bottom of the appliance in the lower part of the holder of the
back shaving attachment. Then press the top against the top part of the
holder until it locks into position with a click.
3 Shave your back by moving the back shaving attachment with the
appliance up and down by its handle.
Page 12
2
1
12
English
Note: For your convenience, the back shaving attachment can be folded
to different angles.
4 To remove the appliance from the back shaving attachment, pull the top
of the appliance towards you until it unlocks from the holder.
Cleaning
5 To close the back shaving attachment, press and hold the release button
(1) and push the handle against the holder (2).
Clean the appliance after every use.
Caution: Never use compressed air, scouring pads, abrasive cleaning
agents or aggressive liquids such as petrol or acetone to clean the
appliance.
1 Switch off the appliance.
Page 13
English
2 If a trimming comb is still attached, remove it.
Note: You can either push the trimming comb off the appliance or pull it
off, depending on how the comb is placed on the appliance.
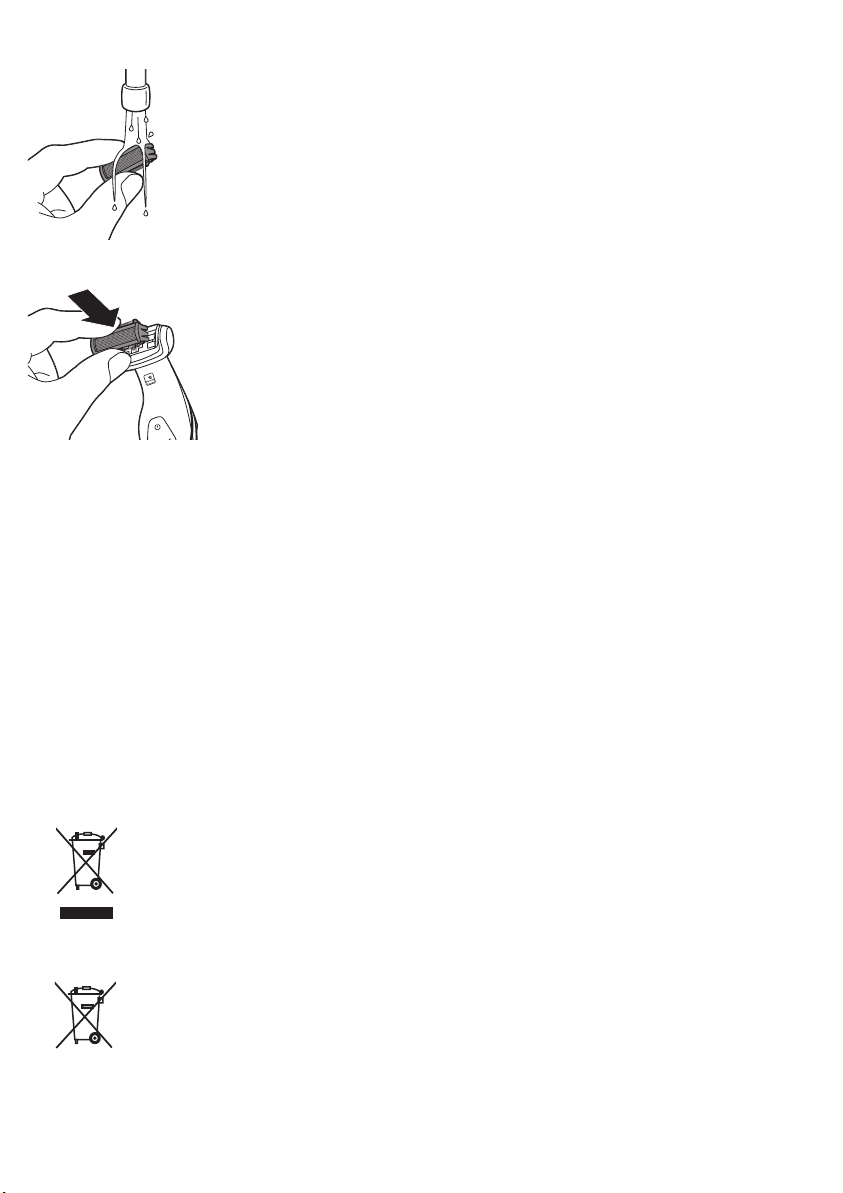
3 Pull the shaving unit out of the appliance.
4 Use the cleaning brush supplied to clean the inside of the shaving head
or rinse the inside under the tap.
13
5 Rinse the shaving unit under the tap.
6 Shake off excess water and place the shaving unit back into the
appliance.
7 Clean the back shaving attachment (BG2038/BG2036 only) with a moist
cloth. Rinse it under the tap if you used it to shave your back with shower
gel or shaving foam.
8 Clean the charging stand with a moist cloth.
Page 14
14
English
Ordering accessories
To buy accessories or spare parts, visit www.shop.philips.com/service or go
to your Philips dealer. You can also contact the Philips Consumer Care
Centre in your country (see the worldwide guarantee leaflet for contact
details).
Shaving unit
If you use the appliance very frequently, replace the shaving unit (type
number BG2000) every year. Replace a damaged shaving unit immediately.
Recycling
-
This symbol means that this product shall not be disposed of with normal
household waste (2012/19/EU).
-
This symbol means that this product contains a built-in rechargeable
battery which shall not be disposed of with normal household waste
(2006/66/EC). We strongly advise you to take your product to an official
collection point or a Philips service centre to have a professional remove
the rechargeable battery.
-
Follow your country’s rules for the separate collection of electrical and
electronic products and rechargeable batteries. Correct disposal helps
prevent negative consequences for the environment and human health.
Removing the rechargeable battery
1 Take the appliance out of the charging stand and let the motor run until
the battery is completely empty.
2 Insert a flathead screwdriver into the slot at the bottom of the handle and
turn it to unlock the rear panel of the housing.
3 Remove the rear panel of the housing and then remove the side panels.
Page 15
English
4 Undo the screws that connect the inner body of the appliance to the
front panel of the housing and separate the inner body from the front
panel.
5 Turn over the inner body. Then detach the cover of the inner body with
the control panel from the inner body.
15
6 Lift the printed-circuit board out of the inner body, turn it over and cut
the wires that connect the battery to the power unit.
Guarantee and support
If you need information or support, please visit www.philips.com/support or
read the separate worldwide guarantee leaflet.
Troubleshooting
This chapter summarizes the most common problems you could encounter
with the appliance. If you are unable to solve the problem with the
information below, visit www.philips.com/support for a list of frequently
asked questions or contact the Consumer Care Center in your country.
Page 16

16
English
Problem Possible cause Solution
The appliance does not
work.
The battery is empty and/or
the appliance does not
charge.
Recharge the battery (see chapter
‘Charging’) and check if you have
followed all instructions in chapters
‘Important’ and ‘Charging’.
The appliance makes more
noise and/or vibrates more
strongly than usual.
The operating time on a full
charge decreases.
Reduced trimming and/or
shaving performance
One or more parts are
broken, perhaps because you
dropped the appliance.
If this appliance is used
professionally, it will reach
the end of its life earlier
The shaving unit is dirty. Clean the shaving unit (see chapter
The shaving unit is worn. Replace the shaving unit.
The shaving unit is dirty. Clean the shaving unit (see chapter
You use the appliance in the
wrong way.
The shaving unit is dirty. Clean the shaving unit (see chapter
The battery is running low. Recharge the battery (see chapter
You have not attached the
trimming comb properly.
If you are trimming very curly
hair, the trimming comb may
not be able to straighten the
hair properly.
Take the appliance to your dealer or to
an authorized Philips service center for
examination or repair.
Do not use the appliance professionally.
‘Cleaning’).
‘Cleaning’).
Follow the instructions in chapter ‘Using
the appliance’.
‘Cleaning’).
‘Charging’).
Remove the trimming comb and reattach
it.
Try straightening the hair with your
hands during trimming.
Page 17
Introduktion
Tillykke med dit køb, og velkommen til Philips! For at få fuldt udbytte af den
support, Philips tilbyder, skal du registrere dit produkt på
www.philips.com/welcome.
Generel beskrivelse (fig. 1)
1 Trimmekam 1 (3 mm)
2 Trimmekam 2 (5 mm) (kun BG2038/BG2036/BG2028/BG2026)
3 Trimmekam 3 (7 mm) (kun BG2038/BG2036/BG2028/BG2026)
4 Indikator for hårlængde (1, 2 eller 3)
5 Skærhoved
6 On/off-knap
7 Batteristatusindikator
8 Strømforsyningsenhed (adapter, kun type HQ8500, BG2038/BG2036)
9 Rensebørste (kun BG2038/BG2036/BG2028/BG2026)
10 Rygbarberingstilbehør (kun BG2038/BG2036)
11 Batteristatusindikator
12 Strømforsyningsenhed (adapter, kun type HQ850,
BG2028/BG2026/BG2025/BG2024)
13 Opladeenhed
Vigtige sikkerhedsoplysninger
Læs disse vigtige oplysninger omhyggeligt igennem, inden apparatet og
tilbehøret tages i brug, og gem dem til eventuel senere brug. Det
medfølgende tilbehør kan variere for forskellige produkter.
Dansk
17
Fare
Advarsel
-
Hold forsyningsenheden tør.
-
Strømforsyningsenheden indeholder en transformator. Klip ikke
strømforsyningsenheden af og udskift den med et andet stik, da dette vil
føre til farlige situationer.
-
Brug kun den medfølgende strømforsyningsenhed ved opladning af
apparatet.
-
Dette apparat må bruges af børn fra 8 år og opefter og personer med
reducerede fysiske, sensoriske eller mentale evner eller manglende
erfaring og viden, hvis de er blevet instrueret i sikker brug af apparatet og
forstår de medfølgende risici. Lad ikke børn lege med apparatet.
Rengøring og vedligeholdelse må ikke foretages af børn uden opsyn.
Page 18
18
Dansk
-
Tag altid stikket ud af apparatet, inden det skylles under vandhanen.
-
Kontroller altid apparatet, inden du anvender det. Anvend ikke apparatet,
hvis det er beskadiget, da dette kan forårsage personskade. Udskift altid
en beskadiget del med en tilsvarende original type.
-
Apparatet må ikke åbnes i forbindelse med udskiftning af det
genopladelige batteri.
Forsigtig
-
Opladeren må aldrig kommes ned i vand eller skylles under vandhanen.
-
Rens aldrig apparatet med vand, der er varmere end 80°C.
-
Brug kun apparatet til det tilsigtede formål som vist i brugervejledningen.
-
Af hygiejniske grunde bør apparatet kun anvendes af en og samme
person.
-
Brug aldrig trykluft, skuresvampe eller skrappe rengøringsmidler, som
f.eks. benzin, acetone eller lignende, til rengøring af apparatet.
-
Brug ikke strømforsyningsenheden i eller i nærheden af stikkontakter,
som indeholder eller har indeholdt en elektrisk luftfrisker, for at forhindre
uoprettelig beskadigelse af strømforsyningsenheden.
Elektromagnetiske felter (EMF)
-
Dette Philips-apparat overholder alle branchens gældende standarder
og regler angående eksponering for elektromagnetiske felter.
Generelt
Opladning
-
Dette apparat er vandtæt. Apparatet er velegnet til brug i badet eller
under bruseren og kan rengøres under vandhanen. Af
sikkerhedsmæssige årsager kan apparatet kun betjenes trådløst.
-
Apparatet kan tilsluttes netspændinger mellem 100 og 240 V.
-
Strømforsyningsenheden omformer 100-240 Volt til en lav
sikkerhedsspænding under 24 Volt.
Opladningen tager 1 time (BG2038/BG2036) eller 8 timer
(BG2028/BG2026/BG2025/BG2024) afhængigt af modellen. Når apparatet
er fuldt opladet, har det en brugstid på op til 50 minutter. Når batteriets
statusindikator blinker rødt, er batteriet ved at være tomt (ca. 10 minutters
brugstid tilbage), og du skal genoplade apparatet.
1 Sæt det lille stik i opladeren.
Page 19

2 Placer apparatet i opladeren.
Batteristatusindikatoren blinker grønt for at indikere, at apparatet
oplades.
Bemærk: Batteristatusindikatoren for BG2028, BG2026, BG2025 og
BG2024 ser anderledes ud, men fungerer på samme måde.
Dansk
19
Når apparatet er fuldt opladet, lyser batteristatusindikatoren konstant
grønt.
Bemærk: Hvis det fuldt opladede apparat stadig er i den strømtilsluttede
opladeenhed efter 30 minutter, slukker batteristatusindikatoren for at
spare energi.
Sådan bruges apparatet
Apparatet kan anvendes til både våd og tør barbering/trimning af alle
kropszoner fra halsen og nedefter.
Bemærk: Brug det ikke til barbering eller trimning af ansigts- og hovedhår.
Page 20
20
Dansk
Gode råd til trimning og barbering
-
Giv dig ekstra god tid, når du barberer følsomme områder, indtil du har
vænnet dig til at bruge apparatet. Du skal vænne dig lidt til at bruge
apparatet. Det tager også lidt tid, inden huden har vænnet sig til denne
metode.
-
Hvis hårene er længere end 10 mm, kan du trimme dem først med
trimmekam 1 til en længde på 3 mm for at gøre barberingen nemmere.
-
Du opnår det bedste trimningsresultat på tør hud og tørt hår.
-
Du kan også bruge shaveren i badet eller under bruseren. For at sikre en
nemmere glidebevægelse kan du påføre lidt barberskum eller flydende
sæbe på huden.
Trimmekamme
BG2025 og BG2024 leveres med trimmekam 1.
BG2038, BG2036, BG2028 og BG2026 leveres med trimmekammene 1, 2 og
3.
Bagsiden af hver kam er nummereret med 1, 2 og 3 (se nedenstående tabel
for tilsvarende hårlængder efter trimning).
En trimmekam giver dig mulighed for at klippe håret i en bestemt længde (se
tabellen nedenfor).
Hvis apparatet leveres med 3 kamme, skal du starte trimning med
trimmekam 3 for at vænne dig til at bruge apparatet.
Kamstørrelsesindikator
1 3 mm
Hårlængde efter trimning
2 5 mm
3 7 mm
Trimning
1 Sæt den ønskede trimmekam fast på apparatet. Sørg for, at kammens
tænder peger i den retning, som apparatet skal bevæges i.
Når du fører apparatet hen imod dig, skal tænderne pege mod dig selv.
Page 21
Barbering
Dansk
Når du fører apparatet væk fra dig selv, skal tænderne pege væk fra dig.
2 Tænd apparatet ved tryk på on/off-knappen.
3 Bevæg altid apparatet imod hårenes vækstretning.
Bemærk: Sørg for, at den flade del af trimmekammen altid er i fuld
kontakt med huden.
1 Hvis en trimmekam stadig er påsat, skal den tages af.
Bemærk: Du kan enten skubbe trimmekammen af apparatet eller trække
den af afhængigt af, hvordan kammen er sat på apparatet.
21
2 Tryk en gang på on/off-knappen for at tænde for apparatet.
3 Placér skærfolien mod huden.
4 Bevæg apparatet imod hårenes vækstretning med den ene hånd, mens
du strækker huden med den anden hånd.
Bemærk: Sørg for, at skærfolieenheden altid er i fuld kontakt med huden.
Barbering med rygbarberingstilbehøret (kun BG2038 og BG2036)
Bemærk: Rygbarberingstilbehøret kan både bruges til våd- og tørbarbering.
Page 22
2
1
22
Dansk
1 Hold udløserknappen (1) nede, og åbn rygbarberingstilbehøret (2).
2 Placer bunden af apparatet i den nederste del af holderen på
rygbarberingstilbehøret. Tryk derefter den øverste mod den øverste del af
holderen, indtil den låser på plads med et "klik".
3 Barber ryggen ved at bevæge rygbarberingstilbehøret med apparatet op
og ned vha. håndtaget.
Bemærk: Af praktiske hensyn kan rygbarberingstilbehøret foldes til
forskellige vinkler.
4 Adskil apparatet fra rygbarberingstilbehøret ved at trække toppen af
apparatet mod dig, indtil det låses ud af holderen.
Page 23
2
1
Rengøring
Dansk
5 Luk rygbarberingstilbehøret ved at holde udløserknappen (1) nede og
skubbe håndtaget mod holderen (2).
Rengør altid apparatet efter brug.
Forsigtig: Brug aldrig trykluft, skuresvampe eller skrappe
rengøringsmidler, som f.eks. benzin, acetone eller lignende, til rengøring
af apparatet.
1 Sluk for apparatet.
2 Hvis en trimmekam stadig er påsat, skal den tages af.
Bemærk: Du kan enten skubbe trimmekammen af apparatet eller trække
den af afhængigt af, hvordan kammen er sat på apparatet.
23
3 Træk skærhovedet ud af apparatet.
4 Brug den medfølgende rengøringsbørste til at rengøre indersiden af
shaverhovedet, eller skyl indersiden under vandhanen.
Page 24
24
Dansk
5 Skyl skærhovedet under rindende vand.
6 Ryst overskydende vand af, og sæt skærhovedet tilbage i apparatet.
7 Rengør rygbarberingstilbehøret (kun BG2038/BG2036) med en fugtig
klud. Skyl det under vandhanen, hvis du har benyttet det til barbering af
ryggen med flydende sæbe eller barberskum.
8 Opladeenheden rengøres med en fugtig klud.
Bestilling af tilbehør
Du kan købe tilbehør og reservedele på www.shop.philips.com/service eller
hos din Philips-forhandler. Du kan også kontakte det lokale Philipskundecenter (du kan finde kontaktoplysninger i folderen "World-Wide
Guarantee").
Skærhoved
Hvis apparatet bruges meget ofte, skal du udskifte skærhovedet
(typenummer BG2000) hvert år. Udskift altid en beskadiget skærenhed med
det samme.
Genanvendelse
-
-
Dette symbol betyder, at dette produkt ikke må bortskaffes sammen med
almindeligt husholdningsaffald (2012/19/EU).
Dette symbol betyder, at dette produkt indeholder et indbygget
genopladeligt batteri, som ikke må bortskaffes sammen med almindeligt
husholdningsaffald (2006/66/EF). Vi anbefaler på det kraftigste, at du
afleverer produktet på et officielt indsamlingssted eller hos en Philips-
forhandler, hvor du kan få en fagmand til at tage det genopladelige
batteri ud.
Page 25
-
Følg den nationale lovgivning om særskilt indsamling af elektriske og
elektroniske produkter og genopladelige batterier. Korrekt bortskaffelse
er med til at forhindre negativ påvirkning af miljøet og menneskers
helbred.
Udtagning af det genopladelige batteri
1 Tag shaveren ud af opladeren, og lad motoren køre, indtil batteriet er
løbet helt tør.
2 Stik en skruetrækker med fladt hoved ind i rillen i bunden af håndtaget.
Drej skruetrækkeren for at låse bagpanelet fri af kabinettet.
3 Fjern bagpanelet af kabinettet, og fjern derefter sidepanelerne.
Dansk
25
4 Skru de skruer ud, der samler apparatets indre kabinet og kabinettets
frontpanel, og adskil det indre kabinet fra frontpanelet.
5 Vend det indre kabinet. Fjern derefter dækslet til det indre kabinet med
kontrolpanelet fra det indre kabinet.
Page 26
26
Dansk
6 Løft printpladen ud af det indre kabinet, vend den om, og klip de
ledninger over, som forbinder batteriet med motorenheden.
Reklamationsret og support
Hvis du har brug for hjælp eller support, bedes du besøge
www.philips.com/support eller læse i den separate folder "World-Wide
Guarantee".
Fejlfinding
Dette afsnit opsummerer de mest almindelige problemer, der kan
forekomme ved brug af enheden. Har du brug for yderligere hjælp og
vejledning, så besøg www.philips.com/support for at få en liste med ofte
stillede spørgsmål, eller kontakt dit lokale Philips Kundecenter.
Problem
Apparatet fungerer ikke. Batteriet er tomt, og/eller
Mulig årsag Løsning
apparatet oplades ikke.
Genoplad batteriet (se afsnittet
"Opladning"), og kontroller, om du har
fulgt alle anvisningerne i afsnittene
"Vigtigt" og "Opladning".
Apparatet larmer mere
og/eller vibrerer mere
kraftigt end normalt.
Brugstiden på en fuld
opladning bliver kortere.
Reduceret trimningsog/eller barberingsevne
En eller flere dele er gået i
stykker, måske fordi du tabt
apparatet.
Hvis apparatet bruges i
professionelt øjemed, vil det
blive slidt op hurtigere
Skærenheden er beskidt. Rengør skærhovedet (se afsnittet
Skærhovedet er beskidt. Udskift skærhovedet.
Skærenheden er beskidt. Rengør skærhovedet (se afsnittet
Du bruger apparatet på den
forkerte måde.
Skærenheden er beskidt. Rengør skærhovedet (se afsnittet
Batteriet er næsten afladet. Genoplad batteriet (se afsnittet
Indlever apparatet til din forhandler eller
det lokale Philips Kundecenter mhp.
eftersyn eller reparation.
Brug ikke apparatet i professionelt
øjemed.
"Rengøring").
"Rengøring").
Følg anvisningerne i afsnittet "Sådan
bruges apparatet".
"Rengøring").
"Opladning").
Page 27

Problem Mulig årsag Løsning
Du har ikke sat
trimmekammen korrekt på.
Fjern trimmekammen, og sæt den på
igen.
Dansk
27
Hvis du trimmer meget krøllet
hår, kan trimmekammen
muligvis ikke glatte håret
korrekt.
Prøv at glatte håret med hænderne
under trimning.
Page 28
28
Deutsch
Einführung
Herzlichen Glückwunsch zu Ihrem Kauf und willkommen bei Philips! Um die
Unterstützung von Philips optimal nutzen zu können, sollten Sie Ihr Produkt
unter www.philips.com/welcome registrieren.
Allgemeine Beschreibung (Abb. 1)
1 Kammaufsatz 1 (3 mm)
2 Kammaufsatz 2 (5 mm) (nur BG2038/BG2036/BG2028/BG2026)
3 Kammaufsatz 3 (7 mm) (nur BG2038/BG2036/BG2028/BG2026)
4 Haarlängenanzeige (1, 2 oder 3)
5 Schereinheit
6 Ein-/Ausschalter
7 Akkustandanzeige
8 Netzteil (Adapter, nur Typen HQ8500, BG2038/BG2036)
9 Reinigungsbürste (nur BG2038/BG2036/BG2028/BG2026)
10 Rasieraufsatz für den Rücken (nur BG2038/BG2036)
11 Akkustandanzeige
12 Netzteil (Adapter, nur Typen HQ850, BG2028/BG2026/BG2025/BG2024)
13 Ladegerät
Wichtige Sicherheitsinformationen
Lesen Sie diese wichtigen Informationen vor dem Gebrauch des Geräts und
des Zubehörs aufmerksam durch, und bewahren Sie sie für eine spätere
Verwendung auf. Das mitgelieferte Zubehör kann für verschiedene Produkte
variieren.
Gefahr
Warnung
-
Halten Sie das Netzteil trocken.
-
Das Netzteil enthält einen Transformator.
Schneiden Sie das Netzteil keinesfalls auf, um
einen anderen Stecker anzubringen, weil dies
eine gefährliche Situation verursachen könnte.
-
Laden Sie das Gerät nur unter Verwendung des
im Lieferumfang enthaltenen Netzteils auf.
Page 29
Deutsch
-
Dieses Gerät kann von Kindern ab 8 Jahren und
Personen mit verringerten physischen,
sensorischen oder psychischen Fähigkeiten oder
Mangel an Erfahrung und Kenntnis verwendet
werden, wenn sie bei der Verwendung
beaufsichtigt werden oder Anleitung zum
sicheren Gebrauch des Geräts erhalten und die
Gefahren verstanden haben. Kinder dürfen nicht
mit dem Gerät spielen. Die Reinigung und Pflege
des Geräts darf von Kindern nicht ohne Aufsicht
durchgeführt werden.
-
Ziehen Sie stets das Netzteil aus der Steckdose,
bevor Sie das Gerät unter fließendem Wasser
reinigen.
-
Überprüfen Sie das Gerät vor jedem Gebrauch.
Um Verletzungen zu vermeiden, benutzen Sie
das Gerät nicht, wenn es beschädigt ist. Ersetzen
Sie ein beschädigtes Teil nur durch Originalteile.
-
Öffnen Sie das Gerät nicht, um den Akku zu
ersetzen.
29
Achtung
-
Tauchen Sie die Ladestation niemals in Wasser.
Spülen Sie sie auch nicht unter fließendem
Wasser ab.
-
Das Wasser zur Reinigung des Geräts darf nicht
heißer als 80 °C sein.
-
Verwenden Sie dieses Gerät nur für den
vorgesehenen Zweck wie in der
Bedienungsanleitung angegeben.
-
Aus hygienischen Gründen sollte das Gerät nur
von einer Person verwendet werden.
Page 30
30
Deutsch
-
Benutzen Sie zum Reinigen des Geräts keine
Druckluft, Scheuerschwämme und -mittel oder
aggressive Flüssigkeiten wie Benzin oder Azeton.
-
Verwenden Sie das Netzteil nicht in oder in der
Nähe von Wandsteckdosen, die einen
elektrischen Lufterfrischer enthalten oder
enthalten haben, um irreparable Schäden am
Netzteil zu vermeiden.
Elektromagnetische Felder
-
Dieses Philips-Gerät erfüllt alle einschlägigen Normen und Vorschriften
zur Exposition gegenüber elektromagnetischen Feldern.
Allgemeines
-
Dieses Gerät ist wasserdicht. Es ist für die Verwendung im Bad oder unter
der Dusche geeignet ist und kann mit Leitungswasser gereinigt werden.
Aus Sicherheitsgründen kann dieses Gerät daher nur kabellos verwendet
werden.
-
Er ist für Stromspannungen zwischen 100 und 240 Volt konzipiert.
-
Das Netzteil wandelt Netzspannungen von 100 bis 240 Volt in eine
sichere Betriebsspannung von unter 24 Volt um.
Laden
Das Laden dauert je nach Modell 1 Stunde (BG2038/BG2036) oder
8 Stunden (BG2028/BG2026/BG2025/BG2024). Mit dem voll aufgeladenen
Gerät können Sie bis zu 50 Minuten arbeiten. Wenn die Akkustandanzeige
rot blinkt, ist der Akku fast leer (ca. 10 Minuten Betriebsdauer verbleiben),
und Sie müssen das Gerät aufladen.
1 Stecken Sie den kleinen Stecker in die Ladestation.
2 Stellen Sie das Gerät in die Ladestation.
Page 31

Deutsch
Das Akkustandanzeige blinkt grün, um anzuzeigen, dass das Gerät
auflädt.
Hinweis: Die Akkustandanzeige von BG2028, BG2026, BG2025 und
BG2024 sieht anders aus, funktioniert aber auf die gleiche Weise.
Ist der Akku vollständig geladen, leuchtet die Akkustandanzeige
dauerhaft grün.
Hinweis: Wenn das vollständig aufgeladene Gerät nach 30 Minuten noch
in der angeschlossenen Ladestation steckt, erlischt die
Akkustandsanzeige, um Energie zu sparen.
31
Das Gerät benutzen
Sie können das Gerät nass oder trocken zum Rasieren und Haareschneiden
an allen Körperpartien unterhalb der Halslinie verwenden.
Hinweis: Verwenden Sie dieses Gerät nicht zum Entfernen oder Kürzen von
Bart- oder Kopfhaar.
Tipps zum Trimmen und Rasieren
-
Nehmen Sie sich beim ersten Gebrauch in empfindlichen
Körperbereichen Zeit. Sie müssen Übung mit dem Gerät bekommen. Ihre
Haut muss sich außerdem erst an den Vorgang gewöhnen.
-
Wenn die Haare länger als 10 mm sind, können Sie sie zuerst mit
Kammaufsatz 1 auf eine Länge von 3 mm kürzen, um die anschließende
Rasur zu erleichtern.
-
Die besten Ergebnisse beim Trimmen erhalten Sie, wenn die Haut und
das Haar trocken sind.
-
Sie können sich mit dem Gerät in der Dusche oder Badewanne rasieren.
Tragen Sie für bessere Gleitfähigkeit Rasierschaum oder Duschgel auf die
Haut auf.
Page 32

32
Deutsch
Kammaufsätze
Im Lieferumfang von BG2025 und BG2024 ist Kammaufsatz 1 enthalten.
Bei BG2038, BG2036, BG2028 und BG2026 sind Kammaufsätze 1, 2 und 3
enthalten.
Jeder Kamm ist auf der Rückseite mit 1, 2 oder 3 gekennzeichnet. Die jeweils
nach dem Schneiden verbleibende Haarlänge entnehmen Sie bitte der
Tabelle unten.
Mit dem Kammaufsatz können Sie Haare auf eine bestimmte Länge
schneiden (siehe Tabelle unten).
Wenn Ihr Gerät über drei Kammaufsätze verfügt, beginnen Sie das Trimmen
mit Kammaufsatz 3, um Erfahrung mit dem Gerät zu sammeln.
Anzeige für Kammaufsatzgröße
1 3 mm
2 5 mm
3 7 mm
Haarlänge nach dem Schneiden
Schneiden
1 Setzen Sie den passenden Kammaufsatz auf das Gerät. Vergewissern Sie
sich, dass die Zähne des Kammaufsatzes in die Richtung weisen, in die
Sie das Gerät bewegen.
Wenn Sie das Gerät in Ihre Richtung bewegen, müssen die Zähne in Ihre
Richtung weisen.
Wenn Sie das Gerät von sich weg bewegen, müssen die Zähne von Ihnen
weg deuten.
Page 33

Rasieren
2
1
Deutsch
2 Drücken Sie den Ein-/Ausschalter, um das Gerät einzuschalten.
3 Führen Sie das Gerät immer gegen die Haarwuchsrichtung.
Hinweis: Die flache Seite des Kammaufsatzes muss immer auf der Haut
aufliegen.
1 Wenn noch ein Kammaufsatz befestigt ist, nehmen Sie ihn ab.
Hinweis: Sie können den Kammaufsatz entweder vom Gerät abziehen
oder durch drücken lösen, abhängig davon, wie der Kamm auf dem Gerät
befestigt ist.
2 Drücken Sie den Ein-/Ausschalter einmal, um das Gerät einzuschalten.
3 Setzen Sie die Schereinheit auf die Haut.
4 Führen Sie das Gerät mit einer Hand gegen die Haarwuchsrichtung,
während Sie die Haut mit der anderen Hand straffen.
Hinweis: Achten Sie darauf, dass die Schereinheit stets vollen Kontakt zur
Haut hat.
33
Rasieren mit dem Rasieraufsatz für den Rücken (nur BG2038, BG2036)
Hinweis: Der Rasieraufsatz für den Rücken ist für Nass- und Trockenrasur
einsetzbar.
1 Halten Sie die Entriegelungstaste gedrückt (1), und öffnen Sie den
Rasieraufsatz für den Rücken (2).
Page 34

2
1
34
Deutsch
2 Stellen Sie den unteren Teil des Geräts in den unteren Teil der Halterung
des Rasieraufsatzes für den Rücken. Drücken Sie dann den oberen Teil
gegen den oberen Teil der Halterung, bis er hörbar einrastet.
3 Rasieren Sie Ihren Rücken, indem Sie das Gerät mit dem Rasieraufsatz für
den Rücken am Griff auf und ab bewegen.
Hinweis: Zu Ihrem Komfort kann der Rasieraufsatz für den Rücken in
verschiedene Winkel geklappt werden.
4 Um das Gerät vom Rasieraufsatz für den Rücken abzunehmen, ziehen
Sie den oberen Teil des Geräts zu sich, bis es sich von der Halterung löst.
5 Um den Rasieraufsatz für den Rücken zu schließen, halten Sie die
Entriegelungstaste gedrückt (1), und drücken Sie den Griff gegen die
Halterung (2).
Page 35

Pflege
Deutsch
Reinigen Sie das Gerät nach jedem Gebrauch.
Achtung: Benutzen Sie zum Reinigen des Geräts keine Druckluft,
Scheuerschwämme und -mittel oder aggressive Flüssigkeiten wie Benzin
oder Azeton.
1 Schalten Sie das Gerät aus.
2 Wenn noch ein Kammaufsatz befestigt ist, nehmen Sie ihn ab.
Hinweis: Sie können den Kammaufsatz entweder vom Gerät abziehen
oder durch drücken lösen, abhängig davon, wie der Kamm auf dem Gerät
befestigt ist.
3 Ziehen Sie die Schereinheit aus dem Gerät.
35
4 Verwenden Sie die mitgelieferte Reinigungsbürste, um die Innenseite des
Scherkopfs zu reinigen, oder spülen Sie die Innenseite unter fließendem
Wasser ab.
5 Spülen Sie die Schereinheit unter fließendem Wasser ab.
6 Schütteln Sie überschüssiges Wasser ab, und setzen Sie die Schereinheit
wieder in das Gerät ein.
7 Reinigen Sie den Rasieraufsatz für den Rücken (nur BG2038/BG2036)
mit einem feuchten Tuch. Spülen Sie ihn unter fließendem Wasser ab,
wenn Sie ihn mit Duschgel oder Rasierschaum verwendet haben.
Page 36

36
Deutsch
8 Reinigen Sie die Ladestation mit einem feuchten Tuch.
Bestellen von Zubehör
Um Zubehör oder Ersatzteile zu kaufen, gehen Sie auf
www.shop.philips.com/service, oder suchen Sie Ihren Philips Händler auf.
Sie können sich auch an ein Philips Service-Center in Ihrem Land wenden.
Die Kontaktdaten finden Sie in der internationalen Garantieschrift.
Schereinheit
Wenn Sie das Gerät sehr oft verwenden, ersetzen Sie die Schereinheit
(Typennummer BG2000) jedes Jahr. Ersetzen Sie eine beschädigte
Schereinheit sofort.
Recycling
-
Dieses Symbol bedeutet, dass das Produkt nicht mit dem normalen
Hausmüll entsorgt werden kann (2012/19/EU).
-
Dieses Symbol bedeutet, dass das Produkt einen Akku enthält, der nicht
mit dem normalen Hausmüll entsorgt werden darf (2006/66/EG). Wir
empfehlen dringend, das Produkt bei einer offiziellen Sammelstelle oder
einem Philips Service-Center abzugeben, um den Akku fachgerecht
ausbauen zu lassen.
-
Beachten Sie die örtlichen Vorschriften zur getrennten Entsorgung von
elektrischen und elektronischen Produkten, Akkus und Batterien. Die
ordnungsgemäße Entsorgung dient dem Schutz von Umwelt und
Gesundheit.
Den Akku entfernen
1 Nehmen Sie das Gerät aus der Ladestation und lassen Sie den Motor
laufen, bis der Akku ganz leer ist.
Page 37

Deutsch
2 Stecken Sie einen Schraubendreher in den Schlitz an der Unterseite des
Griffs. Drehen Sie den Schraubendreher, um die Rückseite des Gehäuses
zu lösen.
3 Entfernen Sie die Rückseite des Gehäuses, und nehmen Sie dann die
Seitenblenden heraus.
4 Entfernen Sie die Schrauben, die das innere Gehäuse des Geräts mit der
Vorderseite des Gehäuses verbinden, und trennen Sie den das innere
Gehäuse von der Vorderseite.
37
5 Drehen Sie das innere Gehäuse um. Nehmen Sie dann die Abdeckung
des inneren Gehäuses mit dem Bedienfeld vom inneren Gehäuse ab.
6 Nehmen Sie die Platine aus dem inneren Gehäuse, drehen Sie sie um,
und durchtrennen Sie die Drähte, die die Batterie mit der Stromeinheit
verbinden.
Page 38

38
Deutsch
Garantie und Support
Wenn Sie Hilfe oder Informationen benötigen, besuchen Sie bitte
www.philips.com/support, oder lesen Sie die internationale Garantieschrift.
Fehlerbehebung
In diesem Kapitel sind die häufigsten Probleme aufgeführt, die beim
Gebrauch des Geräts auftreten können. Sollten Sie ein Problem mithilfe der
nachstehenden Informationen nicht beheben können, besuchen Sie unsere
Website unter www.philips.com/support, und schauen Sie in der Liste
„Häufig gestellte Fragen“ nach, oder wenden Sie sich an das Philips ServiceCenter in Ihrem Land.
Problem
Das Gerät funktioniert
nicht.
Mögliche Ursache Die Lösung
Der Akku ist leer bzw. das
Gerät lädt nicht auf.
Laden Sie den Akku auf (siehe Kapitel
„Laden“), und überprüfen Sie, ob Sie alle
Anweisungen in den Kapiteln „Wichtig“
und „Laden“ eingehalten haben.
Das Gerät ist lauter bzw.
vibriert stärker als üblich.
Die Betriebszeit bei
vollständig aufgeladenem
Akku nimmt ab.
Die Trimm- bzw.
Rasierleistung lässt nach.
Eines oder mehrere Teile sind
beschädigt; möglicherweise
haben Sie das Gerät fallen
lassen.
Wenn dieses Gerät für
professionelle Zwecke
eingesetzt wird, erreicht es
schneller das Ende seiner
Lebensdauer.
Die Schereinheit ist
verschmutzt.
Die Schereinheit ist
abgenutzt.
Die Schereinheit ist
verschmutzt.
Sie verwenden das Gerät
nicht korrekt.
Die Schereinheit ist
verschmutzt.
Die Batterie ist fast leer. Laden Sie den Akku auf (siehe Kapitel
Sie haben den Kammaufsatz
nicht ordnungsgemäß
befestigt.
Wenn Sie sehr lockiges Haar
trimmen, kann der
Kammaufsatz das Haar
möglicherweise nicht
ordnungsgemäß glätten.
Lassen Sie das Gerät von Ihrem Händler
oder einem Philips Service-Center
untersuchen bzw. reparieren.
Verwenden Sie das Gerät nicht für
professionelle Zwecke.
Reinigen Sie die Schereinheit (siehe
Kapitel „Reinigung“).
Wechseln Sie die Schereinheit aus.
Reinigen Sie die Schereinheit (siehe
Kapitel „Reinigung“).
Folgen Sie den Anweisungen im Kapitel
„Das Gerät benutzen“.
Reinigen Sie die Schereinheit (siehe
Kapitel „Reinigung“).
„Laden”).
Nehmen Sie den Kammaufsatz ab, und
befestigen Sie ihn erneut.
Versuchen Sie, das Haar während des
Trimmens mit Ihren Händen zu glätten.
Page 39

Introducción
Enhorabuena por la adquisición de este producto, y bienvenido a Philips
Para sacar el mayor partido a la asistencia que Philips le ofrece, registre el
producto en www.philips.com/welcome.
Descripción general (Fig. 1)
1 Peine-guía 1 (3 mm/0,11 pulgadas)
2 Peine-guía 2 (5 mm/0,19 pulgadas) (solo modelos
BG2038/BG2036/BG2028/BG2026)
3 Peine-guía 3 (7 mm/0,27 pulgadas) (solo modelos
BG2038/BG2036/BG2028/BG2026)
4 Indicación de longitud del vello (1, 2 o 3)
5 Unidad de afeitado
6 Botón de encendido/apagado
7 Indicador de estado de la batería
8 Unidad de alimentación (adaptador, solo tipo HQ8500,
BG2038/BG2036)
9 Cepillo de limpieza (solo modelo BG2038/BG2036/BG2028/BG2026)
10 Accesorio de afeitado para la parte posterior (solo modelo
BG2038/BG2036)
11 Indicador de estado de la batería
12 Unidad de alimentación (adaptador, solo tipo HQ850,
BG2028/BG2026/BG2025/BG2024)
13 Soporte de carga
Español
39
Información de seguridad importante
Antes de utilizar el aparato y sus accesorios, lea atentamente esta
información importante y consérvela por si necesitara consultarla en un
futuro. Los accesorios suministrados pueden variar según los diferentes
productos.
Peligro
-
Mantenga seca la fuente de alimentación.
Advertencia
-
La fuente de alimentación contiene un transformador. No corte la fuente
de alimentación para sustituirla por otra clavija, ya que podría provocar
situaciones de peligro.
-
Cargue el aparato únicamente con la fuente de alimentación
suministrada.
Page 40

40
Español
Precaución
-
Este aparato puede ser usado por niños a partir de 8 años y por
personas con su capacidad física, psíquica o sensorial reducida y por
quienes no tengan los conocimientos y la experiencia necesarios, si han
sido supervisados o instruidos acerca del uso del aparato de forma
segura y siempre que sepan los riesgos que conlleva su uso. No permita
que los niños jueguen con el aparato. Los niños no deben limpiar el
aparato ni realizar tareas de mantenimiento sin supervisión.
-
Desenchufe siempre el aparato antes de limpiarlo bajo el grifo.
-
Compruebe siempre el aparato antes de utilizarlo. No utilice el aparato si
está dañado, ya que podría ocasionar lesiones. Sustituya las piezas
dañadas por repuestos originales.
-
No abra el aparato para cambiar la batería recargable.
-
No sumerja nunca el soporte de carga en agua ni lo enjuague bajo el
grifo.
-
Nunca enjuague el aparato con agua a una temperatura superior a 80 °C.
-
Utilice este aparato solo para el uso al que está destinado como se
indica en el manual de usuario.
-
Por razones de higiene, el aparato debería ser usado únicamente por
una persona.
-
No utilice nunca aire comprimido, estropajos, agentes de limpieza
abrasivos ni líquidos agresivos, como gasolina o acetona, para limpiar el
aparato.
-
No utilice la fuente de alimentación cerca o en tomas de corriente en las
que esté o haya estado enchufado un ambientador eléctrico para evitar
daños irreparables.
Campos electromagnéticos (CEM)
-
Este Philips cumple los estándares y las normativas aplicables sobre
exposición a campos electromagnéticos.
General
-
Este aparato es resistente al agua. Puede utilizarse en la bañera o en la
ducha y puede limpiarse bajo el agua del grifo. Así pues, por motivos de
seguridad, el aparato solo puede utilizarse sin cable.
-
Este aparato es adecuado para voltajes de red de 100 a 240 voltios.
-
La fuente de alimentación transforma la corriente de 100 - 240 voltios en
un bajo voltaje de seguridad inferior a 24 voltios.
Carga
En función del modelo, la duración de la carga puede ser de una hora
(BG2038/BG2036) u ocho (BG2028/BG2026/BG2025/BG2024). Cuando el
aparato esté completamente cargado, proporcionará un tiempo de
Page 41

Español
funcionamiento de hasta 50 minutos. Si el indicador de estado de la batería
parpadea en rojo, la batería se está agotando (quedan aproximadamente
10 minutos de tiempo de funcionamiento) y debe recargar el aparato.
1 Inserte la clavija pequeña en el soporte de carga.
2 Coloque el aparato en el soporte de carga.
El indicador de estado de las pilas parpadea en verde para indicar que el
aparato se está cargando.
Nota: El indicador de estado de la batería de los modelos BG2028,
BG2026, BG2025 y BG2024 parece diferente, pero funciona de la misma
forma.
41
Cuando el aparato está completamente cargado, el indicador de estado
de la batería se ilumina en verde de forma continua.
Nota: Si el aparato completamente cargado sigue colocado en el soporte
de carga después de 30 minutos, el indicador de estado de la batería se
apaga para ahorrar energía.
Uso del aparato
Puede utilizar el aparato en seco o en húmedo para afeitar o recortar el
vello de cualquier zona del cuerpo por debajo del cuello.
Nota: No utilice este aparato para afeitarse la cara o la cabeza.
Page 42

42
Español
Consejos para recortar y afeitar
-
Tómese su tiempo cuando comience a afeitarse zonas sensibles. Debe
adquirir práctica con el aparato. Además, la piel necesita tiempo para
acostumbrarse al procedimiento.
-
Si el vello tiene más de 10 mm, puede recortarlo primero con el peine-
guía 1 a una longitud de 3 mm para facilitar el afeitado.
-
Obtendrá los mejores resultados de recorte si la piel y el vello están
secos.
-
También puede utilizar el aparato en la ducha o en la bañera. Para
facilitar el deslizamiento, aplique espuma de afeitar o gel de ducha sobre
la piel.
Peines-guía
Los modelos BG2025 y BG2024 vienen con el peine-guía 1.
Los modelos BG2038, BG2036, BG2028 y BG2026 vienen con los peines-
guía 1, 2 y 3.
Se ha numerado la parte de atrás de cada peine como 1, 2 y 3 (consulte la
siguiente tabla para ver las longitudes de vello correspondientes después
del corte).
El peine-guía le permite cortar el vello con una longitud concreta (consulte
la tabla siguiente).
Si el aparato trae tres peines, comience a recortar con el peine-guía 3 para
adquirir práctica con el aparato.
Indicación de tamaño del peine-guía
1 3 mm/0,11 pulgadas
Longitud del vello después del corte
2 5 mm/0,19 pulgadas
3 7 mm/0,27 pulgadas
Cómo recortar
1 Encaje el peine-guía adecuado en el aparato. Asegúrese de que las púas
del peine apuntan en la dirección en la que va a mover el aparato.
Si mueve el aparato hacia usted, las púas deberán apuntar en esta
misma dirección.
Page 43

Español
Si mueve el aparato hacia el lado opuesto a usted, las púas deben
apuntar hacia la misma dirección.
2 Pulse el botón de encendido/apagado para encender el aparato.
3 Mueva el aparato en dirección contraria a la de crecimiento del vello.
Nota: Asegúrese de que la parte plana del peine-guía esté siempre en
contacto con la piel.
43
Afeitado
1 Si hay un peine-guía todavía colocado, quítelo.
Nota: Puede presionar el peine-guía o tirar de él para quitarlo, en función
de cómo se coloque el peine-guía en el aparato.
2 Pulse el botón de encendido/apagado una vez para encender el
aparato.
3 Coloque la unidad de afeitado sobre la piel.
4 Mueva el aparato en dirección contraria al crecimiento del vello con una
mano mientras estira la piel con la otra.
Nota: Asegúrese de que la unidad de afeitado esté siempre en contacto
con la piel.
Page 44

2
1
44
Español
Afeitado con el accesorio de afeitado para la parte posterior (solo modelos BG2038, BG2036)
Nota: El accesorio de afeitado para la parte posterior es adecuado para su
uso en seco y húmedo.
1 Mantenga pulsado el botón de liberación (1) y abra el accesorio de
afeitado para la parte posterior (2).
2 Coloque la parte inferior del aparato en la parte de abajo del soporte
correspondiente al accesorio de afeitado para la parte posterior. A
continuación, empuje la parte superior contra la parte de arriba del
soporte hasta que encaje en su posición con un clic.
3 Aféitese la espalda moviendo el accesorio de afeitado para la parte
posterior junto con el mango del aparato hacia arriba y hacia abajo.
Nota: Para su comodidad, el accesorio de afeitado para la parte posterior
se puede plegar en diferentes ángulos.
4 Para quitar el aparato del accesorio de afeitado para la parte posterior,
tire de la parte superior del aparato hacia usted hasta que salga del
soporte.
Page 45

2
1
Limpieza
Español
5 Para cerrar el accesorio de afeitado para la parte posterior, mantenga
pulsado el botón de liberación (1) y presione el mango contra el soporte
(2).
Limpie el aparato después de cada uso.
Precaución: No utilice nunca aire comprimido, estropajos, agentes de
limpieza abrasivos ni líquidos agresivos, como gasolina o acetona, para
limpiar el aparato.
1 Apague el aparato.
2 Si hay un peine-guía todavía colocado, quítelo.
Nota: Puede presionar el peine-guía o tirar de él para quitarlo, en función
de cómo se coloque el peine-guía en el aparato.
45
3 Extraiga la unidad de afeitado del aparato.
Page 46

46
Español
4 Utilice el cepillo de limpieza suministrado para limpiar el interior del
cabezal de afeitado o enjuague el interior bajo el grifo.
5 Enjuague la unidad de afeitado bajo el grifo.
6 Sacuda el exceso de agua y coloque la unidad de afeitado de nuevo en
el aparato.
7 Limpie el accesorio de afeitado para la parte posterior (solo para los
modelos BG2038/BG2036) con un paño húmedo. Enjuáguelo debajo del
grifo si lo usó para afeitarse la espalda con gel de ducha o espuma de
afeitar.
8 Limpie el soporte de carga con un paño húmedo.
Solicitud de accesorios
Para comprar accesorios o piezas de repuesto, visite
www.shop.philips.com/service o acuda a su distribuidor de Philips.
También puede ponerse en contacto con el Servicio de Atención al Cliente
de Philips en su país (consulte los datos de contacto en el folleto de la
garantía mundial).
Unidad de afeitado
Si utiliza el aparato con mucha frecuencia, sustituya la unidad de afeitado
(número de modelo BG2000) cada año. Si la unidad de afeitado está
dañada, sustitúyala inmediatamente.
Reciclaje
-
Este símbolo significa que este producto no debe desecharse con la
basura normal del hogar (2012/19/UE).
Page 47

-
Este símbolo significa que este producto contiene una batería recargable
integrada, que no debe desecharse con los residuos domésticos
normales (2006/66/EC). Recomendamos encarecidamente que se lleve
la batería a un punto de recogida oficial o a un centro de asistencia de
Philips, para desecharla de forma profesional.
-
Siga la normativa de su país para la recogida selectiva de productos
eléctricos y electrónicos y de baterías recargables. El desechado correcto
ayuda a evitar consecuencias negativas para el medio ambiente y la
salud humana.
Cómo extraer la batería recargable
1 Saque el aparato del soporte de carga y deje que el motor funcione
hasta que la batería esté completamente descargada.
2 Introduzca un destornillador de punta plana en la ranura de la parte
inferior del mango y gírelo para desbloquear el panel posterior de la
carcasa.
Español
47
3 Quite el panel posterior de la carcasa y, a continuación, quite los paneles
laterales.
4 Desenrosque los tornillos que conectan el cuerpo interior del aparato
con el panel frontal de la carcasa y separe el cuerpo interior del panel
frontal.
Page 48

48
Español
5 Dele la vuelta. A continuación, extraiga la cubierta del cuerpo interior con
el panel de control.
6 Extraiga el circuito impreso del cuerpo interior, dele la vuelta y corte los
cables que conectan la batería a la unidad de alimentación.
Garantía y asistencia
Si necesita asistencia o información, visite www.philips.com/support o lea
el folleto de garantía mundial independiente.
Resolución de problemas
En este capítulo se resumen los problemas más comunes que pueden surgir
al usar el aparato. Si no puede resolver el problema con la siguiente
información, visite www.philips.com/support para ver las preguntas más
frecuentes o póngase en contacto con el servicio de atención al cliente de
su país.
Problema
El aparato no funciona. La batería está vacía o el
El aparato produce más
ruido o vibra más de lo
normal.
Posible causa Solución
aparato no se carga.
Una o más piezas están rotas,
quizás porque el aparato se
ha caído.
Si el aparato se utiliza
profesionalmente, llegará al
final de su vida útil antes
La unidad de afeitado está
sucia.
La unidad de afeitado está
desgastada.
Recargue la batería (consulte el capítulo
‘Carga’) y compruebe que ha seguido las
instrucciones de los capítulos
‘Importante’ y ‘Carga’.
Lleve el aparato a su distribuidor o a un
centro de servicio autorizado por Philips
para su revisión o reparación.
No utilice el aparato profesionalmente.
Limpie la unidad de afeitado (consulte el
capítulo ‘Limpieza‘).
Sustituya la unidad de afeitado.
Page 49

Problema Posible causa Solución
El tiempo de
funcionamiento con una
carga completa se ha
reducido.
La unidad de afeitado está
sucia.
Limpie la unidad de afeitado (consulte el
capítulo ‘Limpieza‘).
Español
49
Rendimiento de recorte o
afeitado reducido
Está utilizando el aparato de
forma incorrecta.
La unidad de afeitado está
sucia.
La pila se está agotando. Recargue la batería (consulte el capítulo
No ha colocado el peine-guía
correctamente.
Si recorta vello muy rizado,
puede que el peine-guía no
alise el vello correctamente.
Siga las instrucciones del capítulo ‘Uso
del aparato’.
Limpie la unidad de afeitado (consulte el
capítulo ‘Limpieza‘).
‘Carga‘).
Quite el peine-guía y vuelva a colocarlo.
Intente alisar el vello con las manos
mientras lo recorta.
Page 50

50
Français
Introduction
Félicitations pour votre achat et bienvenue dans l'univers Philips ! Pour
profiter pleinement de l'assistance offerte par Philips, enregistrez votre
produit à l'adresse suivante : www.philips.com/welcome.
Description générale (fig. 1)
1 Sabot 1 (3 mm)
2 Sabot 2 (5 mm) (BG2038/BG2036/BG2028/BG2026 uniquement)
3 Sabot 3 (7 mm) (BG2038/BG2036/BG2028/BG2026 uniquement)
4 Indication de longueur de coupe (1, 2 ou 3)
5 Unité de rasage
6 Bouton marche/arrêt
7 Témoin d'état de la batterie
8 Bloc d'alimentation (adaptateur, type HQ8500, BG2038/ BG2036
uniquement)
9 Brossette de nettoyage (BG2038/BG2036/BG2028/BG2026
uniquement)
10 Accessoire de rasage pour le dos (BG2038/BG2036 uniquement)
11 Témoin d'état de la batterie
12 Bloc d'alimentation (adaptateur, type HQ850,
BG2028/BG2026/BG2025/BG2024 uniquement)
13 Socle de charge
Informations de sécurité importantes
Lisez attentivement ces informations importantes avant d'utiliser l'appareil
et ses accessoires et conservez-les pour un usage ultérieur. Les accessoires
fournis peuvent varier selon les différents produits.
Danger
-
Avertissement
-
-
Gardez le bloc d’alimentation au sec.
Le bloc d’alimentation contient un transformateur. N’essayez pas de
remplacer le bloc d’alimentation par une autre fiche afin d’éviter tout
accident.
Chargez toujours l’appareil à l’aide du bloc d’alimentation fourni.
Page 51

Attention
Français
-
Cet appareil peut être utilisé par des enfants âgés de 8 ans ou plus, des
personnes dont les capacités physiques, sensorielles ou intellectuelles
sont réduites ou des personnes manquant d'expérience et de
connaissances, à condition que ces enfants ou personnes soient sous
surveillance ou qu'ils aient reçu des instructions quant à l'utilisation
sécurisée de l'appareil et qu'ils aient pris connaissance des dangers
encourus. Les enfants ne doivent pas jouer avec l'appareil. Le nettoyage
et l'entretien ne doivent pas être effectués par des enfants sans
surveillance.
-
Débranchez toujours l'appareil avant de le nettoyer sous l'eau du robinet.
-
Vérifiez toujours l'appareil avant utilisation. Afin d'éviter tout accident,
n'utilisez pas l'appareil s'il est endommagé. Remplacez toujours une
pièce endommagée par une pièce du même type.
-
N'ouvrez pas l'appareil pour remplacer la pile rechargeable.
-
Ne plongez jamais la base de recharge dans l'eau et ne la rincez pas sous
le robinet.
-
N'utilisez jamais une eau dont la température est supérieure à 80 °C pour
rincer l'appareil.
-
N'utilisez pas cet appareil à d'autres fins que celles pour lesquelles il a
été conçu (voir le mode d'emploi).
-
Pour des raisons d'hygiène, l'appareil doit être utilisé par une seule
personne.
-
N'utilisez jamais d'air comprimé, de tampons à récurer, de produits
abrasifs ou de détergents agressifs tels que de l'essence ou de l'acétone
pour nettoyer l'appareil.
-
N’utilisez pas le bloc d’alimentation dans ou à proximité de prises
murales qui contiennent ou ont contenu un assainisseur d’air électrique,
afin d’éviter que le bloc d’alimentation ne subisse des dommages
irréversibles.
51
Champs électromagnétiques (CEM)
-
Cet Philips appareil est conforme à toutes les normes et à tous les
règlements applicables relatifs à l'exposition aux champs
électromagnétiques.
Informations d'ordre général
-
Cet appareil est étanche. Il peut être utilisé dans la baignoire et sous la
douche, et peut être nettoyé sous l'eau du robinet. Pour des raisons de
sécurité, l'appareil est uniquement prévu pour une utilisation sans fil.
-
L'appareil est conçu pour une tension secteur comprise entre 100 V et
240 V.
-
Le bloc d’alimentation transforme la tension de 100-240 V en une
tension de sécurité de moins de 24 V.
Page 52

52
Français
Charge
La charge dure 1 heure (BG2038/BG2036) ou 8 heures
(BG2028/BG2026/BG2025/BG2024) en fonction du modèle. Une fois
complètement rechargé, l'appareil dispose d'une autonomie maximale de
50 minutes. Lorsque le témoin d'état de la batterie clignote en rouge, la
batterie est presque déchargée (environ 10 minutes d'autonomie restantes).
Il faut alors recharger l'appareil.
1 Insérez la petite fiche dans la base de recharge.
2 Placez l'appareil sur le socle de charge.
Le voyant d'état des piles clignote en vert pour indiquer que l'appareil
est en cours de charge.
Remarque : Le témoin d'état de la batterie des tondeuses BG2028,
BG2026, BG2025 et BG2024 se présente différemment, mais tous
fonctionnent de la même façon.
Lorsque l'appareil est entièrement chargé, le témoin d'état de la batterie
s'allume en vert de manière continue.
Remarque : Si l'appareil est toujours branché sur le secteur 30 minutes
après la fin de la charge, le témoin d'état de la batterie s'éteint pour
économiser de l'énergie.
Utilisation de l'appareil
Vous pouvez utiliser le rasoir sur toutes les zones du corps situées endessous de la nuque, sur une peau sèche ou humide.
Page 53

Remarque : Ce rasoir ne convient ni au rasage du visage, ni à la tonte des
cheveux !
Conseils de coupe et de rasage
-
Lorsque vous utilisez la tondeuse sur des zones sensibles pour la
première fois, prenez votre temps. Vous devez vous familiariser avec
l'appareil. Votre peau doit également s'y habituer.
-
Si la longueur des poils à raser est supérieure à 10 mm, tondez-les
d'abord avec le sabot 1 à une longueur de 3 mm. Il vous sera plus facile
de les raser ensuite.
-
Vous obtenez de meilleurs résultats si vous utilisez la tondeuse sur une
peau ou des poils secs.
-
Vous pouvez utiliser l'appareil pour vous tondre sous la douche ou dans
le bain. Pour garantir une glisse optimale, appliquez de la mousse à raser
ou du gel douche sur votre peau.
Sabots
Les modèles BG2025 et BG2024 sont fournis avec le sabot 1.
Les modèles BG2038, BG2036, BG2028 et BG2026 sont fournis avec les
sabots 1, 2 et 3.
Le dos de chaque sabot porte le chiffre 1, 2 ou 3 (consultez le tableau ci-
dessous pour connaître les longueurs de coupe correspondantes).
Un sabot vous offre des hauteurs de coupe spécifiques (consultez le
tableau ci-dessous).
Si votre appareil est fourni avec 3 sabots, commencez par tondre avec le
sabot 3 pour vous familiariser avec l'appareil.
Indicateur de taille de sabot
1 3 mm
Hauteur obtenue
Français
53
2 5 mm
3 7 mm
Tondeuse
1 Fixez le sabot approprié sur l'appareil. Assurez-vous que les dents du
sabot sont orientées dans le sens de déplacement de l'appareil.
Page 54

54
Français
Lorsque vous déplacez l'appareil vers vous, les dents doivent être
orientées dans votre direction.
Lorsque vous déplacez l'appareil vers l'extérieur, les dents doivent être
orientées à distance.
2 Mettez l'appareil en marche en appuyant sur le bouton marche/arrêt.
3 Déplacez l'appareil dans le sens inverse de la pousse des poils.
Remarque : Assurez-vous que la partie plate du sabot est toujours en
contact avec la peau.
Se raser
1 Si un sabot se trouve sur la tondeuse, retirez-le.
Remarque : Vous pouvez pousser le sabot hors de l'appareil ou le tirer,
en fonction de son positionnement sur l'appareil.
2 Mettez l’appareil en marche en appuyant sur le bouton marche/arrêt.
3 Placez la grille de rasage sur la peau.
4 Déplacez l'appareil dans le sens inverse de la pousse des poils avec une
main, tout en exerçant une légère pression sur la peau avec l'autre main.
Remarque : Veillez à ce que l'unité de rasage soit toujours en contact
avec la peau.
Page 55

2
1
Français
Rasage avec l'accessoire de rasage pour le dos (BG2038, BG2036 uniquement)
Remarque : Cet accessoire de rasage pour le dos convient à une utilisation
sèche comme mouillée.
1 Maintenez le bouton de déverrouillage (1) enfoncé et ouvrez l'accessoire
de rasage pour le dos (2).
2 Placez le bas de l'appareil dans la partie basse du support de l'accessoire
de rasage pour le dos. Puis pressez le haut de l'appareil contre le haut du
support jusqu'à ce qu'il s'enclenche.
3 Rasez votre dos en déplaçant de haut en bas l'appareil muni de
l'accessoire de rasage du dos, en le tenant par le manche.
55
Remarque : Pour plus de confort, l'accessoire de rasage pour le dos peut
être plié sous différents angles.
4 Pour retirer l'accessoire de rasage pour le dos de l'appareil, tirez le haut
de l'appareil vers vous jusqu'à ce qu'il se détache du support.
Page 56

2
1
56
Français
Nettoyage
5 Pour fermer l'accessoire de rasage pour le dos, maintenez le bouton de
déverrouillage (1) enfoncé et poussez le manche contre le support (2).
Nettoyez l'appareil après chaque utilisation.
Attention : N'utilisez jamais d'air comprimé, de tampons à récurer, de
produits abrasifs ou de détergents agressifs tels que de l'essence ou de
l'acétone pour nettoyer l'appareil.
1 Éteignez l'appareil.
2 Si un sabot se trouve sur la tondeuse, retirez-le.
Remarque : Vous pouvez pousser le sabot hors de l'appareil ou le tirer,
en fonction de son positionnement sur l'appareil.
3 Retirez la tête de rasage de l'appareil.
Page 57

Français
4 Utilisez la brossette de nettoyage fournie pour nettoyer l'intérieur de la
tête de rasage ou rincez l'intérieur sous l'eau.
5 Rincez la tête de rasage sous l'eau.
6 Secouez la tête de rasage pour éliminer l'excès d'eau et replacez-la dans
l'appareil.
7 Nettoyez l'accessoire de rasage pour le dos (BG2038/BG2036
uniquement) à l'aide d'un chiffon humide. Rincez-le sous l'eau si vous
l'avez utilisé avec du gel douche ou de la mousse à raser.
8 Nettoyez-la à l'aide d'un chiffon humide.
57
Commande d'accessoires
Pour acheter des accessoires ou des pièces de rechange, consultez le site
Web www.shop.philips.com/service ou rendez-vous chez votre revendeur
Philips. Vous pouvez également communiquer avec le Service
Consommateurs Philips de votre pays (consultez le dépliant de garantie
internationale pour obtenir les coordonnées).
Unité de rasage
Si vous utilisez l'appareil de manière régulière, remplacez la tête de rasage
(référence BG2000) tous les ans. Si la tête de rasage est endommagée,
remplacez-la immédiatement.
Recyclage
-
Ce symbole signifie que ce produit ne doit pas être jetées avec les
déchets ménagèrs (2012/19/EU).
Page 58

58
Français
-
Ce symbole signifie que ce produit contient une batterie rechargeable
intégrée, qui ne doit pas être jetées avec les déchets ménagers
(2006/66/CE). Nous vous recommandons vivement de déposer votre
produit dans un point de collecte agréé ou un centre de service après-
vente Philips pour faire retirer la batterie rechargeable par des
professionnels.
-
Respectez les réglementations de votre pays concernant la collecte
séparée des appareils électriques et électroniques et des piles
rechargeables. La mise au rebut appropriée des piles permet de protéger
l'environnement et la santé.
Retrait de la pile rechargeable
1 Retirez l'appareil de la base de recharge et laissez-le fonctionner jusqu'à
ce que la batterie soit vide.
2 Insérez un tournevis plat dans la fente située en bas du manche et
tournez pour déverrouiller le panneau arrière du logement de batterie.
3 Retirez le panneau arrière du logement, puis les panneaux latéraux.
4 Retirez les vis qui fixent le panneau avant du logement au corps de
l'appareil, puis détachez le panneau avant de ce dernier.
Page 59

5 Retournez le corps de l'appareil. Détachez alors le couvercle ainsi que le
panneau de commande du corps de l'appareil.
6 Ôtez le circuit imprimé du corps de l'appareil. Tournez-le et coupez les
fils reliant la batterie au bloc d'alimentation.
Garantie et assistance
Si vous avez besoin d'aide ou d’informations supplémentaires, consultez le
site www.philips.com/support ou lisez le dépliant séparé sur la garantie
internationale.
Français
59
Dépannage
Problème
L’appareil ne fonctionne
pas.
L'appareil émet plus de
bruit et/ou émet des
vibrations plus fortes que
d'habitude.
Cette rubrique récapitule les problèmes les plus courants que vous pouvez
rencontrer avec l'appareil. Si vous ne parvenez pas à résoudre un problème
à l'aide des renseignements ci-dessous, rendez-vous sur le site
www.philips.com/support et consultez la liste des questions fréquemment
posées ou contactez le Service Consommateurs Philips de votre pays.
Cause possible Solution
La batterie est déchargée
et/ou l'appareil ne se
recharge pas correctement.
Une ou plusieurs pièces sont
endommagées, peut-être
suite à une chute de
l'appareil.
Si cet appareil est destiné à
un usage professionnel, sa
durée de vie sera réduite.
La tête de rasoir est sale. Nettoyez la tête de rasage (voir le
La tête de rasage est usée. Remplacez la tête de rasoir.
Rechargez la batterie (voir le chapitre
« Charge ») et vérifiez si vous avez suivi
toutes les instructions décrites dans les
chapitres « Important » et « Charge ».
Confiez l'appareil à votre revendeur ou à
un Centre Service Agréé Philips pour
vérification ou réparation.
N'utilisez pas l'appareil à des fins
professionnelles.
chapitre « Nettoyage »).
Page 60

60
Français
Problème Cause possible Solution
L'autonomie de l'appareil
après charge complète
diminue.
La tête de rasoir est sale. Nettoyez la tête de rasage (voir le
chapitre « Nettoyage »).
Les résultats de rasage
et/ou de tonte ne sont pas
satisfaisants.
Vous utilisez l'appareil de
manière incorrecte.
La tête de rasoir est sale. Nettoyez la tête de rasage (voir le
La batterie est presque
déchargée.
Vous n'avez pas fixé le sabot
correctement.
Si vous tondez des poils très
frisés, il se peut que le sabot
ne puisse pas les lisser
correctement.
Suivez les instructions décrites au
chapitre « Utilisation de l'appareil ».
chapitre « Nettoyage »).
Rechargez la batterie (voir le chapitre
« Charge »).
Retirez le sabot et fixez-le à nouveau.
Lissez les poils manuellement pendant la
tonte.
Page 61

Introduzione
Congratulazioni per l'acquisto e benvenuti in Philips! Per trarre il massimo
vantaggio dall'assistenza fornita da Philips, registrate il vostro prodotto sul
sito www.philips.com/welcome.
Descrizione generale (Fig. 1)
1 Pettine regola altezza 1 (3 mm)
2 Pettine regola altezza 2 (5 mm) (solo modelli
BG2038/BG2036/BG2028/BG2026)
3 Pettine regola altezza 3 (7 mm) (solo modelli
BG2038/BG2036/BG2028/BG2026)
4 Indicazione della lunghezza dei peli (1, 2 o 3)
5 Unità di rasatura
6 Pulsante on/off
7 Indicatore dello stato della batteria
8 Unità di alimentazione (adattatore, solo modelli HQ8500, BG2038/
BG2036)
9 Spazzolina per la pulizia (solo modelli
BG2038/BG2036/BG2028/BG2026)
10 Accessorio di rasatura per la schiena (solo BG2038/BG2036)
11 Indicatore dello stato della batteria
12 Unità di alimentazione (adattatore, solo modelli HQ850,
BG2028/BG2026/BG2025/BG2024)
13 Supporto di ricarica
Italiano
61
Informazioni di sicurezza importanti
Prima di utilizzare l'apparecchio e i relativi accessori, leggete attentamente
queste informazioni importanti e conservatele per eventuali riferimenti futuri.
Gli accessori forniti potrebbero variare a seconda del prodotto.
Pericolo
-
Tenete l'unità di alimentazione lontano dall'acqua.
Avviso
-
L'unità di alimentazione contiene un trasformatore. Non tagliate l'unità di
alimentazione per sostituirla con un'altra spina onde evitare situazioni
pericolose.
-
Ricaricate l'apparecchio solo con l'unità di alimentazione in dotazione.
Page 62

62
Italiano
Attenzione
-
Questo apparecchio può essere usato da bambini a partire da 8 anni di
età e da persone con capacità mentali, fisiche o sensoriali ridotte, prive di
esperienza o conoscenze adatte a condizione che tali persone abbiano
ricevuto assistenza o formazione per utilizzare l'apparecchio in maniera
sicura e capiscano i potenziali pericoli associati a tale uso. Evitate che i
bambini giochino con l'apparecchio. La manutenzione e la pulizia non
devono essere eseguite da bambini se non in presenza di un adulto.
-
Scollegate sempre la spina dall'apparecchio prima di pulirlo sotto l'acqua
corrente.
-
Controllate sempre l'apparecchio prima di utilizzarlo. Per evitare il rischio
di lesioni, non utilizzate l'apparecchio nel caso in cui sia danneggiato.
Sostituite sempre le parti danneggiate con ricambi originali.
-
Non aprite l'apparecchio per sostituire la batteria ricaricabile.
-
Non immergete mai il supporto di ricarica in acqua né sciacquatelo sotto
l'acqua corrente.
-
Non utilizzate acqua ad una temperatura superiore a 80° C per
sciacquare l'apparecchio.
-
Utilizzate questo apparecchio per lo scopo previsto come indicato nel
manuale dell'utente.
-
Per motivi igienici, l'apparecchio deve essere usato da una sola persona.
-
Non usate aria compressa, prodotti o sostanze abrasive o detergenti
aggressivi, come benzina o acetone, per pulire l'apparecchio.
-
Per evitare danni irreparabili, non usate l'unità di alimentazione in o
vicino a prese a muro che contengono o hanno contenuto un
deodorante elettrico per ambienti.
Campi elettromagnetici (EMF)
-
Questo apparecchio Philips è conforme a tutti gli standard e alle norme
relativi all'esposizione ai campi elettromagnetici.
Indicazioni generali
-
Questo apparecchio è impermeabile. Può essere usato in vasca o doccia
e pulito sotto l'acqua corrente. Per ragioni di sicurezza, l'apparecchio può
quindi essere utilizzato solo senza filo.
-
L'apparecchio funziona con tensioni comprese fra 100 e 240 V.
-
L'unità di alimentazione consente di trasformare la tensione a 100-240
volt in una tensione più bassa e sicura inferiore a 24 volt.
Come ricaricare il dispositivo
Per ricaricare l'apparecchio serve 1 ora (BG2038/BG2036) o 8 ore
(BG2028/BG2026/BG2025/BG2024) in base al modello. Quando
l'apparecchio è completamente carico, ha un'autonomia di funzionamento
Page 63

Italiano
di circa 50 minuti. Quando la spia della batteria lampeggia in rosso, la
batteria si sta scaricando (rimangono circa 10 minuti di autonomia) ed è
necessario ricaricare l'apparecchio.
1 Inserite lo spinotto nel supporto di ricarica.
2 Posizionate l'apparecchio sul supporto di ricarica.
La spia della batteria lampeggia in verde per indicare che l'apparecchio è
in carica.
Nota: la spia della batteria dei modelli BG2028, BG2026, BG2025 e
BG2024 è diversa, ma funziona nella stessa maniera.
63
Quando l'apparecchio è completamente carico, la spia di indicazione
dello stato della batteria diventa fisso.
Nota: se l'apparecchio è completamente carico è rimane collegato
all'alimentazione sull'apposito supporto di ricarica per altri 30 minuti,
l'indicatore di stato della batteria si spegne per risparmiare l'energia.
Modalità d'uso dell'apparecchio
Potete utilizzare l'apparecchio per depilare e rifinire i peli di tutte le parti del
corpo al di sotto del collo, sia bagnate che asciutte.
Nota: non utilizzate l'apparecchio per radere i capelli e i peli del viso.
Page 64

64
Italiano
Consigli per la rifinitura e la depilazione
-
La prima volta che utilizzate l'apparecchio sulle zone sensibili, prestate
particolare cautela per acquisire familiarità e consentire alla pelle di
abituarsi al metodo di rasatura.
-
Se i peli sono più lunghi di 10 mm, potete rifinirli prima con il pettine
regola altezza 1 a una lunghezza di 3 mm per poi raderli più facilmente.
-
I migliori risultati di rifinitura si ottengono quando la pelle e i peli sono
asciutti.
-
Potete usare l'apparecchio nella doccia o durante il bagno. Per farlo
scorrere più facilmente, applicate della schiuma o gel da barba sulla
pelle.
Pettini regola altezza
BG2025 e BG2024 sono dotati di pettine regola altezza 1.
BG2038, BG2036, BG2028 e BG2026 sono dotati di pettini regola altezza 1,
2 e 3.
Il retro di ciascun pettine è stato numerato: 1, 2 e 3 (per la lunghezza dei peli
corrispondente dopo il taglio, vedere la tabella sotto).
Un pettine regola altezza vi consente di tagliare i peli alla lunghezza
desiderata (vedere la tabella sotto).
Se il vostro apparecchio dispone di 3 pettini, iniziate la rifinitura con il
pettine 3 per acquisire familiarità con l'apparecchio.
Indicazione della misura del pettine
1 3 mm
Lunghezza dei peli dopo la rifinitura
2 5 mm
3 7 mm
Rifinitura
1 Inserite il pettine regola altezza appropriato sull'apparecchio facendolo
scattare in posizione. Assicuratevi che i denti del pettine puntino nella
direzione in cui desiderate muovere l'apparecchio.
Quando muovete l'apparecchio verso di voi, i denti devono essere diretti
nella stessa direzione.
Page 65

Rasatura
Italiano
Quando allontanate l'apparecchio, i denti si devono allontanare da voi.
2 Premete il pulsante on/off per accendere l'apparecchio.
3 Muovete sempre l'apparecchio nel senso opposto a quello della crescita.
Nota: controllate che la parte piatta del pettine regola altezza sia sempre
perfettamente a contatto con la pelle.
1 Se è ancora inserito il pettine regola altezza, rimuovetelo.
Nota: potete estrarre il pettine regola altezza dall'apparecchio sia
spingendolo che tirandolo, a seconda di come il pettine è posizionato
sull'apparecchio.
65
2 Premete il pulsante on/off per accendere l'apparecchio.
3 Posizionate l'unità di rasatura sulla pelle.
4 Muovete sempre l'apparecchio nel senso opposto a quello della crescita
con una mano, mentre tendete la pelle con la mano libera.
Nota: controllate che l'unità di rasatura sia sempre in contatto con la
pelle.
Rasatura con l'accessorio per la schiena (solo BG2038, BG2036)
Nota: l'accessorio per la schiena può essere usato sia sulla pelle bagnata
che asciutta.
Page 66

2
1
66
Italiano
1 Tenete premuto il pulsante di rilascio (1) e aprite l'accessorio di rasatura
per la schiena (2).
2 Posizionate la parte inferiore dell'apparecchio nella parte più bassa del
supporto dell'accessorio di rasatura per la schiena. Premete quindi la
parte superiore contro la parte superiore del supporto finché non si
blocca in posizione con uno scatto.
3 Radete la schiena muovendo l'accessorio di rasatura per la schiena
inserito nell'apparecchio verso l'alto e il basso, afferrandolo per
l'impugnatura.
Nota: per maggiore praticità, l'accessorio di rasatura per la schiena può
essere piegato in diverse angolazioni.
4 Per rimuovere l'apparecchio dall'accessorio di rasatura per la schiena,
tirate la parte superiore dell'apparecchio verso di voi finché non si estrae
dal supporto.
Page 67

2
1
Pulizia
Italiano
5 Per chiudere l'accessorio di rasatura per la schiena, tenete premuto il
pulsante di rilascio (1) e spingete l'impugnatura verso il supporto (2).
Pulite l'apparecchio ogni volta che lo usate.
Attenzione: Non usate aria compressa, prodotti o sostanze abrasive o
detergenti aggressivi, come benzina o acetone, per pulire l'apparecchio.
1 Spegnete l'apparecchio.
2 Se è ancora inserito il pettine regola altezza, rimuovetelo.
Nota: potete estrarre il pettine regola altezza dall'apparecchio sia
spingendolo che tirandolo, a seconda di come il pettine è posizionato
sull'apparecchio.
67
3 Estraete l'unità di rasatura dall'apparecchio.
4 Usate la spazzolina per la pulizia fornita per pulire l'interno della testina
di rasatura o risciacquate l'interno con acqua corrente.
Page 68

68
Italiano
5 Risciacquate l'unità di rasatura sotto l'acqua corrente.
6 Eliminate l'acqua in eccesso e riposizionate l'unità di rasatura
nell'apparecchio.
7 Pulite l'accessorio di rasatura per la schiena (solo BG2038/BG2036) con
un panno umido Risciacquatelo sotto l'acqua corrente se l'avete usato
per radere la schiena con gel doccia o una schiuma per rasatura.
8 Pulite il supporto di ricarica con un panno umido.
Ordinazione degli accessori
Per acquistare accessori o parti di ricambio, visitate il sito Web
www.shop.philips.com/service o recatevi presso il rivenditore Philips di
zona. Potete inoltre contattare il Centro Assistenza Clienti Philips del vostro
paese. Per i dettagli, fate riferimento all'opuscolo della garanzia
internazionale.
Unità di rasatura
Riciclaggio
Se usate l'apparecchio molto frequentemente, sostituite l'unità di rasatura
(codice BG2000) ogni anno. Se danneggiata, sostituite l'unità di rasatura
subito.
-
Questo simbolo indica che il prodotto non può essere smaltito con i
normali rifiuti domestici (2012/19/UE).
-
Questo simbolo indica che il prodotto contiene una batteria ricaricabile
integrata conforme alla direttiva europea 2006/66/CE e che quindi non
può essere smaltita con i normali rifiuti domestici. Vi consigliamo di
portare il prodotto presso un punto di raccolta ufficiale o un centro
assistenza Philips, dove un tecnico provvederà alla rimozione della
batteria ricaricabile.
-
Ci sono due situazioni in cui potete restituire gratuitamente il prodotto
vecchio a un rivenditore:
Page 69

1 Quando acquistate un prodotto nuovo, potete restituire un prodotto
simile al rivenditore.
2 Se non acquistate un prodotto nuovo, potete restituire prodotti con
dimensioni inferiori a 25 cm (lunghezza, altezza e larghezza) ai rivenditori
con superficie dedicata alla vendita di prodotti elettrici ed elettronici
superiore ai 400 m2.
-
In tutti gli altri casi, attenetevi alle normative di raccolta differenziata dei
prodotti elettrici, elettronici e delle batterie ricaricabili in vigore nel vostro
paese: un corretto smaltimento consente di evitare conseguenze
negative per l’ambiente e la salute.
Rimozione della batteria ricaricabile
1 Togliete l'apparecchio dal supporto di ricarica e lasciatelo in funzione
fino a quando è completamente scarico.
2 Inserite un cacciavite a testa piatta nella fessura inferiore
dell'impugnatura e ruotatelo per sbloccare il pannello posteriore
dell'alloggiamento.
3 Rimuovete il pannello posteriore dell'alloggiamento e rimuovete quindi i
pannelli laterali.
Italiano
69
4 Svitate le viti che tengono uniti il corpo interno dell'apparecchio al
pannello anteriore dell'alloggiamento e sollevate il corpo interno dal
pannello anteriore.
5 Capovolgete il corpo interno. Togliete quindi il coperchio del corpo
interno con il pannello di controllo dal corpo interno.
Page 70

70
Italiano
6 Estraete la scheda a circuito stampato dal corpo interno, voltatela e
tagliate i cavi metallici che collegano la batteria al gruppo di
alimentazione.
Garanzia e assistenza
Per assistenza o informazioni, visitate il sito www.philips.com/support
oppure leggete l'opuscolo della garanzia internazionale.
Risoluzione dei problemi
Questo capitolo riassume i problemi più comuni che potreste riscontrare con
il dispositivo. Se non riuscite a risolvere il problema con le informazioni
riportate di seguito, visitate il sito www.philips.com/support per un elenco
di domande frequenti oppure contattate il Centro Assistenza Clienti del
vostro paese.
Problema
L'apparecchio non
funziona.
L'apparecchio fa più
rumore e/o vibra più forte
del solito.
Possibile causa Soluzione
La batteria è scarica e/o
l'apparecchio non si ricarica.
Una o più parti sono rotte,
forse perché l'apparecchio è
stato fatto cadere.
Se quest'apparecchio viene
utilizzato a scopo
professionale avrà un ciclo di
vita più breve
L'unità di rasatura è sporca. Pulite l'unità di rasatura (vedete il
L'unità di rasatura è usurata. Sostituite l'unità di rasatura.
Ricaricate la batteria (vedete il capitolo
"Ricarica") e controllate se avete seguito
tutte le istruzioni nei capitoli "Importante"
e "Ricarica".
Portate l'apparecchio dal vostro
rivenditore o presso un Centro
Assistenza Philips autorizzato per farlo
controllare o riparare.
Non utilizzate l'apparecchio a scopo
professionale.
capitolo "Pulizia").
Page 71

Problema Possibile causa Soluzione
La durata di
funzionamento dopo una
ricarica completa
diminuisce.
L'unità di rasatura è sporca. Pulite l'unità di rasatura (vedete il
capitolo "Pulizia").
Italiano
71
Le prestazioni di rifinitura
e/o rasatura si sono ridotte
Usate l'apparecchio in
maniera sbagliata.
L'unità di rasatura è sporca. Pulite l'unità di rasatura (vedete il
La batteria è scarica. Ricaricate la batteria. Vedere il capitolo
Il pettine regola altezza non è
stato collegato
correttamente.
Se dovete tagliare capelli
molto ricci, il pettine regola
altezza non è in grado di
tendere i capelli
correttamente.
Seguite le istruzioni nel capitolo
"Modalità d'uso dell'apparecchio".
capitolo "Pulizia").
"Come ricaricare l'apparecchio".
Rimuovete il pettine regola altezza e
ricollegatelo.
Provate a tendere i capelli con le mani
mentre li tagliate.
Page 72

72
Nederlands
Introductie
Gefeliciteerd met uw aankoop en welkom bij Philips! Registreer uw product
op www.philips.com/welcome om optimaal gebruik te kunnen maken van
de door Philips geboden ondersteuning.
Algemene beschrijving (fig. 1)
1 Trimkam 1 (3 mm)
2 Trimkam 2 (5 mm) (alleen BG2038/BG2036/BG2028/BG2026)
3 Trimkam 3 (7 mm) (alleen BG2038/BG2036/BG2028/BG2026)
4 Haarlengte-indicator (1, 2 of 3)
5 Scheerunit
6 Aan-uitknop
7 Accustatusindicator
8 Voedingsunit (adapter, type HQ8500, alleen BG2038/BG2036)
9 Schoonmaakborsteltje (alleen BG2038/BG2036/BG2028/BG2026)
10 Scheerhulpstuk voor de rug (alleen BG2038/BG2036)
11 Accustatusindicator
12 Voedingsunit (adapter, type HQ850, alleen
BG2028/BG2026/BG2025/BG2024)
13 Oplaadstandaard
Belangrijke veiligheidsinformatie
Lees deze belangrijke informatie zorgvuldig door voordat u het apparaat en
de accessoires gaat gebruiken. Bewaar het boekje om het indien nodig later
te kunnen raadplegen. De meegeleverde accessoires kunnen per product
verschillen.
Gevaar
-
Waarschuwing
-
-
Houd de voedingsunit droog.
De voedingsunit bevat een transformator. Knip de voedingsunit niet af
om deze te vervangen door een andere stekker. Dit leidt tot een
gevaarlijke situatie.
Laad het apparaat alleen op met de meegeleverde voedingsunit.
Page 73

Let op
Nederlands
-
Dit apparaat kan worden gebruikt door kinderen vanaf 8 jaar en door
personen met verminderde lichamelijke, zintuiglijke of geestelijke
capaciteiten of weinig ervaring en kennis, mits zij onder toezicht staan of
instructies hebben gekregen voor veilig gebruik van het apparaat en mits
zij begrijpen welke gevaren het gebruik met zich mee kan brengen.
Kinderen mogen niet met het apparaat spelen. Kinderen mogen het
apparaat niet reinigen en ook geen nieuwe batterijen plaatsen of ander
gebruikersonderhoud uitvoeren zonder toezicht.
-
Koppel altijd de stekker los voordat u het apparaat onder de kraan
schoonspoelt.
-
Controleer het apparaat altijd voordat u het gaat gebruiken. Gebruik het
apparaat niet als het beschadigd is, omdat dit verwondingen kan
veroorzaken. Vervang een beschadigd onderdeel altijd door een
onderdeel van het oorspronkelijke type.
-
Probeer het apparaat niet te openen om de herlaadbare batterij te
vervangen.
-
Dompel de oplader nooit in water en spoel deze ook niet af onder de
kraan.
-
Gebruik nooit water met een temperatuur hoger dan 80 °C om het
apparaat schoon te spoelen.
-
Gebruik dit apparaat alleen voor het beoogde doeleinde zoals
beschreven in de gebruiksaanwijzing.
-
Om hygiënische redenen dient het apparaat slechts door één persoon te
worden gebruikt.
-
Gebruik nooit perslucht, schuursponzen, schurende
schoonmaakmiddelen of agressieve vloeistoffen zoals benzine of aceton
om het apparaat schoon te maken.
-
Gebruik de voedingsunit niet in of in de buurt van stopcontacten waar
een elektrische luchtverfrisser in zit of in heeft gezeten. Dit kan de
voedingsunit onherstelbaar beschadigen.
73
Elektromagnetische velden (EMV)
-
Dit Philips-apparaat voldoet aan alle toepasselijke richtlijnen en
voorschriften met betrekking tot blootstelling aan elektromagnetische
velden.
Algemeen
-
Dit apparaat is waterdicht. Dit betekent dat het in bad of onder de
douche kan worden gebruikt en onder de kraan kan worden gereinigd.
Het apparaat kan derhalve om veiligheidsredenen alleen snoerloos
worden gebruikt.
-
Het apparaat is geschikt voor een netspanning tussen 100 en 240 volt.
-
De voedingsunit zet 100-240 volt om in een veilige laagspanning van
minder dan 24 volt.
Page 74

74
Nederlands
Opladen
Het opladen duurt 1 uur (BG2038/BG2036) of 8 uur
(BG2028/BG2026/BG2025/BG2024), afhankelijk van het model. Wanneer
het apparaat volledig is opgeladen, kunt u het maximaal 50 minuten
gebruiken. Wanneer de accustatusindicator rood knippert, is de accu bijna
leeg (circa 10 minuten gebruikstijd over) en moet u het apparaat opladen.
1 Steek de kleine stekker in de oplader.
2 Plaats het apparaat in de oplaadstandaard.
De batterijstatusindicator knippert groen om aan te geven dat het
apparaat wordt opgeladen.
Opmerking: De accustatusindicatoren van de BG2028, BG2026, BG2025
en BG2024 zien er anders uit, maar werken op dezelfde manier.
Wanneer de accu volledig is opgeladen, blijft de accustatusindicator
groen branden.
Opmerking: Als het volledig opgeladen apparaat na 30 minuten nog
steeds is aangesloten op de oplader, gaat de accustatusindicator uit om
energie te besparen.
Het apparaat gebruiken
U kunt dit apparaat zowel in natte als droge omstandigheden gebruiken om
het haar op alle delen van het lichaam onder de hals te scheren of te
trimmen.
Page 75

Opmerking: Gebruik het apparaat niet om gezichtshaar of hoofdhaar te
scheren of trimmen.
Trim- en scheertips
-
Neem de tijd wanneer u voor het eerst gevoelige plekken scheert. U moet
namelijk vaardigheid krijgen in het gebruik van het apparaat. Uw huid
heeft bovendien enige tijd nodig om aan de behandeling te wennen.
-
Als het haar langer is dan 10 mm, kunt u het eerst met trimkam 1 op een
lengte van 3 mm knippen om het scheren gemakkelijker maken.
-
U bereikt de beste trimresultaten wanneer de huid en het haar droog zijn.
-
U kunt het scheerapparaat ook in bad of onder de douche gebruiken.
Gebruik wat scheerschuim of douchegel, zodat het scheerapparaat
soepel over de huid glijdt.
Trimkammen
De BG2025 en BG2024 worden geleverd met trimkam 1.
De BG2038, BG2036, BG2028 en BG2026 worden geleverd met trimkam 1, 2
en 3.
De achterkant van elke kam is voorzien van een nummer (1, 2 of 3). In de
onderstaande tabel ziet u de bijbehorende haarlengte na het trimmen.
Met de trimkam kunt u uw haar op een specifieke lengte knippen (zie de
onderstaande tabel).
Als uw apparaat wordt geleverd met 3 kammen, begint u met trimkam 3 om
ervaring op te doen met het apparaat.
Aanduiding kamlengte
1 3 mm
Haarlengte na het trimmen
Nederlands
75
2 5 mm
3 7 mm
Trimmen
1 Klik de gewenste trimkam op het apparaat. Zorg ervoor dat de tanden
van de kam in de richting wijzen waarin u het apparaat wilt bewegen.
Wanneer u het apparaat naar u toe beweegt, moeten de tanden in uw
richting wijzen.
Page 76

76
Nederlands
Wanneer u het apparaat van u af beweegt, moeten de tanden van u af
wijzen.
2 Druk op de aan-uitknop om het apparaat in te schakelen.
3 Beweeg het apparaat altijd tegen de haargroeirichting in.
Opmerking: Zorg ervoor dat het oppervlak van de kam altijd volledig
contact maakt met de huid.
Scheren
1 Als er nog een trimkam op het apparaat zit, verwijdert u deze.
Opmerking: U kunt de trimkam van het apparaat af duwen of trekken,
afhankelijk van hoe de kam op het apparaat is geplaatst.
2 Druk één keer op de aan-uitknop om het apparaat in te schakelen.
3 Plaats de scheerunit op de huid.
4 Beweeg met één hand het apparaat tegen de haargroeirichting in, terwijl
u de huid met de andere hand straktrekt.
Opmerking: Zorg ervoor dat de scheerunit altijd volledig in contact is met
de huid.
Page 77

2
1
Nederlands
Scheren met het scheerhulpstuk voor de rug (alleen BG2038, BG2036)
Opmerking: Het scheerhulpstuk voor de rug is geschikt voor zowel nat als
droog gebruik.
1 Houd de ontgrendelknop (1) ingedrukt en open het scheerhulpstuk voor
de rug (2).
2 Plaats de onderkant van het apparaat in het onderste deel van de
houder van het scheerhulpstuk voor de rug. Druk vervolgens de
bovenkant tegen het bovenste deel van de houder tot deze op zijn plaats
klikt.
3 Scheer uw rug door het scheerhulpstuk en het apparaat met het handvat
op en neer te bewegen.
77
Opmerking: Voor uw gemak kan het scheerhulpstuk voor de rug in
verschillende hoeken worden gedraaid.
4 Om het apparaat van het scheerhulpstuk voor de rug te verwijderen, trekt
u de bovenkant van het apparaat naar u toe tot deze van de houder
wordt losgekoppeld.
Page 78

2
1
78
Nederlands
5 Om het scheerhulpstuk te sluiten, houdt u de ontgrendelknop (1)
Schoonmaken
Maak het apparaat na elk gebruik schoon.
Let op: Gebruik nooit perslucht, schuursponzen, schurende
schoonmaakmiddelen of agressieve vloeistoffen, zoals benzine of aceton,
om het apparaat schoon te maken.
1 Schakel het apparaat uit.
2 Als er nog een trimkam op het apparaat zit, verwijdert u deze.
ingedrukt en duwt u het handvat tegen de houder (2).
Opmerking: U kunt de trimkam van het apparaat af duwen of trekken,
afhankelijk van hoe de kam op het apparaat is geplaatst.
3 Trek de scheerunit uit het apparaat.
Page 79

Nederlands
4 Gebruik het bijgeleverde schoonmaakborsteltje om de binnenkant van
het scheerhoofd schoon te maken of spoel de binnenkant onder de
kraan af.
5 Spoel de scheerunit onder de kraan af.
6 Schud het overtollige water van het scheerapparaat af en plaats de
scheerunit terug in het apparaat.
7 Maak het scheerhulpstuk voor de rug (alleen BG2038, BG2036) schoon
met een vochtige doek. Spoel het hulpstuk af onder de kraan als u het
hebt gebruikt om uw rug te scheren met douchegel of scheerschuim.
8 Maak de oplader met een vochtige doek schoon.
79
Accessoires bestellen
Ga naar www.shop.philips.com/service of uw Philips-dealer om
accessoires of reserveonderdelen aan te schaffen. U kunt ook contact
opnemen met het Philips Consumer Care Centre in uw land (zie de
meegeleverde wereldwijde garantieverklaring voor contactgegevens).
Scheerunit
Vervang de scheerunit (typenummer BG2000) ieder jaar als u het apparaat
regelmatig gebruikt. Als een scheerunit beschadigd is, moet deze
onmiddellijk worden vervangen.
Recyclen
-
Dit symbool betekent dat dit product niet samen met het gewone
huishoudelijke afval mag worden weggegooid (2012/19/EU).
Page 80

80
Nederlands
-
Dit symbool betekent dat dit product een ingebouwde oplaadbare
batterij bevat die niet samen met het gewone huishoudelijke afval mag
worden weggegooid (2006/66/EC). Wij raden u aan om uw product in te
leveren bij een officieel inzamelpunt of een Philips servicecentrum zodat
een professional de oplaadbare batterij kan verwijderen.
-
Volg de in uw land geldende regels voor de gescheiden inzameling van
elektrische en elektronische producten en accu’s. Als u oude producten
correct verwijdert, voorkomt u negatieve gevolgen voor het milieu en de
volksgezondheid.
De oplaadbare batterij verwijderen
1 Neem het apparaat uit de oplader en laat de motor lopen totdat de accu
helemaal leeg is.
2 Plaats een schroevendraaier met een platte kop in de sleuf aan de
onderkant van het handvat en draai deze om het achterpaneel van de
behuizing te ontgrendelen.
3 Verwijder het achterpaneel van de behuizing en verwijder dan de
zijpanelen.
4 Maak de schroeven los die de binnenkant van het apparaat aan het
voorpaneel van de behuizing bevestigen en scheid de binnenkant van
het voorpaneel.
5 Keer de binnenkant om. Verwijder vervolgens het deksel met het
bedieningspaneel van de binnenkant.
Page 81

6 Til de printplaat uit de binnenkant, keer deze om en snijd de draden door
die de accu met de voedingsunit verbinden.
Garantie en ondersteuning
Ga voor informatie of ondersteuning naar www.philips.com/support of lees
het afzonderlijke 'Worldwide guarantee'-vouwblad.
Problemen oplossen
In dit hoofdstuk worden in het kort de meest voorkomende problemen
behandeld die zich kunnen voordoen tijdens het gebruik van het apparaat.
Als u het probleem niet kunt oplossen met behulp van de onderstaande
informatie, gaat u naar www.philips.com/support voor een lijst met
veelgestelde vragen of neemt u contact op met het Consumer Care Center
in uw land.
Probleem
Het apparaat werkt niet. De accu is leeg en/of het
Mogelijke oorzaak Oplossing
apparaat laadt niet op.
Nederlands
Laad de accu op (zie het hoofdstuk
'Opladen') en controleer of u alle
instructies in de hoofdstukken 'Belangrijk'
en 'Opladen' hebt gevolgd.
81
Het apparaat maakt meer
geluid en/of trilt sterker
dan gebruikelijk.
De gebruikstijd van een
volledige opgeladen accu
neemt af.
Verminderde trim- en/of
scheerprestaties
Een of meer onderdelen zijn
kapot, misschien omdat u het
apparaat hebt laten vallen.
Als dit apparaat professioneel
wordt gebruikt, wordt het
einde van de levensduur
eerder bereikt.
De scheerunit is vuil. Maak de scheerunit schoon (zie het
De scheerunit is versleten. Vervang de scheerunit.
De scheerunit is vuil. Maak de scheerunit schoon (zie het
U gebruikt het apparaat op de
verkeerde manier.
De scheerunit is vuil. Maak de scheerunit schoon (zie het
Breng het apparaat naar uw dealer of
naar een door Philips geautoriseerd
servicecentrum voor onderzoek of
reparatie.
Gebruik het apparaat niet voor
professionele doeleinden.
hoofdstuk 'Schoonmaken').
hoofdstuk 'Schoonmaken').
Volg de instructies in het hoofdstuk 'Het
apparaat gebruiken'.
hoofdstuk 'Schoonmaken').
Page 82

82
Nederlands
Probleem Mogelijke oorzaak Oplossing
De batterij is bijna leeg. Laad de accu op (zie het hoofdstuk
'Opladen').
U hebt de trimkam niet goed
bevestigd.
Als u heel krullend haar trimt,
kan de trimkam het haar
mogelijk niet goed
rechtkammen.
Verwijder de trimkam en bevestig deze
opnieuw.
Probeer het haar tijdens het trimmen met
uw handen recht te trekken.
Page 83

Innledning
Gratulerer med kjøpet og velkommen til Philips! Registrer produktet på
www.philips.com/welcome for å dra full nytte av støtten som Philips tilbyr.
Generell beskrivelse (fig. 1)
1 Trimmekam 1 (3 mm / 0,11 tommer)
2 Trimmekam 2 (5 mm / 0,19 tommer) (kun
BG2038/BG2036/BG2028/BG2026)
3 Trimmekam 3 (7 mm / 0,27 tommer) (kun
BG2038/BG2036/BG2028/BG2026)
4 Indikasjon for hårlengde (1, 2 eller 3)
5 Skjæreenhet
6 Av/på-knapp
7 Batteristatusindikator
8 Forsyningsenhet (adapter, kun type HQ8500, BG2038/BG2036)
9 Rengjøringsbørste (kun BG2038/BG2036/BG2028/BG2026)
10 Ryggbarberingstilbehør (kun BG2038/BG2036)
11 Batteristatusindikator
12 Forsyningsenhet (adapter, kun type HQ850,
BG2028/BG2026/BG2025/BG2024)
13 Ladestativ
Viktig sikkerhetsinformasjon
Les denne viktige informasjonen nøye før du bruker apparatet og tilbehøret,
og ta vare på den for senere referanse. Tilbehøret som følger med, kan
variere for de ulike produktene.
Norsk
83
Fare
Advarsel
-
Hold forsyningsenheten tørr.
-
Strømadapteren inneholder en omformer. Ikke skjær av strømadapteren
for å erstatte den med en annen kontakt. Da kan det oppstå en farlig
situasjon.
-
Lad bare apparatet med forsyningsenheten levert med.
Page 84

84
Norsk
Forsiktig
-
Dette apparatet kan brukes av barn over 8 år og av personer med nedsatt
sanseevne eller fysisk eller psykisk funksjonsevne, eller personer med
manglende erfaring eller kunnskap, hvis de får instruksjoner om sikker
bruk av apparatet eller tilsyn som sikrer sikker bruk, og hvis de er klar over
risikoen. Barn skal ikke leke med apparatet. Barn skal ikke rengjøre eller
vedlikeholde apparatet uten tilsyn.
-
Trekk alltid ut støpselet før du rengjør apparatet under springen.
-
Sjekk alltid apparatet før du bruker det. Ikke bruk apparatet hvis det er
skadet, da dette kan føre til personskade. Bytt alltid ut en ødelagt del
med tilsvarende originaldel.
-
Ikke prøv å åpne apparatet for å bytte det oppladbare batteriet.
-
Ladestativet må aldri senkes ned i vann eller skylles under springen.
-
Apparatet må aldri rengjøres med vann som er varmere enn 80 °C.
-
Bruk bare dette apparatet til beregnet formål som vist i
brukerhåndboken.
-
Apparatet bør bare brukes av én person av hygieniske årsaker.
-
Ikke bruk trykkluft, skurebørster, skuremidler eller væsker som bensin eller
aceton for å rengjøre apparatet.
-
For å unngå skader som ikke kan repareres, skal du ikke bruke
strømadapteren i eller i nærheten av vegguttak som inneholder eller har
inneholdt elektriske luftfriskere.
Elektromagnetiske felt (EMF)
-
Dette Philips-apparatet overholder alle aktuelle standarder og forskrifter
for eksponering for elektromagnetiske felt.
Generelt
-
Dette apparatet er vanntett. Det kan brukes både i badekaret og i dusjen,
og det kan rengjøres i springen. Av sikkerhetsmessige årsaker kan
apparatet derfor bare brukes uten ledning.
-
Apparatet kan brukes med nettspenninger fra 100 til 240 volt.
-
Strømadapteren omformer 100–240 V til en sikker lavspenning på under
24 V.
Lading
Ladingen tar én time (BG2038/BG2036) eller åtte timer
(BG2028/BG2026/BG2025/BG2024), avhengig av modellen. Når apparatet
er fulladet, har det opptil 50 minutters brukstid. Når batteristatusindikatoren
blinker rødt, er batteriet nesten tomt (omtrent 10 minutter driftstid igjen), og
du må lade opp apparatet.
Page 85

Norsk
1 Sett den lille kontakten i ladestativet.
2 Sett apparatet i ladestativet.
Batteristatusindikatoren blinker grønt for å vise at apparatet lader.
Merk: Batteristatusindikatorene på BG2028, BG2026, BG2025 og BG2024
ser forskjellige ut, men fungerer på samme måte.
85
Når apparatet er fulladet, lyser batteristatusindikatoren kontinuerlig grønt.
Merk: Hvis det fulladede apparatet fortsatt er koblet til ladestativet etter
30 minutter, slukkes batteristatusindikatoren for å spare strøm.
Bruke apparatet
Du kan bruke apparatet vått eller tørt til å barbere hår på hele kroppen fra
halsen og ned.
Merk: Ikke bruk det til å barbere eller trimme hår i ansiktet eller på hodet.
Tips til trimming og barbering
-
Ta deg god tid når du først begynner å barbere følsomme hudpartier. Du
må få litt trening med apparatet. Huden trenger også litt tid til å bli vant til
prosedyren.
Page 86

86
Norsk
-
Hvis hårene er lengre enn 10 mm, kan du først trimme dem til en lengde
på 3 mm med trimmekam 1 for å gjøre barberingen enklere.
-
Du får best trimmeresultater når huden er tørr og håret er tørt.
-
Du kan barbere deg med apparatet i dusjen eller i badekaret. Du kan få
bedre gli ved å smøre inn huden med barberskum eller dusjgel.
Trimmekammer
BG2025 og BG2024 leveres med trimmekam 1.
BG2038, BG2036, BG2028 og BG2026 leveres med trimmekam 1, 2 og 3.
Baksiden av hver av kam er nummerert 1, 2 og 3 (se tabellen nedenfor for
tilsvarende hårlengder etter trimming).
En trimmekam lar deg klippe håret til en bestemt lengde (se tabellen
nedenfor).
Hvis apparatet leveres med tre kammer, begynner du å trimme med
trimmekam 3 for å få trening i å bruke dette apparatet.
Kammens størrelsesindikasjon
1 3 mm / 0,11 tommer
2 5 mm / 0,19 tommer
3 7 mm / 0,27 tommer
Hårlengde etter trimming
Trimming
1 Fest den passende trimmekammen på apparatet. Pass på at tennene på
tuppen av kammen peker i den retningen du skal bevege apparatet.
Når du fører apparatet mot deg, må tennene peke mot deg.
Når du fører apparatet bort fra deg, må tennene peke bort fra deg.
Page 87

Barbering
Norsk
2 Trykk på av/på-knappen for å slå på apparatet.
3 Beveg alltid apparatet mot hårets vekstretning.
Merk: Kontroller at den flate delen av trimmekammen alltid er i kontakt
med huden.
1 Hvis trimmekammen fremdeles sitter på apparatet, må du ta den av.
Merk: Du kan enten skyve eller trekke trimmekammen av apparatet,
avhengig av hvordan kammen er plassert på apparatet.
87
2 Trykk på av/på-knappen én gang for å slå på apparatet.
3 Plasser skjæreenheten på huden.
4 Beveg apparatet mot hårets vekstretning med én hånd, mens du strekker
huden med den andre hånden.
Merk: Kontroller at skjæreenheten alltid er helt i kontakt med huden.
Barbere med ryggbarberingstilbehøret (kun BG2038, BG2036)
Merk: Ryggbarberingstilbehøret kan brukes både vått og tørt.
1 Trykk på og hold nede utløserknappen (1), og åpne
ryggbarberingstilbehøret (2).
Page 88

2
1
88
Norsk
2 Plasser bunnen av apparatet i den nedre delen av holderen på
ryggbarberingstilbehøret. Trykk deretter toppen mot den øvre delen av
holderen til den klikker på plass.
3 Barber ryggen ved å bevege ryggbarberingstilbehøret med apparatet opp
og ned ved hjelp av håndtaket.
Merk: For å gjøre det enkelt kan ryggbarberingstilbehøret foldes sammen
i ulike vinkler.
4 Du tar av ryggbarberingstilbehøret ved å trekke toppen av apparatet mot
deg til den løses ut fra holderen.
Page 89

2
1
Rengjøring
Norsk
5 Du lukker ryggbarberingstilbehøret ved å trykke på og holde inne
utløserknappen (1) og skyve håndtaket mot holderen (2).
Rengjør alltid apparatet etter bruk.
Forsiktig: Bruk ikke trykkluft, skureputer, rengjøringsmidler med skureeffekt eller væsker som bensin eller aceton for å rengjøre apparatet.
1 Slå av apparatet.
2 Hvis trimmekammen fremdeles sitter på apparatet, må du ta den av.
Merk: Du kan enten skyve eller trekke trimmekammen av apparatet,
avhengig av hvordan kammen er plassert på apparatet.
89
3 Dra skjæreenheten ut av apparatet.
4 Bruk rengjøringsbørsten som følger med, og rengjør innsiden av
skjærehodet eller skyll innsiden under springen.
Page 90

90
Norsk
5 Skyll skjæreenheten under springen.
6 Rist av overflødig vann, og sett skjæreenheten tilbake i apparatet.
7 Rengjør ryggbarberingstilbehøret (kun BG2038/BG2036) med en fuktig
klut. Skyll det under springen hvis du har brukt det til å barbere ryggen
med dusjsåpe eller barberskum.
8 Rengjør ladestativet med en fuktig klut.
Bestille tilbehør
Gå til www.shop.philips.com/service eller din lokale Philips-forhandler for å
kjøpe tilbehør eller reservedeler. Du kan også kontakte Philips sin
forbrukerstøtte i landet der du bor (du finner kontaktinformasjonen i
garantiheftet).
Skjæreenhet
Resirkulering
Hvis du bruker apparatet svært ofte, bør du skifte ut skjæreenheten
(typenummer BG2000) én gang i året. Bytt en ødelagt skjæreenhet
umiddelbart.
-
Dette symbolet betyr at dette produktet ikke må avhendes i vanlig
husholdningsavfall (2012/19/EU).
-
Dette symbolet betyr at dette produktet inneholder et innebygd
oppladbart batteri som ikke skal kastes i vanlig husholdningsavfall
(2006/66/EC). Vi anbefaler deg å ta med produktet til et offentlig
innsamlingssted eller til et Philips-servicesenter, slik at det oppladbare
batteriet kan fjernes av en faglært.
-
Følg nasjonale bestemmelser om avfallsdeponering av elektriske og
elektroniske produkter samt oppladbare batterier. Riktig avfallshåndtering
bidrar til å forhindre negative konsekvenser for helse og miljø.
Page 91

Fjerne det oppladbare batteriet
1 Ta apparatet ut av ladestativet, og la motoren kjøre til batteriet er helt
tomt.
2 Sett en flat skrutrekker i sporet nederst på håndtaket, og vri den for å løse
ut bakpanelet på dekselet.
3 Ta av bakpanelet på dekselet, og ta deretter av sidepanelene.
4 Løsne skruene som kobler det innvendige kabinettet i apparatet til
frontpanelet på dekselet, og ta det innvendige kabinettet av frontpanelet.
Norsk
91
5 Snu det innvendige kabinettet. Ta deretter dekselet av det innvendige
kabinettet med kontrollpanelet fra det innvendige kabinettet.
6 Løft kretskortet ut av det innvendige kabinettet, snu det og kutt
ledningene som kobler batteriet til drivverket.
Page 92

92
Norsk
Garanti og støtte
Hvis du trenger informasjon eller hjelp, kan du gå til
www.philips.com/support eller lese det medfølgende garantiheftet med
global gyldighet.
Feilsøking
Dette kapitlet oppsummerer de vanligste problemene som kan oppstå med
apparatet. Hvis du ikke kan løse problemet ved hjelp av informasjonen
under, gå til www.philips.com/support for en liste med ofte stilte spørsmål,
eller ta kontakt med Philips Forbrukerstøttesenter i ditt eget land.
Problem
Apparatet virker ikke. Batteriet er tomt og/eller
Mulig årsak Løsning
apparatet lader ikke.
Lad opp batteriet (se avsnittet Lading),
og kontroller om du har fulgt alle
instruksjonene i avsnittene Viktig og
Lading.
Apparatet lager mer støy
og/eller vibrerer sterkere
enn vanlig.
Driftstiden når enheten er
fulladet, reduseres.
Redusert ytelse for
trimming og/eller barbering
Én eller flere deler er ødelagt.
Kanskje fordi du mistet
apparatet.
Hvis dette apparatet brukes
profesjonelt, når det slutten
av levetiden tidligere
Skjæreenheten er skitten. Rengjør skjæreenheten (se avsnittet
Skjæreenheten er slitt. Bytt skjæreenheten.
Skjæreenheten er skitten. Rengjør skjæreenheten (se avsnittet
Du bruker apparatet på feil
måte.
Skjæreenheten er skitten. Rengjør skjæreenheten (se avsnittet
Batterinivået er lavt. Lad opp batteriet (se avsnittet Lading).
Du har ikke festet
trimmekammen ordentlig.
Hvis du trimmer svært krøllete
hår, er det ikke sikkert at
trimmekammen klarer å rette
håret ordentlig.
Ta apparatet med til forhandleren eller et
autorisert Philips-servicesenter for
undersøkelse eller reparasjon.
Ikke bruk apparatet profesjonelt.
Rengjøring).
Rengjøring).
Følg instruksjonene i avsnittet Bruke
apparatet.
Rengjøring).
Fjern trimmekammen, og sett den på
igjen.
Prøv å rette håret med hendene mens du
trimmer.
Page 93

Introdução
Parabéns pela sua compra e seja bem-vindo à Philips! Para beneficiar na
totalidade da assistência que a Philips oferece, registe o seu produto em
www.philips.com/welcome.
Descrição geral (Fig. 1)
1 Pente aparador 1 (3 mm)
2 Pente aparador 2 (5 mm) (apenas nos modelos
BG2038/BG2036/BG2028/BG2026)
3 Pente aparador 3 (7 mm) (apenas nos modelos
BG2038/BG2036/BG2028/BG2026)
4 Indicação do comprimento do pelo (1, 2 ou 3)
5 Acessório de corte
6 Botão ligar/desligar
7 Indicador de estado das pilhas
8 Unidade de alimentação (adaptador, apenas do tipo HQ8500,
BG2038/BG2036)
9 Escova de limpeza (apenas nos modelos
BG2038/BG2036/BG2028/BG2026)
10 Acessório para cortar os pelos das costas (apenas nos modelos
BG2038/BG2036)
11 Indicador de estado das pilhas
12 Unidade de alimentação (adaptador, apenas do tipo HQ850,
BG2028/BG2026/BG2025/BG2024)
13 Base de carga
Português
93
Informações de segurança importantes
Leia cuidadosamente estas informações importantes antes de utilizar os
aparelhos e respetivos acessórios e guarde-as para uma eventual consulta
futura. Os acessórios fornecidos podem variar consoante os produtos.
Perigo
-
Mantenha a unidade de alimentação seca.
Aviso
-
A unidade de alimentação contém um transformador. Não corte a
unidade de alimentação para a substituir por outra ficha, pois isto
representa uma situação de perigo.
-
Carregue apenas o aparelho com a unidade de alimentação fornecida.
Page 94

94
Português
Cuidado
-
Este aparelho pode ser utilizado por crianças com idade igual ou
superior a 8 anos e por pessoas com capacidades físicas, sensoriais ou
mentais reduzidas ou sem experiência e conhecimentos, caso sejam
supervisionadas ou lhes tenham sido dadas instruções relativas à
utilização segura do aparelho e se compreenderem os perigos
envolvidos. As crianças não devem brincar com o aparelho. A limpeza e
manutenção não devem ser efectuadas por crianças sem supervisão.
-
Antes de lavar em água corrente, desligue sempre a ficha do aparelho.
-
Verifique sempre o aparelho antes de o utilizar. Não utilize o aparelho se
este estiver danificado ou partido, pois isto pode provocar ferimentos.
Substitua sempre uma peça danificada por uma equivalente de origem.
-
Não abra o aparelho para substituir a bateria recarregável.
-
Nunca imerja a base de carga em água, nem a enxague em água
corrente.
-
Não lave o aparelho em água a uma temperatura superior a 80 °C.
-
Utilize este aparelho apenas para o fim a que se destina, conforme
indicado no manual do utilizador.
-
Por questões de higiene, o aparelho só deve ser utilizado por uma
pessoa.
-
Nunca utilize ar comprimido, esfregões, agentes de limpeza abrasivos ou
líquidos agressivos, tais como petróleo ou acetona, para limpar o
aparelho.
-
Não utilize a unidade de alimentação em/perto de tomadas que tenham
ou tenham tido um ambientador elétrico, para evitar danos irreparáveis à
unidade de alimentação.
Campos electromagnéticos (CEM)
-
Este aparelho Philips cumpre todas as normas e regulamentos aplicáveis
relativos à exposição a campos electromagnéticos.
Geral
-
Este aparelho é à prova de água. É adequado para utilização durante o
banho ou duche e para lavar na torneira. Por motivos de segurança, o
aparelho só pode ser utilizado sem o fio.
-
Este aparelho é indicado para voltagens entre 100 e 240 volts.
-
A unidade de alimentação transforma 100-240 volts numa tensão segura
e baixa inferior a 24 volts.
Carregamento
O carregamento demora 1 hora (BG2038/BG2036) ou 8 horas
(BG2028/BG2026/BG2025/BG2024) consoante o modelo. Quando o
aparelho estiver completamente carregado, este possui uma autonomia de
Page 95

Português
até 50 minutos. Quando o indicador do estado da bateria ficar intermitente
a vermelho, a bateria tem pouca carga (restam aprox. 10 minutos de tempo
de funcionamento) e tem de recarregar o aparelho.
1 Introduza a ficha pequena na base de carga.
2 Coloque o aparelho na base de carga.
O indicador do estado da bateria fica intermitente a verde para indicar
que o aparelho está a carregar.
Nota: O indicador do estado da bateria do BG2028, BG2026, BG2025 e
BG2024 tem uma aparência diferente, mas funciona da mesma forma.
95
Quando o aparelho está completamente carregado, o indicador do
estado da bateria mantém-se continuamente aceso a verde.
Nota: Se o aparelho completamente carregado continuar na base de
carga ligada à corrente durante 30 minutos, depois desse período o
indicador do estado da bateria apaga-se para poupar energia.
Utilizar o aparelho
Pode utilizar o aparelho sobre a pele húmida ou seca para depilar todas as
partes do corpo abaixo da linha do pescoço.
Nota: Não utilize este aparelho para depilar ou aparar pelos faciais ou a
cabeça.
Page 96

96
Português
Sugestões para aparar e cortar pelos
-
Demore o tempo necessário na primeira vez que aparar áreas sensíveis.
Deve ganhar prática com o aparelho. A sua pele também necessita de
algum tempo para se ajustar ao procedimento.
-
Se os pelos tiverem um comprimento superior a 10 mm, primeiro pode
apará-los com o pente aparador 1 para estes ficarem com um
comprimento de 3 mm, facilitando o seu corte.
-
Obtém os melhores resultados ao aparar quando a pele e os pelos estão
secos.
-
Pode utilizar o aparelho no banho ou no duche. Para assegurar um
deslizar mais fácil, aplique espuma de barbear ou gel de duche na pele.
Pentes aparadores
O BG2025 e o BG2024 incluem o pente do aparador 1.
O BG2038, BG2036, BG2028 e o BG2026 incluem os pentes do aparador 1,
2 e 3.
A parte traseira de cada pente foi numerada com 1, 2 e 3 (consulte a tabela
abaixo relativamente aos comprimentos de cabelos correspondentes após
aparar).
Um pente aparador permite cortar cabelo de um comprimento específico
(consulte a tabela abaixo).
Se o aparelho incluir 3 pentes, comece a aparar com o pente aparador 3
para praticar com o aparelho.
Indicação do tamanho do pente
1 3 mm
Comprimento depois de aparar
2 5 mm
3 7 mm
Aparar
1 Encaixe o pente aparador adequado no aparelho. Certifique-se de que
os dentes do pente estão voltados na direção em que está a movimentar
o aparelho.
Quando movimentar o aparelho na sua direcção, os dentes têm de estar
voltados para si.
Page 97

Português
Quando movimentar o aparelho afastando-o de si, os dentes têm de
estar voltados na direcção oposta a si.
2 Prima o botão ligar/desligar para ligar o aparelho.
3 Movimente o aparelho no sentido oposto ao do crescimento do pêlo.
Nota: Certifique-se de que a parte plana do pente aparador está sempre
em contacto com a pele.
97
Corte
1 Se ainda estiver encaixado um pente aparador, retire-o.
Nota: Pode pressionar o pente aparador para o desencaixar do aparelho
ou pode puxá-lo para o retirar, dependendo da forma como o pente está
colocado no aparelho.
2 Prima uma vez o botão ligar/desligar no aparelho.
3 Coloque o acessório de corte sobre a pele.
4 Movimente o aparelho na direção contrária à do crescimento do pelo,
enquanto estica a pele com a outra mão.
Nota: Certifique-se de que o acessório de corte está sempre
completamente em contacto com a pele.
Page 98

2
1
98
Português
Cortar com o acessório para cortar os pelos das costas (apenas nos modelos BG2038, BG2036)
Nota: O acessório para cortar os pelos das costas é adequado para uma
utilização a húmido e a seco.
1 Mantenha o botão de libertação (1) premido e abra o acessório para
cortar os pêlos das costas (2).
2 Coloque a parte inferior do aparelho na parte inferior do suporte do
acessório para cortar os pelos das costas. Em seguida, prima a parte
superior contra a parte superior do suporte até ficar preso na posição
correta com um clique.
3 Corte os pelos nas suas costas movimentando o acessório com o
aparelho para cima e para baixo, enquanto o segura pela pega.
Nota: Para lhe proporcionar uma maior comodidade, o acessório para
cortar os pelos das costas pode ser dobrado a diferentes ângulos.
4 Para retirar o aparelho do acessório para cortar os pelos das costas, puxe
a parte superior do aparelho na sua direção, até este se soltar do
suporte.
Page 99

2
1
Limpeza
Português
5 Para fechar o acessório para cortar os pêlos das costas, mantenha o
botão de libertação (1) premido e pressione a pega contra o suporte (2).
Limpe o aparelho após cada utilização.
Atenção: Nunca utilize ar comprimido, esfregões, agentes de limpeza
abrasivos ou líquidos agressivos, tais como petróleo ou acetona, para
limpar o aparelho.
1 Desligue o aparelho.
2 Se ainda estiver encaixado um pente aparador, retire-o.
Nota: Pode pressionar o pente aparador para o desencaixar do aparelho
ou pode puxá-lo para o retirar, dependendo da forma como o pente está
colocado no aparelho.
99
3 Retire o acessório de corte do aparelho.
Page 100

Português
4 Utilize a escova de limpeza fornecida para limpar o interior da cabeça de
corte ou para enxaguar o interior em água corrente.
5 Enxague o acessório de corte em água corrente.
6 Sacuda o excesso de água e volte a colocar o acessório de corte no
aparelho.
7 Limpe o acessório para cortar os pelos das costas (apenas
BG2038/BG2036) com um pano húmido. Exangue em água corrente se
o tiver utilizado para aparar os pelos das costas com gel de duche ou
espuma de barbear.
8 Limpe o suporte de carga com um pano húmido.
Encomendar acessórios
Para comprar acessórios ou peças sobresselentes, visite
www.shop.philips.com/service ou dirija-se ao seu revendedor Philips.
Também pode contactar o Centro de Apoio ao Cliente da Philips no seu
país (consulte os dados de contacto no folheto de garantia mundial).
Acessório de corte
Se utilizar o aparelho com muita frequência, substitua o acessório de corte
(referência BG2000) todos os anos. Substitua imediatamente os acessórios
de corte danificados.
Reciclagem
-
Este símbolo significa que este produto não deve ser eliminado
juntamente com os resíduos domésticos comuns (2012/19/UE).
 Loading...