

Philips BG2024-15 operation manual
BG2038, BG2036, BG2028, BG2026, BG2025, BG2024
1
2
9
10
12
3
5
6
7
8
11
BG2024
BG2025
BG2026
BG2028
BG2036
BG2038
13
4


English 6
Dansk 17
Deutsch 28
Español 39
Français 50
Italiano 61
Nederlands 72
Norsk 83
Português 93
Suomi 104
Svenska 114
Türkçe 124
Ελληνικα 134

6
English
Introduction
Congratulations on your purchase and welcome to Philips! To fully benefit
from the support that Philips offers, register your product at
www.philips.com/welcome.
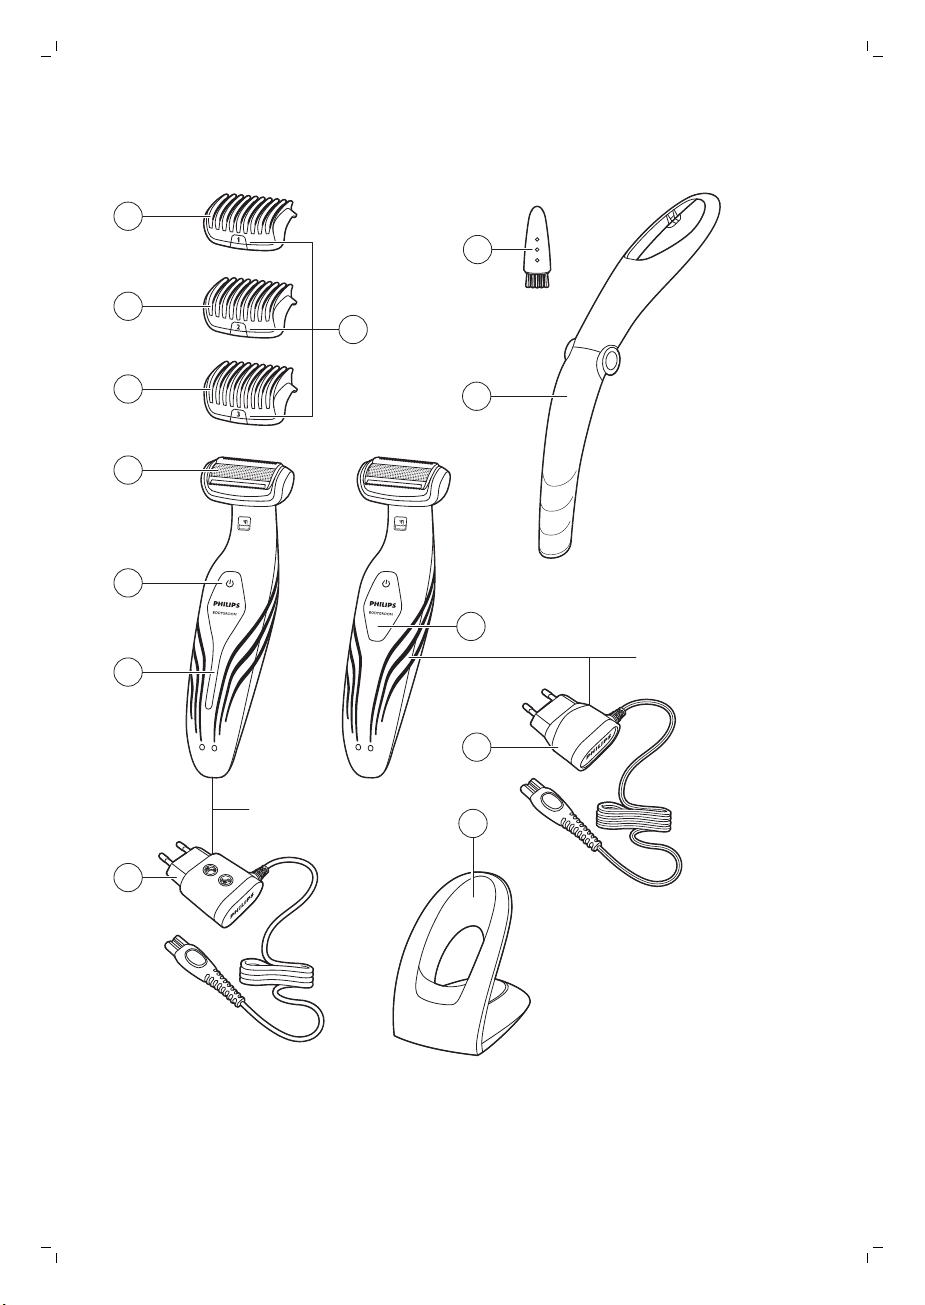
General description (Fig. 1)
1 Trimming comb 1 (3mm/0.11 inch)
2 Trimming comb 2 (5mm/0.19 inch) (BG2038/BG2036/BG2028/BG2026
only)
3 Trimming comb 3 (7mm/0.27 inch) (BG2038/BG2036/BG2028/BG2026
only)
4 Hair length indication (1, 2 or 3)
5 Shaving unit
6 On/off button
7 Battery status indicator
8 Supply unit (adapter, type HQ8500, BG2038/ BG2036 only)
9 Cleaning brush (BG2038/BG2036/BG2028/BG2026 only)
10 Back shaving attachment (BG2038/BG2036 only)
11 Battery status indicator
12 Supply unit (adapter, type HQ850, BG2028/BG2026/BG2025/BG2024
only)
13 Charging stand
Important safety information
Read this important information carefully before you use the appliance and
its accessories and save it for future reference. The accessories supplied
may vary for different products.
Danger
Warning
-
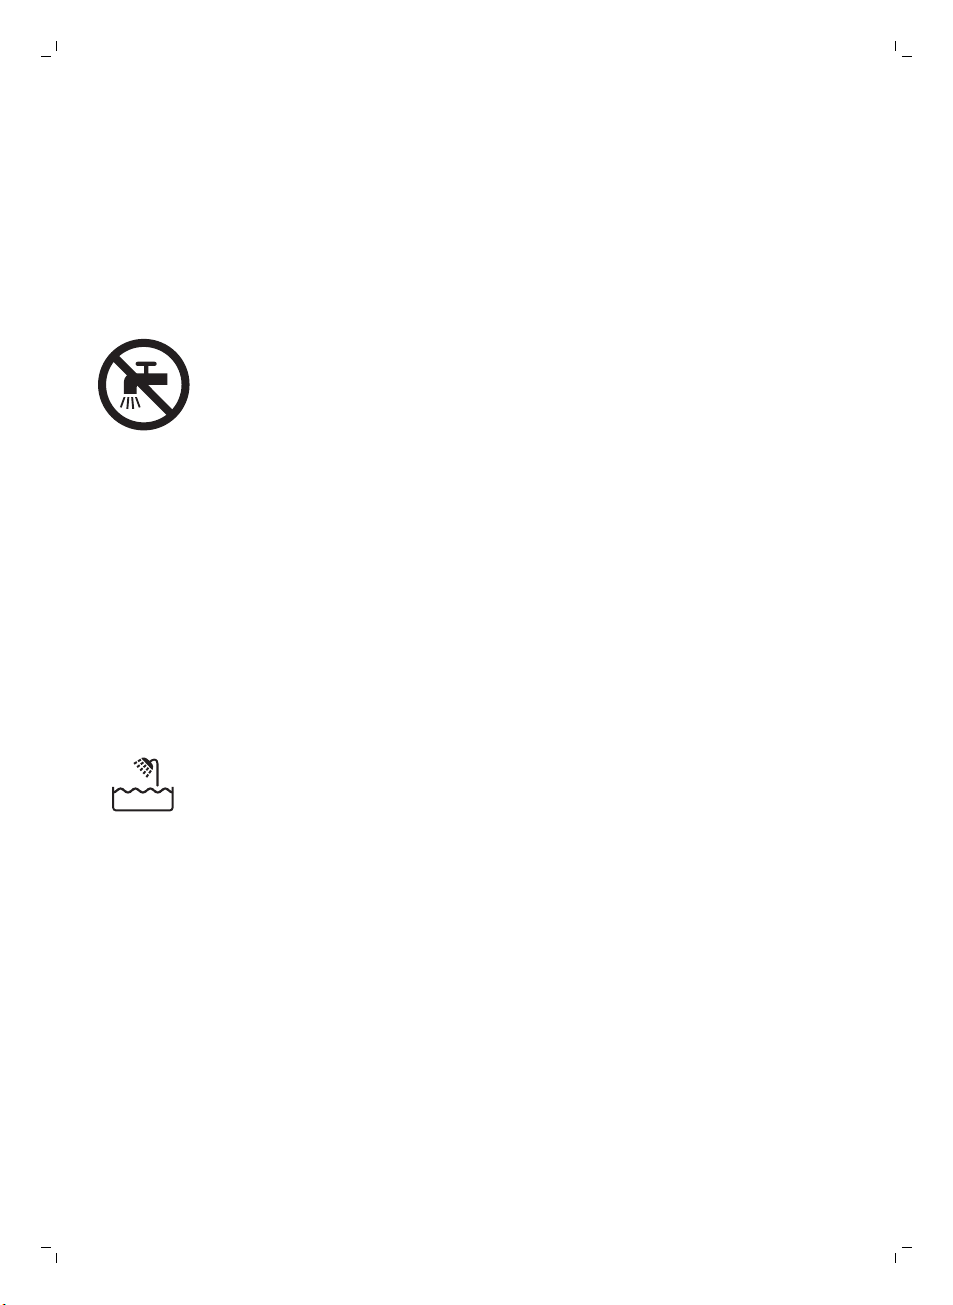
Keep the supply unit dry.
-
The supply unit contains a transformer. Do not
cut off the supply unit to replace it with another
plug, as this causes a hazardous situation.
-
Only charge the appliance with the supply unit
provided.
English

English
-
This appliance can be used by children aged
from 8 years and above and persons with
reduced physical, sensory or mental capabilities
or lack of experience and knowledge if they
have been given supervision or instruction
concerning use of the appliance in a safe way
and understand the hazards involved. Children
shall not play with the appliance. Cleaning and
user maintenance shall not be made by children
without supervision.
-
Always unplug the appliance before you clean it
under the tap.
-
Always check the appliance before you use it.
Do not use the appliance if it is damaged, as this
may cause injury. Always replace a damaged
part with one of the original type.
-
Do not open the appliance to replace the
rechargeable battery.
7
Caution
-
Never immerse the charging stand in water and
do not rinse it under the tap.
-
Never use water hotter than 80°C to rinse the
appliance.
-
Only use this appliance for its intended purpose
as shown in the user manual.
-
For hygienic reasons, the appliance should only
be used by one person.
-
Never use compressed air, scouring pads,
abrasive cleaning agents or aggressive liquids
such as petrol or acetone to clean the appliance.
8
English
-
Do not use the supply unit in or near wall
sockets that contain or have contained an
electric air freshener to prevent irreparable
damage to the supply unit.
Electromagnetic fields (EMF)
-
This Philips appliance complies with all applicable standards and
regulations regarding exposure to electromagnetic fields.
General
-
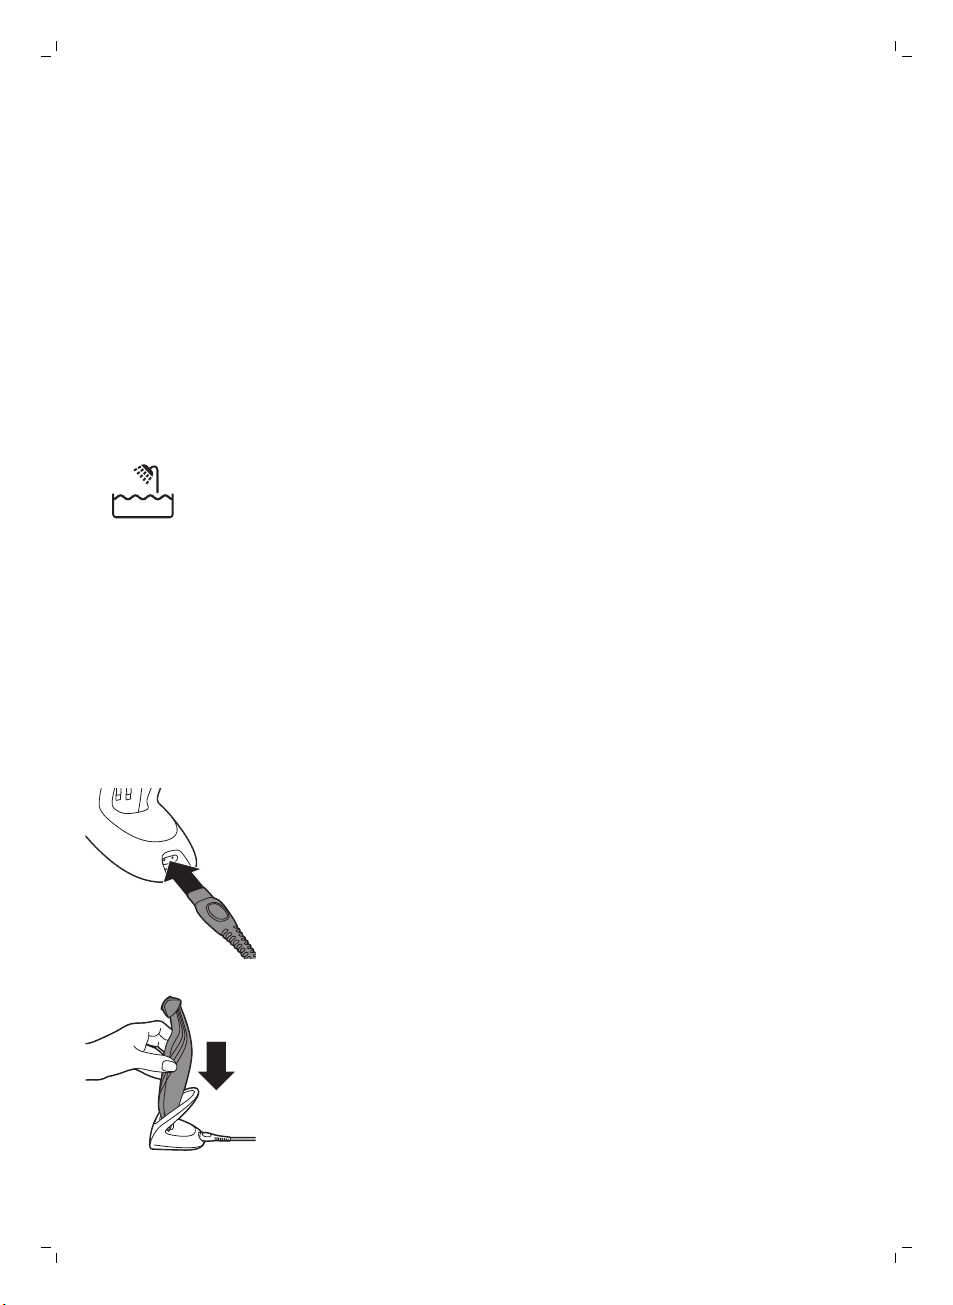
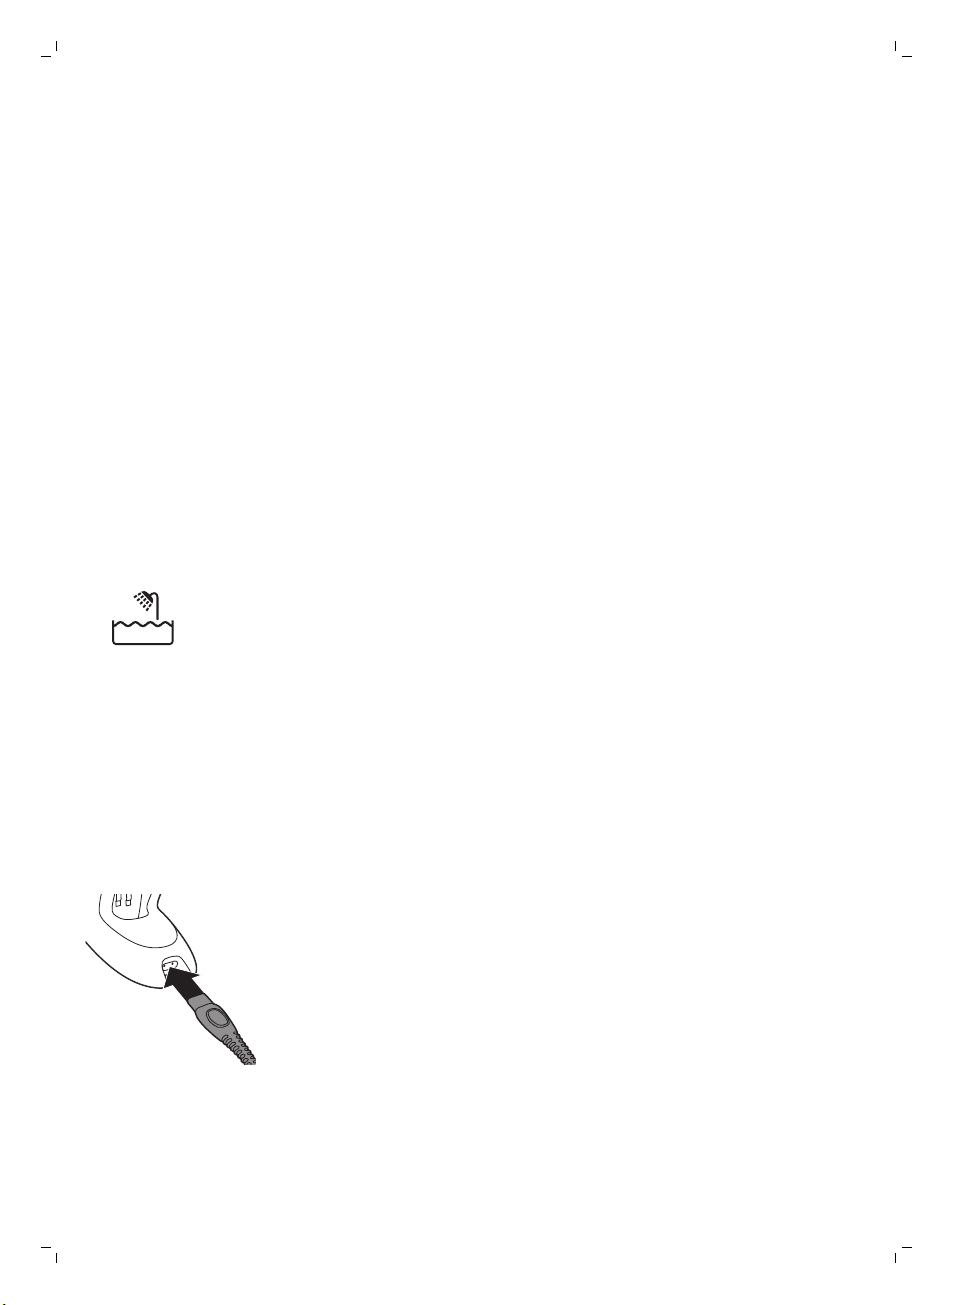
This appliance is waterproof. It is suitable for use in the bath or shower
and for cleaning under the tap. For safety reasons, the appliance can
therefore only be used without cord.
-
The appliance is suitable for mains voltages ranging from 100 to 240
volts.
-
The supply unit transforms 100-240 volts to a safe low voltage of less
than 24 volts.
Charging
Charging takes 1 hour (BG2038/BG2036) or 8 hours
(BG2028/BG2026/BG2025/BG2024) depending on the model. When the
appliance is fully charged, it has an operating time of up to 50 minutes.
When the battery status indicator flashes red, the battery is running low
(approx. 10 minutes of operating time left) and you need to recharge the
appliance.
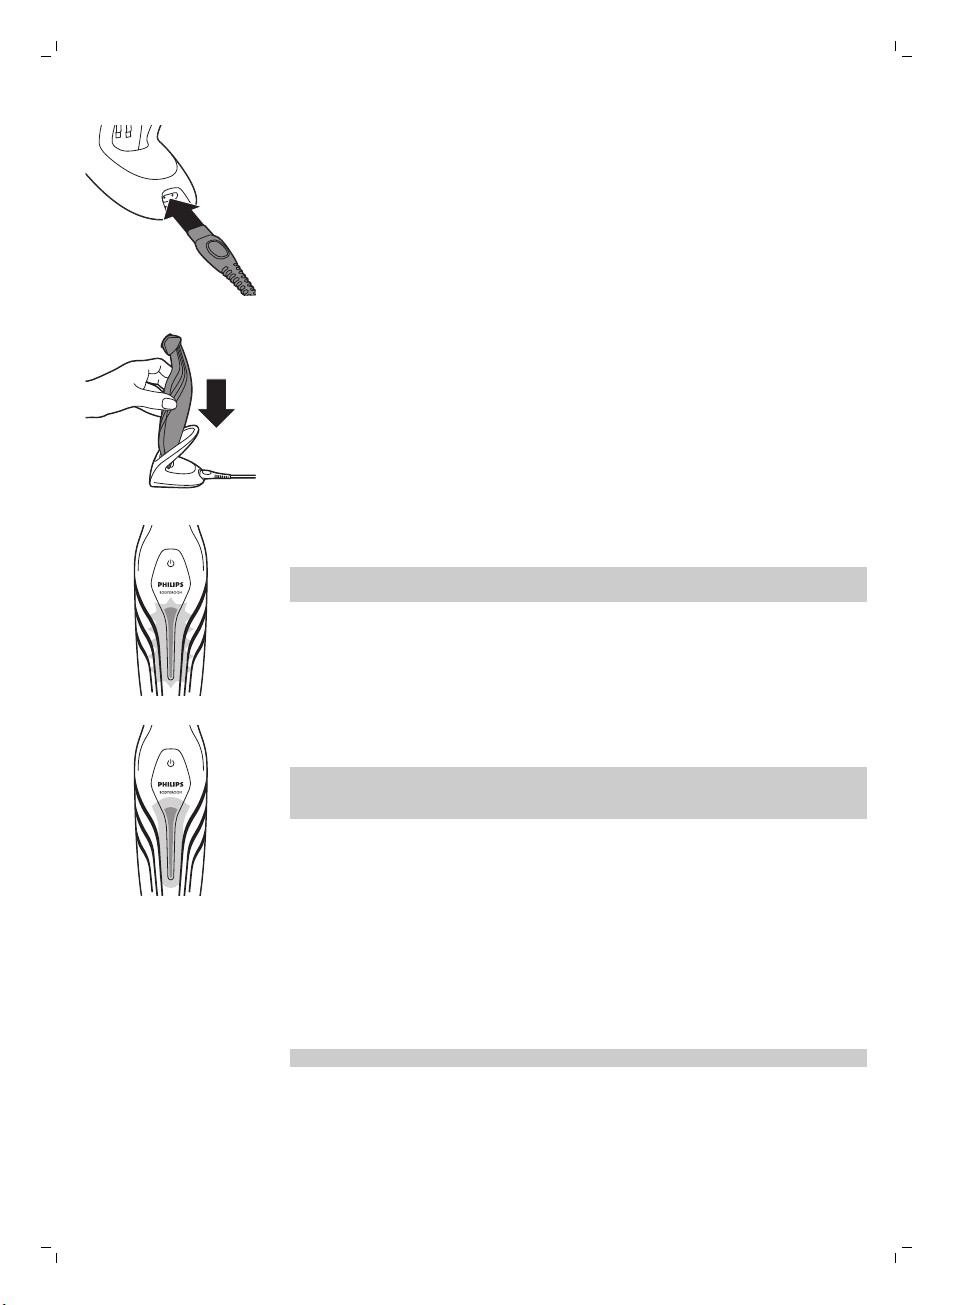
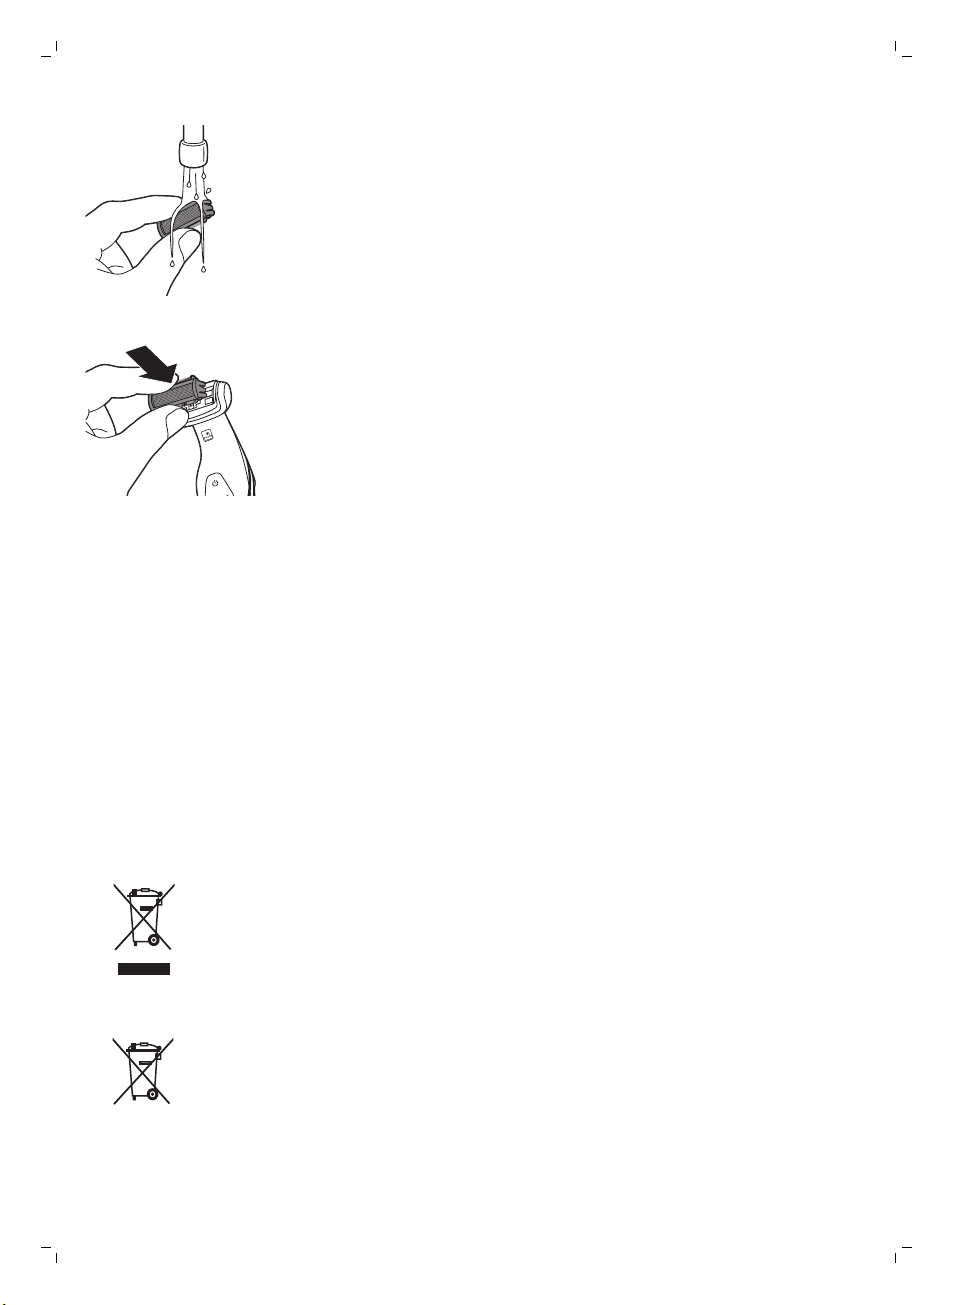
1 Insert the small plug into the charging stand.
2 Put the appliance in the charging stand.
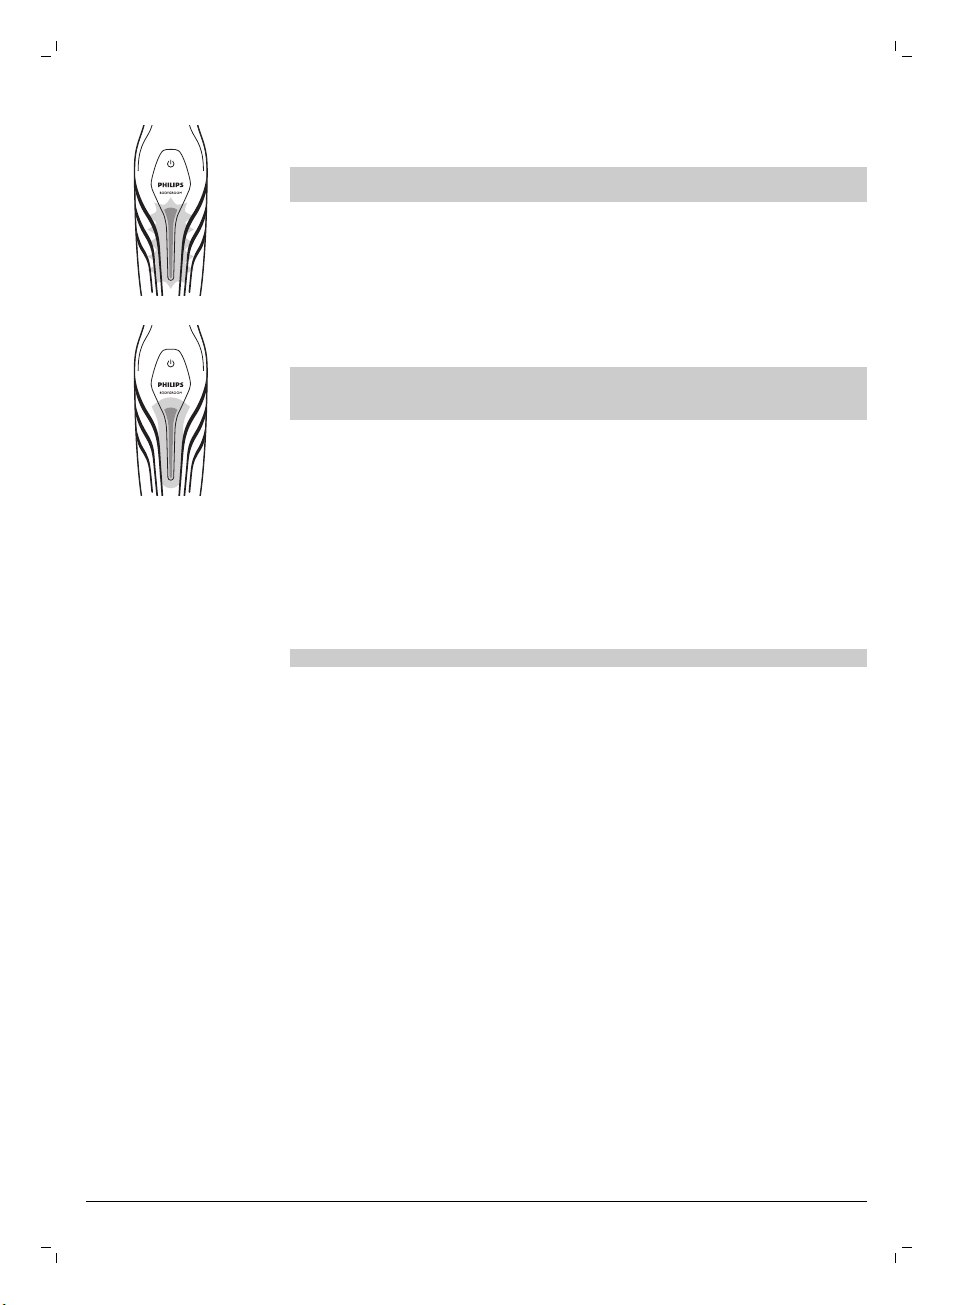
The battery status indicator flashes green to indicate that the appliance is
charging.
Note: The battery status indicator of BG2028, BG2026, BG2025 and
BG2024 looks different, but works in the same way.
When the appliance is fully charged, the battery status indicator lights up
green continuously.
Note: If the fully charged appliance is still in the plugged-in charging
stand after 30 minutes, the battery status indicator goes out to save
energy.
Using the appliance
You can use the appliance wet or dry to shave or trim hair on all parts of the
body below the neckline.
Note: Do not use this appliance to shave or trim facial hair or scalp hair.
English
9
Trimming and shaving tips
-
Take your time when you first start to shave sensitive areas. You have to
acquire practice with the appliance. Your skin also needs some time to
adjust to the procedure.
-
If the hairs are longer than 10 mm, you can trim them first with trimming
comb 1 to a length of 3 mm to make shaving easier.
-
You get the best trimming results when the skin and hair are dry.
-
You can use the appliance to shave in the shower or bath. To ensure
easier gliding, apply some shaving foam or shower gel to your skin.
Trimming combs
BG2025 and BG2024 come with trimming comb 1.
BG2038, BG2036, BG2028 and BG2026 come with trimming combs 1, 2 and
3.
The back of each comb has been numbered 1, 2 and 3 (see the table below
for the corresponding hair lengths after trimming).
A trimming comb allows you to cut hair to a specific length (see the table
below).
If your appliance comes with 3 combs, start trimming with trimming comb 3
to acquire practice with this appliance.
Comb size indication
Hair length after trimming
10
English
1 3mm/0.11 inch
2 5mm/0.19 inch
3 7mm/0.27 inch
Trimming
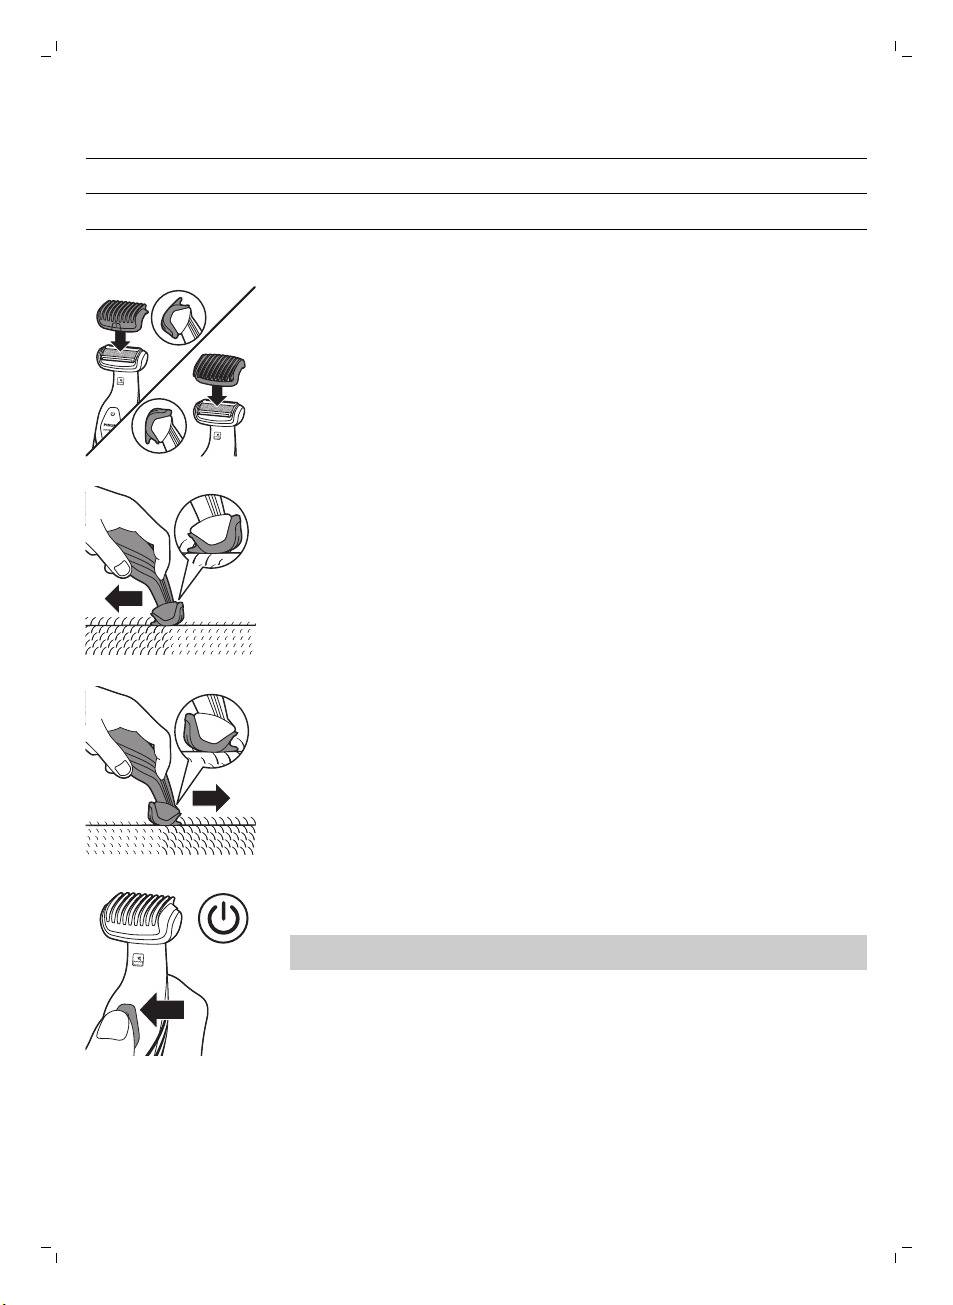
1 Snap the appropriate trimming comb onto the appliance. Make sure the
teeth of the comb point in the direction in which you are going to move
the appliance.
When you move the appliance towards you, the teeth have to point
towards you.
When you move the appliance away from you, the teeth have to point
away from you.
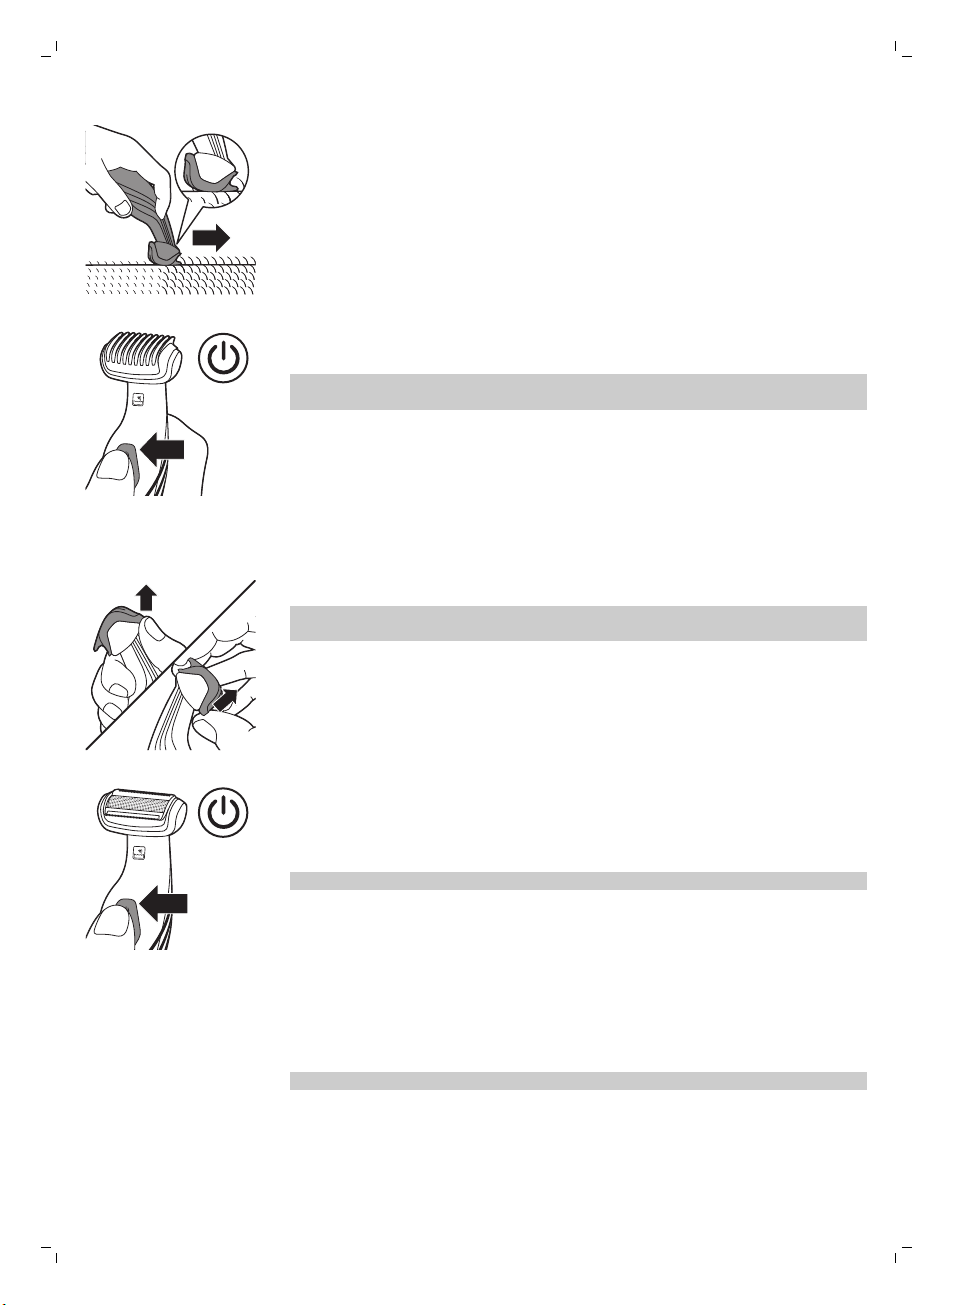
2 Press the on/off button to switch on the appliance.
3 Move the appliance against the direction of hair growth.
Note: Make sure that the flat part of the trimming comb is always fully in
contact with the skin.
2
1
English
Shaving
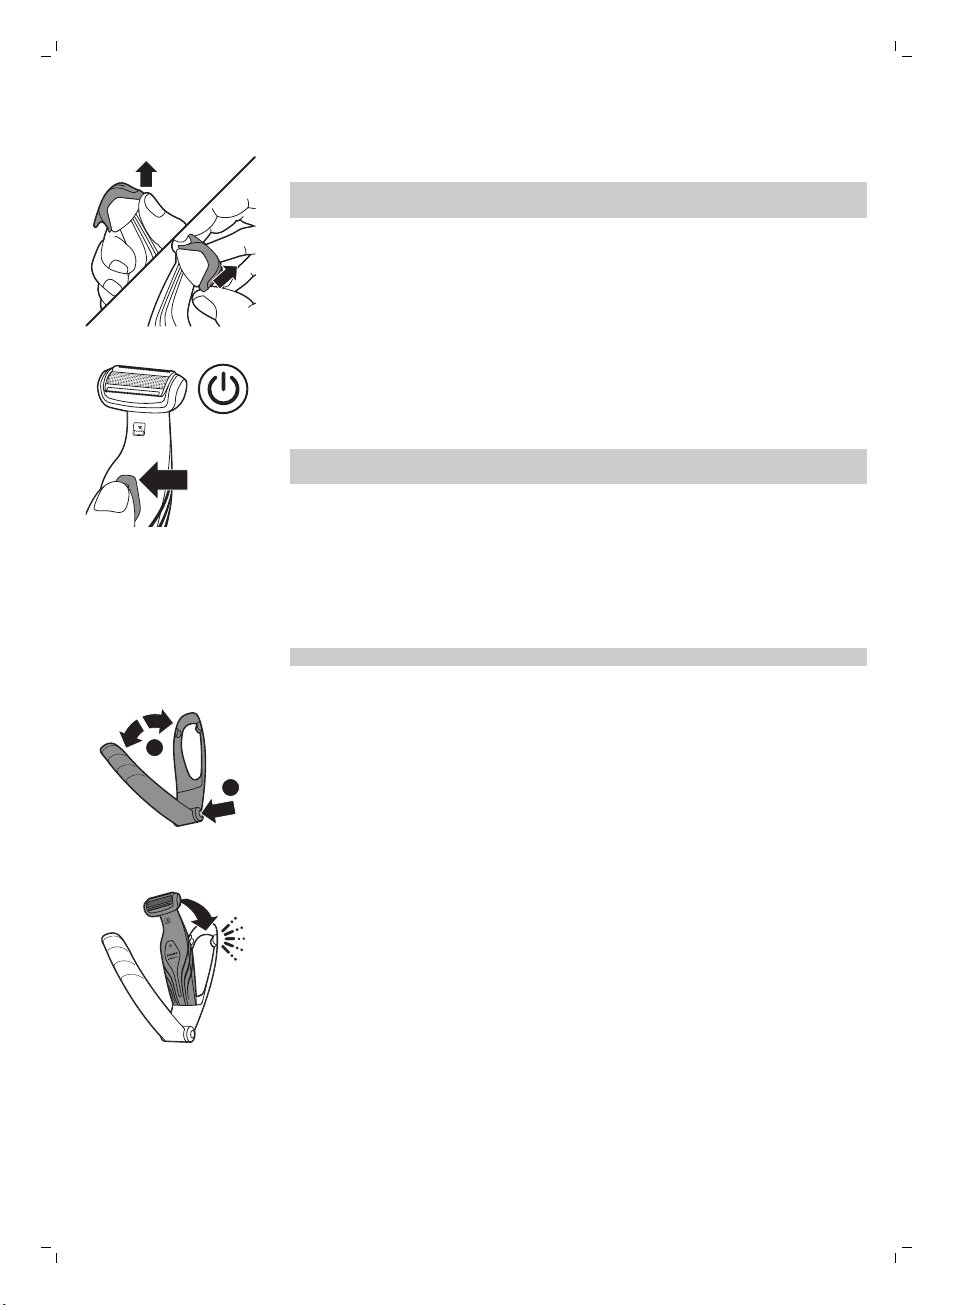
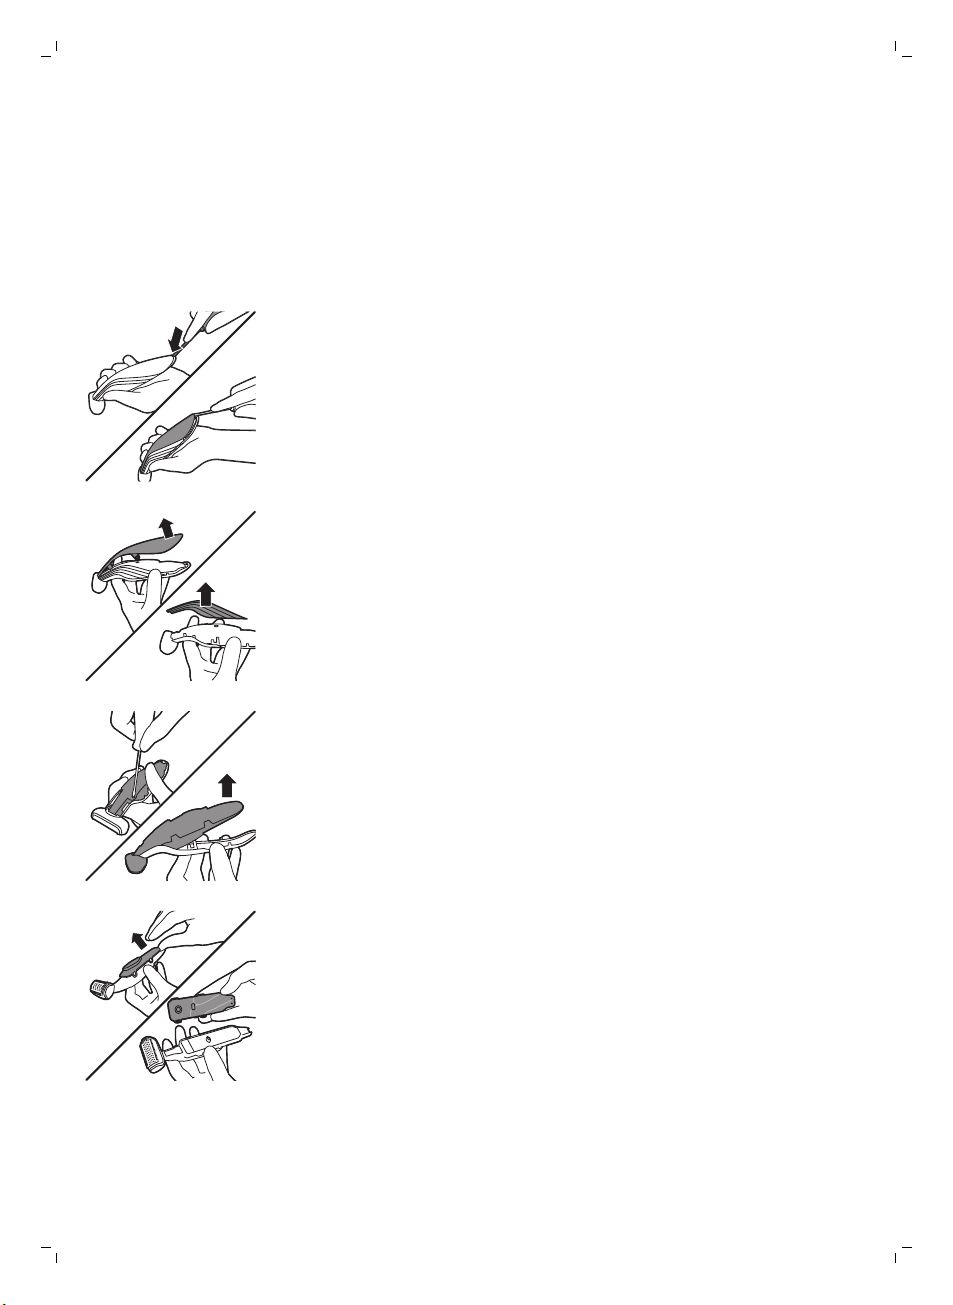
1 If a trimming comb is still attached, remove it.
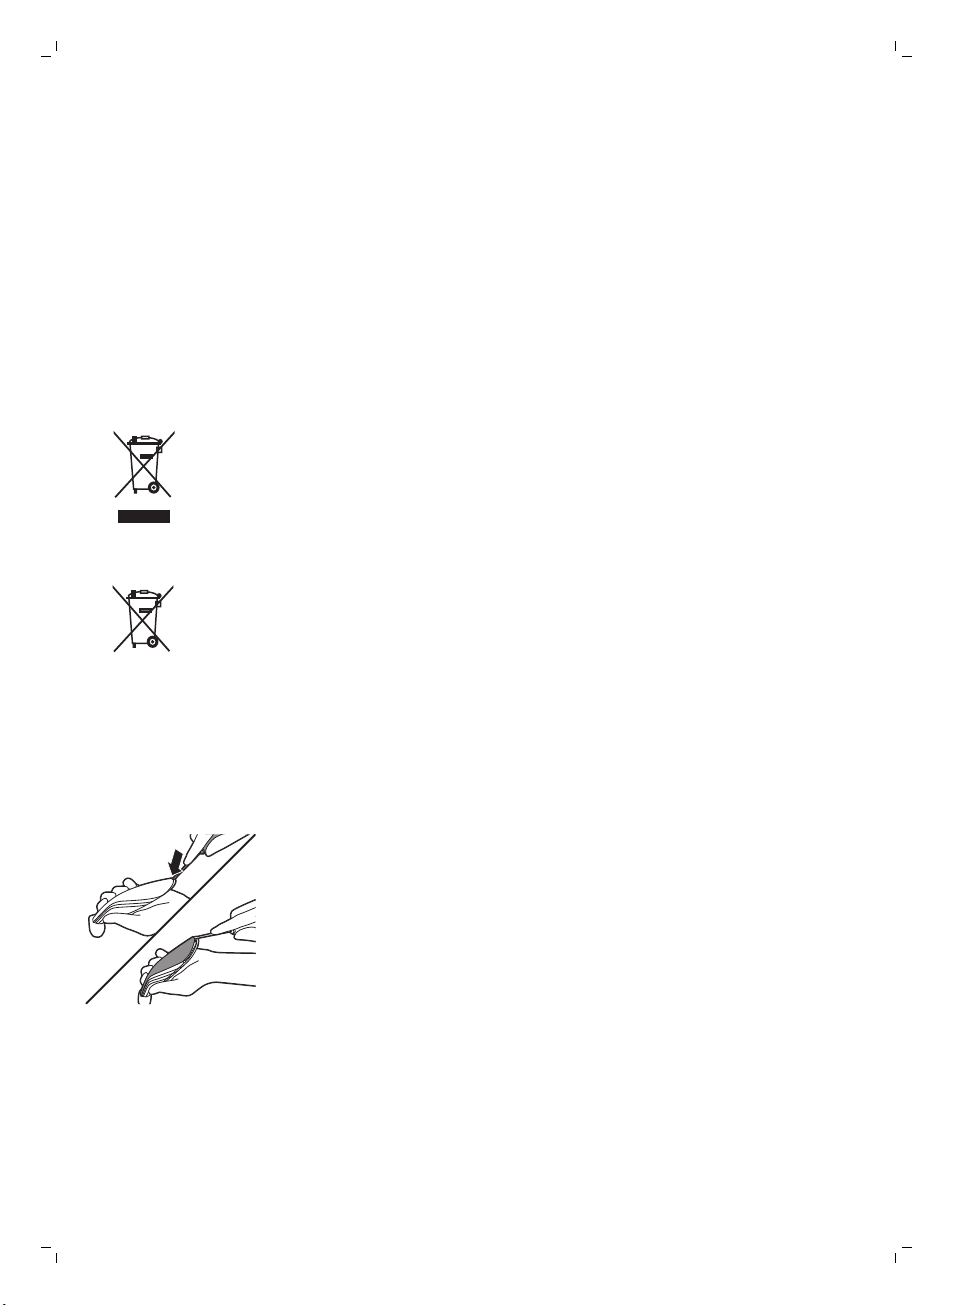
Note: You can either push the trimming comb off the appliance or pull it
off, depending on how the comb is placed on the appliance.
2 Press the on/off button once to switch on the appliance.
3 Place the shaving unit on the skin.
4 Move the appliance against the direction of hair growth with one hand,
while you stretch the skin with the other hand.
Note: Make sure that the shaving unit is always fully in contact with the
skin.
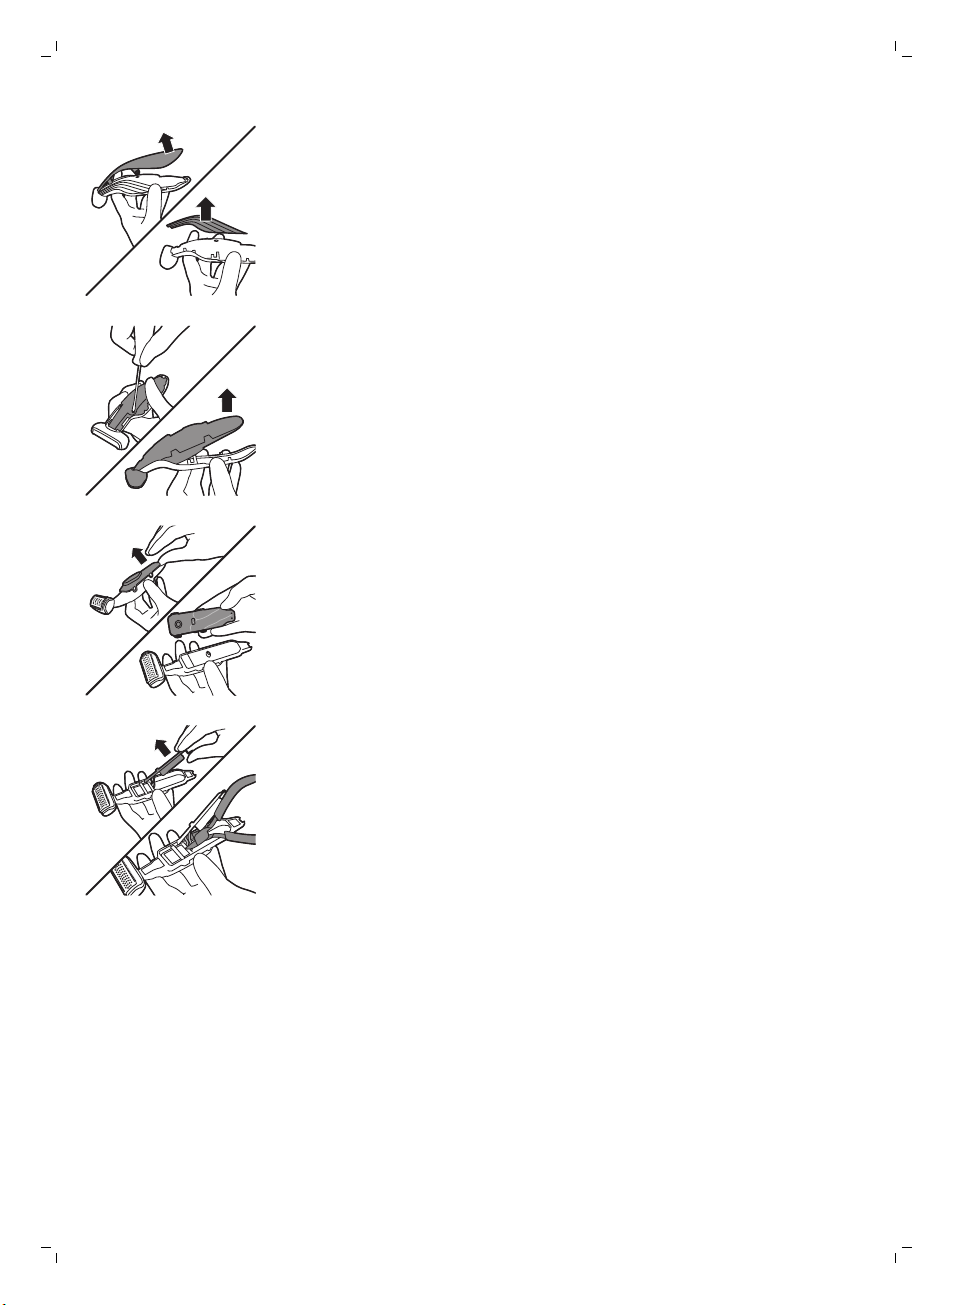
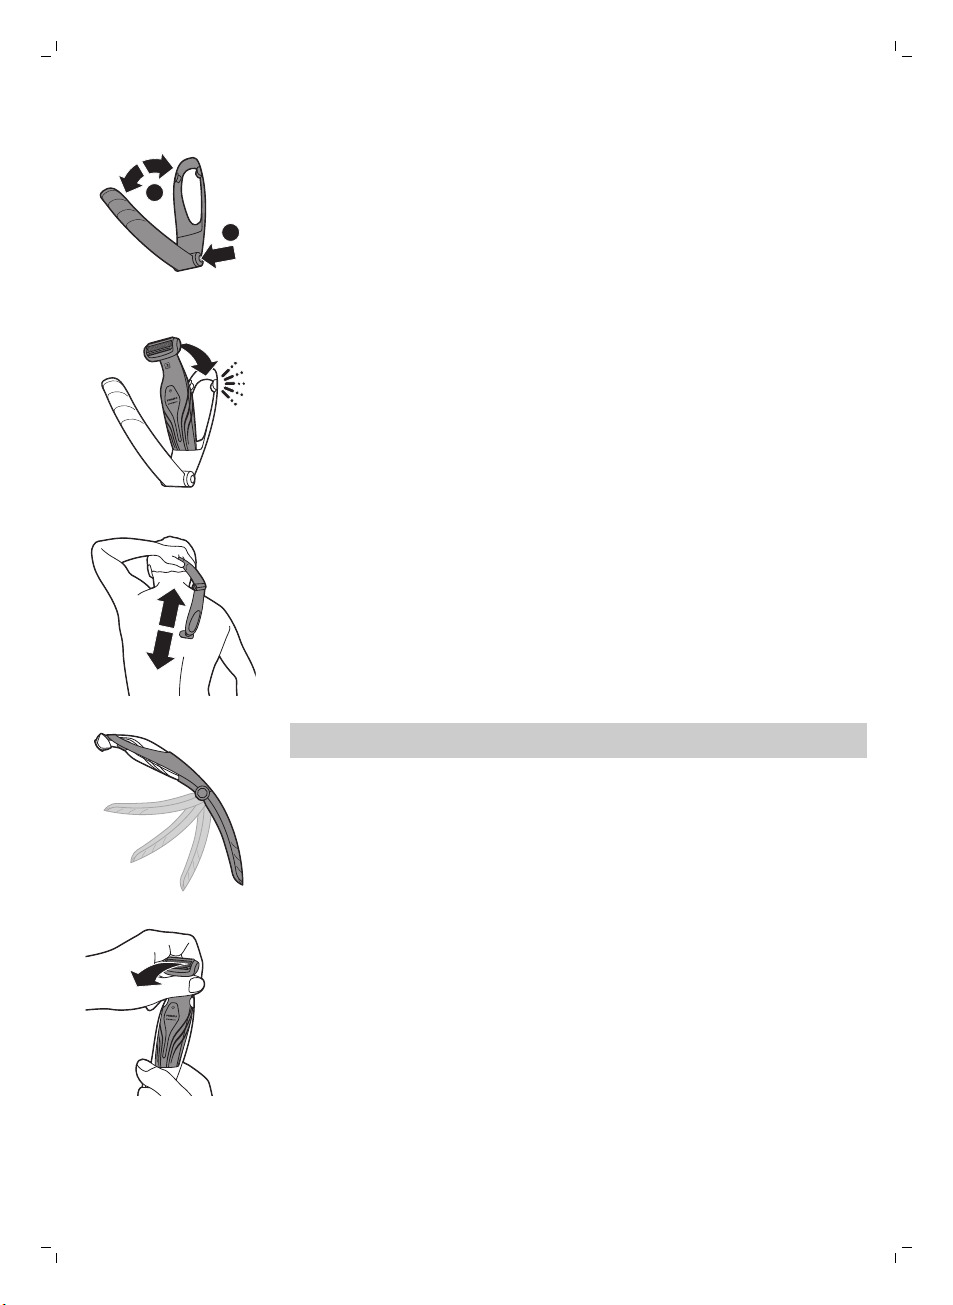
Shaving with the back shaving attachment (BG2038, BG2036 only)
Note: The back shaving attachment is suitable for both wet and dry use.
1 Press and hold the release button (1) and open the back shaving
attachment (2).
11
2 Place the bottom of the appliance in the lower part of the holder of the
back shaving attachment. Then press the top against the top part of the
holder until it locks into position with a click.
3 Shave your back by moving the back shaving attachment with the
appliance up and down by its handle.

2
1
12
English
Note: For your convenience, the back shaving attachment can be folded
to different angles.
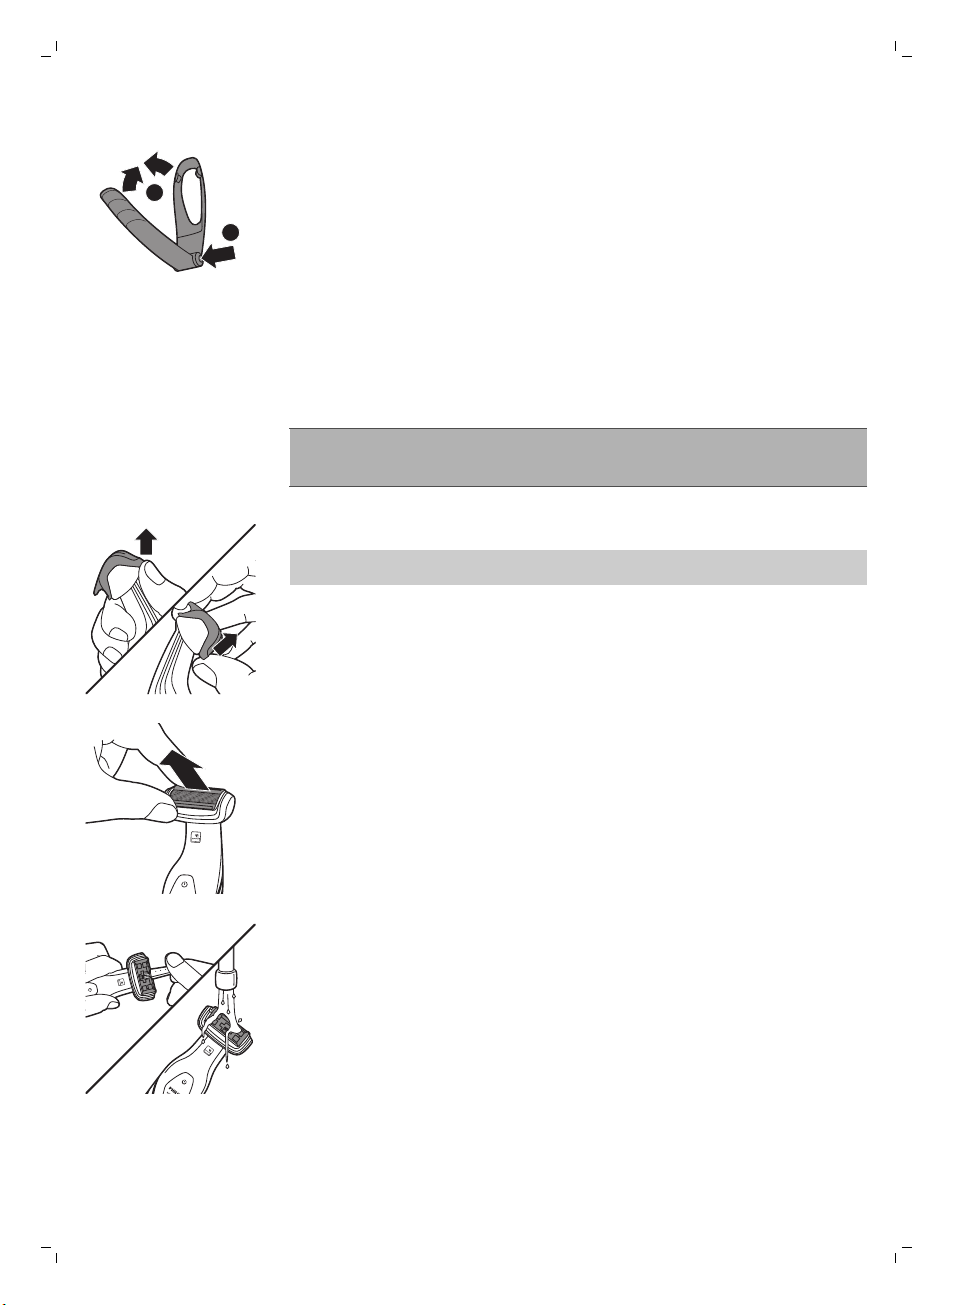
4 To remove the appliance from the back shaving attachment, pull the top
of the appliance towards you until it unlocks from the holder.
Cleaning
5 To close the back shaving attachment, press and hold the release button
(1) and push the handle against the holder (2).
Clean the appliance after every use.
Caution: Never use compressed air, scouring pads, abrasive cleaning
agents or aggressive liquids such as petrol or acetone to clean the
appliance.
1 Switch off the appliance.
English
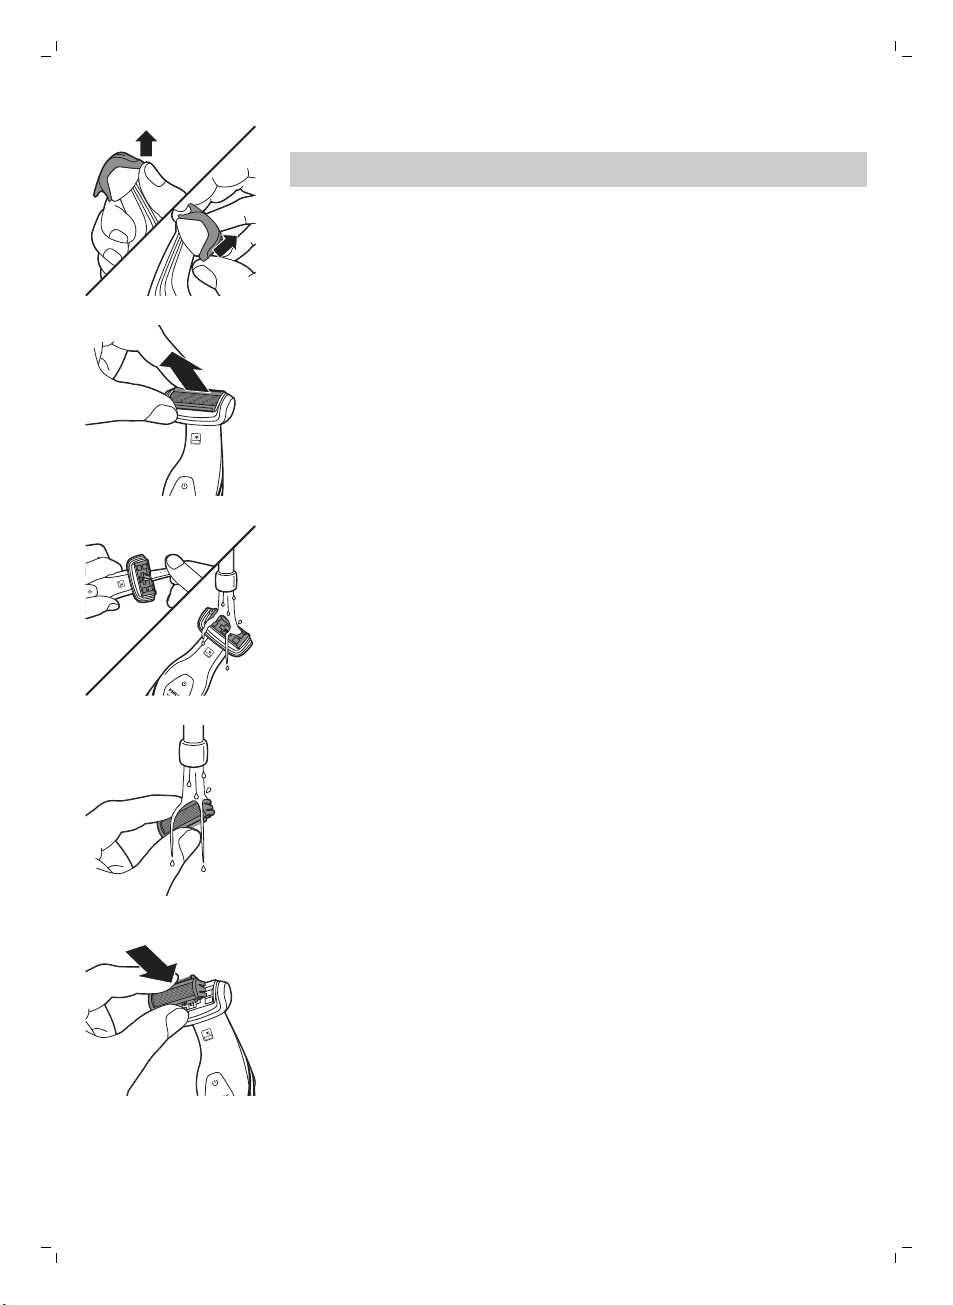
2 If a trimming comb is still attached, remove it.
Note: You can either push the trimming comb off the appliance or pull it
off, depending on how the comb is placed on the appliance.
3 Pull the shaving unit out of the appliance.
4 Use the cleaning brush supplied to clean the inside of the shaving head
or rinse the inside under the tap.
13
5 Rinse the shaving unit under the tap.
6 Shake off excess water and place the shaving unit back into the
appliance.
7 Clean the back shaving attachment (BG2038/BG2036 only) with a moist
cloth. Rinse it under the tap if you used it to shave your back with shower
gel or shaving foam.
8 Clean the charging stand with a moist cloth.
14
English
Ordering accessories
To buy accessories or spare parts, visit www.shop.philips.com/service or go
to your Philips dealer. You can also contact the Philips Consumer Care
Centre in your country (see the worldwide guarantee leaflet for contact
details).
Shaving unit
If you use the appliance very frequently, replace the shaving unit (type
number BG2000) every year. Replace a damaged shaving unit immediately.
Recycling
-
This symbol means that this product shall not be disposed of with normal
household waste (2012/19/EU).
-
This symbol means that this product contains a built-in rechargeable
battery which shall not be disposed of with normal household waste
(2006/66/EC). We strongly advise you to take your product to an official
collection point or a Philips service centre to have a professional remove
the rechargeable battery.
-
Follow your country’s rules for the separate collection of electrical and
electronic products and rechargeable batteries. Correct disposal helps
prevent negative consequences for the environment and human health.
Removing the rechargeable battery
1 Take the appliance out of the charging stand and let the motor run until
the battery is completely empty.
2 Insert a flathead screwdriver into the slot at the bottom of the handle and
turn it to unlock the rear panel of the housing.
3 Remove the rear panel of the housing and then remove the side panels.
English
4 Undo the screws that connect the inner body of the appliance to the
front panel of the housing and separate the inner body from the front
panel.
5 Turn over the inner body. Then detach the cover of the inner body with
the control panel from the inner body.
15
6 Lift the printed-circuit board out of the inner body, turn it over and cut
the wires that connect the battery to the power unit.
Guarantee and support
If you need information or support, please visit www.philips.com/support or
read the separate worldwide guarantee leaflet.
Troubleshooting
This chapter summarizes the most common problems you could encounter
with the appliance. If you are unable to solve the problem with the
information below, visit www.philips.com/support for a list of frequently
asked questions or contact the Consumer Care Center in your country.
16
English
Problem Possible cause Solution
The appliance does not
work.
The battery is empty and/or
the appliance does not
charge.
Recharge the battery (see chapter
‘Charging’) and check if you have
followed all instructions in chapters
‘Important’ and ‘Charging’.
The appliance makes more
noise and/or vibrates more
strongly than usual.
The operating time on a full
charge decreases.
Reduced trimming and/or
shaving performance
One or more parts are
broken, perhaps because you
dropped the appliance.
If this appliance is used
professionally, it will reach
the end of its life earlier
The shaving unit is dirty. Clean the shaving unit (see chapter
The shaving unit is worn. Replace the shaving unit.
The shaving unit is dirty. Clean the shaving unit (see chapter
You use the appliance in the
wrong way.
The shaving unit is dirty. Clean the shaving unit (see chapter
The battery is running low. Recharge the battery (see chapter
You have not attached the
trimming comb properly.
If you are trimming very curly
hair, the trimming comb may
not be able to straighten the
hair properly.
Take the appliance to your dealer or to
an authorized Philips service center for
examination or repair.
Do not use the appliance professionally.
‘Cleaning’).
‘Cleaning’).
Follow the instructions in chapter ‘Using
the appliance’.
‘Cleaning’).
‘Charging’).
Remove the trimming comb and reattach
it.
Try straightening the hair with your
hands during trimming.

Introduktion
Tillykke med dit køb, og velkommen til Philips! For at få fuldt udbytte af den
support, Philips tilbyder, skal du registrere dit produkt på
www.philips.com/welcome.
Generel beskrivelse (fig. 1)
1 Trimmekam 1 (3 mm)
2 Trimmekam 2 (5 mm) (kun BG2038/BG2036/BG2028/BG2026)
3 Trimmekam 3 (7 mm) (kun BG2038/BG2036/BG2028/BG2026)
4 Indikator for hårlængde (1, 2 eller 3)
5 Skærhoved
6 On/off-knap
7 Batteristatusindikator
8 Strømforsyningsenhed (adapter, kun type HQ8500, BG2038/BG2036)
9 Rensebørste (kun BG2038/BG2036/BG2028/BG2026)
10 Rygbarberingstilbehør (kun BG2038/BG2036)
11 Batteristatusindikator
12 Strømforsyningsenhed (adapter, kun type HQ850,
BG2028/BG2026/BG2025/BG2024)
13 Opladeenhed
Vigtige sikkerhedsoplysninger
Læs disse vigtige oplysninger omhyggeligt igennem, inden apparatet og
tilbehøret tages i brug, og gem dem til eventuel senere brug. Det
medfølgende tilbehør kan variere for forskellige produkter.
Dansk
17
Fare
Advarsel
-
Hold forsyningsenheden tør.
-
Strømforsyningsenheden indeholder en transformator. Klip ikke
strømforsyningsenheden af og udskift den med et andet stik, da dette vil
føre til farlige situationer.
-
Brug kun den medfølgende strømforsyningsenhed ved opladning af
apparatet.
-
Dette apparat må bruges af børn fra 8 år og opefter og personer med
reducerede fysiske, sensoriske eller mentale evner eller manglende
erfaring og viden, hvis de er blevet instrueret i sikker brug af apparatet og
forstår de medfølgende risici. Lad ikke børn lege med apparatet.
Rengøring og vedligeholdelse må ikke foretages af børn uden opsyn.
Dansk
18
Dansk
-
Tag altid stikket ud af apparatet, inden det skylles under vandhanen.
-
Kontroller altid apparatet, inden du anvender det. Anvend ikke apparatet,
hvis det er beskadiget, da dette kan forårsage personskade. Udskift altid
en beskadiget del med en tilsvarende original type.
-
Apparatet må ikke åbnes i forbindelse med udskiftning af det
genopladelige batteri.
Forsigtig
-
Opladeren må aldrig kommes ned i vand eller skylles under vandhanen.
-
Rens aldrig apparatet med vand, der er varmere end 80°C.
-
Brug kun apparatet til det tilsigtede formål som vist i brugervejledningen.
-
Af hygiejniske grunde bør apparatet kun anvendes af en og samme
person.
-
Brug aldrig trykluft, skuresvampe eller skrappe rengøringsmidler, som
f.eks. benzin, acetone eller lignende, til rengøring af apparatet.
-
Brug ikke strømforsyningsenheden i eller i nærheden af stikkontakter,
som indeholder eller har indeholdt en elektrisk luftfrisker, for at forhindre
uoprettelig beskadigelse af strømforsyningsenheden.
Elektromagnetiske felter (EMF)
-
Dette Philips-apparat overholder alle branchens gældende standarder
og regler angående eksponering for elektromagnetiske felter.
Generelt
Opladning
-
Dette apparat er vandtæt. Apparatet er velegnet til brug i badet eller
under bruseren og kan rengøres under vandhanen. Af
sikkerhedsmæssige årsager kan apparatet kun betjenes trådløst.
-
Apparatet kan tilsluttes netspændinger mellem 100 og 240 V.
-
Strømforsyningsenheden omformer 100-240 Volt til en lav
sikkerhedsspænding under 24 Volt.
Opladningen tager 1 time (BG2038/BG2036) eller 8 timer
(BG2028/BG2026/BG2025/BG2024) afhængigt af modellen. Når apparatet
er fuldt opladet, har det en brugstid på op til 50 minutter. Når batteriets
statusindikator blinker rødt, er batteriet ved at være tomt (ca. 10 minutters
brugstid tilbage), og du skal genoplade apparatet.
1 Sæt det lille stik i opladeren.
2 Placer apparatet i opladeren.
Batteristatusindikatoren blinker grønt for at indikere, at apparatet
oplades.
Bemærk: Batteristatusindikatoren for BG2028, BG2026, BG2025 og
BG2024 ser anderledes ud, men fungerer på samme måde.
Dansk
19
Når apparatet er fuldt opladet, lyser batteristatusindikatoren konstant
grønt.
Bemærk: Hvis det fuldt opladede apparat stadig er i den strømtilsluttede
opladeenhed efter 30 minutter, slukker batteristatusindikatoren for at
spare energi.
Sådan bruges apparatet
Apparatet kan anvendes til både våd og tør barbering/trimning af alle
kropszoner fra halsen og nedefter.
Bemærk: Brug det ikke til barbering eller trimning af ansigts- og hovedhår.

20
Dansk
Gode råd til trimning og barbering
-
Giv dig ekstra god tid, når du barberer følsomme områder, indtil du har
vænnet dig til at bruge apparatet. Du skal vænne dig lidt til at bruge
apparatet. Det tager også lidt tid, inden huden har vænnet sig til denne
metode.
-
Hvis hårene er længere end 10 mm, kan du trimme dem først med
trimmekam 1 til en længde på 3 mm for at gøre barberingen nemmere.
-
Du opnår det bedste trimningsresultat på tør hud og tørt hår.
-
Du kan også bruge shaveren i badet eller under bruseren. For at sikre en
nemmere glidebevægelse kan du påføre lidt barberskum eller flydende
sæbe på huden.
Trimmekamme
BG2025 og BG2024 leveres med trimmekam 1.
BG2038, BG2036, BG2028 og BG2026 leveres med trimmekammene 1, 2 og
3.
Bagsiden af hver kam er nummereret med 1, 2 og 3 (se nedenstående tabel
for tilsvarende hårlængder efter trimning).
En trimmekam giver dig mulighed for at klippe håret i en bestemt længde (se
tabellen nedenfor).
Hvis apparatet leveres med 3 kamme, skal du starte trimning med
trimmekam 3 for at vænne dig til at bruge apparatet.
Kamstørrelsesindikator
1 3 mm
Hårlængde efter trimning
2 5 mm
3 7 mm
Trimning
1 Sæt den ønskede trimmekam fast på apparatet. Sørg for, at kammens
tænder peger i den retning, som apparatet skal bevæges i.
Når du fører apparatet hen imod dig, skal tænderne pege mod dig selv.
Barbering
Dansk
Når du fører apparatet væk fra dig selv, skal tænderne pege væk fra dig.
2 Tænd apparatet ved tryk på on/off-knappen.
3 Bevæg altid apparatet imod hårenes vækstretning.
Bemærk: Sørg for, at den flade del af trimmekammen altid er i fuld
kontakt med huden.
1 Hvis en trimmekam stadig er påsat, skal den tages af.
Bemærk: Du kan enten skubbe trimmekammen af apparatet eller trække
den af afhængigt af, hvordan kammen er sat på apparatet.
21
2 Tryk en gang på on/off-knappen for at tænde for apparatet.
3 Placér skærfolien mod huden.
4 Bevæg apparatet imod hårenes vækstretning med den ene hånd, mens
du strækker huden med den anden hånd.
Bemærk: Sørg for, at skærfolieenheden altid er i fuld kontakt med huden.
Barbering med rygbarberingstilbehøret (kun BG2038 og BG2036)
Bemærk: Rygbarberingstilbehøret kan både bruges til våd- og tørbarbering.
2
1
22
Dansk
1 Hold udløserknappen (1) nede, og åbn rygbarberingstilbehøret (2).
2 Placer bunden af apparatet i den nederste del af holderen på
rygbarberingstilbehøret. Tryk derefter den øverste mod den øverste del af
holderen, indtil den låser på plads med et "klik".
3 Barber ryggen ved at bevæge rygbarberingstilbehøret med apparatet op
og ned vha. håndtaget.
Bemærk: Af praktiske hensyn kan rygbarberingstilbehøret foldes til
forskellige vinkler.
4 Adskil apparatet fra rygbarberingstilbehøret ved at trække toppen af
apparatet mod dig, indtil det låses ud af holderen.
2
1
Rengøring
Dansk
5 Luk rygbarberingstilbehøret ved at holde udløserknappen (1) nede og
skubbe håndtaget mod holderen (2).
Rengør altid apparatet efter brug.
Forsigtig: Brug aldrig trykluft, skuresvampe eller skrappe
rengøringsmidler, som f.eks. benzin, acetone eller lignende, til rengøring
af apparatet.
1 Sluk for apparatet.
2 Hvis en trimmekam stadig er påsat, skal den tages af.
Bemærk: Du kan enten skubbe trimmekammen af apparatet eller trække
den af afhængigt af, hvordan kammen er sat på apparatet.
23
3 Træk skærhovedet ud af apparatet.
4 Brug den medfølgende rengøringsbørste til at rengøre indersiden af
shaverhovedet, eller skyl indersiden under vandhanen.
24
Dansk
5 Skyl skærhovedet under rindende vand.
6 Ryst overskydende vand af, og sæt skærhovedet tilbage i apparatet.
7 Rengør rygbarberingstilbehøret (kun BG2038/BG2036) med en fugtig
klud. Skyl det under vandhanen, hvis du har benyttet det til barbering af
ryggen med flydende sæbe eller barberskum.
8 Opladeenheden rengøres med en fugtig klud.
Bestilling af tilbehør
Du kan købe tilbehør og reservedele på www.shop.philips.com/service eller
hos din Philips-forhandler. Du kan også kontakte det lokale Philipskundecenter (du kan finde kontaktoplysninger i folderen "World-Wide
Guarantee").
Skærhoved
Hvis apparatet bruges meget ofte, skal du udskifte skærhovedet
(typenummer BG2000) hvert år. Udskift altid en beskadiget skærenhed med
det samme.
Genanvendelse
-
-
Dette symbol betyder, at dette produkt ikke må bortskaffes sammen med
almindeligt husholdningsaffald (2012/19/EU).
Dette symbol betyder, at dette produkt indeholder et indbygget
genopladeligt batteri, som ikke må bortskaffes sammen med almindeligt
husholdningsaffald (2006/66/EF). Vi anbefaler på det kraftigste, at du
afleverer produktet på et officielt indsamlingssted eller hos en Philips-
forhandler, hvor du kan få en fagmand til at tage det genopladelige
batteri ud.
-
Følg den nationale lovgivning om særskilt indsamling af elektriske og
elektroniske produkter og genopladelige batterier. Korrekt bortskaffelse
er med til at forhindre negativ påvirkning af miljøet og menneskers
helbred.
Udtagning af det genopladelige batteri
1 Tag shaveren ud af opladeren, og lad motoren køre, indtil batteriet er
løbet helt tør.
2 Stik en skruetrækker med fladt hoved ind i rillen i bunden af håndtaget.
Drej skruetrækkeren for at låse bagpanelet fri af kabinettet.
3 Fjern bagpanelet af kabinettet, og fjern derefter sidepanelerne.
Dansk
25
4 Skru de skruer ud, der samler apparatets indre kabinet og kabinettets
frontpanel, og adskil det indre kabinet fra frontpanelet.
5 Vend det indre kabinet. Fjern derefter dækslet til det indre kabinet med
kontrolpanelet fra det indre kabinet.

26
Dansk
6 Løft printpladen ud af det indre kabinet, vend den om, og klip de
ledninger over, som forbinder batteriet med motorenheden.
Reklamationsret og support
Hvis du har brug for hjælp eller support, bedes du besøge
www.philips.com/support eller læse i den separate folder "World-Wide
Guarantee".
Fejlfinding
Dette afsnit opsummerer de mest almindelige problemer, der kan
forekomme ved brug af enheden. Har du brug for yderligere hjælp og
vejledning, så besøg www.philips.com/support for at få en liste med ofte
stillede spørgsmål, eller kontakt dit lokale Philips Kundecenter.
Problem
Apparatet fungerer ikke. Batteriet er tomt, og/eller
Mulig årsag Løsning
apparatet oplades ikke.
Genoplad batteriet (se afsnittet
"Opladning"), og kontroller, om du har
fulgt alle anvisningerne i afsnittene
"Vigtigt" og "Opladning".
Apparatet larmer mere
og/eller vibrerer mere
kraftigt end normalt.
Brugstiden på en fuld
opladning bliver kortere.
Reduceret trimningsog/eller barberingsevne
En eller flere dele er gået i
stykker, måske fordi du tabt
apparatet.
Hvis apparatet bruges i
professionelt øjemed, vil det
blive slidt op hurtigere
Skærenheden er beskidt. Rengør skærhovedet (se afsnittet
Skærhovedet er beskidt. Udskift skærhovedet.
Skærenheden er beskidt. Rengør skærhovedet (se afsnittet
Du bruger apparatet på den
forkerte måde.
Skærenheden er beskidt. Rengør skærhovedet (se afsnittet
Batteriet er næsten afladet. Genoplad batteriet (se afsnittet
Indlever apparatet til din forhandler eller
det lokale Philips Kundecenter mhp.
eftersyn eller reparation.
Brug ikke apparatet i professionelt
øjemed.
"Rengøring").
"Rengøring").
Følg anvisningerne i afsnittet "Sådan
bruges apparatet".
"Rengøring").
"Opladning").

Problem Mulig årsag Løsning
Du har ikke sat
trimmekammen korrekt på.
Fjern trimmekammen, og sæt den på
igen.
Dansk
27
Hvis du trimmer meget krøllet
hår, kan trimmekammen
muligvis ikke glatte håret
korrekt.
Prøv at glatte håret med hænderne
under trimning.

28
Deutsch
Einführung
Herzlichen Glückwunsch zu Ihrem Kauf und willkommen bei Philips! Um die
Unterstützung von Philips optimal nutzen zu können, sollten Sie Ihr Produkt
unter www.philips.com/welcome registrieren.
Allgemeine Beschreibung (Abb. 1)
1 Kammaufsatz 1 (3 mm)
2 Kammaufsatz 2 (5 mm) (nur BG2038/BG2036/BG2028/BG2026)
3 Kammaufsatz 3 (7 mm) (nur BG2038/BG2036/BG2028/BG2026)
4 Haarlängenanzeige (1, 2 oder 3)
5 Schereinheit
6 Ein-/Ausschalter
7 Akkustandanzeige
8 Netzteil (Adapter, nur Typen HQ8500, BG2038/BG2036)
9 Reinigungsbürste (nur BG2038/BG2036/BG2028/BG2026)
10 Rasieraufsatz für den Rücken (nur BG2038/BG2036)
11 Akkustandanzeige
12 Netzteil (Adapter, nur Typen HQ850, BG2028/BG2026/BG2025/BG2024)
13 Ladegerät
Wichtige Sicherheitsinformationen
Lesen Sie diese wichtigen Informationen vor dem Gebrauch des Geräts und
des Zubehörs aufmerksam durch, und bewahren Sie sie für eine spätere
Verwendung auf. Das mitgelieferte Zubehör kann für verschiedene Produkte
variieren.
Gefahr
Warnung
-
Halten Sie das Netzteil trocken.
-
Das Netzteil enthält einen Transformator.
Schneiden Sie das Netzteil keinesfalls auf, um
einen anderen Stecker anzubringen, weil dies
eine gefährliche Situation verursachen könnte.
-
Laden Sie das Gerät nur unter Verwendung des
im Lieferumfang enthaltenen Netzteils auf.
Deutsch

Deutsch
-
Dieses Gerät kann von Kindern ab 8 Jahren und
Personen mit verringerten physischen,
sensorischen oder psychischen Fähigkeiten oder
Mangel an Erfahrung und Kenntnis verwendet
werden, wenn sie bei der Verwendung
beaufsichtigt werden oder Anleitung zum
sicheren Gebrauch des Geräts erhalten und die
Gefahren verstanden haben. Kinder dürfen nicht
mit dem Gerät spielen. Die Reinigung und Pflege
des Geräts darf von Kindern nicht ohne Aufsicht
durchgeführt werden.
-
Ziehen Sie stets das Netzteil aus der Steckdose,
bevor Sie das Gerät unter fließendem Wasser
reinigen.
-
Überprüfen Sie das Gerät vor jedem Gebrauch.
Um Verletzungen zu vermeiden, benutzen Sie
das Gerät nicht, wenn es beschädigt ist. Ersetzen
Sie ein beschädigtes Teil nur durch Originalteile.
-
Öffnen Sie das Gerät nicht, um den Akku zu
ersetzen.
29
Achtung
-
Tauchen Sie die Ladestation niemals in Wasser.
Spülen Sie sie auch nicht unter fließendem
Wasser ab.
-
Das Wasser zur Reinigung des Geräts darf nicht
heißer als 80 °C sein.
-
Verwenden Sie dieses Gerät nur für den
vorgesehenen Zweck wie in der
Bedienungsanleitung angegeben.
-
Aus hygienischen Gründen sollte das Gerät nur
von einer Person verwendet werden.
30
Deutsch
-
Benutzen Sie zum Reinigen des Geräts keine
Druckluft, Scheuerschwämme und -mittel oder
aggressive Flüssigkeiten wie Benzin oder Azeton.
-
Verwenden Sie das Netzteil nicht in oder in der
Nähe von Wandsteckdosen, die einen
elektrischen Lufterfrischer enthalten oder
enthalten haben, um irreparable Schäden am
Netzteil zu vermeiden.
Elektromagnetische Felder
-
Dieses Philips-Gerät erfüllt alle einschlägigen Normen und Vorschriften
zur Exposition gegenüber elektromagnetischen Feldern.
Allgemeines
-
Dieses Gerät ist wasserdicht. Es ist für die Verwendung im Bad oder unter
der Dusche geeignet ist und kann mit Leitungswasser gereinigt werden.
Aus Sicherheitsgründen kann dieses Gerät daher nur kabellos verwendet
werden.
-
Er ist für Stromspannungen zwischen 100 und 240 Volt konzipiert.
-
Das Netzteil wandelt Netzspannungen von 100 bis 240 Volt in eine
sichere Betriebsspannung von unter 24 Volt um.
Laden
Das Laden dauert je nach Modell 1 Stunde (BG2038/BG2036) oder
8 Stunden (BG2028/BG2026/BG2025/BG2024). Mit dem voll aufgeladenen
Gerät können Sie bis zu 50 Minuten arbeiten. Wenn die Akkustandanzeige
rot blinkt, ist der Akku fast leer (ca. 10 Minuten Betriebsdauer verbleiben),
und Sie müssen das Gerät aufladen.
1 Stecken Sie den kleinen Stecker in die Ladestation.
2 Stellen Sie das Gerät in die Ladestation.
 Loading...