

Page 1

PHILIPS
^ NORELCO
BodyCroom
BG2022,
BG2020
Rechargeable
Cordless
Register your product and get support at
www.philips.com/norelco
Page 2

ENGLISH
IMPORTANT
SAFEGUARDS
When using an electric appliance, basic precau
tions should always be followed, including the
following:
Read all instructions before using this
appliance.
DANGER
To reduce the risk of electric shock:
1. Do not reach for a charging stand while
plugged in that has fallen into water. Unplug
immediately.
2. Charging stand is not for immersion or for
use while bathing or in a shower.
3. Do not use an extension cord with this
appliance.
4. Do not place or store charging stand where
it can fall or be pulled into a tub or sink. Do
not place or drop a charging stand into
water or other liquid while plugged in.
5. Always unplug the charging stand from the
electrical outlet immediately after use,
except when groomer is (re)charging.
6. Remove power supply cord from charging
stand before cleaning.
WARNING
To reduce the risk of burns, fire, electric
shock or injury to persons:
1. Close supervision is necessary when this
groomer/charging stand is used by, on, or
near children or invalids.
2. Use this groomer/charging stand for its
intended household use as described in this
manual. Do not use attachments not
recommended by Philips Electronics North
America Corporation.
3. Never operate this groomer/charging stand
if it has a damaged cord or charging plug, if
it is not working properly, if it has been
dropped or damaged, or dropped into water.
For assistance call I-800-243-J050.
4. Keep the groomer, charging stand, cord and
charging plug away from heated surfaces.
5. Never drop or insert any object into any
opening.
6. Never operate the groomer with the air
openings blocked or while on a soft surface,
such as a bed or couch, where the air
openings may be blocked. Keep the air
openings free of lint, hair, and the like.
7. Do not charge groomer outdoors, in humid
conditions or operate where aerosol (spray)
products are being used or where oxygen is
being administered.
8. Always check foil, cutters, and trimmers
before using the groomer. Do not use
the groomer if foil, cutters or trimmers are
damaged, as injury may occur.
9. Always attach plug to charging stand first,
then charging plug into outlet.To disconnect,
remove charging plug from outlet.
10. Never put the groomer/charging stand in
direct sunlight or store at a temperature
above I40°F.
I I. Groomer is water-safe and can be rinsed
under running tap water or used in shower.
Do not submerge groomer in water.
12. To prevent possible damage to the cord, do
not wrap cord around the charging stand.
Do not store in a damp environment.
SAVETHESE
INSTRUCTIONS
IMPORTANT: The power plug contains a
transformer. Do not cut off the power plug
to replace it with another plug, as this will
cause a hazardous condition.
Registration
Congratulations on your purchase and welcome
to Philips Norelco!
To fully benefit from the support that Philips
Norelco offers, register your product at
www.philips.com/norelco
Page 3

Create Your Own Look
Your new Philips Norelco Body Groomer offers
you a safe, gentle and quick way to trim and shave
every body part below the neckline. This unique
combination allows you to create your own look
safely and with less irritation. The trimming combs
give you multiple hair length settings to choose
from so you can control the exact hair length you
desire or use the Groomer without the combs
to completely shave off body hair Use wet or dry,
your BodyGroom all-in-one grooming system with
self-sharpening blades will give you a precise trim
and shave anywhere, every time.
Like many new products, your Philips Norelco
Groomer may take a little getting used to. If you
are shaving sensitive areas for the first time, your
skin may need time to adapt. Give yourself some
time to acquaint yourself with your new Groomer.
Stick with it! If you alternate trimming or shaving
methods during the adjustment period it may
make it more difficult to adapt to the Philips
Norelco grooming system. If you are still not
convinced. Philips Norelco will refund you the full
purchase price as long as the request is received
within 45 days of purchase.
Be certain to read the instructions and important
information in this booklet to begin using your
new Groomer to create your own look
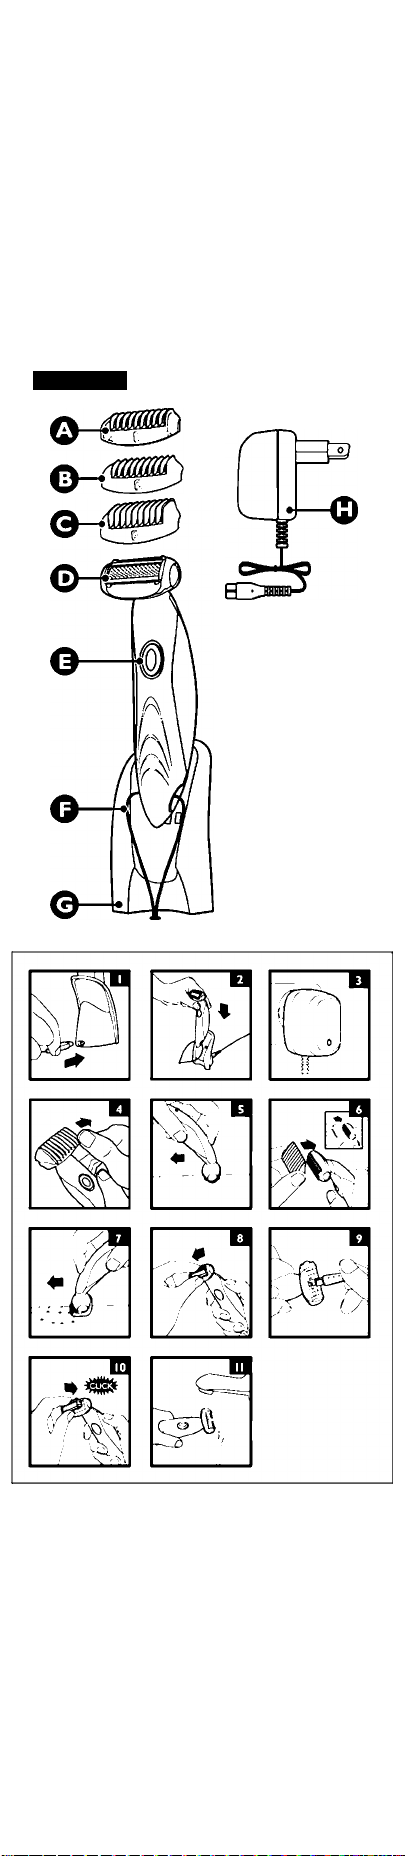
Features
A Small Trimming Comb
B Medium Trimming Comb
C Large Trimming Comb
D Shaving Foil Head Assembly
E ON/OFF Button
F Hanging Cord
G Store & Charge Stand
H Adaptor with Charging Indicator Light
I Cleaning Brush
Full 2-Year Warranty
45-Day Money-Back Guarantee
This symbol indicates that
the Groomer can be used
in the bath or shower.
LED Charging Indicator
I The Charging Indicator Light on the adaptor
will light up to indicate Groomer is
(re)charging.
Page 4

Before First Use
I Charge the Groomer before you start using
it (see ‘Charging’). Make sure the Groomer is
switched off before you start charging it.
I Before using, check foil, cutters and trimmers
for wear or damage. If foil, cutters or trimmers
show signs of wear or damage, do not use
Groomer as injury may occur. Do not use
Groomer until foil, cutters or trimmers have
been replaced.
Important
I Only use the adaptor charging plug provided to
charge the Groomer.
Charging
> Battery performance is best if you recharge only
when the batteries are (almost) completely empty.
► Charging or recharging at temperatures below
40°F or higher than 95°F adversely affects life
time of batteries.
k Continuously recharging will reduce life of
batteries.
I This Groomer will not operate corded directly
from the electrical outlet.
D
Connect cord to charging stand (Fig. I); plug
the adaptor charging plug into any 120V
outlet. Use only the cord provided. Slide the
Groomer down into the charging stand
making sure the hanging cord is pointing
forward when you place the Groomer in the
charging stand (Fig. 2). The charging indicator
on the adaptor will light up to indicate
Groomer is (re)charging (Fig. 3).
Q Charging requires a full 8 hours. A fully
charged Groomer has a cordless grooming
time of up to 50 minutes.
Recharging
U Recharging requires a full 8 hours.
a When Groomer is fully charged, disconnect
the adaptor charging plug from outlet.
D Do not keep charging stand permanently
plugged into outlet.
Page 5

Shaving
> Use this Groomer for its intended household
use as described in this manual.
k Do not use this Groomer to shave or trim
facial or scalp hair. The Groomer should only
be used on skin below the neckline.
I When shaving sensitive areas for the first time,
you may feel some discomfort, irritation or
reddening of the skin. This is normal as your
skin needs time to adjust to shaving.
I If your hair is longer than .40 inch /10 millimeters,
trim hair using a trimmer comb first for optimum
shaving results.
> For dry use, be certain that your skin is clean
and dry before using the Groomer.
k For wet use, you may prepare your skin with
lathered soap or shaving foam before using the
Groomer.
I Make sure the shaving foil is in complete
contact with your skin for the closest shave
and minimum foil wear.
k Pressing too hard may cause skin irritations.
I Practice is best for optimum results.
D
If a trimming comb is attached to the
Groomer, remove it by gently pushing the
outer comb tooth sideways with your thumb
(Fig-4).
B Turn Groomer ON by pressing the on/off
button.
B Stretch your skin taut with your free hand
and gently press Groomer to skin and move
it slowly and smoothly against the direction
of hair growth (Fig. 5). DO NOT press too
hard. Too much pressure can distort the foil
and cause skin irritation.
Q Make sure the shaving head is always in full
contact with your skin.
Turn Groomer OFF by pressing the on/off
button.
Page 6

Trimming
I
If you are trimming for the first time, be
careful. Do not move the Groomer too fast.
Make smooth and gentle movements.
I
Practice trimming with the large comb first to
prevent accidentally trimming hairs too short.
I Trimming is easier and more effective when
skin and hair are dry.
IM Attach desired trimming comb by snapping it
onto the Groomer. The tip of the comb can
point in either direction (Fig. 6).
Trimming Length Setting Table
► The trimming combs allow you to cut hair to 3
different lengths:
Trimming Comb Hair Length after cutting
Small .12 in./3 mm
Medium .28 in./7 mm
Large upto.40iniupto 10 mm
B Turn Groomer ON by pressing the on/off
button.
B Hold Groomer as shown and move against
the direction of hair growth making sure the
tips of the comb point in the same direction
as you are moving the Groomer. Always
make smooth and gentle movements and be
sure the surface of the comb always stays in
contact with your skin (Fig. 7).
NOTE: Since all hairs do not grow in the same
direction, you may want to try different trimming
positions (i.e. upwards, downwards, or across).
Practice is best for optimum results.
□ Turn Groomer OFF by pressing the on/off
button.
Page 7

Cleaning
> The Groomer should be cleaned after each use.
I
Always switch Groomer OFF and remove cord
from charging stand and charging plug from
outlet before cleaning.
I
Never clean, remove or replace shaving head
assembly while motor is on.
I Do not apply pressure to shaving head. Do not
touch foil with hard objects as this may dent or
damage foil or cutters. If damage occurs, replace
damaged parts.
I
Do not use Groomer if foil, cutters or trimmers
are damaged or broken as injury may occur.
> Only use the cleaning brush supplied. Any other
brush may cause damage.
D Always switch Groomer OFF, remove the
charging plug from outlet and remove cord
from charging stand before cleaning.
Qlf a trimming comb is attached to the
Groomer, remove it by pulling it off the
appliance.
H Remove the shaving foil head by pulling it off
the appliance (Fig. 8).
Hold the shaving head by the plastic housing only.
D Brush the hairs off the shaving foil and cutter
block. Make sure to also brush away any
hairs collected under the trimmers (Fig. 9).
B Reattach the shaving foil head by snapping it
back onto the Groomer (Fig. 10). You will hear
a “click”.
B Rinse the Groomer under warm or cool
running tap water to rinse away any
remaining shaving/trimming debris (Fig. 11).
Q After rinsing, gently shake excess water from
Groomer. Wipe the Groomer body dry with
a clean towel or cloth.
I Do not use a towel or cloth to dry shaving
foil or cutters as this may cause damage;
allow to air dry.
I Never clean the Groomer with harsh chemicals
as they can damage the Groomer.
Page 8
Features
y
Page 9

Replacing the Shaving Foil Head
I If the shaving foil and cutters are worn or
damaged, do not continue using the Groomer.
Replace the shaving foil and cutters immediately.
► It is recommended that you replace your
shaving foil and cutters once a year.
k A worn or damaged shaving foil or cutters
should only be replaced with an original Philips
Norelco shaving foil, model BG2000, which is
available on the Philips Norelco website,
www.philips.com/norelco or call
I -800-243-3050 for assistance.
k The foil is a precision part. Handle with care.
D
Always switch Groomer OFF and remove
Groomer from the charging stand before
replacing shaving foils.
B Remove the shaving foil head by pulling it off
the appliance (Fig. 8).
B Place the new shaving foil head on the
Groomer by snapping it into place (Fig. 10).
You will hear a “click”.
After replacing the shaving foil head, check that
the shaving head is firmly attached before using
Groomer
This Groomer has no other user-serviceable parts.
For assistance call I -800-243-3050.
Storage
> The Groomer can be placed in the charging
stand for safe storage. If storing Groomer in
stand, remove the plug from the outlet as soon
as the razor is fully charged.
• Be sure Groomer is turned off. Remove cord
from outlet and charging stand before storing
in a safe, dry location where it will not be
crushed, banged, or subject to damage.
• Do not wrap cord around Groomer/charging
stand when storing.
• Store cord in a safe location where it will not
be cut or damaged.
> Do not place or store Groomer/charging stand
where it can fall or be pulled into a tub or sink,
water or other liquid while plugged in.
Assistance
For assistance, call toll free:
1-800-243-3050
or visit our website:
www.philips.com/norelco
Information is available 24 hours a day, 7 days a
week.
Accessories
I For maximum Groomer performance replace
shaving foil head once a year.
> Replacement Shaving Foil Head
Model BG2000-Philips Norelco Replacement
Shaving Foil Head
• Replacement Parts may be purchased on
our website www.philips.com/norelco
Page 10

PHILIPS
^NORELCO
45-DAY MONEY-
BACK GUARANTEE
If you are not fully satisfied with your Philips Norelco
Product. Philips Norelco will refund you the full purchase
price.
The product must be shipped prepaid by insured
mail, insurance prepaid, and have the original sales
receipt, indicating purchase price and the date of
purchase, enclosed. We cannot be responsible for
lost mail. The product must be postmarked no later
than 45 days after the date of purchase. Philips
Norelco reserves the right to verify the purchase
price of the product and limit refunds not to exceed
suggested retail price.
To obtain money-back guarantee return authorization
form, call I -800-243-3050 for assistance.
4203 000 3314 3
Full Two-Year Warranty
Philips Electronics North America Corporation warrants each new Philips
Norelco Product Model BG2022. BG2020 (except foil and cutters)
against defects in materials or workmanship for a period of two years
from the date of purchase, and agrees to repair cm* replace any defective
product without charge. IMPORTANT: This warranty does not cover
dan^age resulting from accident, misuse or abuse, lack of reasonable care,
the affixing of any attachment not provided with the product or loss of
parts or subjecting the product to any but the specified voltage.* Use of
ur\authorized replacement parts will void this warranty.
PHILIPS ELECTRONICS NORTH AMERICA CORPORATION
WILL NOT PAY FOR WARRANTY SERVICE PERFORMED
BY A NON-AUTHORIZED REPAIR SERVICE AND WILL
NOT REIMBURSE THE CONSUMER FOR DAMAGE
RESULTING FROM WARRANTY SERVICE PERFORMED
BY A NON-AUTHORIZED REPAIR SERVICE. NO
RESPONSIBILITY IS ASSUMED FOR ANY SPECIAL,
INCIDENTAL. OR CONSEQUENTIAL DAMAGES.
In order to obtain warranty service, simprfy go to /. a a pscc ". ::; o -o
or call I -800-243-3050 for assistance. It is suggested that for your protection,
you return shipments of product by insured mail, insurance prepaid.
Damage CKCurring during shipment is not covered by this warranty.
NOTE: No other warranty, written or oral, is authorized by Philips
Electronics North America Corporation.This warranty gives you specific
legal rights, and you may also have other rights that vary from state to
state. Son>e states do not allow the exclusion or limitation of incidental
or consequential damages, so the above exclusion and limitations may not
apply to you.
• Read enclosed instructions carefully.
Manufactured for:
Philips Consumer Lifestyle
A Division of Philips Electronics North America Corporation
1600 Summer Street - 5th Flocw*
Stamford. CT 06905-5125
This symbol on the product's nameplate means
usTio it is listed by Underwriters Laboratories. Inc.
Norelco is a Registered Trademark of Philips Electronics North America
Corporation.
PHILIPS is a Registered Trademark of KoninkJijke Philips Electronics N.V
© 2008 Philips Electronics North America Corporation. All Rights
Reserved.
 Loading...