

Philips BDP-3200-X Service Manual
Blu-ray Disc Player
BDP3200(X)/51/55/77/78
TABLE OF CONTENTS
Chapter
Technical Specification, PCBs Location………………….. 1
Safety Instruction ……………………………………………… 2
Instruction for Use……………………………………………… 3
Mechanical and Dismantling Instructions…………………. 4
Service Modes, Troubleshooting……………………………. 5
Overall Block Diagram, Wiring Diagram……………………. 6
Electrical Diagram……………………………………………… 7
Exploded View Diagram & Service Part List………………..8
Revision List……………………………………………………. 9
©
Copyright 2011 Philips Consumer Electronics B.V. Eindhoven, The Netherlands
All rights reserved. No part of this publication may be reproduced, stored in a retrieval system or
transmitted, in any form or by any means, electronic, mechanical, photocopying, or otherwise without
the prior permission of Philips.
Published by CY_SL1108 BG AVM Printed in The Netherlands Subject to modification
Version 1.1
Version 0.0
CLASS 1
LASER PRODUCT
314178535911

1-1
1.1 Specifications
Specifications are subject to change without notice
Video
Signal system: PAL / NTSC
Composite video output: 1 Vp-p (75 ohm)
Component video output: 480/576i, 480/576p,
720p, 1080i
Y: 1 Vp-p (75 ohm)
Pb: 0.7 V-pp (75 ohm)
Pr: 0.7 V-pp (75 ohm)
HDMI output 480p, 576p, 720p, 1080i, 1080p,
1080p24
Audio
2 Channel analog output
Audio Front L&R : 2 Vrms (> 1 kohm)
Digital output: 0.5 Vp-p (75 ohm)
Coaxial
HDMI output
Sampling frequency:
MP3: 32 kHz, 44.1 kHz, 48 kHz
WMA: 44.1 kHz, 48 kHz
Constant bit rate:
MP3: 112 kbps - 320 kpbs
WMA: 48 kpbs - 192 kpbs
USB
Compatibility: Hi-Speed USB (2.0)
Class support: UMS (USB Mass Storage Class)
Main unit
Power supply rating: AC 220-240V~, ~50 Hz
Power consumption: 25 W
Power consumption in standby mode: < 0.5 W
Dimensions (w x h x d): 435 x 60 x 227 (mm)
Net Weight: 2.35 kg
Accessories supplied
Remote control and batteries
Audio/Video cables
Power cable
Quick start guide
User manual
CD-ROM built in multi-lingual user manual
Laser Specification
Laser Type:
BD Laser Diode: AlGaInN
DVD Laser Diode: AlGaInP
CD Laser Diode: AlGaInP
Wave length
BD: 405 +5nm/-5nm
DVD: 655 +10nm/-10nm
CD: 790 +10nm/-20nm
Output power:
BD: Max. ratings: 20mW
DVD: Max. ratings: 6mW
CD: Max. ratings: 7mW
1.1 PCBs Location
MAIN PCBA
1-2
30W/2P OPEN PCBA
VERSION VARIATIONS
Type/Versions:
Service policy
Board in used:
MAIN BOARD
VFD DISPLAY PCBA
30 W/2P OPEN PCBA
*TIPS: C -- Component Lever Repair.
M -- Module Lever Repair
X -- OCX
VFD DISPLAY PCBA
BDP3200
51 55
C
C C
M
M
55
C
C
C
M
77
C
C
M
78
C
C
M

Software check and upgrade
Preparation to upgrade software
1)Start the CD burning software & create a folder named "UPG_ALL",
2)Then copy the Bin file (BDP3XXXXX-XXX-XXXXXX.bin) into it,
3)Burn the data onto the blank CD.
1-3
B. Read out the software versions to confirm upgrading
4) In homemenu,enter "setup"->"advanced"->"version info", press "OK"
A. Procedure for software upgrade
A) Upgrade software via Disc
1) Power on the set and insert the prepared Upgrade
CDR.
2) The set will starts reading disc & response with the Model:XXX.XXX
following display TV screen: Versions
Now searching for upgrade software!
Please wait…!
3) Then screen will display :
software upgrades for this player has been found!Do you want to upgrade?
and other information will display on the TV screen as below:
subinfo:xxxx
system SW:xxxx
ethernet MAC:xxxxxxxx
http://www.philips.com/support
Caution: The set must not be power off during
upgrading, otherwise the Main board will be
Cancel Start
4) Press Right cursor button to choose "Start", then press <OK>;
5) The software will updagrde and screen will display as below:
Upgrade is ongoing, Please wait…
Please do not unplug or switch off the device.
6) Restart the set.
B) Update software via USB Flash Drive:
1) Go to www.philips.com/support to check if the latest software
version is available for this player.
2) Download the software onto a USB flash drive's root DIR named "UPG_ALL".
3) Insert the USB flash drive to the USB jack of the rear panel.
4) In the Home menu, select <Setup>-<Advanced>-<Software
update>-<USB>.
5) Then press OK
6) you'll see now searching for new software, please wait.......
7) Waiting, the you'll see "software for this player has been found ......"
8) Then select "Start" and press "OK"
9) then you'll see "upgrade is ongoing ......", wait until it ends.
10) Player will restart automatically or press "Restart now" to restart, after restarting the upgrade ends.
damaged entirely.

2.0 Safety instruction
2-1
1. General safety
Safety regulations require that during a repair:
. Connect the unit to the mains via an isolation
transformer.
. Replace safety components indicated by the
symbol
Only by components identical to the original ones.
Any
Other component substitution (other than original
type)
May increase risk of fire or electrical shock hazard.
Safety regulations require that after a repair, you
must
Return the unit in its original condition. Pay, in
particular,
Attention to the following points:
. Route the wires/cables correctly, and fix them with
the
mounted cable clamps
. Check the insulation of the mains lead for external
Damage
. Check the electrical DC resistance between the
mains
Plug and the secondary side:
1) Unplug the mains cord, and connect a wire
between
The two pins of the mains plug.
2) Set the mains switch the “on” position (keep
the
Mains cord unplug).
3) Measure the resistance value between the
mains
plug and the front panel, controls, and chassis
bottom.
4) Repair or correct unit when the resistance
measurement is less than 1M Ω
5) Verify this, before you return the unit to the
customer/user (ref. UL-standard no. 1492).
6) Switch the unit “off”, and remove the wire
between
the two pins of the mains plug.
2. Laser safety
This unit employs a laser. Only qualified service
personnel
May remove the cover, or attempt to service this
device
(due to possible eye injury).
Laser device unit
Type :Semiconductor laser GaAIAs
Wavelength :650nm (DVD)
:780nm (VCD/CD)
Output power :7mW(DVD)
:10mW(DVD/CD)
Beam divergence:60 degree
Note: Use of controls or adjustments or
performance of procedure other than those
specified herein, may result in hazardous
radiation exposure. Avoid direct exposure to
beam.

3-1
3.0 Instruction for Use
You can download this information from the following websites:
http://www.philips.com/support
http://www.p4c.philips.com
4-1
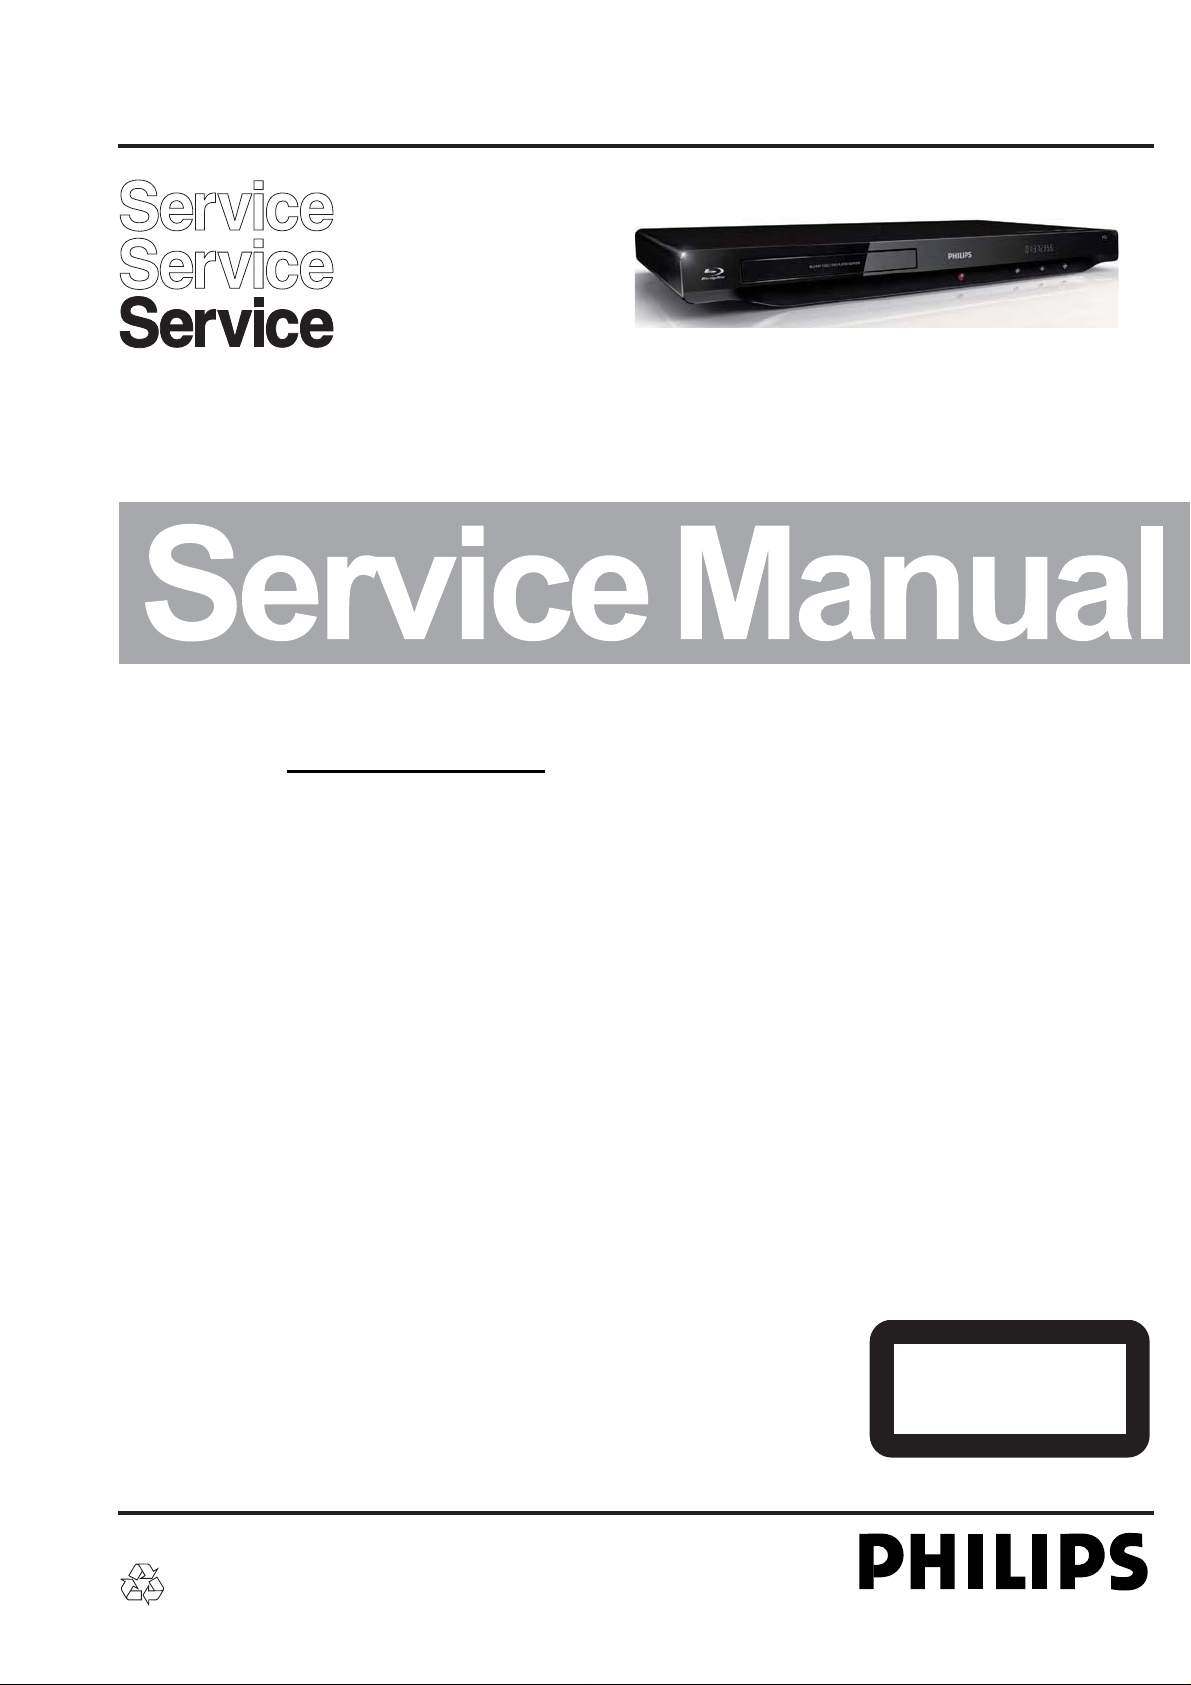
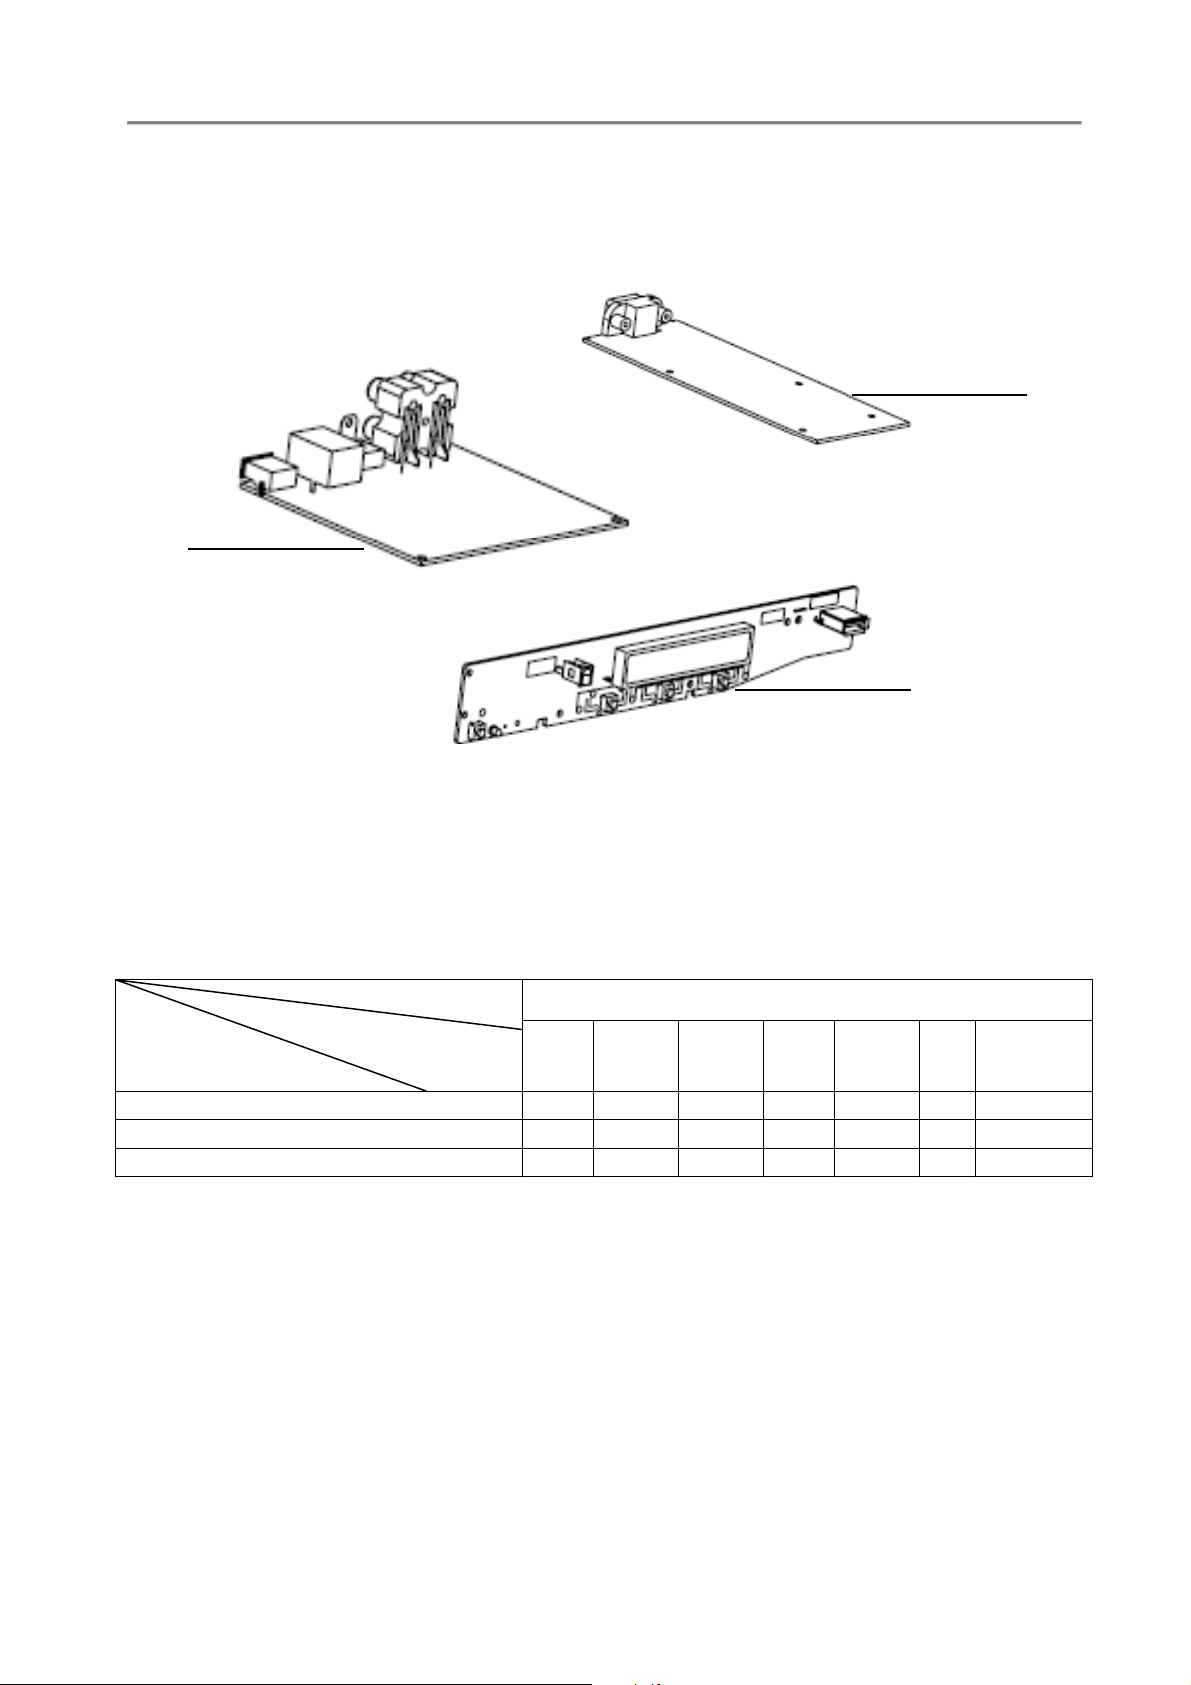
4.0 MECHANICAL AND DISMANTLING INSTRUCTIONS
The following guidelines show how to dismantle the player.
Step1: Remove 6 screws around the Top Cover, and then remove the Top Cover(Figure1)
Step2: Remove the 8 screws on board to dismantle the DVD BOARD & POWER BOARD & LED BOARD & DECK
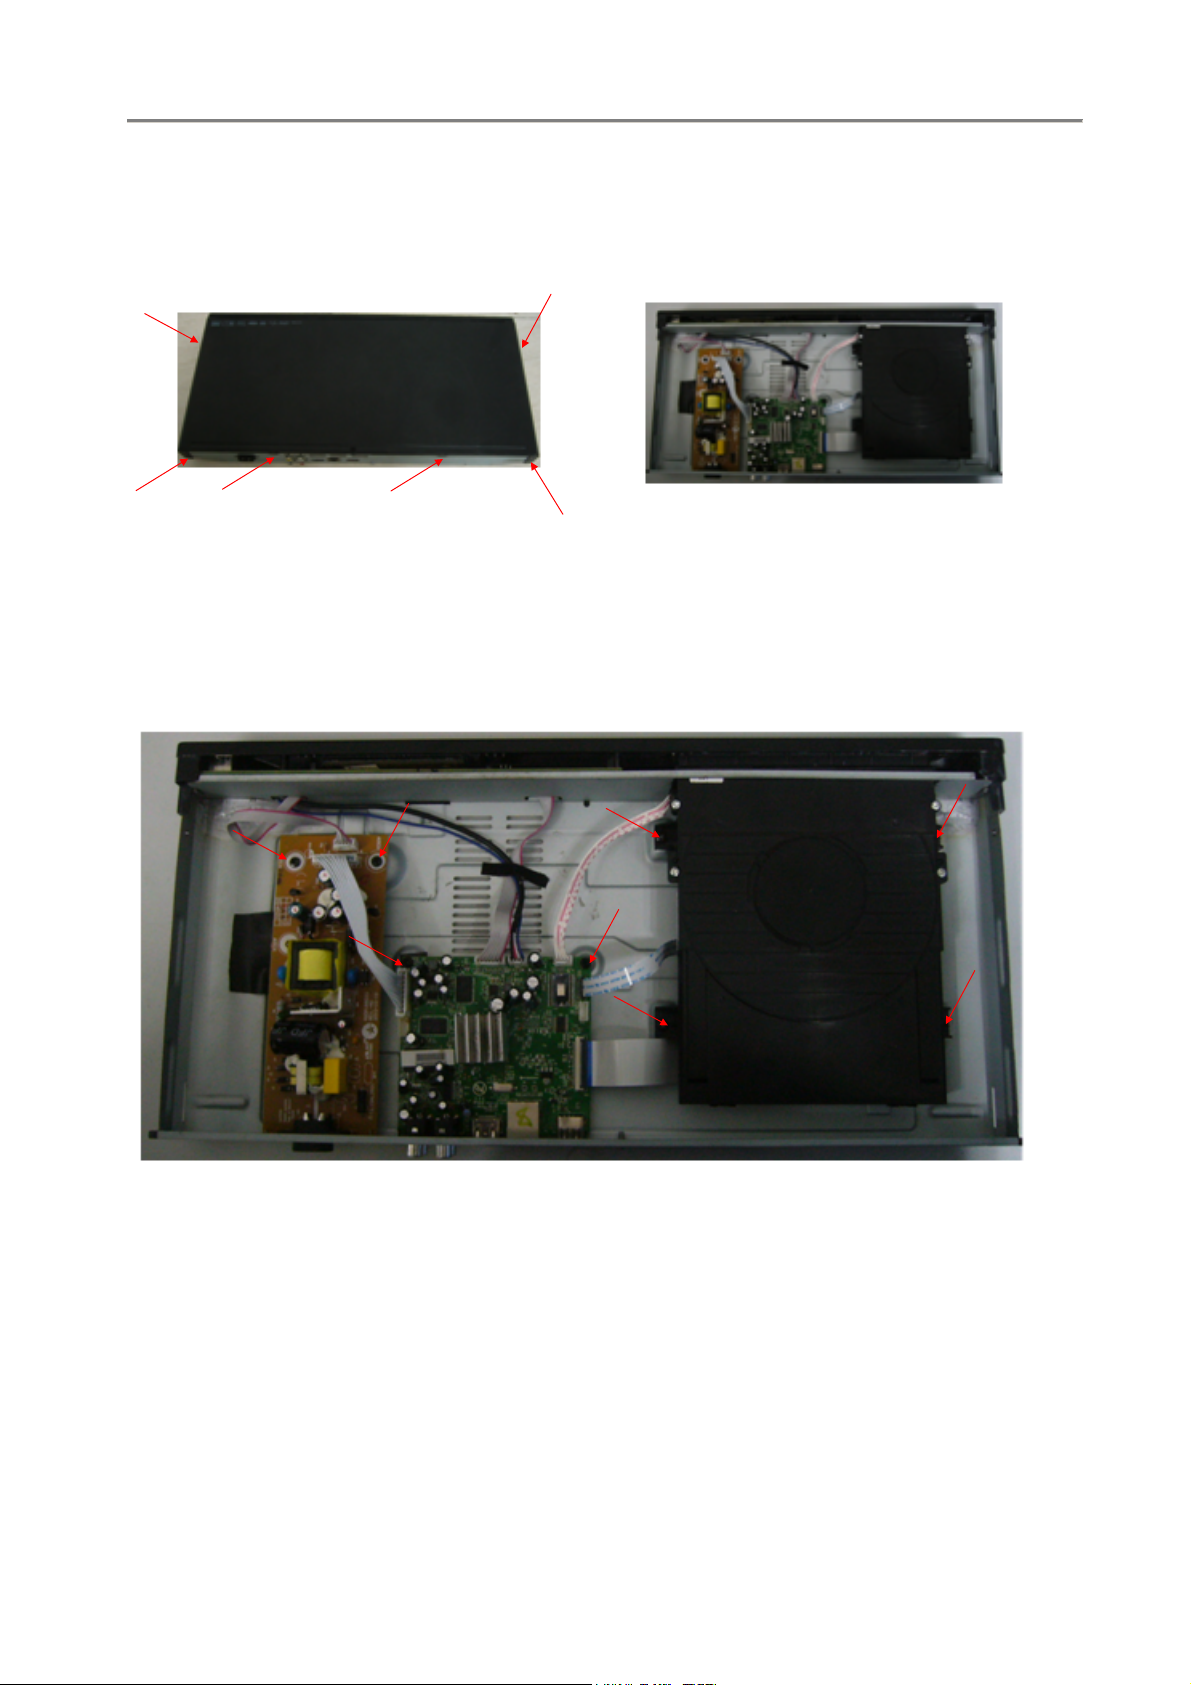
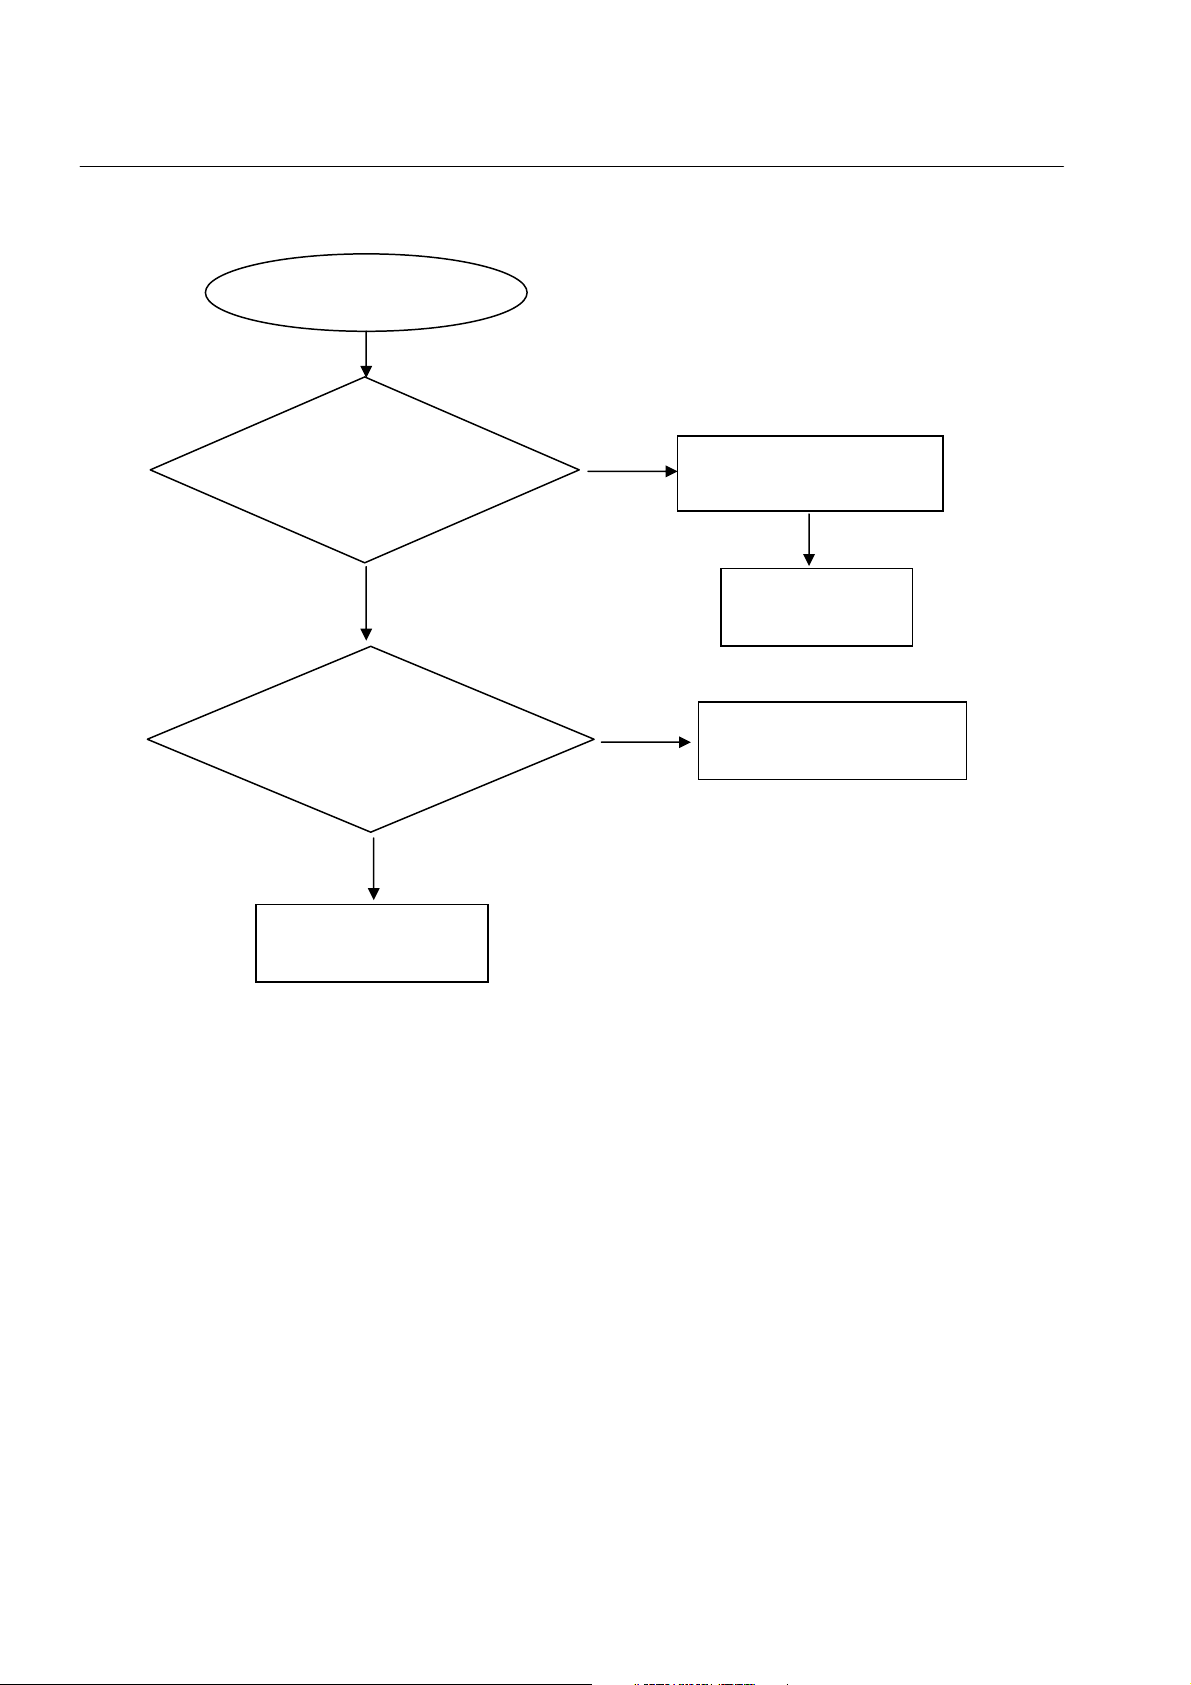
No display on VFD, and buttons do not work
No display on VFD, and
buttons do not work
Go
5-1
Trouble shooting chart
Check every supply
voltage on main board is
normal
Yes
Check +5V,+12V,-24V
voltage on the power
and front board
Yes
Check the signals of the VU1's
SG,GR on the front board
No
No
Refer to Power supply board part
Fix the connection J3 on front board
and CN4 on power board
No
Check the VU1 power supply
(VU1.38= +5V and VU1.27= -24V)
Yes
1.Check whether bad solder exists
on VU1 and pins of VFD
2.Check whether the circuit
connected to K1, K2, K3, K4 is
broken.
No
Replace VU1 or VFD
Yes
Correct connection
No audio output
No audio output
Go
5-2
Trouble shooting chart
Check whether the audio
signal is right from the
U1's pin 8, 9
Yes
Check whether bad solder
exists on pins of J7
No
Replace the J7
No
Yes
Check the U1 power supply
(U1.1= +3.3V and U1.11= +5V)
Yes
Replace the U1
Correct connection
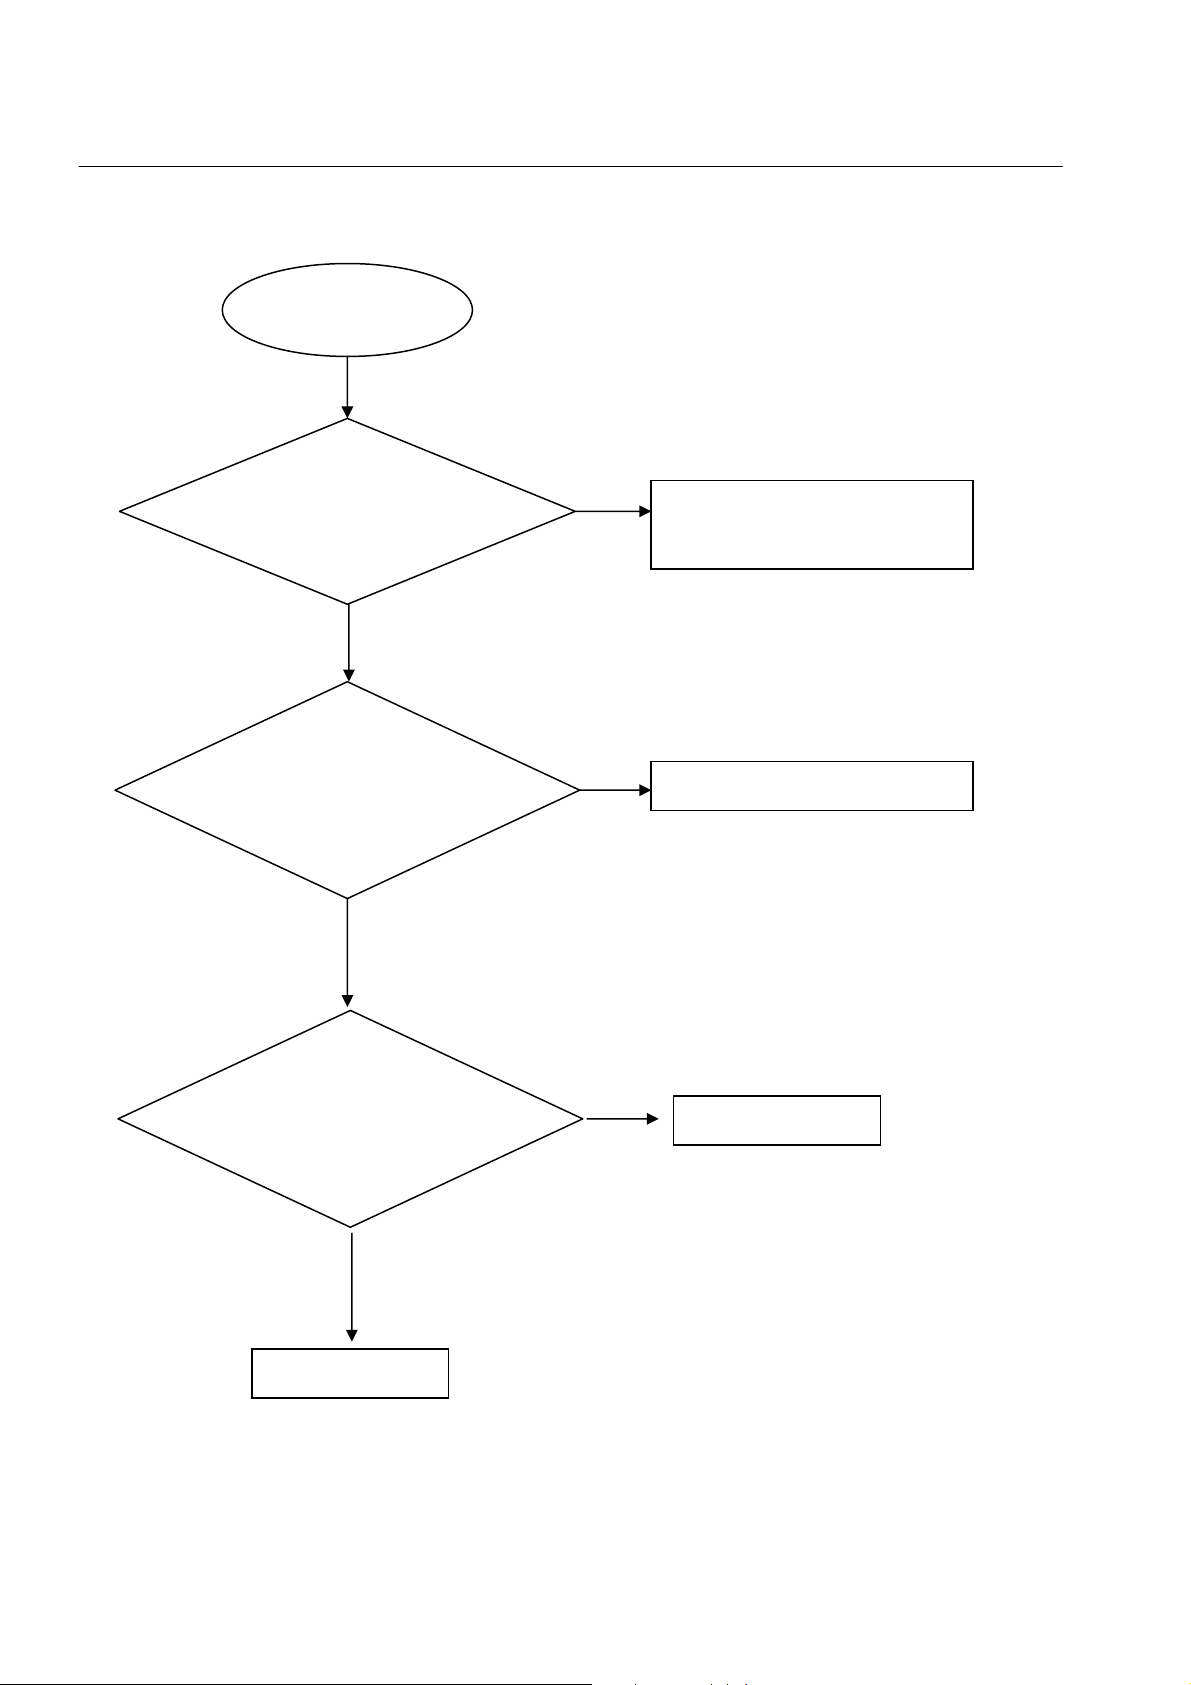
Remote control does not work
Remote control
does not work
Go
5-3
Trouble shooting chart
Check whether the remote
controller’s battery is
exhausted or not.
NO
Check the IR1 power supply is OK
Yes
Ye s
Yes
NO
Replace the battery for remote
controller
Check the Power supply board part
Check the connection J2 on front board
and J502 on main board is broken
NO
Replace IR1
Yes
Fix the connection
 Loading...