

Page 1
Always there to help you
Question?
Contact
Philips
Register your product and get support at
www.philips.com/support
BDP2385
User manual
Page 2

Page 3

Safety and important
notice
Read and understand all instructions before you
use this Blu-ray disc / DVD player. If damage is
caused by failure to follow the instructions, the
warranty does not apply.
Safety
Risk of electric shock or re!
• Before you make or change any
connections, make sure that all devices are
disconnected from the power outlet.
• Never expose the product and accessories
to rain or water. Never place liquid
containers, such as vases, near the product.
If liquids are spilt on or into the product,
disconnect it from the power outlet
immediately. Contact Philips Consumer
Care to have the product checked before
use.
• Never place the product and accessories
near naked ames or other heat sources,
including direct sunlight.
• Never insert objects into the ventilation
slots or other openings on the product.
• Where the mains plug or an appliance
coupler is used as the disconnect device,
the disconnect device shall remain readily
operable.
• Batteries (battery pack or batteries
installed) shall not be exposed to excessive
heat such as sunshine, re or the like.
• Disconnect the product from the power
outlet before lightning storms.
• When you disconnect the power cord,
always pull the plug, never the cable.
Risk of short circuit or re!
• For identication and supply ratings, see
the type plate at the back or bottom of
the product.
• Before you connect the product to the
power outlet, ensure that the power
voltage matches the value printed on the
back or bottom of the product. Never
connect the product to the power outlet if
the voltage is different.
Risk of injury or damage to the product!
• Visible and invisible laser radiation when
open. Avoid exposure to beam.
• Do not touch the disc optical lens inside
the disc compartment.
• Never place the product or any objects
on power cords or on other electrical
equipment.
• If the product is transported in
temperatures below 5 °C, unpack the
product and wait until its temperature
matches room temperature before
connecting it to the power outlet.
Risk of overheating!
• Never install this product in a conned
space. Always leave a space of at least four
inches around the product for ventilation.
Make sure that curtains or other objects
never cover the ventilation slots on the
product.
Risk of contamination!
• Do not mix batteries (old and new or
carbon and alkaline, etc.).
• Danger of explosion if batteries are
incorrectly replaced. Replace only with the
same or equivalent type.
• Remove batteries if they are exhausted or
if the remote control is not to be used for
a long time.
• Batteries contain chemical substances, they
should be disposed of properly.
Risk of swallowing batteries!
• The product/remote control may contain
a coin/button type battery, which can be
swallowed. Keep the battery out of reach
of children at all times! If swallowed, the
battery can cause serious injury or death.
Severe internal burns can occur within two
hours of ingestion.
1
Page 4
• If you suspect that a battery has been
swallowed or placed inside any part of the
body, seek immediate medical attention.
• When you change the batteries, always
keep all new and used batteries out of
reach of children. Ensure that the battery
compartment is completely secure after
you replace the battery.
• If the battery compar tment cannot be
completely secured, discontinue use of the
product. Keep out of reach of children and
contact the manufacturer.
This is CLASS II apparatus with double
insulation, and no protective earth provided.
• Parents should monitor their children
during 3D viewing and ensure they do not
experience any discomfort as mentioned
above. Watching 3D is not recommended
for children under 6 years of age as their
visual system is not fully developed yet.
Care for your product
• Do not insert any objects other than discs
into the disc compartment.
• Do not insert warped or cracked discs into
the disc compartment.
• Remove discs from the disc compartment
if you are not using the product for an
extended period of time.
• Only use microber cloth to clean the
product.
CLASS 1
LASER PRODUCT
3D health warning
• If you or your family has a history of
epilepsy or photosensitive seizures, consult
a medical professional before exposing
yourself to ashing light sources, rapid
image sequences or 3D viewing.
• To avoid discomfort such as dizziness,
headache or disorientation, we
recommend not watching 3D for extended
periods of time. If you experience any
discomfort, stop watching 3D and do
not immediately engage in any potentially
hazardous activity (for example driving a
car) until your symptoms have disappeared.
If symptoms persist, do not resume
watching 3D without consulting a medical
professional rst.
Care of the environment
Disposal of your old product and battery
Your product is designed and manufactured
with high quality materials and components,
which can be recycled and reused.
This symbol on a product means that the
product is covered by European Directive
2012/19/EU.
This symbol means that the product contains
batteries covered by European Directive
2013/56/EU which cannot be disposed of with
normal household waste.
2
Page 5
Inform yourself about the local separate
collection system for electrical and electronic
products and batteries. Follow local rules and
never dispose of the product and batteries
with normal household waste. Correct disposal
of old products and batteries helps prevent
negative consequences for the environment and
human health.
Removing the disposable batteries
To remove the disposable batteries, see battery
installation section.
Compliance
This product complies with the radio
interference requirements of the European
Community.
Hereby, Philips Consumer Lifestyle, declares
that this product is in compliance with the
essential requirements and other relevant
provisions of Directive 1999/5/EC. You
can nd the Declaration of Conformity on
www.p4c.philips.com.
Copyright
This item incorporates copy protection
technology that is protected by U.S. patents
and other intellectual property rights of
Rovi Corporation. Reverse engineering and
disassembly are prohibited.
This product incorporates proprietar y
technology under license from Verance
Corporation and is protected by U.S. Patent
7,369,677 and other U.S. and worldwide
patents issued and pending as well as
copyright and trade secret protection for
certain aspects of such technology. Cinavia is a
trademark of Verance Corporation. Copyright
2004-2013 Verance Corporation. All rights
reserved by Verance. Reverse engineering or
disassembly is prohibited.
Cinavia notice
This product uses Cinavia technology to
limit the use of unauthorized copies of some
commercially-produced lm and videos and
their soundtracks. When a prohibited use of an
unauthorized copy is detected, a message will
be displayed and playback or copying will be
interrupted.
More information about Cinavia technology
is provided at the Cinavia Online Consumer
Information Center at http://www.cinavia.com.
To request additional information about Cinavia
by mail, send a postcard with your mailing
address to: Cinavia Consumer Information
Center, P.O. Box 86851, San Diego, CA, 92138,
USA.
Open source software
Philips Electronics Singapore hereby offers to
deliver, upon request, a copy of the complete
corresponding source code for the copyrighted
open source software packages used in this
product for which such delivery is requested by
the respective licenses. This offer is valid up to
three years after product purchase to anyone
in receipt of this information. To obtain source
code, please send your request in English with
product type to [email protected]. If
you prefer not to use email or if you do not
receive conrmation receipt within 2 weeks
after mailing to this email address, please
write in English to “Open Source Team, Philips
Intellectual Property & Standards, P.O. Box 220,
5600 AE Eindhoven, The Netherlands”. If you do
not receive timely conrmation of your letter,
please email to the email address above. The
texts of the licenses and acknowledgements for
open source software used in this product are
included on a separate leaet.
3
Page 6
C
OA
AL
1
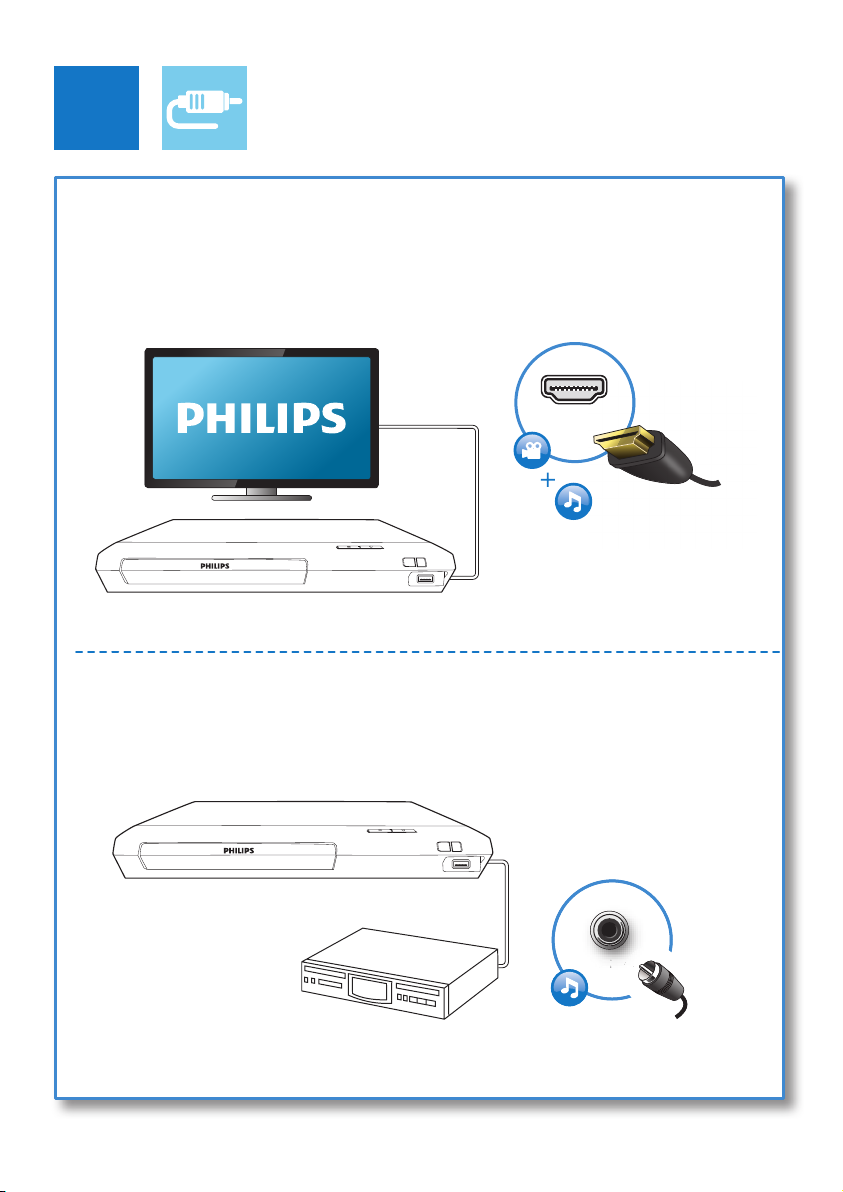
HDMI
COAXIAL
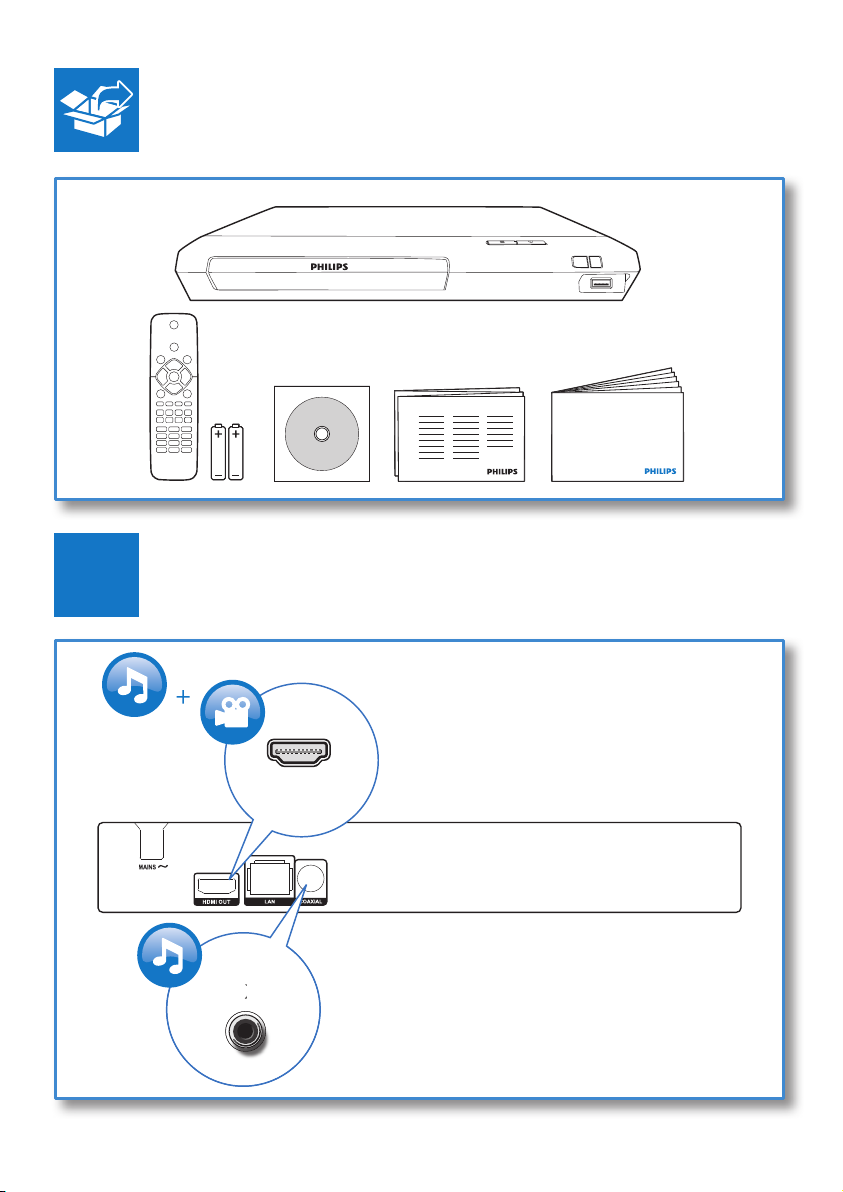
I
User Manual
Quick start guide
4
Page 7
2
HDMI OUT
HDMI OUT
COAXIAL
COAXIAL
5
Page 8
3
4
6
5
1
2
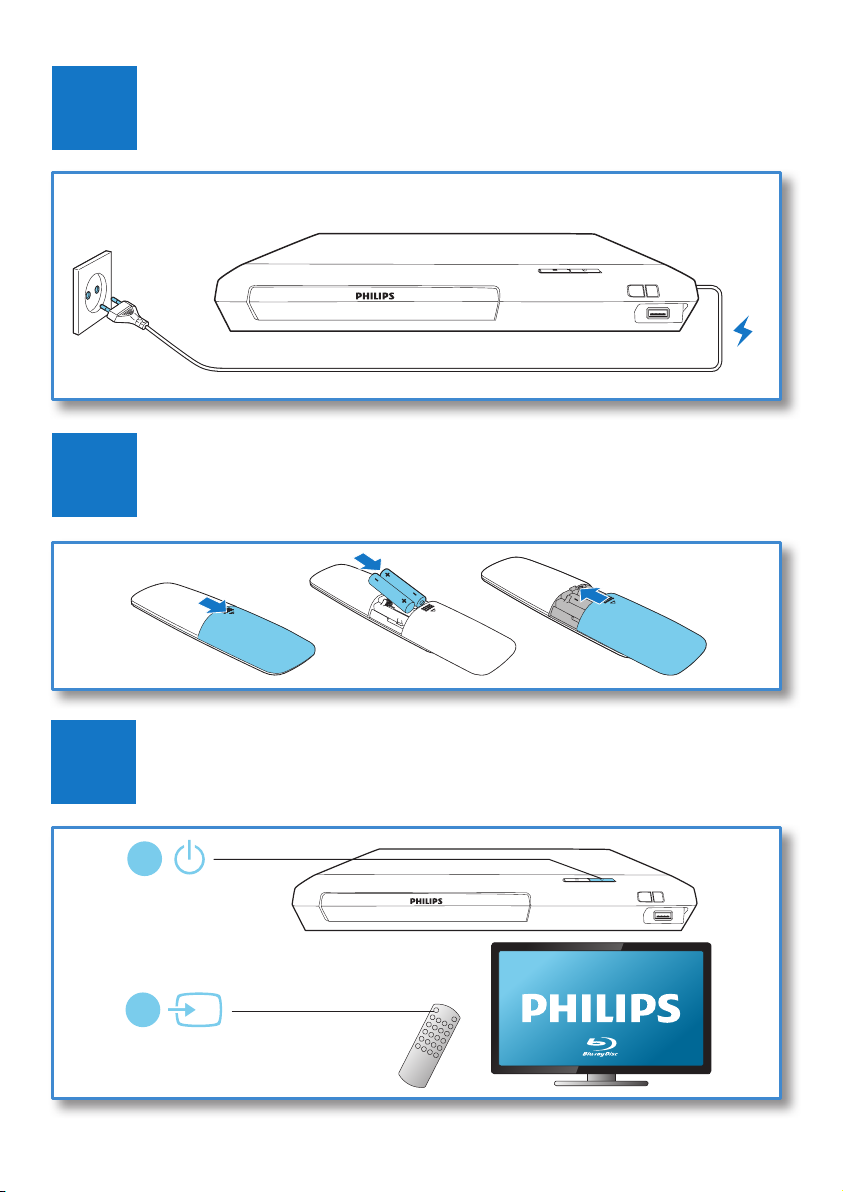
SOURCE
TV
Page 9
6
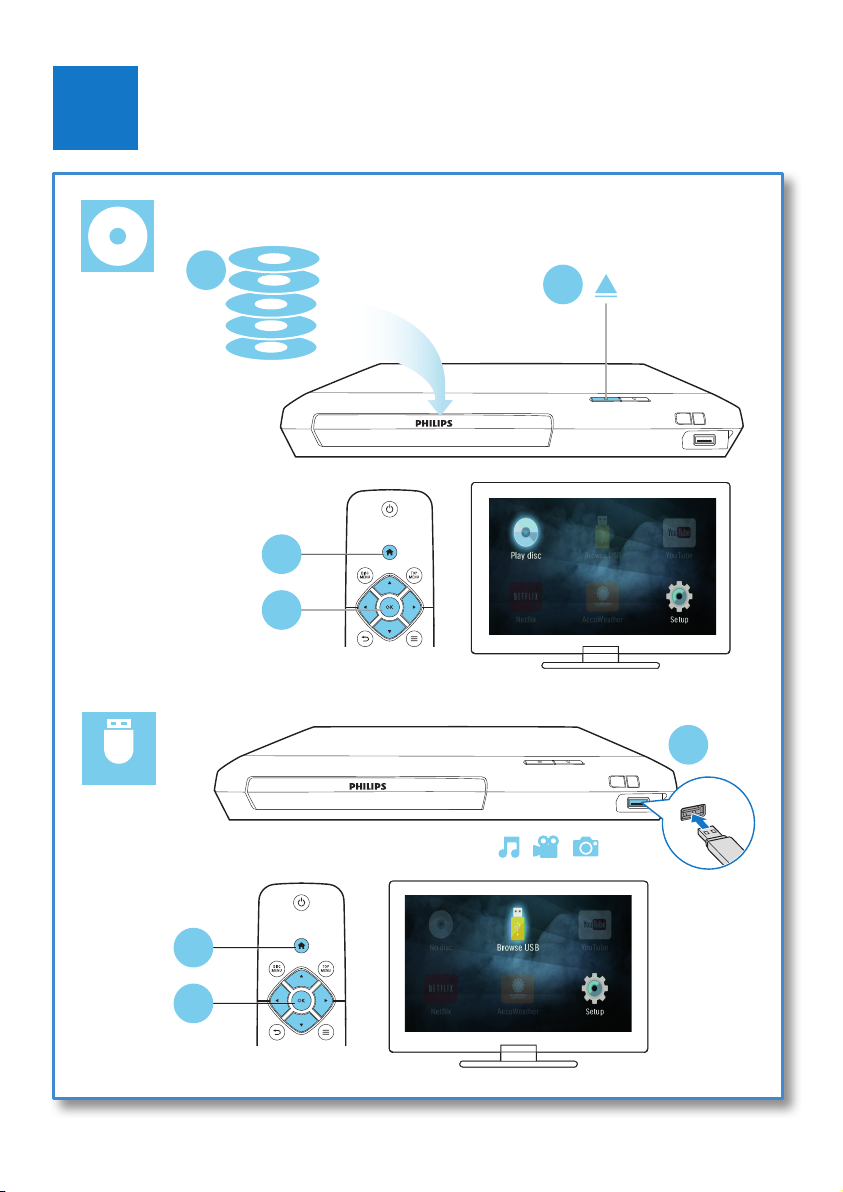
USB
2
BD
BD 3D
DVD/VCD/CD
DivX Plus HD/MKV
MP3 / JPEG
1
3
4
1
2
3
7
Page 10

Page 11

Contents
1 Use your Blu-ray disc / DVD player 2
Basic play control 2
Video, audio and picture options 3
DivX videos 4
Play a musical slideshow 5
Auto play 5
BonusView on Blu-ray 5
BD-Live on Blu-ray 5
Play a Blu-ray 3D video 6
Set up a network 6
Enjoy Internet services 7
Stream multimedia via Miracast 7
Use Philips EasyLink 8
2 Change settings 9
Picture 9
Sound 9
Network (installation, status...) 10
Preference (languages, parental control...) 10
Advanced options (clear memory...) 11
3 Update software 11
Update software via the Internet 11
Update software via USB 11
4 Product specications 12
5 Troubleshooting 15
EN
1
Page 12
1 Use your Blu-
ray disc / DVD
player
Congratulations on your purchase, and
welcome to Philips! To fully benet from
the support that Philips offers (e.g. product
software upgrade), register your product at
www.philips.com/welcome.
Basic play control
During play, press the following buttons to
control.
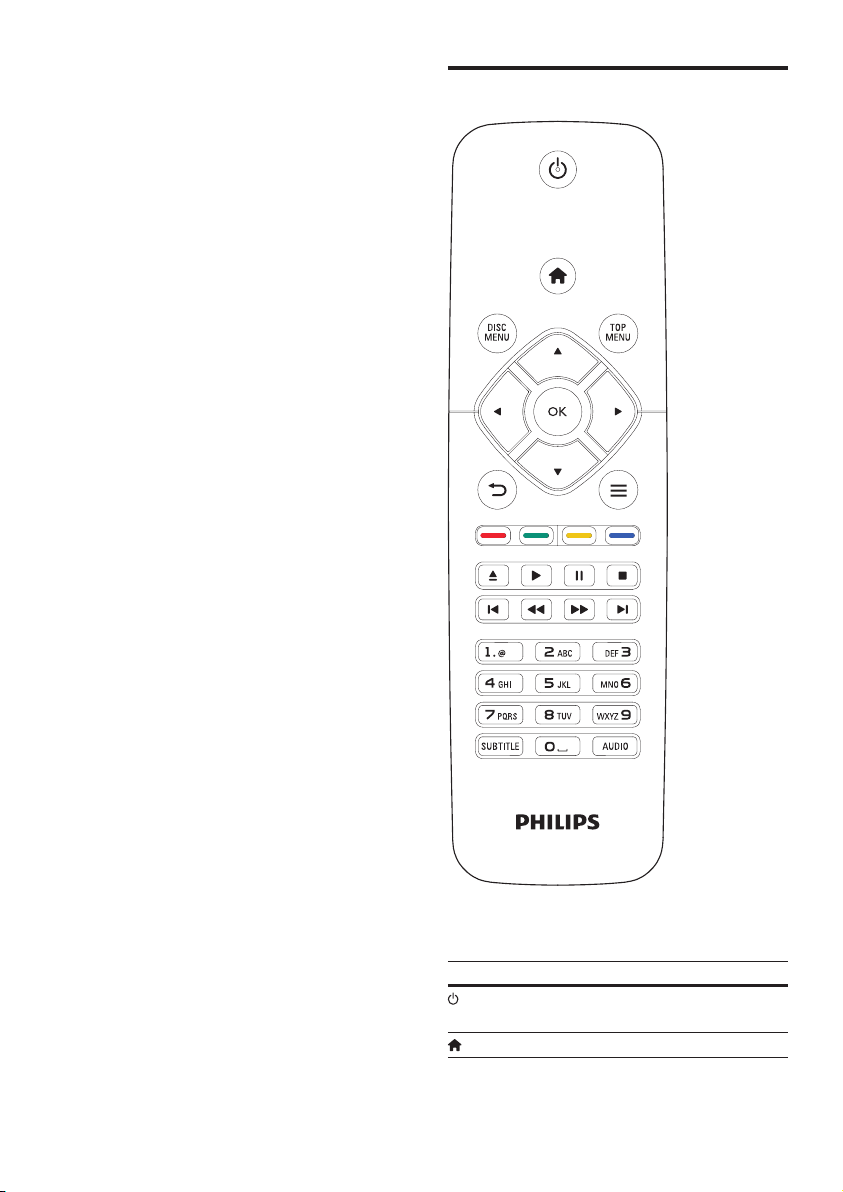
Button Action
Turn on the player, or switch to
standby.
Access the home menu.
2
Page 13
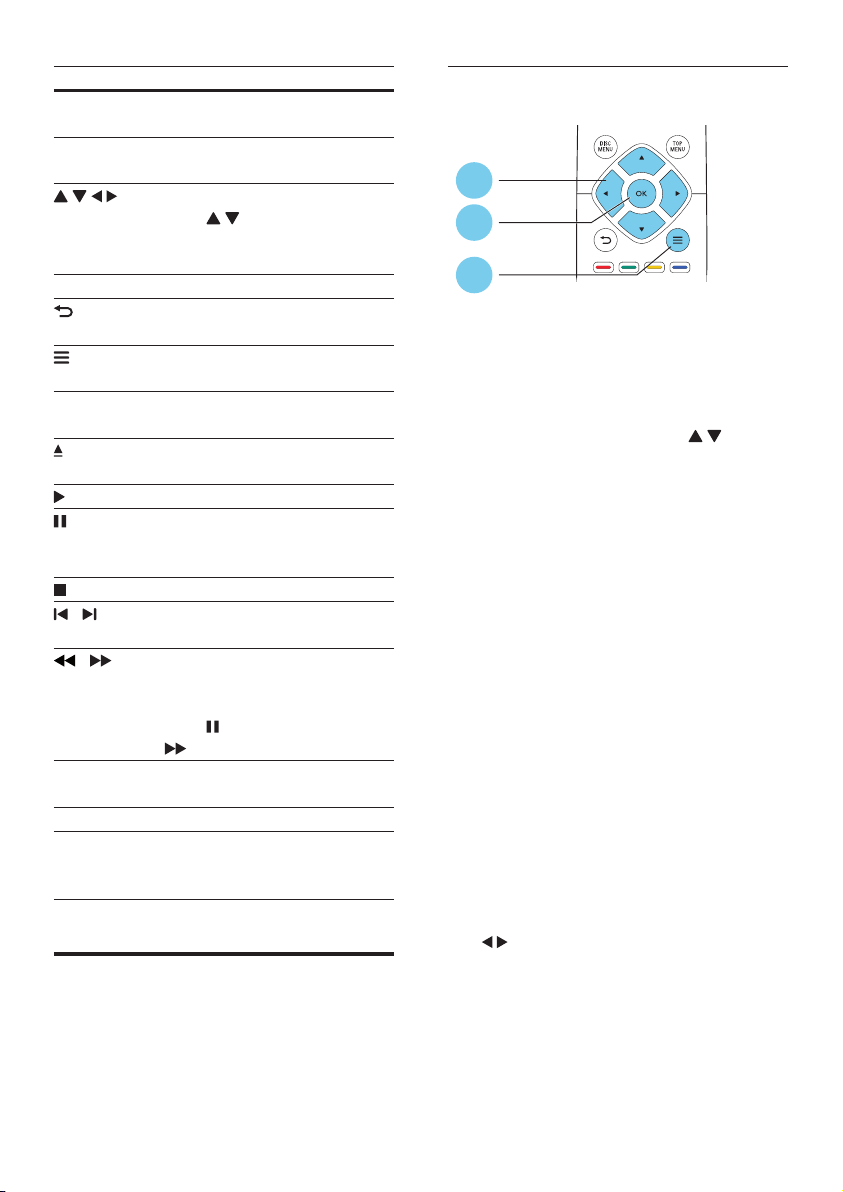
Button Action
DISC MENU Access or exit the disc menu or
Pop-up menu.
TOP MENU Access the main menu of a
video disc.
Navigate the menus.
Press to rotate a picture
clockwise or counter-clockwise
during slideshow.
OK Conrm a selection or entry.
Return to a previous display
menu.
Access more options during
play.
Color
buttons
/ Skip to the previous or next
/ Fast backward or forward.
AUDIO Select an audio language or
SUBTITLE Select a subtitle language.
Alphanumeric
buttons
Select tasks or options for Bluray discs.
Open or close the disc
compartment.
Start or resume play.
Pause play.
Press repeatedly to slow
forward frame by frame.
Stop play.
track, chapter or le.
Press repeatedly to change the
search speed.
Press once, and then press
to slow forward.
channel.
Select an item to play.
Enter values.
Enter letters via SMS style entry.
Video, audio and picture options
More options are available for video or picture
play from a disc or USB storage device.
Video options
2
3
1
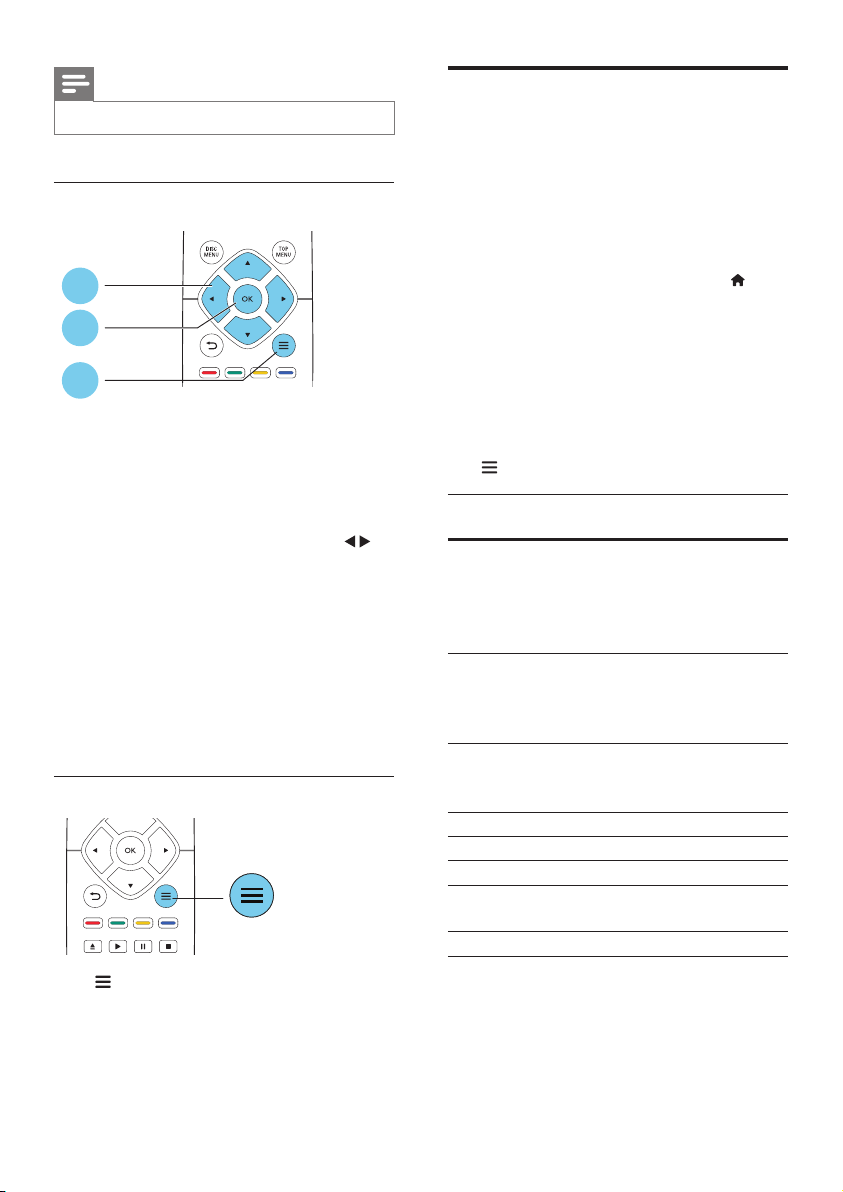
Access more options during video play.
• [Audio language]: Select an audio language.
• [Subtitle language]: Select a subtitle
language.
• [Subtitle shift]: Change the subtitle
position on the screen. Press to
change the subtitle position.
• [Info]: Display play information.
• [Character set]: Select a character set that
supports the DivX video subtitle (only for
DivX videos).
• [Time search]: Skip to a specic time
via the numeric buttons on the remote
control.
• [2nd audio language]: Select the second
audio language (only for Blu-ray discs that
support BonusView).
• [2nd subtitle language]: Select the second
subtitle language (only for Blu-ray discs that
support BonusView).
• [Titles]: Select a title.
• [Chapters]: Select a chapter.
• [Angle list]: Select a camera angle.
• [Menus]: Display a disc menu.
• [PIP selection]: Display a picture-in-picture
window (only for Blu-ray discs that support
BonusView).
• [Zoom]: Zoom into a video picture. Press
to select a zoom factor.
• [Repeat]: Repeat a chapter or title.
• [Repeat A-B]: Mark two points within a
chapter for repeat play, or turn off repeat
mode.
• [Picture settings]: Select a predened
color setting.
3EN
Page 14
Note
• Available video options depend on the video source.
Picture options
2
3
1
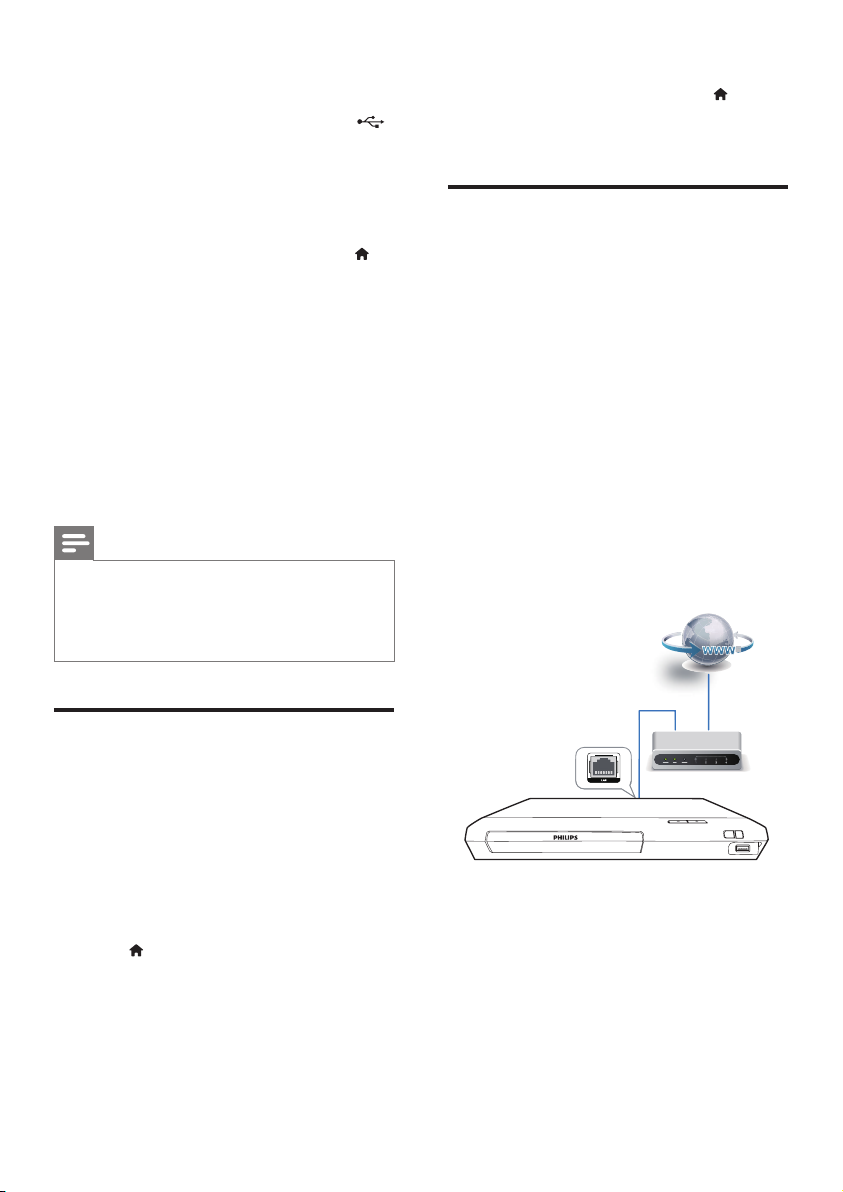
Access more options during slideshow.
• [Rotate +90]: Rotate a picture 90 degrees
clockwise.
• [Rotate -90]: Rotate a picture 90 degrees
counter-clockwise.
• [Zoom]: Zoom into a picture. Press to
select a zoom factor.
• [Info]: Display picture information.
• [Duration per slide]: Set a display interval
for a slideshow.
• [Slide animation]: Select a transition effect
for a slideshow.
• [Picture settings]: Select a predened
color setting.
• [Repeat]: Repeat a selected folder.
Audio options
Press repeatedly to cycle through the
following options.
• Repeat the current track.
• Repeat all the tracks on the disc or folder.
• Play audio tracks in a random loop.
• Turn off a repeat mode.
DivX videos
You can play DivX videos from a disc or a USB
storage device.
VOD code for DivX
• Before you purchase DivX videos and play
them on this player, register this player on
www.divx.com using the DivX VOD code.
• Display the DivX VOD code: press , and
select [Setup] > [Advanced] > [DivX®
VOD Code].
DivX subtitles
• Press SUBTITLE to select a language.
• If the subtitle is not displayed correctly,
change the character set that supports the
DivX subtitle. Select a character set: press
, and select [Character set].
Character
set
[Standard] English, Albanian, Danish, Dutch,
[Central
Europe]
[Cyrillic] Bulgarian, Belorussian, English,
[Greek] Greek
[Baltic] Estonian, Latvian and Lithuanian
[Chinese] Simplied Chinese
[Chinese-
Traditional]
[Korean] English and Korean
Languages
Finnish, French, Gaelic, German,
Italian, Kurdish (Latin), Norwegian,
Portuguese, Spanish, Swedish, and
Turkish
Albanian, Croat, Czech, Dutch,
English, German, Hungarian, Irish,
Polish, Romanian, Slovak, Slovene,
and Serbian
Macedonian, Moldavian, Russian,
Serbian, and Ukrainian
Traditional Chinese
4 EN
Page 15

Note
• To use the subtitles, make sure that the subtitle le
has the same name as the DivX video le name. For
example, if the DivX video le is named “movie.avi",
save the subtitle le as “movie.srt”, or “movie.sub”.
• This player can play subtitle les in the following
formats: .srt, .sub, .txt, .ssa, and .smi.
Play a musical slideshow
Play music and pictures simultaneously to create
a musical slideshow.
1 From a disc or connected USB storage
device, play a music le.
2 Press , and go to the picture folder.
3 Select a picture from the same disc or
USB, and press OK to start slideshow.
4 Press to stop slideshow.
5 Press again to stop music play.
Auto play
This player can automatically play a disc or a
video le.
Auto play disc
When this player is switched on, the disc
automatically plays.
1 Press (Home).
2 Select [Setup], and then press OK.
3 Select [Preference] > [Auto play disc]>
[On].
• The feature is turned on.
• To turn off the feature, select [Off]. The
disc will not automatically play.
Auto play video sequentially
If two or more video les are available in the
same folder from a USB storage device, the
next video le automatically plays after the end
of a video.
1 Press (Home).
2 Select [Setup], and then press OK.
3 Select [Preference] > [Auto play after
video]> [On].
• The feature is turned on.
• To turn off the feature, select [Off]. The
next video le will not automatically
play after the end of a video in the
same folder.
BonusView on Blu-ray
View special content (such as commentaries) in
a small screen window.
This feature is only applicable to Blu-ray discs
compatible with BonusView (also known as
picture in picture).
1 During play, press .
» The options menu is displayed.
2 Select [PIP selection] > [PIP], and press
OK.
» PIP options [1]/[2] depend on the
video contents.
» The secondary video window is
displayed.
3 Select [2nd audio language] or [2nd
subtitle language], and press OK.
BD-Live on Blu-ray
Access exclusive online services, such as movie
trailers, games, ringtones and other bonus
contents.
This feature is only applicable to Blu-ray discs
that are BD-Live enabled.
5EN
Page 16
1 Prepare the Internet connection and set
up a network (see "Set up a network").
2 Connect a USB storage device to the
(USB) connector on this player.
• A USB storage device is used to store
the downloaded BD-Live content.
• To delete the BD-Live previously
downloaded on the USB storage
device for memory release, press
and select [Setup] > [Advanced] >
[Clear memory].
3 Play a disc that is BD-Live enabled.
4 On the disc menu, select the BD-Live icon,
and press OK.
» BD-Live starts to load. The loading
time depends on the disc and the
Internet connection.
5 On the BD-Live interface, select an item
to access.
Note
• BD-Live services var y from discs and countries.
• When you use BD-Live, data on the disc and this player
are accessed by the content provider
• Use a USB storage device with at least 1GB of free
space to store the download.
3 Put on the 3D glasses for 3D effects.
• To turn off 3D output, press , and
select [Setup] > [Video] > [Watch 3D
video] > [Off].
Set up a network
Connect this player to the Internet to access
the services:
• Update software: update the software of
this player via the Internet.
• BD-Live: access online bonus features
(applicable to Blu-ray discs that are BDLive enabled).
• Online services: access Internet ser vices
such as YouTube, Netix, and AccuWeather.
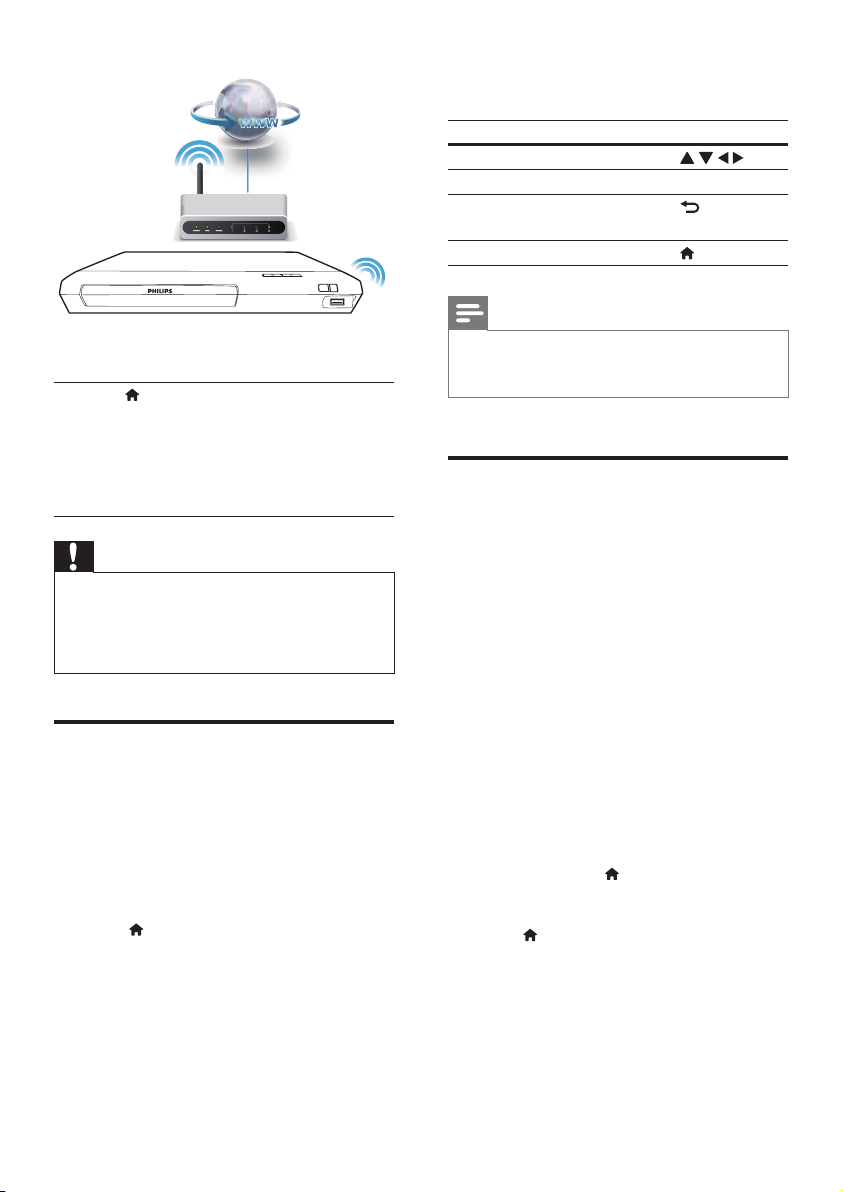
1 Connect this player to a computer
network and the Internet, through wired
(Ethernet) or wireless connection.
• For wired connection, connect a network
cable (not supplied) to the LAN port on
the back panel of this player.
Play a Blu-ray 3D video
What you need
• A 3D compliant TV
• This player is connected to the TV through
HDMI
• 3D glasses compatible with the TV
• 3D Blu-ray disc
1 Make sure that 3D output is turned on:
press , and select [Setup] > [Video]
>[Watch 3D video] > [Auto].
2 Play a Blu-ray 3D video.
6 EN
• This player has a built-in Wi-Fi for a
wireless connection.
Page 17
3 Follow the on-screen instruction and use
your remote control to enjoy the services.
Function Button/Action
Select a service or item.
Conrm a selection. OK
Return to a previous page, or
delete input text.
Return to the home page.
2 Perform the network installation.
1) Press .
2) Select [Setup], and press OK.
3) Select [Network] > [Network
installation], and press OK.
4) Follow the instructions on the TV screen to
complete the installation.
Caution
• Before you connect to a network, familiarize yourself
with the network router and networking principles. If
necessary, read documentation accompanying network
components. Philips is not responsible for lost, damaged,
or corrupt data.
Enjoy Internet services
With this player, you can access online services,
such as movies, pictures and music.
What you need
• Connect this player to the Internet (see
"Set up a network").
1 Press .
2 Select a service and press OK.
• [YouTube]: a video-sharing service
• [Netix]: an online subscription service
streaming movies & TV episodes over
the Internet
• [AccuWeather]: an online weather
forecasting service worldwide
Note
• Netix is available in certain countries. Streaming
membership is required. More information at
www.netix.com.
Stream multimedia via Miracast
Through this player, you can stream audio and
video from a Miracast certied device to your
TV, and the screen of the Miracast device is
viewed on your TV.
What you need
• Smartphones or tablets with Android 4.2/
Windows 8.1 or above, and check those
devices on whether Miracast feature is
available (the name of Miracast feature
may vary on different devices).
• Enable Miracast on your smartphone or
tablet (refer to a related user manual for
details).
• Make sure that Miracast is enabled on
this player (press , and select [Setup] >
[Network] > [Miracast break-in] > [On]).
1 Press to display the home menu screen
of this player.
2 On the Miracast source device, initiate
the search for this player and select this
player when it is found (refer to the source
device's user manual for details).
• If this is the rst time these 2 devices
are paired, an acknowledgement
7EN
Page 18

message is displayed on your TV.
Accept it to continue the pairing.
• To cancel the pairing, press on the
remote control.
3 Wait until the media content from the
source device is displayed on your TV, then
choose the media to start play.
» Audio or video is streamed to your TV
through this player.
Note
• This player can store up to 10 Miracast devices for
pair-up, and can only connect a single Miracast certied
device at a time.
• During Miracast connection, Wi-Fi connection on this
player is temporarily suspended.
• To avoid interference from Bluetooth transmission, turn
off Bluetooth on your Miracast device.
• During Miracast streaming, video stuttering or audio
dropouts may occur, depending on your environment
(video streaming is up to 720p).
Use Philips EasyLink
This player supports Philips EasyLink which
uses the HDMI CEC (Consumer Electronics
Control) protocol. You can use a single remote
control to control EasyLink compliant devices
that are connected through HDMI. Philips does
not guarantee 100% interoperability with all
HDMI CEC devices.
1 Connect the HDMI CEC compliant devices
through HDMI, and turn on the HDMI
CEC operations on the TV and other
connected devices (see the user manual of
the TV or other devices for details).
2 Press .
3 Select [Setup]> [EasyLink].
4 Select [On] under the options: [EasyLink],
[One Touch Play] and [One Touch
Standby].
» EasyLink function is turned on.
One Touch Play
When a video disc is in the disc compartment,
press to wake up the TV from standby, and
then play a disc.
One Touch Standby
When a connected device (for example TV)
is put to standby with its own remote control,
this player is put to standby automatically.
8 EN
Page 19
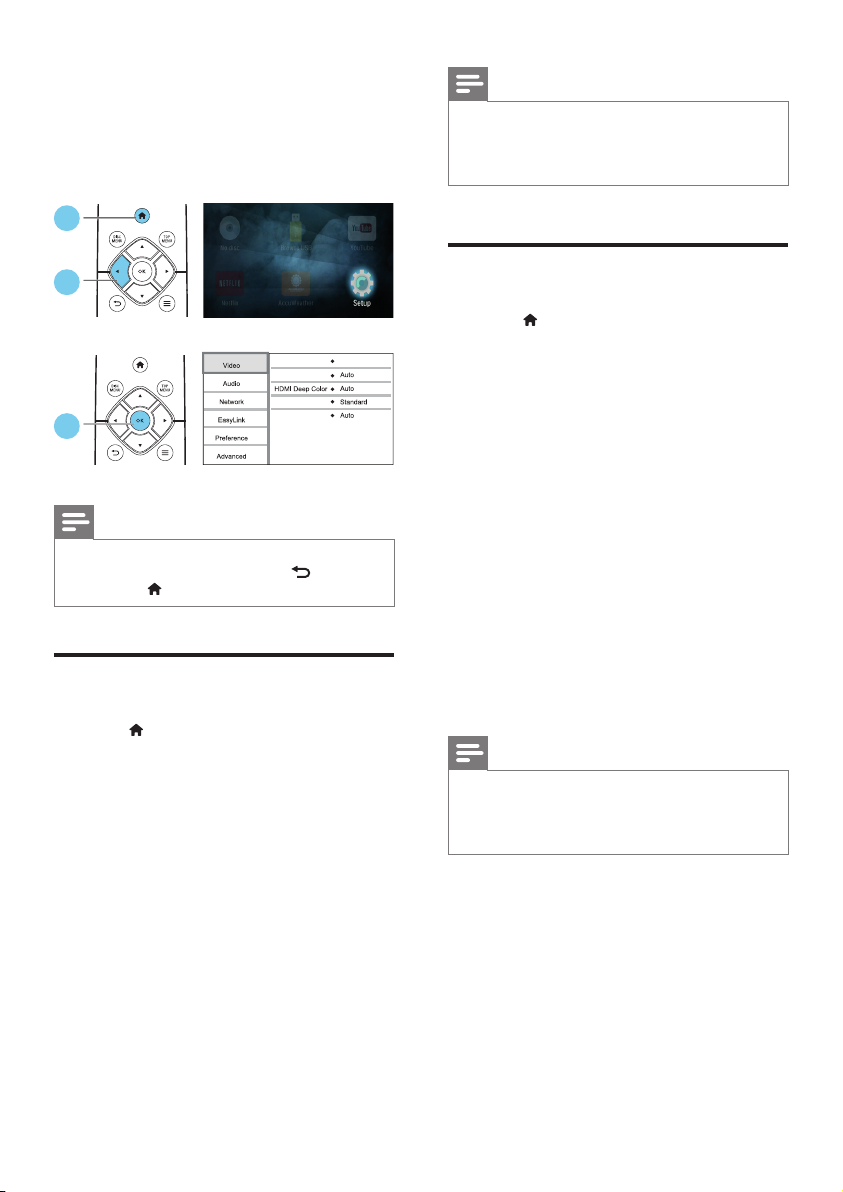
2 Change settings
This section helps you change the settings of
this player.
1
Note
• If you change a setting, make sure that the TV supports
the new setting.
• For settings related to HDMI, the TV must be
connected through HDMI.
2
TV display
HDMI video
Picture settings
3
Watch 3D video
16:9 Widescreen
Note
• You cannot change a menu option that is grayed out.
• To return to the previous menu, press . To exit the
menu, press .
Picture
1 Press .
2 Select [Setup] > [Video] to access the
video setup options.
• [TV display]: Select a picture display format
to t the TV screen.
• [HDMI video]: Select an HDMI video
resolution.
• [HDMI Deep Color]: Display colors with
more shades and hues when the video
content is recorded in Deep Color and the
TV supports this feature.
• [Picture settings]: Select a predened
color setting.
• [Watch 3D video]: Set to 3D or 2D
output when playing a Blu-ray 3D disc.
The player must be connected to a 3D TV
through HDMI.
Sound
1 Press .
2 Select [Setup] > [Audio] to access the
audio setup options.
• [Night mode]: Select quiet or full dynamic
sound. Night mode decreases the volume
of loud sound and increases the volume of
soft sound (such as speech).
• [HDMI audio]: Set an HDMI audio format
when this player is connected through
HDMI.
• [Digital audio]: Select an audio format
for the sound output when this player is
connected through a digital connector
(coaxial).
• [PCM downsampling]: Set the sampling
rate for PCM audio output when this
player is connected through a digital
connector (coaxial).
Note
• For settings related to HDMI, the TV must be
connected through HDMI.
• Night mode is only available for Dolby
Dolby® Digital Plus encoded DVD and Blu-ray discs.
®
Tr ueHD /
9EN
Page 20
Network (installation, status...)
1 Press .
2 Select [Setup] > [Network] to access the
network setup options.
• [Network installation]: Start a wired or
wireless installation to make the network
work.
• [View network settings]: Display the
current network status.
• [View wireless settings]: Display the
current Wi-Fi status.
• [Name your Product:]: Re-name this
player for identication in a home network.
• [Miracast break-in]: Turn on or off
Miracast.
• [Miracast browser]: Scan for Miracast
devices.
• [Miracast role]: Force this player to be
Group Owner or automatically choose a
device to be Group Owner.
• [Auto]: The role of Group owner is
automatically determined between the
source device and this player when
connection is established.
• [Group owner]: Force this player to
be Group Owner and allow it to select
the channel to use for establishing the
link with the source device.
• [Disc menu]: Select a menu language for a
video disc.
• [Parental control]: Restrict access to discs
that are encoded with ratings. Input "0000"
to access the restriction options. To play all
discs irrespective of the rating, select level
"8".
• [Screen saver]: Enable or disable screen
saver mode. If enabled, the screen enters
idle mode after 10 minutes of inactivity (for
example, in pause or stop mode).
• [Auto subtitle shift]: Enable or disable
subtitle shift. If enabled, the subtitle position
is changed automatically to t the TV
screen (this feature works with some
Philips TVs only).
• [Change password]: Set or change a
password to play a restricted disc. Input
"0000" if you do not have a password or if
you have forgotten your password.
• [Auto standby]: Enable or disable auto
standby. If enabled, the player switches to
standby after 18 minutes of inactivity (for
example, in pause or stop mode).
• [VCD PBC]: Display or skip the content
menu for VCD and SVCD.
• [Auto play disc]: Enable or disable the
automatic disc playback after power on.
• [Auto play after video]: Enable or disable
sequential playback of videos from disc/
USB.
Preference (languages, parental control...)
1 Press .
2 Select [Setup] > [Preference] to access
the preference setup options.
• [Menu language]: Select an onscreen
display menu language.
• [Audio]: Select an audio language for video.
• [Subtitle]: Select a subtitle language for
video.
10 EN
Note
• If your preferred language is not available for disc
language, audio or subtitle, you can select [Other]
from the menu options and input 4-digit language code
which can be found at the back of this user manual.
• If you select a language which is not available on a disc,
this player uses the default language of the disc.
Page 21

Advanced options (clear memory...)
3 Update software
1 Press .
2 Select [Setup] > [Advanced] to access the
advanced setup options.
• [BD-Live security]: Restrict or allow access
to BD-Live (only for non-commercial, usercreated BD-Live discs).
• [Downmix mode]: Control 2-channel
stereo audio output.
• [Software update]: Select to update
software from a network or from USB
storage device.
• [Clear memory]: Delete the previous BDLive download on the USB storage device.
A "BUDA" folder is automatically created
to store the BD-Live download.
• [DivX® VOD Code]: Display the DivX®
registration code or the deregistration
code for this player.
• [Netix ESN]: Display ESN (Electronic
Serial Number) for this player.
• [Deactivation]: Cancel Netix activation
on this player.
• [Version information]: Display the
software version of this player.
• [Restore default settings]: Reset this player
to the default settings made at the factory,
except for password and parental control
level.
Note
• You cannot restrict Internet access on commercial
Blu-ray discs.
• Before you purchase DivX videos and play them on this
player, register this player on www.divx.com with the
DivX VOD code.
Before you update the software of this player,
check the current software version:
• Press , and then select [Setup] >
[Advanced] > [Version information], and
press OK.
Update software via the Internet
1 Connect the player to the Internet (see
"Set up a network").
2 Press , and select [Setup].
3 Select [Advanced] > [Software update]>
[Network].
» If an upgrade media is detected, you
are prompted to start the update.
4 Follow the instructions on the TV screen
to update the software.
» When the update is complete, this
player automatically turns off and on
again.
Update software via USB
1 Check the latest software version on
www.philips.com/support.
• Search for your model and click on
"Software and drivers".
2 Download the software into a USB storage
device.
a Unzip the download, and make sure
that the unzipped folder is named
"UPG".
b Put the "UPG" folder in the root
directory.
11EN
Page 22
3 Connect the USB storage device to the
(USB) connector on this player.
4 Press , and select [Setup].
5 Select [Advanced] > [Software update]>
[USB].
» If an upgrade media is detected, you
are prompted to start the update.
6 Follow the instructions on the TV screen
to update the software.
» When the update is complete, this
player automatically turns off and on
again.
Caution
• Do not turn off the power or remove the USB storage
device when the software update is in progress because
you might damage this player.
4 Product
specifications
Note
• Specications and design are subject to change without
notice.
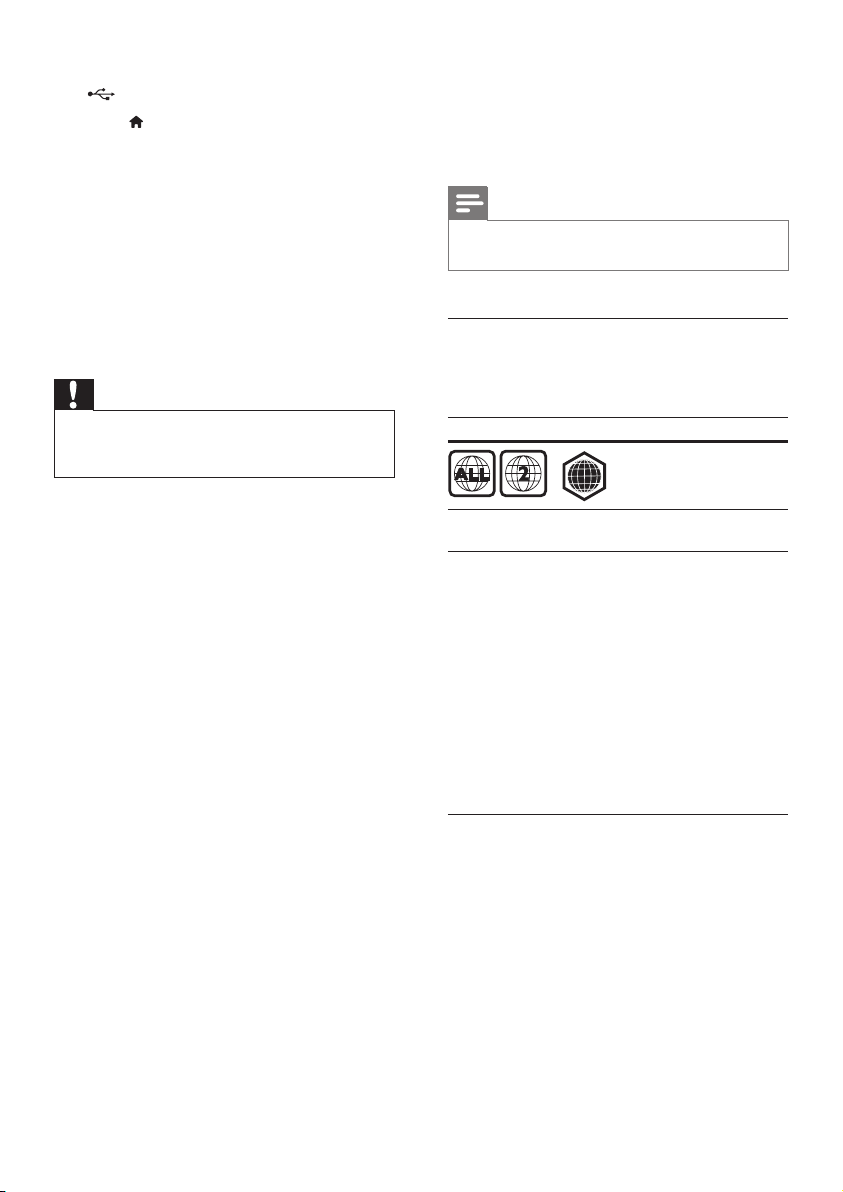
Region code
This player can play discs with the following
region codes.
DVD Blu-ray Countries
Europe, United
Media formats
• BD-Video, BD 3D
• DVD-Video, DVD+R/+RW, DVD-R/-RW,
DVD+R/-R DL (Dual Layer)
• VCD/SVCD
• Audio CD, CD-R/CD-RW, MP3 media,
WMA media, JPEG les
• DivX (Ultra)/DivX Plus HD media, MKV
media
• USB storage device
B
Kingdom
12 EN
File formats
• Audio:
• .aac, .mka, .mp3, .wma, .wav, .m4a, .ac,
.ogg
• Video:
• .avi, .divx, .mp4, .m4v, .ts, .mov, .mkv,
.m2ts, .mpg, .mpeg, .3gp
• Picture: .jpg, .jpeg, .gif, .png
Page 23

Audio formats
This product supports the following audio les.
Exten-
Con-
sion
tainer
.mp3 MP3 MP3 Up to 320 kbps
.wma ASF WMA Up to 192 kbps
.aac AAC AAC, HE-
.wav WAV PCM 27.648 Mbps
.m4a MKV AAC 192 kbps
.mka MKA PCM 27.648 Mbps
AC-3 640kbps
DTS core 1.54 Mbps
MPEG 912 kbps
MP3 Up to 320 kbps
WMA Up to 192 kbps
AAC, HE-
.ac FLAC FLAC Up to 24 bit per
.ogg OGG Vorbis Variable bit rate,
MP3 Upto 320 kbps
Audio
codec
Bit rate
WMA Pro Up to 768kbps
Up to 192 kbps
AAC
ALAC Up to 192kHz
sampling rate
WMA Pro Up to 768kbps
Up to 192 kbps
AAC
sample
maximum block
size 4096
FLAC Up to 192kHz
sampling rate
OGGPCM No limitation
.avi les in AVI container (or .ts les in TS
container)
Audio codec Video codec Bit rate
PCM, AC-3,
DTS core,
MP3, WMA,
DD+
MPEG 1,
DivX 3.11,
DivX 4.x,
DivX 5.x,
DivX 6.x
10 Mbps max
40 Mbps
MPEG 2
MPEG 4 SP /
38.4 Mbps
ASP
H.264/AVC up
25 Mbps
WMV9 45 Mbps
.divx les in AVI container
Audio codec Video codec Bit rate
PCM, AC-3,
DTS core,
MP3, WMA,
DD+
DivX 3.11,
DivX 4.x,
DivX 5.x,
DivX 6.x
10 Mbps max
.mp4 or .m4v les in MP4 container
Audio codec Video codec Bit rate
AC-3, MPEG,
MP3, AAC,
MPEG 1,
MPEG 2
40 Mbps
HE-AAC,
DD+
MPEG 4 ASP 38.4 Mbps
H.264/AVC up
25 Mbps
.mov les in MOV container
Video formats
If you have a high denition TV, this product
allows you to play your video les with:
• Resolution: 1920 x 1080 pixels at
• Frame rate: 6 ~ 30 frames per second.
Audio codec Video codec Bit rate
AC-3, MPEG,
MP3, AAC,
MPEG 1,
MPEG 2
40 Mbps
HE-AAC
MPEG 4 ASP 38.4 Mbps
H.264/AVC up
25 Mbps
13EN
Page 24

.mkv les in MKV container
Audio codec Video codec Bit rate
PCM, AC-3,
DTS core,
MPEG, MP3,
WMA, AAC,
HE-AAC,
DD+, FLAC
.m2ts les in MKV container
DivX Plus HD 30 Mbps
MPEG 1,
MPEG 2
MPEG 4 ASP 38.4 Mbps
H.264/AVC up
to [email protected]
WMV9 45 Mbps
40 Mbps
25 Mbps
Video
• Signal system: PAL / NTSC
• HDMI output: 480i/576i, 480p/576p, 720p,
1080i, 1080p, 1080p/24Hz
Audio
• Digital output: 0.5 Vp-p (75 ohm)
• Coaxial
• HDMI output
• Sampling frequency:
• MP3: 32 kHz, 44.1 kHz, 48 kHz
• WMA: 44.1 kHz, 48 kHz
• Constant bit rate:
• MP3: 112 kbps - 320 kpbs
• WMA: 48 kpbs - 192 kpbs
Audio codec Video codec Bit rate
PCM, AC-3,
DTS core,
MPEG, MP3,
WMA, AAC,
HE-AAC,
DD+
.mpg and .mpeg les in PS container
Audio codec Video codec Bit rate
PCM, DTS
core, MPEG,
MP3
.3gp les in 3GP container
Audio codec Video codec Bit rate
AAC, HEAAC
H.264/AVC up
MPEG 1,
MPEG 2
MPEG 4 ASP 38.4 Mbps
H.264/AVC up
to [email protected]
WMV9 45 Mbps
MPEG 1,
MPEG 2
MPEG 4 ASP 38.4 Mbps
40 Mbps
25 Mbps
40 Mbps
25 Mbps max
Wi-Fi
• Support wireless standards:
IEEE802.11 b/g/n (2.4 GHz)
USB
• Compatibility: Hi-Speed USB (2.0)
• Class support: USB Mass Storage Class
• File system: FAT16, FAT32
• USB port: 5V , 500mA
• Support HDD (a portable hard disc drive):
an external power source may be needed.
Main unit
• Power supply rating: 220-240 V~, 50-60 Hz
• Power consumption: 11 W
• Power consumption in standby mode:
< 0.5 W
• Dimensions (w x h x d):
270 x 41 x 199.3 (mm)
• Net Weight: 0.92 kg
Operating Temperature & Humidity
• 0 °C to 45 °C, 5% to 90% Humidity for all
climates.
Storage Temperature & Humidity
• -40 °C to 70 °C, 5% to 95%
14 EN
Page 25
Standby information
• When the product remains inactive for
18 minutes, it automatically switches to
standby or networked standby.
• The power consumption in standby or
networked standby is less than 0.5W.
5 Troubleshooting
Caution
• Risk of electric shock. Never remove the casing of the
player.
Accessories
• Remote control and batteries
• Quick start guide
• CD-ROM built in multi-lingual user manual
(Continental Europe only)
Laser
• Laser Type (Diode): AlGaInN (BD),
AlGaInP (DVD/CD)
• Wave length: 398nm to 413nm (BD),
645nm to 664nm (DVD), 770nm to
800nm (CD)
• Output power: 1.7mW (BD), 0.19mW
(DVD), 0.25mW (CD)
To keep the warranty valid, never try to repair
the player yourself.
If you have problems using this player, check the
following points before you request service. If
you still have a problem, register your player and
get support at www.philips.com/support.
If you contact Philips, you will be asked for the
model and serial number of this player. The
model number and serial number are on the
back of this player. Write the numbers here:
Model No. __________________________
Serial No. ___________________________
Main unit
The buttons on this player do not work.
• Disconnect this player from the power
supply for a few minutes, and then
reconnect.
Picture
No picture.
• Make sure that the TV is switched to the
correct source input for this player.
No picture on HDMI connection.
• Make sure that the HDMI cable is not
faulty. If it is faulty, replace with a new
HDMI cable.
• On the remote control, press and then
press “731” (numeric buttons) to recover
picture display. Or wait for 10 seconds for
auto recovery.
• If this player is connected to an
unauthorized display device with an HDMI
cable, the audio and video signals may not
be output.
15EN
Page 26

The disc does not play high-denition video.
• Make sure that the disc contains high-
denition video.
• Make sure that the TV suppor ts high-
denition video.
Sound
No audio output from the TV.
• Make sure that the audio cables are
connected to the audio input of the TV.
• Make sure that the TV is switched to the
correct source input for this player.
No audio output from the loudspeakers of
the external audio device (home theater or
amplier).
• Make sure that the audio cables are
connected to the audio input of the audio
device.
• Switch the external audio device to the
correct audio source input.
No sound on HDMI connection.
• You may not hear any sound from the
HDMI output if the connected device
is non-HDCP compliant or only DVIcompatible.
No secondary audio output for Picture-inPicture feature.
• When [Bitstream] under the [HDMI
Audio] or [Digital Audio] menu is selected,
interactive sound like secondary sound for
Picture-in-Picture feature is muted. Deselect [Bitstream].
Play
Cannot play a disc.
• Clean the disc.
• Make sure that the disc is correctly loaded.
• Make sure that this player supports the
disc. See "Specications".
• Make sure that this player supports the
region code of the DVD or BD.
• For DVD±RW or DVD±R, make sure that
the disc is nalized.
Cannot play DivX video les.
• Make sure that the DivX video le is
complete.
• Make sure that the video le name
extension is correct.
DivX subtitles do not display correctly.
• Make sure that the subtitle le has the
same name as the DivX video le.
• Make sure that the subtitle le has an
extension name supported by this player
(.srt, .sub, .txt, .ssa, or .smi).
Cannot read the contents of a connected USB
storage.
• Make sure that the format of the USB
storage device is compatible with this
player.
• Make sure that the le system on the USB
storage device is supported by this player.
• For a USB HDD (a portable hard disc
drive), an external power source may be
needed.
'No entry' or 'x' sign is displayed on the TV.
• The operation is not possible.
EasyLink feature does not work.
• Make sure that this player is connected
to the Philips brand EasyLink TV, and the
EasyLink option is turned on (see "Use
your Blu-ray disc / DVD player" > "Use
Philips EasyLink").
Cannot access BD-Live features.
• Make sure that this player is connected to
the network (see "Use your Blu-ray disc /
DVD player" > "Set up a network").
• Make sure that the network installation is
made (see "Use your Blu-ray disc / DVD
player" > "Set up a network").
• Make sure that the Blu-ray disc supports
BD-Live features.
• Clear memory storage (see "Change
settings" > "Advanced options (BD-Live
security, clear memor y...)").
16 EN
Page 27

Network
Wireless network is not found or distorted.
• Make sure that the network is correctly
connected (see "Use your Blu-ray disc /
DVD player" > "Set up a network").
• Make sure that the network installation is
made (see "Use your Blu-ray disc / DVD
player" > "Set up a network").
• Make sure that the wireless network is
not disturbed by microwave ovens, DECT
phones, or other neighboring Wi-Fi devices.
• If the wireless network does not work
properly, tr y a wired network installation
(see "Use your Blu-ray disc / DVD player"
> "Set up a network").
Internet services do not work.
• Make sure that the network is correctly
connected (see "Use your Blu-ray disc /
DVD player" > "Set up a network").
• Make sure that the network installation is
made (see "Use your Blu-ray disc / DVD
player" > "Set up a network").
• Check the router connection (refer to the
user manual for the router).
Internet services work slowly.
• Look in your wireless router’s user manual
for information on indoor range, transfer
rate, and other factors of signal quality.
• You need a high speed Internet connection
for your router.
Miracast
Cannot play and stream online video through
Miracast.
• Make sure that Miracast is enabled on the
Miracast source device (refer to the source
device's user manual).
• Make sure that Miracast is enabled on this
player (see "Use your Blu-ray disc / DVD
player" > "Stream multimedia via Miracast").
• If the Miracast connection fails or the
media content does not show up
automatically on your TV, press and
select [Setup] > [Network] > [Miracast
role] > [Group owner] > [Auto], then
repeat Miracast connection (see "Use
your Blu-ray disc / DVD player" > "Stream
multimedia via Miracast").
• Make sure that the Miracast source device
supports playing videos from the internet
while performing Miracast streaming to
external player simultaneously (refer to the
source device's user manual).
Miracast connection fails or streaming is
disrupted.
• Make sure that your smartphone or tablet
is ofcially Miracast certied.
3D videos
Cannot see 3D effects
• Make sure that 3D output is turned on(see
"Use your Blu-ray disc / DVD player" >
"Play a Blu-ray 3D video").
• Make sure that the disc title being played is
Blu-ray 3D compliant.
• Make sure that the TV is 3D and HDMI
compliant, and the TV is set to 3D mode
(refer to the TV's user manual).
• Make sure that the 3D glasses are activated
(refer to the TV’s user manual).
17EN
Page 28
‘Blu-ray 3D ’ and ‘Blu-ray 3D ’ logo are the
trademarks of Blu-ray Disc Association.
HDMI, and HDMI logo and High-Denition
Multimedia Interface are trademarks or
registered trademarks of HDMI licensing LLC in
the United States and other countries.
For DTS patents,see http://patents.dts.com.
Manufactured under license from DTS Licensing
Limited. DTS, the Symbol, & DTS and the
Symbol together are registered trademarks, and
DTS 2.0+Digital Out is a trademark of DTS, Inc.
© DTS, Inc. ALL Rights Reserved.
The Wi-Fi CERTIFIED Logo is a certication
mark of the Wi-Fi Alliance.
Dolby, Pro Logic, and the double-D symbol are
registered trademarks of Dolby Laboratories.
This DivX Certied® device has passed rigorous
testing to ensure it plays DivX® video.
To play purchased DivX movies, rst register
your device at vod.divx.com. Find your
registration code in the DivX VOD section of
your device setup menu.
DivX Certied® to play DivX® and DivX Plus®
HD (H.264/MKV) video up to 1080p HD,
including premium content.
DivX®, DivX Cer tied®, DivX Plus® HD and
associated logos are trademarks of DivX, LLC
and are used under license.
Covered by one or more of the following
U.S. patents: 7,295,673; 7,460,668; 7,515,710;
7,519,274; 8,301,793; 8,649,669; 8,656,183.
BONUSVIEW™
‘BD LIVE ‘ and ‘BONUSVIEW ‘ are
trademarks of Blu-ray Disc Association.
‘DVD Video’ is a trademark of DVD Format/
Logo Licensing Corporation.
Netix and the Netix logo are trademarks or
registered trademarks of Netix, Inc.
Oracle and Java are registered trademarks of
Oracle and/or its afliates. Other names may be
trademarks of their respective owners.
18
Page 29
Abkhazian 6566
Language Code
Afar 6565
Afrikaans 6570
Amharic 6577
Arabic 6582
Armenian 7289
Assamese 6583
Avestan 6569
Aymara 6589
Azerhaijani 6590
Bahasa Melayu 7783
Bashkir 6665
Belarusian 6669
Bengali 6678
Bihari 6672
Bislama 6673
Bokmål, Norwegian 7866
Bosanski 6683
Brezhoneg 6682
Bulgarian 6671
Burmese 7789
Castellano, Español 6983
Catalán 6765
Chamorro 6772
Chechen 6769
Chewa; Chichewa; Nyanja
9072
Chuang; Zhuang 9065
Church Slavic; Slavonic 6785
Chuvash 6786
Corsican 6779
Česky 6783
Dansk 6865
Deutsch 6869
Dzongkha 6890
English 6978
Esperanto 6979
Estonian 6984
Euskara 6985
Faroese 7079
Français 7082
Frysk 7089
Fijian 7074
Gaelic; Scottish Gaelic 7168
Gallegan 7176
Georgian 7565
Gikuyu; Kikuyu 7573
Guarani 7178
Gujarati 7185
Hausa 7265
Herero 7290
Hindi 7273
Hiri Motu 7279
Hrwatski 6779
Ido 7379
Interlingua (International)7365
Interlingue 7365
Inuktitut 7385
7889
6976
Inupiaq 7375
Irish 7165
Íslenska 7383
Italiano 7384
Ivrit 7269
Japanese 7465
Javanese 7486
Kalaallisut 7576
Kannada 7578
Kashmiri 7583
Kazakh 7575
Kernewek 7587
Khmer 7577
Kinyarwanda 8287
Kirghiz 7589
Komi 7586
Korean 7579
Kuanyama; Kwanyama 7574
Kurdish 7585
Lao 7679
Latina 7665
Latvian 7686
Letzeburgesch; 7666
Limburgan; Limburger 7673
Lingala 7678
Lithuanian 7684
Luxembourgish; 7666
Macedonian 7775
Malagasy 7771
Magyar 7285
Malayalam 7776
Maltese 7784
Manx 7186
Maori 7773
Marathi 7782
Marshallese 7772
Moldavian 7779
Mongolian 7778
Nauru 7865
Navaho; Navajo 7886
Ndebele, North 7868
Ndebele, South 7882
Ndonga 7871
Nederlands 7876
Nepali 7869
Norsk 7879
Northern Sami 8369
North Ndebele 7868
Norwegian Nynorsk; 7878
Occitan; Provencal 7967
Old Bulgarian; Old Slavonic 6785
Oriya 7982
Oromo 7977
Ossetian; Ossetic 7983
Pali 8073
Panjabi 8065
Persian 7065
Polski 8076
Português 8084
Pushto 8083
Russian 8285
Quechua 8185
Raeto-Romance 8277
Romanian 8279
Rundi 8278
Samoan 8377
Sango 8371
Sanskrit 8365
Sardinian 8367
Serbian 8382
Shona 8378
Shqip 8381
Sindhi 8368
Sinhalese 8373
Slovensky 8373
Slovenian 8376
Somali 8379
Sotho; Southern 8384
South Ndebele 7882
Sundanese 8385
Suomi 7073
Swahili 8387
Swati 8383
Svenska 8386
Tagalog 8476
Tahitian 8489
Tajik 8471
Tamil 8465
Tatar 8484
Telugu 8469
Thai 8472
Tibetan 6679
Tigrinya 8473
To nga (Tonga Islands) 8479
Tsonga 8483
Tswana 8478
Türkçe 8482
Turkmen 8475
Tw i
Uighur 8571
Ukrainian 8575
Urdu 8582
Uzbek 8590
Vietnamese 8673
Volapuk 8679
Walloon 8765
Welsh 6789
Wolof 8779
Xhosa 8872
Yiddish 8973
Yoruba 8979
Zulu 9085
8487
Page 30

Specifications are subject to change without notice
© 2015 Koninklijke Philips N.V. All rights reserved.
Trademarks are the property of Koninklijke Philips N.V. or their respective owners.
BDP2385_12_UM_V4.0
 Loading...