

Page 1
PHILIPS
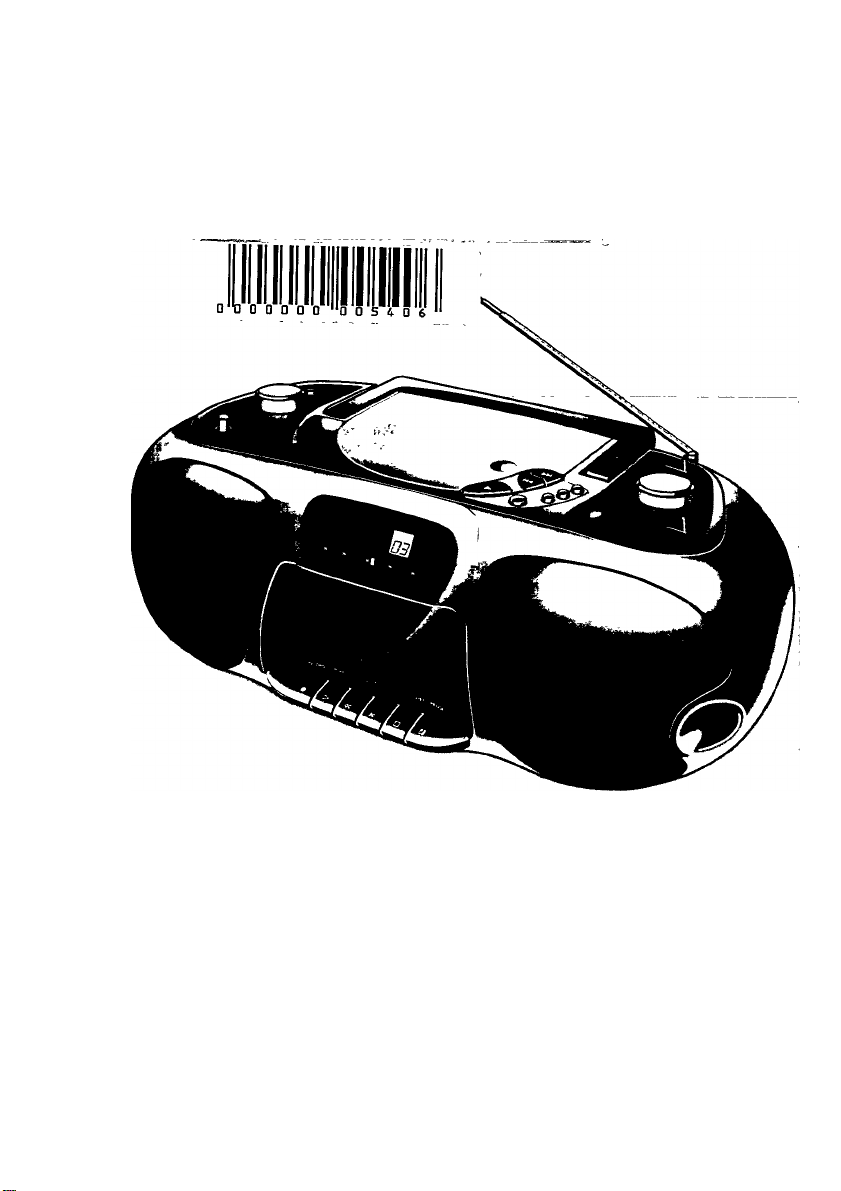
AZ 8070 CD Radio Cassette Recorder
Instructions for use
Mode d'emploi
Instrucciones de manejo
Bedienungsanleitung
Gebruiksaanwijzing
Istruzioni per l'uso
Brugsanvisning
Bruksanvisning
Käyttöohje
OSriYis*? XPnoscüq
Manual de utilizagäo
PHILIPS
Page 2

Norge
Important notes for users in the U.K.
Typeskiltfinnes p3 apparatens underside.
Observer. Nettbryteren er sekundert innkoplet. Den
innebygde netdelen er derfor ikke frakoplet nettet
s§ lenge apparatet ertilsluttet nettkontakten.
For S redusere faren for brann eller elektrisk slot,
skal apparatet ikke utsettes for regn elier fuktighet.
Italia
DICHIARAZIONE DI CONFORMITÀ'
Si dichiara che l'apparecchio Lettore CD/Radioregistratore mod. AZ 8070 Phiiips risponde alle
prescrizioni dell'alt. 2 comma 1 del 0. M. 28 Agosto
1995 n.548.
Fatto a Eindhoven, il 18/09/1996
Philips Sounds Vision
Philips, Glaslaan 2. SFF10
5616 JB Eindhoven, The Netherlands
Mains plug
This apparatus is fitted with an approved moulded 13 Amp
plug. To change a fuse in this type of plug proceed as
follows:
1 Remove fuse cover and fuse.
2 Fix new fuse which should be
a BS1362 5 Amp, AS.TA or BSI approved type.
3 Refit the fuse cover.
If the fitted plug is not suitable for your socket outlets, it
should be cut off and an appropriate plug fitted in its place.
If the mains plug contains a fuse, this should have a value of
5 Amp. If a plug without a fuse is used, the fuse at the
distribution board should not be greater than 5 Amp.
Note: The severed plug must be disposed of to a void a
possible shock hazard should it be inserted into a 13 Amp
socket elsewhere.
How to connect a plug
The wires in the mains lead are coloured with the following
code' blue = neutral (N), brown = live it). As these colours
may not correspond with the colour markings identifying the
terminals in your plug, proceed as follows.
• Connect the blue wire to the terminal marked N or col
oured black.
• Connect the brown wire to the terminal marked L or col
oured red
• Do not connect either wire to the earth terminal in the
plug, marked E (or k) or coloured green (or green and
yellow).
Before replacing the plug cover, make certain that the cord
grip is clamped over the sheath of the lead - not simply over
the two wires.
Copyright in the U.K.
Recording and playback of material may require consent
See Copyright Act 1956 and The Performer's Protection Acts
1958 to 1972.
Page 3
’S
LU
U.
IS
Ш
•a
JO
•a
"co
CO
s
CS
ço
O
CO
a.
c/>
O
СЛ
s
Ш
s
0Э
03
O
e
ço
(0
(/)
c
0)
>
С/Э
CO
a
E
O
3
CO
CT
D
>
c*
•<
-<
Ш
C/3
<03
t:
O
Page 4
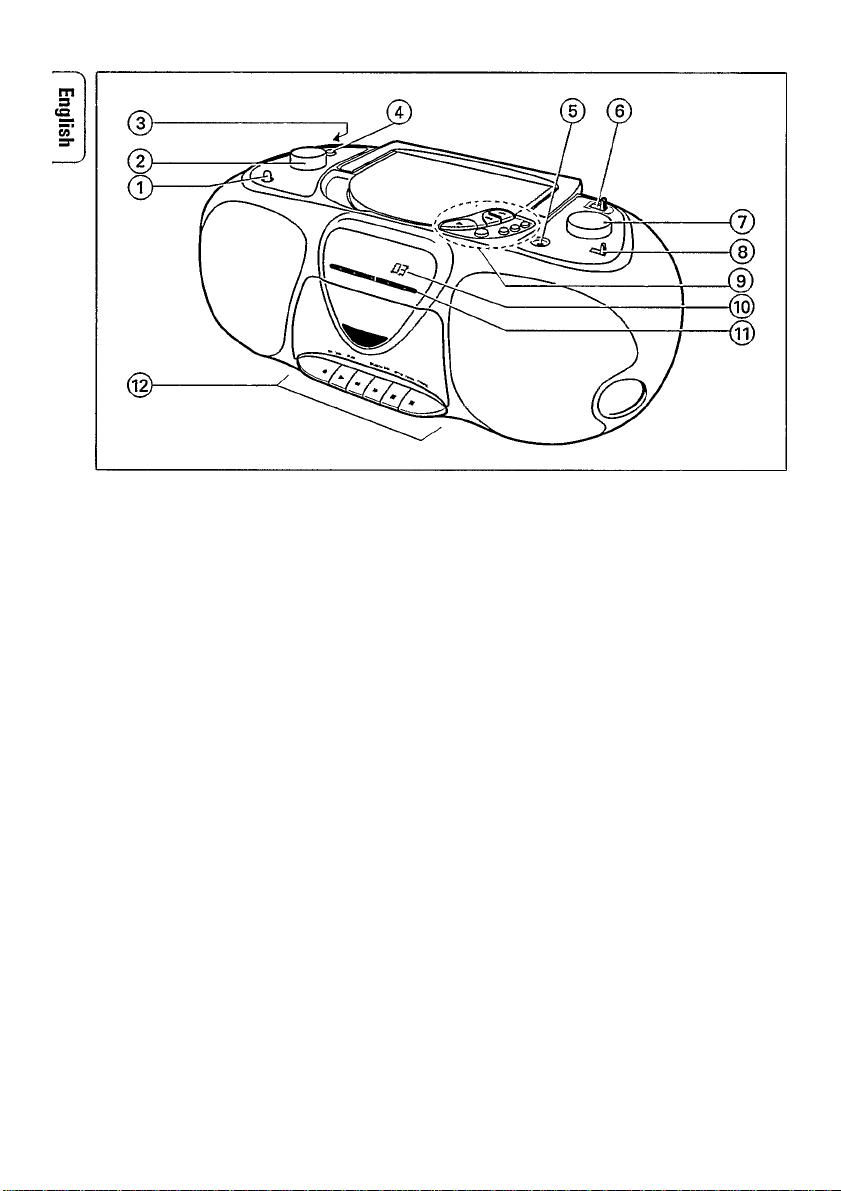
CONTROLS
© INCREDIBLE
SURROUND
© VOLUME....................to adjust the volume level
© ii (at the back)...3.5mm headphone socket.
© DBB
® MIC
© POWER ON
RADIO:
© TUNING....................to tune to radio stations
© FM-MW-LW
® Indicator for radio tuning
..........
............................
............................
..............
...........
.to create a variable
phenomenal stereo effect
Note: Inserting the plug will
disconnect the speakers.
Dynamic Bass Boost;
to increase the bass level
3.5mm microphone socket
(see RECORDING)
to select the sound source:
CD-TAPE/OFF-RADIO
to select the wave band
CD PLAYER:
© OPEN-CLOSE
PLAY-PAUSE ►...to start and to interrupt
SEARCH
STOP ■
SHUFFLE
REPEAT
PROG
® CD Display
CASSEUE RECORDER:
® RECORD •
PLAY ►
«...............................to rewind the tape
►►
STOP-OPEN ■
PAUSE II...................to interrupt recording or
...........
..................
....................
.................
....................
.......................
..............
..................
.........................
to open/close the CD lid
CD play
to skip and to search
forwards and backwards
to stop play and to erase a
program
to play in random order
to repeat one track or to
repeat the CD or program
to program track numbers
and to review the program
to start recording
to start playback
to wind the tape
......
to stop the tape and to open
the cassette compartment
playback
Page 5
POWER SUPPLY
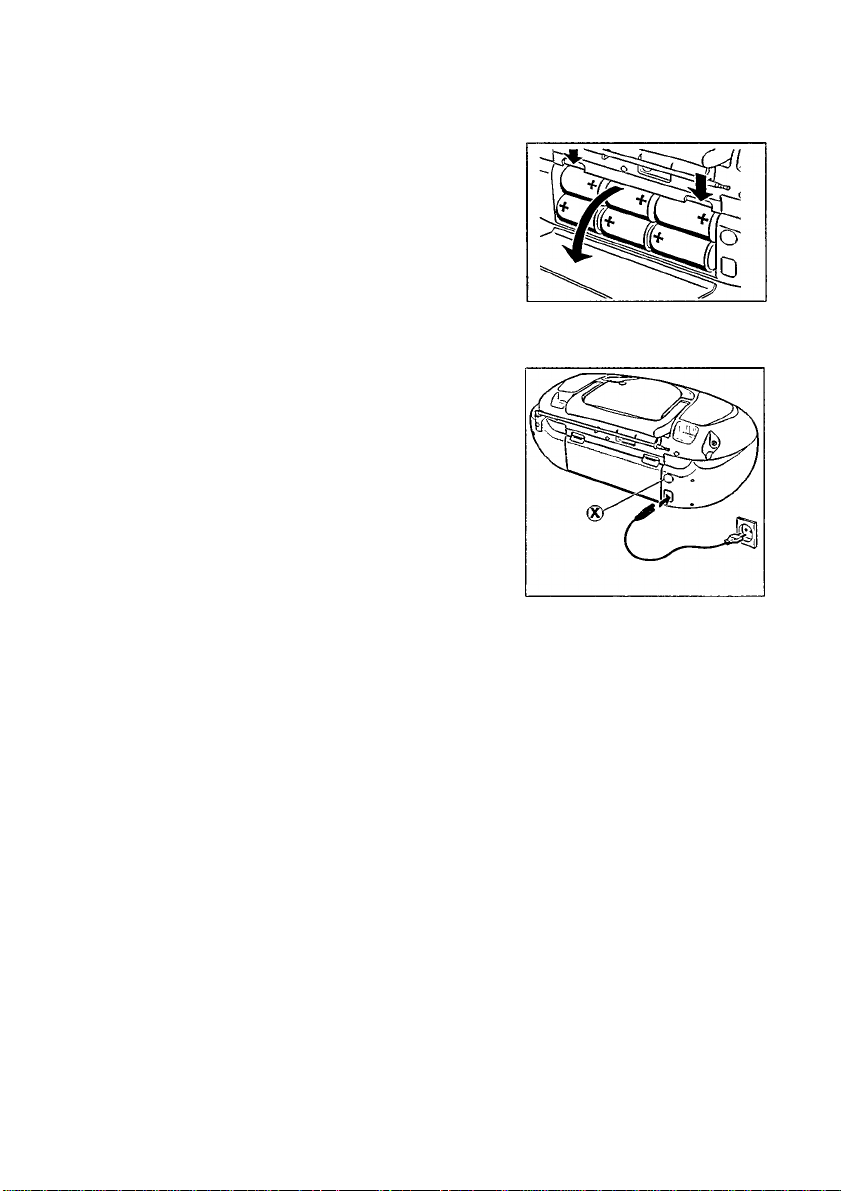
Batteries, R20 UM1 or D cells
Open the battery compartment and insert six batteries, type
R20, UM-I or D-cells (preferably alkaline).
Remove the batteries if they are empty or the set is not to be
used for a long time.
Mains
1 Check if the mains voltage as shown on the type plate (on the
base of the set) corresponds to your local mains voltage. If it
does not, consult your dealer or service organisation.
If the set is equipped with a VOLTAGE selector®, set this
selector to the local mains voltage.
2 Connect the mains lead to the MAINS outlet and the wall socket.
The mains supply is switched on.
• The battery supply is switched off when the set is connected to
the mains. To change over to battery supply, pull out the plug
from the unit's MAINS socket.
• To disconnect the set from the mains completely, withdraw
the mains plug from the wall socket.
Mi
'S)
LU
cz
• For users in the i/.K; please follow the instructions on page 2.
The typeplate is located on the base of the set.
Environmental information
All redundant packaging material has been omitted. We have done our utmost to make the packaging
easy separable into three mono materials: cardboard (box), expandable polystyrene (buffer) and
polyethylene (bags, protective foam sheet).
Your set consists of materials which can he recycled if disassembled by a
specialized company. Please observe the local regulations regarding the disposal
of packing materials, exhausted batteries and old equipment.
Page 6
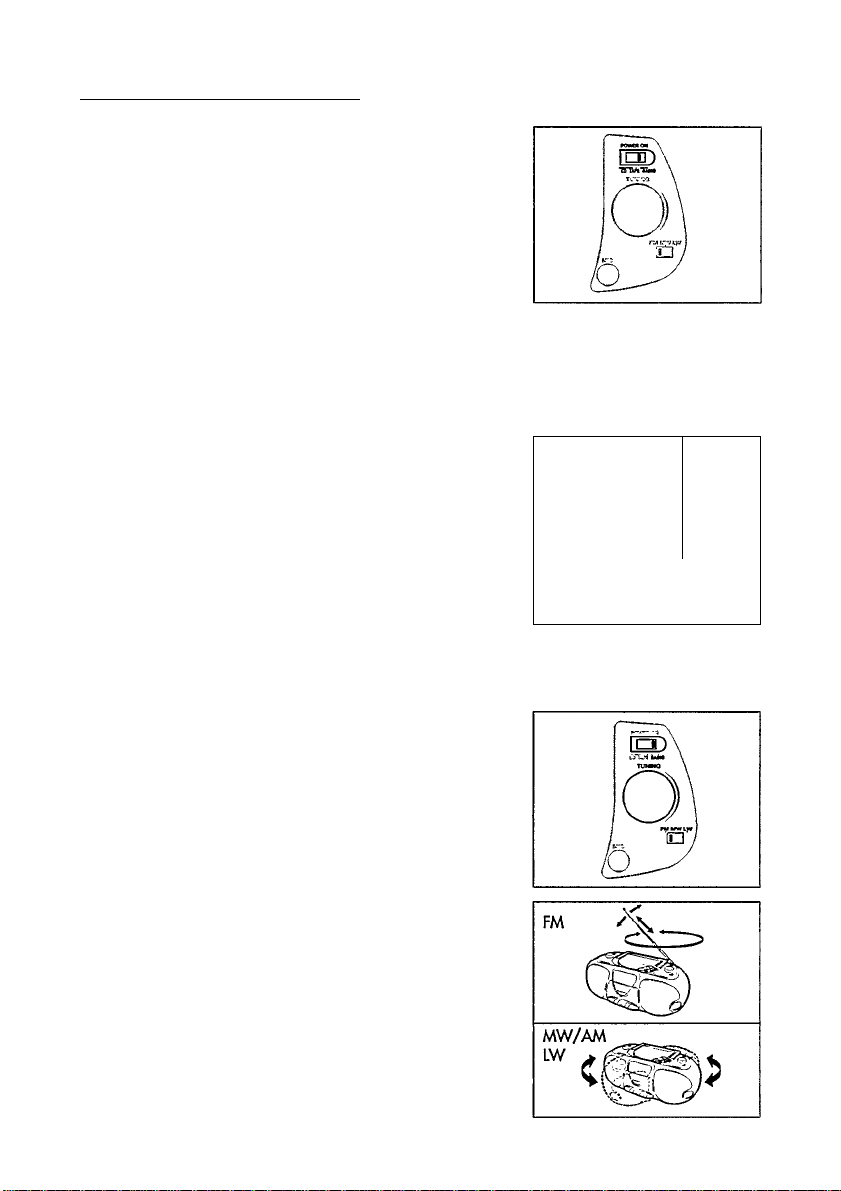
BASIC FUNCTIONS RADIO
Switching on and off/standby
‘S.
U)'
• Set the POWER ON selector to the desired sound source:
CD-TAPE/OFF-RADIO.
• The set is switched off when the POWER ON selector is in
position TAPE/OFF and the recorder keys are released.
• In order to switch off the power supply, remove the rhains plug.
Note: When operating the set with batteries, always be sure to
set the POWER ON selector to position TAPE/OFF when the set is
not used. This will avoid a permanent power consumption.
Adjusting volume and sound
Adjust the sound using the controls VOLUME and DBB and
INCREDIBLE SURROUND.
Use the rotary knob to in- or decrease the phenomenal stereo
sound. The surround effect varies from 0% to 100%.
The bass frequencies can also be emphasised if you place the set
against a wall or bookshelf. (Do not cover any vents and leave
sufficient room around the unit for ventilation.)
RADIO - tuning to radio stations
1 Set the POWER ON selector to RADIO.
2 Select the wave band by using the selector FM-MW-LW.
3 Tune to the desired radio station by using the TUNING knob.
Improving the RADIO reception
• For FM, pull out the telescopic antenna. To improve the FM
signal, incline and turn the antenna. Reduce its length if the
signal is too strong (very close to a transmitter).
/"TT"
/ o-
/0
Vo
• For MW and LW, direct the built-in antenna by turning the whole
set. The telescopic antenna is not needed.
Page 7
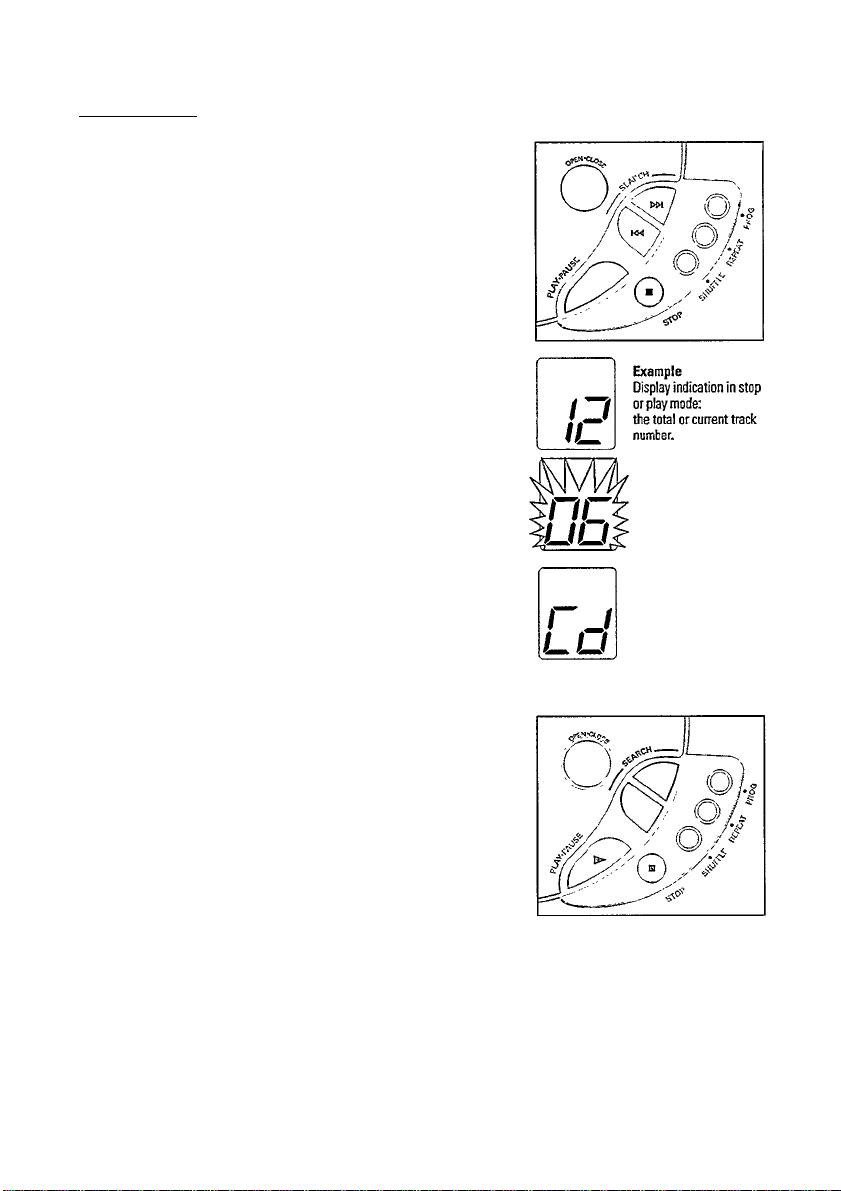
Playing a CD
1 Set the POWER ON selector to CD.
2 Open the lid by pressing the OPEN-CLOSE button.
3 Insert an audio CD (printed side up) and close the lid.
-►The CD player starts and scans the contents list of the CD.
After that, the total number of tracks appear on the display
and the CD player stops.
4 Press the PLAY-PAUSE ► button to start CD play.
-►Display indication; the current track number.
5 Press the STOP ■ button to stop CD play.
-►Display indication: the total number of tracks.
• You can interrupt CD play by pressing PLAY-PAUSE ►.
Continue CD play by pressing the button again.
-►Display indication: the current track number flashes.
Note: CD play will also stop
- If you open the lid;
■ If you move the POWER ON selector or
- If the end of the CD Is reached.
CD PLAYER
Example
Display indication in
pause position;
the current track number
flashes.
Display indication:
when the CD lid is open.
SEARCH backwards rM and forwards
Selecting another track
• Briefly press the SEARCH or button once/several times to
skip to the beginning of the current/previous or subsequent
track(s).
-►Display indication; the selected track number.
-►During play: CD play continues automatically with the
selected track.
-►In stop position; press PLAY-PAUSE ► to start CD play.
Searching for a passage during CD play
1 Hold down the SEARCH or button to find a particular
passage in fonwards or backwards direction.
-►CD play continues at a low volume.
2 Release the button when you have reached the desired passage.
Note: In the SHUFFLE and in REPEAT-1 mode and when playing a
program, searching Is only possible within the particular track.
Page 8
CD PLAYER
m
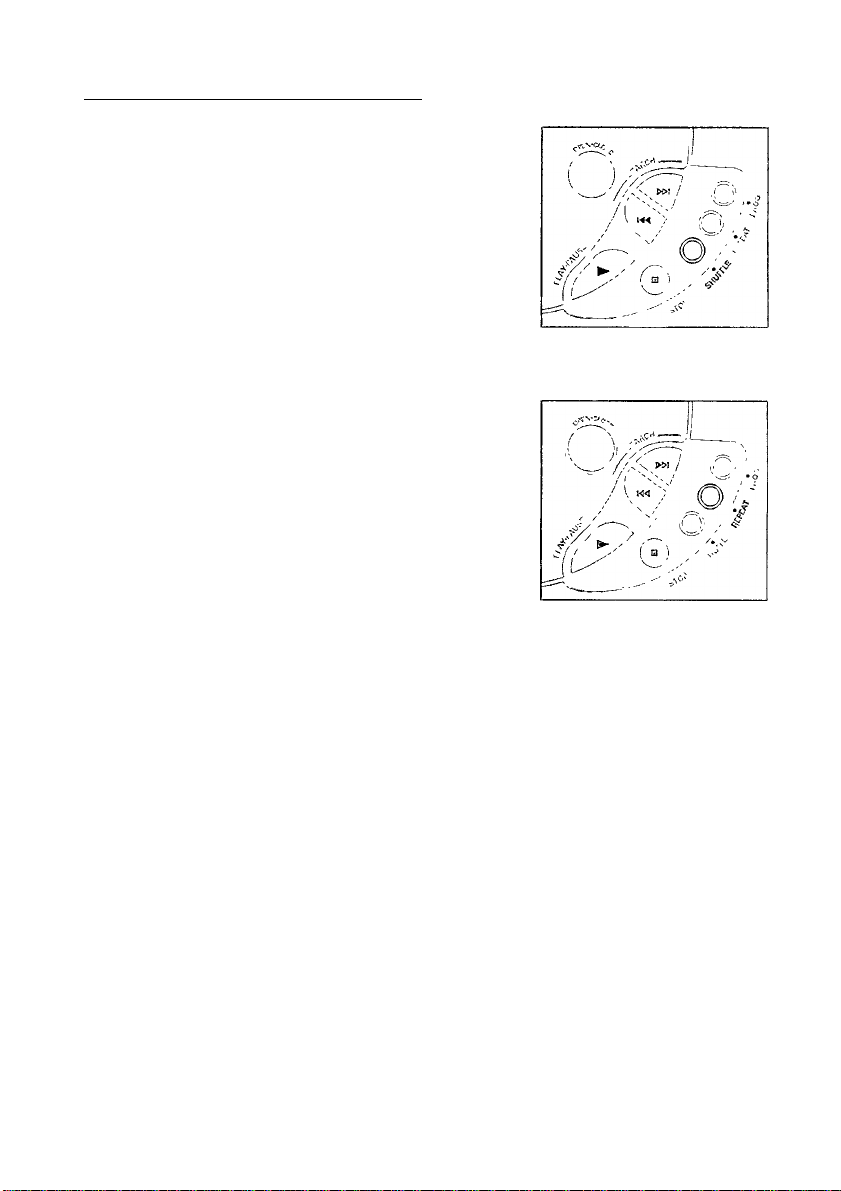
[SHUFFLE - playing in random order
3
(3^
w*
1 Press SHUFFLE before or during CD play.
-►All the tracks will now be played in a random order.
2 To return to normal CD play, press SHUFFLE.
REPEAT - Repeating the entire CD or one track of the CD
1 Before or during CD play, press repeatedly REPEAT to cause
the display showing the different repeating modes.
-►REPEAT: the Current track is played repeatedly.
-►REPEAT ALL the entire CD or program is played repeatedly.
2 To return to normal CD play, press REPEAT until the display
indication disappears.
Note: You can activate the different playing modes at the same
time, e.g. to repeatedly play the entire CD or program in
random order (REPEATALL/SHUFFLEI.
SHUFFIE
REPEAT AU.
nj
Example
Display indication when
the respective playing
mode is activated.
Page 9
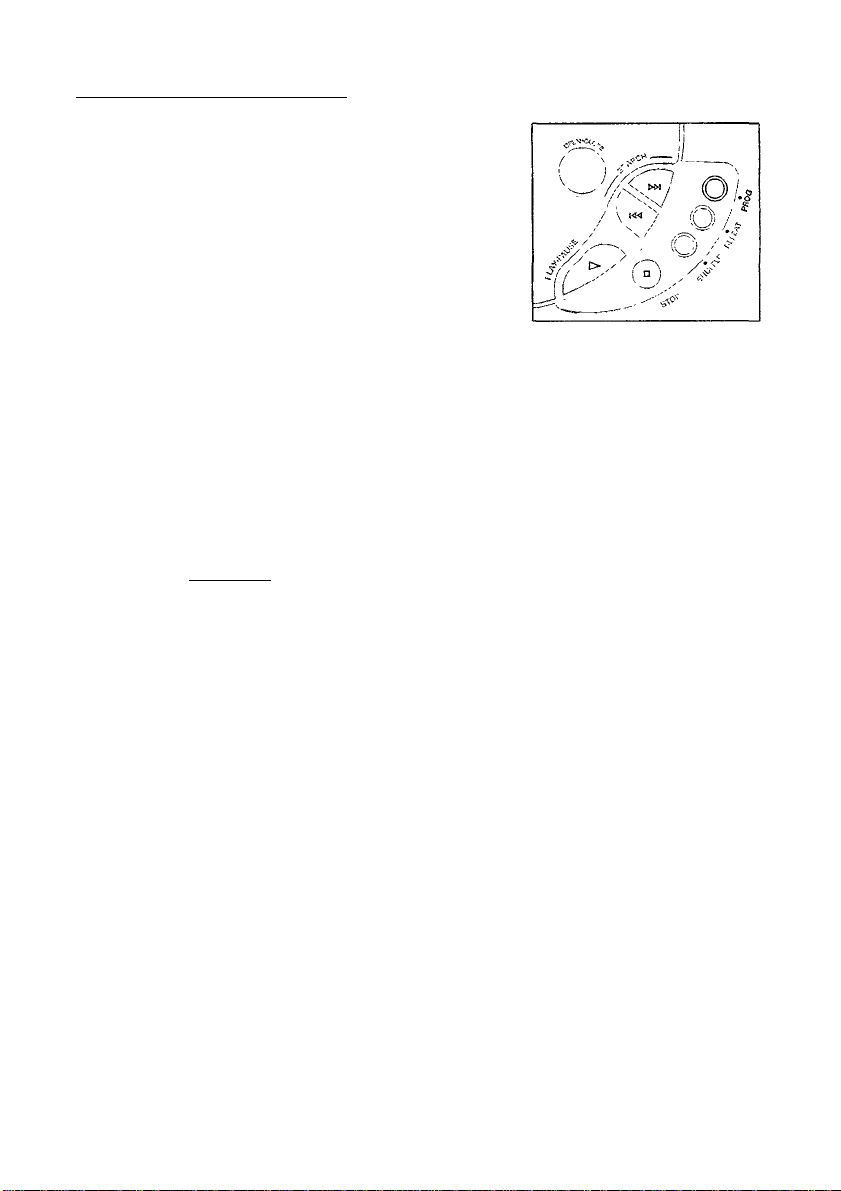
CD PLAYER
Programming track numbers
You may select a number of tracks and store these in the
memory in the desired sequence. You may store any track more
than once. At most, 20 tracks can be stored in the memory.
1 Select with SEARCH or w the desired track.
2 As soon as the desired track is displayed, press the PROG button
to store the track in the memory.
-►On the display program appears and P lights briefly up.
After that the stored track number is shown.
3 Select and store in this way all desired tracks.
• You can review your settings by pressing the PROG button for
more than 2 seconds.
-►The display shows in sequence all stored track numbers.
Playing the program
If you have selected the tracks in the STOP position,
press PLAY-PAUSED.
If you have selected the tracks during CD play, press first STOP I
and then press PLAY-PAUSE ►.
o
c
no
UL^
Display indication:
when you store a track.
Display indication
when you try to store
more than 20 tracks.
Example
Display indication vrhen
you play the program.
<2
"oj
c
LU
Erasing the program from the STOP position
From the stop position, press STOP ■.
-►PROGRAM disappears on the display and your program is
erased.
Note: The program will also be erased
- if you interrupt the power supply;
■ if you open the lid or
- if you move the POWER ON selector.
no
Display indication when
you erase a program.
Page 10
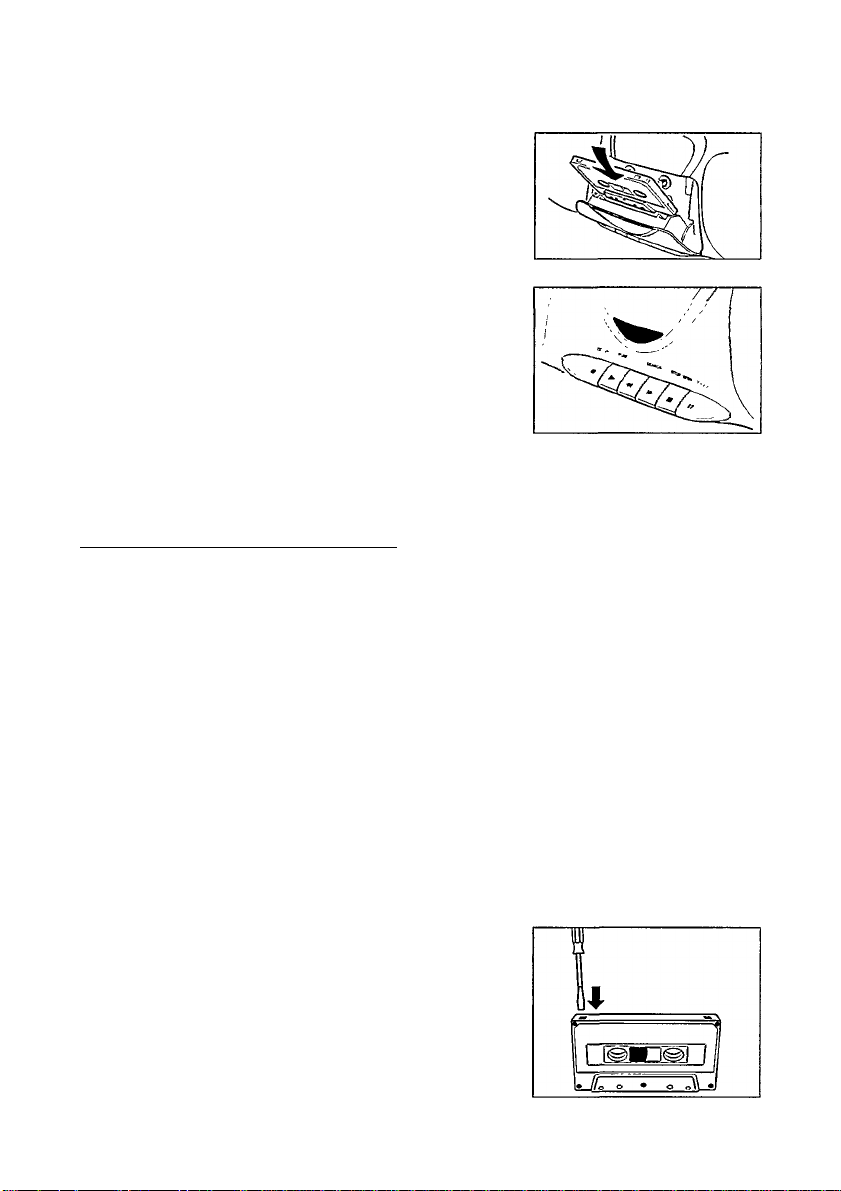
CASSETTE RECORDER
m
[Playing a cassette
3
m'
1 Set the POWER ON selector to TAPE.
2 Press STOP-OPEN ■ to open the cassette compartment.
3 Insert a recorded cassette with the open side downwards.
4 Press PLAY ► to start playback.
5 By pressing ►► fast winding of the tape is possible in both
directions.
6 To stop the tape, press STOP-OPEN ■.
Note: The keys are automatically released at the end of the tape.
General information on recording
Recording is permissible insofar as copyright or other rights
of third parties are not infringed.
For recording on this set you should use a cassette of the type
"NORMAL" (lEC type I). This deck is not suited for recording on
cassettes of the type "CHROME" (lEC n) or "METAL" (lEC IV).
The recording level is set automatically. The controls VOLUME
and DBB or INCREDIBLE SURROUND do not affect the recording.
At the very beginning and end of the tape, no recording will take
place during the 7 seconds when the leader tape passes the
recorder heads.
Protecting tapes from accidental erasure
Keep the cassette side to be safeguarded in front of you and
break out the left tab. Now, recording on this side is no longer
possible.
To render this safeguard ineffective, cover the aperture with a
piece of adhesive tape.
10
Page 11
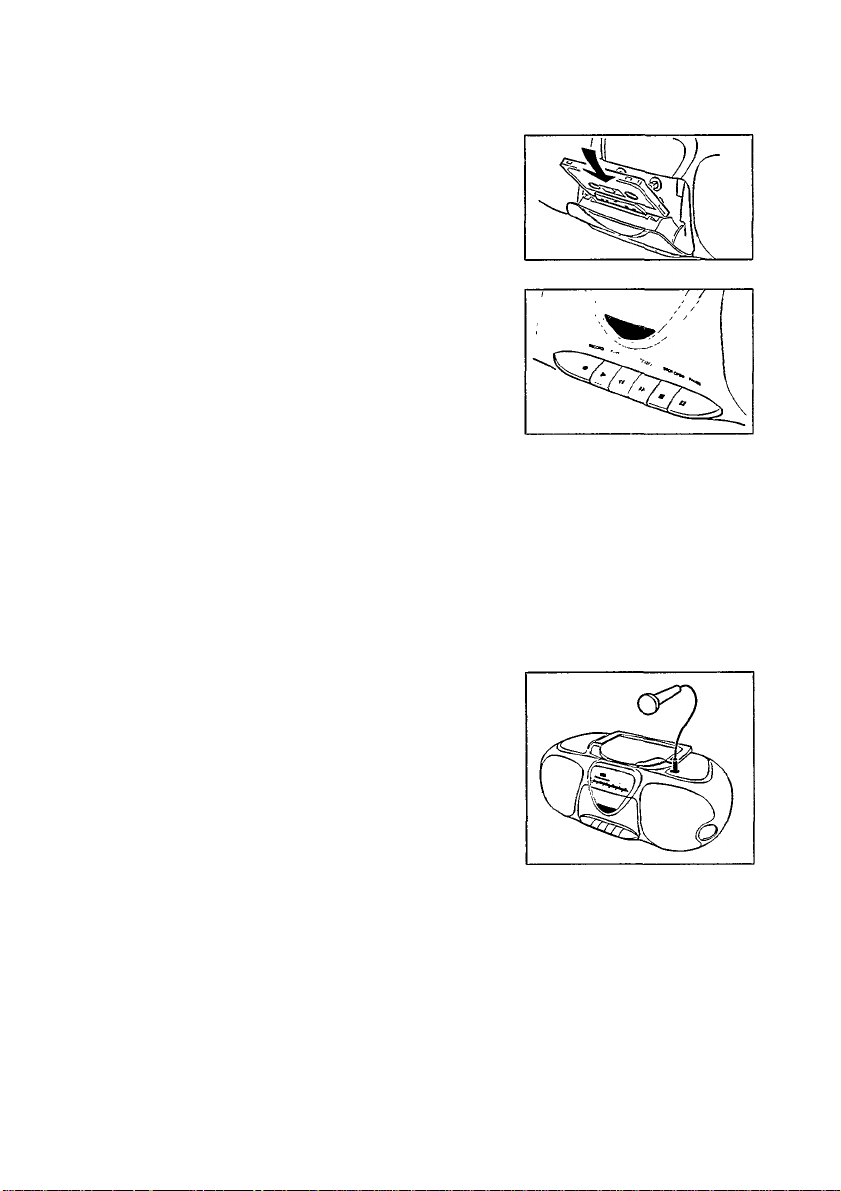
CASSETTE RECORDER
CD synchro start - recording from the CD player
1 Set the POWER ON selector to CD.
2 Insert a CD and if desired, program track numbers.
3 Press STOP-OPEN M to open the cassette compartment.
4 Insert a blank cassette with the open side downwards.
5 Press RECORD • to start recording.
-►Playing of the CD or program starts automatically.
It is not necessary to start the CD player separately.
6 For brief interruptions, press PAUSE II.
To resume recording, press the key once more.
7 To stop recording, press STOP-OPEN ■.
Note: The recording can be started from different positions:
- if the CD player is in the PAUSE position, recording will start
from this very position (use SEARCH orW;
- if the CD player is in the STOP position, recording will start from
the beginning of the CD or program.
Recording from the radio or with the microphone
1 Set the POWER ON selector to TAPE or RADIO.
.¡2
"5
LU
c
2 Prepare the sound source for recording:
RADIO: Tune to a radio station.
TAPE (microphone): Connect a microphone with a 3.5mm plug
to the MIC socket. Set the VOLUME control to zero (monitoring
during microphone recording is not possible).
3 Press STOP-OPEN ■ to open the cassette compartment.
4 Insert a blank cassette with the open side downwards.
5 Press RECORD • to start recording.
6 For brief interruptions, press PAUSE II.
To resume recording, press the key once more.
7 To stop recording, press STOP-OPEN ■.
Note: When recording from the radio ora CD, you can connect a
microphone and mix the sounds. Otherwise, be sure there is no
microphone connected that could disturb your recording.
11
Page 12
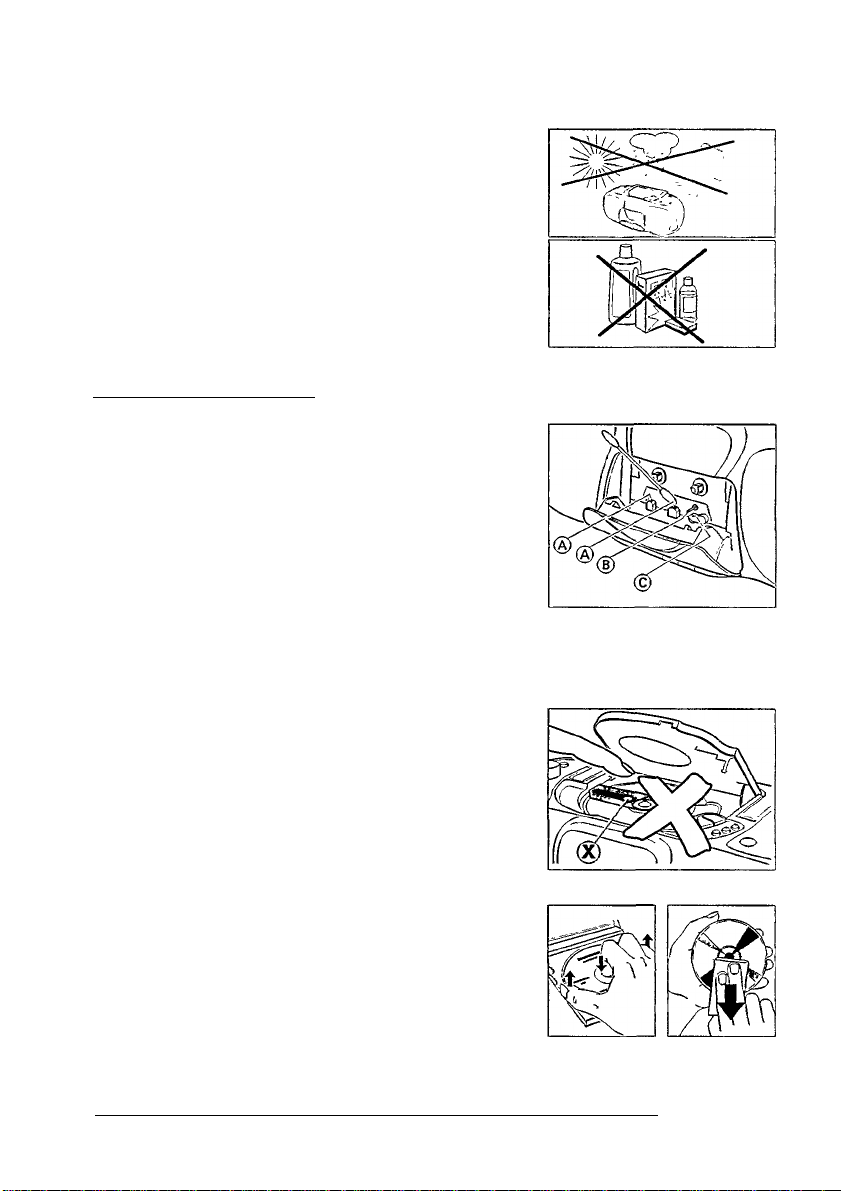
GENERAL INFORMATION
m
IGeneral maintenance
3
!3
• Do not expose the set, batteries, CDs or tapes to humidity or
rain, sand or to excessive heat caused by heating equipment or
direct sunlight.
• The mechanical parts of the set contain self-lubricating bearings
and must not be oiled or lubricated I
• You can clean the set with a soft, slightly dampened chamois
leather. Do not use any cleaning agents as they may have a
corrosive effect.
Tape deck maintenance
To ensure a good recording and playback quality of the tape
deck, clean the parts ©d)© after approx. 50 hours of operation.
Use a cotton bud slightly moistened with alcohol or a special
head cleaning fluid.
Press PLAY and clean the rubber pressure rollers ©.
Press PAUSE and clean the capstans © and the heads ®.
Note: Cleaning of the heads® can also be done by playing a
cleaning tape through once.
CD player and CD handling
• The lens® of the CD player should never be touched!
• The lens may cloud over when the set is suddenly moved from
cold to warm surroundings. Playing a CD is then not possible.
Leave the CD player in a warm environment until the moisture
evaporates.
• To take the CD out of its box easily, press the centre spindle
while lifting the CD.
• Always pick up the CD by the edge and put it back in its box
after use.
• To clean the CD, wipe it off in a straight line from the center
towards the edge using a soft, lint-free cloth. A cleaning agent
may damage the disc!
• Never write on a CD or attach any sticker to it.
This set complies with the radio interference requirements of the European Community.
12
Page 13
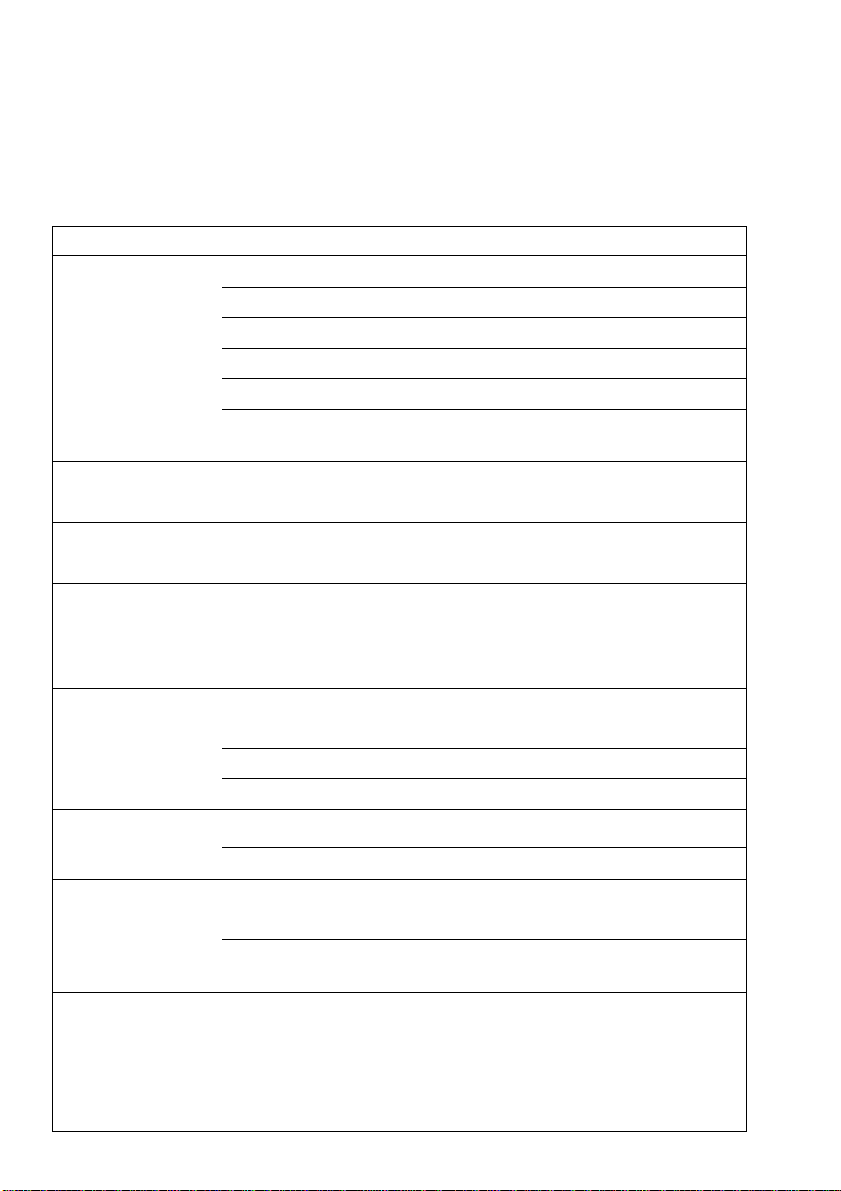
TROUBLESHOOTING
If a fault occurs, first check the points listed
below before taking the set for repair.
If you are unable to remedy a problem by
following these hints, consult your dealer or
service centre.
WARNING:
Under no circumstances should you try
to repair the set yourself, as this will
invalidate the guarantee.
PROBLEM POSSIBLE CAUSE SOLUTION
No sound/no power
Distorted sound
No reaction to
operation of any keys
Poor radio reception
VOLUME is not adjusted
Headphones are connected Disconnect headphones
Mains lead is not securely connected Connect the AC power lead properly
Batteries are exhausted Insert fresh batteries
Batteries are incorrectly inserted Insert the batteries correctly
Changing over from mains to battery
supply
VOLUME too high, INCREDIBLE
SURROUND effect not adjusted
Electrostatic discharge Disconnect the set from power supply
Interference caused by the vicinity of
electrical equipment like TVs, video
recorders, computers, thermostats,
fluorescent lamps (TL), engines, etc.
Adjust the VOLUME
Pull out the mains plug from the
unit's MAINS socket
Reduce VOLUME, adjust INCREDIBLE
SURROUND effect
reconnect it after a few sec
Keep the radio away from electrical
equipment
s
U4
"E" or "no" indication
The CD skips tracks
Poor cassette sound
quality
Recording does not
work
CD is badly scratched or dirty
CD inserted upside down
Laser lens is steamed up Wait until the lens has acclimatized
CD is damaged or dirty Replace or clean the CD
SHUFFLE or PROGRAM is active Switch off SHUFFLE or PROGRAM play
Dust and dirt on the heads, capstan
or pressure roller
Use of not suited cassette types
(METAL or CHROME)
Cassette tab(s) may be broken out Apply a piece of adhesive tape over
Replace or clean the CD, see
maintenance
Insert a CD with label upwards
Clean the heads, capstan and pressure
roller, see maintenance
Only use NORMAL cassettes (lEC I) for
recording
the missing tab space
13
Page 14

115
Page 15

Page 16

Page 17

Page 18

Page 19
KJ
English
Français
Español
Deutsch
ederlands
Italiano
Svenska
Dansk
Suomi
'EAAtivaq
Portugués
 Loading...