

Page 1
PHILIPS
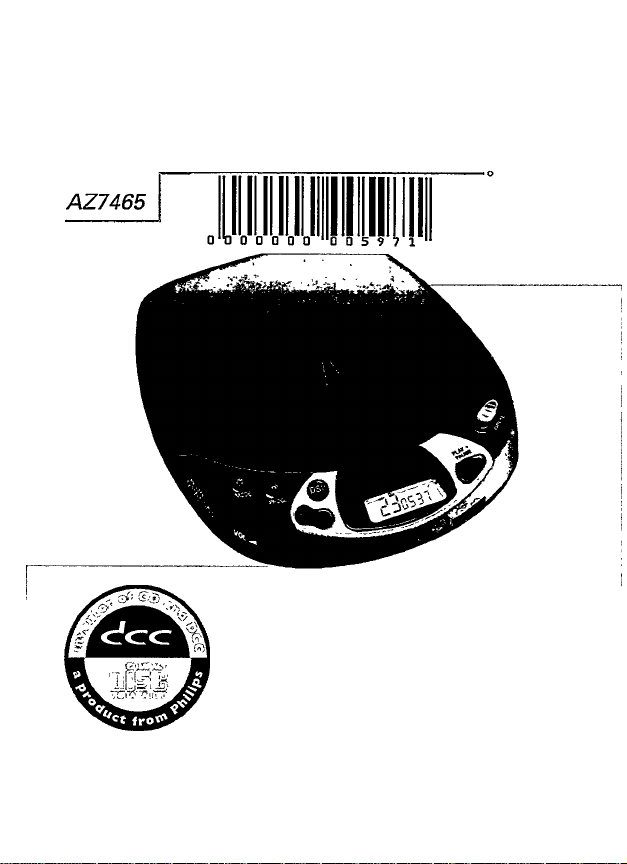
AZ 7462 Portable Compact Disc Player
AZ7464
Instructions for use
Mode d'emploi
Instrucciones de manejo
PHILIPS
Page 2
Australia
Guarantee and Service........................................................
........................................................page 60
New Zealand
Guarantee and Service........................................................
........................................................page 61
Mexico
Es necesario que lea cuidadosamente su instructivo de manejo. ^
Garantía................................................................................................................................................pág. 62
Page 3
English
Controls
.......................
Accessories
Power Supply
Connections...............
.................
............
..........
.4-5 Operation
................B Genaral Information..
................7 Troubleshooting
............
8-9
.......................
..........
...10-14
.........
...16-17
15
Françnis Commandes
Español
N.
.........................................
Accessoires
Alimentation..............................21 Recherche de pannes...30-31
Branchements
Mandos..............................
Accesorios.................................34
Suministro de energía,........35
Conexiones.......................
Sítlg
................................
..............................
Fífft............................... ...................48
5l}g.........................
..............
18-19 Fonctionnement
20 Généralités
................
22-23
.32-33 Funcionamiento
.36-37
.............
46-47
.................
49
.............50-51
..............
...............................
Información general..
Detección de anomalías 44-45
...........................
-SSIiíB.?
....................
fôPSgfl^
.....................
24-28
...........
...38-42
.........
.............52-56
...................57
29
O
xa
43
CO
B.
CO
y
Page 4
Page 5

______________________________________
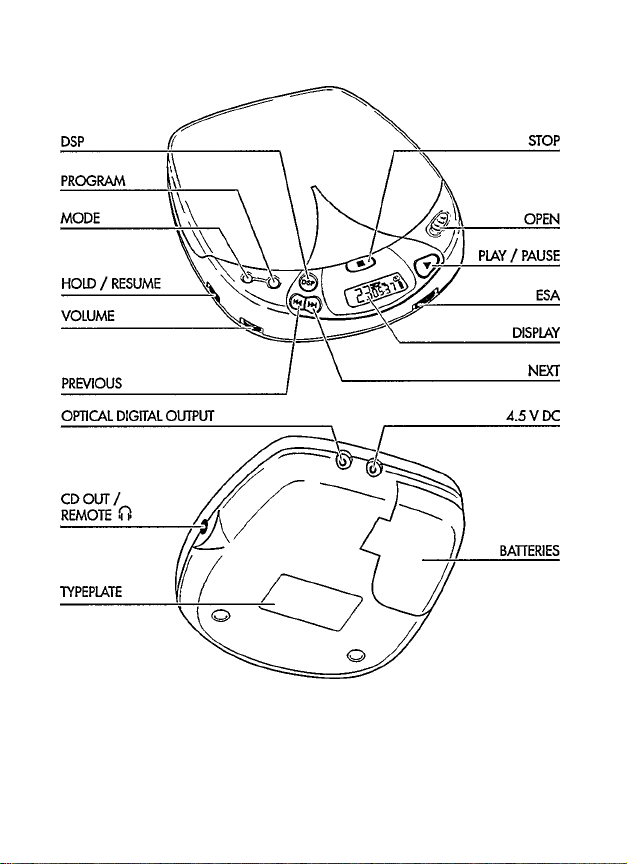
DISPLAY.............................Window for showing the different playing modes, tracks and times
►w.........................................Button for selecting the next music track or, if held down, for
.........................................Button for selecting the previous music track or, if held down,
VOLUME..............................Control for adjusting the volume at the headphone output
RESUME/HOLD
MODE O
.............................
PROG....................................Button for storing tracks in a program and for reviewing the
DSP
.......................................
STOP ■................................Button for stopping CD play, deleting various settings,
OPEN....................................Slide control for opening the lid of the CD player
►II
.........................................
ESA........................................Electronic Shock Absorption: Switch for activating the
CD OUT/
REMOTE FT
Digital out (optical) ..For connecting the CD player to a Digital in (optical) socket in
4,5 V DC
Battery compartment for inserting batteries
........................
........................
searching fonward for a particular passage on the CD
for searching-backward for a particular passage on the CD
................
Switch for activating the RESUME function (resuming CD play)
and/or HOLD (blocking all buttons) function
Button for selecting the different playing modes:
SHUFFLE-SHUFFLE REPEAT ALL-REPEAT 1-REPEAT ALL
-SCAN-off
program
Digital Sound Processing: Button for selecting the different
sound settings at the headphone output:
ROCK-POP-CAR-INCREOIBLE SOUHD-off
switching off the CD player and activating charging.
Button for starting and pausing CD play
electronic buffer memory for an undisturbed sound
Headphone and remote control socket (3.5 mm)
an amplifier or a digital recorder by means of an optical cable
Socket for external power supply
CONTROLS
Note: In case of power supply via the DC jack (mains adapter or cigarette lighter in
your carl the display is backiighted. in battery mode, the illumination is
activated for 10 seconds after key operations.
Page 6
ACCESSORIES
Accessories
m
3
SBC 1059 - signal lead with 3.5 mm stereo plug and two cinch plugs.
E5*
Accessories for power supply
AY 3160 mains adapter 4.5 V/400 mA Direct current, plus-pole to the center pin
Note: Use only the PHILIPS AY 3160 adapter, other products may damage the set.
AY 3360 - NiMH battery pack for recharging on board (AZ 7465)
AY 3361 - NiCad battery pack for recharging on board
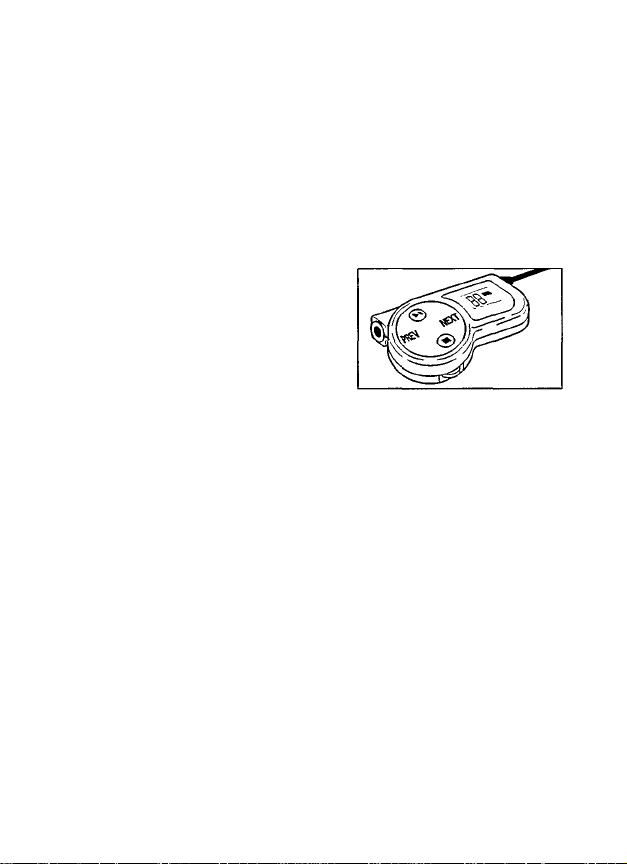
Remote controls
Cord remote control (AZ 7464)
LCD cord remote control (AZ 7465)
• The buttons on the cord remote control
have the same functions as the corresponding
ones on the CD player.
PLAY/PAUSE, PREVIOUS/NEXT, STOP: press on the indicated part of the switch
VOLUME: for reducing the main volume that has been adjusted v/ith the volume
control on the CD player
TECHNICAL DATA
Frequency range...................
Signal-to-noise ratio
Channel separation
Total harmonic distortion.
Conversion
Batteries.................................................
Dimensions (wxhxd)
Weight (without/with batteries).
...........
.............
..............................
..........................
........................
............................
............................
............................
..Bitstream D/A Converter
..2x1.5V,typeAA/LR6/UM3
.......................
......................
20-20000 Hz
typ. 95 dBA
typ. 70 dBA
.typ. 0.05 %
134x30.5x154 mm
approx. 250/290 gms
Page 7
POWER SUPPLY
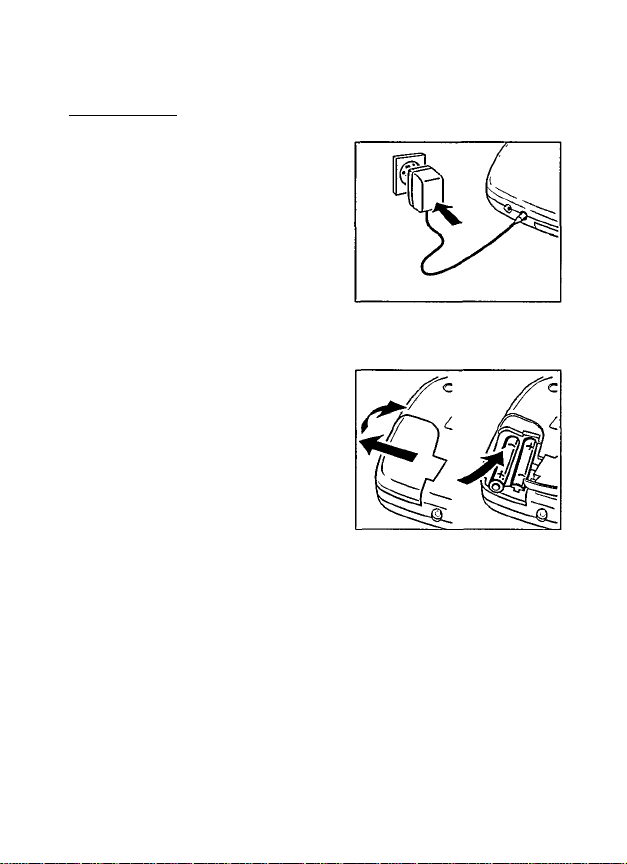
Mains adapter
1 Make sure that the local voltage corresponds
to the voltage of the adapter (see
accessories).
2 Connect the mains adapter to the player's
4.5 V DC socket and to the wall outlet.
• Always disconnect the adapter when you are
not using it.
Batteries, type LR6, UM3 or AA (supplied or optional available)
Open the battery compartment and insert the
rechargeable battery pack or 2 alkaline
batteries.
Typical playing times under normal conditions:
Alkaline batteries: 5.5 hours (ESA off)
Remove the batteries if they are empty or the
CD player is not to be used for a long period
of time.
Note: In the right-hand corner of the display the battery condition will be indicated:
-Full batteries: no indication.
-Weak batteries: (s -symbol lights up. This symbol is not available when
rechargeable batteries are used.
-Empty batteries: <=: -symbol flashes and the message à ffEE appears. Replace
the batteries or connect the mains adapter.
4.5 hours (ESA on)
Batteries contain chemical substances, therefore they should be disposed of
properly.
Page 8
CONNECTIONS
Recharging of Philips battery pack on board
The battery pack will be recharged if the mains adapter is connected, the set is
switched off and you press the STOP ■ button.
-► Display indication during charging; rw,<?rCf and “
Approx, charging time; 5.5 hours.
Display indication if fully charged; FIJL L and *=•
Notes:
- When using rechargeable batteries, we advise the use of the Philips battery pack
only, as conventional separate Nickel-Cadmium batteries cannot be recharged on
board.
- To ensure a long life for your battery pack, charging will automatically be
interrupted at high ambient temperatures (Display indication: h'Ot ].
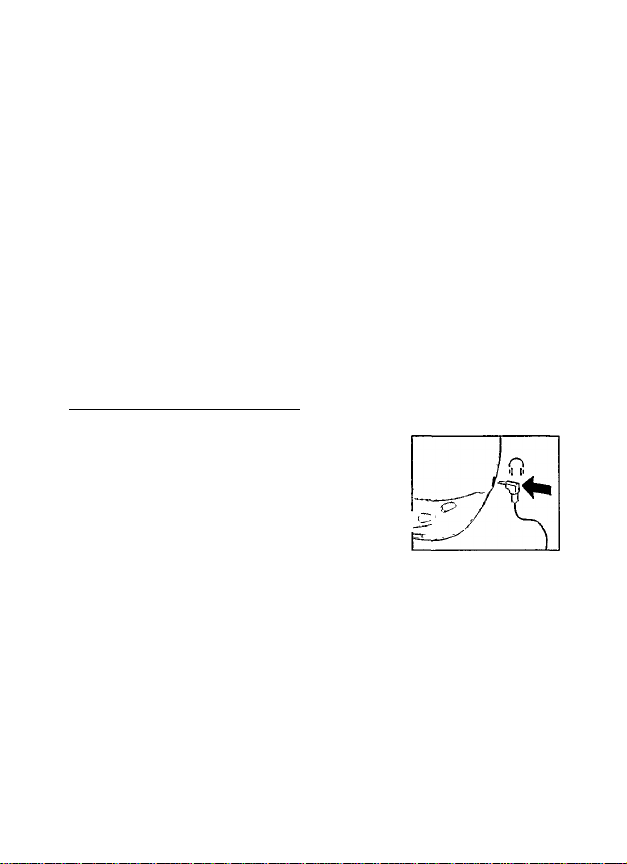
Connecting headphones (supplied)
Connect the supplied headphones (16 ohms/
3.5mm jack plug) with the CD OUT/REMOTE 0 jack.
Note: Use this jack also for connecting your HiPi system
(signal lead! or your car radio (adapter cassette or
signal lead). In both cases, the volume of the CD
player has to be set to maximum position (10).
Use your head when using headphones
Hearing safety: Do not play your headphones at a high volume. Hearing experts
advise that continuous use at high volume can pemnanently damage hearing.
Traffic safety: Do not use headphones while driving a vehicle. It may create a
hazard and it is illegal in many countries. Even if your headphones are an open-air
type designed to let you hear outside sounds, do not turn up the volume so high
that you cannot hear what is going on around you.
Page 9
CONNECTIONS
Connecting the remote control
1 Switch off the CD player (press STOP ■ twice).
2 Connect the remote control firmly to the REMOTE O jack of the CD player.
Optical Digital Out (AZ 7465)
1 Connect the set to an external power source.
2 Turn down the volume of your stereo system.
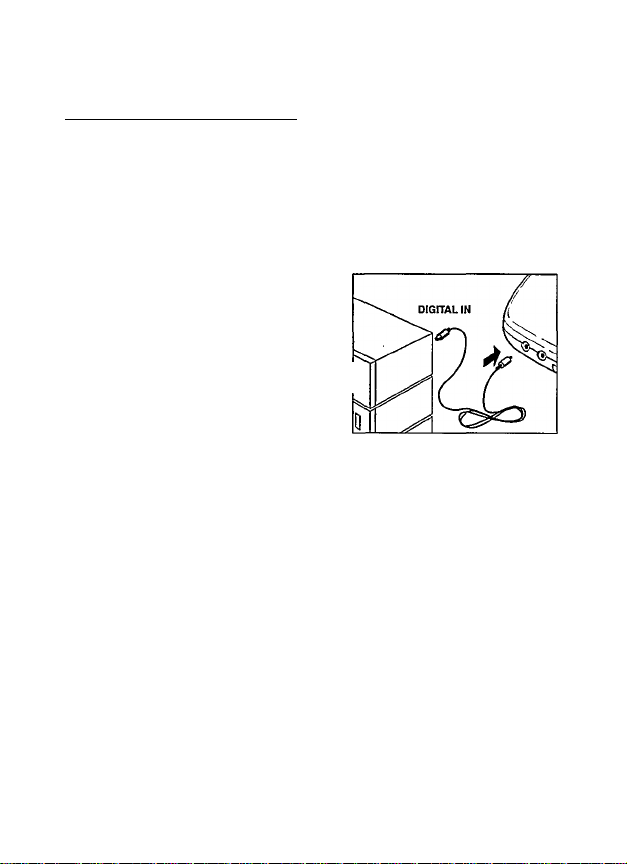
3 Connect the optical signal lead (supplied or .
optional available) to the OPTICAL OUT socket p
of the CD player and to the DIGITAL IN
(OPTICAL) socket of the other set (amplifier,
digital cassette deck etc.).
4 Adjust the sound with the controls of the stereo system.
Note: ESA has to be switched off when using the DIGITAL OUT socket.
o>
c
UJ
Page 10
OPERATION
Inserting the CD
m
3
CO
Push gently on
the CD center by its edge
so that it fits
onto the hub.
Removing the CD
• Hold the CD
/V /
and press the
hub gently.
Playing a CD
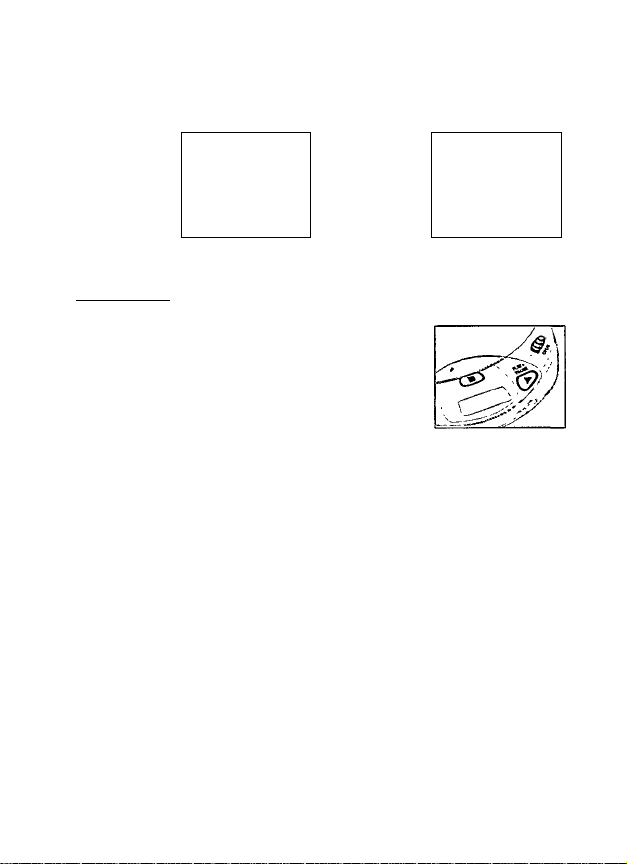
1 Open the lid by pushing the OPEN slide control to the side.
2 Insert an audio CD, printed side up.
3 Close the lid by pushing down on the right-hand side.
Display indication of: (example)
17 = total number of tracks / 51:06 = total playing time
II5 ins
4 Press the ►!! button to start CD play.
Display indication of: (example)
4 = current track / 2:56 = elapsed time of current track
5 Adjust the sound using the controls VOLUME and DSP.
6 You can interrupt CD play by pressing the ►!! button. Continue CD play by pressing
the ►!! button again.
-► Display indication of: time of the current position (flashing).
7 Press the STOP ■ button to stop CD play.
Display indication of: total number of tracks / tbe total playing time.
• If you press the STOP ■ button again, you will switch off the set.
u -irr
I SSS
Note: If no button is pressed for 90 seconds, the set will switch off automatically.
1 0
Page 11
OPERATION
Selecting another track
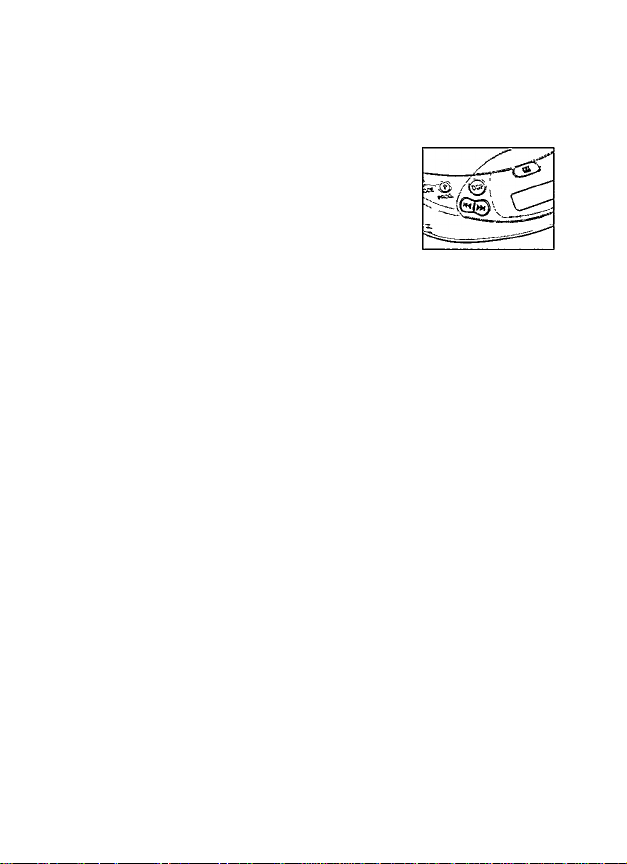
Briefly press the m or »r button once/several times to skip
to the beginning of the current/previous or next track(s).
-► Display indication of: selected track number.
-► During play: CD play continues automatically with the
selected track.
In stop position: press the ►!! button to start CD play.
Searching for a passage during CD play
Hold down the t« or button to find a particular passage in forward or backward
direction.
-► After 2 seconds, searching will start at high speed.
Release the button when you have reached the desired passage.
Note: Searching is only possible within the particular track when you are in one of
these modes: SHUFFLE, REPEAT 1 or PROGRAM. Searching is not possible in
the SCAN mode.
11
Page 12

OPERATION
MODE о - different playing modes
гп
3
<a
• By pressing the MODE о button, you can
successively activate the playing modes:
SHUFFLE: The tracks are played in random orrfer until all
of them have been played once.
SHUFFLE REPEAT ALL: All tracks are played repeatedly in
REPEAT 1: The track is played repeatedly unti\ you leave this mode.
REPEAT ALL: The CD is played repeatedly untW you leave this mode.
SCAN: Each track is scanned for 10 seconds until you leave this mode or all tracks
have been played once.
-► The selected playing mode is indicated in the display.
-► During play: CD play continues automatically with the selected playing mode.
-► In stop position: press the ►!! button to start CD play.
Notes:
- You can choose from 12 different playing modes when you combine all the
above-mentioned modes with PROGRAM.
- Deactivate all modes with the MODE О button.
random orrfer until you leave this mode.
12
Page 13

OPERATION
PROG - programming of tracks (max. 25 tracks)
1 Select the desired track with PREV or NEXT kw.
2 As soon as the desired track is dispiayed, press the PROG button to store the track
in the memory.
-► Display indication of: track number
/ P ! total number of stored tracks, e.g.
Notes:
- When you try to store more than 25 tracks,
the display indicates FUL L.
- When you press PROG and there is no track selected,
the display indicates SELECb.
Playing the program:
• If you have selected the tracks in STOP mode, press the PLAY/PAUSE ►!! button.
• If you have selected the tracks during CD play, first press STOP ■ and then the
PLAY/PAUSE HI button.
-► Dispiay indication: PROGRAM.
-*■ Your program will be played in the selected playing mode (e.g. shuffle).
Reviewing the settings:
• Press the PROG button for more than 2 seconds.
-► Display indication: each stored track successively flashes for a short moment.
Erasing the program in STOP mode:
• Press the STOP ■ button to erase the program.
-► PROGRAM disappears on the display and your program is erased.
-*■ CLERF lights up briefly on the display.
Note: Interrupting the power supply or opening the lid will also erase the program.
necaui
b PDB
Cll,
I ULL
'jElecl
13
Page 14
OPERATION
ESA - Electronic Shock Absorption Memory
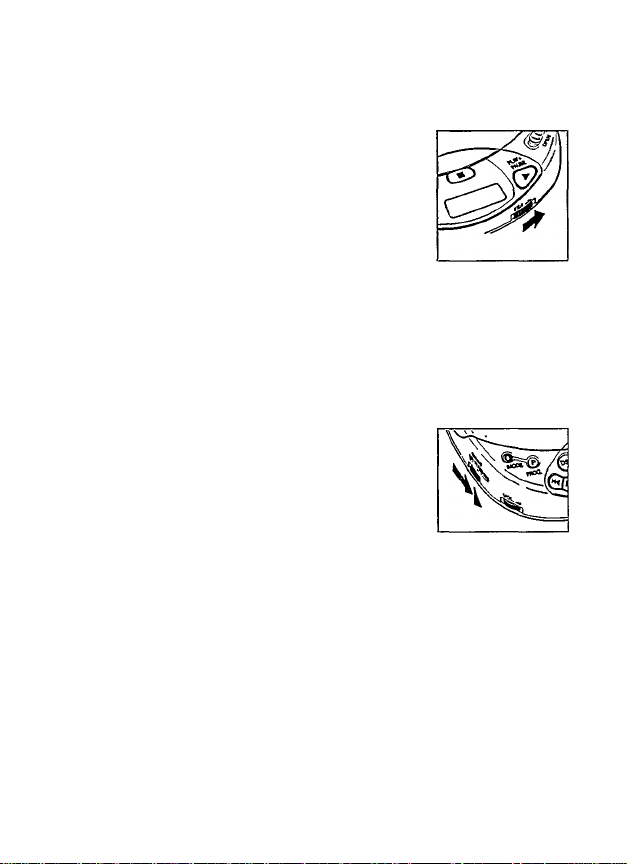
Activate the ESA memoty by sliding the
ESA switch to the right.
-► The ESA symbol lights up in the display.
-► The ESA memory continuously stores in advance the
CD data to be played. This is to prevent sound skipping
during play due to shock and vibration.
-► Prolonged shocks and vibrations may empty the ESA
memory completely. Then the display shows SSTrH
and there will be no sound.
Note: When switching the ESA feature on and off. CD play will be delayed or
interrupted for a short time.
RESUME/HOLD
RESUME - playing from where you have stopped
Activate the RESUME feature by sliding the RESUME/HOLD
switch to the middle.
If you stop CD play by pressing the STOP ■ button, the last
played position will be stored.
Press ►!! to resume CD play from the position where it
was stopped.
HOLD - deactivating all buttons
Activate the HOLD feature by sliding the RESUME/HOLD switch to the far right.
Now all buttons are deactivated and will not function until you switch the
feature off again. If you press a button (except OPEN), the display will indicate
HOLD.
Notes:
-In the hold position, the resume function is automatically activated.
-Do not open the lid as this erases the information about the last position played.
14
Page 15
GENERAL INFORMATION
Maintenance
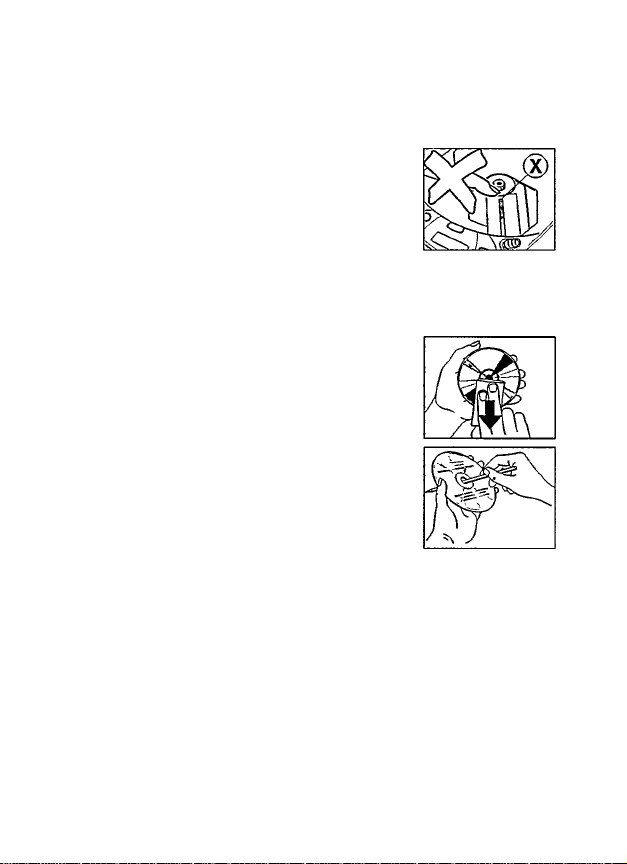
The lens ® of the CD player should never be touched!
Do not expose the CD player, batteries or CDs to rain and
dampness, sand and dust or to excessive heat caused by
heating equipment, or to direct sunlight
The lens may cloud over when the set is suddenly moved
from cold to warm surroundings. Playing a CD is not possible then.
Leave the CD player in a warm environment until the moisture evaporates.
You can clean the CD player with a soft and slightly dampened
chamois leather. Do not use any cleaning agents
as they may have a corrosive effect
Always pick up the CD by the edge and put it back in its
box after use.
To clean the CD, wipe it off in a straight line from the
center towards the edge using a soft, lint-free cloth.
A cleaning agent may damage the disc!
When a new CD does not stay on the hub, this
is caused by small burrs around the center hole of the CD.
Remove the burrs by rubbing the edge of the center hole
with a pen or similar instrument.
Environmental information
Please observe the local regulations regarding the disposal of packing materials,
exhausted batteries and obsolete equipment.
All redundant packaging material has been omitted. We have done our utmost to
make the packaging easily separable into three mono-materials: cardboard (box),
expandable polystyrene (buffer), and polyethylene (bags, protective foam sheet).
Your set consists of materials which can be recycled if disassembled by a '
specialized company.
Do not dispose of exhausted batteries with your household waste.
15
Page 16

TROUBLESHOOTING
If a fault occurs, please check the points listed below before taking your set for
repair.
If you are not able to remedy a problem by following these hints, consult your
dealer or service facility.
PROBLEM POSSIBLE CAUSE REMEDY
No power or no
CD play start
Display:
no indication Contact pins are dirty Clean them with a cloth
CD play does not
start or interrupts CD lid is not closed securely Close the lid securely
Display: no CD is not or incorrectly inserted Insert a CD, label facing up
indication CD is badly scratched
omo o' fSC
Battery-recharging Use of wrong batteries
on board does not
work, no CHARGE-
indication
Play does not start RESUME or SHUFFLE or
from the first track PROGRAM is activated
Batteries
Batteries incorrectly inserted Insert the batteries correctly
Use of new batteries Press HI
Batteries are empty
mains adapter
Loose connection Connect the adapter securely
In-car use
Cigarette lighter is not powered Switch on ignition or
when ignition is switched off insert batteries
HOLD feature is activated Switch off the HOLD feature
Moisture condensation
CD is dirty Clean the CD
Contacts are dirty
Chanqe/recharqe the batteries
Leaye the player in a warm
place until the moisture
evaporates
Use another CD
Dniy a battery pack can
be recharged on board
Clean them with a cloth
Switch off RESUME, SHUFFLE
or PROGRAM
16
Page 17
TROUBLESHOOTING
Under no circumstances should you try to repair the unit yourself, as this
will invalidate the warranty.
PROBLEM POSSIBLE CAUSE REMEDY
No sound or bad
sound quality
Hum or noise in-carUnfit car radio input socket
Malfunctions with
remote control
operation
PAUSE is activated Press ►!!
Loose or wronq connections Check connections
Volume is not turned up Adjust the volume
Headphones worn the wrong
wav
Headphone pluq is dirty Clean the headphone plug
Strong magnetic fields near
the CD player
Electrostatic discharge from
the user via the CD player
In-car use
Strong vibrations Find another place for the set
Adapter cassette is
incorrectly inserted
Temperature inside car is too
hiqh/low
Cigarette lighter/socket is too
dirty
Wrong playback direction of
the autoreverse feature of the
car cassette player
Remote control is not firmly
connected to the CD OUT/
REMOTE 0 socket
Pay attention to the L (left)
and R (right) indications
Change the player's position
or connections
Press or ►>! once or
press HI twice
Insert the adapter cassette
correctly
Let the CD player adjust to
the temperature
Clean the cigarette
lighter/socket
Change the autoreverse
direction
Use the adapter cassette
Check connections
17
Page 18

AUSTRALIA
Guarantee and Service valid for Australia
The benefits given to the purchaser by this warranty are in addition to all other rights
and remedies, which, under the Trade Practices Act or other Commonwealth or State
law, the purchaser or owner has in respect of the product.
The Philips product carries the following warranties:
- C-seriesHiFi-systems 12 months.
- Compact Disc Players: 12 months.
- Home Audio Systems: 6 months.
- Clock radios, portable radios, cassette recorders, cassette players and radio
recorders: 90 days.
Any defect in materials or workmanship occurring within the specified period from the
date of delivery, will be rectified free of charge by the retailer from whom this product
was purchased.
Note; Please retain your purchase docket to assist prompt service.
Conditions of this warranty
1. All claims for warranty service must be made to the retailer from whom this
product was purchased. All transport charges incurred in connection with warranty
service or replacement will be paid by the purchaser.
2. These warranties do not cover batteries and extend only to defects in materials or
workmanship occurring under normal use of the product where operated in accor
dance with our instructions.
Philips Consumer Products Division
Technology Park
Figtree Drive, Australia Centre
Homebush 2140
New South Wales
60
Page 19

NEW ZEALAND
Guarantee and Service for New Zealand
Thank-you for purchasing this quality Philips product.
Philips New Zealand Ltd guarantees this product against defective connponents and
faulty workmanship for a period of 12 months. Any defect in materials or workman
ship occurring within 12 months from the date of purchase subject to the following
conditions will be rectified free of charge by the retailer from whom this product was
purchased.
Conditions
1. The product must have been purchased in New Zealand. As proof of purchase,
retain the original sales docket indicating the date of purchase.
2. The guarantee applies only to faults caused by defective components, or faulty
workmanship on the part of the manufacturer.
3. The guarantee does not cover failures caused by misuse, neglect, normal wear and
tear, accidental breakage, use on the incorrect voltage, use contrary to operating
instructions, or unauthorised modification to the product or repair by an
unauthorised technician.
4. Reasonable evidence (in the form of a sales docket) must be supplied to indicate that
the product was purchased no more than 12 months prior to the date of your claim.
5. In the event of a failure. Philips shall be under no liability for any injury, or any loss
or damage caused to property or products other than the product under guarantee.
This guarantee does not prejudice your rights under common law and statute, and is
in addition to the normal responsibilities of the retailer and Philips.
How to claim
Should your Philips product fail within the guarantee period, please return it to the
retailer from whom it was purchased. In most cases the retailer will be able to satis
factorily repair or replace the product.
However, should the retailer not be able to conclude the matter satisfactorily, or if you
have other diffi-culties olaiming under this guarantee, please contaot
The Guarantee Controller
Philips New Zealand Ltd.
S P.O. Box 41.021
Auckland
Q (09)8434160
fax S (09)8497 858
61
Page 20

MEXICO
HOH
Garantía para México
Este aparato está fabricado con materiales de alta calidad y ha sido cuidadosamente
verificado. Philips, por lo tanto, da a usted una garantía de 12 meses a partir de su
fecha de compra.
La garantid ampara la reposición de las piezas defectuosas debidas a fallas en su
montaje o en los materiales, incluyendo la mano de obra necesaria para su reemplazo
en nuestras Sucursales o talleres autorizados.
En caso de fallas en su aparato le tpgamos se sirva poner en contacto con su dis
tribuidor.
Esta garantía no cubrirá las averías que resulten como consecuencia de una insta
lación incorrecta del aparato, manifiesto maltrato o uso inadecuado del mismo.
Philips se obliga a reparar y devolver a usted su aparato en un plazo no mayor de 30
días hábiles contados a partir de la fecha de haber ingresado su aparato a uno de
nuestros talleres.
Para que esta garantía sea válida, es necesario que el certificado que figura en la
parte posterior de esté instructivo haya sido debidamente llenado en el momento de
la compra del aparato.
En caso de extravío del certificado con la presentación de la factura o remisión de su
aparato podrá hacer efectiva la garantía correspondiente.
Si usted tiene alguna duda o pregunta que no le pueda solucionar su distribuidor, por
favor ponerse en contacto con;
Oficinas Centrales de Servicio,
Av. Coyoacán No. 1051,
Col. del Valle,
03100 México, D.F.
S 5-75-20-22 o 5-75-01-00
62
Page 21

63
Page 22
3103 306 1540.2 Printed in Hong Kong
VieCHC/9622
 Loading...