

Page 1
PHILIPS
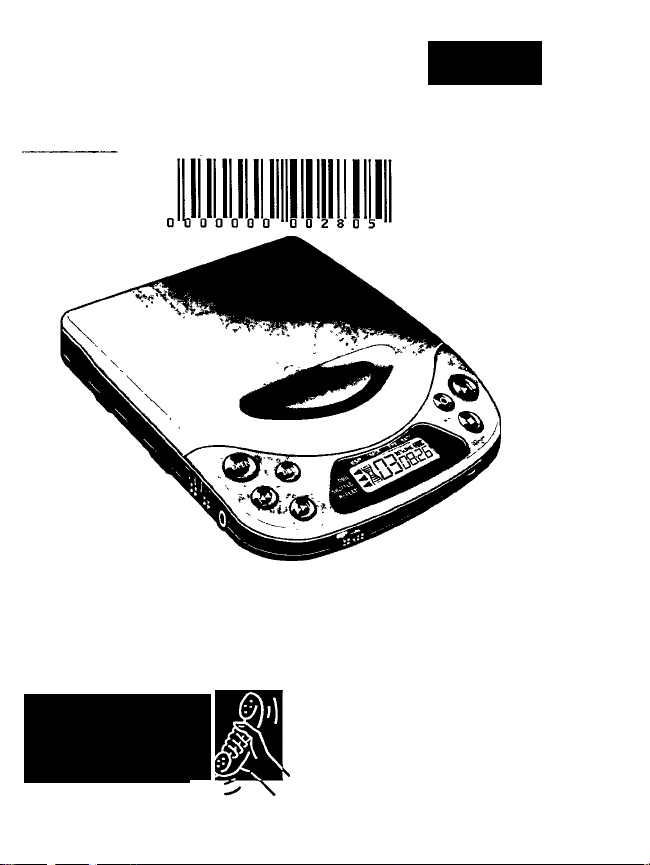
AZ7356 Portable Compact Disc Player
MAGNAVOX
Owner's Manual
Mode d'emploi
Instructivo de manejo
Toll Free Help Line
Ligne d'assistance en service libre
Línea de ayuda telefónica sin cargo
800-53I-0039
/
Page 2
Return your Warranty Registration card today to
ensure you receive all the benefits you’re entitled to.
• Once your Philips Magnavox purchase
is registered, you’re eligible to receive
all the privileges of owning a Philips
Magnavox product
• So complete and return the Warranty
Registration Card enclosed with your
purchase at once.And take advantage
of these important benefits.
, Warranty Verification
Registering your product
within 10 days confirms
your right to maximum
protection under the
terms and conditions of
your Philips Magnavox
warranty.
Know these
'(Q,
RISK OF ELECTRIC SHOCK
A
CAUnON: TO REDUCE THE RISK OF ElfCTRIC SHOCK, 00IMT
REMOVE COVER [OR BACK]. N0 USERSEJMCEABU PARTS
mSIDE. REFER SERVICING TO QUAUHEO SERVICE PERSONNEL
A
within your unit may cause an
electrical shock. For the safety of
everyone in your household, please
do not remove product covering.
A
which you should read the enclosed
literature closely to prevent
operating and maintenance problems.
DO NOT OPEN
This “bolt of lightning”
indicates uninsulated material
The “exclamation point” calls
attention to features for
^ Owner i Confirmation
Your completed Warranty
Registration Card serves
as verification of
ownership in the event of
product theft or loss.
symbols
A
.Model
Registration
Returning your Warranty
Registration Card right
away guarantees you’ll
receive all the information
and special ofi'ers which
you qualify for as the
owner of your model.
For Customer Use
Enter below the Serial No. which is
located on the rear of the cabinet. Retain
this information for future reference.
Modei No..
Seriai No. .
WARNING: TO PREVENT FIRE
OR SHOCK HAZARD, DO NOT
EXPOSETHIS EQUIPMENTTO
RAIN OR MOISTURE
CAUTION: To prevent electric
shock, match wide blade of plug to
wide slot, and fully insert.
Page 3
Page 4
Canada
English:
This digital apparatus does not exceed
the Class B limits for radio noise
emissions from digital apparatus as
set out in the Radio Interference
Regulations of the Canadian
Department of Communications.
Mexico
Es necesario que lea cuidadosamente su instructivo de manejo.
PRECAUCION - ADVERTENCIA
Ño abrir, riesgo de choque eléctrico |
A
Verifíque que el voltaje de alimentaciónj
sea el requerido para su aparato
Para evitar el riesgo de choque eléctrico, no quite la tapa.
En caso de requerir servicio, dirijase al personal calificado.
Français:
Cet appareil numérique n'émet pas de
bruits radioéiectriques dépassant les
limites applicables aux appareils
numériques de Classe B prescrites
dans le Règlement sur le Brouillage
Radioélectrique édicté par le Ministère
des Communications du Canada.
ATENCIONZ
Page 5
Español
Introducción
.............................
Instrucciones sobre seguridad.
Mandos
....................................
Conexiones
Alimentación
Funcionamiento
Accesorios
Información general
Detección de anomalías
...............................
.............................
........................
................................
..................
.............
Garantía limitada.......................
........
........
..38/39
..40/41
........
„43/45
........
........
„48/49
..50/51
36
37
O
ic
42
(ü
a
w
46
lU
47
Page 6

Page 7
PHILIPS
Visiteur World Wide Web Site at http.-AV.v.v.'.magnavox.com
PHILIPS
IVIAGNAVOX
Congratulations on your purchase,
and welcome to the "family!”
Dear Philips Magnavox product owner:
Thank you for your confidence in Philips Magnavox.You’ve selected one of the
best-built, best-backed products available today.And well do everything in our
power to keep you happy with your purchase for many years to come.
As a member of the Philips Magnavox "family,” you’re entitled to protection by
one of the most comprehensive vsrarranties and outstanding service networks in
the industry.
What’s more, your purchase guarantees you’ll receive all the information and
special offers for which you qualify, plus easy access to accessories from our
convenient home shopping network.
And most importandy you can count on our uncompromising commitment to
your total satisfaction.
All of this is our way of saying welcome-and thanks for investing in a Philips
Magnavox product.
Sincerely,
Robert Minkhorst
President and Chief Executive Officer
P.S. Remember, to get the most from your Philips Magnavox product,
you must return your Warranty Registration Card within 10 days.
So please mall it to us right now!
Page 8

SAFETY INSTRUCTIONS - Read before operating equipment
This product was designed and manufactured to meet strict quality and safety standards. There are,
however, some installation and operation precautions of v/hich you should be particularly avare.
Read Instructions ■ All the safety and
operating instructions should be read before
the appliance is operated.
m
3
Retain Instructions - The safety and
(Q_
operating instructions should be retained for
55'
future reference.
3
"
Heed Warnings - All warnings on the
appliance and in the operating instructions
should be adhered to.
Follow Instructions ■ All operating and
use instructions should be followed.
Water and Moisture - The appliance
should not be used near water - for
example, near a bathtub, washbowl, kitchen
sink, laundry tub or swimming pool, or in a
wet basement, etc.
Carts and Stands ■ The appliance should
be used only with a cart or stand that is
recommended by the manufacturer.
6A. An appliance and cart combination
should be moved with care. Quick
stops, excessive force, and uneven
surfaces may cause the appliance
and cart combination to overturn.
Wall or Ceiling Mounting - The appliance
should be mounted to a wall or ceiling only
as recommended by the manufacturer.
Ventilation - The appliance should be
situated so that its location or position does
not interfere with its proper ventilation. For
example, the appliance should not be
situated on a bed, sofa, tug, or similar
surface that may block the ventilation
openings or placed in a built-in installation,
such as a bookcase or cabinet that may
impede the flow of air through the
ventilation openings.
Heat - The appliance should be situated
away from heat sources, such as radiators,
heat registers, stoves, or other appliances
(including amplifiers) that produce heat.
10. Power Sources - The appliance should
only be connected to a power supply of the
type described in the operating instructions
or as marked on the appliance.
11. Power Cord Protection - Power supply
cords should be routed so that they are not
likely to be walked on or pinched by items
placed upon or against them, paying
particular attention to cords and plugs,
convenience receptacles, and the point
where they exit from the appliance.
12. Cleaning - The appliance should be cleaned
only as recommended by the manufacturer.
13. Power Lines - An outdoor antenna should
be located away from power lines.
14. Non-use Periods - The power cord of the
appliance should be unplugged from the out
let when the appliance is unused for a long
period of time.
15. Object and Liquid Entry - Care should be
taken so that objects do not fall and liquids
are not spilled through openings into the
enclosure.
16. Damage Requiring Service-The
appliance should be serviced by qualified
service personnel when:
A. The power supply cord or the plug has
been damaged; or
B. Objects have fallen or liquid has spilled
into the appliance; or
C. The appliance has been exposed to rain; or
D. The appliance doss not appear to
operate normally or exhibits a marked
change in perfomnance; or
E The appliance has been dropped or the
enclosure damaged.
17. Servicing - The user should not attempt to
service the appliance beyond as described in
the operating instructions. All other
servicing should be referred to qualified
service personnel.
S1/8 a«62-l
Page 9

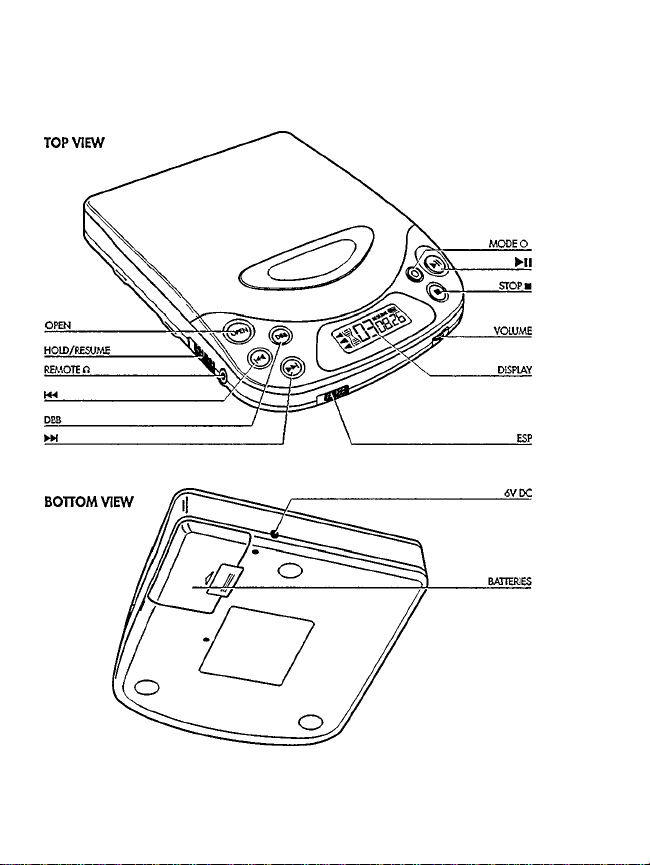
CONTROLS see illustration an page 3
DISPLAY
......................
OPEN............................Button for opening the lid of the CD player
VOLUME
.......................
► ll
................................
STOP ■
........................
DBB
.............................
...............................
► W
...............................
MODE O........................Button for selecting the different playing modes:
ESP
..............................
RESUME/HOLD
REMOTE
......................
6 V DC
......................
Battery compartment ..which holds four batteries
Window for showing the different playing modes, tracks and
times
Control for adjusting the volume at the headphone output
Button for starting and pausing CD play
Button for stopping CD play, deleting various settings, and
switching off the CD player
Dynamic Bass Boost Button for boosting the bass response
Button for selecting the previous music track or, if held down,
for searching backward for a particular passage on tbe CD
Button for selecting the next music track or, if held down,
for searching forward for a particular passage on the CD
SHUFFLE-REPEAT/SHUFFLE-REPEAT-off
Electronic Skip Protection; Switch for activating the
electronic buffer memory for an undisturbed sound
...........
Switch for activating the RESUME feature (resuming CD play)
and/or HOLD feature (blocking all buttons)
Headphone control jack (3.5mm)
Jack for external power supply
£
o>
c
LU
WARNING: To reduce the risk of fire or electric shock, do not expose
this appliance to rain or moisture.
CAUTION: Use of controls or adjustments or performance of
procedures other than those herein may result in hazardous
radiation exposure.
The set complies with the FCC-Rules, Part 15 and with 21CFR1040.10.
Page 10
CONNECTIONS
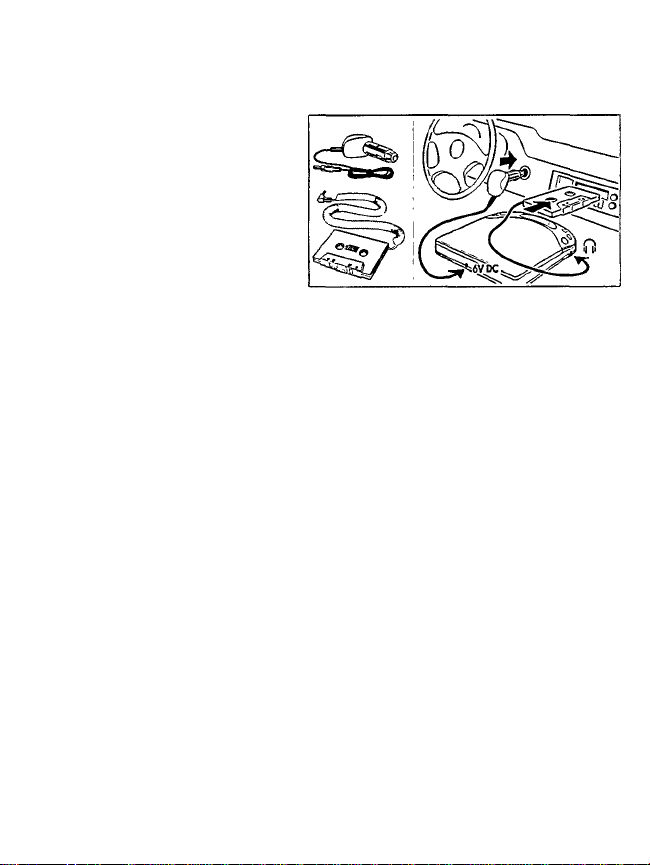
Connections for in-car use
1 Find a good and safe place
for the CD player on a
m
3
horizontal, vibration-free, and
(Q.
stable surface that is not
to'
dangerous or in the way of the
3
"
driver or passengers.
2 Connect the DC plug of the
voltage converter AY 3560
(6V/400 mA Direct Current, <$>
^>- ❖ plus-pole ❖ to the center pin,
only for a 12 V car battery, negative grounding) to the 6V DC jack of your CD player.
3 Then insert the voltage converter into the cigarette lighter jack. If necessary, clean
the cigarette lighter jack to obtain a good electrical contact.
4 Turn down the volume and switch off the auto reverse feature (if present) of
your car radio cassette piayer.
5 Connect the cassette adapter plug to the REMOTE Ci jack of the CD player.
6 Slide the cassette adapter carefully into the car radio cassette player.
7 Make sure that the cord cannot hinder your driving.
8 Start the CD player, turn its volume to middle position (approx, position 6-8) and
adjust the sound with the car radio controls.
• To remove the cassette adapter, press the eject button of the car radio.
• Always remove the voltage converter when the CD player is not in use.
Notes on In-car Use:
- Avoid excessive heat from the car heating or from direct sunshine (e.g., when
parking in the sun).
- if your car radio has a LINE IN jack, it is best to use it for the car radio connection
instead of the cassette adapter. Connect a signal lead (optional) to this LINE IN jack
and the REMOTEii jack of the CD player.
10
Page 11
CONNECTIONS
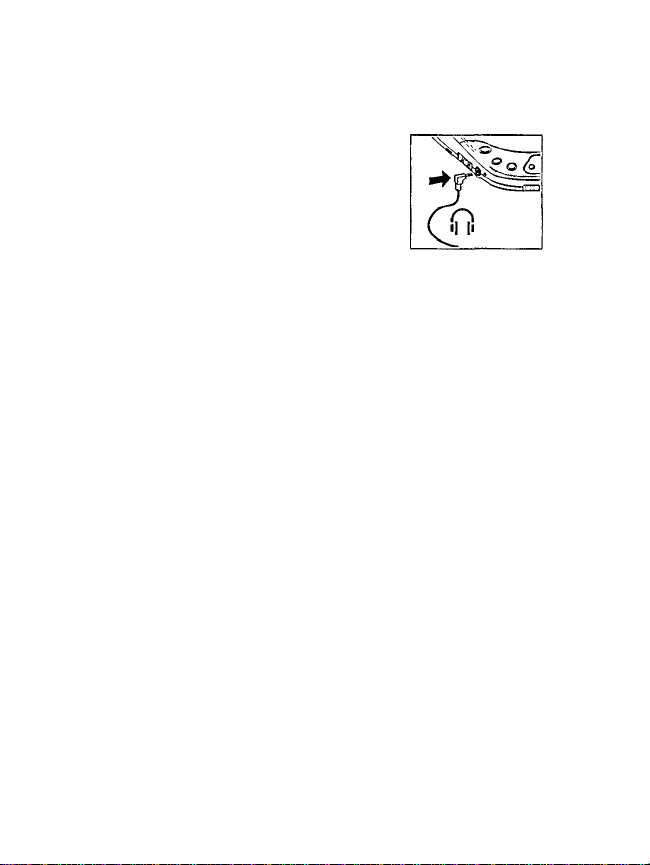
REMOTE» - headphone control jack
Connect the supplied headphones (16-32 ohms
/3.5mm jack plug) with the REMOTE » jack.
Note: Use this jack also for connecting
- your HiFi system or your car radio (the cassette adapter from
the car accessory kit AY3500 ora signal lead): in both cases
the volume of the CD player has to be set to
midposition (aprox. 6-81.
Use your head when using headphones
• Hearing safety: Do not play your headset at a high volume. Hearing experts
advise against continual extended play.
• If you experience a ringing in your ears, reduce the volume or discontinue use.
£
o>
c
lU
• Traffic safety: Do not use while driving a motorized vehicle. Using while driving
may create a traffic hazard and is illegal in many areas.
• You should use extreme caution or temporarily discontinue use in potentially haz
ardous situations.
• Even if your headset is an open-air type designed to let you hear outside sounds,
don't turn up the volume so high that you can't hear the sounds around you.
11
Page 12
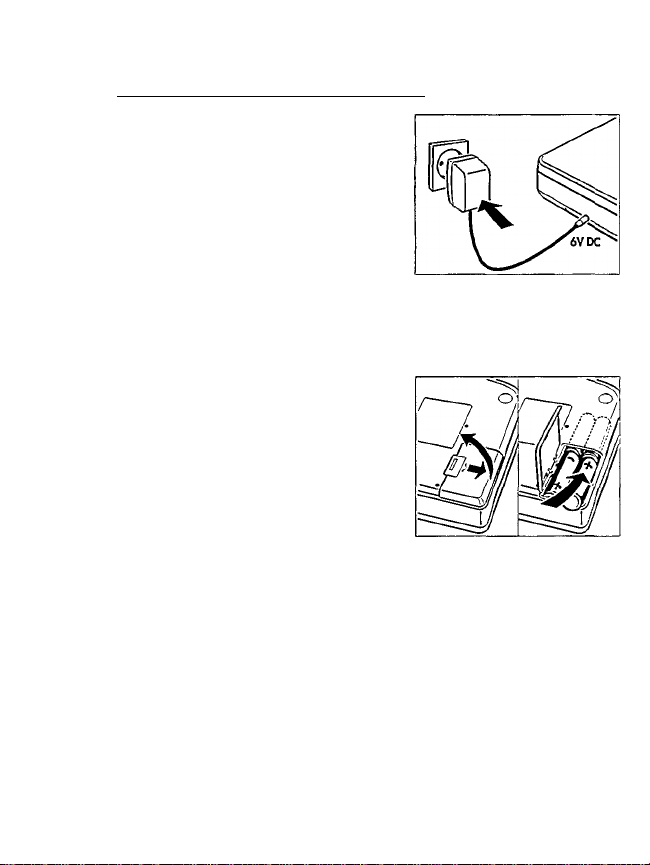
POWER SUPPLY
AC power adapter SBC6622 (supplied)
1 Make sure that the local voltage corresponds to
the voltage of the adapter (see accessories).
m
3
(£_
2 Connect the supplied AC power adapter
in'
(6 V/400 mA Direct Current plus-pole to the
3"
center pin) to the player's 6 V DC jack and to the
wall outlet.
• Always disconnect the adapter if you are not
using it.
[Batteries, type R6, UM3 or AA (optional)
Open the battery compartment and insert
four alkaline batteries.
Approx, playing times under normal conditions:
Alkaline batteries: 10 hours
Remove the batteries if they are empty or the CD
player is not to be used for a long time.
/Vote: In the top right corner of the display the battery condition will be indicated:
- Full batteries: no indication.
- Weak batteries: ГМ" symbol) flashes. (This symbol is not available when
nickel-cadmium batteries are used.)
- Empty batteries: <=: ("empty" symbol) flashes and the message ВАТТ appears.
Replace the batteries or connect the AC power adapter.
12
Page 13
Inserting the CD Removing the CD
OPERATION
• Push gently on
the CD center
so that it fits
onto the hub.
• Hold the CD
by its edge and
press the hub
gently.
Playing a CD
1 Open the lid by pressing the OPEN button.
2 Insert an audio CD, printed side up.
3 Close the lid by pushing it on its left side.
— Display indication of: (example)
23 = total number of tracks / 69:33 = total playing time
4 Press the ► !! button to start CD play.
— Display indication of: (example)
2 = current track /1:08 = elapsed time of current track
5 Adjust the sound using the controls VOLUME and DBB.
6 You can interrupt CD play by pressing the ► !! button. Continue CD play by pressing
the ► II button again.
-* Display indication of: time of the current position (flashing).
7 Press the STOP ■ button to stop CD play.
— Display indication of: total number of tracks / the total playing time.
• If you press the STOP ■ button again, you will switch off the set.
Note: If no button is pressed for 10 seconds, the set will switch off automatically.
1~l
CD85B3
I?
O)
c
U1
13
Page 14
OPERATION
Selecting anothertrack
Briefly press the K< or button once/several times to skip
m
3
to the beginning of the current/previous or next track(s).
(Q.
-* Display indication of: selected track number.
35'
“*■ During play; CD play continues automatically with the
3"
selected track.
In stop position: press the ► !! button to start CD play.
Searching for a passage during CD play
1 Hold down the 1« or button to find a particular passage in foavard or backivard
direction.
After two seconds, searching will start at high speed.
2 Release the button when you have reached the desired passage.
Note: In the shuffle mode, searching is only possible within the particular track.
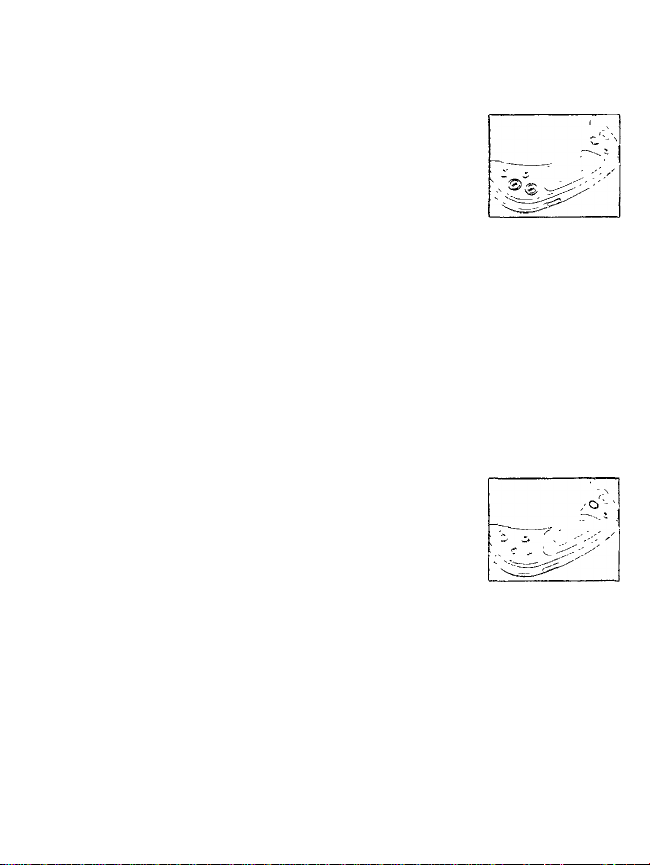
MODE o- different playing inodes
By pressing the MODE O button, you can
successively activate the playing modes:
SHUFFLE: The tracks are played fn random order
SHUFFLE REPEAT: All tracks are played repeatedly fn
until all of them have been played once.
random onferuntil you leave this mode.
REPEAT: The CD is played repeafed/yuntil you leave this mode.
Display indication of: an arrow pointing towards the selected playing mode.
-* During play: CO play continues automatically with the selected playing mode.
In stop position; press the ► !! button to start CD play.
Deactivate all modes with the MODE O button.
14
Page 15
OPERATION
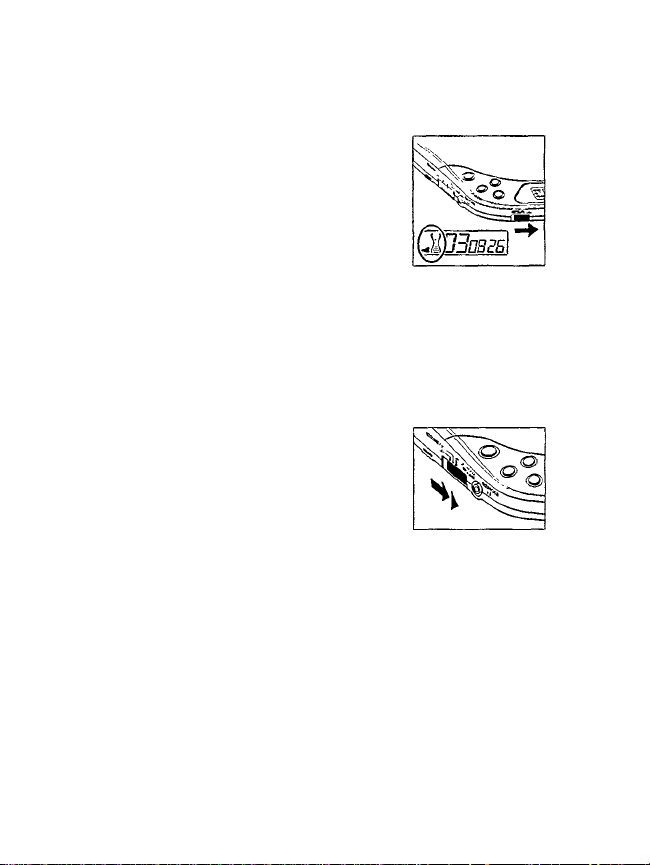
ESP-Electronic Skip Protection system
Activate the ESP system by sliding the ESP switch to the right.
-* *■ The ESP system constantly stores the CD data to be
played in advance in order to prevent sound skipping
during play caused by shock and vibration.
-* The ESP symbol in the display starts tilling, as the
example at the right illustrates:
The state of the ESP symbol in the display changes
according to the state of the ESP memory.
Note: When switching the ESP system on and off, CD play will be delayed or
interrupted fora short time.
RESUME/HOLD
RESUME- playing from where you have stepped
> Activate the RESUME feature by sliding the RESUME/HOLD
switch to the middle.
-* The display indicates: RESUME.
' If you stop CD play by pressing the STOP ■ button, the last
played position will be stored.
• Press ► II to resume CD play from the position where it was stopped.
Note: Do not open the lid. Otherwise, the information about the position last played
gets lost.
O)
c
UJ
HOLD - Deactivating all buttons
• Activate the HOLD feature by sliding the RESUME/HOLD switch to the very right.
-* Now, all buttons are deactivated and will not function until you switch the
feature off again. The lid cannot be opened, if you press a button (except OPEN),
the display will indicate HOLD.
Note: In the hold position, the resume function is automatically activated.
15
Page 16

ACCESSORIES
Accessories
- Headphones 3.5 mm.
- SBC 6622 - AC power adapter.
m
3
CO
Car accessories
(Л
3
”
- AY 3560 - car voltage converter (6 V/400 mA, Direct Current, plus-pole to the center pin)
- AY 3500 - car adapter cassette
16
Page 17
GENERAL INFORMATION
Maintenance and CD handling
The lens (x) of the CD player should never be touched!
Do not expose the CD player, batteries or CDs to rain,
dampness, sand, dust or excessive heat caused by heating
equipment, or to direct sunlight (for example inside
a car parked in the sun).
The iens may cloud over when the set is suddenly moved from cold to warm
surroundings. Playing a CD is then not possibie.
Leave the CD player in a warm environment until the moisture evaporates.
You can clean the CD player with a soft and slightly dampened chamois leather.
Do not use any cleaning agents as they may have a corrosive effect.
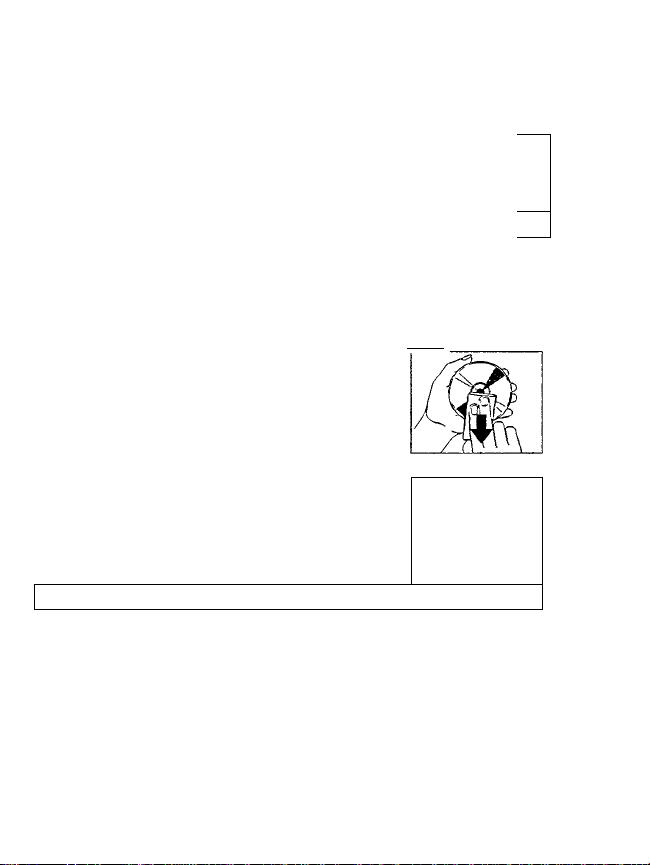
Aiways pick up the CD by the edge and put it back in its box
after use.
To ciean the CD, wipe it off in a straight line from the center
towards the edge using a soft, lint-free cioth.
A cleaning agent may damage the disc!
• When a newly purchased CD does not stay on the hub, this
is caused by small burrs around the center hole of the CD.
Remove the burrs by rubbing the edge of the center hole with
a pen or other such instrument.
Environmental information
Please observe the local regulations regarding the disposal of packing materials,
exhausted batteries, and old equipment.
All redundant packaging material has been omitted. We have done our utmost to
make the packaging easy separable into three mono-materials: cardboard (box),
expandable polystyrene (buffer), polyethylene (bags, protective foam sheet)
Your set consists of materials which can be recycled if disassembled by a specialized
company.
Do not dispose of exhausted batteries with your household waste.
'0\
£
_<2
"o)
c
HI
17
Page 18
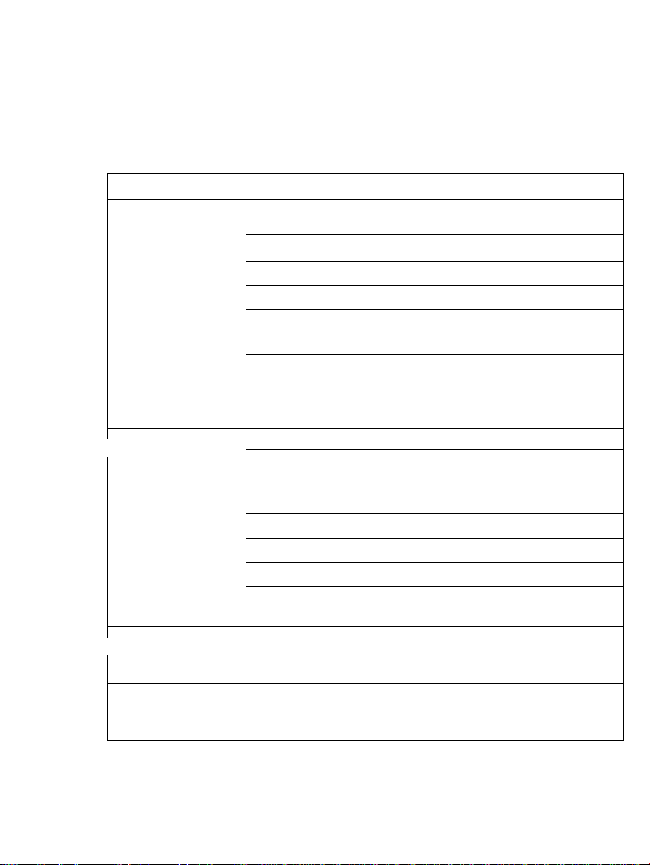
TROUBLESHOOTING
If a problem occurs, please check the points listed below before taking your set for
repair.
If you are not able to remedy a problem by following these hints, consult your dealer
m
or sendee facility.
3
ta
Problem Possible cause
No power or
CD play does not
start
Display: no indication
CD play does not
3^
start or Interrupts
Display:
-no indication or
-ERROR or
■ NO DISC
Batteries
Batteries incorrectly inserted Insert the batteries correctly
Use of new batteries Press ► !!
Batteries are empty
Contact pins are dirty
AC power adapter
Loose connection
In-car use
Cigarette lighter is not powered Insert batteries as an
when ignition is switched off additional power supply
HOLD feature is activated
Moisture condensation
CD lid is not securely closed Close the lid securely
CD is not or incorrectly inserted Insert a CD, label facing up
CD is badly scratched Use another CD
CD is dirty
Remedy
Change/recharge the batteries
Clean them with a cloth
Connect the adapter securely
Switch off the HOLD feature
Leave the player in a warm
place until the moisture
evaporates
Clean the CD
Lid of CD player
3^
does not open
Play does not start
from the first track
18
HOLD feature is activated Switch off the HOLD feature
RESUME or SHUFFLE
is activated
Switch off RESUME or
SHUFFLE
Page 19
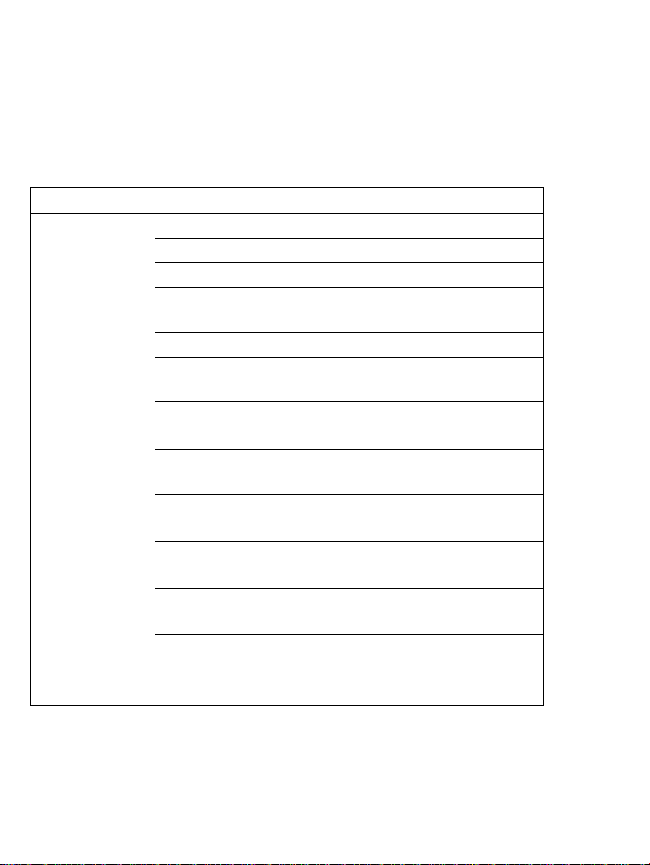
TROUBLESHOOTING
Under no circumstances should you try to repair the unit yourseif, as this
will invalidate the warranty.
Problem
No sound or bad
sound quality
Possible cause Remedy
PAUSE is activated Press ► !!
Loose or wrong connections
Volume is not turned up
Headphones worn the wrong
way
Headphone piug is dirty Clean the headphone plug
Strong magnetic fields near
the CD player
Electrostatic discharge of the
user through the CD player
In-car use
Strong vibrations Find another place for the set
Adapter cassette is
incorrectly inserted
Temperature inside car is too
high/low
Cigarette lighter/jack is too
dirty
Wrong playback direction of
the auto reverse feature of
the car cassette player
Check connections
Adjust the volume
Pay attention to the L (left)
and R (right) indications
Change the player's position or
connections
Press or once or
press ► !! twice
Insert the adapter cassette
correctly
Let the CD player acclimatize
Clean the cigarette
lighter/jack
Change the auto reverse
direction
£
_<2
c
U1
19
Page 20

LIMITED WARRANTY
PHILIPS MAGNAVOX PORTABLE COMPACT DISC
This product must be carried in for an exchange.
WHO IS COVERED?
You must have proof of purchase to exchange the produccA sales receipt or other
document showing that you purchased the product is considered proof of purchase.
Attach it to this owner's manual and keep both nearby.
WHAT IS COVERED?
Warranty coverage begins the day you buy your product. For one year thereafter, a
defective or inoperative product will be replaced with a new, renewed or comparable
product at no charge to you. A replacement product is covered only for the original
warranty period.When the warranty on the original product expires, the warranty on
the replacement product also expires.
WHAT IS EXCLUDED?
Your warranty does not cover:
• labor charges for Installation or setup of the product, adjustment of customer controls
on the product,and installation or repair of antenna systems outside of the producL
• product repair and/or part replacement because of misuse, accident, unauthorized
repair or other cause not within the control of Philips Consumer Electronics
Company.
• reception problems caused by signal conditions or cable or antenna systems outside
the unit.
• a product that requires modification or adaptation to enable it to operate in any
country other than the country for which it was designed, manufactured, approved
and/or authorized, or repair of products damaged by these modifications.
• incidental or consequential damages resulting from the product. (Some states do not
allow the exclusion of incidental or consequential damages, so the above exclusion may
not apply to you.This includes, but is not limited to, prerecorded material, whether
copyrighted or not copyrighted.)
• a product that is used for commercial or institutional purposes.
WHERE 15 EXCHANGE AVAILABLE?
You may exchange the product in all countries where the product is officially distributed
by Philips Consumer Electronics Company. In countries where Philips Consumer
Electronics Company does not distribute the product, the local Philips service
organization will attempt to provide a replacement product (although there may be a
delay if the appropriate product is not readily available).
BEFORE REQUESTING EXCHANGE...
Please check your owner’s manual before requesting an exchange. Adjustments of the
controls discussed there may save you a trip.
One Year Free Exchange
Philips Service Company, P.O. Box 555,
Jefferson City,Tennessee 37760, (423) 475-8869
Page 21

EXCHANGING A PRODUCT IN U.S.A.,
PUERTO RICO OR U.S.VIRGÏN ISLANDS...
Concacc your dealer to arrange an exchange. Or, ship the product, insured and freight
prepaid, and with proof of purchase enclosed, to the address listed below.
(In U.SA, Puerto Rico and U.S.Virgin Islands, all implied warranties, including implied
warranties of merchantability and fitness for a particular purpose, are limited in duration
to the duration of this express warranty. But, because some states do not allow limitations
on how long an implied warrant may last, this limitation may not apply to you.)
EXCHANGING A PRODUCT IN CANADA...
Contact your dealer to arrange an exchange. Or, ship the product, insured and freight
prepaid, and witii proof of purchase enclosed, to one of the Philips consumer service
centers listed below.
(In Canada, this warranty is given In lieu of all other warranties. No other warranties are
expressed or implied, including any implied warranties of merchantabili^ or fitness for a
particular purpose. Philips is not liable under any circumstances for any direct, indirect,
special, incidental or consequential damages, howsoever incurred, even if notifîed of the
possibility of such damages.)
TO GET OUT-OF-WARRANTY EXCHANGE...
In U.SA, Puerto Rico or U.S.Virgin Islands, contact Philips Service Company at (800)
851-8885 to obtain the cost of out-of-warranty exchange.Then carefully pack the
product and ship it to the Small Product Service Center (address listed above). In
Canada, contact the nearest Philips consumer service center (phone number and address
listed above) to obtain the cost of out-of-warranty exchange.Then carefully pack the
product and ship it to that service center.
REMEMBER...
Please record the model and serial numbers found on the product below. Also, please fill
out and mail your warranty registration card promptly. It will be easier for us to notify
you If necessary.
Small Product Service Center
Philips Service Company
907 Snapps Ferry Road, Plant 2, Building 6
Greeneville.TN 37743
601 MilnerAvenue,Scarborough,Ontario,MlB IMS
4977 Levy Street, St. Laurent, Québec. H4R 2N9
1741 Boundary Road.Vancouver, B.C..V5M 3Y7
Philips Electronics Ltd.
(416) 292-5161
(514) 956-0120
(604) 294-3441
MODEL#
SERIAL#
This warranty g/ves you spedfic legal rights.You may have other rights
which vary from stateJprovince to stote/province.
EL4967E0041 MAC 4110 /12-95
Page 22

PHILIPS CONSUMER ELECTRONICS COMPANY
A Division of Philips Electronics North America Corporation
Knoxville, Tennessee 37914-1810, U.S.A.
31401152360.1
Printed In Hong Kong
lB7750T001/VieSRPg644
 Loading...