

Philips AZ6808-17 User Manual [en, es, fr, it]
PHILIPS
■..........1
i
I
AZ6808
@ CD-player
d5 Lecteur de CD
<D> CD-Spieíer 20'
<D Lector de CD 3©
® Lettore CD 44
<X> CD-spelare
<|f) CD-soitin
PHILIPS
4'
12|
® CD-speler 28!
52‘
60

INDEX
Danmark
Typeskiltet findes pà undersiden
af apparaten
Dette produkt overholder kravene
til radio-interferens af Europasisk
Faellesskab.
Advarsel: Usynlig laserudstràling
ved àbning nar sikkerhetsafbrydere er ude af funktion.
Undgà udsaettelse for stràling.
Garanti og service
..........
sider 68-74
Norge
Typeskilt finnes pa apparatens
underside.
Garanti og service..........sider 68-74
(@ México HOM
Es necesario que lea cuidadosa
mente su instructivo de manejo.
(0) English page 4
Guarantee and service pages 68-74
CE> Français page 12 ^
Garantie et service pages 68-74
(d) Deutsch Seite 20
Garantie und Service Seiten 68-74
(D IMederlands pagina 28
Garantie en service pagina's 68-74
CD Español página 36 ^
Garantía y servicio páginas 68-74
CD Italiano pagina 44
Garanzia e servizio pagine 68-74
CD Svenska
Garantí och service sidoma 68-74
(|f) Suomi
Takuu ja huolto
sida 52
sivu 60
sivut 68-74
(Np
CD
I
inoi
FI
MATRIX DISPLAY MODE
MEMORY i
PHONES i
6VDC<3>-0-<^
;CD OUT
PREVIOUS ¡«3
MEXTl>{>I
stopD

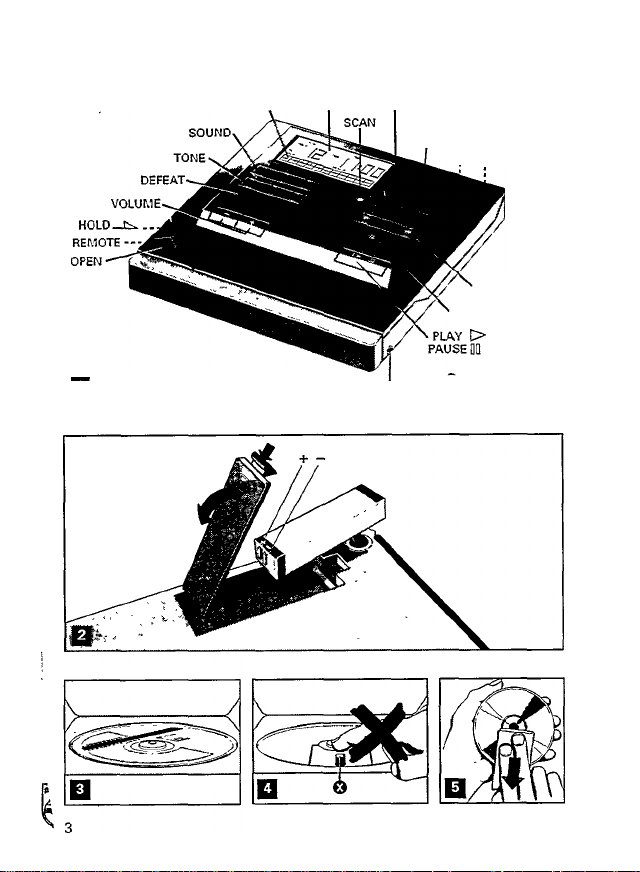
CONTROLS - fig. 1
to open the CD compartment
socket for the supplied remote control unit SBC 6203
in position the CD-buttons are inoperative (except for
the remote control buttons)
VOLUME
DEFEAT
TONE
SOUND
DISPLAY
SCAN
volume buttons - / +
cancels JAZZ/POP/CLASSIC and DBS, AMBIENCE and MUTE
DBB to boost the bass response
press again to cancel
AMBIENCE to obtain a surround sound effect
press again to cancel
MUTE to suppress the volume temporarily
press again to cancel
tone buttons press either JAZZ or POP or CLASSIC
shows
TRACK the total number of tracks
and during PLAY the number of the track being played
TIME the total playing time of the CD
and during PLAY the elapsed time of that track
MATRIX shows all tracks present on the CD
in the event of more than 20 tracks, + will appear
during PLAY the actual track number will flash
after being played, the track number disappears I
JAZZ Of POP or CLASSIC activated
DBB activated
AMBIENCE activated
SCAN activated
PAUSE activated
SHUFFLE activated
REPEAT 1 activated (repeat 1 title)
REPEAT ALL activated (repeat the CD)
MEMORY the programmed selection (memory) is played
ВАТТ the battery becomes exhausted: connect the mams
adapter
HOLD activated, the CD player buttons are inoperative (ex
cept for the remote control buttons
play only the beginning of each track

CONTROLS - fig. 1
MODE
MEMORY
6VDC
CD OUT
J« KH
□ STOP
C> PLAY/iD PAUSE play and pause button
PHONES i) socket for stereo headphones or mini loudspeakers
press repeatedly until the required function appears in the dis
play
REPEAT 1 continuously repeat 1 title (the displayed track)
REPEAT ALL (MEMORY) continuously repeat the CD (or the
stored selection - MEMORY)
SHUFFLE play all tracks in a random order
SHUFFLE REPEAT continuously repeat the CD in the SHUF
FLE mode
NORMAL (no display indication) to cancel the SHUFFLE and
REPEAT modes
press to enter the MEMORY mode
press again to store the displayed track number
press for longer than 1 second to display all stored track num
bers
socket for the supplied mains adapter
socket for CD-reproduction throOgh your stereo system
during PLAY:
• keep pressed to play fast km backward or wt forward
• press briefly to play a km PREVIOUS or NEXT »t track
during programming in STOP-mode:
• press briefly to display a PREVIOUS Ma or NEXT k>i track
stop button
in STOP mode, press STOP □ again to clear the memory
This product complies with the radio interference requirements of the European
Community.
The type plate is located on the base of the set.

POWER SUPPLY
The CD player is delivered with a mains adapter and a rechargeable battery.
Whenever convenient, use the supplied mains adapter if you want to conserve
battery life.
Mains adapter, type SBC 6608 or SBC 6619
Use only the enclosed mains adapter that supplies 6 V DC with the plus pole <$> to
the centre pin €>-G- <$>. Serious damage may occur if another adapter is used.
• First check that the mains voltage of the mains adapter corresponds to your lo
cal mains supply. If not, consult your dealer or service organisation. If the adapter
IS equipped with a voltage selector, set this selector to the local mains voltage.
• At home: connect the mains adapter to the 6 V DC socket. The battery supply is
then switched off. After use, always disconnect the adapter from the wall socket
• In your car, you can use the voltage converter from the optional car accessory
kit SBC 3557 for power supply from the cigar lighter socket on your dashboard.
Rechargeable batteiy, type SBC 6408
Charge the battery prior to use for the first time and also if the battery has not
been used for a long time.
• Insert the battery in the CD player (fig. 2).
• Connect the mains adapter to the 6 V DC socket.
• After approx. 4 hours, the battery is fully charged. Charging for a longer time (with
a maximum of 1 week) will not damage the battery.
• During charging, the CD player may be operated normally.
- If ВАТТ appears in the display, the battery is exhausted and must be re
charged.
- Prevent the battery from being discharged completely; this would affect its
charging capacity and lifetime.
- If the CD player will not be used for a long time, store the battery fully
charged outside the CD player. Each battery, even when not in use, discharges
slowly, so recharge the battery every 6 months to prevent it from being dis
charged completely.
- If the fully charged battery becomes exhausted relatively quickly, it may be
worn out and be due for replacement. A new or additional battery is available
from your dealer under type number SBC 6408. Do not throw batteries in the
bin.
ACCESSORIES available from your dealer
SBC 3557 car accessory kit contains:
SBC 6209 infrared remote control set
SBC 1085 signal lead with 3.5 mm stereo plugs at both ends
1. Supply cable for power supply from the cigarette lighter socket on
your dashboard, with voltage converter from 12 V to 6 V
2. CD cassette adapter for CD reproduction through your car radio cas
sette player, with lead and 3.5 mm stereo plug

CONNECTIONS MAINTENANCE
CONNECTIONS
Headphone socket PHONES 0
• For stereo headphones (or mini loudspeakers) with 3.5 mm plug.
CD OUT socket
• For CD reproduction;
- at home: through your stereo system (amplifier, receiver, recorder, etc.). Con
nect the supplied signal.lead SBC 1059 to the socket CD OUT and the input
sockets LINE IN, AUX or CD IN of the other unit.
- in your car: through your car radio;
- a car radio with LINE IN socket; use the signal lead SBC 1085, available from
your dealer.
- a car radio/cassette player without LINE IN socket; use the cassette adapter
from the car accessory kit SBC 3557.
• Adjust the sound with the controls of the stereo system or the car radio.
REMOTE socket
• For the supplied remote control SBC 6203 with the functions VOLUME, PLAYt>,
STOP □ and KM PREVIOUS/NEXT pm, or for the infrared remote control set SBC
6209, available from your dealer.
GENERAL MAINTENANCE
- Do not expose the set, batteries or CD's to rain or moisture, or. for any great
length of time, to excessive heat from heating equipment or direct sunshine, e.g.
in cars parked in the sun.
- Keep the set and the CD's away from sand.
- The mechanism of the CD player is fitted with self-lubricating bearings and
therefore must not be oiled or greased.
- Fingerprints, dust and dirt on the apparatus can be removed using a soft, clean
and slightly damp leather cloth. Do not use any cleaning agents which contain
abrasives or solvents such as benzine thinner, alcohol, refined petrol or ammonia,
since they may affect and damage the cabinet.
CD player AND DISC MAINTENANCE_______________________________________
- The lens ® (fig. 4) should never be cleaned.
- The lens may steam up when the set is taken from a cold into a warm environ
ment. Playing a CD is not possible then. Do not clean the lens, but let the set ac
climatize for a while.
- Always pick up the CD by the edge and put it back in its box immediately after
use.
- To remove dirt from a CD, first breathe on the CD and wipe it off in a straight
line from centre to edge (fig. 5) using a soft, lint-free cloth. The use of cleaning
agents may damage the CD.
 Loading...