

Page 1
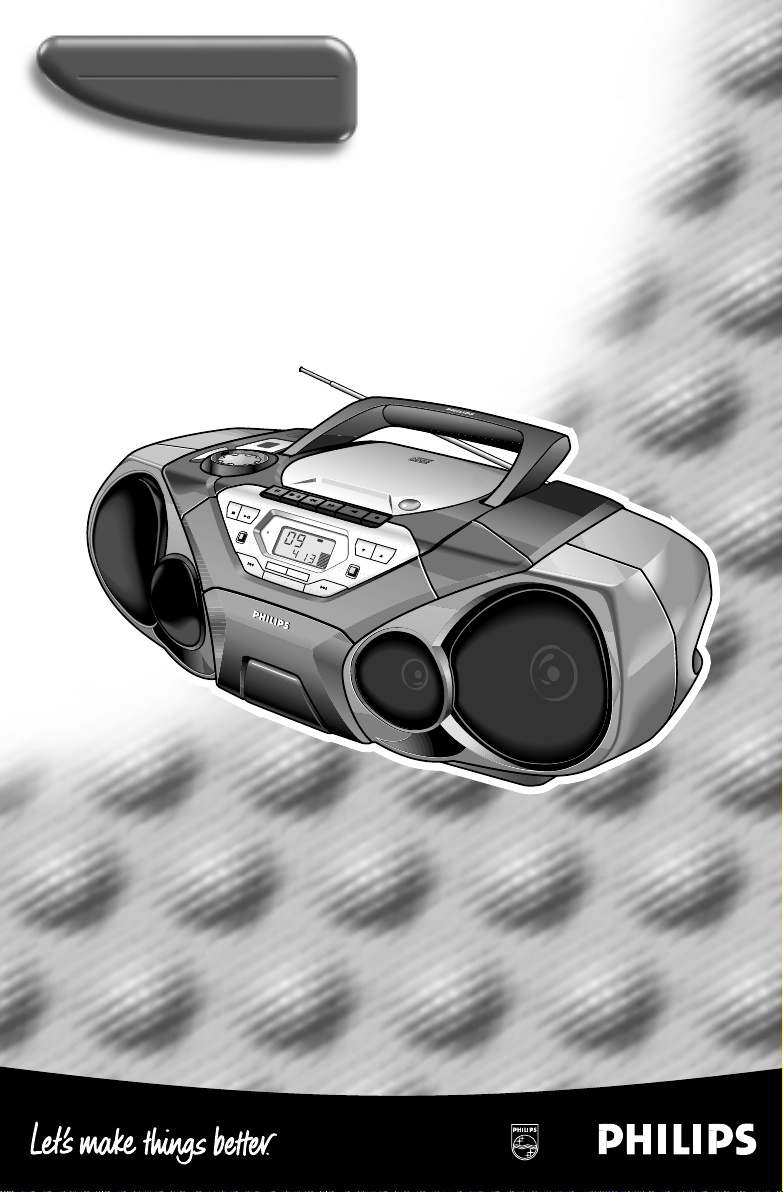
CD Radio Cassette Recorder
STOP
PLAY•PAUSE
TUNER
PRESET
PRO
G
S
H
U
F
F
L
E
R
E
P
E
A
T
S
E
A
R
C
H
D
IG
IT
A
L EQ
U
A
LIZ
ER
D
IG
IT
A
L T
U
N
E
R
D
IG
IT
A
L EQ
U
A
LIZER
D
IG
IT
A
L T
U
N
E
R
IN
C
R
E
D
IB
L
E
S
U
R
R
O
U
N
D
BAND
S
O
U
N
D
C
O
N
T
R
O
L
C
E
N
T
E
R
FM
AM
B
A
T
L
O
W
LW
PROG
SHUFFLE
•
•
V
O
L
S
O
U
N
D
C
O
N
T
R
O
L
C
E
N
T
E
R
S
O
U
N
D
C
O
N
T
R
O
L
C
E
N
T
E
R
V
O
L
U
M
E
V
O
L
U
M
E
AZ 1570
C
D
R
A
D
IO
C
A
S
S
E
T
T
E
R
E
C
O
R
D
E
R
AZ 1570
C
D
R
A
D
I
O
C
A
S
S
E
T
T
E
R
E
C
O
R
D
E
R
O
P
E
N
C
L
O
S
E
O
P
E
N
C
L
O
S
E
C
D
R
E
W
R
I
T
A
B
L
E
C
O
M
P
A
T
IB
L
E
C
D
S
Y
N
C
R
O
S
T
R
A
T
R
E
C
O
R
D
IN
G
C
D
R
E
W
R
I
T
A
B
L
E
C
O
M
P
A
T
IB
L
E
C
D
S
Y
N
C
R
O
S
T
R
A
T
R
E
C
O
R
D
IN
G
AZ 1570
Page 2

Important notes for users in the U.K.
Mains plug
This apparatus is fitted with an approved moulded
13 Amp plug. To change a fuse in this type of plug
proceed as follows:
• Remove fuse cover and fuse.
• Fix new fuse which should be a BS1362 5Amp,
A.S.T.A. or BSI approved type.
• Refit the fuse cover.
If the fitted plug is not suitable for your socket
outlets, it should be cut off and an appropriate plug
fitted in its place.
If the mains plug contains a fuse, this should have a
value of 5 Amp. If a plug without a fuse is used, the
fuse at the distribution board should not be greater
than 5 Amp.
Note: The severed plug must be disposed to avoid a
possible shock hazard should it be inserted into a
13 Amp socket elsewhere.
How to connect a plug
The wires in the mains lead are coloured with the
following code: blue = neutral (N), brown = live (L).
As these colours may not correspond with the colour
markings identifying the terminals in your plug,
proceed as follows:
• Connect the blue wire to the terminal marked N or
coloured black.
• Connect the brown wire to the terminal marked L
or coloured red.
• Do not connect either wire to the earth terminal in
the plug, marked E (or e) or coloured green (or
green and yellow).
Before replacing the plug cover, make certain that the
cord grip is clamped over the sheath of the lead - not
simply over the two wires.Copyright in the U.K.:
Recording and playback of material may require
consent. See Copyright Act 1956 and The Performer’s
Protection Acts 1958 to 1972.
n Norge
Advarsel: For å redusere faren for brann eller elektrisk støt;
skal apparatet ikke utsettes for regn eller fuktighet.
Typeskilt finnes på apparatens underside.
Observer: Nettbryteren er sekundert innkoplet. Den
innebygde netdelen er derfor ikke frakoplet nettet så lenge
apparatet er tilsluttet nettkontakten.
English ........................................... 4
Français ...................................... 14
Español ....................................... 24
Deutsch ....................................... 34
Nederlands .............................. 44
Italiano ........................................ 54
Português .................................. 64
Dansk............................................ 74
Svenska ...................................... 84
Suomi............................................ 94
English
Français
Español
Deutsch
Nederlands
Italiano
Português
Dansk
Svenska
Suomi
i Italia
DICHIARAZIONE DI CONFORMITA’
Si dichiara che l’apparecchio AZ 1570 Philips risponde
alle prescrizioni dell’art. 2 comma 1 del D. M. 28 Agosto
1995 n. 548.
Philips Consumer Electronics
Philips, Glaslaan 2,
5616 JB Eindhoven, The Netherlands
2
Έλληνικά ..................... 104
Έλληνικά
Polski.......................................... 114
Polski
2
Page 3
C
D
R
E
W
R
I
T
A
B
L
E
C
O
M
P
A
T
I
B
L
E
C
D
S
Y
N
C
R
O
S
T
R
A
T
R
E
C
O
R
D
I
N
G
A
Z
1
5
6
0
C
D
R
A
D
IO
C
A
S
S
E
T
T
E
R
E
C
O
R
D
E
R
O
P
E
N
C
L
O
S
E
S
T
O
P
P
L
A
Y
•
P
A
U
S
E
T
U
N
E
R
P
R
E
S
E
T
P
R
O
G
S
H
U
F
F
LE
R
E
P
E
A
T
S
E
A
R
C
H
B
A
N
D
S
O
U
N
D
C
O
N
T
R
O
L
C
E
N
T
E
R
F
M
A
M
B
A
T
L
O
W
L
W
P
R
O
G
S
H
U
F
F
L
E
•
•
V
O
L
S
O
U
N
D
C
O
N
T
R
O
L
C
E
N
T
E
R
V
O
L
U
M
E
DIGITAL EQUALIZER
D
I
G
I
T
A
L
T
U
N
E
R
IN
CRED
IBLE SU
RRO
UND
)
(
¡
*
MAINS ~
1
2345
*
890
@!#$ %
^&
7
6
3
Page 4

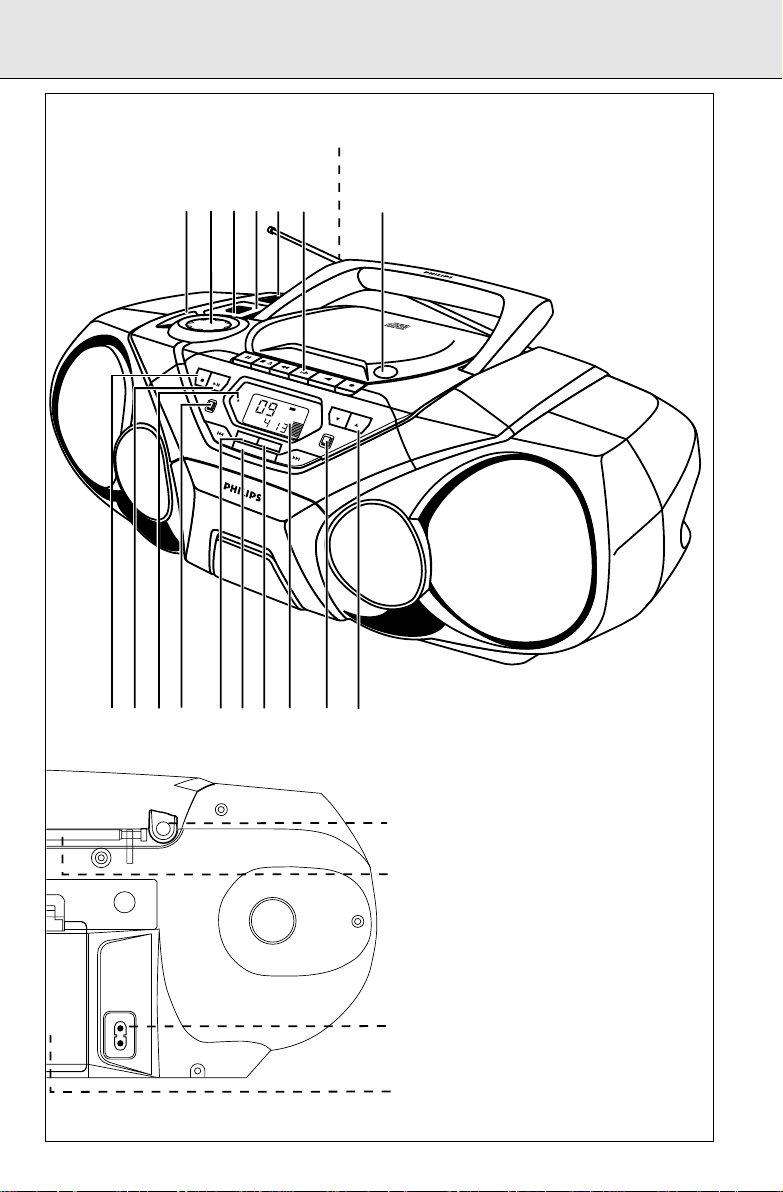
CONTROLS
English
TOP AND FRONT PANELS
1 DIGITAL EQUALIZER – selects volume or the
various frequencies for adjustment: volume,
bass, mid and high frequencies
2 VOLUME/SOUND CONTROL CENTER –
adjusts the volume level and digital equalizer
settings
3 DIGITAL DBB (Dynamic Bass Boost) –
enhances the bass
4 INCREDIBLE SURROUND – creates a super-
enhanced stereo effect
5 POWER slider – selects the sound source for
CD/ TUNER/ TAPE and also
switches the set off
6 CASSETTE RECORDER keys:
RECORD 0 – starts recording
PLAY 1 – starts playback
SEARCH 5, 6 – fast winds/rewinds the tape
OPEN•STOP /9 – opens the cassette
compartment
– stops the tape;
PAUSE ; – interrupts recording or playback
7 OPEN•CLOSE – opens/ closes the CD door
8 STOP 9 – stops CD playback or erase a CD
programme
9 PLAY•P AUSE 2; – starts or interrupts CD
playback
0 BATT LOW – indicates when battery power is
running low
! PROG – CD: programmes tracks and reviews
the programme;
Tuner: programmes preset tuner
stations
@ SHUFFLE – plays CD tracks in random order
# SEARCH ∞, §
Tuner: - (down, up) tunes to radio stations;
CD: - searches back and forward within a
track;
- skips to the beginning of a current
track/ previous/ subsequent track
$ REPEAT – repeats a track / CD programme /
entire CD
% Display – shows the status of the set
^ BAND – selects waveband
& TUNER PRESET 4, 3 – selects a preset
tuner station (down,
up)
BACK PANEL
* p – 3.5 mm headphone socket
( Telescopic aerial– improves FM reception
) AC MAINS – inlet for mains cord
¡ Battery door
CAUTION
Use of controls or adjustments or performance of procedures other than herein may result
in hazardous radiation exposure or other unsafe operation.
Environmental information
All unnecessary packaging material has been omitted. We have done our utmost to make the
packaging easy to separate into three mono-materials: cardboard (box), expandable polystyrene
(buffer), polyethylene (bags, protective foam).
Your set consists of materials which can be recycled if disassembled by a specialized
company. Please observe the local regulations regarding the disposal of packing
materials, exhausted batteries and old equipment.
4
Page 5
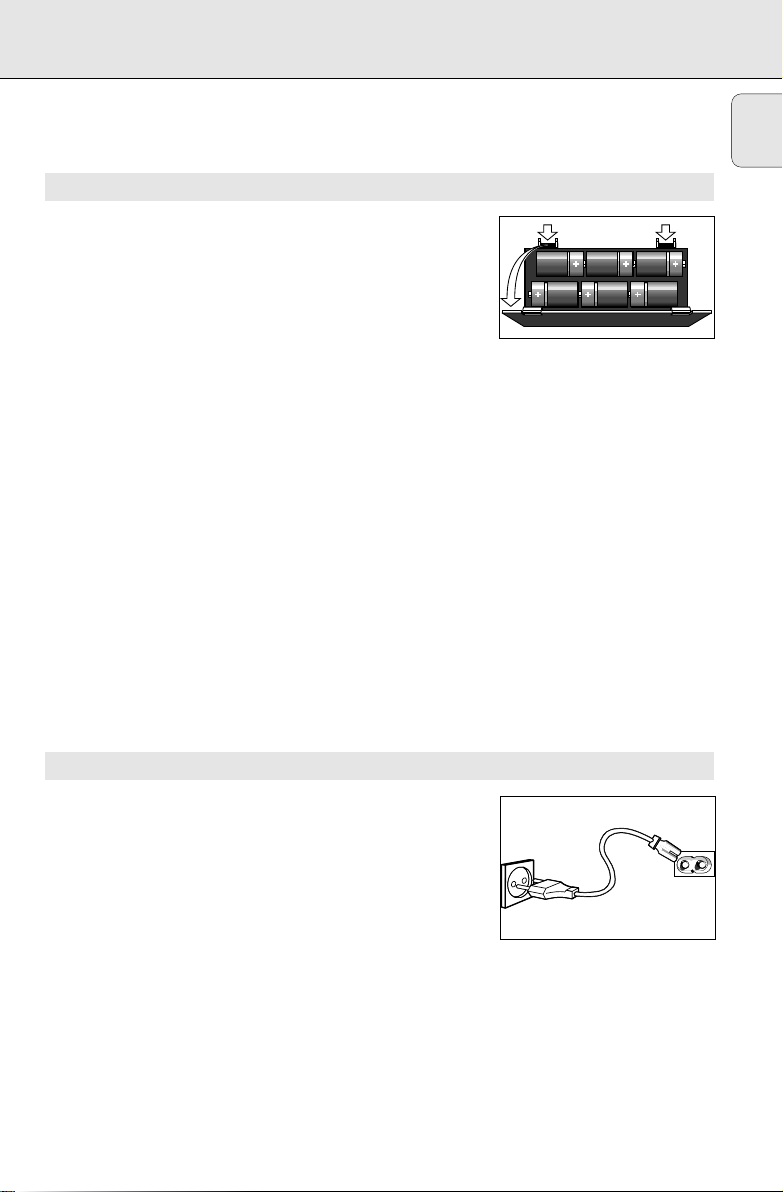
Whenever convenient, use the power supply if you want to
6 x D-cells - R20 - UM1
conserve battery life. Make sure you remove the plug from the
set and wall socket before inserting batteries.
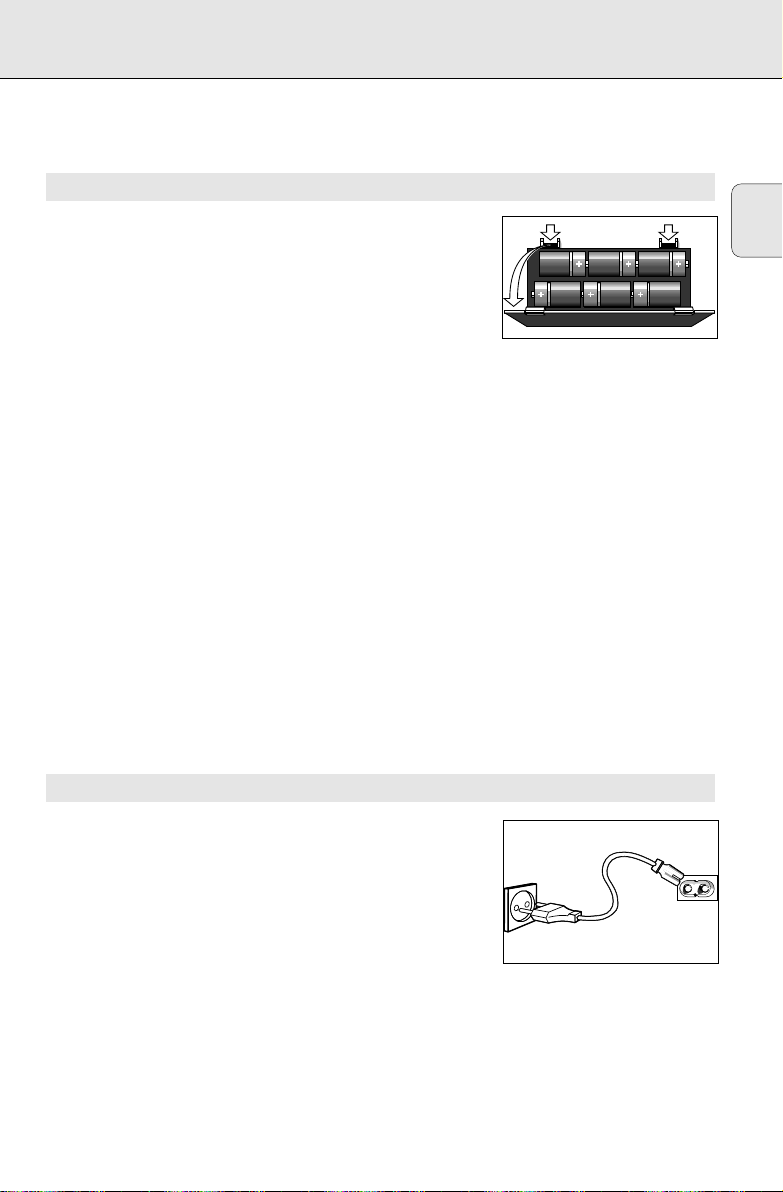
BATTERIES (OPTIONAL)
1. Open the battery compartment and insert six batteries, type
R-20, UM-1 or D-cells, (preferably alkaline) with the correct
polarity as indicated by the "+" and "-" symbols inside the
compartment.
2. Replace the compartment door, making sure the batteries are
firmly and correctly in place. The set is now ready to operate.
– If BATT LOW lights up, battery power is running low.
– The BATT LOW indicator eventually goes out if the
batteries are too weak.
– Incorrect use of batteries can cause electrolyte leakage and
will corrode the compartment or cause the batteries to burst.
Therefore:
– Do not mix battery types, e.g. alkaline with carbon zinc.
Only use batteries of the same type for the set.
– When inserting new batteries, do not try to mix old
batteries with the new ones.
– Remove the batteries if the set is not to be used for a long
time.
– Batteries contain chemical substances, so they
should be disposed of properly
POWER SUPPLY
English
For users in the U.K.: please follow the instructions on page 2.
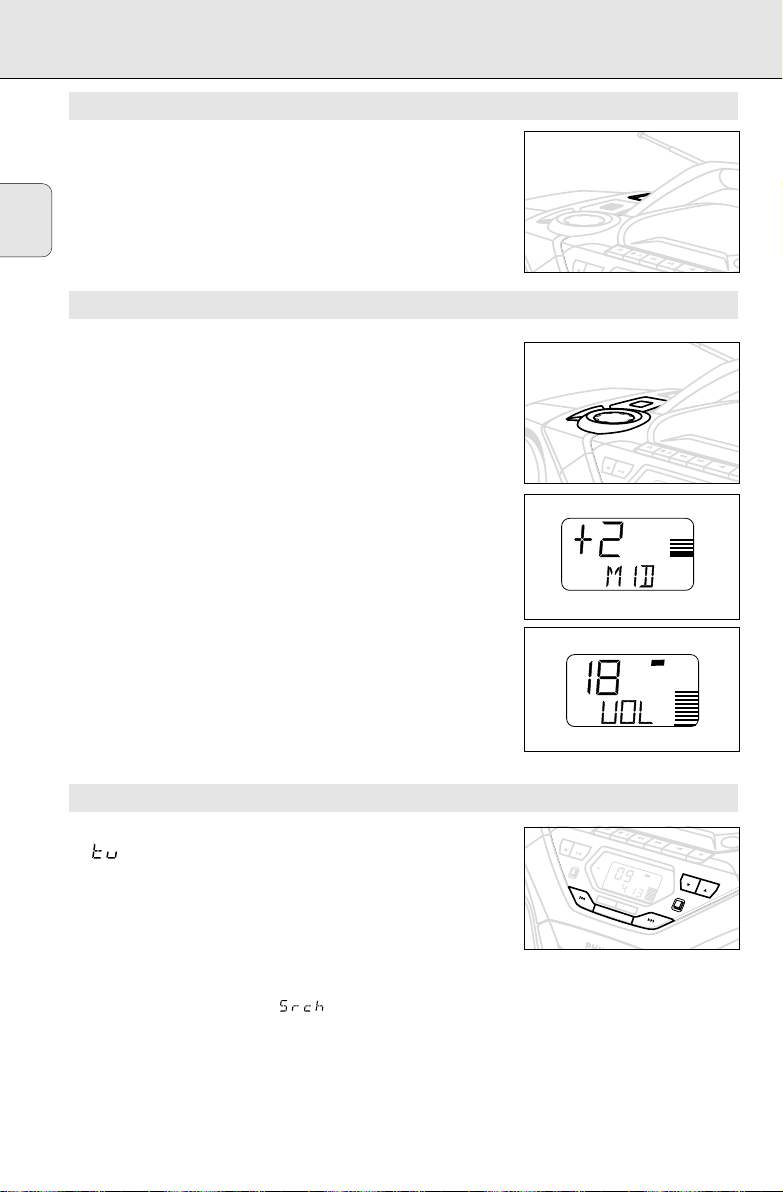
USING AC POWER
1. Check if the mains voltage as shown on the type plate
located on the bottom of the set, corresponds to your local
power supply. If it does not, consult your dealer or service
centre.
2. If your set is equipped with a voltage selector, adjust the
selector so that it matches with the local mains.
3. Connect the mains lead to the wall socket and the set is now
ready for use.
4. To disconnect the set from the mains completely, remove the
plug from the wall socket.
MAINS
5
Page 6
BASIC FUNCTIONS DIGITAL TUNER
CD RE
CD SY
A
Z
1
5
6
0
C
D
R
A
D
I
O
C
A
S
S
E
T
T
E
R
E
C
O
R
D
E
R
S
T
O
P
P
L
A
Y
•
P
A
U
S
E
SOUNDCO
B
A
T
S
O
U
N
D
C
O
N
T
R
O
L
C
E
N
T
E
R
V
O
L
U
M
E
E
T
R
E
+
–
•
•
•
•
•
•
•
•
0
English
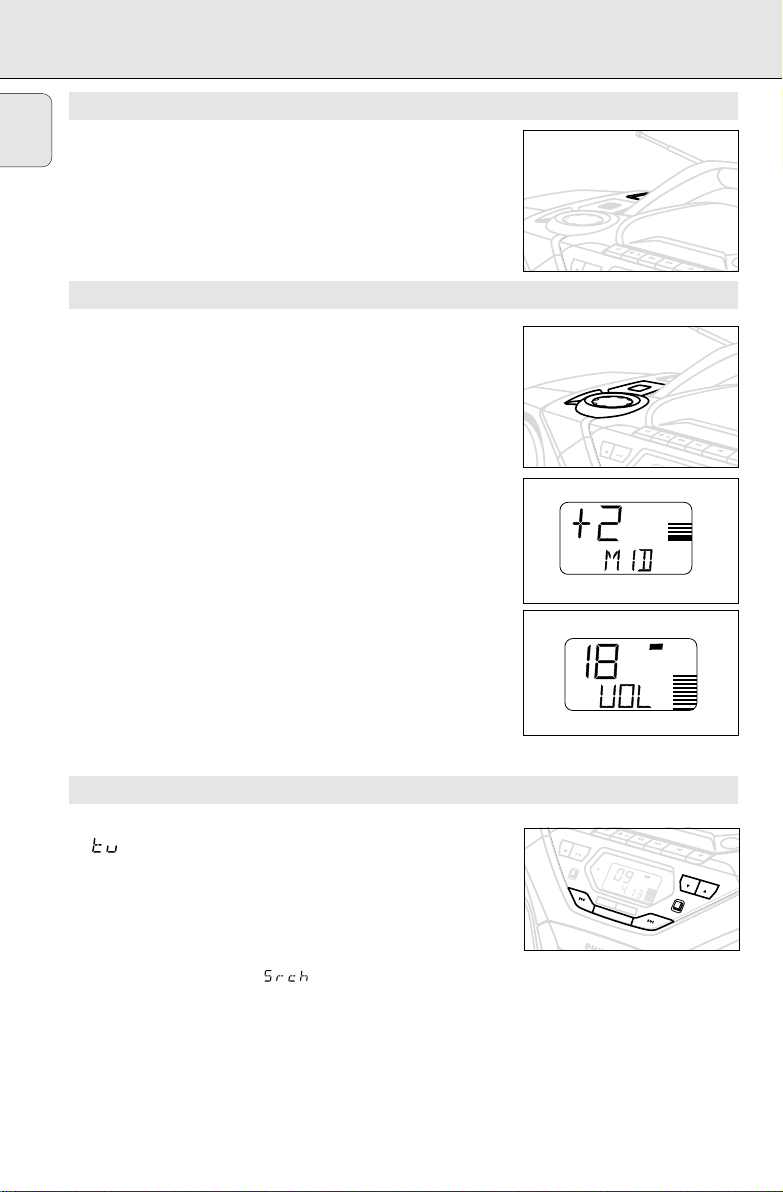
SWITCHING ON AND OFF
• Adjust the POWER slider to the desired sound source: CD,
TUNER or TAPE.
• The set is switched off when the POWER slider is in the
TAPE/OFFposition and the keys on the tape deck are released.
– The volume, sound settings and tuner presets will be retained
in the set's memory.
ADJUSTING VOLUME AND SOUND
1. Turn the VOLUME/ SOUND CONTROL CENTER control
clockwise to increase or anti-clockwise to decrease volume on
the set.
™ Display shows the volume level indication, VOL and a number
from 0-32.
2. To adjust the bass, mid and high frequency levels, press
DIGITAL EQUALIZERonce or more until the desired option is
displayed. While the option is shown, turn the VOLUME/
SOUND CONTROL CENTER control to increase or decrease
(- 5 to + 5 steps maximum) the desired tone.
™ VOLUME can also be adjusted in this way with a level range
from 0-32.
3. Press DIGITAL DBBto switch dynamic bass boost on or off.
™ If on, the DIGITAL DBB light goes on.
4. Press INCREDIBLE SURROUND to switch the surround sound
effect on or off.
™ If on, the INCREDIBLE SURROUND light goes on.
Note: The effect of INCREDIBLE SURROUND may vary with
different types of music.
S
O
U
N
E
M
U
L
O
V
D
C
O
R
N
E
T
T
R
N
O
E
L
C
S
T
O
P
P
L
A
Y
•
P
A
U
S
E
CD REWRITA
CD SYNCRO STRA
BL
C
D
R
A
A
D
I
Z
O
C
A
S
L
O
V
1
5
S
E
6
T
0
T
E
R
E
C
O
R
D
E
R
TUNING TO RADIO STATIONS
1. Select TUNER source.
™ is displayed briefly and then the radio station
frequency is shown.
2. Press BAND once or more to select your waveband.
3. Press SEARCH ∞ or § and release when the frequency in
the display starts running.
™ The TUNER automatically tunes to a station of sufficient
reception. Display shows during automatic tuning.
™ If an FM station is received in stereo,
STEREO is shown.
4. Repeat step 3 if necessary until you find the desired station.
• To tune to a weak station, press SEARCH ∞ or § briefly and
repeatedly until you have found optimal reception.
6
C
D
R
A
A
D
I
Z
O
C
1
A
S
5
S
E
6
T
0
T
E
SOUND CONTROL CENTER
P
R
O
G
S
T
E
R
E
O
S
H
U
F
F
L
E
•
•
R
E
P
E
A
T
R
V
O
L
S
T
O
P
P
L
A
Y
•
P
A
U
S
E
B
A
T
P
R
L
O
O
F
W
G
M
A
M
L
W
S
H
U
F
F
L
E
S
E
A
R
C
H
O
P
E
C
O
R
D
E
R
T
U
N
E
R
P
R
E
S
E
T
B
A
N
D
Page 7
DIGITAL TUNER GENERAL INFORMATION
P
E
To improve radio reception:
• For FM, pull out the telescopic aerial.
Incline and turn the aerial. Reduce its length if the signal is too
strong (very close to a transmitter).
• For MW (AM or LW), the set is provided with a built-in aerial
so the telescopic aerial is not needed. Direct the aerial by
turning the whole set.
English
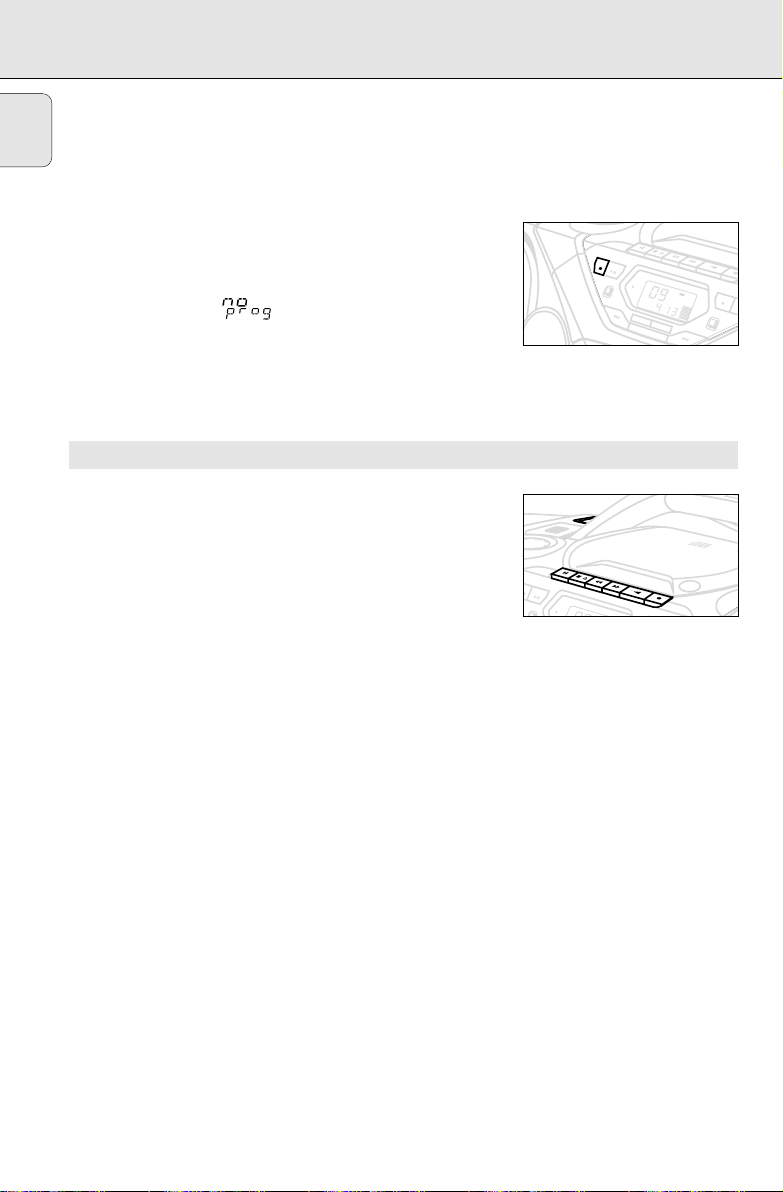
Programming tuner stations
You can store up to a total of 30 tuner stations in the memory.
1. Tune to your desired station (see Tuning to radio stations).
2. Press PROG to activate programming.
™ Display:
PROG flashes.
3. Press PRESET 3 or 4 once or more to allocate a number from
1 to 30 to this station.
4. Press PROG again to confirm the setting.
™ Display:
PROG disappears, the preset number and the frequency
of the preset station are shown.
5. Repeat the above four steps to store other stations.
• You can overwrite a preset station by storing another frequency
in its place.
Tuning to preset stations
Press TUNER PRESET 4 or 3 until the desired preset station is
displayed.
General maintenance
• Do not expose the set, batteries, CDs or cassettes to humidity,
rain, sand or excessive heat caused by heating equipment or
direct sunlight.
• To clean the set, use a soft, slightly dampened chamois leather.
Do not use any cleaning agents containing alcohol, ammonia,
benzene or abrasives as these may harm the housing.
Safety information
• Place the set on a hard and flat surface so that the system
does not tilt. Make sure there is adequate ventilation to
prevent the system from overheating.
• The mechanical parts of the set contain self-lubricating
bearings and must not be oiled or lubricated.
C
D
R
A
A
D
I
Z
O
C
1
A
S
5
S
E
6
T
0
T
E
SOUND CONTROL CENTER
P
S
H
•
•
R
E
P
E
A
T
H
R
R
O
G
V
O
L
U
F
F
L
E
S
T
O
P
P
L
A
Y
•
P
A
U
S
E
B
A
T
P
R
L
O
O
F
W
G
M
A
M
L
W
S
H
U
F
F
L
E
S
E
A
R
C
O
E
C
O
R
D
E
R
T
U
N
E
R
P
R
E
S
E
T
B
A
N
D
7
Page 8

CD PLAYER
A
Z
1
5
6
0
C
D
R
A
D
I
O
C
A
S
S
E
T
T
E
R
E
C
O
R
D
E
R
O
P
E
N
C
L
O
S
E
S
T
O
P
P
L
A
Y
•
P
A
U
S
E
T
U
N
E
R
P
R
E
S
E
T
P
R
O
G
S
H
U
F
F
L
E
R
E
P
E
A
T
S
E
A
R
C
H
B
A
N
D
SOUND CONTROL CENTER
F
M
A
M
B
A
T
L
O
W
L
W
P
R
O
G
S
H
U
F
F
L
E
•
•
V
O
L
English
Playing a CD
1. Select CD source.
2. Press OPEN•CLOSE to open the CD door.
™ Display: when you open the CD door.
3. Insert a CD or CD-R(W) with the printed side facing up and
press OPEN•CLOSE to close the CD door.
™ Display: as the CD player scans the contents of a CD.
The total number of tracks and playing time are then shown.
™ Display: is shown if the CD R(W) is not finalised.
4. Press PLAY•PAUSE 2; to start playback.
™ Display: Current track number and elapsed playing time of the
track during CD playback.
5. To interrupt playback press PLAY•PAUSE 2;. Press
PLAY•PAUSE 2; again to resume play.
™ The display freezes and the elapsed playing time flashes when
playback is paused.
6. To stop CD playback, press STOP 9.
Note: CD play will also stop when:
– the CD door is opened;
– the CD has reached the end (unless you have selected
REPEAT ALL);
– you select another source: TAPE / TUNER.
Selecting a different track
• Press SEARCH ∞ or § once or repeatedly until the desired
track number appears in the display.
• If you have selected a track number shortly after loading a CD
or in the PAUSE position, you will need to press
PLAY•PAUSE 2; to start playback.
Finding a passage within a track
1. Press and hold down on SEARCH ∞ or §.
– The CD is played at high speed and low volume.
2. When you recognize the passage you want,
release SEARCH ∞ or §.
– Normal playback continues.
Note: During a CD programme or if SHUFFLE/ REPEAT active,
searching is only possible within a track.
8
Page 9
Different play modes: SHUFFLE and REPEAT
T
You can select and change the various play modes before or during
playback. The play modes can also be combined with PROGRAM.
SHUFFLE - tracks of the entire CD/ programme are played in
random order
SHUFFLE and REPEAT ALL- to repeat the entire CD/ programme
continuously in random order
REPEAT ALL- to repeat the entire CD/ programme
REPEATand SHUFFLE REPEAT - plays the current (random) track
continuously
CD PLAYER
C
D
R
B
L
O
L
A
T
W
A
M
W
S
H
U
F
M
F
F
L
E
S
E
A
R
C
H
SOUND CONTROL CENTER
P
R
O
G
S
H
U
F
F
L
E
•
•
R
E
P
E
A
T
A
V
O
L
S
T
O
P
P
L
A
Y
•
P
A
U
S
E
P
R
O
G
A
English
D
I
Z
O
C
1
A
S
5
S
E
6
T
0
T
E
R
E
C
O
R
D
E
R
T
U
N
E
R
P
R
E
S
E
T
B
A
N
D
1. To select your play mode, press the SHUFFLE or REPEAT
button before or during playback until the display shows the
desired function.
2. Press PLAY•PAUSE 2; to start playback if in the STOP
position.
• Playback starts immediately if you have selected a SHUFFLE
mode.
3. To return to normal playback, press the respective SHUFFLE or
REPEATbutton until the various SHUFFLE / REPEAT modes are
no longer displayed.
– You can also press STOP 9 to cancel your play mode.
Programming track numbers
Programme in the STOP position to select and store your CD tracks
in the desired sequence. If you like, store any track more than once.
Up to 20 tracks can be stored in the memory.
1. Press SEARCH ∞ or § once or more to select your desired
track number.
2. Press PROG.
™ Display:
™ If you attempt to programme without first selecting a track
3. Repeat steps 1-2 to select and store all desired tracks.
™ is displayed if you attempt to programme more than
4. To start playback of your CD programme,
Note: if you have selected the tracks during CD playback, first
PROG and the selected track number. appears
briefly.
number, is shown.
20 tracks.
press PLAY•PAUSE 2;.
press STOP 9 then PLAY•PAUSE 2;.
C
D
R
A
A
D
I
Z
O
C
1
A
S
5
S
E
6
T
0
T
E
R
E
C
S
H
•
•
R
E
P
E
A
T
SOUND CONTROL CENTER
E
R
E
P
A
R
C
H
O
R
D
E
R
P
T
R
U
O
N
G
E
R
V
O
L
P
R
E
S
U
F
F
L
E
P
R
O
S
H
U
F
•
•
E
A
T
E
B
A
N
D
C
D
R
A
A
D
I
Z
O
C
1
A
S
5
S
E
6
T
0
T
E
R
E
C
O
R
D
E
R
T
U
N
G
E
R
V
O
L
F
L
E
B
A
N
D
S
T
O
P
P
L
A
Y
•
P
A
U
S
E
SOUND CONTROL CENTER
B
A
T
P
R
L
O
O
F
W
G
M
A
M
L
W
S
H
U
F
F
L
E
S
E
A
R
C
H
S
T
O
P
P
L
A
Y
•
P
A
U
S
E
B
A
T
P
R
L
O
O
F
W
G
M
A
M
L
W
S
H
U
F
F
L
S
E
9
Page 10
CD PLAYER CASSETTE RECORDER
W
SYNC
A
Z
1
5
6
0
C
D
R
A
D
I
O
C
A
S
S
E
T
T
E
R
E
C
O
R
D
E
R
S
T
O
P
P
L
A
Y
•
P
A
U
S
E
T
U
N
E
R
P
R
O
G
S
H
U
F
F
L
E
R
E
P
E
A
T
S
E
A
R
C
H
B
A
N
D
SOUND CONTROL CENTER
F
M
A
M
B
A
T
L
O
W
L
W
P
R
O
G
S
H
U
F
F
L
E
•
•
V
O
L
S
O
U
N
D
C
O
N
T
R
O
L
C
E
N
T
E
R
V
O
L
U
TER
C
English
Reviewing the programme
In the stop position or during playback, press and hold down
PROG for a while until the display shows all your stored track
numbers in sequence.
Erasing a programme
You can erase the programme by:
– pressing STOP9 once in the STOP position;
– pressing STOP9 twice during playback;
• The display shows briefly and
The programme is also erased by:
– pressing the CD door open;
– selecting another source: TAPE/ TUNER.
CASSETTE PLAYBACK
1. Select TAPE source.
™ The display shows
TAPE throughout tape operation.
2. Press OPEN•STOP /9 to open the cassette door.
3. Insert a recorded cassette and close the cassette door.
4. Press PLAY 1 to start playback.
5. To interrupt playback press PAUSE;. To resume, press this
key again.
6. By pressing SEARCH 5 or 6 on the set fast winding of the
tape is possible in both directions.
7. To stop the tape, press OPEN•STOP /9.
• The keys are automatically released at the end of the tape,
except if PAUSE ; has been activated.
Note: The sound source cannot be changed while playing a
cassette.
PROG disappears.
E
M
U
L
O
V
R
E
T
N
E
S
T
O
P
P
L
A
Y
•
P
A
P
R
O
G
C
D
R
A
A
D
I
Z
O
C
1
A
S
5
S
E
T
T
E
U
S
E
B
A
T
L
O
F
W
M
SOUND CONTROL CEN
CD REWRITABLE COMPATIBLE
CD SYNCRO STRAT RECORDING
6
0
R
E
C
O
R
D
E
R
O
P
E
N
C
L
O
S
E
10
Page 11

CD PLAYER CASSETTE RECORDER
E
T
TER
C
GENERAL INFORMATION ON RECORDING
• Recording is permissible insofar as copyright or other rights of
third parties are not infringed.
• This deck is not suited for recording on CHROME (IEC II) or
METAL (IEC IV) type cassettes. For recording, use only
NORMAL type cassettes (IEC I) on which the tabs have not
been broken.
• The best recording level is set automatically. Altering the
VOLUME, INCREDIBLE SURROUND, DIGITAL EQUALIZER or DBB
controls will not affect the recording in progress.
• At the very beginning and end of the tape, no recording will
take place during the 7 seconds, when the leader tape passes
the recorder heads.
• To protect a tape from accidental erasure, have the tape in
front of you and break out the left tab.
Recording on this side is no longer possible. To record over this
side again, cover the tabs with a piece of adhesive tape.
Synchro Start CD recording
1. Select CD source.
2. Insert a CD and if desired, programme track numbers.
3. Press OPEN•STOP /9 to open the cassette door.
4. Insert a suitable tape into the cassette deck and close the
cassette door.
5. Press RECORD 0 to start recording.
– Playing of the CD programme starts automatically from the
beginning of the programme. It is not necessary to start the CD
player separately.
To select and record a particular passage within a track
• Press and hold down on SEARCH ∞ or §.
• When you recognize the passage you want,
release SEARCH ∞ or §.
• To interrupt CD playback press PLAY•PAUSE 2;.
• Recording will begin from this exact point in the track when
you press RECORD 0.
6. For brief interruptions during recording, press PAUSE;. To
resume recording, press PAUSE ; again.
7. To stop recording, press OPEN•STOP /9.
T
N
E
S
T
O
1
C
D
R
S
T
O
P
P
L
A
P
R
O
G
A
A
D
I
Z
O
C
1
A
S
5
S
E
6
T
0
T
E
R
E
C
Y
•
P
A
U
S
E
B
A
T
L
O
F
W
M
A
M
L
W
S
H
U
F
F
L
S
E
CD REWRITABLE COMPATIBLE
CD SYNCRO STRAT RECORDING
O
R
D
E
R
C
D
R
A
A
D
I
Z
O
C
A
S
S
SOUND CONTROL CENTER
P
R
O
G
V
O
L
S
H
U
F
F
L
E
•
•
E
R
E
P
E
A
T
A
R
C
H
O
P
E
N
C
L
O
S
E
1
5
E
6
T
0
T
E
R
E
C
O
R
D
E
R
T
U
B
A
N
D
E
M
U
L
O
V
R
E
P
P
L
A
Y
•
P
A
U
S
E
SOUND CONTROL CEN
B
A
T
P
R
L
O
O
F
W
G
M
English
N
E
R
P
R
E
S
11
Page 12
RECORDING GENERAL INFORMATION
CD REWRITABLE COMPATIBLE
CD SYNCRO STRAT RECORDING
A
Z
1
5
6
0
C
D
R
A
D
I
O
C
A
S
S
E
T
T
E
R
E
C
O
R
D
E
R
O
P
E
N
C
L
O
S
E
S
T
O
P
P
L
A
Y
•
P
A
U
S
E
P
R
O
G
SOUND CONTROL CENTER
F
M
B
A
T
L
O
W
C
E
N
T
E
R
V
O
L
U
M
E
English
Recording from the tuner
1. Tune to the desired radio station (see Tuning to radio stations).
2. Press OPEN•STOP /9 to open the cassette door.
3. Insert a suitable tape into the cassette deck and close the
cassette door.
4. Press RECORD 0 to start recording.
5. For brief interruptions, press PAUSE ; To resume recording,
press PAUSE ; again.
6. To stop recording, press OPEN•STOP /9.
CD player and CD handling
• If the CD player cannot read CDs correctly, use a commonly
available cleaning CD to clean the lens before taking the set to
repair. Other cleaning methods may destroy the lens.
• The lens of the CD player should never be touched!
• Sudden changes in the surrounding temperature can cause
condensation to cloud over on the lens of your CD player.
Playing a CD is then not possible. Do not attempt to clean the
lens but leave the set in a warm environment until the moisture
evaporates.
• Always keep the CD compartment closed to avoid dust on the
lens.
• To take a CD out of its box, press the centre spindle while
lifting the CD. Always pick up the CD by the edge and return
the CD to its box after use to avoid scratching and dust.
• To clean the CD, wipe in a straight line from the centre towards
the edge using a soft, lint-free cloth. Do not use cleaning
agents as they may damage the disc.
• Never write on a CD or attach any stickers to it.
X
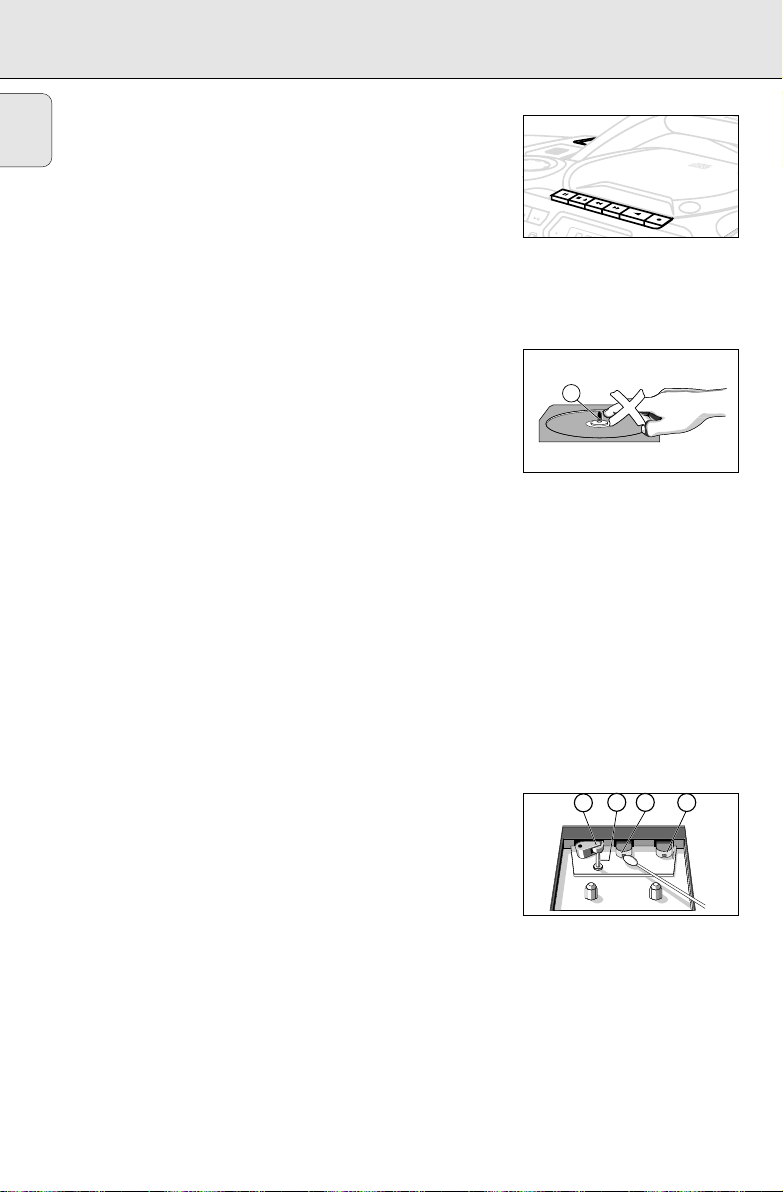
Tape deck maintenance
To ensure quality recording and playback of the tape deck, clean
parts A, B and C shown in the diagram below, after approx.
50 hours of operation, or on average once a month. Use a cotton
bud slightly moistened with alcohol or a special head cleaning
fluid to clean both decks.
1. Open the cassette holder by pressing OPEN•STOP /9.
2. Press PLAY 1 and clean the rubber pressure rollers C.
3. Press PAUSE ; and clean the magnetic heads A and also the
capstan B.
4. After cleaning, press OPEN•STOP /9.
Note: Cleaning of the heads can also be done by playing a
cleaning cassette through once.
12
C
A AB
Page 13

TROUBLESHOOTING
If a fault occurs, first check the points listed below before taking the set for repair.
If you are unable to remedy a problem by following these hints, consult your dealer or service centre.
WARNING:
PROBLEM
– POSSIBLE CAUSE
• REMEDY
No sound/power
– VOLUME not adjusted
• Adjust the VOLUME
– Headphones connected
• Disconnect headphones
– Mains lead not securely connected
• Connect AC mains lead properly
Severe radio hum or noise
– Electrical interference: set too close to TV,
VCR or computer
• Increase the distance
Poor radio reception
– Weak radio signal
• FM: Direct the FM telescopic aerial for
optimum reception
– CD badly scratched or dirty
• Replace/ clean CD, see Maintenance
– Laser lens steamed up
• Wait until lens has cleared
Do not open the set as there is a risk of electric shock. Under no
circumstances should you try to repair the set yourself, as this will
invalidate the guarantee.
The CD skips tracks
– CD damaged or dirty
• Replace or clean CD
– SHUFFLE or PROGRAM is active
• Switch off SHUFFLE / PROGRAM
Poor cassette sound quality
– Dust and dirt on the heads, etc.
• Clean deck parts, see Maintenance
– Use of incompatible cassette types (METAL
or CHROME)
• Only use NORMAL (IEC I) for recording
Recording does not work
– Cassette tab(s) may be broken
• Apply a piece of adhesive tape over the
missing tab space.
indication
– CD-R(W) is blank or the disc is not finalised
• Use a finalised CD-R(W)
indication
English
This product complies with the radio interference requirements of the European Union.
The type plate is located on the bottom of the set.
13
Page 14

COMMANDES
PANNEAUX SUPÉRIEUR ET AVANT
1 DIGITAL EQUALIZER – sélectionne le volume
ou les différentes fréquences pour le réglage
Français
suivant: volume des graves et fréquences
moyennes et hautes
2 VOLUME/SOUND CONTROL CENTER –
réglage du niveau de volume et réglages de
l'égalisateur numérique
3 DIGITAL DBB (Dynamic Bass Boost) –
accentue les graves
4 INCREDIBLE SURROUND – crée un effet
stéréo super accentué
5 Curseur POWER – sélectionne la source
sonore pour CD/ SYNTONISEUR/ CASSETTE et
met l'équipement hors service
6 Touches de la PLATINE DE CASSETTE:
RECORD 0 – démarre l'enregistrement
PLAY 1 – démarre la lecture
SEARCH 5, 6 – pour bobinage/rebobinage
rapide des cassettes
OPEN•STOP /9– pour ouvrir et fermer le
compartiment cassette;
– arrêt de lecture/
l'enregistrement des
cassette
PAUSE ; – pour interrompre l’enregistrement
ou la lecture
7 OPEN•CLOSE – pour ouvrir/fermer le
compartiment du lecteur CD
8 STOP 9 – arrêt de lecture ou effacement d'un
programme
9 PLAY•PAUSE 2; – démarrage ou interruption
de lecture CD
0 BATT LOW – indique que la puissance des
piles est faible
ATTENTION
L’utilisation des commandes ou réglages ou le non-respect des procédures ci-incluses
peuvent se traduire par une exposition dangereuse à l’irradiation.
! PROG – CD: programmation des plages et
passage en revue des morceaux
programmés;
Syntoniseur: programmation des
stations radio préréglées
@ SHUFFLE – lecture CD/programme en ordre
quelconque
# SEARCH ∞, §
Tuner: - (vers le bas, vers le haut) réglage des
émetteurs radio;
CD: - recherche avant/arrière sur une plage;
- saut au début d'une plage en cours/
d'une plage précédente/ d'une plage
suivante
$ REPEAT – répétition d'une plage /programme
CD /CD intégral
% Afficheur – indique le mode actuel de
l'équipement
^ BAND – sélection des longueurs d'onde
& TUNER PRESET 4, 3 – sélectionne une
station préréglée (vers le bas, vers le haut)
PANNEAU ARRIÈRE
* p – 3,5 mm. pour écouteurs
( Antenne télescopique – améliore la
) AC MAINS – entrée pour cordon
d'alimentation
¡ Clapet de compartiment piles
réception FM
Informations sur l'environnement
Tous les matériaux d'emballage inutiles n'ont pas été utilisés et ce, pour faciliter la séparation
plus tard en deux matériaux : le carton (la boîte), le polystyrène (tampon) et le polyéthylène
(sachets, mousse de protection).
Votre équipement est fait de matériaux recyclables après démontage dans une firme
spécialisée. Veuillez observer les régulations locales quant au rebut des matériaux
d'emballage, des piles usées et des équipements vieillis.
14
Page 15
Si possible, utilisez l'alimentation secteur pour garantir la longévité des
6 x D-cells - R20 - UM1
piles. Assurez-vous toujours d'avoir débranché la fiche de l'équipement
et de la prise murale avant d'introduire les piles.
PILES (EN OPTION)
1. Ouvrez le compartiment piles et introduisez les six piles,
type R-20, UM-1 ou cellules D, (de préférence alcaline) de polarité
correcte indiquée par les symboles "+" et "-" à l'intérieur du
compartiment.
2.
Remettez le clapet de compartiment en place, assurez-vous que les
piles soient placées fermement et correctement. L'équipement est
alors prêt à l'emploi.
– Si BATT LOW s'allume, ceci signifie que la charge des piles est
faible.
– L'indication BATT LOW peut même s'éteindre si les piles
sont trop faibles.
– L'emploi incorrect des piles peut causer des fuites électrolytiques
et ce faisant, contaminer le compartiment ou causer l'éclatement
des dites piles. Pour ce faire, procédez comme suit:
–
Ne jamais utiliser des types de piles différents: par exemple
alcalines et des «zinc carbone». Utilisez uniquement des piles
du même type pour l'équipement.
–
Lorsque vous insérez des nouvelles piles, n'utilisez jamais des
anciennes piles avec des nouvelles.
–
Enlevez les piles si l'équipement n'est pas utilisé pendant une
période prolongée.
–
Les piles contiennent des produits chimiques, dont
elles doivent être rebutées adéquatement.
ALIMENTATION
Français
UTILISATION DE L'ALIMENTATION À COURANT ALTERNATIF
1. Contrôlez si la tension secteur indiquée sur la plaquette signalétique
à la base de l'équipement correspond à la tension secteur locale. Si
ce n'est pas le cas, consultez votre concessionnaire ou le service
après-vente.
2. Si votre appareil est équipé d'un sélecteur de tension, réglez le
sélecteur de telle manière qu'il corresponde à la tension secteur
locale.
3. Branchez le cordon secteur à la prise secteur murale. Ce faisant,
l'alimentation secteur est un fait et l'équipement prêt à l'usage.
4. Pour déconnecter entièrement l'équipement, désolidarisez le cordon
secteur de la prise murale.
MAINS
15
Page 16
FONCTIONS DE BASE SYNTONISEUR NUMÉRIQUE
CD RE
CD SY
A
Z
1
5
6
0
C
D
R
A
D
I
O
C
A
S
S
E
T
T
E
R
E
C
O
R
D
E
R
S
T
O
P
P
L
A
Y
•
P
A
U
S
E
SOUNDCO
B
A
T
S
O
U
N
D
C
O
N
T
R
O
L
C
E
N
T
E
R
V
O
L
U
M
E
E
T
R
E
MISE EN/HORS SERVICE
• Réglez le bouton coulissant POWER à la source sonore désirée:
CD, TUNER ou TAPE.
• L'équipement est mis hors service lorsque le bouton coulissant
Français
POWER se trouve en position TAPE/OFF et les touches de
commande de la platine cassette relâchées.
– Le volume, les réglages de son et les préréglages du syntoniseur
sont mémorisés.
RÉGLAGE DU VOLUME ET DU SON
1. Tournez la commande VOLUME/ SOUND CONTROL CENTER dans
le sens horaire pour augmenter ou dans le sens anti-horaire pour
baisser le volume de l'équipement.
™ L'afficheur indique le niveau sonore VOL et un chiffre de 0 à 32.
2. Pour régler les niveaux de grave, des fréquences moyennes et
hautes, appuyez une ou plusieurs fois sur DIGITAL EQUALIZER
jusqu'à ce que l'option désirée soit affichée.
Une fois l'option affichée, tournez la commande VOLUME/ SOUND
CONTROL CENTER pour augmenter ou baisser (de - 5 à + 5 au
maximum) la fréquence désirée.
™ VOLUME peut également être réglé de cette manière sur une plage
de 0 à 32.
3. Appuyez sur DIGITAL DBB pour mettre en/hors circuit le dynamic
bass boost.
™ En service, le DIGITAL DBB s'allume.
4. Appuyez sur INCREDIBLE SURROUND pour mettre en/hors service
l'effet surround sound.
™ En service, la touche INCREDIBLE SURROUND s'allume.
Remarque: L'effet de INCREDIBLE SURROUND peut varier selon les
types de musique.
E
M
S
O
U
L
O
U
V
N
D
C
O
R
N
E
T
T
R
N
O
E
L
C
S
T
O
P
P
L
A
Y
•
P
A
U
S
E
CD REWRITABL
CD SYNCRO S
TRA
C
D
R
A
A
D
I
Z
O
C
A
S
+
•
•
•
•
0
•
•
•
•
–
L
O
V
1
5
S
E
6
T
0
T
E
R
E
C
O
R
D
E
R
SYNTONISATION DES STATIONS RADIO
1. Sélectionnez la source TUNER.
™ est affiché brièvement ainsi que la fréquence de la station
radio.
2. Appuyez une ou plusieurs fois sur BAND pour sélectionner votre
longueur d'onde.
3. Appuyez sur SEARCH ∞ ou § et relâchez lorsque la fréquence
commence à défiler dans l'afficheur.
™ Le syntoniseur se règle automatiquement sur une station à réception
suffisante. L'afficheur indique pendant la syntonisation
automatique.
™ Si une station FM est en stéréo,
4. Répétez l'opération 3 si nécessaire jusqu'à trouver la station désirée.
STEREO
est affiché.
• Pour syntoniser une station faible, appuyez brièvement et par à-
coups sur SEARCH ∞ ou § jusqu'à obtenir la réception optimale.
16
C
D
R
A
A
D
I
Z
O
C
1
A
S
5
S
E
6
T
0
T
E
SOUND CONTROL CENTER
P
R
S
T
E
S
H
U
•
•
R
E
P
E
A
T
H
R
O
G
V
O
L
R
E
O
F
F
L
E
S
T
O
P
P
L
A
Y
•
P
A
U
S
E
B
A
T
P
R
L
O
O
F
W
G
M
A
M
L
W
S
H
U
F
F
L
E
S
E
A
R
C
O
E
P
C
O
R
D
E
R
T
U
N
E
R
P
R
E
S
E
T
B
A
N
D
Page 17

SYNTONISEUR NUMÉRIQUE
A
Z
1
5
6
0
C
D
R
A
D
I
O
C
A
S
S
E
T
T
E
R
E
C
O
R
D
E
R
O
P
E
S
T
O
P
P
L
A
Y
•
P
A
U
S
E
T
U
N
E
R
P
R
E
S
E
T
P
R
O
G
S
H
U
F
F
L
E
R
E
P
E
A
T
S
E
A
R
C
H
B
A
N
D
SOUND CONTROL CENTER
F
M
A
M
B
A
T
L
O
W
L
W
P
R
O
G
S
H
U
F
F
L
E
•
•
V
O
L
INFORMATIONS GENERALES
Pour améliorer la réception radio:
• Pour FM, sortez l'antenne télescopique. Inclinez et tournez
l'antenne.Réduisez sa longueur si le signal est trop fort (à proximité
d'un émetteur).
•
Pour
MW (AM
ou
LW),
l'équipement est pourvu d'une antenne
intégrée, donc l'antenne télescopique est inutile. Pour diriger cette
antenne, il faut agir sur l'équipement dans sa totalité.
Programmation des stations radio
Vous pouvez mémoriser jusqu'à 30 stations radio au total.
1. Syntonisez la station désirée (Voir Syntonisation des stations radio).
2. Appuyez sur PROG pour activer la programmation.
™ Afficheur:
PROG
clignote.
3. Appuyez une ou plusieurs fois sur PRESET 3 ou 4 pour attribuer un
numéro de 1 à 30 à cette station.
4. Appuyez à nouveau sur PROG pour confirmer le réglage.
™ Afficheur:
PROG
disparaît, le numéro préréglé et la fréquence de la
station préréglée apparaissent.
5. Répétez les quatre opérations précédentes pour mémoriser d'autres
stations.
• Vous pouvez "écraser" une station préréglée en mémorisant une
autre fréquence à sa place.
Syntonisation des stations préréglées
Appuyez sur TUNER PRESET 4 ou 3 jusqu'à ce que la station
préréglée désirée soit affichée.
Français
Entretien général
• Ne pas exposer l'équipement ni les piles ni les CD ni les cassettes à
l'humidité, à la pluie, au sable ou à la chaleur excessive due à un
équipement de chauffage ou aux rayons directs du soleil.
• Pour nettoyer l'équipement, utilisez une peau de chamois douce,
légèrement humidifiée. Ne jamais utiliser d'agents de nettoyage
contenant de l'alcool, de l'ammoniaque, du benzène ou des abrasifs,
car ces produits pourraient endommager le boîtier.
Mesures de sécurité
• Placez l'équipement sur une surface plane et dure de sorte que le
système ne soit pas disposé sous un certain angle. Assurez-vous
qu'il y ait une ventilation adéquate pour prévenir la surchauffe de
l'équipement.
• Les sections mécaniques de l'équipement contiennent des paliers
autolubrifiants et ne requièrent ni huilage ni lubrification.
17
Page 18

LECTEUR DE CD
A
Z
1
5
6
0
C
D
R
A
D
I
O
C
A
S
S
E
T
T
E
R
E
C
O
R
D
E
R
O
P
E
N
C
L
O
S
E
S
T
O
P
P
L
A
Y
•
P
A
U
S
E
T
U
N
E
R
P
R
E
S
E
T
P
R
O
G
S
H
U
F
F
L
E
R
E
P
E
A
T
S
E
A
R
C
H
B
A
N
D
SOUND CONTROL CENTER
F
M
A
M
B
A
T
L
O
W
L
W
P
R
O
G
S
H
U
F
F
L
E
•
•
V
O
L
Lecture de CD
1. Sélectionnez la source CD.
2. Appuyez sur OPEN•CLOSE pour ouvrir le clapet CD.
™ Afficheur: dès que vous ouvrez le clapet CD.
Français
3. Placez un CD ou un CD-R(W) avec la face imprimée orientée vers le
haut et appuyez sur OPEN•CLOSE pour fermer le clapet CD.
™ Afficheur
™ Afficheur: lorsque le CD R(W) n'est pas reconnu.
4. Appuyez sur PLAY•PAUSE 2; pour démarrer la lecture
™ Afficheur: Numéro de plage en cours et temps écoulé en cours de
5. Pour interrompre la lecture, appuyez sur PLAY•PAUSE2;.
™ L'affichage se fige et le temps écoulé clignote lorsque la lecture est
6. Pour arrêter la lecture CD, appuyez sur STOP 9
Remarque: La lecture de CD s'arrêtera également dans les cas
: l
orsque le lecteur de CD parcourt le CD. Le
nombre total de plages et la durée de lecture sont alors affichés.
lecture.
Appuyez une nouvelle fois sur PLAY•PAUSE 2; pour reprendre la
lecture.
interrompue.
.
suivants:
– le clapet CD est ouvert;
– le CD est arrivé à la fin (à moins d'avoir
sélectionné REPEAT ALL);
– vous avez sélectionné une autre source:
TAPE / TUNER
Selection d'une autre plage
• Appuyez une ou plusieurs fois sur SEARCH ∞ ou § de
l'équipement, jusqu'à ce que le numéro de plage désiré apparaisse à
l'affichage.
• Si vous avez sélectionné un numéro de plage juste après avoir chargé
un CD ou opter pour une pause, il vous faut appuyer sur
PLAY•PAUSE 2; pour démarrer la lecture.
Sélection d'un passage pendant la lecture d'une plage
1. Appuyez et maintenez enfoncée SEARCH ∞ ou §.
– La lecture rapide se fait à volume réduit.
2. Relâchez le bouton SEARCH ∞ ou § dès que vous avez trouvé le
passage souhaité.
– La lecture normale se poursuit.
Remarque:
Au cours d'un programme CD ou si SHUFFLE/ REPEAT a été activé, la
recherche est uniquement possible à l'intérieur d'une plage.
18
Page 19

Divers modes de lecture: SHUFFLE et REPEAT
A
Z
1
5
6
0
C
D
R
A
D
I
O
C
A
S
S
E
T
T
E
R
E
C
O
R
D
E
R
S
T
O
P
P
L
A
Y
•
P
A
U
S
E
T
U
N
E
R
P
R
E
S
E
T
P
R
O
G
S
H
U
F
F
L
E
R
E
P
E
A
T
S
E
A
R
C
H
B
A
N
D
SOUND CONTROL CENTER
F
M
A
M
B
A
T
L
O
W
L
W
P
R
O
G
S
H
U
F
F
L
E
•
•
V
O
L
T
Vous pouvez sélectionner et changer les modes divers de lecture avant
ou pendant la lecture. Les modes de lecture peuvent aussi être
combinés avec PROGRAM.
SHUFFLE - plages du CD total / programme sont lues en ordre
quelconque
SHUFFLE et REPEAT ALL- pour répéter le CD total / programme de
façon continue en ordre quelconque.
REPEAT ALL- pour répéter le CD total / programme
REPEATet SHUFFLE REPEAT - lit la plage en cours de façon continue
(quelconque)
1. Pour sélectionner un mode de lecture, appuyez sur SHUFFLE ou
REPEAT avant ou pendant la lecture jusqu'à ce que l'affichage
indique la fonction désirée.
2. Appuyez sur PLAY•PAUSE2; pour démarrer la lecture en position
d'arrêt.
• La lecture repart immédiatement dès que vous avez sélectionné un
mode SHUFFLE.
3. Pour repasser en mode de lecture normal, appuyez respectivement
sur SHUFFLE ou REPEAT jusqu'à ce que les différents modes
SHUFFLE / REPEAT ne soient plus affichés.
– Vous pouvez également appuyer sur STOP 9 pour annuler le mode
de lecture en cours.
Programmation des références de plage
Programme servant en position d'arrêt à sélectionner et à mémoriser
vos plages CD dans l'ordre voulu. Il est possible de mémoriser une
certaine plage à plusieurs reprises et de mémoriser jusqu'à 20 plages
au total.
1. Appuyez sur SEARCH ∞ ou § pour sélectionner la plage
souhaitée.
2. Appuyez sur PROG.
™ Afficheur:
brièvement.
™ Si vous essayez de programmer sans avoir sélectionné une
référence de plage à l'avance, est affiché.
3.
Répétez les points 1 et 2 pour sélectionner et mémoriser toutes les
plages souhaitées.
™ est affiché dès que vous tentez de programmer plus de
20 plages.
4. Pour démarrer la lecture de votre programme CD, appuyez sur
PLAY•PAUSE 2;.
Remarque:
PROG
et la référence de plage apparaît
si vous avez sélectionné les plages pendant la lecture de
CD, appuyez d'abord sur STOP 9,
ensuite sur PLAY•PAUSE 2;.
LECTEUR DE CD
C
D
R
A
A
D
I
Z
O
C
1
A
S
5
S
E
6
T
0
T
E
R
E
C
P
S
H
U
•
•
R
E
P
E
A
T
SOUND CONTROL CENTER
•
R
E
P
E
R
C
H
O
R
D
E
R
T
R
U
O
N
G
E
V
O
L
F
F
L
E
B
A
N
D
C
D
R
A
A
D
I
Z
O
C
1
A
S
5
S
E
6
T
0
T
E
R
E
C
O
R
D
P
R
O
G
V
O
L
S
H
U
F
F
L
E
•
B
A
N
D
A
T
19
S
T
O
P
P
L
A
Y
•
P
A
U
S
E
SOUND CONTROL CENTER
B
A
T
P
R
L
O
O
F
W
G
M
A
M
L
W
S
H
U
F
F
L
E
S
E
A
R
C
H
S
T
O
P
P
L
A
Y
•
P
A
U
S
E
B
A
T
P
R
L
O
O
F
W
G
M
A
M
L
W
S
H
U
F
F
L
E
S
E
A
Français
R
P
R
E
S
E
E
R
T
U
N
E
R
Page 20

LECTEUR DE CD PLATINE CASSETTE
W
SYNC
A
Z
1
5
6
0
C
D
R
A
D
I
O
C
A
S
S
E
T
T
E
R
E
C
O
R
D
E
R
S
T
O
P
P
L
A
Y
•
P
A
U
S
E
T
U
N
E
R
P
R
O
G
S
H
U
F
F
L
E
R
E
P
E
A
T
S
E
A
R
C
H
B
A
N
D
SOUND CONTROL CENTER
F
M
A
M
B
A
T
L
O
W
L
W
P
R
O
G
S
H
U
F
F
L
E
•
•
V
O
L
S
O
U
N
D
C
O
N
T
R
O
L
C
E
N
T
E
R
V
O
L
U
TER
C
Passage en revue du programme
En position d'arrêt ou pendant la lecture, maintenez enfoncée la
touche PROG pendant quelques secondes jusqu'à ce que l'affichage
montre toutes les plages mémorisées dans l'ordre mémorisé.
Français
Effacement d'un programme
Pour effacer un programme, procédez comme suit:
– appuyez une fois sur STOP 9 en position d'arrêt;
– appuyez deux fois sur STOP 9 pendant la lecture.
• L'affichage indique brièvement et
Le programme peut également être effacé de la façon suivante:
– ouvrez le clapet du lecteur CD;
– sélectionnez une autre source: TAPE / TUNER.
LECTEUR DE CASSETTE
1. Sélectionnez la source TAPE.
™ L'afficheur indique
TAPE
pendant le fonctionnement en mode
cassette.
2. Appuyez sur OPEN•STOP /9pour ouvrir le compartiment
cassette.
3. Insérez une cassette enregistrée et fermez le compartiment.
4. Appuyez sur PLAY 1 pour démarrer la lecture.
5. Pour interrompre la lecture, appuyez sur PAUSE ;. Pour reprendre
la lecture, appuyez à nouveau sur cette touche.
6. Appuyer sur SEARCH 5 ou 6 de l'équipement pour autoriser le
bobinage rapide de la cassette dans les deux sens.
7. Pour arrêter la cassette, appuyez sur OPEN•STOP /9.
• A la fin de la cassette, les touches se relâchent automatiquement
sauf si la touche PAUSE; a été activée.
Remarque Il est impossible de changer de source pendant la
lecture de casette.
PROG
disparaît.
E
M
U
L
O
V
R
E
T
N
E
S
T
O
P
P
L
A
Y
•
P
A
P
R
O
G
C
D
R
A
A
D
I
Z
O
C
1
A
S
5
S
E
6
T
T
E
R
U
S
E
B
A
T
L
O
F
W
M
E
SOUND CONTROL CEN
CD REWRITABLE COMPATIBLE
CD SYNCRO STRAT RECORDING
0
C
O
R
D
E
R
O
P
E
N
C
L
O
S
E
20
Page 21

LECTEUR DE CD PLATINE CASSETTE
A
Z
1
5
6
0
C
D
R
A
D
I
O
C
A
S
S
E
T
T
E
R
E
C
O
R
D
E
R
S
T
O
P
P
L
A
Y
•
P
A
U
S
E
T
U
N
E
R
P
R
E
S
E
T
P
R
O
G
S
H
U
F
F
L
E
R
E
P
E
A
T
S
E
A
R
C
H
B
A
N
D
SOUND CONTROL CENTER
F
M
A
M
B
A
T
L
O
W
L
W
P
R
O
G
S
H
U
F
F
L
E
•
•
V
O
L
TER
C
INFORMATIONS GÉNÉRALES À PROPOS DE L'ENREGISTREMENT
• L'enregistrement est autorisé dans la mesure où on enfreint ni le
copyright ni les autres droits de tierce partie.
• Cet équipement n'est pas adéquat pour l'enregistrement sur des
cassettes du type CHROME (IEC II) ou METAL (IEC IV). Utilisez des
cassettes de type NORMAL (IEC I) dont les ergots n'ont pas été
rompus.
• Le meilleur niveau d'enregistrement se fait de façon automatique.
Le fait d'agir sur les commandes VOLUME, INCREDIBLE
SURROUND, DIGITAL EQUALIZER ou DBB, n'affecte nullement le
niveau d'enregistrement en cours.
• En début et en fin de cassette, l'enregistrement ne se fait pas
pendant 7 secondes, au moment où l'amorce passe devant les
têtes.
• Pour protéger une cassette contre l'effacement inopiné, tenez la
cassette à protéger avec l'arrière orienté vers vous et rompez
l'ergot gauche. A partir de ce moment-là, l'enregistrement de ce
côté n'est plus possible. Pour pouvoir à nouveau enregistrer de ce
côté, apposez un morceau de ruban adhésif pour recouvrir
l'ouverture.
Enregistrement Synchro Start CD
1. Sélectionnez la source CD.
2. Insérez un CD et si désiré, programmez des numéros des références
de plage.
3. Appuyez sur OPEN•STOP /9pour ouvrir le compartiment
cassette.
4. Insérez une cassette adéquate dans la platine cassette et fermez le
compartiment cassette.
5. Appuyez sur RECORD 0 pour démarrer l'enregistrement.
– La lecture d'un programme de CD commence automatiquement au
début du programme. Il n'est pas nécessaire de démarrer le lecteur
de CD séparément.
Pour sélectionner et enregistrer un passage particulier dans
une plage
• Maintenez enfoncée SEARCH ∞ ou §.
• Lorsque vous reconnaissez le passage désiré,
relâchez SEARCH ∞ ou §.
• Pour interrompre la lecture du CD, appuyez sur PLAY•P AUSE 2;.
• L'enregistrement démarrera à partir de l'endroit exact sur la plage
dès que vous appuyez sur RECORD
0
.
6. Pour interrompre brièvement l'enregistrement, appuyez sur
PAUSE;. Pour reprendre l'enregistrement; appuyez à nouveau sur
PAUSE;.
7. Pour arrêter l'enregistrement, appuyez sur OPEN•STOP /9.
21
T
N
E
S
T
O
P
P
1
E
M
U
L
O
V
R
E
P
L
A
Y
•
P
A
R
O
G
C
D
R
A
A
D
I
Z
O
C
1
A
S
S
E
T
U
S
E
B
A
T
L
O
F
W
M
T
SOUND CONTROL CEN
CD REWRITABLE COMPATIBLE
CD SYNCRO STRAT RECORDING
5
6
0
E
R
E
C
O
R
D
E
R
Français
O
P
E
N
C
L
O
S
E
Page 22

ENREGISTREMENT INFORMATIONS GENERALES
CD REWRITAB
LE COMPATIBLE
CD SYNCRO STRAT RECORDING
A
Z
1
5
6
0
C
D
R
A
D
I
O
C
A
S
S
E
T
T
E
R
E
C
O
R
D
E
R
O
P
E
N
C
L
O
S
E
S
T
O
P
P
L
A
Y
•
P
A
U
S
E
P
R
O
G
SOUND CONTROL CENTER
F
M
B
A
T
L
O
W
C
E
N
T
E
R
V
O
L
U
M
E
Enregistrement à partir du syntoniseur
1. Réglez sur la station radio désirée (voir Syntonisation des stations
radio).
2. Appuyez sur OPEN•STOP /9pour ouvrir le compartiment cassette.
Français
3. Insérez une cassette adéquate dans la platine cassette et fermez le
compartiment cassette.
4. Appuyez sur RECORD 0 pour démarrer l'enregistrement.
5. Pour interrompre brièvement, appuyez sur PAUSE ;. Pour reprendre
l'enregistrement, appuyez à nouveau sur PAUSE ;.
6. Pour arrêter l'enregistrement appuyez sur OPEN•STOP /9.
Entretien du lecteur de CD et des CD
• Si le lecteur de CD ne lit pas correctement les CD, utilisez un CD de
nettoyage en vente dans le commerce, pour nettoyer la lentille avant
d'emmener votre équipement chez le réparateur. D'autres méthodes
de nettoyage pourraient abîmer la lentille.
• Ne jamais toucher à la lentille du lecteur de CD!
• Des changements soudains de température ambiante peuvent entraîner
la condensation et donc agir sur la lentille de votre lecteur de CD. Dans
ce cas, la lecture n'est pas possible. N'essayez pas de nettoyer la
lentille, mais laissez l'équipement s'adapter à la température ambiante,
de sorte que toute l'humidité ait le temps de s'évaporer.
• Laissez toujours le compartiment de CD fermé pour éviter que de la
poussière ne se dépose sur la lentille
• Pour extraire le CD de son coffret, appuyez sur le centre et soulevez
le CD de son logement. Saisissez toujours le CD par le bord et
remettez-le dans son coffret après son utilisation pour éviter de le
griffer et de le contaminer.
• Pour nettoyer le CD, frottez en ligne droite en partant du centre vers
le bord avec un chiffon doux non pelucheux. L'emploi d'un détergent
peut endommager le CD.
• Ne faites jamais d'inscription sur le CD et n'apposez jamais
d'autocollants.
X
Entretien de la platine cassette
Pour assurer la bonne qualité de l'enregistrement et de la lecture de
l'enregistreur cassette, nettoyez les parties A, B et C indiquées dans
le schéma ci-dessous après environ 50 heures de service ou en moyenne
une fois par mois. Pour ce faire, utilisez un coton-tige humecté d'alcool
ou un liquide de nettoyage spécial pour les deux cassettes.
1. Ouvrez le compartiment cassette en appuyant sur
OPEN•STOP /9.
2. Appuyez sur PLAY 1 et nettoyez les galets presseurs en
caoutchouc C.
3. Appuyez sur PAUSE ; et nettoyez les têtes magnétiques A et le
cabestan B.
4. Après le nettoyage, appuyez sur OPEN•STOP /9.
Remarque:
Le nettoyage des têtes peut également se faire en faisant tourner une
fois une cassette de nettoyage.
22
C
A AB
Page 23

DÉPANNAGE
Si une erreur se produit, contrôlez d'abord les points indiqués dans la liste ci-dessous avant d'emmener
l'équipement chez le réparateur. Si vous ne parvenez pas à remédier aux problèmes à partir de ces
indications, consultez votre concessionnaire ou le centre de service après-vente.
ATTENTION: Ne jamais ouvrir vous-même l'équipement au risque de recevoir des
chocs électriques. N'essayez en aucun cas de réparer vous-même
l'équipement, car ceci vous ferait perdre le droit à la garantie.
Français
PROBLEME
– CAUSE POSSIBLE
• REMEDE
Pas de tonalité/puissance
– VOLUME non réglé
• Réglez le VOLUME
– Ecouteurs branchés
• Débranchez les écouteurs
– Cordon d'alimentation mal branché
• Branchez correctement le cordon
d'alimentation
Grésillements/déformation importants du
signal radio
– Interférences électriques: l'équipement est
situé trop près d'un téléviseur, d'une vidéo
ou d'un ordinateur
• Augmentez la distance
Faible réception radio
– Signal radio faible
• FM: Orientez l'antenne télescopique FM pour
une réception optimale.
Indication
– CD griffé/contaminé
• Remplacez ou nettoyez le CD, voir Entretien
– Lentille laser embuée
• Attendez jusqu'à ce que la lentille soit claire
Le CD saute des plages
– CD endommagé ou contaminé
• Remplacez ou nettoyez le CD
– SHUFFLE ou un PROGRAM est actif
• Mettez SHUFFLE / PROGRAM hors service
Mauvaise qualité de son cassette
– Têtes contaminées ou sales, etc.
• Nettoyez les parties de platine, voir
Entretien
– Utilisation de types de cassettes
incompatibles (METAL ou CHROME)
• Utilisez uniquement des cassettes NORMAL
(IEC I) pour l'enregistrement
L'enregistrement ne fonctionne pas
– Ergot(s) de cassette rompu(s)
• Appliquez un morceau de bande adhésive
pour recouvrir l'ouverture
Indication
– CD-R(W) est vierge ou le CD n'a pas été
reconnu
• Utilisez un CD-R(W) reconnu
Ce matériel satisfait aux impératifs de brouillage radio de la Communauté Européenne.
La plaque signalétique se trouve sous l’appareil.
23
Page 24

CONTROLES
PANELES SUPERIOR Y FRONTAL
1 DIGITAL EQUALIZER – selecciona el volumen
o el ajuste de diferentes frecuencias: volumen,
graves, frecuencias media y alta
2 VOLUME/SOUND CONTROL CENTER –
ajusta el nivel del sonido y los ajustes del
ecualizador digital
Español
3 DIGITAL DBB (Dynamic Bass Boost) –
realza los graves
4 INCREDIBLE SURROUND – produce un
efecto estéreo fenomenal
5 Botón deslizante POWER –
fuentes de sonido CD/ TUNER/ TAPE y
también apaga el aparato
6 Botones del GRABADOR DE CASETES:
RECORD 0 – para iniciar la grabación
PLAY 1 – para iniciar la reproducción
SEARCH 5, 6 – para rebobinar/ bobinar la
casete
OPEN•STOP /9
– para abrir el compartimento de la casete;
– para detener la cinta
PAUSE ; – para interrumpir la grabación o la
reproducción
7 OPEN•CLOSE – para abrir/ cerrar la puerta
del CD
8 STOP 9 – para detener la reproducción de un
CD o borrar un programa CD
9 PLAY•PAUSE 2; – para iniciar o interrumpir
la reproducción de un CD
0 BATT LOW – indicación de que las pilas están
desgastadas
selecciona las
! PROG – CD: para programar pistas y repasar el
programa;
Sintonizador: para programar emisoras
de radio preseleccionadas
(presintonías)
@ SHUFFLE – para reproducir pistas de CD al
azar
# SEARCH ∞, §
Sintonizador: - (bajar, subir) para sintonizar
emisoras;
CD: - para atrasar o avanzar dentro de una
pista;
- para saltar al principio de la pista actual/
anterior/ siguiente
$ REPEAT – para repetir una pista/ un programa
de CD/ el CD completo
% Pantalla – indica el estado del aparato
^ BAND – para seleccionar la banda de ondas
& TUNER PRESET 4, 3 – para seleccionar una
presintonía (bajar, subir)
PANEL POSTERIOR
* p – conexión para auriculares de 3,5 mm
( Antena telescópica – mejora la recepción de
FM
) AC MAINS – entrada para el cable de
alimentación
¡ Tapa del compartimento de las pilas
ATENCIÓN
El uso de mandos o ajustes o la ejecucción de métodos que no sean los aquí descritos
puede ocasionar peligro de exposición a radiación.
Información medioambiental
Se ha prescindido de cualquier material de embalaje innecesario. El embalaje esta compuesto de
tres materiales fácilmente separables: cartón (la caja), poliestireno expandible (amortiguación) y
polietileno (bolsas, plancha protectora de espuma).
El aparato está fabricado con materiales que se pueden reciclar si son desmontados por
una empresa especializada. Observe las normas locales concernientes a la eliminación
de estos materiales, pilas usadas y equipos desechables.
24
Page 25

SUMINISTRO DE ENERGÍA
6 x D-cells - R20 - UM1
Si desea aumentar la duración de las pilas, utilice el suministro
de la red. Antes de introducir las pilas, desconecte el enchufe del
aparato y el de la toma mural.
PILAS (OPCIONALES)
1. Abra el compartimento e inserte seis pilas, tipo R-20, UM-1 o
D-cells, (preferiblemente alcalinas) de manera que las
polaridades coincidan con los signos "+" y "-" indicados en el
compartimento.
2. Cerciórese de que las ha insertado bien y con firmeza y
coloque de vuelta la tapa. El aparato está preparado para
funcionar.
– Si se ilumina BATT LOW, la energía de las pilas se está
agotando.
– Si las pilas están muy desgastadas, la indicación
BATT LOW finalmente desaparece.
– Una utilización incorrecta de las pilas puede ocasionar un
derrame electrolítico y la corrosión del compartimento o
provocar un reventón de las mismas. De manera que:
– No mezcle los tipos de pilas, por ej. las alcalinas con las
de carbono-zinc. Utilice únicamente pilas del mismo tipo.
– Cuando vaya a introducir las pilas, no mezcle las gastadas
con las nuevas.
– Saque las pilas si no va a usar el aparato durante mucho
tiempo
– Las pilas contienen sustancias químicas, de manera
que siga las instrucciones a la hora de deshacerse
de ellas.
Español
UTILIZACIÓN DE LA ENERGÍA CA
1. Compruebe que el voltaje que se indica en la placa tipo
situada en la base del aparato coincide con el del
suministro de la red local. De lo contrario, consulte con su
distribuidor o centro de servicio.
2. Si su aparato está equipado con un selector de voltaje,
ajústelo para que coincida con el voltaje del suministro de
energía local.
3. Conecte el cable de alimentación al enchufe mural para
ponerlo en funcionamiento.
4. Para desconectarlo completamente de la red, desenchúfelo de
la toma mural.
MAINS
25
Page 26

FUNCIONES BÁSICAS SINTONIZADOR DIGITAL
CD RE
CD SY
A
Z
1
5
6
0
C
D
R
A
D
I
O
C
A
S
S
E
T
T
E
R
E
C
O
R
D
E
R
S
T
O
P
P
L
A
Y
•
P
A
U
S
E
SOUNDCO
B
A
T
S
O
U
N
D
C
O
N
T
R
O
L
C
E
N
T
E
R
V
O
L
U
M
E
E
T
R
E
ENCENDIDO/APAGADO
•
Deslice el botón POWER a la fuente de sonido deseada: CD,
TUNER o TAPE.
• Si el botón deslizante POWER está en la posición TAPE/OFF y
las teclas de la platina no están apretadas, el aparato
permanece en la posición de apagado.
– Los ajustes de sonido, volumen y las presintonías permanecerán
Español
almacenados en la memoria del aparato.
AJUSTES DE VOLUMEN Y SONIDO
1. Gire el control VOLUME/ SOUND CONTROL CENTER en la
dirección de las agujas del reloj para aumentar el volumen o en
dirección opuesta para disminuirlo.
™ La pantalla muestra el nivel de volumen VOL y un número del 0 al 32.
2. Para ajustar los niveles de frecuencias graves, medias y agudas,
pulse DIGITAL EQUALIZER una o más veces hasta que aparezca
en pantalla la opción deseada. Con la opción en pantalla, gire el
control VOLUME/ SOUND CONTROL CENTER para aumentar o
disminuir la frecuencia deseada ( de - 5 a + 5 máximo) .
™ Igualmente puede ajustarse VOLUME con un nivel de variación
de 0 a 32.
3. Pulse DIGITAL DBB para activar o desactivar “dynamic bass
boost” (realce dinámico de bajos).
™ Si está activado, se enciende DIGITAL DBB.
4. Pulse INCREDIBLE SURROUND para activar o desactivar el
efecto de sonido envolvente.
™ Si está activado, se enciende Si está activado, se enciende
INCREDIBLE SURROUND.
Advertencia: El efecto INCREDIBLE SURROUND puede variar de
acuerdo a los diferentes tipos de música.
S
O
U
N
E
M
U
L
O
V
D
C
O
R
N
E
T
T
R
N
O
E
L
C
S
T
O
P
P
L
A
Y
•
P
A
U
S
E
CD REWRITA
CD SYNCRO STRA
BL
C
D
R
A
A
D
I
Z
O
C
A
S
+
•
•
•
•
0
•
•
•
•
–
L
O
V
1
5
S
E
6
T
0
T
E
R
E
C
O
R
D
E
R
SINTONIZACIÓN DE EMISORAS
1. Seleccione la fuente TUNER.
™ Aparece brevemente en pantalla seguido de la
frecuencia de la emisora.
2. Pulse BAND una o más veces para seleccionar la banda de ondas.
3. Pulse el botón SEARCH ∞ o § y cuando la frecuencia en
pantalla comienza a pasar, suéltelo.
™ El sintonizador sintoniza automáticamente con una emisora de
suficiente intensidad de señal. Durante la sintonización
automática, la pantalla muestra .
™ Si se sintoniza con una emisora FM, aparece
STEREO.
4. Repita el punto 3 tantas veces como sea necesario hasta que
encuentre la emisora deseada.
• Para sintonizar con una estación de señal débil, pulse SEARCH
∞ o § breve y repetidamente hasta que alcance una
recepción óptima.
26
C
D
R
A
A
D
I
Z
O
C
1
A
S
5
S
E
6
T
0
T
E
SOUND CONTROL CENTER
P
S
T
S
H
U
•
•
R
E
P
E
A
T
H
R
R
O
G
V
O
E
L
R
E
O
F
F
L
E
S
T
O
P
P
L
A
Y
•
P
A
U
S
E
B
A
T
P
R
L
O
O
F
W
G
M
A
M
L
W
S
H
U
F
F
L
E
S
E
A
R
C
O
E
P
C
O
R
D
E
R
T
U
N
E
R
P
R
E
S
E
T
B
A
N
D
Page 27

SINTONIZADOR DIGITAL
A
Z
1
5
6
0
C
D
R
A
D
I
O
C
A
S
S
E
T
T
E
R
E
C
O
R
D
E
R
O
P
E
S
T
O
P
P
L
A
Y
•
P
A
U
S
E
T
U
N
E
R
P
R
E
S
E
T
P
R
O
G
S
H
U
F
F
L
E
R
E
P
E
A
T
S
E
A
R
C
H
B
A
N
D
SOUND CONTROL CENTER
F
M
A
M
B
A
T
L
O
W
L
W
P
R
O
G
S
H
U
F
F
L
E
•
•
V
O
L
Para mejorar la recepción de la radio:
• Para FM, saque la antena telescópica. Incline y de vueltas a la
antena. Reduzca la longitud de la misma si la señal es
demasiado fuerte (proximidad al transmisor).
• Para MW (AM
incorporada, de manera que no se necesita la telescópica. Para
manejarla, de vueltas al aparato.
Programación de emisoras de radio
Se pueden almacenar en la memoria hasta un total de 30 emisoras.
1. Sintonice con la emisora que desee (vea: Sintonización de
emisoras)
2. Pulse PROG para activar la programación
™ Pantalla: parpadea
3. Pulse PRESET 3 o 4 una o más veces para asignar a la
emisora un número del 1 al 30.
4. Pulse PROG de nuevo para confirmar el ajuste.
™ Pantalla: desaparece
emisora presintonizada (presintonía) aparecen en pantalla.
5. Repita los números del 1 al 4 para almacenar otras emisoras.
• Se puede sustituir una presintonía simplemente almacenando
otra en su lugar.
Sintonización de presintonías
Pulse TUNER PRESET 4 o 3 hasta que aparezca en pantalla la
presintonía deseada.
o
LW), el aparato posee una antena
PROG.
PROG, el número y la frecuencia de la
Español
Mantenimiento
•
No exponga el aparato, las pilas, los CD o las casetes a la
humedad, lluvia, arena o al calor excesivo causado por sistemas de
calefacción o la luz directa del sol.
•
Para limpiar el aparato, utilice una gamuza suave, ligeramente
humedecida. No utilice productos de limpieza que contengan
alcohol, amoníaco, bencina o abrasivos ya que éstos pueden dañar
la caja.
Información de seguridad
•
Coloque el aparato sobre una superficie lisa para que no quede en
posición inclinada. Asegúrese de que la ventilación es adecuada para
evitar la acumulación de calor dentro del mismo.
•
La parte mecánica del aparato contiene contactos autolubricantes
y no se deben engrasar o aceitar.
27
Page 28

REPRODUCTOR DE CD
A
Z
1
5
6
0
C
D
R
A
D
I
O
C
A
S
S
E
T
T
E
R
E
C
O
R
D
E
R
O
P
E
N
C
L
O
S
E
S
T
O
P
P
L
A
Y
•
P
A
U
S
E
T
U
N
E
R
P
R
E
S
E
T
P
R
O
G
S
H
U
F
F
L
E
R
E
P
E
A
T
S
E
A
R
C
H
B
A
N
D
SOUND
CONTROL CENTER
F
M
A
M
B
A
T
L
O
W
L
W
P
R
O
G
S
H
U
F
F
L
E
•
•
V
O
L
Reproducción de un CD
1. Seleccione la fuente CD.
2. Pulse OPEN•CLOSE para abrir la puerta del CD.
™ Pantalla: Cuando abra la puerta del CD, aparece .
3. Introduzca un CD o CD-R(W) con la parte impresa hacia arriba y
pulse OPEN•CLOSE para cerrar la puerta del CD.
™ Pantalla: muestra: mientras examina el contenido del
Español
CD. Aparecen en pantalla el número total de pistas y el tiempo
de reproducción.
™ Pantalla: muestra si el CD R(W) no es un disco
acabado.
4. Pulse PLAY•PAUSE 2; para comenzar la reproducción.
™ Pantalla: número de pista en curso y el tiempo transcurrido de la
misma.
5. Para interrumpir la reproducción pulse PLAY•PAUSE 2;.
Pulse de nuevo PLAY•PAUSE 2; para reanudar la
reproducción.
™ Cuando se hace una pausa en la reproducción, la pantalla se
para y comienza a parpadear el tiempo transcurrido de
reproducción.
6. Para detener la reproducción del CD, pulse STOP 9.
Advertencia: la reproducción del CD se para también cuando :
– la puerta del CD está abierta;
– el CD ha llegado al final (a menos que haya seleccionado
REPEAT ALL);
– selecciona otra fuente: TAPE / TUNER.
Para seleccionar otra pista diferente
• Pulse SEARCH ∞ o § en el aparato, una vez o repetidamente
hasta que el numero de pista deseada aparezca en la pantalla.
• Si ha seleccionado un numero de pista inmediatamente después
de introducir un CD o en la posición de parada (pause), deberá
pulsar PLAY•PAUSE 2; para comenzar la reproducción.
Búsqueda de un fragmento en una pista
1. Mantenga pulsado SEARCH ∞ o §.
– El CD se reproduce a alta velocidad y con un volumen reducido.
2. Una vez identificado el fragmento que desea,
suelte SEARCH ∞ o §.
– Se restablece la reproducción normal.
Advertencia:
Mientras se reproduce un programa de CD o si permanece activado
SHUFFLE/ REPEAT, la búsqueda sólo se puede realizar dentro de la
pista.
28
Page 29

REPRODUCTOR DE CD
A
Z
1
5
6
0
C
D
R
A
D
I
O
C
A
S
S
E
T
T
E
R
E
C
O
R
D
E
R
S
T
O
P
P
L
A
Y
•
P
A
U
S
E
T
U
N
E
R
P
R
E
S
E
T
P
R
O
G
S
H
U
F
F
L
E
R
E
P
E
A
T
S
E
A
R
C
H
B
A
N
D
SOUND CONTROL CENTER
F
M
A
M
B
A
T
L
O
W
L
W
P
R
O
G
S
H
U
F
F
L
E
•
•
V
O
L
T
Modos diferentes de reproducción: SHUFFLE y REPEAT
Se pueden seleccionar y cambiar los diferentes modos antes o
durante la reproducción. Los modos de reproducción pueden
también combinarse con PROGRAM.
SHUFFLE - para reproducir un programa o todas las pistas del CD
en un orden aleatorio
SHUFFLE y REPEAT ALL- para repetir un programa o el CD
completo en un orden aleatorio
REPEAT ALL- para repetir un programa o el CD completo
REPEATy SHUFFLE REPEAT - para reproducir continuamente la
pista actual (al azar)
1. Para seleccionar el modo de reproducción, pulse el botón
SHUFFLE o REPEAT antes o durante la reproducción hasta
que la pantalla muestre la función deseada.
2. Si está en la posición de parada (stop), pulse PLAY•PAUSE
2; para comenzar la reproducción.
• Si ha seleccionado el modo SHUFFLE, la reproducción comienza
inmediatamente.
3. Para volver a la reproducción normal, pulse el botón
correspondiente SHUFFLE o REPEAT hasta que éstos
desaparezcan de la pantalla.
– También se puede pulsar STOP 9 para desactivar el modo de
reproducción.
Español
C
D
R
A
A
D
I
Z
O
C
1
A
S
5
S
E
6
T
0
T
E
R
E
C
S
T
O
P
P
L
A
Y
•
P
A
U
S
E
SOUND CONTROL CENTER
B
A
T
P
R
L
O
O
F
W
G
M
A
M
L
W
S
H
U
F
F
L
E
S
E
A
R
C
H
O
R
D
E
R
P
T
R
U
O
N
G
E
R
V
O
L
P
R
E
S
S
H
U
F
F
L
E
•
•
R
E
P
E
A
T
E
B
A
N
D
Programación de números de pistas
Efectúe la programación en la posición de parada (stop) para
seleccionar y almacenar las pistas de su CD en la secuencia que
prefiera. Una pista puede almacenarse más de una vez, si así lo desea.
Se pueden almacenar en la memoria hasta un total de 20 pistas.
1. Utilice SEARCH∞ o § en el aparato, para seleccionar el numero
de pista deseada.
2. Pulse PROG.
™ Pantalla: aparece
brevemente .
™ Si intenta la programación sin haber seleccionado un número de
pista, aparece en pantalla .
3.
Repita los pasos del 1 al 2 para seleccionar y memorizar todas las
pistas deseadas.
™ Si intenta almacenar más de 20 pistas, aparece en pantalla .
4.
Para comenzar la reproducción de un programa de CD , pulse
PLAY•PAUSE 2;.
Advertencia:
PROG
y el número de pista seleccionado. Aparece
si ha seleccionado las pistas durante la reproducción
de un CD, pulse primero STOP 9, y a continuación
PLAY•PAUSE 2;.
C
D
R
A
A
D
I
Z
O
C
1
A
S
5
S
E
6
T
0
T
E
R
E
C
S
T
O
P
P
L
A
Y
•
P
A
U
S
E
SOUND CONTROL CENTER
B
A
T
P
R
L
O
O
F
W
G
M
A
M
L
W
S
H
U
F
F
L
E
R
S
E
A
R
C
H
O
R
D
E
R
P
T
R
U
O
N
G
E
R
V
O
L
S
H
U
F
F
L
E
•
•
B
A
N
E
D
P
E
A
T
29
Page 30

REPRODUCTOR DE CD
W
SYNC
A
Z
1
5
6
0
C
D
R
A
D
I
O
C
A
S
S
E
T
T
E
R
E
C
O
R
D
E
R
S
T
O
P
P
L
A
Y
•
P
A
U
S
E
T
U
N
E
R
P
R
O
G
S
H
U
F
F
L
E
R
E
P
E
A
T
S
E
A
R
C
H
B
A
N
D
SOUND CONTROL CENTER
F
M
A
M
B
A
T
L
O
W
L
W
P
R
O
G
S
H
U
F
F
L
E
•
•
V
O
L
S
O
U
N
D
C
O
N
T
R
O
L
C
E
N
T
E
R
V
O
L
U
TER
C
Revisión de un programa
En la posición de parada (stop) o durante la reproducción, mantenga
pulsado PROG durante algunos momentos hasta que la pantalla
muestre todos los números de pista almacenados secuencialmente.
Borrado de un programa
Maneras de borrar un programa:
– pulse una vez STOP 9 (en la posición de parada);
Español
– pulse dos veces STOP 9 durante la reproducción.
• Desaparece
También se puede borrar de la siguiente manera:
– pulse el botón de apertura de la puerta del CD;
– seleccione otra fuente: TAPE / TUNER.
REPRODUCCIÓN DE CASETES
1. Seleccione la fuente TAPE.
™ La pantalla muestra
2. Pulse OPEN•STOP
3. Introduzca un casete grabado y cierre la puerta.
4. Pulse PLAY 1 para comenzar la reproducción.
5. Para interrumpir la reproducción pulse PAUSE;. Para
reanudarla, pulse de nuevo el mismo botón.
6. Si pulsa SEARCH 5 o 6 en el aparato se puede
rebobinar/avanzar rápidamente.
7. Para detener la cinta, pulse OPEN•STOP
• Las teclas se sueltan automáticamente cuando la cinta llega al
final, a menos que se haya activado PAUSE ;.
Nota: No es possible seleccionar otra fuente durante la
PROG
y la pantalla muestra brevemente .
TAPE durante la reproducción de la cinta.
/9
para abrir la puerta del portacasetes.
reprdoucción de la cinta.
/9
.
GRABADORA DE CASETES
C
D
R
A
A
D
I
Z
O
C
A
S
S
CD REWRITABLE COMPATIBLE
CD SYNCRO STRAT RECORDING
1
5
E
6
T
0
T
E
R
E
C
O
R
D
E
R
O
P
E
N
C
L
O
S
E
E
M
U
L
O
V
R
E
T
N
E
S
T
O
P
P
L
A
Y
•
P
A
U
S
E
SOUND CONTROL CEN
B
A
T
P
R
L
O
O
F
W
G
M
30
Page 31

REPRODUCTOR DE CD
A
Z
1
5
6
0
C
D
R
A
D
I
O
C
A
S
S
E
T
T
E
R
E
C
O
R
D
E
R
S
T
O
P
P
L
A
Y
•
P
A
U
S
E
T
U
N
E
R
P
R
E
S
E
T
P
R
O
G
S
H
U
F
F
L
E
R
E
P
E
A
T
S
E
A
R
C
H
B
A
N
D
SOUND CONTROL CENTER
F
M
A
M
B
A
T
L
O
W
L
W
P
R
O
G
S
H
U
F
F
L
E
•
•
V
O
L
TER
C
GRABADORA DE CASETES
INFORMACIÓN GENERAL SOBRE LA GRABACIÓN
• En general, se permiten realizar grabaciones siempre y cuando
no se infrinjan los derechos de autor o los derechos a terceros.
• La platina de este aparato no es compatible con casetes tipo
CHROME (IEC II) o METAL (IEC IV). Utilice únicamente las de
tipo NORMAL (IEC I) con las pestañas de protección intactas.
• El nivel óptimo de grabación se ajusta automáticamente.
La modificación de los controles VOLUME, INCREDIBLE
SURROUND, DIGITAL EQUALIZER o DBB no afectan a la
grabación.
• Al principio y al final, durante los 7 segundos que tarda la cinta
de guía en pasar por las cabezas de grabación, no se grabará
nada.
• Para evitar grabaciones accidentales, rompa la pestaña
izquierda. Para volver a grabar en ese lado de la casete, cubra
el orificio con cinta adhesiva.
Comienzo de la grabación sincronizada
1. Seleccione la fuente CD.
2. Introduzca un CD y si prefiere, números de pista de un
programa.
3. Pulse OPEN•STOP
/9
para abrir el portacasetes.
4. Introduzca una cinta apropiada en el portacasetes y cierre la
tapa.
5. Pulse RECORD 0 para comenzar la grabación.
– Se inicia automáticamente la reproducción del programa desde
el principio. No es necesario activar el reproductor de CD por
separado.
Para seleccionar y grabar un determinado fragmento de
una pista
• Mantenga pulsado SEARCH ∞ o §.
• Cuando encuentre el fragmento deseado,
suelte SEARCH ∞ o §.
• Para interrumpir la reproducción del CD,
pulse PLAY•PAUSE 2;.
• La grabación comenzará exactamente en ese punto cuando
apriete RECORD 0.
6. Para interrumpir el proceso brevemente durante la grabación,
pulse PAUSE ;. Para reanudar la grabación, pulse de nuevo
PAUSE ;.
7. Para finalizar la grabación, pulse OPEN•STOP /9.
Español
1
C
D
R
A
A
D
I
Z
O
C
A
S
CD REWRITABLE COMPATIBLE
CD SYNCRO STRAT RECORDING
1
5
S
E
6
T
0
T
E
R
E
C
O
R
D
E
R
O
P
E
N
C
L
O
S
E
E
M
U
L
O
V
R
E
T
N
E
S
T
O
P
P
L
A
Y
•
P
A
U
S
E
SOUND CONTROL CEN
B
A
T
P
R
L
O
O
F
W
G
M
31
Page 32

GRABACIÓN INFORMACIÓN GENERAL
CD REWRITABLE COMPATIBLE
CD SYNCRO STRAT RECORDING
A
Z
1
5
6
0
C
D
R
A
D
I
O
C
A
S
S
E
T
T
E
R
E
C
O
R
D
E
R
O
P
E
N
C
L
O
S
E
S
T
O
P
P
L
A
Y
•
P
A
U
S
E
P
R
O
G
SOUND CONTROL CENTER
F
M
B
A
T
L
O
W
C
E
N
T
E
R
V
O
L
U
M
E
Grabación de la radio
1. Sintonice con la emisora que desee (Vea, Sintonización de
emisoras).
2. Pulse OPEN•STOP /9para abrir la tapa del portacasetes.
3. Introduzca una cinta apropiada y cierre la tapa.
4. Pulse RECORD 0 para comenzar la grabación.
5. Para efectuar interrupciones breves, pulse PAUSE ; . Para
Español
reanudar la grabación, pulse de nuevo.
6. Para finalizar la grabación, pulse OPEN•STOP /9.
Reproductor de CD y manejo de un CD
•
Si el reproductor de CD no lee los discos correctamente, utilice un
disco limpiador antes de llevar el aparato a reparar. Un método
diferente de limpieza podría destruir la lente.
•
¡No toque nunca la lente del CD!
•
Los cambios repentinos de temperatura en las proximidades pueden
provocar una acumulación de humedad en la lente del reproductor
de CD. En tal caso, se imposibilitará la reproducción. No intente
limpiar la lente, simplemente coloque el aparato en un ambiente
cálido hasta que se disipe el vapor
• Mantenga el compartimento del CD siempre cerrado para evitar la
acumulación de polvo en la lente.
• Para extraer un CD de la caja, presione el eje central y levante
el CD al mismo tiempo. Agarre el CD por los bordes y para
evitar que se raye o se llene de polvo, colóquelo de vuelta en
su caja después de utilizarlo.
• Para limpiar el CD, utilice un paño suave sin pelusas y páselo
desde el centro hacia los bordes. No utilice productos de
limpieza que puedan dañar el disco.
• Nunca escriba o coloque pegatinas en el CD.
.
X
Mantenimiento de la platina
Para obtener una grabación o reproducción óptimas, limpie las
partes A, B y C de la platina cada 50 horas de
funcionamiento, o por termino medio, una vez al mes. Para limpiar
ambas platinas, utilice un trocito de algodón ligeramente
humedecido en alcohol o en algún producto especial de limpieza
de cabezales.
1. Abra el portacasetes pulsando OPEN•STOP /9.
2. Pulse PLAY 1 y limpie el rodillo de presión (de goma) C.
3. Pulse PAUSE ; y limpie las cabezas magnéticas A y también
el cabestrante B.
4. Después de la limpieza, pulse OPEN•STOP /9.
Advertencia: También se pueden limpiar las cabezas pasando una
casete de limpieza una vez.
32
C
A AB
Page 33

PROBLEMAS Y SOLUCIONES
Si ocurre una avería, siga los consejos que se dan más abajo antes de llevar el aparato a reparar. Si,
después de haber seguido estos consejos, no logra solucionar el problema, consulte a su distribuidor o
centro de servicio.
PRECAUCIÓN: No abra el aparato ya que puede recibir una descarga eléctrica. No trate de
reparar el aparato Vd. mismo ya que tal acción invalidaría la garantía.
PROBLEMA
– CAUSA POSIBLE
• SOLUCIÓN
No hay sonido/energía
– VOLUME no está ajustado
• Ajuste VOLUME
– Los auriculares están conectados
• Desconéctelos
– El cable de red no está bien conectado
• Conéctelo bien
Fuerte zumbido o ruido en la radio
– Interferencias eléctricas: el aparato está
demasiado cerca del TV, VCR u ordenador
• Aumente la distancia
La recepción de la radio es débil
– La señal es demasiado débil
• FM: Para obtener una recepción óptima, dirija la
antena telescópica
Indicación
– El CD está rayado o sucio
• Cambie/ limpie el CD, vea Mantenimiento
– La lente láser tiene humedad
• Espere hasta que la humedad se evapore
El CD salta de pista
– El CD está dañado o sucio
• Cambie o limpie el CD
– Está activado SHUFFLE o PROGRAM
• Desactive SHUFFLE / PROGRAM
La calidad de sonido de las cintas es baja
– Polvo y suciedad en las cabezas, etc.
• Limpie las partes de la platina, vea
Mantenimiento
– Se están utilizando tipos de casetes
incompatibles: (METAL o CHROME)
• Utilice las de tipo NORMAL (IEC I) para la
grabación
La grabación no funciona
– Las pestañas de la casete están rotas
• Coloque una cinta adhesiva sobre la endidura
Indicación
– El CD-R(W) es virgen o no está bien acabado
• Utilice un CD-R(W) acabado
Español
Este aparato satisface las normas relativas a la interferencia radioléctrica de la
Comunidad Europea.
La placa de especificaciones eléctrica está situada en la base del aparat.
33
Page 34

BEDIENELEMENTE
OBERES UND VORDERES BEDIENFELD
1 DIGITAL EQUALIZER – wählt Lautstärke oder
die diversen Frequenzen zur Einstellung:
Lautstärke, Baß, mittlere und hohe Frequenzen
2 VOLUME/SOUND CONTROL CENTER –
ändert die Einstellungen für Lautstärkepegel
und digitalen Equalizer
3 DIGITAL DBB (Dynamic Bass Boost) –
optimiert die Tiefen
4 INCREDIBLE SURROUND – sorgt für einen
super-optimierten Stereo-Effekt
5 POWER slider – wählt die Klangquelle für
Deutsch
CD/ TUNER/ TAPE und
schaltet auch das Gerät ab
6 CASSETTE RECORDER Tasten:
RECORD 0 – beginnt mit der Aufnahme
PLAY 1 – beginnt mit dem Abspielen
SEARCH 5, 6 – schnelles Vor-/Rückspulen
des Bandes
OPEN•STOP /9 – hält das Band an;
– öffnet das
Cassettenfach
PAUSE ; – unterbricht Aufzeichnung oder
Wiedergabe (Abspielen)
7 OPEN•CLOSE – öffnet/ schließt die CD-Lade
8 STOP 9 – hält die CD-Wiedergabe an oder
löscht ein CD-Programm
9 PLAY•PAUSE 2; – beginnt oder unterbricht
CD-Wiedergabe
0 BATT LOW – zeigt an, wann die Batterie
erschöpft ist
! PROG – CD: programmiert Titel und überprüft
das Programm;
Tuner: programmiert vorgewählte
Radiosender
@ SHUFFLE – spielt CD-Titel in zufälliger
Reihenfolge ab
# SEARCH ∞, §
Tuner: - (ab, auf) Einstellen auf Radiosender;
CD: - Vorwärts- und Rückwärtssuche
innerhalb eines Titels;
- springt an den Anfang eines aktuellen
Titels / vorigen/ nachfolgenden Titels
$ REPEAT – wiederholt einen Titel / ein
CD-Programm / eine gesamte CD
% Display – zeigt den Gerätestatus an
^ BAND – wählt Wellenbereich
& TUNER PRESET 4, 3 – wählt einen
vorgewählten Tunersender (ab, auf)
RÜCKWAND
* p – Kopfhörerbuchse 3,5 mm
( Teleskopantenne – verbessert FM-Empfang
) AC MAINS – Einlaß für Netzkabel
¡ Batterietür
ACHTUNG
Der Gebrauch von Bedienelemente oder Einstellungen bzw. Verfahrensausführungen die
hier nicht ausdrücklich erwähnt worden sind, kann eine gefährliche Strahlendosierung
oder andere unsichere Operationen zur Folge haben.
Umweltinformationen
Alles überflüssige Verpackungsmaterial wurde vermieden. Wir haben unser möglich-stes getan,
damit die Verpackung leicht in drei Monomaterialien aufteilbar ist: Wellpappe (Schachtel),
expandierbares Polystyrol (Puf-fer) und Polyäthylen (Beutel, Schutzschaum).
Ihr Gerät besteht aus Materialien, die von darauf spezialisierten Betrieben wiederverwertet werden können. Bitte halten Sie sich beim Entsorgen von Verpackungsmaterial, erschöpften Batterien und alter Ausrüstung an örtliche Bestimmungen.
34
Page 35

STROMVERSORGUNG
6 x D-cells - R20 - UM1
Nach Möglichkeit das Stromnetz benutzen, wenn Sie wollen, daß
die Batterien länger halten. Vor dem Einsetzen von Batterien
sicherstellen, daß der Netzstecker aus der Steckdose heraus- und
vom Gerät abgezogen ist.
BATTERIEN (OPTIONAL)
1. Das Batteriefach öffnen und sechs Batterien (Typ R-20, UM-1
oder D-Zellen - vorzugsweise Alkalibatterien) einsetzen, wobei
die richtige Polarität anhand der Symbole „+“ und „-“ im Fach
zu beachten ist.
2. Die Tür des Faches wieder anbringen und sicherstellen, daß die
Batterien fest und richtig eingesetzt sind. Das Gerät ist jetzt
einsatzbereit.
– Wenn BATT LOW aufleuchtet, ist die Batterie erschöpft.
– Der BATT LOW Anzeiger erlischt schließlich, wenn die
Batterien zu stark erschöpft sind.
– Die unsachgemäße Benutzung von Batterien führt zu aus-
tretendem Elektrolyt und korrodiert das Fach oder bewirkt
Bersten der Batterien. Des-halb:
– Batterietypen nicht mischen, z.B. Alkali mit Zink-Kohle.
Nur Batterien desselben Typs für das Gerät benutzen.
– Beim Einsetzen neuer Batterien nicht versuchen, alte
Batterien mit den neuen zu kombinieren.
– Die Batterien herausnehmen, wenn das Gerät längere
Zeit nicht benutzt wird.
– Batterien enthalten Chemikalien, weshalb sie
vorschriftsmäßig zu entsorgen sind.
Deutsch
BENUTZUNG DES WECHSELSTROMNETZES
1. Nachprüfen, ob die auf dem Typenschild auf der
Geräteunterseite angegebene Netzspannung der örtlichen
Netzspannung entspricht. Ist dies nicht der Fall, sich an Ihren
Händler oder Ihr Kundendienstzentrum wenden.
2. Falls Ihr Gerät mit einem Spannungswähler ausgerüstet ist, ist
er auf die örtliche Netzspannung einzustellen.
3. Das Netzkabel an die Steckdose anschließen, und das Gerät ist
jetzt einsatzbereit.
4. Zur völligen Wegnahme des Gerätes von der Stromversorgung
den Netzstecker aus der Steckdose herausziehen.
MAINS
35
Page 36

GRUNDFUNKTIONEN DIGITAL-TUNER
CD RE
CD SY
A
Z
1
5
6
0
C
D
R
A
D
I
O
C
A
S
S
E
T
T
E
R
E
C
O
R
D
E
R
S
T
O
P
P
L
A
Y
•
P
A
U
S
E
SOUNDCO
B
A
T
S
O
U
N
D
C
O
N
T
R
O
L
C
E
N
T
E
R
V
O
L
U
M
E
E
T
R
E
EIN- UND ABSCHALTEN
• Den POWER Regler auf die gewünschte Klangquelle schieben:
CD, TUNER oder TAPE.
• Das Gerät ist abgeschaltet, wenn sich der POWER Schieberegler
in der Stellung TAPE/OFFbefindet und die Tasten am Cassettendeck losgelassen werden.
– Die Lautstärke-/Toneinstellungen und Tunervorwahlen werden im
Gerät gespeichert.
EINSTELLUNG VON LAUTSTÄRKE UND KLANG
1. Den Regler VOLUME/ SOUND CONTROL CENTER zum Erhöhen
der Gerätelautstärke im Uhrzeigersinn oder zum Herabsetzen der
Deutsch
Gerätelautstärke gegen den Uhrzeigersinn drehen.
™ In der Anzeige erscheint die Lautstärkepegelanzeige VOL und
eine Zahl von 0-32.
2. Zur Einstellung der Tiefen, mittleren und hohen Frequenzpegel
wird DIGITAL EQUALIZER einmal oder mehrmals gedrückt, bis
die gewünschte Option angezeigt wird. Während die Option
gezeigt wird, den Regler VOLUME/ SOUND CONTROL
CENTER zum Erhöhen oder Verringern (- 5 bis + 5 Maximum)
der gewünschten Frequenz drehen.
™ Auch VOLUME kann auf diese Weise geändert werden,
bei einem Pegelbereich von 0-32.
3. DIGITAL DBBdrücken, um Dynamic Bass Boost ein- oder
abzuschalten.
™ Wenn ein, leuchtet die DIGITAL DBB Lampe auf.
4. INCREDIBLE SURROUND drücken, um den Surround Sound-
Effekt ein- oder abzuschalten.
™ Wenn ein, leuchtet die INCREDIBLE SURROUND Lampe auf.
Hinweis: Der Effekt von INCREDIBLE SURROUND kann bei
unterschiedlichen Musiktypen schwanken.
S
O
U
N
E
M
U
L
O
V
D
C
O
R
N
E
T
T
R
N
O
E
L
C
S
T
O
P
P
L
A
Y
•
P
A
U
S
E
CD REWRITABL
CD SYNCRO STRA
C
D
R
A
A
D
I
Z
O
C
A
S
+
•
•
•
•
0
•
•
•
•
–
L
O
V
1
5
S
E
6
T
0
T
E
R
E
C
O
R
D
E
R
EINSTELLEN AUF RADIOSENDER
1. TUNER als Quelle wählen.
™ wird kurz angezeigt, und dann wird die Radiosender-
frequenz gezeigt.
2. BAND einmal oder mehrmals drücken, um Ihren Wellenbereich
zu wählen.
3. SEARCH ∞ oder § drücken und loslassen, wenn die Frequenz
in der Anzeige zu laufen beginnt.
™ Der Tuner wird automatisch auf einen Sender mit ausreichend
Empfang eingestellt. In der Anzeige erscheint bei
automatischem Suchlauf.
™
Wenn ein FM-Sender in Stereo empfangen wird, wird
4.
Schritt 3 ggf. wiederholen, bis Sie den gewünschten Sender finden.
•
Zum Einstellen auf einen schwachen Sender SEARCH ∞ oder §
kurz und wiederholt drücken, bis sich optimaler Empfang ergeben hat.
36
STEREO
gezeigt.
C
D
R
A
A
D
I
Z
O
C
1
A
S
5
S
E
6
T
0
T
E
SOUND CONTROL CENTER
P
S
T
S
H
U
•
•
R
E
P
E
A
T
H
R
R
O
G
V
O
E
L
R
E
O
F
F
L
E
S
T
O
P
P
L
A
Y
•
P
A
U
S
E
B
A
T
P
R
L
O
O
F
W
G
M
A
M
L
W
S
H
U
F
F
L
E
S
E
A
R
C
O
E
P
C
O
R
D
E
R
T
U
N
E
R
P
R
E
S
E
T
B
A
N
D
Page 37

DIGITAL-TUNER ALLGEMEINE INFORMATIONEN
A
Z
1
5
6
0
C
D
R
A
D
I
O
C
A
S
S
E
T
T
E
R
E
C
O
R
D
E
R
O
P
E
S
T
O
P
P
L
A
Y
•
P
A
U
S
E
T
U
N
E
R
P
R
E
S
E
T
P
R
O
G
S
H
U
F
F
L
E
R
E
P
E
A
T
S
E
A
R
C
H
B
A
N
D
SOUND CONTROL CENTER
F
M
A
M
B
A
T
L
O
W
L
W
P
R
O
G
S
H
U
F
F
L
E
•
•
V
O
L
Verbesserung des Radioempfangs
• Für FM die Teleskopantenne ausziehen. Die Antenne neigen und
drehen. Sie einziehen, wenn das Signal zu stark (sehr nahe an
einem Sender) ist.
• Für MW (AM oder LW), verfügt das Gerät über eine eingebaute
Antenne, weshalb die Teleskopantenne nicht benötigt wird. Die
Antenne durch Drehen des gesamten Gerätes ausrichten.
Programmieren von Radiosendern
Sie können bis zu 30 Radiosender speichern.
1. Auf Ihren gewünschten Sender einstellen (siehe Einstellen auf
Radiosender).
2. PROG drücken, um die Programmierung zu aktivieren.
™ Anzeige:
3. PRESET 3 oder 4 einmal oder mehrmals drücken, um diesem
Sender eine Nummer von 1 bis 30 zuzuordnen.
4. PROG erneut drücken, um die Einstellung zu bestätigen.
™ Anzeige:
Frequenz des Vorwahlsenders werden gezeigt.
5.
Die vier o.g. Schritte wiederholen, um weitere Sender abzuspeichern.
• Sie können einen Vorwahlsender durch Speichern einer anderen
Frequenz an seiner Stelle überschreiben.
Einstellen auf Vorwahlsender
TUNER PRESET 4 oder 3 drücken, bis der gewünschte Vorwahl-
sender angezeigt wird.
PROG blinkt.
PROG verschwindet, die Vorwahlnummer und die
Deutsch
Allgemeine Pflegehinweise
• Gerät, Batterien, CDs oder Cassetten nicht Feuchtigkeit, Regen,
Sand oder übertriebener Wärme, die auf Heizanlagen oder
direkte Sonneneinstrahlung zurückzuführen ist, aussetzen.
• Zur Reinigung des Gerätes wird ein weiches, leicht
angefeuchtetes Ledertuch benutzt. Keine Reinigungsmittel
verwenden, die Alkohol, Ammoniak, Benzol oder scheuernde
Bestandteile enthalten, weil dadurch das Gehäuse beschädigt
werden könnte.
Sicherheitsinformationen
• Das Gerät auf eine harte, ebene Oberfläche stellen, damit das
System waagerecht steht. Sicherstellen, daß ausreichende
Lüftung vorhanden ist, um Überhitzen des Systems zu verhindern.
• Die mechanischen Teile des Gerätes enthalten selbstschmierende
Lager und dürfen nicht geölt oder geschmiert werden.
37
Page 38

CD SPIELER
A
Z
1
5
6
0
C
D
R
A
D
I
O
C
A
S
S
E
T
T
E
R
E
C
O
R
D
E
R
O
P
E
N
C
L
O
S
E
S
T
O
P
P
L
A
Y
•
P
A
U
S
E
T
U
N
E
R
P
R
E
S
E
T
P
R
O
G
S
H
U
F
F
L
E
R
E
P
E
A
T
S
E
A
R
C
H
B
A
N
D
SOUND CONTROL C
ENTER
F
M
A
M
B
A
T
L
O
W
L
W
P
R
O
G
S
H
U
F
F
L
E
•
•
V
O
L
Abspielen einer CD
1. CD als Quelle wählen.
2. OPEN•CLOSE drücken, um die CD-Lade zu öffnen.
™ Anzeige: , wenn Sie die CD-Lade öffnen.
3. Eine CD oder CD-R(W), mit bedruckter Seite nach oben, einlegen
und OPEN•CLOSE drücken, um die CD-Lade zu schließen.
™ Anzeige: , während der CD-Spieler den Inhalt einer CD
absucht. Die Gesamtzahl Titel und die Abspielzeit werden dann
angezeigt.
™ Anzeige: wird gezeigt, wenn die CD R(W) nicht fertig ist.
4. PLAY•PAUSE 2; drücken, um mit dem Abspielen zu beginnen.
Deutsch
™ Anzeige: Aktuelle Titelnummer und vergangene Abspielzeit des
Titels während des CD-Abspielens.
5. Zur Unterbrechung des Abspielens PLAY•PAUSE 2;; drücken.
PLAY•PAUSE 2; erneut drücken, um mit dem Abspielen
fortzufahren.
™ Die Anzeige wird zum Festbild, und die vergangene Abspielzeit
blinkt, wenn das Abspielen unterbrochen wird (‚Pause‘).
6. Zum Anhalten des CD-Abspielens STOP 9 drücken.
Hinweis: CD-Abspielen hört auch dann auf, wenn:
– die CD-Lade geöffnet wird;
– die CD am Ende angekommen ist (es sei denn, Sie
wählten REPEAT ALL);
– Sie eine andere Quelle wählen: TAPE / TUNER.
Wahl eines anderen Titels
• SEARCH ∞ oder § am Gerät einmal oder wiederholt drücken,
bis die gewünschte Titelnummerin der Anzeige erscheint.
• Wenn Sie eine Titelnummer kurz nach Einlegen einer CD oder in
der Pause-Position gewählt haben, müssen Sie
PLAY•PAUSE 2; drücken, um mit dem Abspielen zu beginnen.
Suche nach einer Passage innerhalb eines Titels
1. SEARCH ∞ oder § drücken und gedrückt halten.
– Die CD wird mit geringer Lautstärke und hoher Geschwindigkeit
abgespielt.
2. SEARCH ∞ oder § loslassen, sobald Sie die gewünschte
Passage erkennen.
– Normales Abspielen wird fortgesetzt.
Hinweis: Während eines CD-Programms oder wenn SHUFFLE/
REPEAT aktiv ist, ist die Suche nur innerhalb eines
Titels möglich.
38
Page 39

Verschiedene Abspielmodi: SHUFFLE und REPEAT
A
Z
1
5
6
0
C
D
R
A
D
I
O
C
A
S
S
E
T
T
E
R
E
C
O
R
D
E
R
S
T
O
P
P
L
A
Y
•
P
A
U
S
E
T
U
N
E
R
P
R
E
S
E
T
P
R
O
G
S
H
U
F
F
L
E
R
E
P
E
A
T
S
E
A
R
C
H
B
A
N
D
SOUND CONTROL C
ENTER
F
M
A
M
B
A
T
L
O
W
L
W
P
R
O
G
S
H
U
F
F
L
E
•
•
V
O
L
T
Sie können die diversen Abspielmodi vor dem oder beim Abspielen
wählen. Die Abspielmodi können auch mit PROGRAM kombiniert werden.
SHUFFLE - Titel der gesamten CD/ des Programms werden in
zufälliger Reihenfolge abgespielt
SHUFFLE und REPEAT ALL - wiederholt die gesamte CD/ das
Programm ununterbrochen in zufälliger Reihenfolge
REPEAT ALL- wiederholt die gesamte CD/ das Programm
REPEATund SHUFFLE REPEAT - spielt den aktuellen (zufälligen)
Titel ununterbrochen ab
CD SPIELER
1. Zur Auswahl Ihres Abspielmodus die Taste SHUFFLE oder
REPEATvor dem oder beim Abspielen drücken, bis die
gewünschte Funktion in der Anzeige erscheint.
2. PLAY•PAUSE 2; drücken, um mit dem Abspielen zu beginnen,
wenn in der Stop-Position befindlich.
• Das Abspielen beginnt sofort, wenn Sie einen SHUFFLE Modus
gewählt haben.
3. Zur Rückkehr zum normalen Abspielen die jeweilige SHUFFLE
oder REPEAT Taste drücken, bis die diversen SHUFFLE / REPEAT
Modi nicht mehr angezeigt werden.
–
Zum Aufheben Ihres Abspielmodus können Sie auch STOP 9 drücken.
Programmieren von Titelnummern
In der Stop-Position programmieren, um Ihre CD-Titel in der
gewünschten Reihenfolge zu wählen und zu speichern. Wenn Sie
wollen, können Sie einen Titel mehr als einmal speichern.
Bis zu 20 Titel können abgespeichert werden.
1. SEARCH ∞ oder § am Gerät benutzen, um Ihre gewünschte
Titelnummer zu wählen.
2. PROG drücken.
™ Anzeige:
kurz.
™ Wenn Sie zu programmieren versuchen, ohne zuerst eine
Titelnummer zu wählen, wird gezeigt.
3. Schritt 1-2 wiederholen, um alle gewünschten Titel zu wählen
und zu speichern.
™ wird angezeigt, wenn Sie versuchen, mehr als 20 Titel
zu programmieren.
4. PLAY•PAUSE 2; drücken, um mit dem Abspielen Ihres CD-
Programms zu beginnen.
Hinweis: wenn Sie die Titel während des CD-Abspielens gewählt
PROG und die gewählte Titelnummer. erscheint
haben, zuerst STOP 9, dann PLAY•PAUSE 2; drücken.
C
D
R
A
A
D
I
Z
O
C
1
A
S
5
S
E
6
T
0
T
E
R
E
C
S
H
•
•
R
E
P
E
A
T
SOUND CONTROL CENTER
L
E
R
E
E
A
R
C
H
O
R
D
E
R
P
T
R
U
O
N
G
E
R
V
O
L
P
R
E
S
U
F
F
L
E
P
R
S
H
U
•
•
P
E
A
T
E
B
A
N
D
C
D
R
A
A
D
I
Z
O
C
1
A
S
5
S
E
6
T
0
T
E
R
E
C
O
R
D
E
O
G
V
O
L
F
F
L
E
B
A
N
D
Deutsch
R
T
U
N
E
R
S
T
O
P
P
L
A
Y
•
P
A
U
S
E
SOUND CONTROL CENTER
B
A
T
P
R
L
O
O
F
W
G
M
A
M
L
W
S
H
U
F
F
L
E
S
E
A
R
C
H
S
T
O
P
P
L
A
Y
•
P
A
U
S
E
B
A
T
P
R
L
O
O
F
W
G
M
A
M
L
W
S
H
U
F
F
S
39
Page 40

CD-SPIELER CASSETTENRECORDER
W
SYNC
A
Z
1
5
6
0
C
D
R
A
D
I
O
C
A
S
S
E
T
T
E
R
E
C
O
R
D
E
R
S
T
O
P
P
L
A
Y
•
P
A
U
S
E
T
U
N
E
R
P
R
O
G
S
H
U
F
F
L
E
R
E
P
E
A
T
S
E
A
R
C
H
B
A
N
D
SOUND CONTROL CENTER
F
M
A
M
B
A
T
L
O
W
L
W
P
R
O
G
S
H
U
F
F
L
E
•
•
V
O
L
S
O
U
N
D
C
O
N
T
R
O
L
C
E
N
T
E
R
V
O
L
U
TER
C
Überprüfen des Programms
In der Stop-Position oder beim Abspielen PROG eine Weile
drücken und gedrückt halten, bis all Ihre gespeicherten
Titelnummern der Reihe nach in der Anzeige erscheinen.
Löschen eines Programms
Sie können das Programm durch folgendes löschen:
– einmaliges Drücken von STOP 9 in der Stop-Position;
– zweimaliges Drücken von STOP 9 beim Abspielen.
•
In der Anzeige erscheint kurz
Das Programm wird ebenfalls gelöscht durch:
Deutsch
– Drücken, um die CD-Lade zu öffnen;
– Wahl einer anderen Quelle: TAPE / TUNER.
ABSPIELEN VON CASSETTEN
1. TAPEals Quelle wählen.
™ In der Anzeige erscheint
TAPE während des gesamten Cassetten-
Abspielvorgangs.
2. OPEN•STOP /9 drücken, um das Cassettenfach zu öffnen.
3. Eine bespielte Cassette einlegen und das Cassettenfach schließen.
4. PLAY1 drücken, um mit dem Abspielen zu beginnen.
5. Zum Unterbrechen des Abspielens PAUSE; drücken.
Zur Fortsetzung diese Taste erneut drücken.
6. Durch Drücken von SEARCH 5 oder 6 am Gerät ist das
Schnellspulen des Bandes in beiden Richtungen möglich.
7. Zum Anhalten des Bandes OPEN•STOP /9 drücken.
• Die Tasten werden am Bandende automatisch abgeschaltet,
außer dann, wenn PAUSE ; aktiviert wurde.
Hinweis: Die Klangquelle kann beim Abspielen einer Cassette
nicht geändert werden.
,
und
PROG
verschwindet.
E
M
U
L
O
V
R
E
T
N
E
S
T
O
P
P
L
A
Y
•
P
A
P
R
O
G
C
D
R
A
A
D
I
Z
O
C
A
S
S
E
U
S
E
B
A
T
L
O
F
W
M
T
SOUND CONTROL CEN
CD REWRITABLE COMPATIBLE
CD SYNCRO STRAT RECORDING
1
5
6
0
T
E
R
E
C
O
R
D
E
R
O
P
E
N
C
L
O
S
E
40
Page 41

CD-SPIELER CASSETTENRECORDER
A
Z
1
5
6
0
C
D
R
A
D
I
O
C
A
S
S
E
T
T
E
R
E
C
O
R
D
E
R
S
T
O
P
P
L
A
Y
•
P
A
U
S
E
T
U
N
E
R
P
R
E
S
E
T
P
R
O
G
S
H
U
F
F
L
E
R
E
P
E
A
T
S
E
A
R
C
H
B
A
N
D
SOUND CONTROL CENTER
F
M
A
M
B
A
T
L
O
W
L
W
P
R
O
G
S
H
U
F
F
L
E
•
•
V
O
L
TER
C
ALLGEMEINE INFORMATIONEN ÜBER DIE AUFNAHME
• Die Aufnahme ist zulässig, solange Urheberrechte oder sonstige
Rechte Dritter nicht verletzt werden.
• Dieses Deck ist für die Aufnahme auf CHROM- (IEC II) oder
METALL- (IEC IV) Cassetten ungeeignet. Für die Aufnahme
sollten Sie ausschließlich NORMAL-Cassetten (IEC I) benutzen,
deren Zungen nicht herausgebrochen wurden.
• Die optimale Aussteuerung wird automatisch eingestellt. Ändern
der Bedienelemente VOLUME, INCREDIBLE SURROUND, DIGITAL
EQUALIZER oder DBB hat keinen Einfluß auf die vor sich gehende
Aufnahme.
• Während der ersten und letzten 7 Sekunden findet keine
Aufnahme statt, wenn das Vorspannband an den
Aufnahmeköpfen vorbeiläuft.
• Um das versehentliche Löschen einer Aufnahme zu verhindern,
die Cassette vor sich halten und die Zunge links herausbrechen.
Aufzeichnung auf dieser Seite ist nicht mehr möglich. Um diese
Aufnahme- bzw. Löschsperre aufzuheben, kann die entstandene
Öffnung mit einem Klebeband abgedeckt werden.
Synchro Start CD-Aufzeichnung
1. CD als Quelle wählen.
2. Eine CD einlegen und, falls gewünscht, Titelnummern
programmieren.
3. OPEN•STOP /9 drücken, um das Cassettenfach zu öffnen.
4. Eine geeignete Cassette in das Cassettendeck einlegen und das
Cassettenfach zudrücken.
5. RECORD 0 drücken, um mit dem Überspielen zu beginnen.
– Das Abspielen des CD-Programms beginnt automatisch ab
Programmanfang. Der CD-Spieler braucht nicht gesondert
gestartet zu werden.
T
N
E
S
T
O
P
P
1
C
D
R
A
A
D
I
O
C
A
S
CD REWRITABLE COMPATIBLE
CD SYNCRO STRAT RECORDING
Z
1
5
S
E
6
T
0
T
E
R
E
C
O
R
D
E
R
O
P
E
N
C
L
O
S
E
E
M
U
L
O
V
R
E
P
L
A
Y
•
P
A
U
S
E
SOUND CONTROL CEN
B
A
T
R
L
O
O
F
W
G
M
Deutsch
Auswahl und Aufnahme einer bestimmten Passage
innerhalb eines Titels
• SEARCH ∞ oder § drücken und gedrückt halten.
• Wenn Sie die von Ihnen gewünschte Passage erkennen,
SEARCH ∞ oder § loslassen.
• Zur Unterbrechung des CD-Abspielens PLAY•PAUSE 2;
drücken.
• Die Aufnahme beginnt ab dieser exakten Stelle im Titel, wenn
man RECORD 0 drückt.
6. Für kurze Unterbrechungen während der Aufzeichnung PAUSE;
drücken. Zur Fortsetzung der Aufnahme erneut PAUSE;
drücken.
7. Zum Anhalten der Aufnahme OPEN•STOP /9 drücken.
41
Page 42

AUFNAHME ALLGEMEINE INFORMATIONEN
CD REWRITABLE COMPATIBLE
CD S
YNCRO STRAT RECORDING
A
Z
1
5
6
0
C
D
R
A
D
I
O
C
A
S
S
E
T
T
E
R
E
C
O
R
D
E
R
O
P
E
N
C
L
O
S
E
S
T
O
P
P
L
A
Y
•
P
A
U
S
E
P
R
O
G
SOUND CONTROL CENTER
F
M
B
A
T
L
O
W
C
E
N
T
E
R
V
O
L
U
M
E
Überspielen vom Tuner
1. Auf den gewünschten Radiosender einstellen (siehe Einstellen
auf Radiosender).
2. OPEN•STOP /9 drücken, um das Cassettenfach zu öffnen.
3. Einen geeigneten Tonträger in das Cassettendeck einlegen und
das Cassettenfach schließen.
4. RECORD 0 drücken, um mit dem Überspielen zu beginnen.
5. Für kurze Unterbrechungen während der Aufzeichnung PAUSE;
drücken. Zur Fortsetzung der Aufnahme erneut PAUSE; drücken.
6. Zum Anhalten der Aufnahme OPEN•STOP /9 drücken.
Umgang mit CD-Spieler und CD
Deutsch
• Wenn der CD-Spieler CDs nicht richtig lesen kann, eine handelsübliche Reinigungs-CD zur Reinigung der Linse benutzen, bevor
das Gerät zur Reparatur gegeben wird. Andere Reinigungsmethoden können die Linse zerstören.
• Die Linse des CD-Spielers sollte niemals berührt werden!
• Plötzliche Änderungen der Umgebungstemperatur können zu
Kondensation führen, und die Linse des CD-Spielers kann
beschlagen. Abspielen einer CD ist dann nicht möglich. Nicht
versuchen, die Linse zu reinigen, sondern des Gerät in einer
warmen Umgebung lassen, bis die Feuchtigkeit verdunstet.
• Das CD-Fach stets geschlossen halten, um Staub auf der Linse zu
vermeiden.
• Zur Herausnahme einer CD aus ihrer Schutzhülle die Zentralspindel beim Anheben der CD drücken. Die CD stets am Rand
anheben und nach Gebrauch wieder in ihre Schutzhülle einlegen,
um Kratzer und Staubeinwirkung zu vermeiden.
• Die CD durch eine geradlinige Bewegung von der Mitte zum
Rand mit einem weichen, fusselfreien Tuch reinigen. Keine
Reiniger benutzen, da sie den Tonträger beschädigen können.
• Niemals auf eine CD schreiben oder Aufkleber an ihr anbringen.
X
Pflege des Cassettendecks
Zur Gewährleistung guter Aufnahme- und Wiedergabequalität sind
die mit A, B und C bezeichneten Teile (im nachstehenden
Diagramm) ca. alle 50 Betriebsstunden oder im Schnitt einmal pro
Monat zu reinigen. Ein leicht mit Alkohol angefeuchtetes Wattestäbchen oder eine spezielle Kopfreinigungsflüssigkeit zur
Reinigung beider Decks benutzen.
1. Das Cassettenfach durch Drücken von OPEN•STOP /9 öffnen.
2. PLAY1 drücken und die Gummi-Andruckrollen C reinigen.
3. PAUSE ; drücken und die magnetischen Köpfe A sowie die
Tonwelle B reinigen.
4. Nach der Reinigung OPEN•STOP /9 drücken.
Hinweis: Die Köpfe können auch durch einmaliges komplettes
42
Abspielen einer Reinigungscassette gereinigt werden.
C
A AB
Page 43

FEHLERSUCHE
Wenn ein Fehler auftritt, zuerst die nachstehenden Punkte überprüfen, bevor das Gerät zur Reparatur
gegeben wird. Wenn Sie das Problem nicht durch Befolgen dieser Ratschläge lösen können, sollten
Sie sich an Ihren Händler oder an Ihr Reparaturzentrum wenden.
WARNHINWEIS: Das Gerät nicht öffnen, weil Stromschlaggefahr besteht. Unter gar
keinen Umständen sollten Sie versuchen, das Gerät selbst zu
reparieren, weil die Garantie dadurch erlischt.
PROBLEM
– MÖGLICHE URSACHE
• ABHILFE
Kein Sound/keine Leistung
– VOLUME nicht eingestellt
• VOLUME einstellen
– Kopfhörer angeschlossen
• Kopfhörer herausziehen
– Netzkabel nicht fest angeschlossen
• AC-Netzkabel ordnungsgemäß anschließen
Heftiges Brummen oder Rauschen des Radios
– Elektrische Störung: Gerät zu nahe am
Fernseher, Videorecorder oder Computer
• Den Abstand vergrößern
Schlechter Radioempfang
– Schwaches Radiosignal
• FM: die FM-Teleskopantenne für optimalen
Empfang ausrichten
Anzeige
– CD stark zerkratzt oder verschmutzt
• CD austauschen/reinigen, siehe Pflege
– Laserlinse ist beschlagen
• Warten, bis Linse sich akklimatisiert hat
Die CD überspringt Titel
– CD beschädigt oder verschmutzt
• CD austauschen oder reinigen
– SHUFFLE oder PROGRAM ist aktiv
• SHUFFLE / PROGRAM abschalten
Mangelnde Tonqualität der Cassette
– Staub und Schmutz an den Köpfen usw.
• Deckteile reinigen, siehe Pflege
– Verwendung inkompatibler Cassettentypen
(METALL oder CHROM)
• Nur NORMAL (IEC I) für Aufnahme verwenden
Aufnahme ist nicht möglich
– Cassettenzunge(n) könnte(n) herausgebrochen
sein
• Ein Stück Klebeband über die fehlende Zunge
kleben
Anzeige
–
CD-R(W) ist unbespielt, oder die CD ist nicht
fertig
• Eine fertige CD-R(W) benutzen
Deutsch
Dieses Gerät entspricht den Funkentstörvorschriften der Europäischen Union.
Das Typenschild befindet sich auf der Geräteunterseite.
43
Page 44

TOETSEN
Batterijen niet weggooien,
maar inleveren als KCA.
ñ
BOVEN- EN VOORKANT
1 DIGITAL EQUALIZER – om het volume of de
verschillende frequenties te kiezen om
vervolgens in te stellen: volume, lage, midden
en hoge frequenties
2 VOLUME/SOUND CONTROL CENTER – om
het volume en de digitale equalizer in te stellen
3 DIGITAL DBB (Dynamic Bass Boost) – om
de lage tonen te versterken
4 INCREDIBLE SURROUND – om een
overweldigend stereo-effect te creëren
5 POWER -schakelaar – om de geluidsbron
CD/ TUNER/ TAPE te kiezen en om het
apparaat uit te zetten
6 CASSETTE RECORDER toetsen:
Nederlands
RECORD 0 – om een opname te starten
PLAY 1 – om het afspelen te starten
SEARCH 5, 6 – om de cassette versneld
vooruit/ terug te spoelen
OPEN•STOP /9 – om het cassettevak te
openen;
– om de cassette te
stoppen
PAUSE ; – om het opnemen of afspelen te
onderbreken
7 OPEN•CLOSE – om het cd-vak te openen/ te
sluiten
8 STOP 9 – om het afspelen van een cd te
beëindigen en om een cd-programma te wissen
9 PLAY•PAUSE 2; – om het afspelen van een
cd te starten/ te onderbreken
0 BATT LOW – geeft aan dat de batterijen bijna
leeg zijn
! PROG – CD: om nummers te programmeren
en om het programma te controleren;
Tuner: om een zender te
programmeren
@ SHUFFLE – om de nummers van een cd in
willekeurige volgorde af te spelen
# SEARCH ∞, §
TUNER: - (omlaag, omhoog) om af te stemmen
op een radiozender;
CD: - om binnen een nummer vooruit of terug
te zoeken;
- om naar het begin van het huidige/
vorige/ volgende nummer te gaan
$ REPEAT – om een nummer/ cd-programma/
hele cd te herhalen
% Display – geeft informatie over het apparaat
^ BAND – om het golfgebied te kiezen
& TUNER PRESET 4, 3 – om af te stemmen op
een geprogrammeerde zender (omlaag,
omhoog)
ACHTERKANT
* p – 3,5 mm -aansluitbus voor een
hoofdtelefoon
( Telescoopantenne– om de FM-ontvangst te
verbeteren
) AC MAINS – aansluitbus voor het netsnoer
¡ Batterijklepje
LET OP
Het gebruik van de toetsen en regelingen of het toepassen van de aanwijzingen anders
dan hier beschreven, kan leiden tot blootstelling aan gevaarlijke straling of tot onveilige
werking.
Met het oog op het milieu...
Wij hebben alle overbodig verpakkingsmateriaal weggelaten en ervoor gezorgd dat de verpakking
gemakkelijk in drie materialen te scheiden is: karton (doos), polystyreenschuim (buffer) en plastic
(zakken, beschermfolie).
Uw apparaat bestaat uit materialen die door een gespecialiseerd bedrijf gerecycleerd
kunnen worden. Informeer waar u verpakkingsmateriaal, lege batterijen en oude
apparatuur kunt inleveren.
44
Page 45

STROOMVOORZIENING
6 x D-cells - R20 - UM1
Wilt u de batterijen sparen, gebruik dan zo vaak als u kunt de
netvoeding. Let erop dat u het netsnoer uit het apparaat en het
stopcontact haalt voor u de batterijen in het apparaat plaatst.
BATTERIJEN (LOS VERKRIJGBAAR)
1. Open het batterijvak en plaats er zes batterijen in, type R20,
UM-1 of D-cellen (bij voorkeur alkaline), met de "+" en "–"-
polen op dezelfde manier als aangegeven binnenin het
batterijvak.
2. Controleer of de batterijen correct en stevig op hun plaats
zitten en plaats het klepje van het batterijvak terug. U kunt het
apparaat nu gebruiken.
– Als BATT LOW brandt dan zijn de batterijen bijna leeg.
– De BATT LOW-indicator gaat op een gegeven moment uit
als de batterijen te zwak geworden zijn.
– Door verkeerd gebruik kunnen batterijen gaan lekken waardoor
roest ontstaat in het batterijvak of waardoor de batterijen
kunnen openbarsten. Daarom:
– Gebruik geen verschillende types batterijen door elkaar,
bijvoorbeeld alkaline met zink-koolstof. Gebruik voor het
apparaat enkel batterijen van hetzelfde type.
– Als u de batterijen vervangt, gebruik dan geen oude en
nieuwe batterijen door elkaar.
– Verwijder de batterijen als u het apparaat langere tijd niet
zult gebruiken.
– Batterijen bevatten chemicaliën en moeten daarom
op de juiste manier ingeleverd worden.
Nederlands
GEBRUIKEN VAN DE NETVOEDING
1. Controleer of de netspanning op het typeplaatje op de
onderkant van het apparaat overeenkomt met de
plaatselijke netspanning. Is dit niet het geval, neem dan
contact op met uw leverancier of serviceorganisatie.
2. Heeft het apparaat een netspanningskiezer, zet deze dan op de
plaatselijke netspanning.
3. Steek de stekker van het netsnoer in het stopcontact. Het
apparaat is nu klaar voor gebruik.
4. Trek de stekker uit het stopcontact als u de netvoeding
helemaal uit wilt schakelen.
MAINS
45
Page 46

BASISFUNCTIES DIGITALE TUNER
CD RE
CD SY
A
Z
1
5
6
0
C
D
R
A
D
I
O
C
A
S
S
E
T
T
E
R
E
C
O
R
D
E
R
S
T
O
P
P
L
A
Y
•
P
A
U
S
E
SOUNDCO
B
A
T
S
O
U
N
D
C
O
N
T
R
O
L
C
E
N
T
E
R
V
O
L
U
M
E
E
T
R
E
AAN- EN UITZETTEN
Zet de POWER-schakelaar op de gewenste geluidsbron: CD,
•
TUNER of TAPE.
•
Het apparaat staat uit wanneer de POWER-schakelaar op
TAPE/OFFstaat en de toetsen van de cassetterecorder
ontgrendeld zijn.
–
Het volume, de geluidsinstellingen en de geprogrammeerde
zenders blijven bewaard in het geheugen van het apparaat.
INSTELLEN VAN HET VOLUME EN HET GELUID
1.
Draai de knop VOLUME/ SOUND CONTROL CENTER in de
richting van de klok om het volume van het apparaat harder te
zetten en tegen de richting van de klok om zachter te zetten.
™
In het display wordt het volumeniveau weergegeven door VOL en
een cijfer van 0 tot 32.
2.
Nederlands
Om het niveau van de lage, midden en hoge frequenties in te
stellen, drukt u één of meerdere keren op DIGITAL EQUALIZER
tot de gewenste keuze in het display weergegeven wordt.
Draai, terwijl de gewenste keuze weergegeven wordt, de knop
VOLUME/ SOUND CONTROL CENTER om de gewenste
frequentie hoger of lager in te stellen (- 5 tot maximaal + 5).
™
VOLUME kan op dezelfde manier ingesteld worden met en
niveaubereik van 0 tot 32.
3.
Druk op DIGITAL DBBom het versterken van de lage tonen
(Dynamic Bass Boost) in en uit te schakelen.
™
Indien ingeschakeld dan brandt de DIGITAL DBB-indicator.
4.
Druk op INCREDIBLE SURROUND om het surround-
geluidseffect in en uit te schakelen.
™
Indien ingeschakeld dan brandt de INCREDIBLE SURROUNDindicator.
Opmerking: Het effect van INCREDIBLE SURROUND kan verschillen
naargelang de verschillende types muziek.
S
O
U
N
E
M
U
L
O
V
D
C
O
R
N
E
T
T
R
N
O
E
L
C
S
T
O
P
P
L
A
Y
•
P
A
U
S
E
CD REWRITA
CD SYNCRO STRA
BL
C
D
R
A
A
D
I
Z
O
C
A
S
+
•
•
•
•
0
•
•
•
•
–
L
O
V
1
5
S
E
6
T
0
T
E
R
E
C
O
R
D
E
R
AFSTEMMEN OP EEN RADIOZENDER
1.
Kies de bron TUNER.
™
verschijnt kort in het display en de frequentie van de
radiozender wordt weergegeven.
2.
Druk één of meerdere keren op BAND om het gewenste golfgebied
te kiezen.
3.
Houd SEARCH ∞ of § ingedrukt en laat los als de frequenties op
het display beginnen te lopen.
™
De TUNER stemt automatisch af op een zender die sterk genoeg is.
Tijdens het automatisch zoeken verschijnt in het display .
™
Als een FM-zender in stereo ontvangen wordt dan verschijnt
4. Herhaal indien nodig stap 3 tot u de gewenste zender gevonden
heeft.
Om af te stemmen op een zwakke zender: druk herhaaldelijk kort op
•
SEARCH ∞ of § tot de ontvangst optimaal is.
46
STEREO
C
D
R
A
A
D
I
Z
O
C
1
A
S
5
S
E
6
T
0
T
E
SOUND CONTROL CENTER
P
S
T
S
H
U
•
•
R
E
P
E
A
T
H
R
R
O
G
V
O
E
L
R
E
O
F
F
L
E
S
T
O
P
P
L
A
Y
•
P
A
U
S
E
B
A
T
P
R
L
O
O
F
W
G
M
A
M
L
W
S
H
U
F
F
L
E
S
E
A
R
C
O
E
P
C
O
R
D
E
R
T
U
N
E
R
P
R
E
S
E
T
B
A
N
D
.
Page 47

DIGITALE TUNER ALGEMENE INFORMATIE
A
Z
1
5
6
0
C
D
R
A
D
I
O
C
A
S
S
E
T
T
E
R
E
C
O
R
D
E
R
O
P
E
S
T
O
P
P
L
A
Y
•
P
A
U
S
E
T
U
N
E
R
P
R
E
S
E
T
P
R
O
G
S
H
U
F
F
L
E
R
E
P
E
A
T
S
E
A
R
C
H
B
A
N
D
SOUND CONTROL CENTER
F
M
A
M
B
A
T
L
O
W
L
W
P
R
O
G
S
H
U
F
F
L
E
•
•
V
O
L
Verbeteren van de radio-ontvangst
•
Voor FM moet u de telescoopantenne uittrekken.
Klap de antenne neer en draai deze. Als het signaal te sterk is
(in de buurt van een zender), schuif dan de antenne in elkaar.
•
Voor
MW (AM
antenne zodat de telescoopantenne niet nodig is. Richt de antenne
door het hele apparaat te draaien.
Programmeren van radiozenders
U kunt in het totaal 30 radiozenders in het geheugen opslaan.
1.
Stem af op de gewenste zender (zie Afstemmen op een radiozender).
2.
Druk op PROG om te beginnen met programmeren.
™
Display:
3.
Druk een of meerdere keren op PRESET 3 of 4 om een nummer
van 1 tot 30 toe te kennen aan deze zender.
4.
Druk opnieuw op PROG om te bevestigen.
™
Display:
geprogrammeerde zender worden weergegeven.
5.
Herhaal deze vier stappen om nog meer zenders op te slaan.
•
U kunt een geprogrammeerde zender wissen door een andere
frequentie op dezelfde plaats op te slaan.
Afstemmen op een geprogrammeerde zender
Druk op TUNER PRESET 4 of 3 tot het nummer van de gewenste
geprogrammeerde zender in het display verschijnt.
of
LW),
heeft het apparaat een ingebouwde
PROG
knippert.
PROG
verdwijnt, het zendernummer en de frequentie van de
Nederlands
Algemene onderhoud
•
Bescherm het apparaat, de batterijen, de cd’s en cassettes tegen
vocht, regen, zand of extreem hoge temperaturen zoals bij
verwarmingsapparatuur of in felle zon.
•
U kunt het apparaat schoonmaken met een licht bevochtigde
zeemlap. Gebruik geen schoonmaakmiddelen die alcohol, spiritus,
ammonia of schuurmiddel bevatten want die kunnen het apparaat
beschadigen.
Veiligheidsvoorschriften
•
Zet het apparaat op een harde, vlakke ondergrond zodat het niet om
kan vallen. Er moet voldoende ventilatieruimte zijn om te voorkomen
dat het apparaat te warm wordt.
•
De mechanische delen van het apparaat zijn voorzien van
zelfsmerende lagers en mogen dus niet gesmeerd of geolied
worden.
47
Page 48

CD SPELER
A
Z
1
5
6
0
C
D
R
A
D
I
O
C
A
S
S
E
T
T
E
R
E
C
O
R
D
E
R
O
P
E
N
C
L
O
S
E
S
T
O
P
P
L
A
Y
•
P
A
U
S
E
T
U
N
E
R
P
R
E
S
E
T
P
R
O
G
S
H
U
F
F
L
E
R
E
P
E
A
T
S
E
A
R
C
H
B
A
N
D
SOUND CONTROL CENTER
F
M
A
M
B
A
T
L
O
W
L
W
P
R
O
G
S
H
U
F
F
L
E
•
•
V
O
L
Afspelen van een cd
1.
Kies de bron CD.
2.
Druk op OPEN•CLOSE om het cd-vak te openen.
™ Display:
3.
Leg een CD of een CD-R(W) in de speler met de bedrukte kant naar
boven en druk op OPEN•CLOSE om het cd-vak te sluiten.
™
Display
:
Vervolgens verschijnen het totale aantal nummers en de totale
speelduur.
™
Display: verschijnt als de CD-R(W) niet afgesloten is.
4.
Druk op PLAY•PAUSE 2; om het afspelen te starten.
™
Display: tijdens het afspelen verschijnen het huidige nummer en de
verstreken speelduur van het nummer.
5.
Nederlands
Wilt u het afspelen tijdelijk onderbreken, druk dan op PLAY•PAUSE
2;. Druk opnieuw op PLAY•PAUSE 2; om verder te gaan met
afspelen.
™
Wanneer het afspelen tijdelijk onderbroken wordt, blijft het display
stilstaan en knippert de verstreken speelduur.
6.
Druk op STOP 9 om het afspelen van de cd te beëindigen.
Opmerking: het afspelen van de cd stopt ook:
–
–
–
wanneer het cd-vak geopend is.
terwijl de cd-speler de inhoud van de cd scant.
wanneer u het cd-vak opent;
aan het eind van de cd
(behalve als u REPEAT ALL gekozen heeft).
als u een andere bron kiest: TAPE / TUNER.
Kiezen van een ander nummer
•
Druk één of meerdere keren op SEARCH ∞ of § op het apparaat
tot het gewenste nummer in het display verschijnt.
•
Heeft u een nummer gekozen kort nadat u een cd in de speler
geplaatst heeft of terwijl het afspelen tijdelijk onderbroken is dan
moet u op PLAY•PAUSE 2; drukken om het afspelen te starten.
Zoeken naar een passage binnen een nummer
1.
Houd SEARCH ∞ of § ingedrukt.
–
De cd wordt dan zachtjes en versneld afgespeeld.
2.
Laat de toets SEARCH ∞ of § los zodra u de gewenste passage
herkent.
–
Het afspelen gaat op de normale manier verder.
Opmerking: Tijdens het afspelen van een programma of als een van
de SHUFFLE/ REPEAT-manieren gekozen is, kunt u enkel
binnen een nummer zoeken.
48
Page 49

Verschillende manieren van afspelen:
A
Z
1
5
6
0
C
D
R
A
D
I
O
C
A
S
S
E
T
T
E
R
E
C
O
R
D
E
R
S
T
O
P
P
L
A
Y
•
P
A
U
S
E
T
U
N
E
R
P
R
E
S
E
T
P
R
O
G
S
H
U
F
F
L
E
R
E
P
E
A
T
S
E
A
R
C
H
B
A
N
D
SOUND CONTROL CENTER
F
M
A
M
B
A
T
L
O
W
L
W
P
R
O
G
S
H
U
F
F
L
E
•
•
V
O
L
T
SHUFFLE en REPEAT
U kunt de verschillende manieren van afspelen kiezen of wijzigen voor
of tijdens het afspelen. U kunt deze manieren van afspelen ook met de
programmeerfunctie combineren.
SHUFFLE - alle nummers van de cd / van het programma worden in
willekeurige volgorde afgespeeld
SHUFFLE en REPEAT ALL - de hele cd/ het hele programma wordt in
willekeurige volgorde telkens opnieuw herhaald
REPEAT ALL- de hele cd/het hele programma wordt herhaald
REPEATen SHUFFLE REPEAT -het huidige (willekeurig gekozen)
nummer wordt telkens opnieuw herhaald
1.
Kies de gewenste manier van afspelen door voor of tijdens het
afspelen één of meerdere keren op de toets SHUFFLE of REPEAT te
drukken tot de gewenste manier in het display verschijnt.
2.
Wanneer de cd-speler op STOP staat,
druk dan op PLAY•PAUSE 2; om het afspelen te starten.
•
Heeft u een manier gekozen met SHUFFLE dan gaat het afspelen
meteen van start.
3.
Wilt u weer op de normale manier verder gaan met afspelen, druk
dan op de toets SHUFFLE of REPEAT tot in het display geen enkele
SHUFFLE/ REPEAT-manier nog aangegeven wordt.
–
U kunt ook op STOP 9 drukken om de manier van afspelen af te
sluiten.
CD SPELER
C
D
R
A
A
D
I
O
T
F
W
M
A
M
W
S
H
U
F
SOUND CONTROL CENTER
F
L
E
R
S
E
A
R
C
H
C
P
R
O
G
V
O
L
S
H
U
F
F
L
E
•
•
E
P
E
A
T
S
T
O
P
P
L
A
Y
•
P
A
U
S
E
B
A
P
R
L
O
O
G
L
Z
1
A
S
5
S
E
6
T
0
T
E
R
E
C
O
R
D
E
R
T
U
N
E
R
P
R
E
S
E
B
A
N
D
Nederlands
Programmeren van cd-nummers
Terwijl de speler stilstaat, kunt u de nummers op uw cd kiezen en in de
gewenste volgorde programmeren. Desgewenst kunt u elk nummer ook
meer dan eens programmeren. In het totaal kunnen 20 nummers in het
geheugen opgeslagen worden.
1.
Kies het gewenste nummer met SEARCH ∞ of § op het apparaat.
2.
Druk op PROG.
™
Display:
PROG
en het gekozen nummer. verschijnt kort.
™
Als u probeert te programmeren
zonder eerst een nummer gekozen te hebben dan verschijnt .
3.
Herhaal de stappen 1 en 2 om op deze manier alle gewenste
nummers te kiezen en te programmeren.
™
probeert te programmeren.
4.
Druk op PLAY•PAUSE 2; om het afspelen van het programma te
starten.
Opmerking: heeft u de nummers gekozen tijdens het afspelen,
verschijnt in het display als u meer dan 20 nummers
druk dan eerst op STOP 9,
en vervolgens op PLAY•PAUSE 2;.
C
D
R
A
A
D
I
Z
O
C
1
A
S
5
S
E
6
T
0
T
E
R
E
C
S
T
O
P
P
L
A
Y
•
P
A
U
S
E
SOUND CONTROL CENTER
B
A
T
P
R
L
O
O
F
W
G
M
A
M
L
W
S
H
U
F
F
L
E
R
S
E
A
R
C
H
O
R
D
E
R
P
T
R
U
O
N
G
E
R
V
O
L
S
H
U
F
F
L
E
•
•
B
A
N
E
D
P
E
A
T
49
Page 50

CD SPELER CASSETTE RECORDER
W
SYNC
A
Z
1
5
6
0
C
D
R
A
D
I
O
C
A
S
S
E
T
T
E
R
E
C
O
R
D
E
R
S
T
O
P
P
L
A
Y
•
P
A
U
S
E
T
U
N
E
R
P
R
O
G
S
H
U
F
F
L
E
R
E
P
E
A
T
S
E
A
R
C
H
B
A
N
D
SOUND CONTROL CENTER
F
M
A
M
B
A
T
L
O
W
L
W
P
R
O
G
S
H
U
F
F
L
E
•
•
V
O
L
S
O
U
N
D
C
O
N
T
R
O
L
C
E
N
T
E
R
V
O
L
U
TER
C
Controleren van een programma
Houd terwijl de speler stilstaat of tijdens het afspelen de toets
PROG even ingedrukt totdat de nummers die u geprogrammeerd
heeft één voor één in het display verschijnen.
Wissen van een programma
U kunt een programma wissen door:
–
eenmaal op STOP 9 te drukken terwijl de speler stilstaat;
–
tweemaal op STOP 9 te drukken tijdens het afspelen.
•
In het display verschijnt kort briefly en
Het programma word ook gewist als u:
– het cd-vak opent;
– een andere bron kiest: TAPE / TUNER.
Nederlands
AFSPELEN VAN EEN CASSETTE
1.
Kies de bron TAPE.
™
Zolang de cassetterecorder in gebruik is, staat in het display
2.
Druk op OPEN•STOP /9om de cassettehouder te openen.
3.
Plaats een bespeelde cassette in de houder en sluit de
cassettehouder.
4.
Druk op PLAY 1 om het afspelen te starten.
5.
Wilt u het afspelen tijdelijk onderbreken, druk dan op PAUSE 2;.
Druk opnieuw op deze toets om verder te gaan met afspelen.
6.
Met SEARCH 5 of 6 kunt u de cassette in beide richtingen
spoelen.
7.
Druk op OPEN•STOP /9om de cassette te stoppen.
• De toetsen worden aan het eind van de cassette automatisch
ontgrendeld behalve wanneer u PAUSE; ingedrukt heeft.
Opmerking: U kunt niet veranderen van geluidsbron terwijl een
cassette aan het spelen is.
PROG
verdwijnt.
TAPE
.
E
M
U
L
O
V
R
E
T
N
E
S
T
O
P
P
L
A
Y
•
P
A
P
R
O
G
C
D
R
A
A
D
I
Z
O
C
1
A
S
S
E
U
S
E
B
A
T
L
O
F
W
M
T
SOUND CONTROL CEN
CD REWRITABLE COMPATIBLE
CD SYNCRO STRAT RECORDING
5
6
0
T
E
R
E
C
O
R
D
E
R
O
P
E
N
C
L
O
S
E
50
Page 51

CD SPELER CASSETTE RECORDER
A
Z
1
5
6
0
C
D
R
A
D
I
O
C
A
S
S
E
T
T
E
R
E
C
O
R
D
E
R
S
T
O
P
P
L
A
Y
•
P
A
U
S
E
T
U
N
E
R
P
R
E
S
E
T
P
R
O
G
S
H
U
F
F
L
E
R
E
P
E
A
T
S
E
A
R
C
H
B
A
N
D
SOUND CONTROL CENTER
F
M
A
M
B
A
T
L
O
W
L
W
P
R
O
G
S
H
U
F
F
L
E
•
•
V
O
L
TER
C
ALGEMENE INFORMATIE OVER HET OPNEMEN
Opnemen is slechts geoorloofd als geen inbreuk wordt gemaakt op
•
auteursrechten of andere rechten van derden.
•
Dit apparaat is niet geschikt voor opnames op CHROME- (IEC II) of
METAL-cassettes (IEC IV). Gebruik voor opnames een NORMALcassette (IEC I) waarvan de nokjes niet uitgebroken zijn.
•
Het opnameniveau wordt automatisch ingesteld. De toetsen
VOLUME, INCREDIBLE SURROUND, DIGITAL EQUALIZER en DBB
hebben geen invloed op de opname die bezig is.
•
Gedurende de eerste en de laatste 7 seconden wordt niet
opgenomen omdat dan de aanloopband langs de opnamekop loopt.
•
Om te voorkomen dat een cassette per ongeluk gewist wordt, houdt
u de cassette met de kant die u wilt beveiligen naar u toe en breekt
u het linkernokje uit.
Op deze kant kan nu niet meer opgenomen worden. U kunt deze
beveiliging weer ongedaan maken door een stukje plakband over de
opening te plakken.
1
Synchroon starten bij opnemen van een cd
1.
Kies de bron CD.
2.
Plaats een cd in de cd-speler en stel, indien gewenst, een
programma samen.
3.
Druk op OPEN•STOP /9om de cassettehouder te openen.
4.
Plaats er een geschikte cassette in de recorder en sluit de
cassettehouder.
5.
Druk op RECORD 0 om de opname te starten.
–
Het cd-programma begint automatisch te spelen vanaf het begin van
het programma. U hoeft de cd-speler niet zelf te starten.
Om een bepaalde passage binnen een nummer te kiezen en op
te nemen
•
Houd de toets SEARCH 5 of 6 ingedrukt.
•
Laat SEARCH 5 of 6 los zodra u de gewenste passage herkent.
•
Druk op PLAY•PAUSE 2; om het afspelen van de cd te
onderbreken.
•
Wanneer u op RECORD 0drukt, begint het opnemen precies vanaf
dit punt in het nummer.
6.
Druk op PAUSE ; voor korte onderbrekingen. Druk opnieuw op
PAUSE ; om verder te gaan met opnemen.
7.
Druk OPEN•STOP /9om het opnemen te beëindigen.
Nederlands
C
D
R
A
A
D
I
Z
O
C
A
S
CD REWRITABLE COMPATIBLE
CD SYNCRO STRAT RECORDING
1
5
S
E
6
T
0
T
E
R
E
C
O
R
D
E
R
O
P
E
N
C
L
O
S
E
E
M
U
L
O
V
R
E
T
N
E
S
T
O
P
P
L
A
Y
•
P
A
U
S
E
SOUND CONTROL CEN
B
A
T
P
R
L
O
O
F
W
G
M
51
Page 52

OPNEMEN ALGEMENE INFORMATIE
CD REWRITABLE COMPATIBLE
CD SYNCRO STRAT RECORDING
A
Z
1
5
6
0
C
D
R
A
D
I
O
C
A
S
S
E
T
T
E
R
E
C
O
R
D
E
R
O
P
E
N
C
L
O
S
E
S
T
O
P
P
L
A
Y
•
P
A
U
S
E
P
R
O
G
SOUND CONTROL CENTER
F
M
B
A
T
L
O
W
C
E
N
T
E
R
V
O
L
U
M
E
Opnemen van de radio
1. Stem af op de gewenste radiozender (Zie Afstemmen op een
radiozender).
2. Druk op OPEN•STOP /9 om de cassettehouder te openen.
3. Plaats er een geschikte cassette in de recorder en sluit de
cassettehouder.
4. Druk op RECORD 0 om de opname te starten.
5. Druk op PAUSE ; voor korte onderbrekingen. Druk opnieuw op
PAUSE ; om verder te gaan met opnemen.
6. Druk OPEN•STOP /9 om het opnemen te beëindigen.
Onderhoud van de cd-speler en de cd’s
•
Als de cd-speler de cd’s niet op de juiste manier kan lezen, gebruik
Nederlands
•
•
•
•
•
•
dan een standaard verkrijgbare schoonmaak-cd om de lens schoon
te maken voor u het apparaat ter reparatie aanbiedt. Schoonmaken
op een andere manier dan deze kan de lens beschadigen.
Raak de lens van de cd-speler nooit aan!
Bij plotse temperatuurveranderingen kan er condens ontstaan en kan
de lens van de cd-speler beslaan. Het afspelen van een cd is dan
niet mogelijk. Probeer niet de lens schoon te maken maar laat de cdspeler enige tijd acclimatiseren in een warme omgeving tot de
condens verdwenen is.
Sluit altijd het cd-vak om te voorkomen dat er stof op de lens komt.
U kunt de cd het eenvoudigst uit het doosje nemen door in het
midden te drukken terwijl u de cd optilt. Houd de cd’s altijd bij de
rand vast en berg ze na gebruik weer op in het doosje om te
voorkomen dat er krassen of vuil op komen.
Maak de cd schoon door met een zachte, pluisvrije doek vanuit het
midden in een rechte lijn naar de rand te wrijven. Gebruik geen
schoonmaakmiddelen want deze kunnen de cd beschadigen.
Schrijf nooit op een cd en plak er geen stickers op.
X
Onderhoud van de cassetterecorder
Om verzekerd te zijn van een goede geluidskwaliteit bij het opnemen
en afspelen, moet u de aangegeven delen A, B en C telkens na
ongeveer 50 uur gebruik of gemiddeld één keer per maand
schoonmaken. Gebruik een wattenstaafje met een beetje alcohol of
speciale reinigingsvloeistof voor beide decks.
1.
Druk op STOP•OPEN /9om de cassettehouder te openen.
2. Druk op PLAY 1 en maak de rubber aandrukrollen C schoon.
3. Druk op PAUSE ; en maak de koppen A en ook de toonas B
schoon.
4. Druk na het schoonmaken op STOP•OPEN /9.
Opmerking: U kunt de koppen ook schoonmaken door eens in de
maand een reinigingscassette af te spelen.
52
C
A AB
Page 53

VERHELPEN VAN STORINGEN
Als zich een probleem voordoet, controleer dan eerst de punten op de onderstaande lijst voor u het
apparaat ter reparatie aanbiedt. Kunt u het probleem niet oplossen aan de hand van deze aanwijzingen,
raadpleeg dan uw leverancier of serviceorganisatie.
WAARSCHUWING: Maak het apparaat niet open want dan loopt u het risico een
elektrische schok te krijgen. Probeer in geen geval zelf het
apparaat te repareren want dan vervalt de garantie.
PROBLEEM
– MOGELIJKE OORZAAK
• OPLOSSING
Geen geluid/voeding
– Het volume staat te zacht
• Zet het volume harder met VOLUME
– De hoofdtelefoon is aangesloten
• Haal de stekker van de hoofdtelefoon uit het
apparaat
– Het netsnoer is niet goed aangesloten
• Sluit het netsnoer op de juiste manier aan
Veel ruis of brom
– Elektrische interferentie: het apparaat staat
te dicht bij een tv, videorecorder of
computer.
• Zet ze verder van elkaar af.
Slechte radio-ontvangst
– Zwak radiosignaal.
• FM: trek de FM-telescoopantenne uit en richt
deze voor de beste ontvangst
in het display
– De cd is beschadigd of vuil
• Vervang de cd/ maak deze schoon, zie
Onderhoud
– De lens van de laser is beslagen
• Wacht tot de lens geacclimatiseerd is
De cd-speler slaat nummers over
– De cd is beschadigd of vuil
• Vervang de cd of maak deze schoon
– De programmeer- of SHUFFLE-functie is
ingeschakeld
• Zet de programmeer- of SHUFFLE-functie uit
Slecht cassettegeluid
– Stof en vuil op de koppen, enzovoort
• Maak cassetterecorderonderdelen schoon,
zie Onderhoud
– Het cassettetype dat u gebruikt, is niet
geschikt (METAL of CHROME)
• Gebruik voor opnames een NORMALcassette (IEC I)
Het opnemen lukt niet
– De cassettenokjes zijn uitgebroken
• Plak een stukje plakband over de opening
heen
in het display
– De CD-R(W) is leeg of niet afgesloten
• Gebruik een afgesloten cd-r(w)
Nederlands
Dit apparaat voldoet aan de radio-ontstoringseisen van de Europese Unie.
Het typeplaatje bevindt zich op de onderkant van het apparaat.
53
 Loading...