

Page 1
User Manual
Register your product and get support at
www.philips.com/welcome
AZ1302MP3-CD Soundmachine
Page 2
1
6
21
TUNER
OFF TAPE
MONO STEREO
CD
REMOTE
SENSOR
4
ALBUM /
PRESET
+
75
689
PROG
ALBUM /
PRESET
SEARCH STOP/BAND PLAY/PAUSEMODE
DIGITAL TUNING
0%!@#$
3
Page 3
2
5
6
*()
&^
34
2
1
7
2 x R06
Page 4
8
4
5
7
3
6
X
C
A AB
Page 5

English Controls
Congratulations on your purchase and
welcome to Philips!
To fully benefit from the support that
Philips offers, register your product at
www.philips.com/welcome.
Supplied accessories
–
AC mains lead
–
remote control
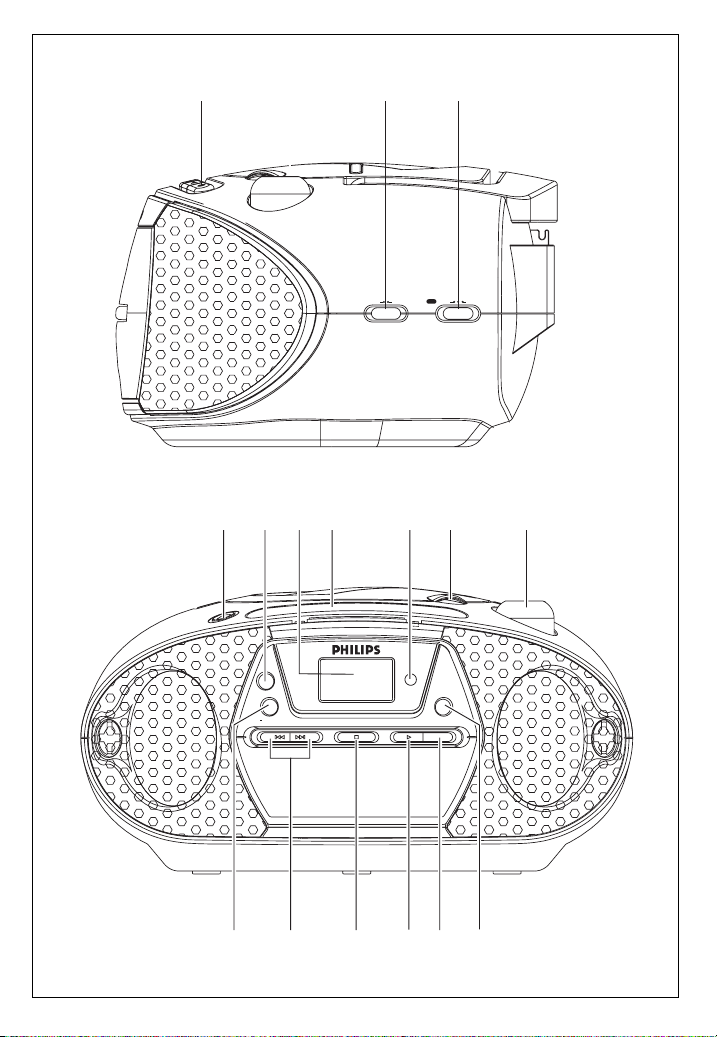
Right panel (See 1)
1
Source selector CD,TUNER,
TAPE/OFF
–
selects CD/MP3-CD, radio or tape source
of sound
–
switches off the set
2 MONO•STEREO
– selects mono or stereo FM reception
Top and front panels(See 1)
3 VOLUME – adjusts volume level
4 LIFT TO OPEN – lift here to open the
disc door
5
REMOTE SENSOR – infrared sensor for
remote control
6 Cassette recorder keys:
PA USE ;–pauses playback or recording
STOP•EJECT 9
/
–
stops playback or recording.
–
opens the cassette holder.
F.FWD/REW 5 or 6–fast
winds/rewinds
the tape
PLAY 1–starts playback
REC 0–starts recording
7 Display – shows the status of the set
8 PROG
CD/MP3: programmes tracks and reviews
the programme;
TUNER: programmes preset radio stations
9 DBB – switches the bass enhancement
on / off
0 ALBUM/PRESET -
MP3 only: selects albums (down);
RADIO: selects preset stations (down)
! SEARCH
∞ , §
CD/MP3: – searches back and forward
within a track;
– skips to the beginning of a cur-
rent track/ previous/ later track
TUNER: tunes to radio stations.
@ STOP/BAND
9
CD/MP3: – stops playback;
– erases a programme.
TUNER: selects wavebands
# PLAY/PAUSE 2/;– starts/ pauses CD
playback
$ MODE – selects different play modes:
e.g. REPEAT or RANDOM
(random order)
% ALBUM/PRESET +
MP3 only: selects albums (up);
TUNER: selects preset stations (up)
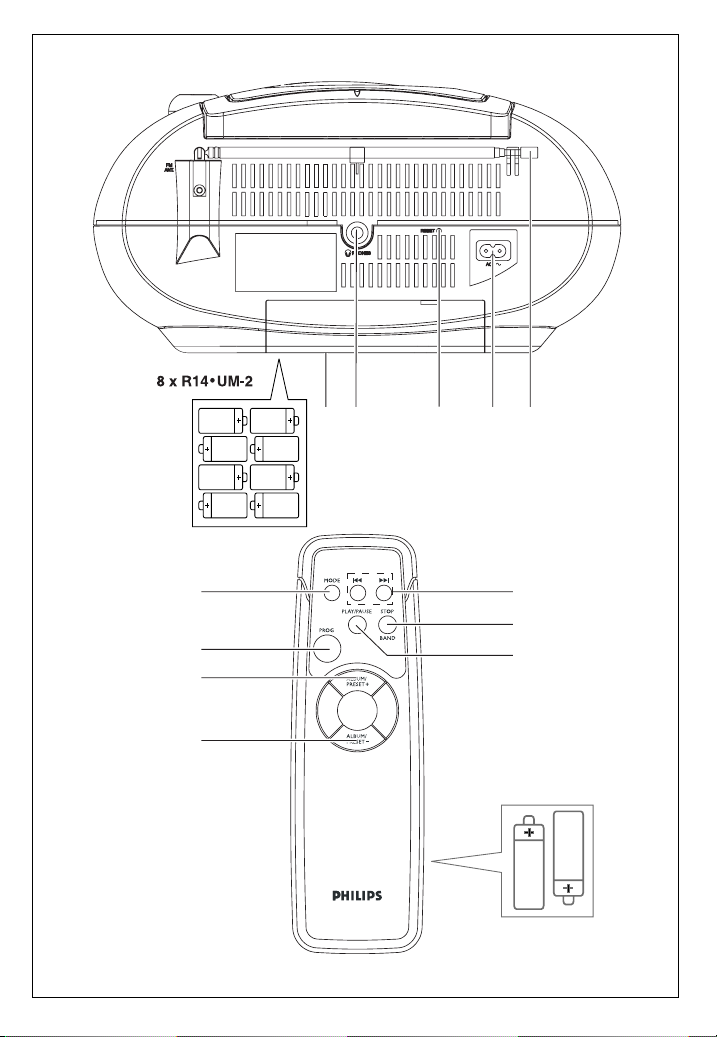
Back panel (See 2)
^ Telescopic antenna -improves FM
reception.
& AC ~ - inlet for mains lead
* RESET – use ball-point pen to press the
hole if the set or display does not
react to any of the controls
( p PHONES- 3.5mm stereo headphone
jack
) Battery door - open to insert 8 x 1.5V
R-14/ UM2/ C-cells.
CAUTION
Use of controls or adjustments or
performance of procedures other
than herein may result in hazardous
radiation exposure or other unsafe
operation.
Page 6

Controls Power Supply
Remote control
1 PLAY/PAUSE – starts / pauses CD
playback
2 STOP/BAND
CD/MP3: – stops playback;
– erases a programme.
TUNER: selects wavebands
3 ∞§
CD/MP3: – searches back and forward
within a track;
– skips to the beginning of a
current track/ previous/ later
track
TUNER: tunes to radºo stations.
4 MODE– selects different play modes:
e.g. REPEAT or RANDOM
(random order)
5 PROG
CD/MP3: programmes tracks and reviews
the programme;
TUNER: programmes preset radio stations
6 ALBUM/PRESET +
MP3 only: selects albums (up);
TUNER: selects preset stations (up)
7 ALBUM/PRESET -
MP3 only: selects albums (down);
TUNER: selects preset stations (down)
Power supply
Whenever convenient, use the mains lead if
you want to conserve battery life. Make sure
you remove the plug from the set and wall
outlet before inserting batteries.
Batteries (not included)
Main set (See 2)
• Insert 8 batteries, type R-14, UM2 or
C-cells (preferably alkaline) with the correct
polarity.
Remote control (See 2)
• Insert 2 batteries, type AA, R06 or UM3
(preferably alkaline).
Batteries contain chemical substances,
so they should be disposed of properly.
• Incorrect use of batteries can cause
electrolyte leakage and will corrode the
compartment or cause the batteries to
burst:
• Do not mix battery types: e.g. alkaline with
carbon zinc. Only use batteries of the same
type for the set.
• When inserting new batteries, do not tr y to
mix old batteries with the new ones.
• Remove the batteries if the set is not to be
used for a long time.
Using AC Mains
1 Check if the mains voltage, as shown on
the type plate located on the
back of the set, corresponds to your local
mains supply. If it does not, consult your
dealer or service center.
2 Connect the mains lead to the AC ~ inlet
and the wall socket.The mains lead is now
connected and ready for use.
3 To switch the set off completely, withdraw
the mains lead from the wall socket.
4 Install the unit near the AC outlet and where
the AC power plug can be easily reached.
• Disconnect the mains lead from the wall
socket to protect your set during heavy
thunderstorms.
Helpful hints : To avoid unnecessary energy
consumption, always adjust the Source
selector to
TAPE/OFF
after using the set.
Also check that the tape deck keys are
released
The type plate is located on the back of
the set.
Page 7

General Operation Digital Tuner
General operation
Switching on and off and selecting
functions
1 To switch on, push the Source selector
slider to CD, TUNER, or
TAPE/OFF as
desired.
➜ In CD or TUNER, the display
lights up blue.
➜ In
TAPE
, the display lights up during tape
operation
2 To switch off, push the Source selector
slider to
TAPE/OFF
and check the cassette
keys are released.
Helpful hints:
– To change from TAPE to TUNER or CD
function, or when you are switching off the set:
first, make sure you press the tape
STOP•EJECT 9
/ key to end playback and
all the cassette keys are released.
– The radio presets will be retained in the set’s
memory.
Adjusting volume and sound
1 Adjust the volume with the
VOLUME
control.
2 Press DBB once or more to select dynamic
bass boost on or off.
Digital tuner
Tuning to radio stations
1 Push the Source selector slider to
TUNER.
➜ The display lights up blue and if
programmed, a preset number appears.
➜ Then, the display shows radio station
frequency and waveband. If programmed,
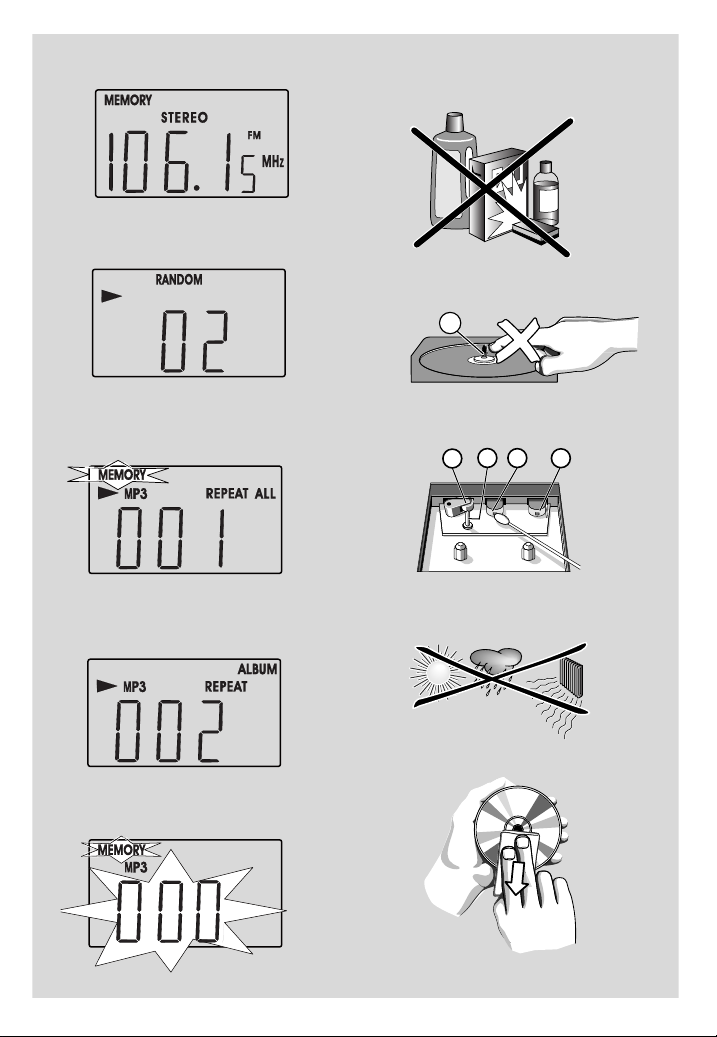
MEMORY appears. (see 3)
2 Press STOP/BAND
9
to select your
desired waveband, FM or MW.
• For FM, adjust MONO•STEREO to
STEREO.
3 Press and hold ∞ or § until the frequency
in the display starts running.
➜ The radio automatically tunes to a station
of sufficient reception.The frequency
keeps running during automatic tuning.
– STEREO lights up for stereo FM reception.
4 Repeat step 3 if necessary until you find the
desired station.
• To tune to a weak station, press ∞ or §
briefly and repeatedly until you have found
optimal reception.
To improve radio reception:
• For FM, extend, incline and turn the tele-
scopic aerial. Reduce its length if the signal is
too strong.
– To tune to a weak FM station, adjust
MONO
•
STEREO to MONO.
• For MW, the set uses a built-in aerial. Direct
this aerial by turning the whole set.
Programming radio stations
You can store up to a total of 20 radio stations in the memory (10 FM and 10 MW),
manually or automatically (Autostore).
Page 8

Digital Tuner CD/MP3 Player
Manual programming
1 Tune to your desired station (see Tuning to
radio stations).
2 Press PROG to activate programming.
➜ Display: MEMORY and P01 are dispalyed.
3 Press ALBUM/PRESET -/+ once or more
to allocate a number from 1 to 10.
4 Press PROG to confirm.
5 Repeat steps 1-4 to store other stations.
Helpful hints:
You can erase a preset station by storing
another frequency in its place.
Autostore
Autostore automatically starts programming
radio stations from preset 1. Any previous
presets e.g. manually programmed will be
erased.
1 In
TUNER
mode, press STOP/BAND
9
to select FM or MW.
2 Press and hold PROG until the frequency
starts to r un.
➜ Display: MEMORY flashes.
➜ Available stations are programmed
(FM or MW ) and a preset number (1
- 10) appears when a station is stored.
➜ After all stations are stored, the first auto-
store preset station automatically plays.
To listen to a preset station
Press the ALBUM/PRESET -/+ button
once or more until the desired preset
station is displayed.
CD/MP3 player
About MP3
The music compression technology MP3
(MPEG1 Audio Layer 3) significantly reduce
the digital data of an audio CD while maintaining CD quality sound.
• Getting MP3 files:you can either down-
load legal music files from the internet to
your computer hard disc, or create such files
by converting audio CD files in your
computer through appropriate encoder software. (128kbps bit rate or higher is recommended for MP3 files.)
• Creating a MP3 CD: burn the music files
from your computer hard disc on a CDR or
CDRW using your CD burner.
Helpful hints:
– Make sure that the file names of the MP3 files
end with .mp3.
– Total number of music files and albums: around
350 (with a typical file name length of 20
characters)
– The length of file names affects the number of
tracks for playback.With shorter file names,
more files can be burned on a disc.
Playing a disc
This player plays Audio Discs including CDR/ CD-RW, and MP3 CD. Do not try to play
a CD-ROM, CD-I, CDV,VCD, DVD or
computer CD.
IMPORTANT!
• CDs encoded with copyright protection
technologies by some record companies
may be unplayable by this product.
•
For a disc with CD Audio tracks and
MP3 files, only the CD Audio tracks
will be played.
Page 9

CD/MP3 Player
1 Push the Source selector slider to CD.
➜ The display lights up blue, and --- is
displayed as the player scans the contents
of a disc.Then,
Audio CD: total number of tracks appears
MP3: total number of file folders appears.
(Note: only MP3 files can be played)
2 Press 2/
;
to start playback.
➜ Audio CD: current track number appears
MP3: The display shows current album
number briefly, then a track
number in the album.
3 To pause playback, press PLAY/PAUSE
2/
;
. Press PLAY/PAUSE 2/;again to
resume play.
4 To stop playback, press STOP/BAND 9.
Helpful hints: CD play will also stop when:
– the CD door is opened
– the CD has reached the end
– you select tuner or tape source.
Selecting a different track
• Press SEARCH ∞ or § once or
repeatedly until the desired track number
appears in the display.
For MP3: first press ALBUM/PRESET -
/+ to find your album.
• In the pause/stop position, press 2/
;
to start
playback.
Finding a passage within a
track
1 During playback, press and hold ∞ or §.
➜The CD is played at high speed and low
volume.
2 When you recognize the passage you want,
release ∞ or § to resume normal playback.
Different play modes:
RANDOM and REPEAT
(see 4 – 6)
RANDOM – tracks of the entire disc are
played in random order
– plays the current track
continuously
REPEAT ALL – repeats the entire disc/
programme
For MP3 only:
REPEAT ALBUM – all tracks of current album
play repeatedly.
1 To select play mode, press MODE once or
more.
For RANDOM mode: select it in the stop
position.
2 Press PLAY/PAUSE 2/
;
to start playback.
if in the stop position.
3 To select normal playback, press MODE
repeatedly until the various modes are no
longer displayed.
Helpful hints:
– Random mode can be selected only in the stop
position.
– In Random mode, press ∞ to go to the
beginning of current track.
Page 10

CD/MP3 Player
Programming track numbers
You may store up to 20 tracks in the desired
sequence. If you like, store any track more
than once.
For Audio CD:
1 In the stop position, press
∞
or §to select
your desired track number.
2 Press PROG to store the desired track
number.
➜ Display: MEMORY and 00 flash for you
to programme the next track.
3 Repeat steps 1 to 2 to select and store all
desired tracks in this way.
➜ Display shows -- after 20 tracks are
stored.
For MP3:
1 In the stop position, press
ALBUM/PRESET -/+ to select an album
(if necessary), then press
∞
or §to select
your desired track number.
2 Press PROG to store the desired track
number.
➜ Display: MEMORY and 000 flash for
you to programme the next track
(see 7)
3 Repeat steps 1 to 2 to select and store all
desired tracks in this way.
➜ Display shows --- after 20 tracks are
stored.
4 To play your programme, press 2/
;
.
➜ During programme playback, MEMORY
flashes.
Helpful hints:
– When playback of your programme comes to
the stop position, your set will return to
normal playback. To re-enter program mode,
press PROG in the stop position.
–
When the programme or RANDOM mode is
active, you cannot press
ALBUM/PRESET -/+
to select an album
.
Reviewing the programme
In the stop position, press PROG repeatedly
to see your stored track numbers.
➜ Audio CD: a stored track number appears
➜ MP3: – ALBUM and an album number
appear, then a stored track
number in the album is displayed.
– Only track number appears if in
the same album.
Erasing the programme
You can erase the contents of the memory
by:
– selecting
TUNERorTAPE
sound source;
– opening the disc door;
– in the stop position, press PROG to
enter program mode and then, press
9.
Page 11

Cassette Recorder
Cassette playback
1 Push the Source selector slider to TAPE
2 Press
STOP•EJECT 9
/ to open the
cassette holder and insert a cassette and
close the deck.
3 Press
PLAY 1
to start playback.
➜ Display lights up blue and shows TAPE
throughout tape operation.
4 To pause playback press
PA USE ;
.
To resume, press the key again.
5 By pressing
F.FWD/REW 5 or 6
,
fast forwading/ rewinding of the tape is possible in both directions.To stop fast winding,
press 9/.
6 To stop the tape, press
9
/.
Helpful hints:
– During playback, the keys are automatically
released at the end of a tape and the set is
switched off (unless
PA USE ;
mode has been
activated.)
– During fast forwarding/rewinding, the keys will
not be released at the end of a tape.To switch
off the set, make sure the cassette keys are
also released.
General information on recording
• Recording is permissible insofar as copyright
or. other rights of third parties are not
infringed.
• For recording, use only NORMAL type cassettes (IEC type I) on which the tabs have
not yet been broken.This deck is not suited
for recording on CHROME (IEC II) or
METAL (IEC IV) type cassettes.
• The best recording level is set automatically.
Altering the VOLUME or DBB will not
affect the recording.
•To protect a tape from accidental erasure,
break out the tabs. If you wish to record
again, cover the tabs with a piece of adhesive
tape.
Recording from the CD Player
1 Select CD source.
2 Insert a CD and if desired, program track
numbers.
3 Press
9
/ to open the cassette holder.
Insert a blank tape and close the deck.
4 Press
REC 0
to start recording.
5 Press PLAY/PAUSE
2;
on the set to
start CD playback.
6 For brief interruptions press ;.To resume
recording, press ;again.
7 To stop recording, press 9/.
Recording from the Radio
1 Select TUNER source.
2 Tune to the desired radio station (see
Tuning to radio stations).
3 Follows steps 3, 4, 6,7 under Recording
from the CD Player.
ORIGINAL COPYRIGHT NOTICE
The making of unauthorized copies of
copy-protected material, including computer
programmes, files, broadcasts and sound
recordings, may be an infringement of
copyrights and constitute a criminal offence.
This equipment should not be used for such
purposes.
Page 12

Maintenance & safety
(see 8)
CD player and CD handling
• If the CD player cannot read CDs correctly,
use a cleaning CD to clean the lens before
taking the set to repair.
• The lens of the CD player should never be
touched!
• Sudden changes in the surrounding
temperature can cause condensation on the
lens of your CD player. Playing a CD is then
not possible. Do not attempt to clean the
lens but leave the set in a warm environment until the moisture evaporates.
•Always close the CD-tape door to avoid
dust on the lens.
•To clean the CD, wipe in a straight line from
the center towards the edge using a soft,
lint-free cloth. Do not use cleaning agents as
they may damage the disc.
• Never write on a CD or attach any stickers
to it.
Ta pe deck maintenance
To ensure quality recording and playback of
the tape deck, clean parts A, B and C as
shown, once a month. Use a cotton bud
slightly moistened with alcohol or a special
head cleaning fluid to clean the deck.
1 Open the cassette holder by pressing 9/.
2 Press 1 and clean the roller C.
3 Press ;and clean the heads A, and the
capstan B.
4 After cleaning, press 9/.
➜ Cleaning of the heads can also be done
by playing a cleaning cassette through
once.
Safety information
• Place the set on a flat, hard and stable surface so that the system does not tilt.
• Where the MAINS plug or an appliance coupler is used as the disconnect device, the disconnet device shall remain readily operable.
• Do not expose the set, batteries, CDs to
humidity, rain, sand or excessive heat caused
by heating equipment or direct sunlight.
• The apparatus shall not be exposed to dripping or splashing.
• Adequate ventilation with a minimum gap of
15cm (6 inches) between the ventilation
holes and surrounding surfaces is necessary
to prevent heat build-up.
• Do not cover the ventilation openings with
items such as newspapers, table-cloths, curtains, etc.
• No objects filled with liquids, such as vases,
shall be placed on the apparatus.
• No naked flame sources, such as lighted candles, should be placed on the apparatus.
• The mechanical par ts of the set contain
self-lubricating bearings and must not be
oiled or lubricated.
• Batteries (batter y pack or batteries installed)
shall not be exposed to excessive heat such
as sunshine, fire or the like.
•To clean the set, use a dry cloth. Do not use
any cleaning agents containing alcohol,
ammonia, benzene or abrasives as these may
harm the housing.
Specifications
Power Consumption . . . . . . . . . . . . . . . . . . . . . . . . . . . . . . . . . . . . . . . . . . . . . 15 W
Dimensions (w x h x d) . . . . . . . . . . . . . . . . . . . . . . . . . . 290 x 151 x 233 (mm)
Weight . . . . . . . . . . . . . . . . . . . . . . . . . . . . . . . . . . . . . . . . . . . . . . . . . . . . . . . .1.95 kg
Page 13

Problem
– Possible cause
• Remedy
No sound /power
– Volume not adjusted
• Adjust the VOLUME
– Power cord not securely connected
• Connect the AC power cord properly
– Batteries dead/ incorrectly inserted
• Insert (fresh) batteries correctly
– Headphones connected to the set
•
Disconnect headphones.
.
Display does not function properly/ No
reaction to operation of any of the
controls
– Electrostatic discharge
• Switch off and unplug the set. Reconnect after a
few seconds
Remote control does not function
properly
– Batteries exhausted/ incorrectly inserted
• Insert (fresh) batteries correctly
– Distance/ angle between the set too large
• Reduce the distance/ angle
Severe radio hum or noise
– Electrical interference: set too close to TV,VCR or
computer
• Increase the distance
Poor radio reception
– Weak radio signal
• FM: Adjust the FM telescopic aerial
---indication
– No disc inserted
•
Insert asuitable disc
– CD badly scratched or dirty
•
Replace/ clean CD, see Maintenance & Safety
– Laser lens steamed up
•Wait until lens has cleared
– CD-R/CD-RW is blank or not finalized
•
Use a finalized CD-R or CD-RW only
Note:
Make sure the CD is not encoded with
Copyright protection technologies, as some
do not conform to the Compact Disc standard.
The CD skips tracks
– CD damaged or dirty
• Replace or clean CD
– Programme/RAMDOM is active
• Quit programme/RANDOM mode
Note:
For a disc with CD Audio tracks and MP3
files, only the CD Audio tracks will be
played.
The MP3-CD skips albums
–
CD contains non-MP3 file folders
• Check your disc contains suitable file folders.
Poor cassette sound quality
– Dust and dirt on the heads, etc.
• Clean deck parts, see Maintenance
– Use of incompatible cassette types (METAL or
CHROME)
• Only use NORMAL (IEC I) for recording
Recording does not work
– Cassette tab(s) may be broken
• Apply adhesive tape over the missing tab space
Tr oubleshooting
If a fault occurs, first check the points listed below before taking the set for repair.
If you are unable to remedy a problem by following these hints, consult your dealer or service centre.
WARNING: Do not open the set as there is a risk of electric shock. Under no
circumstances should you try to repair the set yourself, as this will
invalidate the guarantee.
Page 14
Environmental information
All unnecessary packaging material has been omitted.The packaging can be easily separated into three materials: cardboard, polystyrene and plastic.
Your set consists of materials which can be recycled if disassembled by a
specialized company. Please observe the local regulations regarding the
disposal of packaging, dead batteries and old equipment.
Hearing Safety
Listen at a moderate volume.
• Using headphones at a high volume can impair your hearing. This product can produce sounds
in decibel ranges that may cause hearing loss for a normal person, even for exposure less than a
minute. The higher decibel ranges are offered for those that may have already experienced
some hearing loss.
• Sound can be deceiving. Over time your hearing "comfort level" adapts to higher volumes of
sound. So after prolonged listening, what sounds "normal" can actually be loud and harmful to
your hearing. To guard against this, set your volume to a safe level before your hearing adapts
and leave it there.
To establish a safe volume level:
• Set your volume control at a low setting.
• Slowly increase the sound until you can hear it comfortably and clearly, without distor tion.
Listen for reasonable periods of time:
• Prolonged exposure to sound, even at normally "safe" levels, can also cause hearing loss.
• Be sure to use your equipment reasonably and take appropriate breaks.
Be sure to observe the following guidelines when using your headphones.
• Listen at reasonable volumes for reasonable periods of time.
• Be careful not to adjust the volume as your hearing adapts.
• Do not turn up the volume so high that you can't hear what's around you.
•You should use caution or temporarily discontinue use in potentially hazardous situations.
• Do not use headphones while operating a motorized vehicle, cycling, skateboarding, etc.; it may
create a traffic hazard and is illegal in many areas.
Page 15
English
Printed in China JH/ZYL-0821
W
AZ1302
Meet Philips at the Internet
http://www.philips.com
CLASS 1
LASER PRODUCT
 Loading...