

Philips AZ-1210, AZ-1203, AZ-1208 Owners Manual
CD Radio
Cassette Recorder
AZ1203
AZ1208
AZ1210

2
Typeskilt finnes på apparatens underside.
Observer:
Nettbryteren er sekundert innkoplet.
Den innebygde netdelen er derfor ikke frakoplet
nettet så lenge apparatet er tilsluttet
nettkontakten.
For å redusere faren for brann eller elektrisk støt,
skal apparatet ikke utsettes for regn eller fuktighet.
Norge
Hiermit wird bescheinigt, daß dieses Gerät in
Übereinstimmung mit den Bestimmungen der
Amtsblattverfügung 1046/1984 funkentstört ist.
Der Deutschen Bundespost wurde das
Inverkehrbringen dieses Gerätes angezeigt und die
Berechtigung zur Überprüfung der Serie auf
Einhaltung der Bestimmungen eingeräumt.
Deutschland
Mains plug
This apparatus is fitted with an approved 13 Amp plug.
To change a fuse in this type of plug proceed as follows:
1 Remove fuse cover and fuse.
2 Fix new fuse which should be a BS1362 5 Amp,
A.S.T.A. or BSI approved type.
3 Refit the fuse cover.
If the fitted plug is not suitable for your socket outlets,
it should be cut off and an appropriate plug fitted in its
place. If the mains plug contains a fuse, this should
have a value of 5 Amp. If a plug without a fuse is used,
the fuse at the distribution board should not be greater
than 5 Amp.
Note: The severed plug must be disposed of to avoid a
possible shock hazard should it be inserted into a
13 Amp socket elsewhere.
How to connect a plug
The wires in the mains lead are coloured with the
following code: blue = neutral (N), brown = live (L). As
these colours may not correspond with the colour
markings identifying the terminals in your plug,
proceed as follows:
• Connect the blue wire to the terminal marked N or
coloured black.
• Connect the brown wire to the terminal marked L or
coloured red.
• Do not connect either wire to the earth terminal in
the plug, marked E (or e) or coloured green (or green
and yellow).
Before replacing the plug cover, make certain that the
cord grip is clamped over the sheath of the lead - not
simply over the two wires.
Copyright in the U.K.
Recording and playback of material may require
consent. See Copyright Act 1956 and The Performer’s
Protection Acts 1958 to 1972.
Important notes for users in the U.K.
DICHIARAZIONE DI CONFORMITA’
Si dichiara che l’apparecchio Lettore CD/Radioregistratore mod. AZ1203, AZ1208 & AZ1210 Philips
risponde alle prescrizioni dell’art. 2 comma 1 del D.
M. 28 Agosto 1995 n. 548.
Fatto a Eindhoven, il 27/03/1998
Philips Sound & Vision
Philips, Glaslaan 2, SFF 10
5616 JB Eindhoven, The Netherlands
Italia

3
English
Français
Español
Deutsch
Nederlands
Italiano
Svenska
Dansk
Suomi
Português
∂ППЛУИО¿
Controls .............................4–5
Power supply .........................6
Basic functions ......................7
Radio......................................8
CD player.........................9–11
Cassette recorder..........12–13
General information.............14
Troubleshooting...................15
Comandes......................16–17
Alimentation........................18
Fonctions de base................19
Radio....................................20
Lecteur de CD................21–23
Platine cassette.............24–25
Informations général ...........26
Recherche de pannes ..........27
Controles .......................28–29
Fuente de alimentación.......30
Funciones básicas................31
Radio....................................32
Reproductor CD .............33–35
Grabadora......................36–37
Información general.............38
Localización de averías .......39
Bedienungselemente.....40–41
Stromversorgung .................42
Grundfunktionen..................43
Radio....................................44
CD-Spieler .....................45–47
Kassetterecorder...........48–49
Allgemeine Informationen...59
Fehlerbehebung ...................51
Bedieningstoetsen.........52–53
Voeding................................54
Basisfuncties .......................55
Radio....................................56
Cd-speler .......................57–59
Cassetterecorder...........60–61
Algemene informatie...........62
Problemen oplossen ............63
Comandi.........................64–65
Alimentazione......................66
Funzioni principali................67
Radio....................................68
Lettore CD......................69–71
Registratore...................72–73
Informazioni generale..........74
Ricerca guasti......................75
Kontroller.......................76–77
Strömförsörjning..................78
Basfunktioner.......................79
Radio....................................80
CD-spelare.....................81–83
Kassettspelare...............84–85
Allmän information..............86
Felsökning............................87
Betjeningsorganer.........88–89
Strømforsyning ....................90
Grundfunktioner...................91
Radio....................................92
CD-afspiller....................93–95
Kassettebåndoptager....96–97
Generel information.............98
Fejlfinding ............................99
Saadot .......................100–101
Virtalähde ..........................102
Perustoiminnot...................103
Radio..................................104
CD-soition..................105–107
Kasettinauhuri ...........108–109
Yleistietoja.........................110
Vianetsintä.........................111
Comandos..................112–113
Alimentação.......................114
Funções básicas.................115
Radio..................................116
Leitor CD....................117–119
Gravador de cassetes
..120–121
Informações gerais............122
Localização der avarias .....123
O‰ËÁ›Â˜ ¯Ú‹Û˘........124–125
∆ÚÔÊÔ‰ÔÛ›·.......................126
µ·ЫИО¤˜ ПВИЩФ˘ЪБ›В˜ ........127
ƒ·‰Èfi..................................128
ºÔÚËÙfi CD ................129–131
K·ÛÂÙfiʈÓÔ .............132–133
°ВУИО¤˜ ПЛЪФКФЪ›В˜.......134
∞Ó‡ÚÂÛË ÚÔ‚ÏËÌ¿ÙˆÓ ..135
English
Français
Español
Deutsch
Nederlands
Italiano
Svenska
Dansk
Suomi
∂ППЛУИО¿
Português
CONTROLS
4
English
PAUSE
STOP OPEN
SEARCH
PLA Y
RECORD
OPEN
CD SYN CHRO
S
TAR T
RECORDING
STOP
PLAY
PAUSE
REPEAT
SHUFFLE
PR
ESET
VOLUME
B
A
S
S
R
E
F
L
E
X
S
P
E
A
K
E
R
S
Y
S
T
E
M
SEARCH
PROG
B
AND
1
2
3
4
5
9
SEARCH
PLA
Y
RECORD
STOP
PLAY
PAUSE
REPEAT
SHUFFLE
PR
ESET
SEARCH
PROG
B
AND
8
PAUSE
STOP OPEN
SEARCH
PLA
Y
RECORD
OPEN
CD
SYN
CHRO
STAR
T RECO
RD
IN G
STOP
PLAY
PAUSE
REPEAT
SHUFFLE
PR
ESET
SEARCH
PR
OG
B
AND
7
6
R
E
P
E
A
T
SEARCH
V
O
L
U
M
E
S
T
O
P
T
U
N
E
R
C
O
N
T
R
O
L
S
H
U
F
F
L
E
S
E
A
R
C
H
T
U
N
I
N
G
P
R
E
S
E
T
AZ 1208, AZ 1210
only

CONTROLS
5
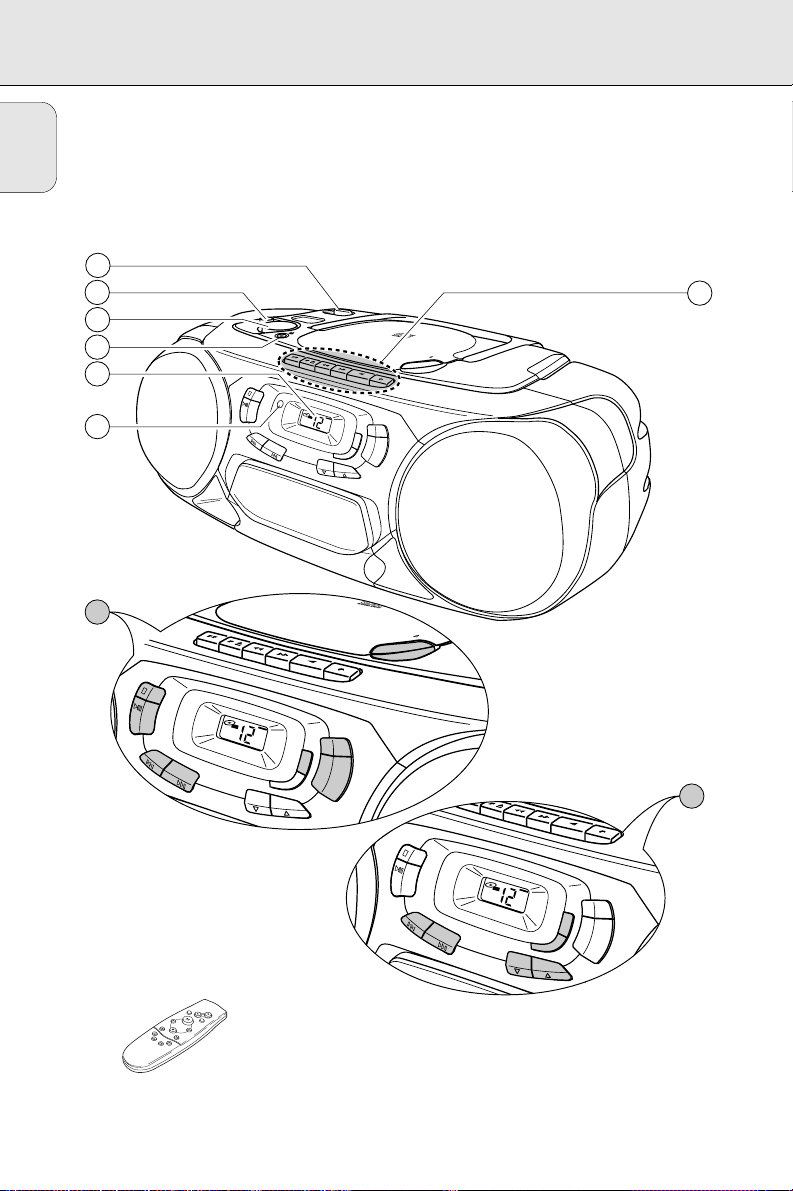
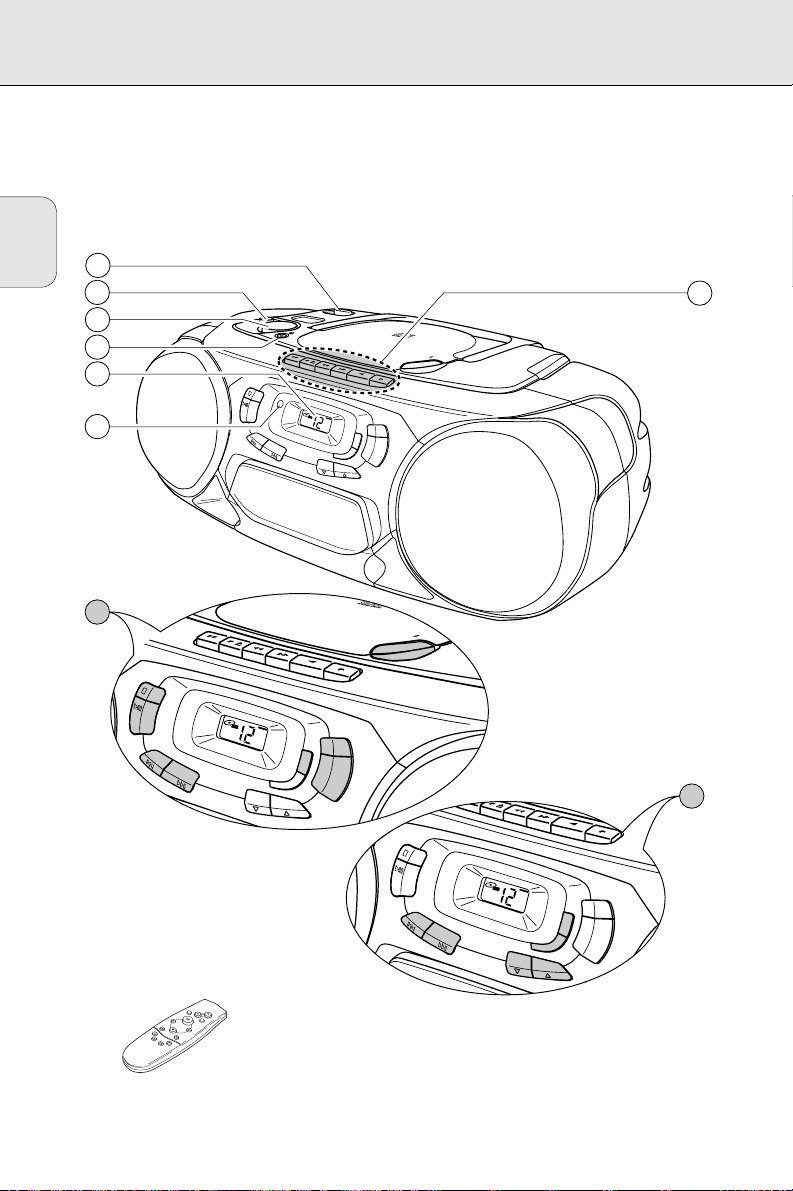
BASIC FUNCTIONS
1 POWER:
CD, TUNER, TAPE
...selects the sound source
2 DBB.......................enhances the bass
3 VOLUME ...............adjusts the volume level
4 p ...........................3.5mm headphone socket
Note: Connecting the headphones will switch
off the speakers.
5 Display
6
REMOTE SENSOR
..sensor for the infrared
remote control (AZ 1208,
AZ 1210 only)
7 CD PLAYER
/ OPEN ................opens the CD
compartment
STOP 9.................stops CD play and erases
the program
PLAY·PAUSE 2;...starts and interrupts CD
play
SEARCH ∞§.....skips and searches
forward and backward
PROGRAM ............programs track numbers
and reviews the program
SHUFFLE ...............plays CD tracks in random
order
REPEAT.................repeats a track, the entire
CD, or the program
8 RADIO
SEARCH ∞§.....tunes to radio stations
BAND....................selects the wave band
PROGRAM ............programs radio preset
stations
PRESET 34........selects a radio preset
station
9 CASSETTE RECORDER
PAUSE ; ...............interrupts recording or
playback
STOP·OPEN 9/ ...stops the tape and opens
the cassette compartment
SEARCH 6 ...........rewinds the tape
SEARCH 5 ...........fast forwards the tape
PLAY 1 .................starts playback
RECORD 0 ...........starts recording
REMOTE CONTROL (AZ 1208,
AZ 1210 only)
VOLUME 43......decreases or increases the
volume level
SHUFFLE ...............plays CD tracks in random
order
REPEAT.................repeats a track, the entire
CD or the program
2; ........................starts and interrupts CD
play
¡™......................selects the beginning of
the current, a previous or a
subsequent track of a CD
9...........................stops CD play and erases
the program
SEARCH 56.....
searches backward/forward
in a CD track
PRESET 34........selects a radio preset
station
TUNING ∞§.....tunes to radio stations
English
6
English
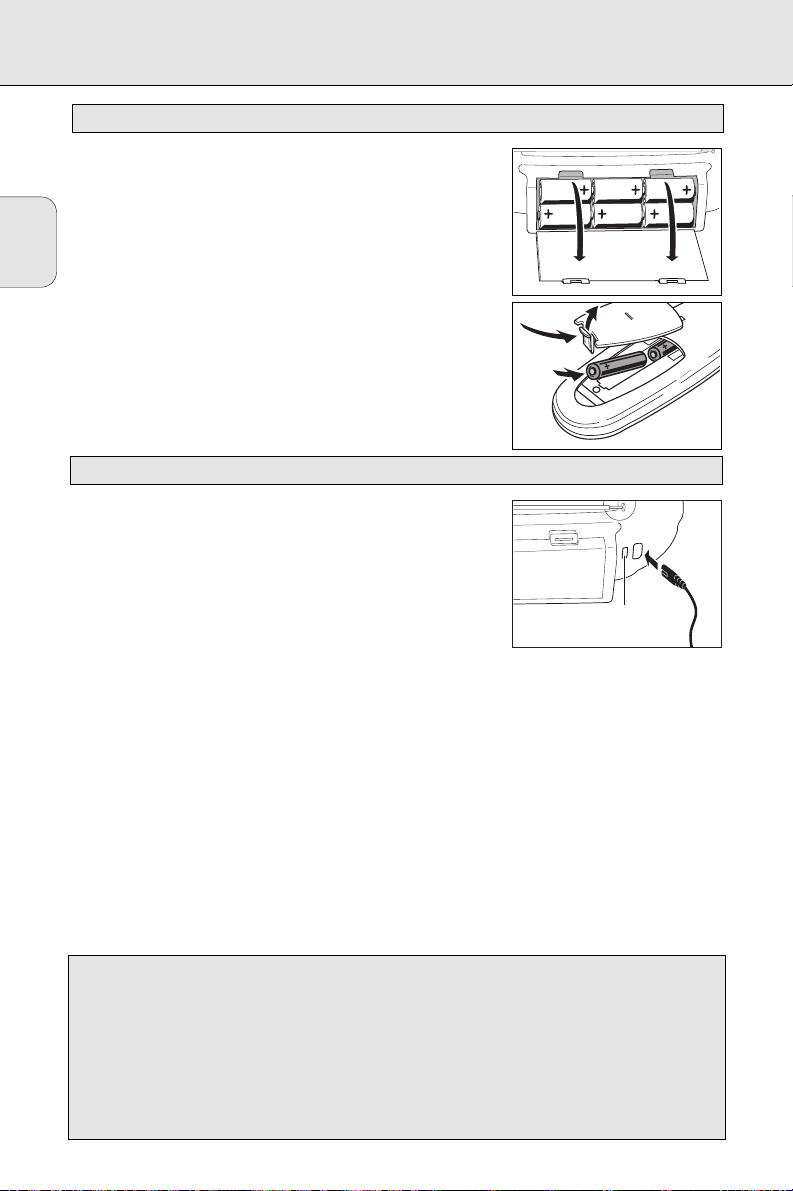
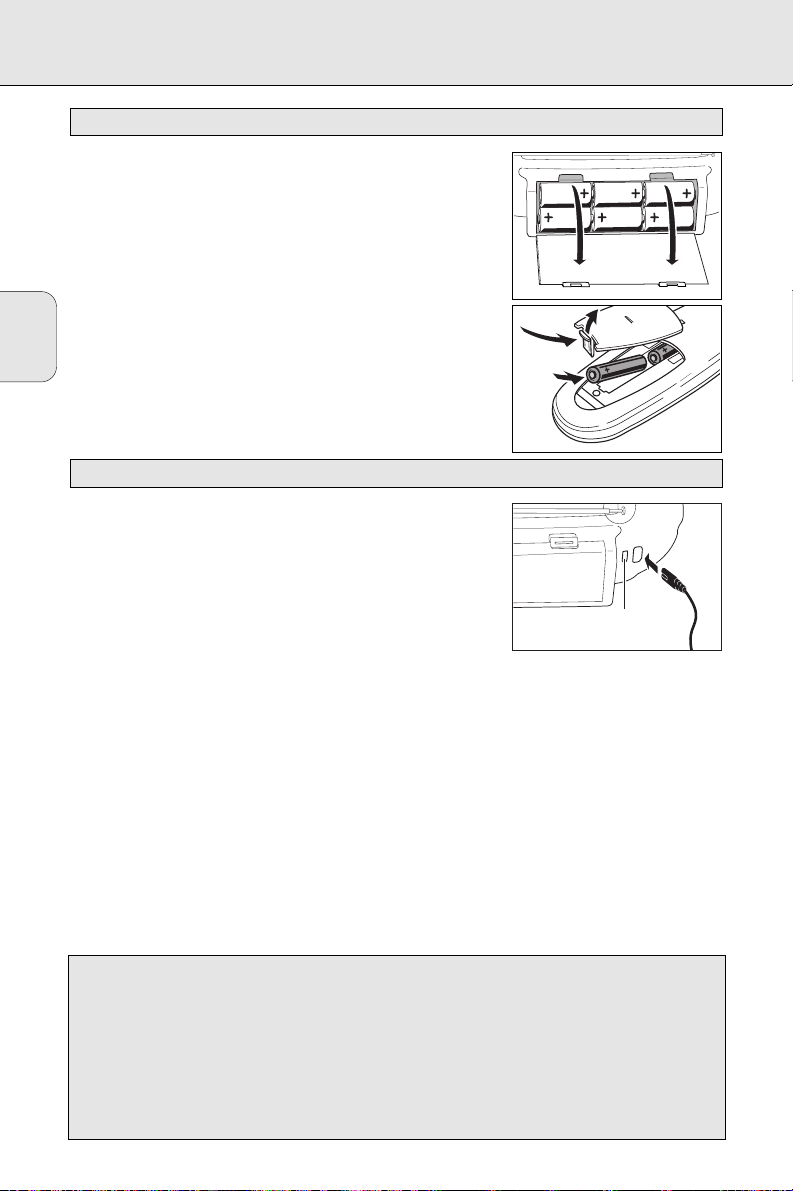
For the set (optional)
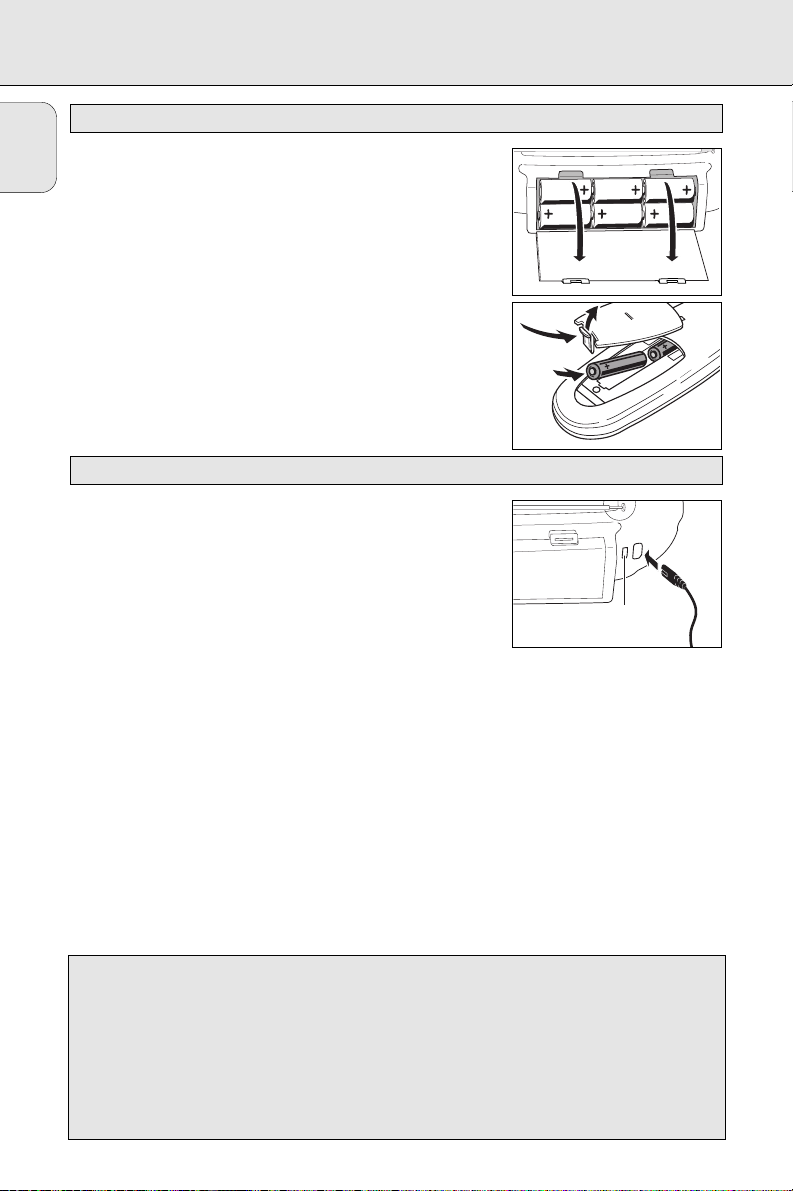
Open the battery compartment of the set and insert 6 batteries,
type R20, UM-1 or D-cells (preferably alkaline).
For the remote control (AZ 1208, AZ 1210 only)
Open the battery compartment of the remote control and insert 2
batteries, type R03, UM-4 or AAA-cells (preferably alkaline).
Remove batteries if they are flat or the set is not going to be used
for a longer period of time.
Batteries contain chemical substances, so they should be
disposed of properly.
1 Check whether the mains voltage as shown on the type plate
corresponds to your local mains voltage. If it does not, consult
your dealer or service organisation.
The type plate is located
on the bottom side of the set.
2 If the set is equipped with a VOLTAGE selector X, set this
selector to the local mains voltage.
3 Connect the mains cable to the AC MAINS inlet and the wall
socket. This switches on the mains supply.
The mains cable is
inside the battery compartment.
The battery supply will be switched off when the set is connected
to the mains. To change over to battery supply, pull out the plug
from the unit’s AC MAINS socket.
To disconnect the set from the mains completely, remove the mains
plug from the wall socket.
For users in the U.K.: please follow the instructions on page 2.
Mains
Batteries
POWER SUPPLY
Environmental information
All redundant packing material has been omitted. We have done our utmost to make the
packaging easily separable into three mono materials: cardboard (box), polystyrene foam (buffer)
and polyethylene (bags, protective foam sheet).
Your set consists of materials which can be recycled if disassembled by a specialized company.
Please observe the local regulations regarding the disposal of packing materials, exhausted
batteries and old equipment.
X
BASIC FUNCTIONS
7
English
Set the POWER slider to the desired sound source:
CD, TUNER, or TAPE.
The set is switched off when the POWER slider is in position
OOFFFF/TAPE and the keys of the tape deck are released.
Note: If you run the set on batteries, always be sure to switch the
set off after use. This will avoid unnecessary power
consumption.
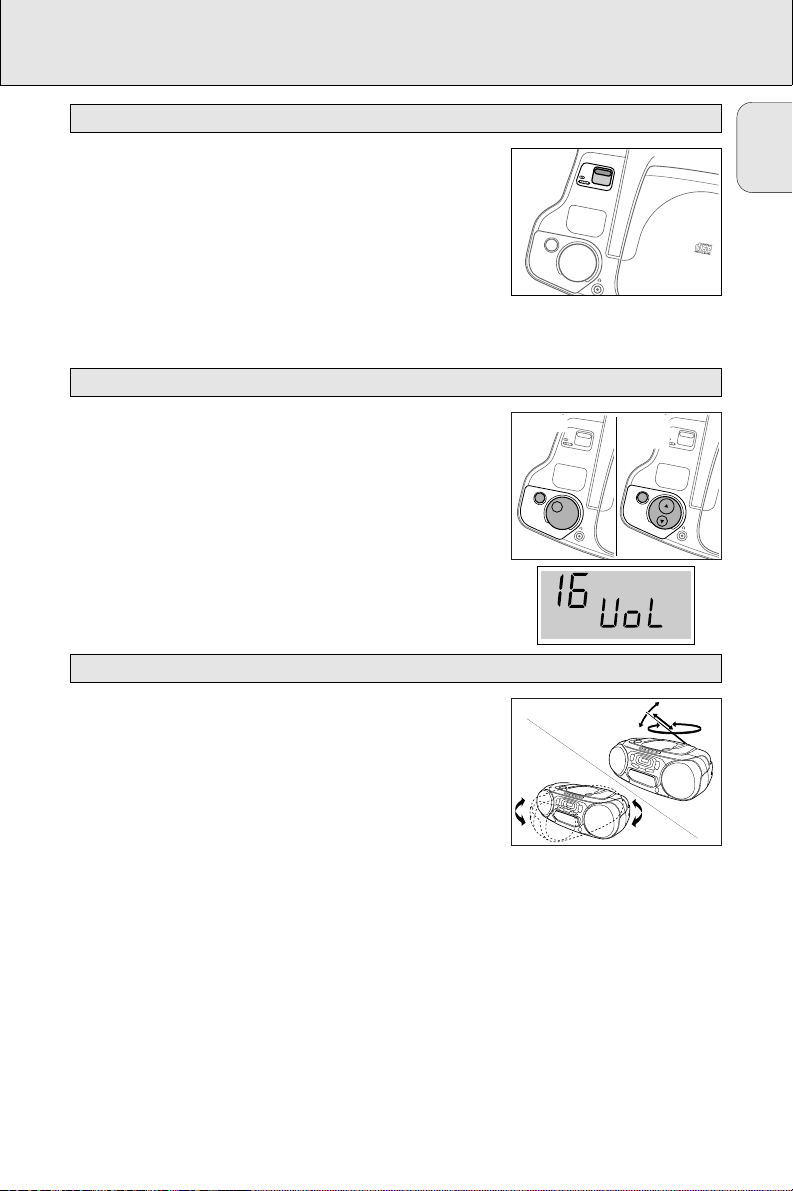
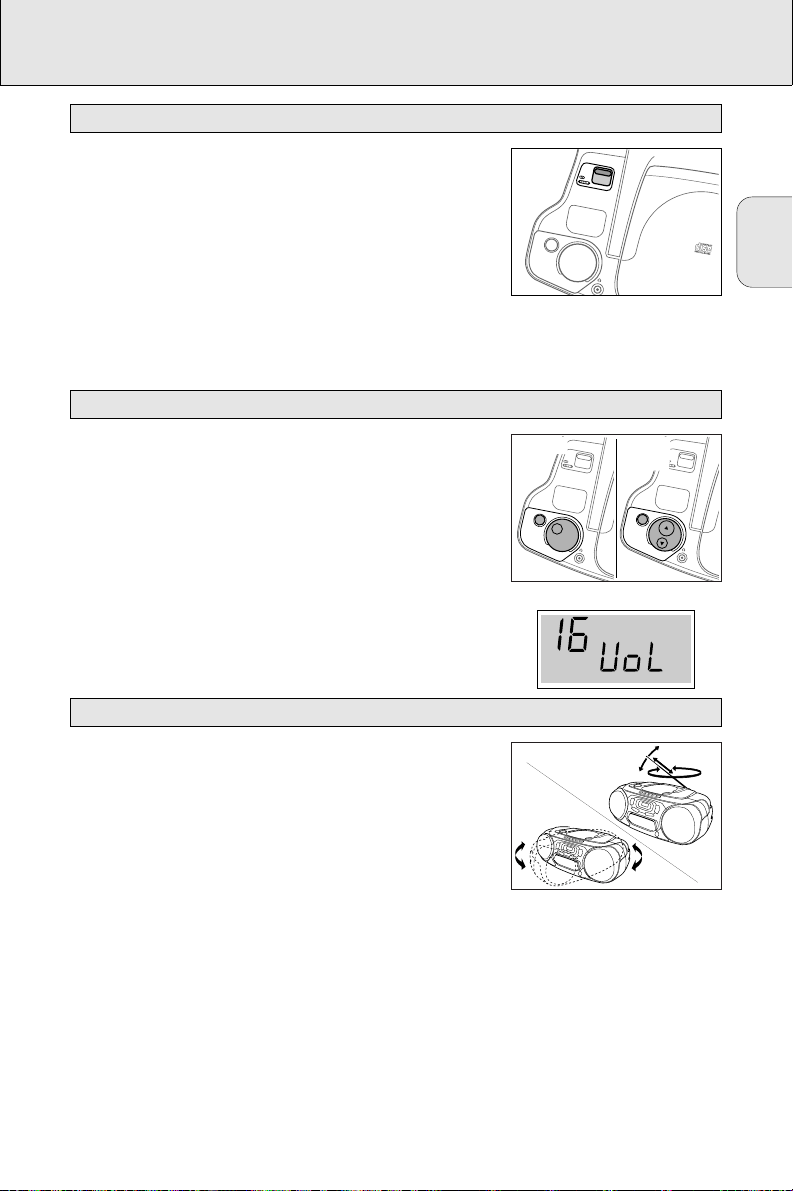
Adjust the volume using the VOLUME control.
™ Display indication: Volume level from 0 to 32
(AZ 1208, AZ1210 only).
Increase and decrease the bass level by pressing DBB.
The bass level can also be emphasised if you place the set against
a wall or shelf. Do not cover any vents and leave sufficient room
around the unit for ventilation.
For FM stations, pull out the telescopic antenna. To improve the
signal, incline and turn the antenna. Reduce its length if the signal
is too strong (very close to a transmitter).
For MW and LW stations, direct the built-in antenna by turning the
whole set. The telescopic antenna is not needed.
Improving radio reception
AZ 1203 AZ 1208
AZ 1210
Adjusting volume and sound
O
Switching on and off
CD
TUNER
TAPE
DBB
DYNAMIC
BASS
BOOST
VOLUME
CD
TUNER
TAPE
DBB
DYNAMIC
BASS
BOOST
VOLUME
DBB
DYNAMIC
BASS
BOOST
VOLUME
CD SYNCHRO START REC
CD
TUNER
TAPE
RADIO
8
English
1 Set the POWER slider to TUNER.
2 Select the wave band by using the BAND selector.
™ Display indication: the selected waveband.
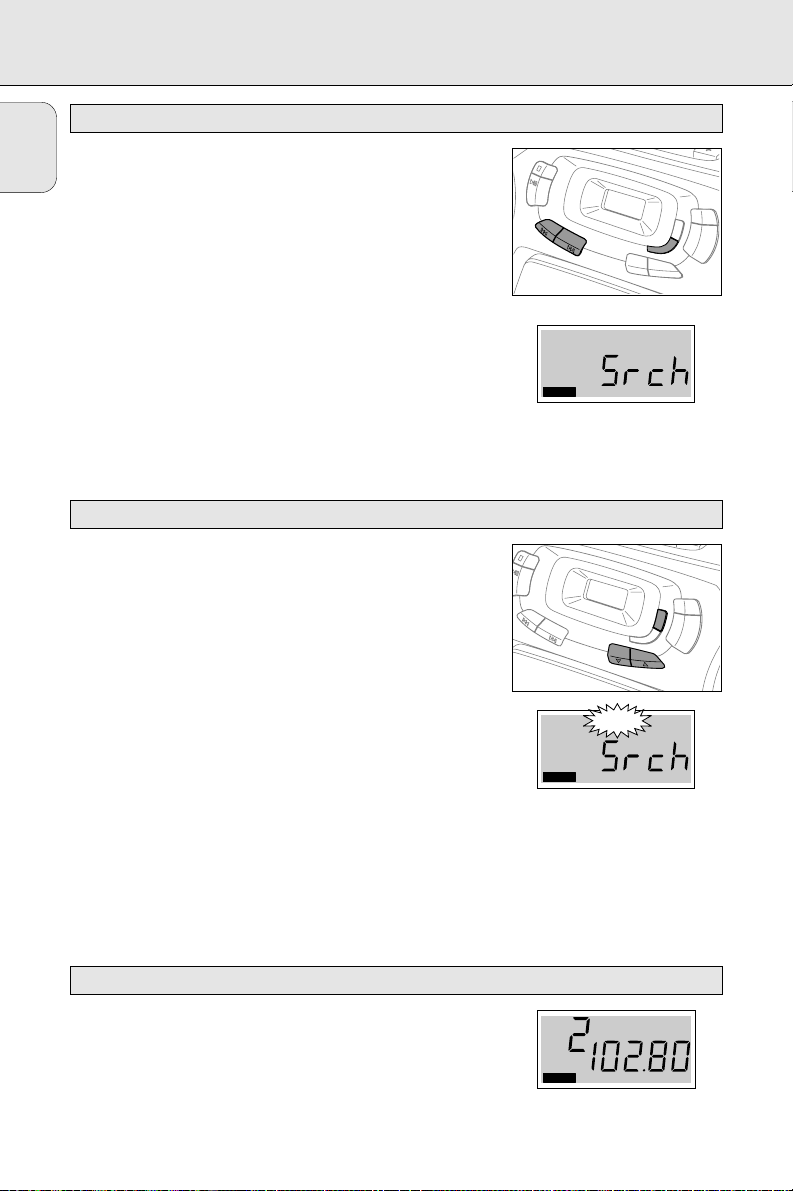
3 Press SEARCH ∞ or § for approx. 1 second and then release
the button.
™ The radio automatically tunes to a station with sufficient
strength. Display indication during automatic tuning: Srch.
4 Repeat this procedure until you find a station you desire.
To tune to a weak transmitter briefly press SEARCH ∞ or § as
often as necessary for optimum reception, or until the correct
frequency is indicated in the display.
You can store up to 29 radio stations in the memory. When
tuning to a preset station, the preset number (1 to 29) is indicated
in the display.
1 Set the POWER slider to TUNER.
2 Press PROGRAM to enter the programming mode.
™ During programming,
PROGRAM flashes on the display.
3 Tune to a desired station with SEARCH ∞ or §, as described
earlier (see ”Tuning to radio stations”).
™ If the frequency is already stored in the memory, the preset
number will be displayed.
4 Press PRESET 4 or 3 to allocate a number from 1 to 29 to the
preset station.
5 Press PROGRAM to confirm the setting.
Press PRESET 4 or 3 until the desired preset number appears
on the display.
FM
STEREO
TUNER
Tuning to preset stations
Programming radio stations (29 preset stations)
F
Tuning to radio stations
STOP
PLAY
PAUSE
SEARCH
PROG
B
AND
SHUF
PR
ESET
TUNER
SEARCH
TUNER
B
AND
PROGRAM
FM
PR
OG
REPEAT
SHUFFLE
PR
ESET
FM
CD PLAYER
9
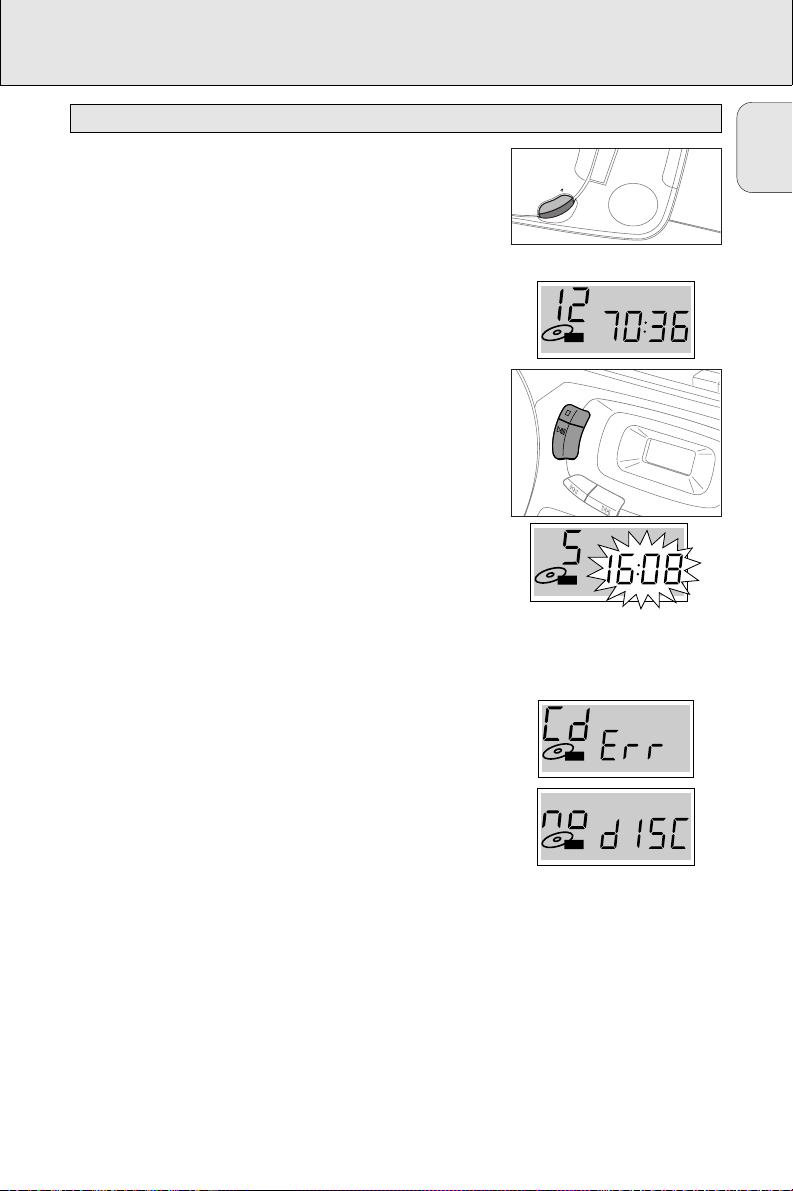
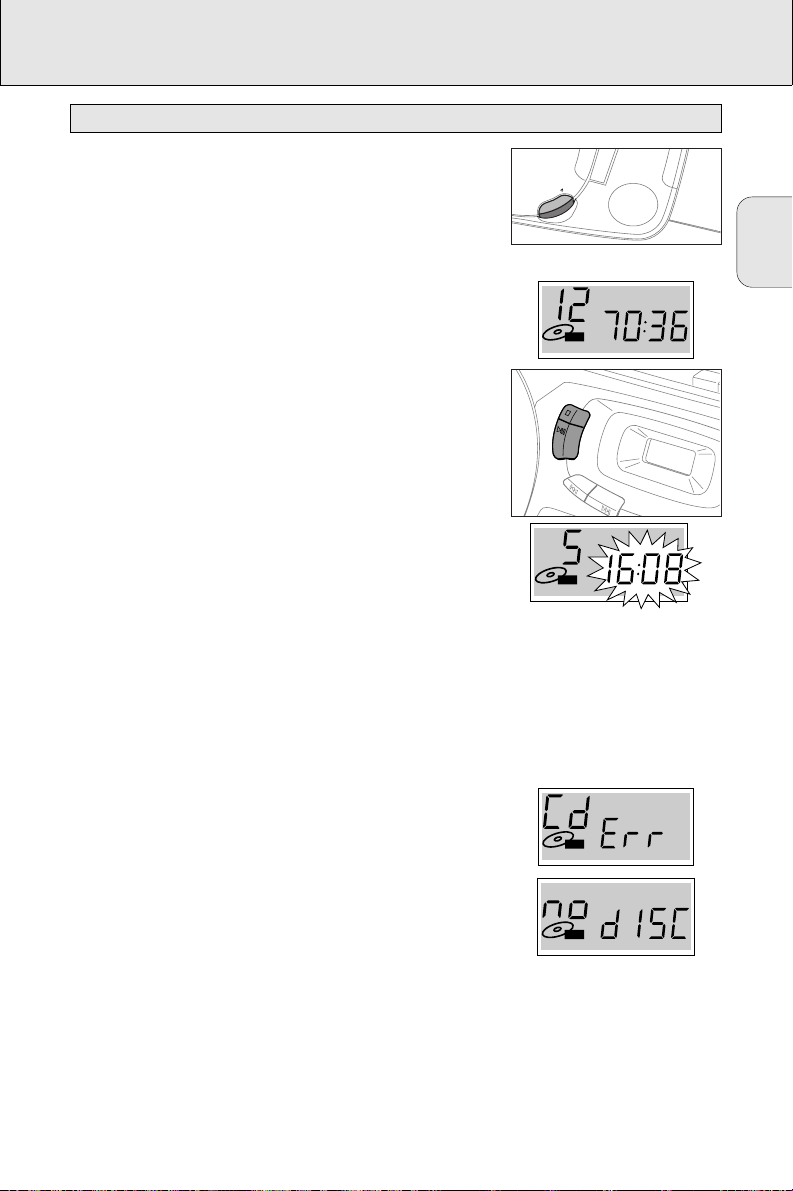
1 Set the POWER slider to CD.
2 Press / OPEN to open the CD compartment.
3 Insert an audio CD (printed side up) and close the CD
compartment.
™ The CD player starts and scans the contents list of the CD.
Then, the CD player stops. Display indication: the total
number of tracks and the total playing time of the CD.
4 Press the PLAY·PAUSE 2; button to start CD play.
™ Display indication: the current track number.
5 Press the STOP 9 button to stop CD play.
™ Display indication: the total number of tracks.
You can interrupt CD play by pressing PLAY·PAUSE 2;. Continue
CD play by pressing the button again.
™ Display indication: the time of the actual position flashes.
Note: CD play will also stop if:
– you open the CD compartment,
– the end of the CD is reached, or
– you move the
POWER
slider to
TUNER
or
TAPE
.
If you make a mistake when operating the CD player, or the
CD player cannot read the CD, the display shows Cd Err. (See
chapter ”TROUBLESHOOTING”.)
If you press PLAY·PAUSE 2; and there is no CD inserted the
display shows no dISC.
CD
CD
CDCD
Playing a CD
English
OPEN
CD
STOP
PLAY
PAUSE
SEARCH
CD PLAYER
10
English
SHUFFLE – Playing in random order
1 Press SHUFFLE before or during CD play.
™ All the tracks of the CD (or program if available) will now be
played in random order.
2 Press SHUFFLE again to return to normal CD play.
REPEAT – Repeating the entire CD or one track of the CD
1 Before or during CD play, press REPEAT repeatedly to cause the
display to show the different repeating modes.
™
REPEAT: the current track is played repeatedly.
™
REPEAT ALL: the entire CD or program is played repeatedly.
2 Press REPEAT until the display indication disappears to return to
normal CD play.
Note: You can activate the different playing modes at the same
time, e. g. you can repeatedly play the entire CD or program
in random order (
SHUFFLE REPEAT ALL
).
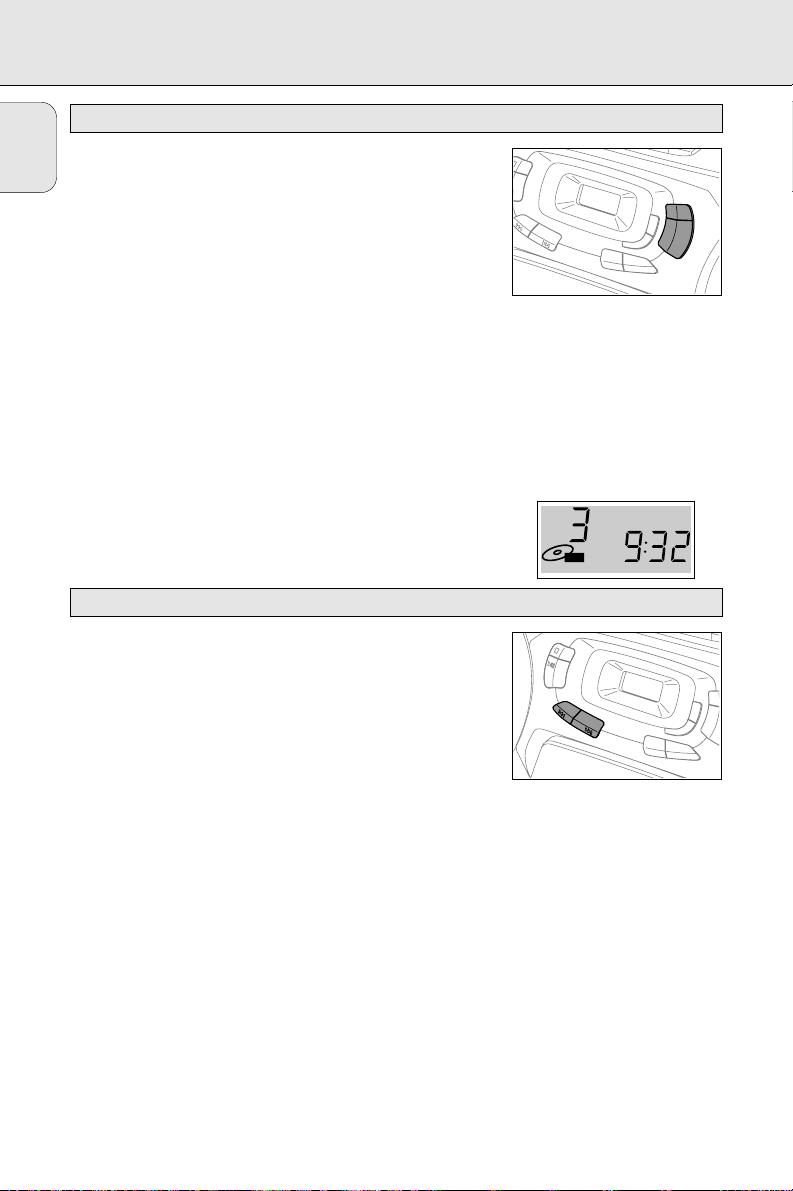
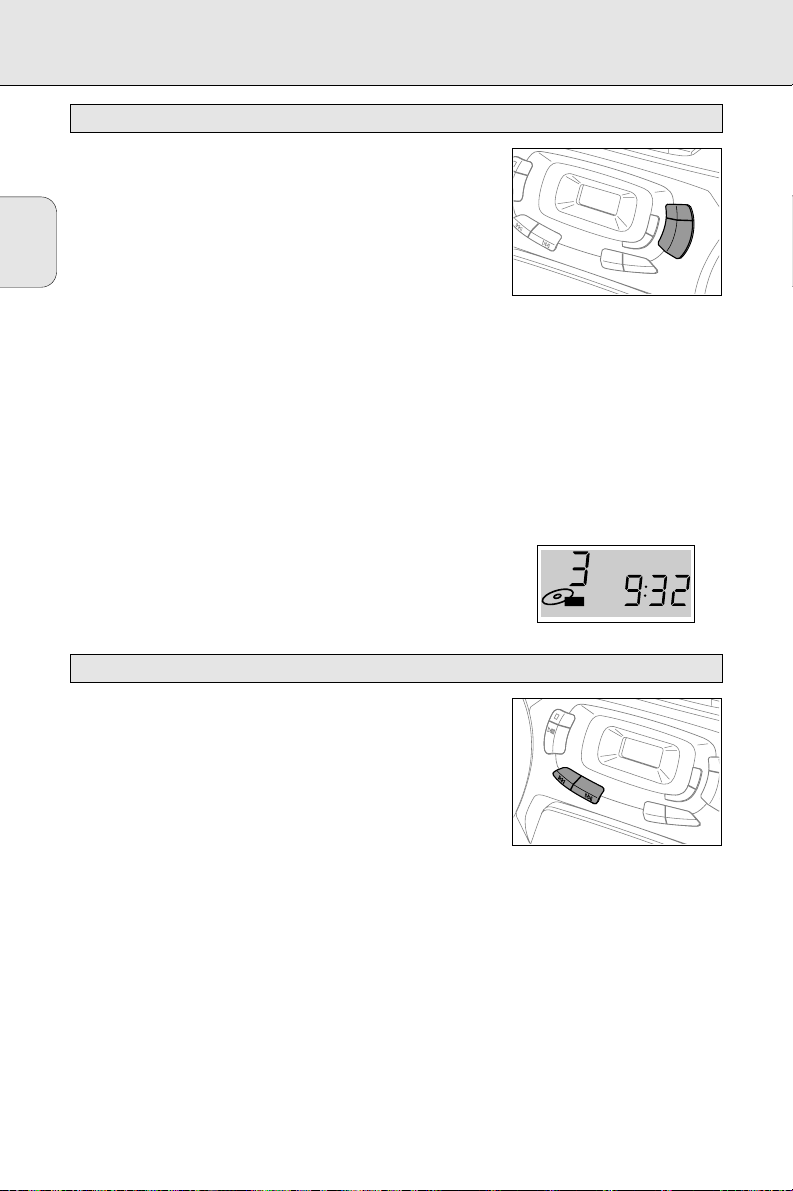
Selecting another track
Briefly press the SEARCH ∞ or § button once/several times to
skip to the beginning of the current/previous or subsequent
track(s).
During play:
CD play continues automatically with the selected track.
When CD playback is stopped:
Press PLAY·PAUSE 2; to start CD play.
™ Display indication: the selected track number.
Searching for a passage during CD play
1 Hold down the SEARCH ∞ or § button to find a particular
passage in a forward or backward direction.
™ CD play continues at a low volume.
2 Release the button when you have reached the desired passage.
Note: In the
SHUFFLE
and
REPEAT
modes or when playing a program,
searching is only possible within the particular track.
Search backward ∞ and forward §
Different playing modes: SHUFFLE / REPEAT
PR
SEARCH
OG
REPEAT
B
AND
SHUFFLE
PR
ESET
SHUFFLE
REPEATALL
CD
STOP
PLAY
PAUSE
SEARCH
PROG
BAND
PRESET
CD PLAYER
11
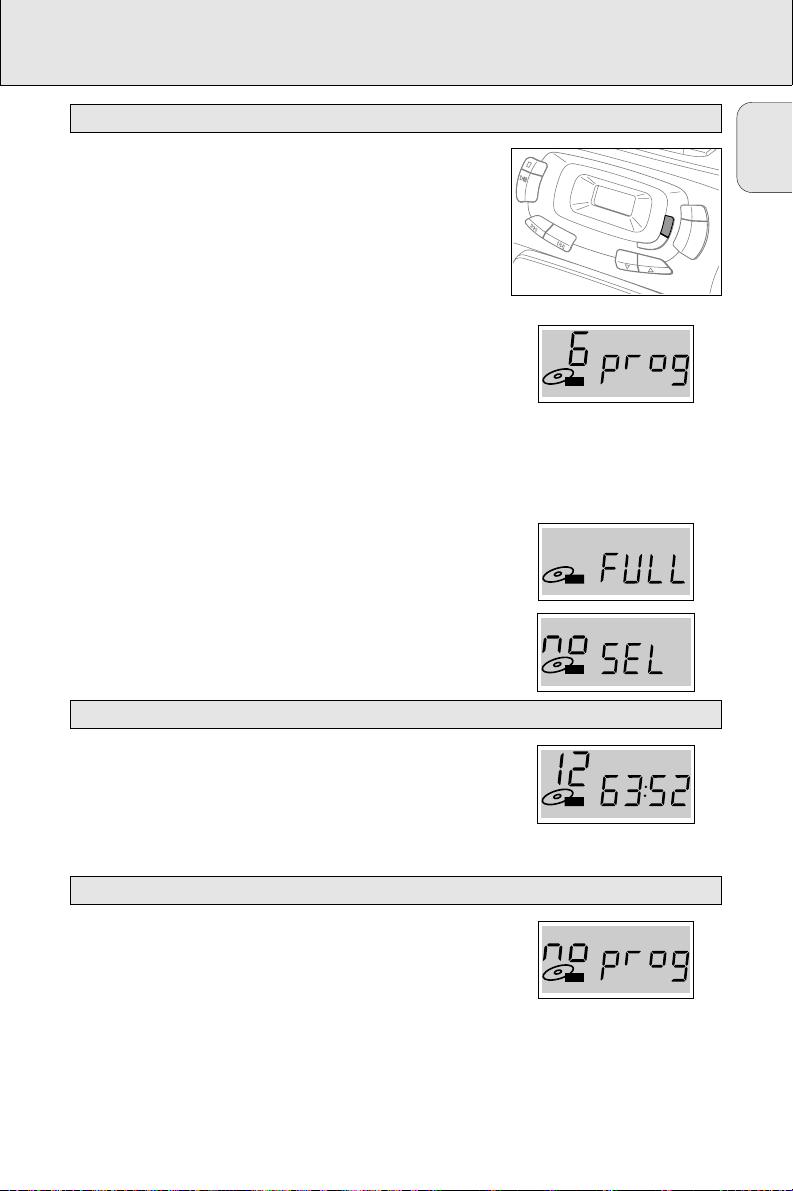
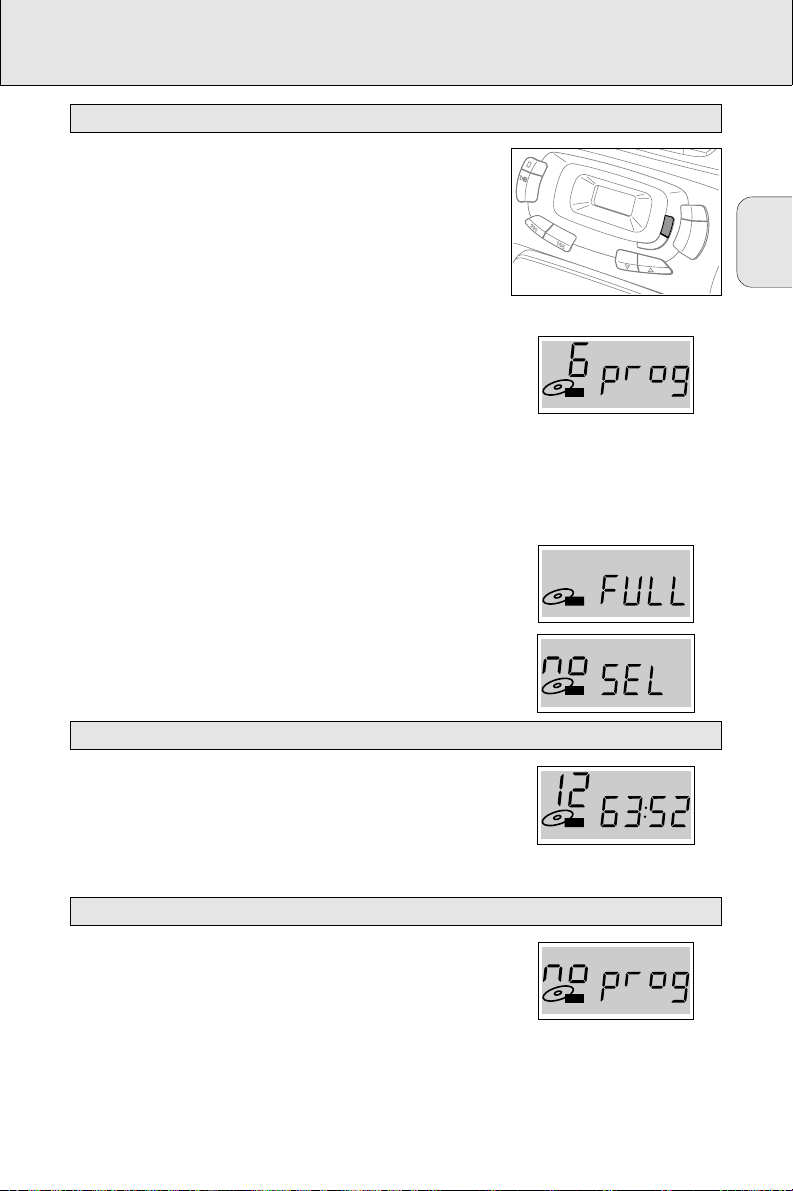
You can select a number of tracks and store these in the memory
in the desired sequence. You can store any track more than once.
A maximum of 20 tracks can be stored in the memory.
1 Select the desired track with SEARCH ∞ or §.
2 As soon as the number of the desired track is displayed, press
the PROGRAM button to store the track in the memory.
™
PROGRAM appears in the display and the number of the
stored track is shown. Then Proglights up briefly.
3 Select and store all desired tracks in this way.
You can review your settings by pressing the PROGRAM button
for more than 2 seconds.
™ The display shows all stored track numbers in sequence.
If you try to store more than 20 tracks the display shows FULL.
If you press PROGRAM and there is no track selected, the display
shows no SEL.
If you have selected the tracks in the stop position, press
PLAY·PAUSE 2;.
If you have selected the tracks during CD play, first press STOP 9,
then press PLAY·PAUSE 2;.
From the stop position, press STOP 9.
™ no Proglights up briefly,
PROGRAM disappears and your
program is erased.
Note: The program will also be erased if you
– interrupt the power supply,
– open the CD compartment, or
– move the
POWER
slider to
TUNER
or
TAPE
.
CD
Erasing the program when CD playback is stopped
Playing the program
E
Programming track numbers
English
STOP
Y
E
SEARCH
PROGRAM
CD
PROG
B
AND
SHUFFLE
PRESET
REP
PROGRAM
CD
CD
PROGRAM
CD
CASSETTE RECORDER
12
English
1 Set the POWER slider to TAPE.
2 Press STOP·OPEN 9/ to open the cassette compartment.
3 Insert a recorded cassette with the open side upwards and close
the cassette compartment.
4 Press PLAY 1 to start playback.
5 Press 6 or 5 to rewind or fast forward the tape.
6 To stop the tape press STOP·OPEN 9/.
Note: The keys are released at the end of the tape.
Recording is permissible insofar as copyright or other rights of
third parties are not infringed upon.
For recording on this set you should use a cassette of the type
NORMAL (IEC type I). This deck is not suitable for recording on
cassettes of the type CHROME (IEC type II) or METAL (IEC
type IV).
The recording level is set automatically. The controls VOLUME and
DBB do not affect the recording.
At the very beginning and end of the tape, no recording will take
place in the 7 seconds during which the leader tape passes the
recorder heads.
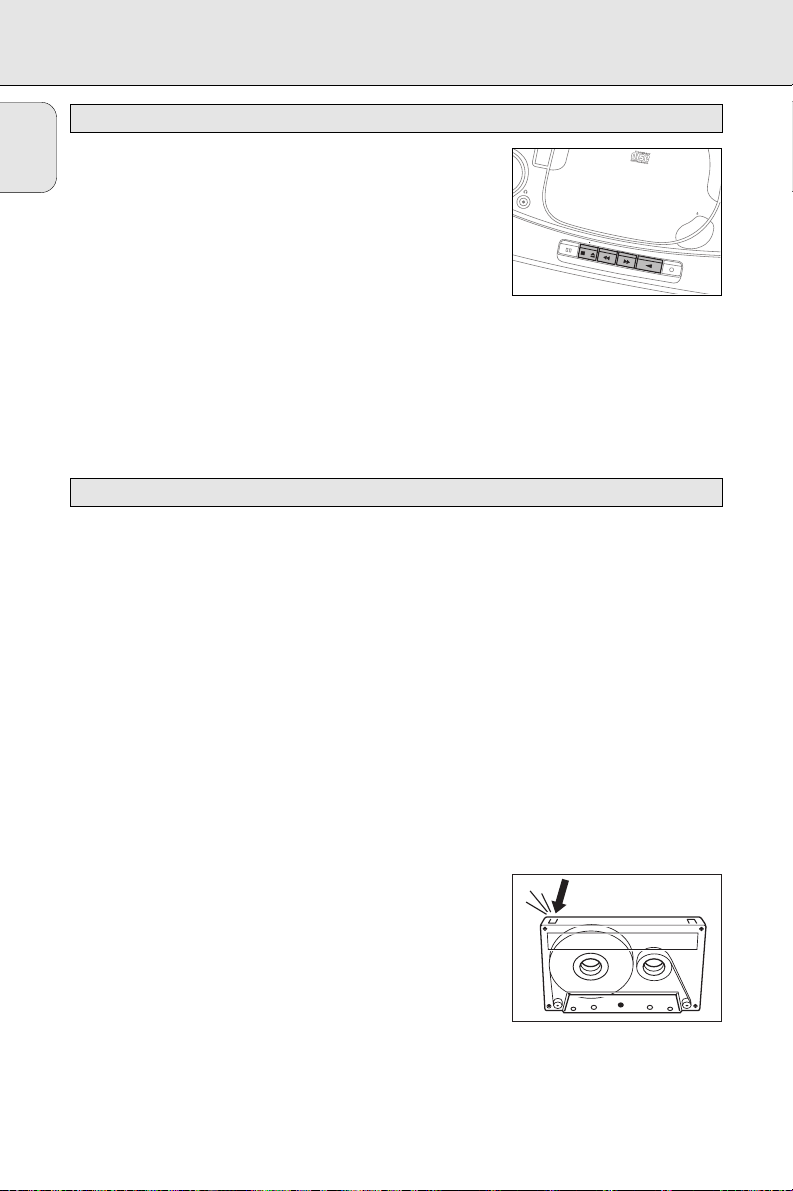
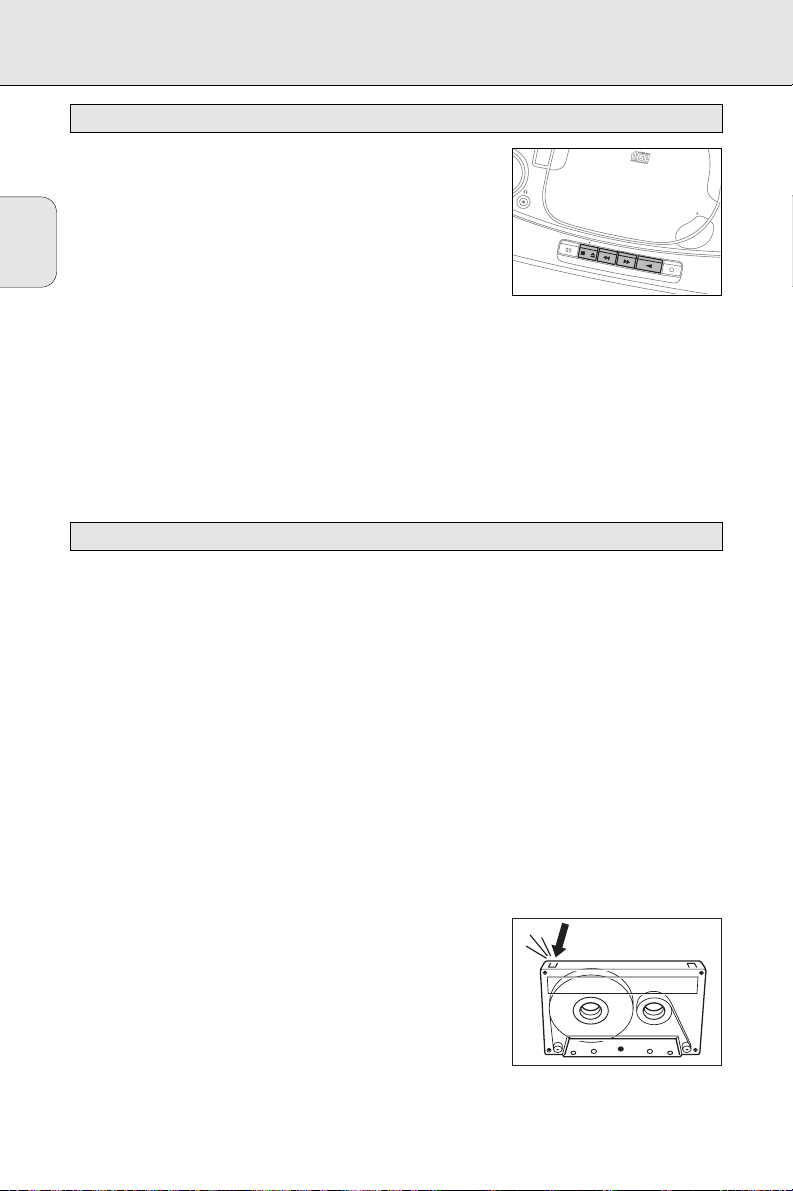
Protecting tapes from accidental erasure
Keep the cassette side to be protected in front of you and snap off
the left tab. Now, recording on this side is no longer possible.
To record again on this side of the cassette, cover the aperture
with a piece of adhesive tape.
General information on recording
Playing a cassette
C
D
S
YN
C
H
RO
ST
A
RT
R
E
C
O
R
D
IN
G
O
PEN
PAUSE
STOP OPEN
SEARCH
PLA
Y
RECORD

CASSETTE RECORDER
13
1 Set the POWER slider to CD.
2 Insert a CD and, if desired, program track numbers.
3 Press STOP·OPEN 9/ to open the cassette compartment.
4 Insert a blank, unprotected cassette and close the cassette
compartment.
5 Press RECORD 0 to start recording.
™ Playing of the CD or program starts automatically. It is not
necessary to start the CD player separately.
6 For brief interruptions press PAUSE ;. Press the PAUSE ; key
again to resume recording.
7 To stop recording, press STOP·OPEN 9/.
Note: the recording can be started from different positions:
– if the CD player is in pause mode, recording will start
from this very position (use
SEARCH ∞
or §);
– if the CD player is in stop mode, recording will start from
the beginning of the CD or program.
1 Set the POWER slider to TUNER.
2 Tune to the desired radio station (see chapter ”RADIO”).
3 Press STOP·OPEN 9/ to open the cassette compartment.
4 Insert a blank, unprotected cassette and close the cassette
compartment.
5 Press RECORD 0 to start recording.
6 For brief interruptions press PAUSE ;. To resume recording press
the PAUSE ; key again.
7 To stop recording, press STOP·OPEN 9/.
Recording from the radio
Recording from the CD player – CD synchro start
English
C
D
SY
N
C
H
RO
S
TA
RT
R
E
C
O
R
D
IN
G
OPEN
PAUSE
STOP OPEN
SEARCH
PLA
Y
RECORD
GENERAL INFORMATION
14
English
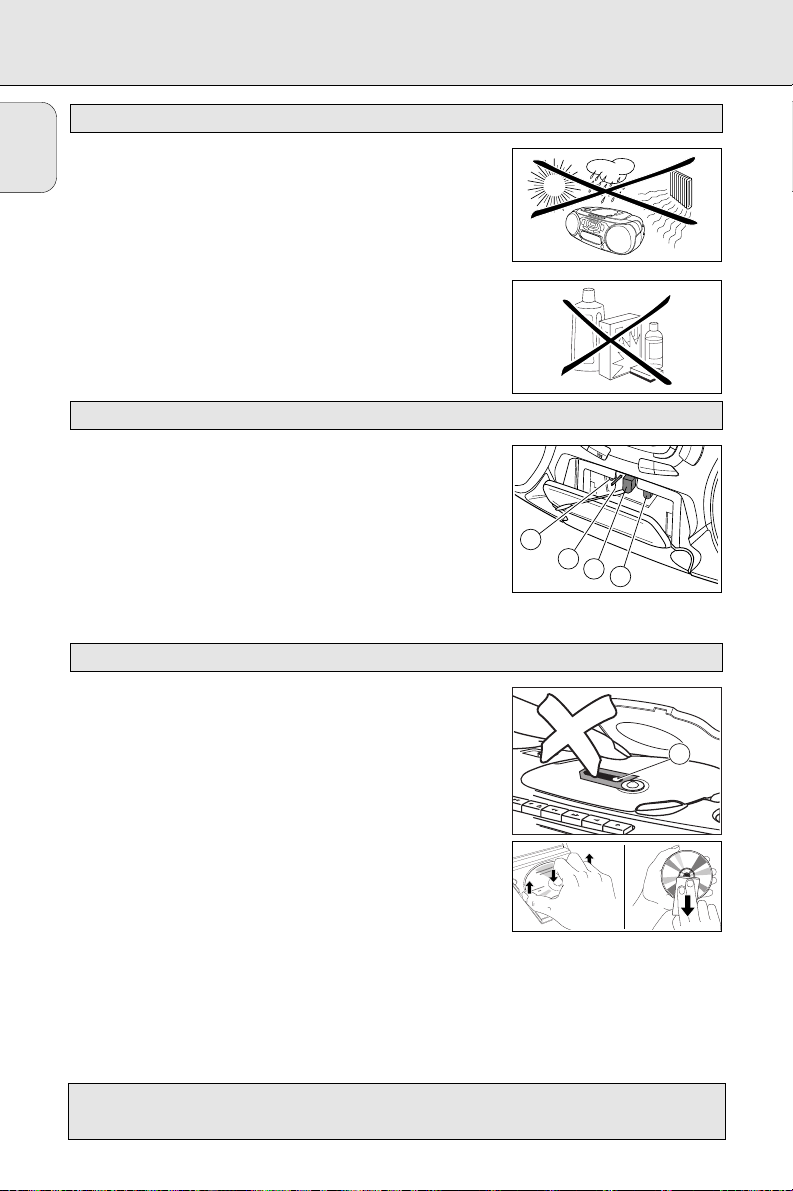
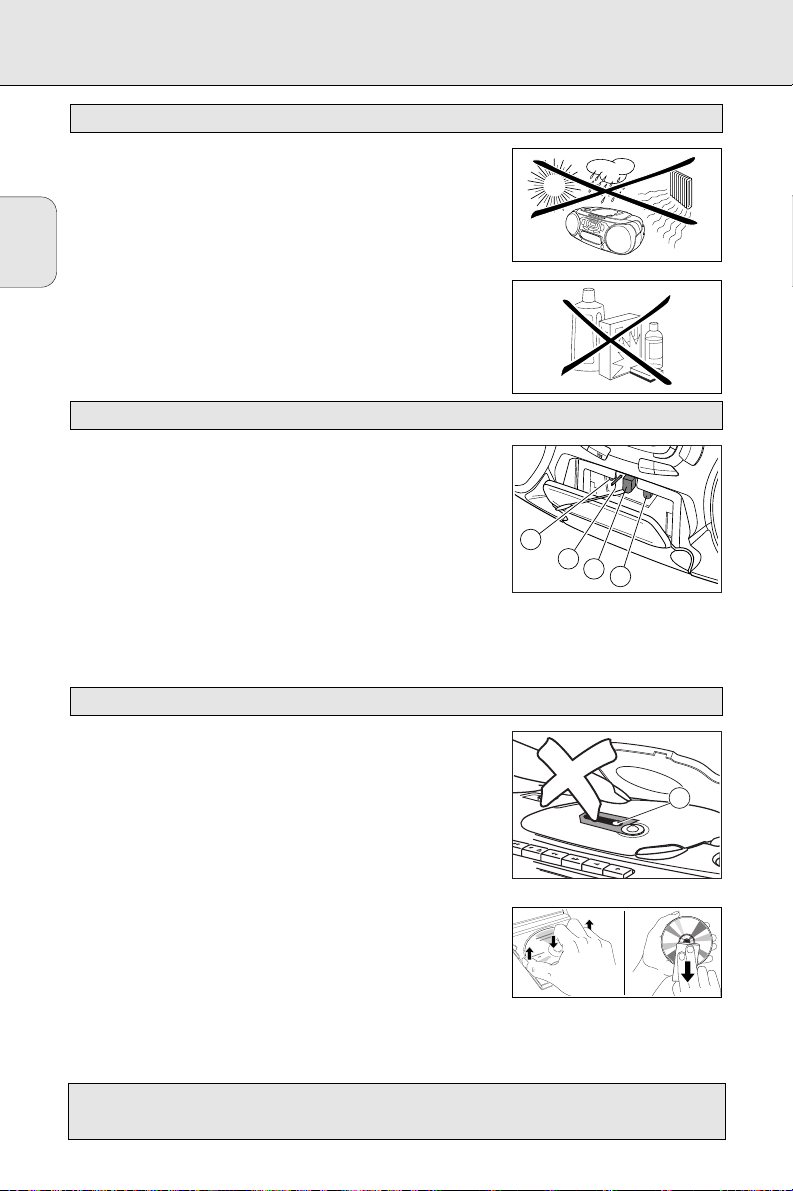
Do not expose the set, batteries, CDs or tapes to humidity,
rain, sand or excessive heat (caused by heating equipment or direct
sunlight).
The mechanical parts of the set contain self-lubricating bearings
and must not be oiled or lubricated!
You can clean the set with a soft, slightly dampened lint-free cloth.
Do not use any cleaning agents as they may have a corrosive effect.
To ensure proper recording and playback quality, clean the parts
A, B and C after approx. 50 hours of operation. Use a cotton
swab slightly moistened with alcohol or head-cleaner fluid.
Press PLAY 1 and clean the rubber pressure rollers A.
Press PAUSE ; and clean the capstans B and the heads C.
Note: Cleaning of the heads Ccan also be done by playing a
cleaning tape once.
The lens X of the CD player should never be touched. Always
keep the CD compartment closed to avoid dust on the lens.
The lens may cloud over when the set is suddenly moved from cold
to warm surroundings. Playing a CD is not possible then. Leave the
CD player in a warm environment until the moisture evaporates.
To take the CD out of its box easily, press the centre spindle while
lifting the CD.Always pick up the CD by the edge and put it back
in its box after use.
To clean the CD, wipe it in a straight line from the center toward
the edge using a soft, lint-free cloth. A cleaning agent may
damage the disc!
Never write on a CD or attach a sticker to it.
CD player and CD handling
SHUFFLE
PRESET
BAND
C
A
B
C
Tape deck maintenance
General maintenance
This set complies with the radio interference requirements of the
European Community
HIGHSPEEDDUBBING
PAUSE
STOP OPEN
SEARCH
PLAY
X
RECORD

TROUBLESHOOTING
15
Problem Possible cause Solution
No sound, VOLUME is not adjusted. Adjust volume.
no power
Headphone is connected. Disconnect headphone.
Mains cable is not securely connected. Connect mains cable properly.
Batteries are flat. Insert fresh batteries.
Batteries are inserted incorrectly. Insert batteries correctly.
Trying to change over from mains to Remove the mains plug from the
battery supply without removing the plug. unit’s AC MAINS inlet.
No reaction to Electrostatic discharge. Disconnect the set from power supply,
operation of any keys reconnect after a few seconds.
Poor radio reception Weak radio signal. Direct the antenna for optimum
reception.
Interference caused by vicinity of electrical Keep the radio away from electrical
equipment like TVs, computers, engines, etc.. equipment.
no dISC or The CD is badly scratched or dirty. Replace or clean the CD.
Cd Err indication
No CD is inserted. Insert a CD.
The CD is inserted upside down. Insert CD with label upwards.
The laser lens is steamed up. Wait until the lens has cleared.
The CD skips tracks The CD is damaged or dirty. Replace or clean the CD.
SHUFFLE or PROGRAM is active. Switch off SHUFFLE or PROGRAM play.
Poor cassette Dust and dirt on the heads, capstans or Clean heads, capstans, and pressure
sound quality pressure rollers. rollers.
Use of unsuitable cassette types Only use NORMAL type cassettes for
(METAL or CHROME) for recording. recording.
Recording does Cassette tab(s) may be snapped off. Apply a piece of adhesive tape over
not work the aperture.
Remote control does Batteries are inserted incorrectly. Insert batteries correctly.
not function properly
Batteries are flat. Insert fresh batteries.
(AZ 1208, AZ 1210 only)
Distance to the set is too large. Reduce distance.
English
WARNING
Under no circumstance should you try to
repair the set yourself as this will
invalidate the guarantee.
If a fault occurs, first check the points listed
below before taking the set for repair.
If you are unable to solve a problem by
following these hints, consult your dealer or
service center.
COMMANDES
16
Français
PAUSE
STOP OPEN
SEARCH
PLA Y
RECORD
OPEN
CD SYN CHRO
S
TAR T
RECORDING
STOP
PLAY
PAUSE
REPEAT
SHUFFLE
PR
ESET
VOLUME
B
A
S
S
R
E
F
L
E
X
S
P
E
A
K
E
R
S
Y
S
T
E
M
SEARCH
PROG
B
AND
1
2
3
4
5
9
SEARCH
PLA
Y
RECORD
STOP
PLAY
PAUSE
REPEAT
SHUFFLE
PR
ESET
SEARCH
PROG
B
AND
8
PAUSE
STOP OPEN
SEARCH
PLA
Y
RECORD
OPEN
CD
SYN
CHRO
STAR
T RECO
RD
IN G
STOP
PLAY
PAUSE
REPEAT
SHUFFLE
PR
ESET
SEARCH
PR
OG
B
AND
7
6
R
E
P
E
A
T
SEARCH
V
O
L
U
M
E
S
T
O
P
T
U
N
E
R
C
O
N
T
R
O
L
S
H
U
F
F
L
E
S
E
A
R
C
H
T
U
N
I
N
G
P
R
E
S
E
T
Uniquement
AZ 1208, AZ 1210

COMMANDES
17
FONCTIONS DE BASE
1 POWER:
CD, TUNER, TAPE
...
sélection de la source audio
2 DBB.......................amélioration des basses
3 VOLUME ...............réglage du volume
4 p ...........................
prise pour écouteurs 3,5 mm
Remarque: en raccordant les écouteurs, vous
désactivez les enceintes.
5 Afficheur
6
REMOTE SENSOR
..capteur pour la télé-
commande à infrarouge
(uniquement AZ 1208,
AZ 1210)
7 LECTEUR DE CD
/ OPEN ................ouvre le compartiment CD
STOP 9.................met fin à la lecture CD et
efface la programmation
PLAY·PAUSE 2; ...démarrage et interruption
de la lecture CD
SEARCH ∞§.....saut et recherche en avant
et en arrière
PROGRAM ............programmation des
morceaux et revue du
programme
SHUFFLE ...............pour jouer les morceaux
dans un ordre aléatoire
REPEAT.................répétition d’un morceau,
du la totalité du CD ou du
programme
8 RADIO
SEARCH ∞§.....réglage des stations radio
BAND....................sélection de la bande de
fréquence
PROGRAM ............pour programmer les
stations radio
PRESET 34........pour choisir une station
radio programmée
9 PLATINE CASSETTE
PAUSE ; ...............interrompt
l’enregistrement ou la
lecture
STOP·OPEN 9/ ...arrête la bande et ouvre le
compartiment cassette
SEARCH 6 ...........rebobinage de la bande
SEARCH 5 ...........avance rapide de la bande
PLAY 1 .................démarre la lecture
RECORD 0 ...........démarre l’enregistrement
TELECOMMANDE (uniquement
AZ 1208, AZ 1210)
VOLUME 43......diminue ou augmente le
volume
SHUFFLE ...............joue les morceaux d’un CD
dans un ordre aléatoire
REPEAT.................répétition d’un morceau,
de la totalité du CD ou du
programme
2; ........................démarre et interrompt la
lecture CD
¡™......................sélectionne le début du
morceau en cours, d’un
morceau précédent ou
suivant d’un CD
9...........................met fin à la lecture CD et
efface la programmation
SEARCH 56.....
recherche en avant / en
arrière dans un morceau CD
PRESET
34.........pour sélectionner une
station radio programmée
TUNING
∞§......réglage des stations radio
Français
Français
18
Pour l’appareil (en option)
Ouvrez le compartiment à piles de l’appareil et insérez 6 piles de
type R20, UM-1 ou D (alcalines de préférence).
Pour la télécommande (uniquement AZ 1208, AZ 1210)
Ouvrez le compartiment à piles de la télécommande et insérez 2
piles de type R03, UM-4 ou AAA (alcalines de préférence).
Retirez les piles lorsqu’elles sont usées ou si l’appareil doit rester
inutilisé pendant une période prolongée.
Les piles contiennent des substances chimiques et doivent
donc être traitées comme des déchets spéciaux.
1 Vérifiez que la tension secteur figurant sur la plaque
signalétique correspond bien à votre tension secteur locale.
Dans le cas contraire, consultez votre revendeur ou votre service
après-vente.
La plaque signalétique se trouve à la base de
l’appareil.
2 Si l’appareil est équipé d’un sélecteur de tension VOLTAGE X,
réglez ce sélecteur sur la tension locale.
3 Raccordez le cordon d’alimentation à la prise AC MAINS de
l’appareil et à la prise de courant.
L’alimentation est ainsi
établie. Le cordon d’alimentation se trouve à l’intérieur
du compartiment à piles.
L’alimentation sur piles est désactivée lorsque l’appareil est
raccordé au secteur. Pour passer à l’alimentation sur piles, retirez
la fiche de la prise AC MAINS de l’appareil.
Pour déconnecter complètement l’appareil du secteur, retirez la
fiche de la prise de courant.
Secteur
Piles
ALIMENTATION
Informations relatives à l’environnement
Tous les matériaux d’emballage superflus ont été supprimés. Nous avons fait de notre mieux pour
que l’emballage soit facilement séparable en trois types de matériaux: carton (boîte), polystyrène
expansé (matériel tampon), polyéthylène (sachets, panneau de protection en mousse).
Votre appareil est composé de matériaux pouvant être recyclés s’il est démonté par une firme
spécialisée. Veuillez observer les règlements locaux lorsque vous vous débarrassez des matériaux
d’emballage, des piles usagées et de votre ancien appareil.
X
FONCTIONS DE BASE
19
Français
Réglez le commutateur coulissant POWER sur la source audio
voulue: CD, TUNER, or TAPE.
L’appareil est arrêté lorsque le commutateur coulissant POWER est
en position OOFFFF/TAPE et que les touches de la platine cassettes
sont relâchées.
Remarque: si l’appareil fonctionne sur piles, veillez bien à toujours
l’arrêter après usage, pour éviter d’user inutilement
les piles.
Réglez le volume au moyen du régulateur VOLUME.
™ Affichage: niveau du volume de 0 à 32
(uniquement AZ 1208, AZ 1210).
Augmentez ou réduisez le niveau des basses en appuyant sur DBB.
Vous pouvez également accentuer le niveau des basses en plaçant
l’appareil contre un mur ou une étagère. N’obstruez pas les fentes
et laissez suffisamment de place tout autour pour la ventilation.
Pour les stations FM, déployez l’antenne télescopique. Pour
améliorer le signal, orientez et inclinez l’antenne. Réduisez sa
longueur si le signal est trop puissant (transmetteur très proche).
Pour les stations MW et LW orientez l’antenne intégrée en
tournant l’ensemble de la chaîne. L’antenne télescopique n’est pas
nécessaire.
Améliorer la réception radio
AZ 1203 AZ 1208
AZ 1210
Réglage du volume et du son
O
Mise en marche et arrêt
CD
TUNER
TAPE
DBB
DYNAMIC
BASS
BOOST
VOLUME
CD
TUNER
TAPE
DBB
DYNAMIC
BASS
BOOST
VOLUME
DBB
DYNAMIC
BASS
BOOST
VOLUME
CD SYNCHRO START REC
CD
TUNER
TAPE

RADIO
20
1 Réglez le commutateur coulissant POWER sur TUNER.
2 Sélectionnez la bande de fréquence au moyen du sélecteur
BAND.
™ Affichage: indication de la bande de fréquence choisie.
3 Appuyez sur SEARCH ∞ ou § pendant environ 1 seconde, puis
relâchez la touche.
™ La radio se règle automatiquement sur une station
d’intensité suffisante. Affichage pendant le réglage
automatique: Srch.
4 Répétez cette opération jusqu’à ce que vous ayez trouvé une
station qui vous convient.
Pour régler un émetteur faible, appuyez brièvement sur
SEARCH ∞ ou § aussi souvent que nécessaire pour obtenir un
réception optimale, ou jusqu’à ce que la fréquence correcte
apparaisse sur l’affichage.
Vous pouvez enregistrer en mémoire jusqu’à 29 stations radio.
Lorsque vous réglez une station programmée, le numéro de
mémoire (1 à 29) apparaît sur l’affichage.
1 Réglez le commutateur coulissant POWER sur TUNER.
2 Appuyez sur PROGRAM pour accéder au mode de
programmation.
™ En cours de programmation,
PROGRAM clignote sur l’affichage.
3 TRéglez la station voulue avec SEARCH ∞ ou §, comme décrit
précédemment (voir „Réglage des stations radio“).
™ Si la fréquence est déjà enregistrée en mémoire, le numéro
de mémoire s’affiche.
4 Appuyez sur 4 ou 3 pour attribuer un numéro entre 1 et 29 à
la station réglée.
5 Appuyez sur PROGRAM pour confirmer la programmation.
Appuyez sur PRESET 4 or 3 jusqu’à ce que le numéro de mémoire
voulu s’affiche.
FM
STEREO
TUNER
Régler des stations programmées
Programmation des stations radio (29 stations en mémoire)
F
Réglage des stations radio
Français
STOP
PLAY
PAUSE
SEARCH
TUNER
SEARCH
PROGRAM
TUNER
PROG
B
AND
FM
B
AND
FM
SHUF
PR
ESET
PR
OG
REPEAT
SHUFFLE
PR
ESET
LECTEUR DE CD
21
1 Réglez le commutateur coulissant POWER sur CD.
2 Appuyez sur / OPEN pour ouvrir le compartiment CD.
3 Introduisez un CD audio (face imprimée vers le haut) et refermez
le compartiment CD.
™ Le lecteur d CD se met en marche et balaye la liste du
contenu du CD, puis s’arrête. Affichage: nombre total de
morceaux et durée totale du CD.
4 Appuyez sur la touche PLAY·PAUSE 2; pour démarrer la lecture
du CD.
™ Affichage: numéro du morceau en cours.
5 Appuyez sur la touche STOP 9 pour mettre fin à la lecture.
™ Affichage: nombre total de morceaux.
Vous pouvez interrompre la lecture CD en appuyant sur
PLAY·PAUSE 2;. et la reprendre en appuyant à nouveau sur cette
touche.
™ Affichage: le temps correspondant à la position momentanée
clignote.
Remarque: la lecture du CD sera également arrêtée:
– si vous ouvrez le compartiment CD,
– lorsque la fin du CD est atteinte, ou
– si vous amenez le commutateur
POWER
en position
TUNER
ou
TAPE.
Si vous faites une erreur lors de l’utilisation du lecteur de CD ou
que le lecteur est incapable de lire le CD, l’affichage indique
Cd Err. (Voir chapitre ”RECHERCHE DE PANNES”.)
Si vous appuyez sur PLAY·PAUSE 2; alors que le compartiment ne
contient pas de CD, l’affichage indique no dISC.
CD
CD
CDCD
Pour lire un CD
Français
OPEN
CD
STOP
PLAY
PAUSE
SEARCH
LECTEUR DE CD
22
SHUFFLE – Lecture dans un ordre aléatoire
1 Appuyez sur SHUFFLE avant ou pendant la lecture CD.
™ Tous les morceaux du CD (ou du programme, le cas échéant)
sont alors joués dans un ordre aléatoire.
2 Appuyez à nouveau sur SHUFFLE pour revenir en lecture CD
normale.
REPEAT – Répéter la totalité ou un morceau du CD
1 Avant ou pendant la lecture CD, appuyez sur REPEAT à plusieurs
reprises, pour afficher les différents modes de répétition.
™
REPEAT: lecture répétée du morceau en cours.
™
REPEAT ALL: lecture répétée de la totalité du CD ou du
programme.
2 Pour revenir en lecture CD normale, appuyez sur REPEAT jusqu’à
ce que l’indication disparaisse de l’affichage.
Remarque: vous pouvez activer simultanément les différents
modes de lecture, p. ex. jouer de manière répétée la
totalité du CD ou du programme dans un ordre aléatoire
(
SHUFFLE REPEAT ALL
).
Sélection d’un autre morceau
Appuyez brièvement sur la touche SEARCH ∞ ou § à une ou
plusieurs reprises pour sauter au début du morceau en cours /
précédent / suivant.
En cours de lecture:
La lecture continue automatiquement avec le morceau choisi.
Lorsque la lecture CD est arrêtée:
Appuyez sur PLAY·PAUSE 2; pour démarrer la lecture CD.
™ Affichage: numéro du morceau sélectionné.
Recherche d’un passage en cours de lecture CD
1 Maintenez la touche SEARCH ∞ ou § appuyée pour chercher
un passage donné en avant ou en arrière.
™ La lecture CD se poursuit à faible volume.
2 Relâchez la touche lorsque vous avez atteint le passage
souhaité.
Remarque: en modes
SHUFFLE
ou
REPEAT
ou en lecture programmée,
la recherche n’est possible qu’au sein du morceau donné.
Recherche en arrière ∞ et en avant §
Les différents modes de lecture: SHUFFLE / REPEAT
Français
PR
SEARCH
OG
REPEAT
B
AND
SHUFFLE
PR
ESET
SHUFFLE
REPEATALL
CD
STOP
PLAY
PAUSE
SEARCH
PROG
BAND
PRESET
LECTEUR DE CD
23
Vous pouvez sélectionner une série de morceaux et les enregistrer
en mémoire dans l’ordre voulu. Vous pouvez programmer un
morceau quelconque plus d’une fois. Vous pouvez enregistrer en
mémoire 20 morceaux au maximum.
1 Sélectionnez le morceau voulu avec SEARCH ∞ ou §.
2 Dès que le numéro du morceau voulu s’affiche, appuyez sur la
touche PROGRAM pour enregistrer le morceau en mémoire.
™
PROGRAM apparaît sur l’affichage, et le numéro du morceau
en mémoire s’affiche. Progs’allume ensuite brièvement.
3 Sélectionnez et mémorisez de la même manière tous les
morceaux voulus.
Vous pouvez vérifier votre programmation en appuyant sur la
touche PROGRAM pendant plus de 2 secondes.
™ L’affichage indique dans l’ordre tous les numéros de
morceaux en mémoire.
Si vous tentez d’enregistrer plus de 20 morceaux, l’affichage
indique FULL.
Si vous appuyez sur PROGRAM sans avoir sélectionné de plage,
l’afficheur indique no SEL.
Si vous avez sélectionné les morceaux pendant que le lecteur
était à l’arrêt, appuyez sur PLAY·PAUSE 2;.
Si vous avez sélectionné les morceaux en cours de lecture CD,
appuyez d’abord sur STOP 9, puis sur PLAY·PAUSE 2;.
En position d’arrêt, appuyez sur STOP 9.
™ no Progs’allume brièvement sur l’affichage,
PROGRAM
disparaît et votre programmation est effacée.
Remarque: le programme sera également effacé:
– si vous coupez l’alimentation électrique,
– si vous ouvrez le compartiment CD ou
– si vous amenez le commutateur
POWER
en position
TUNER
ou
TAPE.
CD
Effacer la programmation lorsque la lecture CD est arrêtée
Lecture programmée
E
Programmation de numéros de morceaux
Français
STOP
Y
E
SEARCH
B
AND
PROGRAM
CD
PROGRAM
CD
PROG
REP
SHUFFLE
PRESET
CD
PROGRAM
CD
PLATINE CASSETTE
24
1 Amenez le commutateur coulissant POWER en position TAPE.
2 Appuyez sur STOP·OPEN 9/ pour ouvrir le compartiment
cassette.
3 Introduisez une cassette enregistrée, face ouverte vers le haut,
et refermez le compartiment.
4 Appuyez sur PLAY 1 pour démarrer la lecture.
5 Appuyez sur 6 ou 5 pour le rebobinage ou l’avance rapide de
la bande.
6 Pour arrêter la bande, appuyez sur STOP·OPEN 9/.
Remarque: ces touches sont relâchées en fin de bande.
L’enregistrement est autorisé dans la mesure où il n’empiète pas
sur les droits d’auteur ou autres droits de tiers.
Pour l’enregistrement sur cet appareil, nous vous recommandons
d’utiliser des cassettes de type NORMAL (type IEC I). La platine
n’est pas prévue pour l’enregistrement de cassettes de type
CHROME (type IEC II) ou METAL (type IEC IV).
Le niveau d’enregistrement se règle automatiquement. Les
régulateurs VOLUME et DBB restent sans effet sur
l’enregistrement.
Tout à fait au début et à la fin de la bande, il n’y a pas
d’enregistrement pendant 7 secondes, le temps pour la bande
amorce de défiler par les têtes d’enregistrement.
Protection des bandes contre un effacement involontaire
La face à protéger de la cassette étant dirigée vers vous, faites
sauter la languette de gauche. L’enregistrement sur cette face est
ainsi devenu impossible.
Pour pouvoir enregistrer à nouveau sur cette face de la cassette,
obstruez l’orifice au moyen d’un morceau de ruban adhésif.
Généralités sur l'enregistrement
Lecture d'une cassette
Français
C
D
S
YN
C
H
RO
ST
A
RT
R
E
C
O
R
D
IN
G
O
PEN
PAUSE
STOP OPEN
SEARCH
PLA
Y
RECORD

PLATINE CASSETTE
25
1 Réglez le commutateur coulissant POWER sur CD.
2 Introduisez un CD et programmez éventuellement les morceaux
voulus.
3 Appuyez sur la touche STOP·OPEN 9/ pour ouvrir le
compartiment cassette.
4 Introduisez une cassette vierge non protégée et fermez le
compartiment cassette.
5 Appuyez sur RECORD 0 pour démarrer l’enregistrement.
™ La lecture du CD ou du programme démarre
automatiquement. Il n’est pas nécessaire de mettre le
lecteur de CD en marche séparément.
6 Pour une brève interruption, appuyez sur PAUSE ;. Appuyez à
nouveau sur PAUSE ; pour reprendre l’enregistrement.
7 Pour mettre fin à l’enregistrement, appuyez sur STOP·OPEN 9/.
Remarque: l’enregistrement peut être démarré à partir de
différentes positions:
– si le lecteur de CD est en mode pause,
l’enregistrement démarrera à partir de cette position
précise (utilisez
SEARCH ∞
ou §);
– si le lecteur CD est à l’arrêt, l’enregistrement
démarrera au début du CD ou du programme.
1 Réglez le commutateur coulissant POWER sur TUNER.
2 Réglez la station radio voulue (voir chapitre ”RADIO”).
3 Appuyez sur la touche STOP·OPEN 9/ pour ouvrir le
compartiment cassette.
4 Introduisez une cassette vierge non protégée et fermez le
compartiment cassette.
5 Appuyez sur RECORD 0 pour démarrer l’enregistrement.
6 Pour une brève interruption, appuyez sur PAUSE ;. Appuyez à
nouveau sur PAUSE ; pour reprendre l’enregistrement.
7 Pour mettre fin à l’enregistrement, appuyez sur STOP·OPEN 9/.
Enregistrement à partir de la radio
Enregistrement depuis le lecteur de CD - CD synchro start
Français
C
D
SY
N
C
H
RO
S
TA
RT
R
E
C
O
R
D
IN
G
OPEN
PAUSE
STOP OPEN
SEARCH
PLA
Y
RECORD
INFORMATIONS GÉNÉRALES
26
Evitez d’exposer l’appareil, les piles, les CD ou les cassettes à
l’humidité, à la pluie ou à une chaleur excessive (chauffage ou
exposition directe au soleil).
Les éléments mécaniques de l’appareil sont dotés de paliers
autolubrifiants qui n’ont pas besoin d’être huilés ou lubrifiés!
Vous pouvez nettoyer l’appareil avec un chiffon doux légèrement
humide, ne peluchant pas. N’utilisez pas de produits de nettoyage,
qui pourraient avoir un effet corrosif.
Pour assurer une bonne qualité d’enregistrement et de lecture,
nettoyez les éléments A, B et C toutes les 50 heures de service
environ. Utilisez un coton-tige légèrement humecté d’alcool ou d’un
liquide de nettoyage pour têtes magnétiques.
Appuyez sur PLAY 1 et nettoyez les galets presseurs en
caoutchouc A.
Appuyez sur PAUSE ; et nettoyez les cabestans B et les têtes C.
Remarque: les têtes Cpeuvent également être nettoyées en
faisant passer une fois une cassette de nettoyage.
Ne touchez jamais la lentille X du lecteur de CD. Gardez toujours
le compartiment CD fermé pour éviter le dépôt de poussière sur la
lentille.
La lentille peut s’embuer si elle passe soudainement d’un milieu
froid en milieu chaud. Il n’est alors pas possible de lire un CD.
Laissez le lecteur de CD dans un environnement chaud jusqu’à ce
que l’humidité se soit évaporée.
Pour retirer sans peine le CD de son boîtier, appuyez sur l’axe
central lorsque vous soulevez le CD. Saisissez toujours le CD par la
tranche, et remettez-le dans son boîtier après usage.
Pour nettoyer un CD, essuyez-le d’un mouvement droit du centre
vers l’extérieur au moyen d’un chiffon doux ne peluchant pas.
Un produit de nettoyage risquerait d’endommager le disque compact!
N’apportez jamais d’inscription sur un CD et n’y collez pas d’étiquette.
Lecteur de CD et manipulation des CD
SHUFFLE
PRESET
BAND
C
A
B
C
Entretien des platines cassettes
Entretien général
Français
Cet appareil est conforme aux normes de la Communauté européenne
en matière d’interférences radio.
HIGHSPEEDDUBBING
PAUSE
STOP OPEN
SEARCH
PLAY
X
RECORD

RECHERCHE DE PANNES
27
Problème Cause possible Solution
Pas de son, Volume mal réglé. Réglez le volume.
pas de courant
Ecouteurs raccordés. Déconnectez les écouteurs.
Cordon d’alimentation mal raccordé. Raccordez correctement le câble.
Piles usées. Changez les piles.
Piles mal installées. Installez correctement les piles.
Vous avez tenté de passer de l’alimentation Retirez la fiche du cordon
secteur au fonctionnement sur piles sans d’alimentation de la prise AC MAINS
retirer la fiche. de l’appareil.
L’appareil ne réagit Décharge électrostatique. Débranchez l’appareil de la prise,
pas à l’appui des et rebranchez-le au bout de quelques
touches secondes.
Mauvaise réception Le signal radio est faible. Orientez l’antenne pour une
radio réception optimale.
Interférence d’un équipement électrique proche Eloignez la radio d’autres appareils
tel que télévision, ordinateur, moteur, etc. électriques.
Affichage
no dISC
Le CD est rayé ou sale. Remplacez ou nettoyez le CD.
ou Cd Err
Pas de CD en place. Introduisez un CD.
Le CD est à l’envers.
Placez le CD face imprimée vers le haut.
La lentille laser est embuée. Attendez que la buée disparaisse.
Le lecteur CD saute Le CD est endommagé ou sale. Remplacez ou nettoyez le CD.
certains morceaux
SHUFFLE ou PROGRAM est activé. Désactivez le mode SHUFFLE ou PROGRAM.
Mauvaise qualité de Poussière ou saleté sur les têtes, Nettoyez les têtes, les cabestans
son de la cassette les cabestans ou les galets. et les galets.
Utilisation de cassettes inappropriées (type N’utilisez que des cassettes de type
METAL ou CHROME) pour l’enregistrement. NORMAL pour l’enregistrement.
L’appareil Languette(s) de protection de la Appliquez un morceau de ruban
n’enregistre pas cassette cassée(s). adhésif sur l’orifice.
La télécommande ne Piles mal installées. Installez correctement les piles.
fonctionne pas
Piles usées. Changez les piles.
correctement
Trop grande distance de l’appareil. Réduisez la distance.
(uniquement AZ 1208,
AZ 1210)
Français
ATTENTION
N'essayez en aucun cas de réparer votre
appareil vous-même, sous peine
d'invalider la garantie.
Dans le cas d'une anomalie de fonctionnement,
commencez par vérifier les points ci-dessous
avant de donner votre appareil à réparer.
Si vous ne parvenez pas à résoudre le problème
en suivant ces instructions, veuillez consulter
votre fournisseur ou le centre SAV
compétent.

CONTROLES
28
Español
PAUSE
STOP OPEN
SEARCH
PLA Y
RECORD
OPEN
CD SYN CHRO
S
TAR T
RECORDING
STOP
PLAY
PAUSE
REPEAT
SHUFFLE
PR
ESET
VOLUME
B
A
S
S
R
E
F
L
E
X
S
P
E
A
K
E
R
S
Y
S
T
E
M
SEARCH
PROG
B
AND
1
2
3
4
5
9
SEARCH
PLA
Y
RECORD
STOP
PLAY
PAUSE
REPEAT
SHUFFLE
PR
ESET
SEARCH
PROG
B
AND
8
PAUSE
STOP OPEN
SEARCH
PLA
Y
RECORD
OPEN
CD
SYN
CHRO
STAR
T RECO
RD
IN G
STOP
PLAY
PAUSE
REPEAT
SHUFFLE
PR
ESET
SEARCH
PR
OG
B
AND
7
6
R
E
P
E
A
T
SEARCH
V
O
L
U
M
E
S
T
O
P
T
U
N
E
R
C
O
N
T
R
O
L
S
H
U
F
F
L
E
S
E
A
R
C
H
T
U
N
I
N
G
P
R
E
S
E
T
Sólo para
AZ 1208, AZ 1210

CONTROLES
29
FUNCIONES BÁSICAS
1 POWER:
CD, TUNER, TAPE
...selecciona la fuente de
sonido
2 DBB.......................realza las frecuencias
graves
3 VOLUME ...............ajusta el nivel de volumen
4 p ...........................toma de auriculares 3,5 mm
Nota: al conectar los auriculares se
desconectan los altavoces.
5 Pantalla de visualización
6
REMOTE SENSOR..sensor correspondiente al
control remoto por infrarrojos
(sólo para AZ 1208, AZ 1210)
7 REPRODUCTOR CD
/ OPEN ................abre el compartimento del
CD
STOP 9.................detiene la marcha del
reproductor CD y borra el
programa actual
PLAY·PAUSE 2; ...pone en marcha e inter-
rumpe la reproducción CD
SEARCH ∞§.....realiza un salto y busca
adelante y atrás
PROGRAM ............programa números de
pistas y revisa el programa
SHUFFLE ...............realiza la reproducción de
las pistas del CD en orden
aleatorio
REPEAT.................repite una pista, el CD
entero o el programa
8 RADIO
SEARCH ∞§.....sintoniza las diferentes
estaciones de radio
BAND....................selecciona una banda de
señal
PROGRAM ............programa las emisoras de
radio prefijadas
PRESET 34........selecciona una emisora de
radio prefijada
9 GRABADORA
PAUSE ; ...............interrumpe la grabación o
la reproducción
STOP·OPEN 9/ ...detiene la cinta y abre el
compartimento del casete
SEARCH 6 ...........rebobina la cinta hacia
atrás
SEARCH 5 ...........rebobina la cinta hacia
adelante
PLAY 1 .................inicia la reproducción
RECORD 0 ...........inicia la grabación
CONTROL REMOTO (sólo para AZ 1208,
AZ 1210)
VOLUME 43......disminuye o aumenta el
nivel de volumen
SHUFFLE ...............realiza la reproducción de
las pistas del CD en orden
aleatorio
REPEAT.................repite una pista, el CD
entero o el programa
2; ........................inicia e interrumpe la
reproducción del CD
¡™......................selecciona el inicio de la
pista actual, la anterior o
alguna de las posteriores
del CD
9...........................para la reproducción del
CD y borra el programa
SEARCH 56.....
busca hacia atrás y hacia
adelante en la pista del CD
PRESET
34.........selecciona una emisora de
radio prefijada
TUNING
∞§......sintoniza las emisoras de
radio
Español
Español
30
Para el equipo (opcional)
Abrir el compartimento de las pilas del equipo, e introducir 6 pilas
tipo R20, UM-1 ó D (preferiblemente alcalinas).
Para el control remoto (sólo para AZ 1208, AZ 1210)
Abrir el compartimento de las pilas del control remoto, e introducir
2 pilas tipo RO3, UM-4 ó AAA (preferiblemente alcalinas).
Retirar las pilas si se encuentran ya agotadas o si el equipo no va
a ser utilizado durante un período de tiempo prolongado.
Las pilas contienen sustancias químicas, por lo que su
eliminación debe realizarse de forma adecuada.
1 Comprobar que la tensión de red indicada en la placa de
especificaciones corresponde a la tensión de red local. Si no es
así, consultar con su distribuidor u organización de servicio
habitual.
La placa de especificaciones está situada en la
parte inferior del equipo.
2 Si el equipo se encuentra equipado con un selector de tensión
VOLTAGE selector X, colocar este selector al valor de la tensión
de red local.
3 Conectar el cable de alimentación a la entrada de AC MAINS y
a la toma de red de la pared. Con ello la alimentación de red
queda conectada.
El cable de alimentación se encuentra
situado en el interior del compartimento de las pilas.
El suministro mediante pilas quedará desconectado cuando el
equipo se conecte a la red eléctrica. Para volver a utilizar la
alimentación con pilas, desconectar el cable de alimentación de la
entrada de AC MAINS de la unidad.
Para desconectar por completo el equipo de la red, retirar el
conector de la toma de red de la pared.
Red eléctrica
Pilas
FUENTE DE ALIMENTACIÓN
Información medioambiental
Se ha suprimido todo el material de embalaje innecesario. Hemos hecho todo lo posible por que el
embalaje pueda separarse en tres materiales independientes: cartón (caja), poliestireno
expandible (amortiguación) y polietileno (bolsas, plancha de espuma protectora).
Los materiales que componen el equipo son reciclables y reutilizables si son desmontados por una
empresa especializada. Por favor, siga las normas y regulaciones locales a la hora de tirar los
materiales de embalaje, pilas agotadas o su antiguo equipo a la basura.
X
 Loading...