

Page 1
PHILIPS
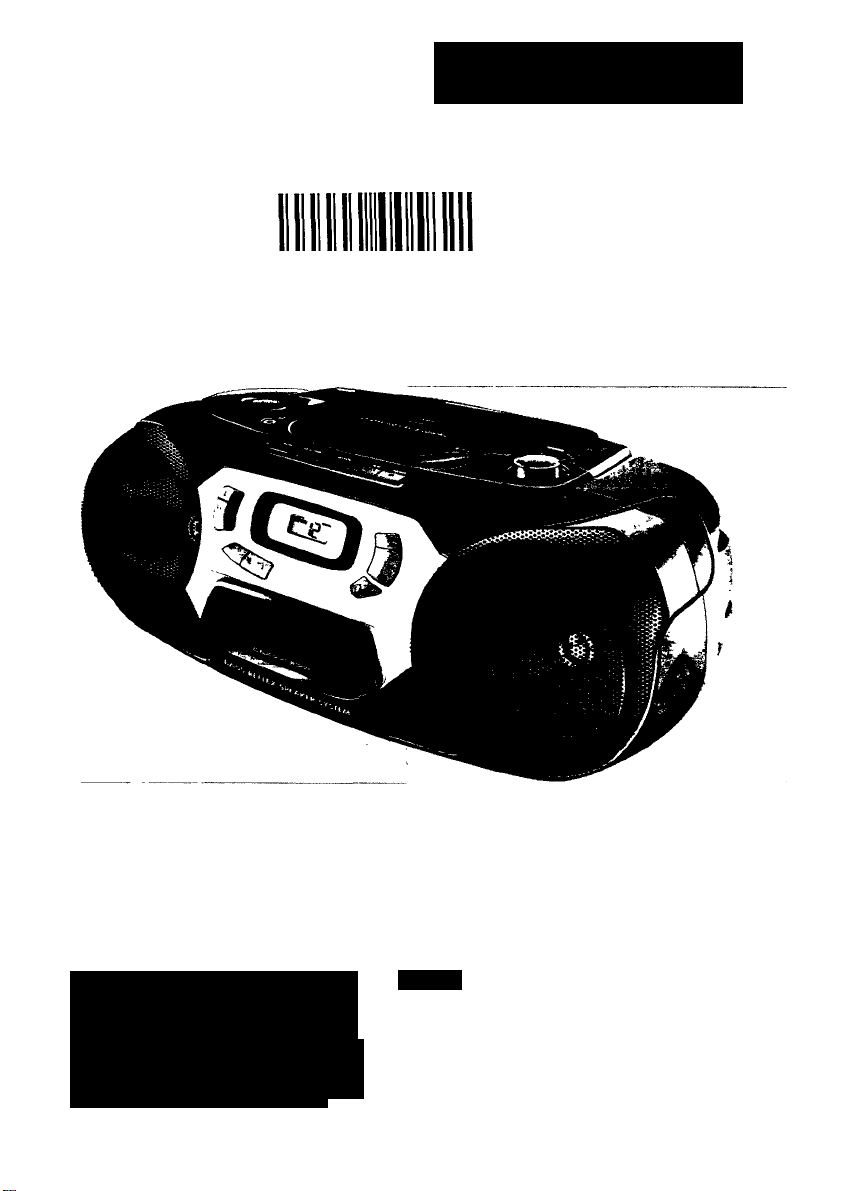
AZ 1200/AZ 1205 CD Radio Cassette Recorder
0"0 QQOOO "0 0S821
MAGNAVOX
Owner's Manual
Mode d'emploi
Instructivo de manejo
Toll Free Help Line
Ligne d'assistance en service iibre
Línea de ayuda telefonica sin cargo
800-53l-0039i
7
Page 2
Return your Warranty Registration card today to
ensure you receive all the benefits you’re entitled to.
' Once your Philips Magnavox purchase
is registered, you’re eligible to receive all
the privileges of owning a Philips
Magnavox product
^ Warranty i
Verification
Registering your product
within 10 days confirms
your right to maximum
protection under the
terms and conditions of
your Philips Magnavox
warranty.
^ Owner I
Confirmation
Your completed Warranty
Registration Card serves
as verification of
ownership in the event of
product theft or loss.
Know these
symbols
CAUTIOIM
RISK OF ELECTRIC SHOCK
A
CAUTION: TO REDUCE THE RISK OF ELECTRIC SHOCK, DO NOT
REMOVE COVER [OR BACKS. NO USER.SERVICEABIE PARTS
INSIDE. REFER SERVICING TO OUAUFIEO SERVICE PERSONNEL
DO NOT OPEN
A
' So complete and return the Warranty
Registration Card enclosed with your
purchase at once. And take advantage
of these important benefits.
^ Model I
Registration
Returning your Warranty
Registration Card right
away guarantees you’ll
receive all the information
and special offers which
you qualify for as the
owner of your model.
For Customer Use
Enter below the Serial No. which is
located on the rear of the cabinet. Retain
this information for future reference.
Model No.
Serial No.____________________________________
__________________________________
This “bolt of lightning’’
indicates uninsulated
A
may cause an electrical shock. For the
safety of everyone in your household,
please do not remove product
covering.
A
enclosed literature closely to prevent
operating and maintenance problems.
material within your unit
The “exclamation point’’ calls
attention to features for
which you should read the
WARNING: TO PREVENT
FIRE OR SHOCK HAZARD, DO
NOT EXPOSETHIS EQUIPMENTTO
RAIN OR MOISTURE.
CAUTION: To prevent electric
shock, match wide blade of plug to
wide slot, and fully insert.
Page 3
English
Safety instructions
Introduction
Controls
.....................................
Power supply...............................8
Basic functions
Radio................................................9
.............
2 & 4
.................................
...........................
6-7
CD player
5
Cassette recorder
General information
Troubleshooting
9
Limited warranty.....................17
.............................
10-12
............
13-14
.............
.....................
15
16
Français
Conseils de sécurité
Español
Comandes
Alimentation..............................22
Fonctions de base
Radio.............................................23
Instrucciones
sobre seguridad
Controles............................
Fuente de alimentación
Funciones básicas
Radio.............................................37
..........................
Canada
English: This digital apparatus does not exceed the Class B limits for radio noise emis
sions from digital apparatus as set out in the Radio Interference Regulations of the Cana
dian Department of Communications.
Français: Cet appareil numérique n'émet pas de bruits radioélectriques dépassant les li
mites applicables aux appareils numériques de Classe B prescrites dans le Règlement sur
le Brouillage Radioélectrique édicté par le Ministère des Communications du Canada.
........
..................
...............
..................
18-19
20-21
32-33
34-35
........
Lecteur de CD
Platine cassette
Informations général............29
23
Recherche de pannes
Garantie limitée
Reproductor CD
Grabadora...........................41-42
Información general
36
Localización de averías
37
Garantia limitada
...................
................
......................
..............
.............
....................
24-26
27-28
..........
38-40
.......
30
31
43
44
45
México
Es necesario que lea cuidadosamente su instructivo de manejo.
PRECAUCION - ADVERTENCIA
I No abrir, riesgo de choque eléctrico i
IVerifique que el voltaje de alimentaciónl
I sea el requerido para su aparato |
Para evitar el riesgo de choque eléctrico, no quite la tapa.
En caso de requerir servicio, diríjase al personal calífícado.
ATENCION
NOM
Page 4
SAFETY INSTRUCTIONS - Read before operating equipment
This product was designed and manufactured to
meet strict quality and safety standards. There are,
however, some installation and operation precautions
which you should be particularly aware of.
1. Read Instructions - All the safety and operating
instmctions should be read before the appliance is
operated.
2. Retain Instructions - The safety and operating
instmctions should be retained for future reference.
3. Heed Warnings - All warnings on the appliance
and in the operating instmctions should be adhered to.
4. Follow Instructions - All operating and use
instmctions should be followed.
5. Water and Moisture - The appliance should not
be used near water - for example, near a bathtub,
washbowl, kitchen sink, laundry tub, in a wet
basement or near a swimming pool, etc.
6. Carts and Stands - The appliance should be
used only with a cart or stand that is recommended
by the manufacturer.
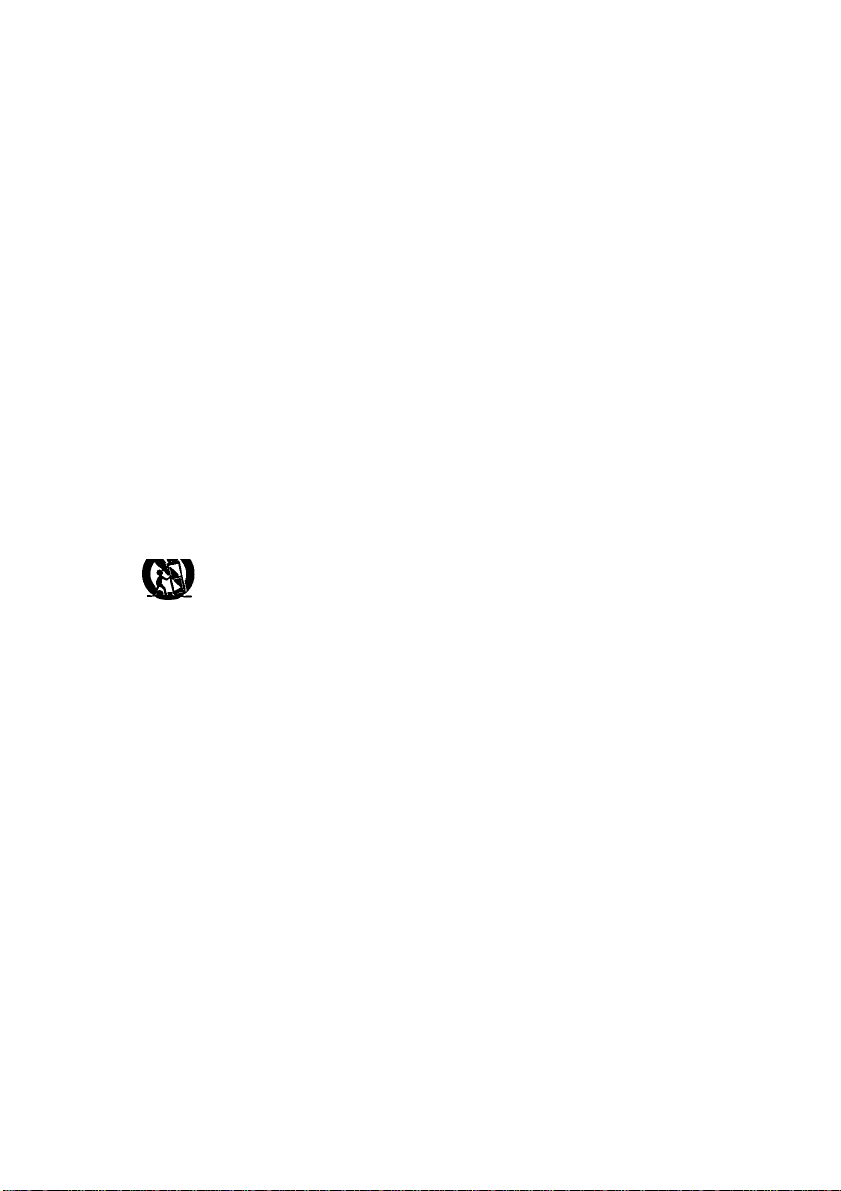
6A. An appliance and cart combination
should be moved with care. Quick
stops, excessive force, and uneven
surfaces may cause the appliance and
cart combination to overturn.
7. Wall or Ceiling Mounting - The appliance
should be mounted to a wall or ceiling only as
recommended by the manufacturer.
8. Ventilation - The appliance should be situated
so that its location or position does not interfere with
its proper ventilation. For example, the appliance
should not be situated on a bed, sofa, mg, or similar
surface that may block the ventilation openings; or,
placed in a built-in installation, such as
or cabinet that may impede the flow of air through
the ventilation openings.
9. Heat - The appliance should be situated away
from heat sources such as radiators, heat registers,
stoves, or other appliances (including amplifiers) that
produce heat.
a bookcase
10. Power Sources - The appliance should be
connected to a power supply only of the type
described in the operating instructions or as marked
on the appliance.
11. Grounding or Polarization-
Precautions should be taken so
that the grounding or polarization
means of an appliance is not
defeated.
Polarized Plug
CAUTION \ To prevent electric shock, match
the wide blade of this plug to the wide slot, fully
insert. Do not use this (polarized) plug v/ith an
extension cord, receptacle or other outlet unless the
blades can be fully inserted to prevent blade
exposure.
12. Power-Cord Protection - Power supply cords
should be routed so that they are not likely to be
walked on or pinched by items placed upon or
against them, paying particular attention to cords
and plugs, convenience receptacies, and the point
where they exit from the appliance.
13. Cleaning - The appliance should be cleaned only
as recommended by the manufacturer.
14. Power Lines - An outdoor antenna should be
located away from power lines.
15. Nonuse Periods - The power cord of the appli
ance should be unplugged from the outlet when left
unused for a long period of time.
16. Object and Liquid Entry - Care should be taken
so that objects do not fall and liquids are not spilled
into the enclosure through openings.
17. Damage Requiring Service - The appliance
should be serviced by qualified service personnel
when:
A. The power-supply cord or the plug has been
damaged: or
B. Objects have fallen, or liquid has spilled into
the appliance; or
C. The appliance has been exposed to rain; or
D. The appliance does not appear to operate
normally or exhibits a marked change in
performance: or
E. The appliance has been dropped, or the
enclosure damaged.
18. Servicing - The user should not attempt to
service the appliance beyond that described in the
operating instmctions. All other servicing should be
referred to qualified service personnel.
91/8 EL 4562-1
Page 5
PHILIPS
Visit our World Wide Web Site at http://www.magnavox.com
PHILIPS
MAGNAYOX
Congratulations on your purchase,
and welcome to the *Jamily!**
Dear Philips Magnavox product owner:
Thank you for your confidence in Philips Magnavox.\bu’ve selected one of the
best-built, best-backed products available today. And we’ll do everything in our
power to keep you happy with your purchase for many years to come.
As a member of the Philips Magnavox “family,” you’re entitled to
protection by one of the most comprehensive warranties and outstanding
service networks in the industry.
What’s more, your purchase guarantees you’ll receive all the information
and special offers for which you qualify, plus easy access to accessories
from our convenient home shopping network.
And most importantly you can count on our uncompromising commitment
to your total satisfaction.
All of this is our way of saying welcome-and thanks for investing in a
Philips Magnavox product.
Sincerely,
Robert Minkhorst
President and Chief Executive Officer
P.S. Remember, to get the most from your Philips Magnavox
product, you must return your Warranty Registration Card
within 10 days. So please mail it to us right now!
Page 6
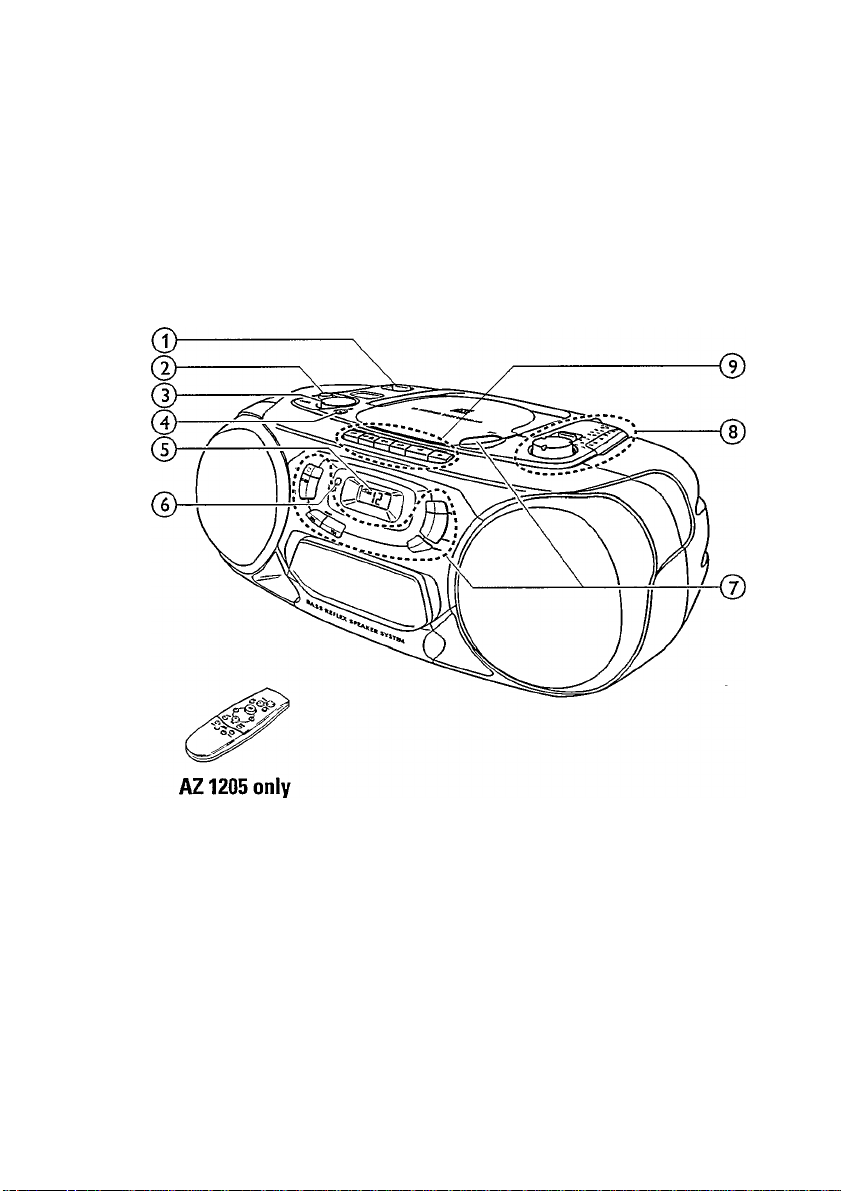
CONTROLS
m
3
(Q
Page 7

CONTROLS
BASIC FUNCTIONS
(T) POWER:
CD, TUNER, TAPE...selects the sound source
(DDBB..................enhances the bass
(?) VOLUME
00
.........................
........
adjusts the volume level
3.5mm headphone socket
©CASSEHE RECORDER
STOP-OPEN DA...stops the tape and opens
Note: Connecting the headphones will switch
off the speakers.
©Display
0 REMOTE SENSOR-sensor for the infrared
remote control (AZ 1205
only)
©CD PLAYER
A OPEN...........opens the CD
compartment
STOP □
PLAY-PAUSE >OD...starts and interrupts CD
SEARCH Kt< r>t>r..skips and searches
PROGRAM......programs track numbers
SHUFFLE
REPEAT
©RADIO
TUNING
BAND
...........
........
..........
..........
..............
stops CD play and erases
the program
play
forward and backward
and reviews the program
plays CD tracks in random
order
repeats a track, the entire
CD, or the program
tunes to radio stations
selects the wave band
Note: 77/e TUNER CONTROL keys on the remote
PAUSE DD
SEARCH »
SEARCH «
PLAY <1
RECORD O
REMOTE CONTROL (AZ1205 only)
VOLUME
SHUFFLE.........plays CD tracks in random
REPEAT..........repeats a track, the entire
►II...................starts and interrupts CD
M ►!.................selects the beginning of a
■
......................
SEARCH « ►►
.......
interrupts recording or
playback
the cassette compartment
......
rewinds the tape
......
fast forwards the tape
..........
starts playback
.....
starts recording
T A
..
decreases or increases the
volume level
order
CD, or the program
play
current, previous or
subsequent track of a CD
stops CD play and erases
the program
....
searches backward/forward
in a CD track
control have no function with this set
Page 8
POWER SUPPLY
Batteries
For the set (optional)
m
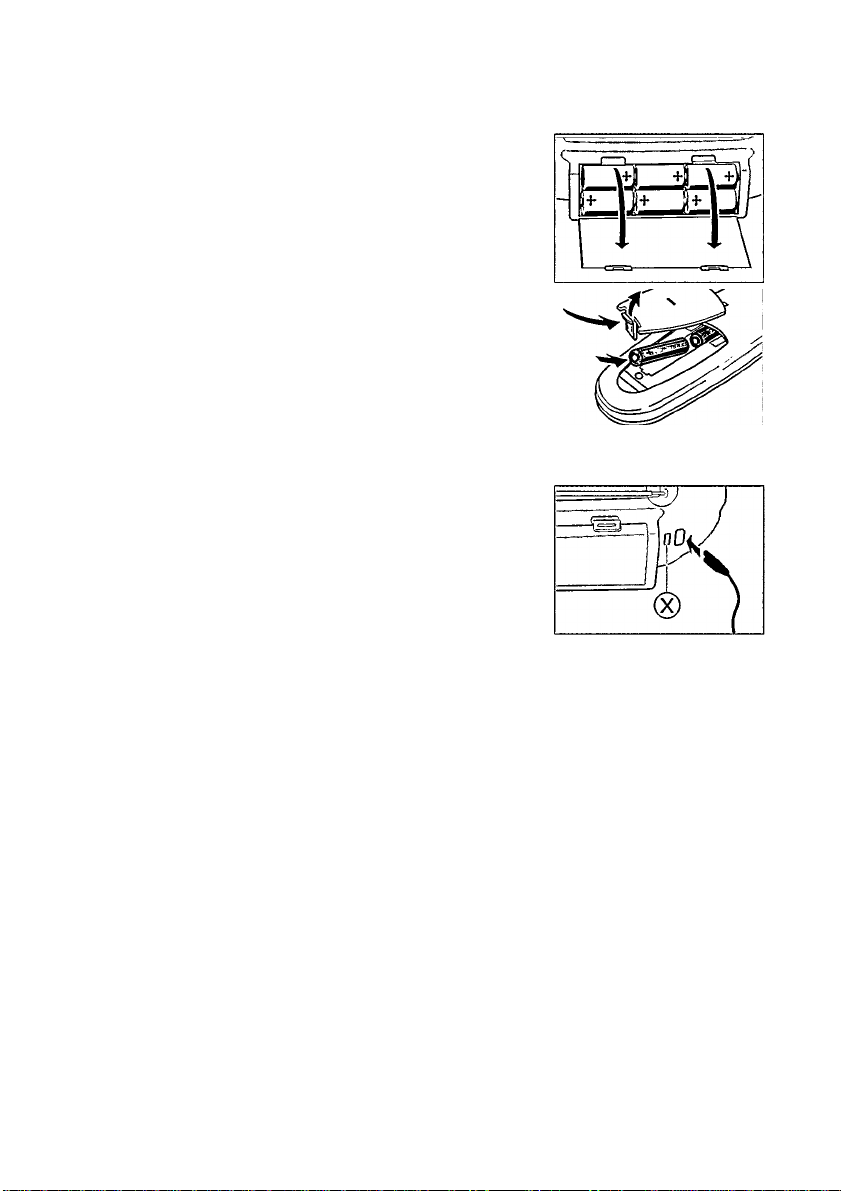
Open the battery compartment of the set and insert 6 batteries,
3
ca
type R20, UM-1 or D-cells (preferably alkaline).
For the remote control (AZ1205 only)
Open the battery compartment of the remote control and insert 2
batteries, type R03, UM-4 or AAA-cells (preferably alkaline).
Remove batteries if they are dead or if the set is not going to be
used for a long time.
Batteries contain chemical substances, so they should be
disposed of properly.
AC power supply
1 Check whether the voltage as shown on the type plate
corresponds to your local voltage. If it does not, consult your
dealer or service organization. The type plate is located on
the bottom of the set
2 If the set is equipped with a VOLTAGE selector (x), set this
selector to the local voltage.
3 Connect the AC power cord to the AC MAINS socket and to the
wall socket. This switches on the AC power supply. The AC
power cord is inside the battery compartment
The battery supply will be switched off when the set is connected
to the AC power. To change to battery supply, disconnect the AC
power cord from the unit's AC MAINS socket.
To disconnect the set from AC power completely, remove the AC
power cord from the wall socket.
The set complies with the FCC-Hules, Part 15 and with 21 CFR 1040.10. Operation is
subject to the following two conditions:
1. This device may not cause harmful interference, and
2. This device must accept any interference received, including interference that
may cause undesired operation.
Page 9
BASIC FUNCTIONS RADIO
Switching the set on and off
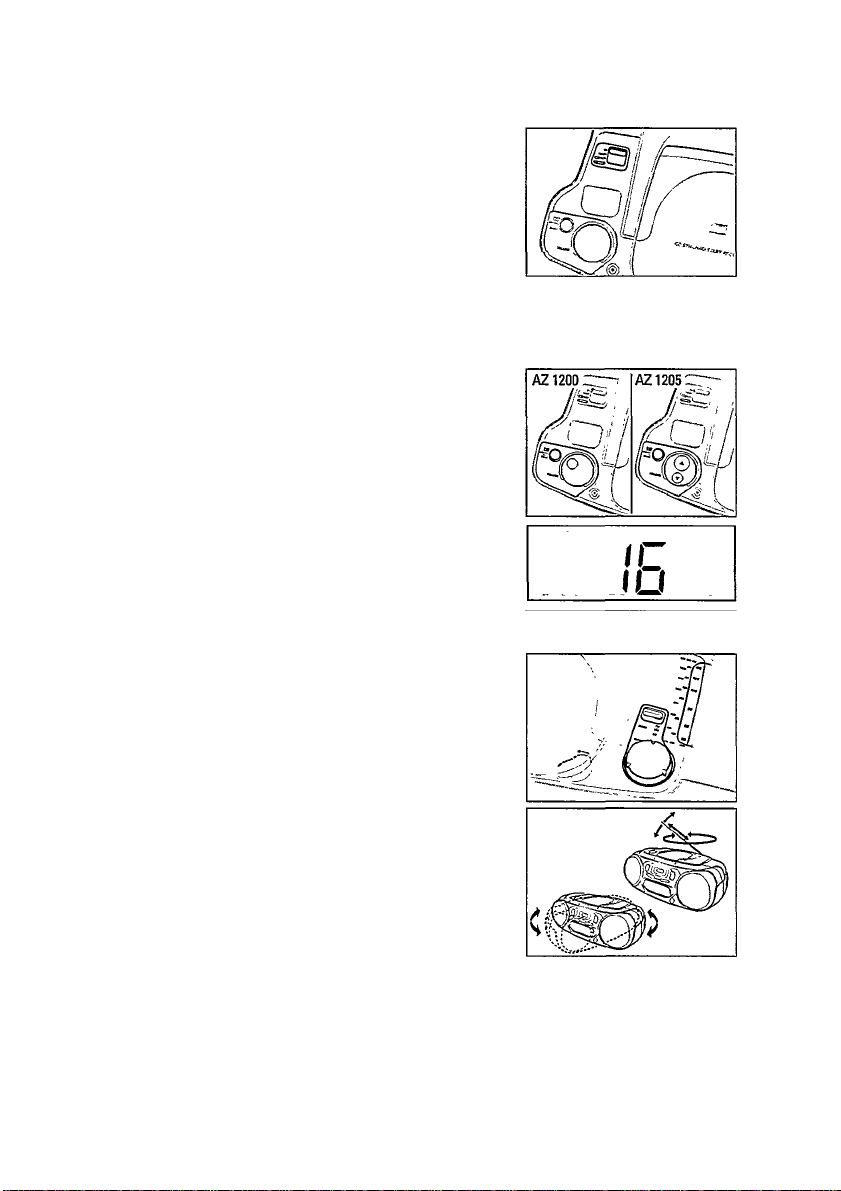
Set the POWER control to the desired sound source:
CD, TUNER, or TAPE.
The set is switched off when the POWER control is set to
OFF/TAPE and the keys of the tape deck are released.
Note: If you use batteries, always be sure to switch the set off
after use. This will avoid unnecessary power consumption.
Adjusting volume and sound
Adjust the volume using the VOLUME control.
Display indication: Volume level from 0 to 32 (AZ1205 only).
Increase and decrease the bass level by pressing DBB.
The bass level can also be emphasized if you place the set against
a wall or shelf. Do not cover any vents; leave sufficient room
around the unit for ventilation.
Radio - tuning to radio stations
1 Set the POWER control to TUNER.
2 Select the wave band using the BAND selector.
3 Tune to the desired radio station by using the TUNING knob.
Improving RADIO reception
For FM stations, pull out the telescopic antenna. To improve the
signal, incline and turn the antenna. Reduce its iength if the signal
is too strong (very close to a transmitter).
For AM stations, direct the built-in antenna by turning the whole
set. The telescopic antenna is not needed.
Page 10
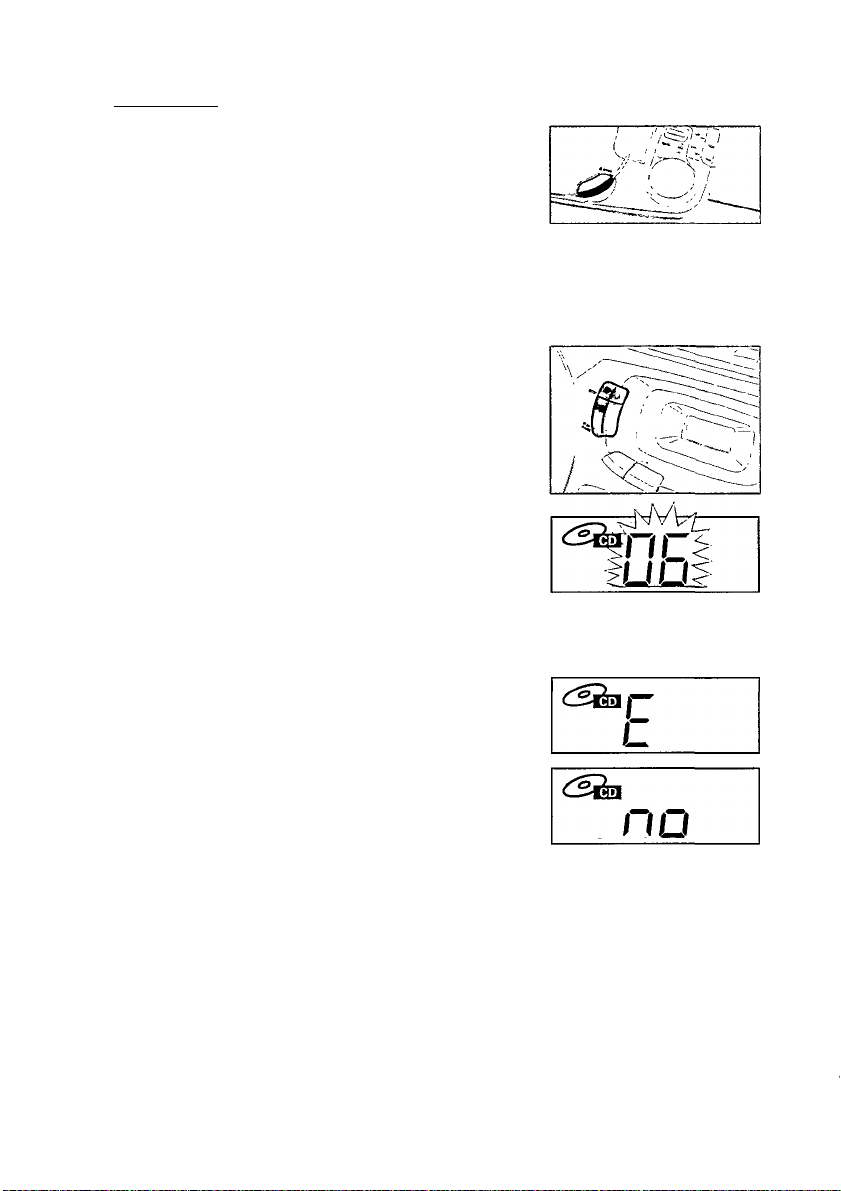
CD PLAYER
Playing a CD__________________________________
1 Set the POWER control to CD.
2 Press A OPEN to open the CD compartment.
3 Insert an audio CD (printed side up) and close the CD
compartment.
The CD player starts and scans the contents list of the CD.
Then, the CD player stops. Display indication; the total
number of tracks.
4 Press the PLAY-PAUSE l>D0 button to start CD play.
Display indication: the current track number.
5 Press the STOP □ button to stop CD play.
Display indication: the total number of tracks.
You can interrupt CD play by pressing PLAY-PAUSE MO. Continue
CD play by pressing the button again.
Display indication: the current track number flashes.
Note: CD play will also stop If:
- you open the CD compartment,
- the end of the CD Is reached, or
- you move the POWER control fo TUNER or TAPE.
^ lO
lU
If you make a mistake when operating the CD player, or if the
CD player cannot read the CD, the display shows £ ото. (See
"TROUBLESHOOTING".)
If you press PLAY-PAUSE MO and there is no CD inserted, the
display shows <1 о.
Environmental information
All redundant packing material has been omitted. We have tried to make the packaging easy to
separate into three materials; cardboard (box), polystyrene foam (buffer) and polyethylene (bags,
protective foam sheet).
Your set consists of materials which can be recycled if disassembled by a specialized company.
Please observe the local regulations regarding the disposal of packing materials, dead batteries
and old equipment
10
Page 11
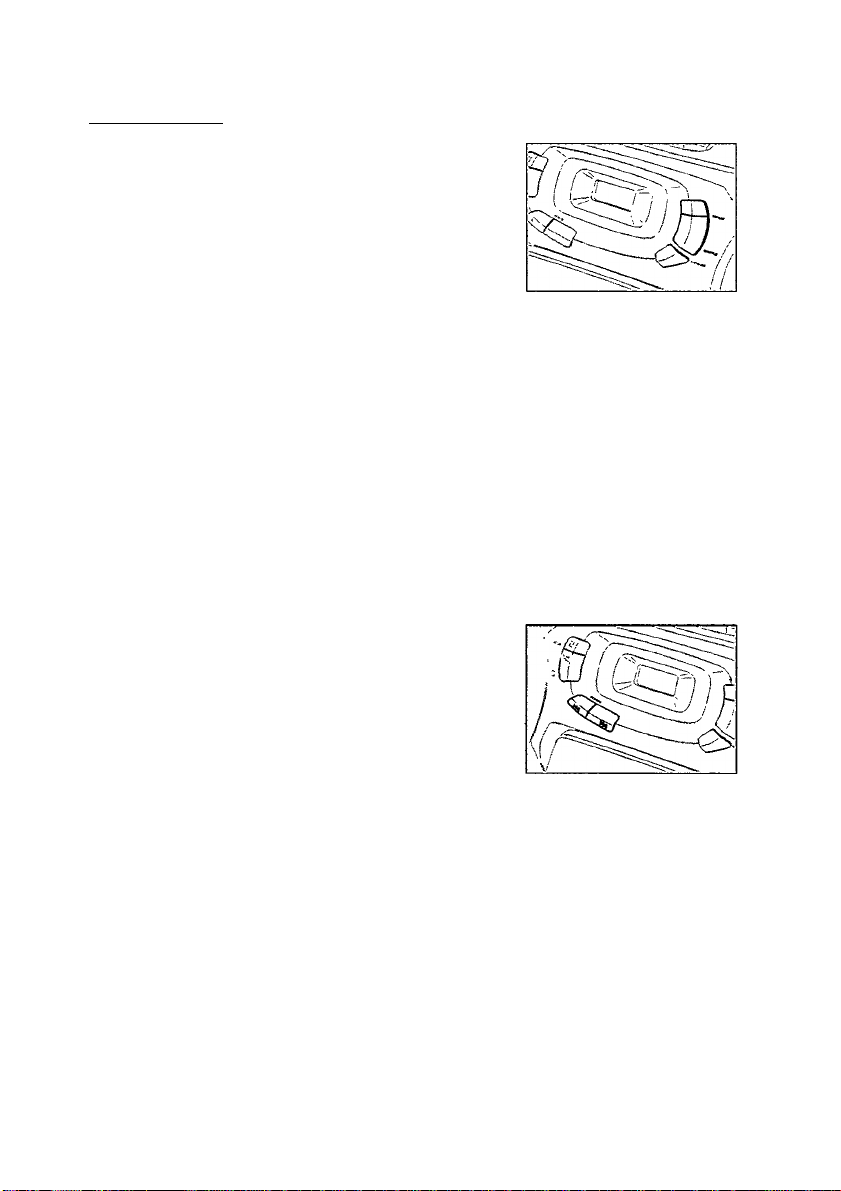
Different playing modes: SHUFFLE/REPEAT
SHUFFLE - Playing in random order
1 Press SHUFFLE before or during CD play.
-* All the tracks of the CD (or program if available) will now be
played in random order.
2 Press SHUFFLE again to return to normal CD play.
REPEAT - Repeating the entire CD or one track of the CD
1 Before or during CD play, press REPEAT repeatedly to cause the
display to show the different repeating modes.
— repeat: the current track is played repeatedly.
— REPEAT Au: the entire CD or program is played repeatedly.
2 Press REPEAT until the display indication disappears to return to
normal CD play.
Note: You can activate the different playing modes at the same
time, e. g. you can repeatedly play the entire CD or program
in random order
/shuffle repeat au/.
Search backward km and forward txx
Selecting another track
Briefly press the SEARCH km or wh button once/several times to
skip to the beginning of the current, previous or subsequent
track(s).
During play:
CD play continues automatically with the selected track.
When playback is stopped:
Press PLAY-PAUSE
— Display indication: the selected track number.
>DD
to start CD play.
CD PLAYER
nj
UJ
SHUFFU
REPEAT
AU
8)
S
UJ
Searching for a passage during CD play
1 Hold down the SEARCH km or >w button to find a particular
passage in a forward or backward direction.
— CD play continues at a low volume.
2 Release the button when you have reached the desired passage.
Note: In the SHUFFLE and REPEAT modes or when playing a program,
searching is only possible within the particular track.
11
Page 12
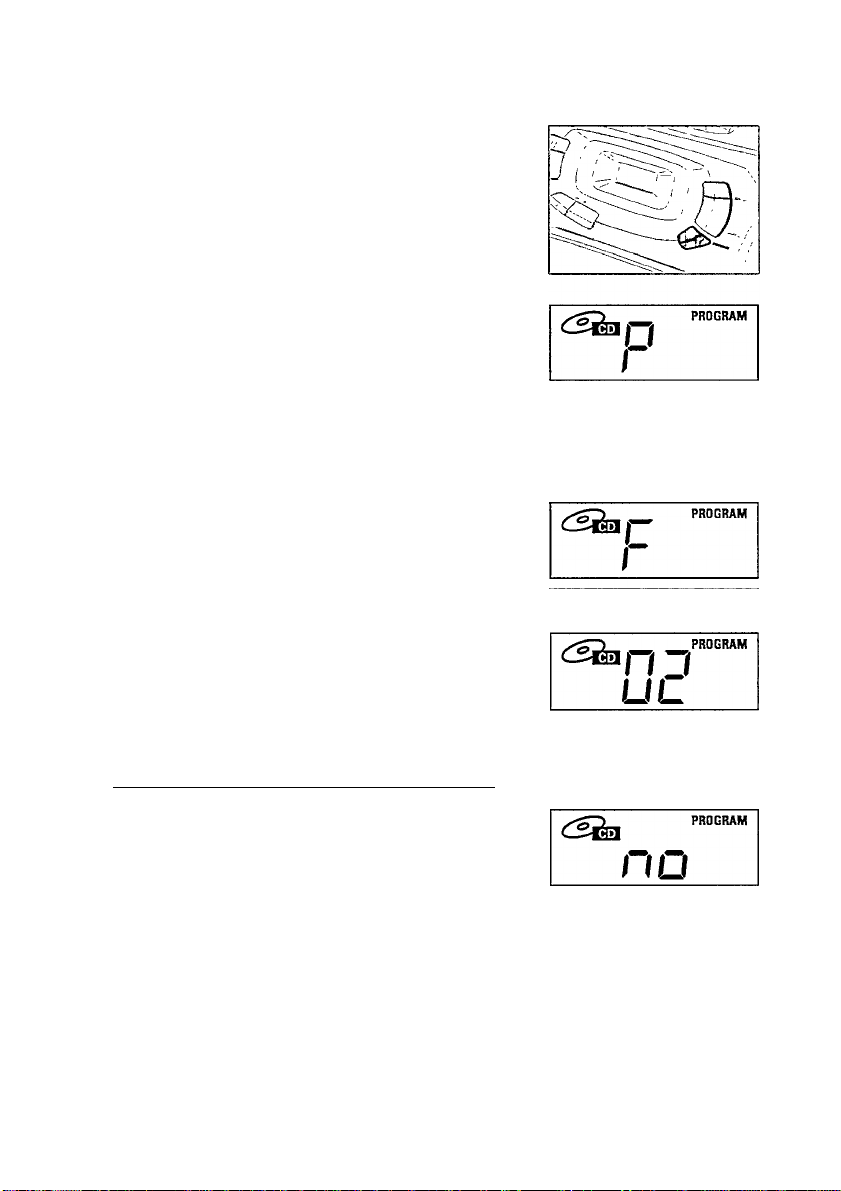
CD PLAYER
Programming track numbers
You can select a number of tracks and store these in the memory
m
in the desired sequence. You can store any track more than once.
s
<n
A maximum of 20 tracks can be stored in the memory.
1 Select the desired track with SEARCH km or t>w.
2 As soon as the number of the desired track is displayed, press
the PROGRAM button to store the track in the memory.
PROGRAM appears in the display and P lights up briefly.
Then, the number of the stored track is shown.
3 Select and store all desired tracks in this way.
You can review your settings by pressing the PROGRAM button
for more than 2 seconds.
-* The display shows all stored track numbers in sequence.
If you tty to store more than 20 tracks, the display shows
Playing the program
If you have selected the tracks while playback is stopped, press
PLAY-PAUSE
>DD.
If you have selected the tracks during CD play, first press STOP □,
then press PLAY-PAUSE >00.
Erasing the program when playback is stopped
From the stop position, press STOP □.
— no lights up briefly, PROGRAM disappears, and your program
is erased.
Note: The program will also be erased if you:
- Interrupt the power supply.
- open the CD compartment, or
-move the POWER control fo TUNER or TAPE.
12
Page 13
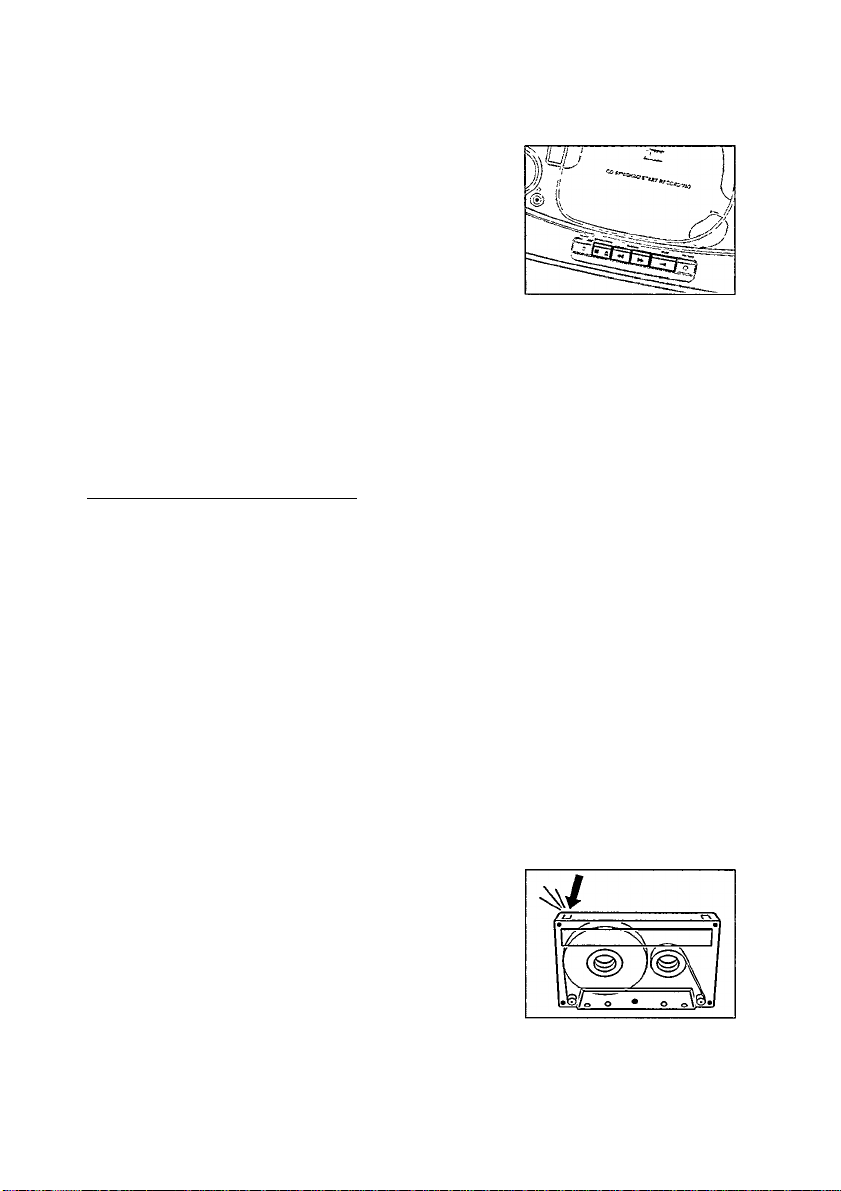
Playing a cassette
1 Set the POWER control to TAPE.
CASSEHE RECORDER
2 Press STOP-OPEN QA to open the cassette compartment.
3 Insert a recorded cassette with the open side upwards and close
the cassette compartment.
4 Press PLAY <3 to start playback.
5 Press» or to rewind or fast forward the tape.
6 To stop the tape press STOP-OPEN QA.
Note: The keys are released at the end of the tape.
General information on recording
Recording is permissible insofar as copyright or other rights of
third parties are not infringed upon.
For recording on this set you should use a cassette of the type
NORMAL (lEC type I). This deck is not suitable for recording on
cassettes of the type CHROME (lEC type n) or METAL (lEC
type TV).
The recording level is set automatically. The controls VOLUME and
DBB do not affect the recording.
At the very beginning and end of the tape, no recording will take
place in the 7 seconds during which the leader tape passes the
recorder heads.
83
C
UJ
Protecting tapes from accidental erasure
Keep the cassette side to be protected in front of you and snap off
the left tab. Now, recording on this side is no longer possible.
To record again on this side of the cassette, cover the opening with
a piece of adhesive tape.
13
Page 14

CASSEHE RECORDER
Recording from the CD player - CD synchro start
1 Set the POWER control to CD.
2 Insert a CD and, if desired, program the track numbers.
3 Press STOP-OPEN QA to open the cassette compartment.
4 Insert a blank, unprotected, cassette and close the cassette
compartment.
5 Press RECORD O to start recording.
Playing of the CD or program starts automatically. It is not
necessary to start the CD player separately.
S For brief interruptions press PAUSE OD. Press the PAUSE DD key
again to resume recording.
7 To stop recording, press STOP-OPEN qa.
Note: the recording can be started from different positions:
- if the CD player is in pause mode, recording will start
from this very position (use SEARCH km on>M);
- if the CD player is in stop mode, recording will start from
the beginning of the CD or program.
Recording from the radio
1 Set the POWER control to TUNER.
2 Tune to the desired radio station (see "RADIO").
$ 7
3 Press STOP-OPEN DA to open the cassette compartment.
4 Insert a blank, unprotected, cassette and close the cassette
compartment.
5 Press RECORD O to start recording.
6 For brief interruptions press PAUSE DD.To resume recording press
the PAUSE on key again.
7 To stop recording, press STOP-OPEN 04.
14
Page 15
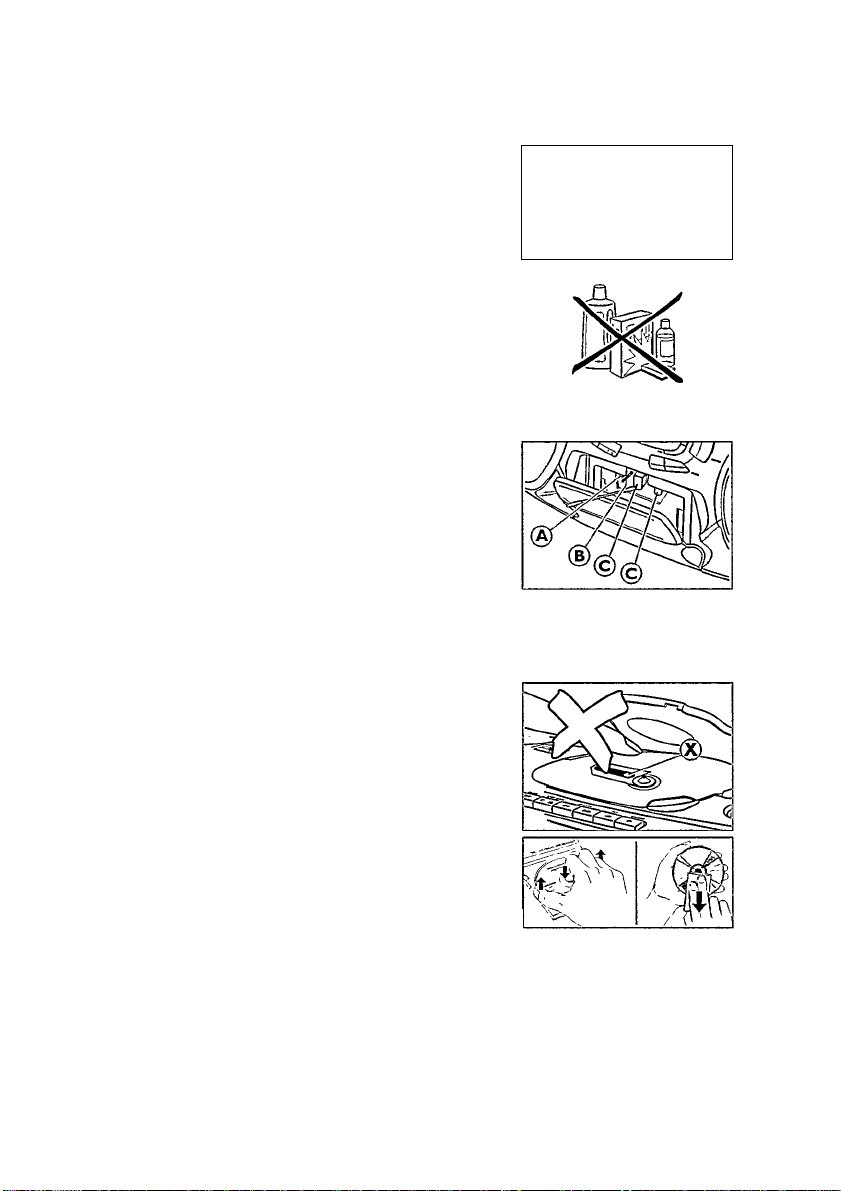
GENERAL INFORMATION
General maintenance
Do not expose the set, batteries, CDs, or tapes to humidity,
rain, sand, or excessive heat (caused by heating equipment or
direct sunlight).
The mechanical parts of the set contain self-lubricating bearings
and must not be oiled or lubricated!
You can clean the set with a soft, slightly dampened, lint-free cloth.
Do not use any cleaning agents as they may have a corrosive effect.
Tape deck maintenance
To ensure proper recording and playback quality, clean parts
(A), (D and (c) after approximately 50 hours of operation. Use a
cotton swab slightly moistened with alcohol or head-cleaner fluid.
Press PLAY < and clean the rubber pressure rollers ®.
Press PAUSE DD and clean the capstans (f) and the heads ©.
Note: Cleaning of the heads© can also be done by playing a
cleaning tape once.
CD player and CD handling
The lens ® of the CD player should never be touched. Always
keep the CD compartment closed to avoid dust on the lens.
The lens may cloud over when the set is suddenly moved from cold
to warm surroundings. Playing a CD is not possible then. Leave the
CD player in a warm environment until the moisture evaporates.
To take the CD out of its box easily, press the center spindle while
lifting the CD. Always pick up the CD by the edge and put it back
in its box after use.
To clean the CD, wipe it in a straight line from the center toward
the edge using a soft, lint-free cloth. A cleaning agent may damage
the disc!
Never write on a CD or attach a sticker to it.
CAUTION
Use of controls or adjustments or performance of procedures other than here
in may result in hazardous radiation exposure.
15
Page 16

TROUBLESHOOTING
WARNING
m
3
(a
U n d er n o c irc um s ta n c es s h ould y o u try
to rep a ir the se t y ourself as th is w ill
in v a lid ate the w a r ra n t y .
Problem
No sound.
no power
No reaction to Electrostatic discharge,
operation of any keys
Poor radio reception Weak radio signal.
no or E indication The CD is badly scratched or dirty.
The CD skips tracks
Poor cassette
sound quality
Recording does
not work
Remote control does Batteries are inserted incorrectly.
not function properly Batteries are dead.
l/u. UU9 omy;
Possible cause
VOLUME is not adjusted.
Headphones are connected.
Power cord is not securely connected.
Batteries are dead.
Batteries are inserted incorrectly.
Trying to change over from AC power to Remove the power cord from the
battery supply without removing the power cord, unit's AC MAINS socket.
Interference caused by electrical equipment
like TVs, computers, engines, etc.
No CD is inserted. Insert a CD.
The CD is inserted upside down.
The laser lens is steamed up.
The CD is damaged or dirty.
SHumf
or PROGRAivi is active.
Dust and dirt on the heads, capstans or
pressure rollers.
Use of unsuitable cassette types
(METAL or CHROME) for recording.
Cassette tab(s) may be snapped off.
Distance to the set Is too large.
If a fault occurs, first check the points listed
below before taking the set for repair.
If you are unable to solve a problem by
following these hints, consult your dealer or
service center.
Solution
Adjust volume.
Disconnect headphones.
Connect the power cord properly.
Insert fresh batteries.
Insert batteries correctly.
Disconnect the set from power supply,
reconnect after a few seconds.
Adjust the antenna for optimum
reception.
Keep the radio away from electrical
equipment
Replace or clean the CD.
Insert CD with label facing up.
Wait until the lens has cleared.
Replace or clean the CD.
Switch
off SHUFFIE or PROGRAM.
Clean heads, capstans, and pressure
rollers.
Only use NORMAL type cassettes for
recording.
Apply a piece of adhesive tape over
the opening.
Insert batteries correctly.
Insert fresh batteries.
Reduce distance.
16
Page 17

LIMITED WARRANTY
PORTABLE AUDIO
This product must be carried in for an exchange.
One Year Free Exchange
WHO IS COVERED?
You must have proof of purchase to exchange the product.
A sales receipt or other document showing that you
purchased the product is considered proof of purchase.
Attach it to this owner's manual and keep both nearby.
WHAT IS COVERED?
Warranty coverage begins the day you buy your product.
For one year thereafter, a defective or inoperative product
will be replaced with a new, renewed or comparable
product at no charge to you.A replacement product is
covered only for the original warranty period.When the
warranty on the original product expires, the warranty on
the replacement product also expires.
WHAT IS EXCLUDED?
Your warranty does not cover:
• labor charges for installation or setup of the product,
adjustment of customer controls on the product, and
installation or repair of antenna systems outside of the
product.
• product repair and/or part replacement because of
misuse, accident, unauthorized repair or other cause
not within the control of Philips Consumer Electronics
Company.
• reception problems caused by signal conditions or
cable or antenna systems outside the unit.
• a product that requires modification or adaptation to
enable it to operate in any country other than the
country for which it Nvas designed, manufactured,
approved and/or authorized, or repair of products
damaged by these modifications.
• incidental or consequential damages resulting from the
product. (Some states do not allow the exclusion of
incidental or consequential damages, so the above
exclusion may not apply to you.This includes, but is not
limited to, prerecorded material, whether copyrighted
or not copyrighted.)
• a product used for commercial or institutional
purposes.
WHERE IS EXCHANGE AVAILABLE?
You may exchange the product in all countries where the
product is officially distributed by Philips Consumer
Electronics Company. In countries where Philips Consumer
Electronics Company does not distribute the product, the
local Philips service organization will attempt to provide a
replacement product (although there may be a delay if the
appropriate product is not readily available).
BEFORE REQUESTING EXCHANGE...
Please check your owner’s manual before requesting an
exchange.Adjustments of the controls discussed there may
save you a trip.
EXCHANGING A PRODUCT IN U.S.A.,
PUERTO RICO ORU.S.VIRGIN ISLANDS...
Contact your dealer to arrange an exchange. Or, ship the
product, insured and freight prepaid, and with proof of
purchase enclosed, to the address listed below.
(In U.SA, Puerto Rico and U.S.Virgin Islands, all implied
warranties, including implied warranties of merchantability and
flmess for a particular purpose, are limited in duration to the
duration of ¿his express warranty. But, because some states do
not allow limitations on how long an implied warranty may
last, this limitation may not apply to you.)
EXCHANGING A PRODUCT IN CANADA...
Please contact Philips ac
(In Canada, this warranty is given in lieu of all other
warranties. No other v.rarranties are expressed or implied,
including any Implied warranties of merchantability or
fitness for a particular purpose. Philips is not liable under
any circumstances for any direct, indirect, special, incidental
or consequential damages, howsoever incurred, even if
notified of the possibility of such damages.)
TO GET OUT-OF-WARRANTY EXCHANGE...
In USA, Puerto Rico or U.S.Virgin Islands, contact Philips
Service Company at (800) 851-8885 to obtain the cost of outof-warranty exchange.Then carefully pack the product and
ship it to the Small Product Service Center (address listed
above). In Canada, call the phone number listed above under
“Exchanging a Product in Canada” to obtain the cost of outof-warranty exchange.
REMEMBER...
Please record the model and serial numbers found on the
product below. Also, please fill out and mail your warranty
registration card promptly. It will be easier for us to notify
you if necessary.
MODEL#
SERIAL#
Small Product Service Center
Philips Service Company
907 Snapps Ferry Road, Plant 2, Building
Greeneville.TN 37743
1-800-661-6162 (French Speaking)
1-800-363-7278 (English Speaking)
6
This warranty gives you spedfic legal rights.You may have other rights which vary from statelprovince to stateiprovince.
Philips Service Company, P.O. Box 555, Jefferson City,Tennessee 37760, (423) 475-8869
EL609ST001 / MAC5433 /1-97 1
7
Page 18

46
Page 19

47
Page 20
>o
PHILIPS CONSUMER ELECTRONICS COMPANY
A Division of Philips Electronics North America Corporation
Knoxville, Tennessee 37914-1810, U.S.A.
a
fi).
V)'
3140 115 2459.1
Printed in Hong Kong
IB7961T001 -VieSRP9745
 Loading...